Specifications subject to change without notice.
TABLE OF CONTENTS
PAGE
A NOTE ABOUT SAFETY ........................................................................................................................2
GENERAL...................................................................................................................................................2
PART NAMES AND DISPLAY.................................................................................................................3
WIRELESS REMOTE CONTROL.............................................................................................................4
REMOTE CONTROL .................................................................................................................................6
OPERATING TEMPERATURE.................................................................................................................8
FEATURES .................................................................................................................................................9
CLEANING, MAINTENANCE AND TROUBLESHOOTING ..............................................................11
NOTE TO EQUIPMENT OWNER:
Please read this Owner’s Information Manual carefully before installing and using this appliance and
keep this manual for future reference.
For your convenience, please record the model and serial numbers of your new equipment in the spaces
provided. This information, along with the installation data and dealer contact information, will be
helpful should your system require maintenance or service.
UNIT INFORMATION
Model # _______________________________
Serial # ________________________________
INSTALLATION INFORMATION
Date Installed ___________________________
DEALERSHIP CONTACT INFORMATION
Company Name: ______________________
Address:_____________________________
Phone Number:________________________
Technician Name:______________________
Ductless Split Unit System
Owner’s Manual
For 9,000, 12,000, 18,000, and 24,000 BTU
Manufacturer reserves the right to change, at any time, specifications and designs without notice and without obligations.
2
A NOTE ABOUT SAFETY
Any time you see this symbol in manuals, instructions and on the unit, be
aware of the potential for personal injury.
There are 3 levels of precaution
:
1. DANGER identifies the most serious hazards which will result in
severe personal injury or death.
2. WARNING signifies hazards that could result in personal injury or
death.
3. CAUTION is used to identify unsafe practices which could result in
minor personal injury or product and property damage.
NOTE is used to highlight suggestions which will result in enhanced
installation, reliability, or operation.
GENERAL
The high wall fan coil unit provides quiet, maximum comfort. In addition
to cooling and/or heating, the high wall fan coil unit matched with an
outdoor condensing unit filters and dehumidifies the air in the room to
provide maximum comfort.
IMPORTANT: The high wall fan coil unit should be installed by
authorized personnel only; using approved tubing and accessories. If
technical assistance, service or repair is needed, contact the installer. The
high wall fan coil unit can be set up and operated from the remote control
(provided). If the remote is misplaced, the system can be operated
from the “Auto” setting on the unit.
Operating Modes
The high wall fan coil unit has five operating modes:
• FAN Only
• AUTO
• HEATING (heat pumps only)
• COOLING
• DEHUMIDIFICATION
FAN Only
In the FAN Only mode, the system filters and circulates the room air
without changing room air temperature.
AUTO
In the AUTO mode, the system automatically cools or heats the room
according to the user-selected set point.
NOTE: AUTO mode is recommended for use on single zone
applications ONLY. Using AUTO CHANGEOVER on multi-
zone applications could set an indoor unit to STANDBY
mode, indicated with two dashes (--) on the display, which
will turn off the indoor unit until all the indoor units are in
the same mode (COOLING or HEATING). HEATING is the
system's priority mode. Simultaneous HEATING and
COOLING is not allowed.
HEATING
In the HEATING mode, the system heats and filters the room air.
COOLING
In the COOLING mode, the system cools, dries and filters the room air.
DEHUMIDIFICATION (DRY)
In the DEHUMIDIFICATION mode, the system dries, filters and
slightly cools the room air temperature. This mode prioritizes air
dehumidification but it does not take the place of a dehumidifier.
Wireless Remote Control
The remote control transmits commands to set up and operate the system.
The control has a window display panel that displays the current system
status. The control can be secured to a surface when used with the
mounting bracket provided.
Wired Remote Control (Optional)
Refer to the Wired Controller manual.
24V Interface (Optional)
Allows the control of the Ductless System with a third party thermostat.
Smartphone Control (Optional)
Capability to be controlled by a smartphone.
Read and follow all instructions and warnings, including labels
shipped with or attached to unit before operating your new air
conditioner.
Failure to follow this warning could result in personal injury,
death or property damage.
Improper installation, adjustment, alteration, service,
maintenance, or use can cause explosion, fire, electrical shock,
or other conditions which may cause personal injury or property
damage. Consult a qualified installer, service agency, or your
distributor or branch for information or assistance. The qualified
installer or service agency must use factory-authorized kits or
accessories when modifying this product.
WARNING
PERSONAL INJURY, DEATH AND / OR PROPERTY
DAMAGE HAZARD
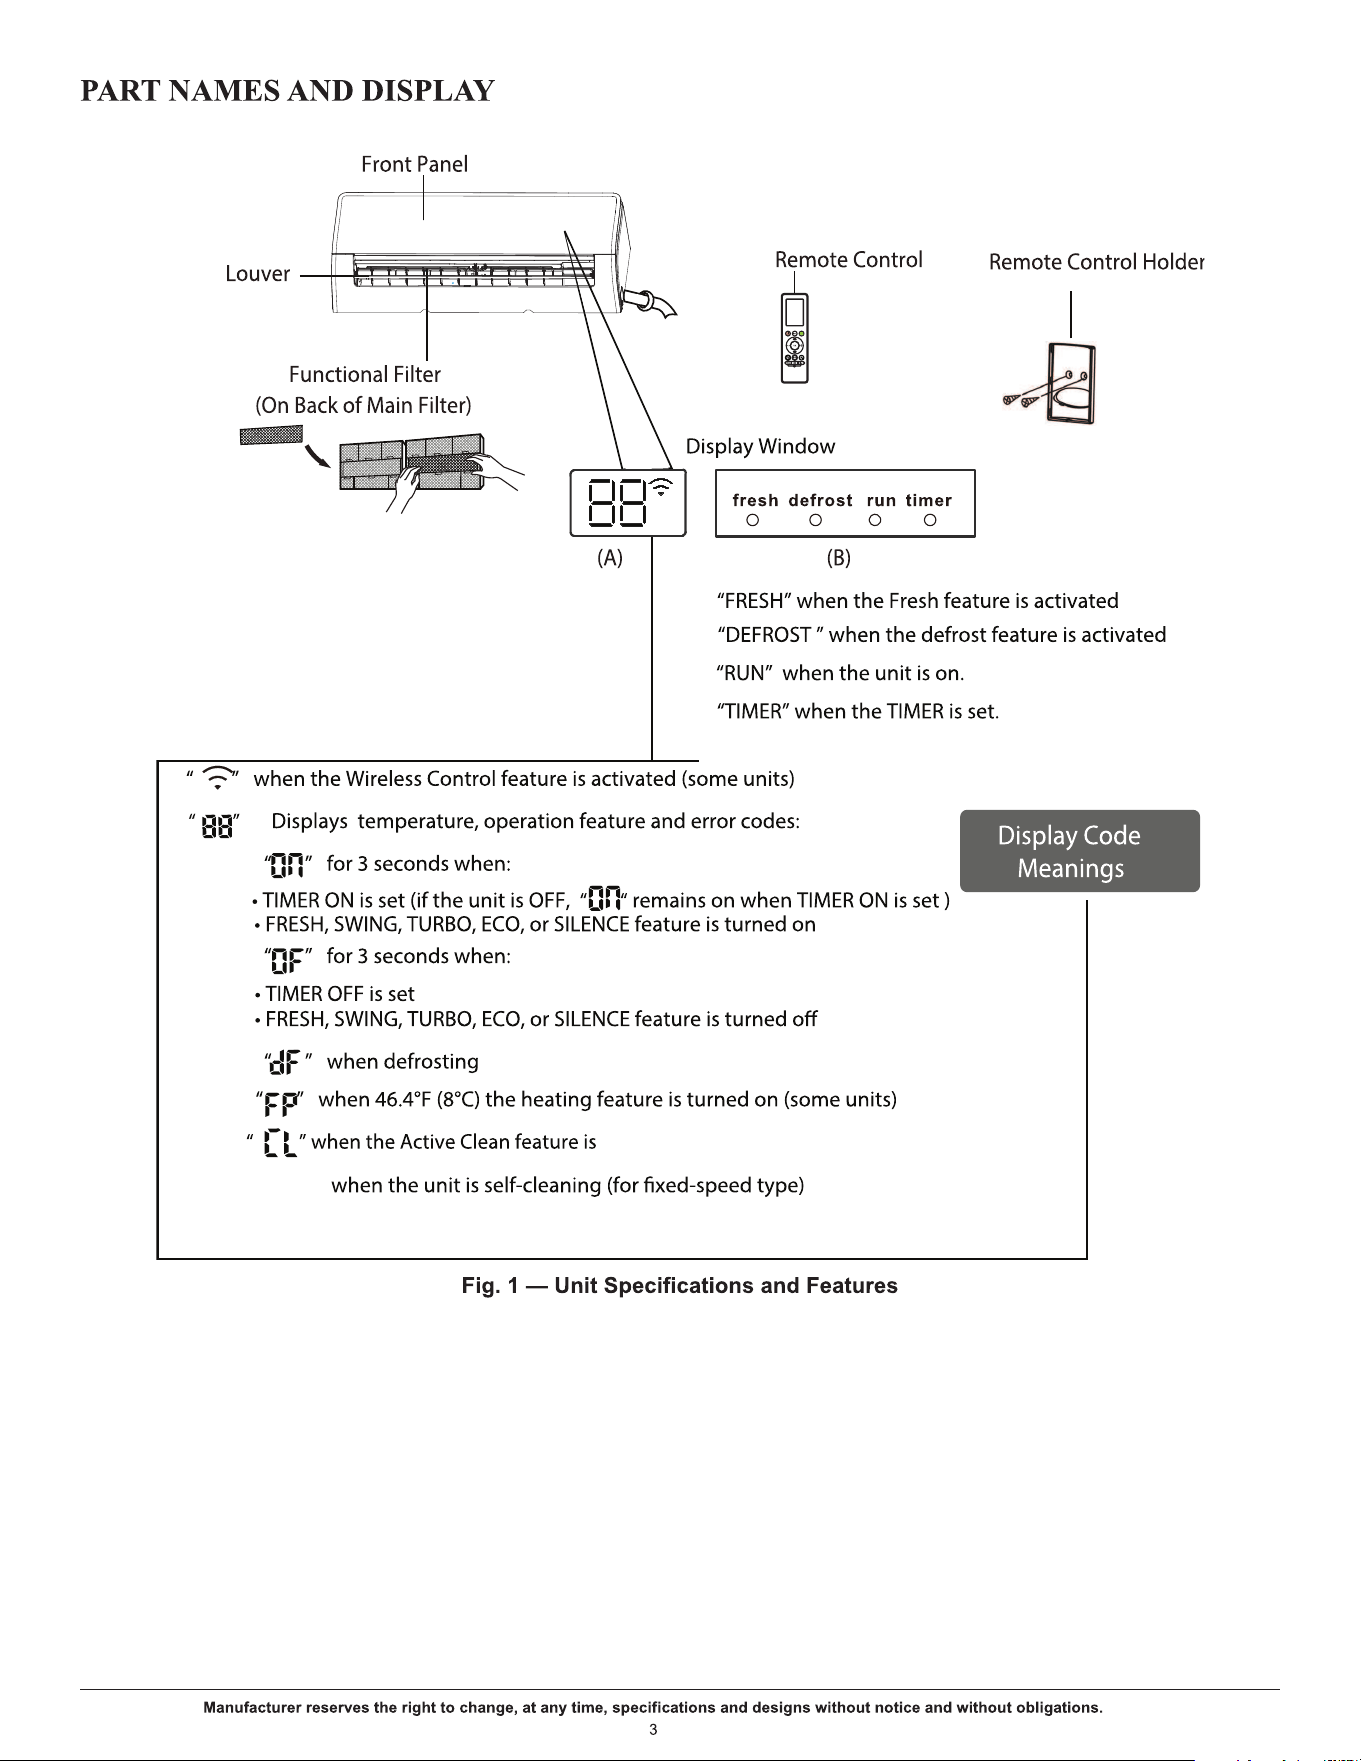
turned on (for the inverter split type)

Manufacturer reserves the right to change, at any time, specifications and designs without notice and without obligations.
4
WIRELESS REMOTE CONTROL
Before using your new air conditioner, familiarize yourself with the wireless remote control.
Fig. 2 — Remote Control Functions
ON/OFF
SET
Turns the unit on or off.
MODE
OK
TIMER
BREEZE AWAY
CLEAN
LED
BOOST
ECO/GEAR
Scrolls through operation modes
as follows:
AUTO
COOL
DRY
HEAT
FAN
FAN SPEED
SWING
Increases temperate in
1°F (1°C) increments.
Max. temperature is
86°F (30°C).
NOTE: Press together &
at the same time for
3 seconds to alternate the
temperature display
between °F & °C.
TEMP
TEMP
Use to confirm the selected
functions
Decreases temperature
O O
in 1 F(1 C) increments.
Min. temperature is
O O
60 F(16 C).
Starts and stops the horizontal
louver movement. Hold down
for 2 seconds to initiate vertical
louver auto swing feature.
This feature avoids direct air flow
from blowing on occupants.
NOTE: This feature is available
under cool, FAN and DRY modes
only
Use to start/stop the Self Clean
or Active Clean function (model
dependent). Please refer to the
user manual and installation
manual for details.
Set timer to turn unit on or off
Press to enter the
energy efficient mode in a
sequence of following:
ECO GEAR(75%)
GEAR(50%)
mode ECO
Scrolls through operation
functions as follows:
Fresh( ) Sleep( )
COMFORTSENSE( )
AP mode( ) Fresh...
The selected symbol flashes
on the display area.
Press OK to confirm.
Selects fan speeds in the
following order:
Auto
20%
60% 40% 80% 100%.
Press the TEMP or button
to increase/decrease the fan
speed in 1% increments.
Enables unit to reach preset
temperature in shortest
possible time
Boost
Previous setting
Turns indoor unit’s LED display
and air conditioner buzzer on
and off (model dependent), which
creates a comfortable and quiet
environment.
Manufacturer reserves the right to change, at any time, specifications and designs without notice and without obligations.
5
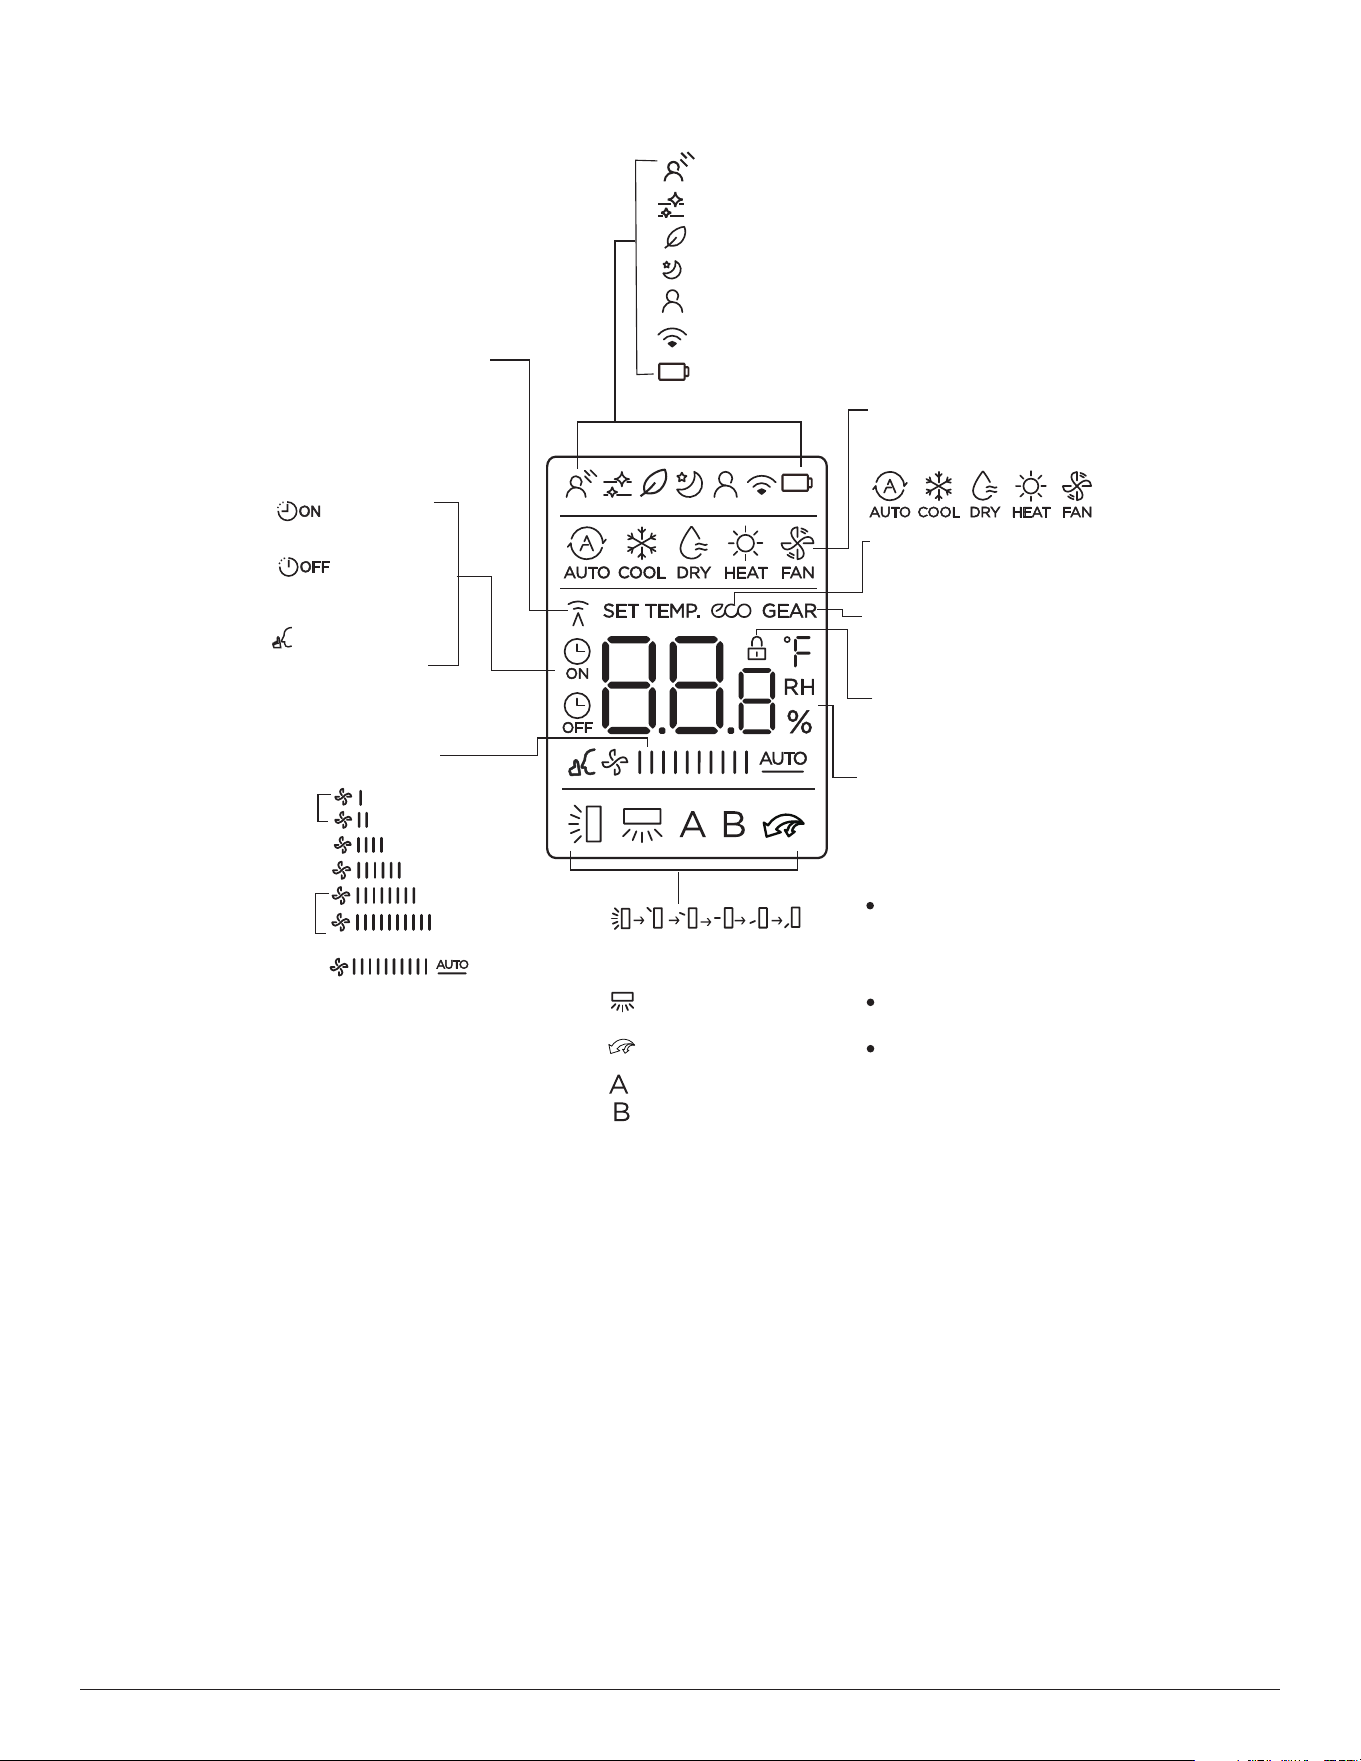
WIRELESS REMOTE CONTROL LCD SCREEN INDICATORS
Fig. 3 — Wireless Remote Controller Indicators
Breeze Away display
Transmission Indicator
MODE display
TIMER ON display
FAN SPEED display
TIMER OFF display
Silence feature
display
ECO display
GEAR display
LOCK display
Horizontal louver
swing display
Vertical louver auto
swing display
TURBO mode display
Not available for
this unit
Temperature/Timer/Fan speed
display
Active clean feature display
Fresh feature display
Sleep mode display
COMFORTSENSE feature display
Wireless control feature display
Low battery detection display(If flashes)
Displays when the LOCK
feature is activated
Silence
LOW
MED
HIGH
AUTO
Lights up when remote
sends signal to indoor
unit
Displays selected fan speed:
Displays the current
including:
mode,
2%-20%
21%-40%
41%-60%
61%-80%
81%-100%
1%
This fan speed can not be
adjusted in
AUTO or DRY
mode.
Displays when ECO
feature is activated
Displays when GEAR
feature is activated
Displays the set temperature
by default, or fan speed or
timer setting when using
TIMER ON/OFF functions.
Temperature range:
Timer setting range:
0-24 hours
Fan speed setting range:
AU -100%
This display is blank when
operating in FAN mode.
60-86°F/16-30°C/
(68-82°F/20-28°C)
Depends on model
Manufacturer reserves the right to change, at any time, specifications and designs without notice and without obligations.
6
REMOTE CONTROL
IMPORTANT:
The remote control can operate the unit from a distance of
up to 26 ft. (8 m) as long as there are no obstructions. When the timer
function is used, the remote control should be kept in the vicinity of the fan
coil (within 26 ft. / 8 m).
The remote control can perform the following basic functions:
• Turn the system ON and OFF
• Select the operating mode
• Adjust room air temperature set point and fan speed
• Adjust right-left airflow direction
Refer to the “WIRELESS REMOTE CONTROL” on page 4 for a
detailed description of all the capabilities of the remote control.
Battery Installation
Two AAA 1.5v alkaline batteries (included) are required for remote
control operation.
To install or replace batteries:
1. Slide the back cover off the control to open the battery compartment.
2. Insert the batteries. Follow the polarity markings inside the battery
compartment.
3. Replace the battery compartment cover.
NOTES:
1. When replacing batteries, do not use old batteries or a different
type battery. This may cause the remote control to malfunction.
2. If the remote is not going to be used for several weeks, remove the
batteries. O
therwise, battery leakage may damage the remote
control.
3. The average battery life under normal use is about 6 months.
4. Replace the batteries when there is no audible beep from the
indoor unit or if the Transmission Indicator fails to light.
NOTE: When batteries
are removed, the remote control erases all
presets (e.g., COMFORTSENSE). The presets must be
restored after the insertion of new batteries.
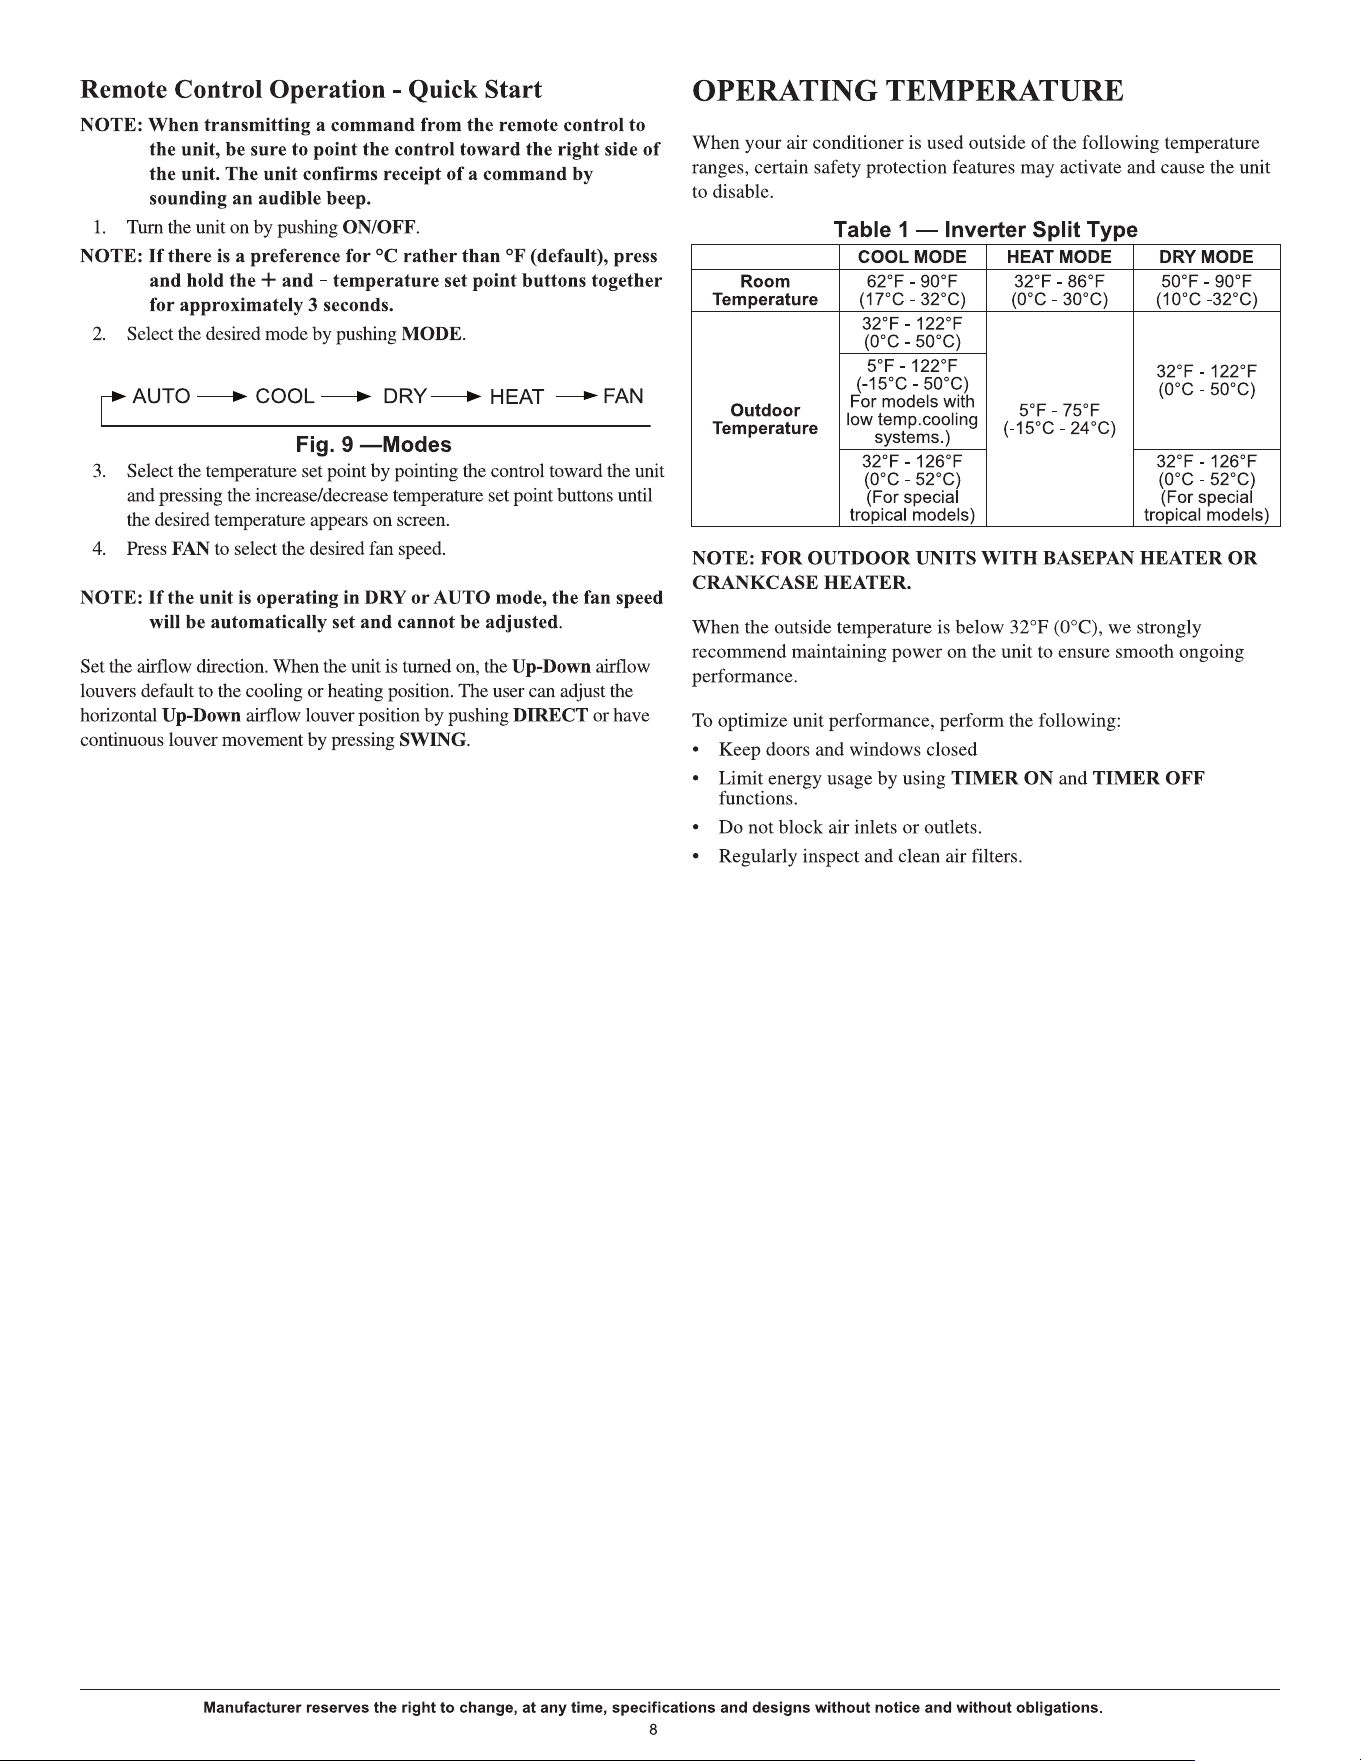
BASIC REMOTE CONTROL OPERATION
Before operation, ensure the unit is plugged in and power is available.
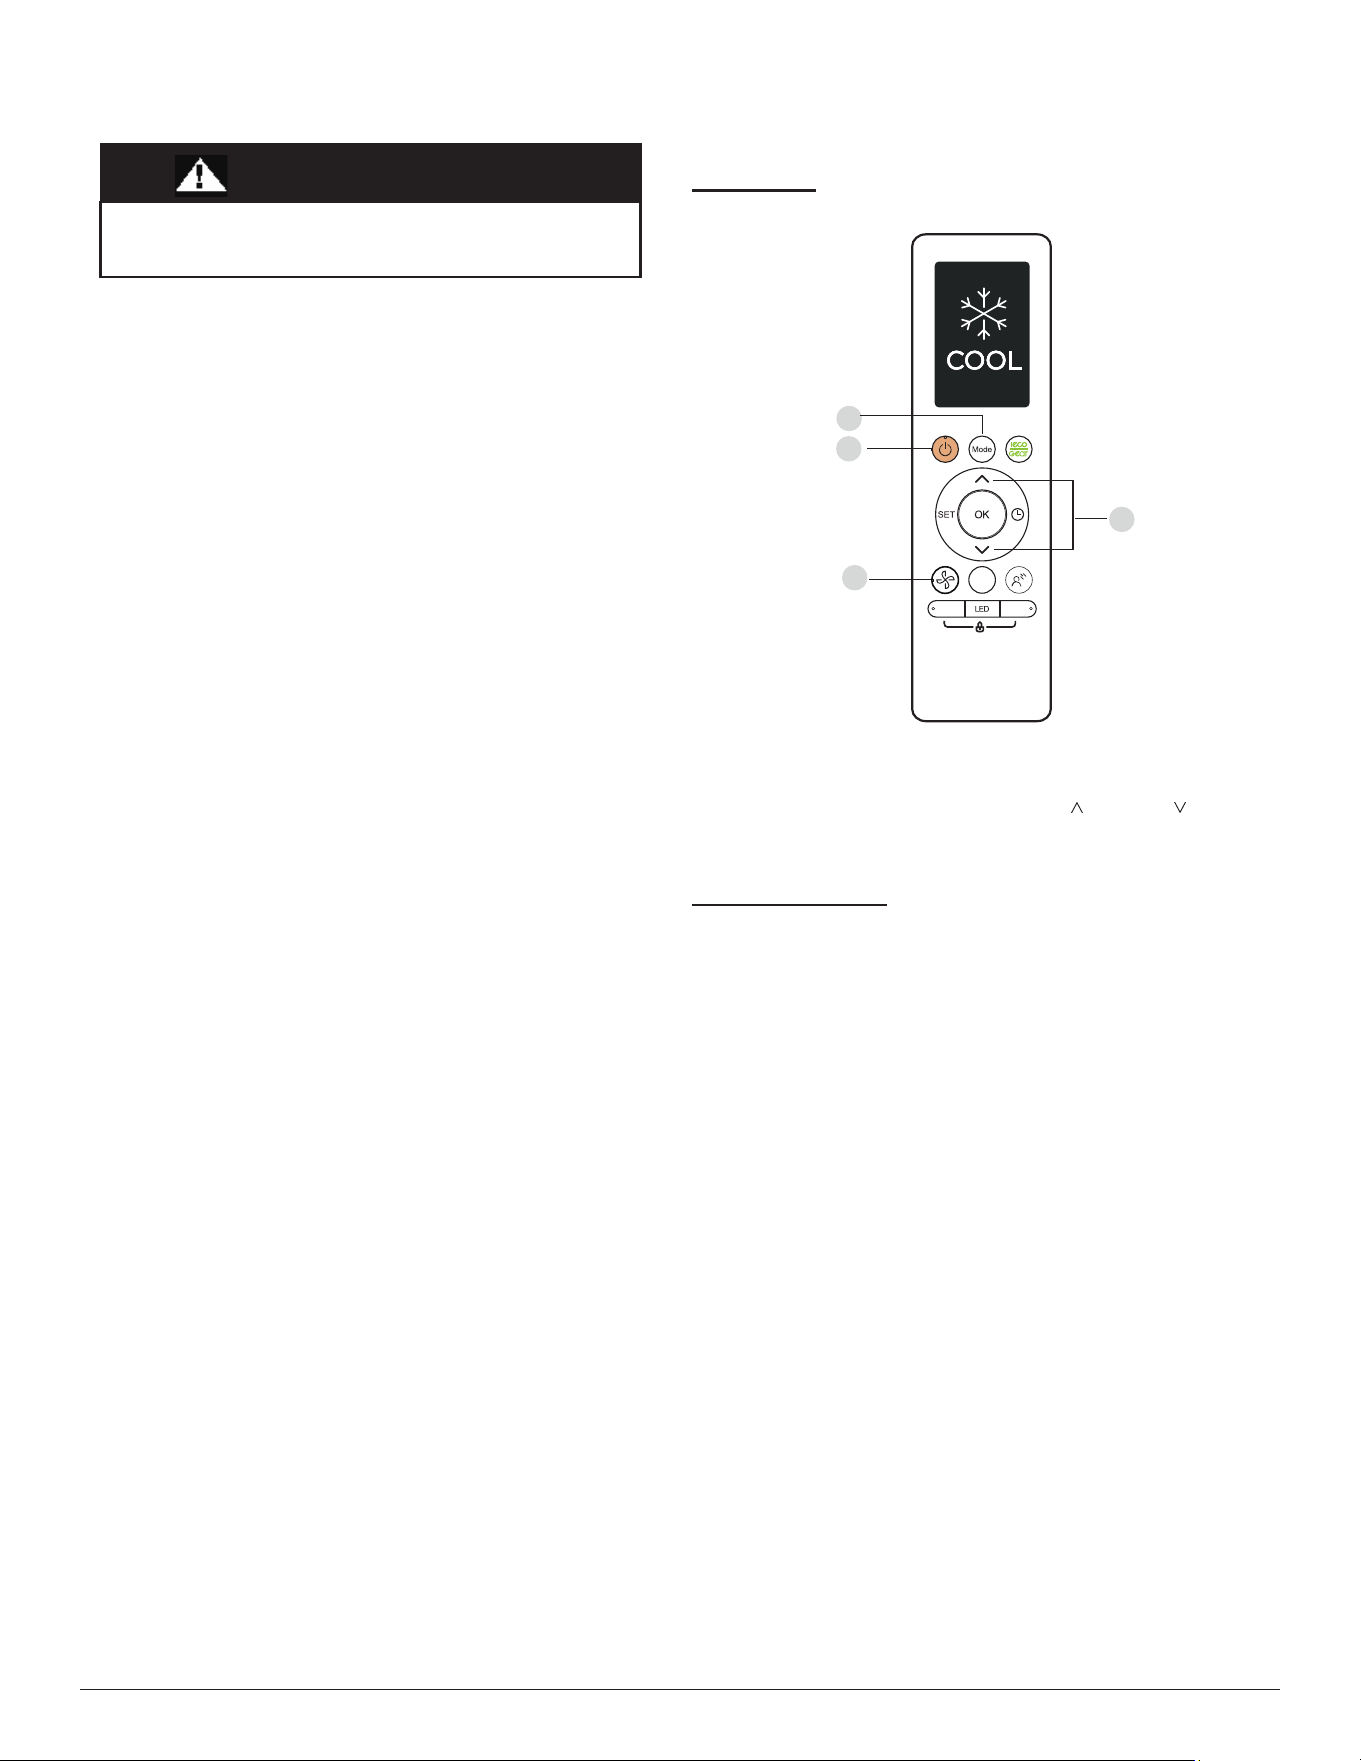
COOL Mode
Fig. 4 — COOL Mode
1. Press MODE to select the COOL mode.
2. Set your desired temperature using TEMP
or TEMP .
3. Press FAN to select the fan speed in a range of Auto - ‘100%,
4. Press ON/OFF to start the unit.
Setting Temperature
The operating temperature range for units is 60-86°F (16-30°C)/(68-82 °F
(20-28°C) (depends on model). You can increase or decrease the set
temperature in 1°F(0.5°C) increments.
EQUIPMENT DAMAGE HAZARD
Failure to follow this caution may result in equipment damage.
Handle the control with care and avoid getting the control wet.
CAUTION
Swing
Boost
Clean
1
3
2
4
Manufacturer reserves the right to change, at any time, specifications and designs without notice and without obligations.
7
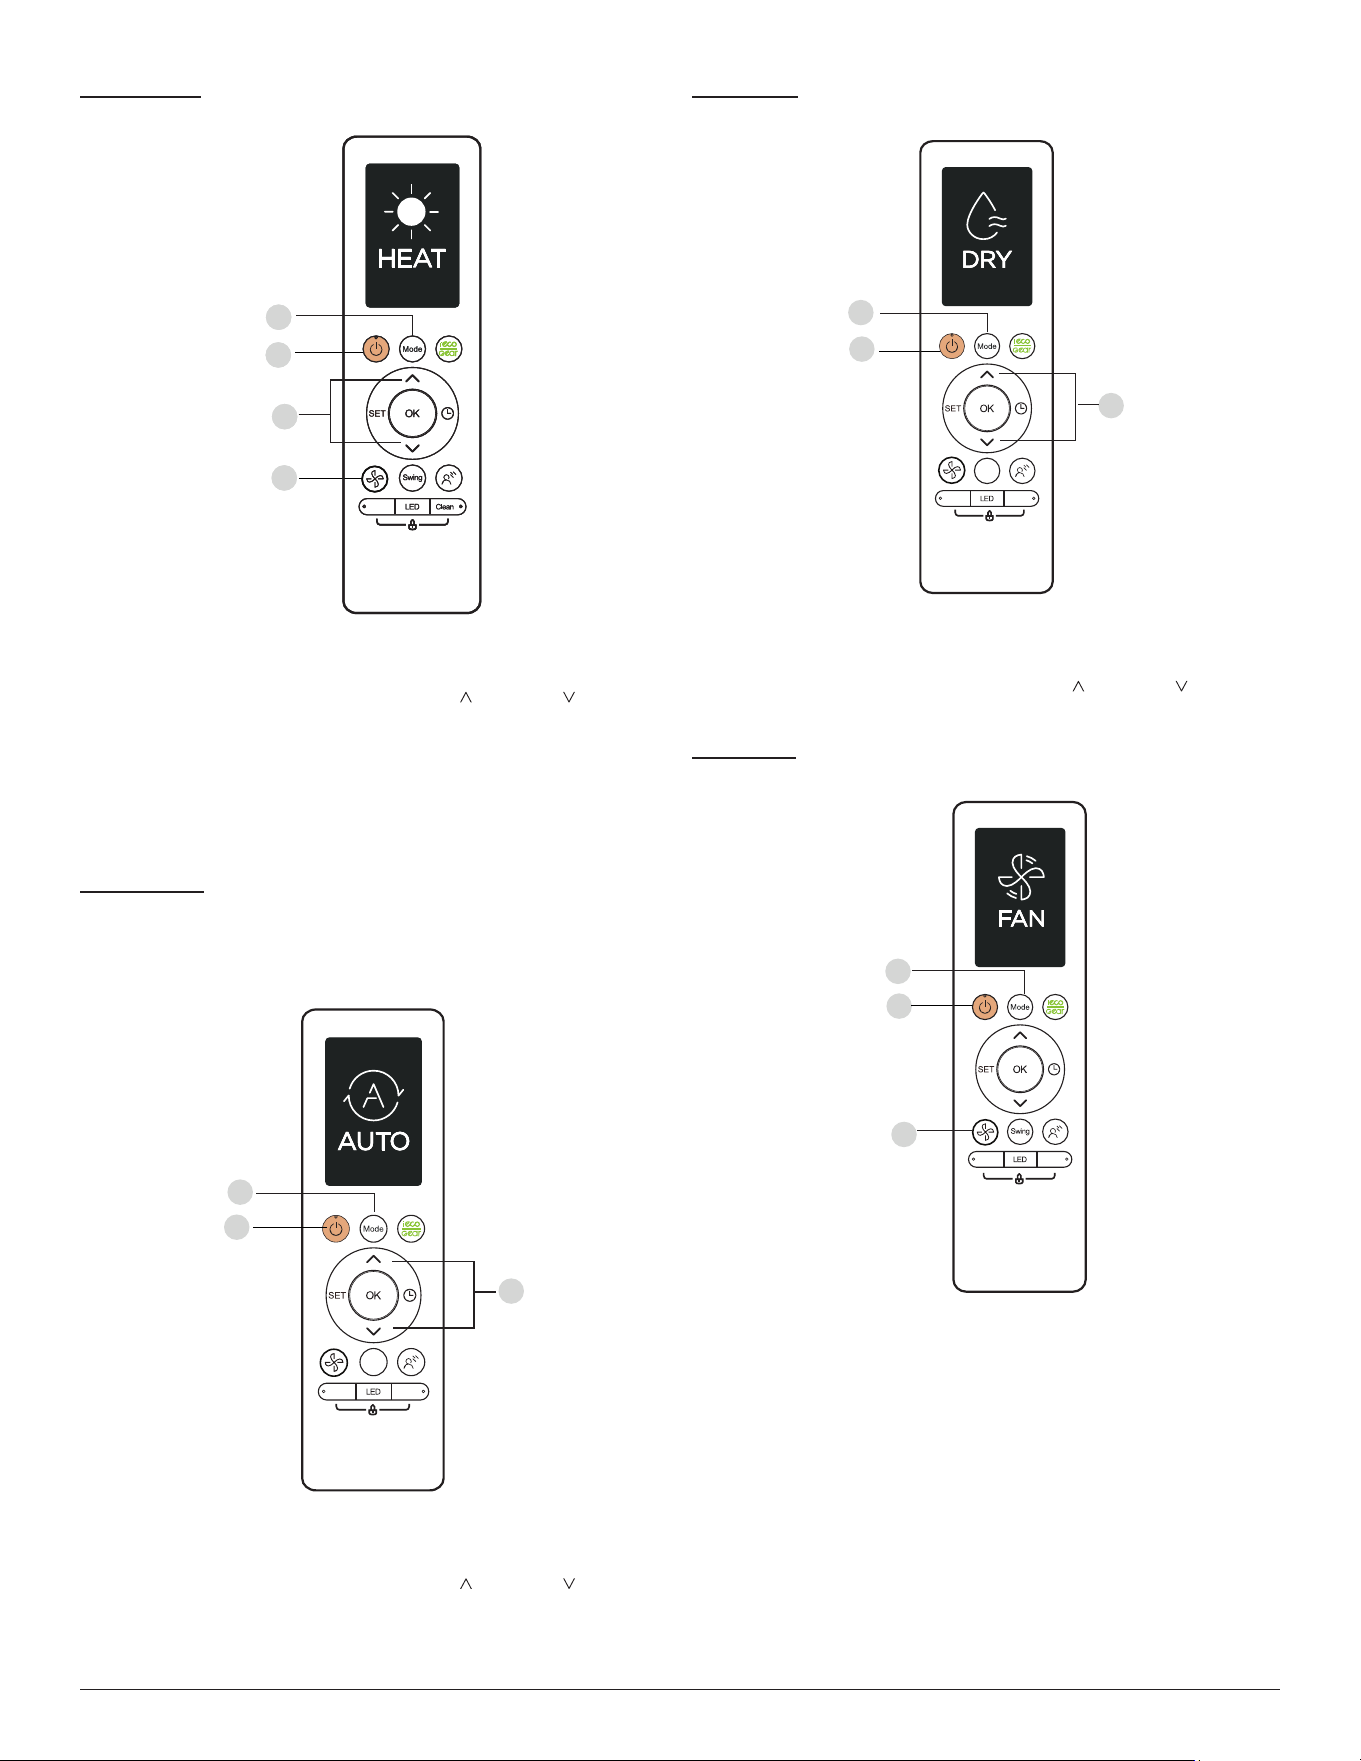
HEAT Mode
Fig. 5 — HEAT Mode
1. Press MODE to select the HEAT mode.
2. Set your desired temperature using TEMP or TEMP .
3. Press FAN to select the fan speed in the range of Auto - 100%.
NOTE: As the outdoor temperature drops, the performance of your
unit’s HEAT function may be affected. In such instances, we
recommend using this air conditioner in conjunction with
other heating appliances.
AUTO Mode
In AUTO mode, the unit automatically selects the COOL, FAN, or
HEAT operation based on the set temperature.
Fig. 6 — AUTO Mode
1. Press MODE to select AUTO.
2. Set your desired temperature using TEMP or TEMP
.
3. Press ON/OFF to start the unit.
NOTE: FAN Speed can not be set in the AUTO mode.
DRY Mode
Fig. 7 — DRY Mode
1. Press MODE to select the DRY mode.
2. Set your desired temperature using TEMP or TEMP .
3. Press ON/OFF to start the unit.
FAN Mode
Fig. 8 — FAN Mode
1. Press MODE to select the FAN mode.
2. Press FAN to select the fan speed in the range of Auto - 100%.
3. Press ON/OFF to start the unit.
1
3
2
4
B o o s t
1
3
2
4
B o o s t
Swing
Boost
Clean
1
3
2
Swing
Boost
Clean
1
3
2
Boost
Clean
1
3
2
Supplier's Declaration of Conformity
Per FCC Part 2 Section 2.1077
Unique Identifier: Midea brand,RG10A(B2S)/BGEFU1
Party issuing Supplier's Declaration of Conformity
Midea America Corporation
300 Kimball Dr
Parsippany NJ
07054
Telephone number or internet contact information: Midea.com/us
Responsible Party U.S. Contact Information
Midea America Corporation
300 Kimball Dr
Parsippany NJ
07054
Telephone number or internet contact information: Midea.com/us
FCC Compliance Statement ( products subject to Part 15)
This device complies with Part 15 of the FCC Rules. Operation is subject to the
following two conditions: (1) This device may not cause harmful interference, and
(2) this device must accept any interference received, including interference that
may cause undesired operation.
Manufacturer reserves the right to change, at any time, specifications and designs without notice and without obligations.
9
FEATURES
The unit provides the following features for added comfort and safety.
Auto-Restart (some units)
If the unit loses power, it automatically restarts with the prior settings
once power has been restored.
Anti-mildew (some units)
When turning off the unit from COOL, AUTO (COOL), or DRY modes,
the air conditioner continues to operate at very low power to dry up any
condensed water and prevent mildew growth.
Wireless Control (some units)
Wireless control allows users to control the air conditioner using a mobile
phone and a wireless connection. For the USB device access,
replacement, maintenance operations must be carried out by professional
staff.
Louver Angle Memory (some units)
When turning on the unit, the louver automatically resumes its former
angle.
Active Clean (some units)
The Active Clean Technology washes away dust, mold, and grease that
may cause odors when it adheres to the heat exchanger by automatically
freezing and then rapidly thawing the frost. The operation produces more
condensed water to improve the cleaning effect.
After cleaning, the blower wheel keeps operating with hot air to blow-dry
the evaporator, thus preventing the growth of mold and keeping the inside
clean. When this function is turned on, the indoor unit window displays
CL. After 20 to 45 minutes, the unit turns off automatically and cancels
the function.
Breeze Away (some units)
This feature avoids direct air flow from blowing on inhabitants.
Refrigerant Leak Detection (some units)
COMFORTSENSE (some units)
The indoor unit auto
The COMFORTSENSE feature enables the emote control to measure the
temperature at its current location. When using AUTO, COOL, or HEAT
modes, measuring ambient temperature from the remote control (instead
of from the indoor unit it self) will enable the air conditioner to optimize
the temperature around you and ensure maximum comfort.
1. Press COMFORTSENSE button to activate feature. The remote control
will send temperature signal to the unit every three minutes.
2. Press COMFORTSENSE button again to turn off this feature.
matically displays EL0C when it detects refrigerant
leakage.
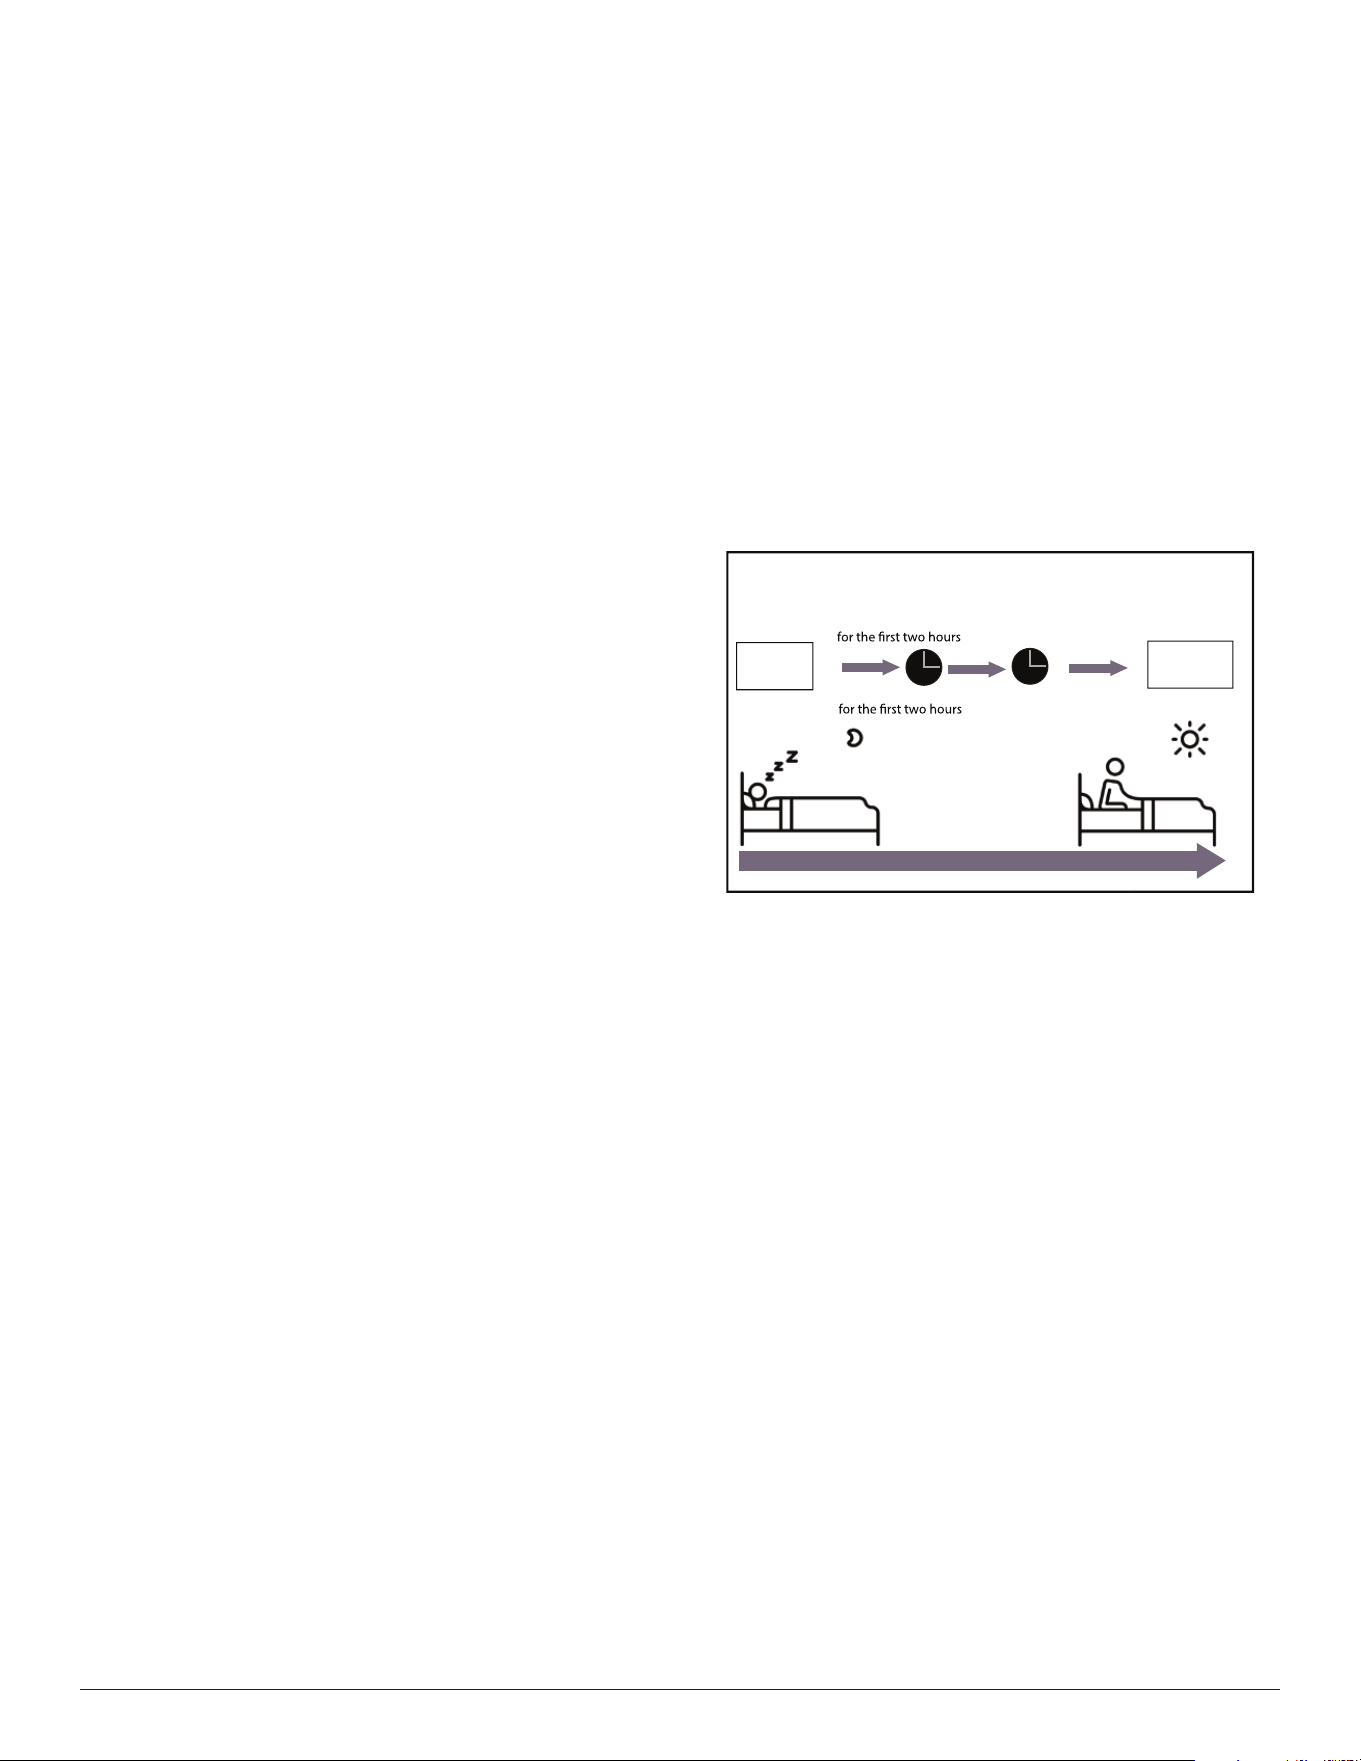
Sleep Operation
The SLEEP function is used to decrease energy use while inhabitants
sleep and do not require the same temperature settings to maintain
comfort. This function can only be activated via the remote control.
NOTE: The SLEEP function is not available in the FAN or DRY
mode.
Press SLEEP when you are ready to sleep. When in the COOL mode, the
unit increases the temperature by 2°F (1°C) after 1 hour, then increases an
additional 2°F (1°C) after another hour. When in the HEAT mode, the
unit decreases the temperature by 2°F (1°C) after 1 hour, and decreases an
additional 2°F (1°C) after another hour.
The SLEEP feature stops after 8 hours and the system keeps running
under the final setting.
Fig. 10 — SLEEP Operation
Resetting the Remote Control
If the batteries in the remote control are removed, the current settings
cancel and the control returns to the initial settings and enters the
STANDBY mode. Push ON/OFF to activate.
NOTE: For multi-zone air conditioners, the following functions are
not available: ACTIVE CLEAN, SILENCE, BREEZE
AWAY, REFRIGERANT LEAKAGE DETECTION and
ECO.
Setting Horizontal Angle of Air Flow
While the unit is on, press SWING on the remote control to initiate the
horizontal louver AUTO SWING feature.
NOTE: When using the COOL or DRY mode, do not set the louver at
a high angle for long periods of time. Doing so may cause
water to condense on the louver blade, which may drop on
floors or furnishings.
NOTE: When using the COOL or HEAT mode, setting the louver at
too high of an angle can reduce the performance of the unit
due to restricted air flow.
Setting Vertica Angle of Air Flow
The vertical angle of the airflow must be set manually. Grip the
deflector rod (see Fig. 12) and manually adjust it to your preferred
direction.
Set
temperature
1hr
1hr
Keep
running
SLEEP Operation
Saving energy during sleep
Heat mode(2°F/-1°C) per hour
Cool mode (2°F/+1°C) per hour
Manufacturer reserves the right to change, at any time, specifications and designs without notice and without obligations.
10
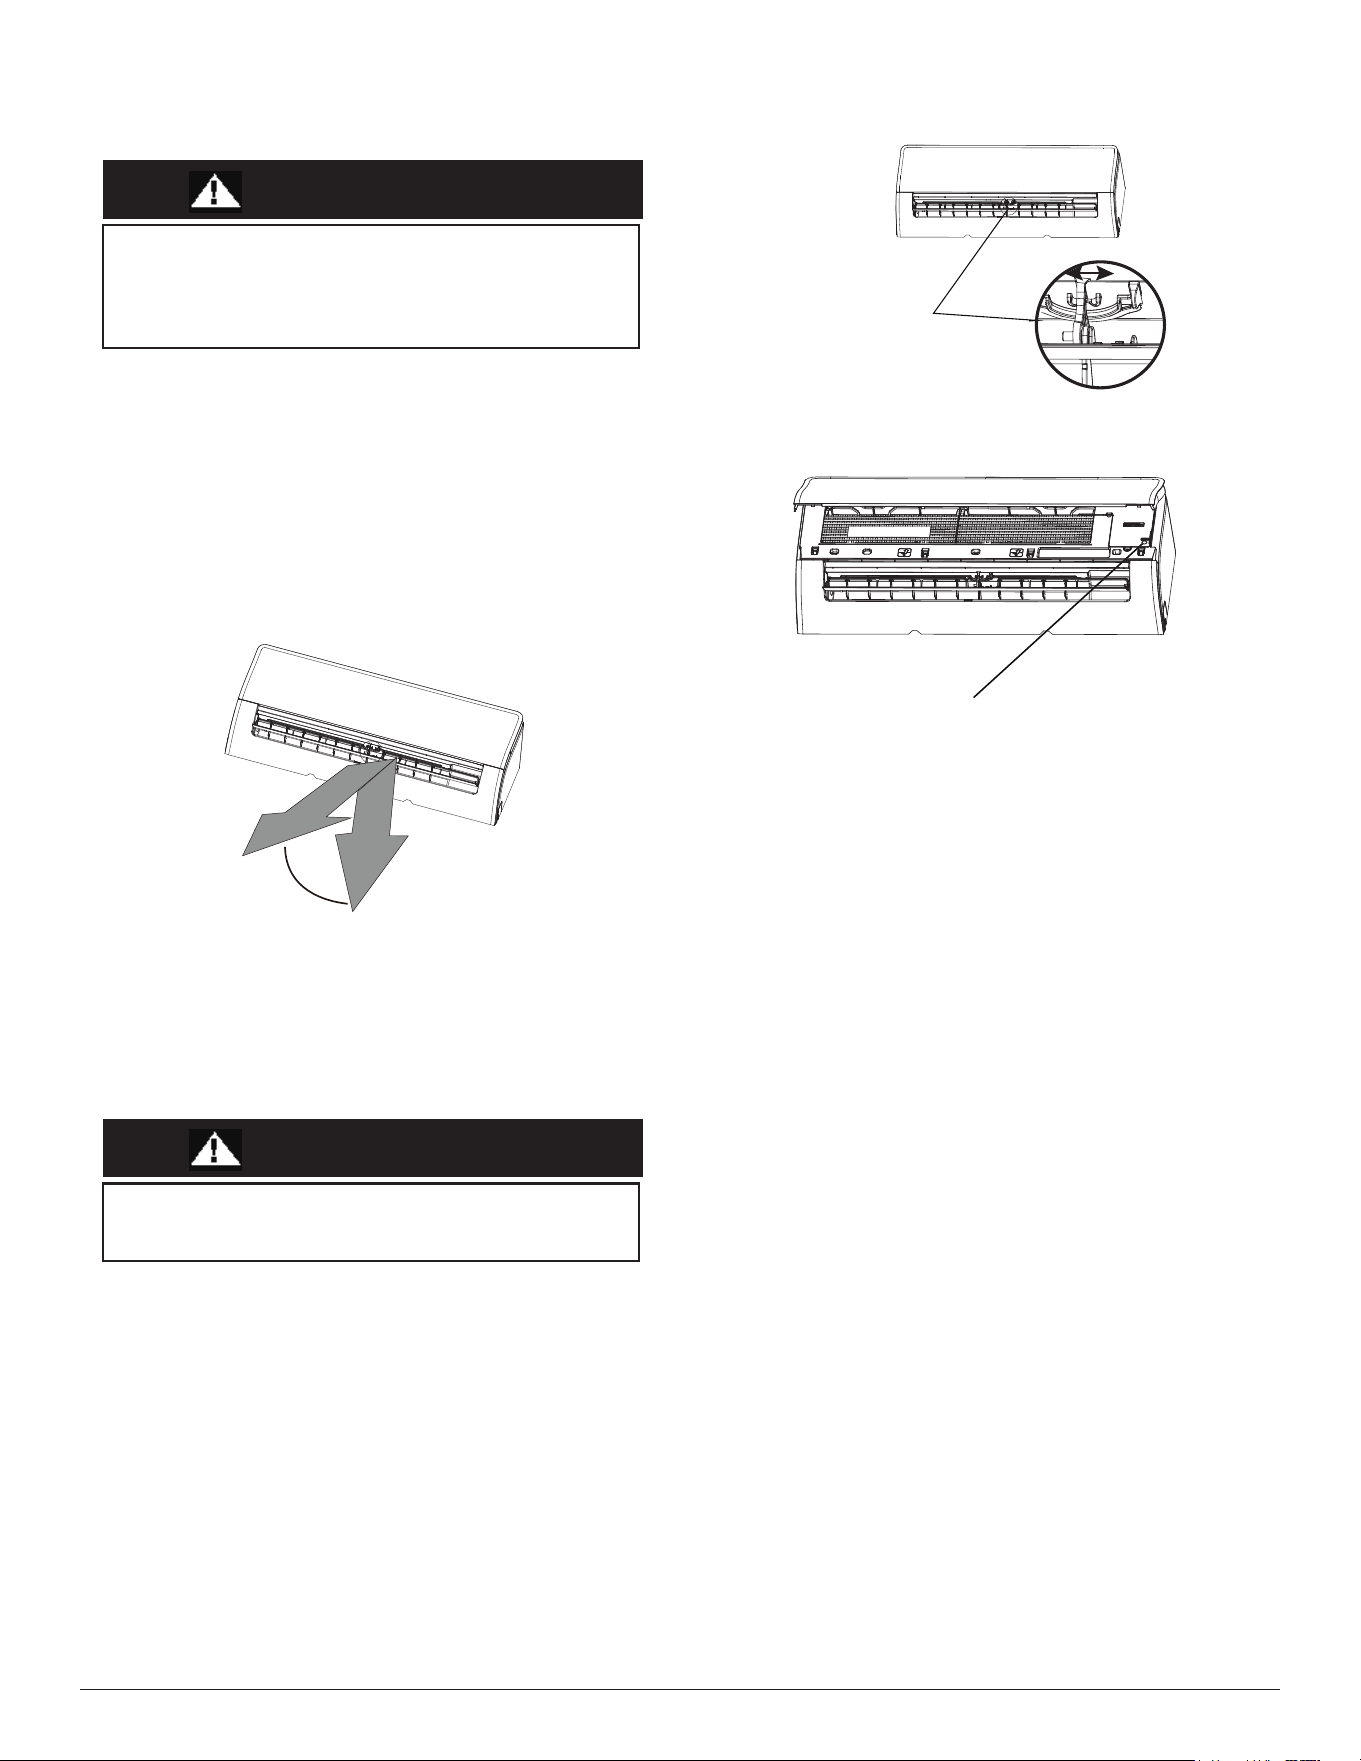
Manual Operation (Without Remote Control)
Fig. 12 — Deflector Rod
Fig. 13 — Manual Control Button
CAUTION
Use the following steps to operate the unit manually:
1. Open the front panel of the indoor unit.
2. Locate the MANUAL CONTROL button on the right-hand side of
the unit.
3. Press MANUAL CONTROL one time to activate the FORCED
AUTO mode.
4. Press MANUAL CONTROL again to activate the FORCED
COOLING mode.
5. Press MANUAL CONTROL a third time to turn the unit off.
6. Close the front panel.
Fig. 11 — Range
NOTE: DO NOT move the louver by hand. Doing so takes the louver
out of sync. Should this occur, turn off the unit and unplug it
for a few seconds, then restart the unit. Doing so resets the
louver.
Rang
e
CAUTION
D
eflector
r
od
Manual Control Button
The MANUAL button is intended for testing purposes and
emergency operation only. Do not use this function unless the
remote control is lost and it is absolutely necessary. To restore
regular operation, use the remote control to activate the unit. Unit
must be turned off before initiating the manual operation.
DO NOT put your fingers in or near the blower and suction unit
side of the unit. The high-speed fan inside the unit may cause
injury.
Before changing the filter or cleaning, turn off the unit and
disconnect its power supply.
When removing the filter, do not touch the metal parts in the unit.
The sharp metal edges can cut you.
Do not
use water to clean the inside of the indoor unit. This can
destroy insulation and cause electrical shock.
Do not
expose filter to direct sunlight when drying. This can
shrink the filter.
Do not
touch air freshening (Plasma) filter for at least 10 minutes
after turning off the unit.
Only use a soft, dry cloth to wipe the unit clean. If the unit is
especially dirty, you can use a cloth soaked in warm water to wipe
it clean.
Operating the system with dirty air filters may damage the
indoor unit and could cause reduced cooling performance,
intermittent system operation, frost build-up on indoor coil or
blown fuses.
Manufacturer reserves the right to change, at any time, specifications and designs without notice and without obligations.
11
CLEANING, MAINTENANCE AND TROUBLESHOOTING
Periodic Maintenance
Periodic maintenance is recommended to ensure proper operation of the unit.
Recommended maintenance intervals may vary depending on the installation
environment, e.g., dusty zones, etc. Refer to Table 2 on page 13.
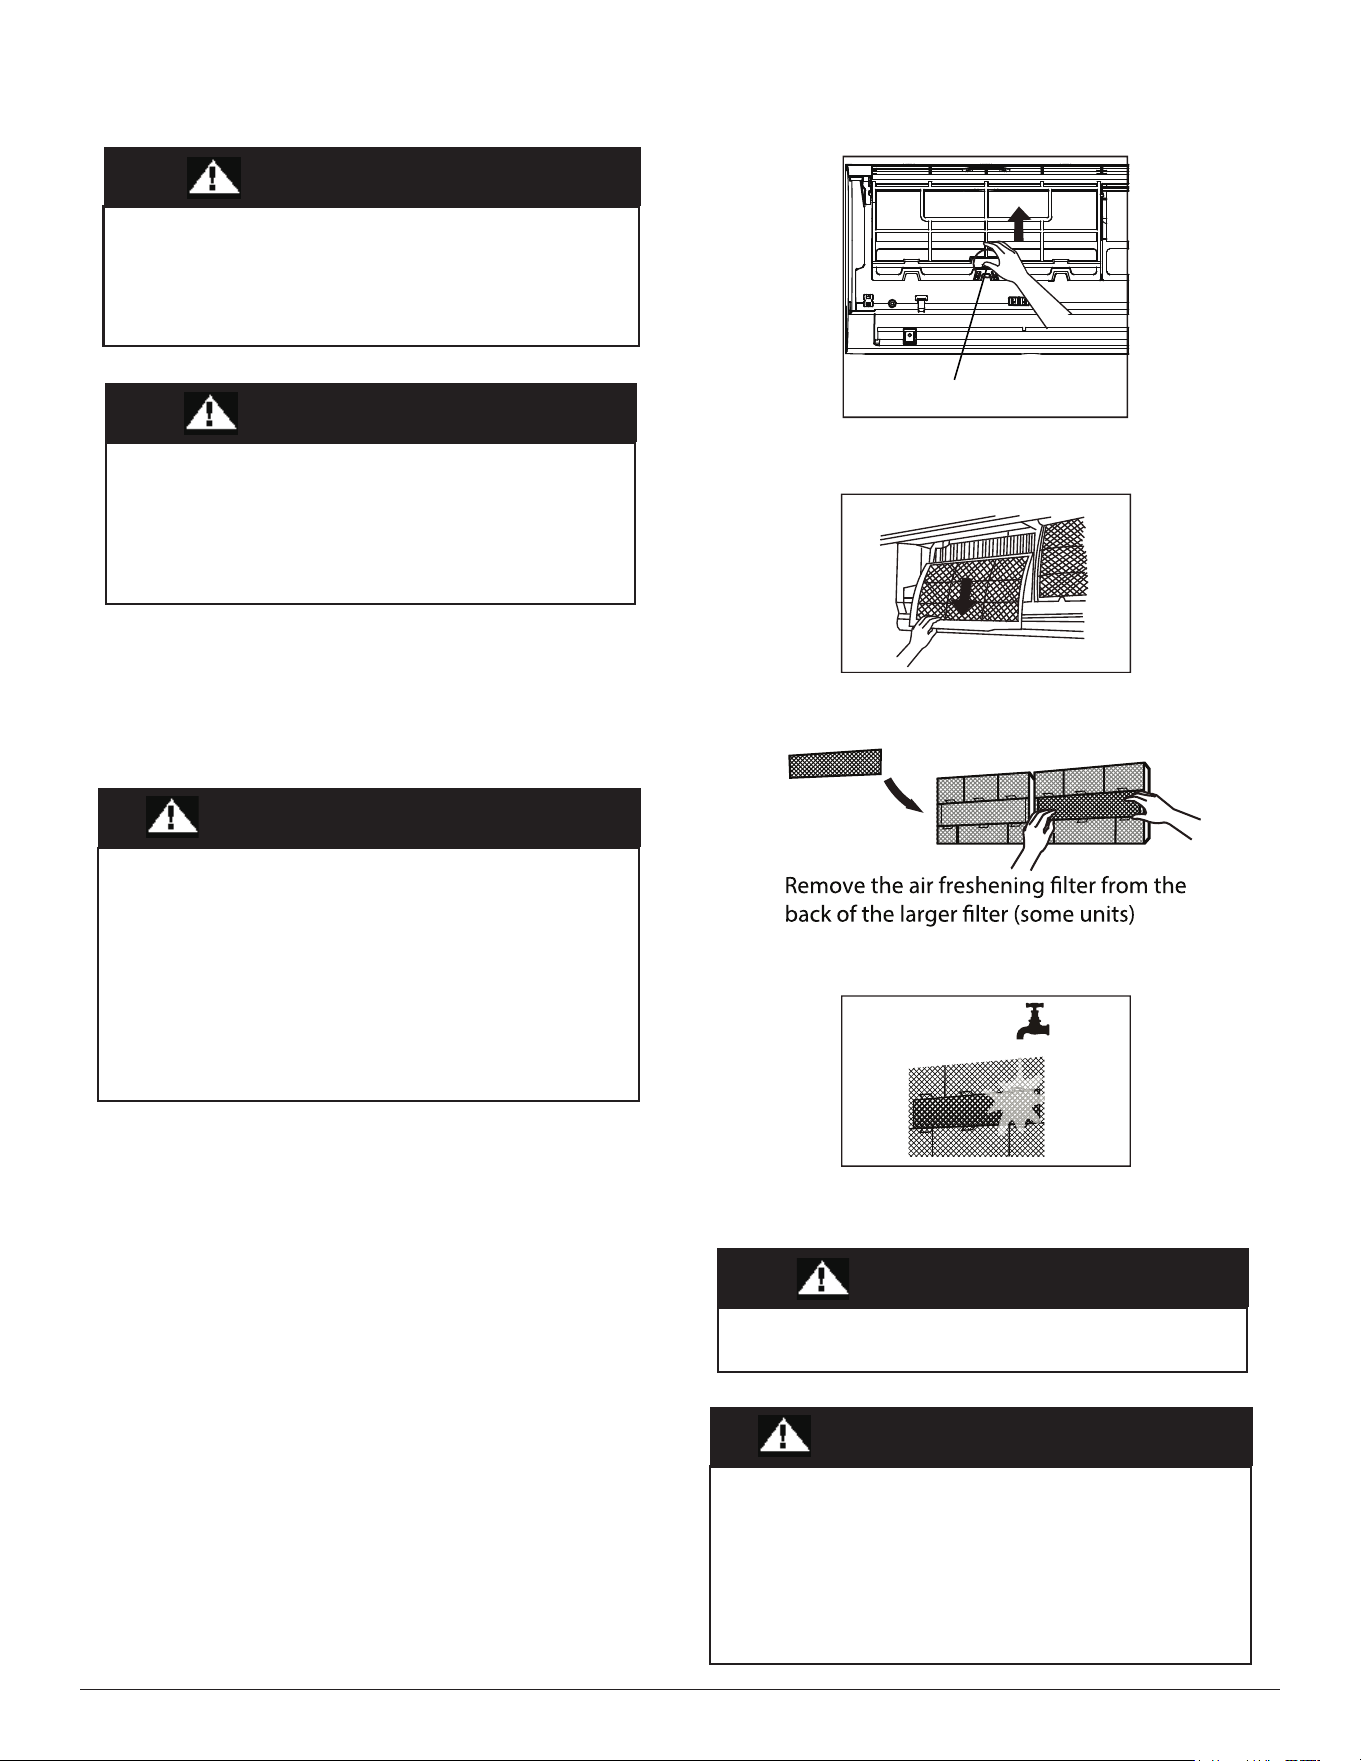
Cleaning the Air Filters
A clogged air conditioner can reduce the cooling efficiency of your unit,
and can also be bad for your health. Make sure to clean the filter once
every two weeks.
1. Lift the front panel of the indoor unit.
2. First press the tab on the end of filter to loosen the buckle, lift it up, then
pull it towards you.
3. Now pull the filter out.
4. If the filter has a small air freshening filter, unclip it from the larger
filter. Clean the air freshening filter with a hand-held vacuum.
5. Clean the large air filter with warm, soapy water. Be sure to use a mild
detergent.
6. Rinse the filter with fresh water, then shake off any excess water.
7. Dry the filter in a cool, dry place, and keep it out of direct sunlight.
8. Once dry, re-clip the air freshening filter to the larger filter, then slide it
back into the indoor unit.
9. Close the front panel of the indoor unit.
Fig. 14 — Filter Tab
Fig. 15 — Remove the Filter
Fig. 16 — Remove the air freshing filter
Fig. 17 — Rinse the filter
ELECTRICAL SHOCK HAZARD
CAUTION
EQUIPMENT DAMAGE/OPERATION HAZARD
Failure to follow this caution may result in equipment damage or
improper unit operation.
CAUTION
Do not
use chemicals or chemically treated cloths to clean the unit.
Do not
use benzene, paint thinner, polishing powder or other
solvents to clean the unit. They can cause the plastic surface to
crack or deform.
Do not
use water hotter than 104°F (40°C) to clean the front panel.
This can cause the panel to deform or become discolored.
CAUTION
Filter Tab
CAUTION
CAUTION
Failure to follow this caution may result in personal injury or
death. Always turn off power to the system before performing
any cleaning or maintenance to the system. Turn off the outdoor
disconnect switch located near outdoor unit.
Be sure to disconnect the indoor unit if on a separate switch.
Any maintenance and cleaning of the outdoor unit should be
performed by an authorized dealer or a licensed service provider.
Any unit repairs should be performed by an authorized dealer or a
licensed service provider.
Manufacturer reserves the right to change, at any time, specifications and designs without notice and without obligations.
12
Air Filter Reminders (Optional)
After 240 hours of use, the display window on the indoor unit will flash
“CL” This is a reminder to clean the filter. After 15 seconds, the unit
reverts to its previous display. To reset the reminder, press LED on the
remote control 4 times, or press the MANUAL CONTROL button 3
times. If the reminder is not reset, the “CL” indicator flashes again once
the unit is restarted.
Air Filter Replacement Reminder
After 2,880 hours of use, the display window on the indoor unit will flash
“nF”. This is a reminder to replace the filter. After 15 seconds, the unit
reverts to its previous display. To reset the reminder, press LED on the
remote control 4 times, or press the MANUAL CONTROL button 3
times. If the reminder is not reset the reminder, the “nF”
indicator flashes
again once the unit is restarted.
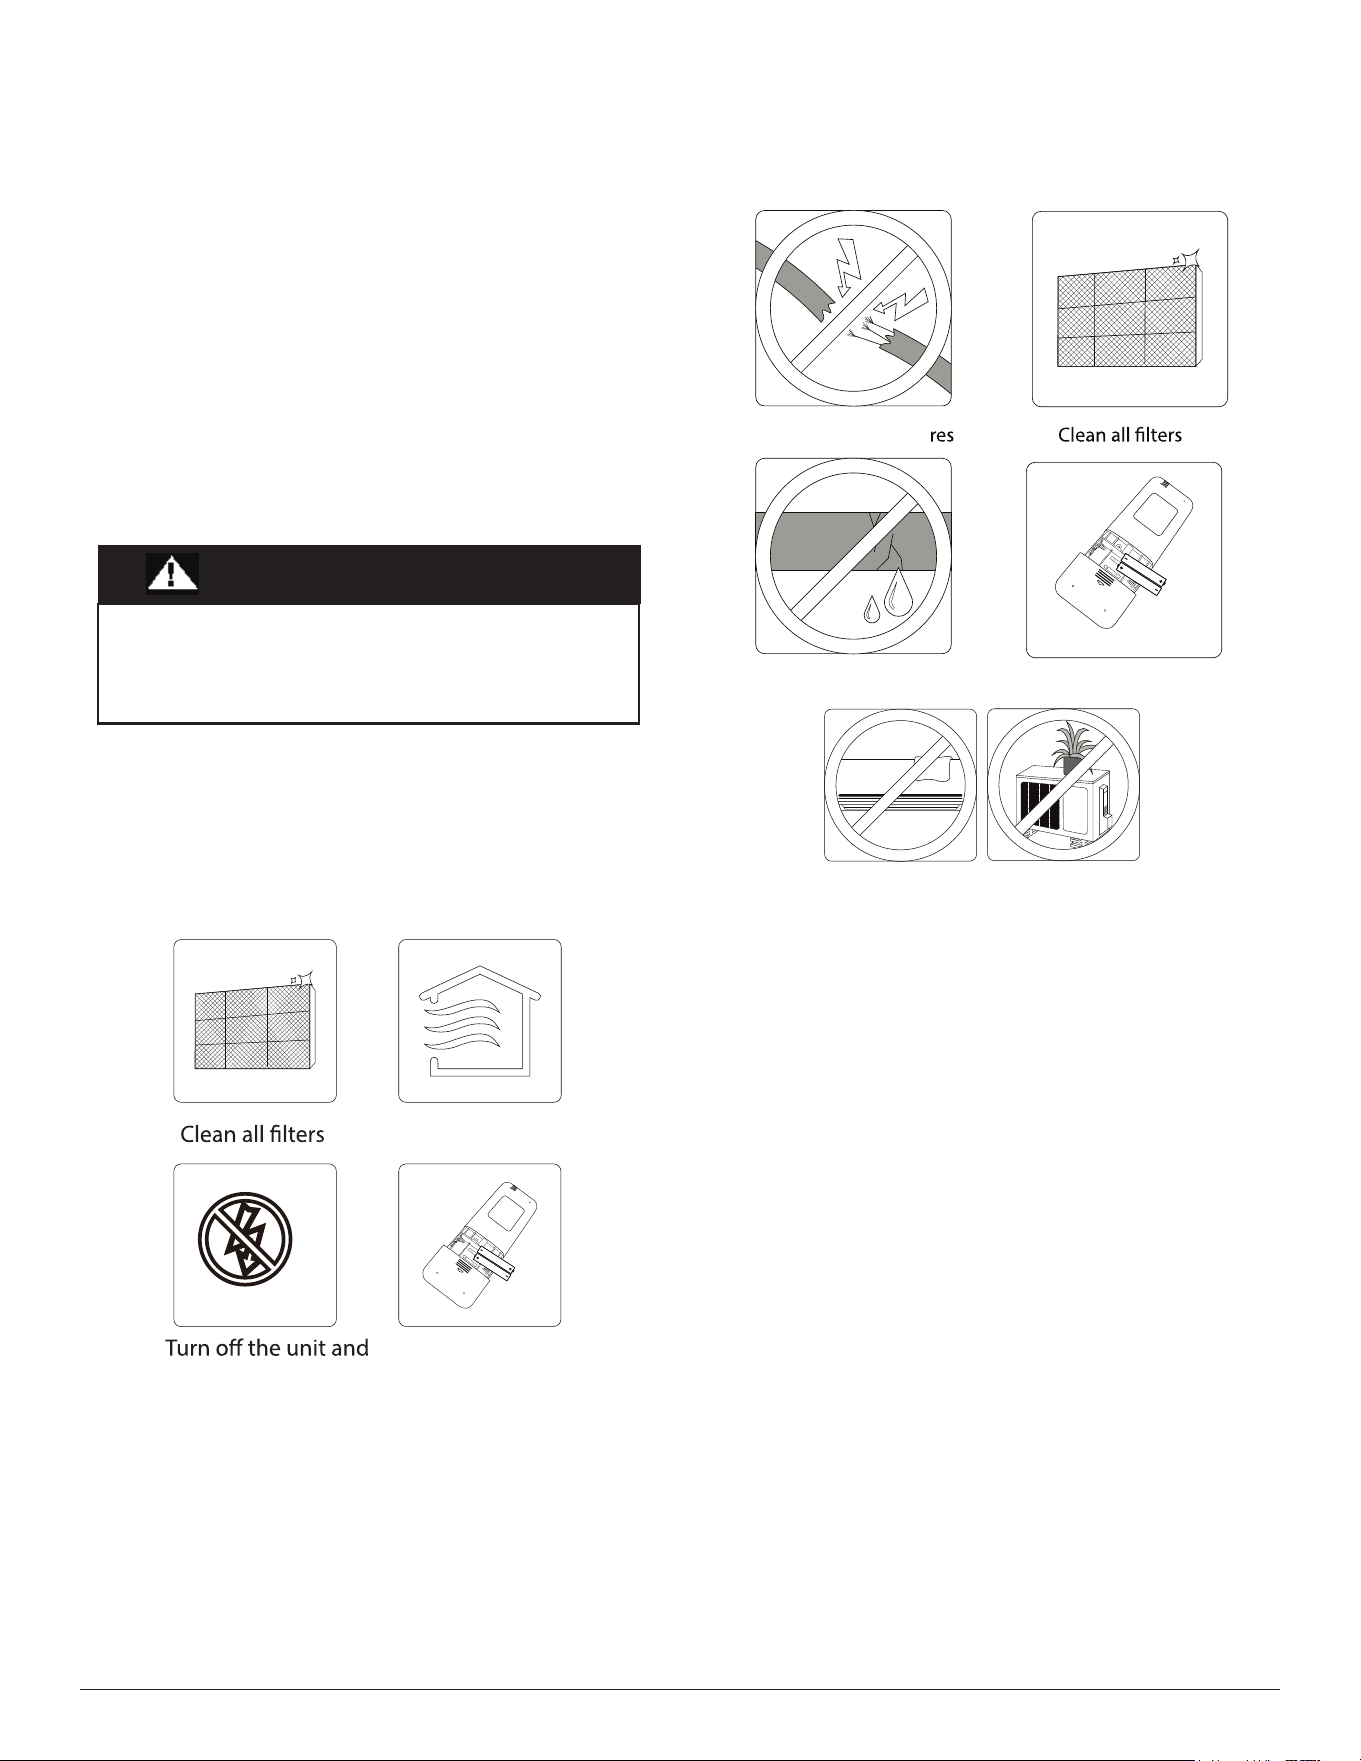
Preparing for Extended Shutdown Period
Clean the filters and reposition them in the unit. Operate the unit in FAN
ONLY mode for 12 hours to dry all internal parts. Turn the main power
supply off and remove the batteries from the remote control.
Fig. 18 — Extended Shutdown Period Steps
Pre-Season Inspection
After long periods of non-use, or before periods of frequent use, perform
the following steps.
Fig. 19 — Pre-Season Inspection
System Operation Recommendations
The items outlined in the following list help to assure proper system operation:
• Replace both remote control batteries at the same time.
• Point the remote control toward the unit display panel when
transmitting a command.
• Keep doors and windows closed while unit is
operating.
• Contact an authorized service representative if a problem arises that
cannot be easily resolved.
• Do not perform cleaning or maintenance activities while the unit is on.
• Keep the display panel on the unit away from direct sunlight and heat
as this may interfere with remote control transmissions.
• Do not block air intakes and outlets on the indoor or outdoor units.
Energy Saving Recommendations
The following recommendations add greater efficiency to the ductless system:
• Select a comfortable thermostat setting and leave it at chosen setting.
Avoid continually raising and lowering the setting.
• Keep the filter clean. Frequent cleaning may be necessary depending
on indoor air quality.
• U
se drapes, curtains or shades to keep direct sunlight from heating the
room on very hot days.
• Limit the unit’s run time by using the TIMER function.
• Do not obstruct the air intake on the front panel.
• Turn on the air conditioning unit before the indoor air becomes too
uncomfortable.
CAUTION
Turn on the FAN function until
unit dries out completely
disconnect the power
Remove batteries
from remote control
Check for damaged wi
Check for leaks
Replace batteries from remote
Make sure nothing is blocking all air inlets and outlets
Manufacturer reserves the right to change, at any time, specifications and designs without notice and without obligations.
13
TROUBLESHOOTING (CONT)
Refer to Table 2 before contacting your local dealer.
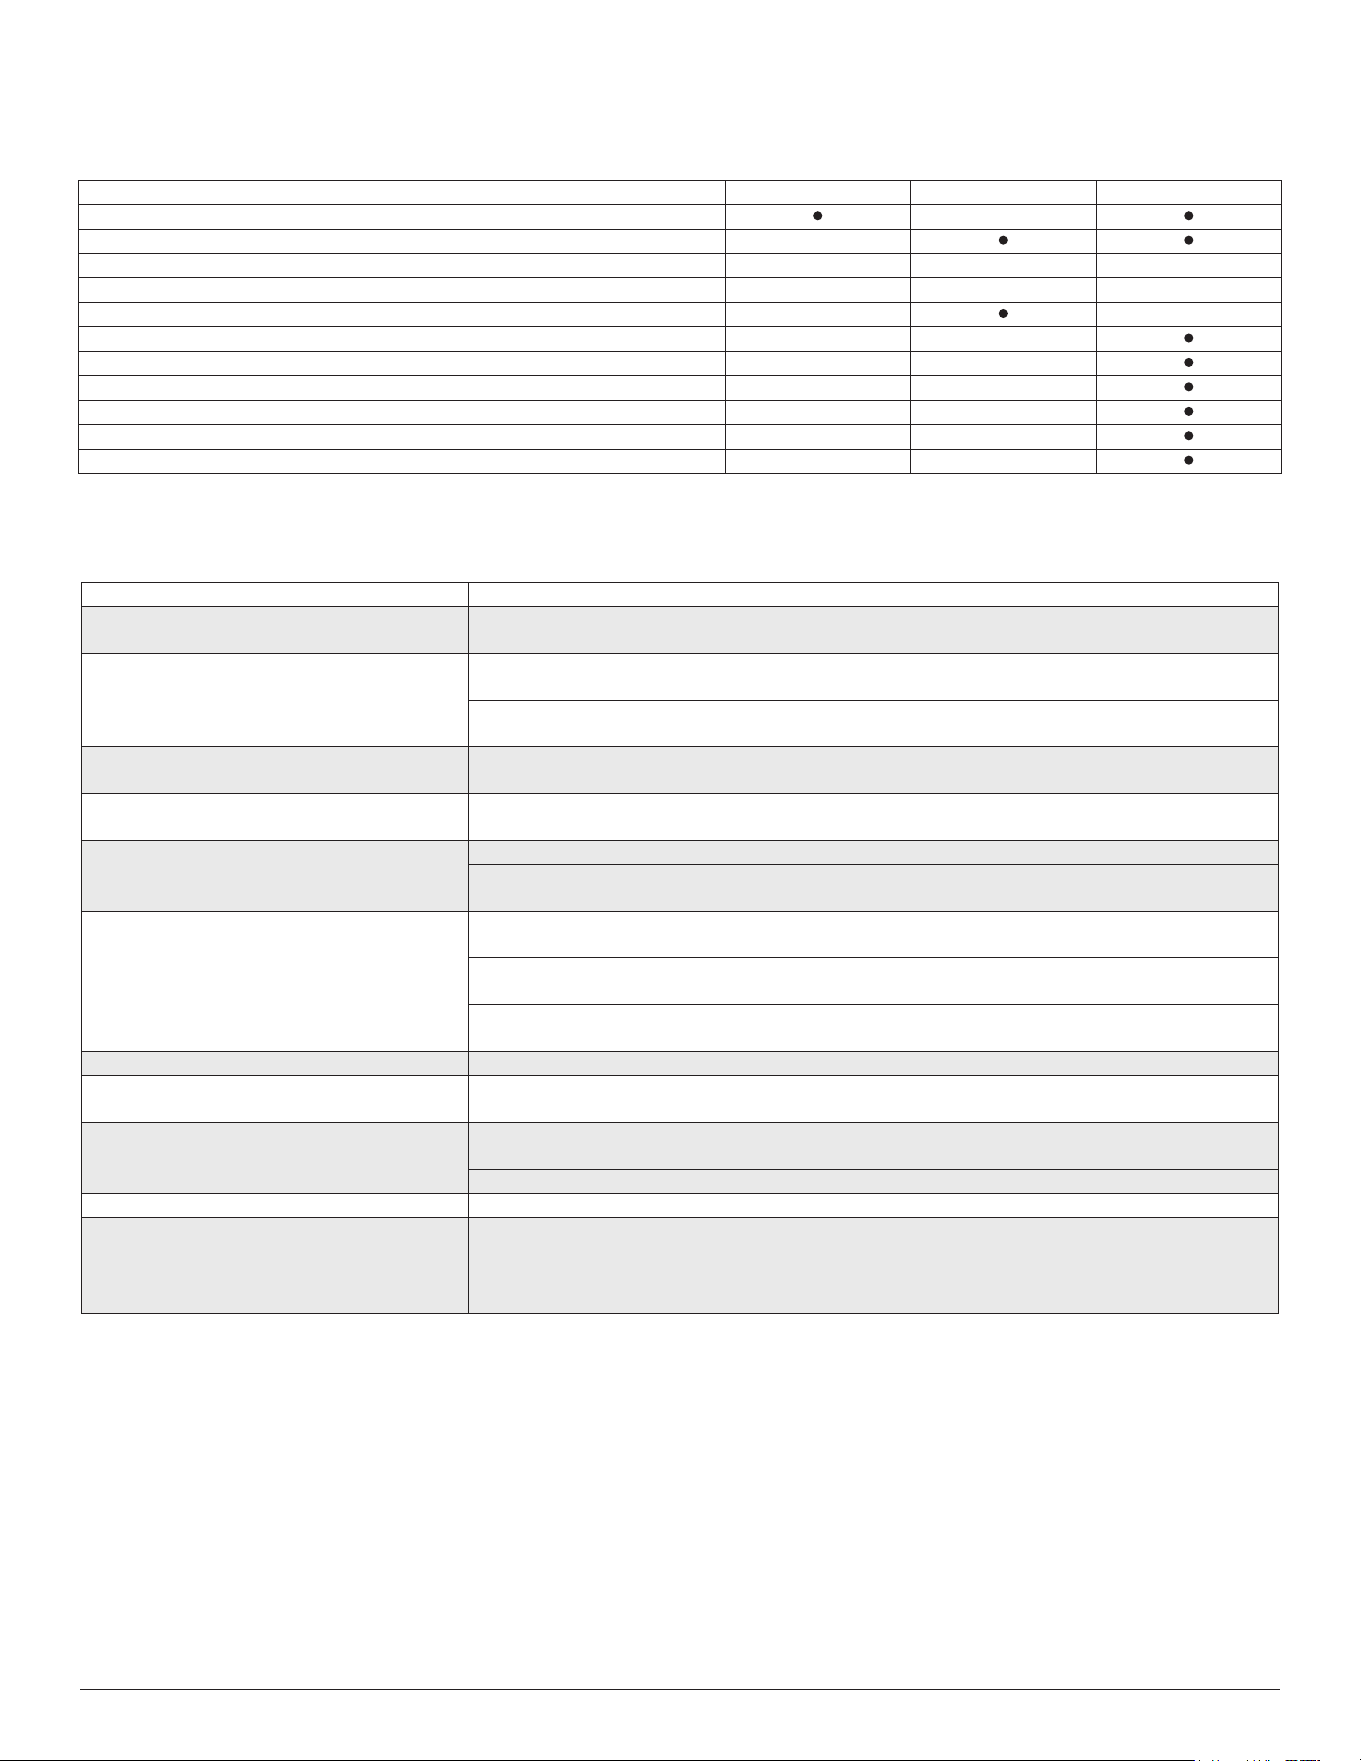
Table 2 — Periodic Maintenance
* Increase frequency in dusty zones.
† Maintenance to be carried out by qualified service personnel. Refer to the Installation Manual
The problems listed in Table 3 are not a malfunction and in most situations will not require repairs.
Table 3 — Common Issues
NOTE: If a problem persists, contact a local dealer or your nearest customer service center. Provide them with a detailed description of the
unit malfunction as well as your model number.
INDOOR UNIT EVERY MONTH EVERY 6 MONTHS EVERY YEAR
Clean Air Filter*
Replace Carbon Filter
Change Remote Control Batteries (as needed)
OUTDOOR UNIT EVERY MONTH EVERY 6 MONTHS EVERY YEAR
Clean Outdoor Coil from Outside
Clean Outdoor Coil from Inside†
Blow Air Over Electric Parts†
Check Electric Connection Tightening†
Clean Fan Wheel†
Check Fan Tightening†
Clean Drain Pans†
Issue Possible Causes
Unit does not turn on when pressing ON/OFF
The unit has a 3-minute protection feature that prevents the unit from overloading. The unit cannot
restart within three minutes of being turned off.
The unit changes from COOL/HEAT mode to
FAN mode
The unit may change its setting to prevent frost from forming on the unit. Once the temperature
increases, the unit will start operating in the previously selected mode.
The set temperature has been reached, at which point the unit turns off the compressor. The unit
continues to operate once the temperature fluctuates again.
The indoor unit emits white mist
In humid regions, a large temperature difference between the room’s air and the conditioned air can
cause white mist.
Both the indoor and outdoor units emit white
mist
When the unit restarts in HEAT mode after defrosting, white mist may be emitted due to moisture
generated from the defrosting process.
The indoor unit makes noises
A rushing air sound may occur when the louver resets its position.
A squeaking sound may occur after running the unit in HEAT mode due to expansion and contraction
of the unit’s plastic parts.
Both the indoor unit and outdoor unit make
noises
Low hissing sound during operation: This is normal and is caused by refrigerant gas flowing
through both indoor and outdoor units.
Low hissing sound when the system starts, has just stopped running, or is defrosting: This noise is
normal and is caused by the refrigerant gas stopping or changing direction.
Squeaking sound: Normal expansion and contraction of plastic and metal parts caused by
temperature changes during operation can cause squeaking noises.
The outdoor unit makes noises The unit makes different sounds based on its current operating mode.
Dust is emitted from either the indoor or outdoor
unit
The unit may accumulate dust during extended periods of non-use, which will be emitted when the
unit is turned on. This can be mitigated by covering the unit during long periods of inactivity.
The unit emits a bad odor
The unit may absorb odors from the environment (such as furniture, cooking, cigarettes, etc.) which
will be emitted during operations.
The unit’s filters have become moldy and should be cleaned.
The outdoor unit fan does not operate During operation, the fan speed is controlled to optimize product operation.
Operation is erratic, unpredictable, or unit is
unresponsive
Interference from cell phone towers and remote boosters may cause the unit to malfunction.
In this case, try the following:
• Disconnect the power, then reconnect.
• Press ON/OFF on the remote control to restart the operation.
Manufacturer reserves the right to change, at any time, specifications and designs without notice and without obligations.
14
TROUBLESHOOTING (CONT)
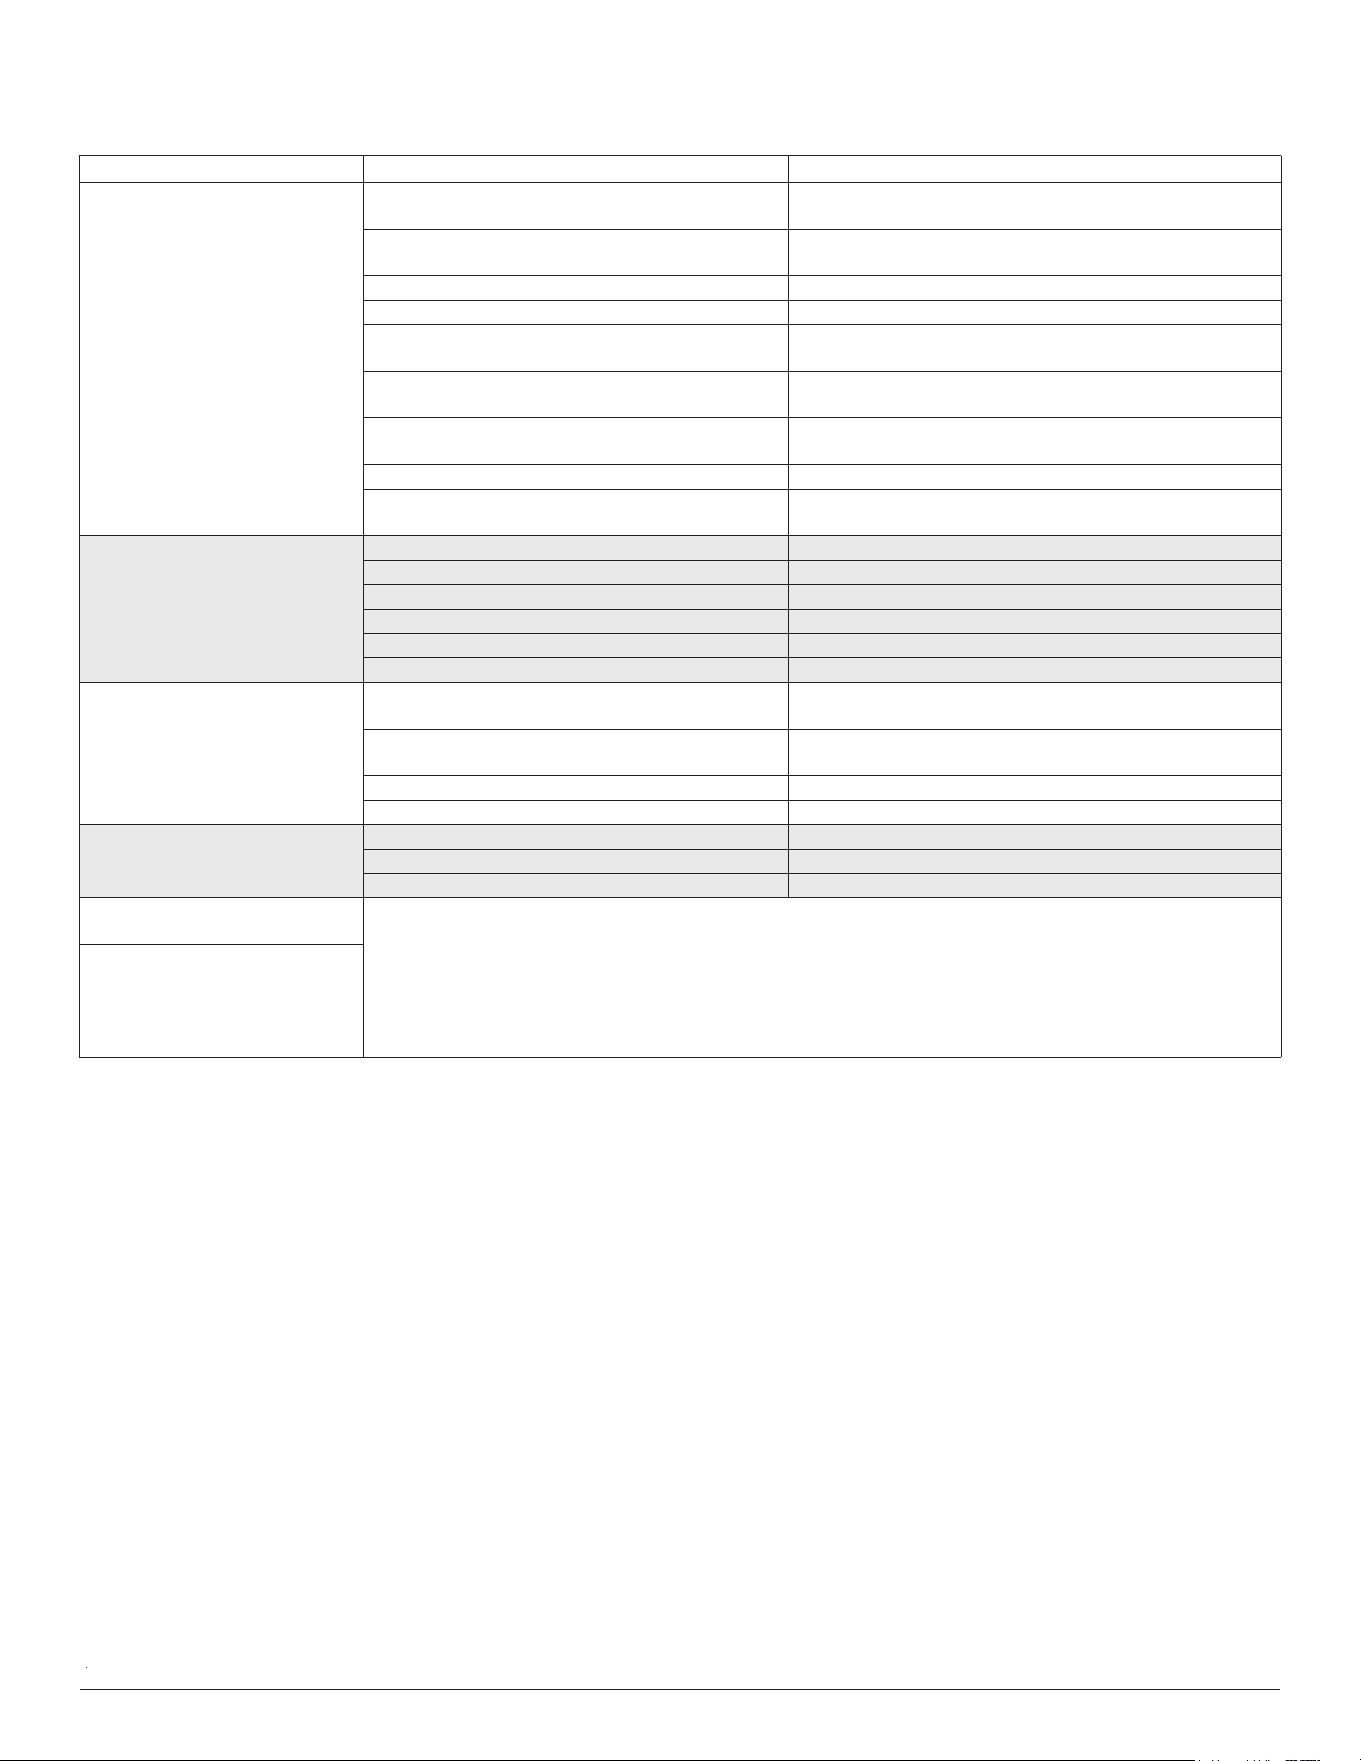
Table 4 — Troubleshooting
* Diagnostic lights are a combination of lights that will illuminate in the display area on the unit. They are a combination of the lights you see during normal operation.
NOTE: If your problem persists after performing the checks and diagnostics listed in the Troubleshooting tables, turn off the unit
immediately and contact an authorized service center.
PROBLEM POSSIBLE CAUSE SOLUTION
Poor Cooling Performance
Temperature setting may be higher than ambient
room temperature
Lower the temperature setting
The heat exchanger on the indoor or outdoor unit is
dirty
Clean the affected heat exchanger
The air filter is dirty Remove the filter and clean it according to instructions
The air inlet or outlet of either unit is blocked Turn the unit off, remove the obstruction and turn it back on
Doors and windows are open
Ensure all doors and windows are closed while operating the
unit
Excessive heat is generated by sunlight
Close windows and curtains during periods of high heat or
direct sunlight
Too many heat sources in the room (people,
computers, electronics, etc.)
Reduce amount of heat sources
Low refrigerant due to leak or long-term use Check for leaks, re-seal if necessary and top off refrigerant
SILENCE function is activated (optional function)
SILENCE function can lower product performance by
reducing operating frequency. Turn off the SILENCE function.
The unit is not working
Power failure Wait for the power to be restored
The power is turned off Turn on the power
The fuse is burned out Replace the fuse
Remote control batteries are dead Replace batteries
The Unit’s 3-minute protection has been activated Wait three minutes after restarting the unit
Timer is activated Turn timer off
The unit starts and stops
frequently
There’s too much or too little refrigerant in the
system
Check for leaks and recharge the system with refrigerant.
Incompressible gas or moisture has entered the
system.
Evacuate and recharge the system with refrigerant
The compressor is broken Replace the compressor
The voltage is too high or too low Install a manostat to regulate the voltage
Poor heating performance
The outdoor temperature is extremely low Use auxiliary heating device
Cold air is entering through doors and windows Ensure that all doors and windows are closed during use
Low refrigerant due to leak or long-term use Check for leaks, re-seal if necessary and top off refrigerant
Indicator lamps
continue flashing
The unit may stop operation or continue to run safely. If the indicator lamps continue to flash or error codes appear,
wait for about 10 minutes. The problem may resolve itself. If not, disconnect the power, then connect it again. Turn
the unit on. If the problem persists, disconnect the power and contact your nearest
customer service center.
Error code appears and begins
with the letters as the following in
the window display of indoor unit:
E(x), P(x), F(x) EH(xx), EL(xx),
EC(xx) PH(xx), PL(xx), PC(xx)