Loading ...
Loading ...
Loading ...
GUIDE BAR MAINTENANCE
NOTE: Proper maintenance of the guide bar is essential to the performance of your pole saw.
Proper guide bar maintenance will keep your saw in good working order.
Most guide bar problems can be prevented merely by keeping the chain saw well maintained. Incorrect
filing and non-uniform cutter and depth gauge settings cause most guide bar problems, primarily
resulting in uneven bar wear. As the bar wears unevenly, the rails widen, which may cause chain clatter
and difficulty in making straight cuts. Insufficient guide bar lubrication and operating the saw with a chain
that is too tight will contribute to rapid bar wear. Refer to Saw Chain Tension Adjustment and Oiling the
Chain. To help minimize bar wear, the following guide bar maintenance is recommended:
Bar Wear
Turn guide bar frequently at regular intervals (for example, after 5 hours of use), to ensure even wear on
top and bottom of bar.
Bar Grooves
Bar grooves (or rails which support and carry the chain) should be
cleaned if the saw has been heavily used or if the saw chain
appears dirty. Rails should always be cleaned every time the saw
chain is removed.
To clean guide bar rails:
1. Remove chain guard, bar, and chain. Refer to Saw Chain
Replacement / Installation.
2. Using a screwdriver, putty knife, wire brush or other similar
instrument, clear residue from the rails on the guide bar
(Fig. 13).
This will keep the oil passages open to provide proper lubrication to the bar and chain.
3. Ensure the sprocket in the bar turns freely during cleaning.
4. Reinstall the bar, chain, chainguard, screw, and bar retaining nuts. Refer to Saw Chain
Replacement / Installation.
Oil Passages
Oil passages at the bar pad should be cleaned to ensure proper lubrication of the bar and chain during
operation. This can be done using a soft wire small enough to insert into the oil discharge hole.
CHAIN MAINTENANCE
Always use a replacement saw chain designed as “low-kickback” or a saw chain which meets the low-
kickback performance. A standard saw chain (a chain which does not have the kickback reducing guard
links) should only be used by an experienced professional chain saw operator.
Low-Kickback Saw Chain
A low-kickback saw chain is a chain which has met the kickback performance requirements of ANSI
B175.1. Do not use other replacement chain unless it has met these requirements for your specific
model. By keeping the saw chain in good working condition and correctly serviced as recommended in
this manual, you will be able to maintain the safety system of your polesaw over the life of the product.
Chain Tension
Check the chain tension frequently and adjust as often as necessary to keep the chain snug on the bar,
but loose enough to be pulled around by hand. Refer to Saw Chain Tension Adjustment.
Breaking in a New Saw Chain
A new chain and bar will need readjustment after as few as 5 cuts. This is normal during the break-in
period, and the interval between future adjustments will begin to lengthen quickly. Over a period of time,
however, the moving parts of the saw chain will become worn, resulting in what is called chain stretch.
This is normal. When it is no longer possible to obtain correct chain tension adjustment, a link will have to
be removed to shorten the chain. See your MTD Authorized Service Center to have this repair performed.
CLEANING AND STORAGE
• Slacken the chain if you have retensioned it at operating temperature during cutting work.
• The chain contracts as it cools down. If it is not slackened, it may damage the gearbox and bearings.
Storing the Machine for a Short Period
Wait for the engine to cool down. Drain the fuel tank and store the machine in a dry place well away
from sources of ignition until you need it again.
• Attach the transport guard to the bar/chain before storing the unit.
• Store the unit in a dry, high and/or locked location, out of the reach of children and other unauthorized
persons.
Long-Term Storage
• Remove the saw chain and guide bar, clean them, and spray them with corrosion inhibiting oil.
• Attach the transport guard to the bar/chain before storing.
5
OPERATING INSTRUCTIONS
• Avoid kickback. Kickback can result in severe injury or death.
• Do not operate the pole saw while in a tree, on a ladder or any other unstable work surface, or in any
awkward position. You may lose control of the pole saw causing severe injury.
• Do not extend your arms above shoulders when using the pole saw.
• Seek professional help if you are facing conditions beyond your ability.
• Trimming a tree is the process of cutting limbs from a living tree. Make sure your footing is firm. Keep
your feet apart. Divide your weight evenly on both feet.
• Before starting unit, always check the chain lubrication and oil tank level.
NOTE: The chain must be continously coated with oil to function properly. Make sure that the oil
adjustment screw is set appropriately.
To trim a limb (pruning):
1. Make the first cut six inches from tree trunk on the
underside of the limb. Use the top of the guide bar to
make this cut. Cut a third of the way through the diameter
of the limb (Fig. 7).
2. Move two to four inches farther out on the limb. Make the
second cut from above the limb. Continue the cut until you
cut the limb off.
3. Make the third cut as close to the tree trunk as possible on
underside of limb stub. Use the top of the guide bar to
make this cut. Cut a third through the diameter of stub.
4. Make the fourth cut directly above the third cut. Cut down
to meet the third cut. This will remove the limb stub.
WARNING:
If the oil tank runs out, the oil ajustment screw hole becomes clogged, or
the chain fails to get proper lubrication in any fashion, the chain will overheat and cause
irreversible damage to the unit and may result in severe injury. Excessive heat from
friction can lead the chain to catastrophically fail and come off the bar while operating.
Cut 1
Fig. 7
Cut 2
Cut 4
Cut 3
MAINTENANCE AND REPAIR INSTRUCTIONS
SAW CHAIN REPLACEMENT/INSTALLATION
1. Remove the bar retaining nuts and screw. Then take off
the chain guard (Fig. 8, B).
2. Using a flat-head screwdriver turn tension adjustment
screw counterclockwise (Fig. 8, A) 4 turns.
3. Take off the chain and bar.
4. Prepare new chain and/or bar, and fit the chain into the
groove in the bar.
5. Loop the saw chain over the drive sprocket with the
cutting edges of the chain pointing in the direction of
rotation (Fig. 9).
6. Adjust the tension adjustment screw (Fig. 8, A) to allow
insertion of the bar (Fig. 10). Make sure the chain follows
the slot in the guide bar and adjust the tension adjustment
screw to make the chain fit snugly on the underside of the
bar.
7. Install the chain guard and tighten bar retaining nuts and
screw (Fig. 8, B).
SAW CHAIN TENSION ADJUSTMENT
Proper tension of the saw chain is extremely important and must
be checked before starting, as well as during, any cutting
operation. Taking the time to make needed adjustments to the
saw chain will result in improved cutting performance and
prolonged chain life.
NOTE: A new chain and bar will need readjustment after as
few as 5 cuts. This is normal during the break-in
period, and the interval between future adjustments
will lengthen quickly (Fig. 11).
To adjust the saw chain tension:
1. Loosen the bar retaining nuts so they are hand tight (Fig. 8, B).
2. Holding the nose of the bar up, use the screwdriver to turn
the guide bar adjustment screw clockwise to tighten the
chain (Fig. 8, A). Turning the screw counterclockwise
loosens the chain on the guide bar.
3. While wearing heavy duty work gloves (after you’ve made
the adjustment), move the saw chain back and forth on the
guide bar to be sure the chain moves freely and is in
proper mesh with the sprocket. Never move the chain with
your bare hands.
NOTE: If the chain is difficult to rotate or if it binds on the guide bar, there is too much tension
applied and it must be adjusted. To decrease tension, turn the adjustment screw
counterclockwise, slowly. Move the chain back and forth until it moves freely.
4. Holding the nose in upper position, securely tighten the bar retaining nuts.
CHAIN LUBRICATION
The pole saw chain is self-lubricating. Oil is dispersed onto the chain as the unit is used. Keep an
adequate amount of oil in the oil tank. Use the bar-chain oil provided in the hardware pack. Always use
bar-chain and sprocket oil or similar chain saw oil.
Setting the Oil Adjustment Screw
The Oil Adjustment Screw is located on top of the gearbox
assembly (Fig. 12).
1. Insert a 3/32-inch Allen wrench into the oil adjustment screw.
2.
Turn the screw counterclockwise to increase oil flow to the chain.
3. Turn the screw clockwise to restrict the oil flow to the chain.
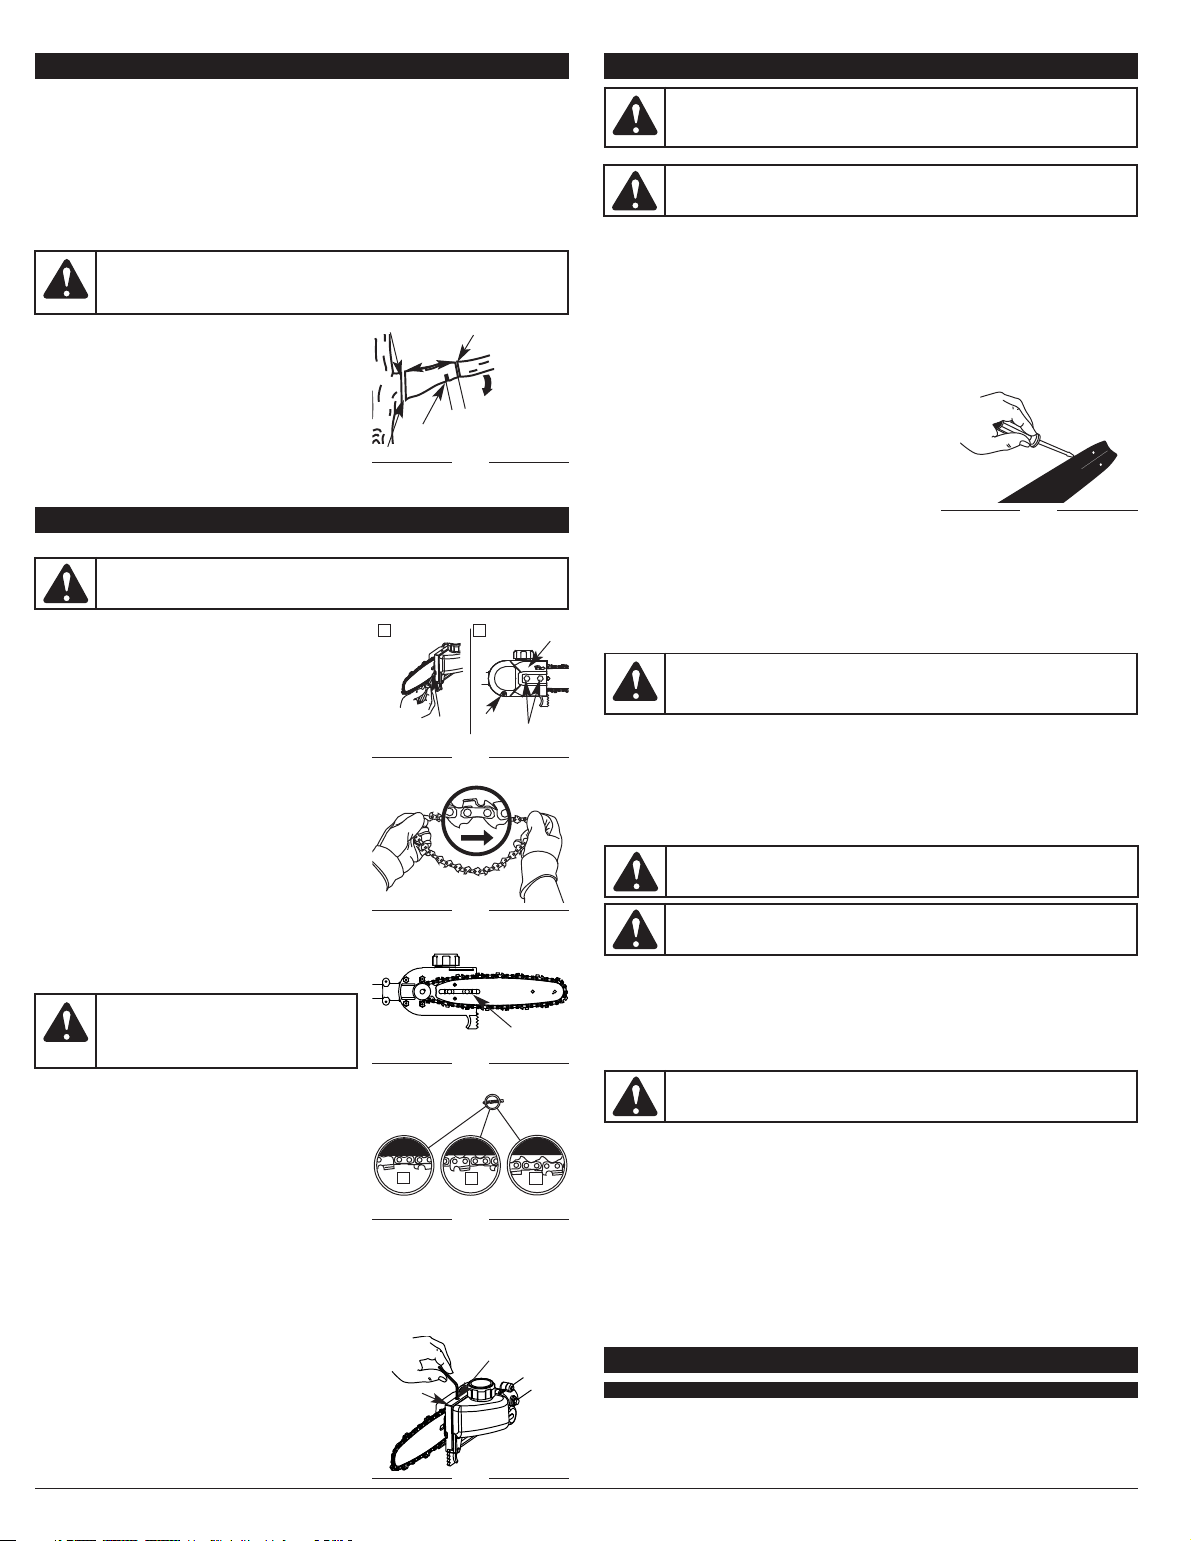
WARNING:
Whenever handling the saw chain, always wear work gloves for protection
against sharp cutting edges.
B
Fig. 8
Bar Retaining
Nuts
A
Tension
Adjustment
Screw
Fig. 9
Fig. 10
Slot
Fig. 11
CAUTION:
If a chain is too loose or too tight, the
bar chain and saw bearings will wear more rapidly.
Refer to Figure 11 for information concerning correct
cold tension (A), correct warm tension (B), and a chain
in need of adjustment (C).
Oil
Adjustment
Screw
Fig. 12
Gearbox
Assembly
WARNING:
If the oil tank runs out, the oil ajustment screw hole becomes clogged, or the chain
fails to get proper lubrication in any fashion, the chain will overheat and cause irreversible damage to
the unit and may result in severe injury. Excessive heat from friction can lead the chain to
catastrophically fail and come off the bar while operating.
MAINTENANCE AND REPAIR INSTRUCTIONS
WARNING:
Ensure that the unit is off and the spark plug is disconnected (gas
powerheads) before performing any maintenance on your saw.
Fig. 13
WARNING:
Unless you have experience and specialized training for dealing with kickback (see
Important Safety Instructions), always use a low-kickback saw chain, which significantly reduces
the danger of kickback. Low-kickback saw chain does not completely eliminate kickback. A low-
kickback or “safety chain,” should never be regarded as total protection against injury.
WARNING:
Never remove, modify or make inoperative any safety device furnished
with your unit. The low-kickback saw chain is a major safety feature provided for your
protection.
WARNING:
Ensure that the unit is off and the spark plug is disconnected (for gas
powerheads) when working on the saw chain. Wear heavy duty gloves too.
WARNING:
Never use a loop of chain that has more than 3 links removed from it. This
could damage the sprocket.
POLE SAW ADD-ON
Approximate Operating Weight of Attachment . . . . . . . . . . . . . . . . . . . . . . . . . . . . . . . . . . 3.3 lbs. (1.5 kg)
Drive Shaft Length . . . . . . . . . . . . . . . . . . . . . . . . . . . . . . . . . . . . . . . . . . . . . . . . . . . . . . 26 inches (66 cm)
Cutting Width . . . . . . . . . . . . . . . . . . . . . . . . . . . . . . . . . . . . . . . . . . . . . . . . . . . . . . . . . . 8 inches (20.3 cm)
SPECIFICATIONS
6in (15.2cm)
2-4in (5.1-10.2 cm)
Screw
Chain
Guard
B
A
C
Loading ...
Loading ...
Loading ...