Majority Everest
5.1 Dolby Audio Surround Sound System
Instructions Guide

Contents
What’s In The Box? --------------------------------------------1
Controls And Functions --------------------------------------2-10
Support ---------------------------------------------------------- 11
Instructions Guide -------------------------------------------- 12-18
Using the AUX IN Cable -----------------------------------12
Using the HDMI (ARC) Input -----------------------------13
Using the Optical Input -----------------------------------14
Using the MP3 Link Connection (Line In) -------------15
Connecting to the Mains Supply ----------------------- 16
Using the Bluetooth Operation -------------------------17
Using the USB Operation ---------------------------------18
Troubleshooting -----------------------------------------------19
Specifications ---------------------------------------------------20
Wall Mount Installation Guide ----------------------------21- 22
Quick System Installation Guide---------------------------23
Safety Information --------------------------------------------24

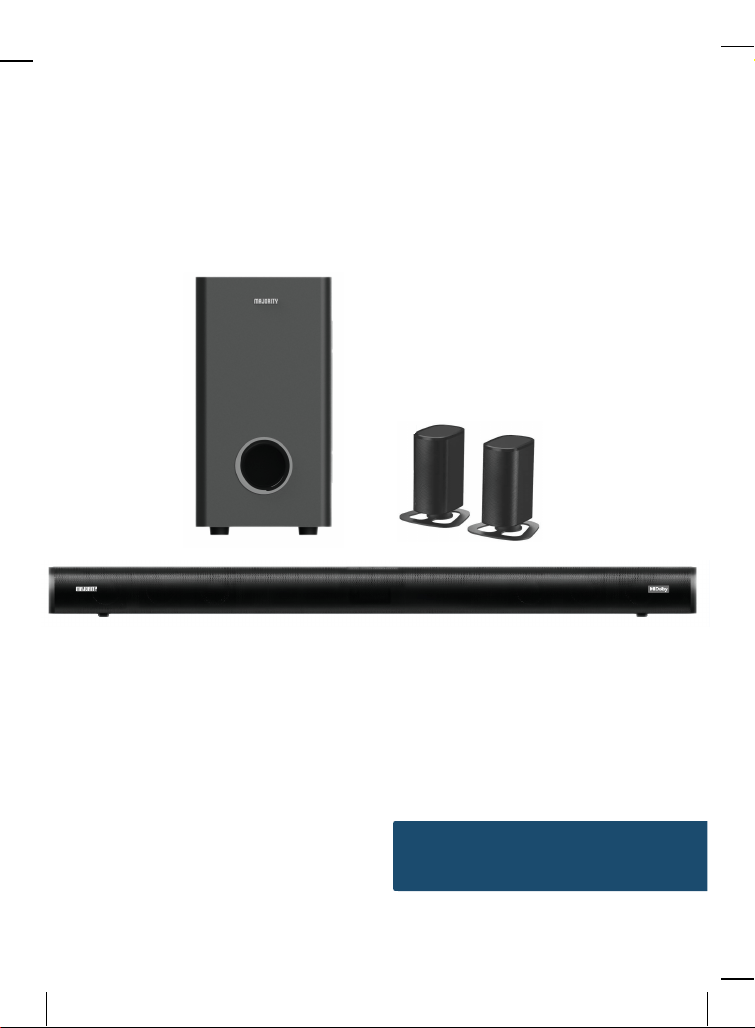
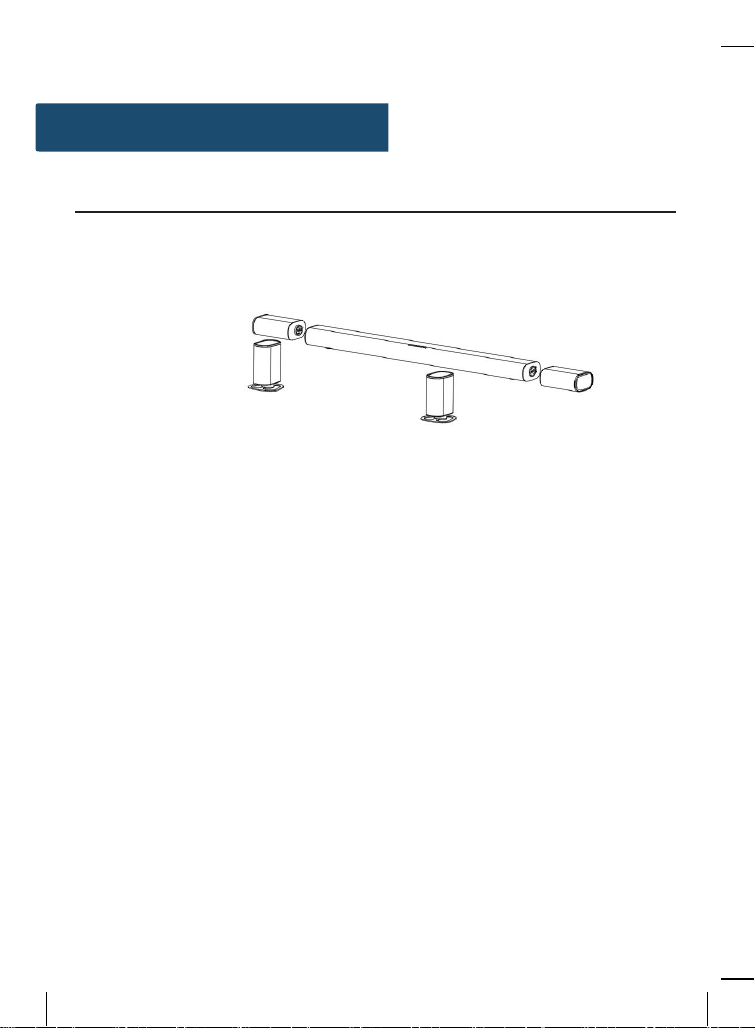
What’s In The Box?
Box Contents
2. Remote
3. Power
Adapter
6. User Manual
Control
4. AUX IN
Cable
5. 3.5mm to
3.5mm Line
In Cable
9. Aluminium
Pedestal
1
10
. Side cover
accessories
8. Subwoofer x 1
7. Surround
8. Subwoofer
9. Aluminium Pedestal
10. Side cover accessories
11. Wall mount adaptor
1.
Majority Everest Soundbar
2.
Remote Control
3.
Power Adapter x 4
4.
AUX IN Cable
5.
3.5mm to 3.5mm Line In Cable
6.
User Manual
7.Surroundx2
11.Wall mount
adaptor
1. Majority Everest Soundbar
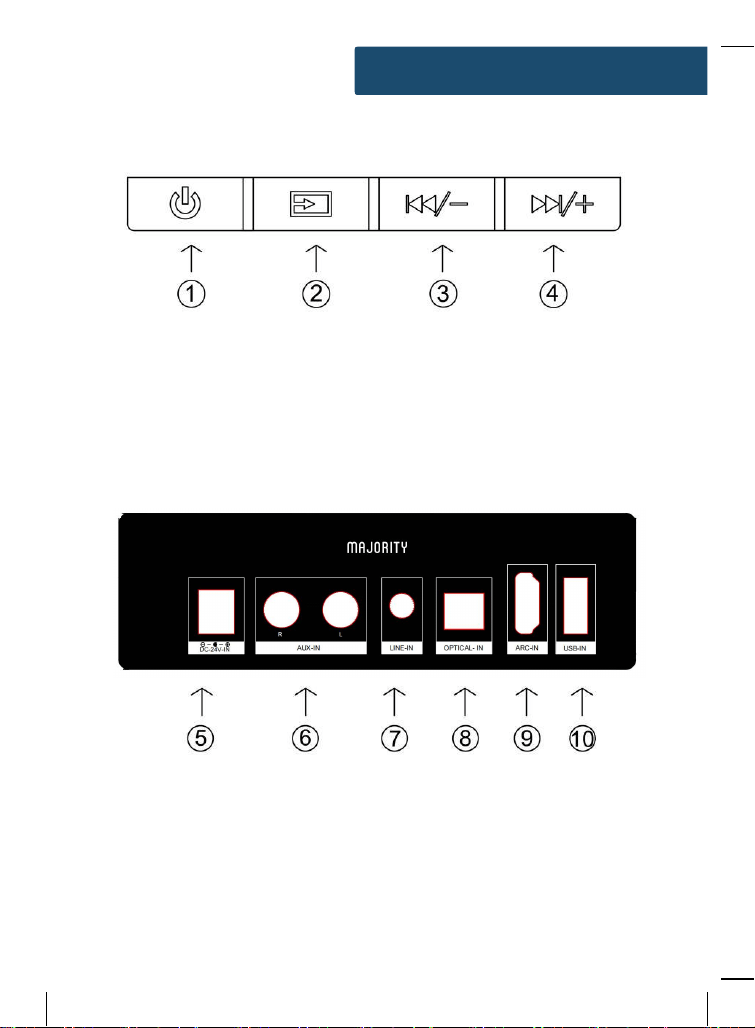
Controls And Functions
Side View/Control Buttons
1. Power On/Off 3. Volume-/Previous
2. Source 4. Volume+/Next
Back View
5. DC Power Input
6. AUX-In Input
7. Line-In Input
2
8. Optical Input
9. ARC Input
10.USB Input
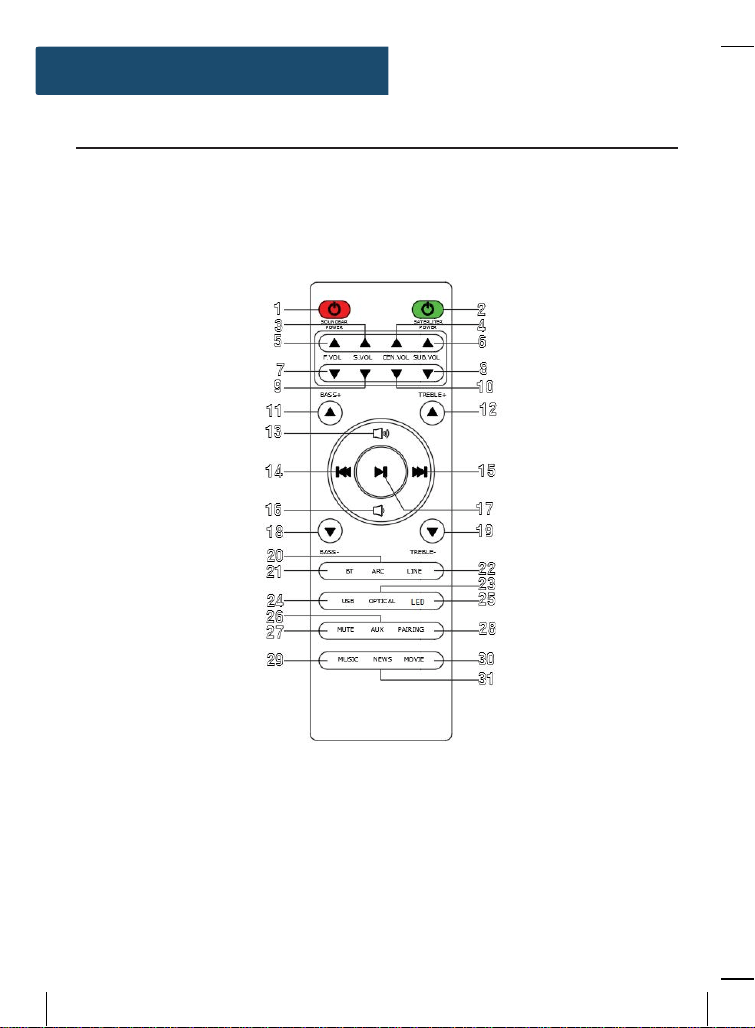
Controls And Functions
Remote Control
3

Controls And Functions
Remote Control
1. Soundbar Power On/Off
Short press the button to turn on/off
2. Saterliter Power On/Off
Short press the button to turn on
Long press the button to turn on
3. S.VOL (Volume + for Wireless Surround)
Press to increase the volume for wireless surrounds
4. CEN.VOL (Volume + for Center Tone)
Press to increase the volume for center tone
5. F.VOL (Volume + for Front Tone)
Press to increase the volume for front tone
6. SUB
.VOL (Volume + for Subwoofer)
Press to increase the volume for subwoofer
7. F.VOL (Volume - for Front Tone)
Press to decrease the volume for front tone
8. S
UB.VOL (Volume - for Subwoofer)
Press
to decrease the volume for subwoofer
9. S.VOL (Volume - for Wireless Surround)
Press to decrease the volume for wireless surrounds
Press to decrease the volume for center tone
4
10. CEN.VOL (Volume - for Center Tone)

Controls And Functions
Remote Control
11. Bass Increase
Press to increase the bass
12. Treble Increase
Press to increase the treble
13. Master.VOL (Master Volume+ for the Whole Kit)
Press to increase the volume for the whole kit
14. Back Step (Previous)
Use in AUX In, Line In or Bluetooth mode to go back a track
15.
Forward Step (Next)
Use in AUX In, Line In or Bluetooth mode to go forward a track
16.
Master
.VOL
(Master Volume- for the Whole Kit)
Press to decrease the volume for the whole kit
17.
Play / Pause
Press to play and pause
18.
Bass Decrease
Press to decrease the bass
19. Treble Decrease
Press to decrease the treble
20.
HDMI (ARC) Mode
Press the button to enter HDMI (ARC) mode
21. Bluetooth Mode
Press the button to enter Bluetooth mode
5

Controls And Functions
Remote Control
22. Line In Mode
Press the button to enter Line In mode
23. Optical Mode
Press the button to enter optical mode
24. USB Mode
Press the button to enter USB mode
25. LED Mode
Press the button to enter power off screen
26. AUX In Mode
Press the button to enter AUX In mode
27. Mute Mode
Press the button to enter mute mode
28. Pairing Mode
Press the button to enter pairing bluetooth
29. Music Mode
Press the button to enter music mode
30. Movie Mode
Press the button to enter movie mode
31. News Mode
Press the button to enter news mode
6
Controls And Functions
Using the Remote Control
The remote control sensor at the front of the soundbar is
sensitive to the remote control’s commands up to a maximum of
8 metres away and within a maximum arc of 30 degrees.
Please note that the operating distance may vary depending on
the brightness of the room.
Automatic Display Dimmer - after 20s if no button is pressed
the display is dimmed to off.Press any button on soundbar or
remote control to reactivate the display.
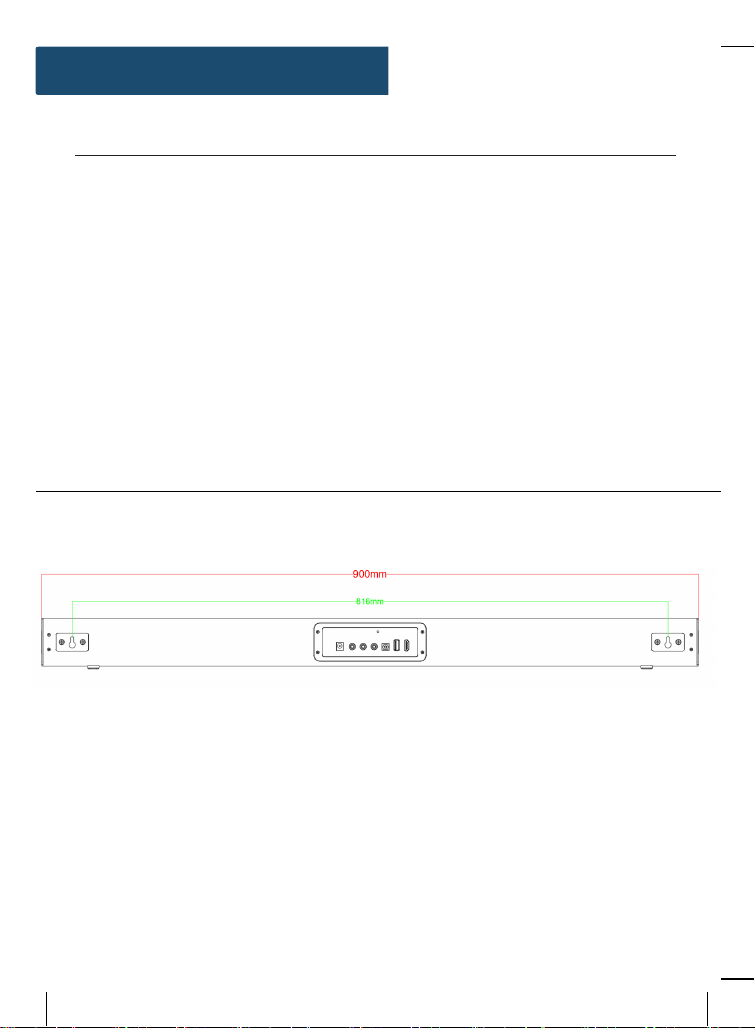
Soundbar Wall Mount Dimensions
7
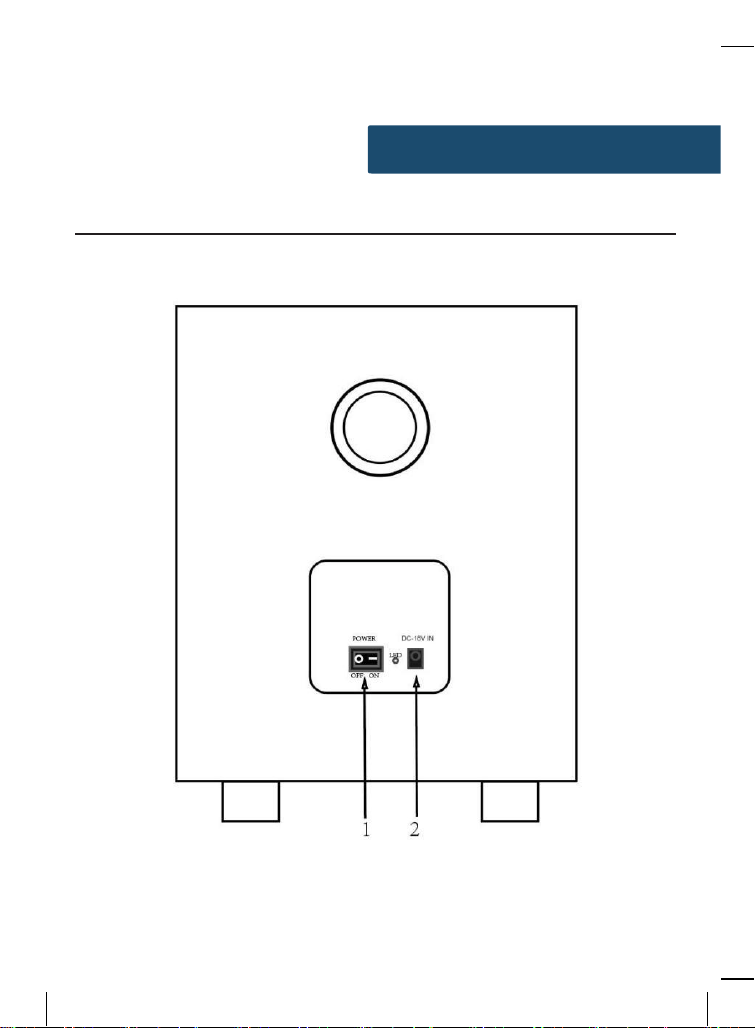
Controls And Functions
Subwoofer
5.25 Inch Wireless Subwoofer
1. Power Switch
2. DC Adapter Input
8
Controls And Functions
Wireless Surround Speaker
2 pieces Wireless Surround Speaker
Detachable Surround Speaker from main Soundbar to be Standing
Speaker, power supported by DC 3.7V / 3600mA built-in battery.
Power of Surround Speaker is supporting charged by main soundbar
directly, it can also be charged with a DC 5V power supply after
disassembly. The battery has an overcharge protection function.
9
When connecting the surround speakers to the main soundbar,
please pay attention to distinguish the left and right surround
speaker. Please make sure the left surround speaker is connected
to the left side of the main soundbar, and the right surround spaker
is connected to the right side of the main soundbar.
Controls And Functions
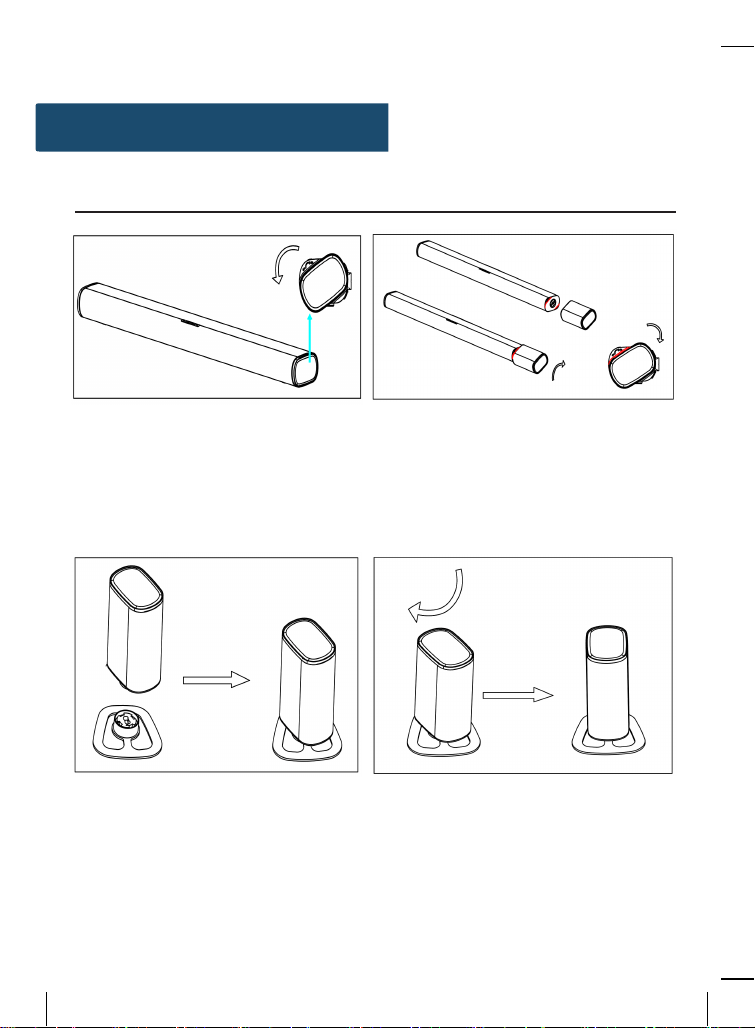
Wireless Surround Speaker
10
Remove the left and right cover by
rotating in the direction of the arrow.
Install left and right surround speakers :
Set the angle between the incline of the
surround and the grain on the side cover
(red), rotate according to the arrow, then
install the speaker.
Install the metal base of the surround
speaker removed from the main
soundbar at the angle shown in the
picture.
Keep the metal base stationary and turn
the surround speaker clockwise (as shown
in the figure) to install the surround
speaker

Support
Support
Thank you for your purchasing the Majority Everest Soundbar.
Please follow the guidance of the user manual to set up your
new purchase and begin enjoying its features.
For further technical support and warranty registration, please
visit our website www.majority.co.uk
11
AUX
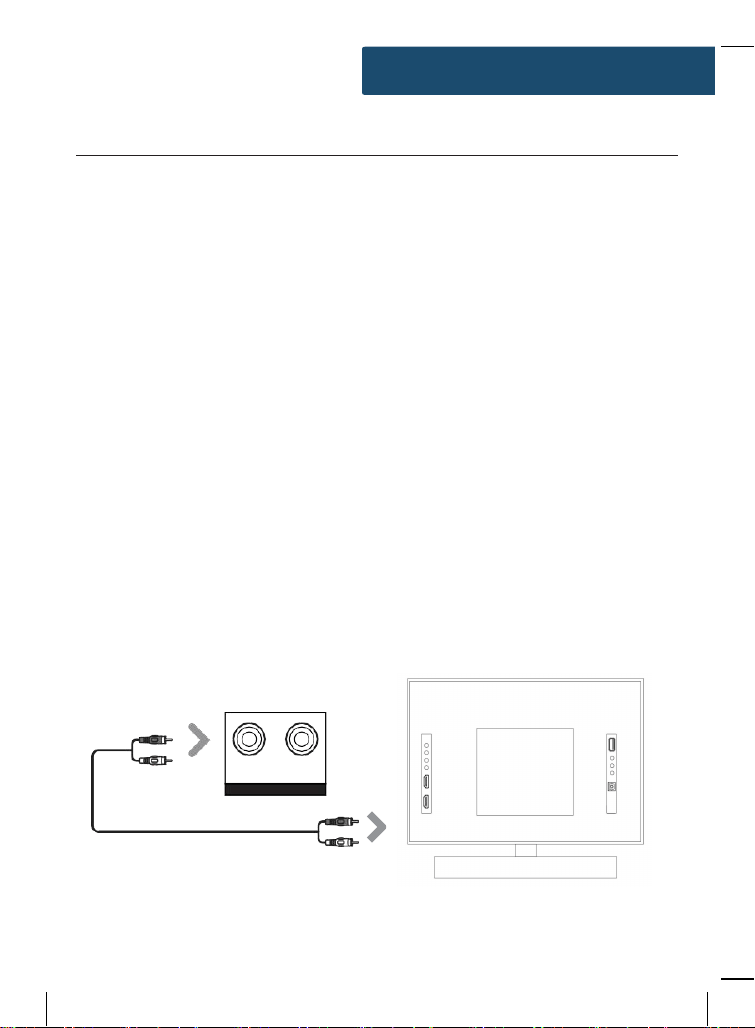
Instructions Guide
Using the AUX IN Cable
Use the AUX Stereo Audio Cable (included) to connect the TV’s
stereo AUX (L/R) audio output socket.
Connect the audio output cable of the soundbar via the‘AUX’
input sockets of the unit .
Press the POWER button on the soundbar or POWER button
directly on the remote control (Rem.1
)
to switch on the unit.
Then press MODE on the remote control (
Rem.26
) or press the
Mode button on the unit to scroll to the AUX IN function.
Turn on your television
Troubleshooting:
If you are not receiving a picture or
encountering interference, please ensure that the AUX cable is
being connected to ‘output’ AUX port on your TV set. This will
ensure that the sound is being exported correctly.
If your TV does not have ‘output’ AUX port, please use an
alternative connection method.
AUX stereo audio cable
Rear view of the unit
12
O
P
T
I
C
A
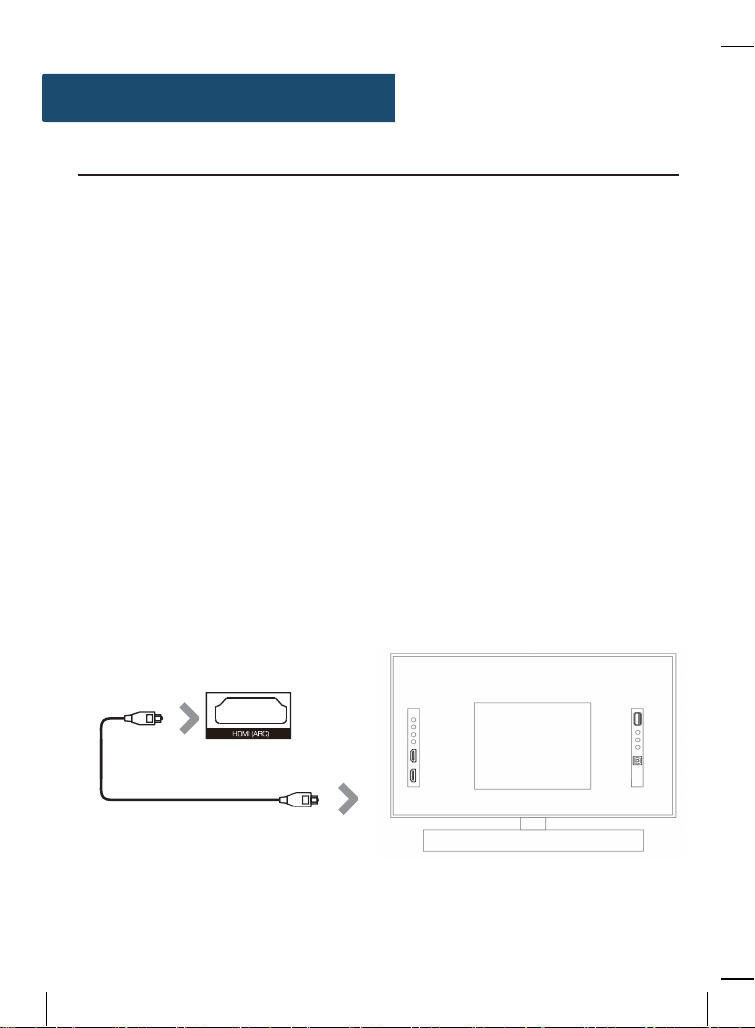
Instructions Guide
Using the HDMI ARC Input
You will need: An audio source with an ARC Audio Output and a
ARC Audio cable (not included).
Connect the ARC Audio cable to the ARC output on the audio
source and to the ARC Input on the soundbar.
Press the POWER button on the soundbar or POWER button
directly on the remote control (Rem.1
)
to switch on the unit.
Long press (2-3 seconds)the MODE button on the remote
control (
Rem.20
) to switch to ARC mode or select the Mode
button on main unit repeatedly to select the ARC mode.
Using the native controls on your connected device, make sure
the audio settings are set to ARC or HDMI Audio and are turned
on. Audio from the connected audio source will now be played
through the speakers.
ARC
cable
Rear view of the unit
13
O
P
T
I
C
A
L
Instructions Guide
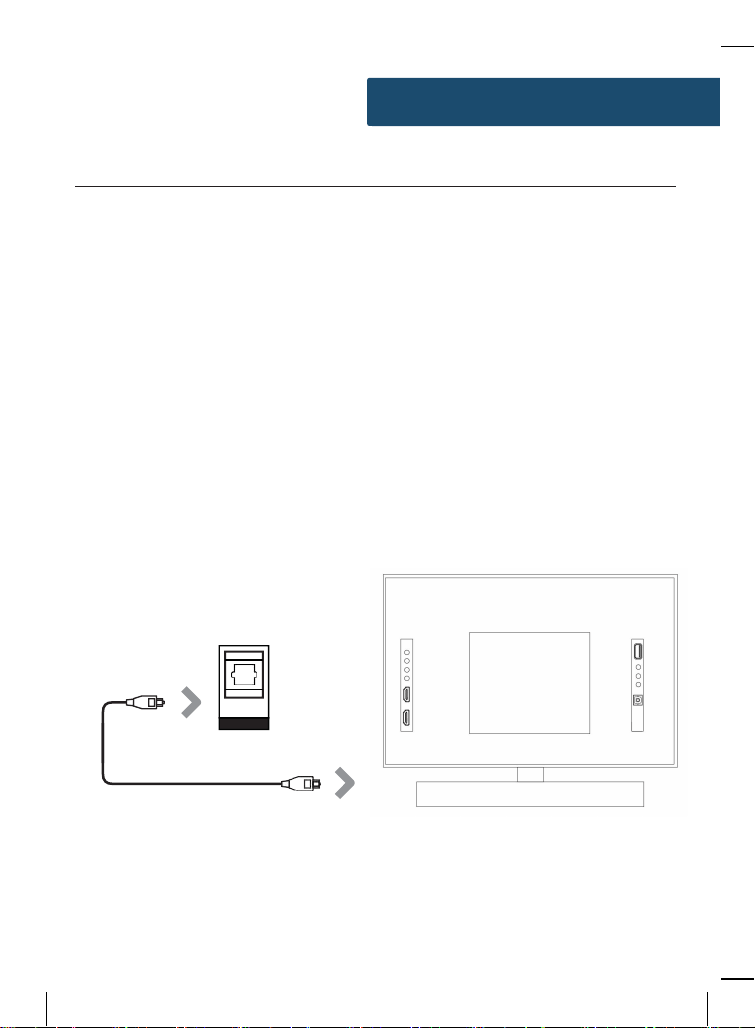
Using the Optical Input
Youwill need: An audio source with an Optical Audio Output and a Digital
Optical Audio cable (not included).
Connect the Digital Optical Audio cable to the optical output
on the audio source and to the Optical Input on the soundbar.
Press the POWER button on the sound bar or POWER button
directly on the remote control (Rem.1
)
to switch on the unit.
Press the MODE button on the remote control (
Rem.23
)to
switch to Optical mode or select the Mode button on main
unit repeatedly to select the Optical mode.
Using the native controls on your connected device, make sure
the audio settings are set to PCM or Optical Audio and are
turned On. Audio from the connected audio source will now be
played through the speakers.
OPTICAL cable
Rear view of the unit
14
OPTICAL IN
Instructions Guide
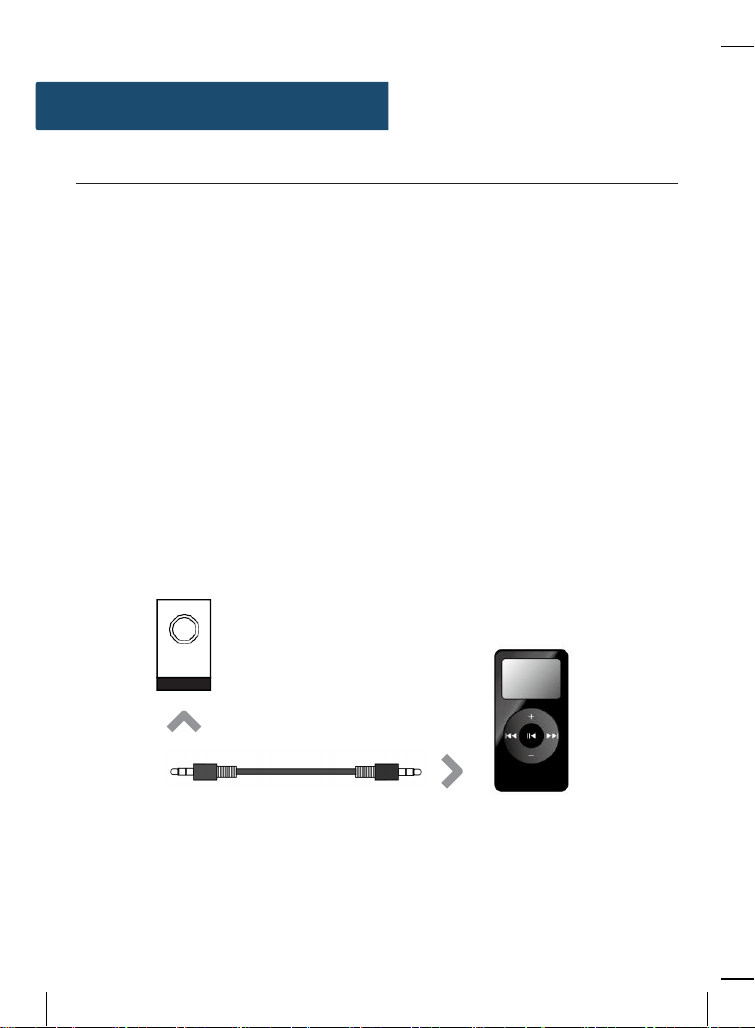
Using the MP3 Link Connection (Line In)
Plug one end of a 3.5mm to 3.5mm Line In cable (included)
into the Line In port on the unit. Before use, disconnect any
cables connected to the Stereo RCAInputs.
Plug the other end of the cable into the audio output/
headphone output on an MP3 player or other audio source.
Press the Power button on the soundbar or POWER button
directly on the remote control (
Rem.1
)to switch on the unit.
Press the Mode button repeatedly on the soundbar or press
the MODE button on remote control (Rem.22) repeatedly to
enter LINE in mode.
Audio played through the connected device will now be heard
through the speakers.
3.5mm to 3.5mm
Line In cable
Audio device
15
LINE-IN
Instructions Guide
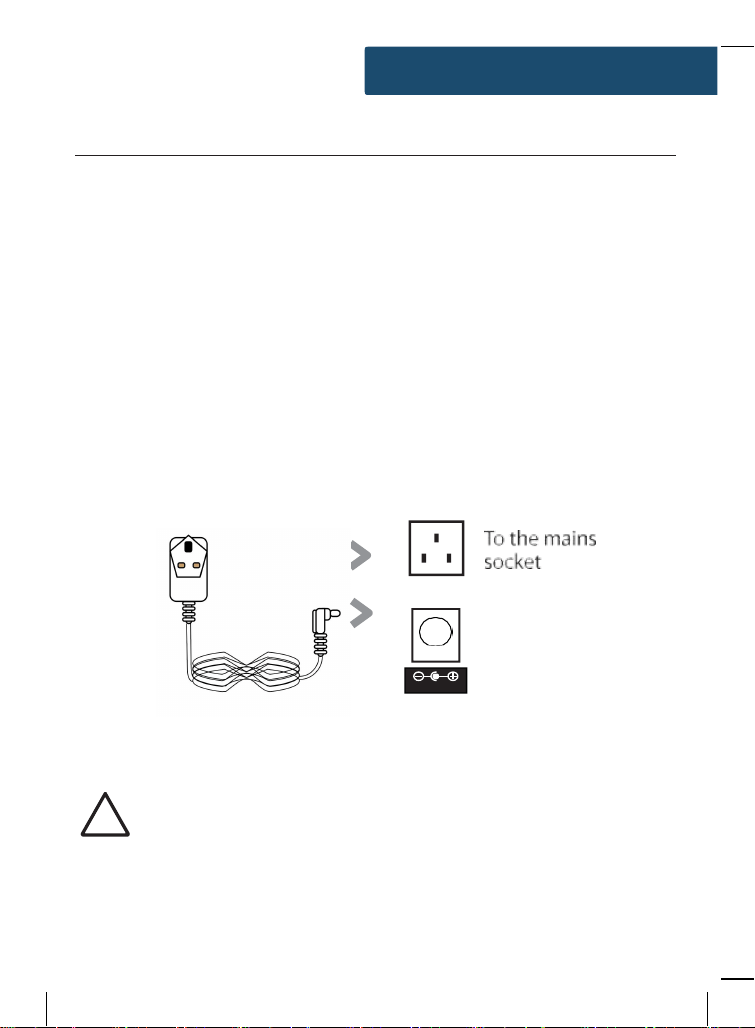
Connecting to the Mains Supply
Ensure that the power supply voltage is in the voltage of
100V~240V.
This unit is designed to use adapter.
Connecting the unit to any other power source may cause
damage to the unit.
Unwind the mains cable to its full length.
Connect the mains plug to a mains socket.
Make sure the mains plug is fully inserted into the mains socket.
Connect the adapter to the unit via the DC input Socket.
(DC-24V-IN)
DC-In Power Cable
Ensure all audio connections of the unit are connected before connecting
to the mains power socket.
Unplug the power cord from the outlet when the unit is use for an
extended period of time.
16
DC 24V IN
!

Instructions Guide
Using the Bluetooth Operation
Pairing a Bluetooth Device for the First Time
Press the POWER button on the unit or the POWER button on
the remote control (Rem.1
)
to switch on the unit.
Select and press the MODE button repeatedly on the remote
control until in Bluetooth mode (
Rem.21
)or press the Mode
button repeatedly on the sound bar to enter Bluetooth
mode.
Using the native controls on your Bluetooth device, select the
“Majority Everest” in your Bluetooth settings to pair.
Refer to the user manual for your specific device for instructions
on pairing and connecting Bluetooth devices.
When successfully paired and connected, a beep will issue from
the unit. After initial pairing, the unit will stay paired unless
unpaired manually by the user.
If your device should become unpaired or you find it is unable to
connect, repeat the above steps.
17

Instructions Guide
Playing Audio Wirelessly
Follow the instructions for pairing a Bluetooth device.
Use the native controls on the connected Bluetooth Device to
select a track.
To Play/Pause the track or Skip Forwards/Backwards to a
selected track, use the remote control (Rem.17,14,15).
Audio played through the connected Bluetooth device will now
be heard through the speakers.
Using the USB Operation
Insert USB to Play Music Automatically.
Select and press the MODE button repeatedly on the remote
control until in USB mode (Rem.24
)
or press the Mode button
repeatedly on the soundbar to enter USB mode.
To Play/Pause the track or Skip Forwards/Backwards to a
selected track, use the remote control (Rem.17,14,15).
Audio played through the connected USB device will now be
heard through the speakers.
18

Troubleshootingg
Troubleshooting
If the soundbar does not work properly as desired, please check
the following.
Malfunction
Possible causes/measures
No power / function
Check whether the power is switched on or
off at the wall.
Check whether the power adaptor is
properly connected to power outlet or not.
No sound
Check whether cables are properly installed.
If they are, please try alternative cable to
connect to your TV if possible.
Check unit is out of standby and in mode.
No sound from bluetooth
connection
Forget the soundbar from your device and
reconnect.
Function disturbance
Switch off and unplug the unit. Leave it for
2 minutes and switch it on again.
If a particular mode is causing problems,
please try an alternative connection to
your TV such as Optical or Bluetooth.
Remote control does not work
[properly]
Check whether the battery run out or not.
Replace with a new one if necessary.
Check whether there is obstacle on the
front of remote sensor.
19

Specifications
Power Supply (Soundbar)
DC 24V / 2.0A
Power Supply (Subwoofer)
DC 18V / 2A
Power Supply (Surround Speaker)
DC 3.7V / 3600mA Built-in Battery
Surrounds Built-in Battery Playing Time
4 Hours (at maximum volume)
Power Consumption
100W
Speaker Size & Number of Speakers
(Soundbar)
2.25'' Full Ranges Speaker x 2 +
2.25’’ Mid-Tweeter x 4
Speaker Size (Subwoofer)
5.25 Inch x 1
Speaker Size & Number of Speakers
(Surround Speaker)
2.25'' Full Ranges Speaker x 2
Working Environment (Temperature) -10~ + 55C
Relative Humidity
5% ~ 90%
Frequency Response
70Hz - 15KHz
Bluetooth Version V 5.0
Bluetooth Distance
≥10M
Connection subwoofer with Soundbar by
UHF 865MHz ≥ 10M
Connection left surround with Soundbar by
UHF 756MHz ≥ 10M
Connection right surround with Soundbar by
UHF 676MHz ≥ 10M
Dimension (LxDxH) 90 x 9.83 x 6.56 cm (Soundbar)
Dimension (LxDxH) 3 1 x 28 x 17cm (Subwoofer)
Dimension (LxDxH)
9.83 x 6.56 x 16.8 cm (Surround)
20
Power Supply (Surround Speaker)
DC 5V / 2A
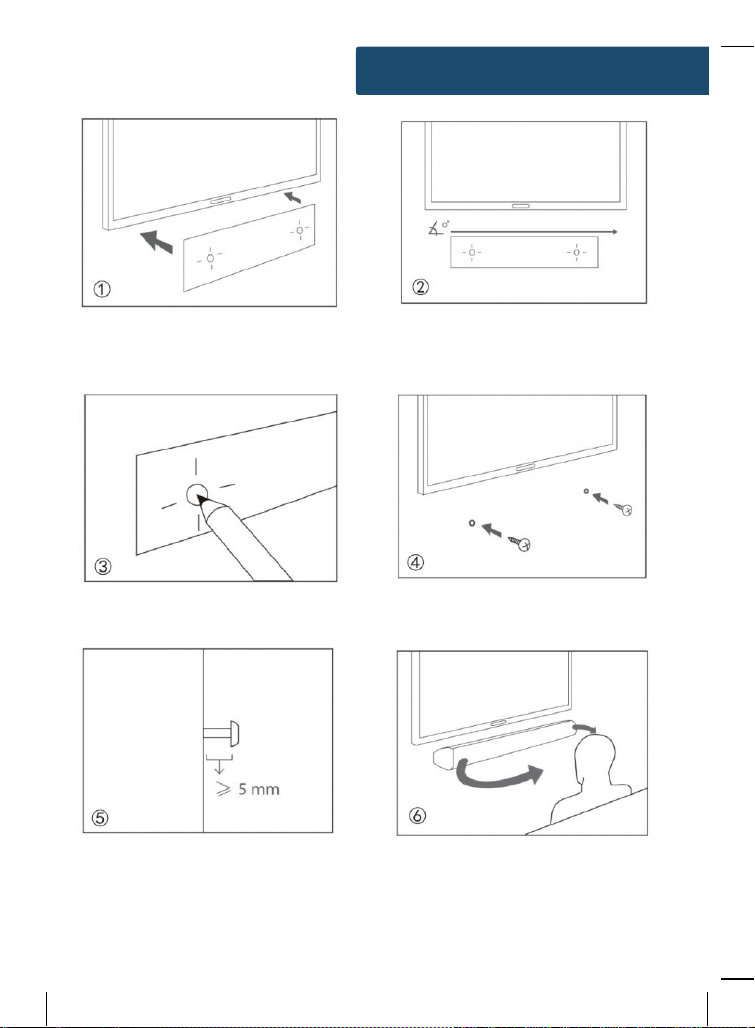
Wall Mount Installation Guide
Place the paper guide on the wall Verify with a level gauge that the inclination
where you want to hang the soundbar. angle of the soundbar is zero degrees.
Locate the screw holes on the paper Make the holes with the corresponding
guide and mark a point with a pencil. drill bit according to the type of wall.
It is advisable to leave no more than 5mm For a better sound experience,
between the head of the screw and the wall it is advisable to place the soundbar
to minimize the inclination angle of the soundbar. at the same height of the ear.
21
Hang the soundbar
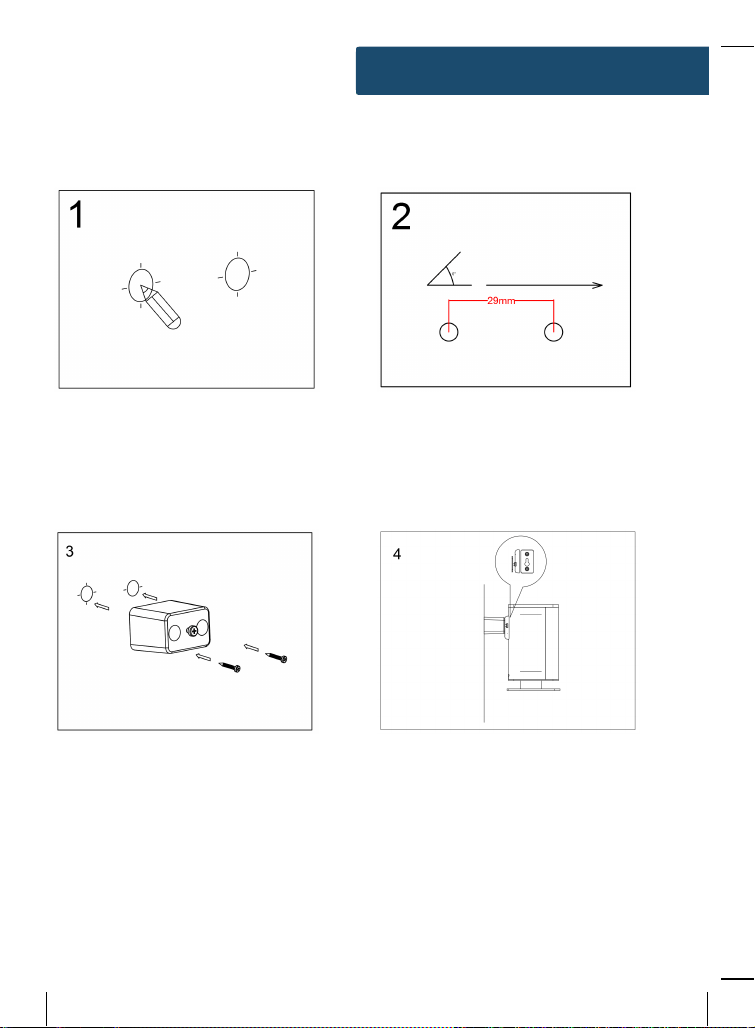
Wall Mount Installation Guide
Use a pencil to fix a point
Use a level to check whether the two holes are
tilted, and drill holes based on the actual hole
spacing of wall mount adptor
After drilling the hole, tighten the wall
mount adaptor with the screws provided
Align the hook hole of the speakr with
the protruding screw of the wall mount
adaptor, and hang
22
Step 4: Install the surround speaker
Step 3: Fix the wall mount adaptor
Step 2: Punch
Hang the surround speaker
Step 1: Fix a point

Quick System Installation Guide
When all the kits connecting with power supply, the subwoofer is flat placed in the
middle under the soundbar, or placed closely on the left and right side of the soundbar,
but not too far from the soundbar.
Detached Surround Speaker from main Soundbar to be Standing Speaker.
Each wireless surround speaker is flat placed on the left and right sides of the sofa,
their speakers are facing right and left ears of people setting on the sofa.
For a better sound, the distance from left & right surround speaker to the
soundbar cannot be far than 10 meters, it is better within 7 meters.
Soundbar is supported to hang on the wall by installing with a screw.
23
Safety Information
1. Read these user manual.
2.
Keep these
user manual
.
3.
Heed all Warnings
4.
Follow all instructions
5.
Do no clean the apparatus near or with water
6.
Do not block any ventilation openings. Install in
accordance withthemanufacturer’sinstructions
7.
Do not install near any heat sources such as
radiators, heat registers, stoves, or other apparatus
(including amplifiers) that produce heat.
8.
Protect the power from being walked on or
pinched particularly at plugs, convenience
receptacles, and the point where they exit from the
apparatus.
9.
Only useattachments/accessories specified bythe
manufacturer.
10.
Unplug this apparatus during light storms or when
unused for long periods of time.
11.
Refer all servicing to qualified service personnel.
Servicing is required when the apparatus has been
damaged in a way, such as power-supply cord or
plug is damaged, liquid has been spilled or objects
have fallen into the apparatus, the apparatus has
been exposed to the rain or moisture, does not
operate normally or has been dropped.
12.
No naked flame sources, such as lit candles, should
be placed on the apparatus.
13.
Dispose of used electrical products and batteries
safely according to your local authority and
regulations.
ADDITIONAL WARNINGS
The apparatus shall not be exposed to dripping or
splashing and no objects filled with liquid, such as
vases, shall be places on the apparatus.
Main plug is used to disconnect device and it should
remain readily operable during intended use. In order
to disconnect the apparatus from the main mains
completely, the mains plug should be disconnected
from the main socket outlet completely.
Battery shall not be exposed to excessive heat such as
sunshine, fire or the like.
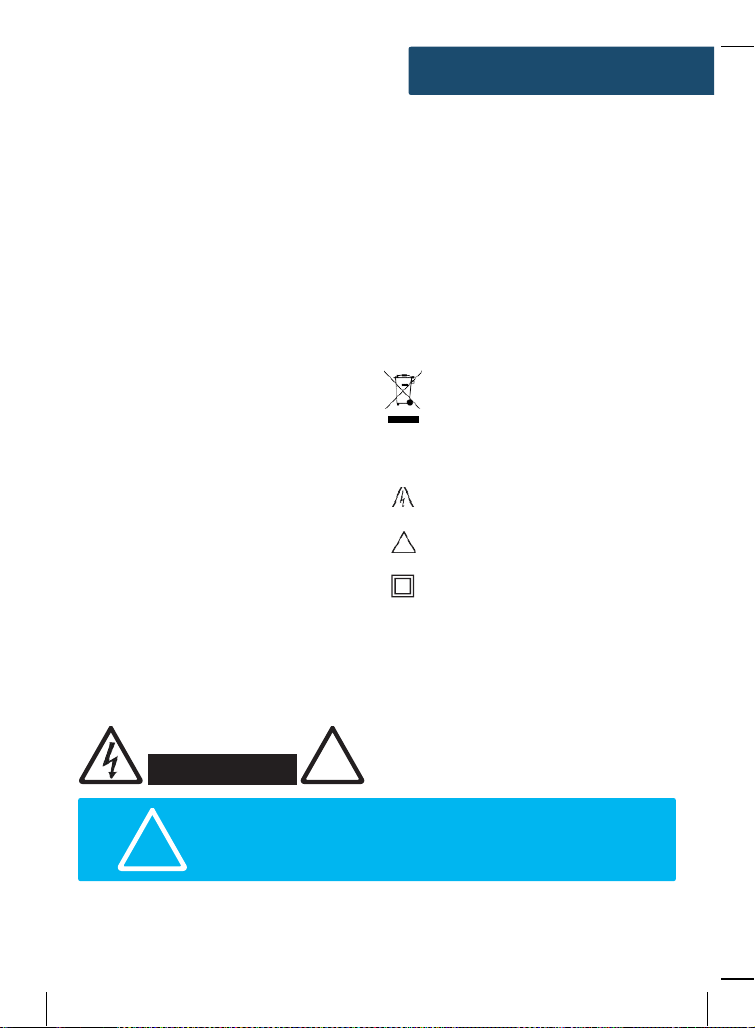
RECYCLING ELECTRICAL PRODUCTS
You should now recycle your waste electrical goods and
in doing so help the environment.
This symbol means an electrical product should
not be disposed of with normal household waste.
Please ensure it is taken to a suitable facility for
disposal when finished with.
IMPORTANT: Please read all instructions carefully
before use and keep for future reference.
Risk of electric shock.
Do not open
Read all instructions carefully before use
and keep for future reference
When servicing, use only identical
replacement parts
RISK OF ELECTRIC SHOCK DO
NOT OPEN
!
!
IMPORTANT: Please read all instructions carefully
before use and keep for future reference.
24
!
CAUTION