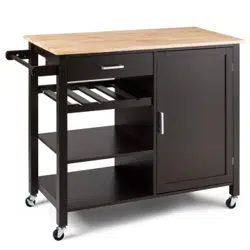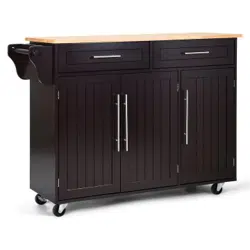
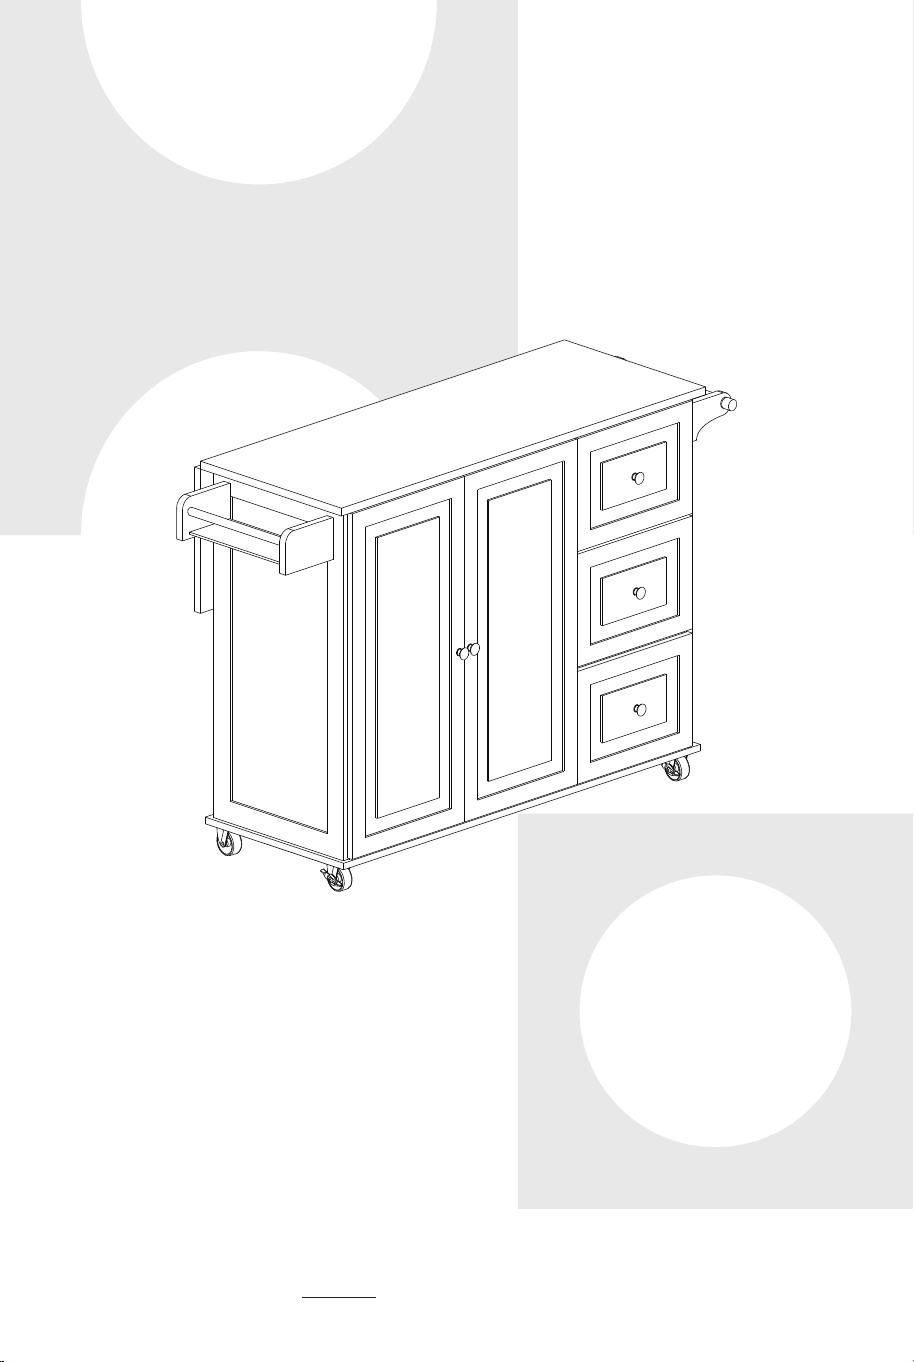
Kitchen Island Cart / Kücheninsel /
Chariot de Cuisine / Carrito de Cocina /
Carrello da Cucina
Wyspa kuchenna na kółkach
If you're having difficulty, our friendly
customer team is always here to help.
AUS:cs.au@costway.com
FRA:cs.fr@costway.com
DEU:cs.de@costway.com
ITA:cs.it@costway.com ESP:cs.es@costway.com
POL:sklep@costway.com
GBR:cs.uk@costway.com
DEU office: FDS GmbH, Neuer Höltigbaum 36, 22143 Hamburg, Deutschland
ITA office: Milano
FRA office: Saint Vigor d'Ymonville
POL office: GdańskGBR office: IpswichAUS office: TruganinaUSA office: Fontana
THIS INSTRUCTION BOOKLET CONTAINS IMPORTANT SAFETY INFORMATION. PLEASE READ AND KEEP FOR FUTURE REFERENCE.

Before You Start
Please read all instructions carefully.
Retain instructions for future reference.
Separate and count all parts and hardware.
Read through each step carefully and follow the proper order.
We recommend that, where possible, all items are assembled near to the area in
which they will be placed in use, to avoid moving the product unnecessarily once
assembled.
Always place the product on a flat, steady and stable surface.
Keep all small parts and packaging materials for this product away from babies
and children as they potentially pose a serious choking hazard.
EN
DE
Bitte lesen Sie alle Anweisungen sorgfältig durch.
Bewahren Sie die Anweisungen zum zukünftigen Verwendung auf.
Überprüfen Sie, ob alle Teile und Zubehörteile vorhanden sind.
Lesen Sie jeden Schritt sorgfältig durch und befolgen Sie die richtige Reihenfolge.
Wir empfehlen, alle Teile möglichst in der Nähe des Aufstellungsortes zu
montieren, um unnötige Bewegungen nach der Montage zu vermeiden.
Stellen Sie den Artikel immer auf eine ebene, feste und stabile Fläche.
Halten Sie alle kleinen Teile und Verpackungsmaterialien fern von Babys und
Kindern, ansonsten besteht Erstickungsgefahr.
Vor dem Beginnen
FR
Veuillez lire attentivement toutes les instructions.
Conservez les instructions pour vous y référer ultérieurement.
Vérifiez toutes les pièces et les accessoires.
Lisez attentivement chaque étape et suivez l’ordre correct.
Nous recommandons que, dans la mesure du possible, tous les produits soient
assemblés à proximité de la zone où ils seront utilisés, afin d’éviter tout
déplacement inutile du produit une fois assemblé.
Placez toujours le produit sur une surface plane et stable.
Conservez toutes les petites pièces de ce produit et les matériaux d’emballage
hors de portée des bébés et des enfants, car ils pourraient présenter un risque
d’étouffement.
Lea atentamente todas las instrucciones.
Conserve las instrucciones para futuras consultas.
Separe y cuente todas las piezas y los accesorios.
Lea detenidamente cada paso y siga el orden correcto.
Recomendamos que, siempre que sea posible, todos los elementos se monten
cerca de la zona en la que se van a utilizar, para evitar mover el producto
innecesariamente una vez montado.
Coloque siempre el producto sobre una superficie plana, estable y firme.
Mantenga todas las piezas pequeñas y los materiales de embalaje de este
producto lejos de los bebés y los niños, ya que pueden representar un grave
riesgo de asfixia.
ES
Avant de Commencer
Antes de Empezar
02 03
Si prega di leggere attentamente tutte le istruzioni.
Conservare le istruzioni per riferimento futuro.
Separare e contare tutte le parti e gli accessori.
Leggere attentamente ogni passo e seguire l'ordine corretto.
Si consiglia, ove possibile, di assemblare tutti gli articoli vicino alla zona in cui
verranno posti in uso, per evitare di spostare inutilmente il prodotto una volta
assemblato.
Posizionare sempre il prodotto su una superficie piana, stabile.
Tenere tutte le piccole parti e i materiali di imballaggio di questo prodotto lontano
dalla portata di neonati e bambini, in quanto possono costituire un serio pericolo
di soffocamento.
Zapoznaj się z instrukcją.
Zachowaj instrukcję do wglądu.
Posortuj części i upewnij się, że zestaw jest kompletny.
Zapoznaj się ze sposobem montażu i postępuj zgodnie z instrukcją.
Zalecamy, aby montaż odbywał się możliwie najbliżej miejsca docelowego
położenia produktu, aby uniknąć niepotrzebnego przesuwania.
Upewnij się, że produkt znajdzie się na płaskiej i stabilnej po wierzchni.
Upewnij się, że materiały wykorzystane podczas pakowania produktu.
oraz jego elementy znajdują się poza zasięgiem dzieci.
IT
PL
Prima di Iniziare
Zanim Zaczniesz
1
X1
2
X1
3
X1
5
X1
6
X1
7
X1
8
X1
9
X1
10
X3
14
X1
25
X1
26
X1
28
X1
22
X1
23
X1
24
X1
11
X2
12
X1
13
X2
04 05
4
X1
15
X3
16
X3
17
X3
18
X3
29
X2
27
X1
21
X1
20
X1
19
X3
A
X35
B
X35
C
X28
D
X12
E
X10
F
X3
M8x30mm
G
X16
H
X87
I
X8
J
X8
K
X1
L
X1
M5x40mmM3x12mm
M
X2
S
X2
X
X2
Y
X2
Z
X9
T
X3
U
X4
W
X3
W
X3
W
X3
W
X3
N
X2
O
X5
P
X2
Q
X3
R
X2
M2.5x14mm M3x20mm
M3x10mm
M4x18mm M4x12mm
M5x12mm
M4x30mm M4x40mm M4x25mm
X3
06 07
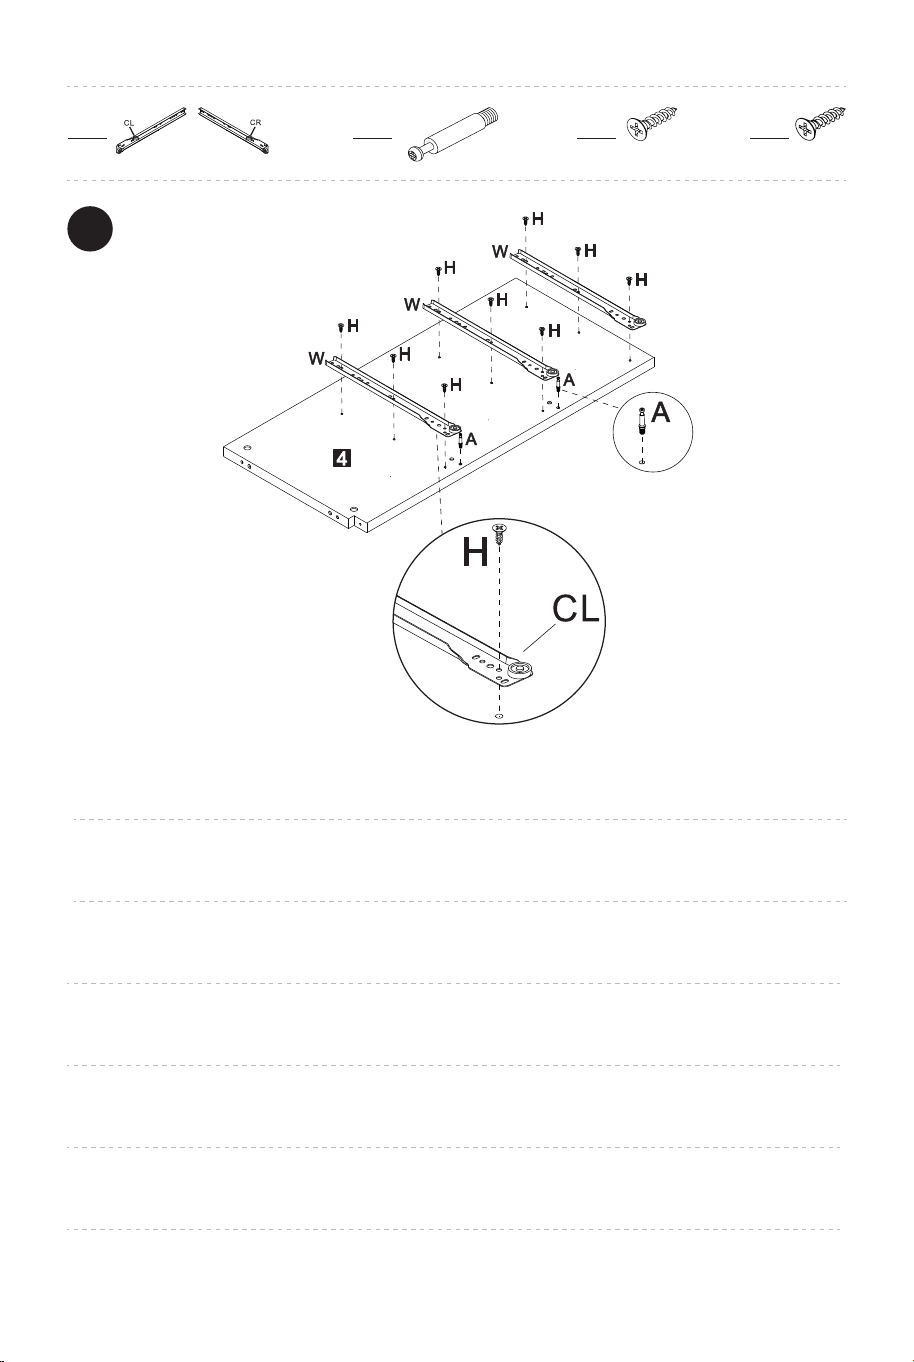
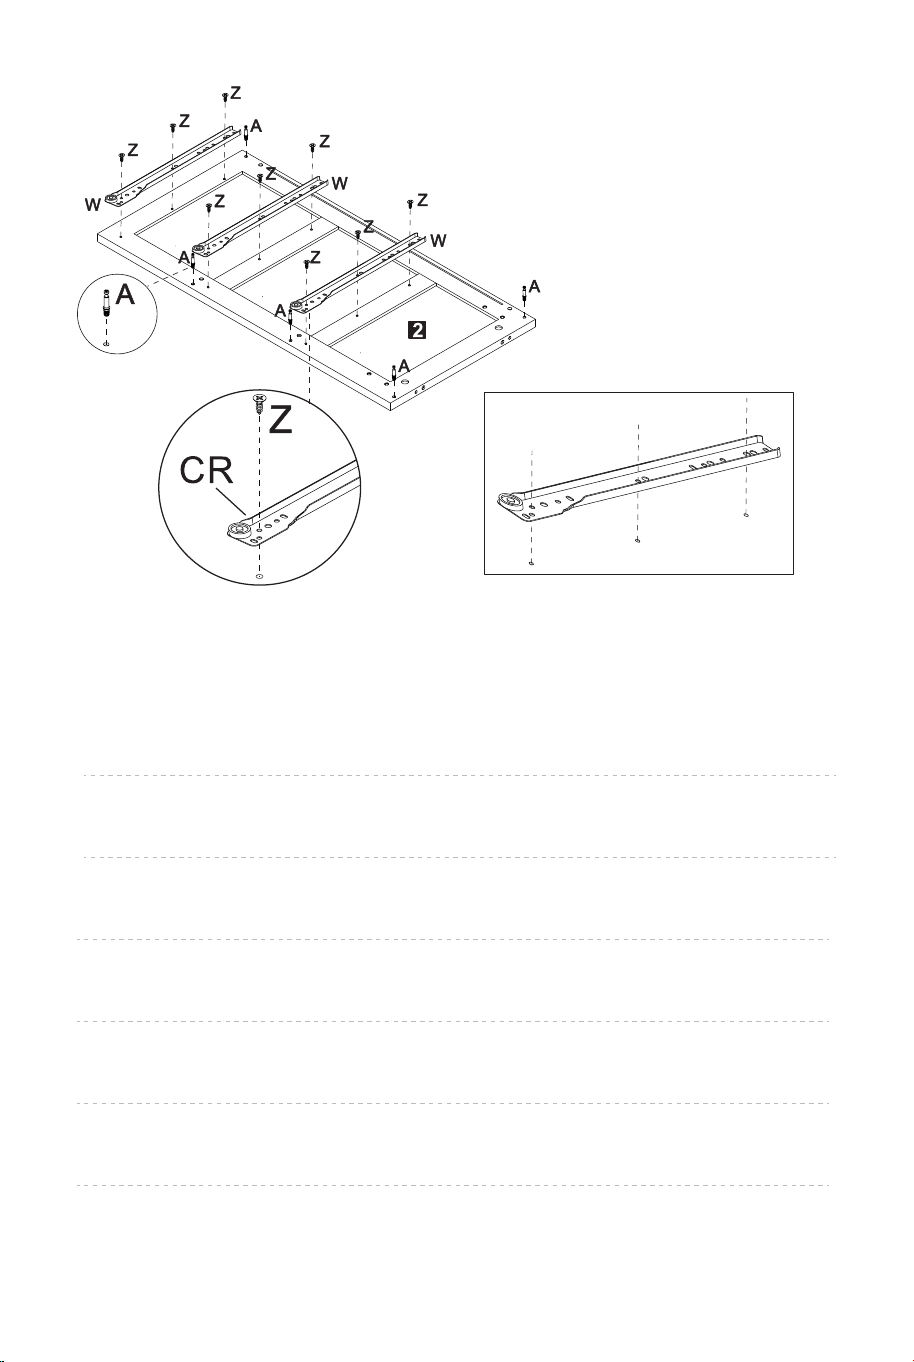
Fix the slide rail (W) on the middle panel (4) with screw (H);
Insert the cam bolt (A) into the hole of the middle panel (4)
Befestigen Sie die Gleitschiene (W) mit der Schraube (H) an der mittleren Platte (4);
Stecken Sie den Verschlussbolzen (A) in das Loch der mittleren Platte (4).
Fixez les glissières (W) sur le panneau central (4) à l’aide des vis (H) ;
Insérez les boulons à came (A) dans les trous du panneau central (4).
Fije las correderas (W) en el panel central (4) con los tornillos (H).
Inserte los pernos de leva (A) en los orificios del panel central (4).
Fissare le guide di scorrimento (W) sul pannello centrale (4) con le viti (H);
Inserire i bulloni a camma (A) nel foro del pannello centrale (4).
Zamocuj szynę ślizgową (W) na środkowym panelu (4) za pomocą śruby (H);
Włóż śrubę krzywkową (A) do otworu w panelu środkowym (4)
W
X3
A
X7
H
X9
Z
X9
1
Fix the slide rail (W) on the right panel (2) with screw (Z);
Insert the cam bolt (A) into the hole of the right panel (2)
Befestigen Sie die Gleitschiene (W) mit der Schraube (Z) an der rechten Platte (2);
Stecken Sie den Verschlussbolzen (A) in das Loch der rechten Platte (2).
Fixez les glissières (W) sur le panneau droit (2) à l’aide des vis (Z) ;
Insérez les boulons à came (A) dans les trous du panneau droit (2).
Fije las correderas (W) en el panel derecho (2) con los tornillos (Z).
Inserte los pernos de leva (A) en los orificios del panel derecho (2).
Fissare le guide di scorrimento (W) sul pannello destro (2) con le viti (Z);
Inserire i bulloni a camma (A) nel foro del pannello destro (2).
Zamocuj szynę ślizgową (W) na prawym panelu (2) za pomocą śruby (Z);
Włóż śrubę krzywkową (A) do otworu prawego panelu (2)
08 09

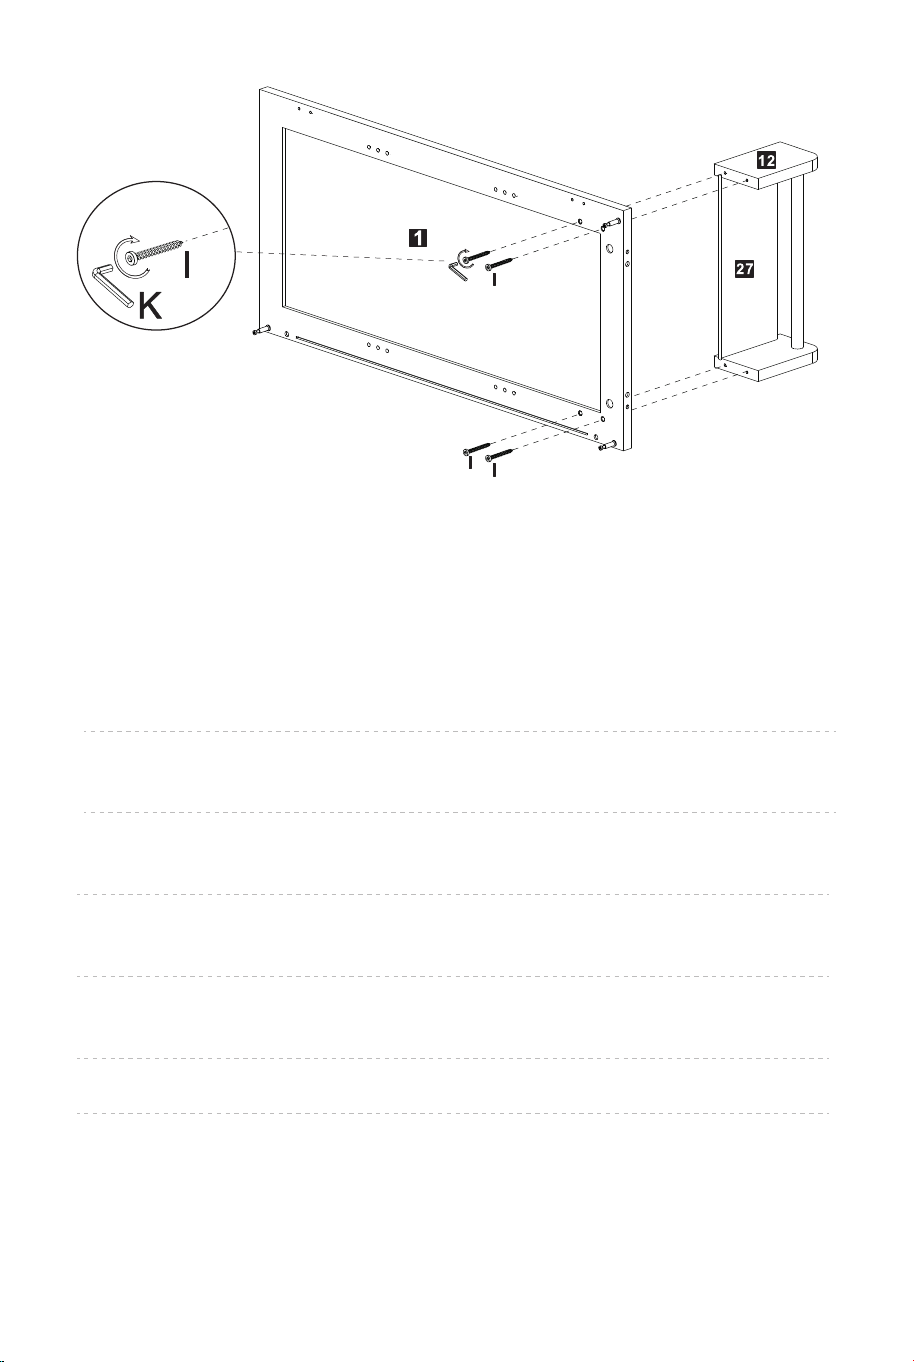
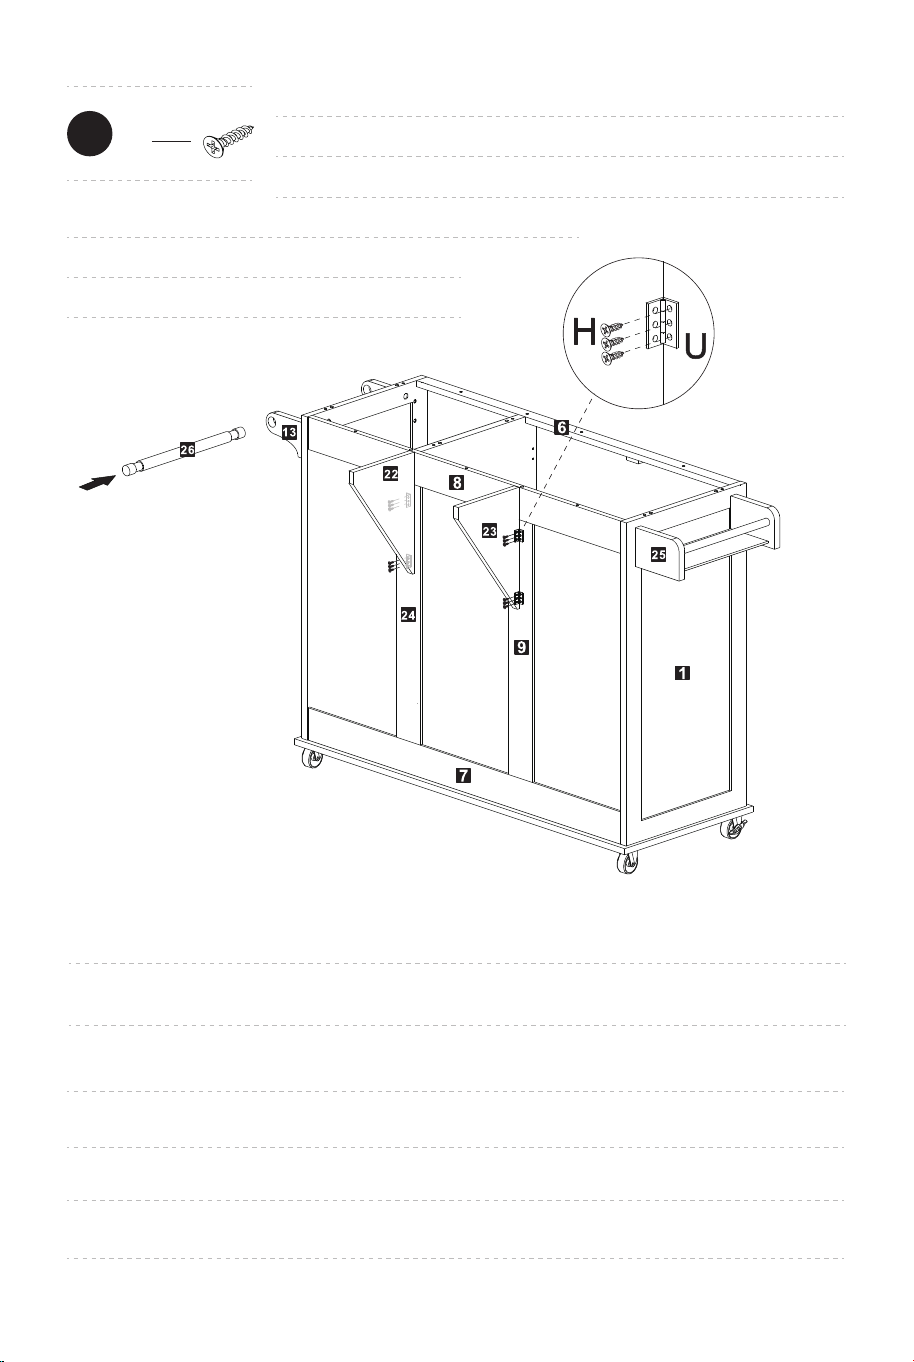
Use the small rod (26) to connect the panel (12) and the panel (25), then insert the panel (27)
into the slot
Verwenden Sie die kleine Stange (26), um die Platte (12) und die Platte (25) zu verbinden, und
setzen Sie dann die Platte (27) in den Schlitz ein.
Utilisez la petite tige (26) pour relier le panneau (12) et le panneau (25), puis insérez le panneau
(27) dans la fente.
Utilice la varilla pequeña (26) para conectar el panel (12) y el panel (25), luego encaje el panel
(27) bien en la ranura.
Utilizzare l'asta piccola (26) per collegare il pannello (12) e il pannello (25), poi inserire il
pannello (27) nella fessura.
Użyj małego pręta (26) do połączenia panelu (12) z panelem (25), a następnie włóż panel (27)
do szczeliny
Insert the cam bolt (A) into the hole of the left panel (1)
Stecken Sie den Verschlussbolzen (A) in das Loch der linken Platte (1).
Insérez les boulons à came (A) dans les trous du panneau gauche (1).
Inserte los pernos de leva (A) en los orificios del panel izquierdo (1).
Inserire i bulloni a camma (A) nel foro del pannello sinistro (1).
Włóż śrubę krzywkową (A) do otworu lewego panelu (1)
A
X3
2
I
X4
K
X1
3
Insert the screw (I) to connect the left panel (1) and the
stand with a wrench (K)
Setzen Sie die Schraube (I) zur Verbindung der linken Platte (1) und
des Ständers mit einem Innensechskantschlüssel (K) ein.
Fixez la partie assemblée (12, 25, 26, 27) au panneau gauche (1)
avec les vis (I) et la clé (K).
Fije el conjunto ensamblado (12, 25, 26, 27) al panel izquierdo (1)
con los tornillos (I) y la llave (K).
Fissare la parte assemblata (12, 25, 26, 27) al pannello sinistro (1)
con le viti (I) e la chiave (K).
Włóż śrubę (I), aby połączyć lewy panel (1) i stojak za pomocą klucza
(K)
10 11
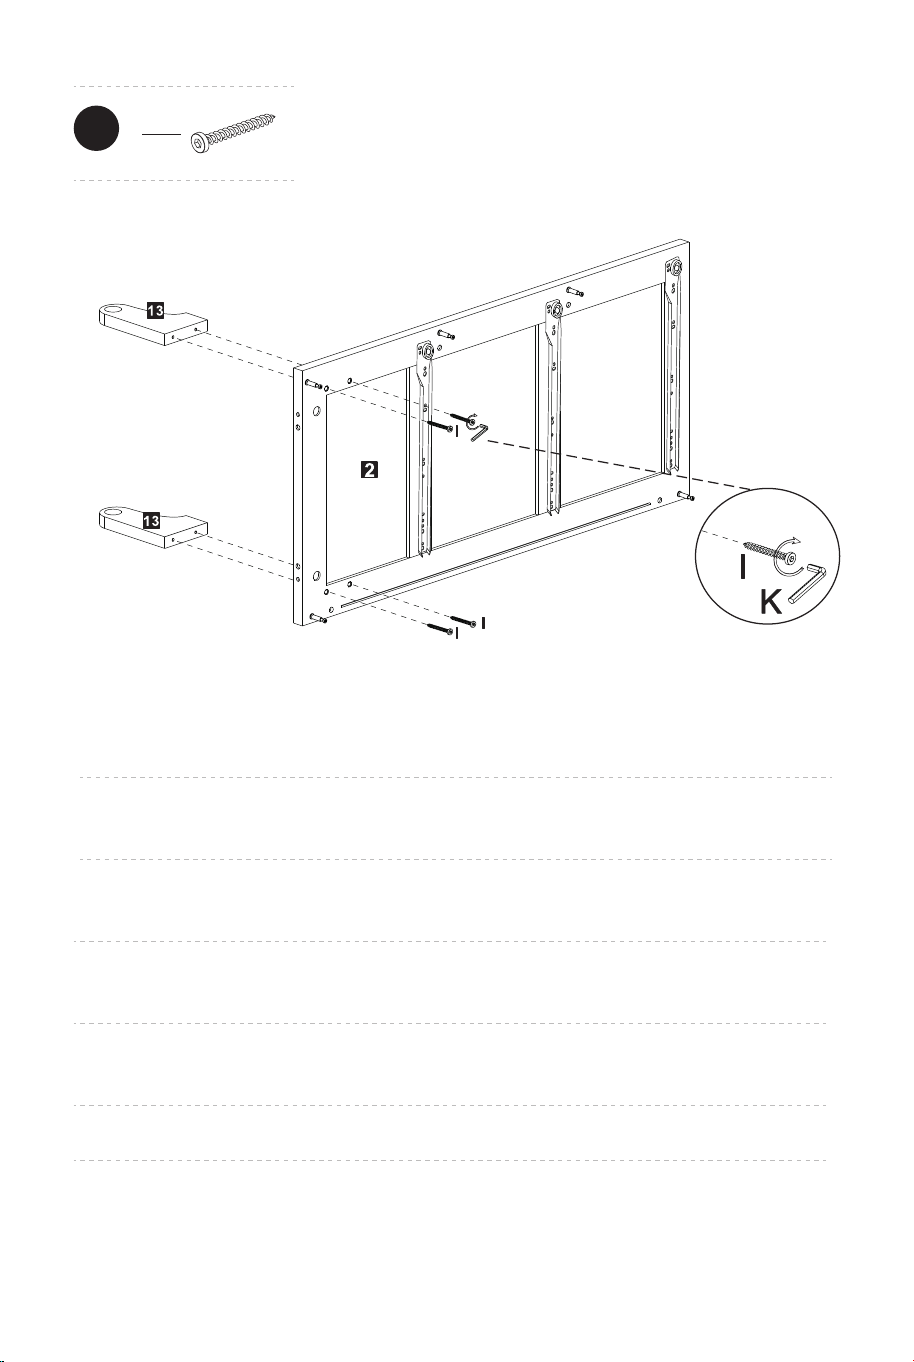
Insert the screw (I) to connect the right panel (2) and the
panel (13) with a wrench (K)
Setzen Sie die Schraube (I) zur Verbindung der rechten Platte (2) und
der Platte (13) mit einem Innensechskantschlüssel (K) ein.
Insérez la vis (I) pour connecter le panneau droit (2) et le panneau (13) avec une clé (K).
Fije los paneles (13) al panel derecho (2) con los tornillos (I) y la llave (K).
Inserire le viti (I) per collegare il pannello destro (2) e il pannello (13) con una chiave
(K).
Włóż śrubę (I), aby połączyć prawy panel (2) i panel (13) za pomocą klucza
(K)
4
I
X4
Insert the cam bolt (A) into the holes of panel (7) and panel (8)
Stecken Sie den Verschlussbolzen (A) in die Löcher von Platte (7) und Platte (8).
Insérez les boulons à came (A) dans les trous du panneau (7) et du panneau (8).
Inserte los pernos de leva (A) en los orificios del panel (7) y del panel (8).
Inserire i bulloni a camma (A) nei fori del pannello (7) e del pannello (8).
Włóż śrubę krzywkową (A) w otwory panelu nr 7 i 8.
A
X4
5
12 13
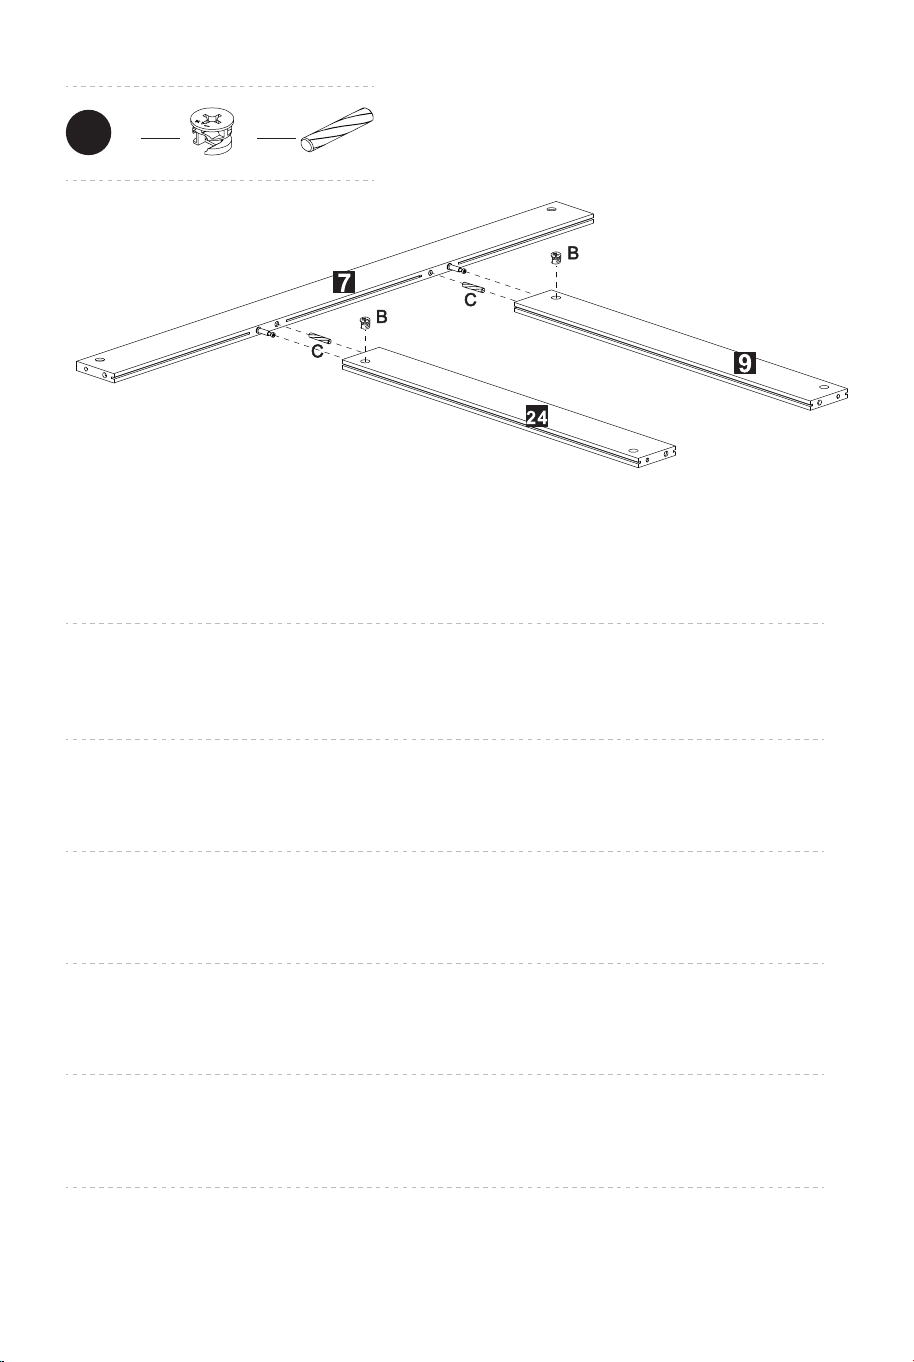
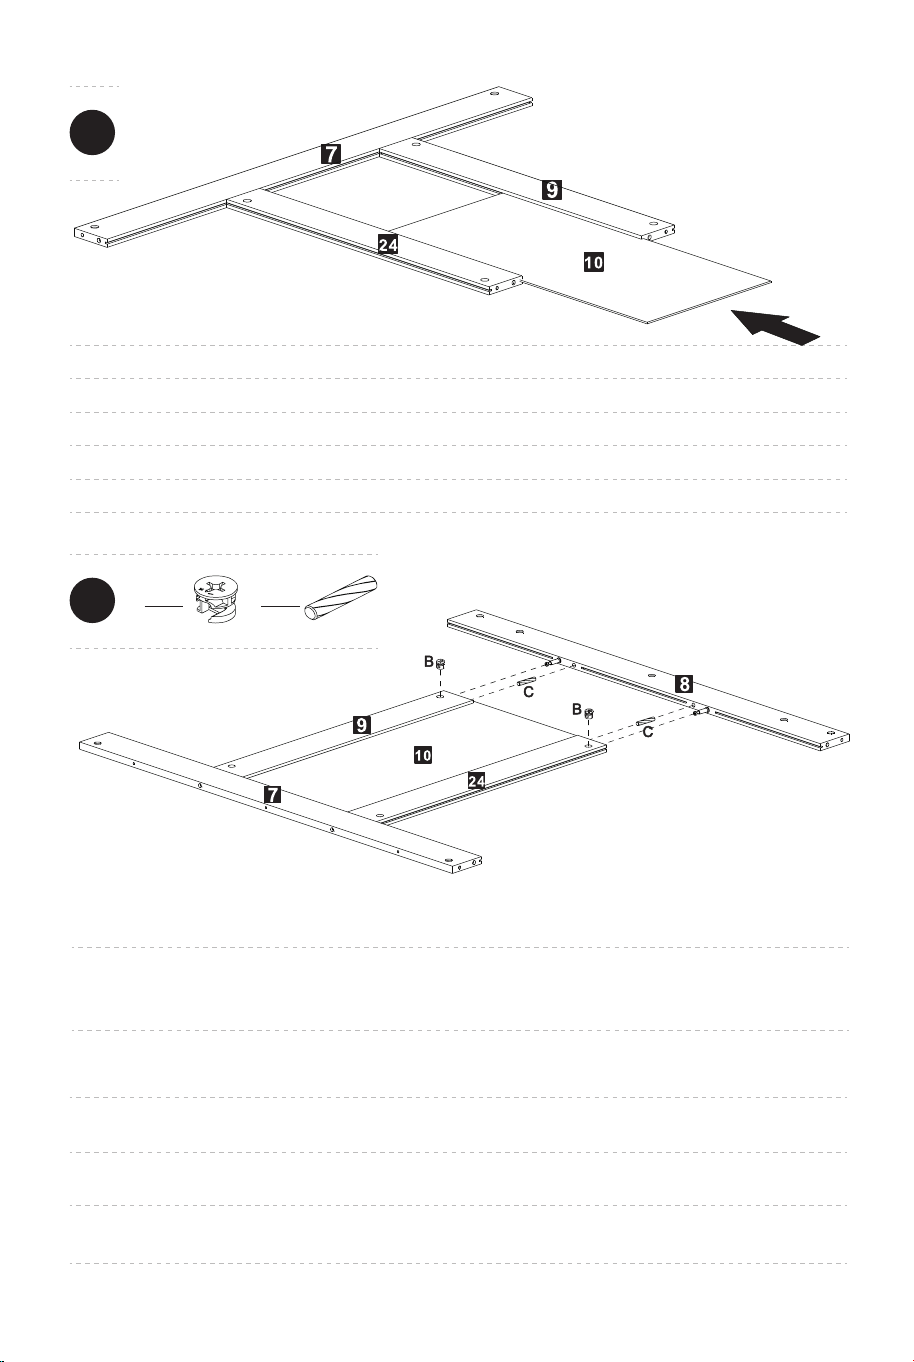
Align the hole of the panel (24) and panel (9) with the cam bolt (A) on the panel (7), and
connect them with the dowel (C), then insert the cam lock (B)
Richten Sie das Loch der Platte (24) und der Platte (9) auf den Verschlussbolzen (A) an
der Platte (7) aus und verbinden Sie sie mit dem Dübel (C), dann setzen Sie den
Möbelverbinder (B) ein.
Alignez le trou du panneau (24) et du panneau (9) avec les boulons à came (A) du
panneau (7), et connectez-les avec les chevilles (C), puis insérez les verrous à came (B).
Alinee los orificios en el panel (24) y el panel (9) con los pernos de leva (A) en el panel (7),
y conéctelos con las espigas (C), luego inserte los bloqueos de leva (B).
Allineare il foro del pannello (24) e del pannello (9) con i bulloni a camma (A) sul pannello
(7), e collegarli con le spine (C), poi inserire le serrature a camma (B).
Wyrównaj otwór panelu (24) i panelu (9) ze śrubą krzywkową (A) na panelu (7) i połącz je z
kołkiem (C), a następnie włóż zamek krzywkowy (B)
6
B
X2
C
X2
Push the back panel (10) along the slot
Schieben Sie die Rückenplatte (10) entlang des Schlitzes.
Poussez le panneau arrière (10) le long de la fente
Empuje el panel trasero (10) a lo largo de la ranura.
Spingere il pannello posteriore (10) lungo la fessura.
Popchnij tylny panel (10) wzdłuż szczeliny
Align the hole of the panel (24) and panel (9) with the cam bolt (A) on the panel
(8), and connect them with the dowel (C), then insert the cam lock (B)
Richten Sie das Loch der Platte (24) und der Platte (9) auf den Verschlussbolzen (A) an der
Platte (8) aus und verbinden Sie sie mit dem Dübel (C), dann setzen Sie den
Möbelverbinder (B) ein.
Alignez le trou du panneau (24) et du panneau (9) avec les boulons à came (A) du panneau
(8), et connectez-les avec les chevilles (C), puis insérez les verrous à came (B).
Alinee los orificios en el panel (24) y el panel (9) con los pernos de leva (A) en el panel (8),
y conéctelos con las espigas (C), luego inserte los bloqueos de leva (B).
Allineare il foro del pannello (24) e del pannello (9) con i bulloni a camma (A) sul pannello
(8), e collegarli con le spine (C), poi inserire le serrature a camma (B).
Wyrównaj otwór panelu (24) i panelu (9) ze śrubą krzywkową (A) na panelu (8) i połącz je
z kołkiem (C), a następnie włóż zamek krzywkowy (B)
7
8
B
X2
C
X2
14 15
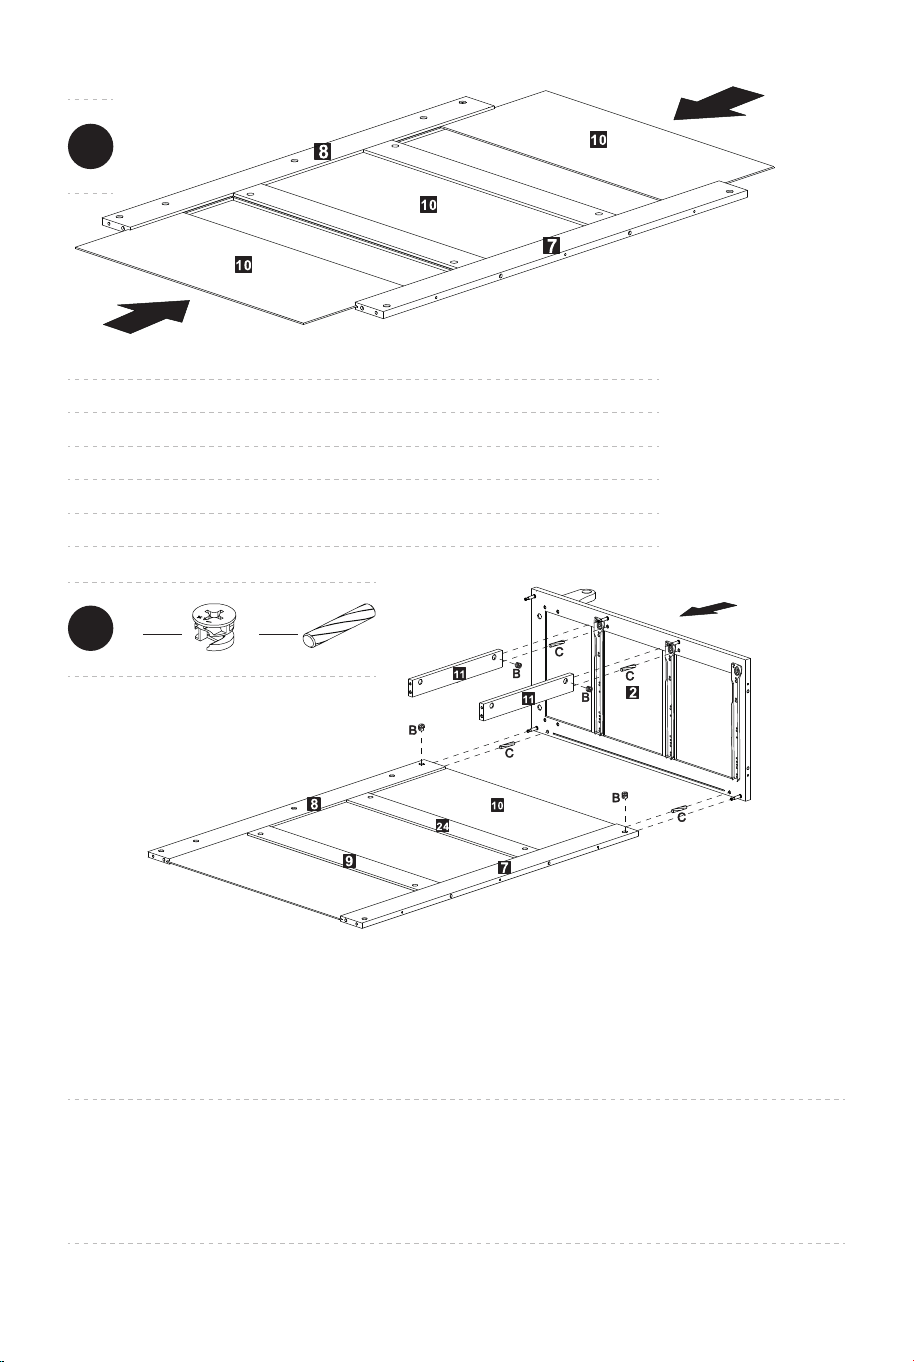
Push the back panel (10) along the slot
Schieben Sie die Rückenplatte (10) entlang des Schlitzes.
Poussez le panneau arrière (10) le long de la fente
Empuje el panel trasero (10) a lo largo de la ranura.
Spingere il pannello posteriore (10) lungo la fessura.
Popchnij tylny panel (10) wzdłuż szczeliny
Align the hole of the panel (7) and panel (8) with the cam bolt (A) on the right panel (2), and
connect them with the dowel (C);
Align the hole of the panel (11) with the cam bolt (A) on the right panel (2), and connect them
with the dowel (C);
Then insert the cam lock (B)
Richten Sie das Loch der Platte (7) und der Platte (8) auf den Verschlussbolzen (A) an
der rechten Platte (2) aus und verbinden Sie sie mit dem Dübel (C);
Richten Sie die Bohrung der Platte (11) auf den Verschlussbolzen (A) an der rechten
Platte (2) aus und verbinden Sie sie mit dem Dübel (C);
Dann das Möbelverbinder (B) einsetzen.
10
B
X4
C
X4
9
Alignez le trou du panneau (7) et du panneau (8) avec les boulons à came (A) sur le
panneau droit (2), et connectez-les avec les chevilles (C) ;
Alignez le trou du panneau (11) avec les boulons à came (A) sur le panneau droit (2), et
connectez-les avec les chevilles (C) ;
Puis insérez les verrous à came (B)
Alinee los orificios en el panel (7) y el panel (8) con los pernos de leva (A) en el panel
derecho (2), y conéctelos con las espigas (C).
Alinee los orificios en los paneles (11) con los pernos de leva (A) en el panel derecho (2),
y conéctelos con las espigas (C).
Luego inserte los bloqueos de leva (B) y bloquéelos.
Allineare il foro del pannello (7) e del pannello (8) con i bulloni a camma (A) sul pannello
destro (2) e collegarli con le spine (C);
Allineare il foro del pannello (11) con i bulloni a camma (A) sul pannello destro (2) e
collegarli con le spine (C);
Poi inserire le serrature a camma (B).
Wyrównaj otwór panelu (7) i panelu (8)ze śrubą krzywkową (A) na prawym panelu (2) i
połącz je z kołkiem (C);
Dopasuj otwór panelu (11) do śruby krzywki (A) na prawym panelu (2) i połącz je z
kołkiem (C);
Następnie włóż zamek krzywkowy (B)
11
B
X2
C
X2
16 17

Align the hole of the panel (11) with the cam bolt (A) on the middle panel
(4), and connect them with the dowel (C), then insert the cam lock (B)
Richten Sie das Loch der Platte (11) auf den Verschlussbolzen (A) an der mittleren Platte (4)
aus und verbinden Sie sie mit dem Dübel (C), dann setzen Sie das Möbelverbinder (B) ein.
Alignez le trou du panneau (11) avec les boulons à came (A) du panneau central (4), et
connectez-les avec les chevilles (C), puis insérez les verrous à came (B).
Alinee los orificios en los paneles (11) con los pernos de leva (A) en el panel central (4)
y conéctelos con las espigas (C), luego inserte los bloqueos de leva (B).
Allineare il foro del pannello (11) con i bulloni a camma (A) sul pannello centrale (4) e
collegarli con le spine (C), poi inserire le serrature a camma (B).
Wyrównaj otwór panelu (11) ze śrubą krzywkową (A) na panelu środkowym (4) i
połącz je z kołkiem (C), a następnie włóż zamek krzywkowy (B)
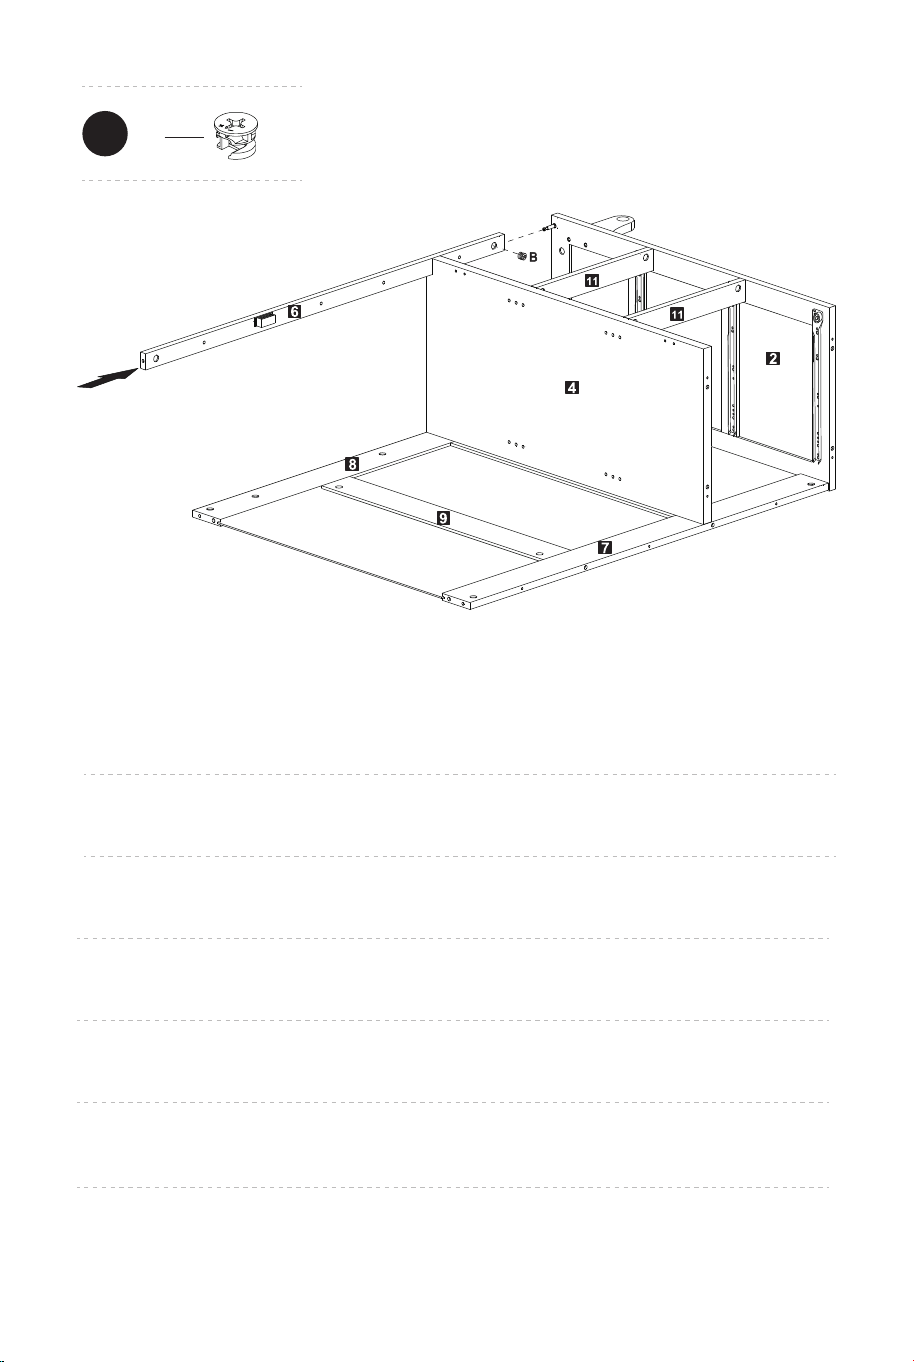
Fix the door stopper (L) to the panel (6) with screw (N)
Befestigen Sie den Türstopper (L) mit der Schraube (N) an der Platte (6).
Fixez la butée de porte (L) au panneau (6) avec les vis (N).
Fije el tope de la puerta (L) al panel (6) con los tornillos (N).
Fissare il fermaporta (L) al pannello (6) con le viti (N).
Zamocuj ogranicznik drzwi (L) do panelu (6) za pomocą śruby (N)
12
L
X1
N
X2
Align the hole of the panel (6) with the cam bolt (A) on the right panel (2), then insert the
cam lock (B)
Richten Sie das Loch der Platte (6) mit dem Verschlussbolzen (A) an der rechten Platte (2)
aus und setzen Sie dann das Möbelverbinder (B) ein.
Alignez le trou du panneau (6) avec les boulons à came (A) du panneau droit (2), puis
insérez le verrou à came (B).
Alinee el orificio en el panel (6) con el perno de leva (A) en el panel derecho (2), luego
inserte el bloqueo de leva (B) y bloquéelo.
Allineare il foro del pannello (6) con il bullone a camma (A) sul pannello destro (2), poi
inserire la serratura a camma (B).
Dopasuj otwór panelu (6) do śruby krzywki (A) na prawym panelu (2), a następnie włóż
zamek krzywkowy (B)
13
B
X1
18 19
Align the hole of the panel (11) with the cam bolt (A) on the middle panel
(4), and connect them with the dowel (C), then insert the cam lock (B)
Richten Sie das Loch der Platte (11) auf den Verschlussbolzen (A) an der mittleren Platte (4)
aus und verbinden Sie sie mit dem Dübel (C), dann setzen Sie das Möbelverbinder (B) ein.
Alignez le trou du panneau (11) avec les boulons à came (A) du panneau central (4), et
connectez-les avec les chevilles (C), puis insérez les verrous à came (B).
Alinee los orificios en los paneles (11) con los pernos de leva (A) en el panel central (4)
y conéctelos con las espigas (C), luego inserte los bloqueos de leva (B).
Allineare il foro del pannello (11) con i bulloni a camma (A) sul pannello centrale (4) e
collegarli con le spine (C), poi inserire le serrature a camma (B).
Wyrównaj otwór panelu (11) ze śrubą krzywkową (A) na panelu środkowym (4) i
połącz je z kołkiem (C), a następnie włóż zamek krzywkowy (B)
Fix the door stopper (L) to the panel (6) with screw (N)
Befestigen Sie den Türstopper (L) mit der Schraube (N) an der Platte (6).
Fixez la butée de porte (L) au panneau (6) avec les vis (N).
Fije el tope de la puerta (L) al panel (6) con los tornillos (N).
Fissare il fermaporta (L) al pannello (6) con le viti (N).
Zamocuj ogranicznik drzwi (L) do panelu (6) za pomocą śruby (N)
12
L
X1
N
X2
Align the hole of the panel (6) with the cam bolt (A) on the right panel (2), then insert the
cam lock (B)
Richten Sie das Loch der Platte (6) mit dem Verschlussbolzen (A) an der rechten Platte (2)
aus und setzen Sie dann das Möbelverbinder (B) ein.
Alignez le trou du panneau (6) avec les boulons à came (A) du panneau droit (2), puis
insérez le verrou à came (B).
Alinee el orificio en el panel (6) con el perno de leva (A) en el panel derecho (2), luego
inserte el bloqueo de leva (B) y bloquéelo.
Allineare il foro del pannello (6) con il bullone a camma (A) sul pannello destro (2), poi
inserire la serratura a camma (B).
Dopasuj otwór panelu (6) do śruby krzywki (A) na prawym panelu (2), a następnie włóż
zamek krzywkowy (B)
13
B
X1
18 19
Connect the panel (6) and the middle panel (4) with screw (E)
Verbinden Sie die Platte (6) und die mittlere Platte (4) mit der Schraube (E)
Reliez le panneau (6) et le panneau central (4) avec la vis (E).
Fije el panel (6) al panel central (4) con el tornillo (E).
Collegare il pannello (6) e il pannello centrale (4) con la vite (E).
Połącz panel (6) i środkowy panel (4) za pomocą śruby (E)
14
E
X1
Align the hole of the panel (6) with the cam bolt (A) on the left panel (1); Align the hole of
the panel (8) with the cam bolt (A) on the left panel (1), and connect them with the dowel
(C); Then insert the cam lock (B)
Richten Sie das Loch der Platte (6) mit dem Verschlussbolzen (A) an der linken Platte (1) aus;
Richten Sie das Loch der Platte (8) mit dem Verschlussbolzen (A) an der linken Platte (1) aus
und verbinden Sie sie mit dem Dübel (C); Setzen Sie dann das Möbelverbinder (B) ein.
Alignez le trou du panneau (6) avec les boulons à came (A) du panneau gauche (1) ;
Alignez le trou du panneau (8) avec les boulons à came (A) sur le panneau gauche (1), et
connectez-les avec les chevilles (C) ; Insérez ensuite les verrous à came (B)
Alinee el orificio en el panel (6) con el perno de leva (A) en el panel izquierdo (1). Alinee el orificio
en el panel (8) con el perno de leva (A) en el panel izquierdo (1), y conéctelos con las espigas (C).
Luego inserte los bloqueos de leva (B).
Allineare il foro del pannello (6) con il bullone a camma (A) sul pannello sinistro (1);
Allineare il foro del pannello (8) con i bulloni a camma (A) sul pannello sinistro (1) e
collegarli con le spine (C); Poi inserire la serratura a camma (B).
Dopasuj otwór panelu (6) do śruby krzywkowej (A) na lewym panelu (1); Dopasuj otwór
panelu (8) do śruby krzywkowej (A) na lewym panelu (1) i połącz je z kołkiem (C);
Następnie włóż zamek krzywkowy (B)
15
B
X3
C
X2
20 21
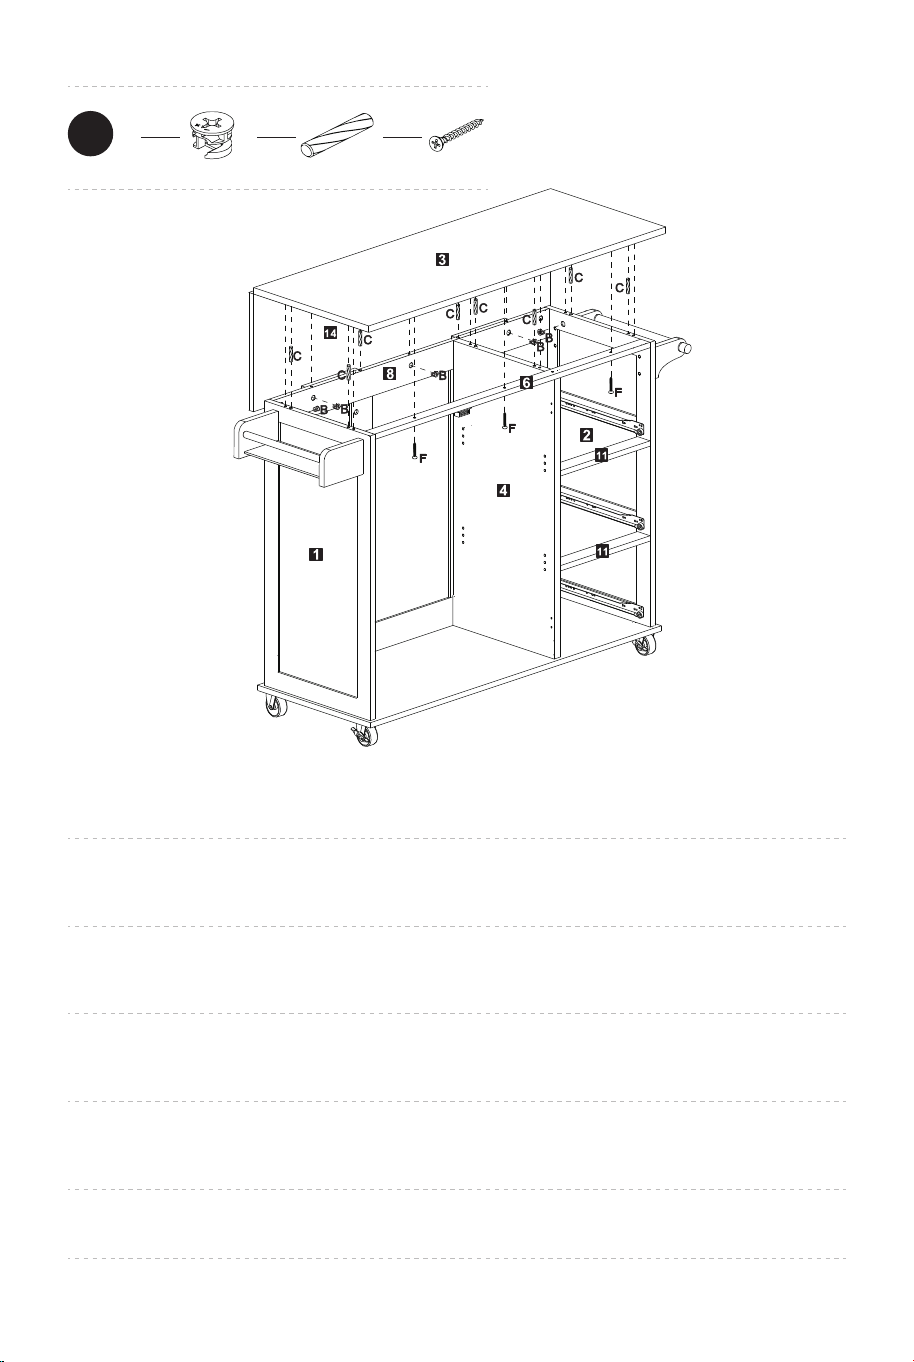
Fix the bottom panel (5) to the left panel (1), right panel (2) and middle panel (4) with screw
(E), and connect them with the dowel (C)
Befestigen Sie die Bodenplatte (5) an der linken Platte (1), der rechten Platte (2) und der
mittleren Platte (4) mit der Schraube (E) und verbinden Sie sie mit dem Dübel (C).
Fixez le panneau inférieur (5) au panneau gauche (1), au panneau droit (2) et au panneau
central (4) avec les vis (E) et les chevilles (C).
Fije el panel inferior (5) a los paneles (1), (2) y (4) con los tornillos (E) y conéctelos con las
espigas (C).
Fissare il pannello inferiore (5) al pannello sinistro (1), pannello destro (2) e pannello
centrale (4) con le viti (E), e collegarli con le spine (C).
Przymocuj panel dolny (5) do panelu lewego (1), panelu prawego (2) i panelu środkowego
(4) za pomocą śruby (E) i połącz je kołkiem (C)
16
C
X8
E
X9
Fix the caster (X) and the caster (Y) on the bottom panel (5) with screw (G)
Befestigen Sie die Lenkrolle (X) und die Lenkrolle (Y) mit der Schraube (G) an der Bodenplatte (5).
Fixez les roulettes (X) et les roulettes (Y) sur le panneau inférieur (5) avec les vis (G).
Fije las ruedas (X) y las ruedas (Y) en el panel inferior (5) con los tornillos (G).
Fissare le ruote (X) e le ruote (Y) sul pannello inferiore (5) con le viti (G).
Zamocuj kółko ( X) i kółko ( Y) na dolnym panelu (5) za pomocą śruby (G)
17
G
X16
X
X2
Y
X2
22 23
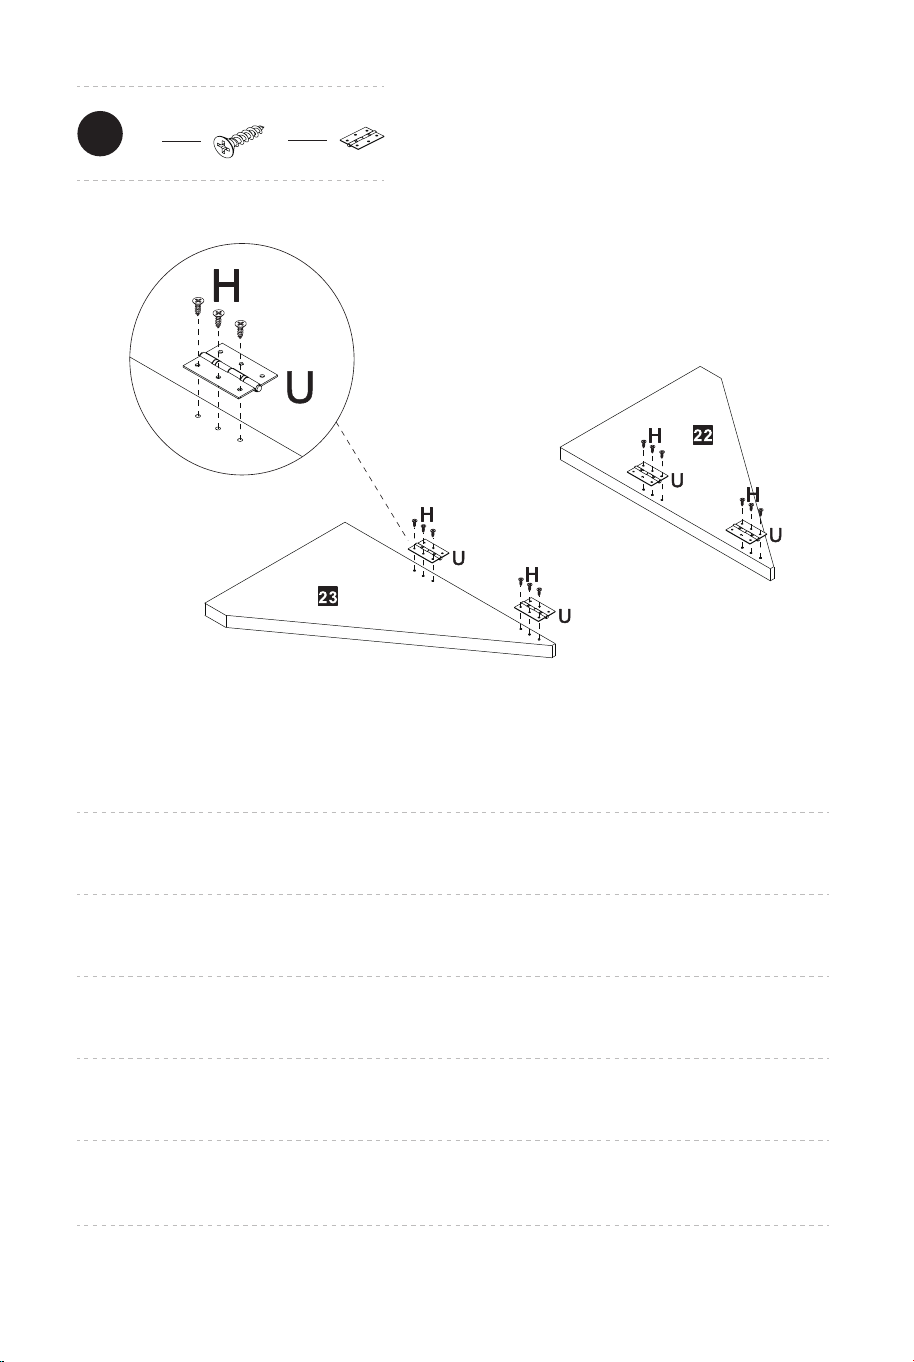
Fix the hinge (U) to the left triangle panel (23) and the right triangle panel (22) with screw
(H)
Befestigen Sie das Scharnier (U) an der linken Dreiecksplatte (23) und der rechten
Dreiecksplatte (22) mit der Schraube (H)
Fixez les charnières (U) au panneau triangulaire gauche (23) et au panneau triangulaire
droit (22) avec les vis (H).
Fije las bisagras (U) al panel triangular izquierdo (23) y al panel triangular derecho (22) con
los tornillos (H).
Fissare i cardini (U) al pannello triangolo sinistro (23) e al pannello triangolo destro (22) con
le viti (H).
Zamocuj zawias (U) do lewego, trójkątnego panelu (23) i prawego, trójkątnego panelu (22)
za pomocą śruby (H)
18
H
X12
U
X4
Insert the screw (H) into the hinge (U) to fix the panel (23) and the panel (9), in the same way,
fix the panel (22) and the panel (24)
Setzen Sie die Schraube (H) in das Scharnier (U) ein, um die Platte (23) und die Platte (9) zu
befestigen, und befestigen Sie auf die gleiche Weise die Platte (22) und die Platte (24).
Insérez les vis (H) dans les charnières (U) pour fixer le panneau (23) et le panneau (9), de la
même façon, fixez le panneau (22) et le panneau (24).
Fije las bisagras (U) en los paneles triangulares (23) y (22) a los paneles (9) y (24) con los
tornillos (H).
Inserire la vite (H) nel cardine (U) per fissare il pannello (23) e il pannello (9), allo stesso modo
fissare il pannello (22) e il pannello (24).
Włóż śrubę (H) do zawiasu (U), aby zamocować panel (23) i panel (9); w ten sam sposób
przymocuj panel (22) i panel (24)
Insert the large rod (26) into the holes on the panel (13)
Setzen Sie die große Stange (26) in die Löcher der Platte (13) ein.
Insérez la grande tige (26) dans les trous du panneau (13).
Introduzca la varilla grande (26) en los orificios de los paneles (13).
Inserire l'asta grande (26) nei fori del pannello (13).
Włóż duży pręt (26) do otworów w panelu (13)
19
H
X12
24 25
Fix the hinge (T) to the panel (3) and the panel (14) with screw (H);
Insert the cam bolt (A) into the hole of the panel (3)
Befestigen Sie das Scharnier (T) mit der Schraube (H) an der Platte (3) und der Platte (14);
Stecken Sie den Verschlussbolzen (A) in das Loch der Platte (3)
Fixez les charnières (T) au panneau (3) et au panneau (14) avec les vis (H) ;
Insérez les boulons à came (A) dans les trou du panneau (3).
Fije las bisagras (T) al panel (3) y al panel (14) con los tornillos (H).
Inserte los pernos de leva (A) en los orificios del panel (3).
Fissare i cardini (T) al pannello (3) e al pannello (14) con le viti (H);
Inserire i bulloni a camma (A) nel foro del pannello (3).
Zamocuj zawias (T) do panelu (3) i panelu (14) za pomocą śruby (H);
Włóż śrubę krzywkową (A) do otworu panelu (3)
20
H
X12
A
X35
T
X3
Align the cam bolt (A) on the panel (3) with the panel (1), (2), (4), (8), and connect them with
dowel (C) / Insert the cam lock (B) / Connect the panel (6) to the panel (3) with the screw (F)
Richten Sie den Verschlussbolzen (A) an der Platte (3) mit der Platte (1), (2), (4), (8) aus und
verbinden Sie sie mit dem Dübel (C). / Setzen Sie das Möbelverbinder (B) ein. / Verbinden Sie
die Platte (6) mit der Platte (3) mit der Schraube (F)
Alignez les boulons à came (A) du panneau (3) avec les panneaux (1), (2), (4), (8), et
connectez-les avec les chevilles (C). / Insérez les verrous à came (B). / Reliez le panneau (6) au
panneau (3) avec les vis (F).
Alinee los pernos de leva (A) del panel (3) con los paneles (1), (2), (4) y (8) y conéctelos con las
espigas (C). / Inserte los bloqueos de leva (B) y bloquéelos. / Conecte el panel (6) al panel (3)
con los tornillos (F).
Allineare i bulloni a camma (A) sul pannello (3) con il pannello (1), (2), (4), (8) e collegarli con le
spine (C). / Inserire le serrature a camma (B). / Collegare il pannello (6) al pannello (3) con le viti
(F).
Dopasuj śrubę krzywkową (A) na panelu (3) do panelu (1), (2), (4), (8) i połącz je kołkiem (C) /
Włóż zamek krzywkowy (B) / Połącz panel (6) z panelem (3) za pomocą śruby (F)
B
X9
C
X8
21
F
X3
26 27
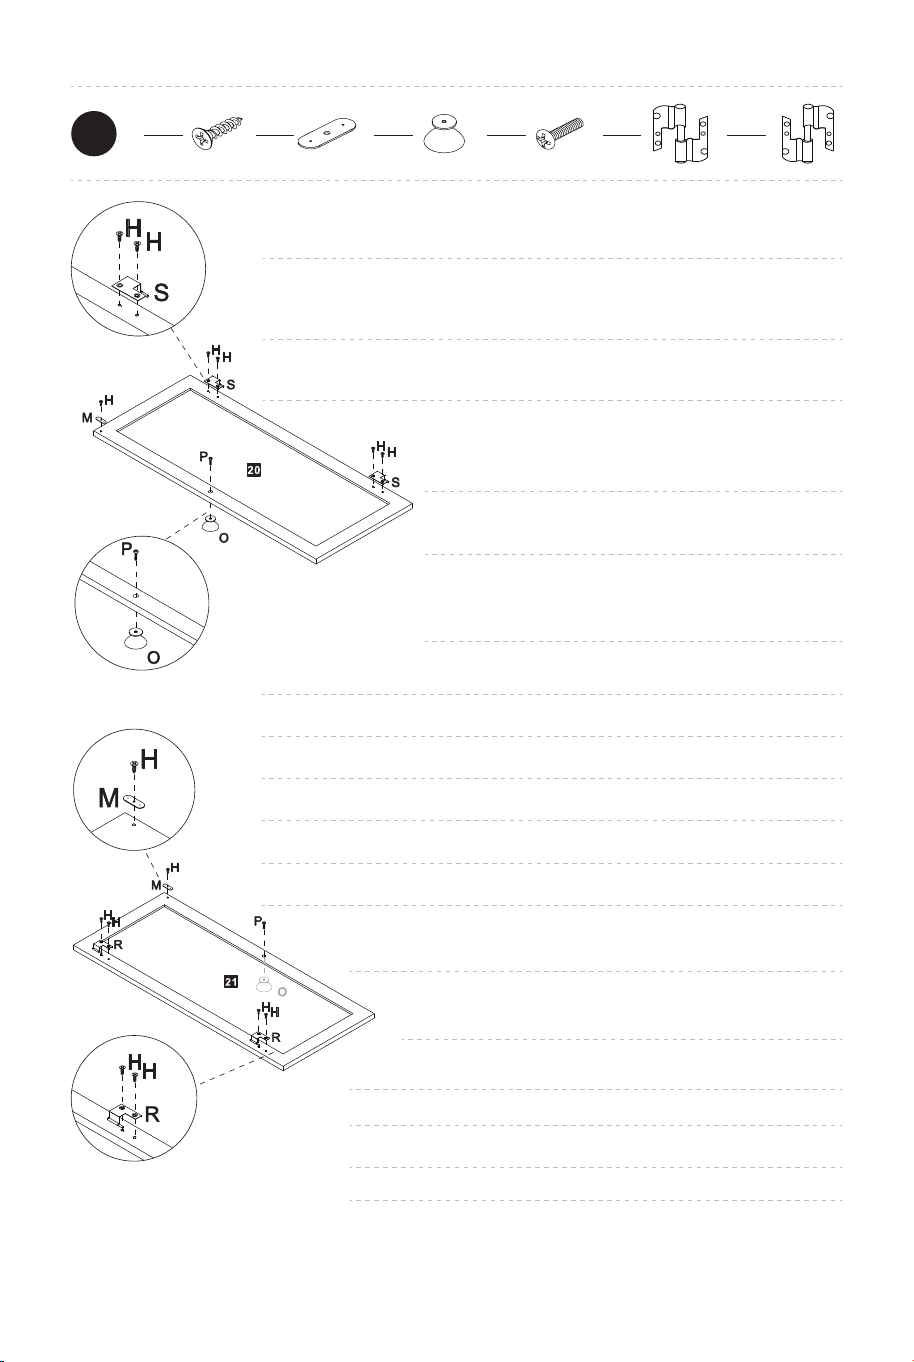
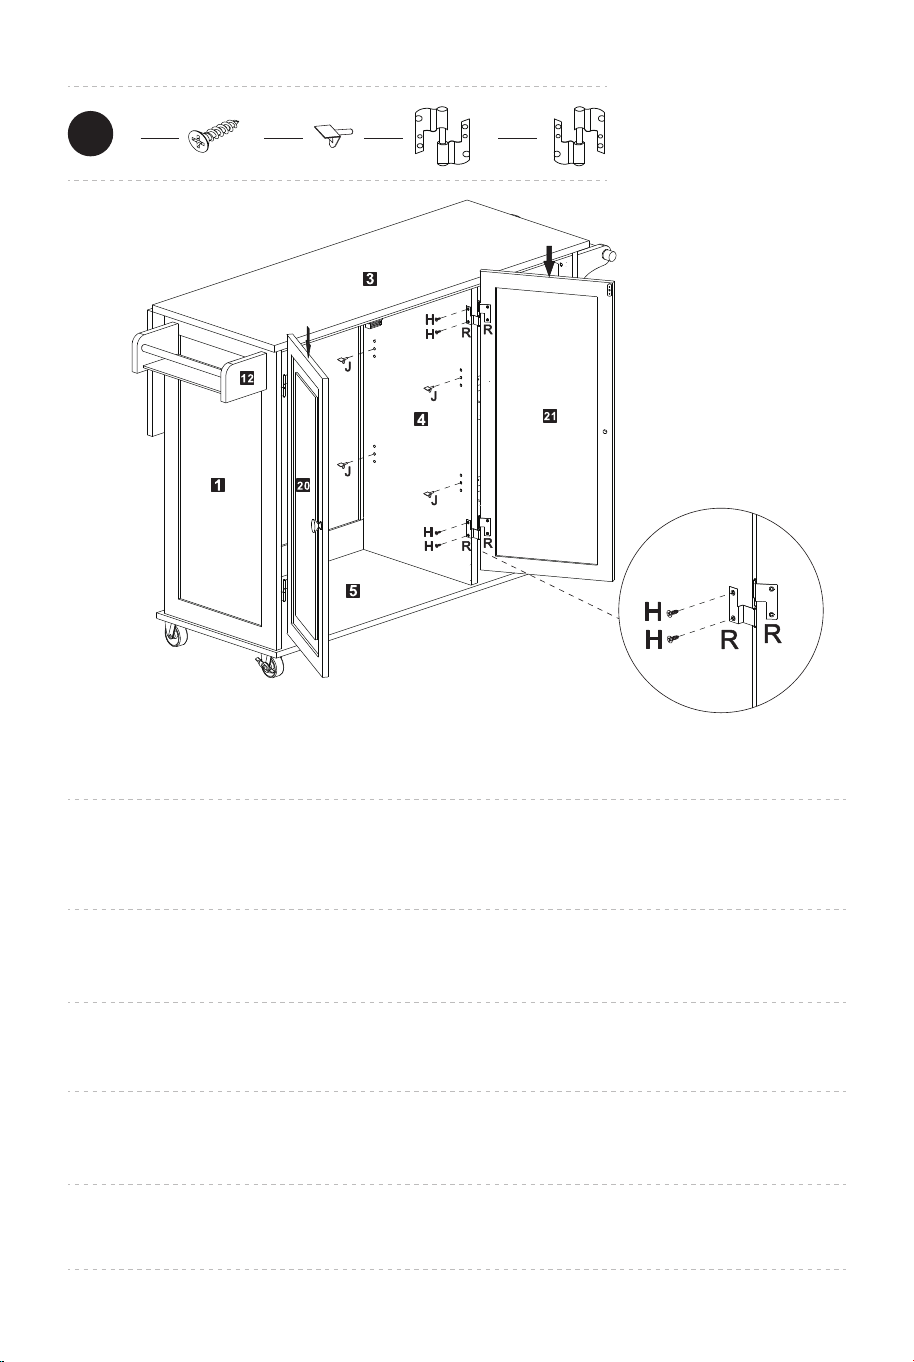
Fix the hinge (R) to the right panel (20) with screw (H)
Befestigen Sie das Scharnier (R) mit der Schraube (H) an der rechten Platte (20)
Fixez les charnières (R) au panneau droit (20) avec les vis (H).
Fije la bisagra (R) al panel derecho (20) con los tornillos (H).
Fissare i cardini (S) al pannello destro (21) con le viti (H).
Zamocuj zawias (R) do prawego panelu (20) za pomocą śruby (H)
Fix the handle (O) to the panel (20) and (21) with the screw (P)
Fixez les poignées (O) au panneau (20) et (21) avec les vis (P).
Fije las manijas (O) a los paneles (20) y (21) con los tornillos (P).
Fissare le maniglie (O) al pannello (20) e (21) con le viti (P).
Przymocuj uchwyt (O) do panelu (20) i (21) za pomocą śruby (P)
Befestigen Sie den Griff (O) an der Platte (20) und
(21) mit der Schraube (P)
Fix the hinge (S) to the left panel (20) with screw (H)
Fix the gasket (M) to the panel (20) and (21) with the screw (H)
Befestigen Sie das Scharnier (S) mit der Schraube (H) an der linken
Platte (20). Befestigen Sie die Dichtung (M) an der Platte (20) und (21)
mit der Schraube (H)
Fixez les charnières (S) au panneau gauche (20) avec les vis (H).
Fixez la pièce (M) au panneau (20) et (21) avec les vis (H).
Fije la bisagra (S) al panel izquierdo (20) con los
tornillos (H). Fije las placas (M) a los paneles (20) y
(21) con los tornillos (H).
Fissare i cardini (S) al pannello sinistro (20) con le viti (H).
Fissare la parte (M) al pannello (20) e (21) con le viti (H).
Zamocuj zawias (S) do lewego panelu (20) za
pomocą śruby (H) Zamocuj uszczelkę (M) do
panelu (20) i (21) za pomocą śruby (H)
22
H
X10
M
X2
S
X2
O
X2
P
X2
R
X2
23
H
X8
J
X8
S
X2
R
X2
Fix the bracket (J) into the hole of the left panel (1) and the middle panel (4)
Fix the hinge (R) to the middle panel (4) with the screw (H), in the same way, fix the hinge (S) to
the left panel (1), then push down the door panel (20) and (21).
Befestigen Sie die Halterung (J) im Loch der linken Platte (1) und der mittleren Platte (4)
Befestigen Sie das Scharnier (R) mit der Schraube (H) an der mittleren Platte (4), befestigen Sie
auf die gleiche Weise das Scharnier (S) an der linken Platte (1) und drücken Sie dann die
Türplatte (20) und (21) herunter.
Fixez les supports (J) dans le trou du panneau gauche (1) et du panneau central (4).
Fixez les charnières (R) au panneau central (4) avec les vis (H), de la même manière, fixez les
charnière (S) au panneau gauche (1), puis poussez vers le bas les panneaux de porte (20) et (21).
Fije los soportes (J) en los orificios del panel izquierdo (1) y del panel central (4).
Fije la bisagra (R) al panel central (4) con los tornillos (H), del mismo modo, fije la bisagra (S) al
panel izquierdo (1), luego empuje hacia abajo los paneles de puerta (20) y (21).
Fissare le staffe (J) nel foro del pannello sinistro (1) e del pannello centrale (4).
Fissare i cardini (R) al pannello centrale (4) con le viti (H), allo stesso modo fissare i cardini (S)
al pannello sinistro (1), poi spingere verso il basso il pannello della porta (20) e (21).
Zamocuj wspornik (J) w otworze lewego panelu (1) i środkowego panelu (4)
Zamocuj zawias (R) do panelu środkowego (4) za pomocą śruby (H); w ten sam sposób
przymocuj zawias (S) do panelu lewego (1), a następnie dociśnij panel drzwi (20) i ( 21).
28 29
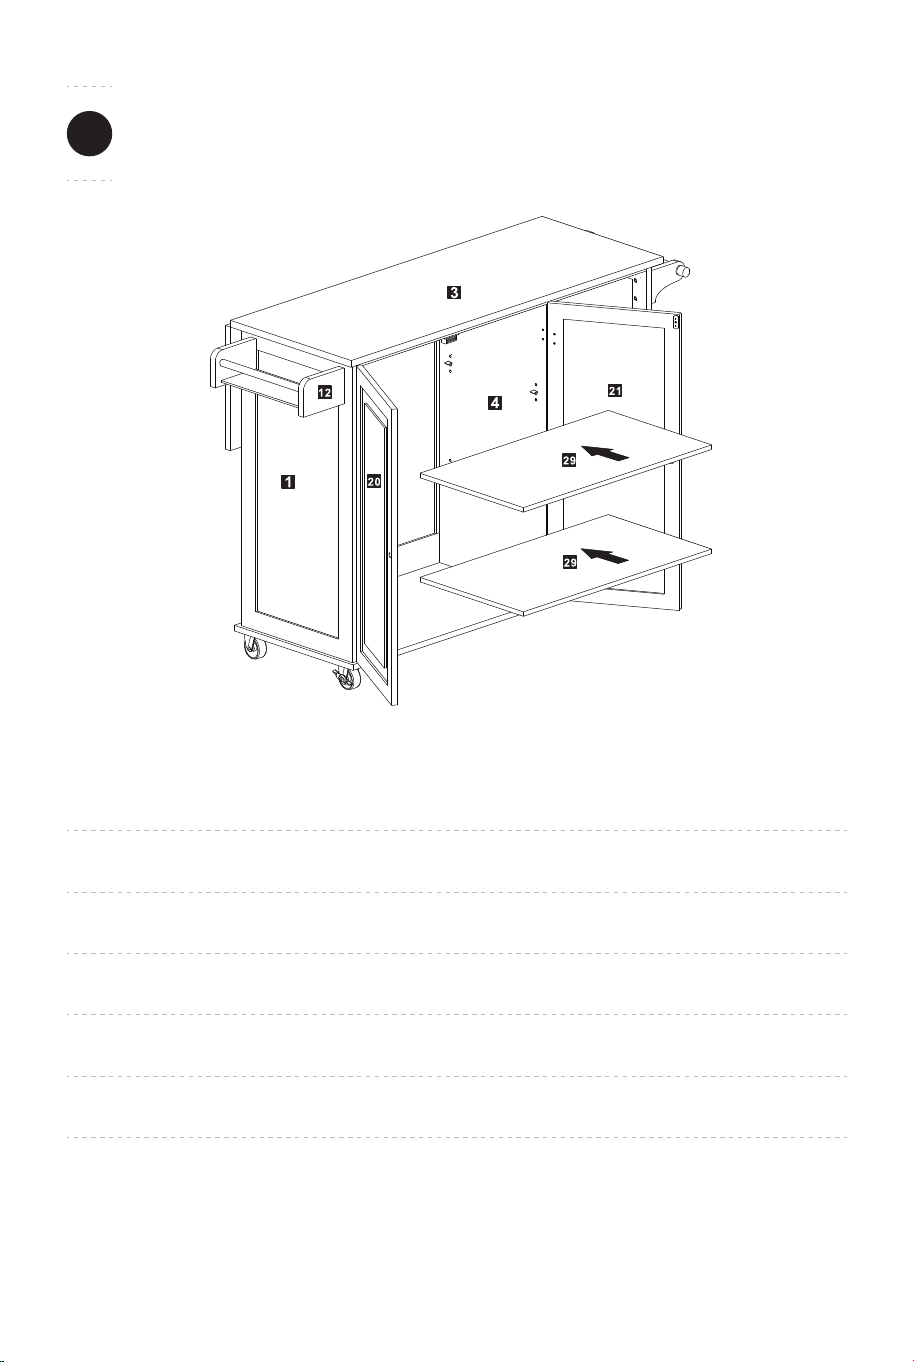
Put the shelf (29) on the bracket (J) of the left panel (1) and the middle panel (4)
Setzen Sie das Regal (29) auf die Halterung (J) der linken Platte (1) und der mittleren Platte (4).
Posez les tablettes (29) sur les supports (J) du panneau gauche (1) et du panneau central (4).
Coloque los estantes (29) en los soportes (J) del panel izquierdo (1) y el panel central (4).
Posizionare il ripiano (29) sulle staffe (J) del pannello sinistro (1) e del pannello centrale (4).
Umieść półkę (29) na wsporniku (J) lewego panelu (1) i środkowego panelu (4)
24
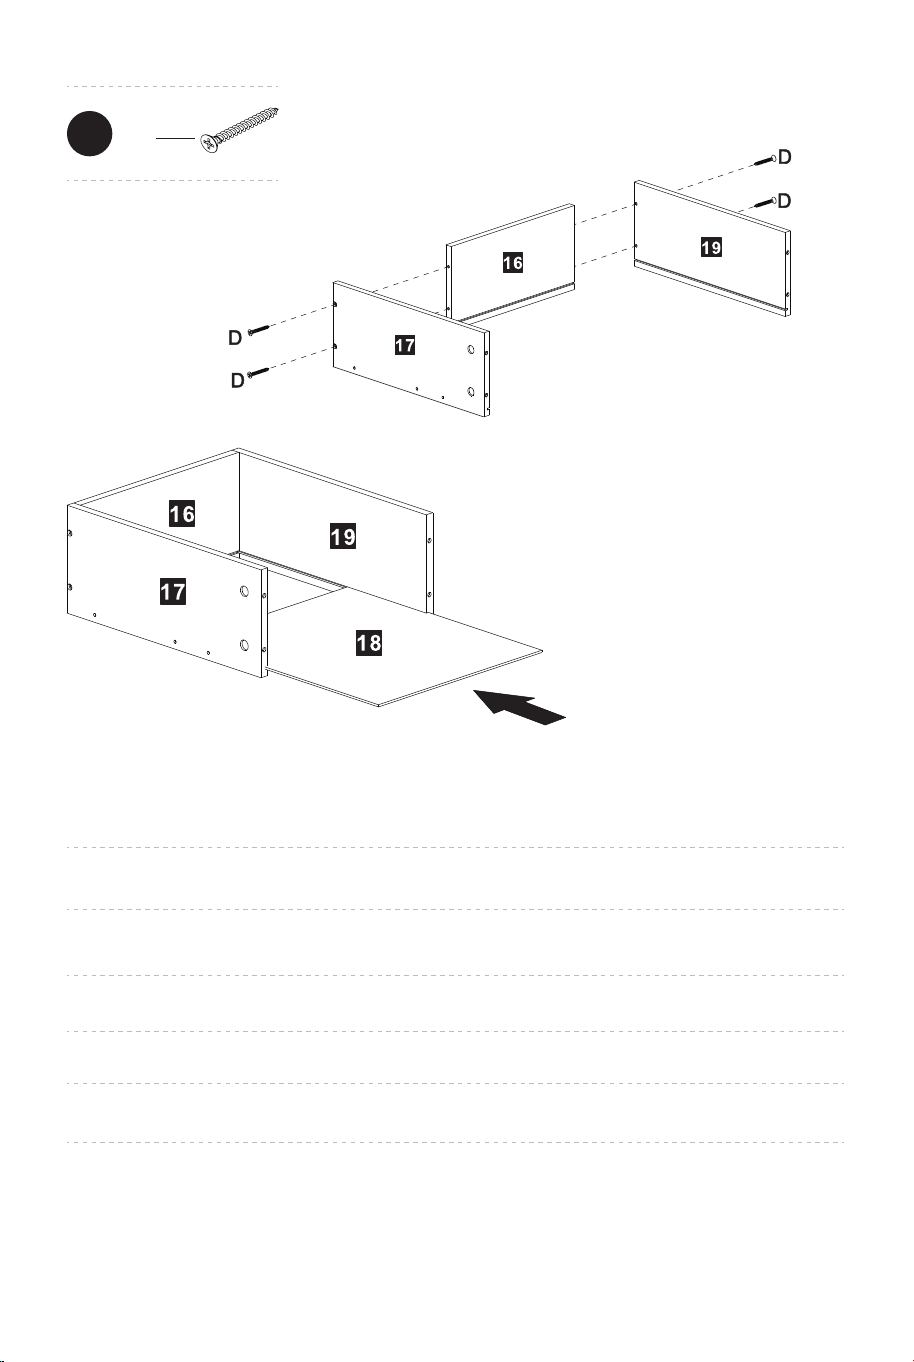
Fix the left panel (17) and right panel (19) on the back panel (16) with screw (D), and push the
bottom panel (18) along the slot.
Befestigen Sie die linke Platte (17) und die rechte Platte (19) mit der Schraube (D) an der
Rückenplatte (16) und schieben Sie die untere Platte (18) in den Schlitz.
Fixez le panneau gauche (17) et le panneau droit (19) sur le panneau arrière (16) avec les vis
(D), et poussez le panneau inférieur (18) le long de la fente.
Fije el panel izquierdo (17) y el panel derecho (19) en el panel posterior (16) con los tornillos
(D) y empuje el panel inferior (18) a lo largo de la ranura.
Fissare il pannello sinistro (17) e il pannello destro (19) sul pannello posteriore (16) con le viti
(D), e spingere il pannello inferiore (18) lungo la fessura.
Zamocuj lewy panel (17) i prawy panel (19) na tylnym panelu (16) za pomocą śruby (D) i wsuń
dolny panel (18) wzdłuż szczeliny.
25
D
X12
X3
30 31
Put the shelf (29) on the bracket (J) of the left panel (1) and the middle panel (4)
Setzen Sie das Regal (29) auf die Halterung (J) der linken Platte (1) und der mittleren Platte (4).
Posez les tablettes (29) sur les supports (J) du panneau gauche (1) et du panneau central (4).
Coloque los estantes (29) en los soportes (J) del panel izquierdo (1) y el panel central (4).
Posizionare il ripiano (29) sulle staffe (J) del pannello sinistro (1) e del pannello centrale (4).
Umieść półkę (29) na wsporniku (J) lewego panelu (1) i środkowego panelu (4)
24
Fix the left panel (17) and right panel (19) on the back panel (16) with screw (D), and push the
bottom panel (18) along the slot.
Befestigen Sie die linke Platte (17) und die rechte Platte (19) mit der Schraube (D) an der
Rückenplatte (16) und schieben Sie die untere Platte (18) in den Schlitz.
Fixez le panneau gauche (17) et le panneau droit (19) sur le panneau arrière (16) avec les vis
(D), et poussez le panneau inférieur (18) le long de la fente.
Fije el panel izquierdo (17) y el panel derecho (19) en el panel posterior (16) con los tornillos
(D) y empuje el panel inferior (18) a lo largo de la ranura.
Fissare il pannello sinistro (17) e il pannello destro (19) sul pannello posteriore (16) con le viti
(D), e spingere il pannello inferiore (18) lungo la fessura.
Zamocuj lewy panel (17) i prawy panel (19) na tylnym panelu (16) za pomocą śruby (D) i wsuń
dolny panel (18) wzdłuż szczeliny.
25
D
X12
X3
30 31
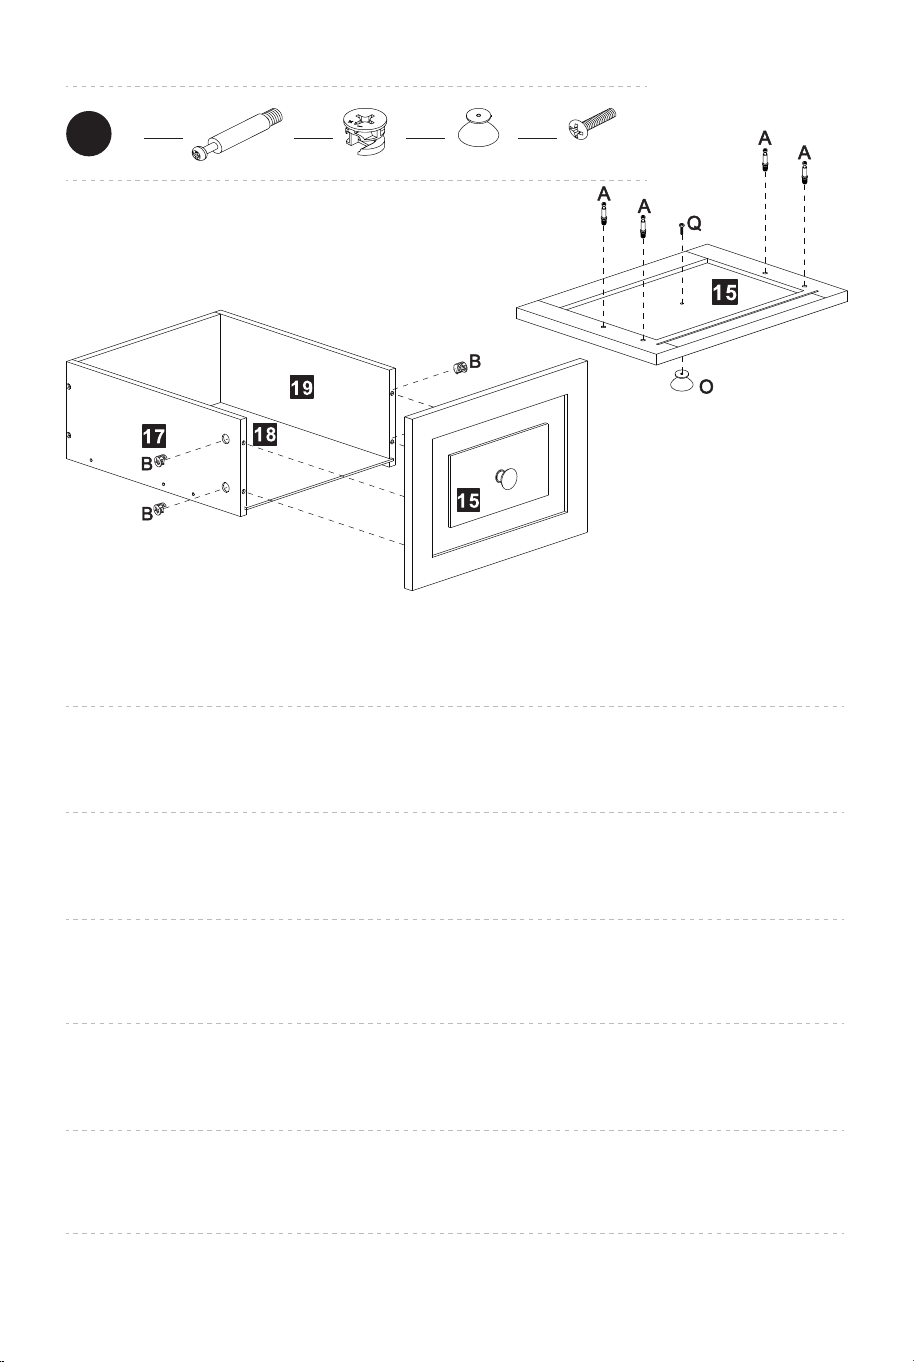
Fix the handle (O) to the front panel (15) with screw (Q)
Insert the cam bolt (A) into the hole of the front panel (15)
Align the cam bolt (A) on the front panel (15) with the holes of the left panel (17) and right
panel (19), then insert the cam lock (B)
Befestigen Sie den Griff (O) mit der Schraube (Q) an der Frontplatte (15).
Stecken Sie den Verschlussbolzen (A) in das Loch der Frontplatte (15).
Richten Sie den Verschlussbolzen (A) an der Frontplatte (15) an den Löchern der linken Platte
(17) und der rechten Platte (19) aus und setzen Sie dann das Möbelverbinder (B) ein.
Fixez la poignée (O) au panneau (15) avec la vis (Q).
Insérez les boulons à came (A) dans les trous du panneau (15).
Alignez les boulons à came (A) du panneau avant (15) avec les trous du panneau gauche (17)
et du panneau droit (19) et fixez, puis insérez les verrous à came (B) et fixez-les.
Fije la manija (O) al panel frontal (15) con el tornillo (Q).
Inserte los pernos de leva (A) en los orificios del panel frontal (15).
Alinee los pernos de leva (A) en el panel frontal (15) con los orificios del panel izquierdo (17) y
del panel derecho (19), luego inserte los bloqueos de leva (B) y bloquéelos.
Fissare la maniglia (O) al pannello anteriore (15) con la vite (Q).
Inserire i bulloni a camma (A) nel foro del pannello anteriore (15).
Allineare i bulloni a camma (A) sul pannello anteriore (15) con i fori del pannello sinistro (17) e
del pannello destro (19), poi inserire le serrature a camma (B).
Przymocuj uchwyt (O) do panelu przedniego (15) za pomocą śruby (Q)
Włóż śrubę krzywkową (A) do otworu w panelu przednim (15)
Wyrównaj śrubę krzywkową (A) na panelu przednim (15) z otworami panelu lewego (17 ) i
panelu prawego (19), a następnie włóż blokadę krzywkową (B)
26
A
X12
B
X12
O
X3
Q
X3
X3
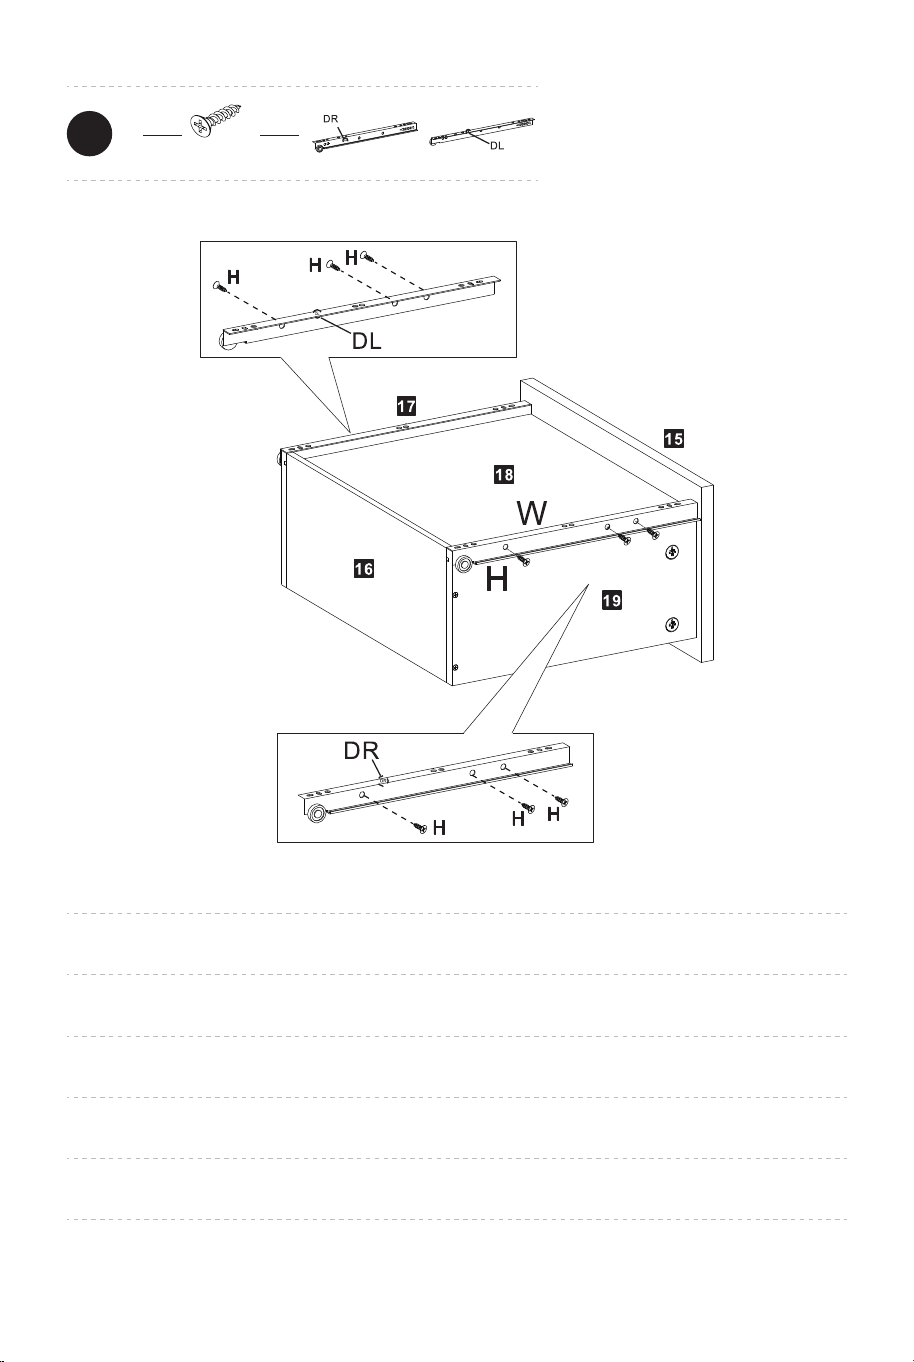
Fix the slide rail (W) on the left panel (17) and right panel (19) with screw (H);
Befestigen Sie die Gleitschiene (W) an der linken Platte (17) und der rechten Platte (19) mit der
Schraube (H).
Fixez les glissières (W) sur le panneau gauche (17) et le panneau droit (19) avec les vis (H) ;
Fije la corredera (W) en el panel izquierdo (17) y el panel derecho (19) con los tornillos (H).
Fissare le guide di scorrimento (W) sul pannello sinistro (17) e sul pannello destro (19)
con le viti (H).
Zamocuj szynę ślizgową (W) na lewym panelu (17) i prawym (19) za pomocą śruby (H);
27
H
X87
W
X3
X3
32 33
Fix the handle (O) to the front panel (15) with screw (Q)
Insert the cam bolt (A) into the hole of the front panel (15)
Align the cam bolt (A) on the front panel (15) with the holes of the left panel (17) and right
panel (19), then insert the cam lock (B)
Befestigen Sie den Griff (O) mit der Schraube (Q) an der Frontplatte (15).
Stecken Sie den Verschlussbolzen (A) in das Loch der Frontplatte (15).
Richten Sie den Verschlussbolzen (A) an der Frontplatte (15) an den Löchern der linken Platte
(17) und der rechten Platte (19) aus und setzen Sie dann das Möbelverbinder (B) ein.
Fixez la poignée (O) au panneau (15) avec la vis (Q).
Insérez les boulons à came (A) dans les trous du panneau (15).
Alignez les boulons à came (A) du panneau avant (15) avec les trous du panneau gauche (17)
et du panneau droit (19) et fixez, puis insérez les verrous à came (B) et fixez-les.
Fije la manija (O) al panel frontal (15) con el tornillo (Q).
Inserte los pernos de leva (A) en los orificios del panel frontal (15).
Alinee los pernos de leva (A) en el panel frontal (15) con los orificios del panel izquierdo (17) y
del panel derecho (19), luego inserte los bloqueos de leva (B) y bloquéelos.
Fissare la maniglia (O) al pannello anteriore (15) con la vite (Q).
Inserire i bulloni a camma (A) nel foro del pannello anteriore (15).
Allineare i bulloni a camma (A) sul pannello anteriore (15) con i fori del pannello sinistro (17) e
del pannello destro (19), poi inserire le serrature a camma (B).
Przymocuj uchwyt (O) do panelu przedniego (15) za pomocą śruby (Q)
Włóż śrubę krzywkową (A) do otworu w panelu przednim (15)
Wyrównaj śrubę krzywkową (A) na panelu przednim (15) z otworami panelu lewego (17 ) i
panelu prawego (19), a następnie włóż blokadę krzywkową (B)
26
A
X12
B
X12
O
X3
Q
X3
X3
Fix the slide rail (W) on the left panel (17) and right panel (19) with screw (H);
Befestigen Sie die Gleitschiene (W) an der linken Platte (17) und der rechten Platte (19) mit der
Schraube (H).
Fixez les glissières (W) sur le panneau gauche (17) et le panneau droit (19) avec les vis (H) ;
Fije la corredera (W) en el panel izquierdo (17) y el panel derecho (19) con los tornillos (H).
Fissare le guide di scorrimento (W) sul pannello sinistro (17) e sul pannello destro (19)
con le viti (H).
Zamocuj szynę ślizgową (W) na lewym panelu (17) i prawym (19) za pomocą śruby (H);
27
H
X87
W
X3
X3
32 33
In case a return is required, the item must be returned in original box. Without this
your return will not be accepted.
DO NOT discard the box / original packaging.
Take a photo of the box markings.
Take a photo of the damaged part (if applicable).
Send us an email with the images requested.
A photo of the markings (text) on the side of the box is required in case a part is
needed for replacement. This helps our staff identify your product number to
ensure you receive the correct parts.
A photo of the damage is always required to file a claim and get your replacement
or refund processed quickly. Please make sure you have the box even if it is
damaged.
Email us directly from marketplace where your item was purchased with the
attached images and a description of your claim.
Falls eine Rücksendung erforderlich ist, muss der Artikel in der
Originalverpackung zurückgeschickt werden. Andernfalls wird Ihre Rücksendung
nicht angenommen.
Werfen Sie den Karton / die Originalverpackung NICHT weg.
Machen Sie ein Foto von der Beschriftung des Kartons.
Machen Sie ein Foto des beschädigten Teils (falls zutreffend).
Schicken Sie uns eine E-Mail mit dem gewünschten Foto.
Für den Fall, dass ein Ersatzteil benötigt wird, benötigen wir ein Foto der
Beschriftung (Text) auf der Seite des Kartons. So können unsere Mitarbeiter Ihre
Artikelnummer identifizieren und sicherstellen, dass Sie die richtigen Teile
erhalten.
Ein Foto des beschädigten Teils ist immer erforderlich, um eine Reklamation
einzureichen und eine schnelle Bearbeitung Ihres Ersatzteils oder Ihrer
Rückerstattung zu gewährleisten. Bitte stellen Sie sicher, dass Sie den Karton
haben, auch wenn er beschädigt ist.
Schicken Sie uns eine E-Mail direkt vom Marktplatz, auf dem Sie den Artikel
gekauft haben, mit den angehängten Fotos und einer Beschreibung Ihrer
Reklamation.
EN
DE
Return / Damage Claim Instructions
Rücksendung/Beschädigung Anweisungen
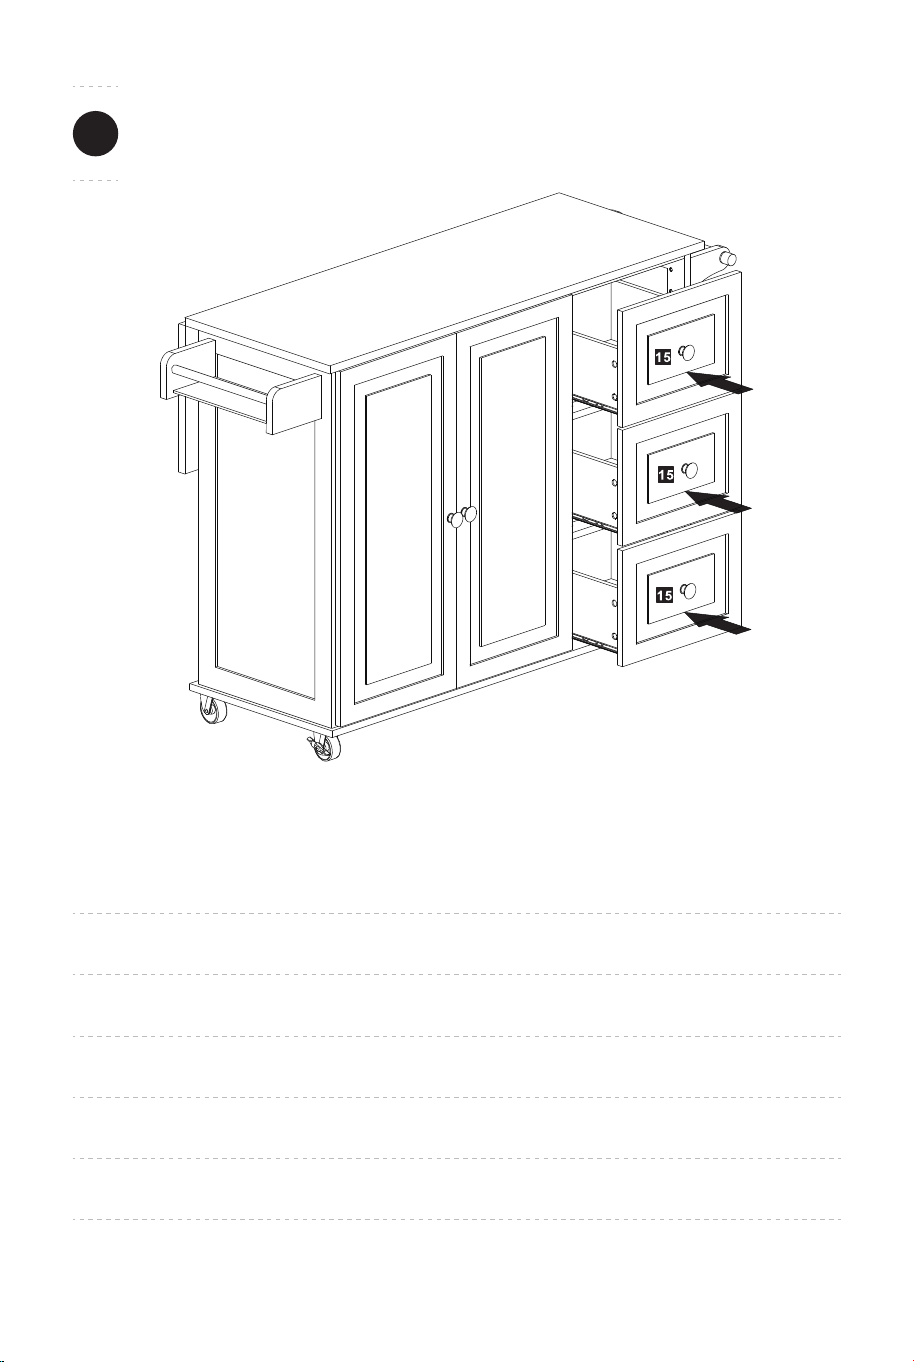
Push the drawers
Schieben Sie die Schubladen.
Poussez les tiroirs
Empuje los cajones.
Spingere i cassetti.
Wsuń szuflady
28
34 35
In case a return is required, the item must be returned in original box. Without this
your return will not be accepted.
DO NOT discard the box / original packaging.
Take a photo of the box markings.
Take a photo of the damaged part (if applicable).
Send us an email with the images requested.
A photo of the markings (text) on the side of the box is required in case a part is
needed for replacement. This helps our staff identify your product number to
ensure you receive the correct parts.
A photo of the damage is always required to file a claim and get your replacement
or refund processed quickly. Please make sure you have the box even if it is
damaged.
Email us directly from marketplace where your item was purchased with the
attached images and a description of your claim.
Falls eine Rücksendung erforderlich ist, muss der Artikel in der
Originalverpackung zurückgeschickt werden. Andernfalls wird Ihre Rücksendung
nicht angenommen.
Werfen Sie den Karton / die Originalverpackung NICHT weg.
Machen Sie ein Foto von der Beschriftung des Kartons.
Machen Sie ein Foto des beschädigten Teils (falls zutreffend).
Schicken Sie uns eine E-Mail mit dem gewünschten Foto.
Für den Fall, dass ein Ersatzteil benötigt wird, benötigen wir ein Foto der
Beschriftung (Text) auf der Seite des Kartons. So können unsere Mitarbeiter Ihre
Artikelnummer identifizieren und sicherstellen, dass Sie die richtigen Teile
erhalten.
Ein Foto des beschädigten Teils ist immer erforderlich, um eine Reklamation
einzureichen und eine schnelle Bearbeitung Ihres Ersatzteils oder Ihrer
Rückerstattung zu gewährleisten. Bitte stellen Sie sicher, dass Sie den Karton
haben, auch wenn er beschädigt ist.
Schicken Sie uns eine E-Mail direkt vom Marktplatz, auf dem Sie den Artikel
gekauft haben, mit den angehängten Fotos und einer Beschreibung Ihrer
Reklamation.
EN
DE
Return / Damage Claim Instructions
Rücksendung/Beschädigung Anweisungen
Push the drawers
Schieben Sie die Schubladen.
Poussez les tiroirs
Empuje los cajones.
Spingere i cassetti.
Wsuń szuflady
28
34 35
Instructions De Retour / Réclamation De Dommages
Dans le cas où un retour est requis, l'article doit être retourné dans sa boîte
d'origine. Sans cela, votre retour ne sera pas accepté.
NE PAS jeter la boîte/l'emballage d'origine.
Prenez une photo des marquages de la boîte.
Prenez une photo des dommages (le cas échéant).
Envoyez-nous un e-mail avec les images demandées.
Une photo des marquages (texte) sur le côté de la boîte est requise au cas où une
pièce serait nécessaire pour le remplacement. Cela aide notre personnel à
identifier votre numéro de produit pour s'assurer que vous recevez les bonnes
pièces.
Une photo des dommages est toujours requise pour déposer une réclamation et
obtenir rapidement votre remplacement ou votre remboursement. Assurez-vous
d'avoir la boîte même si elle est endommagée.
Envoyez-nous un e-mail directement depuis le marché où votre article a été
acheté avec les images ci-jointes et une description de votre réclamation.
Instrucciones de Devolución/Reclamación de Daños
En caso de que se requiera una devolución, el artículo debe ser devuelto en la
caja original. Sin esto su devolución no será aceptada.
NO deseche la caja/embalaje original.
Tome una foto de las marcas de la caja.
Tome una foto de los daños (si procede).
Envíenos un correo electrónico con las imágenes solicitadas.
Se requiere una foto de las marcas (texto) en el lado de la caja en caso de que se
necesite una pieza para reemplazarla. Esto ayuda a nuestro personal a identificar
su número de producto para asegurarse de que recibe las piezas correctas.
Una foto de los daños es siempre necesaria para presentar una reclamación y
conseguir que su reemplazo o reembolso sea procesado rápidamente. Por favor,
asegúrese de tener la caja aunque esté dañada.
Envíenos un correo electrónico directamente desde el mercado donde se compró
su artículo con las imágenes adjuntas y una descripción de su reclamación.
FR
ES
Nel caso in cui sia richiesto un reso, l'articolo deve essere restituito nella scatola
originale. Senza la scatola originale il tuo reso non sarà accettato.
NON scartare la scatola / confezione originale.
Fare una foto dei contrassegni sulla scatola.
Fare una foto di Danno (se è applicabile).
Inviarci una mail con le immagini richieste.
È necessaria una foto dei contrassegni (testo) sul lato della scatola nel caso in
cui la parte debba essere sostituita. Questo aiuta il nostro staff a identificare il
numero del tuo prodotto per assicurarti di ricevere le parti corrette.
Una foto del danno è sempre necessaria per presentare un reclamo e ottenere
rapidamente la sostituzione o il rimborso. Assicurati di avere la scatola anche se
è danneggiata.
Inviarci un’e-mail direttamente dal mercato in cui è stato acquistato il tuo articolo
con le immagini allegate e una descrizione del tuo reclamo.
Jeśli chcesz zwrócić produkt, musi znajdować się on w oryginalnym opakowaniu.
Towar zwrócony w nieoryginalnym opakowaniu nie zostanie przyjęty.
Nie wyrzucaj oryginalnego opakowania.
Zrób zdjęcie oznaczeń na opakowaniu.
Zrób zdjęcie uszkodzonej części (jeśli dotyczy).
Skontaktuj się z nami.
Jeśli jakakolwiek część wymaga wymiany, zrób zdjęcie oznaczeń kodu produktu,
który znajduje się na opakowaniu. Pozwoli nam to zidentyfikować produkt i
dostarczyć ci właściwą część.
Jeśli chcesz złożyć reklamację, zrób zdjęcie uszkodzonej części. Pozwoli nam to
zatwierdzić reklamację i zlecić zwrot środków na twoje konto. Do złożenia
reklamacji potrzebne będzie oryginalne opakowanie.
Skontaktuj się z nami telefonicznie, mailowo lub poprzez formularz kontaktowy.
Załącz zdjęcia produktu i opis roszczenia.
IT
PL
Istruzioni Per La Restituzione / Reclamo Per Danni
Zwroty i reklamacje
36 37

Kitchen Island Cart / Kücheninsel /
Chariot de Cuisine / Carrito de Cocina /
Carrello da Cucina
Wyspa kuchenna na kółkach
If you're having difficulty, our friendly
customer team is always here to help.
AUS:cs.au@costway.com
FRA:cs.fr@costway.com
DEU:cs.de@costway.com
ITA:cs.it@costway.com ESP:cs.es@costway.com
POL:sklep@costway.com
GBR:cs.uk@costway.com
DEU office: FDS GmbH, Neuer Höltigbaum 36, 22143 Hamburg, Deutschland
ITA office: Milano
FRA office: Saint Vigor d'Ymonville
POL office: GdańskGBR office: IpswichAUS office: TruganinaUSA office: Fontana
THIS INSTRUCTION BOOKLET CONTAINS IMPORTANT SAFETY INFORMATION. PLEASE READ AND KEEP FOR FUTURE REFERENCE.