

final page size: 8.5 x 5.5 in CRAFTSMAN
26cc 2-Stroke Hedge Trimmer
26cc 2-Stroke Hedge Trimmer
26cc 2-Stroke Hedge Trimmer
CMXGHBD7186
INSTRUCTION MANUAL | GUIDE D’UTILISATION | MANUAL DE INSTRUCTIONES
IF YOU HAVE QUESTIONS OR COMMENTS, CONTACT US.
POUR TOUTE QUESTION OU TOUT COMMENTAIRE, NOUS CONTACTER.
SI TIENE DUDAS O COMENTARIOS, CONTÁCTENOS.
1-888-331-4569 WWW.CRAFTSMAN.COM

English (original instructions) 1
Français (traduction de la notice d’instructions originale) 9
Español (traducido de las instrucciones originales) 17
Thank you for choosing a CRAFTSMAN product!
At CRAFTSMAN, we have 90 years of quality and innovation.
Together, we are makers.
Please take a moment to read this manual before operating
your new tool. Understanding the safety warnings and
cautions is important before using your new purchase safely.
Knowing the correct operating information will help you to
use your tool to its full potential.
Merci d’avoir choisi un produit CRAFTSMAN!
Chez Craftsman, nous évoluons depuis 90ans avec des
produits de qualité innovants. Avec vous, nous formons une
équipe de bâtisseurs.
Veuillez prendre un moment pour lire le présent guide pour
vous familiariser avec votre nouvel outil. Il est important
de comprendre les avis et avertissements de sécurité avant
d'utiliser votre nouvelle acquisition. Connaître la bonne
façon de la faire fonctionner vous permettra de l'utiliser à
son plein potentiel.
¡Gracias por elegir un producto CRAFTSMAN!
En Craftsman, tenemos 90 de calidad e innovación. Juntos,
somos fabricantes.
Tome un momento para leer este manual antes de operar
su herramienta nueva. Es importante que comprenda las
advertencias y precauciones de seguridad antes de usar su
nueva compra de forma segura. Conocer la información de
operación correcta le ayudará a utilizar su herramienta en
todo su potencial.

1
English
COMPONENTS
1
Front handle
2
recoil starter
3
Fuel tank
4
Engine switch
5
Throttle trigger lockout
6
Rear handle
7
Throttle trigger
8
Handle Locking knob
9
Air filter
10
Unsharpened plate
11
Cutting device
12
Mixing fuel tank
13
Soket spanner
14
Screw driver
Fig. A
WARNING: Read all safety warnings and all
instructions. Failure to follow the warnings and
instructions may result in electric shock, fire and/or
seriousinjury.
WARNING: Never modify the product or any part of
it. Damage or personal injury couldresult.
WARNING: To reduce the risk of injury, read the
instructionmanual.
if you have any questions or comments about this or
any product, call CRAFTsMAn toll free at:
1-888-331-4569.
Definitions: Safety Alert Symbols and Words
This instruction manual uses the following safety alert symbols and words to alert you to hazardous situations and your risk
of personal injury or property damage.
DANGER: Indicates an imminently hazardous situation which, if not avoided, will result in death or seriousinjury.
WARNING: Indicates a potentially hazardous situation which, if not avoided, could result in death or seriousinjury.
CAUTION: Indicates a potentially hazardous situation which, if not avoided, may result in minor or moderateinjury.
(Used without word) Indicates a safety related message.
NOTICE: Indicates a practice not related to personal injury which, if not avoided, may result in propertydamage.
37
4
8
9
5
12 13 14
6
10
11
12

English
2
26cc 2-Stroke Hedge Trimmer
CMXGHBD7186
GENERAL POWER TOOL SAFETY WARNINGS
Spark Arrestor Note
nOTE: For users on U.s. Forest land and in the states
of California, Maine, Oregon and Washington. All U.S.
Forest Land and the state of California (Public Resources
Codes 4442 and 4443), Oregon and Washington require, by
law that certain internal combustion engines operated on
forest brush and/or grass-covered areas be equipped with a
spark arrestor, maintained in effective working order, or the
engine be constructed, equipped and maintained for the
prevention of fire. Check with your state or local authorities
for regulations pertaining to these requirements. Failure to
follow these requirements could subject you to liability or
a fine.
This unit is factory equipped with a spark arrestor. If it
requires replacement, contact a CRAFTSMAN Parts & Repair
Service Center to install the appropriate muffler assembly.
CAliFORniA PROPOsiTiOn 65
WARNING: Engine exhaust, some of its
constituents and certain finished components
contain or emit chemicals known to the State
of California to cause cancer and birth defects
or other reproductive harm. Wash hands after
handling.
Read All Instructions Before Operating
WARNING: Read all safety warnings,
instructions, illustrations and specifications
provided with this power tool. Failure to follow all
instructions listed below may result in electric shock,
fire and/or seriousinjury.
sAVE ThEsE insTRUCTiOns
a ) Read the instructions carefully. Be familiar with the
controls and proper use of the unit.
b ) Do not operate this unit when tired, ill or under
the influence of alcohol, drugs or medication.
c ) Children must not operate the unit. Teens must be
accompanied and guided by an adult.
d ) All guards and safety attachments must be
installed properly before operating the unit.
e ) Inspect the unit before use. Replace damaged
parts. Check for fuel leaks. Make sure all fasteners are
in place and secure. Replace parts that are cracked,
chipped, or damaged in any way. Do not operate the
unit with loose or damaged parts.
f ) Be aware of risk of injury to the head, hands and
arms.
g ) Carefully inspect the area before starting the
unit. Remove and objects that may be thrown or
become entangled with the unit.
h ) Clear the area of children, bystanders and pets;
keep them outside a 50-foot (15 m) radius, at a
minimum. Even then, they are still at risk from thrown
objects. Encourage bystanders to wear eye protection.
If you are approached, stop the unit immediately.
i ) Squeeze the throttle control and check that it
returns automatically to the idle position. Make
all adjustments or repairs before using the unit.
j ) This unit is intended for occasional, household
use only.
Safety Warnings For Gas Units
WARNING: Gasoline is highly flamable and its
vapors can explode if ignited. Take the following
precautions
a ) Store fuel only in containers specifically designed
and approved for the storage of such materials.
b ) Always stop the engine and allow it to cool
before filling the tank. Never remove the fuel tank
cap or add fuel when the engine is hot. Always loosen
the fuel tank cap slowly to relieve any pressure in the
tank before fueling.
c ) Always add fuel in a clean, well-ventilated
outdoor area where there are no sparks or
flames. DO NOT smoke.
d ) Never operate the unit without the fuel cap
securely in place.
e ) Avoid creating a source of ignition for spilled
fuel. Wipe up any spilled fuel from the unit
immediately, before starting the unit.
f ) Move the unit at least 30 ft. (9.1 m) from the
fueling source and site before starting the
engine. DO NOT smoke.
g ) Never start or run the unit inside a closed room
or building.
h ) Breathing exhaust fumes can kill. Operate this unit
only in a well ventilated outdoor area.
Operating Warnings
WARNING: Wear safety glasses or goggles that
meet current ANSI / ISEA Z87.1 standards and are
marked as such. Wear ear/hearing protection when
operating this unit. Wear a face mask or dust mask if
the operation is dusty.
a ) Wear heavy long pants, boots, gloves and a long
sleeve shirt. Do not wear loose clothing, jewelry,

3
English
short pants, sandals or go barefoot. Secure hair above
shoulder level.
b ) Adjust the handle to provide the best grip, if
applicable.
c ) Make sure the attachment is not in contact with
anything before starting the unit.
d ) Use the unit only in daylight or good artificial
light.
e ) Avoid accidental starting. Be in the starting
position whenever pulling the starter rope. The
operator and unit must be in a stable position while
starting. Refer to Starting and Stopping.
f ) Use the right tool. Only use this tool for its intended
purpose.
g ) Always hold the unit with both hands when
operating. Keep a firm grip on both handles or grips.
h ) Do not overreach. Always keep proper footing and
balance. Take extra care when working on stairs,
steep slopes or inclines. To avoid serious injury, do not
operate the unit while on a ladder or a roof.
i ) Keep hands, face, and feet away from all moving
parts. Do not touch or try to stop moving parts.
j ) Do not touch the engine, gear housing or
muffler. These parts get extremely hot from
operation, even after the unit is turned off.
k ) Do not operate the unit faster than the speed
needed to do the job. Do not run the unit at high
speed when not in use.
l ) Do not force the unit. It will do a better, safer job
when used at the intended rate.
m ) Always stop the unit when operation is delayed
or when walking from one location to another.
n ) If you strike or become entangled with a foreign
object, stop the unit immediately and check for
damage. Do not operate the unit before repairing
damage. Do not operate the unit with loose or
damaged parts.
o ) Turn the engine to off and disconnect the spark
plug for maintenance or repair.
p ) Use only original equipment manufacturer
(OEM) replacement parts and accessories for this
unit. Use of any other parts or accessories could lead
to serious injury to the user, or damage to the unit,
and void the warranty.
q ) Keep the unit clean. Carefully remove vegetation
and other debris that could block moving parts.
r ) To reduce fire hazard, replace a faulty muffler
and spark arrestor. Keep the engine and muffler free
from grass, leaves, excessive grease or carbon build up.
s ) If the unit starts to vibrate abnormally, stop the
unit immediately. Inspect the unit for the cause of
the vibration. Vibration is generally an indicator of
trouble.
Other Safety Warnings
WARNING: All service other than the
maintenance procedures described in this
manual should be performed by a qualified
service dealer.
a ) Before inspecting, servicing, cleaning, storing,
transporting or replacing any parts on the unit:
1. Stop the unit.
2. Make sure all moving parts have stopped.
3. Allow the unit to cool.
4. Disconnect the spark plug wire.
b ) Secure the unit while transporting.
c ) Never store the unit with fuel in the tank, inside a
building where fumes may reach an open flame
(pilot lights, etc.) or sparks (switches, electrical
motors, etc.).
d ) Store the unit in a dry place, secured or at a
height to prevent unauthorized use or damage.
Keep the unit out of the reach of children.
e ) Never douse or squirt the unit with water or any
other liquid. Keep handles dry and clean (free from
debris, oil and grease). Clean the unit after each use.
Refer to Cleaning and Storage. Do not use solvents or
strong detergents.
f ) Keep these instructions. Refer to them often and
use them to instruct other users. If you loan this unit to
others, also loan them these instructions.
Service
WARNING: Repairs should only be performed by
qualified service personnel using only identical
replacement parts. This will ensure that the safety
of the power tool is maintained."
Intended Use
a ) Cutting and trimming of hedges, bushes and
ornamental shrubs in the domestic sector only.
All other uses are expressly excluded.
b ) NOT for professional use.

English
4
Technical Specifications
Model HT26E
Engine type Air-cooling, 2-stroke
Engine model SK1E34F-LE
Power 0.7kW
Displacement 25.4 cm3
Volumes of fuel tank 600 cm³
Fuel ratio 40:1
Max engine speed 11500 min
-1
cutting speed 2250 min
-1
Min. Clutch speed 4200min
-1
Engine idling speed 3000±300 min
-1
Blade length 780 mm
Cutting length 600 mm
Max. Cutting dia. 27mm
Unit weight (empty tanks 6.4 kg
Engine Fuel
WARNING: The hedge trimmer is fitted with a
two-stroke engine; use fuel mixed with oil only.
Only fuel the machine in well-lit areas. Avoid fuel
spillage. Never refuel the machine during operation.
WARNING: Do not refill fuel while engine is
running or hot. Let the engine cool down for about
two minutes before refueling. Refueling must not
be carried out near flames, control lamps or spark
producing electrical equipment such as electric
tools, welders or sanders.
Use quality two-stroke oil and make a mixture of 40 parts
petrol to one part oil only (2,5% oil mixed in fuel).
Never use two-stroke oil intended for water-cooled engines.
Never use oil intended for four-stroke engines.
A poor oil quality and/or too high oil/fuel ratio may jeopardise
function and decrease the life time of catalytic converter.
Use at least 90 octane fuel. Unleaded petrol recomended as it
leaves less residues inside the motor and on the ignition plug,
and prolongs the life cycle of the exhaust system. Never use old
or dirty petrol or oil/petrol mixtures.
Avoid contamination with dirt or water in the tank.
1. Make sure the machine is turned off, by turn the engine
switch to the “off” position.
2. Check the fuel level visually by removing the fuel cap and
verifying the fuel level.
3. Shake the fuel container well to ensure the correct mixture
before filling the tank.
4. Fill with unleaded fuel mixed with oil from an approved fuel
container into the fuel tank, because of fuel expands, fill
the tank to the neck of tank only.
5. Turn the fuel cap clockwise to close the fuel tank.
Make sure fuel is not leaking from the rear outlet tube.
Occasionally ignition knocking or clanging can be heard with
high loads. This is normal and no cause for alarm. If ignition
knocking or clanging occurs during normal loads and with
constant motor speed you should change the petrol quality. If
this does not solve the problem contact an authorized specialist
dealer.
When working at continuous high revs a higher octane rating
is recommended.
Check the hand guard
The hand guard prevents hands from coming into contact with
the moving blades, for example, if the operator loses grip on the
front handle.
CAUTION: Check that the hand guard is fitted
correctly. Check that the hand guard is undamaged.
Check the Blade
To ensure good cutting results it is important that the
contact pressure between the blades is correct. The contact
pressure is adjusted by turning the screws on the underside
of the bar clockwise.
When the blades are correctly adjusted the play between
the blades should be 0,6 mm, measured at the screws.
Replace the blades if they are bent or damaged.
Check the cutting edges and reform with flat and round file.
1. Keep the end corner sharp. The best cutting angle should
be 45º.
2. Round the root of the edge.
3. Do not use water during grinding.
5
English
• In case of misfire
• In case of high vibration
• When flames or smoke appear
• In rain or stormy weather
WARNING: Always check that the cutting
attachment is stopped when the engine is idling.
Cutting
During cutting, do not run the engine at just above clutch
engagement speed. Any prolonged use at low speed may
cause premature wear of the clutch.
Do not run the engine at maximum speed after cutting.
Any prolonged use at the highest speed is likely to reduce
lifetime of engine.
• Adjust the throttle setting to suit the load.
• When trimming a hedge the engine should always face
away from the hedge.
• Make sure that the blades do not touch the ground.
• Work steadily, do not rush while using the trimmer.
CAUTION! In an emergency, stop the engine by
moving the engine switch to the STOP position.
In the event of an accident or breakdown, stop
working immediately and contact an authorized
service center.
CAUTION! Trim from sides of hedge first, and
then to the top. Cut slowly, especially thicker brush.
CAUTION! If anything jams in the blades while
you are working, switch off the engine and wait
until it has stopped completely before clearing
the blades.
CAUTION! To avoid possible risk, always remove
the spark plug cover before cleaning.
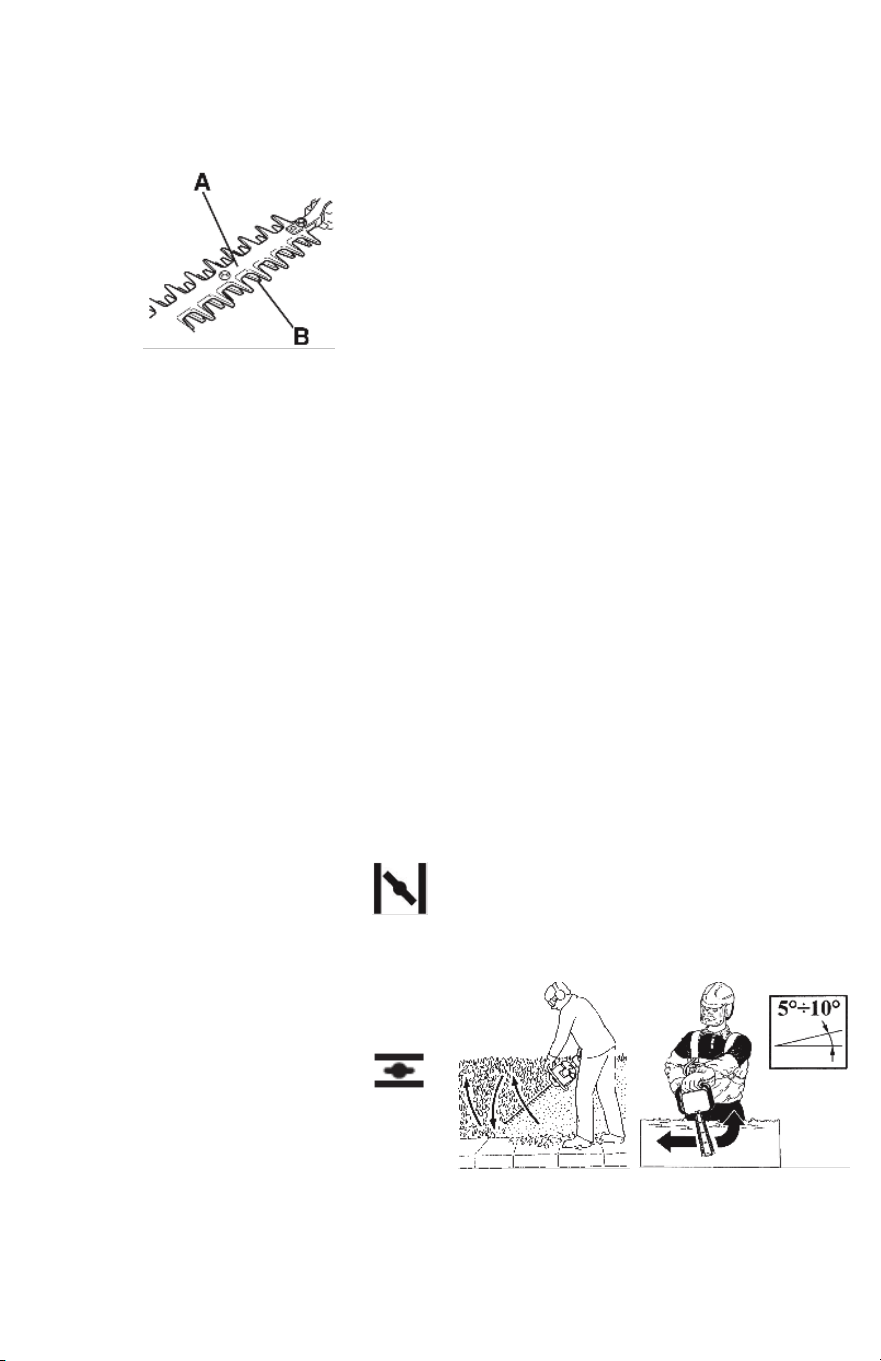
Vertical cut
Use arcing cuts from the bottom upwards, then downwards
using both sides of the blades.
horizontal cut
To get the best cutting results, slightly tilt the blade (5-10°)
in the direction you are cutting.
Check the Blade Guard
The blade guard (A) is intended to protect against any part
of the body coming into contact with the blades (B).
Check that the blade guard is not damaged or distorted.
Replace the blade guard if it is bent or damaged.
Check the Air Cleaner
Check the air filter to be sure it is clean and in good
condition.
Loosen the air cleaner cover screw, and remove the air
cleaner cover, then check the main air filter. Clean or replace
the air filter if necessary.
OPERATION
Starting the engine
WARNING: The cutting attachement may start
to move when the engine is started. Make sure
the attachment can not come into contact with any
object.
CAUTION: Make sure that no unauthorized
persons are in the working area, otherwise there
is a risk of serious personal injury.
1. Press the intake pump several times until fuel begins to fill
the bulb.
2. Turn the engine switch to the” ON “position.
3. To start a cold engine, move the choke lever to
the START position. In order to restart a warm
engine, leave the choke lever in the run position.
4. Close the choke: Start position.
5. Slowly pull the recoil starter until you feel it engage and
then pull it quickly.
6. Return the recoil starter gently and slowly to the original
position by hand.
7. Turn the choke lever to the run positon as the
engine begins to start.
note: when the engine is started for the very first
time. It may require a number of attempts to start until the
fuel has travelled from the tank to the motor.
Under the following conditions the machine must be
stopped:
• When the motor rotary speed changes
• When sparks occur
• When blade are damaged
English
6
Kickback and Related Warnings
A kickback is a sudden reaction to a pinched or snagged
rotating blade. Pinching or snagging causes rapid stalling of
the rotating blades which in turn causes the tool to move
suddenly in the opposite direction of the blades rotation at
the point of binding.
The blade may either jump toward or away from the
operator, depending on direction of the blade’s movement
at the point of pinching
Kickbacks are the result of misuse and/or incorrect operating
procedures or conditions and can be avoided by taking
proper precautions.
a. Maintain a firm grip on the tool and position your
body and arm to allow you to resist kickback forces.
b. Do not position your body in the area where the tool
will move if a kickback occurs.
c. Use special care when working corners, sharp edges
and avoid snagging.
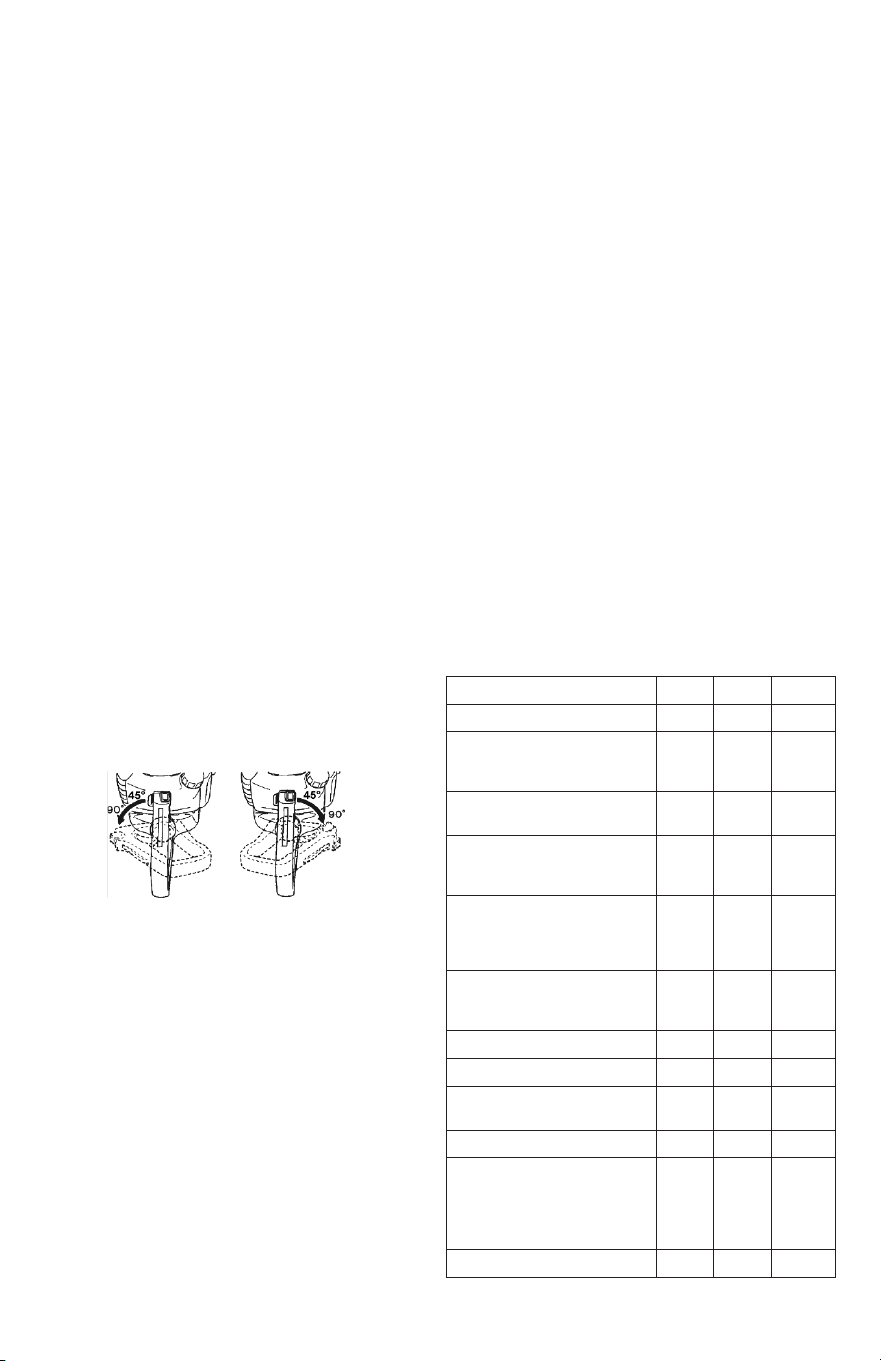
Adjusting the Handle
To reduce fatigue when trimming hedges, the rear handle
can be swiveled to 3 positions, center, left 90°, and right 90°.
WARNING! Do not press the throttle trigger while
adjusting the handle position.
1. Push down the handle locking knob and then turn the
rear handle until the handle locking knob clicks into
place.
2. When the rear handle is locked in its new position, the
user can start working again.
Stopping the engine
1. Reduce the engine speed and let it run with no load for
a few minutes.
2. Switch off the engine by moving the engine switch to
the stop position.
The trimmer may still cause damage or injury after the
engine has been shut off. Check carefully that the accessory
has stopped turning before putting the unit down.
Working advice
• Make sure you always have good balance and secure
footing. Take special care in slippery conditions: damp,
snow, ice, on slopes or uneven ground.
• Watch the cutting blades at all times: do not cut areas
that you cannot see.
• Clear fallen branches, scrub and cuttings. Be extremely
careful when cutting tall hedges, check the other side of
the hedge before starting work.
• The gearbox becomes hot during operation. To reduce
the risk of burn injury, do not touch the gear housing.
• To reduce the risk of accidents, take frequent breaks to
avoid tiredness.
• Never use this machine in the event of nausea,
headache, visual disturbances (e.g. reduced field of
vision), problems with hearing, dizziness, deterioration
in ability to concentrate. These symptoms may be
exaggerated or caused by a high concentration of
exhaust gases in the work area.
MAINTENANCE
Good maintenance is essential for safe, economical and
trouble-free operation. It will also help reduce air pollution.
The purpose of the maintenance and adjustment schedule
is to keep the machine in the best operating condition.
• Turn off the engine before performing any maintenance.
• If the engine must be run, make sure the area is well
ventilated. The exhaust contains poisonous carbon
monoxide gas
• Please always select approved replacement parts and
accessories. Low quality parts may damage the unit.
• Never remove safety devices.
Maintenance Daily Weekly Monthly
Clean the outside of the machine. X
Make sure the throttle trigger lock and
the throttle function correctly from a
safety point of view.
X
Check that the engine switch works
correctly.
X
Check that the blades do not move
when the engine is idling or when the
choke is in the start throttle position.
X
Check that the blades are undamaged
and show no signs of cracking or
other damage. Replace the blades if
necessary.
X
Check that the blade guard is not
damaged or distorted. Replace the
blade guard if it is bent or damaged.
X
Clean the air filter. Replace if necessary.* X
Check that nuts and screws are tight. X
Check that there are no fuel leaks from
the engine, tank or fuel lines.
X
Check the starter and starter cord. X
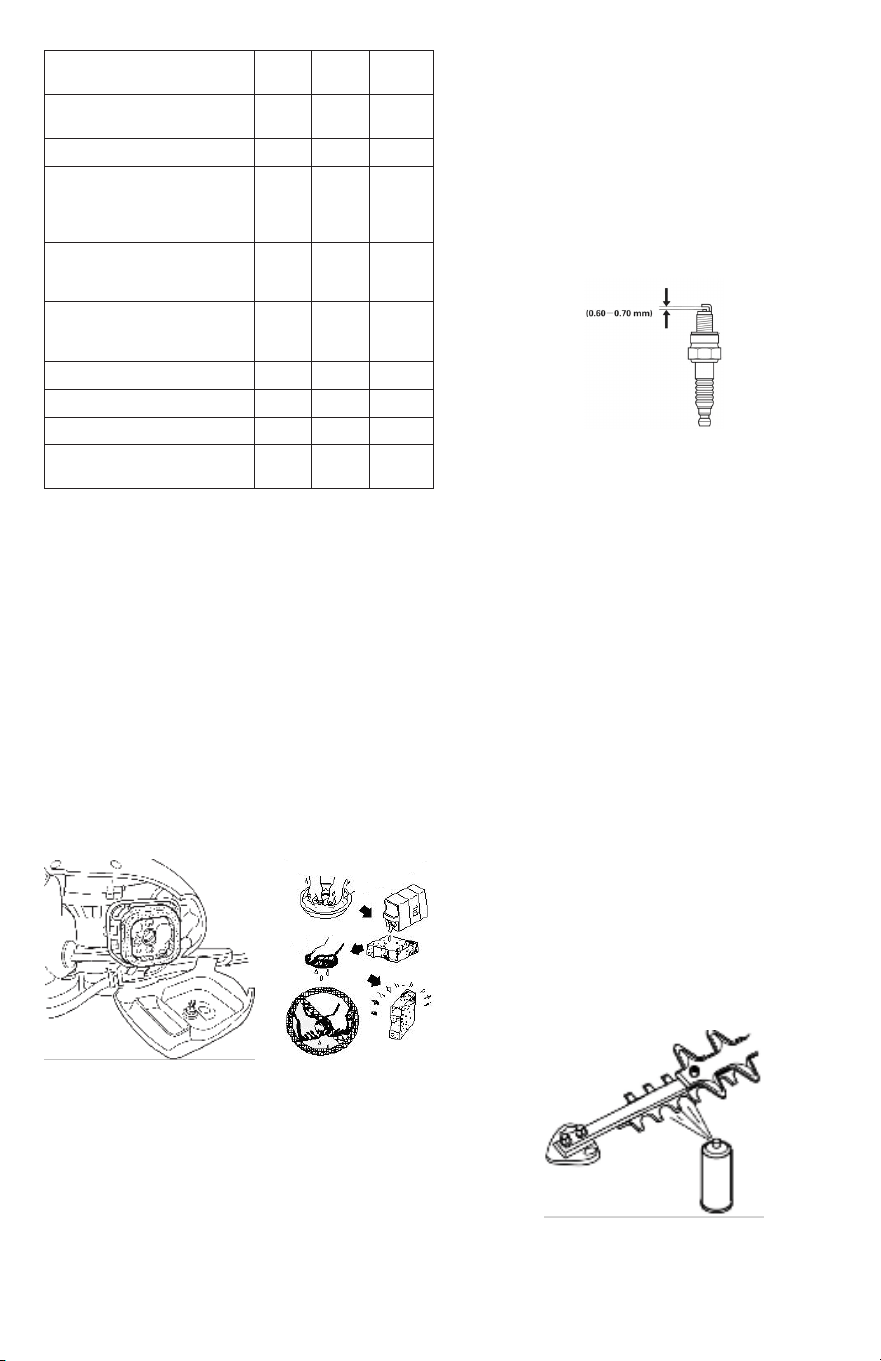
Clean the outside of the spark plug.
Remove it and check the electrode gap.
Adjust the gap to 0.6-0.7 mm or replace
the spark plug. Check that the spark
plug is fitted with a spark plug cap.**
X
Clean the machine’s cooling system.** X
7
English
2. Remove the spark plug cap.
3. Clean any dirt from around the spark plug base.
4. Use the socket spanner which provided to remove the
spark plug.
5. Visually inspect the spark plug. Remove carbon deposits
using a wire brush.
6. Check for discoloration on the top of the spark plug. The
standard color should be a tan color.
7. Check the spark plug gap. The acceptable gap should be
between 0,6-0,7mm.
8. Install /reinstall the spark plug carefully by hand.
9. Once the spark plug has been seated, tighten it with a
spark plug wrench.
10. Reinstall the spark plug cap on top of the spark plug
11. Reinstall the spark plug cover.
Cleaning
• Keep your machine clean, the outside of the machine
can be cleaned using a damp soft cloth with a mild
detergent if required, never use water to clean the
machine as it may cause damage to internal parts.
• Some maintenance products and solvents may damage
the plastic parts, these include products containing
benzene. Trichloroethylene, chloride and ammonia.
• Take special care to keep the ventilation inlets /outlets
free from obstruction. Cleaning with a soft brush
followed by a compressed air jet will usually be sufficient
to ensure acceptable internal cleanliness.
• Wear eye protection when carrying out cleaning.
Cleaning and lubrication
• Clean any resin and plant residue from the blades using
cleaning agent before and after using the machine.
• Lubricate the blade bars with antirust grease before long
periods of storage.
Clean the outside of the carburetor and
the space around it.
X
Check the flange, cap and nut are
assembled correctly and tightened
X
Check all cables and connections. X
Check the clutch, clutch springs and
the clutch drum for wear. Replace if
necessary by an authorized service
workshop.**
X
Replace the spark plug. Check that
the spark plug is fitted with a spark
plug cap.**
X
To reduce the fire hazard, clean dirt,
leaves and surplus lubricant, etc from
the muffler and engine.*
X
Check/clean valve-clearance ** X3
Clean fuel tank and filter ** X12
Grease inside gear box ** X3
Check fuel feed line and replace if
neccesary **
X36
* If operated in dusty areas carry out maintenance more frequently.
** A specialist technician should carry out this maintenance if
the owner does not have the appropriate tools or mechanical
knowledge.
Cleaning the Air Filter
1. Loosen the air filter cover screw and remove the air filter
cover.
2. Wash the air filter in soapy water or a non-combustable
solvent.
3. Thoroughly squeeze the filter removing excess liquid.
4. Reinstall the air filter.
5. Reinstall the air filter cover, and tighten the air filter
cover screw.
WARNING: The use of petrol or combustible
solvents for cleaning can cause fire or explosion.
Only use soapy water or non-combustible solvent.
Never operate the machine without the air filter.
Spark Plug Maintenance
To ensure proper engine operation, the spark plug must be
properly gapped and free of deposits.
1. Remove the spark plug cover from the housing.

English
8
Lubricating the gearbox
Lubricate the gearbox every 10 to 20 operating hours.
1. Put the grease gun onto the zerk fitting (c).
2. Force some grease into the zerk fitting.
Transport and Storage
Store the machine, operating instructions and where
necessary the accessories in the original packaging. This way
you will not loose any information and parts.
Store the machine in dry and well ventilated area with the
fuel tank empty.
Transport the device using the original packaging to avoid
damage or lost parts. Never transport the device before
draining the fuel.
1. Empty the fuel
2. Place the machine on even and stable surface. Warm up
the engine for several minutes and then stop it.
3. Loosen the fuel tank cover and remove it.
4. Drain fuel into a container thoroughly.
5. Press the intake pump several times until fuel begins to
empty the bulb.
6. Drain fuel again.
7. Reinstall the fuel tank cover.
Repairs
WARNING:To assure product SAFETY and
RELIABILITY, repairs, maintenance and adjustment
should be performed by a CRAFTSMAN factory service
center or a CRAFTSMAN authorized service center.
Always use identical replacementparts.
To find the nearest service center, please contact
CRAFTSMAN, call 1-888-331-4569.
Register Online
Thank you for your purchase. Register your product nowfor:
• WARRAnTY sERViCE: Registering your product will
help you obtain more efficient warranty service in case
there is a problem with yourproduct.
• COnFiRMATiOn OF OWnERshiP: In case of
an insurance loss, such as fire, flood or theft, your
registration of ownership will serve as your proof
ofpurchase.
• FOR YOUR sAFETY: Registering your product will
allow us to contact you in the unlikely event a safety
notification is required under the Federal Consumer
SafetyAct.
Register online at www.craftsman.com/registration
Three Year Limited Warranty
CRAFTSMAN will repair or replace, without charge, any
defects due to faulty materials or workmanship for three
years from the date of purchase. This warranty does not
cover part failure due to normal wear or tool abuse. For
further detail of warranty coverage and warranty repair
information, visit www.craftsman.com or call
1-888-331-4569. This warranty does not apply to
accessories or damage caused where repairs have been
made or attempted by others. THIS LIMITED WARRANTY
IS GIVEN IN LIEU OF ALL OTHERS, INCLUDING THE IMPLIED
WARRANTY OF MERCHANTABILITY AND FITNESS FOR A
PARTICULAR PURPOSE, AND EXCLUDES ALL INCIDENTAL
OR CONSEQUENTIAL DAMAGES. Some states do not allow
limitations on how long an implied warranty lasts or the
exclusion or limitation of incidental or consequential
damages, so these limitations may not apply to you. This
warranty gives you specific legal rights and you may have
other rights which vary in certain states orprovinces.
90 DAY MOnEY BACK gUARAnTEE
If you are not completely satisfied with the performance of
your CRAFTSMAN Power Tool or Nailer for any reason, you
can return it within 90 days from the date of purchase with a
receipt for a full refund – no questionsasked.
lATin AMERiCA: This warranty does not apply to products
sold in Latin America. For products sold in Latin America,
see country specific warranty information contained in
the packaging, call the local company or see website for
warrantyinformation.
FREE WARning lABEl REPlACEMEnT: If your warning
labels become illegible or are missing, call 1-888-331-4569
for a freereplacement.

9
English
CRAFTSMAN®
is a registered trademark of Stanley Black & Decker, Inc., used under license.
© 2019 CRAFTSMAN
Made in China
Product manufactured by:
Sunseeker Professional Power Equipment
Charlotte NC 28079
TROUBLESHOOTING GUIDE
BE sURE TO FOllOW sAFETY RUlEs AnD insTRUCTiOns
For assistance with your product, visit our website at www.craftsman.com for a list of service centers, or call CRAFTSMAN
at 1-888-331-4569.
PROBlEM CAUsE CORRECTiOn
The engine stalls, is difficult to start
or does not start
Fuel filter blocked Clean or replace fuel filter
Fuel supply blocked Clean or replace carburetor
Carburetor Ask your distributor for advice
The fuel mixture is too rich Open the throttle valve
Clean or replace the air filter
Adjust the carburetor
Ask your distributor for advice
Switch in off position Set the switch to the ON position (Run)
No spark/electrical problem Ask your distributor for advice
Locked switch Ask your distributor for advice
Bad spacing of the spark plug electrodes Adjust the gap to 0,6-0,7 mm
Spark plug electrodes contaminated Clean or replace spark plug
Defective spark plug Replace the spark plug
The engine turns, but stalls or does
not accelerate correctly
Fair wear and tear Clean or replace air filter
Dirt or residue in the fuel Replace fuel filter
Dirt or residue in the fuel Clean or replace fuel/fuel vent
Fair wear and tear Clean, adjust or replace spark plug
Vibration Adjust carburetor
Prolonged use in dirty or dusty places Clean cooling system
Fair wear and tear Replace spark suppressor
The engine does not engage Internal engine problem Ask your distributor for advice

