
ROBOT VACUUM CLEANER
Please read this User’s Manual carefully for proper use of Midea Robot Vacuum Cleaner.
A quality product of
Customer Care
(02) 863-55-22
Landline:
(0917) 863-5522
Viber/SMS:
[email protected]om.ph
Email:
1-800-10-863-5522
Toll free:
Monday - Sunday / 8:00am - 8:00pm

ROBOT VACUUM CLEANER
Please read this User’s Manual carefully for proper use of Midea Robot Vacuum Cleaner.
A quality product of
Customer Care
(02) 863-55-22
Landline:
(0917) 863-5522
Viber/SMS:
customercare@midea.com.ph
Email:
1-800-10-863-5522
Toll free:
Monday - Sunday / 8:00am - 8:00pm

The power must be turned o before taking out the bat -
tery. Please do not dismantle the battery by yourself.
Please contact the after-sales if you want to change the
battery. When discarding the product, do not discard the
battery at will.
Do not contact the conductor with each pole or socket, so
as not to cause a short circuit.
Before using the product, please remove all vulnerable
goods and fragile items such as glass cup and lamp as well
as the things which may entangle the side brush, block the
air passage or roll into the driven wheelblock, for example,
electric wire, curtain, etc.
Please do not put the product on the place where
it tends
to fall, for example, on the table or chair.
The product may not work normally under strong sunlight.
Please do not bend the wire, or put weight or sharps on
the machine.
Safety Introduction
Product Introduction
Product Operation
Product Maintenance
Trouble Shooting
Warranty Instructions
1
5
7
16
19
21
1 2
Do not place the appliance close to heat sources, radiation,
or burning cigarette.
Do not use the appliance to remove the following objects:
(1) All liquids such as water and solvents.
(2) Lime, cement, ash and other construction dust and
garbage.
(3) Hot objects, such as cigarette butts.
(4) Sharp objects, such as glass shards, etc.
(5) Inflammable and explosive articles, such as gasoline ora
lcoh
ol products.
It is not allowed to dismantle the product by non-techn -
cians without permit.
It is forbidden to let children, mentally retarded person or
person who do not have common knowledge or experience
about the domestic households without surveillance.
The product is for indoor use instead of outdoor.
Your appliance is an electric appliance: It must be used
appropriately.
Do not touch the power cord, socket or power adapter
with wet hands.
Please empty the dust box before using the product.
The power must be turned o during cleaning, maintenance
or when in storage.
To prevent res, do not immerse the appliance in water, do
note xpose it to any heating appliances.
The product only applies the original power adapter, oth
er -
wise, it may bring damage to the product.
●
SAFETY INSTRUCTIONS
●
●
●
●
●
●
●
●
●
●
●
●
●
●
●
●
Battery charging signal:
1. It may take you longer time for charging under the follow-
ing circumstances:
a. Room temperature is higher than 30°C;
b. Recharge immediately after the appliance has stopped
operating.
2. Always recharge the appliance after each usage no matter
how long it has been used.
3. Unplug when not charging.
4. When not in use for more than two months, the appliance
should be disconnected from the power supply.
To ensure a longer service life, the appliance must be
charged once every two months.
5. The appliance or adapter may become hot during
charging so take the necessary precautions to avoid con-
tact.
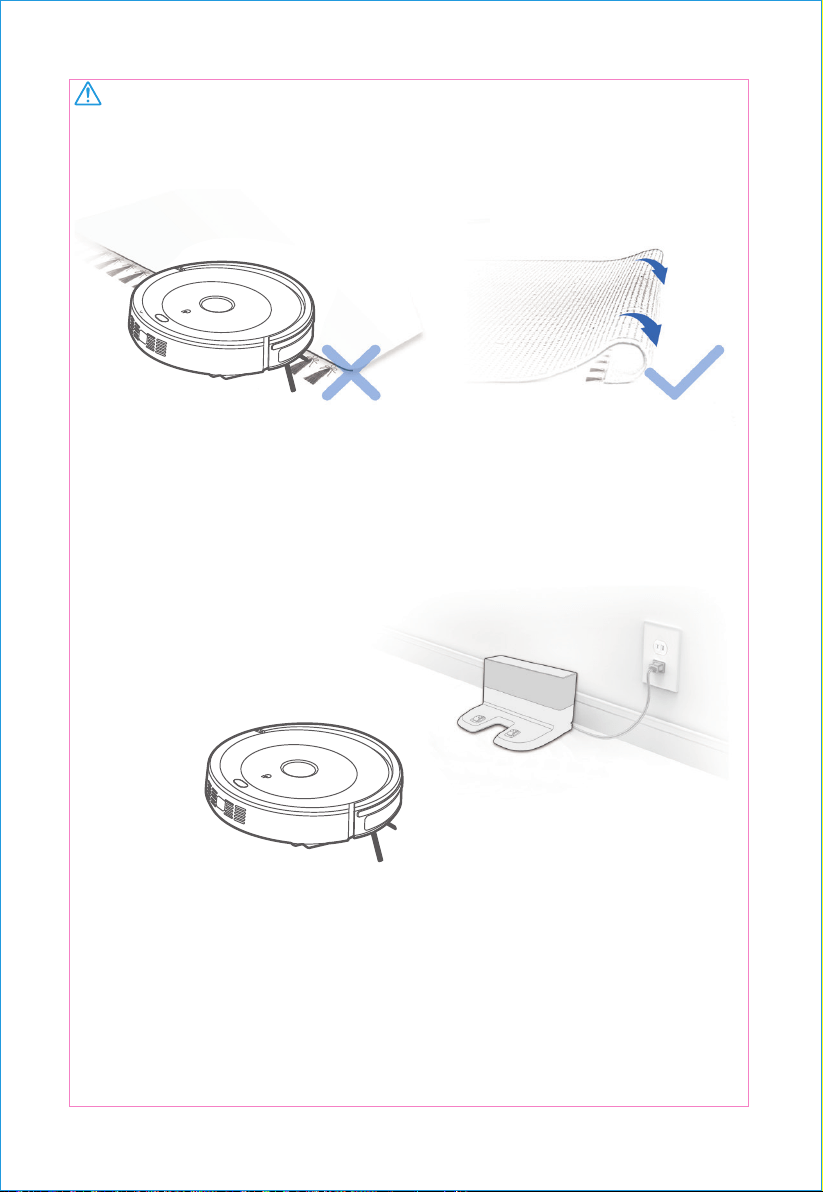
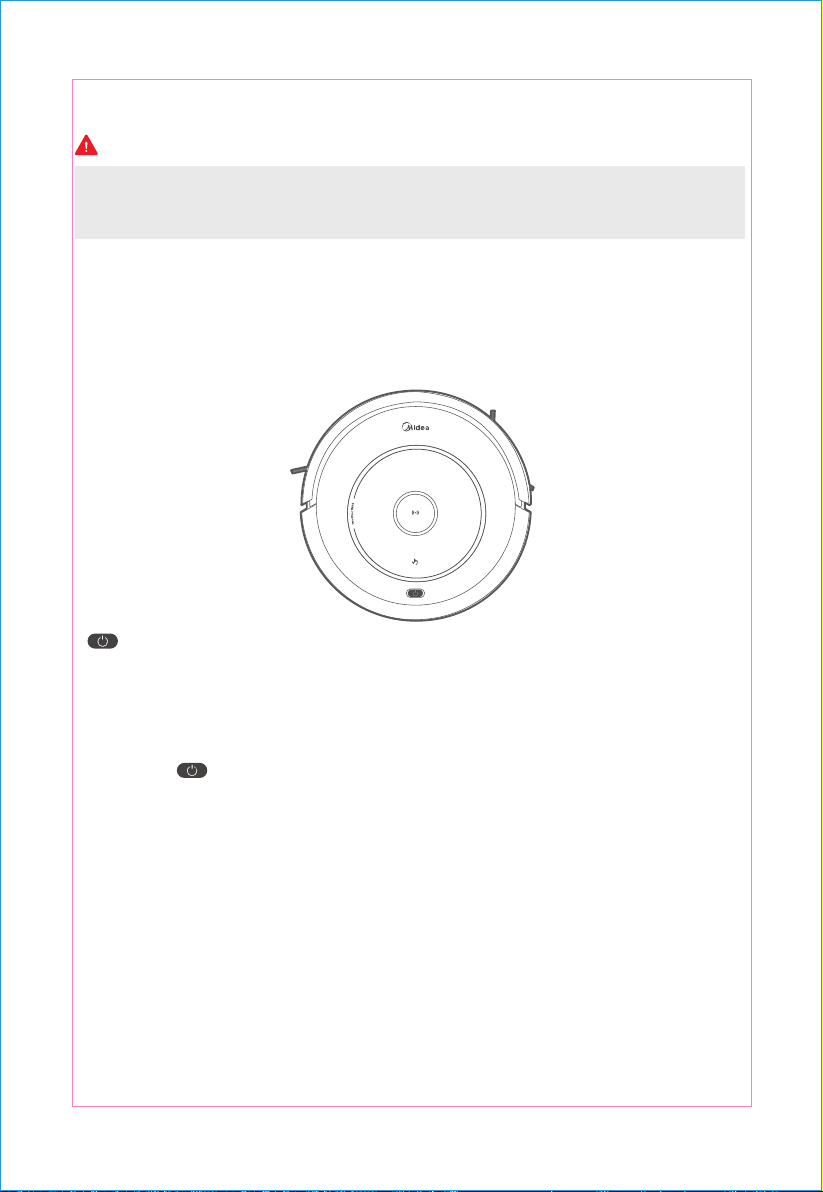
WARNING:
Do not use your RB1 on wet surfaces or surfaces
with standing water.
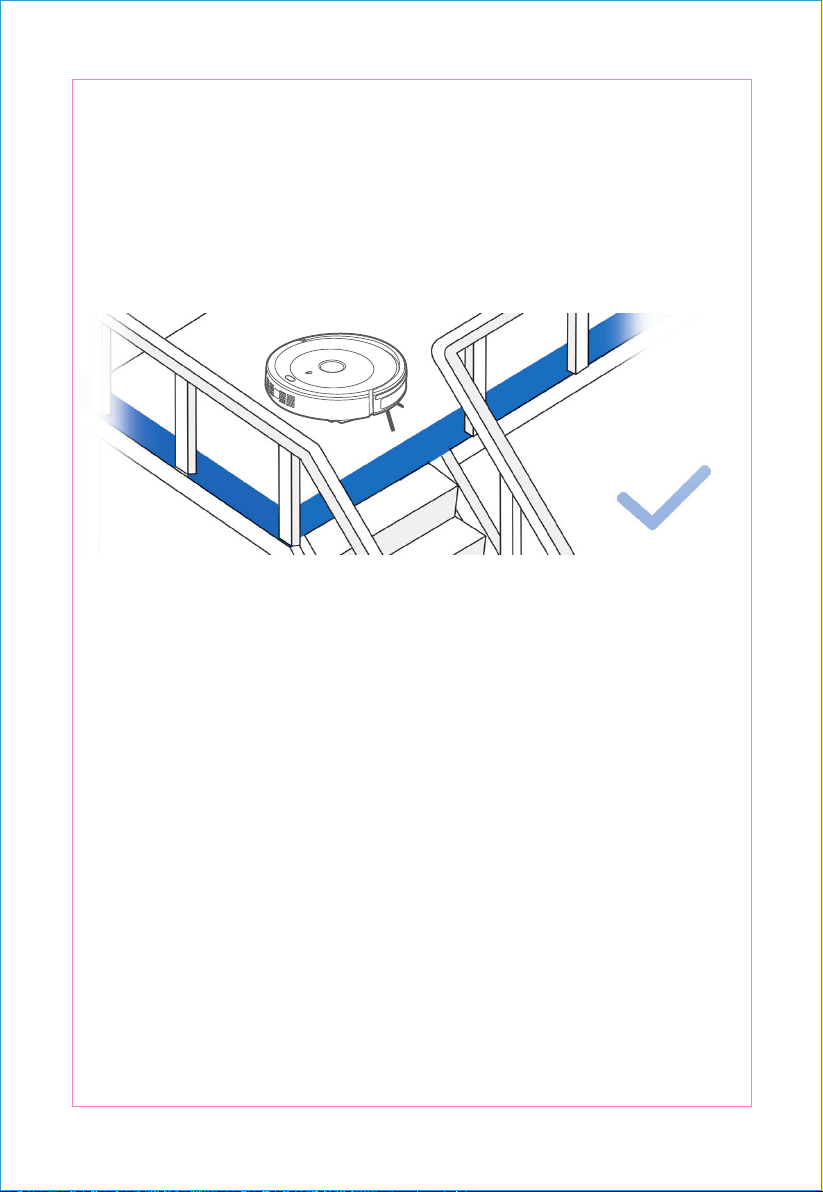
It may be necessary to place a physical barrier at the edge of a drop to stop
the unit from falling over the edge.
Notes Before Cleaning
1
Before using the product on a rug with tasseled edges, please fold the rug
edges under.
3
2
Remove power cords and small objects from the floor that the robot could
be obstructed by, and tidy up the area to be cleaned by putting furniture,
such as chairs, in their proper place.
3 4
WARNING:
Do not use your RB1 on wet surfaces or surfaces
with standing water.
It may be necessary to place a physical barrier at the edge of a drop to stop
the unit from falling over the edge.
Notes Before Cleaning
1
Before using the product on a rug with tasseled edges, please fold the rug
edges under.
3
2
Remove power cords and small objects from the floor that the robot could
be obstructed by, and tidy up the area to be cleaned by putting furniture,
such as chairs, in their proper place.
3 4
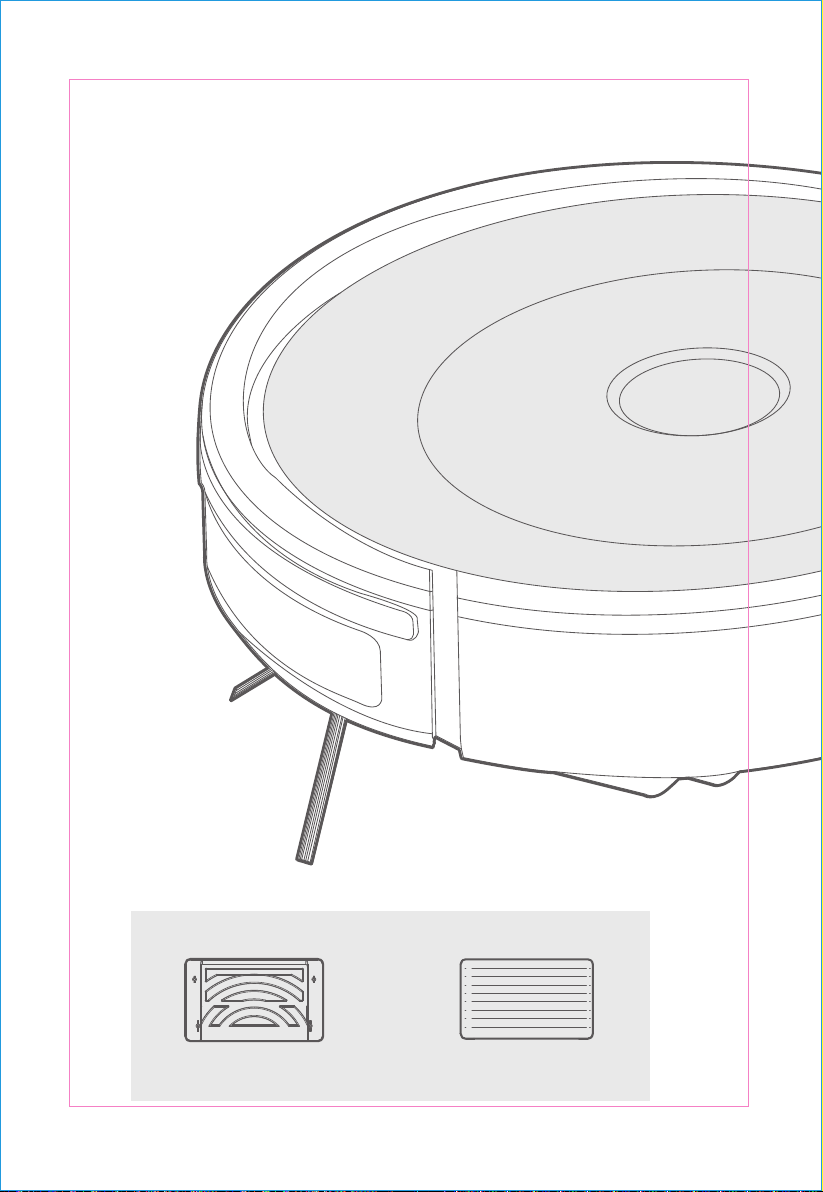
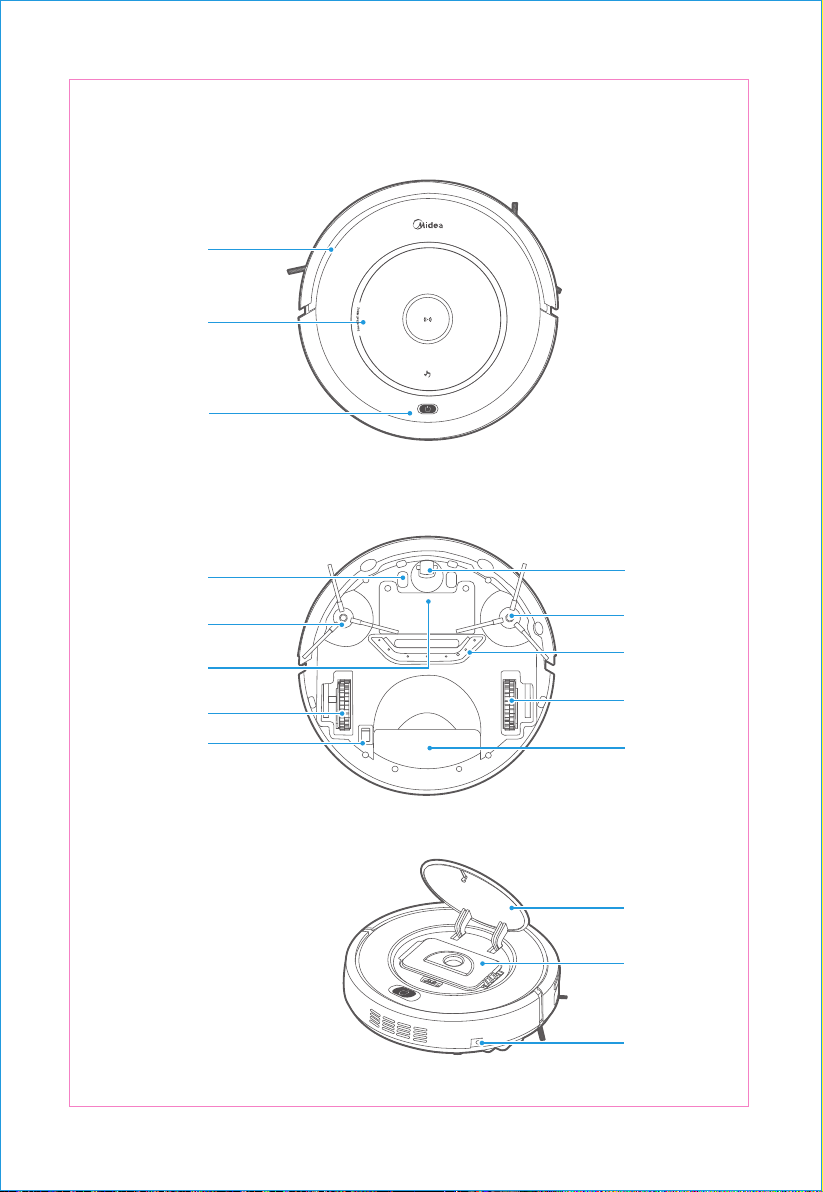
Product Introduction
Dry cleaning cloth X1Cleaning cloth stent X1
Optional Accessories for MR02:
Charging cradle X1
Remote control X1
Power adaptor X1Side brush X2
Manual Instruction X1
Cleaning tool X1 Remote battery X2
Manual
5 6

Product Introduction
Dry cleaning cloth X1Cleaning cloth stent X1
Optional Accessories for MR02:
Charging cradle X1
Remote control X1
Power adaptor X1Side brush X2
Manual Instruction X1
Cleaning tool X1 Remote battery X2
Manual
5 6
Product Operation
Charging
Charging
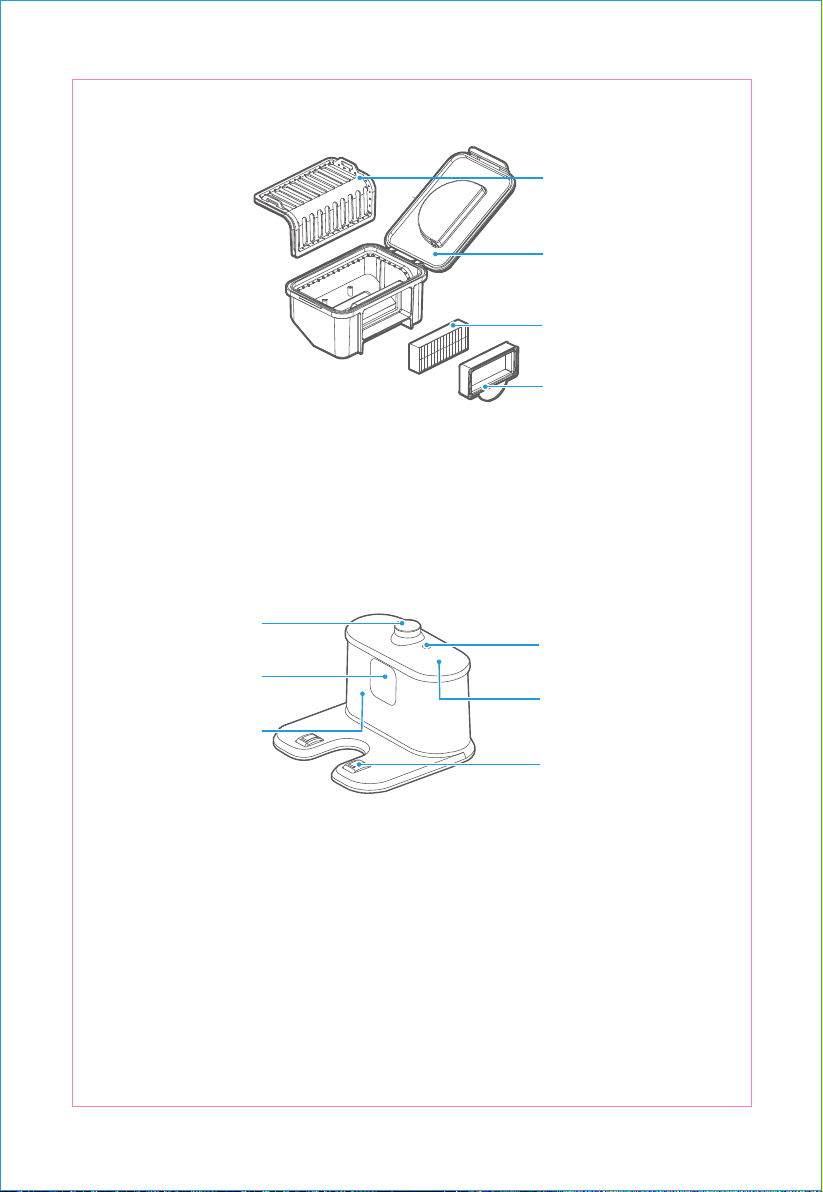
Product Assembling
Autom atic
ch ar ging
pole pie ce
Right wh ee l
L eft sid e b rus h
Batt er y co ve r
S teering whe el
Right sid e b rush
Suc tion inlet
L ow er co ver
L eft whee l
Uppe r co ver
Pow er ou tlet
Du st b ox
Powe r switc h
Infrared sig nal
transmissi on statio n
Pow er outl et
Infrared g uida nc e
signa l launch windo w
Sig nal indic ator
C harging e ndpoin t
T op s hell
Prima ry sc reen
High-effic ienc y
screen holde r
High-effic ienc y s cree n
Dust bo x
Bump er
Uppe r cov er
Touc h butto n
7 8
PUSH
Product Operation
Charging
Charging
Product Assembling
Autom atic
ch ar ging
pole pie ce
Right wh ee l
L eft sid e b rus h
Batt er y co ve r
S teering whe el
Right sid e b rush
Suc tion inlet
L ow er co ver
L eft whee l
Uppe r co ver
Pow er ou tlet
Du st b ox
Powe r switc h
Infrared sig nal
transmissi on statio n
Pow er outl et
Infrared g uida nc e
signa l launch windo w
Sig nal indic ator
C harging e ndpoin t
T op s hell
Prima ry sc reen
High-effic ienc y
screen holde r
High-effic ienc y s cree n
Dust bo x
Bump er
Uppe r cov er
Touc h butto n
7 8
PUSH
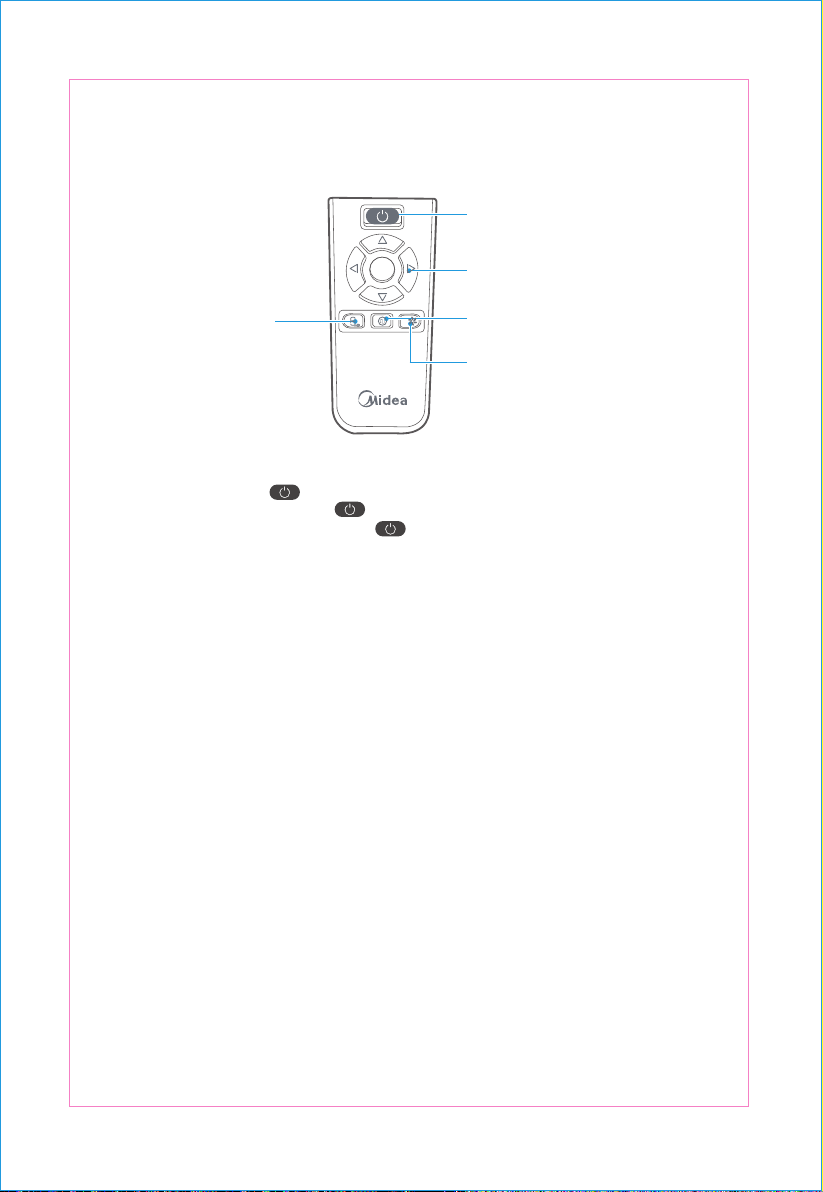
Remote control panel introduction
Buttons and Indicators
1
2
1
2
3
4
5
3
4
5
Caution
On/o button
Direction button
Mode button
Powerful button
Self-charging button
SUPER
recarga modo
" " button and indicator section:
Y ou may use the rem ote contr ol as that for TV s, for which, open the switch at the bott om of the
machine and press the “ ” butt on of machine, then you ca n press the butt ons of remote
control to cont rol mac hine (pr ess“ ”to wake up in ca se that the machin e enters into sle ep
wit hout oper ation wit hin 1 minut e; pre ss“ ”again to op en the mac hine if the machine enters
into o utrage st ate wit hout op er ati on of 15 mi nutes) .
C harging: When the mac hine is in st andby or clean ing mod e, pre ss the Ch arging button, and it
will e nte r the rec overy mode , and c har ge it at t his tim e.
C harging: When the mac hine is in st andby or clean ing mod e, pre ss the Ch arging button, and it
will e nte r the rec overy mode , and c har ge it at t his tim e.
Mode: Wh en the mac hine is in st andby mode, pre ss the “M ode” button and enter th e cleaning
state. W hen the machine is in the clean ing st ate, press the “Mod e” button an
d swit ch to the
cle aning m ode .
Powerf ul: W hen the mac hine is in st an dby mod e, pre ss the Power ful button and enter a strong
cle aning state, and press su ch button again to enter the powerful cleaning state when the
machine is in the cle aning st ate. ( The suc tion will be incr eased when the str ong cleaning state is
in foc used clea ning st ate .)
Please install tw o A A A batte ries b efo re us e. In th e vicinity of th e c ha rgi ng cr adl e, t he m achi ne m ay
not be able to disti ng uis h t he instru c tions issued by the r
em ote c on tr ol. If y ou d o not us e th e rem o te
c ont rol f or a long tim e, ple ase remov e the battery .
Open the pow er switch at the bott om of the ma chine, if the mac hine placed on the gro und work
properly, the blu e indic ator will sl owly fl ash ;
Press the " " cleaning butt on and the buzze r will sound the "Di Di Di", and the blu e
light will fla sh fast at first. If the ma ch ine is norm al to wor k, the blue light will co ntinue to lig ht up,
otherwis e th e m achi ne will r esume to sta ndby m ode , and th e
light will rest ore to the o rigin al state;
W her e there are faults during the work , the indicat or will make a dierent resp onse based on
dier ent faults. See t he failure an alysis b elow i n details;
W hen the battery is low , the red light is flashing qui ckly;
In cha rging state (w hen the machin e is plac ed on the c harging c radle or c onnected to the
ad apter) , the red lig ht of indic ator light slo w ly blinks; aft er charging is saturated, the buzzer
sounds 5 be eps, while the red light tur ns o, the blue light t urns on.
PUSH
9 10
Remote control panel introduction
Buttons and Indicators
1
2
1
2
3
4
5
3
4
5
Caution
On/o button
Direction button
Mode button
Powerful button
Self-charging button
SUPER
recarga modo
" " button and indicator section:
Y ou may use the rem ote contr ol as that for TV s, for which, open the switch at the bottom of the
machine and press the “ ” butt on of machine, then you ca n press the butt ons of remote
control to cont rol mac hine (pr ess“ ”to wake up in ca se that the machin e enters into sle ep
wit hout oper ation wit hin 1 minut e; pre ss“ ”again to op en the mac hine if the machine enters
into o utrage st ate wit hout op er ati on of 15 mi nutes) .
C harging: When the mac hine is in st andby or clean ing mod e, pre ss the Ch arging button, and it
will e nte r the rec overy mode , and c har ge it at t his tim e.
C harging: When the mac hine is in st andby or clean ing mod e, pre ss the Ch arging button, and it
will e nte r the rec overy mode , and c har ge it at t his tim e.
Mode: Wh en the mac hine is in st andby mode, pre ss the “M ode” button and enter th e cleaning
state. W hen the machine is in the clean ing st ate, press the “Mod e” button an
d swit ch to the
cle aning m ode .
Powerf ul: W hen the mac hine is in st an dby mod e, pre ss the Power ful button and enter a strong
cle aning state, and press su ch button again to enter the powerful cleaning state when the
machine is in the cle aning st ate. ( The suc tion will be incr eased when the str ong cleaning state is
in foc used clea ning st ate .)
Please install tw o A A A batte ries b efo re us e. In th e vicinity of th e c ha rgi ng cr adl e, t he m achi ne m ay
not be able to disti ng uis h t he instru c tions issued by the r
em ote c on tr ol. If y ou d o not us e th e rem o te
c ont rol f or a long tim e, ple ase remov e the battery .
Open the pow er switch at the bott om of the ma chine, if the mac hine placed on the gro und work
properly, the blu e indic ator will sl owly fl ash ;
Press the " " cleaning butt on and the buzze r will sound the "Di Di Di", and the blu e
light will fla sh fast at first. If the ma ch ine is norm al to wor k, the blue light will co ntinue to lig ht up,
otherwis e th e m achi ne will r esume to sta ndby m ode , and th e
light will rest ore to the o rigin al state;
W her e there are faults during the work , the indicat or will make a dierent resp onse based on
dier ent faults. See t he failure an alysis b elow i n details;
W hen the battery is low , the red light is flashing qui ckly;
In cha rging state (w hen the machin e is plac ed on the c harging c radle or c onnected to the
ad apter) , the red lig ht of indic ator light slo w ly blinks; aft er charging is saturated, the buzzer
sounds 5 be eps, while the red light tur ns o, the blue light t urns on.
PUSH
9 10
1. Ple a se ke ep th e c hargi ng c radle in the pow er st ate , and ot her w is e, t he m ac hine will no t b e able t o
fin d t he b ase t o char g e. Th is p ro duc t co mpli e s with t he Euro pean E R P ener gy l oss st an dar d.
2. It is normal phenomenon that has the voice of high speed airflow while the product running.
Caution
Caution
Initial Operation
1
2
3
4
1 M
1 M
2 M
A
B
1
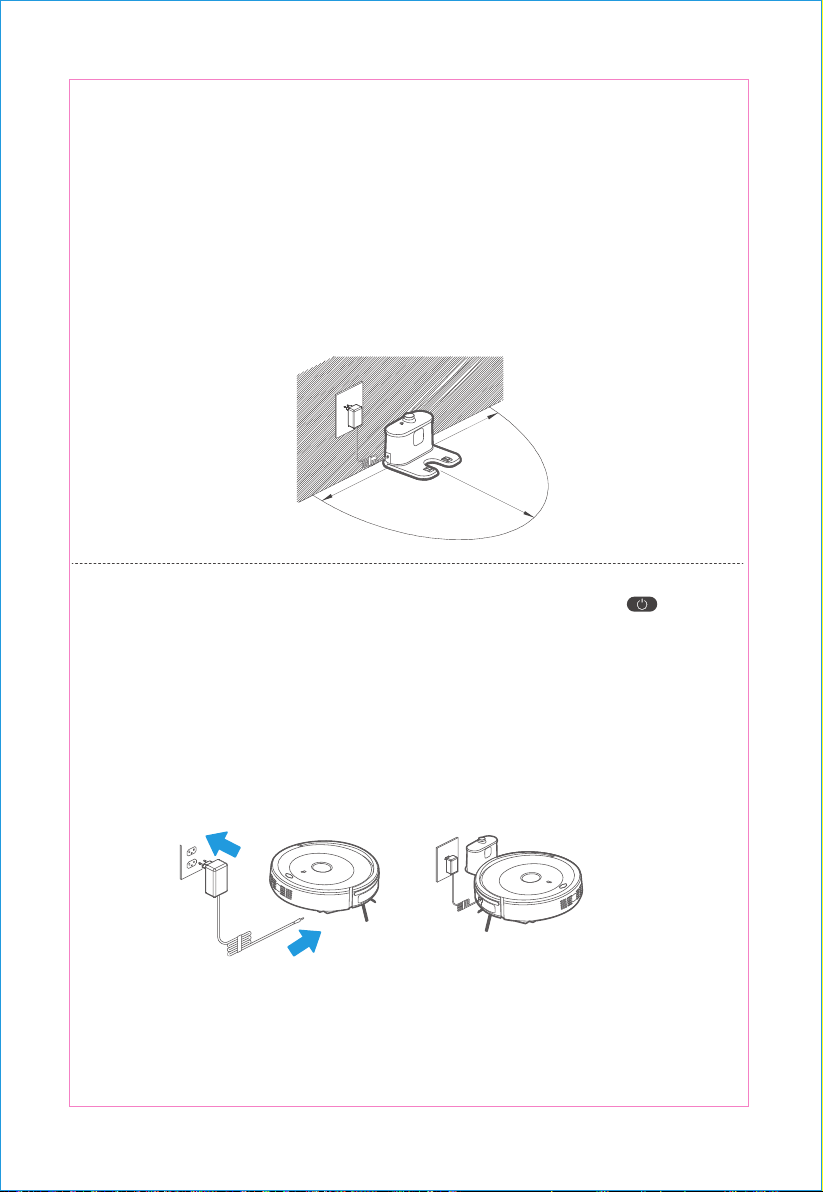
Product Assembling
Put the charging cradle on the gro und against the wa ll and remove all the obst acles within 1
mete r on bot h sid es a nd 2 met ers in fr ont of th e cradle.
Battery charging
Open the pow er switch at the bottom of the mac hin e, and pr ess the m achin e " " button,
and the indicator light is fl ashing in blu e light, and the m achin e is in st andby mod e.
User c an cha rge th e ma ch ine by th e t wo follo wing wa ys:
A . Pl ug th e powe r adapt er dir ec tly on t he m ach ine wit h th e other end conne cted with pow er;
B . C onnect t he pow er adapt er with th e cha rging cradle, an d alig n th e remot e control to th e
machine a nd p ress "Re- charging" b utt on when th e m ac hine is in p owered-on and w ake-up
state, to enabl e th e m ac hine t o re-char ge.
A. Ma ke s ure t he p ower s wit ch is O N b efore char gi ng t he m ach ine, otherw is e t he re d lig ht w ill fla sh
q uickly acco mp an ied by t he b uzzer s oun d;
B . Whe n the machine is c
ha rging, th e " " cleaning butt on becomes red with slowly changing;
C . Aft er c ha rging is c omplet ed, th e b uzzer so unds 5 b eeps (no mo re t ha n 5 ho ur s ea ch tim e)
D. P lea se l e t t he m ach ine run ou t o f elec tric ity i n t he fir st use;
E . Aft er the b att ery is exha ust ed, pl ease re- c harg e t he ma c hine as soo n as possibl e;
F . If you do not use t he mac hine f or a long time, ple ase t urn o the pow er s w itc h.
A utomatic charging W hen the cleaning is co mpl eted or the batte ry is too low , the machine will
aut omatic ally find the c harging cradle for charging .
Pla ce the machin e on the gro und in c ase that do not us e the dry cloth to cl ean, ope n the po wer
sw itch at the bottom of the ma chine, and sho rt pr ess " " butt on or short press the rem ote
contr ol" " bo mak e the ma chin e work; sh ort press the " " butt on again or sh ort
press the remote control " " button to st op the
ma chine; W hen using the dry clot h to
clean , firstly open the pow er swit c h at the bottom of the machine, and then install the dish cloth
bra cket (with dish cl oth) on the ma chine bas e, and plac e the ma chin e on the gr ound to open the
po wer switch at the bottom of th e machine, sh or t pr ess " " button or sh ort pr ess the
remote contr ol " " butt on to m ake the ma chin e work; sh ort pr ess the " " button
ag ain o r sho rt pr ess the " " butt on of rem ote co ntrol t o st op the
mac hine.
11 12
1. Ple a se ke ep th e c hargi ng c radle in the pow er st ate , and ot her w is e, t he m ac hine will no t b e able t o
fin d t he b ase t o char g e. Th is p ro duc t co mpli e s with t he Euro pean E R P ener gy l oss st an dar d.
2. It is normal phenomenon that has the voice of high speed airflow while the product running.
Caution
Caution
Initial Operation
1
2
3
4
1 M
1 M
2 M
A
B
1
Product Assembling
Put the charging cradle on the gro und against the wa ll and remove all the obst acles within 1
mete r on bot h sid es a nd 2 met ers in fr ont of th e cradle.
Battery charging
Open the pow er switch at the bottom of the mac hin e, and pr ess the m achin e " " button,
and the indicator light is fl ashing in blu e light, and the m achin e is in st andby mod e.
User c an cha rge th e ma ch ine by th e t wo follo wing wa ys:
A . Pl ug th e powe r adapt er dir ec tly on t he m ach ine wit h th e other end conne cted with pow er;
B . C onnect t he pow er adapt er with th e cha rging cradle, an d alig n th e remot e control to th e
machine a nd p ress "Re- charging" b utt on when th e m ac hine is in p owered-on and w ake-up
state, to enabl e th e m ac hine t o re-char ge.
A. Ma ke s ure t he p ower s wit ch is O N b efore char gi ng t he m ach ine, otherw is e t he re d lig ht w ill fla sh
q uickly acco mp an ied by t he b uzzer s oun d;
B . Whe n the machine is c
ha rging, th e " " cleaning butt on becomes red with slowly changing;
C . Aft er c ha rging is c omplet ed, th e b uzzer so unds 5 b eeps (no mo re t ha n 5 ho ur s ea ch tim e)
D. P lea se l e t t he m ach ine run ou t o f elec tric ity i n t he fir st use;
E . Aft er the b att ery is exha ust ed, pl ease re- c harg e t he ma c hine as soo n as possibl e;
F . If you do not use t he mac hine f or a long time, ple ase t urn o the pow er s w itc h.
A utomatic charging W hen the cleaning is co mpl eted or the batte ry is too low , the machine will
aut omatic ally find the c harging cradle for charging .
Pla ce the machin e on the gro und in c ase that do not us e the dry cloth to cl ean, ope n the po wer
sw itch at the bottom of the ma chine, and sho rt pr ess " " butt on or short press the rem ote
contr ol" " bo mak e the ma chin e work; sh ort press the " " butt on again or sh ort
press the remote control " " button to st op the
ma chine; W hen using the dry clot h to
clean , firstly open the pow er swit c h at the bottom of the machine, and then install the dish cloth
bra cket (with dish cl oth) on the ma chine bas e, and plac e the ma chin e on the gr ound to open the
po wer switch at the bottom of th e machine, sh or t pr ess " " button or sh ort pr ess the
remote contr ol " " butt on to m ake the ma chin e work; sh ort pr ess the " " button
ag ain o r sho rt pr ess the " " butt on of rem ote co ntrol t o st op the
mac hine.
11 12
1. Pl ea se us e t he c le an ing cl oth i n dry mode .
2. B efo re st a rti ng th e cl ea ning, pl ease m ak e su re w heth er t he d ust b ox is i nst alled .
3. If t he m ach ine is no t oper ated f or 1 min ute , it w ill a utom a tic ally en ter t he sl ee p st a te. 15 mi nu tes
aft er en ter ing su ch st ate , th e m ac hine a uto m atic a lly p o w er o f or p ro tec ting t he b att er y t o p re ven t
t he d am ag e of batt ery lif e ca used by over-dis c harge of batt ery . If y ou d o no t use t he m ach ine f or a
l on g tim e, pl ea se tur n o th e p ow er s w itc h.
Caution
4
It is recommended to use the focused cleaning mode when there is more rubbish on the ground.
You can use powerful mode in focused cleaning mode .
Hold the remot e con trol " " butto n or " " butto n fo r 3 seconds and the ma chine
will enter into sleep mod e. Hold the mach ine " " butto n to w ake up the machine. Press the
" " butt on of rem ote contr ol to wa ke up the mach ine in the 15 minutes befor e the
machi ne enter s into t he sle ep stat e.
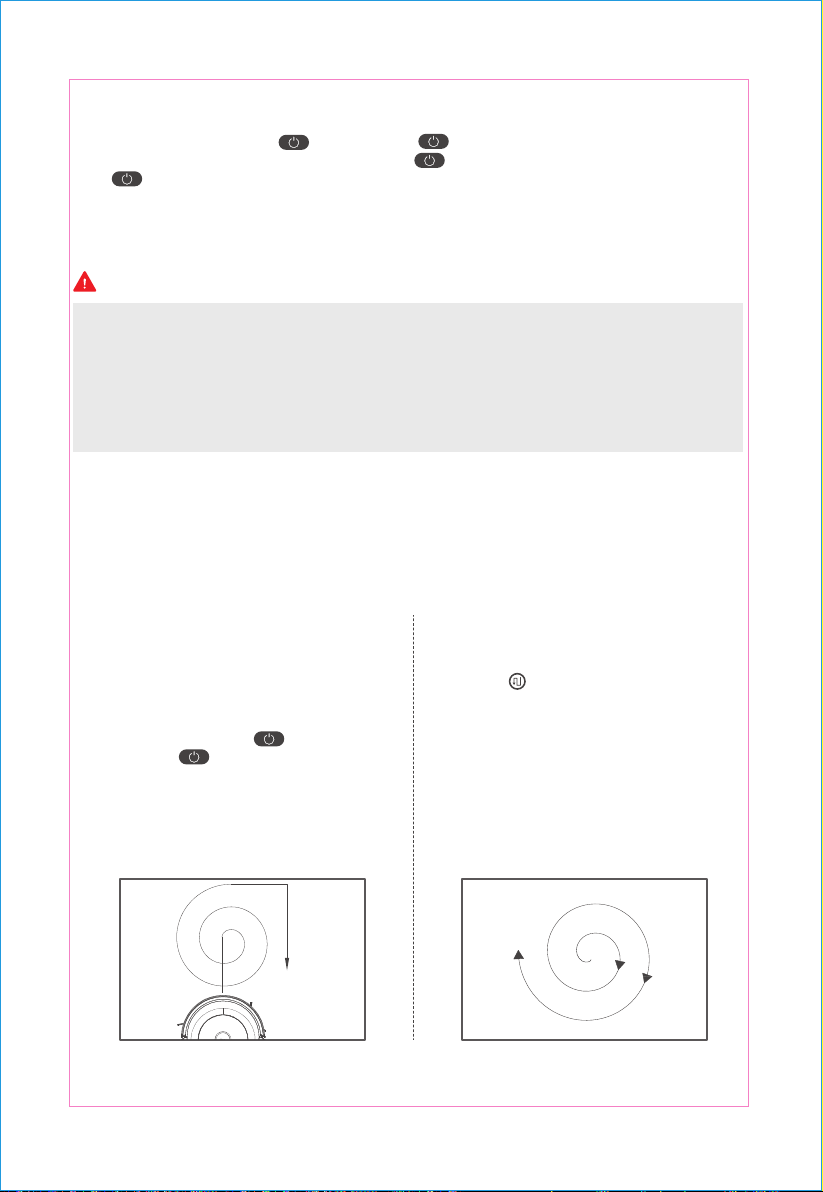
Cleaning Mode
Auto Cleaning Focused cleaning
Pre ss the " " butt on of the rem ote co ntro l
and s witch to f ocused clea ning m ode.
In the automatic c leaning mode , the mach ine
will autom atically clean the room, an d adjust
the cle aning mod e in acc orda nce with di eren t
enviro nme nts. P ress the " " butt on of the
main unit or " " button of the re mote
co ntrol t o ent er t he auto c lear mod e.
Tips
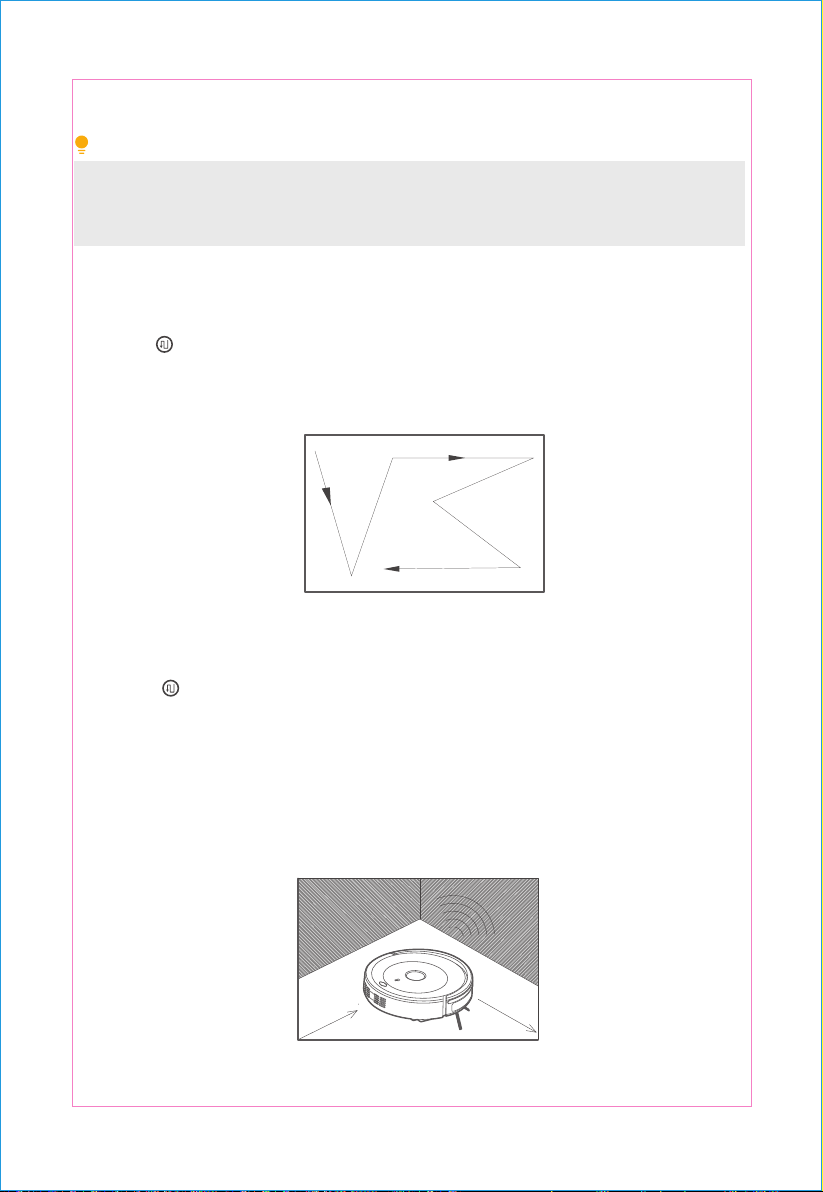
Pr ess t he “ ” butt on of r emote co ntrol t o swit ch to r andom cleaning mode.
Random cleaning
Edgewise cleaning
Pr ess the “ ” butt on of remot e co ntrol to swit ch to border cle aning mode . In the bord er
cleaning mode , th e m achine will sw eep th e edg es of the obstru ctio n along the obstruction .
13 14
1. Pl ea se us e t he c le an ing cl oth i n dry mode .
2. B efo re st a rti ng th e cl ea ning, pl ease m ak e su re w heth er t he d ust b ox is i nst alled .
3. If t he m ach ine is no t oper ated f or 1 min ute , it w ill a utom a tic ally en ter t he sl ee p st a te. 15 mi nu tes
aft er en ter ing su ch st ate , th e m ac hine a uto m atic a lly p o w er o f or p ro tec ting t he b att er y t o p re ven t
t he d am ag e of batt ery lif e ca used by over-dis c harge of batt ery . If y ou d o no t use t he m ach ine f or a
l on g tim e, pl ea se tur n o th e p ow er s w itc h.
Caution
4
It is recommended to use the focused cleaning mode when there is more rubbish on the ground.
You can use powerful mode in focused cleaning mode .
Hold the remot e con trol " " butto n or " " butto n fo r 3 seconds and the ma chine
will enter into sleep mod e. Hold the mach ine " " butto n to w ake up the machine. Press the
" " butt on of rem ote contr ol to wa ke up the mach ine in the 15 minutes befor e the
machi ne enter s into t he sle ep stat e.
Cleaning Mode
Auto Cleaning Focused cleaning
Pre ss the " " butt on of the rem ote co ntro l
and s witch to f ocused clea ning m ode.
In the automatic c leaning mode , the mach ine
will autom atically clean the room, an d adjust
the cle aning mod e in acc orda nce with di eren t
enviro nme nts. P ress the " " butt on of the
main unit or " " button of the re mote
co ntrol t o ent er t he auto c lear mod e.
Tips
Pr ess t he “ ” butt on of r emote co ntrol t o swit ch to r andom cleaning mode.
Random cleaning
Edgewise cleaning
Pr ess the “ ” butt on of remot e co ntrol to swit ch to border cle aning mode . In the bord er
cleaning mode , th e m achine will sw eep th e edg es of the obstru ctio n along the obstruction .
13 14
Battery replacement
Caution
Product Maintenance
1
4
5
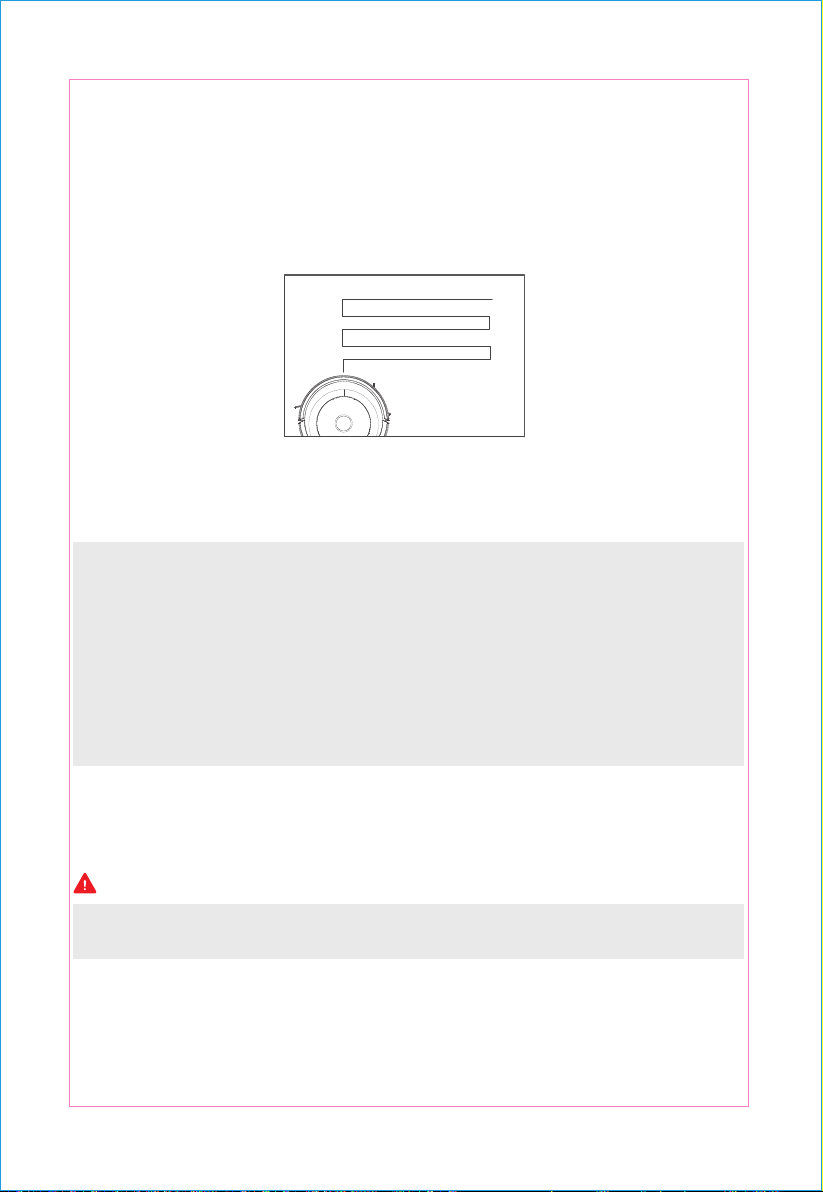
Bow-shaped track cleaning
2 3
Bow-shaped track cl eaning is prim arily used for larg e are a without furnitur e to quickly cl ean the
area with fast cleaning and high effi c ien cy.
1. Loosen the screws in the battery cover with a screwdriver;
2. Remove the battery cover;
3. Seize the battery insulation cloth by hands to pick up the battery;
4. Open the connector to the battery and the main unit;
5. Put a new battery into the battery compartment, of which the side with words should be upwards;
6. Connect the connector to the battery and the main unit;
7. Arrange the battery and insulation cloth;
8. Put the battery cover back in place;
9. Lock the battery cover.
N e v er use b att er ies t hat are not attached in the unit . Ot herwis e it m a y cau s e d am ag e t o t he m ach ine .
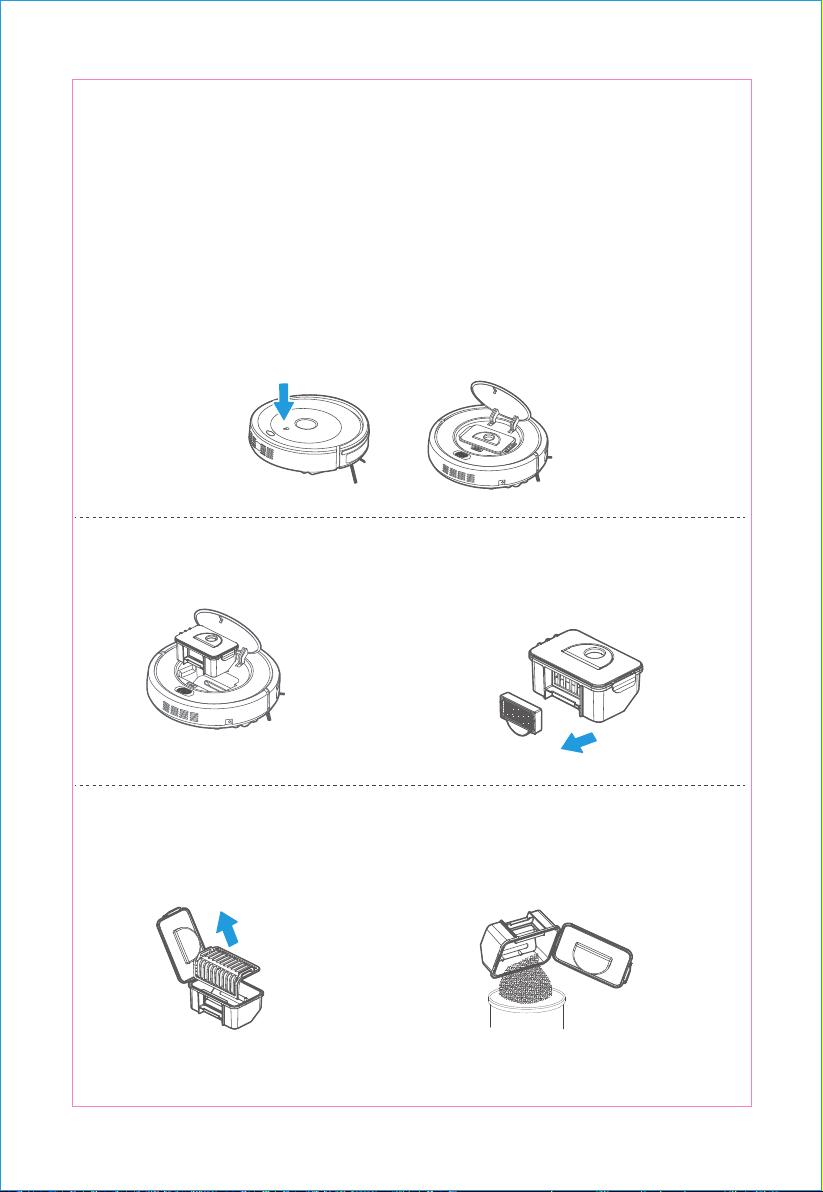
Cleaning of Dust Box and Filter
Plea se clean the dust b ox after each tim e of us e accor ding t o the st eps as s how n in th e following fig ure.
P ress th e “ PUSH ” m ark i n th e middl e of th e upp er c ov er to op en th e middl e c ov er.
T ake t he d ust box o ut.
Ta ke out t he hig h-ef fic ienc y s cree n.
P ress
Ope n t he
dust box cov er and tak e t he
prim ar y s cr een o ut.
D ump t he dust box ;
15 16
Battery replacement
Caution
Product Maintenance
1
4
5
Bow-shaped track cleaning
2 3
Bow-shaped track cl eaning is prim arily used for larg e are a without furnitur e to quickly cl ean the
area with fast cleaning and high effi c ien cy.
1. Loosen the screws in the battery cover with a screwdriver;
2. Remove the battery cover;
3. Seize the battery insulation cloth by hands to pick up the battery;
4. Open the connector to the battery and the main unit;
5. Put a new battery into the battery compartment, of which the side with words should be upwards;
6. Connect the connector to the battery and the main unit;
7. Arrange the battery and insulation cloth;
8. Put the battery cover back in place;
9. Lock the battery cover.
N e v er use b att er ies t hat are not attached in the unit . Ot herwis e it m a y cau s e d am ag e t o t he m ach ine .
Cleaning of Dust Box and Filter
Plea se clean the dust b ox after each tim e of us e accor ding t o the st eps as s how n in th e following fig ure.
P ress th e “ PUSH ” m ark i n th e middl e of th e upp er c ov er to op en th e middl e c ov er.
T ake t he d ust box o ut.
Ta ke out t he hig h-ef fic ienc y s cree n.
P ress
Ope n t he
dust box cov er and tak e t he
prim ar y s cr een o ut.
D ump t he dust box ;
15 16
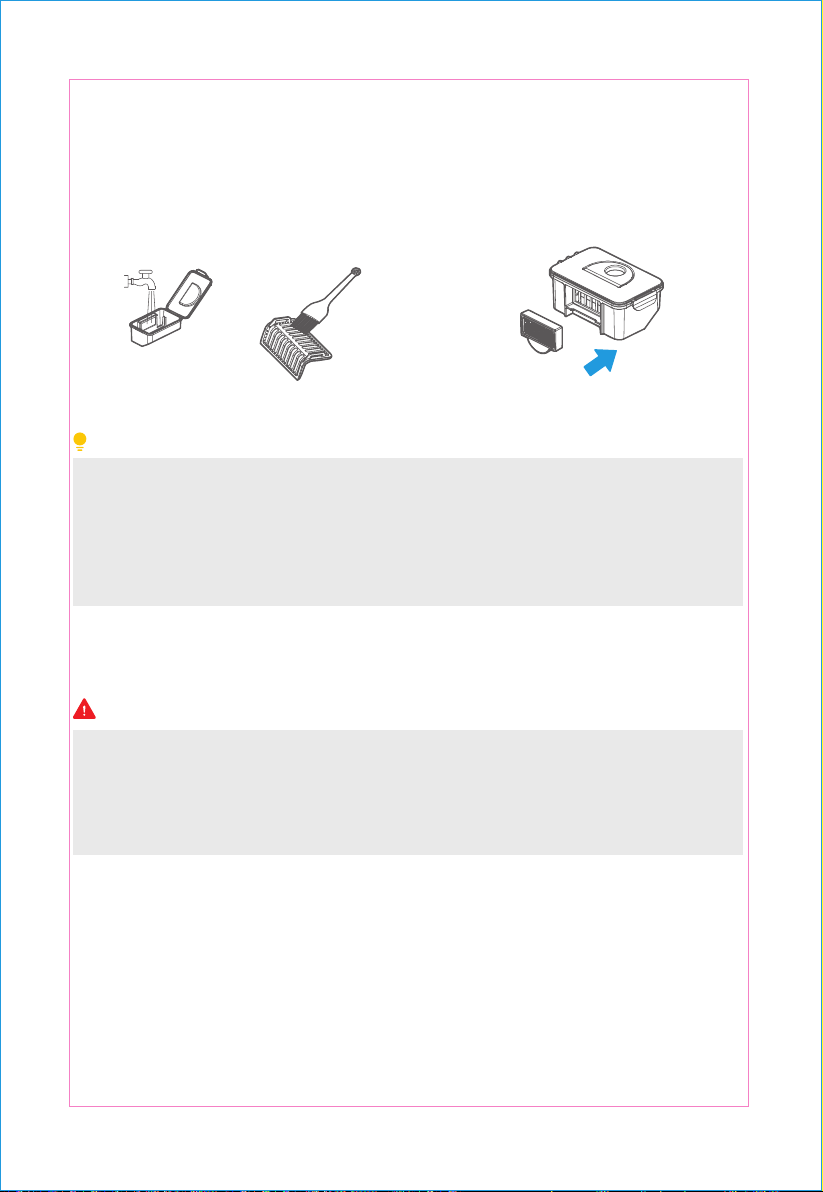
Caution
6
high-effic ienc y s creen into t he d ust b ox.
7
1
2
3
Machine cleaning
Wash the dust box and the prim ary screen
and then clean the high-effic ienc y screen
with brush .
Reinst all the prim ary sc reen an d the
Tips
A. Check the side brush, to see if there is any damage or foreign matter on it.
B. Clean the side brush with cleaning tools or cloth.
C. If the brush is broken and cannot be used, please change it immediately.
1. Pull down the old side brush directly;
2. Press and mount the new brush on bottom of the machine;
1. It is reco mm en ded to wa sh the screen after it is used fo r 15- 20 days . T he se rvic e life of th e
hig h- e ffic ienc y s creen is 24 m on ths.
2. Befo re i nstall ation , pleas e m ake sure the screen is dry .
3. B o th t he hig h-effic ienc y s creen an d t he p rim ar y s creen are a ll re pl acea bl e.
4 . P lease d o not put the scr ee n under the sunlight .
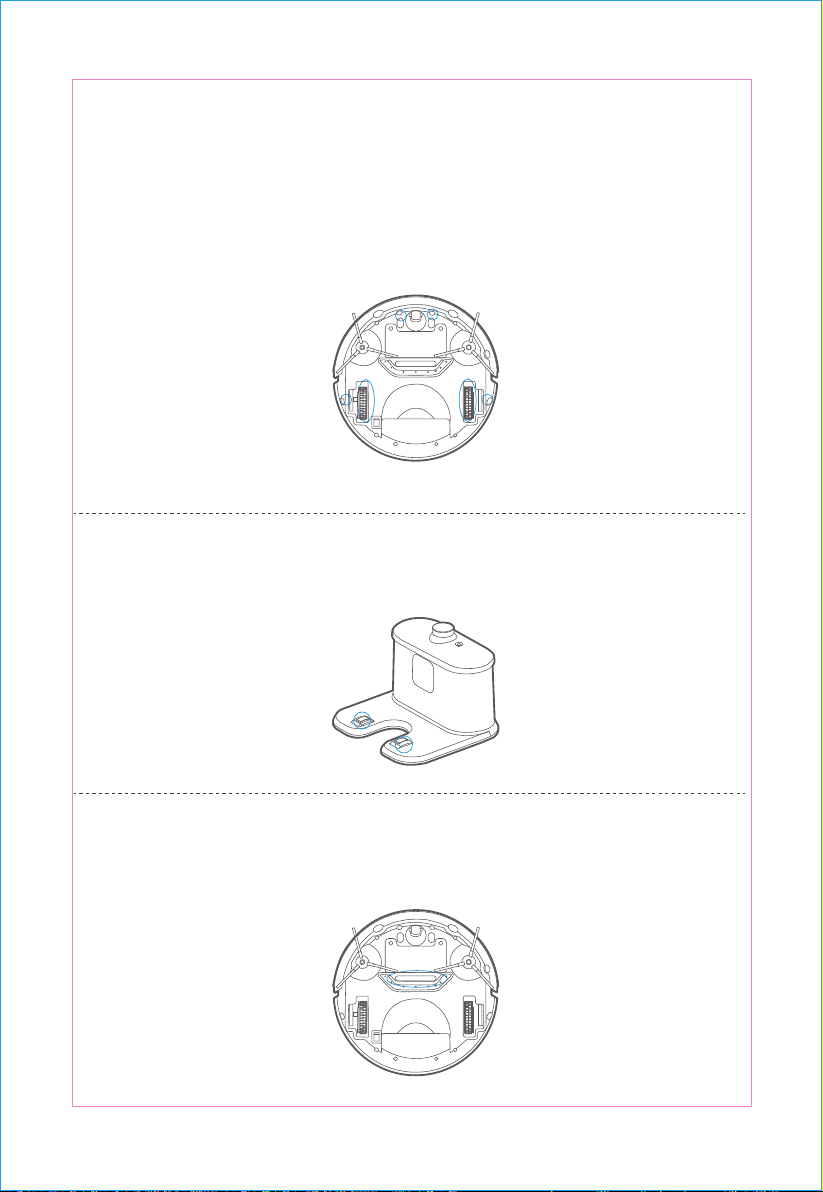
S enso r and w heels clea ning:Wip e t he s enso r and w hee ls ge ntly wit h a c leaning tool or a
soft c lot h, as m ar ked o n the rig ht.
Ch argi ng te rmin al c lean ing:Us e a clea ning tool o r a soft clot h to clea n th e char ging t er mi-
nals on t he char ging cr adl e, as sho wn on t he right .
S uc tio n channel clean ing:Cle an the s uctio n cha nne l wit h a clea ning tool o r a soft cloth, as
indic ated on th e rig ht.
17 18
Caution
6
high-effic ienc y s creen into t he d ust b ox.
7
1
2
3
Machine cleaning
Wash the dust box and the prim ary screen
and then clean the high-effic ienc y screen
with brush .
Reinst all the prim ary sc reen an d the
Tips
A. Check the side brush, to see if there is any damage or foreign matter on it.
B. Clean the side brush with cleaning tools or cloth.
C. If the brush is broken and cannot be used, please change it immediately.
1. Pull down the old side brush directly;
2. Press and mount the new brush on bottom of the machine;
1. It is reco mm en ded to wa sh the screen after it is used fo r 15- 20 days . T he se rvic e life of th e
hig h- e ffic ienc y s creen is 24 m on ths.
2. Befo re i nstall ation , pleas e m ake sure the screen is dry .
3. B o th t he hig h-effic ienc y s creen an d t he p rim ar y s creen are a ll re pl acea bl e.
4 . P lease d o not put the scr ee n under the sunlight .
S enso r and w heels clea ning:Wip e t he s enso r and w hee ls ge ntly wit h a c leaning tool or a
soft c lot h, as m ar ked o n the rig ht.
Ch argi ng te rmin al c lean ing:Us e a clea ning tool o r a soft clot h to clea n th e char ging t er mi-
nals on t he char ging cr adl e, as sho wn on t he right .
S uc tio n channel clean ing:Cle an the s uctio n cha nne l wit h a clea ning tool o r a soft cloth, as
indic ated on th e rig ht.
17 18

In case of mis-function, please refer to the following table.
TROUBLE SHOOTING
- Re-i nstall t he mai n unit back to the g ro und ,
a nd th en r ebo ot i t
- The main unit is hung (i ncluding a
suspensi on sens or inspecting a
c ontinu ous dr opping ha z ard o r
w heel fl oat)
- Suspensi on sens or failu re or w hee l
impendi ng s witc h fail ure
- Clean the suspensi on sens o r, if n ot ye t
rest ored , then se nd to afte r-sales servic e
cente r f or mainte nanc e
- The mac hine p ow er switc h is
n ot tu rned o n
- Tu rn on the p ower switc h
- Bumper sens or e rror
- Check t he b umpe r sensitivity t o ens ure
w hether the re is a f oreign b ody
- The p ower of machin e is l ow - Charge the mac hine
- The side brush o f the ma c hine i s
w rapped or stuc k
- Move the machine t o t he gr oun
d a nd
rem ove t he entanglement of side br ush
The machine does not
change the direction when
touching the obstruction
When charging, the red
light flashes quickly,
accompanied by a
buzzer sound
T he re d li gh t fla shes quick ly
Bl ue li g ht fla she s onc e,
wh ile red l ight flash tw ice
- M ain unit b umpe r is no t fl exibl e
- L oo sen the scre ws at t he b ott om of
the bumper
Bl ue li g ht fla she s onc e,
wh ile red l ight flashe s twi ce
- Mai n unit wheel set is bl ocke d - Clear the obstructi on of w heel s et
Blue li gh t flas hes o ne t ime ,
while re d light fla shes
three t ime s
Machine is suddenly
stopped in the working
period, while blue light
lasts long time.
In case that open th e
power switch and s hort
pr es s the “ ” butt on
of t he mac hine placed on
the gro und, the b lue li gh t
last s long time (the ma chine
is not connected
with t he
charging cr adle or a dapter )
Solution Problem Possible reason
Parameter
300 mm
78 mm
3.5 Kg
14.4 V
NI MH 1000 mAh
0.3 L
Items
Diameter
Height
Net weight
Rated voltage
Battery capacity
Dust bin
Manual / Auto
Less than 300min
Approx. 60min
LEDphysical button
One-key/Remote
ParameterItem
Charging type
Cleaning mode
Charging time
Cleaning time
Button type
PRODUCT PARAMETERS
19 20