1
DO NOT ADD
ESSENTIAL OIL
WATER ONLY
FILL HERE
(0.9 m)
3’
0.9 m
(3 pies)
(3 pi)
0,9 m
ºF
%
RH
ºC
%
RH
Tray for Scent
Pads
DO NOT ADD
ESSENTIAL OIL
WATER ONLY
FILL HERE
(0.9 m)
3’
0.9 m
(3 pies)
(3 pi)
0,9 m
ºF
%
RH
ºC
%
RH
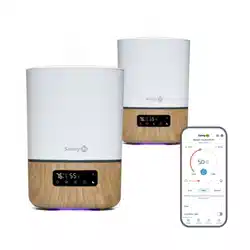
Humid Control Filter Free Humidifier
IH569
User Guide
READ ALL INSTRUCTIONS BEFORE ASSEMBLY AND USE.
KEEP INSTRUCTIONS FOR FUTURE REFERENCE.
• Adultassemblyisrequired.
WARNING
• Keepsmallpartsawayfromchildren.
Whenusingelectricalappliances,basicprecautionsshouldalwaysbe
followedtoreducetheriskofre,electricshockandinjurytoperson,
includingthefollowing:
•Useapplianceonlyasdescribedinthismanual.Anyotherusenot
recommendedbythemanufacturermaycausere,electricshock,or
injurytopersons.Theuseofattachmentsnotrecommendedorsoldby
themanufacturermaycausehazards.DO NOTuseoutdoors.
•Toavoidreorshockhazard,plugtheappliancedirectlyintoa120VAC
electricaloutlet.DO NOTpluginthecordwithwethands.
•Keepthecordoutofheavytrafcareas.Toavoidrehazard,NEVERput
thecordunderrugsornearheatregisters.
• DO NOToperateanyappliancewithadamagedcordorplug,ifthe
appliancemalfunctions,orifithasbeendroppedordamagedinany
manner.Returnappliancetomanufacturerforexamination,electricalor
mechanicaladjustment,orrepair.
• DO NOTattempttorepairoradjustanyelectricalormechanical
functionsonthisunit.Doingsowillvoidyourwarranty.Theinsideof
theunitcontainsnouserserviceableparts.Allservicingshouldbe
performedbyqualiedpersonnelonly.
•Humidiershouldbeunpluggedwhennotinuse.
• DO NOTplacehumidiernearheatsourcessuchasstoves,radiators,
andheaters.DOlocateyourhumidieronaninsidewallnearan
electricaloutlet.Thehumidiershouldbeatleast12inches(30.5cm)
awayfromthewallforbestresults.DO NOTallowthemistoutlets
todirectlyfacethewall.Moisturecouldcausedamage,particularly
towallpaper.
• NEVERplacehumidierinanareawhereitisaccessibletochildren.
NEVERusehumidierinaclosedroom,particularlywhereachildmay
besleeping,resting,orplaying(aclosedroommayresultinexcessive
humidity).NEVERtilt,move,orattempttoemptyunitwhileitisoperating.
Shutoffandunplugbeforeremovingthewatertankandmovingtheunit.
• DO NOTattempttorellhumidierwithoutrstunpluggingtheunitfrom
itselectricaloutlet.Failuretoheedthiswarningmaycausepersonalinjury.
Besuretounplugtheunitbypullingontheplugandnotthecord.
• DO NOTblockairinletoroutletwhileunitisrunning.
•Alwaysplacehumidieronarm,at,levelsurface.Awaterproofmat
orpadisrecommendedforuseunderthehumidier.NEVERplaceiton
arugorcarpet,oronanishedoorthatmaybedamagedbyexposure
towaterormoisture.Topreventdamagetosurfaces,DO NOTplace
humidierunderoverhangingsurfaces.
•DO NOTusehumidierinanareawherehumiditylevelisinexcessof
60%.Useahygrometer,availableatyourlocalretailer,tomeasurethe
humidity.Turnhumidieroffifexcessivehumidityoccurs.
• DO NOTpourwaterinanyopeningsotherthanthewatertank.
• NEVERplacebaseunderwateroworimmerseinliquids.
• NEVERoperateunitwithoutwaterinthetank.
• NEVERtouchexposedmetaldiaphragminbaseafteruse.Metalwill
beHOT.
•Thishumidierrequiresdailyandweeklymaintenancetooperate
appropriately.Refertocleaningprocedures.Use only cleaners recommended
by the manufacturer.
• NEVERdroporinsertanyobjectintoanyopenings.
• NEVERuseapowercordwithoutaappropriateadaptor.
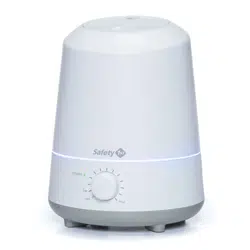
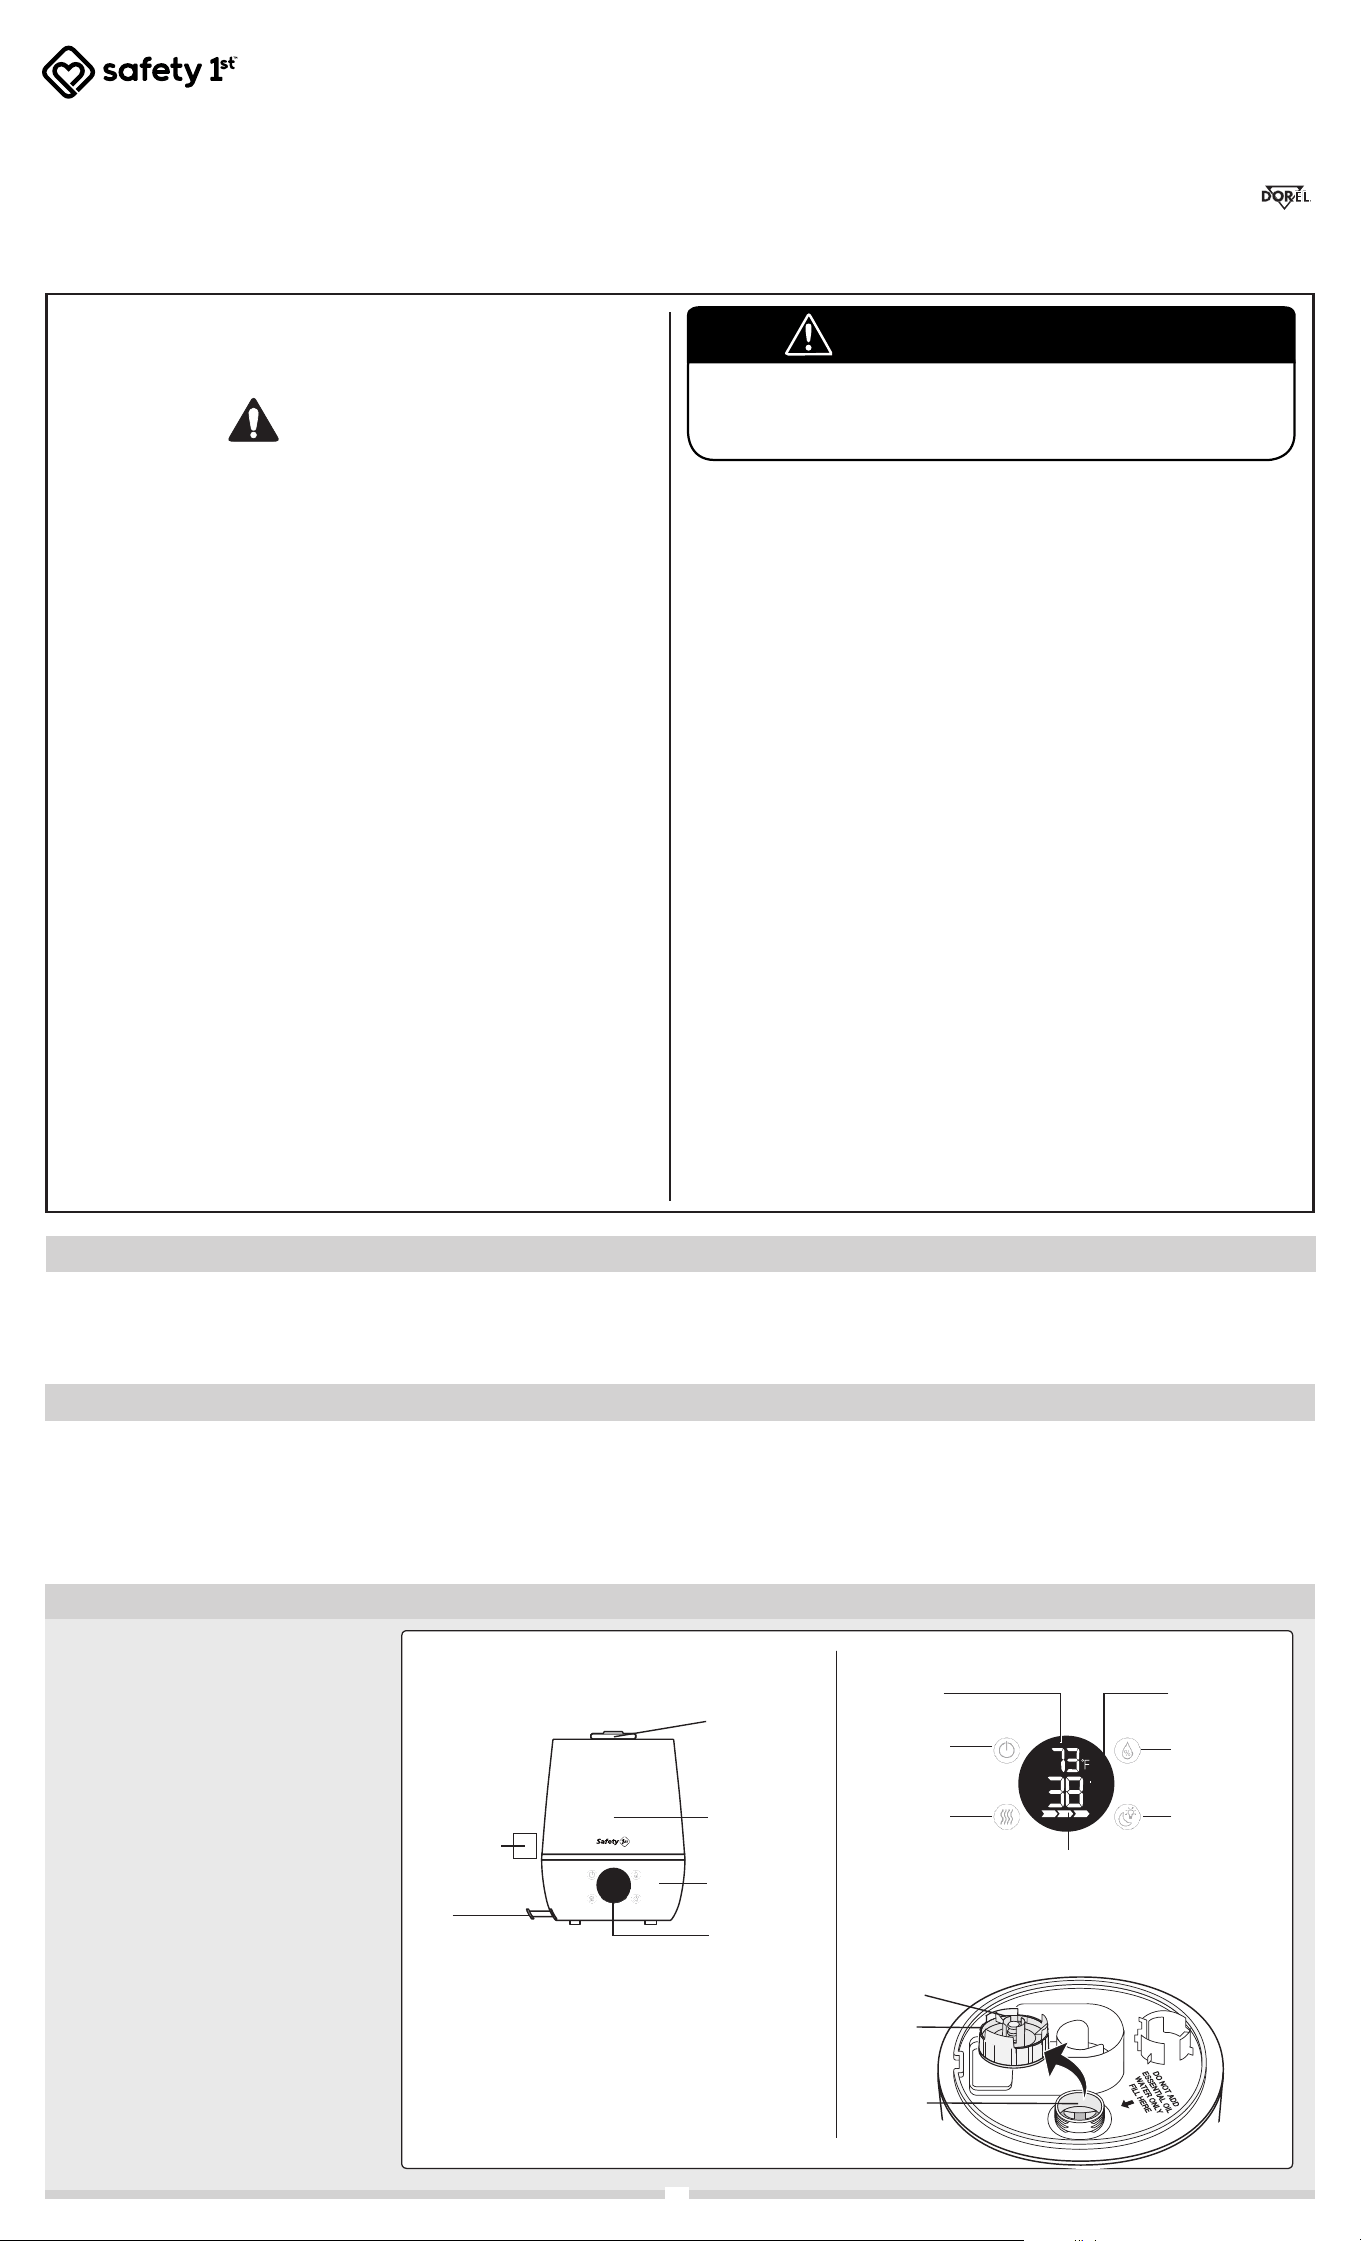
Cap
Float
Front
NOTE:Ifmoistureformsonthewallsorwindowsoftheroom,turnoffthehumidier.Theroomalreadyhasplentyofhumidityandadditionalmoisturemaycausedamage.
Consumer Information
• Do not return this product to the place of purchase. If any parts are missing, visit us at www.safety1st.com to chat with us there. You can also text us at
(812) 652-2525 or call Consumer Care at (800) 544-1108. Have ready the model number (WA095) and date code (manufacture date located on product
label).
• The night light bulb is not replaceable.
How Does it Work?
Humidifiers provide comfort by adding
moisture to dry indoor air. The Humid
Control Filter Free Humidifier uses
ultrasonic technology. A ceramic
diaphragm silently vibrates at a very high
frequency to create droplets, producing a
cool fog or mist.
The humidifier should be placed with the
mist outlets directed away from any nearby
walls or furniture.
NOTE: The recommended humidity level is
between 30%-50%*. A humidity level below
30% or above 50% can be unhealthy and
uncomfortable.
Under normal conditions, it is preferable
to use a lower setting on this humidifier.
The mist will not be visible at a low setting.
Only when the humidity level is extremely
low should the higher settings be used. A
white mist may be visible at higher settings
and there is an increased risk of moisture
damage, particularly to objects near the
humidifier.
*Based on research by CPSC.gov “The
Inside Story: A Guide to Indoor Air Quality.”
Know Your Unit
STRANGULATION HAZARD! Children have STRANGLED in cords.
NEVER place camera or cords within 6 feet of the crib. Do not use
with an extension cord. Only use the AC adapters provided.
WARNING!
STRANGULATION HAZARD! Children have STRANGLED in cords.
NEVER place Baby Unit or cords within 6 feet of the crib. Do not use
with an extension cord. Only use the AC adapters provided.
WARNING!
Video Monitor instruction warning
Audio Monitor instruction warning
Generic Electrical instruction warning w/ adaptors
Generic Electrical instruction warning
STRANGULATION HAZARD!ChildrenhaveSTRANGLEDincords.
NEVERplacecordswithin3feetofthecrib.
Donotusewithanextensioncord.
WARNING!
Rell
Opening
Bottom of Tank
Control Panel
©2023DorelJuvenileGroup,Inc.Safety1st
TM
andtheSafety1stlogoanddesignaretrademarksofDorelJuvenileGroup,Inc.(800)544-1108www.safety1st.com.
Styles,colors,andlabelingmayvary.Losestilos,coloresyetiquetadopuedenvariar.MadeinCHINA.HechoenCHINA.Distributedby(distribuidopor)Dorel
JuvenileGroup,Inc.,2525StateSt.,Columbus,IN47201-7494.DorelJuvenileCanada,2233ArgentiaRoad,Suite110,Mississauga,ONL5N2X7.Representante
exclusivoenChile:DORELJUVENILECHILES.A.Av.delParque4161,oficina602A,Huechuraba,Santiago,Chile-Fono:56224971500-www.infanti.cl-www.
dorel.cl.ImportadoydistribuidoenPerúpor:COMEXACOMERCIALIZADORAEXTRANJERAS.A.SUCURSALDELPERÚ-LosLibertadores455,SanIsidro,Lima
27,Lima,PerúRUC20431062870–Fono:4413029–www.infanti.com.pe.EnCentroAmérica,CaribeyEcuadorpor:BestBrandsGroupS.A.–Av.Balboa,Bay
MallPlaza,PlantaBaja,local9,Panamá.-Fono:(507)3002884.EnColombiapor:BabyUniverseS.A.S.-Vía40No.77-29,Barranquilla,Colombia-Fono:(575)
3531110Importador:DJGM,S.A.DEC.V.GabrielManceraNo.1041Col.DelValle,BenitoJuárezC.P.03100México,CiudaddeMéxicoR.F.C.DJG140305GN9Tel.
(55)6719920211/234358-8189D
Compliance Information Statement
Thisdevicecomplieswith47CFRPart18oftheFCCrules.Theserulesaredesignedtoprovideprotectionagainstharmfulinterferencewithotherdevices.Ifthisdevicecausesinterference
withotherdevices,separatethisproductandtheotherdevice.Conductonlytheusermaintenancefoundintheinstructionmanual.
FCC Information
Tank
MistOutlet/Lid
Basewith
Nightlight
LowWater
Indicator(when
arrowsashit
meanslowwater
level)
**Scent Pad
**Additionalscentpadssoldseparately.
DO NOT ADD
ESSENTIAL OIL
WATER ONLY
FILL HERE
(0.9 m)
3’
0.9 m
(3 pies)
(3 pi)
0,9 m
ºF
%
RH
ºC
%
RH
MistLevelArrows
(Low/Medium/High)
PowerOn/Off
NightLight/
NightMode
MistLevel/
Temperature
Display/
(Pressandhold
totoggleF/C)
Room
Temperature
Display
Relative
HumidityLevel
Display
Desired
Humidity
3
LEATODASLASINSTRUCCIONESANTESDEENSAMBLARYUTILIZAR
DELMOISÉS.GUARDEESTASINSTRUCCIONESPARASUUSOFUTURO.
•
Serequiereelarmadoporpartedeunadulto.
ADVERTENCIA:
•
Mantengalaspiezaspequeñasfueradelalcancedelosniños.
Cuandouseaparatoselectrodomésticos,debesiempretomarprecauciones
básicasparareducirelriesgodeincendios,choqueseléctricosylesionsa
personas,incluidaslassiguientes:
•Utiliceelaparatoelectrodomésticosolamentecomosedescribeeneste
manual.Cualquierotrousonorecomendadoporelfabricantepuede
causarincendios,choqueseléctricosolesionespersonales.Elusode
accesoriosnorecomendadosovendidosporelfabricantepuederesultar
peligroso.NO UTILIZARenexteriores.
•Paraevitarriesgosdeincendioochoqueseléctricos,enchufeel
electrodomésticodirectamenteenunatomadecorrientede120VCA.NO
enchufeelcableconlasmanosmojadas.
•Mantengaelcablefueradelaszonasconmuchotránsito.Paraevitar
riesgosdeincendio,NUNCAcoloqueelcabledebajodealfombrasocerca
desalidasdecalefacción.
• NOopereningúnaparatoelectrodomésticoquetengaelcableoelenchufe
dañado,quehayatenidoundesperfecto,oquesehayacaídoodañadode
algúnmodo.Devuelvaelaparatoelectrodomésticoalfabricanteparasu
revisión,ajusteeléctricoomecánico,oreparación.
• NOintenterepararoajustarningunafuncióneléctricaomecánicade
estaunidad.Silohace,anularálagarantía.Elinteriordelaunidadno
contienepiezasquepuedanserreparadasporelusuario.Todoserviciode
mantenimientodebeserrealizadoúnicamenteporpersonalcalicado.
•Desenchufeelhumidicadorcuandonoestéenuso.
• NOcoloqueelhumidicadorcercadefuentesdecalor,comoestufas,
radiadoresycalentadores.SÍcoloqueelhumidicadorenunaparedinterior,
cercadeunatomadecorriente.Paraobtenermejoresresultados,coloqueel
humidicadoranomenosde12pulgadas(30.5cm)dedistanciadelapared.
NOpermitaquelassalidasdenieblaapuntendirectamentehacialapared.La
humedadpuedeprovocardaños,enespecialalempapelado.
• NUNCAcoloqueelhumidicadorenunlugaraccesiblealosniños.
NUNCAutiliceelhumidicadorenunahabitacióncerrada,especialmente
Humidificador Humid Control Filter Free
IH569 Guía para el usuario
NOTA:Siseacumulahumedadenlasparedesolasventanasdelahabitación,apagueelhumidicador.Lahabitaciónyatienesucientehumedadyelexcesopuedecausardaños.
Información para el consumidor
• No devuelva este producto al lugar donde lo compró. Si falta alguna pieza, visítenos en www.safety1st.com o chatee con nosotros para sacarse dudas. También puede
enviarnos un mensaje al (812) 652-2525 o llamar al Servicio de Atención al Cliente al (800) 544-1108. Tenga a mano el número de modelo (WA095) y el código de fecha (la
fecha de fabricación se encuentra en la etiqueta del producto) a mano.
• La bombilla para la luz noche no es reemplazable.
¿Cómo funciona?
Los humidificadores proporcionan comodidad
al agregar humedad al aire en interiores. El
Humidificador Humid Control Filter Free utiliza
la tecnología ultrasónica. Un diafragama de
cerámica vibra silenciosamente a muy alta
frecuencia para crear pequeñas gotas, lo que
produce una fresca niebla o rocío.
Debe colocar el humidificador con las salidas
de niebla alejadas de cualquier pared o mueble
cercano.
NOTA: El nivel de humedad es recomendado
del 30%-50%*. Un nivel de humedad inferior al
30% o por encima del 50% puede ser insalubre
e incómodo.
En condiciones normales, es recomendable utilizar
un ajuste menor en este humidificador. La niebla
no es visible en un nivel de ajuste más bajo. Los
niveles de ajuste más altos sólo deben utilizarse
cuando el nivel de humedad es extremadamente
bajo. En un ajuste más alto es posible que se vea
una niebla blanca y existe un mayor riesgo de
daño por humedad, especialmente en objetos
que se encuentren cerca del humidificador.
* Basado en una investigación de CPSC.gov
“The Inside Story: A Guide to Indoor Air
Quality.”
Conozca su unidad
STRANGULATION HAZARD! Children have STRANGLED in cords.
NEVER place camera or cords within 6 feet of the crib. Do not use
with an extension cord. Only use the AC adapters provided.
WARNING!
STRANGULATION HAZARD! Children have STRANGLED in cords.
NEVER place Baby Unit or cords within 6 feet of the crib. Do not use
with an extension cord. Only use the AC adapters provided.
WARNING!
Video Monitor instruction warning
Audio Monitor instruction warning
Generic Electrical instruction warning w/ adaptors
Generic Electrical instruction warning
¡PELIGRO DE ESTRANGULACIÓN!LosniñossehanESTRANGULADO
conloscables.NUNCAcoloqueloscablesamenosde3piesde
distanciadelacuna.Nolouseconuncabledeextensión.
¡ADVERTENCIA!
•Whatarethevariablesthat
affectruntime?
•HowdoIremovefilmon
thetank?
•HowcanIextendruntime?
•Whydoesmyhumidifiernot
stoprunning?
•Whyismyhumidifiernot
producingmist?
•Theestimatedruntimeforthishumidifierisbasedonaverageroomconditions
andisdependentonnumerousvariablessuchas:
-Airexchangeintheroom.
-Roomconstructionwherethehumidifierisplaced.
-Temperatureoftheroom.
-Humiditylevelsintheroom.
-Movementofoccupantsandtheopeningandclosingofdoorsintheroom.
-Homefurnishingsintheroom.
•See“DisinfectTank”section.Regularcleaningisrecommended.
•Runyourunitonthelowestsetting.
•Filltankallthewayfullandplaceonthebase.Letwateremptyintothebase
untilitstopsbubbling,thenrefillandre-seattankagain.Thisensuresmaximum
watercapacityandwillextendruntime.
•DesiredHumiditymaybesetto“--”insteadofapercentage.Idealhumidity
levelrangeis30%-50%.
•Selectedhumiditylevelhasnotbeenachieved
•Confirmtheunitissettodesiredhumiditylevel.Idealrangeis30%-50%
•Selectedhumiditylevelhasbeenachieved
•Humidityleveldetectedmaybeaboveselectedhumiditylevel.
Troubleshooting
Problems Causes Actions
•Unitdoesnotturnon
•Whitepowdercomingout
ofhumidifier
•Dampnessinroomson
wallsorwindows
•Unitturnsonandoffor
mistlevelarrowsblink
•Bubblesinthewaterora
gurglingsound
•Waterleakage
•Thenightlightdoesn’tlight
•Nolongeranyscent
•Pluginpowercordorre-seattank
•Adjustthesetting
toreducemistoutput
•Usedistilledorfilteredwaterinstead
oftapwater
•Turnunitofforadjustthe
settingtoreducemistoutput
•Opendoortoroomatleast6’’
•Refilltank
•Cleanfloat(seeCare&Maintenance)
•Cleangasket(seeCare&Maintenance)
•Puthumidifieronalevelsurfaceand
refilltank
•Noactionnecessary
•Emptywaterinbase
•Discardhumidifier,asitcannotberepaired
•Thenightlightbulbisnotreplaceable
•Replacescentpad.Toordermore
scentpadscontactConsumerRelations
orpurchaseatwww.safety1st.com.
•Unitisnotpluggedinortank
isnot
seatedproperly
•Highsetting
(mistcanlooklikewhite
powder)
•
Somemineralsusedinsafewater
treatmentcouldbecomewhite
powderasthewatervaporizes.This
isnotahumidifiermalfunction
•Highsetting
•Tankisalmostempty
•Thefloatinsidebaseunitisdirty
•Gasketinbottomoftankisdirty
•Humidifierisnotonalevelsurfaceso
floatisnotabletooperateproperly
•Normaloperation.Aswaterenters
reservoirinbase,airisdisplacedand
createsbubblesintankandpossibly
agurglingsound
•Waterlevelinbasereservoirmay
betoohigh
•Productmayhavebeenmishandled
•Unitisnotpluggedinort
henight
lightbulbhasburntout
•Thescentpadistooold
Question Answer
Dorel Juvenile Group, Inc., warrants to the original
purchaser that this product (Humid Control Filter Free
Humidifier), is free from material and workmanship
defects when used under normal conditions for a period
of one (1) year from the date of purchase. Should the
product contain defects in material or workmanship
Dorel Juvenile Group, Inc., will repair or replace the
product, at our option, free of charge. Purchaser will be
responsible for all costs associated with packaging and
shipping the product to Dorel Juvenile Group Consumer
Relations Department at the address noted on the front
of this document and all other freight or insurance costs
associated with the return. Dorel Juvenile Group will bear
the cost of shipping the repaired or replaced product to
the purchaser. Product should be returned in its original
package accompanied by a proof of purchase, either a
sales receipt or other proof that the product is within
the warranty period. This warranty is void if the owner
repairs or modifies the product or the product has been
damaged as a result of misuse.
This warranty excludes any liability other than that
expressly stated previously, including but not limited to,
any incidental or inconsequential damages.
SOME STATES DO NOT ALLOW THE EXCLUSION OR
LIMITATION OF INCIDENTAL OR CONSEQUENTIAL
DAMAGES, SO THE ABOVE LIMITATION OR
EXCLUSION MAY NOT APPLY TO YOU.
THIS WARRANTY GIVES YOU SPECIFIC LEGAL RIGHTS,
AND YOU MAY ALSO HAVE OTHER RIGHTS THAT MAY
VARY FROM STATE TO STATE.
One (1) Year Limited Warranty
Care and Maintenance
NOTE: This is an electrical appliance and requires attention when in use. Follow the recommended guidelines to help
prevent micro-organisms from growing in the humidifier.
STORAGE
1 Clean, rinse and thoroughly dry as directed. DO NOT leave any water in the unit as this may render the unit
inoperable for the following season.
2 Place in the original carton and store in a cool, dry place.
WEEKLY MAINTENANCE
Remove Mineral Buildup/Scale:
1 Turn off unit and remove tank: Ensure humidifier is off and unplugged, then remove tank and drain water from
tank into sink. DO NOT place base in sink.
2 Base unit: Scale build-up on electronic sensor and float. Once sensor has had time to cool, wipe isopropyl alcohol
or vinegar directly on sensor and/or float with a paper towel, cloth or safety swab to clean. DO NOT attempt to
remove float to clean.
3 Tank: Partially fill with one 8-ounce cup of undiluted white vinegar. Leave in the tank for at least 30 minutes,
occasionally swishing the vinegar around inside the tank, then gently clean all interior tank surfaces with a soft brush.
Wipe the exterior of the tank with a cloth dampened with undiluted white vinegar. Rinse tank thoroughly with clean
water to remove the mineral and vinegar residue. Rinse a second time to ensure that all residue has been removed.
Disinfect Tank:
1 Fill tank 1/2 full with water and 1/2 teaspoon of chlorine bleach. DO NOT place tank on base unit while it contains
the bleach/water.
2 Let the solution stand for 30 minutes, swishing every few minutes. Wet all surfaces.
3 Carefully empty the tank and rinse with warm water until you can not detect any bleach smell. Dry with a clean cloth
or paper towel.
To Clean Scent Pad Tray: Wipe with damp cloth and dry completely.
2
WARNING
Shutoffandunplughumidierbefore
removingtankfrombase.
Declaración de información de cumplimiento Estedispositivocumplecon47CFRParte18delasreglasdelaFCC.Estasreglasestándiseñadasparabrindarproteccióncontra
interferenciasperjudicialesconotrosdispositivos.Siestedispositivocausainterferenciaconotrosdispositivos,separeesteproductoyelotrodispositivo.Realiceúnicamenteel
mantenimientodelusuarioqueseencuentraenelmanualdeinstrucciones.
Información de FCC
endondeunniñoseencuentredurmiendo,descansandoojugando(una
habitacióncerradapuedeprovocarunexcesodehumedad).NUNCA
incline,muevaointentevaciarlaunidadmientrasestéenfuncionamiento.
Apagueydesenchufelaunidadantesderetirareltanquedeaguay
moverla.
• NOintenterecargarhumidicadorsinantesdesconectarlaunidadde
sutomadecorriente.Elignorarestaadvertenciapuedecausarlesiones
personales.Asegúresededesenchufarlaunidadtirandodelenchufe,yno
delcable.
• NObloqueelasalidanilaentradadeairemientraslaunidadseencuentre
enfuncionamiento.
•Siemprecoloqueelhumidicadorenunasupercierme,planay
nivelada.Serecomiendacolocarunaalfombraoalmohadillaaprueba
deaguadebajodelhumidicador.NUNCAdebecolocarlosobreuna
alfombraounpisoquepuedadañarseporlaexposiciónalaguaoala
humedad.Paraevitardañosalassupercies,NOcoloqueelhumidicador
directamentedebajodesuperciesmásaltas.
• NOutiliceelhumidicadorenunáreadondeelniveldehumedadsea
superioral60%.Paramedirlahumedadutiliceunhigrómetro,disponiblede
sudistribuidorlocal.Apagueelhumidicadorsihayexcesodehumedad.
• NOviertaaguaenaberturasquenoseandeltanquedeagua.
• NUNCAcoloquelabasedebajodeunacorrientedeaguanilasumerjaen
líquidos.
• NUNCAhagafuncionarlaunidadsinaguaeneltanque.
•Despuésdeluso,NUNCAtoqueeldiafragmademetalexpuestoenla
base,puesestaráCALIENTE.
• Parafuncionaradecuadamente,estehumidicadorrequiere
mantenimientodiarioysemanal.Consultelosprocedimientosdelimpieza.
Utilice únicamente los limpiadores recomendados por el fabricante.
• NUNCAdejeinsertenicoloqueobjetosenlasaberturas.
• NUNCAuseuncabledealimentaciónsinunadaptadorapropiado.
To Use Humidifier
WARNING
Shutoffandunplughumidierbeforeremovingtankfrombase.
WARNING
•Useinwellventilatedarea.•KEEPOUTOFREACH
OFCHILDREN.•Tobeusedinnurseriesforchildren
6monthsandabove.•NOT FOR CONSUMPTION. If
swallowedrinsemouthanddrinkplentyofwater.DO
NOTinducevomiting.•Non-medicatedScentpadis
forusewithHumidControlFilterFreeHUMIDIFIERS
ONLY.•DO NOTuseinaclosedroom,alwayskeep
doorpartiallyopen.•Stopusingthescentpads
ifyouareexperiencingdiscomfort.Ifsymptoms
persist,consultadoctororseekmedicaladvice.•
Washhandsthoroughlyafterhandling.CAUTION:
EYE IRRITANT. •Avoidcontactwitheyes.Rinse
eyesimmediatelyifcontactoccurs.
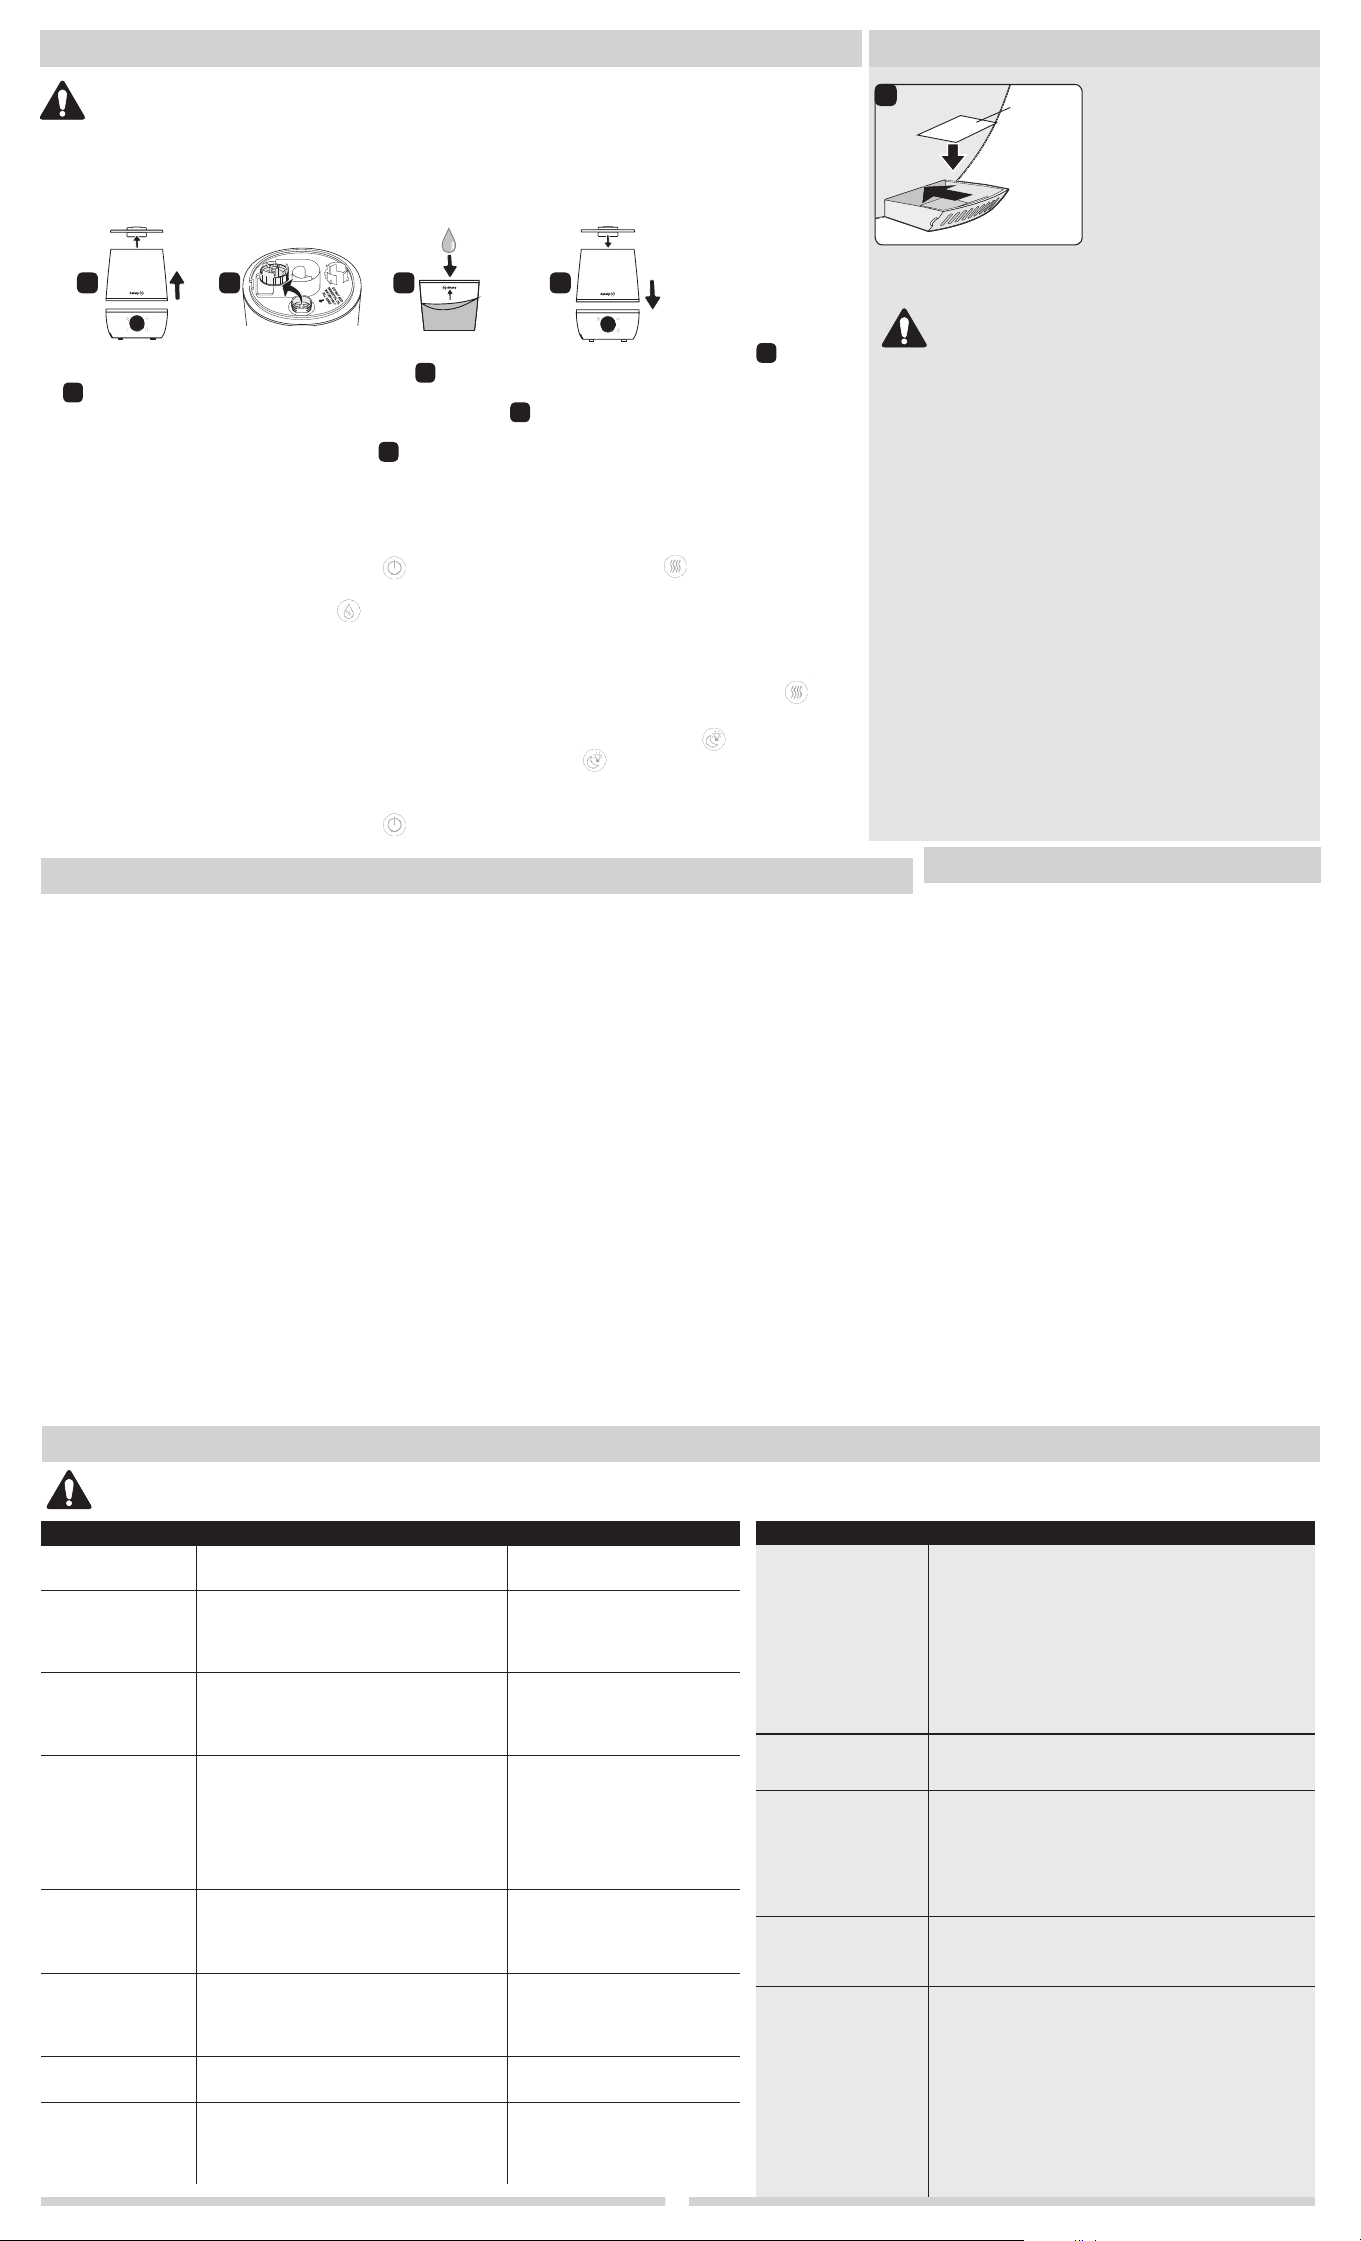
To Use Scent Pad
Press tray and it will open.
Remove scent pad from
packet and insert into tray
(Figure E). Limit touching
pad with hands as much as
possible. Wash hands after
handling pad. Close the tray.
Note: Each pad provides
calming scent for one night.
Scent
Pad
1 Ensure the humidifier is switched OFF and unplugged.
2 Select a location: Choose a flat and level surface 12 inches away from the wall. DO NOT place on a
rug, carpet, finished floor or near furniture which can be damaged by too much moisture or water.
Place on a moisture-resistant surface.
3 Remove and fill tank: Remove mist outlet/lid and lift tank off base
A
. Remove cap on the bottom of
tank
B
and fill with clean, cool water, ideally distilled
C
. Additives are NOT recommended. Replace
cap, turn tank so that cap faces down, and replace tank on the base
D
. Be sure tank is flush with base.
The tank will immediately begin to empty into the base. Place mist outlet/lid on top of tank
D
.
NOTE: Use both hands when carrying full tank of water. It is normal for the water level in the tank to decrease
once full tank has been replaced on base. The water from the tank has simply filled up the empty base.
4 First connect the adapter to the power port of the base, and then plug into a 120VAC electrical outlet.
5 Turn on: Press the Power On/Off button. Press and hold the Mist Level button to toggle between
Fahrenheit and Celsius.
6 Use Desired Humidity button to set a desired humidity level. NOTE: The “- -” setting allows the unit to
run continuously with auto shut off for mist disabled. When no humidity level is selected, the unit will not
be programmed to maintain a certain humidity level.
7 Adjust mist: Rotate the 360° mist outlet and press the Mist Level button to set the desired output (low /
medium / high).
8 Night Light/Night Mode: Press Night Light/Night Mode button to turn on transitioning multi-colored
nightlight. Continue to press button to cycle through single color options. Press and hold the night
light button for 5 seconds and the unit will turn to Night Mode (the night light and display LEDs turn off).
9 Turn off: To manually shut off, press the Power On/Off button. When water level is low, the arrows
will blink and the mist will automatically shut off.
USE AS DIRECTED
CHOKING HAZARD:
DO NOT ADD
ESSENTIAL OIL
WATER ONLY
FILL HERE
(0.9 m)
3’
0.9 m
(3 pies)
(3 pi)
0,9 m
ºF
%
RH
ºC
%
RH
DO NOT ADD
ESSENTIAL OIL
WATER ONLY
FILL HERE
(0.9 m)
3’
0.9 m
(3 pies)
(3 pi)
0,9 m
ºF
%
RH
ºC
%
RH
Tapa
Flotador
Cajónpara
pañosde
esencias
Frente
Oriciode
llenado
Fondo de tanque
Panel de control
Tanque
Salidadeniebla
/tapa
Base con
luzdenoche
Indicadorde
nivelbajodeagua
(cuandolasechas
parpadeansignica
bajoniveldeagua)
**Pañode
esencia
**Pañosdeesenciasadicionalesse
vendenporseparado.
Flechasde
niveldeniebla
(Baja/Media/Alta)
Encendido/
apagado/
DO NOT ADD
ESSENTIAL OIL
WATER ONLY
FILL HERE
(0.9 m)
3’
0.9 m
(3 pies)
(3 pi)
0,9 m
ºF
%
RH
ºC
%
RH
Luzdenoche/
Modonocturno
Niveldeniebla/
Pantallade
temperatura/
(Mantengapresionado
paraalternarF/C)
Pantallade
temperatura
ambiente
Pantallade
niveldehume-
dadrelativa
Humedad
deseado
DO NOT ADD
ESSENTIAL OIL
WATER ONLY
FILL HERE
(0.9 m)
3’
0.9 m
(3 pies)
(3 pi)
0,9 m
ºF
%
RH
ºC
%
RH
DO NOT ADD
ESSENTIAL OIL
WATER ONLY
FILL HERE
(0.9 m)
3’
0.9 m
(3 pies)
(3 pi)
0,9 m
ºF
%
RH
ºC
%
RH
DO NOT ADD
ESSENTIAL OIL
WATER ONLY
FILL HERE
(0.9 m)
3’
0.9 m
(3 pies)
(3 pi)
0,9 m
ºF
%
RH
ºC
%
RH
DO NOT ADD
ESSENTIAL OIL
WATER ONLY
FILL HERE
(0.9 m)
3’
0.9 m
(3 pies)
(3 pi)
0,9 m
ºF
%
RH
ºC
%
RH
A B C D
E
DO NOT ADD
ESSENTIAL OIL
WATER ONLY
FILL HERE
(0.9 m)
3’
0.9 m
(3 pies)
(3 pi)
0,9 m
ºF
%
RH
ºC
%
RH
DO NOT ADD
ESSENTIAL OIL
WATER ONLY
FILL HERE
(0.9 m)
3’
0.9 m
(3 pies)
(3 pi)
0,9 m
ºF
%
RH
ºC
%
RH
DO NOT ADD
ESSENTIAL OIL
WATER ONLY
FILL HERE
(0.9 m)
3’
0.9 m
(3 pies)
(3 pi)
0,9 m
ºF
%
RH
ºC
%
RH
DO NOT ADD
ESSENTIAL OIL
WATER ONLY
FILL HERE
(0.9 m)
3’
0.9 m
(3 pies)
(3 pi)
0,9 m
ºF
%
RH
ºC
%
RH
DO NOT ADD
ESSENTIAL OIL
WATER ONLY
FILL HERE
(0.9 m)
3’
0.9 m
(3 pies)
(3 pi)
0,9 m
ºF
%
RH
ºC
%
RH
DO NOT ADD
ESSENTIAL OIL
WATER ONLY
FILL HERE
(0.9 m)
3’
0.9 m
(3 pies)
(3 pi)
0,9 m
ºF
%
RH
ºC
%
RH
DO NOT ADD
ESSENTIAL OIL
WATER ONLY
FILL HERE
(0.9 m)
3’
0.9 m
(3 pies)
(3 pi)
0,9 m
ºF
%
RH
ºC
%
RH
3
LEATODASLASINSTRUCCIONESANTESDEENSAMBLARYUTILIZAR
DELMOISÉS.GUARDEESTASINSTRUCCIONESPARASUUSOFUTURO.
•
Serequiereelarmadoporpartedeunadulto.
ADVERTENCIA:
•
Mantengalaspiezaspequeñasfueradelalcancedelosniños.
Cuandouseaparatoselectrodomésticos,debesiempretomarprecauciones
básicasparareducirelriesgodeincendios,choqueseléctricosylesionsa
personas,incluidaslassiguientes:
•Utiliceelaparatoelectrodomésticosolamentecomosedescribeeneste
manual.Cualquierotrousonorecomendadoporelfabricantepuede
causarincendios,choqueseléctricosolesionespersonales.Elusode
accesoriosnorecomendadosovendidosporelfabricantepuederesultar
peligroso.NO UTILIZARenexteriores.
•Paraevitarriesgosdeincendioochoqueseléctricos,enchufeel
electrodomésticodirectamenteenunatomadecorrientede120VCA.NO
enchufeelcableconlasmanosmojadas.
•Mantengaelcablefueradelaszonasconmuchotránsito.Paraevitar
riesgosdeincendio,NUNCAcoloqueelcabledebajodealfombrasocerca
desalidasdecalefacción.
• NOopereningúnaparatoelectrodomésticoquetengaelcableoelenchufe
dañado,quehayatenidoundesperfecto,oquesehayacaídoodañadode
algúnmodo.Devuelvaelaparatoelectrodomésticoalfabricanteparasu
revisión,ajusteeléctricoomecánico,oreparación.
• NOintenterepararoajustarningunafuncióneléctricaomecánicade
estaunidad.Silohace,anularálagarantía.Elinteriordelaunidadno
contienepiezasquepuedanserreparadasporelusuario.Todoserviciode
mantenimientodebeserrealizadoúnicamenteporpersonalcalicado.
•Desenchufeelhumidicadorcuandonoestéenuso.
• NOcoloqueelhumidicadorcercadefuentesdecalor,comoestufas,
radiadoresycalentadores.SÍcoloqueelhumidicadorenunaparedinterior,
cercadeunatomadecorriente.Paraobtenermejoresresultados,coloqueel
humidicadoranomenosde12pulgadas(30.5cm)dedistanciadelapared.
NOpermitaquelassalidasdenieblaapuntendirectamentehacialapared.La
humedadpuedeprovocardaños,enespecialalempapelado.
• NUNCAcoloqueelhumidicadorenunlugaraccesiblealosniños.
NUNCAutiliceelhumidicadorenunahabitacióncerrada,especialmente
Humidificador Humid Control Filter Free
IH569 Guía para el usuario
NOTA:Siseacumulahumedadenlasparedesolasventanasdelahabitación,apagueelhumidicador.Lahabitaciónyatienesucientehumedadyelexcesopuedecausardaños.
Información para el consumidor
• No devuelva este producto al lugar donde lo compró. Si falta alguna pieza, visítenos en www.safety1st.com o chatee con nosotros para sacarse dudas. También puede
enviarnos un mensaje al (812) 652-2525 o llamar al Servicio de Atención al Cliente al (800) 544-1108. Tenga a mano el número de modelo (WA095) y el código de fecha (la
fecha de fabricación se encuentra en la etiqueta del producto) a mano.
• La bombilla para la luz noche no es reemplazable.
¿Cómo funciona?
Los humidificadores proporcionan comodidad
al agregar humedad al aire en interiores. El
Humidificador Humid Control Filter Free utiliza
la tecnología ultrasónica. Un diafragama de
cerámica vibra silenciosamente a muy alta
frecuencia para crear pequeñas gotas, lo que
produce una fresca niebla o rocío.
Debe colocar el humidificador con las salidas
de niebla alejadas de cualquier pared o mueble
cercano.
NOTA: El nivel de humedad es recomendado
del 30%-50%*. Un nivel de humedad inferior al
30% o por encima del 50% puede ser insalubre
e incómodo.
En condiciones normales, es recomendable utilizar
un ajuste menor en este humidificador. La niebla
no es visible en un nivel de ajuste más bajo. Los
niveles de ajuste más altos sólo deben utilizarse
cuando el nivel de humedad es extremadamente
bajo. En un ajuste más alto es posible que se vea
una niebla blanca y existe un mayor riesgo de
daño por humedad, especialmente en objetos
que se encuentren cerca del humidificador.
* Basado en una investigación de CPSC.gov
“The Inside Story: A Guide to Indoor Air
Quality.”
Conozca su unidad
STRANGULATION HAZARD! Children have STRANGLED in cords.
NEVER place camera or cords within 6 feet of the crib. Do not use
with an extension cord. Only use the AC adapters provided.
WARNING!
STRANGULATION HAZARD! Children have STRANGLED in cords.
NEVER place Baby Unit or cords within 6 feet of the crib. Do not use
with an extension cord. Only use the AC adapters provided.
WARNING!
Video Monitor instruction warning
Audio Monitor instruction warning
Generic Electrical instruction warning w/ adaptors
Generic Electrical instruction warning
¡PELIGRO DE ESTRANGULACIÓN!LosniñossehanESTRANGULADO
conloscables.NUNCAcoloqueloscablesamenosde3piesde
distanciadelacuna.Nolouseconuncabledeextensión.
¡ADVERTENCIA!
•Whatarethevariablesthat
affectruntime?
•HowdoIremovefilmon
thetank?
•HowcanIextendruntime?
•Whydoesmyhumidifiernot
stoprunning?
•Whyismyhumidifiernot
producingmist?
•Theestimatedruntimeforthishumidifierisbasedonaverageroomconditions
andisdependentonnumerousvariablessuchas:
-Airexchangeintheroom.
-Roomconstructionwherethehumidifierisplaced.
-Temperatureoftheroom.
-Humiditylevelsintheroom.
-Movementofoccupantsandtheopeningandclosingofdoorsintheroom.
-Homefurnishingsintheroom.
•See“DisinfectTank”section.Regularcleaningisrecommended.
•Runyourunitonthelowestsetting.
•Filltankallthewayfullandplaceonthebase.Letwateremptyintothebase
untilitstopsbubbling,thenrefillandre-seattankagain.Thisensuresmaximum
watercapacityandwillextendruntime.
•DesiredHumiditymaybesetto“--”insteadofapercentage.Idealhumidity
levelrangeis30%-50%.
•Selectedhumiditylevelhasnotbeenachieved
•Confirmtheunitissettodesiredhumiditylevel.Idealrangeis30%-50%
•Selectedhumiditylevelhasbeenachieved
•Humidityleveldetectedmaybeaboveselectedhumiditylevel.
Troubleshooting
Problems Causes Actions
•Unitdoesnotturnon
•Whitepowdercomingout
ofhumidifier
•Dampnessinroomson
wallsorwindows
•Unitturnsonandoffor
mistlevelarrowsblink
•Bubblesinthewaterora
gurglingsound
•Waterleakage
•Thenightlightdoesn’tlight
•Nolongeranyscent
•Pluginpowercordorre-seattank
•Adjustthesetting
toreducemistoutput
•Usedistilledorfilteredwaterinstead
oftapwater
•Turnunitofforadjustthe
settingtoreducemistoutput
•Opendoortoroomatleast6’’
•Refilltank
•Cleanfloat(seeCare&Maintenance)
•Cleangasket(seeCare&Maintenance)
•Puthumidifieronalevelsurfaceand
refilltank
•Noactionnecessary
•Emptywaterinbase
•Discardhumidifier,asitcannotberepaired
•Thenightlightbulbisnotreplaceable
•Replacescentpad.Toordermore
scentpadscontactConsumerRelations
orpurchaseatwww.safety1st.com.
•Unitisnotpluggedinortank
isnot
seatedproperly
•Highsetting
(mistcanlooklikewhite
powder)
•
Somemineralsusedinsafewater
treatmentcouldbecomewhite
powderasthewatervaporizes.This
isnotahumidifiermalfunction
•Highsetting
•Tankisalmostempty
•Thefloatinsidebaseunitisdirty
•Gasketinbottomoftankisdirty
•Humidifierisnotonalevelsurfaceso
floatisnotabletooperateproperly
•Normaloperation.Aswaterenters
reservoirinbase,airisdisplacedand
createsbubblesintankandpossibly
agurglingsound
•Waterlevelinbasereservoirmay
betoohigh
•Productmayhavebeenmishandled
•Unitisnotpluggedinort
henight
lightbulbhasburntout
•Thescentpadistooold
Question Answer
Dorel Juvenile Group, Inc., warrants to the original
purchaser that this product (Humid Control Filter Free
Humidifier), is free from material and workmanship
defects when used under normal conditions for a period
of one (1) year from the date of purchase. Should the
product contain defects in material or workmanship
Dorel Juvenile Group, Inc., will repair or replace the
product, at our option, free of charge. Purchaser will be
responsible for all costs associated with packaging and
shipping the product to Dorel Juvenile Group Consumer
Relations Department at the address noted on the front
of this document and all other freight or insurance costs
associated with the return. Dorel Juvenile Group will bear
the cost of shipping the repaired or replaced product to
the purchaser. Product should be returned in its original
package accompanied by a proof of purchase, either a
sales receipt or other proof that the product is within
the warranty period. This warranty is void if the owner
repairs or modifies the product or the product has been
damaged as a result of misuse.
This warranty excludes any liability other than that
expressly stated previously, including but not limited to,
any incidental or inconsequential damages.
SOME STATES DO NOT ALLOW THE EXCLUSION OR
LIMITATION OF INCIDENTAL OR CONSEQUENTIAL
DAMAGES, SO THE ABOVE LIMITATION OR
EXCLUSION MAY NOT APPLY TO YOU.
THIS WARRANTY GIVES YOU SPECIFIC LEGAL RIGHTS,
AND YOU MAY ALSO HAVE OTHER RIGHTS THAT MAY
VARY FROM STATE TO STATE.
One (1) Year Limited Warranty
Care and Maintenance
NOTE: This is an electrical appliance and requires attention when in use. Follow the recommended guidelines to help
prevent micro-organisms from growing in the humidifier.
STORAGE
1 Clean, rinse and thoroughly dry as directed. DO NOT leave any water in the unit as this may render the unit
inoperable for the following season.
2 Place in the original carton and store in a cool, dry place.
WEEKLY MAINTENANCE
Remove Mineral Buildup/Scale:
1 Turn off unit and remove tank: Ensure humidifier is off and unplugged, then remove tank and drain water from
tank into sink. DO NOT place base in sink.
2 Base unit: Scale build-up on electronic sensor and float. Once sensor has had time to cool, wipe isopropyl alcohol
or vinegar directly on sensor and/or float with a paper towel, cloth or safety swab to clean. DO NOT attempt to
remove float to clean.
3 Tank: Partially fill with one 8-ounce cup of undiluted white vinegar. Leave in the tank for at least 30 minutes,
occasionally swishing the vinegar around inside the tank, then gently clean all interior tank surfaces with a soft brush.
Wipe the exterior of the tank with a cloth dampened with undiluted white vinegar. Rinse tank thoroughly with clean
water to remove the mineral and vinegar residue. Rinse a second time to ensure that all residue has been removed.
Disinfect Tank:
1 Fill tank 1/2 full with water and 1/2 teaspoon of chlorine bleach. DO NOT place tank on base unit while it contains
the bleach/water.
2 Let the solution stand for 30 minutes, swishing every few minutes. Wet all surfaces.
3 Carefully empty the tank and rinse with warm water until you can not detect any bleach smell. Dry with a clean cloth
or paper towel.
To Clean Scent Pad Tray: Wipe with damp cloth and dry completely.
2
WARNING
Shutoffandunplughumidierbefore
removingtankfrombase.
Declaración de información de cumplimiento Estedispositivocumplecon47CFRParte18delasreglasdelaFCC.Estasreglasestándiseñadasparabrindarproteccióncontra
interferenciasperjudicialesconotrosdispositivos.Siestedispositivocausainterferenciaconotrosdispositivos,separeesteproductoyelotrodispositivo.Realiceúnicamenteel
mantenimientodelusuarioqueseencuentraenelmanualdeinstrucciones.
Información de FCC
endondeunniñoseencuentredurmiendo,descansandoojugando(una
habitacióncerradapuedeprovocarunexcesodehumedad).NUNCA
incline,muevaointentevaciarlaunidadmientrasestéenfuncionamiento.
Apagueydesenchufelaunidadantesderetirareltanquedeaguay
moverla.
• NOintenterecargarhumidicadorsinantesdesconectarlaunidadde
sutomadecorriente.Elignorarestaadvertenciapuedecausarlesiones
personales.Asegúresededesenchufarlaunidadtirandodelenchufe,yno
delcable.
• NObloqueelasalidanilaentradadeairemientraslaunidadseencuentre
enfuncionamiento.
•Siemprecoloqueelhumidicadorenunasupercierme,planay
nivelada.Serecomiendacolocarunaalfombraoalmohadillaaprueba
deaguadebajodelhumidicador.NUNCAdebecolocarlosobreuna
alfombraounpisoquepuedadañarseporlaexposiciónalaguaoala
humedad.Paraevitardañosalassupercies,NOcoloqueelhumidicador
directamentedebajodesuperciesmásaltas.
• NOutiliceelhumidicadorenunáreadondeelniveldehumedadsea
superioral60%.Paramedirlahumedadutiliceunhigrómetro,disponiblede
sudistribuidorlocal.Apagueelhumidicadorsihayexcesodehumedad.
• NOviertaaguaenaberturasquenoseandeltanquedeagua.
• NUNCAcoloquelabasedebajodeunacorrientedeaguanilasumerjaen
líquidos.
• NUNCAhagafuncionarlaunidadsinaguaeneltanque.
•Despuésdeluso,NUNCAtoqueeldiafragmademetalexpuestoenla
base,puesestaráCALIENTE.
• Parafuncionaradecuadamente,estehumidicadorrequiere
mantenimientodiarioysemanal.Consultelosprocedimientosdelimpieza.
Utilice únicamente los limpiadores recomendados por el fabricante.
• NUNCAdejeinsertenicoloqueobjetosenlasaberturas.
• NUNCAuseuncabledealimentaciónsinunadaptadorapropiado.
To Use Humidifier
WARNING
Shutoffandunplughumidierbeforeremovingtankfrombase.
WARNING
•Useinwellventilatedarea.•KEEPOUTOFREACH
OFCHILDREN.•Tobeusedinnurseriesforchildren
6monthsandabove.•NOT FOR CONSUMPTION. If
swallowedrinsemouthanddrinkplentyofwater.DO
NOTinducevomiting.•Non-medicatedScentpadis
forusewithHumidControlFilterFreeHUMIDIFIERS
ONLY.•DO NOTuseinaclosedroom,alwayskeep
doorpartiallyopen.•Stopusingthescentpads
ifyouareexperiencingdiscomfort.Ifsymptoms
persist,consultadoctororseekmedicaladvice.•
Washhandsthoroughlyafterhandling.CAUTION:
EYE IRRITANT. •Avoidcontactwitheyes.Rinse
eyesimmediatelyifcontactoccurs.
To Use Scent Pad
Press tray and it will open.
Remove scent pad from
packet and insert into tray
(Figure E). Limit touching
pad with hands as much as
possible. Wash hands after
handling pad. Close the tray.
Note: Each pad provides
calming scent for one night.
Scent
Pad
1 Ensure the humidifier is switched OFF and unplugged.
2 Select a location: Choose a flat and level surface 12 inches away from the wall. DO NOT place on a
rug, carpet, finished floor or near furniture which can be damaged by too much moisture or water.
Place on a moisture-resistant surface.
3 Remove and fill tank: Remove mist outlet/lid and lift tank off base
A
. Remove cap on the bottom of
tank
B
and fill with clean, cool water, ideally distilled
C
. Additives are NOT recommended. Replace
cap, turn tank so that cap faces down, and replace tank on the base
D
. Be sure tank is flush with base.
The tank will immediately begin to empty into the base. Place mist outlet/lid on top of tank
D
.
NOTE: Use both hands when carrying full tank of water. It is normal for the water level in the tank to decrease
once full tank has been replaced on base. The water from the tank has simply filled up the empty base.
4 First connect the adapter to the power port of the base, and then plug into a 120VAC electrical outlet.
5 Turn on: Press the Power On/Off button. Press and hold the Mist Level button to toggle between
Fahrenheit and Celsius.
6 Use Desired Humidity button to set a desired humidity level. NOTE: The “- -” setting allows the unit to
run continuously with auto shut off for mist disabled. When no humidity level is selected, the unit will not
be programmed to maintain a certain humidity level.
7 Adjust mist: Rotate the 360° mist outlet and press the Mist Level button to set the desired output (low /
medium / high).
8 Night Light/Night Mode: Press Night Light/Night Mode button to turn on transitioning multi-colored
nightlight. Continue to press button to cycle through single color options. Press and hold the night
light button for 5 seconds and the unit will turn to Night Mode (the night light and display LEDs turn off).
9 Turn off: To manually shut off, press the Power On/Off button. When water level is low, the arrows
will blink and the mist will automatically shut off.
USE AS DIRECTED
CHOKING HAZARD:
DO NOT ADD
ESSENTIAL OIL
WATER ONLY
FILL HERE
(0.9 m)
3’
0.9 m
(3 pies)
(3 pi)
0,9 m
ºF
%
RH
ºC
%
RH
DO NOT ADD
ESSENTIAL OIL
WATER ONLY
FILL HERE
(0.9 m)
3’
0.9 m
(3 pies)
(3 pi)
0,9 m
ºF
%
RH
ºC
%
RH
Tapa
Flotador
Cajónpara
pañosde
esencias
Frente
Oriciode
llenado
Fondo de tanque
Panel de control
Tanque
Salidadeniebla
/tapa
Base con
luzdenoche
Indicadorde
nivelbajodeagua
(cuandolasechas
parpadeansignica
bajoniveldeagua)
**Pañode
esencia
**Pañosdeesenciasadicionalesse
vendenporseparado.
Flechasde
niveldeniebla
(Baja/Media/Alta)
Encendido/
apagado/
DO NOT ADD
ESSENTIAL OIL
WATER ONLY
FILL HERE
(0.9 m)
3’
0.9 m
(3 pies)
(3 pi)
0,9 m
ºF
%
RH
ºC
%
RH
Luzdenoche/
Modonocturno
Niveldeniebla/
Pantallade
temperatura/
(Mantengapresionado
paraalternarF/C)
Pantallade
temperatura
ambiente
Pantallade
niveldehume-
dadrelativa
Humedad
deseado
DO NOT ADD
ESSENTIAL OIL
WATER ONLY
FILL HERE
(0.9 m)
3’
0.9 m
(3 pies)
(3 pi)
0,9 m
ºF
%
RH
ºC
%
RH
DO NOT ADD
ESSENTIAL OIL
WATER ONLY
FILL HERE
(0.9 m)
3’
0.9 m
(3 pies)
(3 pi)
0,9 m
ºF
%
RH
ºC
%
RH
DO NOT ADD
ESSENTIAL OIL
WATER ONLY
FILL HERE
(0.9 m)
3’
0.9 m
(3 pies)
(3 pi)
0,9 m
ºF
%
RH
ºC
%
RH
DO NOT ADD
ESSENTIAL OIL
WATER ONLY
FILL HERE
(0.9 m)
3’
0.9 m
(3 pies)
(3 pi)
0,9 m
ºF
%
RH
ºC
%
RH
A B C D
E
DO NOT ADD
ESSENTIAL OIL
WATER ONLY
FILL HERE
(0.9 m)
3’
0.9 m
(3 pies)
(3 pi)
0,9 m
ºF
%
RH
ºC
%
RH
DO NOT ADD
ESSENTIAL OIL
WATER ONLY
FILL HERE
(0.9 m)
3’
0.9 m
(3 pies)
(3 pi)
0,9 m
ºF
%
RH
ºC
%
RH
DO NOT ADD
ESSENTIAL OIL
WATER ONLY
FILL HERE
(0.9 m)
3’
0.9 m
(3 pies)
(3 pi)
0,9 m
ºF
%
RH
ºC
%
RH
DO NOT ADD
ESSENTIAL OIL
WATER ONLY
FILL HERE
(0.9 m)
3’
0.9 m
(3 pies)
(3 pi)
0,9 m
ºF
%
RH
ºC
%
RH
DO NOT ADD
ESSENTIAL OIL
WATER ONLY
FILL HERE
(0.9 m)
3’
0.9 m
(3 pies)
(3 pi)
0,9 m
ºF
%
RH
ºC
%
RH
DO NOT ADD
ESSENTIAL OIL
WATER ONLY
FILL HERE
(0.9 m)
3’
0.9 m
(3 pies)
(3 pi)
0,9 m
ºF
%
RH
ºC
%
RH
DO NOT ADD
ESSENTIAL OIL
WATER ONLY
FILL HERE
(0.9 m)
3’
0.9 m
(3 pies)
(3 pi)
0,9 m
ºF
%
RH
ºC
%
RH
•¿Cuálessonlas
variablesqueafectanel
tiempodefuncionamiento?
•¿Cómoeliminolapelícula
deltanque?
•¿Cómopuedoprolongarel
tiempodefuncionamiento?
•¿Porquémihumidificador
nodejadefuncionar?
•¿Porquémihumidificador
noproduceniebla?
•Eltiempodefuncionamientoestimadodeestehumidificadorse
basaenlascondicionesdeunahabitacióntípicaydependede
numerosasvariables,como:
-Elintercambiodeaireenlahabitación.
-Ellugardelahabitacióndondesecolocaelhumidificador.
-Latemperaturadelahabitación.
-Losnivelesdehumedaddelahabitación.
-Elmovimientodelosocupantes,ylaaperturayelcierredelas
puertasdelahabitación.
-Losmueblesdelahabitación.
•Consultelasección“Paradesinfectareltanque”.Serecomienda
realizarunalimpiezaregular.
•Hagafuncionarlaunidadenajustándolaalnivelmásbajo.
•Lleneeltanquecompletamenteycolóqueloenlabase.Dejeque
elaguaseviertadentrodelabasehastaquedejedeburbujear;
luegovuelvaallenareltanqueycolóquelonuevamente.Esto
aseguralamáximacapacidaddeaguayprolongaeltiempode
funcionamiento.
•Elniveldehumedadseestableceen“--”enlugardeunporcentaje.
Elrangodeniveldehumedadideales30%-50%.Veaelpaso6.
•Nosehaalcanzadoelniveldehumedadseleccionado.
•Confirmequelaunidadestéconfiguradaenelniveldehumedad
deseado.Elrangoideales30%-50%.
•Sehaalcanzadoelniveldehumedadseleccionado.
•Elniveldehumedaddetectadopuedeestarporencimadelnivelde
humedadseleccionado.
Solución de problemas
Problemas Causas Acciónes
•Launidadnose
enciende
•Salepolvoblancodel
humidificador(laniebla
puedeparecerblanca
polvo)
•Humedadenhabitaciones,
paredesoventanas
•Launidadse
enciendeyseapagaolas
flechasdelniveldeniebla
parpadean
•Burbujasenelaguaoun
sonidoquegorjea
•Pérdidadeagua
•Laluzdenochenose
enciende
•Nohaymásesencia
•Enchufeelcabledealimentacióno
vuelvaacolocareltanqueenlabase
•Cambieelajusteparareducirlasalida
deniebla
•Useaguadestiladaofiltradaenlugarde
aguadelgrifo
•Apaguelaunidadocambieelajuste
parareducirlasalidadeniebla
•Abralapuertadelahabitaciónunos15
cm(6pulgadas)
•Vuelvaallenareltanque
•Limpieelflotador(consulte“Cuidadoy
mantenimiento”)
•Limpielajunta(consulte“Cuidadoy
mantenimiento”)
•Coloqueelhumidificadorenunasuperficie
planayvuelvaallenareltanque
•Nodeberealizarseningunaacción
•Vacíeelaguaenlabase
•Desecheelhumidificador,puesno
puedeserreparado
•Lalamparitanosepuedereemplazar
•Reemplaceelpañodeesencia.Para
pedirmáspañosdeesencia,póngase
encontactoconelDepartamentode
AtenciónalClienteocómpreloen
www.safety1st.com.
•Launidadnoestáenchufadaoeltanquenoestá
colocadoadecuadamente
•Launidadestáajustadaaunnivelalto
•Algunosmineralesutilizadoseneltratamientode
aguapotablepodríanconvertirseenpolvodecolor
blancocomoelaguaseevapora
•Launidadestáajustadaaunnivelalto
•Launidadestáajustadaaunnivelbajo
•Eltanqueestácasivacío
•Elflotadordentrodelaunidaddebaseestásucio
•Lajuntaenlaparteinferiordeltanqueestásucia
•Elhumidificadornoestáenuna
superficieplanayelflotadornopuedefuncionar
correctamente
•Funcionamientonormal.Amedidaqueelagua
ingresaeneldepósitodelabase,desplazaelairey
creaburbujaseneltanqueyposiblementeunsonido
quegorjea
•Elniveldeaguaenelreservoriopuedeserdemasiado
alto.
•Esposiblequeelproductosehayautilizadodemanera
incorrecta.
•Launidadnoestáenchufadaolalamparitase
quemó
•Elpañodeesenciaesmuyviejo
Pregunta Respuesta
Para usar el humidificador
La firma Dorel Juvenile Group, Inc., asegura al comprador original
que este producto (Humidificador Humid Control Filter Free),
está garantizado contra materiales defectuosos o mano de obra
deficiente durante un (1) año a partir de la fecha de compra, si
se utiliza en condiciones normales. Si el producto presentara
materiales defectuosos o mano de obra deficiente, Dorel Juvenile
Group, Inc. reparará o sustituirá el producto, a nuestra discreción,
de manera gratuita. El comprador cubrirá todos los costes
relacionados con el envase y envío del producto al Departamento
de Relaciones con el Consumidor de Dorel Juvenile Group,
a la dirección que aparece al inicio de este documento, y los
demás costes de transportación o aseguramiento relacionados
con el envío. Dorel Juvenile Group cubrirá los costes de
devolución al comprador del producto reparado o sustituido.
El producto debe enviarse en su envase original junto con una
prueba documental de la compra, ya sea el recibo de venta u
otro medio demostrativo de que el producto aún esté dentro
del período de garantía. Esta garantía quedará anulada si el
propietario hubiera reparado o modificado el producto, o si
éste se hubiera dañado como consecuencia del uso incorrecto.
Esta garantía excluye cualesquiera otras responsabilidades
ajenas a la expresada más arriba, entre otras los daños
incidentales o consecuentes.
EN ALGUNOS ESTADOS NO SE PERMITEN LAS EXCLUSIONES
O LIMITACIONES REFERENTES A LOS DAÑOS INCIDENTALES O
CONSECUENTES, DE MODO QUE LA LIMITACIÓN O EXCLUSIÓN
ANTES EXPUESTA QUIZÁS NO SE APLIQUE EN SU CASO
PARTICULAR.
ESTA GARANTÍA LE OTORGA DERECHOS LEGALES ESPECÍFICOS
Y ES POSIBLE QUE USTED TAMBIÉN CUENTE CON OTROS
DERECHOS QUE PUDIERAN VARIAR EN DISTINTOS ESTADOS.
Garantía limitada durante un (1) año
NOTA: Este es un aparato electrodoméstico y requiere atención cuando está en uso. Siga las pautas recomendadas
para ayudar a prevenir el desarrollo de microorganismos en el humidificador.
GUARDADO
1 Limpie, enjuague y seque completamente como se indica. NO deje nada de agua en la unidad, ya que esto podría
hacer que deje de funcionar para la temporada siguiente.
2 Colóquelo en la caja original y guárdelo en un lugar fresco y seco.
MANTENIMIENTO SEMANAL
Retire la acumulación de minerales/sarro:
1 Apague la unidad y retire el tanque: Asegúrese de que el humidificador esté apagado y desenchufado antes de
retirar el tanque y vaciarlo en el lavabo. NO coloque la base en el lavabo.
2 Unidad de base: Acumulación de sarro en el sensor electrónico y el flotador. Después de que el sensor haya
tenido tiempo de enfriarse, limpie el sensor y/o el flotador directamente con alcohol isopropílico o vinagre
utilizando una toalla de papel, un paño o una gasa. NO intente retirar el flotador para limpiarlo.
3 Tanque: Llene el tanque parcialmente con una taza de 8 onzas de vinagre blanco sin diluir. Deje la solución en el
tanque durante al menos 30 minutos, revolviendo ocasionalmente el vinagre en su interior. Después, limpie con
cuidado las superficies internas del tanque con un cepillo suave. Limpie la parte exterior del tanque con un paño
humedecido con vinagre blanco sin diluir. Enjuague el tanque completamente con agua limpia para eliminar los
residuos minerales y de vinagre. Enjuáguelo una segunda vez para asegurarse de eliminar todos los residuos.
Para desinfectar el tanque:
1 Llene el tanque con agua hasta la mitad y agregue 1/2 cucharadita de blanqueador con cloro. NO coloque el
tanque en la unidad de base mientras contiene blanqueador y agua.
2 Deje reposar la solución durante 30 minutos, agitándola cada pocos minutos. Humedezca todas las superficies.
3 Vacíe el tanque cuidadosamente y enjuáguelo con agua tibia hasta que no tenga olor a cloro. Séquelo con un
trapo limpio o una toalla de papel.
Para limpiar la bandeja para paño de esencia: Limpiar con un paño húmedo y secar completamente.
ADVERTENCIA
Apagueydesenchufeantesdequitar
eltanquedeaguaymoverlabase.
4
ADVERTENCIA
Apagueydesenchufeantesdequitareltanquedeaguay
moverlabase.
1 Asegúrese de que el humidificador esté APAGADO y desenchufado.
2 Elija una ubicación: Elija una superficie plana y nivelada 12 pulgadas (30.5 cm) de distancia de la pared.
NO coloque el humidificador sobre una alfombra, el piso o cerca de muebles que puedan dañarse por el
exceso de humedad o agua. Colóquelo sobre una superficie resistente a la humedad.
3 Retire el tanque y llénelo: Retire la tapa de salidas de niebla
y levante el tanque de la base
A
.
Quite la tapa que está en el fondo del tanque
B
y llénelo con agua limpia y fría, idealmente destilada
C
. NO se recomiendan los aditivos. Coloque nuevamente la tapa, de vuelta el tanque para que la tapa
quede hacia abajo y vuelva a colocar el tanque en la base
D
. Asegúrese de que el tanque esté alineado
con la base. El tanque comenzará a vaciarse inmediatamente dentro de la base. Coloque la tapa / salida
de niebla en la parte superior del tanque
D
.
NOTA: Cuando transporte el tanque lleno de agua, use ambas manos. Es normal que el nivel de agua en el tanque
baje una vez que se coloque el tanque lleno en la base. El agua del tanque simplemente llena la base vacía.
4 Primero conecte el adaptador al puerto de alimentación de la base y luego conéctelo a un
tomacorriente de 120 VCA.
5 Encienda: Presione el botón de encendido . Presione el botón nivel de niebla para alternar entre
Fahrenheit y Celsius.
6 Utilice el botón de humedad deseada para establecer el nivel de humedad deseado. NOTA: La configura-
ción “- -” permite que la unidad funcione continuamente con el apagado automático por neblina desactivado.
Cuando no se selecciona ningún nivel de humedad, la unidad no se programará para mantener un cierto nivel
de humedad.
7 Ajuste de la niebla: Gire la salida de niebla de 360° y presione el botón de nivel de niebla para
configurar la salida deseada (baja / media / alta).
8 Luz de noche /Modo nocturno: Presione el botón de luz de noche /modo nocturno para encender
la luz de noche multicolor de transición. Siga presionando el botón para pasar por cada una de
las opciones de color. Mantenga presionado el botón de luz nocturna durante 5 segundos y la unidad
cambiará al modo nocturno (la luz nocturna y los LED de la pantalla se apagan).
9 Apague: Presione el botón de encendido para apagar manualmente. Cuando el nivel del agua es
bajo, las flechas parpadearán y la niebla se apagará automáticamente.
ADVERTENCIA
•Useenunáreabienventilada.•MANTENERFUERA
DELALCANCEDELOSNIÑOS.•Puedeutilizarse
enguarderíasparaniñosmayoresde6meses.•NO
ES PARA CONSUMO.Encasodeinjerirse,enjuague
labocaybebamuchaagua.NOinduzcaelvómito.•
Elpañodeesencianomedicinalesparausarsecon
elHumidControlFilterFreeHUMIDIFICADORS
SOLAMENTE.•NOuseenhabitacionescerradas,
siempremantengalapuertaparcialmenteabierta.
•Dejedeusarlospañosdeesenciaencasode
experimentarciertomalestar.Silossíntomas
continúan,consulteaunmédicoosoliciteasistencia
médica.•Lávesebienlasmanosdespuésde
manipularlo.PRECAUCIÓN: IRRITANTE DE LOS
OJOS. •Eviteelcontactoconlosojos.Enjuágueselos
ojosdeinmediatoencasodehabercontacto.
Para usar el paño de esencia
Presione la bandeja y se abrirá.
Retire el paño de esencia del
paquete y colóquelo en la
bandeja (Figura E). Evite lo que
más pueda tocar el paño con
las manos. Lávese las manos
después de haber manipulado
el paño. Cerrar la bandeja.
Nota: La esencia relajante de
cada paño dura una noche.
Paño de
esencia
USE COMO SE INDICA.
RIESGO DE ASFIXIA:
DO NOT ADD
ESSENTIAL OIL
WATER ONLY
FILL HERE
(0.9 m)
3’
0.9 m
(3 pies)
(3 pi)
0,9 m
ºF
%
RH
ºC
%
RH
DO NOT ADD
ESSENTIAL OIL
WATER ONLY
FILL HERE
(0.9 m)
3’
0.9 m
(3 pies)
(3 pi)
0,9 m
ºF
%
RH
ºC
%
RH
DO NOT ADD
ESSENTIAL OIL
WATER ONLY
FILL HERE
(0.9 m)
3’
0.9 m
(3 pies)
(3 pi)
0,9 m
ºF
%
RH
ºC
%
RH
DO NOT ADD
ESSENTIAL OIL
WATER ONLY
FILL HERE
(0.9 m)
3’
0.9 m
(3 pies)
(3 pi)
0,9 m
ºF
%
RH
ºC
%
RH
A B C D
E
DO NOT ADD
ESSENTIAL OIL
WATER ONLY
FILL HERE
(0.9 m)
3’
0.9 m
(3 pies)
(3 pi)
0,9 m
ºF
%
RH
ºC
%
RH
DO NOT ADD
ESSENTIAL OIL
WATER ONLY
FILL HERE
(0.9 m)
3’
0.9 m
(3 pies)
(3 pi)
0,9 m
ºF
%
RH
ºC
%
RH
DO NOT ADD
ESSENTIAL OIL
WATER ONLY
FILL HERE
(0.9 m)
3’
0.9 m
(3 pies)
(3 pi)
0,9 m
ºF
%
RH
ºC
%
RH
DO NOT ADD
ESSENTIAL OIL
WATER ONLY
FILL HERE
(0.9 m)
3’
0.9 m
(3 pies)
(3 pi)
0,9 m
ºF
%
RH
ºC
%
RH
DO NOT ADD
ESSENTIAL OIL
WATER ONLY
FILL HERE
(0.9 m)
3’
0.9 m
(3 pies)
(3 pi)
0,9 m
ºF
%
RH
ºC
%
RH
Cuidado y mantenimiento
DO NOT ADD
ESSENTIAL OIL
WATER ONLY
FILL HERE
(0.9 m)
3’
0.9 m
(3 pies)
(3 pi)
0,9 m
ºF
%
RH
ºC
%
RH
DO NOT ADD
ESSENTIAL OIL
WATER ONLY
FILL HERE
(0.9 m)
3’
0.9 m
(3 pies)
(3 pi)
0,9 m
ºF
%
RH
ºC
%
RH