

_
cos冒WAY
I
80STWAY
®
COST
IROMMAX
USER'S MANUAL
Electric Tiller
GT3587US
THIS INSTRUCTION BOOKLET CONTAINS IMPORNT SAFETY INFORMION. PLEASE READ AND KEEP FOR FUTURE REFERENCE

COST
.
02
COST
COST
3
9
7
4
6
18
03
COST
1
—
5
仁
:
11
—
C
,
.
,
芍§
-
•
·
t
L
�
。
3
2
COST
Service information
Please note that the following parts of this product
are subject to normal or natural wear and that the fol
lowing parts are therefore also required for use as
consumables.
Wear parts*: Brush Assemblies, Blade Roller
• Not necessarily included in the scope of delivery!
14. Troubleshooting guide
Fault
Possible causes
Rectification
Motor does not start
• No electricity in plug
• Check line and fuse
• Cable defective • Have machine checked by a customer service
center
• Switch, switch/plug block defective • Have machine checked by a customer service
center
• Connections to motor or capacitor
• Have machine checked by a customer service
disconnected
center
• Blade roller blocked
• If necessary adjust working depth Clean housing
so that the roller can run freely
Engine performance
• Soil is too firm
• Change working depth
drops
• Carbonbrushes worn out • Check by a customer service center
• Roller badly worn
• Replace roller
The Electric Tiller is
• roller worn
• Replace roller
difficult to check
• Wrong working depth
• Correct working depth
Motor is running, roller • Gearing defective
• By customer service workshop
is not rotating
04
17
Connections and repairs of electrical equipment may
only be carried out by an electrician
Please provide the following information in the event
of any enquiries:
• pe of current for the motor
• Machine data - type plate
• Motor data - type plate
10.Cleaning and maintenance
Dangerl
Always pull out the mains power plug before starting
any cleaning work
Cleaning
• Keep all safety devices, air vents and the motor
housing free of dirt and dust as far as possible
Wipe the equipment with a clean cloth or blow it
with compressed air at low pressure
• We recommend that you clean the device immed1一
ately each time you have finished using it
• Clean the equipment regularly with a moist cloth
and some soft soap. Do not use cleaning agents or
solvents; these could attack the plastic parts of the
equipment. Ensure that no water can seep into the
device. The ingress of water into an electric tool
increases the risk of an electric shock
Carbon brushes
In case of excessive sparking, have the carbon
brushes checked only by a qualified electrician
Danger! The carbon brushes should not be replaced
by anyone but a qualified electrician.
Maintenance
• A worn out or damaged cutting unit should be re
placed by an authorised expert
• Take care that all fastening elements (screws,
nuts, etc.) are firmly tightened, so that you can
work safely with the Electric Tiller.
• Store the Electric Tiller in a dry place
• For longer life, all screw-fastened parts, such as
wheels and axles should be cleaned and subse
quently oiled
• Regular servicing of the implement not only se
cures longer endurance and performance, it also
contributes to an accurate and simple dig up of
your bed
• At the end of the season, carry out a general check
of the Electric Tiller, and remove all residue col
lected. Before the start of every season, it is ab
solutely necessary to check the state of the ma
chine. Contact our Customer Service if repair work
is necessary.
16
COST
11.Storage
Store the device and its accessories in a dark, dry
and frost-proof place that is inaccessible to children
The optimum storage temperature is between 5 and
30"C
Store the electrical tool in its original packaging
Cover the electrical tool in order to protect it from
dust and moisture. Store the operating manual with
the electrical tool.
12.Disposal and recycling
The equipment is supplied in packaging to prevent it
from being damaged in transit. The raw materials in
this packaging can be reused or recycled. The equip
ment and its accessories are made of various types
of material, such as metal and plastic. Defective
components must be disposed of as special waste
Ask your dealer or your local council
Old devices must not be disposed of with house
hold wastel
宜
This symbol indicates that this product must
not be disposed of together with domestic
waste in compliance with the Directive
(2012/19/EU) pertaining to waste electrical
and electronic equipment (WEEE). This product must
be disposed of at a designated collection point. This
can occur, for example, by handing it in at an author
ised collecting point for the recycling of waste elec
trical and electronic equipment. Improper handling
of waste equipment may have negative consequenc
es for the environment and human health due to po
tentially hazardous substances that are often con
tained in electrical and electronic equipment. By
properly disposing of this product, you are also con
tributing to the eective use of natural resources
u can obtain information on collection points for
waste equipment from your municipal administration,
public waste disposal authority, an authorised body
for the disposal of waste electrical and electronic
equipment or your waste disposal company
13.Spare-part ordering
Please quote the following in your order for spare
parts:
• pe of device
• Article No. of deviceldent. No. of device
• Spare Part No. of the required spare part
COST
11
05
COST
A
COST
Laying the power cord (fig. 5, 6)
Mount the cable and the cable guide (11) on the low
er right bar (4) and (in the working direction) bar (3)
by pushing them on
Install the transport aid (fig. 8, 9)
Remove the pre-assembled split pin (16) and the
washer (15). Place the wheel (7) on the wheel holder
(14). Secure it with the washer (15) and the split pin
(16). Then mount the wheel cap (8). (Assembly is
identical on both sides)
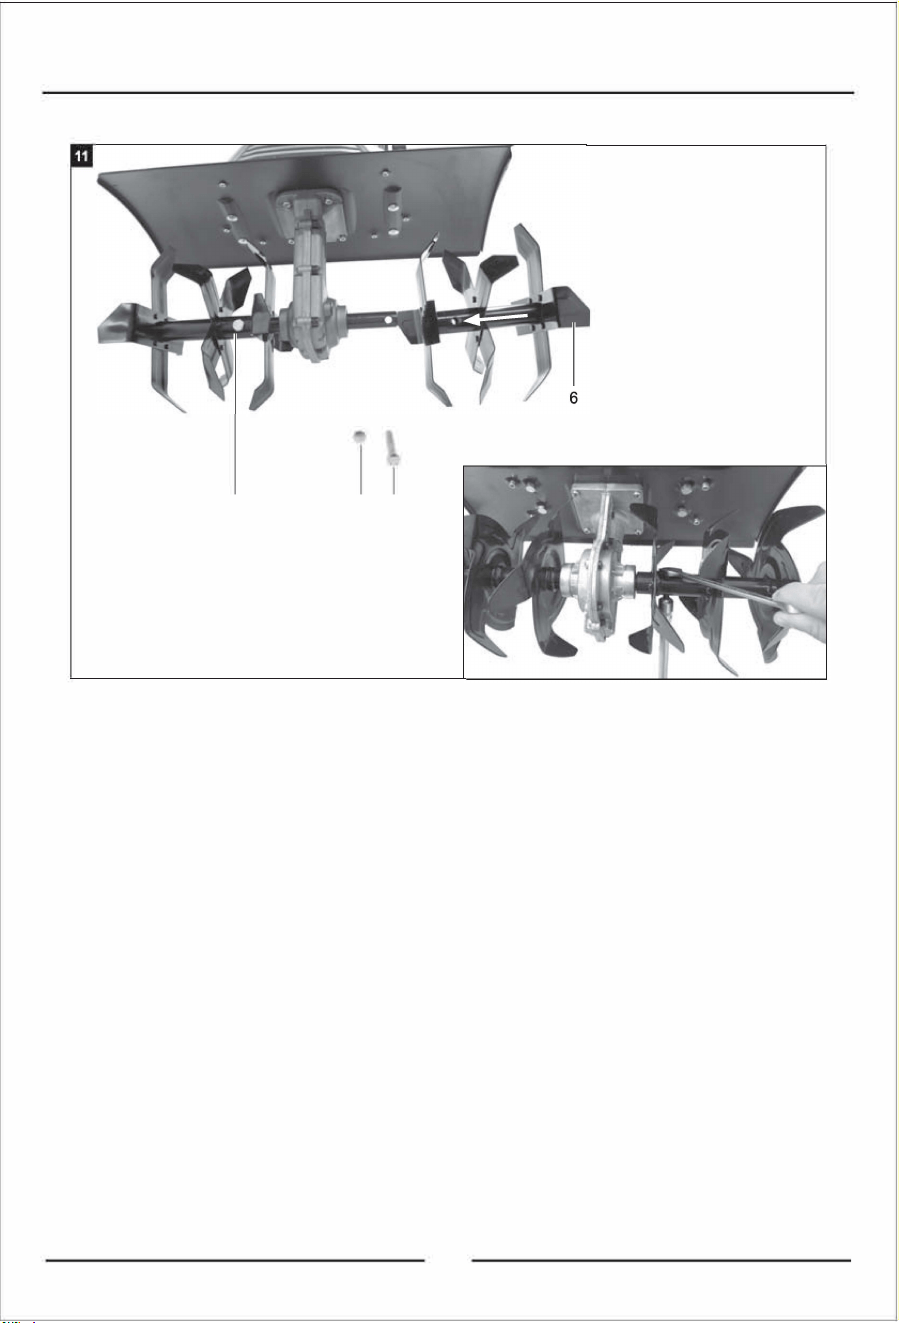
Blade roller installing/ uninstalling (fig. 11)
Push the blade roller (6) on the drive shaft (20) of the
machine. The blade roller (6) can be mounted left or
right side. Be sure that the holes of the blade roller
(6) and the drive shaft (20) are aligned
Now the MB screw (18) is pushed through and se
cured with the MB locking nut (19).
Tighten the lock nut (19) hand-tight using a fork
wrench or ratchet with socket (the tools are not in
cluded)
For uninstall: Proceed in reverse order.
8. Operation
Start and stop the implement (fig. 7)
prevent an accidental start-up of the implement,
the throttle handle (1) is equipped with a safety re
lease switch (12) which must be pressed before the
On/O switch (13) can be pressed. If the On/O
switch (13) is released, the equipment switches off.
Repeat this process several times so that you are
sure that the machine functions properly. Bere you
perform any repair or maintenance work on the ma
chine, ensure that the cutting unit is not rotating and
that the power supply is disconnected. Always ensure
that a safe distance (provided by the long handles) is
maintained between the user and the housing
The safety distance between housing and user given
by the handle (1) must always be observed. Be espe
cially careful when digging and changing direction on
slopes and inclines
Maintain a solid footing and wear sturdy, non-slip
footwear and long trousers. Always dig along the in
cline (not up and down). For safety reasons, the Elec
tric Tiller may not be used to dig up inclines whose
gradient exceeds 15 degrees. Use special caution
when backing up and pulling the implement (tripping
hazard)!
Tips for proper working
Always guide the machine slowly and wisely forward
Dig up the area in straight lines. Let the tracks overlap
slightly to not miss any stripes to dig. Only use the
machine to dig up already loosened soil
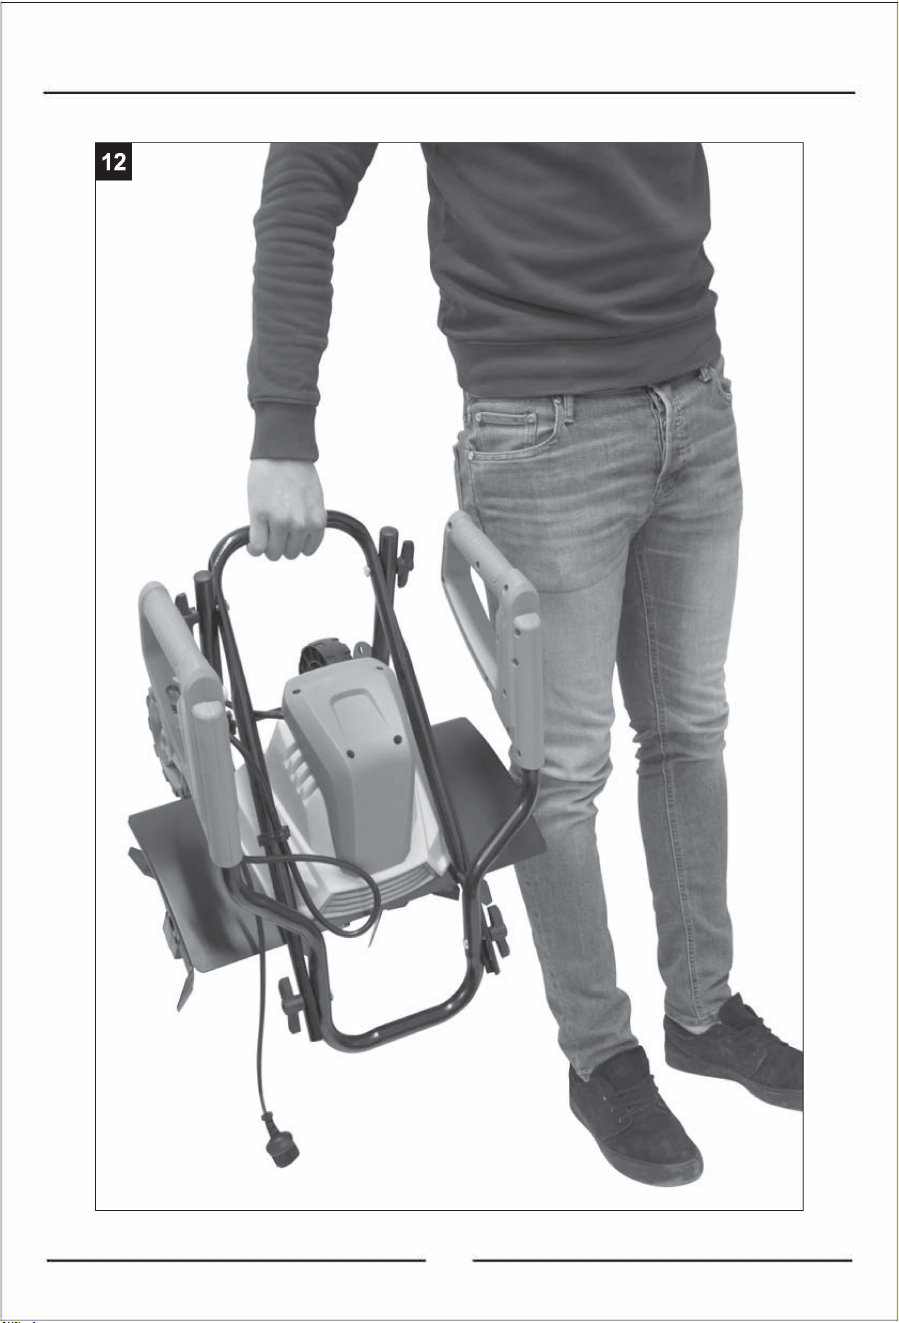
Transport and storage (fig. 10, 12)
Always pull out the power cord before transpo巾ng!
Pull the lock pin (17). u can now move the wheels
(7) to the lower position. Make sure that the lock pin
(17) engages again in the lower position. (fig. 10)
Attention! The wheels must be fixed in the upper
position during operation'
For storage or transport in a limited space, proceed
as follows
Open the wing nuts (10) until you can fold the handles
forward. Attention! Danger of crushing your fingers
Now you can transport your machine with the trans
port handle (3)
So you can storage the machine too
9. Electrical connection
The electrical motor installed is connected and
ready for operation. The connection complies
with the applicable VDE and DIN provisions.
The customer's mains connection as well as
the extension cable used must also comply with
these regulations.
Damaged electrical connection cable
The insulation on electrical connection cables is of
ten damaged
This may have the following causes
• Passage points, where connection cables are
passed through windows or doors
• Kinks where the connection cable has been im
properly fastened or routed
• Places where the connection cables have been cut
due to being driven over.
• Insulation damage due to being ripped out of the
wall outlet
• Cracks due to the insulation ageing
Such damaged electrical connection cables must not
be used and are life-threatening due to the insula
lion damage
Check the electrical connection cables for damage
regularly. Make sure that the connection cable does
not hang on the power network during the inspection
Electrical connection cables must comply with the
applicable VOE and DIN provisions. Only use con
nection cables with the marking ,,HOSVV-F"
The printing of the type designation on the con nee
tion cable is mandatory.
AC motor
• The mains voltage must be 120V/ 60Hz
• Extension cables up to 25 m in length must have
a cross section of at least 1,5 mm', above 25 m
at least 2,5 mm'
• The mains connection is protected with a 16 A
slow-blow fuse
06
15
• Only use approved extension cables of the type
H05VV-F or H05RN-F with a maximum length of
75 m and which have been approved for open-air
use. The stranded cord diameter of the extension
cable must be at least 2.5 mm
2
. Always unreel a
cable drum to its full length so that the entire cable
can be checked for damage
• Use the envisaged cable suspension when attach
ing an extension cable
• Never pull the cable to disconnect the plug from
the socket. Protect the cable from heat, oil and
sharp edges
• If the connecting cable is damaged, first disconnect
the extension cable from the socket. You can then
disconnect the connecting cable of the equipment
• If the power cable for this equipment is damaged, it
must be replaced by the manufacturer, a customer
service agent of the same or a similarly qualified
person in order to prevent hazards
Residual risks
Even if you use this electric power tool in ac
cordance with instructions, certain residual risks
cannot be ruled out. The following hazards may
arise in connection with the equipment's con
struction and layout:
1 Damage to hearing if no suitable ear protection
is used
2 Health damage caused by hand-arm vibrations if
the equipment is used over a prolonged period or
is not properly guided and maintained.
3. Even when all safety measures are taken, some
remaining hazards which are not yet evident may
still be present.
4. Remaining hazards can be minimized by follow
ing the instructions in Safety Precautions, Proper
Use and in the entire operating manual.
5. Injuries caused by the rotating blade.
6. Health risks caused by electricity. When mcor
rect or damaged mains cables are used. Follows
instructions in the manual Electrical Connections.
Warning! This electric tool generates an electro
magnetic field during operation. This field can impair
active or passive medical implants under certain
conditions. In order to prevent the risk of serious or
deadly in」uries, we recommend that persons with
medical implants consult with their physician and the
manufacturer of the medical implant prior to operat
ing the electric tool
14
6. chnical data
Main Voltage
Power Input
Working width
Working depth
L
• sound pressure level
K
A
uncertainty
L.
A
sound
power level
K w
A
uncerta
.
inty
Vibration left hand
Vibration right hand
K uncertainty
Protection class
Protection type
COST
120V/ 60Hz
13.SA
450mm(17 7")
max 220mm(8 7")
80,4 dB(A)
3 dB
{A
)
91,57 dB(A)
1,28 dB(A)
0,968 m/s
2
0,947 m/s
2
1,5 m/s'
IPX4
Keep the noise emissions and vibrations to a
minimum.
• Only use appliances which are in perfect work-
ing order.
• Service and clean the appliance regularly.
• Adapt your working style to suit the appliance
• Do not overload the appliance
• Have the appliance serviced whenever necessary.
• Switch the appliance o when it is not in use.
• Wear protective gloves
7. Bere starting the equipment
Before you connect the equipment lo the mains sup
ply make sure that the data on the rating plate are
identical to the mains data
Warning!
Always pull the power plug before making ad
justments to the equipment.
The Electric Tiller is delivered unassembled. The
handles and the driving device must be assembled
and mounted before using the Electric Tiller. Follow
the operating instructions step-by-step and use the
pictures provided as a visual guide to easily assem
ble the machine
Montage (fig. 3-9)
Important!
You must fully assemble the appliance before
using it for the first time!
•
Connect the bar (3) and the handle (1) to the lower
bars (4) using the wing nut (10) and lock screw (9)
(
fi
g. 3, 4)
COST
20
19 18
07
COST
08
• Always guide the implement at a walking pace with
both hands on the handle. Be especially careful
when you turn the implement around or draw it
towards you. Danger of stumbling!
• Start or actuate the starting lever with care and in
conformity with the directions in these Instructions
• Do not tilt the implement when starting, other than
it has to be lifted. In this case tilt the implement
only to the extent that is absolutely necessary and
always lift the implement on the side that is oppo
site to the operator.
• Do not operate the implement in the vicinity of in
flammable liquids or gases as this could give rise
to the danger of a fire or explosion
Work intervals.
• After the implement has been turned off, the cutting
cylinder will continue to rotate for a few seconds
Keep hands and feet well away.
• Only shift working depth when the implement 1s
completely stillstanding
• Only remove plant parts and soil when the imple
ment is standing completely still
• Switch o the power when the implement is to be
transported, lifted or tilted and when traversing
other surfaces than soil
• Never leave the implement unattended at the place
of work.
• Always switch off the implement and disconnect
the power plug
- Whenever you leave the implement
- Before you clean the e」ector opening or unblock
or unclog the implement
- When the implement is not being used
- During all maintenance and cleaning work
- When the power cable is damaged or has be-
come tangled
- When the implement hits an obstruction during
work or when unusual vibrations arise. Establish
the cause and see if the implement has been
damaged
• Do not repair it yourself! Have the implement re
paired by an authorised workshop!
• Store the implement in a dry place well out of reach
of children
CAUTION! The following states how to avoid damage
to the implement and any resulting harm to people
13
COST
Take care of your implement
• Switch o the power when the implement is to be
carried across steps
• Inspect the implement each time before it is to be
used. Never operate the implement if safety de
vices (e.g. impact protector, parts of the cutting
facility or bolts are missing, worn out or damaged
Check especially the power cable and starting lever
for damage. To avoid imbalance, all tools and bolts
must be exchanged as complete sets
• Only use spare parts and accessories that have
been supplied or recommended by the manufactur
er. The use of alien parts results in the immediate
loss of all guarantee claims. Ensure that all nuts,
bolts and screws are firmly tightened and that the
implement is in a safe working state.
• Never try to repair the implement yourself, other
than you have been trained accordingly. All work
that has not been listed in these Instructions must
only be carried out by authorised servicing agen
cies
• Treat the implement with the greatest care. Always
keep the tool clean for better and safer work. Follow
the maintenance instructions.
• Never overload the implement. Always work within
the specified capacity range. Do not use low-power
machines for heavy-duty work. Do not operate the
implement for purposes for which it is not intended.
Electrical safety:
CAUTION! The following states how to avoid acci
dents and injuries due to electric shock:
• Before each use, carry out a visual inspection of
the power and extension cables for signs of dam
age or ageing.
• If the power cable for this equipment is damaged, it
must be replaced by the manufacturer, a customer
service agent of the same or a similarly qualified
person in order to prevent hazards
• Keep the power cable well away from the cutting
tools. Should the power cable become damaged
during work, then instantly disconnect the power
cable from the mains
DO NOT touch the power cable before it has
been disconnected from the mains.
• Keep the extension cables away from the teeth
The teeth may damage the cables and result in
contact with live parts
• Check that the mains voltage is the same as ind卜
cated on the rating plate
• Wherever possible connect the implement to a
power socket with a residual- current circuit break
er that has a rated current of not more than 30 mA
• Avoid body contact with earthed parts (e.g. metal
fences, metal posts).

必ATTENTION!
The device and packaging materials are not toysl
Children must not be allowed to play with plastic
bags, film and small parts! There is a risk of swal
lowing and suocation!
4. Intended use
The machine is designed for digging over beds and
fields. Be sure lo observe the restrictions in the ad
dilional safely instructions
The equipment is allowed to be used only for its pre
scribed purpose. Any other use is deemed to be a
case of misuse. The user/operator and not the man
ufacturer will be liable for any damage or injuries of
any kind resulting from such misuse
Please note that our equipment has not been de
signed for use in commercial, trade or industrial ap
plications
Our warranty will be voided if the equipment is used
in commercial, trade or industrial businesses or for
equivalent purposes.
5. Safety information
General safety instructions
This implement can cause serious in」uries if it is not
properly used. Please read these Operating lnstruc
lions carefully and familiarize yourself with all the
control elements before operating this implement
Keep these Operating Instructions in a readily ac
cessible place so that this information is always at
your disposal
Operating the implement:
WARNING! The implement can cause serious 1n1u
ries. How to a avoid accidents and injuries
Preparations
• Never allow children and people who are not fa
miliar with these Operating Instructions to use the
implement. Local regulations may stipulate a mini一
mum age for operators.
• This appliance is not intended for use by persons
(including children) with reduced physical, sensory
or mental capab仙es, or lack of experience and
knowledge, unless they have been given supervi一
sion or instruction concerning use of the appliance
by a person responsible for their safety
• Never start up the implement while other people,
but especially children and domestic pets, are in
the vicinity.
• Check the area on which the implement is to be
used. Remove all stones, sticks, wire and other for
eign bodies that could be caught up and flung out.
12
COST
• Always wear appropriate protective work clothes
and firm shoes with nonslip soles, strong long trou
sers, ear defenders and goggles. Never operate
the implement while bare footed or when wearing
open sandals.
• Never operate the implement if it is damaged, in
complete or has been modified without the consent
of the manufacturer. Never work with damaged or
missing protective devices (e.g. starting lever, un
locking knob, impact protecto「)
• Never disengage protective devices (e.g. by tying
the starting lever)
• Children must be supervised in order to ensure that
they do not play with the equipment.
• Before starting the equipment, ensure that no ob
jects or branches are pushed into the blade open
ing, that the equipment is standing stably and that
the workspace is tidy and not blocked. Check the
condition of your extension cable and the connect
ing cable of your equipment. Use the necessary
protective equipment.
• If your equipment vibrates or emits unusual noises
when switched on, disconnect the plug from the
socket and check the cutting cylinder. Ensure that
no remains of chopped matter are blocking the
cutting cylinder or jammed between the blades
If you still didn't find the problem after checking these,
return the equipment to a customer service centre
• If the blades no longer dig correctly or if the motor
is overloaded, check all the parts of your equipment
and replace the worn parts. If a more extensive re
pair is required, contact a customer service centre
Use
• CAUTION - A very sharp tool. Avoid cutting your
fingers or toes. While working always keep your
feet and fingers well away from the cutting cylinder
and the e」ector opening. There is the danger of
serious injury!
• Do not operate the implement while it is raining, in
poor weather conditions and when the surround
ing area and lawn are wet. Operate the implement
only during daylight hours or with bright lighting
• Do not operate the implement if you are tired
or are lacking in concentration and afte「having
drunk alcohol or taken medicine. Always take a
work break in due time. Approach the work with
common sense
• Familiarize yourself with the terrain and remain
focused on the potential hazards that you could
miss on account of the motor noise
• Always maintain a secure footing while working,
especially on a slope, never up and down! Be
particularly careful when changing the travelling
direction. Do not work on very steep slopes
COST
Explanation of the symbols on the equipment
。
Read instruction manual and safety instructions before starting up and pay attention!
I.
Wear safety goggles!
@
Wear ear-mus!
Wear work gloves!
。
Wear robust footwear when using the device!
。
Make sure that other persons maintain a suicient safety distance
Keep uninvolved persons away from the device
@
Attention! Do not touch rotating parts. There is a serious risk of injury!
@
Don't use your device in moisty weather.
�
Risk of catapulted parts甘the engine is running. Be sure to keep a safe distance.
回
Protection class II
09

COST
�
Switch o and unplug the device before cleaning or performing maintenance on it
A
Attention! Power cord can be pulled in Keep the power cord away from the cutting roll-
ers
配
Guaranteed sound power level
10
1. Introduction
Dear Customer,
we hope your new tool brings you much enjoyment
and success
Note:
According to the applicable product liability laws, the
manufacturer of the device does not assume liability
for damages to the product or damages caused by
the product that occurs due to
• Improper handling,
• Non-compliance of the operating instructions,
• Repairs by third parties, not by authorized service
technicians,
• Installation and replacement of non-original spare
parts,
• Application other than specified,
• A breakdown of the electrical system that occurs
due to the non-compliance of the electric regu
lations and VOE regulations 0100, DIN 57113 /
VDE0113.
WE RECOMMEND:
Read through the complete text in the operating m
structions before installing and commissioning the
device
The operating instructions are intended to help the
user to become familiar with the machine and take
advantage of its application possibilities in accord
ance with the recommendations
The operating instructions contain important infor
mation on how to operate the machine safely,
pro
fessionally and economically, how to avoid danger,
costly repairs, reduce downtimes and how to in
crease reliability and service life of the machine
In addition to the safety regulations in the operating
instructions, you have to meet the applicable regula
tions that apply for the operation of the machine in
your country.
Keep the operating instructions package with the
machine at all times and store it in a plastic cover to
protect it from dirt and moisture
Read the instruction manual each time before oper
ating the machine and carefully follow its information.
The machine can only be operated by persons who
were instructed concerning the operation of the ma
chine and who are informed about the associated
dangers. The minimum age requirement must be
complied with
11
COST
In addition lo the safely notices contained in this
operating manual and the particular instructions for
your country, the generally recognised technical reg
ulations for the operation of identical devices must
be complied with.
We cannot accept any liab山ty for damage or acc, 一
dents which arise due to a failure to follow these in
structions and the safety instructions
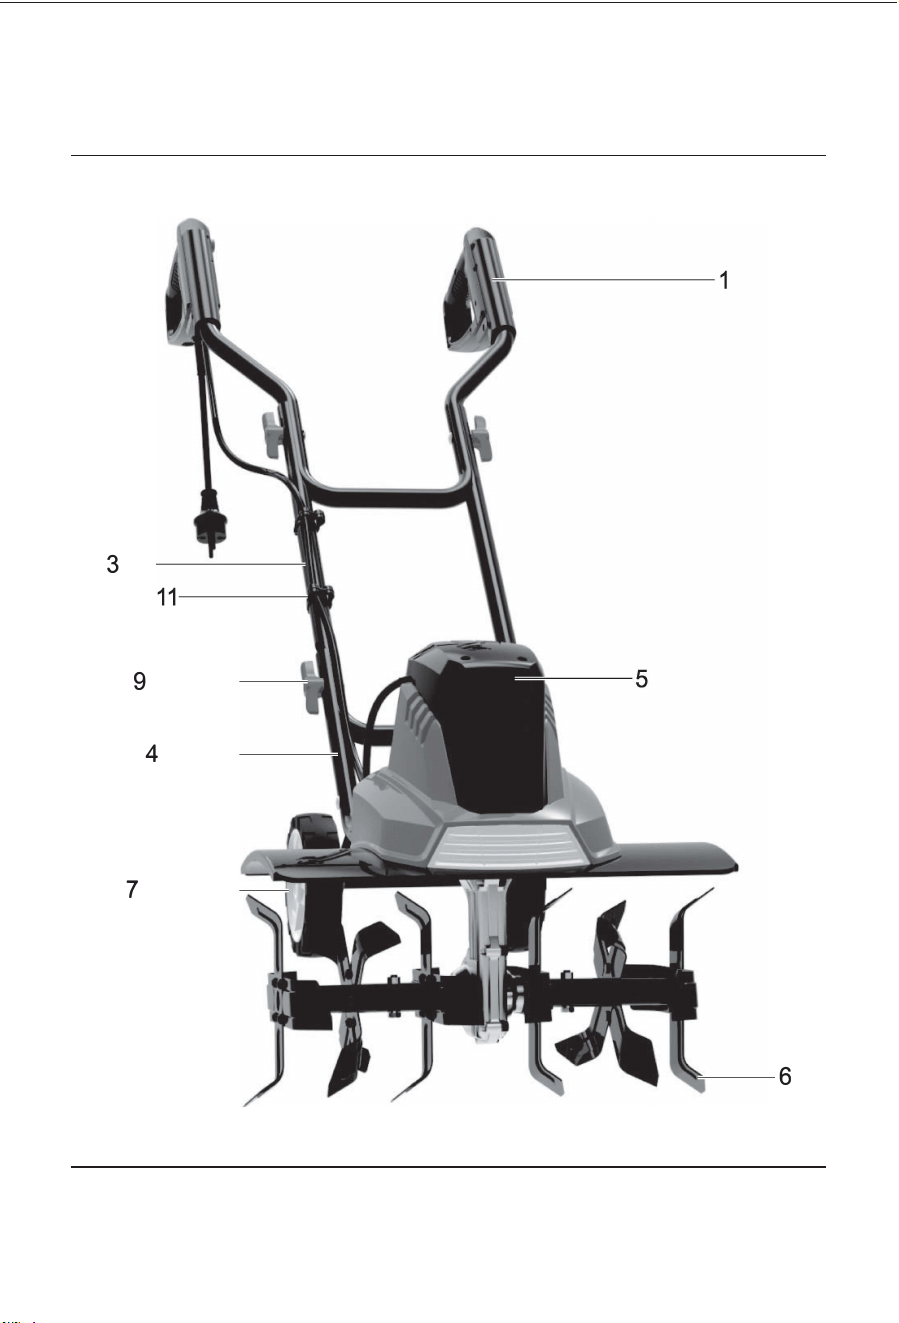
2. Device Description (Fig. 1-2)
1. Handle
2. Power cord
3. Frame tubing
4. lower bar
5. Machine frame
6. Blade roller
7. Wheel
8. Wheel cap
9. Carriage bolt
10. Wing nut (plactic)
11. Cable clip
12. Safety release catch
13. On/O switch
14. Wheel suspension
15. washer (pre-assembled)
16. Split pin (pre-assembled)
17. Lock pin
18.Screw MS
19. Nut MS
20. Drive shaft
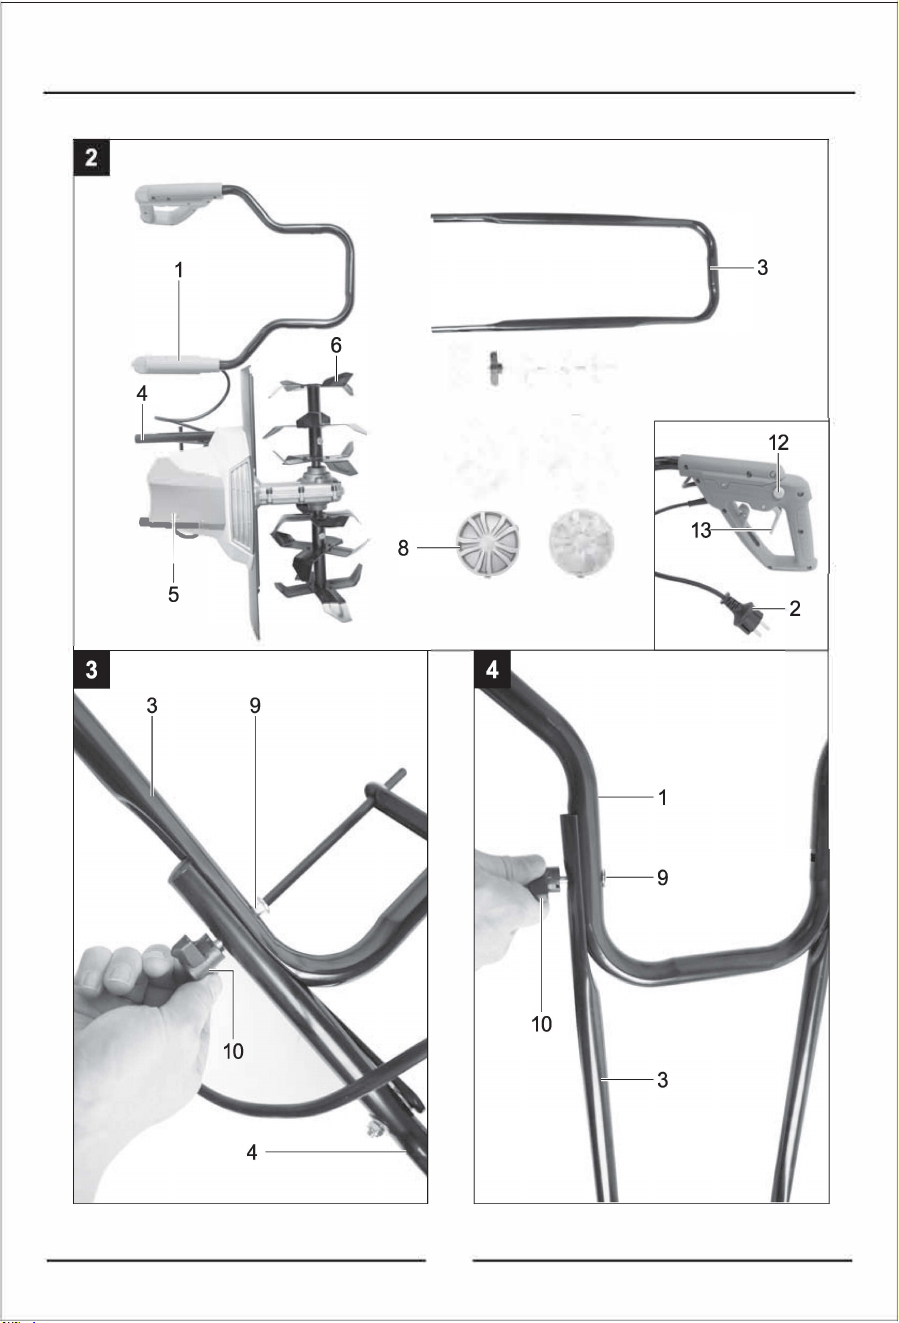
3. Scope of delivery (Fig. 2)
• 1x
Handle (1)
• 1x Machine frame (5)
•
1x Frame tubing(3)
• 4x Carriage bolt (9)
•
4x Wing nut
(plactic) (10
)
•
2x Cable clip (11)
•
2x Wheel
(7)
•
2x
Wheel
cap (8)
• 1x Manual
• Open the packaging and remove the device care
fully.
• Remove the packaging material as well as the
packaging and transport bracing (if available)
• Check that the delivery is complete
• Check the device and accessory parts r trans
port damage. If there is any damage, please contact
customer seice in time and we will provide you with
a satisfacto solution
• If possible, store the packaging until the warranty
period has expired

COST
�
Switch o and unplug the device before cleaning or performing maintenance on it
A
Attention! Power cord can be pulled in Keep the power cord away from the cutting roll-
ers
配
Guaranteed sound power level
10
1. Introduction
Dear Customer,
we hope your new tool brings you much enjoyment
and success
Note:
According to the applicable product liability laws, the
manufacturer of the device does not assume liability
for damages to the product or damages caused by
the product that occurs due to
• Improper handling,
• Non-compliance of the operating instructions,
• Repairs by third parties, not by authorized service
technicians,
• Installation and replacement of non-original spare
parts,
• Application other than specified,
• A breakdown of the electrical system that occurs
due to the non-compliance of the electric regu
lations and VOE regulations 0100, DIN 57113 /
VDE0113.
WE RECOMMEND:
Read through the complete text in the operating m
structions before installing and commissioning the
device
The operating instructions are intended to help the
user to become familiar with the machine and take
advantage of its application possibilities in accord
ance with the recommendations
The operating instructions contain important infor
mation on how to operate the machine safely,
pro
fessionally and economically, how to avoid danger,
costly repairs, reduce downtimes and how to in
crease reliability and service life of the machine
In addition to the safety regulations in the operating
instructions, you have to meet the applicable regula
tions that apply for the operation of the machine in
your country.
Keep the operating instructions package with the
machine at all times and store it in a plastic cover to
protect it from dirt and moisture
Read the instruction manual each time before oper
ating the machine and carefully follow its information.
The machine can only be operated by persons who
were instructed concerning the operation of the ma
chine and who are informed about the associated
dangers. The minimum age requirement must be
complied with
11
COST
In addition lo the safely notices contained in this
operating manual and the particular instructions for
your country, the generally recognised technical reg
ulations for the operation of identical devices must
be complied with.
We cannot accept any liab山ty for damage or acc, 一
dents which arise due to a failure to follow these in
structions and the safety instructions
2. Device Description (Fig. 1-2)
1. Handle
2. Power cord
3. Frame tubing
4. lower bar
5. Machine frame
6. Blade roller
7. Wheel
8. Wheel cap
9. Carriage bolt
10. Wing nut (plactic)
11. Cable clip
12. Safety release catch
13. On/O switch
14. Wheel suspension
15. washer (pre-assembled)
16. Split pin (pre-assembled)
17. Lock pin
18.Screw MS
19. Nut MS
20. Drive shaft
3. Scope of delivery (Fig. 2)
• 1x
Handle (1)
• 1x Machine frame (5)
•
1x Frame tubing(3)
• 4x Carriage bolt (9)
•
4x Wing nut
(plactic) (10
)
•
2x Cable clip (11)
•
2x Wheel
(7)
•
2x
Wheel
cap (8)
• 1x Manual
• Open the packaging and remove the device care
fully.
• Remove the packaging material as well as the
packaging and transport bracing (if available)
• Check that the delivery is complete
• Check the device and accessory parts r trans
port damage. If there is any damage, please contact
customer seice in time and we will provide you with
a satisfacto solution
• If possible, store the packaging until the warranty
period has expired

必ATTENTION!
The device and packaging materials are not toysl
Children must not be allowed to play with plastic
bags, film and small parts! There is a risk of swal
lowing and suocation!
4. Intended use
The machine is designed for digging over beds and
fields. Be sure lo observe the restrictions in the ad
dilional safely instructions
The equipment is allowed to be used only for its pre
scribed purpose. Any other use is deemed to be a
case of misuse. The user/operator and not the man
ufacturer will be liable for any damage or injuries of
any kind resulting from such misuse
Please note that our equipment has not been de
signed for use in commercial, trade or industrial ap
plications
Our warranty will be voided if the equipment is used
in commercial, trade or industrial businesses or for
equivalent purposes.
5. Safety information
General safety instructions
This implement can cause serious in」uries if it is not
properly used. Please read these Operating lnstruc
lions carefully and familiarize yourself with all the
control elements before operating this implement
Keep these Operating Instructions in a readily ac
cessible place so that this information is always at
your disposal
Operating the implement:
WARNING! The implement can cause serious 1n1u
ries. How to a avoid accidents and injuries
Preparations
• Never allow children and people who are not fa
miliar with these Operating Instructions to use the
implement. Local regulations may stipulate a mini一
mum age for operators.
• This appliance is not intended for use by persons
(including children) with reduced physical, sensory
or mental capab仙es, or lack of experience and
knowledge, unless they have been given supervi一
sion or instruction concerning use of the appliance
by a person responsible for their safety
• Never start up the implement while other people,
but especially children and domestic pets, are in
the vicinity.
• Check the area on which the implement is to be
used. Remove all stones, sticks, wire and other for
eign bodies that could be caught up and flung out.
12
COST
• Always wear appropriate protective work clothes
and firm shoes with nonslip soles, strong long trou
sers, ear defenders and goggles. Never operate
the implement while bare footed or when wearing
open sandals.
• Never operate the implement if it is damaged, in
complete or has been modified without the consent
of the manufacturer. Never work with damaged or
missing protective devices (e.g. starting lever, un
locking knob, impact protecto「)
• Never disengage protective devices (e.g. by tying
the starting lever)
• Children must be supervised in order to ensure that
they do not play with the equipment.
• Before starting the equipment, ensure that no ob
jects or branches are pushed into the blade open
ing, that the equipment is standing stably and that
the workspace is tidy and not blocked. Check the
condition of your extension cable and the connect
ing cable of your equipment. Use the necessary
protective equipment.
• If your equipment vibrates or emits unusual noises
when switched on, disconnect the plug from the
socket and check the cutting cylinder. Ensure that
no remains of chopped matter are blocking the
cutting cylinder or jammed between the blades
If you still didn't find the problem after checking these,
return the equipment to a customer service centre
• If the blades no longer dig correctly or if the motor
is overloaded, check all the parts of your equipment
and replace the worn parts. If a more extensive re
pair is required, contact a customer service centre
Use
• CAUTION - A very sharp tool. Avoid cutting your
fingers or toes. While working always keep your
feet and fingers well away from the cutting cylinder
and the e」ector opening. There is the danger of
serious injury!
• Do not operate the implement while it is raining, in
poor weather conditions and when the surround
ing area and lawn are wet. Operate the implement
only during daylight hours or with bright lighting
• Do not operate the implement if you are tired
or are lacking in concentration and afte「having
drunk alcohol or taken medicine. Always take a
work break in due time. Approach the work with
common sense
• Familiarize yourself with the terrain and remain
focused on the potential hazards that you could
miss on account of the motor noise
• Always maintain a secure footing while working,
especially on a slope, never up and down! Be
particularly careful when changing the travelling
direction. Do not work on very steep slopes
COST
Explanation of the symbols on the equipment
。
Read instruction manual and safety instructions before starting up and pay attention!
I.
Wear safety goggles!
@
Wear ear-mus!
Wear work gloves!
。
Wear robust footwear when using the device!
。
Make sure that other persons maintain a suicient safety distance
Keep uninvolved persons away from the device
@
Attention! Do not touch rotating parts. There is a serious risk of injury!
@
Don't use your device in moisty weather.
�
Risk of catapulted parts甘the engine is running. Be sure to keep a safe distance.
回
Protection class II
09

COST
08
• Always guide the implement at a walking pace with
both hands on the handle. Be especially careful
when you turn the implement around or draw it
towards you. Danger of stumbling!
• Start or actuate the starting lever with care and in
conformity with the directions in these Instructions
• Do not tilt the implement when starting, other than
it has to be lifted. In this case tilt the implement
only to the extent that is absolutely necessary and
always lift the implement on the side that is oppo
site to the operator.
• Do not operate the implement in the vicinity of in
flammable liquids or gases as this could give rise
to the danger of a fire or explosion
Work intervals.
• After the implement has been turned off, the cutting
cylinder will continue to rotate for a few seconds
Keep hands and feet well away.
• Only shift working depth when the implement 1s
completely stillstanding
• Only remove plant parts and soil when the imple
ment is standing completely still
• Switch o the power when the implement is to be
transported, lifted or tilted and when traversing
other surfaces than soil
• Never leave the implement unattended at the place
of work.
• Always switch off the implement and disconnect
the power plug
- Whenever you leave the implement
- Before you clean the e」ector opening or unblock
or unclog the implement
- When the implement is not being used
- During all maintenance and cleaning work
- When the power cable is damaged or has be-
come tangled
- When the implement hits an obstruction during
work or when unusual vibrations arise. Establish
the cause and see if the implement has been
damaged
• Do not repair it yourself! Have the implement re
paired by an authorised workshop!
• Store the implement in a dry place well out of reach
of children
CAUTION! The following states how to avoid damage
to the implement and any resulting harm to people
13
COST
Take care of your implement
• Switch o the power when the implement is to be
carried across steps
• Inspect the implement each time before it is to be
used. Never operate the implement if safety de
vices (e.g. impact protector, parts of the cutting
facility or bolts are missing, worn out or damaged
Check especially the power cable and starting lever
for damage. To avoid imbalance, all tools and bolts
must be exchanged as complete sets
• Only use spare parts and accessories that have
been supplied or recommended by the manufactur
er. The use of alien parts results in the immediate
loss of all guarantee claims. Ensure that all nuts,
bolts and screws are firmly tightened and that the
implement is in a safe working state.
• Never try to repair the implement yourself, other
than you have been trained accordingly. All work
that has not been listed in these Instructions must
only be carried out by authorised servicing agen
cies
• Treat the implement with the greatest care. Always
keep the tool clean for better and safer work. Follow
the maintenance instructions.
• Never overload the implement. Always work within
the specified capacity range. Do not use low-power
machines for heavy-duty work. Do not operate the
implement for purposes for which it is not intended.
Electrical safety:
CAUTION! The following states how to avoid acci
dents and injuries due to electric shock:
• Before each use, carry out a visual inspection of
the power and extension cables for signs of dam
age or ageing.
• If the power cable for this equipment is damaged, it
must be replaced by the manufacturer, a customer
service agent of the same or a similarly qualified
person in order to prevent hazards
• Keep the power cable well away from the cutting
tools. Should the power cable become damaged
during work, then instantly disconnect the power
cable from the mains
DO NOT touch the power cable before it has
been disconnected from the mains.
• Keep the extension cables away from the teeth
The teeth may damage the cables and result in
contact with live parts
• Check that the mains voltage is the same as ind卜
cated on the rating plate
• Wherever possible connect the implement to a
power socket with a residual- current circuit break
er that has a rated current of not more than 30 mA
• Avoid body contact with earthed parts (e.g. metal
fences, metal posts).

• Only use approved extension cables of the type
H05VV-F or H05RN-F with a maximum length of
75 m and which have been approved for open-air
use. The stranded cord diameter of the extension
cable must be at least 2.5 mm
2
. Always unreel a
cable drum to its full length so that the entire cable
can be checked for damage
• Use the envisaged cable suspension when attach
ing an extension cable
• Never pull the cable to disconnect the plug from
the socket. Protect the cable from heat, oil and
sharp edges
• If the connecting cable is damaged, first disconnect
the extension cable from the socket. You can then
disconnect the connecting cable of the equipment
• If the power cable for this equipment is damaged, it
must be replaced by the manufacturer, a customer
service agent of the same or a similarly qualified
person in order to prevent hazards
Residual risks
Even if you use this electric power tool in ac
cordance with instructions, certain residual risks
cannot be ruled out. The following hazards may
arise in connection with the equipment's con
struction and layout:
1 Damage to hearing if no suitable ear protection
is used
2 Health damage caused by hand-arm vibrations if
the equipment is used over a prolonged period or
is not properly guided and maintained.
3. Even when all safety measures are taken, some
remaining hazards which are not yet evident may
still be present.
4. Remaining hazards can be minimized by follow
ing the instructions in Safety Precautions, Proper
Use and in the entire operating manual.
5. Injuries caused by the rotating blade.
6. Health risks caused by electricity. When mcor
rect or damaged mains cables are used. Follows
instructions in the manual Electrical Connections.
Warning! This electric tool generates an electro
magnetic field during operation. This field can impair
active or passive medical implants under certain
conditions. In order to prevent the risk of serious or
deadly in」uries, we recommend that persons with
medical implants consult with their physician and the
manufacturer of the medical implant prior to operat
ing the electric tool
14
6. chnical data
Main Voltage
Power Input
Working width
Working depth
L
• sound pressure level
K
A
uncertainty
L.
A
sound
power level
K w
A
uncerta
.
inty
Vibration left hand
Vibration right hand
K uncertainty
Protection class
Protection type
COST
120V/ 60Hz
13.SA
450mm(17 7")
max 220mm(8 7")
80,4 dB(A)
3 dB
{A
)
91,57 dB(A)
1,28 dB(A)
0,968 m/s
2
0,947 m/s
2
1,5 m/s'
IPX4
Keep the noise emissions and vibrations to a
minimum.
• Only use appliances which are in perfect work-
ing order.
• Service and clean the appliance regularly.
• Adapt your working style to suit the appliance
• Do not overload the appliance
• Have the appliance serviced whenever necessary.
• Switch the appliance o when it is not in use.
• Wear protective gloves
7. Bere starting the equipment
Before you connect the equipment lo the mains sup
ply make sure that the data on the rating plate are
identical to the mains data
Warning!
Always pull the power plug before making ad
justments to the equipment.
The Electric Tiller is delivered unassembled. The
handles and the driving device must be assembled
and mounted before using the Electric Tiller. Follow
the operating instructions step-by-step and use the
pictures provided as a visual guide to easily assem
ble the machine
Montage (fig. 3-9)
Important!
You must fully assemble the appliance before
using it for the first time!
•
Connect the bar (3) and the handle (1) to the lower
bars (4) using the wing nut (10) and lock screw (9)
(
fi
g. 3, 4)
COST
20
19 18
07

COST
A
COST
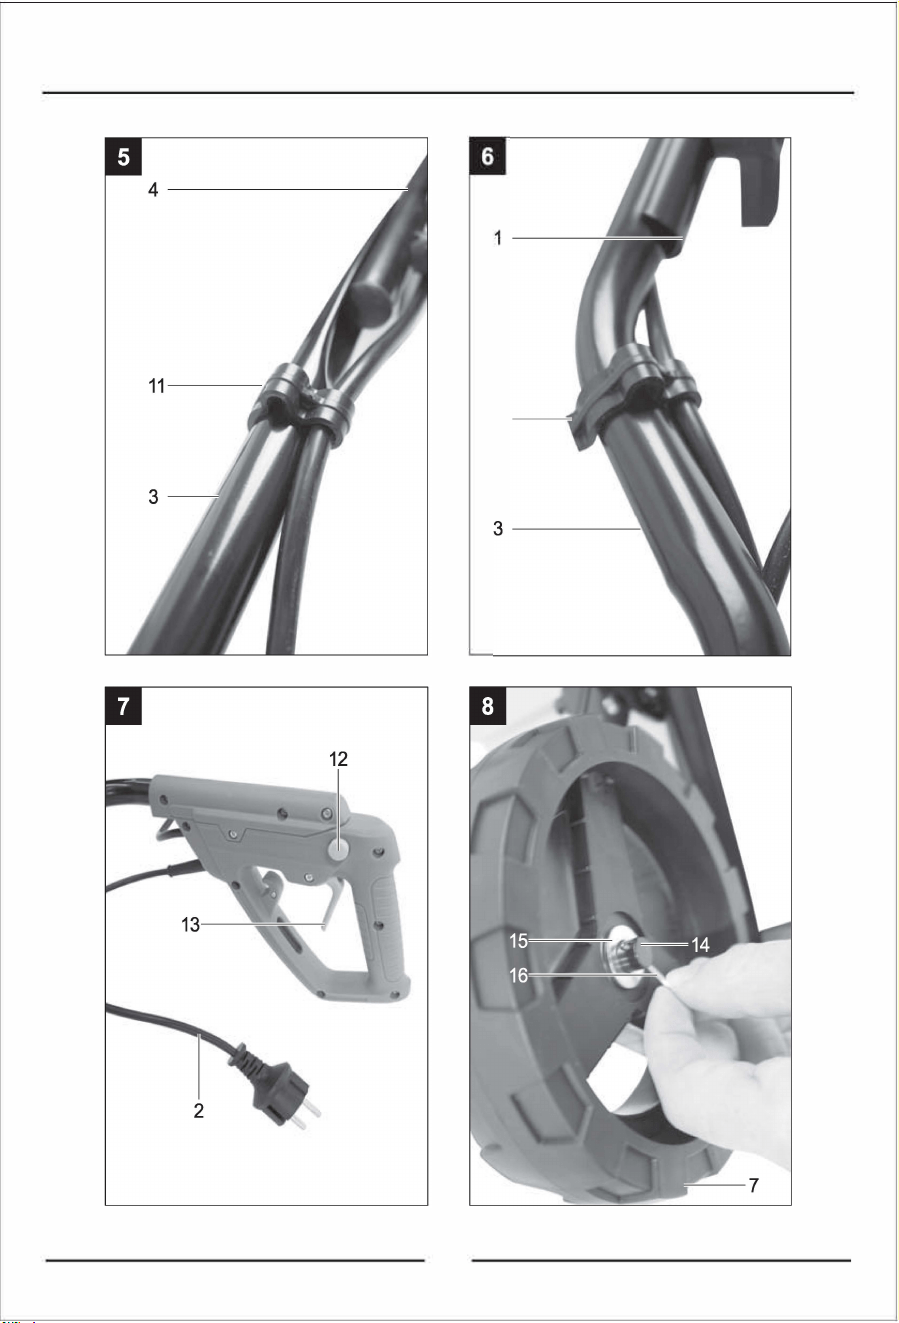
Laying the power cord (fig. 5, 6)
Mount the cable and the cable guide (11) on the low
er right bar (4) and (in the working direction) bar (3)
by pushing them on
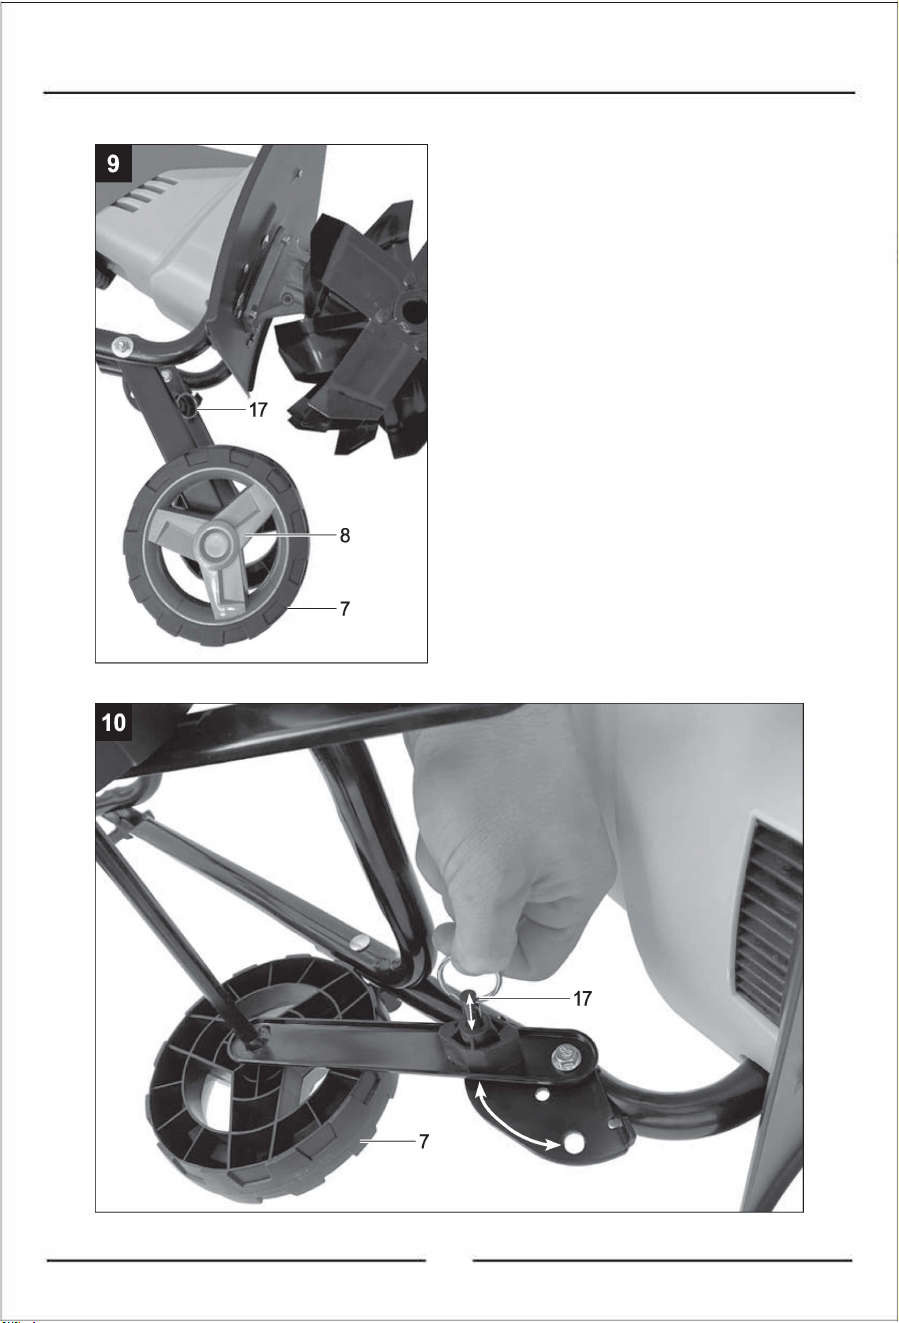
Install the transport aid (fig. 8, 9)
Remove the pre-assembled split pin (16) and the
washer (15). Place the wheel (7) on the wheel holder
(14). Secure it with the washer (15) and the split pin
(16). Then mount the wheel cap (8). (Assembly is
identical on both sides)
Blade roller installing/ uninstalling (fig. 11)
Push the blade roller (6) on the drive shaft (20) of the
machine. The blade roller (6) can be mounted left or
right side. Be sure that the holes of the blade roller
(6) and the drive shaft (20) are aligned
Now the MB screw (18) is pushed through and se
cured with the MB locking nut (19).
Tighten the lock nut (19) hand-tight using a fork
wrench or ratchet with socket (the tools are not in
cluded)
For uninstall: Proceed in reverse order.
8. Operation
Start and stop the implement (fig. 7)
prevent an accidental start-up of the implement,
the throttle handle (1) is equipped with a safety re
lease switch (12) which must be pressed before the
On/O switch (13) can be pressed. If the On/O
switch (13) is released, the equipment switches off.
Repeat this process several times so that you are
sure that the machine functions properly. Bere you
perform any repair or maintenance work on the ma
chine, ensure that the cutting unit is not rotating and
that the power supply is disconnected. Always ensure
that a safe distance (provided by the long handles) is
maintained between the user and the housing
The safety distance between housing and user given
by the handle (1) must always be observed. Be espe
cially careful when digging and changing direction on
slopes and inclines
Maintain a solid footing and wear sturdy, non-slip
footwear and long trousers. Always dig along the in
cline (not up and down). For safety reasons, the Elec
tric Tiller may not be used to dig up inclines whose
gradient exceeds 15 degrees. Use special caution
when backing up and pulling the implement (tripping
hazard)!
Tips for proper working
Always guide the machine slowly and wisely forward
Dig up the area in straight lines. Let the tracks overlap
slightly to not miss any stripes to dig. Only use the
machine to dig up already loosened soil
Transport and storage (fig. 10, 12)
Always pull out the power cord before transpo巾ng!
Pull the lock pin (17). u can now move the wheels
(7) to the lower position. Make sure that the lock pin
(17) engages again in the lower position. (fig. 10)
Attention! The wheels must be fixed in the upper
position during operation'
For storage or transport in a limited space, proceed
as follows
Open the wing nuts (10) until you can fold the handles
forward. Attention! Danger of crushing your fingers
Now you can transport your machine with the trans
port handle (3)
So you can storage the machine too
9. Electrical connection
The electrical motor installed is connected and
ready for operation. The connection complies
with the applicable VDE and DIN provisions.
The customer's mains connection as well as
the extension cable used must also comply with
these regulations.
Damaged electrical connection cable
The insulation on electrical connection cables is of
ten damaged
This may have the following causes
• Passage points, where connection cables are
passed through windows or doors
• Kinks where the connection cable has been im
properly fastened or routed
• Places where the connection cables have been cut
due to being driven over.
• Insulation damage due to being ripped out of the
wall outlet
• Cracks due to the insulation ageing
Such damaged electrical connection cables must not
be used and are life-threatening due to the insula
lion damage
Check the electrical connection cables for damage
regularly. Make sure that the connection cable does
not hang on the power network during the inspection
Electrical connection cables must comply with the
applicable VOE and DIN provisions. Only use con
nection cables with the marking ,,HOSVV-F"
The printing of the type designation on the con nee
tion cable is mandatory.
AC motor
• The mains voltage must be 120V/ 60Hz
• Extension cables up to 25 m in length must have
a cross section of at least 1,5 mm', above 25 m
at least 2,5 mm'
• The mains connection is protected with a 16 A
slow-blow fuse
06
15

Connections and repairs of electrical equipment may
only be carried out by an electrician
Please provide the following information in the event
of any enquiries:
• pe of current for the motor
• Machine data - type plate
• Motor data - type plate
10.Cleaning and maintenance
Dangerl
Always pull out the mains power plug before starting
any cleaning work
Cleaning
• Keep all safety devices, air vents and the motor
housing free of dirt and dust as far as possible
Wipe the equipment with a clean cloth or blow it
with compressed air at low pressure
• We recommend that you clean the device immed1一
ately each time you have finished using it
• Clean the equipment regularly with a moist cloth
and some soft soap. Do not use cleaning agents or
solvents; these could attack the plastic parts of the
equipment. Ensure that no water can seep into the
device. The ingress of water into an electric tool
increases the risk of an electric shock
Carbon brushes
In case of excessive sparking, have the carbon
brushes checked only by a qualified electrician
Danger! The carbon brushes should not be replaced
by anyone but a qualified electrician.
Maintenance
• A worn out or damaged cutting unit should be re
placed by an authorised expert
• Take care that all fastening elements (screws,
nuts, etc.) are firmly tightened, so that you can
work safely with the Electric Tiller.
• Store the Electric Tiller in a dry place
• For longer life, all screw-fastened parts, such as
wheels and axles should be cleaned and subse
quently oiled
• Regular servicing of the implement not only se
cures longer endurance and performance, it also
contributes to an accurate and simple dig up of
your bed
• At the end of the season, carry out a general check
of the Electric Tiller, and remove all residue col
lected. Before the start of every season, it is ab
solutely necessary to check the state of the ma
chine. Contact our Customer Service if repair work
is necessary.
16
COST
11.Storage
Store the device and its accessories in a dark, dry
and frost-proof place that is inaccessible to children
The optimum storage temperature is between 5 and
30"C
Store the electrical tool in its original packaging
Cover the electrical tool in order to protect it from
dust and moisture. Store the operating manual with
the electrical tool.
12.Disposal and recycling
The equipment is supplied in packaging to prevent it
from being damaged in transit. The raw materials in
this packaging can be reused or recycled. The equip
ment and its accessories are made of various types
of material, such as metal and plastic. Defective
components must be disposed of as special waste
Ask your dealer or your local council
Old devices must not be disposed of with house
hold wastel
宜
This symbol indicates that this product must
not be disposed of together with domestic
waste in compliance with the Directive
(2012/19/EU) pertaining to waste electrical
and electronic equipment (WEEE). This product must
be disposed of at a designated collection point. This
can occur, for example, by handing it in at an author
ised collecting point for the recycling of waste elec
trical and electronic equipment. Improper handling
of waste equipment may have negative consequenc
es for the environment and human health due to po
tentially hazardous substances that are often con
tained in electrical and electronic equipment. By
properly disposing of this product, you are also con
tributing to the eective use of natural resources
u can obtain information on collection points for
waste equipment from your municipal administration,
public waste disposal authority, an authorised body
for the disposal of waste electrical and electronic
equipment or your waste disposal company
13.Spare-part ordering
Please quote the following in your order for spare
parts:
• pe of device
• Article No. of deviceldent. No. of device
• Spare Part No. of the required spare part
COST
11
05

COST
1
—
5
仁
:
11
—
C
,
.
,
芍§
-
•
·
t
L
�
。
3
2
COST
Service information
Please note that the following parts of this product
are subject to normal or natural wear and that the fol
lowing parts are therefore also required for use as
consumables.
Wear parts*: Brush Assemblies, Blade Roller
• Not necessarily included in the scope of delivery!
14. Troubleshooting guide
Fault
Possible causes
Rectification
Motor does not start
• No electricity in plug
• Check line and fuse
• Cable defective • Have machine checked by a customer service
center
• Switch, switch/plug block defective • Have machine checked by a customer service
center
• Connections to motor or capacitor
• Have machine checked by a customer service
disconnected
center
• Blade roller blocked
• If necessary adjust working depth Clean housing
so that the roller can run freely
Engine performance
• Soil is too firm
• Change working depth
drops
• Carbonbrushes worn out • Check by a customer service center
• Roller badly worn
• Replace roller
The Electric Tiller is
• roller worn
• Replace roller
difficult to check
• Wrong working depth
• Correct working depth
Motor is running, roller • Gearing defective
• By customer service workshop
is not rotating
04
17

_
cos冒WAY
I
80STWAY
®
COST
IROMMAX
USER'S MANUAL
Electric Tiller
GT3587US
THIS INSTRUCTION BOOKLET CONTAINS IMPORNT SAFETY INFORMION. PLEASE READ AND KEEP FOR FUTURE REFERENCE