
Write the model and serial
numbers here:
Model # _______________
Serial # _______________
You can find them on a label
on the front of the upper oven
behind the oven door.
OWNER’S MANUAL
WALL OVEN
Built-In Combination
49-2001799 Rev. 1 07-24
PT9900
GE is a trademark of the General Electric Company. Manufactured under trademark license.
SAFETY INFORMATION ............3
USING THE OVEN
Features ...........................23
Oven Controls ......................24
Oven Settings ......................25
UPPER OVEN
Before Using .......................30
Microwave Cookware Guide ..........30
Microwave Mode ...................34
Convection Bake Mode ..............35
Broil Mode .........................35
Popcorn Mode ......................36
Defrost Mode ......................36
Speed Cook Mode ..................37
Sensor Cook Mode ..................38
Microwave Quick Start Mode .........39
Precision Cook Mode ............... 40
Soften Mode .......................43
Melt Mode .........................43
Warm Mode ........................44
Proof Mode ........................44
LOWER OVEN
Before Using .......................45
Oven Racks ........................45
Convection Bake and Roast Mode ....46
Bake Mode .........................47
Broil Mode .........................48
Warm Mode ........................51
Proof Mode ........................52
Air Fry ............................52
Probe Mode ........................55
Favorite Mode ......................57
Precision Cook Mode ................59
Steam Function .....................60
Sous Vide ..........................61
CARE AND CLEANING
Upper Oven Interior .................62
Cleaning the Exterior ................63
Lower Oven Interior .................64
EasyClean ......................64
Self Clean ......................67
Oven Light .....................70
TROUBLESHOOTING ..............71
LIMITED WARRANTY .............78
ACCESSORIES ....................79
CONSUMER SUPPORT ............80

2
49-2001799 Rev. 1
THANK YOU FOR MAKING GE APPLIANCES A PART
OF YOUR HOME.
Whether you grew up with GE Appliances, or this is your first, we’re happy to have
you in the family.
We take pride in the craftsmanship, innovation and design that goes into every
GE Appliances product, and we think you will too. Among other things, registration
of your appliance ensures that we can deliver important product information and
warranty details when you need them.
Register your GE appliance now online. Helpful websites and phone numbers are
available in the Consumer Support section of this Owner’s Manual. You may also
mail in the pre-printed registration card included in the packing material.

49-2001799 Rev. 1
3
READ AND SAVE THESE INSTRUCTIONS
IMPORTANT SAFETY INFORMATION
READ ALL INSTRUCTIONS BEFORE USING THE APPLIANCE
SAFETY INFORMATION (Upper Oven)
WARNING
To reduce the risk of burns, electric shock, fire, injury to persons,
or exposure to excessive microwave energy:
When using electrical appliances, basic safety precautions should be followed,
including the following:
Ŷ 5HDGDOOLQVWUXFWLRQVEHIRUHXVLQJWKLV
appliance.
Ŷ 5HDGDQGIROORZWKHVSHFL¿F
precautions in the PRECAUTIONS TO
AVOID POSSIBLE EXPOSURE TO
EXCESSIVE MICROWAVE ENERGY
section.
Ŷ 8VHWKLVDSSOLDQFHRQO\IRULWVLQWHQGHG
use as described in this manual. Do not
use corrosive chemicals or vapors in
WKLVDSSOLDQFH7KLVRYHQLVVSHFL¿FDOO\
designed to heat, dry or cook food,
and is not intended for laboratory or
industrial use.
Ŷ 7KLVDSSOLDQFHPXVWRQO\EHVHUYLFHG
E\TXDOL¿HGVHUYLFHSHUVRQQHO&RQWDFW
nearest authorized service facility for
examination, repair or adjustment.
INSTALLATION
Ŷ ,QVWDOORUORFDWHWKLVDSSOLDQFHRQO\LQ
accordance with the provided installation
instructions.
Ŷ %HVXUH\RXUDSSOLDQFHLVSURSHUO\
installed and grounded by a qualified
technician in accordance with the
provided installation instructions.
Ŷ 7KLVRYHQLV8/OLVWHGIRUVWDQGDUGZDOO
installation.
Ŷ 'RQRWRSHUDWHWKLVDSSOLDQFHLILWLV
not working properly or it has been
damaged or dropped.
Ŷ 'RQRWFRYHURUEORFNDQ\RSHQLQJVRQ
the appliance.
Ŷ 'RQRWVWRUHWKLVDSSOLDQFHRXWGRRUV
Do not use this product near water—for
example, in a wet basement, near a
swimming pool, near a sink or in similar
locations.
Ŷ 'RQRWPRXQWWKLVDSSOLDQFHRYHUDVLQN
TO REDUCE THE RISK OF FIRE IN THE
CAVITY:
Ŷ 'RQRWRYHUFRRNIRRG&DUHIXOO\DWWHQG
appliance when paper, plastic or other
combustible materials are placed inside
the oven to facilitate cooking.
Ŷ 5HPRYHZLUHWZLVWWLHVDQGPHWDO
handles from paper or plastic containers
before placing them in the oven.
Ŷ ,IPDWHULDOVLQVLGHWKHRYHQLJQLWHNHHS
WKHRYHQGRRUFORVHGWXUQWKHRYHQRႇ
and disconnect the power cord or shut
RႇSRZHUDWWKHIXVHRUFLUFXLWEUHDNHU
panel.
Ŷ 'RQRWVWRUHDQ\PDWHULDOVLQWKLVRYHQ
when not in use. Do not leave paper
products, cooking utensils or food in the
cavity when not in use. All racks should
be removed from oven when not in use.
Ŷ 'RQRWRSHUDWHWKHPLFURZDYHIHDWXUH
without food in the oven.
TO REDUCE THE RISK OF BURNS:
Ŷ %HFDUHIXOZKHQRSHQLQJFRQWDLQHUV
of hot food. Use pot holders and direct
steam away from face and hands.
Ŷ 9HQWSLHUFHRUVOLWFRQWDLQHUV
pouches, or plastic bags to prevent
build-up of pressure.
Ŷ %HFDUHIXOZKHQWRXFKLQJWKHWXUQWDEOH
door, racks, or walls of the oven which
may become hot during use.
Ŷ (QHUJL]HGLQWHULRUFDYLW\OLJKWLQJ
will cause burns. Use caution when
cleaning and allow lamps to cool prior
to replacement.
Ŷ
HOT CONTENTS CAN CAUSE
SEVERE BURNS, DO NOT ALLOW
CHILDREN TO USE THE MICROWAVE.
Use caution when removing hot items.

4
49-2001799 Rev. 1
SAFETY INFORMATION (Upper Oven)
READ AND SAVE THESE INSTRUCTIONS
IMPORTANT SAFETY INFORMATION
READ ALL INSTRUCTIONS BEFORE USING THE APPLIANCE
WARNING
Continued
OPERATING
Ŷ 'RQRWRSHUDWHWKHRYHQZLWKRXWWKH
turntable in place. The turntable must
be unrestricted so it can turn.
Ŷ 2YHUVL]HGIRRGVRURYHUVL]HGPHWDO
utensils should not be inserted in a
microwave/convection oven as they
PD\FUHDWHD¿UHRUULVNRIHOHFWULF
shock.
Ŷ Do not use paper products in oven
when appliance is operating in any
cooking mode except microwave.
Ŷ 0DNHVXUHDOOFRRNZDUHXVHGLQ
your microwave oven is suitable for
microwaving. Most glass casseroles,
cooking dishes, measuring cups,
pottery or china dinnerware, which
does not have metallic trim or
glass with a metallic sheen can be
used in compliance with cookware
manufactures’ recommendations.
Ŷ 6RPHSURGXFWVVXFKDVZKROHHJJV
and sealed containers—for example,
closed jars—are able to explode and
should not be heated in this oven.
Ŷ 'RQRWRYHUFRRNSRWDWRHV7KH\FRXOG
GHK\GUDWHDQGFDWFK¿UH
Ŷ 'RQRWFRYHUWKHWXUQWDEOHZLUHRYHQ
rack, trays or any part of the oven with
metal foil. This will cause arcing in the
microwave/convection oven.
Ŷ 7KLVRYHQLVQRWDSSURYHGRUWHVWHGIRU
marine use.
CLEANING
Ŷ 'LVFRQQHFWSRZHUEHIRUHFOHDQLQJ
Ŷ 'LVFRQQHFWSRZHUEHIRUHUHSODFLQJ
cavity lamps.
Ŷ .HHSWKHRYHQIUHHIURPJUHDVH
buildup.
Ŷ 'RQRWFOHDQZLWKPHWDOVFRXULQJ
SDGV3LHFHVFDQEXUQRႇWKHSDGDQG
touch electrical parts involving a risk of
electric shock.
Ŷ :KHQFOHDQLQJVXUIDFHVRIGRRUDQG
oven that comes together on closing
the door, use only mild, nonabrasive
soaps, or detergents applied with a
clean sponge or soft cloth. Rinse well.
SUPER HEATED WATER
Ŷ /LTXLGVVXFKDVZDWHUFRႇHHRUWHD
are able to be overheated beyond the
boiling point without appearing to be
boiling. Visible bubbling or boiling when
the container is removed from the
microwave oven is not always present.
THIS COULD RESULT IN VERY
HOT LIQUIDS SUDDENLY BOILING
OVER WHEN THE CONTAINER
IS DISTURBED OR A SPOON OR
OTHER UTENSIL IS INSERTED INTO
THE LIQUID.
Ŷ 7RUHGXFHWKHULVNRILQMXU\WRSHUVRQV
- Do not overheat the liquid.
- Stir the liquid both before and halfway
through heating it.
- Do not use straight-sided containers
with narrow necks.
- After heating, allow the container
to stand in the microwave oven for
a short time before removing the
container.
- Use extreme care when inserting
a spoon or other utensil into the
container.
49-2001799 Rev. 1
5
WARNING
ARCING
Arcing can occur during microwave cooking and, for certain models, in fast cook and
SUHFLVLRQFRRNPRGHV,I\RXVHHDUFLQJSUHVVWKH&OHDU2IISDGRU3RZHU.H\DQG
correct the problem.
Arcing is the microwave term for sparks in the oven. Arcing is caused by:
Ŷ 0HWDORUIRLOWRXFKLQJWKHVLGHRIWKH
oven.
Ŷ )RLOQRWPROGHGWRIRRGXSWXUQHG
edges act like antennas).
Ŷ 8VHIRLORQO\DVUHFRPPHQGHGLQWKLV
manual.
Ŷ 0HWDOFRRNZDUHXVHGGXULQJ3UHFLVLRQ
6SHHG&RRNRQVRPHPRGHOVRU
PLFURZDYHFRRNLQJH[FHSWIRUSDQV
provided with the oven).
Ŷ 0HWDOVXFKDVWZLVWWLHVSRXOWU\SLQV
or gold-rimmed dishes, in the oven.
Ŷ 5HF\FOHGSDSHUWRZHOVFRQWDLQLQJVPDOO
metal pieces being used in the oven.
READ AND SAVE THESE INSTRUCTIONS
IMPORTANT SAFETY INFORMATION
READ ALL INSTRUCTIONS BEFORE USING THE APPLIANCE
SAFETY INFORMATION (Upper Oven)
WARNING
MICROWAVE-SAFE COOKWARE
Make sure to use suitable cookware
during microwave cooking. Most glass
casseroles, cooking dishes, measuring
cups, custard cups, pottery or china
dinnerware which does not have metallic
trim or glaze with a metallic sheen can be
used. Some cookware is labeled “suitable
for microwaving.”
Ŷ 3ODFHIRRGRUPLFURZDYDEOHFRQWDLQHU
directly on the clear glass tray to cook
your food.
Ŷ 8VHRIDPHWDOWUD\GXULQJPLFURZDYH
cooking will result in inferior cooking
performance.
Ŷ &RRNZDUHPD\EHFRPHKRWEHFDXVHRI
heat transferred from the heated food.
Oven mitts may be needed to handle
the cookware.
Ŷ 'RQRWXVHUHF\FOHGSDSHUSURGXFWV
Recycled paper towels, napkins and
ZD[HGSDSHUFDQFRQWDLQPHWDOÀHFNV
which may cause arcing or ignite.
Paper products containing nylon or
Q\ORQ¿ODPHQWVVKRXOGEHDYRLGHGDV
they may also ignite.
Ŷ 8VHIRLORQO\DVGLUHFWHGLQWKLVPDQXDO
When using foil in the oven, keep the
foil at least 1” away from the sides of
the oven.
Ŷ ,I\RXXVHDPHDWWKHUPRPHWHUZKLOH
cooking, make sure it is safe for use in
microwave ovens.
Ŷ 6RPHIRDPWUD\VOLNHWKRVHWKDWPHDW
is packaged on) have a thin strip of
metal embedded in the bottom. When
microwaved, the metal can burn the
ÀRRURIWKHRYHQRULJQLWHDSDSHU
towel.
Ŷ 3DSHUWRZHOVZD[HGSDSHUDQGSODVWLF
wrap can be used to cover dishes in
order to retain moisture and prevent
spattering. Be sure to vent plastic wrap
so steam can escape.
Ŷ 1RWDOOSODVWLFZUDSLVVXLWDEOHIRUXVHLQ
microwave ovens. Check the package
for proper use.
6
49-2001799 Rev. 1
SAFETY INFORMATION (Upper Oven)
READ AND SAVE THESE INSTRUCTIONS
IMPORTANT SAFETY INFORMATION
READ ALL INSTRUCTIONS BEFORE USING THE APPLIANCE
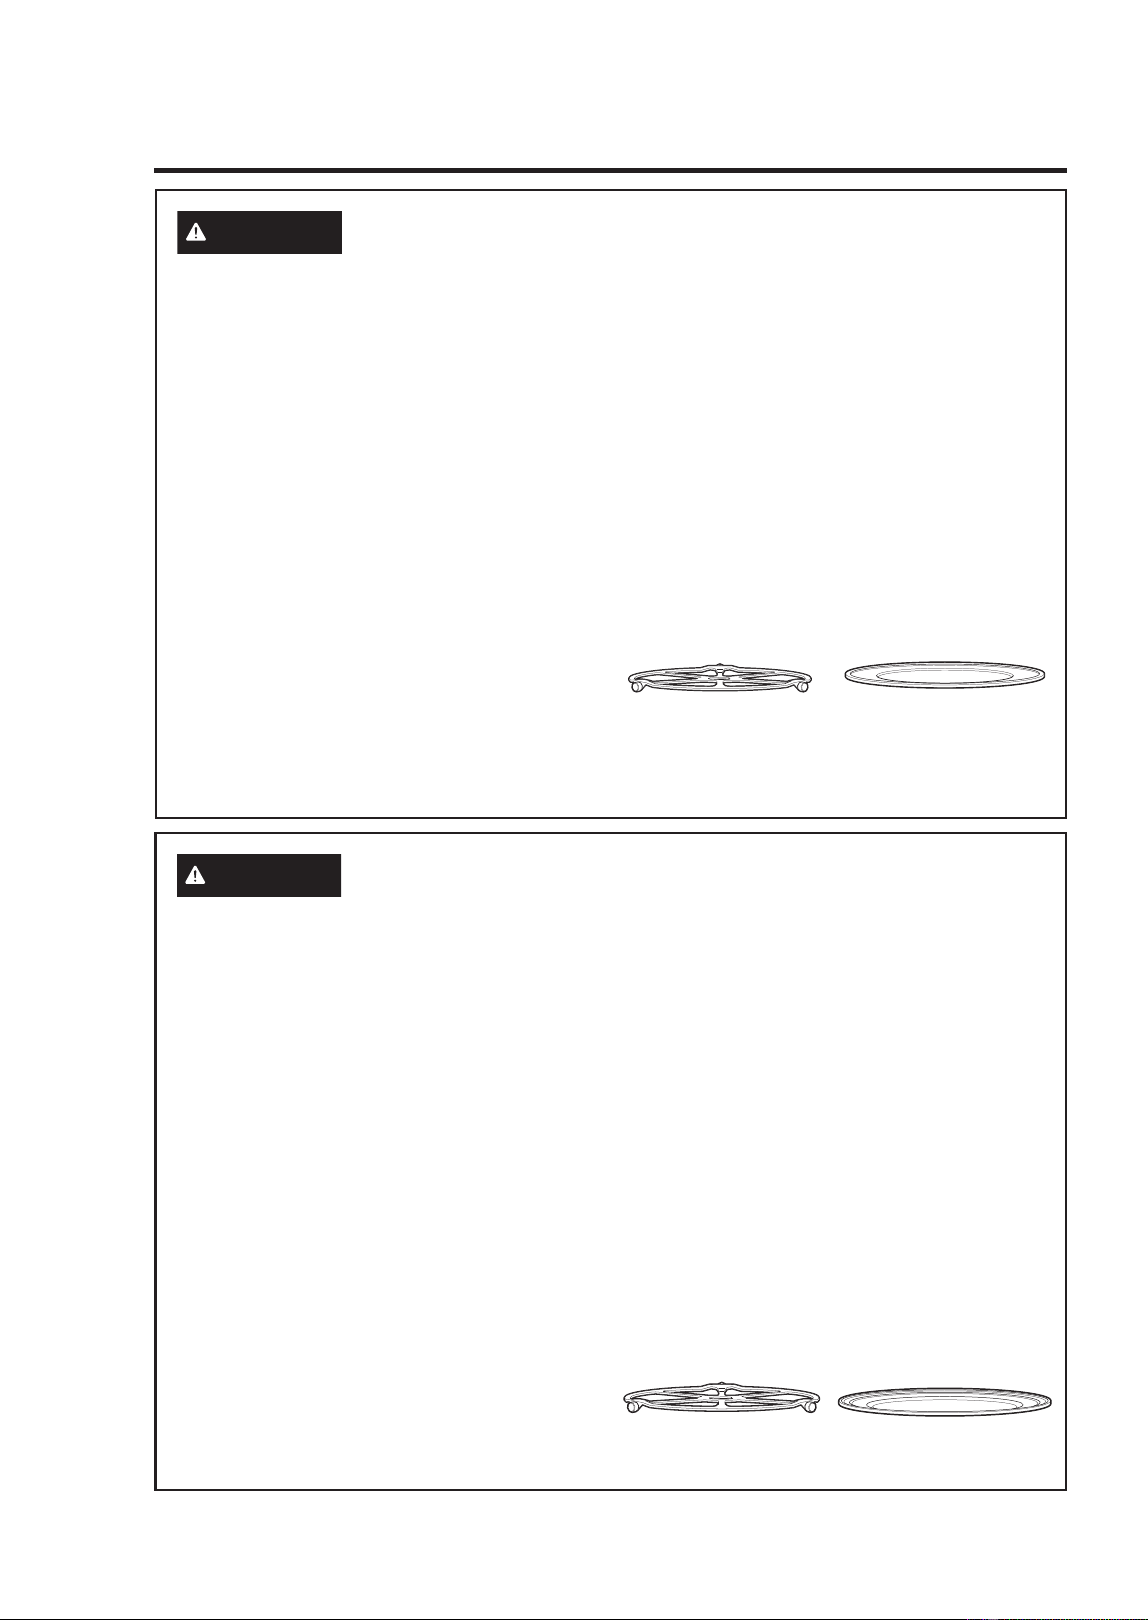
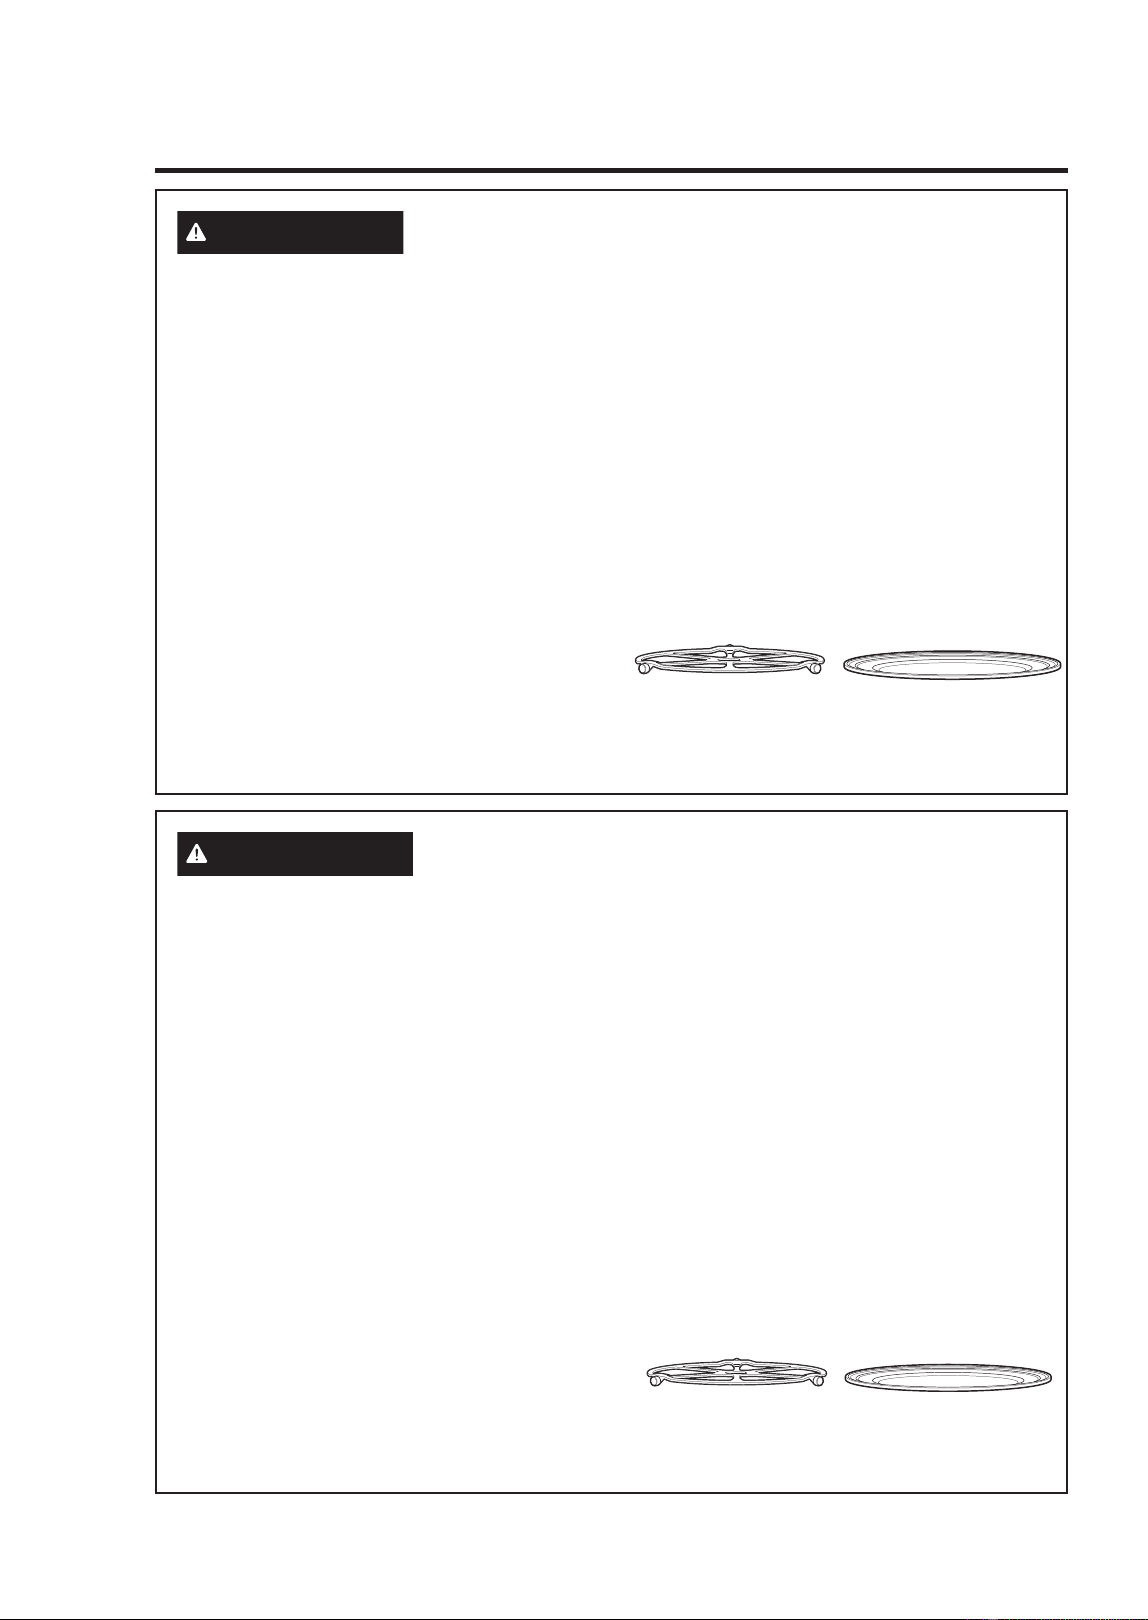
The turntable must
always be in place when
using the oven.
The clear glass tray
should always be in place
when microwaving.
WARNING
(On Some Models) OVEN-SAFE COOKWARE FOR
PRECISION/SPEED COOK
Ŷ 7KHRYHQDQGGRRUZLOOJHWYHU\KRW
when Precision/Speed Cooking.
Ŷ &RRNZDUHZLOOEHFRPHKRW2YHQPLWWV
will be needed to handle the cookware.
Ŷ 'RQRWXVHFRYHULQJVFRQWDLQHUVRU
cooking/roasting bags made of foil,
plastic, wax or paper when Precision/
Speed Cooking.
Ŷ 'RQRWFRYHUWKHWXUQWDEOHZLUHRYHQ
rack, trays or any part of the oven with
metal foil. This will cause arcing in the
microwave/convection oven.
Ŷ 8VHWKHPHWDOWUD\LQWKHVDPHZD\
you would use a shallow baking pan or
baking tray.
Ŷ 3ODFHIRRGGLUHFWO\RQWKHPHWDOWUD\V
when cooking unless prompted by the
oven to do otherwise.
Ŷ $Q\QRQPHWDORYHQVDIHGLVKFDQ
be used in your oven. Recipes in
the Advantium Cookbook were
tested in Pyrex
®
glass cookware and
Corningware
®
ceramic casseroles.
Cook times and results may vary when
using other types of oven-safe dishes.
Place them directly on the trays.
Ŷ 8VHRIWKHFOHDUJODVVWUD\ZKHQ
Precision/Speed Cooking will result
in inferior cooking performance and
possible cracking of the glass tray.
Ŷ 8VHRQO\WKHPHWDOWUD\VVSHFL¿HGIRU
use with this oven. Other metal trays
are not designed for use with this
oven and will result in inferior cooking
performance.
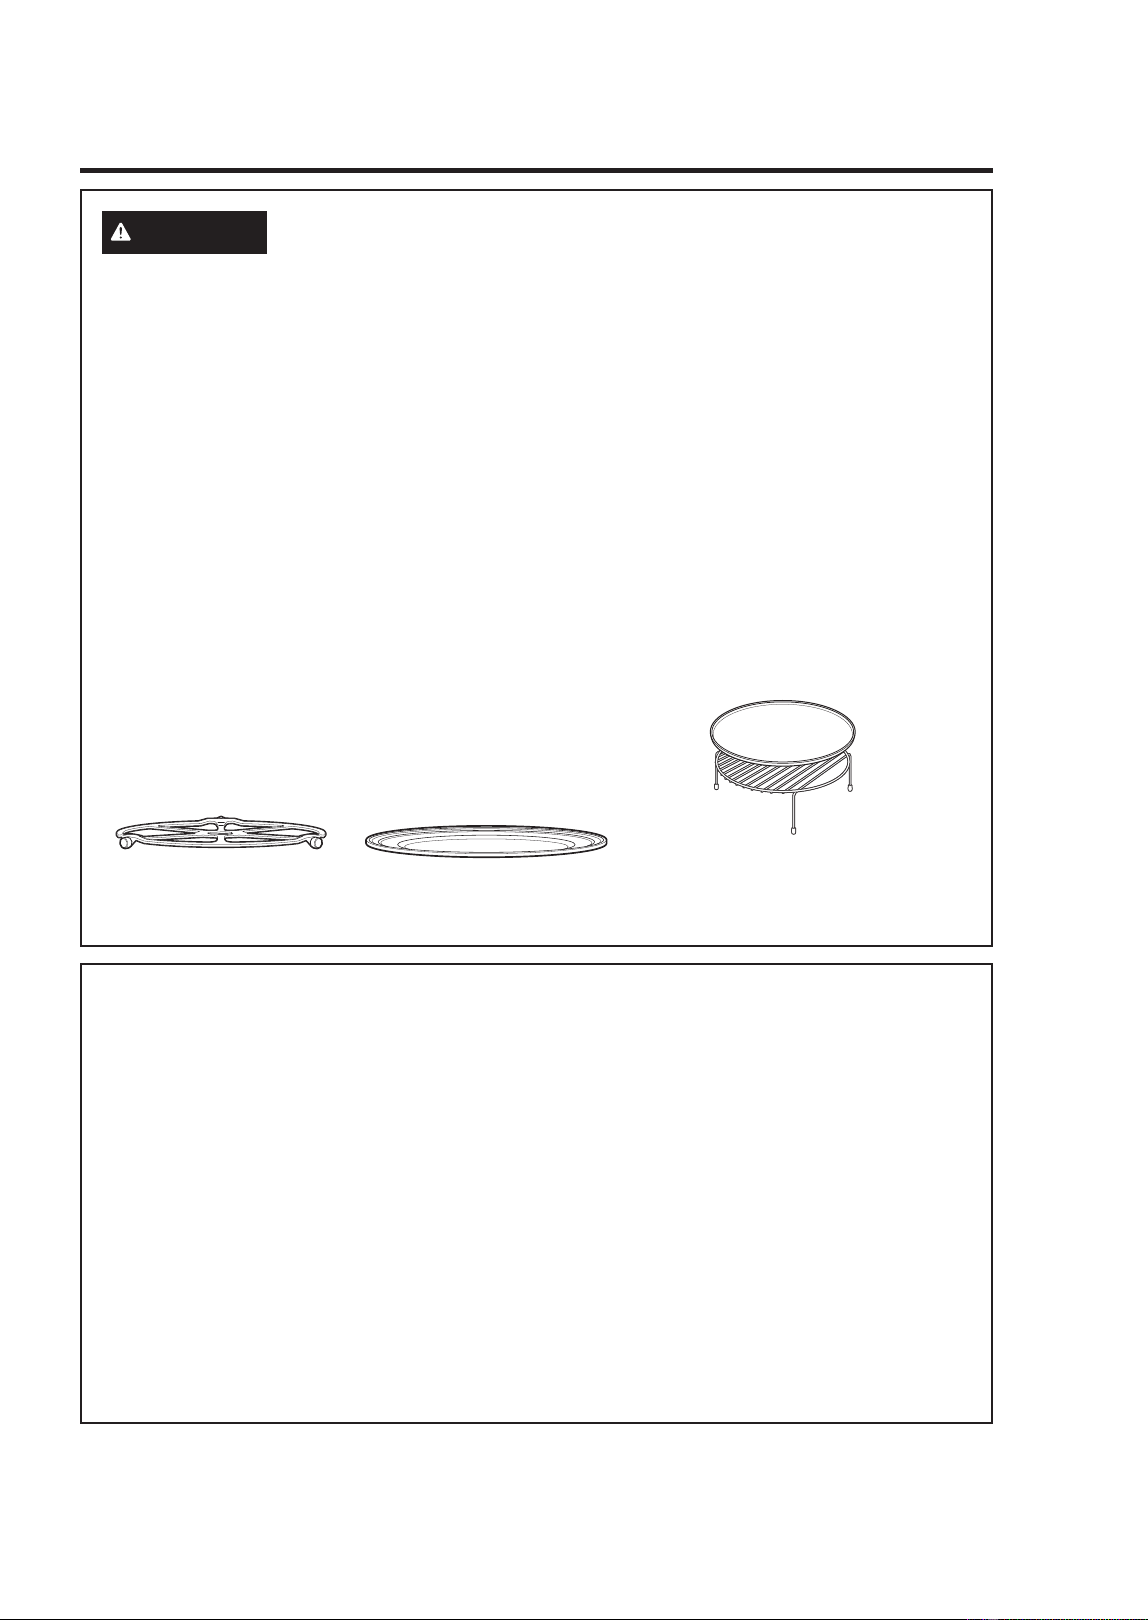
The turntable must
always be in place when
using the oven.
Put food directly on the
metal tray to convection
bake, warm or toast.
WARNING
MICROWAVE-SAFE COOKWARE (Cont.)
Ŷ ³%RLODEOH´FRRNLQJSRXFKHVDQG
tightly closed plastic bags should be
slit, pierced or vented as directed by
package instructions. If they are not,
plastic could burst during or immediately
after cooking, possibly resulting in injury.
Also, plastic storage containers should
be at least partially uncovered because
they form a tight seal. When cooking
with containers tightly covered with
plastic wrap, remove covering carefully
and direct steam away from hands and
face.
Ŷ 3ODVWLFFRRNZDUH²3ODVWLFFRRNZDUH
designed for microwave cooking is very
useful, but should be used carefully.
Even microwave-safe plastic may not be
as tolerant of overcooking conditions as
are glass or ceramic materials. Plastic
may soften or char if subjected to
short periods of overcooking. In longer
exposures to overcooking, the food and
cookware could ignite.
Ŷ 'RQRWXVHWKHZLUHRYHQUDFNIRU
microwaving.
)ROORZWKHVHJXLGHOLQHV
1. Use microwave-safe plastics only,
and use them in strict compliance
with the cookware manufacturer’s
recommendations.
2. Do not microwave empty containers.
49-2001799 Rev. 1
7
READ AND SAVE THESE INSTRUCTIONS
IMPORTANT SAFETY INFORMATION
READ ALL INSTRUCTIONS BEFORE USING THE APPLIANCE
SAFETY INFORMATION (Upper Oven)
WARNING
(On Some Models) OVEN-SAFE COOKWARE FOR
BAKING, BROILING, WARMING, PROOFING & TOASTING
Ŷ 7KHRYHQDQGGRRUZLOOJHWYHU\KRW
when convection baking, broiling,
warming or toasting.
Ŷ &RRNZDUHZLOOEHFRPHKRW2YHQPLWWV
will be needed to handle the cookware.
Ŷ 'RQRWXVHFRYHULQJVFRQWDLQHUVRU
cooking/roasting bags made of foil,
plastic, wax or paper when broiling or
toasting.
Ŷ 'RQRWFRYHUWKHWXUQWDEOHZLUHRYHQ
rack, trays or any part of the oven with
metal foil. This will cause arcing in the
microwave/convection oven.
Ŷ 8VHWKHPHWDOWUD\LQWKHVDPHZD\
you would use a shallow baking pan or
baking tray.
Ŷ 8VHWKHZLUHRYHQUDFNZKHQ
convection baking or warming on two
levels.
Ŷ 3ODFHIRRGGLUHFWO\RQWKHPHWDO
trays when cooking unless the recipe
requires a dish.
Ŷ $Q\RYHQVDIHGLVKFDQEHXVHGLQ
your oven. Recipes in the Advantium
Cookbook were tested in Pyrex
®
glass
cookware and Corningware
®
ceramic
casseroles. Cook times and results
may vary when using other types of
oven-safe dishes. Place them directly
on the trays.
Ŷ 8VHRIWKHFOHDUJODVVWUD\ZKHQ
convection baking, broiling, warming
or toasting will result in inferior cooking
performance.
The turntable must always
be in place when using the
oven.
Put food directly on the metal
tray to convection bake, warm
or toast.
Put food directly on the aluminum baking
sheet on the wire oven rack, and place them
on the non-stick metal tray, when baking on
two levels, broiling or toasting foods.
PRECAUTIONS TO AVOID POSSIBLE EXPOSURE
TO EXCESSIVE MICROWAVE ENERGY
(a) Do Not Attempt to operate this
oven with the door open since open-
door operation can result in harmful
exposure to microwave energy. It is
important not to defeat or tamper with
the safety interlocks.
(b) Do Not Place any object between the
oven front face and the door or allow
soil or cleaner residue to accumulate
on sealing surfaces.
(c) Do Not Operate the oven if it is
damaged.
It is particularly important that the oven
door close properly and that there is no
damage to the:
GRRUEHQW
KLQJHVDQGODWFKHVEURNHQRU
loosened),
GRRUVHDOVDQGVHDOLQJVXUIDFHV
(d) The Oven Should Not be adjusted or
repaired by anyone except properly
TXDOL¿HGVHUYLFHSHUVRQQHO

8
49-2001799 Rev. 1
SAFETY INFORMATION (Upper Oven)
READ AND SAVE THESE INSTRUCTIONS
IMPORTANT SAFETY INFORMATION
READ ALL INSTRUCTIONS BEFORE USING THE APPLIANCE
WARNING
NOTICE—PACEMAKERS
Most pacemakers are shielded from interference from electronic products, including
microwaves. However, patients with pacemakers may wish to consult their physicians if
they have concerns.
49-2001799 Rev. 1
9
READ AND SAVE THESE INSTRUCTIONS
IMPORTANT SAFETY INFORMATION
READ ALL INSTRUCTIONS BEFORE USING THE APPLIANCE
WARNING
5HDGDOOVDIHW\LQVWUXFWLRQVEHIRUHXVLQJWKHSURGXFW)DLOXUHWRIROORZWKHVH
instructions may result in fire, electrical shock, serious injury or death.
WARNING
GENERAL SAFETY INSTRUCTIONS
Ŷ 8VHWKLVDSSOLDQFHRQO\IRULWVLQWHQGHG
purpose as described in the Owner’s
Manual.
Ŷ +DYH\RXUDSSOLDQFHLQVWDOOHGDQG
properly grounded by a qualified
installer in accordance with the
provided installation instructions.
Ŷ $Q\DGMXVWPHQWUHSDLURUVHUYLFH
not specifically recommended in the
Owner’s Manual should be performed
ONLY by a qualified appliance installer
or service technician.
Ŷ %HIRUHSHUIRUPLQJDQ\VHUYLFHXQSOXJ
the appliance or disconnect the power
supply at the household distribution
panel by removing the fuse or switching
off the circuit breaker.
Ŷ
Be sure all packing materials are removed
from the appliance before operating to
prevent ignition of these materials.
Ŷ $YRLGVFUDWFKLQJRULPSDFWLQJJODVV
doors, cooktops, or control panels.
Doing so may lead to glass breakage.
Ŷ 'RQRWFRRNRQDSURGXFWZLWKEURNHQ
glass. Shock, fire, or cuts may occur.
Ŷ 'RQRWOHDYHFKLOGUHQDORQHRU
unattended in an area where an
appliance is in use. They should never
be allowed to climb, sit or stand on any
part of the appliance.
Ŷ
CAUTION
Do not store items of
interest to children in cabinets above
or on top of the appliance - children
climbing on the oven to reach items
could be seriously injured.
Ŷ 1HYHUXVH\RXUDSSOLDQFHIRUZDUPLQJ
or heating the room.
Ŷ 'RQRWDOORZDQ\RQHWRFOLPEVWDQG
or hang on the oven door, drawer,
or cooktop. They could damage the
appliance or tip it over causing severe
injury or death.
Ŷ 8VHRQO\GU\SRWKROGHUV²PRLVWRU
damp pot holders on hot surfaces may
result in burns from steam. Do not let
pot holders touch surface units or oven
heating elements. Do not use a towel or
other bulky cloth in place of pot holders.
Ŷ 'RQRWWRXFKWKHEXUQHUVJULGGOHV
RQVRPHPRGHOVJUDWHVRQVRPH
models), the cooktop or oven heating
elements, or the interior surface of the
oven. These surfaces may remain hot
enough to burn for an extended period
of time following cooking, even though
they no longer appear to be on or hot.
Ŷ During and after use, do not touch, or
let clothing or other flammable materials
contact any interior area of the oven;
allow sufficient time for cooling first.
Other surfaces of the appliance may
become hot enough to cause burns.
Potentially hot surfaces include burners
RUKHDWLQJHOHPHQWVJUDWHVRQVRPH
models), cooktop surface, oven vent
openings, surfaces near the openings,
crevices around the oven door, metal trim
parts above the door, any backguard, or
shelves located above cooking surface.
Ŷ 'RQRWKHDWXQRSHQHGIRRGFRQWDLQHUV
Pressure could build up and the
container could burst, causing an injury.
Ŷ &RRNIRRGWKRURXJKO\WRKHOS
protect against foodborne illness.
Minimum safe food temperature
recommendations are provided by
WKH86'$DQG)'$8VHDIRRG
thermometer to take food temperatures
and check several locations.
Ŷ
.HHSWKHYHQWLODWRUKRRGDQGJUHDVH
filters clean to maintain good venting and
to avoid grease fires. Turn the ventilator
2))LQFDVHRIDILUH7KHEORZHULILQ
operation, could spread the flames.
SAFETY INFORMATION (Lower Oven)
10
49-2001799 Rev. 1
READ AND SAVE THESE INSTRUCTIONS
IMPORTANT SAFETY INFORMATION
READ ALL INSTRUCTIONS BEFORE USING THE APPLIANCE
WARNING
KEEP FLAMMABLE MATERIALS AWAY FROM THE
RANGE Failure to do so may result in fire or personal injury.
Ŷ 'RQRWVWRUHRUXVHIODPPDEOHPDWHULDOV
in an oven or near the cooktop,
including paper, plastic, pot holders,
linens, wall coverings, curtains, drapes
and gasoline or other flammable vapors
and liquids.
Ŷ 1HYHUZHDUORRVHILWWLQJRUKDQJLQJ
garments while using the appliance.
These garments may ignite if they
contact hot surfaces causing severe
burns.
Ŷ 'RQRWOHWFRRNLQJJUHDVHRURWKHU
flammable materials accumulate in or
near the appliance. Grease in the oven
or on the cooktop may ignite.
Ŷ Do not store any flammable materials or
temperature sensitive items inside of or on
the appliance.
Ŷ Clean ventilating hoods frequently.
Grease should not be allowed to
accumulate on the hood or filter.
Ŷ 2QVRPHPRGHOVRemote Operation
– This appliance is configurable to allow
remote operation at any time.
WARNING
IN THE EVENT OF A FIRE, TAKE THE FOLLOWING
STEPS TO PREVENT INJURY AND FIRE SPREADING
Ŷ 'RQRWXVHZDWHURQJUHDVHILUHV1HYHU
pick up a flaming pan. Turn the controls
off. Smother a flaming pan on a surface
unit by covering the pan completely with
a well-fitting lid, cookie sheet or flat tray.
Use a multi-purpose dry chemical or
foam-type fire extinguisher.
Ŷ ,IWKHUHLVDILUHLQWKHRYHQGXULQJ
baking, smother the fire by closing the
oven door and turning the oven off or
by using a multi-purpose dry chemical
or foam-type fire extinguisher.
Ŷ ,IWKHUHLVDILUHLQWKHRYHQGXULQJVHOI
clean, turn the oven off and wait for
the fire to go out. Do not force the door
open. Introduction of fresh air at self-
clean temperatures may lead to a burst
RIIODPHIURPWKHRYHQ)DLOXUHWRIROORZ
this instruction may result in severe
burns.
WARNING
OVEN SAFETY INSTRUCTIONS
Ŷ 6WDQGDZD\IURPWKHDSSOLDQFHZKHQ
opening the oven door. Hot air or steam
which escapes can cause burns to
hands, face and/or eyes.
Ŷ 'RQRWXVHWKHRYHQLIDKHDWLQJ
element develops a glowing spot during
use or shows other signs of damage.
A glowing spot indicates the heating
element may fail and present a potential
burn, fire, or shock hazard. Turn the
oven off immediately and have the
heating element replaced by a qualified
service technician.
Ŷ .HHSWKHRYHQYHQWXQREVWUXFWHG
Ŷ 1HYHUSODFHFRRNLQJXWHQVLOVSL]]DRU
baking stones, or any type of foil or liner
on the oven floor. These items can trap
heat or melt, resulting in damage to the
product and risk of shock, smoke or fire.
SAFETY INFORMATION (Lower Oven)
49-2001799 Rev. 1
11
SAFETY INFORMATION (Lower Oven)
WARNING
OVEN SAFETY INSTRUCTIONS (Cont.)
Ŷ 3ODFHRYHQUDFNVLQGHVLUHGORFDWLRQ
while oven is cool. If rack must be
moved while oven is hot, be careful
to avoid touching hot surfaces and do
not let pot holder contact hot heating
element in oven.
Ŷ 'RQRWOHDYHLWHPVVXFKDVSDSHU
cooking utensils or food in the oven
when not in use. Items stored in an
oven can ignite.
Ŷ 'RQRWOHDYHLWHPVRQWKHFRRNWRSQHDU
the oven vent. Items may overheat
resulting in a risk of fire or burns.
Ŷ 1HYHUEURLOZLWKWKHGRRURSHQ
Ŷ .HHSWKHRYHQIUHHIURPJUHDVH
buildup. Grease in the oven may ignite.
Ŷ :KHQXVLQJFRRNLQJRUURDVWLQJEDJV
in the oven, follow the manufacturer’s
directions.
Ŷ SHOCK OR BURN HAZARD: Before
replacing oven light bulb, disconnect
the electrical power to the appliance at
the main fuse or circuit breaker panel.
)DLOXUHWRGRVRPD\UHVXOWLQHOHFWULF
shock or burn.
Ŷ
CAUTION
BURN HAZARD:
The glass cover and bulb should be
removed when cool. Touching hot glass
with bare hands or a damp cloth can
cause burns.
Ŷ 'RQRWXVHDQ\W\SHRIIRLORUOLQHUWR
cover the oven bottom or anywhere in
the oven, except as described in the
Owner’s Manual. Oven liners can trap
heat or melt, resulting in damage to the
product and risk of shock, smoke or
fire.
IMPORTANT SAFETY INFORMATION
READ ALL INSTRUCTIONS BEFORE USING THE APPLIANCE
READ AND SAVE THESE INSTRUCTIONS
WARNING
SELF-CLEANING OVEN SAFETY INSTRUCTIONS
(On some models)
The self-cleaning feature operates the oven at temperatures high enough to burn away
IRRGVRLOVLQWKHRYHQ)ROORZWKHVHLQVWUXFWLRQVIRUVDIHRSHUDWLRQ
Ŷ 'RQRWWRXFKRYHQVXUIDFHVGXULQJVHOI
FOHDQRSHUDWLRQ.HHSFKLOGUHQDZD\
from the appliance during self-cleaning.
)DLOXUHWRIROORZWKHVHLQVWUXFWLRQVPD\
cause burns.
Ŷ %HIRUHRSHUDWLQJWKHVHOIFOHDQF\FOH
remove pans, shiny metal oven racks,
and other utensils from the oven. Only
dark-colored porcelain-coated oven
UDFNVPD\EHOHIWLQWKHRYHQ)DLOXUH
to do so may cause damage to these
items and the oven and present a
potential burn or fire hazard.
Ŷ %HIRUHRSHUDWLQJWKHVHOIFOHDQF\FOH
wipe grease and food soils from the
oven. Excessive amount of grease may
ignite leading to smoke damage to your
home.
Ŷ ,IWKHVHOIFOHDQLQJPRGHPDOIXQFWLRQV
turn the oven off and disconnect the
power supply. Have it serviced by a
qualified technician.
Ŷ 'RQRWXVHRYHQFOHDQHUV1R
commercial oven cleaner or oven liner
protective coating of any kind should
be used in or around any part of the
oven unless certified for use in a self-
cleaning oven.
Ŷ 'RQRWFOHDQWKHGRRUJDVNHW7KH
door gasket is essential for a good
seal. Care should be taken not to rub,
damage or move the gasket.
Ŷ IMPORTANT: The health of some birds
is extremely sensitive to the fumes
given off during the self-cleaning cycle
of any appliance. Move birds to another
well-ventilated room.

12
49-2001799 Rev. 1
READ AND SAVE THESE INSTRUCTIONS
IMPORTANT SAFETY INFORMATION
READ ALL INSTRUCTIONS BEFORE USING THE APPLIANCE
How to Remove Protective Shipping Film and Packaging Tape
Carefully grasp a corner of the protective
shipping film with your fingers and slowly
peel it from the appliance surface. Do not
use any sharp items to remove the film.
Remove all of the film before using the
appliance for the first time.
To assure no damage is done to the finish
of the product, the safest way to remove
the adhesive from packaging tape on new
appliances is an application of a household
liquid dishwashing detergent. Apply with a
soft cloth and allow to soak.
NOTE: The adhesive must be removed from
all parts. It cannot be removed if it is baked
on.
Consider recycling options for your
appliance packaging material.
PROPER DISPOSAL OF YOUR APPLIANCE
'LVSRVHRIRUUHF\FOH\RXUDSSOLDQFHLQDFFRUGDQFHZLWK)HGHUDODQG/RFDO5HJXODWLRQV
Contact your local authorities for the environmentally safe disposal or recycling of your
appliance.
WARNING
REMOTE ENABLE EQUIPMENT (On some models)
This device complies with part 15 of the
)&&5XOHV2SHUDWLRQLVVXEMHFWWRWKH
following two conditions:
7KLVGHYLFHPD\QRWFDXVHKDUPIXO
LQWHUIHUHQFHDQGWKLVGHYLFHPXVW
accept any interference received,
including interference that may cause
undesired operation. The wireless
communication equipment installed on
this range has been tested and found to
comply with the limits for a Class B digital
GHYLFHSXUVXDQWWRSDUWRIWKH)&&
Rules.
These limits are designed to:
DSURYLGHUHDVRQDEOHSURWHFWLRQDJDLQVW
harmful interference in a residential
installation. This equipment generates,
uses and can radiate radio frequency
energy and, if not installed and used
in accordance with the instructions,
may cause harmful interference to
radio communications. However, there
is no guarantee that interference will
not occur in a particular installation.
If this equipment does cause harmful
interference to radio or television
reception, which can be determined
by turning the equipment off and on,
the user is encouraged to try to correct
the interference by one or more of the
following measures:
Ŷ5HRULHQWRUUHORFDWHWKHUHFHLYLQJ
antenna.
Ŷ,QFUHDVHWKHVHSDUDWLRQEHWZHHQWKH
equipment and receiver.
Ŷ&RQQHFWWKHHTXLSPHQWLQWRDQRXWOHWRQ
a circuit different from that to which the
receiver is connected.
Ŷ&RQVXOWWKHGHDOHURUDQH[SHULHQFHG
radio/TV technician for help.
EDFFHSWDQ\LQWHUIHUHQFHUHFHLYHG
including interference that may cause
undesired operation of the device. Note
that any changes or modifications to the
wireless communication device installed
on this appliance that are not expressly
approved by the manufacturer could
void the user's authority to operate the
equipment.
SAFETY INFORMATION (Lower Oven)

49-2001799 Rev. 1
13
INFORMACIÓN IMPORTANTE DE SEGURIDAD
LEA TODAS LAS INSTRUCCIONES ANTES DE USAR ESTE ELECTRODOMÉSTICO
LEA Y GUARDE ESTAS INSTRUCCIONES
ADVERTENCIA
Para reducir el riesgo de quemaduras, descargas eléctricas,
incendio, lesiones o exposición a energía de microondas excesiva:
Cuando utilice aparatos eléctricos, se deben seguir las precauciones de seguridad básicas, entre
las que se incluyen las siguientes:
Ŷ /HDWRGDVODVLQVWUXFFLRQHVDQWHVGHXWLOL]DU
este aparato.
Ŷ /HD\VLJDODVSUHFDXFLRQHVHVSHFt¿FDV
descritas en la sección PRECAUCIONES
PARA EVITAR LA POSIBLE EXPOSICIÓN
A ENERGÍA DE MICROONDAS EXCESIVA
de la página 8.
Ŷ 8WLOLFHHVWHDSDUDWRVRODPHQWHSDUDHO
¿QSUHYLVWRFRPRVHGHVFULEHHQHVWH
PDQXDO1RXWLOLFHTXtPLFRVQLYDSRUHV
corrosivos en este aparato. Este horno está
HVSHFt¿FDPHQWHGLVHxDGRSDUDFDOHQWDU
secar o cocinar alimentos y bebidas y no
HVWiGLVHxDGRSDUDXVDUVHHQQODERUDWRULR
ni para uso industrial.
Ŷ 6yORSHUVRQDOFXDOL¿FDGRGHEHUHSDUDUHVWH
aparato. Póngase en contacto con el centro
de mantenimiento autorizado más cercano
en caso de necesitar revisión, reparación o
ajuste.
INSTALLATION
Ŷ ,QVWDOHRXELTXHHVWHDSDUDWR~QLFDPHQWHGH
acuerdo a las instrucciones de instalación
suministradas.
Ŷ $VHJ~UHVHTXHVXDSDUDWRHVWpLQVWDODGR
y puesto a tierra apropiadamente por
XQWpFQLFRFXDOL¿FDGRGHDFXHUGRDODV
instrucciones de instalación suministradas.
Ŷ (VWHKRUQRHVWiOLVWDGRSRU8/SDUDOD
instalación de pared estándar.
Ŷ 1RXWLOLFHHVWHHOHFWURGRPpVWLFRVLHOPLVPR
no funciona de forma correcta o si sufrió
GDxRVRFDtGDV
Ŷ 1RFXEUDQLEORTXHHQLQJXQDDSHUWXUDGH
este aparato.
Ŷ 1RDOPDFHQHHVWHDSDUDWRDODLUHOLEUH1R
utilice este producto cerca del agua; por
HMHPSORHQXQVyWDQRK~PHGRFHUFDGH
una piscina, cerca de un lavabo o lugares
similares.
Ŷ 1RPRQWHHVWHDSDUDWRVREUHHOIUHJDGHUR
PARA REDUCIR EL RIESGO DE INCENDIO
DENTRO DEL HORNO:
Ŷ 1RFRFLQHH[FHVLYDPHQWHORVDOLPHQWRV
Vigile cuidadosamente el aparato cuandose
coloque papel, plástico u otros materiales
combustibles dentro del microondas para
facilitar la cocción.
Ŷ 4XLWHODVWLULWDVGHVHJXULGDGWZLVWWLHV\
asas metálicas de los recipientes de papel
o plástico antes de colocarlos dentro del
microondas.
Ŷ 6LORVPDWHULDOHVTXHVHHQFXHQWUDQGHQWUR
del horno prenden fuego, mantenga cerrada
la puerta del horno, apáguelo y desconecte
HOFDEOHHOpFWULFRRFRUWHODHQHUJtDGHVGH
el panel de fusibles o del interruptor de
circuitos.
Ŷ 1RXWLOLFHHOKRUQRSDUDDOPDFHQDU
elementos. No deje productos de papel,
utensilios de cocina o alimentos en el
horno cuando no lo esté usando. Todos los
estantes deberán ser retirados del horno
cuando no se encuentren en uso.
Ŷ 1RRSHUHHOKRUQRVLQDOLPHQWRVDGHQWUR
A FIN DE REDUCIR RIESGOS DE
QUEMADURAS:
Ŷ 7HQJDFXLGDGRDODEULUHQYDVHVFRQFRPLGD
caliente. Use manijas y aleje el vapor del
rostro y las manos.
Ŷ 9HQWLOHSHUIRUHRFRUWHHQYDVHVEROVDVR
bolsas plásticas para evitar la acumulación
de presión.
Ŷ 7HQJDFXLGDGRDOWRFDUHOSODWRJLUDWRULROD
puerta, estantes o paredes del horno, los
cuales se podrán calentar durante el uso.
Ŷ /DOX]GHODFDYLGDGLQWHULRUHQFHQGLGD
ocasionará quemaduras. Tenga cuidado al
limpiar y espere hasta que las bombillas se
HQIUtHQDQWHVGHVXUHHPSOD]R
Ŷ /26&217(1,'26&$/,(17(632'5È1
OCASIONAR QUEMADURAS GRAVES;
NO PERMITA QUE LOS NIÑOS USEN EL
HORNO MICROONDAS. Tenga cuidado al
UHWLUDUDUWtFXORVFDOLHQWHV
INFORMACIÓN DE SEGURIDAD (Horno Superior)

14
49-2001799 Rev. 1
INFORMACIÓN IMPORTANTE DE SEGURIDAD
LEA TODAS LAS INSTRUCCIONES ANTES DE USAR ESTE ELECTRODOMÉSTICO
LEA Y GUARDE ESTAS INSTRUCCIONES
ADVERTENCIA
Continuado
USO
Ŷ No haga funcionar el microondas sin tener
colocada en su lugar la base giratoria. La
base giratoria debe estar libre de bloqueos
para poder girar.
Ŷ /DVFRPLGDVRXWHQVLOLRVPHWiOLFRVGH
WDPDxRH[FHVLYRQRGHEHUiQVHULQVHUWDGRV
en un horno microondas/ convección, ya que
podrán generar un incendio o riesgos de
descargas eléctricas.
Ŷ 1RXWLOLFHSURGXFWRVGHSDSHOFXDQGRHO
aparato se utiliza en modos diferentes al
microondas.
Ŷ $VHJ~UHVHGHTXHWRGRVORVXWHQVLOLRV
usados en el horno microondas sean
para uso en el mismo. Se podrá usar la
PD\RUtDGHODVFDFHURODVGHYLGULRSODWRV
de cocción, tazas graduadas, vajillas de
cerámica o porcelana que no posean bordes
metálicos o vidrios con un brillo metálico, en
cumplimiento con las recomendaciones del
fabricante de utensilios.
Ŷ $OJXQRVSURGXFWRVWDOHVFRPRKXHYRV
HQWHURV\FRQWHQHGRUHVVHOODGRVSRU
ejemplo, frascos sellados) son propensos
a explotar y no deben calentarse en este
horno. Tal uso del horno puede resultar en
lesiones personales.
Ŷ 1RFRFLQHODVSDSDVH[FHVLYDPHQWH3XHGHQ
deshidratarse y provocar fuego.
Ŷ 1RFXEUDODEDVHJLUDWRULDSDUULOODGH
alambre, bandejas ni ninguna pieza del
horno con láminas de metal. Esto causará
arqueo voltaico en el microwave/convection
oven.
Ŷ (VWHKRUQRQRKDVLGRDSUREDGRQLSUREDGR
para utilización marina.
LIMPIEZA
Ŷ 'HVFRQHFWHODFRUULHQWHDQWHVGHUHDOL]DUOD
limpieza.
Ŷ 'HVFRQHFWHODFRUULHQWHDQWHVGHUHHPSOD]DU
los bombillos de la cavidad.
Ŷ 0DQWHQJDHOKRUQROLEUHGHDFXPXODFLyQGH
grasa.
Ŷ 1ROLPSLHFRQHVSRQMLOODVGHPHWDO3XHGHQ
desprenderse pedazos de la esponjilla y
tocar partes eléctricas, provocando un riesgo
de descarga eléctrica.
Ŷ $OOLPSLDUVXSHU¿FLHVGHSXHUWDV\KRUQR
que se unen al cerrar la puerta, sólo use
detergentes suaves no abrasivos aplicados
FRQXQDHVSRQMDOLPSLDRXQSDxRVXDYH
Enjuague bien.
AGUA SOBRECALENTADA
Ŷ /tTXLGRVWDOHVFRPRDJXDFDIpRWp
son capaces de sobrecalentarse más
allá del punto de ebullición sin parecer
que estén hirviendo. No siempre hay
burbujeo o hervor visible cuando se
saca el recipiente del horno microondas.
ESTO PUEDE RESULTAR EN LA
EBULLICIÓN REPENTINA DE LÍQUIDOS
MUY CALIENTES CUANDO SE MUEVE
EL RECIPIENTE O SE INSERTA UNA
CUCHARA U OTRO UTENSILIO DENTRO
DEL LÍQUIDO.
Ŷ 3DUDUHGXFLUHOULHVJRGHOHVLyQItVLFD
1RVREUHFDOLHQWHHOOtTXLGR
5HYXHOYDHOOtTXLGRDQWHV\DODPLWDGGHO
tiempo de calentamiento.
- No utilice recipientes con costados rectos y
cuellos angostos.
- Después de calentar el recipiente, déjelo
HQHOKRUQRPLFURRQGDVSRUXQSHUtRGR
corto de tiempo antes de sacarlo.
- Tenga extrema precaución cuando
introduzca una cuchara u otro utensilio en
el recipiente.
INFORMACIÓN DE SEGURIDAD (Horno Superior)
49-2001799 Rev. 1
15
INFORMACIÓN DE SEGURIDAD (Horno Superior)
INFORMACIÓN IMPORTANTE DE SEGURIDAD
LEA TODAS LAS INSTRUCCIONES ANTES DE USAR ESTE ELECTRODOMÉSTICO
LEA Y GUARDE ESTAS INSTRUCCIONES
ADVERTENCIA
ARQUEO VOLTAICO
Se pueden producir arqueos voltaicos al cocinar con microondas y, en ciertos modelos, en los
modos de cocción rápida y cocción con precisión. Si nota que ocurre arqueo voltaico, apriete el
botón táctil Clear/Off (Borrar/ Apagar) y corrija el problema.
El arqueo voltaico es el término técnico que define las chispas en el horno. El arqueo voltaico es
causado por:
Ŷ 0HWDOROiPLQDGHPHWDOHQFRQWDFWRFRQHO
costado del horno.
Ŷ /iPLQDQRPROGHDGDDODOLPHQWRORV
ERUGHVGREODGRVKDFLDDUULEDDFW~DQFRPR
antenas).
Ŷ 8WLOLFHODOiPLQDGHPHWDOVHJ~QODV
recomendaciones de este manual.
Ŷ 8WHQVLOLRVPHWiOLFRVXVDGRVGXUDQWHOD
IXQFLyQ3UHFLVLRQ6SHHG&RRN&RFFLyQFRQ
Precisión/ Velocidad) o en la cocción con
PLFURRQGDVH[FHSWRFRQFKDURODVSURYLVWDV
con el horno).
Ŷ 0HWDOWDOFRPRWLULWDVPHWiOLFDVGH
seguridad, sujetadores para carne de ave o
platos con borde de oro en el horno.
Ŷ 7RDOODVGHSDSHOUHFLFODGRTXHFRQWHQJDQ
SHGD]RVGHPHWDOSHTXHxRVTXHVHXWLOL]DQ
en el horno.
ADVERTENCIA
RECIPIENTES DE COCINA SEGUROS
DISEÑADOS PARA MICROONDAS
$VHJ~UHVHGHXWLOL]DUUHFLSLHQWHVGHFRFLQDDGHFXDGRVGXUDQWHODFRFFLyQDPLFURRQGDV6H
SXHGHQXWLOL]DUODPD\RUtDGHODVFDFHURODVSODWRVSDUDFRFLQDUWD]DVGHPHGLUWD]DVQRUPDOHV
cerámica o loza que no tengan bordes metálicos o vidriados con un recubrimiento metálico.
Algunos recipientes de cocina se encuentran marcados como adecuados para microondas.
Ŷ &RORTXHORVDOLPHQWRVRUHFLSLHQWHSDUD
microondas directamente en la bandeja
de vidrio transparente para cocinar sus
alimentos.
Ŷ (OXVRGHXQDFKDURODPHWiOLFDGXUDQWHOD
cocción con microondas generará como
resultado un rendimiento inferior de la
cocción.
Ŷ /RVXWHQVLOLRVGHFRFLQDSXHGHQWRUQDUVH
muy calientes debido a la transferencia
de calor proveniente de los alimentos
FDOHQWDGRV3RGUtDQUHTXHULUVHJXDQWHVGH
cocina para manipular los recipientes de
cocina.
Ŷ 1RXWLOLFHSURGXFWRVGHSDSHOUHFLFODGR
Las toallas, servilletas y papel encerado
fabricados de material reciclado pueden
FRQWHQHUSDUWtFXODVPHWiOLFDVTXHSXHGHQ
causar arqueo voltaico o prender fuego. Se
deben evitar los productos de papel que
contienen nylon o filamentos de nylon, ya
que también pueden incendiarse.
Ŷ 8WLOLFHODVOiPLQDVPHWiOLFDV~QLFDPHQWH
como se indica en este manual. Cuando
utilice la lámina de metal en el horno,
PDQWHQJDODOiPLQDSRUORPHQRVƎDOHMDGD
de los costados del horno.
Ŷ 6LXWLOL]DXQWHUPyPHWURGHFDUQHPLHQWUDV
FRFLQDDVHJ~UHVHTXHVHDVHJXURSDUD
utilizarse en hornos microondas.
Ŷ $OJXQDVEDQGHMDVGHHVSXPDFRPR
aquellas en las que se empaca la
carne) tienen una tirita de metal delgada
empotrada en la parte inferior. Cuando se
cocinan con microondas, el metal puede
quemar el fondo del horno o o encender
una toalla de papel.
Ŷ 6HSXHGHXWLOL]DUWRDOODVGHSDSHOSDSHO
encerado y las envolturas plásticas
para cubrir los platos con el propósito
de mantener la humedad y prevenir los
VDOSLFRQHV$VHJ~UHVHGHYHQWLODUFRUWDQGR
la envoltura plástica para que pueda
escapar el vapor.
Ŷ 1RWRGDVODVFXELHUWDVSOiVWLFDVVRQ
adecuadas para hornos microondas. Lea en
la caja las instrucciones correspondientes.
16
49-2001799 Rev. 1
INFORMACIÓN IMPORTANTE DE SEGURIDAD
LEA TODAS LAS INSTRUCCIONES ANTES DE USAR ESTE ELECTRODOMÉSTICO
LEA Y GUARDE ESTAS INSTRUCCIONES
ADVERTENCIA
RECIPIENTES DE COCINA SEGUROS
DISEÑADOS PARA MICROONDAS (Cont.)
Ŷ 6HGHEHQFRUWDUSHUIRUDURYHQWLODUFRPR
se indica en la caja las bolsas de cocina
“hervibles” y bolsas plásticas cerradas
herméticamente. De lo contrario, el
plástico puede reventarse durante o
inmediatamente después de la cocción,
resultando en una posible lesión. También,
los recipientes de almacenamiento plásticos
deben al menos estar parcialmente
descubiertos debido a que forman un sello
muy ajustado. Al cocinar con recipientes
cubiertos con envoltura plástica de manera
muy ajustada, quite cuidadosamente la
cubierta y dirija el vapor fuera y alejado de
manos y rostro.
Ŷ 5HFLSLHQWHVGHFRFLQDSOiVWLFRV²/RV
UHFLSLHQWHVGHFRFLQDGLVHxDGRVSDUD
PLFURRQGDVVRQPX\~WLOHVSHURGHEHQ
utilizarse con cuidado. Incluso el plástico
GLVHxDGRSDUDPLFURRQGDVSRGUtDQR
WROHUDUFRQGLFLRQHVGHVREUHFRFFLyQDVt
como los materiales de vidrio o cerámica
\SRGUtDQVXDYL]DUVHRFDUERQL]DUVHVL
VHH[SRQHQDSHUtRGRVFRUWRVGHVREUH
cocción. En exposiciones más prolongadas
a la sobrecocción, los alimentos y los
UHFLSLHQWHVGHFRFLQDSRGUtDQFRJHUIXHJR
Ŷ 1RXWLOLFHODUHMLOODGHOKRUQRSDUDFRFLQDUHQ
el microondas.
Siga las siguientes pautas:
1. Utilice plásticos seguros para microondas
~QLFDPHQWH\XWLOtFHORVHVWULFWDPHQWHVHJ~Q
las especificaciones del fabricante.
2. No cocine en el microondas recipientes
YDFtRV
El plato giratorio siempre
deberá estar en la
ubicación correcta al
usar el horno.
Coloque la comida
directamente sobre la
bandeja metálica para
hornear, calentar o dorar
por convección.
ADVERTENCIA
(En Algunos Modelos) UTENSILIO DE COCCIÓN
SEGURA PARA LA COCCIÓN CON PRECISIÓN/ VELOCIDAD
Ŷ El horno y la compuerta se tornarán muy
calientes cuando se utiliza la función de
Precision/Speed Cooking.
Ŷ Los utensilios de cocina se tornarán muy
calientes debido a la transferencia de calor
proveniente de los alimentos calentados.
Se requerirán guantes de cocina
protectores para manipular los recipientes
de cocina.
Ŷ 1RXWLOLFHWDSDVUHFLSLHQWHVREROVDVGH
cocción/asado fabricadas de láminas de
metal, plástico, cera o papel cuando cocine
con la función de cocción rápida.
Ŷ 1RFXEUDODEDVHJLUDWRULDSDUULOODGH
alambre, bandejas ni ninguna pieza del
horno con lámina de metal. Esto provocará
arqueo voltaico en el horno.
Ŷ 8WLOLFHODEDQGHMDGHPHWDODQWLDGKHUHQWHH
ODPLVPDIRUPDTXHXWLOL]DUtDXQDEDQGHMDR
charola para hornear plana.
Ŷ &RORTXHORVDOLPHQWRVGLUHFWDPHQWHHQODV
bandejas cuando cocine, a menos que el
horno le indique otra cosa.
Ŷ 3XHGHXWLOL]DUHQHOKRUQRFXDOTXLHUSODWR
GLVHxDGRSDUDPLFURRQGDV/DVUHFHWDV
del Libro de cocina Advantium se probaron
en recipientes de cocina de vidrio Pyrex
®
y cacerolas de cerámica Corningware
®
.
Los tiempos y resultados de cocción
pueden variar cuando se utilizan otros
WLSRVGHUHFLSLHQWHVGLVHxDGRVSDUDKRUQRV
microondas. Colóquelos directamente en
las bandejas.
Ŷ (OXVRGHODEDQGHMDGHYLGULRFODURDO
cocinar en velocidad resultará en un
rendimiento inferior de la cocción y posibles
¿VXUDVVREUHODEDQGHMDGHYLGULR
Ŷ 8VHVROREDQGHMDVPHWiOLFDVHVSHFL¿FDGDV
para uso con este horno. Otras bandejas
PHWiOLFDVQRIXHURQGLVHxDGDVSDUD
uso con este horno y resultarán en un
rendimiento inferior de la cocción.
El plato giratorio siempre
deberá estar en la
ubicación correcta al
usar el horno.
Coloque la comida
directamente sobre la
bandeja metálica para
hornear, calentar o dorar
por convección.
INFORMACIÓN DE SEGURIDAD (Horno Superior)
49-2001799 Rev. 1
17
INFORMACIÓN DE SEGURIDAD (Horno Superior)
INFORMACIÓN IMPORTANTE DE SEGURIDAD
LEA TODAS LAS INSTRUCCIONES ANTES DE USAR ESTE ELECTRODOMÉSTICO
LEA Y GUARDE ESTAS INSTRUCCIONES
ADVERTENCIA
(En Algunos Modelos) RECIPIENTES DE
COCINA SEGUROS DISEÑADOS PARA HORNEAR, ASAR,
CALENTAR, ACTIVAR Y TOSTAR
Ŷ El horno y la compuerta se tornarán
muy calientes cuando se hornea, asa,
calienta, activa o tuesta algo.
Ŷ Los recipientes de cocina se tornarán
muy calientes. Se requerirán guantes
de cocina protectores para manipular los
recipientes de cocina.
Ŷ 1RXWLOLFHWDSDVUHFLSLHQWHVQLEROVDVGH
cocción/asado fabricadas de láminas de
metal, plástico, cera o papel cuando cocine
con la función de asar o dorar.
Ŷ 1RFXEUDHOSODWRJLUDWRULRHOHVWDQWH
parrilla del horno, las charolas o cualquier
parte del horno con papel de aluminio. Esto
ocasionará arcos eléctricos en el horno
microondas/ por convección.
Ŷ 8WLOLFHODEDQGHMDPHWiOLFDDQWLDGKHUHQWHGH
ODPLVPDIRUPDTXHXWLOL]DUtDXQDEDQGHMDR
charola para hornear plana.
Ŷ 8VHODEDQGHMDFRQUHMLOODGHOKRUQRSDUD
hornear por convección o calentar en dos
niveles.
Ŷ &RORTXHORVDOLPHQWRVGLUHFWDPHQWHHQODV
bandejas cuando cocine, a menos que el
horno le indique hacer otra cosa.
Ŷ 3XHGHXWLOL]DUHQHOKRUQRFXDOTXLHUSODWR
GLVHxDGRSDUDPLFURRQGDV/DVUHFHWDV
del Libro de cocina Advantium se probaron
en recipientes de cocina de vidrio Pyrex
®
y cacerolas de cerámica Corningware
®
.
Los tiempos y resultados de cocción
pueden variar cuando se utilizan otros
WLSRVGHUHFLSLHQWHVGLVHxDGRVSDUDKRUQRV
microondas. Colóquelos directamente en
las bandejas.
Ŷ 8WLOL]DUODEDQGHMDGHYLGULRWUDQVSDUHQWH
cuando hornea, asa, calienta, activa
o tuesta puede producir resultados
insatisfactorios.
El plato giratorio siempre
deberá estar en la
ubicación correcta al usar
el horno.
Coloque la comida
directamente sobre la bandeja
metálica para hornear, calentar
o dorar por convección.
Coloque la comida directamente en la
bandeja para hornear de aluminio sobre el
estante rejilla del horno, y coloque ambos
sobre la bandeja metálica no adherente, al
hornear en dos niveles, asar o dorar comidas.
PRECAUCIONES PARA EVITAR LA POSIBLE
EXPOSICIÓN A ENERGÍA DE MICROONDAS EXCESIVA
(a) No intente hacer funcionar el horno con
la compuerta abierta ya que ésto puede
SURYRFDUH[SRVLFLyQSHOLJURVDDODHQHUJtD
de microondas. Es importante no forzar ni
GDxDUORVVHJXURV
(b) No coloque QLQJ~QREMHWRHQWUHODSDUWH
frontal del horno y la compuerta, ni permita
que se acumulen residuos de producto
limpiador o detergente, suciedad o polvo en
ODVVXSHU¿FLHVGHVHOODGR
(c) No haga funcionar el horno si se
HQFXHQWUDGDxDGR(VSDUWLFXODUPHQWH
importante cerrar bien la compuerta
ODFRPSXHUWDGREODGDRFXUYDGD
ODVELVDJUDV\SHVWLOORVURWRVRÀRMRV
VHOORVGHODFRPSXHUWD\VXSHU¿FLHV
de sellado.
(d) El horno no debe ser ajustado o reparado
por ninguna persona, excepto por personal
GHPDQWHQLPLHQWRFDOL¿FDGR
ADVERTENCIA
AVISO: MARCAPASOS
/DPD\RUtDGHORVPDUFDSDVRVVHHQFXHQWUDQ
protegidos contra la interferencia de productos
electrónicos, incluyendo los microondas.
Sin embargo, los pacientes que tengan
PDUFDSDVRVGHEHUtDQFRQVXOWDUDVXVPpGLFRV
si tienen alguna duda.

18
49-2001799 Rev. 1
ADVERTENCIA
Lea todas las instrucciones de seguridad antes de utilizar este producto.
No seguir estas instrucciones puede generar un incendio, una descarga
eléctrica, lesiones corporales o la muerte.
INFORMACIÓN DE SEGURIDAD DEL HORNO INFERIOR
ADVERTENCIA
INSTRUCCIONES GENERALES DE SEGURIDAD
Ŷ 8VHHVWHDSDUDWRVyORFRQHOREMHWLYRSDUD
el que fue creado, como se describe en este
Manual del Propietario.
Ŷ 6ROLFLWHTXHXQLQVWDODGRUFDOLILFDGRLQVWDOH
su estufa y que esté adecuadamente
conectada a tierra, de acuerdo con las
instrucciones de instalación provistas.
Ŷ &XDOTXLHUDMXVWHUHSDUDFLyQRVHUYLFLR
WpFQLFRQRUHFRPHQGDGRHVSHFtILFDPHQWH
en este manual deberá ser realizado SOLO
por un instalador o técnico del servicio con
calificación en estufas.
Ŷ $QWHVGHUHDOL]DUFXDOTXLHUFODVHGH
reparación, desenchufe la cocina o
desconecte el suministro eléctrico desde el
panel de distribución doméstico quitando
el fusible o desconectando el interruptor de
circuitos.
Ŷ $VHJ~UHVHGHTXHWRGRVORVPDWHULDOHVGH
embalaje sean retirados de la estufa antes
de su uso, a fin de evitar que los mismos se
incendien.
Ŷ (YLWHUD\RQHVRLPSDFWRVVREUHODVSXHUWDV
de vidrio, placas de cocción o paneles de
control. Hacer esto podrá producir la rotura
de vidrios.
Ŷ 1RFRFLQHVREUHXQSURGXFWRFRQXQ
vidrio roto. Se podrán producir descargas,
incendios o cortes.
Ŷ 1RGHMHDORVQLxRVVRORVRVLQDWHQFLyQ
en un área donde un aparato esté en uso.
Nunca debe permitirse que se suban, sienten
o paren en cualquier parte de este aparato.
Ŷ
PRECAUCIÓN
1RJXDUGHtWHPV
GHLQWHUpVSDUDORVQLxRVHQORVJDELQHWHV
que están sobre o en la parte superior de
XQDHVWXIDVLORVQLxRVWUHSDQVREUHOD
HVWXIDSDUDDOFDQ]DUHVWRVDUWtFXORVSRGUiQ
sufrir lesiones graves.
Ŷ 1XQFDXVHHOHOHFWURGRPpVWLFRSDUDFDOHQWDU
o calefaccionar la habitación.
Ŷ 1RSHUPLWDTXHQDGLHVHWUHSHVHSDUHR
cuelgue de la puerta del horno, del cajón
RODSODFDGHFRFFLyQ6HSRGUiGDxDUOD
HVWXIDRSURYRFDUVXFDtGDRFDVLRQDQGR
lesiones graves o la muerte.
Ŷ 6yORXVHDJDUUDGHUDVVHFDVODV
DJDUUDGHUDVK~PHGDVRPRMDGDVFRORFDGDV
en superficies calientes pueden provocar
quemaduras de vapor. No permita que
las agarraderas tengan contacto con
las unidades de la superficie ni con los
elementos para calentar del horno. No
utilice toallas u otras telas gruesas en lugar
de una agarradera.
Ŷ 1RWRTXHORVTXHPDGRUHVSODQFKDVHQ
DOJXQRVPRGHORVSDUULOODVHQDOJXQRV
modelos), la superficie de cocción o
los elementos calefactores del horno,
ni la superficie interior del horno. Estas
superficies podrán permanecer lo
suficientemente caliente como para quemar
GXUDQWHXQSHUtRGRGHWLHPSRSURORQJDGR
luego de la cocción, incluso aunque ya no
parezcan estar encendidas o calientes.
Ŷ 'XUDQWH\GHVSXpVGHOXVRQRWRTXH
ni permita que telas u otros materiales
inflamables toquen cualquier área interior
del horno; espere hasta que haya pasado un
WLHPSRVXILFLHQWHKDVWDTXHVHHQIUtHQ2WUDV
superficies del electrodoméstico se podrán
calentar lo suficiente como para ocasionar
lesiones. Las superficies potencialmente
calientes incluyen quemadores o elementos
FDOHIDFWRUHVSDUULOODVHQDOJXQRVPRGHORV
superficie de cocción, aberturas de la
ventilación del horno, superficies cercanas a
las aberturas, grietas alrededor de la puerta
del horno, partes con marcos metálicos por
encima de la puerta, cualquier protección
trasera, o repisas ubicadas encima de una
superficie de cocción.
Ŷ 1RFDOLHQWHUHFLSLHQWHVFHUUDGRVGH
DOLPHQWRV3RGUtDKDEHUXQDDFXPXODFLyQ
GHSUHVLyQHQHOUHFLSLHQWH\pVWHSRGUtD
explotar, provocando lesiones.
Ŷ &RFLQHODFRPLGDFRPSOHWDPHQWHSDUD
evitar que se produzcan enfermedades a
SDUWLUGHODFRPLGD86'$\)'$EULQGDQ
las recomendaciones de temperatura
PtQLPDSDUDXQDFRPLGDVHJXUD8WLOLFHXQ
termómetro para tomar la temperatura de
la comida y haga controles en diferentes
ubicaciones.
Ŷ 0DQWHQJDOLPSLDODFDPSDQDGHOYHQWLODGRU
y los filtros de grasa, con el fin de conservar
una buena ventilación y de evitar incendios
con grasa. En caso de incendio, apague el
ventilador. Si el extractor se encuentra en
funcionamiento, podrá esparcir las llamas.
INFORMACIÓN IMPORTANTE DE SEGURIDAD
LEA TODAS LAS INSTRUCCIONES ANTES DE USAR ESTE ELECTRODOMÉSTICO
LEA Y GUARDE ESTAS INSTRUCCIONES
INFORMACIÓN DE SEGURIDAD (Horno Inferior)
49-2001799 Rev. 1
19
INFORMACIÓN DE SEGURIDAD (Horno Inferior)
INFORMACIÓN IMPORTANTE DE SEGURIDAD
LEA TODAS LAS INSTRUCCIONES ANTES DE USAR ESTE ELECTRODOMÉSTICO
LEA Y GUARDE ESTAS INSTRUCCIONES
ADVERTENCIA
MANTENGA LOS MATERIALES INFLAMABLES
ALEJADOS DE LA ESTUFA
Si esto no se cumple, se podrán sufrir lesiones personales
graves o incendios.
Ŷ 1RDOPDFHQHRXWLOLFHPDWHULDOHV
inflamables dentro de un horno o cerca
de la estufa, tales como papel, plástico,
agarraderas, telas, recubrimientos de
pared, cortinas y gasolina u otros vapores y
OtTXLGRVLQIODPDEOHV
Ŷ 1XQFDXVHYHVWLPHQWDVKROJDGDVR
amplias mientras utilice el aparato. Estas
vestimentas pueden prenderse fuego
si entran en contacto con superficies
calientes, provocando quemaduras graves.
Ŷ 1RSHUPLWDTXHODJUDVDGHODFRFFLyQX
otros materiales inflamables se acumulen
GHQWURGHODHVWXIDRHQVXFHUFDQtD/D
grasa dentro del horno o sobre la estufa
puede encenderse.
Ŷ 1RJXDUGHPDWHULDOHVLQIODPDEOHVQLtWHPV
sensibles a la temperatura dentro del
electrodoméstico.
Ŷ /LPSLHODVFDPSDQDVGHYHQWLODFLyQGH
forma frecuente. No se debe permitir la
acumulación de grasa en la campana o el
filtro.
Ŷ (QDOJXQRVPRGHORV)XQFLRQDPLHQWR
Remoto - Este electrodoméstico permite
su configuración para permitir un
funcionamiento remoto en cualquier
momento.
ADVERTENCIA
EN CASO DE INCENDIO, SIGA LOS SIGUIENTES
PASOS PARA EVITAR LA PROPAGACIÓN DEL
FUEGO
Ŷ 1RXWLOLFHDJXDHQLQFHQGLRVGHJUDVD
Nunca levante una sartén en llamas.
Apague los controles. Apague una sartén
en llamas sobre una unidad de superficie
cubriendo la sartén por completo con una
tapa que ajuste bien, una plancha para
galletas o una bandeja plana. Utilice un
TXtPLFRVHFRPXOWLXVRRXQH[WLQWRUGH
incendios de espuma.
Ŷ 6LKD\XQLQFHQGLRHQHOKRUQRGXUDQWHHO
horneado, apáguelo cerrando la puerta
del horno y apagando el control o usando
XQTXtPLFRVHFRPXOWLXVRRXQH[WLQWRUGH
incendios de espuma.
Ŷ 6LKD\XQLQFHQGLRHQHOKRUQRGXUDQWHOD
auto-limpieza, apague el horno y espere
a que el incendio se consuma. No abra la
puerta del horno a la fuerza. El ingreso de
aire fresco a temperaturas de auto-limpieza
puede provocar una explosión de llamas
desde el horno. No seguir esta instrucción
puede provocar quemaduras graves.
ADVERTENCIA
INSTRUCCIONES DE SEGURIDAD DEL HORNO
Ŷ 0DQWpQJDVHDOHMDGRGHOKRUQRDODEULUOD
puerta del mismo. El aire caliente o el vapor
que sale puede causar quemaduras en las
manos, rostro y/u ojos.
Ŷ 1RXVHHOKRUQRVLXQHOHPHQWRGH
calentamiento genera un punto brillante
durante el uso o aparecen otros signos
GHGDxRV8QSXQWREULOODQWHLQGLFDTXH
el elemento para calentar puede fallar y
generar una posible quemadura, incendio
o descarga eléctrica. Apague el horno de
inmediato y solicite a un técnico calificado
del servicio que reemplace el elemento
para calentar.
Ŷ 0DQWHQJDGHVREVWUXLGDODYHQWLODFLyQGHO
horno.
20
49-2001799 Rev. 1
INFORMACIÓN IMPORTANTE DE SEGURIDAD
LEA TODAS LAS INSTRUCCIONES ANTES DE USAR ESTE ELECTRODOMÉSTICO
LEA Y GUARDE ESTAS INSTRUCCIONES
ADVERTENCIA
INSTRUCCIONES DE SEGURIDAD DEL HORNO
(Cont.)
Ŷ 1XQFDFRORTXHORVXWHQVLOLRVGHFRFLQD
piedras para pizza u horneado o cualquier
otro tipo de aluminio o cobertor en la base
GHOKRUQR(VWRVtWHPVSXHGHQDWUDSDUHO
FDORURGHUUHWLUVHRFDVLRQDQGRGDxRVVREUH
el producto y el riesgo de descargas, humo
o incendios.
Ŷ &RORTXHORVHVWDQWHVGHOKRUQRHQOD
ubicación deseada mientras éste se
HQFXHQWUDIUtR6LHVQHFHVDULRPRYHUHO
estante mientras el horno está caliente,
tenga cuidado de evitar tocar superficies
calientes y evite que el mango de la olla
tenga contacto con el elemento calentador
en el horno.
Ŷ 1RGHMHSURGXFWRVWDOHVFRPRSDSHO
utensilios de cocina ni comida en el horno
cuando éste no se encuentre en uso. Los
DUWtFXORVJXDUGDGRVHQHOKRUQRVHSXHGHQ
incendiar.
Ŷ 1RGHMHDUWtFXORVVREUHODVXSHUILFLHGH
cocción cerca de la ventilación del horno.
/RVtWHPVVHSRGUiQVREUHFDOHQWDU\H[LVWH
el riesgo de incendio o quemaduras.
Ŷ 1XQFDDVHFRQODSXHUWDDELHUWD
Ŷ 0DQWHQJDHOKRUQROLEUHGHDFXPXODFLyQ
de grasa. La grasa del horno se puede
incendiar.
Ŷ $OXVDUODVEROVDVSDUDFRFLQDURGRUDU
en el horno, siga las instrucciones del
fabricante.
Ŷ PELIGRO DE DESCARGA O
QUEMADURAS: Antes de reemplazar
la bombilla de luz del horno, desconecte
la conexión eléctrica del horno desde
el fusible principal o desde el panel del
disyuntor. Si esto no se cumple, se podrá
producir una descarga eléctrica o un
incendio.
Ŷ
PRECAUCIÓN
RIESGO DE
INCENDIO: La tapa de vidrio y la bombilla
de luz se deberán retirar cuando estén
IUtDV7RFDUHOYLGULRFDOLHQWHVLQSURWHFFLyQ
HQODVPDQRVRFRQXQDWHODK~PHGDSRGUi
ocasionar quemaduras.
Ŷ 1RXVHQLQJ~QWLSRGHDOXPLQLRRFREHUWRU
para cubrir el fondo del horno o cualquier
parte del horno, excepto como se describe
en este manual. Los cobertores de horno
pueden atrapar el calor o derretirse,
RFDVLRQDQGRGDxRVVREUHHOSURGXFWR\HO
riesgo de descargas, humo o incendios.
ADVERTENCIA
INSTRUCCIONES DE SEGURIDAD DEL HORNO
CON LIMPIEZA AUTOMÁTICA (en algunos
modelos)
La función de limpieza automática usa el horno en temperaturas lo suficientemente altas como
para consumir la suciedad de comida que haya dentro del horno. Para un funcionamiento
seguro, siga estas instrucciones.
Ŷ 1RWRTXHODVVXSHUILFLHVGHOKRUQRGXUDQWH
el ciclo de limpieza automática. Mantenga
DORVQLxRVDOHMDGRVGHOKRUQRGXUDQWH
la limpieza automática. Si no se siguen
estas instrucciones, se podrán producir
quemaduras.
Ŷ $QWHVGHXWLOL]DUHOFLFORGHOLPSLH]D
automática, retire las ollas, estantes de
metal brillante del horno y otros utensilios
que haya en el horno. Sólo se pueden
dejar dentro del horno los estantes para
horno de color oscuro con revestimiento de
porcelana. No hacer esto podrá ocasionar
GDxRVVREUHHVWRVtWHPV\HOKRUQR\
presentar una posible quemadura o riesgo
de incendio.
INFORMACIÓN DE SEGURIDAD (Horno Inferior)
49-2001799 Rev. 1
21
INFORMACIÓN DE SEGURIDAD (Horno Inferior)
INFORMACIÓN IMPORTANTE DE SEGURIDAD
LEA TODAS LAS INSTRUCCIONES ANTES DE USAR ESTE ELECTRODOMÉSTICO
LEA Y GUARDE ESTAS INSTRUCCIONES
ADVERTENCIA
INSTRUCCIONES DE SEGURIDAD DEL HORNO
CON LIMPIEZA AUTOMÁTICA (en algunos
modelos) (Cont.)
Ŷ $QWHVGHXWLOL]DUHOFLFORGHOLPSLH]D
automática, limpie la grasa y restos de
comida que haya en el horno. Una cantidad
excesiva de grasa se puede incendiar, lo
FXDOSXHGHSURGXFLUGDxRVFRQKXPRHQVX
hogar.
Ŷ 6LHOPRGRGHOLPSLH]DDXWRPiWLFDIXQFLRQD
de forma incorrecta, apague el horno y
desconecte el suministro de corriente.
Solicite el servicio de un técnico calificado.
Ŷ 1RXVHOLPSLDGRUHVSDUDKRUQR1RVH
deberá usar limpiadores comerciales para
horno ni revestimientos de protección para
KRUQRVGHQLQJ~QWLSRHQRDOUHGHGRUGH
cualquier parte del horno, a menos que
cuente con certificación para uso en un
horno con limpieza automática.
Ŷ 1ROLPSLHODMXQWDGHODSXHUWD/DMXQWDGH
la puerta es esencial para un buen sellado.
6HGHEHWHQHUFXLGDGRGHQRIURWDUGDxDU
ni mover la junta.
Ŷ IMPORTANTE: La salud de algunas aves
es extremadamente sensible a los humos
emitidos durante el ciclo de limpieza
automática de cualquier estufa. Coloque las
aves en otra habitación bien ventilada.
ADVERTENCIA
EQUIPO DE ACCESO REMOTO INSTALADO
(Algunos modelos)
Este dispositivo cumple con la Parte 15 de la
1RUPDWLYDGHOD)&&6XIXQFLRQDPLHQWRHVWi
sujeto a las dos condiciones siguientes:
(VWHGLVSRVLWLYRQRGHEHUiFDXVDU
LQWHUIHUHQFLDVQRFLYDV\HVWHGLVSRVLWLYR
deberá aceptar cualquier interferencia recibida,
incluyendo interferencias que puedan generar
un funcionamiento no deseado. El equipo de
comunicación inalámbrica instalado en esta
HVWXIDIXHSUREDGR\FXPSOHFRQORVOtPLWHV
establecidos para un dispositivo digital de
Clase B, de acuerdo con la parte 15 de la
1RUPDWLYDGHOD)&&
(VWRVOtPLWHVIXHURQGLVHxDGRVSDUD
DEULQGDUXQDSURWHFFLyQUD]RQDEOHFRQWUD
interferencias nocivas en una instalación
residencial. Este equipo genera, usa y
SXHGHHPLWLUHQHUJtDGHUDGLRIUHFXHQFLD\
si no se instala y utiliza de acuerdo con las
instrucciones, puede ocasionar interferencias
perjudiciales en las comunicaciones de
radio. Sin embargo, no se garantiza que
no se presenten interferencias en una
instalación en particular. Si el equipo provoca
interferencias perjudiciales para la recepción
de radio o televisión, lo cual puede comprobar
encendiendo y apagando el equipo, se
aconseja al usuario que intente corregir
la interferencia con una de las siguientes
medidas:
Ŷ5HRULHQWHRUHXELTXHODDQWHQDUHFHSWRUD
Ŷ$XPHQWHODVHSDUDFLyQHQWUHHOHTXLSR\HO
receptor.
Ŷ&RQHFWHHOHTXLSRDXQWRPDFRUULHQWHGHXQ
circuito diferente del tomacorriente al que se
encuentra conectado el receptor.
Ŷ3DUDVROLFLWDUD\XGDFRQVXOWHFRQHO
proveedor minorista o a un técnico
experimentado de radio/ TV.
EWROHUDUFXDOTXLHULQWHUIHUHQFLDUHFLELGD
incluyendo las interferencias que puedan
provocar un funcionamiento no deseado del
dispositivo. Observe que todos los cambios
o modificaciones sobre el dispositivo de
comunicación inalámbrico instalado en este
horno que no estén expresamente aprobados
SRUHOIDEULFDQWHSRGUtDQDQXODUODDXWRULGDG
del usuario para operar el equipamiento..

22
49-2001799 Rev. 1
INFORMACIÓN IMPORTANTE DE SEGURIDAD
LEA TODAS LAS INSTRUCCIONES ANTES DE USAR ESTE ELECTRODOMÉSTICO
LEA Y GUARDE ESTAS INSTRUCCIONES
Cómo Retirar la Película Protectora de Envío y la Cinta de Embalaje
&RQFXLGDGRWRPHXQH[WUHPRGHODSHOtFXOD
SURWHFWRUDGHHQYtRFRQORVGHGRV\
lentamente retire la misma de la superficie del
HOHFWURGRPpVWLFR1RXWLOLFHQLQJ~QSURGXFWR
ILORVRSDUDUHWLUDUODSHOtFXOD5HWLUHWRGDOD
SHOtFXODDQWHVGHXVDUHOHOHFWURGRPpVWLFRSRU
primera vez.
3DUDDVHJXUDUTXHQRKD\DGDxRVVREUHHO
acabado del producto, la forma más segura
de retirar el adhesivo de la cinta de embalaje
en electrodomésticos nuevos es aplicando un
GHWHUJHQWHOtTXLGRKRJDUHxRSDUDODYDUSODWRV
Aplique con una tela suave y deje que se seque.
NOTA: El adhesivo deberá ser eliminado de
todas las partes. No se puede retirar si se hornea
con éste dentro.
Tenga en cuenta las opciones de reciclaje del
material de embalaje de su electrodoméstico.
FORMA ADECUADA DE DESCARTAR SU ELECTRODOMÉSTICO
'HVFDUWHRUHFLFOHVXHOHFWURGRPpVWLFRGHDFXHUGRFRQODV5HJXODFLRQHV)HGHUDOHV\/RFDOHV
&RPXQtTXHVHFRQODVDXWRULGDGHVORFDOHVSDUDGHVFDUWDURUHFLFODUVXHOHFWURGRPpVWLFRGHIRUPD
ambientalmente segura.
INFORMACIÓN DE SEGURIDAD (Horno Inferior)
49-2001799 Rev. 1
23
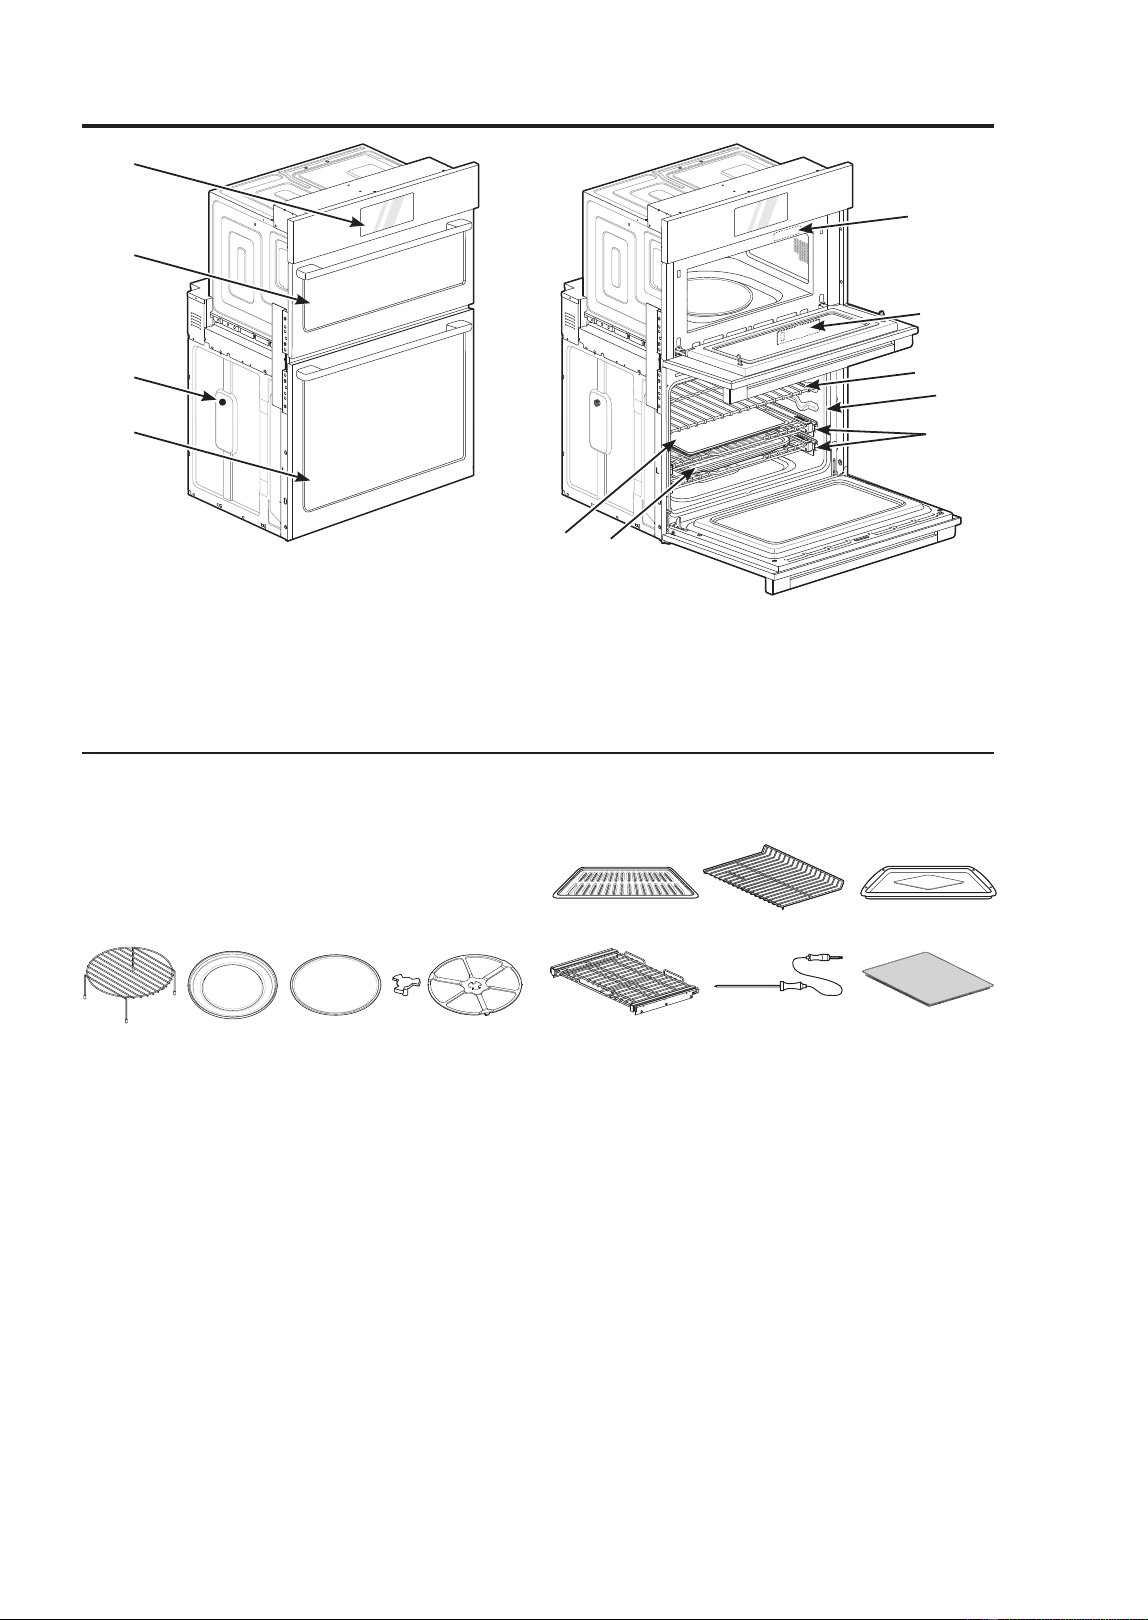
1 Control Panel
2 Upper Oven Door
3 Spacer
4 Lower Oven Door
5 Rating Label, Model and
Serial Number Plate
6 6WHDP)HHGHU7DQN
7 Broiler Pan and Grid
8 Standard Racks
9 Gasket
10 Extension Racks
11 $LU)U\7UD\
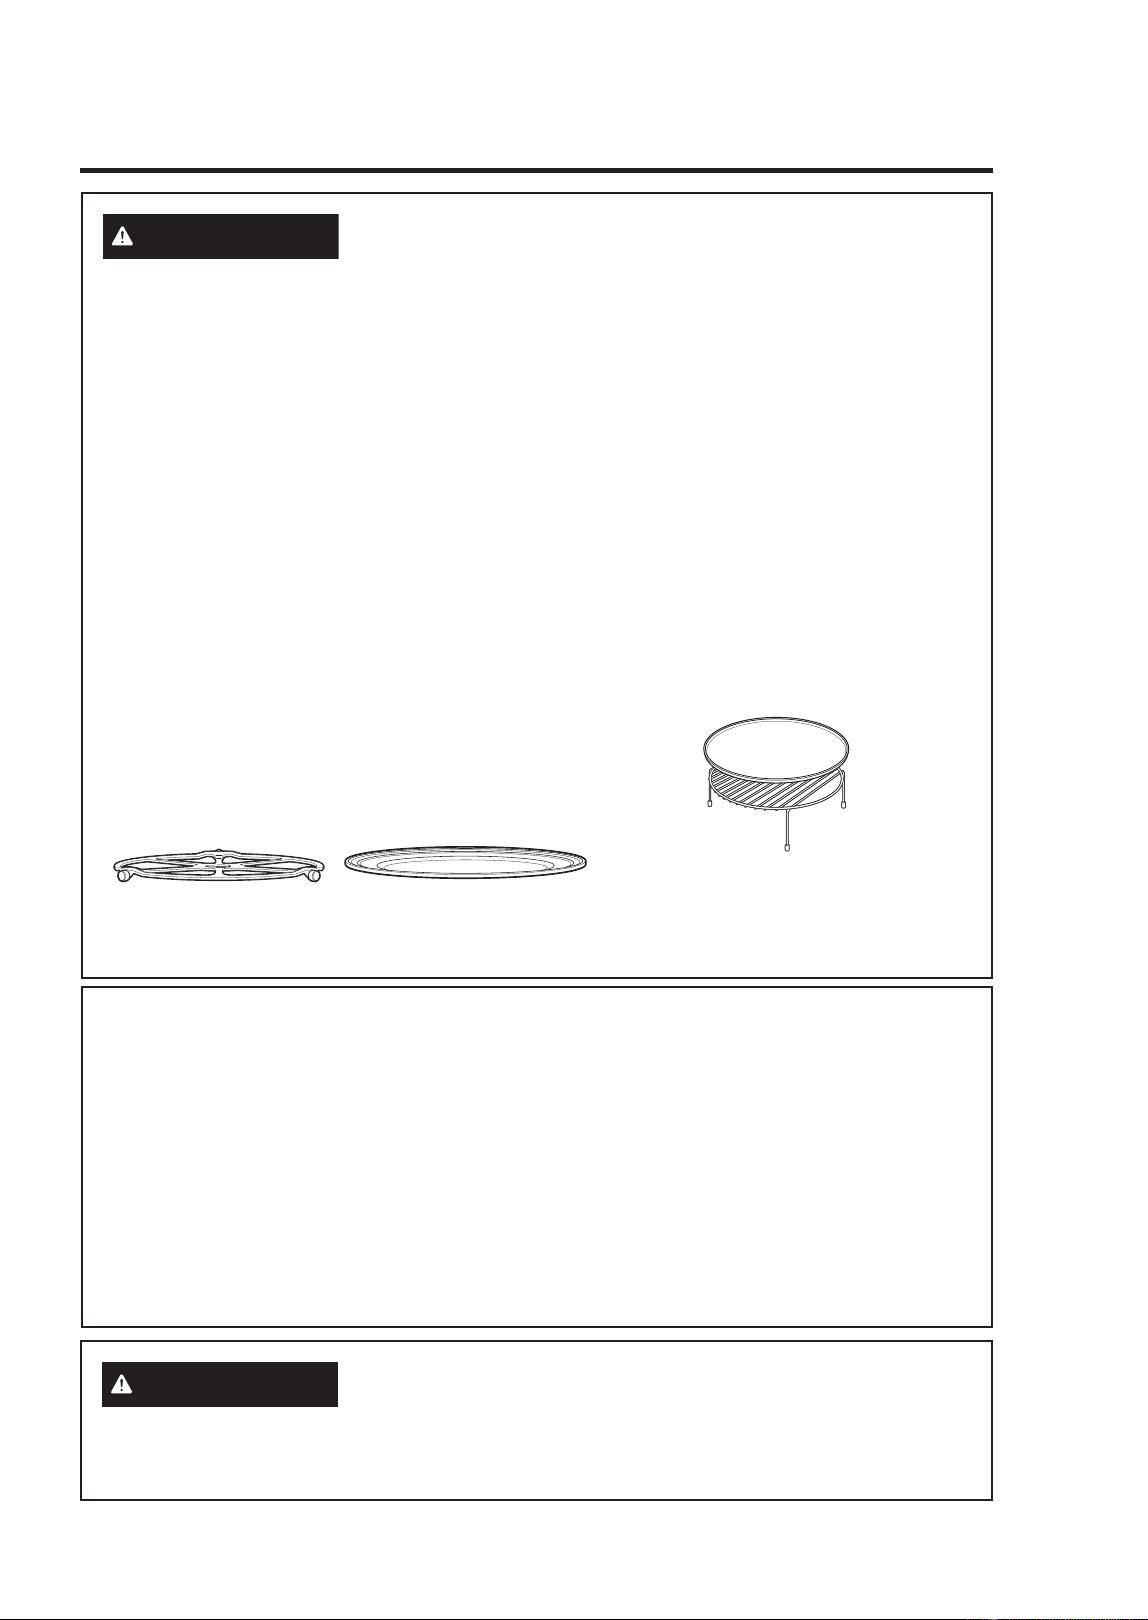
UPPER OVEN COOKING
ACCESSORIES
The turntable rotates in both directions to
help food cook more evenly. Do not operate
the microwave oven without the glass tray
in place.
1 5DFNIRUWKH&RQYHFWLRQ%DNH%URLODQG
Speed Cook functions)
2 0HWDOWUD\)RUWKH&RQYHFWLRQ%DNH
Broil, and peed Cook functions)
3 7XUQWDEOH*ODVVWUD\)RUWKH0LFURZDYH
and Defrost functions)
4 Shaft
5 Rotating ring
1 Grid
2 Standard rack
3 Broiler pan
4 Extension rack
HD
5 Meat probe
6 Air fry tray
Features
1
5
6
8
9
10
7
11
2
3
4
LOWER OVEN COOKING
ACCESSORIES
13425
1
4
5
23
6
NOTE
• Contact GE Appliances at GEAppliances.com/contact if any accessories are missing.
)RU\RXUVDIHW\DQGIRUH[WHQGHGSURGXFWOLIHRQO\XVHDXWKRUL]HGFRPSRQHQWV
• The manufacturer is not responsible for product malfunction or accidents caused by the
use of separately purchased, unauthorized components or parts.
• The images in this guide may be different from the actual components and accessories,
which are subject to change by the manufacturer without prior notice for product
improvement purposes.
• Do not remove extension racks from the base packing. The extension racks are wrapped
separately for the top and bottom ovens.
NOTE: The model and serial number can be verified at the rating label.
USING THE OVEN: )HDWXUHV
24
49-2001799 Rev. 1
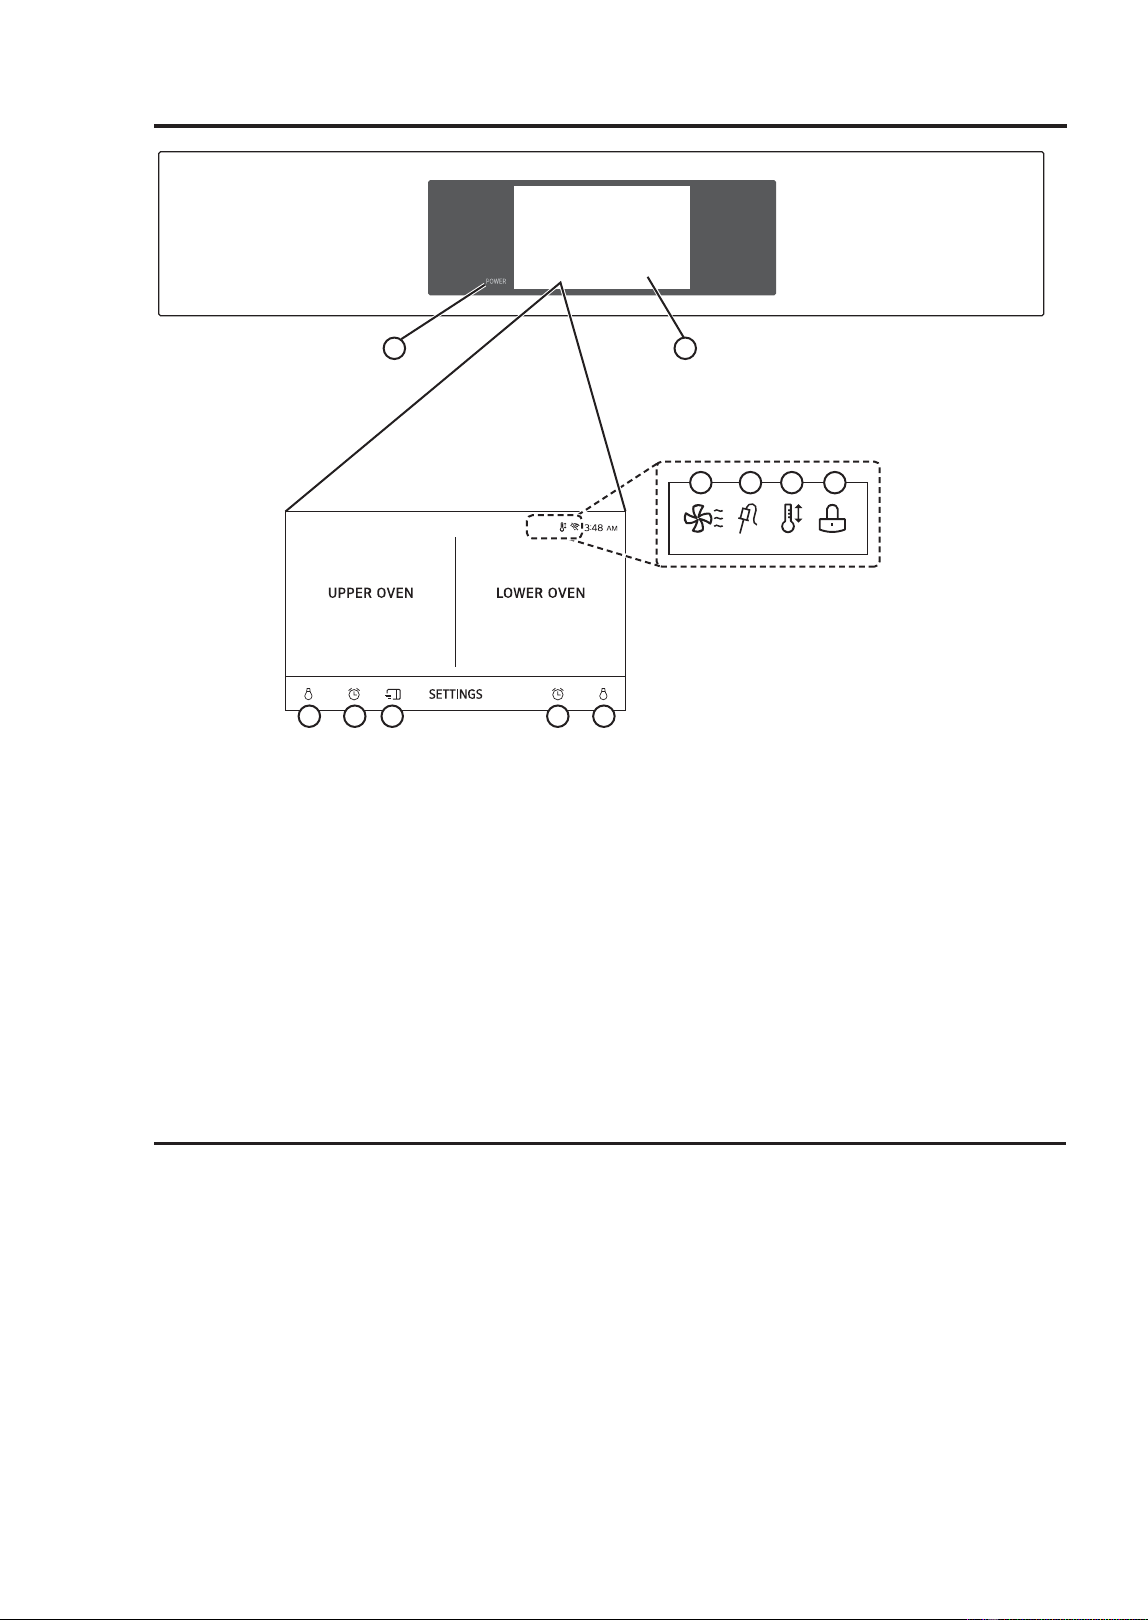
Oven Controls
8
3 4 5 6 7
9
10 11
1. Power Key
2. LCD Touchscreen for Ovens
3. Lamp Icon (Upper Oven): Touch to
turn light on/off.
4. Timer Icon (Upper Oven): Touch to set
a timer.
5. Microwave Quick Start: Touch to start
Microwave mode quickly.
6. Timer Icon (Lower Oven): Touch to set
a timer.
7. Lamp Icon (Lower Oven): Touch to
turn light on/off.
8. Oven Cooling Icon: Appears during or
after oven operation to indicate cooling
fan is running in oven.
9. Probe Icon: Appears when probe is
connected.
10. Auto Conversion Icon: Appears when
Convection Auto Conversion is turned
on.
11. Lock Icon: Appears when Lockout is
on.
ENERGY SAVING TIPS
Ŷ 0XOWLSOHUDFNFRRNLQJVDYHVWLPHDQG
energy. Whenever possible, cook foods
requiring the same cooking temperature
together in one oven.
Ŷ )RURSWLPDOSHUIRUPDQFHDQGHQHUJ\
savings, follow the guides for proper rack
and pan placement.
Ŷ 5HGXFHHQHUJ\XVHE\FOHDQLQJOLJKWRYHQ
soil with the EasyClean feature instead
of self-clean.
Ŷ $YRLGRSHQLQJWKHRYHQGRRUPRUHWKDQ
necessary during use. This helps the
oven maintain temperature, prevents
unnecessary heat loss, and saves on
energy use.
1 2
USING THE OVEN: Oven Controls
49-2001799 Rev. 1
25
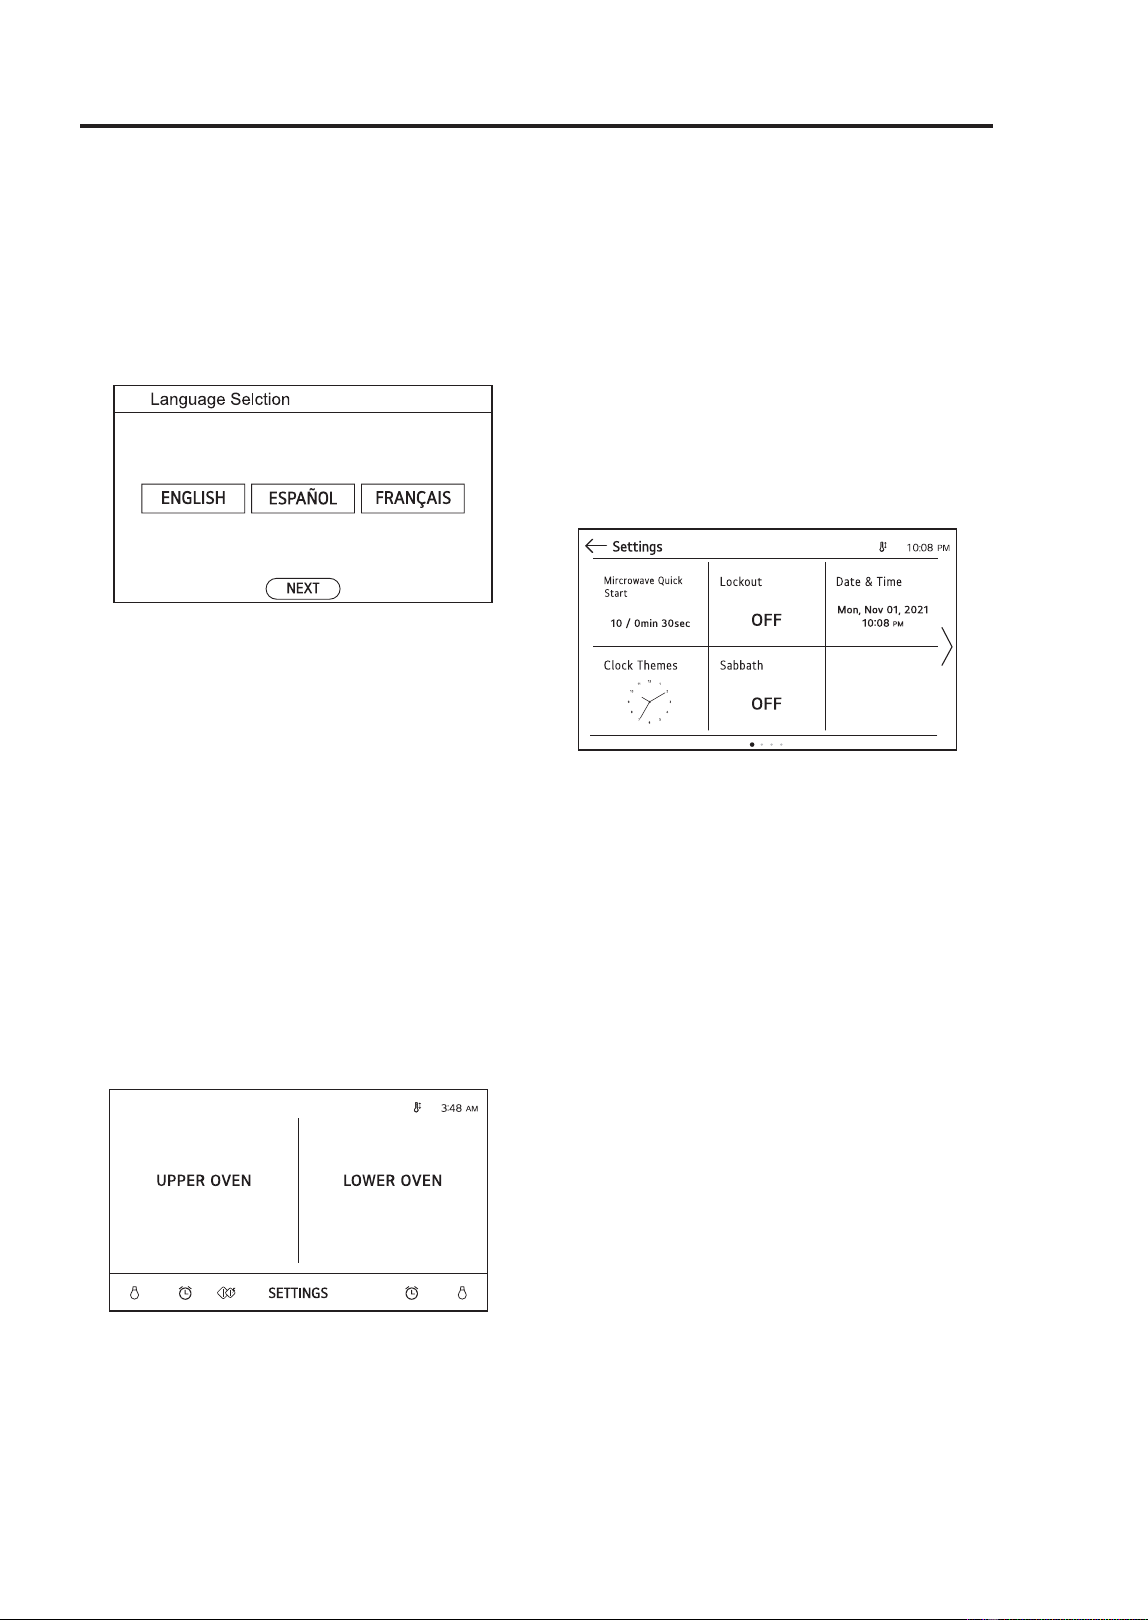
Oven Settings
GETTING STARTED
When turning on the oven for the first time,
adjust the settings to suit your preferences.
1. Connect oven to power source and turn
on.
2. Select the disired language and touch
NEXT.
3. Set the correct time and choose between
a 12-hour and 24-hour time format. Touch
NEXT.
4. If desired, change the default clock theme
by swiping through the examples. Touch
NEXT.
SETTINGS
To adjust settings after the initial setup,
touch the display to open the Main screen.
Touch SETTINGS at the bottom center of
the Main screen.
Swipe the screen or touch the < > arrow
keys to navigate through the SETTINGS
screens.
Location of Settings:
Page 1: Microwave Quick Start, Lockout,
Time, Clock Themes, Sabbath
Mode, Brightness
Page 2: Display, Convection Auto
Conversion, Language Selection,
Volume, Preheat Alarm,
Temperature Adjustment
Page 3: Temperature Units, Program
8SGDWH'HPR0RGH)DFWRU\'DWD
Reset, Open Source License
Microwave Quick Start
Use the Microwave Quick Start setting to
adjust the preset cook time that is activated
when you press Start without setting a
time. The power level of the microwave and
preset time can be set from 1 to 10 and 1
second to 5 minutes.
Setting Cook Time:
1. Touch SETTINGS at the center bottom of
the main screen.
2. Touch Microwave Quick Start on the
first SETTINGS screen.
3. Set the power level and cook time.
4. Touch OK.
Lockout
The Lockout feature automatically prevents
most oven controls from being turned on. It
does NOT disable the clock, timer and the
interior oven light.
Lock:
1. Touch SETTINGS at the center bottom of
the Main screen.
2. Touch Lockout on the first SETTINGS
screen.
Brightness
USING THE OVEN: Oven Settings

26
49-2001799 Rev. 1
SETTINGS (Cont.)
3. When Lockout is turned on, the lock icon
appears at the top of the display.
Unlock:
1. Touch any part of screen while Lockout
is on.
2. A popup screen appears. Touch Unlock
for 3 seconds.
3. The lock icon disappears from the top of
the display.
Time
The time shows in the LCD display when
the ovens are not in use.
Setting Time:
1. Touch SETTINGS at the center bottom of
the Main screen. Then touch Time on the
Settings screen.
2. Touch Time and scroll to set the correct
hour and minutes. You can also touch the
number pad icon and enter the desired
numbers.
3. Select either a 12-hour or 24-hour clock
PRGH++
4. Touch OK.
CLOCK THEMES
There are 3 different clock themes available,
including analog and digital clocks.
1. Touch SETTINGS at the center bottom of
the Main screen.
2. Touch Clock Themes on the first
SETTINGS screen and swipe to browse
through the clock themes.
3. Select a clock theme and touch OK.
SABBATH
Sabbath mode is used on the Jewish
Sabbath and Holidays.
While the oven is in Sabbath mode, the
temperature cannot be changed and
the timer, light, and alarm functions are
disabled. Only the cooking mode and set
temperature appear in the display.
NOTE: If the oven light is turned ON and the
Sabbath mode is active, the oven light will
VWD\2))6DEEDWKPRGHFDQRQO\EHXVHG
in Bake mode.
Setting Sabbath:
1. Disconnect the probe. The Probe function
is not available in Sabbath mode.
2. Touch SETTINGS at the center bottom of
the Main screen, and touch Sabbath in
the first SETTINGS screen.
3. Read the instructions, and touch NEXT.
4. Set the desired temperature and cook
time. Any cook time can be set from 1
minute to 73 hours 59 minutes. Touch
START.
5. To stop Sabbath mode, press POWER on
the LCD display.
NOTE:
• If a cook time is set, the oven turns off
automatically at the end of the cook time,
without chiming. The oven remains in
Sabbath mode, but is turned off.
• If no cook time is set, the oven will not
automatically turn off.
• After a power failure, the display will turn
back on in Sabbath mode, but the oven
will be off.
• In Sabbath mode, the upper oven functions
are blocked.
BRIGHTNESS
Adjust the brightness of the LCD display
from 20% to 100% in increments of 20%.
1. Touch SETTINGS at the center bottom
of the Main screen, swipe to the
second SETTINGS screen, and touch
Brightness.
Oven Settings
USING THE OVEN: Oven Settings

49-2001799 Rev. 1
27
USING THE OVEN: Oven Settings
BRIGHTNESS (Cont.)
2. Adjust the display brightness by touching
and dragging the dot across the bar,
by tapping anywhere on the bar, or by
touching + or -.
3. Touch OK.
DISPLAY
Set the length of time before the display
sleeps. There are three options you can
select.
• ON : Always on
2))$XWRPDWLFDOO\WXUQVRIILILGOHIRU
minutes.
1LJKW2))7XUQVRIIIURP30WR
5:00 AM.
Setting Display Option:
1. Touch SETTINGS at the center bottom
of the Main screen, swipe to the second
SETTINGS screen, and touch Display.
2. Select the desired option.
3. Touch OK.
CONVECTION AUTO
CONVERSION
There is no need to remember to convert
standard recipe temperatures for convection
cooking.
Convection Auto Conversion automatically
VXEWUDFWV)&IURPWKHVHW
temperature when a convection cooking
mode is selected. The converted
temperature appears in the display once
preheating is finished.
)RUH[DPSOHVHOHFW&onvection Bake and
enter 350°F. The temperature will auto-
convert to 325°F and display the converted
temperature.
Convection Auto Conversion is turned ON
by default.
Turning Convection Auto Conversion
On/Off:
1. Touch SETTINGS at the center bottom
of the Main screen, swipe to the
second SETTINGS screen, and touch
Convection Auto Conversion.
2. Select ON or OFF.
3. When Convection Auto Conversion is ON,
the icon appears at the top of the display.
NOTE: If Convection Auto Conversion is
ON, the icon flashes in the display while
cooking in a convection mode.
LANGUAGE SELECTION
Set the display language to English,
6SDQLVKRU)UHQFK
1. Touch SETTINGS at the center bottom
of the Main screen, swipe to the second
SETTINGS screen, and touch Language
Selection.
2. Select the desired language.
3. Touch OK.
VOLUME
1. Touch SETTINGS at the center bottom
of the Main screen, swipe to the second
SETTINGS screen, and touch Volume.
2. Select Mute, Low, or High.
3. Touch OK.
PREHEAT ALARM LIGHT
When the oven reaches its set-temperature,
the preheating alarm light flashes 5 times or
until the oven door is opened.
You can turn the preheat alarm light on or
off.
Oven Settings

28
49-2001799 Rev. 1
PREHEAT ALARM LIGHT
(Cont.)
1. Touch SETTINGS at the center bottom
of the Main screen, swipe to the third
SETTINGS screen, and touch Preheat
Alarm Light.
2. Select ON or OFF.
3. Touch OK.
TEMPERATURE ADJUSTMENT
Your new oven may cook differently than
the one it replaced. Use your new oven for
a few weeks to become more familiar with
it before changing the temperature settings.
If after familiarizing yourself with the new
oven, you still think that it is too hot or too
cold, you can adjust the oven temperature
yourself.
1. Touch SETTINGS at the center bottom
of the Main screen, swipe to the
third SETTINGS screen, and touch
Temperature Adjustment.
2. To make large adjustments, drag the
central indicator toward the + or - ends of
the scale or tap a location on the scale.
To make small adjustments, tap + or - to
raise or lower the thermostat in 1-degree
increments. Tap and hold + or - to scroll
up or down the scale.
3. When the desired change appears above
the range, touch OK.
TEMPERATURE UNITS
Set the oven temperature display to show
HLWKHU)DKUHQKHLWRU&HOVLXVXQLWV
7KHRYHQGHIDXOWVWR)DKUHQKHLWXQOHVV
changed by the user.
1. Touch SETTINGS at the center bottom
of the Main screen, swipe to the
third SETTINGS screen, and touch
Temperature Units.
6HOHFW)RU&
3. Touch OK.
DEMO MODE
Demo Mode for showroom use only. The
oven will not heat up.
1. Touch SETTINGS at the center bottom
of the Main screen, swipe to the third
SETTINGS screen, and touch Demo
Mode.
2. Select either the ON or OFF mode.
3. Touch OK.
NOTE:
• When Demo Mode is on, the appliance will
not heat up.
• The oven Demo Mode icon appears in the
display if the Demo Mode is on.
FACTORY DATA RESET
This function returns all settings to the
factory defaults.
NOTE: All stored data will be deleted.
1. Touch SETTINGS at the center bottom
of the Main screen, swipe to the fourth
SETTINGS screen, and touch Factory
Data Reset.
2. If you want to reset data to the factory
defaults, touch RESET and then OK.
OPEN SOURCE LICENSE
This screen displays a list of the open
source software contained in this product.
Refer to the indicated licenses for the terms
and conditions of their use.
1 Touch SETTINGS at the center bottom of
the Main screen and swipe to the fourth
Settings screen.
2 Touch Open Source License.
Oven Settings
USING THE OVEN: Oven Settings
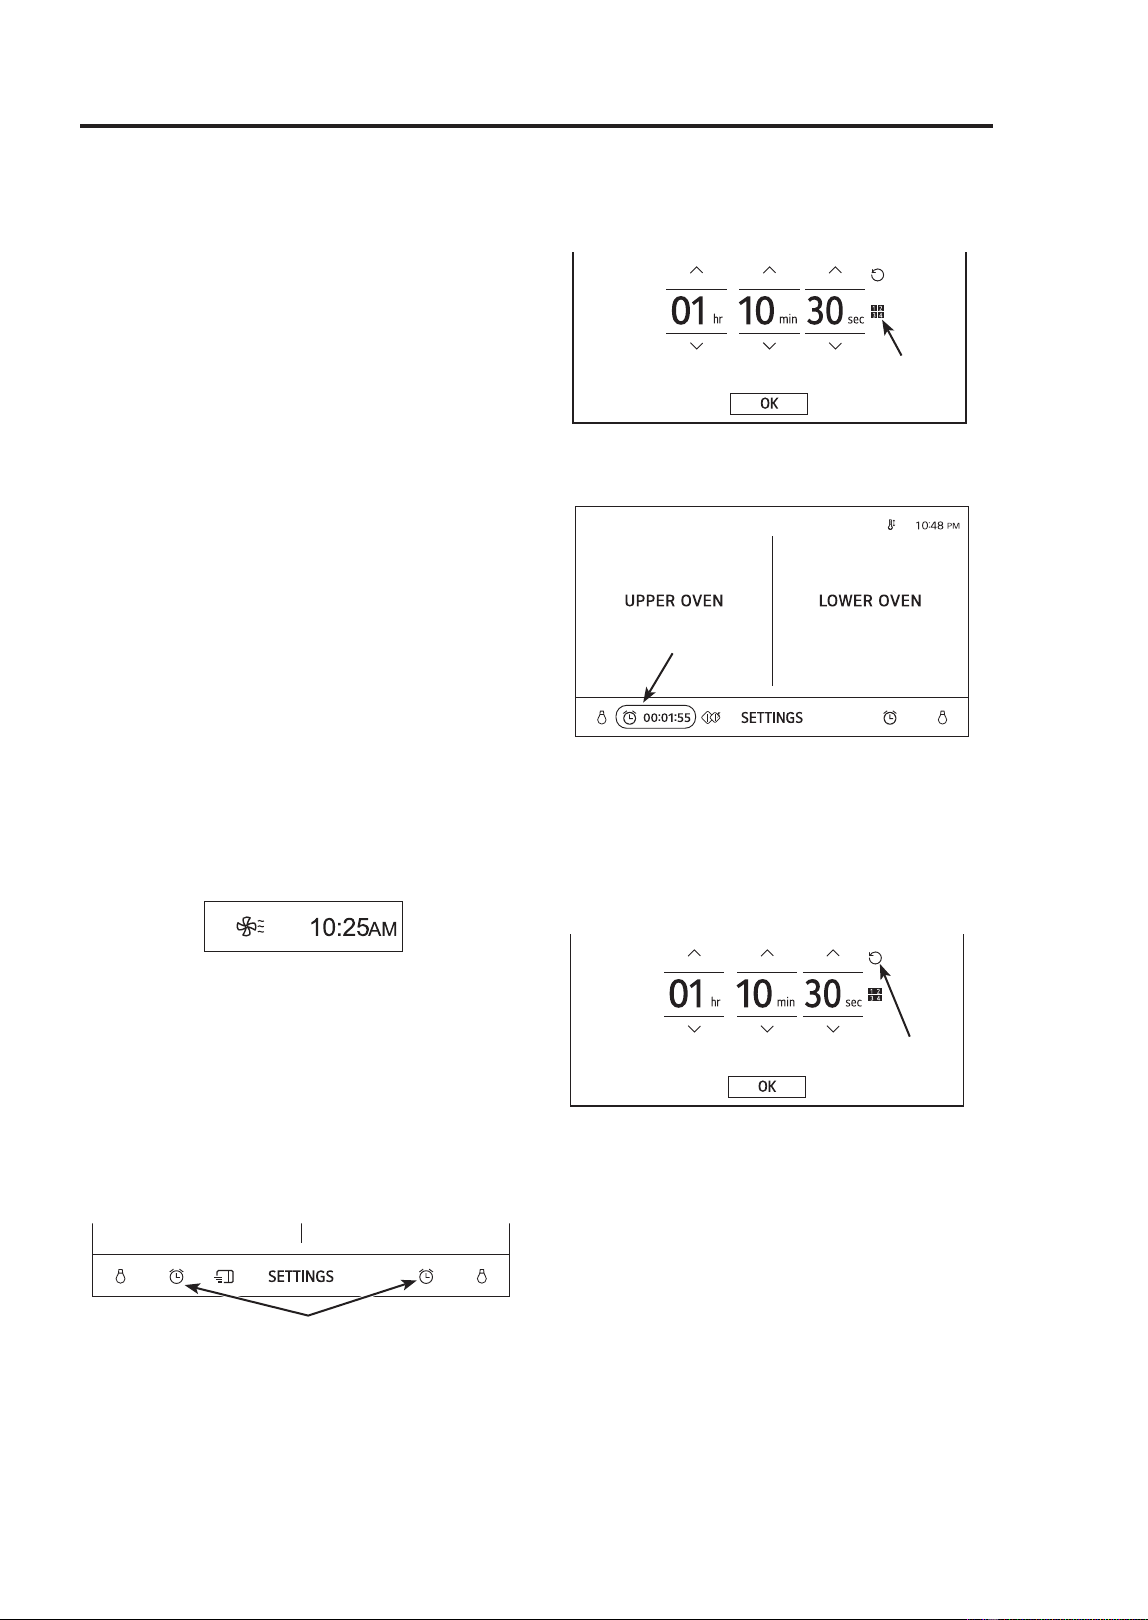
49-2001799 Rev. 1
29
USING THE OVEN: Oven Settings
Oven Settings
OPEN SOURCE LICENSE
(Cont.)
Open Source Software Notice Information
To obtain the source code that is contained
in this product, under GPL, LGPL, MPL, and
other open source licenses that have the
obligation to disclose source code, and to
access all referred license terms, copyright
notices and other relevant documents,
please visit https:// opensource.lge.com.
LG Electronics will also provide open
source code to you on CD-ROM for a
charge covering the cost of performing such
GLVWULEXWLRQVXFKDVWKHFRVWRIPHGLD
shipping, and handling) upon email request
7KLVRႇHULVYDOLGWRDQ\RQHLQUHFHLSWRIWKLV
information for a period of three years after
our last shipment of this product.
OVEN COOLING
The oven cooling icon appears in the
display if the temperature inside the oven
is high during or after operation. The icon
disappears if the oven temperature is below
)&
TIMER
The oven timers don’t affect oven operation
or cooking time. Use them as extra kitchen
timers. Once the time runs out, the oven
chimes and “Upper timer finished” appears
in the display.
1. Touch either clock icon at the bottom of
the display.
2. Scroll through the numbers in the popup
until the desired time appears in the
display, or touch the number pad icon to
enter the numbers directly, and touch OK.
3. The time remaining appears next to the
clock icon in the display.
Adjusting or Cancelling the Timer:
1. Touch the remaining time next to the
clock icon in the display.
2. To cancel the timer, touch the Reset icon
in the popup. Then touch OK.
3. To adjust the time, scroll the numbers in
the popup until the desired time appears.
Then touch OK.
4. The remaining time in the display is
adjusted.
Reset Icon
Remaining Time
Number Pad

30
49-2001799 Rev. 1
Upper Oven
BEFORE USING
• Do not strike the control panel with
silverware, cookware, etc. It may be
damaged or broken.
• Always be careful when taking cookware
out of the oven. Some dishes absorb heat
from the cooked food and may be hot.
See the Cookware Guide section for more
information.
• To avoid breakage, allow cookware to
cool before rinsing or submerging in water.
Always allow the turntable to cool before
removing it from the oven.
• Use thermometers that have been
approved for microwave oven cooking.
• The turntable must always be in place
when you operate the oven.
• The wire rack should not be used for
Precision Cook or microwave cooking to
prevent arcing.
MICROWAVE COOKWARE
GUIDE
Microwave-Safe Cookware:
Ŷ Ovenproof Glass
Ovenproof glassware that is treated for
high intensity heat so it is heat-resistant is
microwave-safe.
Use utility dishes, loaf dishes, pie plates,
cake plates, liquid measuring cups,
casseroles and bowls without metal rims.
Do not use delicate glassware, such as
tumblers or wine glasses, as these might
shatter when heated.
Ŷ Plastic
Plastic Storage Containers: Use plastic
dishes, cups, semi-rigid freezer containers
and plastic bags only for short cooking
times. Do not use them when cooking
food for long periods or at high power
levels, as the hot food will eventually warp
or melt the plastic.
Plastic wrap (as a cover): Lay the plastic
wrap loosely over the dish and press it
to the sides. Vent plastic wrap by turning
back one edge slightly to allow excess
steam to escape. The dish should be deep
enough so that the plastic wrap will not
touch the food. As the food heats it may
melt the plastic wrap wherever the wrap
touches the food.
Plastic Cooking Bags: Provided they
are specially made for cooking, cooking
bags are microwave safe. Remember to
make a slit in the bag so that steam can
escape. Never use ordinary plastic bags
for cooking in the microwave oven, as
they will melt and rupture.
Ŷ Paper
Use paper towels, waxed paper,
paper napkins, and paper plates with
no metal rims or design. Look for the
manufacturer’s label for use in the
microwave oven.
Paper plates and containers are
convenient and safe to use in the
microwave oven, provided that the
cooking time is short and foods to be
cooked are low in fat and moisture. Paper
towels are also very useful for wrapping
foods and for lining baking trays in which
greasy foods such as bacon are cooked.
Avoid colored paper products as the
color may run. Do not use recycled
paper products in the microwave oven.
They may contain impurities which could
cause arcing or fires when used in the
microwave.
Ŷ Tableware
Do not put plates with painted decoration
in the oven, as the paint may contain
metal and cause arcing.
Microwave-Unsafe Cookware:
Ŷ Metal Containers/Metal Decoration
Never use metal or metal-rimmed
cookware in the microwave oven.
Microwaves cannot penetrate metal.
They will bounce off any metal object in
the oven and cause arcing, an alarming
phenomenon that resembles lightning.
Metal shields the food from microwave
energy and produces uneven cooking.
Also avoid metal skewers, thermometers,
foil trays, metal-rimmed or metal-banded
dinnerware, casserole dishes, etc. The
metal rim interferes with normal cooking
and may damage the oven.
USING THE OVEN: Microwave Cookware Guide

49-2001799 Rev. 1
31
Upper Oven
MICROWAVE COOKWARE
GUIDE (Cont.)
Ŷ Aluminum Foil
Avoid large sheets of aluminum foil
because they hinder cooking and may
cause harmful arcing.
Use small pieces of foil to shield poultry
legs and wings.
.HHS$//DOXPLQXPIRLODWOHDVW´
FPIURPWKHVLGHZDOOVDQGGRRURI
the oven.
Ŷ Wood
Wood bowls and boards will dry out and
may split or crack when you use them in
the microwave oven.
Baskets react in the same way.
Ŷ Tightly Covered Cookware
Be sure to leave openings for steam to
escape from covered containers.
Pierce plastic pouches of vegetables or
other food items before cooking.
Tightly closed pouches could explode.
Ŷ Brown Paper
Avoid using brown paper bags.
They absorb too much heat and could
burn.
Ŷ Flawed or Chipped Cookware:
Any container that is cracked, flawed, or
chipped may break in the oven.
Ŷ Metal Twist Ties
Remove metal twist ties from plastic or
paper bags.
They become hot and could cause a fire.
COOKING TIPS
Carefully monitor the food in the microwave
oven while it is cooking. Directions given
in recipes to elevate, stir, etc., are the
minimum steps recommended. If food is
RYHUFRRNHGGU\XQGHUFRRNHGRUXQHYHQO\
cooked, make adjustments before or during
cooking to correct the problem.
Ŷ Overcooked or Dry Food
Sprinkling: Sprinkle low-moisture foods
such as roasts and vegetables with water
before cooking, or cover them to retain
moisture.
Density: Light, porous food such as
cakes and breads cook more quickly than
heavy, dense foods such as roasts and
casseroles.
Shielding: Cover the corners of square
dishes with small strips of aluminum foil to
prevent overcooking. Don’t use too much
IRLODQGVHFXUHWKHIRLOWRWKHGLVK)RLO
can cause arcing if it gets too close to the
oven walls during cooking.
Bones and Fat: Bones conduct heat, and
fat cooks more quickly than meat. Take
care with bony or fatty cuts of meat.
Ŷ Undercooked Food
Covering: Cover food with a microwave-
VDIHOLGSDUFKPHQWSDSHUQRWZD[HG
paper), or plastic wrap to trap heat and
steam and cook food more quickly.
Standing Time: Let food stand for several
minutes after it is removed from the oven
to allow it to finish cooking and help
flavors blend and develop.
Quantity: The more food you place in
the oven, the longer the required cooking
time.
Temperature: Ice-cold ingredients
take much longer to cook than room
temperature ingredients.
USING THE OVEN: Microwave Cookware Guide / Cooking Tips

32
49-2001799 Rev. 1
Upper Oven
COOKING TIPS (Cont.)
Ŷ Unevenly Cooked Food
Stirring: Stir food from the outside toward
the center during cooking, as food at the
outside of the dish heats more quickly.
Arranging: Turn food over several times
during cooking. The upper portions of
thick foods cook more quickly than the
lower portions. Thick or dense foods can
be elevated so that microwaves can be
absorbed by the underside and center of
the foods.
Shaping: Place the thickest portions of
foods like meat, poultry or fish toward the
outside of the cookware to help them cook
more evenly. If possible, shape foods into
thin rounds or rings.
Ŷ Foods with Skin, Shell or Membrane
Skin or Membrane: Pierce the outsides
of foods like potatoes, sausages, or egg
whites or yolks before cooking.
Shell: Pierce or remove the shells from
eggs,clams, oysters, or other shelled
foods before cooking.
Ŷ Testing if Cooked
Microwaves cook food quickly, so test
food for doneness frequently. Some foods
are left in the microwave until completely
cooked, but most foods, including meats
and poultry, should be removed from the
oven while still slightly undercooked and
allowed to finish cooking during standing
time. The internal temperature of foods will
ULVHEHWZHHQ)&DQG)&
during standing time.
Ŷ Defrosting Tips
Remove fish, shellfish, meat, and poultry
from their original wrapping paper or
plastic package. Otherwise, the wrap
close to the food will hold steam and heat,
which can cause the outer surface of the
food to be cooked.
Remove any metal twist ties.
Always slit or pierce plastic pouches or
packaging.
Open containers such as cartons before
they are placed in the oven.
If food is foil wrapped, remove the foil and
place the food in a suitable container.
The length of defrosting time varies
depending on the shape of the food and
on how solidly the food is frozen.
As food begins to defrost, separate the
food into pieces so that they can defrost
more easily.
Turn over food during defrosting or
standing time. Separate into pieces and
remove food as required.
/HWIRRGVWDQGDIWHUGHIURVWLQJ)RRG
should still be somewhat icy in the center
when removed from the oven.
When using Defrost, the weight to be
entered is the net weight in pounds and
WHQWKVRISRXQGVWKHZHLJKWRIWKHIRRG
minus the container).
Shielding: Cover the corners of square
dishes with small strips of aluminum foil to
prevent overcooking. Don’t use too much
IRLODQGVHFXUHWKHIRLOWRWKHGLVK)RLO
can cause arcing if it gets too close to the
oven walls during cooking.
Bones and Fat: Bones conduct heat, and
fat cooks more quickly than meat. Take
care with bony or fatty cuts of meat.
Ŷ Undercooked Food
Covering: Cover food with a microwave-
VDIHOLGSDUFKPHQWSDSHUQRWZD[HG
paper), or plastic wrap to trap heat and
steam and cook food more quickly.
Standing Time: Let food stand for several
minutes after it is removed from the oven
to allow it to finish cooking and help
flavors blend and develop.
Quantity: The more food you place in
the oven, the longer the required cooking
time.
Temperature: Ice-cold ingredients
take much longer to cook than room
temperature ingredients.
USING THE OVEN: Cooking Tips

49-2001799 Rev. 1
33
USING THE OVEN: Cooking Tips
Upper Oven
COOKING TIPS (Cont.)
Ŷ Unevenly Cooked Food
Stirring: Stir food from the outside toward
the center during cooking, as food at the
outside of the dish heats more quickly.
Arranging: Turn food over several times
during cooking. The upper portions of
thick foods cook more quickly than the
lower portions. Thick or dense foods can
be elevated so that microwaves can be
absorbed by the underside and center of
the foods.
Shaping: Place the thickest portions of
foods like meat, poultry or fish toward the
outside of the cookware to help them cook
more evenly. If possible, shape foods into
thin rounds or rings.
Ŷ Foods with Skin, Shell or Membrane
Skin or Membrane: Pierce the outsides
of foods like potatoes, sausages, or egg
whites or yolks before cooking.
Shell: Pierce or remove the shells from
eggs,clams, oysters, or other shelled
foods before cooking.
Ŷ Testing if Cooked
Microwaves cook food quickly, so test
food for doneness frequently. Some foods
are left in the microwave until completely
cooked, but most foods, including meats
and poultry, should be removed from the
oven while still slightly undercooked and
allowed to finish cooking during standing
time. The internal temperature of foods will
ULVHEHWZHHQ)&DQG)&
during standing time.
Ŷ Defrosting Tips
Remove fish, shellfish, meat, and poultry
from their original wrapping paper or
plastic package. Otherwise, the wrap
close to the food will hold steam and heat,
which can cause the outer surface of the
food to be cooked.
Remove any metal twist ties.
Always slit or pierce plastic pouches or
packaging.
Open containers such as cartons before
they are placed in the oven.
If food is foil wrapped, remove the foil and
place the food in a suitable container.
The length of defrosting time varies
depending on the shape of the food and
on how solidly the food is frozen.
As food begins to defrost, separate the
food into pieces so that they can defrost
more easily.
Turn over food during defrosting or
standing time. Separate into pieces and
remove food as required.
/HWIRRGVWDQGDIWHUGHIURVWLQJ)RRG
should still be somewhat icy in the center
when removed from the oven.
When using Defrost, the weight to be
entered is the net weight in pounds and
WHQWKVRISRXQGVWKHZHLJKWRIWKHIRRG
minus the container).
Slit the skins of frozen food such as sausage.
Bend plastic pouches of food to ensure
even defrosting.
Place food in a shallow container or in
a microwave roasting dish to catch the
drippings.
Always underestimate defrosting time.
)RRGVKRXOGVWLOOEHVRPHZKDWLF\LQWKH
center when removed from the oven. If
defrosted food is still frozen solid in the
center, return it to the upper oven for more
defrosting.
Depending on the shape of the food,
some areas may defrost more quickly than
others.
The shape of the package affects how
quickly food will defrost. Shallow packages
will defrost more quickly than a deep
block.
)RUEHVWUHVXOWVVKDSHJURXQGPHDWLQWR
the form of a doughnut before freezing.
When defrosting, scrape off thawed meat
when the beep sounds and continue
defrosting.
Use small pieces of aluminum foil to shield
parts of food such as chicken wings, leg
tips, fish tails, or areas that start to get
warm. Make sure the foil does not touch
the sides, top, or bottom of the oven. The
foil can damage the oven lining.

34
49-2001799 Rev. 1
Upper Oven
MICROWAVE POWER LEVELS
This microwave oven is equipped with 10
power levels to give you maximum flexibility
and control over cooking.
MICROWAVE MODE
Cooking at High Power Level
1. Touch Microwave in the cooking mode
screen.
2. Touch numbers to set the cook time.
3. Touch Start to start cooking.
- When the cook time is over a melody
sounds.
Cooking at Lower Power Levels
High power cooking does not always give
the best results with foods that need slower
cooking, such as roasts, baked goods, or
custards. The oven has 9 power settings in
addition to HIGH.
1. Touch Microwave in the cooking mode
screen.
2. Set the cook time in the display.
3. Set the power level in the display.
4. Touch Start to start cooking.
• When the cook time is over a melody
sounds.
To Stop Cooking
Touch Stop in the display and select Yes.
Power
Level
Use
10
• Boiling water
• Browning ground beef
• Making candy
• Cooking whole poultry, poultry
pieces, fish & vegetables
• Cooking tender cuts of meat
• Reheating rice, pasta &
vegetables
• Reheating prepared foods
quickly
• Reheating sandwiches
• Cooking egg, milk and cheese
dishes
• Melting chocolate
• Cooking veal
• Cooking whole fish
• Cooking puddings and custard
• Cooking ham, whole poultry
and lamb
• Cooking rib roast and sirloin
tip
• Thawing meat, poultry and
seafood
• Cooking less tender cuts of
meat
• Cooking pork chops and
roasts.
• Taking chill out of fruit
• Softening butter
.HHSLQJFDVVHUROHVDQGPDLQ
dishes warm
• Softening butter and cream
cheese
USING THE OVEN: Cooking Tips

49-2001799 Rev. 1
35
USING THE OVEN: Convection Bake / Broil
Upper Oven
CONVECTION BAKE MODE
During Convection Bake, a heating element
is used to raise the temperature of the air
inside the oven. The convection cooking
WHPSHUDWXUHUDQJHVIURP)&WR
)&,WLVEHVWWRSUHKHDWWKHRYHQ
when convection cooking.
NOTE: 5HGXFHRYHQWHPSHUDWXUHE\)
from the temperature recommended on
packaged foods. The baking time may vary
according to the food condition or individual
preference.
Setting the Convection Bake Function
1. Touch Convection Bake in the cooking
mode screen.
2. Set the temperature. Scroll through the
numbers on the display, or touch the
number pad icon to enter the numbers
directly.
3. If desired, set the cook time.
4. Touch Start. The oven starts to preheat.
5. If the cook time is set, the remaining time
appears in the display.
6. A chime sounds once preheating is
complete.
7. A chime sounds at the end of the set cook
time and a notification appears in the
display. Open the oven door and remove
the food.
Changing the Convection Bake
Settings
1. Touch Edit in the display to bring up the
Cook Settings screen.
2. Adjust the settings.
3. Touch Start.
To Stop Cooking
Touch Stop in the display and select Yes.
NOTE:
• When the oven reaches the set preheat
temperature, a melody will sound. The
oven automatically holds that temperature
for 30 minutes.
• The oven temperature drops very quickly
when the door is opened; however, this
should not prevent food from being fully
cooked during normal cooking time.
BROIL MODE
This feature will allow you to brown and
crisp food quickly. There is no need for
preheating.
Setting the Broil Function
1. Touch Broil in the cooking mode screen.
2. Set the cook time in the display.
3. Touch Start. The oven begins to heat.
Changing the Broil Settings
1. Touch Edit in the display to bring up the
Cook Settings screen.
2. Adjust the settings.
3. Touch Start.
To Stop Cooking
Touch Stop in the display and select Yes.
NOTE: )RUEHVWUHVXOWVXVH
the rack when broiling in the
upper oven.

36
49-2001799 Rev. 1
Upper Oven
POPCORN MODE
Prepare microwave popcorn simply and
easily, one bag at a time.
3ODFHRQHEDJRQO\JRI
prepackaged microwave popcorn on a
microwave-safe / oven-safe dish on the
turntable. The package should be at room
temperature.
Setting the Popcorn Function
1. Touch Popcorn in the cooking mode
screen.
2. Touch Start. The Popcorn function starts.
To Stop Cooking
Touch Stop in the display and select Yes.
NOTE:
• When popping prepackaged popcorn,
place the bag carefully in the oven so it
GRHVQRWWRXFKWKHZDOOVDVLWURWDWHV)ROG
the ends of the bag up and toward the
center of the bag.
• If popcorn bag size is not known, follow
manufacturer’s instructions and do not use
this feature.
• Do not attempt to reheat or cook any
unpopped kernels.
• Do not reuse bag. Overcooking can result
in an oven fire.
• Prepare only one bag at a time.
• Do not use popcorn popping devices in
microwave oven with this feature.
• Do not leave microwave unattended while
cooking popcorn.
DEFROST MODE
The oven has 4 preset defrost modes. The
Defrost Menu shows the suggested defrost
mode for various foods. This defrost function
conveniently chimes during the mode to
remind you to check, turn over, separate, or
rearrange the food.
• 1: Meat mode
• 2: Poultry mode
• 3:)LVKPRGH
• 4: Bread mode
Setting the Defrost Function
1. Touch Defrost in the cooking mode
screen.
2. Set the type of food in the display.
3. Set the weight in the display.
4. Touch Start to start defrosting.
To Stop Cooking
Touch Stop in the display, and select Yes.
NOTE
• The countdown appears in the display after
Start is pressed. The oven chimes twice
during the defrost cycle.
• At the chime, open the oven door and turn
the food over. Remove any food that has
thawed. Return the still frozen items to
the oven and press Start to complete the
defrost cycle.
Weight Conversion Table
Most food weights are given in pounds and
ounces. If using pounds, food weights must
be entered into Auto Defrost in pounds and
WHQWKVRISRXQGVGHFLPDOV
Use the following table if necessary to
convert food weights to decimals.
Ounces Decimal Weight
1.6 0.1
3.2 0.2
4.8 0.3
6.4 0.4
8.0 2QHKDOISRXQG
9.6 0.6
11.2 0.7
12.8 0.8
14.4 0.9
16.0 2QHSRXQG
USING THE OVEN: Popcorn / Defrost

49-2001799 Rev. 1
37
USING THE OVEN: Defrost / Speed Cook
Upper Oven
DEFROST MODE (Cont.)
Defrost Menu
Refer to the information below to set the
desired code and weight.
Meat (0.1 - 6.0 lbs)
• Beef: Ground beef, round steak, stew
cubes, tenderloin steak, pot roast, rib
roast, rump roast, chuck roast, hamburger
patties
• Lamb: Chops, rolled roast
• Pork: Chops, hot dogs, spareribs, country-
style ribs, rolled roast, sausage
9HDO&XWOHWVOEòLQFKWKLFN
• Turn food over at beep.
• Standing time: 5-15 minutes
Poultry (0.1 - 6.0 lbs)
3RXOWU\:KROHFXWXSEUHDVWERQHOHVV
• Cornish Hens: Whole
• Turkey: Breast
• Rinse chicken with tap water and let stand
for 60 minutes after defrosting for better
results.
• Turn food over at beep.
• Standing time: 60 minutes
Fish (0.1 - 4.0 lbs)
)LVK)LOOHWVZKROHVWHDNV
• Shellfish: Crab meat, lobster tails,
shrimp,scallops
• Turn food over at beep.
• Standing time: 5-10 minutes
Bread (0.1 - 2.0 lbs)
• Sliced bread, buns, baguettes, etc.
• Separate slices and place between paper
towels or on flat plate.
• Turn food over at beep.
• Standing time: 1-2 minutes
SPEED COOK MODE
This feature uses power from a
halogen light, heaters, and microwaves
simultaneously to allow quick cooking.
NOTE
• Power levels only can be selected from 1
WRWR(DFKSRZHUOHYHOJLYHV
you heater power and microwave energy
for a certain percentage of the time.
Setting the Speed Convection
Function
Use this mode for roast meat, roast chicken,
roast vegetables, frozen pizza, cake, pies
and breads.
1. Touch Speed Cook and Speed
Convection in that order.
2. Set the power level in the display.
3. Set the temperature. Scroll through the
numbers on the display, or touch the
number pad icon to enter the numbers
directly.
4. Set the cook time. Touch the arrow key
on the right side of the display to set the
cook time.
5. Touch Start. The oven begins to heat.
Setting the Speed Broil Function
Use this mode for steaks, chicken fillets, fish
or seafood.
1. Touch Speed Cook and Speed Broil in
that order.
2. Set the power level and cook time in the
display.
3. Touch Start. The oven begins to heat.

38
49-2001799 Rev. 1
Upper Oven
SPEED COOK MODE (Cont.)
Changing the Speed Cook Settings
1. Touch Edit in the display to bring up the
Cook Settings screen.
2. Adjust the settings.
3. Touch Start.
To Stop Cooking
Touch Stop in the display and select Yes.
SENSOR COOK MODE
Use Sensor Cook to heat common
microwave-prepared foods without needing
to program times and power levels. Sensor
Cook has preset programs for 9 food
categories. See the Sensor Cook Menu for
more information.
About Features
This function reheats favorite foods without
selecting cooking times and power levels.
The oven automatically determines required
cooking time for each food item. When the
internal sensor detects a certain amount of
humidity coming from the food, it tells the
oven how much longer to heat.
The display shows the remaining heating
WLPH)RUEHVWUHVXOWVZKHQVHQVRUFRRNLQJ
follow these recommendations.
)RRGFRRNHGZLWKWKHVHQVRUV\VWHP
should be at normal storage temperature.
• The glass tray and the outside of the
container should be dry to assure best
cooking results.
)RRGVVKRXOGDOZD\VEHFRYHUHGORRVHO\
with microwavable plastic wrap, waxed
paper, or a lid.
• Do not open the door during the sensing
time. When sensing time is over, the oven
beeps and the remaining cooking time
will appear in the display window. At this
time you can open the door to stir, turn, or
rearrange the food.
Appropriate containers and coverings help
assure good sensor cooking results.
• Always use microwavable containers and
cover them with lids or vented plastic wrap.
• Never use tight-sealing plastic covers.
They can prevent steam from escaping
and cause food to overcook.
• Match the amount to the size of the
FRQWDLQHU)LOOFRQWDLQHUVDWOHDVWKDOIIXOO
for best results.
• Be sure the outside of the cooking
container and the inside of the upper oven
are dry before placing food in the oven.
Beads of moisture turning into steam can
mislead the sensor.
'RQRWXVH6HQVRU)HDWXUHVWZLFHLQ
succession on the same food portion.
If food is undercooked after the first
FRXQWGRZQXVH&22.%<7,0(IRU
additional cooking time.
Setting the Sensor Cook Function
1. Touch Sensor Cook in the cooking mode
screen.
2. Touch a category to filter the options.
3. Touch Start.
When the cook time is over a melody
sounds.
To Stop Cooking
Touch Stop in the display and select Yes.
Sensor Cook Menu
Refer to the information below to set
the desired menu item and see the
recommended amounts.
Ŷ 1. Beverage FXSV
†
)
ƒCookware: Mug or microwave-safe
cup on the glass tray
ƒFood temperature: Room
ƒInstructions: Use microwave safe
mug or cup without covering. After
cooking, stir to complete reheating.
Ŷ 2. Casserole R]
ƒCookware: Microwave-safe bowl on
the glass tray
ƒFood temperature: Refrigerated
ƒ Instructions: Use microwave safe
bowl. Cover container with vented
plastic wrap. After cooking, let stand
for 3 minutes.
USING THE OVEN: Speed Cook / Sensor Cook

49-2001799 Rev. 1
39
USING THE OVEN: Sensor Cook / Quick Start
Upper Oven
SENSOR COOK MODE (Cont.)
Ŷ 3. ChickenR]
ƒCookware: Microwave-safe bowl on
the glass tray
ƒFood temperature: Refrigerated
ƒInstructions: Use microwave safe
bowl. Cover container with vented
plastic wrap. After cooking, let stand
for 3 minutes.
Ŷ 4. Pasta òFXSV
†
)
ƒCookware: Microwave-safe bowl on
the glass tray
ƒFood temperature: Refrigerated
SUHFRRNHG
ƒ Instructions: Use microwave safe
bowl. Cover container with vented
plastic wrap. After cooking, let stand
for 3 minutes.
Ŷ 5. Pizza VOLFHV
ƒCookware: Microwave-safe dish on
the glass tray
ƒFood temperature: Refrigerated
ƒInstructions: This is a reheat function
for leftover pizza. Use microwave
safe plate without covering.
Ŷ 6. Plate of FoodVHUYLQJ
ƒCookware: Microwave-safe dish on
the glass tray
ƒFood temperature: Refrigerated
ƒ Instructions: Use microwave safe
plate. Cover container with vented
plastic wrap. After cooking, let stand
for 3 minutes.
Ŷ 7. Rice òFXSV
†
)
ƒCookware: Microwave-safe bowl on
the glass tray
ƒFood temperature: Refrigerated
SUHFRRNHG
ƒ Instructions: Use microwave safe
bowl. Cover container with vented
plastic wrap. After cooking, let stand
for 3 minutes.
Ŷ 8. Soup FXSV
†
)
ƒCookware: Microwave-safe bowl on
the glass tray
ƒ Food temperature: Room
ƒ Instructions: Use microwave safe
bowl. Cover container with vented
plastic wrap. After cooking, let stand
for 3 minutes.
Ŷ 9. Vegetable FXSV
†
)
ƒCookware: Microwave-safe bowl on
the glass tray
ƒFood temperature: Refrigerated
ƒ Instructions: Use microwave safe
bowl. Cover container with vented
plastic wrap. After cooking, let stand
for 3 minutes.
R]POSHUFXS
MICROWAVE QUICK START
MODE
Use this to quickly add 30 seconds to
microwave cooking time.
To use, touch the Microwave Quick Start
icon at the bottom left side of the screen.

40
49-2001799 Rev. 1
Upper Oven
PRECISION COOK MODE
Use this function to heat common prepared
foods without selecting cooking times and
power levels.
This function has preset programs for 28
food items.
Setting the Precision Cook Mode
1. Touch Precision Cook in the cooking
mode screen.
2. Touch a desired menu in the display.
3. Scroll through or tap the arrow key to
select recommended amounts. Touch
Next.
)ROORZWKHUHFRPPHQGDWLRQVLQWKH
display regarding accessories.
5. Touch Start.
Precision Cook Menu
Refer to the information below to set
the desired menu item and see the
recommended amounts.
Ŷ 1. Bacon (3-4 or 5-6 slices)
ƒ Cookware: Microwave-safe bacon
rack or plate on the glass tray
ƒFood temperature: Refrigerated
ƒ Instructions: Place bacon slices on a
microwave rack for best results. Use
a plate lined with paper towels if rack
is not available.
Ŷ 2. Frozen Bagels (1 or 2-3 bagels)
ƒCookware: Metal tray
ƒFood temperature: )UR]HQ
Ŷ 3. Baked Potatoes (1, 2, 3-4 potatoes
(7-9 oz/ea))
ƒCookware: Metal tray
ƒ Food temperature: Room
ƒ Instructions: Pierce each potato
several times with a fork.
Ŷ %URZQLHVƎ;ƎƎ;Ǝ
ƒCookware: Microwave-safe bowl on
the glass tray
ƒ Food temperature: Room
ƒ
Instructions: Spray microwave-safe
glass or silicone bakeware with cooking
spray. Pour batter into bakeware,
spreading it evenly. After cooking, allow
to rest for a few minutes.
Ŷ 5. Cod Fillets (1 lb)
ƒCookware: Metal tray
ƒFood temperature: Refrigerated
ƒ Instructions: Brush with oil and
season with salt and pepper. Turn
food over at the beep.
Ŷ 6. Frozen Corn Dog (1-2, 3-4)
ƒCookware: Metal tray
ƒFood temperature: )UR]HQ
Ŷ 7. Fresh Vegetable (4-6, 7-9, 10-12,
13-15, 16-20 oz)
ƒCookware: Microwave-safe bowl on
the glass tray
ƒFood temperature: Refrigerated
ƒ Instructions: Add water according
WRWKHTXDQWLW\R]DGGWEVS
water, 13-20 oz: add 4 tbsp water).
Cover with vented plastic wrap.
After cooking, stir and let stand for 3
minutes.
Ŷ 8. Frozen Chicken Nuggets
servings R]JSHUVHUYLQJ
ƒCookware: Metal tray
ƒFood temperature:)UR]HQ
ƒ Instructions: Turn food over at the
beep.
Ŷ 9. Frozen Chicken Wings
VHUYLQJVR]JSHUVHUYLQJ
ƒCookware: Metal tray
ƒFood temperature:)UR]HQ
ƒ Instructions: Turn food over at the
beep.
Ŷ 10. Frozen Fries VHUYLQJV
oz / 100 g per serving)
ƒCookware: Metal tray
ƒFood temperature:)UR]HQ
ƒ Instructions:Turn food over at the
beep.
USING THE OVEN: Precision Cook

49-2001799 Rev. 1
41
USING THE OVEN: Precision Cook
PRECISION COOK MODE (Cont.)
Precision Cook Menu (Cont.)
Ŷ 11. Frozen Pizza ,QGLYLGXDOƎ
5HJXODUƎ
ƒCookware: Metal tray
ƒFood temperature:)UR]HQ
Ŷ 12. Frozen Pretzels (1, 2, 3-4 pretzels)
ƒCookware: Metal tray
ƒFood temperature:)UR]HQ
Ŷ 13.
Frozen vegetables
13-15, 16-20 oz)
ƒCookware: Microwave-safe bowl on
the glass tray
ƒFood temperature:)UR]HQ
ƒ Instructions: Add water according
WRWKHTXDQWLW\R]DGGWEVS
water, 13-20 oz: add 4 tbsp water).
Cover with vented plastic wrap.
After cooking, stir and let stand for 3
minutes.
Ŷ 14. Frozen Garlic Bread
pieces)
ƒCookware: Metal tray
ƒFood temperature:)UR]HQ
ƒ Instructions: Turn food over at the
beep.
Ŷ +DPEXUJHUƎWKLFN
patties)
ƒCookware: Metal tray
ƒFood temperature: Refrigerated
ƒ Instructions: Turn food over at the
beep.
Ŷ /DPE&KRSVƎWKLFNR]
2, 3-4 chops)
ƒCookware: Metal tray
ƒFood temperature: Refrigerated
ƒ Instructions: Brush with oil and
season with salt and pepper. Turn
food over at the beep.
Ŷ 17. Meat Loaf Ǝ;Ǝ
ƒCookware: Microwave-safe glass or
silicone bakeware on the glass tray
ƒFood temperature: Refrigerated
ƒIngredients:
Ground meat: 28 oz / 800 g, Egg
UHIULJHUDWHGR]J6DOW
tsp / 2 g)
ƒInstructions: Place meat mixture
into microwave-safe 9” x 5” glass or
silicone bakeware.
Ŷ 18. NachosVHUYLQJVHD
serving))
ƒCookware: Metal tray
ƒFood temperature: Room
Ŷ 19. Oatmeal VHUYLQJV
ƒCookware: Large microwave-safe
bowl on the glass tray
ƒFood temperature: Room
ƒIngredients:
1 Serving: 2DWVFXSJ
:DWHURU0LONFXSJ6DOW
2SWLRQDOGDVK
2 Servings: 2DWVFXSJ
:DWHURU0LONFXSVJ
6DOW2SWLRQDOWVS
ƒ Instructions: Combine water
or milk, salt and oats in a large
microwave-safe bowl. Cover with
vented plastic wrap. After cooking,
let stand for 3 minutes.
Ŷ 3RUN&KRSVƎWKLFN
chops)
ƒCookware: Metal tray
ƒFood temperature: Refrigerated
ƒ Instructions: Brush with oil and
season with salt and pepper. Turn
food over at the beep.
Upper Oven

42
49-2001799 Rev. 1
PRECISION COOK MODE (Cont.)
Precision Cook Menu (Cont.)
Ŷ 21. Quinoa JHQHURXVVHUYLQJV
ƒCookware: Microwave-safe bowl on the
glass tray
ƒFood temperature: Room
ƒIngredients:
6HUYLQJ4XLQRDFXSJ
Water or Milk
FXSJ6DOW2SWLRQDOGDVK
6HUYLQJV4XLQRDFXSJ
Water or Milk 1
FXSVJ6DOW2SWLRQDO
tsp
ƒ Instructions: Combine water or
milk, salt and quinoa in a large
microwave-safe bowl. Cover with
vented plastic wrap. After cooking,
let stand for 3 minutes.
Ŷ 22. Ribeye Steak R]VWHDNV
ƒCookware: Metal tray
ƒFood temperature: Refrigerated
ƒ Instructions: Brush with oil and
season with salt and pepper. Turn
food over at the beep.
Ŷ 23. Rice FXS
ƒCookware: Deep and large
microwave-safe bowl on the glass
tray
ƒFood temperature: Room
ƒIngredients:
5LFHFXSJFXSJ
:DWHUFXSJFXSVJ
Salt: Optional
ƒInstructions: Cover with vented
plastic wrap. After cooking, let stand
for 5-10 minutes.
Ŷ 24. Salmon Steak VWHDNV
ƒCookware:Metal tray
ƒFood temperature: Refrigerated
ƒInstructions: Brush with oil and
season with salt and pepper. Turn
food over at the beep.
Ŷ 25. Sausage OLQNV
ƒCookware: Metal tray
ƒFood temperature: Refrigerated
ƒInstructions: Turn food over at the
beep.
Ŷ 26. Sirloin Steak R] VWHDNV
ƒCookware: Metal tray
ƒFood temperature: Refrigerated
ƒInstructions: Brush with oil and
season with salt and pepper. Turn
food over at the beep.
Ŷ 27. Tenderloin ôòOE
ƒCookware: Metal tray
ƒFood temperature: Refrigerated
ƒInstructions:Brush with oil and
season with salt and pepper. Turn
food over at the beep.
Ŷ 28.
Canned Vegetables
13-15, 16-20 oz)
ƒCookware: Microwave-safe bowl on
the glass tray
ƒFood temperature: Room
ƒInstructions: Transfer canned
vegetables to microwave-safe bowl.
Cover with vented plastic wrap.
After cooking, stir and let stand for 3
minutes.
Upper Oven
USING THE OVEN: Precision Cook

49-2001799 Rev. 1
43
USING THE OVEN: Soften / Melt
Upper Oven
SOFTEN MODE
The oven uses low power to soften foods
such as butter, cream cheese, frosting, and
ice cream. See the following table.
Setting the Soften Mode
1. Touch Soften in the cooking mode
screen.
2. Set the type of food in the display.
3. Set the weight in the display.
4. Touch Start.
5. When the cook time is over a melody
sounds.
To Stop Cooking
Touch Stop in the display and select Yes.
Soften Table
Ŷ 1. Butter òVWLFNV
ƒCookware: Microwave-safe dish on
the glass tray
ƒFood temperature: Refrigerated
ƒInstructions: Butter will be at room
temperature and ready for use in a
recipe.
Ŷ 2. Cream cheeseR]
ƒCookware: Microwave-safe dish on
the glass tray
ƒFood temperature: Refrigerated
ƒInstructions: Cream cheese will be
at room temperature and ready for
use in a recipe.
Ŷ 3. Frosting R]
ƒCookware: Microwave-safe bowl on
the glass tray
ƒFood temperature: Refrigerated
ƒInstructions:)URVWLQJZLOOEHDWURRP
temperature and ready for use in a
recipe.
Ŷ 4. Ice cream SLQWTXDUW
ƒCookware: Glass tray
ƒFood temperature:)UR]HQ
ƒInstructions: Remove lid and cover.
Ice cream will be soft enough to make
scooping easier.
MELT MODE
The oven uses low power to melt foods
such as butter, caramel, cheese, chocolate,
and marshmallows. See the following table.
Setting the Melt Mode
1. Touch Melt in the cooking mode screen.
2. Set the type of food in the display.
3. Set the weight in the display.
4. Touch Start.
When the cook time is over a melody
sounds.
To Stop Cooking
Touch Stop in the display and select Yes.
Melt Table
Ŷ 1. Butter òVWLFNV
ƒCookware: Microwave-safe bowl on
the glass tray
ƒFood temperature: Refrigerated
ƒInstructions: After cooking, stir to
complete melting.
Ŷ 2. CaramelR]
ƒCookware: Microwave-safe bowl on
the glass tray
ƒFood temperature: Room
ƒInstructions: After cooking, stir to
complete melting.

44
49-2001799 Rev. 1
Upper Oven
MELT MODE (Cont.)
Melt Table (Cont.)
Ŷ 3. Cheese R]
ƒCookware: Microwave-safe bowl on
the glass tray
ƒFood temperature: Refrigerated
ƒInstructions: Use processed cheese
food only. Cut into cubes. After
cooking, stir to complete melting.
Ŷ 4. ChocolateR]
ƒCookware: Microwave-safe bowl on
the glass tray
ƒFood temperature: Room
ƒInstructions: Chocolate chips or
squares of baking chocolate may be
used. After cooking, stir to complete
melting.
Ŷ 5. MarshmallowR]
ƒCookware: Microwave-safe bowl on
the glass tray
ƒFood temperature: Room
ƒInstructions: After cooking, stir to
complete melting.
WARM MODE
This function maintains an oven temperature
RIOHVVWKDQ)7KLVIXQFWLRQVKRXOGQRW
be used to reheat cold food. This function
keeps cooked food warm for serving up to
3 hours after cooking has finished. After
KRXUVWKLVIXQFWLRQVKXWVWKHRYHQ2))
automatically.
Setting the Warm Mode
1. Touch Warm in the cooking mode screen.
2. Select the temperature level: Low,
Medium, or High.
/RZ))&&
0HGLXP))&&
+LJK))&&
3. Select the type: moist, crisp.
4. Touch Start to start warming.
To Stop Cooking
Touch Stop in the display and select Yes.
NOTE:
• This function is intended to keep food
warm. Do not use it to cool food down.
• It is normal for the fan to operate during
this function.
PROOF MODE
This function maintains a warm oven for
rising yeast-leavened products before
baking.
Setting the Proof Mode
1. Touch Proof in the cooking mode screen.
2. Touch Start to start proofing.
To Stop Cooking
Touch Stop in the display and select Yes.
NOTE
• To avoid lowering the oven temperature
and lengthening proofing time, do not open
the oven door unnecessarily.
• Check bread products early to avoid over-
proofing.
• Do not use the Proofing mode for warming
food or keeping food hot. The proofing
oven temperature is not hot enough to hold
foods at safe temperatures. Use the Warm
function to keep food warm.
• Proofing will not operate if the oven is too
hot. Allow the oven to cool before proofing.
USING THE OVEN: Melt / Warm / Proof
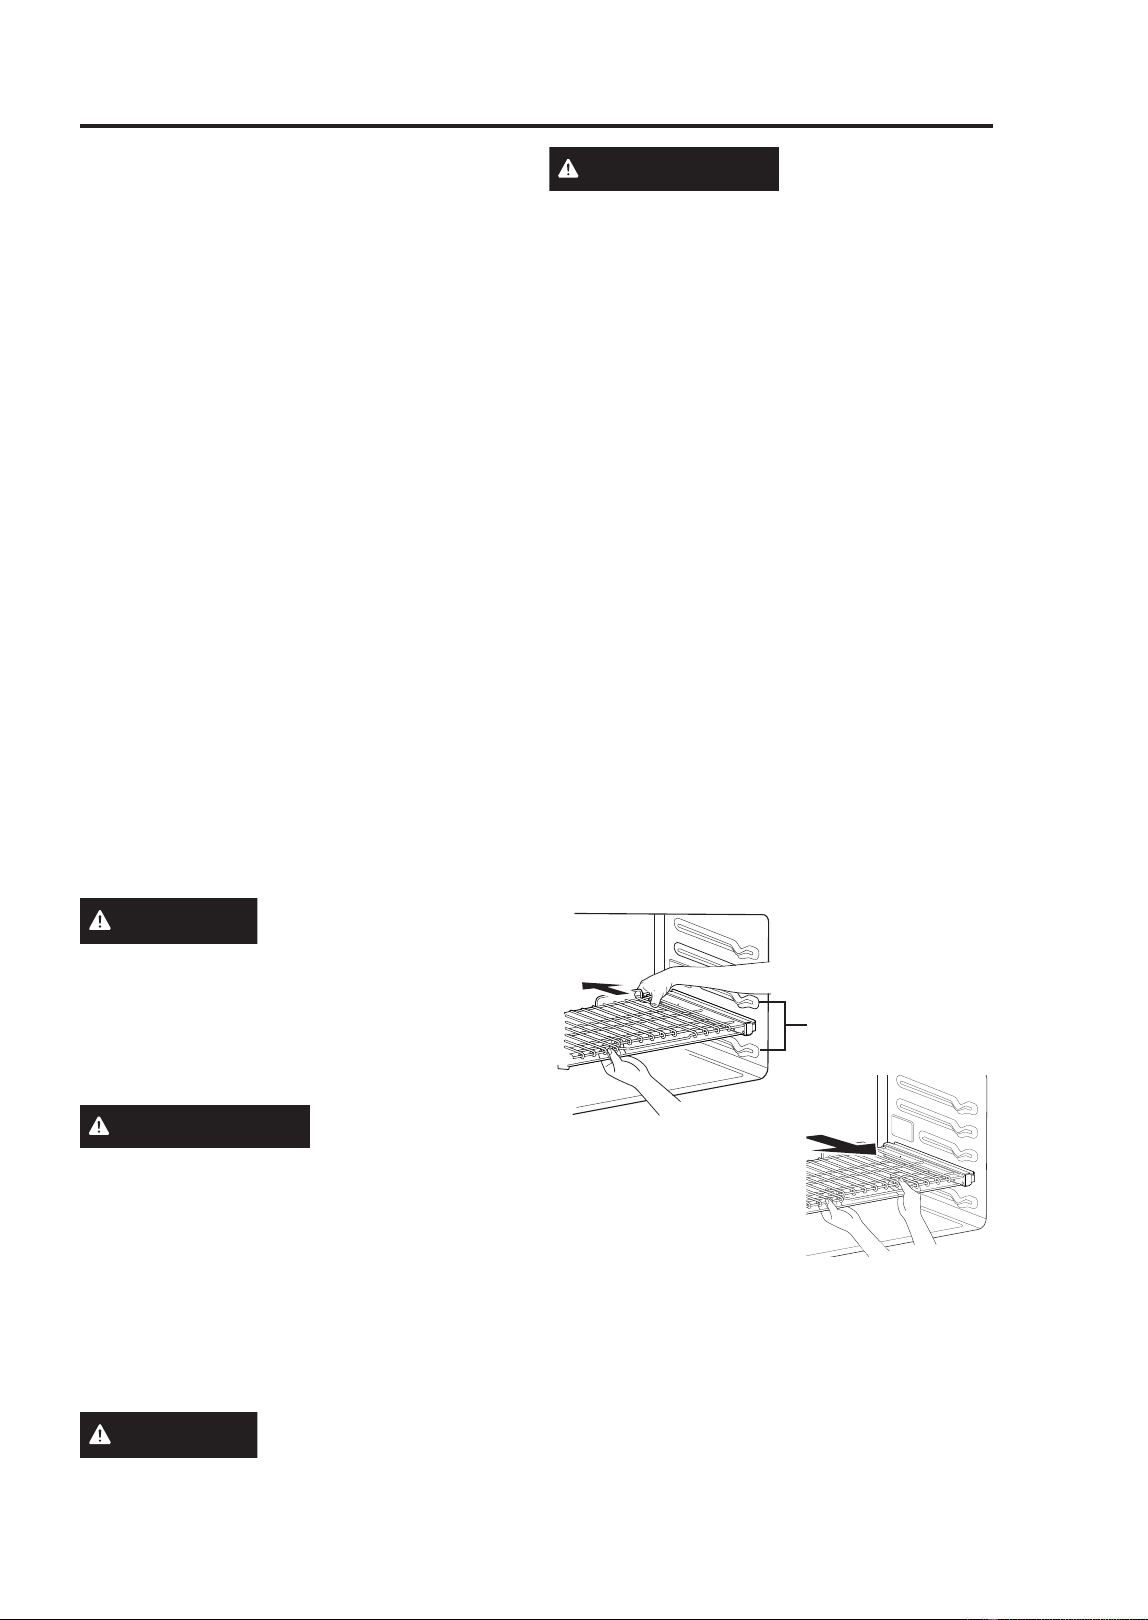
49-2001799 Rev. 1
45
USING THE OVEN: Before Using Lowe Oven / Racks
Lower Oven
BEFORE USING THE LOWER
OVEN
• Because the oven temperature cycles,
an oven thermometer placed in the oven
cavity may not show the same temperature
that is set on the oven.
• It is normal for the convection fan to run
while preheating during a regular bake
cycle.
• The convection fan motor may run
periodically during a regular bake cycle.
• The heat turns off if the door is left open
during baking. If the door is left open for
longer than 30 seconds during baking,
the heat turns off. The heat turns back on
automatically once the door is closed.
• Avoid opening the oven door more than
necessary during use. This helps the
oven maintain temperature, prevents
unnecessary heat loss, and saves on
energy use.
Oven Vent
Areas near the vent may become hot during
operation and may cause burns. Avoid
placing plastics near the vent as heat may
distort or melt the plastic.
It is normal for steam to be visible when
cooking foods with high moisture content.
CAUTION
Do not use any type of
foil or oven liner to cover the oven bottom.
These items can trap heat or melt, resulting
in damage to the product and risk of shock,
smoke, or fire. Damage from improper use
of these items is not covered by the product
warranty.
PRECAUCIÓN
1RXVHQLQJ~QWLSRGH
papel de aluminio ni revestimiento de horno para
FXEULUODSDUWHLQIHULRUGHOKRUQR(VWRVtWHPV
podrán atrapar el calor o derretirse, ocasionando
GDxRVVREUHHOSURGXFWR\HOULHVJRVGH
GHVFDUJDKXPRRLQFHQGLR/RVGDxRVSRUXVR
LQDGHFXDGRGHHVWRVtWHPVQRHVWiQFXELHUWRV
SRUODJDUDQWtDGHOSURGXFWR
USING STANDARD OVEN
RACKS
CAUTION
Use caution with
removing a rack from the lowest position as
door may be hot.
PRECAUCIÓN
Tenga cuidado al
retirar una parrilla desde la posición más baja, ya
que la puerta podrá estar caliente.
The racks have a turned-up back edge that
prevents them from being pulled out of the
oven cavity.
Removing Racks
1. Pull the rack straight out until it stops.
2. Lift up the front of the rack and pull it out.
Replacing Racks
1. Place the end of the rack on the support.
2. Tilt the front end up and push the rack in.
USING EXTENSION RACKS
The gliding racks slide in and out on a
frame. This keeps heavy cookware level and
prevents it from sliding forward when the
rack is completely extended.
Installing Extension Racks
1. Start with the rack in the closed position.
Hold the rack with one hand at the center
front and the other hand at the back right
corner.
2. Carefully insert the rack between the rack
guides, and slide it back until the shelf
drops into place.
3. Once the rack is
secured in the back,
pull the entire rack
forward until the rack
locks into place.
Removing Extension Racks
1. With the rack in the closed position, grasp
the front of the rack and frame and lift up.
Slowly push the rack towards the back
wall until it is free of the rack stop.
2. After disengaging the rack stop, lift the
back of the rack and pull the rack and
frame out between the rack guides.
Rack
Guides
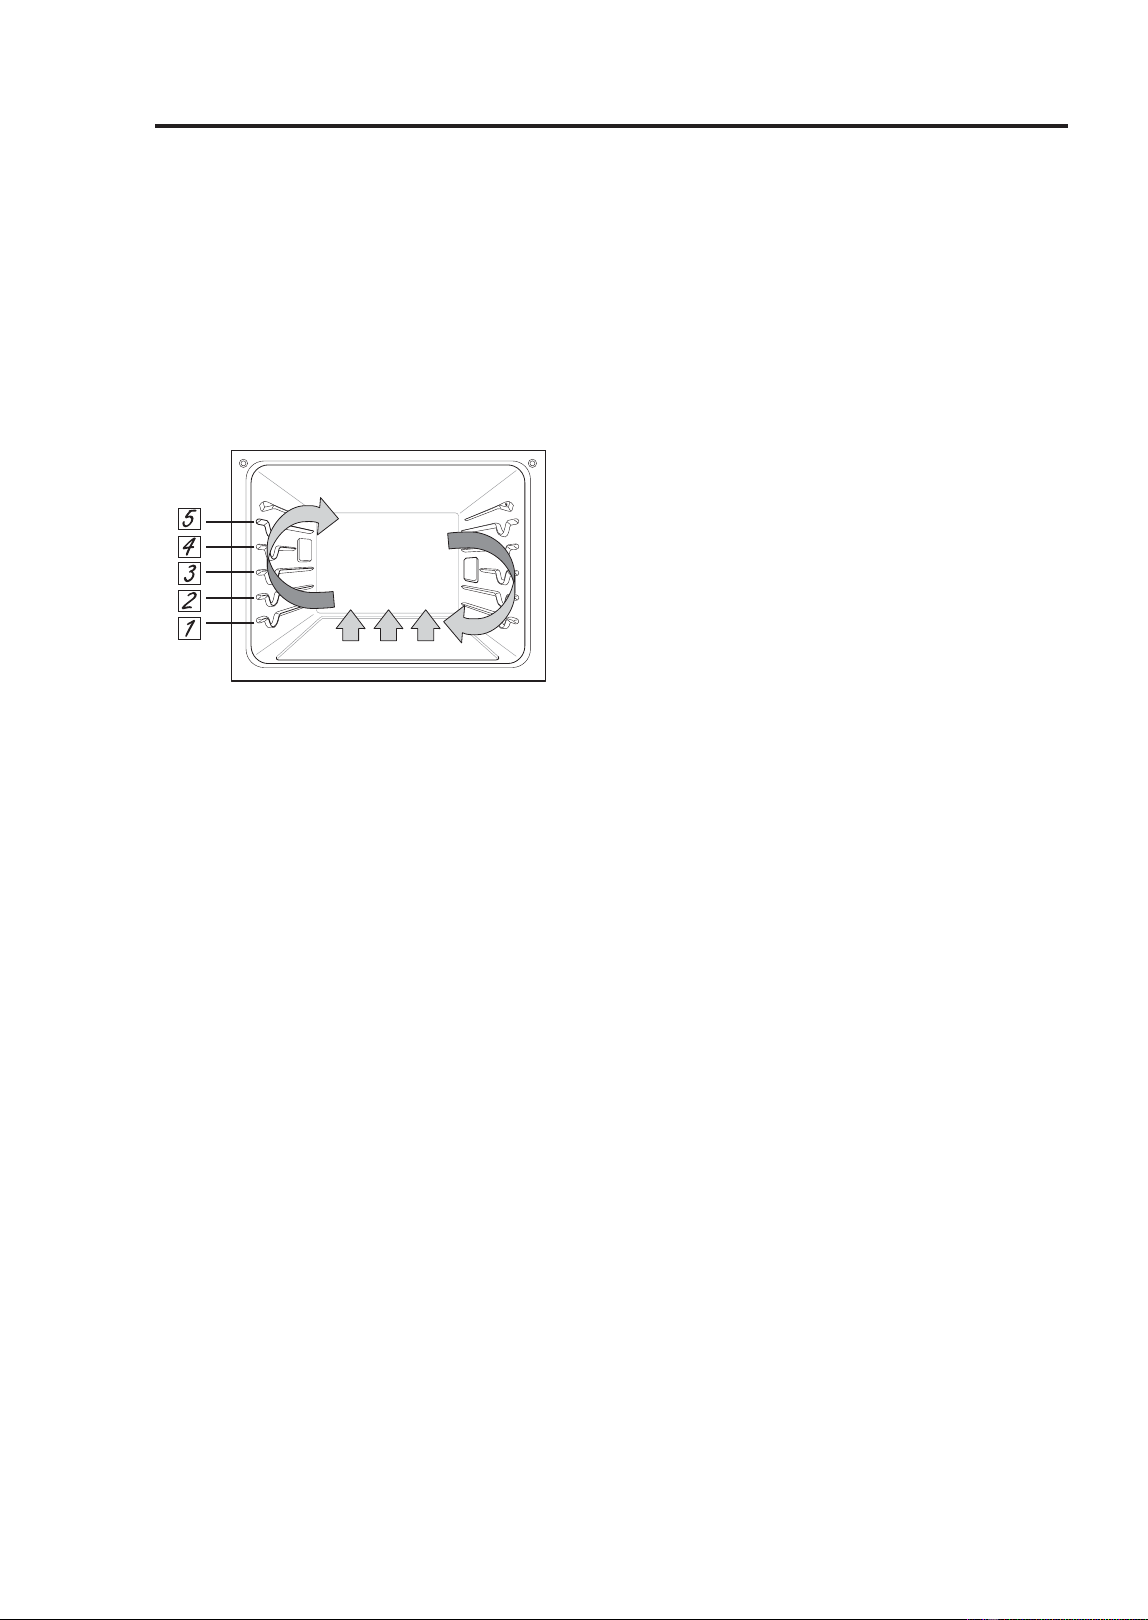
46
49-2001799 Rev. 1
Lower Oven
CONVECTION BAKE AND ROAST MODE
The convection system uses a fan to
circulate the heat evenly within the oven.
Improved heat distribution allows for even
cooking and excellent results while cooking
with single or multiple racks.
The oven can be programmed to bake
DWDQ\WHPSHUDWXUHIURP)&WR
)&7KHGHIDXOWWHPSHUDWXUHLV
)&
Using Convection
1. Touch Convection Bake or Convection
Roast in the cooking mode screen.
2. Set the temperature. Scroll through the
numbers on the display or touch the
number pad icon to enter the numbers
directly.
3. If desired, set the cook time and delayed
start time using the same method. Touch
the arrow key on the right side of the
display to see the delayed start time
settings.
4. Touch Start. The oven starts to preheat.
5. If the cook time is set, the remaining time
appears in the display. If a delayed start
time is set, the start time appears in the
display.
6. A chime sounds once preheating is
complete.
7. A chime sounds at the end of the set cook
time and a notification appears in the
display. Open the oven door and remove
the food.
NOTE
• If no cook time is set, the oven turns off
automatically after 12 hours.
• The heating elements and fan turn off
immediately when the door is opened.
They turn on again approximately 1
second after the door is closed.
• Touch Stop in the display to cancel
Convection Bake and Convection Roast at
any time.
• When preparing meats for roasting, use
the broiler pan and grid. The broiler pan
catches grease spills and the grid helps
prevent grease splatters.
• The oven fan runs while convection baking
and convection roasting. The fan stops
when the door is opened. In some cases,
the fan may shut off during a convection
bake cycle.
Changing the Cook Settings
1 Touch Edit in the display to bring up the
Cook Settings screen.
2 Adjust the settings using the number pad
or scroll function.
3 Touch Start.
To Stop Cooking
Touch Stop in the display, and select Yes.
Tips for Convection Baking
• Use Convection Bake for faster and more
even multiple-rack cooking of pastries,
cookies, muffins, biscuits, and breads of all
kinds.
• Bake cookies and biscuits on pans with no
sides or very low sides to allow heated air
WRFLUFXODWHDURXQGWKHIRRG)RRGEDNHG
on pans with a dark finish will cook faster.
• When using Convection Bake with a single
rack, place oven rack in position 3. If
cooking on multiple racks, place the oven
racks in positions 2 and 4.
• Multiple oven rack cooking may slightly
increase cook times for some foods.
• Cakes, cookies and muffins have better
results when using multiple racks.
USING THE OVEN: Convection Bake and Roast

49-2001799 Rev. 1
47
USING THE OVEN: Convection Bake and Roast
Lower Oven
CONVECTION BAKE AND
ROAST MODE (Cont.)
The Convection Roast feature is designed
to give optimum roasting performance.
Convection Roast combines cooking with
the convection fan to roast meats and
poultry. The heated air circulates around
the food from all sides, sealing in juices
DQGIODYRUV)RRGVDUHFULVS\EURZQRQWKH
outside while staying moist on the inside.
Convection roasting is especially good for
large tender cuts of meat, uncovered.
Tips for Convection Roasting
Use a broiler pan and grid when preparing
meats for convection roasting. The broiler
pan catches grease spills and the grid helps
prevent grease splatters.
1. Place the oven rack in position 1 or 2.
2. Place the grid in the broiler pan.
3. Place the broiler pan on the oven rack.
BAKE MODE
Bake is used to prepare foods such as
pastries, breads and casseroles.
The oven can be programmed to bake at
DQ\WHPSHUDWXUHIURP)&WR)
&7KHGHIDXOWWHPSHUDWXUHLV)
&
Setting the Bake Function
1. Touch Bake in the cooking mode screen.
2. Set the oven temperature. Scroll through
the numbers on the display or touch the
number pad icon to enter the numbers
directly.
3. If desired, set the cook time and delayed
start time using the same method. Touch
the arrow key on the right side of the
display to see the delayed start time
settings.
4. Touch Start. The oven starts to preheat.
5. If the cook time is set, the remaining time
appears in the display. If a delayed start
time is set, the start time appears in the
display.
6. A chime sounds once preheating is
complete.
7. A chime sounds at the end of the set cook
time and a notification appears in the
display. Open the oven door and remove
the food.
NOTE: If no cook time is set, the oven turns
off automatically after 12 hours.
Changing the Cook Settings
1. Touch Edit in the display to bring up the
Cook Settings screen.
2. Adjust the settings using the number pad
or scroll function.
3. Touch Start.
To Stop Cooking
Touch Stop in the display, and select Yes.
NOTE
• It is normal for the convection fan to
operate periodically throughout a normal
bake cycle in the oven. This is to ensure
even baking results.
Baking Tips
)RUEHVWUHVXOWVIRRGVKRXOGEHSODFHGRQ
a single rack with at least 1” to 1 1/2” of air
space between the pans and oven walls.
• Baking time and temperature will vary
depending on the characteristics, size, and
shape of the baking pan used.
• Check for food doneness at the minimum
recipe time.
8VHPHWDOEDNHZDUHZLWKRUZLWKRXWD
nonstick finish), heatproof glass-ceramic,
ceramic or other bakeware recommended
for oven use.
• Dark metal pans or nonstick coatings
will cook food faster with more browning.
Insulated bakeware will slightly lengthen
the cooking time for most foods.
• The oven bottom has a porcelain-enamel
finish. To make cleaning easier, protect
the oven bottom from excessive spillovers
by placing a cookie sheet on the rack
below the rack you are cooking on. This
is particularly important when baking a
fruit pie or other foods with a high acid
content. Hot fruit fillings or other foods that
are highly acidic may cause pitting and
damage to the porcelain-enamel surface
and should be wiped up immediately.
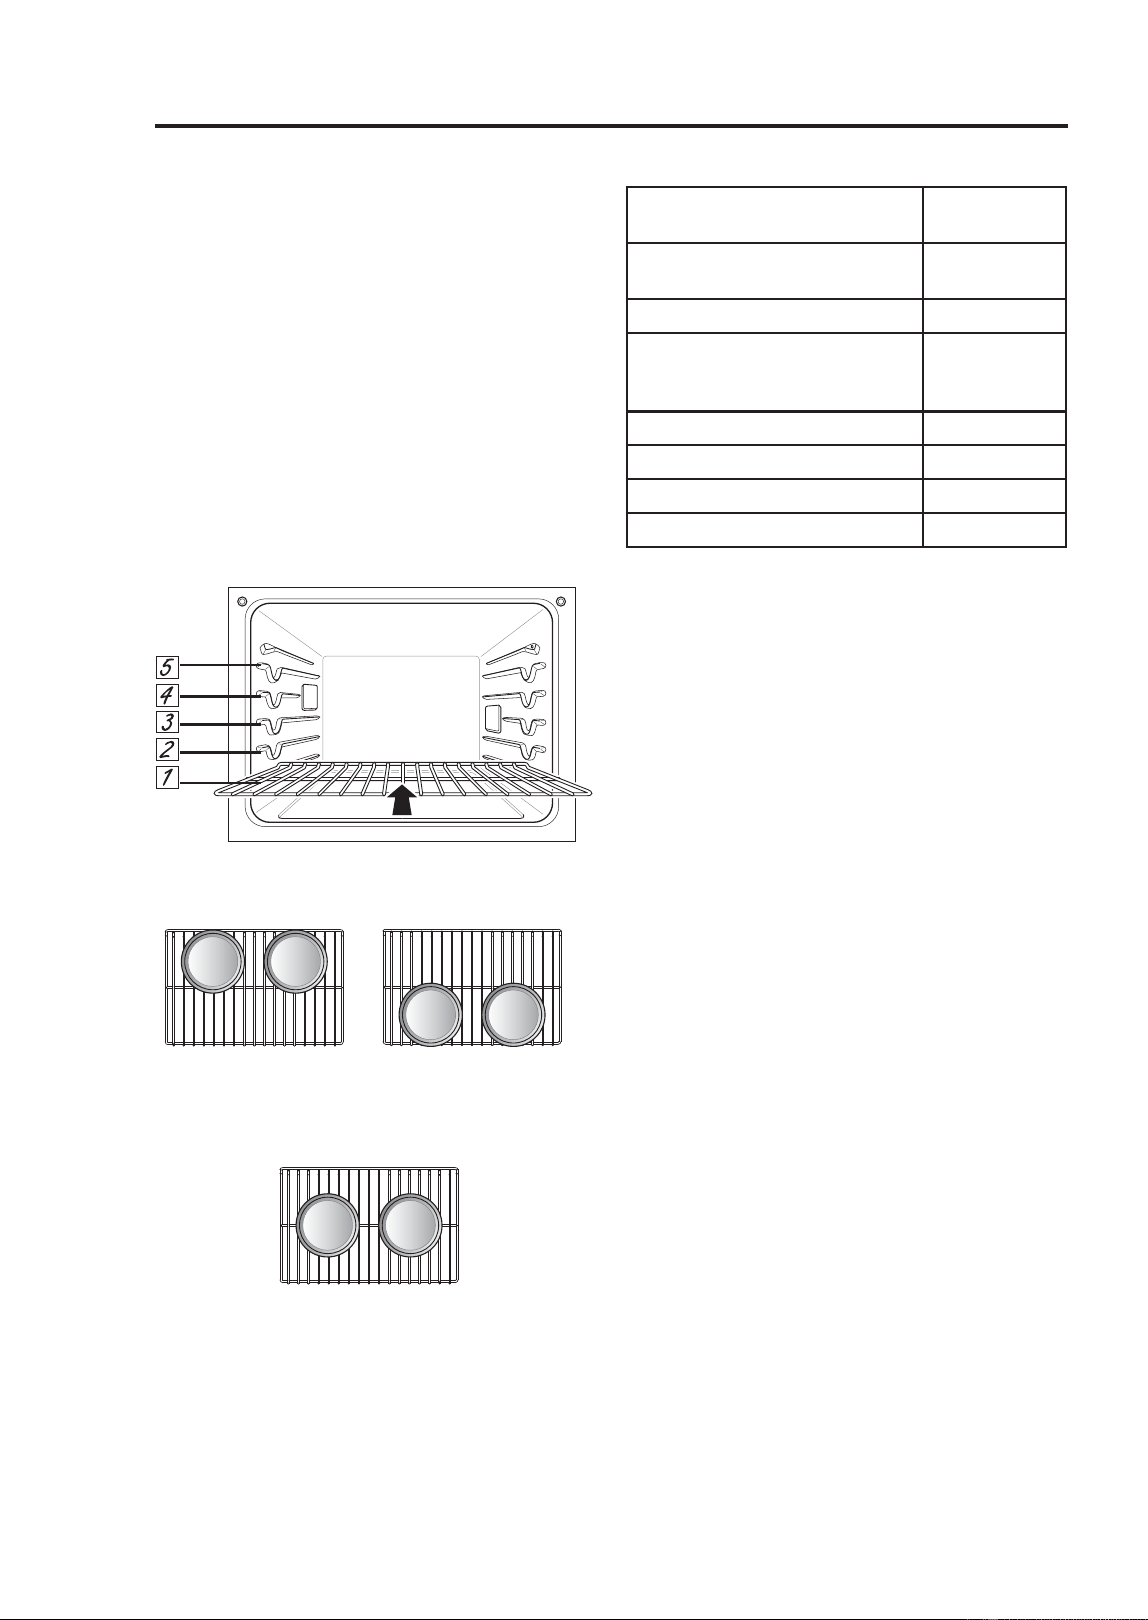
48
49-2001799 Rev. 1
Lower Oven
RECOMMENDED BAKING
GUIDE
Rack and Pan Placement
Baking results will be better if baking pans
are centered in the oven as much as
possible. If cooking on multiple racks, place
the oven racks in the positions shown.
Multiple-rack cooking saves time and
energy. Whenever possible, cook foods
requiring the same cooking temperature
together in one oven.
If baking with more than one pan, place the
pans so that each one has at least 1” to 1
ò´RIDLUVSDFHDURXQGWKHP
Multiple Rack
Single Rack
Single Rack Baking Rack Guide
NOTE: When baking cakes and cookies on
multiple racks, use the Convection Bake
mode and place racks in positions 2 and 4.
Cook food thoroughly to help protect against
foodborne illness. Minimum safe food
temperature recommendations for food
safety can be found at food.safety.gov.
Make sure to use a food thermometer to
take food temperatures.
BROIL MODE
Setting the Oven to Broil
Broiling uses an intense, radiant heat to
cook food. Both the inner and outer broil
elements heat during full broiling. Only the
inner broil element heats during center
EURLOLQJ7KHHOHPHQWVF\FOHRQDQGRIIDW
intervals to maintain the oven temperature.
The meat probe cannot be used with this
mode.
.HHSWKHRYHQGRRUFORVHGZKLOHEURLOLQJ
Let the oven preheat for approximately 5
minutes before cooking food.
Extension Rack
Position 2
Extension Rack
Position 4
Type of Food Rack
Position
Angel food cake, frozen
pies
3
Bundt or pound cakes 2
Biscuits, muffins, brownies,
cookies, cupcakes, layer
cakes, pies
3
Casseroles 2
Turkey, roasts, or ham 1
)UR]HQSL]]D 3
Roast chicken 2
USING THE OVEN: Baking Guide / Broil

49-2001799 Rev. 1
49
USING THE OVEN: Broil
Lower Oven
BROIL MODE (Cont.)
NOTE
• This appliance is designed for closed-
door broiling. Close the door to set the
Broil function. If the door is open, the Broil
function cannot be set and DOOR OPEN
appears on the display. Close the door
and reset the Broil function. If the door is
opened during broiling, the broil burner
turns off after five seconds. The broiler
turns back on automatically once the door
is closed.
1. Place the food on the broiler pan grid.
2. Touch Broil in the cooking mode screen.
3. Scroll to set the desired temperature:
Low, Medium, or High. If desired, scroll
to set a cook time.
4. If desired, set the cook time and delayed
start time using the same method. Touch
the arrow key on the right side of the
display to see the delayed start time
settings.
5. Touch Start. The oven door must be
closed to use the Broil function.
6. Let the oven preheat for approximately 5
minutes before cooking the food.
7. If the cook time is set, the remaining time
appears in the display. If a delayed start
time is set, the start time appears in the
display.
8. Touch Stop to cancel at any time or when
cooking is complete.
NOTE
• If the cook time is not set, the oven
automatically turns off after 3 hours.
7KHKHDWLQJHOHPHQWVWXUQRIIDIWHU
seconds when the door is opened. They
turn on again immediately when the door is
closed.
• Touch Stop in the display to cancel Broil at
any time.
Changing the Broil Settings
1. Touch Edit in the display to bring up the
Cook Settings screen.
2. Adjust the settings.
3. Touch Start.
To Stop Broiling
Touch Stop in the display, and select Yes.
Tips for Reducing Smoke
Due to the intense heat associated with
broiling, it is normal to experience smoke
during the cooking process. This smoke is a
natural by-product of searing and should not
cause you to worry. If you are experiencing
more smoke than you are comfortable with,
use the following tips to reduce the amount
of smoke in your oven.
• Always use a broiler pan. Do not use saute
pans or regular baking sheets for safety
reasons.
• The broiler pan should always be
thoroughly cleaned and at room
temperature at the beginning of cooking.
.HHSWKHLQWHULRURI\RXURYHQDVFOHDQDV
possible. Leftover debris from prior meals
can burn or catch fire.
• Avoid fatty marinades and sugary glazes.
Both of these will increase the amount of
smoke you experience. If you would like
to use a glaze, apply it at the very end of
cooking.
• If you are experiencing significant smoke
with any food item, consider:
- Switching the broiler to the LO setting.
- Lowering the rack position to cook the food
farther away from the broiler.
- Using the HI broil setting to achieve the
level of searing you desire, and then
either switching to the LO broil setting, or
switching to the Bake function.
• As a rule, fattier cuts of meat and fish will
produce more smoke than leaner items.
• Adhere to the guidelines in the
Recommended Broiling Guide section
whenever possible.
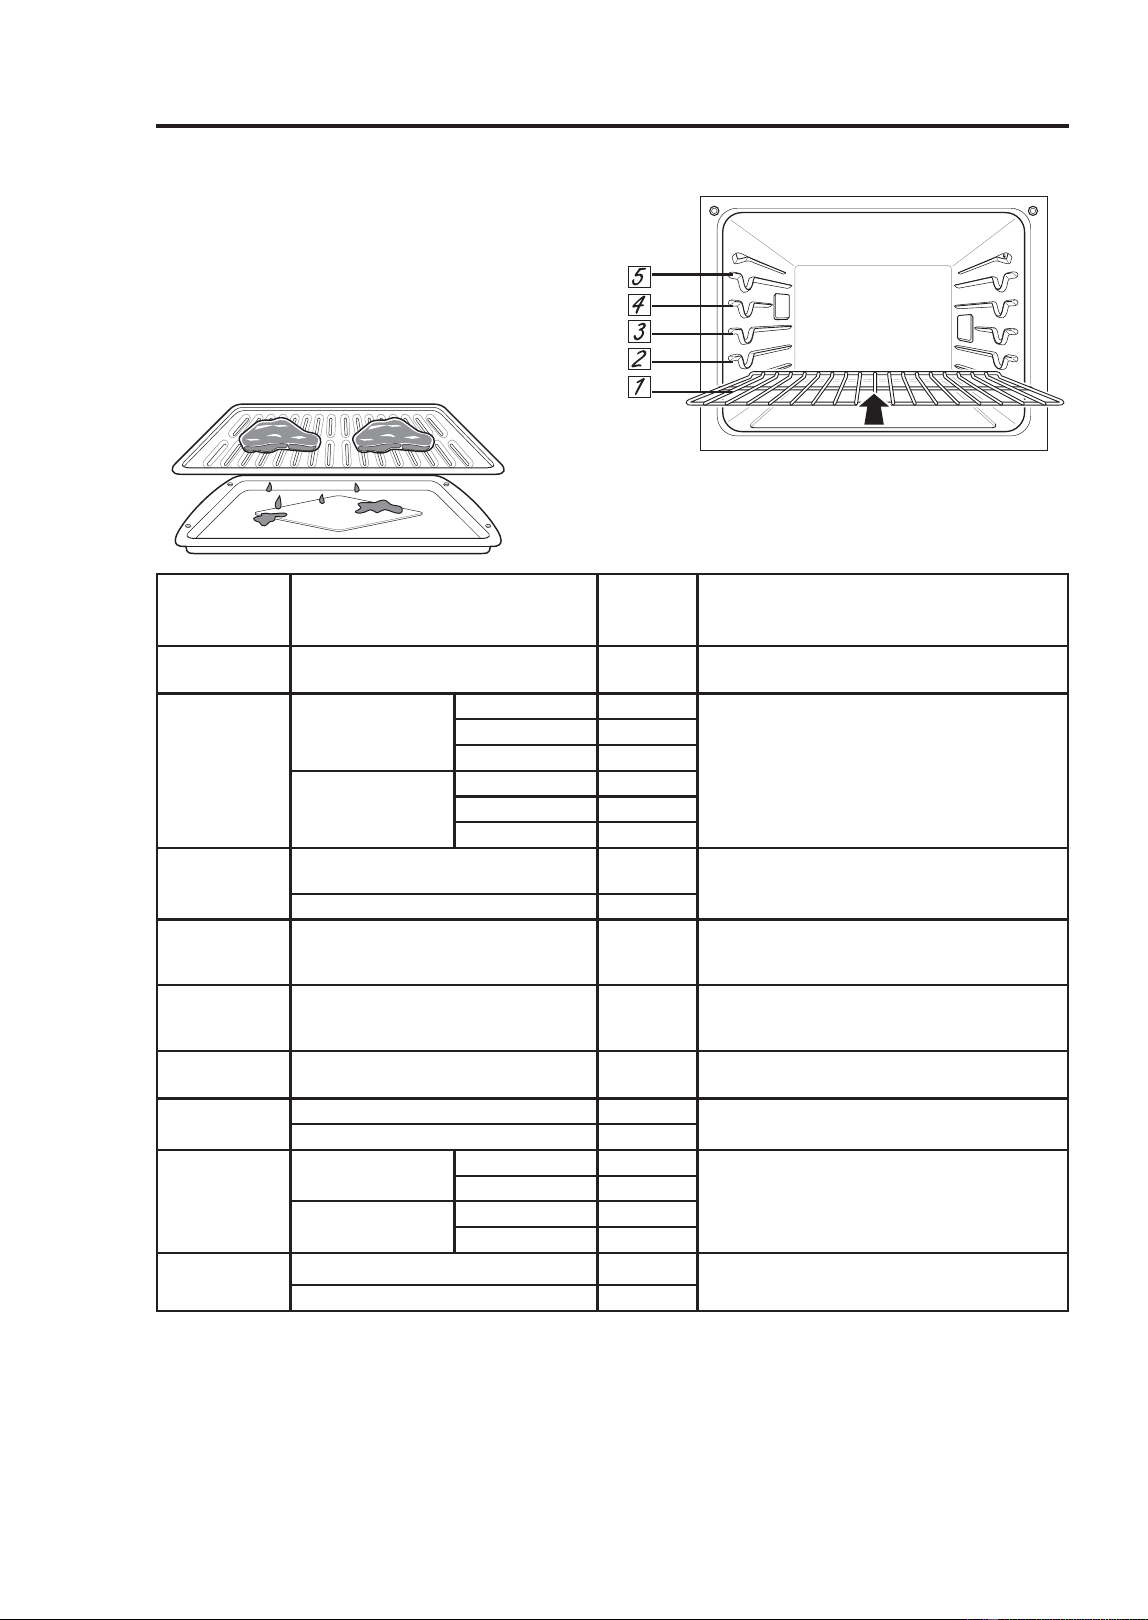
50
49-2001799 Rev. 1
Lower Oven
BROIL MODE (Cont.)
Recommended Broiling Guide
The size, weight, thickness, starting
temperature, and your preference of
doneness will affect broiling times. This
guide is based on meats at refrigerator
WHPSHUDWXUH)RUEHVWUHVXOWVZKHQEURLOLQJ
use a pan designed for broiling.
Grid
Broiler Pan
NOTE
• The USDA advises that consuming raw or
undercooked fish, meat, or poultry can increase
your risk of food-borne illness.
• The USDA has indicated the following as safe
minimum internal temperatures for consumption:
*URXQGEHHI)&
3RXOWU\)&
%HHIYHDOSRUNRUODPE)&
)LVK6HDIRRG)&
Food Quantity and/or Thickness
Rack
Position
Comments
Ground
Beef
OESDWWLHV
to 3/4" thick
5 Space evenly. Up to 9 patties may be broiled
at once.
Beef Steaks
1" thick
1 to 1-1/2 lbs.
Rare 4 Steaks less than 1" thick cook
through before browning. Pan frying is
recommended. Slash fat.
Medium 4
Well done 4
1-1/2" thick
2 to 2-1/2 lbs
Rare 4
Medium 4
Well done 4
Chicken
1 whole, 2 to 2-1/2 lbs., split
lengthwise
3 Broil skin-side-down first.
2 Breasts 3
Lobster
Tails
2–4
10 to 12 oz each
3 Cut through back of shell. Spread open.
Brush with melted butter before broiling and
after half of broiling time.
Fish Fillets
1/4 to 1/2" thick 4 or 5 Handle and turn very carefully. Brush with
lemon butter before and during cooking, if
desired.
Ham Slices
(precooked)
1/2" thick 4 Increase time 5 to 10 minutes per side for
1-1/2" thick or home-cured ham.
Pork Chops
Well done
WKLFN 4 or 5 Slash fat.
WKLFNDERXWOE 4 or 5
Lamb
Chops
WKLFN
about 10 to 12 oz
Medium 4 Slash fat.
Well done 4
WKLFN
about 1lb
Medium 4
Well done 4
Salmon
Steaks
WKLFN 4 or 5 Grease pan. Brush steaks with melted butter.
WKLFNDERXWOE 4 or 5
This guide is only for reference. Adjust rack position according to your preference.
USING THE OVEN: Broil

49-2001799 Rev. 1
51
USING THE OVEN: Broil / Warm / Proof
BROIL MODE (Cont.)
Tips for Broiling
Beef
• Steaks and chops should always be
allowed to rest for five minutes before
being cut into and eaten. This allows the
heat to distribute evenly through the food
and creates a more tender and juicy result.
• Pieces of meat that are thicker than
two inches should be removed from the
refrigerator 30 minutes prior to cooking.
This will help them cook more quickly and
evenly, and will produce less smoke when
broiling.
)RUERQHLQVWHDNVRUFKRSVWKDWKDYH
EHHQIUHQFKHGDOOPHDWUHPRYHGIURP
around the bone), wrap the exposed
sections of bone in foil to reduce burning.
Seafood
• When broiling skin-on fish, always use the
Lo broil setting and always broil the skin
side last.
• Seafood is best consumed immediately
after cooking. Allowing seafood to rest after
cooking can cause the food to dry out.
• It is a good idea to rub a thin coating of oil
on the surface of the broiling pan before
cooking to reduce sticking, especially with
fish and seafood. You can also use a light
coating of non-stick pan spray.
Vegetables
Toss your vegetables lightly in oil before
cooking to improve browning.
WARM MODE
This function will maintain an oven
WHPSHUDWXUHRIOHVVWKDQ)&,W
will keep cooked food warm for serving up
to 3 hours after cooking has finished.
Setting the Warm Mode
1. Touch Warm in the cooking mode screen.
2. Scroll to set the desired temperature:
Low, Medium, or High. If desired, scroll to
set a run time.
+LJK)&
0HGLXP)&
/RZ)&
3. If desired, set the warming time and
delayed start time using the same
method. Touch the arrow key on the right
side of the display to see the delayed
start time settings.
4.. Touch Start. If the run time was set, the
remaining time appears in the display.
Changing the Warm Settings
1. Touch Edit in the display to bring up the
Cook Settings screen.
2. Adjust the settings as desired.
3. Touch Start.
Cancelling the Warm Function
Touch Stop in the display, and select Yes.
NOTE
• The Warm function is intended to keep
food warm. Do not use it to cool food down
or to heat cold food.
• If the cook time is not set, the oven
automatically turns off after 3 hours.
PROOF MODE
This feature maintains a warm oven for
rising yeast-leavened products before
baking.
Setting the Proof Mode
1. Touch Proof in the cooking mode screen.
2. Read the instruction and touch the arrow
key on the right side of the display.
3. Scroll through the numbers to set a
proofing time or touch the number pad
icon to enter the numbers directly.
4. If desired, set the cook time and delayed
start time using the same method.
5. Touch Start. The remaining proofing time
appears in the display.
NOTE: If the proofing time is not set, the
oven automatically turns off after 12 hours.
Canceling the Proof Function
Touch Stop in the display, and select Yes.
NOTE:
• To avoid lowering the oven temperature
and lengthening proofing time, do not open
the oven door unnecessarily. Check bread
products early to avoid over proofing.
Lower Oven
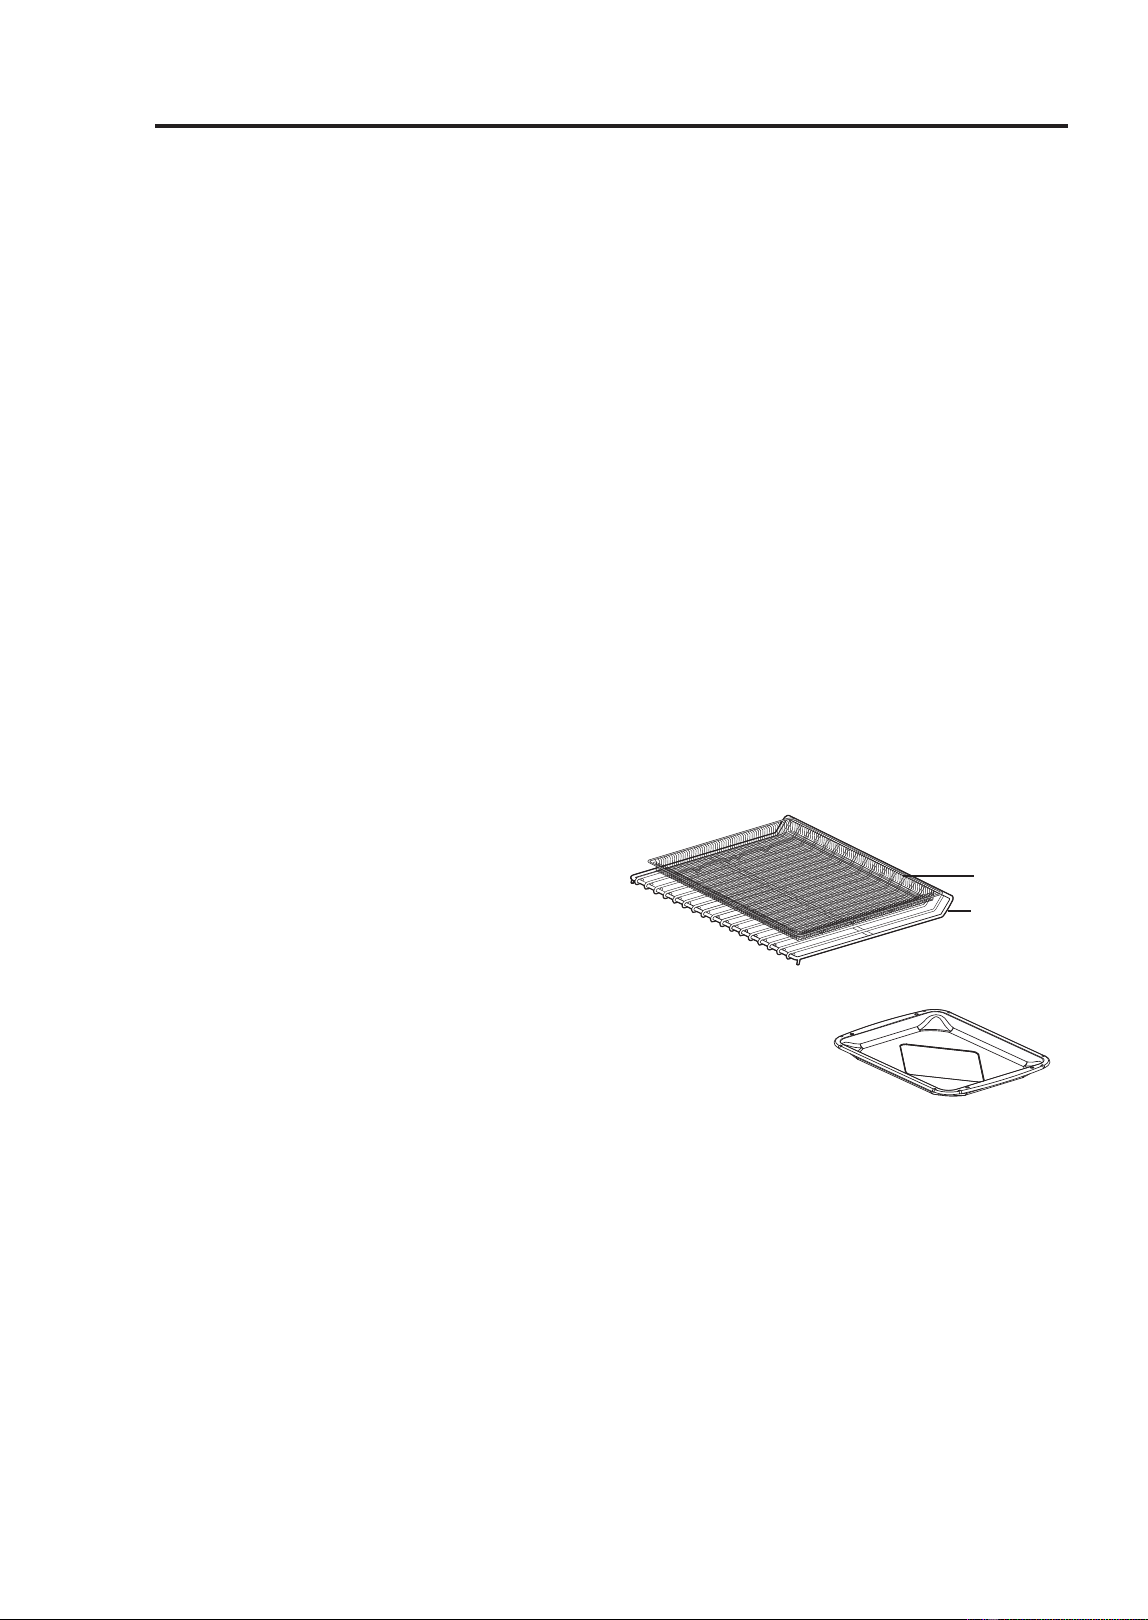
52
49-2001799 Rev. 1
PROOF MODE (Cont.)
• Do not use the Proofing mode for warming
food or keeping food hot. The proofing
oven temperature is not hot enough to
keep foods at safe temperatures. Use the
Warm feature to keep food warm. Proofing
does not operate when the oven is above
)OVEN IS HOT shows in the display.
• It is normal for the fan to operate during
the Proof function.
• The proof feature automatically provides
the optimum temperature for the proofing
process, and therefore does not have a
temperature adjustment.
)RUEHVWUHVXOWVFRYHUWKHGRXJKZLWK
DFORWKRUZLWKSODVWLFZUDS7KHSODVWLF
may need to be anchored underneath the
container so the oven fan does not blow it
off.)
AIR FRY
This feature automatically increases the
HQWHUHGWHPSHUDWXUHE\)IRURSWLPDO
SHUIRUPDQFHZKHQXVLQJ$LU)U\
7KH$LU)U\PRGHFDQEHSURJUDPPHGWR
FRRNDWDQ\WHPSHUDWXUHIURP)&
WR)&7KHGHIDXOWWHPSHUDWXUHLV
)&
7KH$LU)U\IXQFWLRQLVVSHFLDOO\GHVLJQHGIRU
oil free frying.
Setting the Air Fry Mode
1. Touch Air Fry in the cooking mode
screen.
2. Set the oven temperature. Scroll through
the numbers on the display or touch the
number pad icon to enter the numbers
directly.
3. If desired, set the cook time and delayed
start time using the same method. Touch
the arrow key on the right side of the
display to see the delayed start time
settings.
4. Touch Start.
5. If the cook time is set, the remaining time
appears in the display. If a delayed start
time is set, the start time appears in the
display.
Changing the Cook Settings
1. Touch Edit in the display to bring up the
Cook Settings screen.
2. Adjust the settings using the number pad
or scroll function.
3 Touch Start.
To Stop Cooking
Touch Stop in the display, and select Yes.
NOTE:
• No preheating is required when using the
$LU)U\PRGH
• If cooking multiple batches, the later
batches may take less time to cook.
• Wet batters and coatings will not crisp or
VHWZKHQXVLQJWKH$LU)U\PRGH
Tips for Air Fry
)RUEHVWUHVXOWVXVHWKHSURYLGHGDLUIU\
tray.
The mesh section of the air fry tray can be
cleaned in a dishwasher.
• If you don’t have
the air fry tray,
place food on a
wire rack inside
a foil-lined broiler
pan.
)RUEHVWUHVXOWVFRRNIRRGRQDVLQJOH
rack placed in positions suggested in the
chart in this manual.
• Spread the food out evenly in a single
layer.
• Use either the optional air fry tray available
from GE Appliances or a dark baking tray
with no sides or short sides that does not
cover the entire rack. This allows for better
air circulation.
Lower Oven
$LU)U\
Tray
Heavy
Duty
Standard
Rack
Broiler Pan
USING THE OVEN:3URRI$LU)U\

49-2001799 Rev. 1
53
USING THE OVEN:$LU)U\
Lower Oven
AIR FRY(cont.)
• If desired, spray the baking tray or air fry
tray with a pan spray. Use an oil that can
be heated to a high temperature before
smoking, such as avocado, grapeseed,
peanut or sunflower oil.
• Place a foil-lined baking tray on a rack in
position 2 to catch the oil falling from the
IRRG)RUKLJKIDWIRRGVOLNHFKLFNHQZLQJV
add a few sheets of parchment paper to
absorb the fat.
• Check food often and shake it or turn it
over for crisper results.
• Prepared frozen foods may cook faster
ZLWKWKH$LU)U\PRGHWKDQVWDWHGRQWKH
package. Reduce the cooking time by
about 20 percent, check food early, and
adjust cooking time as needed.
• Use a food thermometer to make sure
food has reached a safe temperature for
consumption. Eating undercooked meats
can increase your risk of food-borne
illness.
)RUWKHFULVSLHVWUHVXOWVGUHGJHIUHVK
chicken wings or tenders in seasoned flour.
Use 1/3 cup flour for 2 pounds of chicken.
Recommendations When Air Frying
High-Fat Foods
)RRGVKLJKLQIDWZLOOVPRNHZKHQXVLQJWKH
$LU)U\PRGH)RUEHVWUHVXOWVIROORZWKHVH
recommendations when air frying foods
that are high in fat, such as chicken wings,
bacon, sausage, hot dogs, turkey legs, lamb
chops, ribs, pork loin, duck breasts, or some
plant-based proteins.
• Turn on your exhaust hood at a high fan
VHWWLQJEHIRUH\RXVWDUW$LU)U\DQGOHDYHLW
on for 15 minutes after you’re done.
• Open a window or sliding glass door, if
possible, to make sure the kitchen is well-
ventilated.
• Clean the grease filters on your exhaust
hood regularly.
.HHSWKHRYHQIUHHIURPJUHDVHEXLOGXS
Wipe down the interior of the oven before
DQGDIWHUDLUIU\LQJRQFHWKHRYHQKDV
cooled).
5XQRYHQFOHDQLQJF\FOHV(DV\&OHDQRU
SelfClean) regularly, depending on how
RIWHQDQGZKDWW\SHVRIIRRG\RX$LU)U\
• Avoid opening the oven door more than
necessary to help maintain the oven
temperature, prevent heat loss, and save
energy.
• Air-frying fresh chicken pieces such as
wings or drumsticks with the skin left on
can produce smoke as the fat renders
at high temperatures. If the smoke is
excessive, use the Convection Roast mode
LQVWHDGRI$LU)U\
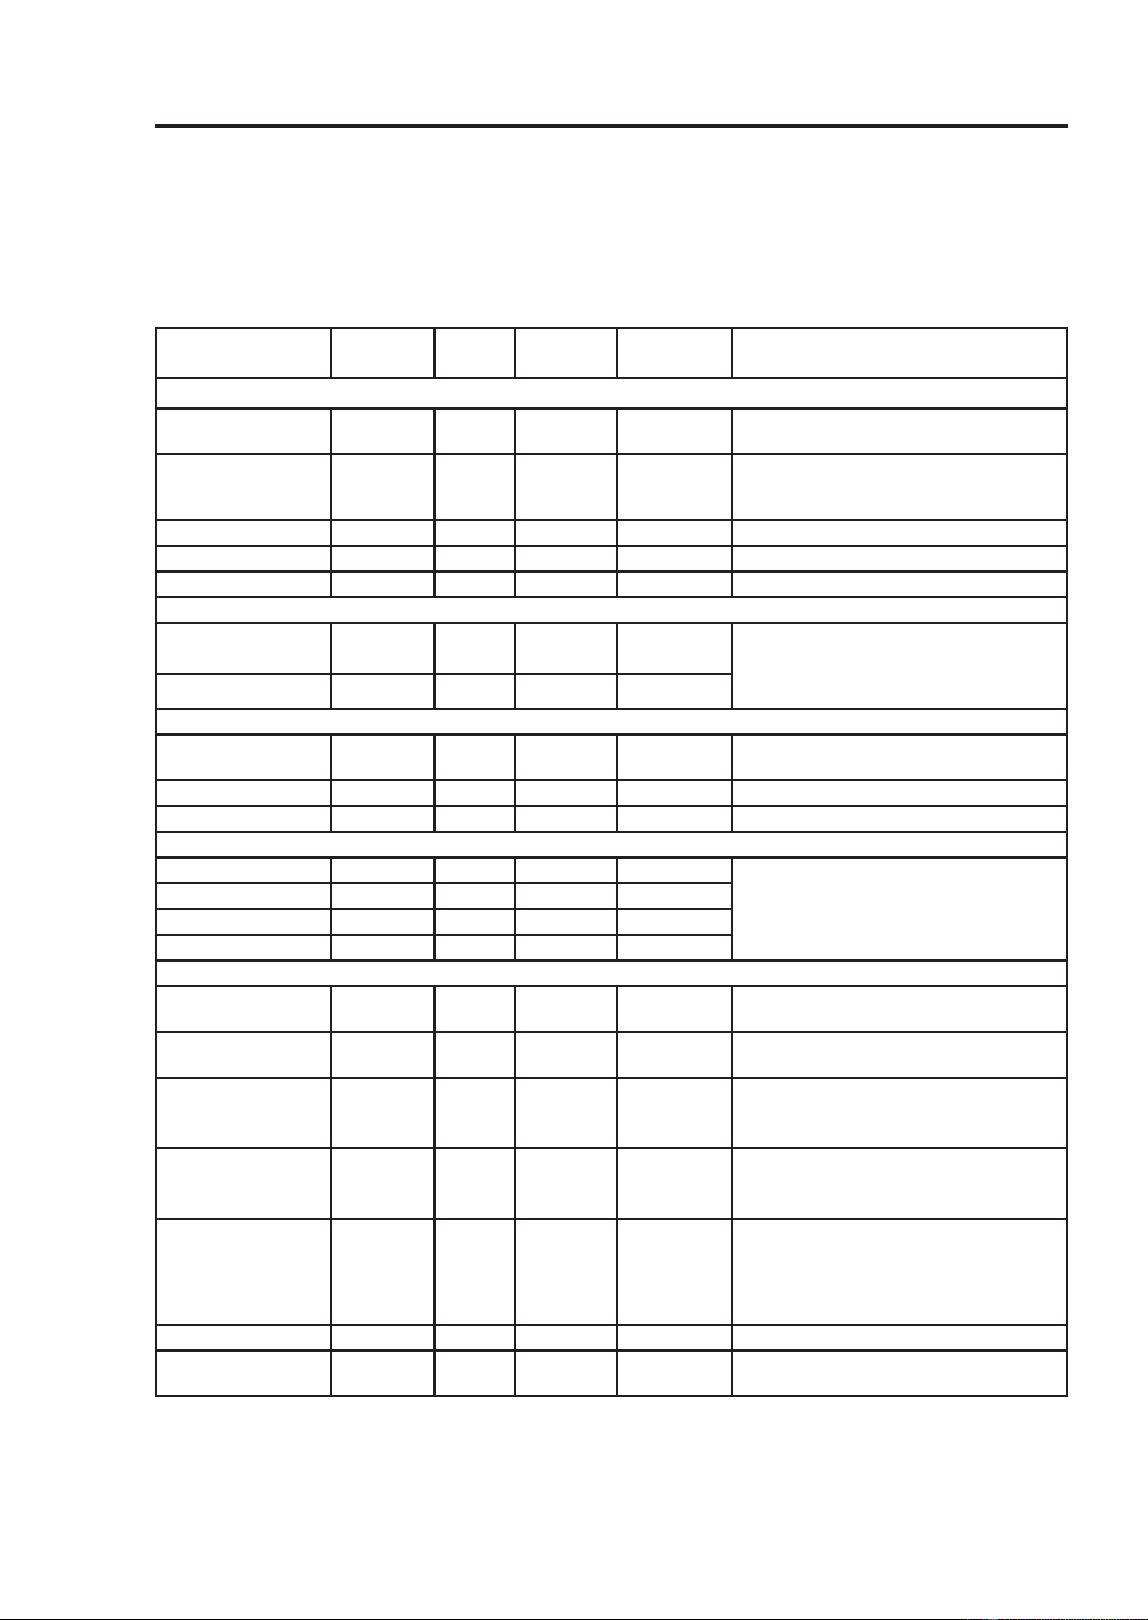
54
49-2001799 Rev. 1
Lower Oven
AIR FRY(cont.)
Recommended Air Frying Guide
• Arrange food evenly in a single layer.
• Put a foil-lined baking pan on a rack in position 2 to catch drips. If needed, add parchment
paper to absorb oil and reduce smoking.
)OLSIRRGRYHUGXULQJFRRNLQJWRDYRLGEXUQLQJLW
Recommended
Items
Quantity
(oz)
Temp.
(°F)
Rack
Position
Time
(minutes)
Guide
POTATOES-Frozen
)UHQFK)ULHV
6KRHVWULQJ
20 425 3 15-25
)UHQFK)ULHV
&ULQNOHFXW[
mm)
35 400 3 18-28
6ZHHW3RWDWR)ULHV 25 400 3 15-25
Tater Tots 50 425 3 18-28
Hash Browns 40 425 3 18-28
POTATOES-Fresh/Homemade
)UHQFK)ULHV[
mm)
25 425 3 20-30 Cut the potatoes and soak for 30 minutes
in hot tap water. Drain and pat dry. Brush
or lightly spray with 3 tbsp. of oil. Add salt
and pepper to taste.
Potato Wedges 60 425 3 30-40
CHICKEN-Frozen
Chicken Nuggets,
Crispy
30 400 3 15-25
Chicken Strips 35 400 3 25-35
Hot Wings, Bone-in 50 400 3 25-35
CHICKEN-Fresh, Skin on
Chicken Wings
†
40 450 3 25-35 Brush or lightly spray with 1 tbsp. of oil.
$GGVDOWDQG)UHVK&KLFNHQSHSSHUWR
taste.
Drumsticks
†
70 450 30-40
Thighs 40 450 3 25-35
Breasts 40 450 3 25-35
OTHER
)UR]HQ2QLRQ
Rings, Breaded
20 400 3 15-25
)UR]HQ6SULQJ5ROOV
R]HDFK
45 400 3 15-25
7KLQ6DXVDJH
oz each, diameter
0.8")
90 400 3 15-25
)UR]HQ&RFRQXW
Shrimp
25 400 3 15-25 Brush or lightly spray the surface of food
with oil.
)UHVK6FDOORSVRQ
WKHKDOIVKHOO
oz)
35 400 3 15-25 Melt 4 tbsp. of butter and brush on
scallops. Mix 1/2 cup bread crumbs,
1 tbsp. minced garlic, 1/4 cup grated
Parmesan cheese and season to taste.
Sprinkle mixture over scallops.
)UHVK6KULPS 50 400 3 15-25
Mixed Vegetables 35 425 3 13-23 Brush or lightly spray with 4 tbsp. of
olive oil. Add salt and pepper to taste.
†
+LJKIDWLWHPVPD\SURGXFHPRUHVPRNHZKHQFRRNHGXVLQJ$LU)U\)RUOHVVVPRNHFRRNXVLQJ
Convection Roast mode.
USING THE OVEN:$LU)U\

49-2001799 Rev. 1
55
USING THE OVEN: Probe
Lower Oven
PROBE MODE
WARNING
Consuming undercooked
food can result in foodborne illness. Use
probe according to the following instructions to
ensure all portions of hte food reach minimum
safe cooking temperatures. Recommendations
for minimum safe food temperatures can be
found at foodsafety.gov.
ADVERTENCIA
Consumir comidas sin
cocción completa podrá generar enfermedades
producidas a través de la comida. Use la sonda
de acuerdo con las siguientes instrucciones
para asegurar que todas las partes de la comida
DOFDQFHQODVWHPSHUDWXUDVPtQLPDVGHVHJXULGDG
en la cocción. Podrá acceder a recomendaciones
VREUHWHPSHUDWXUDVPtQLPDVGHVHJXULGDGHQOD
cocción en foodsafety.gov.
The probe accurately measures the
internal temperature of meat, poultry and
casseroles. Always unplug and remove the
probe from the oven before removing food.
Before using, insert the probe into the center
of the thickest part of meat or into the inner
thigh or breast of poultry, away from fat
RUERQH)RUEHVWSHUIRUPDQFHWKHSUREH
should be fully inserted into the food. Place
food in the oven and connect the meat
SUREHWRWKHMDFN.HHSWKHSUREHDVIDU
away from heat sources as possible.
• The probe cannot
be used in the Broil,
Sous Vide, Steam
Maintenance, Self
Clean, Easy Clean,
Warm or Proof modes.
)RUWKLQFXWVRIPHDWLQVHUWSUREH
in thickest side of meat.
Using the Meat Probe Feature
1. Insert the probe into the food.
2. Connect the probe to the jack in the oven.
“Probe is connected” pops up in the
display and the probe icon appears at the
top of the display.
3. Touch an appropriate cooking mode.
4. Set the oven temperature and the probe
temperature. Scroll through the numbers
on the display or touch the number pad
icon to enter the numbers directly.
7KHGHIDXOWSUREHWHPSHUDWXUHLV)
&EXWFDQEHFKDQJHGWRDQ\
WHPSHUDWXUHEHWZHHQ)&DQG
)&
5. If desired, set the delayed start time using
the same method. Touch the arrow key
on the right side of the display to see the
additional settings.
6. Touch Start. If a delayed start time has
been set, the start time appears in the
display.
7. When the set probe temperature is
reached, the oven shuts off automatically.
NOTE: Calculating a total cooking time
by weight is no longer necessary using
this feature. See the Recommended
Probe Temperature Chart to set the probe
temperature.
Changing the Probe Temperature
while Cooking
1. Touch Edit in the display to bring up the
Cook Settings screen.
2. Adjust the settings as desired.
3. Touch Start.
To Stop Cooking
Touch Stop in the display, and select Yes.
NOTE:
• Touch Stop in the display at any time to
cancel a cooking operation.
• To avoid breaking the probe, make sure
food is completely defrosted before
inserting.
• While the meat probe mode is running,

56
49-2001799 Rev. 1
Lower Oven
RECOMMENDED PROBE GUIDE
Recommended Probe Placement Temperature Chart
Category Examples of Food Probe
Placement
Desired Doneness
Ground Meat &
Meat Mixtures
Meatloaf
Insert in the
thickest part
)&
Meatballs )&
)UHVK%HHI
Veal, Lamb
Steaks, Roasts, Chops
Insert in the
thickest part,
away from bone,
fat and gristle
5DUH)&
0HGLXPUDUH)&
0HGLXP)&
0HGLXPZHOOGRQH)&
:HOOGRQH)&
Poultry Whole Chicken or Turkey
Insert in the
thickest part of
thigh, avoiding
bone
)&
Poultry Breasts or Roasts
Duck, Goose, Pheasant
6WXIILQJ$ORQHRULQ%LUG
Pork & Ham )UHVK3RUN
Insert in the
thickest part,
away from bone,
fat and gristle
:HOOGRQH)&
)UHVK+DP5DZ
3UHFRRNHG+DP5HKHDW
& Serve)
:HOOGRQH)&
Leftovers &
Casseroles
Leftovers Insert in the
thickest part of
the dish
)&
Casseroles
Seafood :KROH)LVK
Insert in the
thickest part of
the fish
)&)LVK)LOOHW6LGHRI)LVK
)LVK6WHDNVRU3RUWLRQV
USING THE OVEN: Probe

49-2001799 Rev. 1
57
USING THE OVEN:)DYRULWH0RGH
Lower Oven
FAVORITE MODE
)RUIUHTXHQWO\XVHGFRRNLQJPHQXV\RXFDQ
combine up to three different temperatures
and cooking modes into one hot key.
Creating a Favorite
• When combining two or more cooking
modes, a cooking time or probe
temperature must be set before selecting
an additional cooking mode.
• The Probe function cannot be used with
the Broil, Sous Vide, Steam Maintenance,
Self-clean, Easy Clean, Warm, or Proof
modes.
1. Touch Favorite in the Cooking Modes
screen.
2. Touch Create to make a new hot key.
3. Select a cook mode listed in the display
and set the desired cook temperature.
4. Touch Set Cook Time or Set Probe.
5. If there are no additional cooking stages,
touch Done. To add another cooking
stage, set a cooking time or probe
temperature for the previous stage. Then
touch Add Cook Stage.
6. Repeat steps 3-5 until all desired cooking
stages have been entered. Then touch
Done.
7. Enter a name for your recipe using the
keyboard and touch Save.
7KHUHFLSHQDPHLVDGGHGWRWKH)DYRULWH
menu.
NOTE:
• If the probe was inserted in the oven jack
to add a probe temperature, remember to
remove it.
• Proofing doesn’t operate when the oven is
DERYH)&
• If using Proof after cooking, wait for the
oven to cool first.
• The Proof mode can only be set as a
single stage, not as part of multi-stage
cooking.
Editing a Favorite
• The Edit function cannot add or remove
cooking stages to a recipe. Only the oven
temperature, probe temperature and cook
time can be changed.
1. Touch Favorite in the Cooking Modes
screen.
2. Select the recipe to edit then touch the
pencil icon at the bottom left of the
screen.
3. Edit the settings for the first cooking stage
and touch Done to proceed to the next
cooking stage, if any.
4. Edit the next cooking stage, touch Done,
and proceed through all cooking stages in
the same way.
5. Once the last cooking stage has been
edited, enter a new name for the recipe
or keep the previous name. Then touch
Save.
Deleting Favorite
1. Touch Favorite in the Cooking Modes
screen.
2. Select the recipe and touch the trash can
icon at the bottom left of the screen.
3. Touch Yes.

58
49-2001799 Rev. 1
Lower Oven
PRECISION COOK MODE
The Precision Cook function provides
guidance for cooking foods or dishes
that may be unfamiliar. It contains preset
programs for cooking many popular food
items, with information on recommended
preheating, accessories, and rack position
for optimal results.
NOTE: This function provides pre-
programmed timing and power levels for
3UREHUHFLSHVRQO\)RUQRQSUREHUHFLSHV
oven must be turned off manually when
finished cooking.
Setting Precision Cook Mode
1. Touch Precision Cook in the Cooking
Modes screen.
2. Touch a category to filter the options.
3. Scroll through or tap the letters to find
and select an item.
)ROORZWKHUHFRPPHQGDWLRQVLQWKH
display regarding accessories and rack
position.
5. Touch Start.
PRECISION COOK GUIDE
If using probe, insert after preheating.
NOTE: When cooking thin cuts of meat, insert the probe into the thickest part of the meat. If
the probe is inserted incorrectly, the oven could turn off too soon. See the Probe section for
instructions.
Menu Accessories/Cookware
Shelf
Position
Cooking time
in min.
(side 1 + side 2)
Beef
Beef
Tenderloin
Rare
Grid on broiler pan
230~60
Medium rare 2 35~65
Medium 2 40~70
Medium well done 2 45~75
Well done 2 50~80
Pot Roast Ovenproof pot with cover 2 50~80
Roast Beef
Rare
Grid on broiler pan
2 40~70
Medium rare 2 45~75
Medium 2 50~80
Medium well done 2 55~85
Well done 2 60~90
London Broil
Rare 5 3~10 + 3~10
Medium rare 5 5~15 + 3~10
Medium 5 5~15 + 5~10
Medium well done 5 ~15 + 5~10
Well done 5 10~15 + 8~15
Steak
Rare 5 3~10 + 3~10
Medium rare 5 5~15 + 3~10
Medium 5 5~15 + 5~10
Medium 5 8~15 + 5~10
Well done 5 10~15 + 8~15
Beef
Beef Marinade Grid on broiler pan 3 20~50
Meat Loaf Loaf pan 2 40~60
Pork
Pork Butt Casserole dish 2 60~90
Pork Chops
Grid on broiler pan
430~50
Pork Loin 2 50~80
Pork Tenderloin
2 20~40
Veal
Veal Top Sirloin
Grid on broiler pan
2 80~100
Veal Chops
5 4~15 + 3~10
Veal Rolled Roast
2 50~70
Veal Rib Roast
2 50~80
Veal Tenderloin
2 50~80
USING THE OVEN: Precision Cook
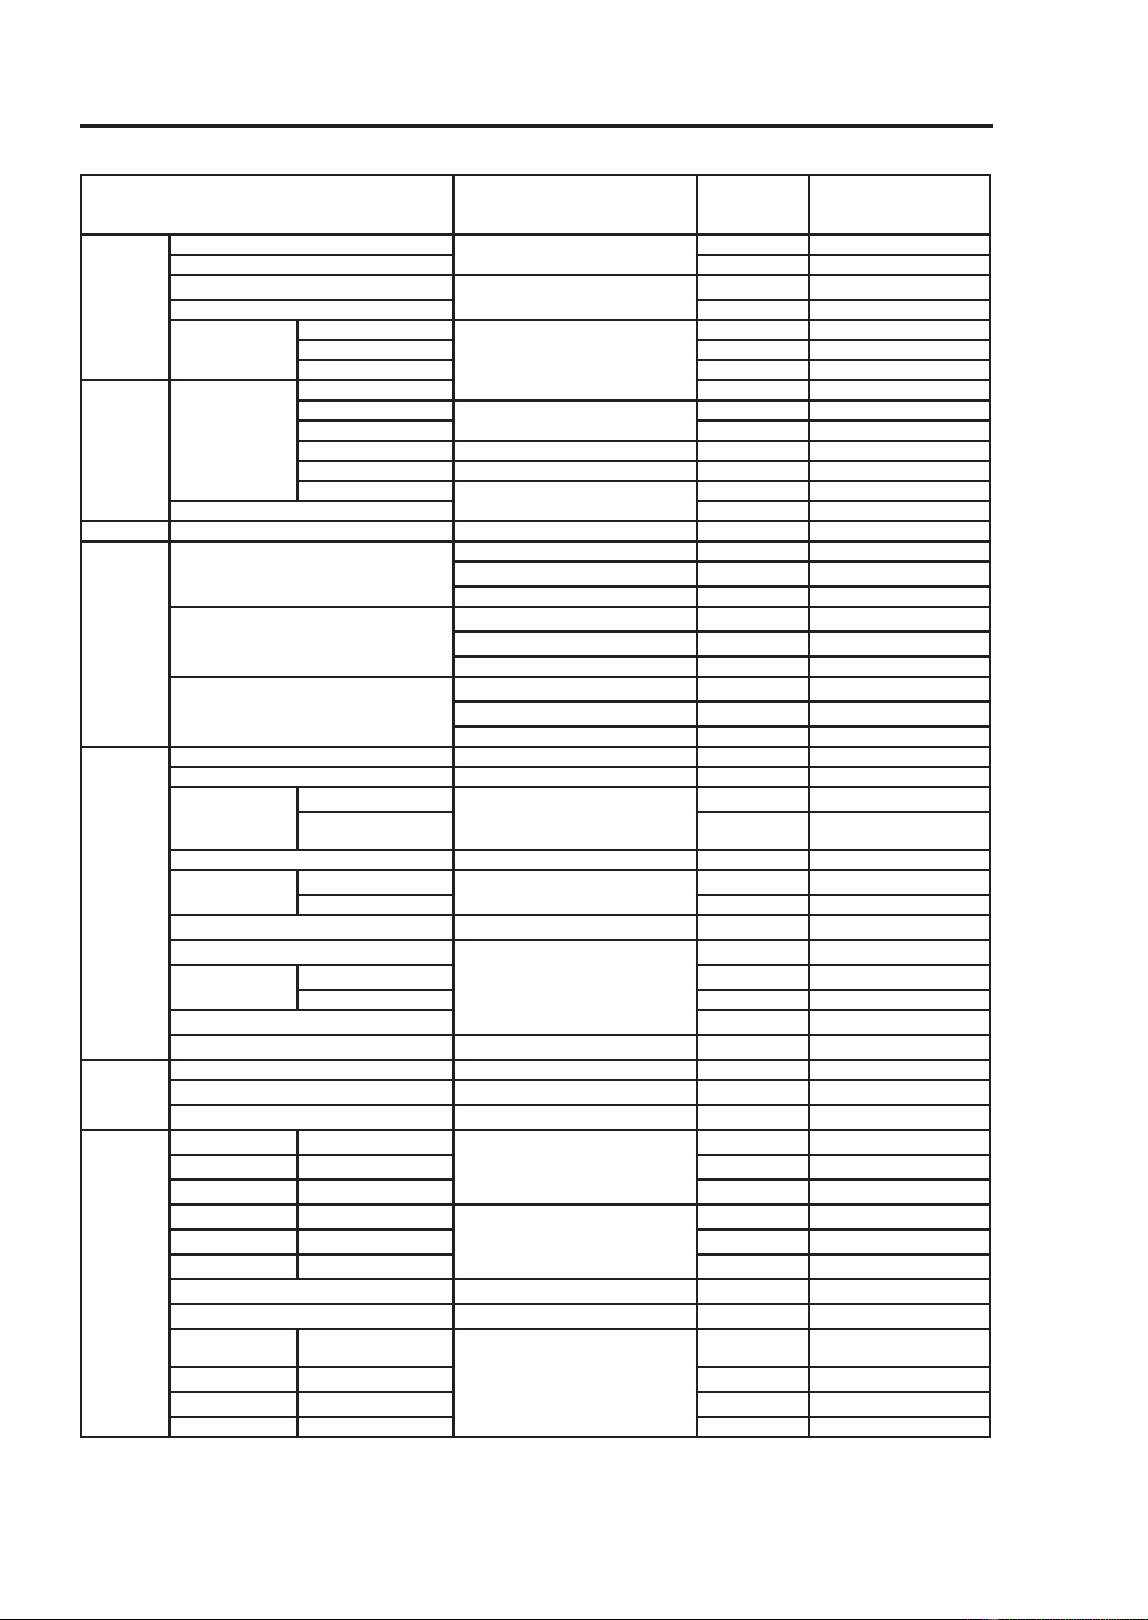
49-2001799 Rev. 1
59
USING THE OVEN: Precision Cook
Lower Oven
PRECISION COOK GUIDE (Cont.)
Menu Accessories/Cookware
Shelf
Position
Cooking time
in min.
(side 1 + side 2)
)LVK
)LVK)LOOHW
Baking dish
4 10~15
Whole 4 15~30
Shrimp
Grid on broiler pan
5 5~15
Lobster Tails 4 20~30
Salmon Steak
Rare
Baking dish
4 5~20
Medium rare 4 20~25
Well done 4 15~30
Poultry
Chicken
Legs & Thighs 4 20~40
:LQJV)UHVK
Grid on broiler pan
5 8~20
:LQJV)UR]HQ 4 20~40
Breasts Baking dish 4D 20~40
Cutlet Casserole dish 4 20~30
Whole
Grid on broiler pan
2 60~80
Whole Turkey 2 150~240
Casserole /DVDJQD)UHVK Baking dish 3 50~70
Pizza
)UR]HQ7KLQ&UXVW
Directly on rack 3 10~20
On pizza pan
3 10~20
On pizza stone 3 10~20
)UR]HQ5LVLQJ&UXVW
Directly on rack
3 10~20
On pizza pan
3 10~20
On pizza stone 3 10~20
)URP6FUDWFK+RPHPDGH
Directly on rack
3 10~20
On pizza pan
3 10~20
On pizza stone 3 10~20
Desserts
Brownies Baking dist 3 30~40
Cheesecake Cake pan 3 60~70
)UXLW3LH
Whole Pie
Pie pan
3 25~45
Par Bake Bottom
Crust Only
3 20~40
)UXLW7DUW Tart pan 3 20~40
Cakes
Layer Cake
Cake pan
3 25~45
$QJHO)RRG&DNH 3 30~40
Muffins/Cupcakes Muffin pan
3 20~30
Puff Pastry
Baking Sheet
3 20~40
Cookies
Single Tray
3 15~20
Multiple Trays 2 + 4 20~28
Biscuits/Scones
3 10~20
Soufflé Soufflé dish
2 60~80
Misc.
Proof Oven bowl with cover 3 30~40
Drying/Dehydrating Baking sheet
3 120~480
Slow Roasting Grid on broiler pan
2 120~240
Bread
6WHDP
White Bread Homemade
Loaf pan
3 20~50
)UR]HQ
3 20~50
Par Baked
3 20~50
Baguette Homemade
Perforated baguette pan
3 15~35
)UR]HQ
3 15~35
Par Baked
3 15~35
Cinnamon Raisin Bread Loaf pan
3 20~40
Walnut Bread Loaf pan or perforated tray
3 40~50
Whole Grain
Bread
Homemade
Loaf pan
3 25~45
)UR]HQ
3 25~45
Par Baked
3 25~45
Banana Bread Homemade 3 25~50
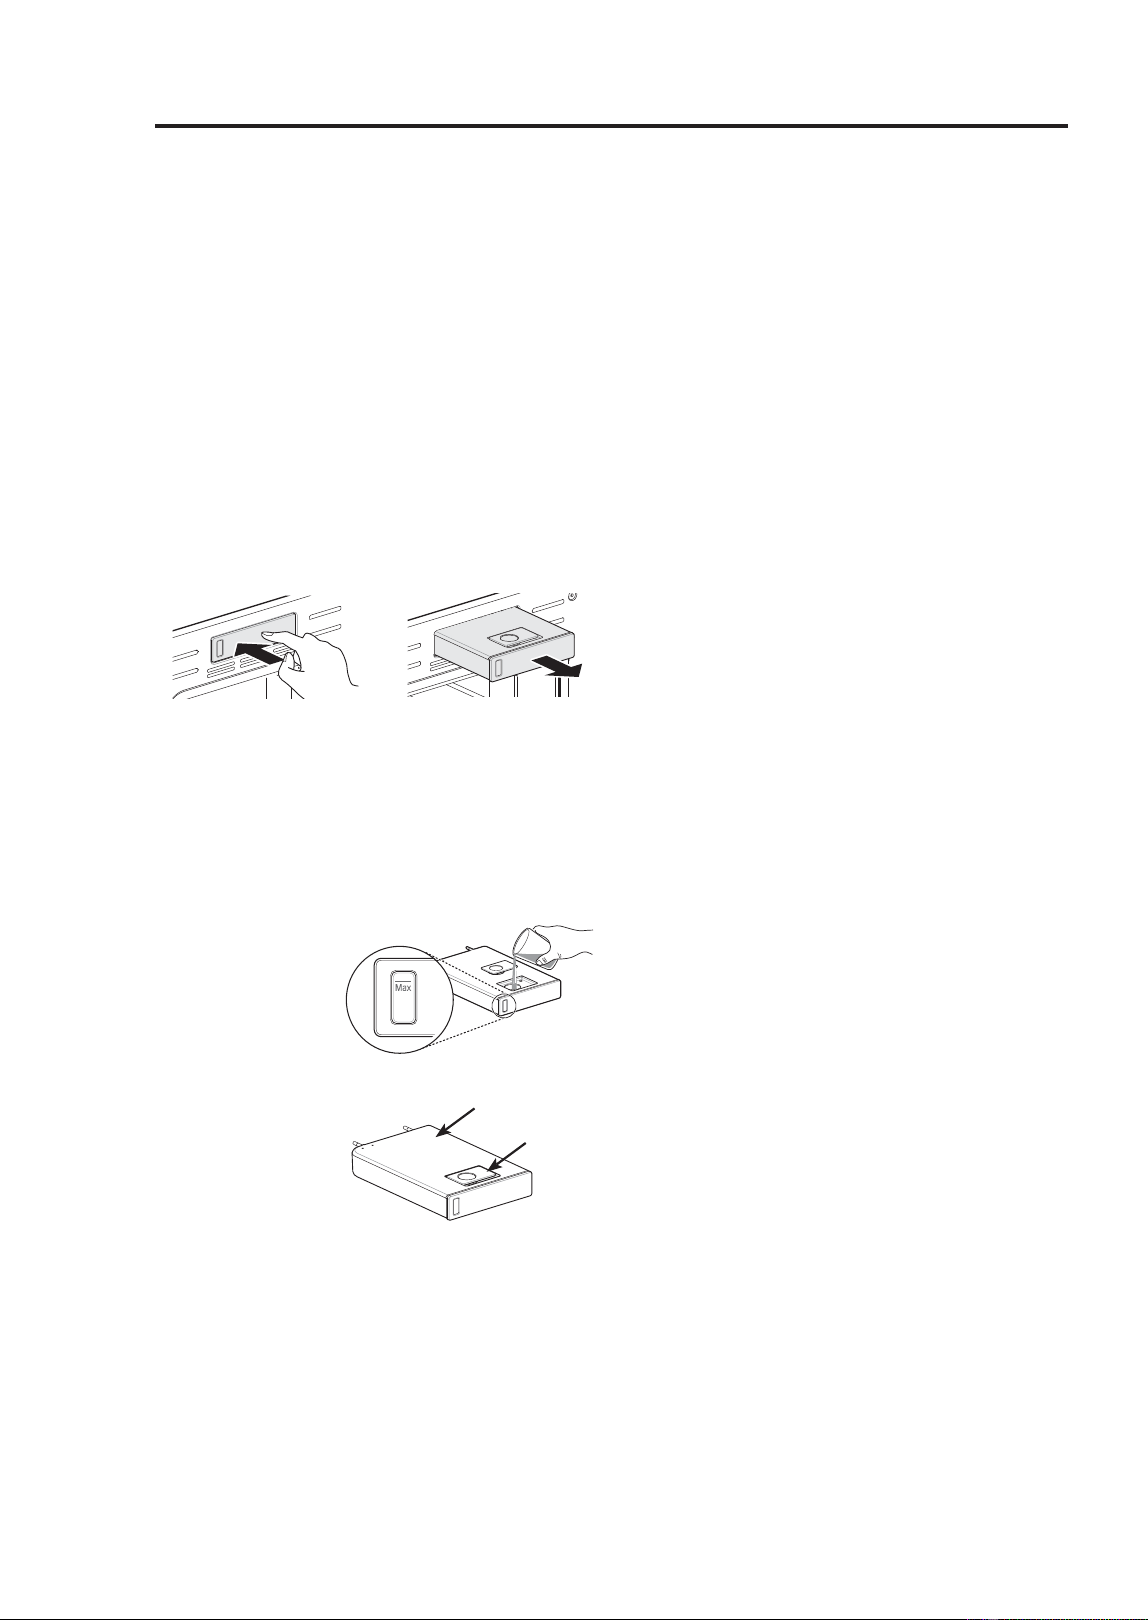
60
49-2001799 Rev. 1
Lower Oven
STEAM FUNCTION
Steam cooking uses the moist heat of
steam to cook food. This is an ideal cooking
method for delicate food items such as
seafood, which can lose nutrients when
boiled.
The oven provides 2 methods of steam
cooking: Steam Bake and Sous Vide.
Using the Steam Feeder Tank
The steam feeder tank is located over the
oven cavity.
1. Gently push the front of the steam feeder
tank to slide it out.
2. Remove the tank and place it on a flat
surface.
3. Remove the tank cover or flip open the fill
lid at the front of the tank cover.
)LOOWKHWDQNWRWKHPD[OLQHORFDWHGDWWKH
front of the tank. Use softened, filtered
water, if
possible. Hard
water may
clog the steam
generator
more quickly
with scale
buildup.
5. Assemble the
cover or snap
closed the fill
lid.
6. Carefully insert the tank into the steam
feeder slot, making sure to keep the tank
level while carrying it. If the tank is not
kept level, water will drain out of the tubes
in the back.
7. Slide the tank into the slot until it clicks
into place.
STEAM BAKE MODE
The Steam Bake mode heats food gradually,
using both the oven heating elements
and moist steam heat. The oven can be
programmed to cook at any temperature
IURP)&WR)&
3UHVHWWHPSHUDWXUHRSWLRQVVWDUWDW)
&
Setting Steam Bake Mode
1. Touch Steam Cook in the Cooking
Modes screen.
2. Touch Steam Bake in the display.
3. Select the desired temperature and steam
level: Low, Medium, or High.
4. If desired, scroll to set the cook time and
delayed start time. Touch the arrow key
on the right side of the display to see the
delayed start time settings.
5 . Touch Start.
6. Once cooking is finished, allow the oven
to cool completely. Then wipe up any
water left on the oven interior.
NOTE:
• Once Steam Bake cooking is started, an
indicator on the display shows the status of
the steam function.
• Make sure the steam feeder tank is filled
with water before starting the Steam Bake
mode. If the water in the tank runs out
during cooking, a chime sounds and a
popup appears in the display. The oven
continues to cook without steam.
• Remember to drain the steam feeder tank
after use.
• When the temperature rises in the oven,
steam may not be visible.
• It is normal to hear the sound of boiling
water from the steam generator while
running the steam functions.
Changing the Steam Cook Settings
1. Touch Edit in the display to bring up the
Cook Settings screen.
2. Adjust the settings as desired.
3. Touch Start.
To Stop Steam Cooking
Touch Stop in the display, and select Yes.
)LOO/LG
Tank Cover
USING THE OVEN: Steam

49-2001799 Rev. 1
61
USING THE OVEN: Sous Vide
Lower Oven
SOUS VIDE
Sous vide cooking uses steam to cook foods
“low and slow.” Use it to cook meat, fish,
VHDIRRGSRXOWU\RUYHJHWDEOHV)RRGPXVW
be vacuum packed in pouches.
It is not necessary to preheat the oven when
using sous vide.
Refer to the cooking guide for recommended
sous vide settings.
Benefits of Sous Vide
The lower temperatures and long cooking
times used in sous vide cooking provide
many benefits.
Ŷ Healthier
Compared to other cooking methods, sous
vide retains most of the original nutrients
in food.
Ŷ Safe and Convenient
The long cooking times used in sous vide
cooking allow food to be pasteurized.
Because food is vacuum packed before
cooking, the unopened pouches can be
quickly chilled then easily stored after
cooking.
Ŷ Crisp and Moist Results
The fine temperature control of sous vide
cooking is an excellent way to achieve
the perfect texture when cooking meat
and poultry. The low temperatures used
retain more of the moisture in food than
conventional cooking methods. After
cooking, a final sear in a frying pan adds
the perfect crisp finish.
Setting Sous Vide Mode
)LOOWKHWDQNZLWKZDWHUXSWRWKHPD[OLQH
located at the front of the tank.
2. Place the standard rack in position 3 and
place the sealed food bag on it.
3. Touch Steam Cook in the Cooking Modes
screen.
4. Touch Sous Vide in the display.
5. Select the desired temperature.
6. If desired, scroll to set the cook time and
delayed start time. Touch the arrow key
on the right side of the display to see the
delayed start time settings.
7. Touch Start.
8. Once cooking is finished, allow the oven
to cool completely. Then wipe up any
water left on the oven interior.
Changing the Sous Vide Settings
1. Touch Edit in the display to bring up the
cook settings screen.
2. Adjust the settings as desired.
3. Touch Start.
To Stop Cooking
Touch Stop in the display, and select Yes.
NOTE: As the temperature in the oven rises,
steam may not be visible.
SOUS VIDE COOKING GUIDE
The size, weight, thickness, set temperature,
and your personal preferences will affect
operating times. This guide is only for
reference. Adjust cook time according to
your preference.
• Cook 30 mins. or 1 hour more if you use
meats thicker than 1”.
• If you use larger cuts of meat, cut to match
WKHUHFRPPHQGHGZHLJKW)RUPXOWLSOH
pieces of meat sealed in separate bags, be
careful not to put pieces of meat too close
together.
Food Quantity
(oz)
Temp.
(°F)
Time
Min Target Max
Beef Steak
0HGLXP
rare)
1” thick
14.1-17.6
oz
135 - 2.5 hr. 3 hr.
Chicken
breast
4.2-5.3
oz
149 - 2.5 hr. 3 hr.
Salmon 1” thick
7 oz
140 - 2 hr. 2.5 hr.
Asparagus 2.8 oz / 6
ea 5.6 oz
/ 12 ea
185 20
min.
30 min. 45
min.
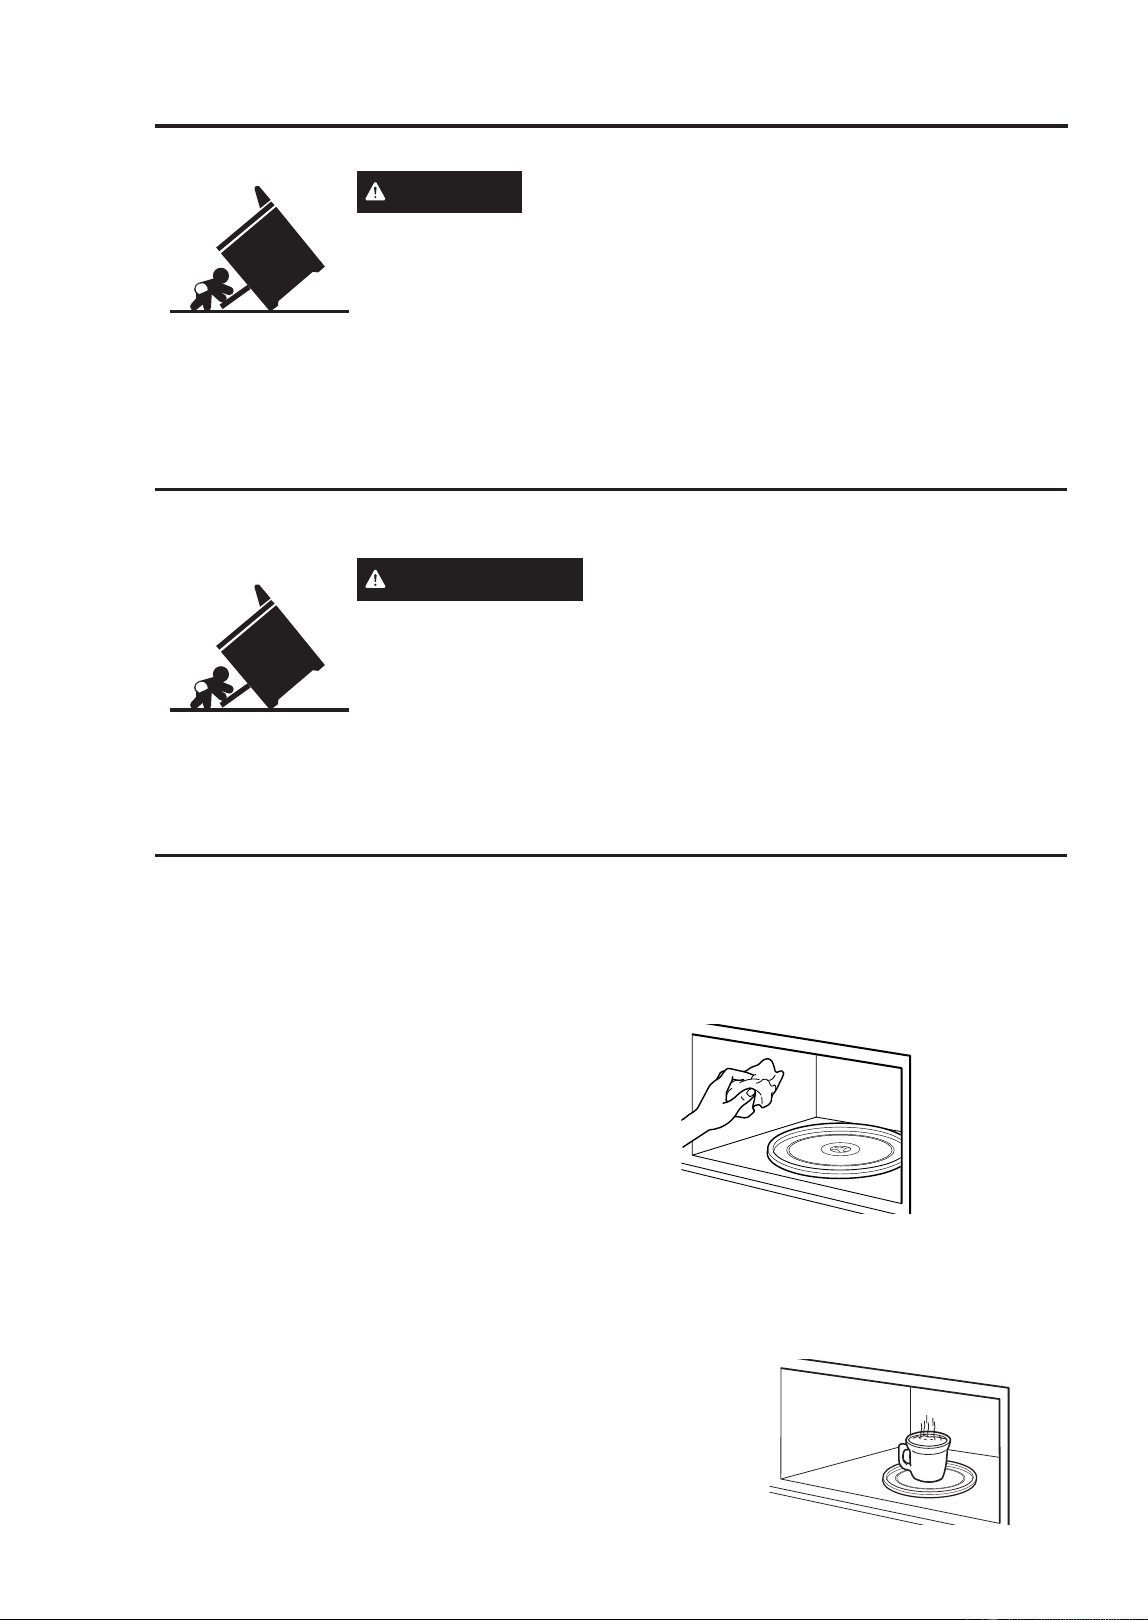
62
49-2001799 Rev. 1
Cleaning the Oven
Be sure all controls are off and all surfaces are cool before cleaning any part of the range.
WARNING
If your range is removed for cleaning, servicing or
any reason, be sure the anti-tip device is reengaged properly when the
UDQJHLVUHSODFHG)DLOXUHWRWDNHWKLVSUHFDXWLRQFRXOGUHVXOWLQWLSSLQJ
of the range and can result in death or serious burns to children or
adults.
NOTE: DO NOT allow stainless steel cleaner to come in contact with any plastic parts such
as the control knobs or control panel. If unintentional contact of cleaners with plastic parts
does occur, clean plastic part with a sponge and mild detergent mixed with warm water.
NOTE: The ceramic cooktop cleaner is NOT recommended for use on external painted
surfaces.
CLEANING
General Cleaning Tips
• A plastic spatula can be used as a scraper
to scrape off any chunks or debris before
and during oven cleaning.
• Using the rough side of a non-scratch
scouring pad may help to take off burnt-on
stains better than a soft sponge or towel.
• Certain non-scratch scrubbing sponges,
such as those made of melamine foam,
available at your local stores, can also help
improve cleaning.
CLEANING THE INTERIOR -
UPPER OVEN
Wash often with warm, sudsy water and a
sponge or soft cloth. Use only mild, non-
DEUDVLYHVRDSVRUDPLOGGHWHUJHQW.HHS
the areas clean where the door and oven
frame touch when closed.
Wipe well with a clean cloth. Over time,
stains can occur on the surfaces as the
result of food particles spattering during
cooking. This is normal.
)RUVWXEERUQVRLOERLODFXSRIZDWHULQWKH
oven for 2 to 3 minutes. Steam will soften
the soil. To get rid of odors inside the oven,
boil a cup of water with some lemon juice or
vinegar in it.
$VHJ~UHVHGHTXHWRGRVORVFRQWUROHVHVWpQDSDJDGRV\TXHODVVXSHUILFLHVHVWpQIUtDVDQWHVGHOLPSLDU
cualquier parte de la cocina.
ADVERTENCIA
Si se quita la cocina para efectuar una limpieza,
reparaciones o cualquier otra razón, verifique que el dispositivo anti-volcaduras
se coloque de manera adecuada cuando vuelva a instalarse la cocina. Si no
toma esta precaución, la cocina puede volcarse y provocar lesiones.
NOTA: NO permita que el limpiador de acero inoxidable entre en contacto con
cualquier parte plástica tal como las perillas de control o el panel de control.
Si se produce un contacto no intencional de los limpiadores con las partes plásticas, limpie la parte
plástica con una esponja y un detergente suave mezclado con agua caliente.
NOTA: NO se recomienda el uso del limpiador de la superficie de cocción de cerámica sobre las
superficies exteriores pintadas.
CLEANING THE OVEN: Cleaning the Interior
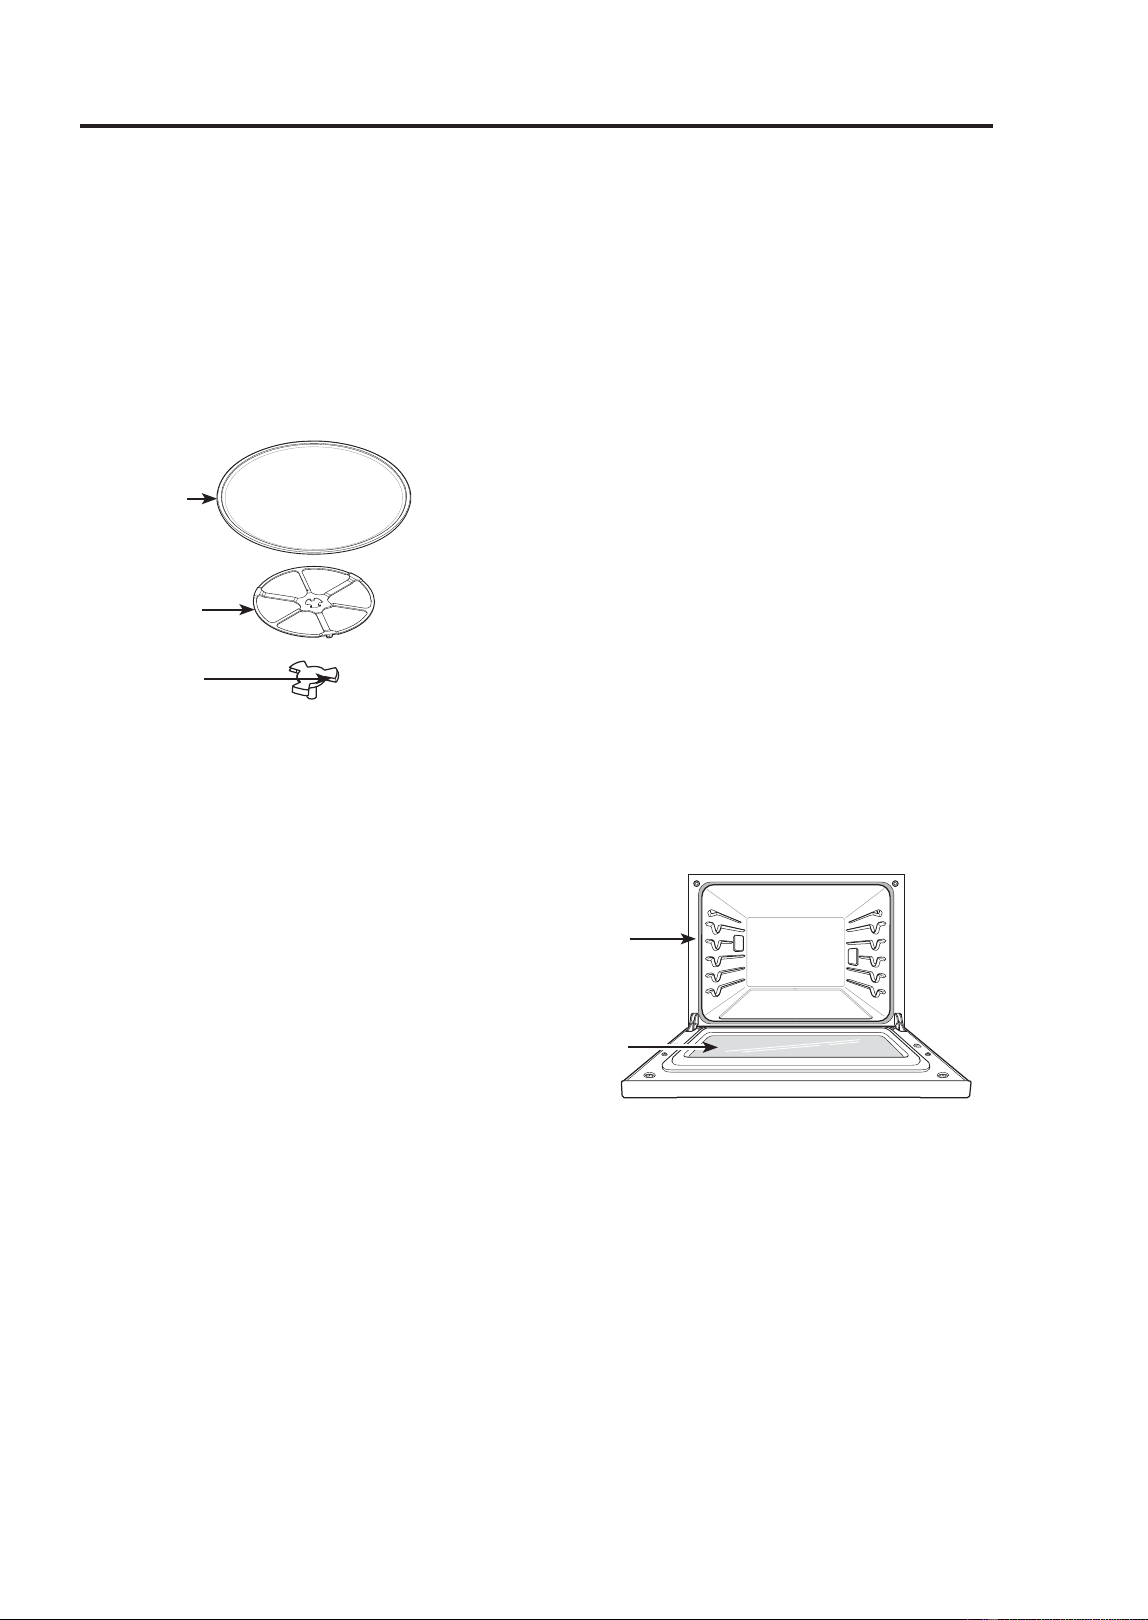
49-2001799 Rev. 1
63
CLEANING THE OVEN: Cleaning the Interior/Exterior
Cleaning the Oven
CLEANING THE INTERIOR -
UPPER OVEN (Cont.)
Glass Tray and Rotating Ring
To clean the glass tray and rotating ring,
wash in mild, sudsy water.
)RUKHDYLO\VRLOHGDUHDVXVHDPLOGFOHDQVHU
and scouring sponge.
NOTE: The glass tray and rotating ring are
dishwasher safe.
CLEANING THE EXTERIOR
Control Panel
To prevent activating the control panel
during cleaning, disconnect power to the
appliance. Clean up splatters with a damp
cloth using a glass cleaner. Remove heavier
soil with warm, soapy water. Do not use
abrasives of any kind.
Painted and Decorative Trim
)RUJHQHUDOFOHDQLQJXVHDFORWKZLWKKRW
VRDS\ZDWHU)RUPRUHGLIILFXOWVRLOVDQG
built-up grease, apply a liquid detergent
directly onto the soil.
Leave it on for 30 to 60 minutes. Rinse with
a damp cloth and dry. Do not use abrasive
cleaners.
Stainless Steel Surfaces
To avoid scratches, do not use steel wool
pads.
1. Place a small amount of stainless steel
appliance cleaner or polish on a damp
cloth or paper towel.
2. Clean a small area, rubbing with the grain
of the stainless steel if applicable.
3. Dry and buff with a clean, dry paper towel
or soft cloth.
4. Repeat as necessary.
NOTE
• To clean the stainless steel surface, use
warm sudsy water or a stainless steel
cleaner or polish.
• Always wipe in the direction of the metal
surface finish.
• Stainless steel appliance cleaner or polish
can be purchased online or from most
retailers of appliances or home goods.
Oven Doors
• Use soapy water to thoroughly clean the
oven door. Rinse well. Do not immerse the
door in water.
• You may use a glass cleaner on the
outside glass of the oven door. Do not
spray water or glass cleaner on the door
vents.
• Do not use oven cleaners, cleaning
powders, or harsh abrasive cleaning
materials on the outside of the oven door.
• Do not clean the oven door gasket. The
oven door gasket is made of a woven
material that is essential for a good seal.
Care should be taken not to rub, damage,
or remove this gasket.
Glass
Tray
Rotating
Ring
Shaft
Door
Gasket
Hand
Clean
Oven
Door
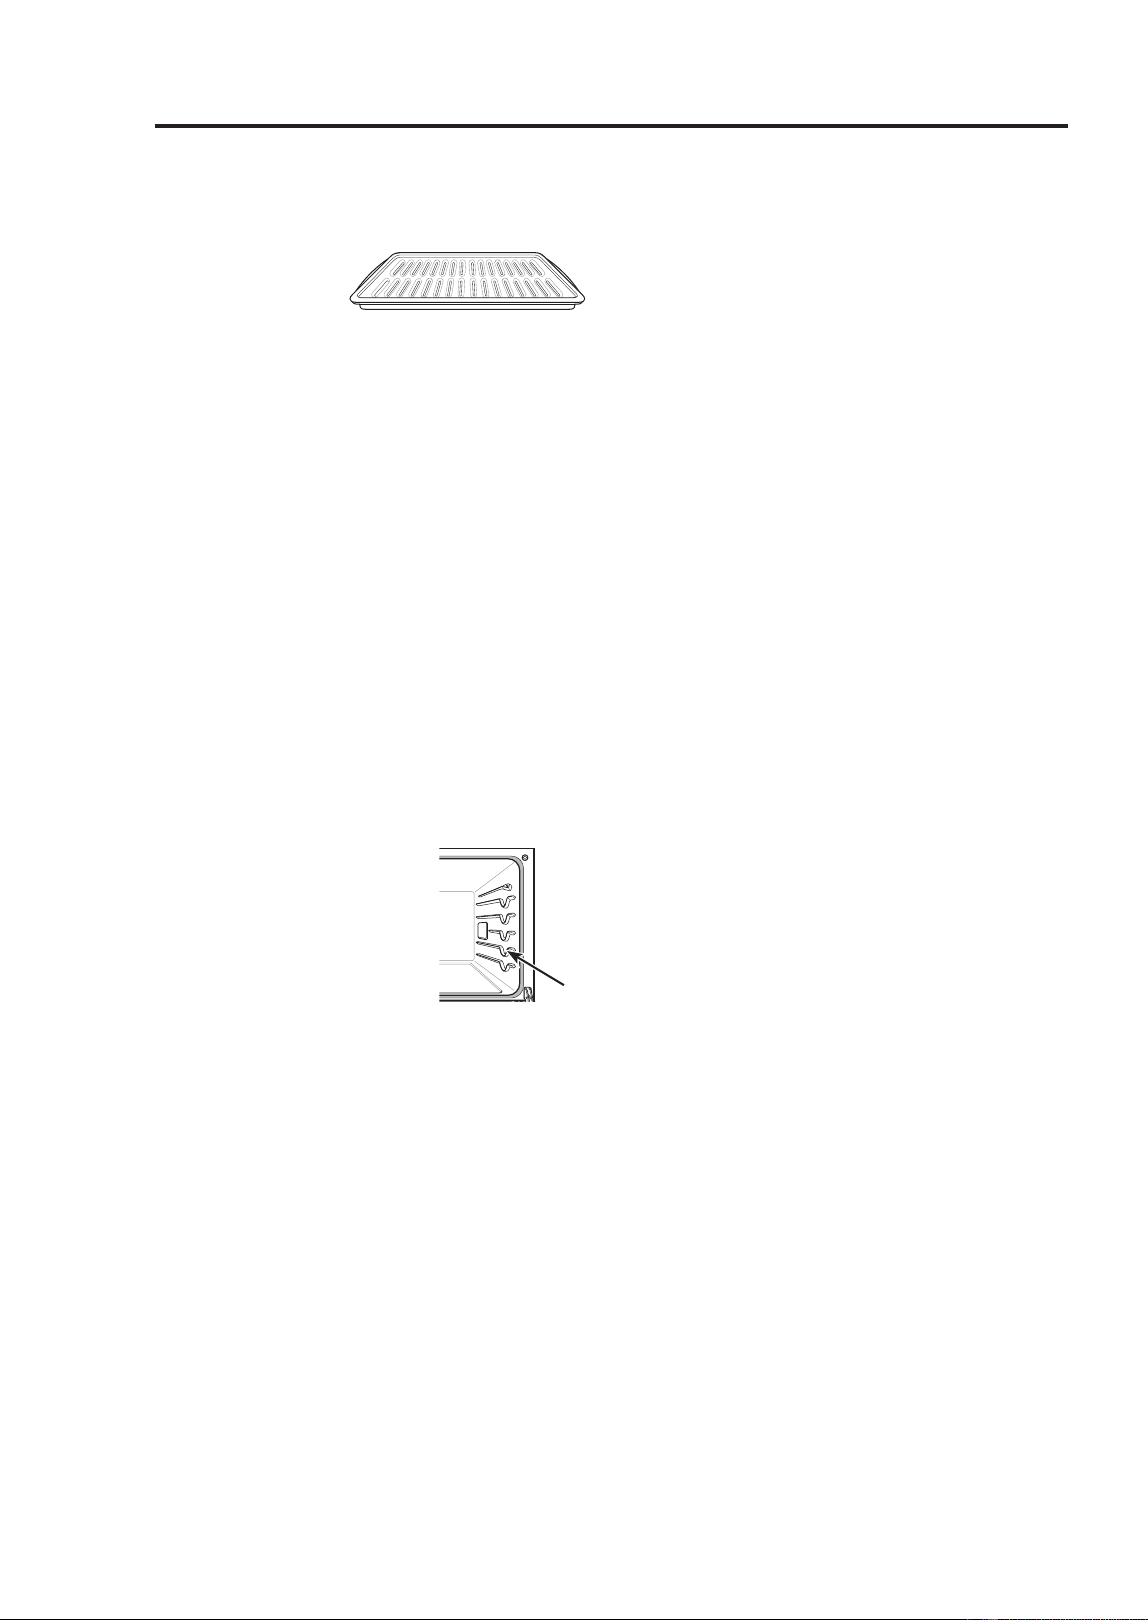
64
49-2001799 Rev. 1
CLEANING INTERIOR - LOWER OVEN
Broiler Pan and Grid
• Do not store a soiled broiler pan or grid
anywhere in the
appliance.
• Do not clean the
broiler pan or grid in a self cleaning mode.
• Remove the grid from the pan. Carefully
pour out the grease from the pan into a
proper container.
• Wash and rinse the broiler pan and grid
in hot water with a soap-filled or plastic
scouring pad.
• If food has burned on, sprinkle the grid with
cleaner while hot and cover with wet paper
towels or a dishcloth. Soaking the pan will
remove burned-on foods.
• Both the broiler pan and grid may be
cleaned with a commercial oven cleaner or
in the dishwasher.
Oven Racks
Remove the oven racks before operating the
Self Clean cycle and EasyClean.
1. Clean with a mild,
abrasive cleaner.
)RRGVSLOOHGLQWRWKH
tracks could cause the
racks to become stuck.
2. Rinse with clean water
and dry.
NOTE: If the racks are cleaned using the
6HOI&OHDQF\FOHQRWUHFRPPHQGHGWKH
color will turn slightly blue and the finish will
become dull. After the Self Clean cycle is
complete, and the oven has cooled, rub the
sides of the racks with wax paper or a cloth
containing a small amount of vegetable oil.
This will make the racks glide more easily
into the rack tracks.
Oven Cavity
DO NOT use oven cleaners.
NEVER wipe a warm or hot porcelain
surface with a damp sponge; it may cause
FKLSSLQJRUFUD]LQJWLQ\KDLUOLNHFUDFNV
)RRGVSLOOVVKRXOGEHFOHDQHGZKHQWKH
oven cools. At high temperature, foods react
with porcelain and a permanent dull spot
can result. When cleaning a spot, use only
nonabrasive cleaners or scrubbers.
EASYCLEAN
EasyClean enamel technology provides
two cleaning options for the inside of the
oven. The EasyClean feature lift soils
without harsh chemicals, and it runs using
ONLY WATER for just 10 minutes in low
temperatures to help loosen LIGHT soils
before hand cleaning.
While EasyClean is quick and effective
for small and LIGHT soils, the Self Clean
feature can be used to remove HEAVY, built
up soils. The intensity and high heat of the
Self Clean cycle may result in smoke which
will require the opening up of windows to
provide ventilation. Compared to the more
intense Self Clean process, this gives you
the option of cleaning with LESS HEAT,
/(667,0(DQGYLUWXDOO\12602.(25
)80(6<RXFDQUHGXFHHQHUJ\XVHE\
cleaning light oven soils with the EasyClean
feature instead of Self Clean.
When needed, the oven still provides the
Self Clean option for longer, more thorough
oven cleaning for heavier, built up soils.
)RUKDUGWRUHDFKDUHDVVXFKDVWKH
back surface of the oven, it is better to
use the Self Clean cycle.
Cleaning the Oven
Track
CLEANING THE OVEN: Cleaning the Interior / EasyClean
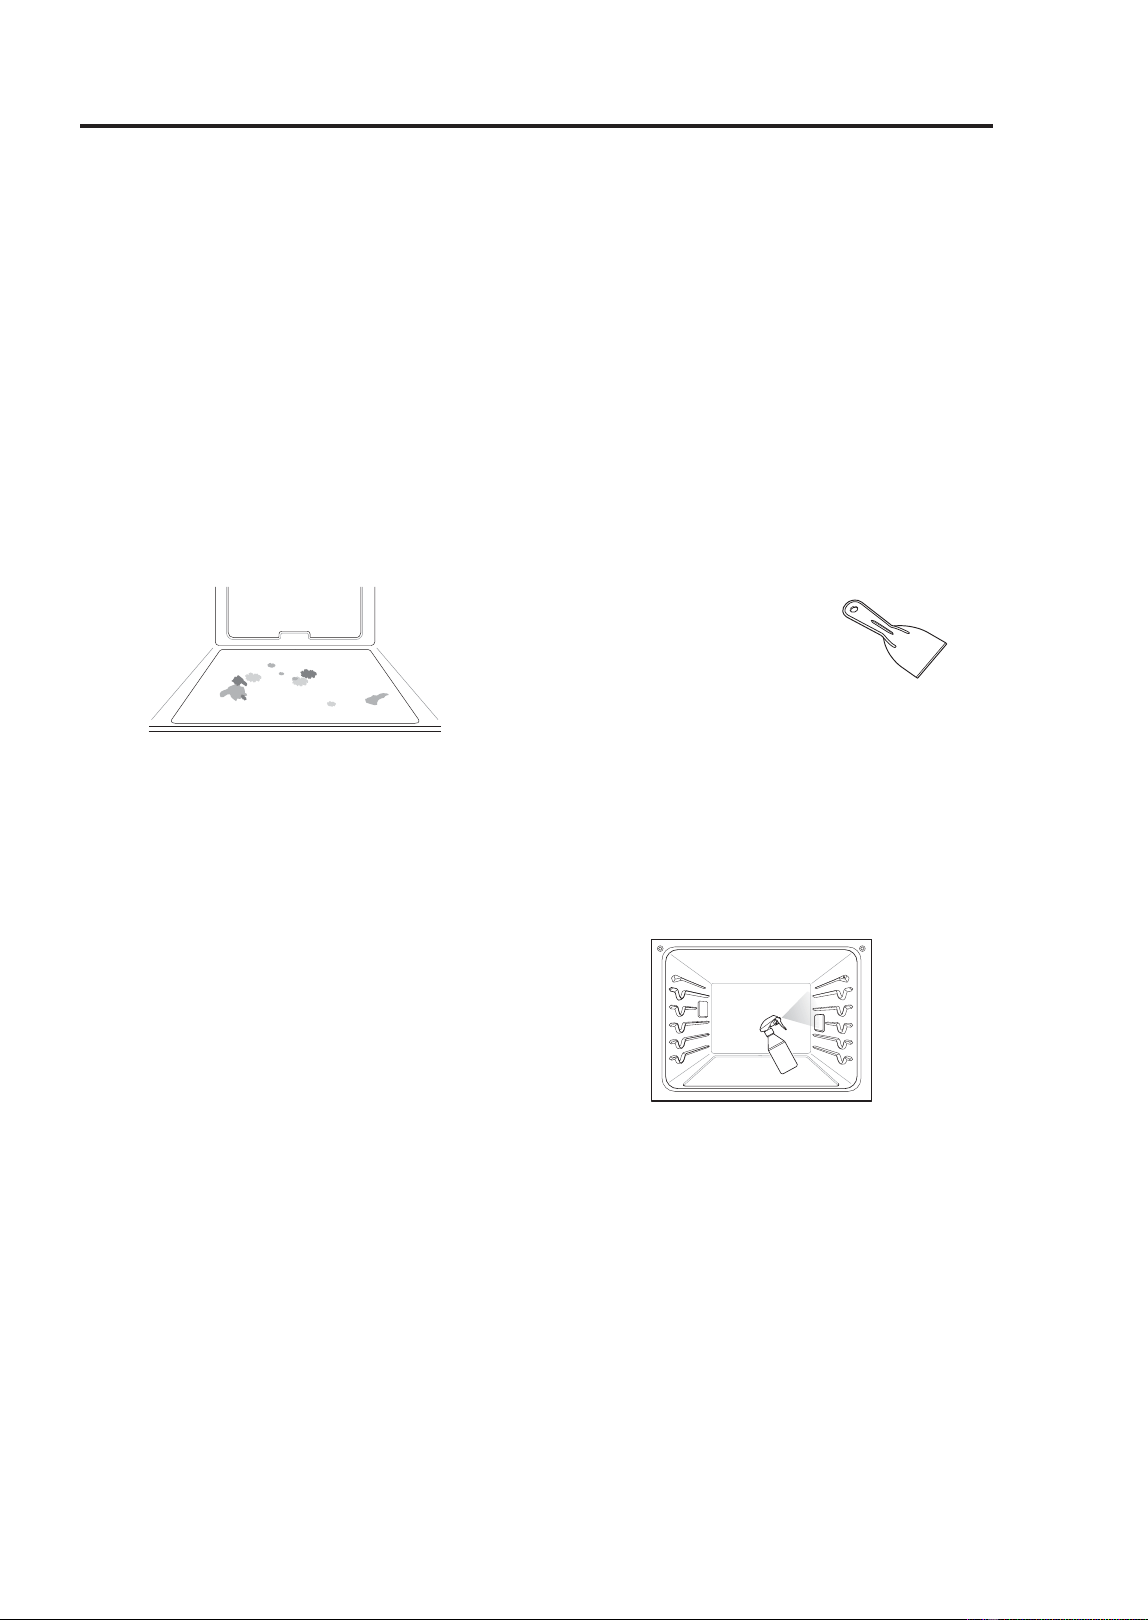
49-2001799 Rev. 1
65
CLEANING THE OVEN: EasyClean
Cleaning the Oven
EASYCLEAN (Cont.)
Benefits of EasyClean
• Helps loosen light soils before hand-
cleaning
• EasyClean only uses water; no chemical
cleaners
• Makes for a better Self Clean experience.
- Delays the need for a Self Clean cycle
- Minimizes smoke and odors
- Can allow shorter Self Clean time
When to Use EasyClean
Example of oven soiling
Ŷ Case 1
- Soil pattern: Small drops or spots
- Types of soils: Cheese or other
ingredients
- Common food items that can soil your
oven: Pizza
Ŷ Case 2
- Soil pattern: Light splatter
7\SHVRIVRLOV)DWJUHDVH
- Common food items that can soil your
RYHQ6WHDNVEURLOHG)LVKEURLOHG
Meat roasted at low temperatures.
EasyClean Instruction Guide
• Allow the oven to cool to room temperature
before using the EasyClean cycle. If your
RYHQFDYLW\LVDERYH)&WKH
EasyClean cycle will not be activated until
the oven cavity cools down.
• The oven should be level to ensure that
the bottom surface of the oven cavity is
entirely covered by water at the beginning
of the EasyClean cycle.
)RUEHVWUHVXOWVXVHGLVWLOOHGRUILOWHUHG
water. Tap water may leave mineral
deposits on the oven bottom.
• Soil baked on through several cooking
cycles will be more difficult to remove with
the EasyClean cycle.
• Do not open the oven door during the
EasyClean cycle. Water will not get hot
enough if the door is opened during the
cycle.
1. Remove oven racks and accessories from
the oven.
2. Scrape off and remove any burnt-on
debris with a plastic scraper.
• Suggested plastic scrapers:
- Hard plastic spatula
- Plastic pan scraper
- Plastic paint scraper
)LOODVSUD\ERWWOHR]RUPO
with water and use the spray bottle to
thoroughly spray the inside surfaces of
the oven.
8VHDWOHDVWR]RUPORIWKH
water in the bottle to completely saturate
the soil on both the walls and in the
corners of the oven.
6SUD\RUSRXUWKHUHPDLQLQJZDWHU
oz or 240 ml) onto the bottom center of
the oven cavity. The indentation on the
oven bottom should be fully covered
to submerge all soils. Add water if
necessary.
NOTE: Use an entire bottle of water to
clean each oven. Do not spray water directly
on the door. Doing so will result in water
dripping to the floor.
6. Touch Clean in the Cooking Modes
screen. Touch EasyClean in the display.
7. Touch Start. The remaining time appears
in the display.

66
49-2001799 Rev. 1
EASYCLEAN (Cont.)
EasyClean Instruction Guide (Cont.)
8. A tone will sound at the end of the 10
minute cycle. Touch End of the Cleaning
in the display to end the EasyClean mode
and the tone.
9. After the cleaning cycle and during
handcleaning, enough water should
remain on the oven bottom to completely
submerge all soils. Add water if
necessary. Place a towel on the floor in
front of the oven to capture any water that
may spill out during hand-cleaning.
10. Clean the oven cavity
immediately after the
EasyClean cycle by
scrubbing with a wet,
nonscratch scouring sponge or pad.
7KHVFRXULQJVLGHZLOOQRWVFUDWFKWKH
finish.) Some water may spill into the
bottom vents while cleaning, but it will
be captured in a pan under the oven
cavity and will not hurt the burner.
NOTE: Do not use any steel scouring
pads, abrasive pads or cleaners as these
materials can permanently damage the oven
surface.
11. Once the oven cavity is cleaned, wipe
any excess water with a clean dry
towel. Replace racks and any other
accessories.
12. If some light soils remain, repeat the
above steps, making sure to thoroughly
soak the soiled areas.
• If stubborn soils remain after multiple
EasyClean cycles, run the Self Clean
cycle. Be sure that the oven cavity
is empty of oven racks and other
accessories, and that the oven cavity
surface is dry before running the Self
Clean cycle. Consult the Self Clean
section of your owner’s manual for
further details.
NOTE:
• The cavity gasket may be wet when the
EasyClean cycle finishes. This is normal.
Do not clean the gasket.
• If mineral deposits remain on the oven
bottom after cleaning, use a cloth or
sponge soaked in vinegar to remove them.
• It is normal for the fan to operate during
the EasyClean cycle.
• Using commercial oven cleaners or bleach
to clean the oven is not recommended.
Instead, use a mild liquid cleanser with a
pH value below 12.7 to avoid discoloring
the enamel.
Cleaning the Oven
CLEANING THE OVEN: EasyClean
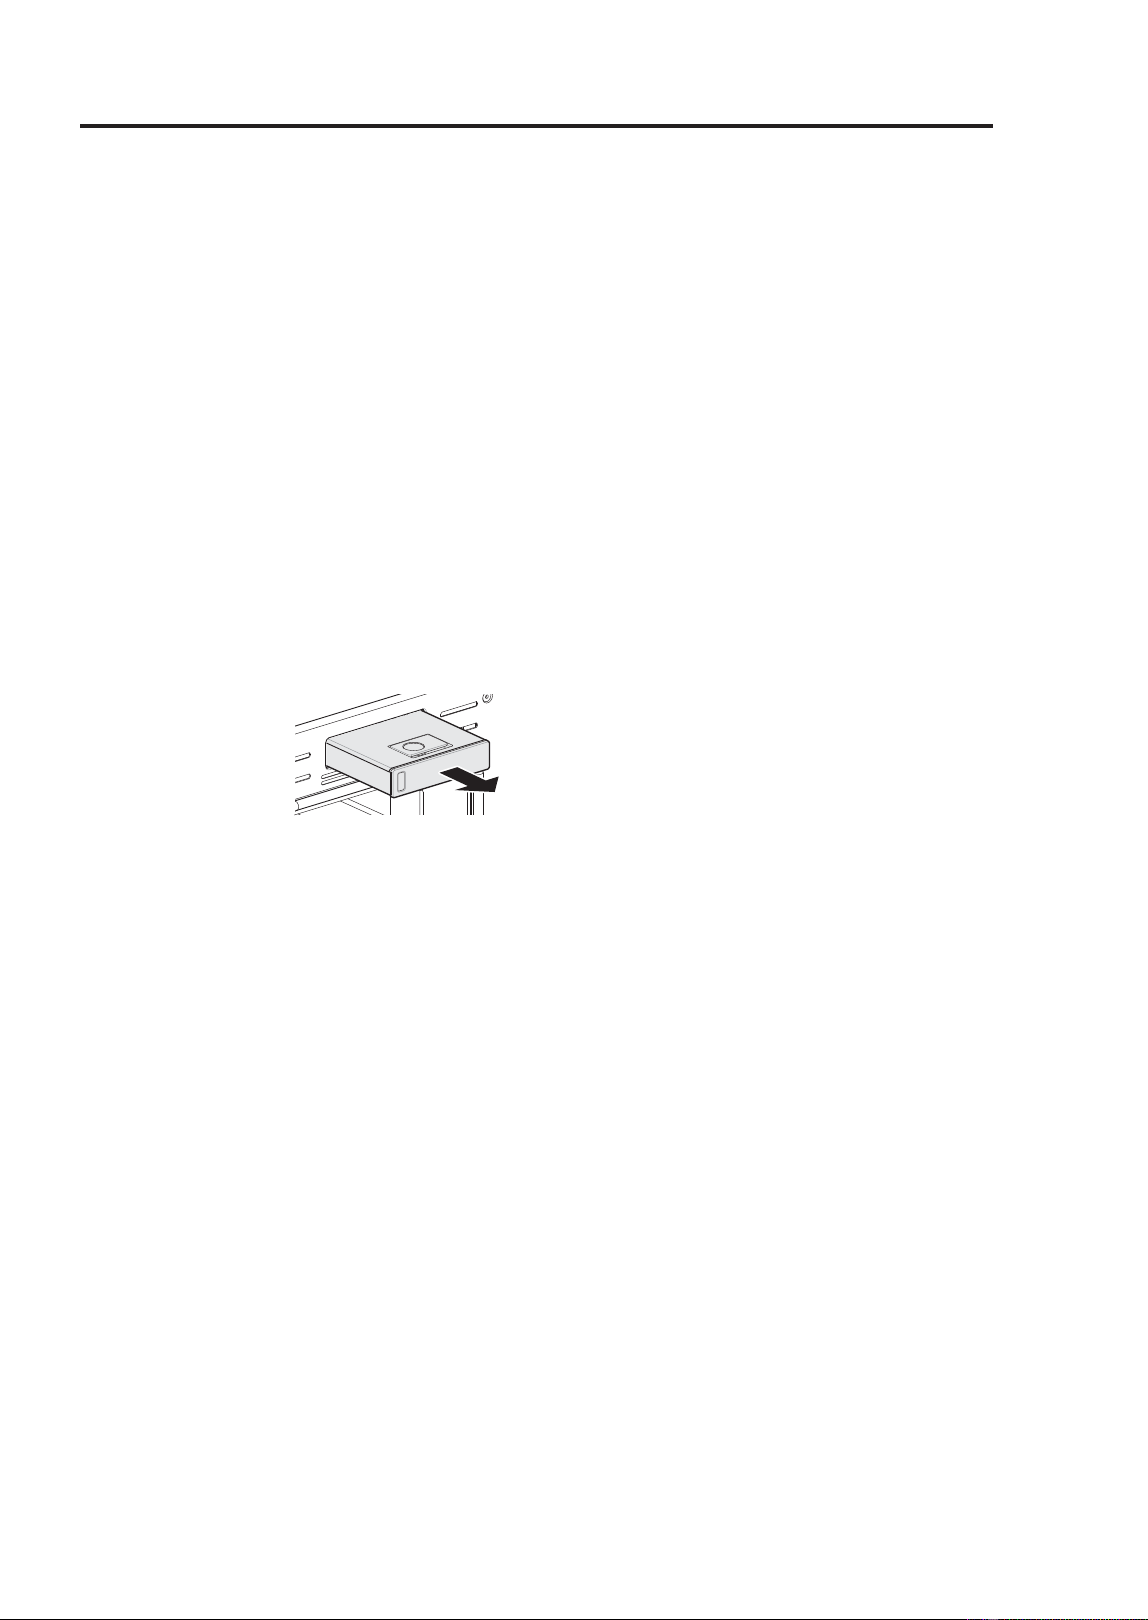
49-2001799 Rev. 1
67
CLEANING THE OVEN: Self Clean
SELF CLEAN (LOWER OVEN)
The Self Clean cycle uses extremely hot
temperatures to clean the oven cavity.
While running the Self Clean cycle, you may
notice smoking or an odor. This is normal,
especially if the oven is heavily soiled.
During Self Clean, the kitchen should be
well ventilated to minimize the odors from
cleaning.
Before Starting Self Clean
• Clean only parts listed in manual. Remove
the water tank, oven racks, broiler pan,
broiler grid, all cookware, aluminum foil or
any other material from the oven.
- If oven racks are left in the oven cavity
during the Self Clean cycle, they will
discolor and become difficult to slide in
and out.
- If you don’t
remove the water
tank from the
oven, a beep
sounds and the
Self Clean cycle
does not start.
- The kitchen should be well ventilated to
minimize the odors from cleaning. Open
a window or turn on a ventilation fan or
hood before self-cleaning.
- Wipe any heavy spillovers on the bottom
of the oven.
- Make sure that the oven light cover is in
place and the oven light is off.
- Clean the frame of the oven and door
with hot soapy water. Rinse well.
• NOTE: The oven light cannot be turned
on during a Self Clean cycle. The oven
light cannot be turned on until the oven
WHPSHUDWXUHKDVFRROHGEHORZ)
&DIWHUD6HOI&OHDQF\FOHLV
complete.
• Clean the frame of the oven and door with
hot soapy water. Rinse well.
• Do not clean the gasket. The fiberglass
material of the oven door gasket cannot
withstand abrasion. It is essential for the
gasket to remain intact. If you notice it
becoming worn or frayed, replace it.
• It is normal for the fan to operate during
the Self Clean cycle.
• As the oven heats, you may hear sounds
of metal parts expanding and contracting.
This is normal and will not damage the
oven.
• You may notice some white ash in the
oven. Wipe it off with a damp cloth or a
soap-filled steel wool pad after the oven
cools. If the oven is not clean after one
Self Clean cycle, repeat the cycle.
• If oven racks were left in the oven and do
not slide smoothly after a Self Clean cycle,
wipe racks and rack tracks with a small
amount of vegetable oil to make them glide
more easily.
• After a Self Clean cycle, fine lines may
appear in the porcelain because it went
through heating and cooling. This is normal
and will not affect performance.
• The Self Clean cycle cannot be started if
the Lock Out feature is active.
• Once the Self Clean cycle is set, the oven
door locks automatically. You will not be
able to open the oven door until the oven
is cooled. The lock releases automatically.
• Allow about 15 seconds for the oven door
lock to activate.
• If the clock is set for a 12-hour display
GHIDXOWWKH'HOD\HG6HOI&OHDQFDQQHYHU
be set to start more than 12 hours in
advance.
• After the oven is turned off, the cooling fan
keeps operating until the oven has cooled
down.
Cleaning the Oven

68
49-2001799 Rev. 1
Cleaning the Oven
SELF CLEAN (LOWER OVEN) (Cont.)
When to Use Self Clean
• Example of oven soiling
Ŷ Case 1
• Soil pattern: Medium to heavy splatter
7\SHVRIVRLOV)DWJUHDVH
• Common food items that can soil your
oven:
Meat roasted at high temperatures
Ŷ Case 2
• Soil pattern: Drops or spots
7\SHVRIVRLOV)LOOLQJRUVXJDUEDVHG
soils
• Common food items that can soil your
oven: Pies
Ŷ Case 3
• Soil pattern: Drops or spots
• Types of soils: Cream or tomato sauce
• Common food items that can soil your
oven:
Casseroles
NOTE: The Self Clean cycle can be used for
soil that has been built up over time.
Setting Self Clean
The Self Clean function has cycle times of
3, 4, or 5 hours.
Self Clean Soil Guide
1. Remove all racks and accessories from
the oven.
2. Touch Clean, Self Clean in that order.
The oven defaults to the recommended
four hour self clean for a moderately
soiled oven.
3. Select the desired cycle time.
4. If desired, scroll to set a delayed start
time or touch the number pad icon to
enter the start time directly.
5. Touch Start. The remaining time or the
delayed start time appears in the display.
6. Once the self-clean cycle is set, the oven
door locks automatically and the lock icon
displays.
• You will not be able to open the oven
door until the oven has cooled. The lock
releases automatically when the oven
KDVFRROHG)RUFLQJWKHGRRURSHQZLOO
damage the door.
• It may become necessary to cancel
or interrupt a Self Clean cycle due to
excessive smoke or fire in the oven. To
cancel the Self Clean function, touch
Stop in the display.
During Self Clean
•
The Self Clean cycle uses extremely hot
temperatures to clean the oven cavity. While
running the Self Clean cycle, you may
notice smoking or an odor. This is normal,
especially if the oven is heavily soiled.
• As the oven heats, you may hear sounds of
metal parts expanding and contracting. This
is normal and will not damage the oven.
After the Self Clean Cycle
• The oven door remains locked until the
RYHQWHPSHUDWXUHKDVFRROHG)RUFLQJWKH
door open will damage the door.
• You may notice some white ash in the
oven. Wipe it off with a damp cloth or a
soap-filled pad after the oven cools. If
the oven is not clean after one self-clean
cycle, repeat the cycle.
• If oven racks were left in the oven and do
not slide smoothly after a self-clean cycle,
wipe racks and rack supports with a small
amount of vegetable oil to make them glide
more easily.
)LQHOLQHVPD\DSSHDULQWKHSRUFHODLQ
because it went through heating and
cooling. This is normal and will not affect
performance.
Soil Level Cycle Setting
Lightly Soiled Oven Cavity 3-Hour
Moderately Soiled Oven Cavity 4-Hour
Heavily Soiled Oven Cavity 5-Hour
CLEANING THE OVEN: Self Clean

49-2001799 Rev. 1
69
CLEANING THE OVEN:6WHDP)HHGHU7DQN'HVFDOLQJ
Cleaning the Oven
CLEANING THE STEAM
FEEDER TANK
The steam feeder tank is used during the
steam cooking functions. Use filtered,
softened water if possible.
NOTE:
• After using the steam function, the steam
feeder tank should be drained. To avoid
bacteria or odors, clean and dry the steam
feeder tank after every use.
• Do not clean in a dishwasher.
• If the steam feeder tank does not slide in
as smoothly as it should, clean the bottom
of the tank.
• After the steam mode is used for 8 hours,
a reminder to descale the product appears
in the display the next time the steam
mode is selected. You will not be able to
use the steam mode until the Descaling
function is run. To avoid this delay, run the
Descaling function after every 2-3 uses of
the steam mode.
• If the descaling reminder appears, press
2.WRUXQWKH'HVFDOLQJIXQFWLRQ
Hard Water Scale
If hard water is used in the steam feeder
tank, the steam generator may become
clogged with hard water scale. In areas
with hard water, run the Descaling function
frequently or use softened water.
CLEANING SCALE ON LOWER
OVEN BOTTOM
To remove mineral deposits that remain
on the oven bottom after using the steam
mode, use a cloth or sponge soaked in
YLQHJDURUDZHDNFLWULFDFLGVROXWLRQ)RU
more stubborn or extensive scaling, use the
Descaling function.
Descaling
Use this function to remove the white
deposits that form after the steam generator
is used for a long period.
The Descaling function runs for 1 hour 43
minutes. Water will come out of the steam
generator while it is being cleaned.
)RULQVWUXFWLRQVRQUHPRYLQJDQGILOOLQJWKH
steam feeder tank, see “Using the Steam
)HHGHU7DQN´
Setting Descaling
)LOOWKHVWHDPIHHGHUWDQNZLWKD
PL[WXUHRIZDWHUDQGFLWULFDFLG)RU
example, use 4 tsp of citric acid in 4 1/4
FXSVZDWHUJFLWULFDFLGLQPO
water).
Setting Descaling (Cont.)
2. Insert the steam feeder tank into the slot
over the oven cavity and push it in until it
clicks into place.
3. Touch Clean in the Cooking Modes
screen. Touch Steam Maintenance and
Descaling in that order.
4. After 1 hour 43 minutes of descaling, a
SRSXSZLOODSSHDULQWKHGLVSOD\)ROORZLQJ
the instructions, drain the tank and fill it
with clean water.
5. Insert the tank and start the Rinsing
function.
6. Once the Rinsing function is complete,
dry the inside of the oven with a soft
cloth. Leave the oven door open and
allow the oven to dry completely.
NOTE:
• The Rinsing function must be completed
even if the Descaling function is cancelled.
• If water remains on the oven bottom after
descaling, it can leave a residue after the
oven is used. To remove the residue, see
the instructions under “Cleaning Scale on
Oven Bottom.”
• After running the Descaling function, clean
the steam feeder tank.
DRYING THE LOWER
OVEN CAVITY AND STEAM
GENERATOR
The Drying function removes residual water
inside the steam generator. The function
takes a little over 1 minute and runs
automatically after any steam cooking cycle.
The Drying function can also be started
manually, if needed.
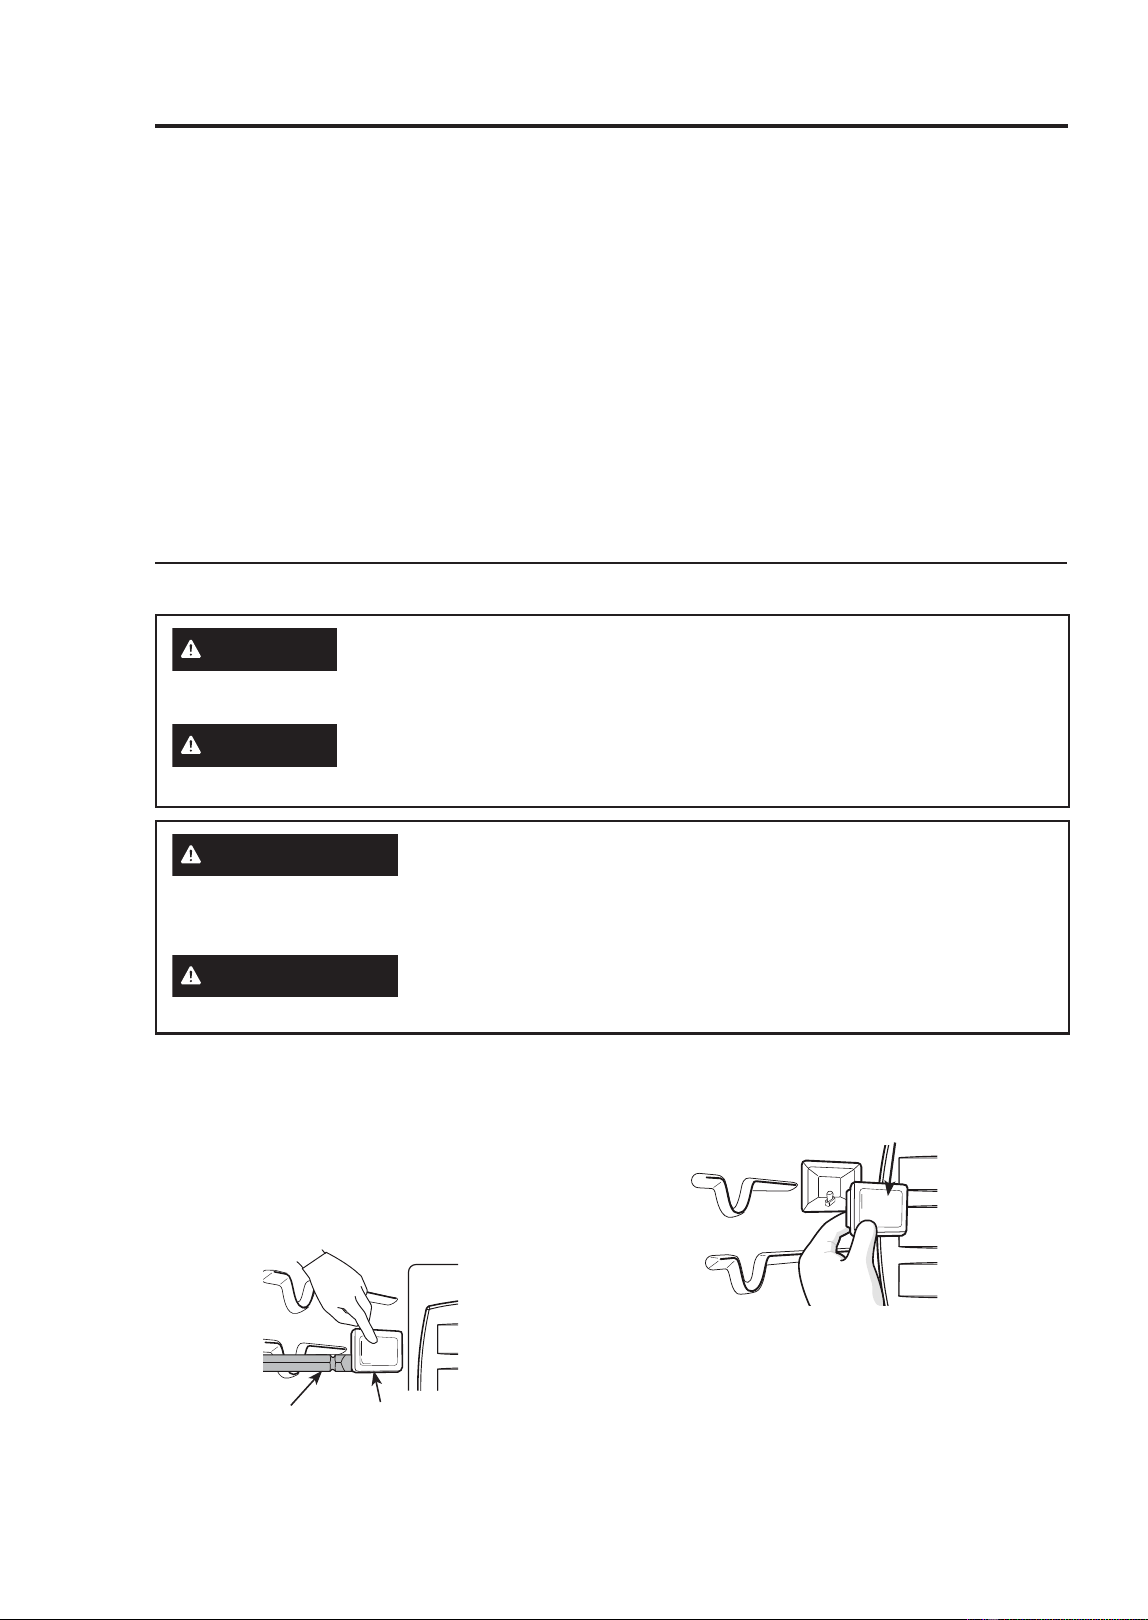
70
49-2001799 Rev. 1
Cleaning the Oven
DRYING THE LOWER OVEN CAVITY AND STEAM GENERATOR
(Cont.)
Setting Drying
1. Make sure that the steam feeder tank is
empty.
2. Touch Clean in the Cooking Modes
screen. Touch Steam Maintenance and
Drying in that order.
3. Touch Start to begin Drying. The
remaining time appears in the display.
Using Evaporation Function
Use the Evaporation function to dry the
oven cavity after a steam cooking cycle.
Evaporation runs for 12 minutes.
Setting Evaporation
1. Touch Clean in the Cooking Modes
screen. Touch Steam Maintenance and
Evaporation in that order.
2. Touch Start to begin Evaporation. The
remaining time appears in the display.
CHANGING THE OVEN LIGHT
The oven light is a standard 25-watt halogen
bulb for ovens.
1. Unplug the oven or disconnect power.
2. Remove the oven racks.
3. Slide a flat blade screwdriver a between
the housing and the glass light cover.
4. Support the glass light cover with two
fingers to prevent the cover from falling to
the bottom of the oven.
5. Gently twist the screwdriver blade to
loosen the glass light cover.
6. Remove the bulb from the socket.
7. Replace the bulb, and reassemble the
light cover by snapping it back into place.
8. Plug in the oven or reconnect power.
WARNING
SHOCK OR BURN HAZARD: Before replacing oven light bulb,
disconnect the electrical power to the oven at the main fuse or circuit
EUHDNHUSDQHO)DLOXUHWRGRVRPD\UHVXOWLQHOHFWULFVKRFNRUEXUQ
CAUTION
BURN HAZARD: The glass cover and bulb should be removed when
cool. Touching hot glass with bare hands or a damp cloth can cause
burns.
ADVERTENCIA
PELIGRO DE DESCARGA ELÉCTRICA O QUEMADURAS: Antes
de reemplazar la bombilla del horno, desconecte la alimentación de
HQHUJtDDOKRUQRGHVGHHOSDQHOSULQFLSDOGHIXVLEOHVRGHOLQWHUUXSWRU
de circuitos. No hacerlo puede provocar una descarga eléctrica o una
quemadura.
PRECAUCIÓN
RIESGO DE INCENDIO: La tapa de vidrio y la lámpara de luz se deberán
UHWLUDUFXDQGRHVWpQIUtDV7RFDUHOYLGULRFDOLHQWHVLQSURWHFFLyQHQODV
PDQRVRFRQXQWUDSRK~PHGRSXHGHRFDVLRQDUTXHPDGXUDV
Screwdriver
Light Cover
Light Cover
CLEANING THE OVEN: Drying The Lower Oven Cavity / Oven Light

49-2001799 Rev. 1
71
Troubleshooting FAQs
TROUBLESHOOTING FAQs
Frequently Asked Questions
About the Upper Oven
Q: Can I use a rack in my upper oven to reheat or cook on two levels at once?
A: Only use the rack that is supplied with your upper oven. Use of any other rack can result
in poor cooking performance and/or arcing and may damage your oven.
Q: Will the upper oven be damaged if it operates while empty?
A: Yes. Never operate the oven while it is empty or without the glass tray.
Q: Does microwave energy pass through the viewing screen in the door?
$1R7KHPHWDOVFUHHQERXQFHVWKHHQHUJ\EDFNWRWKHRYHQFDYLW\7KHKROHVRUSRUWV
allow only light to pass through. They do not let microwave energy pass through.
Q: Why do I see a light reflection around the outer case?
A: This light is from the upper oven light which is located between the oven cavity and the
outer wall of the oven.
Q: What are the various sounds I hear when the upper oven is operating?
A: The clicking sound is caused by a mechanical switch turning the microwave oven's
PDJQHWURQ21DQG2))
The heavy hum and clunk is from the change in power the magnetron draws as it is
WXUQHG21DQG2))E\DPHFKDQLFDOVZLWFK7KHFKDQJHLQEORZHUVSHHGLVIURPWKH
FKDQJHLQOLQHYROWDJHFDXVHGE\WKHPDJQHWURQEHLQJWXUQHG21DQG2))
Q: Can my upper oven be damaged if food is cooked for too long?
A: Like any other cooking appliance, it is possible to overcook food to the point that the food
creates smoke and even possibly fire, and damages the inside of the oven. It is always
best to be near the oven while you are cooking.
Q: Why is a standing time recommended after microwave cooking time is over?
A: Standing time allows foods to continue cooking evenly for a few minutes after the actual
microwave oven cooking cycle. The amount of standing time depends upon the density
of the foods.
Q: Why is additional time required for cooking food stored in the refrigerator?
A: As in conventional cooking, the initial temperature of food affects total cooking time.
You need more time to cook food taken out of a refrigerator than for food at room
temperature.
Q: Can I use either metal or aluminum pans in my upper oven?
$8VDEOHPHWDOLQFOXGHVDOXPLQXPIRLOIRUVKLHOGLQJXVHVPDOOIODWSLHFHVDQGVKDOORZ
IRLOWUD\VLIWUD\LVôLQFKGHHSDQGILOOHGZLWKIRRGWRDEVRUEPLFURZDYHHQHUJ\1HYHU
allow metal to touch walls or door.
TROUBLESHOOTING FAQs

72
49-2001799 Rev. 1
Troubleshooting FAQs
TROUBLESHOOTING FAQs (Cont.)
Q: Sometimes the door of my upper oven appears wavy. Is this normal?
A: This appearance is normal and does not affect the operation of your oven.
Q: Why does the glass tray not move?
A: The correct side of the tray should be facing up and the tray should sit firmly on the
center hub. The support is not operating correctly. Reinstall the glass tray and restart the
oven. Cooking without the glass tray can give you poor results.
Q: Why does the dish become hot when I microwave food in it? I thought that this
should not happen.
A: As the food becomes hot it will conduct the heat to the dish. Use hot pads to remove
food after cooking.
Q: What does standing time mean?
A: Standing time means that food should be taken out of the oven and covered for
additional time after cooking. This process allows the cooking to finish, saves energy,
and frees the oven for other purposes.
Q: Can I pop popcorn in my upper oven? How do I get the best results?
A: Yes. Pop packaged microwave popcorn following manufacturer’s guidelines or use the
pre-programmed Popcorn button.
Do not use regular paper bags. Use the listening test by stopping the oven as soon as
the popping slows to a pop every one or two seconds. Do not try to repop unpopped
kernels. You can also use special microwave poppers. When using a popper, be sure to
follow manufacturer’s directions. Do not pop popcorn in glass utensils.
Q: Why does steam come out of the air exhaust vent?
A: Steam is normally produced during cooking. The upper oven has been designed to vent
steam out of the top vent.
About the Lower Oven
Q: My new oven doesn’t cook like my old one. Is there something wrong with the
temperature settings?
$1R<RXURYHQKDVEHHQIDFWRU\WHVWHGDQGFDOLEUDWHG)RUWKHILUVWIHZXVHVIROORZ\RXU
recipe times and temperatures carefully. If you still think your new oven is too hot or too
cold, you can adjust the oven temperature yourself to meet your specific cooking needs.
Refer to the Changing Settings section in this manual for easy instructions on how to
adjust your thermostat.
Q: Is it normal to hear a clicking noise coming from the back of my oven when I am
using it?
A: Your new appliance is designed to maintain a tighter control over your oven’s
temperature. You may hear your oven’s heating elements click on and off more frequently
on your new oven. This is NORMAL.
Q: Why is the time flashing?
A: This means that the product has just been plugged in, or that it has experienced a power
interruption. To clear the flashing time, touch any button and reset the clock if needed.
Q: During convection cooking the fan stops when I open the door. Is that normal?
A: Yes, this is normal. When the door is opened, the convection fan will stop until the door
is closed.
TROUBLESHOOTING FAQs

49-2001799 Rev. 1
73
TROUBLESHOOTING FAQs
Troubleshooting FAQs
TROUBLESHOOTING FAQs (Cont.)
Q: Can I use aluminum foil to catch drippings in my oven cavity?
A: Never use aluminum foil to line the bottom or sides of the oven. The foil will melt and
stick to the bottom surface of the oven and will not be removable. Use a foil-lined sheet
SDQSODFHGRQDORZHURYHQUDFNWRFDWFKGULSSLQJVLQVWHDG,IIRLOKDVDOUHDG\PHOWHG
onto the bottom of the oven, it will not interfere with the oven’s performance.)
Q: Can I use aluminum foil on the racks?
A: Do not cover racks with aluminum foil. Covering entire racks with foil restricts air flow,
leading to poor cooking results. Use a sheet pan lined with foil under fruit pies or other
acidic or sugary foods to prevent spillovers from damaging the oven finish.
Q: Can I leave my racks in the oven when running a Self Clean cycle? (On some
models)
A: No. Although it will not damage the racks, it will discolor them and may make them hard
to slide in and out during use. Remove all items from the oven before starting a Self
Clean cycle.
Q: What should I do if my racks are sticky and have become hard to slide in and out?
A: Over time, the racks may become hard to slide in and out. Apply a small amount of olive
oil to the sides of the racks. This will work as a lubricant for easier gliding.
Q: Why aren’t the function buttons working?
A: Make sure that the appliance is not in Lock Out mode. The lock will show in the display if
/RFN2XWLVDFWLYDWHG7RGHDFWLYDWH/RFN2XWUHIHUWRWKH/RFNRXW)HDWXUHVHFWLRQ7KH
unlock melody sounds and Loc appears in the display until the controls are unlocked.
Q: My appliance is still dirty after running the EasyClean cycle. What else should I
do?
A: The EasyClean cycle only helps to loosen light soils in your appliance to assist in hand-
cleaning of your oven. It does not automatically remove all soils after the cycle. Some
scrubbing of your appliance is required after running the EasyClean cycle.
Q: I tried scrubbing my oven after running EasyClean, but some soils still remain.
What can I do?
A: The EasyClean feature works best when the soils are fully soaked and submerged in
water before running the cycle and during hand-cleaning. If soils are not sufficiently
soaked in water, it can negatively affect the cleaning performance. Repeat the EasyClean
process using sufficient water. Sugar-based and certain greasy soils are especially hard
to clean. If some stubborn soils remain, use the Self Clean feature to thoroughly clean
your oven.

74
49-2001799 Rev. 1
TROUBLESHOOTING FAQs (Cont.)
Q: Soils on my oven walls are not coming off. How can I get the oven walls clean?
A: Soils on the side and rear walls of your appliance may be more difficult to fully soak with
ZDWHU7U\UHSHDWLQJWKH(DV\&OHDQSURFHVVZLWKPRUHWKDQWKHóFXSR]RUPORI
spray recommended.
Q: Will EasyClean get all of the soils and stains out completely?
A: It depends on the soil type. Sugar-based and certain grease stains are especially hard
to clean. Also, if stains are not sufficiently soaked in water, this can negatively affect
cleaning performance. If stubborn or built-up stains remain, use the Self Clean feature.
Refer to the Self Clean section of your owner’s manual.
Q: Are there any tricks to getting some of the stubborn soils out?
A: Scraping the soils with a plastic scraper before and during hand-cleaning is
UHFRPPHQGHG)XOO\VDWXUDWLQJVRLOVZLWKZDWHULVDOVRUHFRPPHQGHG+RZHYHUFHUWDLQ
W\SHVRIVRLOVDUHKDUGHUWRFOHDQWKDQRWKHUV)RUWKHVHVWXEERUQVRLOVWKH6HOI&OHDQ
cycle is recommended. Consult the Self Clean section of your owner's manual for details.
Q: Is it safe for my convection fan or heater element to get wet during EasyClean?
A: Yes. The convection fan or heater element may get a little wet during cleaning. However,
direct spray onto the broil burner and heater elements is not necessary because these
are self-cleaning during regular use.
Q: Do I need to use all 1 ¼ cups (10 oz or 300 ml) of water for EasyClean?
$<HV,WLVKLJKO\UHFRPPHQGHGWKDWFXSR]RUPORIZDWHUEHVSUD\HGRUSRXUHG
RQWKHERWWRPDQGDQDGGLWLRQDOóFXSR]RUPORIZDWHUEHVSUD\HGRQZDOOVDQG
other soiled areas to fully saturate the soils for better cleaning performance.
Q: I see smoke coming out of my appliance’s vents during EasyClean. Is this normal?
$7KLVLVQRUPDO7KLVLVQRWVPRNH,WLVDFWXDOO\ZDWHUYDSRUVWHDPIURPWKHZDWHULQ
the oven cavity. As the oven heats briefly during EasyClean, the water in the cavity
evaporates and escapes through the oven vents.
Q: How often should I use EasyClean?
A: EasyClean can be performed as often as you wish. EasyClean works best when your
oven is LIGHTLY soiled from such things as LIGHT grease splatter and small drops
of cheese. Please refer to the EasyClean section in your owner’s manual for more
information.
Q: What is required for EasyClean?
$$VSUD\ERWWOHILOOHGZLWKóFXSVR]RUPORIZDWHUDSODVWLFVFUDSHUDQRQ
scratch scrubbing pad and a towel. You should not use abrasive scrubbers such as
heavy-duty scouring pads or steel wool.
Q: How can I help keep children safe around the appliance?
A: Children should be supervised around the appliance whenever it is in use, and after
use until surfaces have cooled. You can also use the Lock Out feature to help prevent
children from accidentally turning on the oven. The Lock Out feature disables most
FRQWUROSDQHOEXWWRQV&RQVXOWWKH/RFNRXW)HDWXUHVHFWLRQRI\RXURZQHU¶VPDQXDOIRU
GHWDLOV,QPRGHOVZLWKRXWD6HOI&OHDQRSWLRQWKH/RFN2XWIHDWXUHORFNVWKHFRQWUROV
but does not lock the oven door.)
Troubleshooting FAQs
TROUBLESHOOTING TIPS

49-2001799 Rev. 1
75
TROUBLESHOOTING FAQs
Troubleshooting Tips
BEFORE CALLING FOR SERVICE
Review this section before calling for service; doing so will save you both time and money.
Cooking
Problem Possible Cause & Solution
Arcing or Sparking Cookware is not microwave safe.
• When in doubt, test cookware before use.
Do not operate oven while empty.
• Place the food in the oven.
Unevenly Cooked Foods,
Overcooked Foods, Undercooked
Foods, Improper Defrosting
Carefully monitor the food in the microwave oven while it is
cooking.
• See the Cooking Tips in the Operating the Upper Microwave Oven
section.
If the display shows a time counting
down but the oven is not cooking.
The oven door is not closed.
• Check that the oven door is firmly closed.
Oven will not work Plug on appliance is not completely inserted in the electrical
outlet.
• Make sure electrical plug is plugged into a live, properly grounded
outlet.
A fuse in your home may be blown or the circuit breaker tripped.
• Replace the fuse or reset the circuit breaker.
Oven controls improperly set.
• See the Using the Oven section.
Oven too hot.
• Allow the oven to cool to below locking temperature.
Steam is exhausted through the
oven vent.
Cooking foods with high moisture produces steam.
• This is normal.
Appliance does not operate. Cord is not plugged in correctly.
• Make sure cord is plugged correctly into outlet. Check circuit
breakers.
Service wiring is not complete.
• Contact your electrician for assistance.
Power outage.
• Check house lights to be sure. Call your local electric company for
service.
Oven smokes excessively during
broiling.
Control not set properly.
)ROORZLQVWUXFWLRQVXQGHU&KDQJLQJ6HWWLQJV
Meat too close to the element.
• Reposition the rack to provide proper clearance between the meat
and the element. Preheat broil element for searing.
Meat not properly prepared.
• Remove excess fat from meat. Cut remaining fatty edges to prevent
curling.
Insert on broiler pan wrong side up and grease not draining.
• Always place the grid on the broiler pan with ribs up and slots down
to allow grease to drip into the pan.
Grease has built up on oven surfaces. Old grease or food
spatters cause excessive smoking.
• Regular cleaning is necessary when broiling frequently.
Food does not bake or roast
properly
Oven controls improperly set.
• See the Using the Oven section.
Rack position is incorrect or the rack is not level.
• See the Using the Oven section.
Incorrect cookware or cookware of improper size being used.
• See the Using the Oven section.

76
49-2001799 Rev. 1
Troubleshooting Tips
Problem Possible Cause & Solution
Oven temperature too hot
or cold
Aluminum foil used on the broiling pan and grid has not been fitted
properly and slit as recommended.
• See the Using the Oven section.
In some areas the power voltage may be low.
• Preheat the broil element for 5-7 minutes.
• See the Using the Oven section.
Oven sensor needs to be adjusted.
• See the Using the Oven section.
Food does not broil properly Oven controls improperly set.
• Make sure you select the Broil mode properly.
Improper rack position being used.
• See the Broiling Guide.
Cookware not suited for broiling.
• Use broiling pan and grid.
Aluminum foil used on the broiling pan and grid has not been fitted
properly and slit as recommended.
• See the Using the Oven section.
In some areas the power voltage may be low.
• Preheat the broil element for 5-7 minutes. See the Broiling Guide.
Excessive smoking during a
Self Clean cycle
Excessive soil.
• Turn off the Self Clean function. Open the windows to rid the room of smoke.
Wait until the Self Clean mode is cancelled. Wipe up the excess soil and reset
the clean.
Burning or oily odor
emitting from the vent
This is normal in a new oven.
• This will disappear in time. To speed the process, set a Self Clean cycle for a
minimum of 3 hours. See the Self Clean section.
Moisture collects on oven
window or steam comes
from oven vent
This happens when cooking foods high in moisture.
• This is normal.
Excessive moisture was used when cleaning the window.
• Do not use excessive moisture when cleaning the window.
Oven will not steam cook Improper assembly
• Make sure to slide the tank into the slot until it clicks into place.
The drain in the water tank may be clogged with hard water scale.
• If this happens, the descaling function must be run before the steam function
can be used.
Water pools in the bottom
of the oven during or after
steam cooking (On some
models)
During steam cooking, the water in the water tank is transferred to the
bottom of the oven.
• It is normal for water to fill the bottom of the oven during or after the Steam
mode.
• If the water leaves mineral deposits on the oven bottom, remove the deposits
with a cloth or sponge soaked in vinegar.
White residue appears on
the oven bottom after steam
cooking
Using hard water in the water tank can result in hard water scale on the
oven bottom.
• To remove mineral deposits that remain on the oven bottom, use a cloth or
sponge soaked in vinegar or a weak citric acid solution.
The sous vide module
beeps during operation
This alert sounds when the sous vide module is operated without water in
the steam feeder tank.
)LOOWKHVWHDPIHHGHUWDQNWRWKHUHFRPPHQGHGOHYHOEHIRUHXVLQJ
Cooking (Cont.)
TROUBLESHOOTING TIPS

49-2001799 Rev. 1
77
TROUBLESHOOTING TIPS
Troubleshooting Tips
Problem Possible Cause & Solution
Oven control beeps and
displays any F code error.
Electronic control has detected a fault condition.
• Turn off the oven function you are using to clear the display and stop beeping.
Reprogram oven. If fault recurs, record fault number and call for service.
- [Case 1 ]
&RGH)
&DXVH2YHQQRWKHDWLQJXSSHURYHQ
- [Case 2 ]
&RGH)
&DXVH2YHQQRWKHDWLQJORZHURYHQ
Lock icon is on in the
display when you want to
cook
The oven door is locked because the temperature inside the oven has not
dropped below the locking temperature.
• Press the STOP button. Allow the oven to cool.
Oven light does not work. It is time to replace the bulb or the bulb is loose.
• Replace or tighten bulb. See "Changing the Oven Light" section in this
Owner’s Manual.
Cooling fan continues to run
after oven is turned off.
The fan turns off automatically when the electronic components have
cooled sufficiently.
• This is normal.
Oven will not Self Clean. The oven temperature is too high to set a Self Clean operation.
• Allow the appliance to cool and reset the controls.
Oven controls improperly set.
• See the Self Clean section.
A Self Clean cycle cannot be started if oven door is open.
• Close the oven door.
Oven door does not open
after a Self Clean cycle
Oven is too hot.
• Allow the oven to cool below locking temperature.
The control and door may be locked.
• Allow about one hour for the oven to cool after the completion of a Self Clean
cycle. The door can be opened when the lock k is no longer displayed.
The oven is not clean after a
Self Clean cycle
Oven controls not properly set.
• See the Self Clean section.
Oven was heavily soiled.
• Clean up heavy spillovers before starting the clean cycle. Heavily soiled
ovens may need to Self Clean again or for a longer period of time.
Convection fan stops Convection fan stops during a convection bake cycle. It is done to allow
for more even heating during the cycle.
• This is not a failure of the range and should be considered normal operation.
Displayed Time is flashing This means that the product has just been plugged in, or that it has
experienced a power interruption.
• Touch the Clock key and reset the time, or touch any key to stop the flashing.
Oven racks are difficult to
slide
The shiny, silver-colored racks were cleaned in a Self Clean cycle.
• Apply a small amount of vegetable oil to a paper towel and wipe the edges of
the oven racks with the paper towel.
Parts & Features
Problem Possible Cause & Solution
“Crackling” or “popping”
sound
This is the sound of the metal heating and cooling during both the
cooking and Self Clean functions.
• This is normal.
Fan noise A convection fan may automatically turn on and off.
• This is normal.
Steam feeder tank noise After any steam cooking cycle, the drying function will run automatically.
It is normal to hear the steam pump running during the drying function.
Noises
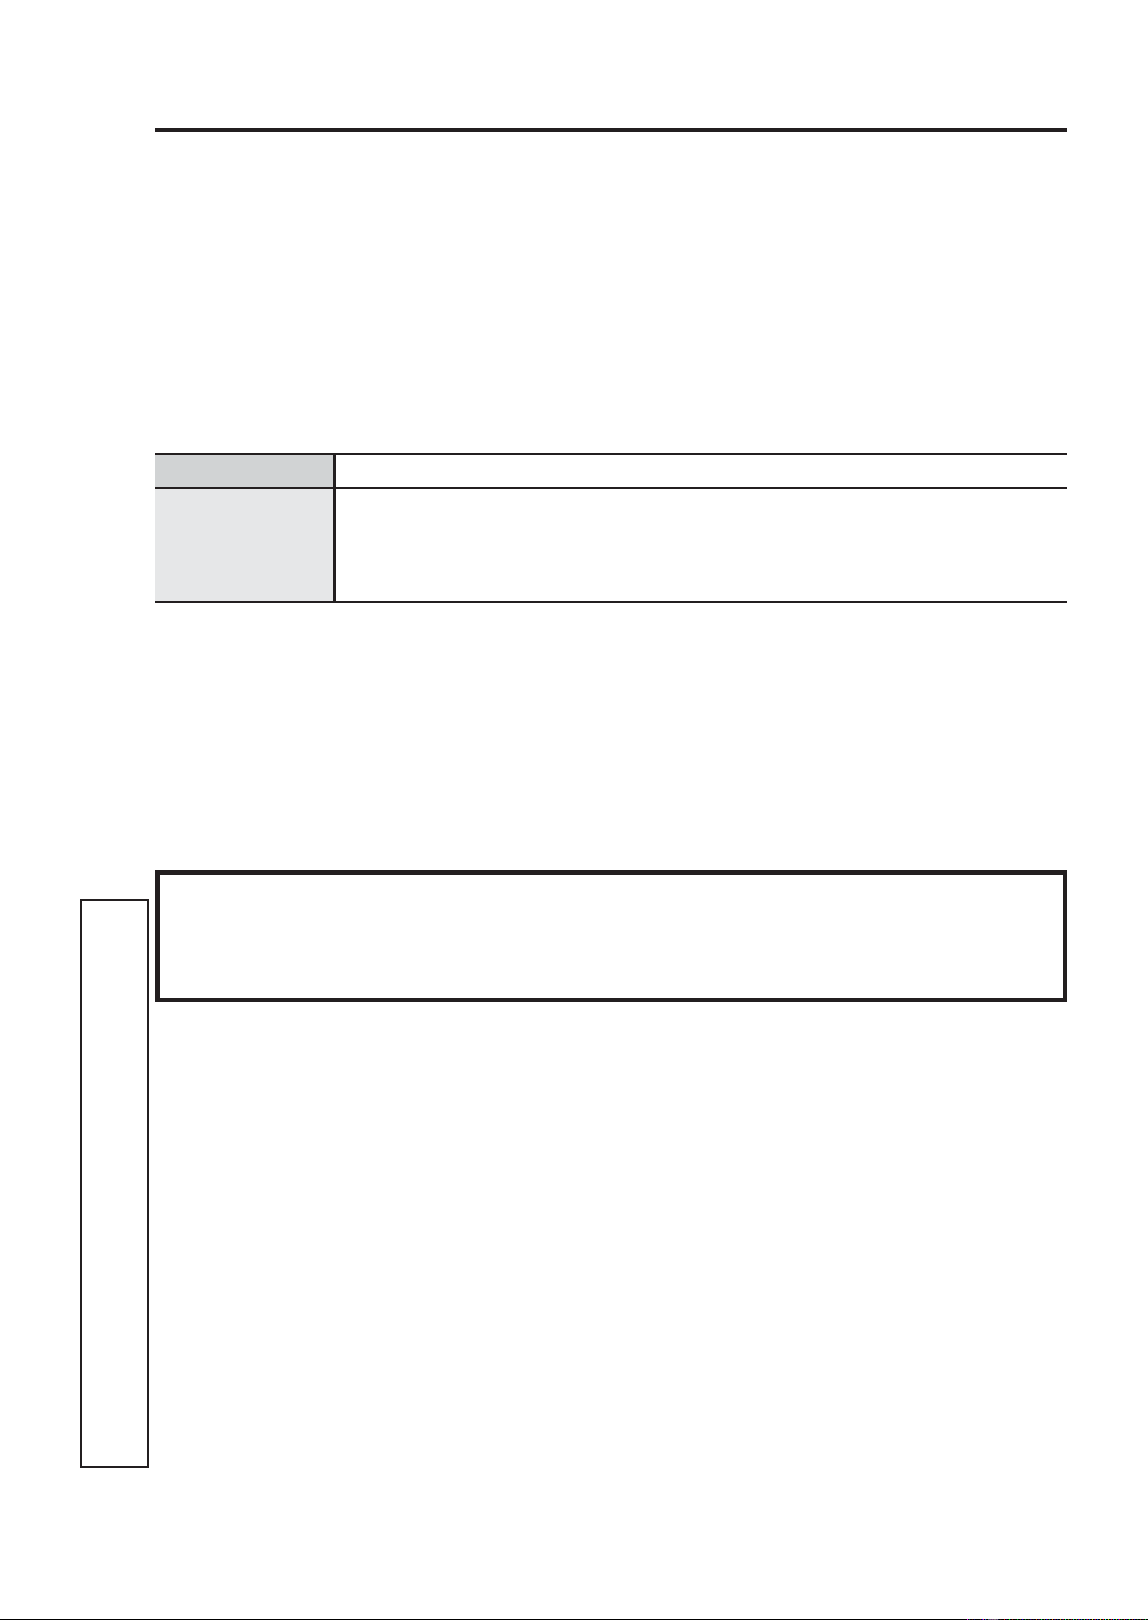
78
49-2001799 Rev. 1
Staple your receipt here. Proof of the original purchase
date is needed to obtain service under the warranty.
LIMITED WARRANTY
Limited Warranty
GEAppliances.com
All warranty service for your appliance is provided exclusively by GE Appliances, a Haier company’s
)DFWRU\6HUYLFH&HQWHUVRUE\DVHUYLFHWHFKQLFLDQDXWKRUL]HGE\*($SSOLDQFHVWRSURYLGHZDUUDQW\
service for your appliance. To schedule service online, visit us at GEAppliances.com/service, or call GE
$SSOLDQFHVDW*(&$5(63OHDVHKDYH\RXUVHULDOQXPEHUDQG\RXUPRGHOQXPEHU
available when calling for service. Service that has not been scheduled or otherwise arranged for by GE
Appliances will not be covered under this warranty, including any parts and/or services provided.
Servicing your appliance may require the use of the onboard data port for diagnostics. This gives a GE
Appliances factory service technician the ability to quickly diagnose any issues with your appliance and
helps GE Appliances improve its products by providing GE Appliances with information on your appliance.
If you do not want your appliance data to be sent to GE Appliances, please advise your technician not to
submit the data to GE Appliances at the time of service.
What GE Appliances will not cover:
Ŷ Service trips to your home to teach you how to
use the product.
Ŷ ,PSURSHULQVWDOODWLRQGHOLYHU\RUPDLQWHQDQFH
Ŷ )DLOXUHRIWKHSURGXFWLILWLVDEXVHGPLVXVHG
modified or used for other than the intended
purpose or used commercially.
Ŷ 5HSODFHPHQWRIKRXVHIXVHVRUUHVHWWLQJRI
circuit breakers.
Ŷ 'DPDJHWRWKHSURGXFWFDXVHGE\DFFLGHQW
fire, floods or acts of God.
Ŷ 'DPDJHWRILQLVKVXFKDVVXUIDFHUXVW
tarnish, or small blemishes not reported within
48 hours of delivery.
Ŷ ,QFLGHQWDORUFRQVHTXHQWLDOGDPDJHFDXVHG
by possible defects with this appliance.
Ŷ 'DPDJHFDXVHGDIWHUGHOLYHU\
Ŷ 3URGXFWQRWDFFHVVLEOHWRSURYLGHUHTXLUHG
service.
Ŷ 6HUYLFHWRUHSDLURUUHSODFHOLJKWEXOEVH[FHSW
for LED lamps.
EXCLUSION OF IMPLIED WARRANTIES
Your sole and exclusive remedy is product repair as provided in this Limited Warranty. Any
implied warranties, including the implied warranties of merchantability or fitness for a particular
purpose, are limited to one year or the shortest period allowed by law.
This limited warranty is extended to the original purchaser and any succeeding owner for products
purchased for home use within the USA. If the product is located in an area where service by a GE
Appliances Authorized Servicer is not available, you may be responsible for a trip charge or you may
be required to bring the product to an Authorized GE Appliances Service location for service. In Alaska,
the limited warranty excludes the cost of shipping or service calls to your home.
Some states do not allow the exclusion or limitation of incidental or consequential damages. This
limited warranty gives you specific legal rights, and you may also have other rights which vary from
state to state. To know what your legal rights are, consult your local or state consumer affairs office or
your state’s Attorney General.
Warrantor: GE Appliances, a Haier company
/RXLVYLOOH.<
For the period of GE Appliances will replace
One year
)URPWKHGDWH
of the original
purchase
Any part of the range which fails due to a defect in materials or workmanship.
During this limited one-year warranty, GE Appliances will provide, free of
charge, all labor and in-home service to replace the defective part.

49-2001799 Rev. 1
79
Looking For Something More?
GE Appliances offers a variety of
accessories to improve your cooking and
maintenance experiences!
Refer to the Consumer Support page for
phone numbers and website information.
The following products and more are
available:
Accessories
Accessories
6PDOO%URLOHU3DQô´[ó´[ò³
/DUJH%URLOHU3DQô´[ó´[ò³
;/%URLOHU3DQ´[ó´[³
Parts
Glass Tray
Metal Tray
Turntable
Oven Racks
Oven Elements
Light Bulbs
Cleaning Supplies
16 oz. Micro Bryte
®
Appliance Cleaner
CitruShine™ Stainless Steel Wipes
Stainless Steel Appliance Cleaner
Graphite Lubricant
*The large broiler pan does not fit in 20”/24” ranges.
**The XL broiler pan does not fit in 24” wall ovens, 27”drop ins or 20”/24” ranges
ACCESSORIES

80
49-2001799 Rev. 1
CONSUMER SUPPORT
Consumer Support
GE Appliances Website
Have a question or need assistance with your appliance? Try the GE Appliances Website
24 hours a day, any day of the year! You can also shop for more great GE Appliances
products and take advantage of all our on-line support services designed for your
convenience. GEAppliances.com.
Register Your Appliance
Register your new appliance on-line at your convenience! Timely product registration will
allow for enhanced communication and prompt service under the terms of your warranty,
should the need arise. You may also mail in the pre-printed registration card included in the
packing material. GEAppliances.com/register.
Schedule Service
Expert GE Appliances repair service is only one step away from your door. Get on-line and
schedule your service at your convenience any day of the year. GEAppliances.com/service
or call 800.432.2737 during normal business hours.
Parts and Accessories
Individuals qualified to service their own appliances can have parts or accessories sent
directly to their homes
9,6$0DVWHU&DUGDQG'LVFRYHUFDUGVDUHDFFHSWHG2UGHURQOLQHWRGD\KRXUVHYHU\
day.
GEApplianceparts.com or by phone at 877.959.8688 during normal business hours.
Instructions contained in this manual cover procedures to be performed by any user.
Other servicing generally should be referred to qualified service personnel. Caution
must be exercised, since improper servicing may cause unsafe operation.
Contact Us
If you are not satisfied with the service you receive from GE Appliances, contact us on our
Website with all the details including your phone number, or write to:
General Manager, Customer Relations | GE Appliances, Appliance Park |
/RXLVYLOOH.<
GEAppliances.com/contact or call 800.626.2000
Printed in the China