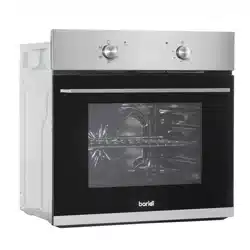
60cm Built In 4 Function Fan Assisted Single Oven,
Black/Stainless Steel
Model No. DH124, DH125
Thank you for purchasing a Dellonda product. Manufactured to a high standard, this product will,
if used according to these instructions, and properly maintained, give you years of trouble free performance.
DG124, DG125 Issue:2 07/06/22
www.dellonda.co.uk
Important Information
Please read these instructions carefully. Note the safe operational requirements, warnings & cautions. Use the product correctly and with care
for the purpose for which it is intended. Failure to do so may cause damage and/or personal injury and will invalidate the warranty. Keep these
instructions safe for future use.
Refer to
instruction
manual
Warning:
Hot
Surface
Specication
Cable Length: 1.2m
Capacity: 55L
Colour: Black/Stainless Steel
Energy Efciency Class: A
Power: 2350W
Product dimensions (W x D x H): 595 x 590 x 520mm
Supply: 220-240V
Safety Instructions
• ELECTRICAL SAFETY
• WARNING! It is the user’s responsibility to check the following:
• Check all electrical equipment and appliances to ensure that they are safe before using. Inspect power supply leads, plugs and all electrical
connections for wear and damage. Dellonda recommend that an RCD (Residual Current Device) is used with all electrical products. You may
obtain an RCD by contacting your local domestic stockist. If the product is used in the course of business duties, it must be maintained in a
safe condition and routinely PAT (Portable Appliance Test) tested.
• Electrical safety information: It is important that the following information is read and understood.
• Ensure that the insulation on all cables and on the appliance is safe before connecting it to the power supply.
• Regularly inspect power supply cables and plugs for wear or damage and check all connections to ensure that they are secure.
• Important: Ensure that the voltage rating on the appliance suits the power supply to be used and that the plug is tted with the correct fuse - see
fuse rating in these instructions.
• DO NOT pull or carry the appliance by the power cable.
• DO NOT pull the plug from the socket by the cable.
• DO NOT use worn or damaged cables, plugs or connectors.
• Ensure that any faulty item is repaired or replaced immediately by a qualied electrician.
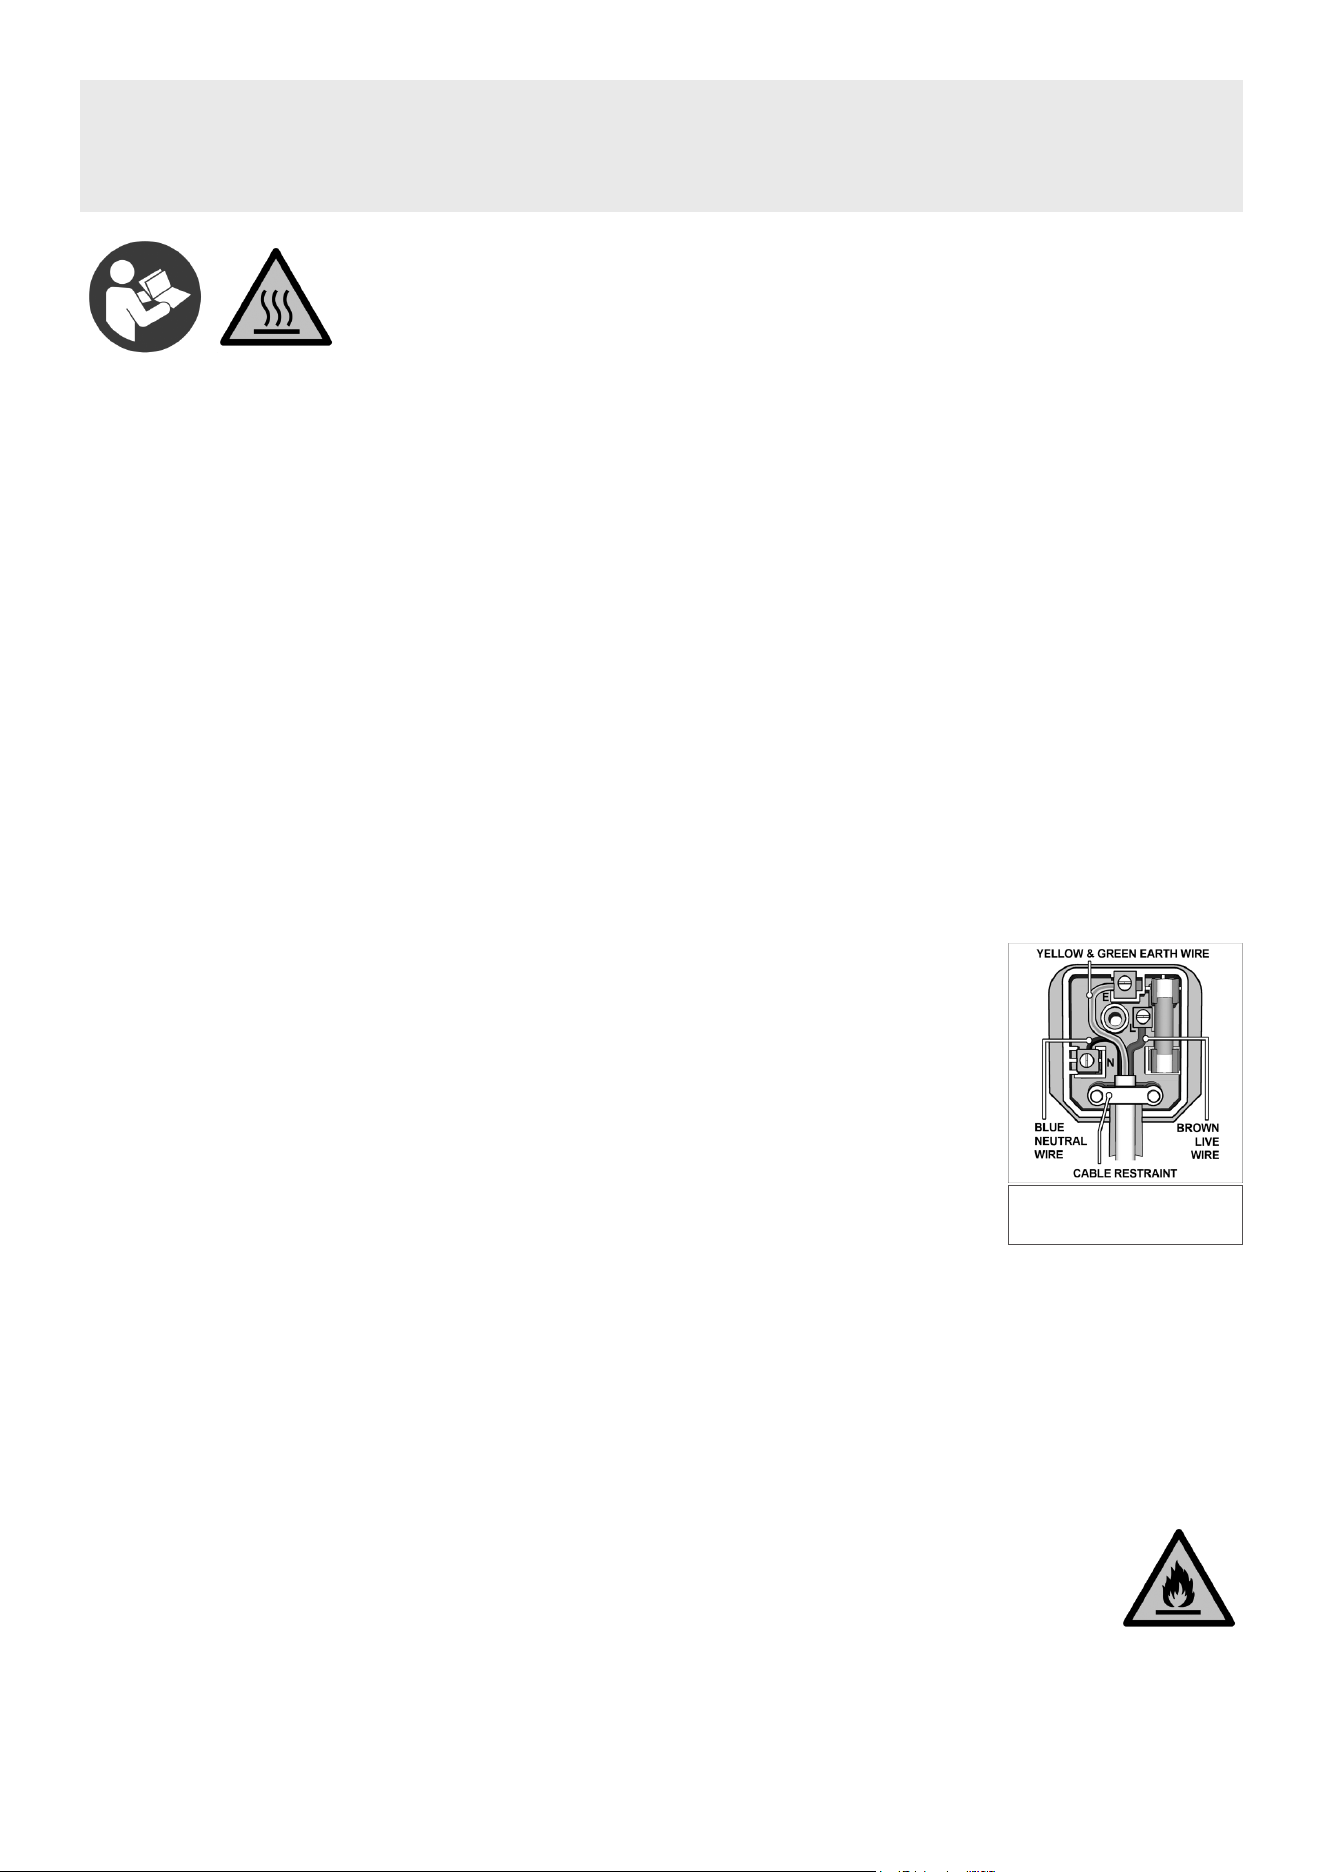
• This product is tted with a BS1363/A 13 Amp 3 pin plug. If the cable or plug is damaged
during use, switch off the electricity supply and remove from use. Ensure that repairs are
carried out by a qualied electrician.
• Replace a damaged plug with a BS1363/A 13 amp 3 pin plug. If in doubt contact a qualied electrician.
A) Connect the GREEN/YELLOW earth wire to the earth terminal ‘E’.
B) Connect the BROWN live wire to the live terminal ‘L’.
C) Connect the BLUE neutral wire to the neutral terminal ‘N’.
• Ensure that the cable outer sheath extends inside the cable restraint and that the restraint is tight.
• Dellonda recommend that installation and repairs are carried out by a qualied electrician.
• GENERAL SAFETY
• The appliance and its accessible parts become hot during use. Care should be taken to avoid touching heating elements.
• Children less than 8 years of age shall be kept away unless continuously supervised.
• This appliance can be used by children aged from 8 years and above and persons with reduced physical, sensory or mental capabilities or lack of
experience and knowledge or they have been given supervision or instruction concerning use of the appliance in a safe way and understand the
hazards involved. Children shall not play with the appliance. Cleaning and user maintenance shall not be made by children without supervision.
• A steam cleaner is not to be used.
• Accessible parts may become hot during use. Young children should be kept well away when in use.
• DO NOT use harsh abrasive cleaners or metal scrapers to clean the oven door glass as this can scratch the surface, which may result in the oven
glass shattering.
• DO NOT use abrasive products to clean the glass door panel to avoid scratching it. Otherwise, severe failure might happen to the appliance.
• The appliance must not be installed behind a decorative door in order to avoid overheating.
• The air must not be discharged into a ue that is used for exhausting fumes from appliances burning gas or other fuels.
• OPERATIONAL SAFETY
• DO NOT allow paper or cloth to come in contact with any heating element.
• Never store or use corrosive chemicals, vapors, ammables or nonfood products in or near oven.
• It is specically designed for use when heating or cooking food. The use of corrosive chemicals in heating or cleaning will damage the appliance
and could result in injury
• If food inside an oven should ignite, keep door closed. Switch off the oven and disconnect from mains supply.
• Exercise caution when opening the door. Standing to the side, open the door slowly and slightly to let hot air and/or steam escape. Keep your face
clear of the opening and make sure there are no children or pets near the oven.
• Keep door closed at all time unless necessary for cooking or cleaning purposes.
• Only use utensils that are suitable for use with ovens.
Replacement fuse rating:
13A
• WARNING! DANGER OF EXPLOSION!
• Liquids and other foods must not be heated in sealed containers since they are liable to explode.
• If smoke is observed, switch off the oven and keep the door closed in order to stie any ames.
• DO NOT allow any accessories or electric cables to contact the hot parts of the appliance.
• HOT SURFACES! RISK OF BURNS!
• During use the appliance becomes hot. Care should be taken to avoid touching heating elements inside the oven.
• WARNING! Accessible parts may become hot during use. Young children should be kept away.
• Never move racks or pans when they are hot. Wait until they cool.
• IMPORTANT!
• Always switch off the electricity supply at the mains during installation and maintenance.
• GENERAL INFORMATION
• This appliance is designed for domestic household use and can be built into a standard kitchen cabinet or housing unit.
• The appliance surfaces will become hot during use and retain heat after operation.
• Any damage caused by the non-compliance of temperature tolerance of oven during installation or by the too close distance between the
furniture and the oven will be borne by the owner.
• This appliance is not intended for use by persons (including children) with reduced physical sensory, or mental capabilities, or by those who lack
experience and knowledge, unless they have been given supervision and instruction concerning the use of the appliance by a person responsible
for their safety .
• INSTALLATION
• The oven must be installed in accordance with the installation instructions and all measurements must be followed.
• All installation work must be carried out by a competent person or qualied electrician.
• CHILDREN
• Please dispose of the packaging material carefully. Packaging material can be dangerous to children.
• Make sure to keep children away from the appliance, children should be supervised to ensure that they do not play with the appliance. It might be
dangerous to allow the children to touch the appliance.
• GENERAL SAFETY
• DO NOT place heavy objects on the oven door or lean them on the oven door when it is open, as it may cause damages to the oven door hinges.
• DO exercise caution when cooking with hot fat/oil. DO NOT leave it unattended, as it will be a re risk.
• DO NOT place pans or baking trays directly on the base of the oven cavity, even if aluminium foil is placed below them.
• DO NOT allow cable or plug to come into contact with the heating areas of appliance.
• DO NOT install the appliance next to curtains or soft furnishings.
• DO NOT attempt to lift or move cooking appliances by using the oven door or handle, as this may cause damage to the appliance or result in
injury to the person lifting the appliance.
• ELECTRICAL SAFETY
• If the supply cord is damaged, it must be replaced by the manufacturer, its service agent or similarly qualied persons in order to avoid a hazard.
• The appliance must be placed in such a way, that the power supply is accessible at all times.
• Before connecting the appliance to the power supply, check that the power supply voltage and current rating corresponds with the power supply
details shown on the appliance rating label.
• Never use a damaged appliance! Disconnect the appliance from the power source and contact your supplier if it is damaged.
• Danger of electric shock! Do not attempt to repair the appliance yourself. In case of malfunction, repairs are to be conducted by qualied
personnel only.
• To avoid damaging the cord, do not squeeze, bend or chafe it on sharp edges. Keep it away from hot surfaces and open ames as well.
• Lay out the cord in such a way that no unintentional pulling or tripping over it is possible.
• DO NOT open the appliance casing under any circumstances. Do not insert any foreign objects into the inside of the casing.
• Never use accessories which are not recommended by the manufacturer. They could pose a safety risk to the user and might damage the
appliance. Only use original parts and accessories.
• Keep the appliance away from any hot surfaces and open ames. Always operate the appliance on a level, stable, clean and dry surface. Protect
the appliance against heat, dust, direct sunlight, moisture, dripping and splashing water.
• DO NOT place objects with open ames, e.g. candles, on top of or beside the appliance.
• WARNING: Ensure that the appliance is switched off before replacing the lamp to avoid the possibility of electric shock.
• The xed wiring for applicant shall have an all-pole disconnection device.
• GENERAL SAFETY
• Attention, the glass is extremely fragile. Always wear gloves when handling.
• For your safety, this product is made of tempered glass. This type of glass is highly resistant but has the feature to retain the “memory” of
shocks.
• Therefore, it should handle the product with the greatest care to avoid shocks and twists, especially during installation.
• Avoid installing this type of product in areas where it would be highly exposed to shocks.
• DO NOT let children play with the product.
• DO NOT stick adhesive lm on the glass surface. In case of breakage, it would generate large pieces that could be dangerous
• ELECTRICAL CONNECTION
• DANGER OF ELECTRIC SHOCK!
• Any electrical installation must be carried out by an authorised professional.
• All ttings must be installed by a competent person in accordance with local regulations. If in doubt, consult a qualied electrician.
• IMPORTANT! Always switch off the electricity supply at the mains during installation and maintenance. We recommend that the fuse is
withdrawn or circuit breaker switched off at the distribution board whilst work is in progress.
• This product must be earthed – if no earth feed wire is available, consult an electrician.
• Means for disconnection must be incorporated in the xed wiring in accordance with the wiring rules. To achieve this install appropriate switched
fused connection unit.
• Note! A switched fused connection unit having a contact separation of at least 3mm in all poles should be connected in xed wiring.
• Connect the incoming positive, neutral and earth cables to the terminals of the switched fused connection unit. Ensure connections are tight.
• The spur outlet must still be accessible even when your oven is located in its housing to enable the appliance to be disconnected from the mains
supply.
• CLEANING
• Always disconnect the power supply prior to cleaning the appliance. If the switched fused connection unit is difcult to reach, shut off the power
supply by using the corresponding circuit breaker at the distribution board.
• Clean the appliance thoroughly before rst use. The oven should be cleaned regularly and any food deposits removed.
• Never clean the oven surfaces by steam cleaning.
• The oven cavity should only be cleaned with warm soapy water, using either a sponge or soft cloth. No abrasive cleaners should be used.
• Any stains that may appear on the bottom of the oven will have originated from food splashes or spilt food, these splashes occur during the
cooking process. These could possibly be a result of the food being cooked at an excessively high temperature or being placed in cookware that
is too small.
• You should select a cooking temperature and function that is appropriate for the food that you are cooking. You should also ensure that the food
is placed in an adequately sized dish and that you use the drip tray where appropriate.
Installation
• ELECTRICAL CONNECTION
• Before connecting the appliance, make sure that the supply voltage marked on the Rating Plate corresponds with your mains supply voltage.
• WARNING: THIS APPLIANCE MUST BE EARTHED.
• A suitable disconnection switch is to be incorporated in the permanent wiring. The switch is to be of approved type and positioned in accordance
with local wiring and electrical rules and specications. The switch must have 3 mm air gap contact separation in all poles, in the active (phase)
conductor of the xed wiring.
• To connect the oven power cord, loosen and remove the cover on the terminal block, in order to gain access to the contacts inside. Make the
connection, securing the cord in place with the cable clamp provided and then immediately close the terminal block cover again.
• If you have to change the oven power cord, the earthing (yellow/green) conductor must always be 10 mm longer than the line conductors.
• The installation must include 1.2m of free cable within the enclosure for ease of installation and future maintenance.
• The mains cable must not touch any hot metal.
• Care must be taken to ensure that the temperature of the mains supply cable does not exceed 50°C.
• If the mains supply cable is damaged, then it must be replaced by an appropriate replacement which can be obtained from Spares Department.
• INSTALLING THE OVEN INTO THE KITCHEN CABINET
• The kitchen area should be dry and aired and equipped with efcient ventilation. When installing the oven, easy access to all control elements
should be ensured.
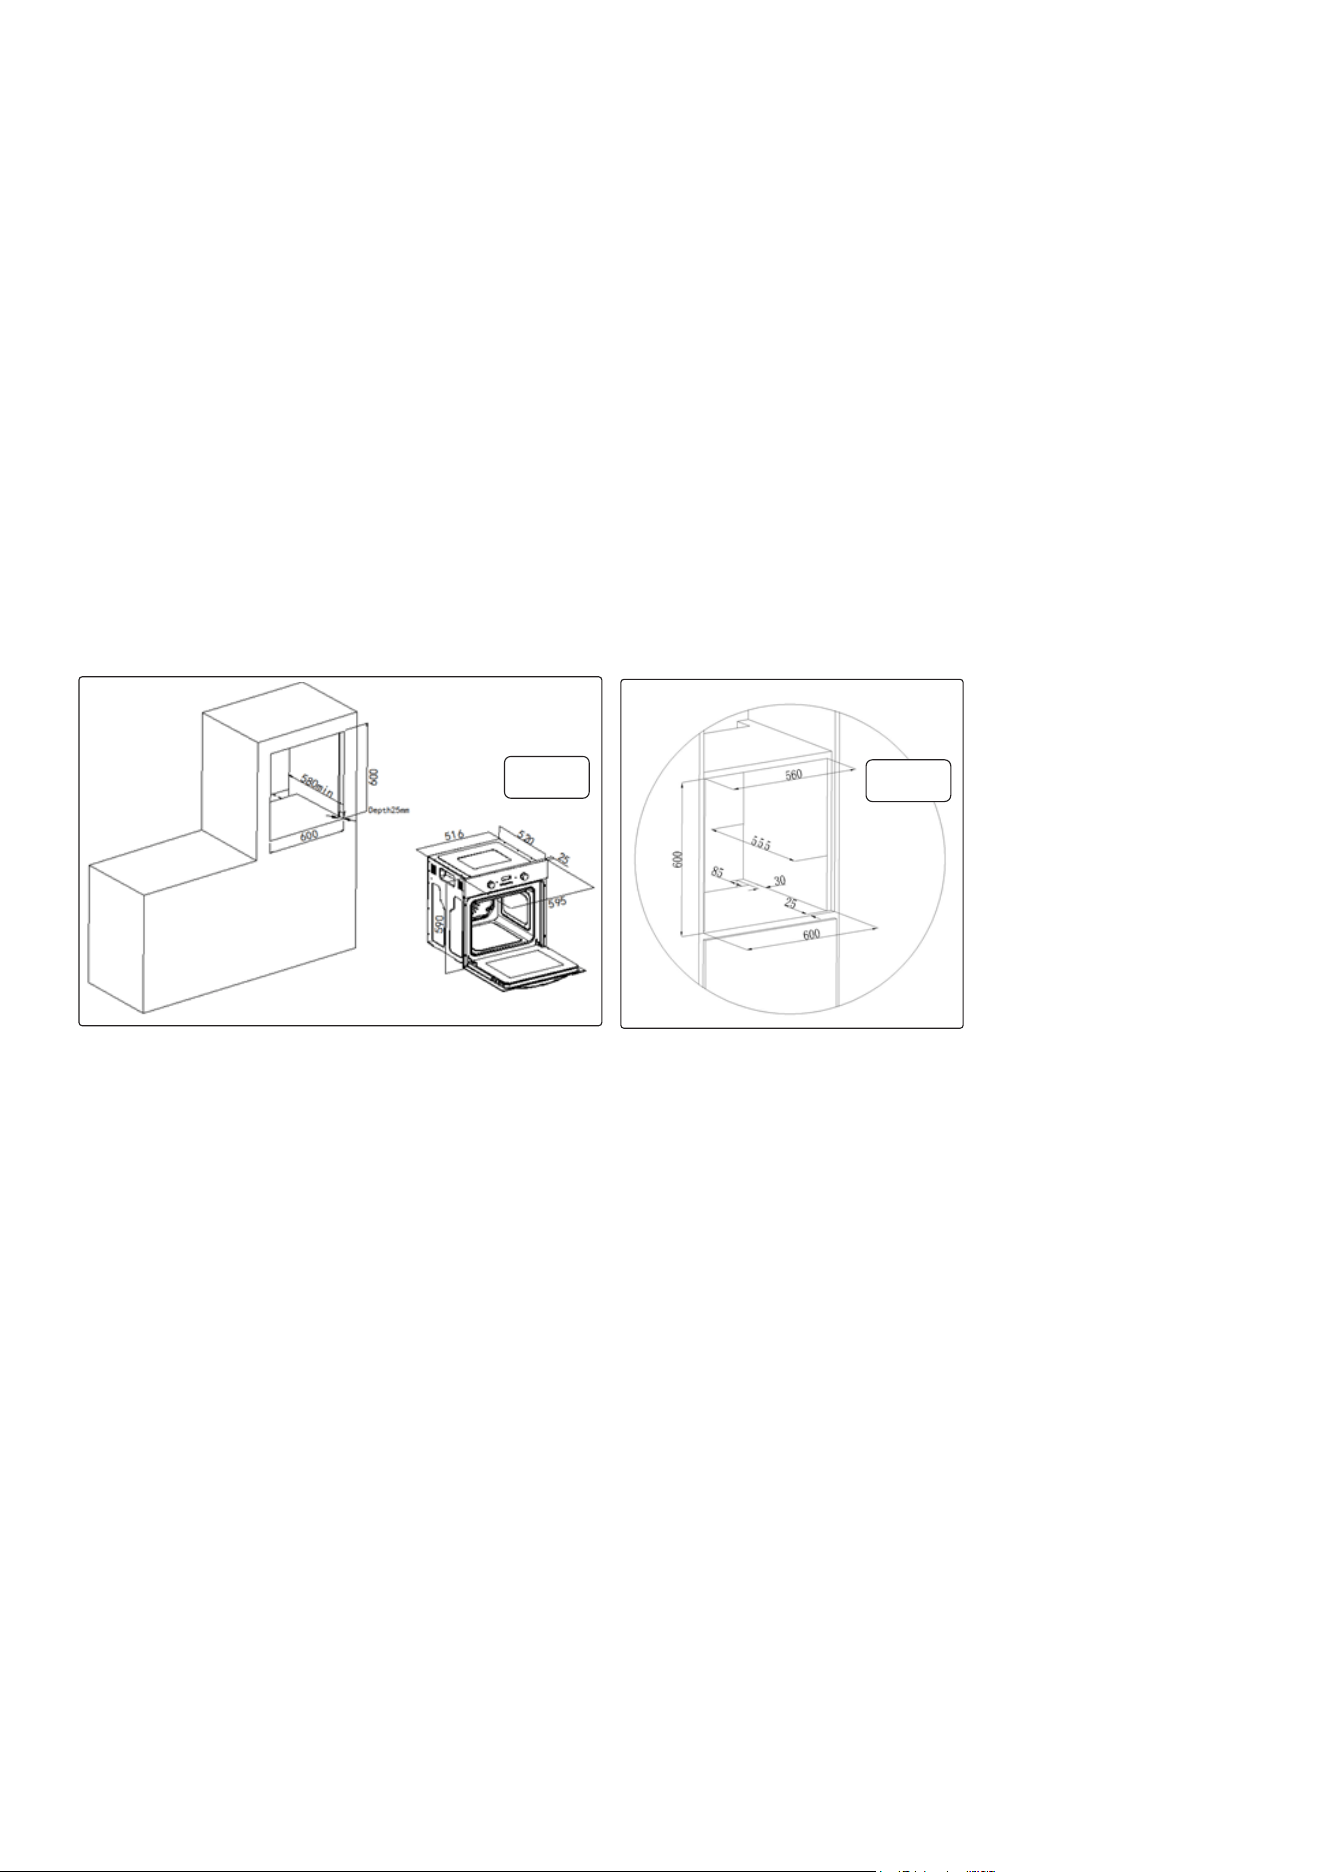
• POSITIONING THE APPLIANCE SEE FIG.1
•
• Ensure that the aperture that you will be tting the oven into is of the size given in g.1.
• The oven must be tted into an oven housing with the ventilation cut-outs shown in the “Ventilation requirements” section below.
• Ensure that the rear panel of the furniture housing unit has been removed.
• Ensure that the oven has been securely xed into the housing unit.
• The xing of the oven into the housing is made by using four screws supplied holes located in the closing face of the door.
• These should be screwed through the oven cabinet and into the housing unit.
• VENTILATION REQUIREMENTS SEE FIG.2
• Ensure that the oven has been securely xed into the housing unit. The xing of the oven into the housing is made by using four screws.
• These should be screwed through the oven cabinet and into the housing unit.
Preparation - BEFORE USING THE APPLIANCE
• Once this simple operation has been carried out the oven is ready to use for cooking.
• This appliance is exclusively for domestic use.
• Use the oven to cook food only.
• Before cooking,make sure all oven accessories that are not required are removed from the oven.
• Pre-heat the oven to the cooking temperature before using it.
• Place the cooking trays in the center of oven and leave space in between when using more than one, so that the air can circulate.
• DO NOT put oven trays on the base of the oven or cover it with aluminium foil.
• This will cause thermal accumulation.
• The cooking and roasting times will not coincide and the enamel may be damaged.
• Try to open the oven door as little as possible to see the food (the oven light remains on during cooking).
• Take care when opening the door to avoid contact with hot parts and steam.
• COOLING FAN
• A tangential cooling fan is tted inside of this appliance, to make the internal temperature of the oven stable and the external surface temperature
lower. After the oven has been used the cooling fan will run on for a period of time, until the oven is sufciently cooled.
fig.
1
fig.
2

Operation
• CONTROL PANEL FIG.3
• 1. Oven function selector knob
• 2. Power indicator light
• 3. Oven operating light
• 4. Thermostat control knob
• SELECTING COOKING FUNCTION AND TEMPERATURE FIG.3/3A
• When appliance is connected to mains supply for the rst time, the power indicator light g.3.2 will come on.
• After selecting the cooking function and setting a temperature, the operating light g.3.3 will come on and the oven will start working.
• The oven function selector knob should be used to select the particular mode of cooking required. The appliance will utilise different elements
within the oven cavity, depending on the oven function selected. When a function is selected, the power indicator light will come on.
• SELECTING THE OVEN FUNCTIONS FIG.3A:
• DEFROST: The fan runs without heat to reduce the defrosting time of frozen foods. The time required to defrost the food will depend on the
room temperature, the quantity and type of food.
• FAN AND GRILL: This method of cooking utilises the top element in conjunction with the fan, which helps to provide a quick circulation of heat.
This function is suitable where quick browning is required and “sealing” the juices in, such as steaks, hamburgers, some vegetables etc.
• FAN AND BOTTOM ELEMENT: This method of cooking utilises the bottom element in conjunction with the fan, which helps to circulate the heat.
This function is suitable for sterilizing preserving jars.
•
• INTENSIVE BAKE: This method of cooking is a conventional cooking method, the oven heat from top element to lower element, and the fan
helps to circulate the heat to achieve an even baking result.
• ENERGY SAVING GRILLING MODE (ECO): Heat is evenly distributed from top and bottom.
• THERMOSTAT CONTROL KNOB FIG.3/3A
• The oven thermostat control knob sets the required temperature of the oven. It is possible to regulate the temperature within a range of 50 -
250°C.
• Turn the control knob clockwise.
• OVEN OPERATING LIGHT g.3.3
• This light will come on to indicate that the oven’s heating elements are in operation. The light will turn off when the temperature set on the
thermostat control knob has been reached. It will cycle on and off throughout the cooking time.
• DO NOT place food inside the cavity, until the correct cooking temperature has been reached.
• COOKING GUIDELINES
• Please refer to the information given on food packaging for guidance on cooking temperatures and times. Once familiar with the performance of
your appliance, temperatures and times can be varied to suit personal preference.
• If you are using the fan oven function, then you should follow the information given on the food packaging for this particular mode of cooking.
• Make sure that frozen foods are thoroughly thawed before cooking, unless the instructions on the food packaging advise that you can “cook from
frozen”.
• You should pre-heat the oven and not place food inside of it until the oven operating light has gone off. You can choose not to pre-heat when
using the fan oven mode; however you should extend the cooking time given on the food packaging by approximately ten minutes.
• Before cooking, check that any accessories that are not required are removed from the oven.
• Place cooking trays in the centre of the oven and leave gaps between the trays to allow air to circulate.
• Try to open the door as little as possible to view the dishes.
• The oven operating light g.3.2 will remain on during cooking.
• WARNINGS:
• Keep the oven door closed when using any of the grill functions.
• DO NOT use aluminium foil to cover the grill pan or heat items wrapped in aluminium foil under the grill. The high reectivity of the foil could
potentially damage the grill element.
• Never line the base of your oven with aluminium foil.
• During cooking, never place pans or cookware directly onto the bottom of your oven. They should always be placed on the shelves provided.
• The grill heating element and other internal components of the oven becomes extremely hot during operation, avoid touching it inadvertently
when handling the food which you are grilling.
• Important: Be careful when opening the door, to avoid contact with hot parts of the oven and steam.
• A steam cleaner is not to be used.
• WARNING: Accessible parts may become hot during use. Young children should be kept well away when in use.
• DO NOT use harsh abrasive cleaners or metal scrapers to clean the oven door glass as this can scratch the surface, which may result in the oven
glass shattering.
fig.
3
fig.
3A
Troubleshooting
Maintenance and cleaning
• The oven should be cleaned after every use. When cleaning the oven the lighting should be switched on to enable you to see the surfaces better.
• The oven chamber should only be washed with warm water and a small amount of washing-up liquid.
• After cleaning the oven chamber wipe it dry.
• Never clean the oven surfaces by steam cleaning.
• The oven cavity should only be cleaned with warm soapy water, using either a sponge or soft cloth. No abrasive cleaners should be used.
• Any stains that may appear on the bottom of the oven will have originated from food splashes or spilt food, these splashes occur during the
cooking process. These could possibly be a result of the food being cooked at an excessively high temperature or being placed in cookware that
is too small.
• You should select a cooking temperature and function that is appropriate for the food that you are cooking. You should also ensure that the food
is placed in an adequately sized dish and that you use the drip tray where appropriate.
• Outer parts of the oven should only be cleaned with warm soapy water, using either a sponge or soft cloth. No abrasive cleaners should be used.
• If you use any form of oven cleaner on your appliance, then you must check with the manufacturer of the cleaner that it is suitable for use on your
appliance.
• Any damage that is caused to the appliance by a cleaning product will not be xed free of charge, even if the appliance is within the guarantee
period.
• DO NOT use cleaning products containing abrasive materials for the cleaning and maintenance of the glass front panel.
• REPLACEMENT OF OVEN LIGHT BULB
• Disconnect from mains supply.
• Set all controls to “O” position.
• Unscrew the light cover anticlockwise, wash and allow to dry.
• Ensure the bulb has cooled down and pull from its socket.
• Replacement is reverse procedure. Replace with correct high temperature (300°C, 230V, 25W) bulb. DO NOT use any other type of bulb.
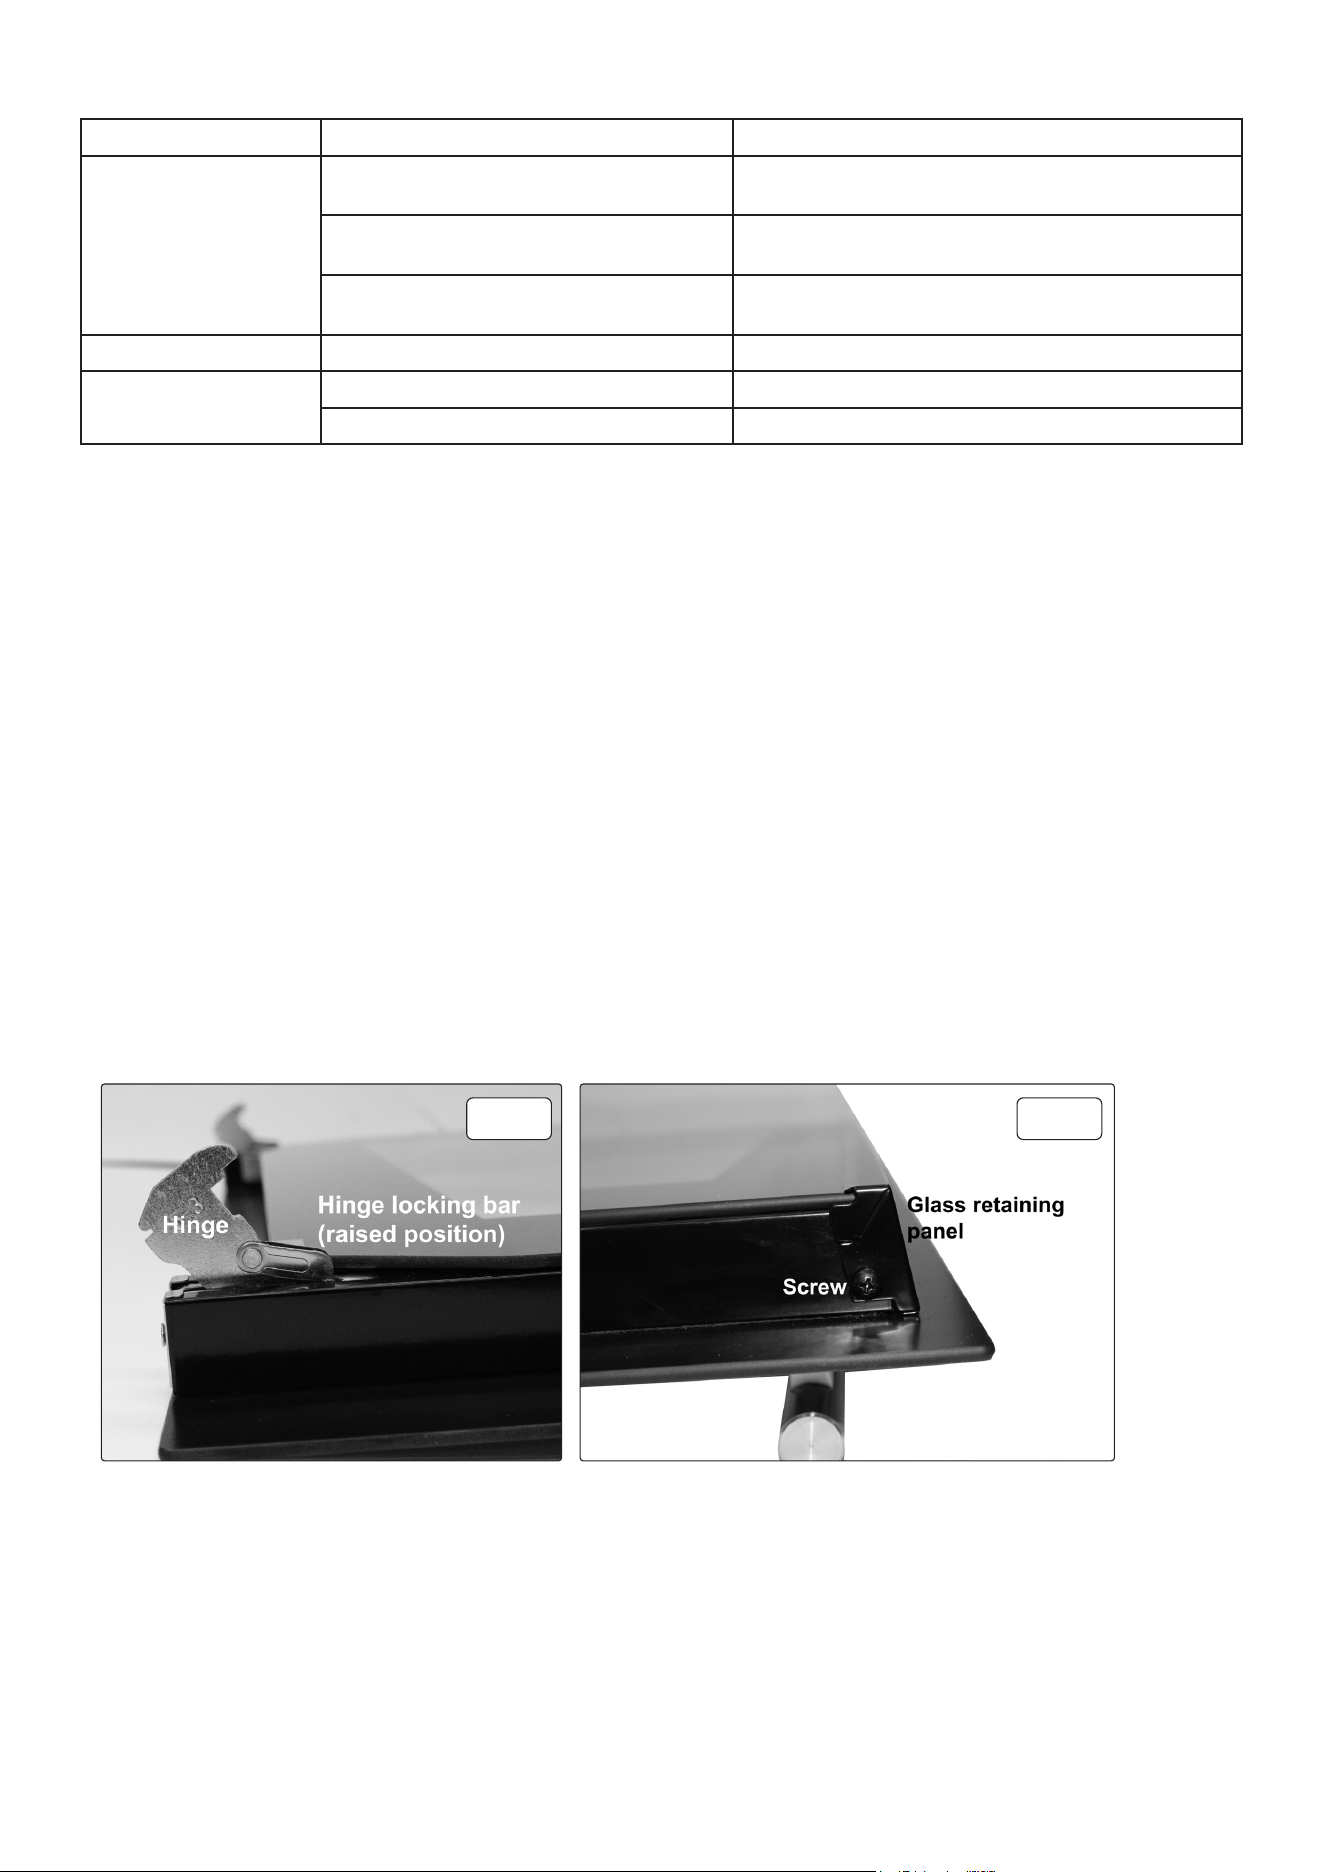
• DOOR REMOVAL FIG.4
• Open the door fully.
• Fold the locking bars on each hinge upwards.
• Push the door towards its closed position until resistance is felt. Hold both sides of the door and continue to move it to its closed position pulling
upwards and downwards gently until the door comes out.
• REFIT THE DOOR
• Retting the door is the reverse of the door removal procedure above.
• Offer both the door hinges into their respective sockets. If the door suddenly drops or if the hinges shut up suddenly, do not use your hands or put
them in the way of the hinges, contact Dellonda.
• REMOVAL OF THE INTERNAL GLASS PANEL FIG.5
• Remove the 2 screws at each side of the top of the door internal glass. Remove the internal glass retaining panel. Slide the glass out of the top of
the door.
• REGULAR INSPECTIONS
• Besides keeping the cooker clean, you should:
• 1. Carry out periodic inspections of the control elements and cooking units of the cooker. After the guarantee has expired you should have a
technical inspection of the cooker carried out at a service centre at least once every two years.
• 2. Fix any operational faults
• Carry out periodical maintenance of the cooking units of the cooker.
• WARNING! All repairs should be carried out by an appropriate service centre or properly qualied personnel.
Problem Cause Solution
Oven does not work Mains connection faulty/not connected Turn off mains supply and check if a wire has been
disconnected.
Mains connection loose. Turn off mains supply and check if a wire has been
disconnected.
Fault with mains supply. Turn off mains supply and check if a wire has been
disconnected.
Oven light not working. Bulb is blown. Replace bulb refer to manual.
Oven will not heat. No function is selected. Select a cooking function using selector.
No temperature is selected. Select a temperature using selector.
fig.
4
fig.
5

Transportation
• Keep the original carton of the product and use this packaging if the item needs to be transported.
• Follow the transport signs on the carton.
• Tape cardboard or paper onto the inside face of the glass as it will be prone to damage from the trays. Use cardboard covers for the wire grill and
trays in your oven. Also tape the oven’s covers to the side walls.
• If the original carton is unavailable, take measures to protect the external surfaces (glass and painted surfaces) of oven against possible blows,
as well as the above.
• WHEN YOUR APPLIANCE IS CONNECTED TO YOUR MAINS SUPPLY FOR THE FIRST TIME, THE POWER
INDICATOR LIGHT WILL COME ON, AFTER SELECTING THE COOKING FUNCTION AND SETTING A
TEMPERATURE, THE OPERATING LIGHT WILL COME ON AND THE OVEN WILL START WORKING, FINALLY
SETTING THE COOKING TIME;(THE COOKING TIME IS FROM 0MIN TO 120MINS, REVOLVING THE KNOB IN
CLOCKWISE DIRECTION TO THE CORRESPONDING TIME ON PANEL WHEN SETTING THE COOKING TIME.
•
CONTROL PANEL
Environment Protection and Waste Protection and Electrical Equipment Regulations (WEEE)
Recycle unwanted packaging materials. When this product is no longer required, or has reached the end of it’s useful life, please dispose of it in
an environmentally friendly way. Drain any fluids (if applicable) into approved containers, in accordance with local waste regulations. Under the
Waste Batteries and Accumulators Regulations 2009, Dellonda would like to inform the user that this product contains one or more batteries. It
is our policy to continually improve products and we reserve the right to alter data, specifications and parts without prior notice. No liability is
accepted for incorrect use of this product. Guarantee is 12 months from purchase date, proof of which is required for any claim.
Dellonda Limited
Kempson Way, Suffolk Business Park, Bury St Edmunds, Suffolk. IP32 7AR
01284 757575 [email protected] www.dellonda.co.uk