Corded 3-in-1 Cleaner
WD100 Series
INSTRUCTION BOOKLET

1. If the power cord plug does not
fit fully into the outlet, contact the
place of purchase. DO NOT force
into outlet or try to modify to fit.
2. To reduce the risk of shock and
unintended operation, turn o
power before servicing.
3. This 3-in-1 Cleaner consists of a
motorised nozzle, main body, pole,
and handle. These components
contain electrical connections,
electrical wiring, and moving parts
that potentially present risk to the
user.
4. Before each use, carefully inspect
all parts for any damage. If a part is
damaged, discontinue use.
5. Use only identical replacement
parts.
6. Use only as described in this
Owner’s Guide Instruction Booklet.
DO NOT use the 3-in-1 Cleaner
for any purpose other than those
described in this Instruction
Booklet.
7. DO NOT immerse or spray water
on the body of the 3-in-1 Cleaner.
To clean the surface, wipe with a
dry cloth.
8. 3-in-1 Cleaner and dock’s cord
out of reach of children. DO NOT
allow the appliance to be used
by children. DO NOT allow to be
used as a toy. Close supervision is
necessary when used near children.
9. This appliance can be used by
persons with reduced physical,
sensory or mental capabilities or
lack of experience or knowledge if
they have been given supervision
or instruction concerning use of
the appliance in a safe way and
understand the hazards involved.
Cleaning and user maintenance
should not be done by children.
10. Always turn o the 3-in-1 Cleaner
before connecting or disconnecting
any current-carrying hoses,
motorised nozzles, chargers, or
other electrical or mechanical parts.
11. DO NOT handle plug or 3-in-1
Cleaner with wet hands.
12. DO NOT use without the dirty
water tank, clean solution tank,
filter, brushroll, and brushroll cover
in place.
13. Only use Shark® branded filters and
accessories.
14. DO NOT put any objects into
nozzle or accessory openings. DO
NOT use with any opening blocked;
keep free of dust, lint, hair, and
anything that may reduce airflow.
15. DO NOT use if nozzle or accessory
airflow is restricted. If the air
paths or the motorised floor
nozzle becomes blocked, turn
the 3-in-1 Cleaner o. Remove all
obstructions before you turn on
the unit again.
WARNING
To reduce the risk of fire, electric shock, injury, or property damage:
IMPORTANT SAFETY INSTRUCTIONS
FOR HOUSEHOLD USE ONLY.
READ ALL INSTRUCTIONS BEFORE USING THIS 3-IN-1 CLEANER
SAVE THESE INSTRUCTIONS
16. Keep nozzle and all 3-in-1 Cleaner
openings away from hair, face,
fingers, uncovered feet, or loose
clothing.
17. DO NOT use if 3-in-1 Cleaner is not
working as it should, or has been
dropped, damaged, left outdoors,
or dropped into water.
18. Use extra care when cleaning on
stairs.
19. DO NOT leave the 3-in-1 Cleaner
unattended while powered on.
20. When powered on, always keep
the 3-in-1 Cleaner moving over the
carpet surface to avoid damaging
the carpet fibres.
21. DO NOT place 3-in-1 Cleaner on
unstable surfaces such as chairs or
tables.
22. DO NOT use to pick up:
a) Large objects
b) Hard or sharp objects (glass,
nails, screws, or coins)
c) Large quantities of dust
(including drywall, fireplace ash,
or embers).
d) Smoking or burning objects
(hot coals, cigarette butts, or
matches)
e) Flammable or combustible
materials (lighter fluid, petrol, or
kerosene)
f) Toxic materials (chlorine bleach,
ammonia, or drain cleaner)
23. DO NOT use in the following areas:
a) Poorly lit areas
b) Outdoor areas
c) Spaces that are enclosed and
may contain explosive or toxic
fumes or vapours (lighter
fluid, petrol, kerosene, paint,
paint thinners, mothproofing
substances, or flammable dust).
24. Turn o the 3-in-1 Cleaner
before any adjustment, cleaning,
maintenance, or troubleshooting.
25. During cleaning or routine
maintenance, DO NOT cut anything
other than hair, fibres, or string
wrapped around the brushroll.
26. Allow all filters to air-dry
completely before reinstalling them
in the 3-in-1 Cleaner to prevent
liquid from being drawn into
electric parts.
27. DO NOT modify or attempt to
repair the 3-in-1 Cleaner yourself,
except as indicated in this
Instruction Booklet.
DO NOT use the 3-in-1 Cleaner if it
has been modified or damaged.
28. Use only Shark brand cleaning
fluids intended for use with this
appliance to prevent internal
component damage.
29. The 3-in-1 Cleaner will not run
without sucient water supply in
the clean solution tank.
sharkclean.co.uksharkclean.co.uk
NOTE: To remove the handle, press the release button located on the back of the unit with a thin tool while pulling up on the
handle.
NOTE: When assembling your Hydrovac, there may be a little water in or around the water tanks. This is because we test all
our HydroVacs before you buy them to ensure the highest quality.
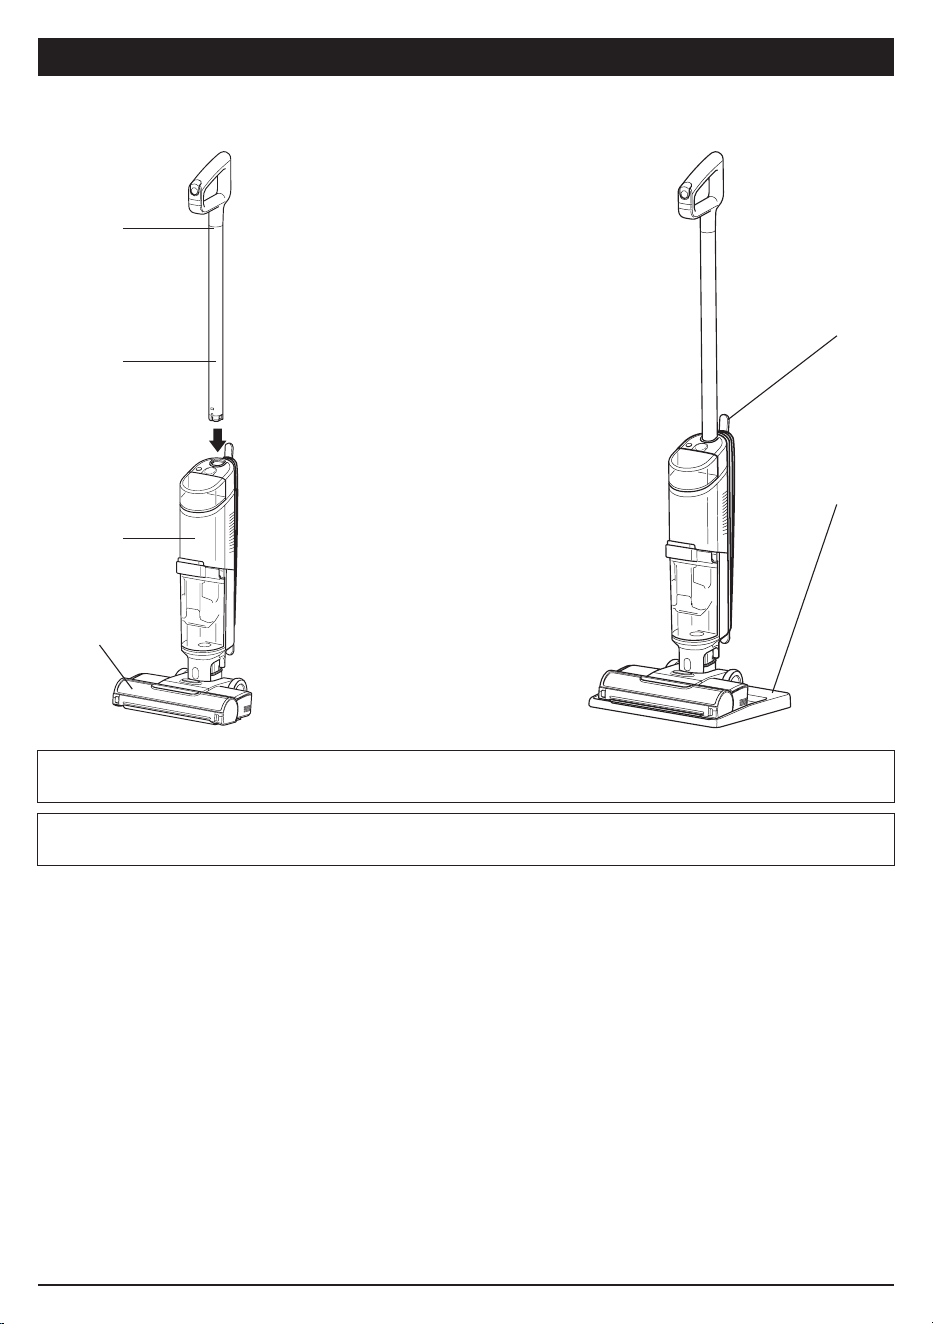
ASSEMBLY
Cord Wrap
Storage Dock
(Click)
Handle
Pole
Main Body
Floor Head
1. Align the Pole with the opening in the
Main Body and insert it until it clicks into
place.
2. Place the Storage Dock on the floor near
a wall outlet. Place the 3-in-1 Cleaner on
the tray.
USING YOUR 3-IN-1 CLEANER
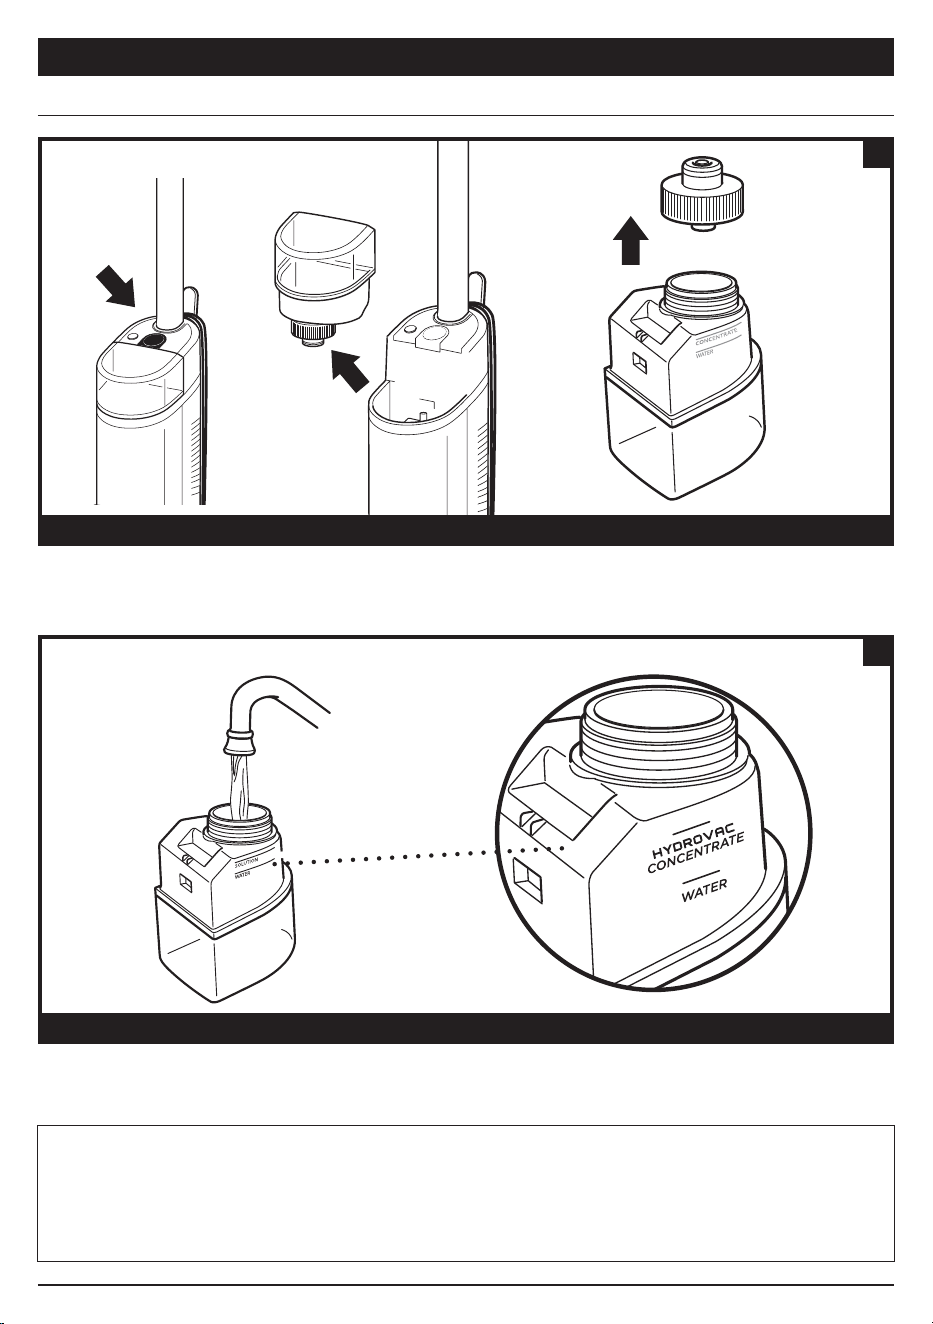
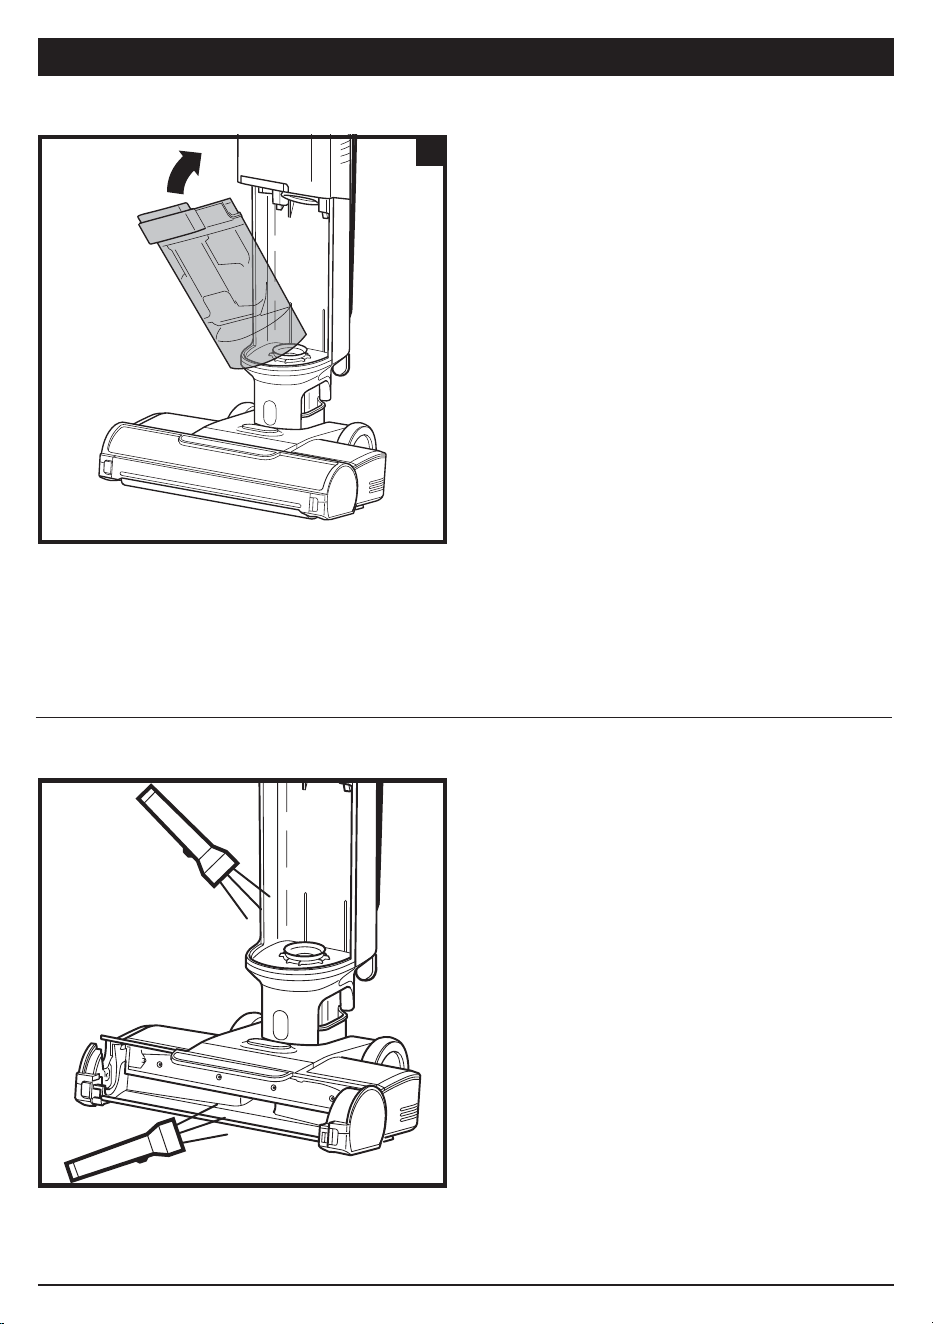
Press the release button and lift o the Clean Solution Tank.
FILLING THE CLEAN SOLUTION TANK
REMOVE THE CLEAN SOLUTION TANK
1
FILL THE CLEAN SOLUTION TANK
Unscrew the cap and add water to the tank, up to the WATER line. Next, add Shark HydroVac Multi-Surface
Concentrate, filling to the HYDROVAC CONCENTRATE line. Replace the cap and reinsert the tank until it clicks
into place. The top of the tank should be flush with the top of the body.
2
NOTE: Only use Shark HydroVac Multi-Surface Cleaning Solution and water with this product.
NOTE: Be sure to not overfill the Clean Solution Tank with more HydroVac Multi Surface Concentrate than instructed, as this
may clause streaking.
NOTE: Without sucient water supply in the clean solution tank, HydroVac will not run.
sharkclean.co.uksharkclean.co.uk
NOTE: To remove the handle, press the release button located on the back of the unit with a thin tool while pulling up on the
handle.
NOTE: When assembling your Hydrovac, there may be a little water in or around the water tanks. This is because we test all
our HydroVacs before you buy them to ensure the highest quality.
ASSEMBLY
Cord Wrap
Storage Dock
(Click)
Handle
Pole
Main Body
Floor Head
1. Align the Pole with the opening in the
Main Body and insert it until it clicks into
place.
2. Place the Storage Dock on the floor near
a wall outlet. Place the 3-in-1 Cleaner on
the tray.
USING YOUR 3-IN-1 CLEANER
Press the release button and lift o the Clean Solution Tank.
FILLING THE CLEAN SOLUTION TANK
REMOVE THE CLEAN SOLUTION TANK
1
FILL THE CLEAN SOLUTION TANK
Unscrew the cap and add water to the tank, up to the WATER line. Next, add Shark HydroVac Multi-Surface
Concentrate, filling to the HYDROVAC CONCENTRATE line. Replace the cap and reinsert the tank until it clicks
into place. The top of the tank should be flush with the top of the body.
2
NOTE: Only use Shark HydroVac Multi-Surface Cleaning Solution and water with this product.
NOTE: Be sure to not overfill the Clean Solution Tank with more HydroVac Multi Surface Concentrate than instructed, as this
may clause streaking.
NOTE: Without sucient water supply in the clean solution tank, HydroVac will not run.
sharkclean.co.uksharkclean.co.uk
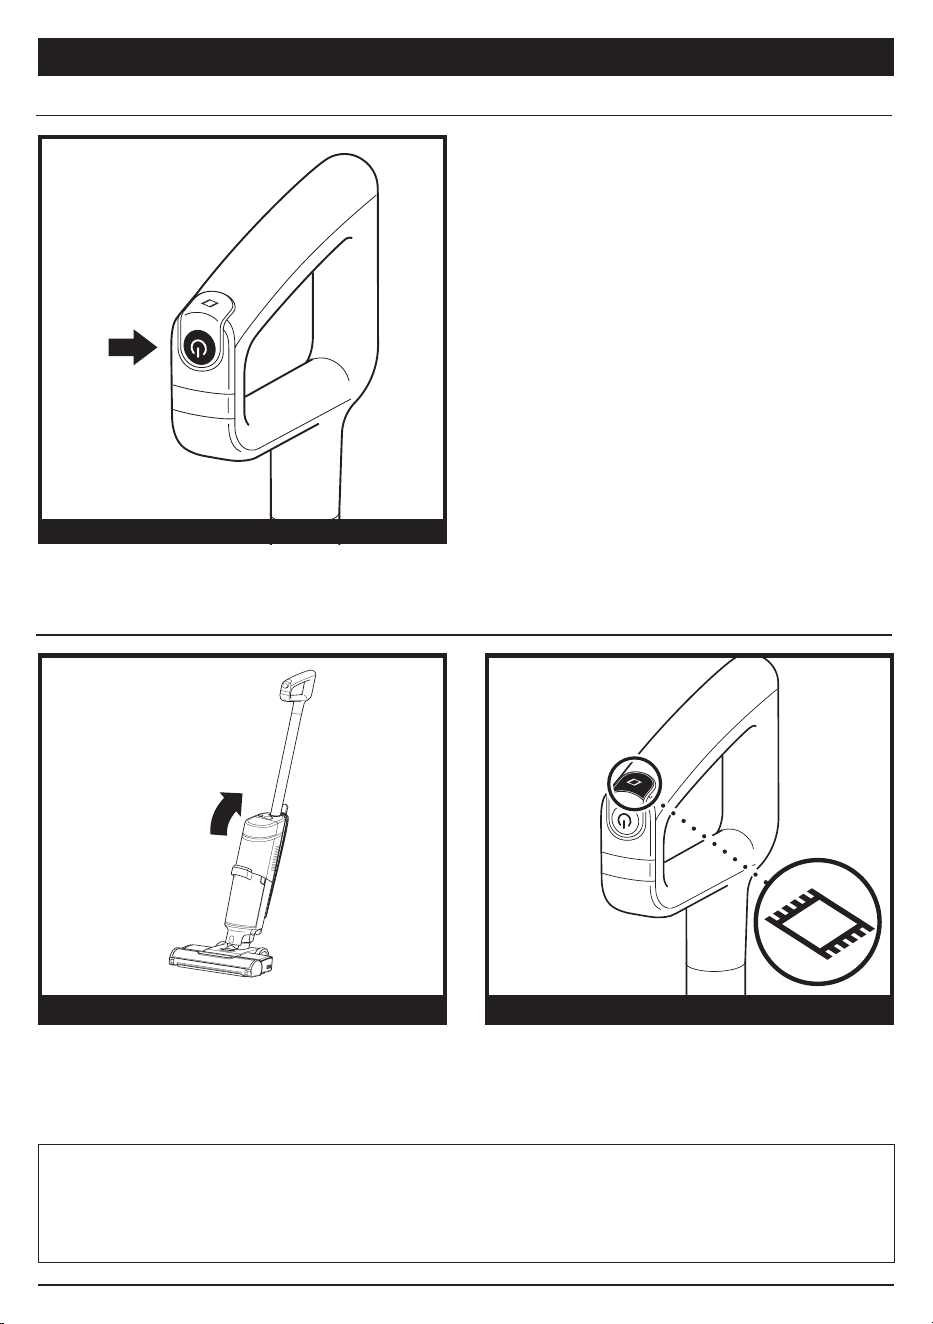
USING YOUR 3-IN-1 CLEANER
POWER
HARD FLOOR MODE FRESHEN MODE MODE
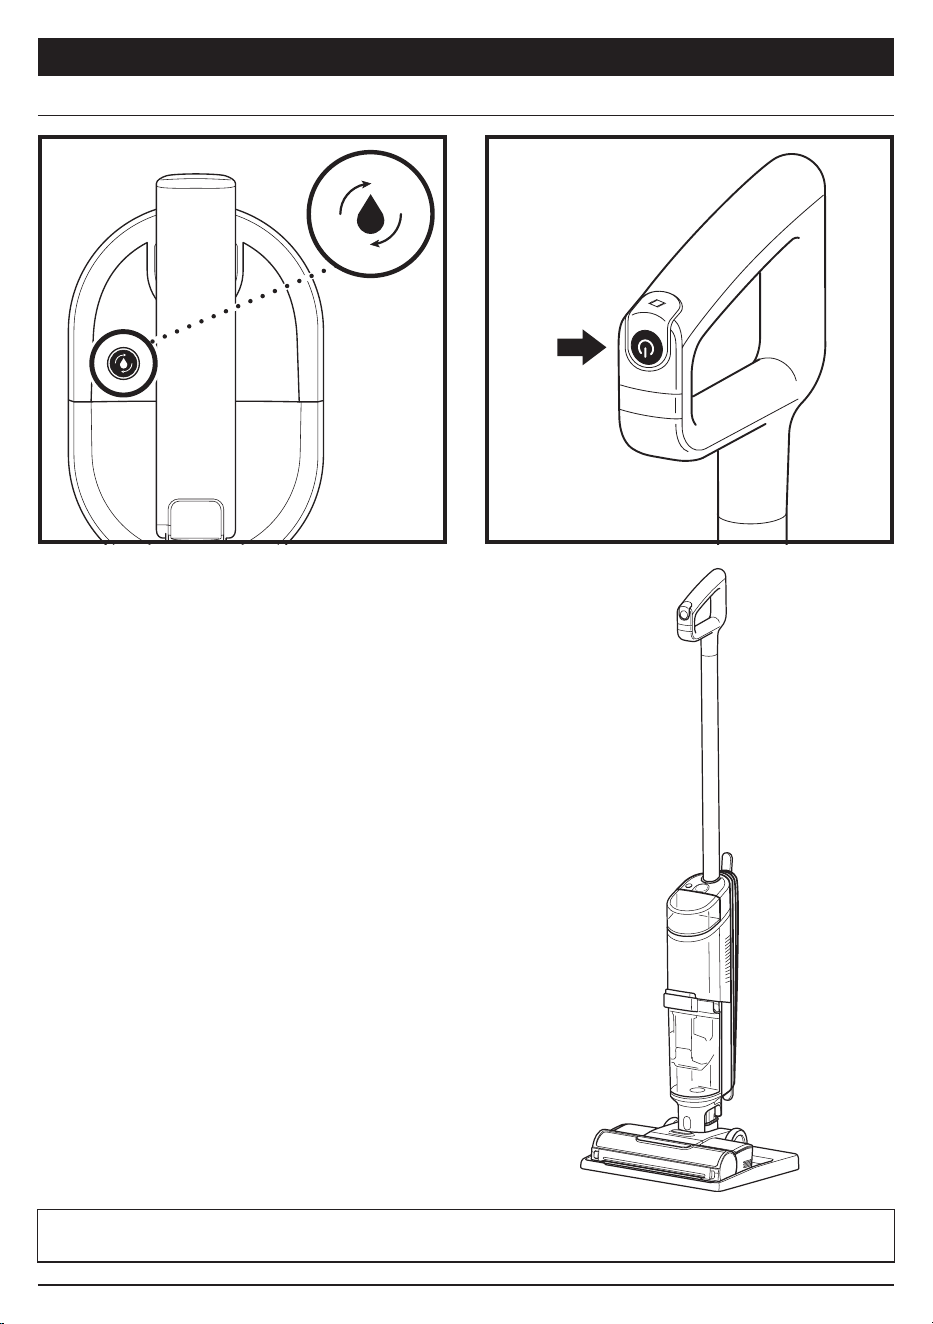
MAINTAINING YOUR 3-IN-1 CLEANER
RECOMMENDED AFTER EVERY USE
1. Place the unit on the Storage Dock. The Self-
Clean mode icon located on the top of the main
body will pulse.
2. Empty the Dirty Water Tank and make sure the
clean solution tank is at least half full.
3. Press the Power Button to start the self-clean
cycle. The icon will illuminate for the full 2-minute
duration of the cycle.
4. DO NOT remove the unit from the tray during the
self-cleaning cycle. The icon will turn o when the
cycle is complete.
5. Empty the dirty water tank.
Press and release the Power button on the handle
to turn on power. To turn o power, press the
button again.
Use Hard Floor mode for powerful cleaning on bare
floors. To activate Hard Floor mode, turn on the unit
and tilt the handle back.
To clean area rugs, press the Freshen Mode icon on
top of the handle. The Freshen Mode light on the
main body will illuminate. To turn o Freshen Mode
mode, press the button again.
CONTROLS SELF-CLEANING MODE
CLEANING MODES
NOTE: Make sure the clean solution tank is at least half full and that the dirty water tank is empty before running the self-
cleaning cycle.
NOTE: To prevent leakage, DO NOT place the main body on the floor. The nozzle should always be kept flat on the floor.
NOTE: If you encounter a dicult stain, use Freshen Mode for improved stain cleaning.
NOTE: If you encounter a stubborn odor on your floor or area rug, continue to clean in Freshen Mode until the odor is gone.
NOTE: If your floors are cloudy, streaky, or spotty after cleaning, it may be due to accumulated soap or grease residue. The
floor may require several cleanings with the Hydrovac.
See Troubleshooting for more information on
Self-Clean information.
sharkclean.co.uksharkclean.co.uk
USING YOUR 3-IN-1 CLEANER
POWER
HARD FLOOR MODE FRESHEN MODE MODE
MAINTAINING YOUR 3-IN-1 CLEANER
RECOMMENDED AFTER EVERY USE
1. Place the unit on the Storage Dock. The Self-
Clean mode icon located on the top of the main
body will pulse.
2. Empty the Dirty Water Tank and make sure the
clean solution tank is at least half full.
3. Press the Power Button to start the self-clean
cycle. The icon will illuminate for the full 2-minute
duration of the cycle.
4. DO NOT remove the unit from the tray during the
self-cleaning cycle. The icon will turn o when the
cycle is complete.
5. Empty the dirty water tank.
Press and release the Power button on the handle
to turn on power. To turn o power, press the
button again.
Use Hard Floor mode for powerful cleaning on bare
floors. To activate Hard Floor mode, turn on the unit
and tilt the handle back.
To clean area rugs, press the Freshen Mode icon on
top of the handle. The Freshen Mode light on the
main body will illuminate. To turn o Freshen Mode
mode, press the button again.
CONTROLS SELF-CLEANING MODE
CLEANING MODES
NOTE: Make sure the clean solution tank is at least half full and that the dirty water tank is empty before running the self-
cleaning cycle.
NOTE: To prevent leakage, DO NOT place the main body on the floor. The nozzle should always be kept flat on the floor.
NOTE: If you encounter a dicult stain, use Freshen Mode for improved stain cleaning.
NOTE: If you encounter a stubborn odor on your floor or area rug, continue to clean in Freshen Mode until the odor is gone.
NOTE: If your floors are cloudy, streaky, or spotty after cleaning, it may be due to accumulated soap or grease residue. The
floor may require several cleanings with the Hydrovac.
See Troubleshooting for more information on
Self-Clean information.
sharkclean.co.uksharkclean.co.uk

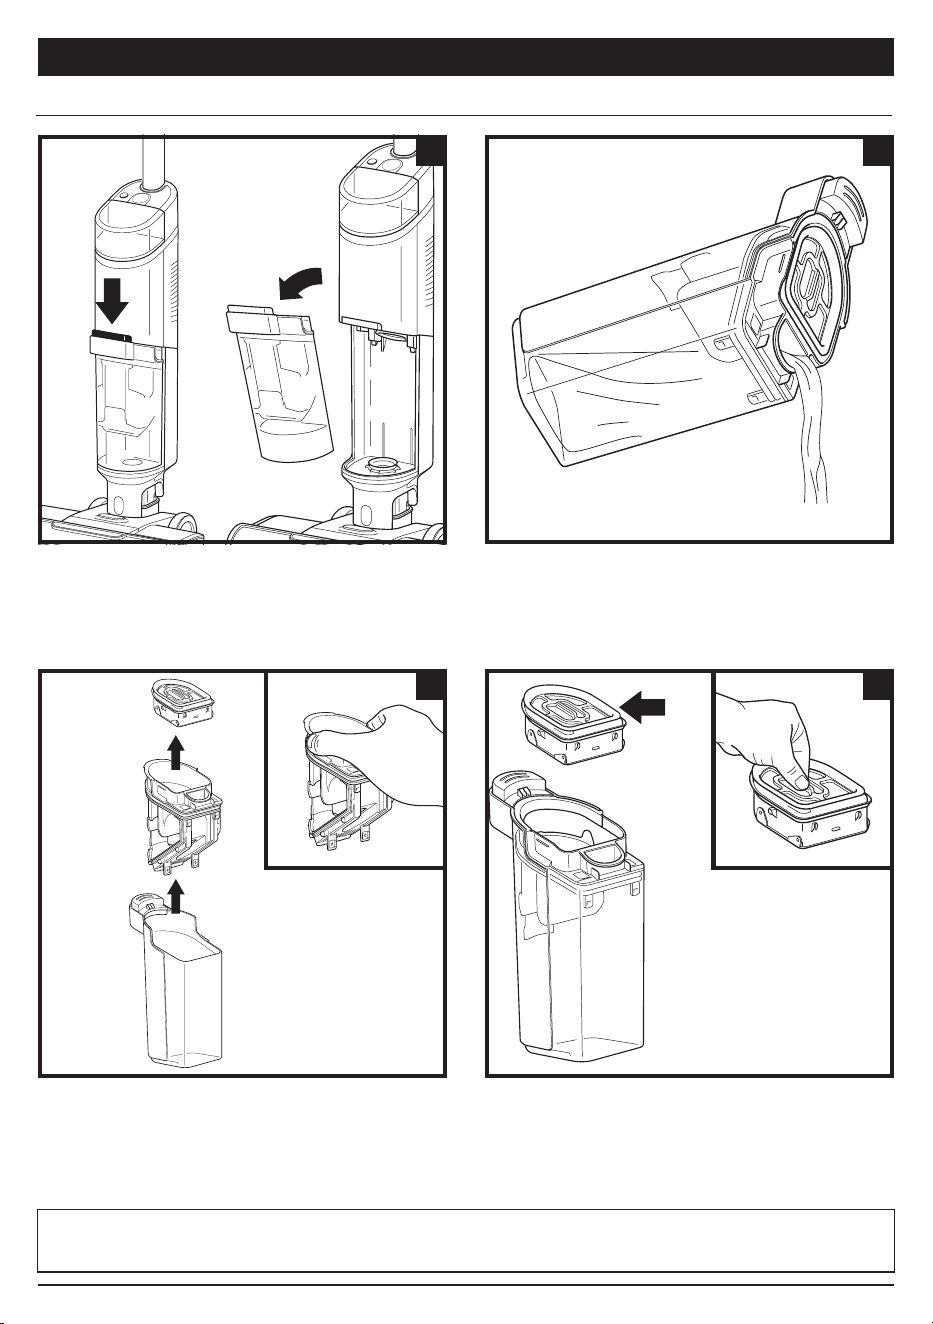
MAINTAINING YOUR 3-IN-1 CLEANER MAINTAINING YOUR 3-IN-1 CLEANER
1. To access the brushroll, press the button on the top
of the nozzle and lift o the brushroll cover.
1. To remove the dirty water tank, press the release
button and pull out the tank.
2. Remove the brushroll by pulling up on the pull tab on
the left side of the nozzle.
Wash thoroughly with warm water. Allow the
brushroll to air-dry completely in a well-ventilated
area for at least 24 hours.
2. To dispose of liquid waste only, pour it out though
the Express Clean Spout on the back of the dirty
water tank.
3. Reinsert the brushroll by lining up the grooves on the
end of the brushroll with the helix on the inner right side
of the nozzle, then press down on the left side of the
brushroll. When properly installed, the brushroll tab will
be flush with the left side of the nozzle.
3. To dispose of solid debris, lift out the Solids
Separator. Grasp the recessed areas on the sides of
the separator and lift it out. Empty the solid debris
into the trash. If any liquid waste remains in the tank,
pour it down a drain. To clean, rinse the separator
and the tank with water.
4. To reinstall the brushroll cover, insert the hooks on
the bottom of the cover into the unit first. Press
down on the cover until it clicks into place.
4. Clean the filter in the top of the solids separator
every month. Pull out the filter and hand-wash
with warm water and soap. Allow the filter to
air-dry completely in a well-ventilated area before
reinstalling it.
CLEANING THE BRUSHROLL CLEANING THE DIRTY WATER TANK
NOTE: Do not place brushroll in washing machine or dishwasher. Replace the brushroll after 6 months.
NOTE: Replace the filter every 6 Months.
NOTE: Do not place dirty water tank in washing machine or dishwasher.
1 2
3 4
Pull
from here
1 2
2
1
3 4
1
1
2
sharkclean.co.uksharkclean.co.uk
MAINTAINING YOUR 3-IN-1 CLEANER
5. After cleaning the dirty water tank and the solids
separator, allow them to air-dry in a well-ventilated
area for at least 24 hours. To reinstall the tank, insert
the bottom into the opening in the main body, then
tilt the tank back until it clicks into place.
1. Turn o the power.
2. Remove the brushroll cover, brushroll, and dirty
water tank.
3. Check the openings and remove all debris.
4. When finished, reinstall the brushroll and the cover.
5
CHECKING FOR BLOCKAGES
ORDERING REFILLS AND PARTS
If you run over a hard or sharp object or notice a noise change while using your unit, check for blockages or
objects caught in the brushroll, nozzle chamber, or inlet hose.
MAINTAINING YOUR 3-IN-1 CLEANER
TROUBLESHOOTING
WARNING: To reduce the risk of shock and unintended operation, turn o power before servicing.
NOTE: If 3-in-1 Cleaner still does not operate properly, contact Customer Service at +44 (0)800 862 0453 or
www.sharkclean.co.uk
Replace the filter and brushroll every 6 months. Only use Shark HydroVac™ Disinfectant,
Shark HydroVac Concentrate, or water with the Shark HydroVac. To order brushrolls,
filters, Shark HydroVac Multi-Surface Concentrate, and Shark HydroVac. Disinfectant,
please visit sharkclean.com or scan the QR code here.
sharkclean.co.uksharkclean.co.uk
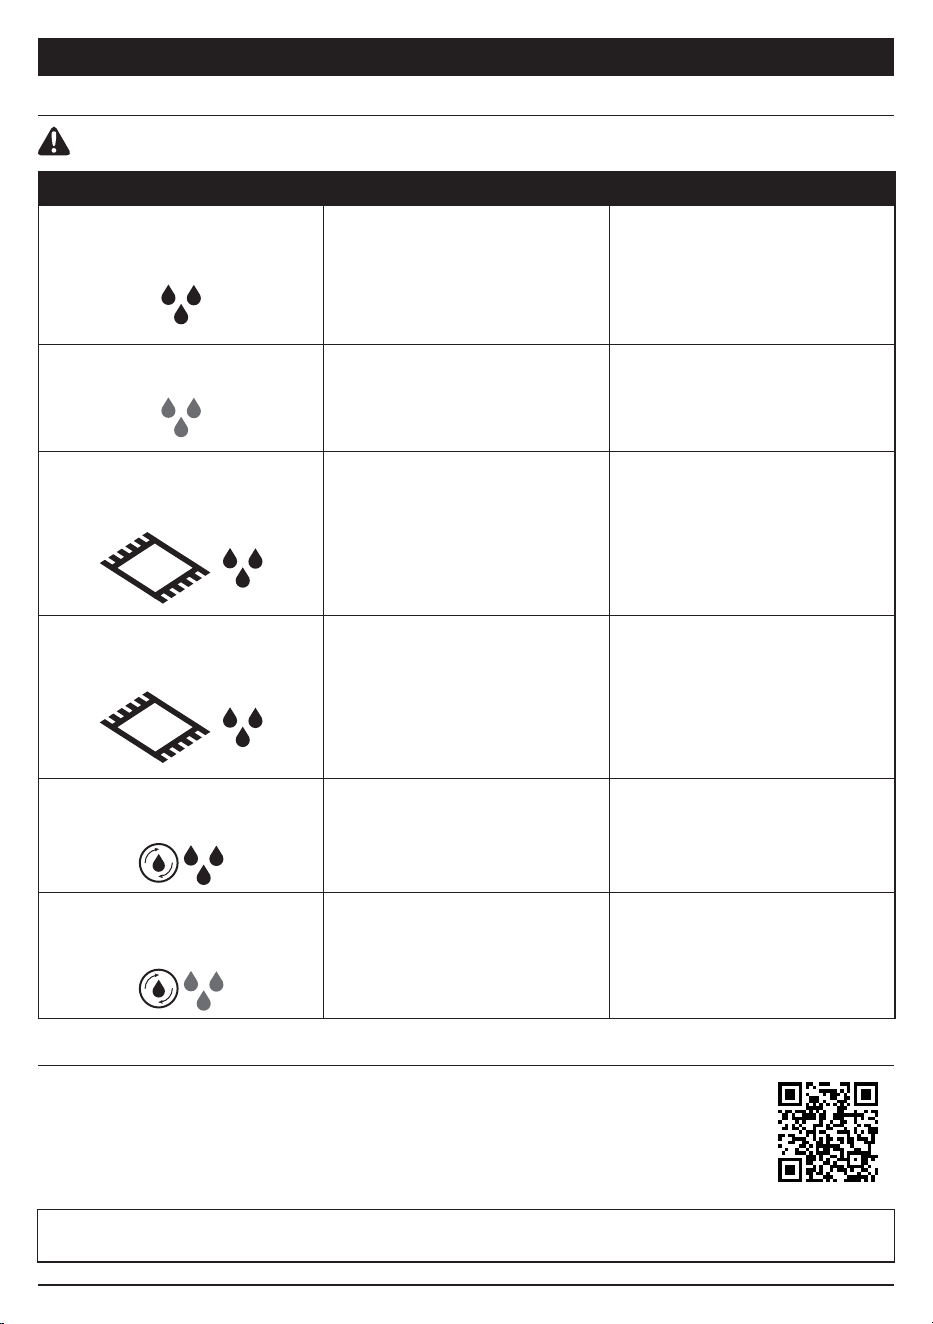
LED INDICATOR WHAT IT MEANS WHAT TO DO
The Water Droplet LED is
pulsing red.
The dirty water tank is full.
Empty the fluid in the dirty
water tank.
*If this is a false error, remove
solids separator and clean
completely. Allow part to dry
for 24 hours or dry manually.
The Water Droplet LED is
pulsing aqua.
The clean solution tank is
empty.
Fill the clean solution tank.
Refer to the “Filling the Clean
Solution Tank” section.
The Freshen Mode icon and the
three water droplet lights are
flashing red at the same time.
Brushroll cover is not installed
properly.
Refer to the “Cleaning the
Brushroll” section, step 4
The Freshen Mode icon and
the three water droplet lights
are flashing red out of sync.
The brushroll is jammed.
Turn o the power before
cleaning the brushroll and any
debris that may be causing
the jam. Refer to the “Cleaning
the Brushroll” section.
Self-Clean icon and droplets
are flashing blue.
Not enough solution to run
Self-Clean Cycle.
Fill clean solution tank to
allow self-clean cycle to run.
Self-Clean icon and droplets
are flashing red.
Dirty water tank is full and
preventing Self-Clean Cycle to run.
Empty dirty water tank to
allow self-clean cycle to run.
MAINTAINING YOUR 3-IN-1 CLEANER
5. After cleaning the dirty water tank and the solids
separator, allow them to air-dry in a well-ventilated
area for at least 24 hours. To reinstall the tank, insert
the bottom into the opening in the main body, then
tilt the tank back until it clicks into place.
1. Turn o the power.
2. Remove the brushroll cover, brushroll, and dirty
water tank.
3. Check the openings and remove all debris.
4. When finished, reinstall the brushroll and the cover.
5
CHECKING FOR BLOCKAGES
ORDERING REFILLS AND PARTS
If you run over a hard or sharp object or notice a noise change while using your unit, check for blockages or
objects caught in the brushroll, nozzle chamber, or inlet hose.
MAINTAINING YOUR 3-IN-1 CLEANER
TROUBLESHOOTING
WARNING: To reduce the risk of shock and unintended operation, turn o power before servicing.
NOTE: If 3-in-1 Cleaner still does not operate properly, contact Customer Service at +44 (0)800 862 0453 or
www.sharkclean.co.uk
Replace the filter and brushroll every 6 months. Only use Shark HydroVac™ Disinfectant,
Shark HydroVac Concentrate, or water with the Shark HydroVac. To order brushrolls,
filters, Shark HydroVac Multi-Surface Concentrate, and Shark HydroVac. Disinfectant,
please visit sharkclean.com or scan the QR code here.
sharkclean.co.uksharkclean.co.uk
LED INDICATOR WHAT IT MEANS WHAT TO DO
The Water Droplet LED is
pulsing red.
The dirty water tank is full.
Empty the fluid in the dirty
water tank.
*If this is a false error, remove
solids separator and clean
completely. Allow part to dry
for 24 hours or dry manually.
The Water Droplet LED is
pulsing aqua.
The clean solution tank is
empty.
Fill the clean solution tank.
Refer to the “Filling the Clean
Solution Tank” section.
The Freshen Mode icon and the
three water droplet lights are
flashing red at the same time.
Brushroll cover is not installed
properly.
Refer to the “Cleaning the
Brushroll” section, step 4
The Freshen Mode icon and
the three water droplet lights
are flashing red out of sync.
The brushroll is jammed.
Turn o the power before
cleaning the brushroll and any
debris that may be causing
the jam. Refer to the “Cleaning
the Brushroll” section.
Self-Clean icon and droplets
are flashing blue.
Not enough solution to run
Self-Clean Cycle.
Fill clean solution tank to
allow self-clean cycle to run.
Self-Clean icon and droplets
are flashing red.
Dirty water tank is full and
preventing Self-Clean Cycle to run.
Empty dirty water tank to
allow self-clean cycle to run.
NOTES
sharkclean.co.uksharkclean.co.uk
When a consumer buys a product in the UK, they get the benefit of legal rights relating to the quality of the
product (your “statutory rights”). You can enforce these rights against your retailer. However, at Shark® we are
so confident about the quality of our products that we give you an additional manufacturer’s warranty of up to
three years (one year as standard, plus a further two years upon registration with Shark®). Oer valid only in
United Kingdom and Republic of Ireland. These terms and conditions relate to our manufacturer’s guarantee
only – your statutory rights are unaected.
The conditions below describe the prerequisites and scope of our guarantee.
Shark
®
Guarantees
A household appliance like a vacuum cleaner constitutes a sizeable investment. Your new machine needs
to work properly for as long as possible. The guarantee it comes with is an important consideration - and
reflects how much confidence the manufacturer has in its product and manufacturing quality.
Every Shark® machine comes with a free parts and labour guarantee. Our customer service helpline
(0800 862 0453) is open from 9.00am to 6.00pm Monday - Friday. It’s free to call, and you’ll be put straight
through to a Shark® representative. You’ll also find online support at sharkclean.co.uk.
How do I register my extended Shark
®
guarantee?
If you have purchased your vacuum directly from sharkclean.co.uk your guarantee is registered automatically.
You can also register your guarantee at sharkclean.co.uk within 28 days of purchase. To save time, you’ll need
the following information about your machine:
• Date you purchased the machine (receipt or delivery note)
• Model Number
IMPORTANT
• Your guarantee will only cover your product from the date of purchase.
• Please keep your receipt at all times. Should you need to use your guarantee we will need your receipt
to verify the information you have supplied to us is correct. The inability to produce a valid receipt may
invalidate your ability to claim against your guarantee.
What are the benefits of registering my free Shark
®
guarantee?
When you register your guarantee we’ll have your details to hand if we ever need to get in touch. You can also
receive tips and advice on how to get the best out of your Shark® vacuum and hear the latest news about new
Shark
®
technology and launches.
If you register your guarantee online, you’ll get instant confirmation that we’ve received your details.
How long are new Shark
®
machines guaranteed for?
Our confidence in our design and quality control means that your new Shark® vacuum cleaner is guaranteed
for a total of up to three years (1 year plus an extended guarantee of 2 years on registration).
What is covered by the free Shark
®
guarantee?
At Shark’s discretion repair or replacement of your Shark® machine, including all parts and labour. A Shark®
guarantee is in addition to your legal rights as a consumer.
What is not covered by the free Shark
®
guarantee?
• Blockages – for details of how to unblock your 3-in-1 vacuum cleaner, please refer to the Instruction Booklet.
• Normal wear and tear such as brush bar, fuse, belt etc.
• Accidental damage, faults caused by negligent use or care, misuse, neglect, careless operation or
handling of the vacuum cleaner which is not in accordance with the Shark® Instruction Booklet supplied
with your machine.
• Use of the vacuum cleaner for anything other than normal domestic household purposes.
• Use of parts not assembled or installed in accordance with the operating instructions.
• Use of parts and accessories which are not Shark® Genuine Components.
• Faulty installation (except where installed by Shark®).
• Repairs or alterations carried out by parties other than Shark® or its agents.
What happens when my guarantee runs out?
Shark® does not design products to last for a limited time. We do appreciate that there may be a desire for
our customers to want to repair their vacuum cleaners after the guarantee has lapsed. In this case please
contact our Freephone customer service help line and ask about our out of guarantee program,
on 0800 862 0453.
Where can I buy genuine Shark
®
spares and accessories?
Shark® spares and accessories are developed by the same engineers who developed your Shark® vacuum.
You’ll find a full range of accessories, spares and replacement parts for all Shark® machines at sharkclean.co.uk
Only use Shark® branded filters and accessories. Damage caused by use of non-Shark parts may not be
covered by your guarantee.
THREE (3) YEAR LIMITED GUARANTEE

PLEASE READ CAREFULLY AND KEEP FOR FUTURE REFERENCE.
This Owner's Guide is designed to help you keep your Shark Hydrovac 3-in-1 Cleaner running at peak
performance.
TECHNICAL SPECIFICATIONS
Voltage: 220V-240V
TIP: You can find the model on the QR code label on
the bottom of the back of the 3-in-1 Cleaner.
All testing on carpet (e.g. per ASTM-F608) shall be
conducted in Freshen Mode.
RECORD THIS INFORMATION
Model Number: �����������������������������
Date Code: ���������������������������������
Date of Purchase: ���������������������������
(Keep receipt)
Store of Purchase: ���������������������������
REGISTER YOUR PURCHASE
registeryourshark.com
NOTES
sharkclean.co.uksharkclean.co.uk
PLEASE READ CAREFULLY AND KEEP FOR FUTURE REFERENCE.
This Instruction Booklet is designed to help you get a complete understanding of your new Shark HydroVac™
Cordless 3-in-1 Cleaner.
SharkNinja Europe Limited,
3150 Century Way, Thorpe Park,
Leeds, LS15 8ZB, UK
+44 (0)800 862 0453
www.sharkclean.co.uk
SharkNinja Germany GmbH,
Rotfeder-Ring 9, 3rd Floor,
60327 Frankfurt am Main,
Germany
www.sharkclean.eu
Illustrations may dier from actual product. We are constantly striving to improve our products, therefore the specifications
contained herein are subject to change withoutnotice.
SHARK and SHARK HYDROVAC are registered trademarks of SharkNinja Operating LLC.
© 2023 SharkNinja Operating LLC.
WD100UKSeries_IB_MP_230417_Mv1
PRINTED IN CHINA
@sharkcleaninguk
@sharkcleanuk
@sharkcleanuk