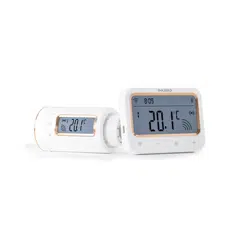
USER MANUAL
IRC-RW1
SMART RADIATOR CONTROL VALVE
Scan to download
Please keep this manual properly for reference. You can also scan the QR code below to visit
our official website for product usage videos. For any usage issues, please feel free to contact us

07 Get Start
07
08 Instruction for First-Time Use of the INKBIRD APP
11
09 How to Pair the Gateway with the APP
12
CONTENTS
CONTENTS
01
01 Overview
01
02 Safety Instruction
02
03 Technical Specifications
03
04 Package Contents
04
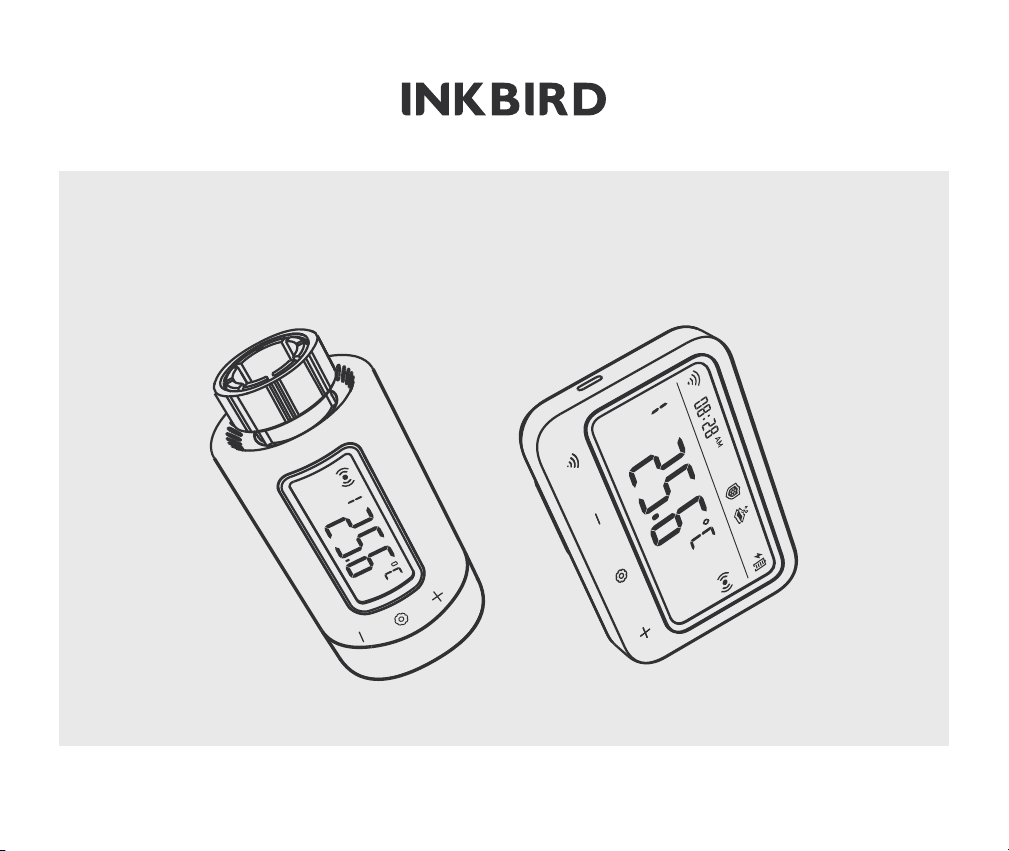
05 Product Diagram
06
06 Operation Instructions
10 Main Interface of INKBIRD APP
15
13 Gateway Operation Instruction
25
14 Control Valve Operation Instruction
42
15 Precautions For Use
50
20
11 Parameter Setting
24
12 Troubleshooting Guide
16 Customer Service
50
01
Overview
INKBIRD smart radiator control valve helps you precisely detect radiator temperature and efficiently
controls it in the desired temperature range. By sequentially linking the control valve, Wi-Fi Gateway, and
smartphone, you can freely control the smart radiator control valve via your smartphone anytime,
anywhere, including the remote setting of air temperature and checking temperature history. This
control valve features multiple protective functions like anti-frost, anti-limescale, and vacation mode.
It’s an efficient product with power conservation and emission reduction, saving heating bills in
winter and keeping your home warm and comfortable even in cold winters.
02
Safety Instruction
As with all electronic products, this device should be placed out of the reach of children.
Do not use this product in areas where electronic products are prohibited.
Protect this product from dust, moisture, and excessive heat. Use only in dry rooms.
Do not use this product in a wet environment to avoid splashing water.
Do not subject this product to any violent impact.
To prevent suffocation, keep the packaging material out of the reach of children.
Do not bend or press the power cord.
If the device is damaged, do not turn it on or continue to operate it.
Do not attempt to service or repair this device by yourself.
01
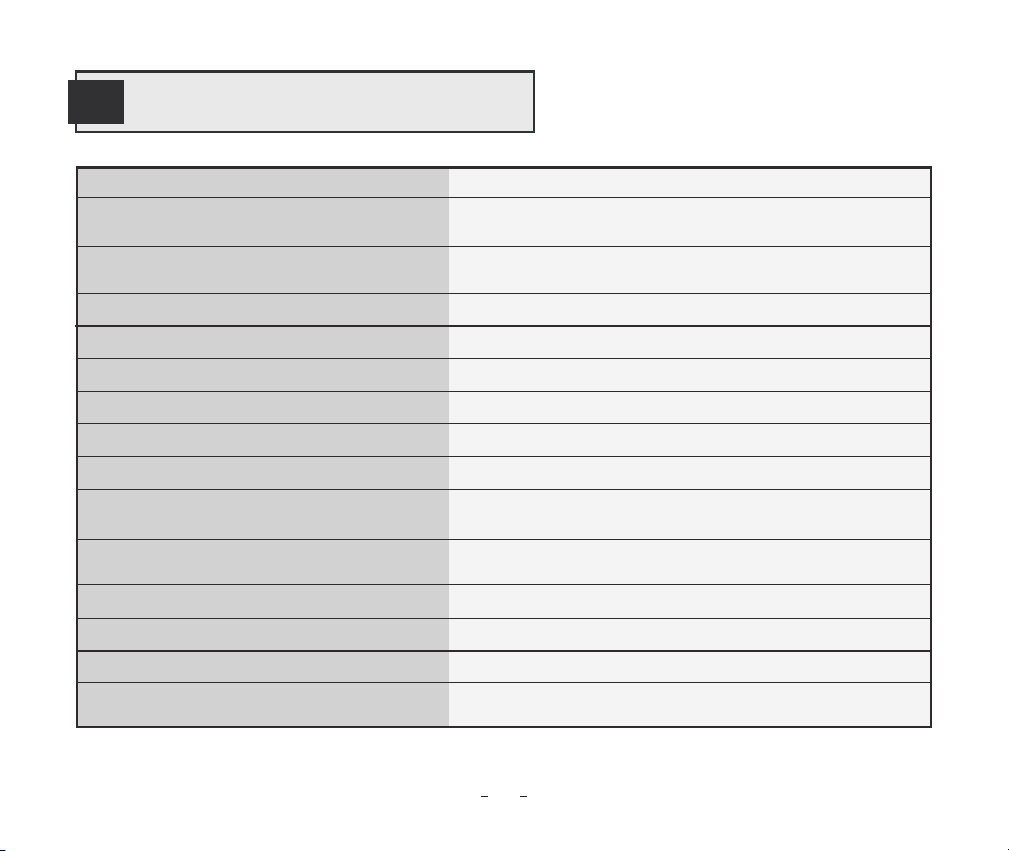
03
Technical Specifications
Product Model IRC-RW1
Screen
LCD Screen; The screen on the control valve features a
manual rotationtion function for easy viewing.
Power Source
Wi-Fi Gateway:powered by lithuim battery, DC5V, 1A;
Control Valve:2*AA dry batteries (not included)
Maximum Number of Connectable Devices
Up to 5 control valves can be connected and controlled
by a smartphone connected to the gateway.
Connection Range
Up to 180 meters of communication distance between
the Wi-Fi gateway and the control valve
Low Power Prompt
Reminds the user to replace batteries when the battery
power of the control valve is too low.
Temperature Heating Range
0.0℃~35.0℃
High Temperature Alarm Range
-10-50℃
Low Temperature Alarm Range
-10-50℃
Calibration Range
-4.9℃~4.9℃
Time Setting Range
00:00~23:59
Maximum Time Period Can Be Set
11
Wi-Fi Gateway Dimension
110*80*48.7mm
Control Valve Dimension
Ø 57*110.9mm
Warranty Period
2 Years
02
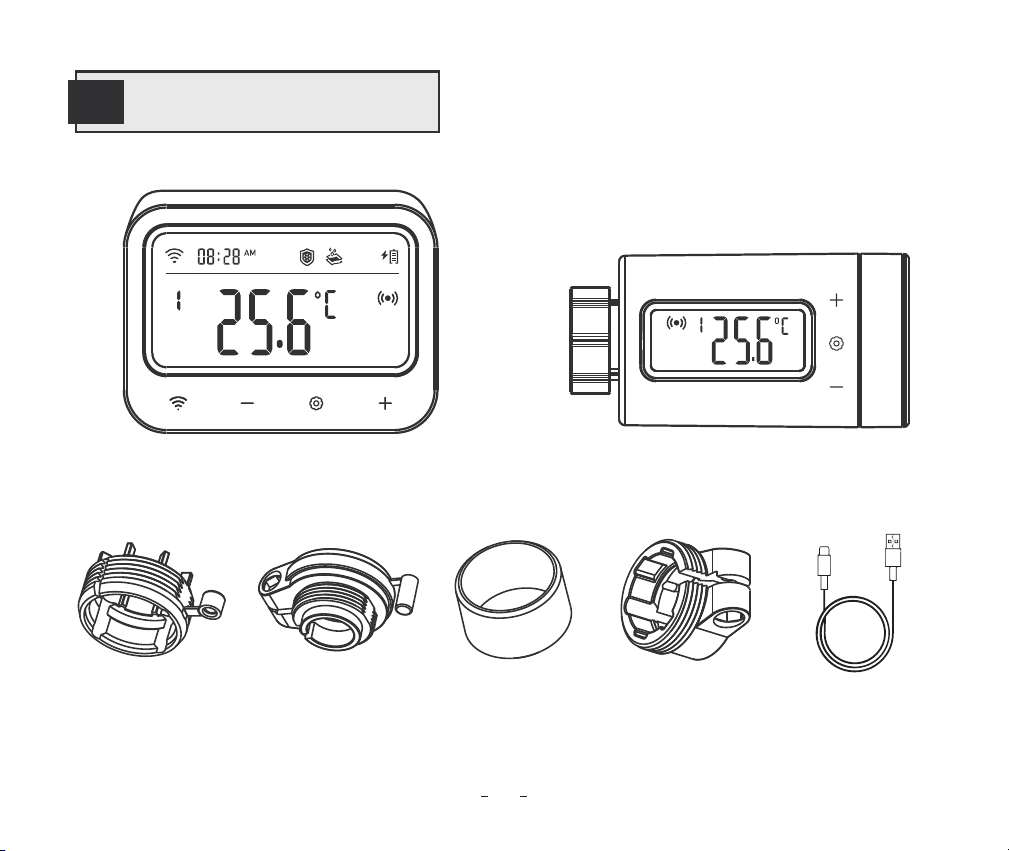
04
Package Contents
Wi-Fi Gateway
RAVL Connector RAV Connector Round Ring
RA Connector Type-c USB cable
Control Valve
03
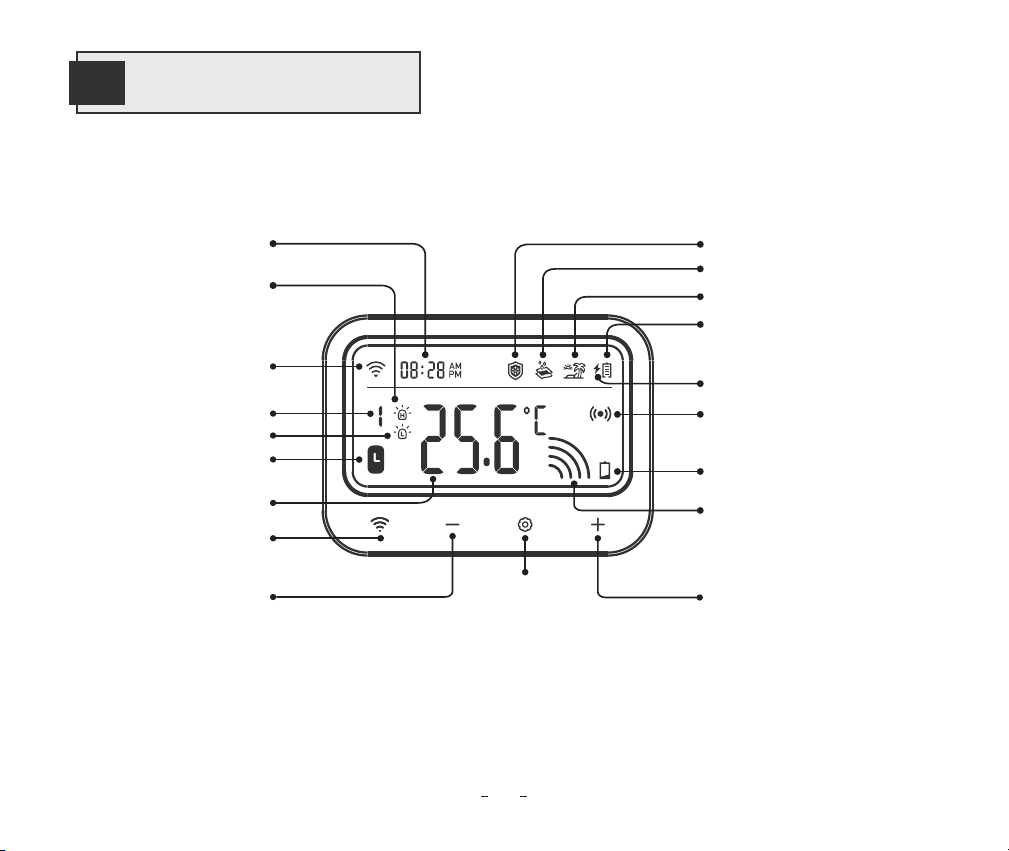
Local Time
High-Temperature Alarm
Anti-Frost Mode
Anti-Limescale Mode
Vacation Mode
Battery Level of WiFi Gateway
Heating State
Low Battery Alarm
USB Battery Charging State
Connection state of the
Gateway and Control Valve
WiFi Icon
WiFi Button
Decrease
Button
Control Valve Channel
Low-Temperature Alarm
Time Switch
Current temperature
of control valve
05
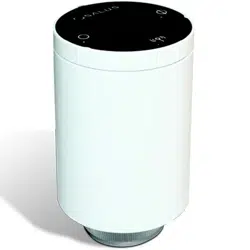
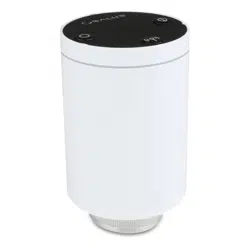
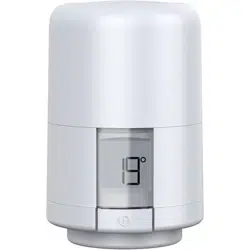
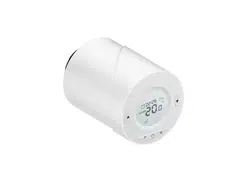
Product Diagram
Set
Button
Increase
Button
04
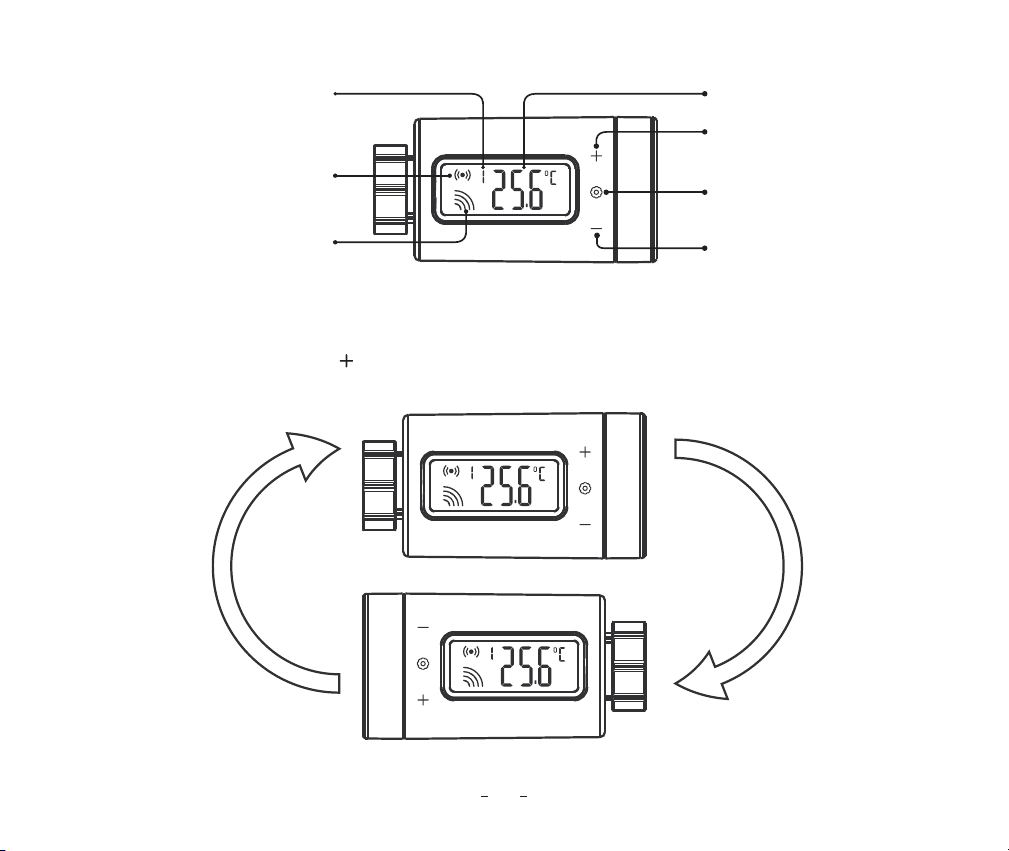
05
Heating State
Connection state of the
Gateway and Control Valve
Control Valve Channel
Current temperature
of control valve
Increase Button
Decrease Button
Set button
For easy viewing, short press the key to rotate the screen 180 degrees.
Manually screen rotation function
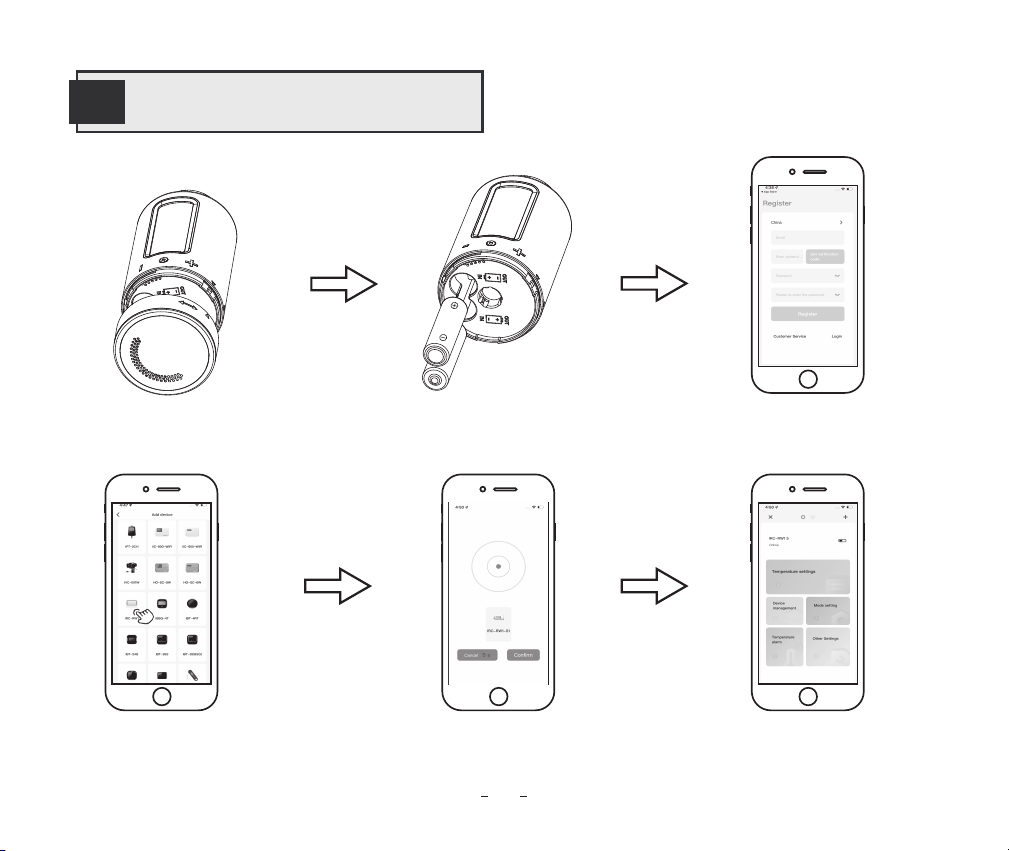
Check if the control valve is
compatible with the radiator
Complete installation and start
customizing the parameters.
Check if the control valve is
paired with the gateway
Add the gateway
device to the app
Download and register the app
Install battery in the control valve
06
Operation Instructions
06
Make sure the polarity is correct when installing the batteries.
If you are not going to use the device for a long time, please remove the battery from the device to
avoid the risk of leakage.
Please keep the battery out of the reach of children to prevent accidental ingestion and burns. Do not
recharge spent batteries or try to reactivate them by heating or any other means. Do not short-circuit
the battery. If you accidentally swallow a cell or battery, please seek medical attention immediately.
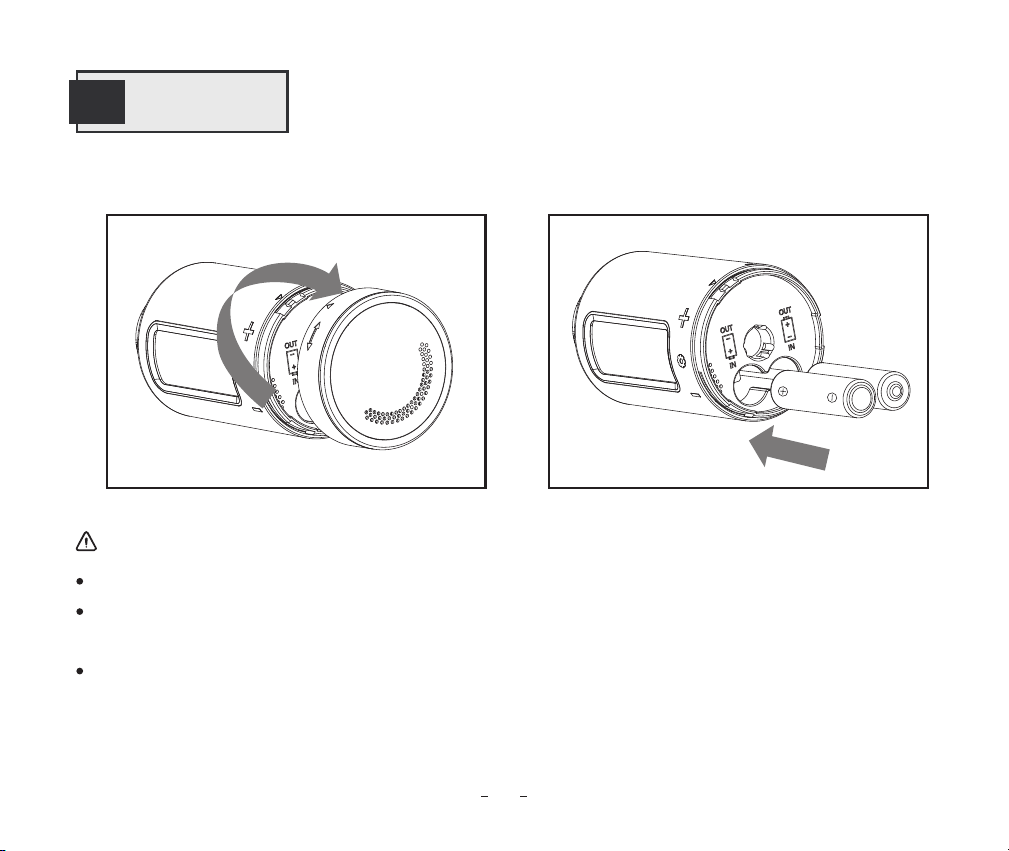
7.1 Battery Installation
Battery Precautions:
07
Get Start
07
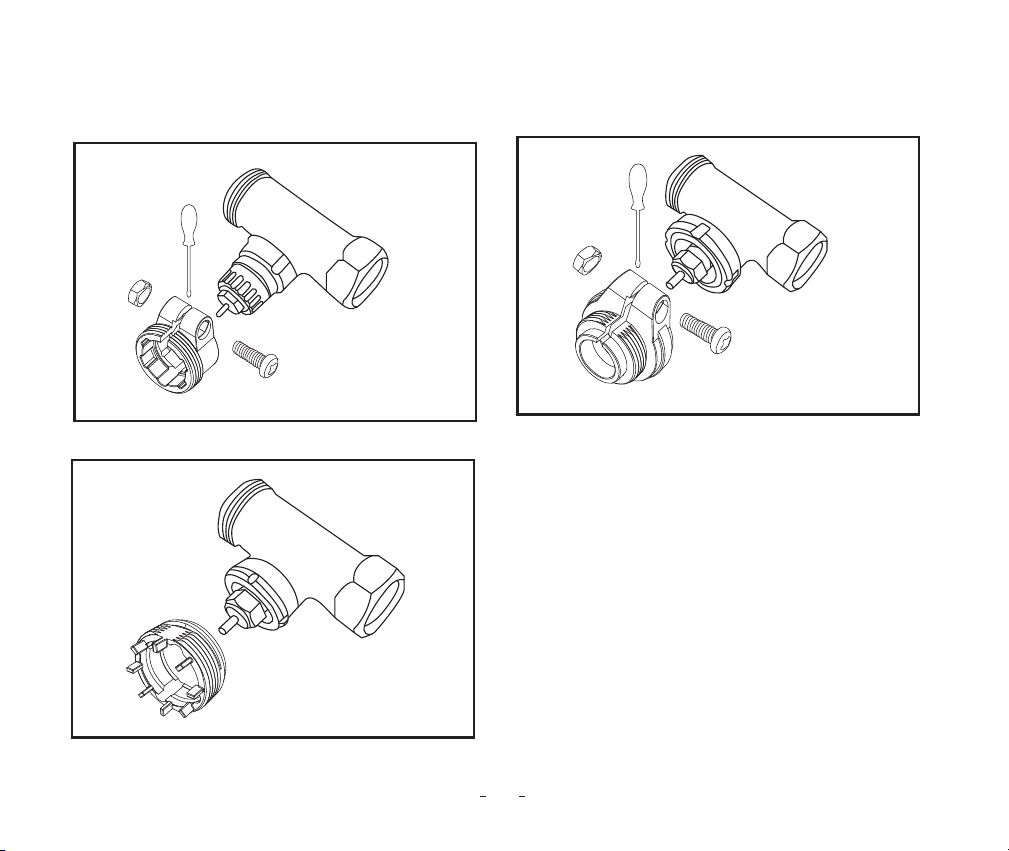
7.2.1: Choose a connector for your radiator from
the included connectors, RA type, RAV type, and
RAVL type.
7.2 Control Valve Installation
08
RA
RAV
RAVL
After installing the battery, if the control valve is in
the heating-on state.
it can be installed directly on the
radiator.
Otherwise, if the control valve is in the heating-off
state, it should be installed according to the
following steps.
7.2.2: Install it on the control valve.
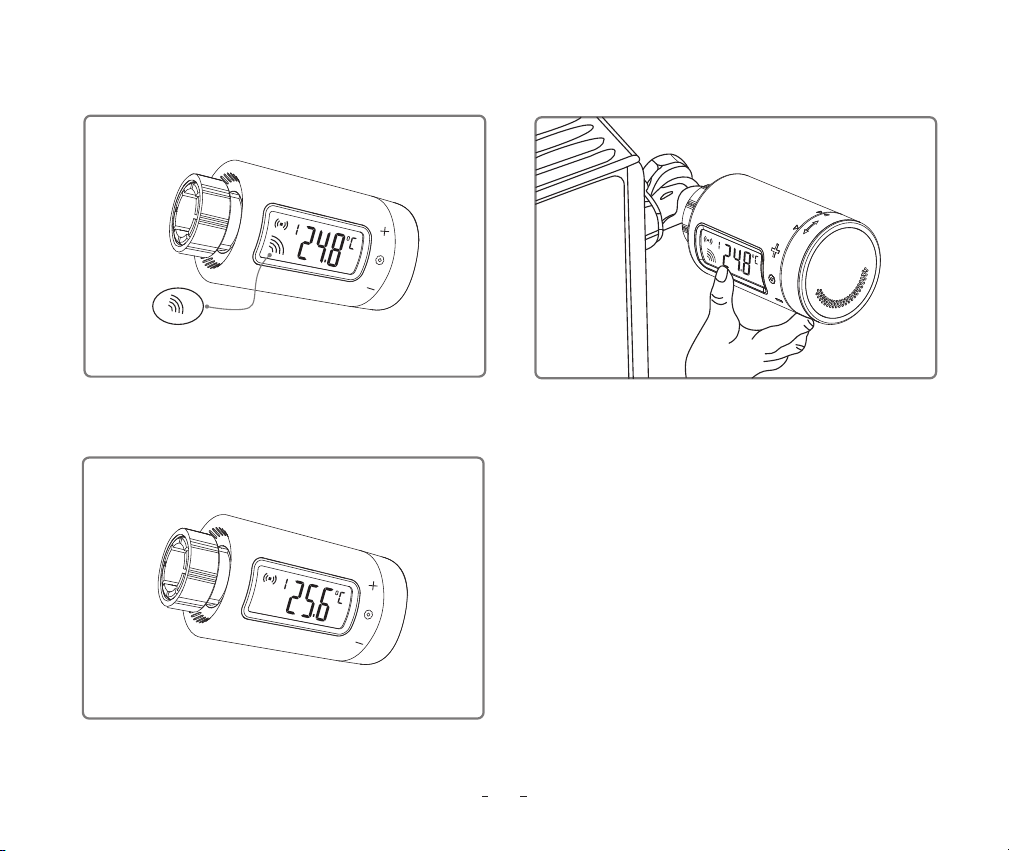
09
Heating symbol
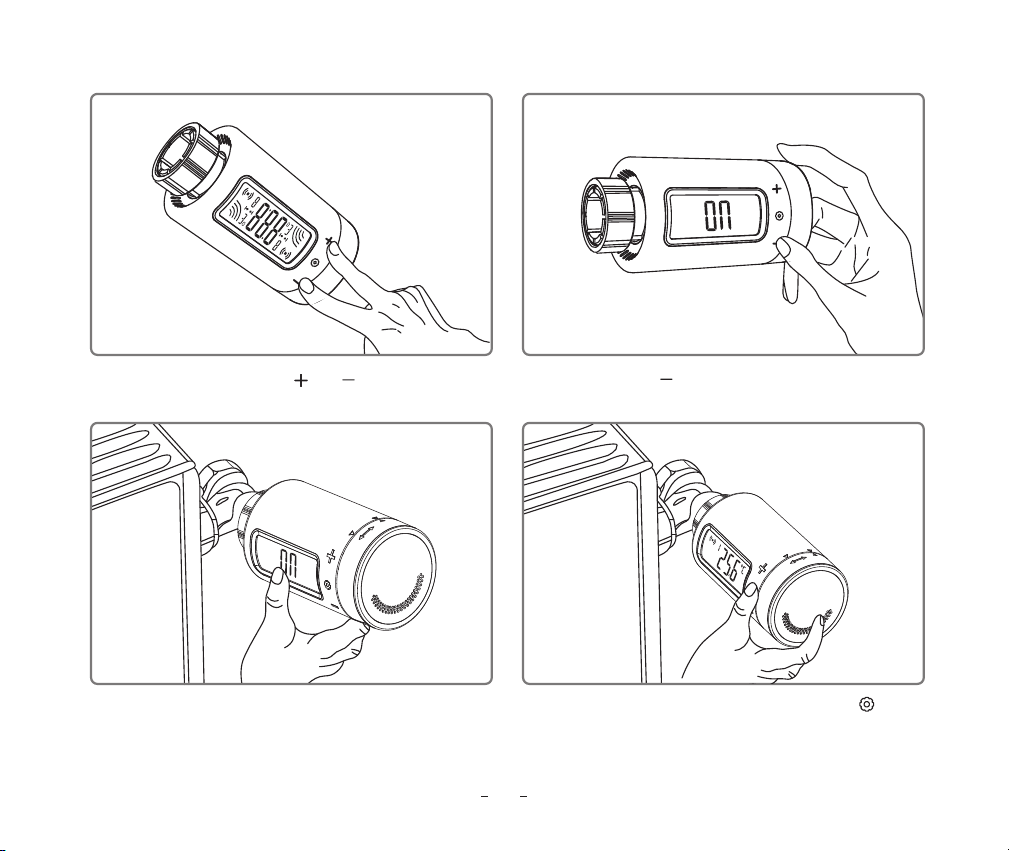
10
Step2: Press the button: the LCD shows On, and the
nut cap is sucked into place.
Step1: Long-press the and buttons for
2 seconds to enter the installation mode.
Step4: After installation, press and hold the
button for 2 seconds to exit the installation mode.
Step3:The installation begins.
Your iOS devices must be running iOS 12.0 or above to download the app smoothly.
Your android devices must be running android 7.1 or above to download the app smoothly.
The device supports a 2.4GHz Wi-Fi router only.
Step1: Open the app, select your Country/Region, and a verification code will be sent to you.
Step2: Enter the verification code to confirm your identity, and the registration is complete.
08
Instruction for First-Time Use of the INKBIRD APP
11
8.1 How to Download the INKBIRD APP
8.2 Registration
NOTES:
Search "INKBIRD" in the App Store or Google Play or scan the QR code
to download and install the INKBIRD application. Open the App,
complete registration, and log in, then follow the app operation
prompts to connect the gateway.
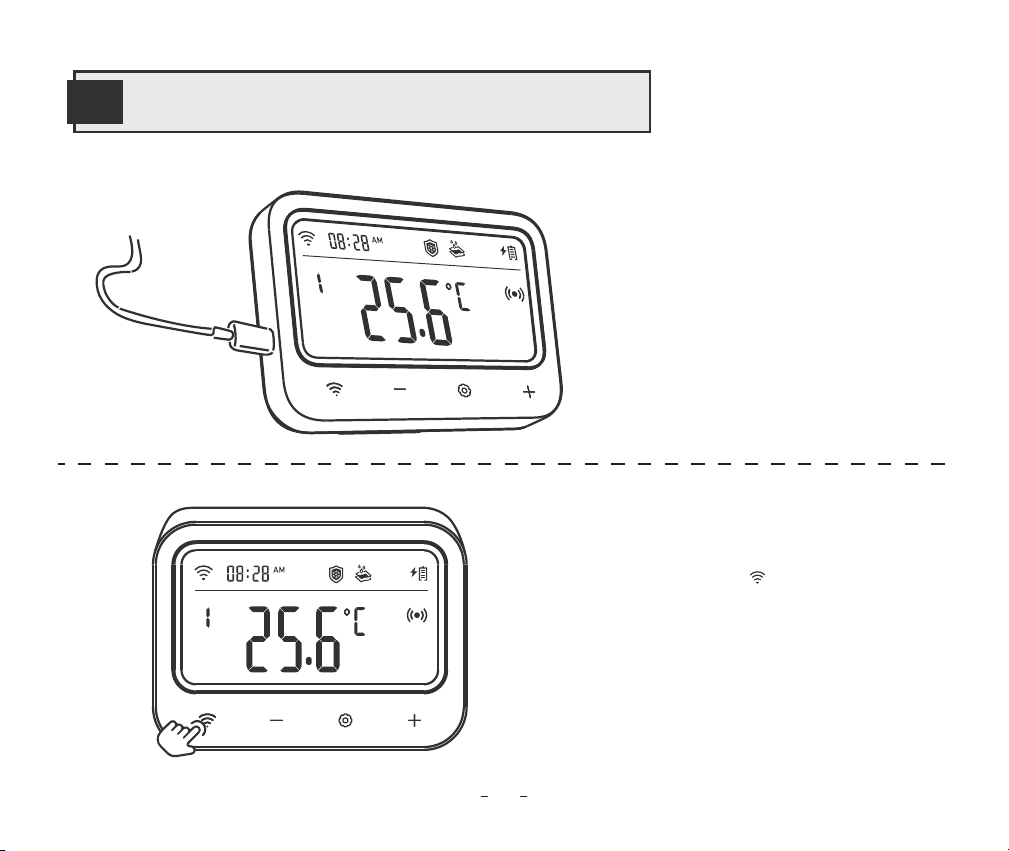
Step1: Plug the USB power connector
directly into Gateway and keep it constantly
connected when using.
09
How to Pair the Gateway with the APP
12
Step2: Press and hold the button until the
icon quickly flashes to enter pairing mode.
Note: Please make sure your phone has
Bluetooth enabled and keep the Gateway as close
as possible to your router and smartphone.
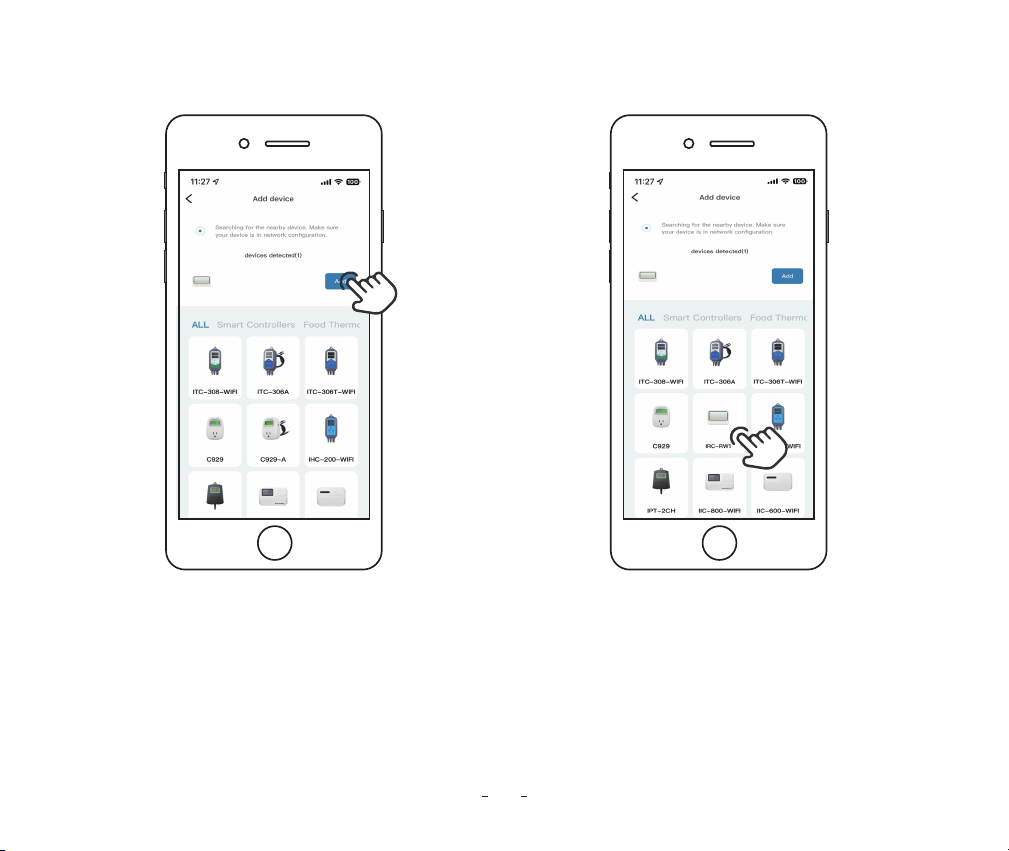
Step3: Open the INKBIRD app and click "Add"
in the right corner. Add the IRC-RW1 after
automatically searching the device.
Note: If the IRC-RW1 cannot be found automatically,
please manually select the device model and follow
the prompts to complete the connection.
13
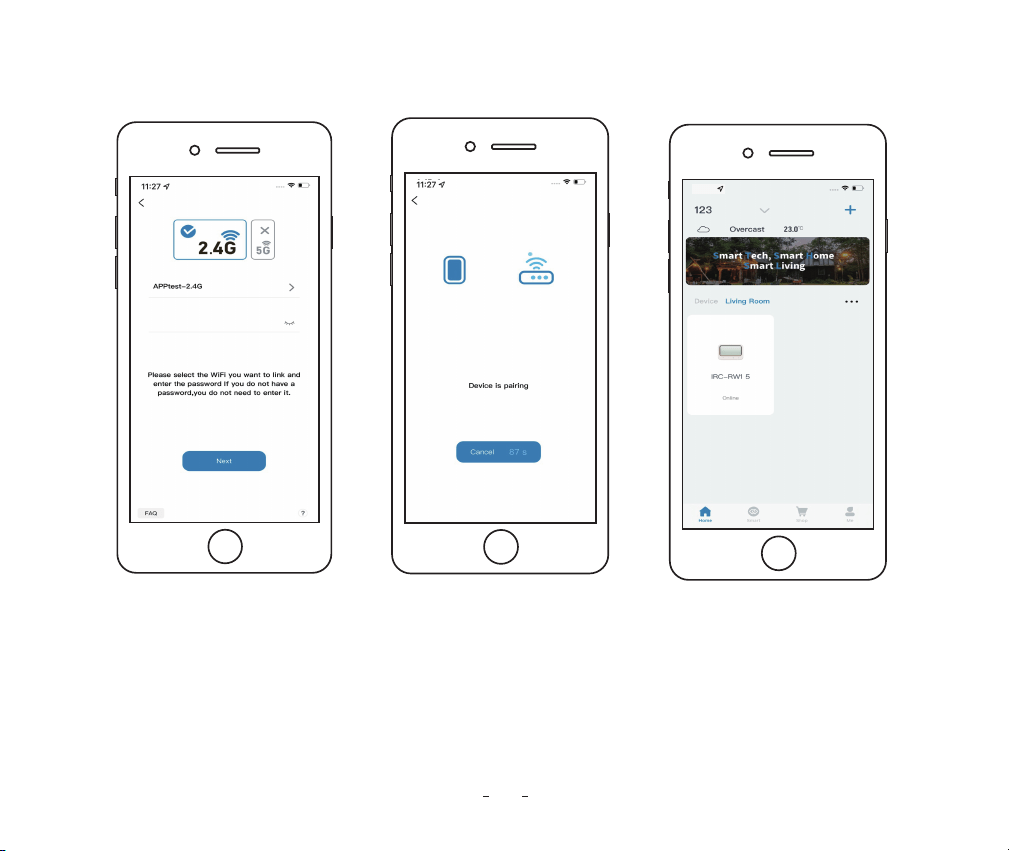
Step4: Choose a WiFi
network and connect it,
enter the password, then
click Next Step.
Step5: The device is
automatically pairing
with your smartphone.
14
Step6: Pairing is
successful.
11: 27
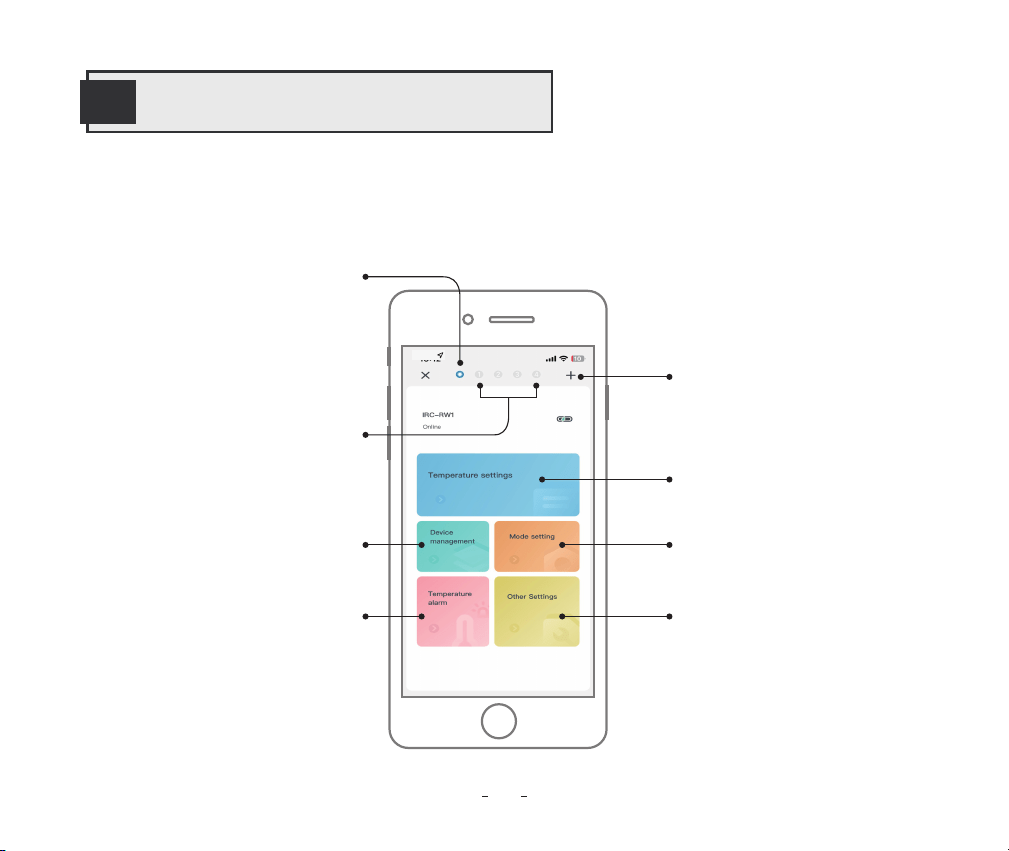
10.1 The gateway control interface can set multiple control valves at the same time.
10
Main Interface of INKBIRD APP
15
11: 27
Central Control Interface,
to send the same command
to multiple sub-devices at
the same time
Sub-Device Channels
Temperature Settings
Add Control Valves
Working Mode Settings
Other Settings
Device Management
Temperature Alarm Settings
10.2 Control Valve Interface
16
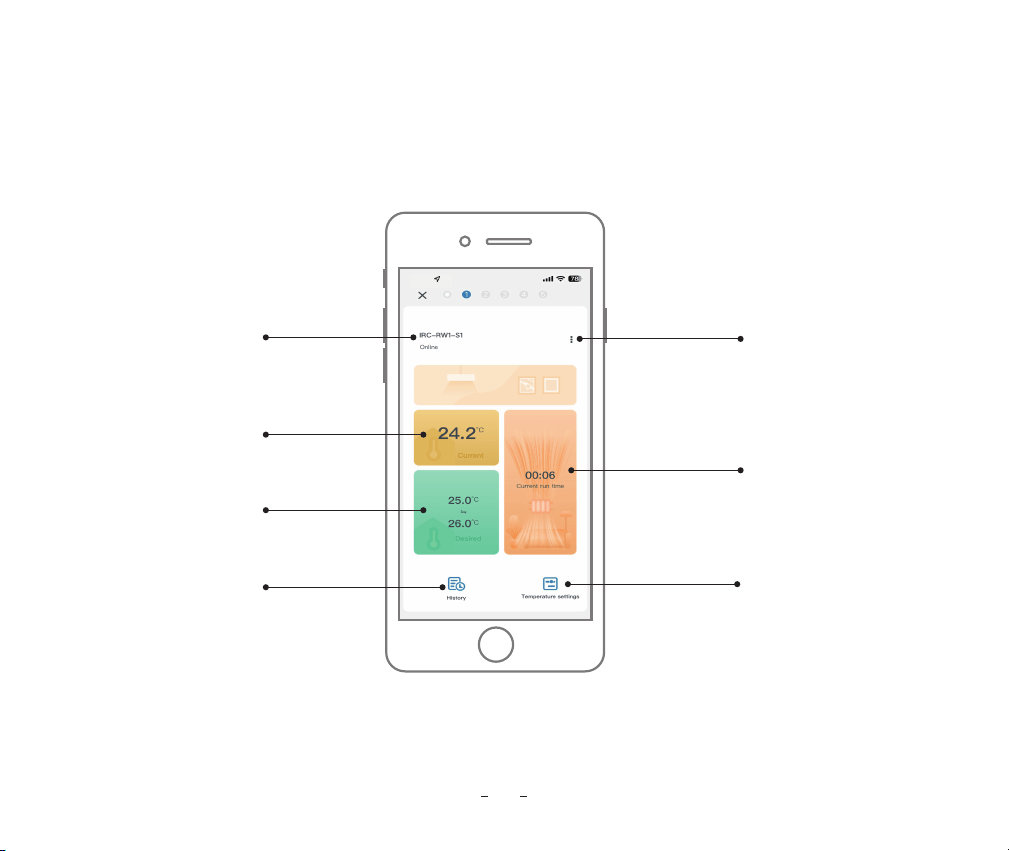
11: 27
Device Name
Enter Calibration
Temperature Settings
Interface
Enter the
settings
Current
temperature
Current Target
temperature range
Single heating
duration
Historical data
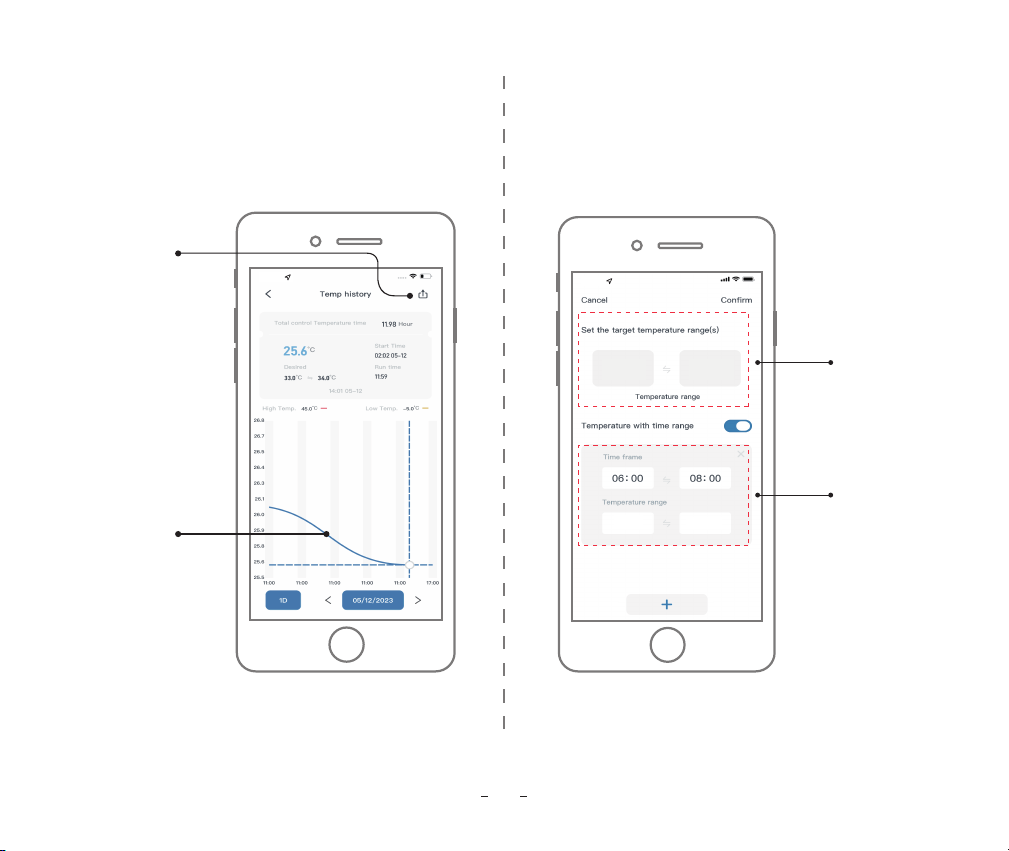
11: 27
10.3 History Graph Interface
10.4 Control Valve Setting Interface
17
11: 27
Temperature
curve
Export
historical data
Target Temperature
Range for all day
Temperature Setting Interface
Target Temperature
Range at
different times
25.0
�
� �
�
24.0
25.0
26.0
10.4 Control Valve Setting Interface
18
11: 2711: 27
Mode Setting Interface High/Low-Temperature
Alarm Setting Interface
11: 27
Calibration Temperature
Settings Interface
10.4 Control Valve Setting Interface
19
11: 27 11: 27
Device Management Interface
11: 27
Other Setting Interface
11
Parameter Setting
20
11.1 Parameter Setting Range
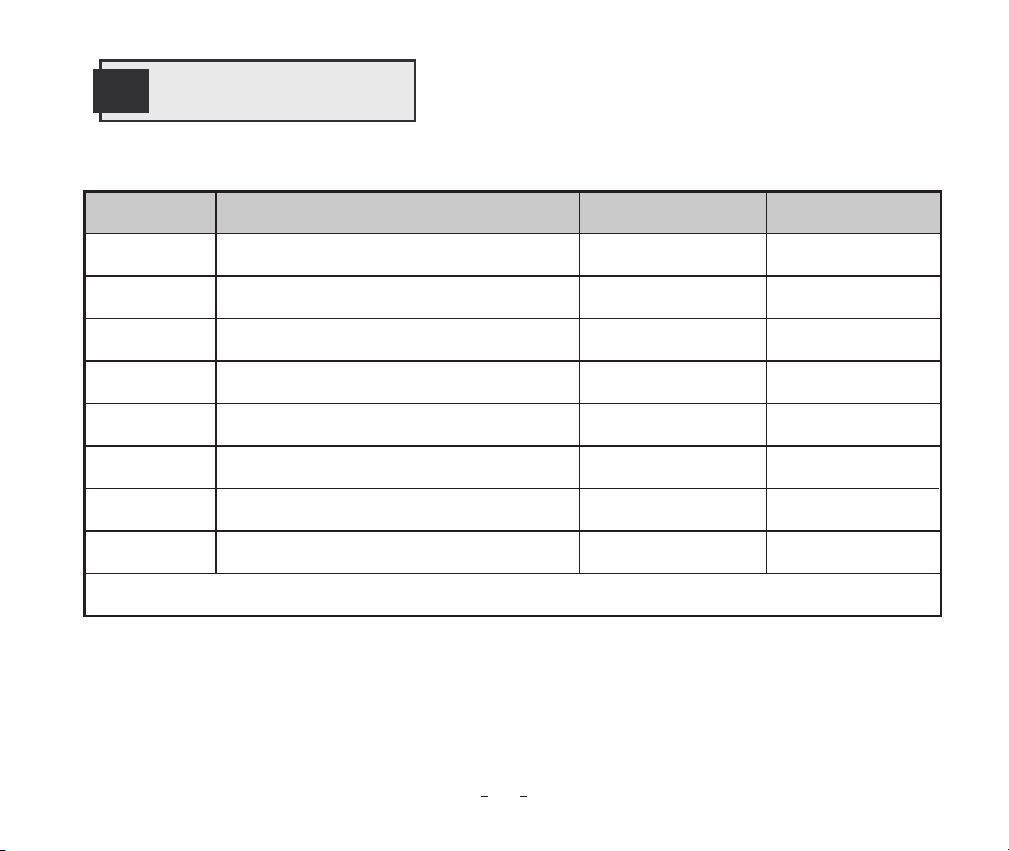
Code Function Default Setting Setting Range
ST
SP
AH
AL
CA
ST1...ST11
SP1...SP11
26.0
℃�
45.0
℃�
-5.0
℃�
0.0
℃�
00:00
00:00
0.0�~35.0
℃�
-10-50
℃�
-10-50
℃�
-4.9�~4.9
℃�
00:00~23:59
00:00~23:59
Start Heating Temperature
Stop Heating Temperature
High-Temperature Alarm Value
Low-Temperature Alarm Value
Temperature Calibration Value
CF
Note: The minimum setting differential value of ST and SP is 0.3℃.
C C/FTemperature Unit
Start Heating Time
Stop Heating Time
25.0
℃� 0.0�~35.0℃�
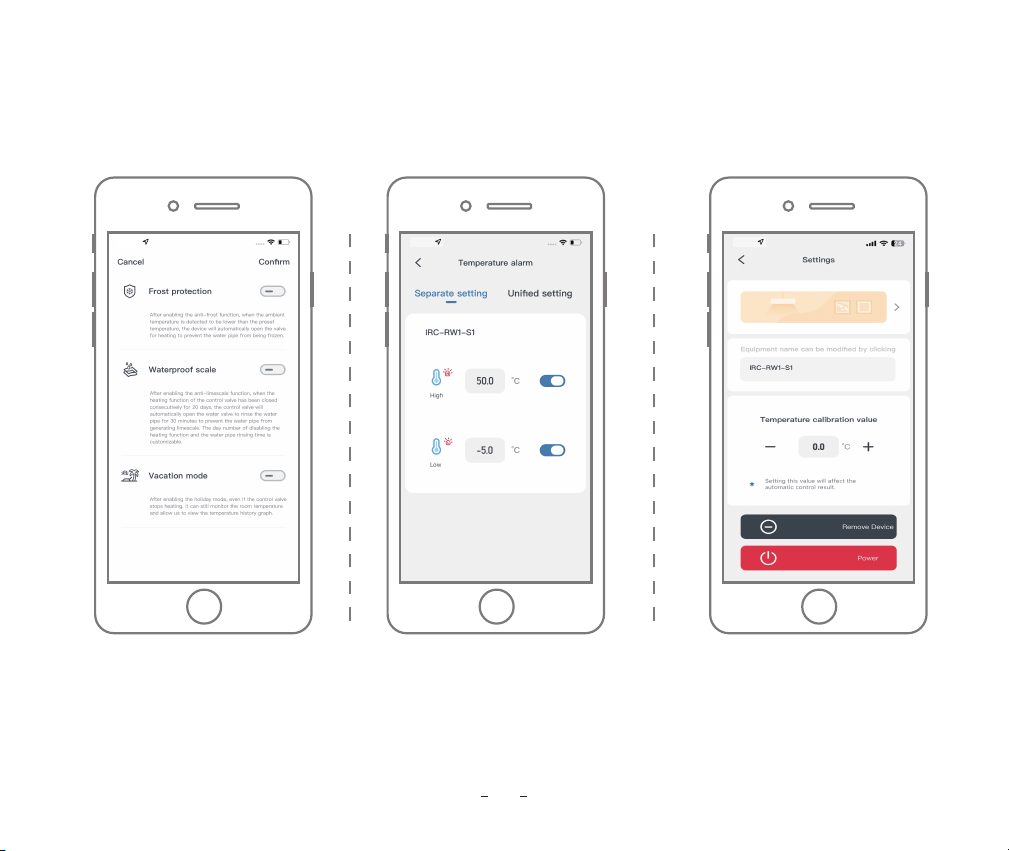
11.2 Working Principle
The valve will close to stop heating when the current temperature reaches the SP(stop heating temperature) and
will open to start heating when it reaches the ST(start heating temperature).
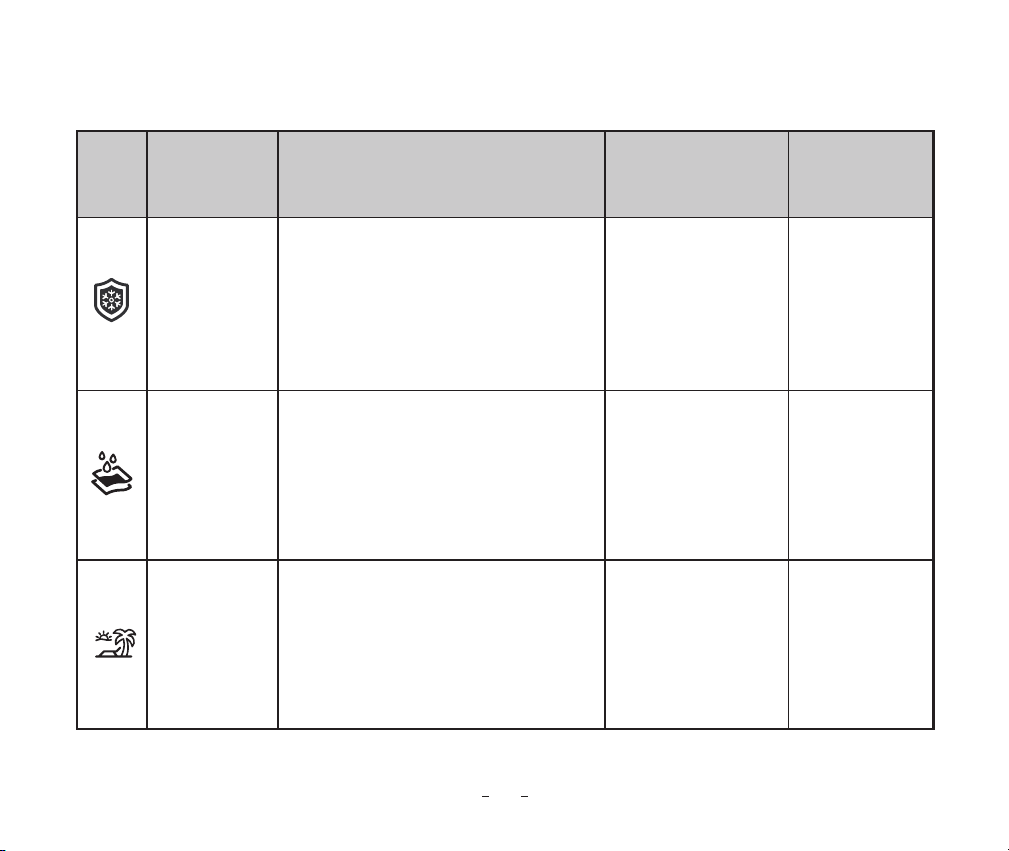
In order to prevent the water in the pipe
from freezing, the control valve will
automatically activate the heating
function when it detects that the ambient
temperature is too low.
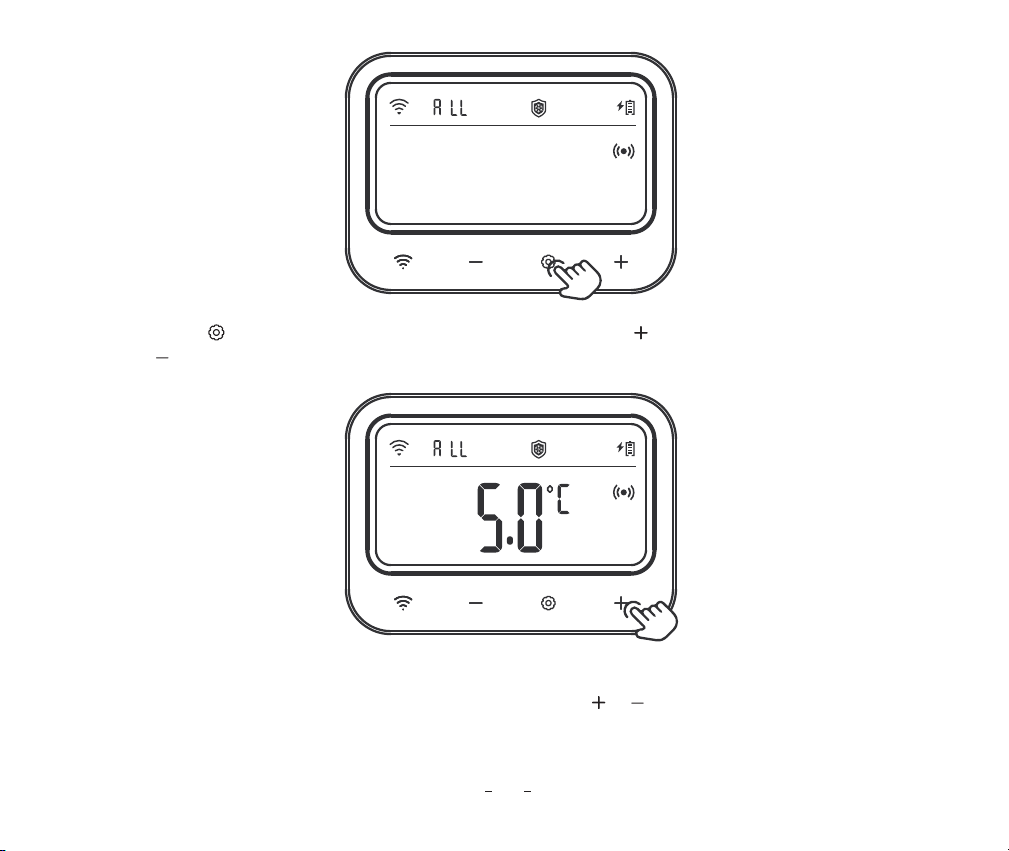
Enabled when the
temperature is
below 5.0℃�.
OFF
ON/OFF
The default number
of days is 20, and
the flushing time is
30 minutes.
0.0�~10.0℃�
Day setting:
5~30 days
Time setting:
10~60 min
In order to prevent water pipes from
forming scale, the valve will automatically
be opened to flush when the control valve
has not been opened for a long time.
After enabling the vacation mode function,
the control valve will close the heating
function but will maintain the function of
detecting the indoor temperature, and you
can see the historical temperature curve record.
Anti-Frost Mode
Anti-Limescale
Mode
Vacation Mode
21
Function Description
Icon Mode Definition Default Setting Custom
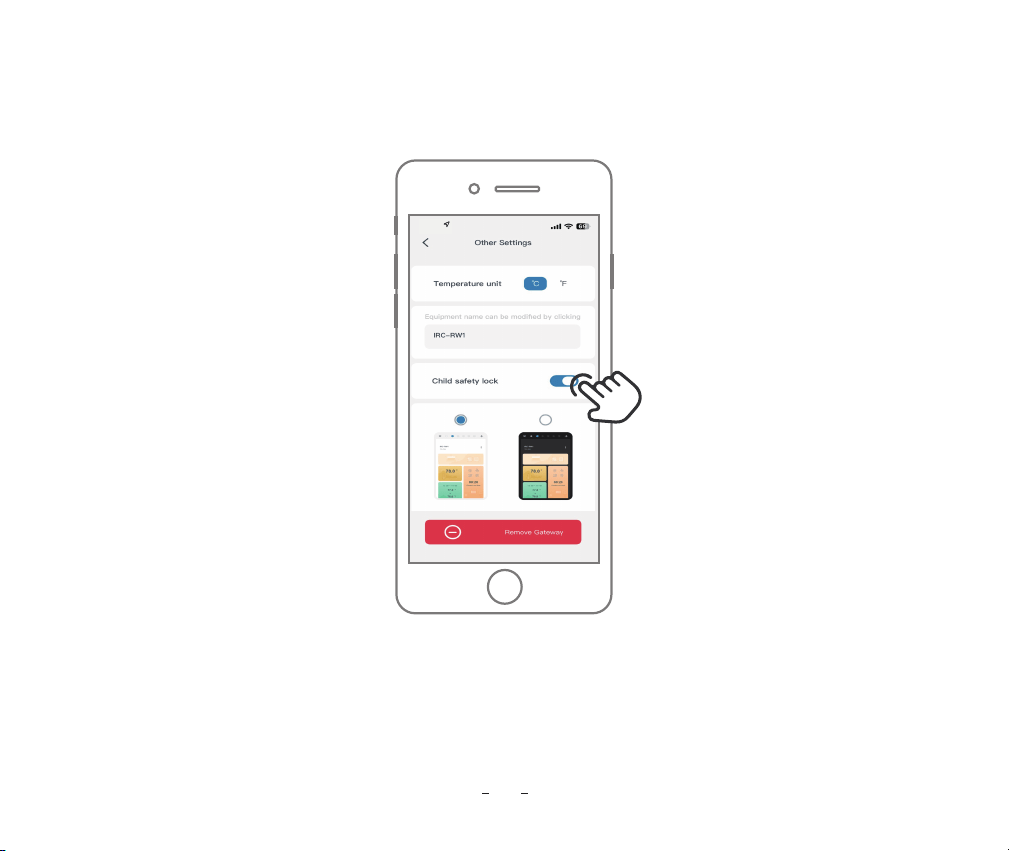
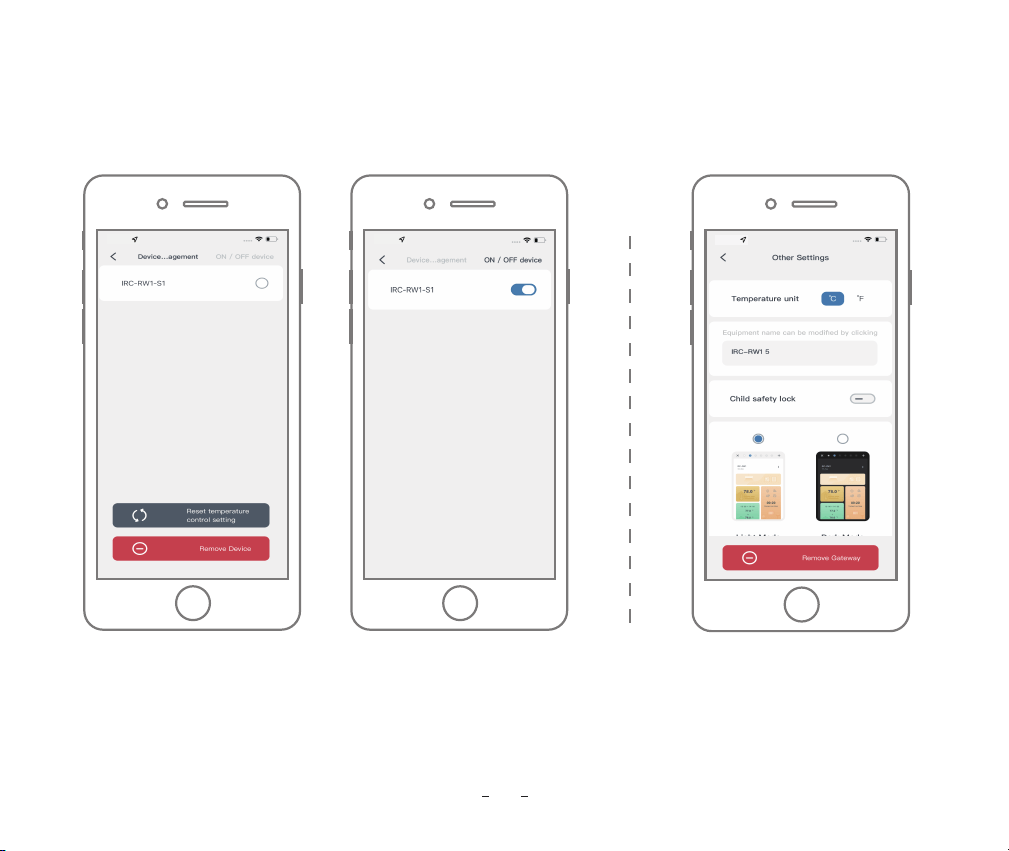
How to enable the child safety lock?
When the child safety lock is enabled on App, pressing any button will immediately display the LoC charac-
ter, and the buzzer will sound three times.
11: 27
22
11.3 Child Safety Lock Function
23
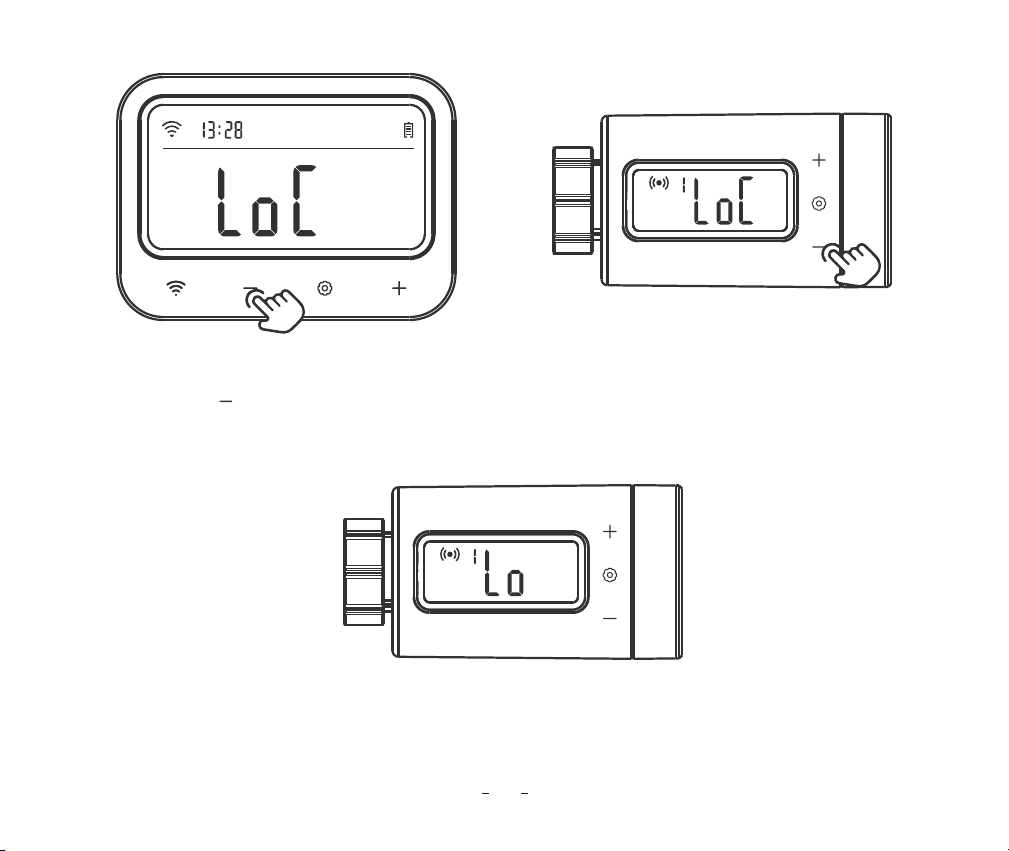
How to unlock the child safety lock on the Gateway or Control Valve ?
Press and hold the button for 2 seconds to unlock the child safety lock on Gateway or Control Valve. If
no button is pressed within 60 seconds, the function reverts to the locked state.
11.4 Low Battery Alarm Function
When the battery power is too low, the control valve will automatically be closed, and the character "Lo" will
be displayed. At the same time, all action keys are disabled and the App sends you a low-battery notification.
When the battery power is low, we strongly recommend replacing the battery immediately so as not to affect
its normal work.
24
12
Troubleshooting Guide
1) What should you do if the connection between the WiFi gateway and the control valve is abnormal?
a. Remove the control valve from the App and add it again.
2) The WiFi network is often dropped, historical data is lost, or the network cannot be connected?
a. Make sure the WiFi signal is stable, and place the device as close to the router as possible.
b. Make sure there are as few barriers as possible between the device and the router.
c. Check to see if the battery level is low.
d. Enable Bluetooth and positioning functions, allow the App to obtain location information, and allow the
local network (iOS System).
3) The alarm notification is not received or delayed?
a. Make sure the WiFi signal is stable, and place the device as close to the router as possible.
b. Make sure there are as few barriers as possible between the device and the router.
c. Check to see if the app notification permission is enabled.
25
Long press to enter the
WiFi pairing mode
Long press for 2s to
power on/off
13
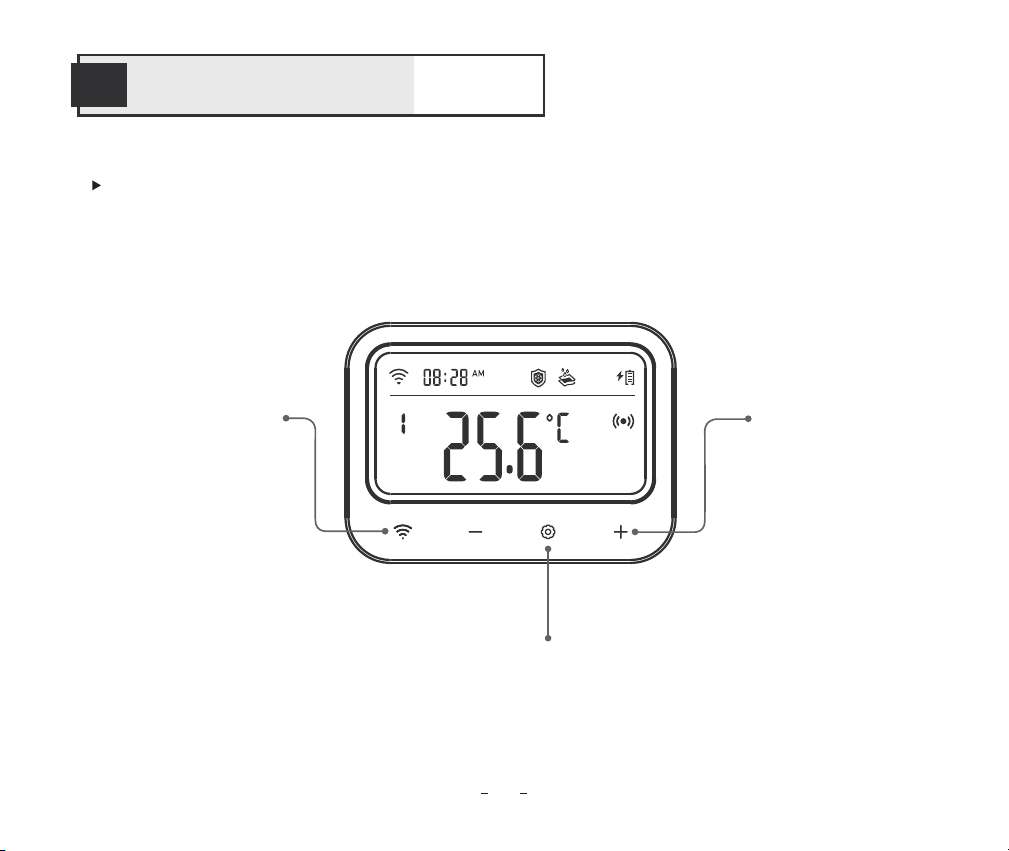
Gateway Operation Instruction
Product Introduction
Set
Button
26
Start Heating Temperature
Stop Heating Temperature
Start Time
Stop Time
High-Temperature Alarm Value
Low-Temperature Alarm Value
High-Temperature Alarm Icon
Low-Temperature Alarm Icon
Anti-Frost Function Icon
Anti-Frost Temperature Value
Anti-Limescale Function Icon
Number of Days without Heating
Anti-Limescale Rinse Time
Vacation Function Icon
0.0�~35.0
℃
�
32.0�~95℉�
0.0�~35.0
℃
�
32.0�~95℉�
00:00~23:59
00:00~23:59
-10.0�~50.0
℃
�
14.0�~122℉�
-10.0�~50.0
℃
14.0�~122℉�
ON/OFF
ON/OFF
5~30 days
10~60 minutes
ON/OFF
0.0�~10.0
℃
�
32.0�~50.0℉�
25.0
℃
77.0℉�
26.0
℃
�
78.0℉�
00:00
00:00
45.0
℃
113℉�
-5.0
℃
�
23.0℉�
OFF
OFF
20 days
30 minutes
OFF
5.0
℃
�
41.0℉�
Icon Function Setting Range Default Setting
* Gateway Parameter Setting
+ Temp
+ Temp
ST + Temp
SP + Temp
+ Temp
+ Temp
+ Temp +
+ No.+d
+ No.
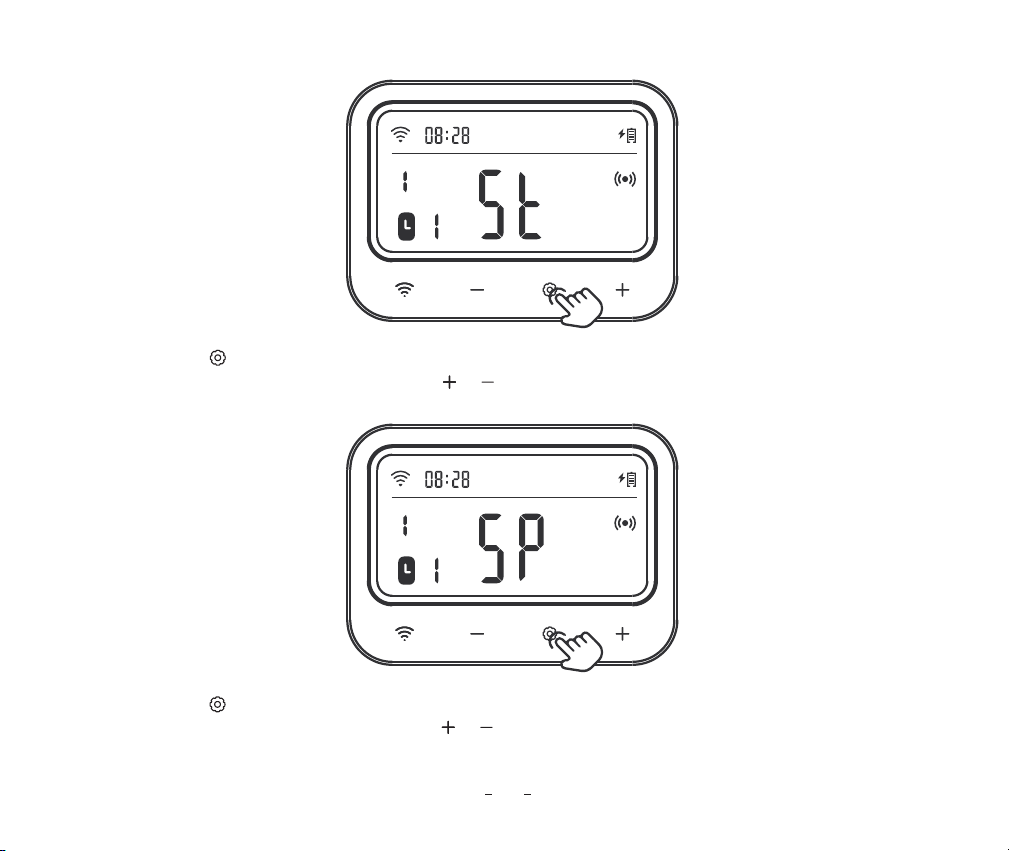
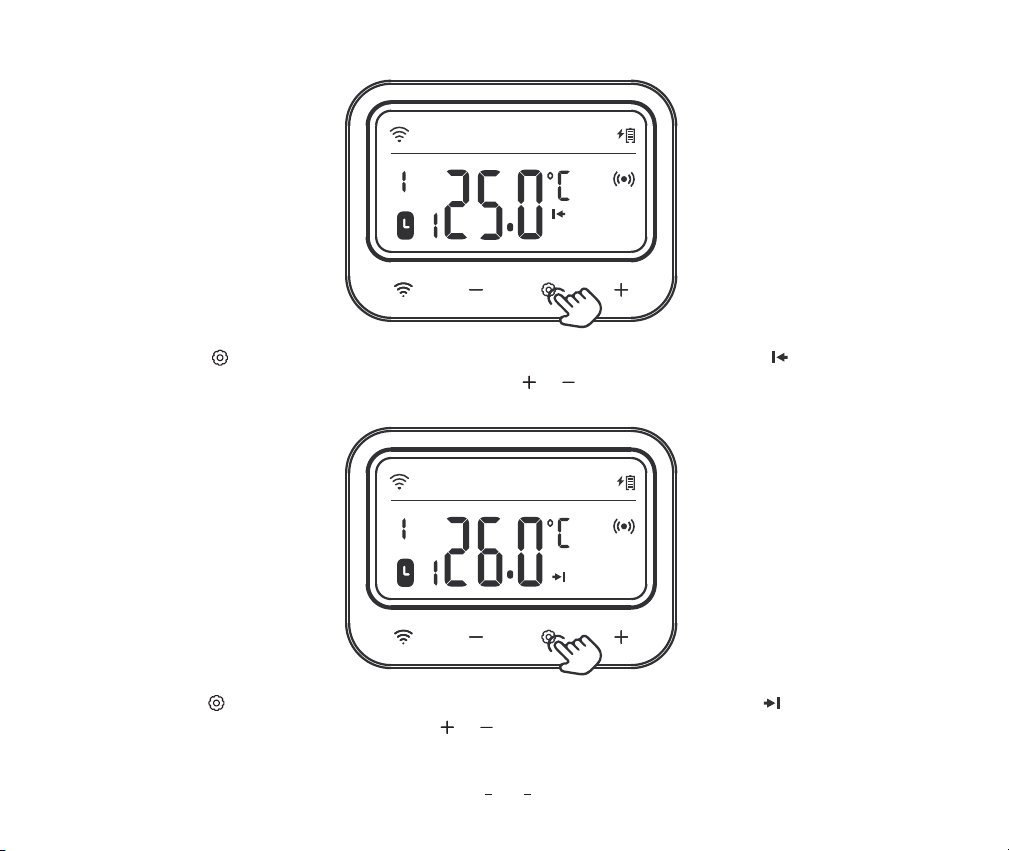
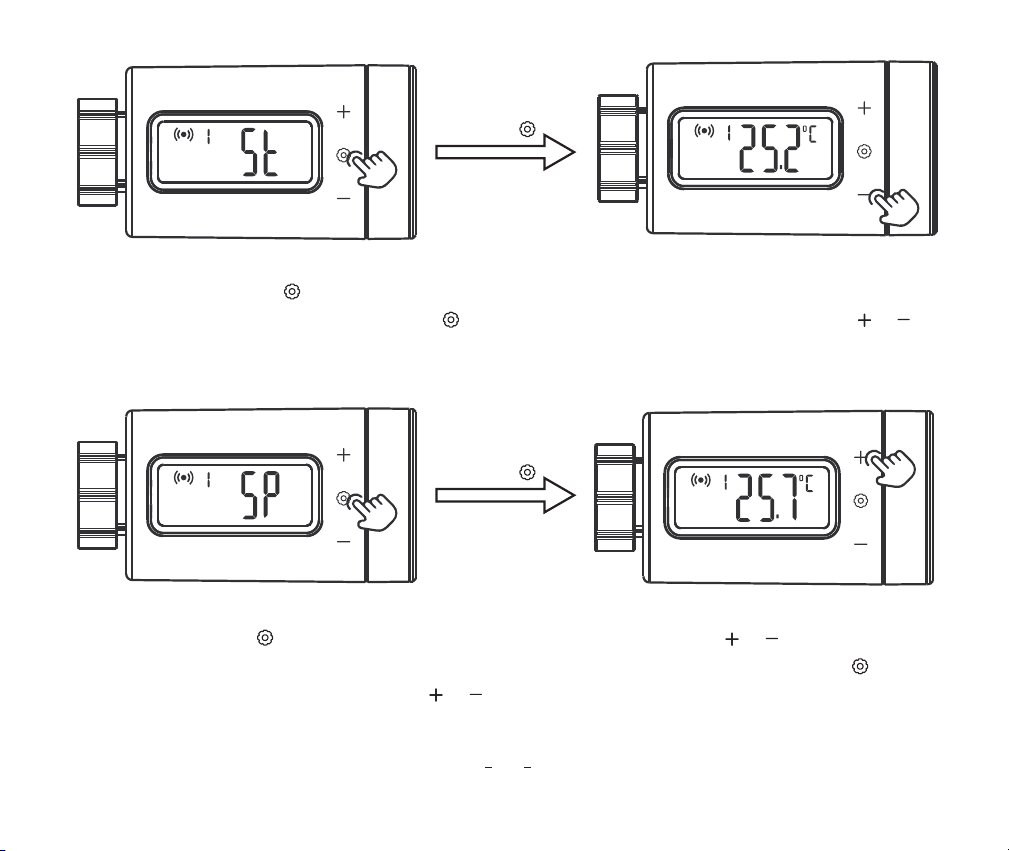
Step2: Short press the key to set the start heating temperature, and the relevant parameter will flash. Then
press the or key to adjust the target value to 25.0℃.
27
Step1: Press and hold the key for 2 seconds to enter the setting, then short press the or key to
select the temperature control valve to set.
How to control the target temperature at 25.0℃~26.0℃ ?
28
Step4: Press and hold the key for 2 seconds or no operation for 60 seconds to save the settings and return
to working mode.
Step3: Short press the key to set the stop heating temperature, and the relevant parameter will flash. Then
press the or key to adjust the target value to 26.0℃.
29
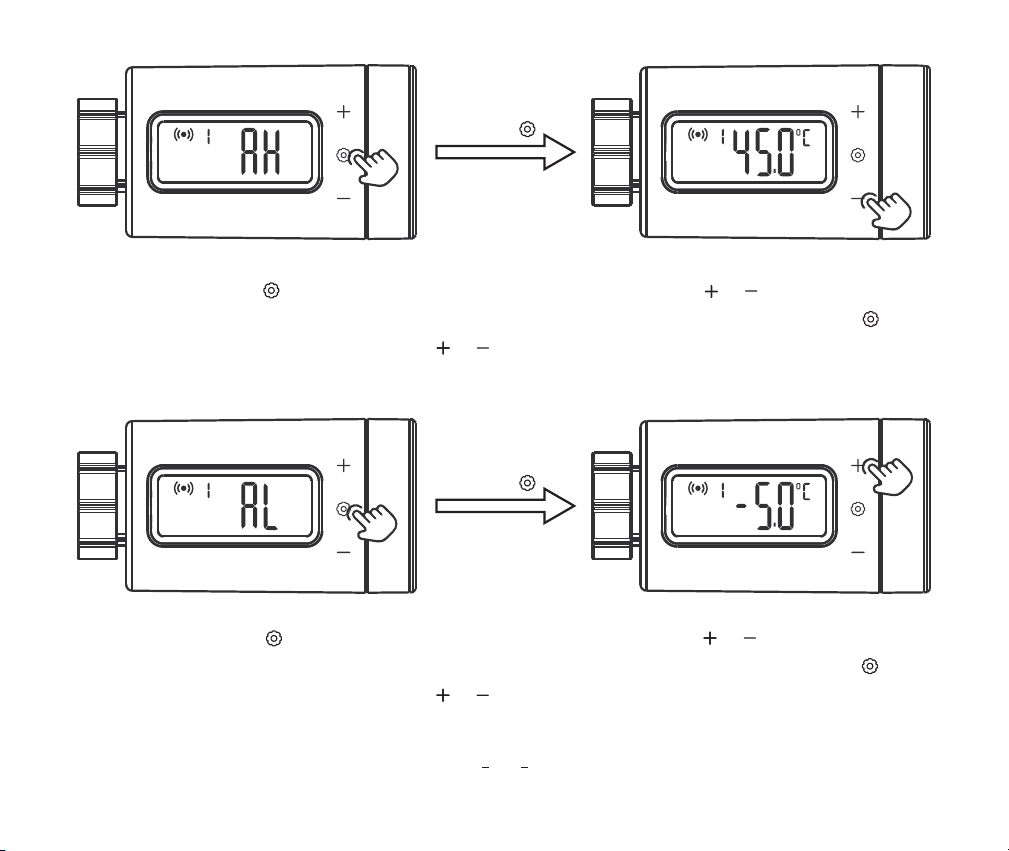
For example, set the high-temperature alarm value as 28.0℃, and set the low-temperature alarm value as 23.0℃.
How to set a high/low-temperature alarm value ?
Step2: Short press the key to select the low-temperature alarm value, the symbol will be displayed and
the relevant parameter will flash. Press the or key to adjust the value to 23.0℃.
Step1: Press and hold the key for 2 seconds to enter the setting and select the temperature control valve to
set. Then short press the key to select the high-temperature alarm value, the symbol will be displayed
and the relevant parameter will flash. Press the or key to adjust the value to 28.0℃.
30
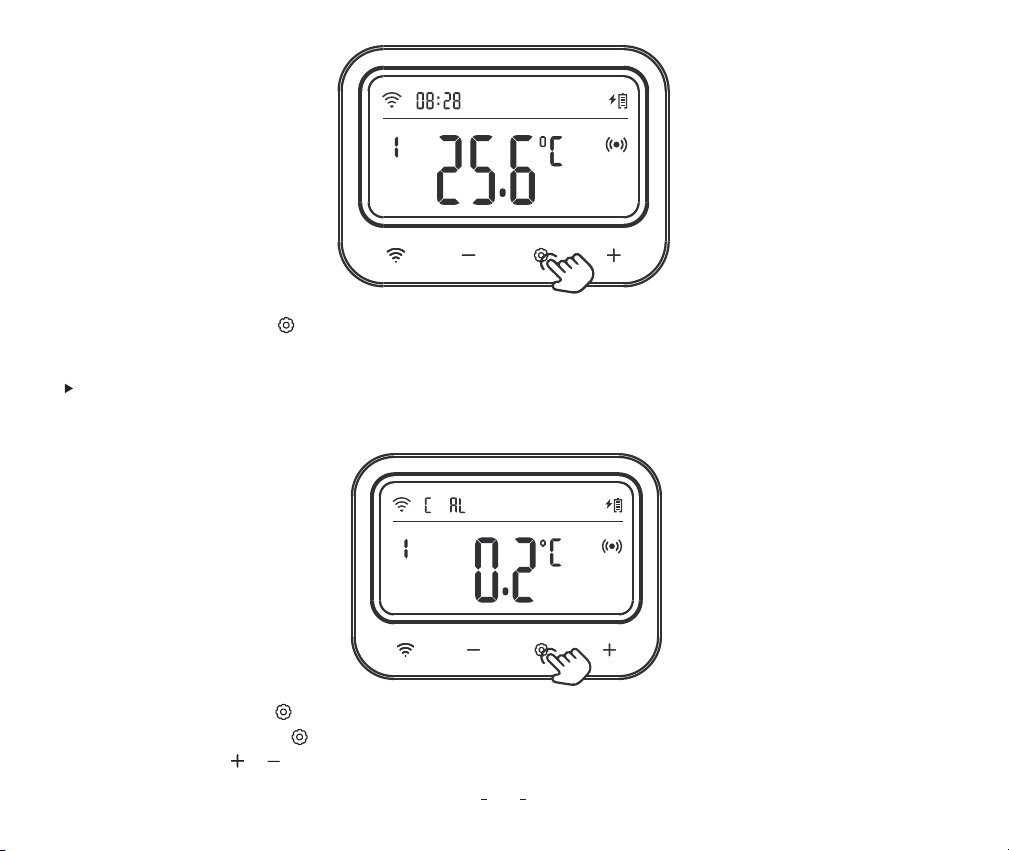
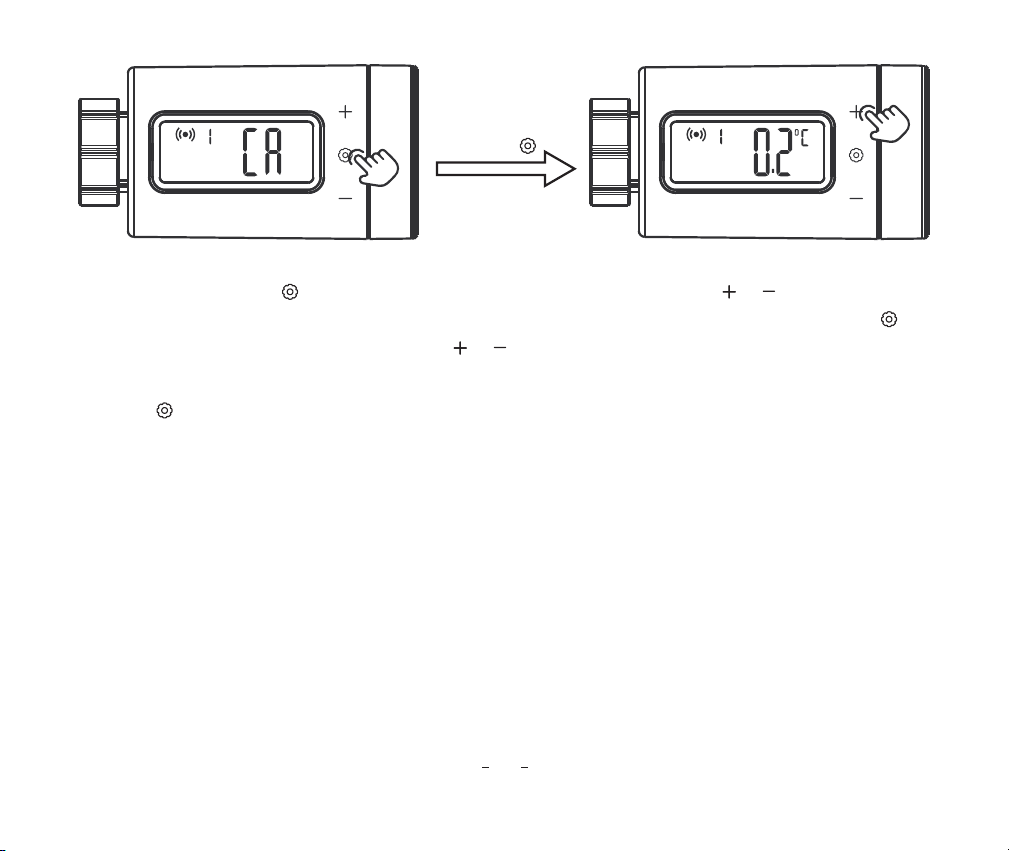
For example, set the calibration temperature as 0.2℃.
How to set the calibration temperature?
Step1: Press and hold the key for 2 seconds to enter the setting and select the temperature control valve
to set. Then short press the key to select the temperature calibration value, and the relevant parameter
will flash. Press the or key to adjust the value to 0.2℃�.
Step3: Press and hold the key for 2 seconds or no operation for 60 seconds to save the settings and return
to working mode.
31
Time period
Start time
End time Start heating temperature
Stop heating temperature
1
2
3
22.0℃�
26.0℃�
24.0℃�
23.0℃�
27.0℃�
25.0℃�
21:00
02:00
09:00
23:00
05:00
11:00
For example, let the control valve run on the following schedule.
How to set different target temperature ranges for different time periods?
Step2: Press and hold the key for 2 seconds or no operation for 60 seconds to save the settings and return
to working mode.
32
Note: For the time outside of the above schedule, the temperature range will be controlled according to
the original preset parameters, such as the target temperature range of 25.0℃~26.0℃ mentioned above.
Step1: Press and hold the key for 2 seconds to enter the setting, and select the temperature
control valve to set. Then short press the key to select the timing function, and the relevant
parameter will flash. Press the or key to set the time period to 3. Note that when the time period is
set to 0, it means that the timing function is turned off. Up to 11 time periods can be set.
33
Step3: Press the key to enter the stop time setting of the first time period. The character "SP" is displayed
and the relevant parameter flashes. Press the or key to adjust the hour to 11:00.
Step2: Press the key to enter the start time setting of the first time period. The character "ST" is displayed
and the relevant parameter flashes. Press the or key to adjust the hour to 09:00.
34
Step5: Press the key to set the stop heating temperature of the first time period. The symbol is displayed
and the relevant parameter flashes. Press the or key to adjust the temperature to 25.0℃.
Step4: Press the key to set the start heating temperature of the first time period. The symbol is
displayed and the relevant parameter flashes. Press the or key to adjust the temperature to 24.0℃.
35
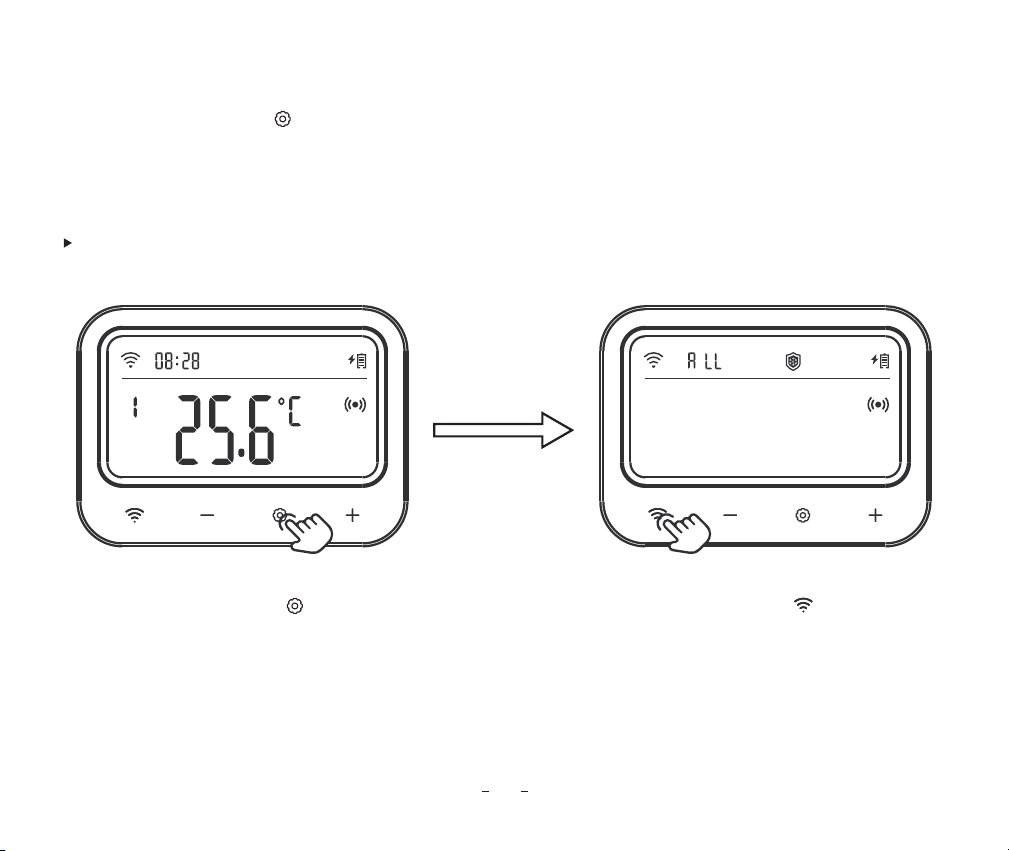
Step1: Press and hold the key for 2 seconds to enter the setting, then short press the key to switch
to setting mode, The character ALL remains on at this time, meaning the Anti-Frost function of all control
valves has been selected.
How to Turn On/Off Anti-Frost Function?
Step6: Repeat steps 2~5 to complete the settings for other time periods.
Step7: Press and hold the key for 2 seconds or no operation for 60 seconds to save the settings and return
to working mode.
36
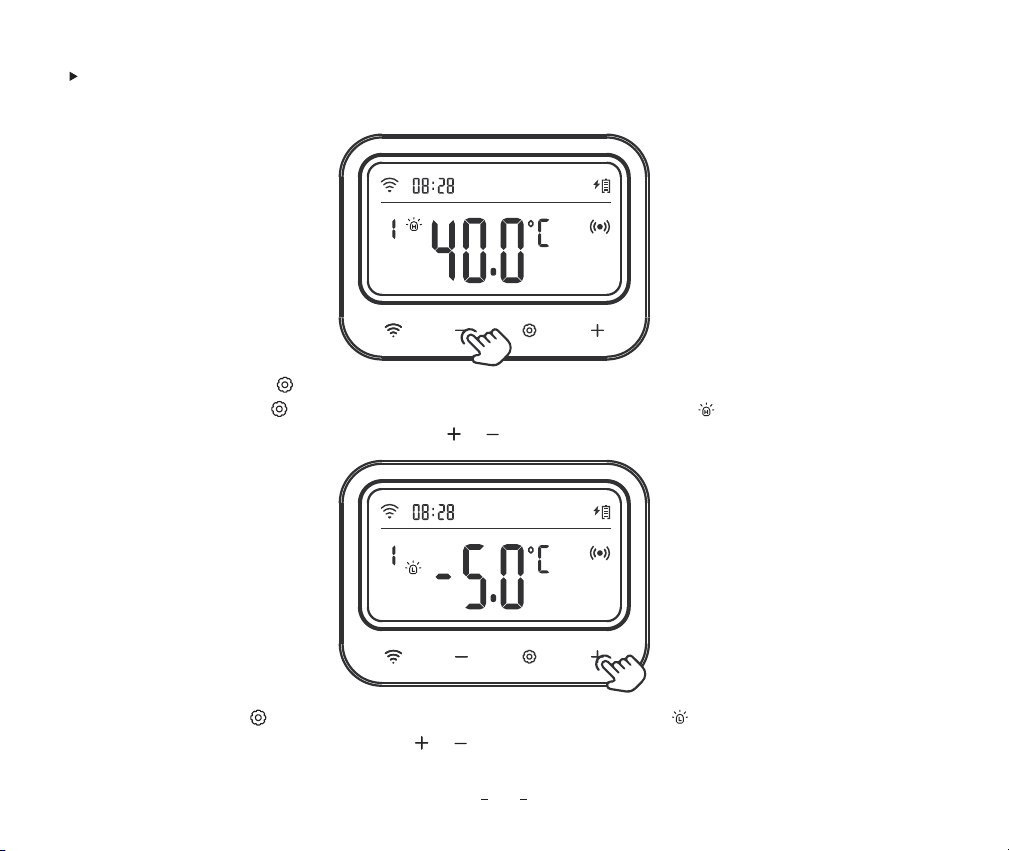
Step3: After turning on the Anti-Frost function, set the number of consecutive days without an open action
for the control valve. The relevant parameter will flash. Press the or key to adjust the parameter.
Step2: Press the key, and the Anti-Frost symbol will flash. Press the key to turn on the Anti-Frost function;
press the key to turn off the function.
37
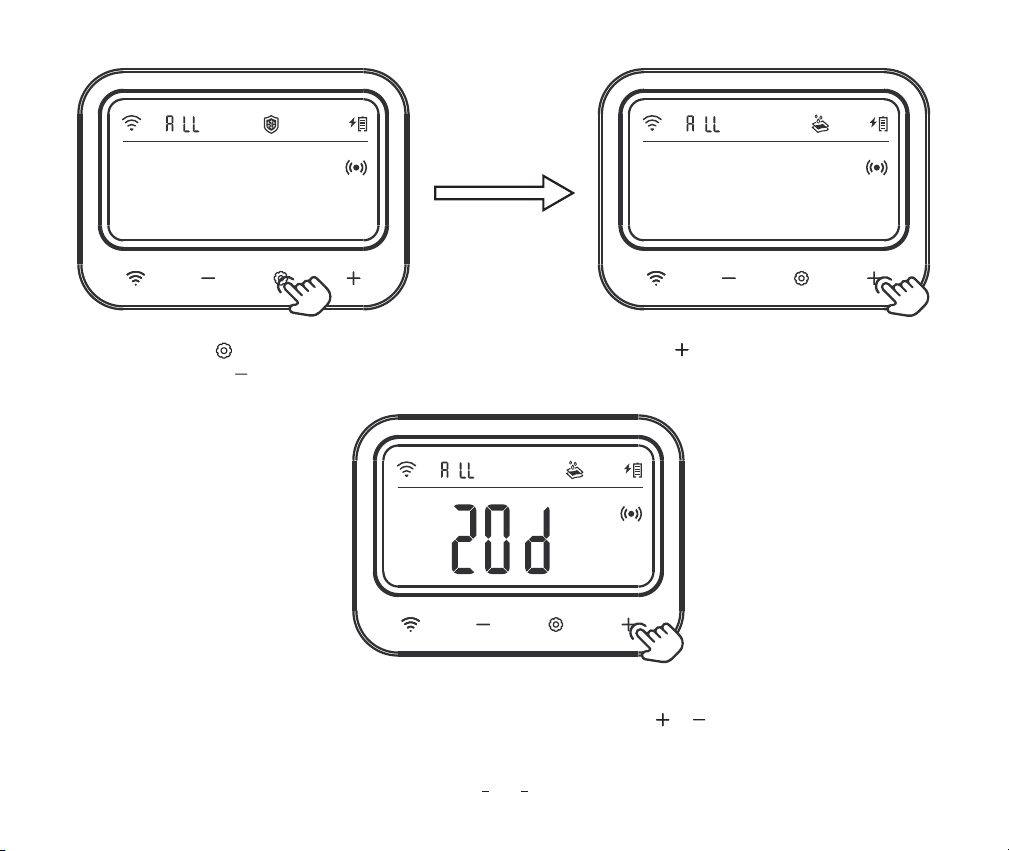
How to Turn On/Off Anti-Limescale Function?
Step4: Press and hold the key for 2 seconds or no operation for 60 seconds to save the settings and return
to working mode.
Step1: Press and hold the key for 2 seconds to enter the setting, then short press the key to switch
to setting mode, The character ALL remains on at this time, meaning the anti-limescale function of all
control valves has been selected.
38
Step2: Press the key, and the anti-limescale symbol will flash. Press the key to turn on the anti-limescale
function; press the key to turn off the function.
Step3: After turning on the anti-limescale function, set the number of consecutive days without an open
action for the control valve. The relevant parameter will flash. Press the or key to adjust the parameter.
39
Step4: Press the key set the minutes for rinsing the water pipe, and the relevant parameter will flash.
Press the or key to adjust the parameter.
Step5: Press and hold the key for 2 seconds or no operation for 60 seconds to save the settings and return
to working mode.
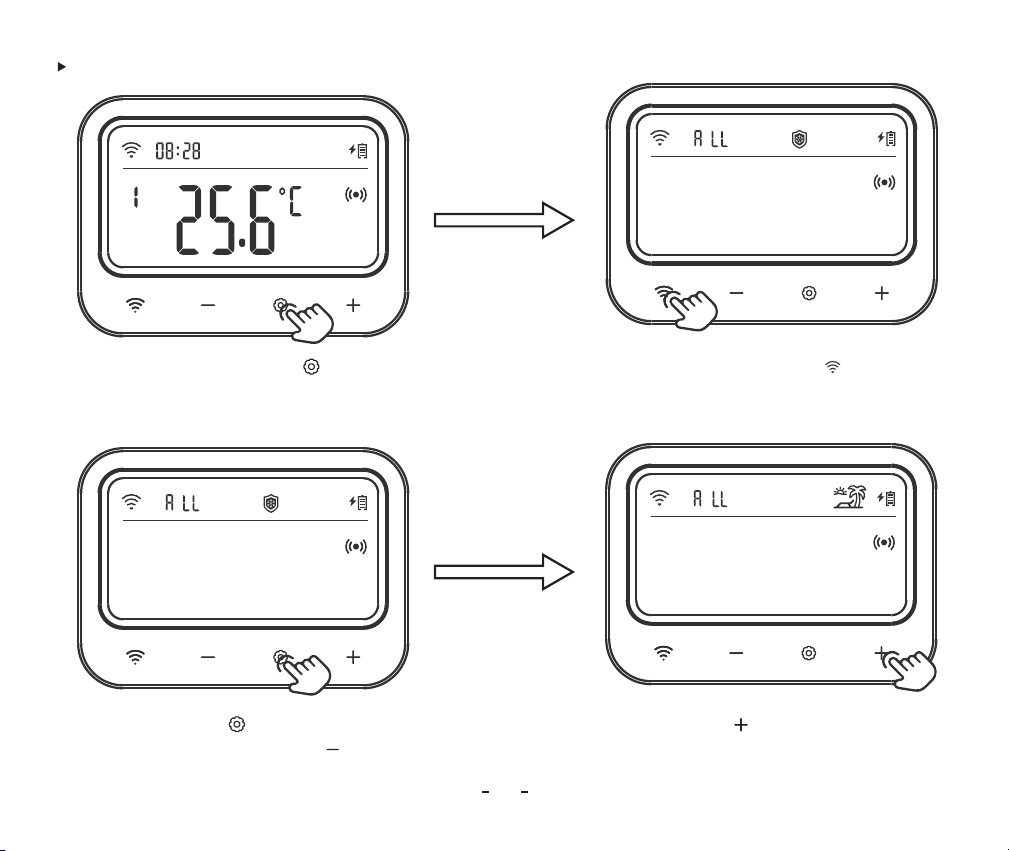
Step2: Press the key, and the vacation mode symbol will flash. Press the key to turn on the
vacation function; press the key to turn off the function.
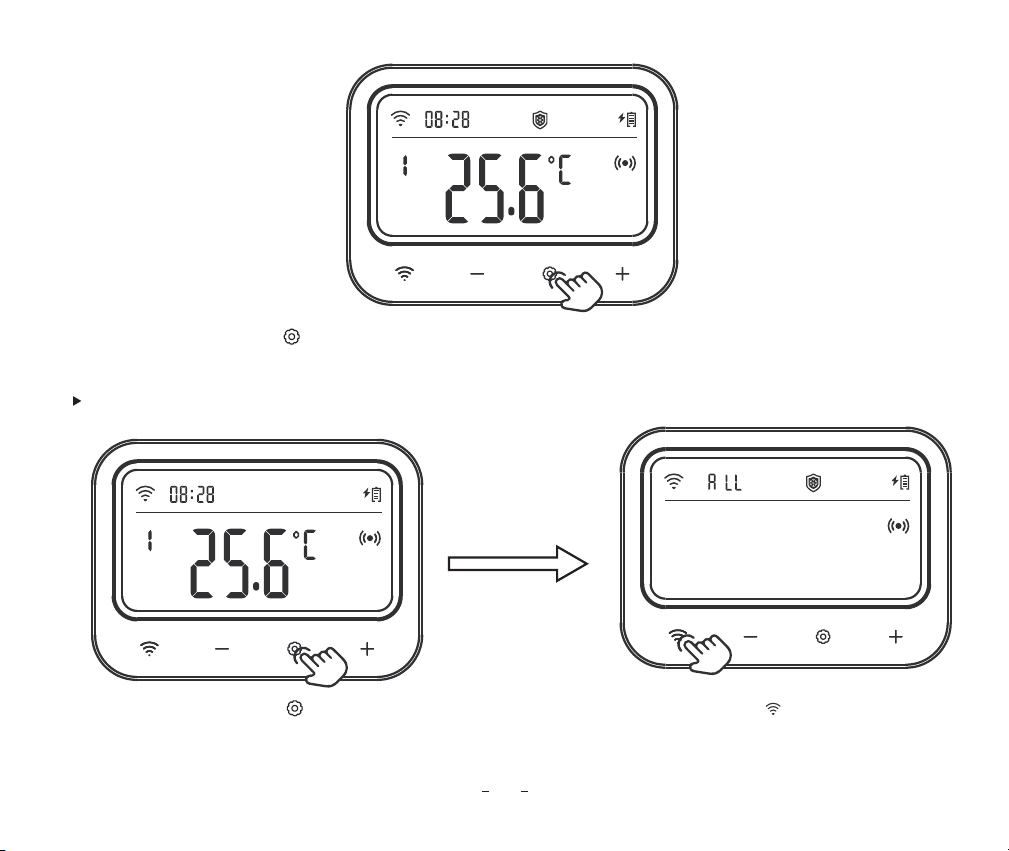
Step1: Press and hold the key for 2 seconds to enter the setting, then short press the key to
switch to setting mode, The character ALL remains on at this time, meaning the vacation mode of all
control valves has been selected.
40
How to Turn On/Off Vacation Mode?
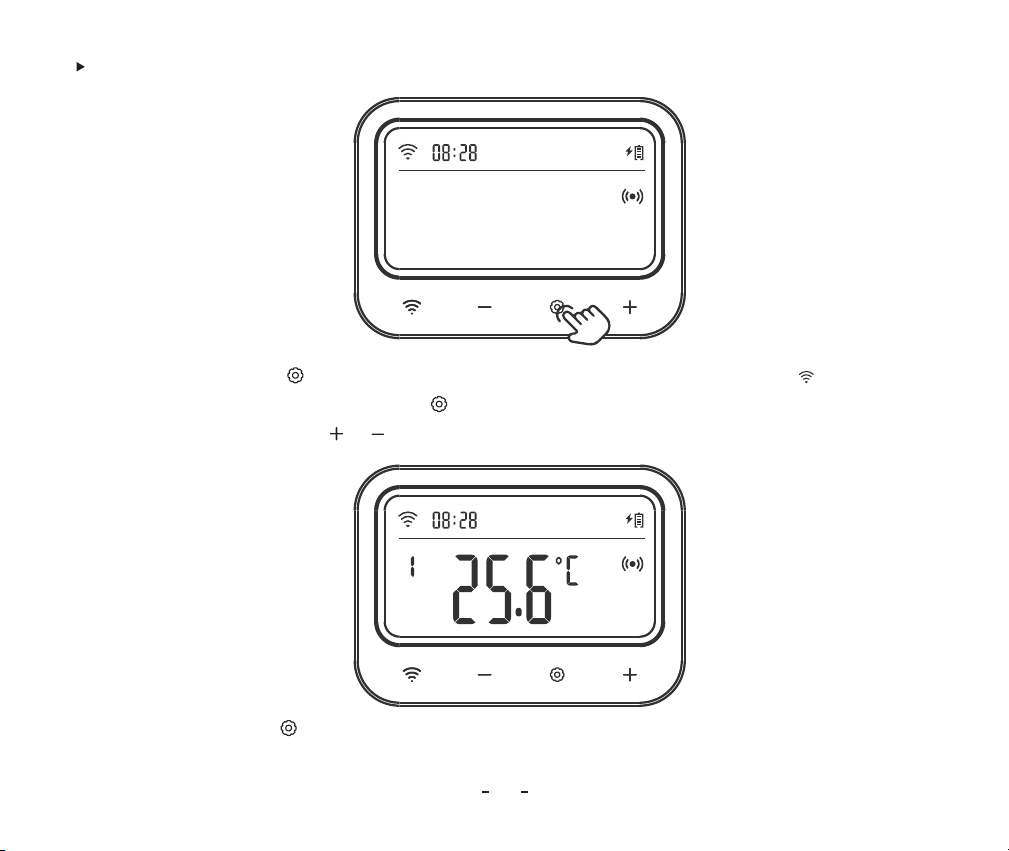
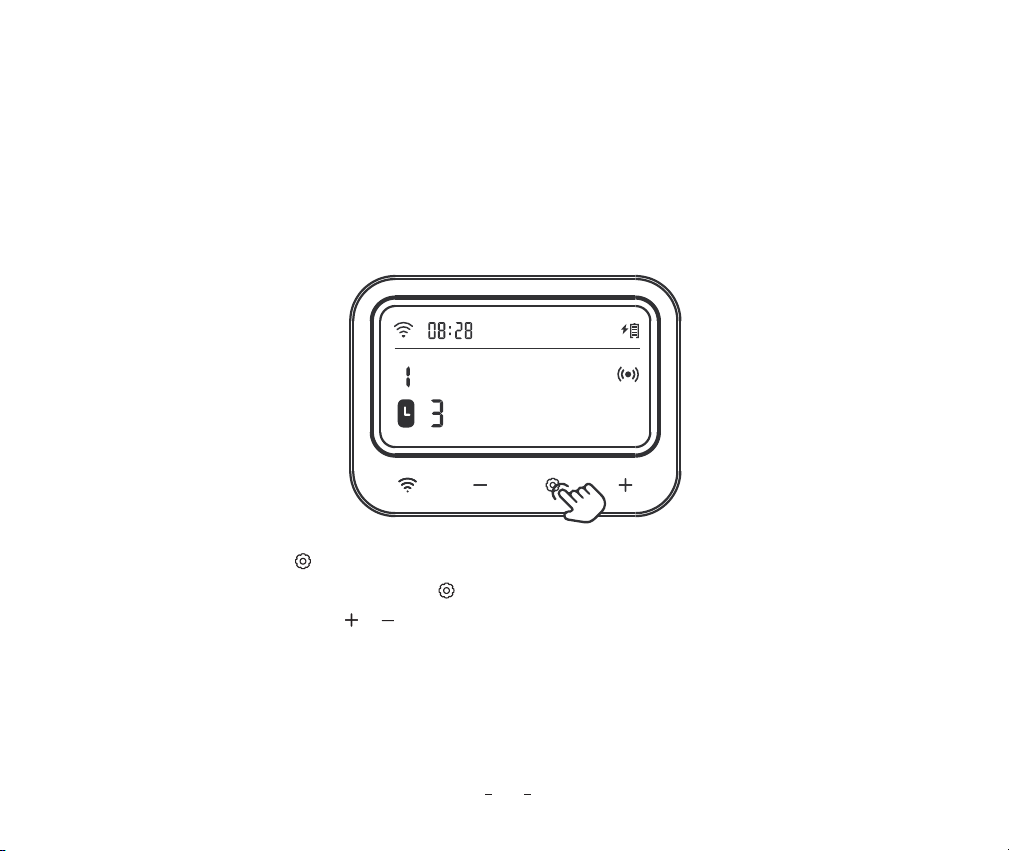
Step1: Press and hold the key for 2 seconds to enter the setting, then short press the key to switch
to setting mode. After that, short press the key to select the current time menu, and the relevant
parameter will flash. Press the or key to adjust the current time.
41
How to Set the Current Time ?
Step2: Press and hold the key for 2 seconds or no operation for 60 seconds to save the settings and return
to working mode.
42
14
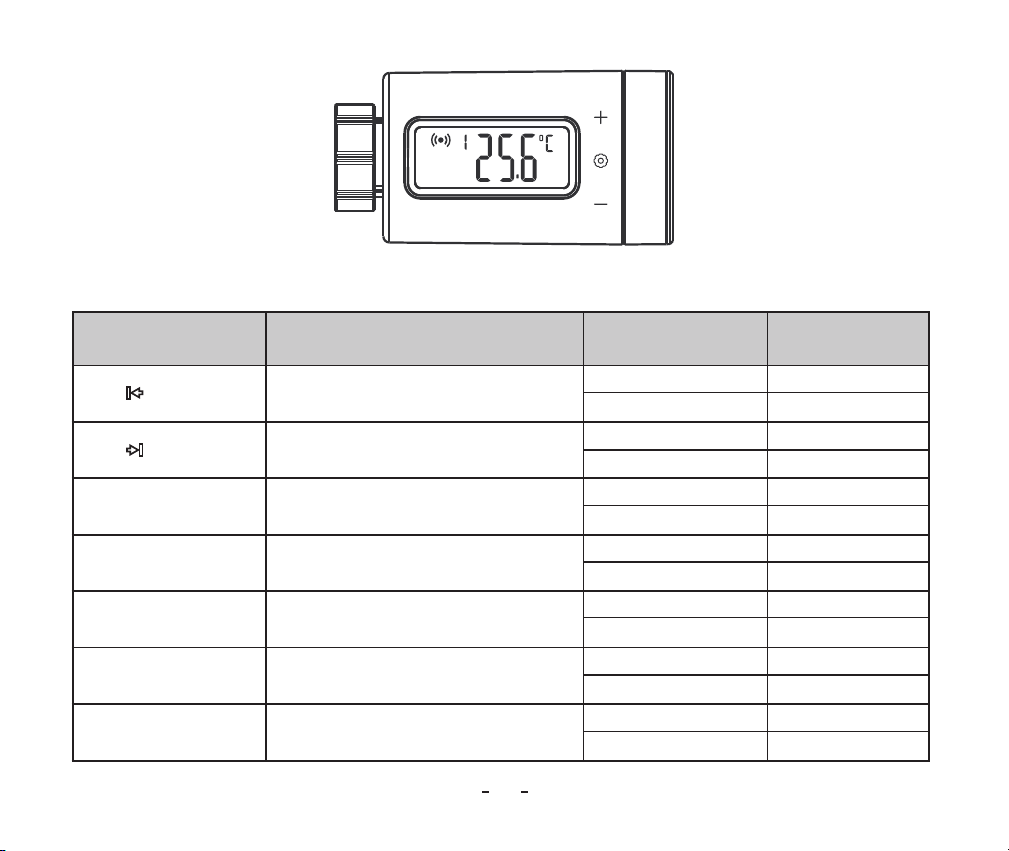
Control Valve Operation Instruction
Product Introduction
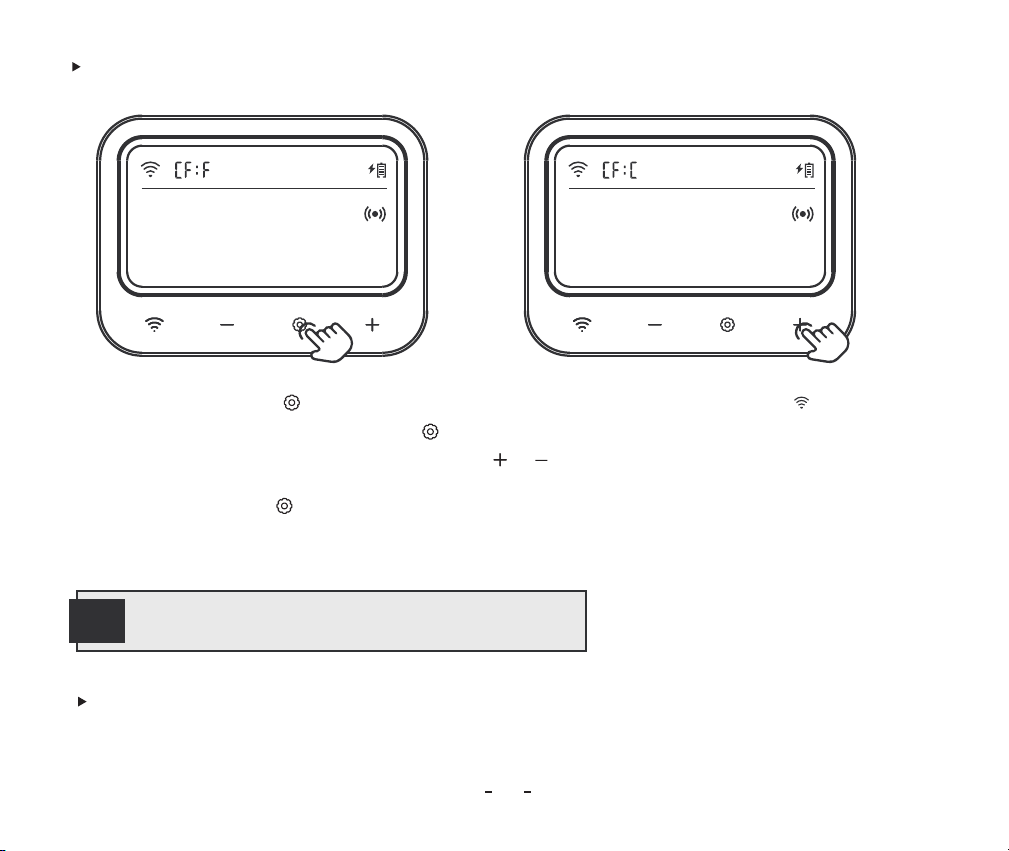
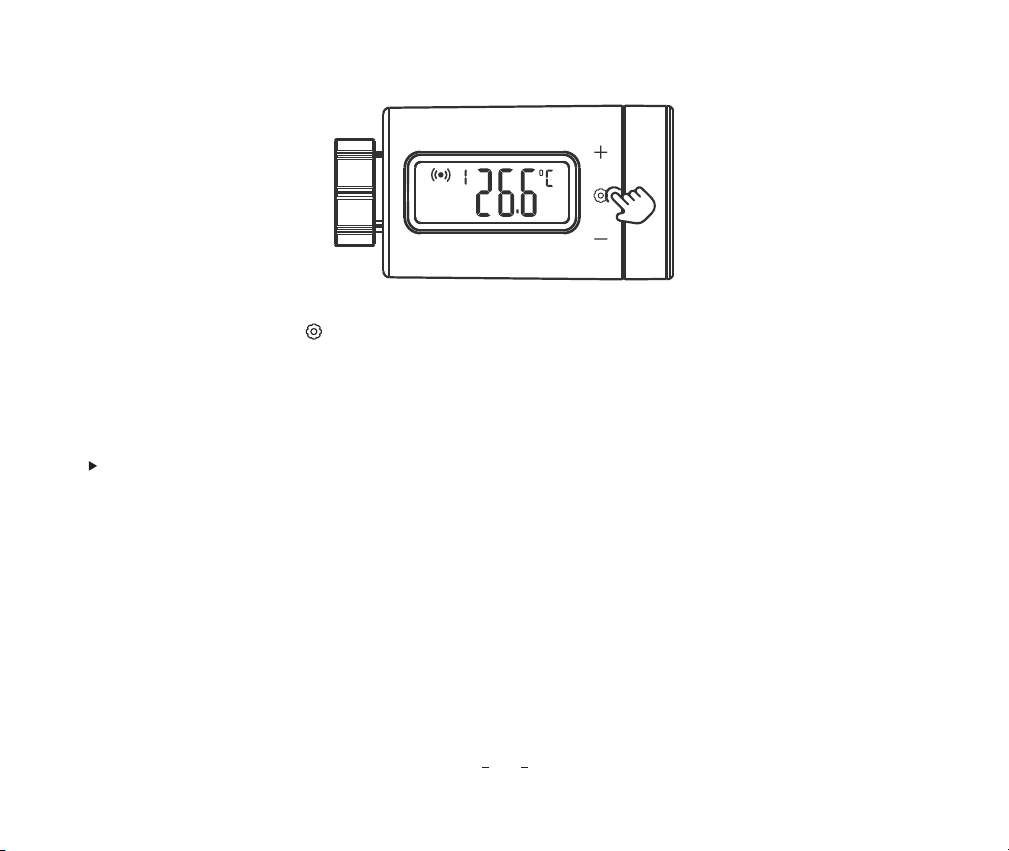
How to Set the Temperature Unit ?
Step1: Press and hold the key for 2 seconds to enter the setting, then short press the key to switch
to setting mode. After that, short press the key to select the temperature unit menu, which displays
"CF" and the relevant parameter flashes. Press the or key to adjust the parameter.
Step2: Press and hold the key for 2 seconds or no operation for 60 seconds to save the settings and return
to working mode.
43
Start Heating Temperature
Stop Heating Temperature
Start Heating Temperature
Stop Heating Temperature
High-Temperature Alarm Value
Low-Temperature Alarm Value
Temperature Calibration Value
0.0�~35.0
℃
�
32.0�~95℉�
0.0�~35.0
℃
�
32.0�~95℉
0.0�~35.0
℃
�
32.0�~95℉�
0.0�~35.0
℃
32.0�~95℉�
-10.0�~50.0
℃
�
14.0�~122℉�
-10.0�~50.0
℃
�
14.0�~122℉�
-4.9�~4.9
℃
�
-9.9�~9.9℉�
25.0
℃
�
77.0℉�
26.0
℃
�
78.0℉�
25.0
℃
�
77.0�℉
26.0
℃
�
78.0℉�
45.0
℃
�
113℉�
-5.0
℃
�
23.0℉
0.0
℃
�
0.0℉�
Icon Function Setting Range Default Setting
* Control Valve Parameter Setting
+ Temp
+ Temp
ST
SP
AH
AL
CA
44
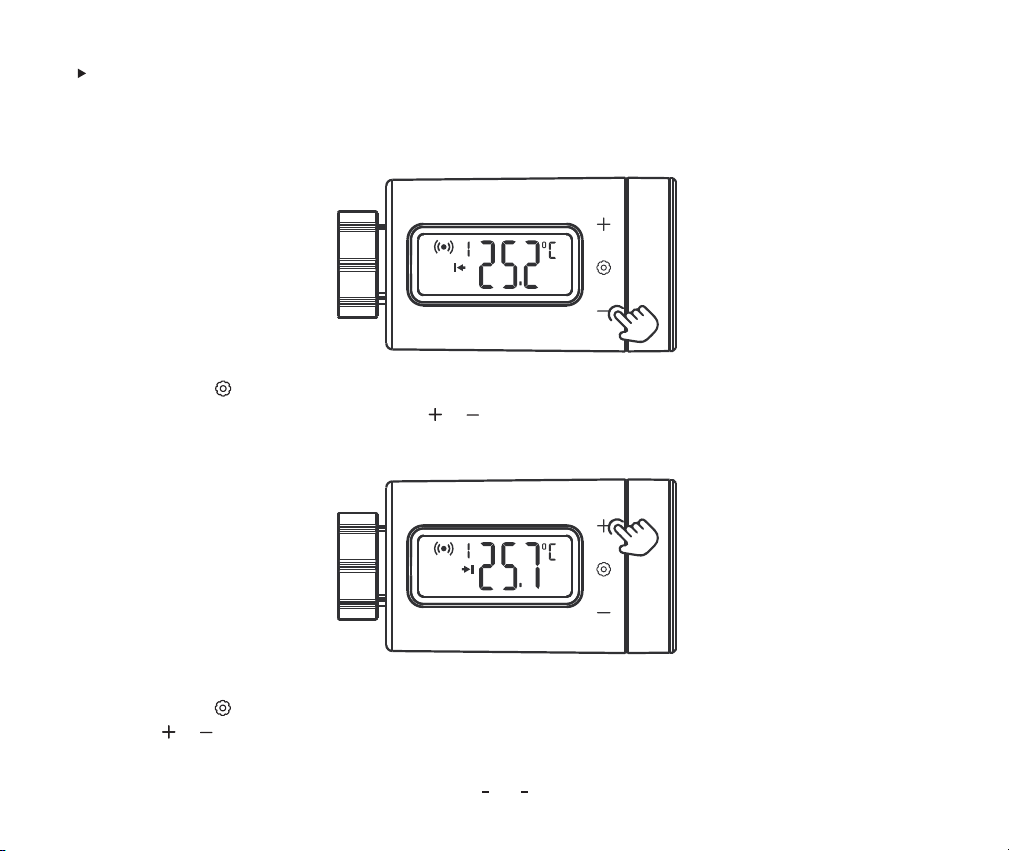
For example, set the temperature control range to 25.0℃~26.0℃.
How to quickly set the target temperature range ?
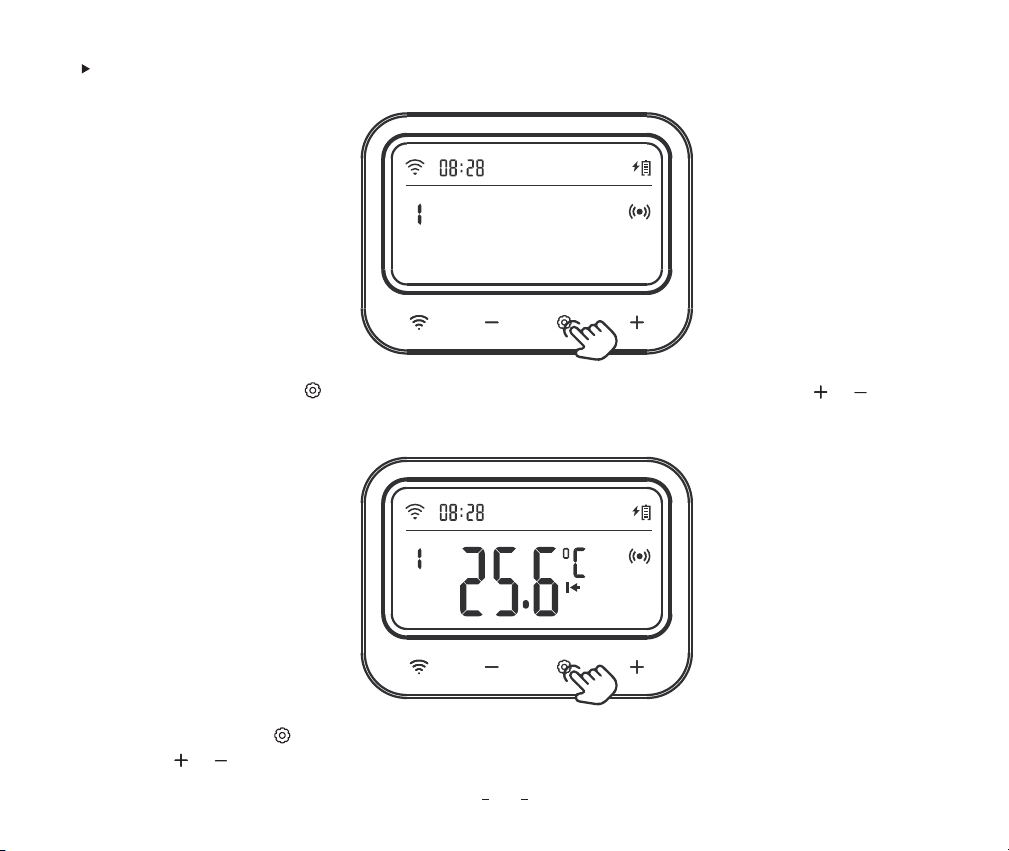
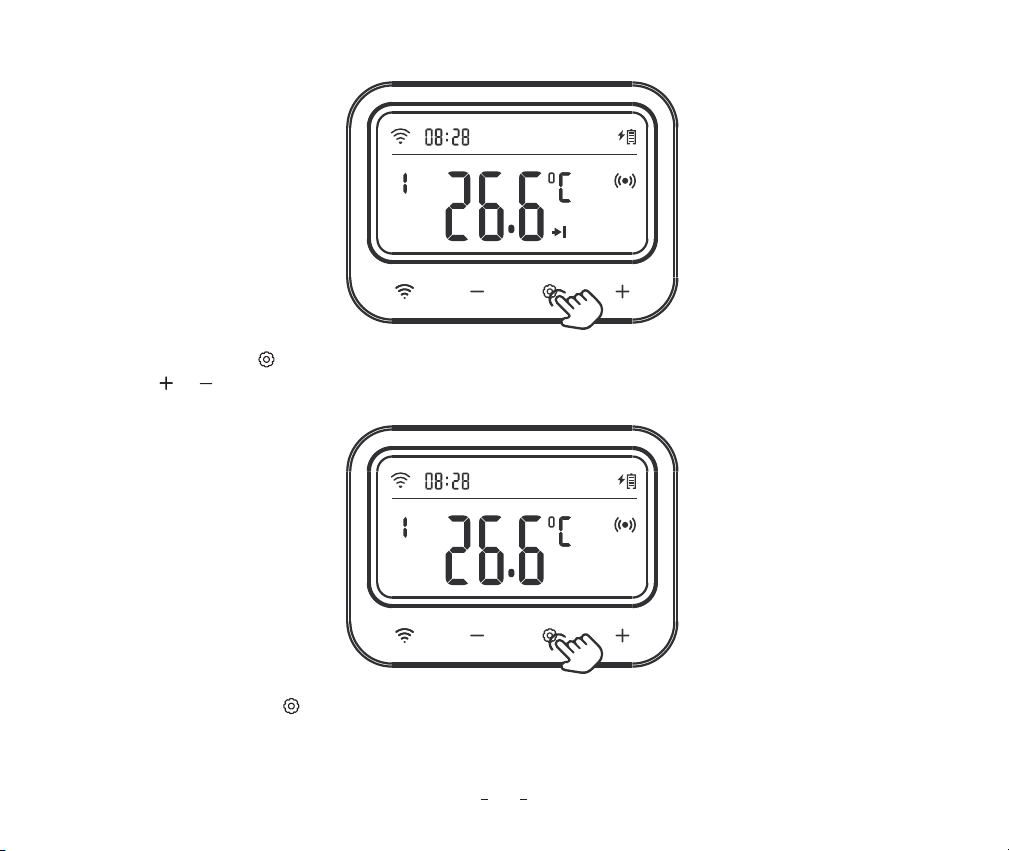
Step2: Press the key to switch to stop heating temperature value, and the relevant parameter will flash.
Press the or key to adjust the stop heating temperature to 26.0℃.
Step1: Press the key to enter the quick setting state, the start heating temperature will be displayed, and
the relevant parameter will flash. Press the or key to adjust the start heating temperature to 25.0℃.
Step3: Press and hold the key for 2 seconds or no operation for 60 seconds to quit the setting and
save all parameters.
45
For example:
Target temperature control range: 25.0℃�~26.0℃�
High-temperature alarm: 28.0℃�
Low-temperature alarm: 23.0℃�
Temperature calibration: 0.2℃�
How to set parameters ?
Step2: Short press the key to switch to the menu character, then press the or key to select
menu, and the character "SP" (stop heating temperature) will be displayed. Short press the key to
enter the parameter setting, then press the or key to adjust the stop heating temperature to 26.0℃.
short press
Step1: Press and hold the key for 2 seconds to enter the setting, and the character "ST" (start heating
temperature) will be displayed. Short press the key to enter the parameter setting, then press the or
key to adjust the start heating temperature to 25.0℃.
46
short press
Step4: Short press the key to switch to the menu character, then press the or key to select the
menu, and the character "AL" (low-temperature alarm value) will be displayed. Short press the key to
enter the parameter setting, then press the or key to adjust the low-temperature alarm value to 23.0℃�.
Step3: Short press the key to switch to the menu character, then press the or key to select the
menu, and the character "AH" (high-temperature alarm value) will be displayed. Short press the key to
enter the parameter setting, then press the or key to adjust the high-temperature alarm value to
28.0℃.
47
short press
short press
Step5: Short press the key to switch to the menu character, then press the or key to select the
menu, and the character "CA" (temperature calibration value) will be displayed. Short press the key to
enter the parameter setting, then press the or key to adjust the temperature calibration value to 0.2℃.
48
Step6: key for 2 seconds or no operation for 60 seconds to quit the setting and save all parameters.
short press
49
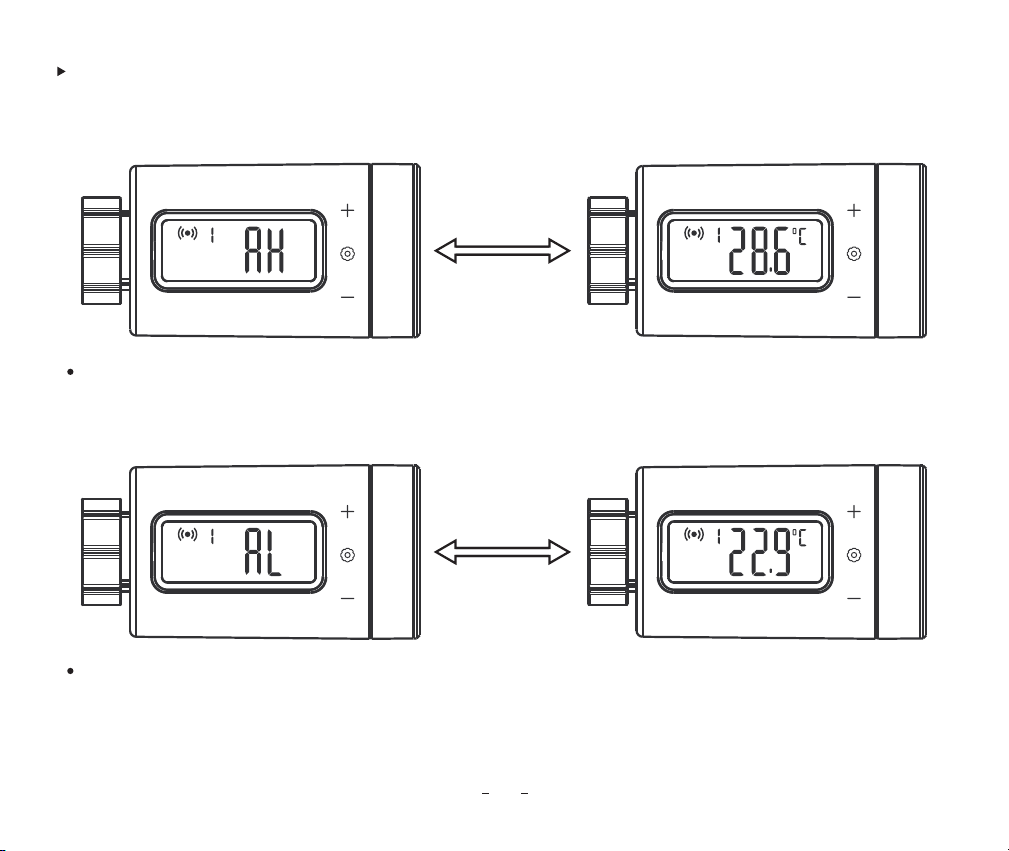
For example, the high-temperature alarm value is 28.0℃ and the low-temperature alarm is 23.0℃.
Display function of high-temperature alarm and low-temperature alarm
When the current temperature is higher than the high-temperature alarm value, the character "AH" and
the current temperature value are displayed in turns at a frequency of 1Hz. After the current temperature
is lower than the high-temperature alarm value, the display will return to normal.
When the current temperature is lower than the low-temperature alarm value, the character "AL" and
the current temperature value are displayed in turns at a frequency of 1Hz. After the current temperature
is higher than the low-temperature alarm value, the display will return to normal.
50
15
Precautions For Use
1. Please do not disassemble the product if you are not a professional.
2. Use a slightly damp, lint-free cloth to clean the product. Do not use corrosive cleansers
16
Customer Service
This item carries a 2-year warranty against defects in either components or workmanship. During
this period, products that prove to be defective will, at the discretion of INKBIRD, be either repaired or
replaced without charge. For any problems in use, please feel free to contact us at support@ink-
bird.com. We will do our best to help you.
51
INKBIRD TECH.C.L.
Factory address: 6th Floor, Building 713, Pengji Liantang
Industrial Area, NO.2 Pengxing Road, Luohu District,
Shenzhen, China
Office address: Room 1803, Guowei Building, NO.68
Guowei Road, Xianhu Community, Liantang, Luohu
District, Shenzhen, China
MADE IN CHINA