
16/24-Port Gigabit Ethernet Switch Quick Start Guide
i
16/24-Port Gigabit Ethernet Switch
Quick Start Guide

16/24-Port Gigabit Ethernet Switch Quick Start Guide
i
TABLE OF CONTENTS
Chapter 1 Introduction ................................................................................................................................................................... 1
1.1 Overview ....................................................................................................................................................................................1
1.2 Packing List ................................................................................................................................................................................1
1.3 Appearance ................................................................................................................................................................................2
1.3.1 Front Panel ......................................................................................................................................................................2
1.3.2 Rear Panel .......................................................................................................................................................................3
Chapter 2 Installation..................................................................................................................................................................... 4
2.1 Preventive and Cautionary Tips .................................................................................................................................................4
2.2 Working Environment Requirements .........................................................................................................................................4
2.2.1 Temperature and Humidity .............................................................................................................................................4
2.2.2 Static Electricity Protection .............................................................................................................................................4
2.2.3 Lightning Protection ........................................................................................................................................................5
2.2.4 Installation Position ........................................................................................................................................................5
2.3 Installation .................................................................................................................................................................................5
2.4 Grounding ..................................................................................................................................................................................6
2.4.1 With Grounding Bar ........................................................................................................................................................6
2.4.2 Without Grounding Bar ..................................................................................................................................................7
Chapter 3 Physical Connection ....................................................................................................................................................... 9
3.1 Connecting RJ45 Port .................................................................................................................................................................9
3.2 Checking the Cabling .................................................................................................................................................................9
3.3 Powering on Switch .................................................................................................................................................................10

16/24-Port Gigabit Ethernet Switch Quick Start Guide
ii
Quick Start Guide
COPYRIGHT © 2018 Hangzhou Hikvision Digital Technology Co., Ltd.
ALL RIGHTS RESERVED.
Any and all information, including, among others, wordings, pictures, graphs are the properties of
Hangzhou Hikvision Digital Technology Co., Ltd. or its subsidiaries (hereinafter referred to be
“Hikvision”). This user manual (hereinafter referred to be “the Manual”) cannot be reproduced,
changed, translated, or distributed, partially or wholly, by any means, without the prior written
permission of Hikvision. Unless otherwise stipulated, Hikvision does not make any warranties,
guarantees or representations, express or implied, regarding to the Manual.
About this Manual
This Manual is applicable to DS-3E03XXP Series 100M PoE Switch.
The Manual includes instructions for using and managing the product. Pictures, charts, images and
all other information hereinafter are for description and explanation only. The information
contained in the Manual is subject to change, without notice, due to firmware updates or other
reasons. Please find the latest version in the company website
(http://overseas.hikvision.com/en/).
Please use this user manual under the guidance of professionals.
Trademarks Acknowledgement
and other Hikvision’s trademarks and logos are the properties of Hikvision in various
jurisdictions. Other trademarks and logos mentioned below are the properties of their respective
owners.
Legal Disclaimer
TO THE MAXIMUM EXTENT PERMITTED BY APPLICABLE LAW, THE PRODUCT DESCRIBED, WITH ITS
HARDWARE, SOFTWARE AND FIRMWARE, IS PROVIDED “AS IS”, WITH ALL FAULTS AND ERRORS,
AND HIKVISION MAKES NO WARRANTIES, EXPRESS OR IMPLIED, INCLUDING WITHOUT LIMITATION,
MERCHANTABILITY, SATISFACTORY QUALITY, FITNESS FOR A PARTICULAR PURPOSE, AND
NON-INFRINGEMENT OF THIRD PARTY. IN NO EVENT WILL HIKVISION, ITS DIRECTORS, OFFICERS,
EMPLOYEES, OR AGENTS BE LIABLE TO YOU FOR ANY SPECIAL, CONSEQUENTIAL, INCIDENTAL, OR
INDIRECT DAMAGES, INCLUDING, AMONG OTHERS, DAMAGES FOR LOSS OF BUSINESS PROFITS,
BUSINESS INTERRUPTION, OR LOSS OF DATA OR DOCUMENTATION, IN CONNECTION WITH THE
USE OF THIS PRODUCT, EVEN IF HIKVISION HAS BEEN ADVISED OF THE POSSIBILITY OF SUCH
DAMAGES.
REGARDING TO THE PRODUCT WITH INTERNET ACCESS, THE USE OF PRODUCT SHALL BE WHOLLY
AT YOUR OWN RISKS. HIKVISION SHALL NOT TAKE ANY RESPONSIBILITES FOR ABNORMAL
OPERATION, PRIVACY LEAKAGE OR OTHER DAMAGES RESULTING FROM CYBER ATTACK, HACKER
ATTACK, VIRUS INSPECTION, OR OTHER INTERNET SECURITY RISKS; HOWEVER, HIKVISION WILL
PROVIDE TIMELY TECHNICAL SUPPORT IF REQUIRED.
SURVEILLANCE LAWS VARY BY JURISDICTION. PLEASE CHECK ALL RELEVANT LAWS IN YOUR
JURISDICTION BEFORE USING THIS PRODUCT IN ORDER TO ENSURE THAT YOUR USE CONFORMS
THE APPLICABLE LAW. HIKVISION SHALL NOT BE LIABLE IN THE EVENT THAT THIS PRODUCT IS
USED WITH ILLEGITIMATE PURPOSES.
IN THE EVENT OF ANY CONFLICTS BETWEEN THIS MANUAL AND THE APPLICABLE LAW, THE LATER
PREVAILS.

16/24-Port Gigabit Ethernet Switch Quick Start Guide
iii
Regulatory Information
FCC Information
Please take attention that changes or modification not expressly approved by the party
responsible for compliance could void the user’s authority to operate the equipment.
FCC compliance: This equipment has been tested and found to comply with the limits for a Class A
digital device, pursuant to part 15 of the FCC Rules. These limits are designed to provide
reasonable protection against harmful interference when the equipment is operated in a
commercial environment. This equipment generates, uses, and can radiate radio frequency energy
and, if not installed and used in accordance with the instruction manual, may cause harmful
interference to radio communications. Operation of this equipment in a residential area is likely to
cause harmful interference in which case the user will be required to correct the interference at
his own expense.
FCC Conditions
This device complies with part 15 of the FCC Rules. Operation is subject to the following two
conditions:
1. This device may not cause harmful interference.
2. This device must accept any interference received, including interference that may cause
undesired operation.
EU Conformity Statement
This product and - if applicable - the supplied accessories too are marked with "CE" and
comply therefore with the applicable harmonized European standards listed under the
EMC Directive 2014/30/EU, the LVD Directive 2014/35/EU, the RoHS Directive 2011/65/EU.
2012/19/EU (WEEE directive): Products marked with this symbol cannot be disposed of
as unsorted municipal waste in the European Union. For proper recycling, return this
product to your local supplier upon the purchase of equivalent new equipment, or
dispose of it at designated collection points. For more information see: www.recyclethis.info
2006/66/EC (battery directive): This product contains a battery that cannot be disposed
of as unsorted municipal waste in the European Union. See the product documentation
for specific battery information. The battery is marked with this symbol, which may
include lettering to indicate cadmium (Cd), lead (Pb), or mercury (Hg). For proper recycling, return
the battery to your supplier or to a designated collection point. For more information see:
www.recyclethis.info
Industry Canada ICES-003 Compliance
This device meets the CAN ICES-3 (A)/NMB-3(A) standards requirements.
16/24-Port Gigabit Ethernet Switch Quick Start Guide
iv
Applicable Models
This manual is applicable to DS-3E0516 and DS-3E0524 series gigabit Ethernet switch.
Symbol Conventions
The symbols that may be found in this document are defined as follows.
During the installation and utilization of the device, please strictly conform to electrical safety
rules in different nations and regions.
The device must be installed in machine room only, and only maintenance staff or qualified
person should access to the device.
Do not touch the upper cover area of the device that may be overheated.
Power must be shut down during cable connection, device installation and dismantlement.
You shall acknowledge that the use of the device with Internet access might be under network
security risks, please strengthen protection for your personal information and data security. If
you find the device might be under network security risks, please contact with us.
Proper configuration of all passports and other security settings is the responsibility of the
installer, and you shall keep user name and passports properly.
This is a class A product and may cause radio interference in which case the user may be
required to take adequate measures.
Symbol
Description
Provides additional information to emphasize or supplement
important points of the main text.
Indicates a potentially hazardous situation, which if not avoided,
could result in equipment damage, data loss, performance
degradation, or unexpected results.
Indicates a hazard with a high level of risk, which if not avoided, will
result in death or serious injury.
16/24-Port Gigabit Ethernet Switch Quick Start Guide
1
Chapter 1 Introduction
1.1 Overview
DS-3E0516 and DS-3E0524 series unmanaged switches are layer 2 gigabit Ethernet switches,
providing 16 or 24 10/100/1000M Ethernet ports to upload data via convergence switches.
DS-3E0516 and DS-3E0524 series switches are reliable, easy to install and maintain, and equipped
with rapid switching functions. With multiple access ports, the switches are applicable for access
or aggregation and upload of small-scale LAN devices.
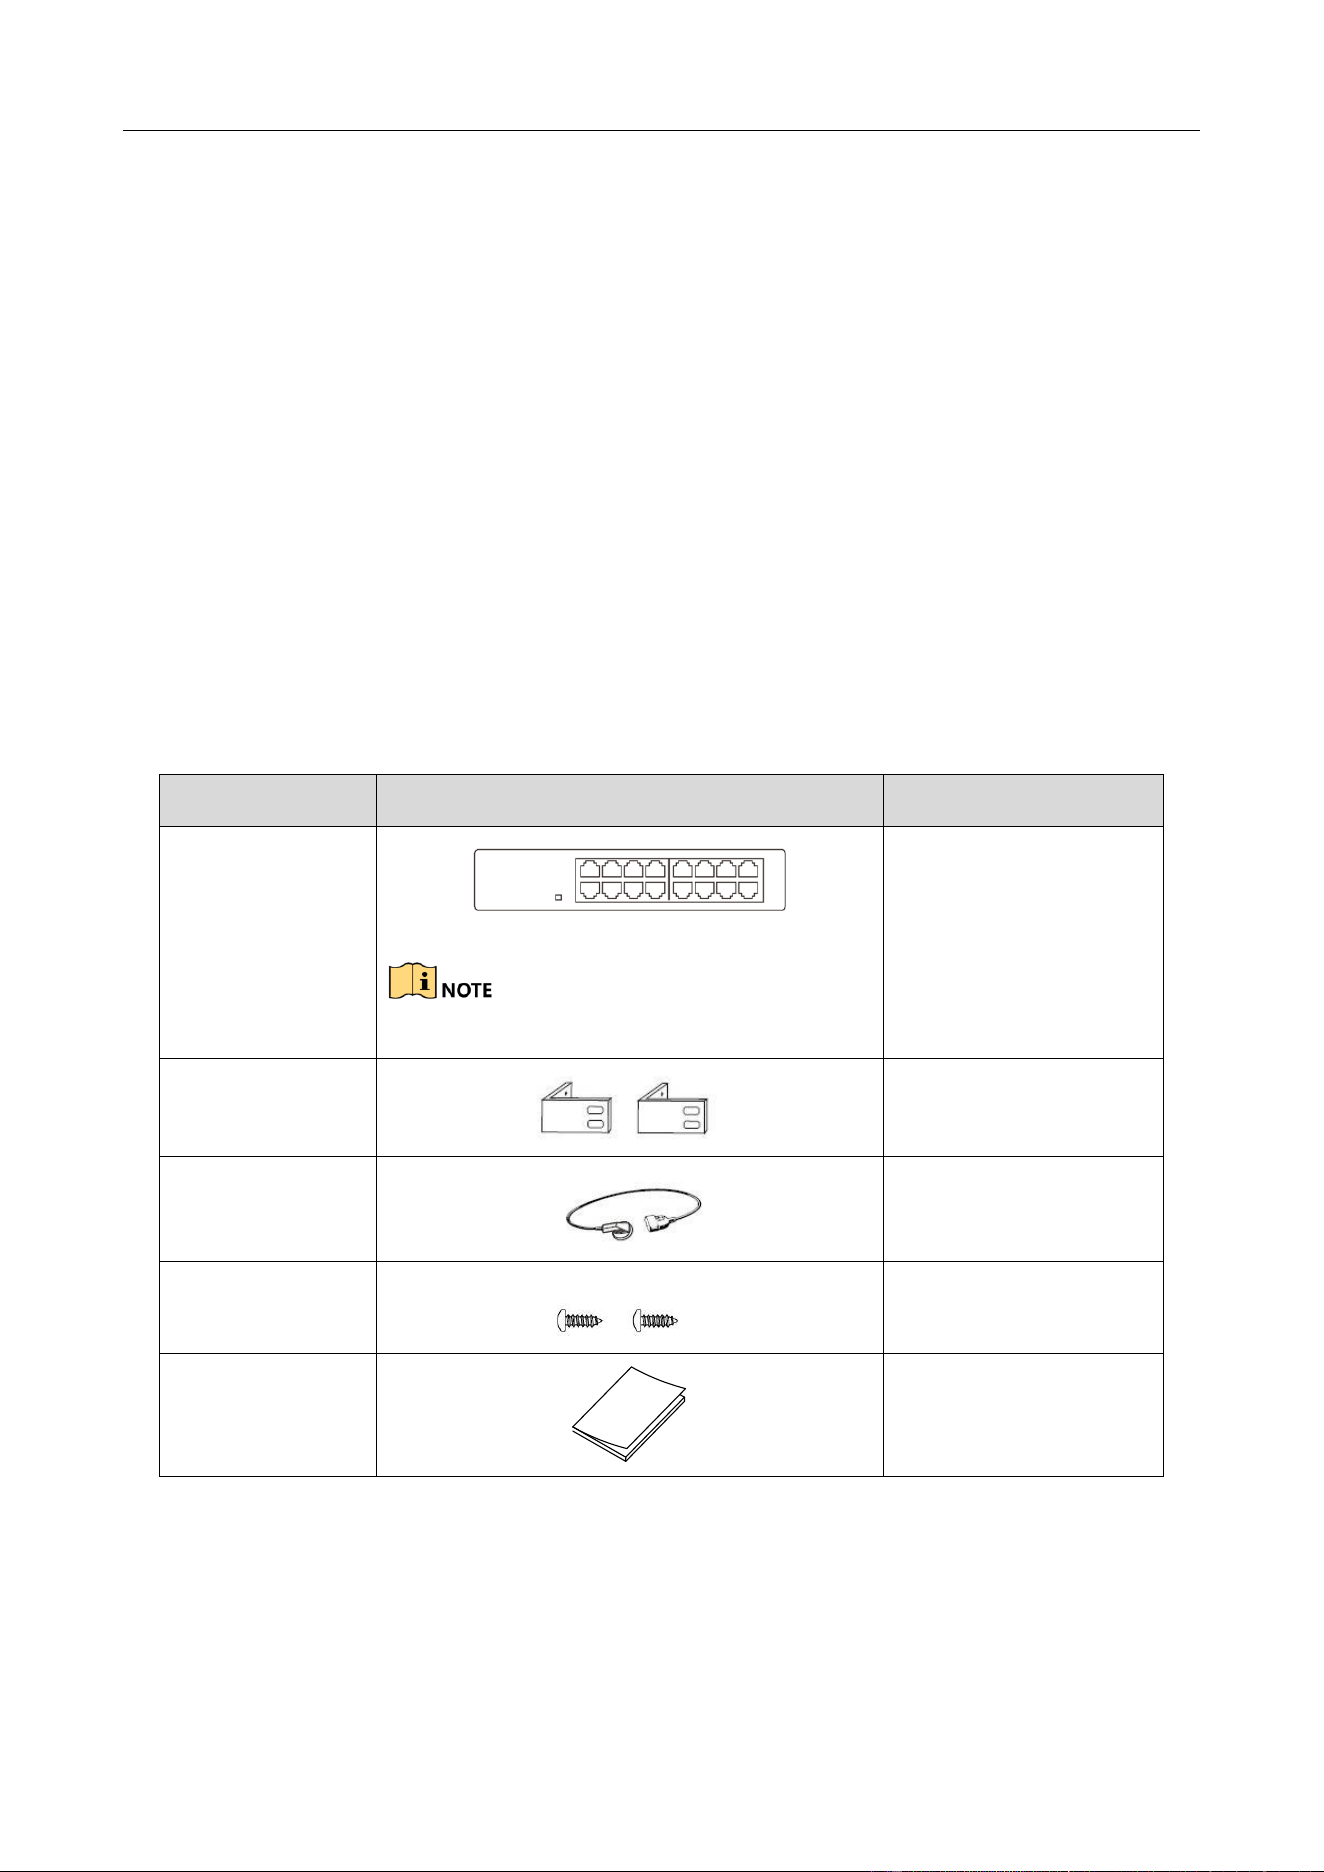
1.2 Packing List
The packing list is shown as below. If any accessories are damaged or lost, keep the package intact
and contact your dealer for replacement.
Table 1-1 Packing List of DS-3E0516 and DS-3E0524
Name
Item
Quantity
Switch
Use DS-3E0516 as an example.
1
L-shaped bracket
1
Power cord
1
Screw
4
User manual
1
16/24-Port Gigabit Ethernet Switch Quick Start Guide
2
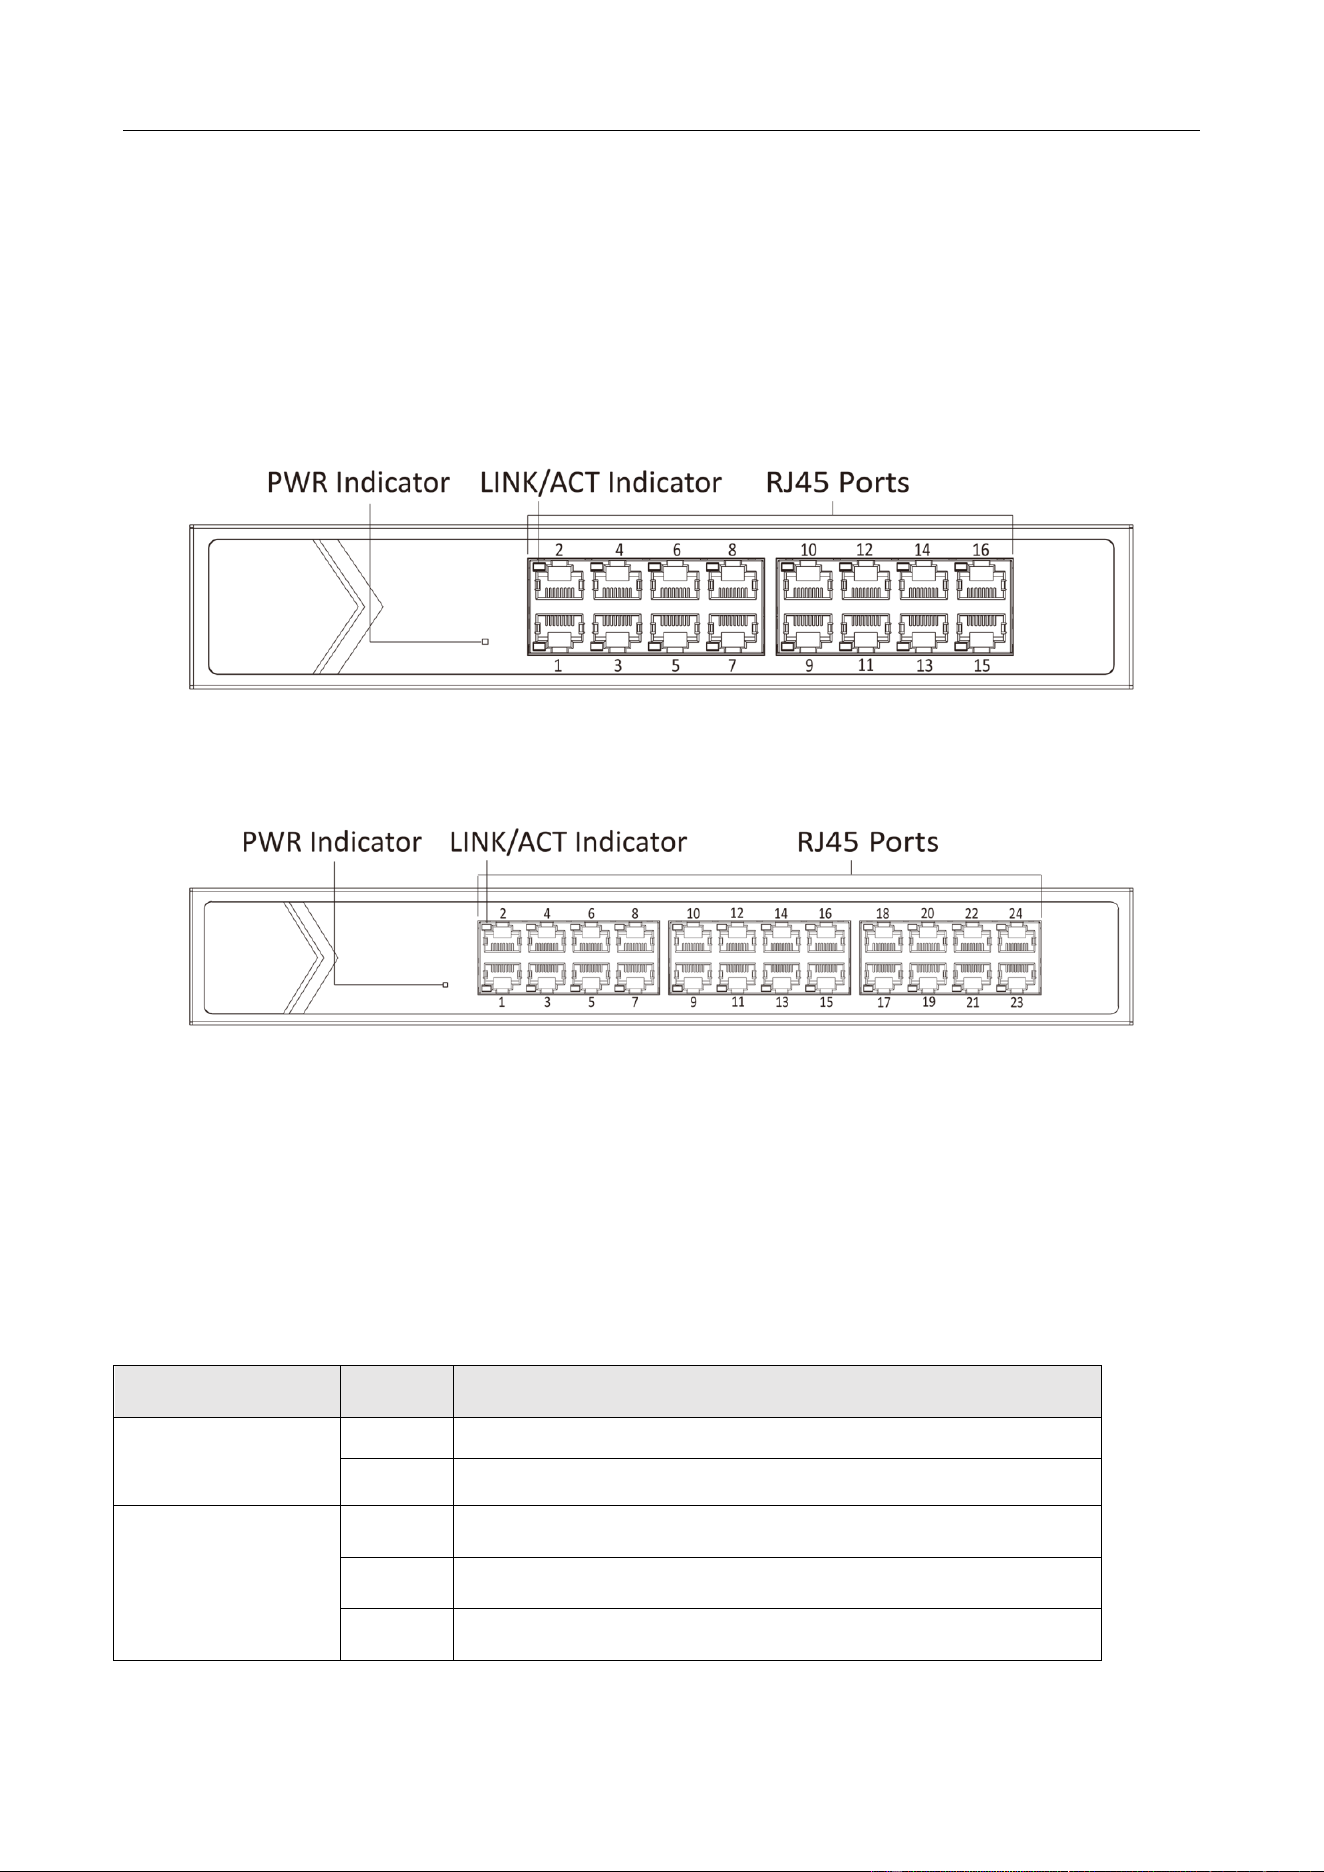
1.3 Appearance
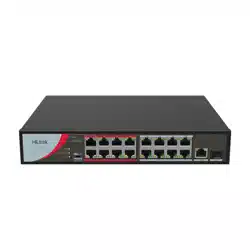
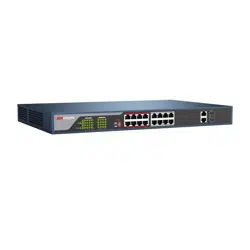
1.3.1 Front Panel
Front panels of DS-3E0516 and DS-3E0524 are shown as below.
Front Panel of DS-3E0516
Figure 1-1 DS-3E0516 Front Panel
Front Panel of DS-3E0524
Figure 1-2 DS-3E0524 Front Panel
RJ45 Ports
1000M Ethernet ports are used for devices connection via network cables.
Indicator
Indicators are used to monitor the status of switches. See the following table for the description of
the indicators.
Table 1-2 Indicator Description
Indicator
Status
Description
PWR indicator
Solid on
The switch is powered on normally.
Unlit
No power supply connected or power supply is abnormal.
LINK/ACT indicator
Solid on
RJ45 port is connected.
Flashing
RJ45 port is transmitting data.
Unlit
RJ45 port is disconnected or connection is abnormal.

16/24-Port Gigabit Ethernet Switch Quick Start Guide
3
1.3.2 Rear Panel
Rear panel of DS-3E0516 and DS-3E0524 is shown as below.
Rear Panel of DS-3E0516 and DS-3E0524
Figure 1-3 DS-3E0516 and DS-3E0524 Rear Panel
Grounding Terminal
The grounding terminal is used to connect to the ground cable to protect the switch from lightning.
For details about grounding, see section Grounding.
Power Supply
Connect power port of the switch with power socket by power cord, and use 100 to 240 VAC to
provide power to the switch.
Use the attached power cord to connect the switch to socket.

16/24-Port Gigabit Ethernet Switch Quick Start Guide
4
Chapter 2 Installation
2.1 Preventive and Cautionary Tips
Before installation, put on anti-static gloves.
During the installation, power off your switch.
Use the attached power adapter or power cord to connect the switch to power supply.
The input voltage range must be consistent with the voltage range of the power adapter and
switch.
Ensure the switch is installed in a well-ventilated position.
Do not open or dismantle the shell of the switch.
Cut off power supply before cleaning the switch. Do not clean the switch with any liquid.
Keep the switch away from power line, electric light, and power grid.
2.2 Working Environment Requirements
2.2.1 Temperature and Humidity
In order to ensure normal working and operation life of the switch, room temperature and
humidity must be kept at certain level.
If room humidity is too high for a long time, insulating materials may be ineffective or even
lead to electricity leakage; mechanical performance of materials may change, and metal
components may be rust, etc.
If relative humidity is too low in the room, insulating gaskets may shrink, which leads to the
loosening of screws and static electricity, and damages circuit of your switch.
If room temperature is too high for a long time, insulating materials may be aging in a fast
speed, which substantially reduces the reliability of your switch and seriously impacts its
operation life.
2.2.2 Static Electricity Protection
Dust may lead to electrostatic adsorption. To protect the device from static electricity harm, pay
attention to the following requirements:
Keep the environment air clean. A regular dusting is necessary.
Make sure the device is grounded well.
16/24-Port Gigabit Ethernet Switch Quick Start Guide
5
2.2.3 Lightning Protection
In thunderstorm weather, a sudden strong current may damage the switch. To protect your switch
from lightning strike or strong current, please:
Make sure the switch, rack, installation desktop, and power socket on the wall all are
well-grounded.
Route the switch cables properly.
If you need to route cables outdoors, it is advised to use a lightning arrester.
2.2.4 Installation Position
No matter whether your switch is installed on a rack or desktop, follow the instructions below:
Make sure the rack or desktop be stable and firm enough.
The room must be well-ventilated. Keep at least 10 cm distance between all sides for cooling.
Do not place any heavy or big-size object on the switch.
Keep at least 1.5 cm vertical distance between each switch while installing it on a rack.
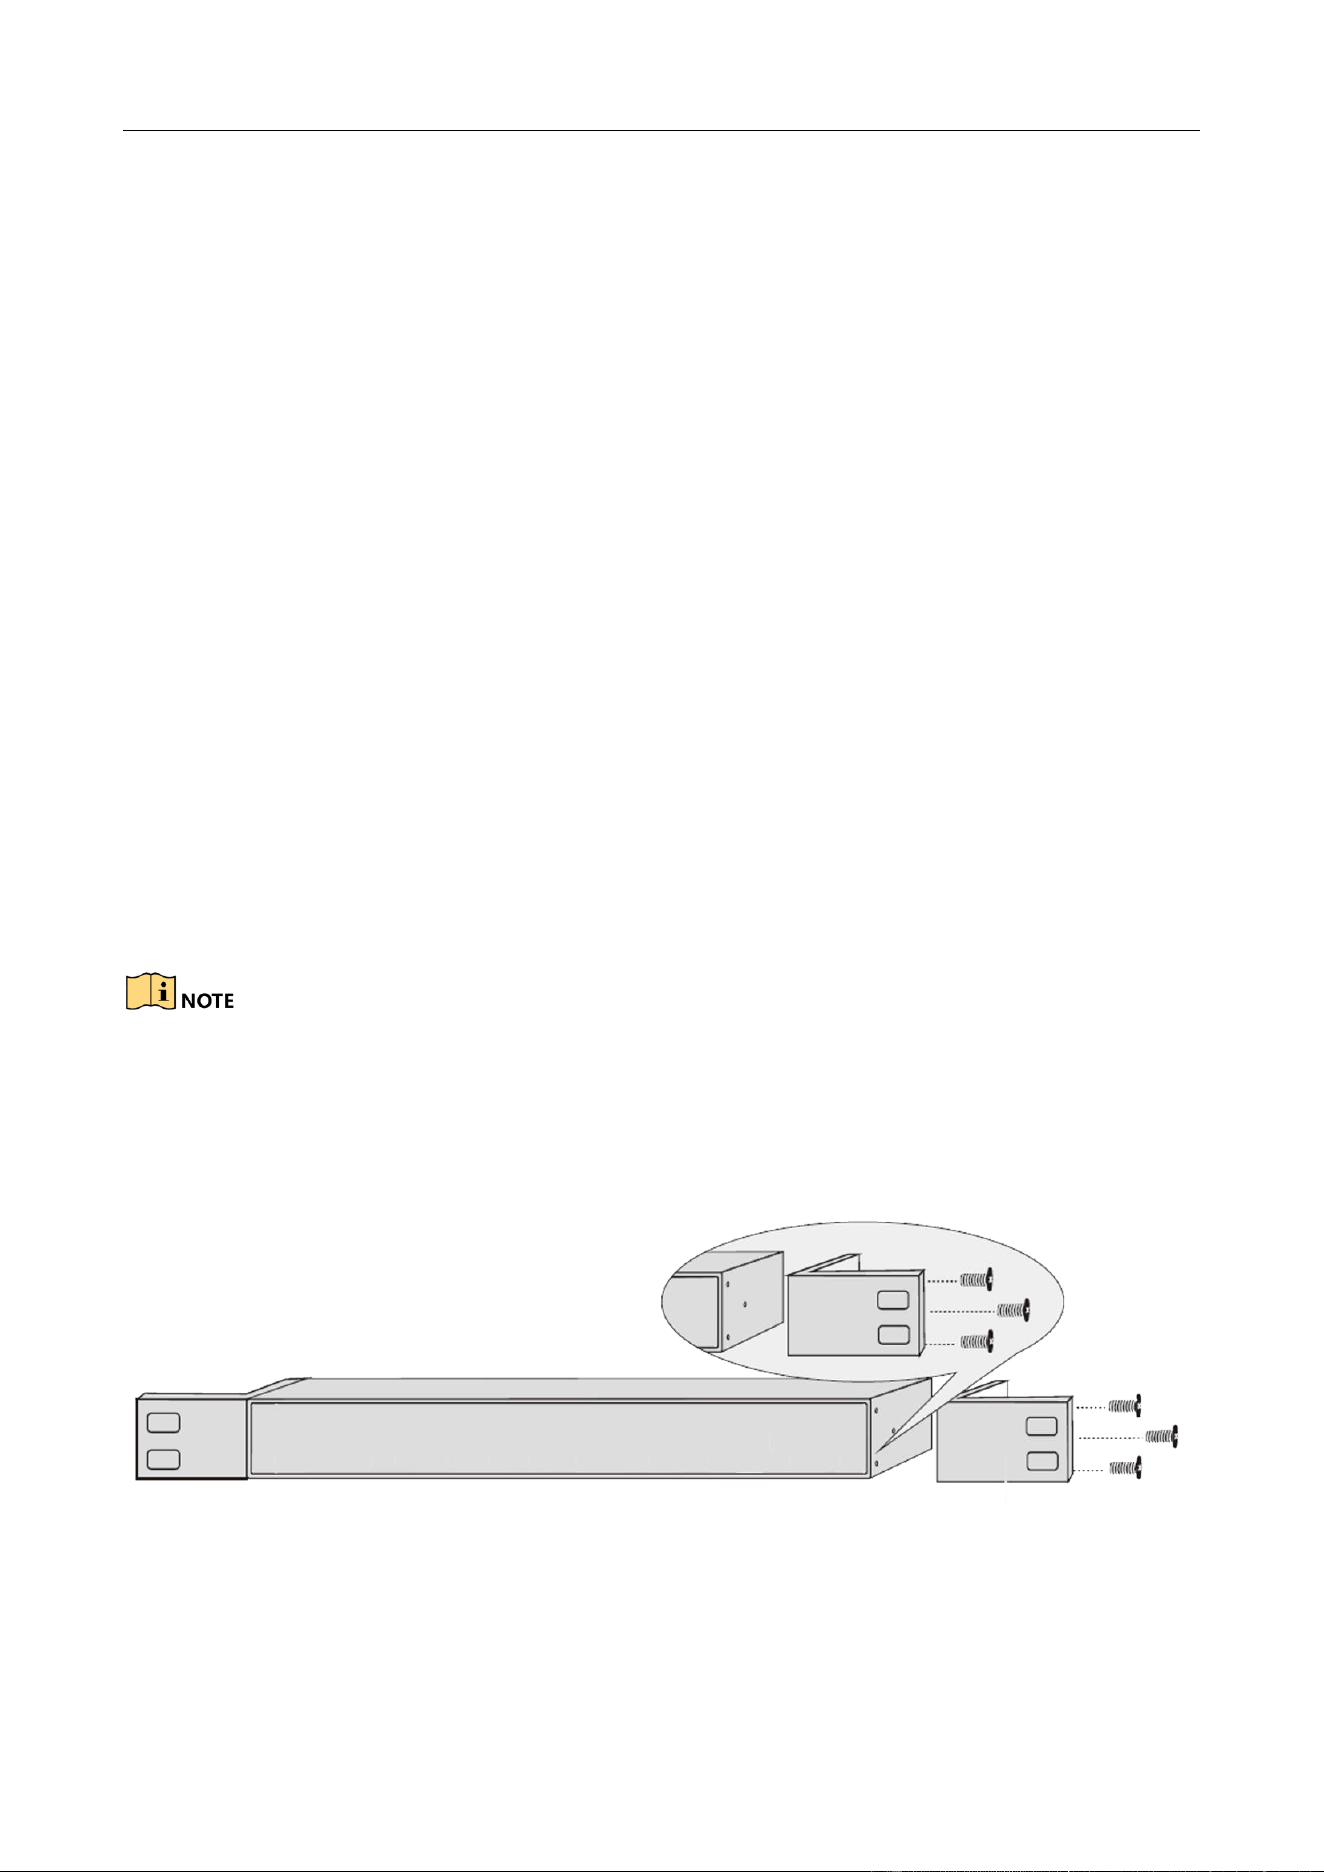
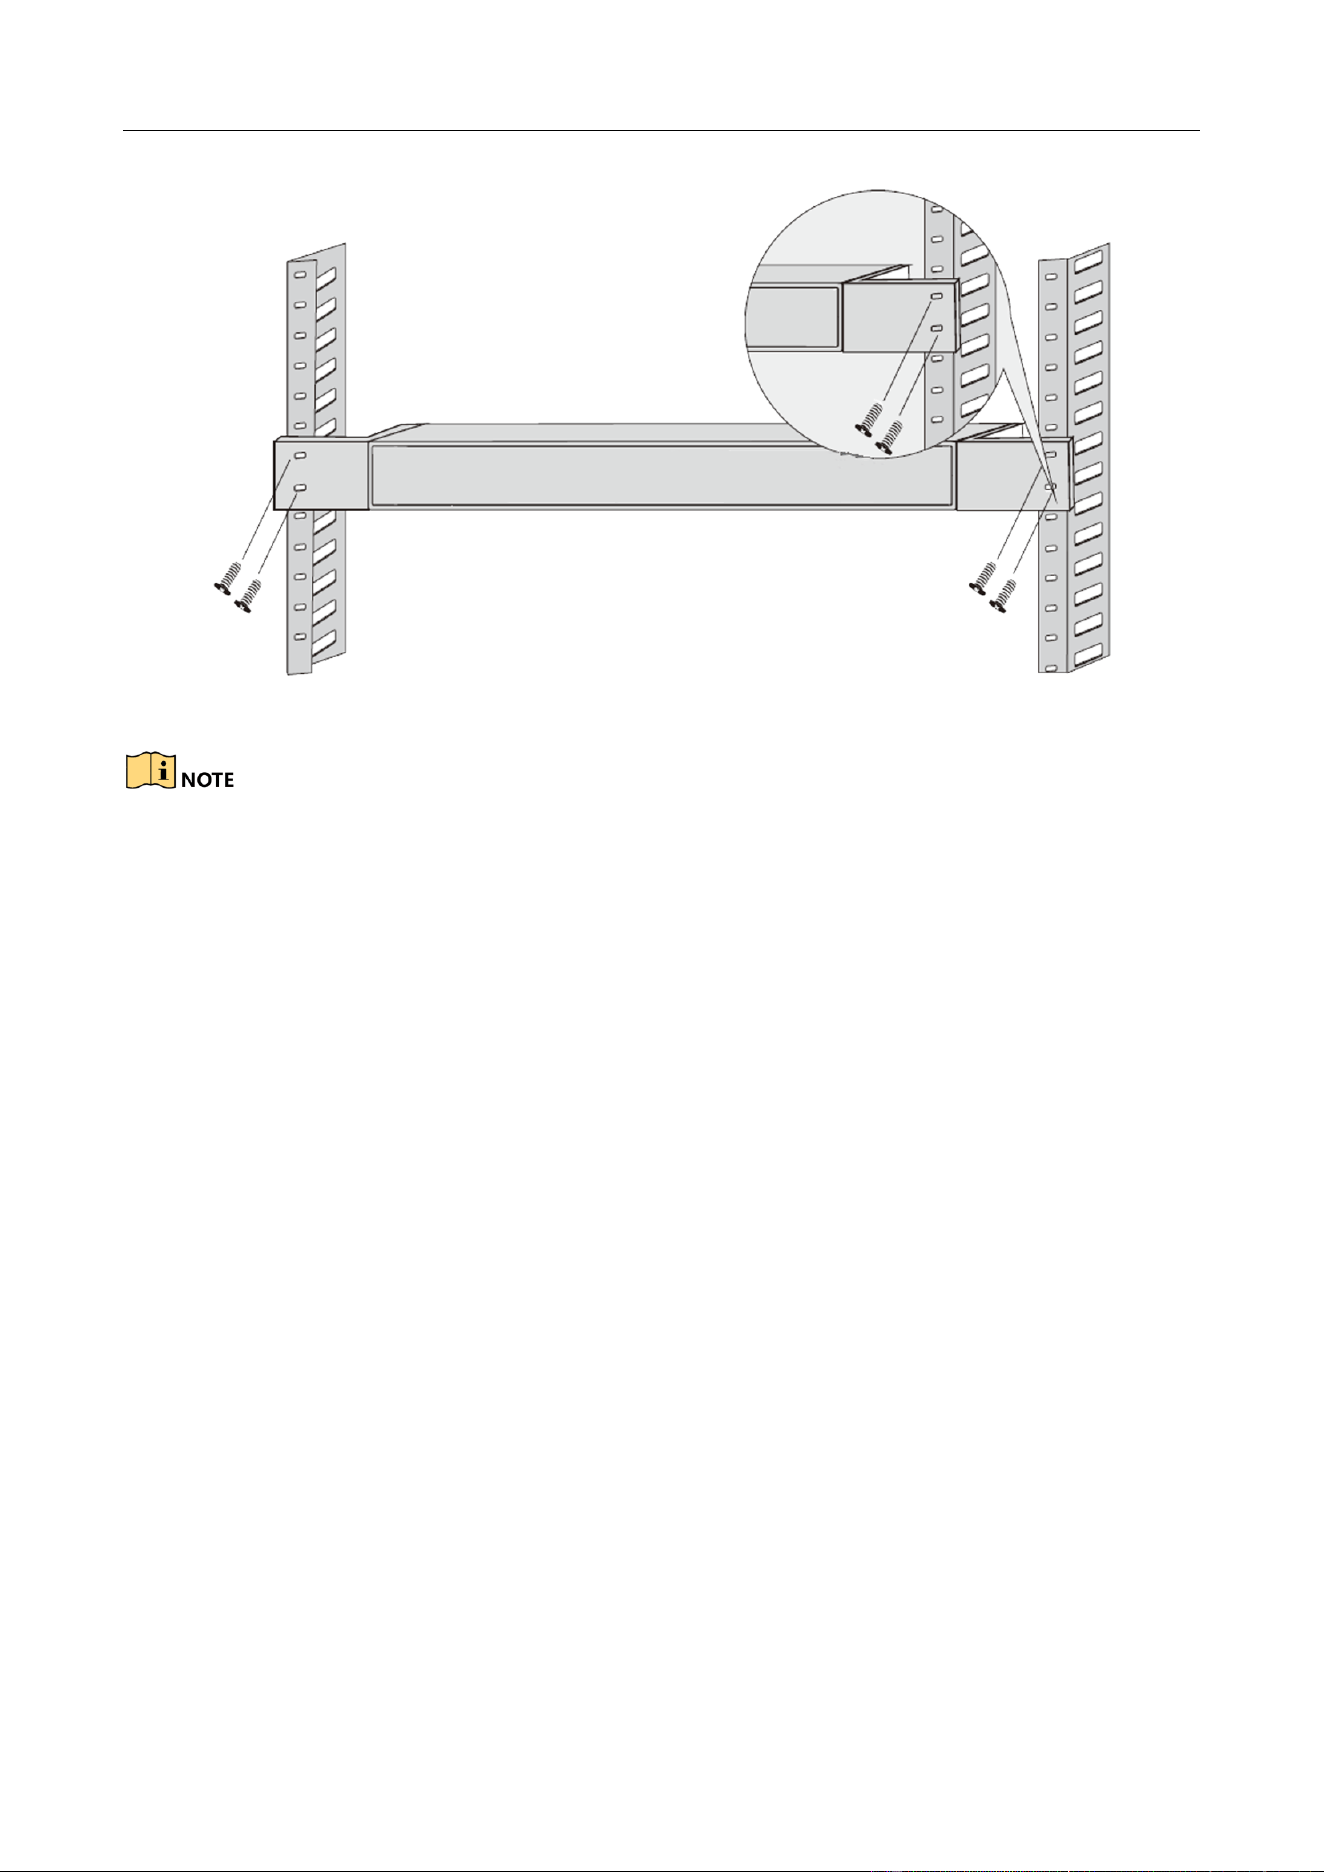
2.3 Installation
DS-3E0516 and DS-3E0524 switches only support rack installation. Follow the steps below for rack
installation.
The following panel is the front panel of the switch. For details about the ports, see section
Appearance.
Step 1 Check the grounding and stability of the rack.
Step 2 Use the attached screws to fix the two L-shaped brackets to the sides of the switch.
Figure 2-1 Install L-Shaped Brackets
Step 3 Place your switch on the rack, fix it to the rack with self-prepared screws, and ensure the
stable installation of your switch to the rack.
16/24-Port Gigabit Ethernet Switch Quick Start Guide
6
Figure 2-2 Fix Switch to Rack
Do not place any heavy object on the switch in case of any incident.
Make sure sound cooling and ventilation.
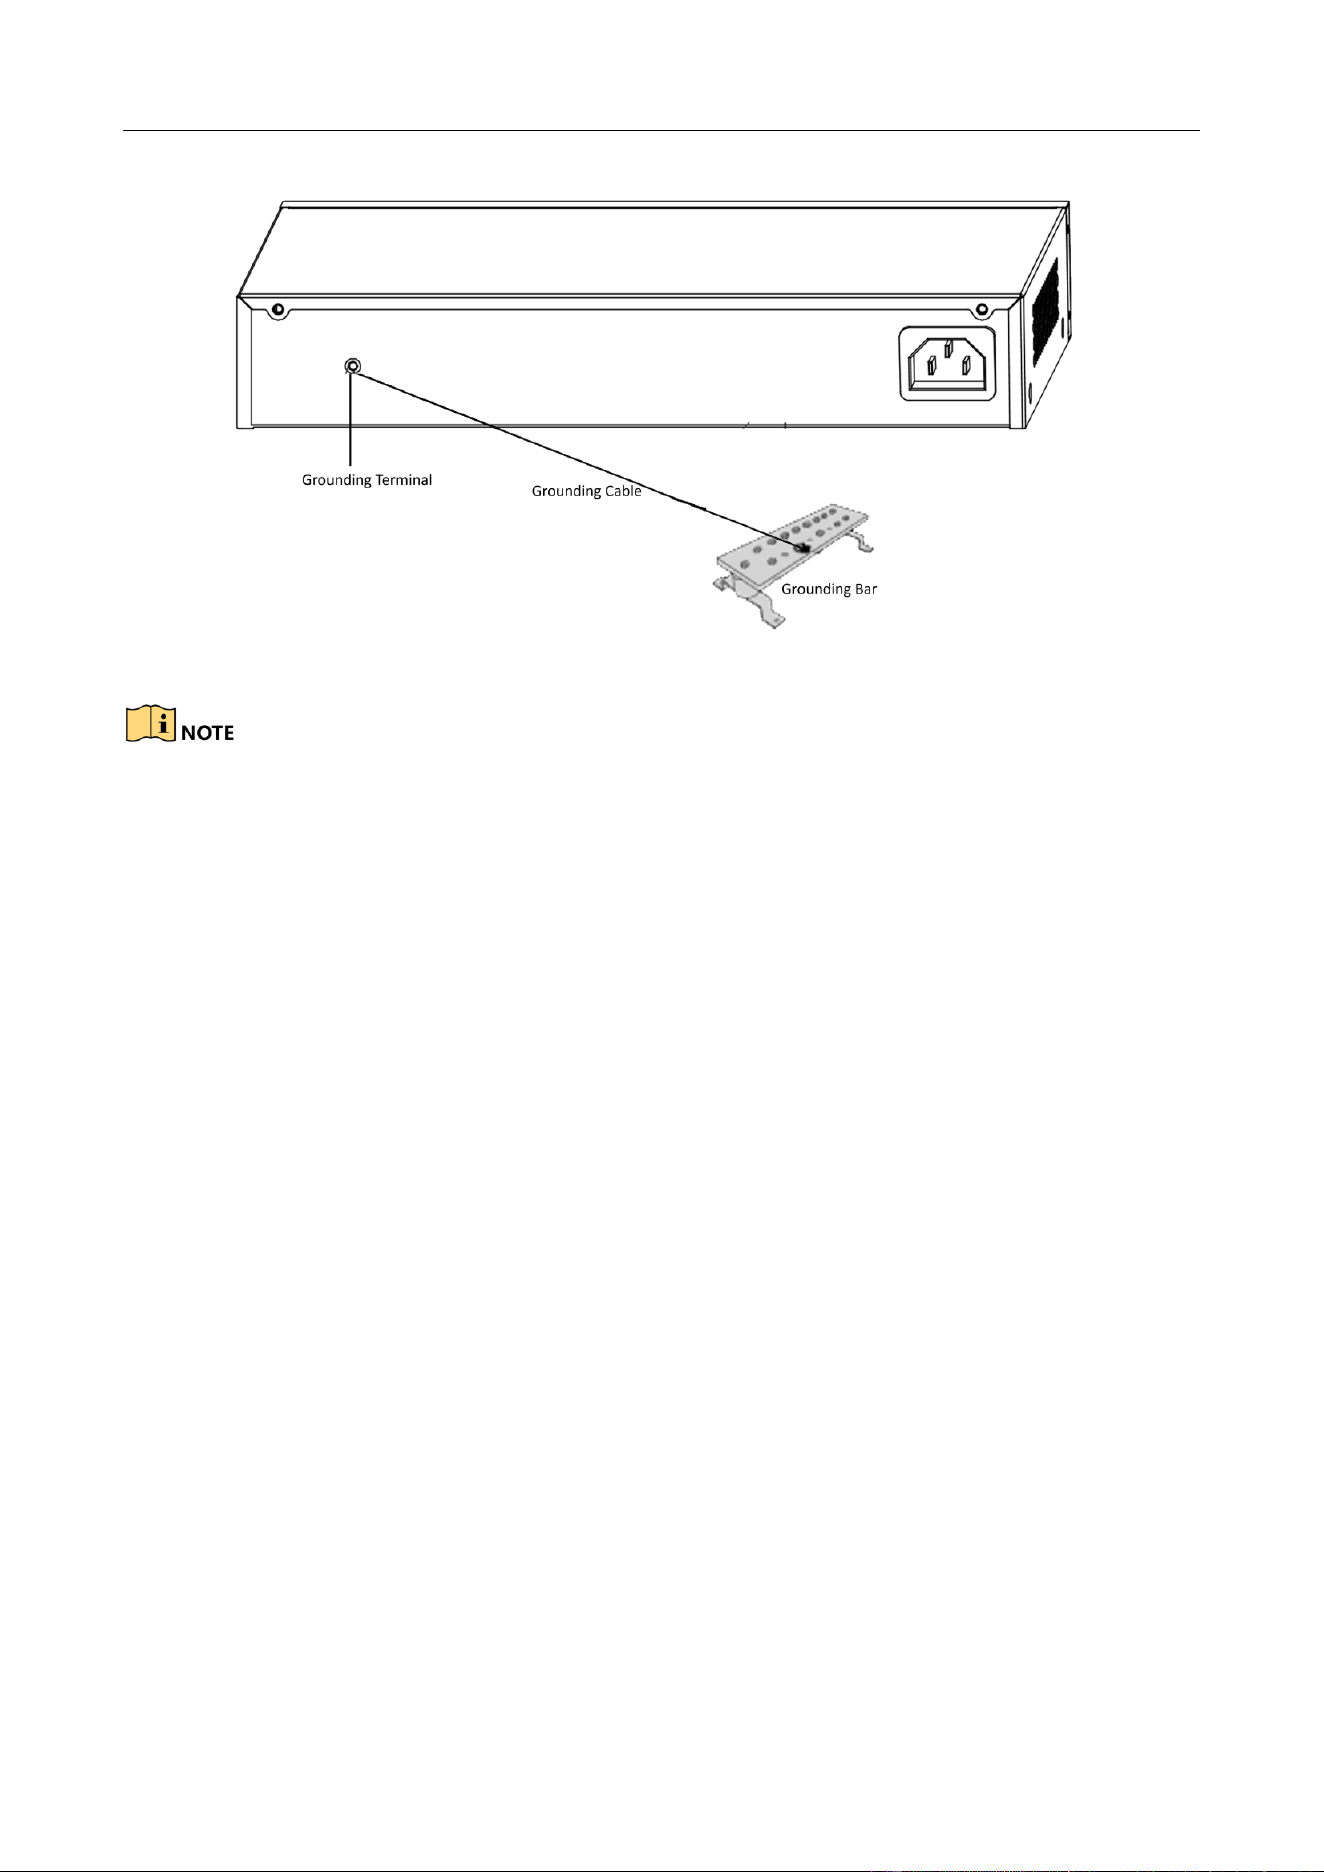
2.4 Grounding
Purpose:
Grounding is used to quickly release overvoltage and overcurrent induced by lightening for switch,
and to protect personal safety. Select the appropriate grounding method according to your needs.
2.4.1 With Grounding Bar
If a grounding bar is available at the installation site, follow the steps below.
Step 1 Connect one end of the grounding cable to the binding post on the grounding bar.
Step 2 Connect the other end of the grounding cable to the switch grounding terminal and fix the
screw.
16/24-Port Gigabit Ethernet Switch Quick Start Guide
7
Figure 2-3 Grounding with Grounding Bar
Connect the grounding cable to the grounding system in the equipment room. Do not connect it to
a fire main or lightning rod.
2.4.2 Without Grounding Bar
If there is no grounding bar but earth is nearby and the grounding body is allowed to be buried,
follow the steps below.
Step 1 Bury an angle steel or steel pipe (≥ 0.5 m) into the mud land.
Step 2 Weld one end of the grounding cable to the angle steel or steel pipe and embalm the
welding point via electroplating or coating.
Step 3 Connect the other end of the grounding cable to the grounding terminal.

16/24-Port Gigabit Ethernet Switch Quick Start Guide
8
Figure 2-4 Grounding with Angle Steel
If it is not proper to bury the grounding body, an AC-powered Ethernet switch can be grounded by
using the PE (Protective Earth) wire of the AC power supply. The prerequisite is that the power
cord of the switch should adopt 3-pin cable with protective earth wire, and the AC power supply
protective earth wire has been well grounded on the side of distribution room or AC power supply
transformer.
16/24-Port Gigabit Ethernet Switch Quick Start Guide
9
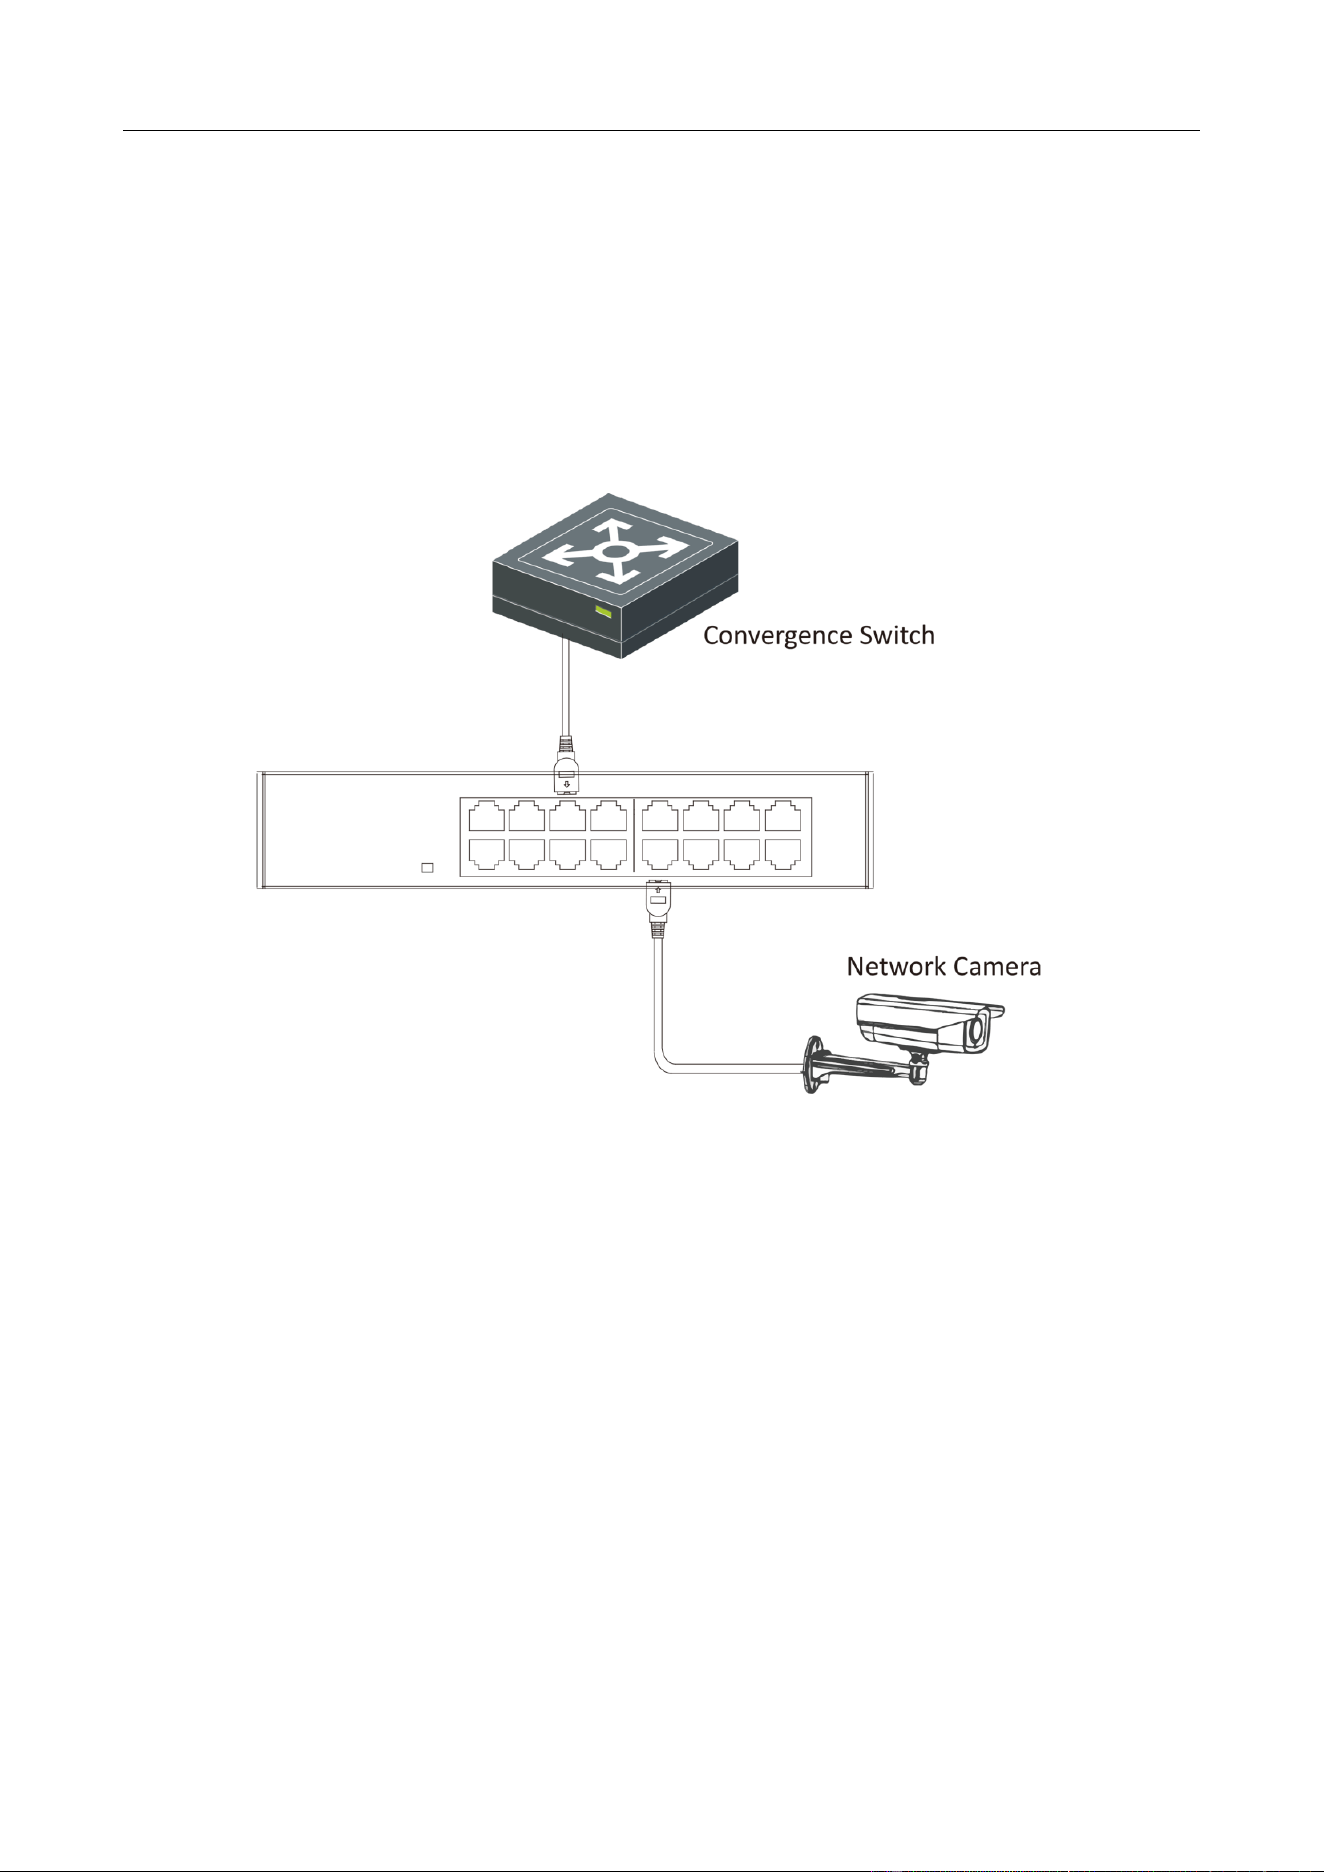
Chapter 3 Physical Connection
3.1 Connecting RJ45 Port
Use a network cable to connect your switch to the RJ45 port of an opposite end device. The RJ45
port can connect with network camera, IP camera, NVR, switch, etc.
Figure 3-1 RJ45 Port Connection
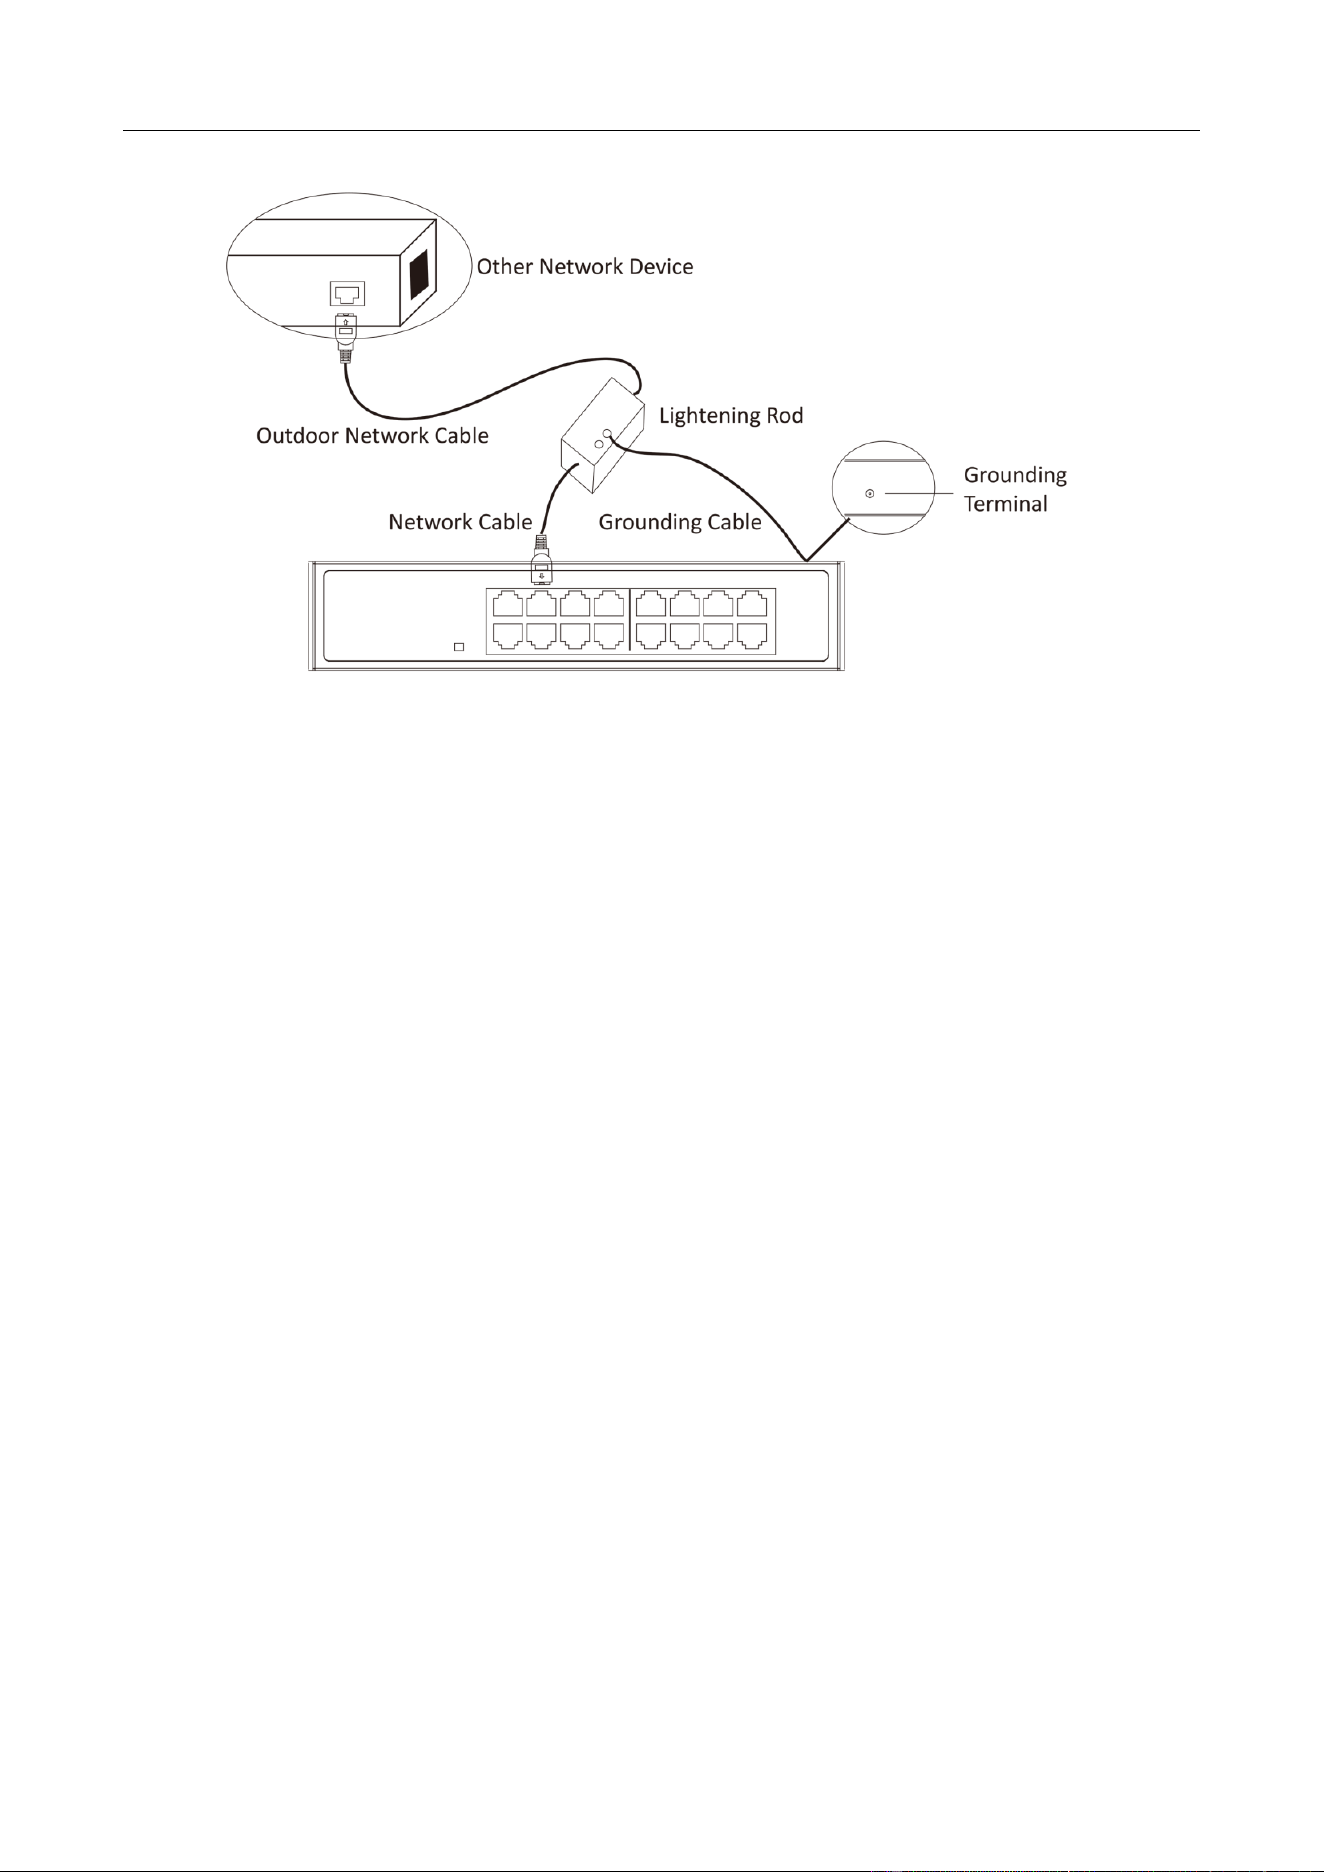
3.2 Checking the Cabling
Before powering on your switch, make sure that:
The operating power supply is compliant with rated input standard.
Port cables and grounding cables are correctly connected.
If there is outdoor cabling, connect a lightning rod and lightening arrester to the cable.
16/24-Port Gigabit Ethernet Switch Quick Start Guide
10
Figure 3-2 Lightning Rod Connection
3.3 Powering on Switch
Please use the attached power cord to provide power to the switch.

16/24-Port Gigabit Ethernet Switch Quick Start Guide
11
UD11866B-A