PIZZA OVEN
OWNERS MANUAL
REVISED JUNE 3, 2019
MOBILE MODELS: PZ24-MB, PZ36-MB, PZ48-MB, PZ36-CB, PZ48-CB
PORTABLE MODELS: PZ24-TT, PZ36-TT, PZ48-TT
Page 2 of 33
Congratulations and thank you for choosing Crown
Verity. You are the proud new owner of the finest
commercial mobile pizza oven available. CROWN
VERITY Inc. pizza ovens are designed to last a
lifetime and with proper care and maintenance,
your pizza oven will provide unparalleled
performance for countless years of outdoor
cooking.
Our pizza ovens are designed for high performance
and are distinctly different than our grill line. This
manual contains important information necessary
for the proper and safe use of the pizza oven.
Please read this manual carefully and follow all
warnings and instructions before operating the
pizza oven to ensure safe operation and to
maximize your cooking enjoyment.
Crown Verity is here to help. Should you ever have
any questions about cooking with or caring for your
Crown Verity product, please contact our customer
service desk at:
1-888-505-7240
or
service@crownverity.com
Please have your model number and serial number ready when you call or include it in your
email.
Model Number
Serial Number
Note: The serial number and model number can be found on the rating plate.
PROUDLY MADE IN
NORTH AMERICA
Page 3 of 33
For your Safety
WARNING:
This appliance shall be used only in a well ventilated space and
shall not be used in a building, garage, or any other enclosed area. Ensure
that the clearances to combustibles is adhered to as listed in this manual.
WARNING:
Improper installation, adjustment, alteration, service or
maintenance can cause property damage, injury or death. Please read the
installation, operating and maintenance instructions provided in this
manual thoroughly before installing or servicing this equipment.
It is your
responsibility to see that your pizza oven is properly assembled, installed,
and cared for.
WARNING:
Keep any electrical supply cords and fuel supply hoses(s) away
from any hot surfaces.
WARNING:
This appliance has been tested according to
ANSI Z83.11/CSA 1.8
2016
This is an outdoor commercial cooking appliance and is not intended to be
installed in or on a boat or recreational vehicle.
DANGER: IF YOU SMELL GAS
1. Shut off gas to the appliance.
2. Extinguish any open flame.
3. Open doors and remove any storage cover(s).
4. If the odor continues, keep away from the appliance and immediately call your gas
supplier or fire department.
Failure to follow these instructions could result in fire or explosion which could cause property
damage, personal injury or death.
Page 4 of 33
IMPORTANT: Damage caused by a failure to heed the warnings or follow the safety
instructions and practices described in this manual is not covered by the warranty.
WARNING: FOR YOUR SAFETY
DO NOT store or use gasoline or other flammable vapors and liquids in the vicinity of this or any
other appliance.
DO NOT check for leaks with a match or open flame.
DO NOT store a LP cylinder that is not connected for use in the vicinity of this or any other
appliance.
DO NOT use your pizza oven if there is evidence of damage (cuts, cracks, burns) or excessive
wear to the gas supply hose.
DO NOT obstruct the flow of combustion and ventilation air to the pizza oven.
DO NOT place combustibles on the undershelf. Do not stand on the undershelf as it could result
in injury or irreparable damage.
DO NOT store a spare LP (propane) cylinder under your pizza oven.
DO NOT leave your pizza oven unattended while in operation.
DO NOT use under the influence of alcohol or drugs.
DO NOT use this pizza oven until you have read and understood all of the information in this
manual.

Page 5 of 33
California Proposition 65 Warning
The burning of gas cooking fuel generates some by-products that are on the list of substances
which are known by the State of California to cause cancer or reproductive harm. California law
requires businesses to warn customers of potential exposure to such substances. To minimize
exposure to these substances, always operate the pizza oven according to this Owners Manual
and ensure you provide good ventilation when cooking with gas.
Unpacking
This pizza oven was carefully inspected and tested before leaving the factory.
Upon acceptance of the shipment, all freight damage responsibility is
relinquished by the freight carrier.
Immediately after unpacking the pizza oven, check for possible shipping
damage. If the appliance is damaged, save the packaging material and contact
the carrier immediately.

Page 6 of 33
Table Of Contents
FOR YOUR SAFETY 3
CALIFORNIA PROPOSITION 65 WARNING 5
UNPACKING 5
SAFELY OPERATING YOUR PIZZA OVEN 7
IMPORTANT LP TANK SAFETY INFORMATION 8
INSTALLATION 10
NOTE TO GAS TECHNICIAN 11
LIQUID PROPANE GAS REQUIREMENTS (20/30-POUND CYLINDERS) 12
NATURAL GAS REQUIREMENTS 15
BULK SUPPLY LIQUID PROPANE GAS REQUIREMENTS 16
LEAK TESTING 16
WARNING!- NATURAL HAZARD - SPIDERS 18
LOCATING THE PIZZA OVEN 18
BEFORE YOU COOK 20
GENERAL OPERATING PROCEDURES 21
WHILE YOU ARE COOKING 21
ADDITIONAL COOKING TIPS 21
LIGHTING YOUR PIZZA OVEN 23
BURNER ADJUSTMENTS 25
PIZZA OVEN DIMENSIONS 27
OVEN ASSEMBLY 28
CARING FOR YOUR PIZZA OVEN 29
TROUBLESHOOTING 32
INSTALLATION CHECKLIST 33

Page 7 of 33
Safely Operating Your Pizza Oven
WARNING:
Certain surfaces of your pizza oven can get hot enough to cause
severe burns. Never leave the appliance unattended when in use to prevent
unintentional contact.
IMPORTANT:
Improper use or installation of the pizza oven is dangerous. The pizza
oven produces intense heat and therefore the risk of accidents or potential injuries
is increased. Carefully follow all instructions, including the following:
•
To reduce the risk of fire, burns or other injury, read this manual thoroughly.
Begin by ensuring proper installation and servicing. Do not repair or replace any
part of the pizza oven yourself unless it is specifically recommended in manual.
All other service must be carried out by a licensed gas technician.
•
Do not heat unopened food containers in the pizza oven. The buildup of pressure
resulting from the heat may cause the container to burst.
•
Never lean on any part of the pizza oven.
•
The pizza oven is equipped with a pilot tube burner. When lighting the pizza oven,
always pay close attention to what you are doing. Make sure the pilot tube burner is
lit before attempting to light the main burners.
•
When the burners are on the oven will become very hot quickly. Use caution
when making contact with any part of the oven. The surfaces of the oven will
become extremely hot and may cause severe burns. It is recommended that care
be taken when touching any part of the oven while operating.
•
The oven will retain heat after the burners have been turned off, especially the
cooking stones. Use caution when coming in contact with the oven immediately
after use.
•
Do not use any cleaner, including water, on a hot pizza oven. Never use any
liquids when cleaning the cooking stones.
•
Be sure all control knobs are in the OFF position and the pizza oven is cool before
using any aerosol cleaner on it or near it. The chemical used for aerosol
propellant could ignite in the presence of heat. Never use aerosol cleaner on the
cooking stones.
•
Always use dry pot holders or gloves on hot surfaces or cooking tools: moist
or damp pot holders or gloves may cause steam burns. Never use a towel or
bulky cloth in place of pot holders. Do not let pot holders touch hot
portions of the pizza oven or allow them to get near the open flame.

Page 8 of 33
Safely Operating Your Pizza Oven (Cont’d)
•
Do not operate the pizza oven under an unprotected combustible
construction. Use only in a well- ventilated area. The oven is for outdoor use
only.
•
Do not obstruct any of the openings on the pizza oven or otherwise
obstruct the flow of combustion and ventilation air. Do not build the pizza
oven into any structure that is closer than 12 inches from the sides, back
and top.
•
Keep all gas hoses away from the hot surfaces of the pizza oven, including
all external surfaces of the unit.
•
Keep all electrical cords away from the hot surfaces of the pizza oven.
•
Ensure proper installation and servicing by following all instructions in this
manual and any other instructions or markings provided with this product.
Have your pizza oven installed by a licensed gas technician.
•
If you smell gas, there is likely a problem with the installation. If the
connections are not perfectly sealed, you can have a small leak resulting in the
faint smell of gas -- even if the pizza oven appears to be working properly.
Shut the gas supply off to the pizza oven and call a licensed gas
technician to locate and resolve the leak.
Important LP Tank Safety Information
Although safe to use when properly handled, careless handling of a
propane gas cylinder could result in fire, explosion and/or serious injury.
To avoid risk of fire, explosion or injury, take the following safety precautions:
WARNING:
For safety reasons, the LP gas cylinder, if supplied with your pizza
oven, has been shipped empty. The cylinder must be purged of air and filled
prior to use.
•
Allow only a qualified LP gas dealer to fill or repair cylinders.
•
A liquid propane cylinder should never be “overfilled” beyond the
cylinder filling capacity. “Overfilling may create a dangerous condition.
“Overfilled” tanks can build up excess pressure. The standard safety
device on tanks is the safety relief valve. This valve vents propane gas
vapors to relieve excess pressure. These vapors are combustible and
can be ignited.
Page 9 of 33
Important LP Tank Safety Information (Cont’d)
•
Make sure the gas dealer checks the cylinder for leaks after filling.
•
Do not store spare LP gas cylinders under the pizza oven.
•
Never use a dented, rusty or expired LP tank.
•
Always use the protective cap provided with your cylinder whenever it is
not connected to your pizza oven.
•
Never connect the pizza oven to anything other than the fuel source
indicated on the rating plate. Factory conversion kits are available for
switching fuel sources. Contact Crown Verity or an authorized dealer for
details. Conversion kit installation must be done by a licensed gas
technician.
•
The LP-gas cylinder must include a collar to protect the cylinder valve from
damage.
•
Ensure proper ventilation of the cylinder. The cylinder supply system must
be arranged for vapor withdrawal.
•
The LP-gas supply cylinder to be used must be constructed and marked in
accordance with the specifications for LP-gas cylinders, U.S. Department of
Transportation (DOT) or the standard for Cylinders, Spheres and Tubes for the
Transportation of Dangerous Goods, CAN/CSA-B339.
•
When the pizza oven is not in use, the gas must be turned off at the supply
cylinder.
•
Handling, storage and transportation of propane cylinders must be in
accordance with Storage and handling of Liquid Petroleum Gases,
ANSI/NFPA 58 or Natural Gas and Propane Installation Code, CSA B149.1
DANGER:
Do not store a spare LP-gas cylinder under or near this appliance;
Never fill the cylinder beyond 80 percent full; and
If instructions A and B are not followed exactly, a fire causing death or
serious injury may occur.

Page 10 of 33
Important LP Tank Safety Information (Cont’d)
•
The pizza oven may be stored indoors, but only if the cylinder is
disconnected and removed from the oven. An LP cylinder MUST NEVER BE
STORED INDOORS.
•
Cylinders must be stored outdoors and must not be stored in a building,
garage or any other enclosed area. Store in a well-ventilated area.
•
Do not store in the vicinity of any gas burning apparatus or in any high heat area
such as a closed car or trunk.
•
Do not smoke while transporting a LP cylinder in your vehicle.
•
Always close the main valve on the tank before disconnecting or transporting the
tank.
•
Transport and store cylinders in an upright position. Do not tip it on its side. (The 30
lbs. tanks supplied with the Club model (CB) variation are designed to be used and
stored on their side.)
•
The pressure regulator and hose assembly supplied with the pizza oven must be
used. Replacement pressure regulators and hose assemblies must be the type
specified by Crown Verity and installed by a licensed gas technician. For
replacement parts, contact Crown Verity Customer Service at 1-888-505-7240.
Installation
The installation of this appliance must be in accordance with:
A.
All applicable local codes, or in the absence of local codes;
a.
Canada: must conform to current National Standard CAN/CGA
B149.1&.2 - natural gas/ propane installation code.
b.
U.S.A.: must conform to national Fuel Gas Code, ANSI Z223.1/NFPA
54 edition.
B.
Use only hoses, regulators and quick disconnects supplied by Crown
Verity.
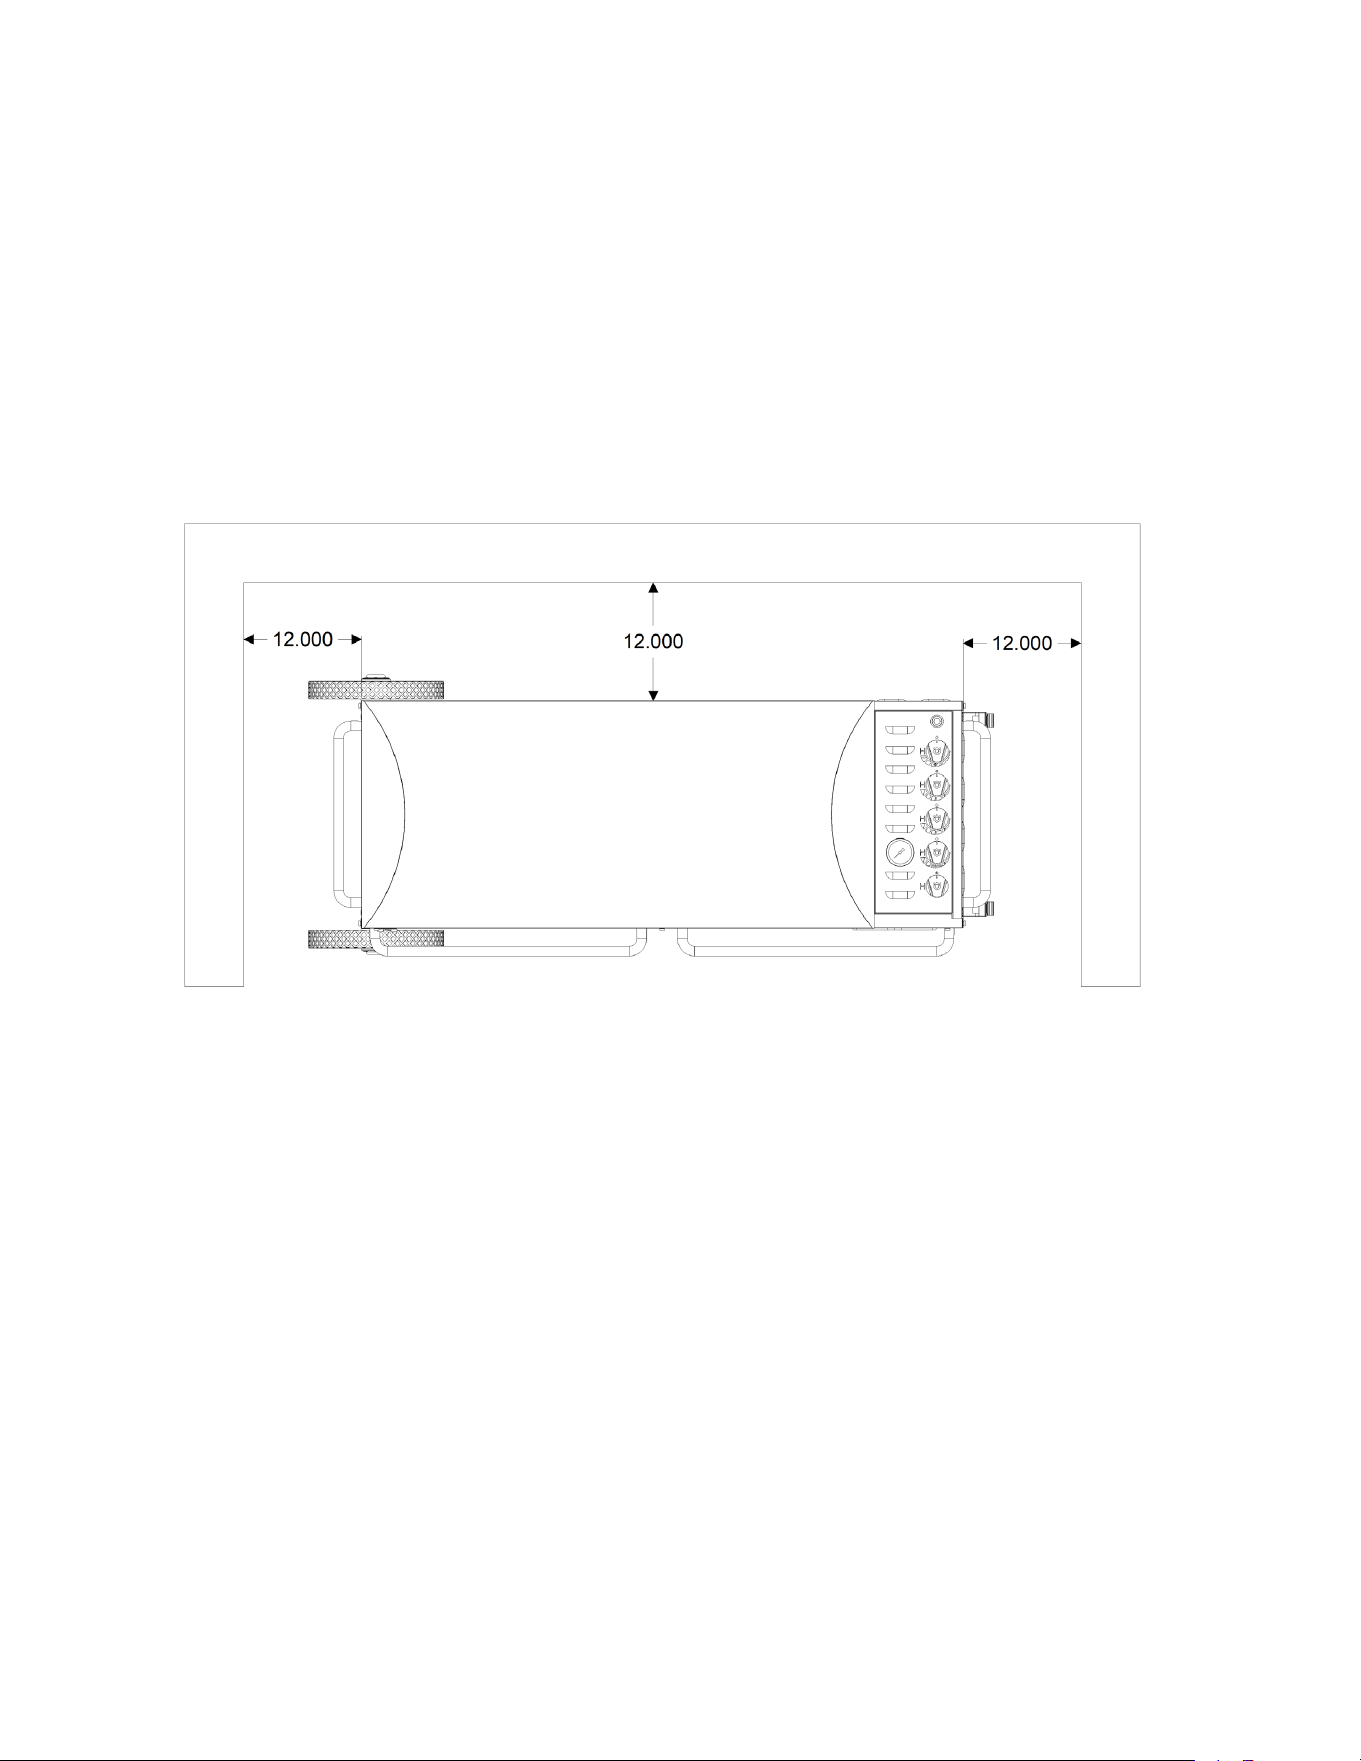
C.
Maintain minimal clearances to combustible materials
a.
12 inches from side(s)
b.
12 Inches from back (see Figure 1)
D.
This appliance is suitable for use on combustible floors.
E.
Always level your pizza oven front to back & side to side.
F.
Always keep the area surrounding your pizza oven clear of all
combustible materials, gasoline, or other flammable liquids.
Page 11 of 33
Installation (Cont’d)
G.
Use your pizza oven OUTDOORS ONLY and in a well-ventilated space,
preferably 10 ft. from dwellings or outbuildings.
H.
Casters must be locked when the appliance is in operation.
FIGURE 1. CLEARANCES TO COMBUSTIBLES
Note to Gas Technician
WARNING:
DO NOT
perform any pressure tests on this appliance or the
regulator supplied in excess of 1/2 PSIG.
For fixed fuel supply systems. RE: Pressure tests
A.
The appliance and its individual shut-off valve must be disconnected from
the gas supply piping system during any pressure testing of that system at
test pressures in excess of 1/2 psi. (3.45 kPa).
B.
The appliance must be isolated from the gas supply piping system by
closing it’s individual manual shut-off valve during any pressure testing of
the gas supply piping system at test pressures equal to or less than 1/2 psi.
(3.45kPa).

Page 12 of 33
WARNING:
DO NOT
install any gas handling components/materials affected by
elevated temperatures within 18” of any side of this appliance.
Make sure that the supply line is of adequate capacity to accommodate the
higher inputs of the pizza oven before you begin. They are significantly higher
inputs than average appliances of this type.
The use of a typical corrugated metallic appliance connector is recommended for
connecting the appliance, with a minimum diameter of 1/2”.
BTU Table
Pizza Oven
Model
BTU’s
LP Pilot
Orifice - 69
BTU’s
LP Burner
Orifice - 59
BTU’s
NG Pilot
Orifice - 56
BTU’s
NG Burner
Orifice - 51
Total
BTU’s
NG/LP
PZ24 (All Models)
5,000
12,500
5,000
12,500
30,000
PZ36 (All Models)
5,000
12,500
5,000
12,500
42,500
PZ48 (All Models)
5,000
12,500
5,000
12,500
55,000
Note: For LP (Liquid Propane) applications, the specified BTU’s are calculated at
a manifold pressure of 11 inches W.C.. For NG (Natural Gas) applications, the
specified BTU’s are calculated at a manifold pressure of 4 inches W.C..
For reference, orifice sizes and manifold pressures are indicated on the rating
plate of the appliance.
You are encouraged to explain any provisions or concerns you may have
regarding the placement of your equipment near or within the supporting
structure and the surroundings. Please forward any suggestions you may have
should the gas supply components pose any aesthetic problems that the
property owner may be concerned with before you begin. Should you have any
questions or require technical assistance, please call Crown Verity Inc. at 1-888-
505-7240.
Liquid Propane Gas Requirements (20/30-Pound Cylinders)
Verify the type of gas your pizza oven has been configured for by the factory by
checking the rating plate on the oven. Pizza ovens configured for liquid
propane (LP) gas are orificed differently than ovens configured for natural gas
(NG). Pizza ovens configured for use with 20 or 30-pound LP cylinders (Type 1)
are shipped with an LP regulator hose assembly attached.

Page 13 of 33
Liquid Propane Gas Requirements (Cont’d)
WARNING:
For Pr
opane Gas Models: Your pizza oven is designed to operate on L.P.
(propane) gas pressure regulated at 11” water column. The regulator(s) supplied with
the pizza oven is set to this pressure and must be used.
Connection:
The Type I (Q.C.C.1) cylinder valve is recognizable by the large
external thread on the outlet part of the valve. Standard valves do not have
these exterior threads. Any attempt to fit the regulator(s) with anything other
than the mating Type I (Q.C.C.1) connector, (recognized by the large plastic
coupling nut) will negate the important safety features designed into the Type I
(Q.C.C.1) system. Fitting a standard #510 P.O.L connector, will not provide the
flow control or temperature shut-off safety features built into the complete
Type I (Q.C.C.1) system.
This regulator is equipped with the Type I (Q.C.C.1), quick
closing connection system, which incorporates the following features:
• Will not allow gas to flow until a positive seal has been made.
• Has a thermal element that will shut off the flow of gas if subjected to temperatures
between 115° and 150°C (240° & 300°F).
• Has a flow limiting device which, when activated, will restrict the flow of gas to 10
cubic feet per hour (25000 BTUs).
To connect the LP regulator hose assembly to the LP tank, first make sure the main
valve on the tank is completely closed. Make sure also that the control valves on the
pizza oven are OFF. Thread the regulator inlet over the tank valve. Use care to
ensure proper alignment of the threaded coupler and avoid cross-threading or
damaging the coupler. Turn the coupler clockwise until tightened up, but do not
over-tighten.
After connecting a fresh LP tank, you may need to purge air from the system. Before
lighting, open the main valve on the tank. Turn one of the burner control valves on
the pizza oven to the HIGH position for about 15 seconds to purge air from the
system. Turn the control valve on the pizza oven OFF and wait 5 minutes for any gas
to clear. Finally, continue with the normal lighting procedure.
Troubleshooting :
If the large thermally sensitive coupling nut is exposed to
temperatures above 115°- 150°C, it will soften and allow the regulator probe to
disengage from the cylinder valve, thereby shutting off the flow of gas. Should this
occur: do not attempt to reconnect the nut. Remove the entire regulator assembly
and replace it with a new one. The cause of the excessive heat should be
determined and corrected before operating the pizza oven again.
Page 14 of 33
Liquid Propane Gas Requirements (Cont’d)
The regulator probe also contains a flow-sensing element, which will limit the flow
of gas to the regulator to a manageable amount (10 cubic feet per hour) in the event
of a hose or regulator failure, or a leak. If it is evident that the flow-limiting device
has activated, the cause of the excessive flow should be determined and corrected
before using your grill again.
Improper lighting procedures can also cause the flow-limiting device to
activate, resulting in reduced heat output. If this is suspected, shut off all
burner controls and cylinder valve, and carefully repeat lighting instructions
step by step. Do not remove the nut and probe and do not attempt to connect
to anything other than a mating Type I (Q.C.C.1) cylinder valve.
DANGER:
Never connect a propane pizza oven to an unregulated propane gas supply or
other gas type.
Do not attempt to alter the hose or regulator in any way.
Do not allow the hose to come in contact with any hot surfaces of the pizza
oven.
Visually inspect the entire length of the hose assembly before each use for any
evidence of damage (cuts, cracks, burns) or excessive wear. If found, replace
the assembly before using your pizza oven.
The connection fitting must be protected when disconnected from the
LP cylinder. If the fitting is allowed to drag on the ground, damage to
the fitting may occur resulting in leaks or an incomplete connection.
Dirt could also enter the small inlet hole, blocking gas flow
completely.

Page 15 of 33
Natural Gas Requirements
Verify the type of gas your pizza oven has been configured for by the factory by
checking the rating plate on the oven. Pizza ovens configured for natural gas (NG) are
orificed differently than ovens configured for liquid propane (LP) gas. Pizza ovens
configured for use with natural gas are shipped with a hose, regulator and quick-
connect fitting.
WARNING:
For Natural
Gas Models: Your pizza oven is designed to operate on natural gas
(NG) pressure regulated at 4” water column. The regulator supplied with the pizza oven is set to
this pressure and must be used.
Connection:
Quick-connect hose and regulator assembly (included).
IMPORTANT:
Always close the gas supply shutoff valve before disconnecting the pizza oven
gas supply hose.
IMPORTANT:
An installer-supplied safety shutoff valve MUST be installed on the natural gas
supply line for the pizza oven. The valve should be easily accessed and located between 3 and
20 feet away from the oven (always check with local codes for specified clearances and
distances) . All gas connections should be made by a licensed technician. The installation and
all installer-supplied parts must conform to local codes. In the absence of local codes, the
installation and all parts should conform to the National Fuel Gas Code, ANSI Z223.1/ NFPA 54
or Natural Gas and Propane Installation Code, CSA B149.1.
IMPORTANT:
Diameter and length of the gas supply pipe may limit the pressure and BTU
delivery of gas to the oven. The installer must ensure proper delivery to the pizza oven or it will
not operate properly. The appliance and its individual shutoff valve must be disconnected from
the gas supply piping system during any pressure testing of that system at pressures in excess
of 1/2 psi (3.5 kPa). During any pressure testing of the gas supply piping system at test
pressures equal to or less than 1/2 psi (3.5 kPa), the appliance must be isolated from the
system by closing its individual manual shutoff valve.
All pipe sealants must be of an approved type
.

Page 16 of 33
Bulk Supply Liquid Propane Gas Requirements
Verify the type of gas your pizza oven has been configured for by the factory by
checking the rating plate on the oven. Pizza ovens configured for liquid
propane (LP) gas are orificed differently than ovens configured for natural gas (NG). For
pizza ovens configured for use with bulk LP tanks, a regulator is not supplied. To
purchase these options, please contact Crown Verity at 1-888-505-7240.
Connection:
A quick-connect hose is provided to support the connection to a bulk
supply.
WARNING:
The Operating Pressure of the appliance is 11.0" W.C. A step down regulator MUST
be used on an LP house system to reduce the pressure down to 11.0" W.C. for the pizza oven.
IMPORTANT:
Always close the gas supply shutoff valve before disconnecting the pizza oven
gas supply hose.
IMPORTANT:
An installer-supplied safety shutoff valve MUST be installed on the liquid
propane gas supply line for the pizza oven. The valve should be easily accessed and located
between 3 and 20 feet away from the oven. All gas connections should be made by a licensed
technician. The installation and all installer-supplied parts must conform to local codes. In the
absence of local codes, the installation and all parts should conform to the National Fuel Gas
Code, ANSI Z223.1/ NFPA 54 or Natural Gas and Propane Installation Code, CSA B149.1.
IMPORTANT:
Diameter and length of the gas supply pipe may limit the pressure and BTU
delivery of gas to the oven. The installer must ensure proper delivery to the pizza oven or it will
not operate properly. The appliance and its individual shutoff valve must be disconnected from
the gas supply piping system during any pressure testing of that system at pressures in excess
of 1/2 psi (3.5 kPa). During any pressure testing of the gas supply piping system at test
pressures equal to or less than 1/2 psi (3.5 kPa), the appliance must be isolated from the
system by closing its individual manual shutoff valve.
All pipe sealants must be of an approved type
.
Leak Testing
Although all gas connections on the pizza oven are leak tested at the factory prior to
shipment, a complete test must be performed:
A.
After installation due to possible mishandling during shipping or installation.
B.
Periodic checks are also required every time the propane cylinder is refilled, any
gas component is changed or at least once a year.

Page 17 of 33
C.
Immediately check for leaks if you smell gas.
WARNING: Never use an open flame to look for a leak. Perform the leak test outdoors in a
well-ventilated area. Extinguish all open flames and keep away from any heat or ignition
sources. DO NOT SMOKE! Use only a 50/50 mixture of liquid soap and water for leak testing.
IMPORTANT: Owners should only check for leaks on the gas connections that are external to
the pizza oven. If the valves or other internal connections need to be checked, please call a
licensed technician or Crown Verity Customer Service at 1-888-505-7240.
For LP units using a 20 or 30 pound cylinder, a full cylinder should be used.
To Conduct the Test:
Make a soap solution of one part liquid dish soap and one part water.
Make sure the pizza oven control valve(s) is in the OFF position. Turn the gas supply
ON. Use a spray bottle, brush or rag to apply the mild soap solution to all connections
from the supply line or LP cylinder to the connection on the rear of the pizza oven
including the following:
A.
Cylinder valve including the threads into the tank.
B.
All cylinder welds.
C.
Regulator fitting(s) and cylinder connections.
D.
All hose connections.
Soap bubbles will appear at any connections with a leak. Turn OFF the gas supply and
tighten any leaky connections. Recheck, applying more mild soap solution.
IMPORTANT: Do not use the pizza oven if any leaks cannot be stopped. Turn off
the gass supply valve, remove any gas cylinder and call a licensed gas appliance
service technician for proper repairs.
Page 18 of 33
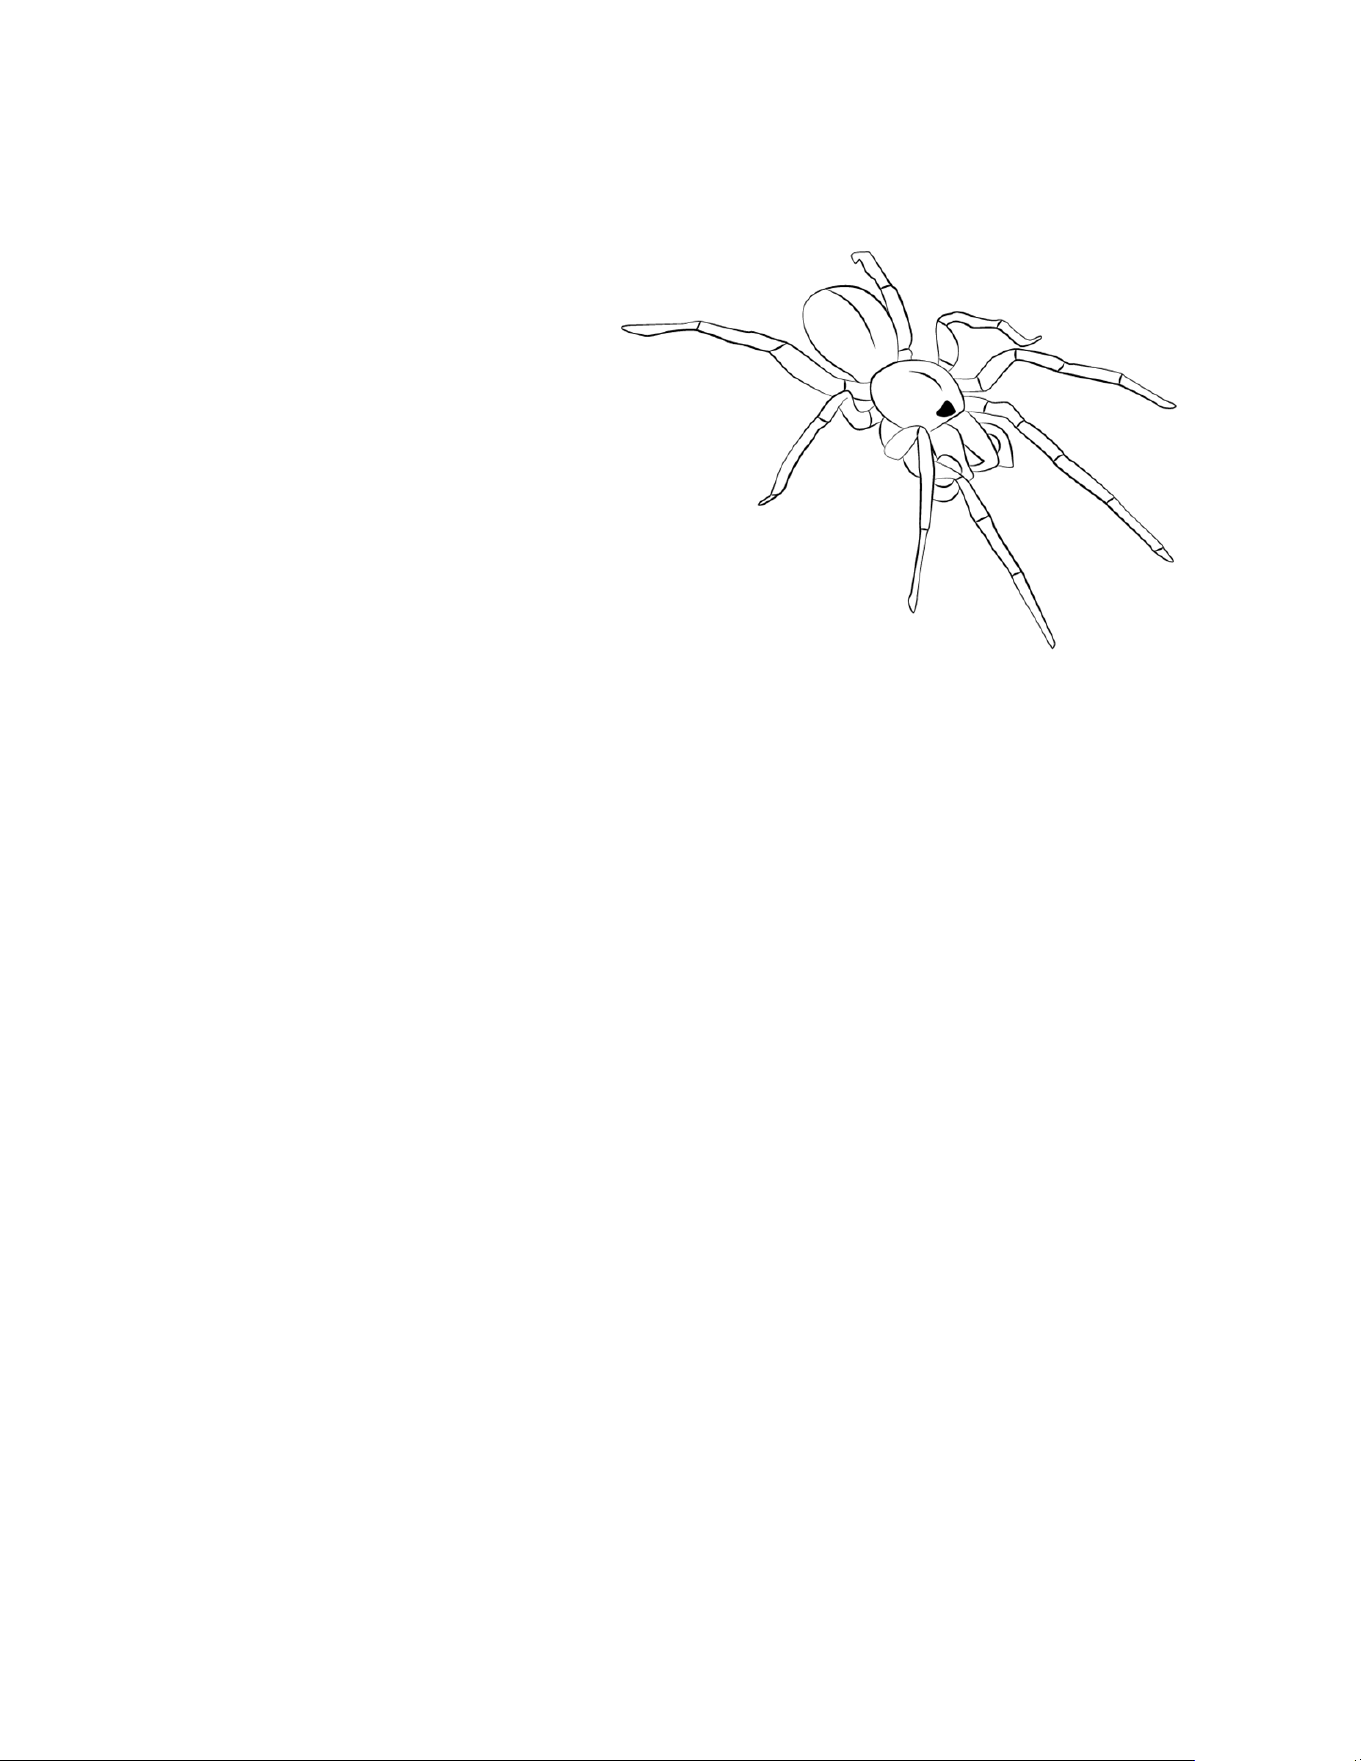
Warning!- Natural Hazard - Spiders
Spiders and other insects are
attracted by the smell of gas and
could make webs or nests in the
burners. This could partially or
completely block the flow of gas
through the venturis and is
indicated by a smoky, yellow
flame, and/or a burner that is
difficult or impossible to light.
Ultimately, it may cause the gas
to burn outside the venturis,
which can seriously damage your
pizza oven. If this happens, immediately shut off the propane at the cylinder, or natural
gas at the main shut-off valve. To prevent and/or correct this occurrence, periodically
check the venturis for obstructions by inserting a pipe cleaner or flexible wire through
the air inlet of the burner and twisting it. Ensure venturi tubes are properly “seated”
over the orifices after cleaning.
Locating the Pizza Oven
The Crown Verity pizza oven is available in two versions. Depending on the model
purchased, there are several factors to consider when placing the oven for use.
Choosing a Location:
Important considerations for all pizza oven placements
include
exposure to wind, proximity to foot traffic or areas where people congregate.
The mobile pizza oven models have an integrated base with large wheels. Options
include mounting supports for 20 pound LP gas cylinders (not included) or integrated
30 pound LP gas cylinders that are included with the CB model option. It can also be
specified for connection to either a natural gas or a bulk propane supply. Factors to
consider with this version of the pizza oven include:
•
DO NOT
place the pizza oven in a location where the oven opening is likely to be
exposed to strong wind.
•
DO NOT
place the pizza oven where it is likely to be bumped into or inadvertently
touched by passersby.
•
DO NOT
place the pizza oven on a surface that is unable to safely support the 300-
pound weight of the pizza oven as it may topple or tip over.

Page 19 of 33
Locating the Pizza Oven (Cont’d)
•
DO NOT
place the pizza oven on any surface that would allow the pizza oven to easily or
inadvertently change position. When in use, always have the casters in the locked position.
•
For natural gas and bulk propane models,
NEVER
place the pizza oven where the gas
hose creates a safety hazard. Tripping over an exposed gas hose may create a gas leak,
cause the oven to tip or topple over or create other serious safety hazards.
•
NEVER
locate the pizza oven in a building, breezeway, shed or other such enclosed
areas.
The countertop versions are identical to the mobile versions with the exception of the
mobile base. Countertop ovens are supplied with a shorter leg for countertop
installations. They are available with LP gas cylinders connections up to 100 lbs. They
can also be specified for natural gas or bulk propane supply.
•
DO NOT place the countertop oven on a combustible surface.
•
DO NOT
place the pizza oven in a location where the oven opening is likely to be
exposed to strong wind.
•
DO NOT
place the pizza oven where it is likely to be bumped into or inadvertently
touched by passersby.
•
It is recommended that the countertop or other surface extend 9 inches beyond the
sides and back of the pizza oven as a safety clearance to protect people from injury.
•
DO NOT
place the pizza oven on a table or cart that is unable to safely support the 200
plus pound weight of the pizza oven or may topple or tip over.
•
DO NOT
place the pizza oven on any surface that allows the pizza oven to slide easily or
inadvertently change position.
•
NEVER
place the pizza oven where the gas hose creates a safety hazard. Tripping over
an exposed gas hose may create a gas leak, pull the pizza oven off the counter or create
other serious safety hazards.
•
NEVER locate the pizza oven in a building, breezeway, shed or other such enclosed areas.
•
The pizza oven is not intended to be installed in or on a boat or recreational vehicle.
•
For ease of use and safe operation, it is recommended the surface on which the pizza oven sits
be at least 36 inches high (counter-height) and not more than 42 inches high (bar-height).

Page 20 of 33
Before You Cook
A quick safety check should be performed before each time you use the pizza oven.
•
Clean and inspect the gas hose. If there is evidence of abrasion, wear, cuts or leaks, do not use
the pizza oven. The hose must be replaced prior to using the pizza oven. Replace the hose
assembly with the exact type specified by Crown Verity.
•
Ensure the gas hose is clear of the pizza oven. Keep the fuel supply hose away from any heated
surface(s).
•
Check that the area near the pizza oven is clear of combustible materials and vapors, including
alcohol, gasoline, aerosol containers and dry goods. Keep electrical cords from being in contact
with the pizza oven.
•
Check that nothing is interfering with the safe operation of the oven by obstructing the
ventilation around and under the unit. The pizza oven requires 12 inches of clearance to the
left, right and back of the unit with no obstructions above.
•
Do not use the oven with overly loose-fitting clothing, especially loose sleeves that may come in
contact with the hot surfaces inside the oven or near the door.
•
Have insulated gloves with long cuffs ready and available.
IMPORTANT: Do not build the pizza oven into any type of enclosure. Proper air
circulation in and around the pizza oven is critical to its operation. Maintain at
least 12 inches of clearance around the sides and back of the pizza oven, and 12
inches above the top. Do not obstruct the open space below the pizza oven.
NEVER place the pizza oven underneath an overhead combustible surface. The
pizza oven must be placed on top of a non-combustible surface.
IMPORTANT: The pizza oven comes equipped with a thermometer. There are
three types of heat required to properly cook pizza which include direct (cooking
stones), radiant (surrounding materials) and convection. The thermometer only
measures the oven temperature which does not correlate directly with the surface
temperature of the cooking stones. Through extensive testing, we recommend
that the temperature of the pizza stone be regulated between 500 to 525 degrees
Fahrenheit for best results. The oven thermometer may register a slightly
different temperature, so it is recommended that you familiarize yourself with the
temperature settings and your own personal cooking environment to optimize the
temperature setting for the best cooking performance.

Page 21 of 33
General Operating Procedures
The pizza oven reaches operating temperatures in approximately 20 minutes but may vary
depending on environmental conditions. The ideal surface temperature of the cooking stones,
specifically for pizza, is between 500-525 degrees Fahrenheit, however for compliance
requirements, the temperature gauge for the oven is specific to the air temperature. There is
not a direct correlation between the oven air temperature and the stone temperature, so the
actual values will differ slightly.
While You are Cooking
The pizza oven surfaces get very hot as will the pizzas you are cooking. Follow these tips while
operating the oven:
•
Never move the pizza oven while it is in use or when it is hot.
•
The use of alcohol, prescription or non-prescription drugs may impair your ability to safely
operate the pizza oven.
•
Do not touch the top of the pizza oven, the front shelf or any surfaces inside or near the door
opening while the oven is hot. These surfaces can cause serious burns.
•
Be very careful transporting hot pizzas. The toppings can cause serious burns to yourself or
those around you.
•
Only use a long-handled tools to clean the cooking deck. The handle must be long enough that
your hands stay safely outside of the oven.
•
Never empty the crumb tray while the oven is hot. The tray and its contents become very hot
while the oven is in use.
Additional Cooking Tips
Here are some additional tips specific to cooking pizza with this appliance. We recommend
you follow these tips to help ensure consistent results with your cooking experience.
•
Our polished cooking stones are less likely to stick to the pizza dough than traditional
cordierite stones. However, you can use corn meal between the dough and the peel to
help slide the pizza off the peel. Be sure the dough is floured enough that it is not
sticky on the bottom.
Practice with your pizza oven to understand the temperature variables and
nuances of your oven before hosting your guests.

Page 22 of 33
Additional Cooking Tips (Cont’d)
•
Do not leave an assembled pizza on the peel longer than absolutely necessary. This can
lead to the pizza sticking to the peel.
•
Cook thin to medium crust pizzas directly on the cooking deck.
•
Use multiple, smaller “flicking” gestures to coax the pizza off the peel into the oven.
Trying to do it with one, larger gesture is more likely to dislodge pizza toppings.
•
Do not overload a thin-crust or medium-crust pizza with too many toppings. This will
most often lead to a soggy center crust. When in doubt, less is more.
•
If the pizza sticks to the cooking deck, the deck was probably not hot enough before
the pizza was put onto the deck.
•
Do not put a frozen pizza on the cooking deck. It is almost certain to stick and to
become burned before it releases.
•
Rotate pizzas for even cooking.
•
Brush any burnt cornmeal off the cooking deck and into the crumb tray before cooking
the next pizza.
•
If you have any difficulty rotating the pizza inside the oven using a peel, try using long-
handled grill tongs to do the job. You can also use the tongs to lift the edge of the pizza
to check on the bottom of the crust.
•
Avoid letting the pizza contact the cooking deck backstop. This is a very hot surface
that will quickly burn the crust.

Page 23 of 33
FIGURE 2. CONTROL DETAILS
Lighting Your Pizza Oven
Before lighting your pizza oven, be sure you have followed the instructions in this manual
regarding proper setup, placement, gas connections leak testing and safe operation, all
of which precede this page.
IMPORTANT:
Do not use the pizza oven if the odor of gas is present at any time. Follow
leak testing procedures before using the pizza oven.
Standard Lighting Procedure:
•
Position the wind guards in the fully open position.
•
Make sure the main burner valves are in the OFF position (See Figure 3.).
•
Turn the main gas supply on and wait 15 seconds.
•
Turn the pilot valve into the on position.
•
Press down and hold the piezo ignition button to engage the electronic ignition and light the
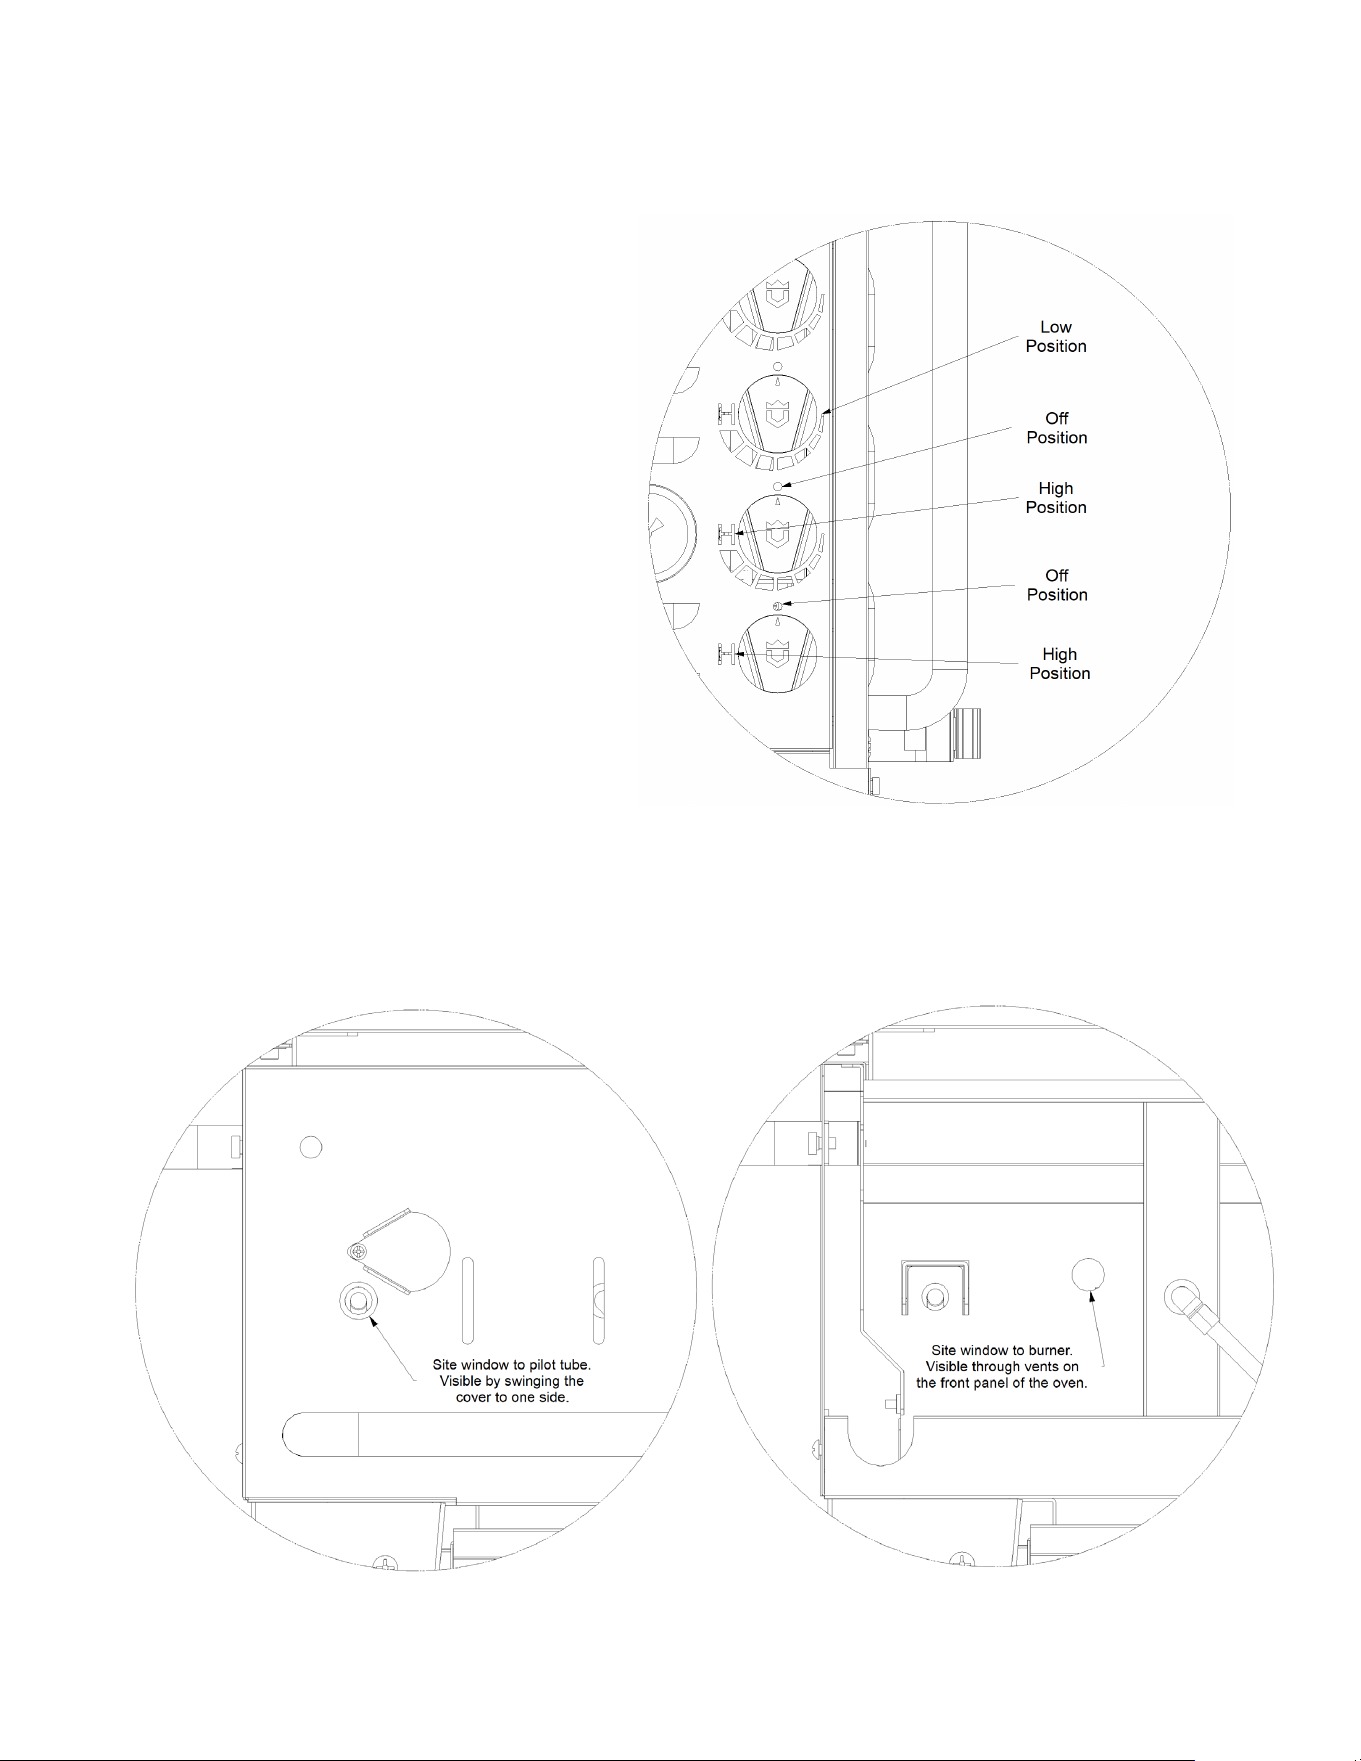
pilot tube. Confirm that the pilot is lit by looking through the opening behind the wing door.
•
Turn the main burner valves on to the desired temperature setting. (See general operating
procedures for guidelines on how to determine ideal temperature settings). Ignition should
take place within 4 to 5 seconds. Verify that the burners are lit by looking through the site
widows on the face of the oven
(See Figure 5.). If the burners do
not light within this time, turn the
temperature knob to the OFF
position and wait 5 minutes for the
gas to dissipate before trying again.
If the appliance will not light after
multiple attempts, refer to the
troubleshooting section of this
manual.
Page 24 of 33
FIGURE 3. VALVE POSITIONS
FIGURE 4. MANUAL LIGHTING ACCESS
FIGURE 5. BURNER SITE WINDOW
Manual Lighting Procedure:
•
Open the pizza oven doors and position
on the sides of the oven.
•
Make sure the main burner valve is the
OFF position (See Figure 3.).
•
Turn the main gas supply on and wait 15
seconds.
•
Turn the pilot valve to the on position.
•
Insert a barbeque lighter into the hole
located behind the wing door on the face
of the pizza oven (see Figure 4).
•
Visually inspect to see that the pilot tube
is lit.
•
Turn the main burner valves on to the
desired temperature setting. (See general
operating procedures for guidelines on
how to determine ideal temperature
settings). Ignition should take place within 4 to 5 seconds. Verify that the burners are lit by
looking through the site widows on the face of the oven (See Figure 5.). If the burners do not
light within this time, turn the temperature knob to the OFF position and wait 5 minutes for the
gas to dissipate before trying again. If the appliance will not light after multiple attempts, refer
to the troubleshooting section of this manual.
A
B
C
D

Page 25 of 33
Burner Adjustments
Every burner is tested and adjusted at the factory for proper performance. If a burner is
not operating properly, it may be due to variations in the local gas supply or because of
an obstructed air shutter or orifice. Flames should be stable without lifting from the
burner. The flames should burn cleanly without creating any sooty residue.
Burner Flame Characteristics:
•
The flame should be blue and stable with only a small amount of orange, if any, at the
tips. There should be little noise and no lifting.
•
The inner cone should be 1/4 inch high.
•
The outer cone should be 5/8 inch high.
Visually inspect the flames in your pizza oven and adjust if necessary, using the
instructions below.
IMPORTANT:
A sooty flame is usually caused by dirt, debris or spider nests blocking the
air shutter or orifice. This is a dangerous condition. The pizza oven should NOT be used
until the problem is rectified. If you are not comfortable addressing the issue yourself,
please hire a licensed technician or contact Crown Verity Service at 1-888-505-7240.
To Clean the Air Shutter:
Turn off the gas supply shutoff valve or close the main valve on the LP cylinder. Ensure
the pizza oven control knobs are in the OFF position.
If your pizza oven is equipped with side and or front shelves, remove the shelves and
carefully place them on their backs to avoid scratching the surfaces. Next, remove the
faceplate of the burner box by removing the four screws on the outside edge of the
face. Once the four screws are removed, gently lift up and forward to remove the face.
Place the face down on its back to avoid surface scratches.
The shutter is located at the end of the burner tubes closest to the gas orifice.
Use a flashlight to view the screened openings of the air shutter from and remove any
obvious obstructions from the screen protecting the air shutter.
To Adjust the Air Shutter:
Leave the gas supply shutoff valve in the OFF position or leave the main valve on the LP
cylinder in the closed position. The pizza oven control knobs should also remain in the
OFF position.
Page 26 of 33
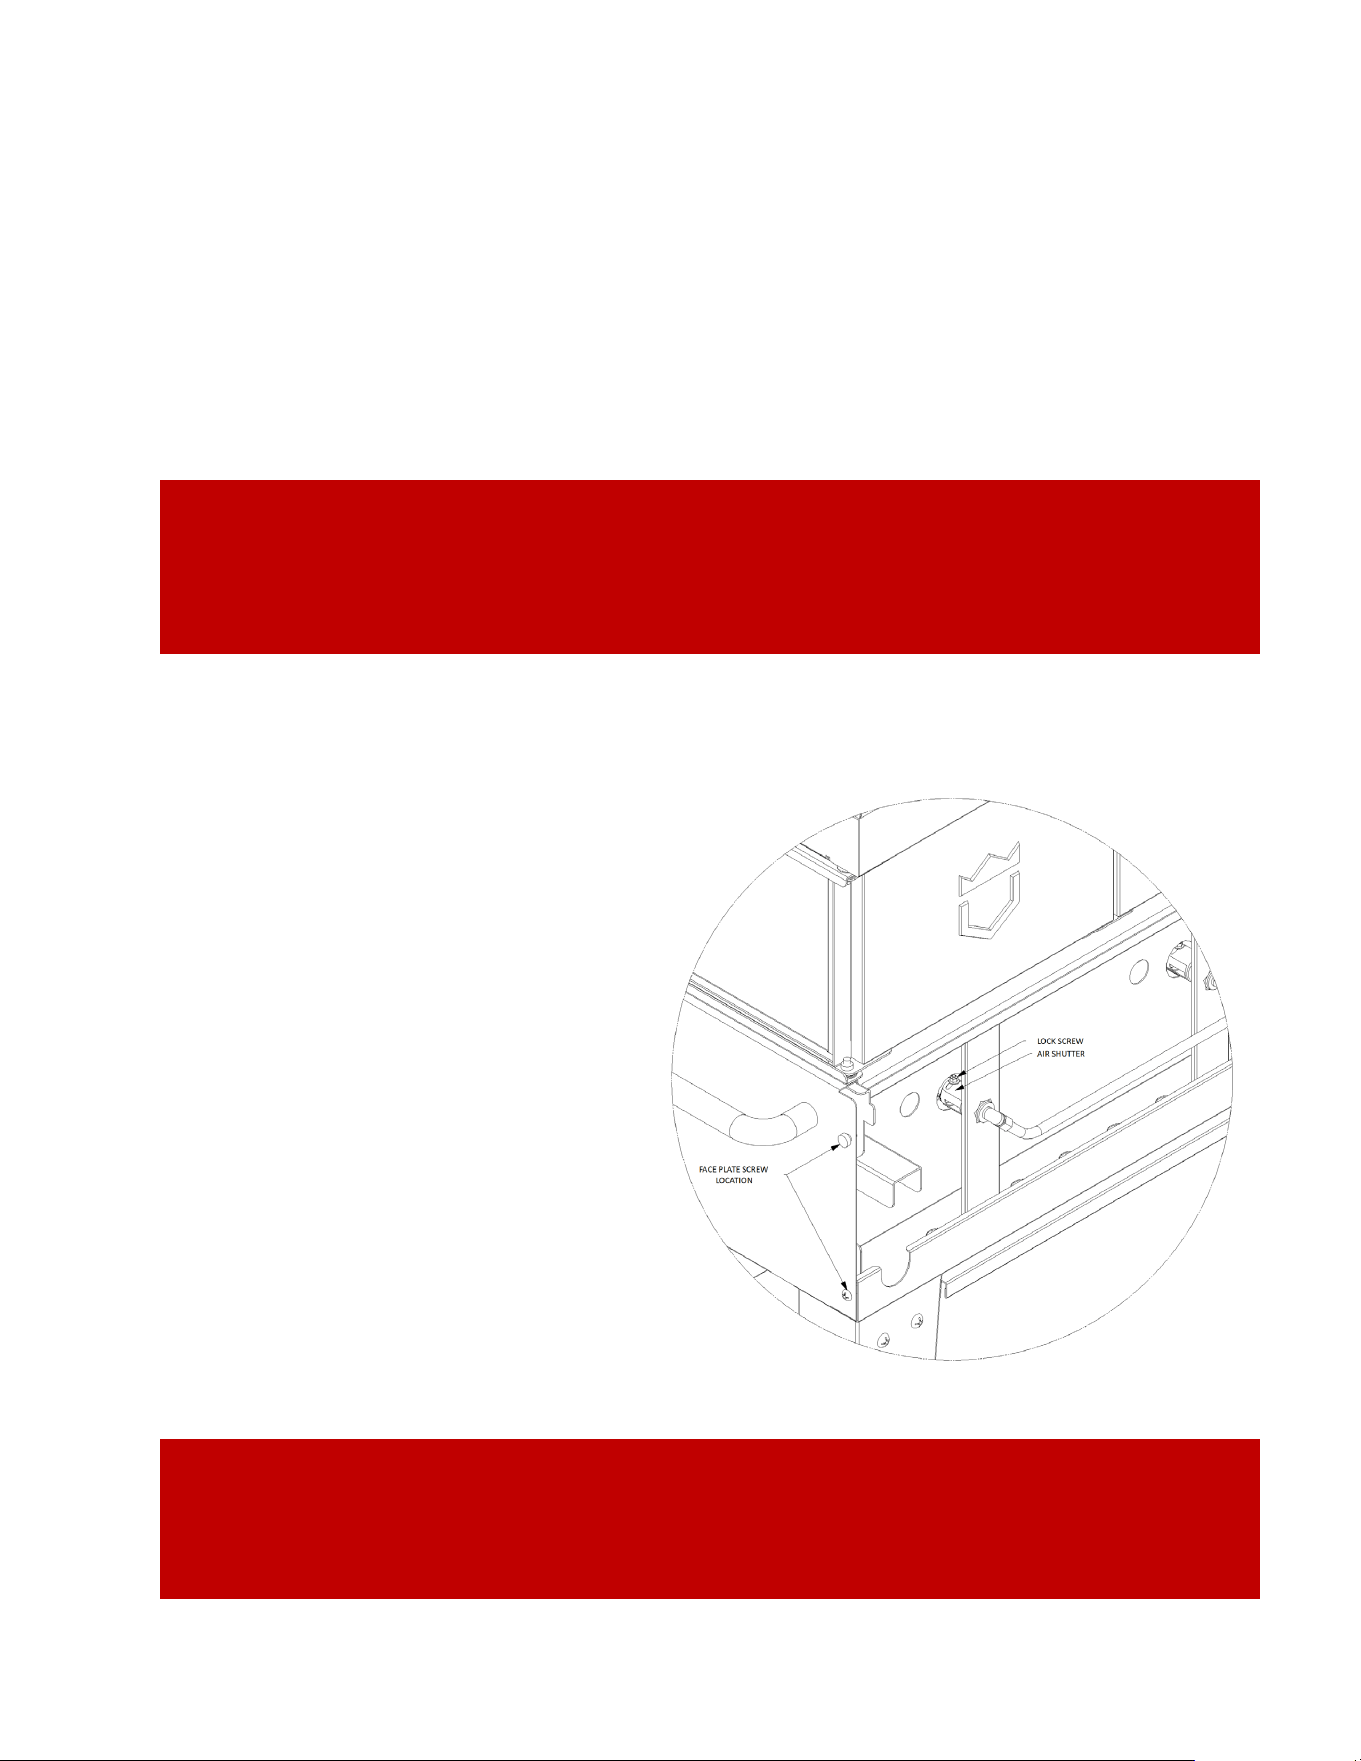
FIGURE 6. SHUTTER ADJUSTMENT
With the face removed, you will also need to remove the cooking stones to have clear
access to the burners.
Using a screwdriver, loosen the lock screw (see Figure 6). Be careful not to remove the
lock screw. Once loose, you can rotate the air shutter to adjust the amount of air
entering the venturi.
Turn on the gas supply valve or open the main valve on the LP cylinder. Following the
lighting instructions, light the burners to be adjusted.
Check that the flame is mostly blue - some random yellow flecks are normal, as is a
muffled “pop” when the burner is turned off.
If the flames are mostly yellow or are
noisy and lift off the burner ports, rotate
the air shutter to progressively reduce
the amount of air entering the venturi.
Continue to close the air shutter until
the flame no longer lifts from the burner.
For a sooty flame, progressively open
the air shutter until the flame burns
cleanly.
Once adjusted to a stable flame that burns
cleanly and does not lift, turn the pizza
oven control knob to the OFF position.
Tighten the lock screw. Re-light and
confirm the adjustment is good. Once
confirmed, replace the cooking stones and
faceplate.
B
IMPORTANT: Always ensure that the brass orifices are inserted into the holes in
the ends of the air shutters and centered.
IMPORTANT: Use caution when handling the burner tubes as they can get very
hot. The adjacent surfaces can also get very hot and can cause severe burns. Use
caution when handling components and use protective gloves.
Page 27 of 33
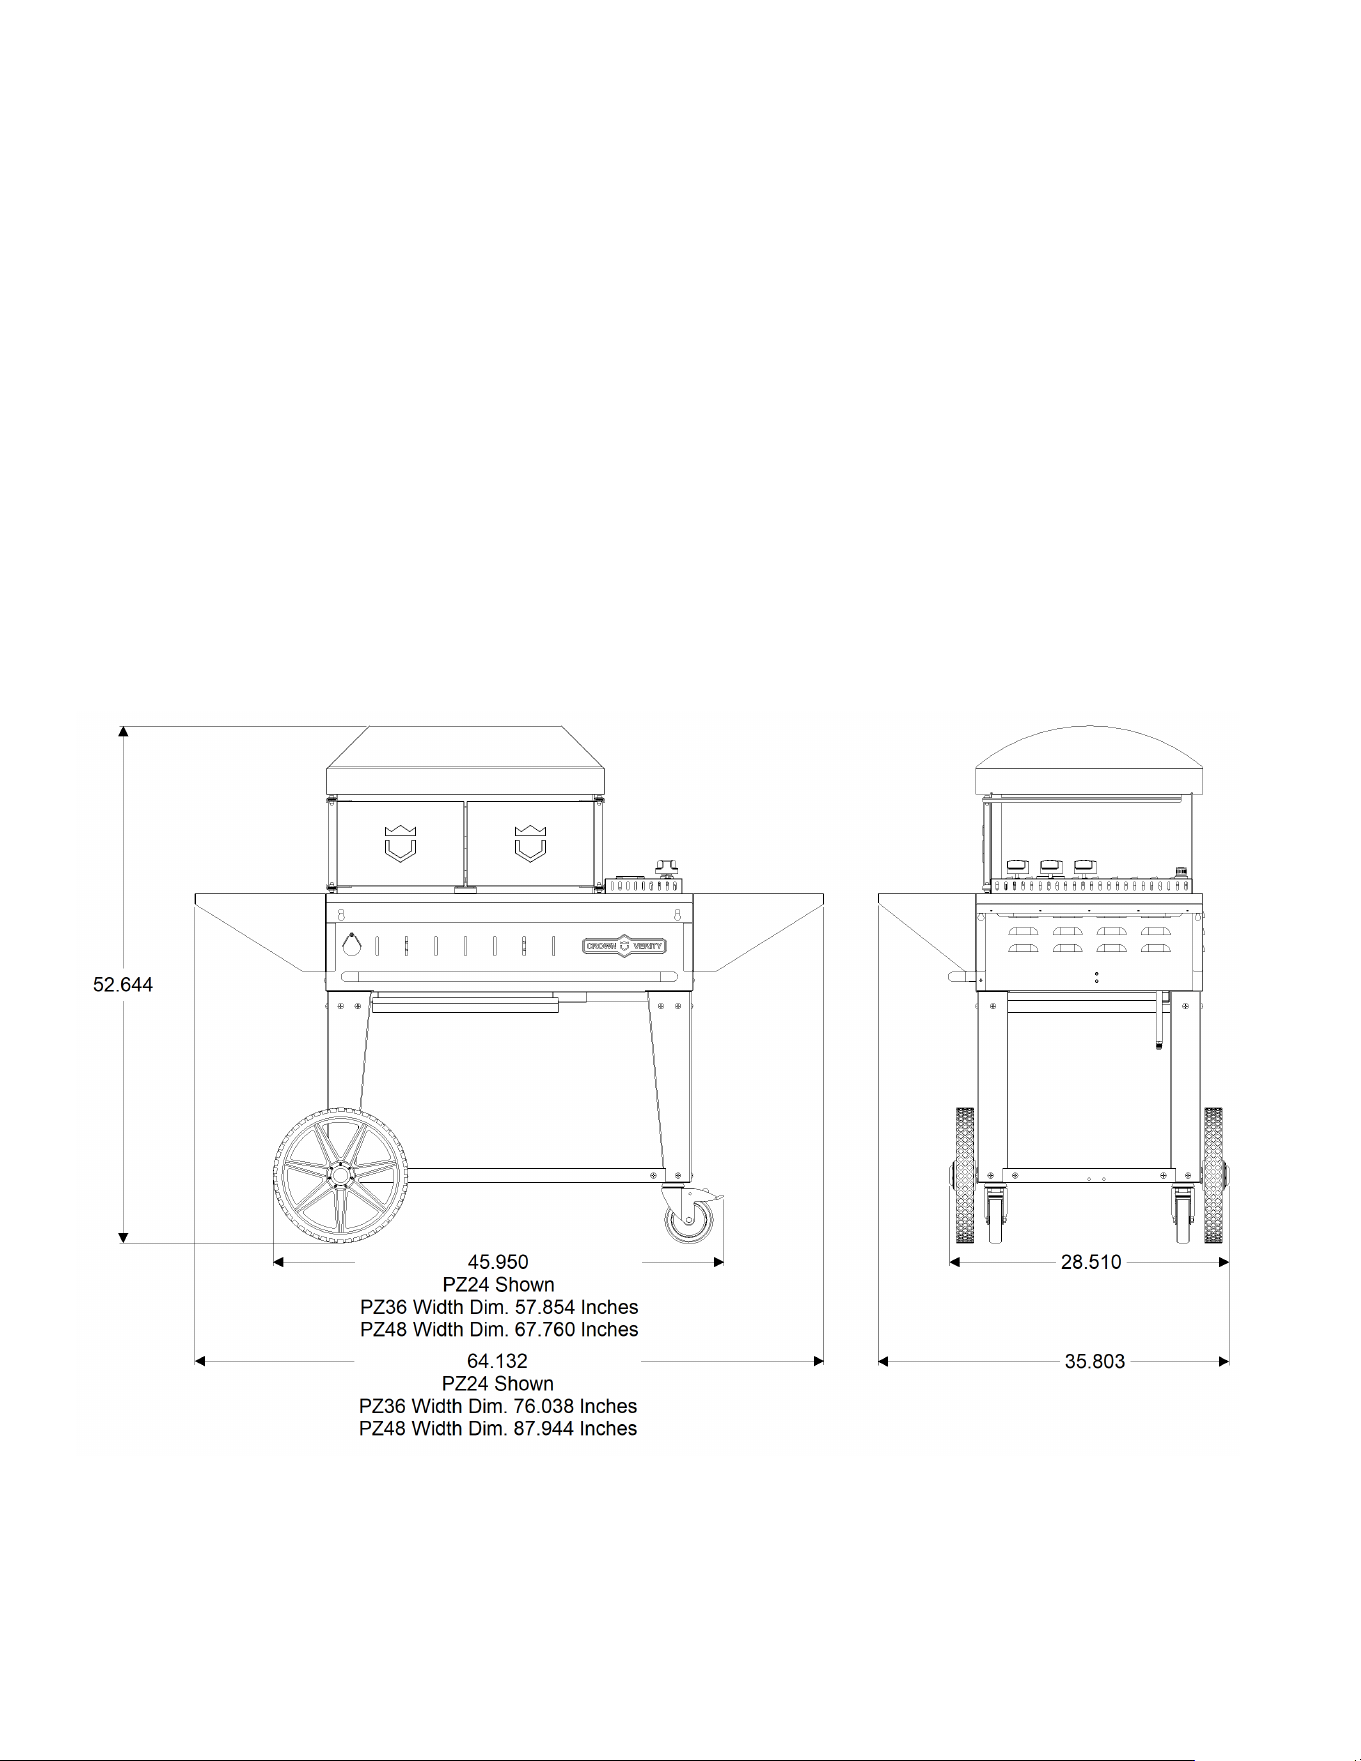
FIGURE 7. PRODUCT DIMENSIONS
Pizza Oven Dimensions
•
Do not “build-in” the pizza oven.
•
Maintain at least 12 inches clearance to the sides and back, and 12 inches clearance to
the top for proper ventilation.
•
Do not install beneath any overhead combustible structure.
•
For outdoor use only.
Page 28 of 33
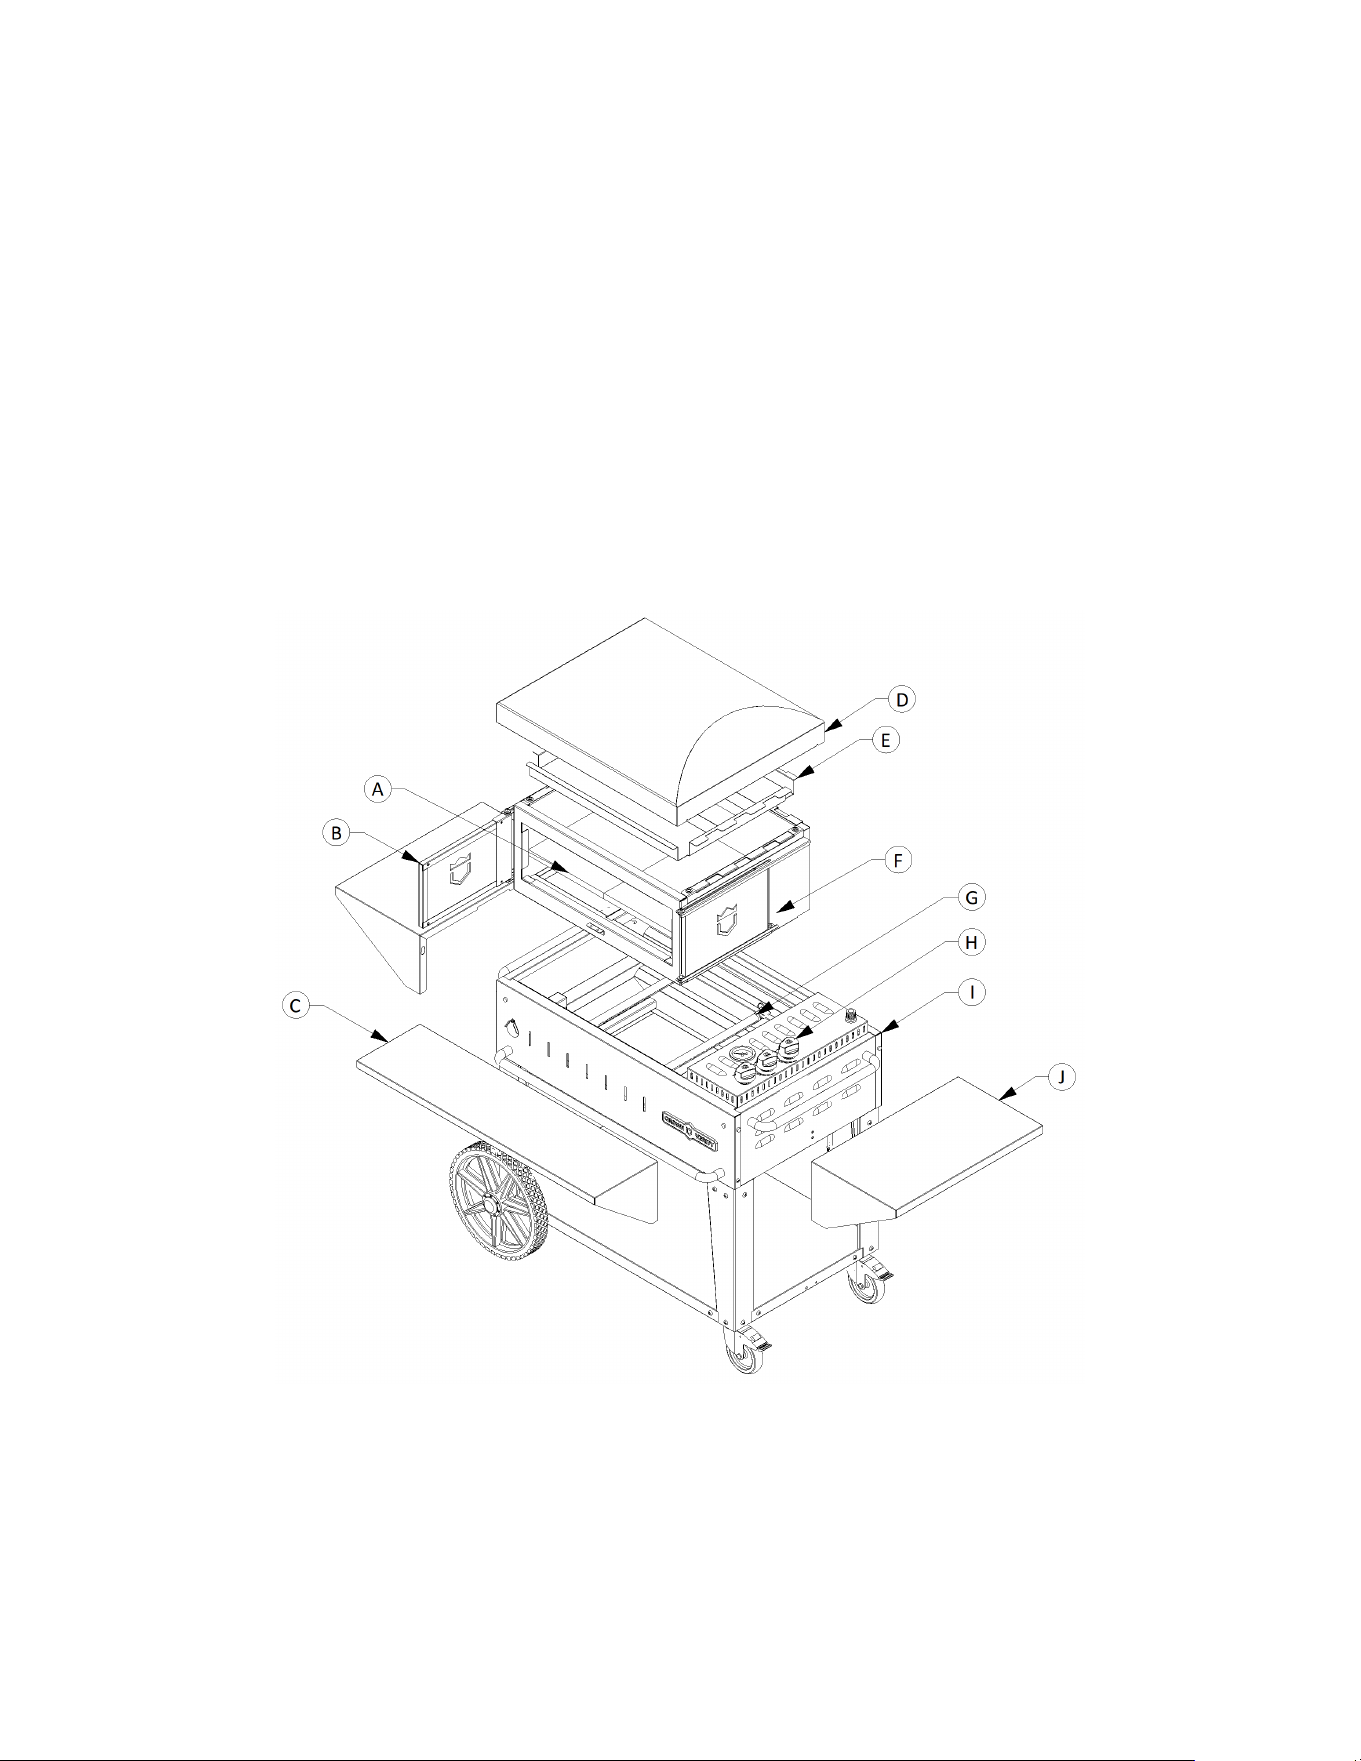
FIGURE 8. OVEN ASSEMBLY
Oven Assembly
For easier care and service, your Pizza Oven stacks together. No tools are
required for disassembly.
A. Cooking Stones
F. Oven Cabinet
B. Retractable Wind Guard
G. Gas Burners
C. Optional Front Shelf
H. Temperature Gauge and Control Knobs
D. Oven Dome
I. Mobile Burner Cabinet/Fire Box
E. Heat Deflector
J. Optional Side Shelves
WARNING:
The crumb tray will become hot during operation. To avoid burns, be
certain the oven is cool before touching the tray, or use an appropriate cooking mitt.

Page 29 of 33
Caring for Your Pizza Oven
Stainless Steel Care:
The Crown Verity Pizza Oven is built from 304 stainless steel, which is a high-quality,
non-magnetic stainless steel that is very corrosion resistant. It is also a highly-sanitary
surface.
The stainless steel components of your pizza oven are warranted for life
against structural deterioration or failure. With proper care, your pizza oven should
last a lifetime. The stainless steel may discolor from the intense heat. This condition is
normal.
Always clean your stainless steel pizza oven with a mild, food-safe, organic degreaser,
followed by a stainless steel polish.
Always scrub with the grain, never across.
Remove all
cleaner residue before lighting the pizza oven in order avoid a build-up of film from the
cleaner.
Cooking Stone Care:
Clean the cooking stones with a long-handled brass brush. It is best to do this while the
cooking stones are hot.
•
Wear long, insulated gloves and use caution when doing so.
•
Never cook greasy, oily or buttery foods directly on the cooking stones. Never use
cleaners on the cooking stones.
•
Do not cook frozen pizza on the cooking stones.
•
Never drop the cooking stone or cause sudden impact. The stone will most likely crack.
SALT WATER ENVIRONMENTS: 304 Stainless steel is corrosion resistant but is not
impervious to rust in salt-water environments. Exposure to salt air and sea spray
will eventually damage the appliance if not cared for properly. The best thing
you can do to protect it is to clean it frequently. Don’t give the salt time to
establish the chemical reaction that contributes to rust. In salt air environments,
we recommend cleaning all stainless steel surfaces at least every two weeks to
keep your oven in prime condition. When not in use, we recommend that you
keep the cover on the appliance.
Page 30 of 33
Caring for Your Pizza Oven (Cont’d)
Burner Care:
The burners should be visually inspected once a year. To access the burners, first make
sure the pizza oven is completely cooled. Ensure the pizza oven control valves are in
the OFF position and turn off the main gas
supply. Remove the Oven Dome and Heat
Deflector (see Figure 4). Carefully remove the Cooking Stones as they are heavy and could
break if dropped. The burners are now exposed. Visually inspect the burners to confirm
they are structurally sound (you have the option of removing the Oven Cabinet to gain
better visual access if desired).
It is unlikely the burners in your pizza oven will become dirty. However, they may be
cleaned using a brass brush if necessary. Gently brush off any debris, being careful not
to dislodge the burners. Clogged burner ports may be opened up with a straightened
paper clip. Do not use a toothpick or anything else that could break off inside the
burner ports. To remove the burners for cleaning, remove the burner pin and swing
the burner to either side of the retaining bracket to lift and remove the burner (see
Figure 5). After cleaning the burners, you must make sure the venturi opening of the
burner is centered over the brass orifice when replacing the burner. Once the burners
are in place, reassemble the pizza oven and visually inspect the gas hose before
lighting.
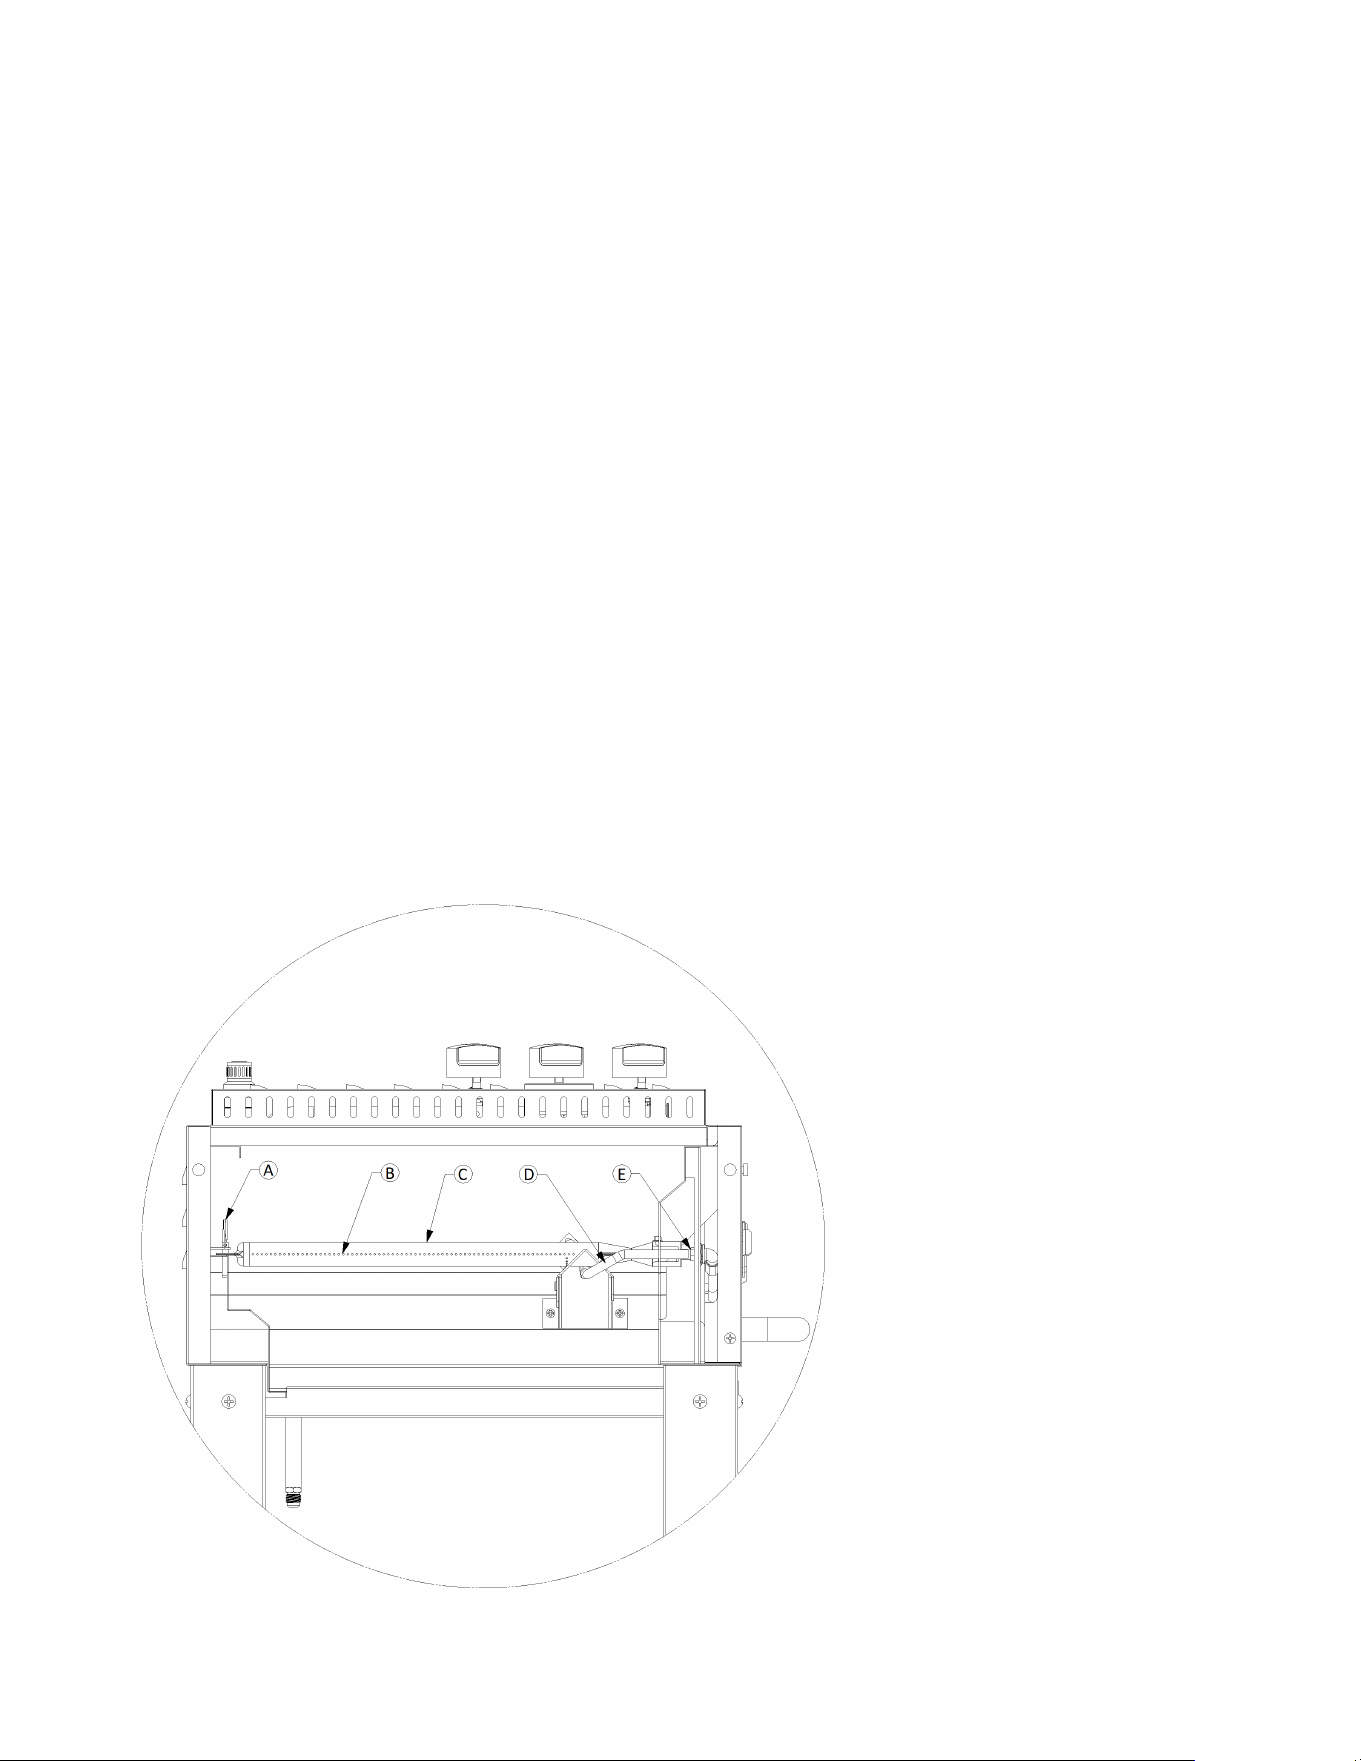
FIGURE 9. BURNER DETAILS
A.
Burner Pin
B.
Burner Ports
C.
Burner
D.
Pilot Tube
E.
Brass Orifice
Page 31 of 33
Caring for Your Pizza Oven (Cont’d)
Orifice Cleaning:
Clogged orifices create a dangerous condition that must be resolved before the pizza
oven may be used. If you are not entirely comfortable with the procedure, please use a
licensed technician or contact Crown Verity customer service at 1-888-505-7240
The orifices can be accessed once the burners are removed. Remove the brass orifice
using a 1/2 inch rachetting socket wrench.
Shine a flashlight through the orifice to look for any obstructions. Remove obstructions
with a needle. Use extreme care not to enlarge the hole. Reinstall and tighten the orifice.
Re-install the burner ensuring it is centered on the orifice. Test fire the burners and check
for proper flame characteristics.
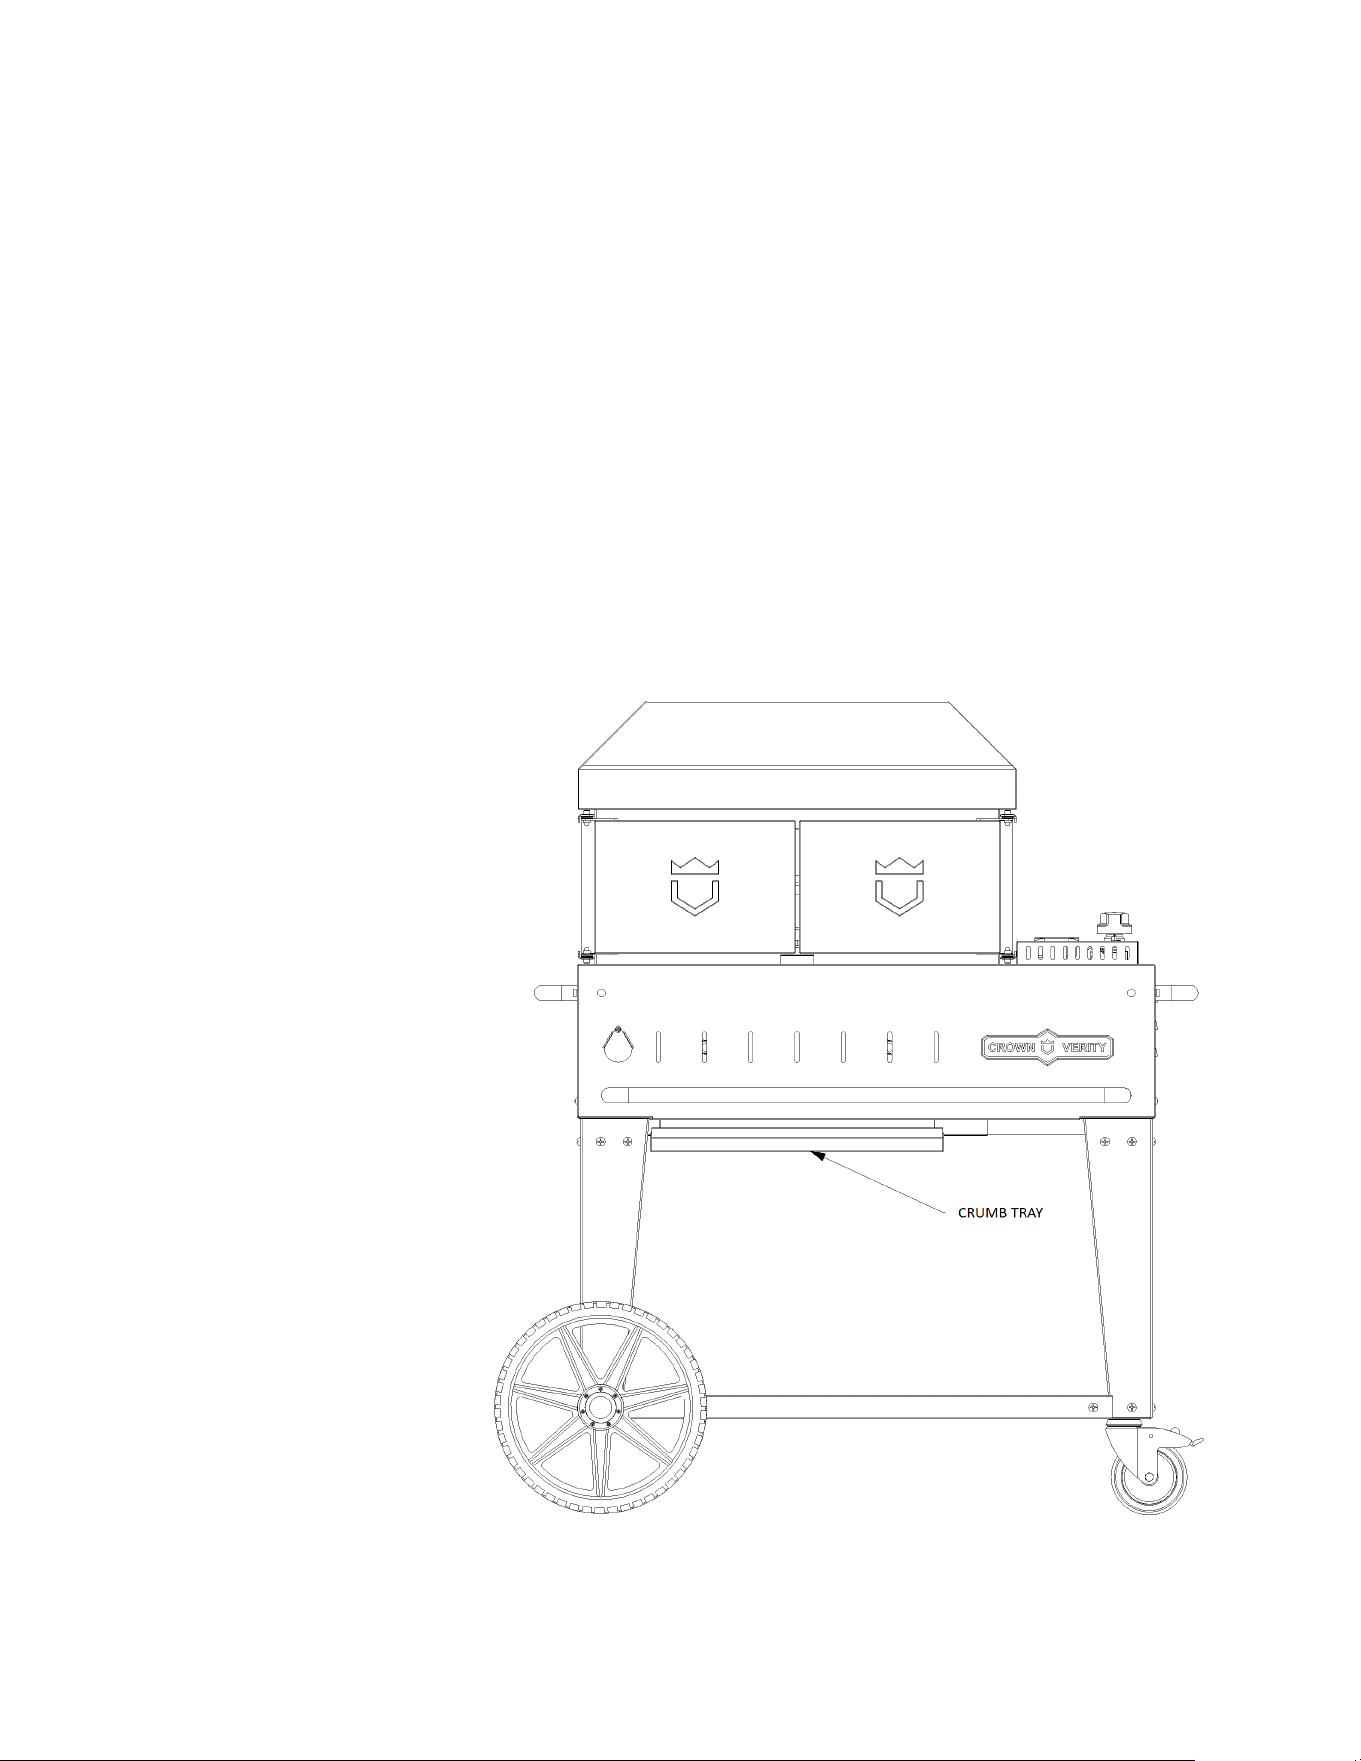
Igniter Batteries: FIGURE 10. CRUMB TRAY
The electronic ignition system
is battery operated. If you do
not hear a rapid and strong
clicking sound when you press
and hold the operating knob,
you may need to change the
batteries.
Emptying the Crumb Tray:
WARNING:
The crumb tray
gets extremely hot when the
pizza oven is operating. Empty
the crumb tray only when the
oven is cool. Before lighting the
oven is a good time to empty
the tray.
The tray hangs on rails below the
fire box. After cleaning, re-insert
fully making sure it is properly
seated on the rails.

Page 32 of 33
Troubleshooting
The troubleshooting tips here are for general information only. The information may
save you the trouble of a service call. If your pizza oven requires service, contact Crown
Verity customer service at 1-888-505-7240.
Pizza oven won’t light:
•
Do you hear a rapid clicking noise when you press and hold the electronic ignition button? If
there is no clicking, or the clicking is slow or faint, replace the ignition batteries (refer to the
Caring for Your Pizza Oven section of the manual).
•
If you do hear rapid clicking, but the pizza oven won’t light with the electronic ignition, try
manually lighting the oven (follow the instructions in the Lighting Your Pizza Oven section of
this manual). If the oven does not light manually, there may not be any gas getting to the
burners. Turn the pizza oven control knobs to the OFF position. Confirm that the pizza oven is
connected to the gas supply, that the main gas supply is on, or that the LP cylinder is not empty.
Pizza oven won’t get to temperature:
If the oven does not get to operating temperature within 30 minutes of starting, the
burners may not be getting sufficient gas flow.
•
If possible re-orient the oven to ensure that excessive wind is not affecting performance.
•
Leaving the burner valve open before opening the cylinder valve may cause the flow
control device to activate. Close all valves and follow the lighting procedures.
•
LP cylinder does not have enough gas to deliver proper pressure. Change the tank if
necessary. In some situations, in cold ambient temperatures, an LP cylinder will ice up,
creating a drop in pressure. If this happens, turn off the tank and let it warm up before
trying again. A full tank is less likely to ice up than a tank that is less than half full.
•
Check that the Main gas supply is fully on and not only partially opened.
•
Orifices are clear and not clogged. A clogged orifice creates a dangerous situation. Do not
use the pizza oven until the issue has been resolved (See Caring for Your Pizza Oven).
Pizzas stick to the cooking deck:
•
The oven is most likely not hot enough when the pizza is put in. Pizzas are also more likely
to stick when they are cold. The cooking deck must be hot, and pizza dough should ideally
be at room temperature before putting it in the oven.
The oven is producing a lot of smoke:
•
This is typically caused by something oily getting onto the cooking deck. If this
happens, the only thing you can do is to try and burn it off. Oily foods should never be
placed directly on the cooking deck. Burnt cheese or other solids can be scraped or
brushed off the cooking deck.

Page 33 of 33
Installation Checklist
Installer should initial next to each item:
Specified clearances maintained
Initial assembly completed — all tape and internal packaging removed
Crumb tray installed
Control knobs installed
Cooking stones installed
Igniters click when operating knob is pressed
Pilot and Burner Tubes light
Gas pressures have been set in accordance with the rating plate on the oven.
Manual shutoff valve is installed and accessible
Owner informed of shutoff valve location
Unit and supply connections have been tested and are free of leaks
Leave this Manual with the owner
Installer Signature Date
Please ensure the installer completes the checklist,
explaining each item to you. The
installer should initial each item above
and sign below.