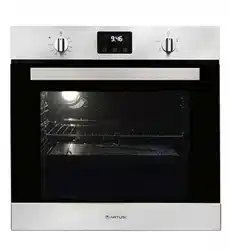

CAO611*
INSTALLATION &
OPERATION MANUAL
APPLIANCES
FOR LIVING

Congratulations, you are now the proud owner of an ARTUSI cooking appliance. Thank you for purchasing ARTUSI
and welcome to the ARTUSI Family.
This instruction manual has been specially created to inform you of the full range of features your ARTUSI appliance
has to offer and serves as an introduction to getting the very best out of your ARTUSI appliance.
We present detailed information on each of the features your ARTUSI appliance consists of. Once you have read
this section you will be able to choose the most appropriate settings for your appliance when cooking different types
of food.
We ask you to read the instructions in this booklet very carefully as this will allow you to get the best results from
using your appliance. KEEP THE DOCUMENTATION OF THIS PRODUCT FOR FUTURE REFERENCE.
TO REGISTER YOUR PRODUCT WITH ARTUSI, PLEASE FILL OUT THE WARRANTY CARD AT THE END OF
THIS BOOKLET AND POST IT TO:
REPLY PAID 83617
LEICHHARDT NSW 2040
Dear Artusi Customer, please read this user manual carefully before using the product and, keep it permanently at
your disposal.
Note: This user manual is prepared for more than one model. Some of the features specified in this Manual may not
be available on your appliance.
All our appliances are only for domestic use, not for commercial use. Products marked with (*) are optional.
“THIS APPLIANCE SHALL BE INSTALLED IN ACCORDANCE WITH THE REGULA TIONS FORCE AND ONLY
USED IN A WELL VENTILATED SPACE. READ THE INSTRUCTIONS BEFORE INSTALLING OR USING THIS
APPLIANCE”
“Conforms with the WEEE Regulations.”

,0"&+,*-,"'&+
'/,'+.&* 0
"+('+$',!(($"&
&(#"&
+*"(,"'&',!(($"&
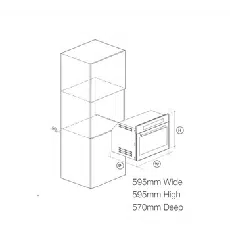
&+,$$,"'&
(*,"'&
*"'*"*+,-+
$,*'&"(*' *%%*
.&
$&"& &%"&,&&
*'-$+!'',"&
#"& "&,!'.&
!&"$+("","'&
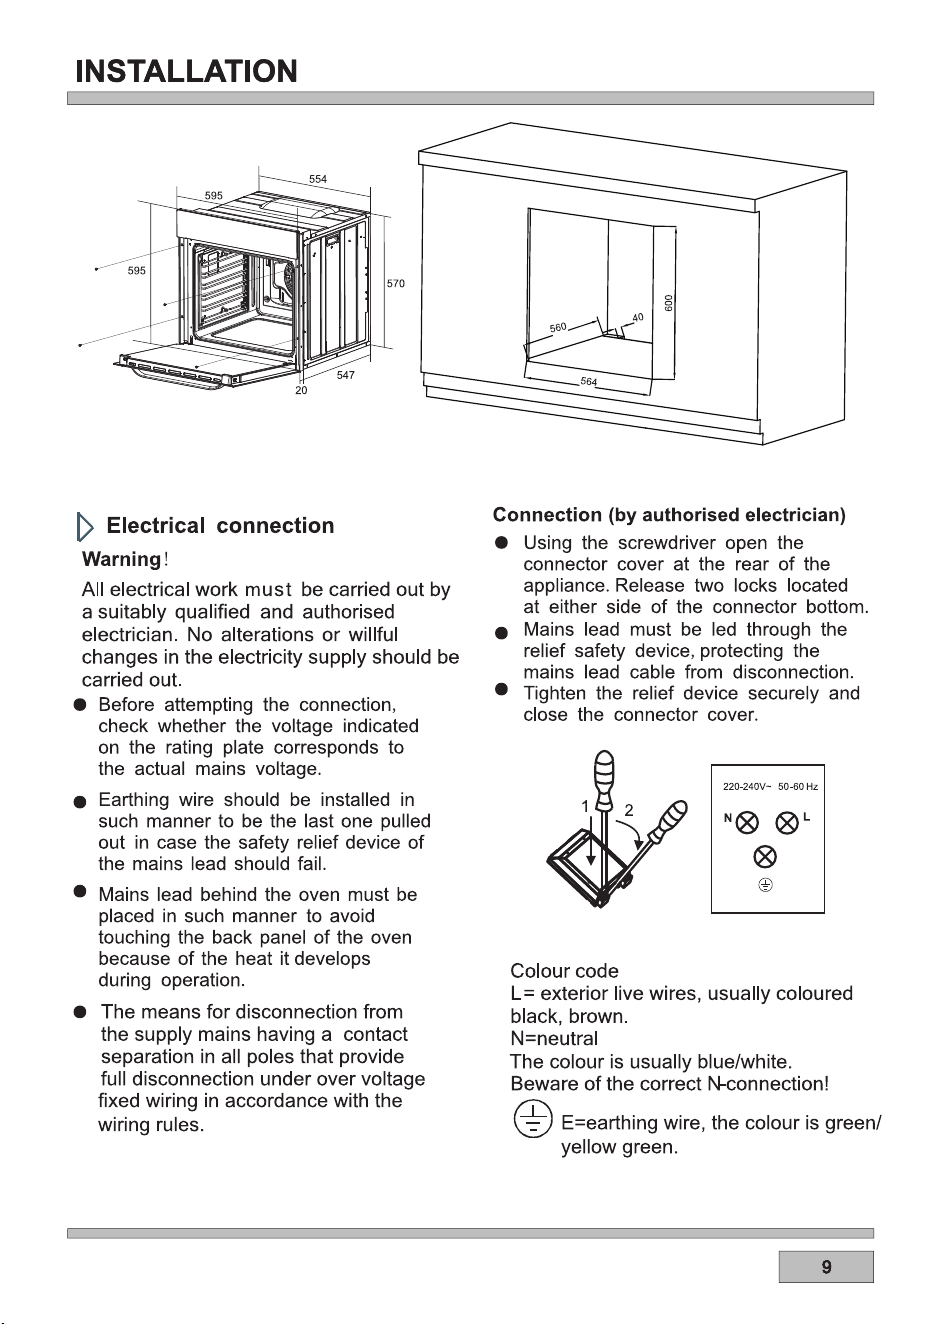
When the oven is in operation, opening the door will cause the oven to stop heating.
After closing the door, the oven will resume normal operation. With the door open, only
the heating elements are disconnected; the light and any fans will continue to run
When the oven is in operation, opening the door will cause the oven to stop heating.
After closing the door, the oven will resume normal operation. With the door open, only
the heating elements are disconnected; the light and any fans will continue to run
$(($"&++!'-$&',
+"%($0"+('+'/",!
&'*%$ !'-+!'$/+,
-,+!'-$$".*,'
'$$,"'&&*0$"&
&,* '* $,*" &
$,*'&")-"(%&,
+0%'$ +!'/& '& ,! (*'-,,!
"&+,*-,"'&%&-$'*,!(# "& +!'/+
,!,","++-",$'**0$"&
,*"$+-+"&+",!(($"&*
*0$$&*$$/",!"&'*%,"'&
'&*&"& ,!"+0*0$"& %,*"$+'*
',!*(*,+*'% -+."+0'-*
%#"& +" &""&,'&,*"-,"'&,',!
(*',,"'&''-*&."*'&%&,
&'*%,"'& '& ((*'(*", "+('+$
&,*+'*-+."+&(*'."
00'-*$'$-,!'*",0
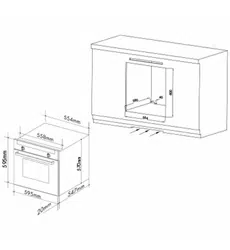
<;A?<9=.;29
%C2;1<<?5.;192
%C2;1<<?
.
(Only available for junction box models)
(2920A<?
BAA<;@
<16;4@D6A05
8;</
(2920A<?
BAA<;@
B;0A6<;@
16@=9.F
B;0A6<;@
16@=9.F
)6:2)2:=2?.AB?2
16@=9.F
<<86;4A6:2
;1<30<<86;4A6:2
56919<08
9<08@2AA6;4
A2:=2?.AB?2@2AA6;4
(A.?A=.B@282F
%C2;9.:=
%$%/BAA<;
1.When the power is turned on for the first time, it enters the standby state, the display is completely
1s, buzzer prompt, time display the default time 12:00 and flash.
3.When the duration remains for 1 min, the duration icon starts to flash, the display interface shows
the countdown, when the countdown is 0, the time display area and the key are flicker, after the
buzzer continuous buzzer 120s , the sound signal can be automatically stopped by pressing any key
or after 120 seconds.
2.When the oven begins to run, the working time enters the countdown mode, the timing is a
decrement count.
2.The rotary coding switch can set the time, after setting is completed Tap the coded switch
confirmation or 5 seconds automatically confirm.
3.In standby mode, press and hold the power button for 3 seconds to turn on,After boot, the first
function is selected by default, display the default temperature and time.
4.When the oven function is selected, after setting the working temperature and related working time,
press the key once, and the oven will start to run.
1.The clock can only be set in the standby state. After confirming, if you want to set the time again,
click the time button to set (same as the first power-on);
2.Return to standby for 10 minutes without operation under power-on state.
2.Return to standby after 10 minutes of no operation after cooking.
1.After the duration function is activated, if you want to cancel the continuous working time, you can
cancel the function by setting the time to "0:00". (After canceling the duration, it will run according to
the maximum working time).
How to operate the oven
Semi-automatic operation
Caution!
Caution!
1.Setting the semi-automatic mode, click the time button or knob to set the duration, the
icon is lit, the clock display interface displays the set continuous working time, the encoding
switch settings.After the setting is complete, click the knob to enter the next setting and confirm the
previous one, or click the key to directly start the confirmation.
For example: Now the clock is set to 12:00 and the duration is set to 30 minutes, After the end time is
14:00, then the automatic mode is turned on, the clock display interface displays 14:00 and the time
button is always bright, and when the clock is 13:30 minutes, The oven begins.
End of cooking time range: current time<end of cooking time<current time+24hours.
Caution!
After the oven is set to the fully automatic mode, the clock display interface will display the end time
After the duration setting is completed, click the knob to set the end time , the icon flashes,
the knob is set, after the setting is completed, press the knob to enter the next item and confirm
the previous item or click the key to confirm
of the oven. After the appointment time is over, the oven starts to work (the working method is the
same as semi-automatic operation).
Automatic operation
End of cooking time= current time+cooking time+waiting time .
The reservation is waiting in the stage the furnace light is not bright, the wait time ends to enter the
duration stage of the furnace light to light a minute (same normally).
When the oven working program is selected, before starting to run, if you want to change the
1.After selecting the cooking function, the default temperature value is displayed, point the
temperature button, the temperature display module flashes , and the rotary coding switch can set
the temperature. After the setting is completed, click the coding switch or click the start button to
directly start the confirmation.
2.Touch time key sequentially to switche duration and end time, the display module displays the
default time and flash, and the rotation coding switch can set the length of time. After the setting is
complete, press the " " button, the oven works in accordance with the new setting parameters.
3.When you want to change the working time or the operating temperature during the
operation, you must first press the " " button at which point the time and temperature can be set
according to the above steps, the setting is completed, and the "Start Pause" button can be
confirmed to operate, the oven is set according to the new setting parameters.
operating temperature and operating time, you can press the key and (Click the knob to cycle
through the settings ).
2.When the alarm time is up,and the buzzer will sound for 90 seconds to remind the user . To
silence the sound, press any key or it will automatically stop beeping after 90 seconds, and the
alarm clock icon will go out.
3.After the alarm function is activated, if you want to cancel the alarm, you can cancel the alarm
function by setting the alarm time to "0:00".
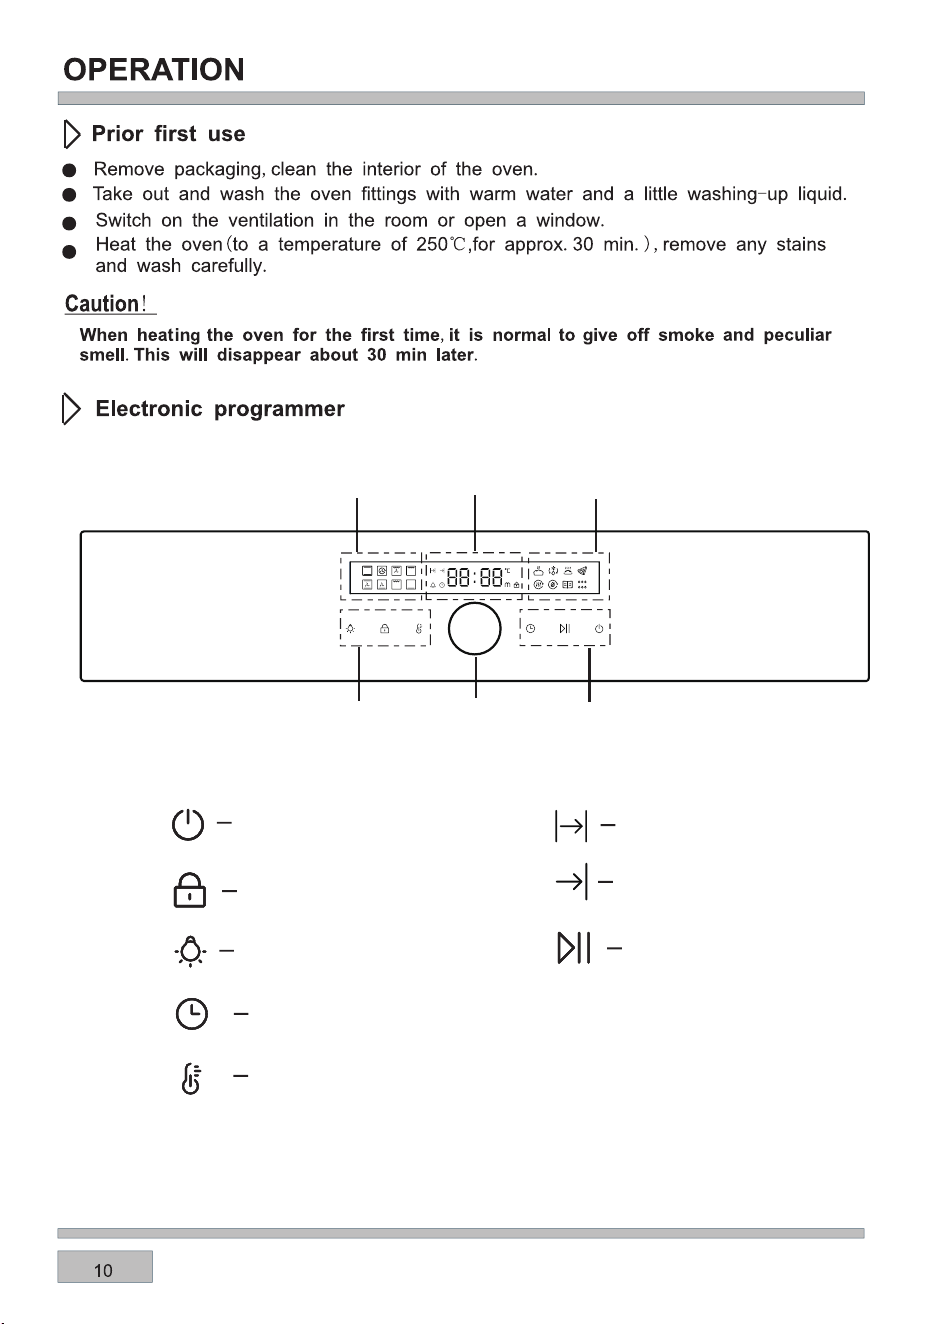
Temperature and time regulation
Setting the alarm
1.Select the alarm setting by pressing the button, Alarm clock on.The rotary coding switch
can set the time. After activating the cooking function, the alarm clock
starts counting down.
1.In the boot state, press and hold for 3 seconds to enter the child lock function, accompanied
by a prompt sound; except for the power button and the stove lamp button, the rest of the buttons will
not be touched. Enabling/cancelling child lock does not affect the operation of existing functions.
2.Press and hold for 3 seconds to cancel the child lock function and restore the state before the
child lock. When the key is invalid in the child lock state, there will be a prompt sound .
1.The oven light can be turned on/off by the oven light button in the boot state.
2.After selecting a function to start, the oven light will turn on, and the oven light will automatically turn
off after turning on for 1 minute.
3.
After the pause state is ended, the oven light will start working with the heating element,
and it will turn off after 1 min.
Oven light
Child Safety Device
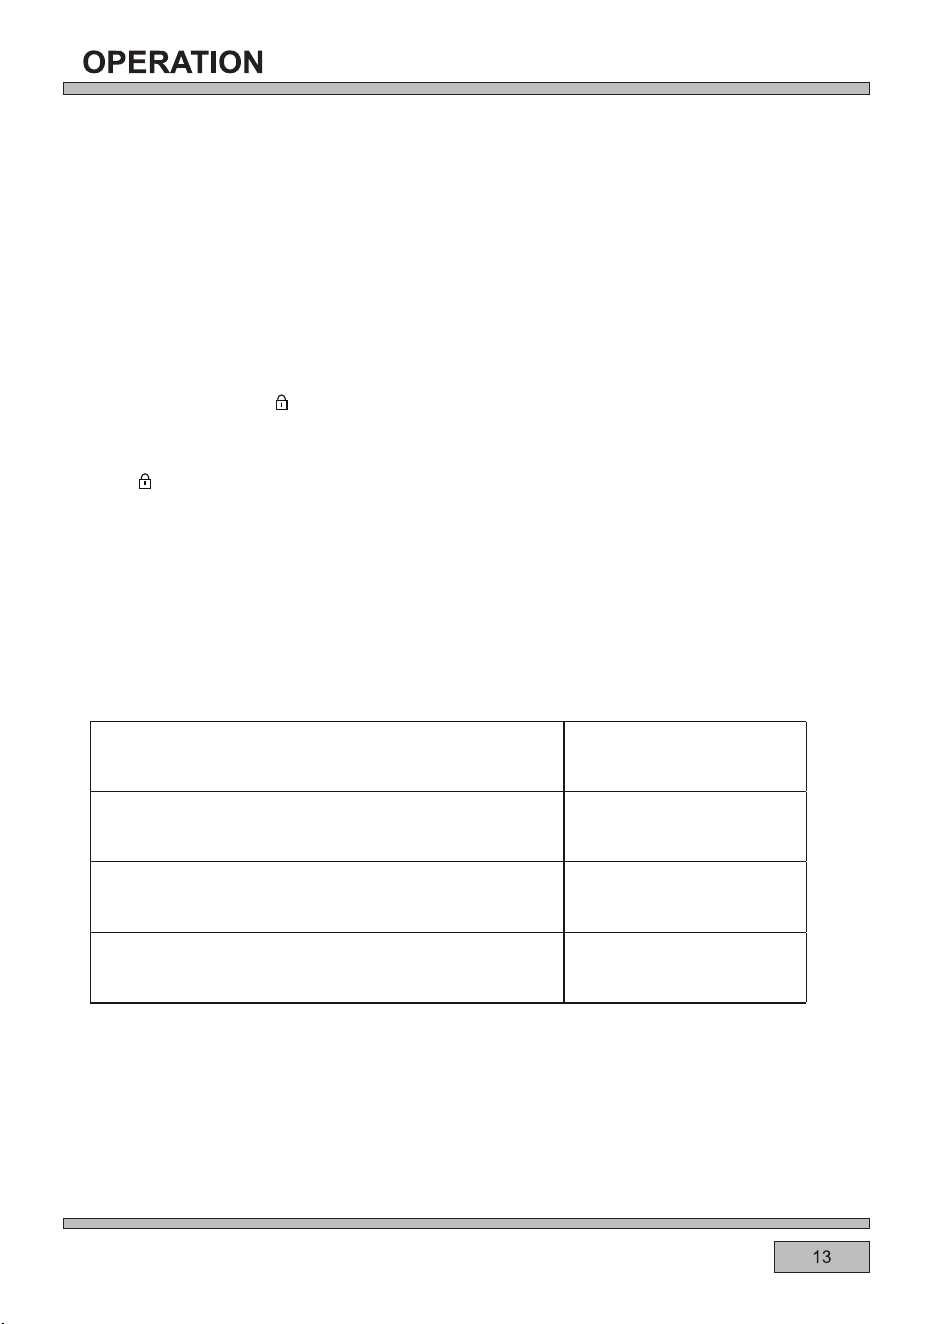
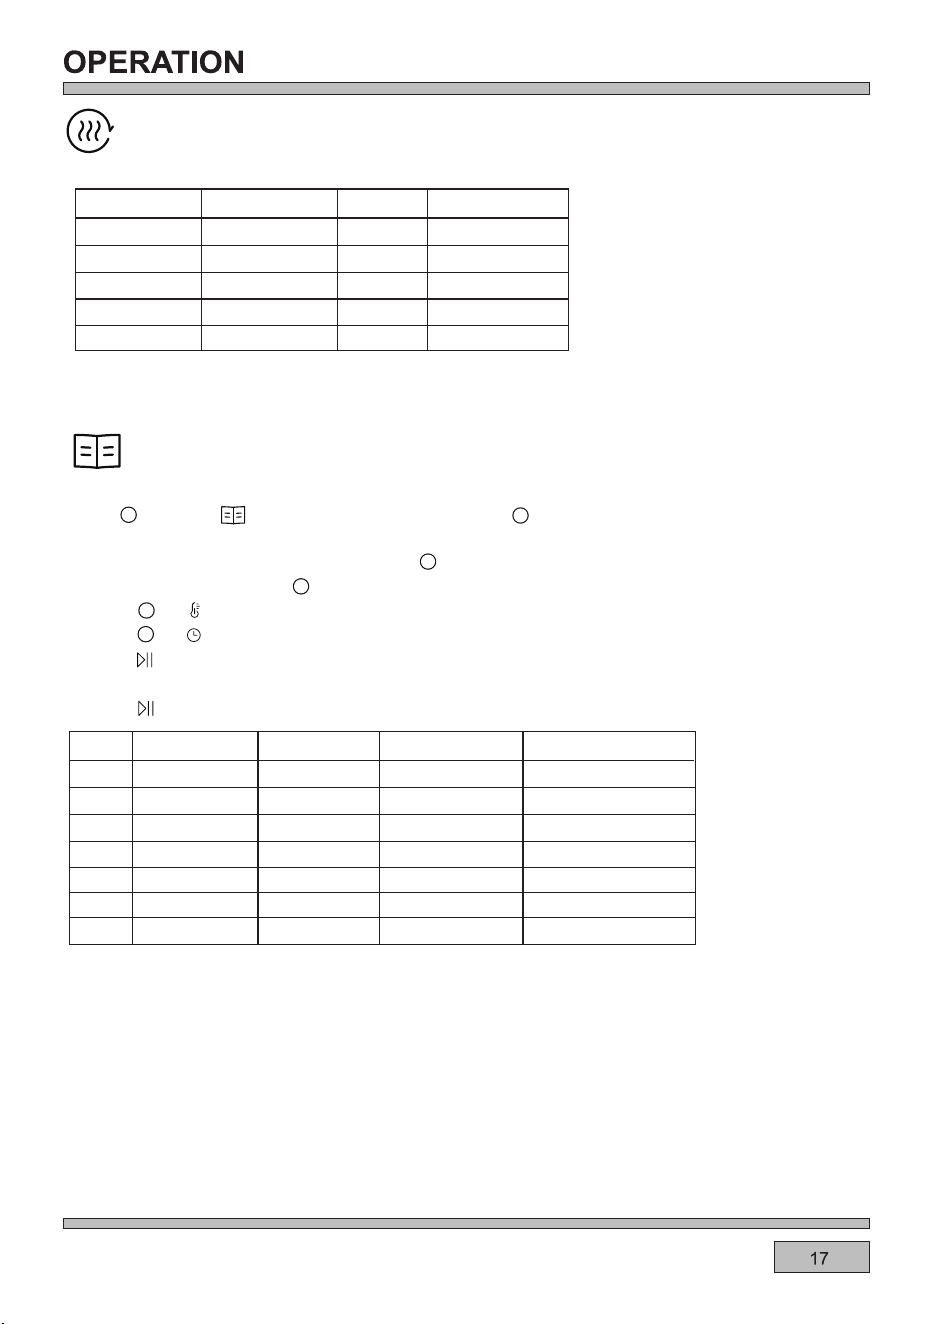
Each mode has a maximum working time, auto shut off function noted in the following criteria:
When select oven cook time, its prior to the auto shut off function (assume that set shut off
temperature to 201
°C-250°C, set cook time to 5 hours, so oven will not auto shut off when
working for 4hours, and keep working when reach 5 hours).
Automatic shut-off feature
Temperature Working Hours
35-120 °C 24h
121-200 °C 6 h
201-250 °C 4 h
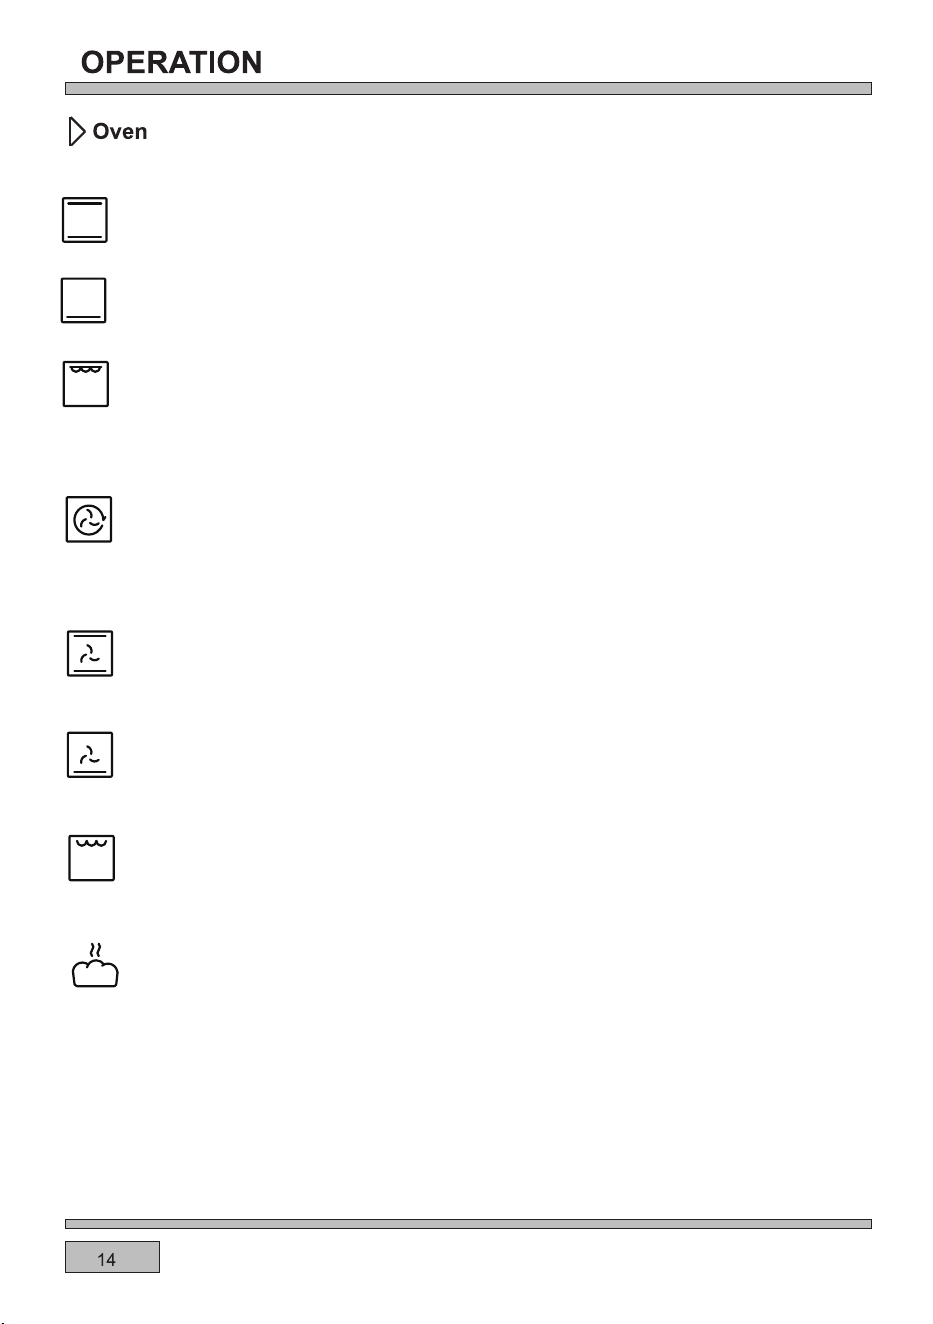
Bottom and top element on
Possible settings of the oven function knob
This function uses the upper and lower heating elements, creating a natural convection oven.
The warming oven programme uses heat from the bottom element only.
Bottom element
This function radiates the heat from the grill element and the top element. This function allows a higher
temperature at the top of the cooking area which is ideal for grilling large portions.
Note: The end time cannot be set for this function.
Note: If the temperature is higher than the limit value, it cannot be started.
Note: The end time cannot be set for this function.
Full Grill
Fan Assisted Oven
Using the top and bottom elements and the fan, this cooking function distributes the heat around the
oven to give an even temperature throughout.
Fan with Lower Heater
This programme uses the bottom heater and the fan function. This is ideal for certain pastries and
one-pot dishes.
Economy Grill
Use this grill function for grilling a small amount of food.
Ferment
At this function is ferment mode, fan with rear heater is ON.
At this function ,allows the oven to be heated up with forced air by the thermofan,which is in the central
part of the oven tank.Heating the oven up in this way peimits everheat circulation around the dish that
is in the oven.
Circular element fan
Note: The end time cannot be set for this function.
Fanned Grill
This function uses the fan to circulate the heat from the grill element around the food.
Keep warm
The fan with rear heater of the oven works to keep the cavity temperature.
Defrost
Using the fan with rear heater, this oven function circulates the air around the oven cavity, speeding
up the natural defrost process.
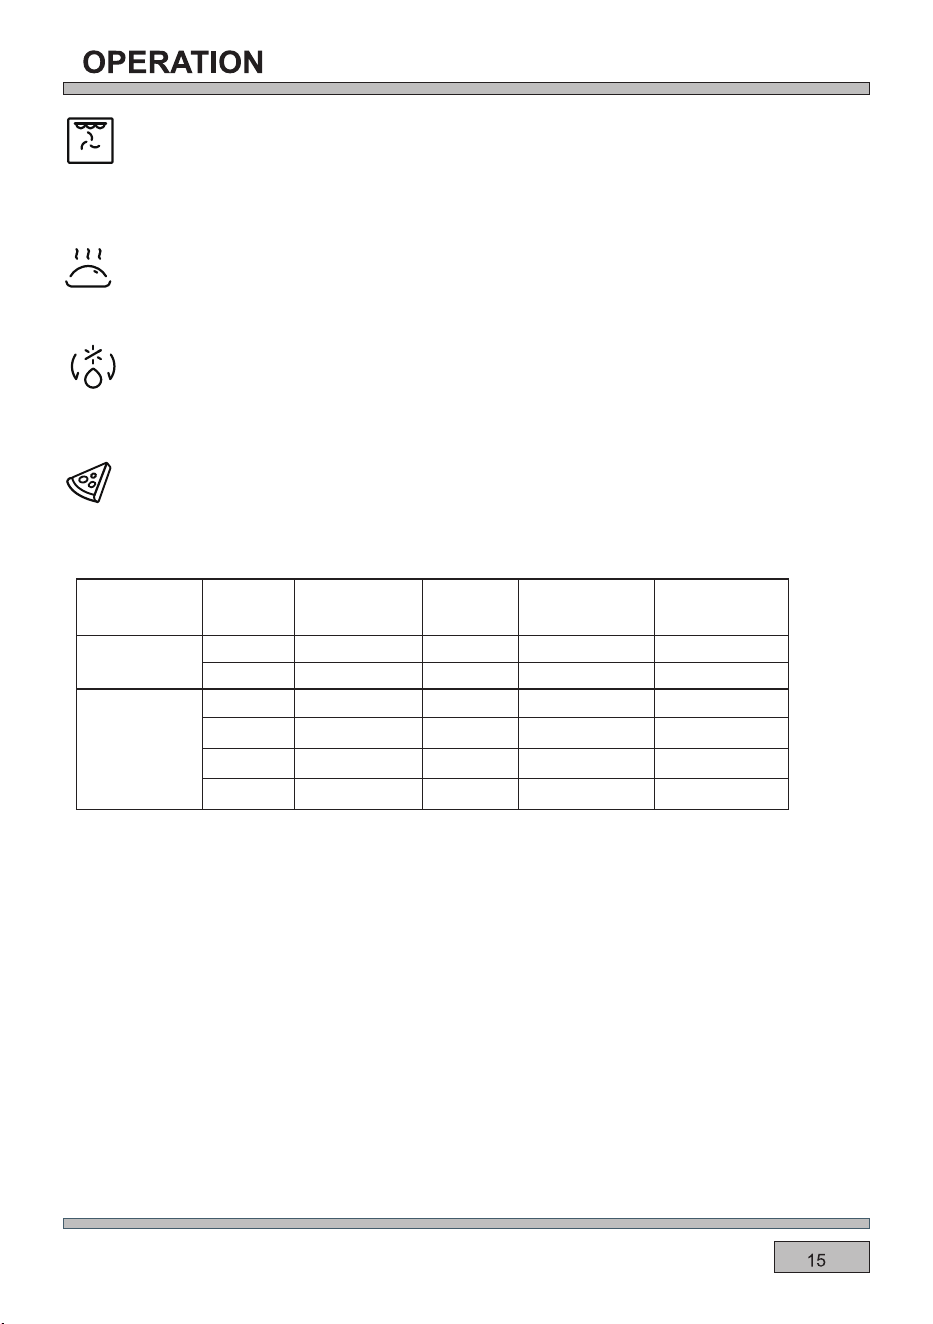
Pizza
Pizza
Temperature
in
Cooking time
in mins
Shelf
position
Type
Accessories/
cookware
200
℃
15-20
15-20
15-20
2
2
2
2
2
2
20-25
10-15
8-12
200
200
250
200
200
Homemade
Forzen
Thin base
Wire rack
Baking tray
Baking tray
Pizza tray
Pizza tray
Wire rack
Thick base
Thin base
Thin base
Thick base
Thick base
Excellent for cooking pizza as it crisps the base beautifully without overcooking the topping.
For best results, pre-heat a pizza stone for at least 1 hour and bake on oven shelf position 1 or 2.
IMPORTANT!
Except for 310°C gear
,if you don`t set a duration for Pizza mode, the oven will continuously
The 310°C is suitable for homemade thin-crust pizza. Put the pizza tray or other containers in the
oven to preheat. When the temperature reaches the temperature,buzzer to remind, put the pizza
on the preheated container and use the high temperature inside the cavity and the container to
finish cooking in about 5 minutes.The whole cooking time of this gear is 30 minutes and cannot be
changed.
work until you stop the oven manually.You should pay more attention to observe the status
of food to avoid the food overcooked.
Air dry
In this mode, both the rear heater and the fan are on.
Recommended air drying temperature 60-100
°C.
Note: Use above 100°C is easy to cause air-drying failure due to overcooking.
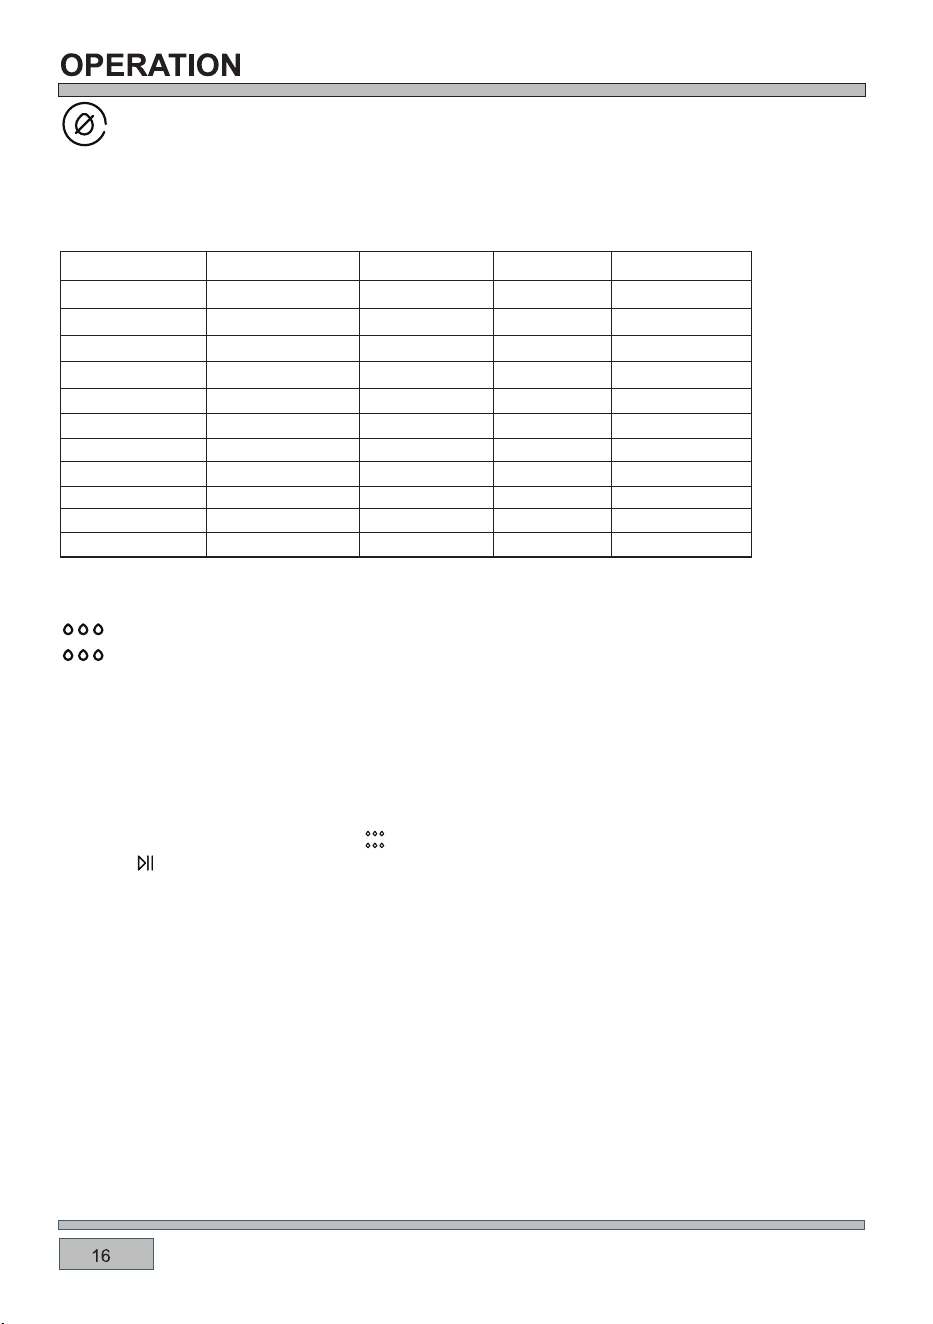
Aqua cleaning
When the Aqua cleaning function is active, you cannot set temperature and time.
1.Pour 400ml water to the oven liner.
2. Choose the Aqua cleaning function .
3. Press to start the function.
Remove as much dirt as possible manually. Remove the accessories and the shelf support to clean
the side walls.The Aqua cleaning functions support the steam cavity cleaning of the appliance. For a
better performance you should start the function when the appliance is cool. The specified time is
related to the duration of the function and does not include the time required for cleaning of the cavity
by user.
Menu
Prepare
Temperature
Time
70℃
70℃
70℃
90℃
1H30min
3H
2H
13H,flip after 2H
8H,flip after 4H
7H,flip after 2H
15H,flip after 2H
8H,flip after 2H
7H,flip after 2H
5H,flip after 1H
6H,flip after 2H
55℃
55℃
70℃
55
℃
55
℃
55
℃
55
℃
Sweet potato wedge
Mango slice
Banana slice
Lemon slice
Apple slice
Raw chicken breast
Raw pork lean
Prawn with shell
Beef jerky
Cabbage leaf Boiled
Boiled
Boiled
Boiled and marinated
Steamed
Dipped in salt water
Dipped in salt water
Long bean
Shelf position
3
3
3
3
3
3
3
3
3
3
3
The cooking advice given is approximate and can be adjusted based on your previous experience
and cooking preferences.
/
/
/
/
WARNING:
After cleaning keep the oven door open for approximately 1 hour. Wait until the appliance is dry. To
speed up the drying you can heat up the appliance with hot air at temperature 150°C for approximately
15 minutes. You can get maximum effects of the cleaning function if you manually clean the appliance
immediately after the function ends.
When you clean the cavity surface with sponge, wear a Hot-Insulating glove to protect hands.
Do not open the oven door when the oven is generating steam to avoid risk of burns.
Be aware of hot steam when open the oven door after the program finished to avoid risk of burns.
Always use clean drinking water to fill the liner. Do not use any other liquids to fill.
Never start the steam if the liner is not filled with enough water.
Clean up the water remain in the cavity after use to avoid risk of microbial hazard.
•
•
•
•
•
•
4. An acoustic signal sounds when the program is completed.
5. After function selection, wipe the internal surface of the appliance with a non-abrasive surface care
sponge.
You can use warm water or oven detergents to clean the cavity.
Auto menu
For better experience of cooking , there are some programs for recipes you can select.
1.Use to select the display will show P1
,press , P1 blinks,turn the knob to switch the
menu.
2.7 recipes are set in the oven , you canuse to select P1~P7.
5.Press to start preheat.
6.When the temperatureis reached,the bee buzzes three times to prompt the food to be put in.
7.Press to start cooking.
3.Refer to below chart , use to select a recipe which you need.
4.Press or to view the recommended temperature ,and you can adjust it .
The time showed in the table is only for reference.
Auto
Menu
Temperature
Time
Amount of food
Chiffon cake
P1
P2
P3
P4
P5
P6
P7
160℃
35min
500g
1200g
670g
20pcs
12pcs
20pcs
20pcs
18min
21min
9min
17min
18,flip after 6min
19min
160℃
190℃
200℃
200℃
220℃
190℃
Small cake
Egg tart
Cookies
Chicken nuggets
Chicken wings
Ribs
Press or to view the recommended time,and you can adjust it .
Air fry
Menu
Temperature
Time
200℃
20-25min
18-23min
23-27min
17-20min
15-18min
200℃
180℃
200℃
200℃
Fish fillet
French fries
Onion rings
Chicken nuggets
Chicken wings
Shelf position
3
3
3
4
4
Fast cooking with top grill, bottom grill, rear grill and rear fan.Mainly used for non-fried food.
The cooking advice given is approximate and can be adjusted based on your previous experience
and cooking preferences.
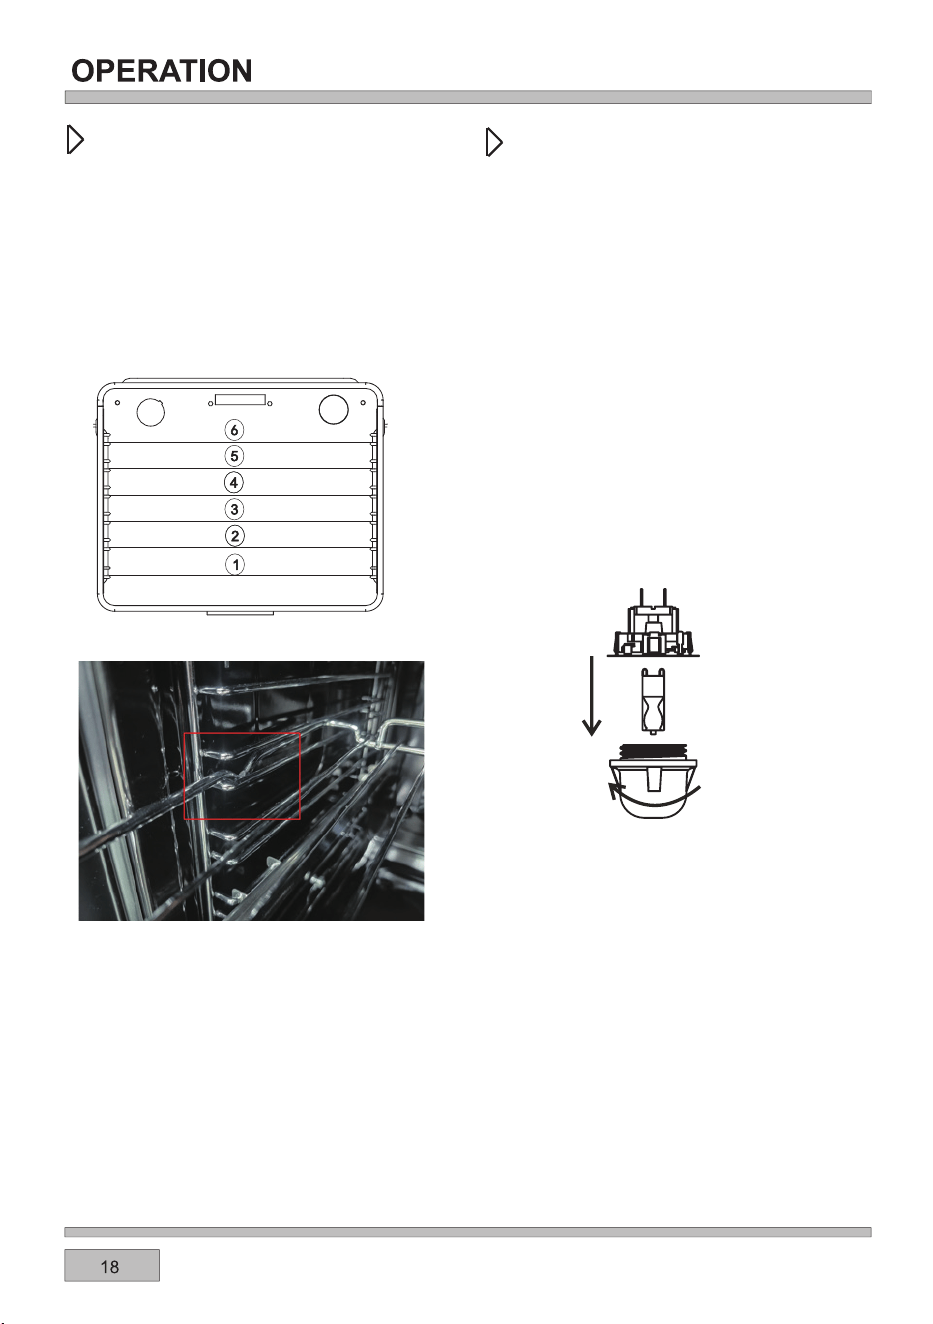
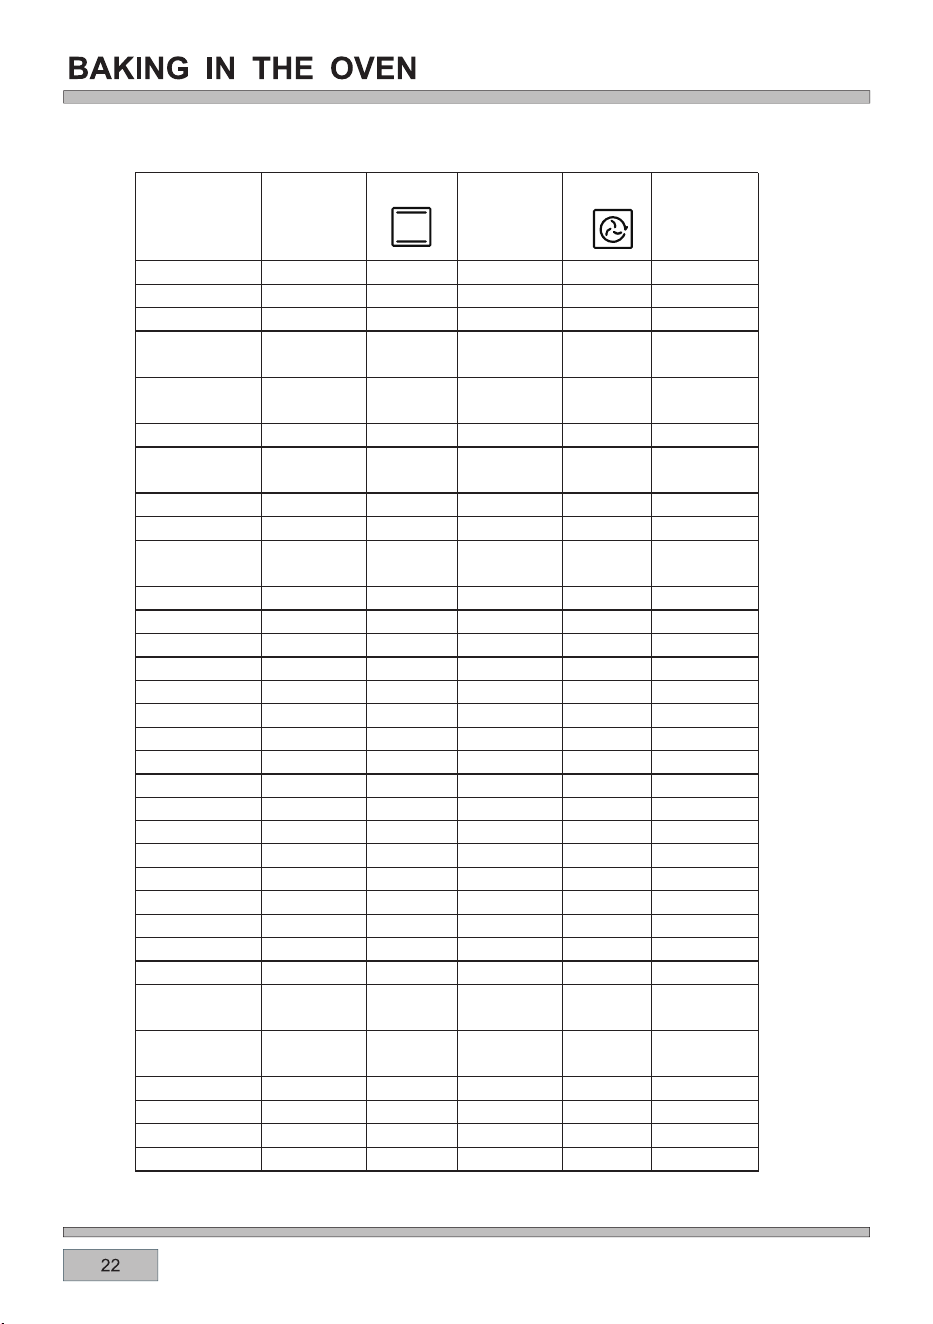
1!).$!'"#0% !'!1!'.
)52?2.?216332?2;A4B61292C29@A5.A0.;
/2B@213<?A52<C2;@529C2@.;1/.86;4
A?.F@@22699B@A?.A6<;
)52@292C29@.?2?232??21A<6;A520<<86;4
A./92@.AA522;1<3A52:.;B.9
9D.F@0<B;AA5292C29@3?<:A52/<AA<:
B=D.?1@
!"*-!)3(%)/!))!
/$!++'%)!(0./! %.*))!/!
"-*(/$!+*2!-.0++'3"/$!*1!)$.
!!)%)0.!'!//$!*1!)1%/3) /$!
$!/%)#!'!(!)/.**' *2)*(+'!/!'3
!"*-!//!(+/%)#)3(%)/!))!
!+'%)#/$!*1!)'%#$/0'
*;@0?2DA5249.@@=?<A20A6C20<C2?
%;02?2:<C2A520<C2?D2?20<::2;1
D.@56;4.;11?F6;4A520<C2?/23<?2
?2=9.06;46A
.?23B99F?2:<C2A52<91/B9/.;16;@2?A
A52;2D/B9/@B6A./923<?5645
A2:=2?.AB?2@5.C6;4A52
3<99<D6;4@=206360.A6<;@++
,36AA6;4
'2=9.02A52=?<A20A6C20<C2?
!1!-0.!.-!2 -%1!-.*-*/$!-/**'.
/*-!(*1!/$!'%#$/*1!-$%.*0'
(#!/$!!)(!'*"/$!*1!)*-/$!
'(+$*' !-)'3-!(*1!3$)
!1!--!+'!/$!0'2%/$-!$) .
.*)/(%)/%*)"-*(3*0-"%)#!-.)
0.!+-!(/0-!"%'0-!'23.0.!
'!)'*/$*-#'*1!.
$!0'-!+'!(!)/%.)*/*1!-! 3
/$!#0-)/!!
z
z
z

;<?12?A<4.6;2.@62?.002@@A<A52<C2;
0.C6AF3<?092.;6;4.;1:.6;A2;.;02=B?=<@2@
A521<<?0.;/2?2:<C21
)<?2:<C2A521<<?36?@AA69AA52@.32AF0.A05
=.?A<3A5256;42B=D.?1@2;A9F09<@2A52
1<<?.==?<E6:.A29F5.93D.F963AA521<<?.;1
=B996A<BAA<D.?1@F<B
<99<DA52@2@A2=@6;?2C2?@2A<?2=9.02A52
1<<?
,52;?2=9.06;4A521<<?2;@B?2A5.A
A52;<A05<3A5256;42@22699B@A?.A6<;
6;@2?A@6;A<A5256;42@9<A6;A520.C6AF
3?.:2%;02A521<<?5.@/22;?236AA21
?2:2:/2?A<9<D2?1<D;A52@.32AF0.A05
.69B?2A<1<A56@:.F1.:.42A5256;42
D52;09<@6;4A521<<?
)69A6;4A5256;42@.32AF0.A052@
<<??2:<C.9
))!-#'..+)!'-!(*1'
'2:<C.9<3A526;A2?;.949.@@=.;29
'2:<C2/<A51<<?A<=0<?;2?=6202@
)52@20.;/2?2:<C21/F=?2@@6;46;
A52.??<D:.?821A./@<;26A52?@612
<3A521<<?.;1@9616;4A520<?;2?=6202@
<BA
"63AA522142<3A526;;2?49.@@@9645A9F
.;1A52;@96126A3?<:6A@9<D2?096=@)52
:6119249.@@=.;290.;A52;.9@</2
?2:<C21<99<DA52@2@A2=@6;?2C2?@2
A<?2=9.02A5249.@@
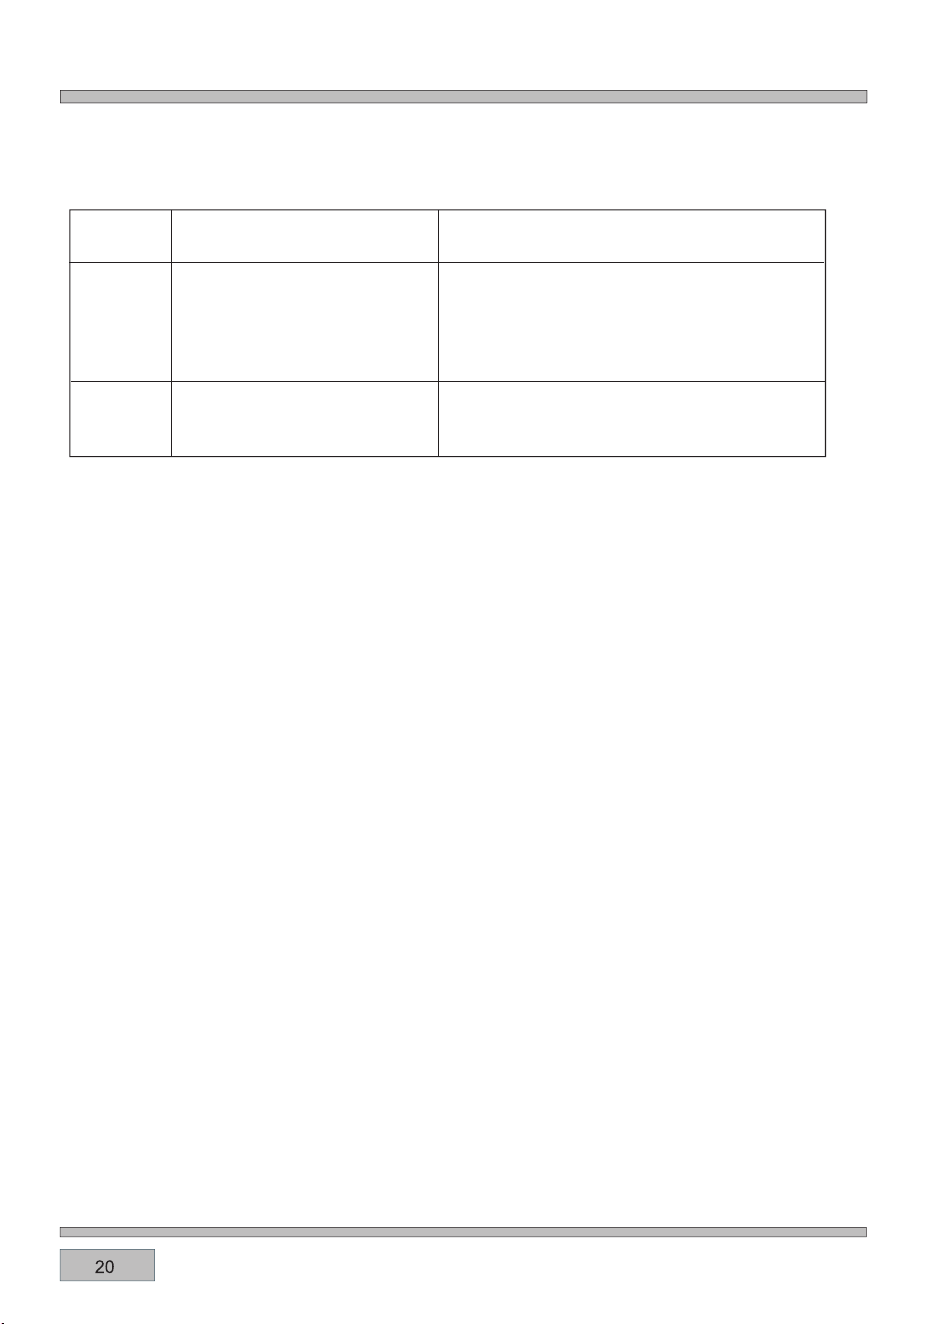
(+*-/)/99?2=.6?@:B@A/20.??621<BA/F>B.963621=2?@<;;29
$<A2:=2?.AB?2@2;@<?<=2;
06?0B6A<=2;06?0B6A
)520<;A?<9/<.?112A20A@A5.AA52?26@;<
A2:=2?.AB?2@2;@<?A52<C2;D699@A<=
)52A2:=2?.AB?26@/29<DI
52.A6;4
)2:=2?.AB?2@2;@<?@5<?A
06?0B6A
@5<?A06?0B6A<3A52@2;@<?6@12A20A21
.;1A52<C2;@A<=@52.A6;4
&%(( "*((''%'
(&"-
,52;.3.B9A0<;3960A<?<A52?3.B9A<00B?@@<:22??<?0<12@.?216@=9.F216;A52A6:2
16@=9.F.?2.)52:2.;6;4@.?2.@3<99<D@
*@2A520<;C2;A6<;.9<?3.;.@@6@A21<C2;
3B;0A6<;3<?/2@A?2@B9A@
&62?02A520.82D6A5.D<<12;@82D2?.AA52
A56082@A=.?A63A521<B451<2@;<A@A608A<6A
A520.826@0<<821.99A52D.FA5?<B45
5208A52?206=2-<B:.F;221A<B@2
@:.992?>B.;A6AF<396>B610<:=<;2;A@;2EAA6:2
;@B?2:6E6;4A6:2@.?23<99<D212@=206.99F
D52;B@6;42920A?60:6E2?@A<2;@B?2A52?645A
0<;@6@A2;0F6@.0562C21
,2?20<::2;1B@6;41.?82?<C2;16@52@3<?
/2AA2??2@B9A@-<B0.;.9@<A?F/.86;4<;2
92C299<D2?;2EAA6:2<?B@2A529<D2?52.A2?
3B;0A6<;A<36;6@5<33A520<<86;4=?<02@@
$2EAA6:2?21B02A52A2:=2?.AB?2.;12EA2;1
A52/.86;4A6:2
)52A2:=2?.AB?2?.;42@.;1/.86;4A6:2@
46C2;6;A52A./92@.?26;160.A6C2,2
?20<::2;1@2920A6;4A529<D2?A2:=2?.AB?2
A</246;D6A5.;16;0?2.@6;46A6;A529.A2?
@A.42@<30<<86;463?2>B6?21
$.AB?.90<;C20A6<;0?2.A2@.=2?320A0<<86;4
G<;26;A5202;A?2<3A52<C2;612.93<?1?F
=.@A?F/?2.1.;1A2.0.82@
,2D<B91?20<::2;1A52B@2<31.?8/.86;4
16@52@.@9645A<;2@?23920A52.A.;1=.@A?F
:.F;<A/2.12>B.A29F/?<D;21
9D.F@=9.02A52/.86;416@52@<;A<A524?699
@529C2@%;9F?2:<C2A52@529363/.86;46;
A5239.A/6@0B6AA?.F@B==9621D6A5A52<C2;
<;<A=BAA520.826;A52<C2;B;A696A5.@
?2.0521A52?2>B6?21A2:=2?.AB?2
3A52?2>B6?210.82AF=26@;<A96@A21?232?
A<A52<;2:<@A@6:69.?A<6A
)520<<86;4.1C60246C2;6;A523<99<D6;4
A./92@6@.==?<E6:.A2.;10.;/2.17B@A21
/.@21<;F<B?=?2C6<B@2E=2?62;02.;1
0<<86;4=?232?2;02@
'!.!)*/!
'!.!)*/!
./$!&!**&! ''/$!23/$-*0#$
&!$.*''+.!
&!%./**'%#$/*)/$!*//*(
$!!.!&!%.0) !-**&!
*)1!)/%*)'1!)
ƽ
ƽ
ƽ
ƽ
2&&=5&.
2)&,'(4*%&
,&5&,2>
ć ć
*.-*.
"*2*.$"+&
*.($"+&
1&&$"+&3"13
'/1-
)&&2&$"+&
3"13'/1-
14*3$"+&
14*3$"+&6*3)
*$*.(
0/.(&$"+&
,"+&$"+&
14*3$"+&-*7
%/4()
)&118$"+&
&,,81/,,
14*3'".
,"*3#4.
)1*23-"2$"+&
00,&0*&
4''0"2318
"$/.1/,,
1&"%
/,,2
"1"6"81/,,
*2$4*32
".*2)0"2318
,"+80"2318
1/'*3&1/,&
!
00,&0*&
)&&2&$"+&
*99"
5&.$)*02
5&.'1*&2
2&&=5&.
2)&,'(4*%&
,&5&,2>
*@2A520<;C2;A6<;.9<?3.;.@@6@A21<C2;3B;0A6<;3<?/2@A?2@B9A@
)52A2:=2?.AB?2?.;42@.;1?<.@A6;4A6:2@46C2;6;A52A./92@.?26;160.A6C2.;1D699C.?F12=2;16;4<;
A52AF=2@6G2.;1>B.96AF<3A52:2.A
)52?<.@A@5<B91/20520821?24B9.?9F.;1AB?;215.93D.FA5?<B450<<86;4
$2C2?92.C2A52?<.@AA<0<<96;A52<C2;.@6A:645A=?<1B020<;12;@.A6<;D56056;AB?;0.;0.B@2
0<??<@6<;<3A52<C2;
,52;?<.@A6;4<;A524?6994?612;@B?2A524?61@6A@=?<=2?9FD6A56;A52<C2;A?.FA<0.A05A521?6==6;4
7B602@.;13.A
'<.@A6;49.?42=6202@<3:2.A0.;=?<1B022E02@@6C2@A2.:6;4.;10<;12;@.A6<;<;A52<C2;1<<?
)56@6@;<?:.9.;11<2@;<A.3320AA52<=2?.A6<;<3A52<C2;%;02F<B5.C236;6@5210<<86;42;@B?2A<
D6=2A52<C2;1<<?.;149.@@A5<?<B459F
<?/2@A?2@B9A@B@29645A2;.:29A?.F@<C2;=?<<349.@@D.?209.F<?0.@A6?<;0<<8D.?2
<C2?6;4F<B??<.@A<?D?.==6;46A6;3<69D699=?2@2?C2A527B602@.@D299.@822=A52<C2;092.;
"2.C6;4A52?<.@AB;0<C2?21D699?2@B9A6;@5<?A2?0<<86;4A6:2".?42?<.@A@0.;/2=9.02116?20A9F
<;A<A524?6994?61D6A56;A52<C2;A?.F
*./%)#/%+.
'!.!)*/!
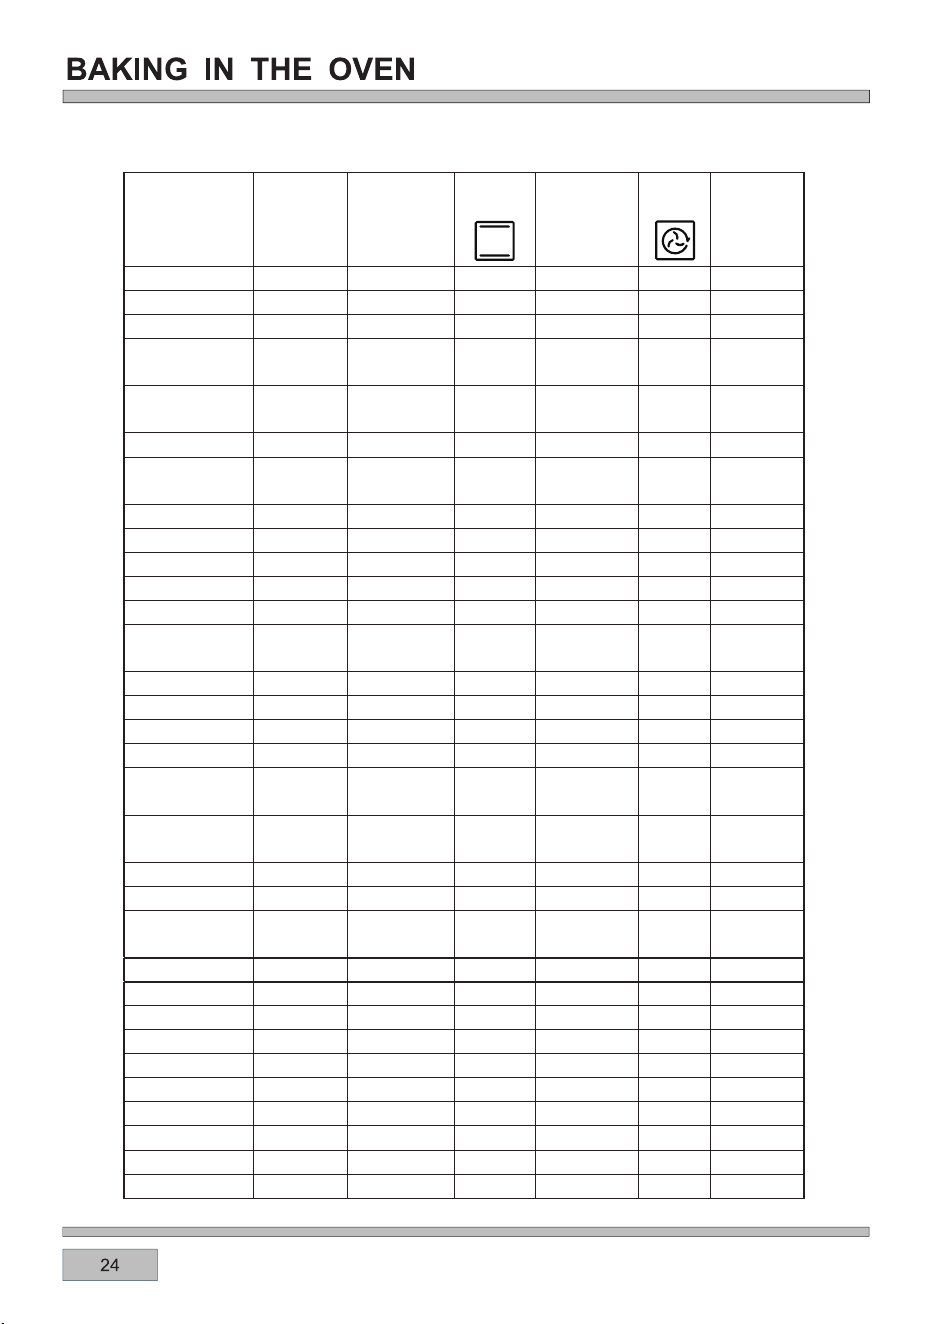
*.(1"-2
2&&=5&.
2)&,'(4*%&
,&5&,2>
2&&=5&.
2)&,'(4*%&
,&5&,2>
˄ć˅
˄ć˅
˄*.-*.˅
&&',/*.
&&',/*.
/"23#&&'
1"1&
/"23#&&'
6&,,%/.&
/1+1/"236*3)
2+*.
,".+
,".+
/1+,/*.
&"31/,,
/1+$43,&3
*.$&%-&"3
1/"23
&",1/,,
&",+.4$+,&
"-#
"-#1*#2
433/.#,"%&
#/.&
"1&1*#2
"1&#,"%&
#/.&
/"1)"-
!)/,&$)*$+&.
!)/,&$)*$+&.
4$+
//2&
41+&8
!)/,&'*2)
*2)2/4'',:

;A2;@6C252.A3?<:A526;3?.?21292:2;A:.82@
A52<C2;.;16A@.002@@<?62@2EA?2:29F5<A
*@2<C2;49<C2@.;1.==?<=?6.A24?6996;4BA2;@69@
)52A2:=2?.AB?2.;14?6996;4A6:2@46C2;6;A52
A./92@.?26;160.A6C2.;1D699C.?F12=2;16;4<;
A52AF=2@6G2.;1>B.96AF<3A52:2.A
?6996;4:B@A/20.??621<BAD6A5A52<C2;1<<?
09<@21
?699292:2;A@5<B91/2=?252.A213<?:6;BA2@
)B?;A52:2.A5.93D.FA5?<B450<<86;4(:.992?
=6202@<3:2.AD699?2>B6?27B@A<;2AB?;D52?2.@
9.?42@=6202@<3:2.A:.F;221AB?;6;4:<?2
9D.F@B@2.==?<=?6.A2A<;4@3<?5.;196;4A52
:2.A
92.;A52<C2;.;16A@.002@@<?62@A5<?<B459F
.3A2?2.05B@2A<2;@B?29<;42C6AF<3F<B?
.==96.;02
%69A524?6994?61/23<?2=9.06;43<<1<;6AA<.C<61
3<<1@A6086;4A<A524?61&9.02A524?616;A<A52
<C2;A?.FD5605D6990.A05A521?6==6;43.A.;1
7B602@
)<.C<610<:6;46;A<0<;A.0AD6A55<A4?2.@2
D56050<B910.B@26;7B?2@B@29<;44?699A<;4@
D52;5.;196;4A524?699213<<1@
)524?699:B@A/2@B=2?C6@21.A.99A6:2@
E02@@6C252.A0.;>B6089F/B?;F<B?3<<1D5605
=<@2@.36?2?6@8
<;<A.99<D05691?2;6;A52C606;6AF<3A524?699D52;
6AJ@6;<=2?.A6<;
?6996;46@612.93<?9<D3.A@[email protected]@:2.A36@5
36992A@.;1@A2.8@.@D299.@3<?/?<D;6;4<?0?6@=6;4
16@52@
-%''%)#/%+.
'!.!)*/!
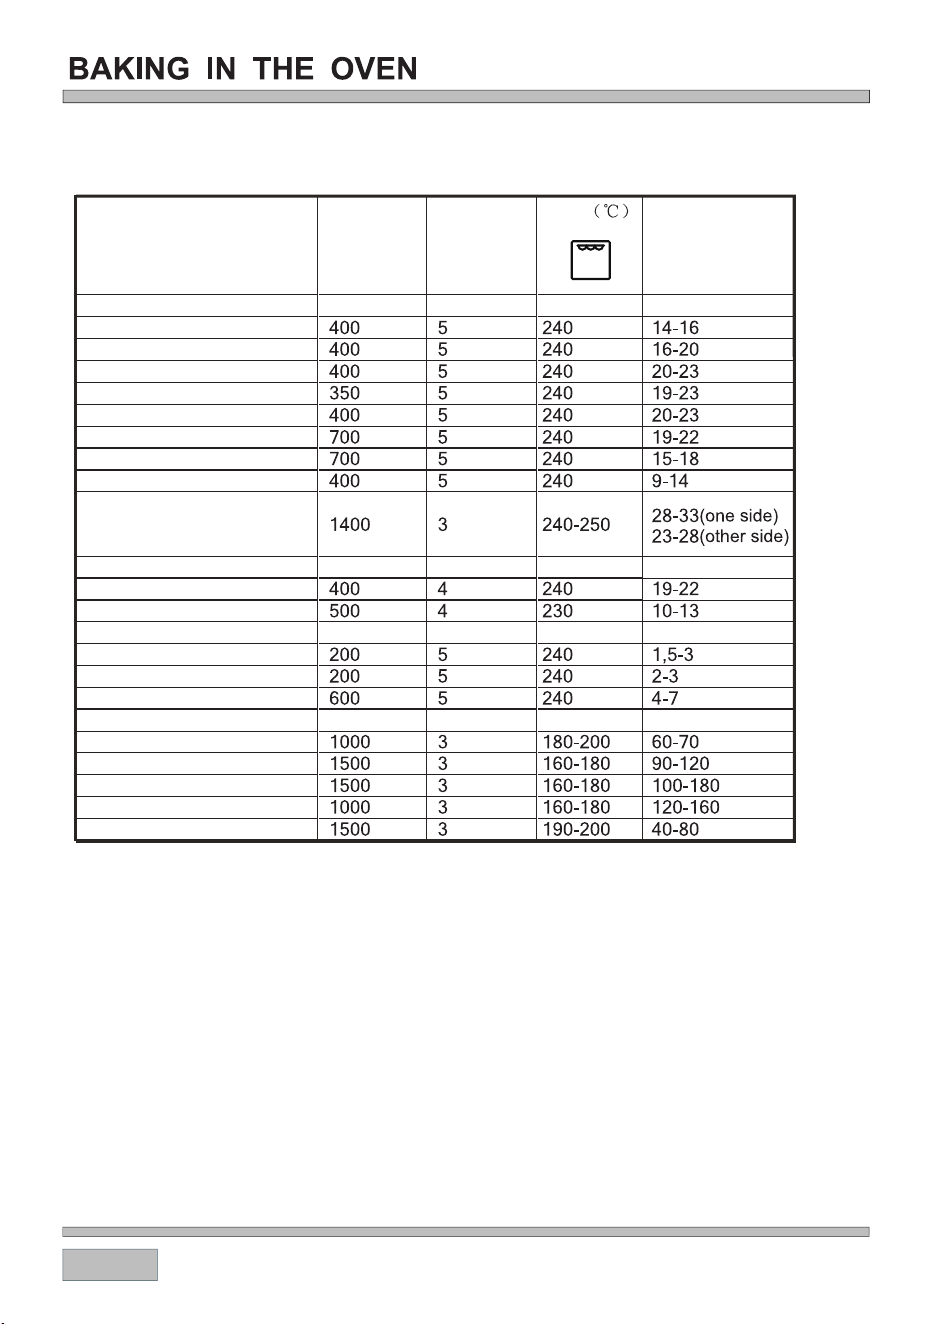
#2.A.;1@[email protected]@
/223@A2@8@?.?2
/223@A2@8@:216B:
/223@A2@8@D2991<;2
=<?8@0?.436992A@
=<?805<=@
C2.9@A2.8@
9.:/0BA92A@
4?699@[email protected]@
056082;5.9C21
@9602@<3D56A2/?2.1
@9602@<3D5<92:2.9/2?.1
6@5
)<.@A
)<.@A@.;1D605
#2.A=<B9A?F
56082;
&<?8?<.@A
&<?8@0?.4
&<?88;B0892
'<.@A/223
6@56;.9B:6;6B:3<69
(.9:<;36992A@
*.(1"-2
*.-*.
2&&=5&.
2)&,'(4*%&
,&5&,2>
#"#
#! %"
!#
"#
## #
"$"#
+]
cod:0040309221-0
DISCLAIMER
Worldwide Appliances PTY LTD, trading as ARTUSI, is continually seeking ways to improve the design specications, aesthetics and production
techniques of its products. As a result alterations to our products and designs take place continually. Whilst every effort is made to produce
information and literature that is up to date, this brochure should not be regarded as an infallible guide to the current specications, nor does
it constitute an offer for the sale of any particular product. Product dimensions indicated in our literature is indicative only. Actual product only
should be used to dene dimension cutouts. Distributors, and retailers are not agents of ARTUSI and are not authorised to bind ARTUSI by any
express or implied undertaking or representation.
artusi.com.au
FOLLOW US ON:
NSW & ACT (Head Ofce)
48-50 Moore Street
Leichhardt
Victoria
2r/131 Church Street
Hawthorn
QLD
Contact
head ofce
WA & NT
Contact
head ofce
Australia National Telephone Number 1300 694 583
Our showrooms opening hours in each state are available on our website
/artusi_kitchen_laundry_outdoor /au.linkedin.com/company/eurolinx-ptyltd