
不属于印刷内容印刷
规格:A5
材质:80g双胶
黑白印刷
第22页, 修改细节
请按2024.7.23图纸生产
GB IE MT
DETAILED
INSTRUCTIONS
FOR USE OF ELECTRIC
FREE STANDING
COOKER
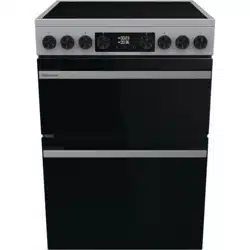
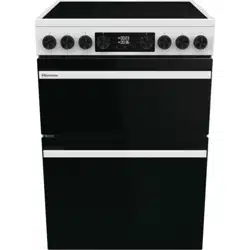
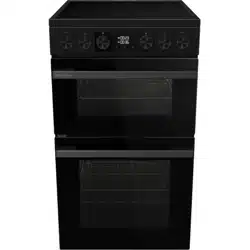
HDCEC5C10W
HDCEC5C10B

You’ll soon be enjoying your new Freestanding Cooker
It all begins here, with your instructions. Don’t worry,
there’s nothing too technical coming up. Just simple, step-
by-step guidance to get you up and running quickly.
Sound good?Then let’s get started.
1

Contents
2
Safety information
SAFETY INFORMATION
Getting to know your Freestanding Cooker
Overview
Accessories
Installing your Freestanding Cooker
Installation requirements
Electrical connection
Using your Freestanding Cooker
Contr
ol panel
Oven functions
Using the Ceramic cooking zones of your cooker
General oven and cooking tips
Practical Cooking Advice
Care and maintena
nce
Cleaning
Repla
cing the oven lamps
How to remove the oven d
oors
Technical Data
Te
chnical specification
Ene
rgy fiche
Product support
Troubleshooting
Decla
ration of conformance to product standards
Disposal
31
29
28
27
26
14
9
7
3
8
12
18
21
23
24
30
32
32

SAFETY INFORMATION
IMPORTANT
Please read these instructions fully before installing or operating.
INSTALLATION WARNINGS
IMPORTANT: Prior to Installation ensure that the local supply conditions
(electricity voltage and frequency) are compatible with the requirements of your
freestanding cooker.
IMPORTANT: Carefully unpack and examine the appliance for any damage. If
you think there is a defect, do not use the appliance and contact product support.
Packaging materials should be collected together and disposed of immediately as
they maybe harmful to children.
IMPORTANT: Keep the electrical cable (not supplied) of your freestanding cooker
away from the hot areas of your appliance, do not let the cable touch the
app
liance. Keep the cable away from sharp edges and heated surfaces.
IMPORTANT: Ensure that the electric supply cable is not trapped or damaged
during installation.
IMPORTANT: In the event that the cable connecting your freestanding cooker
becomes damaged, it must be replaced by a suitably qualified person. This cable
must not be replaced by an unauthorised person.
IMPORTANT: Protect your freestanding cooker against atmospheric effects. Do
not expose your cooker to effects such as sun, rain, snow etc.
IMPORTANT: The materials surrounding the appliance (cabinets) must be able to
withstand a minimum t
emperature of 100°C.
IMPORTANT: When using your oven for the first time your cooker may give off
an smoke or an unusual odour from the heating elements and insulation
materials. To eliminate this odour run the oven at 250 degrees for 40-60 minutes
with the oven empty.
WARNING: Before obtaining access to terminals, all supply circuits must be
disconnected.
IMPORTANT: Make sure the oven control knobs are all in the off position when
not in use.
IMPORTANT: If you do not intend to use your built in oven for a long period of
time then turn off the electric supply t
o the oven.
3

SAFETY INFORMATION
DURING USAGE
IMPORTANT: This appliance is not intended to be used by persons (including
children) with reduced physical, sensory or mental capabilities, or lack of
experience and knowledge, unless they have been given supervision or
instruction concerning use of the appliance by a person responsible for their
safety. Children should be supervised to ensure that they do not play with their
appliance.
WARNING: The ap
pliance and its accessible parts become hot during use. Care
should be taken to avoid touching heating elements.
WARNING: NEVER try to extinguish a cooking fire with water. Instead switch off
the appliance and cover flame e.g with a lid or a fire blanket.
CAUTION: Do not allow children in the kitchen when cooking or after, as the
parts may still be hot. Many parts of the cooker will become hot and present a
considerable hazard to children.
CAUTION: When the cooker is hot never touch the o
ven glass by hand or with
tools.
CAUTION: Before starting to use your appliance, ensure curtains, pap
er or
flammable items are kept away from your appliance. Do not keep flammable
materials inside of or around your cooker.
CAUTION: Take care when closing the oven door that there is nothing
obstructing it from closing as this may break the glass door.
IMPORTANT: The protection shield must be added when using the top oven
grill.
IMPORTANT: When the door of the oven is open, do not hang or lean anything
on it. You may unbalance your appliance or damage the door or door hinges.
IMPORTANT: Do not hang towels, dishcloths or clothes from the built-in oven or
its handles.
GENERAL SAFETY WARNINGS
IMPORTANT: This appliance has been designed for non-professional, domes
tic
use only. Do not use this oven for commercial use or any other application e.g
room heating.
WARNING: Danger of fire: do not store flammable items on or near the cooking
surfaces or inside the oven.
IMPORTANT: Do not try to lift or move this appliance by pulling on the door
handle.
4

WARNING: Ensure that the appliance is switched off before replacing the lamp
to avoid the possibility of electric shock.
IMPORTANT: Your appliance is produced in accordance with all applicable local
and international standards and regulations.
IMPORTANT: Maintenance and repair work must only be performed by
authorised service technicians. Installation and repair work that is carried out by
unauthorised technicians is dangerous and could invalidate your guarantee.
GENERAL SAFETY WARNINGS
IMPORTANT: Always turn the appliance off before operations such as cleaning
or maintenance. You can do this by switching the freestanding cooker off using
the cooker isolation switch.
IMPORTANT: Do not remove the control knobs to clean the control panel.
WARNING: Do not use harsh abrasive cleaners or sharp metal scrapers to clean
the oven door glass since they can scratch the surface, which may result in
shattering of the glass.
SAFETY INFORMATION
5

Getting to know your Freestanding Cooker
Ready? Let’s begin...
Please read these instructions carefully. They contain important information
which will help you get the best from your freestanding cooker and ensure safe
and correct installation and operation.
If you require any further assistance, our technical experts are happy to help.
For full details, refer to the product support section at the end of these
instructions.
6
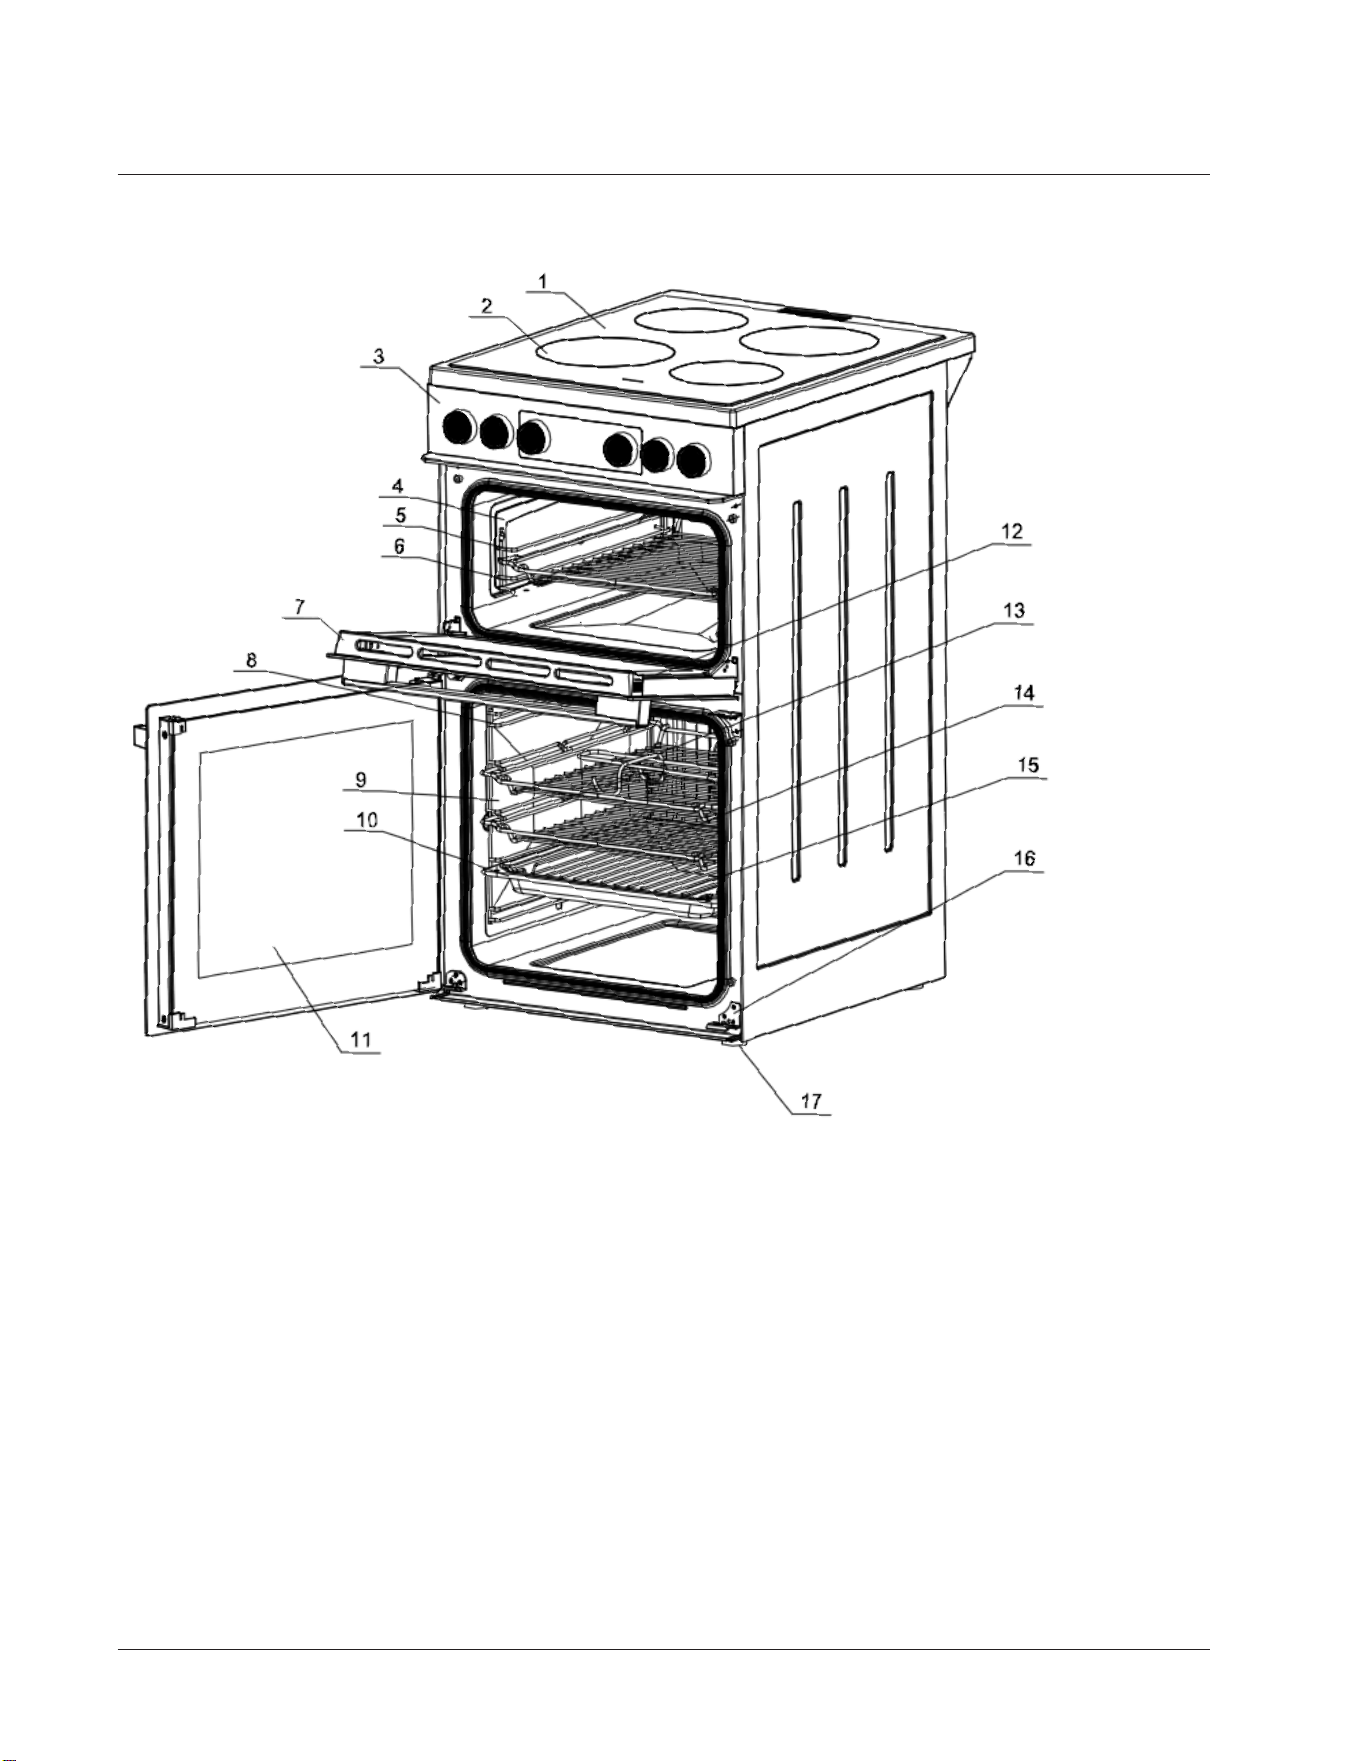
Overview
1. Hob
2. Cooking zone
3. Control Panel
Catalytic panel
Shelf positions
Wire Shelf
Oven Door
Shelf positions
4.
5.
6.
7.
8.
9. Catalytic panel
10.
Baking tray
11. Oven Door
12. Hinge
13. Handle
14. Wire shelf
15. Inner shelf
16. Door lock
17. Anti slip feet
Getting to know your Freestanding Cooker
7
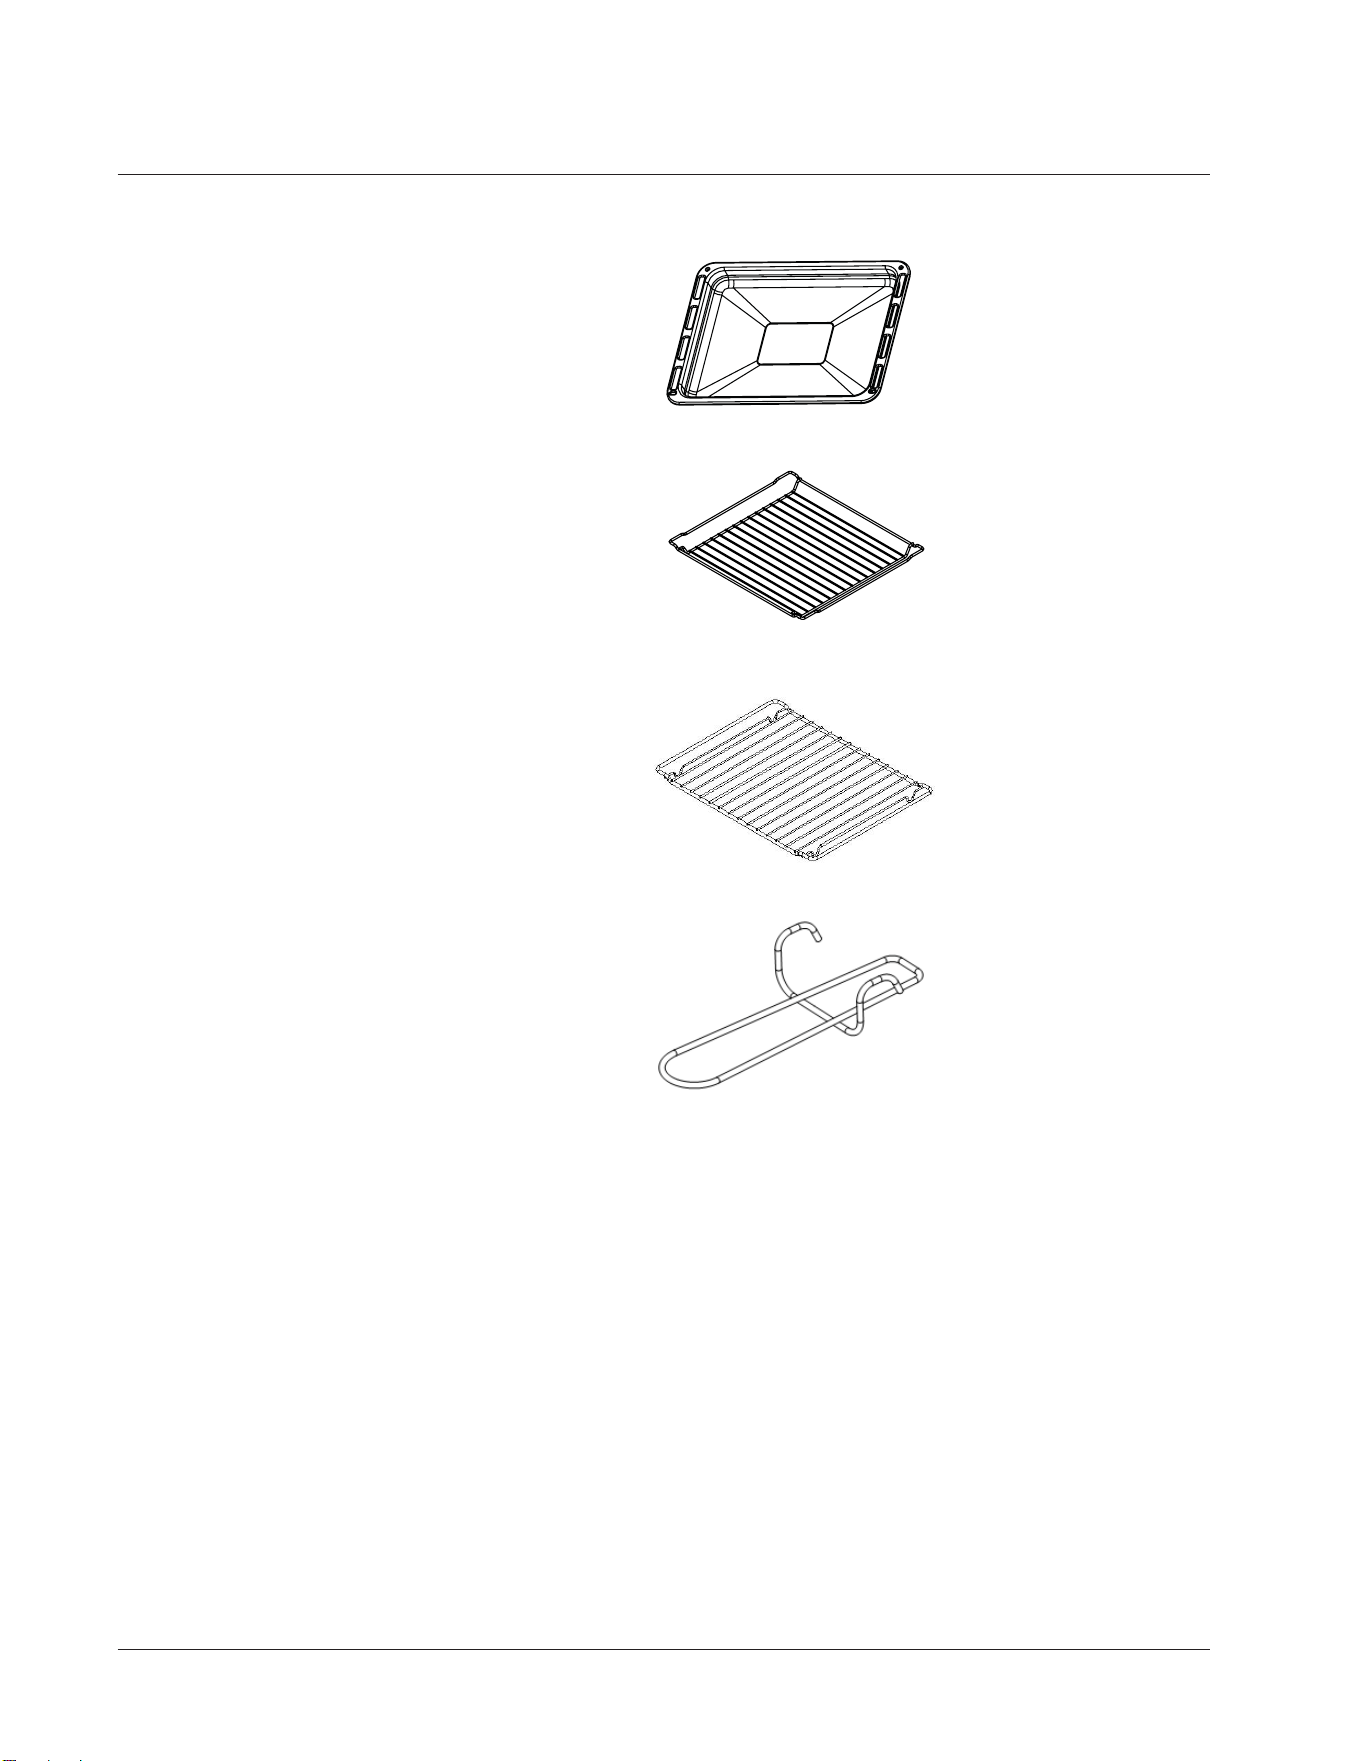
Accessories
1. Baking tray x 1
2. Grill x 3
3. Oven Rack x 1
4. Handle x 1
Getting to know your Freestanding Cooker
8
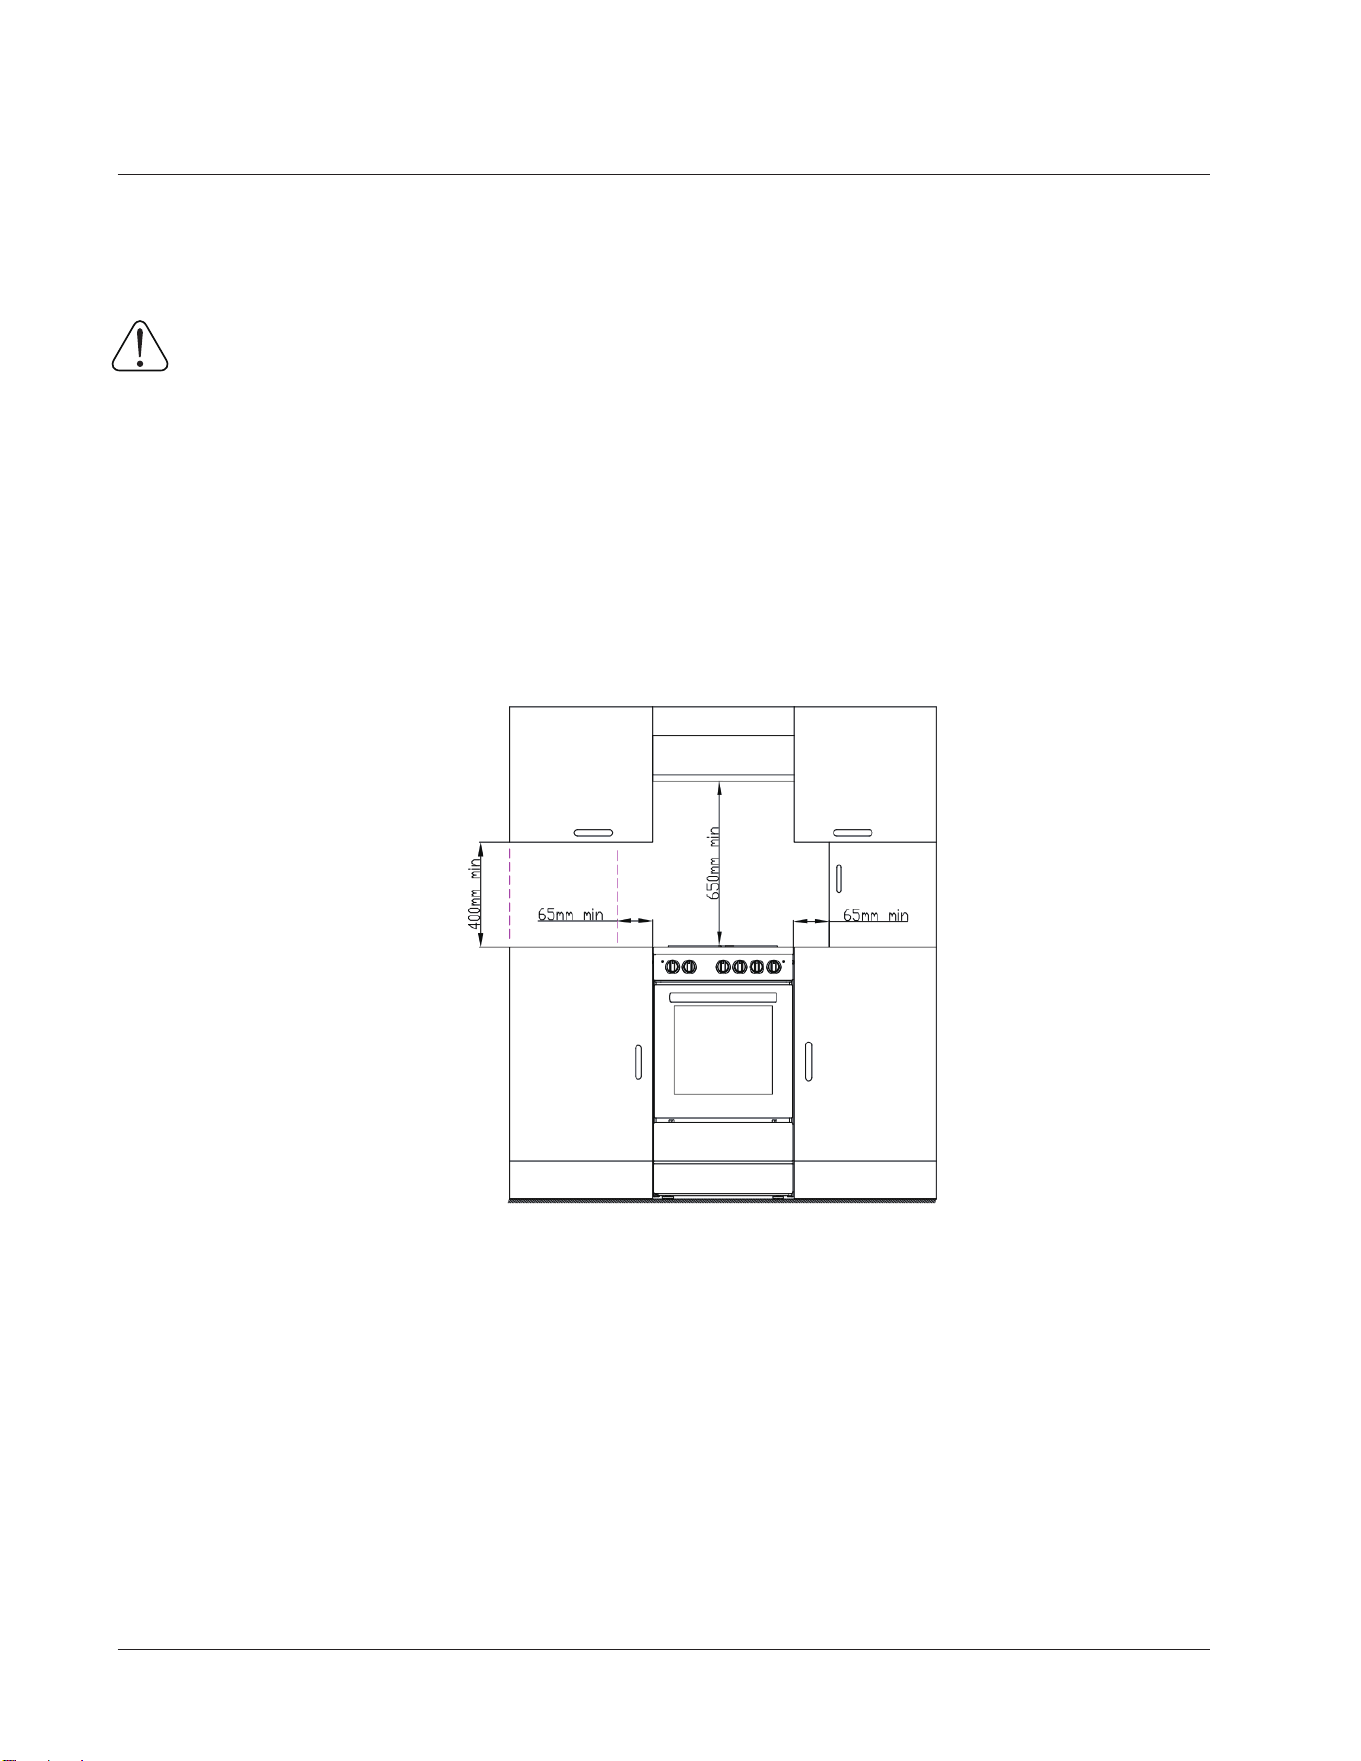
Installing your Freestanding Cooker
Positioning
Installation requirements
THIS COOKER MUST BE INSTALLED BY A QUALIFIED INSTALLER IN
ACCORDANCE WITH LOCAL REGULATIONS.
IMPORTANT: CONTACT AN AUTHORISED SERVICE AGENT FOR
INST
ALLATION OF YOUR FREESTANDING COOKER!
1. Make sure that there are no combustible or flammable materials, such as
curtains, in the vicinity of the installation.
2. Furn ture and cabinets surrounding the cooker must be of material resistant
to temperatures greater than 100°C.
3. Surrounding furniture, cabinets and extractor fans should be positioned in
accordance with the diagram shown in the figure 1.
4. If fitted, the extractor fan must be at least 65cm above the hotplates. If no
fan is fitted the minimum distance between the hotplates and any cabinet or
other structure must be 75cm.
First Use
IMPORTANT:When using your oven for the first time your cooker may
give off smoke or an unusual odour from the heating elements and
insulation materials. This is normal fo
r new cookers. To eliminate this
odour run the oven at 250 degr
ees for 40-60 mins with the oven empty.
Figure 1
9
Installing your Freestanding Cooker
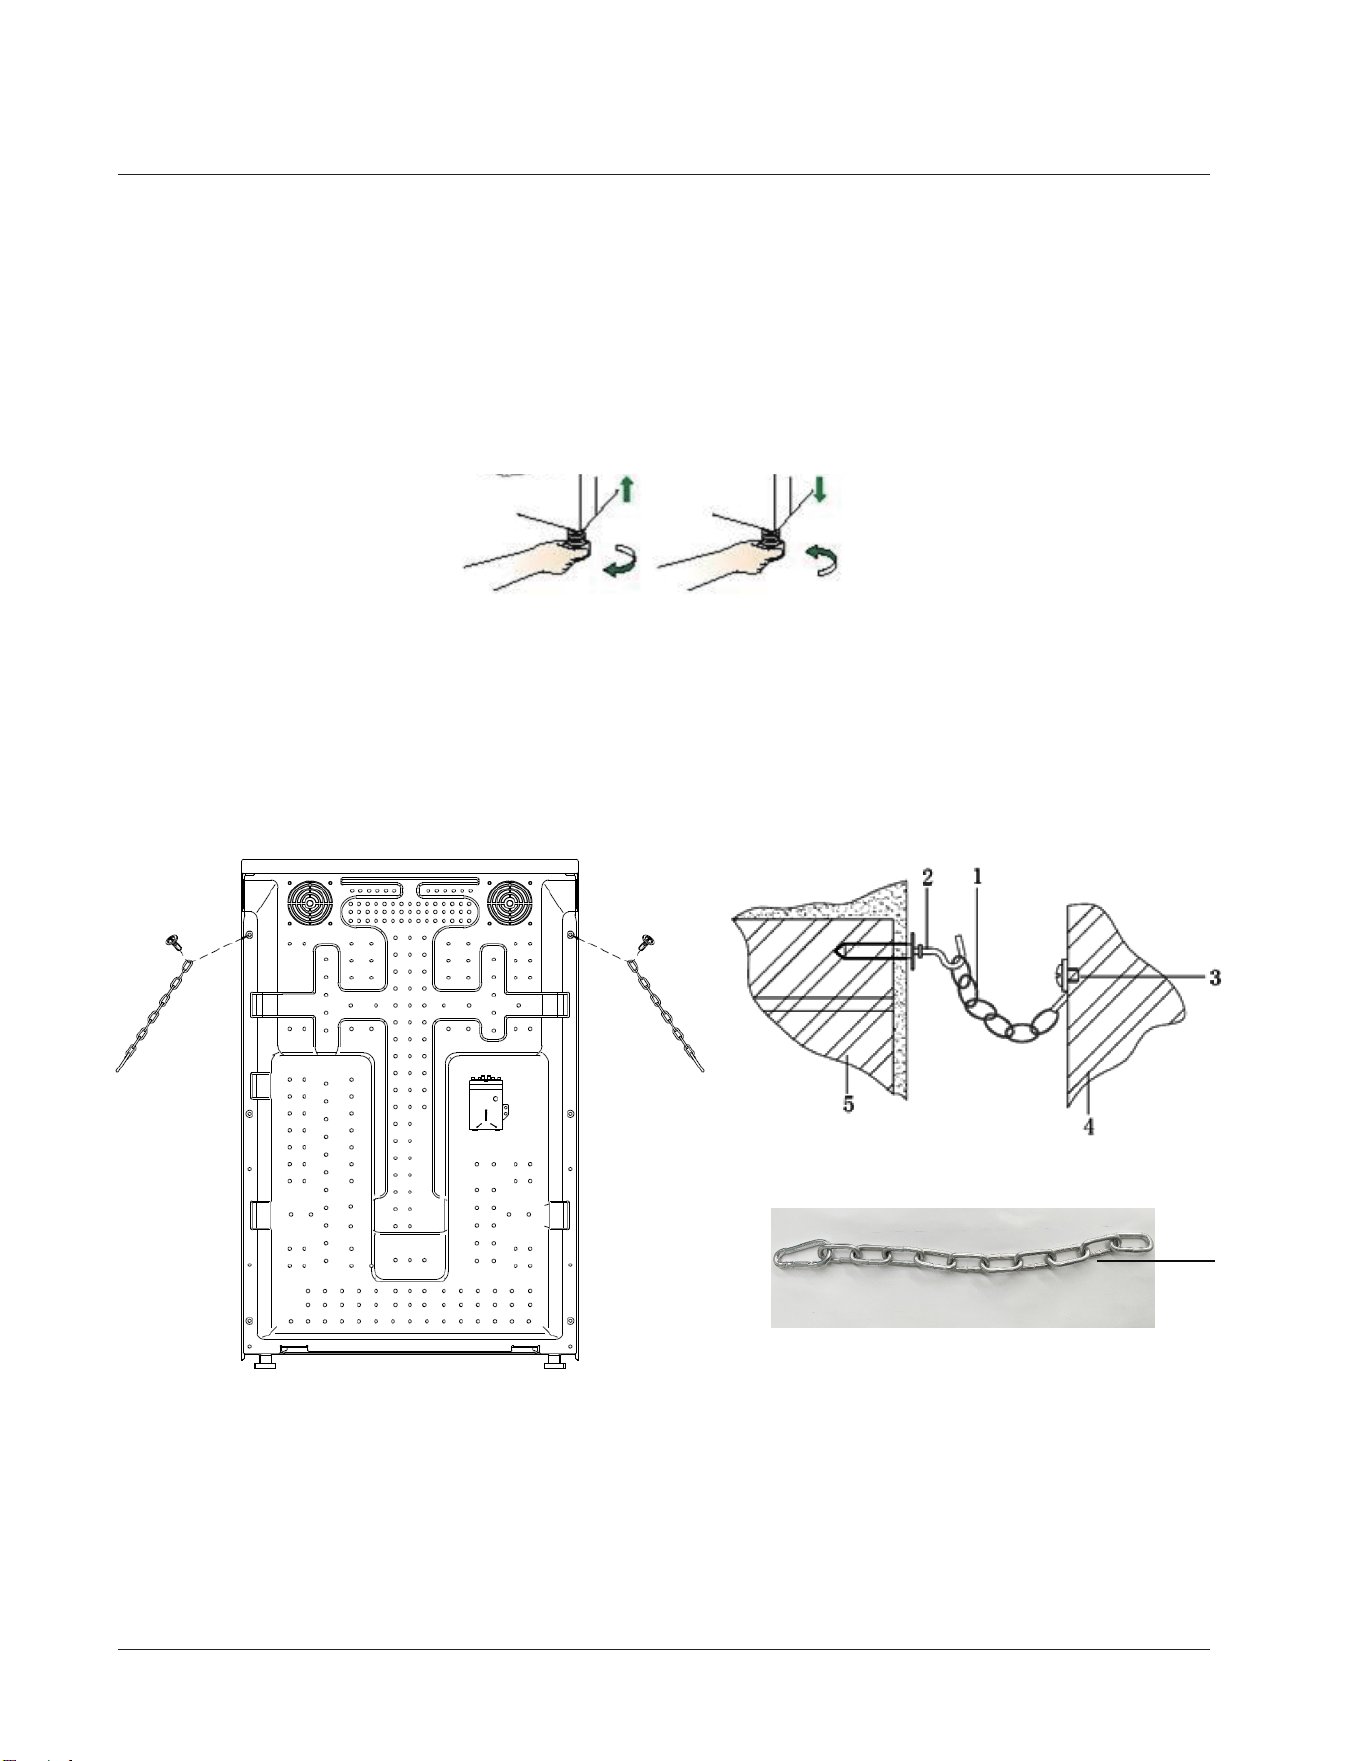
1
Unpacking
Carefully unpack and examine the appliance for any damage.
Levelling feet
The height and level of the appliance can be adjusted by rotating the feet
located underneath the appliance at each corner. Rotate the feet to decrease
or increase the height.
Safety chain
The appliance must be secured against the possibility of tipping forward by
using the supplied safety chains attached to the rear of your oven. Fasten the
stability hook provided by inserting a wall plug into the kitchen wall and then
connect the safety chain to the hook via the locking mechanism.
1.Safety chain (supplied in the Accessory bag)
2.Stability hook (no supplied)
3.Screw (Installed in the rear of the cooker)
4.Rear of the cooker
5.Kitchen wall
10
Installing your Freesta
nding Cooker
Attachmen
t screws
baffle
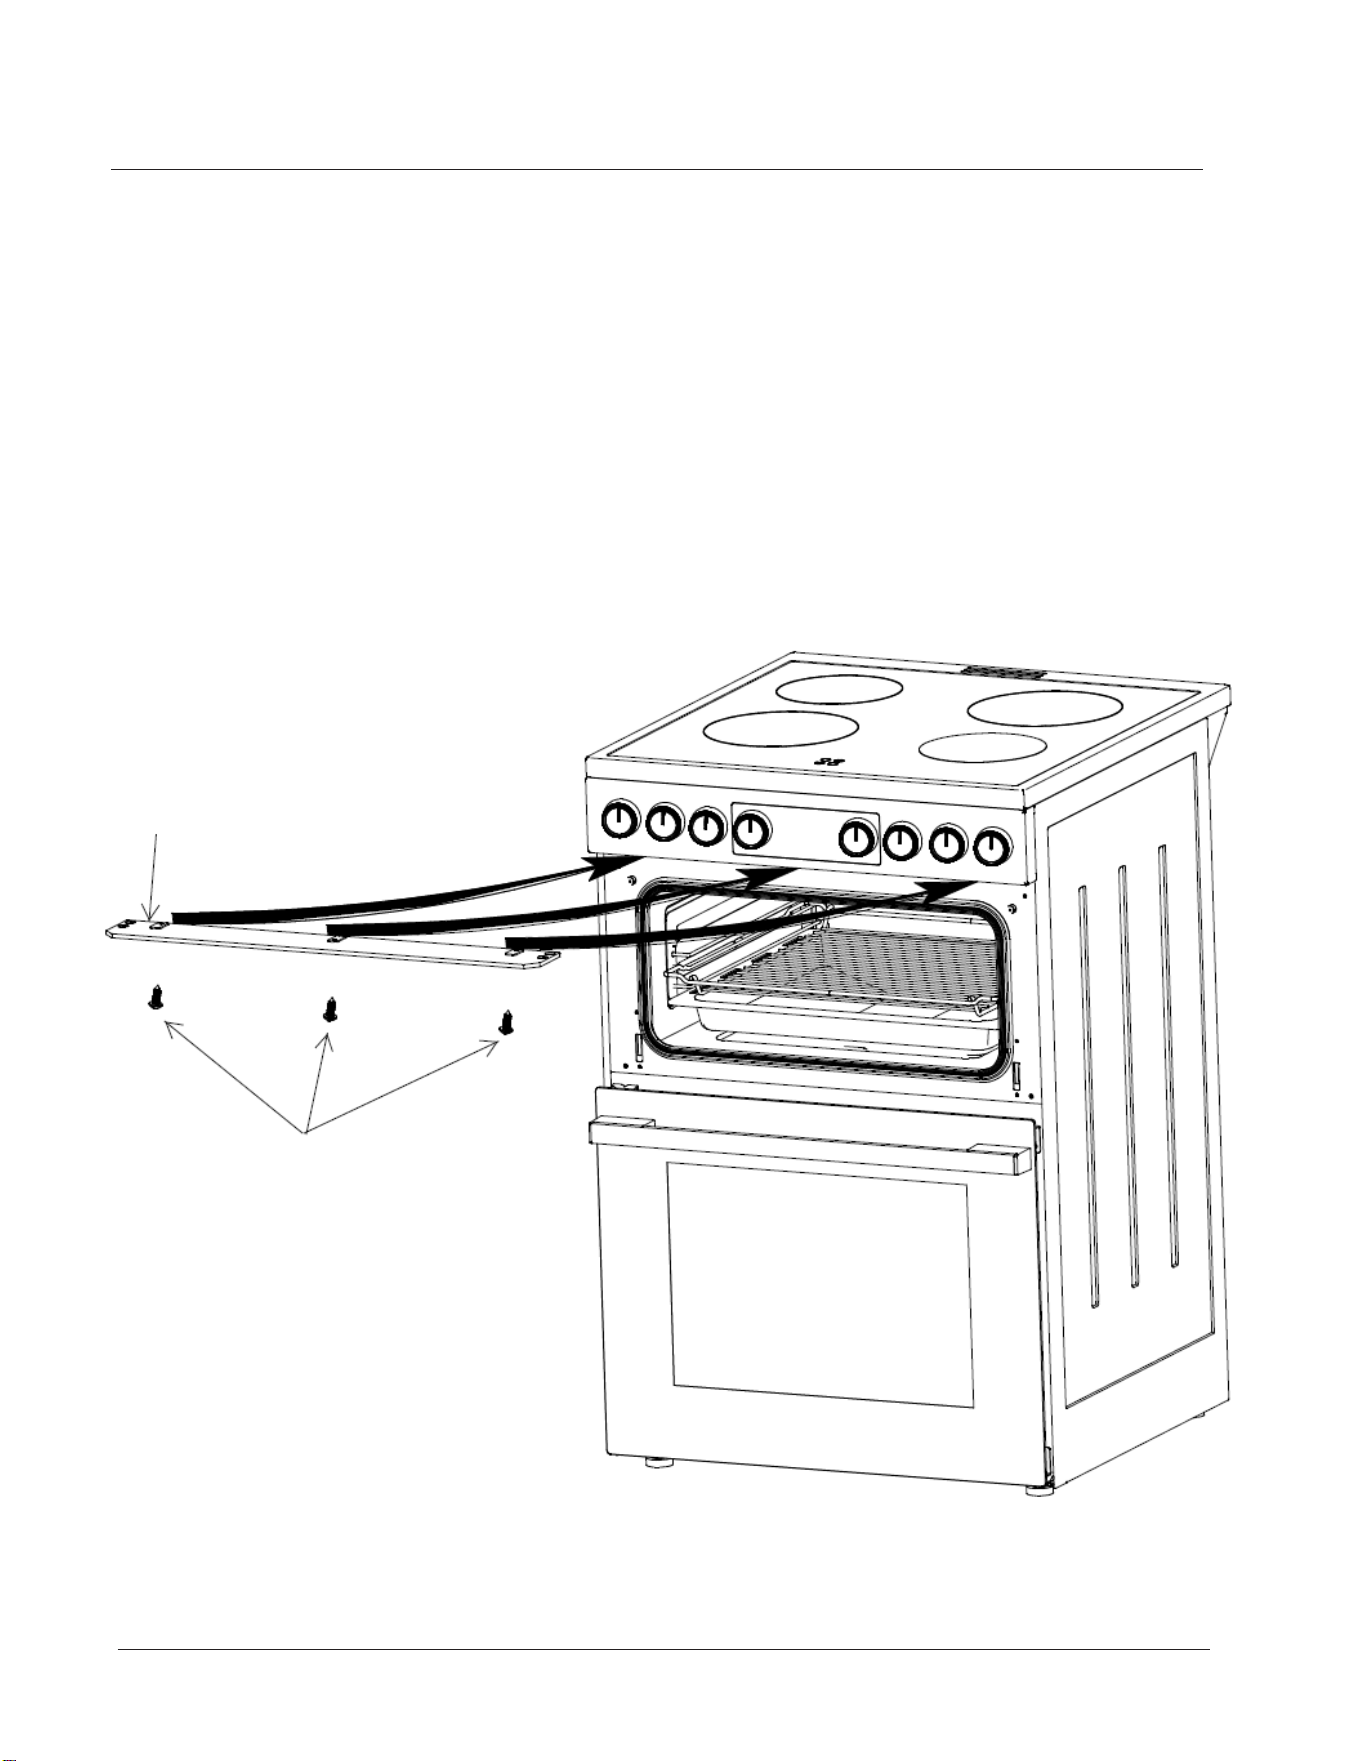
Installation and use of baffle
When usin
g the upper chamber, please install the baffle at
the bottom of the
p
anel first;
1.
Place the baffle at the screw hole corresponding to the bottom of the surface
an
alyzer;
2. Use attachment screws to secure the baffle to the panel;
As shown in the figure:
11

Installing your Freestanding Cooker
Electrical connection
IMPORTANT: Electrical connections must be carried out by a suitably qualified
person and in accordance with all relevant local building and installation
regulations.
Fitting on a Power Supply Cable
Connecting appropriate power supply terminal board/ connector block:
Using a screwdriver, prize open tabs of the Terminal board cover.
Remove the wire clamp screw.
Fasten the wires beneath the corresponding screw heads, using
brass ‘link’ for single phase supply.
Fasten cable clamp and close the cover of the terminal board.
The ac power supply should be 220-240 V, 50/60 Hz.
Connecting the supply cable to the mains
Install an approved circuit breaker with a minimum contact opening of 3 mm,
between the appliance and the mains Distribution board .The circuit breaker
should be sized according to the load and should comply with current
regulations (the earth wire should not be interrupted by the circuit breaker).
The supply cable should be positioned so that it does not reach a temperature
of more than 50℃ with respect to the room temperature, anywhere along its
length. Before switching fuse ON in meter-box check:
Earth continuity. The electrical safety of this appliance can only be guaranteed
if the cooker is correctly installed and earthed, in compliance with regulations
on electrical installations.
The electrical capacity of the system and sockets will support the maximum
power of the appliance, as indicated on the data plate.
12
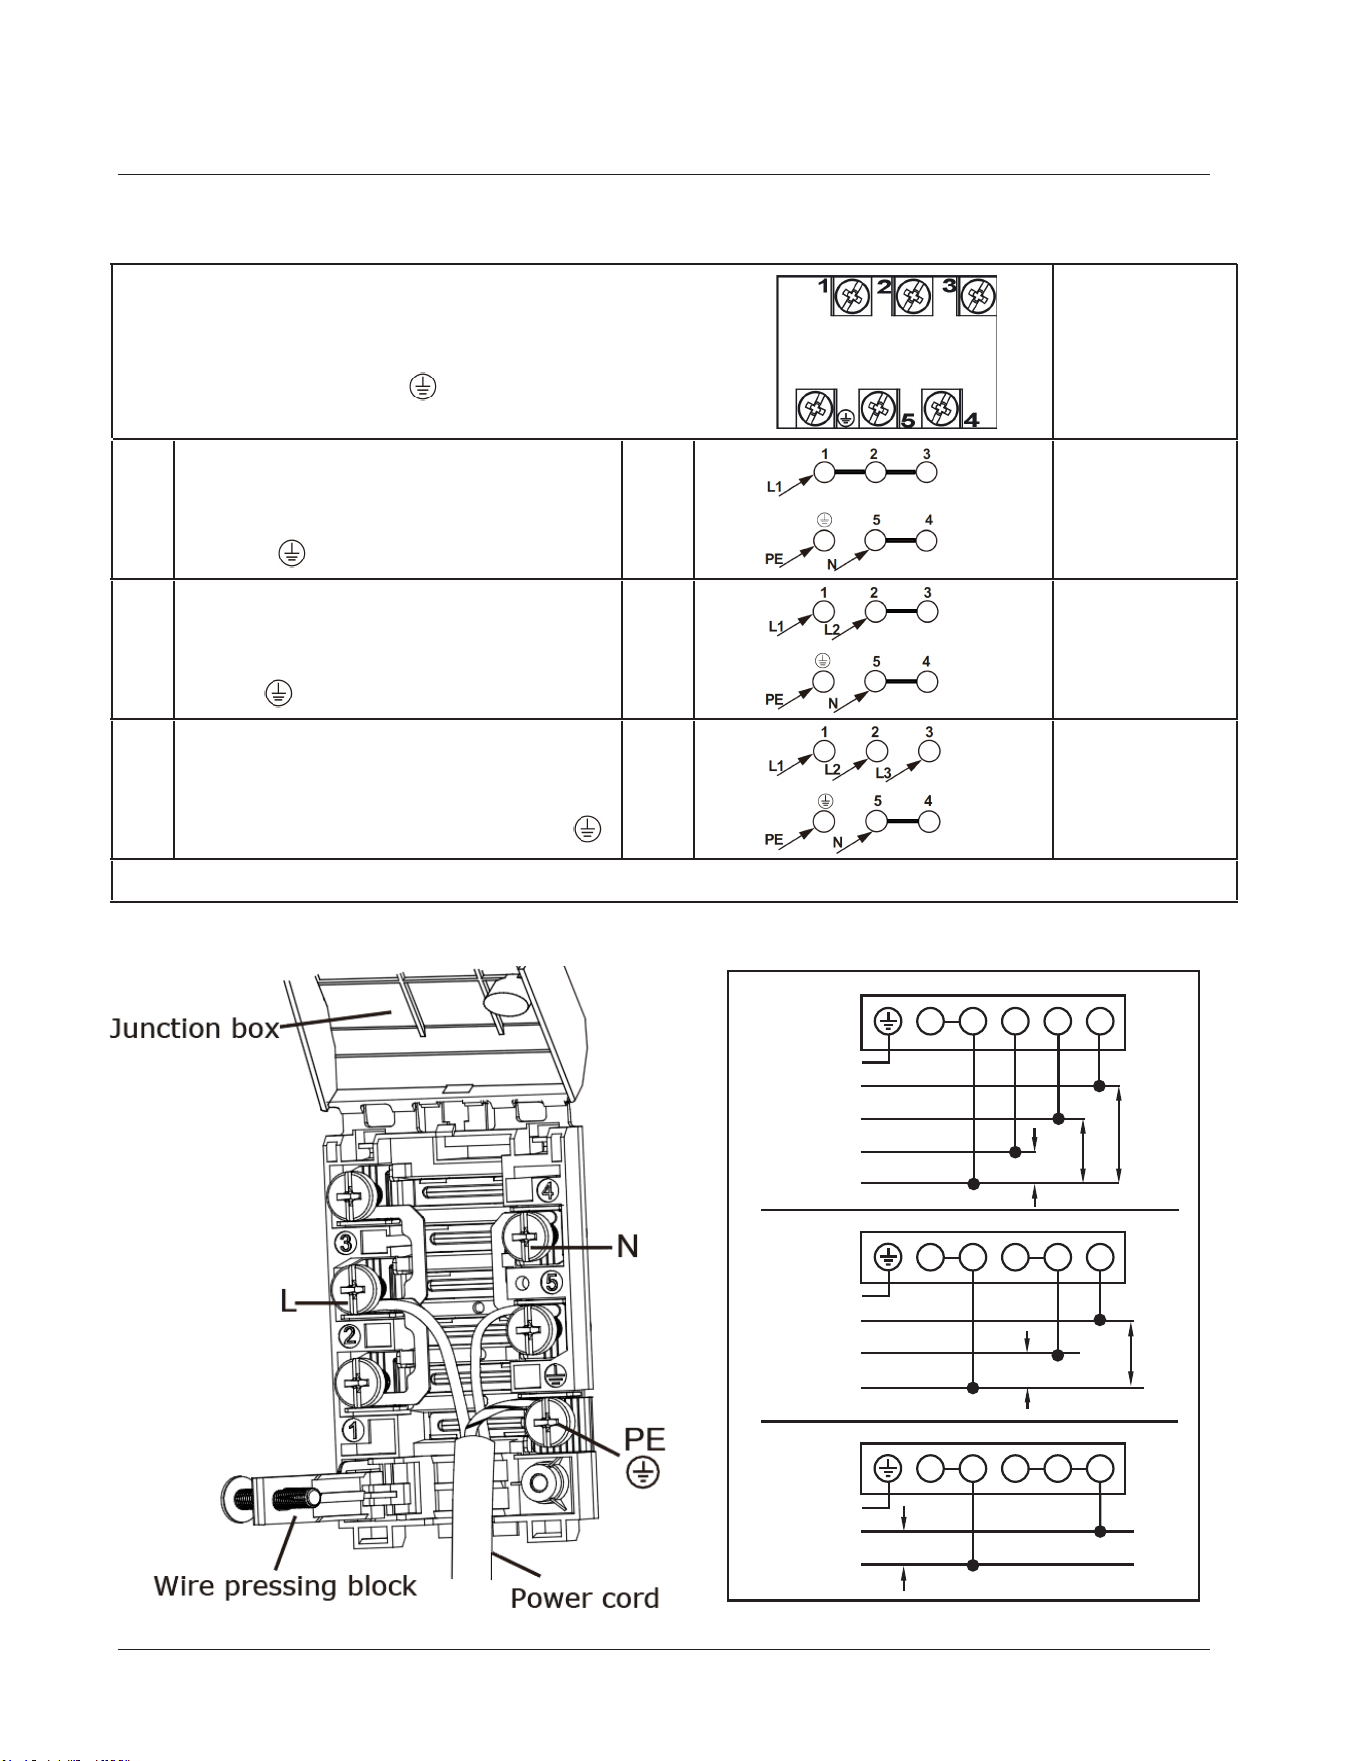
Installing your Freestanding Cooker
H05VV-F3G6
Fuse 32 A
H05VV-F4G2,5
Fuse 20 A x2
H05VV-F5G2,5
Fuse 16 A x3
CONNECTION DIAGRAM
Caution! Voltage of heating elements 230V
Caution! In the event of any connection the safety
wire must be connected to the PE terminal
Recommen-
ded
type
of connection
lead
For 230 V earthed one - phase
connection, bridges connect 1-2-3
terminals and 4 - 5 terminals, safety
wire to .
For 400/230 V earthed two - phase
connection, bridges connect 2 - 3 ter
minals and 4 - 5 terminals, the safety
wire to .
For 400/230V earthed three -phase
connection, bridges connect 4 - 5 ter
minals, phases in succession 1,2 and
3, earth to 4 - 5, the safety wire to .
L1=R,L2=S,L3=T,N=earth terminal, PE= safety wire terminal
13
5 4
3 2
1
5 4
3 2
1
5 4
3 2
1
3N AC
380-415V
PE
L1
L2
L3
N
2N AC
380-415V
PE
L1
L2
N
L1
N
1N AC
220-240V
220-240V
220-240V
220-240V
220-240V
220-240V
220-240V
PE
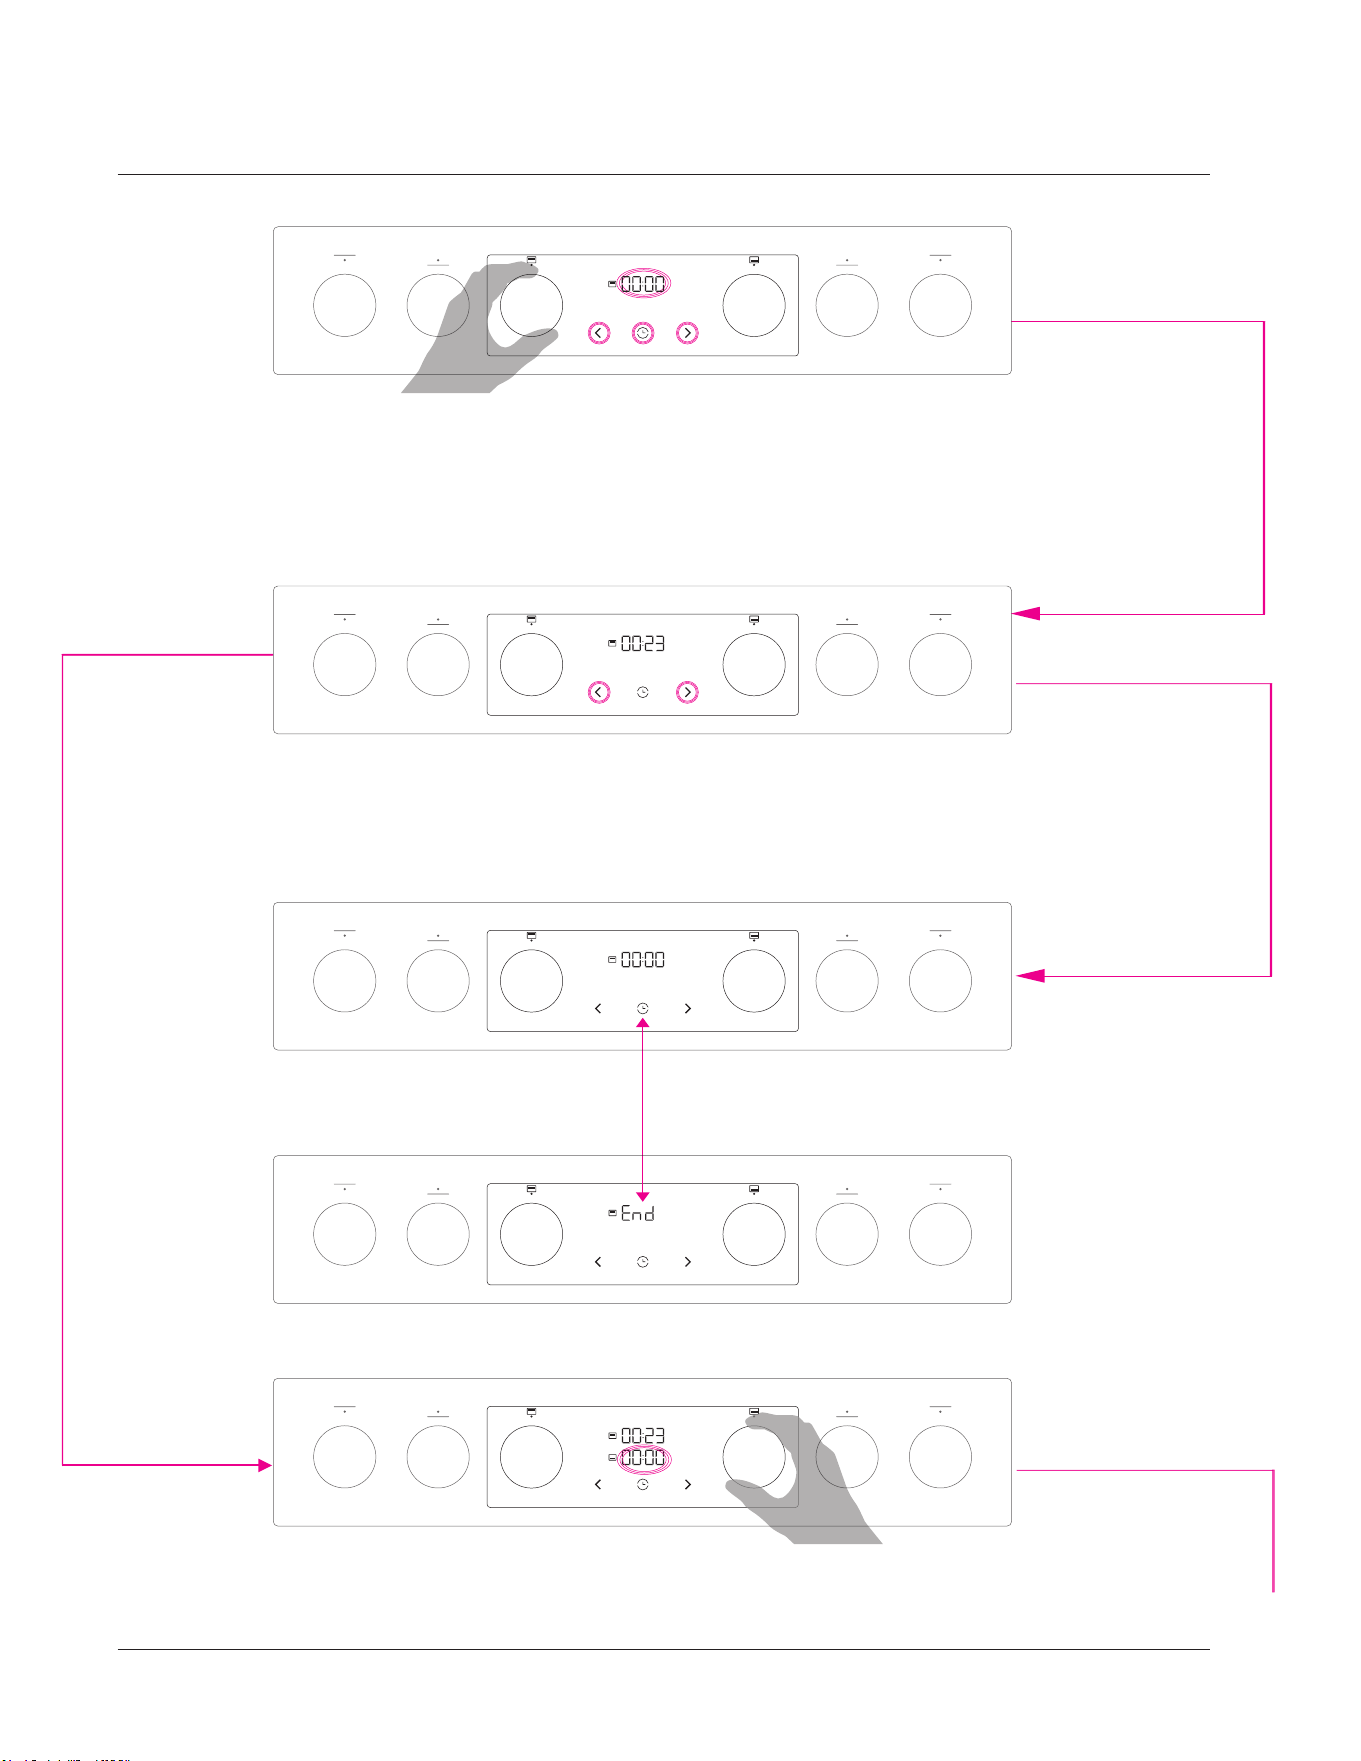
Control Panel
Time Digits - Upper oven
Illuminated digits, 7 segments, without touch.
llluminated icon, without touch, illuminated50%,
75%,100%, blinking
Upper Oven icon - time related Illuminated icon,
without touch, illuminated50%, 75%,100%, blinking
Bottom Oven icon - time related Illuminated icon,
without touch, illuminated50%, 75%, 100%, blinking
Decrease function - time related
Touch key, printed icon.
With one press, the value can be reduced by 1 minute,
by holding the touch key (2 sec) values start
automatically decreasing first up to full value later for 10
minutes, later for 1 hour. Example: 02:02, 02:01,
02:00,01:50, 01:40...00:00.
Time function for bottom and upper oven
Touch key, printed icon.
Function is avalible only if bottom or upper
oven program is selected. With one press time function for
bottom or upper oven can be activated. If only one oven is
running (bottom or upper) by activation the time function the
duration digits are automaticaly connected and starts
blinking periodically. By pressing the decrease or increase
touch keys duration can be selected. By no touch (8 sec)
time function/digits dissapere, world time is visible again.
When time function is selected time digits start decreasing
automaticaly withoutconfirmation. When reach the end time
00:00 function automaticaly finish theprogram and complete
the process. Time function in running can be canceled/
deleted by simmultynuesly touch on decrease and increase
touch key or by setting the 00:00 value. After this time digits
dissapere by not ouch for 8 sec. automaticaly.If the time
function is activated for both ovens (bottom/upper) both
time values are active. By pressing the time touch key we
can toggle between upper or bottom time value.
Time Digits - Bottom oven
Illuminated digits, 7 segments, without touch.
llluminated icon, without touch, illuminated50%,
75%, 100%, blinking
Increase function - time related
Touch key, printed icon. With one press, the value
can be increased by 1 minute, by holding the touch
key (2 sec) values start automatically increasing first
up to full value later for 10 minutes, later for 1 hour.
Example: 00:07, 00:08, 00:09,00:10,00:20...01:00,
02:00.
Left front heater
Left back heater
Upper oven systems
Bottom oven systems
Right back heater
Right front heater
Hisense Display- Off mode, out of electricity
Hisense Display- All content activated
Using your Freestanding Cooker
14
Using your Freestanding Cooker
15
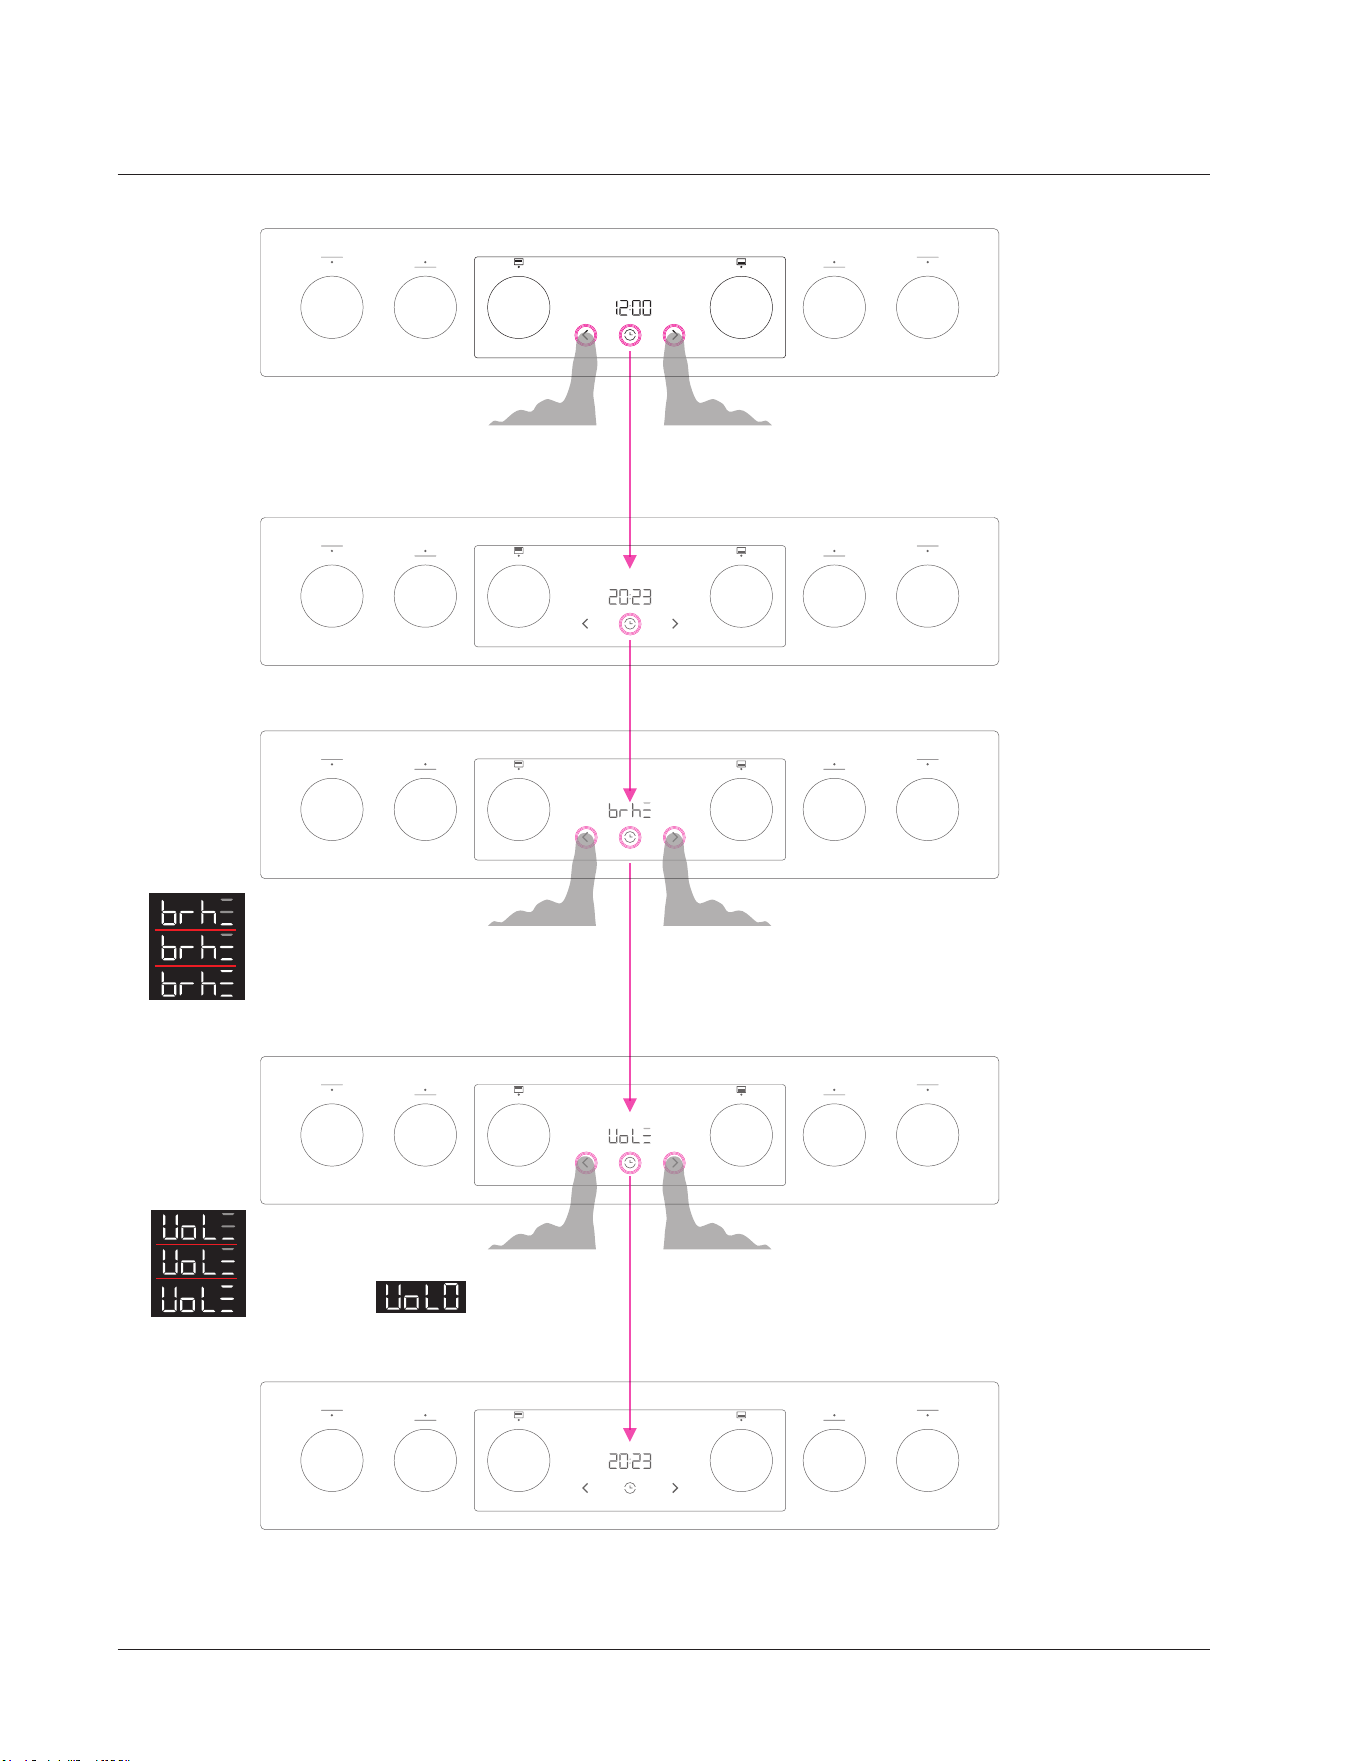
By pressing the decrease or increase touch keys World time can be selected.
Pre-set time is 12:00. With one press , the value can be increased by 1 minute, by holding the touch key (2 sec)
values start automatically increasing first up to full value later for 10 minutes, later for 1 hour.
Function is the same ifor increase or decrease the value.
Example: 00:07, 00:08, 00:09, 00:10, 00:20...01:00,02:00.
1.
By pressign the time touch key World time is confirmed, display goes to next screen(Brightness).
2.
Minimum
Medium
Maximum
Minimum
Medium
Maximum Off
1.
By pressing the decrease or increase touch keys brightness
level (low, mid, high) can be selected. Pre-set Brightness is
Medium.
By pressign the time touch key Brightness level is confirmed,
display goes to next screen (Volume settings).
2.
By pressing the decrease or increase touch keys Volume level
(low, mid, high, off) can be selected. Pre-set Volume is
Medium.
1.
By pressign the time touch key Volume level is confirmed,
display goes to next screen (World time settings).
2.
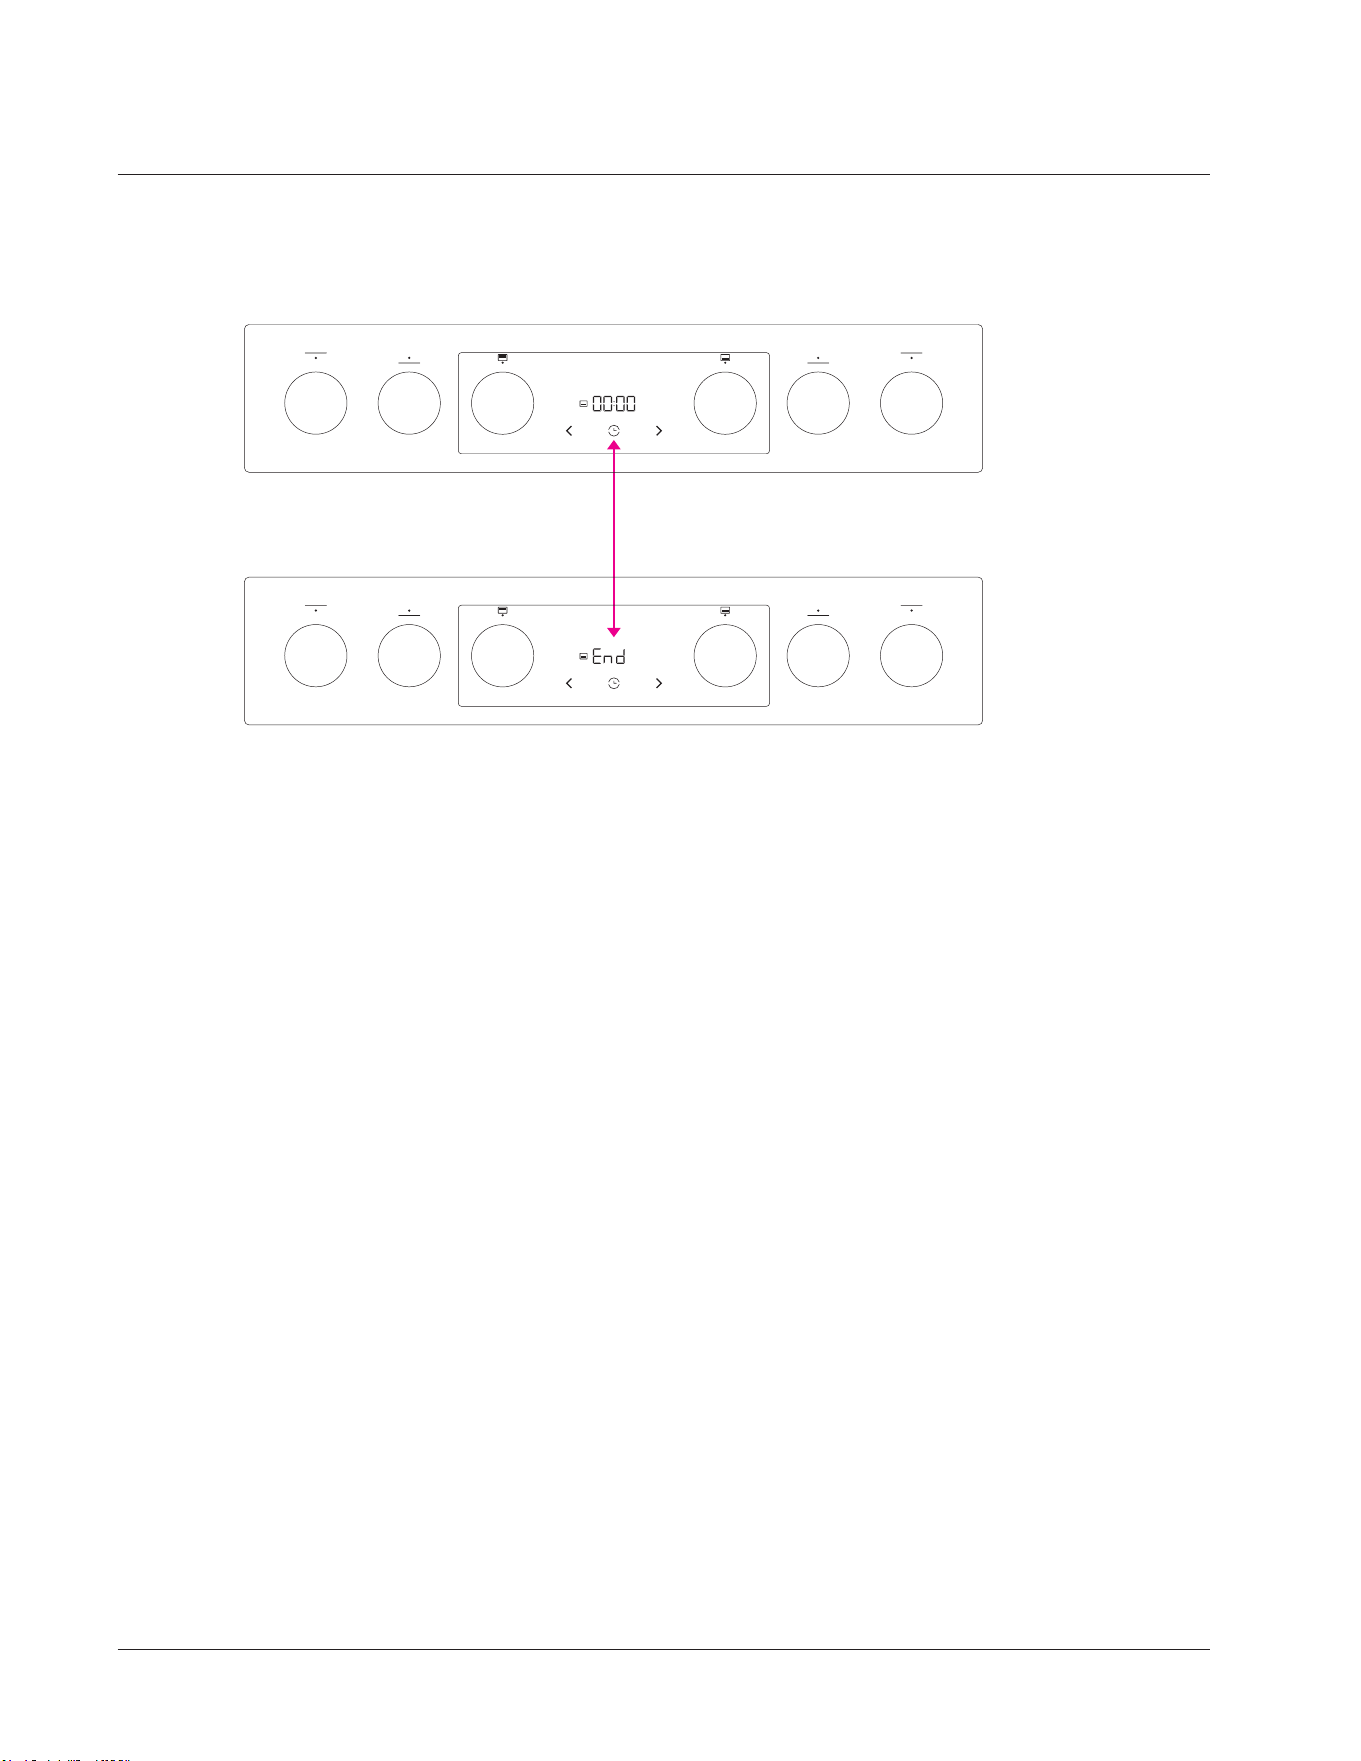
In stanby World time is active. Touch keys are not active-only time touch key if pressing and holding the touchkey
for 3 sec the settings menu can be activated. Settings menu is the same like Starting Wizzard where brightness,
volume and world time can be adjusted.
Hisense Display-Starting Wizzard - World time Set
Hisense Display- Starting Wizzard - World time Set
Hisense Display-Starting Wizzard - Brightness Set
Hisense Display-Starting Wizzard - Volume Set
Hisense Display-Standby
Using your Freestanding Cooker
16
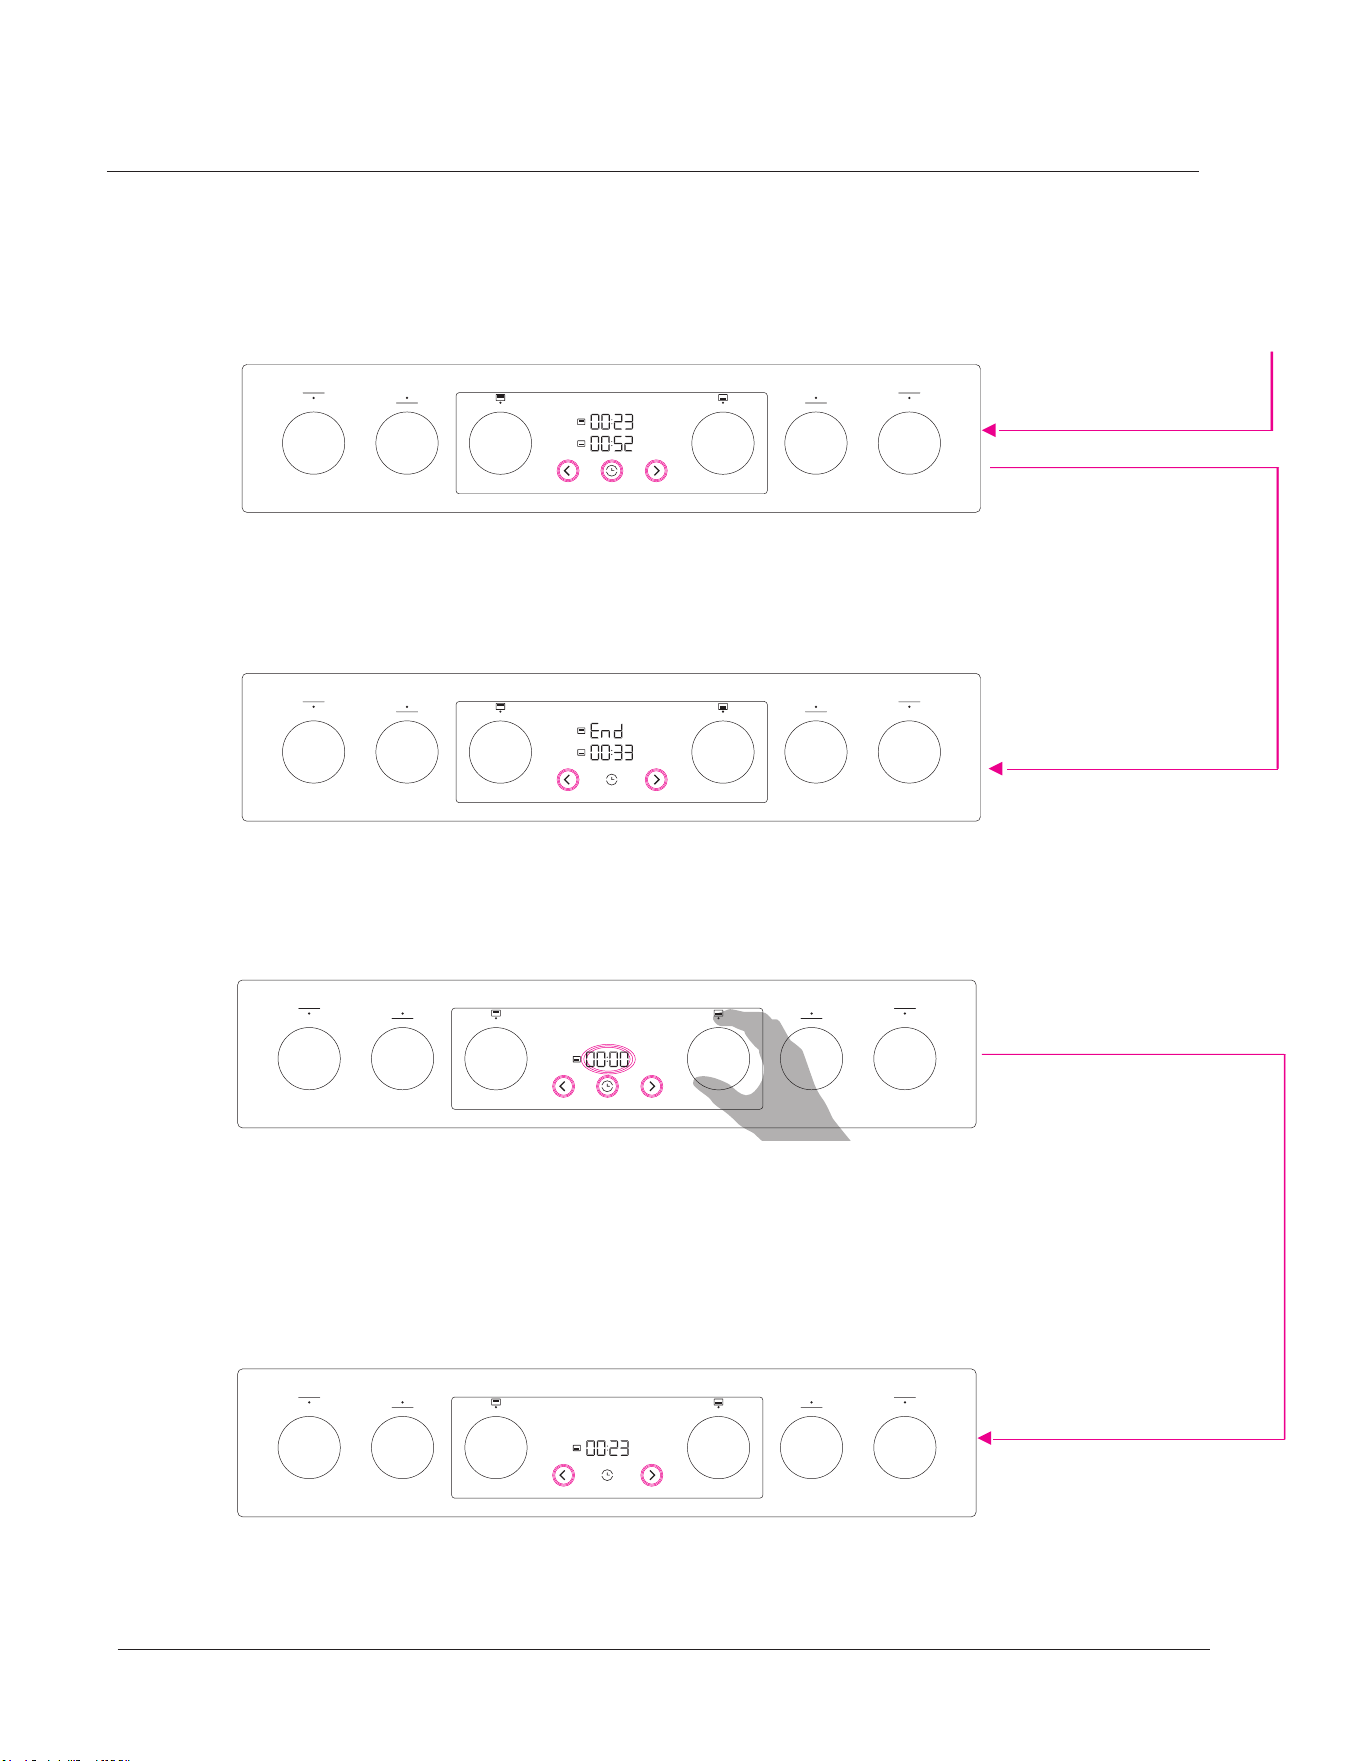
By roatating the knob upper oven systems/programs can be selected. Time digits for the upper oven is
automaticaly active/pre-set and blinking periodically. Upper ovenicon is fully illuminated and not blinking.
1.
2. Duration can be selected by pressing the decrease or increase touch key on the same way like all time realted functions.
*If time touch keys are not pressed in 10 sec, digits disapere time function is not active anymore.
Time function can be activated by pressing the time touch key. Time functions for the bottom or upper
oven are possible to select only if system knob (upper or bottom oven) is rotated and the program is selected.
When the duration is set and the time touch keys are not pressed for 5 sec time function/digits starts automatically counting
down up to 00:00.In running digits are not blinking, only dots between digits blinking all the running process.
By pressign the decrease/increase touch keys during the running/baking process the time can be adjusted directly. Time
functions/durations can be canceled/deletedby simmultaneusly press on both decrease and increase touch keys or by setting
the time value on 00:00. Time functions are deleted also by rotating the system knob to off position.
When the program is completed digits/display toggle between 00:00 and End for 2 min. Finish sound / Alarm is active.
Upper oven icon is illuminated fully and not blinking.
Oven function is automatically switched off, program is completed.
By rotating the upper oven knob on off position the oven functionality is deactivated, standby mode is active (world time).
Both ovens (bottom an upper) can be active at the same time. If the bottom or upper oven is activated
(by rotating the system knob) when one of the oven is already active and is in running mode, time function is
automaticaly active, ready to select, digitsa are blinking.
1.
Hisense Display-Upper oven - program selection - time function
Hisense Display-Upper oven -program selection - time functions - running
Hisense Display-Upper oven - program selection - time functions - Program completed
Hisense Display-Upper oven - program selection - time functions - Program completed
Hisense Display- Upper and bottom oven activated at the same time
Using your Freestanding Cooker
17
Hisense Display- Upper and bottom oven activated at the same time -Running
Hisense Display-Upper and bottom oven activated at the same time - Upper oven process completed
Hisense Display- Bottom oven - program selection - time function
Hisense Display- Bottom oven - program selection - time functions - running
2. Duration can be selected by pressing the decrease or increase touch key on the same way like all time realted
functions.
*If time touch keys are not pressed in 10 sec, digits disapere time function is not active anymore. Time function can
be activated by pressing the time touch key. With time touch key we can toggle between bottom or upper
oven duration and than set the values by decrease or increase touch keys. Time functions for the bottom or upper
oven are possible to select only if system knob (upper or bottom oven) is rotated and the program is selecteld.
When the duration is set and the time touch keys are not pressed for 5 sec time function/digits starts automatically
counting down up to 00:00.In running digits are not blinking, only dots between digits blinking all the running process.
Last setted/ adjusted time is in primary position and can be adjusted in running mode anytime by pressign the decrease/
increase touch keys directly. By pressinf the time touch key we can toggle between bottom or upper durations and later
adjust it if needed,
When the program is completed digits/display toggle between 00:00 and End for 2 min. Finish sound /Alarm is active.
Upper oven icon is illuminated fully and not blinking. Oven function is automatically switched off, program is completed.
Bottom oven duration is still active and can be adjusted directly by pressing the decrease or increase touch keys.
By roatating the knob bottom oven systems/programs can be selected. Time digits for the bottom oven are
automaticaly active/pre-set and blinking periodically. Bottom ovenicon is fully illuminated and not blinking.
Duration can be selected by pressing the decrease or increase touch key on the same way like all time realted
functions.
1.
2.
*If time touch keys are not pressed in 10 sec, digits disapere time function is not active anymore. Time function can be
activated by pressing the time touch key.Time functions for the bottom or upper oven are possible to select only if
system knob (upper or bottom oven) is rotated and the program is selected.
When the duration is set and the time touch keys are not pressed for 5 sec time function/digits starts automatically
counting down up to 00:00.In running digits are not blinking, only dots between digits blinking all the running process.
Using your Freestanding Cooker
18
Hisense Display-Bottom oven - program selection -time functions - Program completed
Hisense Display-Bottom oven - program selection -time functions - Program completed
By pressign the decrease/increase touch keys during the running/baking process the time can be adjusted directly.
Time functions/durationscan be canceled/deletedby simmultaneusly press on both decrease and increase touch keys
or by setting the time value on 00:00. Time functions are deleted also by rotating the system knob to off position.
When the program is completed digits/display toggle between 00:00 and End for 2 min. Finish sound / Alarm is active.
Bottom oven icon is illuminated fully and not blinking.
Oven function is automatically switched off, program is completed.
By rotating the bottom oven knob on off position the oven functionality is deactivated, standby mode is active (world time).
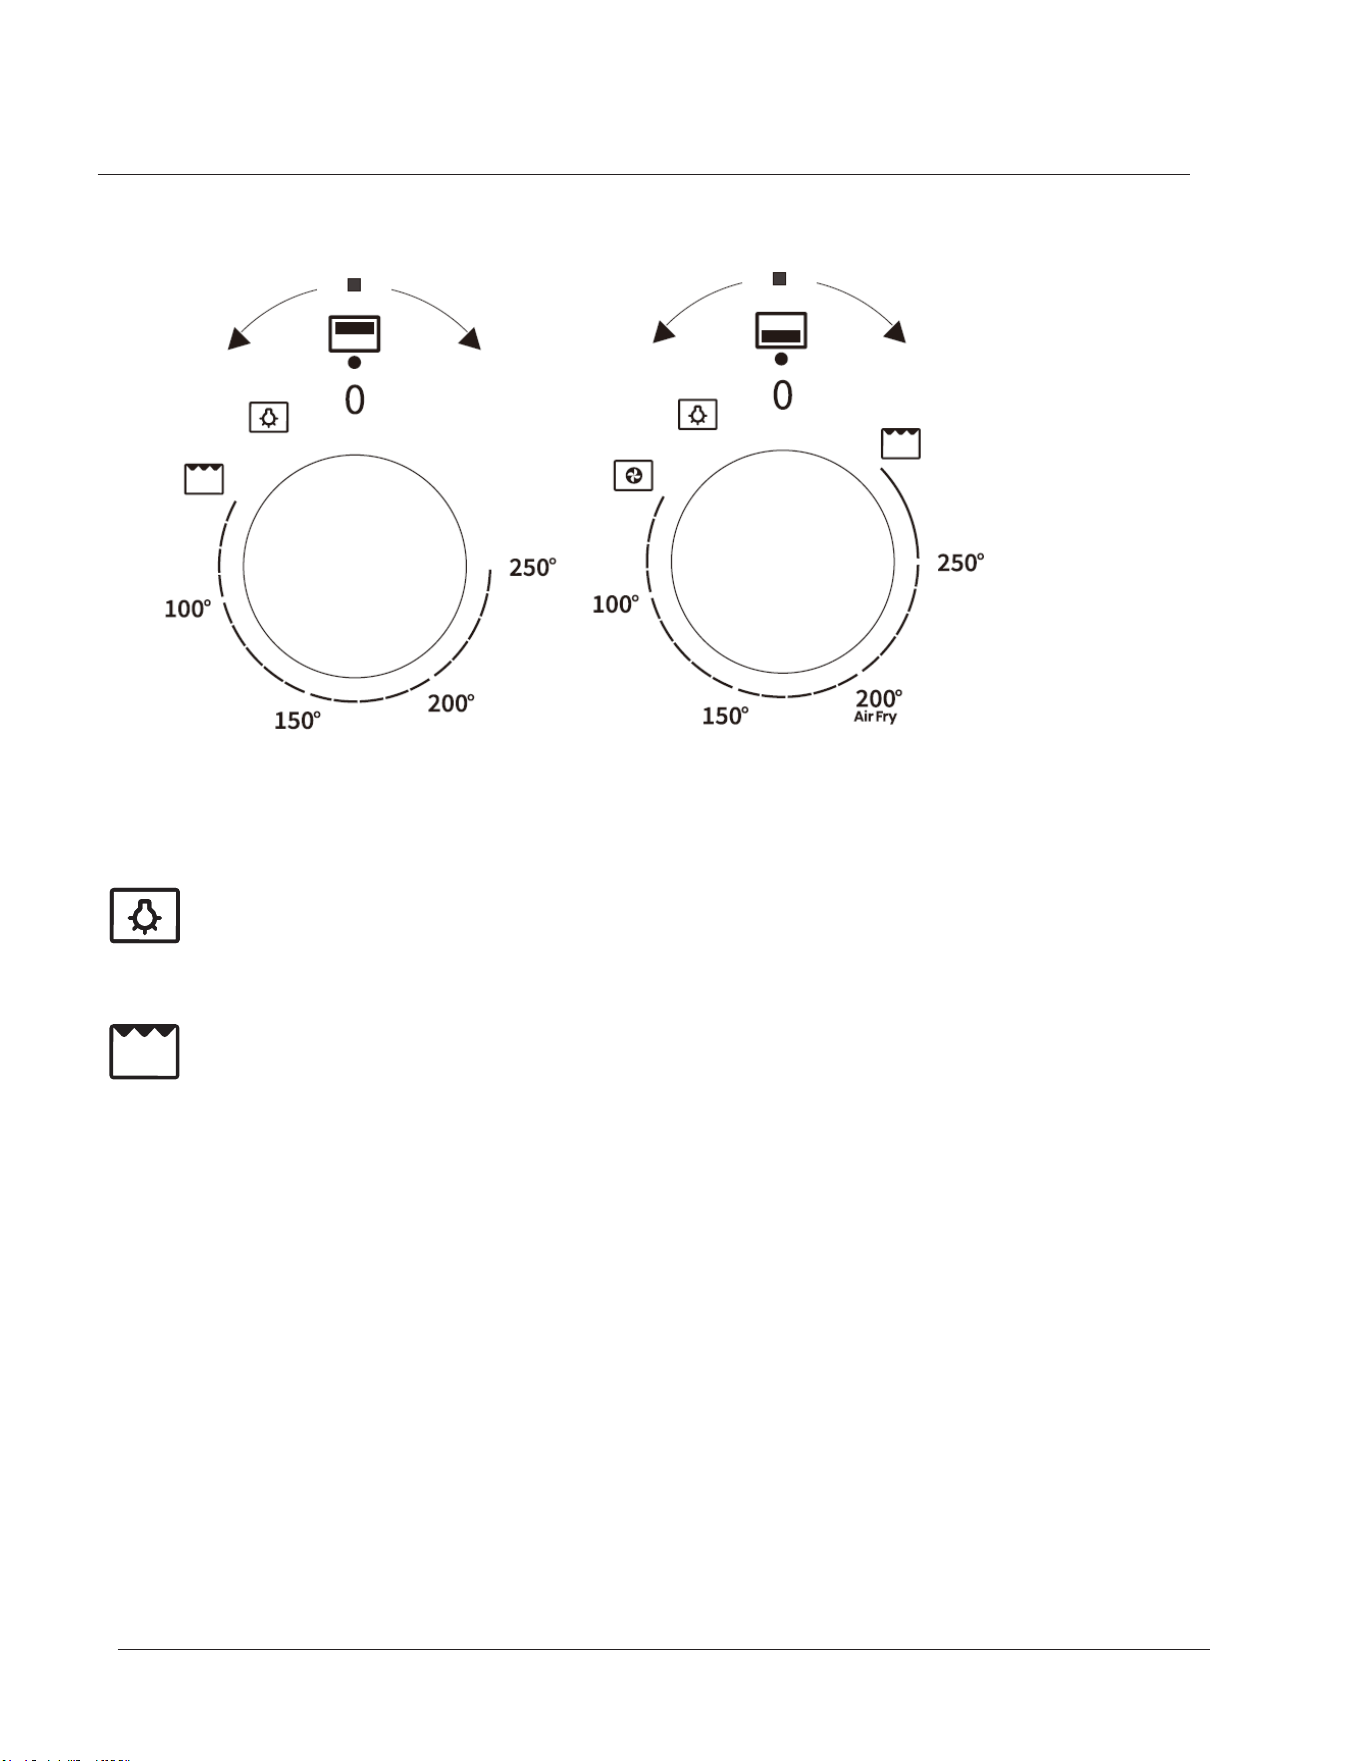
Oven functions
OOVVEENN LLIIGGHHTT:: SSeeppaarraattee lliigghhtt ccoonnttrrooll wwhhiicchh aalllloowwss tthhee lliigghhtt ttoo
bbee sswwiittcchheedd oonn,, eevveenn wwhheenn tthhee oovveenn iiss nnoott ccooookkiinngg..
Grill: The top central heating elements comes on .The extremely
high and direct temperature of the grill makes it possible to brown
the surface of meats and roasts while locking the juices in to keep
them tender. The grill is also highly recommended for dishes that
require a high temperature on the surface: beef steaks, veal, rib
steak, fillets, hamburgers etc.
Note:
Upper Oven: The adjustable temperature range of this function is 60-250°C.
Bottom Oven: The working temperature of this function is 250°C and the
temperature is not adjustable.
Using your Freestanding Cooker
Note: The indicator icon is on the knob
19
Fan Oven:
When set to Baking mode, the fan element and the fan operate
providing a delicate heat distributed uniformly throughout the
oven. This mode is ideal for baking and cooking delicate foods on
multiple shelves, especially cakes that need to rise such as cream
puffs and for certain tartlets, sweet or savory biscuits, savory
puffs, swiss rolls and small portions of vegetables. etc.
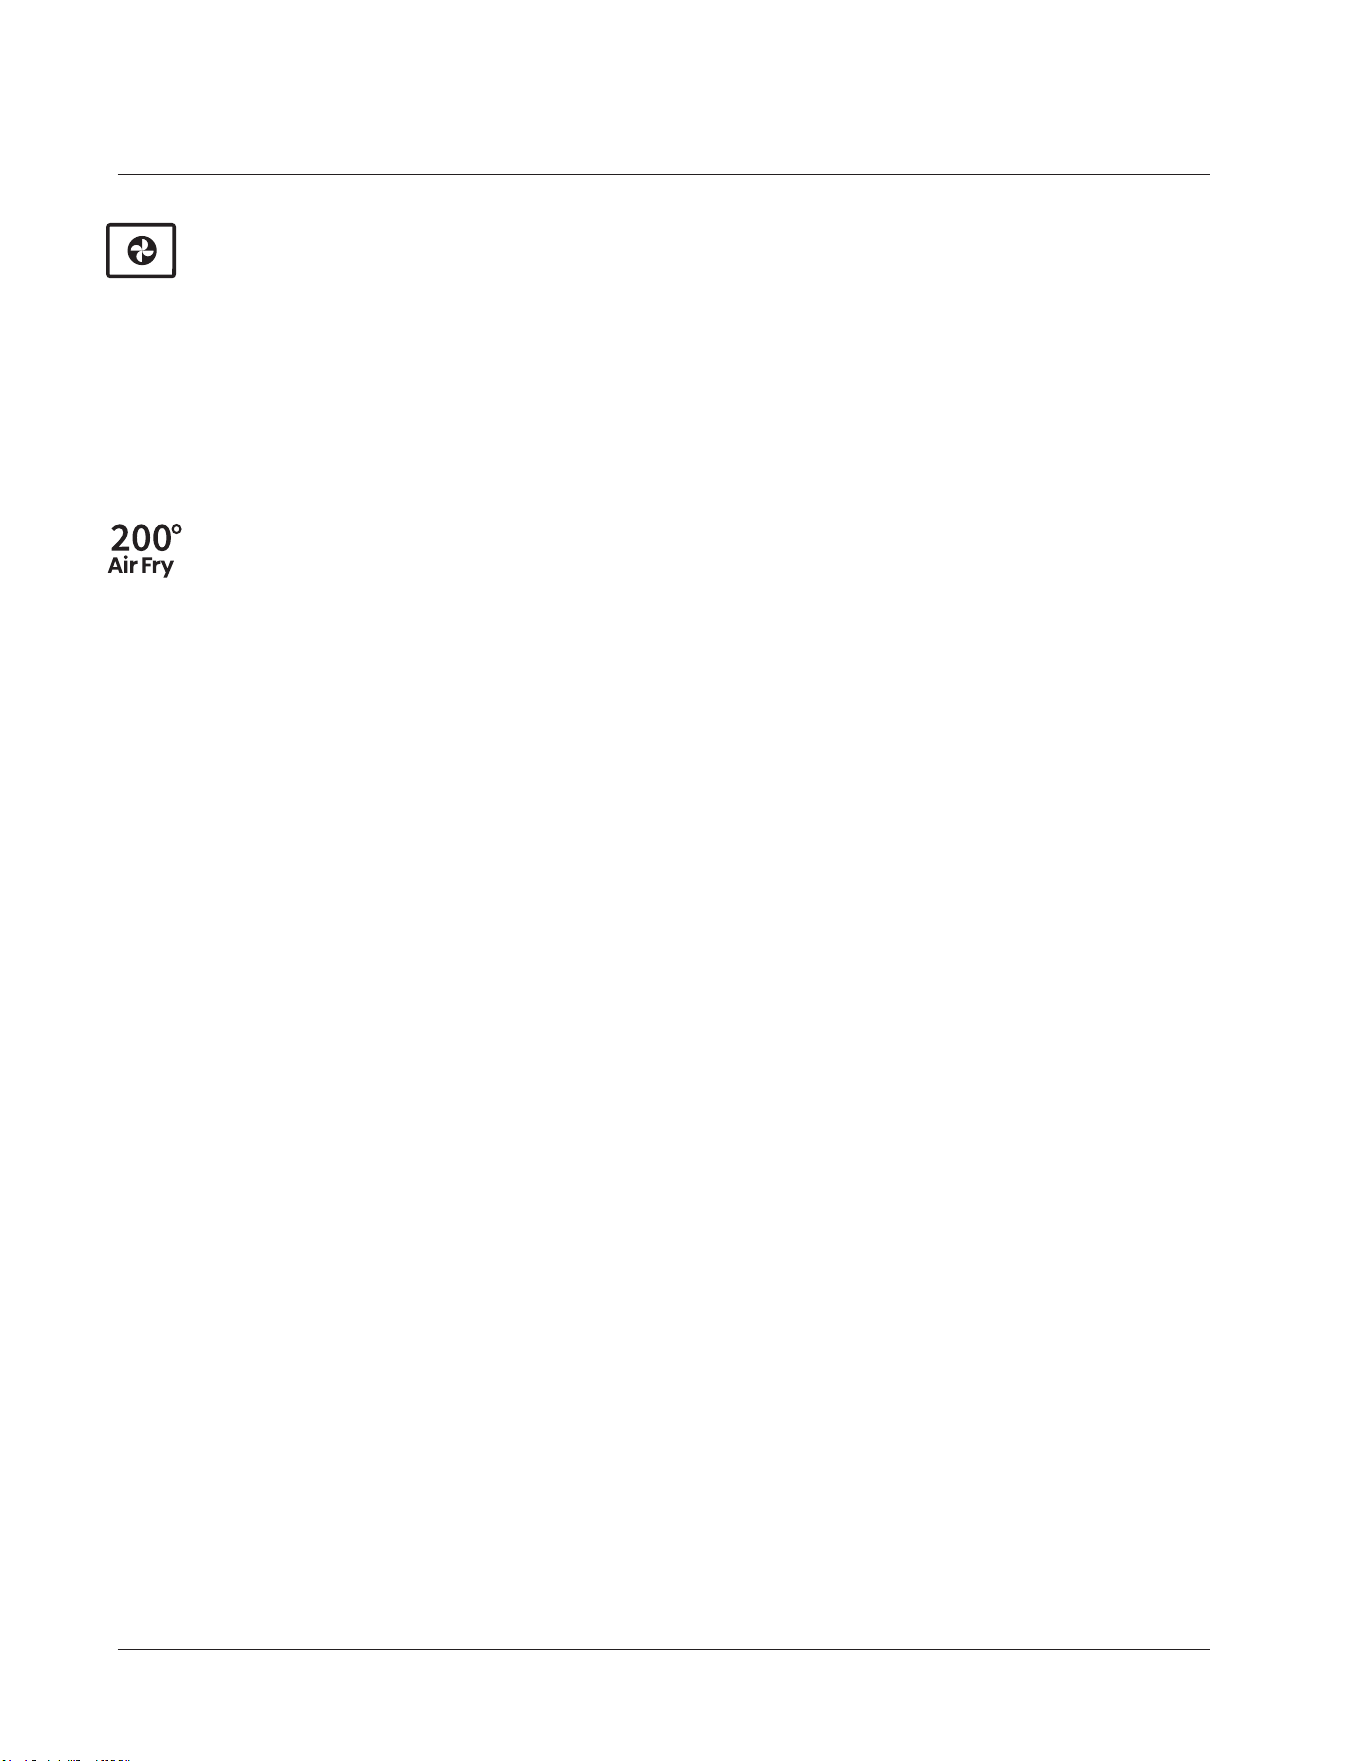
Air fry function:
By utilizing the rapid heating function, the internal air is
accelerated and evenly distributed, allowing the food to ripen; At
the same time, the hot air also blows away the moisture on the
surface of the food, making the ingredients achieve a similar frying
effect.
Note:
The adjustable temperature range of this function is 60-250°C.
The upper oven is used only for grilling and baking food with an upper heater.
Using your Freestanding Cooker
20
Note: The indicator icon is on the knob
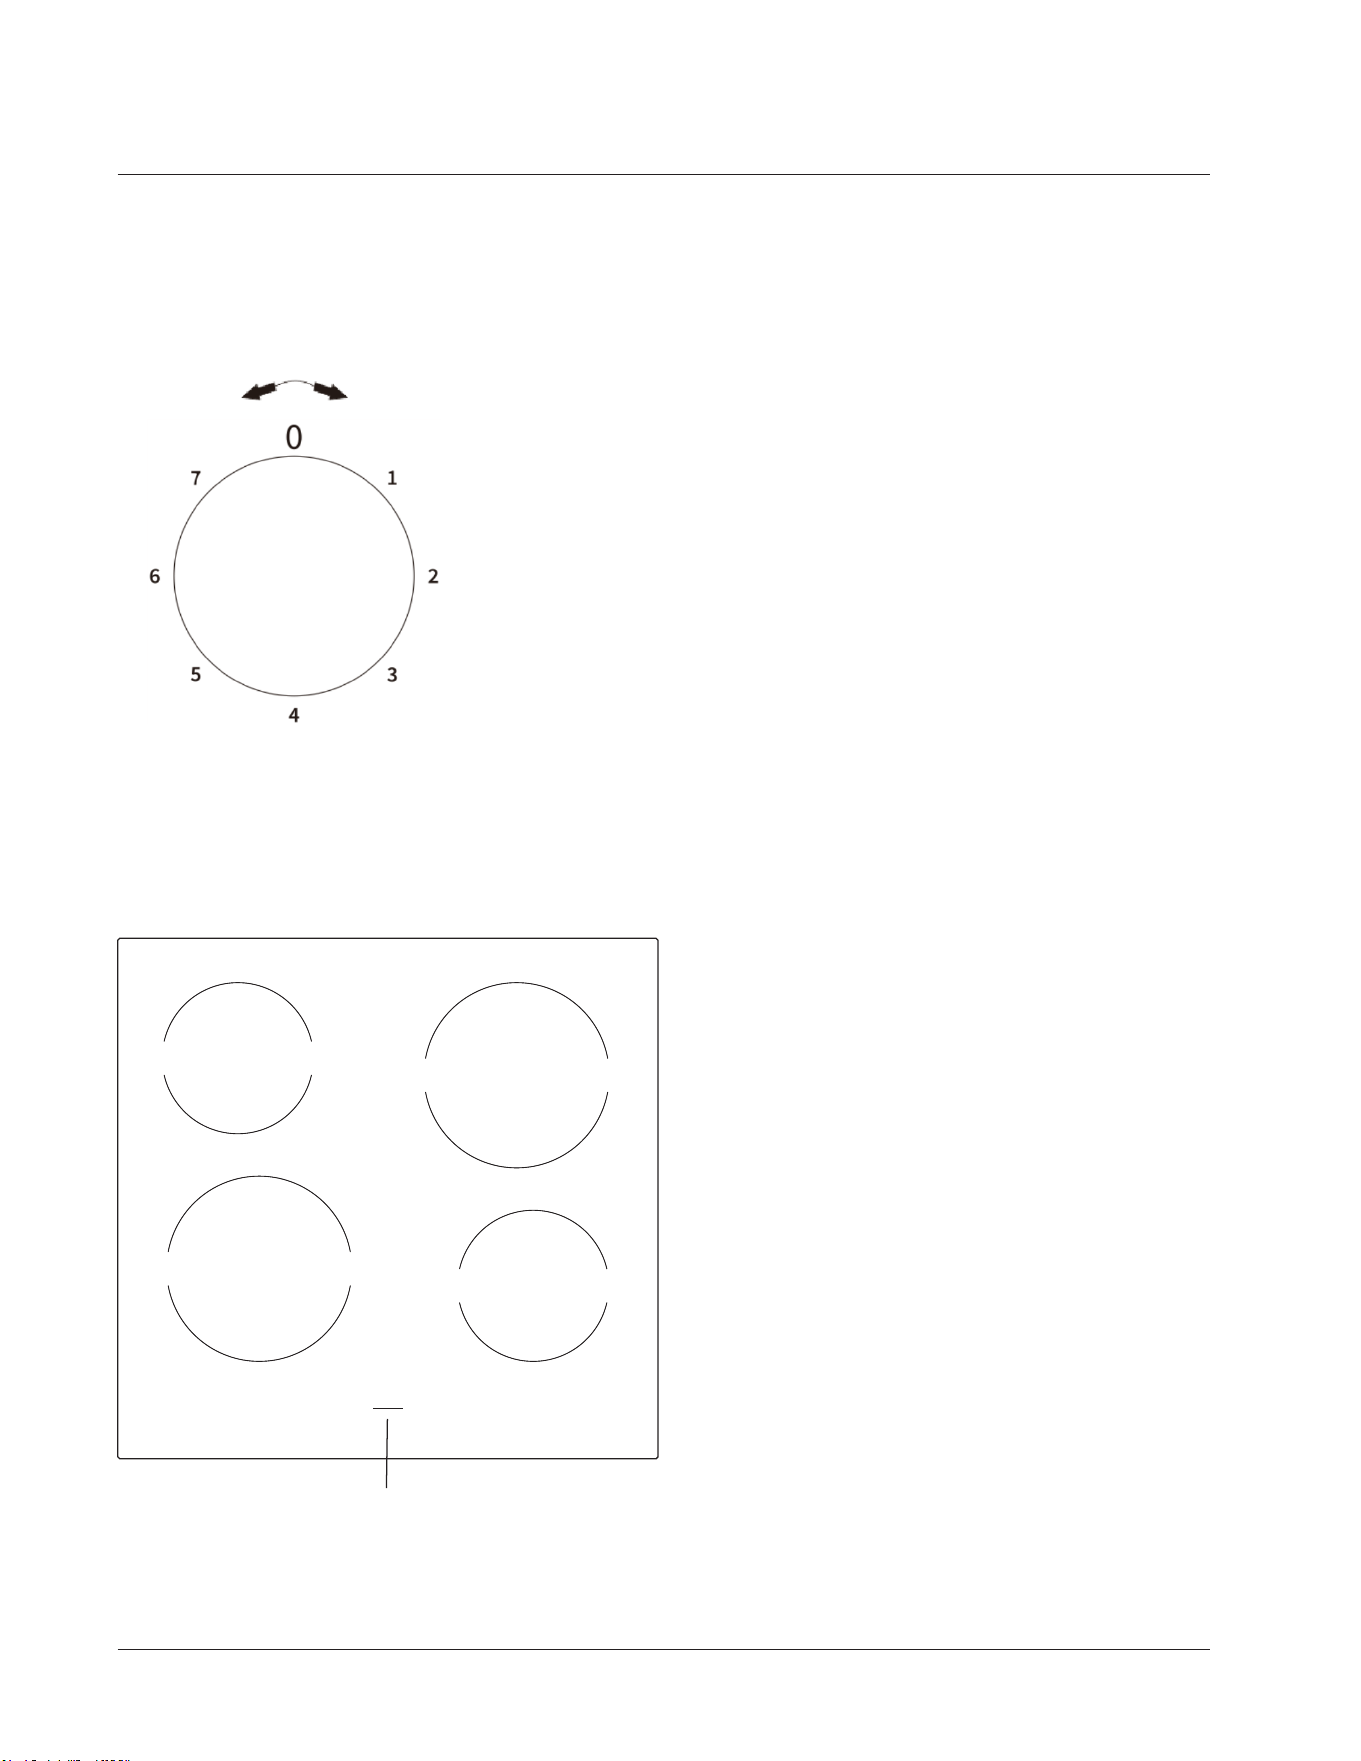
Level 7 : the Max power level
Level 1 : the Min power level
Level 0 : Zone Off
Zone heating indicator
1a
2a
3a
4a
Using the ceramic cooking zones of your cooker
Select the knob of the zone on the control panel, turn the knob to the
power level you want.
Using your Freestanding Cooker
21
Rated power
1800 W
1200 W
1800 W
1200 W
Diameter
1a Φ190 mm
2a Φ155 mm
3a Φ190mm
4a Φ155mm
Ceramic hotplate
Do not use if the ceramic glass top is cracked or broken.
Do not leave aluminum foil on the hot ceramic hotplates (permanent
damage will occur).
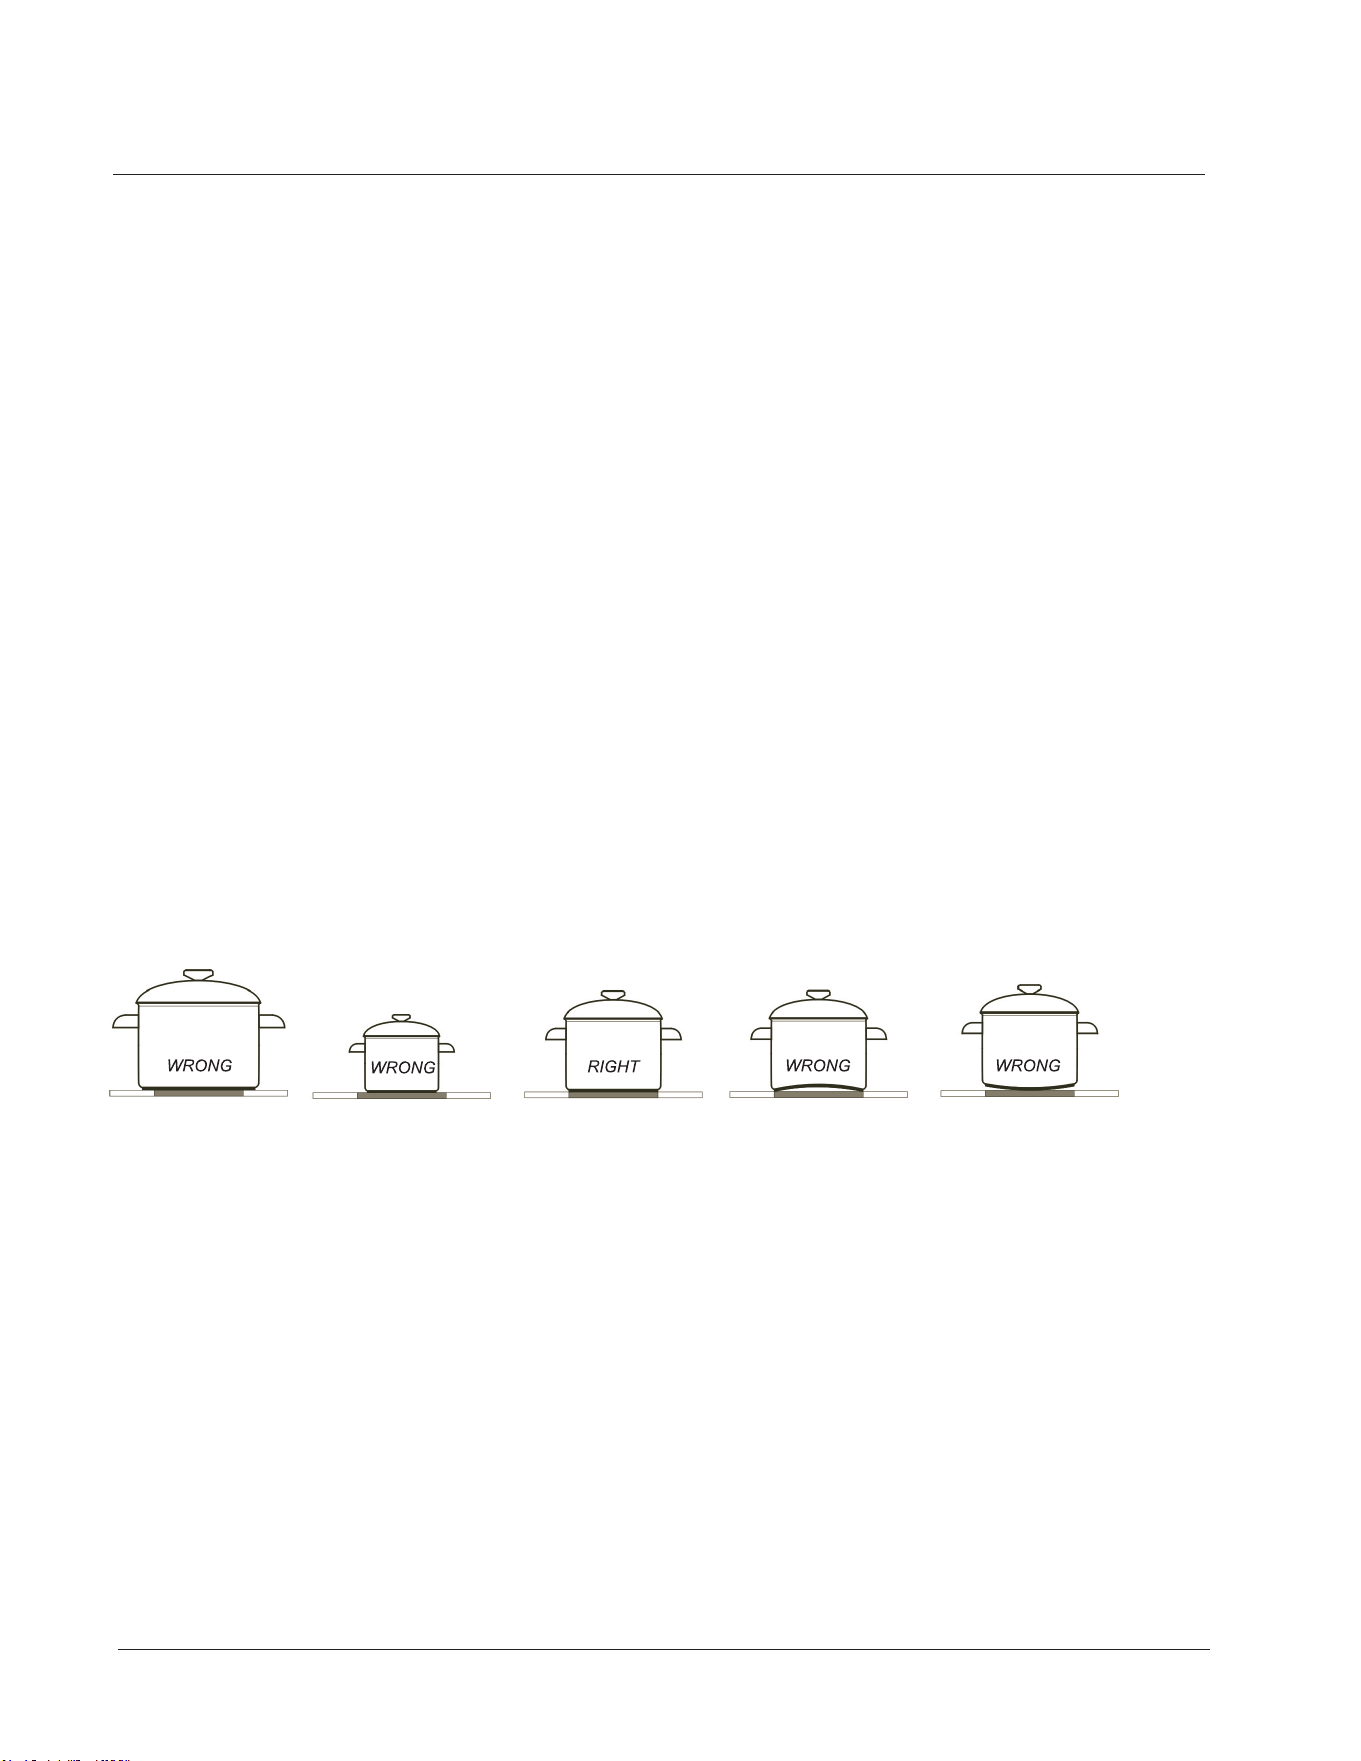
Choosing Cooking Pots
Look at this diagram below which shows you which pans to use on the
hotplates and which pans should not be used.
Always use pots and pans with flat bottoms. Uneven or thin bottoms will
waste energy and cook slowly.
Always use pots and pans which are slightly larger than the hotplate.
Small pans waste energy.
Always put dry pots and pans on the hotplates.
Using your Freestanding Cooker
22

The oven light
Set cooking mode selection knob to symbol to switch on the oven light/s. The
oven light/s stay on when the oven is operating.
General oven and cooking tips
The wire shelves should always be pushed firmly to the back of the oven.
Baking trays with food cooking on them
should be placed level with the front
edge of the oven’s wire shelves. Other containers should be placed centrally.
Keep all trays and containers away from the back of the oven, as over-browning
of the food may occur.
When the oven is on, do not leave the door open for longer than necessary,
otherwise the knobs may get very hot.
Always leave 1cm gap between dishes on the same shelf. This allows the heat
to circulate freely around them.
To reduce fat splashing when you add vegetables to hot fat around a roast, dry
them thoroughly or brush lightly with cooking oil.
Where dishes may boil and spill over during cooking, place them on a baking
tray.
Using your Freestanding Cooker
23

Using your Freestanding Cooker
Practical Cooking Advice
The oven offers a wide range of alternatives which allow you to cook any type
of food in the best possible way. With time you will learn to make the best use
of this versatile cooking appliance and the following directions are only a
guideline which may be varied according to your own personal experience.
Preheating
You should always preheat your oven before placing food in it to cook.
Once the food has been placed in the oven, the most appropriate cooking mode
can then be selected.
Using the Grill
Use the grill mode , placing the food under the center of the grill (situated on
the 3rd or 4th rack from the bottom) due to the central part of the top heating
element being active.
Please use the grill pan set provided ensuring that there is no unwanted spillages
formed inside your o
ven. When using this mode, we recommend you set the
thermostat to the highest setting. However, this does not mean you cannot use
lower temperatures, simply by adjusting the thermostat knob to the desired
temperature.
When using this mode, we advise you to set the thermostat to 200°C, as it is the
most efficient way to use the grill, which is based on the use of infrared rays.
Baking Cakes
When baking cakes, always place them in a preheated oven. Make sure you
wait until the oven has been preheated thoroughly (the pilot lamp will turn off).
To prevent cake from dropping/sinking - do not open the oven door during
baking.
Pastry is too dry
Increase the temperature by 10°C and reduce the cooking time.
Pastry dropped
Use less liquid or lower the temperature by 10°C.
Pastry is too dark on top
Place it on a lower rack, lower the temperature, and increase the cooking time.
24

Using your Freestanding Cooker
Cooked well on the inside but sticky on the outside
Use less liquid, lower the temperature, and increase the cooking time.
The Pastry sticks to the pan
Grease the pan well and sprinkle it with a dusting of flour or use greaseproof
paper.
Use a lower temperature setting. It is not necessary to remove the food from all
the racks at the same time.
Cooking Fish and Meat
When cooking white meat, fowl and fish, use temperature setting from 180°C to
200°C.
For red meat that should be well done on the outside while tender and juicy in the
inside, it is a good idea to start with a high temperature setting (200°C- 220°C)
for a short tim eth,en turn the oven down afterwards.
In general, the larger the roast, the lower the temperature setting. Place the meat
on the center of the grid and place the dripping pan beneath it to catch the fat.
Make sure that the grid is inserted so that it is in the center of the oven. If you
would like to increase the amount of heat from below, use the low rack heights.
For savory roasts (especially duck and wild game), dress the meat with lard or
bacon on the top.
25

Care and maintenance
Cleaning
WARNING! Isolate the power supply to the appliance and make sure that the
cooker is cool.
Before cleaning your cooker or performing maintenance, make sure that the
cooking mode selection knob and the cooking temperature selection knob is set
to ‘OFF’. To extend the life of your cooker, it must be cleaned frequently. The
inside of the cooker should preferable be cleaned immediately after use, when it
is still warm (but not hot, with warm water and soap. The soap should be rinsed
away and the interior dried thoroughly. Avoid using abrasive detergents,
scourers, acidic cleaners such as lime scale remover, etc, as these could damage
the enamel, and can result in development of rust and corrosion. If stains are
particularly tough to remove, use cleaners specifically recommended to clean
cookers and follow the instructions provided with the cleaner.
Never use steam cleaner for cleaning inside the cooker.
Do not clean using caustic creams, abrasive cleaning powders, thick wire wool or
hard tools. Enamelled parts of the cooker can be damaged if excess cleaning
liquids are not immediately removed.
After cleaning the interior parts of the cooker with a soapy cloth, rinse it and
then dry thoroughly with a soft cloth.
Clean the glass surfaces with special glass cleaning agents.
Never use flammable agents like acid, thinner or petrol when cleaning your
appliance.
Clean the glass surfaces with special glass cleaning agents.
Do not clean your cooker with a steam cleaner.
Do not wash any part of your cooker in a dishwasher.
Enamelled Parts:
In order to keep enamelled parts as new, it is necessary to clean them frequently
with mild warm soapy water and then dry with a cloth. Do not wash them while
hot and never use abrasive powders or abrasive cleaning materials. Do not leave
anything spilled onto enamelled parts for long periods of time.
26
Care and maintenance
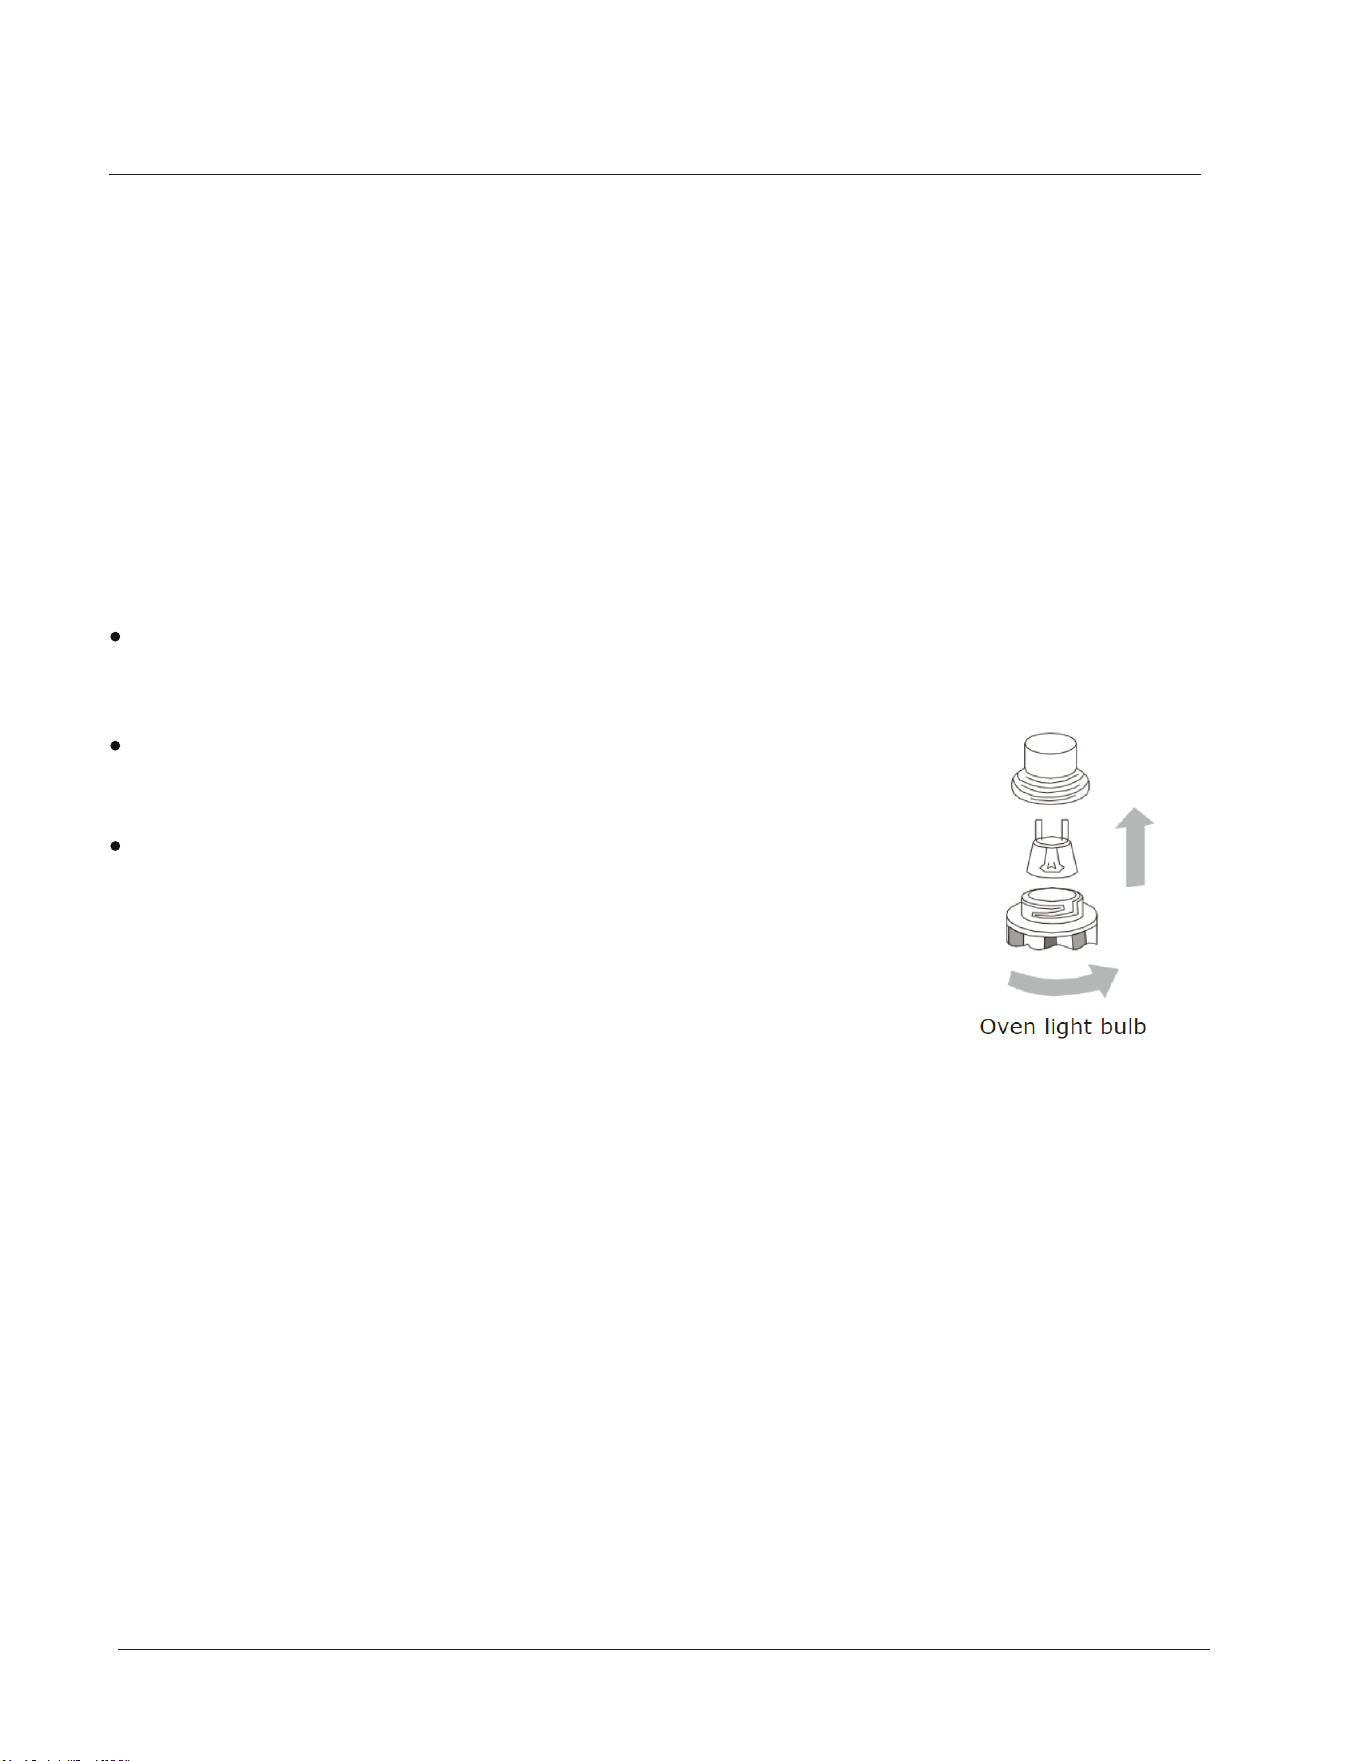
Replace the glass cover. Reconnect the appliance to the mains power supply.
Remove the glass cover of the lamp-holder by rotating
anti-clockwise.
Remove the lamp and replace with a lamp resistant to
high temperatures (300°C) with the following
characteristics:
Disconnect the oven from the power supply at the fuse-box by means of
the switch used to connect the appliance to the electrical mains ;or unplug
the appliance.
Replacing the oven lamps
Voltage: 220-240V
Wattage: 25W
Type: G9
Ceramic Glass:
The ceramic glass should be regularly cleaned, always wipe clean immediately
after each use once the residual heat warnings have switched off - DO NOT
clean when hob is still hot. Smudges from pans with an aluminum bottom can
be easily cleaned off with a cloth dampened in vinegar. Remove any burnt
residues immediately after cooking, rinse with water and wipe dry with a clean
cloth. Never use abrasive or corrosive detergents, cleaning powders, oven
sprays, spot-removers, steel wool or scourers.
27
Care and maintenance
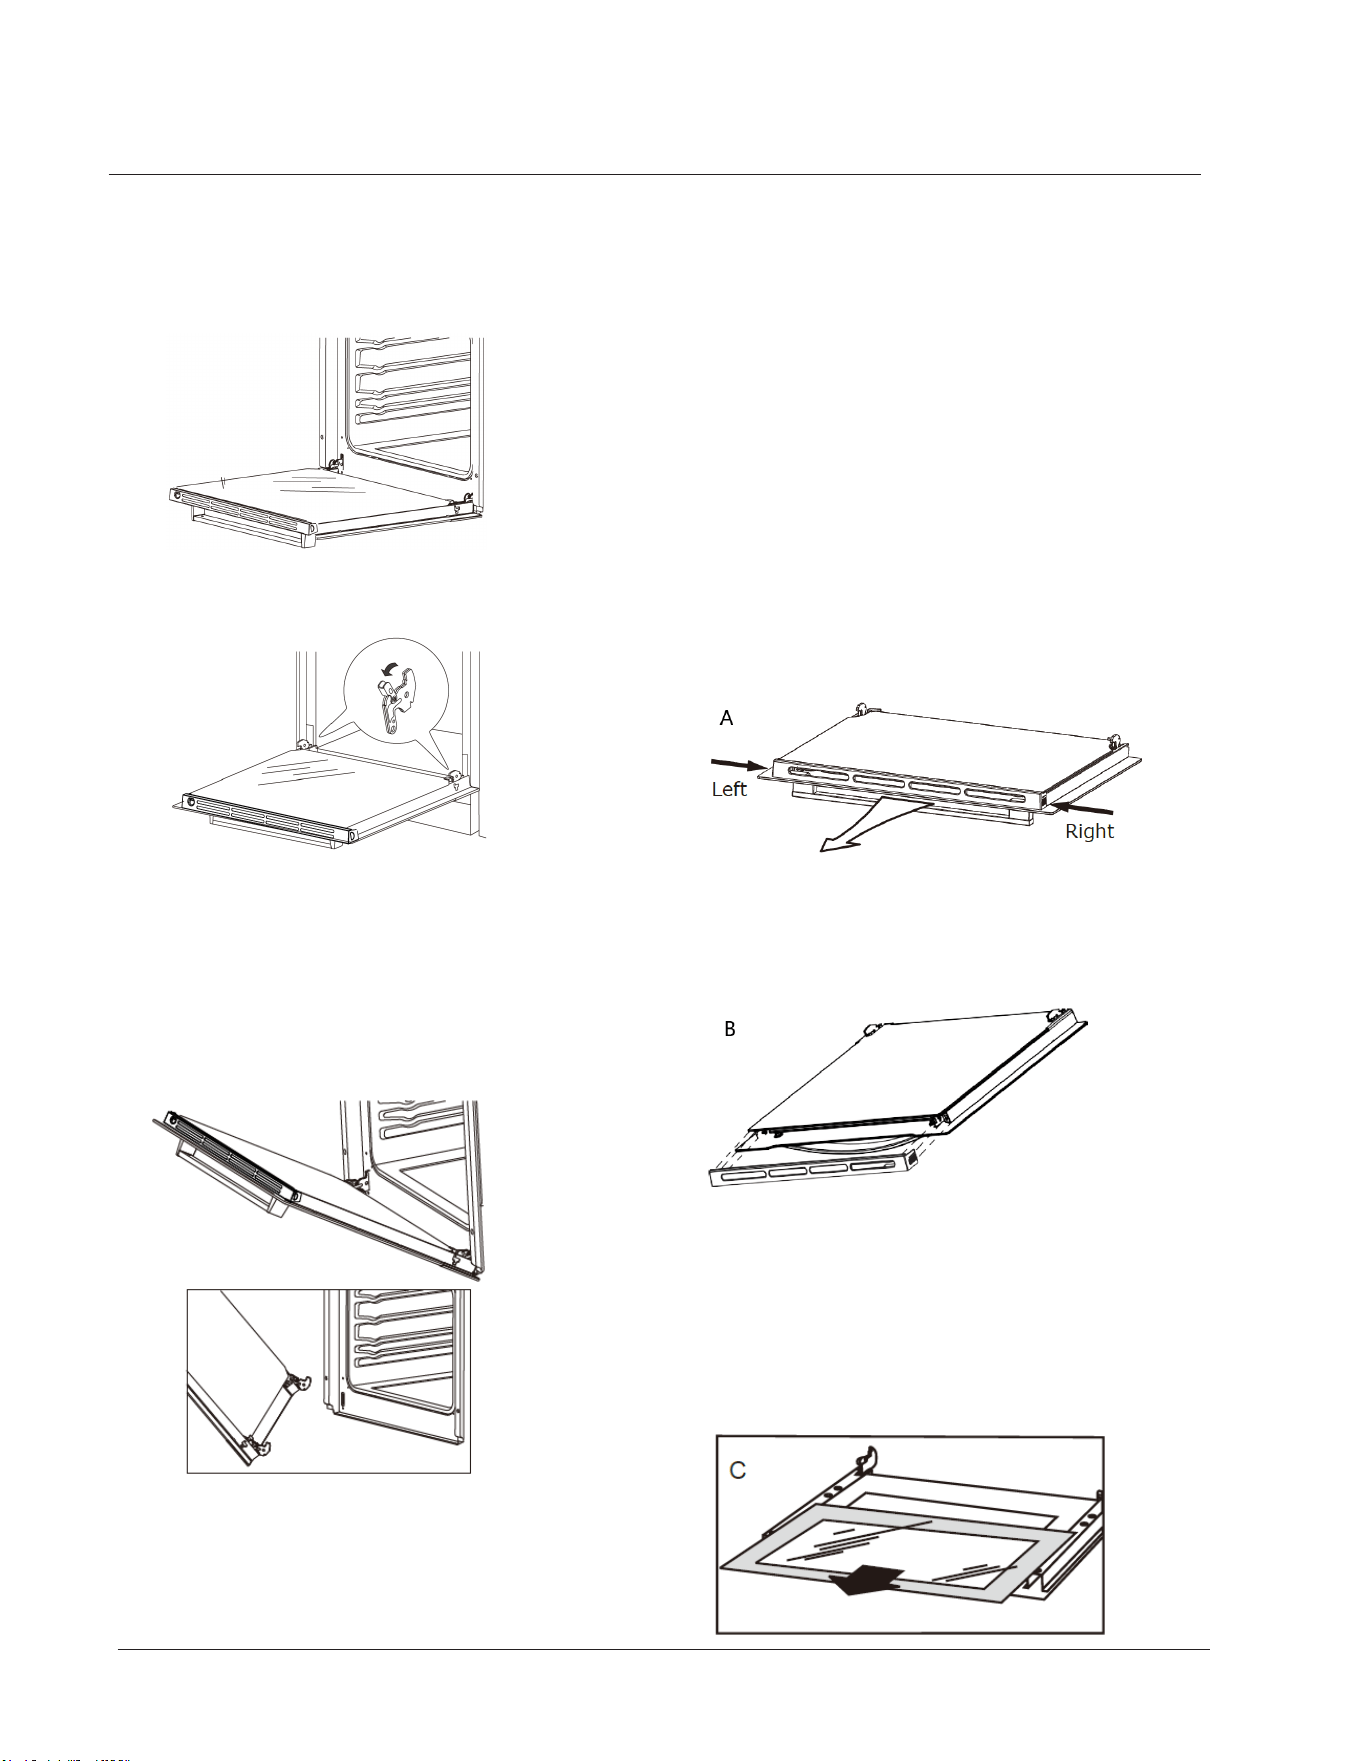
Removing the doors
a. The oven door is fully open.
b. The latch hinges completely lifted.
c. Gently close the oven door until you
hear the sound of engagement, once
they reach a clamping position, with
both hands holding the door and
continue to push, pull up at the same
time so that the hinge bolt removed
from the oven.
d. After cleaning, align the hinge with
the oven door. Latch and push it until
it catches. Take care to ensure that
the hinge and door are properly.
aligned to avoid door damage.
If in doubt, contact the service centre
- information is listed on the back of
this user manual.
e.With the oven door fully opened,
push the latch down to it's initial
position to complete the oven door
installation.
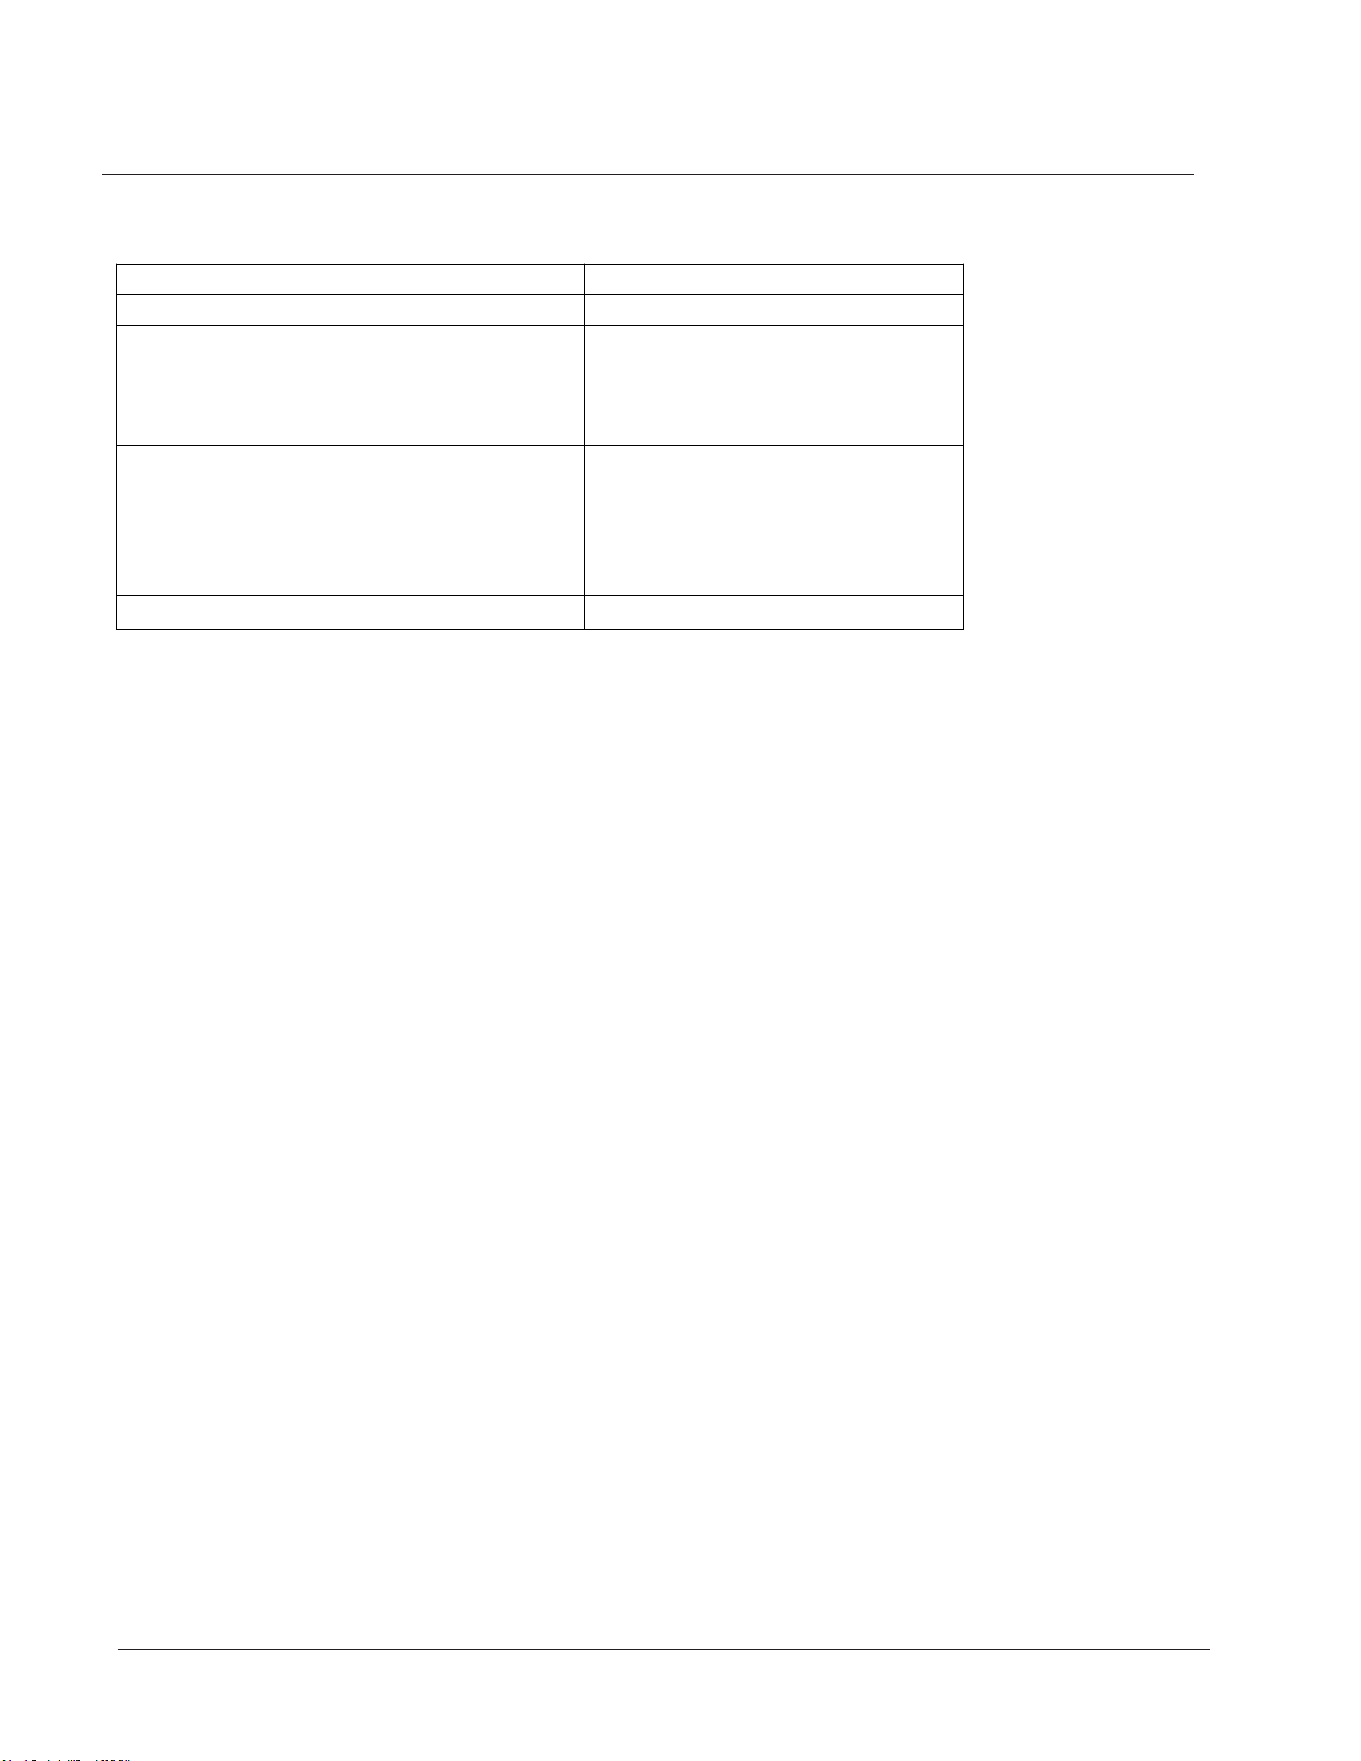
Remove the inner glass panel
a.Press and hold the two sides of the
grid wiboth hands to pull it out .
Pull out the grid
b. Remove the inner glass
c. Locate the glass stopper and remove
it.Remove the glass for cleaning. To
reinstall the inner glass, simply gently
place it back onto the door and reinsert
the glass stopper to secure the glass in
place.
Cleaning the oven door / How to remove the oven doors
28
Cooking hob 50cm Ceramic Cooker
Hob Cooking Zones 4 Zones
Supply Voltage
220-240V~
50/60Hz
Installed Electric Power Max Total Power:9400W
Hob:6000W
Oven:
Upper:1600W
Lower:1800W
Product dimension
500 x 600 x 900mm
We apologise for any inconvenience cause by minor inconsistencies
within these instructions that may occur due to product improvements
and development.
All images and drawings are for illustration purposes only.
Technical specification
Technical Data
29
Energy fiche
Brand
Product fiche pursuant to Delegated Regulation(EU) No. 65/2014 and 66/2014
Product Line
Net weight(kg)
Large Description
84.9
86.9
A
A
0.62
-
-
0.73
2
Electricity
43L
69L
0.9W ( with electric timer)
-
Energy consumption conventional(kWh) - cavity 1
Energy consumption conventional(kWh) - cavity 2
Energy consumption forced air convection(kWh) - cavity 1
Energy consumption forced air convection(kWh) - cavity 2
Oven number
Heat source
Cavity capacity(I) - cavity 1
Cavity capacity(I) - cavity 2
Power Consumption in standby mode
Power Consumption in network stand-by mode
Energy Saving
Tips Oven
- Cook the meals together, if possible
- Keep the pre-heating time short
- Do not elongate cooking time
- Do not forget to turn-off the oven at the end of cooking.
- Do not open oven door during cooking period
Type of Hob Electric
Number of Cooking Zones 4
Heating Technology-1
Size-1
cm
Energy Consumption-1 Wh/kg
Heating Technology-2
Size-2 cm
Energy Consumption-2 Wh/kg
Heating Technology-3
Size-3 cm
Energy Consumption-3 Wh/kg
Heating Technology-4
Size-4 cm
Energy Consumption-4 Wh/kg
Energy Consumption of Hob Wh/kg
This hob complies with EN 60350-2
Energy Saving Tips
Hob
- Use cookwares having flat base
- Use cookwares with proper size .
- Use cookwares with lid.
- Minimize the amount of liquid or fat.
- When liquid starts boiling , reduce the setting.
Ceramic
Ø19
191.7
195.9
195.3
Ceramic
Ø15.5
Ceramic
Ø15.5
Ceramic
Ø19
181.7
191.1
HDCEC5C10W / HDCEC5C10B
FS Cooker with Double Oven
Energy Efficiency Index, EEl Cav 1
Energy Efficiency Index, EEl Cav 2
Energy efficiency - cavity 1
Energy efficiency - cavity 2
Technical Data
-
30
Troubleshooting
If you have a problem with your appliance, check the troubleshooting table
below to try and rectify your problem before calling your product support
service centre.
Problem Possible Cause Solution
Nothing works
The cooking zones are
not operating
Oven not heating up
Oven will not operate Control knob is not
set in the correct
position
Move the control knob In
a clockwise direction and
select the desired
function
Power is turned off at
the isolation switch or
the consumer unit
Poor electrical
connection
Poor electrical
connection
Power is turned off at
the isolation switch
Oven temperature not
set correctly
Door is not properly
closed
Ensure isolation switch is
on and check the
consumer unit has not
tripped out
Have the connections been
checked by a qualified
electrician?
Ensure that the
correct temperature
has been selected
and the door is
properly closed
Have the connections been
checked by an electrician
electrician?
Ensure the isolation switch
is on, check the consumer
unit has not tripped out
Product support
31

Declaration of conformance to product standards
This appliance conforms to all relavant standards applicable to domestic appliances sold
in the UK.
Disposal
This appliance/fitting is marked according to the European directive
2012/19/EU on Waste Electrical and Electronic Equipment (WEEE).
By ensuring this product is disposed of correctly, you will help prevent
potential negative consequences for the environment and human health,
which could otherwise be caused by inappropriate waste handling of this product.
The symbol on the product, or on the documents accompanying the product, the crossed
out wheelie bin symbol, indicates that this appliance/fitting may not be treated as
household waste. Instead it shall be handed over to the applicable collection point for the
recycling of electrical and electronic equipment.
Disposal must be carried out in accordance with local environmental regulations for
waste disposal.
For more detailed information about treatment, recovery and recycling of this product,
please contact your local authority, your household waste disposal service or the retailer
where you purchased the product.
Product support
32