USER MANUAL
Smart Air Dehumidifier & Purifier
Model:
AroDry-P10 & AroDry-P16
This user manual provides safety and opera�ng instruc�ons.
Please read this user manual thoroughly before using the product.
This user manual will help get to know your dehumidifier in just a few quick minutes.

Copyright © 2019-2021, Arovec, Australia. All Rights Reserved.

3
Important Safety Instruc�ons
Ge�ng to Know Your Dehumidifier
Before the First Use
Product Features & Opera�on
Draining the Collected Water
Filters Cleaning & Replacement
Cleaning & Care
Storage
Disposal
Troubleshoo�ng
Warranty Informa�on
Defec�ve Products & Returns
Customer Support – Australia
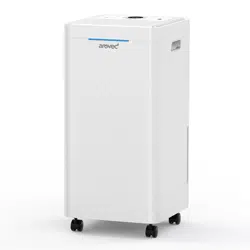
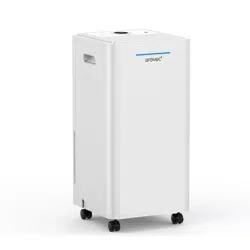
1 AroDry-P10/AroDry-P16 Smart Air Dehumidifier & Purifier
1 Filter Pack (Pre-fi�ed)
1 Drain Hose
1 User Manual
1 Warranty Card
4
5
7
9
12
13
15
15
15
16
17
18
18
Product AroDry-P10 AroDry-P16
Dehumidifica�on Capacity
10 L/day (30
�
C RH 80%)
5 L/day (27
�
C RH 60%)
Water Tank Capacity
Coverage Area
Noise Level
Rated Power
Standby Power
Voltage/Frequency
Refrigerant
Net Weight
Product Dimensions
2.5 L
Up to 30 m
2
42 dB
220 W
<0.5 W
220-240 V / 50 Hz
R134 A (60 g)
9.5 kg
25 × 25 × 46 cm
16 L/day (30
�
C RH 80%)
8 L/day (27
�
C RH 60%)
2.5 L
Up to 50 m
2
42 dB
210 W
<0.5 W
220-240 V / 50 Hz
R134 A (105 g)
10.5 kg
25 × 25 × 46 cm
THANK YOU FOR CHOOSING THE AROVEC SMART
AIR DEHUMIDIFIER & PURIFIER
We are here to help you with any ques�ons.
Customer Support - Australia
www.arovec.com.au
@aroveclifestyle
Table 1: Technical Specifica�ons
PRODUCT SPECIFICATIONS
PACKAGE CONTENTS
TABLE OF CONTENTS

4
• Always turn off and unplug the dehumidifier before cleaning, emptying the water tank, changing the filter and if it
is not in use.
• Do not use the dehumidifier if it has been dropped, damaged, le� outside, dropped in water or not working
properly.
• If the dehumidifier falls over with a full water tank, immediately unplug the power cord. Ensure the unit is dried
thoroughly before resuming opera�on.
• Do not move the dehumidifier when the water tank is full to prevent water spillage.
• Water collected in the water bucket should not be used for drinking, serving animals and plants watering. Use a
drainage to empty the water.
• Do not turn on the dehumidifier when the water tank is removed from the unit.
• Do not remove the water tank when the dehumidifier is turned on.
• Do not use the dehumidifier when the cord looks damaged.
• Do not use the dehumidifier near gas appliances, fire places, stoves, candles, or hea�ng devices.
• Posi�on the appliance at a minimum distance of 30 cm away from walls, curtains and other heat or steam
sensitve materials and provide adequate space above and on all sides for air circula�on.
• Do not use the dehumidifier in an area with insect repellents, burning incense, toxic fumes, flammable dust or
oxygen tanks. Always leave at least 1.5 m of clear space from any oxygen being administered.
• Do not run the power cord under furniture, other appliances, carpet, or cover with rugs, runners or floor
covering.
• Always tuck away the power cord to prevent tripping accidents.
• Do not put the dehumidifier on an unstable surface e.g. bed or couch.
• Do not touch any part of the dehumidifier with the wet hands.
• Do not immerse the dehumidifier in water or liquids to avoid electrical hazards and possible damages.
• Do not use the dehumidifier in the immediate surroundings of a bath, shower, or swimming pool.
• Do not use for commercial or/and outdoor purposes. This appliance is for household only.
• Do not a�empt to repair or adjust any electrical or mechanical func�ons of the dehumidifier, as this may cause
danger and void the warranty.
• Do not let children or people with reduced physical or mental capabili�es to use or clean the dehumidifier.
• Do not let children play with this appliance or packaging including plas�c bag. Children must
be supervised around the dehumidifier to help keep them safe.
• Do not sit on the dehumidifier or put any object on the top of the unit.
• Do not block the air inlet/outlet of the dehumidifier. Keep free of anything that cause airflow reduc�on.
• Do not insert fingers or any object into the air inlet/outlet, par�cularly when the device is plugged in power
source.
• Do not pull the cord to unplug the dehumidifier.
• Do not use an external �mer or control device to switch on the dehumidifier automa�cally since a fire risk may
occur if the dehumidifier is covered or posi�oned incorrectly.
• Do not spray air fresheners, perfumes, or oils on or near the dehumidifier.
• Do not fit the dehumidifier with a different power supply rather than 220-240 V power outlet.
• During electrical storms, the appliance should be disconnected from the power source at the wall socket to
prevent any electrical surges which may cause damage to the unit’s electronic componentry.
• Keep the dehumidifier and dust filters clean. Do not clean the device while it is plugged in and follow the cleaning
instruc�ons provided in this user manual.
• It is recommended to not use the appliance with a nonstandard extension cord to avoid electrical shock or spark.
Please read all safety instruc�ons before use to prevent the risk of injury, fire, electric shock or damage. Use your
dehumidifier safely by following the instruc�ons in this user manual.
Cau�on! Please keep these safety instruc�ons in a safe place and always follow the
recommended instruc�ons in this user manual for any hazard preven�on to you and your device.
IMPORTANT SAFETY INSTRUCTIONS
5
Introduc�on
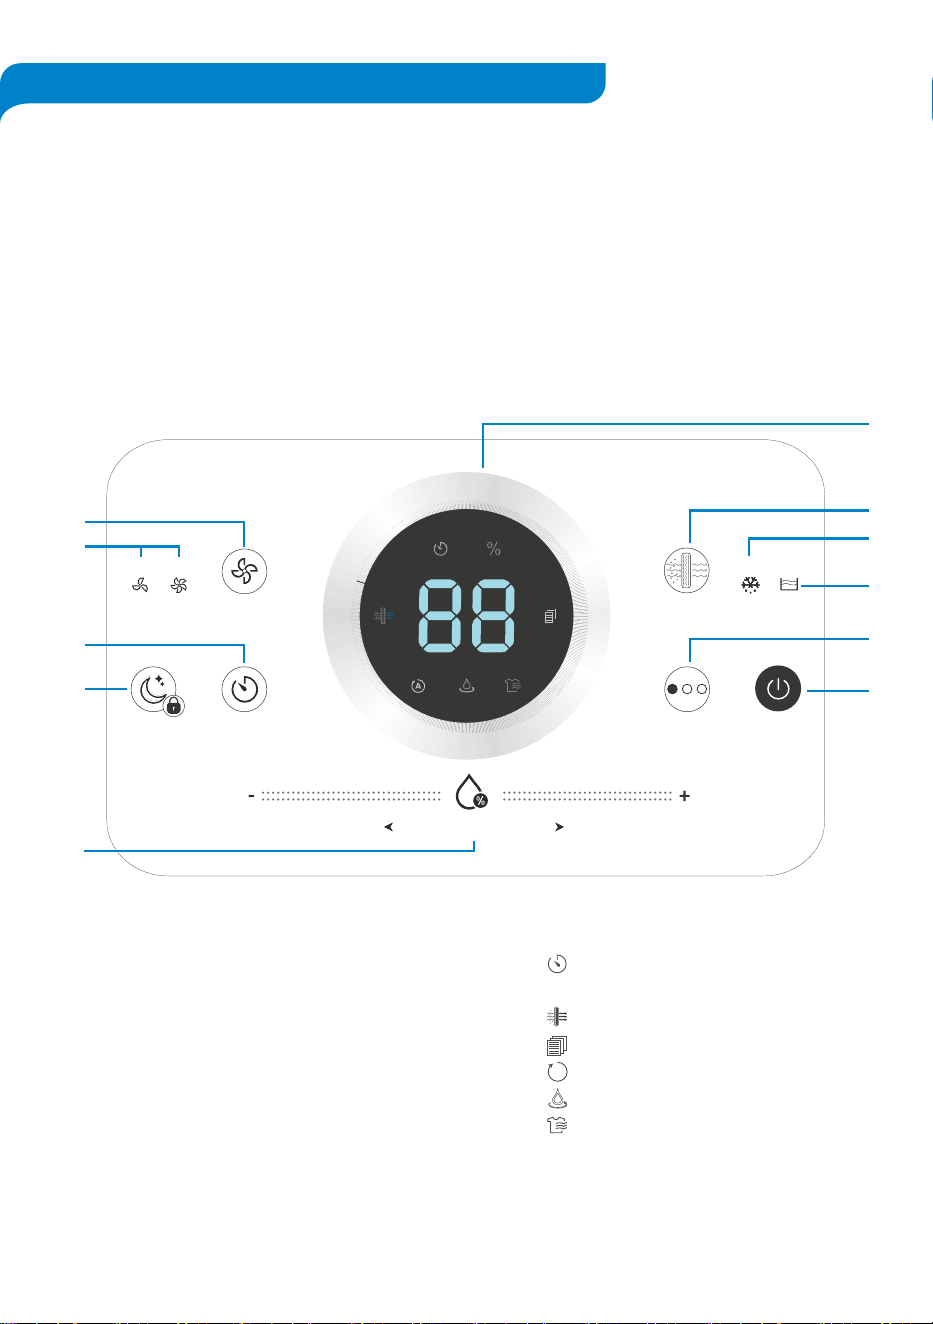
Control Panel Diagram
AroDry-P10 & AroDry-P16 are smart 2-in-1 dehumidifier and air purifiers which reduce
humidity levels, making your home less hospitable to allergens such as dust mites, mould
and mildew. These smart dehumidifiers with their excep�onal bi-func�onality fulfil both air
dehumidifica�on and purifica�on op�onally and according to your choice. Also, their
fantas�cally designed shape maximise fashion in your room.
Low High Defrost Tank Full
Humidity Level (%RH)
Speed Only Air Purifier
Night Mode
Child-lock (3s)
Auto. Cont. LaundryTimer Power
F
A
B
C
D
E
G
H
I
J
K
A.
B.
C.
D.
E.
F.
G.
H.
I.
J.
K.
Speed mode bu�on
Low and high speed mode indicators
Timer bu�on
Night mode & child-lock bu�on
Humidity level control
Display panel
Only air purifier mode bu�on
Auto defrost indicator
Tank full indicator
Dehumidifier modes (Auto, Con�nuous, Laundry) bu�on
Power ON/OFF bu�on
Timer
Rela�ve humidity level
Only air purifier mode
Filter change reminder
Auto-mode dehumidifica�on
Con�nuous-mode dehumidifica�on
Laundry-mode dehumidifica�on
%
Display Icons:
A
GETTING TO KNOW YOUR DEHUMIDIFIER
6
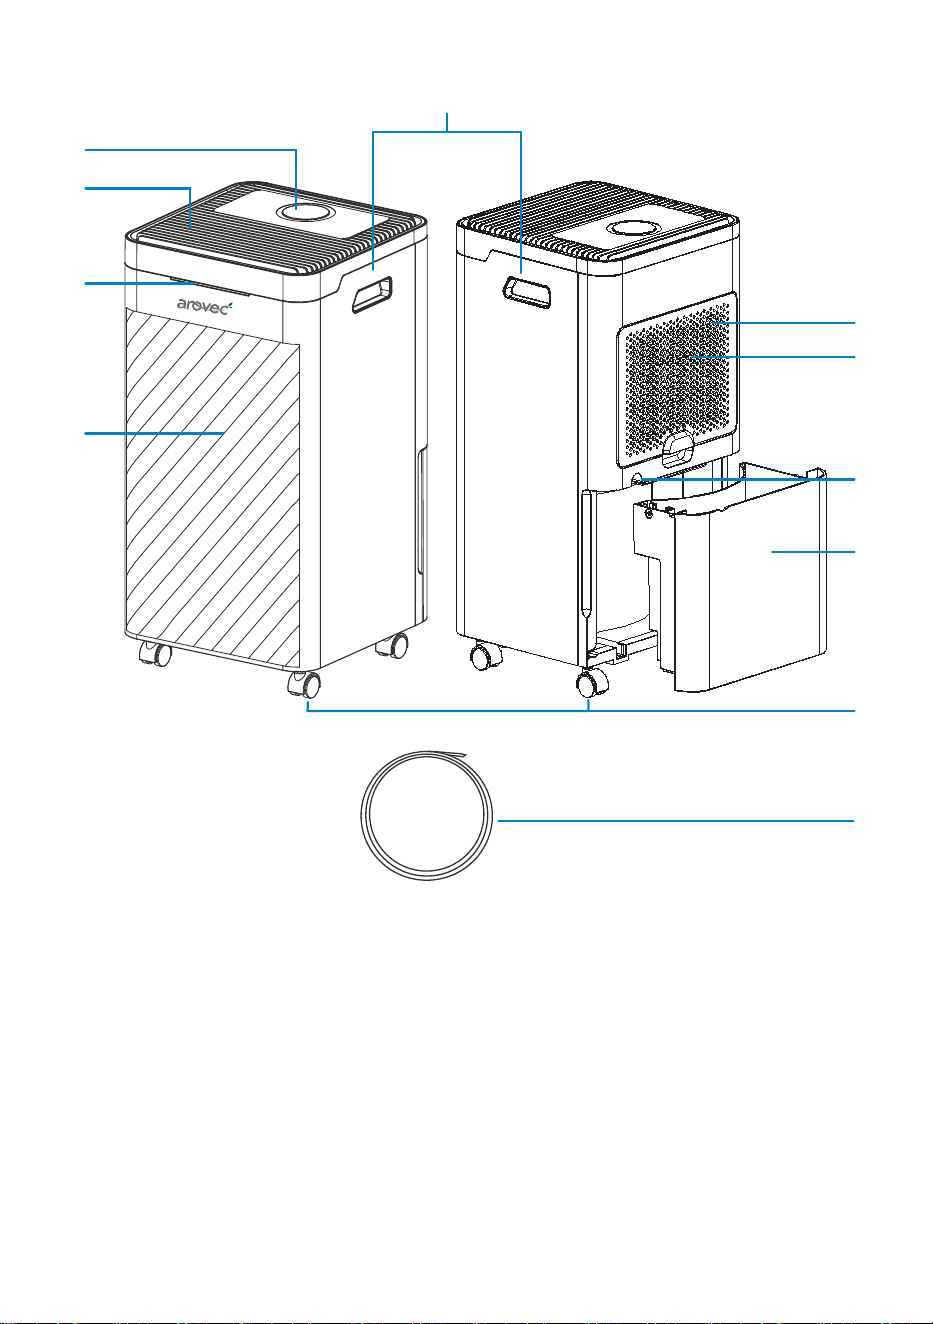
Components Diagram
Control panel
Air outlet
Humidity level status indicator
Body
Carry handle
Air filter
• Preliminary filter
• High grade H13 True HEPA filter
• Ac�vated carbon filter
Air inlet
Drain hose outlet
Water tank
Wheels
Drain hose
A.
B.
C.
D.
E.
F.
G.
H.
I.
J.
K.
A
B
C
D
E
K
F
G
H
I
J
7
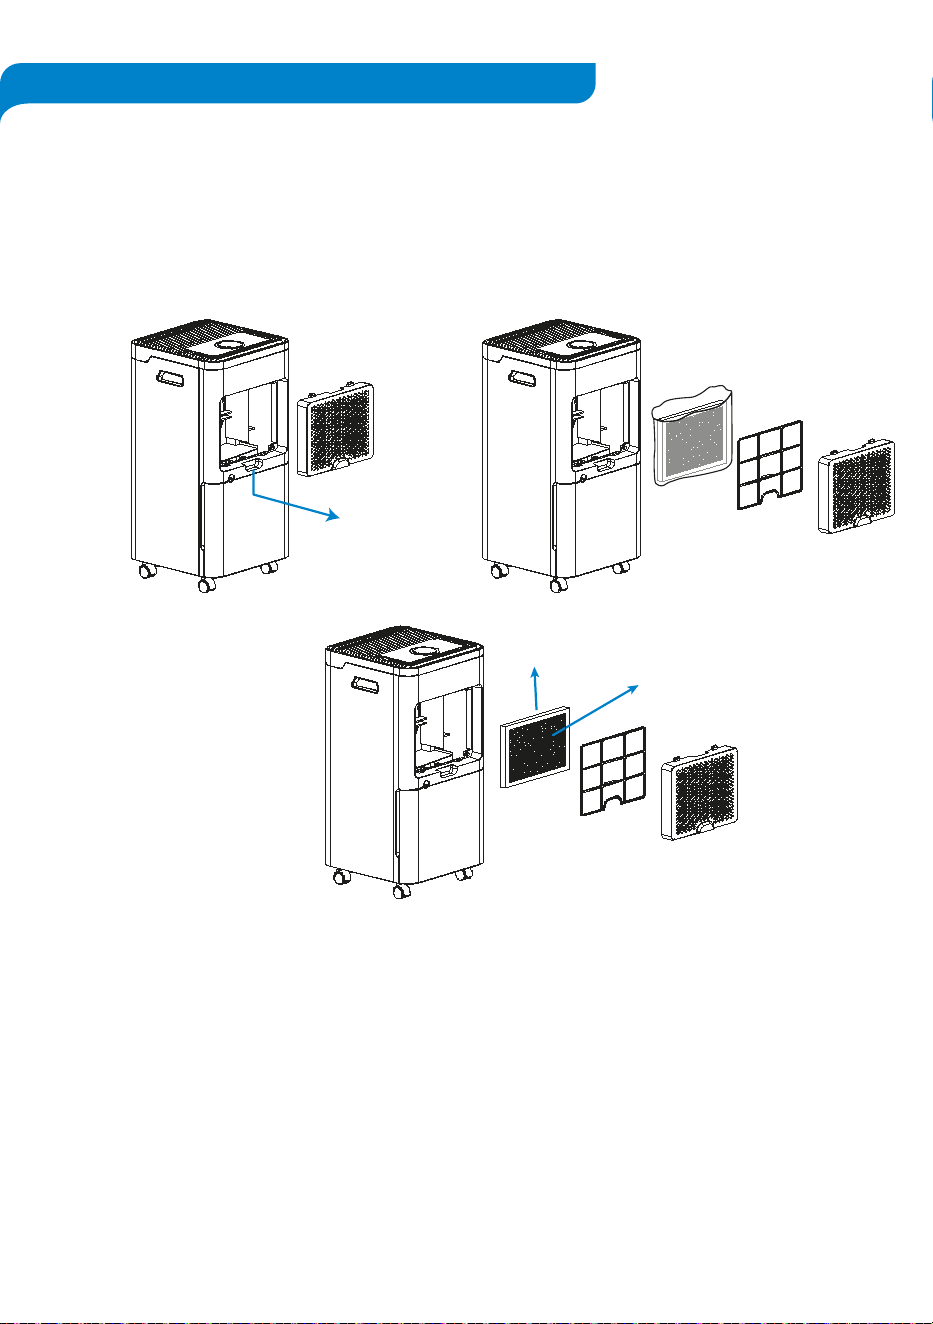
Steps To Remove Filter Packaging
1.
2.
3.
4.
5.
All packaging material and promo�onal labels should be removed before using your
dehumidifier for the first �me.
The filters are a�ached to inner side of the air inlet grille at the back of the dehumidifier. The
filter pack includes a mesh dust filter to trap larger airborne par�cles, High Grade H13 True
HEPA Filter to capture fine par�cles and a black Ac�vated Carbon Filter to help reduce odours
and smoke, as shown in [Figures 1].
This dehumidifier comes with the filters fi�ed inside and packed with plas�c for performance
protec�on purpose. The filters MUST be removed from its packaging before opera�ng the
device.
Open the air inlet grille. [Figure 1(a)]
Disengage the filters pack from the air inlet grille. [Figure 1(b)]
Remove the filters from its packaging. [Figure 1(c)]
A�ach the unpacked filters back to the air inlet grille in the order, as shown in [Figure1(c)].
Place back the air inlet grille onto the dehumidifier. Ensure the grille sets properly into its
place before opera�ng the unit.
Ac�vated Carbon
Filter (black colour)
H13 True HEPA
Filter (white colour)
Figure 1(a)
Figure 1(b)
Figure 1(c)
BEFORE THE FIRST USE
8
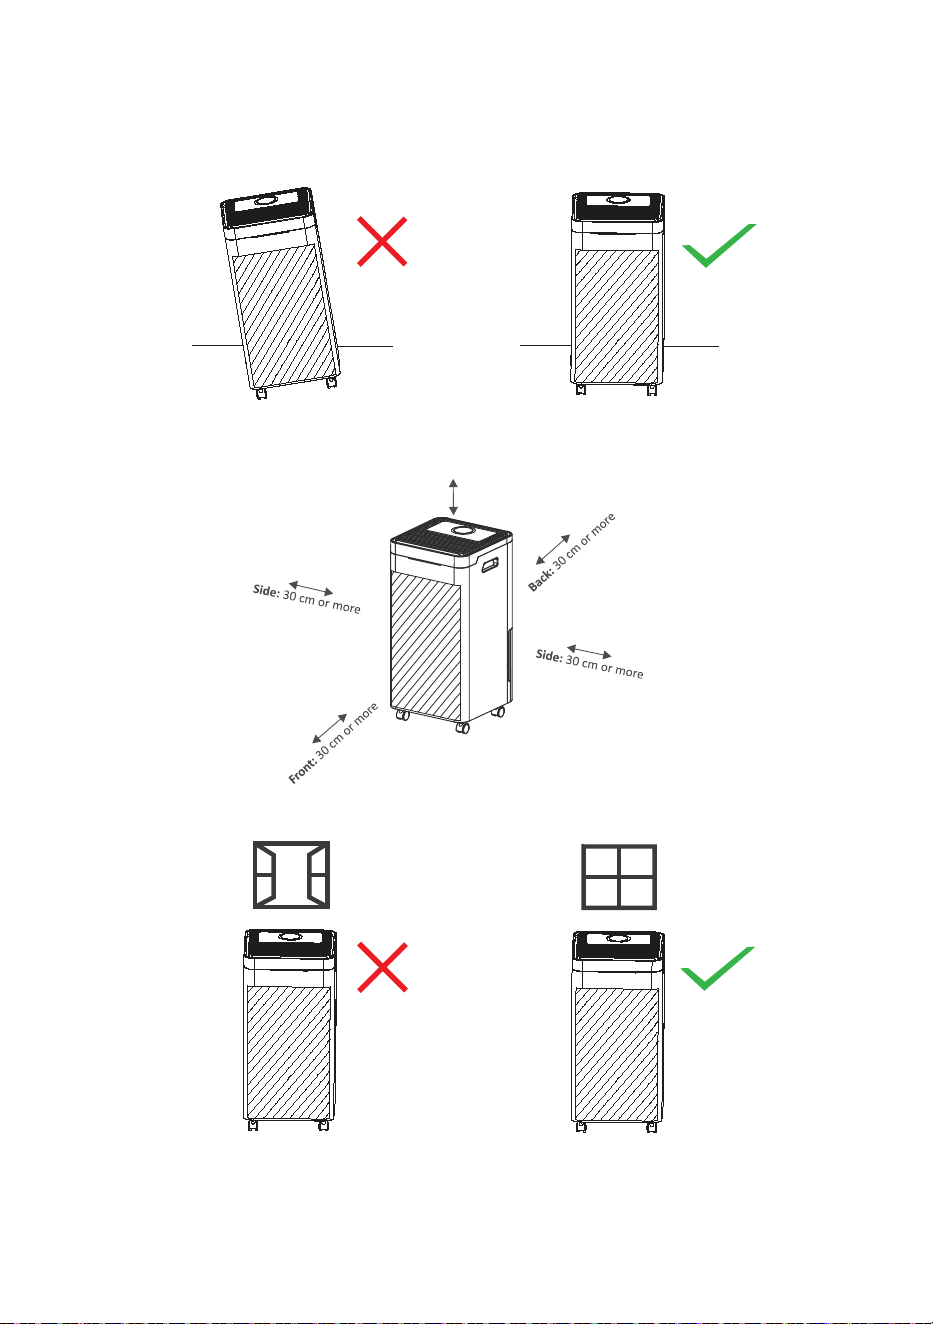
Proper Posi�oning and Usage
1. The dehumidifier should be placed on a flat level surface with the control panel facing up
before switching it ON. [Figure 2]
2. Leave at least 30 cm of clear space around the dehumidifier when it is in opera�on.
[Figure 3]
3. For op�mal efficiency, shut all windows and doors when the dehumidifier is opera�ng.
[Figure 4]
4. The dehumidifier contains refrigerant inside the unit. In transit, your appliance gets shake
around. It is recommended to leave it at least two hours before you plug it in.
Figure 2
Figure 3
Figure 4
Top: 30 cm or more
9
Note: Rela�ve humidity is the amount of water vapour in the air and it is commonly
expressed as a percentage of the maximum amount of water vapour that the air can
hold at a given temperature. A comfortable %RH level is commonly considered to be
between 40-60 %RH.
Dehumidifica�on Modes
This feature is designed for opera�ng the device in three op�onal dehumidifica�on
modes: Auto, Con�nuous, and Laundry. By repeatedly pressing the desired
mode can be selected.
Auto Mode: In this mode, both desired humidity and fan speed can be
selected, and the device will operate automa�cally to maintain the desired
humidity.
Con�nuous Mode: In this mode, the device operates in low fan speed and
humidity level cannot be selected. It will con�nue opera�on �ll its manual
turn OFF.
Laundry Mode: In this mode, the device operates in high fan speed and
humidity level cannot be selected. This mode assists on fast drying of wet
cloths hanging indoor and wet carpets.
Real-Time Humidity Level Control
This op�on helps adjus�ng humidity level (Rela�ve Humidity %RH) and controls
dehumidifica�on to maintain pre-set humidity levels.
To manually adjust the humidity level, scroll your finger le� or right on the Humidity
Level bar un�l the desired level flashes and then illumina�ng on the display panel.
Humidity Level (%RH)
Only Air Purifier Func�on
This feature turns the device into an air purifying only mode to clean and fresh the air.
By pressing bu�on, the dehumidifica�on func�on will be stopped.
Power Bu�on
Press for turning ON or OFF the dehumidifier.
A
PRODUCT FEATURES & OPERATION
10
Filter Change Indicator
When filter change is required, the indicator on the display screen and the air
purifier bu�on will start blinking simultaneously.
Hold for 3-5 seconds a�er replacing the filters to reset the filter change
reminder.
The filter change indicator will disappear from the display a�er successful reset.
For filter change instruc�ons, refer to FILTERS CLEANING & REPLACEMENT sec�on, page 13.
Fan Speed
Press to select the low and high fan speed. This op�on is ac�ve only when the
device operates in one of the Auto or Only Air Purifier modes.
Night Mode
Child-Lock (3 Seconds)
This control key is designed to operate for two func�ons, Night Mode and Child-Lock.
Night Mode: By pressing once, its indicator lights up for 5 seconds and then
the device enters Night Mode. Display light will deem and then turn OFF shortly.
By pressing any keys except Night Mode and Power Bu�on during ac�ve Night
Mode opera�on, the display will turn ON and if the keys are not used for 5
seconds, the display will deem and turn OFF again.
Press to exit from the Night Mode.
Child-Lock: Long pressing for 3 seconds ac�vates the Child-Lock Mode.
The bu�ons will be deac�vated completely, the display will show CL blinking for 3
seconds with buzzer, and then the current opera�ng se�ng will be displayed.
If any bu�on is pressed during Child-Lock Mode, the display will show CL blinking
for 3 seconds with no buzzer.
Long press the for 3 seconds to exit the Child-Lock Mode.
Timer
The �mer is conveniently designed to auto turn ON/OFF up to 24-hr steps in two ways.
Press repeatedly to increase the �me op�onally up to 24 hours.
The �me will countdown each hour, and automa�cally turning the dehumidifier
ON or OFF when it reaches ‘00’.
To cancel Auto Off or Delayed Start, con�nue to press un�l it reaches '00'.
1.
2.
3.
Auto OFF: Works when the device is opera�ng, and the �mer determines when to
turn the device OFF.
Delayed Start: Works when the device is OFF, and the �mer determines when to
turn the device ON.
Steps to set a �mer:
11
Tank Full Indicator
This indicator turns ON and blinks with red colour when the water tank is full.
In Tank Full status, for protec�on and safety purpose, the compressor will turn OFF
immediately and the fan turns OFF a�er 3 minutes.
For draining the collected water or using a hose for con�nuous drainage instruc�ons,
refer to DRAINING THE COLLECTED WATER sec�on, page 12.
Auto Shut-OFF
The dehumidifier will automa�cally turn OFF when the water bucket is full or
removed from the unit. During full water tank, Only Air Purifier Mode can operate.
AUTO
AUTO
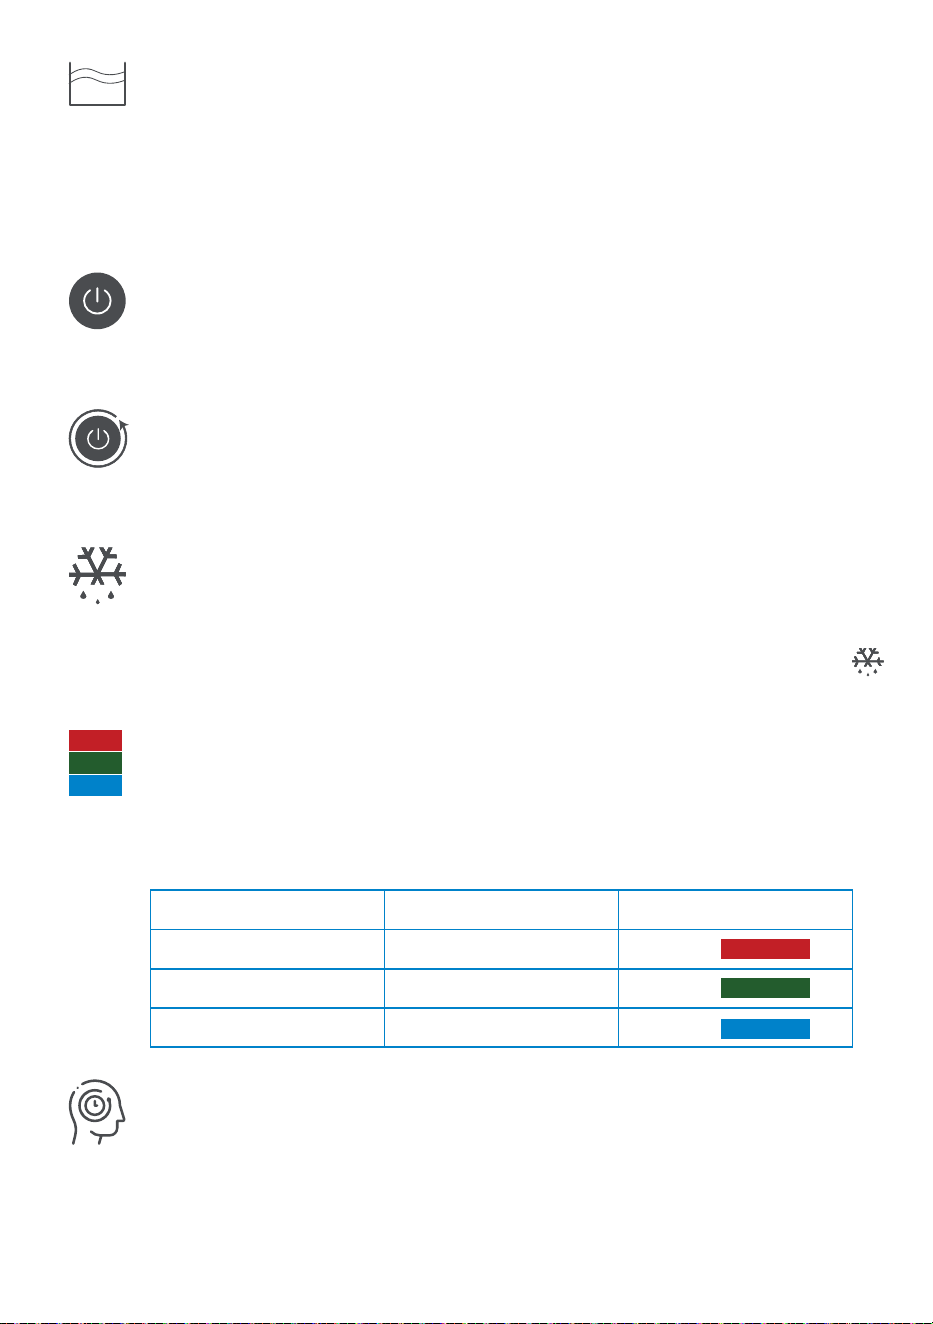
Ambient Humidity Level Indicator Light
The colour of LED light that is placed on the front view of the dehumidifier indicates
rela�ve humidity status in three different colours (Table 2).
Humidity Level (%)
≥70
50-70
≤50
Humidity Status Humidity Indicator Colour
High
Moderate
Low
Red
Green
Blue
Table 2: Real Time Humidity Level Indicator
AUTO
Auto Restart
When power restored a�er power outage, the dehumidifier resumes its previous
opera�ng mode.
Auto Defrost Func�on
The defrost feature is designed to con�nuously maintain the device running properly
during low temperatures that is less than 23
o
C. The defros�ng occurrence �me will
be automa�cally jus�fied based on low temperature level. The defrost indicator
will flash on the display during defrost opera�on and will last for up to 5 minutes.
Memory Func�on
The dehumidifier is designed to con�nue its opera�on in previous se�ng a�er an
intended restart or sudden power outage restora�on.
AUTO
12
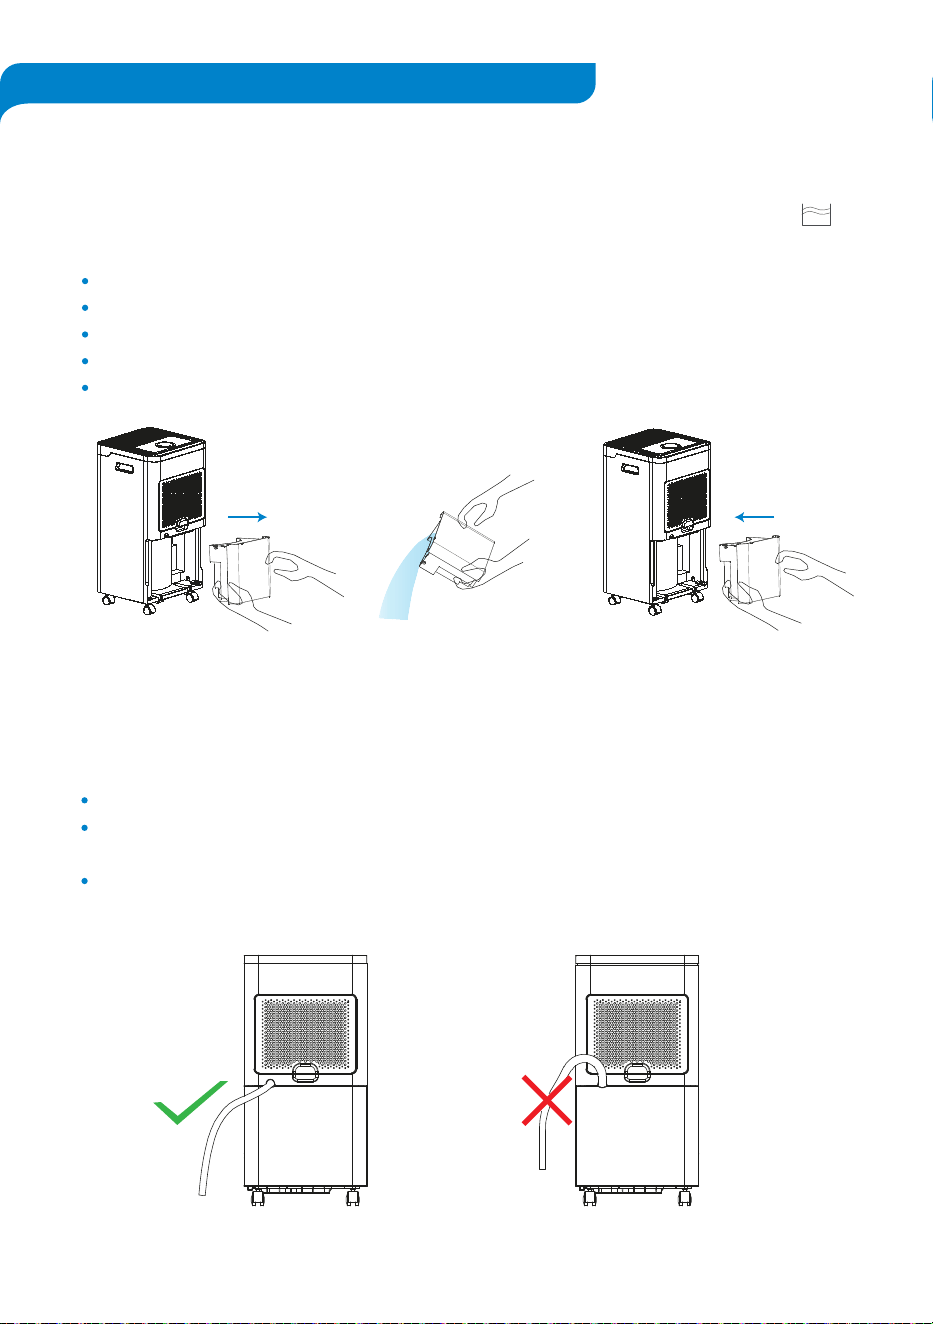
If Using The Water Tank to Collect Water
When the water tank is full, the dehumidifier will automa�cally turn OFF and the will
start blinking.
If Using a Drain Hose (Con�nuous Drainage)
Follow the below �ps to properly use the drain hose for con�nuous drainage.
Connect the hose to the drain hose outlet. [Figure 6(a)]
The connected hose must be sloping downwards as the drain hose outlet does not
operate with a pump. [Figure 6(b)]
Place the end of the drain hose at a suitable drain system.
Switch OFF the dehumidifier and remove the water tank. [Figure 5(a)]
Drain the collected water from the water tank. [Figure 5(b)]
Rinse inside of the water tank with clean water.
Wipe any water on the outside of the water tank with a dry cloth.
Place back the water tank to the appliance. [Figure 5(c)]
Allways turn OFF and unplug the dehumidifier before draining the collected water.
Figure 5(a)
Figure 6(a) Figure 6(b)
Figure 5(b) Figure 5(c)
DRAINING THE COLLECTED WATER
13
Steps to clean the filters:
1. Open the air inlet grille. [Figure 7(a)]
2. Disengage the filters pack from the air inlet grille. [Figure 7(b)]
3. Clean the filters using a so� brush or vacuum cleaner. Do not wash or clean the filters
with water or any other liquids. [Figure 8]
4. If the dirt and dust has built up on the mesh dust filter, hand wash in warm and soapy
water, then rinse well and dry before replacing. Never wash the True HEPA and Ac�vated
Carbon Filter package.
5. A�ach the filters back to the air inlet grille in the order, as shown in [Figure 7(b)].
6. Place back the air inlet grille onto the dehumidifier. Ensure the grille sets properly into its
place before opera�ng the unit.
Filters Cleaning
It is important to keep the filters clean as a dirty filter may emit bad odours and also may
cause to reduce the dehumidifica�on efficiency. Clean the filters at least monthly, or more
o�en if in frequent use.
Allways turn OFF and unplug the dehumidifier before cleaning or replacing the filters.
The filters are a�ached to inner side of the air inlet grille at the back of the dehumidifier. The
filter pack includes a mesh dust filter to trap larger airborne par�cles, High Grade H13 True
HEPA Filter to capture fine par�cles and a black Ac�vated Carbon Filter to help reduce odours
and smoke, as shown in [Figures 7].
Figure 7(a)
Figure 8
Ac�vated Carbon
Filter (black colour)
H13 True HEPA
Filter (white colour)
Figure 7(b)
FILTERS CLEANING & REPLACEMENT
14
When to Replace the Filter:
It is best to change the filter every 4-5 months (3000 hours used). You may need to change
the filter more o�en or less o�en, depending on how much you use your dehumidifier
and on how much pollu�on is in the air.
You do not need to wait for the to turn ON for changing the filter. You may need to
change the filter if you no�ce any of the following:
Steps for Replacing the Filter:
1. Open the air inlet grille. [Figure 7(a)]
2. Disengage the used filters pack from the air inlet grille.
[Figure 7(b)]
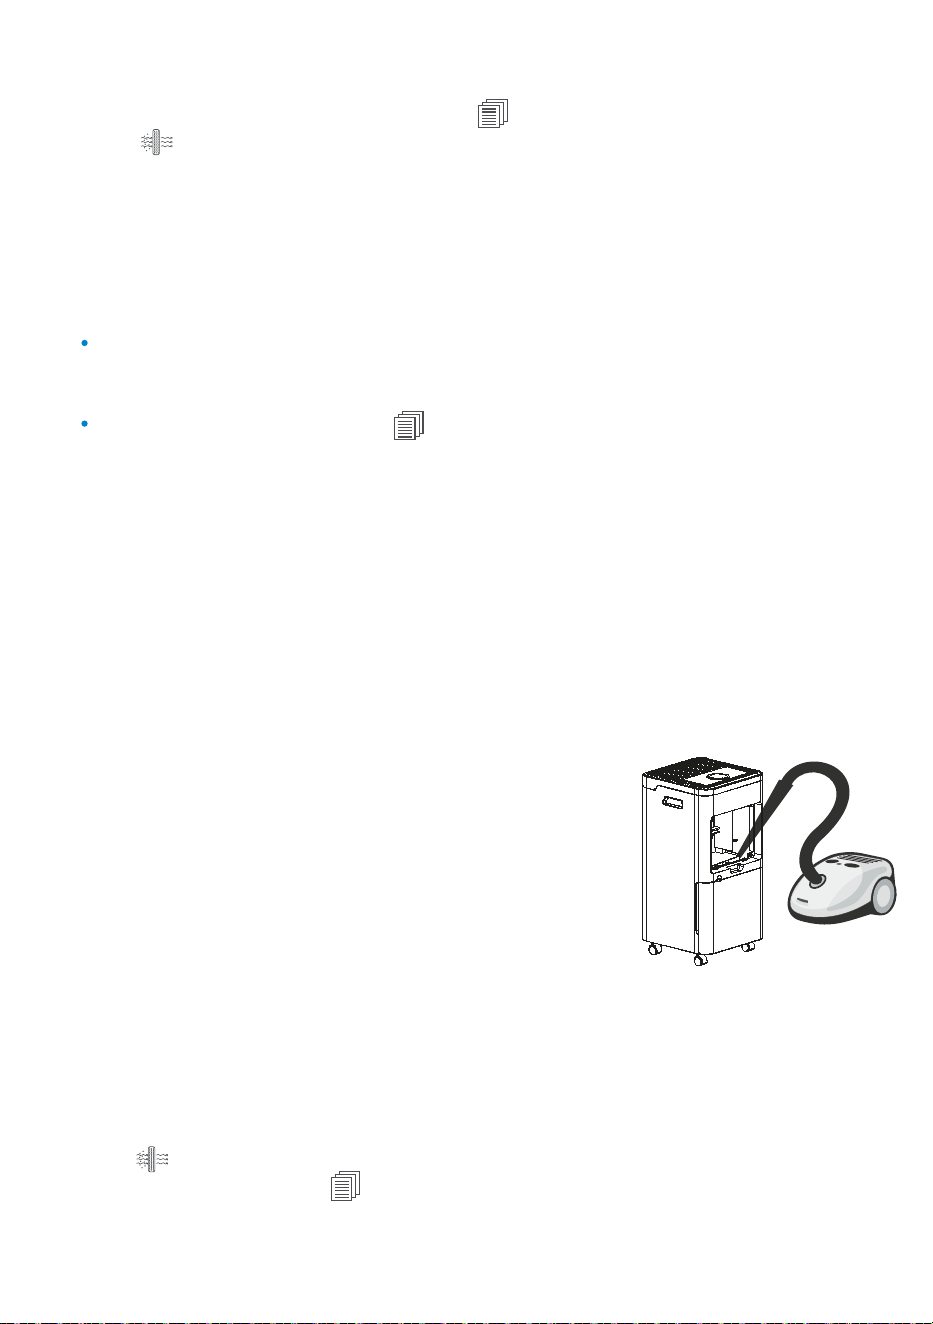
3. Clean any remaining dust or hair inside the dehumidifier
and air inlet grille with a vacuum cleaner. DO NOT use
water or any liquids to clean the dehumidifier. [Figure 9]
4. If the dirt and dust has built up on the mesh dust filter,
hand wash in warm and soapy water, then rinse well and
dry before replacing. Never wash the True HEPA and
Ac�vated Carbon Filter package.
Rese�ng the Dehumidifier A�er Filter Replacement:
Hold bu�on for 3-5 seconds a�er replacing the filter to reset the filter change reminder.
The filter change indicator will disappear from the display a�er successful reset.
5. Remove the new filters from the packaging.
6. A�ach the new unpacked filters to the air inlet grille in
the order, as shown in [Figure 7(b)].
7. Place back the air inlet grille onto the dehumidifier.
Ensure the grille sets properly into it place before
opera�ng the unit.
- Increased noise from the device when it is switched ON.
- No effec�ve difference in air dehumidifica�on or quality.
- Decreased airflow.
- Unusual odours.
- Clogged filter.
Filters Replacement
When filter change is required, the indicator on the display screen and the air purifier
bu�on will start blinking simultaneously.
Only use original Arovec AroDry-P-RF replacement filter when changing the filter is required.
This will help your dehumidifier to work effec�vely and last longer.
Replacement filter is available at www.arovec.com.au
The preliminary mesh filter is whashable and does not require to be replaced.
Figure 9
Turn OFF and unplug the dehumidifier before you clean it.
Wipe down the outside of dehumidifier regularly with a so� and clean cloth.
DO NOT use any harsh cleaning agents e.g., bleach or alcohol to clean any part of the
dehumidifier.
For detailed instruc�ons on how to clean the water tank and filters refer to sec�ons
“DRAINING THE COLLECTED WATER”, on page 12 and “FILTERS CLEANING & REPLACEMENT”,
on page 13, respec�vely.
To prevent possible harm to the environment or human health from uncontrolled waste
disposal, separate the unneeded dehumidifier and its related accessories from other types of
wastes. Ask your local council where to dispose of your dehumidifier and its related
accessories. You should not throw your dehumidifier and its related accessories away with
the daily normal household waste.
If not using the dehumidifier for an extended period of �me, it is a good idea to wrap the
dehumidifier in plas�c packaging and store in a dry place to avoid moisture damage.
It is not recommended to store the used filter pack (True HEPA & Ac�vated Carbon Filter)
for long period of �me.
Store the dehumidifier in an upright posi�on. Do not store anything on the top of
dehumidifier.
15
TABLE OF CONTENTS
STORAGE
DISPOSAL
CLEANING & CARE
Problem
Possible Solu�onPossible Reason
Cannot be turned ON or
not working.
The device is unplugged.
The water tank is full.
The water tank is not properly
posi�oned.
Water tank is full.
The water tank is not in place or
removed.
The room temperature may be
outside of the zone of the dehumidifier.
The dehumidifier is placed on an
uneven surface, so water drips
out of the tank.
Fan is in opera�on.
The temperature in the room is
very low.
The unit will shudder slightly as the
compressor turns ON and OFF.
Like a refrigerator, the compressor
will turn OFF and ON during
opera�on.
The humidity sensor stopped working.
Place the dehumidifier on a smooth
and even surface.
This is normal, wind from the fan
creates noise during opera�on.
When the room temperature is low,
the drying goes slower.
This is normal.
This is normal.
Contact Arovec customer support.
Drain the collected water.
Place back the water tank properly
into unit.
The dehumidifier will reread the
temperature and will start
automa�cally.
The unit’s inlet or outlet is blocked.
The filter is expired and dirty.
Doors and windows are open and
enters extra humidity.
There are other sources of humidity
in the room like water heater and so on.
The temperature in the room is
too low.
The dehumidifica�on �me is not
sufficient to remove moisture.
Connect it to the power source.
Empty the water tank.
Place the water tank properly.
Check to remove any obstacle which
blocks the air.
Clean or replace the filter.
Keep the doors and windows closed.
Prevent the humidity sources in
the room.
The dehumidifier is designed to
operate between 15
o
C and 32
o
C.
Moisture removal is greatly reduced
if room temperatures exceed this
temperature range.
Allow few more hours to maintain
desired dryness.
1. Dehumidifier operates,
but humidity does not
decrease.
2. The dehumidifica�on
strength has decreased.
Water leaks down on the
floor.
Dehumidifier stopped
working.
The unit is producing noise.
Cloths are drying very
slowly.
The dehumidifier seems to
shudder at �mes.
A noise keeps turning ON
and OFF during opera�on.
An error code displaying
E2 in the screen panel.
16
TROUBLESHOOTINGS
Arovec air treatment technology products are designed and manufactured to the highest
quality standards. Your dehumidifier is covered for parts and labour (excluding filters) for 2
years, which includes 1-year standard warranty and 1-addi�onal year, from the date of
original purchase.
Table 3: Warranty Informa�on Table
Product name
Model
Standard warranty period
Addi�onal warranty
Record your order details here. This will help if you have any warranty ques�ons in the future.
Date of original purchase
Order number
Smart Air Dehumidifier & Purifier
AroDry-P10 / AroDry-P16
1 Year
Extend your warranty for 1-addi�onal year.
Simply register on to arovec.com.au/warranty
within the first 14 days of original purchase.
TERMS & CONDITIONS
In addi�on to your rights under the Arovec warranty, you are also covered by guarantees
under Australian Consumer Law. The Arovec warranty is only available in Australia. In Australia our
goods come with guarantees that cannot be excluded under the Australian Consumer Law.
You are en�tled to a replacement or refund for a major failure and compensa�on for any
other reasonably foreseeable loss or damage. You are also en�tled to have the goods
repaired or replaced if the goods fail to be of acceptable quality and the failure does not
amount to a major failure.
What is Covered:
The repair or replacement of your Arovec air dehumidifier (at Arovec’s discre�on) if the
product is found to be defec�ve due to faulty manufacture. Arovec reserves the right to
determine if the fault requires a replacement or repair.
Packaging and instruc�ons of a faulty air dehumidifier may also be replaced if damaged.
This warranty is valid for using your air dehumidifier within Australia.
This warranty is valid for personal use only.
Warrantees are limited to the 2 years (1-year standard and 1-add�onal year)
from the date of original purchase.
17
WARRANTY INFORMATION

What is Not Covered:
Replacement filters are not included in warranty.
Using your dehumidifier for commercial purposes, or anything other than normal domes�c use.
Using your dehumidifier outside of Australia.
Accidental damage or faults caused by negligence, misuse, vandalism or neglect.
Damage or faults caused by not following the instruc�ons in this user manual.
Unsupervised use by children under the age of 18.
Repairs or altera�ons carried out by par�es other than Arovec or an authorised agent.
Damage caused by using filters other than genuine Arovec replacement filters.
All the condi�ons that are not covered by Arovec warranty as listed above.
This warranty is not transferable:
Arovec is not responsible or liable for any damages, losses or inconveniences caused by
product failure or accidental damage or faults caused by not following the instruc�ons or
safety warnings contained in this User Manual.
Please email at support@arovec.com.au with any further inquiries about Arovec warranty
or to ask about making a warranty claim. You must contact us within your warranty period
for your claim to be eligible.
Once your product proved as a defec�ve within the specified warranty period, stop using it
and contact customer support at support@arovec.com.au with your order number.
Please feel free to contact our helpful customer support team with any inquiries or ques�ons
regarding Arovec product.
Your sa�sfac�on is our priority!
Customer support: Ausbrilliant Brands, PO Box 2, Ermington 1700, NSW Australia
www.arovec.com.au, support@arovec.com.au
Please provide your order number when you contact customer support.
18
DEFECTIVE PRODUCTS & RETURNS
CUSTOMER SUPPORT – AUSTRALIA


Ques�ons or Concerns?
support@arovec.com.au
V1.0121