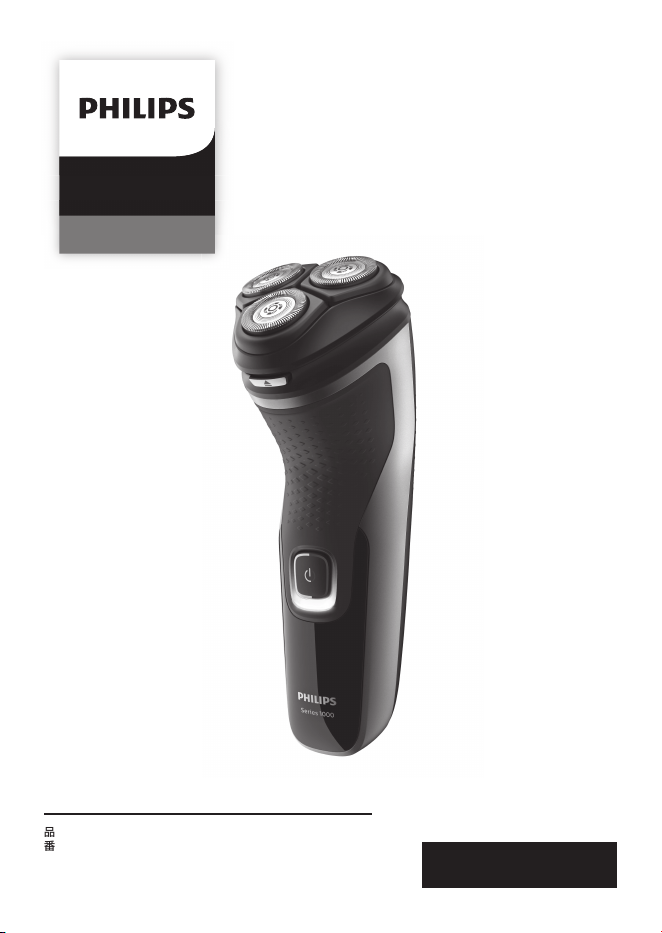
フィリップス
電動シェーバー
品
番
S1334/41, S1232/41,
S1231/41, S1133/41
Shaver
Series 1000
※この写真の製品は
S1334/41
です。
キ
リ
ト
リ
線
キ
リ
ト
リ
線
取扱説明書
1
フィリップス
シェーバーをお買い上げいただき、まことにありがとう
ございます。長い間ご愛用いただくために、ご使用前にこの取扱
説明書をよくお読みのうえ、正しくお使いください。
また、お読みになった後は、お使いになる方がいつでも見られる
ところに必ず保管してください。
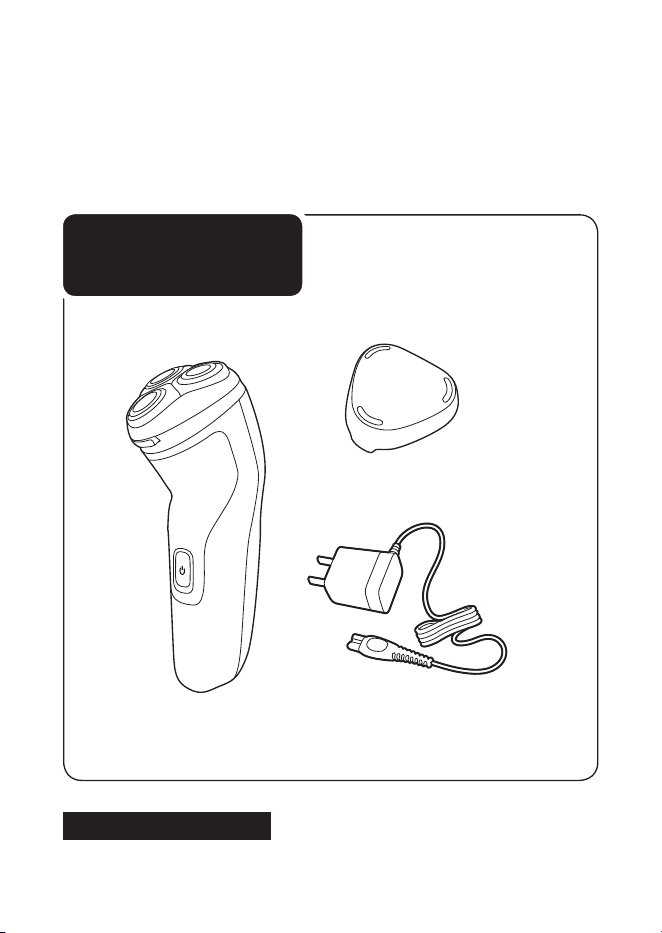
商品のご確認
商品をご確認ください。
※改良の為、仕様を予告なく変更することがあります。
本体
充電アダプタ
保護キャップ
お買い上げのお客様へ
初めてご使用になる際は、ご使用前に充電してください。
2
目 次
●
●
●
●
●
ご使用方法
廃棄について
困ったとき
英文解説
保
証
はじめに
1
商品のご確認
1
目次
2
必ずお守りください
3
・
4
各部の名称
5
LED
表示について
6
充電のしかた
7
シェービングのしかた
8
・
9
トリマーの使い方
10
お手入れ方法
11
~
14
刃の交換
15
保護キャップの取り付け方
16
製品を廃棄するとき
17
故障かな?と思ったら
18
Guidance in English
19
~
36
保証とアフターサービス
39
仕様
40
無料修理規定
42
保証書
最終ページ
3
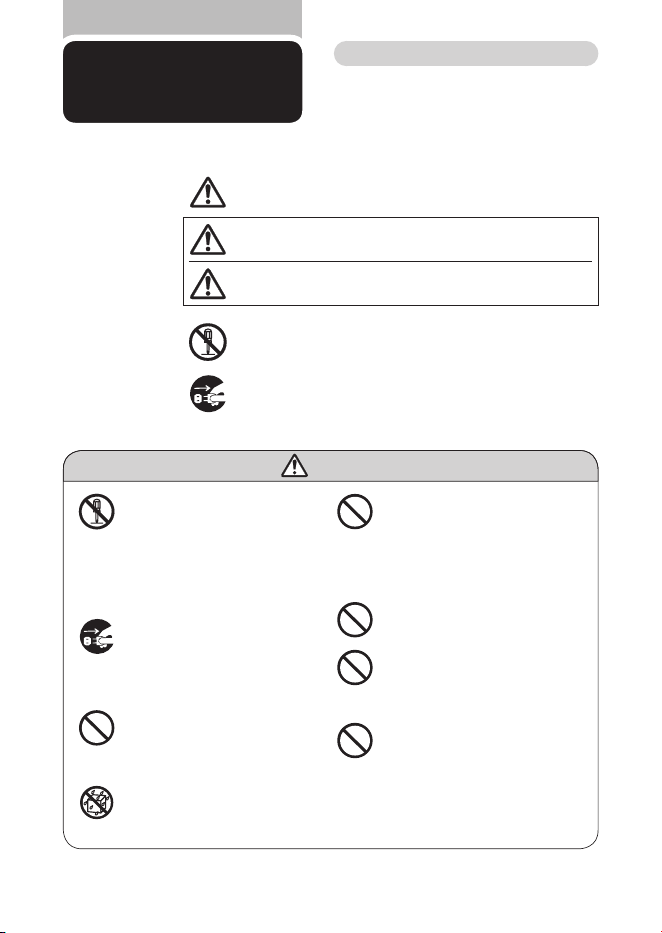
必ずお守り
ください
●ここに示した注意事項は、安全に関する重要
な内容ですので、必ず守ってください。
●誤った取扱いをしたときに想定される内容を
「警告」と「注意」とに区分けしています。
安 全 上 の ご 注 意
警 告
●充電アダプタを傷付けたり、電源
コードを無理に曲げたり、引っ張った
り、ねじったり、たばねたり、重い物を
載せたり、挟み込んだり、加工したり
しないでください。電源コードが破
損し、火 災
・
感電の原因となります。
●乳幼児の手の届くところに本製品を
置かないでください。
●充電アダプタには変圧器が内蔵さ
れています。充電アダプタを切り離
して別のプラグに接続するのは危険
ですのでおやめください。
●自分で意思表示できない人(幼児を
含む)に使用させないでください。
また、お体の不自由な人だけでは使
用しないでください。
●シェーバー本体ならびに充電アダプ
タは改造しないでください。また、修
理技術者以外の人は、分解したり修
理をしないでください。火災、感電、
ケガの原因となります。修理はフィ
リップスサポートセンターにお問い
合わせください。
●お手入れの際は必ず充電アダプタ
の電源プラグをコンセントから抜い
てください。また、濡れた手で抜き差
ししないでください。感電やケガを
することがあります。
●充電アダプタが傷んだり、コンセント
の差込みが緩いときは使用しないで
ください。感電・ショート・発火の原
因になります。
●充電アダプタを水につけたり、水を
かけたりしないでください。故障や、
ショート・感電の原因になります。
○絵表示について
記号は、「警告、注意」を示します。
図の中や近くに具体的な注意内容を示します。
○絵表示の例
記号は、してはいけない「禁止」を示します。図の中や近くに
具体的な禁止内容(左図の場合は分解禁止)を示します。
記号は、必ずしていただく「強制」を示します。図の中や近くに
具体的な強制内容(左図の場合は電源プラグをコンセント
から 抜くこと )を示しま す 。
人が死亡または重傷を負う可能性が想定される内容。
人が傷害を負う可能性及び物的損害のみの発生が
想定される内容。
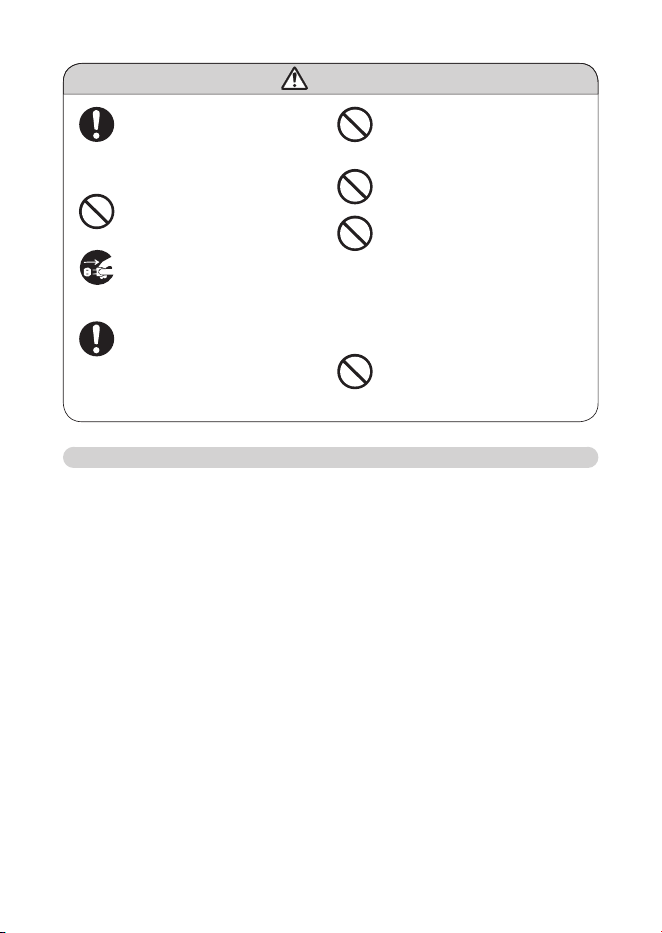
注意
警告
4
注 意
●電源コネクタ受部にピンやごみを付
着させないでください。感電・ショー
ト・発火の原因になります。
●刃は強く押さえないでください。破損
して皮膚を傷つけることがあります。
●
充電アダプタは付属の専用アダプ
タを使用してください。また付属の
専用アダプタで他の商品を充電し
ないでください。ショート、異常発熱
による発火の原因になります。
破
損、故障 し た場合は、事故を避ける た
めに必ずフィリップス社製の同型充
電アダプタをお求めください。
●お手入れの際 に 、アル コール、酢 、漂
白剤などを使用しないでください。
変色、変形の原因になります。
●充電アダプタの電源プラグを抜くと
きは、電源コード部を持たずに必ず
先端の電源アダプタ部を持って引
き抜いてください。感電やショートし
て発火することがあります。
●シェーバーは家族や他人と共用し
ないでください。感染や炎症の原
因になります。
●充電時以外は、充電アダプタをコン
セントから抜いてください。ケガやや
けど、絶縁劣化による感電・漏電・
火災の原因となります。
●刃が破損または故障した場合は、本
製品を使用しないでください。ケガ
の原因になります。交換の際には必
ずフィリップス社製の同型部品とお
取り替えください。
使用上のご注意
1.
本製品はヒゲ(あごヒゲ、口ヒゲ、もみあげなど)の長さを整えたり、シェービングするためのものです。それ以外
の目的で使用しないでください。
2.
フィリップスシェーバーを初めてお使いの方は、剃り方に慣れるまで
2
〜
3
週間かかることがあります。
3.
60
℃以上の水でシェーバーを洗浄しないでください。
4.
本製品の使用、充電、保管は室温
5
℃〜
35
℃の環境下で行ってください(尚、低温や高温で充電すると、充電池の
寿命が短くなります)。
5.
外刃は、薄く仕上げてありますので、刃部を強く押さえたり、硬いものに当てないよう、ていねいに扱ってくださ
い。
6.
シェービングユニットの清掃や着脱は、必ず電源をOFFにしてから行ってください。
7.
切れ味が衰えてきたり、刃が破損した場合は、使用せず必ず新しいシェービングヘッドと交換してください。
8.
直射日光の当たる場所には保管しないでください。夏場、車の中に放置しないでください。
9.
乳幼児の手の届かないところに保管してください。
10.
ご使用の都度お手入れ方法(
P11
〜
14
)に従ってお手入れしてください。
11.
シェーバー本体は防水加工をしておりますが、水や液体の中に浸けないでください。
12.
プラグ式消臭・芳香剤を使用しているコンセント、あるいは近くのコンセントに充電アダプタを接続しないでくださ
い。充電アダプタを傷める原因となります。
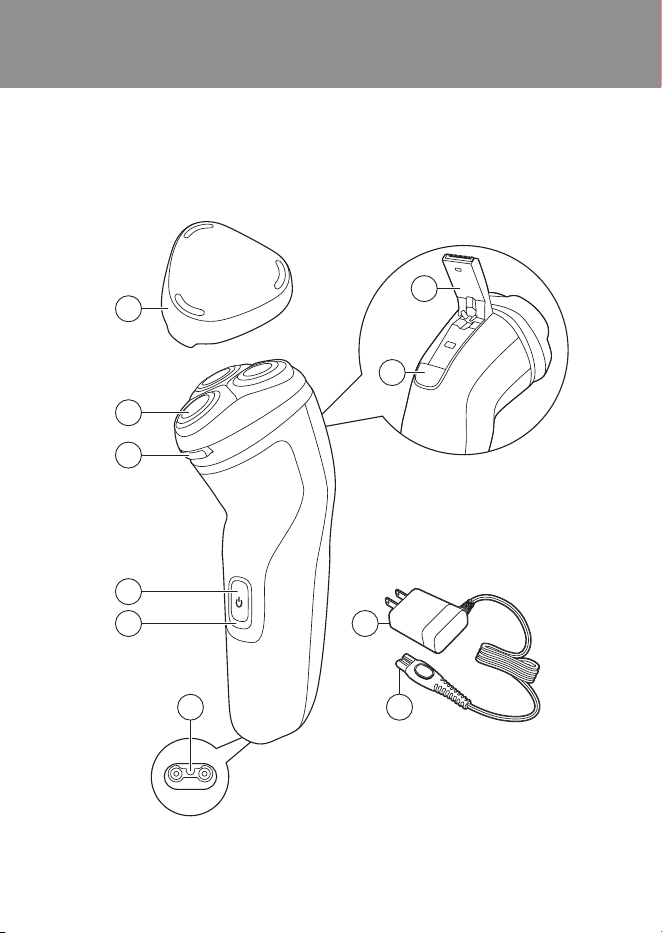
5
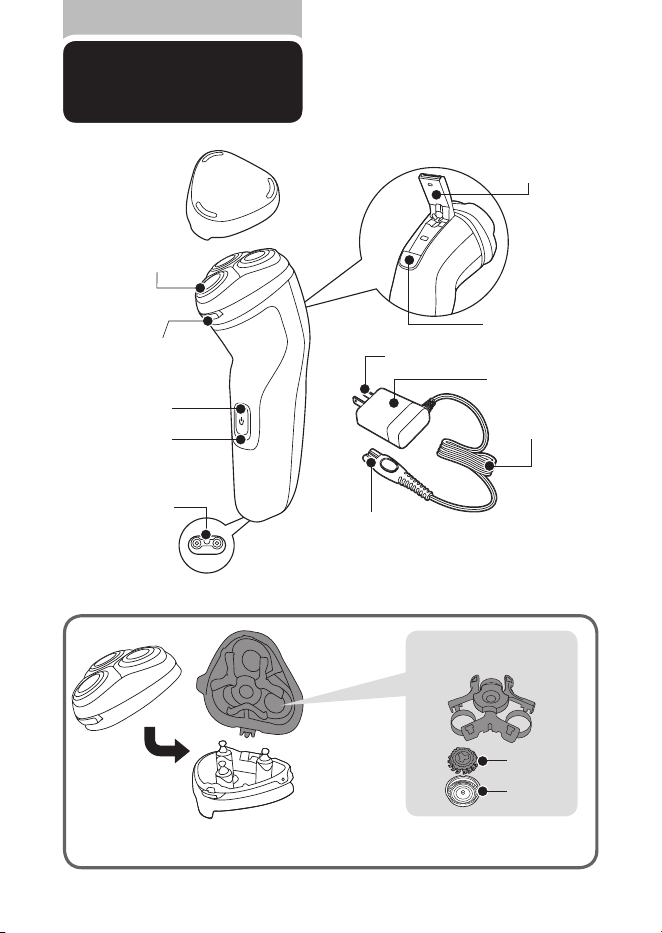
各部の名称
※替刃は内刃と外刃で
1
組 で す(替刃品番:
SH30
[替刃
3
個入り])。
●
シェービングユニット
保護キャップ
電源ボタン
充電表示ランプ
シェービングユニット
シェービングユニット
リリースボタン
トリマー
※付属モデルのみ
トリマースライド
※付属モデルのみ
電源コネクタ受部
電源コネクタ部
電源コード部
充電アダプタ部
電源プラグ部
シェービング
ヘッドホルダー受部
シェービング
ヘッドホルダー
シェービングヘッド分解図
保持板
内刃
外刃
6
LED
表示について
初めてお使いになるときや、長い間ご使
用にならなかったときは、
LED
表示が出
るまでに時間がかかる場合があります。
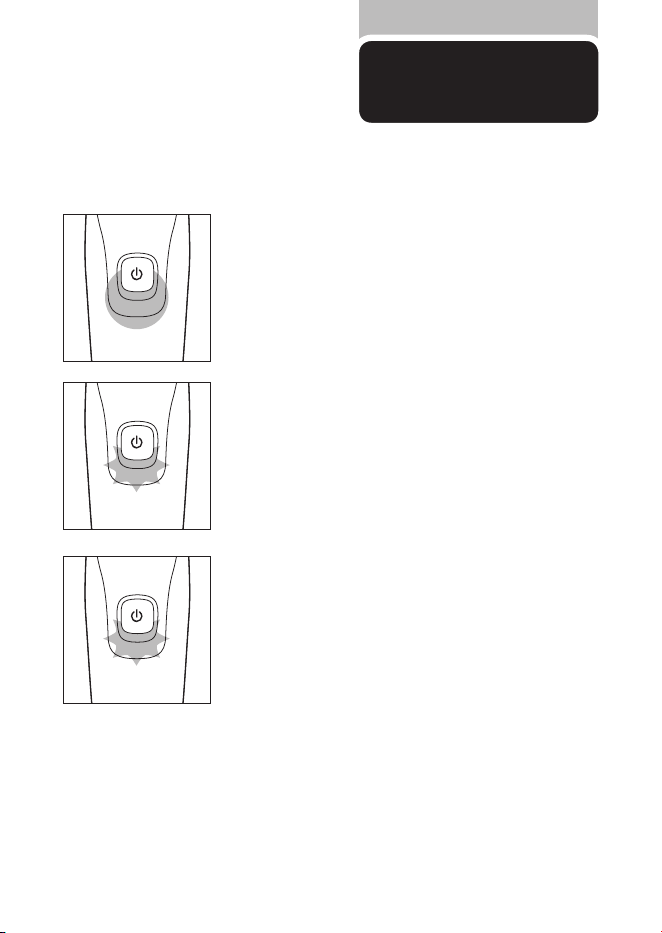
充電完了表示
充電が完了すると、充電表示ランプが白く点灯します。
※
満充電後、約
30
分経過すると充電表示ランプが消えます。
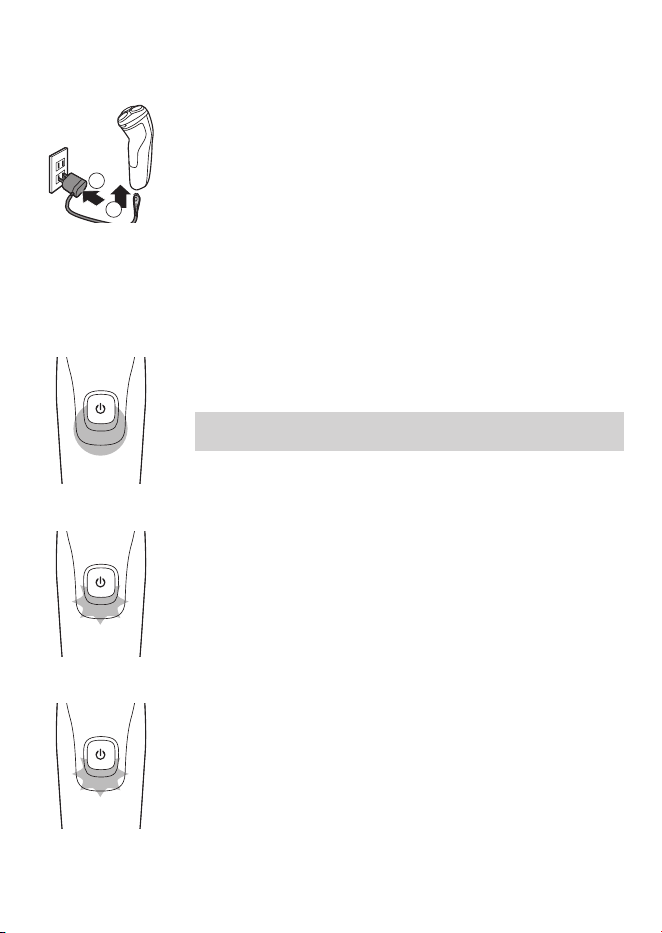
充電催促表示
動作中に充電残量が少なくなると、充電表示ランプがオレンジ
色に点滅します。
充電表示
充電中は充電表示ランプが白色に点滅します。

1
2
7
充電のしかた
浴室で充電をしないでください。
充電開始後数分間、充電表示ランプが点滅しないことがありますが、そのまま充電すると充電表示ラン
プが点滅します。海外(
100
~
240V
)でのご使用も可能です。ただし、コンセントの形状や電圧など現
地で充分お確かめのうえご使用ください。
※
ニッケル水素電池の特性上、電池容量を使い切らずに充電を繰り返すと使用可能時間が減少すること
があります。これを避ける為、最後まで充電を使いきってから、充電することをおすすめします。
1
シェーバー本体の電源が
OFF
になっていることを
確認してください。
2
充電アダプタの電源コネクタ部をシェーバー本体
の電源コネクタ受部に差し込みます(図①)。
3
ご家庭のコンセントに充電アダプタの電源プラ
グ部を差し込みます
(図②)
。充電が完了したらコ
ンセントから電源プラグ部を引き抜きます。
※
クイックチャージ中は充電表示ランプが高速点滅します。
※
クイックチャージが完了すると通常の充電が行われます。その際、充電表示ランプがゆっくり点滅します。
充電残量が
0
の状態で充電アダプタで充電するとシェービング
1
回分が約
5
分で急速充電されます。
クイックチャージ
※
S1334/41
のみ
8
シェービングの
しかた
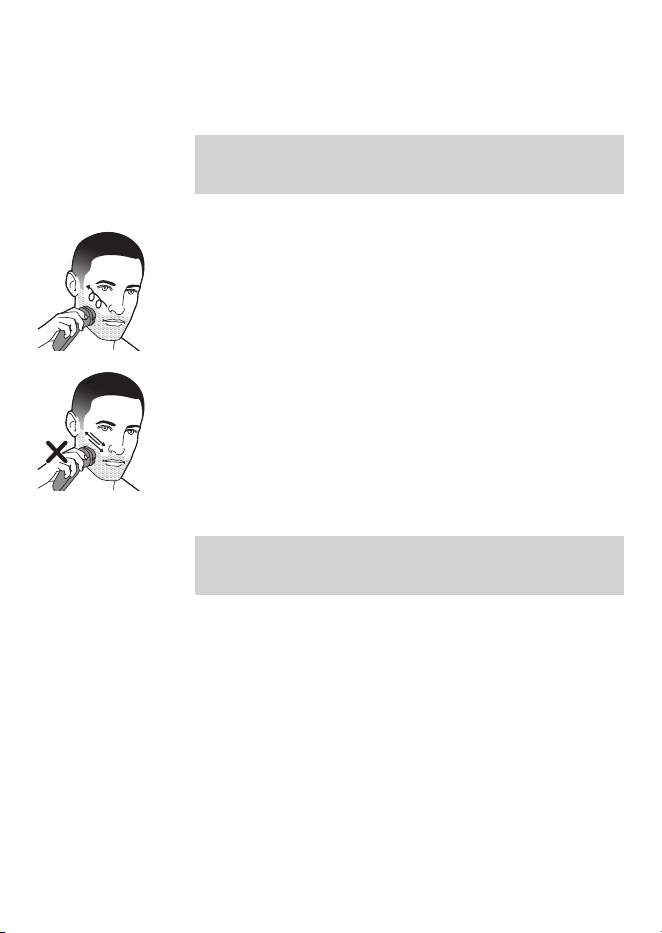
肌が乾いた状態でのシェービングの
しかたです。
本製品は交流式(充電アダプタをつなげたまま)でも使用いただけます。
●モーターの始動時、微弱な振動がシェーバー本体に伝わりますが、問題はありません。
●ほこりなどで肌が汚れている場合、ふきとってからご使用ください。
●ご使用の前に外刃の破れや変形がないか確認してください
(外刃に破れや変形があると肌を傷つける原因になります)。
●ヒゲ剃り以外の目的(頭髪など)には、使用しないでください。
警告
●
浴室やシャワー中に使用しないでください(感電することがありま
す )。
●
シェーバー本体は水や液体に浸けないでください(故障の原因となり
ま す )。
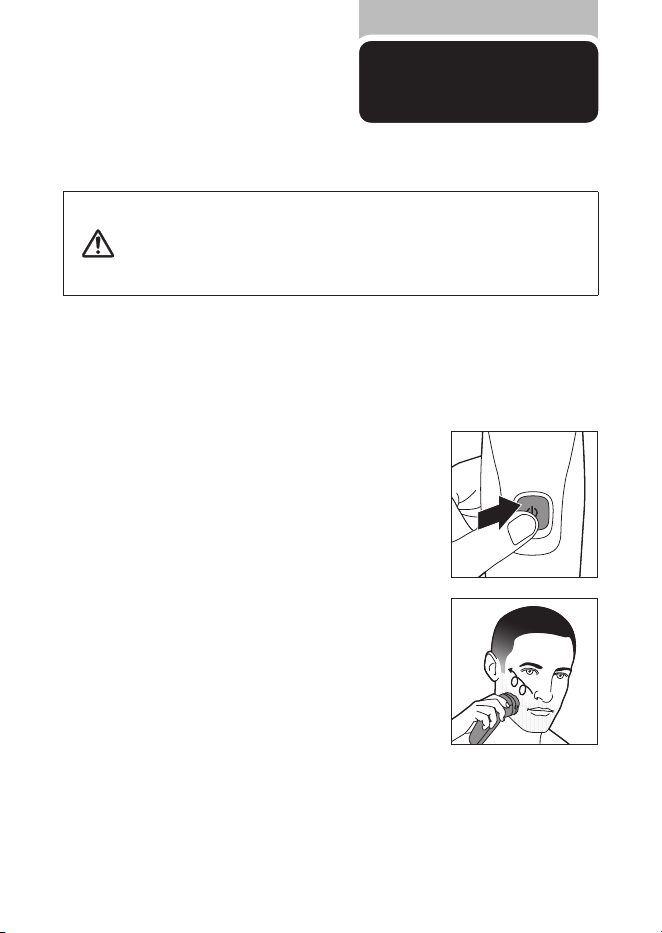
3
シェービング後は電源ボタンを押し、電源を
OFF
にします。
2
刃を肌に軽く押しあて、円を描くように動かしながら
剃ります。
1
電源ボタンを押し電源を
ON
にします。
9
上手に
剃るには
フィリップスのシェーバーを初めてお使いの方は、剃り方に慣れるまで
2
〜
3
週間かかることがあり
ます。初めてのシェービングで思い通りの結果が得られないことや、少し肌にヒリヒリ感が残る場合
がありますが、これは普通のことです。フィリップスのシェーバーに限らずシェービング方法を変え
る時には、肌もヒゲも新しいシェービング方法に慣れる時間が必要です。新しいシェーバーに肌を
慣らす為、まずは
3
週間このシェーバーを使い続けてみてください(最低でも
1
週間に
3
回 以上)。こ の
3
週間は、あまりシェービング方法を変えたりせず、同じシェーバーで肌を慣らすことが大切です。
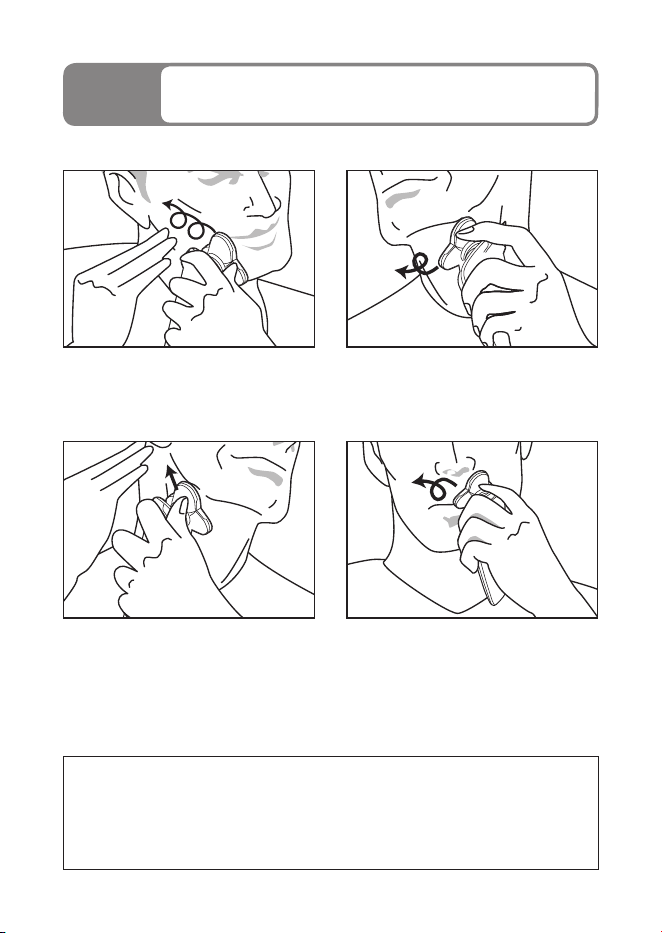
ほお
肌を伸ばし、ヒゲを立たせるように円を描く
ように小さく回転させながら剃ります。
あごの裏側
刃を肌に軽くあて、図のようにあごを上げて円
を描くように小さく回転させながら剃ります。
ほおの奥から首筋
片方の手で肌を後ろに引っ張りながら剃り
ます。
鼻の下
鼻の下を伸ばし、円を描くように小さく回転
させながら剃ります。
肌に強く押しつけるのではなく、軽く押しあてて
円を描くように回転させながら剃るのがコツです。
10
トリマーの使い方
トリマーはヘアーライン、もみあげ、
ヒゲなどを整えるのに便利です。
※付属モデルのみ
注意
あまり押し当て過ぎると肌を傷めますのでご注意ください。
※トリマーの切れ味を保つため、使用後
は必ずぬるま湯または水ですすぎ洗
い をしてくだ さ い(
P12
「トリマーのお
手入れ方法」)。
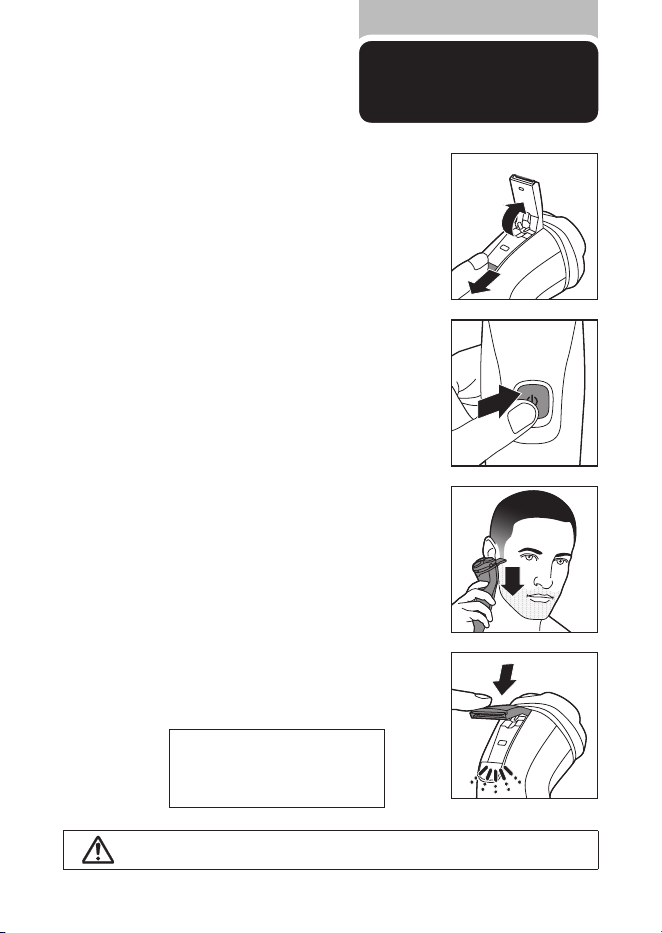
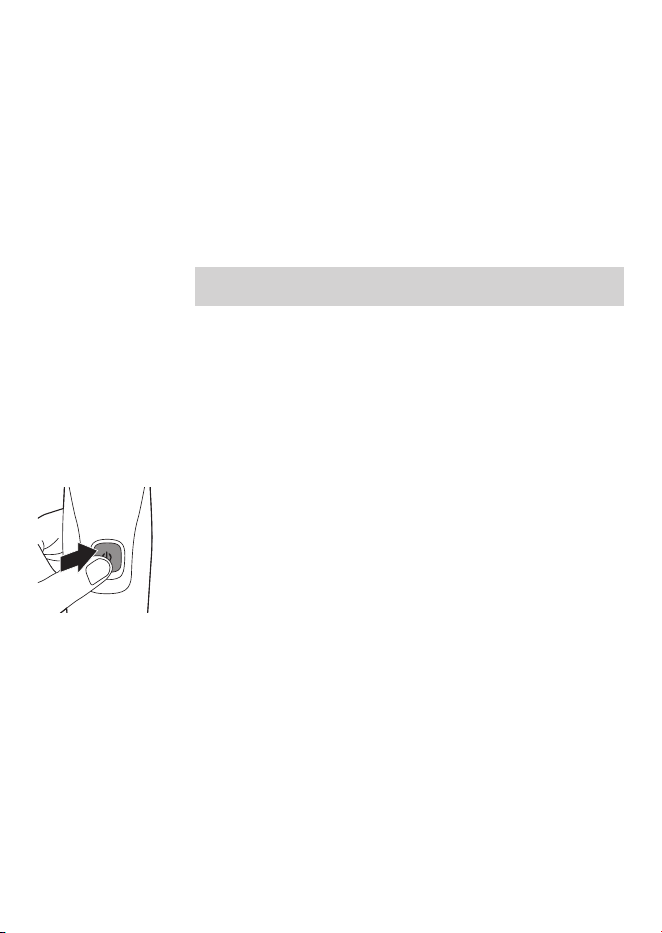
2
電源ボタンを押し、電源を
ON
にします。
3
鏡を見ながらトリマーをカットしたいところに直角に
あたるようにしてください。一度に切らずに、少しず
つカットしてください。
4
ご使用ごとに必ず電源を
OFF
にし、トリマーをぬる
ま湯または水ですすいでください。その後トリマー
の余分な水分を切り、よく乾かします。
1
トリマースライドを下方向に押し、トリマーを開きま
す。電源を
ON
にすると、トリマーの先端の刃が往復
してカットします。
11
お手入れ方法
※洗剤は使用しないでください。
※ぬるま湯(
40
℃前後)でのお手入れをおすすめします。臭いのもととなる皮脂や汗などが取れやすくな
ります。ただし、熱湯はお止めください。故障の原因となります。
※お手入れ中にシェーバーの底から水が漏れてくる場合がありますが、異常ではありません。
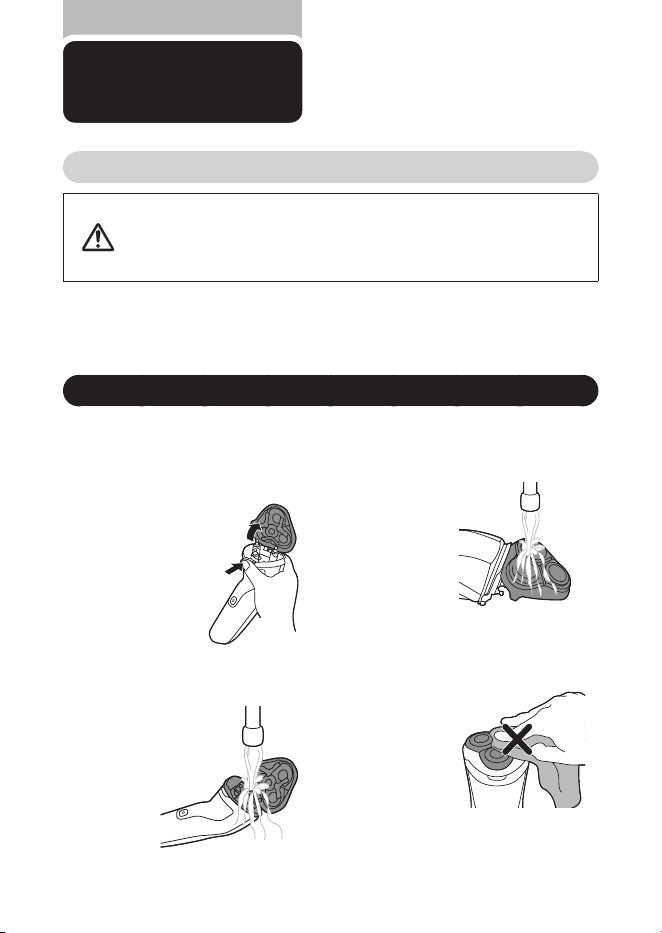
水洗いによるお手入れ方法
シェービングユニットのお手入れ方法
注意
●お手入れの際は、電源を
OFF
にしてから水洗いしてください。
●
シェービングユニットは水洗いできますが、本体は水中に浸けないでください。
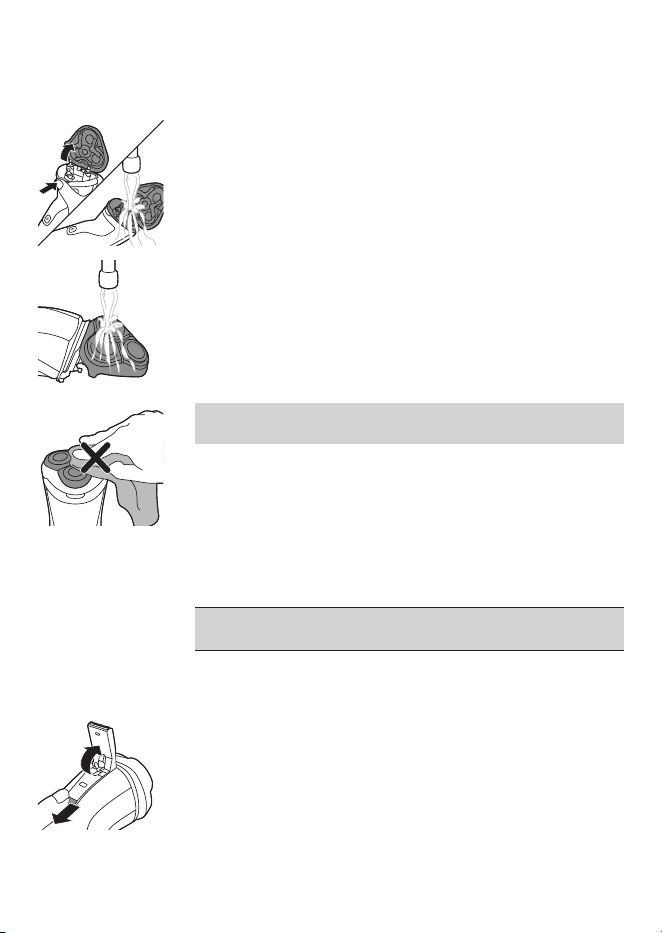
●シェービングユニットを乾燥させる時に、タオルやティッシュペー
パーを使用しないでください。刃を傷める場合があります。
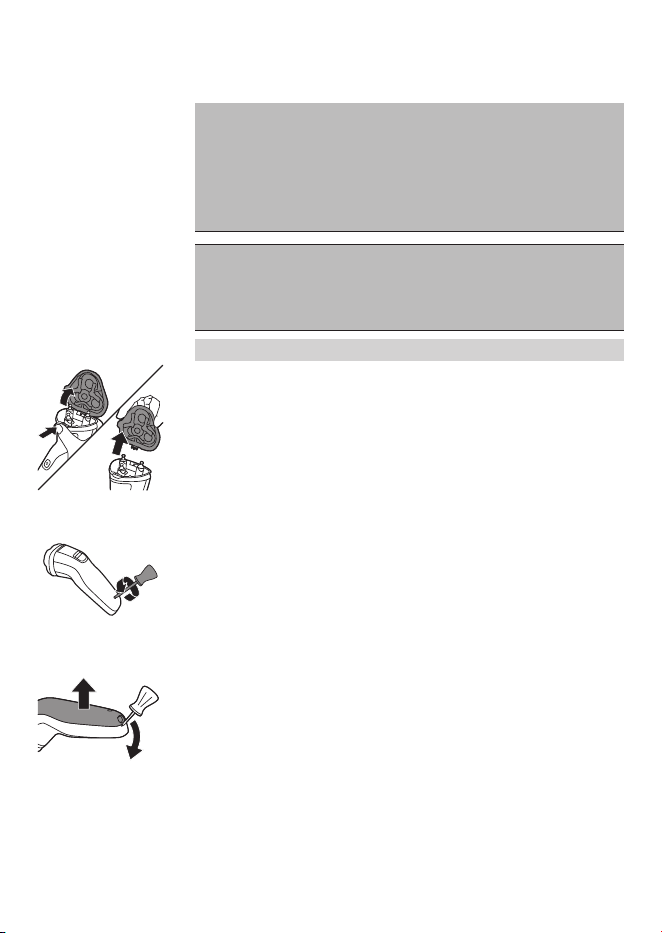
1
シェービングユニットリリースボタン
(図❶)を押し、シェービングユニットを
開けます。
2
シェービングユニットの内部をぬるま湯
または水で約
30
秒洗います。
3
シェービングユニットの外側をぬるま
湯または水で約
30
秒洗い流します。
4
シェービングユニットの余分な水を切
り 、よく 乾 か しま す。
5
乾いたことを確認したら、シェービング
ユニットを閉じてください。
シェービングユニットはご使用の都度、
水洗いによるお手入れをしてください。
❶
12
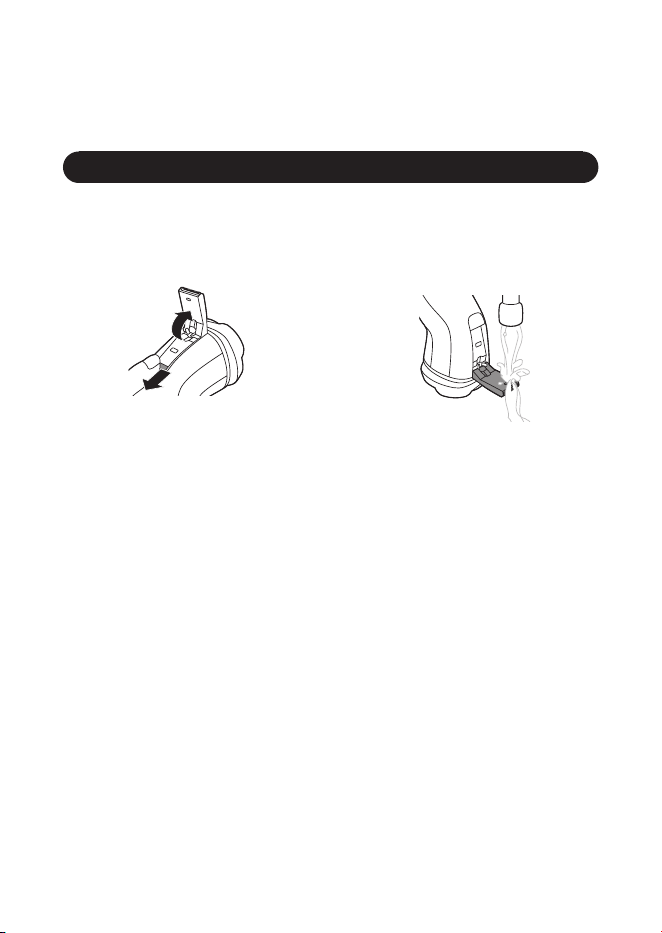
※トリマーは、使用後必ずお手入れしてください。
トリマーのお手入れ方法 ※付属モデルのみ。
1
トリマースライドを下方向に押し、ト
リマーを開きます。
2
シェーバーの電源を
ON
にし、ぬ るま 湯
または水ですすぎ洗いをします。
3
シェーバーの電源を
OFF
にし、トリ
マーを充分に乾燥させてください。
※トリマーはティッシュペーパーやタオルなど
でふかないでください。刃を傷める原因にな
ります。
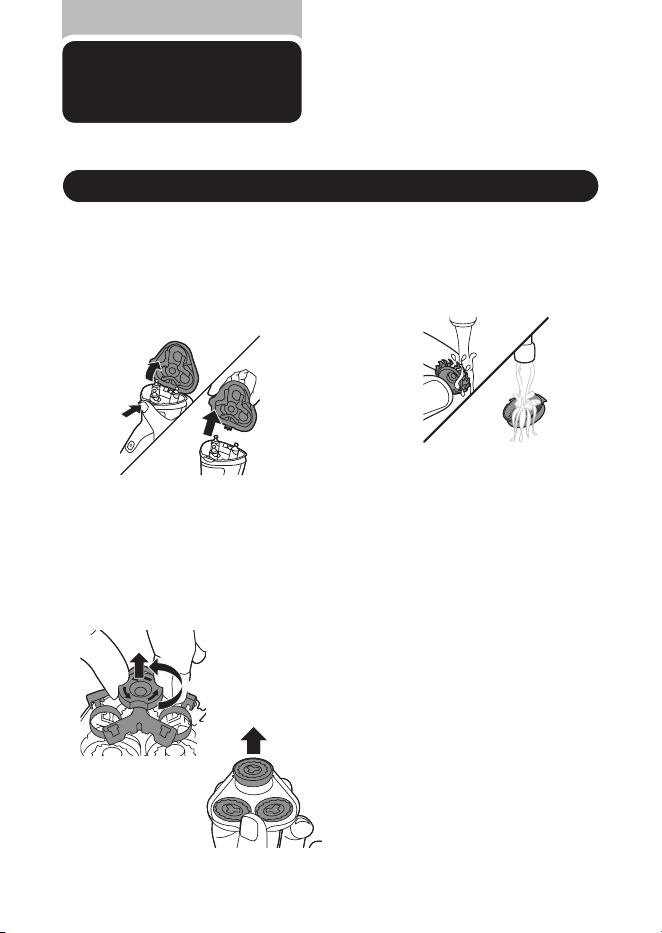
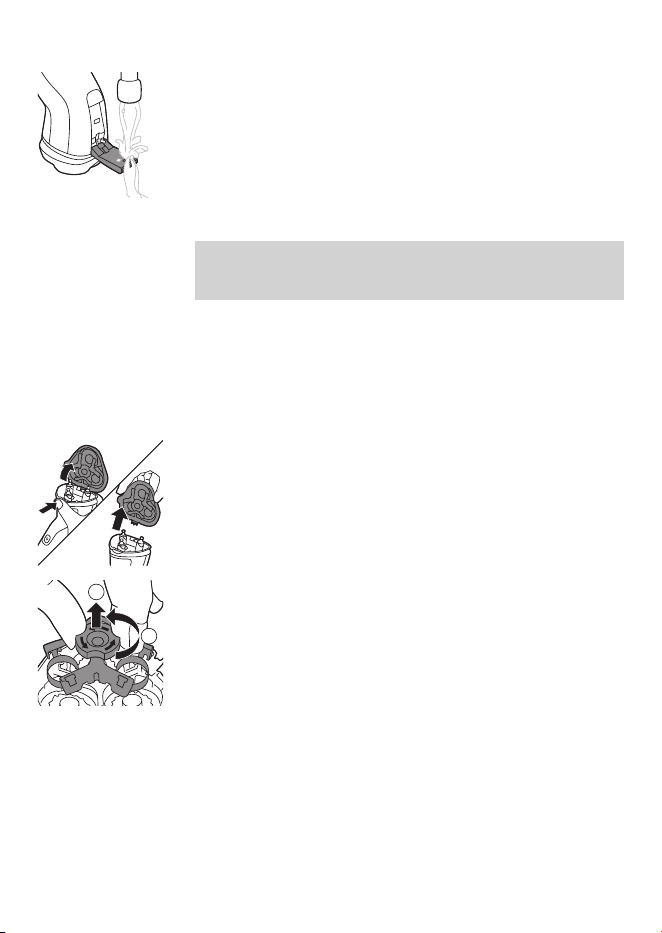
13
❶
❷
1
シェービングユニットリリースボタン
(図❶)を押し、シェービングユニット
を開けます。シェービングユニットを上
方向に動かす(図❷)と本体からはずす
ことができます。
3
取り外した回転刃を内刃・外刃
1
組ず
つ お湯(
40
℃前後)に浸して皮脂やヒ
ゲくずを落とします。
2
保持板は中央のつまみを図❶矢印の
方向(反時計回り)に回し、図❷の方向
に持ち上げるとはずれます。回転刃を
1
組ずつユニットフレームより取り外しま
す(図❸)。
4
内刃と外刃を充分乾燥させます。
❶
❷
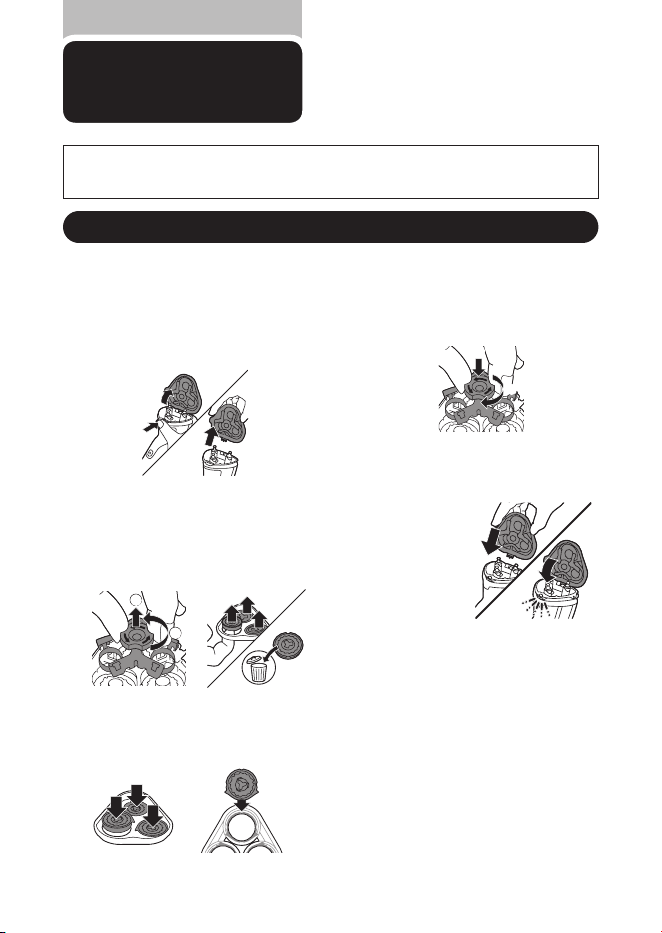
分解掃除のしかた
●分解掃除は約
1
カ月に
1
回が目安です。
●
分解掃除する場合は、内刃と外刃の組み
合わせを変えないようにご注意ください。
組み合わせが変わると、刃の状態が元通り
になるまで数週間かかる場合があります。
刃の取り外し方
❸
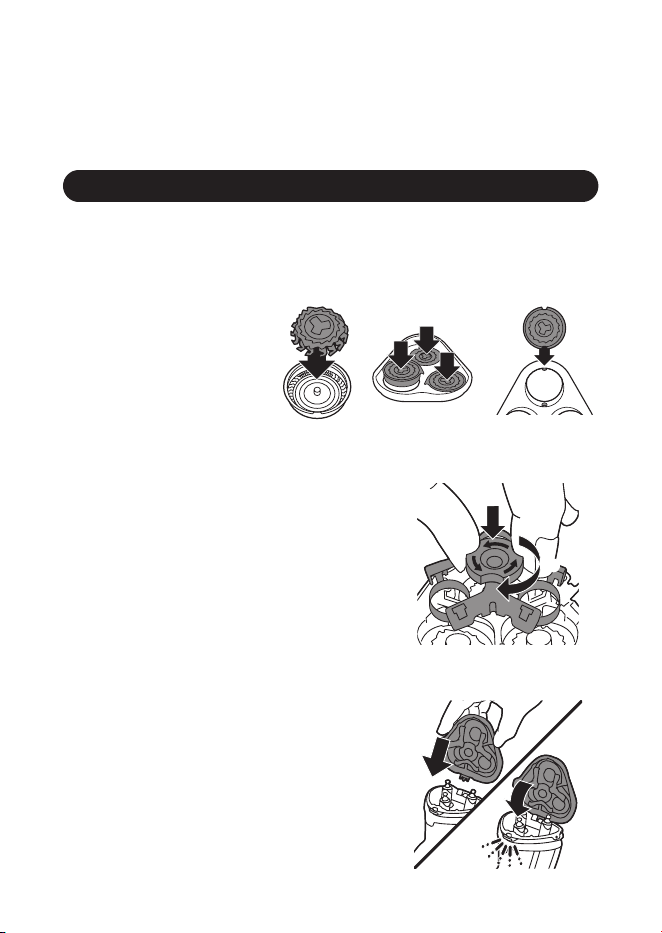
14
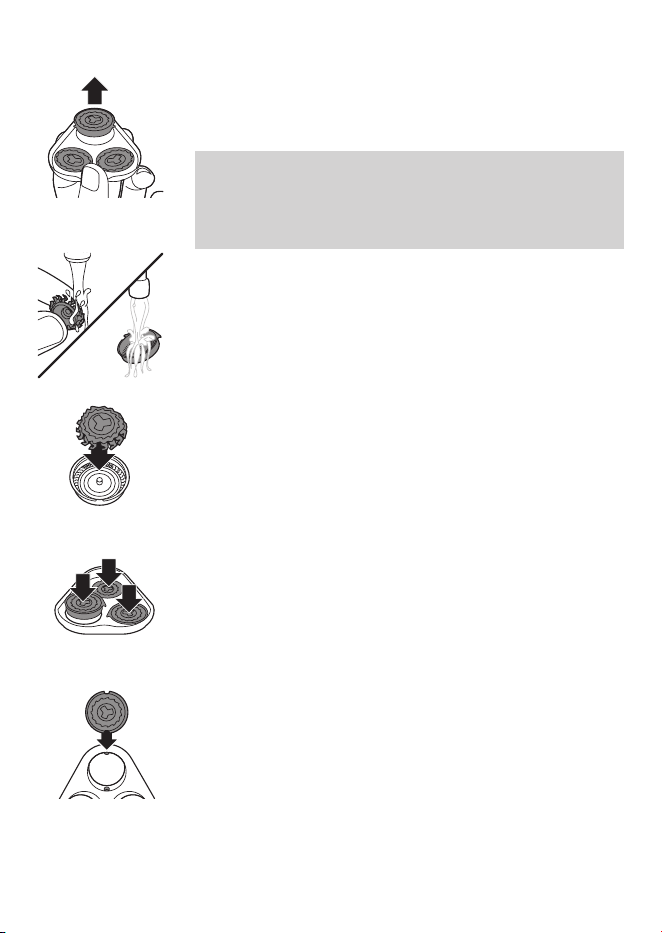
1
内刃と外刃を正しい組み合わせにセットし、外刃
をユニットフレームに戻します。このとき外刃と
シェービングヘッドホルダーの凸凹が合うように
入れてください。
2
保持板をユニットフ レームに戻し(図❶)、中央の
つまみを時計回りに回して(図❷)セ ット し て く だ
さい。
3
シェービングユニットの金具を本体のくぼみに
差 し 込み( 図❶)、本体に セット します(図❷)。
シェービングユニットがスムーズに閉じないとき
は、シェ ービングヘ ッ ドホルダーが正しくセッテ ィ
ングされているかを確認してください。
刃の取り付け方
❶
❷
❶
❷
15
刃の交換
専用の替刃品番は
SH30
です。
※シェービング性能を維持するために、刃は
2
年ごとに交換することをおすすめします。
※交換する際は、必ずフィリップス社製の替刃(
SH30
)にお取替えください。
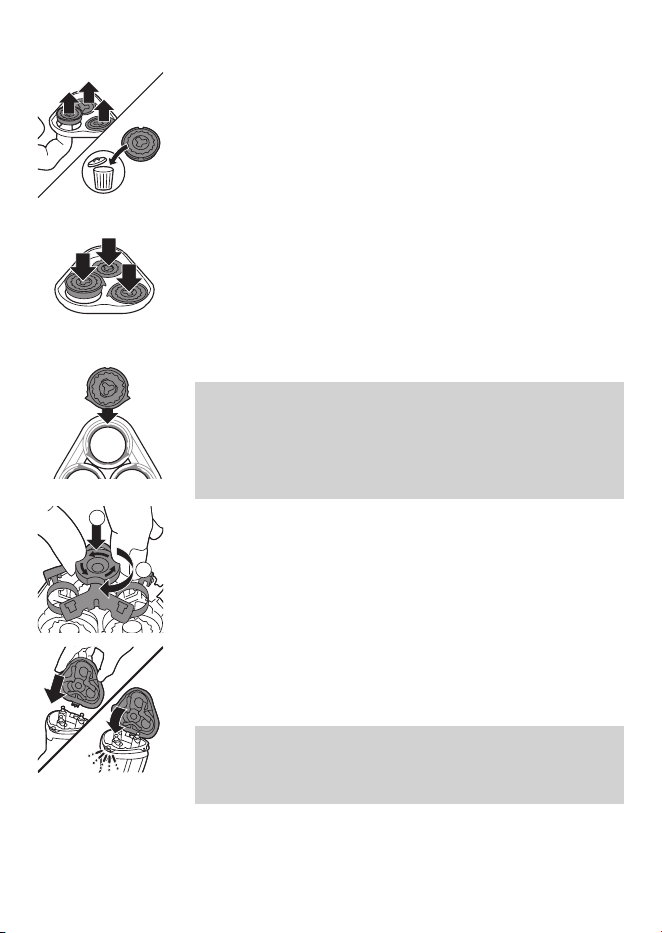
3
新しい内刃と外刃を正しい組み合わせに
セットし、外刃の突起部分をユニットフレー
ムの切り込み部分に合わせて戻します。
2
1
❶
❷
❸
❶
❷
4
保持板をユニットフレー ムに戻し(図
❶)、中央のつまみを時計回りに回して
(図❷)セ ット し てください。
5
シェービングユニットの金具を本体の
く ぼみに差 し込み(図❶)、本体にセッ
ト し ま す(図❷)。
6
スイッチを押し電源を
ON
にします。
シェービングユニットがスムーズに閉
じないときは、シェービングヘッドが
正しくセッティングされているかを確
認してください。
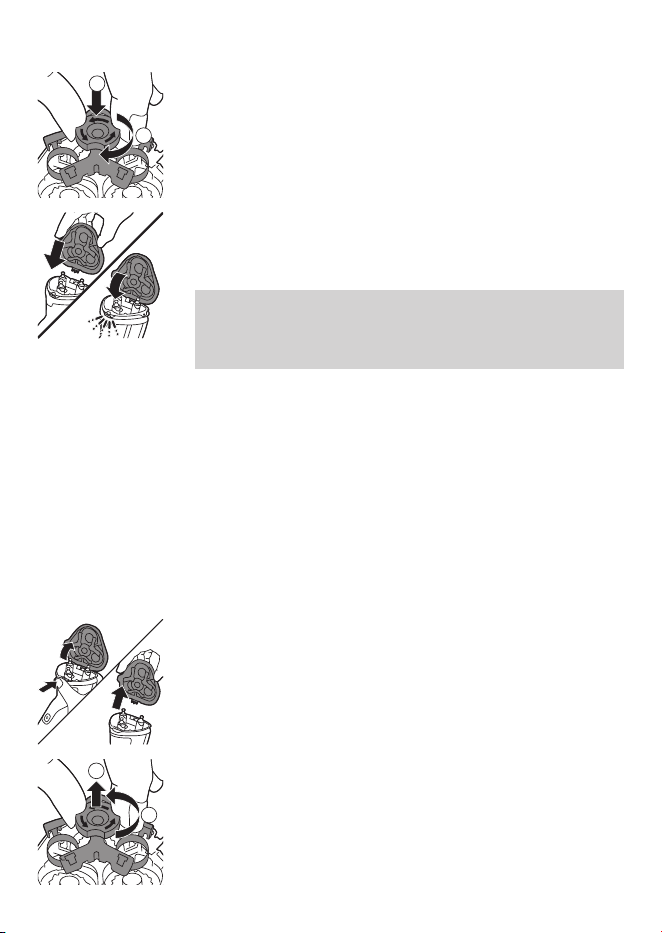
●外刃の向きが異なると正しくセットできませんのでご注意ください。
1
シェービングユニットリリースボタン
(図❶)を押し、シェービングユニット
を開けます。シェービングユニットを
図❷の方向に動かすと本体からはず
すことができます。
2
保持板は中央のつまみを図❶矢印の
方向(反時計回り)に回し、図❷の方向
に持ち上げるとはずれます。回転刃を
1
組ずつユニットフレームより取り外し
ます(図❸)。
❶
❷
替刃
SH30
と交換する場合
❶
❷
16
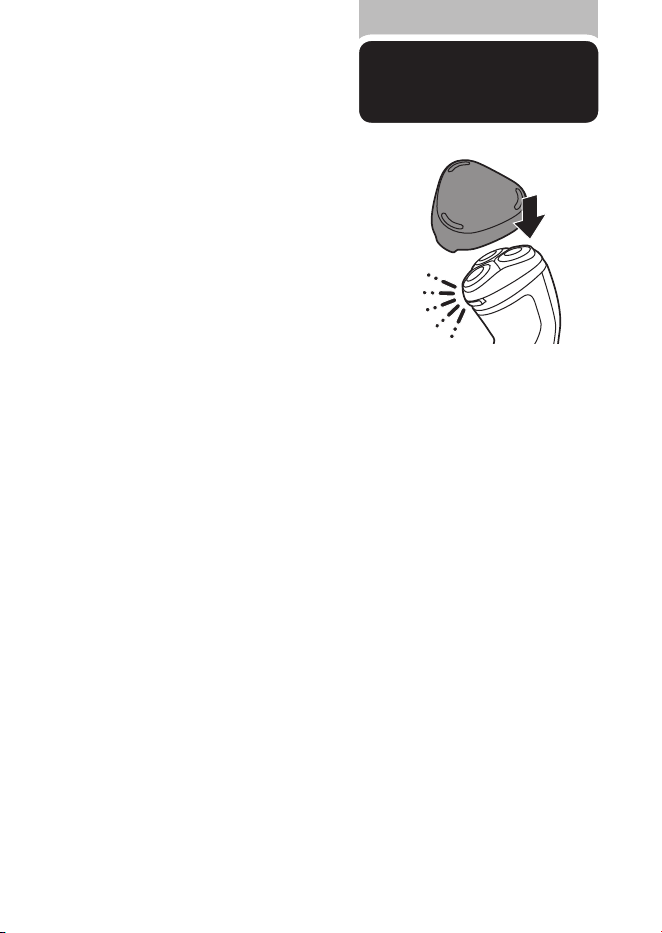
保護キャップを取り付ける前にシェー
バーをきちんと乾燥させてください。
●
保護キャップを図のように、シェービングユニット
に 取り付 け 、保 護しま す 。
刃の交換
保護キャップの
取り付け方
17
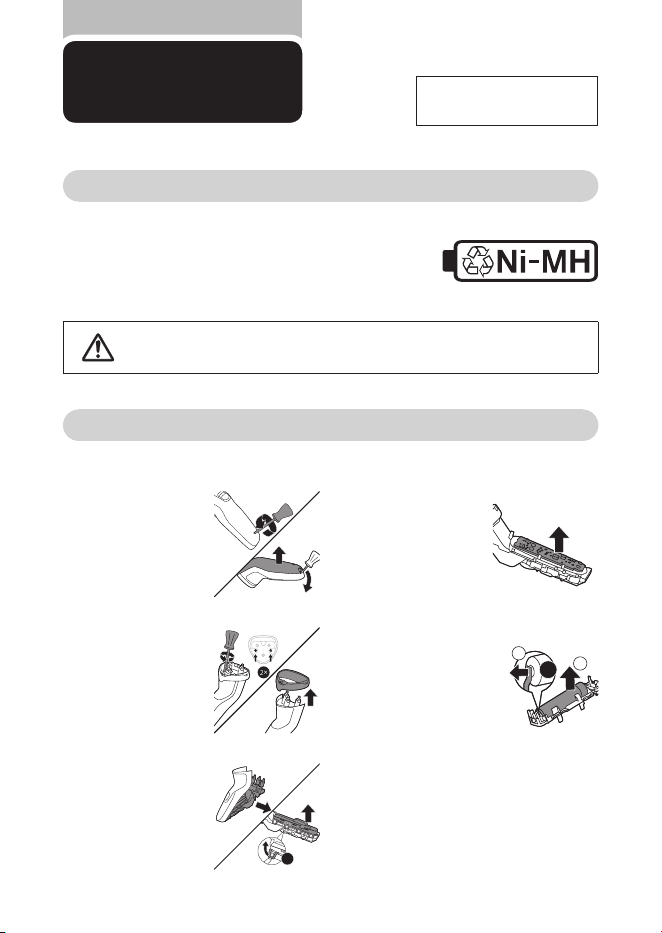
製品を
廃棄するとき
ニッケル水素電池のリサイクルについて
このシェーバーはニッケル水素電池を使用しています。
ニッケル水素電池はリサイクル可能な貴重な資源です。
ご使用済みの製品の廃棄に際しては、ニッケル水素電池を
取り出し、各自治体の処理方法に従い、リサイクル協力店に
お持ちください。
充電池の取り外し方
電源を
ON
にして、完全に動作しなくなるまで充電池を放電させてから、行ってください。
8×
×
※お客様による充電池の
修理交換はできません。
注意
●製品を廃棄するとき以外は、絶対に本体を分解しないでください。
●本体内部の金具は鋭いので、ご注意ください。
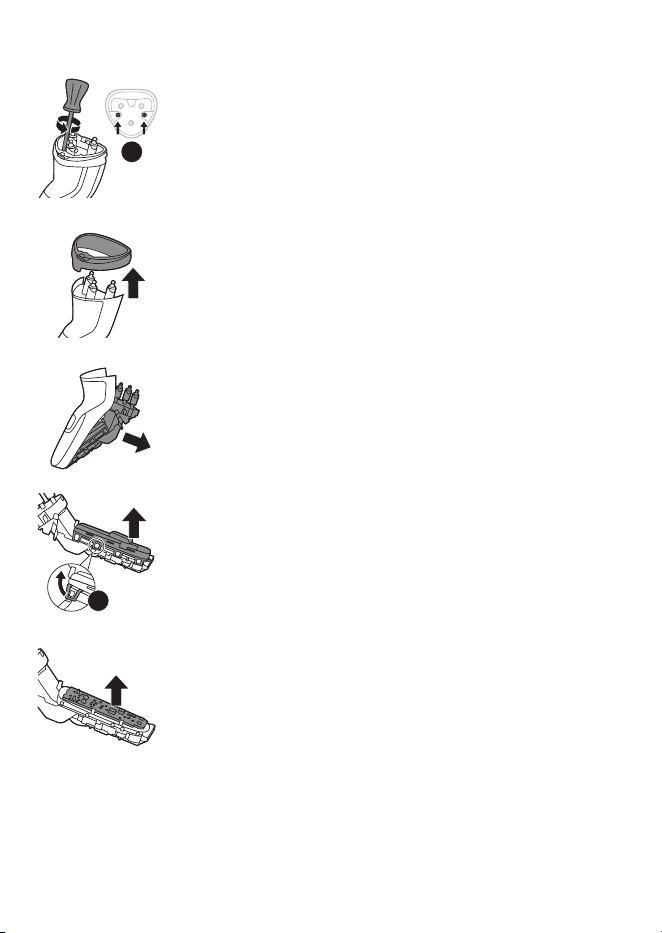
1
シェービングユニッ
トをはずし 、本体下
部のネジを⊖ドラ
イバ ー で はずし 、背
面カバーをはずし
ます。
2
ドライバーを使い
シェービングユニッ
ト受部のねじ
2
本
を外し、上面カバ ー
を取り外します。
3
正面カバーをはず
し 、モーター ユニッ
トのカバーに
8
つ
あるツメをはずし、
カバーを開けます。
4
モーターユニットか
ら電子基板を取り
出します。
5
電子基板と充電池
の接続部分をニッ
パ ーなどで切 り、充
電池を取り外しま
す。
1
2
2×
※充電池を取り外した後は、通電しないでください。
※
ショートしないように充電池の端子をテープで覆って
ください。
※
充電池を取り外した後の製品の廃棄については、お
住まいの地域の条例などに従って処分してください。

18
故障かな?
と思ったら
故障かな?と思ったら、
お調べください。
以上の点検により、正常な状態に戻らない場合は、
フィリップスサポートセンターにお問い合わせください。
だんだん切れ味が悪くなった
●
シェービングヘッド部が汚れていないか確認してください。
●
シェービングヘッド部が損傷または摩耗していないか確認してください。損
傷または摩耗しているときは、シェービングヘッドを交換してください。(替
刃品番:
SH30
)
●
シェービングヘッドに長いヒゲがからまっていないか確認してください。
充電しても使用時間が極端に短い
●
シェーバーが完全に止まるまで作動させてから、もう一度充電してくださ
い。それでも改善されないときは、充電池の寿命です。
シェーバーの電源ボタンを押しても作動しない
●
充電がされていない場合は
8
時間以上の充電をしてください。
※
S1334/41
のみ
1
時間
●
刃が動かなくなるほど汚れている場合はシェービングヘッドをお手入れして
ください。
●
刃が破損している場合は交換をしてください。
シェーバー本体のモーターは回転しているが、内刃が回転しない
●
外刃にキズ、ヘコミがある場合はシェービングヘッドを交換してください。
(替刃品番:
SH
30)
充電できない
●
シェーバー本体の電源コネクタ受部に充電アダプタのコードがきちんと差
し込まれているか確認してください。
●
充電アダプタの電源コードが断線している場合は新しい充電アダプタ(品
番:
HQ8505
)をお買い求めください。
English
2
1
7
8
3
4
5
6
10
9
English
S1000 Series
19

English
Introduction
Congratulations on your purchase and welcome to
Philips! To fully benet from the support that
Philips oers, register your product at
www.philips.com/welcome.
General description (Fig. 1)
1 Protection cap
2 Shaving unit
3 Shaving unit release button
4 On/o button
5 Charging light
6 Socket for small plug
7 Pop-up trimmer (S1231, S1232, S1334 only)
8 Trimmer release slide switch
9 Supply unit
10 Small plug
Important safety information
Read this important information carefully before
you use the appliance and save it for future
reference.
20

English
Danger
- Keep the supply unit dry.
Warning
- To charge the battery, only use the detachable
supply unit (HQ8505) provided with the
appliance.
- The supply unit contains a transformer. Do not
cut o the supply unit to replace it with another
plug, as this causes a hazardous situation.
- This appliance can be used by children aged
from 8 years and above and persons with
reduced physical, sensory or mental capabilities
or lack of experience and knowledge if they
have been given supervision or instruction
concerning use of the appliance in a safe way
and understand the hazards involved. Children
shall not play with the appliance. Cleaning and
user maintenance shall not be made by
children without supervision.
- Always unplug the shaver before you clean it
under the tap.
- Always check the appliance before you use it.
Do not use the appliance if it is damaged, as
this may cause injury. Always replace a
damaged part with one of the original type.
- Do not open the appliance to replace the
rechargeable battery.
21

English
Caution
- This appliance contains batteries that are non-
replaceable.
- Never immerse the charging stand in water and
do not rinse it under the tap.
- Never immerse the shaver in water. Do not use
the shaver in the bath or in the shower.
- Never use water hotter than 60°C to rinse the
shaver.
- Only use this appliance for its intended purpose
as shown in the user manual.
- For hygienic reasons, the appliance should only
be used by one person.
- Never use compressed air, scouring pads,
abrasive cleaning agents or aggressive liquids
such as petrol or acetone to clean the
appliance.
- Water may drip from the socket at the bottom
of the shaver when you rinse it. This is normal
and not dangerous because all electronics are
enclosed in a sealed power unit inside the
shaver.
- Do not use the supply unit in or near wall
sockets that contain an electric air freshener to
prevent irreparable damage to the supply unit.
Electromagnetic elds (EMF)
This Philips appliance complies with all applicable
standards and regulations regarding exposure to
electromagnetic elds.
22

English
General
- This shaver can be safely cleaned under the
tap.
- The supply unit is suitable for mains voltages
ranging from 100 to 240 volts.
- The supply unit transforms 100-240 volts to a
safe low voltage of less than 24 volts.
Charging
Note: You can also use the shaver while it is
plugged-in and charging.
Charge the shaver before you use it for the rst
time and when the display indicates that the
battery is almost empty.
When you charge the appliance for the rst time or
after a long period of non-use, let it charge until
the charging light lights up continuously.
Charging takes approx. : 8 hours (S1133, S1231,
S1232 only) or 1 hour (S1334 only). A fully charged
shaver has a shaving time of up to 40 minutes.
S1334 only
Note: Before rst usage charge the appliance for 3
hours without interruptions and until the battery
charging indication shows that the battery is full.
This is needed to make maximum use of the
battery capacity. All future charges will take 1 hour.
23
English
Charging with the supply unit
1 Put the small plug in the appliance.
2 Put the supply unit in the wall socket.
- The charging light shows the charging status of
the appliance.
3 After charging, remove the supply unit from the
wall socket and pull the small plug out of the
appliance.
Charging indications
Battery fully charged
When the battery is fully charged, the charging
light lights up white continuously.
Note: After approx. 30 minutes, the charging light
goes out to save energy.
Battery low
- When the battery is almost empty (when there
are only 5 or fewer shaving minutes left), the
charging light ashes orange.
- When you switch o the appliance, the charging
light continues to ash orange for a few
seconds.
Charging
When the shaver is charging, the charging light
ashes white.
1
2
24
English
Quick charge (S1334 only)
When you start charging the empty battery, the
charging light ashes white quickly. After approx. 5
minutes the charging light ashes white slowly. The
shaver now contains enough energy for a
5-minute shave.
Using the appliance
Note: This appliance can be used without cord or
when it is connected to the wall socket.
Shaving tips and tricks
- Make circular movements during use. Circular
movements provide better shaving results than
straight movements.
- Your skin may need 2 or 3 weeks to get
accustomed to the Philips shaving system.
Switching the appliance on and o
1 To switch on the appliance, press the on/o
button once.
2 To switch o the appliance, press the on/o
button once.
25
English
Shaving
Dry shaving
Note: For the best results on skin comfort, pre-
trim your beard if you have not shaved for 3
days or longer.
1 Switch on the appliance.
2 Move the shaving heads over your skin in
circular movements to catch all hairs growing in
dierent directions.
3 Stretch your skin with your free hand so the
blades can lift and cut hair. Gently press the
shaver onto you skin so the oating heads can
follow the contours of your face.
Note: Do not press too hard as too much
pressure can cause shaving heads to pinch the
skin.
4 Switch o and clean the appliance after each
use.
5 Put the protective cap on the appliance to
protect the shaving heads during storage and
travel.
- For the best results on skin comfort, pre-trim
your beard if you have not shaved for 3 days or
longer.
26

English
Trimming
(S1231, S1232, S1334 only)
You can use the trimmer to groom your sideburns
and moustache.
1 Push the trimmer release slide downwards to
open the trimmer.
2 Switch on the appliance.
3 Hold the trimmer perpendicular to the skin and
move the appliance downwards while you exert
gentle pressure.
4 Switch o and clean the trimmer after each use.
5 Close the pop-up trimmer (‘click’).
Cleaning and maintenance
Cleaning the shaver
Clean the shaver after every shave for optimal
shaving performance.
Caution: While rinsing shaving heads, water may
drip out of the base of shaver. This is a normal
occurrence. Internal electric parts are in a
waterproof compartment so the shaver will be
protected against water damage.
27
English
1 Switch o the appliance and make sure it is
disconnected from the wall socket.
2 Press the release button to open the shaving
unit.
3 Rinse the shaving unit and hair chamber with
lukewarm water.
4 Rinse the outside of the shaving unit with
lukewarm water.
Never dry the shaving unit with a towel or
tissue, as this may damage the shaving heads.
5 Carefully shake o excess water and let the
shaver air dry.
6 Close the shaving unit.
Cleaning the pop-up trimmer (S1231, S1232, S1334 only)
Clean the pop-up trimmer after each use.
Never dry the trimmer teeth with a towel or
tissue, as this may damage the trimmer teeth.
1 Switch o the appliance and make sure it is
disconnected from the wall socket.
2 Push the trimmer release slide button down to
open the pop-up trimmer.
28
English
3 Switch on the appliance and rinse the pop-up
trimmer with warm water.
4 After cleaning, switch o the appliance.
5 Carefully shake o excess water and let the
pop-up trimmer air dry.
6 Close the pop-up trimmer (‘click’).
Tip: For optimal performance, lubricate the teeth
of the pop-up trimmer with a drop of mineral oil
every six months (oil not included).
Thorough cleaning
Clean the shaving heads thoroughly once a month
for optimal performance.
1 Switch o the appliance and make sure it is
disconnected from the wall socket.
2 Press the release button to open the shaving
unit. Pull the shaving unit o the appliance.
3 Turn the lock anticlockwise (1) and remove the
retaining frame (2).
2
1
29
English
4 Remove and clean one shaving head at a time.
Each shaving head consists of a cutter and a
guard.
Note: Do not clean more than one cutter and
guard at a time, since they are all matching sets.
If you accidentally mix up the cutters and
guards, it may take several weeks before
optimal shaving performance is restored.
5 Remove the cutter from the shaving guard and
clean both parts under the tap.
6 Put the cutter back into the guard.
7 Put the shaving heads back into the shaving
unit.
30
English
8 Put the retaining frame back into the shaving
unit (1) and turn the lock clockwise (2).
9 Insert the hinge of the shaving unit into the slot
in the top of the shaver. Then close the shaving
unit.
Note: If the shaving unit does not close
smoothly, check if you have inserted the
shaving heads properly and if the retaining
frame is locked.
Replacement
Replacing the shaving heads
For maximum shaving performance, we advise you
to replace the shaving heads every two years.
Replace damaged shaving heads immediately.
Always replace the shaving heads with original
Philips shaving heads (see 'Ordering accessories').
1 Switch o the appliance and make sure it is
disconnected from the wall socket.
2 Press the shaving unit release button to open
the shaving unit. Pull the shaving unit o the
appliance.
3 Turn the lock anticlockwise (1) and remove the
retaining frame (2). Place it aside in a safe place.
1
2
2
1
31
English
4 Remove the shaving heads from the shaving
unit.
Discard the used shaving heads immediately to
avoid mixing them with the new shaving heads.
5 Place new shaving heads in the shaving unit.
Note: Make sure that the shaving heads with
the projections t exactly onto the hooks of the
shaving head holder when placing them. The
shaving heads supplied with the shaver either
have notches or projections. Both shaving
systems are the same.
6 Put the retaining frame back into the shaving
unit (1) and turn the lock clockwise (2).
7 Insert the hinge of the shaving unit into the slot
in the top of the shaver. Then close the shaving
unit.
Note: If the shaving unit does not close
smoothly, check if you have inserted the
shaving heads properly and if the retaining
frame is locked.
1
2
32

English
Storage
Put the protective cap on the shaver to prevent
damage.
Note: Always let the shaver dry completely before
storing.
Ordering accessories
To buy accessories or spare parts, visit
www.philips.com/parts-and-accessories or go to
your Philips dealer. You can also contact the
Philips Consumer Care Center in your country (see
the international warranty leaet for contact
details).
Recycling
- Do not throw away the product with the normal
household waste at the end of its life, but hand
it in at an ocial collection point for recycling.
By doing this, you help to preserve the
environment.
- This product contains a built-in rechargeable
battery which shall not be disposed of with
normal household waste. Please take your
product to an ocial collection point or a
Philips service center to have a professional
remove the rechargeable battery.
- Follow your country’s rules for the separate
collection of electrical and electronic products
and rechargeable batteries. Correct disposal
helps prevent negative consequences for the
environment and human health.
33
English
Removing the rechargeable shaver battery
Only remove the rechargeable batteries
when you discard the appliance. Before you
remove the batteries, make sure that the
appliance is disconnected from the wall
socket and that the batteries are
completely empty.
Take any necessary safety precautions
when you handle tools to open the
appliance and when you dispose of the
rechargeable battery.
Be careful, the battery strips are sharp.
1 Press the shaving unit release button to open
the shaving unit. Pull the shaving unit o the
shaver.
2 Remove the screw in the back of the shaver.
3 Remove the back panel by using a athead
screwdriver.
34
English
4 Remove two screws and then remove the hair
chamber from the shaver.
5 Lift out the front panel.
6 Bend the eight snap hooks aside with a
athead screwdriver and remove the cover of
the power unit.
7 Lift out the power unit.
2×
8×
35

English
8 Break the battery tags with a pair of cutting
pliers.
9 Remove the two rechargeable batteries.
Warranty and support
If you need information or support, please visit
www.philips.com/support or read the
international warranty leaet.
Warranty restrictions
The shaving heads (cutters and guards) are not
covered by the terms of the international warranty
because they are subject to wear.
1
2
2×
36

37

38

39
保証
期間
お買い上げ日から
2
年間
対象
部分
本体、充電アダプタ(シェービ
ングユニット、保護キャップを
除く)
保証と
アフターサービス
〈保証書・最終ページに付属〉
●
保証書は、必ず「お買い上げ日・販売店名」等の記入
をお確かめのうえ、販売店から受け取っていただき
内容をよくお読みのあと大切に保管してください。
【補修用性能部品の保有期間】
●
補修用性能部品の保有期間は製造打ち切り後
6
年です。
●
性能部品とは、その製品の機能を維持するために必要な部品です。
【ご不明な点や修理に関するご相談は】
●
修理に関するご相談ならびにご不明な点は、フィリップスサポートセンターにお問い合わ
せください。
【修理を依頼されるときは】
●
修理をご依頼される前に、この取扱説明書をよくお読みいただき、再度点検ください。尚、
異常のあるときはご使用を中止し、フィリップスサポートセンターにお問い合わせください。
【保証期間中は】
●
製品と保証書をご用意いただき、フィリップスサポートセンターにお問い合わせください。
保証書の記載内容により無料修理いたします。
【保証期間が過ぎているときは】
●
修理によって商品の機能が維持できる場合は、補修用性能部品の保有期間内であれば、
ご希望により有料で修理させていただきます。
●
部品の在庫がなくなった場合には、保有期間内でも修理できないことがあります。
【海外での本製品の保証及びアフターサービスについて】
●
本製品の保証は海外においても有効です。(同シリーズ製品の取り扱いがある国に限ります)
●
日本国以外のフィリップスサービス部門においても保証期間内及び保証期間の経過後の
アフターサービスを受けることができますが、この場合多少日数を要することもあります。
●
海外にてアフターサービスを受けられる場合は、現地のフィリップスサービス部門に
お問い合わせください。尚、お困りの点がございましたら下記までご連絡ください。
Philips Consumer Lifestyle Service Department P.O.Box 20100 9200 CA DRACHTEN
The Netherlands Fax:+31 51 259 2785
【お客様の個人情報のお取り扱いについて】
●
お受けしましたお客様の個人情報は、株式会社フィリップス・ジャパンのホームページ
http://www.philips.co.jp/
に掲載されている「プライバシーに関する通知」に基づき適
切に管理いたします。
保証書と修理サービスについて
(必ずお読みください)
40
お買い上げ
店 名
お買い上げ日年
月
日
TEL.
(
)
便利メモ
ご使用の時、このような症状はありませんか?
●本体にさわると時々電気を感じる。
●こげくさい臭いがする。
●電源コード部を動かすと通電したり、しなかったりする。
●その他の異常、故障がある。
このような症状の時は、故障や事故防止のため、電源を
OFF
にし、充電アダプタをコンセントから外して、必ずフィ
リップスサポートセンターにお問い合わせください。
〒
108-8507
東京都港区港南
2-13-37
フィリップスビル
株式会社
フィリップス・ジャパン
品番
S1334/41 S1232/41 S1231/41 S1133/41
ハンドル品番
S1334
S1232
S1231
S1133
替刃品番
SH30
充電アダプタ品番
HQ8505
本体寸法
(高さ×幅×奥行)
161x58x70mm
質量
約
185g
約
175g
電源方式
充電・交流式(専用充電アダプタ使用)
定格電圧
AC100-240V
、
50/60Hz
充電時間
約
1
時間約
8
時間
使用時間
約
40
分
使用充電池
ニッケル水素充電池
(Ni-MH)
消費電力
9W
仕様
※改良のため、予告なく仕様を変更することがあります。

41
42
無料修理規定
キ
リ
ト
リ
線
キ
リ
ト
リ
線
〈無料修理規定〉
1.
取扱説明書、本体貼付ラベル等の注意書に従った正常な使用状態で保証期間
内に故障した場合には、無料修理します。
2.
保証期間内に故障して無料修理をお受けになる場合には、フィリップスサポート
センターにお問い合わせください。
3.
ご贈答品の修理に関するご相談は、フィリップスサポートセンターにお問い
合わせください。
4.
保証期間内でも次の場合には有料修理になります。
○
1
使用上の誤り及び不当な修理や改造による故障及び損傷。
○
2
お買い上げ後の輸送、移動、落下等による故障及び損傷。
○
3
火災、地震、水害、落雷、その他の天災地変、公害や異常電圧による故障及び損傷。
○
4
一般家庭以外(例えば、業務用の長時間使用)に使用された場合の故障及び損傷。
○
5
保証書の提示がない場合。
○
6
保証書にお買い上げ年月日、お客様名、販売店名の記入のない場合、或は字句を書き
換えられた場合。
※
保証書は、本書に明示した条件のもとにおいて無料修理をお約束するもので
す。従って保証書を発行している者(保証責任者)、及びそれ以外の事業者に
対するお客様の法律上の権利を制限するものではありません。
保証期間経過後の修理についてご不明の場合は、フィリップスサポートセン
ターにお問い合わせください。
※
保証期間経過後の修理・補修用性能部品の保有期間について詳しくは取扱
説明書の保証とアフターサービスの項目をご覧ください。
※
お客様にご記入いただいた個人情報(保証書の控え)は保証期間内のサービス
活動及びその後の安全点検活動のために利用させていただく場合がございま
す。ご了承ください。また個人情報は、株式会社フィリップス・ジャパンのホーム
ページ
http://www.philips.co.jp/
に掲載されている「プライバシーに関す
る通知」に基づき適切に管理いたします。
フィリップス
電動シェーバー
保証書
CERTIFICATE OF PURCHASE
この保証書は、「無料修理規定」記載内容で無料修理を行うことをお約束するものです。お買い上げの日
から下記期間中に故障が発生した場合は、フィリップスサポートセンターにお問い合わせください。
お客様にご記入いただいた個人情報(保証書の控え)は、株式会社フィリップス・ジャパンのホームペー
ジ
http://www.philips.co.jp/
に掲載されている「プライバシーに関する通知」に基づき適切に管理
いたします。
★
保証書は再発行しませんので、大切に保管してください。
★
ご販売店様へ
この保証書はお客様へのアフターサービスの実施と責任を明確にするものです。
贈答品、記念品の場合も含めて必ず記入捺印してお客様にお渡しください。
この印刷物は再生紙を使用しております。
©2020 Philips Japan, Ltd.
3000.043.0051.1
(
02/20
)
品名電動シェーバー
品番
S1334/41, S1232/41, S1231/41, S1133/41
保証期間お買い上げ日より
2
年
対象部分本体、充電アダプタ(シェービングユニット、保護キャップを除く)
お買い上げ日
年 月 日
お客様
ご住所
〒
ご芳名
電話番号
★販売店
販売店名・住所・電話番号
キ
リ
ト
リ
線
キ
リ
ト
リ
線
受付時間:
9
:
00
~
18
:
00
(年末年始除く)
フィリップスサポートセンター
0120
(
944
)
859
Web
からの
お問い合わせ
製品の使用方法や修理に関するお問い合わせ
★
フィリップスでは、製品をより快適にご使用いただくために
製品登録をおすすめしております。
MyPhilips
では製品の保証書や購入証明書の写真も保管でき、
万が一購入証明書を紛失された場合にも安心です。
http://www.philips.co.jp/myphilips-about
URL
MyPhilips
登録のご案内