
1
SAVE THESE INSTRUCTIONS
CAUTION
SPECIAL INSTRUCTIONS
• The Cuisinart
®
mandoline’s stainless steel blades are extremely sharp. Please handle with care.
Keep ngers and hands away from blades when using, cleaning, assembling, or reassembling the unit.
• ALWAYS use the food pusher to guide food properly into the cutting blade and to prevent injuries.
• Never use your hands instead of the food pusher to guide food.
• Prongs and pins are very sharp; always use caution when placing food onto or removing it from the food
pusher.
• Always set the thickness dial to zero to lower the blades for safe storage.
• Keep this product and its components away from children.
PARTS
This package contains a Cuisinart
®
PrecisionSlice™ Upright Mandoline and the following components:
1. Mandoline body
2. Food pusher
3. Collection container
4. Cleaning brush
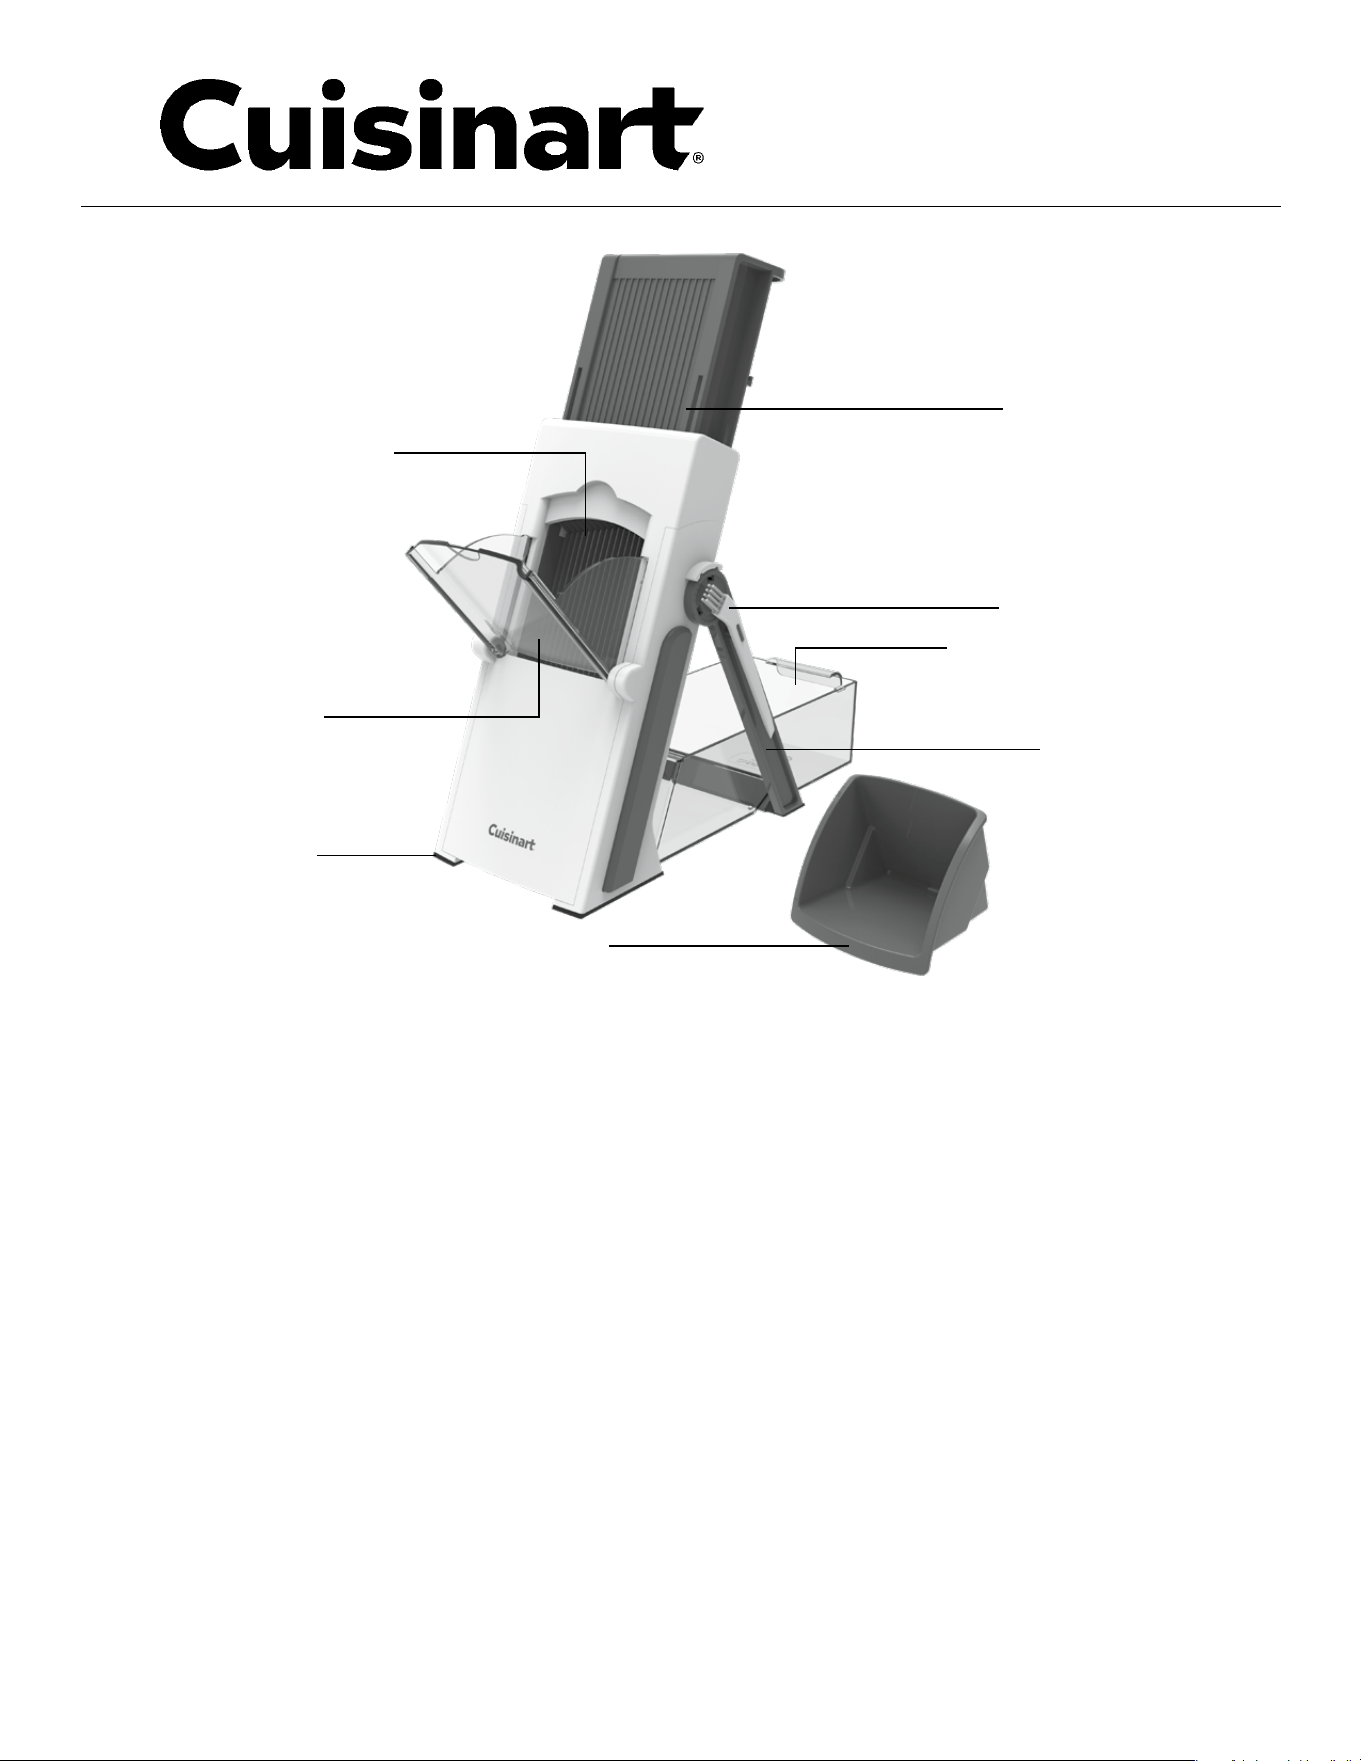
Durable,
Precision-Sharpened
Stainless-Steel
Blades
Spring-Loaded
Push Handle
Collection Container
Collapsible
Kickstand
Cleaning Brush
Food Pusher
Extra-Wide
Feed Chute
Suction Feet
FEATURES
PrecisionSlice
™
Upright Mandoline

2
CONTENTS
Features. . . . . . . . . . . . . . . . . . . . . . . . . . . . . . . . . . . . . . . . . . . . . . . . . . . . . . . . . . . 1
Special Instructions . . . . . . . . . . . . . . . . . . . . . . . . . . . . . . . . . . . . . . . . . . . . . . . . . . . . 1
Parts. . . . . . . . . . . . . . . . . . . . . . . . . . . . . . . . . . . . . . . . . . . . . . . . . . . . . . . . . . . . . 1
Operating Instructions . . . . . . . . . . . . . . . . . . . . . . . . . . . . . . . . . . . . . . . . . . . . . . . . . . 2
Cleaning and Storage . . . . . . . . . . . . . . . . . . . . . . . . . . . . . . . . . . . . . . . . . . . . . . . . . . 2-3
Suggested Usage and Tips . . . . . . . . . . . . . . . . . . . . . . . . . . . . . . . . . . . . . . . . . . . . . . . 3-4
Recipe . . . . . . . . . . . . . . . . . . . . . . . . . . . . . . . . . . . . . . . . . . . . . . . . . . . . . . . . . . . . 5
Warranty . . . . . . . . . . . . . . . . . . . . . . . . . . . . . . . . . . . . . . . . . . . . . . . . . . . . . . . . . . 10
Read instructions before using.
OPERATING INSTRUCTIONS
1. Before rst use, wash the body of the mandoline and all
components with hot, soapy water. Refer to instructions 2–4 to
separate parts for cleaning.
2. Slide the collection container to separate it from mandoline
body. Remove the food pusher.
3. Open the kickstand until it clicks into place and is fully
extended. Place the mandoline upright. Place the collection
container over the kickstand (with the handle facing out).
4. Hold the spring-loaded handle, push down rmly, and use your free
hand and the nger notch to open the feed chute (see Image A).
Slowly release the handle.
5. Refer to the Cutting Guide below to select
cuts and thicknesses.
6. Trim your food, if necessary, to t in the feed chute.
7. Place your food in the chute. Use the food pusher with one
hand to guide the food (teeth facing the cutting runway). With
your other hand, push the handle down to cut. Release the handle to return to the starting
position.
8. Return the thickness dial to zero before washing and storing the mandoline.
CUTTING GUIDE
• Use the dial to select your cut thickness (see Image B)
• To slice: Both sliders to the OFF position
• Thin julienne: Both sliders to the ON position
• Thick julienne: One slider ON, one slider OFF
CLEANING AND STORAGE
EASY TO CLEAN
1. Remove the food pusher and collection container from the mandoline.
2. Carefully remove any remaining food with the cleaning brush.
3. Wash the food pusher, mandoline, and collection container with warm, soapy water and let dry.
4. Do not submerge mandoline and hand-wash only. Collection container is top rack dishwasher
safe.
Image A
Image B

3
SAFE AND EASY TO STORE
1. Be sure the mandoline and all parts are washed
and thoroughly dry.
2. Make sure the thickness adjuster dial is set to zero.
Set both sliders to the OFF position.
3. Push and hold down the handle. With your other
hand, close the chute.
4. Fold the kickstand legs at.
5. Place the food pusher on the back of the mandoline
with the notch pointing down. Slide and lock to
attach the collection container (see image C).
Image C
FOODS
STRAIGHTEDGE
BLADE
JULIENNE
BLADE
RECIPE IDEAS
Apples
Use the straightedge blade with the thickness dial set between 2 and 3 for apple chips, or 4 for perfect slices for an apple pie.
Beets
Use the straightedge blade with the thickness dial set between 2 and 3 for beautiful beet chips.
Bok Choy
Broccoli Stalks Don’t toss those broccoli stalks. After peeling the tougher outer parts, use the julienne blade to cut the stalks to use in stir fries or
raw in salads.
Brussels Sprouts
Use the straightedge blade on a thin setting to prep the sprouts to use in a salad. We love replacing romaine with sliced Brussels
sprouts in a twist on a Caesar salad.
Butternut Squash
Use the straightedge blade with the thickness dial set between 2 and 3 for perfect slices for roasting or air frying.
Cabbage
Using the straightedge blade is the best way to prep cabbage for any type of slaw.
Carrots
Use thin julienne setting up to 4 and thick julienne setting up to 7. Use the straightedge blade to slice carrots into coins of any size for
roasting or eating raw for dipping.
Cauliflower
Thickly slice cauliflower for roasting.
Cucumbers
Slice, between 2 and 4 on the thickness dial, to toss in a refreshing cucumber salad, or to layer in your favorite sandwich.
Daikon
This radish gives zing to salads and crudite platters. Use any setting to slice and cut as desired, be it thick julienne cuts at setting 4, or
thin slices at setting 2.
Eggplant
Use the straightedge blade with the thickness dial set to 4 to achieve perfect slices for eggplant Parmesan.
Endive
Using the straightedge blade on settings 2 to 4 is the best way to prep endive. Toss it with mixed greens and a light vinaigrette for a
refreshing salad.
Fennel
Sliced fennel adds great flavor, when it is roasted with other vegetables.
Ginger
Thinly slice peeled ginger, on setting 1 or 2, to prep for pickling. Or on setting 2 for a thin julienne cut to add to a stir fry.
Iceberg Lettuce
For a hearty salad, slice lettuce on a medium setting 4 to 5, and then toss with your favorite salad ingredients.
Lemons
Make the perfect lemon slices with the straightedge blade on setting 1 to add to a pitcher of lemonade, iced tea, or water.
Onions
Use the straightedge blade with the thickness dial set to 4 to make perfect onion rings.
Oranges
Parsnips Slice with the straightedge blade on settings 4 to 6 to prep for soups, or use the julienne blade for roasting.
Pears
Slice for pies, tarts, and all your other favorite baked desserts.
Peppers
Use the straightedge blade with the thickness dial set to 4 to slice a variety of bell peppers to grill on the barbecue.
Potatoes
Slice thinly for potato chips, thickly for a quick version of smashed potatoes, or use the thick julienne blade at setting 4 to make the
perfect french fries.
Radicchio
Slice and mix into coleslaw for added crunch and color.
Radishes
Use the thin julienne on setting 2 to add into a salad, or use the straightedge blade to slice to desired thickness for salads or
sandwiches.
Rutabaga
Using the thick julienne setting on 4 to 6 thickness level, you can make a tasty alternative french fries when tossed with oil and air fried
or roasted.
Summer Squash
Summer squash looks beautiful when julienned with the thickness dial set between 1 and 2. Toss with pasta or grains.
Tomatoes
Use the straightedge blade with the thickness dial set at 4 or higher. Results vary based on firmness and type of tomato.
Turnips
Another favorite for roasting, make into chips, french fry cuts, or thinner julienne for crispy bites.
Zucchini
There are so many options with zucchini, be it zucchini fries, on setting 4 with a thick julienne, or a medium slice with the straightedge
blade for a quick sauté.
SUGGESTED USAGE AND TIPS

4
OTHER TIPS
• Always use the food pusher when slicing.
• Using a mandoline takes some practice. You may not get perfect results right away, but after a
few tries, you will be slicing like a pro.
• Softer foods may require less pressure when cutting, while harder foods may call for more
pressure.
• Prepare a quick salad or stir-fry with a mix of julienned and sliced vegetables.
• For optimal results when slicing tomatoes, use setting 4 or higher. Results vary based on
rmness and type of tomato. Works best on plum or Roma tomatoes.
• Prepare fruit or vegetable platters in a ash.
• For harder foods, like carrots, use thin julienne setting up to 4 and thick julienne
setting up to 7.
• Make sure to push the handle all the way down and come all the way up, swiftly, for optimal
results.
• It is easiest to cut foods that are at on the bottom. Trim rounded edges so they are
ush with the cutting surface.

5
RECIPES
Potatoes au Gratin
Thinly sliced potatoes are the star of this luxurious side dish.
Makes 12 servings
2 garlic cloves, minced
1 medium shallot, minced
2 cups heavy cream
2 teaspoons fresh thyme leaves, plus more for garnish
1 teaspoon kosher salt, plus more as needed
¼ teaspoon freshly ground black pepper, plus more as needed
4 pounds russet potatoes, scrubbed and peeled
3 ounces Gruyère, finely grated
1 ounce Parmesan, finely grated
1. Preheat the oven to 350°F.
2. Butter a 9x13-inch baking dish with 1 tablespoon of the butter.
3. In a small saucepan, melt the remaining 1 tablespoon butter. Add the garlic and shallot, and
sauté until aromatic. Add the cream, thyme, 1 teaspoon salt, and ¼ teaspoon pepper.
Bring to a simmer and cook for 5 minutes while prepping the potatoes.
4. Position the sliders to the slice position and set the turn dial between settings 1 and 2.
Slice the potatoes.
5. Shingle a single layer of sliced potatoes in the prepared baking dish. Season with salt and
pepper. Ladle one-third of the heavy cream mixture over the potatoes and then sprinkle
one-third of the Gruyère over the potatoes. Repeat this layering one more time. Add one
nal layer of potatoes, season with salt and pepper, and top with the remaining heavy cream
mixture.
6. Cover the baking dish with foil. Transfer to the oven and bake for 60 to 70 minutes, until the
potatoes are cooked through.
7. Heat the broiler. Remove the foil and top with the Parmesan and remaining Gruyère. Broil until
the cheeses turn golden brown. Let stand for 15 minutes, then garnish with additional thyme
before serving.

6
Asian Slaw with Ginger-Sesame Dressing
The Cuisinart
®
PrecisionSlice
™
Upright Mandoline makes homemade coleslaw possible.
Here is a delicious Asian-flavor-inspired version. This colorful side dish goes beautifully with grilled
fish or chicken.
Makes 8 to 10 servings
Dressing:
1 garlic clove, peeled
1 inch piece ginger, peeled
1 tablespoon natural-style peanut butter, chunky or creamy
1 tablespoon rice vinegar
2 tablespoons soy sauce (reduced sodium works well)
1 tablespoon honey
2 tablespoons sesame oil (we recommend hot sesame oil, but it may be a bit too spicy for
some. If so, use half regular sesame oil and half spicy)
Salad:
6 small to medium red radishes, trimmed
1 broccoli stalk (florets trimmed and reserved for another use)
2 medium carrots, peeled and halved to fit the safety guard
2 medium stalks bok choy (greens trimmed and reserved for another use)
½ small radicchio
¼ small to medium green cabbage
½ small to medium red cabbage
¼ cup chopped cilantro
1. Put the garlic and ginger in a Cuisinart
®
Food Processor tted with the metal blade. Process
until nely chopped. Add the peanut butter, rice vinegar, soy sauce and honey. Process until
fully combined. With the unit running, add the oil through the drizzle hole in the feed tube and
process until emulsied. Reserve.
2. Position the sliders to the thin julienne setting and set the turn dial between setting 1 and
2mm. Use the food holder to julienne the radishes, broccoli, and carrots; reserve in a large
mixing bowl.
3. Position the sliders to the slice position and set the turn dial to 2mm. Use the food holder to
slice the bok choy and radicchio; add to the mixing bowl. Re-adjust the slice thickness on the
indicator between setting 1 and 2 mm. Use the food holder to slice the green and red cabbage;
add to the mixing bowl.
4. Add the chopped cilantro to the vegetables and toss – using tongs works best – to fully com-
bine. Right before serving, add the reserved dressing and toss to fully coat. (NOTE: It is im-
portant not to add dressing until immediately before serving; otherwise the salad will not be
as bright in color and the vegetables will not be as crisp.)
Nutritional information per serving (based on 10 servings):
Calories 81 (47% from fat) • carb. 9g • pro. 2g • fat 5g • sat. fat 1g
chol. 0mg • sod. 162mg • calc. 45mg • ber 2g

7
Perfect French Fries
The Cuisinart
®
PrecisionSlice
™
Upright Mandoline makes cutting perfect French fries a breeze!
Makes 2 to 3 servings
Vegetable or peanut oil for frying
1 pound russet potatoes
Kosher salt and freshly ground pepper to taste
1. Heat oil in a Cuisinart Compact Deep Fryer to 325°F.
2. Scrub potatoes well or peel if preferred.
3. Position the sliders to the thick julienne and set the turn dial to 8.
4. If needed, trim the potato to t in the food chute and use the food pusher to julienne the
potatoes. As you slice, put the French fries into a bowl of ice water to keep them from turning
brown.
5. Once oil is ready, drain and dry the French fries completely and thoroughly in batches. (If they
are wet at all, the oil will spatter and spit.) Fry the potatoes in small batches. Cook for about
3 minutes, remove and drain on a tray lined with a wire cooling rack, or on layers of paper
towels.
6. Increase the oil temperature to 375°F. In small batches again, fry the potatoes for a second
time, this time about 4 minutes, until golden and crispy. Drain on fresh layers of paper towels.
Season with salt and pepper to taste when hot and serve immediately.
NOTE: French fries can be fried once in 375°F until golden brown. Frying them twice makes them
extra crispy!
Nutritional information per serving (based on 10 servings):
Calories 332 (64% from fat) • carb. 27g • pro. 3g • fat 24g • sat. fat 4g
chol. 0mg • sod. 52mg • calc. 20mg • ber 2g

8
Radish, Cucumber, and Feta Salad
This light and colorful salad is full of bright flavors and couldn’t be easier to make.
Makes 5 cups
1 tablespoon fresh lemon juice
2 tablespoons extra-virgin olive oil
1 to 2 pinches sea salt
1 to 2 pinches freshly ground black pepper
1 bunch small radishes, trimmed (about 8 radishes)
½ medium seedless cucumber, trimmed
2 ounces crumbled feta cheese
¼to⅓cupmixedfreshherbs,roughlychopped(parsley,mint,basil,etc.)
1. Put the lemon juice, olive oil, salt, and pepper in a small bowl and whisk until homogenous.
Reserve.
2. Position the sliders to the slice position and set the turn dial between settings 2-3. Slice the
radishes and then the cucumber and transfer to a serving bowl. Add about 1 tablespoon of the
dressing to the vegetables and toss gently to coat.
3. Add crumbled feta to the bowl with the dressed vegetables, along with the chopped herbs.
Toss gently to combine.
4. Taste and adjust seasoning as desired, adding more salt and pepper or more dressing. Serve
immediately.
Nutritional information per serving (based on 10 servings):
Calories 52 (72% from fat ) • carb. 2g • pro. 2g • fat 4g • sat. fat 2g
chol. 10mg • sod. 162mg • calc. 62g • ber 0g

9
Parmesan Zucchini Fries
A quick and cheesy treat!
Makes 2 to 3 servings
2 medium zucchini, trimmed to fit food chute
1 large egg
½ teaspoon salt
½ cup grated Parmesan cheese
1 teaspoon Italian seasoning (optional)
Olive oil, for greasing the baking sheet or AirFryer basket
Marinara sauce, warmed for serving
1. Position the sliders to the thick julienne position, set the turn dial to 8 and cut the zucchini.
Put cut zucchini in a colander set over a bowl and sprinkle with ½ teaspoon salt. Let sweat
for 15 to 20 minutes. Rinse and completely dry.
2. Beat the egg in a shallow bowl. In a separate bowl, combine parmesan and Italian seasoning.
3. Bake: Preheat the oven to 425°F with a rack positioned in the lower third. Liberally grease a
baking sheet with olive oil. Dip cut zucchini into the egg, dripping o any excess, and dredge
in the seasoned Parmesan. Spread out in a single layer on the prepared baking sheet. Bake for
30 to 35 minutes, ipping halfway through, until golden brown and crisp.
Air-Fry: Place the Cuisinart
®
AirFryer Basket onto the Baking/Drip Pan and liberally spray with
olive oil. Dip cut zucchini into the egg, dripping o any excess, and dredge in the seasoned
Parmesan. Transfer to the greased AirFry basket in a single layer, AirFrying in two batches if
needed. AirFry in the upper position at 400°F for 8 to 10 minutes, ipping halfway through,
until golden brown.
4. Taste nished fries and adjust seasoning as desired. Fries will continue to crisp up as they
cool down. Serve with warmed marinara sauce.
Nutritional information per serving (based on 10 servings):
Calories 113 (51% from fat) • carb. 4g • pro. 9g • fat 6g • sat. fat 2g
chol. 75mg • sod. 328mg • calc. 460mg • ber 1g

10
©2023 Cuisinart
Glendale, AZ 85307
Printed in China
23CT088682
IB -18152
WARRANTY
LIFETIME WARRANTY (U.S. AND CANADA ONLY)
Cuisinart
®
Tools & Gadgets are warranted to be free of defects in materials and workmanship under normal home use from
the date of original purchase throughout the original purchaser’s lifetime.
HASSLE-FREE REPLACEMENT WARRANTY
Your ultimate satisfaction in Cuisinart products is our goal, so if your Cuisinart
®
Tools & Gadgets product should fail within
the generous warranty period, we will repair it or, if necessary, replace it at no cost to you. To obtain a return shipping label,
visit us at http://www.cuisinart.com/customer-care/product-assistance/product-inquiry. Or call our customer service
department toll-free at 1-800-726-0190 to speak with a representative. This warranty excludes damage caused by accident,
misuse, or abuse, including damage caused by overheating, and it does not apply to scratches, stains, discoloration, or other
damage to external or internal surfaces that does not impair the functional utility of the tool/gadget. This warranty also
expressly excludes all incidental or consequential damages. Some states do not allow the exclusion or limitation of incidental
or consequential damages, so the foregoing limitation or exclusion may not apply to you. This warranty gives you specic
legal rights, and you may also have other rights, which vary from state to state.
CALIFORNIA RESIDENTS ONLY
California law provides that for In-Warranty Service, California residents have the option of returning a nonconforming
product (a) to the store where it was purchased or (b) to another retail store that sells Cuisinart
®
products of the same
type. The retail store shall then, according to its preference, either repair the product, refer the consumer to an independent
repair facility, replace the product, or refund the purchase price less the amount directly attributable to the consumer’s
prior usage of the product. If the above two options do not result in the appropriate relief to the consumer, the consumer
may then take the product to an independent repair facility, if service or repair can be economically accomplished. Cuisinart,
and not the consumer, will be responsible for the reasonable cost of such service, repair, replacement, or refund for
nonconforming products under warranty. California residents may also, according to their preference, return nonconforming
products directly to Cuisinart for repair or, if necessary, replacement by calling our Consumer Service Center toll-free at
1-800-726-0190. To obtain a return shipping label, visit us at http://www.cuisinart.com/customer-care/product-assistance/
product-inquiry. Cuisinart will be responsible for the cost of the repair, replacement, and shipping and handling for such
nonconforming products under warranty.