WARRANTY
TROUBLESHOOTING
8
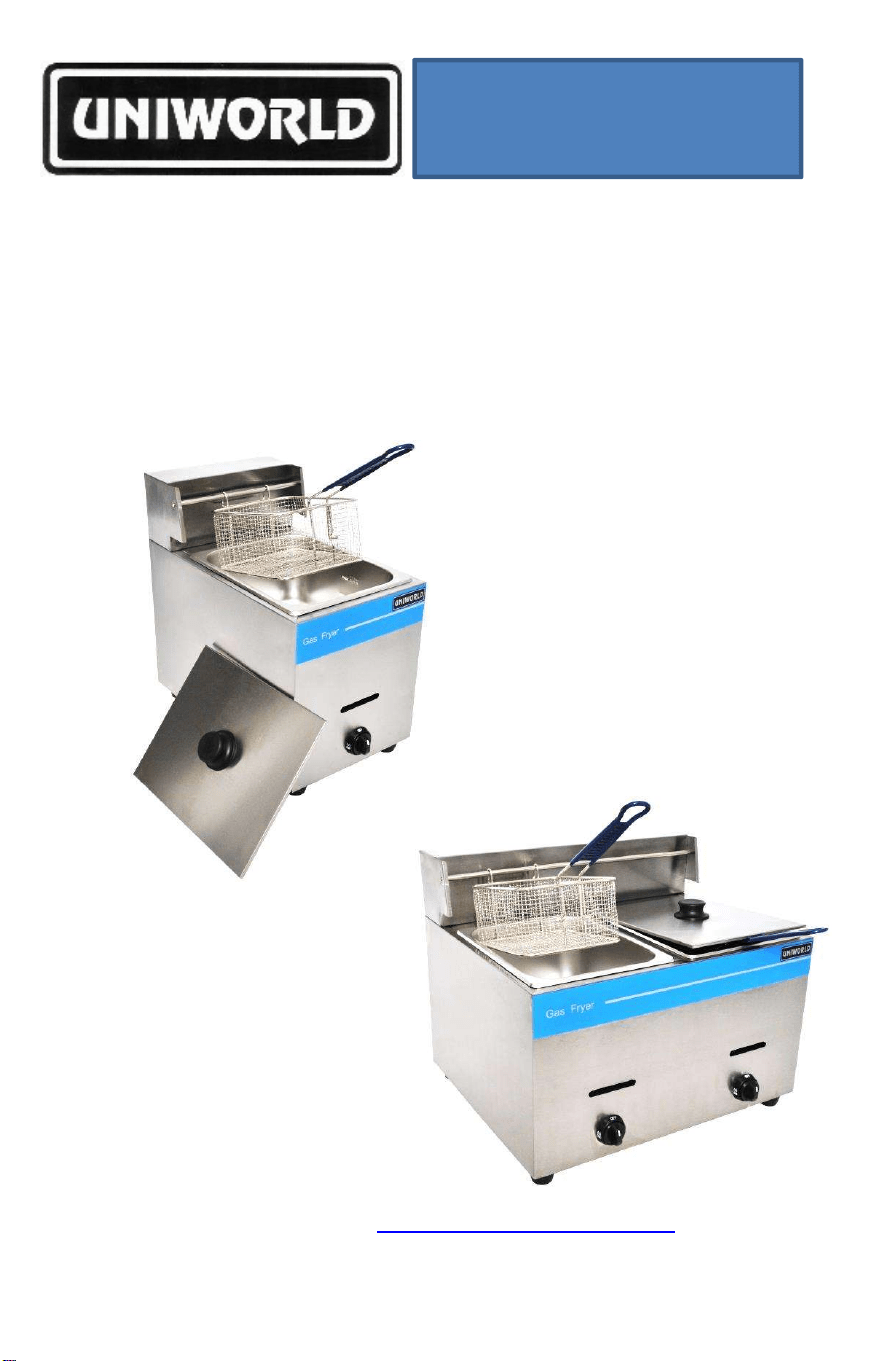
MANUAL INSTRUCTIONS FOR
UGF-71 & UGF-72
(Propane)
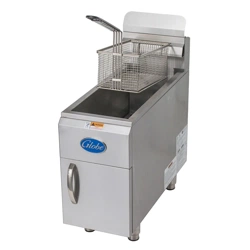
UGF-71
ECONOMY FRYER WITH
1 BASKET, 1 WELL
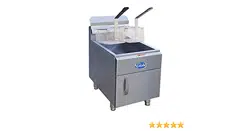
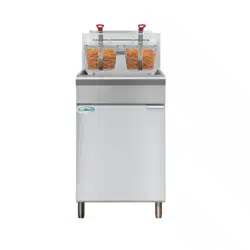
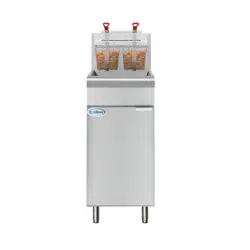
UGF-72
ECONOMY FRYER WITH
2 BASKETS, 2 WELLS
Visit our Website: www.uniworldfoodequip.com
Toll Free Phone: (888) 777-0671: Fax: (888) 888-3185
1
All products manufactured and sold by UNIWORLD are warranted to be free from defects in material or
workmanship. UNIWORLD’s obligation and liability is expressly limited to repairing or replacing equipment that
proves to be defective in material or workman
ship for one (1) year from the date of purchase, unless specified
otherwise. Notice of claims under this warranty must be received in writing by UNIWORLD in timely manner in order
for warranty coverage of parts to apply. Labor charges will be charged accor
dingly. In no event shall UNIWORLD be
liable for damages arising from personal injuries, loss of property, loss of business opportunity, profit or revenue for
indirect consequential damages.
Our warranty does not apply to:
- Misuse or abuse of the machines,
willful or accidental damage, overloading, improper storage or any other
cause unrelated to UNIWORLD.
- Normal wear and tear such as: blades, discs, switches, knobs, cutting knives, etc.
- Machines or parts that have been tampered with, altered or modified by third parties.
- Damages occurred during shipment.
- Equipments sold, shipped, and used outside the Continental U.S.A.
Electrical motors are subject to inspection in our plant or authorized service centers. All other electrical components
are subject to natural wear and tear, and are not covered by a warranty.
BENCH WARRANTY
Defective equipment or parts must be sent freight prepaid to UNIWORLD for evaluation. If warranty applies,
defective equipment or parts will be repaired and replaced for free and reshipp
ed from our warehouse. UNIWORLD
cannot warrant products returned to our premises not properly packaged, causing additional damage. Bench
warranty applies to all electrical equipment up to 65 lbs (product net weight).
PROBLEM REASON SOLUTION
Does not light up No gas flow Check valve is open
Does not light up Igniter not working
Check igniter is properly
connected
Low Flame Inappropiate gas regulator
Make sure a low pressure gas
regulator is installed
Low Flame Air flow not properly adjusted
Adjust air flow
(Located at the back of burner)
GAS FRYERS
ECONOMY

PART
NO. ITEM ID DESCRIPTION
1 UGF-P01
LID
2 UGF-P02
BASKET
3 UGF-P03
HANDLE
4 UGF-P04
WELL
5 UGF72-P05
BODY
6 UGF-P06
GAS TYPE
7 UGF-P07
NOZZLE (NATURAL)
7 UGF-P07
NOZZLE (PROPANE)
8 UGF-P08
BURNER
9 UGF-P09
DOWN STREAM
10 UGF-P10
PIPE CONNECTOR
11 UGF-P11
FOOT
12 UGF-P12
SCREW
13 UGF-P13
KNOB
14 UGF-P14
VALVE / SWITCH
15 UGF72-P15
INLET TUBE
UGF-CB
COMPLETE BASKET (PART# 2-3)
MODEL
NO. FEATURES
FAT
CAP. BTU BASKET SIZE
PRODUCT DIM.
( W x D x H )
NET WT.
(LBS)
UGF-71
1 Well 1 Basket 10 ltr 25000 7" x 8" x 4.25" 11.5" x 18.5" x 19" 28
UGF-72
2 Wells 2 Baskets 2x10 ltr 25000 7" x 8" x 4.25" 23" x 18.5" x 19" 46
Presentation
1. The purpose of this handbook is to provide accurate information
on how to use the Gas Fryer safely and efficiently. To maintain
properly to keep the machine in good working condition at all
time.
2. This manual should be read and followed by a qualified person in
your establishment on how to use the unit safely and its
maintenance.
3. This manual should be kept in an easily accessible place for quick
reference.
4. The fryer is subject to revision and therefore, may show details
different from the picture or drawing illustrated in this manual.
General Description
This Gas Fryer is space saver and perfect for use in hotels, restaurants,
fast-food, canteens, etc. The body is made of high quality stainless steel
to guarantee hygienic standards of the parts that have contact with
food. Easy and safe to operate.
Technical Specifications
Caution: Make sure you hold tight the nut (use
appropriate tool) on pipe before tightening it to the
gas hose line or you may break the pipe.
2
Complete Parts List for Gas Fryer
UGF-72
7
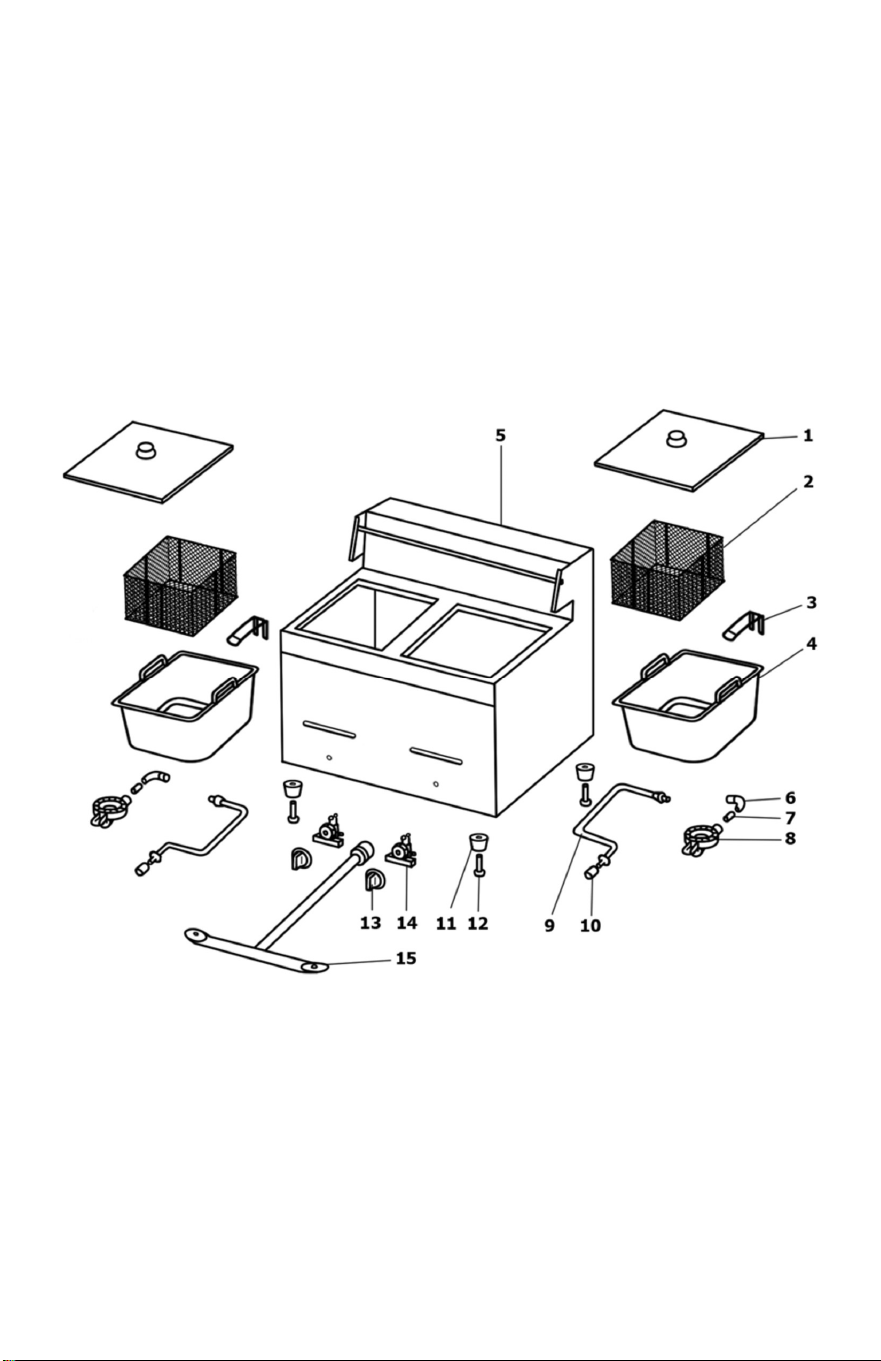
Diagram for Gas Fryer
UGF-72
6
Operating Instructions
1. The Gas Fryer must be placed and installed on a flat working table.
2. Fill each container with correct amount of quality oil (fat). Do not
overfill passing the “Max Line”.
3. To turn on flames, press down and turn knob counter-clockwise,
release when flames are operational. Adjust flames to your desired
temperature.
4. When frying food, put the food into the basket and sink into oil; after
finishing frying, hang the basket on the hook in order to filter the oil.
5. After finishing frying or when unit is not in use, turn off machine by
turning the knob clockwise back to zero.
Warnings and safety rules
1. The manufacturer is not responsible for all damages and injuries
resulting from improper and unreasonable use of this machine.
2. Do not use the fryer without oil. The unit will get damaged severely if
heated dry.
3. Do not touch hot surfaces.
4. Do not overfill baskets. Carefully load them into hot oil. A danger of
surge boiling can also occur if the food to be fried is excessively wet or
the frying basket is too full.
5. Hot oil can cause burns. Spilling oil can cause severe burns. Do not
move fryer without draining all the oil from the tank.
6. Close supervision is necessary when it is being used by or near
children.
7. Lower the flame or turn off if unit is unattended. Otherwise
product can catch on fire.
Maintenance
1. Wait until oil cools down and proceed to remove the oil tank to empty
the oil.
2. Appliance should not be cleaned with a water jet or immersed in
water. Use only a damp cloth or sponge dipped in soapy water and
degreaser. Wipe off appliance with a dry cloth.
Note: Use a Low Pressure Regulator (not included) between the unit and gas
tank. Appliances can be found in your local hardware store.
3
PART
NO. ITEM ID DESCRIPTION
1 UGF-P01
LID
2 UGF-P02
BASKET
3 UGF-P03
HANDLE
4 UGF-P04
WELL
5 UGF71-P05
BODY
6 UGF-P06
GAS TYPE
7 UGF-P07
NOZZLE (NATURAL)
7 UGF-P07
NOZZLE (PROPANE)
8 UGF-P08
BURNER
9 UGF-P09
DOWN STREAM
10 UGF-P10
PIPE CONNECTOR
11 UGF-P11
FOOT
12 UGF-P12
SCREW
13 UGF-P13
KNOB
14 UGF-P14
VALVE / SWITCH
15 UGF71-P15
INLET TUBE
UGF-CB
COMPLETE BASKET (PART# 2-3)
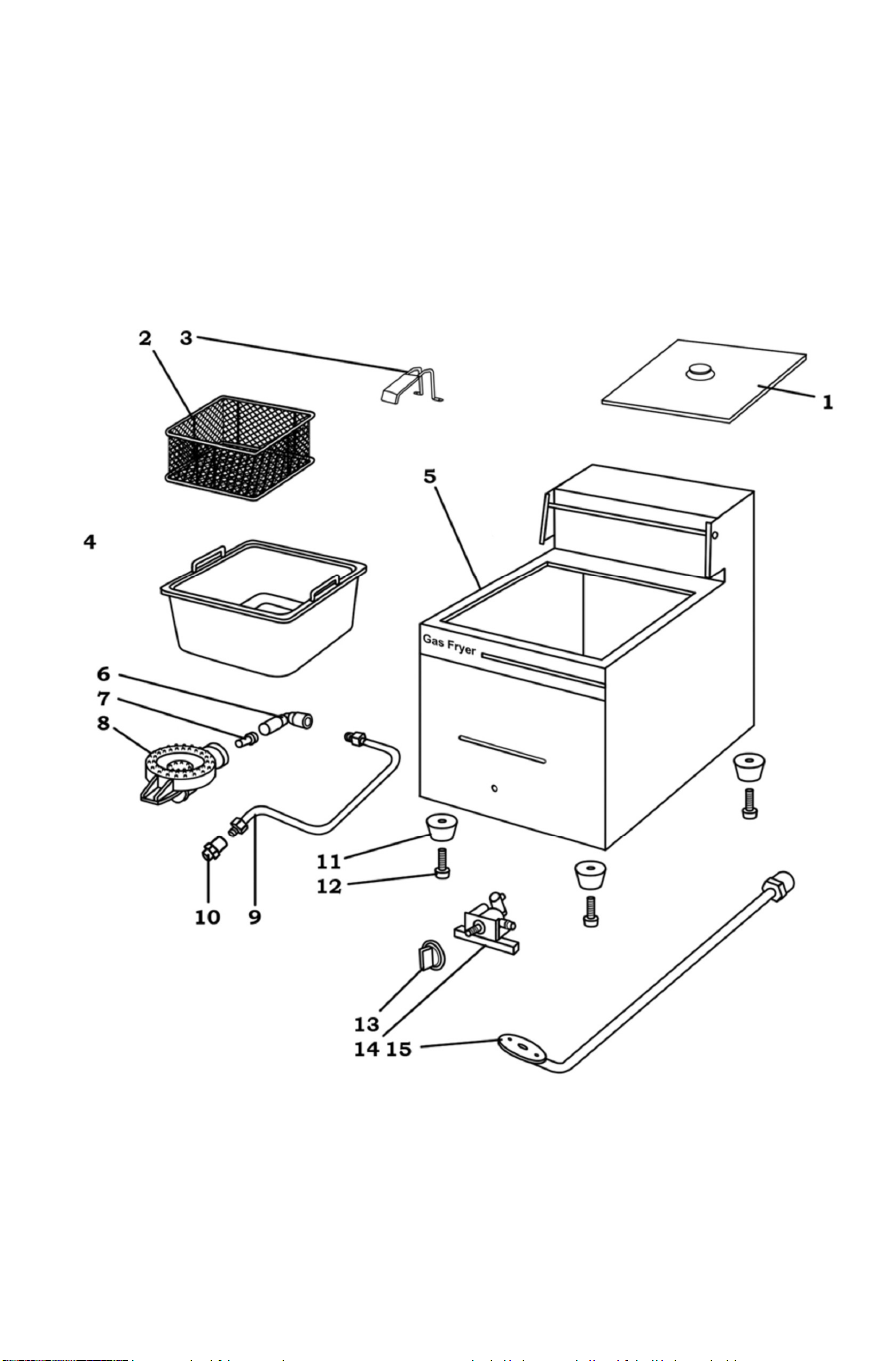
Diagram for Gas Fryer
UGF-71
4
Complete Parts List for Gas Fryer
UGF-71
5
PART
NO. ITEM ID DESCRIPTION
1 UGF-P01
LID
2 UGF-P02
BASKET
3 UGF-P03
HANDLE
4 UGF-P04
WELL
5 UGF71-P05
BODY
6 UGF-P06
GAS TYPE
7 UGF-P07
NOZZLE (NATURAL)
7 UGF-P07
NOZZLE (PROPANE)
8 UGF-P08
BURNER
9 UGF-P09
DOWN STREAM
10 UGF-P10
PIPE CONNECTOR
11 UGF-P11
FOOT
12 UGF-P12
SCREW
13 UGF-P13
KNOB
14 UGF-P14
VALVE / SWITCH
15 UGF71-P15
INLET TUBE
UGF-CB
COMPLETE BASKET (PART# 2-3)
Diagram for Gas Fryer
UGF-71
4
Complete Parts List for Gas Fryer
UGF-71
5

WARRANTY
TROUBLESHOOTING
8
MANUAL INSTRUCTIONS FOR
UGF-71 & UGF-72
(Propane)
UGF-71
ECONOMY FRYER WITH
1 BASKET, 1 WELL
UGF-72
ECONOMY FRYER WITH
2 BASKETS, 2 WELLS
Visit our Website: www.uniworldfoodequip.com
Toll Free Phone: (888) 777-0671: Fax: (888) 888-3185
1
All products manufactured and sold by UNIWORLD are warranted to be free from defects in material or
workmanship. UNIWORLD’s obligation and liability is expressly limited to repairing or replacing equipment that
proves to be defective in material or workman
ship for one (1) year from the date of purchase, unless specified
otherwise. Notice of claims under this warranty must be received in writing by UNIWORLD in timely manner in order
for warranty coverage of parts to apply. Labor charges will be charged accor
dingly. In no event shall UNIWORLD be
liable for damages arising from personal injuries, loss of property, loss of business opportunity, profit or revenue for
indirect consequential damages.
Our warranty does not apply to:
- Misuse or abuse of the machines,
willful or accidental damage, overloading, improper storage or any other
cause unrelated to UNIWORLD.
- Normal wear and tear such as: blades, discs, switches, knobs, cutting knives, etc.
- Machines or parts that have been tampered with, altered or modified by third parties.
- Damages occurred during shipment.
- Equipments sold, shipped, and used outside the Continental U.S.A.
Electrical motors are subject to inspection in our plant or authorized service centers. All other electrical components
are subject to natural wear and tear, and are not covered by a warranty.
BENCH WARRANTY
Defective equipment or parts must be sent freight prepaid to UNIWORLD for evaluation. If warranty applies,
defective equipment or parts will be repaired and replaced for free and reshipp
ed from our warehouse. UNIWORLD
cannot warrant products returned to our premises not properly packaged, causing additional damage. Bench
warranty applies to all electrical equipment up to 65 lbs (product net weight).
PROBLEM REASON SOLUTION
Does not light up No gas flow Check valve is open
Does not light up Igniter not working
Check igniter is properly
connected
Low Flame Inappropiate gas regulator
Make sure a low pressure gas
regulator is installed
Low Flame Air flow not properly adjusted
Adjust air flow
(Located at the back of burner)
GAS FRYERS
ECONOMY