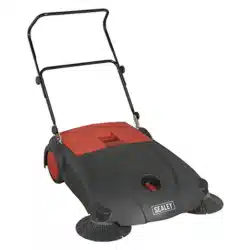
650MM FLOOR SWEEPER
MODEL NO: FSW70.V2
Thank you for purchasing a Sealey product. Manufactured to a high standard, this product will, if used according to these instructions,
and properly maintained, give you years of trouble free performance.
IMPORTANT: PLEASE READ THESE INSTRUCTIONS CAREFULLY. NOTE THE SAFE OPERATIONAL REQUIREMENTS, WARNINGS & CAUTIONS. USE
THE PRODUCT CORRECTLY AND WITH CARE FOR THE PURPOSE FOR WHICH IT IS INTENDED. FAILURE TO DO SO MAY CAUSE DAMAGE AND/OR
PERSONAL INJURY AND WILL INVALIDATE THE WARRANTY. KEEP THESE INSTRUCTIONS SAFE FOR FUTURE USE.
1. SAFETY
9 Ensure that the sweeper is only used on hard/dry surfaces.
9 Ensure that the dirt collection hopper is present and properly seated before commencing sweeping.
9 The sweeper is for indoor use only.
8 DO NOT leave the sweeper unattended, where it could become a hazard to other people or traffic in the sweeping area. For example, in
a warehouse situation.
8 DO NOT allow anyone to ride on the sweeper.
8 DO NOT use the sweeper for any purpose other than that for which it was designed.
8 DO NOT use the sweeper to clear up hazardous materials or any material that may damage the plastic chassis of the sweeper.
8 DO NOT use the sweeper on wet surfaces.
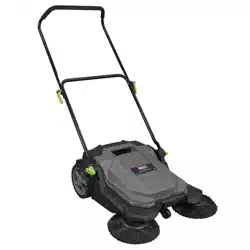
2. INTRODUCTION
Threebrushsystemwith2largediskbrushes,pairedwithalargecylindricalbrushformaximumcleaningeciency.Suitablefor
maintaininganyhardoor,idealforremovingdirt,dustanddebrisfromlargesurfaceareas.Adjustableheighttubularhandlewitheasy
toadjustangletobestsuittheuser.Builtincarryhandleforeasytransportation.Large20Lwastecollectionbiniseasytoremoveand
empty.
3. SPECIFICATION
MODEL NO: ..................................................FSW70.V2
HOPPERCAPACITY: ...............................................20L
OPERATINGWIDTH: .........................................650MM
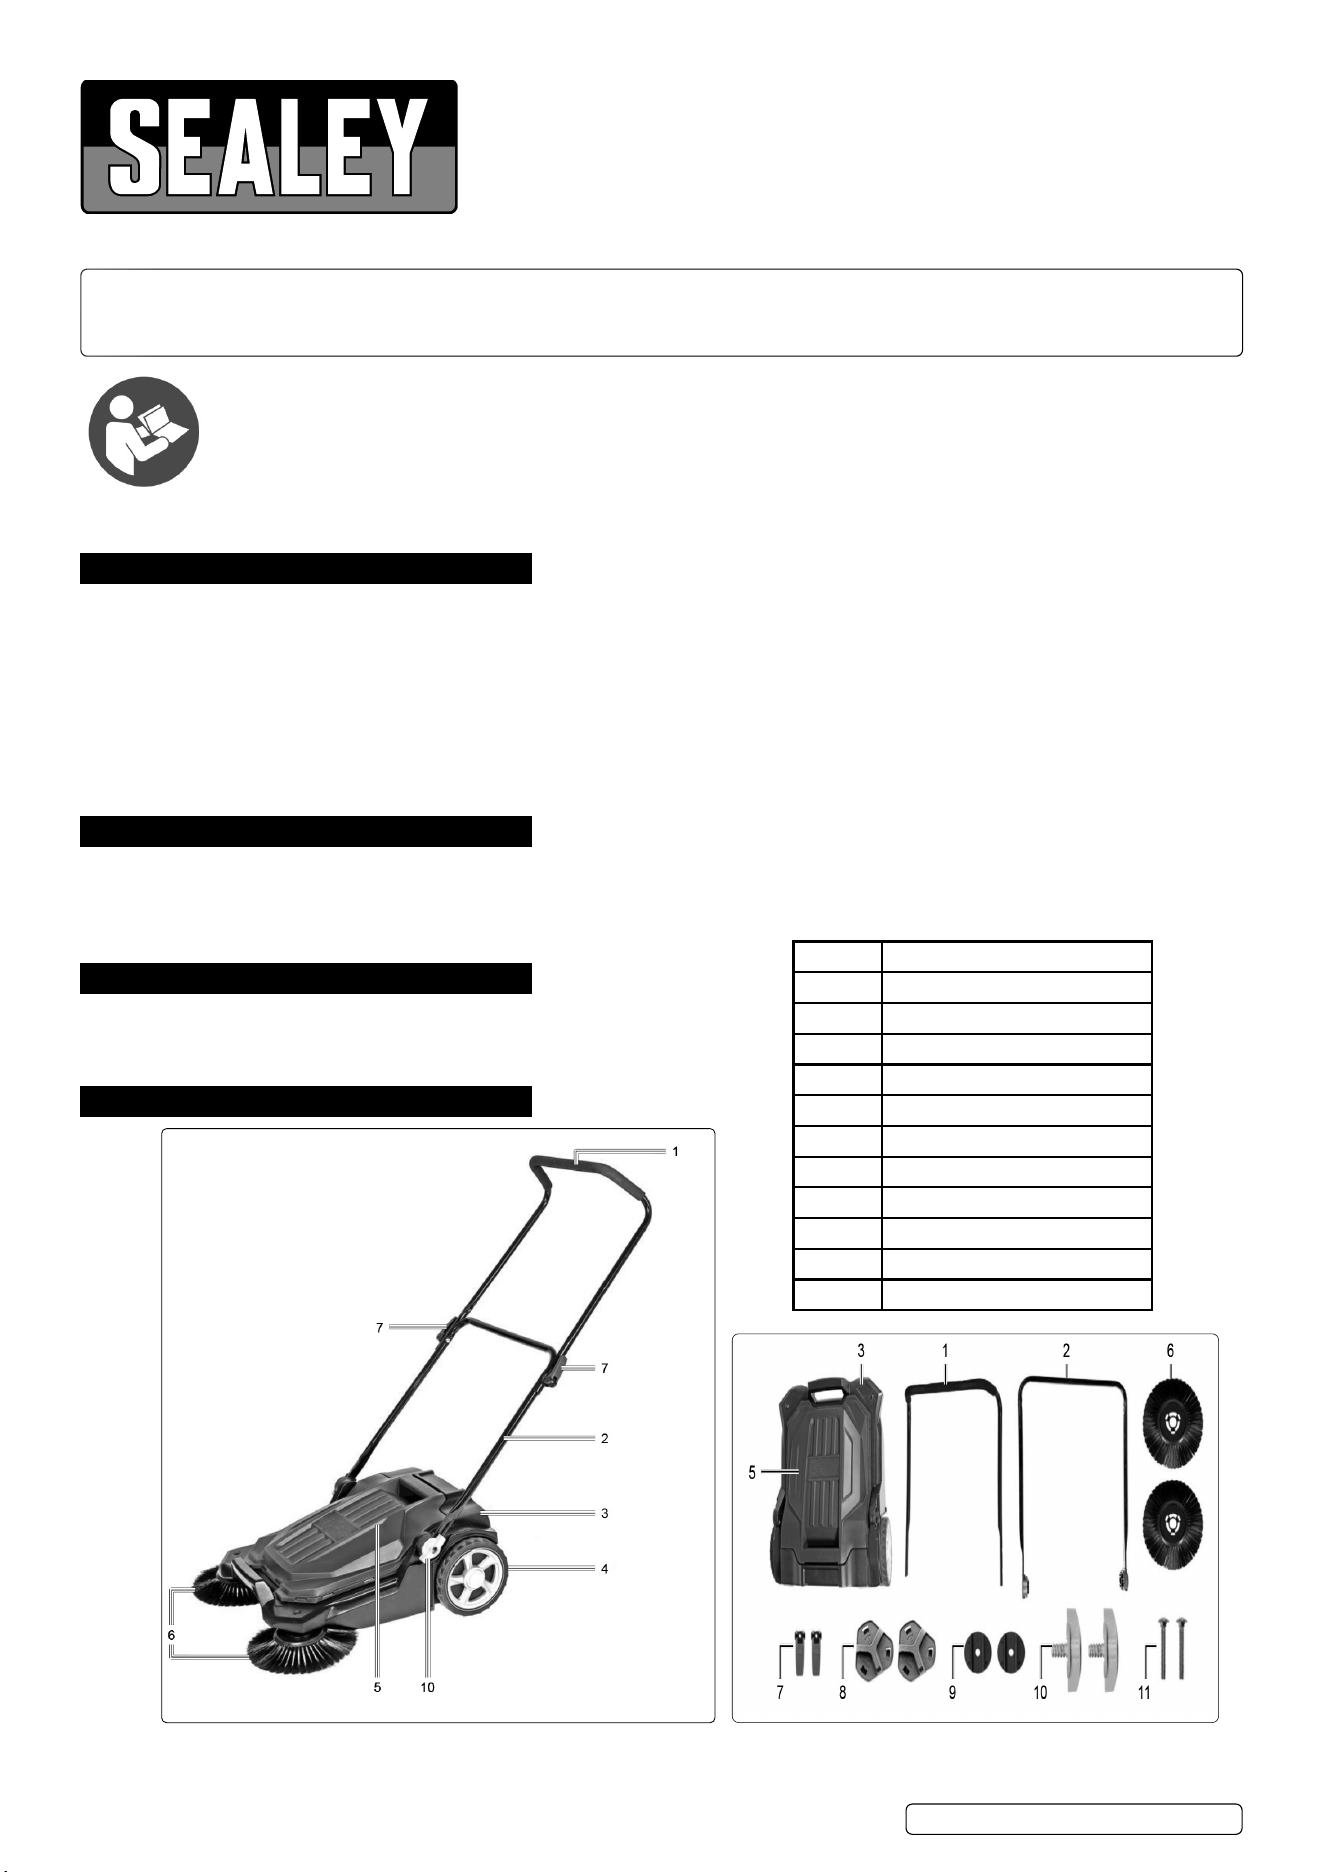
4. CONTENTS
Refer to
instruction
manual
FSW70.V2Issue:103/01/24
Original Language Version
©JackSealeyLimited
Number Components
1 Upper push bar
2 Lower push bar
3 Sweeping machine
4 Wheel
5 Waste container
6 Feeding brushes
7 Nut with quick release function
8 Cap
9 Support disc
10 Connection knob
11 Screw
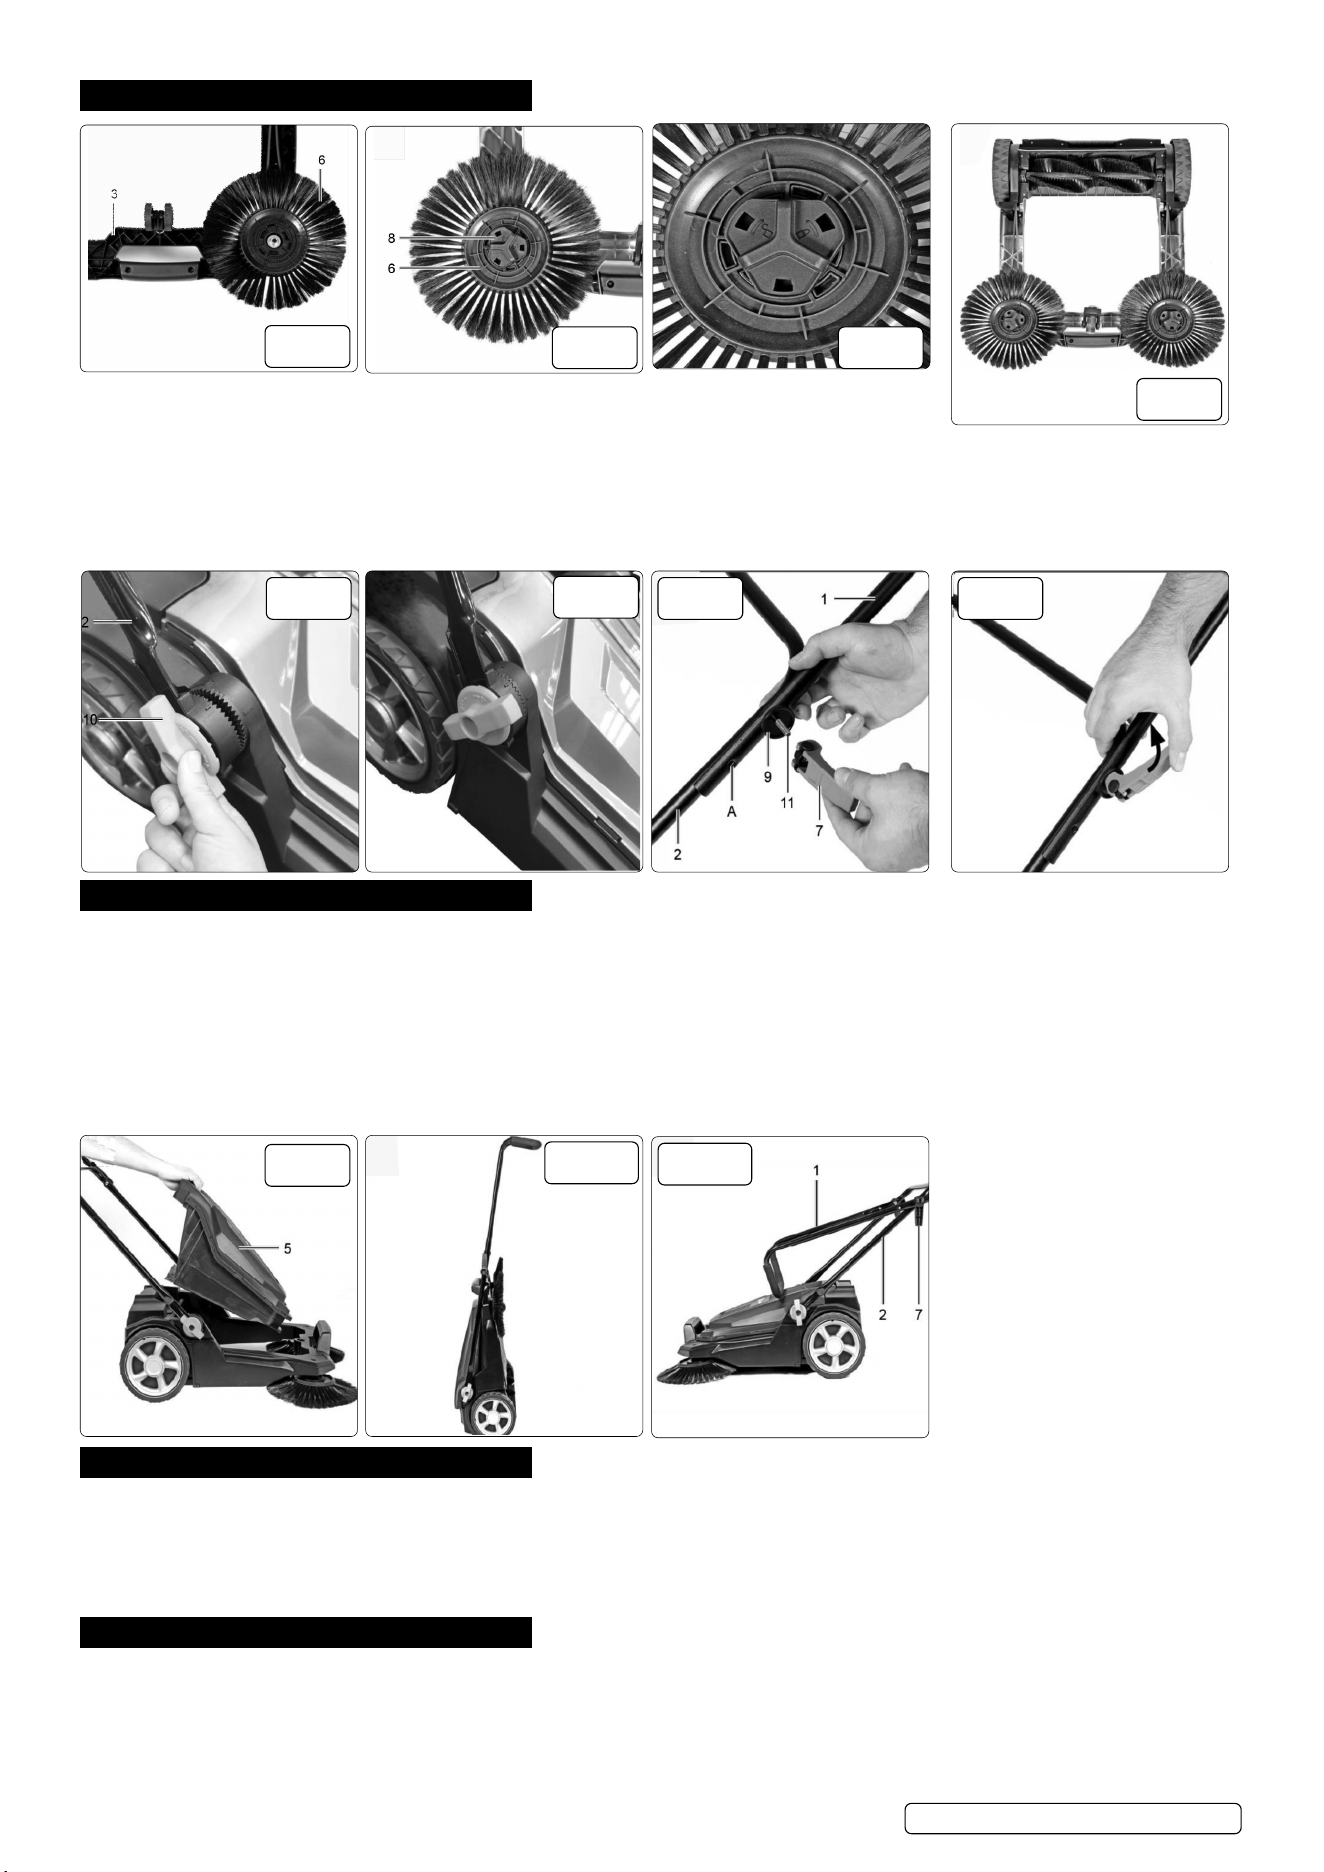
5. ASSEMBLY
5.1. INSTALLATION OF FEED BRUSHES (see g.1 to g.4).
5.1.1. Insertthefeedbrushontothesweeper.
5.1.2. Then attach the feed brush with cap. Pay attention to the lettering on the cap. Turn in the direction of arrowhead.
5.1.3. Repeat the procedure on the other side.
5.1.4. To disassemble the feed brushes, turn the cap in the opposite direction of the arrow, remove the cap and the feeding brush.
5.2. MOUNTING OF THE PUSH BARS (see g.5 to g.8).
Mountthelowerandupperbarasshowning.5tog.8.Theheightofthepushbarcanbeadjustedbyselectingthesecondmounting
hole.
6. OPERATION
6.1. Bypushingthesweeper,thefeedbrushesandthesweeperbrusharerotatedviathedrivebelt.Therotatingfeedbrushessweepthedirt
to the centre. This is collected by the sweeping brush and transported to the waste container.
6.2. EMPTYING THE WASTE CONTAINER (fig.9)
WARNING! Dustcanbehazardoustohealth.Wearadustmask.
6.2.1. Remove the dust container from the appliance as shown in fig.9. Empty and insert the waste collector back into the sweeper.
6.3. PARKING POSITION (fig.6, fig.10, fig.11)
6.3.1. The device can be folded for space-saving storage. To do this, loosen the lower nuts with quick-release function until the pins (figure
6)popoutofthefixationandunfoldthepushbar(figure10).Alternatively,theuppernutswithquickreleasefunctioncanbeloosened
afterwards.
7. MAINTENANCE
7.1. Keep guards and air vents as dust and dirt free as possible.
7.2. Clean the appliance immediately after each use.
7.3. Clean the appliance regularly with a damp cloth and some soap.
8 DO NOT use detergents or solvents; these could attack the plastic parts of the device. Make sure that no water can enter the inside of the
appliance.
8. STORAGE
8.1. Storetheapplianceanditsaccessoriesinadark,dryandfrost-freeplace.Theoptimalstoragetemperatureisbetween5and30°C.
fig.
1
fig.
4
fig.
2
fig.
3
©JackSealeyLimited
Original Language Version
FSW70.V2Issue:103/01/24
fig.
5
fig.
6
fig.
7
fig.
8
fig.
9
fig.
10
fig.
11

9. TROUBLESHOOTING
Original Language Version
©JackSealeyLimited
Sealey Group, Kempson Way, Suffolk Business Park, Bury St Edmunds, Suffolk. IP32 7AR
01284 757500 01284 703534 sales@sealey.co.uk www.sealey.co.uk
ENVIRONMENT PROTECTION
Recycleunwantedmaterialsinsteadofdisposingofthemaswaste.Alltools,accessoriesandpackagingshouldbesorted,
takentoarecyclingcentreanddisposedofinamannerwhichiscompatiblewiththeenvironment.Whentheproduct
becomes completely unserviceable and requires disposal, drain any fluids (if applicable) into approved containers and
dispose of the product and fluids according to local regulations.
FSW70.V2Issue:103/01/24
Note:Itisourpolicytocontinuallyimproveproductsandassuchwereservetherighttoalterdata,specificationsandcomponentpartswithoutprior
notice. Pleasenotethatotherversionsofthisproductareavailable.Ifyourequiredocumentationforalternativeversions,pleaseemailorcall
ourtechnicalteamontechnical@sealey.co.ukor01284757505.
Important: No Liability is accepted for incorrect use of this product.
Warranty:Guaranteeis12monthsfrompurchasedate,proofofwhichisrequiredforanyclaim.
REGISTER YOUR
PURCHASE HERE
Fault Possible Cause Solution
Inexabilityoftheguide
wheel. Poor operation.
When pushing the sweeper it does not operate
smoothly, lift the machine to check the chassis
guide wheel for any entanglement or debris, which
may cause poor rotation.
Remove the debris around the guide
wheel.
The feeding brush is not
free in operation and is
diculttopushforward.
Whenitisdiculttopushforward,liftthemachine
to check if the chassis cannot be swept up due to
excessive or large debris branches, and wrap them
around the feeding brush.
Remove large branches and debris
that cannot be swept up.
When the machine is
pushed, the wheels slide
and do not rotate.
The ground is too smooth, or there is water on the
ground,whichleadstoinsucientfrictionofthe
rollers and slipping when pushed.
The machine cannot work on
surfaces that are too smooth or have
water stains.