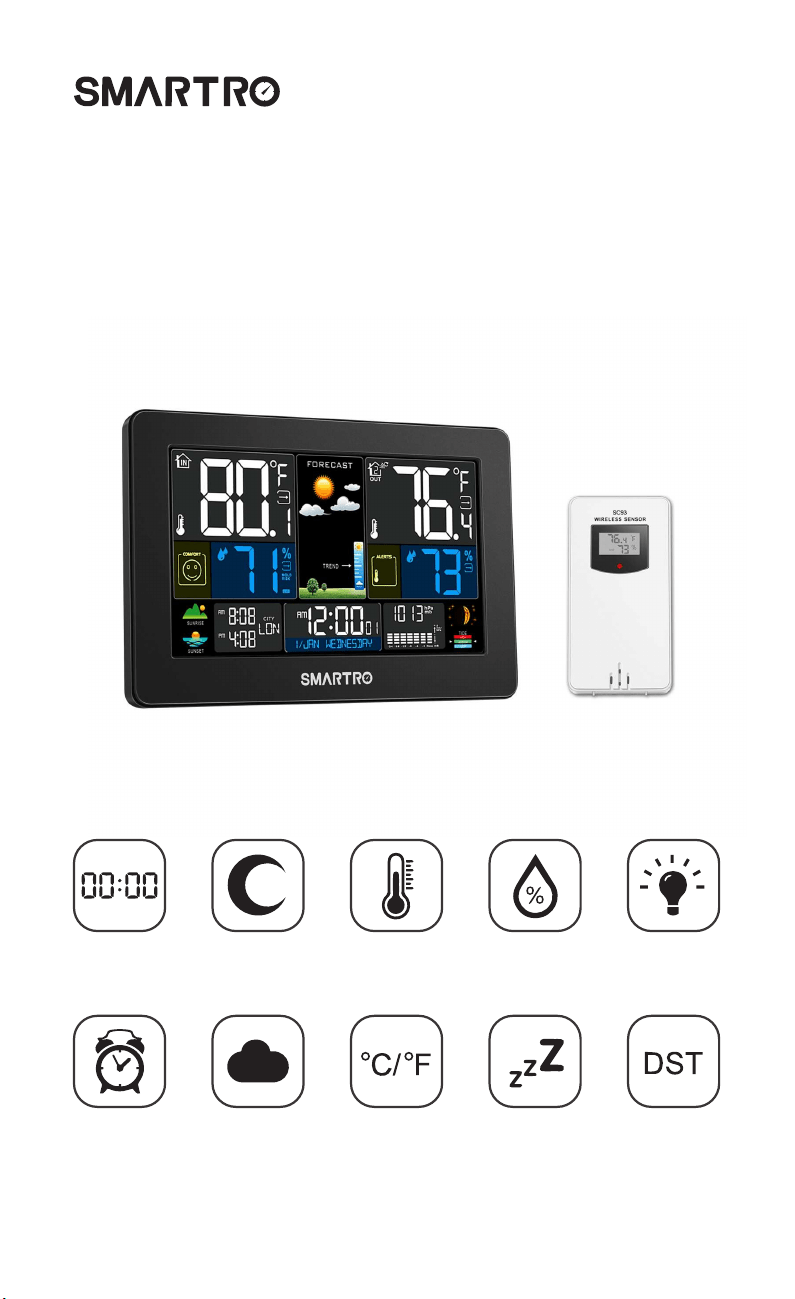
Instruction Manual
WIRELESS WEATHER STATION
Model: SC93
TIME Moon
Phase
In&Out
Temp
In&Out
Humidity
Adjustable
Backlit
Dual
Alarms
Weather
Forecast
°C/°F
Switchable
Snooze
Function
DST
Function


Content
1. Preface
2. Attention
3. Package Content
4. Product Specification
4.1 Color Weather Station
4.2 Wireless Remote Sensor
5. Know Your Device
5.1 Screen
5.2 Buttons
5.3 Wireless Remote Sensor
6. Preparation
7. Initial Time Setup
8. Dual Alarm Setting
8.1 Alarm Setting
8.2 How to Turn on/off the Alarms
8.3 How to Check the Alarms
8.4 Turn off the Alarm Tone
8.5 Snooze Function
9. Weather Station and Remote Sensor Pairing & Manual Signal Reception
9.1 Weather Station and Remote Sensor Pairing
9.2 Outdoor Channel Cycle Mode
9.3 Manual Signal Reception
9.4 How to Check Maximum/Minimum Temperature/Humidity
10. Temperature & Humidity
10.1 How to Set Temperature Alert
10.2 Frost Point Alert
10.3 Comfort Indicator & Mold Risk
10.4 Temperature & Humidity Trend
11. Weather Forecast
11.1 Weather Forecast Statement
11.2 The Symbols of Weather Forecast
12. Moon Phase & Tide Indicator
13. Air Pressure
14. Backlight & Night Mode
14.1 Backlight Setting
14.2 Night Mode Setting
15. City Setting for Sunrise & Sunset Time
16. Low Battery
17. Troubleshooting
18. After-sales Support
19. Waste Disposal
Appendix 1: City Code of the United States
Appendix 2: City Code of other Countries
1
1
1
2
2
2
3
3
4
5
6
6
7
7
8
8
8
8
9
9
9
9
10
11
11
12
12
12
13
13
13
13
14
14
14
14
15
16
16
17
18
19
21

1. Preface
2. Attention
3. Package Content
Thank you for choosing this weather station from SMARTRO.
● Make sure to read the instruction manual carefully. This information will help
you to familiarize yourself with your new device, to learn all of its functions and get
advice in the event of problems.
● Following the instructions will prevent damage to your device.
● We shall not be liable for any damage that occurs as a result of not following
these instructions.
● Please keep this instruction manual for future reference.
● Please follow the instructions for operation.
● Please use the original or manufacturer specified attachments or accessories.
● To avoid safety hazards, do not disassemble the product.
● Do not place any items on top of the product that may damage it.
● Do not place the product near a water source or in a damp place.
● Please terminate use immediately upon damage, which is caused as a result of
improper use or repair by a non-factory approved technician.
● Do not place the product in places that are exposed to direct sunlight and high
temperatures such as a radiator, electric heater, stove, etc.
● Keep the product away from strong electromagnetic waves, strong static
electricity, or moisture and condensation.
● Children below 10 years of age should be supervised by an adult when using
this product.
● Clean your device with a soft damp cloth. Do not use solvents or scouring
agents.
● Color Weather Station*1
● Wireless Remote Sensor*1
● DC Power Adapter*1
● Instruction Manual*1
Before Use
1

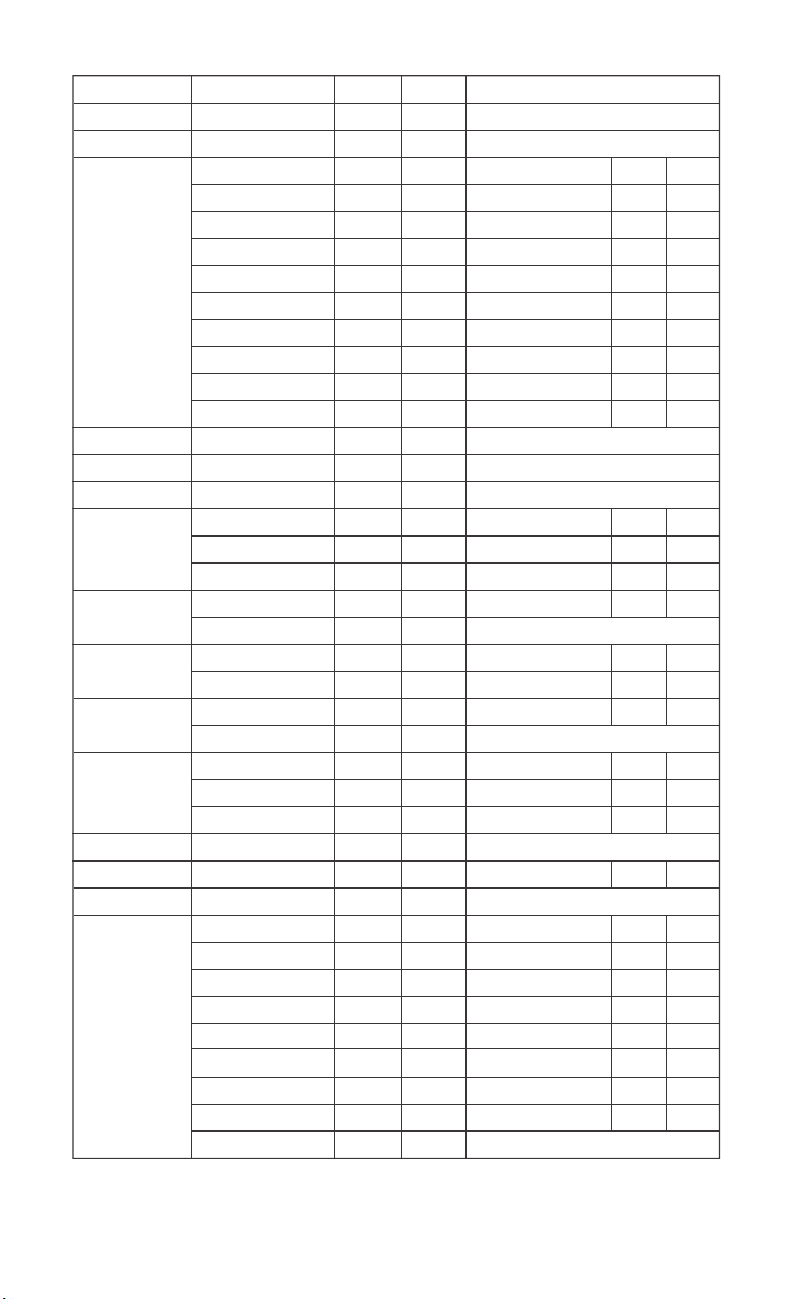
4. Product Specification
● DST function
● Weather forecast
● Low battery indicator
● Moon phases and tides
● Sunrise and sunset time
● Time in 12/24-hour format
● Tabletop stand/wall mount
● Dual alarms with snooze function
● Perpetual calendar up to the year 2099
● Adjustable backlight and night mode
● Indoor comfort indicator and mold risk display
● Maximum/minimum temperature and humidity record
● Frost alarm and settable outdoor temperature alert
● Barometric pressure
— Barometric pressure measurement range: 600hPa/mb to 1100hPa/mb
(17.72 inHg to 32.48 inHg)
● Indoor & outdoor temperature
— Indoor temperature measurement range: +14°F (-9.9°C) ~ +122°F (+50°C)
— Outdoor temperature measurement range: -40°F (-40°C) ~ +158°F (+70°C)
— Indoor humidity measurement range: 20%RH~95%RH
● Power supply:
Battery: 2 x AA batteries (not included)
DC power adapter: 5V 1.2A
● USB charger output: 5V 1A
● °C/°F switchable
● Low battery indicator
● Tabletop stand/wall mount
● 3 channels available (one sensor included)
● Power supply: 2 x AA batteries (not included)
● Range of transmission: 200 feet in an open area
● Outdoor temperature measurement range: -40°F (-40°C) ~ 158°F (+70°C)
● Outdoor humidity measurement range: 20%RH ~ 95%RH
4.1 Color Weather Station
4.2 Wireless Remote Sensor
2
Please choose the right battery according to the limit temperature of the wireless sensor:
Alkaline zinc manganese battery can work at -4°F (-20°C) to 140°F (+60°C).
Polymer lithium ion rechargeable battery can work at -40°F (-40°C) to 158°F (+70°C).
Note:

5. Know Your Device
A1: Indoor mold risk A2: Indoor temperature
A3: Indoor humidity A4: Indoor comfort indicator
A5: Sunrise time A6: City
A7: Sunset time A8: Month and date
A9: Time A10: Day of the week
A11: Historical pressure histogram
A12: Tide level
A13: Moon phase
A14: Barometric pressure
A15: Outdoor humidity
A16: Alert of outdoor temperature
A17: Outdoor temperature
A18: Outdoor temperature channel and reception icon
A19: Weather forecast
5.1 Screen
3
SUNSET
SUNRISE
MOLD
RISK
TIDE
MEDIUM
HIGH
TREND
A1
A5
A2
A3
A4
A7
A6 A8 A9 A10 A11
A12
A13
A14
A15
A16
A17
A19 A18
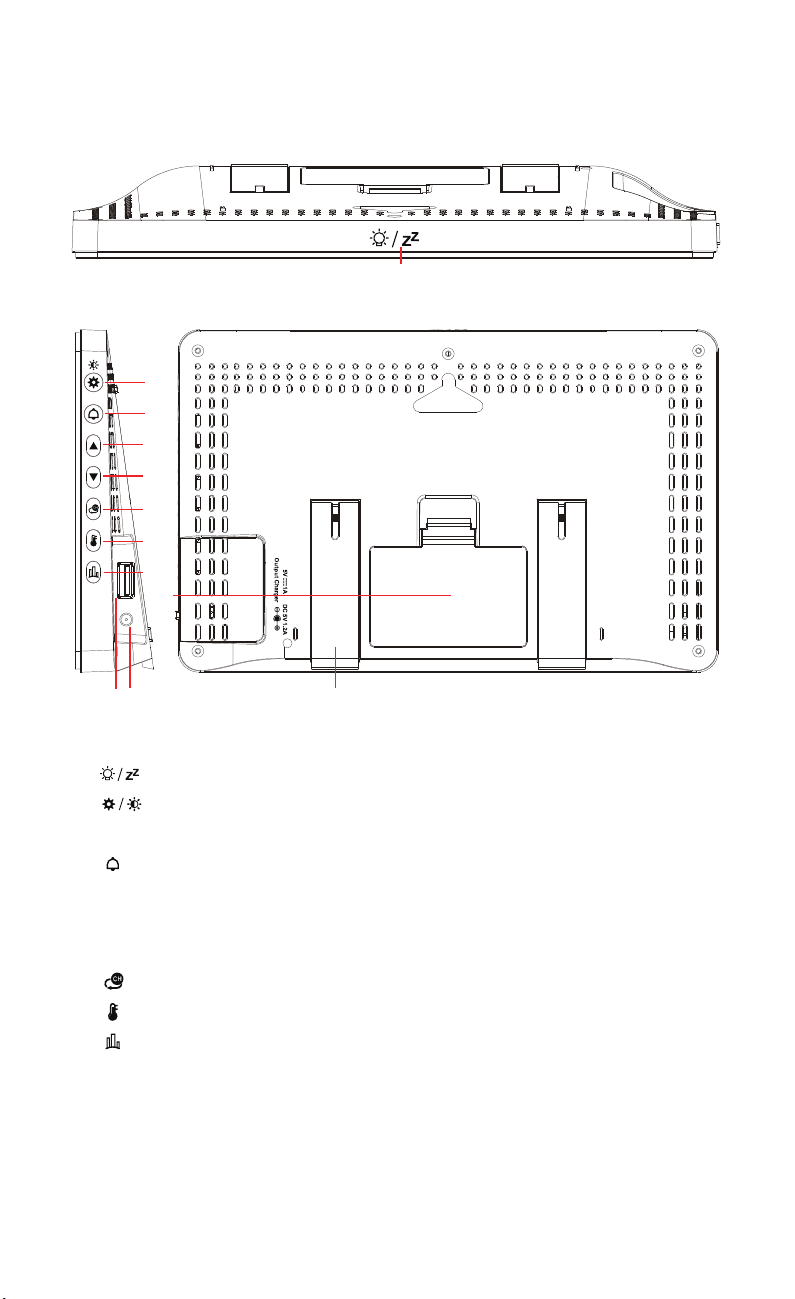
B1: : Night mode setting (long press 2s to set)
B2: : Time setting (long press 2s to set)
Backlight setting
B3: : Alarm setting (long press 2s to set)
B4: ▲ : For setup preference
B5: ▼ : For setup preference
Max/min temperature and humidity check
B6: : Channel switch
B7: : Temperature alert setting (long press 2s to set, short press to turn on/off)
B8: : City Setting
B9: Battery compartment
B10: USB charger socket
B11: Power supply socket
B12: Support stand
5.2 Buttons
4
B1
B2
B3
B4
B5
B6
B7
B8
B9
B10 B11 B12
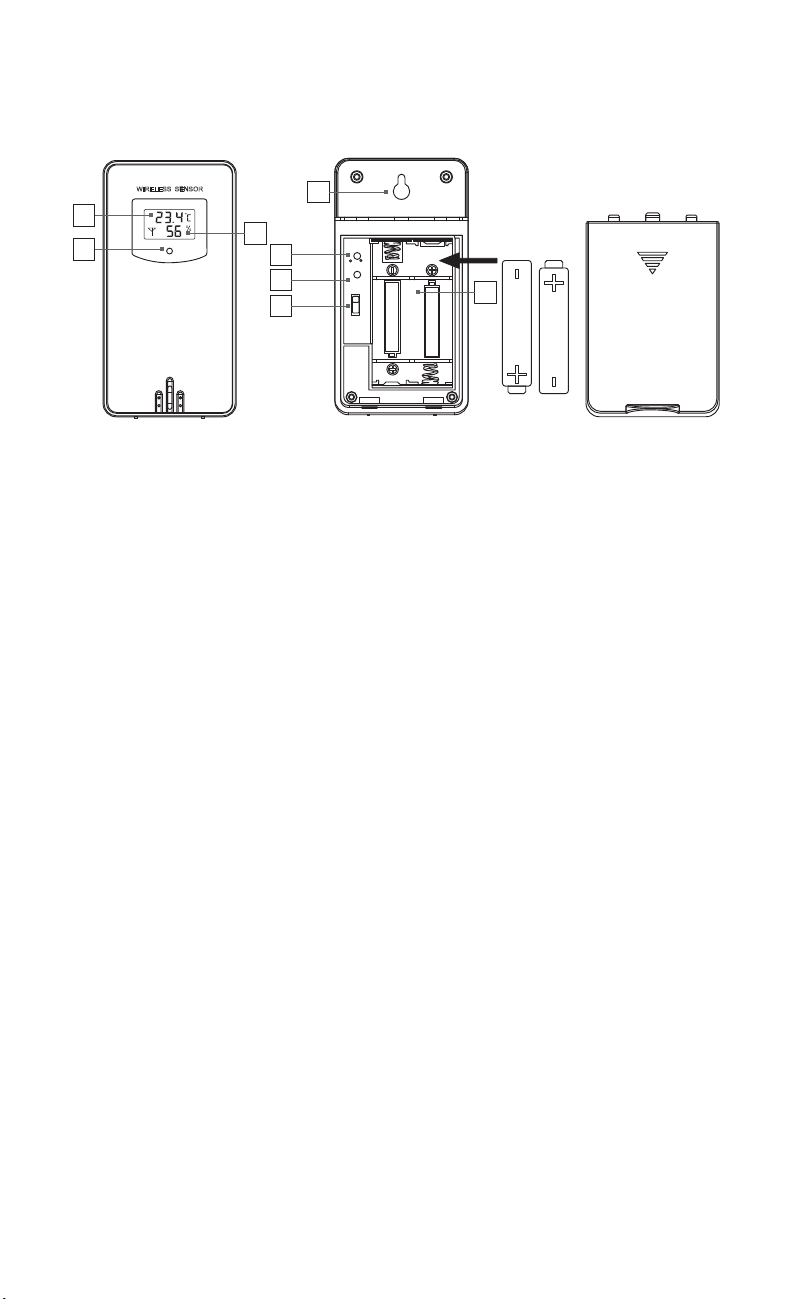
C1: Temperature
C2: Humidity
C3: Transmission signal light
C4: "°C/°F" switch button
C5: "TX" button
C6: Channel switch knob
C7: Battery compartment
C8: Wall-mount hole
5.3 Wireless Remote Sensor
5
WIRELESS SENSOR
AAUM-3)1. 5V(
AAUM-3)1. 5V(
C / F
T X
1
2
3
CH1
C1
C3
C2
C4
C5
C6
C8
C7
SC93
6. Preparation
7. Initial Time Setup
● Open weather station battery compartment cover, insert 2 x AA batteries,
ensure correct battery polarities [ "+" and "–" ] and connect the DC adapter to
power the weather station.
● The screen will light up, and the device will make a beeping sound. The weather
station will start to detect indoor temperature and humidity.
● Open the wireless remote sensor battery compartment cover. Choose the same
channel as the weather station through the numbered knob. Insert 2 x AA batteries,
ensure correct battery polarities [ "+" and "–" ].
● The sensor will send out a red light which means that it’s sending signals to the
main unit.
● The weather station will start to make a connection with the outdoor remote
sensor, a reception RF antenna symbol in the "OUT" display area will flicker on the
screen. This procedure will take 3 minutes at most.
● After the unit has made a connection with the outdoor remote sensor, the
detected temperature and humidity will be displayed on the screen.
● Hold " " button for 2 seconds.
● The "OFF" indicates the status of button sound, it will be flashing. If changed to
"ON", a beep sound will be heard when pressing buttons on the device. Press "▲" or
"▼" to choose whether to have beep sounds on or off and press " " to confirm.
● The temperature unit "°F" will be flashing, press "▲" or "▼" to choose "°F" or "°C"
and press " " to confirm.
● The pressure unit "INHG" will be flashing, press "▲" or "▼" to choose "HPA" or
"INHG" and press " " to confirm.
● The daylight saving time (DST) function status "ON" will be flashing, press "▲" or
"▼" to choose the function on or off and press " " to confirm.
● The 12Hr will be flashing, press "▲" or "▼" to choose 12Hr or 24Hr format and
press " " to confirm.
● The HOUR will be flashing, press "▲" or "▼" to set the correct hour and press
" " to confirm.
● The MINUTE will be flashing, press "▲" or "▼" to set the correct minute and press
" " to confirm.
● The YEAR will be flashing, press "▲" or "▼" to set the correct year and press
" " to confirm.
● The MONTH will be flashing, press "▲" or "▼" to set the correct month and press
" " to confirm.
● The DATE will be flashing, press "▲" or "▼" to set the correct date and press
" " to confirm.
6
7
● The PRESSURE value will be flashing, press "▲" or "▼" to set the correct pressure
and press " " to confirm.
● The WEATHER icon will be flashing, press "▲" or "▼" to set the current weather
icon. Press " " to confirm and to end up the time setting.
● Hold " " button for 2 seconds.
● The hour of alarm 1 will be flashing, press "▲" or "▼" to set the required hour and
press " " to confirm.
● The minute of alarm 1 will be flashing, press "▲" or "▼" to set the required minute
and press " " to confirm.
● The cycle icon of alarm 1 (M-F, M-S or S-S) will be flashing, press "▲" or "▼" to
set the alarm repeat date and press " " to confirm.
-M-F: The alarm will go off from Monday to Friday.
-M-S: The alarm will go off from Monday to Sunday.
-S-S: The alarm will go off from Saturday to Sunday.
● Default snooze time 00:05 of alarm 1 will be flashing, press "▲" to increase the
snooze time or press "▼" to turn off the snooze function and press " " to confirm.
● The hour of alarm 2 will be flashing, press "▲" or "▼" to set the required hour and
press " " to confirm.
● The minute of alarm 2 will be flashing, press "▲" or "▼" to set the required minute
and press " " to confirm.
● The cycle icon of alarm 2 (M-F, M-S or S-S) will be flashing, press "▲" or "▼" to
set the alarm date and press " " to confirm.
● Snooze time of alarm 2 will be flashing, press "▲" to increase the snooze time or
press "▼" to turn off the snooze function and press " " to confirm and complete
the setup.
● During the setup, if you want to exit, double click " " button. If there is no operation
of buttons within 20 seconds, the weather station will save the current settings and
automatically return to the normal display.
● You can long press "▲" or "▼" button to quickly change values.
● The barometer has been calibrated during the manufacturing, it’s not suggested to
adjust the barometric pressure and weather forecast.
● When the DST function is activated, the time will automatically be adjusted to daylight
saving time or standard time on the required date.
Note:
8. Dual Alarm Setting
8.1 Alarm Setting
8
● Press " ", alarm 1 will be displayed on the screen, press "▲" to turn on or off
alarm 1 and press " " to confirm.
● Then, alarm 2 will be displayed on the screen, press "▲" to turn on or off alarm 2
and press " " to confirm.
● Press " " button.
● Press once to check alarm 1.
● Press twice to check alarm 2.
● Press a third time and the display will return to the current time.
● While the alarm is ringing, touch " " to activate the snooze function. When
the snooze function is activated, " " or " " will keep flashing on the display. The
alarm will ring again after the snooze time.
● When the snooze function is activated, press any button except " " or hold
" " area for 2 seconds to exit the snooze mode.
● If alarm 2 rings during the snooze mode of alarm 1, the snooze function of alarm
1 will automatically be deactivated.
The alarm will ring for 2 minutes and will change 4 times in total during that time.
Pressing any button can stop the alarm tone. Short pressing " " can activate
the snooze function but long pressing " " can stop both the ring and snooze
function. Once turned off, the alarm will repeat at the same time the next day.
● During the alarm setting, double clicking " " or not operating any buttons within 20
seconds will cause the weather station to save the current settings and automatically
return to the normal display.
● The snooze time can be set from 5 ~ 60MIN. It can also be deactivated by setting it to OFF.
● For quick setting of the values, long press "▲" or "▼".
Note:
- Only pressing "▲" can turn the alarm on/off.
- When the alarms are activated, " " and " " icons and the alarm cycle icon(M-F, M-S or
S-S) will be displayed on the screen.
- When the alarms are deactivated, " " or " " with the alarm cycle icon will not appear
on the screen.
Note:
1
1
2
2
8.2 How to Turn on/off the Alarms
8.3 How to Check the Alarms
8.4 Turn off the Alarm Tone
8.5 Snooze Function
1 2
9. Weather Station and Remote Sensor Pairing & Manual Signal Reception
— Insert 2 x AA batteries in the weather station and connect it with the adapter.
— Insert 2 x AA batteries in the remote sensor.
This mode is applicable if multiple wireless remote sensors are used simultaneously.
9.1 Weather Station and Remote Sensor Pairing
9.2 Outdoor Channel Cycle Mode
9.3 Manual Signal Reception
Step 1:
— Select a channel for the remote sensor through the numbered knob (1, 2, and 3).
The indicator will light up once to indicate that the wireless remote sensor is
sending out signals.
— Select the same channel with the remote sensor for the weather station. Press
" " button to select CH1, CH2, CH3 or CH1 to CH3 (cycle mode).
- When the weather station successfully receives signals from the remote sensor,
the temperature and humidity detected by the remote sensor will display in the
"OUT" column of the weather station.
- The weather station can connect up to 3 wireless remote sensors at the same
time. If multiple sensors are used simultaneously, please make sure these sensors
are on different channels and press " " button on the weather station to view the
readings of each channel.
- Press " " button on the weather station until " " is displayed above the
outdoor channel. In this mode, the outdoor readings will display from CH1 to CH3
automatically every 5 seconds.
- To make the temperature and humidity on a fixed channel, just press " "
button until " " disappears. Once it disappears, the outdoor readings will stop
cycling.
If there is no outdoor temperature displayed on the weather station, or there is no
change in the temperature and humidity for a long time, it indicates that the
weather station is failing to receive signals from the wireless remote sensor. Please
take the following actions:
Step 2:
9
- Please ensure that the channels of the weather station and sensor are the same.
- Long press " " button to receive signals manually. A flashing RF antenna
symbol will be displayed beside the channel. This means that the weather station is
in a receiving state.
- Press "TX" button on the wireless remote sensor to send out signals manually, a
red light will flash.
9.4 How to Check Maximum/Minimum Temperature/Humidity
● To toggle indoor/outdoor maximum, minimum temperature and humidity data,
please press "▼" :
Press once to show the maximum temperature and humidity values.
Press twice to show the minimum temperature and humidity values.
Press three times to return to the current temperature and humidity values.
● To reset the maximum and minimum temperature and humidity, hold "▼"
button for 2 seconds, dashes will be displayed on the screen and the recorded
history of indoor maximum and minimum temperature, humidity and outdoor
values of current channel will be cleared away. The weather station will start to
re-record the maximum/minimum values.
● To clear the maximum and minimum temperature and humidity of the other
channels, press " " button to switch channels and repeat the steps above.
10
● In the case of using only one sensor, when the channel of the weather station is not the
same as the channel of the sensor, there will be no outside temperature readings shown
on the weather station.
● The wireless sensor can be placed anywhere (indoor or outdoor) you want to measure
the temperature remotely.
● If you want to measure the outdoor temperature, place the sensor outside away from
direct sunlight and rain such as under a roof or on a porch.
● If the temperature or humidity reading is below the ranges, “LL.L” will appear. If the
temperature or humidity reading is above the ranges, “HH.H” will appear.
● Indoor temperature measurement range: +14°F (-9.9°C) ~ +122°F (+50°C)
● Outdoor temperature measurement range: -40°F (-40°C) ~ +158°F (+70°C)
● Indoor humidity measurement range: 20%RH~95%RH
Note:
10. Temperature & Humidity
● Firstly choose a channel you want to set the outdoor temperature and humidity
alert on, then press " " to activate the alert, " " will be displayed in the ALERT
column.
● Press and hold " " button for 2 seconds to enter the temperature and humidity
alert setting.
● The highest outdoor temperature and " " will be flashing. Press "▲" or "▼" to set
the required highest outdoor temperature alert of the selected channel and press
" " to confirm.
● The lowest outdoor temperature and " " will be flashing. Press "▲" or "▼" to set
the required lowest outdoor temperature alert of the selected channel and press
" " to confirm.
● To set the alert values of the other 2 channels, press " " to change the channel
and repeat the steps above.
● When the outdoor temperature exceeds the set highest alert temperature, the
weather station will emit 3 beeps. The temperature, " " and " " will be flashing on
the screen.
● When the outdoor temperature is below the set lowest alert temperature, the
weather station will also emit 3 beeps. The temperature, " " and " " will be
flashing on the screen.
● If the outdoor temperature is updated but still exceeds or is lower than the alert
temperature, the weather station will beep once.
● To completely end the alert, just press " " till " " disappears. To turn off the
alert of the other channels, press " " button to switch the channel and press " "
to turn it off.
10.1 How to Set Temperature Alert
11
● Outdoor channel update frequency:CH1: 68S, CH2: 72S, CH3: 76S.
● The temperature and humidity alerts of the 3 channels can be set separately. The alert
will only go off on the channel that is currently displayed on the screen. If the channels is
switched to another channel, the main unit will not ring for the previous channel’s set alert
values.
● In any case, if " " is displayed on the screen and the alert function is not needed,
please press " " to clear it away. Otherwise, it will ring at any time when the set
temperature or humidity set value is reached. To avoid disturbance at the night, please
turn it off.
● During the setup, if there is no operation of buttons within 20 seconds, the weather
station will save the current settings and automatically return to the normal display from
manual setting mode.
● When the detected indoor or outdoor humidity is below 20%RH, the weather station will
only display 20%RH. When the humidity is beyond 95%RH, the weather station will only
display 95%RH.
Note:
10.2 Frost Point Alert
10.3 Comfort Indicator & Mold Risk
10.4 Temperature & Humidity Trend
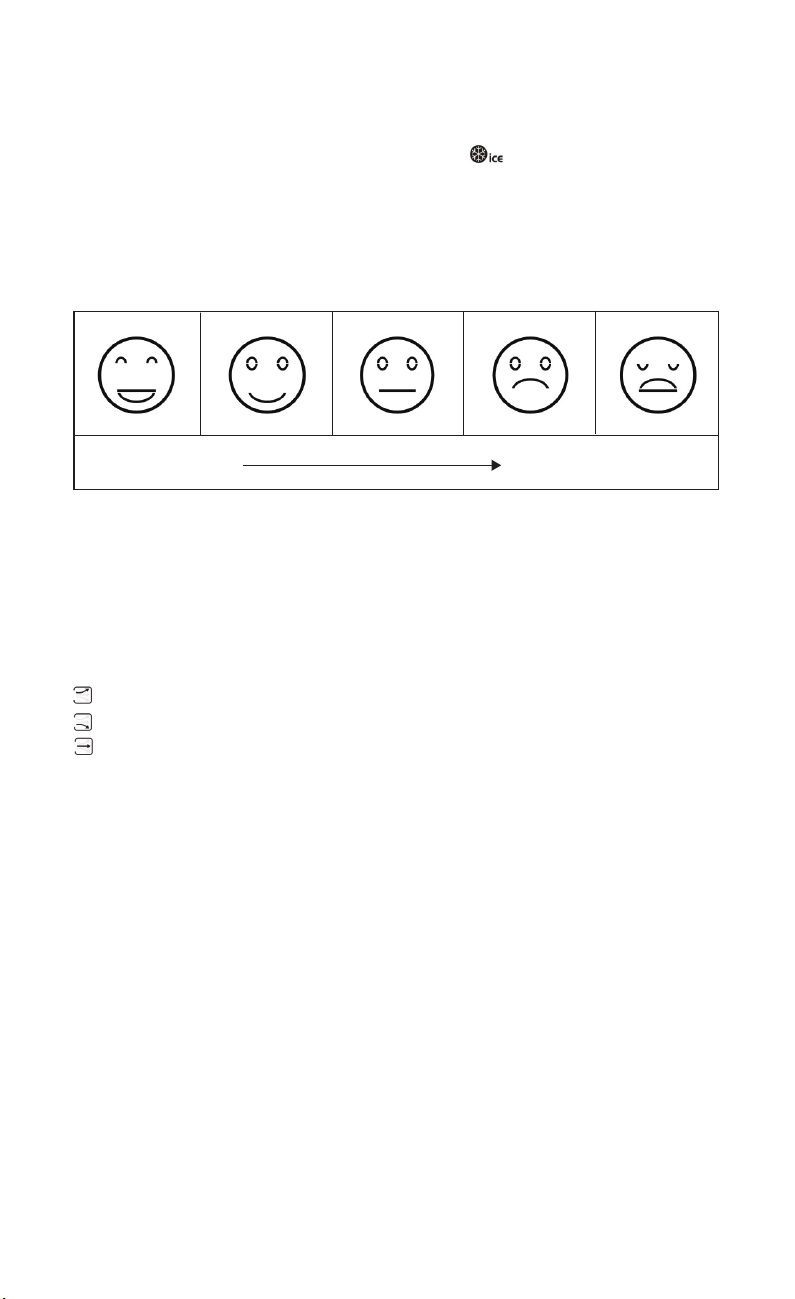
Comfortable too cold or too hot
When the outdoor temperature reaches +30.2°F (-1.0°C) ~ +37.3°F (+2.9°C), the frost
alert will be automatically activated and the icon " " will be flashing.
● Indoor comfort level is generated based on the indoor temperature and
humidity, there are 5 levels as follows:
● The mold risk level is generated based on the indoor temperature and humidity.
There are 4 levels: HI (high), ME (medium), LO (low) and no risk (no display).
The weather station monitors the current temperature and humidity change.
: The temperature/humidity is rising.
: The temperature/humidity is falling.
: The temperature/humidity is remaining constant.
12
11. Weather Forecast
12. Moon Phase & Tide Indicator
● The weather station calculates the weather forecast based on the historical
recorded barometric pressure where you are located.
● The weather forecast cannot be compared with the professional weather
services supported by satellites and high-performance computers.
● If the weather information on the device is different from the local weather
forecasting service, please take the advice of the latter as authoritative.
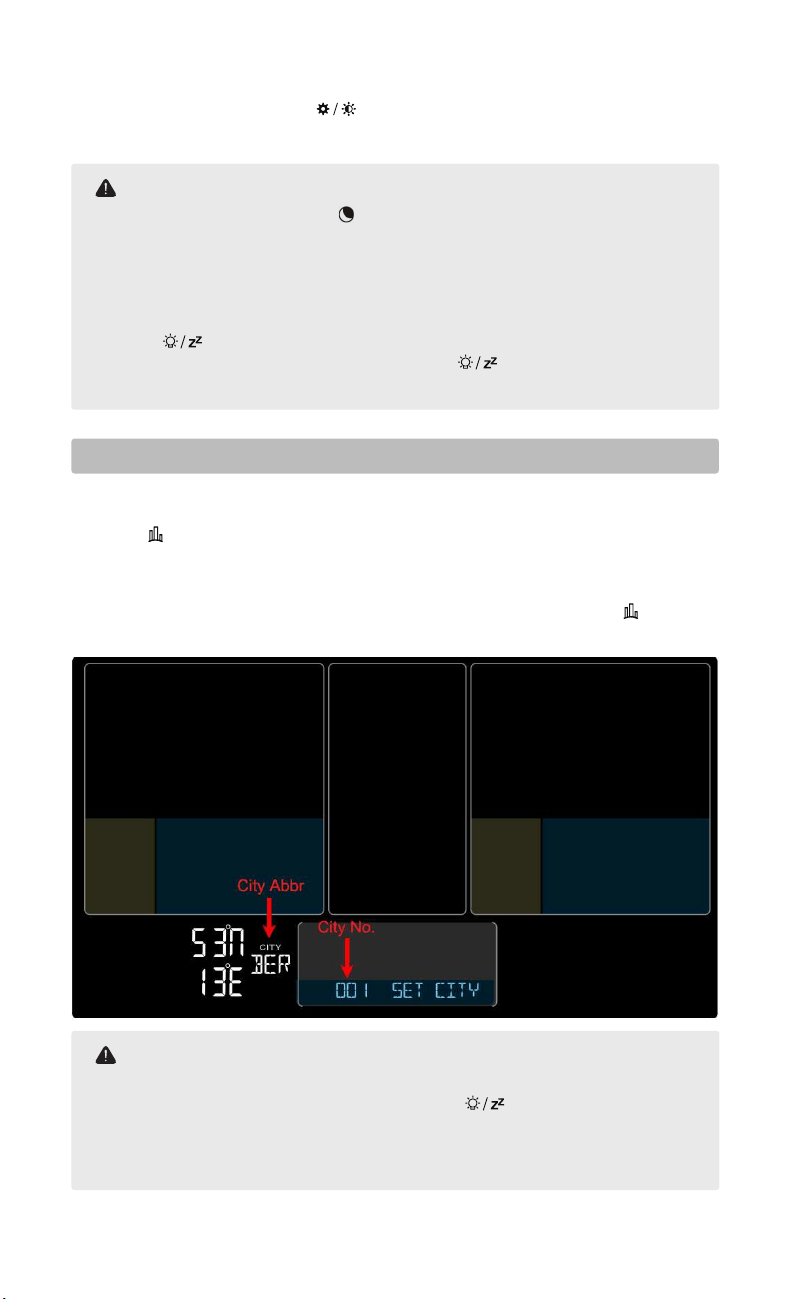
When the calendar has been set, the weather station will display 3 tide levels and
12 different moon phases: New Moon, Waxing Crescent, First Quarter, Waxing
Gibbous, Full Moon, Waning Gibbous, Last Quarter, Waning Crescent.
11.1 Weather Forecast Statement
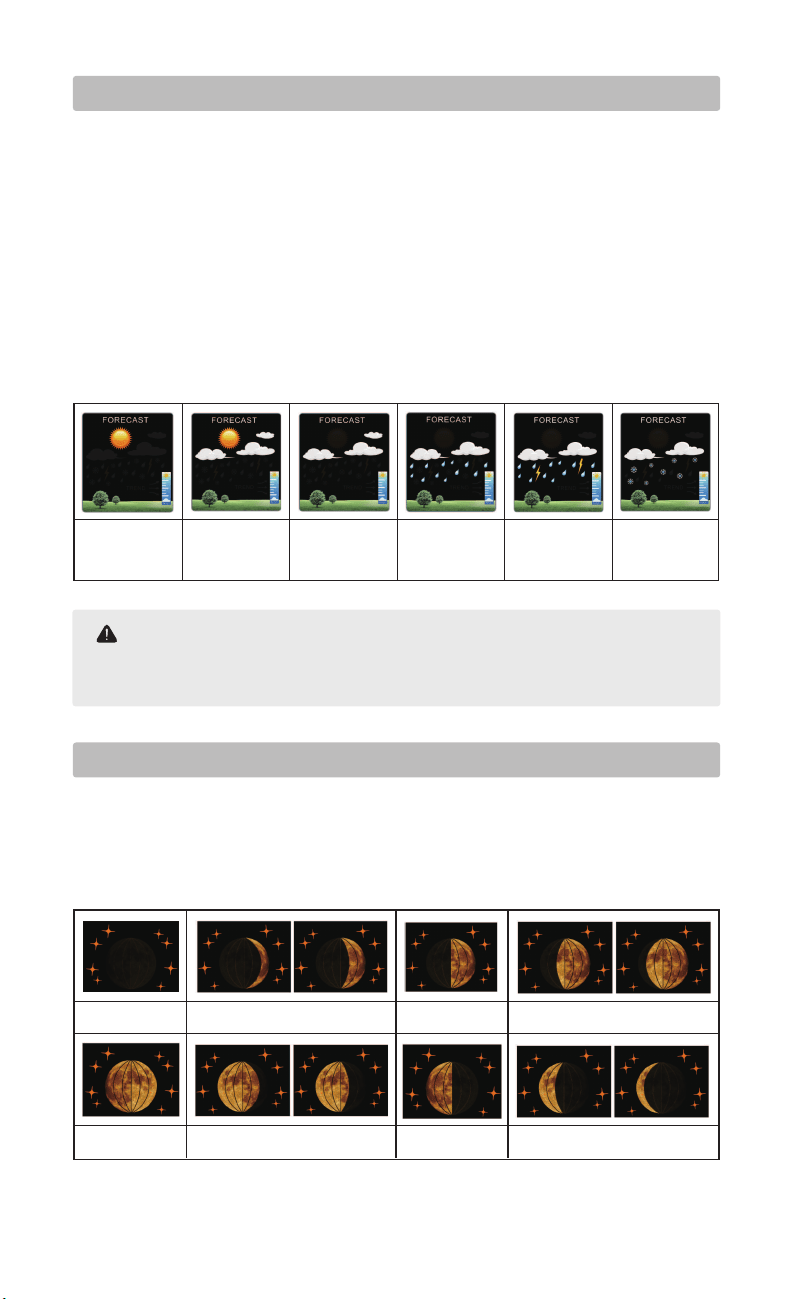
11.2 The Symbols of Weather Forecast
13
When the pressure change causes a rainy prediction, and the outside temperature is below
+24.8°F (-4°C), the snow icon appears.
Note:
sunny
New Moon First QuarterWaxing Crescent
Waxing Gibbous
Full Moon Last QuarterWaning Gibbous
Waning Crescent
cloudy
rainy
stormy
snowy
slightly
cloudy

13. Air Pressure
14. Backlight & Night Mode
The barometric pressure updates every hour. The weather station will record the
pressure of the last 3, 6, 9, 12, 18, 24 hours and compare it with the current
barometric pressure to generate a histogram.
In night mode, the backlight will automatically dim at the set entry time.
● To set night mode, press and hold the " " for more than 2 seconds. "OFF"
(the state of the night mode) will be flashing, press "▲" or "▼" to turn on or off night
mode and press " " to confirm.
● The brightness level will be flashing, there will be 3 brightness levels for
selection, press "▲" or "▼" to select a level and press " " to confirm.
● The hour of the entry time of night mode will be flashing, press "▲" or "▼" to set
the required hour and press " " to confirm.
● The minute of the entry time of night mode will be flashing, press "▲" or "▼" to
set the required minute and press " " to confirm.
● The hour of the exit time of night mode will be flashing, press"▲" or "▼" to set the
required hour and press " " to confirm.
— When connecting the weather station with the DC adapter, the backlight will
remain on. The backlight has 5 brightness levels for selection: level 1, level 2, level 3,
level 4 and OFF. To adjust the backlight brightness, press " " to choose a
brightness that is comfortable for you.
— When the backlight brightness is not at the maximum brightness, touching
" " can make the backlight light up to the maximum brightness for 15 seconds.
— Any restart or power break will cause a loss of the previous manual settings. In
case of power failure, please insert 2 AA batteries in the weather station to protect
saved manual settings.
14
● The power of the batteries is not enough to support the dynamic lighting of the large
display. It is recommended to connect the weather station with the DC adapter.
● When the weather station is only powered by batteries, touching " " will
temporarily activate the backlight for 15 seconds, after which the screen will return to the
dimmest brightness level and enter power-saving mode.
Note:
14.1 Backlight Setting
14.2 Night Mode Setting
15. City Setting for Sunrise & Sunset Time
● The minute of the exit time of night mode will be flashing, press "▲" or "▼" to set
the required minute and press " " to confirm. After completing these steps the
weather station will return to the original display.
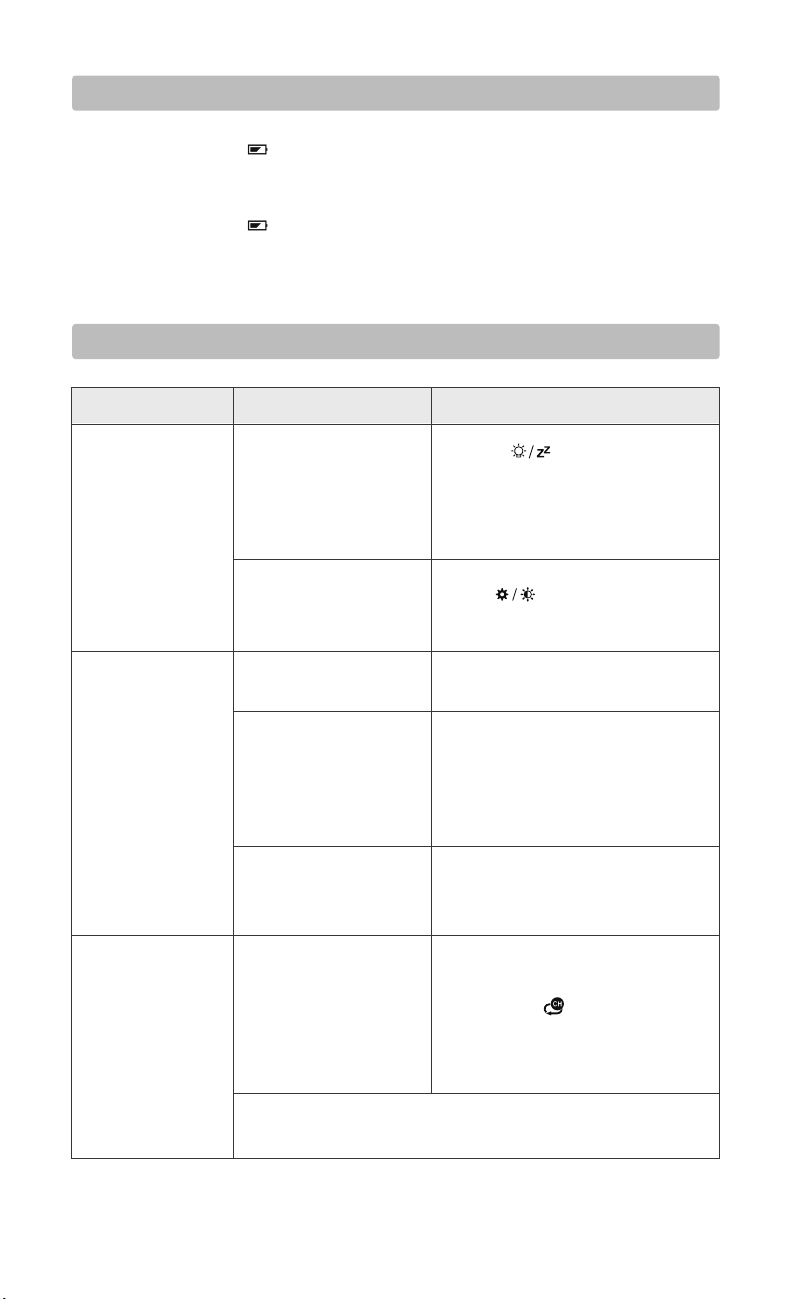
● Press " " button once to enter the city selection mode, the city abbr will be
flashing.
● Refer to the chart on appendix 1 on page 19.
● Press "▲" or "▼" button to select the city abbr or number and press " " to
confirm.(for quick setting, long press "▲" or "▼")
15
● When night mode is on, the icon " " will be displayed on the screen. When reaching the
set night mode entry time, the backlight will automatically get dim according to the set
night mode brightness, and when reaching the set night mode exit time, the backlight will
return to the original brightness.
● When night mode is off, the screen will be on constantly.
● In night mode, the backlight can be switched to the highest brightness for 15 seconds by
touching " ".
● During setup, if you want to exit it, just double click " " and the weather station will
save the current settings and return to the display.
Note:
● If your city is not listed in the chart, please select a neighboring city.
● During the setting, if you want to exit it, double click " " or no operation of buttons
within 20 seconds, the weather station will save the current setting and automatically return
to the normal display.
● For quick setting, long press "▲" or "▼".
Note:
When the city is selected, the sunrise and sunset time will be automatically generated.
16. Low Battery
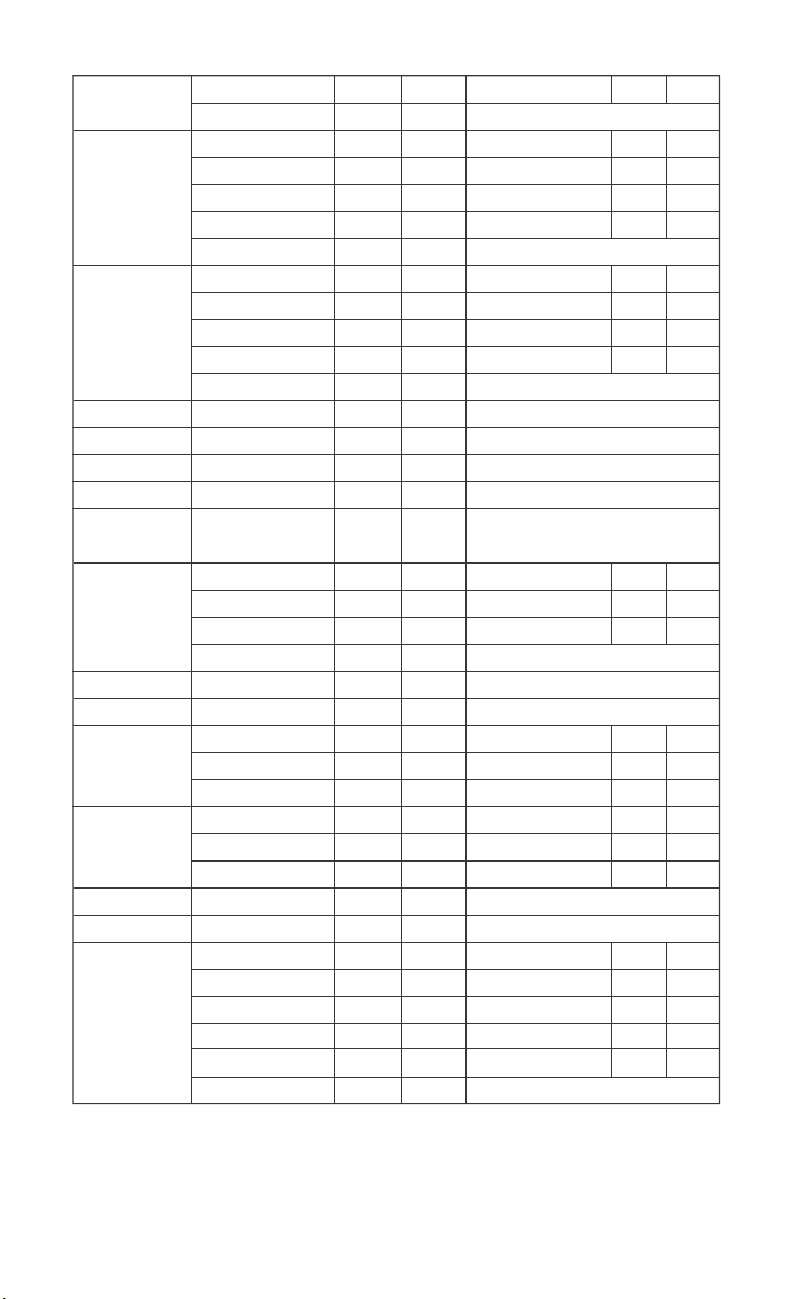
17. Troubleshooting
PROBLEM CAUSE SOLUTION
No backlight.
● If the battery icon " " is displayed in the "INDOOR" column, it means that the
weather station batteries are running out. Please replace the batteries as soon as
possible.
● If the battery icon " " displays in the "OUTDOOR" column, it means that the
remote sensor batteries are running out. Please replace the batteries as soon as
possible.
16
No outdoor
temperature
displayed on the
weather station.
The weather station is
only powered by
batteries.
DC adapter is connected,
but the backlight is set on
the dimmest level.
The batteries of the
sensor have run out.
The channel displayed
on the weather station is
different from the
channel of the remote
sensor.
The weather station did
not receive signals from
the outdoor sensor.
There is a delay or
interruption of
transmission.
1. Place the sensor next to the weather
station.
2. Long press " " button on the
weather station till the dashes appear.
3. Press "TX" button on the sensor to
send signals.
If the problem persists, please contact after-sales support at:
Please refer to the instructions on
page 9 to receive the signals
manually.
Adjust the channel of the weather
station or the sensor to keep them
paired.
For detailed instructions, please refer
to page 9.
Replace 2×AA batteries for the outdoor
remote sensor.
Press " " button to adjust the
backlight brightness.
1. Press " " to temporarily
activate the backlight for 15 seconds.
2. Connect DC adapter to power up
the weather station, the backlight will
remain on.
The outdoor
temperature on
the weather
station is different
from that on the
sensor.
18. After-sales Support
If your device fails to work despite these measures or your experience with us was
less than perfect in any way, please do not hesitate to contact us.
For more products, please visit our website: https://www.smartro.co/
For further support and discount information, join our Facebook group or follow us
on Instagram.
17
The alarm rings
The indoor and
outdoor readings
are different
when putting the
two devices
together.
The device has some
tolerance. Temperature
range in
32°F~104°F(0-40°C),
tolerance:±1.8°F. Other:
±3.6°F.
Humidity range in
40%~80%, tolerance: ±5%.
Other: ±8%.
The time alarm function is
activated.
The temperature alert is
activated. The tempera-
ture has reached the alert
range.
unexpectedly at
night.
The display was set to
loop mode.
Press " " until the arrow icon
disappears to cancel the loop mode.
If the problem persists, please contact after-sales support at:
Press " " to turn off the alert.
Please check if the alarms are set
correctly or turn them off.
If the difference is beyond the range,
please please contact after-sales
support at: [email protected].
The outdoor
readings only
occasionally appear
on the display.
: +1(323)287-5798
: http://bit.ly/smartro_01
: smartro_01

19. Waste Disposal
● This product is manufactured with high-grade materials and components
which can be recycled and reused.
● As a consumer, you are legally required to take them to your retail store or an
appropriate collection site depending on national or local regulations in order to
protect the environment.
● The symbols for the heavy metals contained are: Cd=cadmium, Hg=mercury,
Pb=lead.
● Please do not dispose of this instrument in household waste.
The user is obligated to take end-of-life devices to a designated collection point
for the disposal of electrical and electronic equipment, in order to ensure
environmentally-compatible disposal.
18
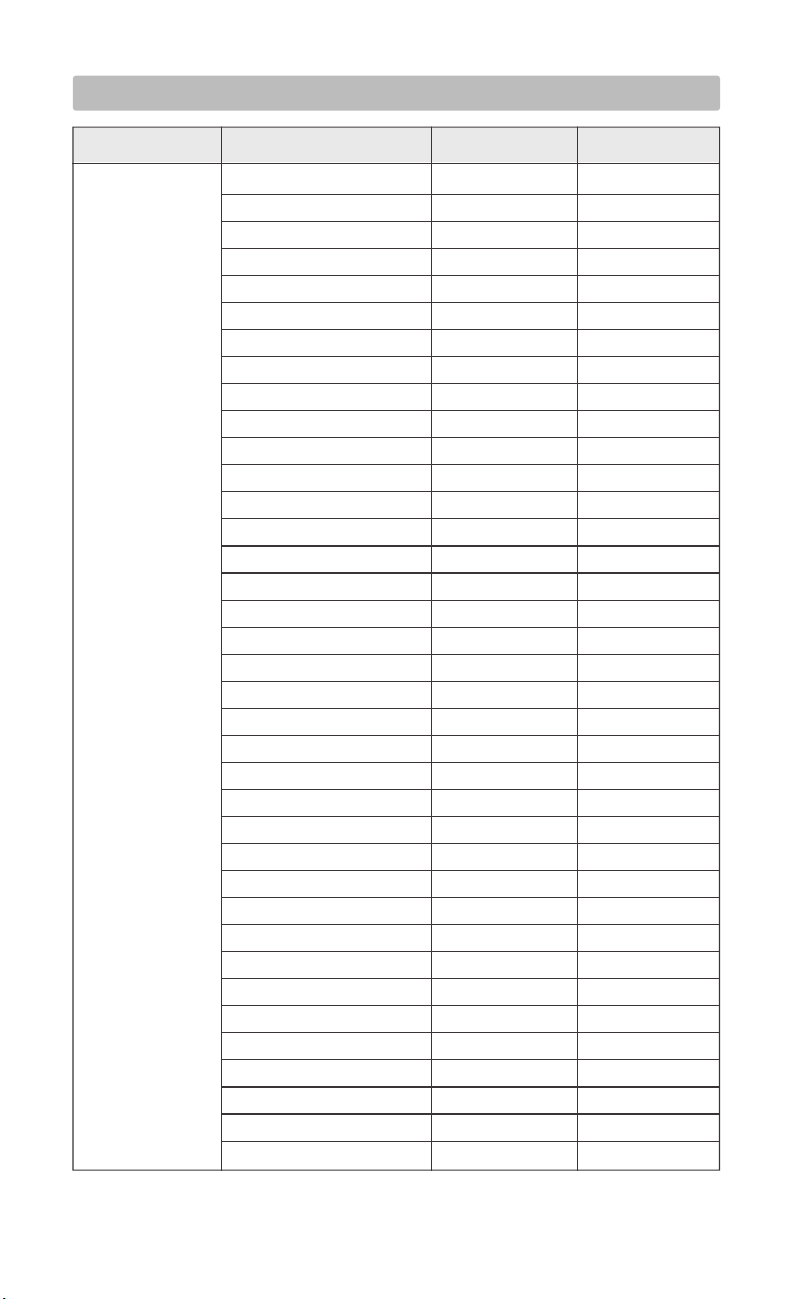
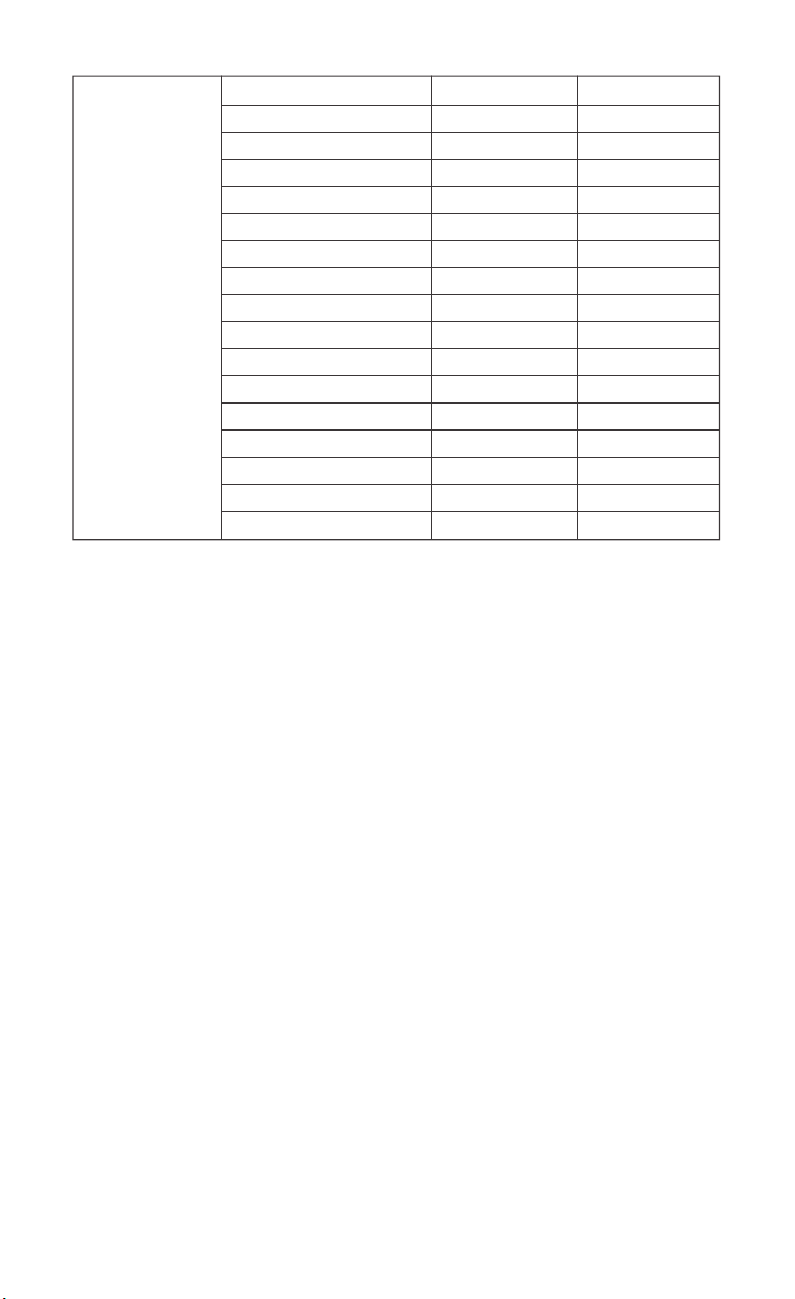
Appendix 1: City Code of the United States
19
Washington DC
New York
Los Angeles
Chicago
Houston
Phoenix
San Antonio
San Diego
Dallas
San Francisco
Philadelphia
Charlotte
Seattle
Denver
Boston
Detroit
Nashville
Memphis
Portland
Oklahoma city
Las Vegas
Milwaukee
Kansas City
Atlanta
Miami
Virginia beach
Oakland
Minneapolis
New Orleans
Cleveland
Tampa
Honolulu
St.Louis
Pittsburgh
Cincinnati
Lincoln
Orlando
United States(US)
WDC
NYC
LAS
CHI
HOU
PHO
SAO
SDO
DAL
SFO
PHL
CHA
SEA
DEN
BOS
DET
NAS
MEM
PTL
OKC
LVG
MWK
KAN
ATL
MIA
VAB
OAK
MIN
NOL
CLE
TAM
HON
SLS
PIT
CIN
LIN
ORD
164
165
166
167
168
169
170
171
172
173
174
175
176
177
178
179
180
181
182
183
184
185
186
187
188
189
190
191
192
193
194
195
196
197
198
199
200
Country City Abbr No.
20
Buffalo
Richmond
Columbia
Little Rock
Columbus
Grand Rapids
Salt Lake City
Providence
Manchester (NH)
San Diego
Santa Fe
Bismarck
Reno
New Haven
Baltimore
South Carolina (SC)
Savannah
BUF
RMD
COL
LRC
CLS
GRS
SLC
PVD
MNH
SDG
SFE
BIS
REN
NHV
BAL
SCR
SAV
201
202
203
204
205
206
207
208
209
210
211
212
213
214
215
216
217
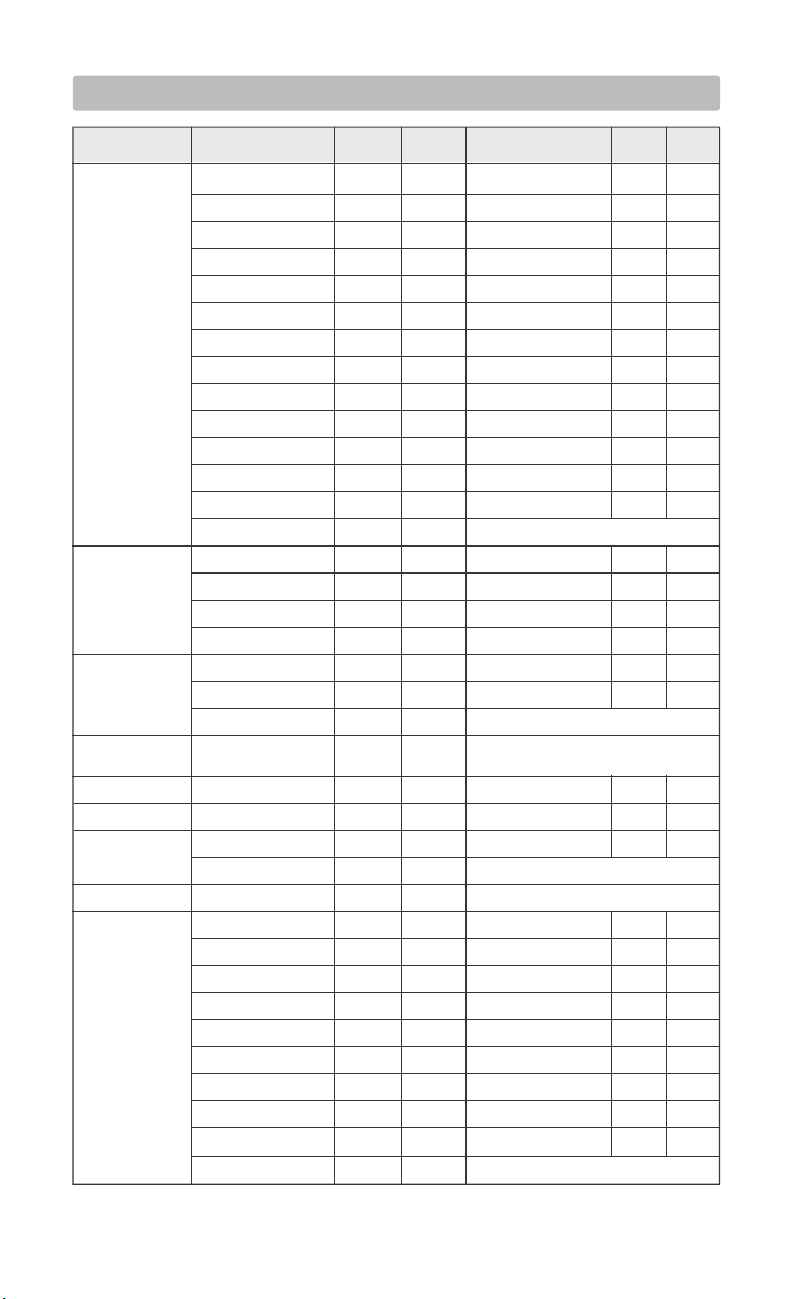
Appendix 2: City Code of other Countries
21
Berlin
Bremen
Köln
Dortmund
Dresden
Düsseldorf
Erfurt
Frankfurt
Freiburg
Hamburg
Hannover
Hof
Kaiserslautern
Kassel
Bregenz
Graz
Innsbruck
Linz
Antwerp
Bruges
Brussels
Split
Brno
Aalborg
Copenhagen
Helsinki
Ajaccio
Biarritz
Bordeaux
Brest
Cherbourg-Octeville
Clermont-Ferrand
Dijon
Lille
Lyon
Marseille
SPL
BRN
ALB
KOB
HEL
AJA
BIA
BOR
BRT
CHE
CMF
DIJ
LIL
LYO
MRS
ZAG
PRG
ODE
MET
NAN
NCE
ORL
PAR
PER
ROU
STR
TOU
43
45
48
60
61
62
63
64
65
66
67
68
Zagreb
Prague
Odense
Metz
Nantes
Nice
Orleans
Paris
Perpignan
Rouen
Strasbourg
Toulouse
42
44
46
47
49
50
51
52
53
54
55
56
57
58
59
Sarajevo SAR 41
Germany(DE)
Austria(AT)
Belgium(BE)
Bosnia &
Herzegovina(BA)
Croatia(HR)
Czech(CZ)
Denmark(DK)
Finland(FI)
France(FR)
BER
BRE
KOE
DOR
DRE
DUS
ERF
FRA
FRE
HAM
HAN
HOF
KAI
KAS
BRZ
GRZ
INN
LNZ
ANT
BRG
BRU
1
2
3
4
5
6
7
8
9
10
11
12
13
14
28
29
30
31
36
37
38
Kiel
Leipzig
Magdeburg
München
Nürnberg
Osnabrück
Passau
Regensburg
Rostock
Saarbrücken
Stuttgart
Ulm
Würzburg
Salzburg
Vienna
Villach
Wels
Libramont
Liege
KIE
LEI
MAG
MUN
NUR
OSN
PAS
REG
ROS
SAA
STU
ULM
WUR
SLZ
WIE
VIL
WEL
LIB
LIE
15
16
17
18
19
20
21
22
23
24
25
26
27
32
33
34
35
39
40
Country City Abbr No. City Abbr No.
22
Athens
Budapest
Dublin
Ancona
Bari
Bolzano
Cagliari
Florence
Foggia
Genoa
Lecce
Messina
Milan
Vaduz
Luxembourg
Monte Carlo
Amsterdam
Arnhem
Eindhoven
Bergen
Lillehammer
Cracow
Gdansk
Faro
Lisbon
St. Petersburg
Moscow
Novosibirsk
Belgrade
Bratislava
Ljubliana
Alicante
Andorra
Badajoz
Barcelona
Bilbao
Cordoba
Eivissa Ibiza
La Coruña
Las Palmas
BGN
LLH
KRA
GDA
FAR
LIS
PET
MOS
NOV
BEO
BRV
LUB
ALI
AND
BAD
BRC
BIL
COR
IBZ
LCO
LPA
OSL
POZ
WAR
POR
KAZ
VOL
YEK
KOS
LEO
MAD
MAL
PDM
SAL
SEV
VAL
ZAR
103
106
107
110
114
115
116
119
130
131
132
133
134
135
136
137
Oslo
Poznan
Warsaw
Porto
Kazan
Volgograd
Yekaterinburg
Kosice
Leon
Madrid
Malaga
Palma de Mallorca
Salamanca
Sevilla
Valencia
Zaragoza
101
102
104
105
108
109
111
112
113
117
118
120
121
122
123
124
125
126
127
128
129
Greece(GR)
Hungary(HU)
Ireland(IE)
Italy (IT)
Liechtenstein(LI)
Luxemburg(LU)
Monaco(MC)
Netherlands
(NL)
Norway(NO)
Poland(PL)
Portugal(PT)
Russian
Federation(RU)
Serbia(RS)
Slovakia(SK)
Slovenia(SI)
Spain(ES)
AHN
BUD
DUB
ANC
BAR
BOZ
CAG
FIR
FOG
GEN
LEC
MES
MIL
VDZ
LUX
MCM
AMS
ARN
EIN
69
70
71
72
73
74
75
76
77
78
79
80
81
92
93
94
95
96
97
Naples
Palermo
Parma
Perugia
Rome
San Remo
Triest
Turin
Venice
Verona
Groningen
Rotterdam
The Hague
NAP
PAL
PRM
PEG
ROM
SRE
TRI
TUR
VEN
VER
GRO
ROT
DHA
82
83
84
85
86
87
88
89
90
91
98
99
100
23
Gothenburg
Karlstad
Basel
Berne
Chur
Geneva
Lucerne
Aberdeen
Belfast
Birmingham
Cardiff
Glasgow
Vilnius
Sofia
Bucharest
Nicosia
Belfast BFS 163
Ottawa
Quebec City
Edmonton
Calgary
Mexico City
Panama City
Brasília
Belo Horizonte
Recife
Buenos Aires
Cordoba
La Plata
Santiago de Chile
Bogotá
Canberra
Melbourne
Sydney
Wellington
Adelaide
Brisbane
OTT
QUC
EDM
CLY
MEX
PAN
BRA
BHZ
REC
BUE
CDB
LPL
SAN
BOG
CBR
MEL
SYD
WLG
ADE
BRI
VAN
MON
TOR
RIO
SPA
SLV
MAR
MEN
ROO
DRW
HBA
PEH
AKL
CHC
222
223
224
230
231
232
236
237
238
247
248
249
250
251
Vancouver
Montreal
Toronto
Rio de Janeiro
São Paulo
Salvador
Mardel Plata
Mendoza
Rosario
Darwin
Hobart
Perth
Auckland
Christchurch
218
219
220
221
225
226
227
228
229
233
234
235
239
240
241
242
243
244
245
246
Sweden(SE)
Switzerland
(CH)
United
Kingdom(GB)
Lithuania(LT)
Bulgaria(BG)
Romania(RO)
Cyprus(CY)
Northen
Ireland(NI)
Canada(CA)
Mexican
Panama
Brazil(BR)
Argentina
Chile
Colombia
Australia(AU)
and New
Zealand(NZ)
GOT
KAR
BAS
BNE
CHU
GNV
LUC
ABD
BEL
BIR
CAR
GLW
VNO
SOF
BUH
NIC
138
139
141
142
143
144
145
150
151
152
153
154
159
160
161
162
Stockholm
Lugano
Sion
St. Gallen
Zurich
London
Manchester
Newcastle upon Tyne
Plymouth
STO
LUG
SIO
SGL
ZUR
LON
MAN
NEC
PLY
140
146
147
148
149
155
156
157
158