
Loading ...
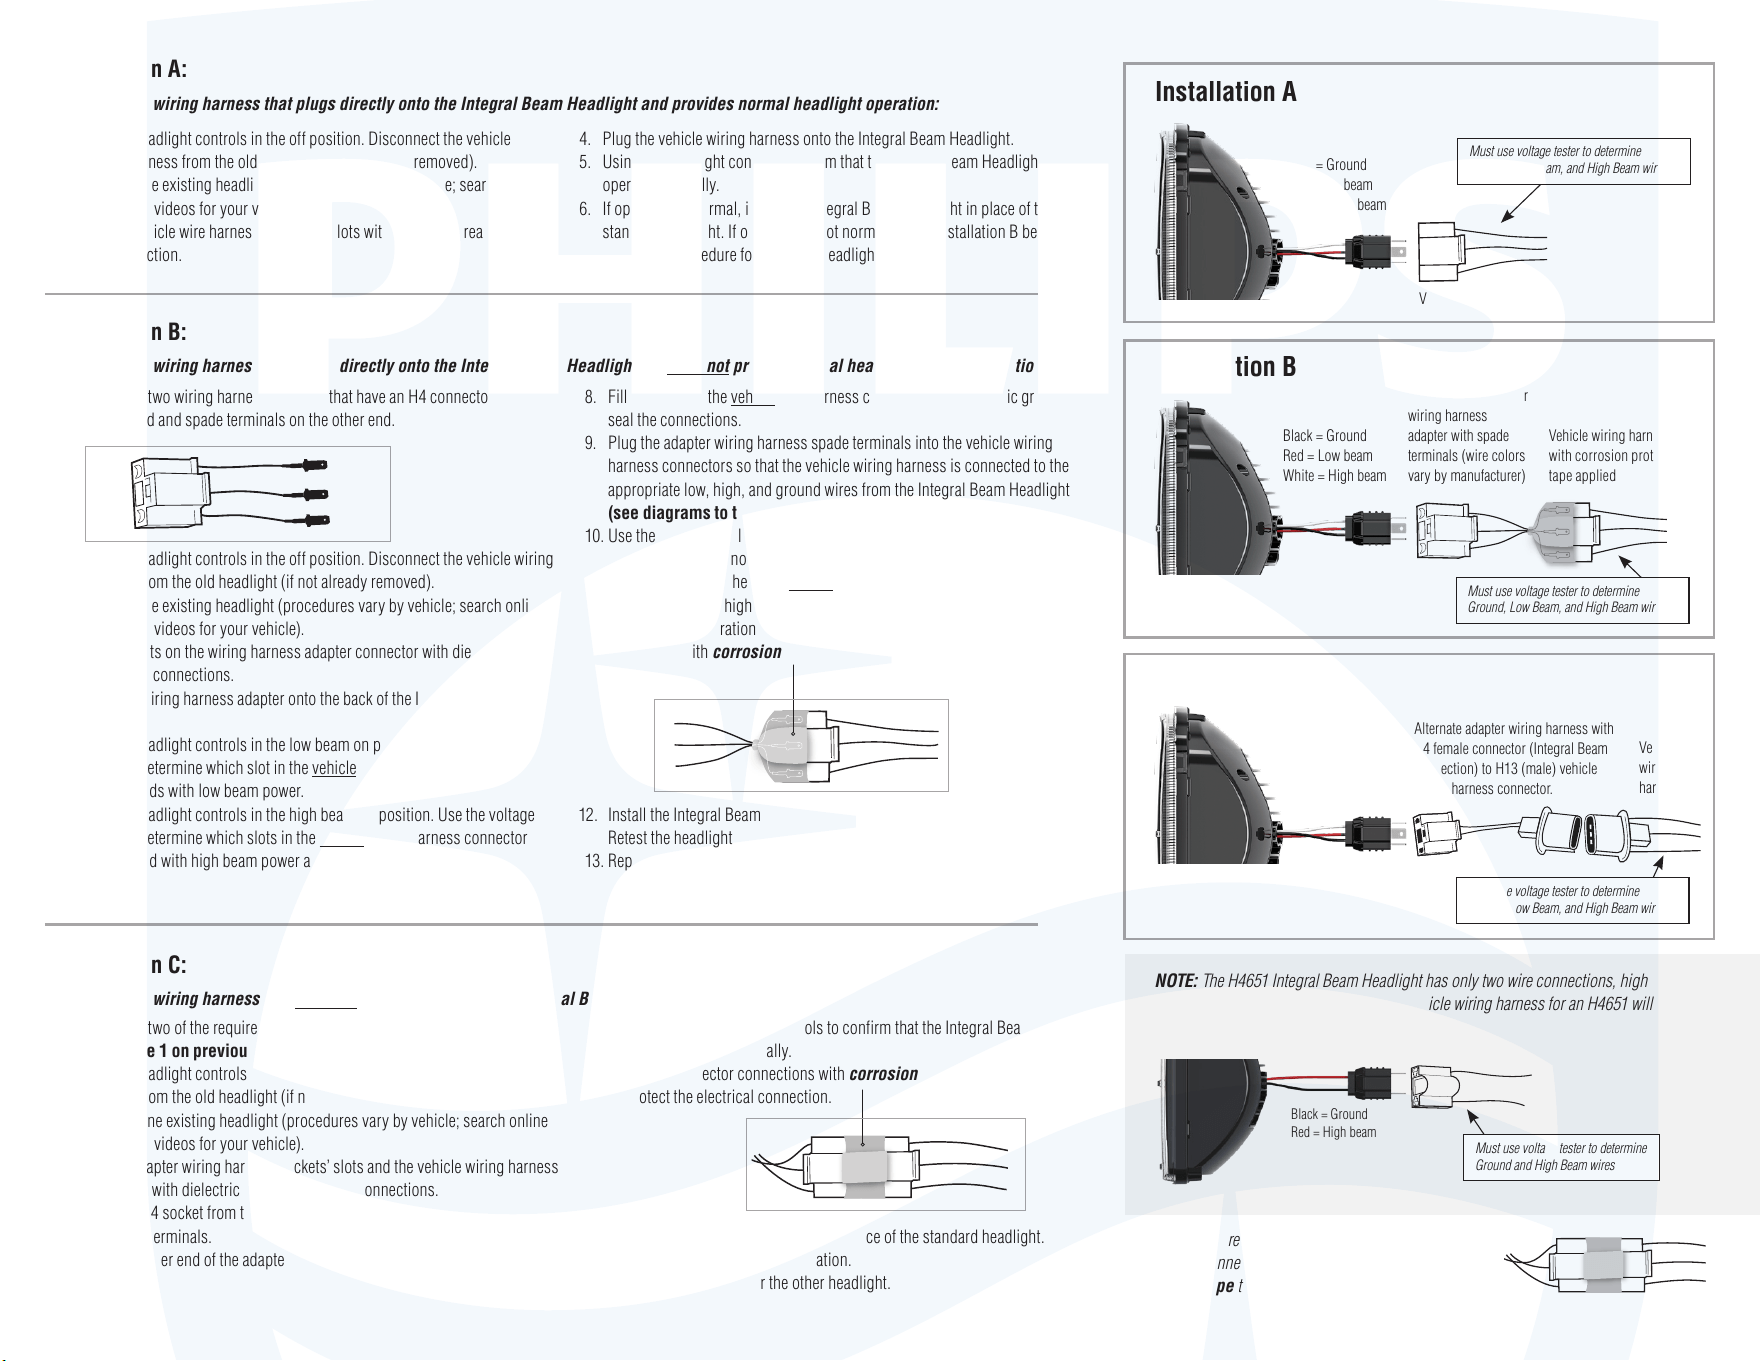
Installation A
Installation B
Installation C
Alternate adapter wiring harness with
H4 female connector (Integral Beam
connection) to H13 (male) vehicle
wiring harness connector.
H4 (female) connector
wiring harness
adapter with spade
terminals (wire colors
vary by manufacturer)
Vehicle wiring harness
Vehicle wiring harness
with corrosion protection
tape applied
Vehicle
wiring
harness
Vehicle wiring harness
Installation A:
For a vehicle wiring harness that plugs directly onto the Integral Beam Headlight and provides normal headlight operation:
Installation B:
For a vehicle wiring harness that plugs directly onto the Integral Beam Headlight but does not provide normal headlight control operation:
Installation C:
For a vehicle wiring harness that does not plug directly onto the Integral Beam Headlight:
1. Put the headlight controls in the off position. Disconnect the vehicle
wiring harness from the old headlight (if not already removed).
2. Remove the existing headlight (procedures vary by vehicle; search online
for how-to videos for your vehicle).
3. Fill the vehicle wire harness connector slots with dielectric grease to seal
the connection.
4. Plug the vehicle wiring harness onto the Integral Beam Headlight.
5. Using the headlight controls, confirm that the Integral Beam Headlight
operates normally.
6. If operation is normal, install the Integral Beam Headlight in place of the
standard headlight. If operation is not normal, follow Installation B below.
7. Repeat the procedure for the other headlight.
1. Purchase two wiring harness adapters that have an H4 connector (female)
on one end and spade terminals on the other end.
2. Put the headlight controls in the off position. Disconnect the vehicle wiring
harness from the old headlight (if not already removed).
3. Remove the existing headlight (procedures vary by vehicle; search online
for how-to videos for your vehicle).
4. Fill the slots on the wiring harness adapter connector with dielectric grease
to seal the connections.
5. Plug the wiring harness adapter onto the back of the Integral Beam
Headlight.
6. Put the headlight controls in the low beam on position. Use the voltage
tester to determine which slot in the vehicle wiring harness connector
corresponds with low beam power.
7. Put the headlight controls in the high beam on position. Use the voltage
tester to determine which slots in the vehicle wiring harness connector
correspond with high beam power and ground.
8. Fill the slots on the vehicle wire harness connector with dielectric grease to
seal the connections.
9. Plug the adapter wiring harness spade terminals into the vehicle wiring
harness connectors so that the vehicle wiring harness is connected to the
appropriate low, high, and ground wires from the Integral Beam Headlight
(see diagrams to the right).
10. Use the vehicle headlight controls to confirm that the Integral Beam
Headlight operates normally. If it does not operate normally, use the
voltage meter to recheck the vehicle wire harness connector slots for
correct low beam, high beam, and ground.
11. When correct operation is confirmed, wrap the spade / connector
connection with corrosion protection tape to protect the electrical
connection.
12. Install the Integral Beam Headlight in place of the standard headlight.
Retest the headlight controls to check operation.
13. Repeat the procedure for the other headlight.
1. Purchase two of the required adapter wiring harnesses
(see Case 1 on previous page).
2. Put the headlight controls in the off position. Disconnect the vehicle wiring
harness from the old headlight (if not already removed).
3. Remove one existing headlight (procedures vary by vehicle; search online
for how-to videos for your vehicle).
4. Fill the adapter wiring harness sockets’ slots and the vehicle wiring harness
connector with dielectric grease to seal the connections.
5. Plug the H4 socket from the adapter wiring harness onto the Integral Beam
Headlight terminals.
6. Plug the other end of the adapter wiring harness into the vehicle wiring
harness.
7. Use the vehicle headlight controls to confirm that the Integral Beam
Headlight operates normally.
8. Wrap the connector connections with corrosion protection tape
to protect the electrical connection.
9. Install the Integral Beam Headlight in place of the standard headlight.
Retest the controls to check operation.
10. Repeat the procedure for the other headlight.
Black = Ground
Red = Low beam
White = High beam
Black = Ground
Red = Low beam
White = High beam
Black = Ground
Red = Low beam
White = High beam
Black = Ground
Red = High beam
NOTE: The H4651 Integral Beam Headlight has only two wire connections, high
beam power and ground and the vehicle wiring harness for an H4651 will
have only two socket slots.
NOTE: It is recommended to always wrap the connector
connections with corrosion protection
tape to protect the electrical connection.
Must use voltage tester to determine
Ground, Low Beam, and High Beam wires
Must use voltage tester to determine
Ground, Low Beam, and High Beam wires
Must use voltage tester to determine
Ground and High Beam wires
Must use voltage tester to determine
Ground, Low Beam, and High Beam wires
Shield_CMYK_2013
Version 1.1 – 25 October 2013