
SAFETY | WARRANTY | TROUBLESHOOTING
IMPORTANT SAFETY INSTRUCTIONS
When using electrical appliances, especially when children are present, basic
safety precautions should always be followed, including the following:
FOR HOUSEHOLD USE ONLY
READ ALL INSTRUCTIONS BEFORE USING—SAVE THESE INSTRUCTIONS
WARNINGS: KEEP AWAY FROM WATER
DANGER—
As with most electrical appliances, electrical parts
are electrically live even when the switch is o.
WARNING
To reduce the risk of death by electric shock:
1. Always unplug the unit immediately after using.
2. Do not use while bathing.
3. Do not place or store appliance where it can fall or
be pulled into a tub or sink.
4. Do not place in or drop into water or other liquid.
5. If an appliance falls into water, unplug the unit
immediately. Do not reach into the water.
WARNING
To reduce the risk of burns, electrocution, fire, or
injury to persons:
1. An appliance should never be left unattended
when plugged in.
2. Close supervision is necessary when this appliance
is used by, on, or near children or individuals with
certain disabilities.
3. Use this appliance only for its intended use as
described in this manual. Do not use attachments
not recommended by the manufacturer.
4. Never operate this appliance if it has a damaged
cord or plug, if it is not working properly, or if it has
been dropped, damaged, or dropped into water.
5. Keep the cord away from heated surfaces.
6. Do not wrap the cord around the appliance.
7. Never block the air openings of the appliance or
place it on a soft surface, such as a bed or couch,
where the air openings may be blocked. Keep the
air openings free of lint, hair, and the like.
8. Never use while sleeping.
9. Never drop or insert any object into any opening.
10. Do not use outdoors or operate where aerosol
(spray) products are being used or where oxygen
is being administered.
11. Do not use an extension cord with this appliance.
12. Do not direct hot air toward eyes or other heat-
sensitive areas.
13. Attachments may be hot during use. Allow them to
cool before handling.
14. Do not place appliance on any surface while it is
operating.
15. While using the appliance, keep your hair away
from the air inlets.
16. Do not operate with a voltage converter.
17. Only use the appliance with the voltage, frequency
and power shown on the rating label on the
product.
18. Do not use this appliance on hair extensions or
wigs unless recommended by the hair extension or
wig manufacturer.
19. If hair styling product is being used in conjunction
with this appliance please read and follow all
of the hair styling product safety warnings and
instructions before use.
SAVE THESE INSTRUCTIONS
For accessories and replacement parts,
visit sharkbeauty.com
SCAN QR CODE FOR FULL
INSTRUCTIONS, WARRANTY
INFORMATION, AND HOW-TOS
© 2023 Shark Ninja Operating LLC. © 2023 SHARK is a registered trademark of SharkNinja Operating LLC.
SPEEDSTYLE is a trademark of SharkNinja Operating LLC.
HD300_Series_Warning_Insert_E_REV_Mv1
SpeedStyle
TM
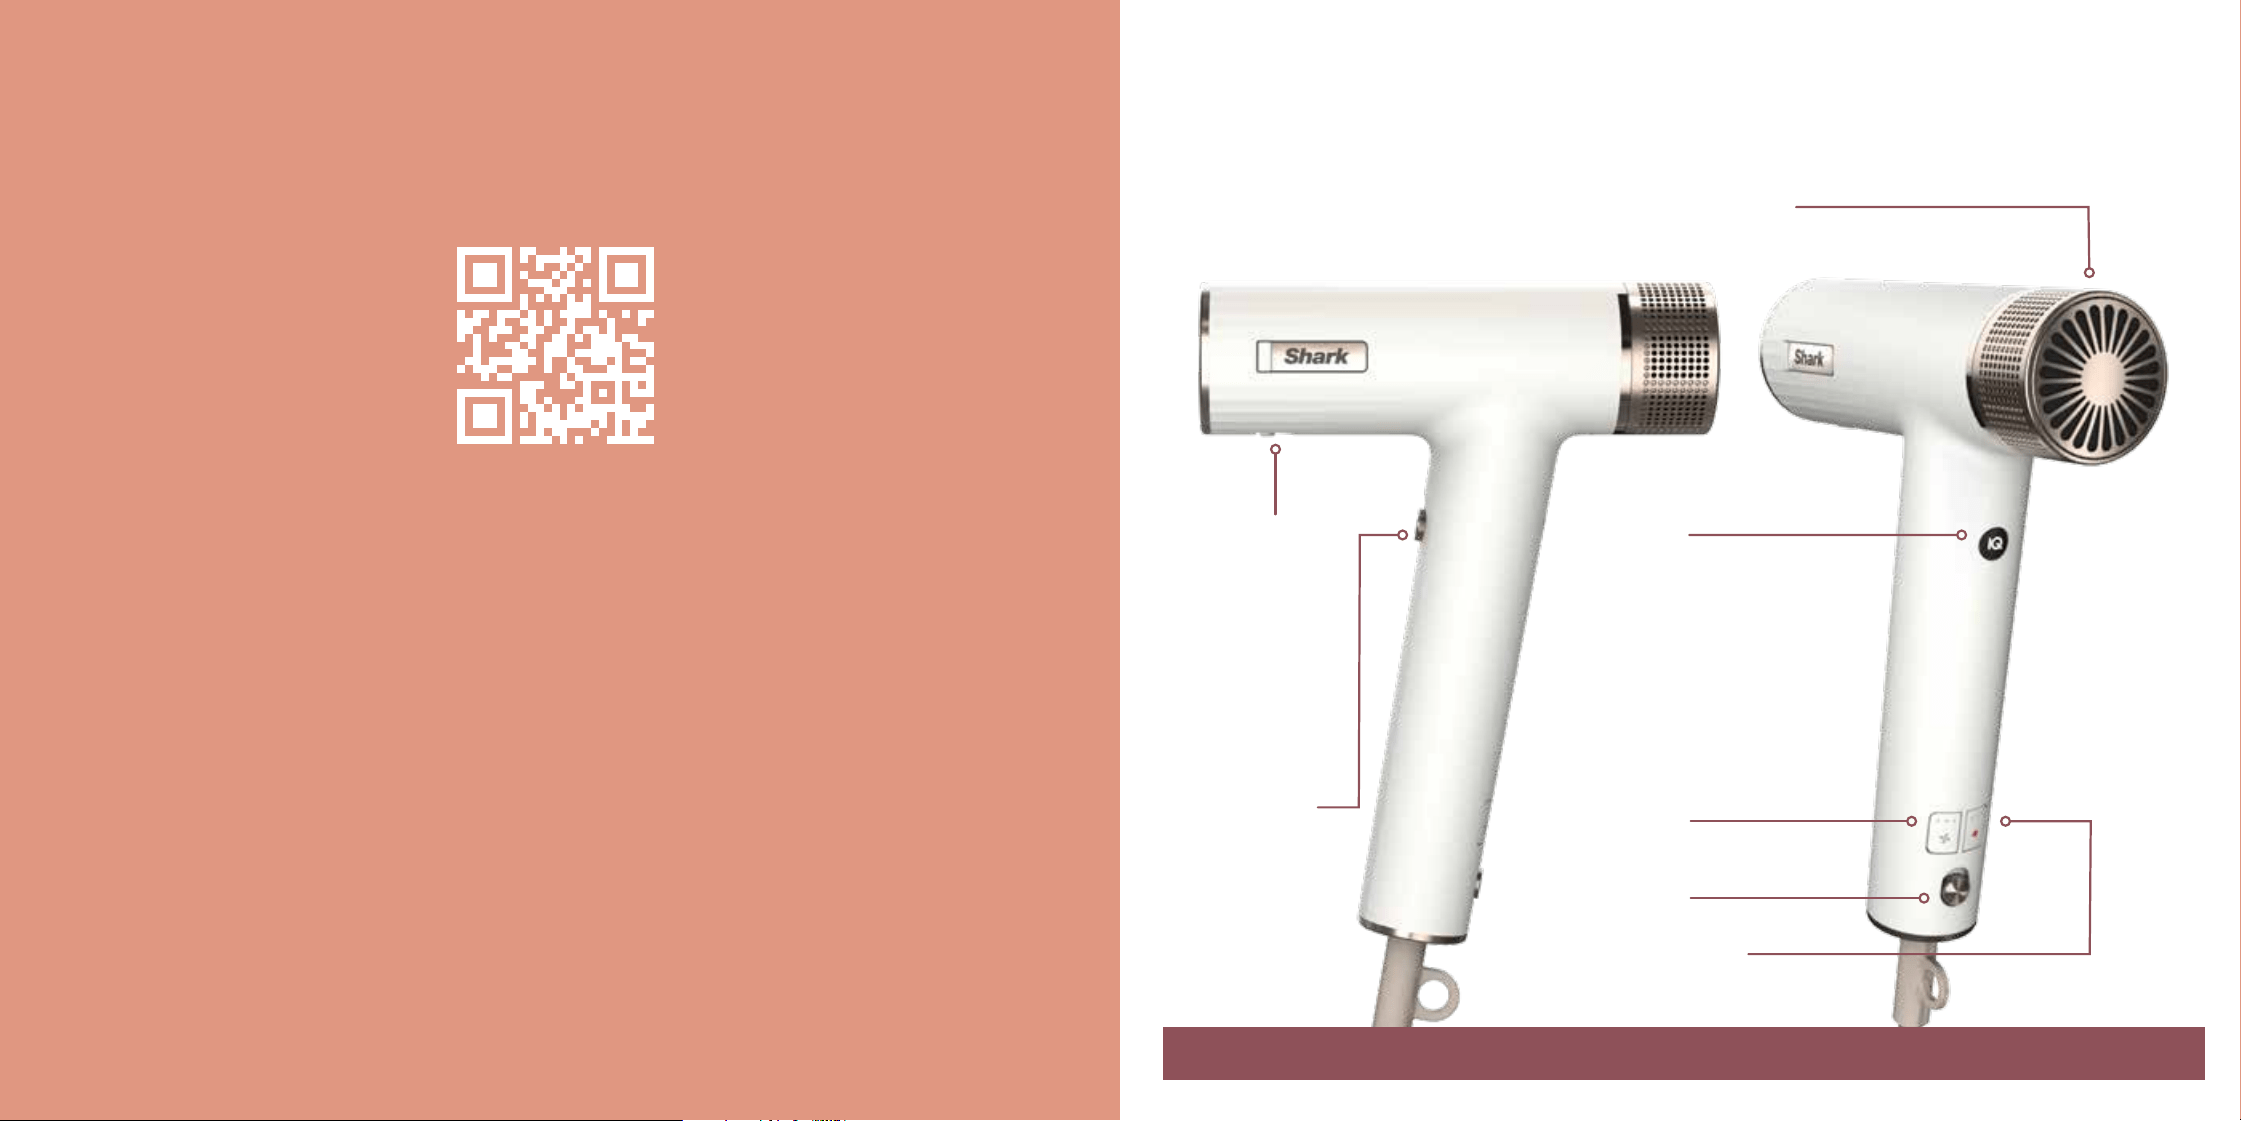
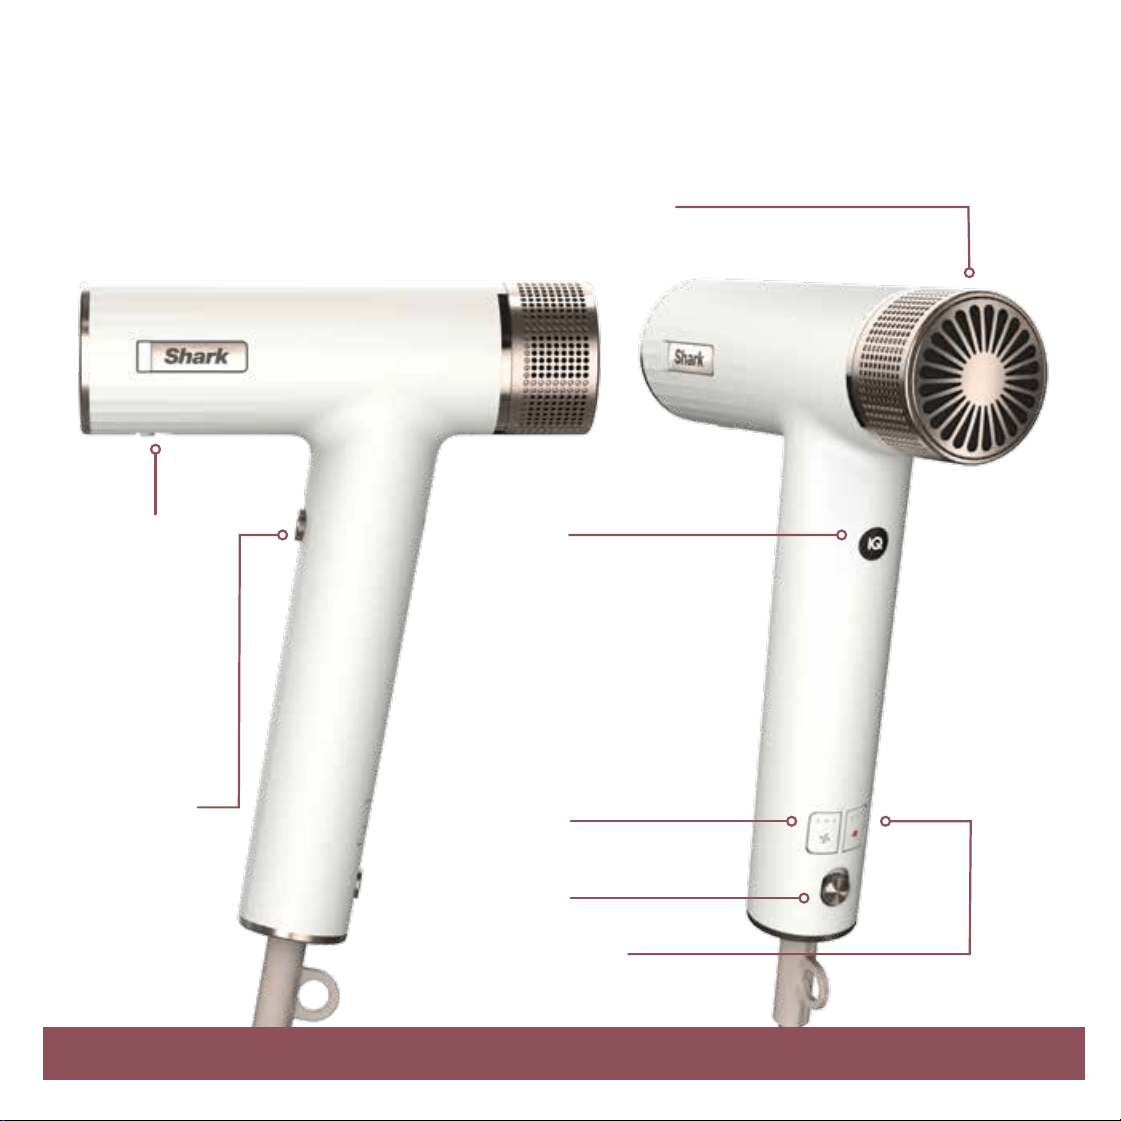
1. Slide the power button to turn the dryer on and o.
2. Press the airflow button to choose a low, medium,
or high airflow.
3. Press the temperature button to choose no heat, or
low, medium, or high temperature.
4. Press and hold the Cool Shot button for a cool burst
of air to set your style.
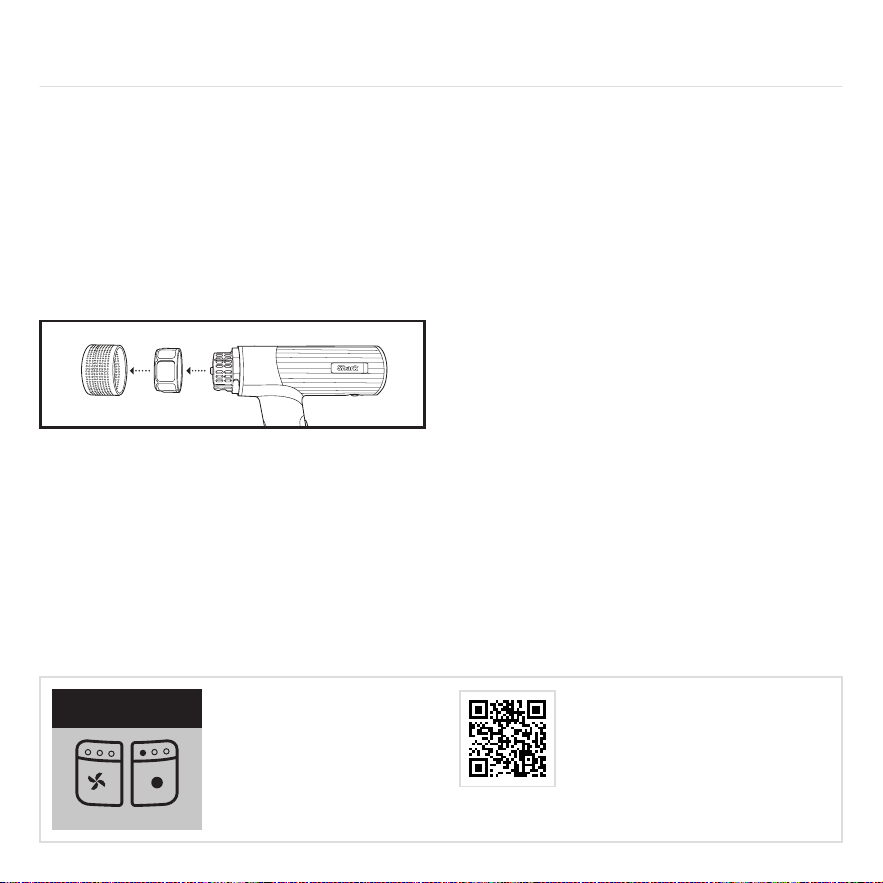
5. To attach any accessories included with your model,
press them into the nozzle outlet. You will know they
are properly attached when they click in place.
6. To remove an accessory, slide the lock down and lift
the accessory o the nozzle by holding onto the
touchpoints identified in your Styling Guide.
7. To remove the filter cover on the back of the
unit, rotate it counterclockwise, then pull it o.
To reattach the cover, align the open circle icon
with the arrow icon on the unit. Rotate the cover
clockwise until the filled-in circle icon aligns with
the arrow.
8. Press the ALCI button to reset the dryer. See
Troubleshooting & Error Codes for more information.
9. Rating label location.
For further operating instructions, please
consult the Styling Guide or scan the QR code.
Storage, Cord Safety, and Maintenance/Cleaning:
• Ensure the cord is not knotted, twisted, or wrapped
around any nearby objects when in use.
• Store the unit in a dry location away from water and
other heat sources.
• To help prevent bristle damage, store brush
accessories so the bristles aren’t touching anything.
• Clean the filter on the back of the unit monthly. To
clean the filter, first twist the filter cover o the back
of the unit, then use a new toothbrush to brush o
any dust or debris on the filter. Once the filter is clean,
twist the filter cover back onto the back of the unit.
• Remove any hair on the brush accessories after every
use to help maintain performance.
OPERATING INSTRUCTIONS
4
5
1
2
3
6
7
8
9
MAINTENANCE/CLEANING
Reduction in airflow.
A change in airflow or air power, airflow blockages,
and/or visible buildup on the inlet at the back of the
unit could indicate your unit needs to be cleaned. To
maintain performance, clean the filter at the back of
the unit every month, using a new toothbrush.
Removing the Filter
1. Turn o the unit and unplug it. Rotate the filter cover on
the back of the unit counterclockwise, then pull it o.
Then rotate the filter counterclockwise and pull it o.
Cleaning the Filter
1. Using a clean toothbrush, gently brush any dust o
the mesh filter. Then soak the mesh filter in warm,
soapy water for at least 30 minutes.
2. Wipe down the back of the unit with a microfiber cloth
to remove the debris.
3. After 30 minutes, remove the filter from the water and
rinse it under a faucet.
4. Pat the filter dry with a microfiber cloth. Let the filter
air-dry for up to 24 hours before reinstalling.
5. To reinstall the filter, reinsert it and rotate it
clockwise. Then align the filter cover and rotate it
clockwise until it fits securely.
ALCI OPERATION
Electricity flickers or trips circuit breaker during use.
This dryer is equipped with an Appliance Leakage
Circuit Interrupter (ALCI), a safety feature that
renders it inoperable under abnormal conditions.
Should the dryer turn o in use, press the red Reset
button on the plug and the dryer should function
normally. If the dryer does not reset, please check
your circuit breaker. If the issue persists, ensure there
are no other appliances plugged in within the room
where the dryer is being used. Do not use the dryer
with a power strip.
OVERHEATING
Hair dryer is overheating or shuts o.
This unit is equipped with a temperature-protective
thermostat. If for some reason your hair dryer overheats,
the thermostat will automatically turn the unit o. To
prevent power-down recurrence, unplug the hair dryer
and set it aside to cool, or press the Cool Shot button
during use. Overheating may result if the unit is powered
on for a long duration. Overheating can also indicate a
blockage or dust buildup. To prevent overheating, clean
the filter at the bottom of the unit every month, using
a new toothbrush. Make sure you are not covering the
filter with your hand when operating the unit, as this
could also cause overheating. If overheating continues
to occur, contact Customer Service at 855-522-0912.
TROUBLESHOOTING & ERROR CODES
If a dierent error code appears, please scan the QR code for additional
troubleshooting or contact Customer Service at 855-522-0912.
Overheating
Error Code
1. Slide the power button to turn the dryer on and o.
2. Press the airflow button to choose a low, medium,
or high airflow.
3. Press the temperature button to choose no heat, or
low, medium, or high temperature.
4. Press and hold the Cool Shot button for a cool burst
of air to set your style.
5. To attach any accessories included with your model,
press them into the nozzle outlet. You will know they
are properly attached when they click in place.
6. To remove an accessory, slide the lock down and lift
the accessory o the nozzle by holding onto the
touchpoints identified in your Styling Guide.
7. To remove the filter cover on the back of the
unit, rotate it counterclockwise, then pull it o.
To reattach the cover, align the open circle icon
with the arrow icon on the unit. Rotate the cover
clockwise until the filled-in circle icon aligns with
the arrow.
8. Press the ALCI button to reset the dryer. See
Troubleshooting & Error Codes for more information.
9. Rating label location.
For further operating instructions, please
consult the Styling Guide or scan the QR code.
Storage, Cord Safety, and Maintenance/Cleaning:
• Ensure the cord is not knotted, twisted, or wrapped
around any nearby objects when in use.
• Store the unit in a dry location away from water and
other heat sources.
• To help prevent bristle damage, store brush
accessories so the bristles aren’t touching anything.
• Clean the filter on the back of the unit monthly. To
clean the filter, first twist the filter cover o the back
of the unit, then use a new toothbrush to brush o
any dust or debris on the filter. Once the filter is clean,
twist the filter cover back onto the back of the unit.
• Remove any hair on the brush accessories after every
use to help maintain performance.
OPERATING INSTRUCTIONS
4
5
1
2
3
6
7
8
9
MAINTENANCE/CLEANING
Reduction in airflow.
A change in airflow or air power, airflow blockages,
and/or visible buildup on the inlet at the back of the
unit could indicate your unit needs to be cleaned. To
maintain performance, clean the filter at the back of
the unit every month, using a new toothbrush.
Removing the Filter
1. Turn o the unit and unplug it. Rotate the filter cover on
the back of the unit counterclockwise, then pull it o.
Then rotate the filter counterclockwise and pull it o.
Cleaning the Filter
1. Using a clean toothbrush, gently brush any dust o
the mesh filter. Then soak the mesh filter in warm,
soapy water for at least 30 minutes.
2. Wipe down the back of the unit with a microfiber cloth
to remove the debris.
3. After 30 minutes, remove the filter from the water and
rinse it under a faucet.
4. Pat the filter dry with a microfiber cloth. Let the filter
air-dry for up to 24 hours before reinstalling.
5. To reinstall the filter, reinsert it and rotate it
clockwise. Then align the filter cover and rotate it
clockwise until it fits securely.
ALCI OPERATION
Electricity flickers or trips circuit breaker during use.
This dryer is equipped with an Appliance Leakage
Circuit Interrupter (ALCI), a safety feature that
renders it inoperable under abnormal conditions.
Should the dryer turn o in use, press the red Reset
button on the plug and the dryer should function
normally. If the dryer does not reset, please check
your circuit breaker. If the issue persists, ensure there
are no other appliances plugged in within the room
where the dryer is being used. Do not use the dryer
with a power strip.
OVERHEATING
Hair dryer is overheating or shuts o.
This unit is equipped with a temperature-protective
thermostat. If for some reason your hair dryer overheats,
the thermostat will automatically turn the unit o. To
prevent power-down recurrence, unplug the hair dryer
and set it aside to cool, or press the Cool Shot button
during use. Overheating may result if the unit is powered
on for a long duration. Overheating can also indicate a
blockage or dust buildup. To prevent overheating, clean
the filter at the bottom of the unit every month, using
a new toothbrush. Make sure you are not covering the
filter with your hand when operating the unit, as this
could also cause overheating. If overheating continues
to occur, contact Customer Service at 855-522-0912.
TROUBLESHOOTING & ERROR CODES
If a dierent error code appears, please scan the QR code for additional
troubleshooting or contact Customer Service at 855-522-0912.
Overheating
Error Code
The Two (2) Year Limited Warranty applies to purchases
made from authorized retailers of SharkNinja Operating LLC.
Warranty coverage applies to the original owner and to the
original product only and is not transferable.
SharkNinja warrants that the unit shall be free from defects in
material and workmanship for a period of two (2) years from
the date of purchase when it is used under normal household
conditions and maintained according to the requirements
outlined in the Owner’s Guide, subject to the following
conditions and exclusions:
What is covered by this warranty?
1. The original unit and/or non-wearable parts deemed
defective, in SharkNinja’s sole discretion, will be repaired
or replaced up to two (2) years from the original
purchase date.
2. In the event a replacement unit is issued, the warranty
coverage ends six (6) months following the receipt date
of the replacement unit or the remainder of the existing
warranty, whichever is later. SharkNinja reserves the right
to replace the unit with one of equal or greater value.
What is not covered by this warranty?
1. Normal wear and tear of wearable parts (such as
accessories), which require regular maintenance and/
or replacement to ensure the proper functioning of your
unit, are not covered by this warranty. Replacement parts
are available for purchase at sharkbeauty.com.
2. Any unit that has been tampered with or used for
commercial purposes.
3. Damage caused by misuse, abuse, negligent handling,
failure to perform required maintenance (e.g., failure to
keep the well of the motor base clear of food spills and
other debris), or damage due to mishandling in transit.
4. Consequential and incidental damages.
5. Defects caused by repair persons not authorized by
SharkNinja. These defects include damages caused in the
process of shipping, altering, or repairing the SharkNinja
product (or any of its parts) when the repair is performed
by a repair person not authorized by SharkNinja.
6. Products purchased, used, or operated outside
North America.
How to get service
If your appliance fails to operate properly while in use under
normal household conditions within the warranty period,
visit sharkbeauty.com for product care and maintenance self-
help. Our Customer Service Specialists are also available at
855-522-0912 to assist with product support and warranty
service options, including the possibility of upgrading to our
VIP warranty service options for select product categories.
So we may better assist you, please register your product
online at registeryourshark.com and have the product on
hand when you call.
SharkNinja will cover the cost for the customer to send in the
unit to us for repair or replacement. A fee of $20.95 (subject
to change) will be charged when SharkNinja ships the
repaired or replacement unit.
How to initiate a warranty claim
You must call 855-522-0912 to initiate a warranty claim.
You will need the receipt as proof of purchase. We also ask
that you register your product online at registeryourshark.
com and have the product on hand when you call, so we may
better assist you. A Customer Service Specialist will provide
you with return and packing instruction information.
How state law applies
This warranty gives you specific legal rights, and you also
may have other rights that vary from state to state. Some
states do not permit the exclusion or limitation of incidental or
consequential damages, so the above may not apply to you.
TWO (2) YEAR LIMITED WARRANTY
FCC WARNINGS
This equipment has been tested and found to comply
with the limits for a Class B digital device, pursuant to
parts 15 of the FCC Rules. These limits are designed to
provide reasonable protection against harmful interference in a
residential installation.
This equipment generates, uses, and can radiate radio frequency
energy and, if not installed and accordance with the instructions,
may cause harmful interference to radio communications.
However, there is no guarantee that interference will not occur
in a particular installation. If this equipment does cause harmful
interference to radio or television reception, which can be
determined by turning the equipment o and on, the user is
encouraged to try to correct the interference by one or more of
the following measures:
1
Reorient or relocate the receiving antenna.
2
Increase the separation between the equipment and receiver.
3
Connect the equipment into an outlet on a circuit dierent from
that to which the receiver is connected.
4
Consult the dealer or an experienced radio/TV technician for help.
This device complies with part 15 of the FCC rules.
Operation is subject to the following conditions:
1
This device may not cause harmful interference.
2
This device must accept any interference received, including
interference that may cause undesired operation.
Changes or modifications not expressly approved by the party
responsible for compliance could void the user’s authority to
operate this device.
ISED Statement
This device complies with Industry Canada license-exempt RSS
standard(s). Operation is subject to the following two conditions:
(1) this device may not cause interference, and (2) this device must
accept any interference, including interference that may cause
undesired operation of the device.
STYLING GUIDE
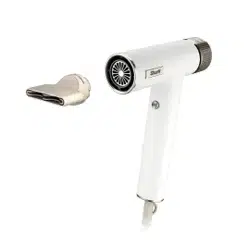
RapidGloss Finisher & High-Velocity Dryer
How it works
Airflow
Low / Medium / High
Temperature
No Heat / Low / Medium / High
Removable Filter
Twist and remove for easy cleaning.
ATTACHDETACH
On/O
Cool Shot
Press and hold
Cool Shot as
desired to seal
the hair cuticle
and lock in your
styles.
IQ Speed Styler
Attachment Indicator
Push the styler onto the
nozzle until it clicks. LED
will illuminate when styler
connection is identified and
will remain illuminated while
in recommended settings.
IQ Speed
Styler
Detachment
Location
Slide the lock
down to detach
and remove the
styler.
TIP: All 3 red temperature lights will be OFF when Cool Shot is engaged.
1
Get to know your SpeedStyle.
Table of Contents
Getting Started:
How it Works ������������������������������������������������������������������������������������������������������������������������������������������������������������1
Get to Know Your Stylers ����������������������������������������������������������������������������������������������������������������������������������������2-3
Shark Beauty™ Unique Accessories:
QuickSmooth Brush ��������������������������������������������������������������������������������������������������������������������������������������������� 4–5
Express Touchup Brush ����������������������������������������������������������������������������������������������������������������������������������������� 6-7
RapidGloss Finisher ���������������������������������������������������������������������������������������������������������������������������������������������� 8-9
Shark Beauty™ Traditional Accessories:
Turbo Concentrator ������������������������������������������������������������������������������������������������������������������������������������������� 10 –11
DefrizzFast Diffuser ������������������������������������������������������������������������������������������������������������������������������������������ 12-13
Lift & Strecth Wide-Tooth Comb ������������������������������������������������������������������������������������������������������������������������ 14-15
Accessories may vary per model.
For accessories and replacements, please visit sharkbeauty.co.uk
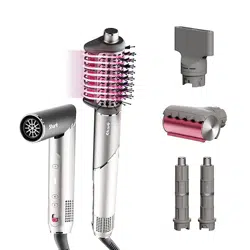
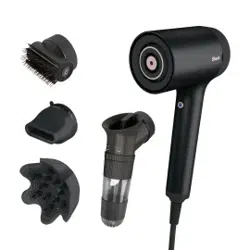
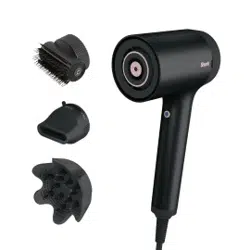
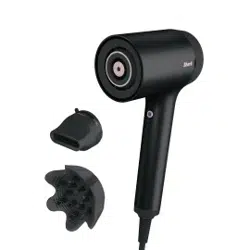
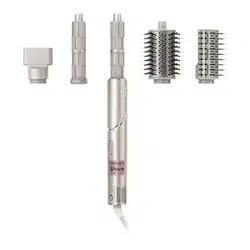
IQ Speed Styling & Drying Suite
This model may not include all stylers.
1 4
RapidGloss Finisher: Smooths frizz and flyaways
Uses Coanda Technology to automatically attract frizz and flyaways
and smooths them in seconds.
DefrizzFast Diuser: Fast, even drying from root to tip
Use the lever to extend or retract the prongs for a customisable airflow.
Extend prongs—for longer, thicker hair or reaching and lifting the roots.
Retract prongs—for shorter, finer hair or if the ends need a little extra air.
To order additional accessories, visit sharkbeauty.co.uk To order additional accessories, visit sharkbeauty.co.uk
2
5
2
QuickSmooth Brush: Dry, volumise, and smooth all at once
2 bristle types
Combination of volumising and smoothing bristles for grabbing,
smoothing, and shining.
Express Touchup Brush: Smooths and tames bangs, layers, and ends
2 bristle types
Combination of volumising and smoothing bristles for
added tension, smoothing, and shining.
6
3
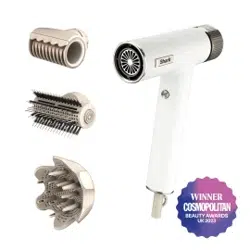
Turbo Concentrator: Style and dry at the same time
Concentrated air path for precise, fast drying.
Rotates for easy styling.
Lift & Stretch Wide-Tooth Comb: Stretch and lengthen from roots to ends
Uses two rows and two lengths of teeth to stretch
and elongate natural curls and coils.
Cool Touch Locations Cool Touch Locations
Hold accessories here when removing them. Hold accessories here when removing them.
3
IQ Speed Styling & Drying Suite
This model may not include all stylers.
1 4
RapidGloss Finisher: Smooths frizz and flyaways
Uses Coanda Technology to automatically attract frizz and flyaways
and smooths them in seconds.
DefrizzFast Diuser: Fast, even drying from root to tip
Use the lever to extend or retract the prongs for a customisable airflow.
Extend prongs—for longer, thicker hair or reaching and lifting the roots.
Retract prongs—for shorter, finer hair or if the ends need a little extra air.
To order additional accessories, visit sharkbeauty.co.uk To order additional accessories, visit sharkbeauty.co.uk
2
5
2
QuickSmooth Brush: Dry, volumise, and smooth all at once
2 bristle types
Combination of volumising and smoothing bristles for grabbing,
smoothing, and shining.
Express Touchup Brush: Smooths and tames bangs, layers, and ends
2 bristle types
Combination of volumising and smoothing bristles for
added tension, smoothing, and shining.
6
3
Turbo Concentrator: Style and dry at the same time
Concentrated air path for precise, fast drying.
Rotates for easy styling.
Lift & Stretch Wide-Tooth Comb: Stretch and lengthen from roots to ends
Uses two rows and two lengths of teeth to stretch
and elongate natural curls and coils.
Cool Touch Locations Cool Touch Locations
Hold accessories here when removing them. Hold accessories here when removing them.
3

Additional Styling Tips:
• If you have thick hair, try brushing smaller sections for smoother results.
• If you have curly or coily hair, try repeatedly brushing smaller sections and increasing the heat to help achieve a straighter style.
• For added volume, place the brush under the hair section close to the roots and brush upward using a rounding motion.
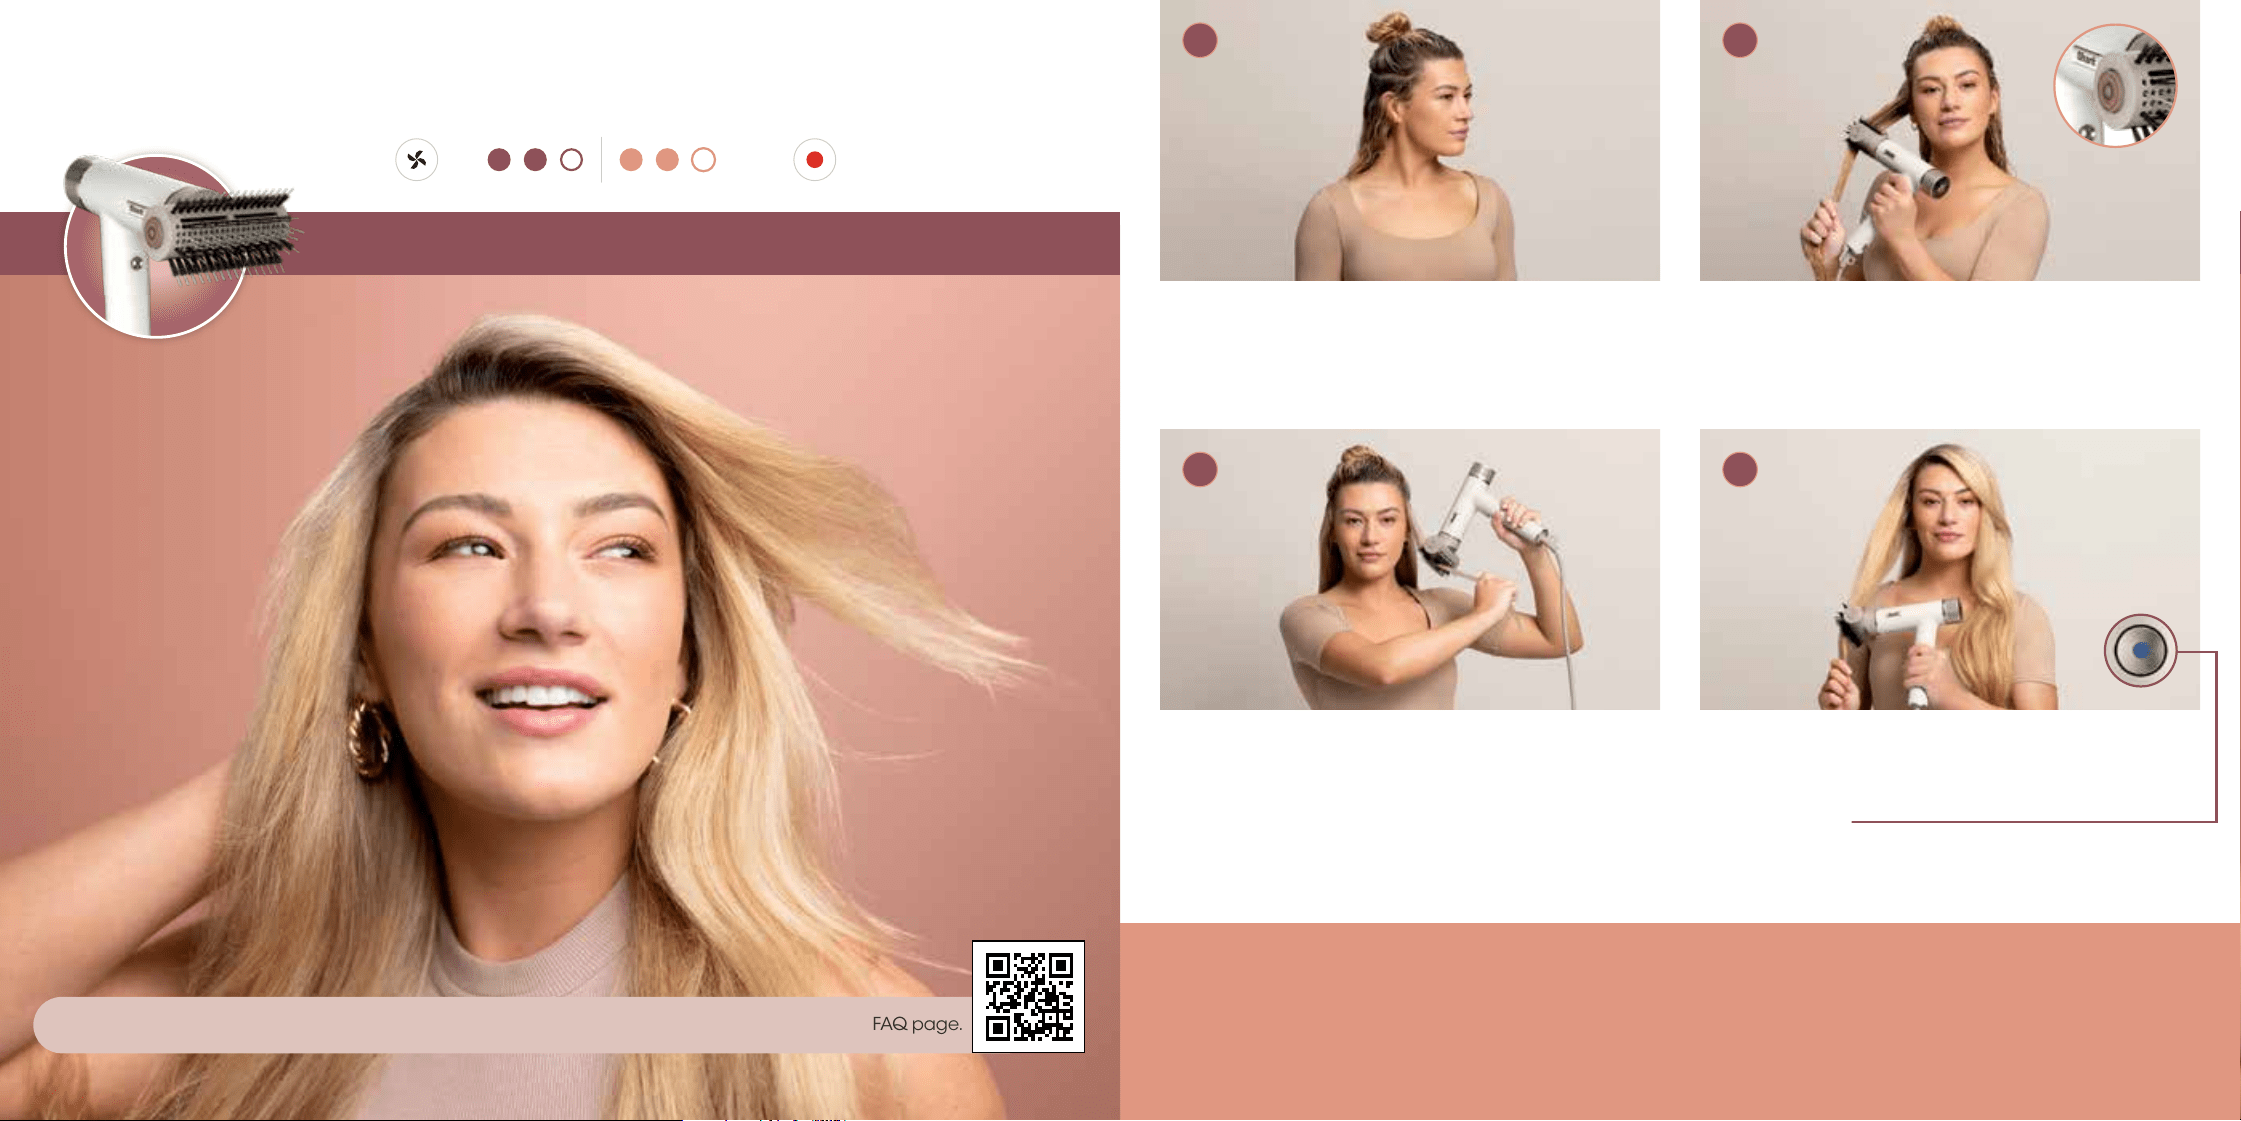
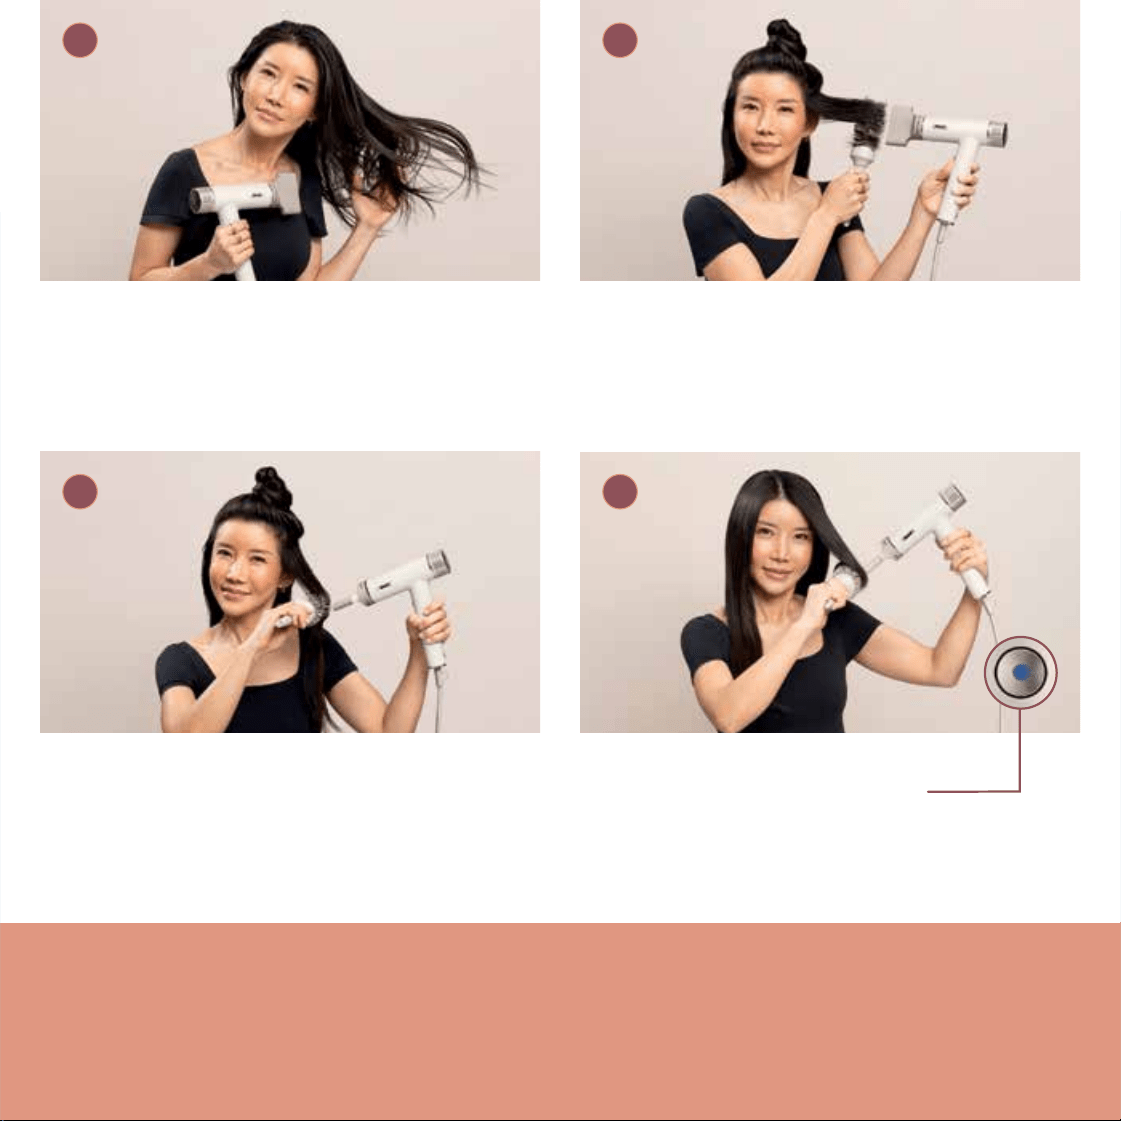
5 4
Use a rounding motion as you brush down your
hair to engage the smoothing bristles and gently
grip the hair.
Pro Tip: For volume and shape, scoop from underneath
the root.
Repeat on remaining sections until hair has been
dried into a sleek blowout.
Pro Tip: Set your style and help reduce frizz by pressing the
Cool Shot button.
Begin with 80% dry hair.For best results,section
and detangle your hair asdesired to help
buildvolume at the roots.
Pro Tip: Apply hair products or styling agents as desired.
Press the button on the side of the brush to rotate
the brush into the desired orientation. For a sleek
blow-dry, place the brush close to the roots to
engage the bristles.
Achieve sleek blow dry styles.
Setting:
tempair
3 4
1 2
QuickSmooth Brush
For help and tips based on your hair type, scan the QR code to watch how-to videos and visit our FAQ page.

Additional Styling Tips:
• If you have thick hair, try brushing smaller sections for smoother results.
• If you have curly or coily hair, try repeatedly brushing smaller sections and increasing the heat to help achieve a straighter style.
• For added volume, place the brush under the hair section close to the roots and brush upward using a rounding motion.
5 4
Use a rounding motion as you brush down your
hair to engage the smoothing bristles and gently
grip the hair.
Pro Tip: For volume and shape, scoop from underneath
the root.
Repeat on remaining sections until hair has been
dried into a sleek blowout.
Pro Tip: Set your style and help reduce frizz by pressing the
Cool Shot button.
Begin with 80% dry hair.For best results,section
and detangle your hair asdesired to help
buildvolume at the roots.
Pro Tip: Apply hair products or styling agents as desired.
Press the button on the side of the brush to rotate
the brush into the desired orientation. For a sleek
blow-dry, place the brush close to the roots to
engage the bristles.
Achieve sleek blow dry styles.
Setting:
tempair
3 4
1 2
QuickSmooth Brush
For help and tips based on your hair type, scan the QR code to watch how-to videos and visit our FAQ page.
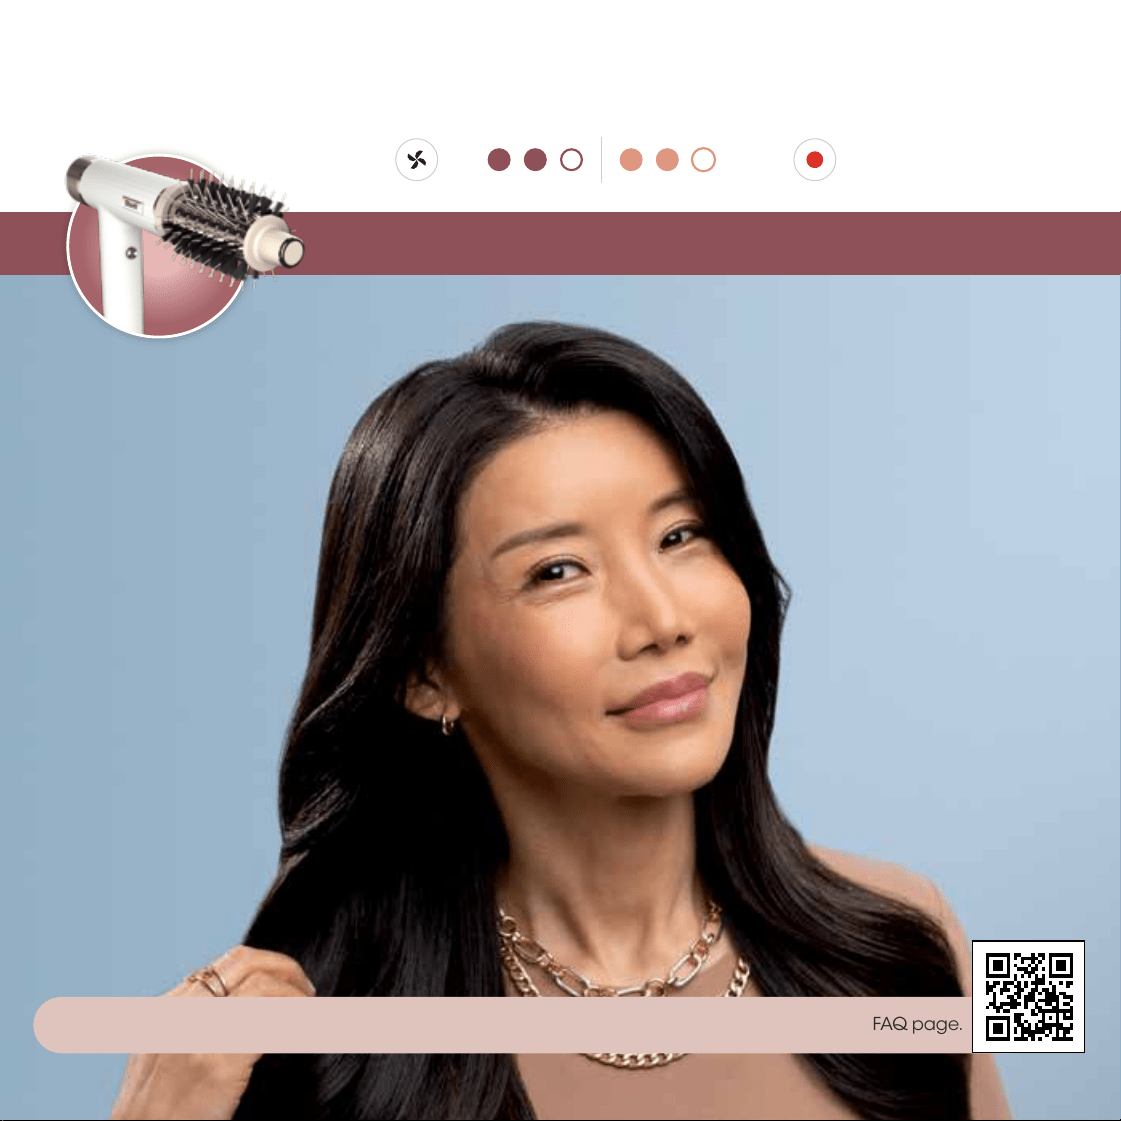
Additional Styling Tips:
• If you have thick hair, try increasing the heat for even faster results.
• If you have curly or coily hair, try increasing the heat to help achieve a straighter style.
• For added volume and shape, brush opposite of the way the hair falls while twisting to smooth and dry.
• Brush is best used to finish styling your face-framing pieces and ends of hair.
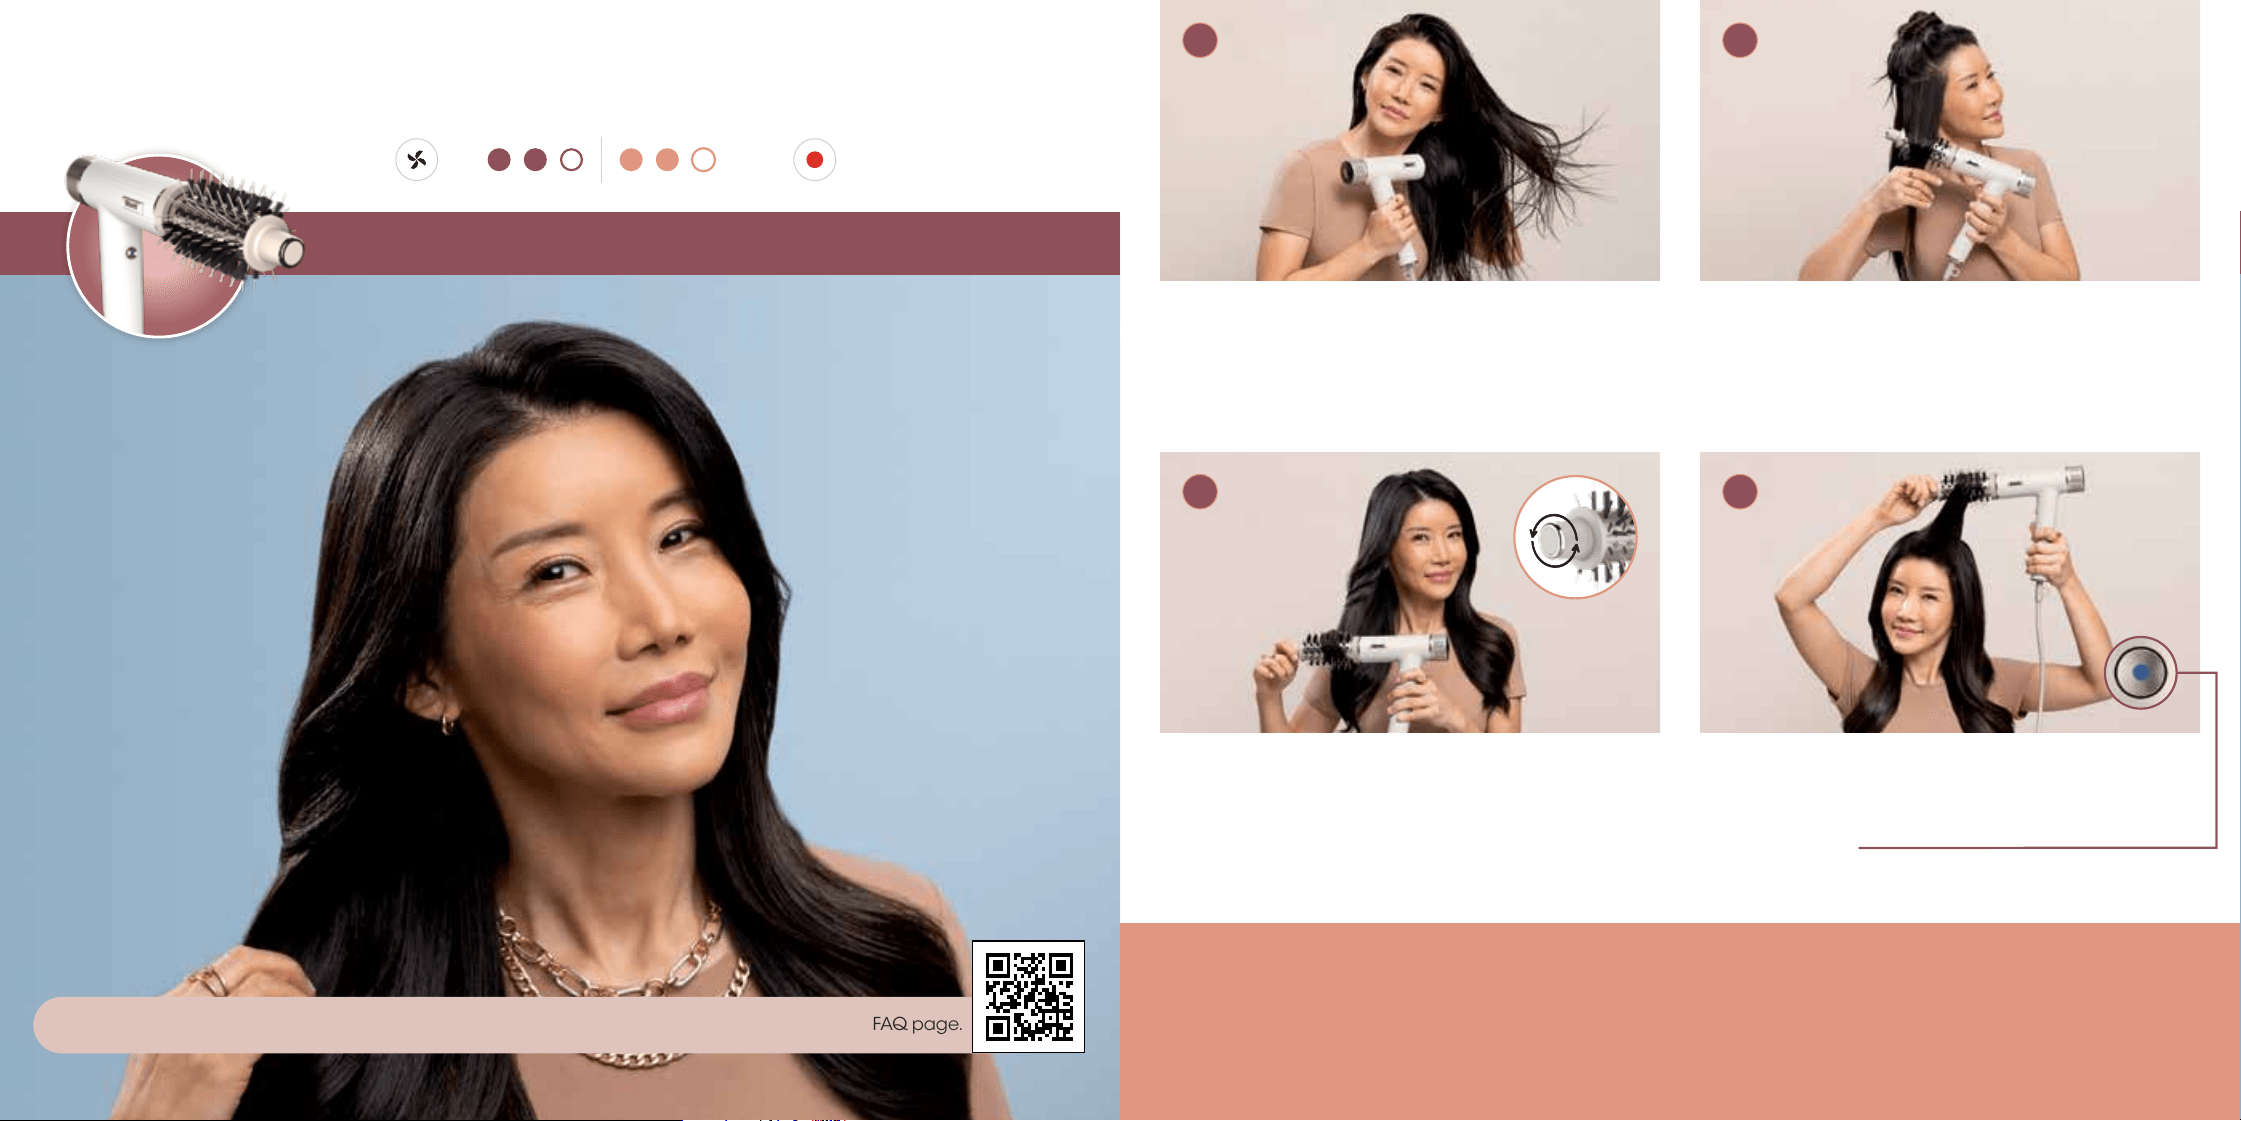
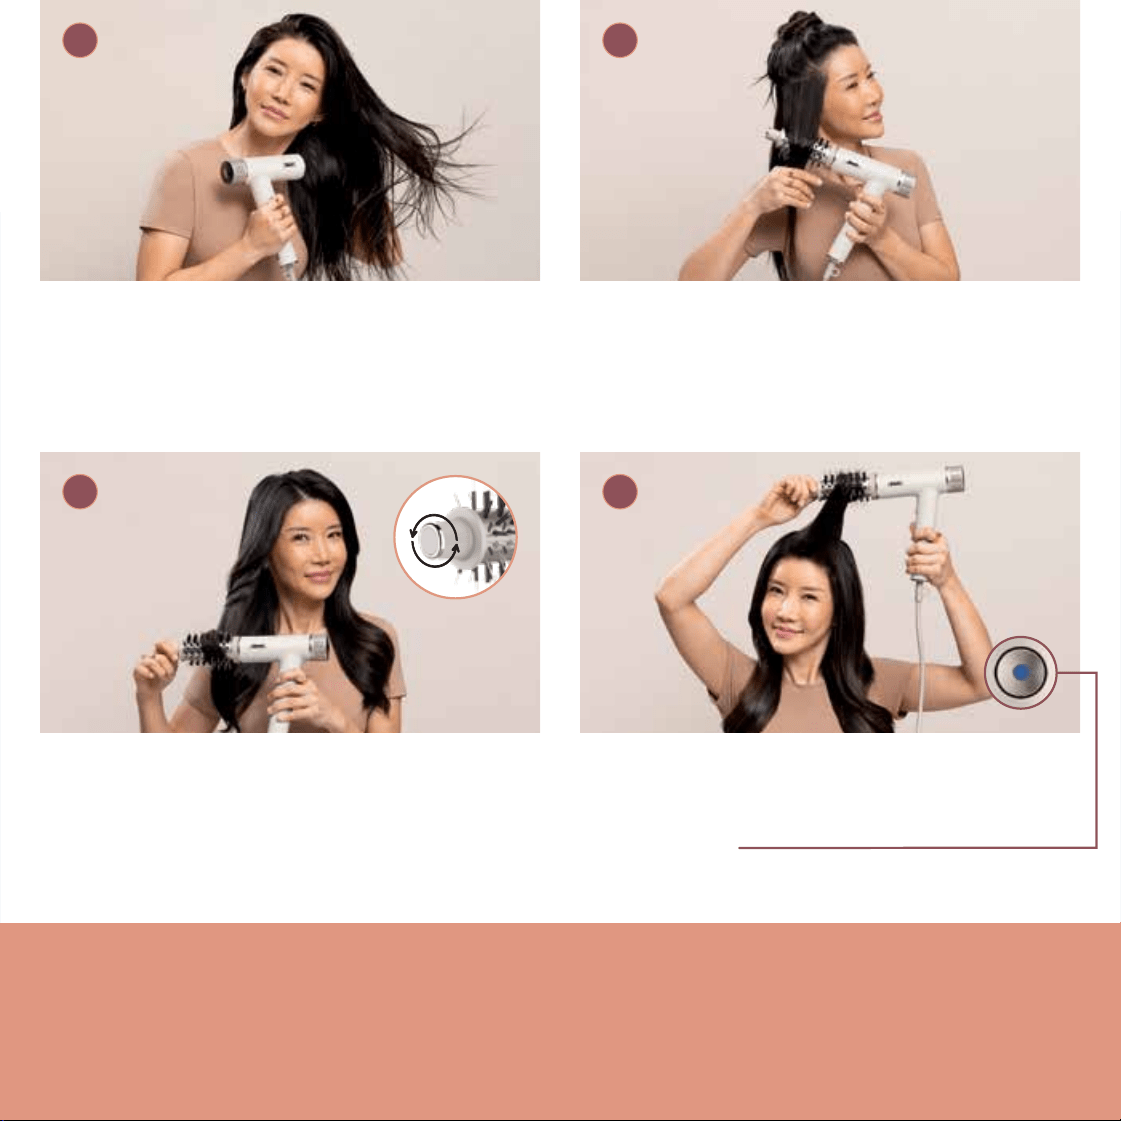
7 6
Using the knob, roll the brush outward from the
roots to the ends to engage the bristles and gently
grip the hair.
Pro Tip: For extra volume, brush your hair in an upward
direction.
To style your bangs or ends, place hair on the brush,
then twist the brush to dry and create shape.
Pro Tip: Set your style and help reduce frizz by pressing the
Cool Shot button.
Begin with 90% dried hair.
Pro Tip: Apply hair products or styling agents as desired.
Section your hair as desired. For a voluminous blow-
dry, start by placing theround brush under the hair
close to the roots.
Pro Tip: For even more volume, hold the brush under your hair
close to the roots for 3 seconds before brushing outward.
Bring the bounce.
Setting:
tempair
3 4
1 2
Express Touchup Brush
For help and tips based on your hair type, scan the QR code to watch how-to videos and visit our FAQ page.
Additional Styling Tips:
• If you have thick hair, try increasing the heat for even faster results.
• If you have curly or coily hair, try increasing the heat to help achieve a straighter style.
• For added volume and shape, brush opposite of the way the hair falls while twisting to smooth and dry.
• Brush is best used to finish styling your face-framing pieces and ends of hair.
7 6
Using the knob, roll the brush outward from the
roots to the ends to engage the bristles and gently
grip the hair.
Pro Tip: For extra volume, brush your hair in an upward
direction.
To style your bangs or ends, place hair on the brush,
then twist the brush to dry and create shape.
Pro Tip: Set your style and help reduce frizz by pressing the
Cool Shot button.
Begin with 90% dried hair.
Pro Tip: Apply hair products or styling agents as desired.
Section your hair as desired. For a voluminous blow-
dry, start by placing theround brush under the hair
close to the roots.
Pro Tip: For even more volume, hold the brush under your hair
close to the roots for 3 seconds before brushing outward.
Bring the bounce.
Setting:
tempair
3 4
1 2
Express Touchup Brush
For help and tips based on your hair type, scan the QR code to watch how-to videos and visit our FAQ page.
Additional Styling Tips:
• If you have thinner/finer hair you could decrease the airflow to help reduce flyaways.
• If you have thinner/finer hair you could decrease the heat.
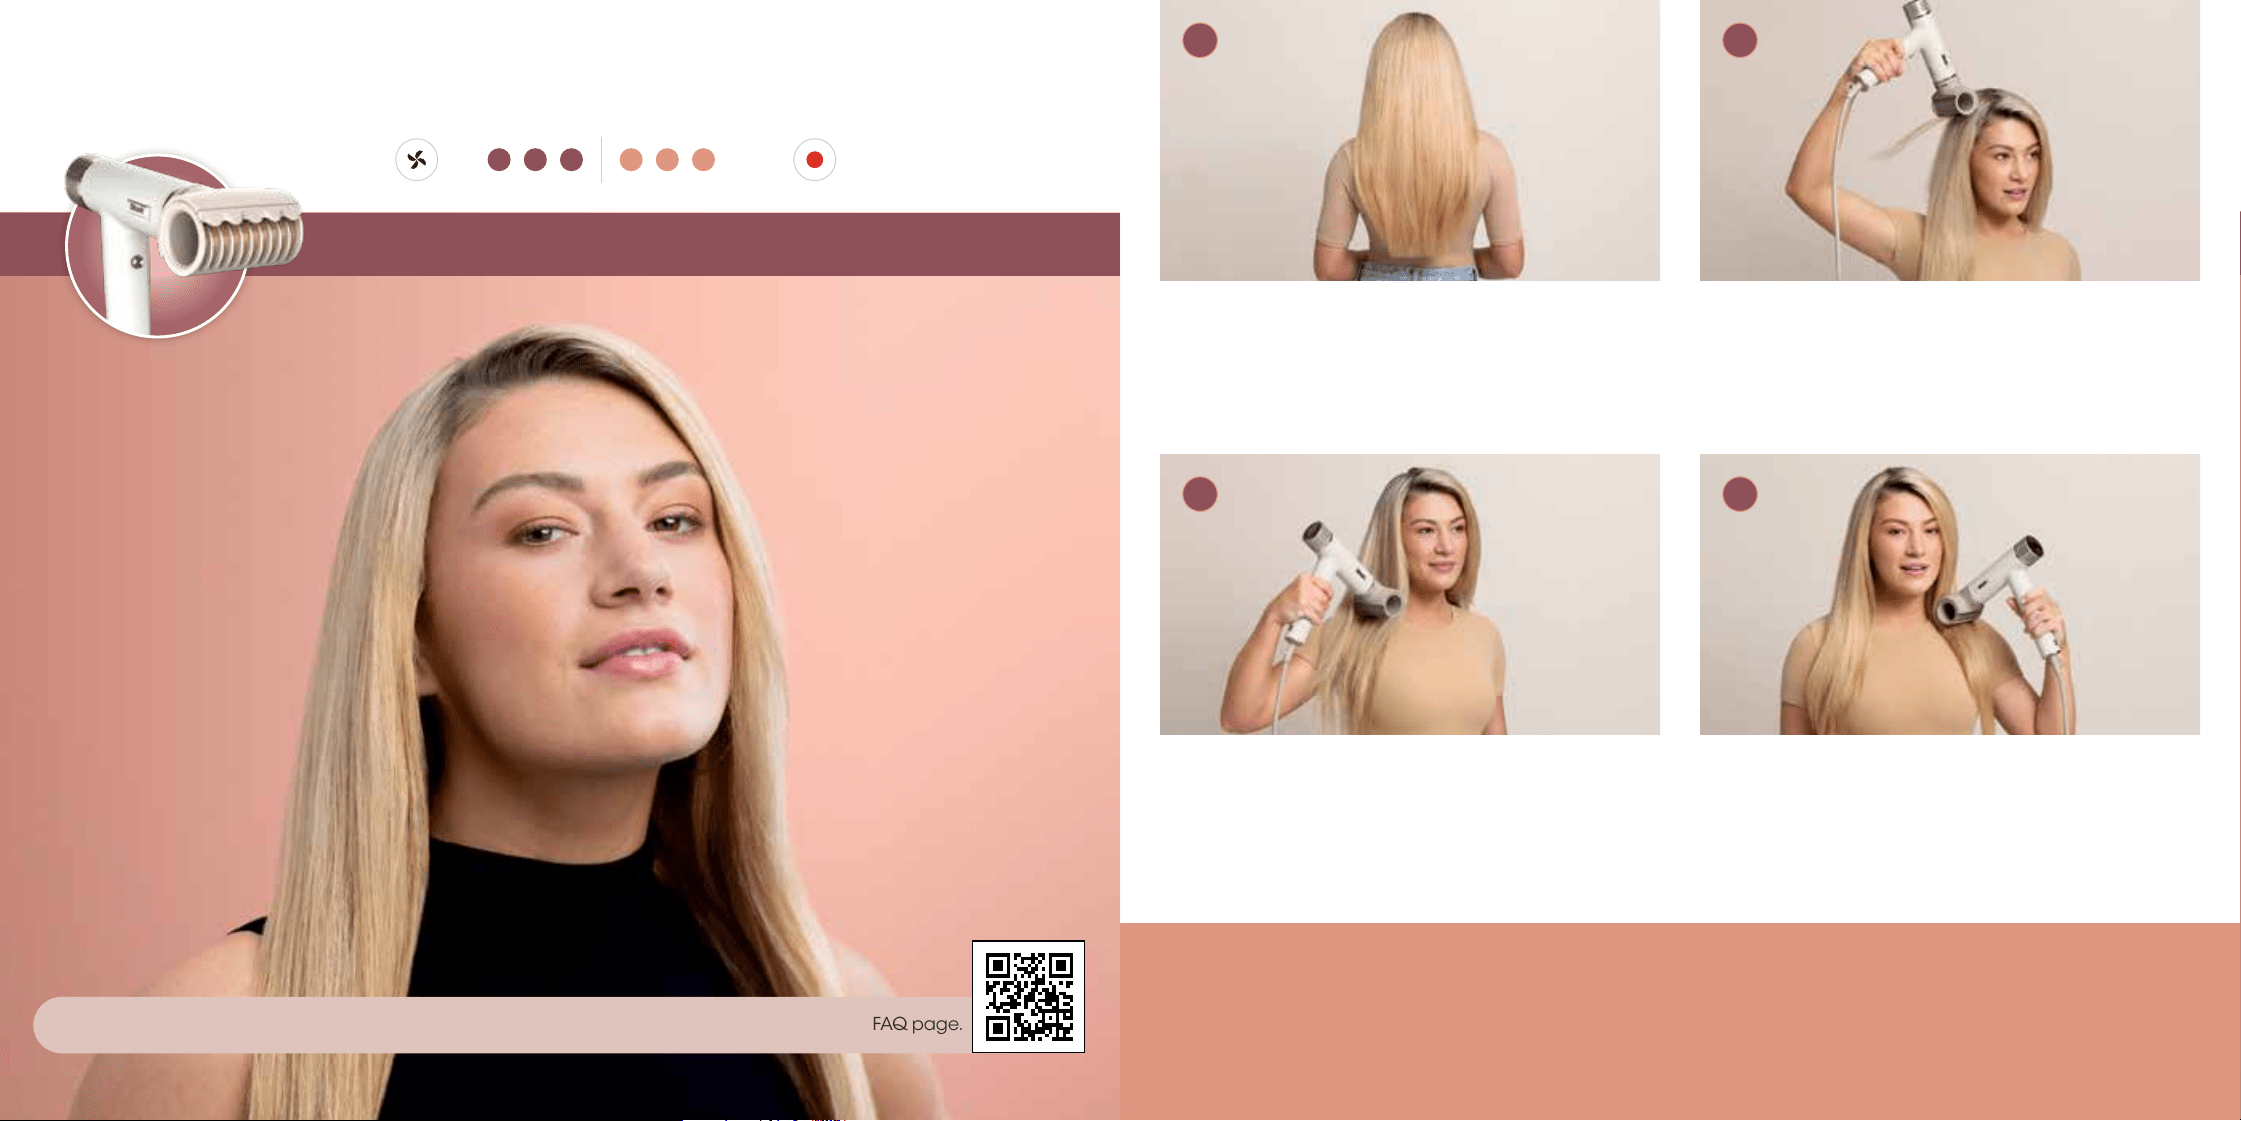
Slowly glide the RapidGloss Finisher down the
length of your hair. Gently touch your hair with the
tool—no need to press it against your head.
Repeat around your head.
Begin with completely dry hair that has been styled
with the Turbo Concentrator, QuickSmooth Brush
or Express Touchup Brush.
Pro Tip: Works best on straight or straightened hair.
Start at the top of your head, close to the roots.
Hold until the hair attracts.
9
Go from frizzy to glossy.
3 4
1 2
8
Setting:
tempair
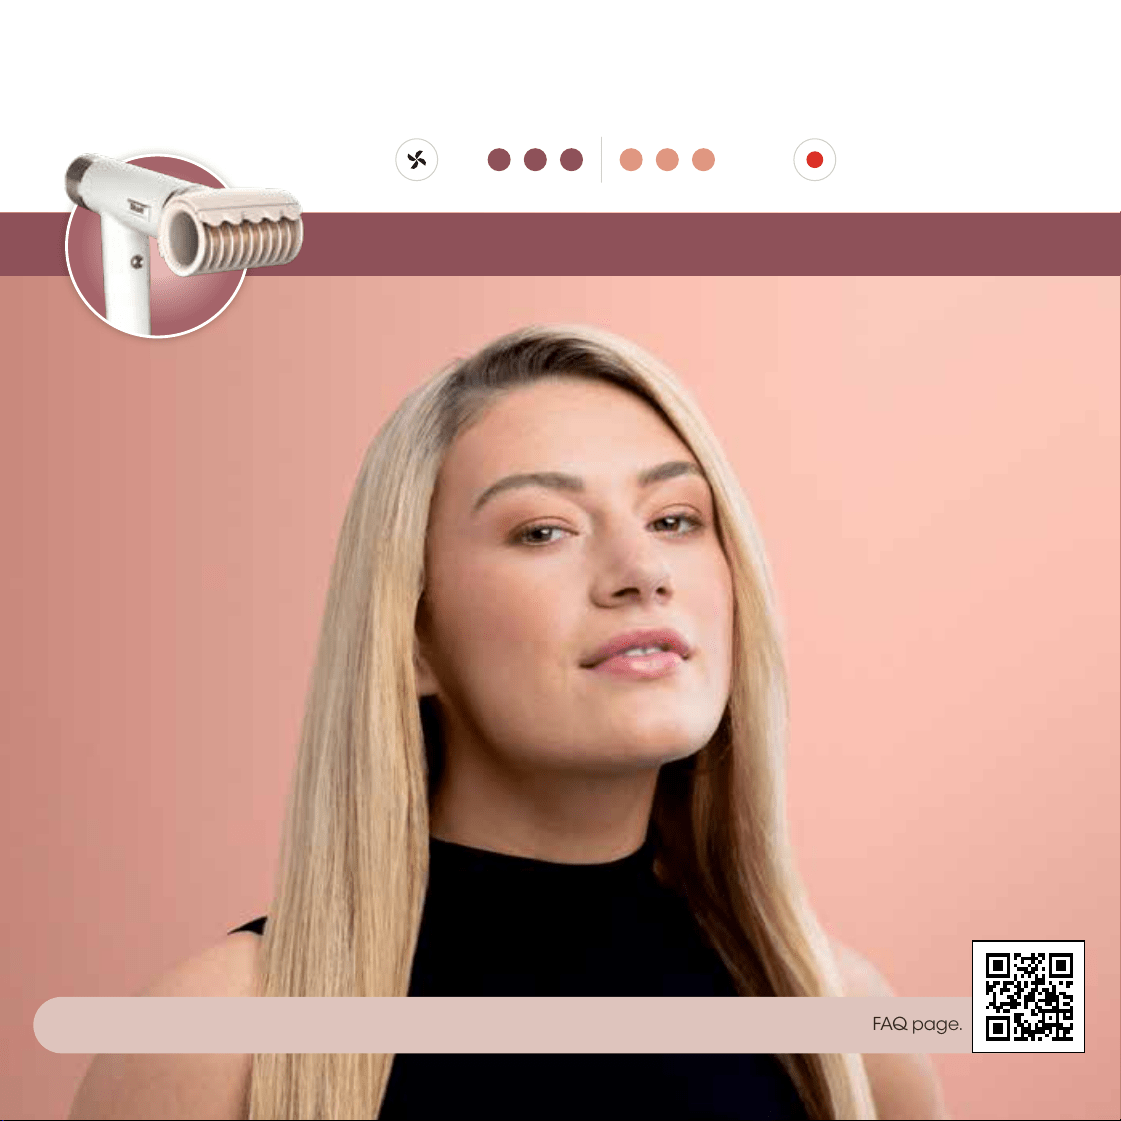
RapidGloss Finisher
For help and tips based on your hair type, scan the QR code to watch how-to videos and visit our FAQ page.

Additional Styling Tips:
• If you have thinner/finer hair you could decrease the airflow to help reduce flyaways.
• If you have thinner/finer hair you could decrease the heat.
Slowly glide the RapidGloss Finisher down the
length of your hair. Gently touch your hair with the
tool—no need to press it against your head.
Repeat around your head.
Begin with completely dry hair that has been styled
with the Turbo Concentrator, QuickSmooth Brush
or Express Touchup Brush.
Pro Tip: Works best on straight or straightened hair.
Start at the top of your head, close to the roots.
Hold until the hair attracts.
9
Go from frizzy to glossy.
3 4
1 2
8
Setting:
tempair
RapidGloss Finisher
For help and tips based on your hair type, scan the QR code to watch how-to videos and visit our FAQ page.
Additional Styling Tips:
• If you have fine hair, try reducing the airflow to help cut down on frizz.
• To create a curl, wrap your hair around a round brush and dry it in place using the concentrator.
• For added volume, place a round brush under the roots and brush upward while drying with the concentrator.
• For an added curl at the ends, roll the ends of the hair onto a round brush and dry in place using the concentrator.
11
10
Apply heat in a downward motion for smoothing.
Pro Tip: Apply heat at ends for shaping and bending.
Finish styling by setting shape at ends
and pressing the Cool Shot button.
Begin with damp hair. Gentle-dry, applying airflow
from the roots to the ends.
Pro Tip: Apply hair products or styling agents as desired.
When excess moisture is gone, start styling with a
round brush. Rotate the concentrator so airflow is
always in line with the round brush.
Sleek blow dries, made easy.
Setting:
tempair
3 4
1 2
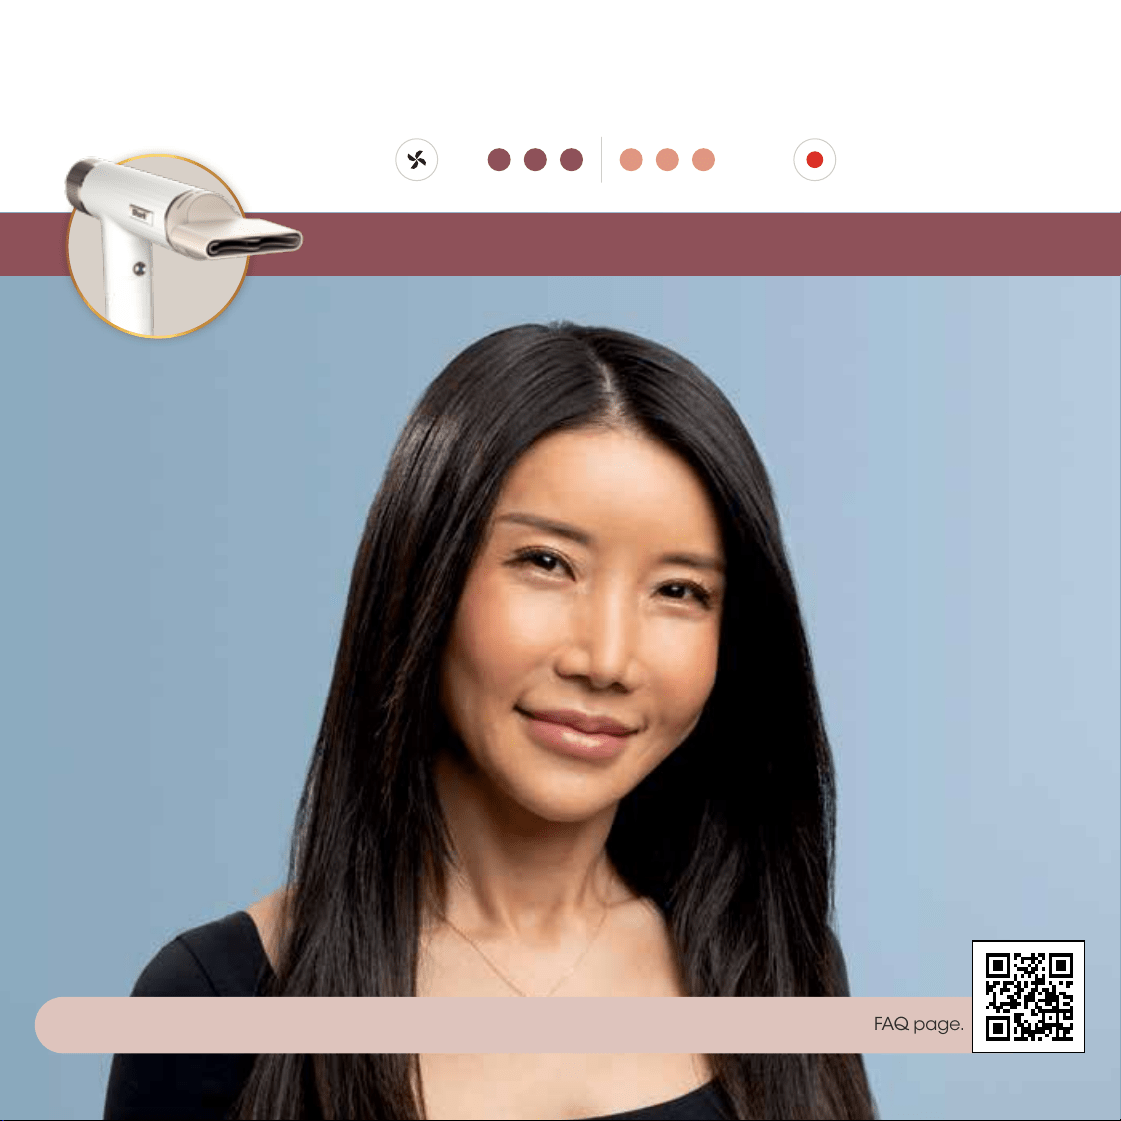
Turbo Concentrator
For help and tips based on your hair type, scan the QR code to watch how-to videos and visit our FAQ page.
Additional Styling Tips:
• If you have fine hair, try reducing the airflow to help cut down on frizz.
• To create a curl, wrap your hair around a round brush and dry it in place using the concentrator.
• For added volume, place a round brush under the roots and brush upward while drying with the concentrator.
• For an added curl at the ends, roll the ends of the hair onto a round brush and dry in place using the concentrator.
11
10
Apply heat in a downward motion for smoothing.
Pro Tip: Apply heat at ends for shaping and bending.
Finish styling by setting shape at ends
and pressing the Cool Shot button.
Begin with damp hair. Gentle-dry, applying airflow
from the roots to the ends.
Pro Tip: Apply hair products or styling agents as desired.
When excess moisture is gone, start styling with a
round brush. Rotate the concentrator so airflow is
always in line with the round brush.
Sleek blow dries, made easy.
Setting:
tempair
3 4
1 2
Turbo Concentrator
For help and tips based on your hair type, scan the QR code to watch how-to videos and visit our FAQ page.
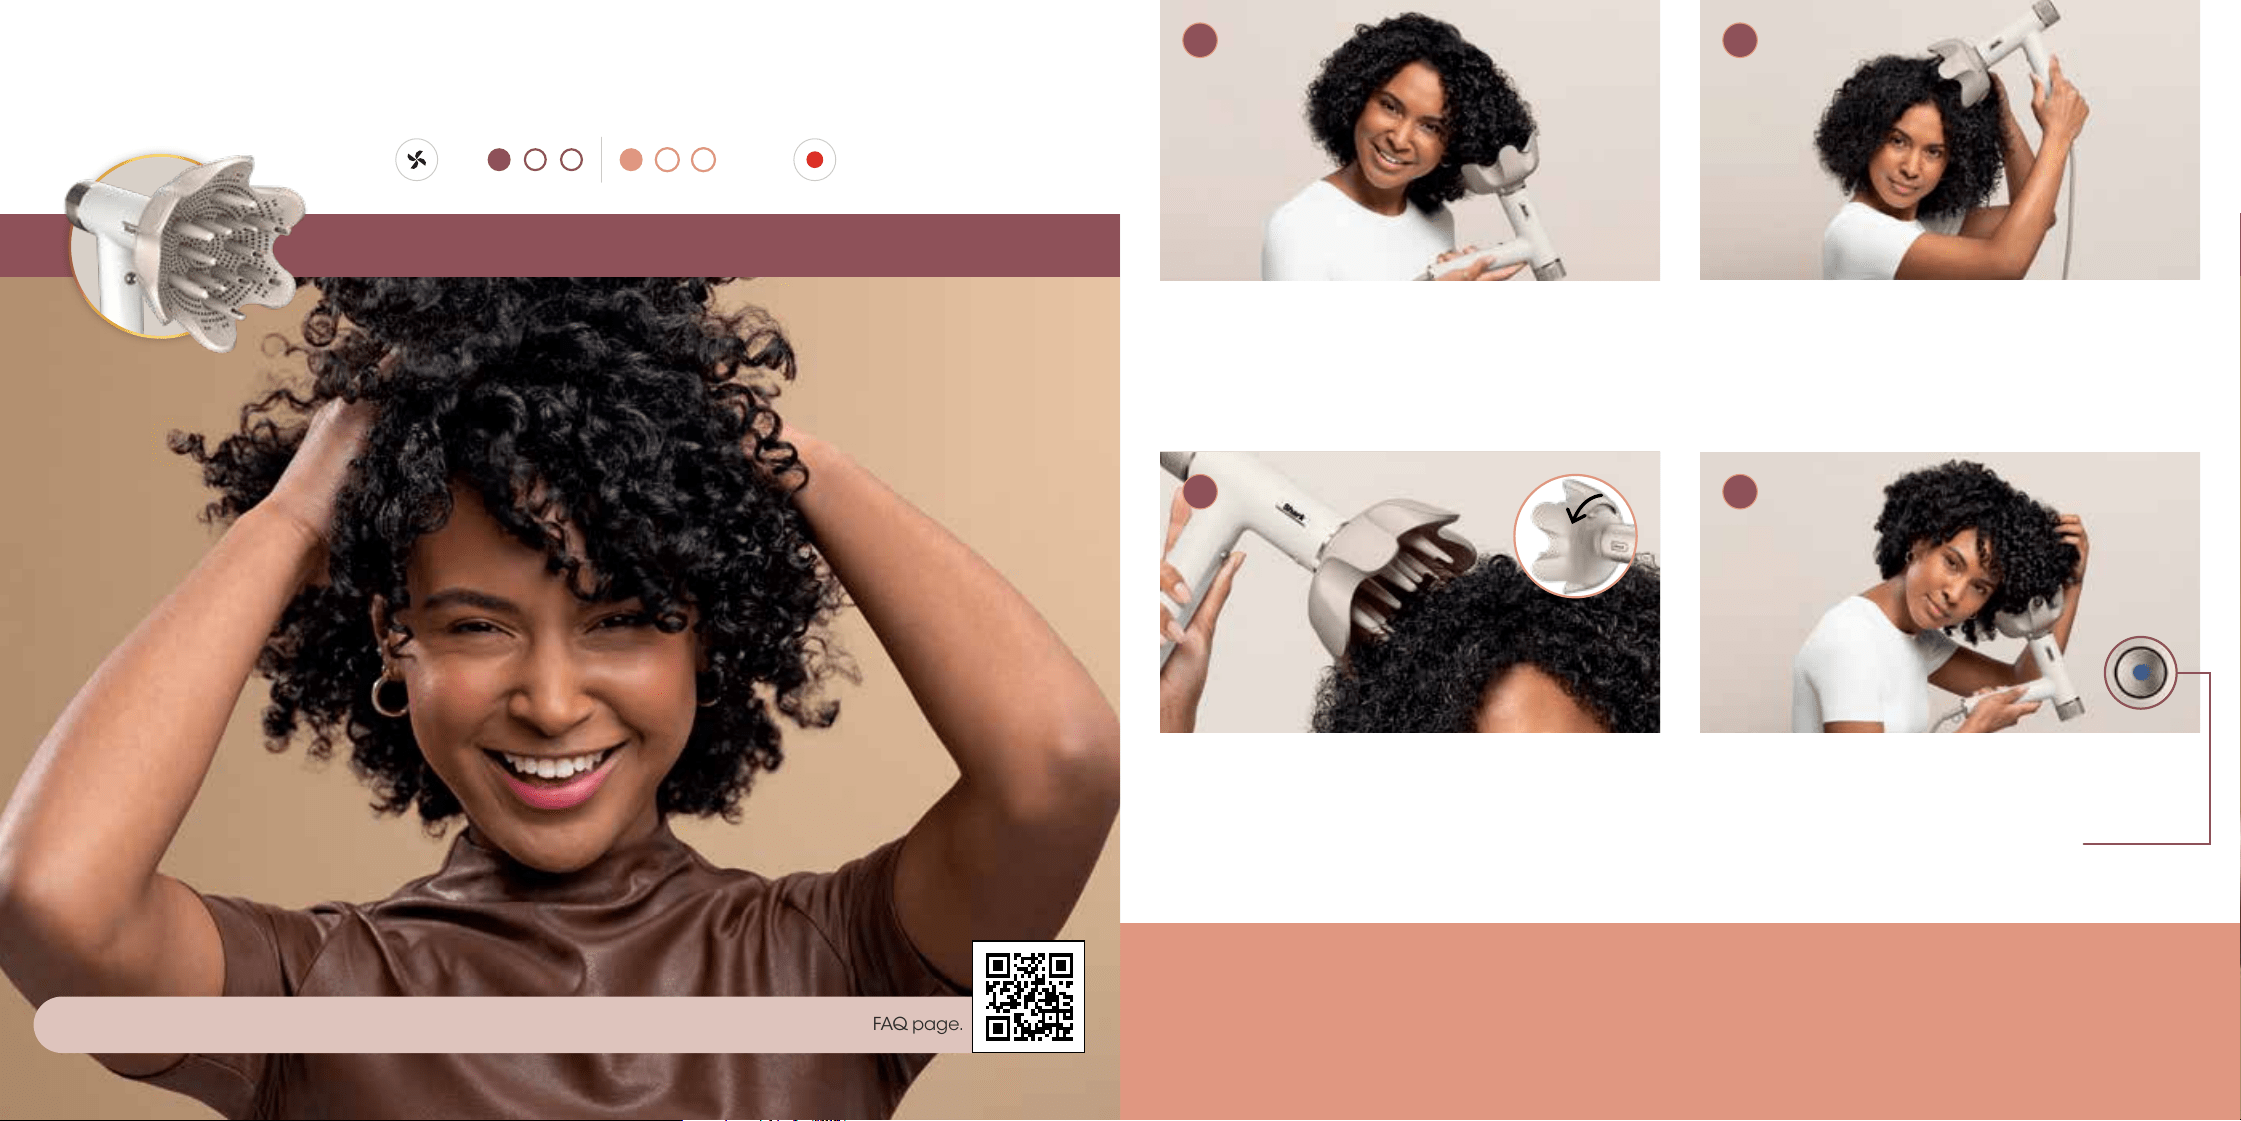
Additional Styling Tips:
• Apply curly hair products to wet hair before drying to help define your curls and cut down on frizz.
• If you have thick hair, try increasing the heat for even faster results.
13 12
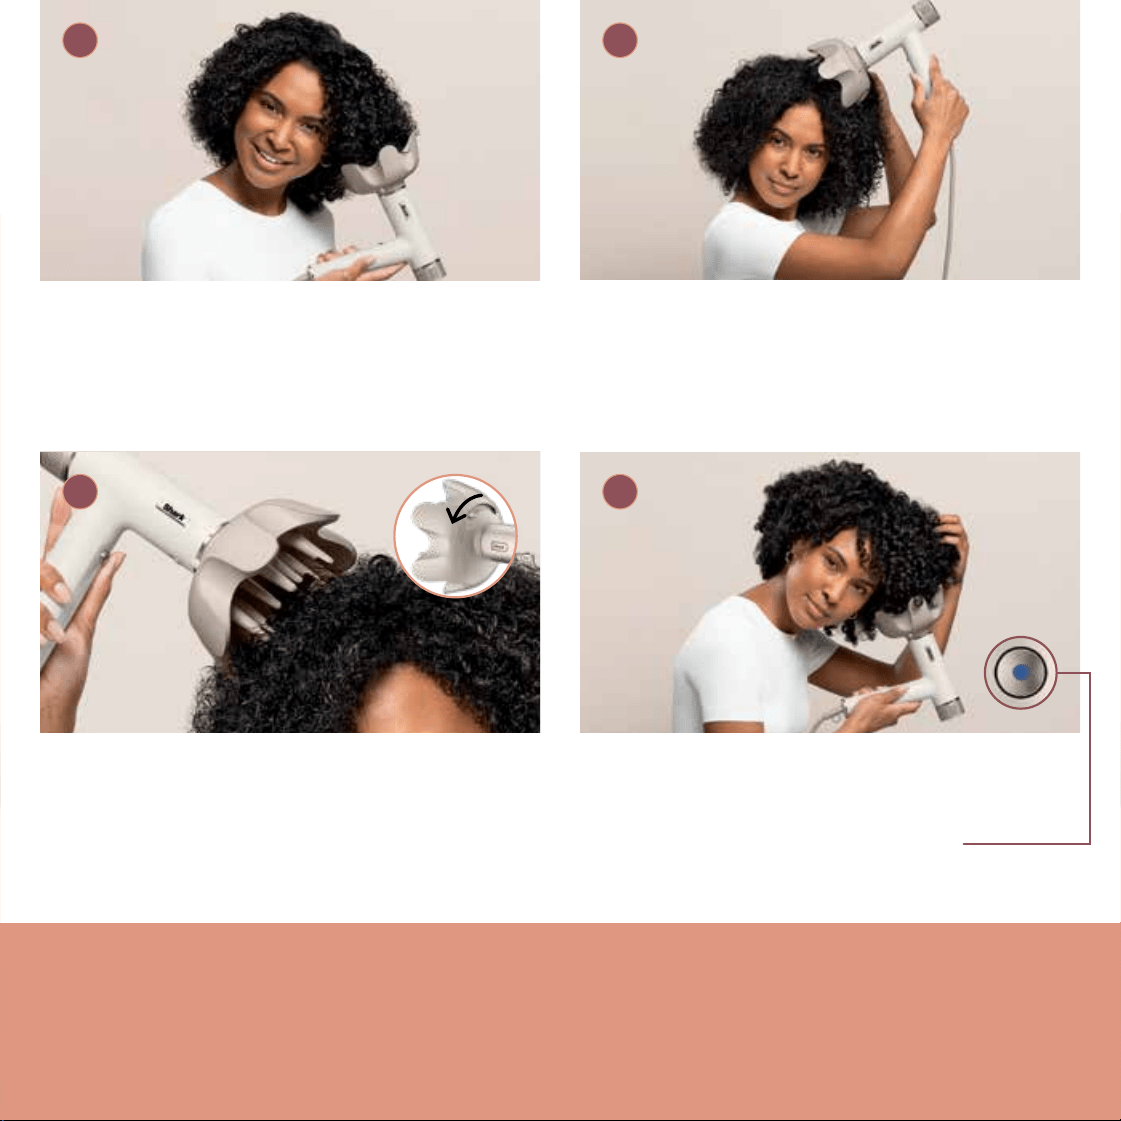
For more volume, slide the lever to extend prongs
to lift roots higher.
Pro Tip: Gather hair in diuser with prongs retracted, then
extend them when you reach the roots to increase grab and
maximize airflow.
If desired, flip upside down and bunch from below
for extra volume.
Pro Tip: Keep the integrity of your natural curls by switching
between Low temp and the Cool Shot button.
Begin with towel-dried hair. Working around your
head, bunch curls from ends between the petals of
the diuser.
Pro Tip: Apply curly hair products or styling agents as
desired to wet hair.
Bring the diuser up to the roots. Pause and hold.
Setting:
tempair
3 4
1 2
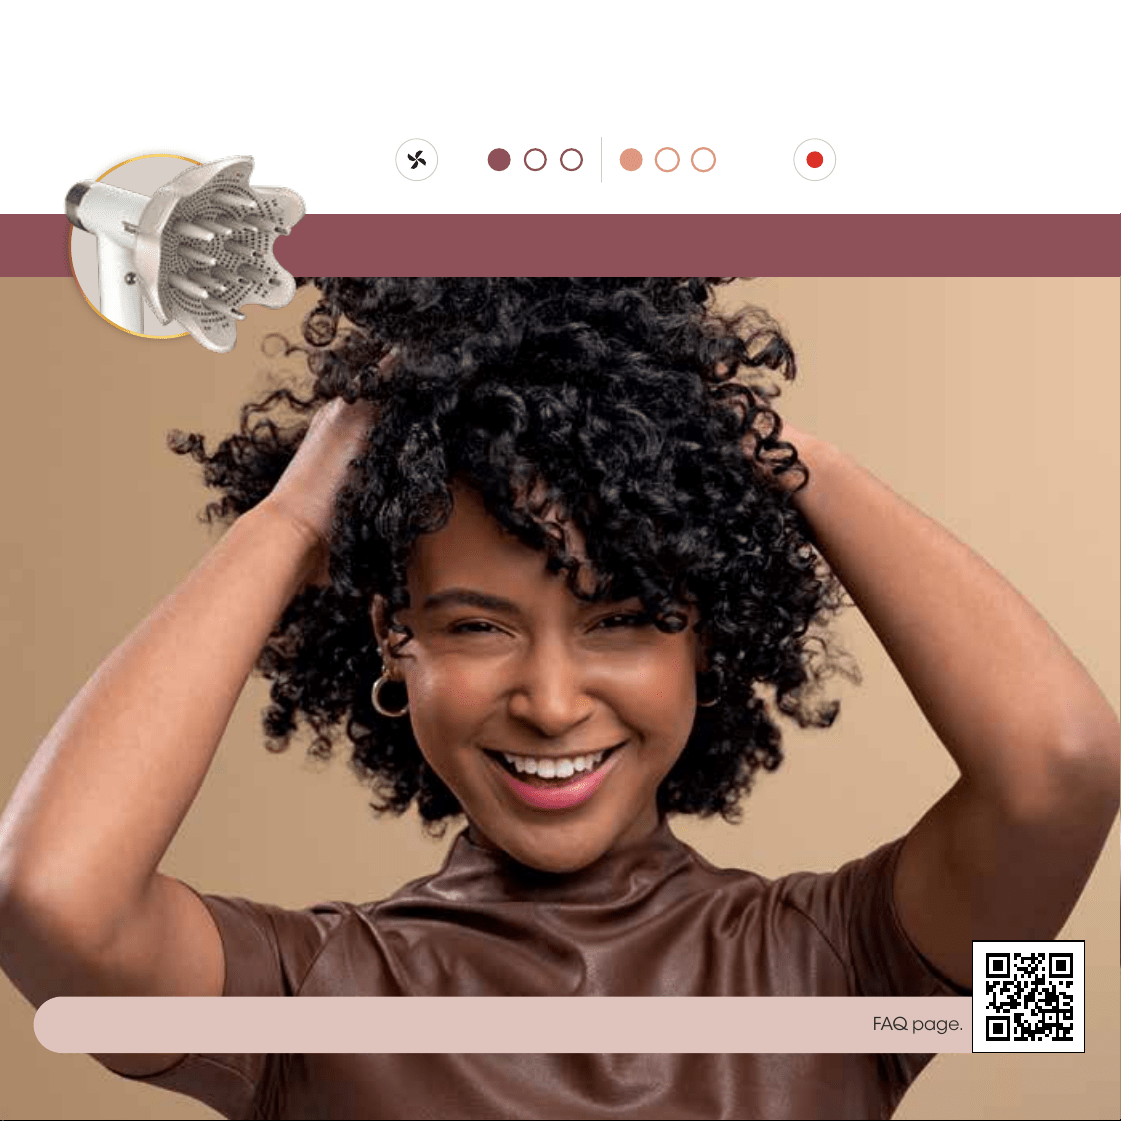
Define your natural curls.
DefrizzFast Diffuser
For help and tips based on your hair type, scan the QR code to watch how-to videos and visit our FAQ page.
Additional Styling Tips:
• Apply curly hair products to wet hair before drying to help define your curls and cut down on frizz.
• If you have thick hair, try increasing the heat for even faster results.
13 12
For more volume, slide the lever to extend prongs
to lift roots higher.
Pro Tip: Gather hair in diuser with prongs retracted, then
extend them when you reach the roots to increase grab and
maximize airflow.
If desired, flip upside down and bunch from below
for extra volume.
Pro Tip: Keep the integrity of your natural curls by switching
between Low temp and the Cool Shot button.
Begin with towel-dried hair. Working around your
head, bunch curls from ends between the petals of
the diuser.
Pro Tip: Apply curly hair products or styling agents as
desired to wet hair.
Bring the diuser up to the roots. Pause and hold.
Setting:
tempair
3 4
1 2
Define your natural curls.
DefrizzFast Diffuser
For help and tips based on your hair type, scan the QR code to watch how-to videos and visit our FAQ page.
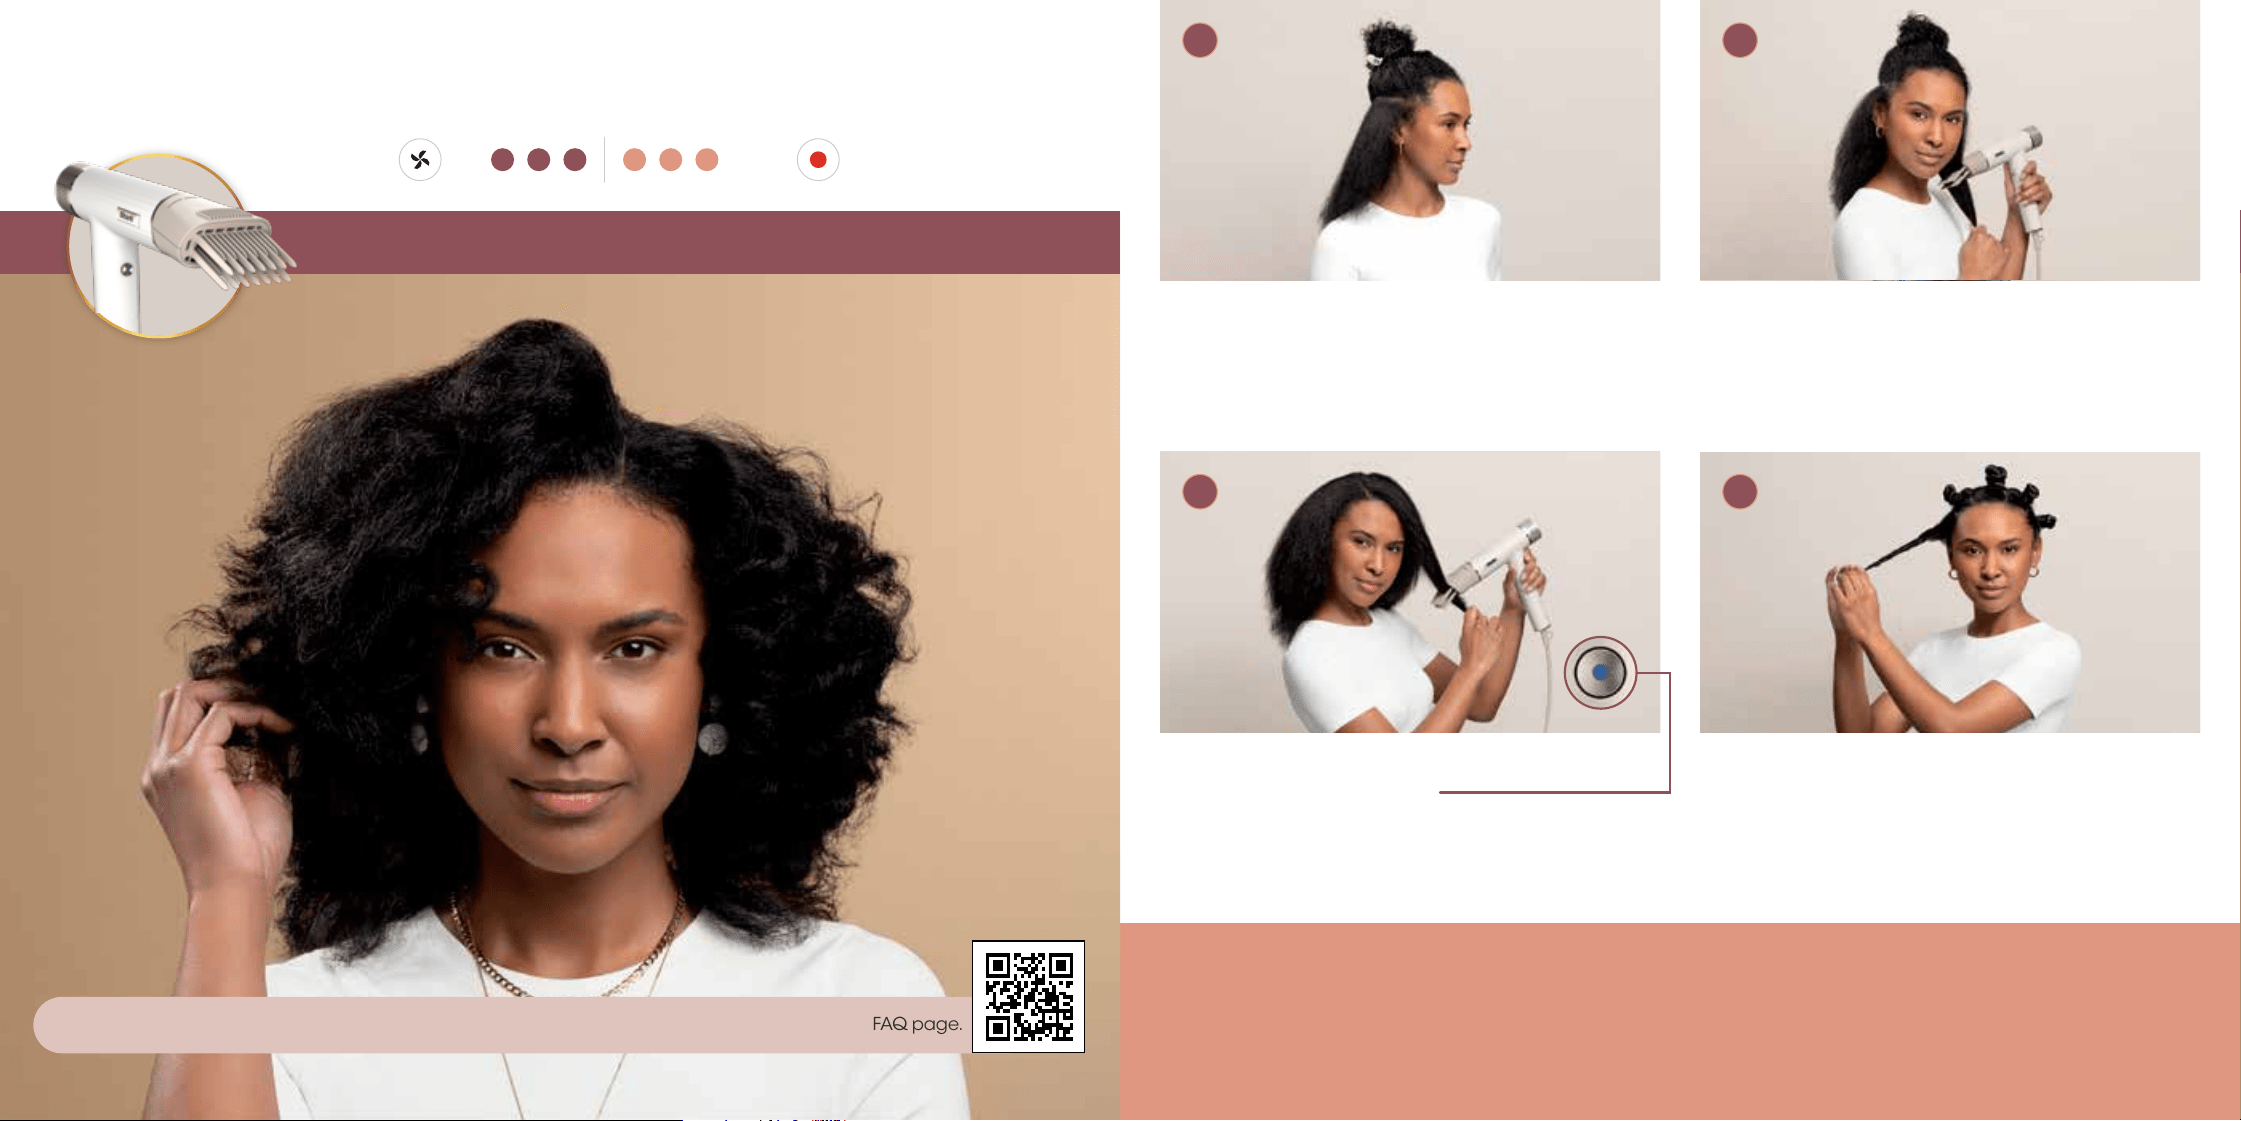
Additional Styling Tips:
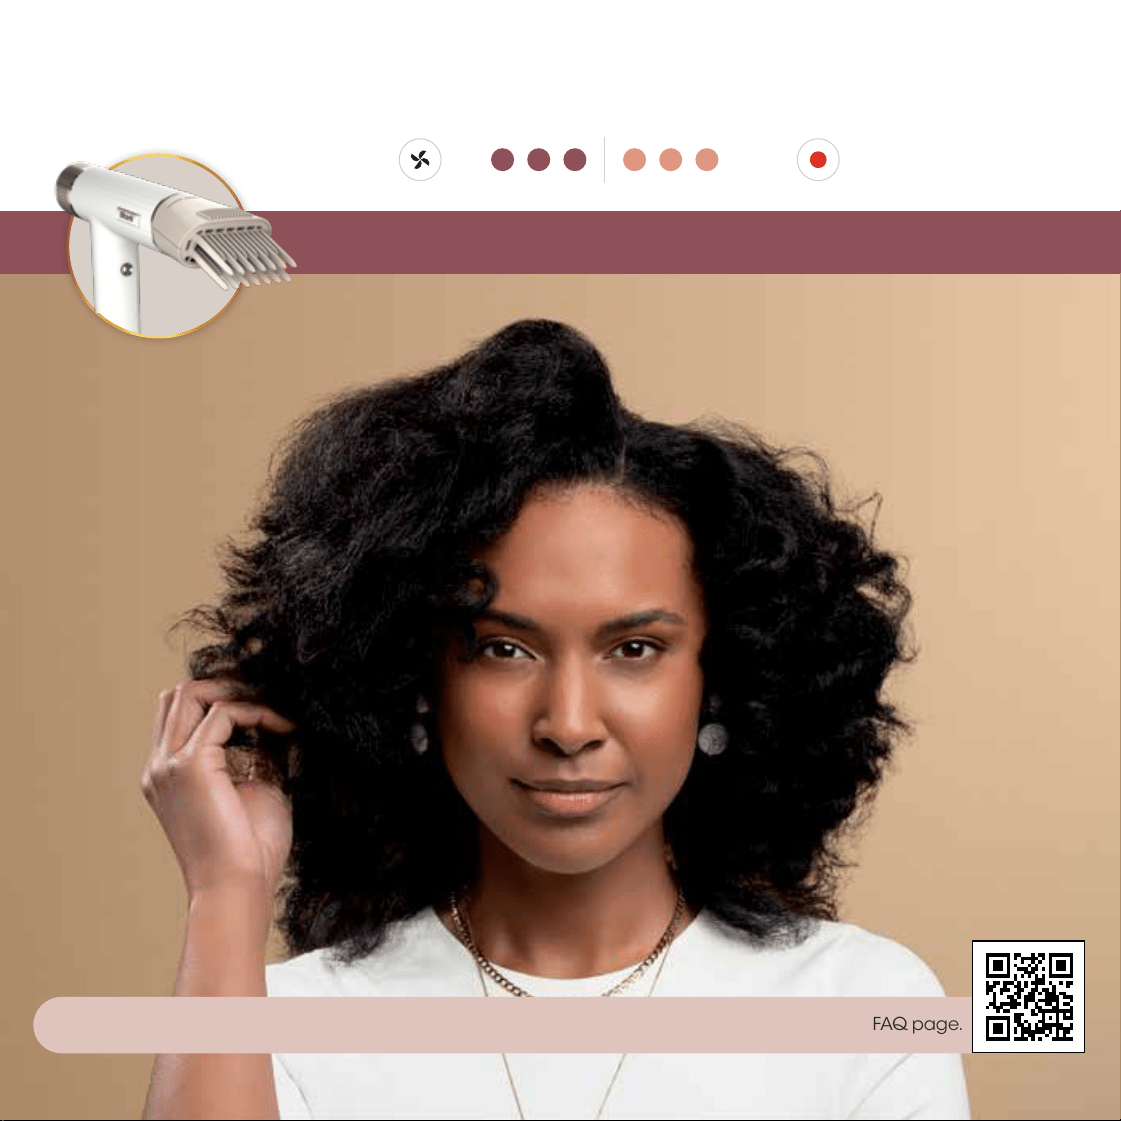
• For added volume at the roots, comb through hair in an upward direction.
• Decrease the heat to help maintain hair texture while stretching.
15 14
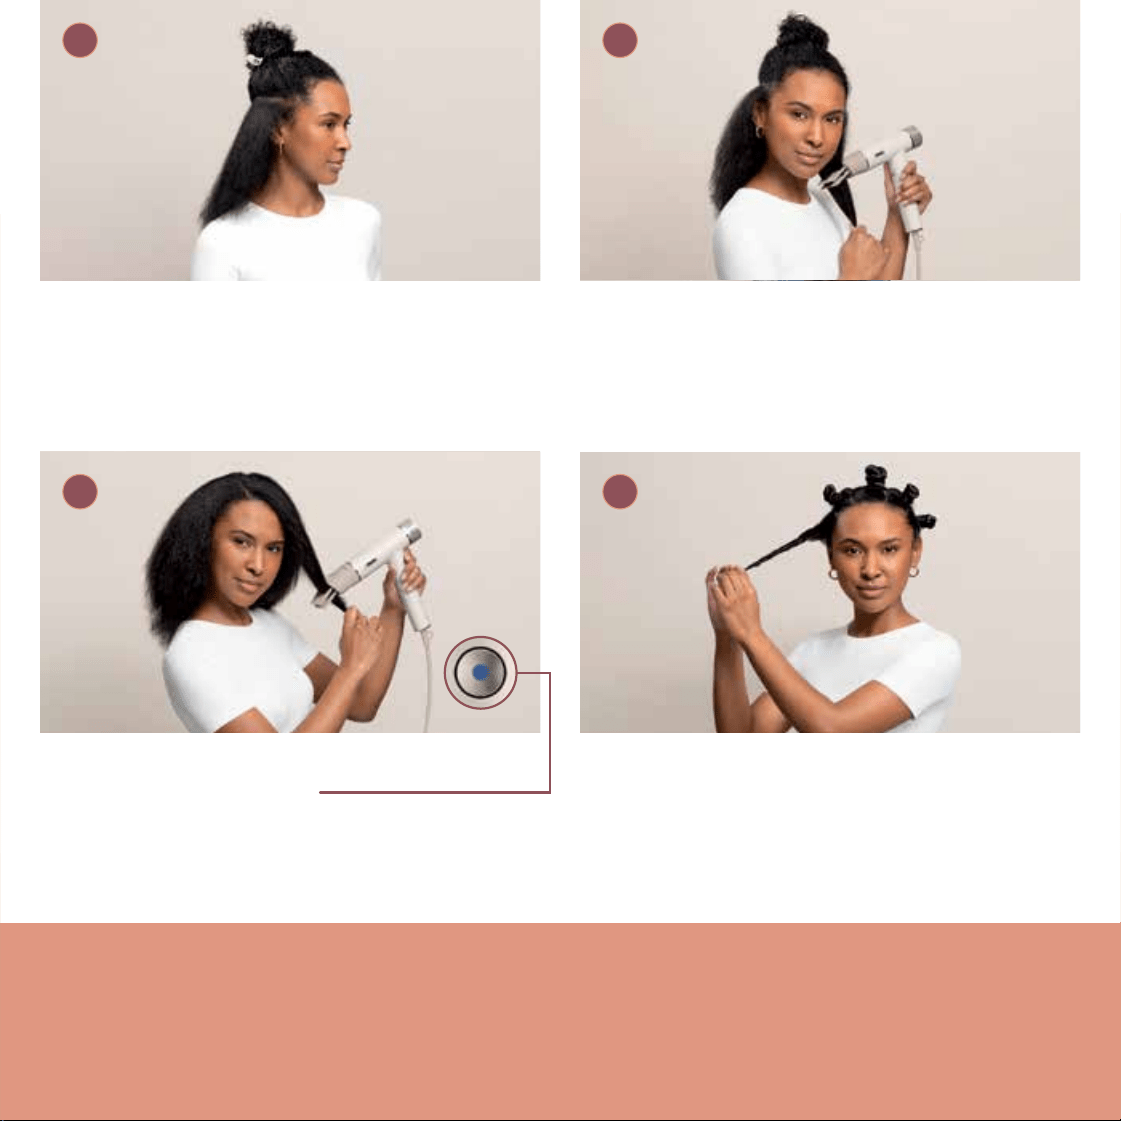
Repeat on remaining sections. Press the Cool Shot
button to lock in your style.
Pro Tip: Detach and reorient the comb as needed to easily
reach all areas on your head.
Continue styling your stretched hair as desired.
Begin with towel-dried hair. Section your hair as
desired. Make sure to detangle each section to help
prevent snagging.
Pro Tip: Apply your favorite styling products as desired.
Slowly comb your hair from the roots to the ends.
Continue combing your section until hair has been
stretched and dried.
Pro Tip: Hold the ends of your hair while combing for added
tension and length.
Stretch your natural hair.
3 4
1 2
Setting:
tempair
Lift & Stretch Wide-Tooth Comb
For help and tips based on your hair type, scan the QR code to watch how-to videos and visit our FAQ page.
Additional Styling Tips:
• For added volume at the roots, comb through hair in an upward direction.
• Decrease the heat to help maintain hair texture while stretching.
15 14
Repeat on remaining sections. Press the Cool Shot
button to lock in your style.
Pro Tip: Detach and reorient the comb as needed to easily
reach all areas on your head.
Continue styling your stretched hair as desired.
Begin with towel-dried hair. Section your hair as
desired. Make sure to detangle each section to help
prevent snagging.
Pro Tip: Apply your favorite styling products as desired.
Slowly comb your hair from the roots to the ends.
Continue combing your section until hair has been
stretched and dried.
Pro Tip: Hold the ends of your hair while combing for added
tension and length.
Stretch your natural hair.
3 4
1 2
Setting:
tempair
Lift & Stretch Wide-Tooth Comb
For help and tips based on your hair type, scan the QR code to watch how-to videos and visit our FAQ page.

Notes
17 16

HD300UK_Series_StyleGuide_MP_Mv2_230609
© 2023 SharkNinja Operating LLC.
SHARK and FOR ALL HAIRKIND are registered trademarks in the United Kingdom of
SharkNinja Operating LLC.

HD300UK_Series_StyleGuide_MP_Mv2_230609
© 2023 SharkNinja Operating LLC.
SHARK and FOR ALL HAIRKIND are registered trademarks in the United Kingdom of
SharkNinja Operating LLC.