MODEL/MODELO
GFP84SP
CUSTOMER CARE LINE:
USA/Canada 1-800-231-9786
Accessories/Parts (USA/Canada)
Accesorios/Partes (EE.UU/Canadá)
1-800-738-0245
For online customer service
and to register your product,
go to www.prodprotect.com/applica
3-yEAR LIMITEd wARRANTy
Find healthy recipes at
www.georgeforemancooking.com
GETTING STARTEd
• Removeallpackingmaterialand,ifapplicable,anystickersfromthe
product; remove and save literature.
• Foradditionalinformationgotowww.georgeforemancooking.com.
• Washmini-burgerinsertandcool-touchhandleinhotsoapywater,
rinse and dry thoroughly.
Note: Although the insert is dishwasher-safe, we recommend hand
washing to preserve its appearance. In the dishwasher, the metal may
get a cloudy lm; this lm will not aect the performance.
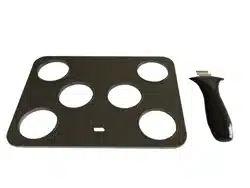
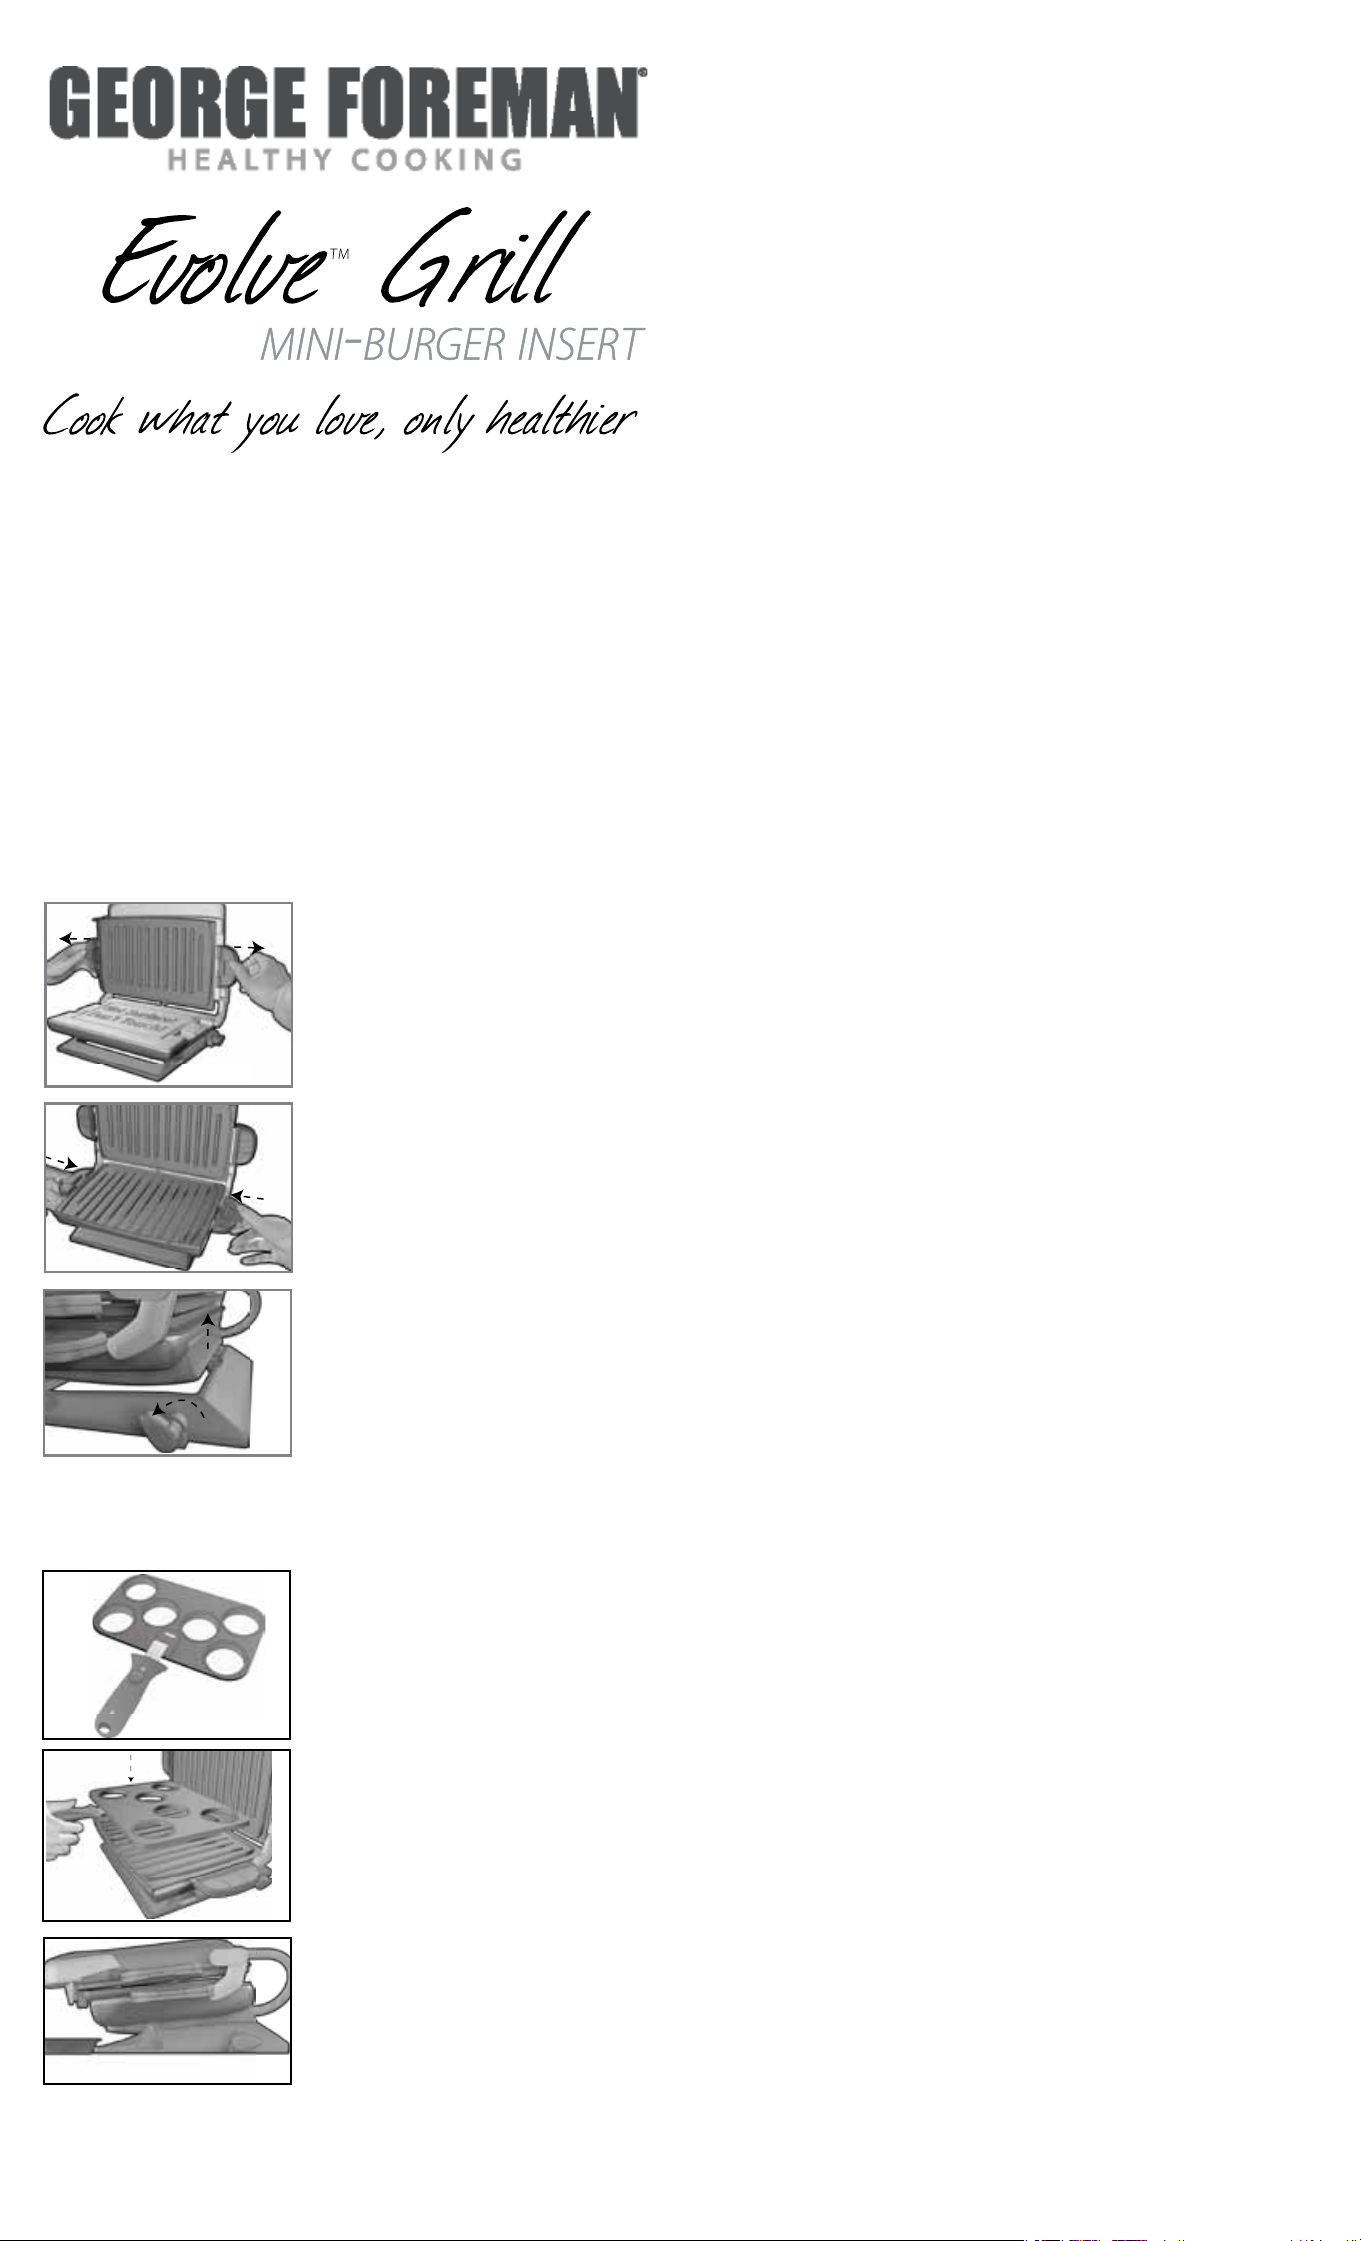
ATTACHING THE PLATES
Important: your grill should always be used with 2 plates securely
attached. when using the mini-burger insert, attach the cross-hatch
grill or Panini top plate, plus the bottom grill plate.
1. To attach the top plate, pull out on
bothreleasehandles,settheplateat
against the inside frame and release
the handles (A).
2. Repeatwiththebottomgrillplate(B).
3. Movetheadjustableslopeswitchon
thebackrightsideofthegrillforward,
so the grill is in the sloped position
(C). This allows fat and grease to drain
away as you cook.
Tip: Beforeplacingthemini-burger
insert, you may wish to use it to shape
yourmini-burgerpatties;thiswillprovide
betterlookingpattiesoncecooked.Ifusingtheinserttoshape,take
about2ouncesofmeatperpatty,placeintheinsertandpressto
shape. Once shaped, remove the patties so you can set the insert on
the grilling surface and preheat.
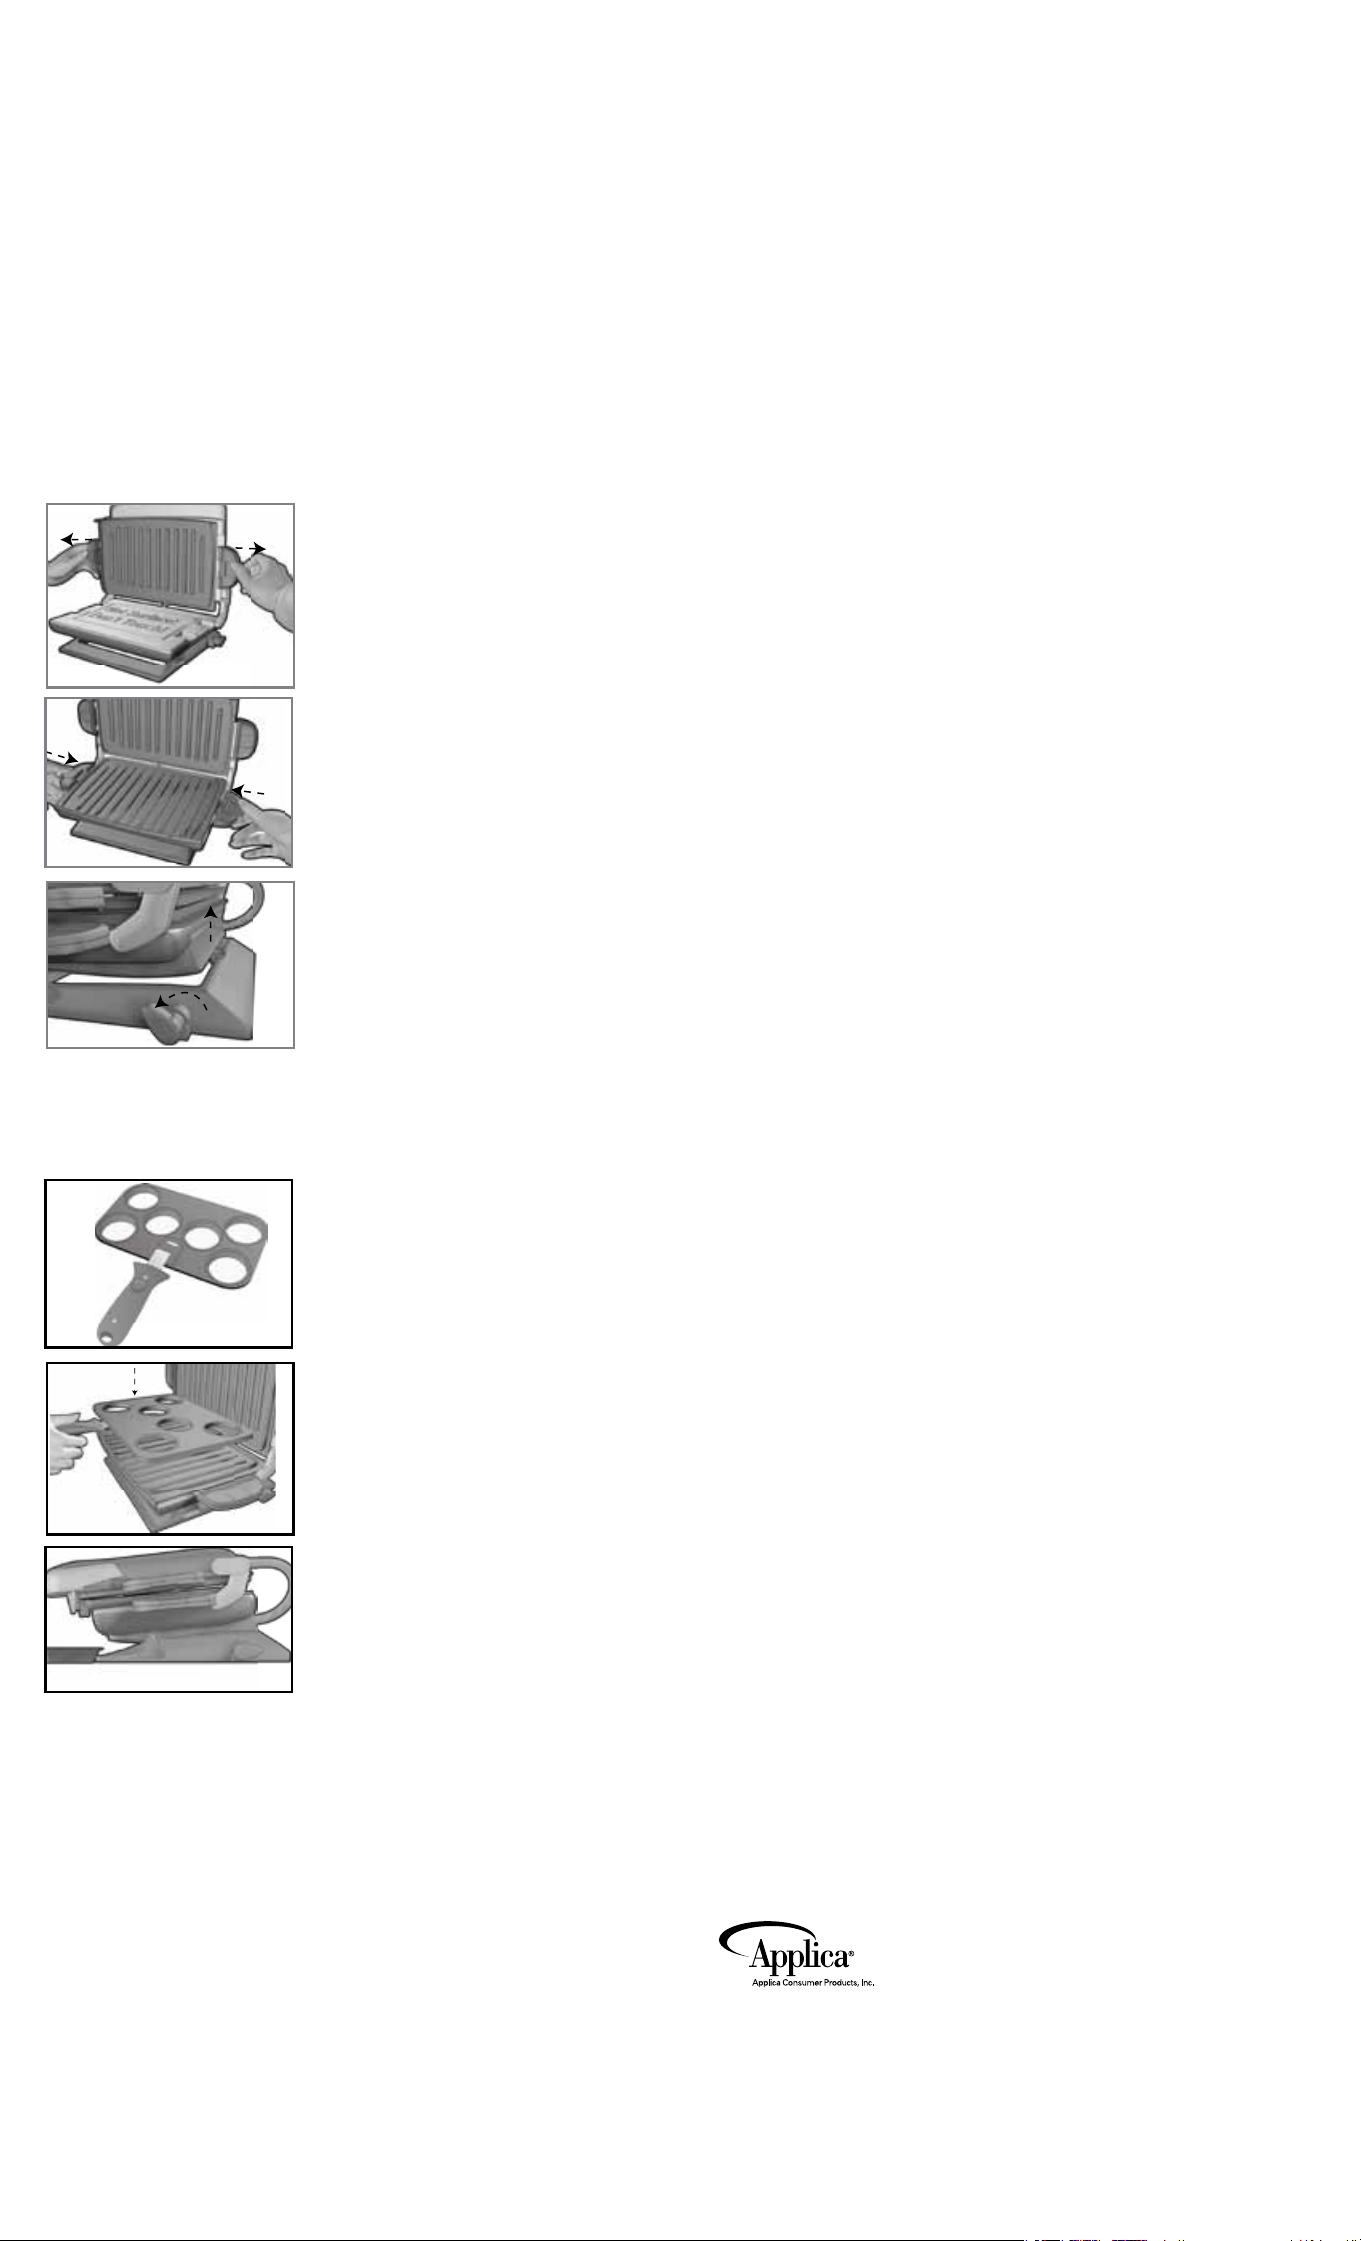
4. Attach the cool-touch handle to the
mini-burgerinsertbyslidingtheat
end into the indented opening in the
plate (d).
Important: Be sure the handle is
assembled and fastened properly.
5. Setthemini-burgerinsertontothe
bottomgrillplateandthenremovethe
handle (E).
Caution: Remove the cool-touch handle
from the mini-burger plate when
cooking.
6. Place the drip tray in front of the grill
(F).
USING yOUR MINI-BURGER INSERT
1. Pluginthegrillandpressthepowerbuttontoturnon.
2. Set temperature at 425º F and allow grill to preheat for at least 5
minutes.
3. Using a pot holder, carefully open the preheated grill.
4. Carefullyplaceabout2ouncesofmeatintoeachofthecutoutson
themini-burgerinsert.
Note: Do not overload the cooking plate.
5. Close the grill cover.
Important: do not leave the appliance unattended during use.
6. Mini-burgerstakeabout4minutestocook.Setthecountdowntimer
onthetopofthegrillandasignalbellwillsoundwhencookingis
complete.
7. Using a pot holder, carefully open the grill cover.
8. Whennishedcooking,usethecool-touchhandletoremovethe
mini-burgerinsertfromontopofthegrillplate.
9. Setmini-burgerinsertonawireracktocool,thenremovethemini-
burgersusingaplasticspatulaoranothernon-metallicutensil.
Note: Always use heatproof plastic, silicone or wood utensils to avoid
scratching the nonstick surface. Never use metal skewers, tongs, forks or
knives.
10. Pressthepowerbuttonandunplugtoturnthegrillo.
Care and Cleaning
CLEANING THE MINI-BURGER INSERT
1. Before cleaning, unplug grill from wall outlet and allow to cool.
Caution: do not remove the plates while the appliance is hot. Always
allow them to cool to room temperature before removing or cleaning.
2. Toremovethegrillplates,pulloutonthereleasehandlesonboth
sides of the plates and remove from the grill.
3. Themini-burgerinsert,cool-touchhandleandplatescanbewashed
inthedishwasherorbyhandwithhot,soapywater.
Note: Dishwasher detergent may cause oxidation on uncoated side of
cookingplates.Thisisnotharmfulbutmaychangetheappearanceof
your plates.
4. Alwaysdryplatesthoroughlybeforereattaching.
5. Toremovestubbornbuildup,useanylonornonmetallicscrubbing
pad to clean.
Important: do not use metallic scrubbing pads, steel wool or any
abrasive cleaners to clean any part of your grill; use only nylon or
nonmetallic scrubbing pads.
A
B
C
E
d
CompatiblewiththeEvolveGrillseries,KitchenBistro,andNextGrillerationG3,
G4andG5grills(modelnumbersGRP4EMB,GRP4EP,GRP4EWS,GRP90WGR,
GRP93G,GRP94WR).
F
NEEd HELP?
For service, repair or any questions
regarding your appliance, call the
appropriate800numberoncoverof
thisbook.PleaseDONOTreturnthe
product to the place of purchase. Also,
pleaseDONOTmailproductbackto
manufacturer,norbringittoaservice
center. You may also want to consult
thewebsitelistedonthecoverofthis
manual.
Three-year Limited warranty
(Applies only in the United States
and Canada)
what does it cover?
• Anydefectinmaterialor
workmanship provided; however,
Applica’sliabilitywillnotexceedthe
purchase price of product.
For how long?
• Threeyearsfromthedateof
original purchase with proof of such
purchase.
what will we do to help you?
• Provideyouwithareasonably
similar replacement product that is
eitherneworfactoryrefurbished.
How do you get service?
• Saveyourreceiptasproofofdateof
sale.
• Checkouron-lineservicesiteat
www.prodprotect.com/applica,
orcallourtoll-freenumber,
1-800-231-9786, for general
warranty service.
• Ifyouneedpartsoraccessories,
please call 1-800-738-0245.
what does your warranty not cover?
• Damagefromcommercialuse
• Damagefrommisuse,abuseor
neglect
• Productsthathavebeenmodified
in any way
• Productsusedorservicedoutside
the country of purchase
• Glasspartsandotheraccessory
items that are packed with the unit
• Shippingandhandlingcosts
associated with the replacement of
the unit
• Consequentialorincidental
damages (Please note, however,
that some states do not allow
the exclusion or limitation of
consequential or incidental
damages, so this limitation may not
apply to you.)
How does state law relate to this
warranty?
• Thiswarrantygivesyouspecific
legal rights, and you may also have
other rights that vary from state to
state or province to province.
PARA COMENZAR
• Retiretodoelmaterialdeempaqueycualquieretiquetaquetengael
producto; retire y guarde el material de lectura.
• Porfavor,irawww.prodprotect.com/applicapararegistrarsugarantía;
para información adicional, ir a www.georgeforemancooking.com.
• Laveelmoldeparaminihamburguesasconaguacalientejabonaday
séquelobien.
Nota:Aunqueelmoldesonlavablesenlamáquinalavaplatos,le
recomendamos fregarlas a mano para que conserve su apariencia. Al
lavarloenlamáquinalavaplatosseleformaunacapaturbiaalmetalque
no afecta el rendimiento del electrodoméstico.
COLOCACIÓN dE LAS PLACAS
Importante: Este aparato debe utilizarse siempre con 2 placas
rmemente aseguradas. Al usar el molde para mini hamburguesas,
adjunte la placa superior rayada o la placa para Panini de la parrilla,
más la placa inferior de la parrilla.
1. Para colocar la placa superior de la
parrilla,haleambasasashaciaafuera,
coloque la placa plana contra el marco
interior y suelte las asas. (A).
2.Repitaconlaplacainferiordelaparrilla
(B).
3.Muevalainclinaciónajustableenla
parte de atrás derecha de la parrilla,
de forma que la parrilla quede en la
posición inclinada (C). Esto permite que
la grasa se escurra mientras cocina.
Consejo: Antes de colocar el molde para
minihamburguesas,puedequeusted
deseedarleformaalacarne;asílogrará
hamburguesasqueluzcanmejorunavezquelascocine.Siusaelmolde
paradarleformaalacarne,tomealrededorde2onzasdecarnepor
hamburguesa,colóquelasenelmoldeypresioneparadarlesforma.Una
vezquetenganforma,retirelashamburguesasparaquepuedacolocarel
molde en la supercie de la parrilla y que se precaliente.
4.Colóqueleelasafríaaltactoalmolde
paraminihamburguesascorriendola
punta plana dentro de la hendidura en
la placa (d).
Importante: Asegúrese de que el
asa esté bien armada y colocada
correctamente.
5. Coloque el molde para mini
hamburguesassobrelaplacainferior
de la parrilla y luego retire el asa (E).
Precaución: Retire el asa fría al tacto de
la placa para mini hamburguesas para
cocinar.
6.Coloquelabandejadegoteoalfrente
de la parrilla (F).
USO dEL MOLdE PARA MINI HAMBURGUESAS
1. Enchufelaparrillaypresioneelbotóndefuncionamientopara
encenderla.
2. Congure la temperatura a 425º F y permita que la parrilla se caliente
durante al menos 5 minutos.
3. Usandounagarrador,abraconcuidadolaparrillaprecalentada.
4. Cuidadosamentecoloquealrededorde2onzasdecarnedentrode
cadaespaciodelmoldeparaminihamburguesas.
Nota:Nosobrecarguelaplacadecocción.
5. Cierre la tapa.
Importante: No deje el electrodoméstico sin supervisión durante
su uso.
6. Lasminihamburguesassetomanalrededorde4minutospara
cocinarse.Congureelrelojautomáticoenlapartedearribade
la parrilla y la señal auditiva le avisará cuando termine el proceso
de cocción.
7. Usandounagarrador,abraconcuidadolatapa.
8. Cuandoterminedecocinar,useelasafríaaltactopararetirarel
moldeparaminihamburguesasdeencimadelaplacadelaparrilla.
9. Coloqueelmoldeparaminihamburguesasenunarejilladonde
estasseenfríen,antesderetirarlasconunaespátulaplásticauotro
utensilio que no sea de metal.
Nota: Siempre utilice utensilios de plástico, silicona o madera resistentes
al calor para evitar rayar la supercie antiadherente de las planchas para
asar.Nuncausepinchos,pinzas,tenedoresocuchillosdemetal.
10. Presioneelbotóndefuncionamientoydesenchufelaparrillapara
apagar.
Cuidado y limpieza
LIMPIEZA dEL MOLdE PARA MINI HAMBURGUESAS
1. Antes de limpiar, desenchufe la parrilla del tomacorriente de la pared
ydejequeseenfríe.
Precaución: No retire las placas mientras el electrodoméstico
esté caliente. Siempre permita que se enfríen hasta alcanzar la
temperatura ambiente antes de retirarlas o limpiarlas.
2. Para retirar las placas de la parrilla, hale las asas a cada lado hacia
afuerayretírelasdelaparrilla.
3. El molde y las placas se pueden lavar en la máquina lavaplatos o a
manoconaguacalientejabonada.
Nota: El detergente de fregar platos puede oxidar la parte de las placas
sin capa protectora. Esto no es dañino.
4. Siempre séquelas completamente antes de colocarlas en la parrilla
nuevamente.
5. Paraeliminarlasacumulacionesdifíciles,useunaesponjilladenailon
o no metálica para limpiar las placas de la parrilla.
Importante: No use esponjillas metálicas, lana de acero ni limpiadores
abrasivos para limpiar ninguna parte de su plancha; use únicamente
esponjillas de nailon o no metálicas.
2010/8-12-38E/S
© 2010 Applica Consumer Products, Inc.
MadeinPeople’sRepublicofChina
PrintedinPeople’sRepublicofChina
FabricadoenlaRepúblicaPopulardeChina
ImpresoenlaRepúblicaPopulardeChina
A
B
C
E
d
F
¿NECESITA AyUdA?
Para servicio, reparaciones o
preguntas relacionadas al producto,
porfavorllamegratisalnúmero“800”
queapareceenlacubiertadeeste
manual. No devuelva el producto al
establecimientodecompra.Noenvíe
elproductoporcorreoalfabricante
ni lo lleve a un centro de servicio.
Tambiénpuedeconsultarelsitioweb
queapareceenlacubiertadeeste
manual.
Tres años de garantía limitada
(Aplica solamente en Estados Unidos
o Canadá)
¿Qué cubre la garantía?
• Lagarantíacubrecualquierdefecto
dematerialesodemanodeobra.
Applicanoseresponsabilizapor
ningúncostoqueexcedaelvalor
de compra del producto.
¿Por cuánto tiempo es válida la
garantía?
• Portresañosapartirdelafecha
original de compra mientras que
tengaunapruebadelacompra.
¿Qué clase de asistencia recibe el
consumidor?
• Elconsumidorrecibeunproducto
dereemplazonuevoorestaurado
defábrica,parecidoaloriginal.
¿Cómo se obtiene el servicio
necesario?
• Conserveelrecibooriginalcomo
comprobantedelafechade
compra.
• Sepuedevisitarelsitiowebde
asistencia al consumidor
www.prodprotect.com/applica, o
sepuedellamargratisalnúmero
1-800-231-9786,paraobtener
información relacionada al servicio
degarantía.
• Sinecesitapiezasoaccesorios,
por favor llame gratis al
1-800-738-0245.
¿Qué aspectos no cubre esta
garantía?
• Losdañosalproductoocasionados
por el uso comercial
• Losdañosocasionadosporelmal
uso,abusoonegligencia
• Losproductosquehansido
alterados de cualquier manera
• Losproductosutilizadoso
reparadosfueradelpaísoriginalde
compra
• Laspiezasdevidrioydemás
accesorios empacados con el
aparato
• Losgastosdetramitacióny
embarquerelacionadosconel
reemplazo
del producto
• Losdañosyperjuiciosindirectos
oincidentales(sinembargo,por
favorobservequealgunosestados
no permiten la exclusión ni la
limitación de los daños y perjuicios
indirectos ni incidentales, de
maneraqueestarestricciónpodría
no aplicar a usted).
¿Qué relación tiene la ley estatal con
esta garantía?
• Estagarantíaleotorgaderechos
legalesespecíficosyelconsumidor
podríatenerotrosderechosque
varíandeunaregiónaotra.
CompatibleconlaseriedeparrillasEvolveGrill,KitchenBistroyNextGrilleration
G3,G4yG5(modelosGRP4EMB,GRP4EP,GRP4EWS,GRP90WGR,GRP93G
yGRP94WR).
