OPERATING INSTRUCTIONS
Gas induction hob
EN (AU) (NZ)
HIG89524BGDx
HIG89524MGDx

3Pictograms used ........................................
4Safety ..........................................................
7Safe use .......................................................
9Power management .....................................
10Your gas-induction hob .............................
10Dear customer! ............................................
10These instructions ........................................
12Description ...................................................
17Induction use ..............................................
17Induction cooking ........................................
17Operation of the touch keys and sliders ......
18How induction works ....................................
18Induction sounds .........................................
19Pans for induction cooking ..........................
21Wok burner use ..........................................
21Pans .............................................................
22Wok ring and simmer grid ...........................
22Pan support .................................................
22Wok burner position .....................................
23Operation ....................................................
23Start Preparing .............................................
23Standard cooking ........................................
25Cooking with the PLUS menu ......................
27Cooking with Celsius°Cooking™ .................
28
Cooking with Celsius°Cooking™ cookware
and programs ..............................................
31
Step-by-Step cooking guide on
CelsiusCooking.com ....................................
32Bridge Induction zone .................................
33Pause ...........................................................
33Child lock .....................................................
34Timer functions ............................................
35Operation of the linked extraction hood ......
37Wok burner operation ................................
37Ignition and adjustment ...............................
38ConnectLife and Wi-Fi ...............................
38ConnectLife-app and Wi-Fi connection ......
40Firmware Update .........................................
41Settings .......................................................
45Maintenance ...............................................
45Cleaning glass top .......................................
45Cleaning wok burner elements ....................
46Troubleshooting .........................................
46General ........................................................
46Troubleshooting table ..................................
51Installation ..................................................
51Safety ..........................................................
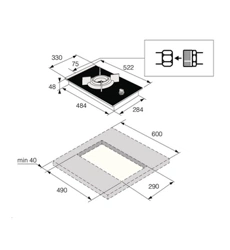
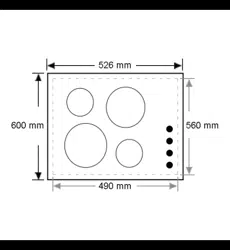
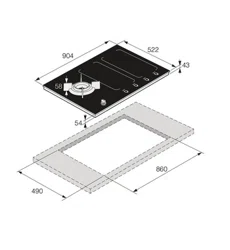
54Preparations for installation .........................
55Built-in ..........................................................
56Gas connection ............................................
58Electrical connection ...................................
59Connecting & testing ...................................
60Environmental aspects ..............................
60Disposal of the appliance and packaging ....
Contents
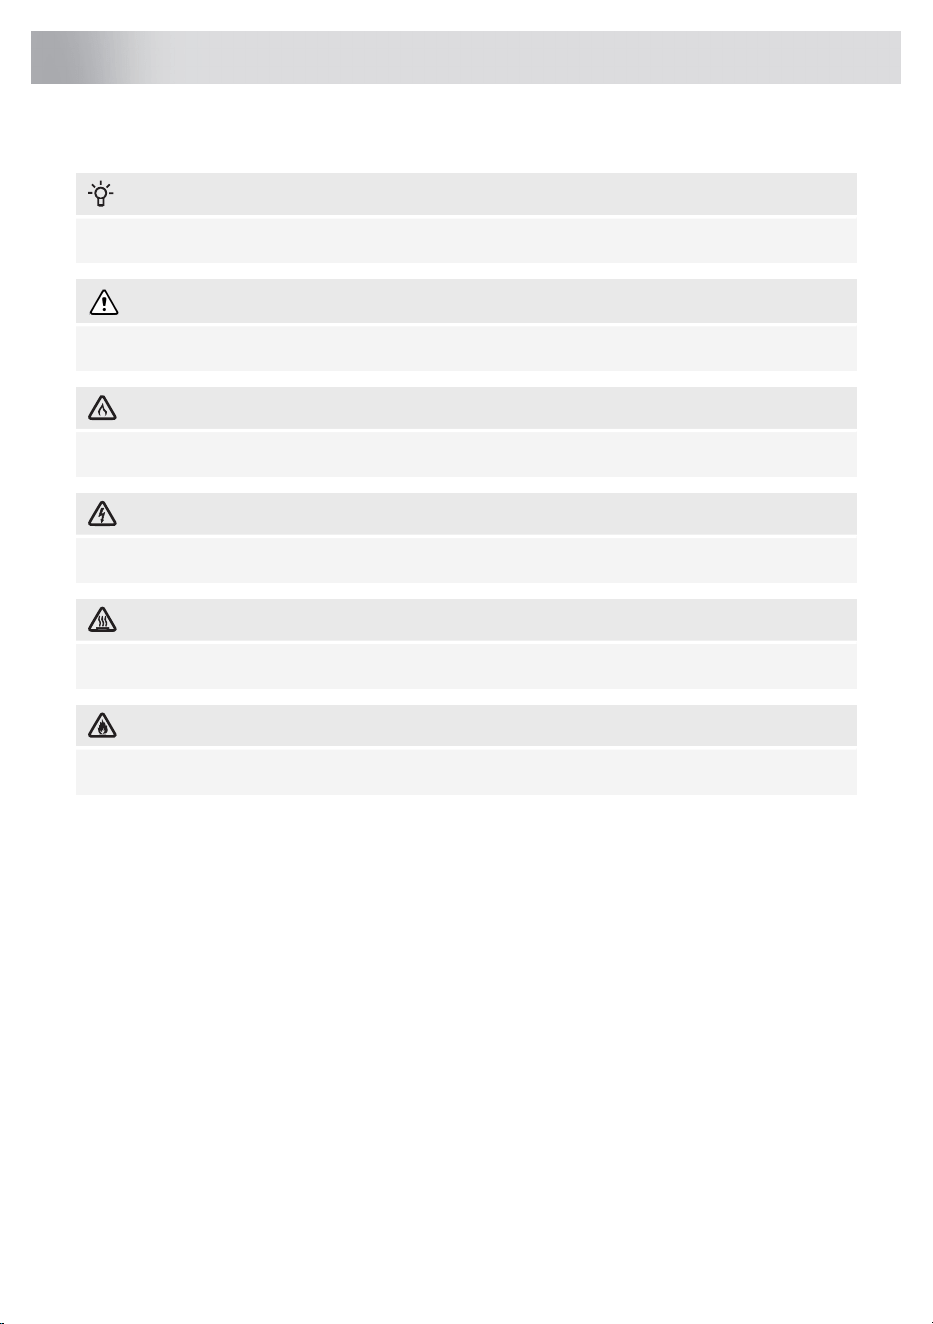
The following symbols are used throughout the manual and they have the following meanings:
INFORMATION!
Information, advice, tip, or recommendation
WARNING!
Warning – general danger
GAS CONNECTION!
Warning – gas connection
ELECTRIC SHOCK!
Warning – danger of electric shock
HOT SURFACE!
Warning – danger of hot surface
DANGER OF FIRE!
Warning – danger of fire
It is important that you carefully read the instructions.
3
Pictograms used
WARNING!
READ CAREFULLY AND KEEP FOR FUTURE REFERENCE!
General
The manufacturer cannot be held liable for any damage resulting
from failure to follow the safety instructions and warnings.
Damage caused by incorrect connection, incorrect fitting, or incorrect
use is not covered by the warranty.
WARNING!
• This appliance is not intended for use by persons (including
children) with reduced physical, sensory or mental capabilities,
or lack of experience and knowledge, unless they have been
given supervision or instruction concerning use of the appliance
by a person responsible for their safety.
• Accessible parts may become hot during use. Young children
should be kept away.
Children should be supervised to ensure that they do not play with
the appliance.
Do not use or store flammable materials in the appliance storage
drawer or near this appliance.
Do not modify this appliance.
Do not spray aerosols in the vicinity of this appliance while it is in
operation.
Children are not to be allowed near the device unsupervised.
NOTE!
CAUTION! The cooking process has to be supervised. A short
term cooking process has to be supervised continuously.
4
Safety
DANGER OF FIRE!
WARNING: Danger of fire: do not store items on the cooking
surfaces.
DANGER OF FIRE!
WARNING: Cooking with fat or oil on a hob without supervision
can be dangerous and can lead to a fire.
NEVER try to extinguish a fire with water. Instead, switch the
appliance off and then cover the flames with for example a lid or a
fire blanket.
WARNING!
Use only hob guards designed by the manufacturer of the cooking
appliance or indicated by the appliance manufacturer in the
instructions for use as suitable or hob guards incorporated in the
appliance. The use of inappropriate guards can cause accidents.
If a drawer underneath the appliance is permitted (see the installation
instructions), without an intermediate bottom, this should not be used
to store highly flammable objects/materials. Ensure that there is
adequate clearance of a few centimetres between the bottom of the
hob and the contents of any drawers.
The hob is only to be used for the preparation of food.
This appliance is only designed for household use.
Do not use this appliance as a space heater.
The appliance is not intended to be operated by means of an external
timer or separate remote control system.
Never use a steam cleaner for cleaning the appliance. Only clean
the appliance when switched off. The steam of a steam cleaner could
reach the conducting parts and cause an electrical short.
5
Safety
The ceramic top is extremely strong, but not unbreakable. For
example, a spice jar or sharp utensil falling on it could cause it to
break.
The hob is fitted with a Wi-Fi module that allows the appliance to
connect to a mobile device such as a smartphone or tablet. It offers
to monitor the cooking hob status via the mobile device. For safety
reasons, it is not possible to remotely control, turn on or turn off the
hob. The monitoring function via mobile device shall not be used to
replace the personal supervision of the cooking process directly at
the hob.
If you decide to discontinue using the appliance because of a fault,
we recommend you cut off the cable after removing the plug from
the plug socket. Take the appliance to your municipality’s waste
disposal site.
WARNING!
WARNING: If the surface is cracked, switch off the appliance to
avoid the possibility of electric shock.
Ceramic glass plate broken
• Shut immediately off all burners and any electrical heating element
and isolate the appliance from the power supply.
• Do not touch the appliance surface.
• Do not use the appliance.
The cooking zones/burners heat up during use and stay hot for a
while afterwards. Keep young children away from the hob during
and immediately after cooking.
Gas burners
WARNING!
Prolonged intensive use of the appliance may call for additional
ventilation, for example opening of a window, or more effective
ventilation, for example increasing the level of mechanical
ventilation where present.
6
Safety

CAUTION: The use of a gas cooking appliance results in the
production of heat, moisture and products of combustion in the room
in which it is installed. Ensure that the kitchen is well ventilated
especially when the appliance is in use: keep natural ventilation
holes open or install a mechanical ventilation device (mechanical
extractor hood).
• Do not use large pots or heavy weights which can bend the pan
support or deflect flame onto the hotplate.
• Locate pan centrally over the burner so that it is stable and does
not overhang the appliance.
The burner components are hot during and immediately after use.
Do not touch them, and avoid contact with non-heat resistant
materials.
The distance between the pan and a knob or non-heat resistant wall
should always be greater than one centimetre. In case of smaller
distances, the high temperature may cause the knobs or wall to
discolour and/or deform.
Induction cooking zones and cooking areas
Do not place metal objects such as knives, forks, spoons and lids
on the surface of the hob, they may become hot.
When the induction hob is in use, keep objects that are sensitive to
magnetic fields (credit cards, bank cards, discs, watches and similar
items) away from the hob. We advise anyone with a pacemaker to
consult their cardiologist first.
Safe use
• Never use aluminium foil for cooking and never place products packaged in aluminium on the
hob. The aluminium would melt and irreparably damage your device.
• Remember that if the hob is used on a high setting the heating time will be very short. Do not
leave the hob unattended if you are using a zone on a high setting.
• As soon as you remove the pan from the hob, the cooking process will stop automatically. Get
into the habit of switching off the cooking zone or hob manually to avoid unintentionally switching
on the appliance.
After use, switch off the hob element using the controls and don’t rely only on the pan detector.
• Do not keep objects that children might find interesting in cupboards above or behind the
appliance.
7
Safety

• The cooking zones/burners heat up during use and stay hot for a while afterwards. Keep young
children away from the hob during and immediately after cooking.
• Never flambé under a cooker hood. The high flames can cause a fire, even if the cooker hood
is switched off.
• Do not warm closed tins on the hob. There will be a build-up of pressure that will cause tins to
explode. You might get injured or scalded.
• Never cover the appliance with a cloth or something similar. If the appliance is still hot or is
switched on, there is a risk of fire.
• Do not use the appliance as a worktop. The appliance may accidentally be switched on or still
be hot, which means objects could melt, become hot or catch fire.
• Do not use the appliance in temperatures below 5 °C.
• The appliance should not be placed or used outdoors.
• When you use the hob for the first time you will notice a “new smell”. Don’t worry, this is normal.
If the kitchen is well ventilated, the smell will soon disappear.
• The ceramic top is extremely strong, but not unbreakable. For example, a spice jar or sharp
utensil falling on it could cause it to break.
• Never immerse hot burner caps and pan supports in cold water. The rapid cooling can damage
the enamel.
• Always use the pan supports and suitable cookware.
• Always place the pan on the pan support. Placing the pan directly on the burner cap can result
in dangerous situations.
• Aluminium trays or foil are not suitable as cooking utensils. They can burn into the burner caps
and pan supports.
• The hob can only function effectively if the burner components have been assembled using the
guide ridges. Ensure that the pan supports lie properly against each other and flat on the drip
tray. Only then can the pans be positioned stably.
• Keep oven gloves or oven cloths away from the flame.
• Do not use griddle plates or baking plates.
• Clean the burner parts regularly for safe and correct operation of the burners.
• Missing rubber feet from the pan supports can cause scratches on the drip tray or poor
combustion of the burner. If the rubber feet are missing, please contact our service department.
Temperature safety induction zones
• The hob is fitted with a cooling fan which cools the electronic components during cooking.
The fan may operate for a while, even after the end of the cooking process.
• The cooking hob is also fitted with an overheating protector which protects the electronic
components from damage. The protector operates in several ways. When the cooking zone
temperature gets very high, the cooking power is automatically reduced. If this does not suffice,
the cooking zone power continues to decrease, until the safety mechanisms switch off the cooking
zone completely. When the cooking hob is cooled down, its total power will be available again.
Cooking time limiter
WARNING!
The cooking-time limiter is a safety function of your cooking appliance. It will operate if you forget
to switch off your hob.
8
Safety
Depending on the setting you have chosen, the cooking time will be limited as follows:
The cooking zone or wok burner switches off
automatically after:
Cooking settings
9 hours1 and 2
6 hours3, 4 and 5
4 hours6, 7 and 8
3 hours9
2 hours10
1 hour11 and 12
The cooking-time limiter switches the cooking zones off if the time in the table has elapsed.
The cooking zone switches to setting 12
automatically after:
Cooking settings
10 minutesboost
NOTE!
• The Cooking-time limiter for the specific cooking zone is reset after the user has changed
the cooking level of the specific cooking zone.
• Cooking zone related timers take priority over the cooking-time limiter.
Power management
The induction part of this hob is equipped with a smart power management system. This system
ensures a maximum permissible power cannot be exceeded for safety reasons.
• The smart power management system will arrange the power distribution across the zones
automatically. This means the hob could automatically decrease the power on one zone when
the power level of another zone is increased. The level of activity of the power management
system depends on the available power per electrical phase, the setting of the current limiter
and the connected load.
• The power level of one zone can affect the power of another zone as the maximum available
power is distributed among the zones. If the combined zones reach the maximum available
power when a new power level is set, the power levels of one or more zones are automatically
reduced within the power limit. This is indicated by the flashing of the relevant control element.
• Intervention by the smart power management system is more likely when the current limiter is
set to a lower level.
• The current limiter setting must be set according to your connection and circuit breakers by a
registered and qualified installer (see 'Current limiter' for the details on currents and electrical
installation).
9
Safety
Dear customer!
Welcome to our growing ASKO family!
We are proud of our appliances. We hope that this appliance will be an appreciated and dependable
aid for many years to come.
Please read the operating instructions before use. They include general tips, information about the
settings and adjustments you can make, and the best way to take care of your appliance.
The manual also serves as reference material for service technicians. Please, therefore, stick the
appliance identification card in the space provided, at the back of the manual. The appliance
identification card contains all the information that the service technician will need in order to respond
appropriately to your needs and questions.
TIP!
You can find the most recent version of the instructions for use on our website.
Enjoy your cooking!
These instructions
These instructions are written for:
• The user; to quickly become familiar and make optimal use of the appliance.
• An installer; to install the appliance in accordance with the applicable standards.
The table below gives you information on the different chapters you can find in order in these
instructions.
PurposePageChapter
Explains the pictograms used in these instructions.3
Pictograms used
Provides information, warnings and tips on using the appliance
safely so that you will not get hurt and the device will not
malfunction. Always read this section thoroughly before using
the appliance.
4
Safety
Describes the available functions of the appliance. The tables
clearly show what the different keys can be used for. The
various possible displays and messages on the appliance
are also explained.
10
Your gas-induction
hob
This chapter finds information on the operation and use of
induction. You will also find advice on the cookware to be
used and information on cooking levels.
17
Induction use
It gives you step-by-step information on how to operate the
device. The steps include illustrations that consist of a left-side
drawing showing the action (which key to touch) and a
right-side drawing showing the reaction of the device.
23
Operation
Refer to this section if you want to connect the appliance to
Wi-Fi in your home. It also describes how to use the
ConnectLife app and how to update the appliance firmware.
38
ConnectLife and Wi-Fi
10
Your gas-induction hob
PurposePageChapter
You can fully customise the induction zones of this
gas-induction hob to your cooking style! Several settings can
be adjusted. This chapter also contains settings for the
installer.
41
Settings
Provides information on cleaning and maintaining your device.45
Maintenance
If the appliance does not work correctly or displays unclear
messages, please refer to this section.
46
Troubleshooting
It gives you packaging information and how to dispose of the
appliance responsibly at the end of its life.
60
Environmental
aspects
This chapter is intended for the installer. Only a qualified
installer may install this appliance.
51
Installation
Table continued from last page
11
Your gas-induction hob
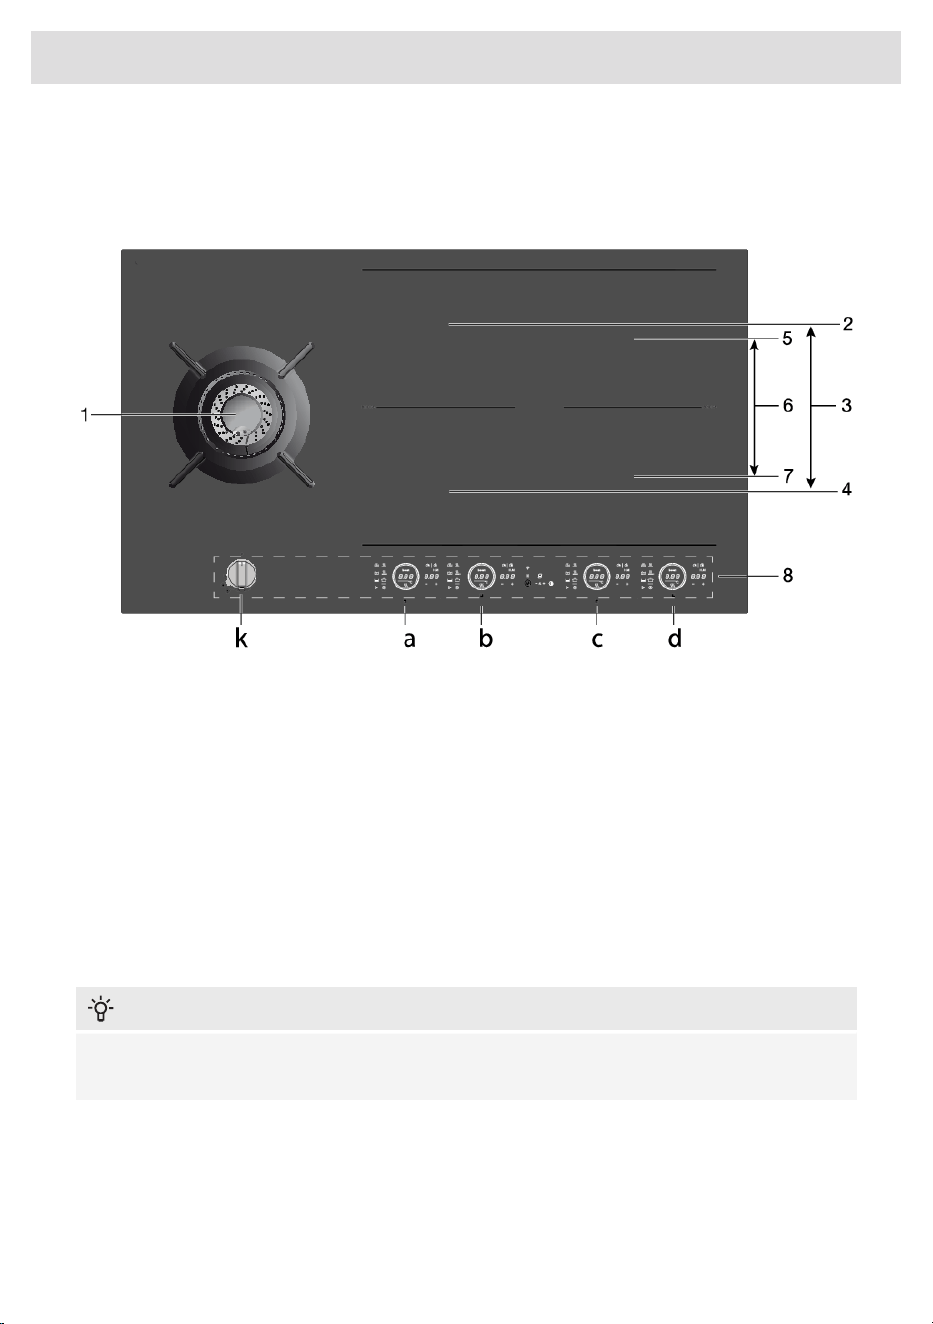
Description
Since the appliances for which these instructions were drawn up may have different equipment,
some functions or equipment may be described in the manual that may not be present in your
appliance.
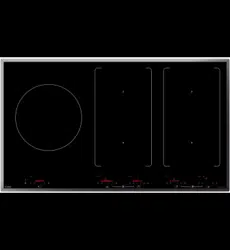
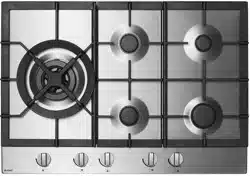
1. Fusion Volcano wokburner (gas) to be operated with 'k'
2. Bridge Induction Cooking zone 18 x 22 cm / max. 2.3 kW / max. 3.7 kW (boost) to be operated
with 'b'
3. Connected Bridge induction cooking zones (2 and 4) control with 'a'
4. Bridge Induction Cooking zone 18 x 22 cm / max. 2.3 kW / max. 3.7 kW (boost) to be operated
with 'a'
5. Bridge Induction Cooking zone 18 x 22 cm / max. 2.3 kW / max. 3.7 kW (boost) to be operated
with 'd'
6. Connected Bridge induction cooking zones (5 and 7) to be operated with 'c'
7. Bridge Induction Cooking zone 18 x 22 cm / max. 2.3 kW / max. 3.7 kW (boost) to be operated
with 'c'
8. Control panel (visible only when the hob is turned on)
INFORMATION!
The maximum power output is depending on the type of cookware used and the thermal condition
of the appliance.
12
Your gas-induction hob
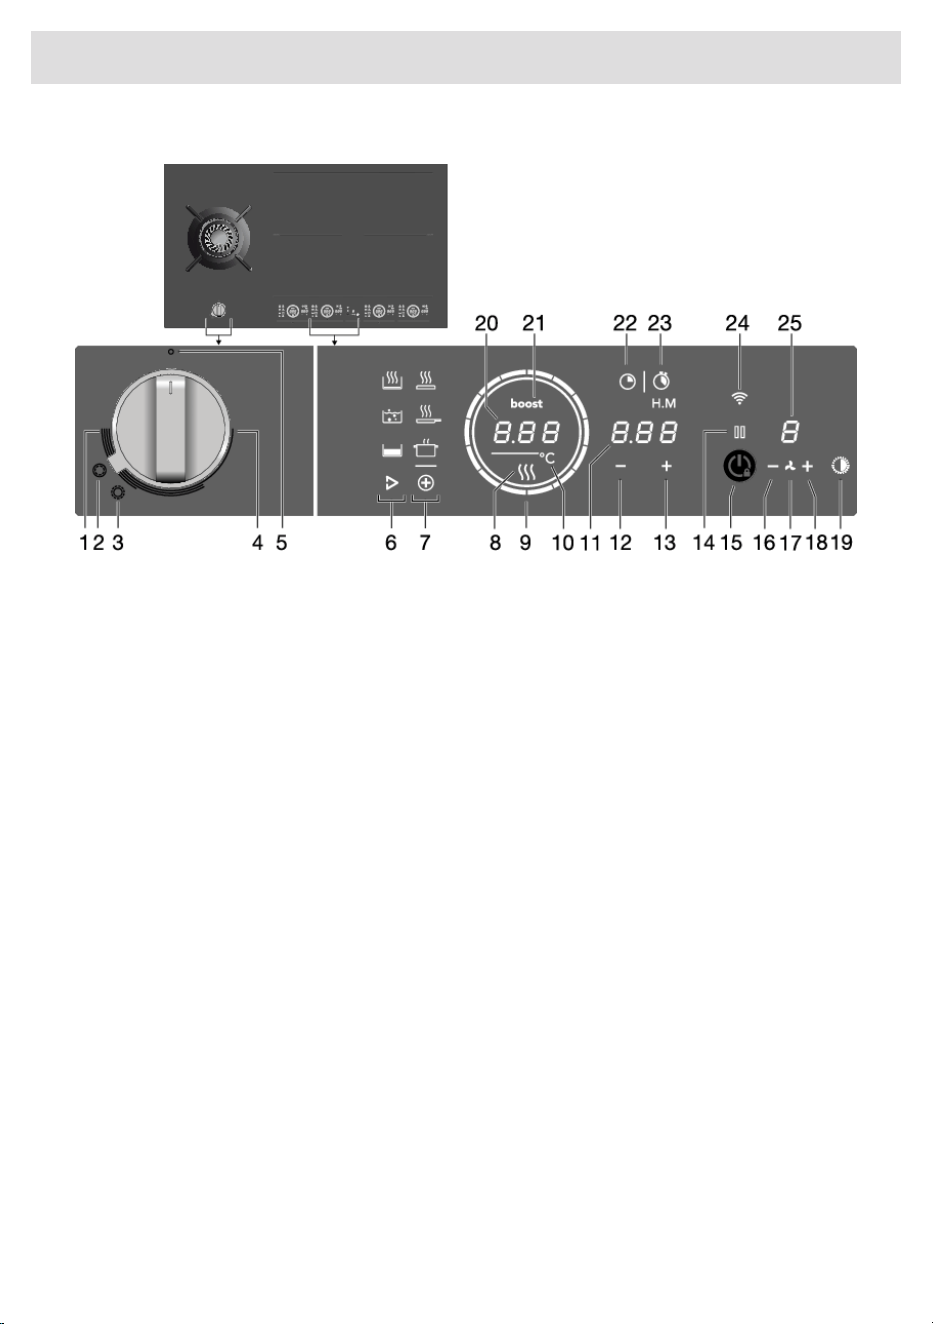
Control panel
1. High setting
2. Wok setting (wok burner)
3. Roasting setting (wok burner)
4. Low setting
5. 0 position
6. Touch key to start Celsius°Cooking™ programs
7. Touch key to start PLUS programs
8. Residual Heat indication
9. Slide control (12 settings) / Hob standby indication
10. Degrees celsius indication for Celsius°Cooking™ and PLUS programs.
11. Display time function
12. Time setting - (minus) touch key
13. Time setting + (plus) touch key
14. Pause touch key
15. On/Off and Child lock touch key
16. Extraction hood (linked) lower extraction - (minus) touch key
17. Extraction hood (linked) extraction touch key
18. Extraction hood (linked) switch on and higher extraction + (plus) touch key
19. Extraction hood (linked) lighting touch key
20. Display cooking settings / text display
21. Boost indicator
22. Count-down timer touch key
23. Touch key for display cooking time - stopwatch
24. Wi-Fi/connectivity touch key
25. Extraction hood (linked) display extraction level
13
Your gas-induction hob
Explanation of the touch keys function
Description (see chapter 'Operation')
Touch key/slider
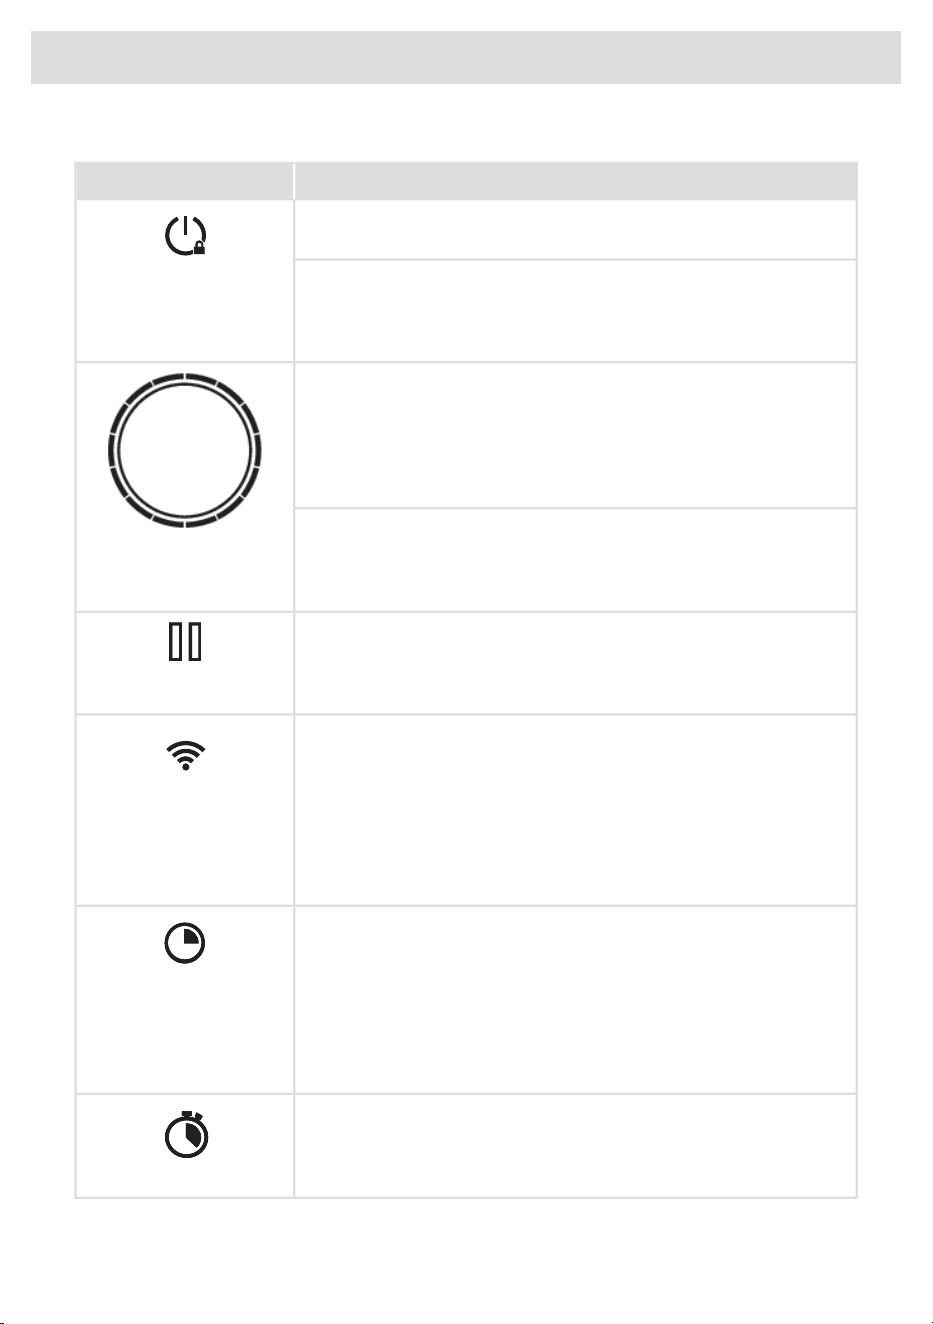
Switching the hob on/off
The appliance can be switched on and off with the on/off key.
Child lock
On/Off
The cooking zones can be locked and unlocked to prevent them from
being switched on inadvertently. Touch the on/off key for approximately
3 seconds.
Slider inner circle
• Hob switched on indication.
• If the hob is switched off and at least one of the cooking zones is
still hot, the inner circle remains illuminated. When the temperature
of the hob drops below 65 °C, the inner circle also goes out.
Slider outer circle
Slide control (12 settings)
• Setting cooking zone power levels.
• Setting temperature for Celsius°Cooking™ and PLUS function.
Pause
The pause function can be used to pause the operation of the entire
cooking hob for up to 10 minutes. This gives you time to safely clean
the cooking hob without losing your settings.
Pause
Wi-Fi
The cooking hob is equipped with a Wi-Fi module that allows the
appliance to connect to a mobile device such as a smartphone or
tablet. It offers to monitor the cooking hob status via the mobile device.
It is not possible to remotely control, turn on, or turn off the cooking hob
for safety reasons.
Wi-Fi
The monitoring function via mobile device shall not be used to directly
replace the cooking process personal supervision on the cooking hob.
Count-down timer
The count-down timer makes the cooking process easier by setting the
cooking time for the selected cooking zone. When the time set on the
timer expires, the cooking zone will automatically switch off and emit
an acoustic signal. You can switch off the acoustic signal by touching
the count-down timer key; alternatively, it will switch off automatically
after a while. You can set the count-down timer independently for all
cooking zones.
Count-down timer
Cooking time display - stopwatch
The stopwatch can be used to see how long you have been
continuously cooking on the selected cooking zone and starts counting
automatically in the background.
Stopwatch
14
Your gas-induction hob
Description (see chapter 'Operation')
Touch key/slider
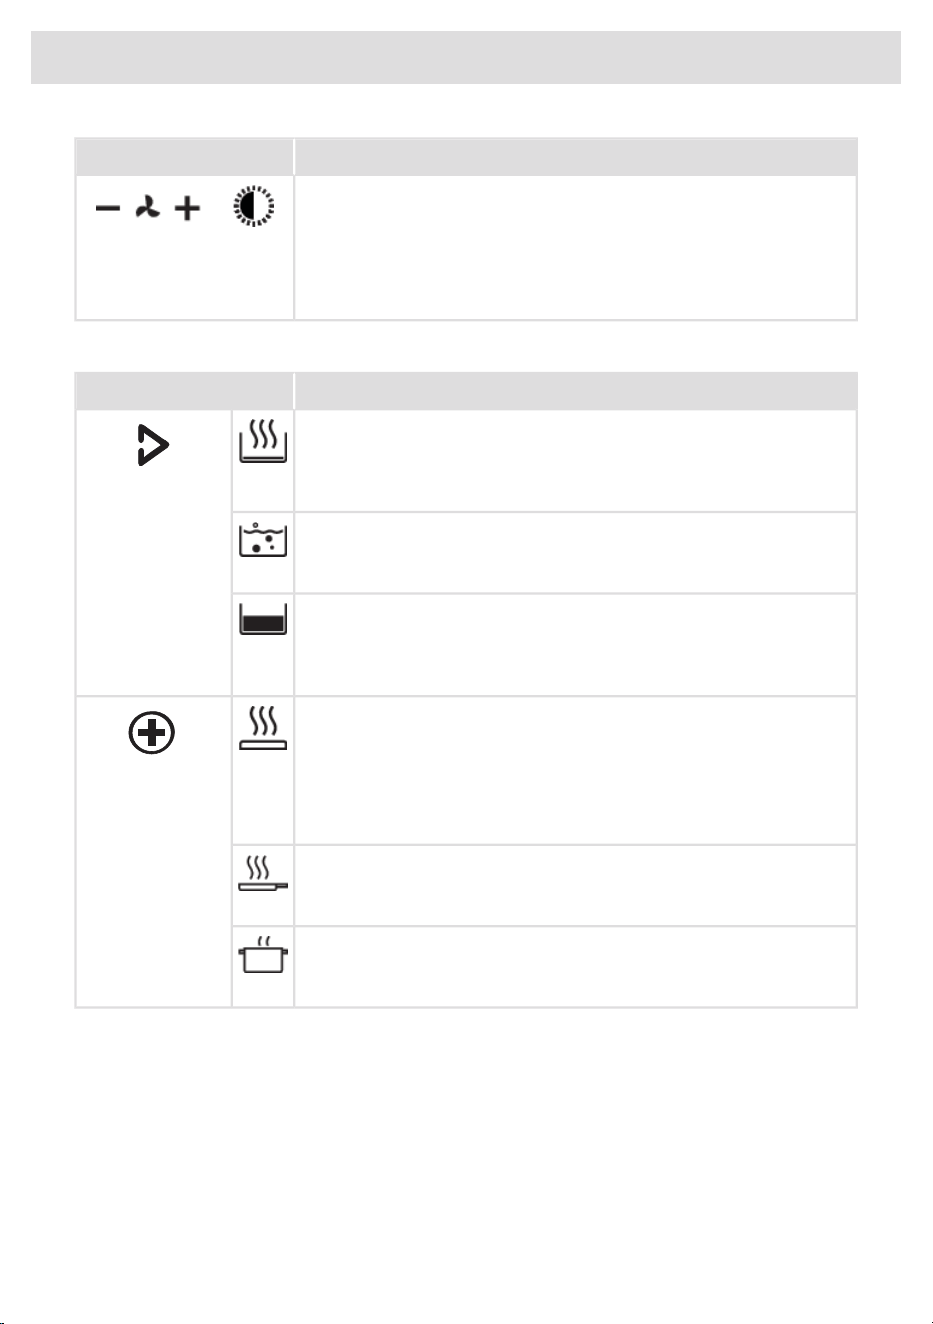
Operation linked extraction hood
If you own a compatible RF enabled hood, it can be connected to the
induction part of your hob. To pair and customize the behaviour of your
hood see chapter 'Settings'. Parameter hth is used for pairing, while
hSt and hSc effect the behaviour of your hood so you can customize
it according to your kitchen habbits.
Extraction hood (linked)
Program function explanation
Description (see chapter 'Operation')
Program
Heating up and frying
This program is to reach high temperatures rapidly. High pan bottom
temperatures can be reached. Always add oil or butter before starting
it. For healthy cooking don’t exceed the smoke point of the used oil.
Celsius°Cooking™
Only visible as a
Celsius°Cooking™
pan or probe is
detected.
Boiling/cooking with water
With this program, the water gets to boil quickly. Always add water
before starting.
Slow cooking or sous vide
This program is to control low to medium temperatures, preventing high
bottom temperatures. Larger quantities and thicker dishes need to be
stirred occasionally to ensure a homogeneous heat distribution.
Grill
This function is exclusively for Bridge Induction cooking zones, that
are linked to create one larger cooking zone.
PLUS
Grilling is optimized for ASKO induction accessories grill plate and
teppanyaki. But it will also work with different cookware, but perhaps
less accurate.
(Automatic
cooking programs)
Frying/wok
With this function, you can cook vegetables, fish, bacon, meat, fried
potatoes, or eggs in butter or oil.
Heating up/keeping warm
With this function you can, for example, melt chocolate (45 °C), keep
food warm (70 °C), simmer (94 °C) or bring it to boil (100 °C).
Hob recall function
This feature allows you to recall all the settings of the cooking zones if the hob was accidentally
switched off.
Within 6 seconds, the hob must be switched back on. Pressing anywhere on the slider within
6 seconds recalls all the settings from before the last switching off of the appliance.
Table continued from last page
15
Your gas-induction hob
Pan move function
If you remove the pan from an active cooking zone and within 6 seconds place it on a different
cooking zone, you can transfer all the timer and cooking-related settings to the new cooking zone
by touching the slider of the new cooking zone. To indicate this possibility, the new cooking zone
displays copied settings on the slider. When the confirmation is done, the previous cooking zone is
deactivated.
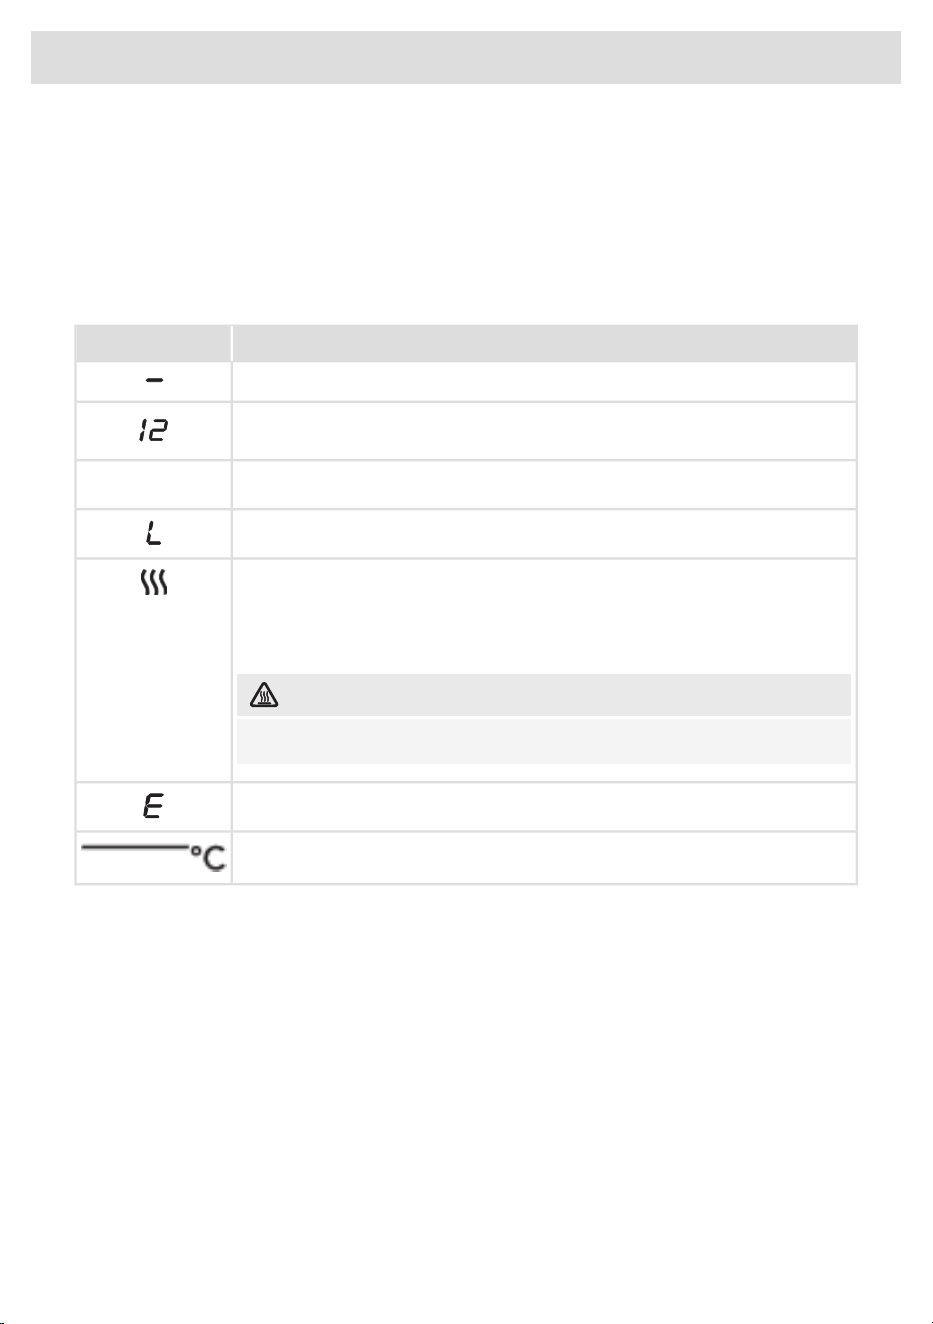
Indications on the display
StatusIn display
Power level ‘0’ for a cooking zone.
Power level that is set for a cooking zone; 1 = low / 12 = high.
Boost function active.
boost
The locking function is activated; the control panel is locked.
Residual heat indicator: The hob has a residual heat indicator for each cooking
zone to show which cooking zones are hot after the cooking zone is turned off.
Although the hob is switched off, the indicator will remain on as long as the
cooking zone is hot! Avoid touching those cooking zones when this indicator
is lit.
HOT SURFACE!
Danger! Risk of burns.
Error code; See chapter 'Troubleshooting'.
Degrees celsius indication for Celsius°Cooking™ and PLUS programs.
16
Your gas-induction hob
Induction cooking
Induction cooking is fast
To start with, you will be surprised by the speed of induction cooking.
Especially at higher settings, foods and liquids will come to a boil very
rapidly. It is best not to leave pans unattended to avoid them boiling
over or boiling dry. With induction cooking, there is no heat loss, and
the handles stay cool.
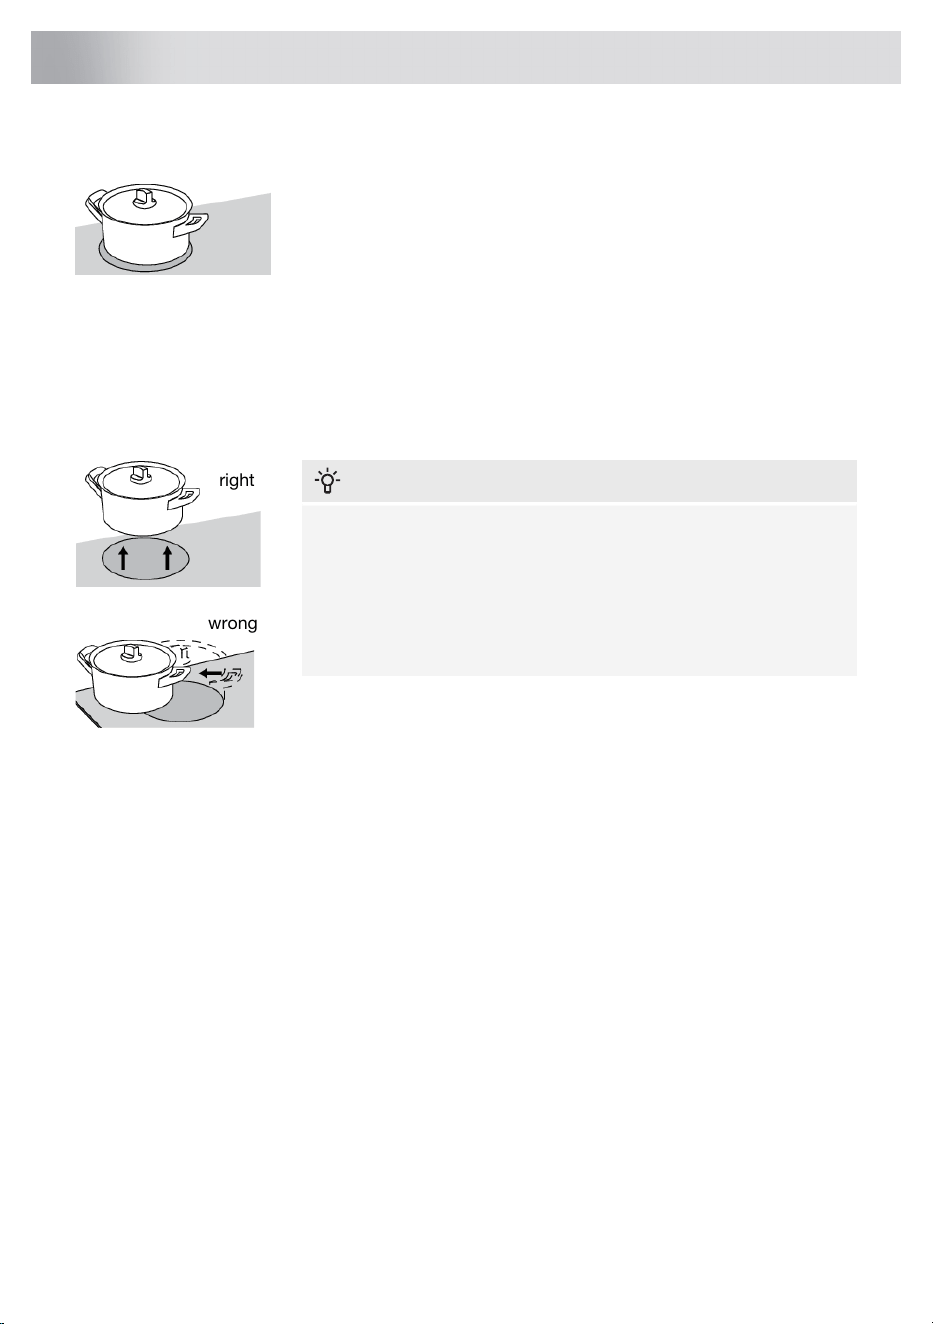
The power level adjusts itself
In induction cooking, only the zone on which the pan is placed is used. If you use a small pan on a
large zone, the power will be adjusted to the diameter of the pan. The power will thus be lower and
it will take longer before the food comes to the boil.
right
wrong
INFORMATION!
• Grains of sand may cause scratches that you cannot remove.
Therefore, only put pans with a clean base on the cooking
surface and always pick pans up to move them.
• Do not use the hob as a worktop.
• Always keep the lid on the pan when cooking, in order to avoid
energy loss.
Operation of the touch keys and sliders
• The touch controls may take some getting used to if you are used to other (rotary) controls.
Place the tip of your finger flat on the control to achieve the best results.
• The touch sensors only react to the light pressure of a fingertip. Do not operate the controls with
any other objects.
• The cooking hob is operated by a slider. You can either touch the selected part of the slider or
slide in a circular motion clockwise to increase or anti-clockwise to decrease the power level
and temperature.
• To set the cooking zone power level, touch the desired spot on the slider. As you touch the slider,
the selected power level will appear on the cooking zone display unit.
• The selected part of the slider will be fully lit.
• Do not use any objects to operate the slider.
17
Induction use
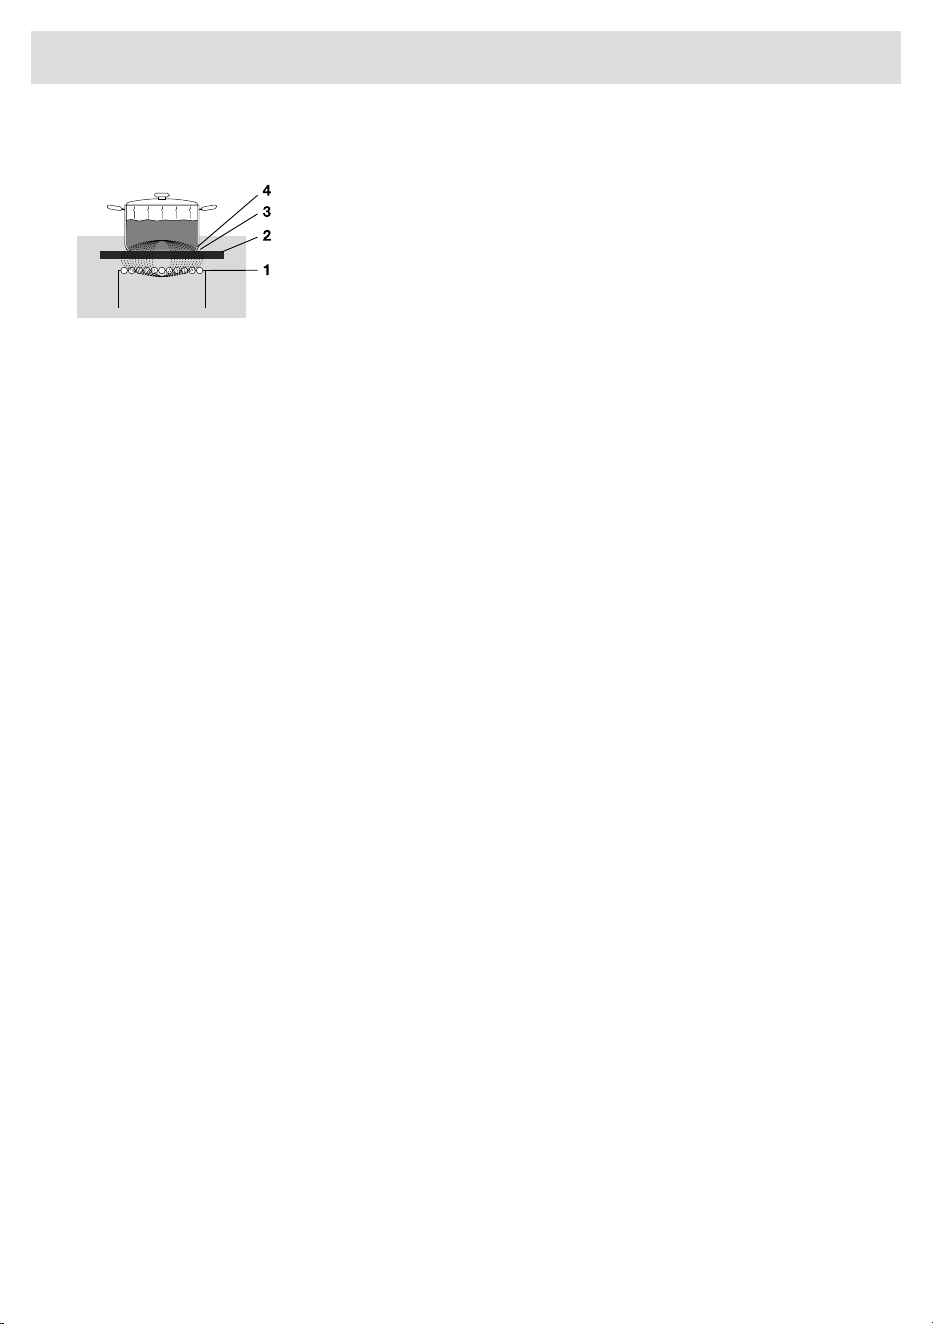
How induction works
The coil (1) in the hob (2) generates a magnetic field (3). By placing a
pan with an iron base (4) on the coil, a current is induced in the base
of the pan.
Easy
The electronic controls are accurate and easy to set. On the lowest setting, you can melt chocolate
directly in the pan, for example, or cook ingredients that you would normally heat in au bain-marie.
Fast
Thanks to the induction hob’s high power levels, bringing food to the boil is very quick. Cooking food
through takes just as long as for other types of cooking.
Clean
The hob is easy to clean. Because the cooking zones do not get any hotter than the pans themselves,
food spills cannot burn into the glass.
Safe
The heat is generated in the pan itself. The glass top does not get any hotter than the pan. This
means that the cooking zone is considerably cooler than a ceramic hob, for example.
Once a pan has been removed, the cooking zone cools down quickly.
Capacity distribution of cooking zones
Depending on the hob model, the cooking zones can affect each other. When several cooking zones
are switched on simultaneously, the available capacity is shared automatically between them.
When the maximum capacity of the combination of cooking levels is reached during setting, one or
more zones are automatically reduced to the highest possible setting at that moment. This is indicated
by the flashing of the relevant control element.
Induction sounds
Ticking sound
A light ticking sound is caused by the capacity limiter on the front and back zones. A soft ticking
sound can also occur at lower settings.
Pan makes sounds
The pan can make sounds during cooking. This is caused by the energy flowing from the hob to the
pan. This is normal for certain pans, particularly at high settings. This is not harmful for the pans or
the hob.
Ventilator makes sounds
The appliance is fitted with a ventilator in order to increase the lifespan of electronic components.
If you use the appliance intensively, the ventilator will be switched on and you will hear a humming
sound. The ventilator can also make sounds after you have switched off the appliance.
18
Induction use

Pans for induction cooking
Induction cooking requires a particular type of pan in terms of quality.
• Pans that have already been used for cooking on a gas hob are no longer suitable for use on
an induction hob.
• Only use pans that are suitable for electric and induction cooking with:
- a thick base of a minimum of 2.25 mm;
- a flat base.
TIP!
You can use a magnet to check whether your pans are suitable. A pan is suitable if the base of
the pan is attracted by the magnet.
UnsuitableSuitable
EarthenwareSpecial stainless steel pans
Stainless steelClass Induction
PorcelainSolid enamelled pans
CopperEnamelled cast-iron pans
Plastic
Aluminium
WARNING!
Be careful with thin enamelled sheet steel pans:
• the enamel may come loose from the steel at high settings if the pan boils dry;
• high power level settings may cause the base of the pan to warp.
Never use pans with a misshapen base. A hollow or rounded base can interfere with the operation
of the overheating protection, causing the appliance to become too hot. This may lead to the
glass top cracking and the pan base melting. Damage caused by using unsuitable pans or boiling
dry is excluded from the guarantee.
Container diameter
The minimum diameter for the pan base is 12 cm. If a pan is too small, the zone will not work.
Pressure cookers
Induction cooking is very suitable for pressure cookers. The fast-reacting cooking zone brings the
pressure cooker to pressure quickly. As soon as you switch off a cooking zone, the dish stops
cooking immediately.
Pan detection
The cooking zone automatically detects a suitable pan placed on a cooking zone. The cooking zone
display lights up.
19
Induction use
Integrated pan recognition
If a certain power level is set for a cooking zone and there is no (suitable) pan on the cooking zone,
the cooking zone will not deliver any power. After a certain period, the cooking zone will switch off
automatically.
Grill plates
The hob has a Grill function (depending on the model) for using a grill plate. The function keeps the
grill plate at an ideal temperature for grilling.
Cooking settings
Because the settings depend on the quantity and composition of the pan and its contents, the table
below is intended as a guideline only.
PurposeLevel
Use settings 1 - 5 to:
• simmer bouillon,
• stew meats,
• simmer vegetables,
• melt chocolate,
• poach,
• melt cheese.
Use settings 6 - 9 to:
• complete the cooking of large quantities,
• defrost hard vegetables,
• fry thick slices of breaded meat.
Use settings 10 - 11 to:
• fry thick pancakes,
• fry bacon (fat),
• cook raw potatoes,
• make breaded fish,
• cook through fish,
• fry thin slices of breaded meat.
Use setting 12 to:
• sear meats,
• cook fish,
• cook omelettes,
• fry boiled potatoes,
• deep fry foods.
Use setting boost to:
• bring liquids to a boil quickly,
• shrink greens,
• heat oil and fat,
• wok.
20
Induction use
Pans
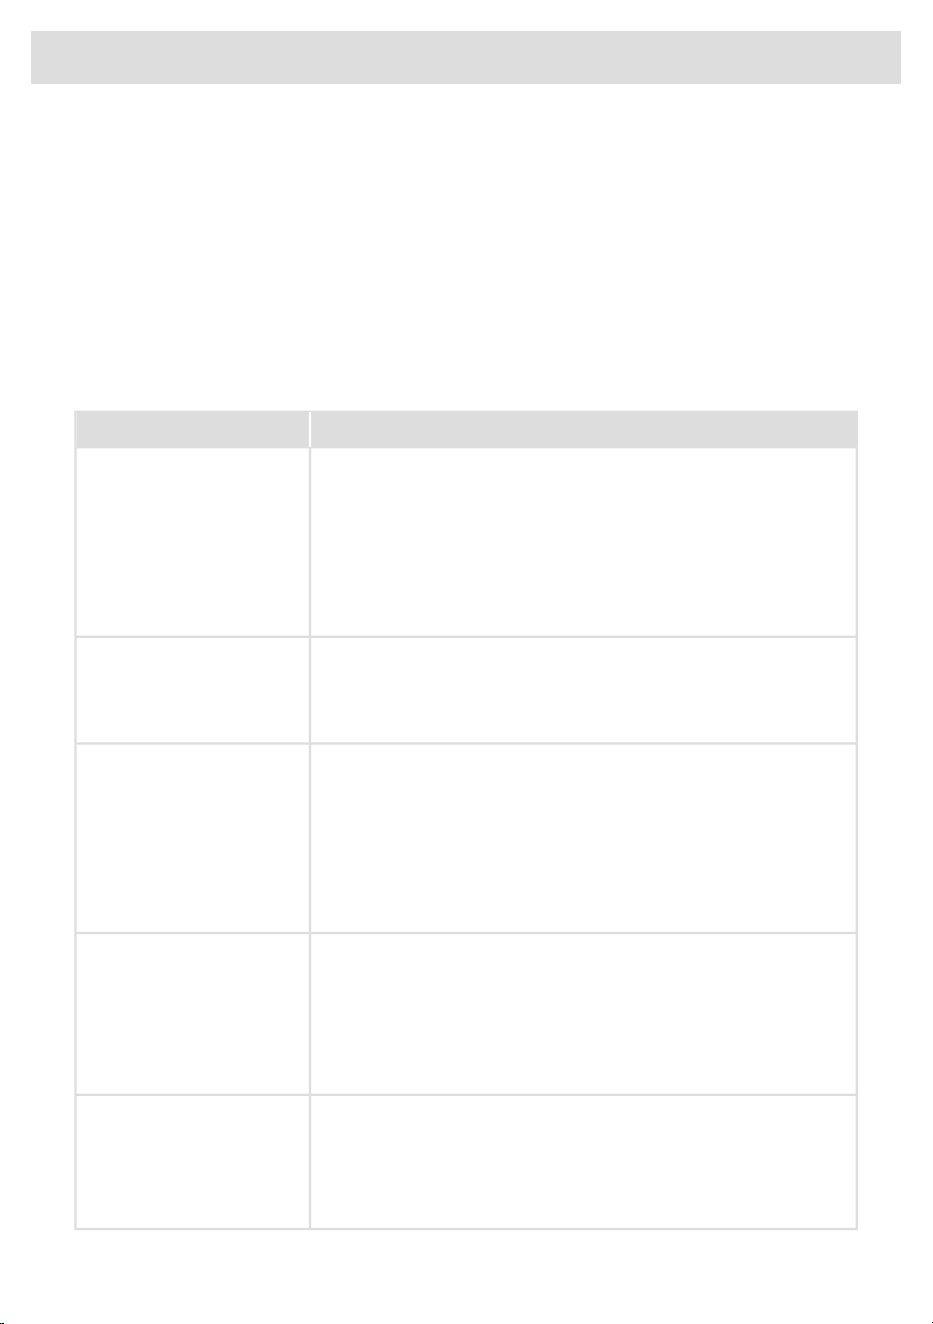
Always ensure that the flames remain under the pan. A lot of energy is lost when flames burn around
the outside of the pan. The handles could also become too hot.
wrong
right
Suitable cookware
Only use cookware with a suitable diameter. The cookware must not protrude over the edge of the
hob. Never use small cookware on large burners. The flames must not touch the sides of the cookware.
Refer to the table.
Maximum pan bottom
diameter
Minimum pan bottom diameterBurner
30 cm22 cmWok burner
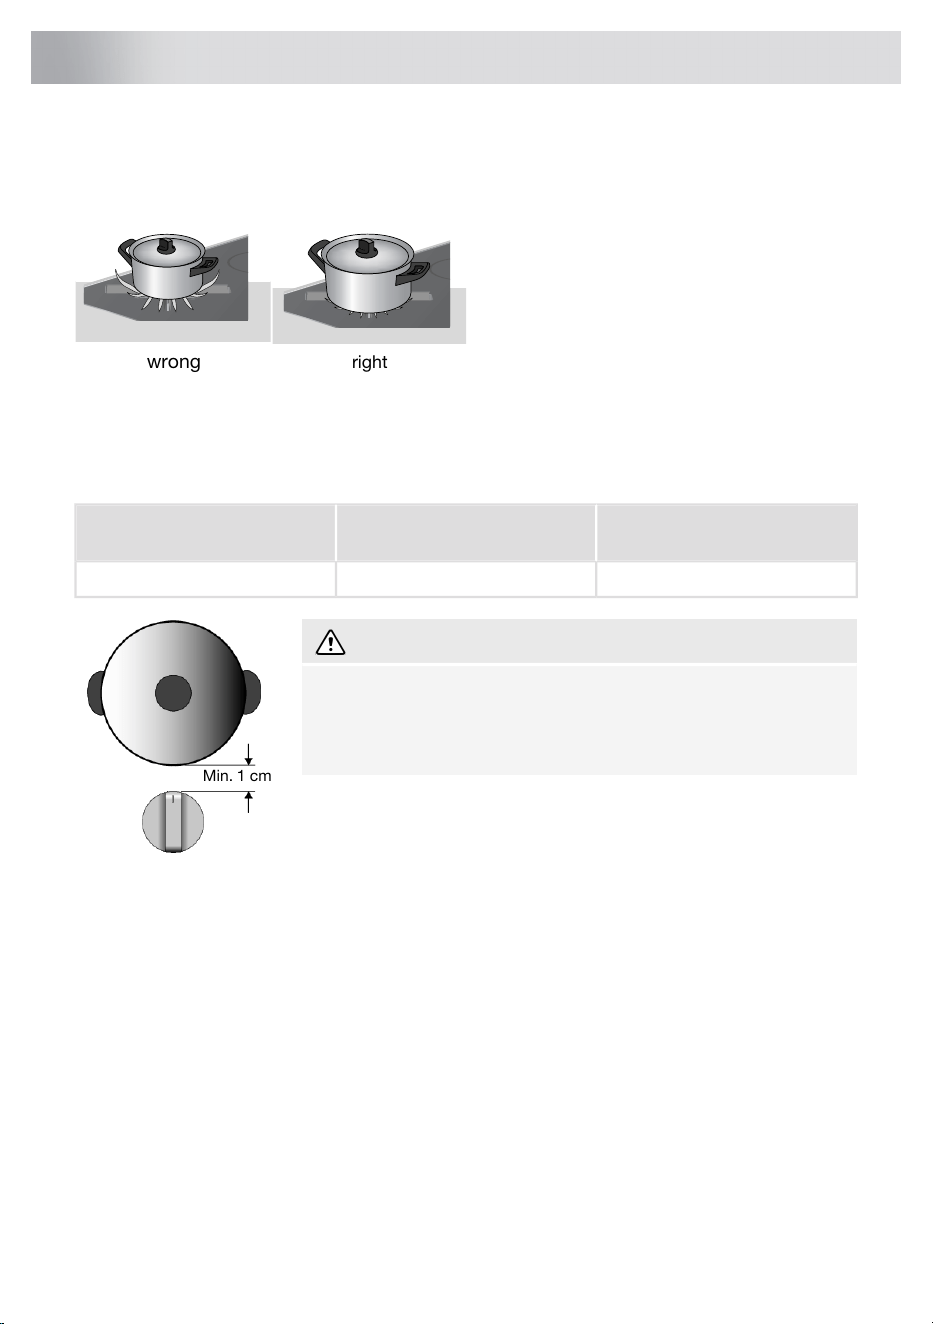
Min. 1 cm
WARNING!
The distance between the pan and a knob or non-heat resistant wall
should always be greater than one centimetre. In case of smaller
distances, the high temperature may cause the knobs or wall to
discolour and/or deform.
21
Wok burner use
Wok ring and simmer grid
Small pan support + simmer gridLarge pan support + wok ring
The wok ring for use with the wok burner supplied or obtainable as an accessory provides extra
stability for woks with a round base.
The simmer grid-supplied or obtainable as an accessory makes it possible to use very small pans.
CAUTION!
Only use the lowest power setting when using the simmer grid on the wok burner. The simmer
grid may discolour when used on a wok burner with a medium or high power setting.
Only use the wok ring on the large pan support in combination with a (round-based) wok. The
wok ring may discolour if using a wok with a flat bottom.
Pan support
Place the pan support vertically, without sliding it over the glass top. Use the positioning notches to
position the pan support on the glass top.
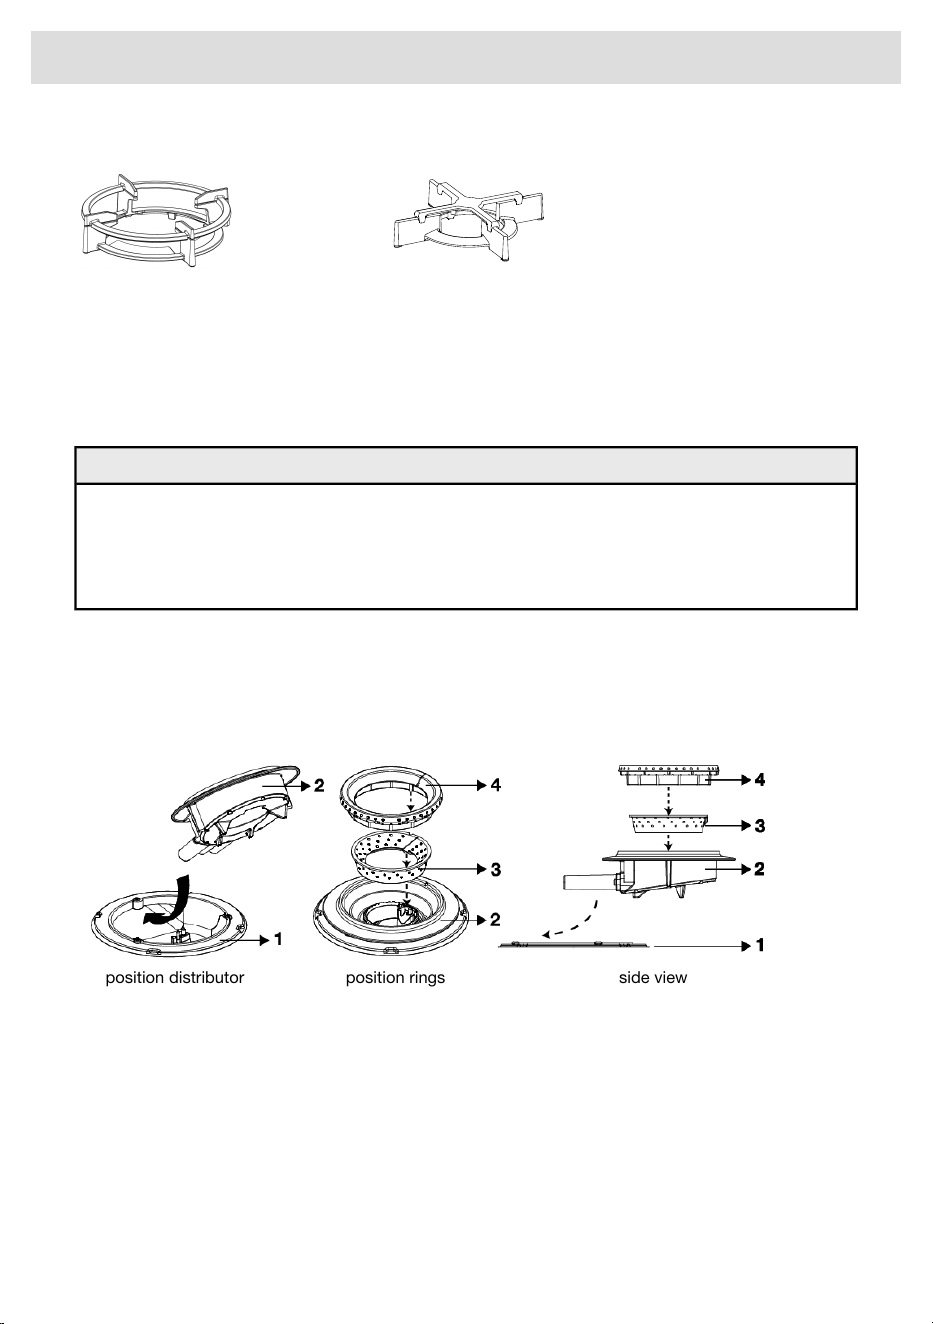
Wok burner position
position distributor position rings side view
Place the wok burner in the correct way. Placing the wok burner parts incorrectly can result in a
poorly functioning burner.
1. Place the burner distributor (2) in the burner housing (1).
2. Use the positioning notches to place the inner ring (3) on the burner distributor (2) .
3. Use the positioning notches to place the outer ring (4) on the burner distributor (2) .
22
Wok burner use
Start Preparing
Three cooking modes are available:
1. Standard cooking with power levels.
2. Cooking with the PLUS menu.
3. Cooking with Celsius°Cooking™ by measuring cookware temperature (available depending on
the model).
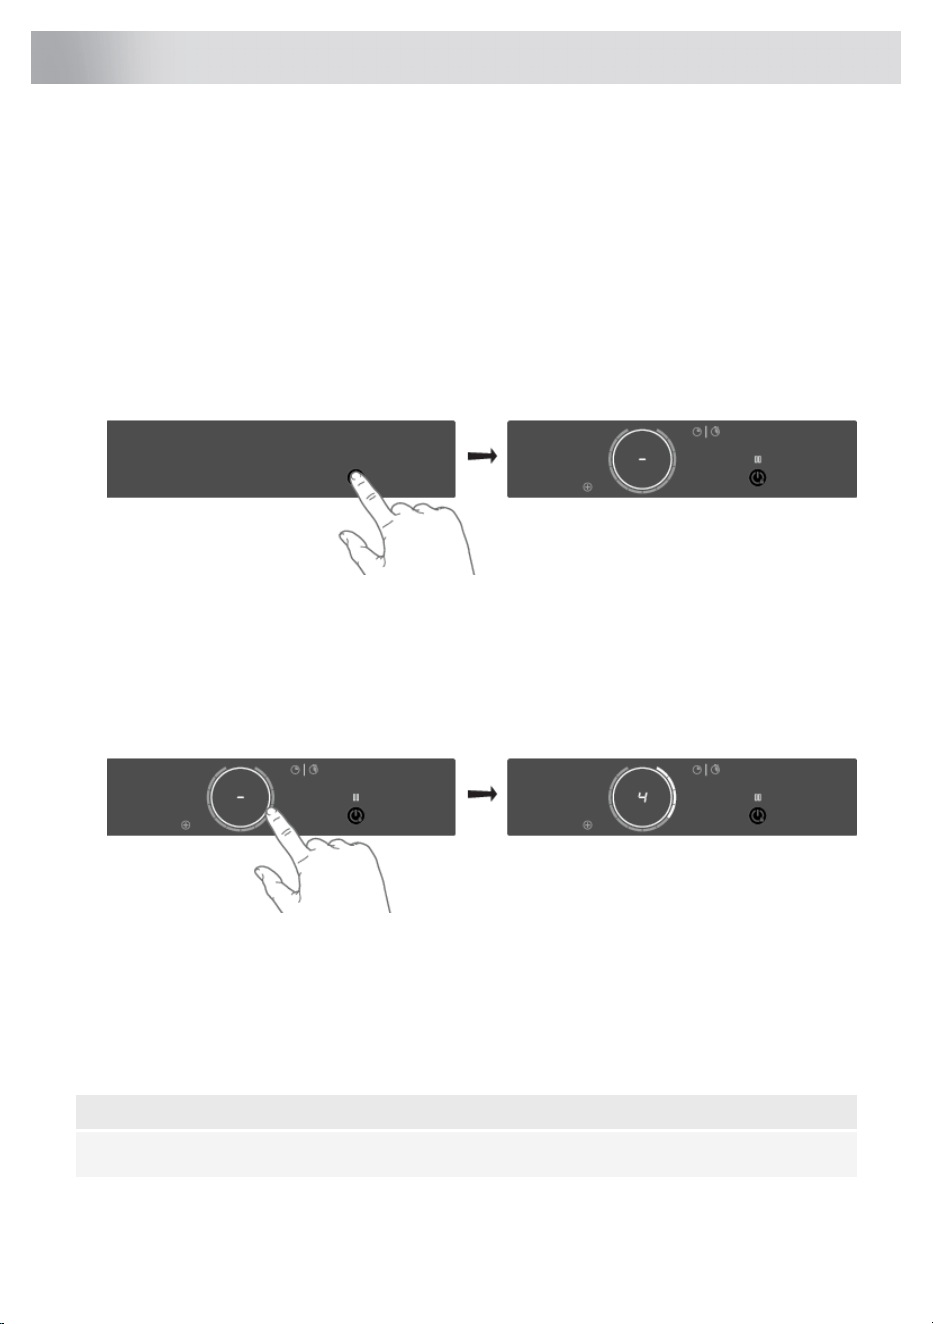
Standard cooking
1. Place a pan on a cooking zone.
2. Touch the on/off key to switch on the hob.
• A single audio signal sounds.
• The inner rings will light up.
• All the sliders light up; then they gradually go out. The slider only remains lit for the selected
cooking zones on which you have placed a pan.
3. Slide with your finger over the slide control (clockwise) or tap with your finger on the slide control
to set the desired setting.
• The cooking zone starts automatically at the setting that has been set.
4. Set a higher or lower setting by sliding over the slide control with your finger or by tapping on
the slide control.
• The cooking zones have 12 settings. There is also a ‘boost’ setting.
5. Remove the pan or touch the slider for 3 seconds to switch the cooking zone off.
NOTE!
When no cooking zone is active for 60 seconds, the cooking hob will power off.
23
Operation
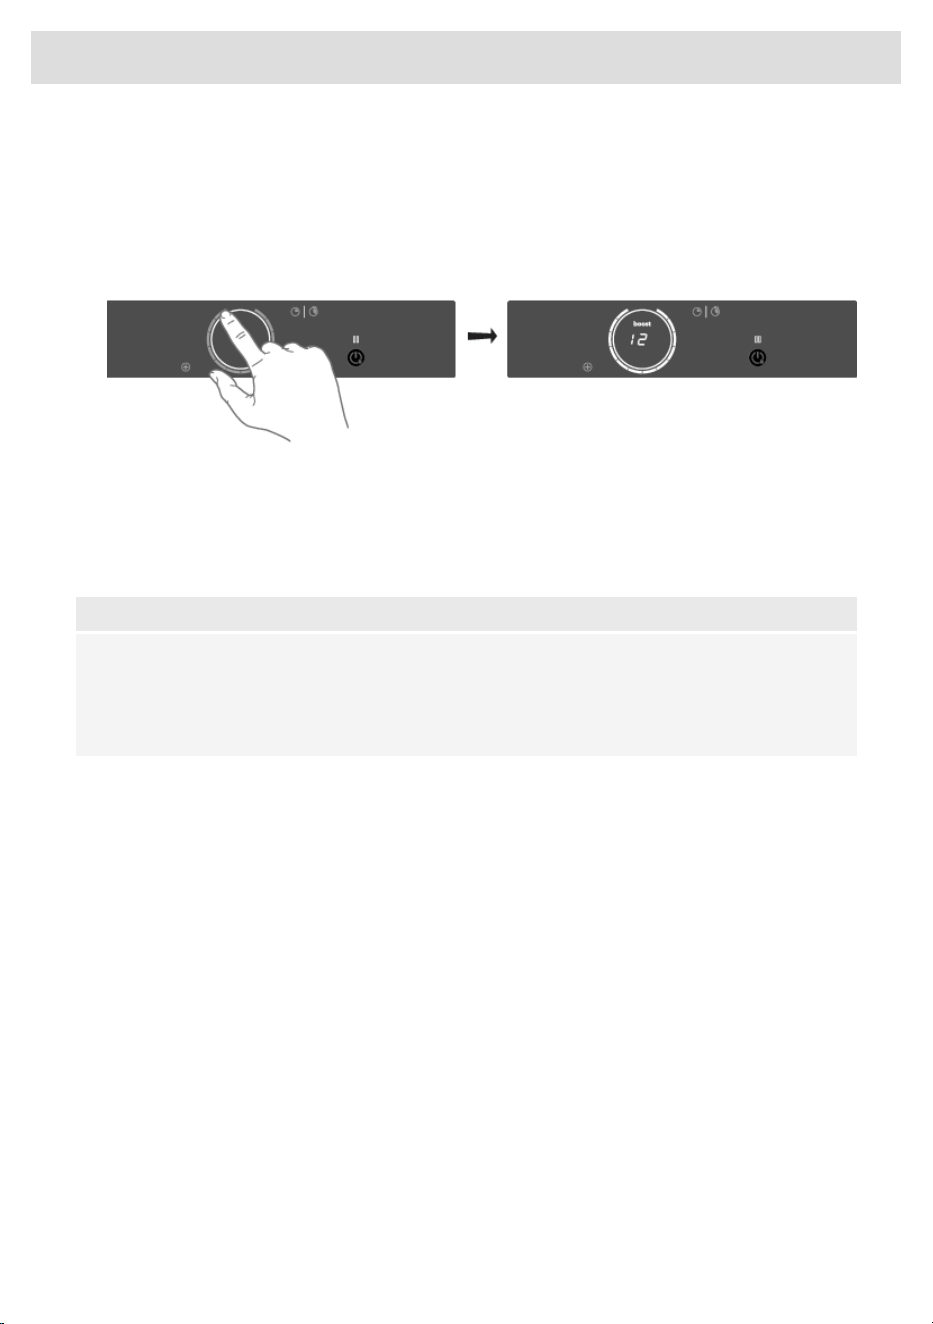
Boost
You can use the ‘boost’ function to cook at the highest power level during a short period of time (max
10 minutes). After the maximum boost time has passed, the power will be reduced to setting 12.
1. Place a pan on a cooking zone.
2. Touch level 12 of the slider or slide along level 12 to set the boost level. Touch level 12 twice if
'Auto Boost' is off (refer to chapter 'Settings').
• ‘12’ and ‘boost’ appear in the display.
• If 'Auto Boost' is active, boost is automatically activated when power level 12 is selected
(consult chapter 'Settings').
3. To deactivate the boost for the selected cooking zone, again touch level 12 on the slider.
NOTE!
To avoid overheating, the electronic control system may automatically deactivate boost prematurely
and decrease the power level to 12.
If there is no suitable pan on the cooking zone, the set level of temperature will flash. After one
minute, the cooking zone will be switched off.
24
Operation
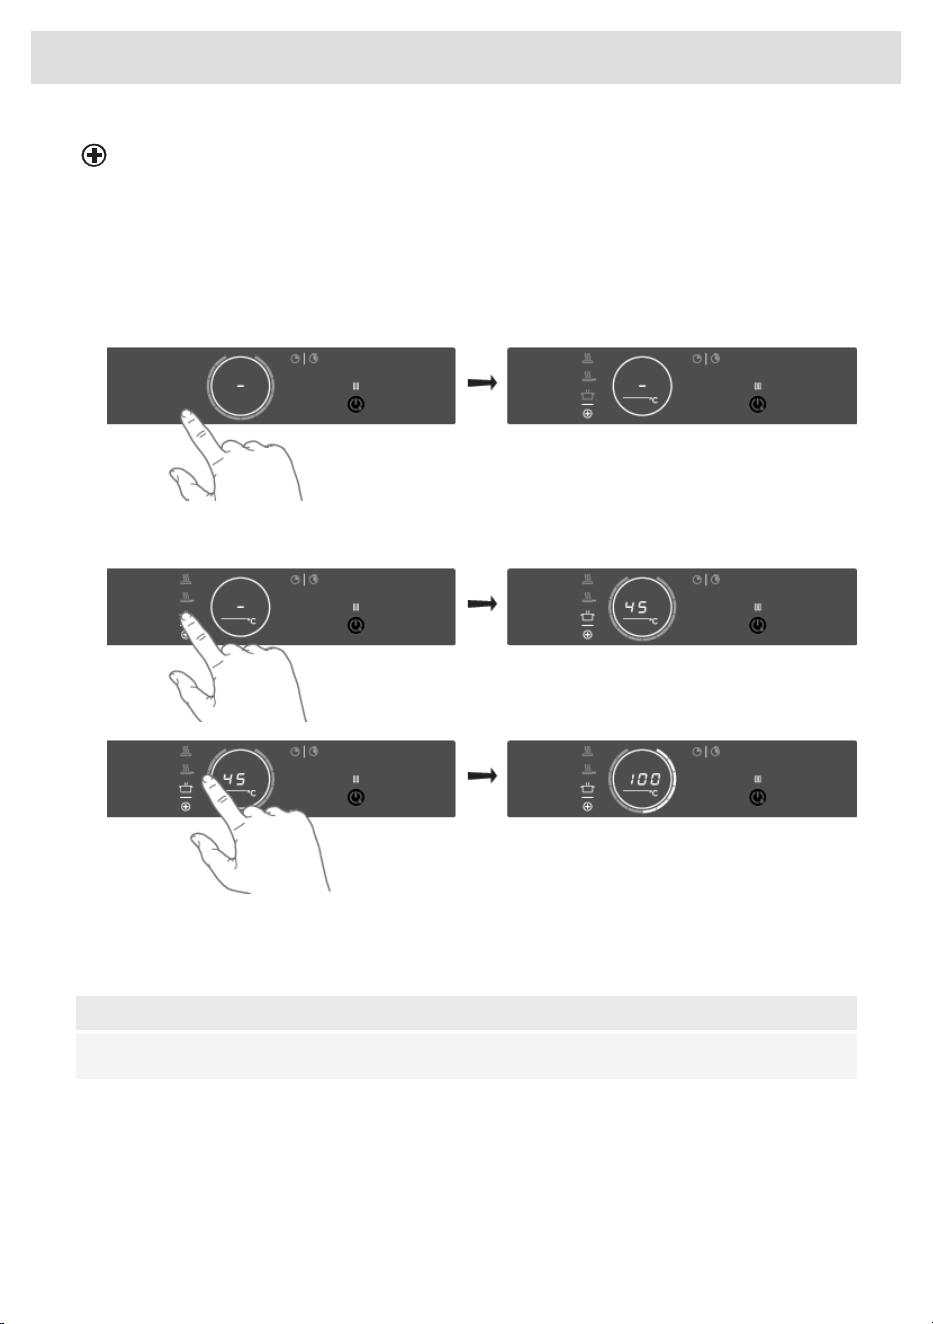
Cooking with the PLUS menu
The PLUS menu allows cooking with semi-automatic programs, enabling temperature cooking for
all kinds of cookware that fit the program's purpose.
1. Touch the PLUS menu key to display the program line: keeping warm/heating up, frying/wok,
and grill.
• When selecting the Grill program, you must use a grill plate that covers two linked cooking
zones.
2. Select the desired program and temperature range by touching the relevant symbol. You can
also toggle through the menu or temperature by long-pressing the relating touch key.
When the program or temperature selection does not change for 3 seconds, the program is activated.
To deactivate a PLUS program, press the active program key for about three seconds or select a
power level manually.
NOTE!
Always add water, oil or butter before starting a program; do not use an empty pan or pot.
25
Operation
Keeping warm and Heating up
UseTemperature (°C)
melt chocolate45
heating up/keeping warm70
simmer vegetables94
bring food or liquid to the boil quickly100
Frying/wok
UseTemperature (°C)
fish, bacon, fried egg, vegetables in butter140 / 160
schnitzel, sausages, jacket potatoes180 / 200
wok220
Grill
This function is exclusively for connected Bridge Induction cooking zones that are combined to form
a larger cooking zone.
Grilling is optimized for ASKO induction accessories: the grill plate and the teppanyaki. It will also
work with different cookware, but perhaps less accurate.
Some functions are indicating the heat up time, counting down. In the heating-up stage, the slider
and the set temperature will flash. When the set temperature is reached, a short beep will be emitted,
and the slider will be constantly lit. You may then start cooking.
The sensor which measures the temperature while cooking within the PLUS menu programs is located
in the glass below the cookware. Because of this, there is always an offset between the setpoint and
the actual temperature of the content inside the cookware. The temperature of the content inside
the cookware is therefore also dependent on factors such as the type of pan, the volume of liquid
and whether a lid is placed on the pan.
NOTE!
Up to a temperature of 94 °C, the programs allow the hob to reach and maintain the set
temperature automatically by measuring the glass surface temperature. This will avoid liquids
overflowing and burning on the bottom of the pan.
NOTE!
From 100 °C on these programs will heat cookware with different timed power steps. The set
temperature serves as an indication of the approximately to be reached temperature range.
Someone must always be present to supervise the cooking process.
NOTE!
For more accuracy, Celsius°Cooking™ cookware such as Frying Pan, Chef's Pot or the Probe is
recommended, with separate functions for it (see chapter 'Cooking with Celsius°Cooking™').
26
Operation
NOTE!
Starting these menu functions at the beginning of the cooking process will give the best results.
An already hot surface will influence the performance.
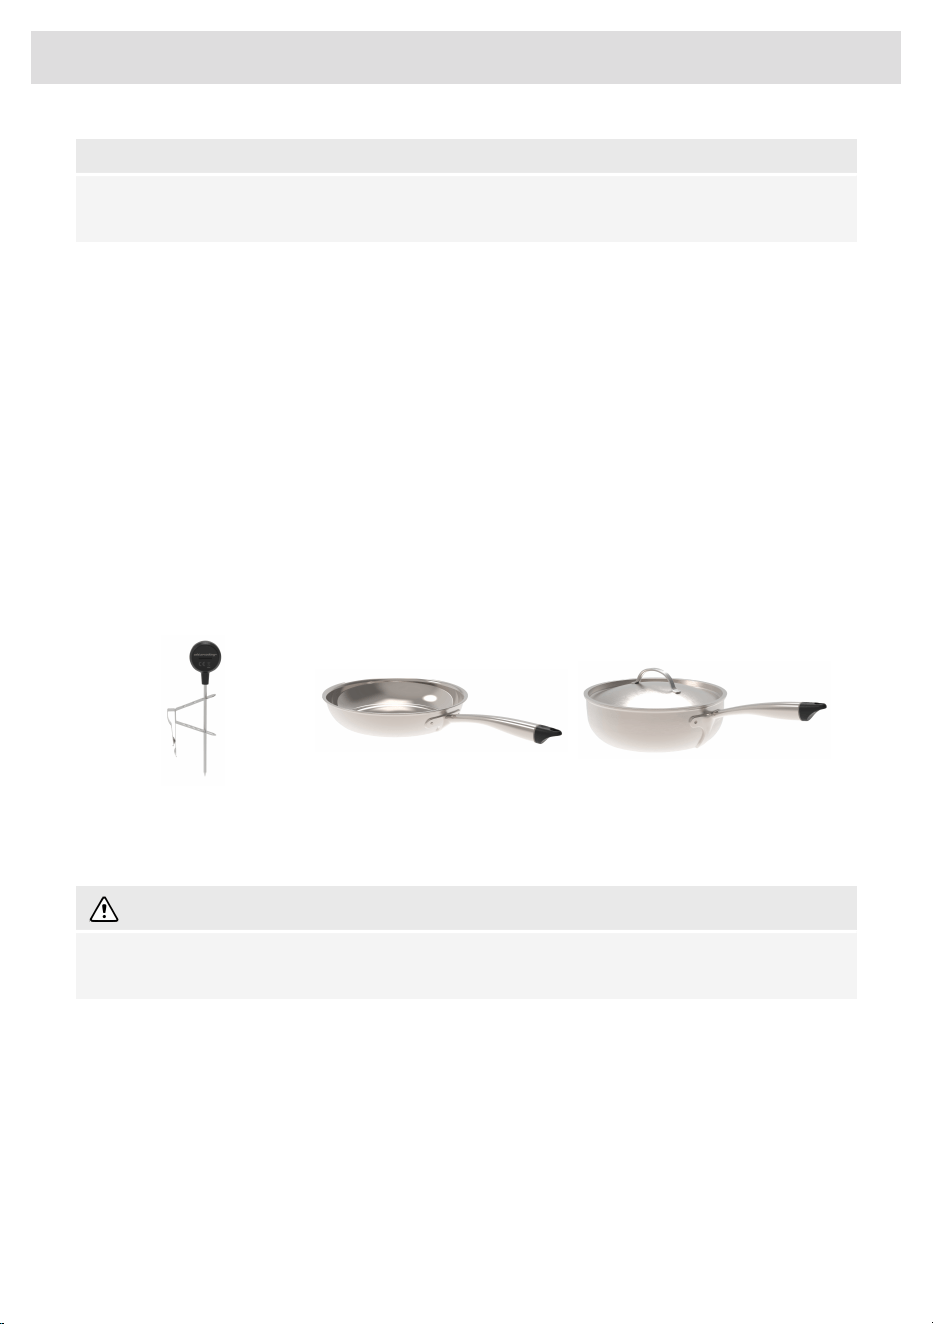
Cooking with Celsius°Cooking™
Introduction
Welcome to Celsius°Cooking™.
The Celsius°Cooking™ programs have been developed in cooperation with Hestan Cue. Your new
induction hob is fully packed with smart functions and features that make cooking easier and more
pleasant.
In order to get the most out of these and explore what's possible with Celsius°Cooking™, you can
also buy some additional connected equipment that will help you gain total control over temperatures
and timings.
Additional accessories are included with some models.
This equipment lets you unlock the full power of Celsius°Cooking™, reading and communicating
exact information about the temperature of your ingredients, giving perfect results. The equipment
is:
Chef's potFrying panProbe
Find out more at www.celsiuscooking.com, www.asko.com.
WARNING!
The Frying pan and Chef's pot are not suitable for use on the gas burner! Only use the pan / pot
on the induction part of the cooking appliance.
27
Operation
Cooking with Celsius°Cooking™ cookware and programs
This option involves cooking using either the Celsius°Cooking™ cookware (frying pan or pot’s) that
continuously measures the temperature inside the cookware or the Celsius°Cooking™ temperature
probe. All use Bluetooth connections to send information about the temperature to the cooking hob.
Preparing the system
Before you start cooking, please make sure you complete all the preparation steps. Otherwise, you
may run into difficulties or inadvertently cause damage to the system.
Using Celsius°Cooking™ ensures the cookware is always at the right temperature needed to prepare
the food you are cooking.
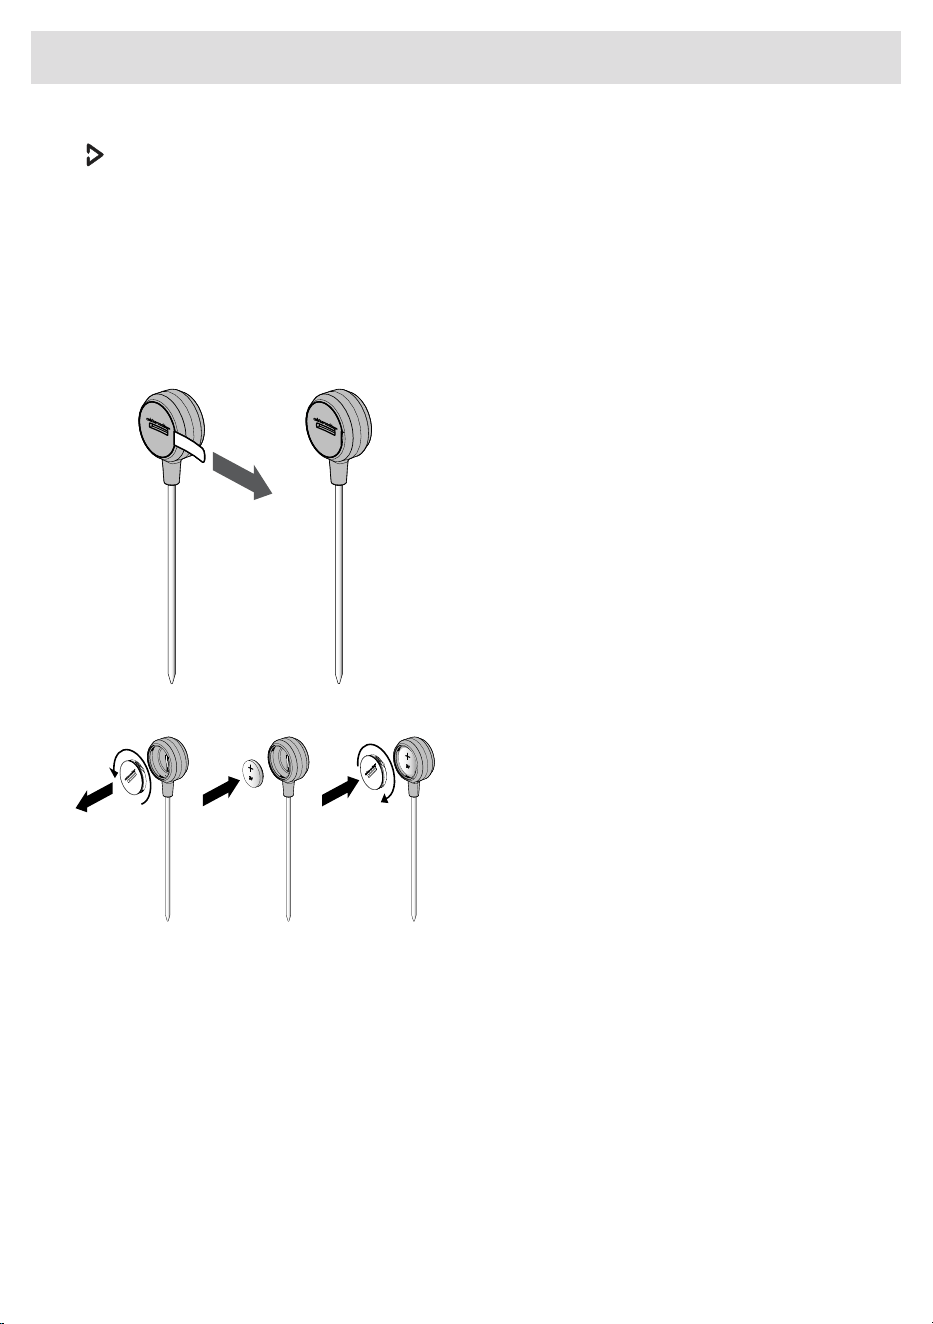
Prepare Celsius°Cooking™ Probe
1. Pull the battery protection tab out of the
Celsius°Cooking™ Probe housing.
2. The Celsius°Cooking™ Probe is ready to
be used. If necessary, replace the battery.
Battery installation Celsius°Cooking™
Probe
1. Unscrew and remove the battery cover
and replace the battery (negative (-) side
goes in first).
2. Replace the battery cover. Do not
overtighten.
Insert the Celsius°Cooking™ Probe into a cooking pan
The Celsius°Cooking™ Probe can be used with different types and sizes of pans. Due to the use of
a suspension bracket with different holes, the Probe can be suspended in different ways.
28
Operation
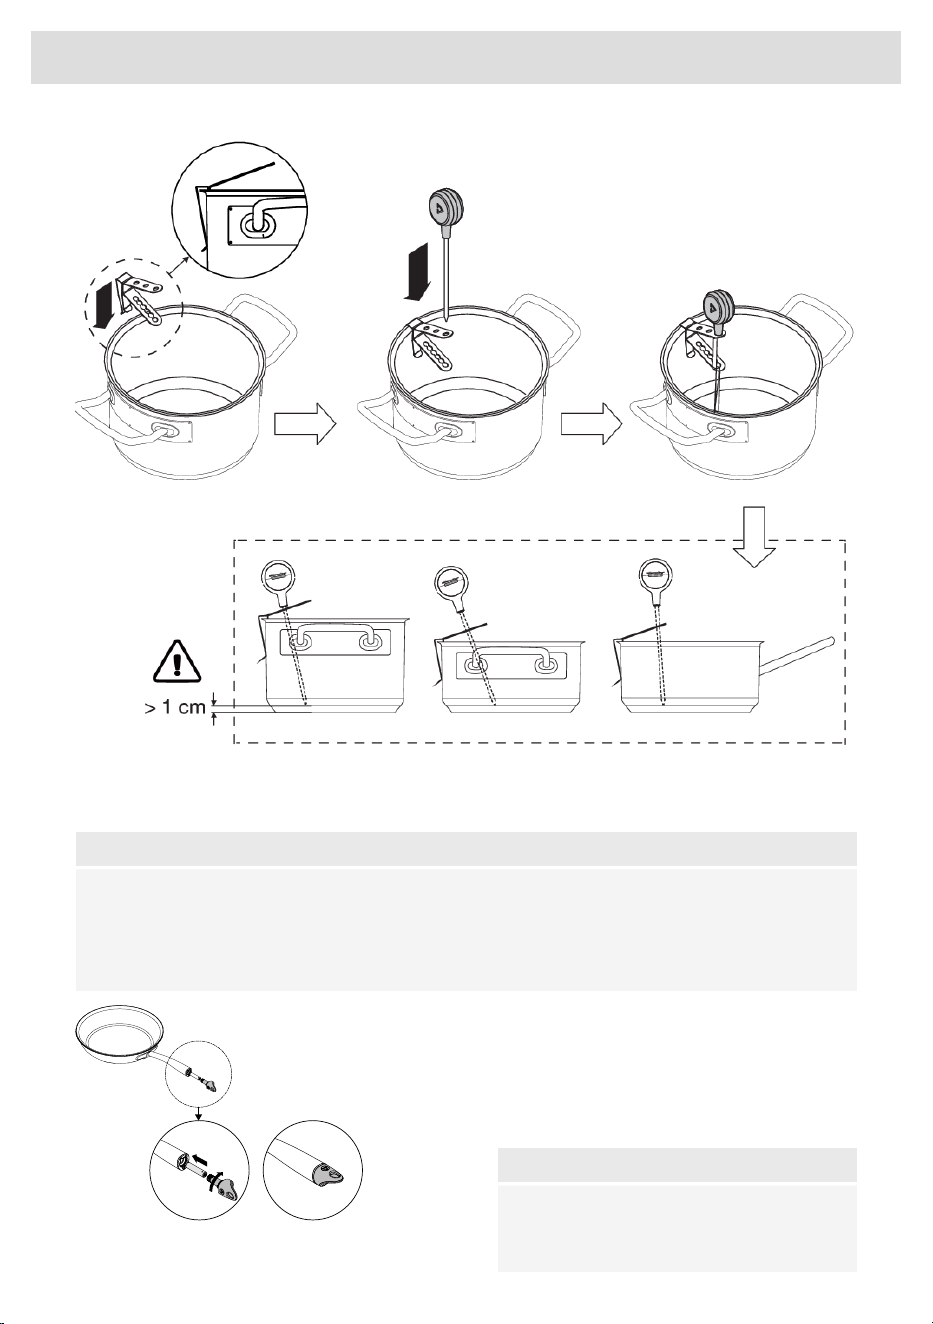
1. Slide the suspension bracket over the pan edge.
2. Insert the probe into the suspension bracket from above.
NOTE!
• Leave a minimum distance of 1 cm between the pan base and the measuring point of the
probe!
• In case the connectivity between cookware and the hob is unstable, this could be due to a
low battery. In those cases, we recommend changing the battery.
Celsius°Cooking™ Cookware
1. Insert an AAA battery in the panhandle
(negative (-) end goes in first).
2. Insert the handle end into the panhandle
and turn it a quarter to secure.
NOTE!
Do not exchange the handle cap of a chef's
pot (31620) with that of a frying pan (31619)
or vice versa.
29
Operation
Assigning the cookware to the cooking zone
Switch on the hob and wait until the end of the start-up animation.
Place the Celsius°Cooking™ cookware or a regular pan fitted with the Celsius°Cooking™ probe on
the desired cooking zone. After it has been detected, quickly tap twice with your fingertip on the
sensor in the end cap or the probe housing to activate it. Then the Celsius°Cooking™ mode key will
immediately light up. To assign the probe, the Celsius°Cooking™ mode key will light upon every
possible cooking zone. Press the Celsius°Cooking™ mode key of the desired cooking zone. The
Celsius°Cooking™ menu will be opened. With a short press again, it can be closed.
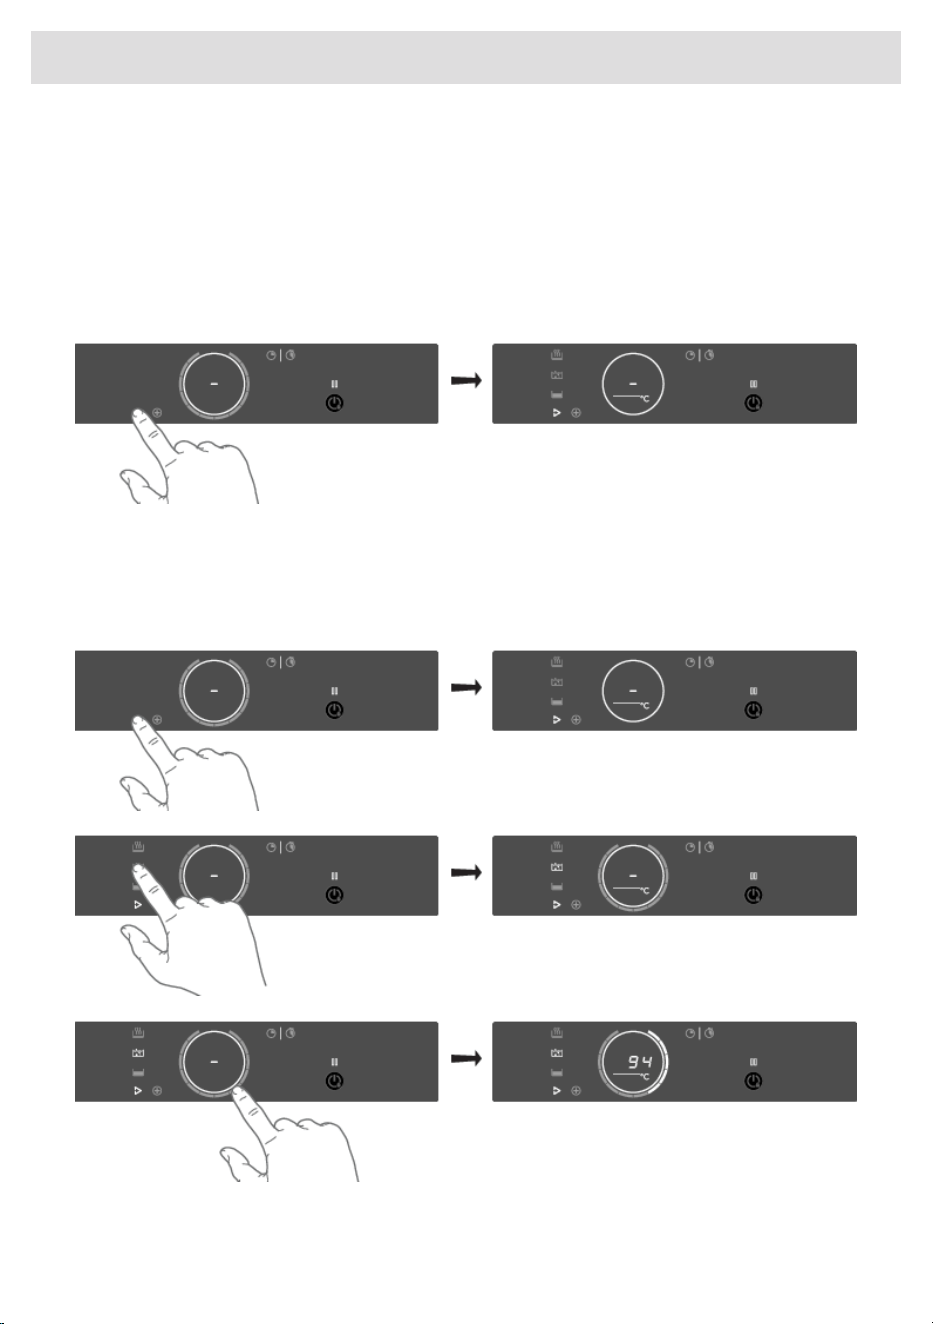
Cooking with the embedded Celsius°Cooking™ programs
The hob comes along with integrated Celsius°Cooking™ programs, optimized for Celsius°Cooking™
cookware. With the opened menu, 3 different cooking methods can be chosen, with different
temperature ranges. If the probe is used, only two suitable Celsius°Cooking™ methods are shown.
Use the one that fits the desired purpose:
30
Operation
Heating up and frying
This program is to reach high temperatures rapidly. High pan bottom temperatures can be reached.
Always add oil or butter before starting it. For healthy cooking don’t exceed the smoke point of the
used oil.
Boiling or cooking with water
With this program, the water gets to boil quickly. Always add water before starting.
Slow cooking or sous vide
This program is to control low to medium temperatures, preventing high bottom temperatures.
Larger quantities and thicker dishes need to be stirred occasionally to ensure a homogeneous heat
distribution.
Using the probe as a cooking thermometer
When a Celsius°Cooking
TM
probe is used it can also be used as a thermometer to just monitor e.g.
the core temperature of a certain dish. This can be done on normal level cooking or PLUS menu
programs. To use the probe as thermometer, lift up the pan you want to use for a few seconds, place
it back on the zone and activate the probe by tapping. When the Celsius°Cooking™ symbol appears
on the display, touch it.
INFORMATION!
Please make sure that the appliance is already switched on before placing the Celsius°Cooking™
cookware so that the system can clearly identify its position.
TIP!
When the Celsius°Cooking™ Probe is recognized on a cooking zone, it can also be used as a
thermometer. The display then shows the temperature instead of the power level. As the power
level changes, it is temporarily displayed in place of the actual temperature.
Probe removal detection
If the probe is moved out during cooking, the hob will detect that and stop heating. When placed
back, the user can confirm that by touching the now blinking Celsius°Cooking™ mode button, or it
might get re-detected automatically.
Adding e.g. cold water to the pot might trigger this detection too!
Step-by-Step cooking guide on CelsiusCooking.com
The best-tasting food is prepared at the right temperature and for the
right length of time. The ability to set temperature instead of power levels
supported by how-to (video) guidance lets you create chef-like meals
cooked to perfection. The CelsiusCooking.Com website is full of inspiring
recipes with step-by-step instructions based on chef=tested techniques
guiding you to prepare deliciously, fail-proof recipes over and over
again.
31
Operation
CelsiusCooking.com
• Whether you are a chef or a beginner, CelsiusCooking.com is going to help you cook better food
more often by acting as your guide in the kitchen. You'll learn new techniques, novel combinations,
and gain confidence in more difficult dishes. Instead of just cooking at a power level, you will
be cooking at an exact temperature level.
• Our recipes lead you through the process of 'Mise en place’ where you'll gather and prepare all
of your ingredients in advance. This is particularly important following the recipes on
CelsiusCooking.com as each recipe has been carefully timed to give you the perfect results.
• Just follow the steps. The timing and temperature guide will make sure your food is prepared to
perfection. It may take some getting used to, but you will end up with an even better meal.
Switching off the cooking zone
Switching off a Celsius°Cooking™ controlled zone is possible by setting the temperature to zero (0).
The display will show a dash. Alternatively, touch the Slider or the Celsius°Cooking™ key from the
zone to be switched off for at least 3 seconds to deactivate the Celsius°Cooking™ mode completely.
INFORMATION!
While the Celsius°Cooking™ probe is used to control the temperature of the content inside a pan
(e.g. water or soup) the Celsius°Cooking™ cookware is controlled on the pan bottom temperature.
Due to this, there is always an offset between the set-point and actual temperature of the content
INSIDE the cookware. When, e.g. trying to boil a liquid on the Celsius°Cooking™ cookware may
be necessary to set a higher temperature to reach the boiling point. Reaching the boiling point
is also further dependent on the volume of the liquid and whether a lid is placed on top of the
cookware. Furthermore, regular stirring improves this behaviour, even when cooking with the
probe.
Bridge Induction zone
The Bridge Induction zones can be linked together. This creates one large zone that can be used,
for example, for a large fish pan or various pans at the same power.
• Pan position recognition is activated automatically after the appliance is switched on. When a
pan is placed on the hob, the pan recognition function recognizes its position and automatically
bridges the cooking zones depending on the size of the pan (only if the hob was already switched
on).
• If the Bridge Induction zones are linked, they cannot be set to boost and the menu functions
cannot be used.
• Use a fish or other pan that covers at least one of the Bridge Induction zones in the middle.
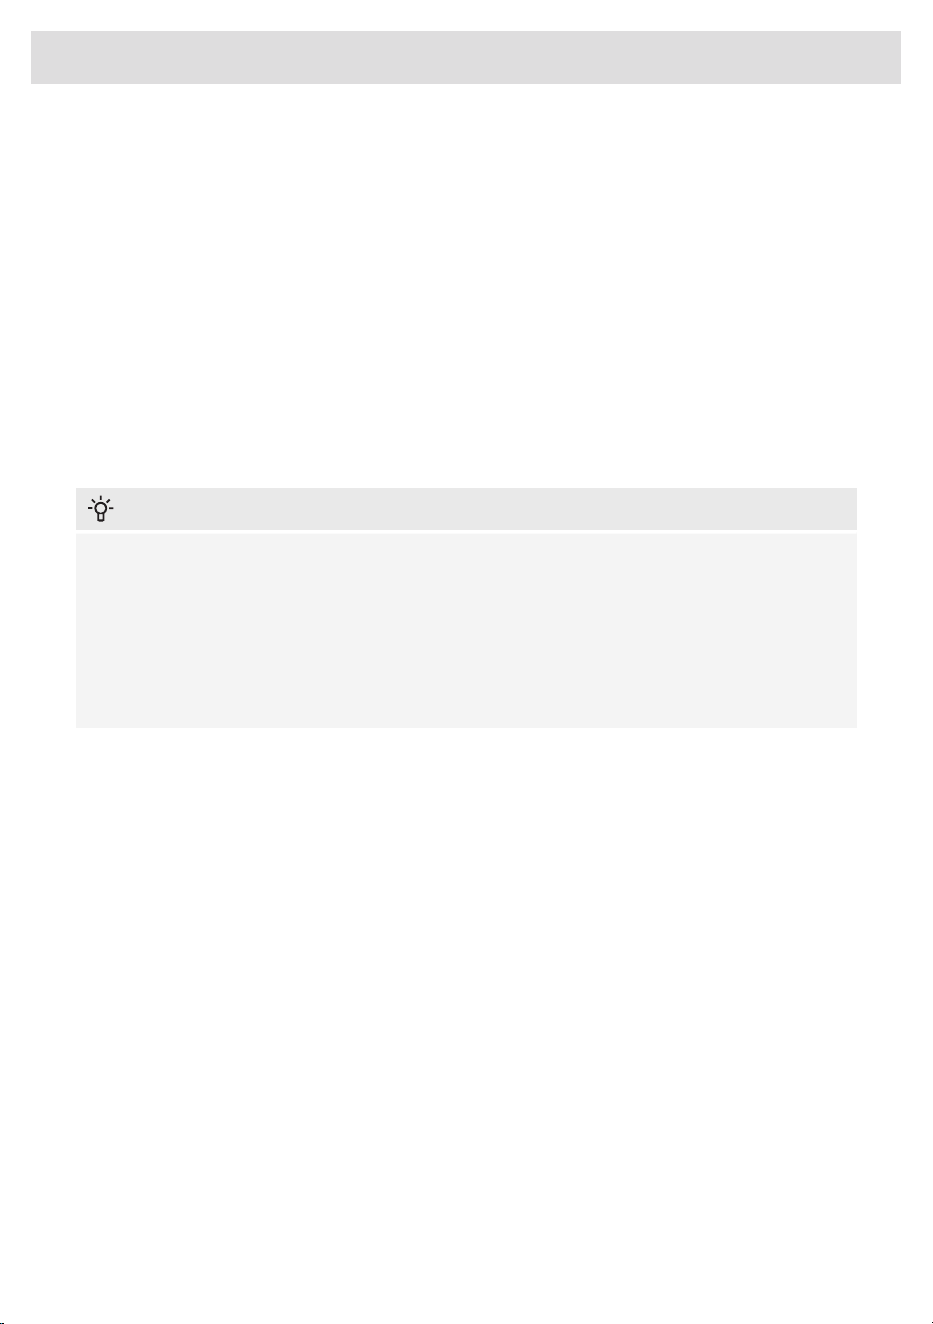
Connecting Bridge Induction zones
1. Place a large pan on both cooking zones so that both zones are well covered.
•
If the brd (auto-connecting) function is active, the zones are linked automatically (consult
chapter 'Settings').
2. Touch the sliders of both left or both right cooking zones.
32
Operation
• The power level or temperatures are displayed simultaneously on both connected cooking
zones.
3. Use the slider of the front cooking zone to set the desired cooking setting for the linked cooking
zones.
4. Touch both sliders again to unlink the cooking zones.
Pause
The pause function can be used to pause the operation of the entire cooking hob for up to 10 minutes.
Thus, you can walk away from the appliance or safely clean the cooking hob, within a short period,
without losing your settings.
Switching on the pause
At least one cooking zone must be active.
Touch the pause key.
• You will hear a short beep.
• The settings on all active hobs are reduced to level 2.
• All timer functions are paused.
• The pause key flashes.
• All keys are inactive except the pause and on/off-key.
If no key is pressed within 10 minutes, all active hobs automatically turn off.
Celsius°Cooking™ programs are not paused since they are automatically operated.
Switching off the pause
Touch the pause key again within 10 minutes.
• The hob continues to operate with the same settings.
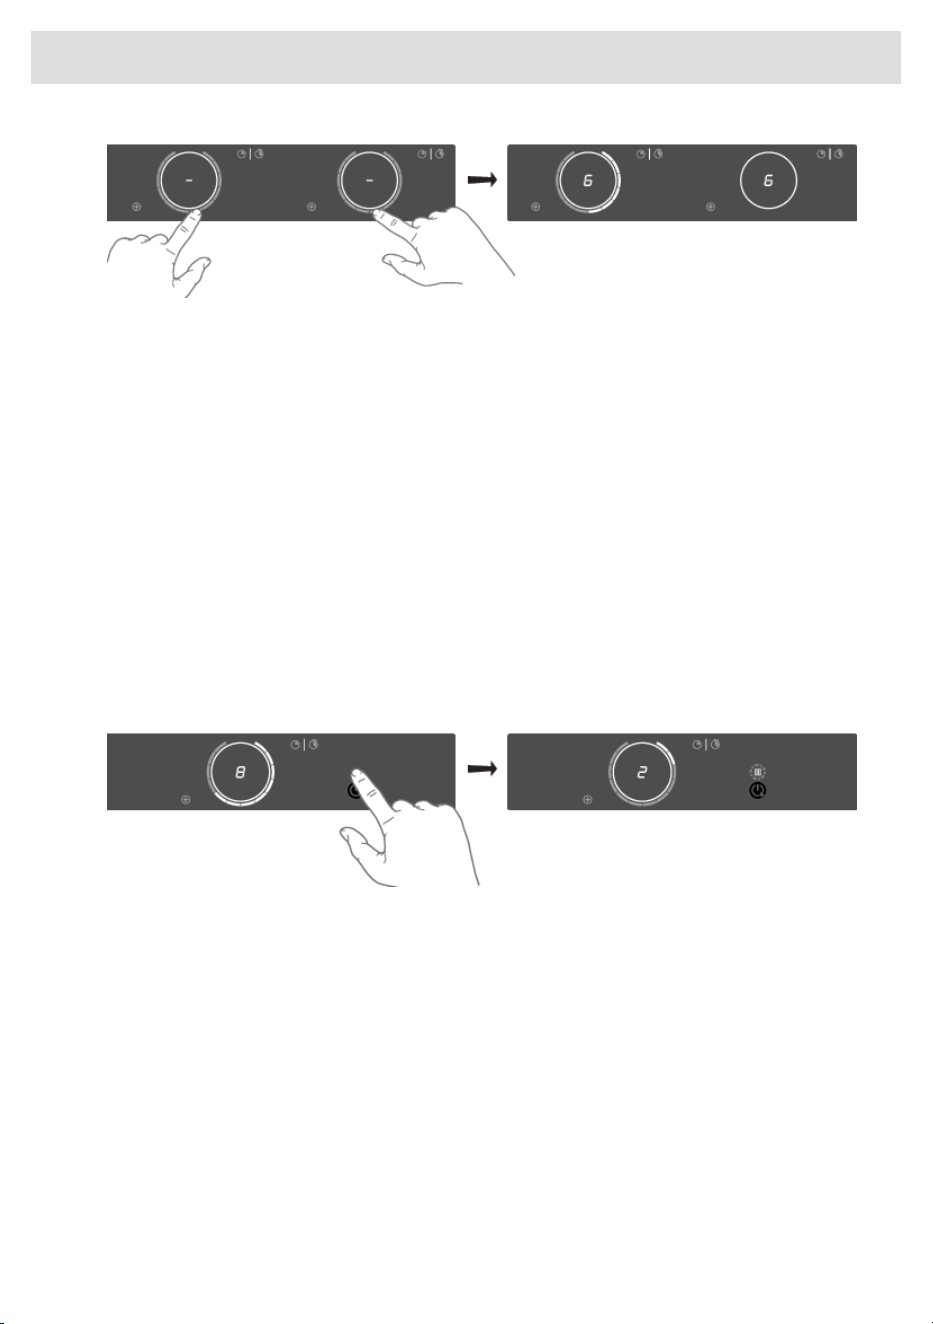
Child lock
The cooking zones can be locked to prevent them from being switched on inadvertently.
1. Touch the on/off key to switch on the hob.
33
Operation
2. Touch the on/off key for approximately 3 seconds.
3 sec.
• The indication 'L' appears on the display and the hob controls are locked.
3. Proceed in the same way to unlock the controls.
• When touching and holding the on/off key, 'L' appears on the display and then disappears.
The controls are unlocked.
Timer functions
Every cooking zone has two timers: a count-down timer and a stopwatch (count-up timer).
Count-down timer
The count-down timer makes the cooking process easier by setting the cooking time for the selected
cooking zone. When the time set on the timer expires, the cooking zone will automatically switch off
and emit an acoustic signal. You can switch off the acoustic signal by touching the count-down timer
key; alternatively, it will switch off automatically after a while. You can set the count-down timer
independently for all cooking zones.
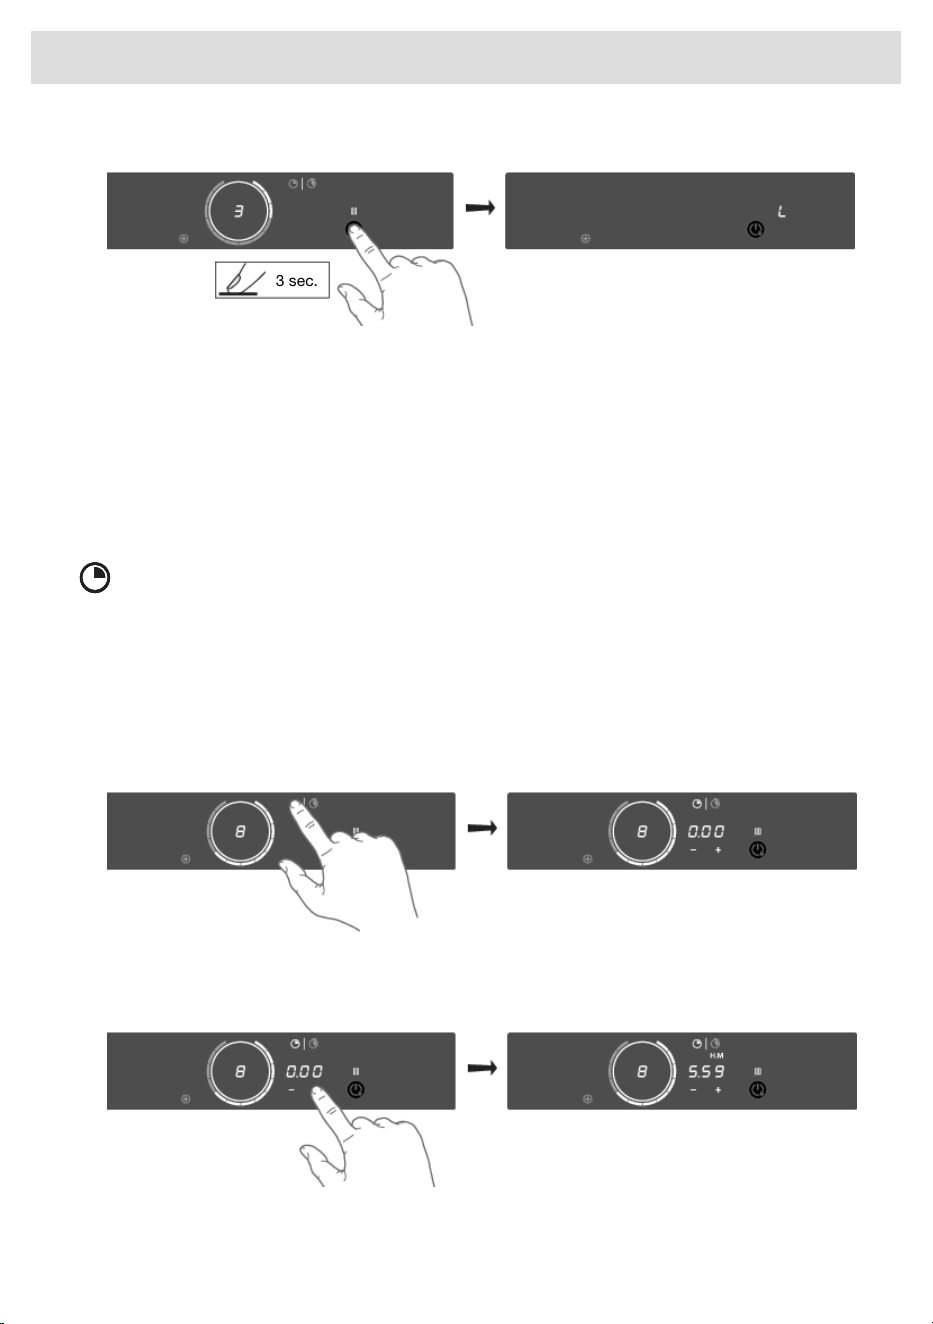
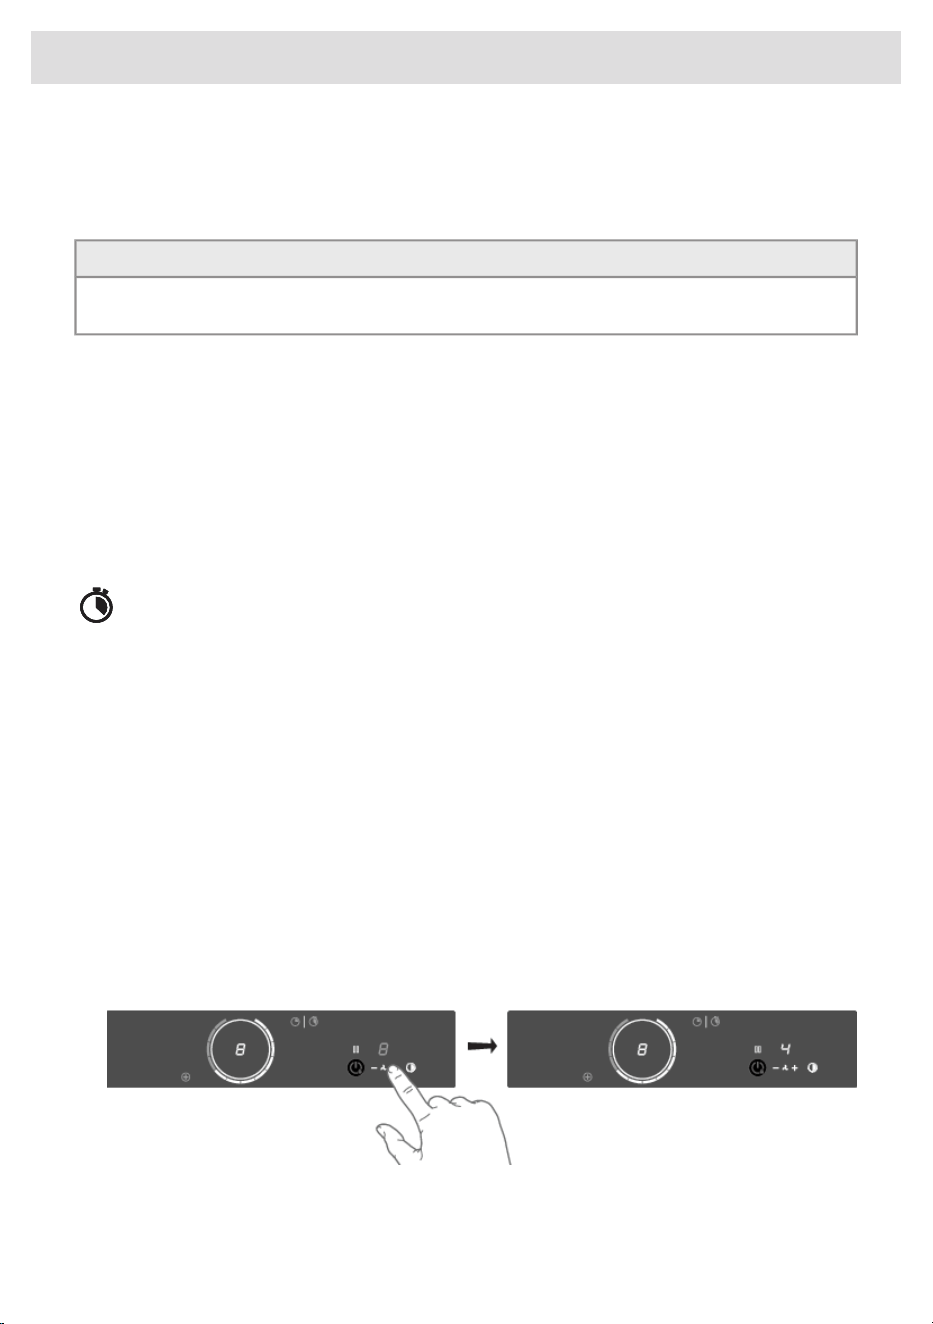
Setting the count-down timer
1. Touch the count-down timer key for the desired active cooking zone.
• The count-down timer key and 000 will flash on the cooking zone display unit.
2. Set the desired cooking time with + (plus) and - (minus) touch keys.
• Touch the - (minus) key to increase the time in hours. Touch the + (plus) key to increase the
time in minutes. Then, if desired, touch the - (minus) key to decrease the time in minutes.
• If the time is not set within five seconds, the count-down timer is disabled.
34
Operation
3. If desired, repeat the same steps to set the count-down timer for another active cooking zone.
• When a Celsius°Cooking™ program is active, the timer will start counting down when the
program reaches the desired temperature.
TIP!
If you move the pan from the cooking zone, all timer functions set for that cooking zone will be
paused.
Deactivating the count-down timer
Long touch the count-down timer key for the desired active cooking zone.
• The timer is switched off.
• Deactivating the count-down timer alarm.
• When the set time expires, alarm will be sounded, the key for the relevant cooking zone will flash,
and 0:00 will flash on the count-down timer display unit.
• To acknowledge and stop the alarm, touch the count-down timer key, or remove the pan from
the cooking zone.
Cooking time display – stopwatch
The stopwatch can be used to see how long you have been continuously cooking on the selected
cooking zone and starts counting automatically in the background.
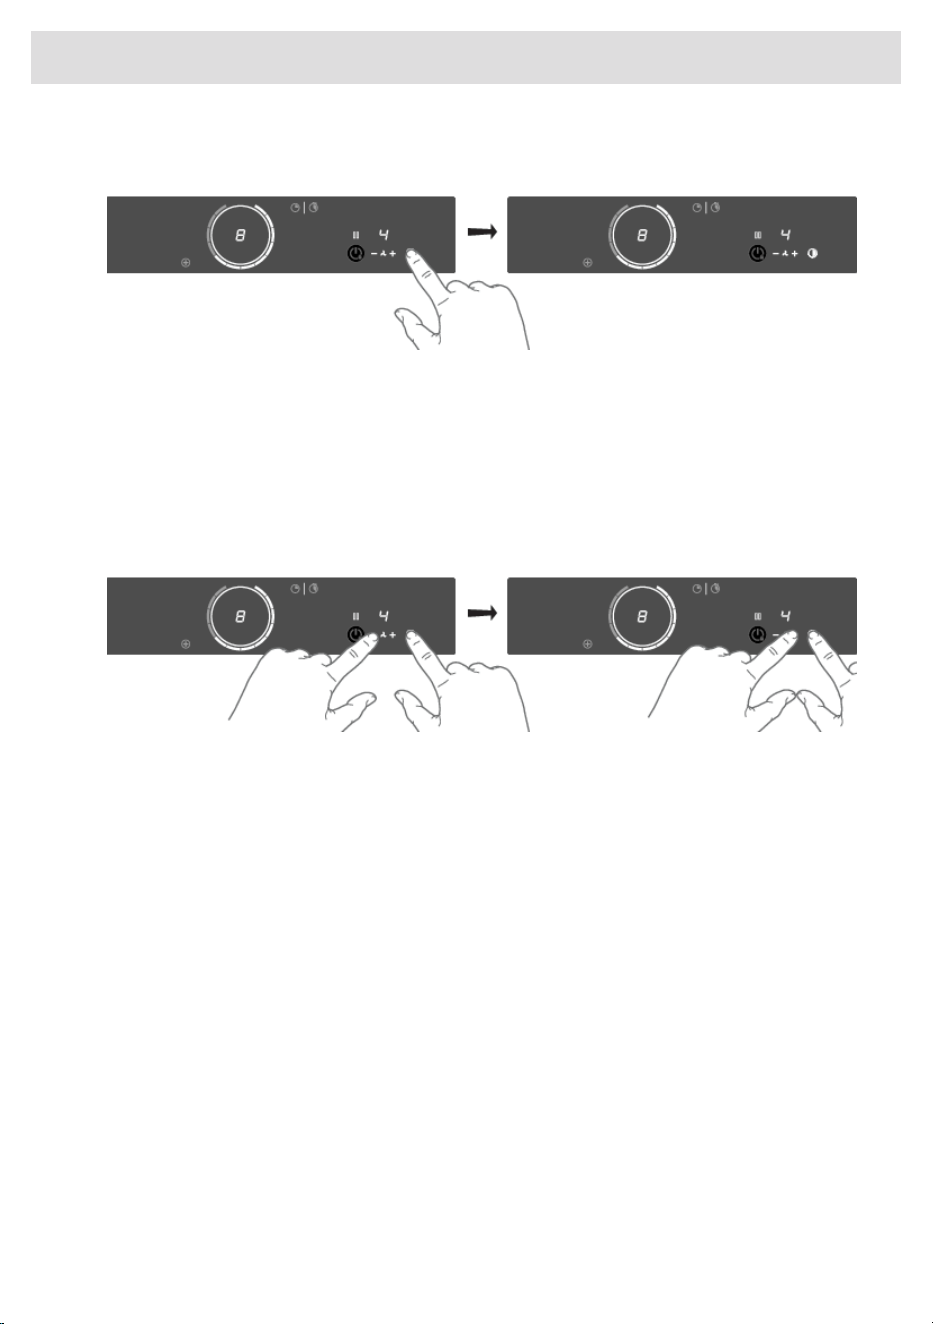
Touch the stopwatch key.
• The stopwatch time will be displayed on the cooking zone display unit.
• The stopwatch can be reset if you press the stopwatch key for 3 seconds.
Operation of the linked extraction hood
If you own a compatible RF enabled hood, it can be connected to the induction part of your hob. To
pair and customize the behaviour of your hood see chapter 'Settings'. Parameter hth is used for
pairing, while hSt and hSc effect the behaviour of your hood so you can customize it according to
your kitchen habbits.
Switching extraction on and off
1. Touch the + (plus) key for a higher fan setting. Touch the + (plus) key for 1 second to select the
highest setting.
2. Touch the – (minus) key to select a lower setting.
3. To switch off the cooker hood, press and hold the ‘Fan’ key for 1 second.
35
Operation
Switching the light on and off
1. Touch the lighting key.
• The light switches on at maximum strength.
2. Long touch the lighting key to set the lighting strength.
3. Short touch the lighting key to turn off the light.
Changing the colour lighting temperature
1. You can adjust the lighting temperature.
2. Long touch the lighting key and simultaneously the – (minus) key to make the light ‘colder’ or
the + (plus) key to select a ‘warmer’ light.
Automatic extraction
The extraction module has three automatic extraction settings (see chapter 'Settings'):
• Synchro Start (Settings)
This setting allows the induction hob to automatically activate the lights of the connected hood
every time the induction hob is turned on. Depending on the value you set, the ventilation will
automatically start at that speed level when any cooking zone is activated.
• Synchro Control (Settings)
In addition to Synchro Start, the hood will be controlled automatically depending on the current
highest activated cooking level.
• Synchro Stop (Settings)
The lights will be switched off together with the hob and the fan will, with a delay, also be switched
off.
36
Operation

Ignition and adjustment
The burner is fully adjustable between high and low settings.
1. Press the control knob and turn it anticlockwise. The burner will
ignite.
2. Keep the control knob fully depressed for at least 3 seconds
between high and low settings. The thermocouple safety pilot has
been activated.
3. Turn the wok control knob to the low setting (3).
4. If desired, turn the wok selector ring to the roasting setting (5). The
inner ring (wok setting) will switch off and the outer ring (roasting
setting) will switch on.
5. The wok burner will switch automatically to the wok setting if the
control knob of the wok burner is set to 0.
NOTE!
It is possible to switch between wok setting and roasting setting and back during cooking.
If the control knob is in the off setting (0-setting) the selector ring cannot be changed to the
roasting setting. Always turn this knob back completely to 0.
37
Wok burner operation
ConnectLife-app and Wi-Fi connection
The hob is equipped with a Wi-Fi module that allows the appliance to connect to the internet via your
home network and to use it with the ConnectLife-app, installed on a mobile device like a smartphone
or tablet.
The app is available on the Apple App Store and Google Play Store. You will need the app to connect
the hob to your network. After your user account is paired with the cooking hob, the app can be
used to monitor the status of the cooking hob and enables to update its firmware (see chapter
‘Firmware Update').
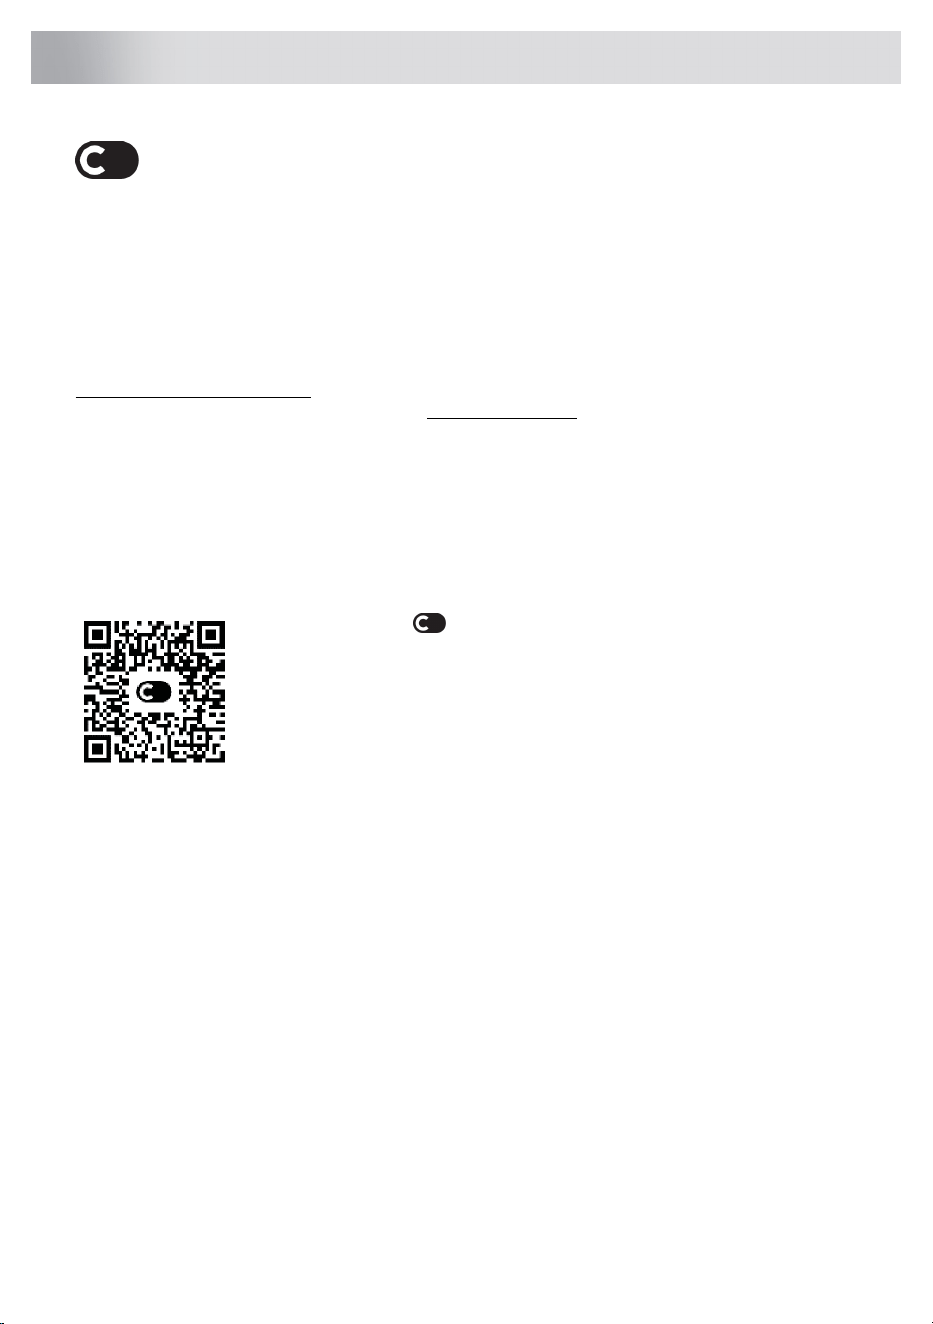
You can find direct links for the different stores to the ConnectLife-app under
www.connectlife.io/getstarted and more information about the system, support, available
functionalities, and additional options under www.connectlife.io.
For safety reasons, it is not possible to remotely control, turn on or turn off the hob.
Preparation
• Make sure you know the name/SSID of your router’s Wi-Fi network and its password
1)
.
• Make sure you have the label with the QR code of the appliance unique ID (‘AUID’) accessible
– you need to scan it with your mobile device when the App prompts to do so.
• Your smart device's Bluetooth is turned on.
•
Install the ConnectLife-app on a mobile device – scan the QR
code to find it.
• Launch the App. Please register if you don’t have an account yet.
• Log in with your account.
• The App will need access the mobile’s location to search for Wi-Fi
networks and to the camera to scan QR codes.
Wi-Fi Connection setup
You will first connect your mobile device directly to the appliance via Wi-Fi, and then use this
connection to share the data of your Wi-Fi home network. The hob can then connect to the home
network.
1. Launch the ConnectLife-app.
2. In the ConnectLife application, go to the "Add device" menu and select the appropriate type of
device. Then scan the QR code (it can be found on the rating plate of the appliance; you can
also enter the AUID/SN code manually).
Follow the instructions in the ConnectLife-app.
The user account signed in on the mobile device used for the Connection setup will automatically
be paired with the cloud. If you’d like to pair another account, e.g. on a second user’s mobile device
see “Pairing additional user”.
For safety reasons, only paired users can communicate with the hob.
1)
NOTE: only 2,4 Ghz networks are supported
38
ConnectLife and Wi-Fi

Activate Wi-Fi
1. Switch off the hob.
2. Touch the on/off key for 5 seconds.
• A short beep will be emitted. The Wi-Fi key will appear.
Wi-Fi menu
Activate Wi-Fi to enable the Wi-Fi menu. The hob must be switched on.
1. Touch the Wi-Fi key for 3 seconds to open the Wi-Fi menu.
•
Depending on the Wi-Fi state, there are 1 to 3 options available in the menu: 'C’ (connection)
to set up a connection, 'P' (pair) to pair an additional user, and 'U’ (unpair) to unpair all users.
2. Use the + (plus) and - (minus) keys to switch between them, if more than 1 option is available.
3. Touch the Wi-Fi key to confirm the selected option.
4. Touch the on/off key or touch the slider to close the menu.
• If no key is pressed within 60 seconds, the menu will be switched off automatically.
Connection setup
1. Select option ‘C’ in the Wi-Fi menu.
• The appliance is in “Connection Setup Mode” for 5 minutes.
•
‘C’ will flash, and the + (plus) and – (minus) keys will be switched off.
2. On the mobile app, start the process to ‘Add appliances’ and follow the instructions to set up
the network.
Pairing additional user
This option requires that the connection setup has been performed successfully and the hob is
connected to the cloud (Wi-Fi key is constantly full lit).
1. Select option ‘P’ in the Wi-Fi menu.
• The appliance is in “Pairing Mode” for 3 minutes.
• The Wi-Fi key will flash, and the + (plus) and – (minus) keys will be off.
2. On the mobile app, start the process to ‘Add appliances’ and follow the instructions to pair the
appliance.
Unpair all users
This option requires that the connection setup has been performed successfully and the hob is
connected to the cloud (Wi-Fi key is constantly full lit).
1. Select option ‘U’ in the Wi-Fi menu to unpair all users and disconnect from the cloud.
• The Wi-Fi key will flash 3 times.
• The hob will delete all paired users and disconnects from the cloud (“unpair”).
Switching off Wi-Fi
1. Enter the Wi-Fi menu as explained in ‘Wi-Fi menu’.
2. Touch the Wi-Fi key for 3 seconds to deactivate Wi-Fi.
• A short beep will be emitted. The Wi-Fi key will be off.
39
ConnectLife and Wi-Fi

Firmware Update
The cooking hob is equipped with a Wi-Fi module that you could use to receive updates of the
appliance firmware (for example, improved function updates or safety-relevant updates). This requires
that the cooking hob is connected to the cloud and paired with a registered user account on the
ConnectLife-app. If this is not yet established, consult chapter 'ConnectLife and Wi-Fi'.
When new firmware is available, a notification is sent to the ConnectLife-app. Please follow the
instructions.
To start the update process, the cooking hob needs to have the FoA setting set to ON in the settings
menu (see ‘Settings’). This confirms your presence at the cooking hob. After 90 minutes, this setting
is automatically reset to OFF.
After the FoA setting on the cooking hob is set to ON, start the update process on your
ConnectLife-app. The cooking hob will switch OFF. As an indication, the Wi-Fi symbol flashes during
the process. Depending on the configuration, the update process can take up to 60 minutes.
NOTE!
During the update process, you cannot use the hob. The hob will restart several times and will
not respond for periods. Make sure that the power supply and the Wi-Fi connection are not
interrupted during the update.
If the update fails, the hob will remain on the previous firmware version and operate as usual. Try again
after a short period of time. If the update continues to fail, please get in touch with the service
department for further assistance.
If the hob is not responding after updating, it may not have completed the update. Wait for the update
process to complete. If the hob still does not respond after a while, please contact the service
department for further assistance.
40
ConnectLife and Wi-Fi
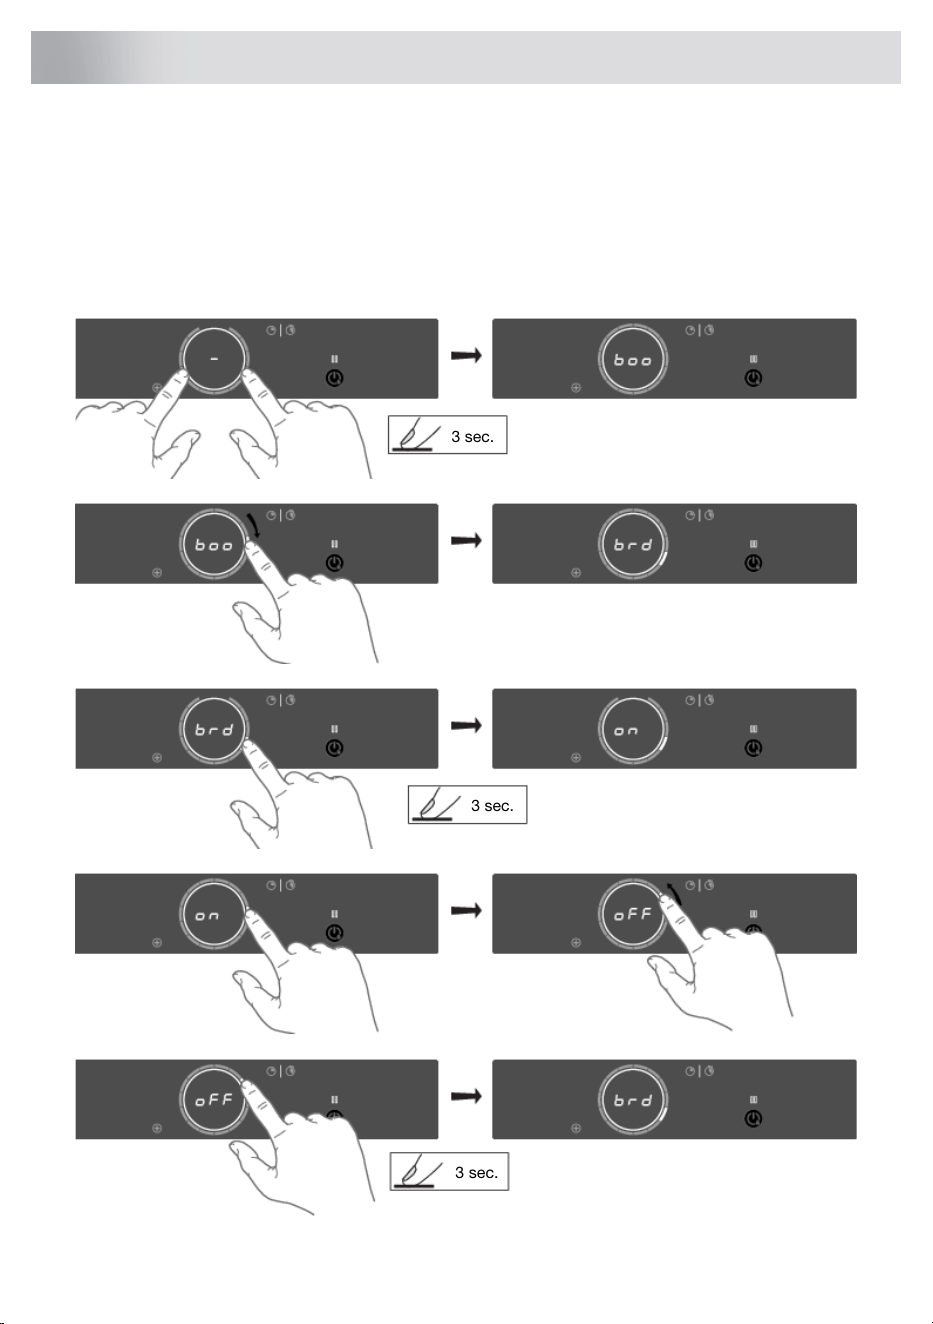
You can tailor the behaviour of this induction hob to suit your cooking style! There are various settings
available for adjustment.
While there are no pans on any zone, touch any ring with two fingers and keep it pressed for
3 seconds. Different settings can now be toggled through using the slider. To view or change a
particular setting, touch the higlighted element of the slider with one finger and keep it pressed for
3 seconds. Now you can choose to change or disable that setting. To do this, toggle to the desired
value. After 3 seconds of innactivity the new setting will be confirmed.
3 sec.
3 sec.
3 sec.
41
Settings
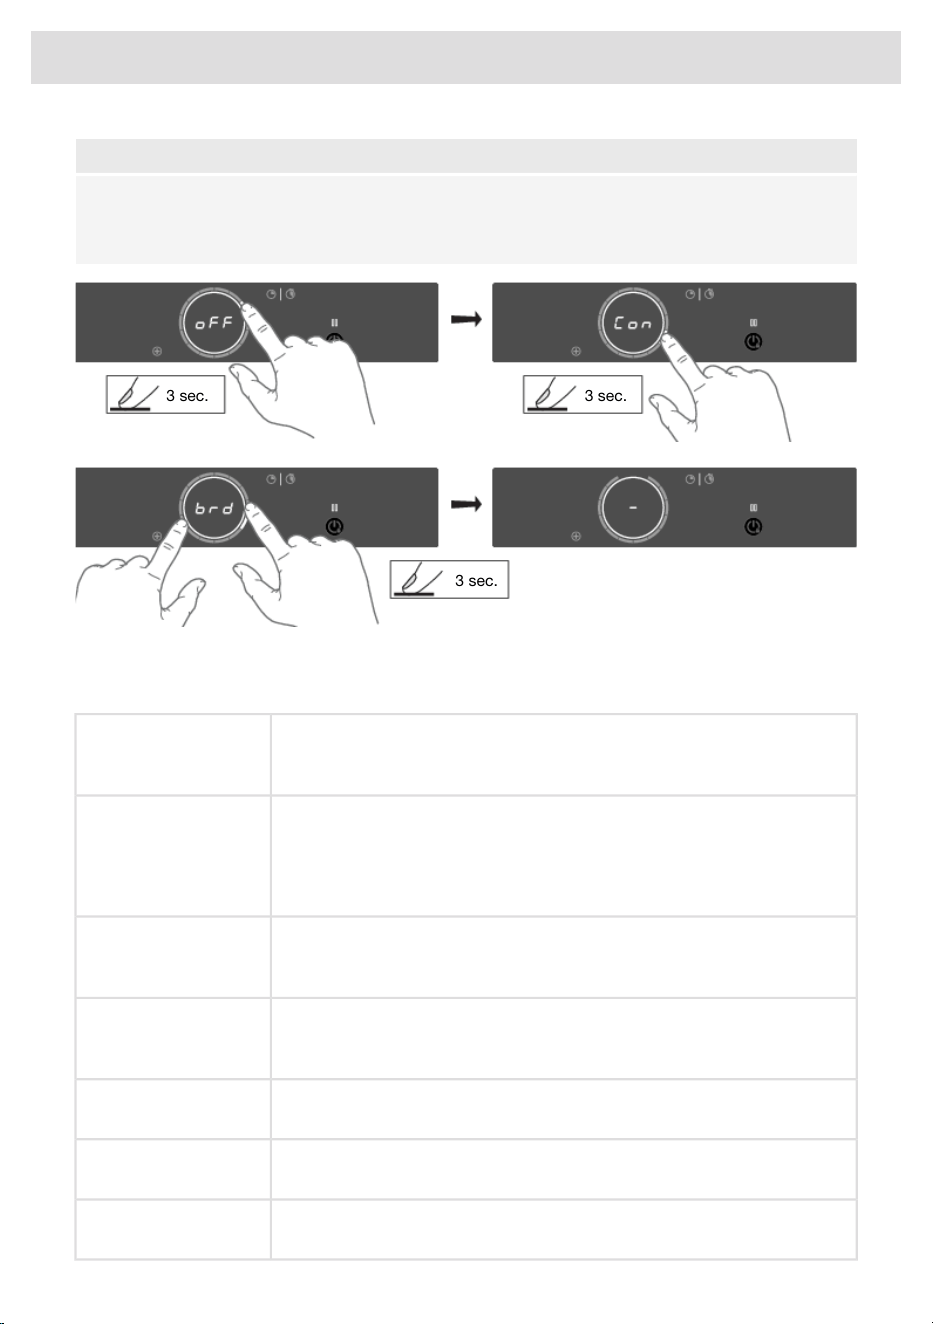
NOTE!
To prevent unintentional adjustment of the 'Con - connected power', Con setting must be confirmed
when changed by touching the slider for 3 seconds. A change without confirmation will not be
implemented!
3 sec. 3 sec.
3 sec.
To exit the menu, touch with two fingers anywhere the slider for 3 seconds.
The following settings are available (depending on the model).
While on, boost is automatically activated when power level 12 is activated.
While off, the boost is activated by sliding past the power level 12 or
touching power level 12 twice.
boo - Auto boost
Automatic Boost
activation
While on, when a new pan is detected on two connected Bridge Induction
cooking zones, the cooking zones are automatically connected into one
big cooking zone. While off, connecting must be done manually by
pressing on the sliders of two Bridge Induction cooking zones at the same
time.
brd - Auto bridge
Automatic coupling
While on, the recovery function is active and, settings can be moved from
one cooking zone to the other when a pan switches position.
rEC – Recovery
function
Recovery function
While on, the stopwatch (count-up timer) starts counting in the background
whenever a cooking zone is activated. While off, the stopwatch must be
activated manually and starts counting from 0:00.
AtI – Auto timer
Automatic stopwatch
timer
While on, the hob is automatically locked at every switch off.ACL - Auto child lock
Auto child lock
Sound volume has 4 different options. L3 (high), L2 (medium), L1 (low),
off (only error and alarm sounds).
Snd - Sound volume
Sound volume
Key responsiveness has 3 different speed options. L3 (quick), L2 (medium),
L1 (slow).
SEn - Key sensitiveness
Key responsiveness
42
Settings
If you own a compatible hood with RF connectivity, you can pair it to your
induction hob! To do so, set this parameter to on. Hood control icons will
start blinking. You now have 5 minutes to activate the pairing on your RF
hood. Once the hood is paired to your induction hob, the hood control
icons will stop blinking.
hth - Hob-to-hood
pairing (RF)
Hood control
This setting allows the induction hob to automatically activate the lights of
the connected hood every time the induction hob is turned on. Depending
on the value you set, the ventilation will automatically start at that speed
level when any cooking zone is activated.
hSt- Hob-to-hood
(Synchro Start Level)
Hood Start Level
This setting allows the induction hob to automatically activate the lights of
the connected hood every time the induction hob is turned on. While on,
the hood will be controled automatically depending on the current highest
activated cooking level. If you manually change any hood related settings,
the hood turns to manual control for the rest of this cooking session. The
response level can be set: L3 (high), L2 (medium), L1 (low), off.
hSc- Hob-to-hood
(Synchro Control,
response Level)
Hood response Level
This setting allows the induction hob to automatically deactivate the lights
of the connected hood every time the induction hob is turned off.
Depending on the value you set, the ventilation will switch to that speed
level and stop with a delay.
hSP- Hob-to-hood
(Synchro Stop Level)
Hood Stop Level
To pair a Bluetooth device, set this setting to on. You now have 3 minutes
to pair a new Bluetooth device to this induction hob.
btP - Bluetooth pairing
Bluetooth device
pairing
To unpair, all the Bluetooth devices set this setting to Clr. All your
connected Bluetooth devices are now unpaired.
btC - Bluetooth clear
Bluetooth clear paired
devices
To display the current software versions of the hob. The UI software version
and the Celsius°Cooking
TM
software version will be shown in alternating
order.
FIr - Display firmware
version
Firmware version
To receive firmware updates for the cooking hob, you need to be paired
to the cooking hob via the mobile app. You will receive a notification, or
you can check available firmware updates on the mobile app menu for
updates.
FoA - Firmware update
over the air
Firmware update via
Wi-Fi
In order to start the firmware update via the mobile app, set this setting to
on to confirm your presence at the cooking hob. For more information, see
chapter "ConnectLife and Wi-Fi". After 10 min, this setting is automatically
reset to off.
Table continued from last page
43
Settings
If your electrical wiring or circuit breakers do not meet the specified current
draw on the rating plate, the current limiter can be activated by reducing
the value of this setting. Doing so may cause a reduced performance of
the induction hob.
Con - Connection
power
Current limiter
(connection to power
grid)
The following numbering format of the setting is available: X.XX.
The number left of the dot represents the number of connected phases,
while the number right of the dot represents the electrical current per
phase in Ampere.
NOTE!
To prevent unintentional adjustment of the 'Con - connected power',
Con setting must be confirmed when changed by touching the slider
for 3 seconds. A change without confirmation will not be implemented!
WARNING!
The appliance must always be set to the actual or lower rating of the
electrical wiring or circuit breakers. This setting can only be set by an
authorised expert.
In demo mode, the appliance will act as usual, without the possibility to
heat the cookware.
dE - Demo mode
Demo Mode for Dealer
Showrooms When set, this will be indicated after switching on the appliance with a
short "d" indication.
Without any user interaction, the appliance will automatically switch off
after 10 minutes.
Table continued from last page
44
Settings
Cleaning glass top
TIP!
Activate the child lock before cleaning the hob.
Daily cleaning
• Although food spills cannot burn into the glass, we nevertheless recommend you clean the hob
immediately after use.
• For daily cleaning, a damp cloth with a mild cleaning agent is best.
• Dry off with kitchen paper or a dry tea towel.
Stubborn stains
• Stubborn stains can also be removed with a mild cleaning agent, washing-up liquid, for example.
• Remove water circles and limescale with cleaning vinegar.
• Traces of metals (caused by sliding pans) can be difficult to remove. Special products are
available for this.
• Use a glass scraper to remove food spills. Melted plastic and sugar are also best removed with
a glass scraper.
NOTE!
• Never use abrasives. These leave scratches in which dirt and limescale can accumulate.
• Never use anything sharp such as steel wool or scourers.
Cleaning wok burner elements
NOTE!
Burner parts should not be cleaned in the dishwasher.
Dishwasher detergents can corrode burner parts!
Persistent stains on enamel (pan supports, burner caps)
Persistent stains can best be removed with a fluid detergent or a plastic scouring sponge. Never
use scouring powder, scouring pads, sharp objects or aggressive cleaning products.
Brass wok burner parts
Some wok burner parts are made of brass. It is not unusual to see a change in the colour of the
brass as a result of the high temperatures involved in wok use.
TIP!
Consult the website for additional maintenance and cleaning instructions!
45
Maintenance

General
NOTE!
If you notice a crack in the glass top (however small), switch off the hob immediately, unplug the
hob, and close off the gas supply.
Then contact the Service Department.
Troubleshooting table
If your hob does not work properly, it does not always mean that it is defective. Make sure to check
the points mentioned below in the table, or visit our website for more information.
SolutionPossible causeSymptom
Normal operation.This is the standard set-up
routine.
Characters appear in the
displays when the appliance is
connected for the first time.
Normal operation.The hob is cooling down.The fan runs on for several
minutes after the hob has been
switched off.
This is normal and disappears
after the hob has been used a
few times. Ventilate the kitchen.
The new appliance is heating
up.
A slight smell is noticeable the
first few times the hob is used.
Normal operation.This is caused by the capacity
limiter on the front and back
zones. A soft ticking sound can
also occur at lower settings.
You can hear a ticking sound in
your hob.
Clean the induction hob with a
ceramic hob cleaner and
remove the dirt / grease from the
pan bottom.
Contaminated pan bottom used
on the cooking zone.
Circle of pan bottom remains
visible after cleaning.
This is normal for certain pans,
particularly at high settings. This
is not harmful to the pans or the
hob.
This is caused by the energy
flowing from the hob to the
saucepan.
The pans make noise while
cooking.
Use a suitable pan (see chapter
'Induction use').
The pan you are using is not
suitable for induction cooking or
has a diameter of less than 12
cm.
You have switched a cooking
zone on, but the display keeps
flashing.
Switch off the signal by pressing
the - or + button on the timer.
The preset time has ended.A cooking zone suddenly stops
working and you hear a signal.
Check the fuses or the electric
switch (if there is no plug).
There is no power supply due to
a defective cable or a faulty
connection.
The hob is not working and
nothing appears in the display.
After the hob has cooled down,
cooking can be continued.
Zone is overheated.Zone stops unintended and
residual heat indicator is shown.
46
Troubleshooting
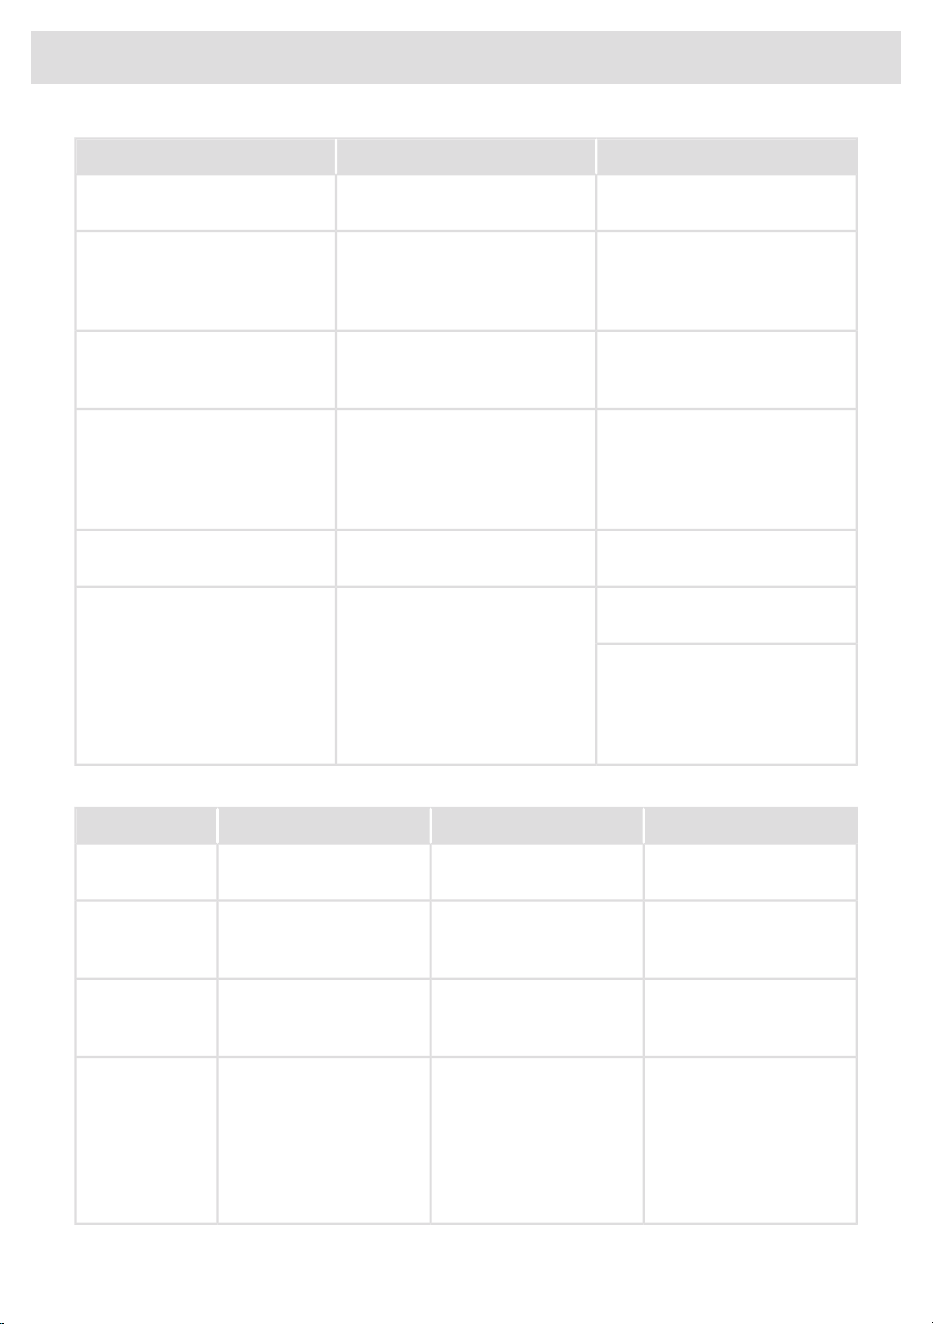
SolutionPossible causeSymptom
Check the electrical
connections.
The appliance is incorrectly
connected.
A fuse blows as soon as the hob
is switched on.
Remove cookware and assign
again.
Celsius°Cooking™ cookware is
assigned to wrong cooking
zone.
Celsius°Cooking™ key is
blinking, together with set
cooking method key and
display.
Switch off the cooktop for 10
seconds and/or change the
battery.
Low battery of cookware or
unstable bluetooth connection.
Unstable connection between
cookware and hob.
Place Probe back or reposition
- press cooking method key if
probe isn't auto detect.
Celsius°Cooking™ Probe is
removed or not in touch with the
content. Or the temperature has
fallen rapidly, e.g. due to adding
cold water.
Set Celsius°Cooking™ cooking
method key is blinking together
with set temperature display
while using the probe.
Check the electrical
connections.
The appliance is incorrectly
connected.
A fuse blows as soon as the hob
is switched on.
Pull the plug out of the socket.
Contact your installer.
The ceramic glass plate is
broken.
Please note! Do not throw a
broken ceramic glass plate in
the glass recycling bin but take
this to the Municipality's waste
recycling centre.
Error codes
SolutionPossible causeSymptomError code
Clean the control panel.The control panel is dirty
or has water on it.
Er03 appears on display.Er03
Wait for cooking zone to
cool down or fill the pan
with foodstuff.
Empty pan was heated on
the cooking zone.
E2 appears on display.E2
Connect the appliance in
accordance to rating plate
and instructions.
Voltage of the mains is too
high.
U 400 appears on display
with continuous sound
tone.
U400
Try to connect the device
to your network again.
Failed to connect to Wi-Fi
network.
E7 appears on display
after setting up the Wi-Fi
connection.
E7
Make sure that new
devices can connect to
the network (e.g. MAC
address filtering is
disabled).
Table continued from last page
47
Troubleshooting

SolutionPossible causeSymptomError code
Unblock the ventilator;
disconnect appliance
from main voltage for
10 sec.
Ventilator is blocked (eg
possible by item in the
drawer).
E8 appears on display.E8
Use Celsius°Cooking™
cookware.
Non-Celsius°Cooking™
cookware is not
supported.
E65 appears on display,
together with
Celsius°Cooking™ is
blinking
E65
Replace battery.Celsius°Cooking™
cookware was not found
(empty battery, out of
range, etc.).
E66 is blinking together
with the
Celsius°Cooking™ key.
E66
If handle cap is mounted
correctly; Replace battery.
Celsius°Cooking™
cookware missing.
E67 is blinking together
with the
Celsius°Cooking™ key.
E67
NOTE!
In case of other error codes: please write down the error code and contact the service department.
Table continued from last page
48
Troubleshooting
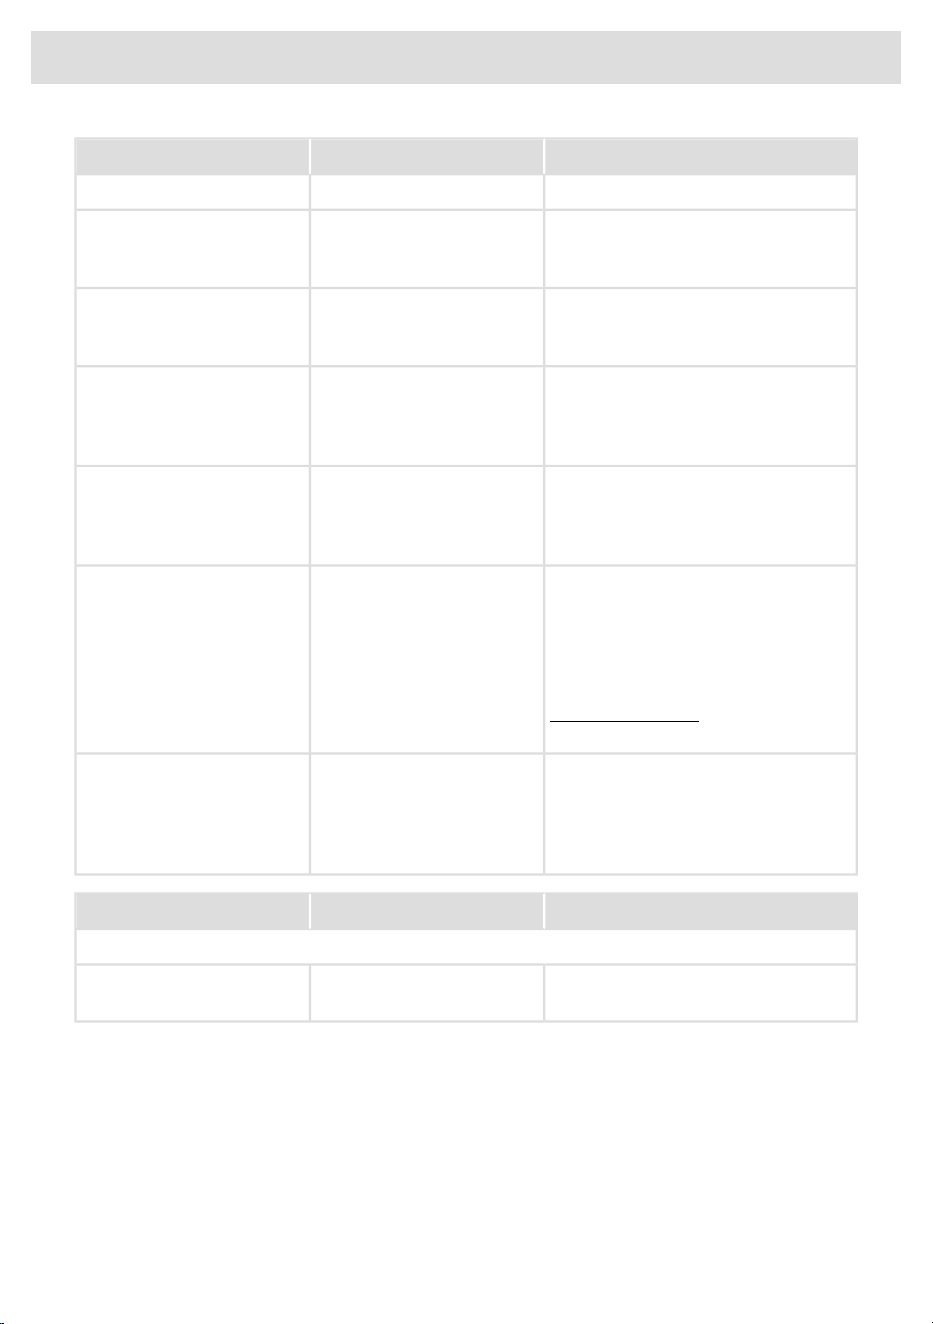
SolutionPossible causeSymptom
Troubleshooting Wi-Fi
The hob must be switched off, then
touch the on/off key and hold it for
5 seconds.
Wi-Fi turned off.Wi-Fi icon not shown.
Check that your home network signal
is strong and internet connection is
working.
Home network issues.Wi-Fi setup failed.
Please check the network settings.
Ensure a 2.4 GHz and visible network.
If the signal is too weak, try to move the
network router closer to the appliance.
The home network is not on
2.4 GHz, the network is
hidden, or the signal strength
is too weak.
Home network is not
displayed during connection
setup.
Ensure that Wi-Fi is enabled and the
internet connection in your home
network is working. Repeat the
connection setup if necessary.
Wi-Fi is disabled or home
network issues.
Cooking hob is shown
disconnected on the mobile
app
First disable the Wi-Fi and enable it
again. Check that the internet
connection in your home network is
working. Repeat the connection setup
if necessary.
Further troubleshooting available on
www.connectlife.io or contact the
service department.
Different causes.Other Wi-Fi problem.
Ensure the power supply is not
terminated and a stable internet
connection before retrying again.
If failed again, contact the service
department.
Internet connection lost or
power supply terminated.
Firmware update process
failed.
SolutionPossible causeSymptom
Wok burner
Turn off the main gas supply valve.
Contact your installer.
The appliance connection is
leaking.
There is a smell of gas near
the appliance.
49
Troubleshooting
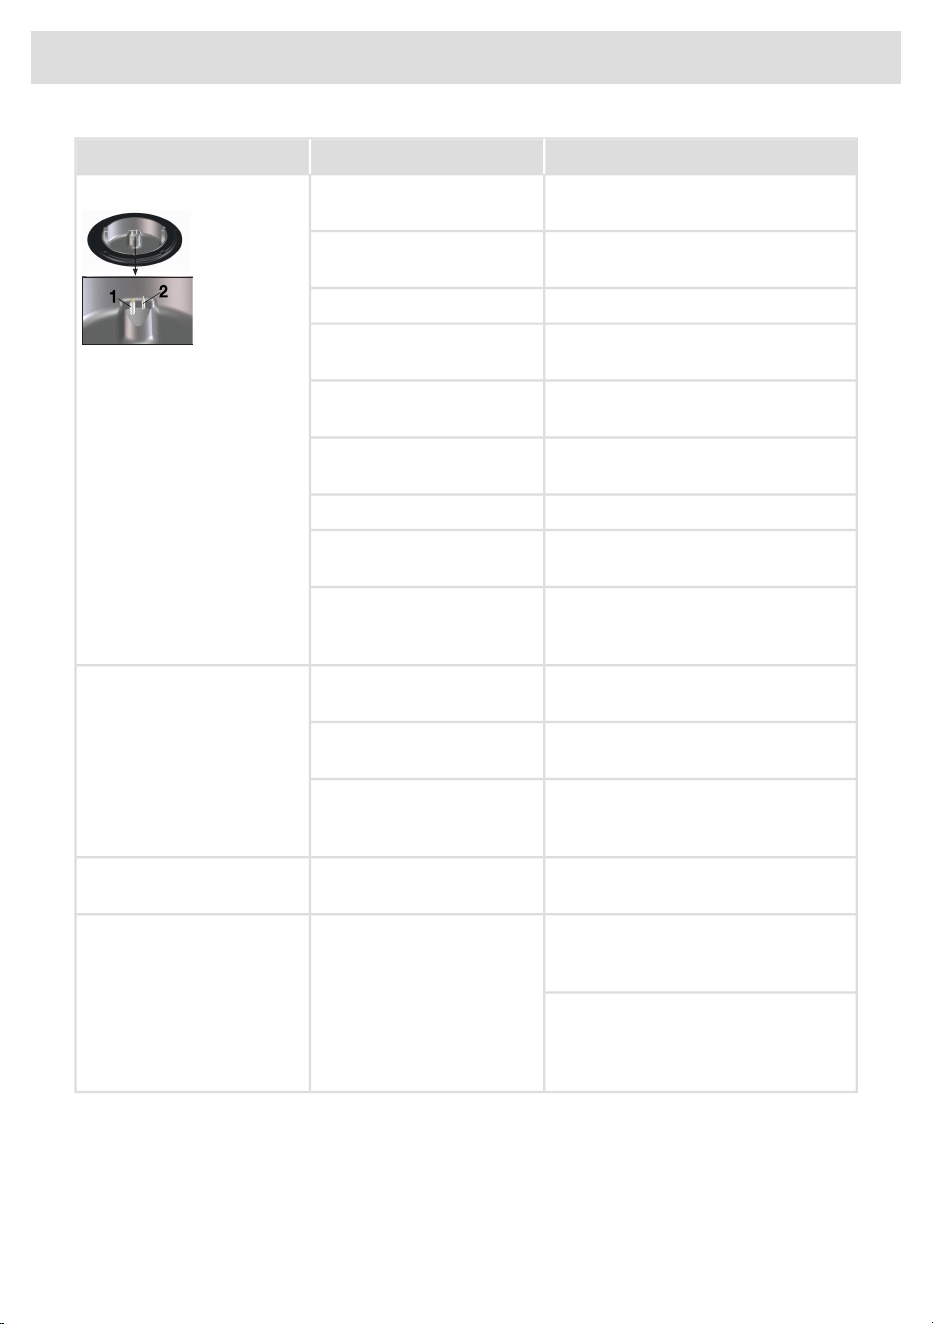
SolutionPossible causeSymptom
Contact your installer.The electrical connection is
not correct.
The burner does not ignite.
Replace the fuse or switch on the fuse
again in the fuse box.
Fuse defective/fuse switched
off in fuse cupboard.
Clean/dry the spark plug.Spark plug (1) dirty/damp.
Use the centring notches to put the
burner parts together.
Burner parts not placed
correctly.
Clean/dry the burner parts. Make sure
that the outflow holes are open.
Burner parts dirty/damp.
Open the main gas valve.Main gas supply valve
closed.
Consult you gas supplier.Fault in gas mains.
Connect a new gas bottle or have the
tank refilled.
Gas bottle or tank is empty.
Check whether the gas used is suitable
for the appliance. Contact your installer
if it is not correct.
The wrong type of gas used.
Use the centring notches to put the
burner parts together.
Burner parts not placed
correctly.
The burner does not burn
evenly.
Clean/dry the burner parts. Make sure
that the outflow holes are open.
Burner parts dirty/damp.
Check whether the gas used is suitable
for the appliance. Contact your installer
if it is not correct.
The wrong type of gas used.
Clean/dry the thermocouple.Thermocouple (2) is dirty.Burner extinguishes after
igniting.
Close the gas main switch and pull the
plug out of the socket. Contact your
installer.
Ceramic glass plate broken
Please note! Do not throw a broken
ceramic glass plate in the glass
recycling bin but take this to the
Municipality's waste recycling centre.
Table continued from last page
50
Troubleshooting

If the supply cord is damaged, it must be replaced by the
manufacturer, its service agent or similarly qualified persons in order
to avoid a hazard.
The device should be disconnected from the mains prior to
maintenance or repairs.
The device is only disconnected from the electric power if:
• the main switch of the electrical wiring/installation in the house is
switched off,
• or the fuse for the electrical wiring/installation in the house has
been completely removed,
• or the plug has been pulled out of the socket.
It is recommended the hotplate be checked and serviced by an
authorized person every 2 years. This is not covered by warranty.
For New Zealand
If the cooking range is not provided with a supply cord fitted with a
plug or an installation male connector and if this appliance is to be
connected to a new or upgraded electrical installation, then it must
be connected to the supply by a supply cord fitted with:
• an appropriately rated plug that is compatible with the
socket-outlet fitted to the final sub circuit in the fixed wiring that
supplies this appliance.
• or an appropriately rated installation male connector that is
compatible with the installation female connector fitted to the final
sub-circuit in the fixed wiring that supplies this appliance.
Safety
Disconnect the appliance from the mains supply before starting any repair work.
Faulty parts may only be replaced by original parts. The manufacturer can only guarantee that original
parts meet safety requirements.
If the safety instructions and warnings are not followed, the manufacturer cannot be held responsible
for any resulting damage.
Installation, maintenance or repairs should only be carried out by professionals who are authorized
by the manufacturer, as failure to do so will void the warranty.
51
Installation

Prior to installation, ensure that the local distribution conditions (voltage, frequency, nature of the
gas and gas pressure) and the adjustment of the appliance are compatible.
The voltage, frequency, power, type of gas and the country for which the appliance has been
designed are shown on the appliance rating plate.
The walls and the worktop surrounding the appliance must be heat resistant up to at least 105 °C.
Duplicate rating plates should be attached to an adjacent surface, such as a cupboard door.
The appliance is not suitable for installation and operation with aftermarket lids or covers fitted.
Please contact the service department if installation or operational faults occur during installation.
The worktop into which the hob is fitted should be flat.
Electrical connection
• This appliance must be earthed.
• The electrical connection must comply with national and local regulations.
• For class I appliances, check that your home’s electrical system provides proper earthing.
• The wall plug socket and plug should always be accessible.
• If a stationary appliance is not fitted with a supply cord and a plug, or with other means for
disconnection from the supply mains having a contact separation in all poles that provide full
disconnection under overvoltage category III conditions, the means for disconnection must be
incorporated in the fixed wiring in accordance with the wiring rules. This is also applicable for
appliances with a supply cord and plug when the plug is not accessible after installing the
appliance. Using an omnipolar switch with a contact separation of at least 3 mm fitted in the
fixed wiring will fulfil this requirement.
• The connection cable must hang freely and should not be fed through a drawer.
• For connecting, use an approved cable with the correct cable diameters appropriate for the
connection. The cable casing should be made of rubber (preferably of the H05V2V2 or H07V2V2
type).
• Before connecting the appliance, make sure the voltage indicated on the rating plate conforms
to the voltage in your power mains.
• The connection should be adjusted to the current and fuses.
• The appliance should not be connected to the mains via a multi-plug adapter or extension cable,
as the safe use of the equipment cannot be guaranteed.
• After installation, the parts carrying electrical current and insulated parts shall be protected
against contact.
•
WARNING!
Failure to use screws or fasteners for installation as described in the installation instructions
may result in electric shock.
• Do not use an adapter or an extension lead to connect the device to the electrical mains. Safe
use of the device cannot be guaranteed with these accessories.
• Use a (flexible) cable that is flame retardant made from PVC suitable for 300/500V in a 0…70
ºC environment.
• Means providing full disconnection under overvoltage category III conditions must be incorporated
in the fixed wiring in accordance with AS/NZS 3000.
52
Installation

Gas connection
• Gas connection 1/2” ISO 228 / ISO 7-1
• The gas connection must comply with national and local regulations. See appliance label for
technical gas data.
• This appliance cannot be converted from natural gas to LPG nor from LPG to natural gas (no
conversion kits are available for this model).
• This appliance is not connected to a combustion products evacuation device. It shall be installed
and connected in accordance with current installation regulations. Particular attention shall be
given to the relevant requirements regarding ventilation.
• We recommend that the gas hob be connected by means of a fixed pipe. Connection using a
specially designed safety hose is also permitted.
• A safety hose may not be bent and must not come into contact with moving parts of kitchen
units.
• The connection point for the appliance must always be placed in an easily accessible position.
• When the appliance is connected with a hose assembly, the supply point shall be accessible
with the appliance installed.
• The hotplate can be connected with rigid pipe as specified in AS/NZS5601 - current edition.
• The hotplate can be connected with a Flexible Hose, which complies with AS/NZS 1869, 10 mm
ID, class B or D, no more than 1.2 m long and in accordance with AS/NZS5601 - current edition.
Ensure that the Hose does not contact the hot surfaces of the hotplate, oven, dishwasher or
other appliance that may be installed underneath or next to the hotplate.
53
Installation
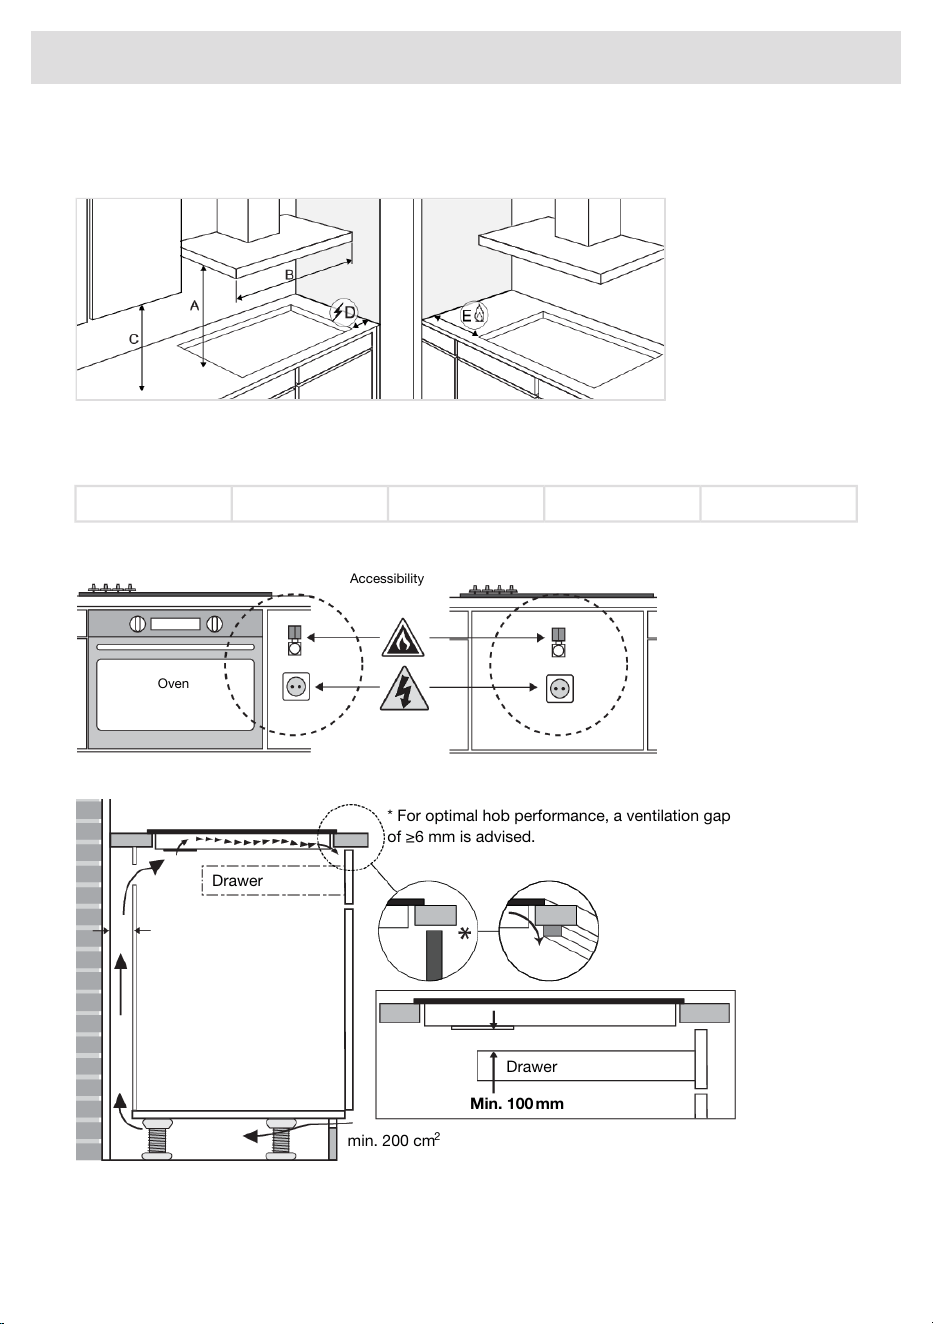
Preparations for installation
Free space around the appliance
Rangehoods and exhaust fans shall be installed in accordance with manufacturers instructions.
For an overhead exhaust fan A>750 mm!
E (>mm) = 120D (>mm) = 50C (>mm) = 450B (>mm) = 900A (>mm) = 650
Accessibility
Accessibility
Oven
Ventilation
* For optimal hob performance, a ventilation gap
of ≥6 mm is advised.
Drawer
Drawer
Min. 100 mm
min. 200 cm
2
54
Installation
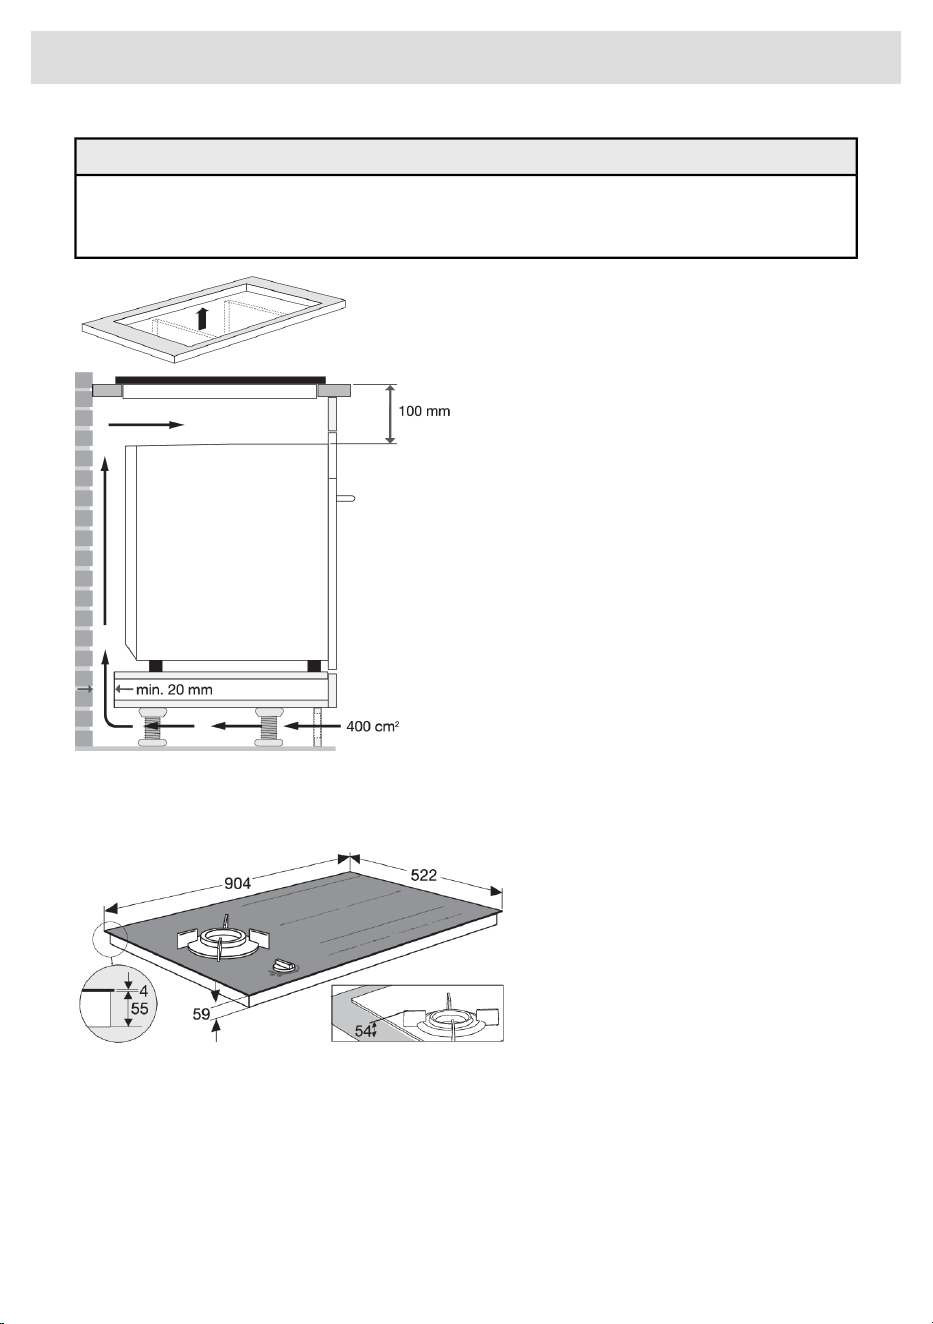
CAUTION!
Prevent ventilation interference if an oven is installed underneath the gas hob.
Always provide adequate ventilation!
Built-in
Appliance dimensions
Cut-out in the worktop
55
Installation
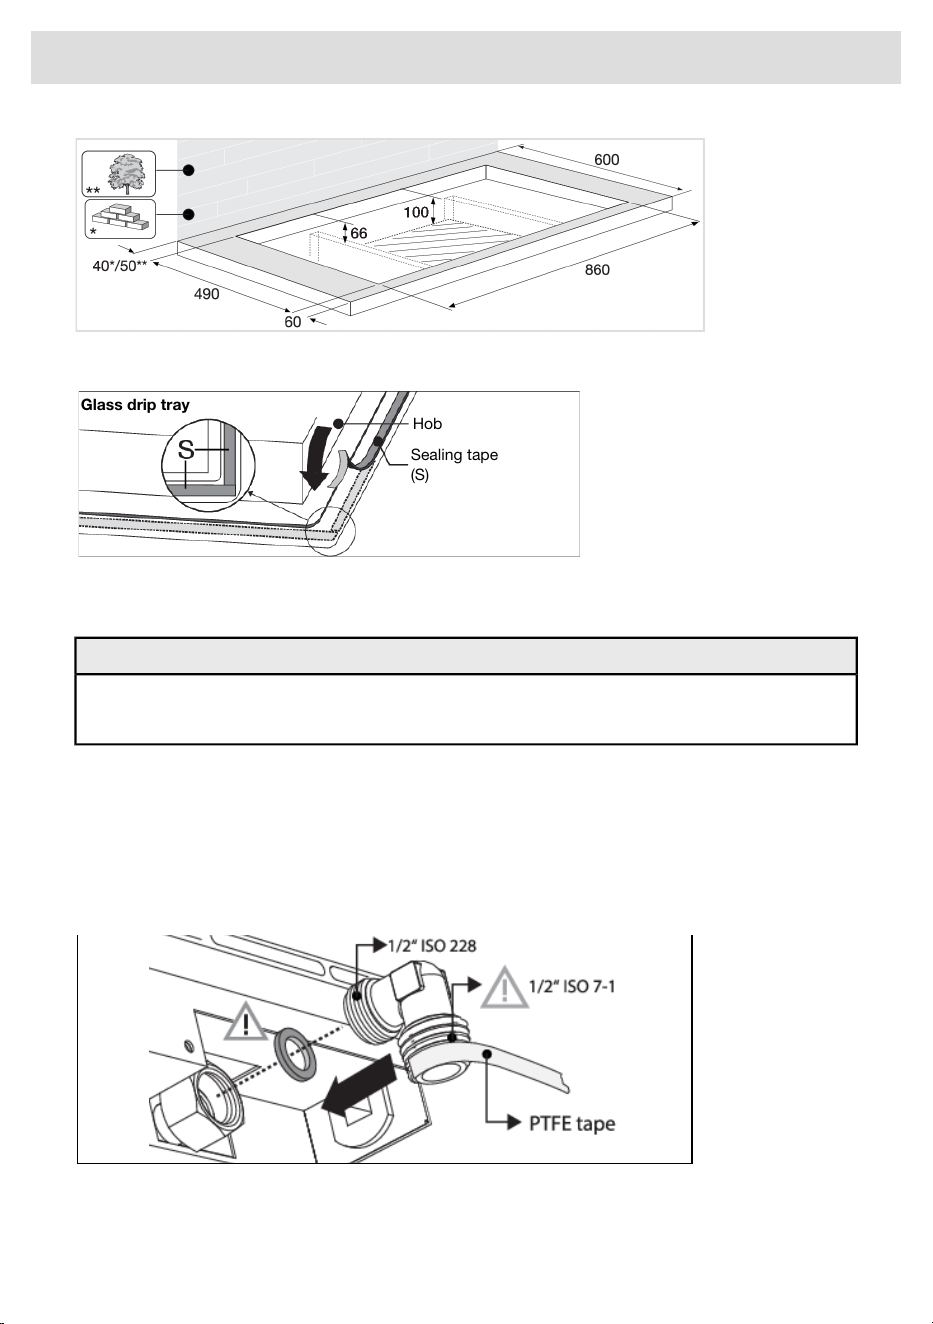
Sealing tape
Glass drip tray
Sealing tape
(S)
Hob
Gas connection
CAUTION!
This appliance cannot be converted from natural gas to LPG nor from LPG to natural gas
(no conversion kits are available for this model).
The hotplate can be connected with rigid pipe as specified in AS/NZS 5601.1 current edition.
1. Fit the gas elbow fitting.
2. Mount the appliance regulator for Natural gas.
3. Check and set the gas pressure with the appliance operating!
56
Installation

GAS
PRESSURE
(KpA)
BURNER
RATE (MJ/h)
INJECTOR
BURNER
GAS BURNER
1.08.701.20 + 0.66Wok (inner)N.G.
20.002.10 + 0.66Wok (outer)
57
Installation
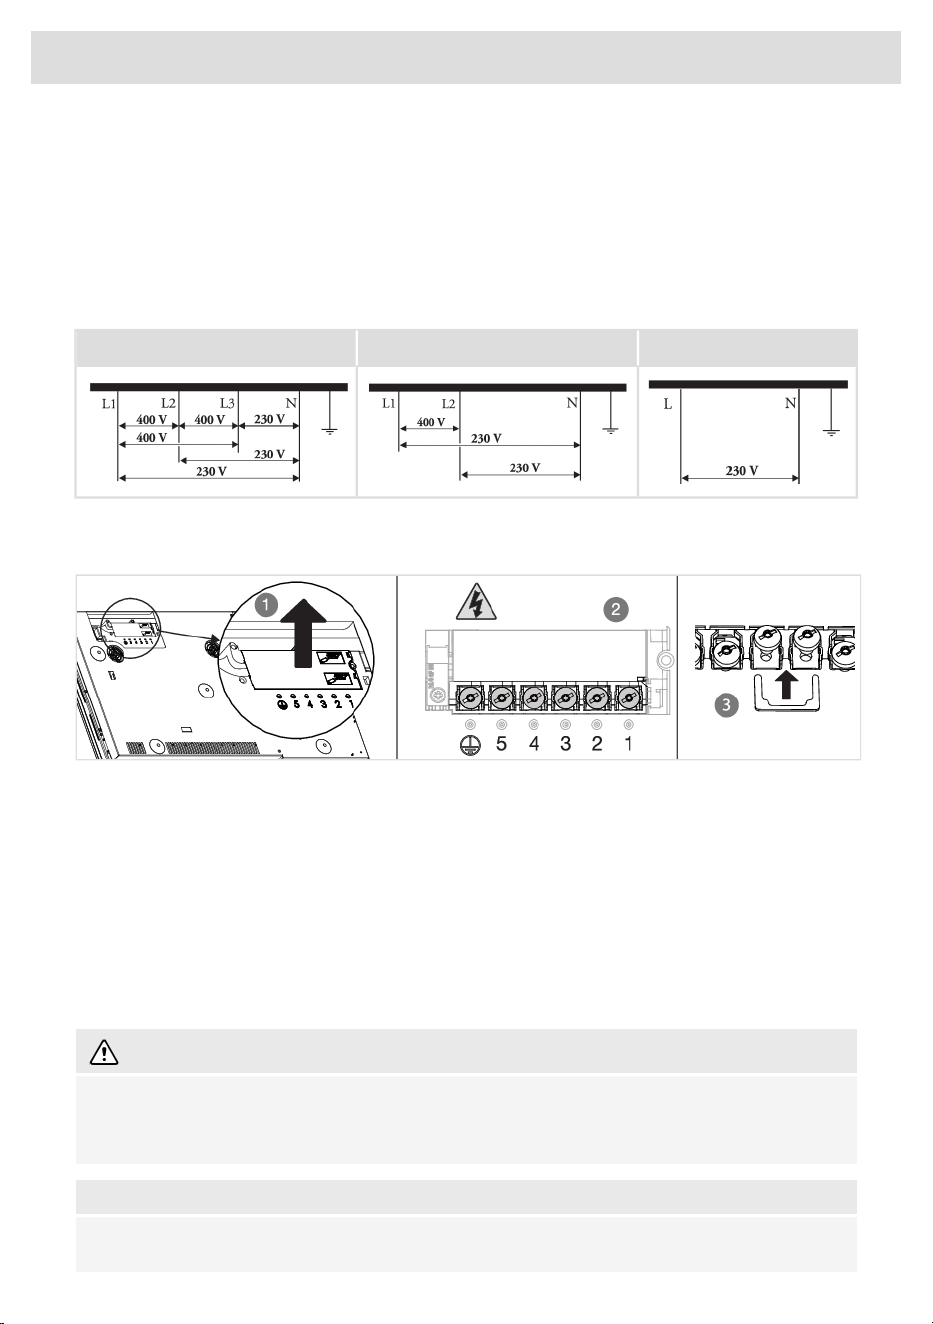
Electrical connection
Determining the existing electrical connection
• Check the voltage. Before connecting the appliance, make sure the voltage specified on the
rating plate conforms to the voltage of your power mains. The voltage of your power mains
(220–240 V between L and N) should be checked by an expert using an appropriate measuring
device.
• Check the voltages present as indicated in the diagrams below.
1 phase - 1 neutral2 phases - 1 neutral3 phases - 1 neutral
Connection diagram
Consult the wiring diagrams on the bottom of the appliance.
1. Open the cover of the connection terminal box.
2. Run the power cord through a cord strain relief (clamp) which protects the cable from being
pulled out.
Connect the wires according to your type of appliance.
3. Make the necessary connections between the terminals using the supplied terminal bridges .
The terminal bridges are provided seperately.
Current limiter
See chapter 'Settings', under parameter Con - Current limiter to set the parameter. This parameter
must be set before any pan is placed on the hob or cooking zone activated.
WARNING!
Current limiter setting must be set according to your connection and circuit breakers by a
registered and qualified installer. Please read the safety regulations and the installation instructions
carefully.
NOTE!
Setting a lower value of the Current limiter parameter may cause a reduced performance of the
induction hob.
58
Installation
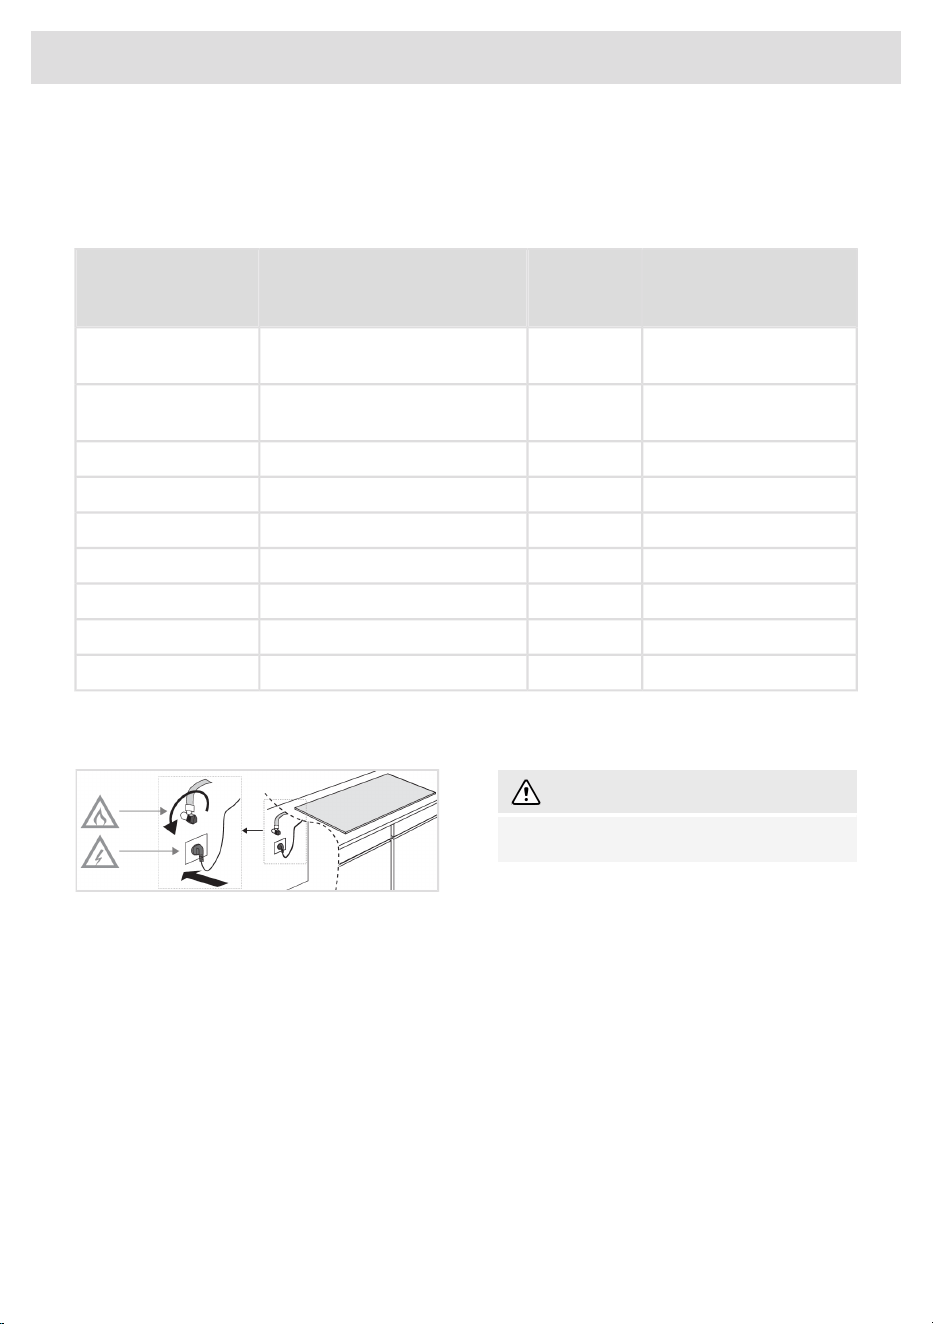
See the connection diagrams for the voltage between the phase and neutral conductors and voltage
between the phase conductors.
Power cord core cross sectional area should be at least 1,5 mm² for the following current limiter
settings which should be adjusted to your circuit breakers:
Number and cross
section of Power cord
wires
Power cord
Type
Connection typeCurrent limiter
settings
5 x 1.5 mm²H05V2V2-F3 phases - 1 neutral3x16 A / 3x13 A /
3x10 A / 3x06 A
4 x 1.5 mm²H05V2V2-F2 phases - 1 neutral2x16 A / 2x13 A /
2x10 A / 2x06 A
5 x 1.5 mm²H05V2V2-F2 phases - 2 neutral (only for NL)2 x 16 A
4 x 1.5 mm²H05V2V2-F3 phases (only for BE)3 x 16 A
4 x 4.0 mm²H05V2V2-F2 phases - 1 neutral2 x 32 A
3 x 6.0 mm²H05V2V2-F1 phase - 1 neutral1x48 A / 1x35 A
3 x 4.0 mm²H05V2V2-F1 phase - 1 neutral1x32 A / 1x25 A
3 x 2.5 mm²H05V2V2-F1 phase - 1 neutral1x20 A
3 x 1.5 mm²H05V2V2-F1 phase - 1 neutral1x16 A
Connecting & testing
WARNING!
Check if connections are gastight.
59
Installation
Disposal of the appliance and packaging
Sustainable materials have been used during manufacture of this appliance. This appliance must
be disposed of responsibly at the end of its service life. Ask your local authorities for more information
about how to do this.
The appliance packaging is recyclable. The following may have been used:
• cardboard;
• polyethylene film (PE);
• CFC-free polystyrene (PS rigid foam).
Dispose of these materials in a responsible manner and in accordance with government regulations.
The product has been marked with a crossed-out dustbin symbol to
remind you of the obligation to dispose of electrical household
appliances separately. This means that the appliance may not be
included with normal domestic refuse at the end of its service life. The
appliance must be taken to a special municipal centre for separated
waste collection or to a dealer providing this service.
Separate collection of household appliances helps to prevent any
potential negative impact on the environment and on human health
caused by improper disposal. It ensures that the materials of which the
appliance is composed can be recovered to obtain significant savings
in energy and raw materials.
NOTE!
Please note! Do not throw a broken ceramic glass plate in the glass recycling bin but take this
to the Municipality's waste recycling centre.
Declaration of conformity
We hereby declare that our products satisfy the applicable European
directives, orders and regulations, as well as the requirements stated
in the referenced standards.
60
Environmental aspects

61
Your notes
62
Your notes

63
Your notes
902795
www.asko.com
We reserve the right to make changes.
-a9