instructions for
exhaust fume extractor with 3mtr
ducting
model no: efs07
thank you for purchasing a sealey product. manufactured to a high standard, this product will, if used according to these instructions,
and properly maintained, give you years of trouble free performance.
IMPORTANT: PLEASE READ THESE INSTRUCTIONS CAREFULLY. NOTE THE SAFE OPERATIONAL REQUIREMENTS, WARNINGS & CAUTIONS. USE
THE PRODUCT CORRECTLY AND WITH CARE FOR THE PURPOSE FOR WHICH IT IS INTENDED. FAILURE TO DO SO MAY CAUSE DAMAGE AND/OR
PERSONAL INJURY AND WILL INVALIDATE THE WARRANTY. KEEP THESE INSTRUCTIONS SAFE FOR FUTURE USE.
1. safetY
1.1. generaL safetY
warning! Ensure Health & Safety, local authority, and general workshop practice regulations are adhered to when using this
equipment.
9 familiarise yourself with the application, limitations and potential hazards peculiar to the extractor.
warning! disconnect the unit from the air supply before servicing or performing any maintenance.
9 maintain the extractor in good condition (use an authorised service agent).
9 replace or repair damaged parts. Use genuine parts only. Unauthorised parts may be dangerous and will invalidate the warranty.
9 locate the extractor in a suitable working area, keep area clean and tidy and free from unrelated materials. ensure there is adequate
ventilation.
warning! use only on level ground or slopes not exceeding 8%.
9 ensure there are no flammable or combustible materials near the work area.
9 Keep children and unauthorised persons away from the working area.
8 do not use the extractor for a task it was not designed to perform.
8 do not operate the extractor if any parts are damaged or missing as this may cause failure or possible personal injury.
8 do not get the extractor wet or use in damp or wet locations or areas where there is condensation.
8 do not allow untrained persons to operate the extractor.
8 do not operate the extractor when you are tired or under the influence of alcohol, drugs or intoxicating medication.
8 do not use the extractor where there are flammable liquids, solids or gases such as paint solvents, etc.
8 do not leave the extractor operating unattended.
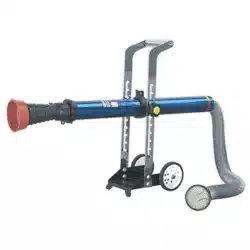
2. introduction
ideal for small or large garages and workshops. features soft rubber cylindrical cone to suit most exhausts. Adjustable height for use on small cars or
commercial vehicles. compressed air flow creates vortex within extractor to ensure all fumes are dispersed (requires air supply). 1.2mtr body length with
additional 3mtr flexible ducting. mounted vertically on trolley with integral duct compartment for easy manoeuvrability and compact storage.
3. specification
model no: ........................................................................efs07
recommended air pressure: ............................................ 90psi
Air consumption: ..............................................................16cfm
minimum height: ............................................................185mm
maximum height: ...........................................................550mm
duct length: ....................................................................... 3mtr
overall length: ................................................................ 4.2mtr
4. air suppLY
4.1. the recommended hook-up is shown to the right.
4.2. ensure that the air tap (fig.1) is in the “off” position before connecting to the air supply.
4.3. An air pressure of 90psi and an air flow of 16cfm is required.
warning! ensure that the air supply is clean and does not exceed the pressure quoted. too high an air pressure and/or unclean air
will shorten the life of the extractor due to excessive wear and may be dangerous, causing damage and/or personal injury.
4.4. drain the compressor’s air tank daily. Water in the air line will damage the extractor.
4.5. clean compressor air inlet filter weekly.
4.6. line pressure should be increased to compensate for unusually long air hoses (over 8 metres). the minimum bore for hose and fittings
is 1/4”.
4.7. Keep hoses away from heat, oil and sharp edges. check hoses for wear and make certain that all connections are secure.
efs07| issue: 3 (H,f) 20/02/18
Original Language Version
© Jack sealey limited
refer to
instruction
manual
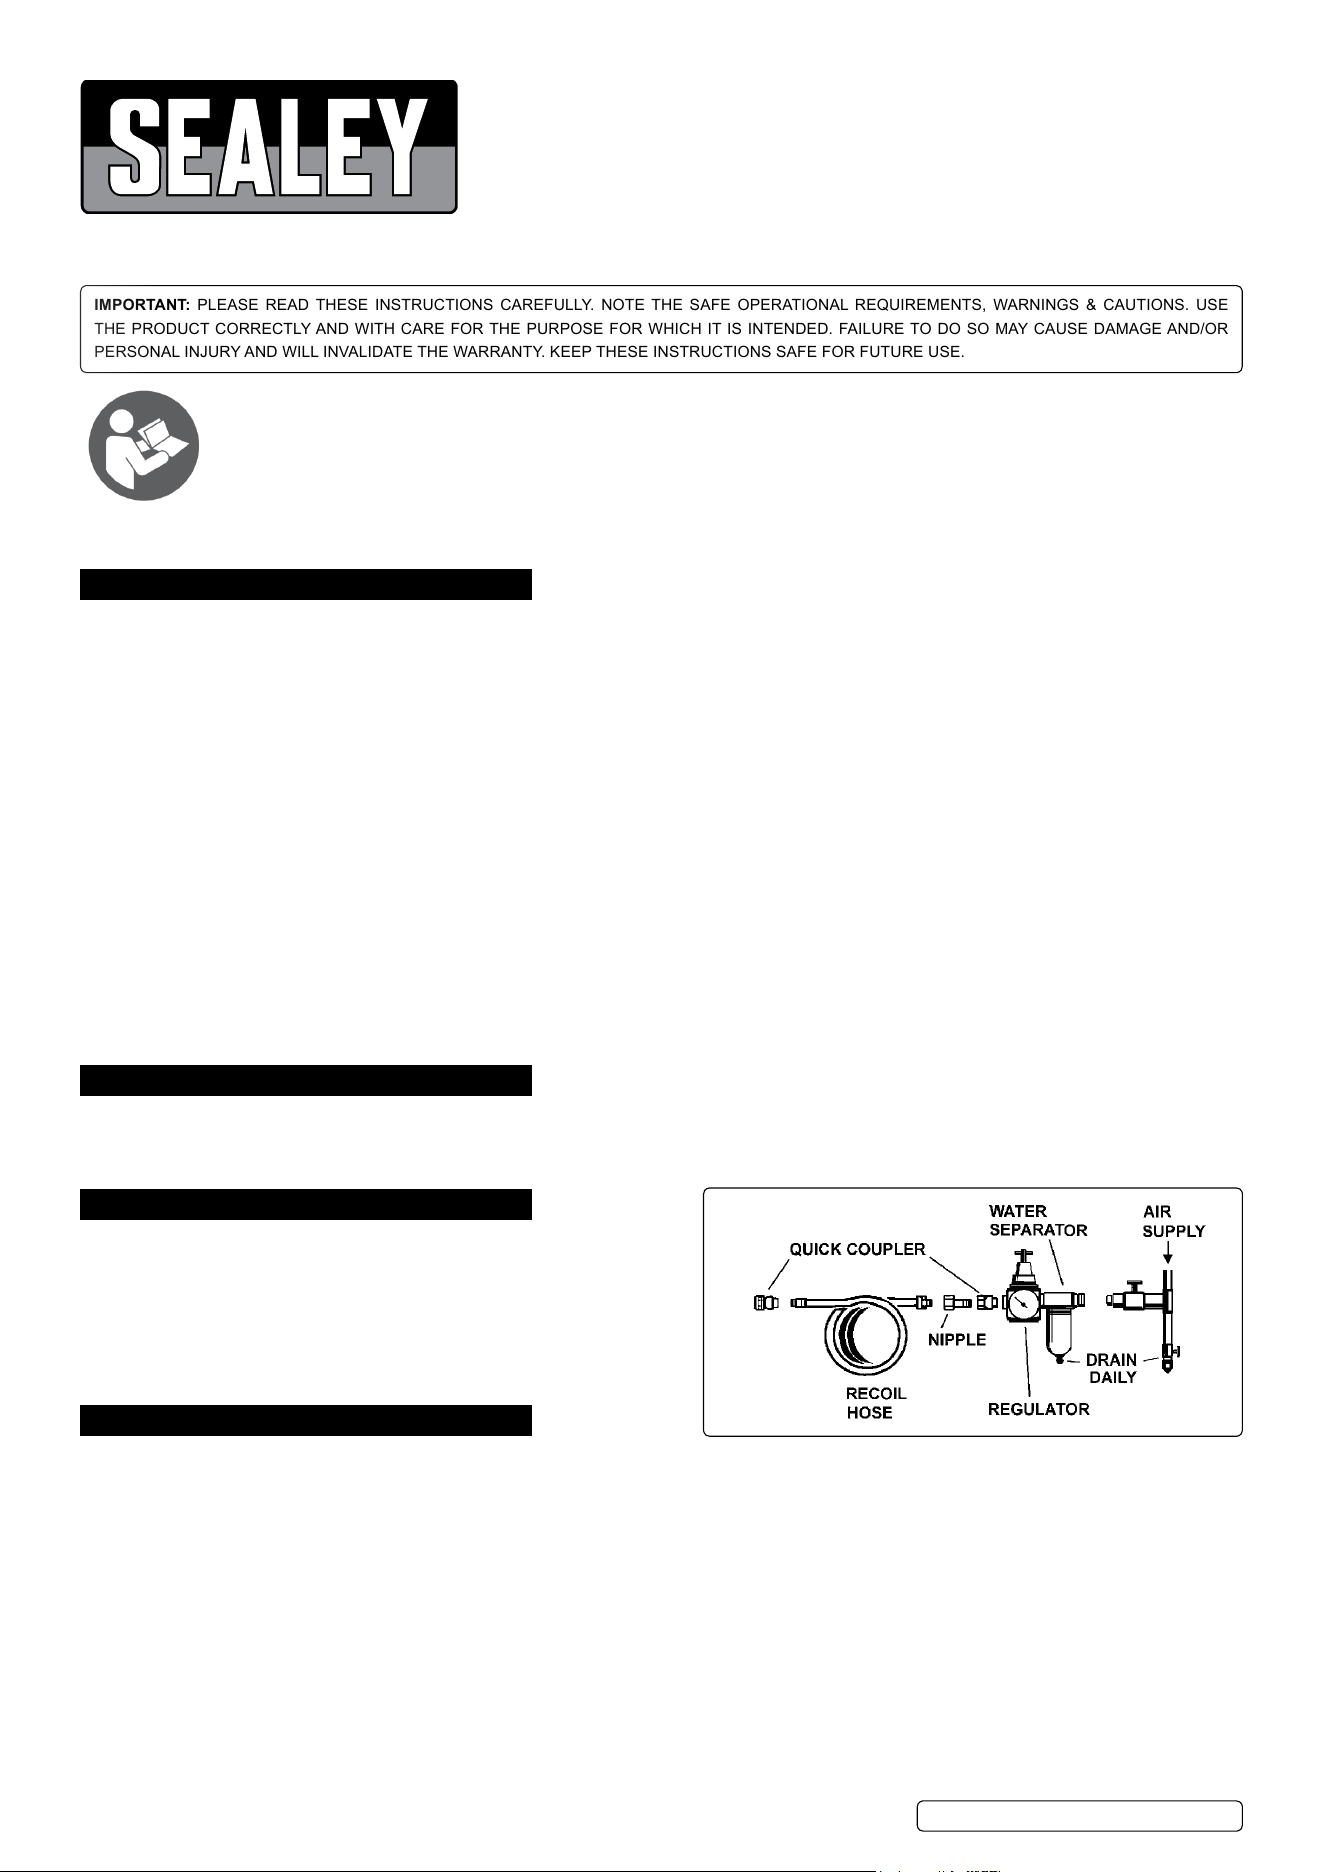
5. operation
5.1. Before starting, consideration should be given to the positioning of the vehicle in relation to the external
venting required for the ducting.
5.2. the unit is normally stored in the vertical position with the 3 metre length of flexible ducting inside the
aluminium tube.
5.3. Wheel the unit close to the vehicle.
5.4. to prepare the unit for use loosen the tube clamp butterfly nut and the two height adjusting knobs and
swing the unit into the horizontal position. Keep hold of the filter on the back end of the tube to stop it
falling out. slide the aluminium tube within its clamping bracket until it is in balance and then tighten the
plastic butterfly nut.
5.5. to adjust the height of the tube in relation to the exhaust, hold the aluminium tube either side of the clamps
and slide it out of the slot it is in and up or down to the required height. move the clamps into the nearest
convenient slots and tighten them.
5.6. extend the flexible ducting and place the filter in a position where the exhaust fumes can be vented outdoors.
5.7. the unit should be positioned so that the exhaust pipe is within the cone but not touching it.
5.8. connect the workshop air supply to the ball valve at the base of the cone using the hook up recommended in section 4. Alternatively an
adequately specified portable air compressor can be used. see specification in section 3.
5.9. turn the air supply on and open the ball valve on the unit.
5.10. start the vehicles engine and check that the exhaust fumes are being properly extracted. if adjustments are required to the positioning of
the unit, turn the engine off first.
note: for cars with twin exhausts, an accessory is available. order model no: efs07de (fig.2).
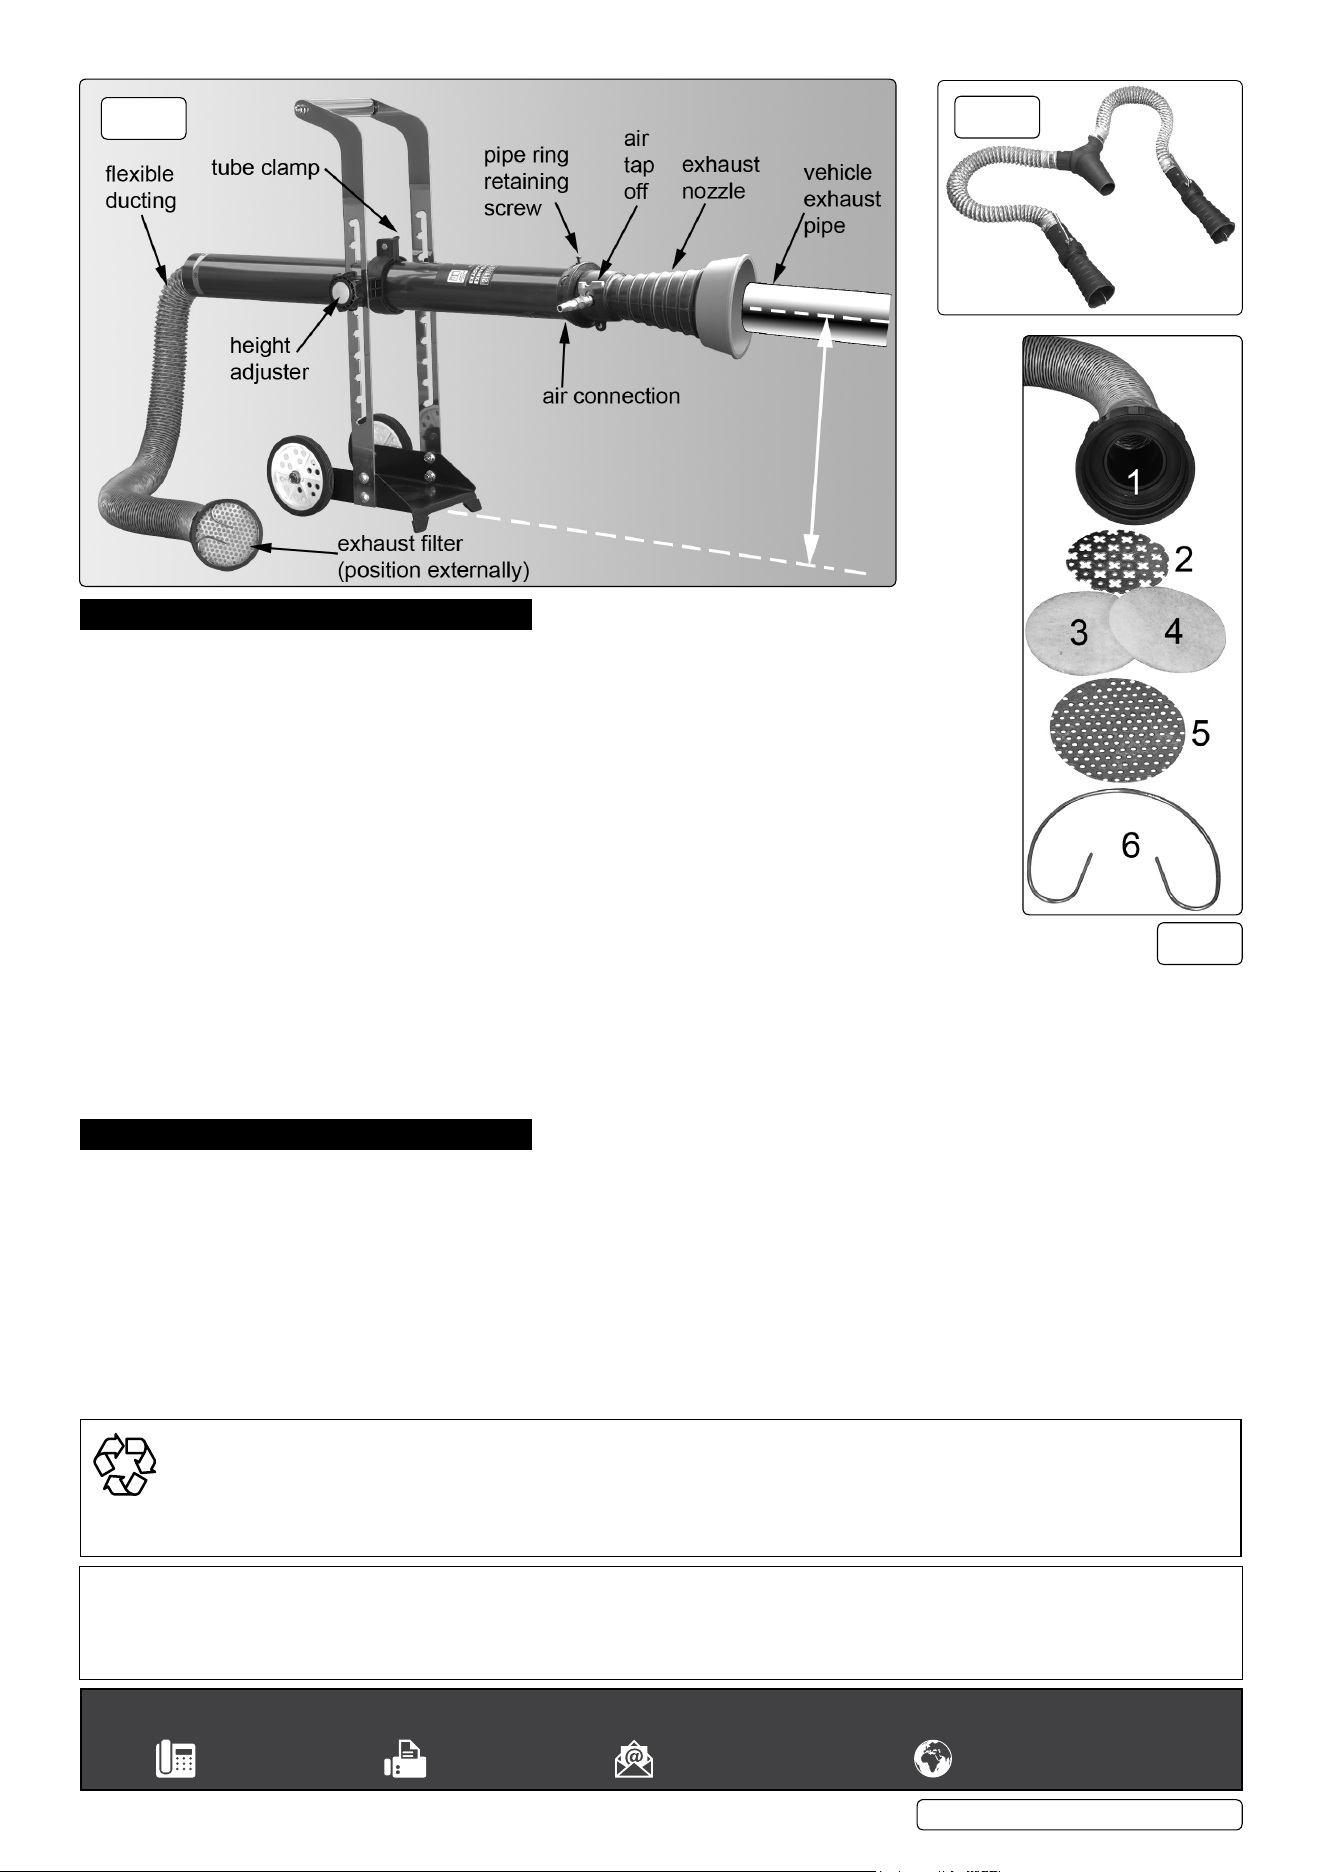
6. maintenance
6.1. Keep the extractor clean and repair or replace any damaged parts.
6.2. clean the ducting outlet filter once a week. refer to fig.3. squeeze and remove the spring clip (6). remove the outer filter plate (5) and
the two layers of filter material (3 & 4). Wash the filter material in ordinary detergent and let it dry. Place the inner grille (2) back into the
filter housing (1) followed by the two filters (3 & 4). Place the outer filter plate (5) over the filters and retain all parts by squeezing and
re inserting the spring clip (6).
fig.
2
fig.
3
fig.
1
efs07| issue: 3 (H,f) 20/02/18
Original Language Version
© Jack sealey limited
sealey group, Kempson way, suffolk Business park, Bury st edmunds, suffolk. ip32 7ar
01284 757500 01284 703534 sales@sealey.co.uk www.sealey.co.uk
environment protection
recycle unwanted materials instead of disposing of them as waste. All tools, accessories and packaging should be sorted, taken to
a recycling centre and disposed of in a manner which is compatible with the environment. When the product becomes completely
unserviceable and requires disposal, drain any fluids (if applicable) into approved containers and dispose of the product and fluids
according to local regulations.
note: it is our policy to continually improve products and as such we reserve the right to alter data, specifications and component parts without prior
notice.
important: no liability is accepted for incorrect use of this product.
warranty: Guarantee is 12 months from purchase date, proof of which is required for any claim.

