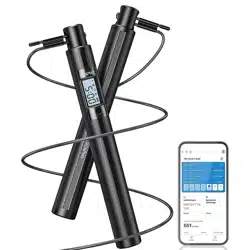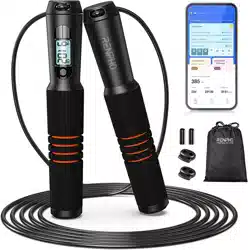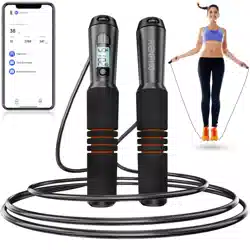
Smart Jump Rope
User Manual
Model: R-Q001

Thank you for purchasing
RENPHO Smart Jump Rope!
To ensure safety and avoid any property damage, please
read this manual carefully and keep it for future reference.
01
When using this device, the following basic precautions should be
followed.
1. Do not use the jump rope for something other than its intended use.
2. This is not a toy. Children shall not play with this product.
3. Do not skip rope before and within half an hour after a meal to avoid
physical discomfort, and do not drink a lot of water before skipping rope.
4. If you feel shortness of breath or any discomfort, slow down to get
circulation back to normal, then stop.
5. Do not keep the jump rope in a magnetic area or a magnet-influenced
space, which may result in malfunctionand battery loss.
6. Bending or twistingthejump rope may break the external and/or
internal parts of the product.
7. Ambient temperature significantly below or above room temperature
andany liquid component including water and humidity may damage the
parts.
8. Do not use strong chemical agents or cleaner to clean the jump rope, it
may cause discoloring or corrosion of the exteriorpart.
Tip: It is recommended to grip the handle of the rope with the Mode
Button facingupward for easy reading of the LCD display.
Important Safety Instructions
02
1. What’s in the Box
2 × Handles
1 × Rope
2 × Rope Buckles
2 × RopeCaps
2 × AAA Batteries
1 × User Manual
1 × Storage Bag
2. Product Parameters
Product Name: Smart Jump Rope
Model: R-Q001
App Compatibility: Renpho Health APP
Handle Size: 33×193mm/1.3×7.6inch
Handle Material: ABS+PC+EVA
Rope Length: 3m/9.8ft (Adjustable)
Rope Material: TPU+Steel Wire
Power Supply: 2×AAA Batteries
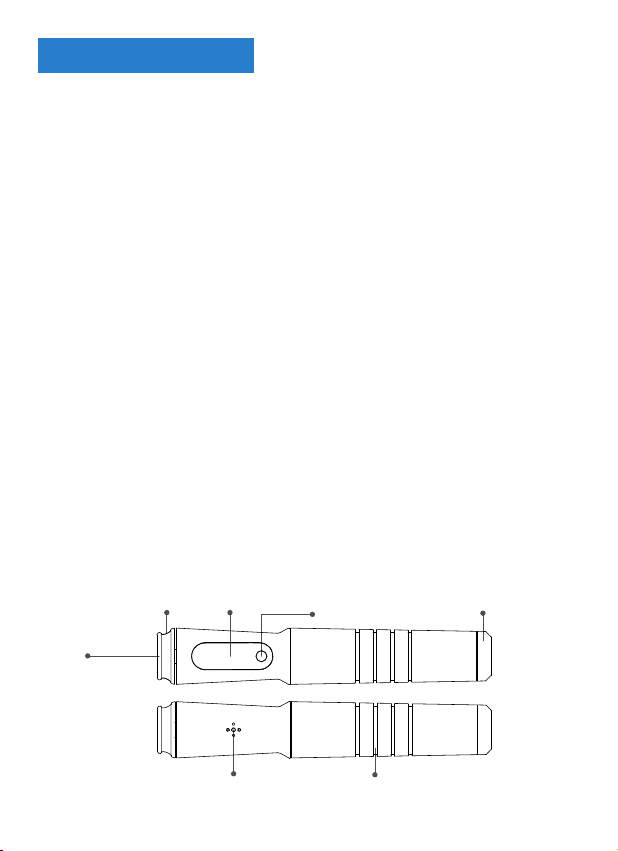
3. Product Introduction
LCD Display
Buzzer
Mode Button
Handle
Battery CoverRope Eyelet
Front
Back
Turner
About the Product
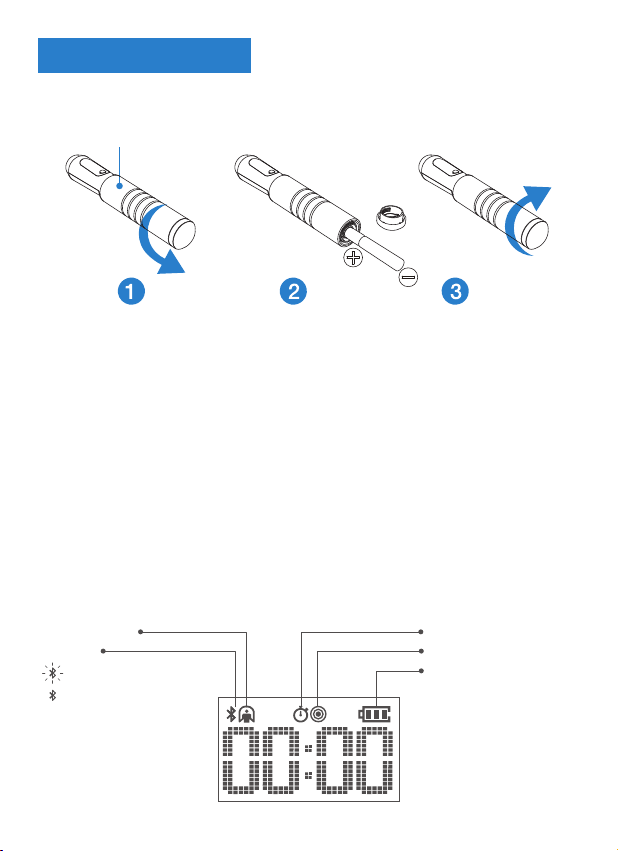
03
① Rotate the battery cover of the handle with a display counterclockwise.
② Place the provided batteries into the battery compartment. (Make sure
that the twopositive poles are facing inside.)
③ Rotate the battery cover clockwise until it is installed tightly.
2. Operation
*Once battery installation is complete, the jump rope will automatically
power on.
*Once the jump rope enters the standby mode, press the Mode Button
to activate it.
1. Battery Installation (Batteries are included.)
Bluetooth
Free Jump Mode
Numbers Countdown Mode
Battery Level Indicator
BT is connected.
BT is on but not connected.
Time Countdown Mode
Mode Button
Using the Product
04
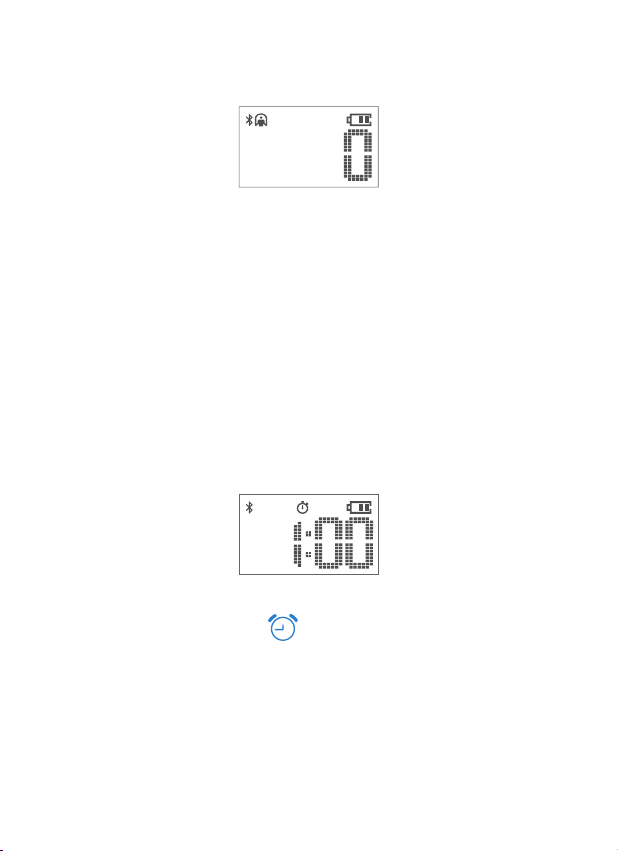
a. Once the jump rope is powered on, the Free Jump mode will be
automatically activated.
b. Start to rope skip and the skipping number will be shown on the display.
(If left idle for 3min, the jump rope will enter the standby mode and the
data will be automatically saved on the jump rope or synced to the app if
the connection is successful. Then the jump rope will shut down 20s
later.)
c. To reset or to manually save the data to the jump rope, press and hold
the Mode Button and the data will be synced to the app if the connection
is successful.
a.Press the Mode Button until appears on the display.
b.Press and hold to enter the Time Countdown mode. (a short beep)
c.Press to select rope skipping time from 1min to 10min on the jump rope
(You can select up to 59min and 59s via the app) and long press to get
started. (The display will show 3-2-1 countdown with beeps, followed by a
long beep to remind you to start.)
d. The jump rope will play six beeps as a reminder of the completion of
the target. The display will automatically show the rope skipping number
(2) Setting the Time Countdown Mode
Free Jump
Time Countdown
Training Mode Setting
(1) Setting the Free Jump Mode
05
and the data will be automatically saved to the jump rope or synced to
the app if the connection is successful.
e. To stop during the set time or to manually save the data to the jump
rope, press and hold the Mode Button and the data will be synced to the
app if the connection is successful.
Tips:
a. During the set time, if the jump rope is left idle for less than 3min, the
display will show the skipping number when the time countdown is over
(six beeps) and the data will be automatically saved to the jump rope or
synced to the app if the connection is successful. The jump rope will shut
down 200s later from the start of being idle.
b. During the set time, if the jump rope is left idle for more than 3min, the
display will show “--:--” after 3min idle time (a short beep) and the data
will be automatically saved to the jump rope or synced to the app if the
connection is successful. Then, the jump rope will shut down 20s later.
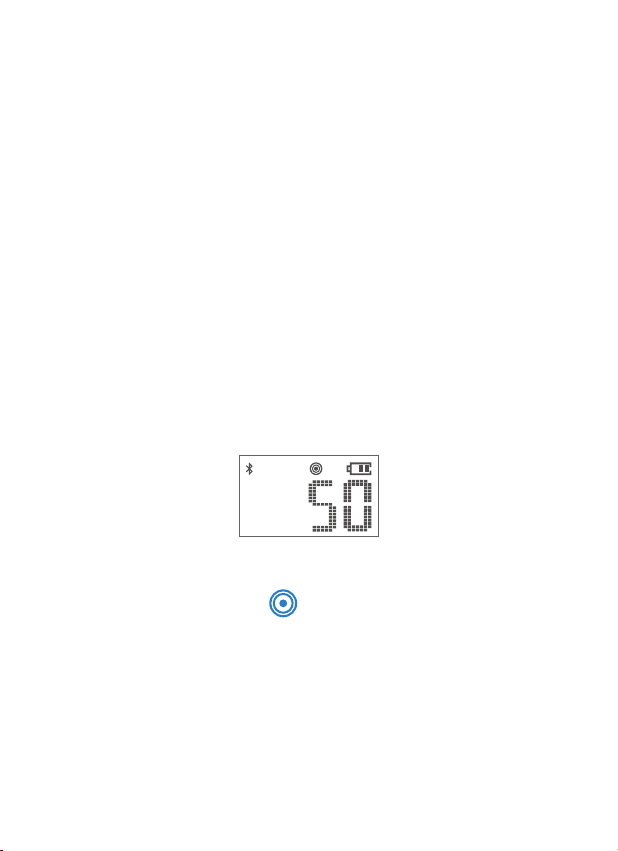
(3) Setting the Numbers Countdown Mode
a.Press the Mode Button until appears on the display.
b.Press and hold to enter the numbers countdown mode. (a short beep)
c.Press to select the number from 50 to 2000 on the jump rope. (You can
set up to “9999” via the app.)
d. After setting the number, press and hold to get started. (The display
will show 3-2-1 countdown with beeps, followed by a long beep to remind
you to start.)
e. When the numbers countdown is over, the time spent will be displayed
and the data will be automatically saved to the jump rope or synced to the
Numbers Countdown

06
Bluetooth Connection
Once the jump rope is turned on, the Bluetooth icon on the display will
flash. Once the connection is successful, the Bluetooth icon will turn solid
and your rope skipping data can be synced to the app.
app if the connection is successful.
f. To reset or to manually save the data to the jump rope, press and hold
the Mode Button and the data will be synced to the app if the connection
is successful.
Note: If the jump rope is left idle for 3min, the display will show “--:--” and
the data will be automatically saved on the jump rope or synced to the
app if the connection is successful. Then the jump rope will shut down
20s later.
07
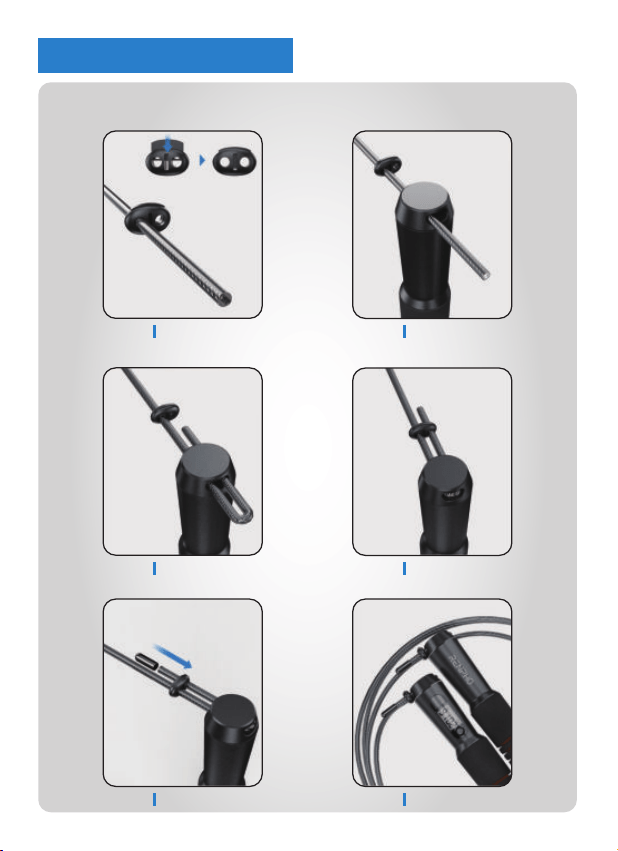
Length Adjustable (3M/9.8FT)
Done
Step 5
Step 4Step 3
Step 2Step 1
Jump Rope Assembly
08
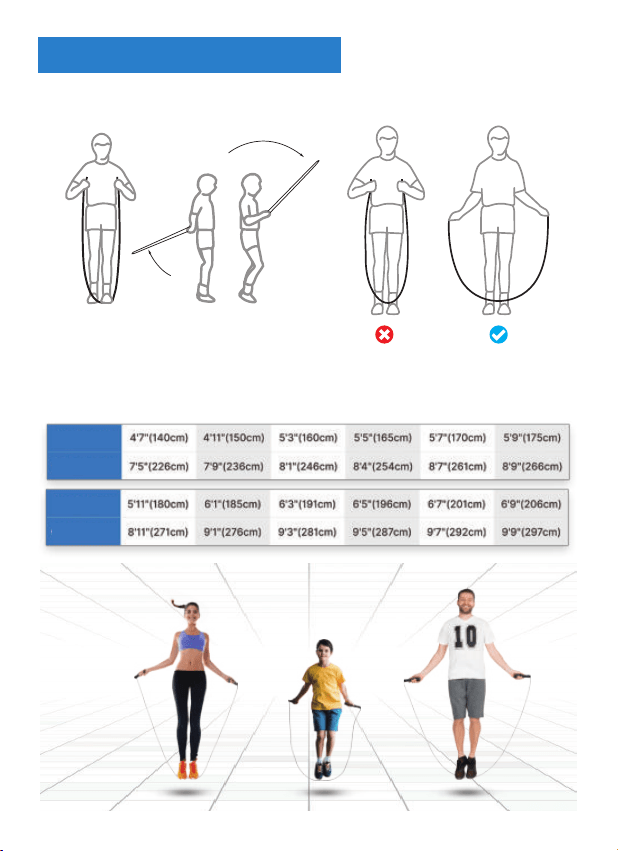
2. Please follow the chart below to adjust the rope length.
OPTIMAL JUMP ROPE LENGTH CHART
1. Straighten the rope to your armpits (as shown). Try jumping
and check whether the rope length is suitable.
Rope Length
Rope Length
Your Height
Your Height
4'7"(140cm) 7'5"
5'5"(165cm) 8'4"
6'1"(185cm) 9'1"
The Guide of Rope Length
09
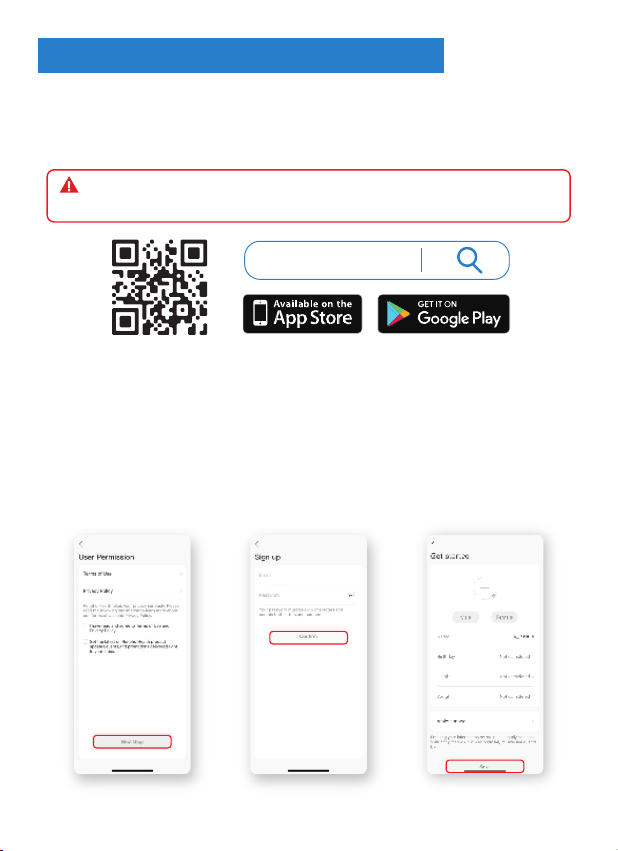
(1) Download the Renpho Health App
Register a new account with your email address andcomplete your profile
information, which is onlyintended for the calculation of parameters such
ascalories.
(2) Sign up
Search “
Renpho Health” from Apple Store / Google Play or scan the QR
code below to download the app. System Requirement: iOS 11.0 or above,
Android 7.0 or above.
*Due to continuous updates and improvements, the "Renpho Health"
App may appear slightly different.
Note: RENPHO Smart Jump Rope now is compatible with Renpho
Health App, not Renpho Fit App.
Renpho Health
Renpho Health
Renpho Health App Operation Guide
10
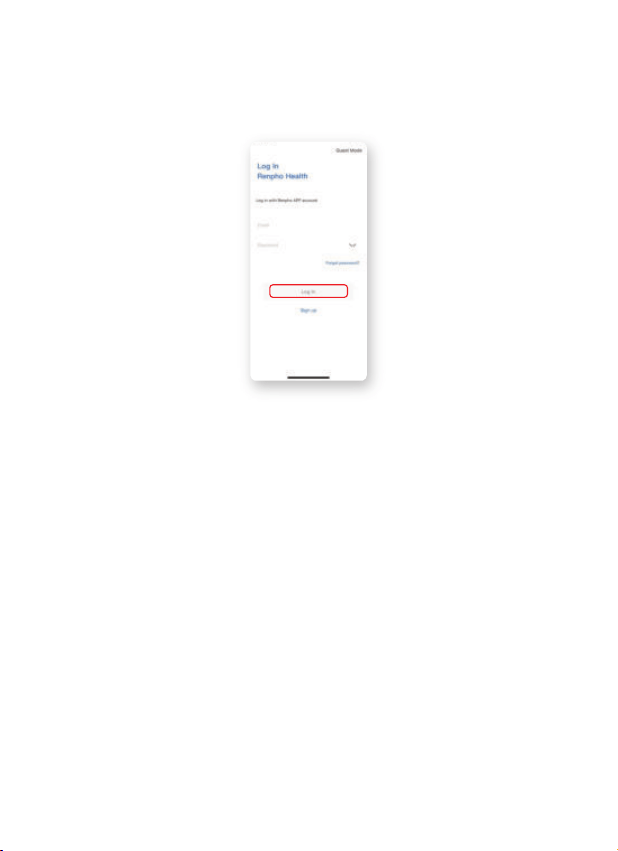
Log in with a new account or log in directly with an existing Renpho App
account.
(3)Log in
11
*Make sure that both the jump rope and Bluetooth on your phone are
on. (For iOS, you need to turn on Bluetooth only. For Android, you need to
turn on both Bluetooth and GPS.)
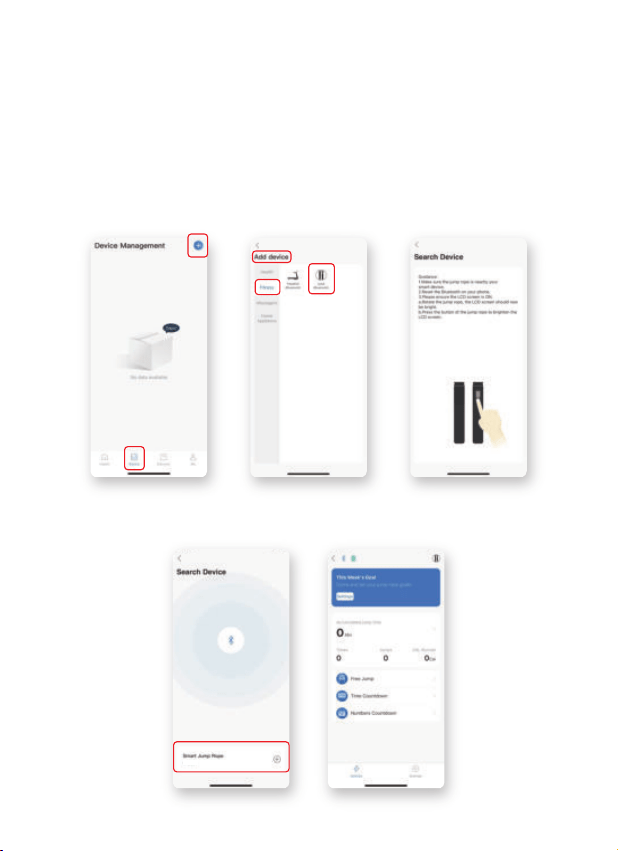
a. Click “+” in the top right corner of the “Device Page”.
b. Click “Fitness”, then click the jump rope icon on the “Add Device Page”.
c. Click “+” to add the “Smart Jump Rope (RENPHO-ROPE-R1)” to the
app.
(4) Add device
RENPHO-ROPE-R1
12
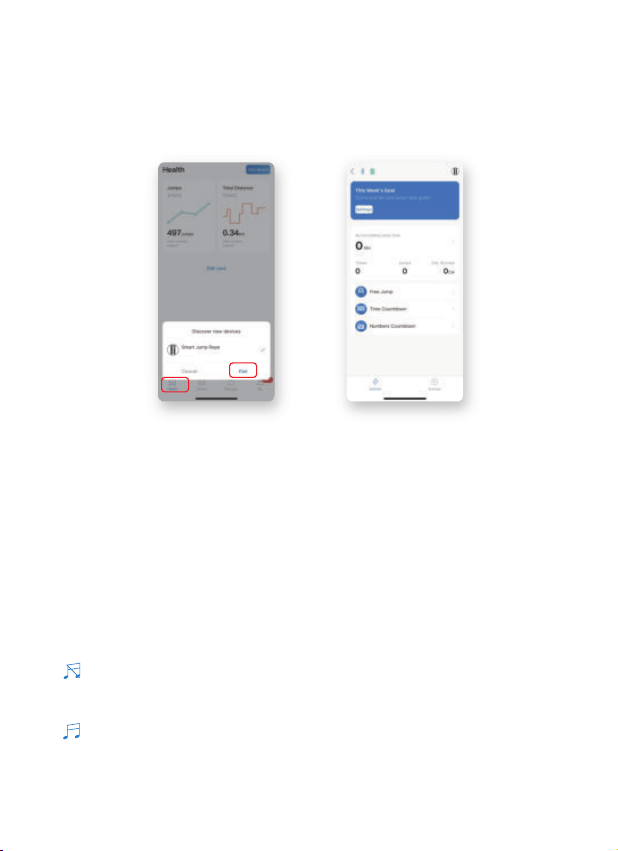
a. After logging in, the window (as shown) will pop up on the “Health
Page” if the jump rope has been connected before.
b. Click “Pair” to connect the “Smart Jump Rope (RENPHO-ROPE-R1)” to
the app.
Or
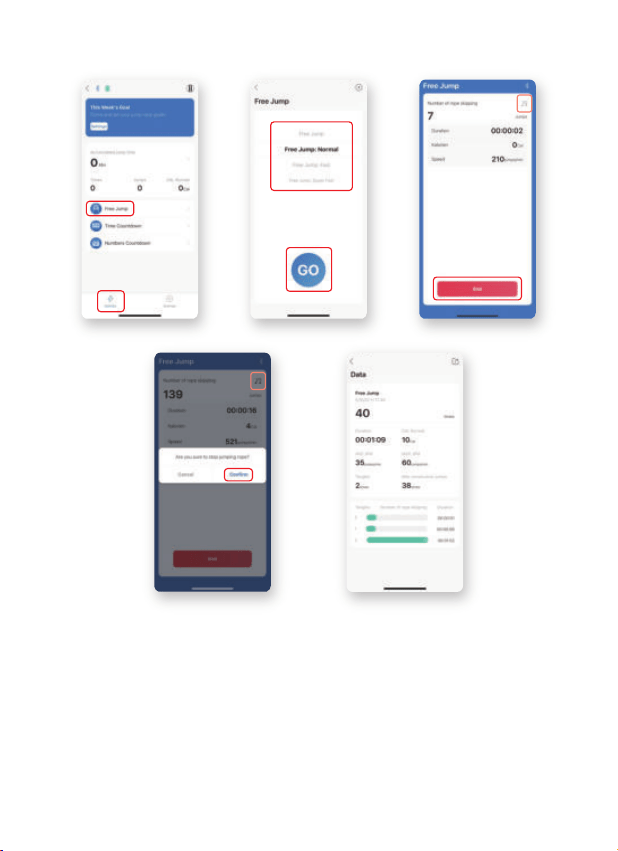
Free Jump
a. Click “Free Jump” on the”Activity Page” to enter the Free Jump mode.
b. Select music among Free Jump (No Music), Free Jump: Normal, Free
Jump: Fast, Free Jump: Super Fast to follow the rhythm of the music to
change your rope skipping speed while skipping.
c. Click “GO” to start skipping.
d. Click "End" to end the Free Jump mode, and then click “Confirm” to get
your rope skipping data. (If less than 5, your skipping number will not be
recorded.)
Note:
* appears in the top right corner, which means you haven’t
downloaded the music. Please download the music on the “Settings
Page”.
* appears in the top right corner, which means you have
downloaded the music.
*If you do not need music, please choose “Free Jump” on the Free Jump
Page.
(5) 3 Training modes instructions
RENPHO-ROPE-R1
13
14
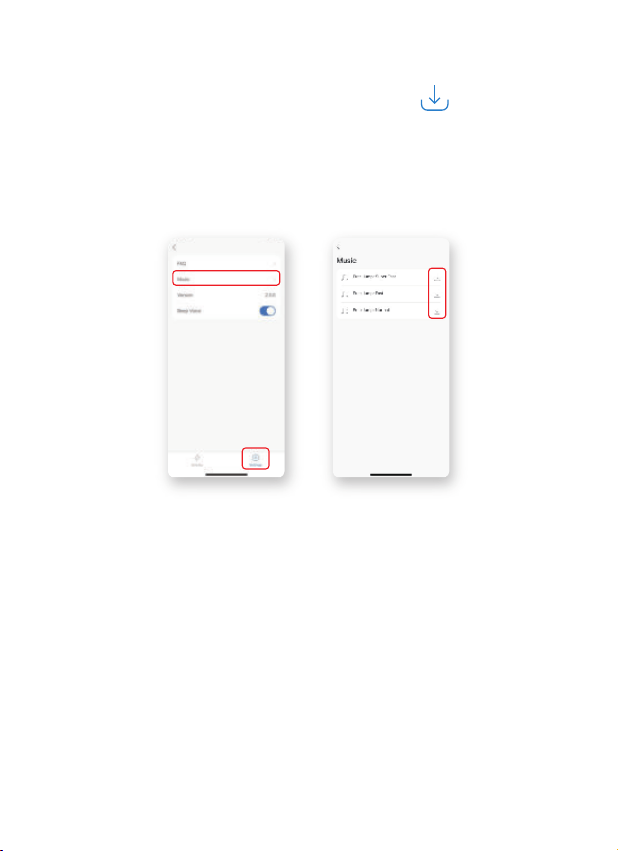
a. Click “Settings” to enter the “Settings Page”.
b. Click “Music” to enter the “Music Page” and click to download the
music.
c. After downloading the music, you can enjoy music while skipping.
*Download the Music
15
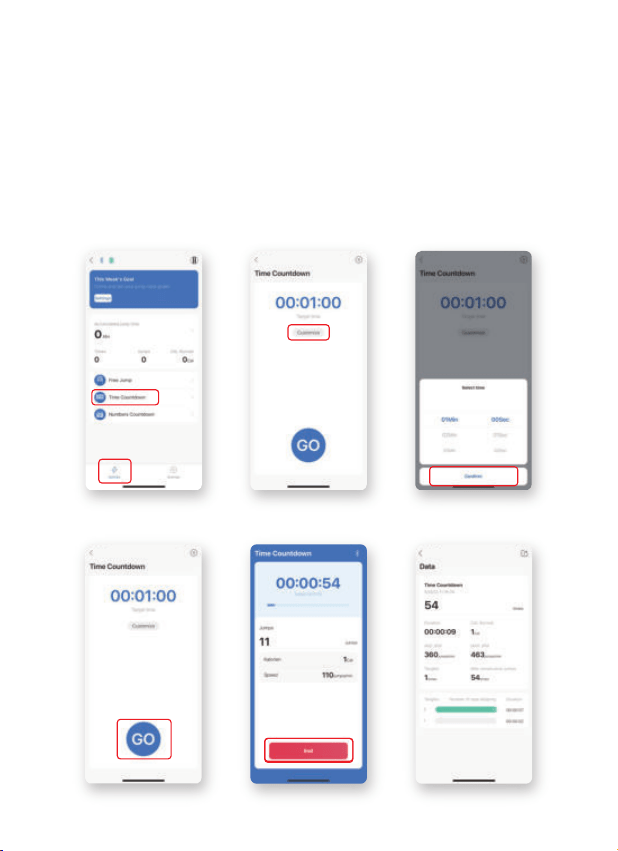
a. Click “Time Countdown” on the “Activity Page” to enter the Time
Countdown mode.
b. Click “Customize” to select time and confirm.
c. Click “GO” to start time countdown.
d. Click “End” to end the Time Countdown mode, and then click “Confirm”
to get your rope skipping data. (If less than 5, your skipping number will
not be recorded.)
Time Countdown Mode
16
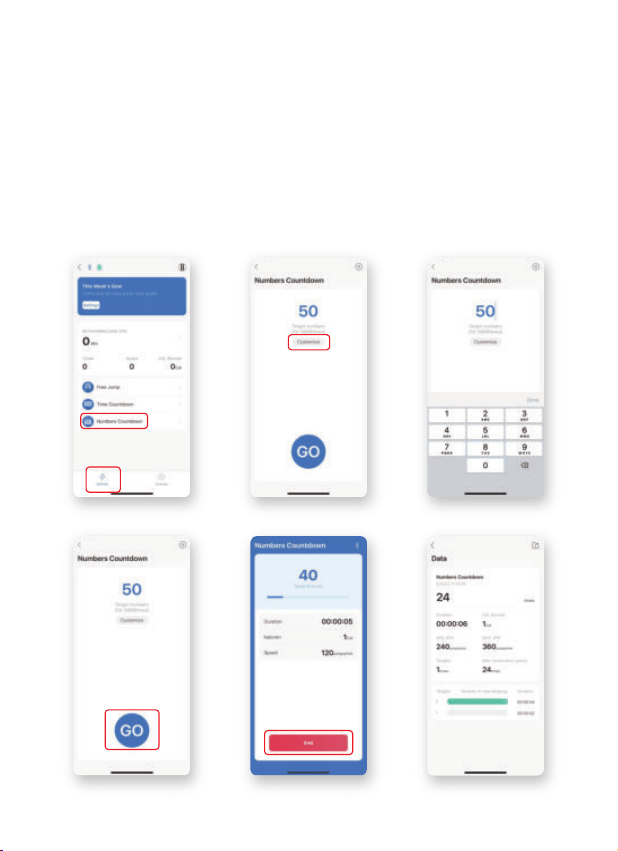
a. Click “Numbers Countdown” on the”Activity Page” to enter the
Numbers Countdown mode.
b. Click “Customize” to edit your target number and confirm.
c. Click “GO” to start numbers countdown.
d. Click “End” to end the Numbers Countdown mode, and then confirm to
get your rope skipping data. (If less than 5, your skipping number will not
be recorded.)
Numbers Countdown Mode

17
a. Click “Settings” on the “Activity Page” to set your week’s goal through
Jump Times, Duration and Activity.
b. Click “Save” to save your week’s goal.
(6) Set Weekly Goals
a. Click “>” on the “Activity Page” to enter the “Total Skips Page”.
b. Your daily, weekly and monthly rope skipping records will be displayed
on the “Total Skips Page”.
c. Click and select the data you want to delete and click “Delete”.
(7) Total Skips
18
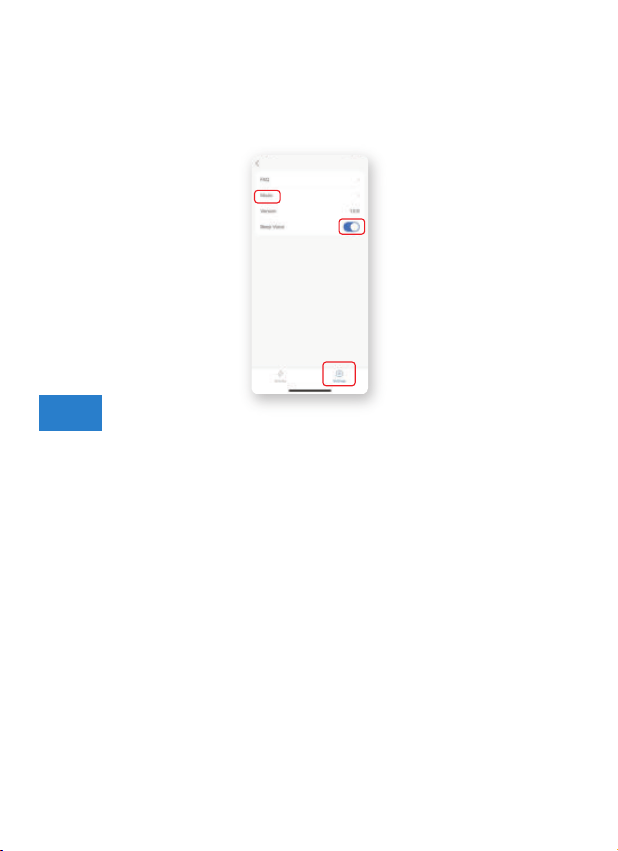
a. Click “Music” on the “Settings Page” to download the music.
b. Turn on/off the beep voice on the “Settings Page”.
(8) Settings
1. How do I turn OFF the jump rope?
Leave the jump rope idle for 3mins and it will automatically enter the
standby mode and then shut down 20 seconds later.
2. How can I sync my skipping data to the Renpho Health App?
a. Turn on the jump rope.
b. Activate your phone's Bluetooth and keep your phone within 1 meter
from the jump rope. (No match code required)
c. Open the Renpho Health App and click “Pair”.
d. Once paired successfully, the data will be automatically synchronized.
Note: If bound before, you can just repeat the step. a & b to sync the data
to the Renpho Health App.
3. How can I turn off the beep voice of the jump rope?
If the jump rope is connected to the app via Bluetooth, you can manually
turn OFF or ON the beep voice on the “Settings Page” of the Renpho
Health App.
FAQ

19
4. What should I pay attention to when using the jump rope?
a. To avoid damage, please do not use the rope on the rough or sandy
ground like concrete floors, cobblestone roads.
b. Avoid “fancy skipping” or “cross skipping” in case of getting tangled or
counting errors.
5. Why is my data lost when syncing to the app?
a. The batteries are removed or the battery cover is loose. Once the jump
rope is not powered by the batteries, the data will be cleared. Please sync
the data to the app before removing the batteries.
b. Failed to save data. To avoid data loss, press and hold the Mode Button
for 3s to save data when the Free Jump mode ends.
c. Memory exceeded. Each jump rope supports storing 90-100 data. Once
exceeded, it will automatically cover the first data one after another.
6. The screen doesn't light up.
First, check the battery andmake sure that the twopositive poles are
facing inside. Then, check the battery cover. The battery cover with a
spring should be installed on the handle with a display.
7. Bluetooth connection failed.
Connect via Renpho Health app, not via phone Bluetooth settings.
8. Why is the total exercise time 40min, but it displays 30min?
The APP only counts the actual skipping time. If you stop to rest during
the set time, the rest time will not be counted.
9. Why do l feel that one handle is heavier than the other?
The handle without the battery has a counterweight to offset the battery
weight of the other handle, so their weight isthe same.

20
10. Should the app be opened for the data to be synced to?
The skipping data will be synced to the Renpho Health app regardless of
whether it is opened during exercise or after exercise. Please make sure
that both the jump rope and the Bluetooth on your phone are turned on to
synchronize the data. (For iOS, you only need to turn on the Bluetooth. For
Android, you need to turn on both the Bluetooth and the GPS.)
11. Why can't I pair the jump rope with the app?
a.Please uninstall the “Renpho Health” app, then download and reinstall it
before restarting your phone. (Please note that the app is “Renpho
Health”, not “Renpho Fit" or “Renpho”.)
b.Open the “Renpho Health” app to register or log in and turn on the jump
rope. (If you have registered a Renpho App account, you can still use it to
log in.)
c. Confirm your phone GPS is turned on.
Tip: Don't worry about the privacy warning that pops up because GPS has
been required to locate the Bluetooth device since SDK (Software
Development Kit) was updated.
d.Click “Allow only while using the app” to access your phone’s location
information.
e.After logging in, click “+” on the “Device Page”. Click “Fitness”, and then
click the jump rope icon on the “Add Device Page” to add the “Smart
Jump Rope (RENPHO-ROPE-R1)” to the app. Or, open your phone
Bluetooth and the window will pop up on the “Health Page”. Then, click
“Pair”.
Note: The jump rope should be kept within 1 meter from your phone when
connected to the app via Bluetooth.
If the above instructions do not solve your problem, please send your
account, mobile phone model, mobile phone system version and the
Renpho Health app version you downloaded to “
We will look into this and try our best to offer you a solution.

21
*For defective products or the return of items, please contact us with
your order number within the specified warranty period. DO NOT dispose
of any product parts as they may be required for inspection/repair.
Please feel free to contact us if you have any questions or concerns.
RENPHO Customer Service Team guarantees a quick response and
hassle-free solutions to any issue you may have within business hours.
Your RENPHO product purchase is covered by a one-year limited
manufacturer warranty from the date of delivery.
For warranty terms and conditions, please visit:
https://renpho.com/pages/warranty-terms-and-conditions
Note: Product registration is not required for the warranty. If you choose
not to register your product, it will not diminish the product warranty.
Email: [email protected] (US&CA)
[email protected] (AU)
+1(844) 417 0149 (US ONLY)
Monday-Friday 9:00AM-4:30PM
(888)316-1491 (CA ONLY)
Monday-Friday 9:00AM-5:00PM (PST)
1800 MY RENPHO (1800 69 7367) (AU ONLY)
Monday-Friday 9:00AM-6:00PM (AEST)
TEL:
Warranty Policy
Customer Service

FCC Regulatory Compliance
This device complies with part 15 of the FCC Rules. Operation is subject to the following
two conditions: (1) This device may not cause harmful interference, and (2) this device
must accept any interference received, including interference that may cause undesired
operation.
Warning: changes or modifications not expressly approved by the party responsible for
compliance could void the user’s authority to operate the equipment.
Note: This equipment has been tested and found to comply with the limits for a Class B
digital device, pursuant to Part 15 of the FCC Rules. These limits are designed to provide
reasonable protection against harmful interference in a residential installation. This
equipment generates, uses and can radiate radio frequency energy and, if not installed and
used in accordance with the instructions, may cause harmful interference to radio
communications.
However, there is no guarantee that interference will not occur in a particular installation.
If this equipment does cause harmful interference to radio or television reception, which
can be determined by turning the equipment off and on, the user is encouraged to try to
correct the interference by one or more of the following measures:
- Reorient or relocate the receiving antenna.
- Increase the separation between the equipment and receiver.
- Connect the equipment into an outlet on a circuit different from that to which the receiver
is connected.
- Consult the dealer or an experienced radio/TV technician for help.
RF Exposure Compliance
This equipment complies with FCC radiation exposure limits set forth for an uncontrolled
environment. This transmitter must not be co-located or operating in conjunction with any
other antenna or transmitter.
ISED Regulatory compliance
This device contains licence-exempt transmitters that comply with Innovation, Science and
Economic Development Canada’s licence-exempt RSS(s).
Operation is subject to the following two conditions:
(1)This device may not cause interference.
(2)This device must accept any interference, including interference that may cause
undesired operation of the device.
LeprésentappareilestconformeauxCNRd'IndustrieCanadaapplicablesauxappareils
radio exemptsdelicence. L'exploitationestautoriséeauxdeuxconditionssuivantes:
(1)l'appareilne doitpasproduiredebrouillage,et
(2)l'utilisateurdel'appareildoitacceptertoutbrouillage radioélectriquesubi,mêmesile
brouillageestsusceptibled'encompromettrelefonctionnement.
This equipment complies with IC RSS-102 radiation exposure limits set forth for an
uncontrolled environment.
Cet équipement est conforme aux limites d'exposition aux radiations IC CNR-102 établies
pour un environnement non contrôlé.
22

US Importer: JOICOM CORPORATION
14129 The Merge Street, Building 3 Unit A, Eastvale, CA 92880
Manufacturer: Shenzhen Ruiyi Business Technology Co., Ltd.
Qianhai Complex A201, Qianwan Road 1, Qianhai Shenzhen-Hong Kong
Cooperation Zone, Shenzhen, 518000 P.R.China
NA1
Made in China
View and download the full version of the electronic
User Manual by scanning the QR Code or entering the
URL below.
https://renpho.com/pages/smart-jump-rope-user-manual