Home
Bookmarks
Home
Neff
Neff D98IPT2Y5-MS User Manual
Page 23
Neff D98IPT2Y5-MS 90cm N 90 Inclined Canopy Rangehood Flex Design Metallic Silver
User Manual - Page 23
For D98IPT2Y5-MS.
PDF File Manual
,
24 pages
,
Read Online
|
Download pdf file
More photos
Extractor hood
en
Table of contents
1 Safety
1.1 General information
1.2 Intended use
1.3 Restriction on user group
1.4 Safe use
2 Avoiding material damage
3 Environmental protection and saving energy
3.1 Disposing of packaging
3.2 Saving energy
4 Operating modes
4.1 Air extraction mode
4.2 Air recirculation
5 Familiarising yourself with your appliance
5.1 Overall view
5.2 Control panel
6 Before using for the first time
6.1 Setting an operating mode
7 Basic operation
7.1 Switching on the appliance
7.2 Switching off the appliance
7.3 Selecting a fan setting
7.4 Switching on intensive mode
7.5 Switching off intensive mode
7.6 Setting the Power Boost position
7.7 Switching on automatic mode
7.8 Switching off automatic mode
7.9 Sensor sensitivity
7.10 Switching on the lighting
7.11 Setting the brightness
7.12 Switching on Ambient Light
7.13 Setting the Ambient Light colour
7.14 Saturation indicator
7.15 Resetting the saturation indicator
7.16 Selecting the favourites function
7.17 Remote display
8 Additional functions in the Home Connect app
8.1 Automatic sensor system
8.2 Ambient Light
8.3 Performance profile
8.4 Filter saturation
8.5 Cooktop-based Hood Control
8.6 Fan run-on
8.7 Interval ventilation
8.8 Favourites button
8.9 Voice Control
8.10 Setting the colour temperature
9 Home Connect
9.1 Setting up the Home Connect app
9.2 Setting up Home Connect
9.3 Resetting the connection
9.4 Software update
9.5 Remote diagnostics
9.6 Data protection
10 Hob-based hood control
11 Cleaning and servicing
11.1 Cleaning products
11.2 Cleaning the appliance
11.3 Cleaning controls and lights
11.4 Removing the grease filter
11.5 Cleaning grease filters manually
11.6 Cleaning grease filters in the dishwasher
11.7 Fitting grease filters
12 Troubleshooting
Malfunctions
12.1 Malfunctions
13 Disposal
13.1 Disposing of old appliance
14 Customer Service
14.1 Product number (E-Nr.), production number (FD) and consecutive numbering (Z-Nr.)
15 Accessories
16 Declaration of Conformity
16.1 Statement of Compliance for Great Britain
17 Information regarding Free and Open Source Software
18 Test information
19 Installation instructions
19.1 Installation video
19.2 Included with the appliance
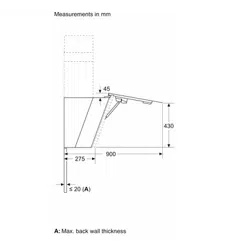
19.3 Dimensions
19.4 Safety clearances
19.5 Secure installation
19.6 General information
19.7 Instructions for the electrical connection
19.8 Information on the installation situation
19.9 Instructions for the exhaust air pipe
19.10 Instructions for the air extraction mode
19.11 Installation
19.11.1 Checking the wall
19.11.2 Preparing the wall
19.11.3 Installing the appliance bracket
19.11.4 Installing the appliance
19.11.5 Piping
19.11.5.1 Establishing the exhaust air connection (exhaust pipe, 150 mm diameter)
19.11.6 Installing the flue duct
19.11.7 Installing design profiles
19.11.8 Removing the appliance
Page 23/24
Page 1
Page 2
Page 3
Page 4
Page 5
Page 6
Page 7
Page 8
Page 9
Page 10
Page 11
Page 12
Page 13
Page 14
Page 15
Page 16
Page 17
Page 18
Page 19
Page 20
Page 21
Page 22
Page 23
Page 24
Contents
Table of Contents
Search
Previous
Next
Troubleshooting
Bookmarks
Loading ...
Loading ...
Loading ...
Loading ...
File type: PDF
File name: 4375099_d98ipt2y5-ms.pdf
File size: 15.96 MB
File Language: English
Pages: 24
Author: Neff
Published: 2024-03-29
Updated: 2024-03-29
Download File
Table of Contents
×
Extractor hood
1
en
2
Table of contents
2
1 Safety
2
1.1 General information
2
1.2 Intended use
2
1.3 Restriction on user group
2
1.4 Safe use
2
2 Avoiding material damage
4
3 Environmental protection and saving energy
5
3.1 Disposing of packaging
5
3.2 Saving energy
5
4 Operating modes
5
4.1 Air extraction mode
5
4.2 Air recirculation
5
5 Familiarising yourself with your appliance
6
5.1 Overall view
6
5.2 Control panel
6
6 Before using for the first time
6
6.1 Setting an operating mode
6
7 Basic operation
7
7.1 Switching on the appliance
7
7.2 Switching off the appliance
7
7.3 Selecting a fan setting
7
7.4 Switching on intensive mode
7
7.5 Switching off intensive mode
7
7.6 Setting the Power Boost position
7
7.7 Switching on automatic mode
7
7.8 Switching off automatic mode
7
7.9 Sensor sensitivity
7
7.10 Switching on the lighting
7
7.11 Setting the brightness
7
7.12 Switching on Ambient Light
7
7.13 Setting the Ambient Light colour
7
7.14 Saturation indicator
7
7.15 Resetting the saturation indicator
7
7.16 Selecting the favourites function
8
7.17 Remote display
8
8 Additional functions in the Home Connect app
8
8.1 Automatic sensor system
8
8.2 Ambient Light
8
8.3 Performance profile
8
8.4 Filter saturation
8
8.5 Cooktop-based Hood Control
8
8.6 Fan run-on
8
8.7 Interval ventilation
8
8.8 Favourites button
8
8.9 Voice Control
8
8.10 Setting the colour temperature
8
9 Home Connect
8
9.1 Setting up the Home Connect app
9
9.2 Setting up Home Connect
9
9.3 Resetting the connection
9
9.4 Software update
9
9.5 Remote diagnostics
9
9.6 Data protection
9
10 Hob-based hood control
9
11 Cleaning and servicing
10
11.1 Cleaning products
10
11.2 Cleaning the appliance
10
11.3 Cleaning controls and lights
10
11.4 Removing the grease filter
10
11.5 Cleaning grease filters manually
11
11.6 Cleaning grease filters in the dishwasher
11
11.7 Fitting grease filters
11
12 Troubleshooting
11
Malfunctions
12
12.1 Malfunctions
12
13 Disposal
12
13.1 Disposing of old appliance
12
14 Customer Service
13
14.1 Product number (E-Nr.), production number (FD) and consecutive numbering (Z-Nr.)
13
15 Accessories
13
16 Declaration of Conformity
13
16.1 Statement of Compliance for Great Britain
14
17 Information regarding Free and Open Source Software
14
18 Test information
14
19 Installation instructions
15
19.1 Installation video
15
19.2 Included with the appliance
15
19.3 Dimensions
16
19.4 Safety clearances
16
19.5 Secure installation
16
19.6 General information
18
19.7 Instructions for the electrical connection
18
19.8 Information on the installation situation
19
19.9 Instructions for the exhaust air pipe
19
19.10 Instructions for the air extraction mode
19
19.11 Installation
19
19.11.1 Checking the wall
19
19.11.2 Preparing the wall
19
19.11.3 Installing the appliance bracket
20
19.11.4 Installing the appliance
20
19.11.5 Piping
22
19.11.5.1 Establishing the exhaust air connection (exhaust pipe, 150 mm diameter)
22
19.11.6 Installing the flue duct
22
19.11.7 Installing design profiles
22
19.11.8 Removing the appliance
22
Search:
×
Search