10 English
Contents
General notes
Read these original operating instruc-
tions and the enclosed safety instruc-
tions before using the device for the first
time. Proceed accordingly.
Keep both books for future reference or for future own-
ers.
Function
This scouring and vacuum machine is used for wet
cleaning of level floors.
The device can be adjusted to suit the respective clean-
ing task by setting the water volume and detergent vol-
ume appropriately. The detergent dosing is adjusted via
the amount added to the tank.
The working width and the capacity of the fresh and
waste water tanks (see chapter Technical data) enable
effective cleaning with a long working time.
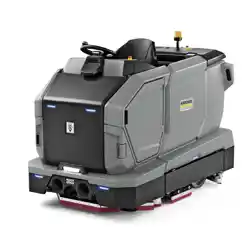
BD 50/55 W Classic Bp is with a drive motor.
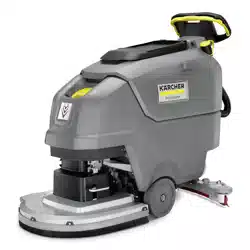
BD 50/55 C Classic Bp is without a drive motor.
Note
The device can be equipped with various accessories to
suit the respective cleaning task. Request a copy of our
catalogue or visit our Internet website at www.kaerch-
er.com.
Intended use
This device is suitable for commercial and industrial
use, e.g. in hotels, schools, hospitals, factories, shops,
offices, and rental companies. Use the device only in
accordance with the information in these operating in-
structions.
● The device may only be used for cleaning smooth
surfaces that are insensitive to water and polishing.
● The device is not suitable for cleaning frozen floors
(e.g. in cold stores).
● The device is not suitable for use in potentially ex-
plosive environments.
● The device is approved for operation on surfaces
with a maximum slope (see chapter Technical da-
ta).
Environmental protection
The packing materials can be recycled. Please
dispose of packaging in accordance with the en-
vironmental regulations.
Electrical and electronic appliances contain valu-
able, recyclable materials and often components
such as batteries, rechargeable batteries or oil,
which - if handled or disposed of incorrectly - can
pose a potential threat to human health and the environ-
ment. However, these components are required for the
correct operation of the appliance. Appliances marked
by this symbol are not allowed to be disposed of togeth-
er with the household rubbish.
Notes on the content materials (REACH)
Current information on content materials can be found
at: www.kaercher.com/REACH
Accessories and spare parts
Only use original accessories and original spare parts.
They ensure that the appliance will run fault-free and
safely.
Information on accessories and spare parts can be
found at www.kaercher.com.
Scope of delivery
Check the contents for completeness when unpacking.
If any accessories are missing or in the event of any
shipping damage, please notify your dealer.
Safety instructions
Before using the device for the first time, read and ob-
serve these operating instructions and the accompany-
ing brochure: Safety information for brush cleaning units
spray retraction devices, No. 5.956-251.0.
The device is approved for operation on surfaces with a
specified limited slope (see Chapter Technical data).
WARNING
Device tipping over
Danger of injury
Do not operate the device on sloping surfaces.
The device may only be operated when the hood and all
covers are closed.
Safety devices
CAUTION
Missing or modified safety devices
Safety devices are provided for your own protection.
Never modify or bypass safety devices.
Safety switch
The device switches off when the safety switch is re-
leased.
Key-operated switch
Pulling the key out of the key-operated switch secures
the device against unauthorised use.
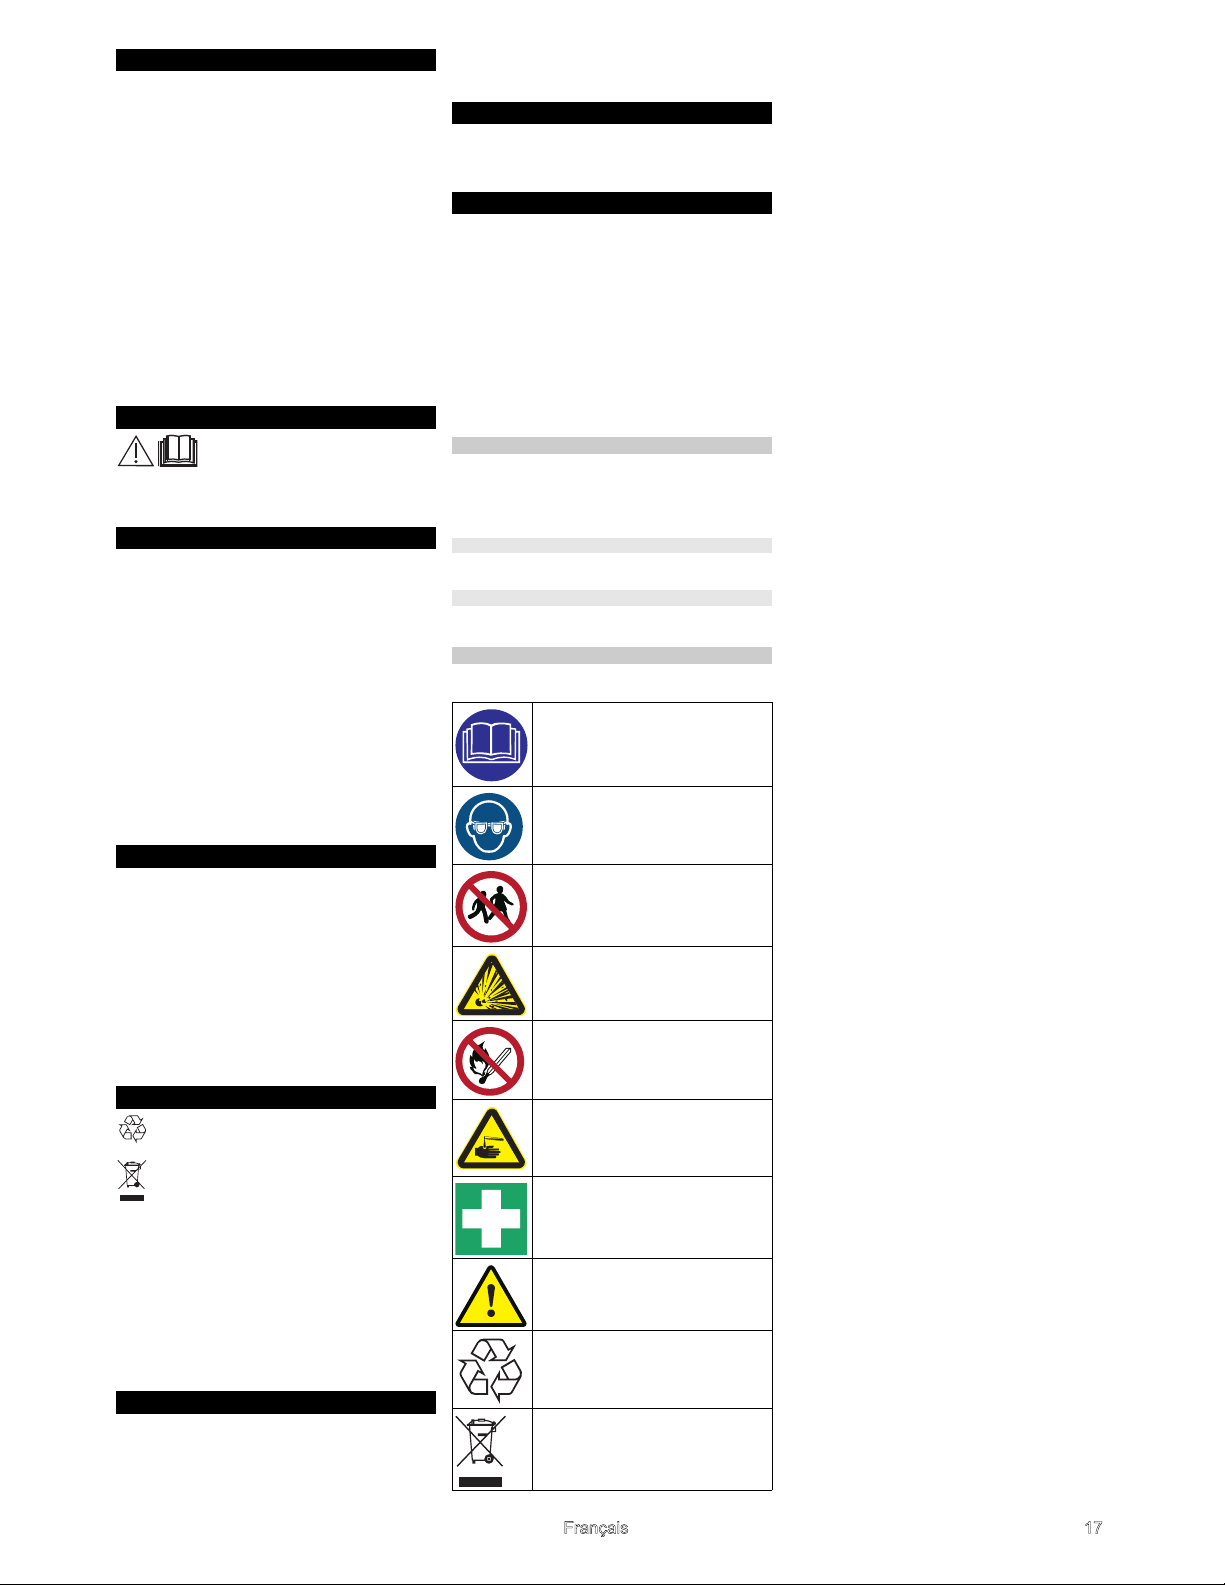
Warning symbols
Observe the following warnings when handling the bat-
teries:
General notes ..................................................... 10
Function .............................................................. 10
Intended use ....................................................... 10
Environmental protection .................................... 10
Accessories and spare parts............................... 10
Scope of delivery ................................................ 10
Safety instructions............................................... 10
Description of the unit ......................................... 11
Installation........................................................... 12
Initial startup........................................................ 12
Operation ............................................................ 13
Transport............................................................. 13
Storage ............................................................... 14
Care and service................................................. 14
Troubleshooting guide......................................... 15
Warranty.............................................................. 15
Accessories......................................................... 15
Technical data..................................................... 15
EU Declaration of Conformity ............................. 16
Observe notes in the instructions for the
battery, on the battery and in these oper-
ating instructions.
Wear eye protection.
Keep acids and batteries away from chil-
dren.
Risk of explosion
Fire, sparks, open flames and smoking
are prohibited.
Risk of acid burns
First aid.
Warning
Disposal
Do not throw batteries in the bin.
English 11
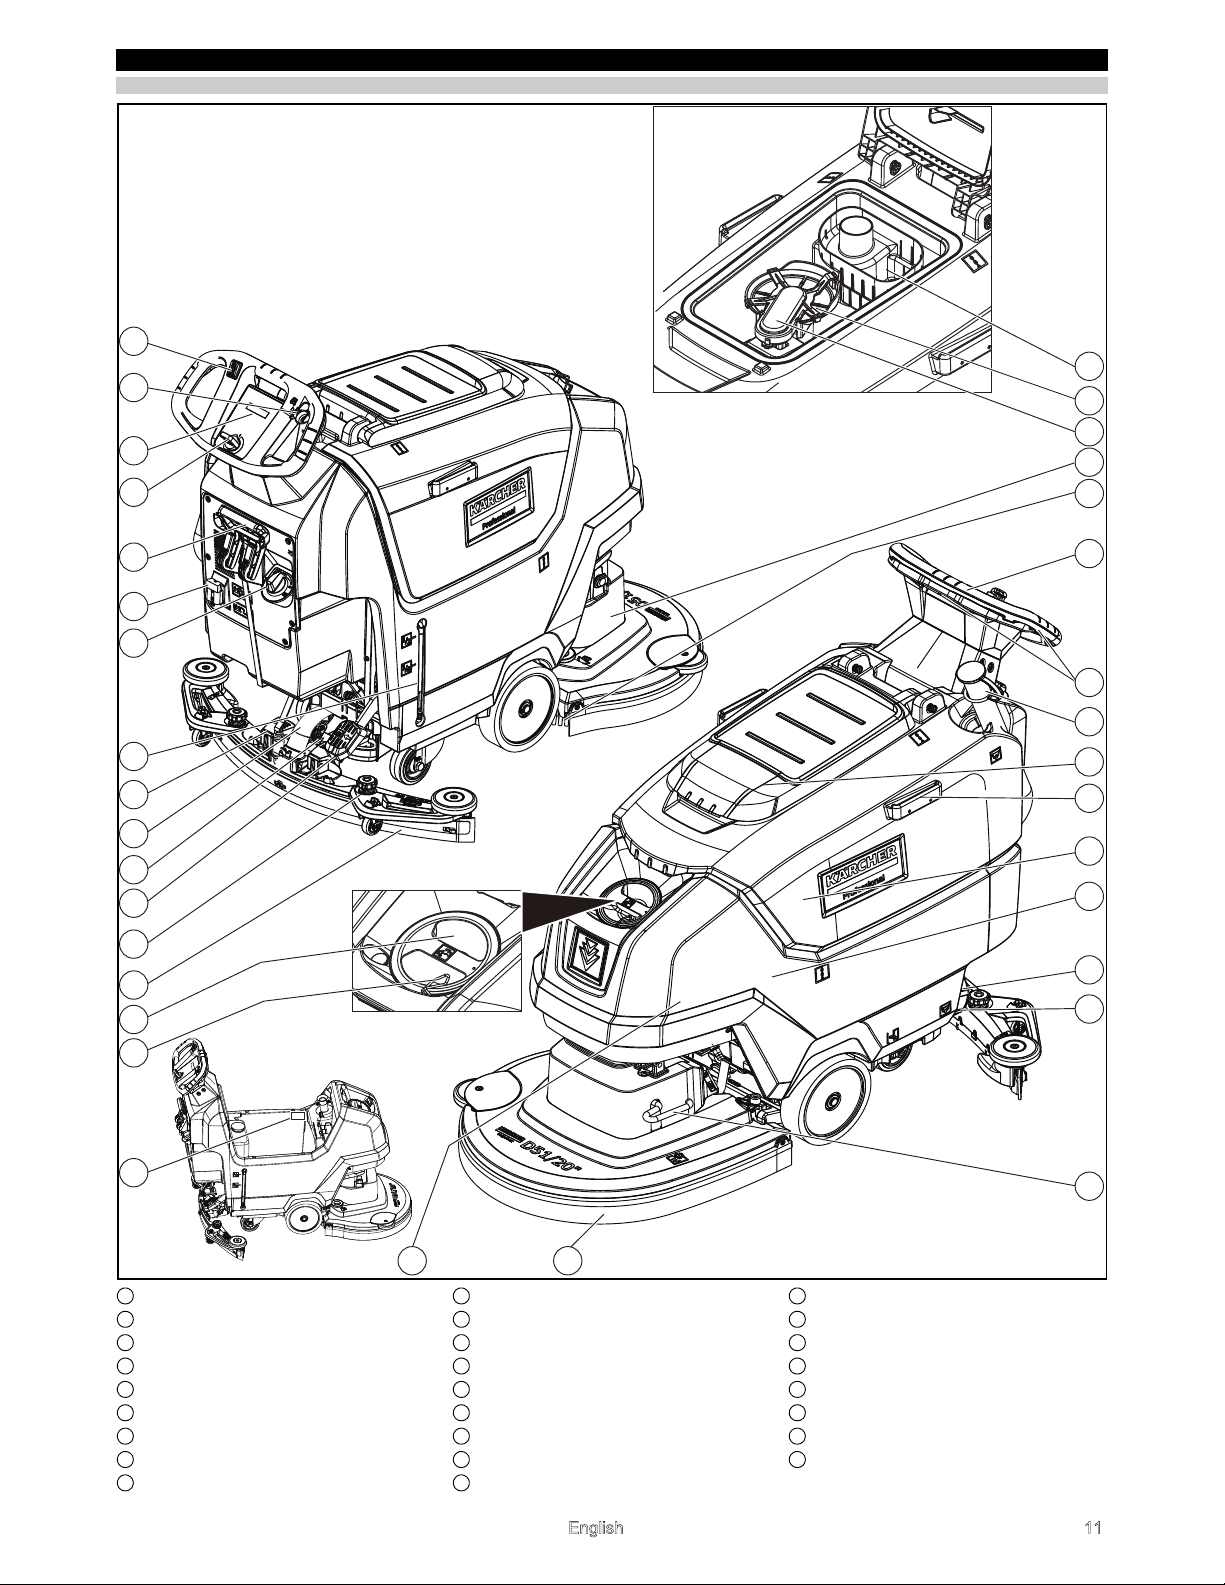
Description of the unit
Overview of the unit
1
Coarse dirt filter
2 Fluff filter
3
Float
4
Brush head
5
Disk brush
6 Handle
7
Safety switch
8
Waste water tank drain hose with dosing unit
9 Waste water tank lid
10
Home base retaining rail
11
Waste water tank
12
** Battery
13
Fresh water filter
14
Fresh water tank drain
15
Brush release pedal
16
Splash guard
17
Fresh water tank
18
Rating plate
19
Hose clamp
20 Fresh water tank filling funnel
21
Suction bar
22
Suction bar closure
23
Brush head pedal
24 Suction bar inclination adjustment
25
Suction hose
26
Eccentric lever
For fastening the suction bar
7
10
11
13
14
16
17
19
20
25
26
27
29
30
31
32
33
28
18
21
34
1
2
4
3
6
8
9
12
22
23
24
5
15
12 English
27
Fresh water filling level display
28
Water volume regulation knob
29 Battery plug connector
30
Suction bar lever
31
Key-operated switch
32 Display
33
Working speed rotary knob
(Only for BD 50/55 W Classic Bp)
34
Driving direction switch
(Only for BD 50/55 W Classic Bp)
** Not in scope of delivery
Colour coding
● The control elements for the cleaning process or
daily maintenance are yellow.
● The control elements for maintenance and servicing
are light grey.
Symbols on the device
* optional
Installation
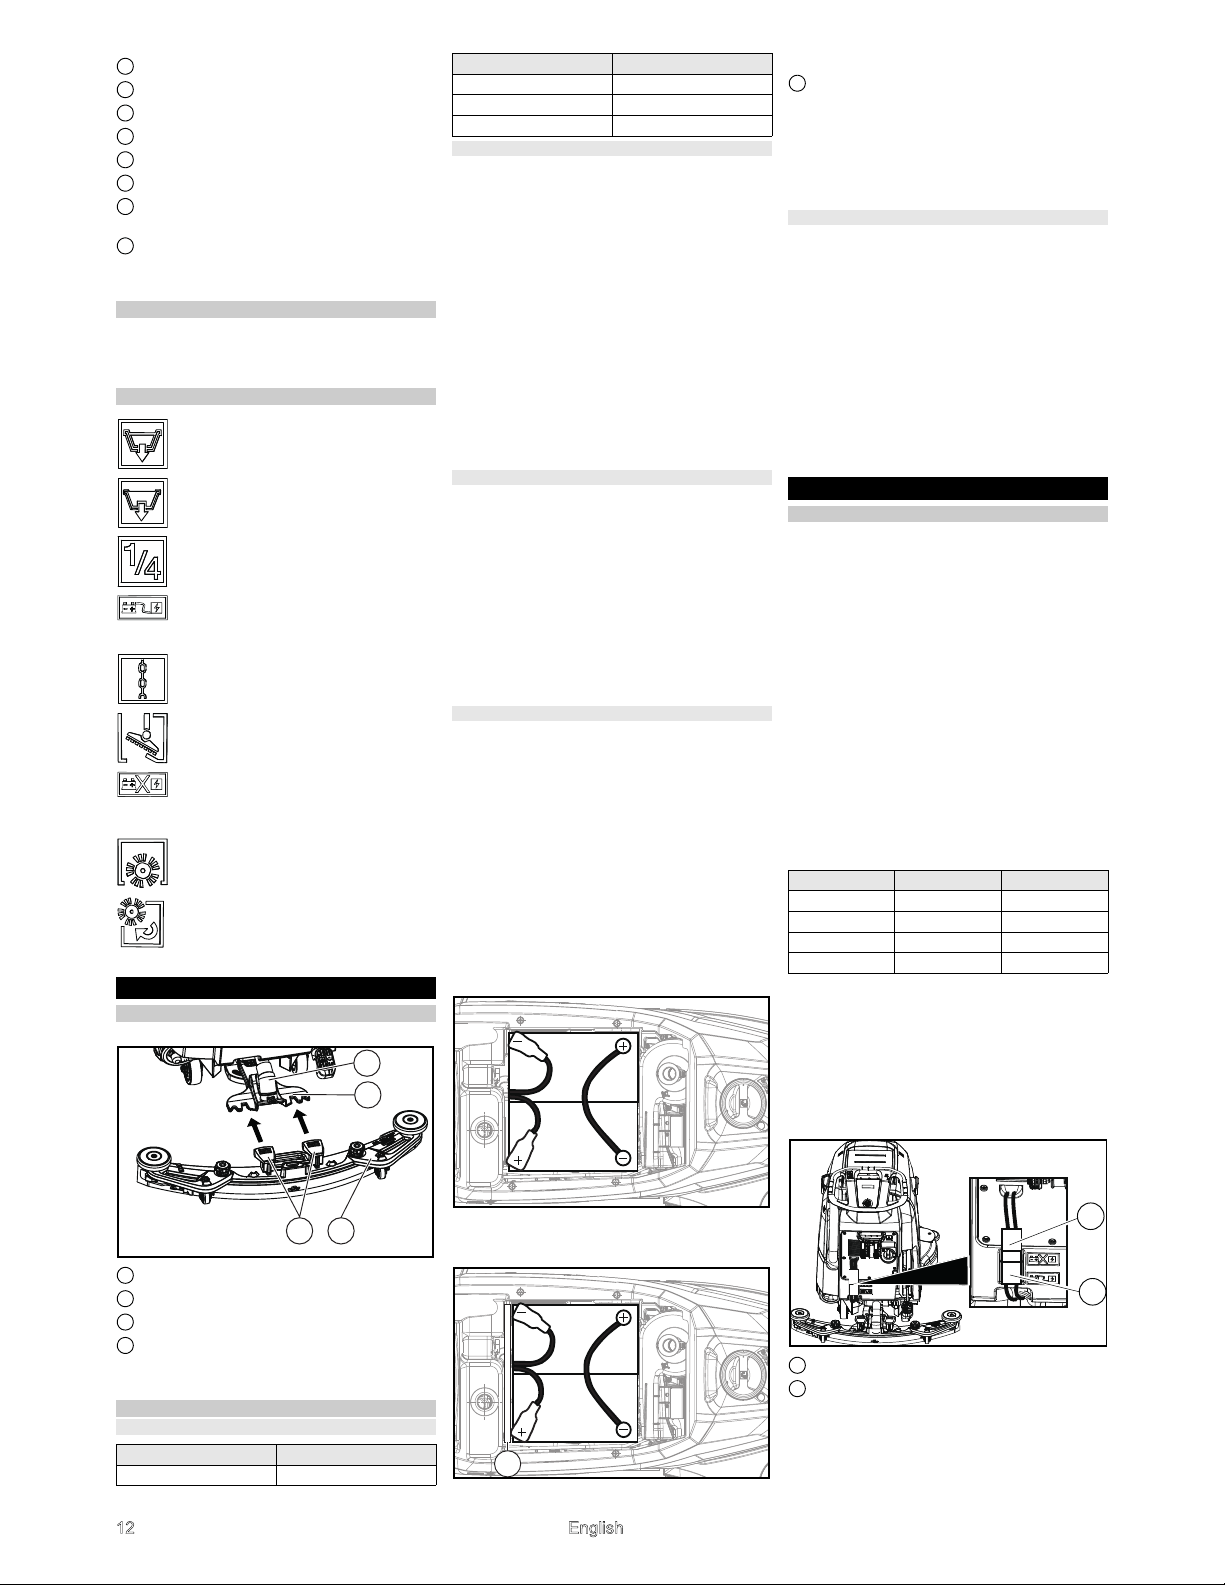
Installing the suction bar
1. Pivot both clamping levers upwards.
1 Suction hose
2 Suction bar suspension
3
Suction bar
4
Clamping lever
2. Insert the suction bar in the suction bar mount.
3. Pivot both clamping levers downwards.
Batteries
Recommended battery sets BD 50/55
Low-maintenance batteries (wet batteries)
DANGER
Refilling discharged batteries with water
Danger of acid burns from escaping acid, destruction of
clothing
Wear safety goggles when handling the batteries.
Observe the applicable regulations.
Immediately rinse off any splashed acid from the skin or
clothing using copious amounts of water.
ATTENTION
Using water with additives
Defective batteries, loss of warranty eligibility
Top up the batteries using only distilled or desalinated
water (EN 50272-T3).
Do not use any foreign additives, so-called enhancing
agents, because this will invalidate the warranty.
1. Add distilled water one hour before the charging
process comes to an end. Observe the correct acid
level according to the battery label.
All cells must produce gas at the end of the charging
process.
Maintenance-free batteries (AGM and gel batteries)
ATTENTION
Risk of damage when opening AGM and gel batter-
ies!
AGM and gel batteries are maintenance-free and have
a closed battery housing. Refilling them with distilled
water or battery acid is not possible and is not neces-
sary. Opening or drilling the battery housing will damage
an AGM or gel battery. It must then be replaced.
Do not open the battery housing and do not drill any
holes.
Do not cover the pressure relief valve and do not
change it.
1. Only charge AGM and gel batteries using the spec-
ified chargers, see chapter: Charging the battery.
Installing and connecting batteries
CAUTION
Removing and installing the batteries
Unstable machine position
Ensure that the machine is positioned stably when re-
moving and installing the batteries.
ATTENTION
Incorrect connection polarity
Destruction of the control electronics
Take care to ensure the correct polarity when connect-
ing the batteries.
ATTENTION
Deep discharge
Risk of damage
Charge the batteries before starting the device.
1. Drain the waste water.
2. Lift up the waste water tank, and set it aside.
3. Place the battery in the device as shown.
115 Ah, 2.815-091.0
80 Ah, 2.815-090.0
105 Ah, 2.815-100.0
76 Ah, 2.815-099.0
1 Spacers
4. Connect the poles to the connection cables from the
battery installation kit.
5. Clamp the connecting cables on the (+) and (-) bat-
tery terminals that are still free.
6. Connect the device-side battery connector to the
battery-side battery connector.
7. Recover the waste water tank.
Removing the battery
CAUTION
Removing and installing the batteries
Unstable machine position
Ensure that the machine is positioned stably when re-
moving and installing the batteries.
1. Turn the key-operated switch to "0", and remove the
key.
2. Disconnect the battery plug.
3. Drain the waste water.
4. Lift up the waste water tank, and set it aside.
5. Disconnect the device-end cable from the negative
terminal of the battery.
6. Disconnect the remaining cables from the battery.
7. Remove the battery.
8. Dispose of the used batteries in accordance wit
h
statutory provisions.
Initial startup
Charging the battery
DANGER
Inappropriate use of the charger
Electric shock
Adhere to the mains voltage and fuse values specified
on the device type plate.
Only use the charger in dry rooms with sufficient venti-
lation.
ATTENTION
Accumulation of dangerous gases under the tank
during the charging process
Risk of explosion
Pivot the waste water tank upwards before charging
low-maintenance batteries.
ATTENTION
Using an unsuitable charger
Risk of damage
Do not connect the charger to the device-side battery
connector.
Use only a charger suitable for the type of battery in-
stalled.
Read the operating instructions of the charger manufac-
turer and observe the safety instructions in particular.
The average charging time is approx. 10-15 hours.
The device cannot be used during the charging pro-
cess.
Note
The device has deep discharge protection, i.e. the
brush motor and turbine are switched off automatically
when the permitted minimum capacity level is reached.
1. Drive the device directly to the charger and do not
drive on slopes.
2. Pull out the device-side battery connector.
1 Battery connector, device side
2 Battery connector, battery side
3. Connect the battery-side battery connector to the
charger.
4. Plug the mains plug of the charger into the socket.
5. Carry out the charging process in accordance with
the operating instructions for the charger.
Fresh water tank drain opening
Waste water tank drain opening
Fresh water tank filling level (25%)
Insert the charger plug here
Lashing point
* Mop holder
ATTENTION
Incorrect socket
Risk of damage
DO NOT insert the charger plug here
Pedal for raising/lowering the brush head
Brush release pedal
Description Order no.
115 Ah - Maintenance-free 2.815-091.0
1
2
4 3
80 Ah - Maintenance-free 2.815-090.0
76 Ah - Maintenance-free 2.815-099.0
105 Ah - Maintenance-free 2.815-100.0
Description Order no.
1
Battery set Capacity Charger
2.815-091.0 115 Ah 6.654-329.0
2.815-090.0 80 Ah 6.654-329.0
2.815-099.0 76 Ah 6.654-329.0
2.815-100.0 105 Ah 6.654-329.0
1
2
English 13
6. Connect the device-side battery connector to the
battery-side battery connector.
Operation
ATTENTION
Risks during operation
Danger of injury
Release the safety switch in the case of danger.
Filling with operating materials
Filling with fresh water
1. Open the fresh water tank cap.
2. Fill fresh water (max. 50 °C) to the lower edge of the
filling funnel.
Note
The fresh water hose can be clamped in place using the
hose clip while filling.
3. Close the fresh water tank cap.
Notes on detergents
WARNING
Unsuitable detergents
Health risk, damage to the device
Use only recommended detergents. The operator car-
ries all increased risks relating to operational safety and
increased risk of accidents if using other detergents.
Use only detergents free of solvents, salt and hydrofluo-
ric acid.
Adhere to the safety instructions stated on the detergent
packaging.
Note
Do not use heavily foaming detergent.
Recommended detergents
Detergent
1. Fill the detergent into the fresh water tank.
Note
The cap for the fresh water tank filling funnel can be
used for measuring the correct quantity of detergent. It
has a measuring scale marked on the inner side.
Adjusting the water volume
1. Adjust the water volume via the regulating knob to
suit the degree of soiling of the floor covering.
Note
Perform initial cleaning tests with a low water volume.
Increase the water volume step by step until achieving
the desired cleaning result.
Note
The brush head continues operating without a liquid
supply if the fresh water tank is empty.
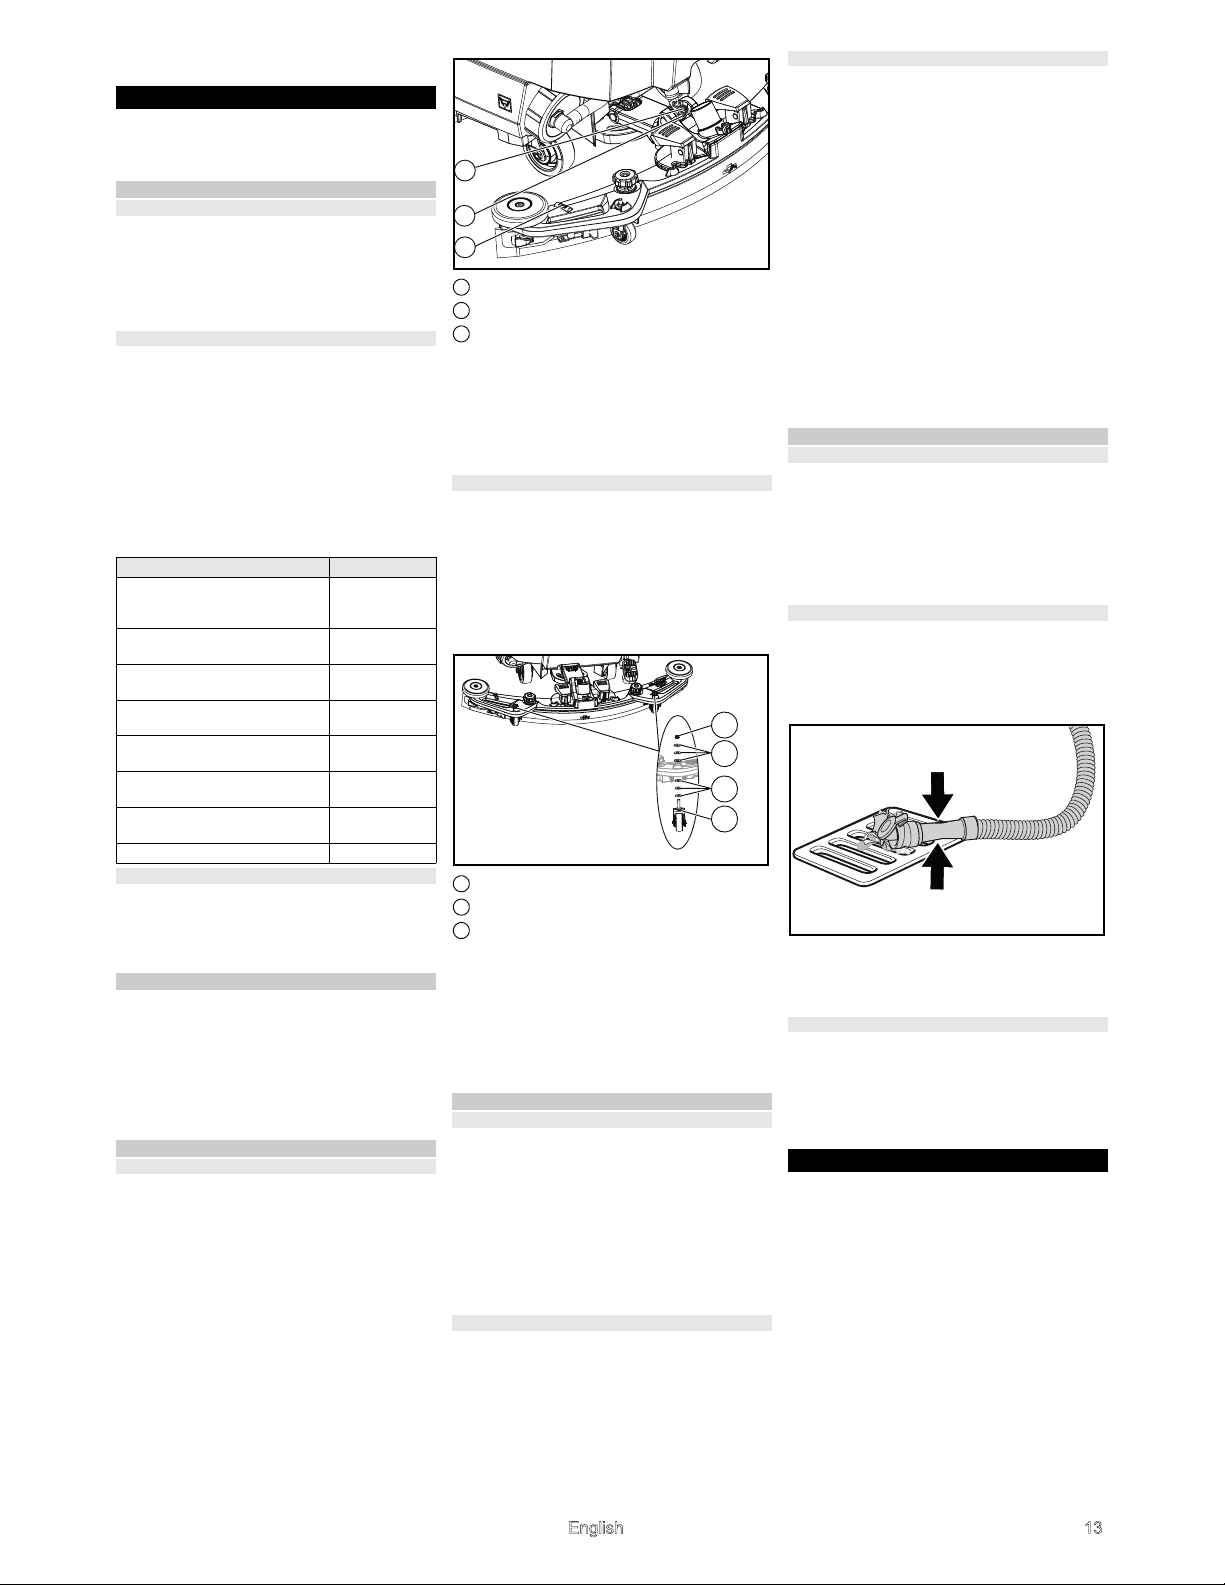
Adjusting the suction bar
Adjusting the inclination
The inclination must be adjusted so that the suction lips
of the suction bar make even contact with the floor over
the entire length of the suction bar.
1. Park the device on a surface without a slope.
2. Turn the key-operated switch to ON. Put down the
suction bar.
3. Drive the device a small distance forwards.
4. Read the spirit level.
1
Screw
2
Nut
3
Spirit level
5. Unscrew the nut.
6. Adjust the screw so that the spirit level indicator is
between the two lines.
7. Tighten the nut.
8. To check the new setting, move the device forward
again a short distance. Repeat the adjustment pro-
cess if necessary.
9. Turn the key-operated switch to OFF.
Adjusting the height
The height adjustment affects the bending of the suction
lips on contact with the floor.
Note
Standard setting: 3 washers above, 3 washers below
the suction bar.
Uneven floor: 5 washers above, 1 washer below the
suction bar.
Very smooth floor: 1 washer above, 5 washers below
the suction bar.
1. Unscrew the nuts.
1
Nut
2
Washer
´
3 Spacer roller with holder
2. Place the desired number of washers between the
suction bar and the spacer roller.
3. Fit the remaining unused washers above the spacer
roller.
4. Screw on the nut and tighten.
5. Repeat the entire procedure with the second spacer
roller.
Note
Set both spacer rollers to the same height.
Cleaning
Switching on the device
1. Turn the key-operated switch to "1".
The display shows the following one after the other:
● Kärcher
● Charging state of the battery and number of operat-
ing hours
● Period of time until the next after-sales servicing for
the customer
● Software version, control panel
● Charging state of the battery and number of operat-
ing hours (for BD 50/55 C Classic Bp)
Charging state of the battery and speed (for BD 50/
55 W Classic Bp)
Driving
Note
The direction of travel can be changed during the clean-
ing operation. This way, a certain position can be inten-
sively cleaned by driving back and forth several times.
1. Set the driving direction switch to "forward".
Cleaning
Note
The inclination and height of the suction bar can be ad-
justed to improve the vacuuming results (see chapter
Adjusting the suction bar).
Note
When the waste water tank is full, the float switch closes
the suction opening and the suction turbine runs at a
higher speed. In this case, raise the suction bar and
drive to the location for emptying the waste water tank.
1. Turn the working speed rotary knob to the desired
value.
The speed is shown on the display during the ad-
justment. The display is shown in percentage of the
maximum speed.
2. Set the water volume at the regulating valve.
3. Press the suction bar lever downwards.
The suction bar lowers.
Vacuuming begins.
4. Press the brush head pedal downwards, unlatch it
and allow it to move upwards.
5. Pull the safety switch towards the push handle.
The brush head starts up and the device moves at
the set speed.
Finishing operation
Finishing cleaning
1. Let go of the safety switch.
2. Press the brush head pedal down and latch it in
place.
3. Continue moving a short distance.
The residual water is vacuumed up.
4. Lift the suction bar.
The suction continues to run for 10 seconds.
5. Turn the key-operated switch to "0".
6. Charge the battery if necessary.
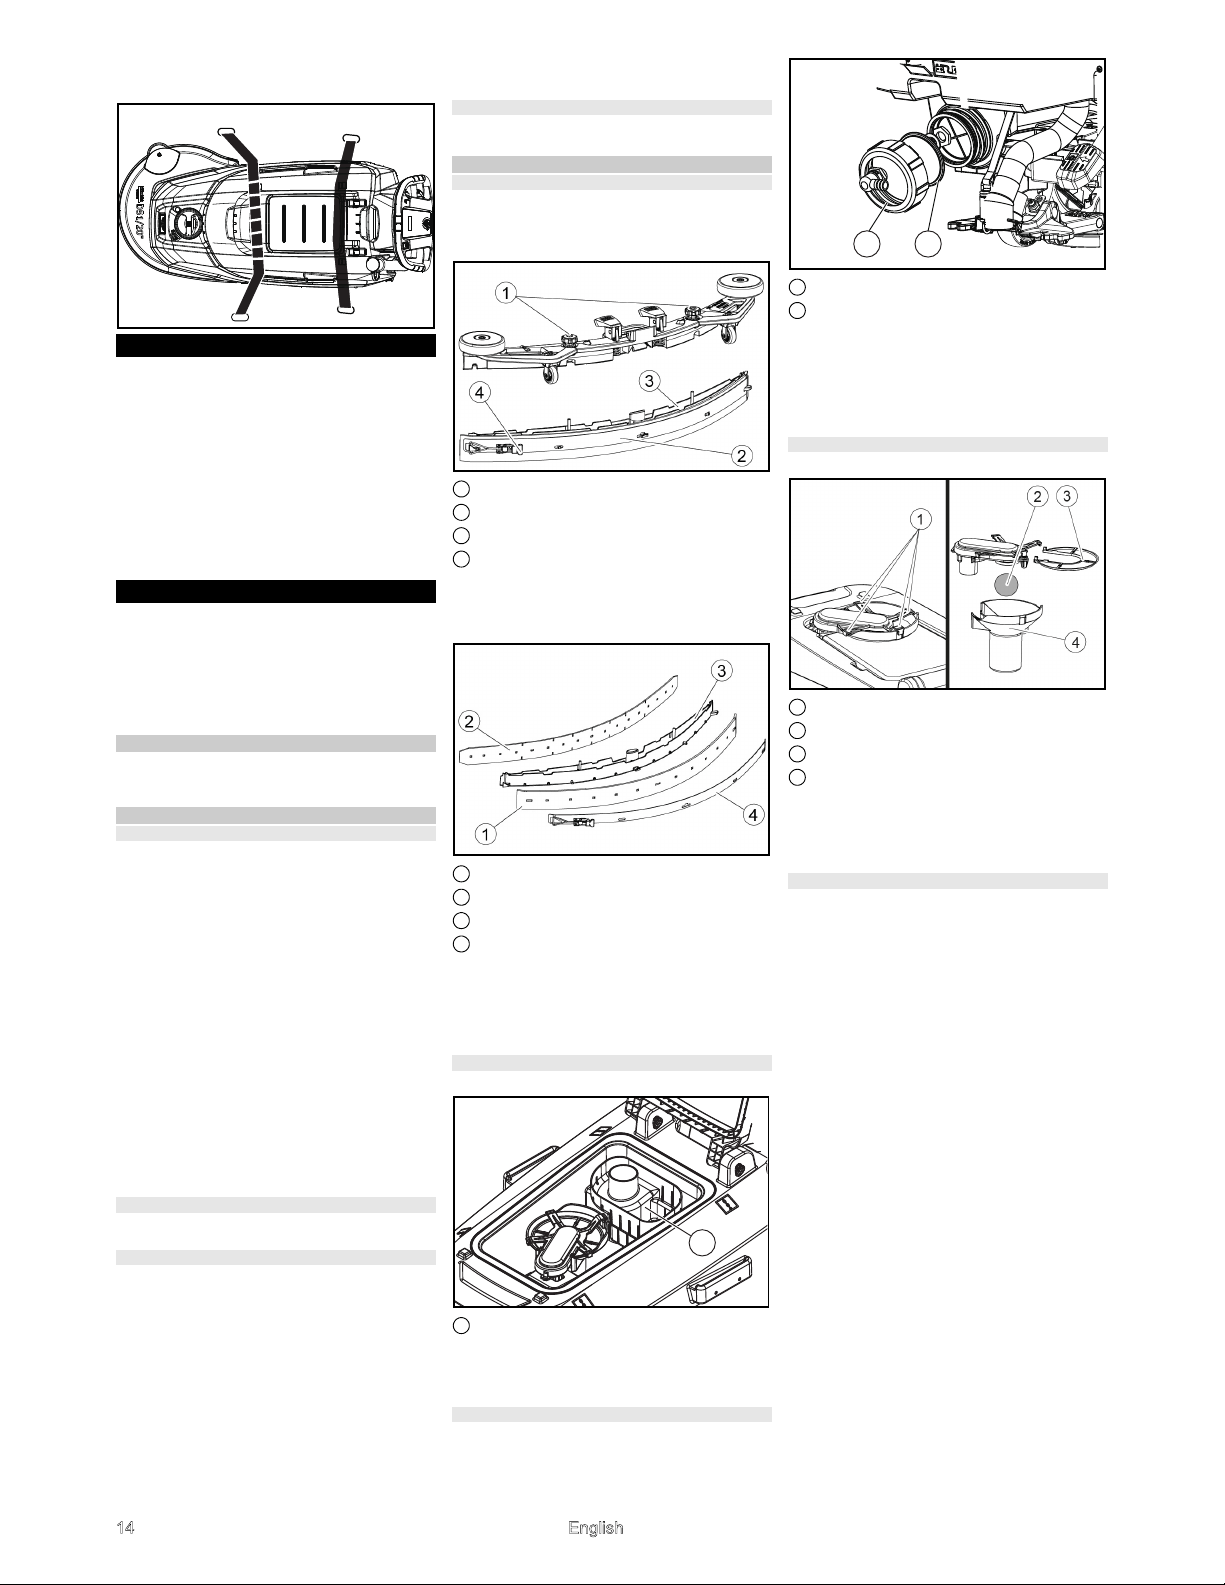
Draining the waste water
WARNING
Improper disposal of waste water
Environmental pollution
Observe the local waste water treatment regulations.
1. Remove the drain hose from the support and lower
it over a suitable collecting device.
2. Press the dosing unit together or kink the hose.
3. Open the dosing unit cover.
4. Drain the waste water. Regulate the water volume
by pressing or kinking.
5. Rinse the waste water tank with clear water.
Quickly draining fresh water
1. Unscrew the fresh water drain cap.
2. Allow the fresh water to drain away.
3. Fit the fresh water drain cap and screw into place.
Note
Take care to ensure that the hose connection in the
fresh water tank cap is positioned at the lowest point in
the tank after screwing the cap in place.
Transport
DANGER
Driving on slopes
Risk of injury
Observe the maximum permissible inclination when
driving the device on slopes for loading and unloading
purposes (see Chapter Technical data).
Drive slowly.
CAUTION
Failure to observe the weight
Risk of injury and damage
Be aware of the weight of the device during transport.
Only load the device with the assistance of another per-
son or by using the drive.
1. Press the brush head pedal down, and latch it in
place.
2. Raise the suction bar.
3. Turn the key-operated switch to "1".
4. Select the travel direction with the travel direction
switch.
5. Pull the safety switch towards the push handle.
Usage Detergent
Maintenance cleaning of all water-
resistant floors
RM 746
RM 756
RM 780
Maintenance cleaning of polished
hard surfaces (e.g. granite)
RM 755 es
Maintenance cleaning and basic
cleaning of industrial floors
RM 69 ASF
Maintenance cleaning and basic
cleaning of fine stone tiles
RM 753
Maintenance cleaning of tiles in san-
itary areas
RM 751
Cleaning and disinfection in sanitary
areas
RM 732
Coating removal on all alkaline-re-
sistant floors (e.g. PVC)
RM 752
Coating removal on linoleum floors RM 754
1
2
3
1
2
2
3
14 English
6. When transporting in vehicles, secure the device
against slipping and tipping over according to the
applicable guidelines.
Storage
CAUTION
Failure to observe the weight
Risk of injury and damage
Be aware of the weight of the device during storage.
ATTENTION
Frost
Destruction of the device through freezing water
Drain all water from the device.
Store the device in a frost-free location.
● This device may only be stored indoors.
● Fully charge the batteries before storing them for a
long period.
● Fully charge the batteries at least every month dur-
ing storage.
Care and service
DANGER
Inadvertently starting up device
Risk of injury, electric shock
Turn the key-operated switch to "0" and remove the key
before performing any work on the device.
Pull out the charger mains plug.
Drain and dispose of the waste water and fresh wa-
ter.
Safety inspection/maintenance contract
You can agree on regular safety inspections or close a
maintenance contract with your dealer. Please seek ad-
vice on this.
Maintenance intervals
Each time after use
ATTENTION
Improper cleaning
Risk of damage.
Do not spray the device with water.
Do not use aggressive cleaning agents.
A detailed description of the individual maintenance
work is provided in Chapter Maintenance work.
Drain the waste water.
Rinse the waste water tank with clear water.
Clean the exterior of the device using a damp cloth,
wetted with a mild washing lye.
Check the fluff filter and clean if required.
Clean the coarse dirt filter.
Clean the suction lips, check for wear and adjust the
height or replace if necessary.
Check the disc brushes for wear and replace if nec-
essary.
Charge the battery.
If the charging state of the battery is below 50%,
charge the battery fully and without interruption.
If the charging state of the battery is above 50%,
only recharge the battery if the entire operating
duration will be required when next used.
Weekly
When used regularly, charge the battery fully and
without interruption at least once a week.
Monthly
A detailed description of the individual maintenance
work is provided in Chapter Maintenance work.
1. Drain the fresh water tank and flush out deposits.
2. Clean the fresh water filter.
3. Clean the float and fluff filter.
4. Check battery poles for oxidation, brush off if neces-
sary. Make sure the connection cables are firmly in
place.
5. Clean the seals between the waste water tank and
the cover, check for leaks and replace if necessary.
6. Check the acid density of the cells if the batteries are
not maintenance-free.
7. For longer periods of disuse, shut down the device
when the battery is fully charged. Fully charge the
battery at least once a month.
Annually
Have the prescribed inspection performed by Cus-
tomer Service.
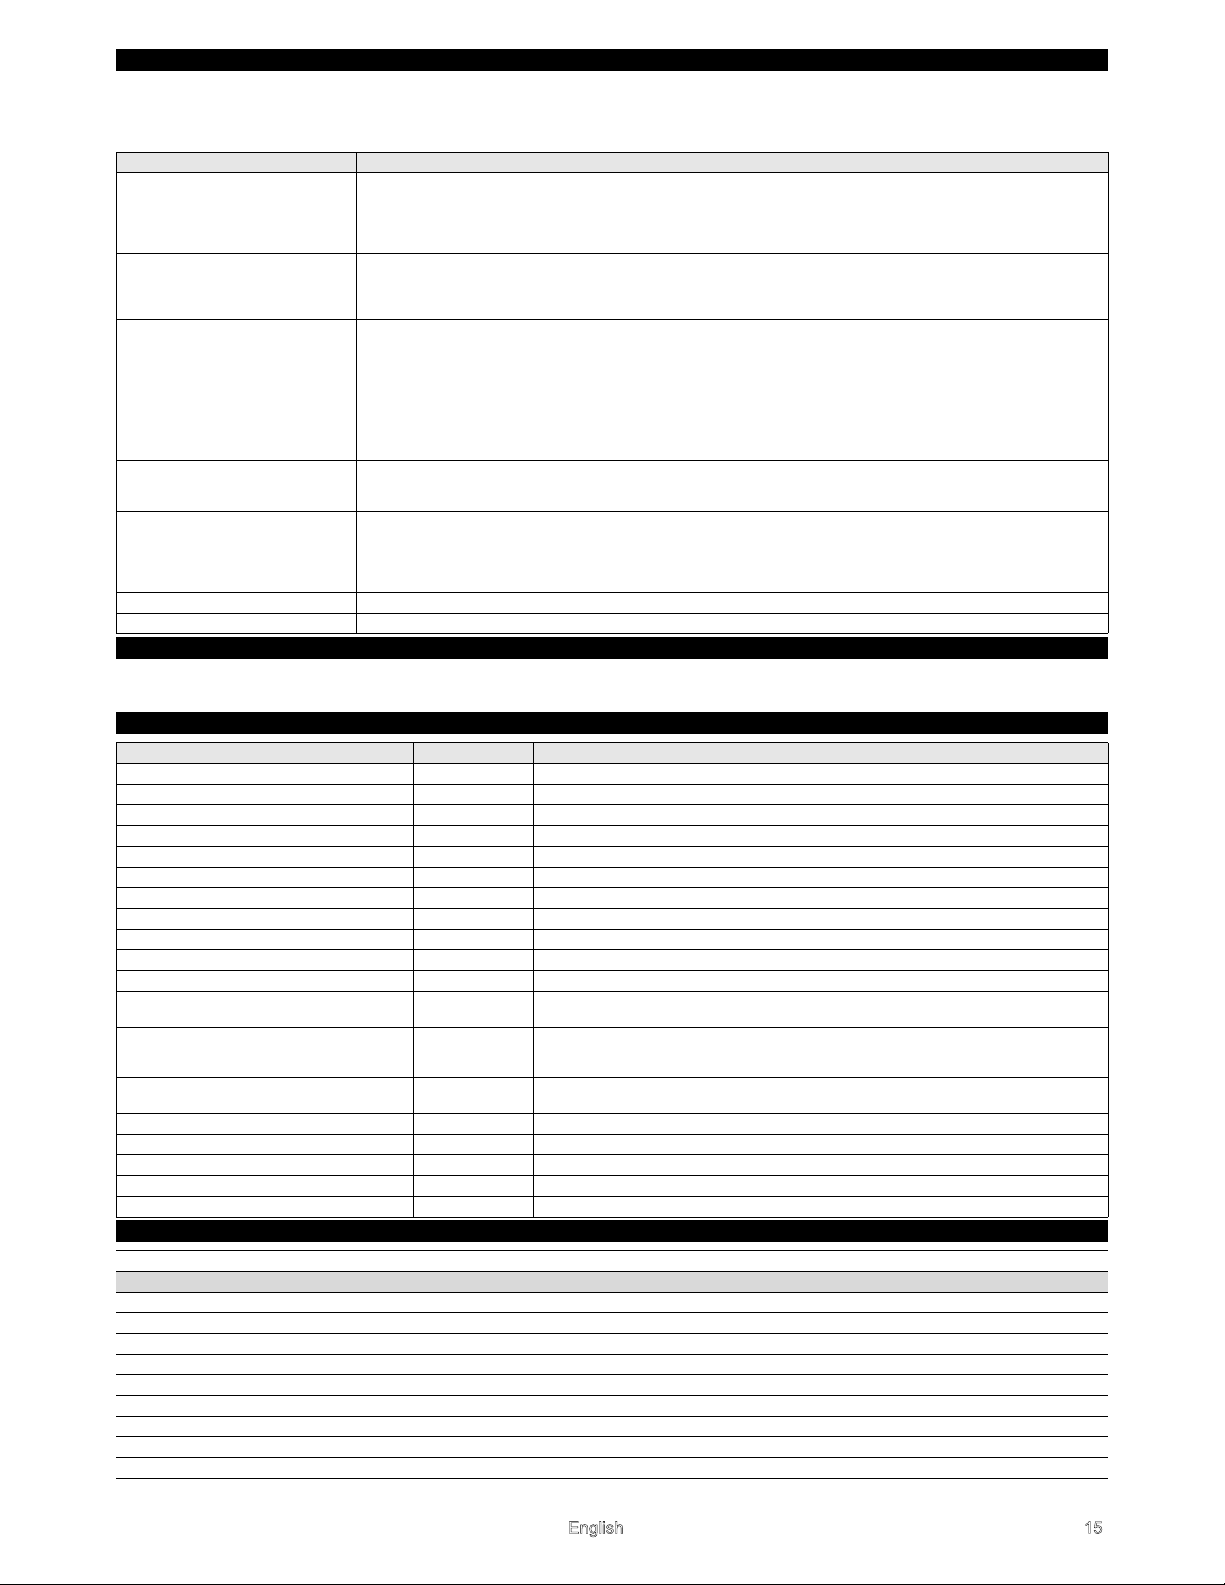
Maintenance work
Turn over or replace the worn suction lips
The suction lips must be turned over or replaced when
worn out.
1. Remove the suction bar.
2. Unscrew the star handles.
1
Star grip
2
Strap
3
Inner part of the suction bar
4
Tension lock
3. Pull out the inner part of the suction bar.
4. Open the tension lock.
5. Remove the strap.
6. Release the suction lips from the inner part.
1
Rear suction lip
2
Front support lip
3
Inner part of the suction bar
4
Strap
7. Press the turned or new suction lips onto the knobs
of the inner part of the suction bar.
8. Attach the strap.
9. Push the inner part of the suction bar into the upper
part.
10. Screw in and tighten the star handles.
Cleaning the coarse dirt filter
1. Open the waste water tank cover.
1
Coarse dirt filter
2. Pull the coarse dirt filter upwards and off.
3. Rinse off the coarse dirt filter under running water.
4. Reinsert the coarse dirt filter into the waste water
tank.
Cleaning the fresh water filter
1. Drain the fresh water (see Chapter Quickly draining
fresh water).
2. Unscrew the fresh water tank cap.
1 Fresh water tank cap
2
Fresh water filter
3. Pull out the fresh water filter and rinse with clean wa-
ter.
4. Insert the fresh water filter.
5. Fit the fresh water tank cap.
Note: Take care to ensure that the hose connection
in the fresh water tank cap is positioned at the low-
est point in the tank after screwing the cap in place.
Clean the float and fluff filter
1. Open the waste water tank cover.
1 Latching hooks
2
Float
3
Fluff filter
4 Float housing
2. Release the latching hooks.
3. Pull the float housing downwards and off.
4. Remove the float from the float housing and clean it.
5. Remove the fluff filter and clean it.
6. Assemble all parts in the reverse order.
Replacing the disc brush
Note
Replace the disc brushes when the bristle length has
reached 10 mm.
1. Raise the brush head.
2. Push the brush release pedal down.
3. Pull the disc brush sideways and out from under-
neath the brush head.
4. Hold the new disc brush under the cleaning head,
then press upwards and latch it into position.
1.
2.
1
1 2
English 15
Troubleshooting guide
DANGER
Inadvertently starting up device
Risk of injury, electric shock
Turn the key-operated switch to "0" and remove the key
before performing any work on the device.
Pull out the charger mains plug.
Drain and dispose of the waste water and fresh wa-
ter.
Contact Customer Service in the case of malfunc-
tions that cannot be corrected using this table.
WARNING
Be careful when approaching blind corners, bushes,
trees or objects that might restrict your view.
Warranty
The warranty conditions issued by our relevant sales
company apply in all countries. We shall remedy possi-
ble malfunctions on your appliance within the warranty
period free of cost, provided that a material or manufac-
turing defect is the cause. In a warranty case, please
contact your dealer (with the purchase receipt) or the
next authorised customer service site.
(See overleaf for the address)
Accessories
Technical data
Malfunction Rectification
The device cannot be started 1. Turn the key-operated switch to "1".
2. Actuate the safety switch.
3. Insert the battery plug.
4. Check the battery and charge if necessary.
5. Check that the battery terminals are correctly connected.
The water volume is insufficient 1. Check the fresh water filling level and fill the tank if necessary.
2. Increase the water volume at the water volume regulating knob.
3. Clean the fresh water filter.
4. Check the hoses for clogging and clean if necessary.
The suction performance is too low 1. Shut down the device and drain the waste water.
2. Clean the seals between the waste water tank and the cover, check for leaks and replace if necessary.
3. Check that the suction hose is correctly connected to the waste water tank.
4. Check the fluff filter for soiling and clean if necessary.
5. Clean the suction lips at the suction bar, turn over or replace if necessary.
6. Check that the cap on the waste water drain hose is closed.
7. Check the adjustment of the suction bar.
8. Check the suction hose for clogging and clean if necessary.
9. Check the suction hose for leaks and replace if necessary.
The cleaning results are unsatisfacto-
ry
1. Reduce the driving speed.
2. Check the brushes for wear and replace if necessary.
3. Check the suitability of the brush type and detergent used.
The suction turbine runs at an in-
creased speed
1. Drain the waste water.
2. Clean the float.
3. Check the fluff filter and clean if necessary.
4. Check the suction hose for clogging and clean if necessary.
5. Check the suction bar for clogging and remove any clogging if necessary
The brushes do not rotate 1. Check if the brushes are blocked by a foreign body and remove the foreign body if necessary.
The device vibrates during cleaning 1. Use a softer brush.
Description Part no. Description
Disc brush, complete red D51 9.753-021.0 For general cleaning, for all surfaces.
Disc brush, (very soft) 4.905-028.0 For cleaning sensitive floors and polishing.
Disc brush, (soft) 4.905-027.0 Made of natural fibers, for cleaning and polishing.
Disc brush, (medium soft) 4.905-026.0 For general cleaning, for all surfaces.
Disc brush, (hard) 4.905-029.0 For stubborn dirt and deep cleaning. Only for hard-wearing surfaces.
Pad drive board, 479 mm 4.762-534.0 For cleaning with pads. With quick-change coupling and Centerlock.
Pad, 500 mm, (soft)
6.371-146.0 With natural hair, for polishing. Removes scuff marks effectively.
Pad, 508 mm, (soft) 6.369-468.0 Light grit, suitable for polishing floors.
Pad, 508 mm, (medium-soft) 6.369-079.0 For cleaning all types of floors.
Pad, 508 mm, (medium-hard) 6.369-078.0 For removing stubborn dirt and deep cleaning.
Pad, 508 mm, (hard) 6.369-077.0 For cleaning heavily soiled floors and for deep cleaning.
Diamond pad, 508 mm, (coarse) 6.371-260.0 For coarse cleaning / restoring. Removes small scratches, for a clean, silky matt surface. For sur-
face preparation prior to using the yellow pad. As a crystallization pad for basic crystallization.
Diamond pad, 508 mm, (medium) 6.371-261.0 For coarse cleaning / restoring. Removes fine scratches for a more homogenous and shinier sur-
face. For surface preparation prior to using the green diamond pad. As a crystallization pad for high-
gloss crystallization.
Diamond pad, 508 mm, (fine) 6.371-240.0 For effortless polishing of laminated floors, terrazzo, and natural stone surfaces. For maintenance
cleaning after using white and yellow pads.
Microfiber pad, 508 mm 6.371-271.0 Excellent cleaning power. Also effectively cleans fine stoneware tiles.
Melamine pad, 508mm 6.371-025.0 Melamine pad set for the effective cleaning of microporous surfaces.
Squeegee, 850mm 4.778-008.0 Parabolic squeegee, Suction lips made of wear-resistant, red Linatex, with support rollers.
Suction lips, 33in, red 4.400-011.0 Made from Linatex, wear-resistant.
Suction lips, 33in, transparent 4.400-005.0 Made from PU, oil-resistant.
BD 50/55 W Classic Bp BD 50/55 C Classic Bp
Device performance data
Nominal voltage V 24 24
Battery capacity Ah (5 h) 80 / 115 80 / 115
Mean power input W 880 750
Driving motor power W 130 -
Suction turbine power W 250 250
Brush drive power W 500 500
Theoretical surface performance m
2
/h 2550 2040
Fresh water tank capacity l 55 55
Waste water tank capacity l 55 55

16 English
Subject to technical modifications.
EU Declaration of Conformity
We hereby declare that the machine described below
complies with the relevant basic safety and health re-
quirements in the EU Directives, both in its basic design
and construction as well as in the version placed in cir-
culation by us. This declaration is invalidated by any
changes made to the machine that are not approved by
us.
Product: Floor cleaner
Type: 1.127-xxx
Currently applicable EU Directives
2006/42/EC (+2009/127/EC)
2014/30/EU
2014/53/EU (TCU)
Harmonised standards used
EN 60335-1
EN 60335-2-72
EN 60335-2-29
EN 62233: 2008
EN 55012: 2007 + A1: 2009
EN 61000-6-2: 2005
TCU
EN 300 328 V2.1.1
EN 300 330 V2.1.1
EN 300 440 V2.1.1
EN 301 511 V12.5.1
EN 62368-1:2014+A11:2017
National standards used
-
The undersigned act on behalf and under the power of
attorney of the company management.
Documentation supervisor:
S. Reiser
Alfred Kärcher SE & Co. KG
Alfred-Kärcher-Str. 28 - 40
71364 Winnenden (Germany)
Ph.: +49 7195 14-0
Fax: +49 7195 14-2212
Winnenden, 2019/01/25
Water temperature max. °C 50 50
Water pressure max. bar 0.06 0.06
Max. working area slope % 2 2
Vacuuming
Suction performance, air quantity l/s 24 24
Suction performance, vacuum kPa (mbar) 9.5 (95) 9.5 (95)
Cleaning brushes
Working width mm 510 510
Brush diameter mm 510 510
Brush speed 1/min 140
140
Brush contact pressure kg ≥ 27 ≥ 27
Dimensions and weights
Approved total weight kg 240
225
Net weight (transport weight) kg 115 110
Battery compartment dimensions mm 330 x 355 x 290 330 x 355 x 290
Determined values in acc. with EN 60335-2-72
Overall vibration value m/s
2
<2.5 <2.5
Uncertainty K dB(A) 0.2 0.2
Sound pressure level L
pA
dB(A) 65.2 65.2
Uncertainty K
pA
dB(A) 2 2
Sound power level L
WA
+ K uncertainty
WA
dB(A) 84.1 84.1
BD 50/55 W Classic Bp BD 50/55 C Classic Bp
Chairman of the Board of Management
Director Regulatory Affairs & Certification
H. Jenner
S. Reiser
Français 17
Contenu
Remarques générales
Veuillez lire le présent le manuel d'ins-
tructions original et les consignes de sé-
curité jointes avant la première
utilisation de l'appareil. Suivez ces instructions.
Conservez les deux manuels pour une utilisation ulté-
rieure ou pour le propriétaire suivant.
Fonction
Cette autolaveuse est utilisée pour le nettoyage à leau
de sols plats.
L'appareil peut être adapté à chaque de tâche de net-
toyage en réglant la quantité d'eau et de détergent. Le
dosage du détergent est adapté par ajout dans le réser-
voir.
La largeur de travail et la capacité du réservoir d'eau
propre et du bac d'eau sale (voir le chapitre Caractéris-
tiques techniques) permettent un nettoyage efficace et
une durée d'utilisation élevée.
Lautolaveuse BD 50/55 W Classic Bp dispose dun mo-
teur de traction.
Lautolaveuse BD 50/55 C Classic Bp ne dispose pas
de moteur de traction.
Remarque
L'appareil peut être équipé de différents accessoires en
fonction des tâches de nettoyage souhaitées. Deman-
dez notre catalogue ou visitez notre site internet
www.kaercher.com.
Utilisation conforme
Cet appareil est conçu pour une utilisation profession-
nelle et idustriels, p. ex. dans les hôtels, les écoles, les
hôpitaux, les usines, les bureaux et les magasins de
loueurs. Utilisez cet appareil uniquement suivant les in-
dications dans cette notice d'utilisation.
● Utiliser l'appareil uniquement pour le nettoyage de
sols plats résistants à l'humidité et au polissage.
● L'appareil n'est pas adapté au nettoyage de sols ge-
lés (p.ex. dans les chambres froides).
● L'appareil n'est pas adapté à une utilisation dans
des environnements à risque d'explosion.
● L'appareil est autorisé pour un fonctionnement sur
des surfaces d'une inclinaison maximale (voir le
chapitre Caractéristiques techniques).
Protection de l'environnement
Les matériaux d'emballage sont recyclables.
Veuillez éliminer les emballages dans le respect
de lenvironnement.
Les appareils électriques et électroniques
contiennent des matériaux précieux recyclables
et souvent des composants tels que des piles,
batteries ou de lhuile représentant un danger po-
tentiel pour la santé humaine et l'environnement, s'ils ne
sont pas manipulés ou éliminés correctement. Ces
composants sont cependant nécessaires pour le fonc-
tionnement correct de l'appareil. Les appareils marqués
par ce symbole ne doivent pas être jetés dans les or-
dures ménagères.
Remarques concernant les matières composantes
(REACH)
Les informations actuelles concernant les matières
composantes sont disponibles sous : www.kaer-
cher.com/REACH
Accessoires et pièces de rechange
Utiliser exclusivement des accessoires et pièces de re-
change originaux. Ceux-ci garantissent le fonctionne-
ment sûr et sans défaut de votre appareil.
Des informations sur les accessoires et pièces de re-
change sont disponibles sur le site Internet www.kaer-
cher.com.
Étendue de livraison
Lors du déballage, vérifiez que le contenu de la livraison
est complet. Si des accessoires manquent ou en cas de
dommage dû au transport, veuillez informer votre distri-
buteur.
Consignes de sécurité
Avant la première utilisation de l'appareil, veuillez lire et
observer cette notice d'utilisation la brochure de
consignes de sécurité fournie pour les appareils de net-
toyage à brosses et les appareils d'injection-extraction,
n° 5.956-251.0 et agir en conséquence.
L'appareil est autorisé pour un fonctionnement sur des
surfaces d'une inclinaison limitée (voir le chapitre Ca-
ractéristiques techniques).
AVERTISSEMENT
Basculement de l'appareil
Risque de blessures
N'utilisez pas l'appareil sur des surfaces inclinées.
Utilisez l'appareil uniquement si le capot et tous les cou-
vercles sont fermés.
Dispositifs de sécurité
PRÉCAUTION
Dispositifs de sécurité manquants ou modifiés
Les dispositifs de sécurité servent à vous protéger.
Ne modifiez, ni ne contournez jamais les dispositifs de
sécurité.
Interrupteur de sécurité
Lorsque vous relâchez l'interrupteur de sécurité, l'appa-
reil s'éteint.
Interrupteur à clé
Si vous retirez l'interrupteur à clé, l'appareil est protégé
contre toute utilisation non autorisée.
Symboles d'avertissements
Respecter les avertissements suivants lors de la mani-
pulation de batteries :
Remarques générales......................................... 17
Fonction .............................................................. 17
Utilisation conforme ............................................ 17
Protection de l'environnement............................. 17
Accessoires et pièces de rechange .................... 17
Étendue de livraison ........................................... 17
Consignes de sécurité ........................................ 17
Description de l'appareil...................................... 18
Montage .............................................................. 19
Mise en service ................................................... 19
Fonctionnement .................................................. 20
Transport............................................................. 20
Stockage ............................................................. 21
Entretien et maintenance .................................... 21
Dépannage en cas de défaut.............................. 22
Garantie .............................................................. 22
Accessoires......................................................... 22
Caractéristiques techniques................................ 22
Déclaration de conformité UE ............................. 23
Observer les remarques dans le manuel
d'utilisation de la batterie et sur la batterie
ainsi que dans ce manuel d'utilisation.
Porter une protection oculaire.
Tenir les enfants éloignés d'acides et de
batteries.
Risque d'explosion
Le feu, les étincelles, les flammes nues
et fumer sont interdits.
Risque de brûlure chimique
Premiers secours.
Avertissement
Élimination
Ne pas jeter la batterie à la poubelle.