
0
Storage Management System
User Manual

Storage Management System • User Manual
I
Legal Information
About this Document
●
This Document includes instructions for using and managing the Product. Pictures, charts, images and all other
information hereinafter are for description and explanation only.
●
The information contained in the Document is subject to change, without notice, due to firmware updates or other
reasons. Please find the latest version of the Document at the Hikvision website (https://www.hikvision.com).
Unless otherwise agreed, Hangzhou Hikvision Digital Technology Co., Ltd. or its affiliates (hereinafter referred to as
"Hikvision") makes no warranties, express or implied.
●
Please use the Document with the guidance and assistance of professionals trained in supporting the Product.
About this Product
●
This product can only enjoy the after-sales service support in the country or region where the purchase is made.
●
If the product you choose is a video product, please scan the following QR code to obtain the "Initiatives on the Use
of Video Products", and read it carefully.
Acknowledgment of Intellectual Property Rights
●
Hikvision owns the copyrights and/or patents related to the technology embodied in the Products described in this
Document, which may include licenses obtained from third parties.
●
Any part of the Document, including text, pictures, graphics, etc., belongs to Hikvision. No part of this Document
may be excerpted, copied, translated, or modified in whole or in part by any means without written permission.
●
and other Hikvision’s trademarks and logos are the properties of Hikvision in various
jurisdictions.
●
Other trademarks and logos mentioned are the properties of their respective owners.
●
The terms HDMI and HDMI High-Definition Multimedia Interface, and the HDMI Logo are trademarks or
registered trademarks of HDMI Licensing Administrator, Inc. in the United States and other countries.
LEGAL DISCLAIMER
●
TO THE MAXIMUM EXTENT PERMITTED BY APPLICABLE LAW, THIS DOCUMENT AND THE PRODUCT DESCRIBED,
WITH ITS HARDWARE, SOFTWARE AND FIRMWARE, ARE PROVIDED "AS IS" AND "WITH ALL FAULTS AND ERRORS".
HIKVISION MAKES NO WARRANTIES, EXPRESS OR IMPLIED, INCLUDING WITHOUT LIMITATION, MERCHANTABILITY,

Storage Management System • User Manual
II
SATISFACTORY QUALITY, OR FITNESS FOR A PARTICULAR PURPOSE. THE USE OF THE PRODUCT BY YOU IS AT YOUR
OWN RISK. IN NO EVENT WILL HIKVISION BE LIABLE TO YOU FOR ANY SPECIAL, CONSEQUENTIAL, INCIDENTAL, OR
INDIRECT DAMAGES, INCLUDING, AMONG OTHERS, DAMAGES FOR LOSS OF BUSINESS PROFITS, BUSINESS
INTERRUPTION, OR LOSS OF DATA, CORRUPTION OF SYSTEMS, OR LOSS OF DOCUMENTATION, WHETHER BASED
ON BREACH OF CONTRACT, TORT (INCLUDING NEGLIGENCE), PRODUCT LIABILITY, OR OTHERWISE, IN CONNECTION
WITH THE USE OF THE PRODUCT, EVEN IF HIKVISION HAS BEEN ADVISED OF THE POSSIBILITY OF SUCH DAMAGES
OR LOSS.
●
YOU ACKNOWLEDGE THAT THE NATURE OF THE INTERNET PROVIDES FOR INHERENT SECURITY RISKS, AND
HIKVISION SHALL NOT TAKE ANY RESPONSIBILITIES FOR ABNORMAL OPERATION, PRIVACY LEAKAGE OR OTHER
DAMAGES RESULTING FROM CYBER-ATTACK, HACKER ATTACK, VIRUS INFECTION, OR OTHER INTERNET SECURITY
RISKS; HOWEVER, HIKVISION WILL PROVIDE TIMELY TECHNICAL SUPPORT IF REQUIRED.
●
YOU AGREE TO USE THIS PRODUCT IN COMPLIANCE WITH ALL APPLICABLE LAWS, AND YOU ARE SOLELY
RESPONSIBLE FOR ENSURING THAT YOUR USE CONFORMS TO THE APPLICABLE LAW. ESPECIALLY, YOU ARE
RESPONSIBLE, FOR USING THIS PRODUCT IN A MANNER THAT DOES NOT INFRINGE ON THE RIGHTS OF THIRD
PARTIES, INCLUDING WITHOUT LIMITATION, RIGHTS OF PUBLICITY, INTELLECTUAL PROPERTY RIGHTS, OR DATA
PROTECTION AND OTHER PRIVACY RIGHTS. YOU SHALL NOT USE THIS PRODUCT FOR ANY PROHIBITED END-USES,
INCLUDING THE DEVELOPMENT OR PRODUCTION OF WEAPONS OF MASS DESTRUCTION, THE DEVELOPMENT OR
PRODUCTION OF CHEMICAL OR BIOLOGICAL WEAPONS, ANY ACTIVITIES IN THE CONTEXT RELATED TO ANY
NUCLEAR EXPLOSIVE OR UNSAFE NUCLEAR FUEL-CYCLE, OR IN SUPPORT OF HUMAN RIGHTS ABUSES.
●
IN THE EVENT OF ANY CONFLICTS BETWEEN THIS DOCUMENT AND THE APPLICABLE LAW, THE LATTER PREVAILS.
© Hangzhou Hikvision Digital Technology Co., Ltd. All rights reserved.

Storage Management System • User Manual
I
Regulatory Information
FCC Information
Please take attention that changes or modification not expressly approved by the party responsible
for compliance could void the user’s authority to operate the equipment.
FCC Compliance
This equipment has been tested and found to comply with the limits for a Class A digital device,
pursuant to part 15 of the FCC Rules. These limits are designed to provide reasonable protection
against harmful interference when the equipment is operated in a commercial environment. This
equipment generates, uses, and can radiate radio frequency energy and, if not installed and used in
accordance with the instruction manual, may cause harmful interference to radio communications.
Operation of this equipment in a residential area is likely to cause harmful interference in which
case the user will be required to correct the interference at his own expense.
FCC Conditions
This device complies with part 15 of the FCC Rules. Operation is subject to the following two
conditions:
1. This device may not cause harmful interference.
2. This device must accept any interference received, including interference that may cause
undesired operation.
EU Conformity Statement
This product and - if applicable - the supplied accessories too are marked with "CE" and
comply therefore with the applicable harmonized European standards listed under the
EMC Directive 2014/30/EU, the LVD Directive 2014/35/EU, the RoHS Directive 2011/65/EU.
2012/19/EU (WEEE directive): Products marked with this symbol cannot be disposed of as
unsorted municipal waste in the European Union. For proper recycling, return this product
to your local supplier upon the purchase of equivalent new equipment, or dispose of it at
designated collection points. For more information see: www.recyclethis.info
2006/66/EC (battery directive): This product contains a battery that cannot be disposed
of as unsorted municipal waste in the European Union. See the product documentation
for specific battery information. The battery is marked with this symbol, which may include
lettering to indicate cadmium (Cd), lead (Pb), or mercury (Hg). For proper recycling, return the
battery to your supplier or to a designated collection point. For more information see:
www.recyclethis.info
Industry Canada ICES-003 Compliance
This device meets the CAN ICES-3 (A)/NMB-3(A) standards requirements.
Storage Management System • User Manual
II
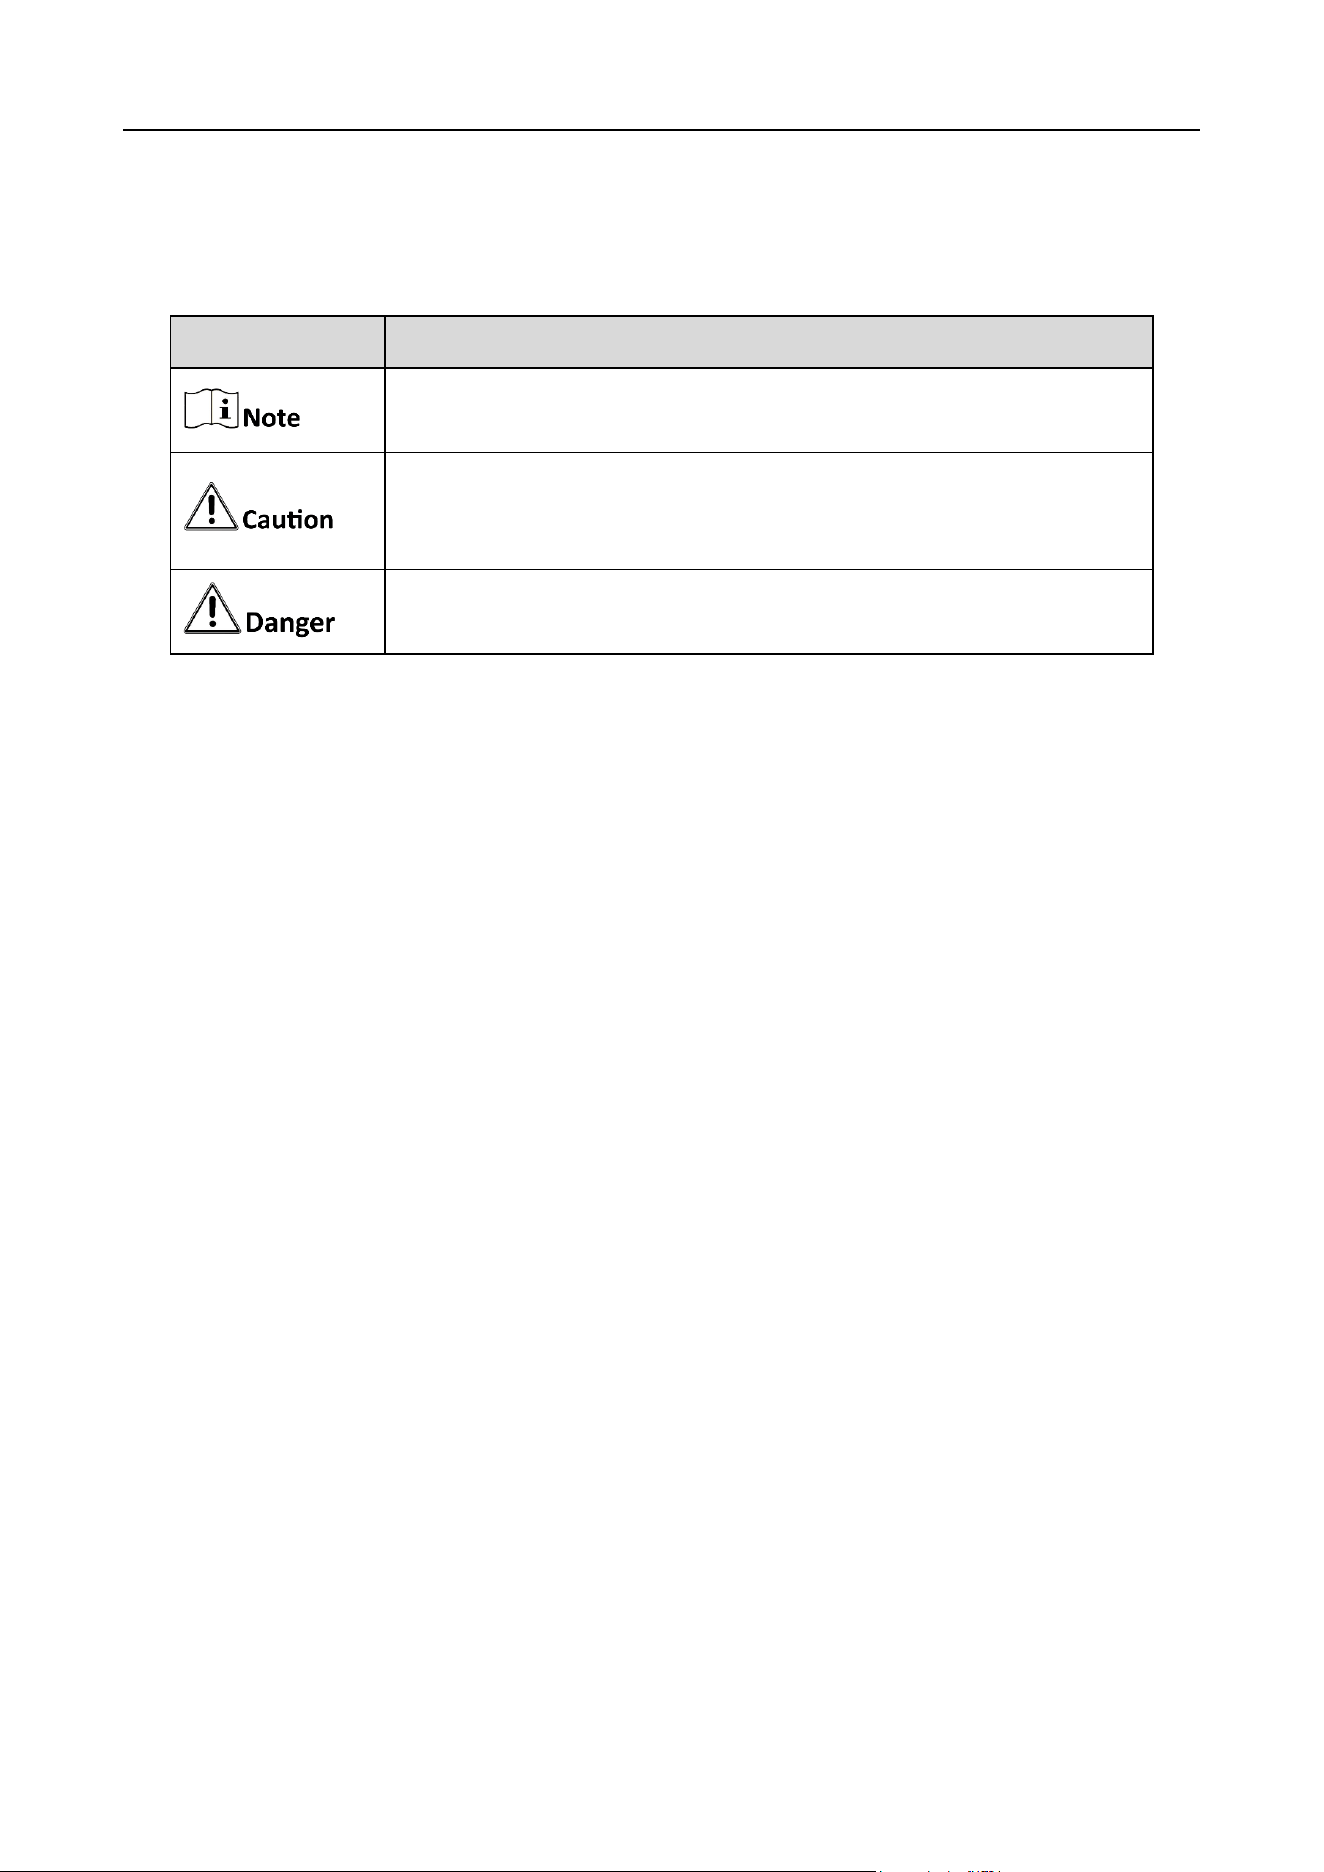
Symbol Conventions
The symbols that may be found in this document are defined as follows.
Safety Instructions
Proper configuration of all passwords and other security settings is the responsibility of the
installer and/or end-user.
In the use of the product, you must be in strict compliance with the electrical safety
regulations of the nation and region. Please refer to technical specifications for detailed
information.
Input voltage should meet both the SELV (Safety Extra Low Voltage) and the Limited Power
Source with 100 to 240 VAC or 12 VDC according to the IEC60950-1 standard. Please refer to
technical specifications for detailed information.
Do not connect several devices to one power adapter as adapter overload may cause over-
heating or a fire hazard.
Please make sure that the plug is firmly connected to the power socket.
If smoke, odor or noise rise from the device, turn off the power at once and unplug the power
cable, and then please contact the service center.
Symbol
Description
Provides additional information to emphasize or supplement
important points of the main text.
Indicates a potentially hazardous situation, which if not avoided,
could result in equipment damage, data loss, performance
degradation, or unexpected results.
Indicates a hazard with a high level of risk, which if not avoided, will
result in death or serious injury.

Storage Management System • User Manual
III
TABLE OF CONTENTS
Chapter 1 Login and Activation ................................................................................................... 1
Login ...................................................................................................................................................................... 1
Device Activation .................................................................................................................................................. 1
Chapter 2 System Configuration ................................................................................................. 3
Quick Configuration .............................................................................................................................................. 3
Format Storage Space ........................................................................................................................................... 4
Chapter 3 Hybrid SAN Sub-System Configuration ........................................................................ 7
Network ................................................................................................................................................................ 7
3.1.1 Basic Settings ............................................................................................................................................. 7
3.1.2 Advanced Settings ...................................................................................................................................... 8
System................................................................................................................................................................. 12
3.2.1 System Settings ........................................................................................................................................ 12
3.2.2 Maintenance ............................................................................................................................................ 12
3.2.3 Camera Management .............................................................................................................................. 14
3.2.4 User Management ................................................................................................................................... 16
Event ................................................................................................................................................................... 19
3.3.1 Configure Video Tampering Alarms ......................................................................................................... 19
3.3.2 Configure Video Loss Alarms ................................................................................................................... 20
3.3.3 Configure Exceptions Alarms ................................................................................................................... 21
3.3.4 Configure Arming Schedule ..................................................................................................................... 21
3.3.5 Configure Alarm Linkage Method ............................................................................................................ 22
Storage ................................................................................................................................................................ 23
3.4.1 Schedule Settings ..................................................................................................................................... 23
3.4.2 Storage Management .............................................................................................................................. 25
3.4.3 Copy-Back ................................................................................................................................................ 26
3.4.4 Storage Mode .......................................................................................................................................... 27
3.4.5 Advanced Settings .................................................................................................................................... 29
Chapter 4 Shortcut ................................................................................................................... 30
Chapter 5 Overview.................................................................................................................. 32
Platform Overview .............................................................................................................................................. 32
View Performance .............................................................................................................................................. 32
View CPU and Memory Usage ............................................................................................................................ 33
Chapter 6 Device ...................................................................................................................... 34
Node Tree ........................................................................................................................................................... 34
6.1.1 View Node Tree........................................................................................................................................ 34
6.1.2 Map .......................................................................................................................................................... 34
Node Status......................................................................................................................................................... 34
Refresh Domain .................................................................................................................................................. 35
Device Overview ................................................................................................................................................. 36
6.4.1 Locate Device ........................................................................................................................................... 36

Storage Management System • User Manual
IV
6.4.2 Mute Device ............................................................................................................................................. 36
6.4.3 Reboot and Shut down Device ................................................................................................................. 36
6.4.4 More Operations ...................................................................................................................................... 37
Device Graph of a Node ...................................................................................................................................... 37
6.5.1 Device Indicator ....................................................................................................................................... 37
6.5.2 HDD Slot Graph ........................................................................................................................................ 38
6.5.3 Health Checkup ........................................................................................................................................ 39
6.5.4 Information Overview .............................................................................................................................. 42
Chapter 7 Resource .................................................................................................................. 50
Manage RAID Resource Pool .............................................................................................................................. 50
7.2.2 Maintain Disks .......................................................................................................................................... 50
7.2.3 Safely Remove Disks ................................................................................................................................ 51
Manage RAID ...................................................................................................................................................... 51
Chapter 8 Storage .................................................................................................................... 53
Service ................................................................................................................................................................. 53
8.2.1 Service Management ............................................................................................................................... 53
8.2.2 Service Resource ...................................................................................................................................... 56
Mirror .................................................................................................................................................................. 57
Chapter 9 Log ........................................................................................................................... 58
Search Log ........................................................................................................................................................... 58
Download Log ..................................................................................................................................................... 58
Clear Log ............................................................................................................................................................. 59
Chapter 10 Maintenance .......................................................................................................... 60
Version Information .......................................................................................................................................... 60
System Upgrade ................................................................................................................................................ 60
Disk Management ............................................................................................................................................. 61
Password Management .................................................................................................................................... 61
Time Management ............................................................................................................................................ 62
10.5.1 Time Zone Configuration ....................................................................................................................... 62
10.5.2 Time Sync Configuration ........................................................................................................................ 63
10.5.3 DST Configuration .................................................................................................................................. 64
Default Settings................................................................................................................................................. 65
Snapshot Management ..................................................................................................................................... 65
SNMP Management .......................................................................................................................................... 67
Security Management ....................................................................................................................................... 68
Network Management .................................................................................................................................... 69
10.10.1 Modify Network ................................................................................................................................... 69
10.10.2 Network Detection............................................................................................................................... 69
Storage Management System • User Manual
1
Chapter 1 Login and Activation
Login
Purpose
You can use Microsoft Edge web browser to access your device.
Before you start
Use a network cable to connect Ethernet port of your computer and the Management LAN of
the device.
Configure your computer IP address. Ensure it is in the same network segment with the
Management LAN of the device (the default IP address of Management LAN is 10.254.254.254).
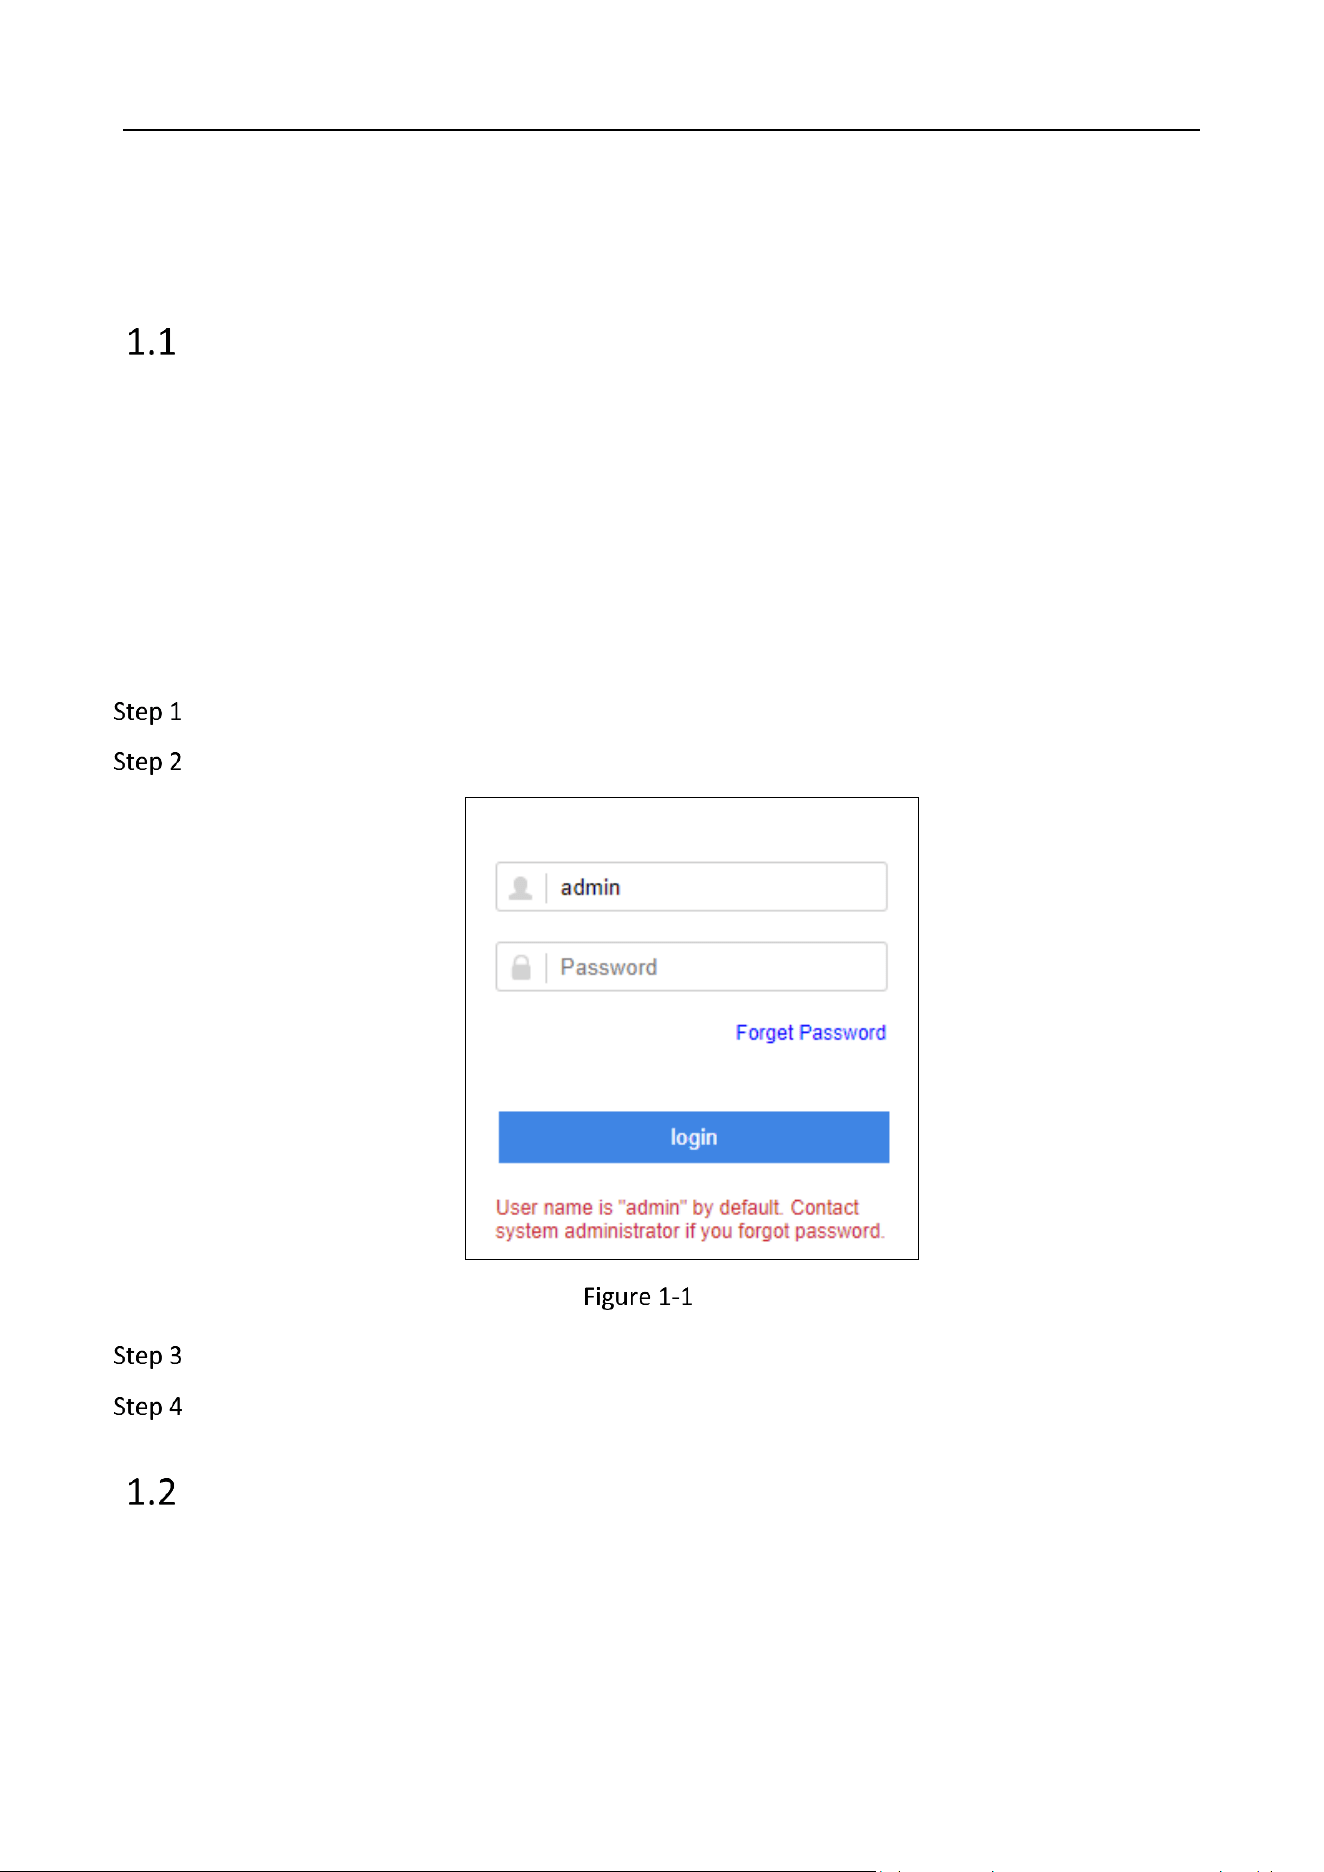
Enter the device IP address (https://IP Address:2004) in web browser.
Press Enter. Then login interface appears.
Login
Enter User Name and Password.
Click login.
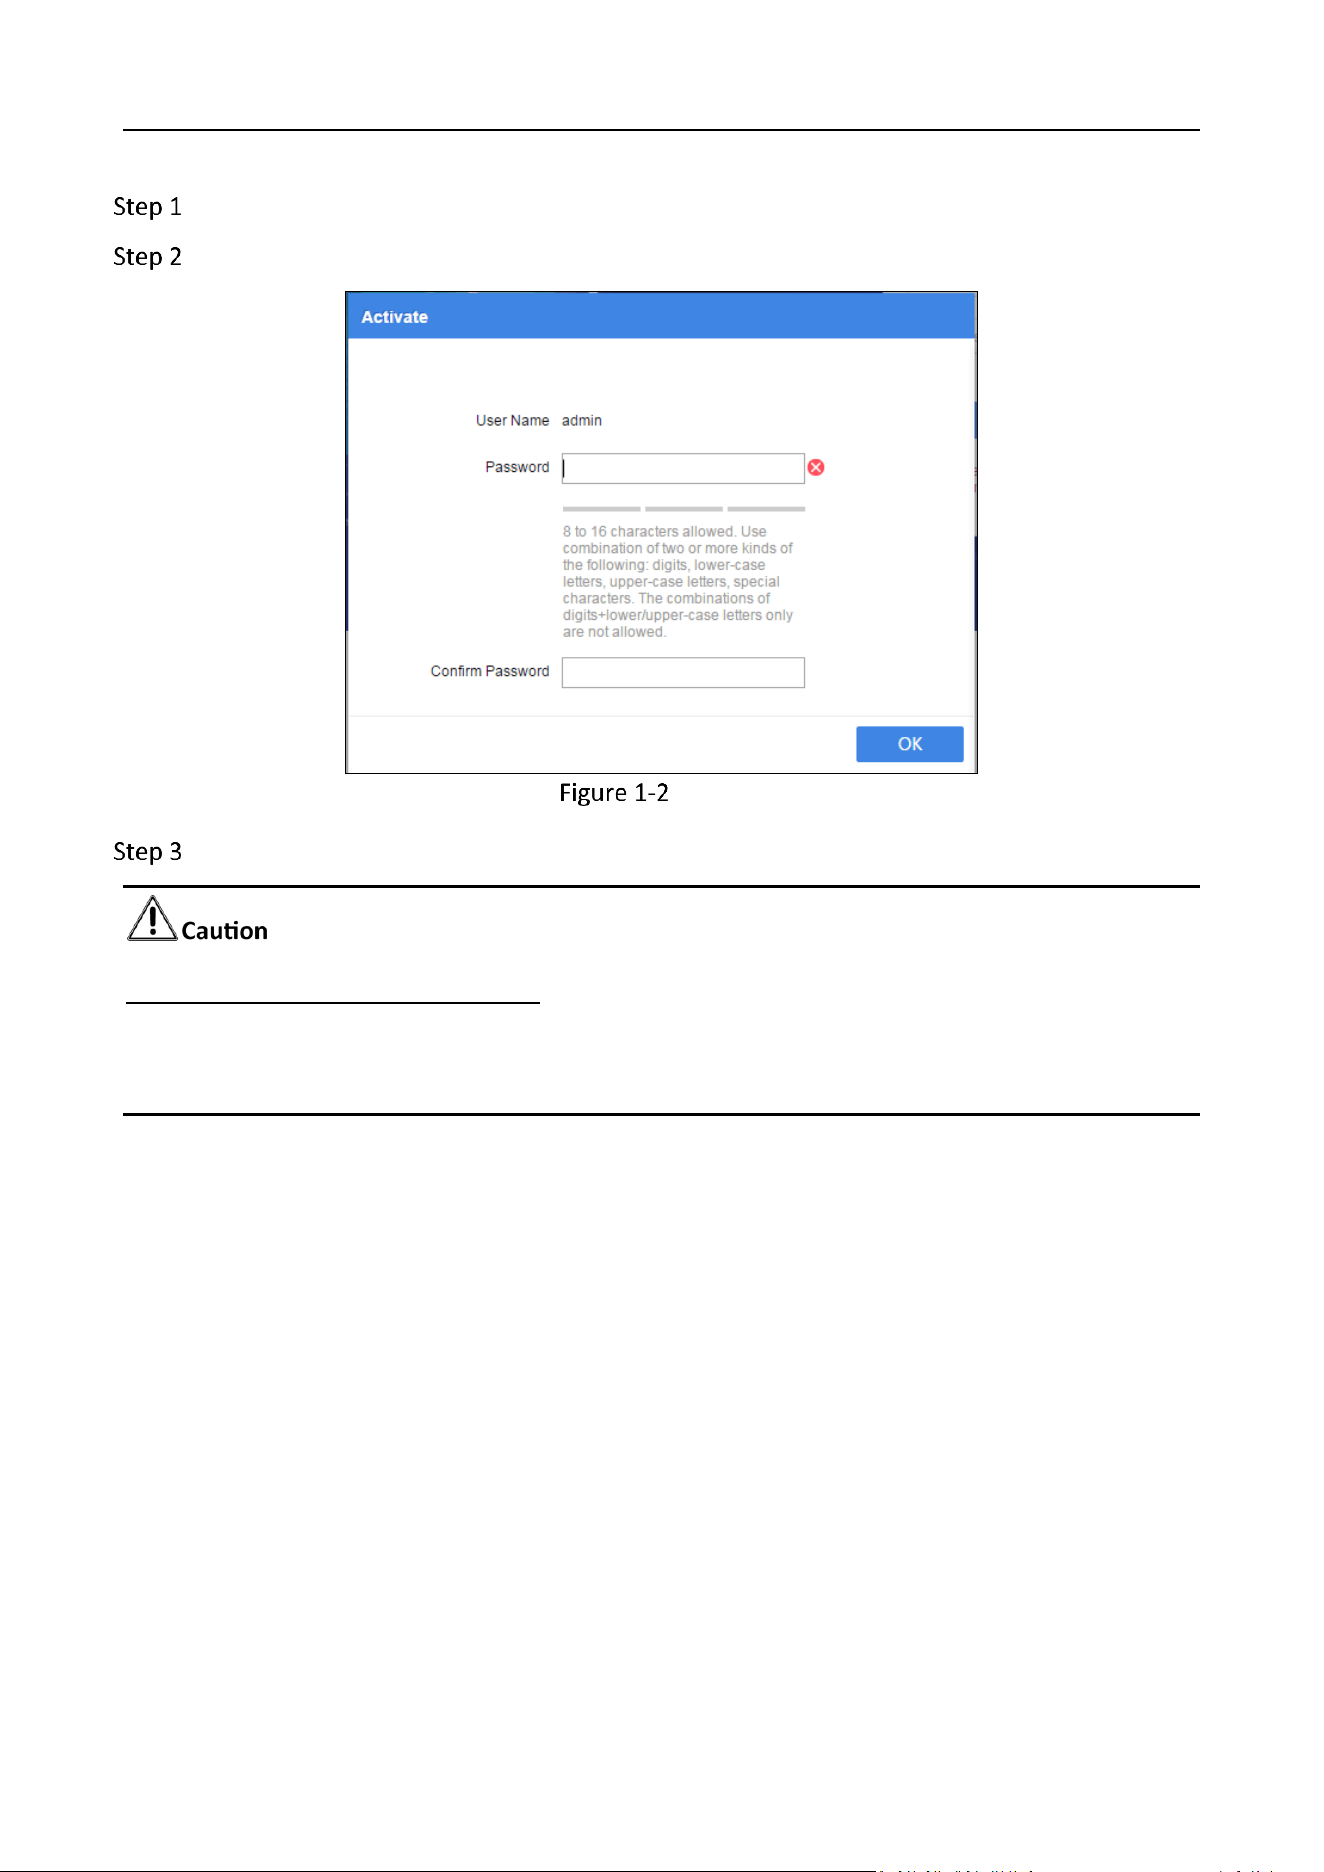
Device Activation
Purpose:
For the first-time access, you need to activate the device by setting an admin password. No operation
is allowed before activation.
Storage Management System • User Manual
2
Access device via web browser.
Enter the same password in Create New Password and Confirm New Password.
Activation
Click OK.
STRONG PASSWORD RECOMMENDED–We highly recommend you create a strong password of your
own choosing (Using a minimum of 8 characters, including at least three of the following categories:
upper case letters, lower case letters, numbers, and special characters.) in order to increase the
security of your product. And we recommend you reset your password regularly, especially in the
high security system, resetting the password monthly or weekly can better protect your product.
Storage Management System • User Manual
3
Chapter 2 System Configuration
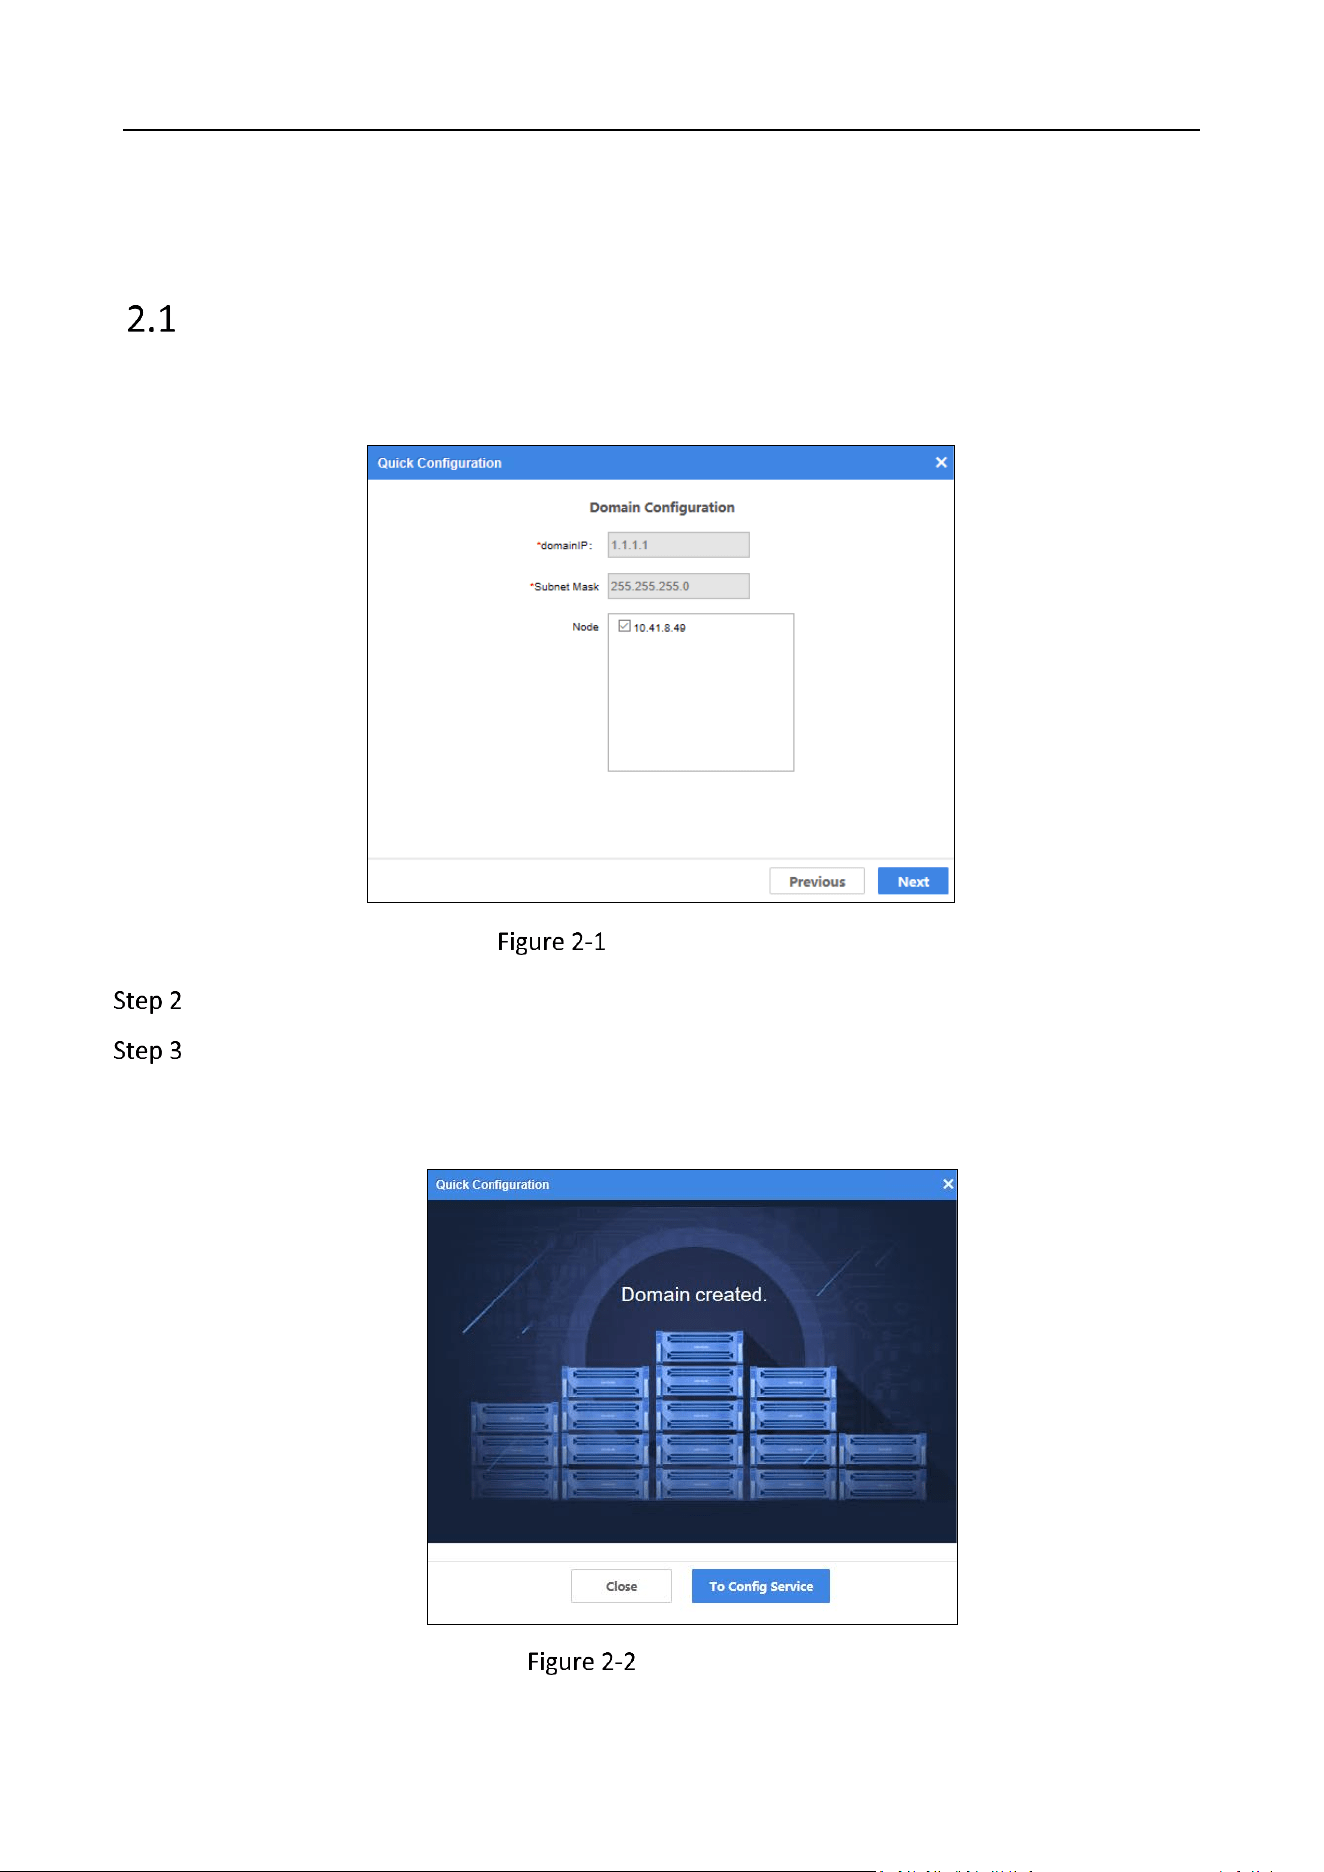
Quick Configuration
When you log in to the system for the first time after activation, the Quick Configuration window
will pop up.
Domain Configuration
Check the node.
Click Next to create domain.
The creation process takes some time. The following window will pop up after the creation is
completed.
Domain Created
Storage Management System • User Manual
4
Click To Config Service to follow the wizard to configure service.
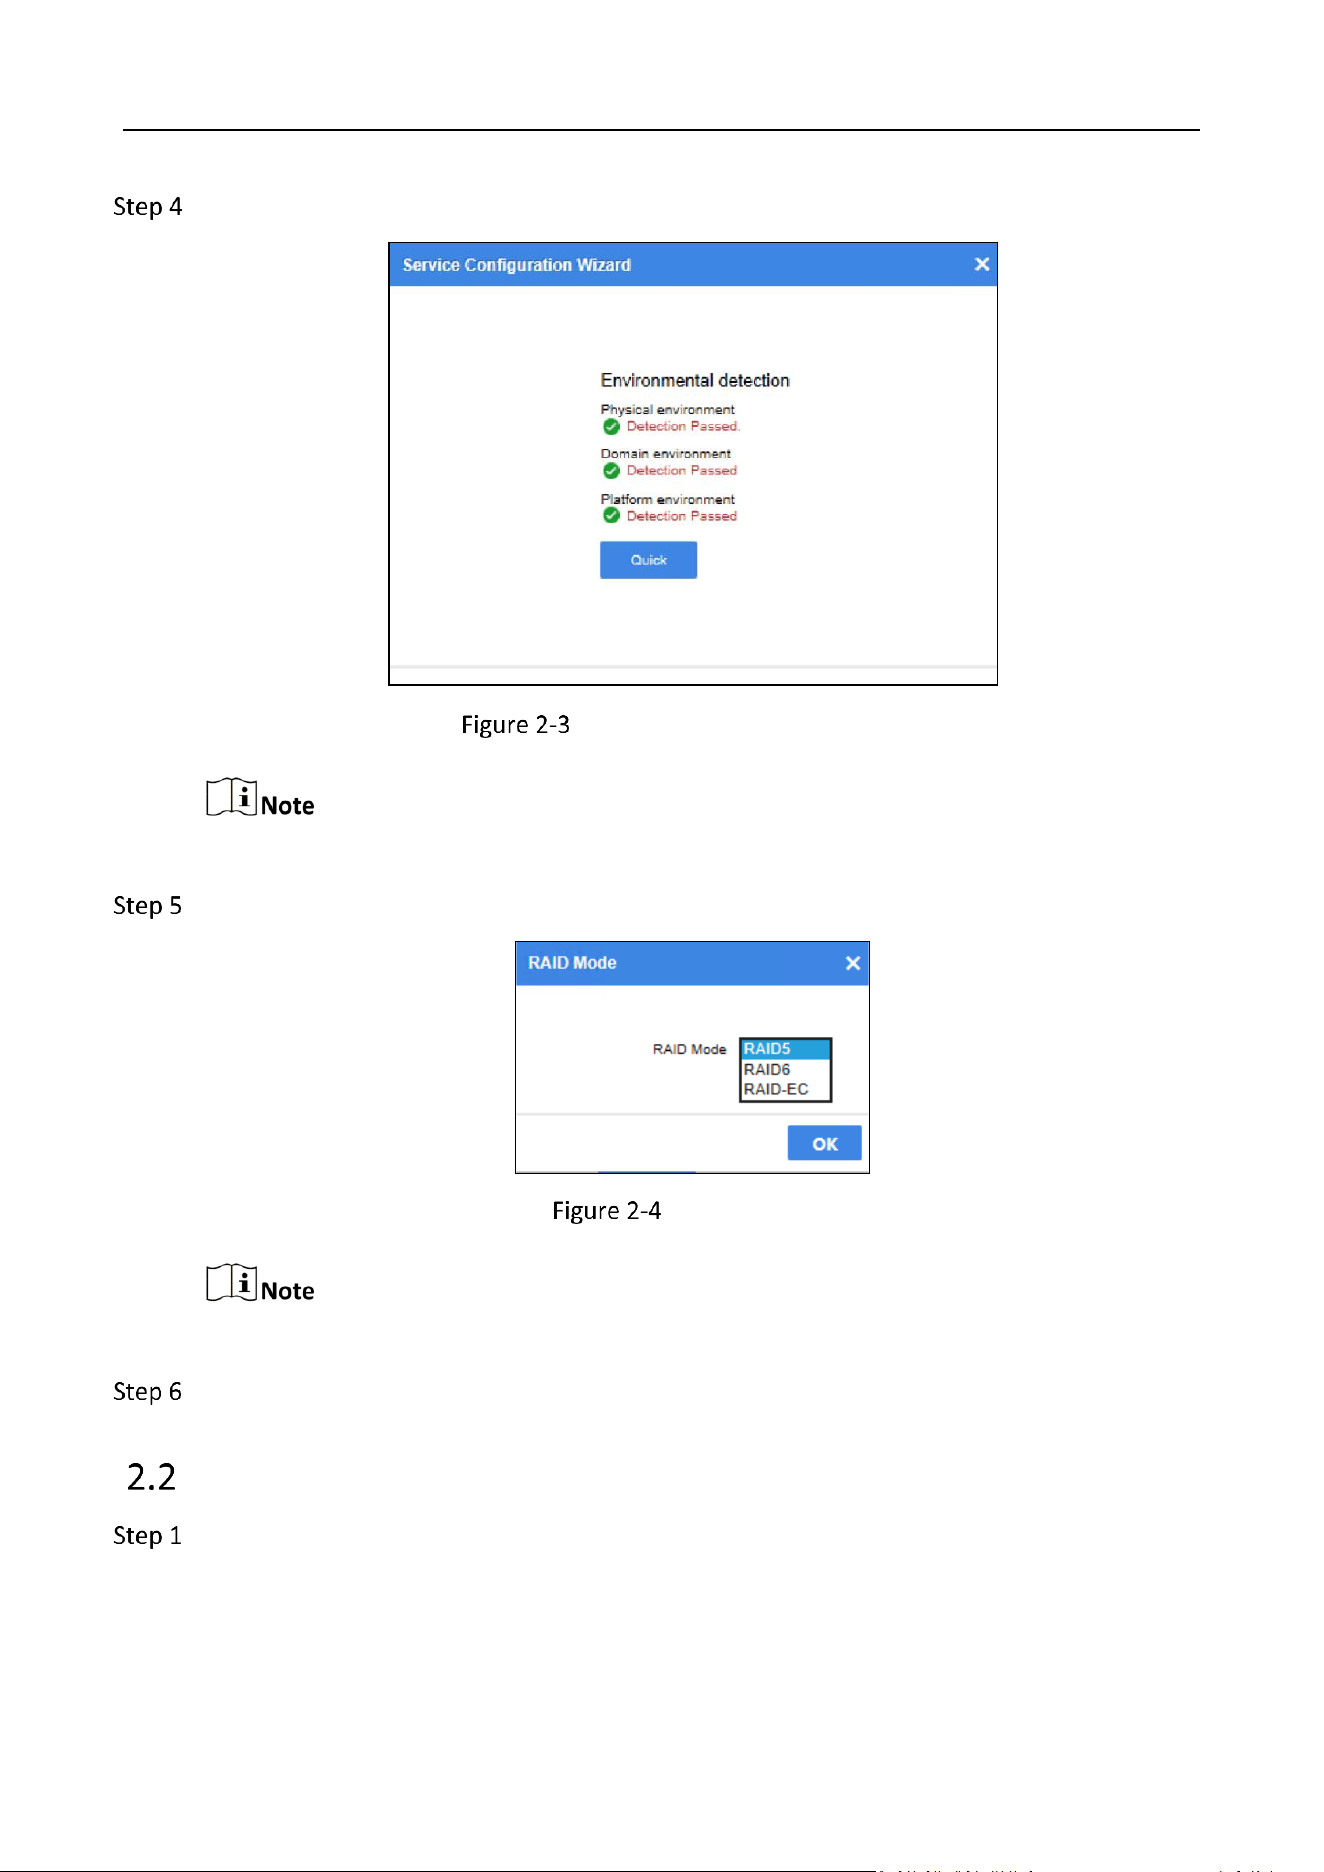
Service Configuration Wizard
The service can only be configured after the environment detection is passed.
Click Quick to select RAID mode.
RAID Mode
RAID-EC mode is recommended.
Click OK to start the quick configuration.
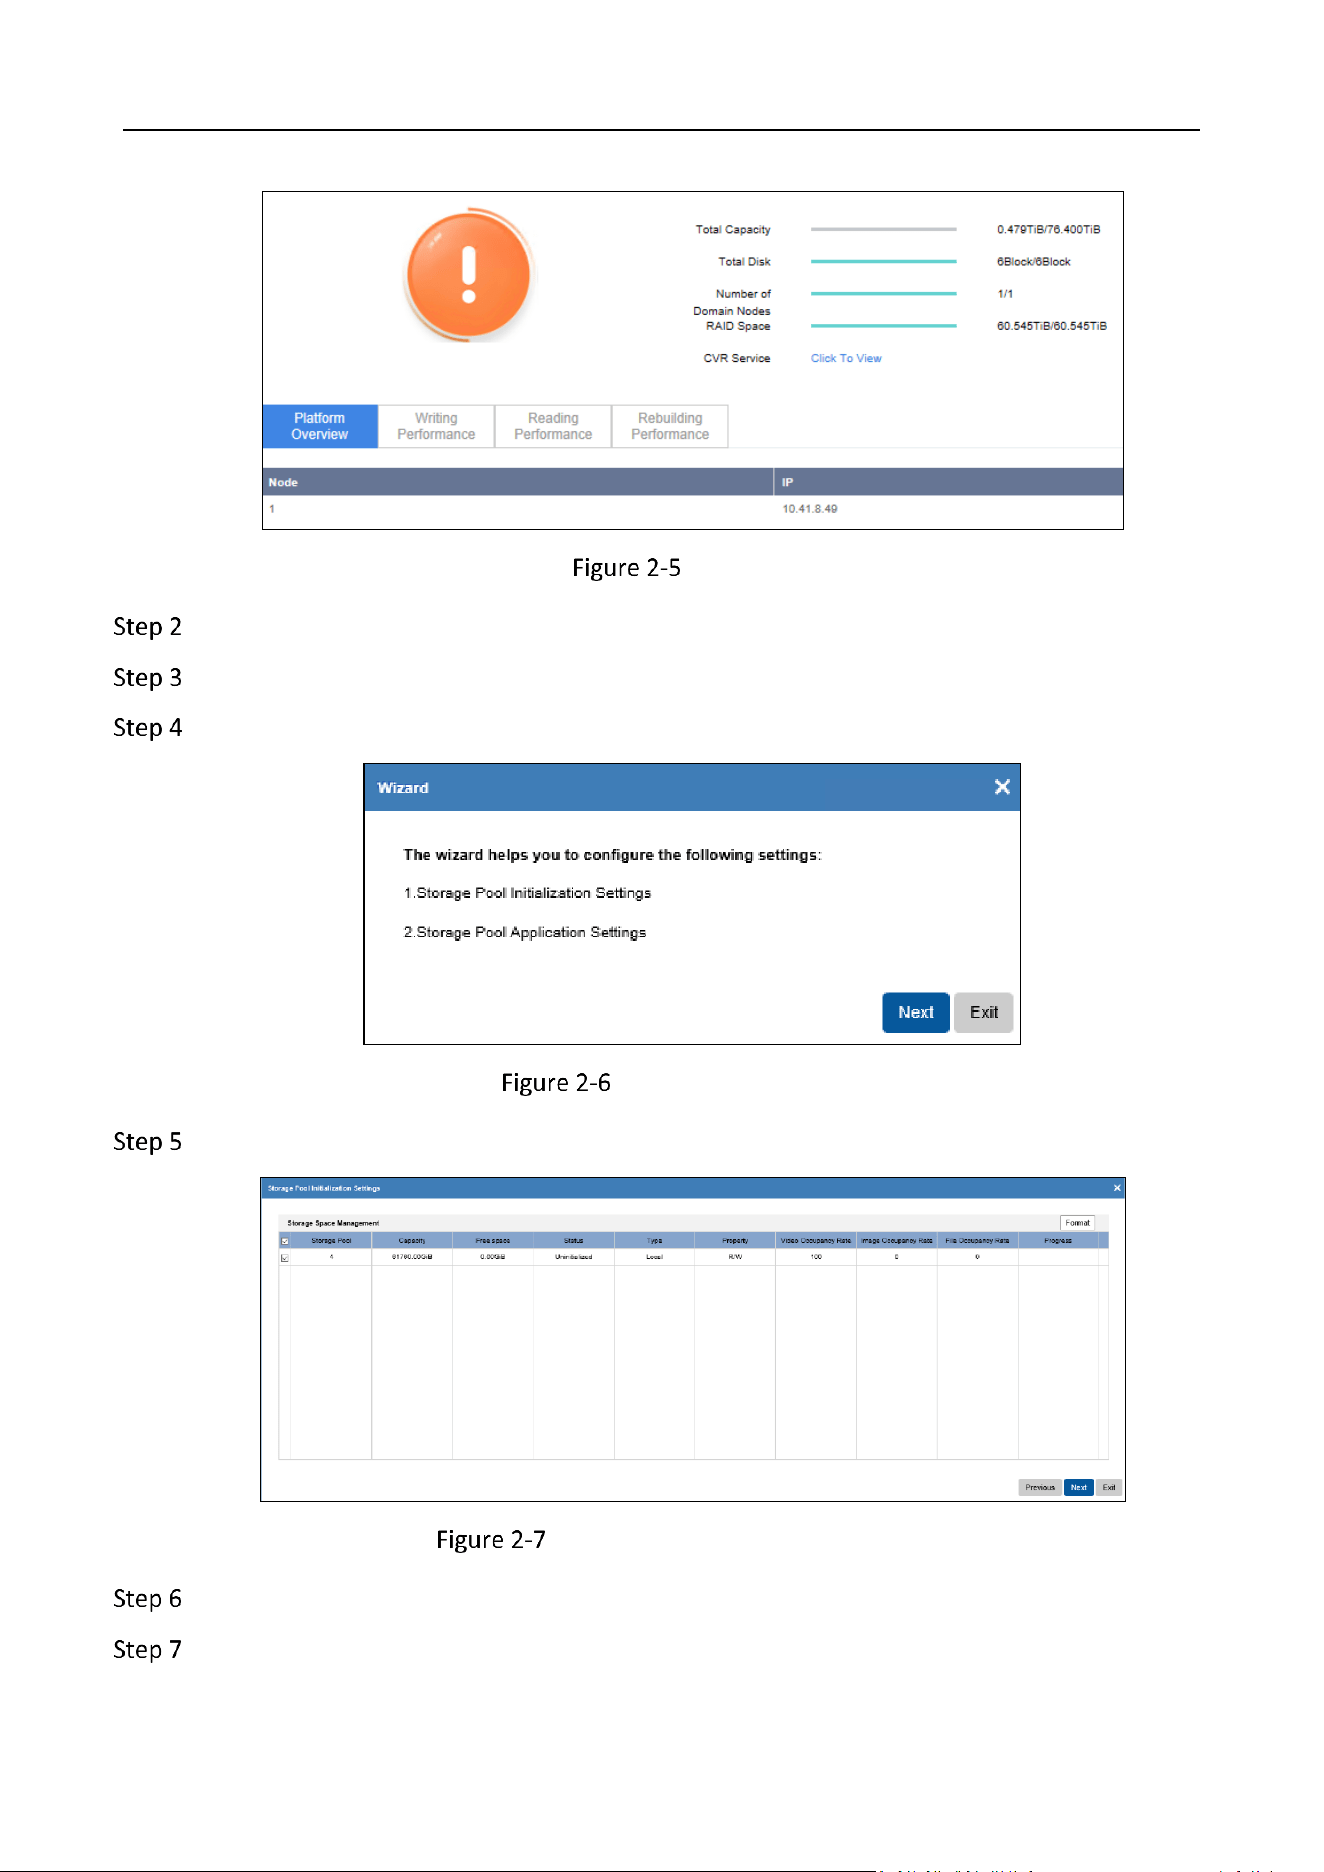
Format Storage Space
Go to Storage.
Storage Management System • User Manual
5
Storage
Click Click To View to redirect to Hybrid SAN sub-system.
Enter Hybrid SAN System.
Follow the wizard to complete configurations.
Configuration Wizard
Click Next to configure storage pool initialization.
Storage Pool Initialization Settings
Check the storage pool and click Format.
Click OK to confirm the operation.
Storage Management System • User Manual
6
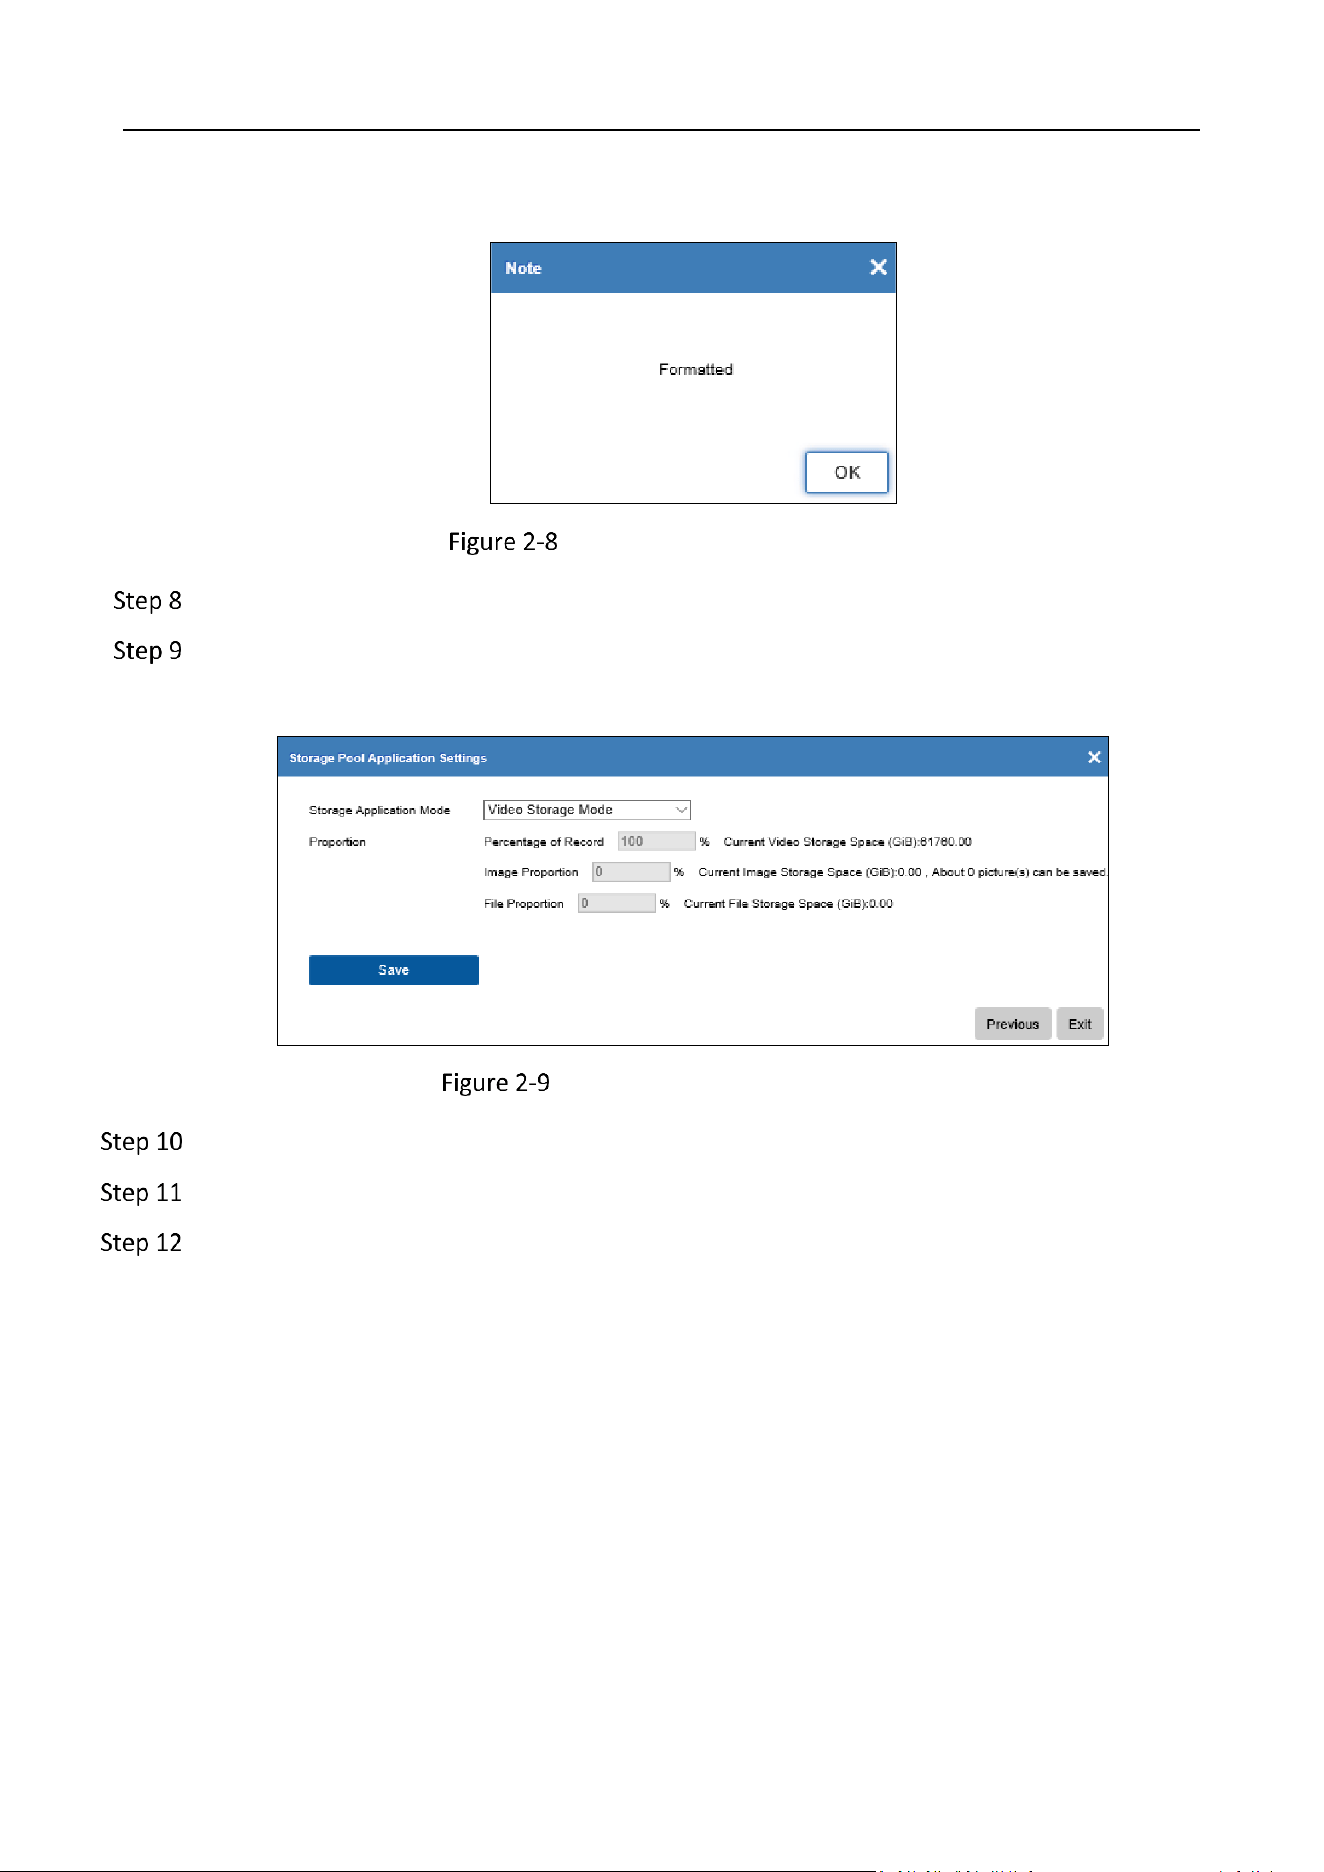
The following prompt will pop-up after the storage pool is formatted.
Formatting Completion Prompt
Click OK.
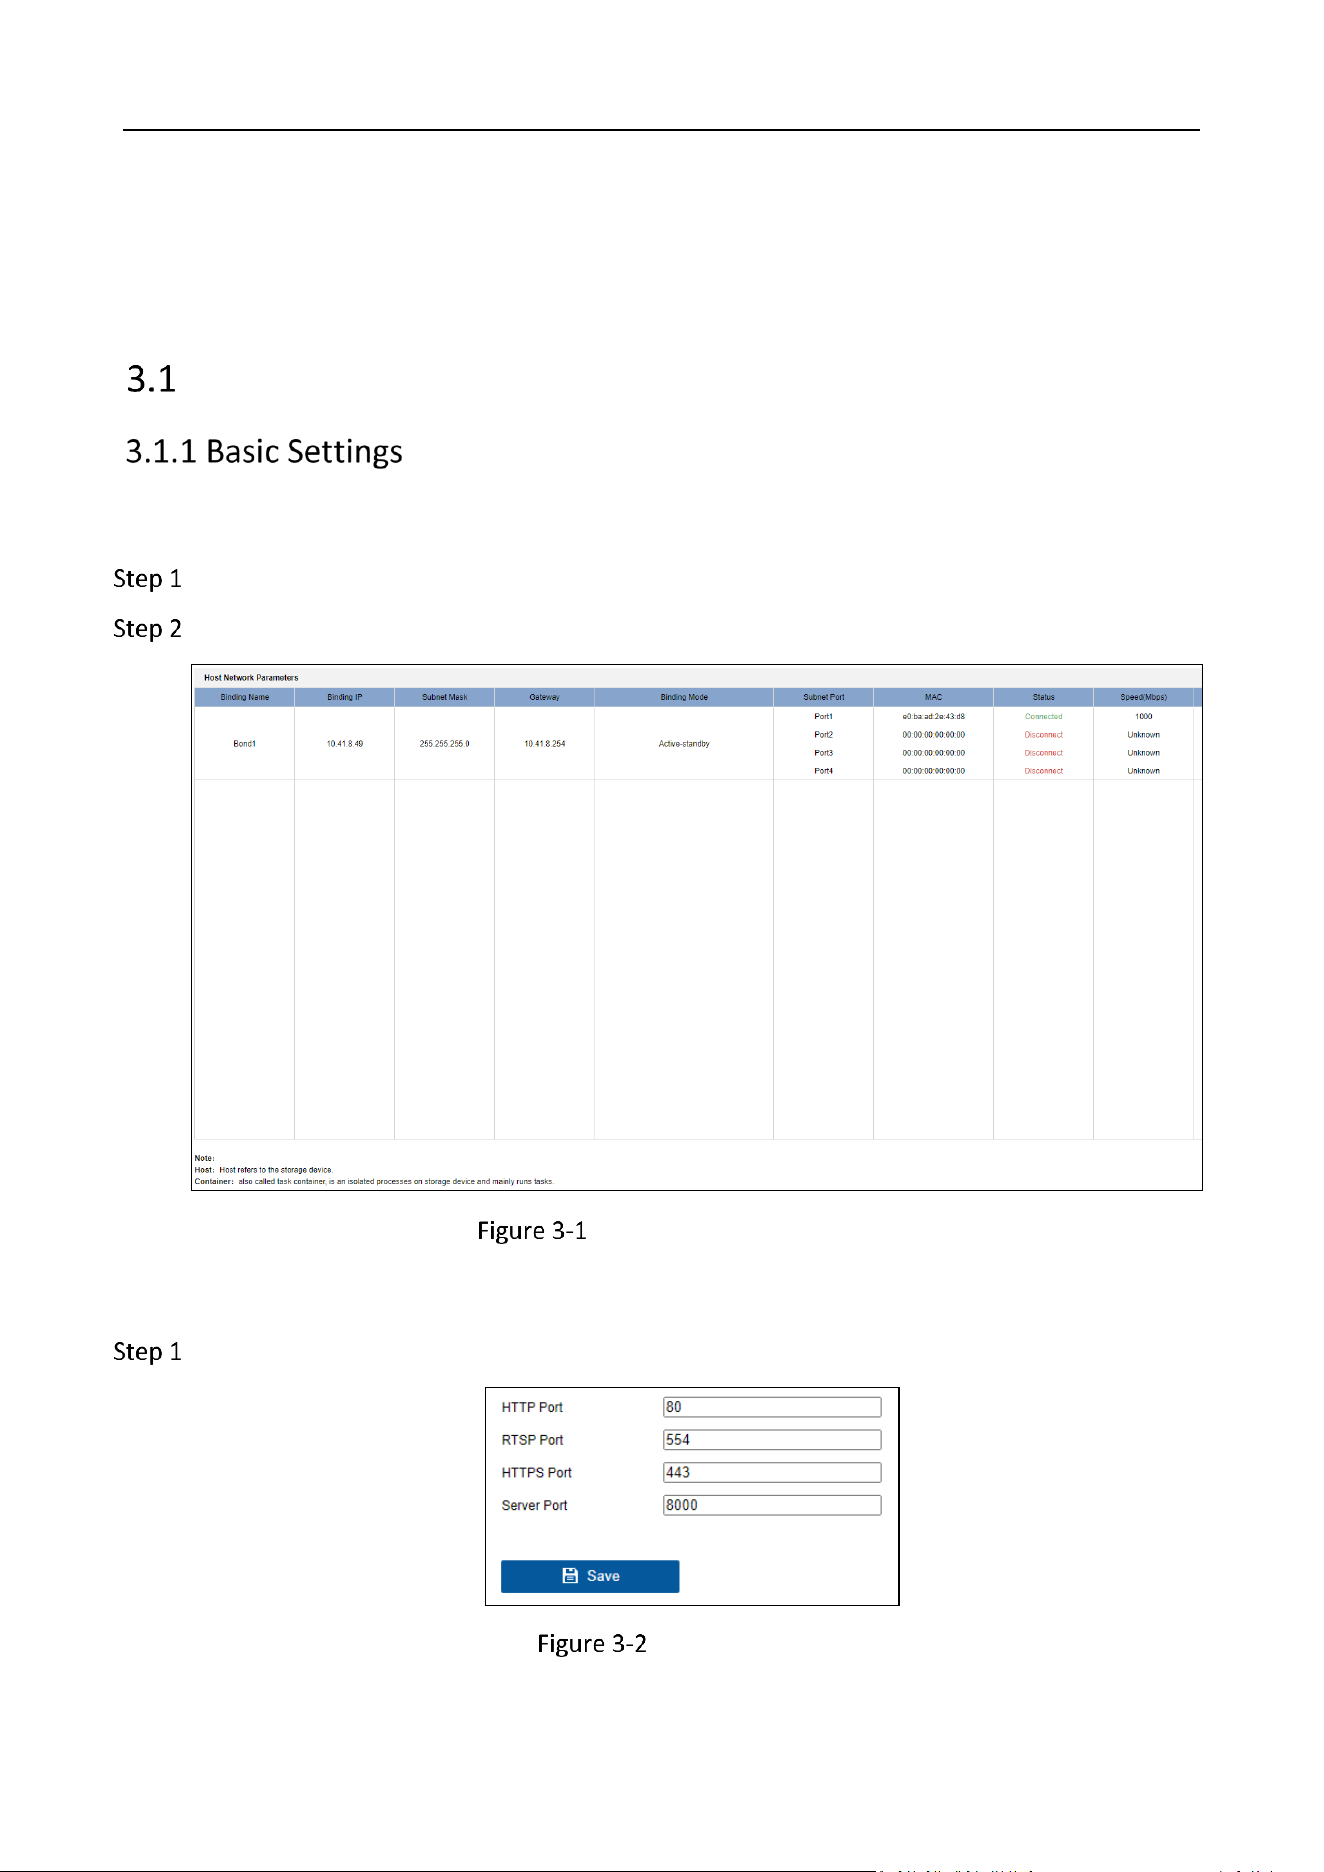
Click Next to configure storage pool application.
Video Storage Mode is selected by default.
Storage Pool Application Settings
Click Save.
Click OK to confirm the operation.
Click Exit to finish the configuration.
Storage Management System • User Manual
7
Chapter 3 Hybrid SAN Sub-System
Configuration
Network
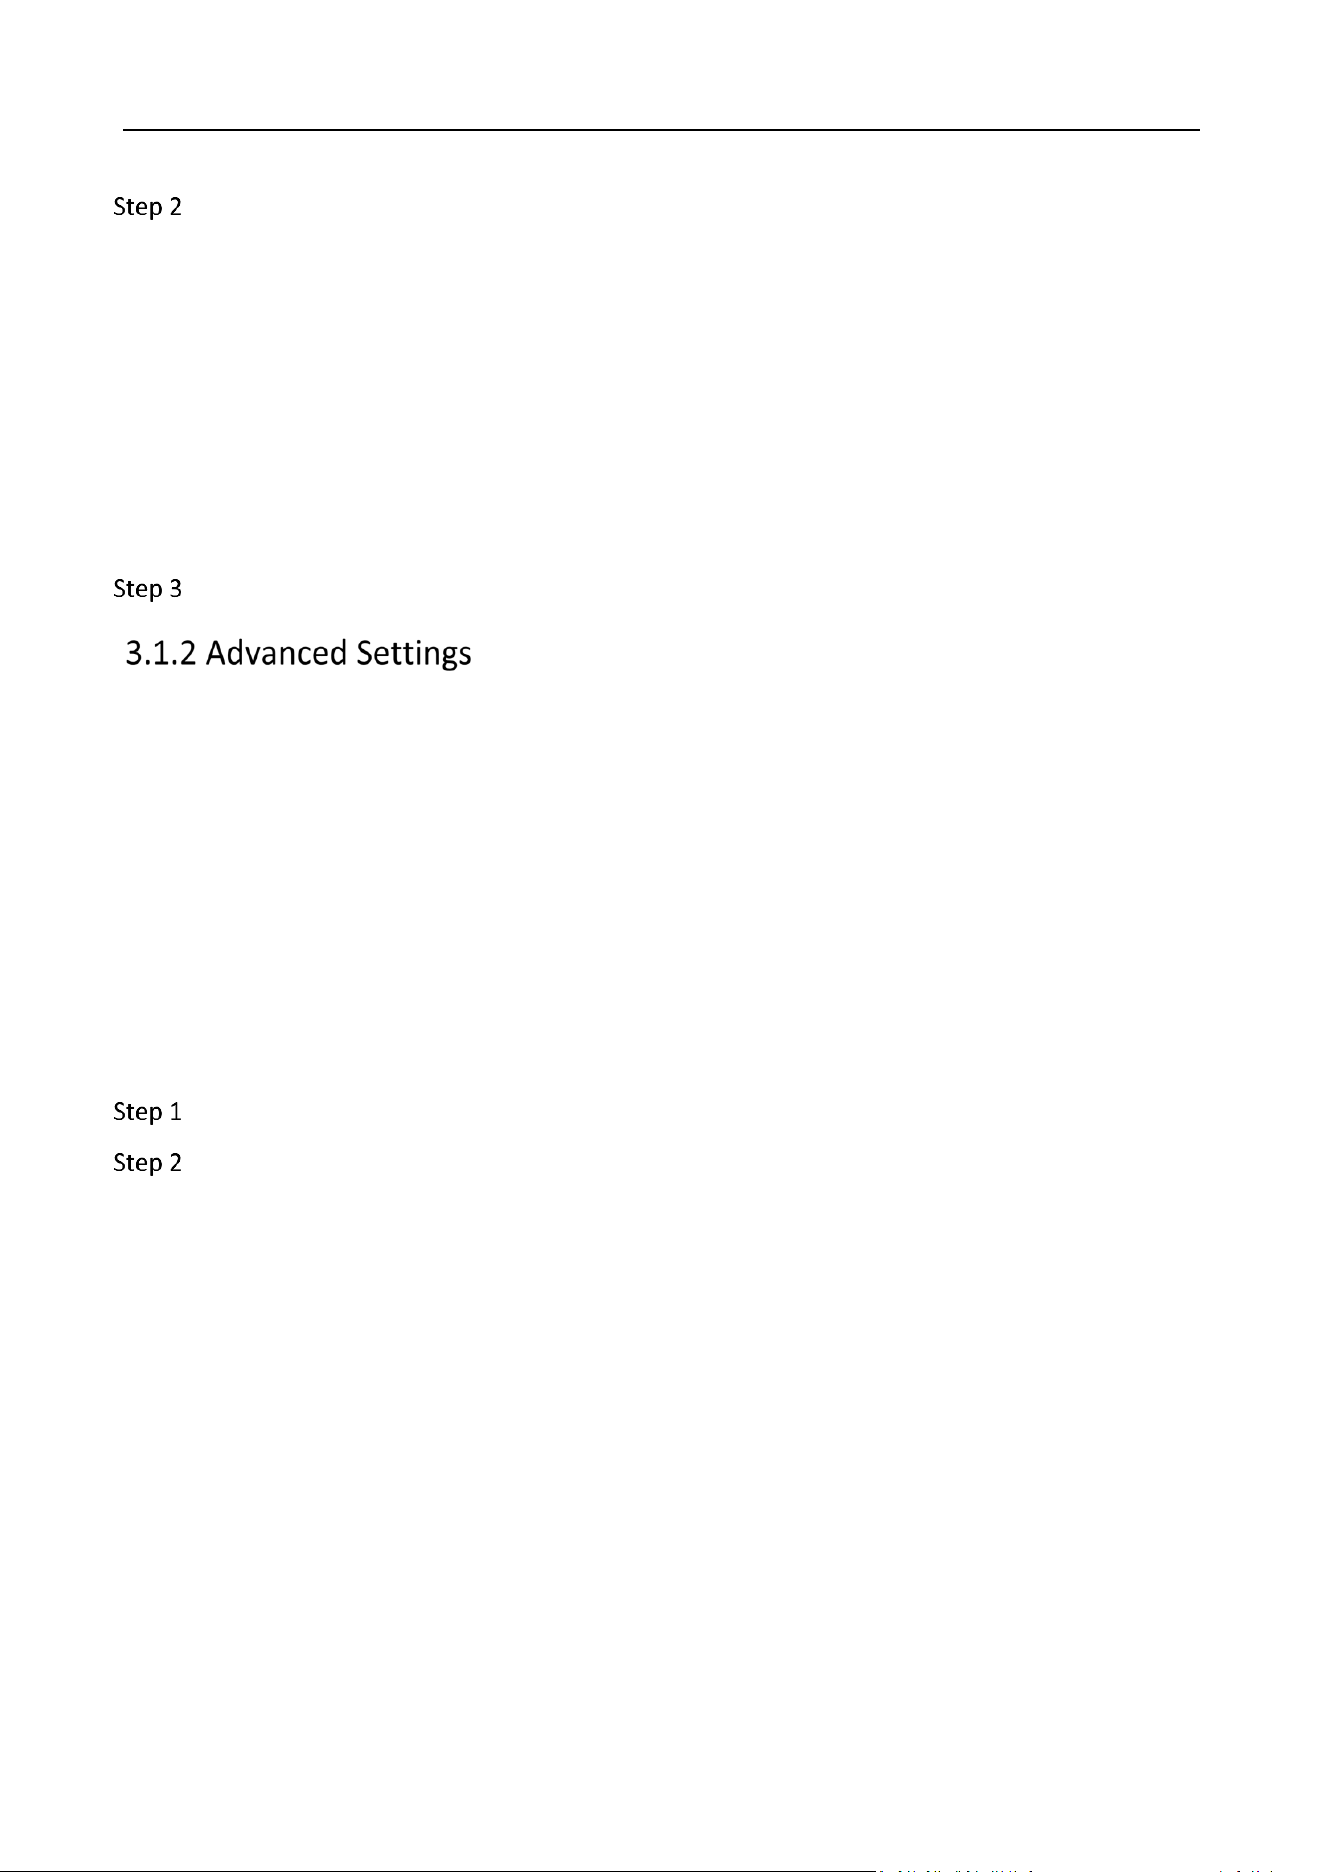
TCP/IP
Go to Configuration > Network > Basic Settings > TCP/IP.
View the host network parameters.
Host Network Parameters
Port
Go to Configuration > Network > Basic Settings > Port.
Port Settings
Storage Management System • User Manual
8
Set the HTTP port, RTSP port, HTTPS port and server port of the camera.
HTTP Port: The default port number is 80, and it can be changed to any port No. which is
not occupied.
RTSP Port:The default port number is 554 and it can be changed to any port No. ranges
from 1024 to 65535.
HTTPS Port: The default port number is 443, and it can be changed to any port No. which
is not occupied.
Server Port: The default server port number is 8000, and it can be changed to any port
No. ranges from 2000 to 65535.
Click Save to save the settings.
Email
Purpose
The system can be configured to send an e-mail notification to all designated users when a specified
event occurs such as when an alarm or event is detected, or the administrator password is changed,
etc.
Before you start
The device must be connected to a local area network (LAN) that contains an SMTP mail server. The
network must also be connected to either an intranet or the Internet depending on the location of
the email accounts to which you want to send notifications.
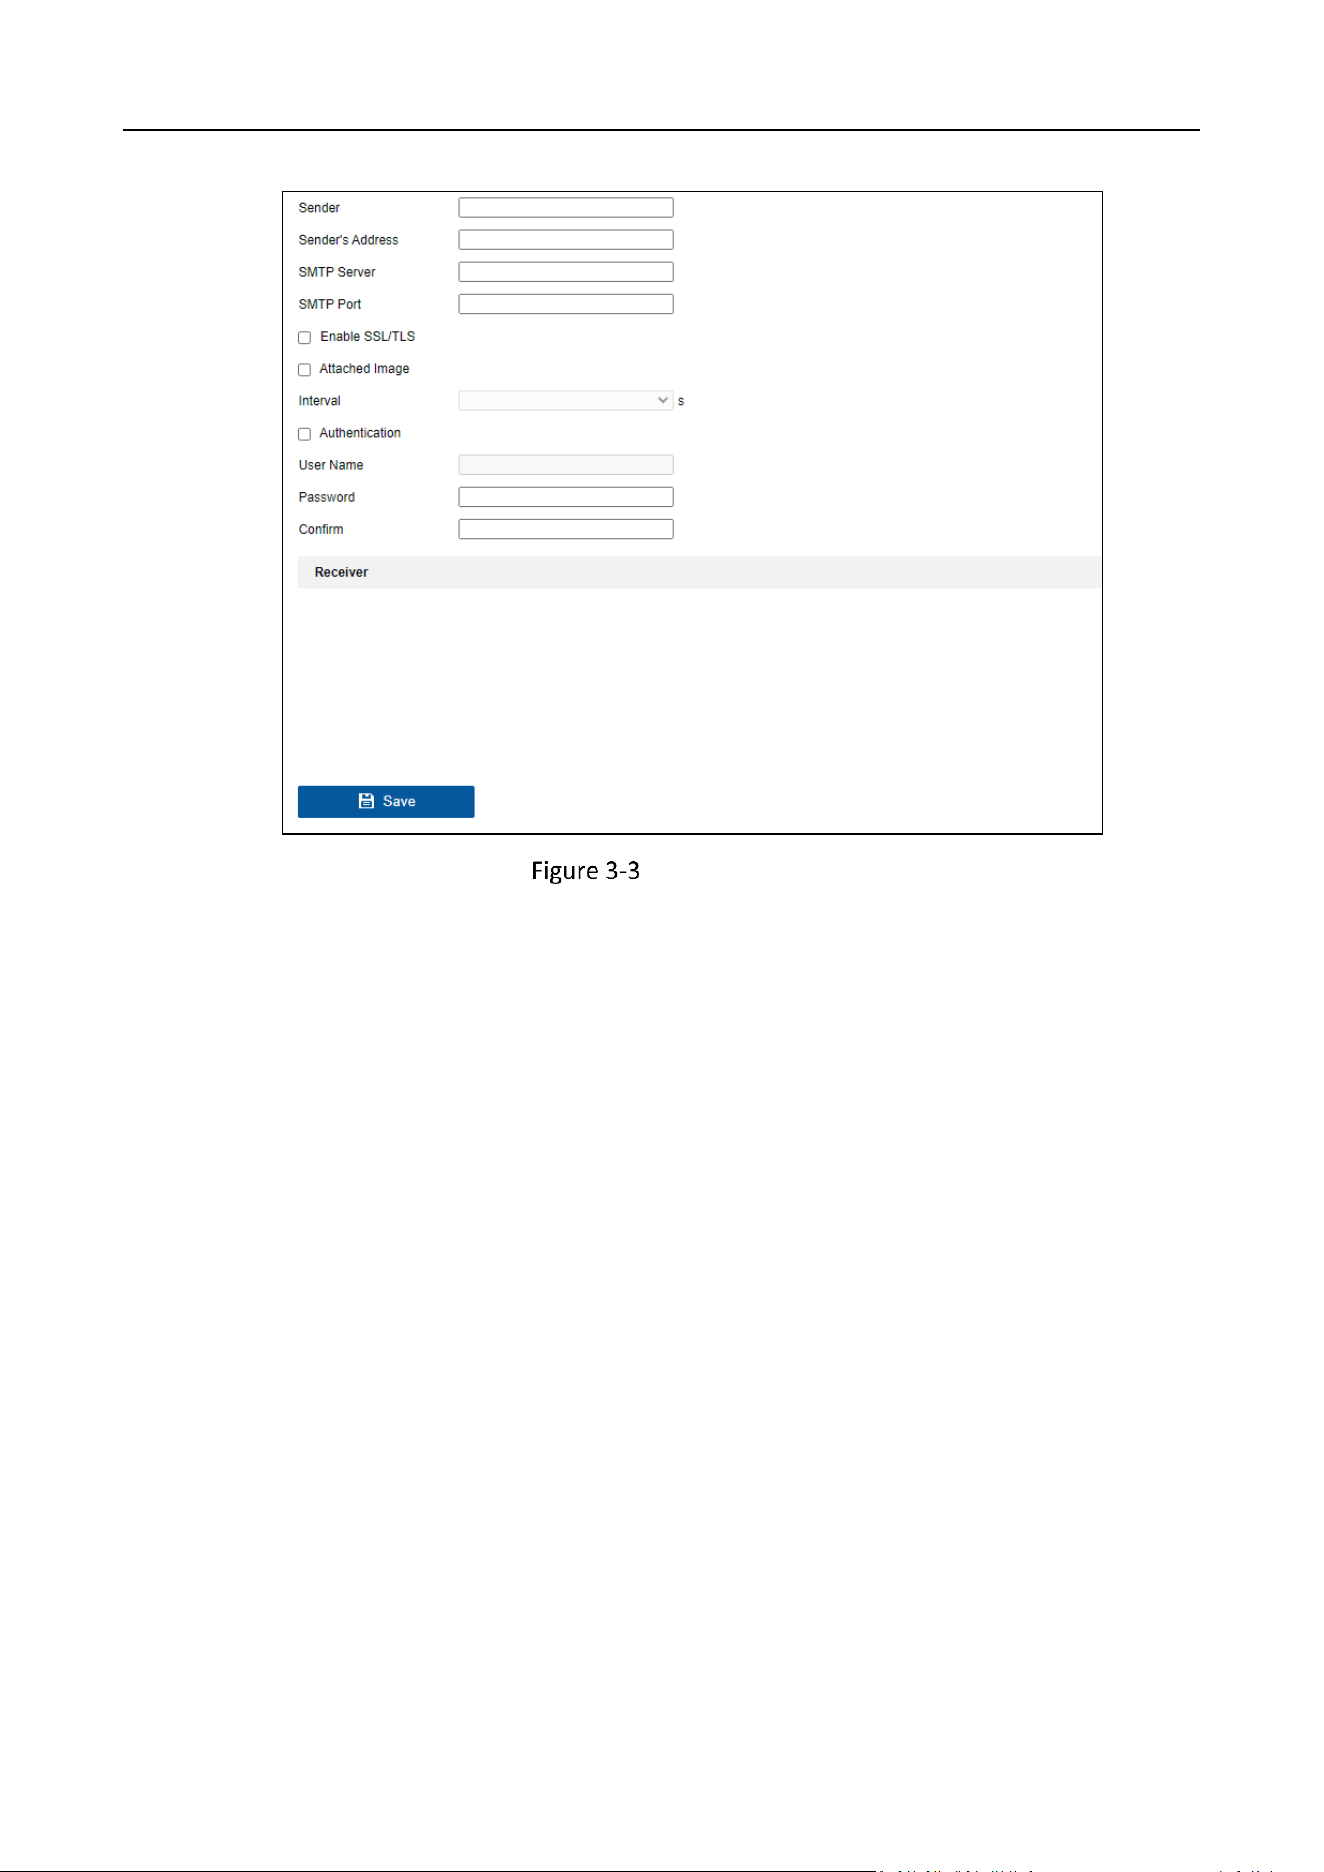
Go to Configuration > Network > Basic Settings > Email.
Configure the email settings.
Storage Management System • User Manual
9
Email Settings
Sender
The sender's name.
Sender's Address
The sender's address.
SMTP Server
The IP address of SMTP Server or host name (e.g., smtp.263xmail.com).
SMTP Port
The SMTP port. The default TCP/IP port used for SMTP is 25.
Enable SSL/TLS
Check to enable SSL/TLS if required by the SMTP server.
Attached Image
Check to send email with attached alarm images. The interval is the time between sending
two subsequent alarm images.
Interval
The time interval for capturing the attached images.
Storage Management System • User Manual
10
Authentication
Check to enable the function if the SMTP server requires user authentication and enter the
user name and password accordingly.
Select Receivers
Select the receiver. Up to 3 receivers can be configured.
Receiver
The receiver's name.
Receiver's Address
The email address of the user to be notified.
Click Save to save the settings.
Picture Storage
Go to Configuration > Network > Basic Settings > Picture Storage.
Click Browse and select certificate file.
Only CRT and PEM files are supported.
Click Import.
The certificate status will change to Imported.
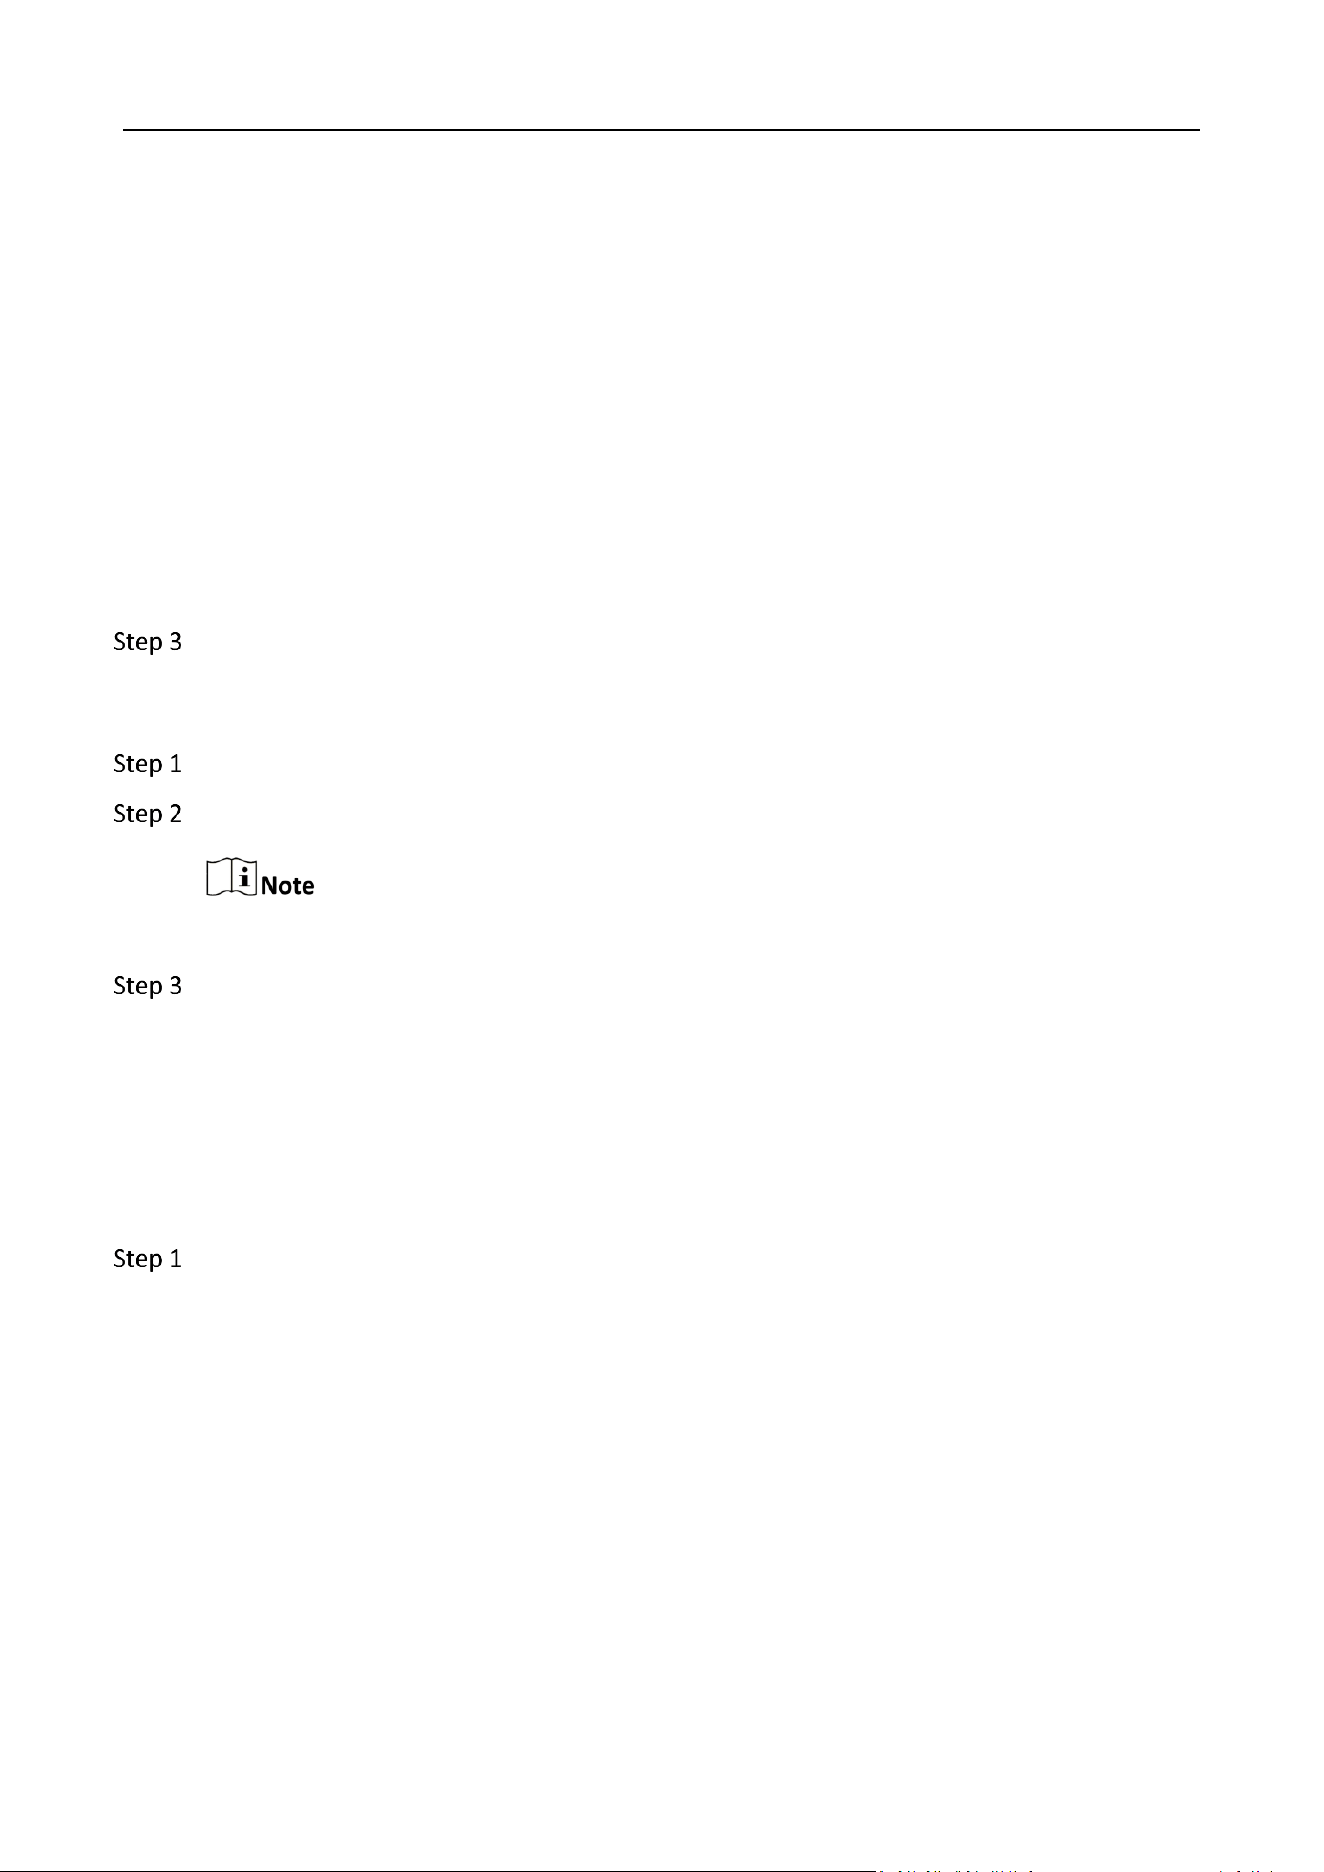
N+1
Purpose
N+1 working mode refers to N working device(s) and 1 back device.
Go to Configuration > Network > Basic Settings > N+1.
Storage Management System • User Manual
11
N+1 Settings
Enter the number of working device(s) to be taken over by the backup device.
Click Save.
Add working device.
1) Click Add Working Device.
2) Enter the working device IP address and password.
3) Click OK.
Add working device.
1) Click Add Backup Device.
2) Enter the backup device IP address and password.
3) Click OK.
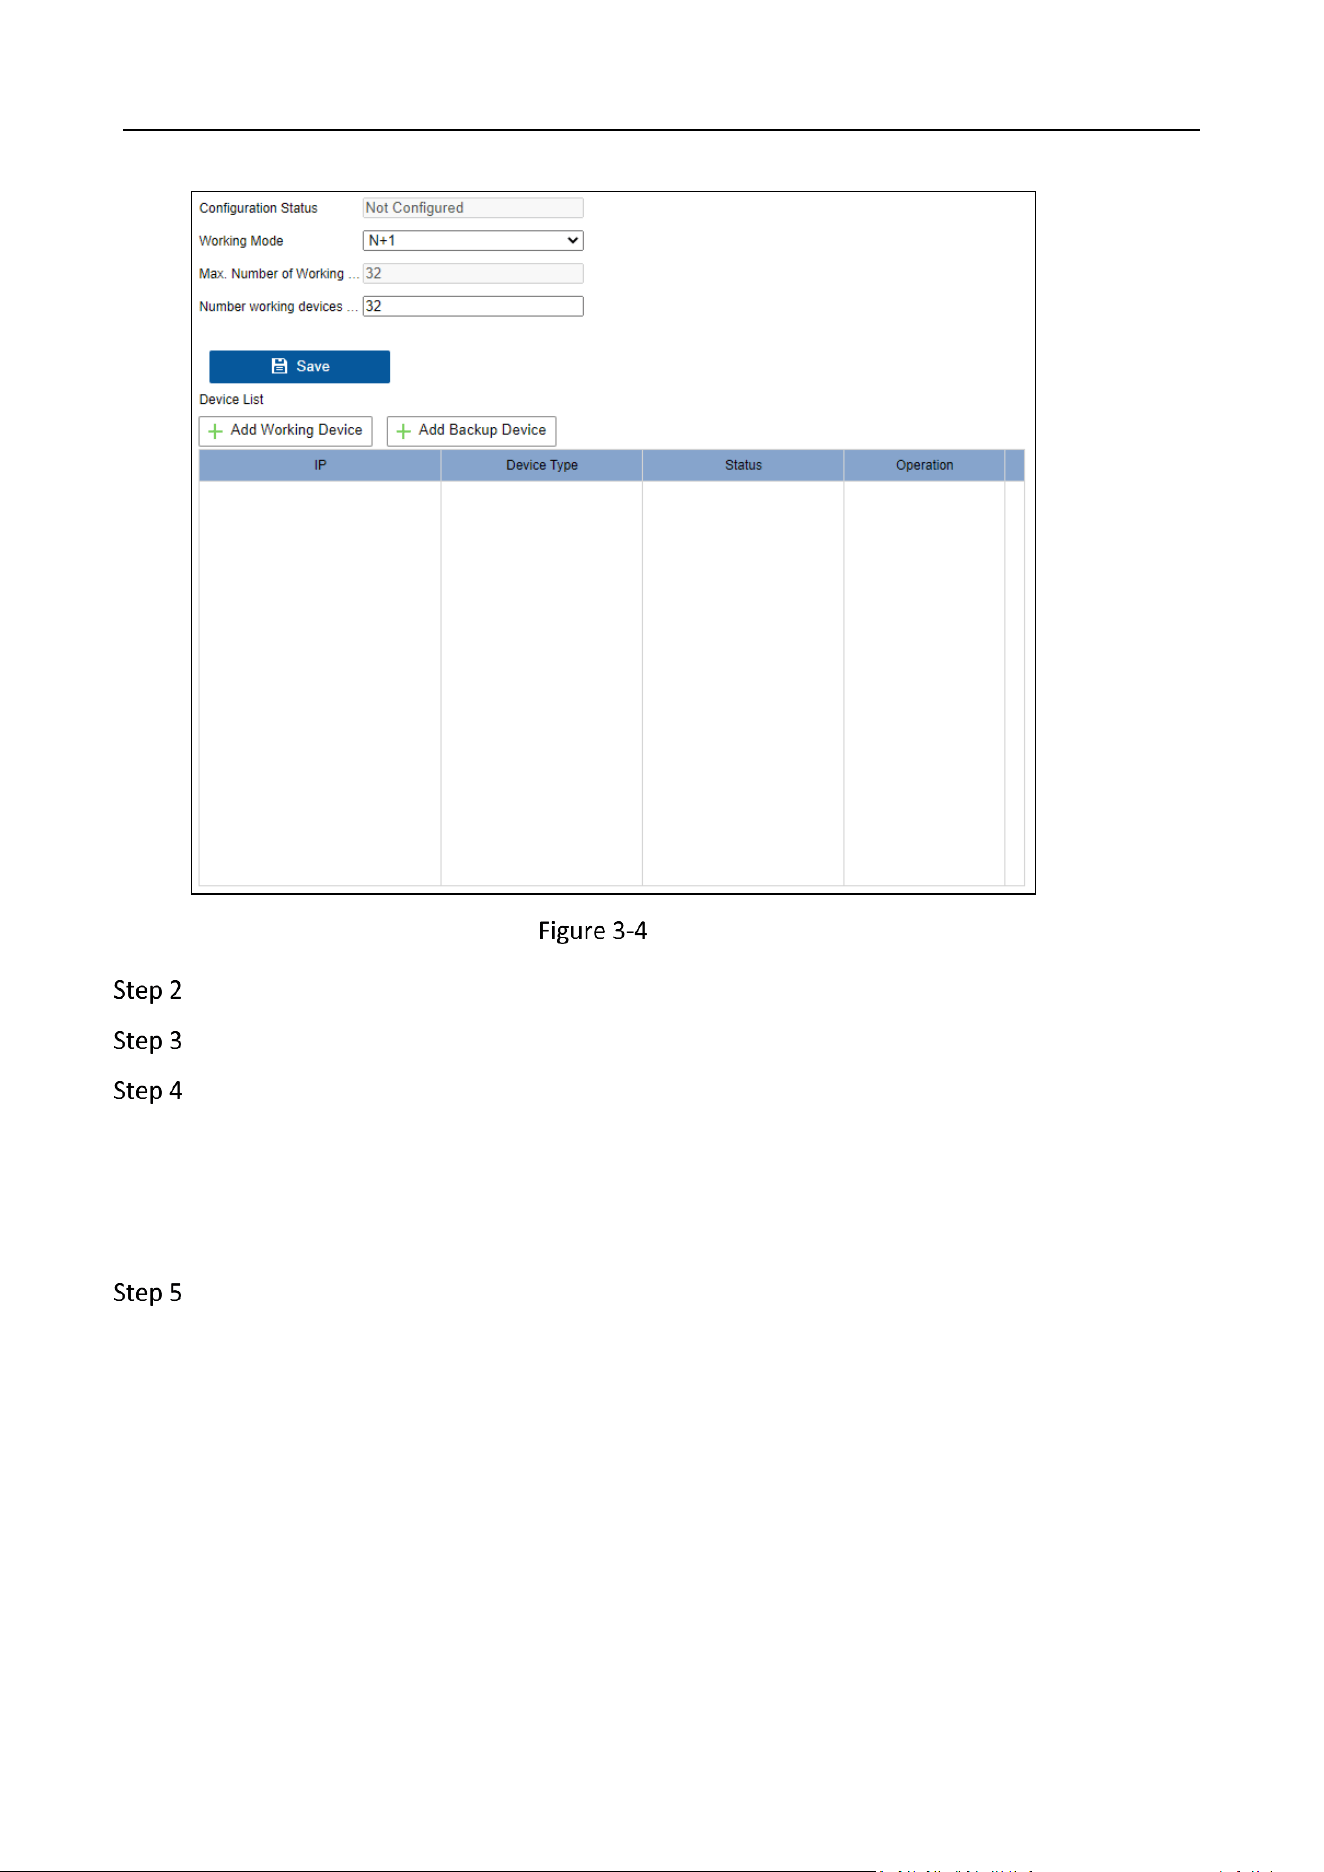
Other
Purpose
Alarm host: If the alarm center is set, the information will be sent to the remote alarm host when
an alarm or exception occurs on the device.
Storage Management System • User Manual
12
Multicast: When remotely accessing a device, use multicast to avoid the problem of the device's
access limit.
Go to Configuration > Network > Basic Settings > Other.
Other Settings
Enter the IP address and port of the alarm host.
Enter the multicast address.
Click Save.
System
Basic Information
The device information interface allows you to check the basic information of the device. It is the
reference for maintenance or modification in future. Only device name and Hybrid SAN No. is
editable in this interface.
Basic Settings
Go to Configuration > System > System Settings > Basic Settings.
Check IP Camera Time Sync to synchronize the time of connected network camera.
Click Save.
Reboot Device
Go to Configuration > System > Maintenance > Upgrade & Maintenance.
Click Reboot to reboot the device.

Storage Management System • User Manual
13
Restore Default Settings
Go to Configuration > System > Maintenance > Upgrade & Maintenance.
Click Restore to Factory Settings.
All parameters will be restored to factory settings except IP address, subnet mask, gateway, user
information, and storage mode.
Export/Import Configuration Files
Go to Configuration > System > Maintenance > Upgrade & Maintenance.
Export configuration files.
1) Click Hybrid SAN Parameters.
2) Enter the encrption password and confirm it.
Import configuration files.
1) Click Browse to select the saved configuration file.
2) Click Import.
Device will reboot automatically after importing configuration parameters.
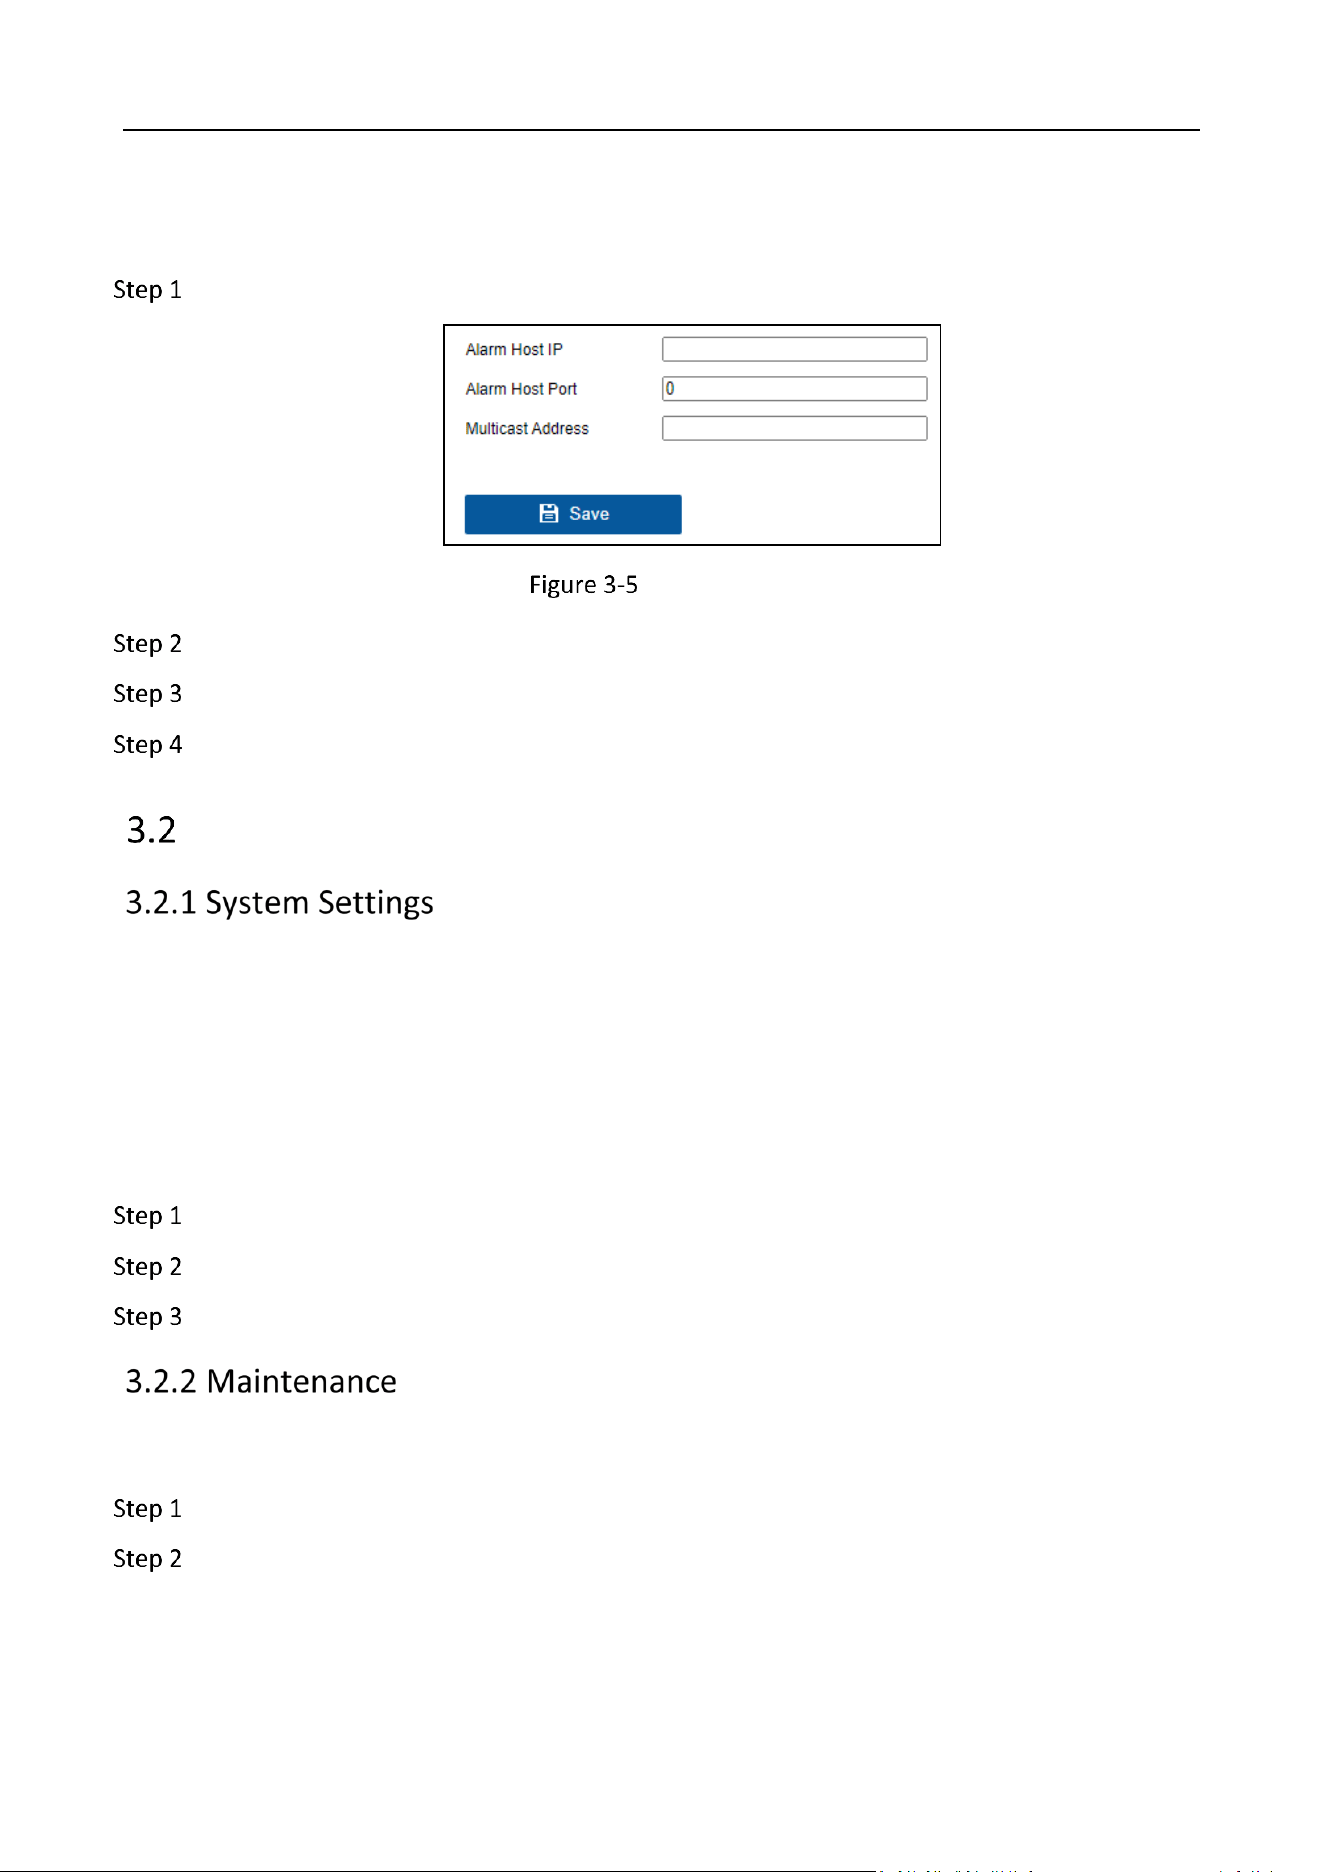
Search and Export Log
Purpose
Search and export the log files of operation, alarm, exception, and information.
Go to Configuration > System > Maintenance > Log.
Storage Management System • User Manual
14
Log
Select the Major Type and Minor Type of log files.
Set Start Time and End Time.
Click Search.
Click Export to export the log file of total items.
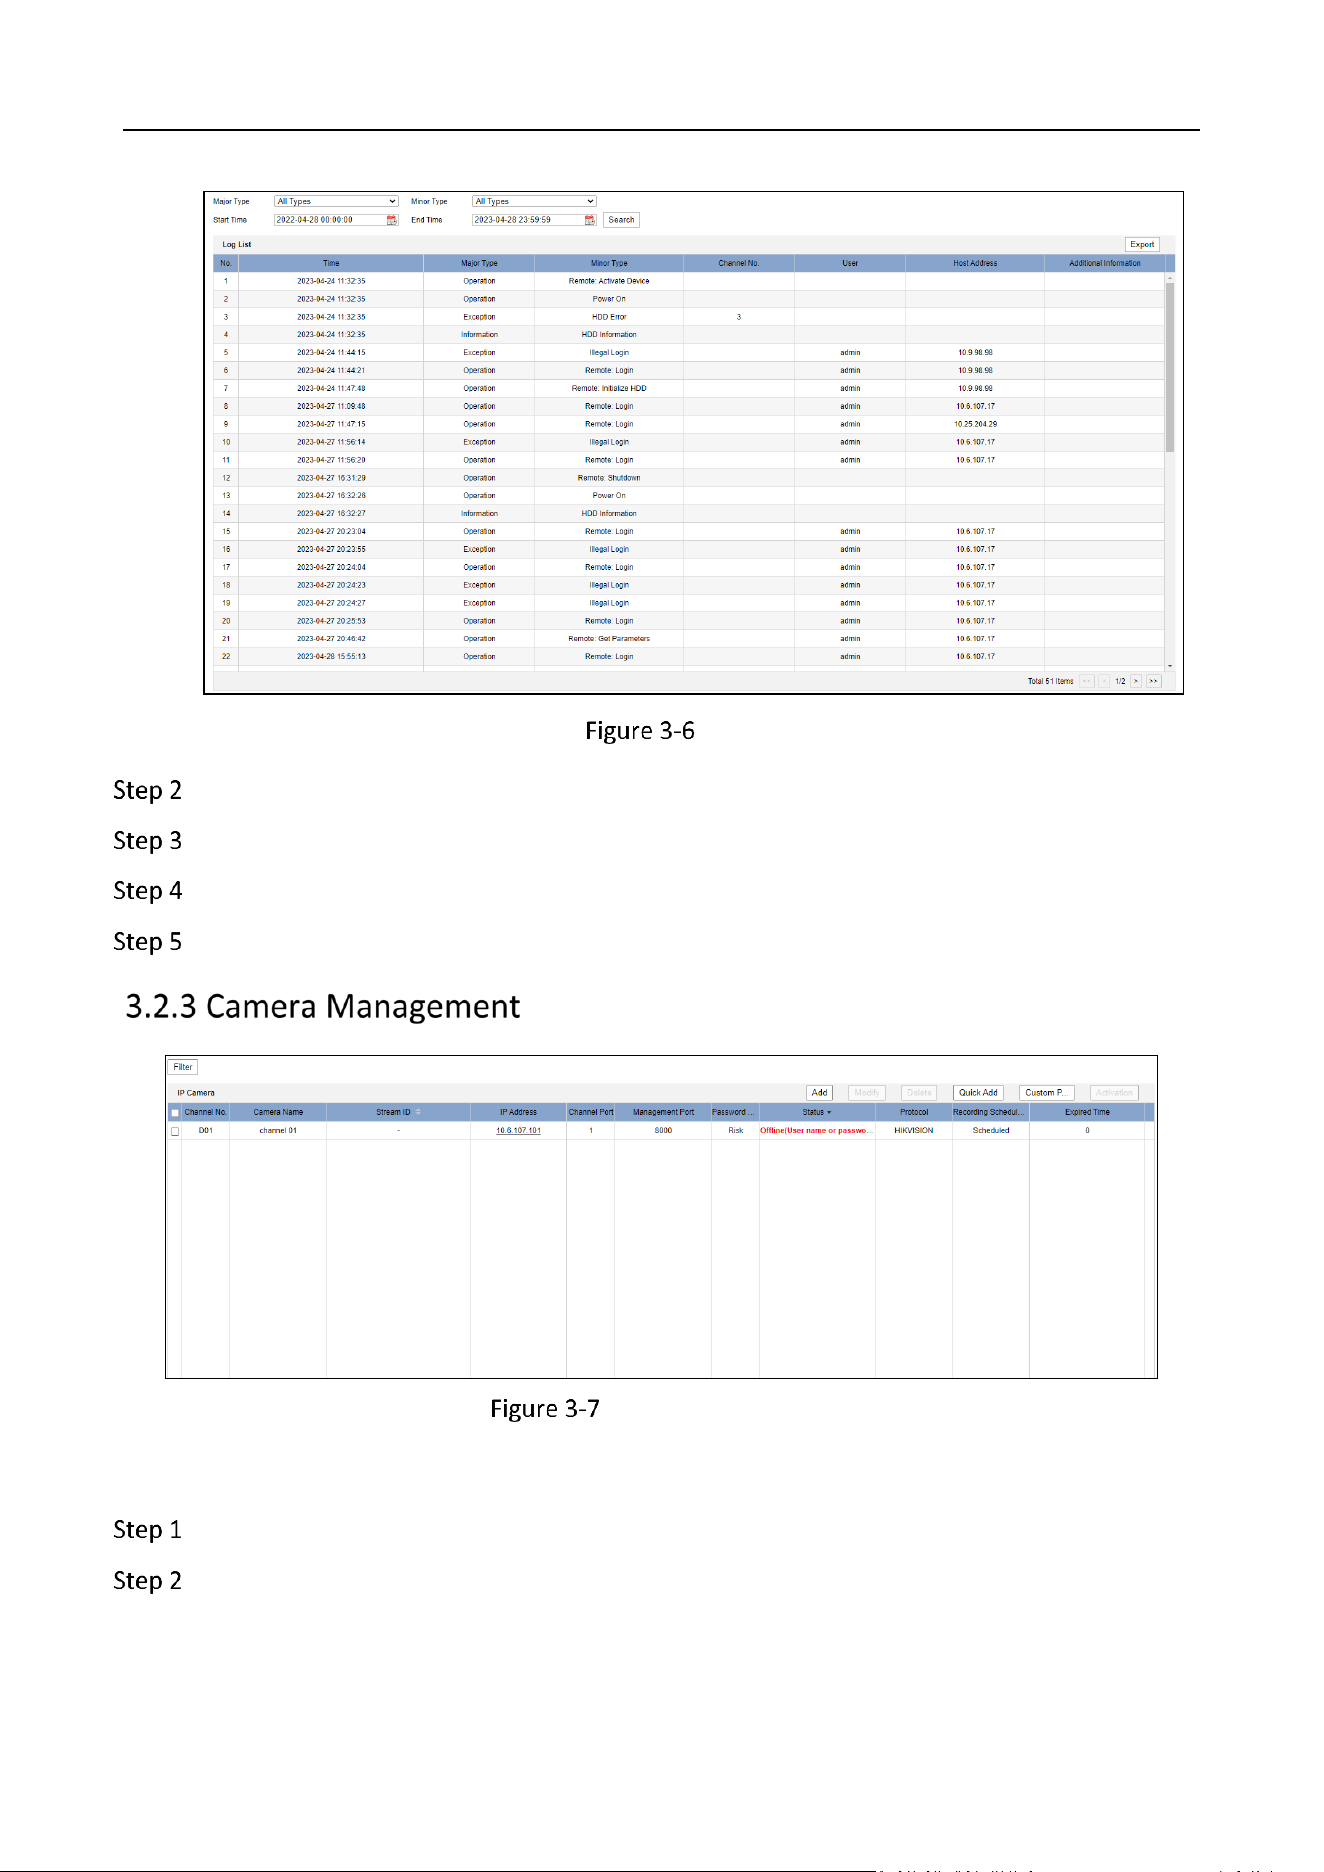
Camera Management
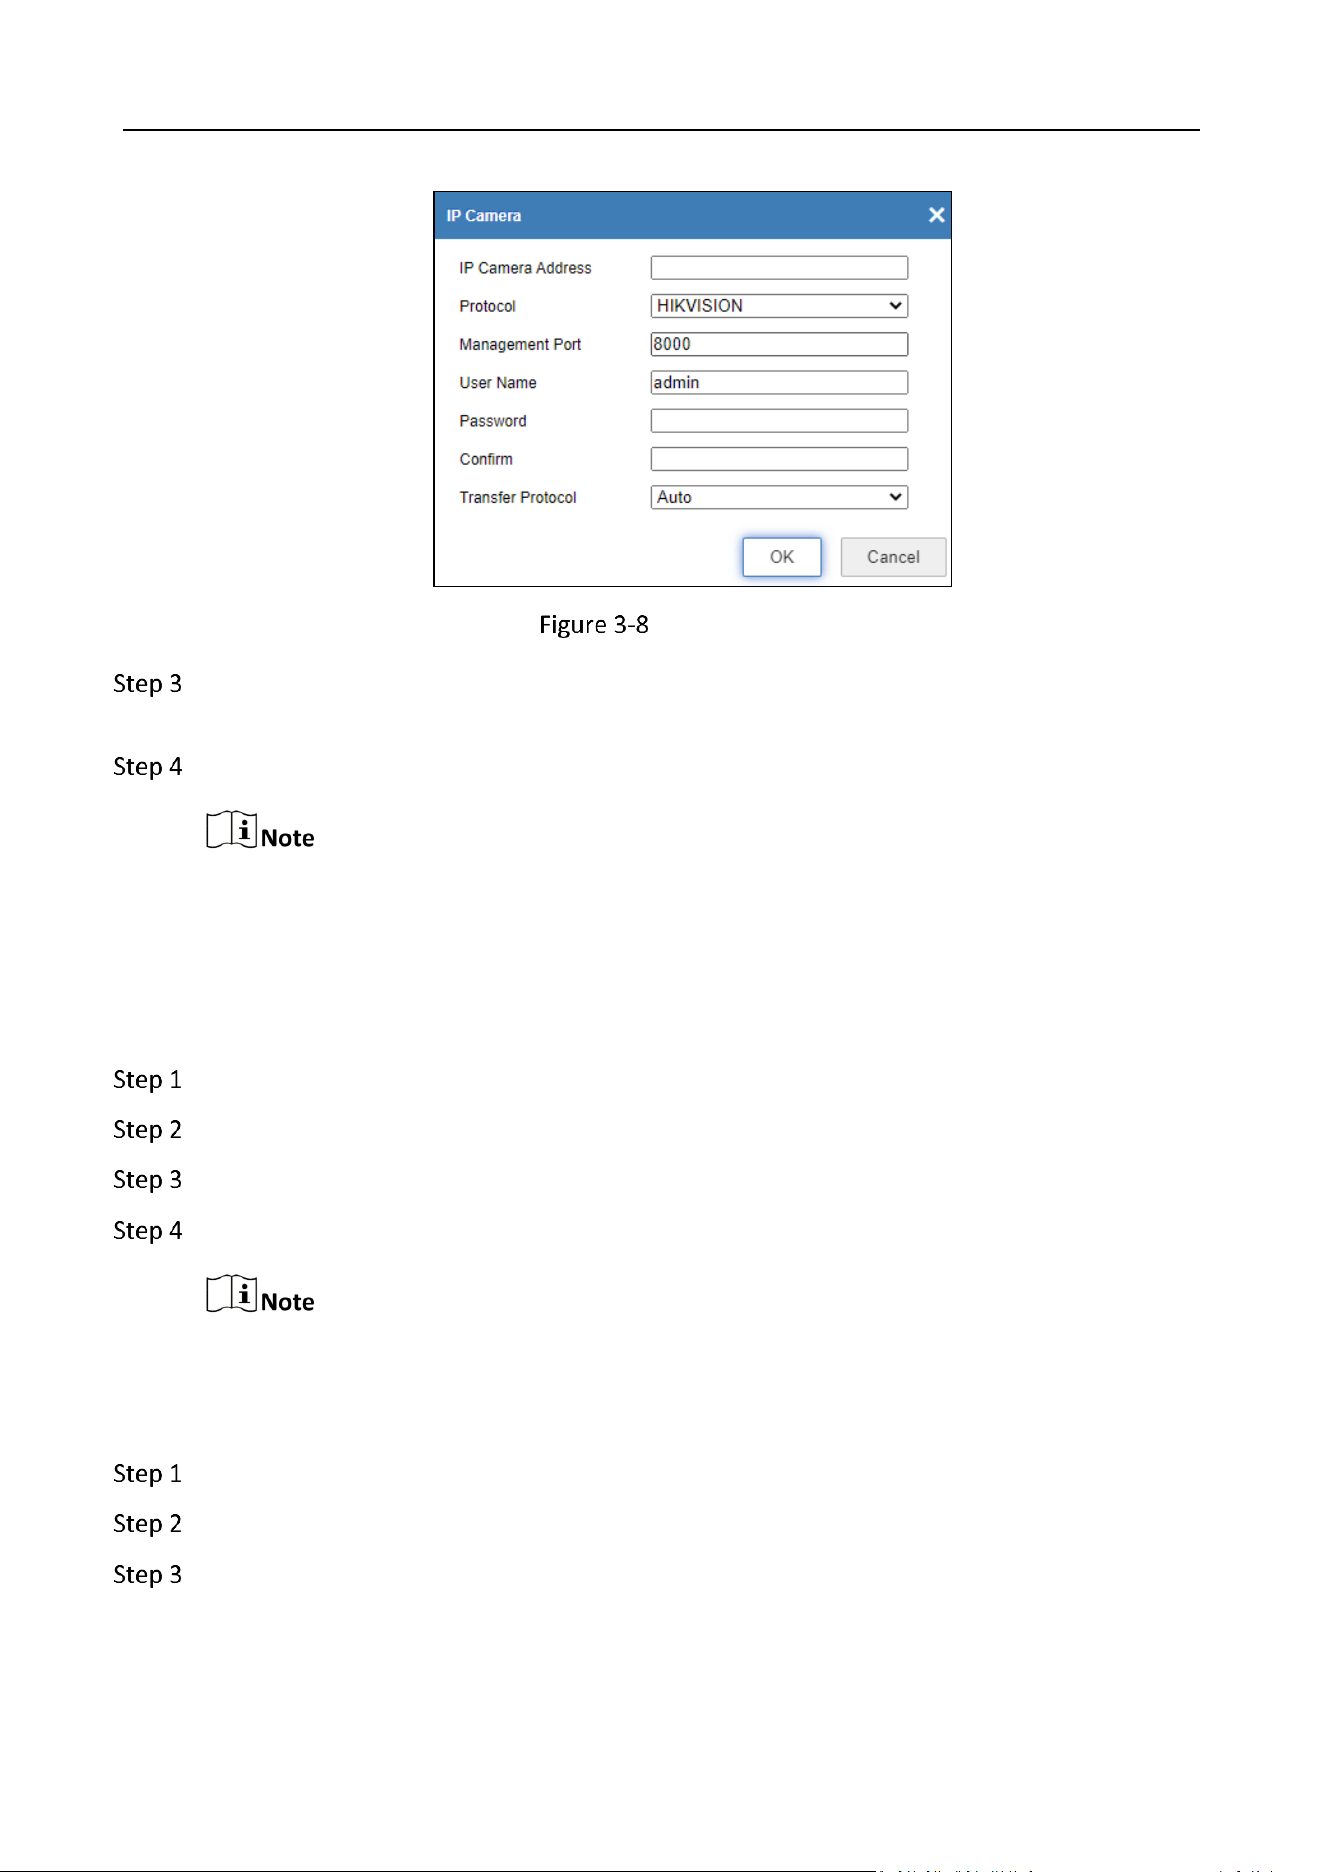
Add Camera Manually
Go to Configuration > System > Camera Management > IP Camera.
Click Add.
Storage Management System • User Manual
15
Add Camera
Enter the IP address, management port, user name, an password of the camera, and select
the protocol and transfer protocol.
Click OK.
If the status changes to Online, it indicates that the camera has been added. Otherwise, please
check the network or check whether the user name, password, protocol, and other information
are correct.
Quick Add Camera
Go to Configuration > System > Camera Management > IP Camera.
Click Quick Add to search the camera(s) on the same network segment as the device.
Check the camera(s) to add.
Click OK.
Only cameras that support the SADP protocol can be quickly added.
Modify/Delete/Activate Camera
Go to Configuration > System > Camera Management > IP Camera.
Check the IP camera in the IP camera list.
Modify camera.
1) Click Modify to modify the parameters.
Storage Management System • User Manual
16
2) Click OK to save the configuration.
Delete camera.
1) Click Delete to delete the selected camera.
2) Click OK to confirm the operation.
Activate camera.
1) Click Activation.
2) Check Use Admin Password.
3) Enter the admin password and confirm it
4) Click OK.
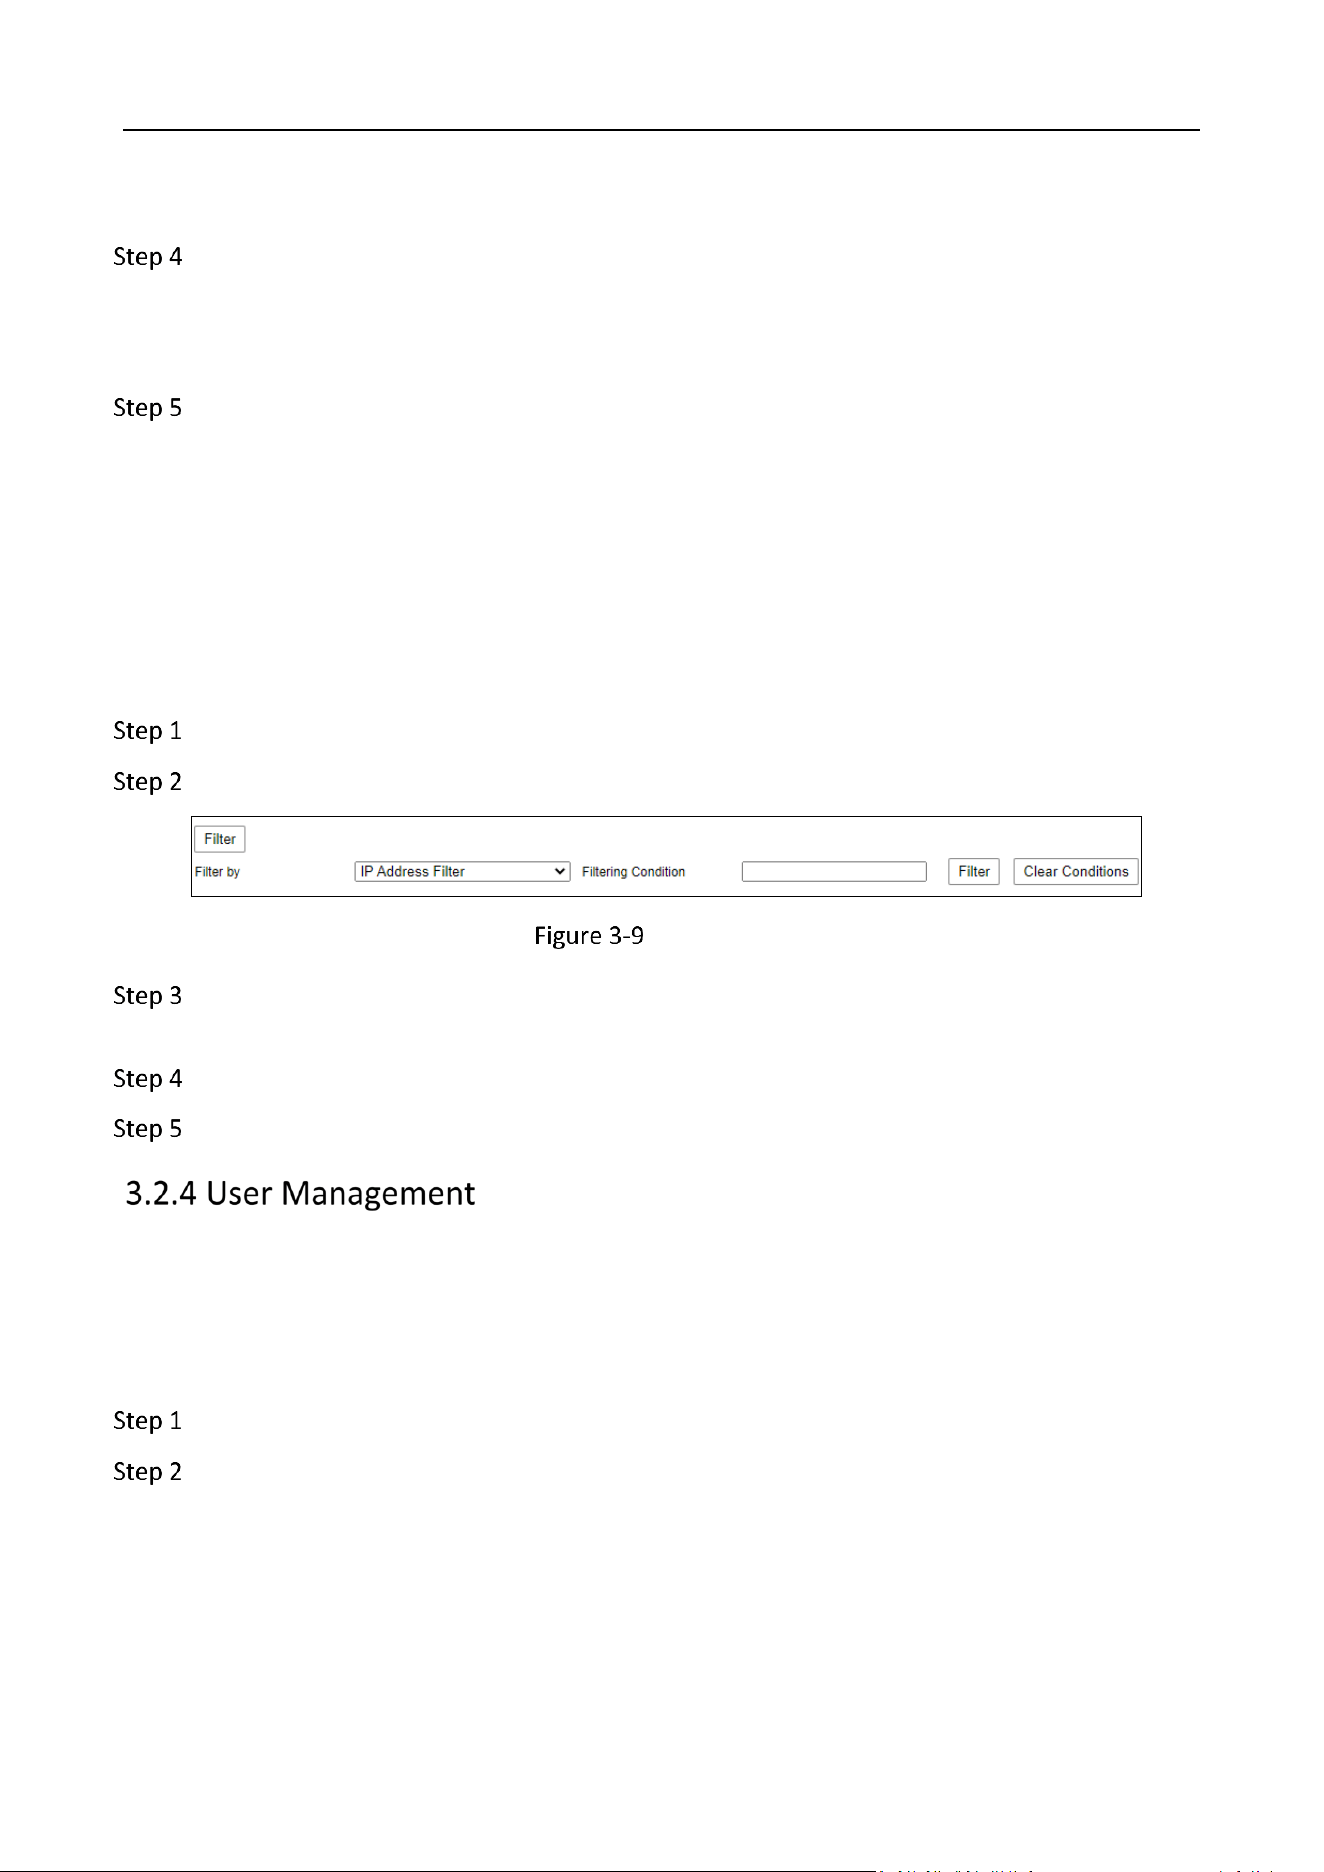
Filter Camera
Go to Configuration > System > Camera Management > IP Camera.
Click Filter to expand the filtering conditions.
Filter Camera
Select the types in the Filter by drop-down box. You can select IP Address Filter or ID Stream
Filter.
Enter the specified IP address or ID stream in the Filtering Condition.
Click Filter to the right of the input box.
Purpose
Manage users, view online users, and manage encryption key.
Add User
Go to Configuration > System > User Management > User Management.
Click Add.

Storage Management System • User Manual
17
Add User
Enter the User Name and select the Level as Operator or User.
Enter admin password.
Enter user password and confirm it.
Check the user permissionson the right.
Click OK.
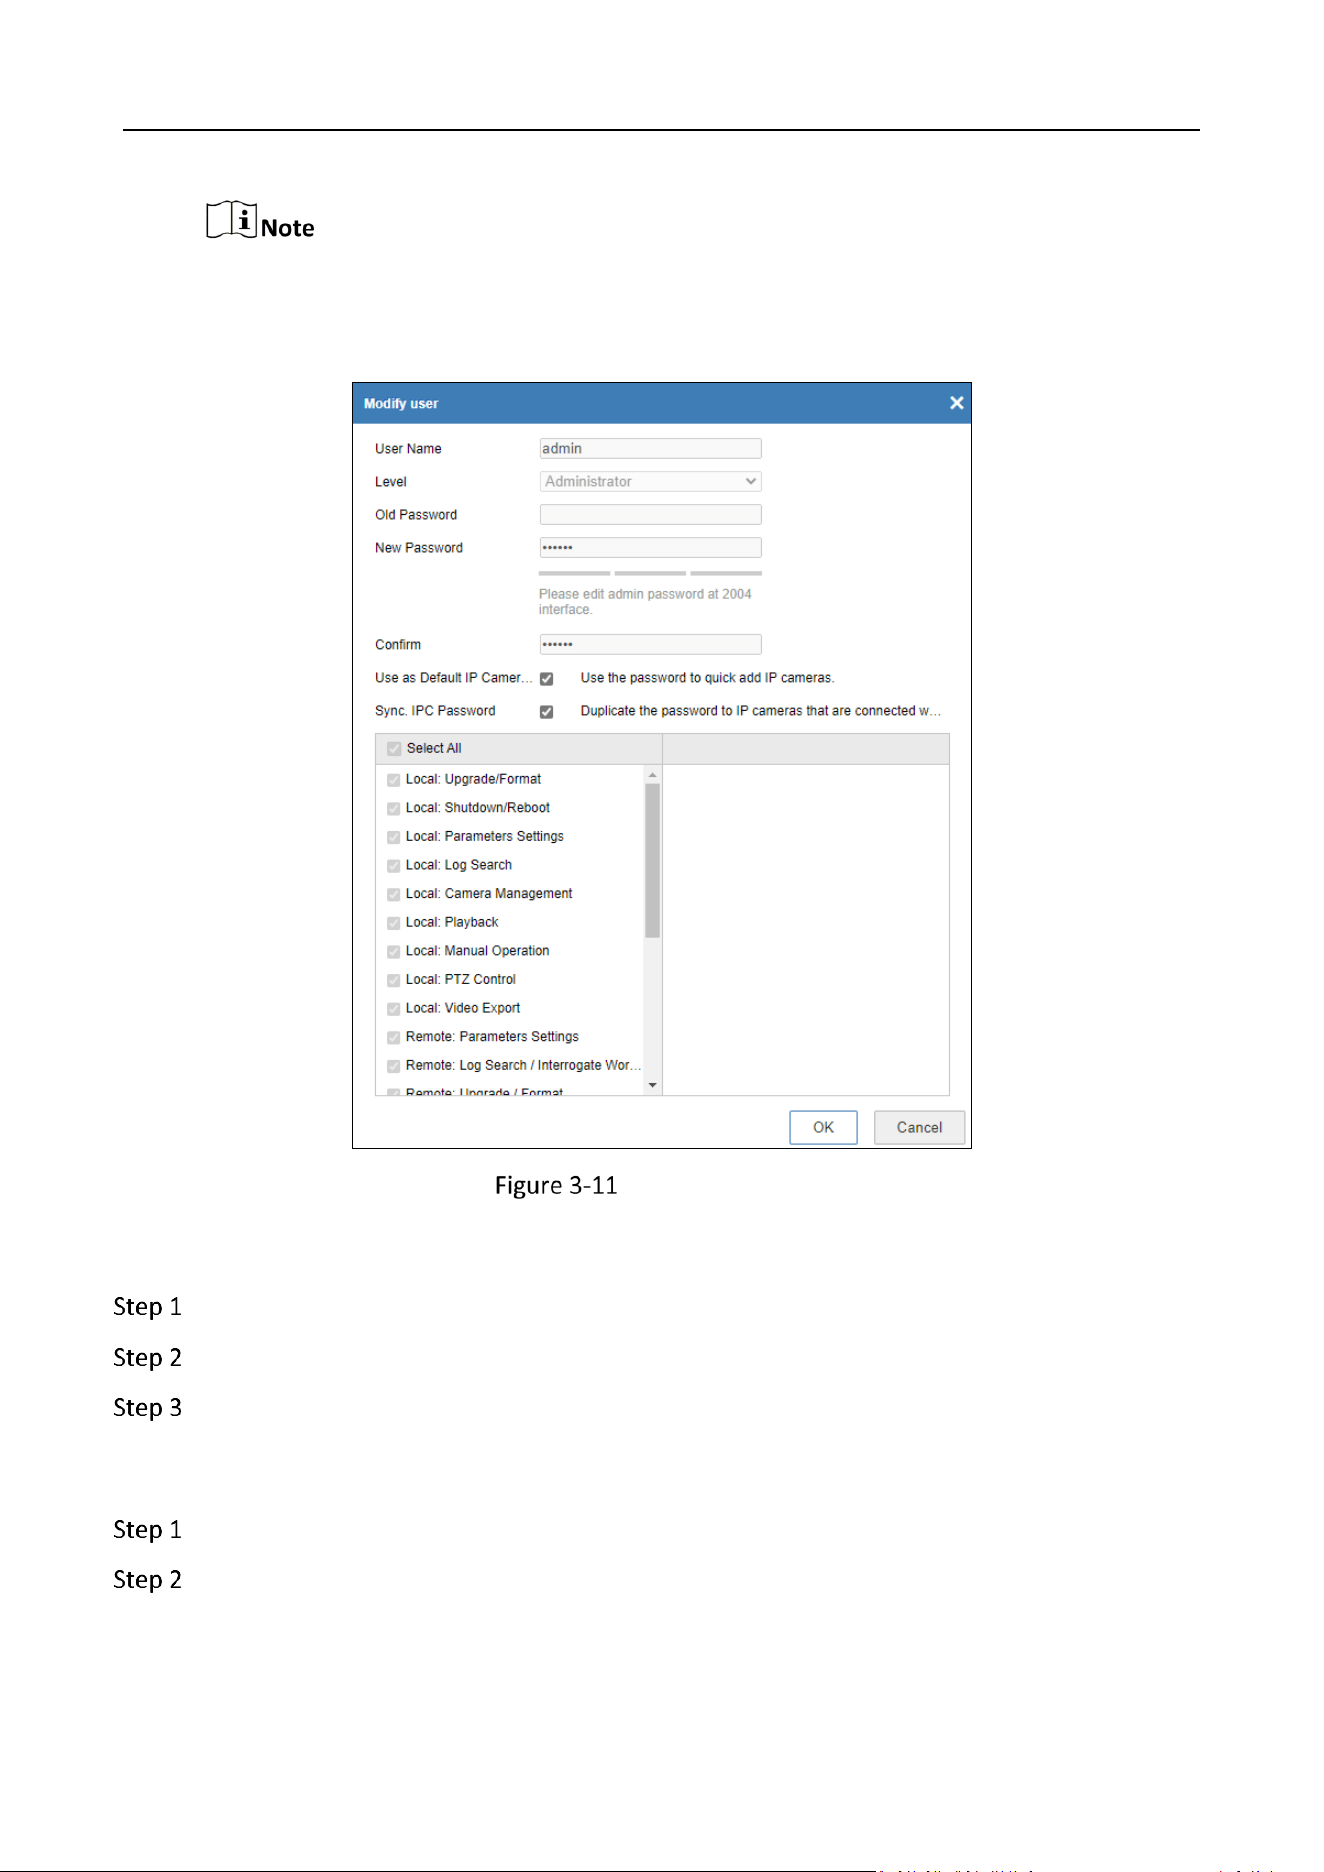
Modify/Delete User
Go to Configuration > System > User Management > User Management.
Select a user in the user list.
Modify user.
1) Click Modify.
2) Modify the user information.
3) Click OK to save the modifications.
Storage Management System • User Manual
18
For admin user, the user name, password, and permissions cannot be modified. You can select
whether to use the admin password to quick add IP cameras and whether to duplicate the admin
password to IP cameras that are connected with default protocol.
Modify Admin User
View Online Users
Go to Configuration > System > User Management > Online User.
View the online user list.
(Optional) Click Refresh to refresh it.
Manage Key
Go to Configuration > System > User Management > Key Management.
Import key file.
1. Click Browse and select the key file.
Storage Management System • User Manual
19
2. Click Import to import the key file.
Key file contains AK and SK, which is used for restful protocol access.
Click Export Encryption Key to export key file.
Click Reset Password to use the new password to access the platform.
Event
Purpose
Basic event settings refer to the configuration of supported basic events type, including video
tampering, video loss, exception, etc.
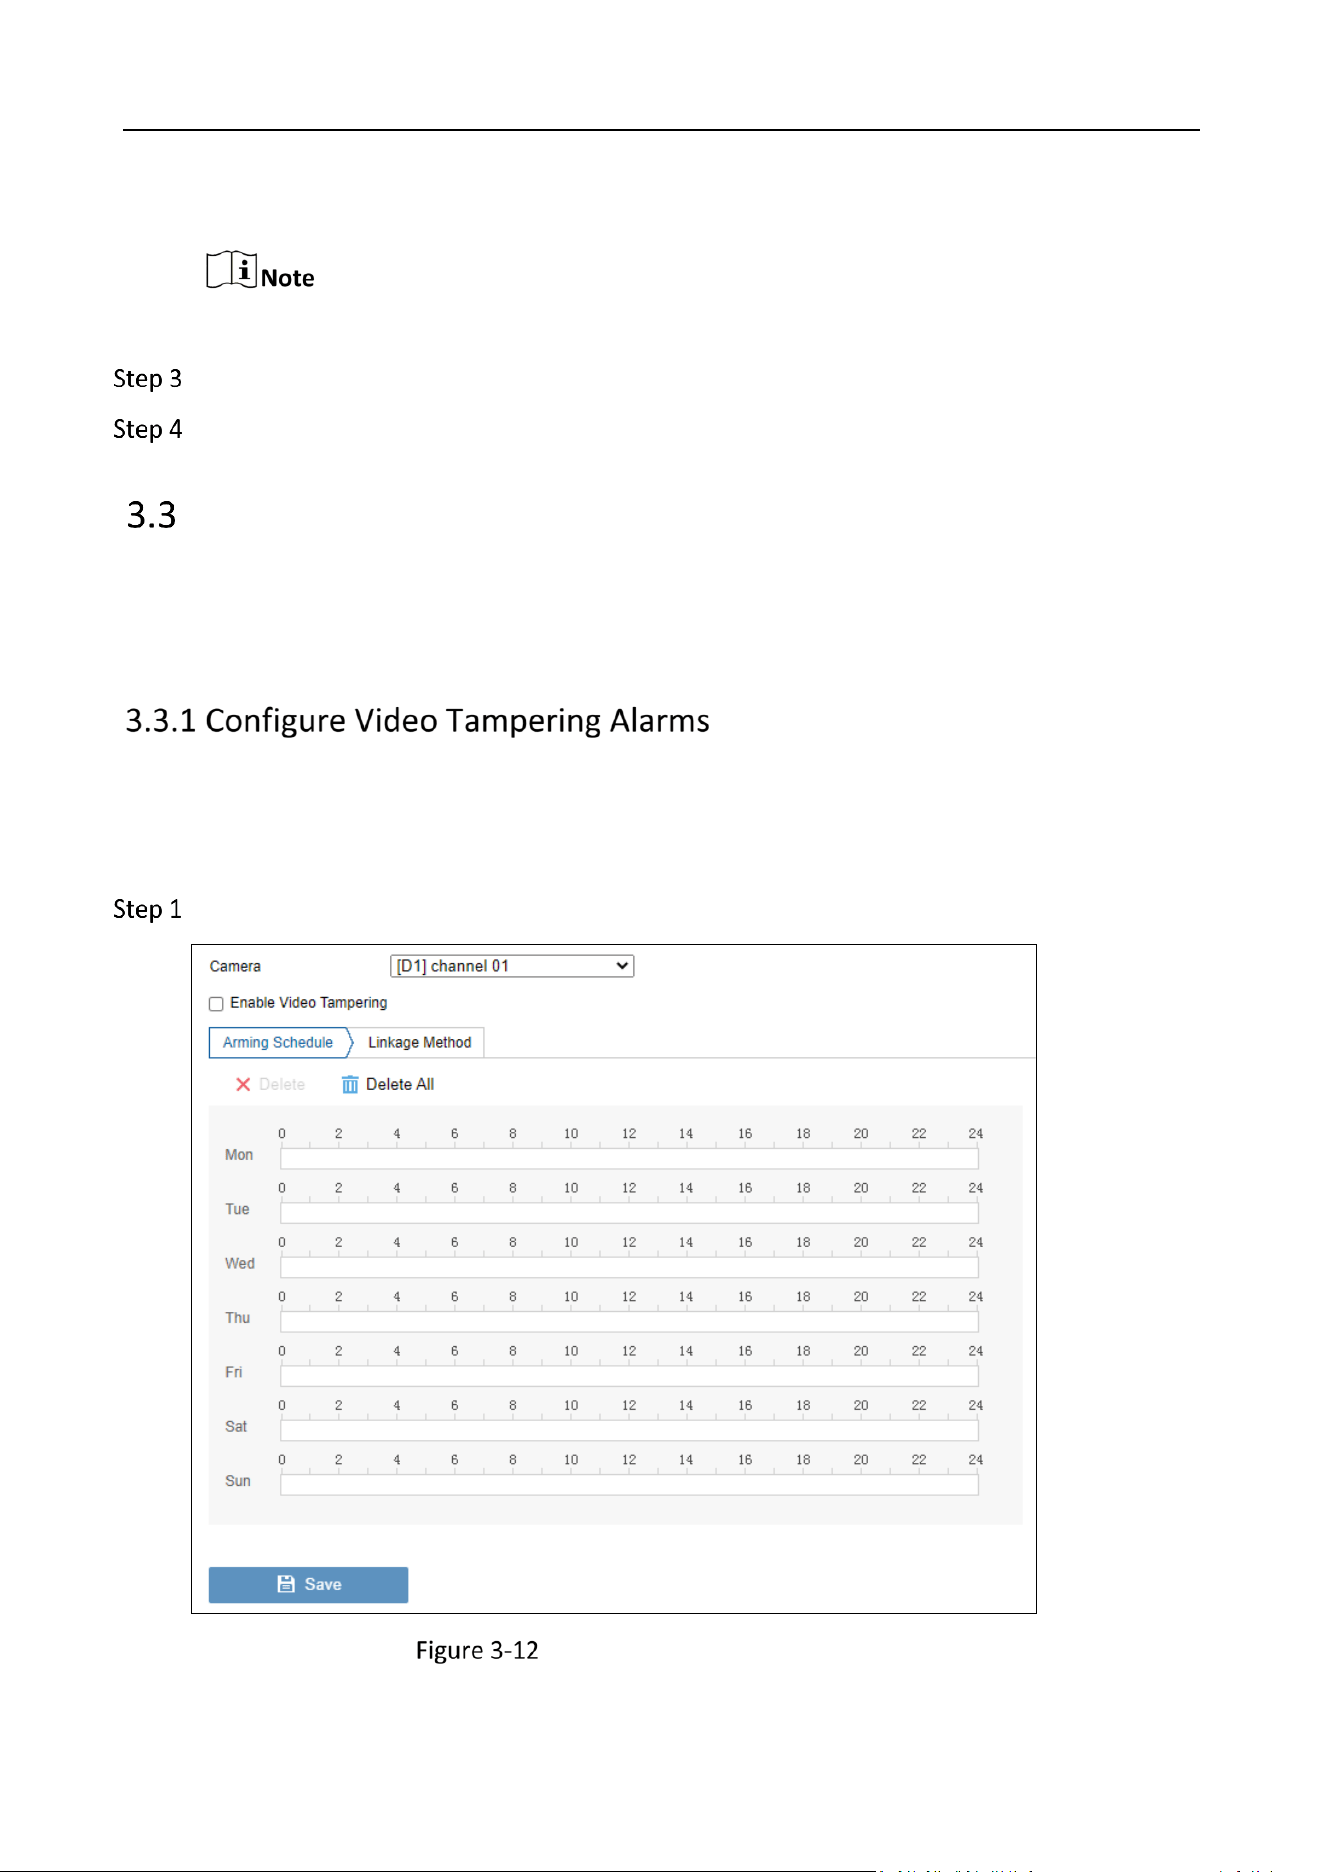
Purpose
Video tampering detection triggered an alarm when the camera lens is covered and takes alarm
response action(s).
Go to Configuration > Event > Basic Event > Video Tampering.
Configure Video Tampering Alarms
Storage Management System • User Manual
20
Select the camera in the drop-down box.
Check the checkbox of Enable Video Tampering.
Set the arming schedule. Refer to Configure Arming Schedule for details.
Set the linkage methods. Refer to Configure Alarm Linkage Method for details.
Click Save.
Purpose
Video loss detection detects video loss of a channel and takes alarm response action(s).
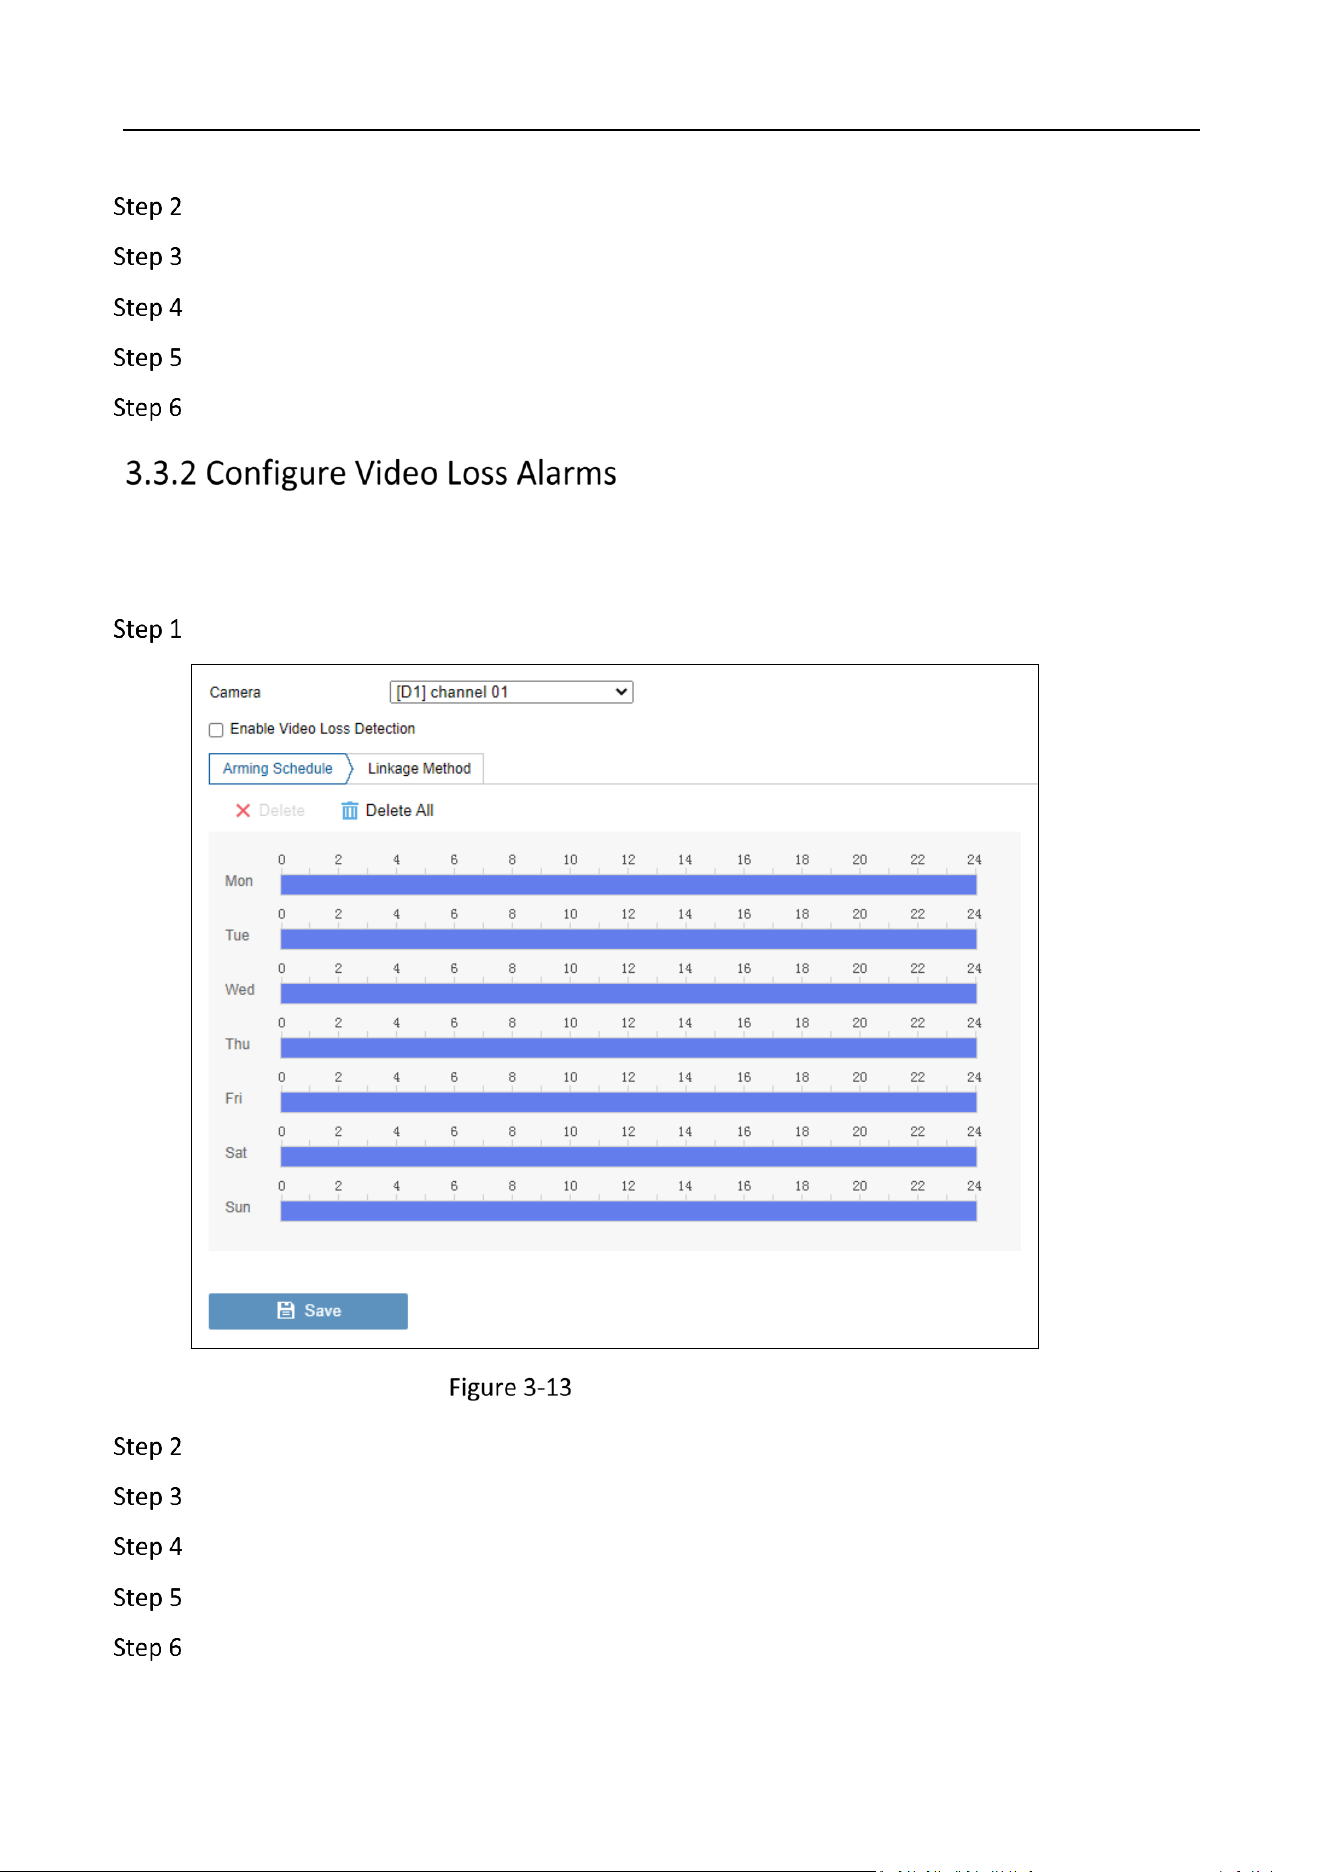
Go to Configuration > Event > Basic Event > Video Loss.
Configure Video Loss Alarms
Select the camera in the drop-down box.
Check the checkbox of Enable Video Loss Detection.
Set the arming schedule. Refer to Configure Arming Schedule for details.
Set the linkage methods. Refer to Configure Alarm Linkage Method for details.
Click Save.
Storage Management System • User Manual
21
Purpose
Exception events can be configured to take the event hint in the Live View window and trigger
alarm output and linkage actions.
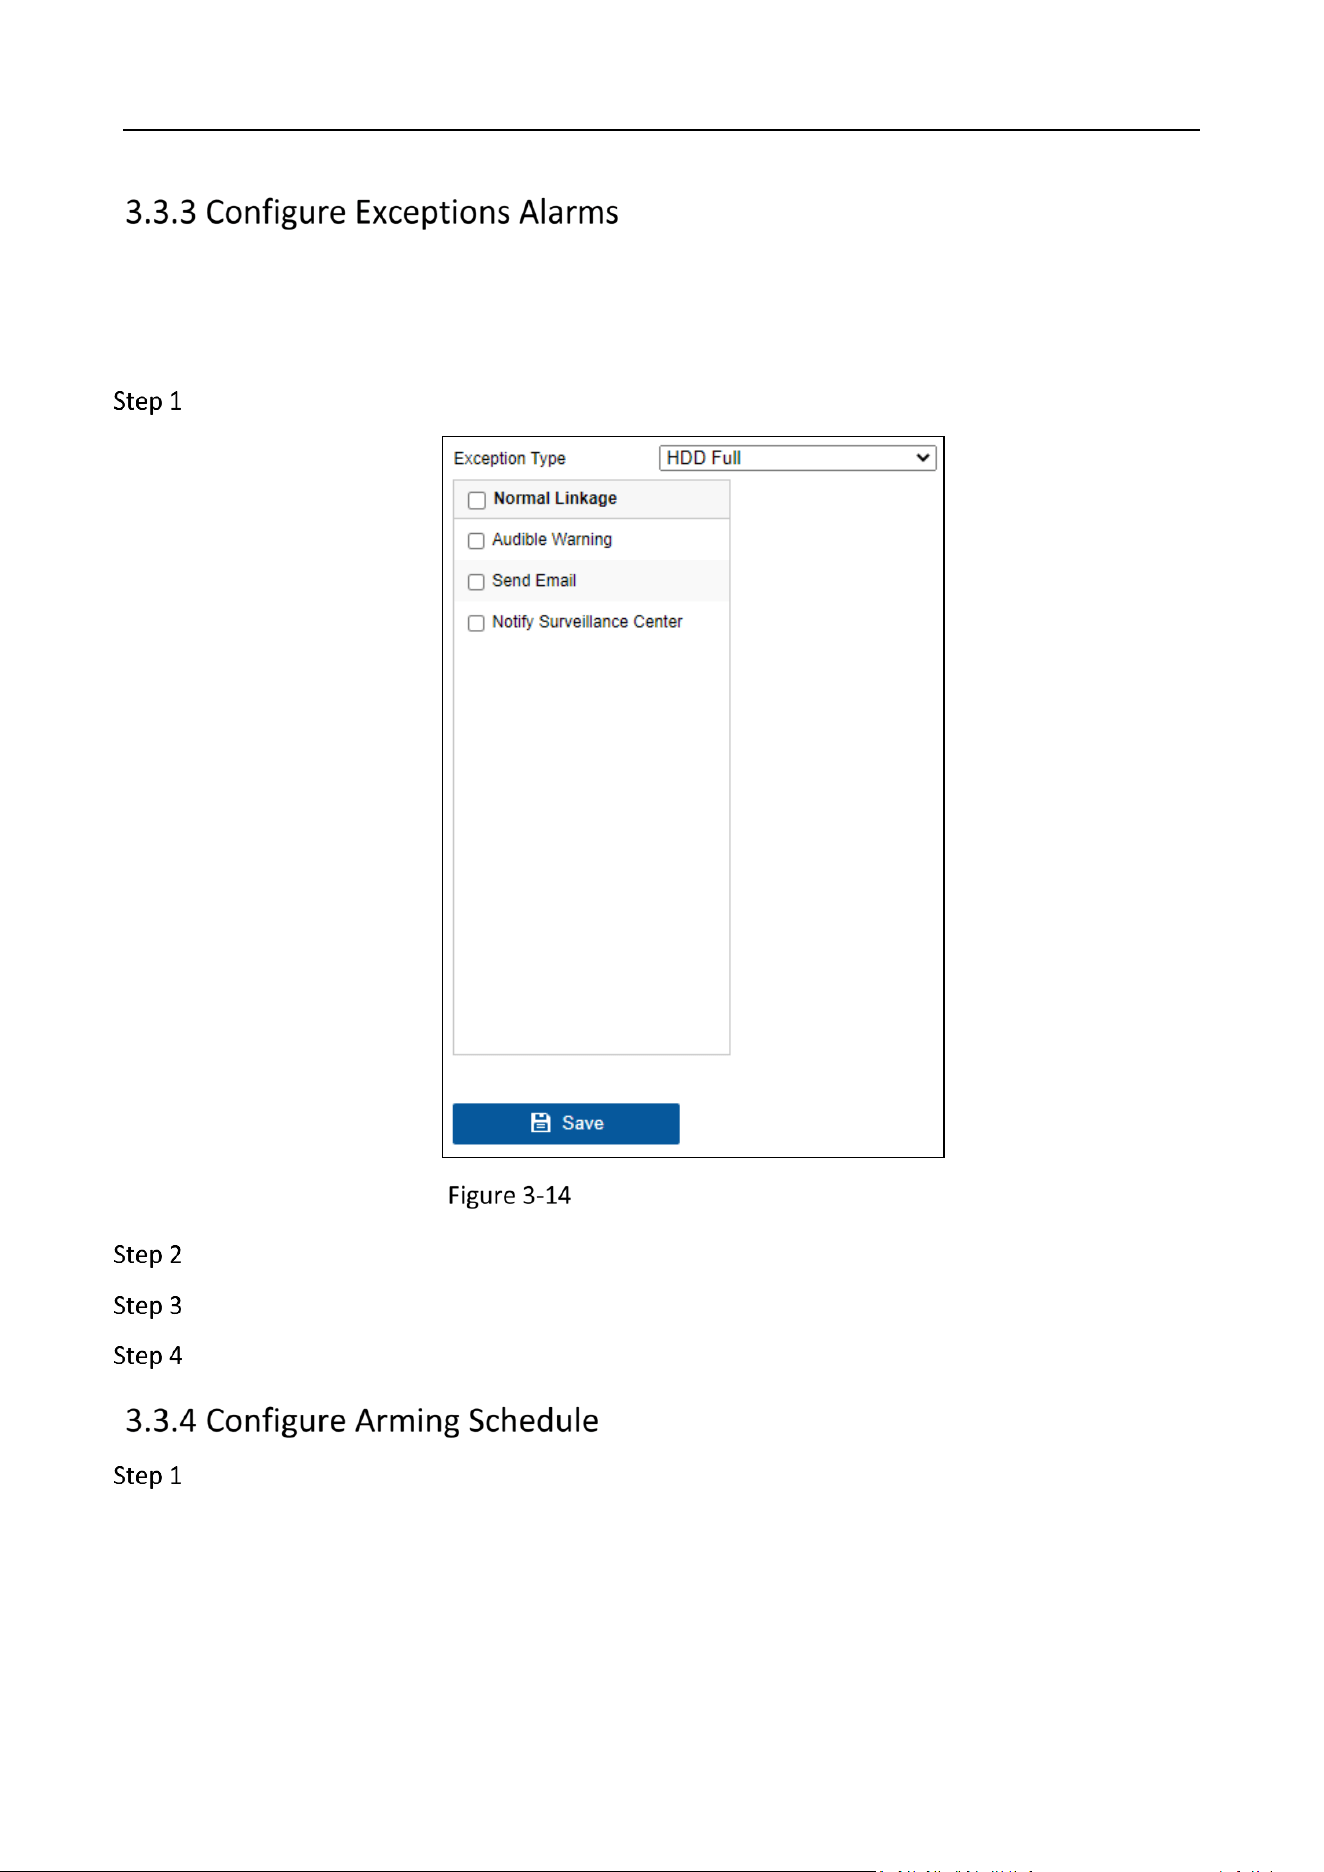
Go to Configuration > Event > Basic Event > Exception.
Configure Exceptions Alarms
Select the Exception Type in the drop-down box.
Set the linkage methods. Refer to Configure Alarm Linkage Method for details.
Click Save.
Select Arming Schedule.
Storage Management System • User Manual
22
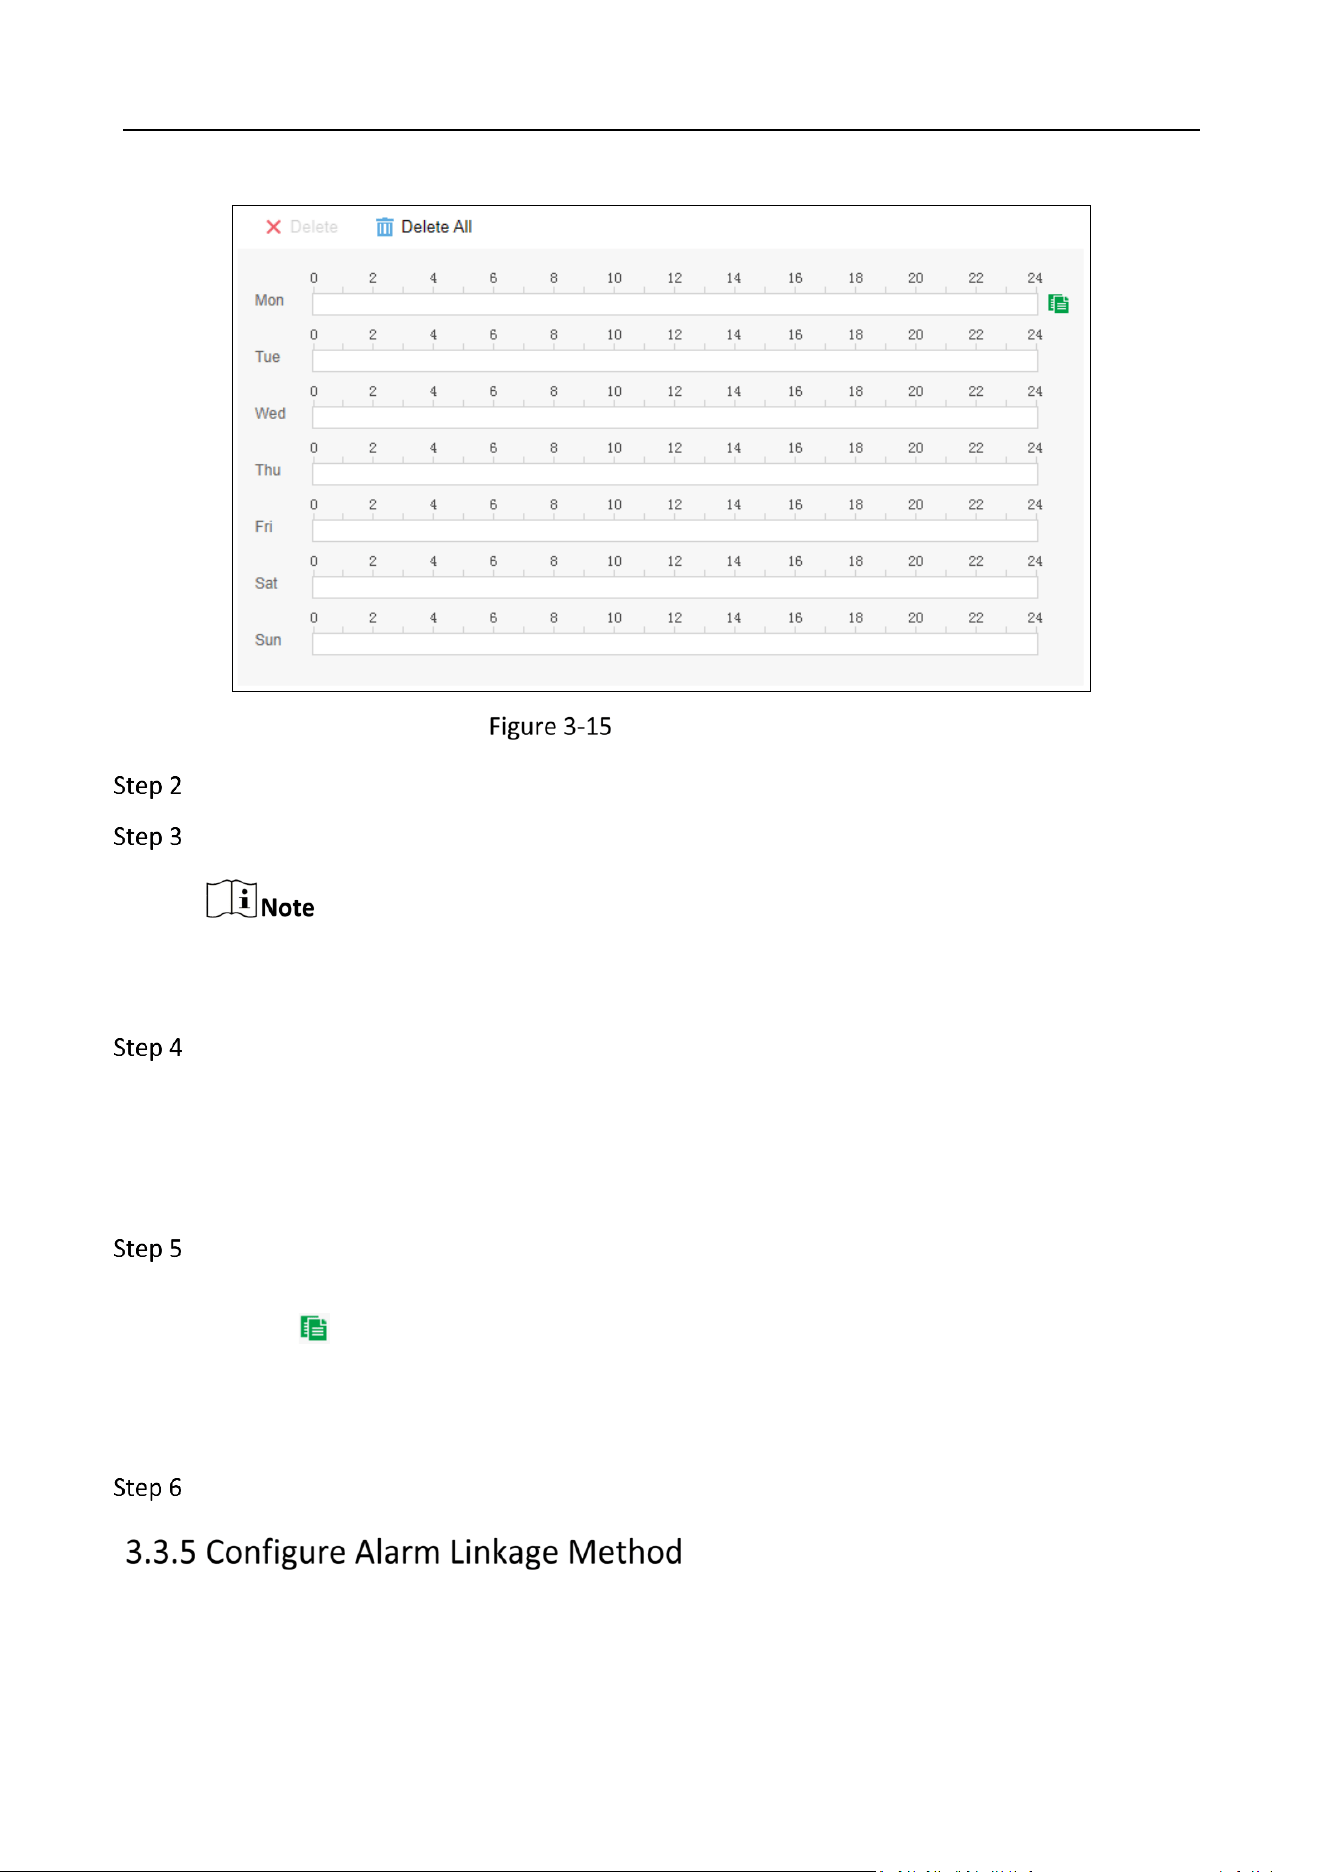
Set Arming Schedule
Choose the day you want to set the arming schedule.
Left-click and drag to draw the time period.
Up to eight time periods can be set within each day.
Time periods shall not be repeated or overlapped.
Manually adjust the time period.
1) Select a drawn period.
2) Enter the start time and end time of the period in the text box.
3) Click Save.
(Optional) After you set the arming schedule, you can copy the arming schedule for the day
to other days.
1) Click to the right of the time bar.
2) Check the day you want to copy the arming schedule to.
3) Click OK.
Click Save.
Purpose
Alarm linkage actions will be activated when an alarm or exception occurs.
Storage Management System • User Manual
23
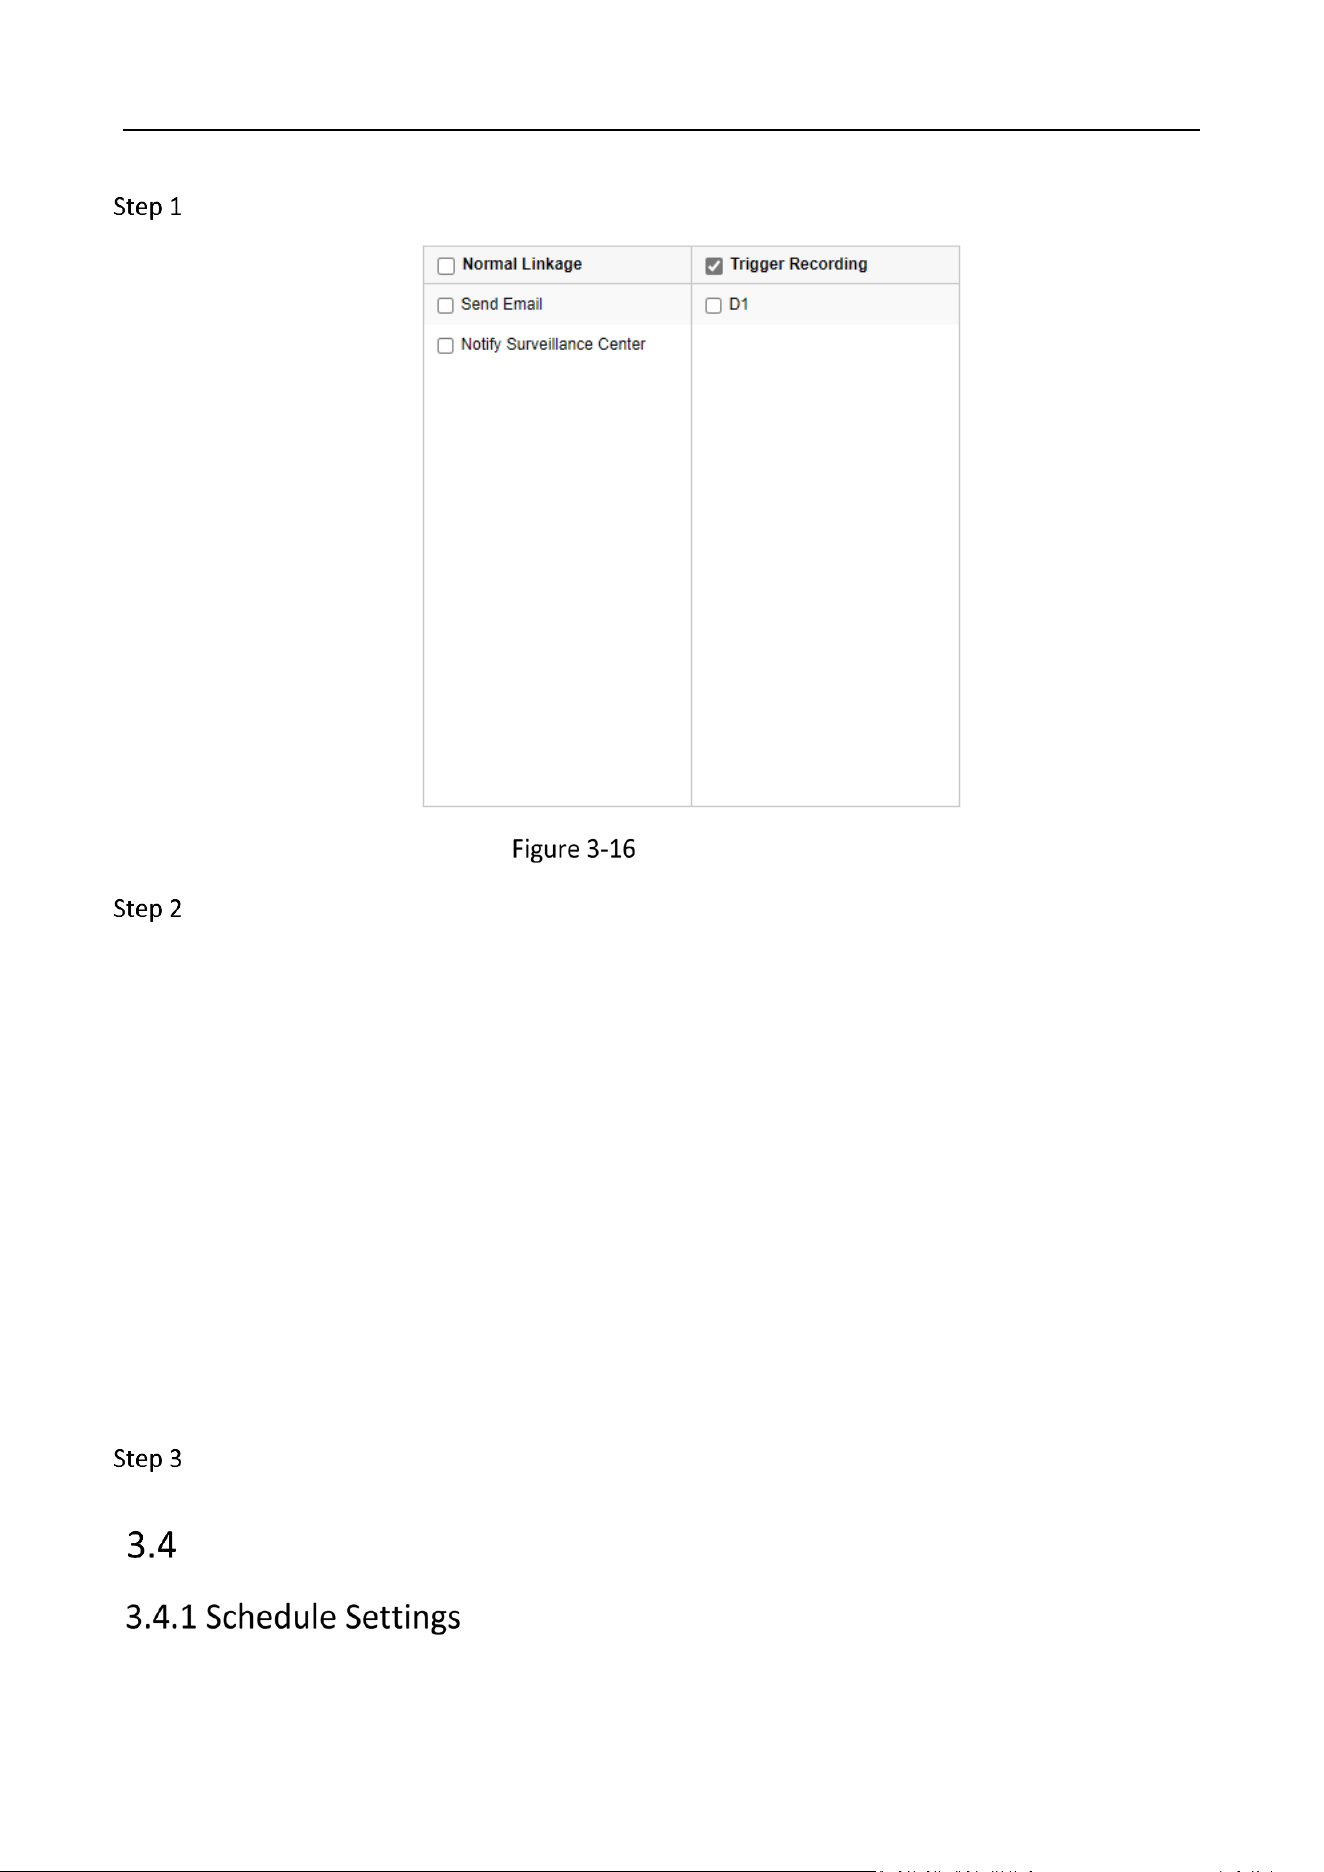
Select Linkage Method.
Linkage Method
Check to set normal linkage actions, trigger recording, etc.
Send Email
It will send an email with alarm information when an alarm is triggered.
Notify Surveillance Center
The device will send an exception or alarm signal to the remote client software when an
alarm is triggered.
Audible Warning
It will trigger an audile warning locally when an alarm is triggered. It is only supported by the
device with the audio output.
Trigger Recording
The checked channel will start recording when an alarm is triggered. You have to set the
recording schedule first.
Click Save.
Storage

Storage Management System • User Manual
24
Purpose
When the device is equipped with a local HDD or a network HDD, and the HDD can work normally,
the recording schedule of each channel can be configured. After configuring the recording schedule,
the device will automatically perform different recording tasks for the configured time and save the
recordings.
Go to Configuration > Storage > Schedule Settings > Record Schedule.
Record Schedule
Select the camera in the drop-down box.
Check Enable to enable the record schedule settings.
Select recording type in the drop-down box. You can select Continuous, Motion, and Event.
Choose the day you want to set the arming schedule.
Left-click and drag to draw the time period.
Up to eight time periods can be set within each day.
Time periods shall not be repeated or overlapped.
Manually adjust the time period.
1) Select a drawn period.
2) Enter the start time and end time of the period in the text box.
Storage Management System • User Manual
25
3) Click Save.
(Optional) After you set the arming schedule, you can copy the arming schedule for the day
to other days.
1) Click to the right of the time bar.
2) Check the day you want to copy the arming schedule to.
3) Click OK.
(Optional) Click Advanced to make advanced configurations.
Record Audio
After checked, the audio and video will be saved in the HDD together. If unchecked, only the
video will be saved.
Pre-record
The pre-recording time before the recording starts.
● No Pre-record means no pre-recording.
● Not Limited means that pre-recording is carried out according to the maximum pre-
recording time. The maximum pre-recording time is calculated at a 2Mbps bitrate, which
will become shorter as a higher bitrate is selected.
Post-record
The post-recording time after the recording ends.
Stream Type
Select the stream type of the recording.
Keep Video/Pictures for
The time length the recording was saved on the HDD. If you select 1, the recording will
remain on the HDD for one day and will be automatically overwritten the next day. If you
select 0, the recording will remain on the HDD until the HDD is full.
Click Save.
Go to Configuration > Storage > Storage Management > Storage Space Management.
View the HDD status.
(Optional) Check the HDD and click Format to format the HDD.
Storage Management System • User Manual
26
All data will be lost after formatting. Please be cautious.
Many Copy-Back
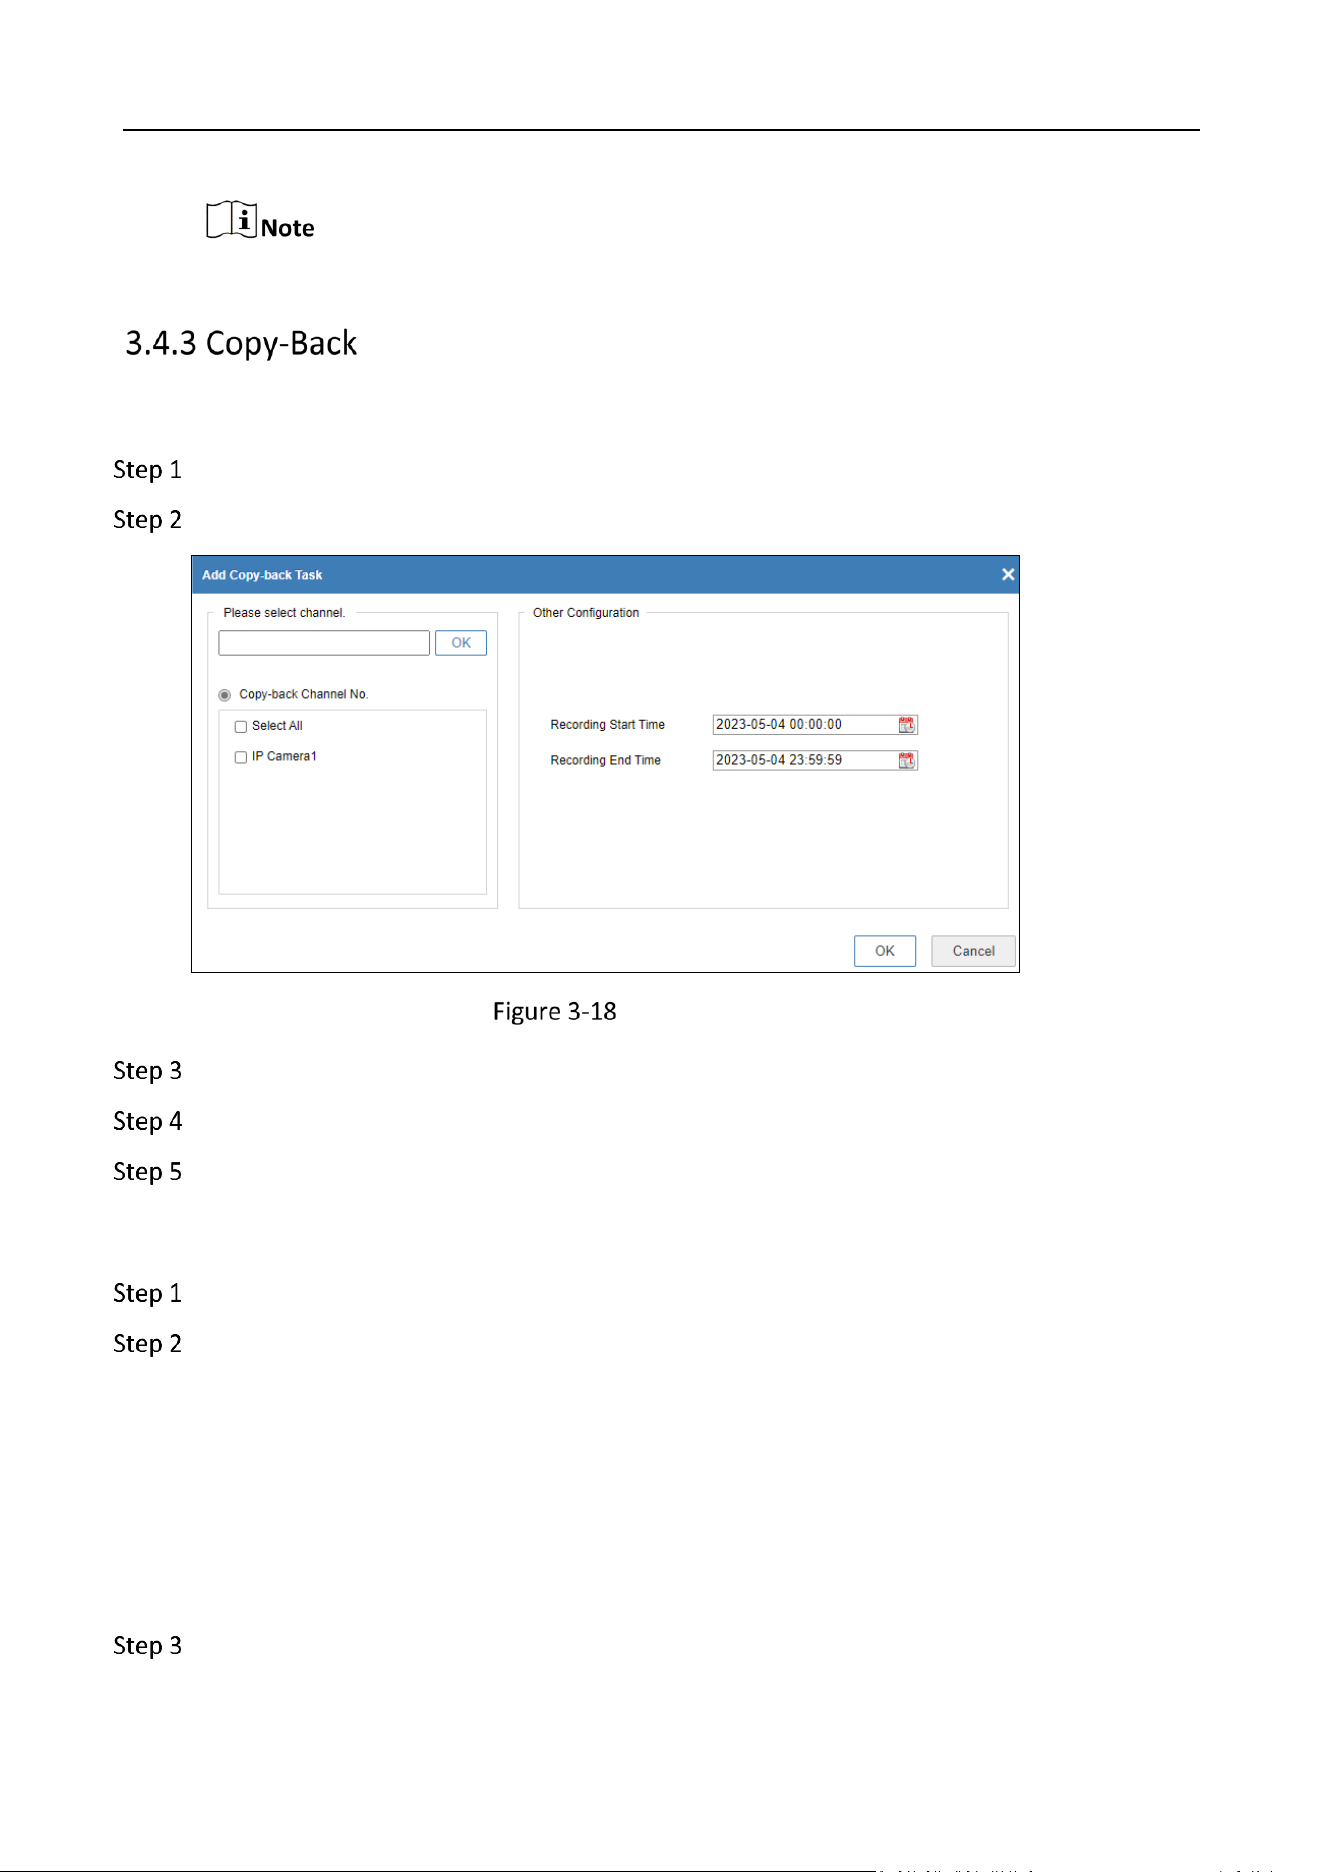
Go to Configuration > Storage > Copy-back > Many Copy-back.
Click Add Copy-back Task.
Add Copy-Back Task
Select channel on the left.
Set the Recording Start Time and Recording End Time on the right.
Click OK.
Scheduled Copy-Back
Go to Configuration > Storage > Copy-back > Scheduled Copy-back.
Set video upload schedule.
1) Select Video Upload Schedule Settings in the drop-down box.
2) Click Video Upload Schedule Settings.
3) Select channel on the left.
4) Select date, copy-back mode, and time periods on the right.
5) Click OK.
Set video upload execution.
Storage Management System • User Manual
27
1) Select Video Upload Execution Settings in the drop-down box.
2) Click Video Upload Execution Settings.
3) Select channel on the left.
4) Select date, copy-back mode, and time periods on the right.
5) Click OK.
Scheduled Upload Task List
Go to Configuration > Storage > Copy-back > Schedule Upload Task List.
View the scheduled upload task list.
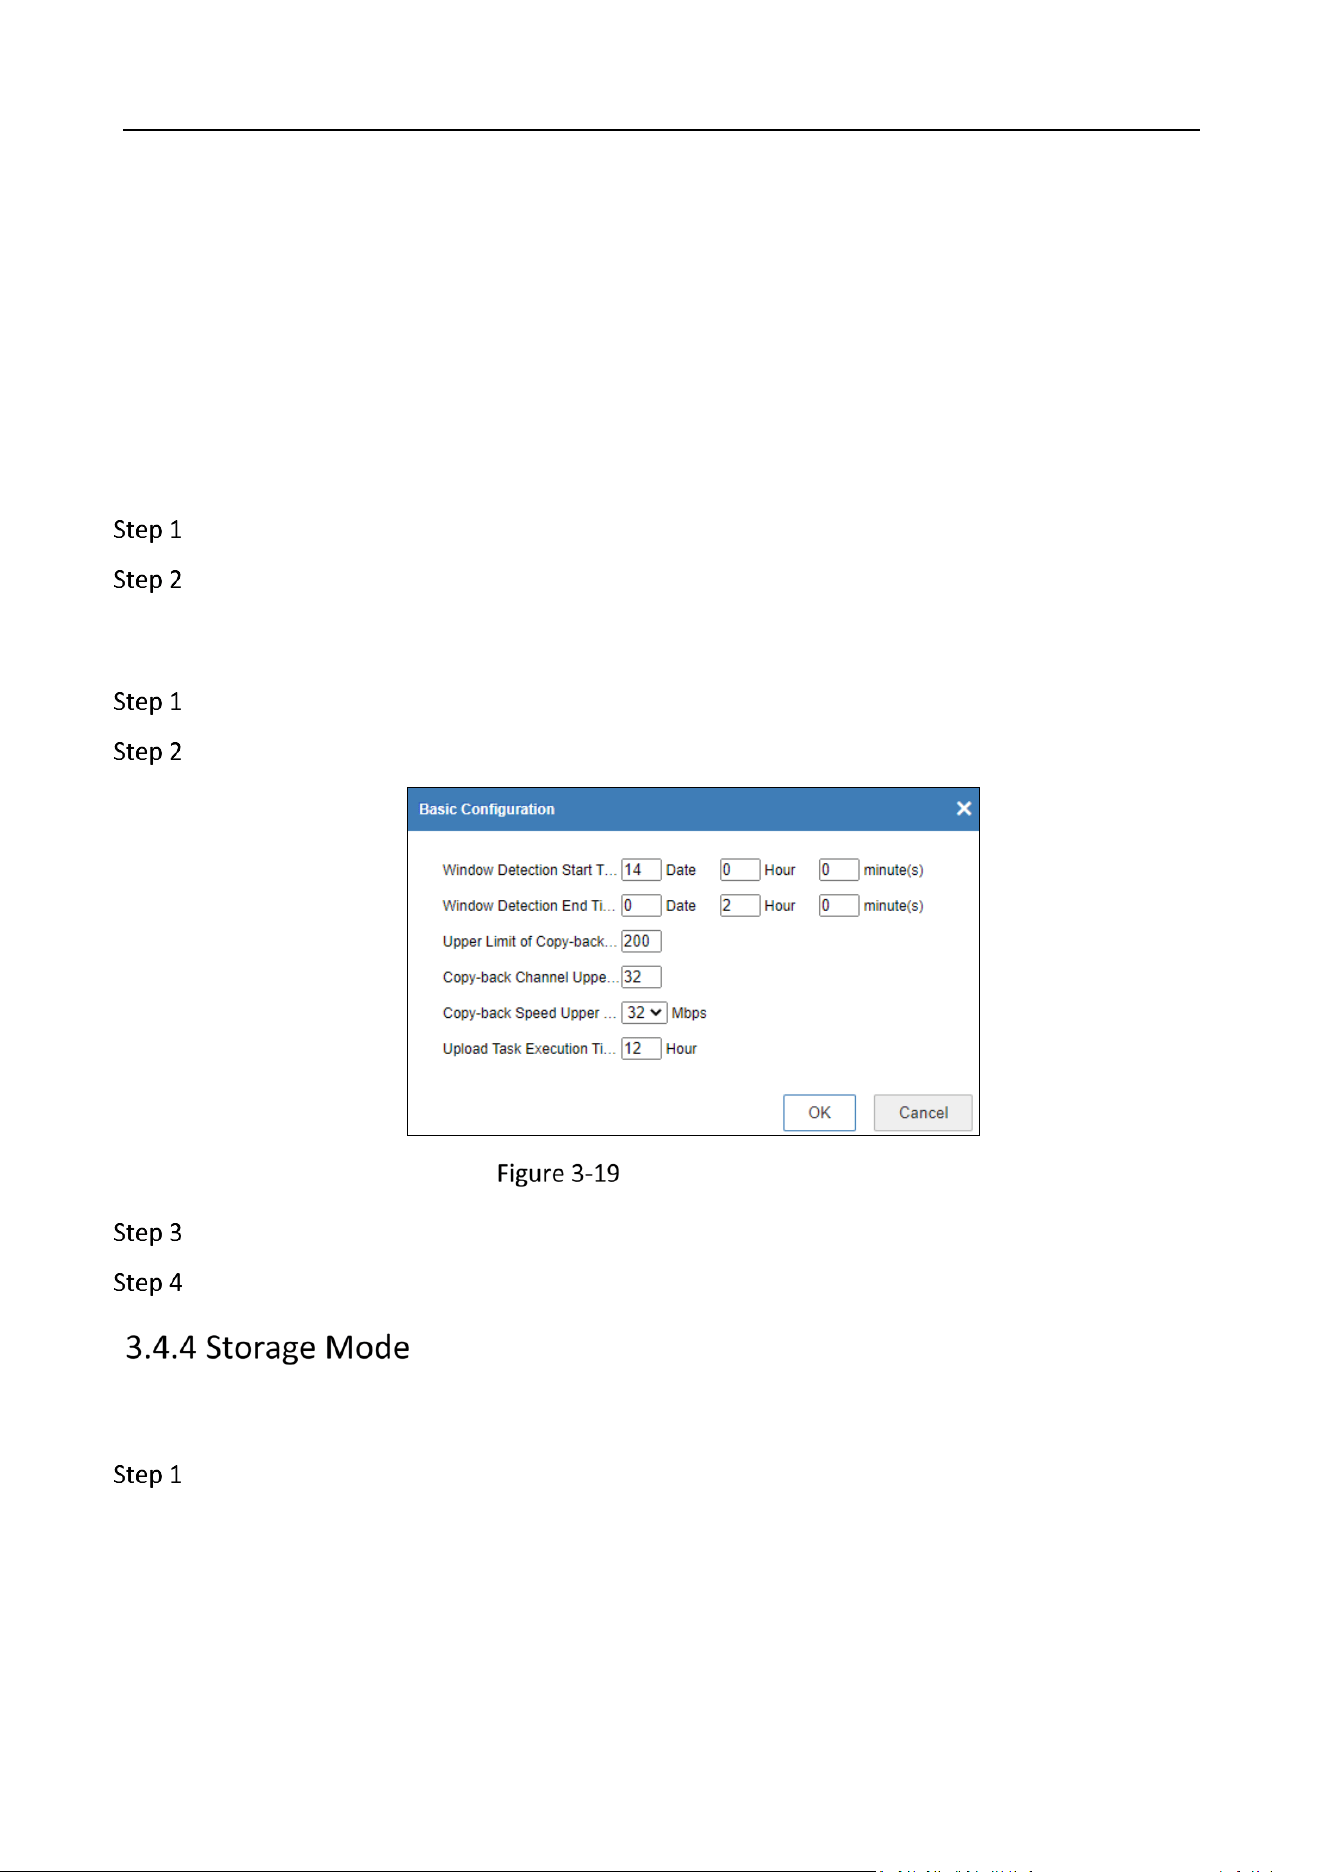
Basic Configuration
Go to Configuration > Storage > Copy-back.
Click Basic Configuration.
Basic Configuration
Set the parameters.
Click OK.
Storage Application Mode
Go to Configuration > Storage > Storage Mode > Storage Application Mode.

Storage Management System • User Manual
28
Storage Application Mode
View the storage space of video, image, and file.
Advanced Storage Mode
Go to Configuration > Storage > Storage Mode > Advanced Storage Mode.
Advance Storage Mode
Select the Storage Mode as Quota.
Under quota mode, the CVR will use all storage spaces.
Selece the Channel in the drop-down box.
Set the quota for video and picture.
● When video quota and picture quota are set as 0, the videos of all channels would be
recorded and overwritten as the same time.
● When video quota and picture quota are not set as 0, videos of the channel would be
recorded as the preset space.
● The picture quota of quota mode refers to the pictures that are generated by network
camera, differs from the pictures of direct storage.

Storage Management System • User Manual
29
Click Save.
Holiday
Go to Configuration > Storage > Advanced Settings > Holiday.
Holiday Settings
Click to edit holiday name, select holiday type, and set the start date and end date.
Check the holiday.
Click Save to make the holiday settings take effect.
Other
Go to Configuration > Storage > Advanced Settings > Other.
Check Enable Overwriting.
After checked, after the HDD is full, the latest video files will overwrite the first video files
one by one. If unchecked, recording will stop after the HDD is full.
Click Save.
Storage Management System • User Manual
30
Chapter 4 Shortcut
The bar on top right corner of device webpage shows the shortcut buttons for quick configuration.
Shortcut
: Mute alarm sound for alarm events. Only valid for current alarm events.
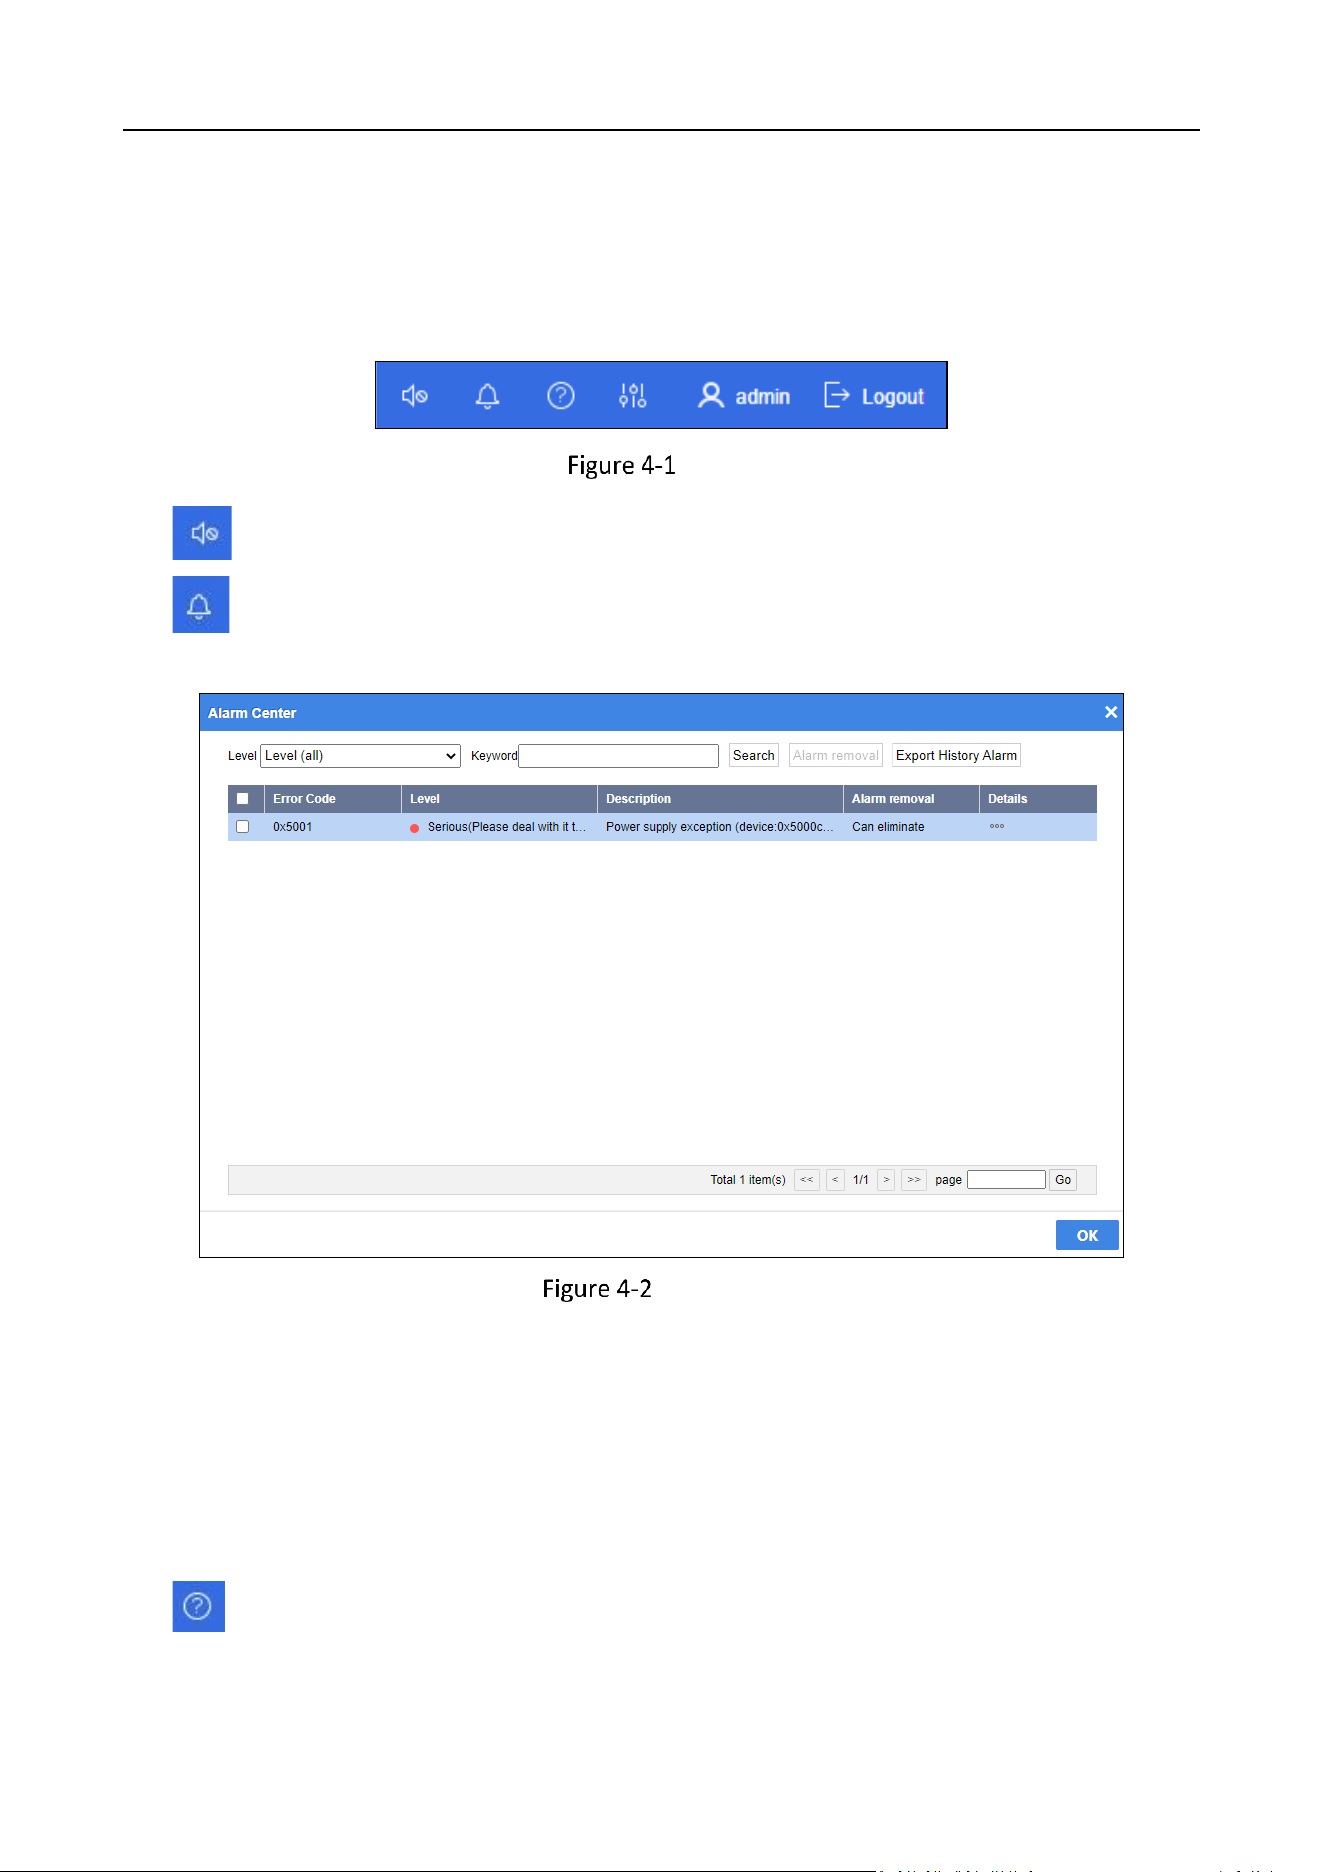
: Show the exception alarm information. You can search alarm information by specifying
alarm level and keyword.
Alarm Center
Search alarm information: Select the Level of the alarm, enter the Keyword, and click
Search to search the alarm information
Remove alarm: Select the alarm item(s) you want to eliminate, click Alarm removal, and
enter the administrator password and verification code in the pop-up window to confirm
the operation.
Export history alarm: Click Export History Alarm to download the historical alarm
information file to the local computer.
: View quick start guide, user manual, and download Command Line Tool.
Storage Management System • User Manual
31
: After following the wizard to complete quick configuration, click the icon and the following
prompt will pop up to show that the system is configured.
System Configuration Completion Prompt
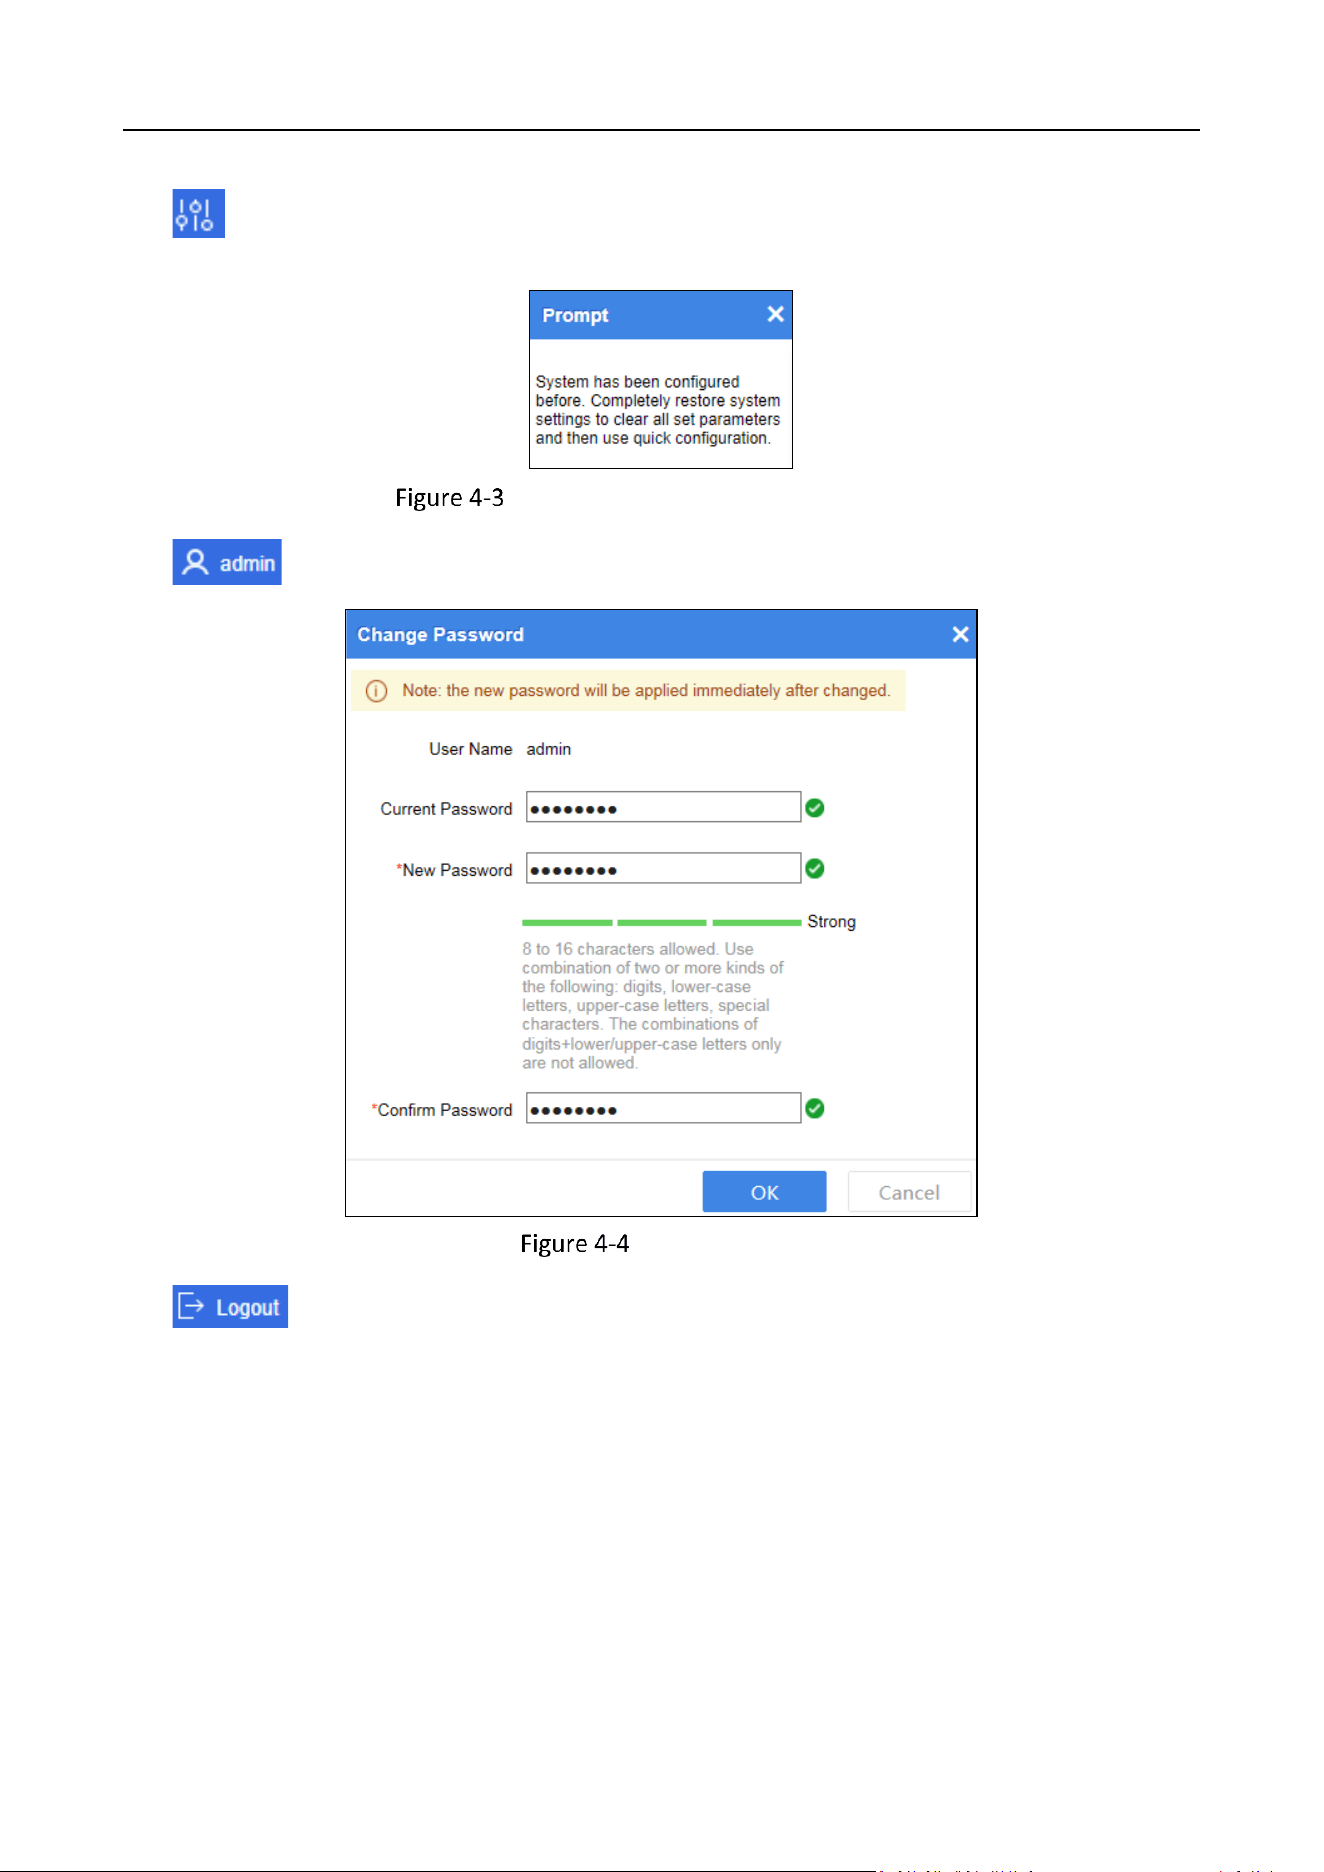
: Change admin password.
Change Password
: Log out system. At the next login, you will automatically enter the page of last login.
Storage Management System • User Manual
32
Chapter 5 Overview
Platform Overview
Go to Storage.
Select Platform Overview to view the IP address, running state, and number of mirrors.
View Performance
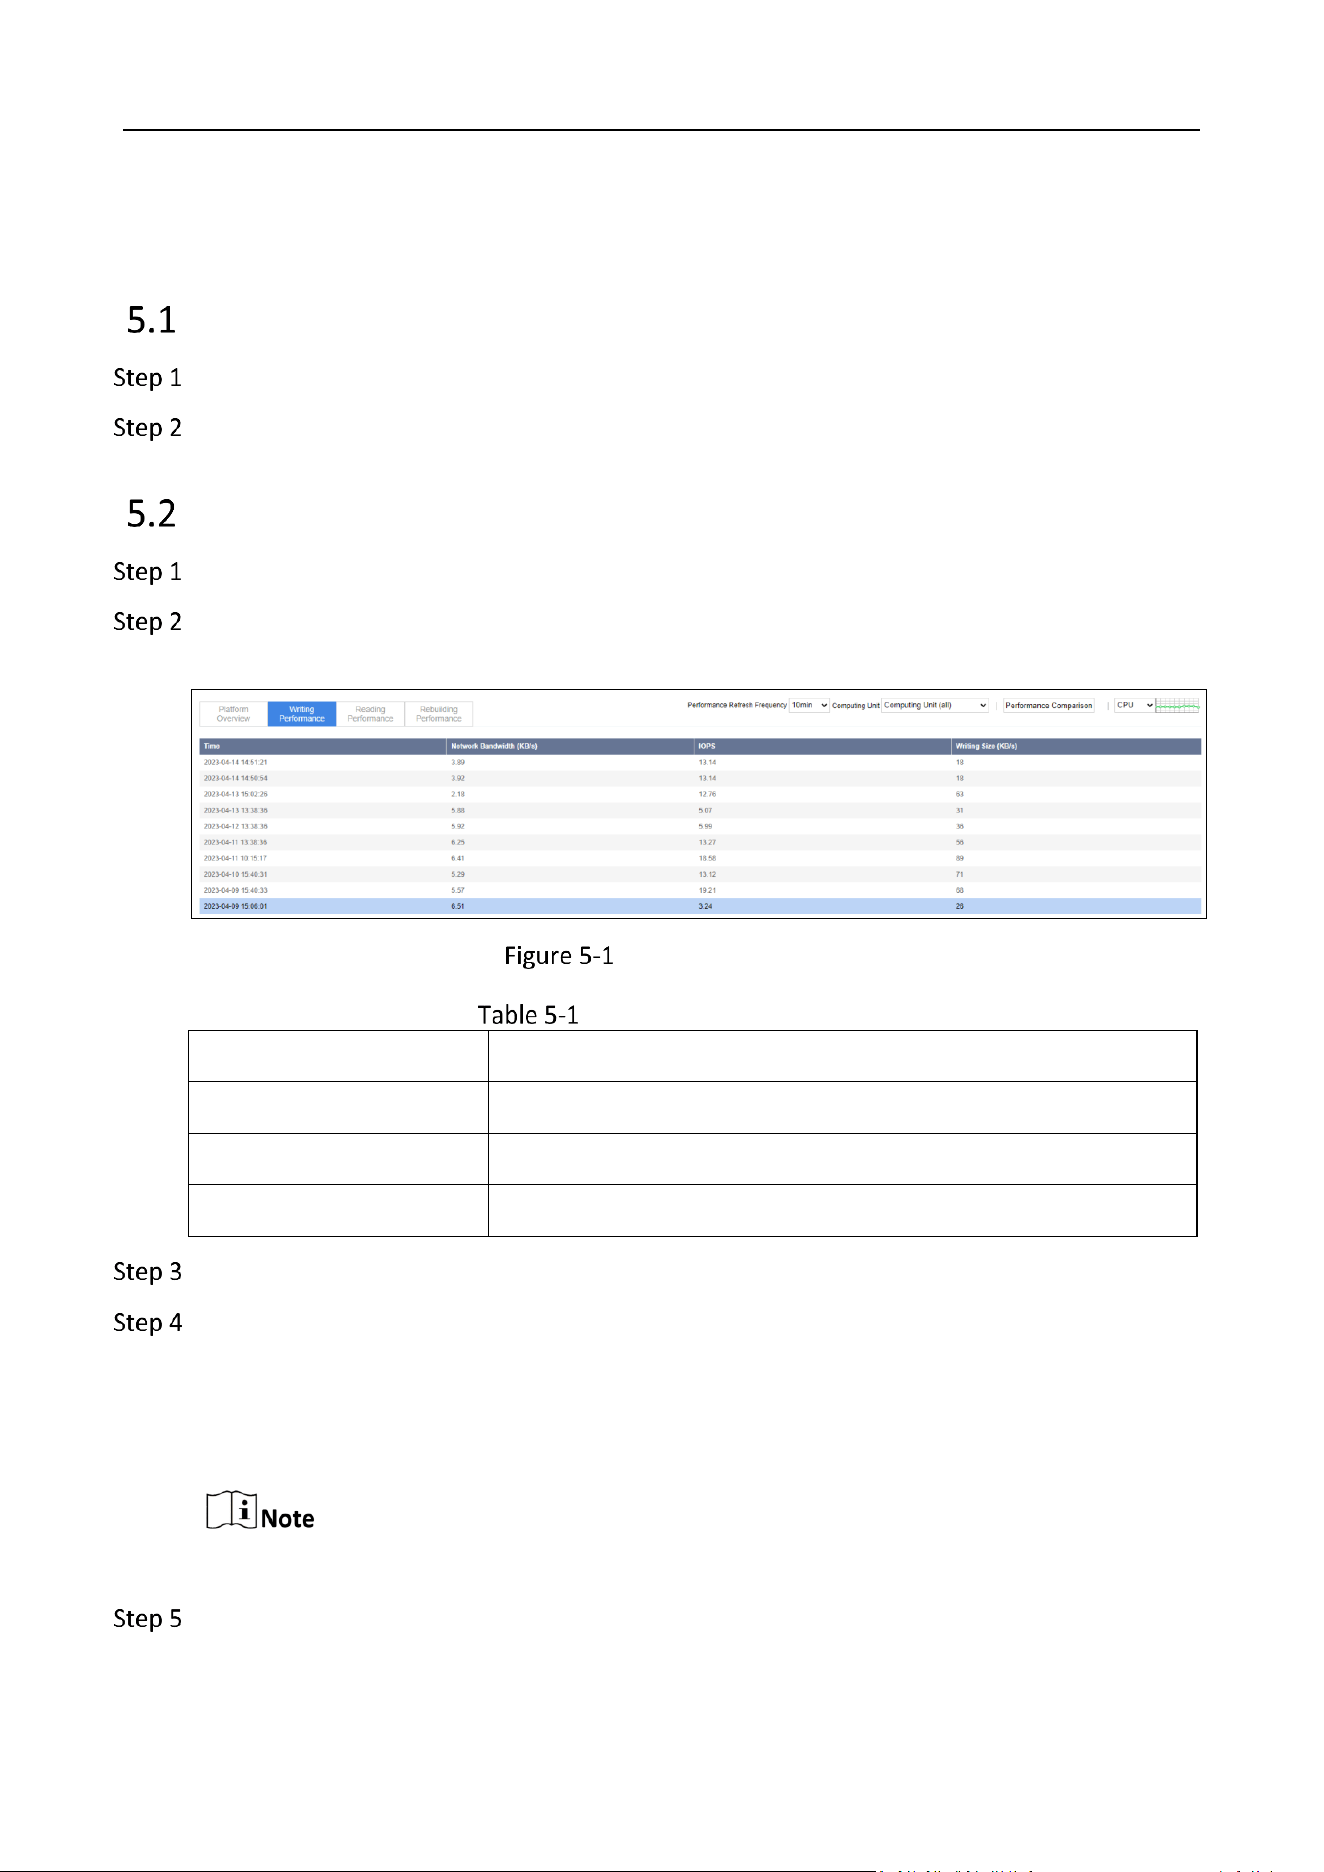
Go to Storage.
Click Writing Performance, Reading Performance, or Rebuilding Performance to view system
performance.
System Performance
Performance Description
Status
Description
Writing performance
Shows the time, network bandwidth, IOPS, and writing size.
Reading performance
Shows the time, network bandwidth, IOPS, and reading size.
Rebuilding performance
Shows the time and speed.
Set the Performance Refresh Frequency.
Compare the writing, reading, and rebuilding performances of different devices.
1) Click Performance Comparison.
2) Click Select Device.
3) Check the device you want to compare and click OK.
Up to 5 devices can be selected for performance comparison.
(Optional) Select the Computing Unit to filter performance to show.

Storage Management System • User Manual
33
Selecting computing unit is only available for dual-controller devices.
View CPU and Memory Usage
Purpose:
You can view the CPU and memory usage, number of cores, and total memory.
Go to Storage.
Select CPU or Memory to view.
View CPU and Memory Performance
Storage Management System • User Manual
34
Chapter 6 Device
Node Tree
Go to Device.
Click of node tree dropdown list.
Click to show device name.
Node Tree
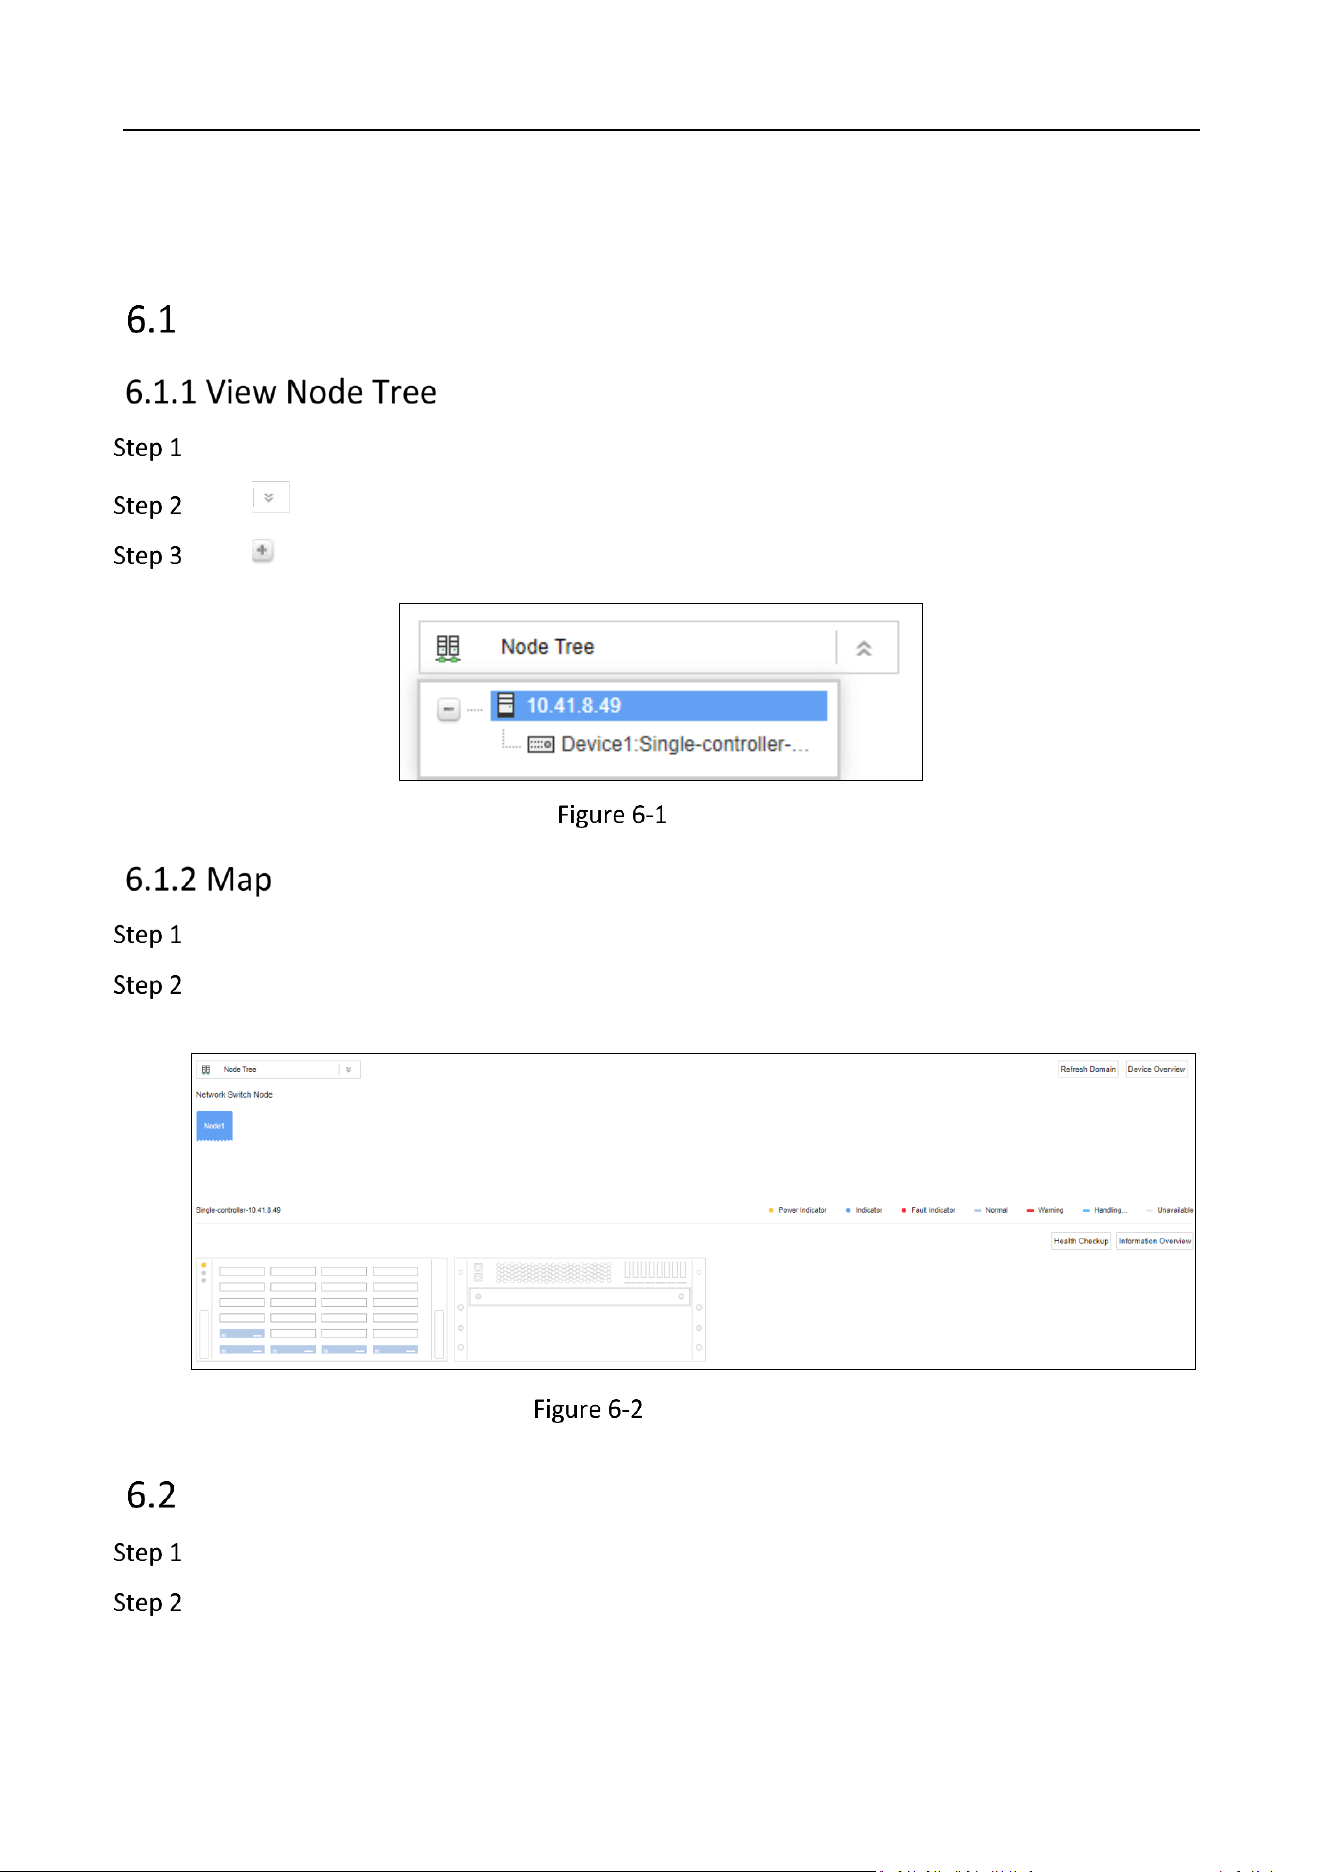
Go to Device.
Click a node in node tree to refresh the topological graph of network switch node and the
topological graph of specified device.
Node Mapping
Node Status
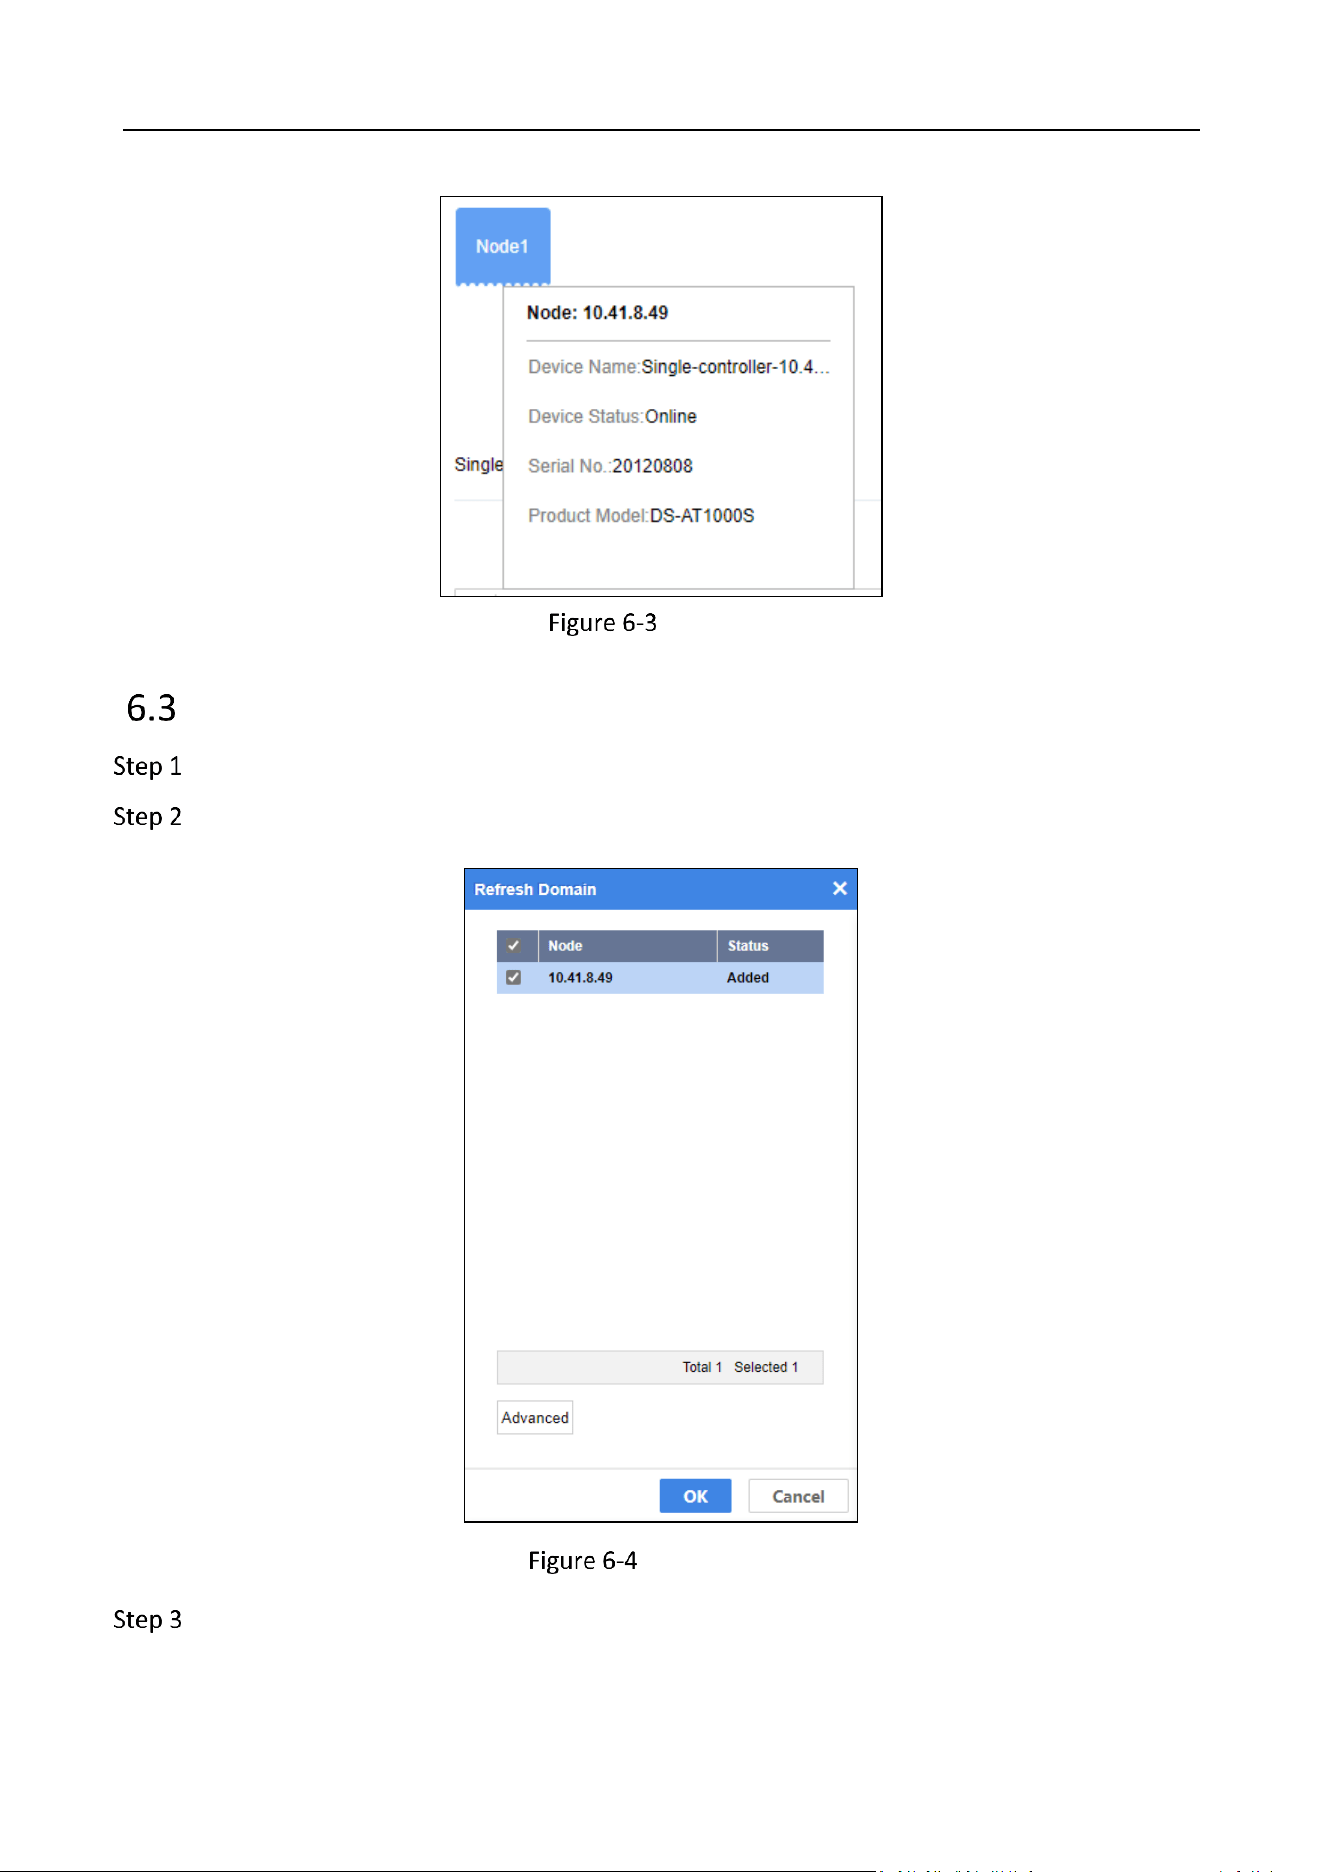
Go to Device.
Position the mouse on a node to show node status, including Device Name, Device Status,
Serial No., and Product Model.
Storage Management System • User Manual
35
Node Status
Refresh Domain
Go to Device.
Click Refresh Domain.
Refresh Domain
Check the node(s) you want to refresh.

Storage Management System • User Manual
36
(Optional) Click Advanced to set domainIP and Subnet Mask.
Click OK to refresh domain.
Device Overview
Go to Device and click Device Overview to view device name, IP address, port, status, etc.
Device Overview
Purpose:
To find a device, turn on FN indicator on its front panel.
Check the device.
Click Device Location. FN indicator of the selected device will keep flashing for 10 minutes.
Purpose:
Turn off alarm sound of a device.
Check the device.
Click Mute Device. Device alarm sound will be turned off.
Storage Management System • User Manual
37
Purpose:
Restart or shut down a device.
Check the device.
Click More Operations.
Select Device Restart or Device Shutdown.
Enter the administrator password and verification code to confirm the operation.
Rename a device. For details, refer to Rename Device.
Modify device network parameters. For details, refer to View Environment and Control
Information.
Modify HDD property. For details, refer to Manage Disk.
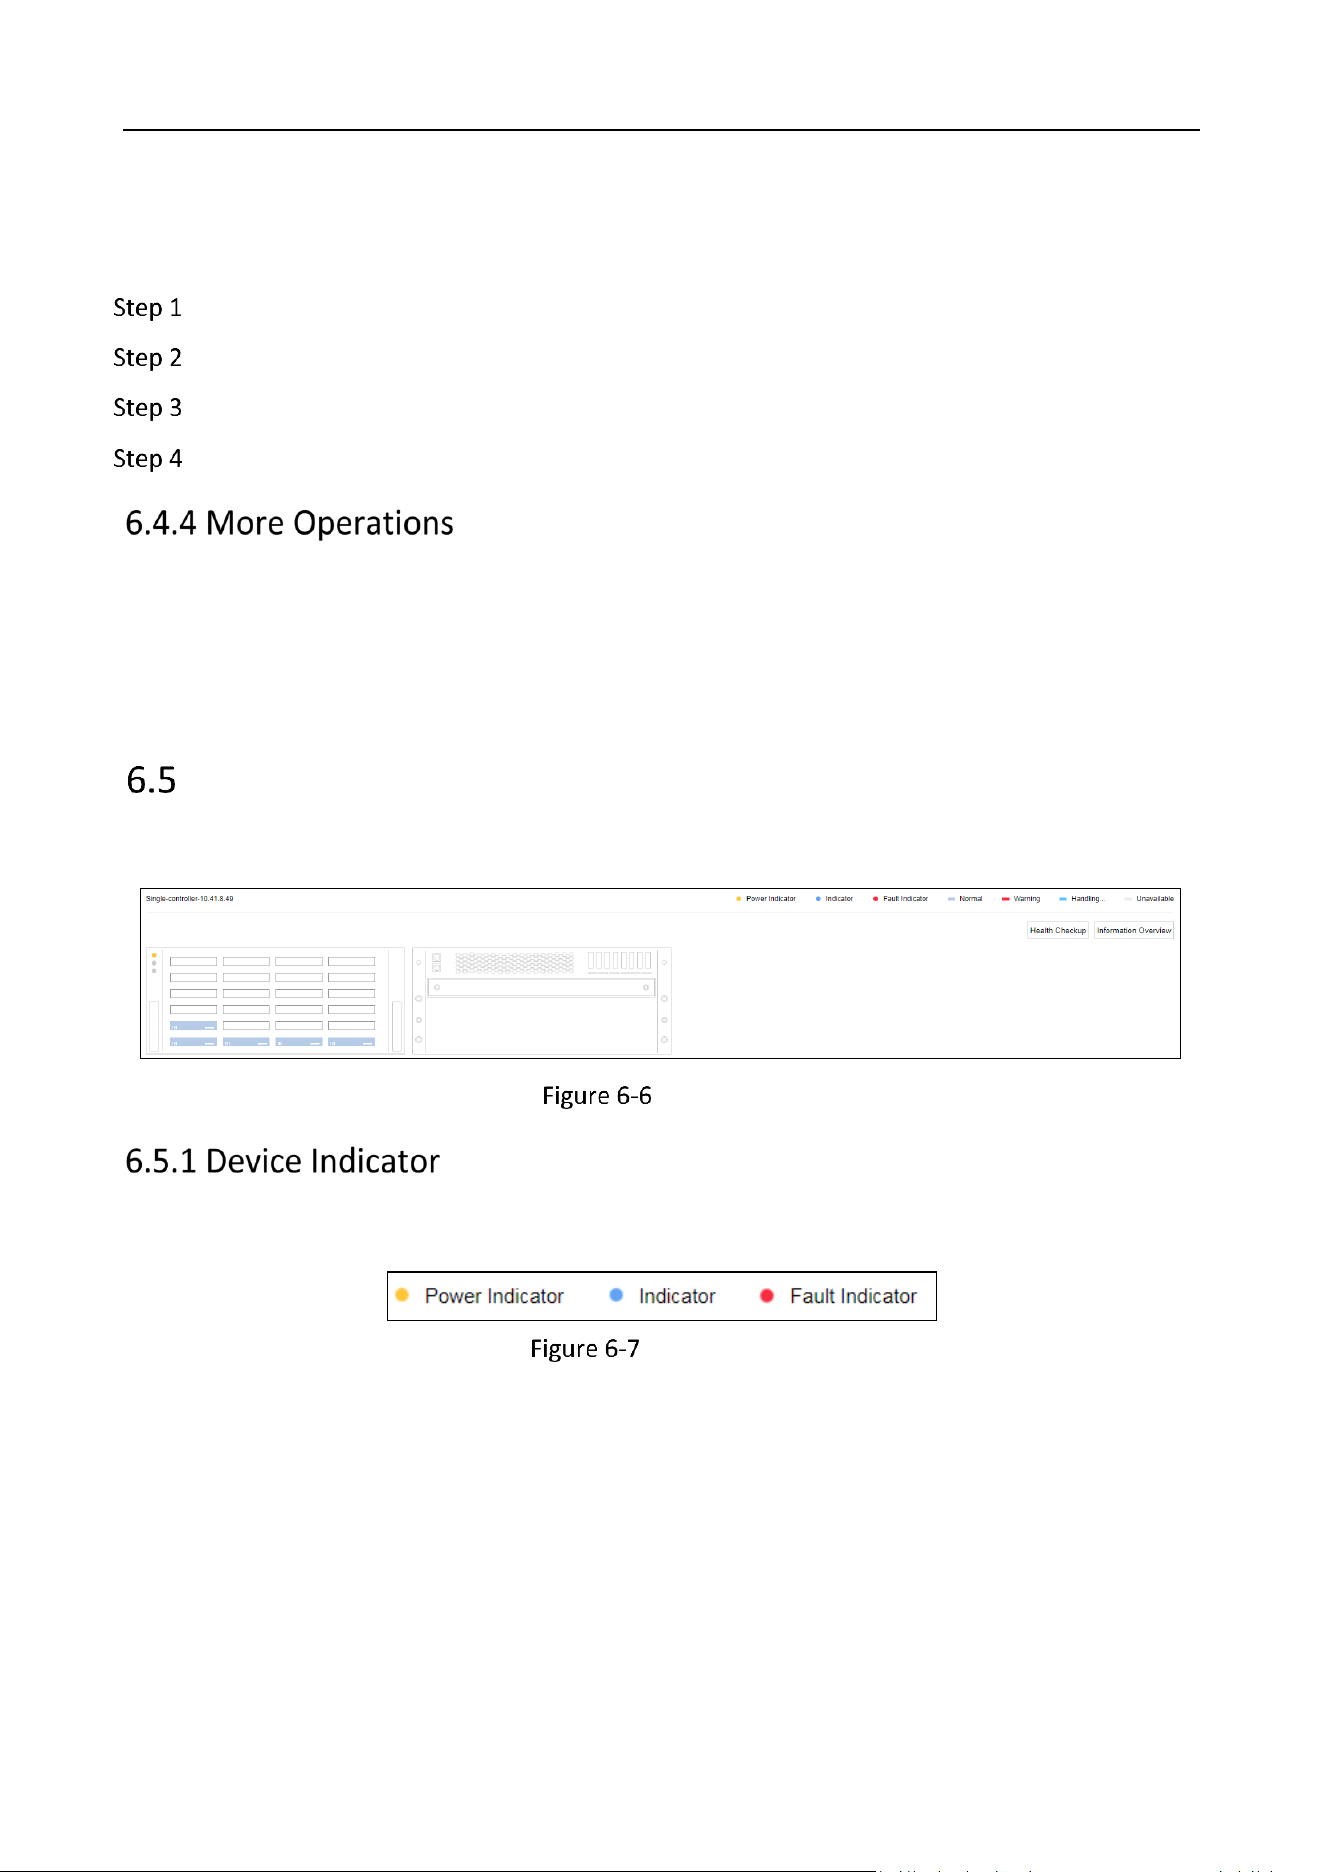
Device Graph of a Node
The bottom half of the Device page shows the device graph, device name, and device indicators.
Device Graph
Status Indicator
Status Indicator
Storage Management System • User Manual
38
Indicator Description
No.
Description
Power indicator
Yellow: Default.
Grey: Device is powered off or shut down.
FN indicator
Blue.
Fault indicator
Red: Device is abnormal.
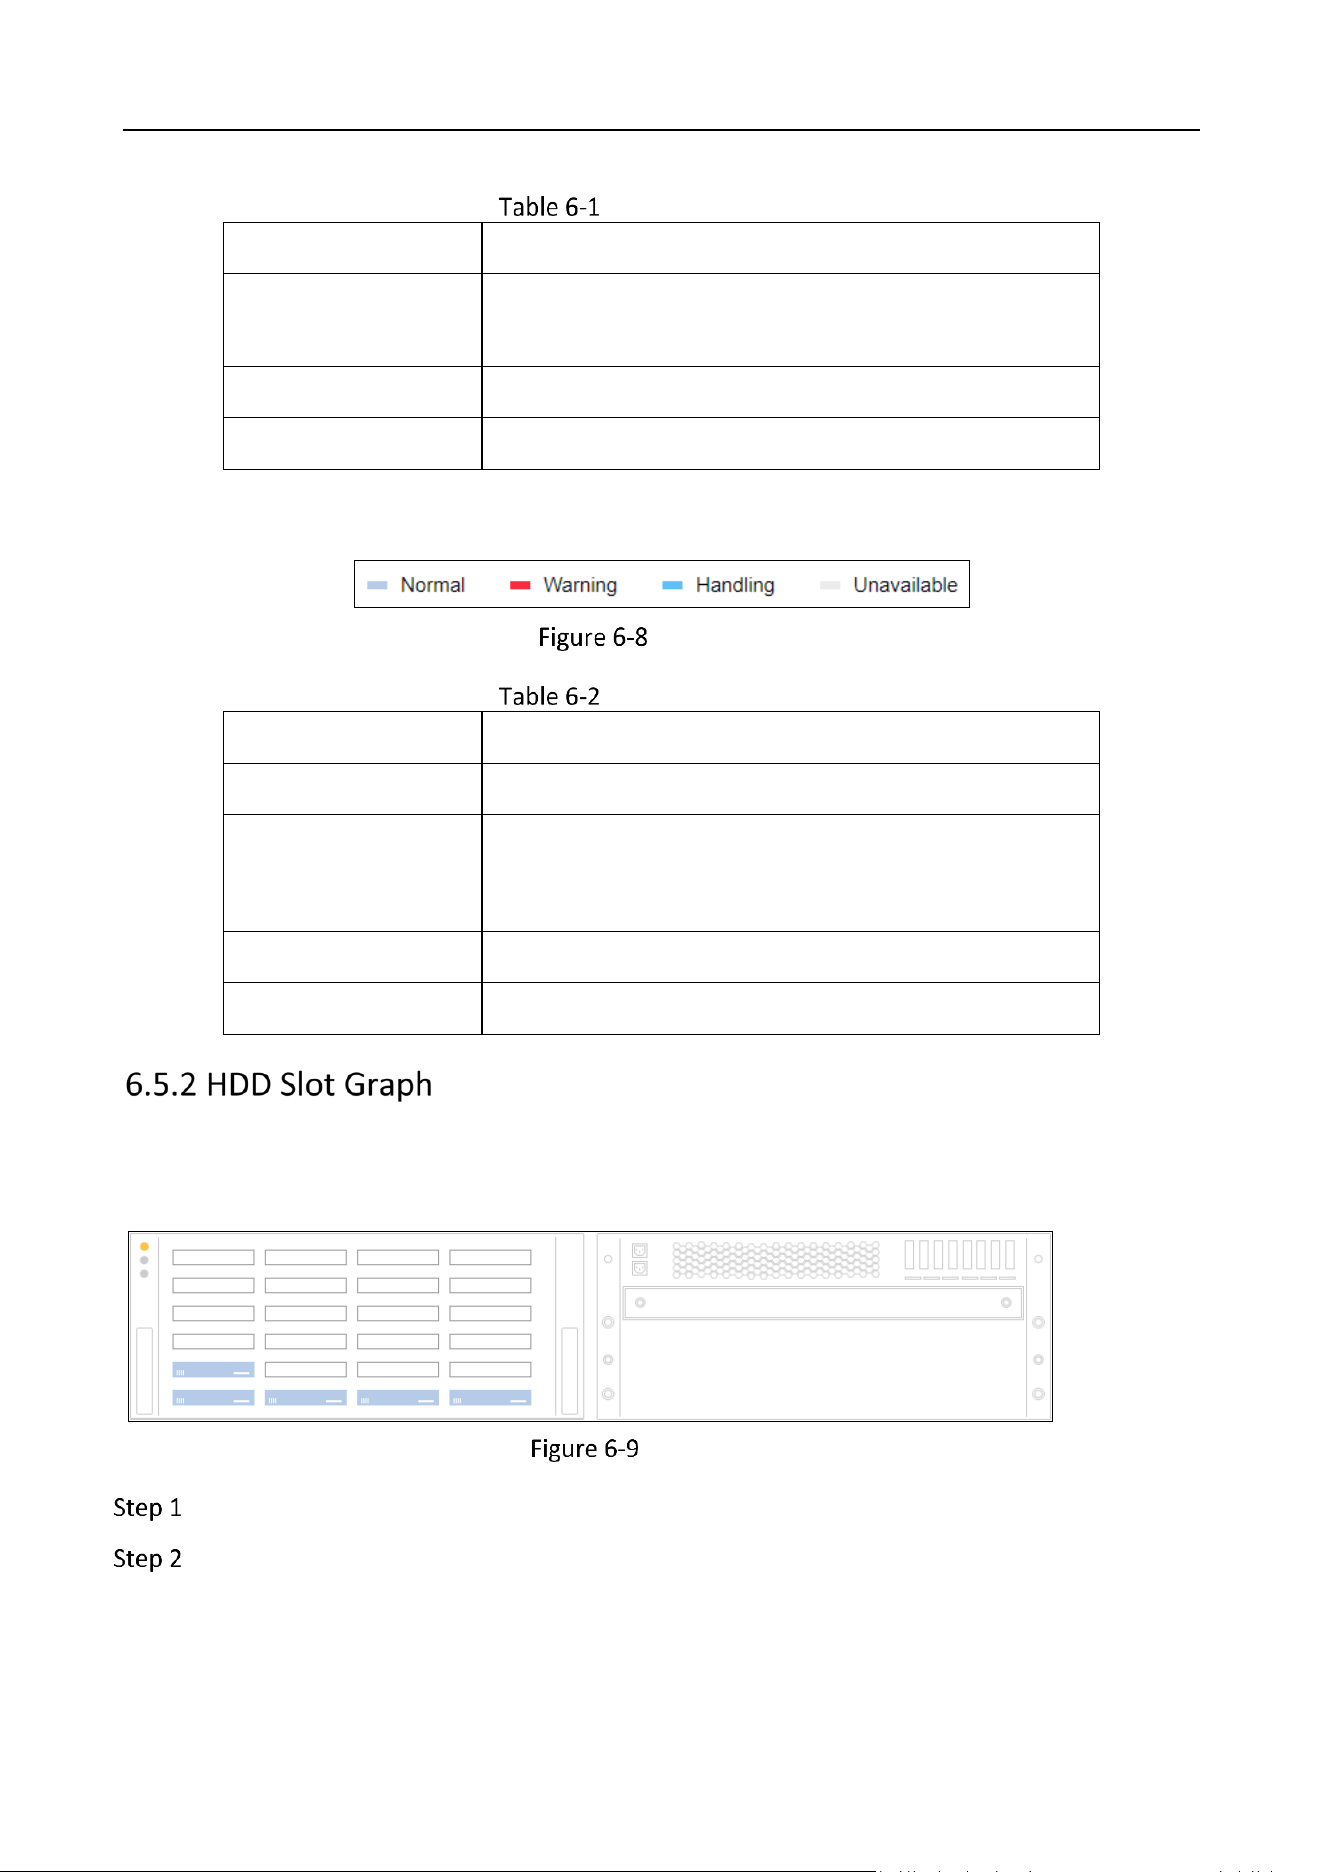
HDD Indicator
HDD Indicator
Indicator Description
No.
Description
Normal
Blue: HDD detection is normal.
Warning
Red: HDD is not available instantly after HDD detection.
Only after repair can you decide if the HDD is normal or
not.
Handling
Light blue: HDD is being detected or located.
Unavailable
Grey: HDD detection fails and HDD cannot be repaired.
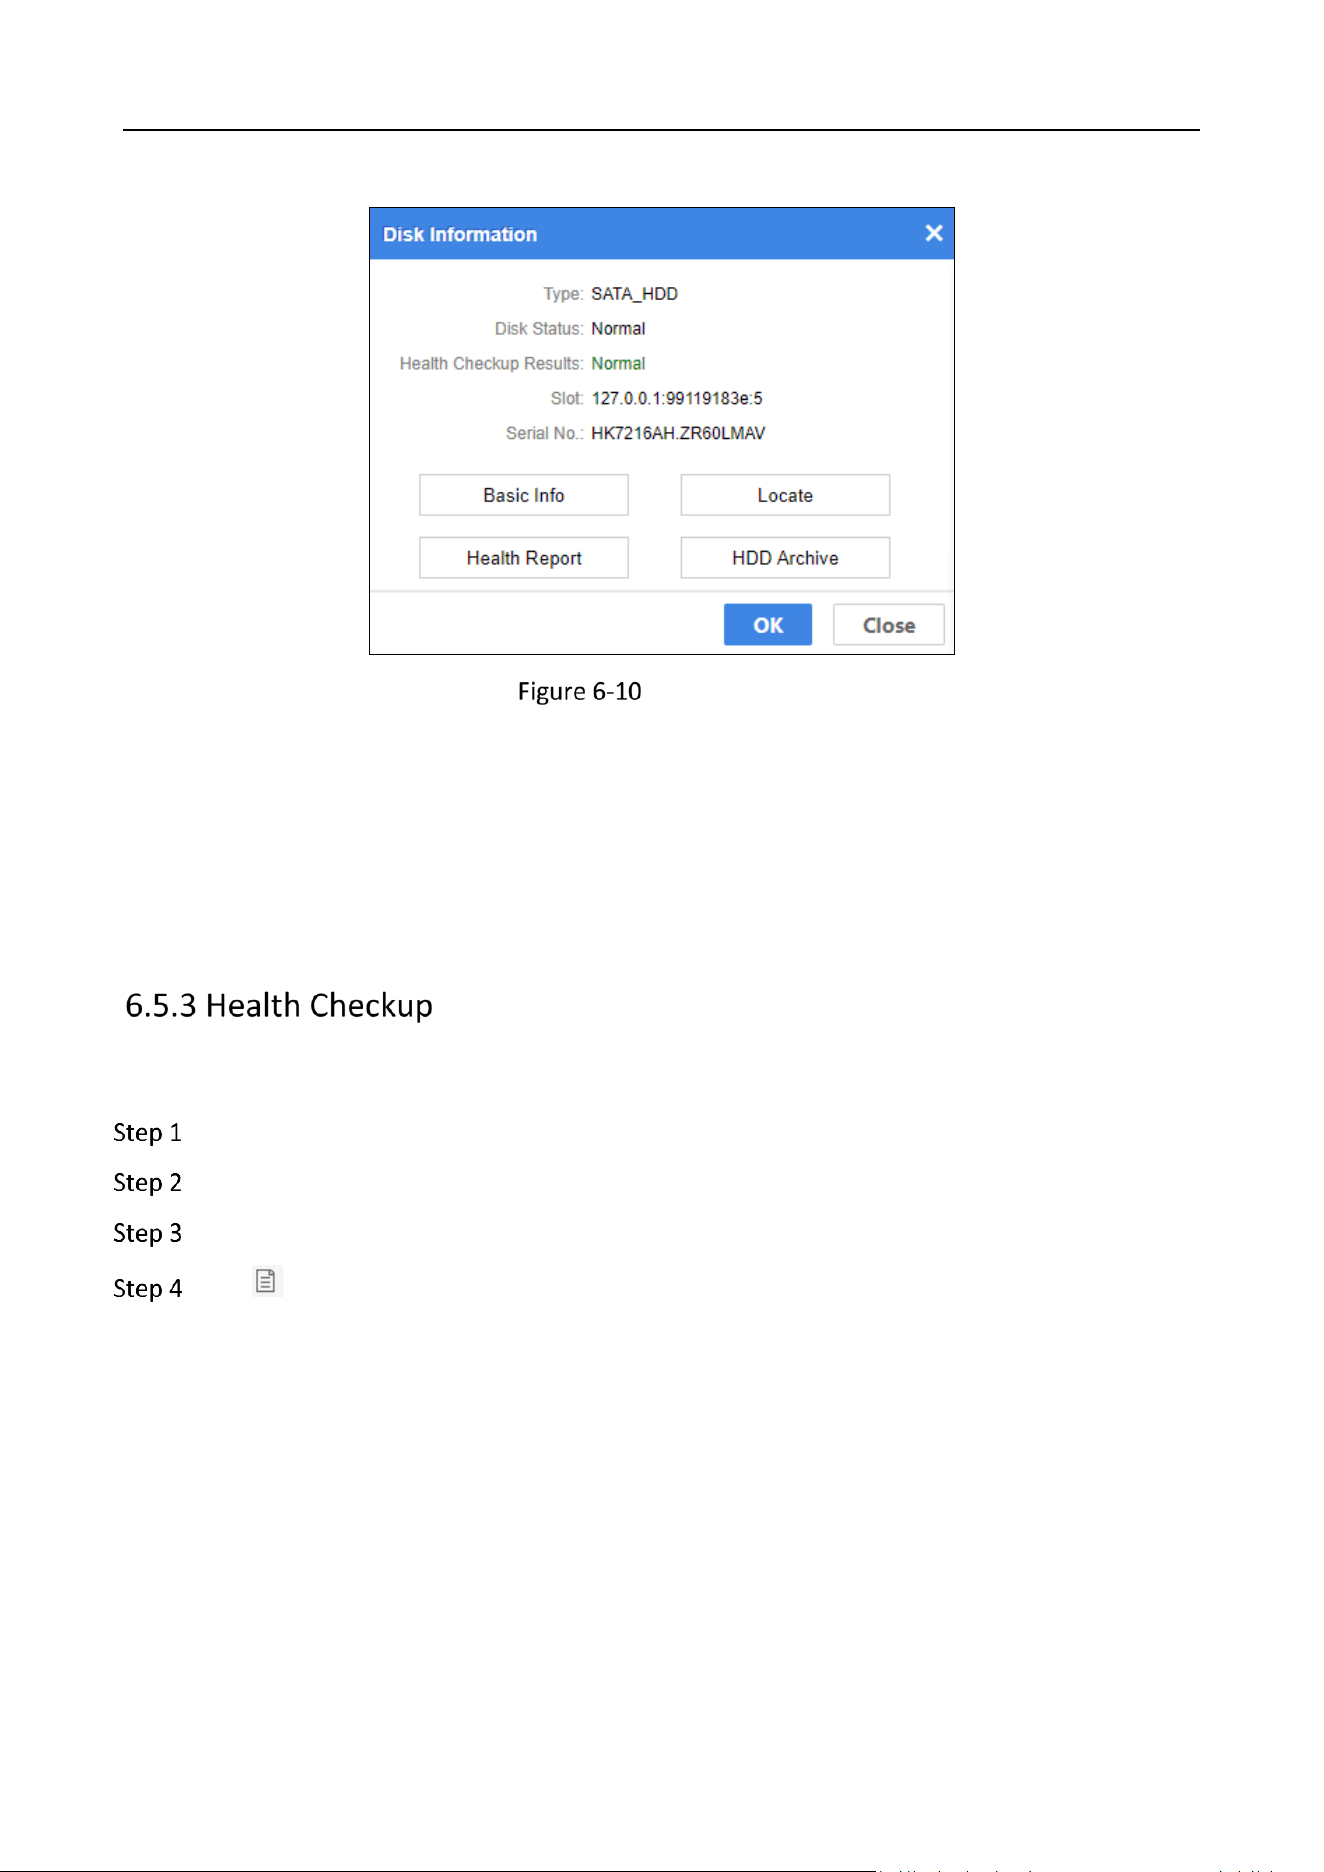
Purpose:
HDD slot graph shows the HDD working status.
HDD Slot Graph
Go to Device.
Click an HDD slot. Then the disk information window will pop up.
Storage Management System • User Manual
39
Disk Information
Basic Info: Click to show the status, statistics data, and S.M.A.R.T. information of HDD.
Locate: Click to turn on FN indicator of the selected HDD. The indicator will keep flashing (default
flashing time is 600 seconds).
Health Report: Click to show the health checkup results. For details, please refer to View Health
Checkup Report.
HDD Archive: For details, please refer to View HDD Archive.
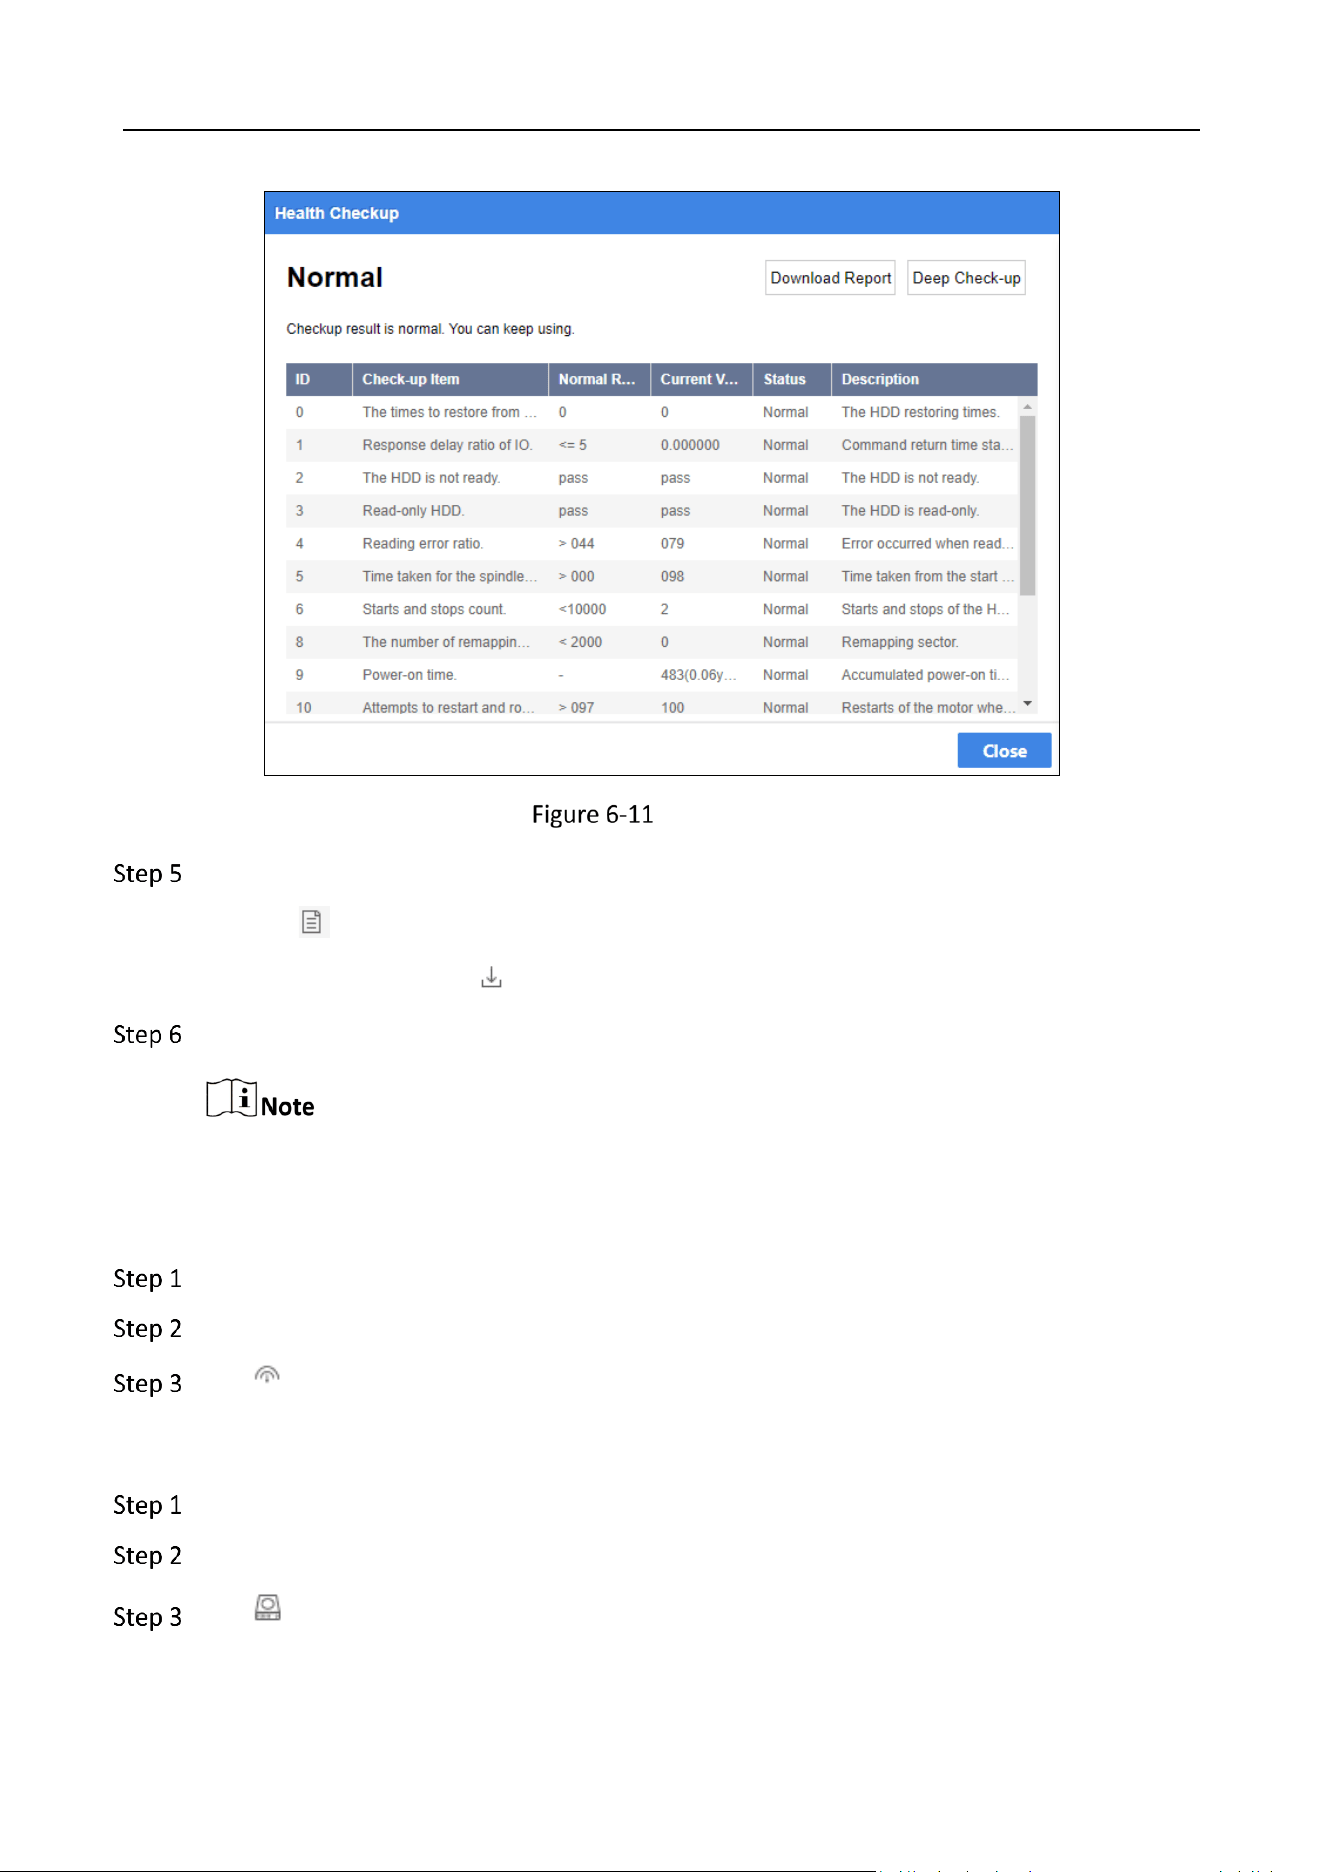
View Health Checkup Report
Go to Device.
Click Health Checkup.
Check the Health Checkup Results of HDD.
Click to view the health report.
You can view all health check-up items and the normal value, current value, health status, and
description of each check-up item.
Storage Management System • User Manual
40
Health Report
Download the health checkup report.
Click and click Download Report to download the health checkup report.
Check HDDs and click to download multiple HDD health check reports.
Click Deep Check-up to start a deep check-up.
The deep check-up may cost HDD resource and affect the performance.
Start an Isolated Deep Checkup
Go to Device.
Click Health Checkup.
Click to start an isolated deep checkup.
View HDD Archive
Go to Device.
Click Health Checkup.
Click to view HDD archive.
Storage Management System • User Manual
41
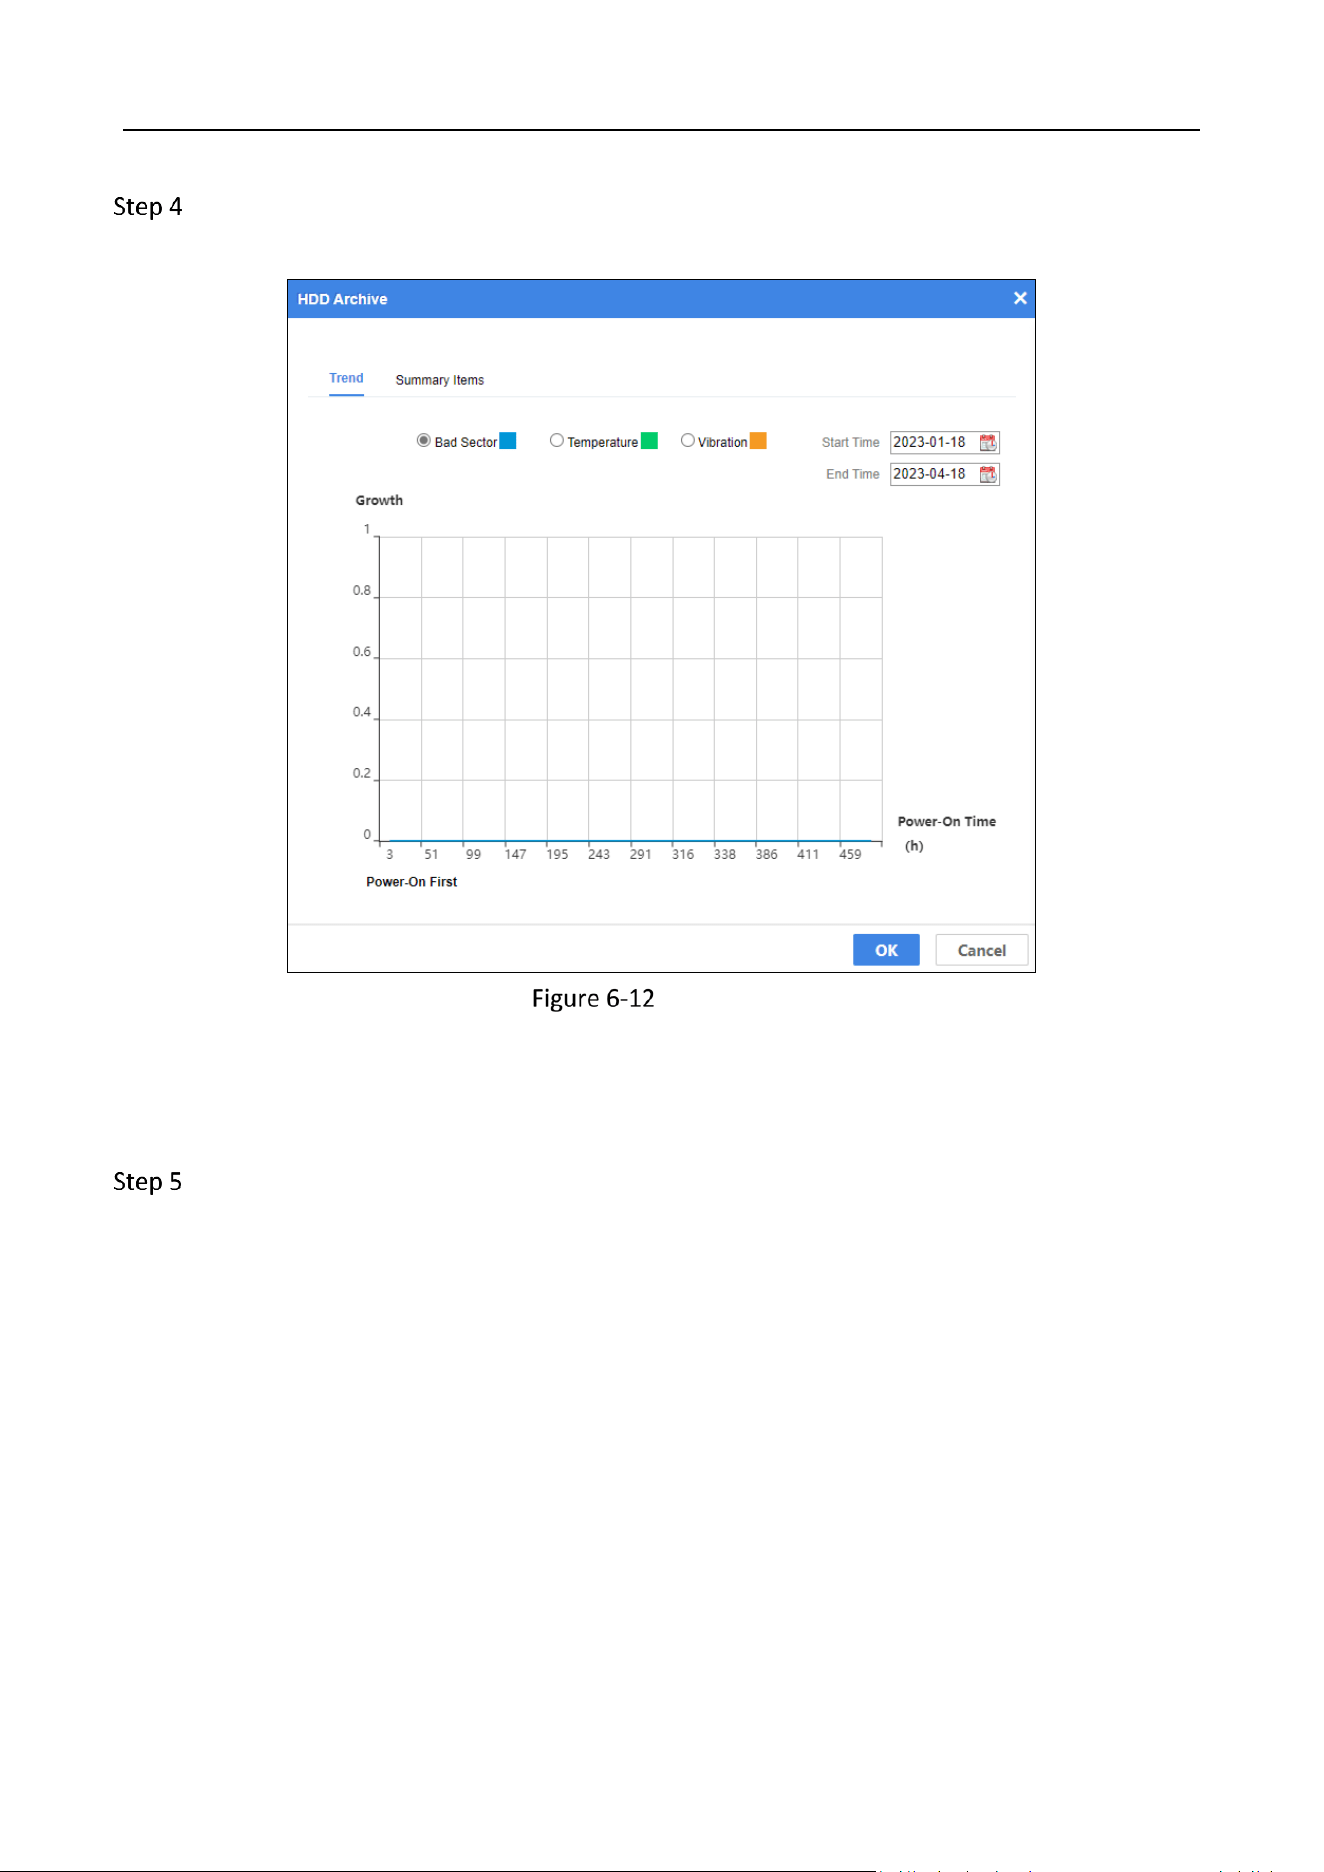
Check the growth trend of bad sector(s), temperature, and vibration.
1) Click Trend.
Growth Trend
2) Set the start time and end time.
3) Check Bad Sector, Temperature, or Vibration.
4) View the growth trend in the line chart below.
Check the summary items.
1) Click Summary Items.
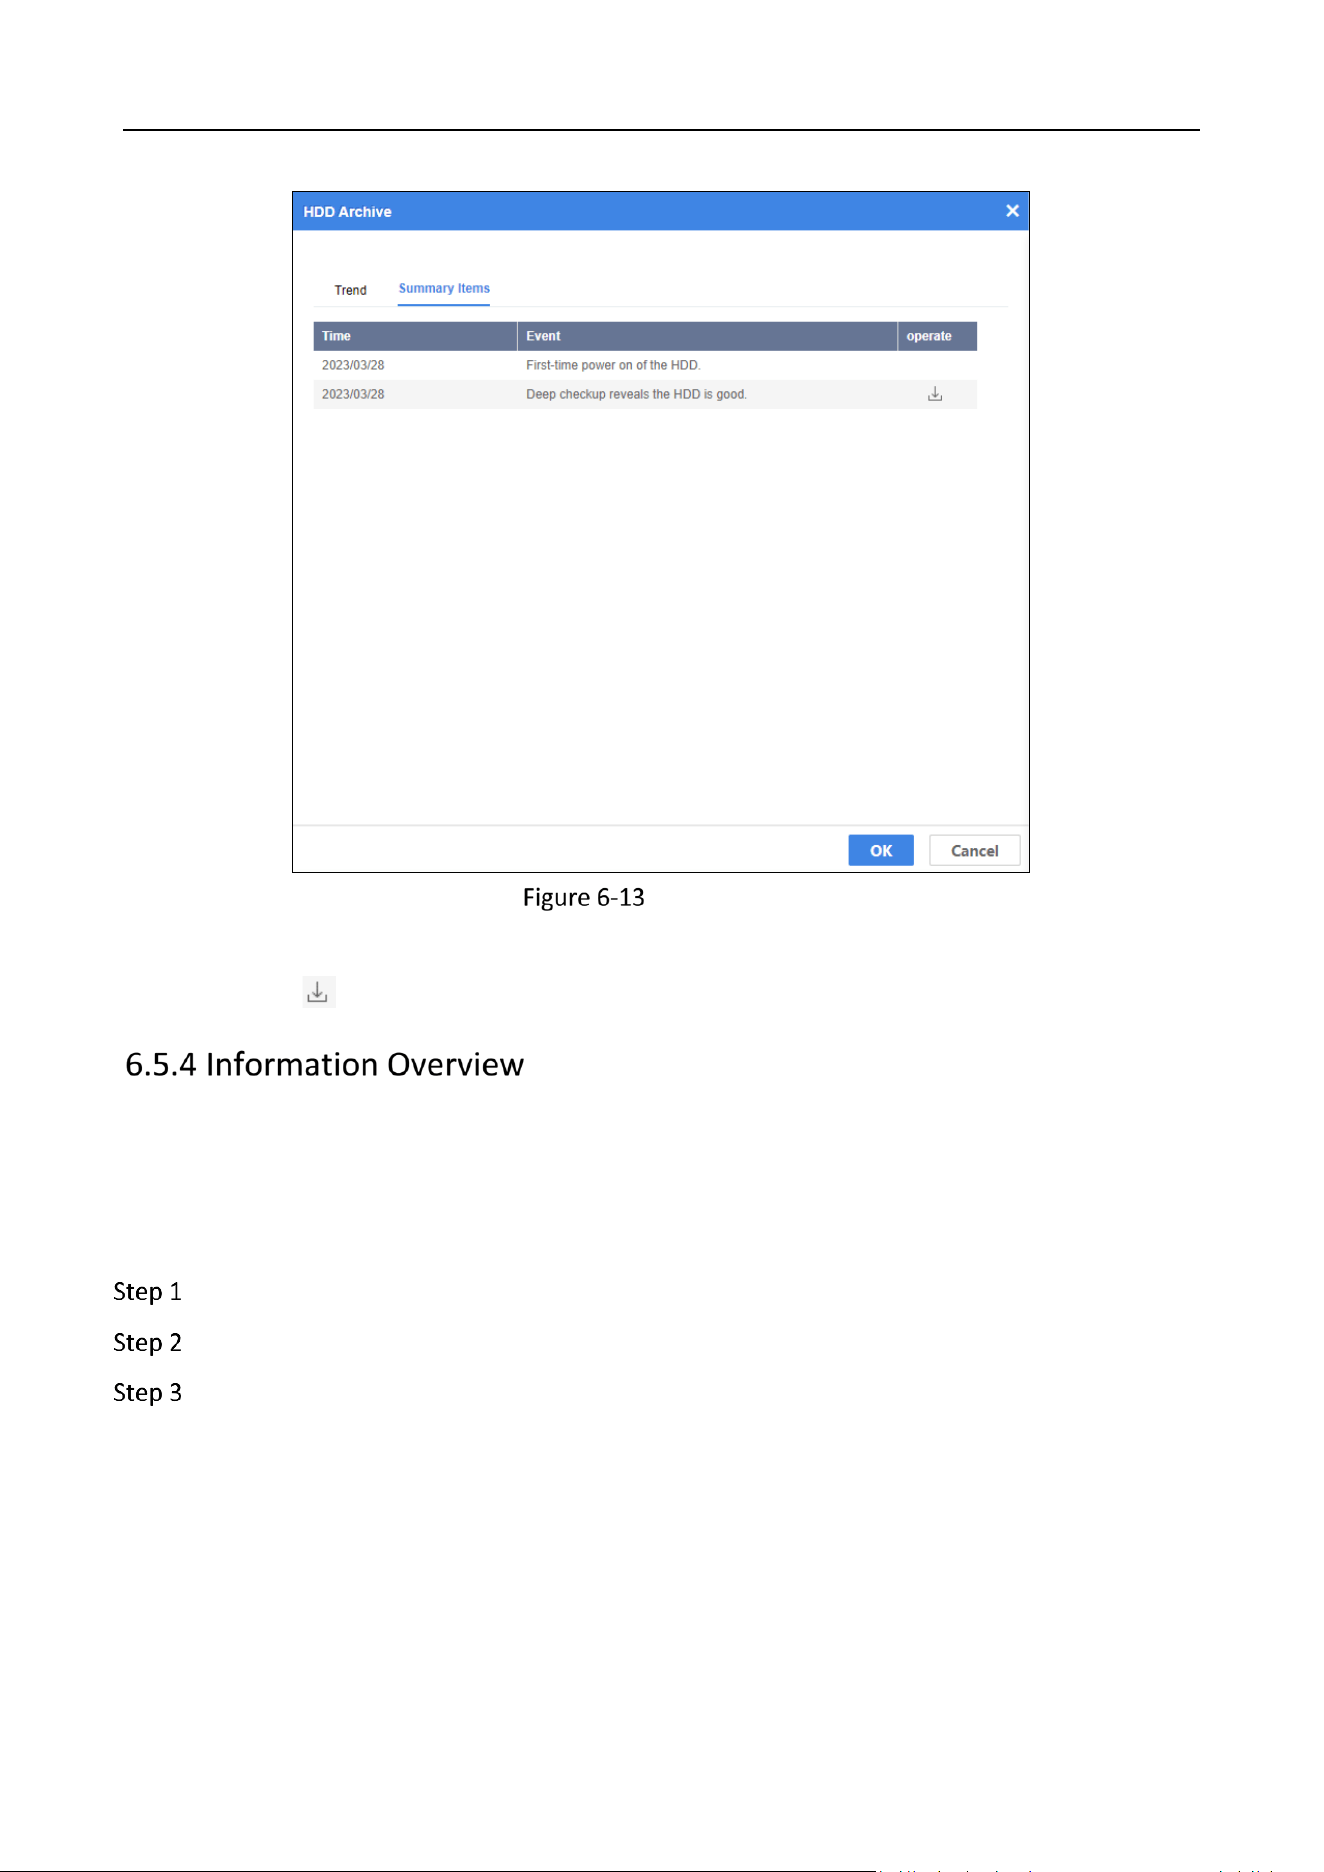
Storage Management System • User Manual
42
Summary Items
2) View the time and events.
3) Click to download logs.
Purpose:
View environment and control information, manage disks, mute device, etc.
View Environment and Control Information
Go to Device.
Click Information Overview.
View environment and control information.
Temperature: Temperature of CPU, IC, system, etc.
Fan: Working status of chassis fan.
Power: Power module working status.
Storage Management System • User Manual
43
Information Overview
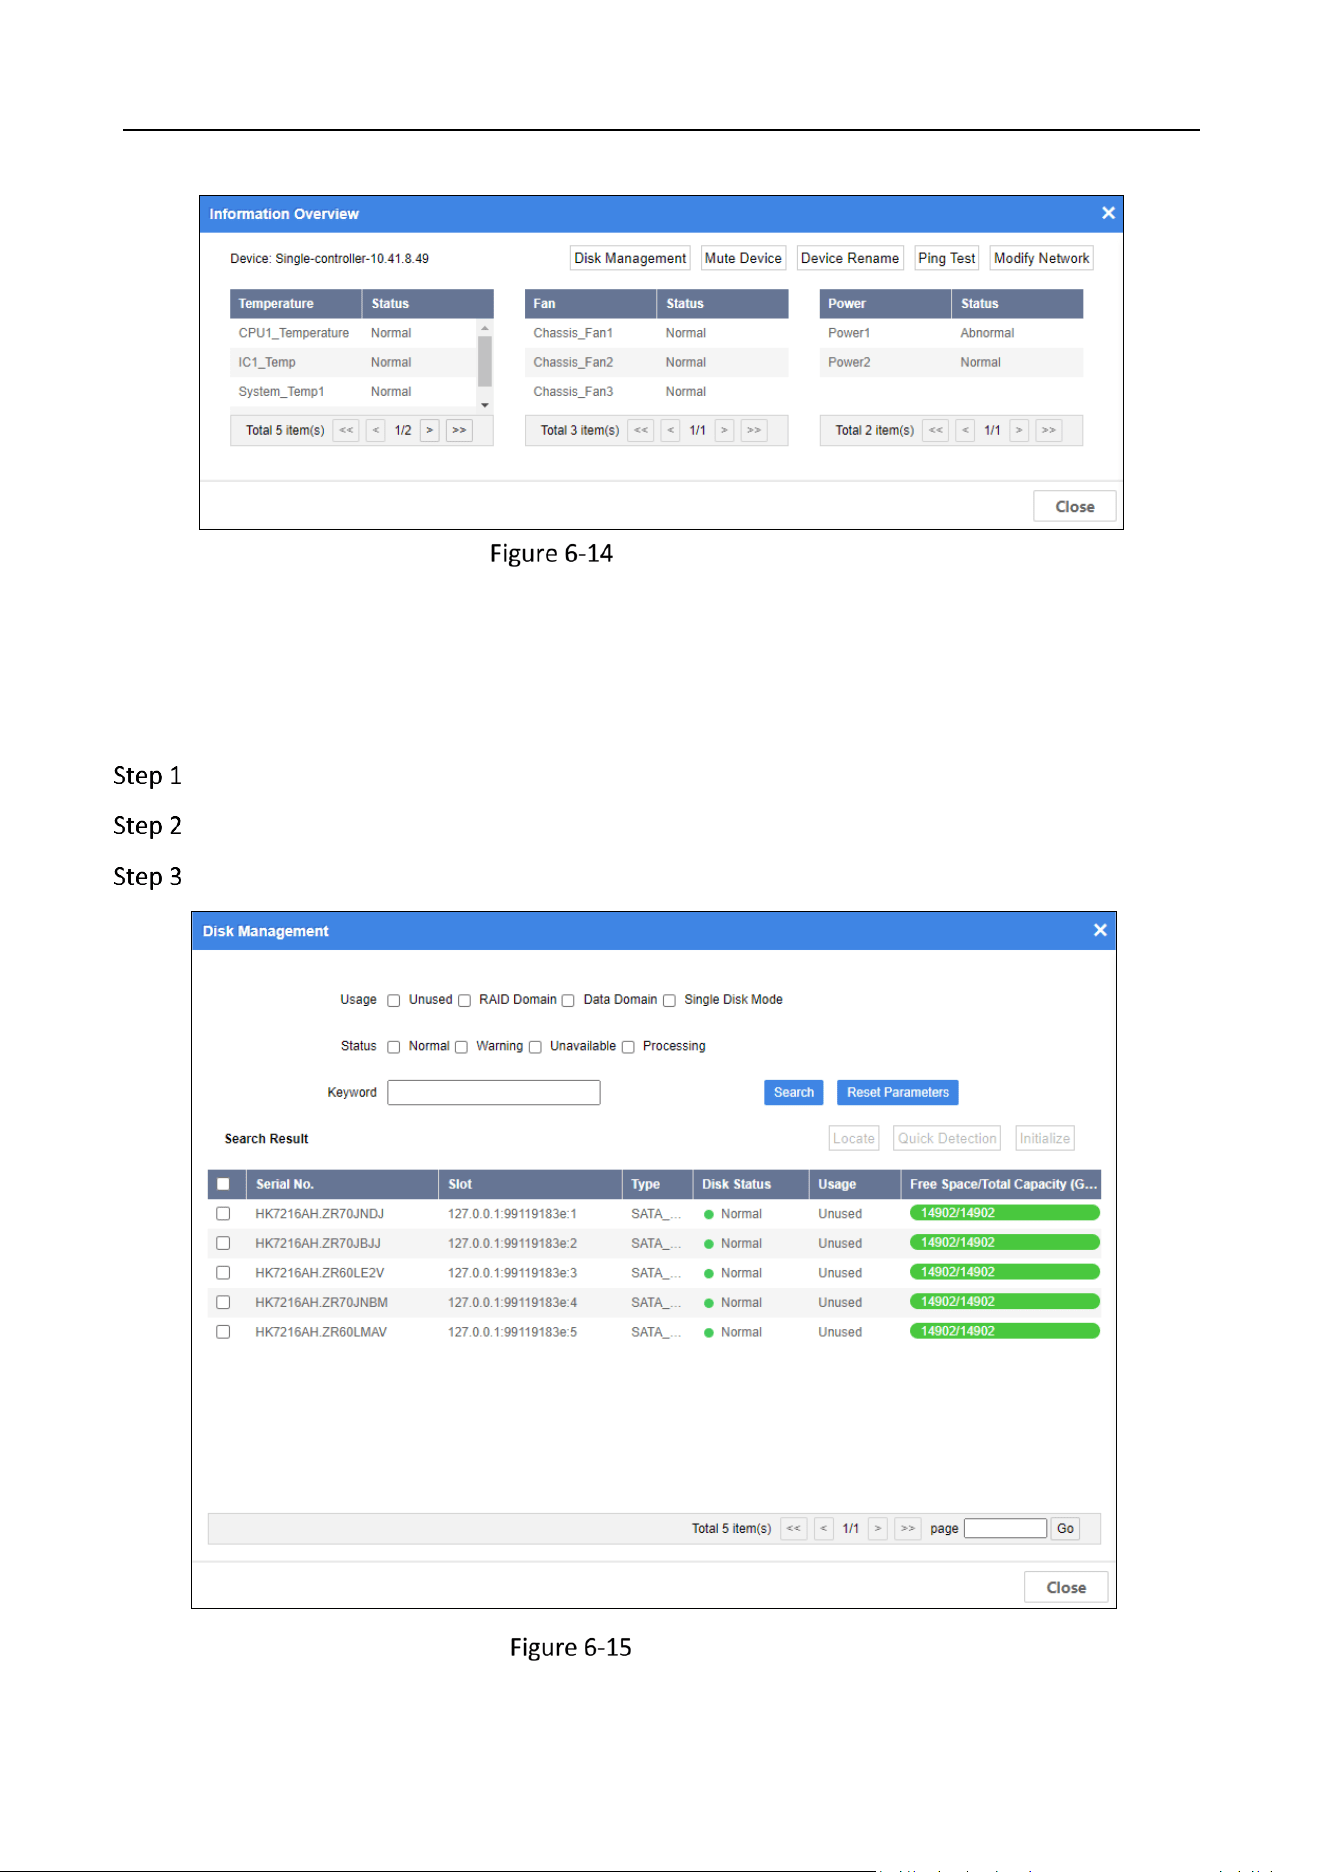
Manage Disk
Purpose:
You can search the information of all the HDDs in storage device.
Go to Device.
Click Information Overview.
Click Disk Management.
Disk Management

Storage Management System • User Manual
44
Specify search conditions.
Usage
Unused: Disk not used by any RAID domain.
Single Disk Mode: Reserved.
Status
Normal: Disk is normal in all online nodes.
Warning: Disk is normal in some online nodes. Or bad sector exists in the disk.
Unavailable: Disk is abnormal in all the online nodes. Disk will be removed from resource
pool.
Processing: Disk is being detected, located, repaired, moved, or maintained.
(Optional) Enter the keyword.
Click Search.
When disk status is warning, unavailable, or processing, click the status in status column to
show help. You can follow the help to recover disk.
(Optional) To locate a disk, check the disk and click Locate to turn on FN indicator of the disk.
FN indicator will keep flashing (default flashing time is 600 seconds).
(Optional) To detect a disk, check the disk and click Quick Detection. Detection progress will
be shown in Status column.
(Optional) To initialize a disk, check the disk and click Initialize. Enter the admin password and
verification code to initialize HDD.
Initialize the HDD will cause its data loss. Please proceed with caution.
Mute Device
Purpose:
When device is abnormal and sending alarm sound, you can mute it.
Go to Device.
Click Information Overview.
Click Mute Device.
Rename Device
Go to Device.
Storage Management System • User Manual
45
Click Information Overview.
Click Device Rename.
Enter New Name and click OK.
Device name must be unique in the domain. Valid name contains 1 to 16 characters and only
digits, lowercase, and uppercase are allowed.
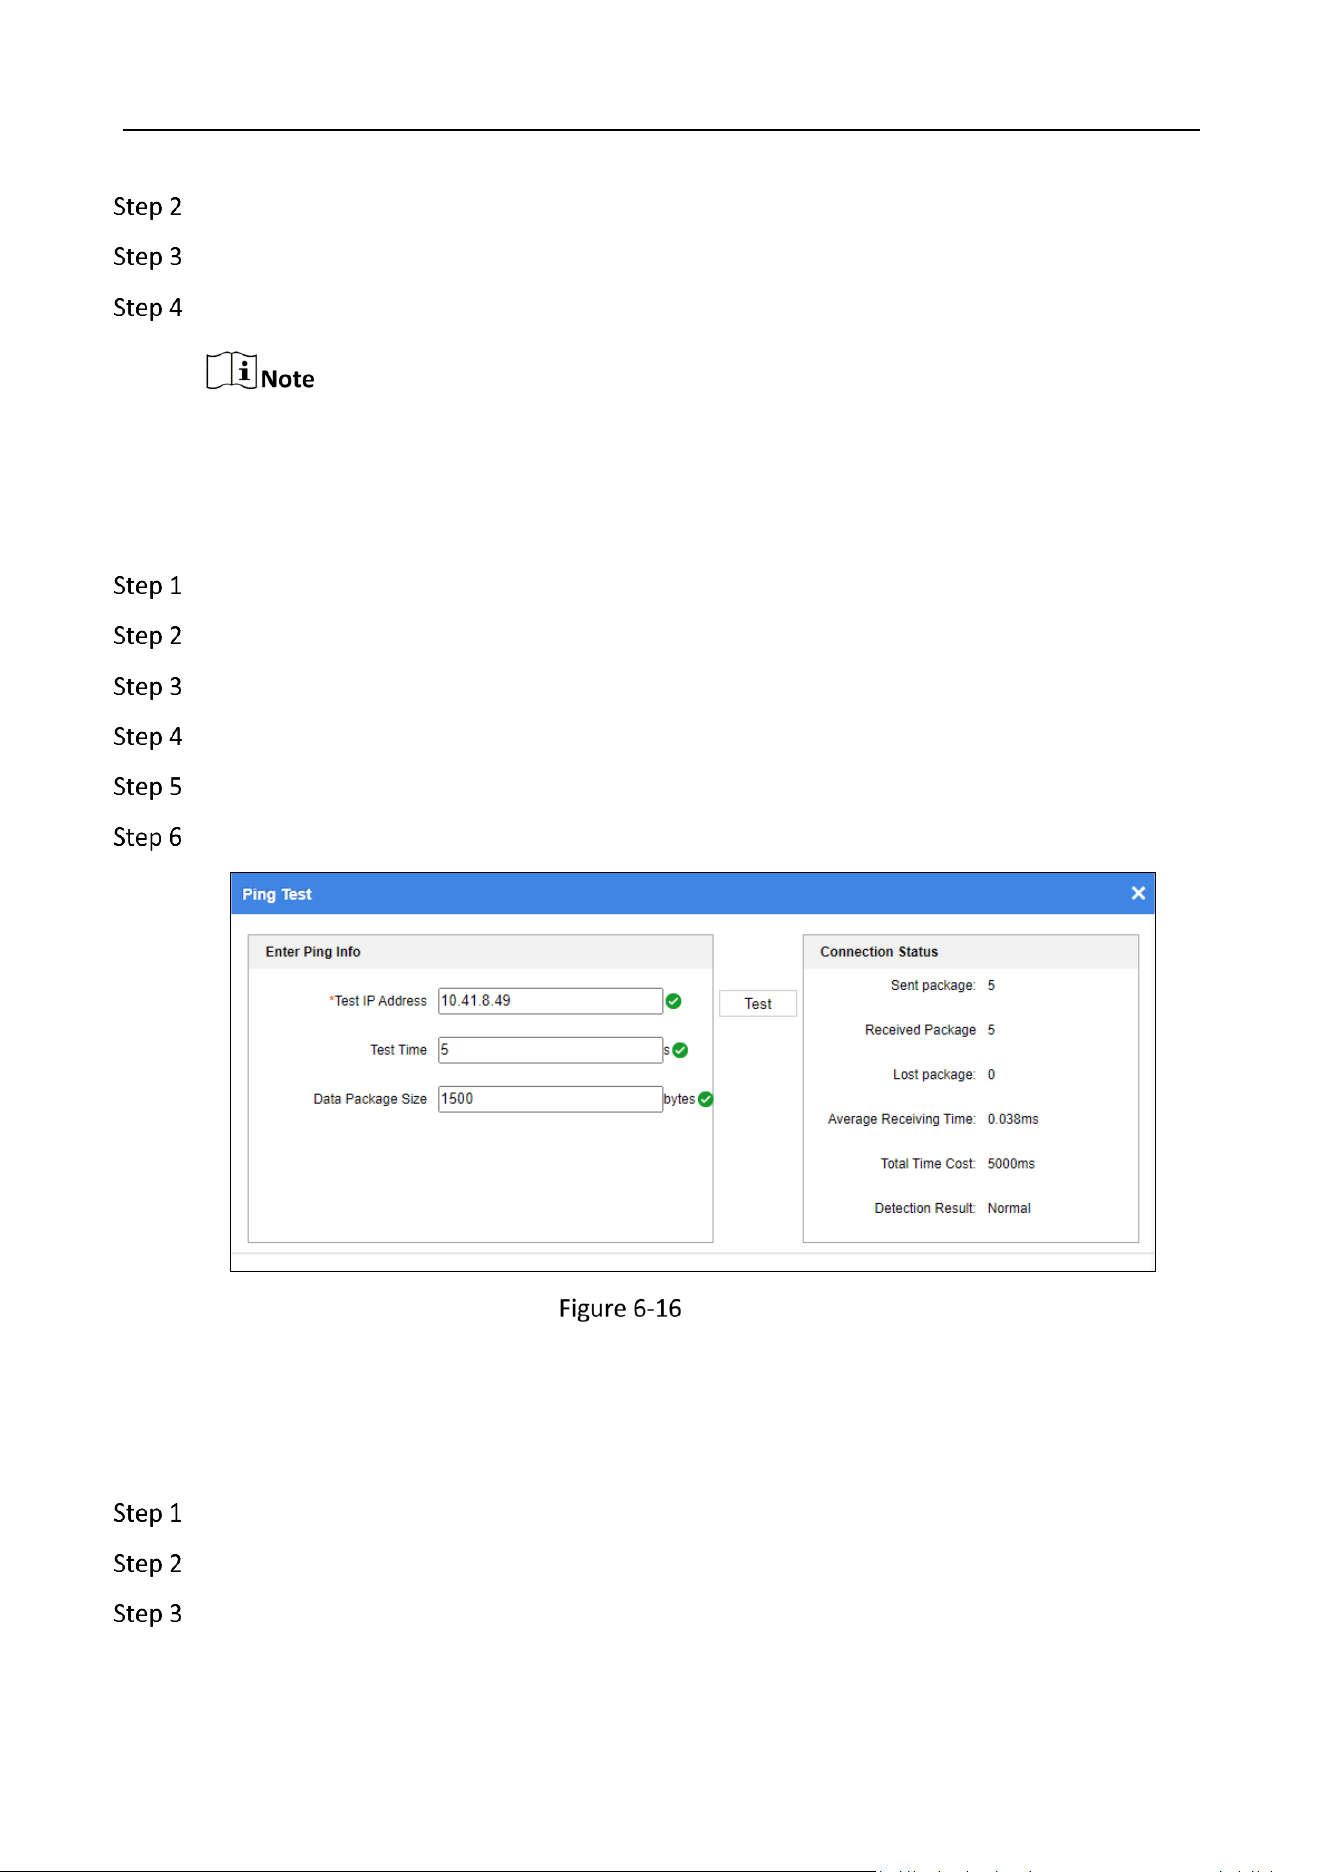
Perform Ping Test
Go to Device.
Click Information Overview.
Click Ping Test.
Enter the Test IP Address, set Test Time and Data Package Size.
Click Test.
Check the Connection Status.
Ping Test
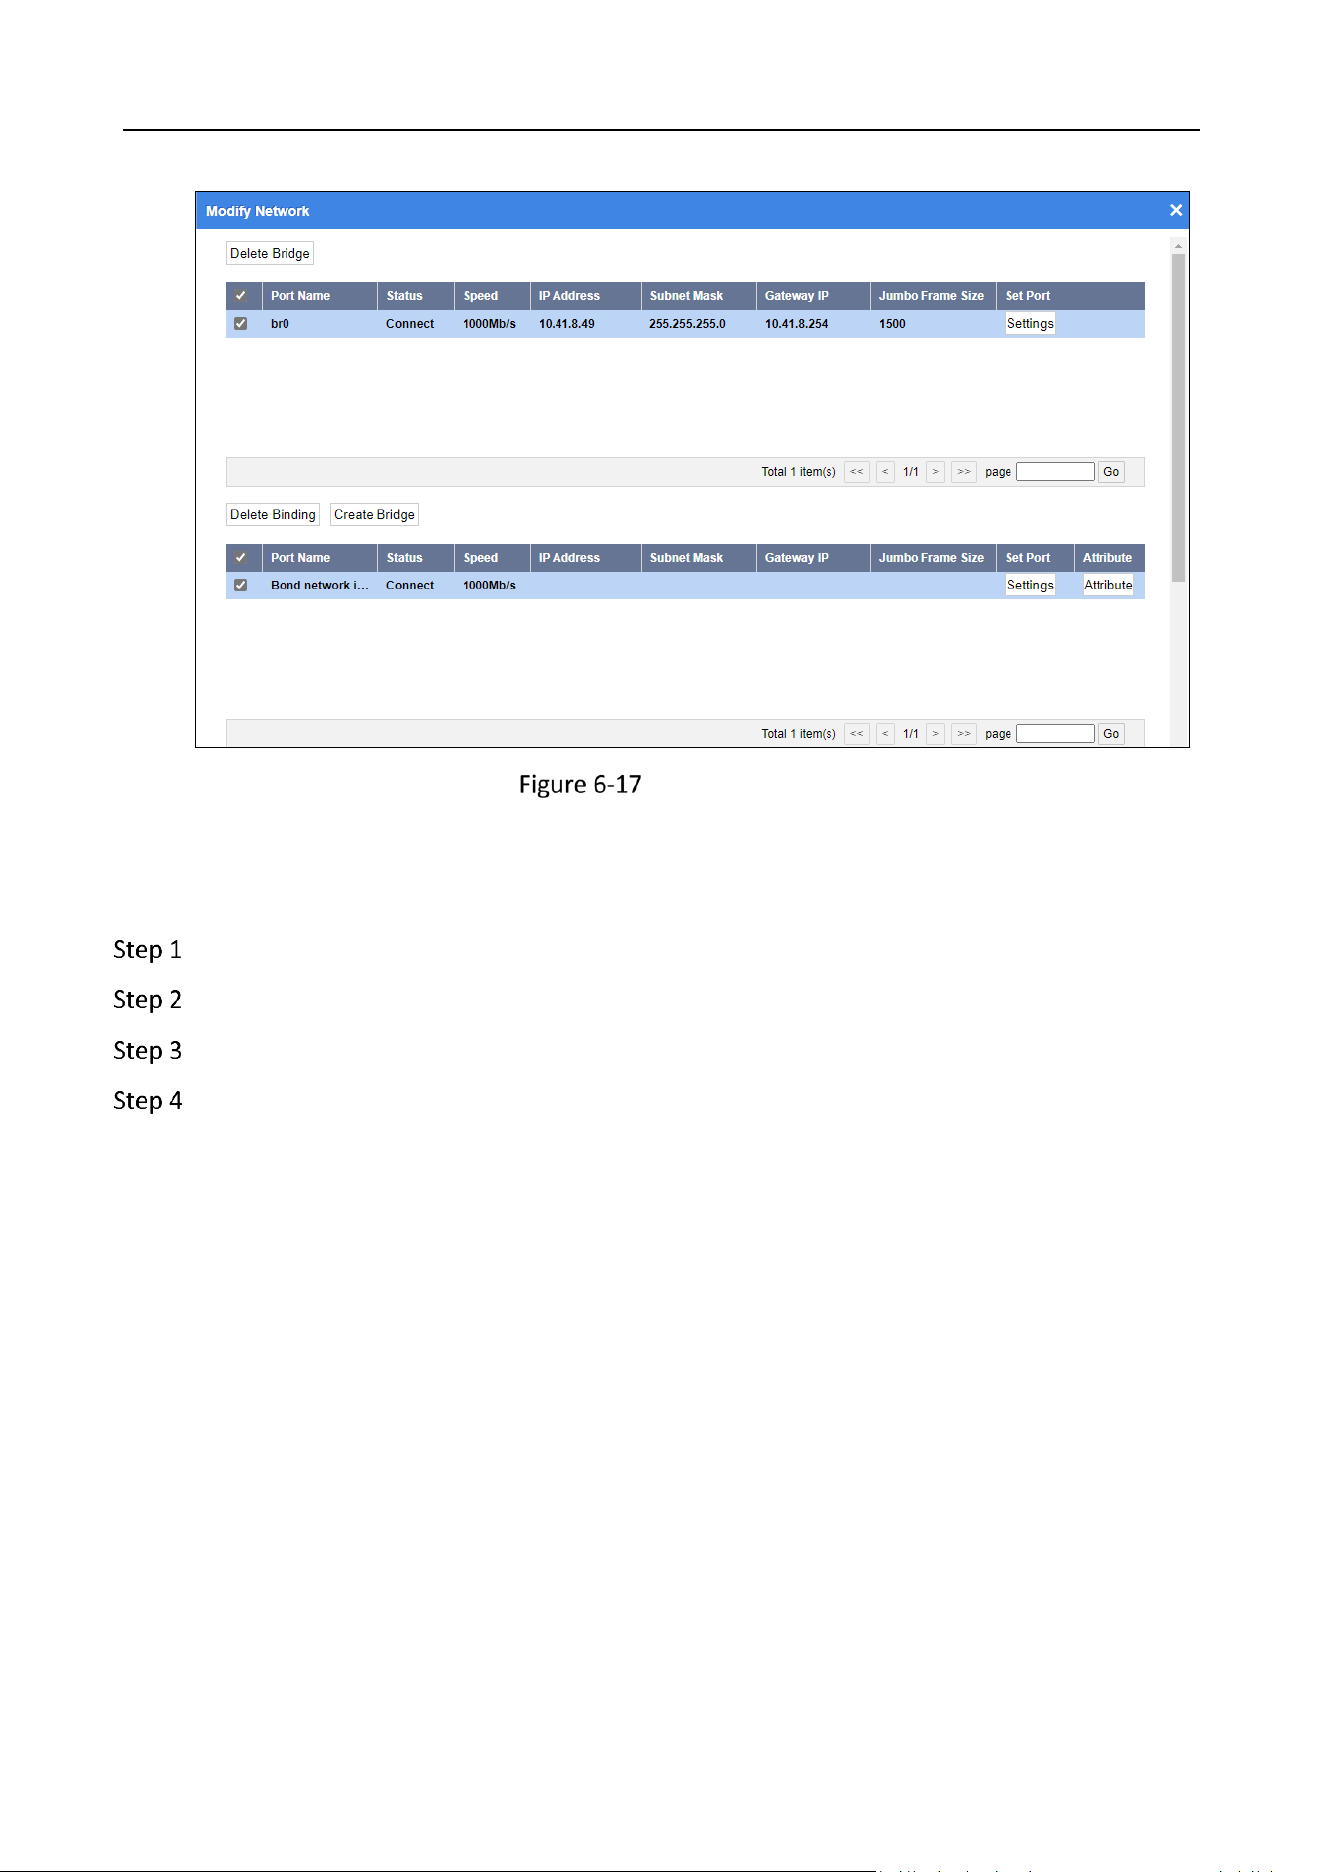
Modify Network
You can view port name, status, speed, IP address, subnet mask, gateway IP, and jumbo frame size,
bound ports, and modify network parameters.
Go to Device.
Click Information Overview.
Click Modify Network.
Storage Management System • User Manual
46
Modify Network
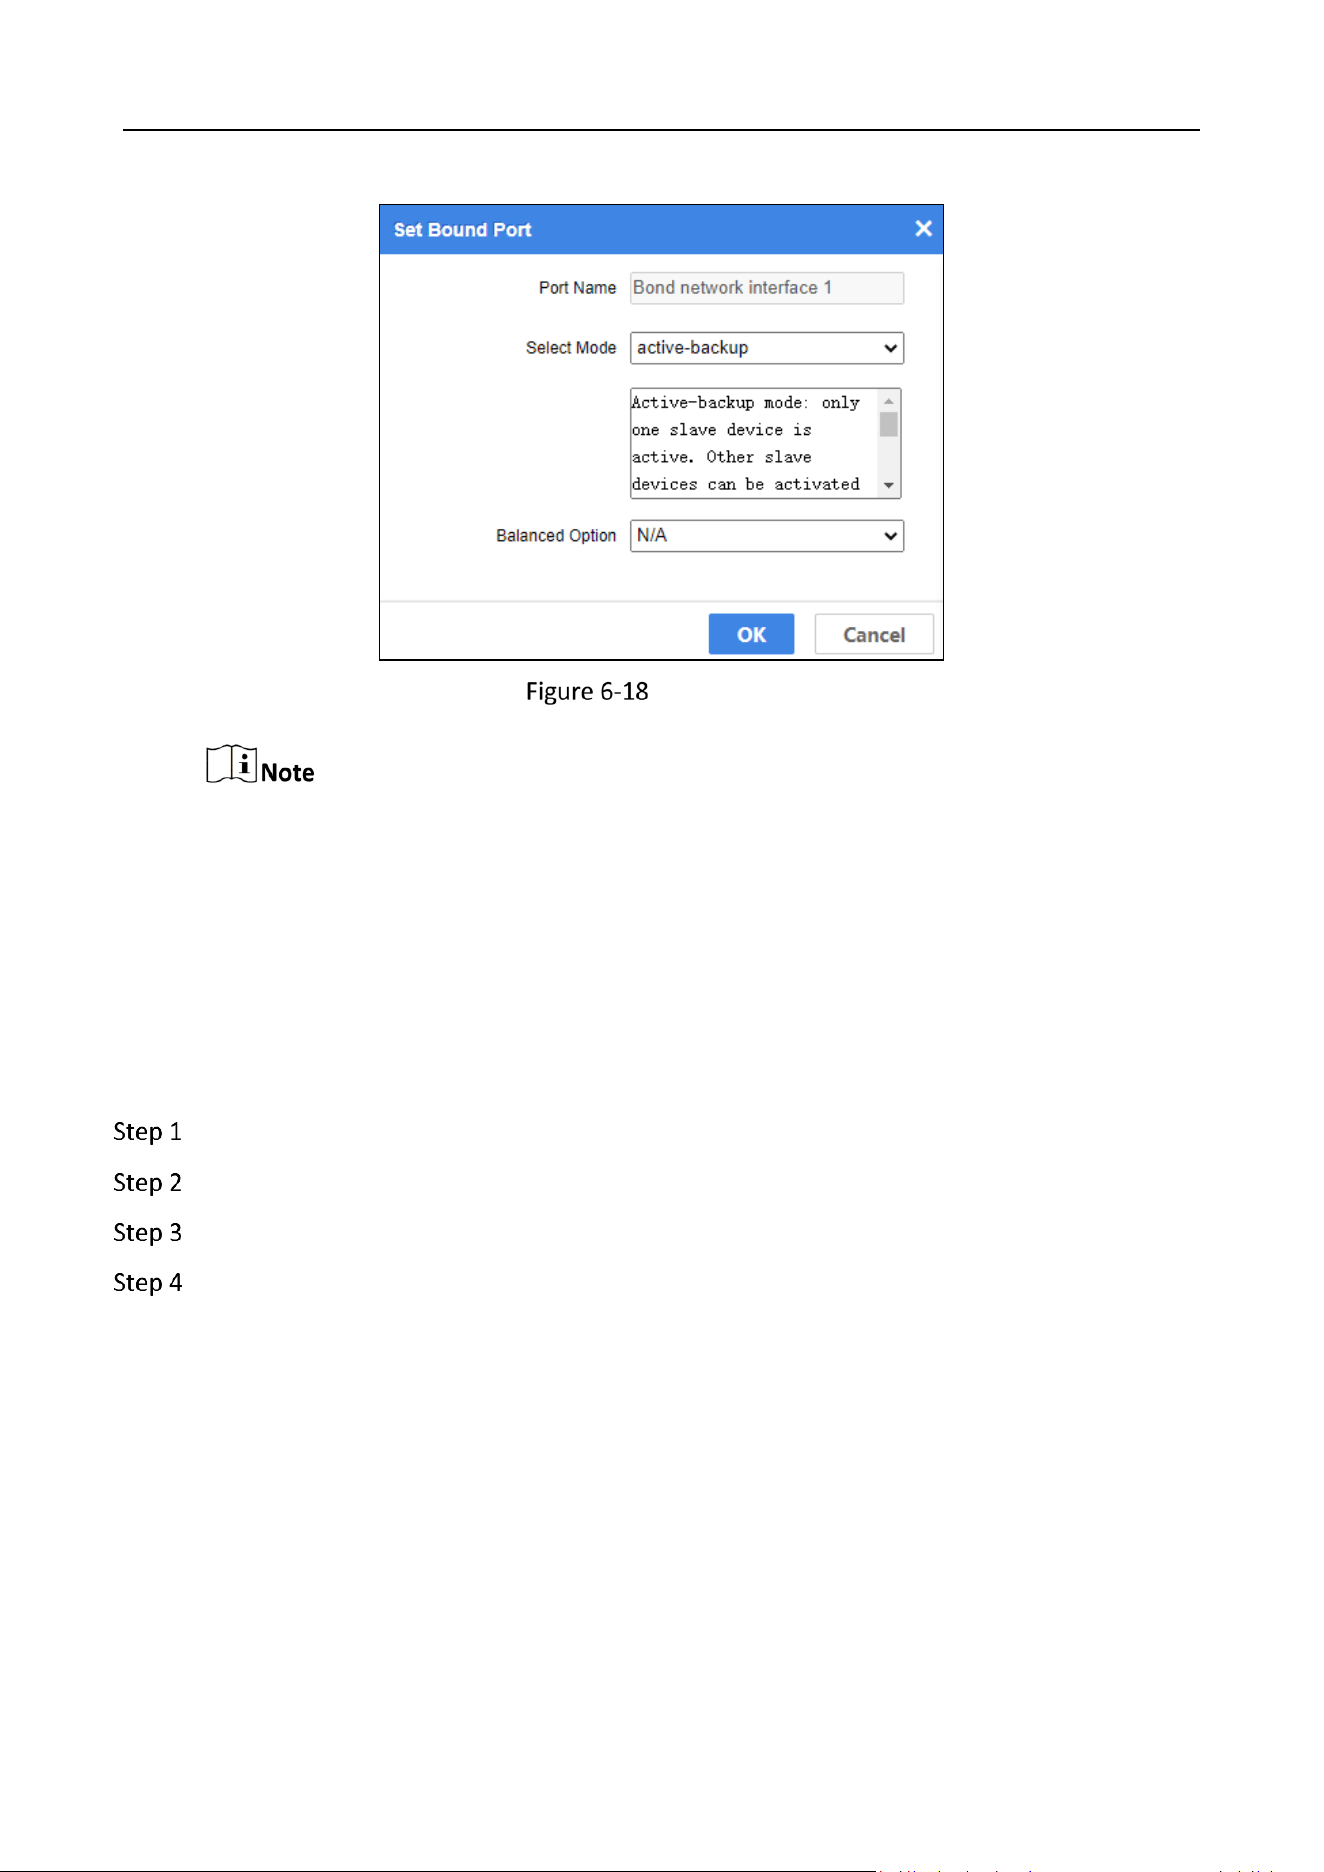
Set Bound Port
Go to Device.
Click Information Overview.
Click Modify Network.
Click Settings of a bound port.
Port Name
Not editable.
Select Mode
3 bound modes are selectable. Default mode is active-backup.
Storage Management System • User Manual
47
Set Bound Port
Management port does not support port binding.
Connect all bound ports to network.
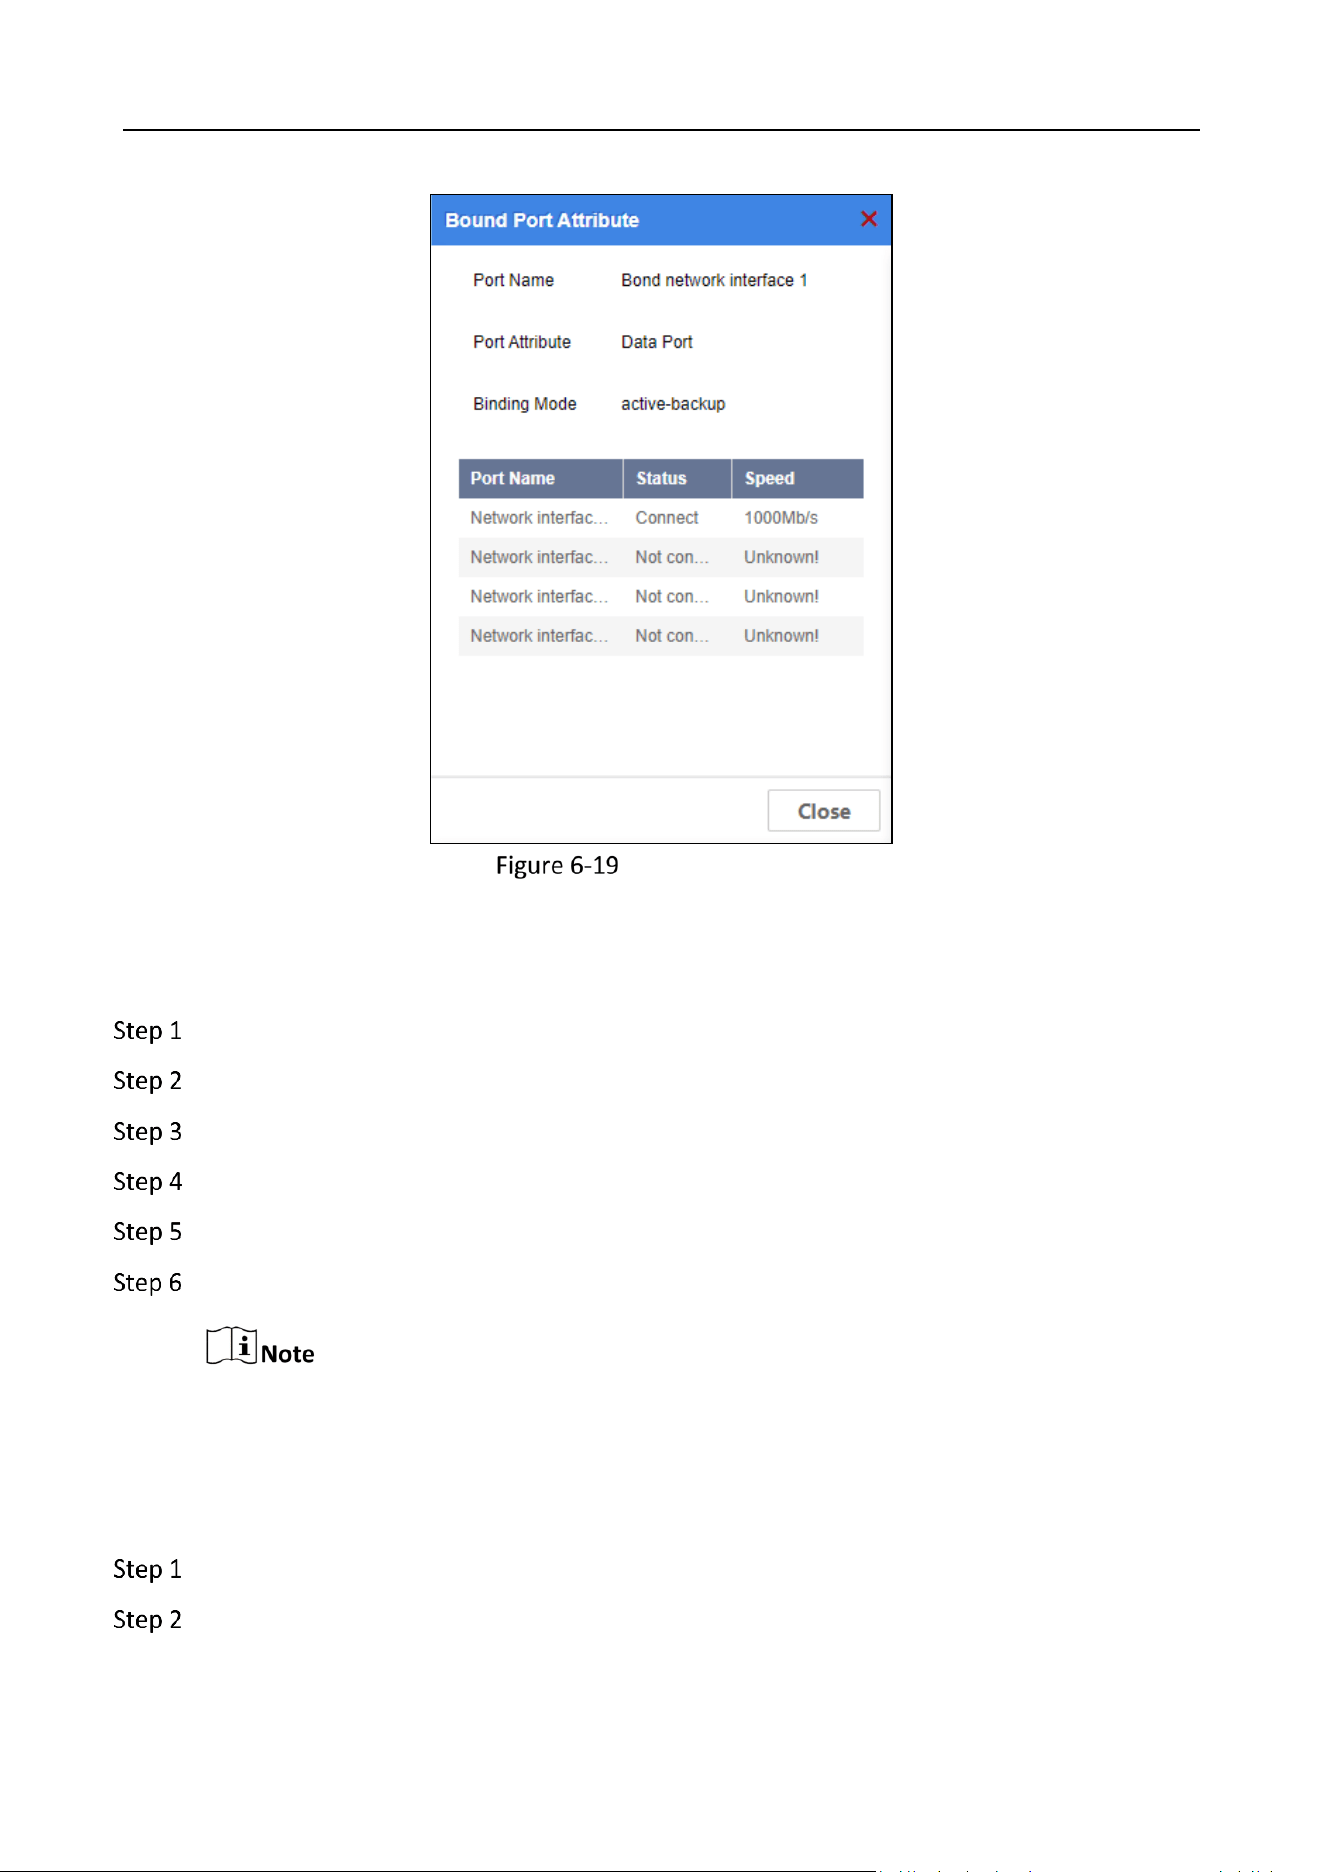
View Bound Port Attribute
Purpose:
View bound port attribute, including port name, port attribute, binding mode, etc.
Go to Device.
Click Information Overview.
Click Modify Network.
Click Attribute of a bound port.
Storage Management System • User Manual
48
Bound Port Attribute
Delete Bound Port
Go to Device.
Click Information Overview.
Click Modify Network.
Check bound port to delete.
Click Delete Binding.
Click OK in message box to confirm the operation.
Unbounded ports will be listed in top half of the page.
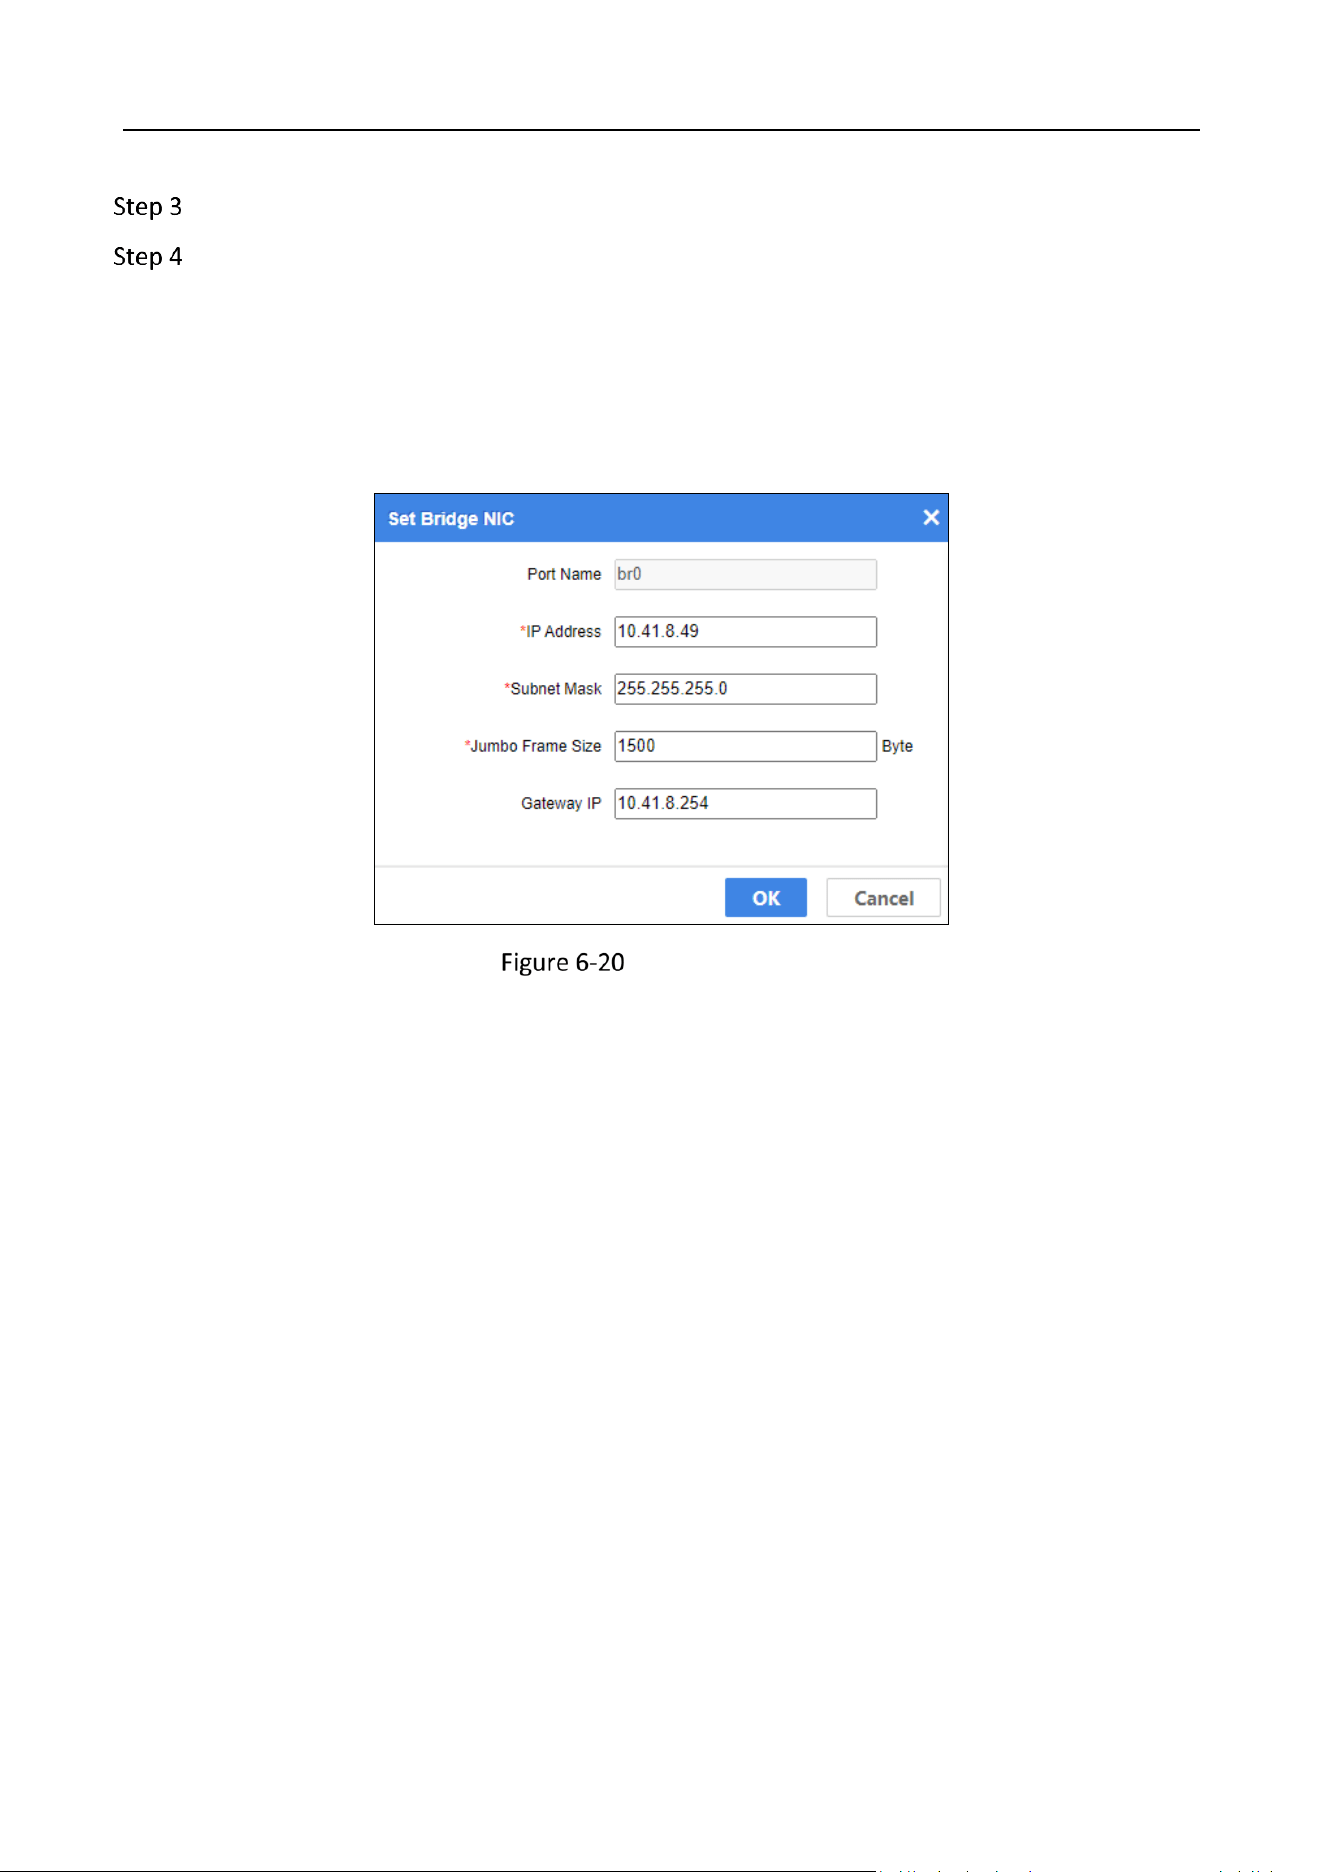
Set Port Parameters
Go to Device.
Click Information Overview.
Storage Management System • User Manual
49
Click Modify Network.
Click Settings of unbounded port to configure its network parameters.
Port Name
Not editable.
Jumbo Frame Size
Default value is 1500. Default value is recommended.
Set Port Parameters
Storage Management System • User Manual
50
Chapter 7 Resource
Purpose:
Manage resource pool and RAID.
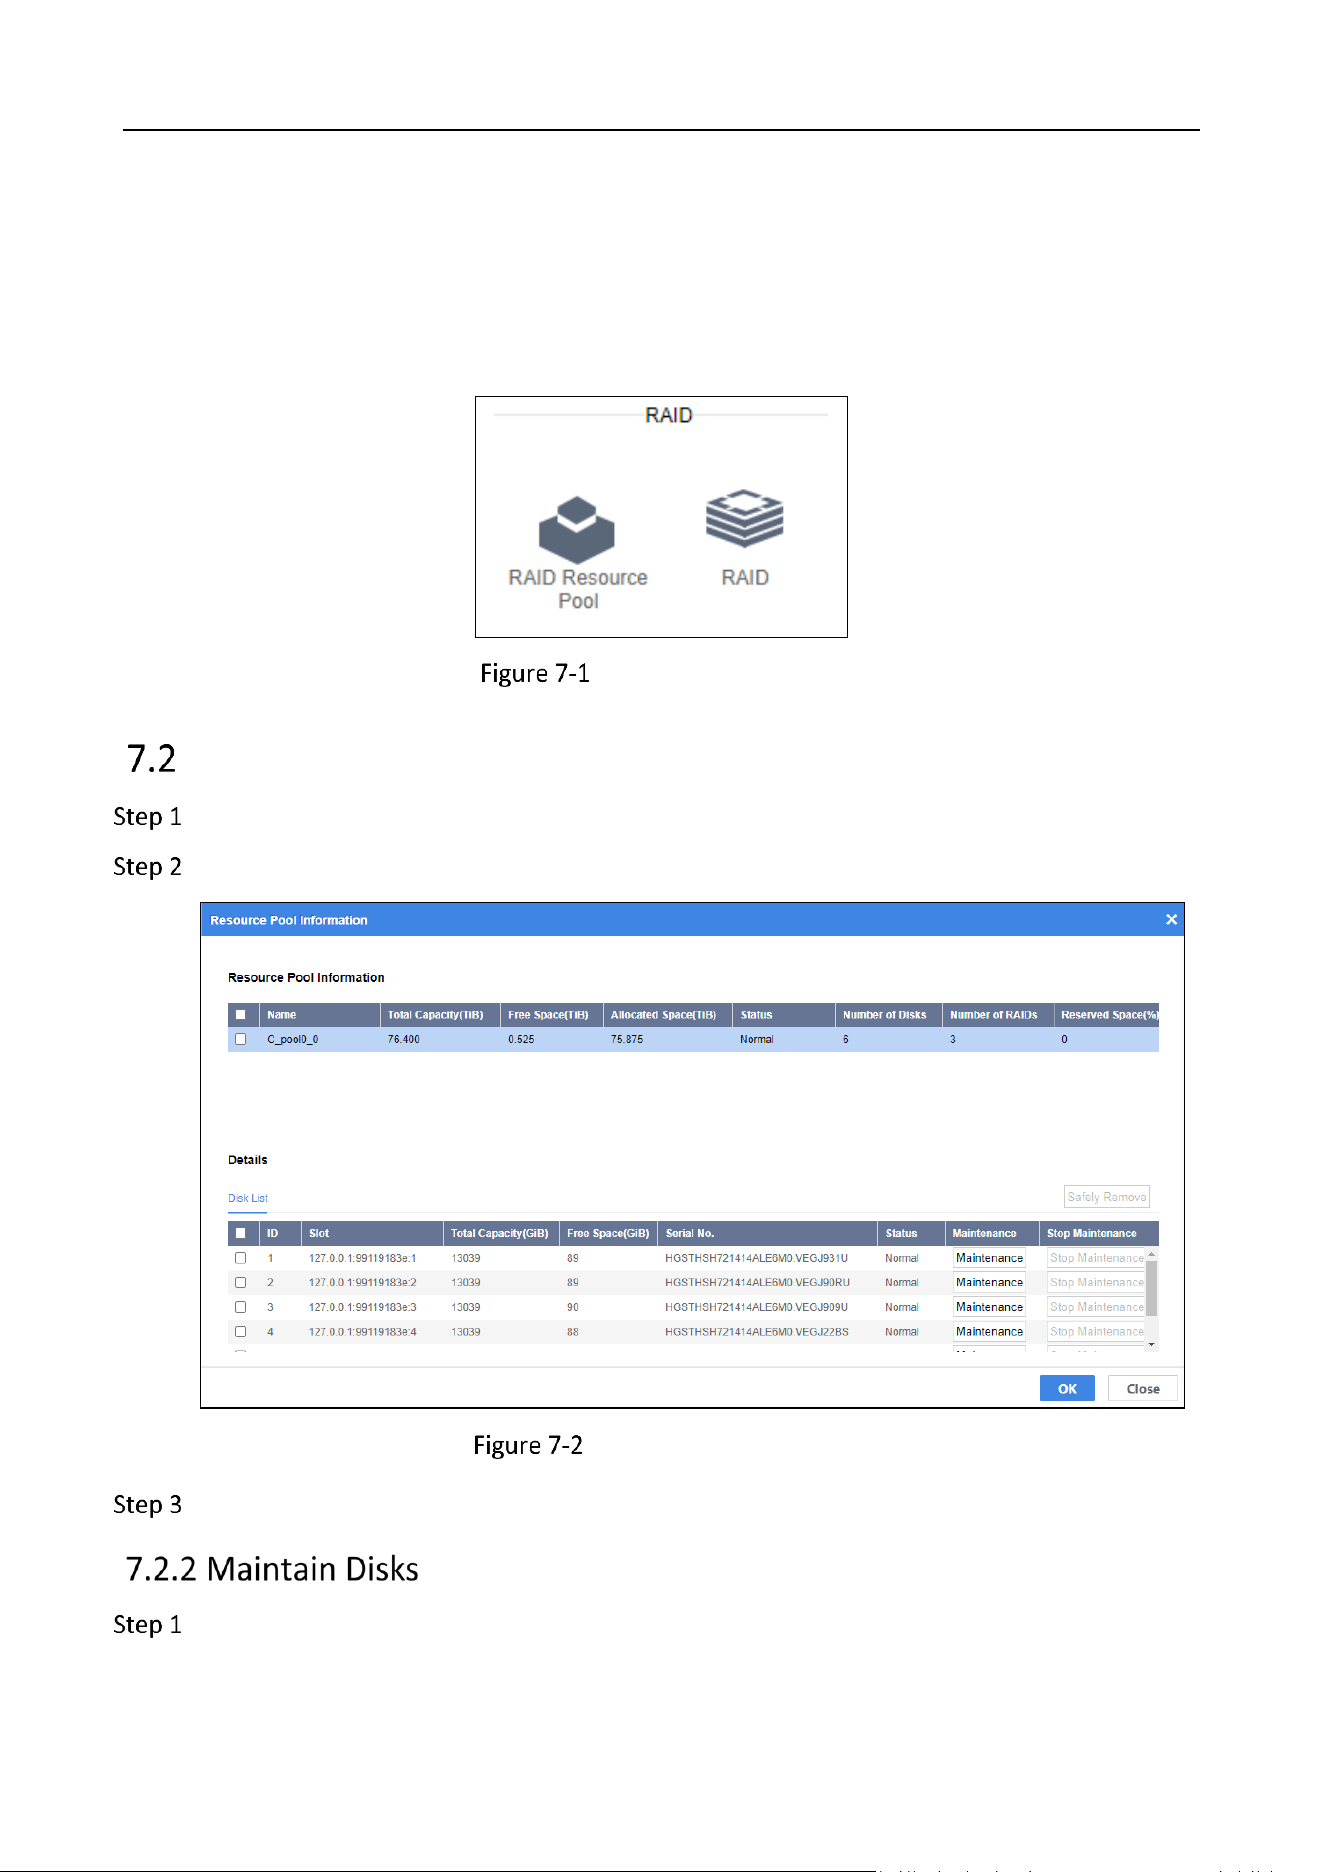
Details and Management
Manage RAID Resource Pool
Go to Resource.
Click RAID Resource Pool.
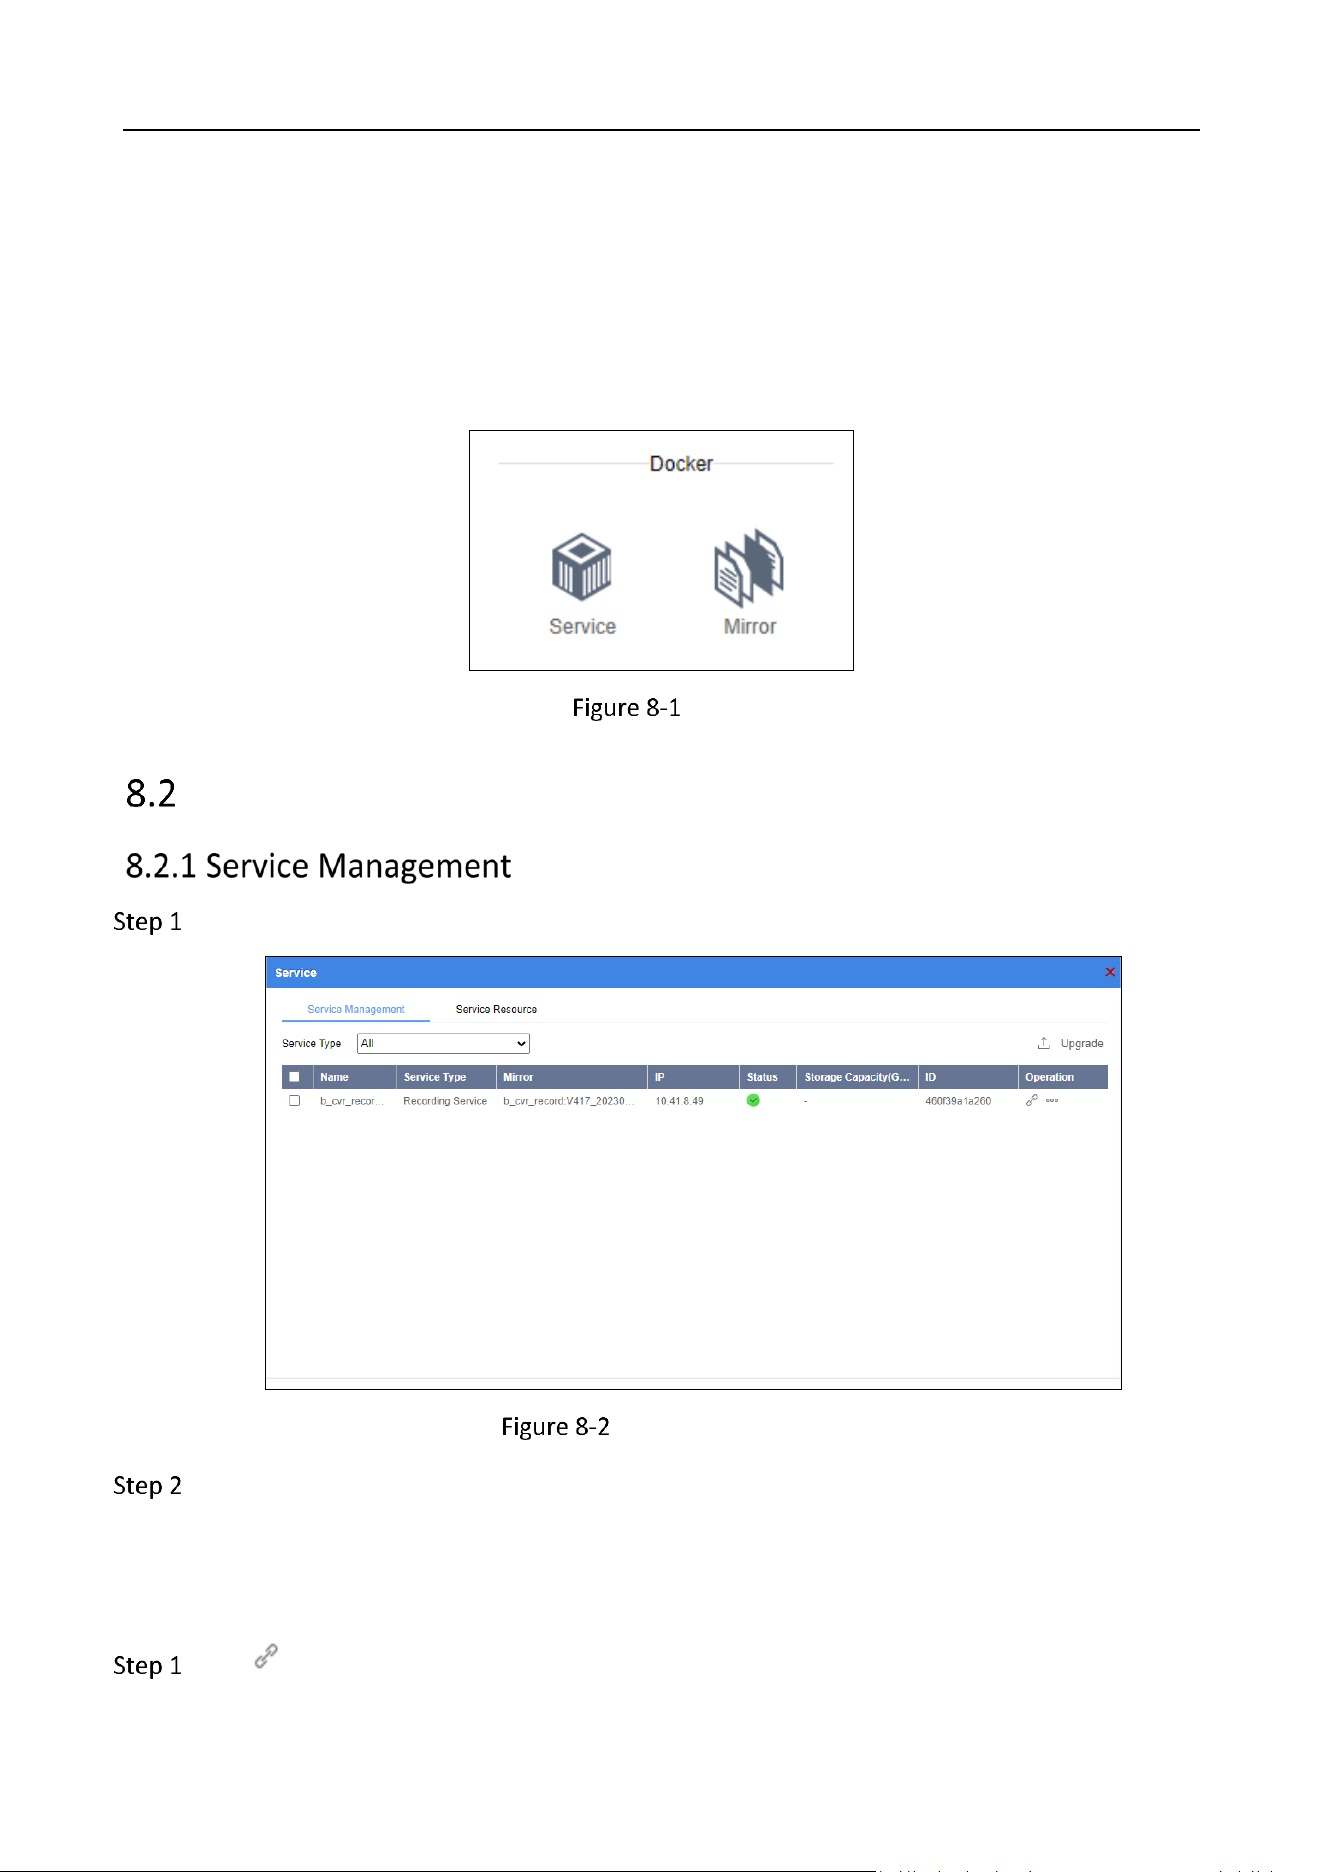
Resource Pool Information
View the resource pool information and disk information.
Go to Resource.

Storage Management System • User Manual
51
Click RAID Resource Pool.
In the Disk List, click Maintenance in the information bar of the disk that need to be
maintained.
Click Stop Maintenance to stop disk maintenance.
Go to Resource.
Click RAID Resource Pool.
In the Disk List, check disk(s) to be removed.
Click Safely Remove.
Disk Removal Prompt
Remove disks or change disks.
Click Continue to Move to remove the selected disk(s) safely.
Click to view Changing HDD Steps and follow the steps.
Manage RAID
Go to Resource.
Click RAID to view RAID information.

Storage Management System • User Manual
52
RAID Information
Check RAID and click Details to view RAID details.
Storage Management System • User Manual
53
Chapter 8 Storage
Purpose:
Manage service and mirror.
Storage
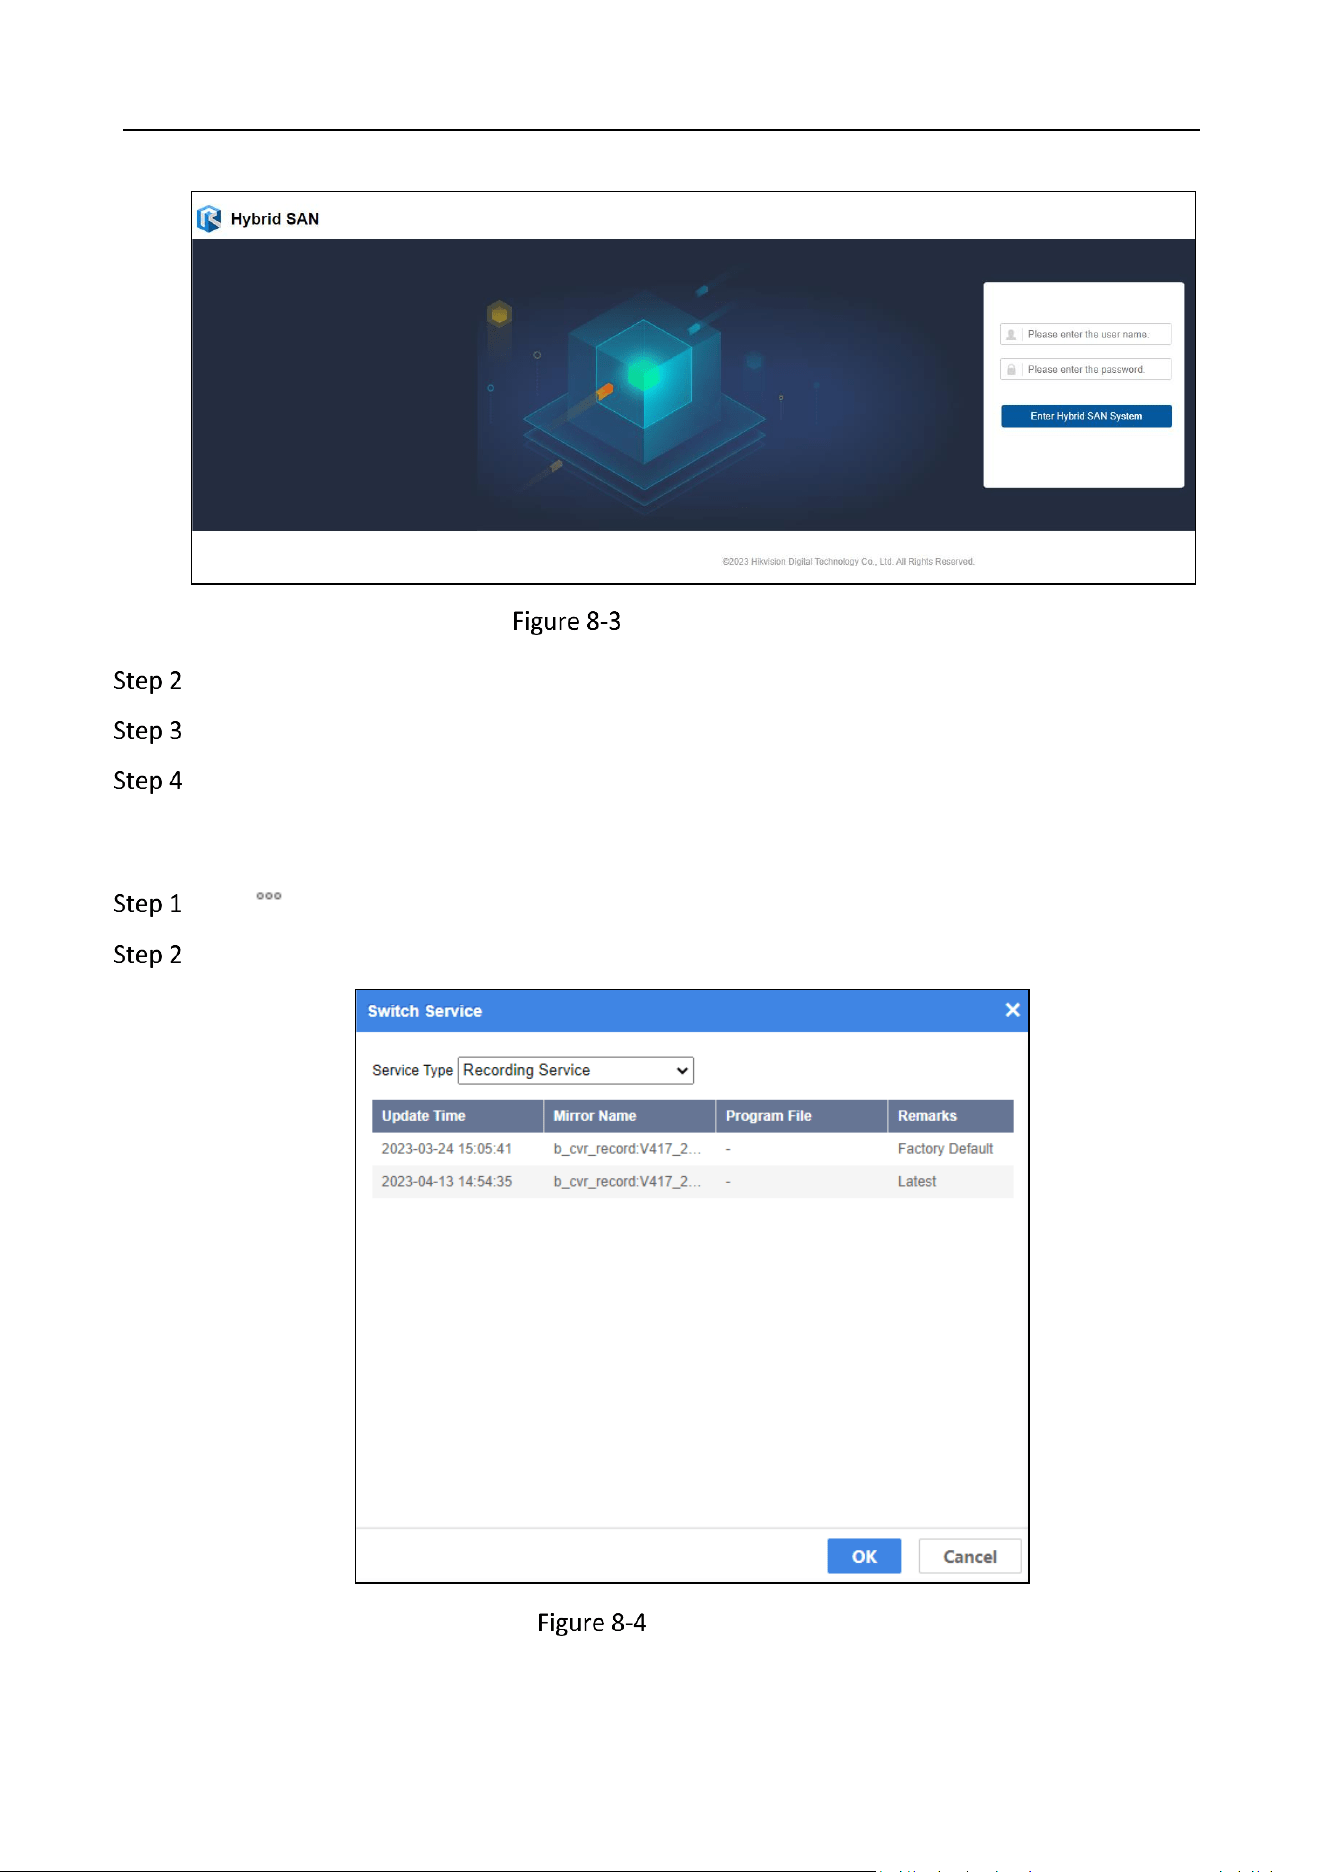
Service
Go to Storage > Service > Service Management.
Service Management
Select Service Type.
View the service information.
Redirect to Hybrid SAN System
Click to redirect to the Hybrid SAN system.
Storage Management System • User Manual
55
Select the Service Type in the drop-down box.
Select the service version to switch to.
Click OK.
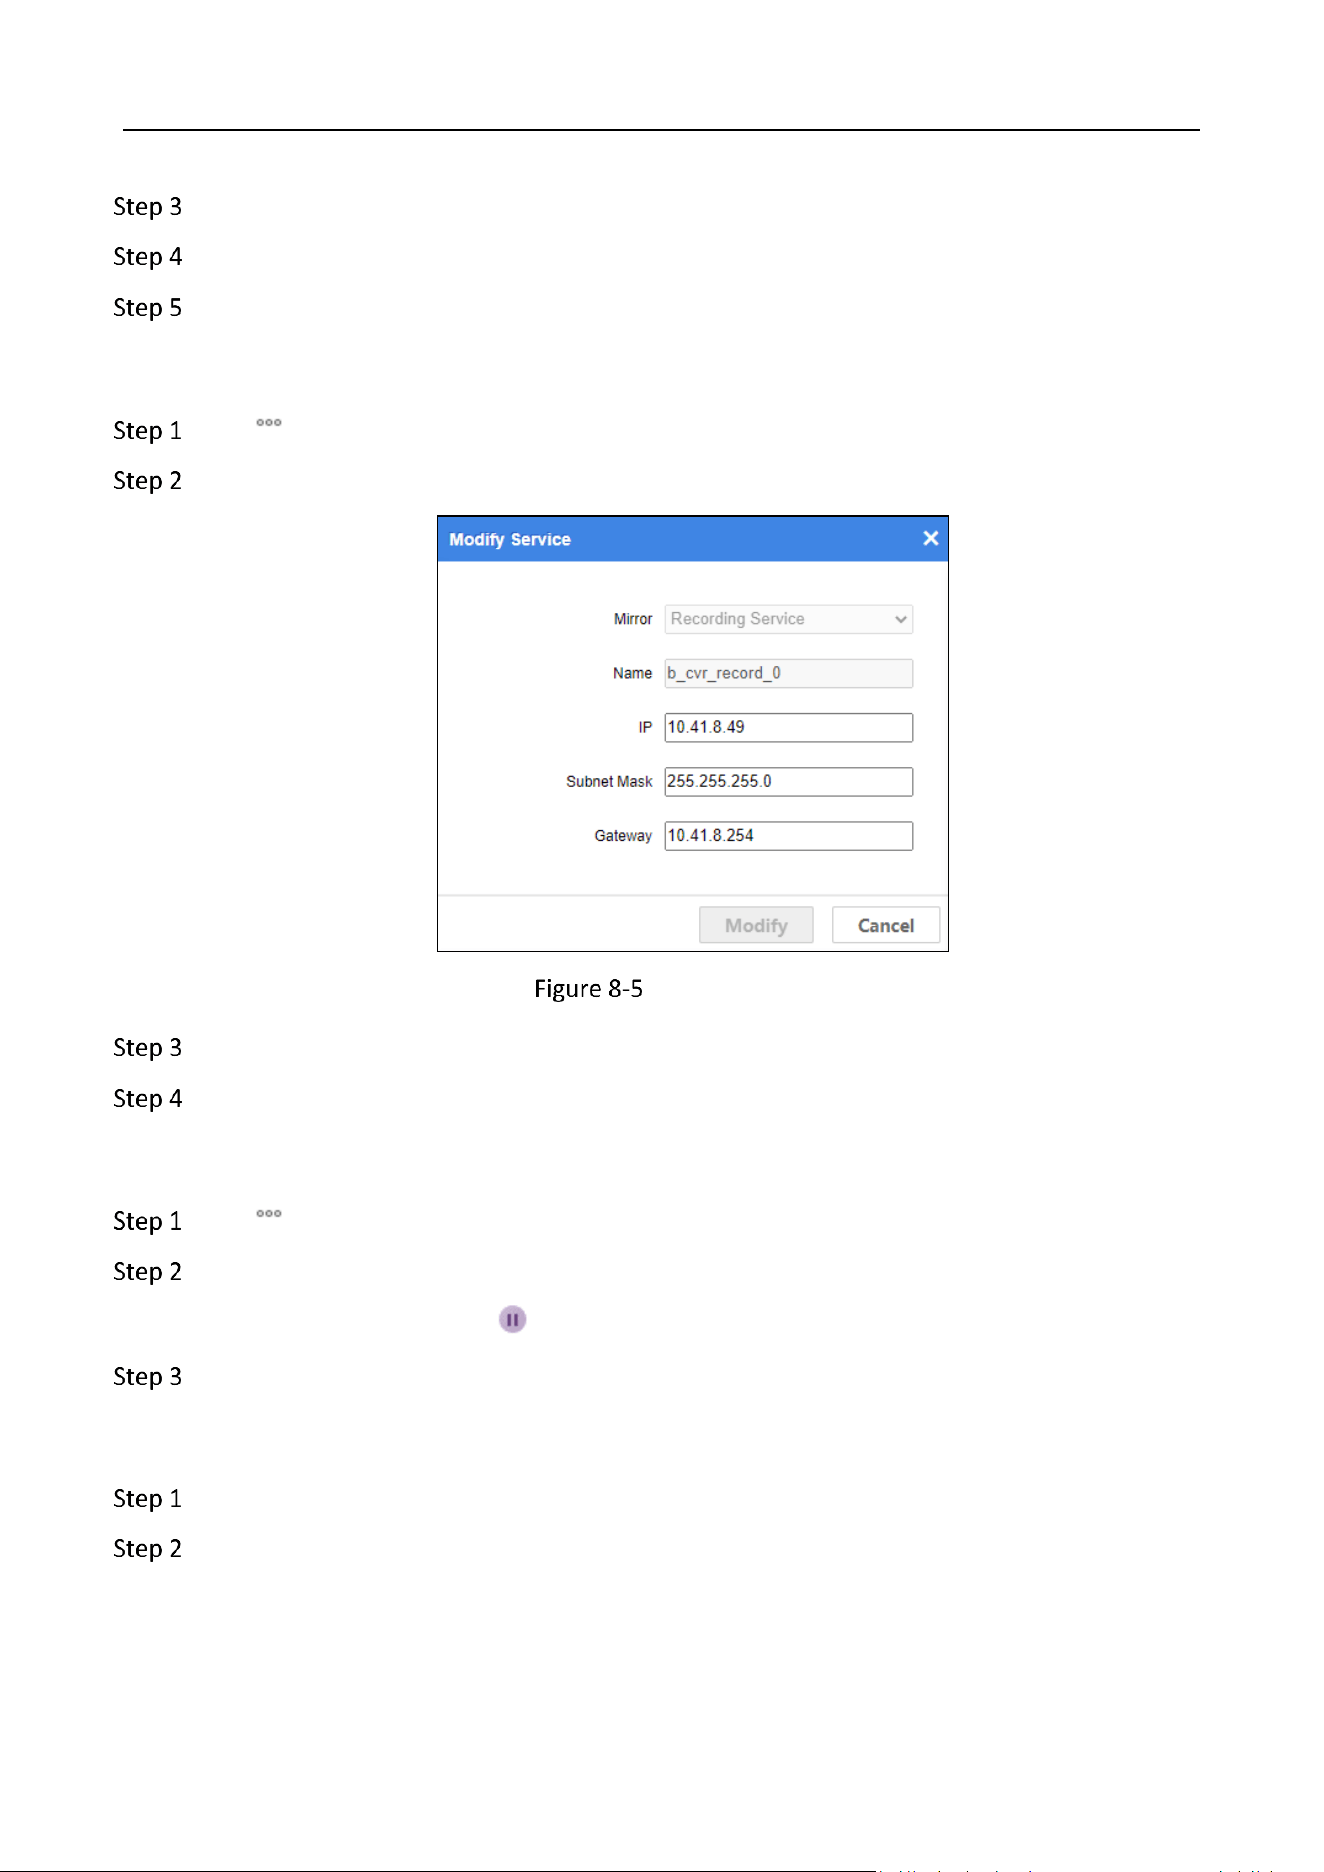
Modify Service
Click .
Click Modify Service.
Modify Service
Edit the IP, Subnet Mask, and Gateway of the service.
Click Modify.
Pause Service
Click .
Click Pause Service.
The Status icon switches to .
Click Start Service to recover.
Upgrade Service
Check the service.
Click Upgrade.
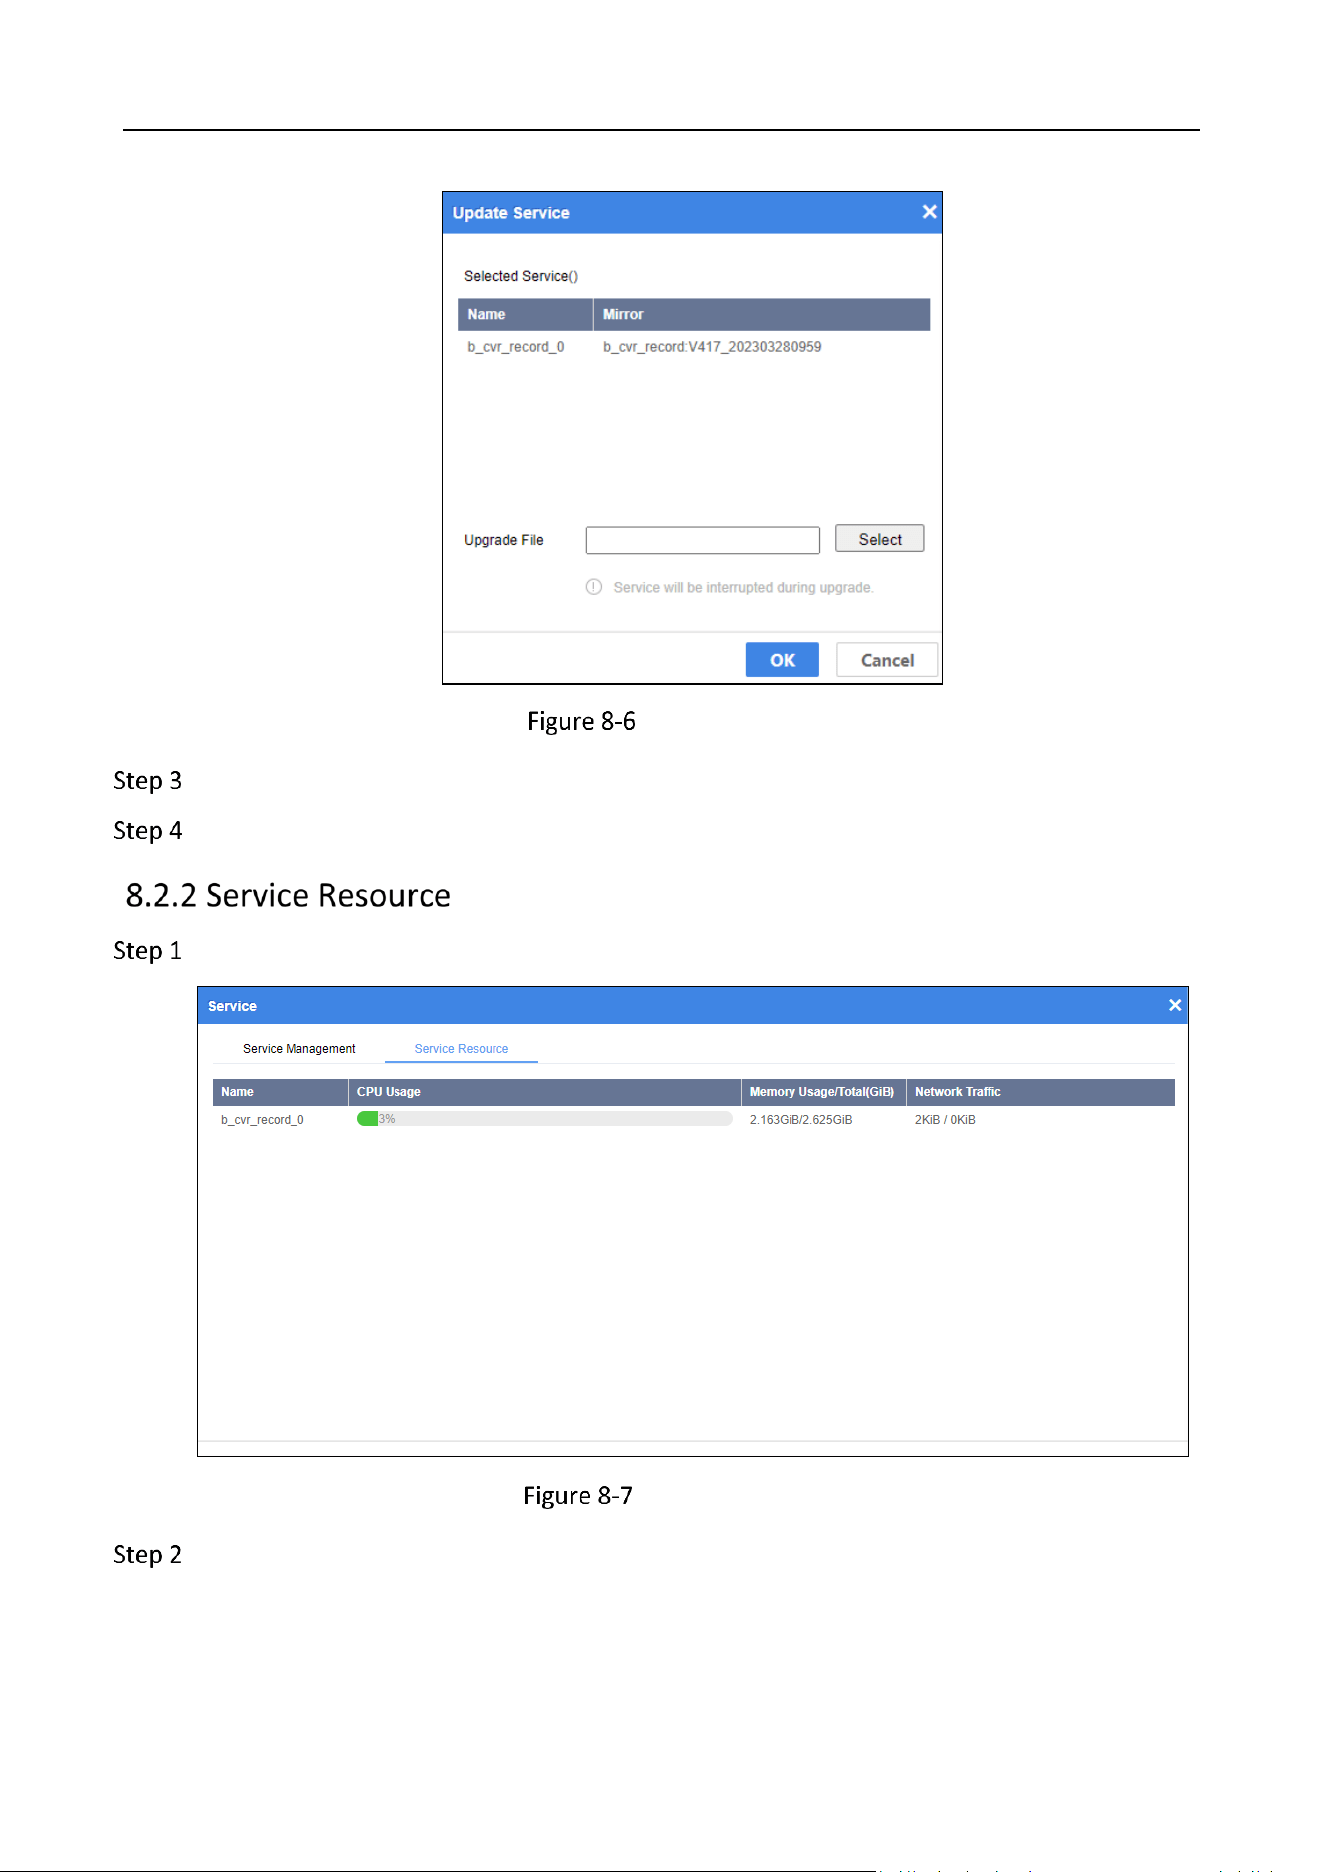
Storage Management System • User Manual
56
Upgrade Service
Click Select to select and open an upgrade file.
Click OK.
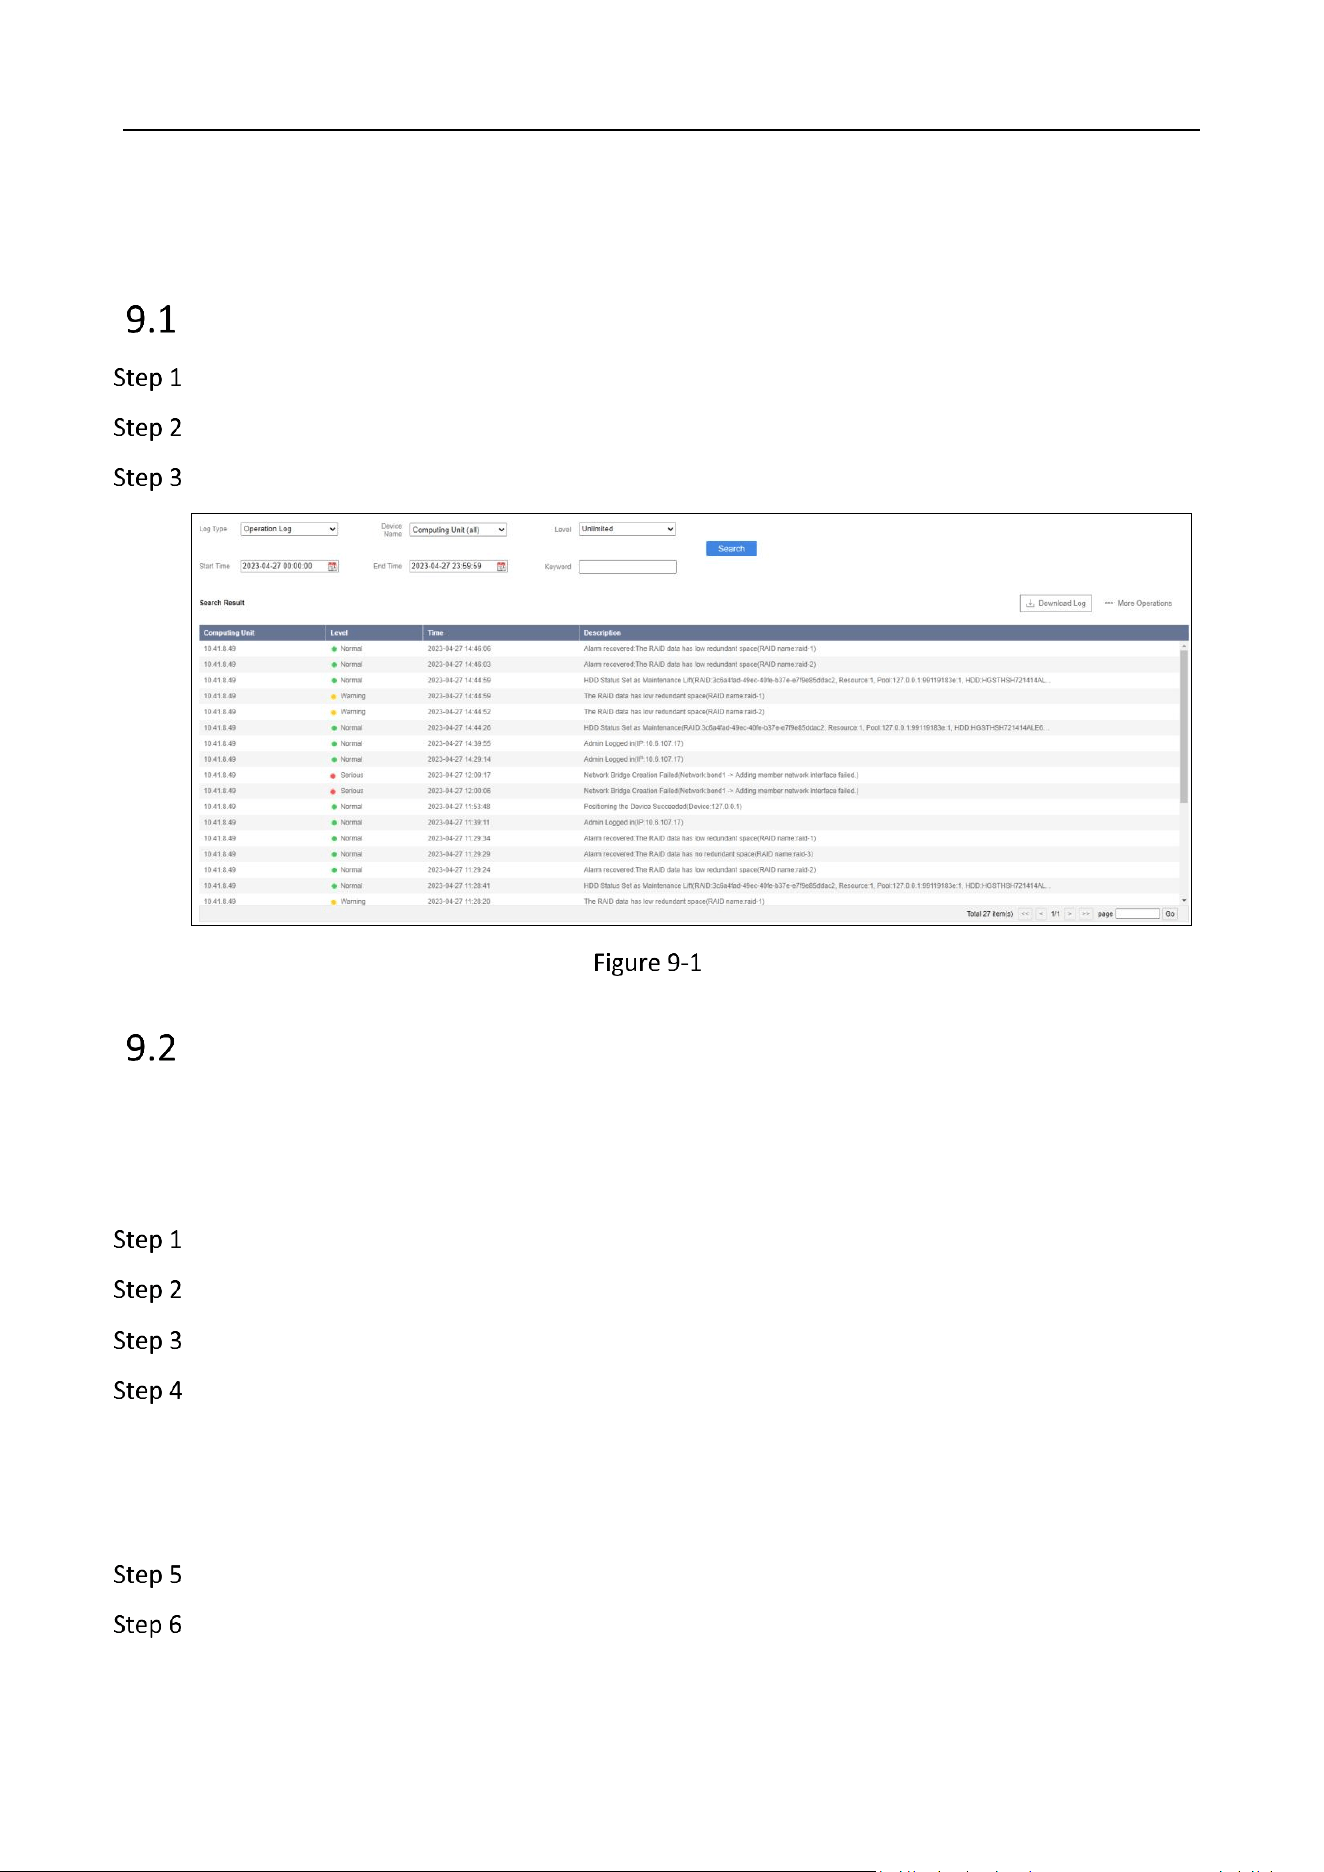
Go to Storage > Service > Service Resource.
Service Resource
View the service resource information.

Storage Management System • User Manual
57
Mirror
Go to Storage.
Click Mirror.
Mirror
Select the Service Type in the drop-down box.
View the Name, Update Time and Remarks of the mirrors.
Click Upload and select a mirror to upload.
Check the mirror(s) to delete and click delete.
Storage Management System • User Manual
58
Chapter 9 Log
Search Log
Go to Log.
Specify search conditions.
Click Search.
Log
Download Log
Before you start:
Enable web browser file download permission by going to Options > Security > Internet > Custom
Level Download.
Go to Log.
Click Download Log.
Check Maintenance Log or Module Log.
Specify download conditions.
Maintenance log: Select log type in Downloads drop-down box, and select Download
Mode.
Module log: Select the module in Downloads drop-down box..
Check the computing unit to download.
Click Download.

Storage Management System • User Manual
59
View the download progress in Progress.
Clear Log
Go to Log.
Click More Operations and select Clear Log.
Enter Admin Password and Verification Code.
Click OK to confirm the operation.
The operation will clear all logs in device. You are recommended to back up logs before clearing.

Storage Management System • User Manual
60
Chapter 10 Maintenance
Version Information
Go to Maintenance.
Click Version Information.
Select a node in Node List.
View the version information.
Version Information
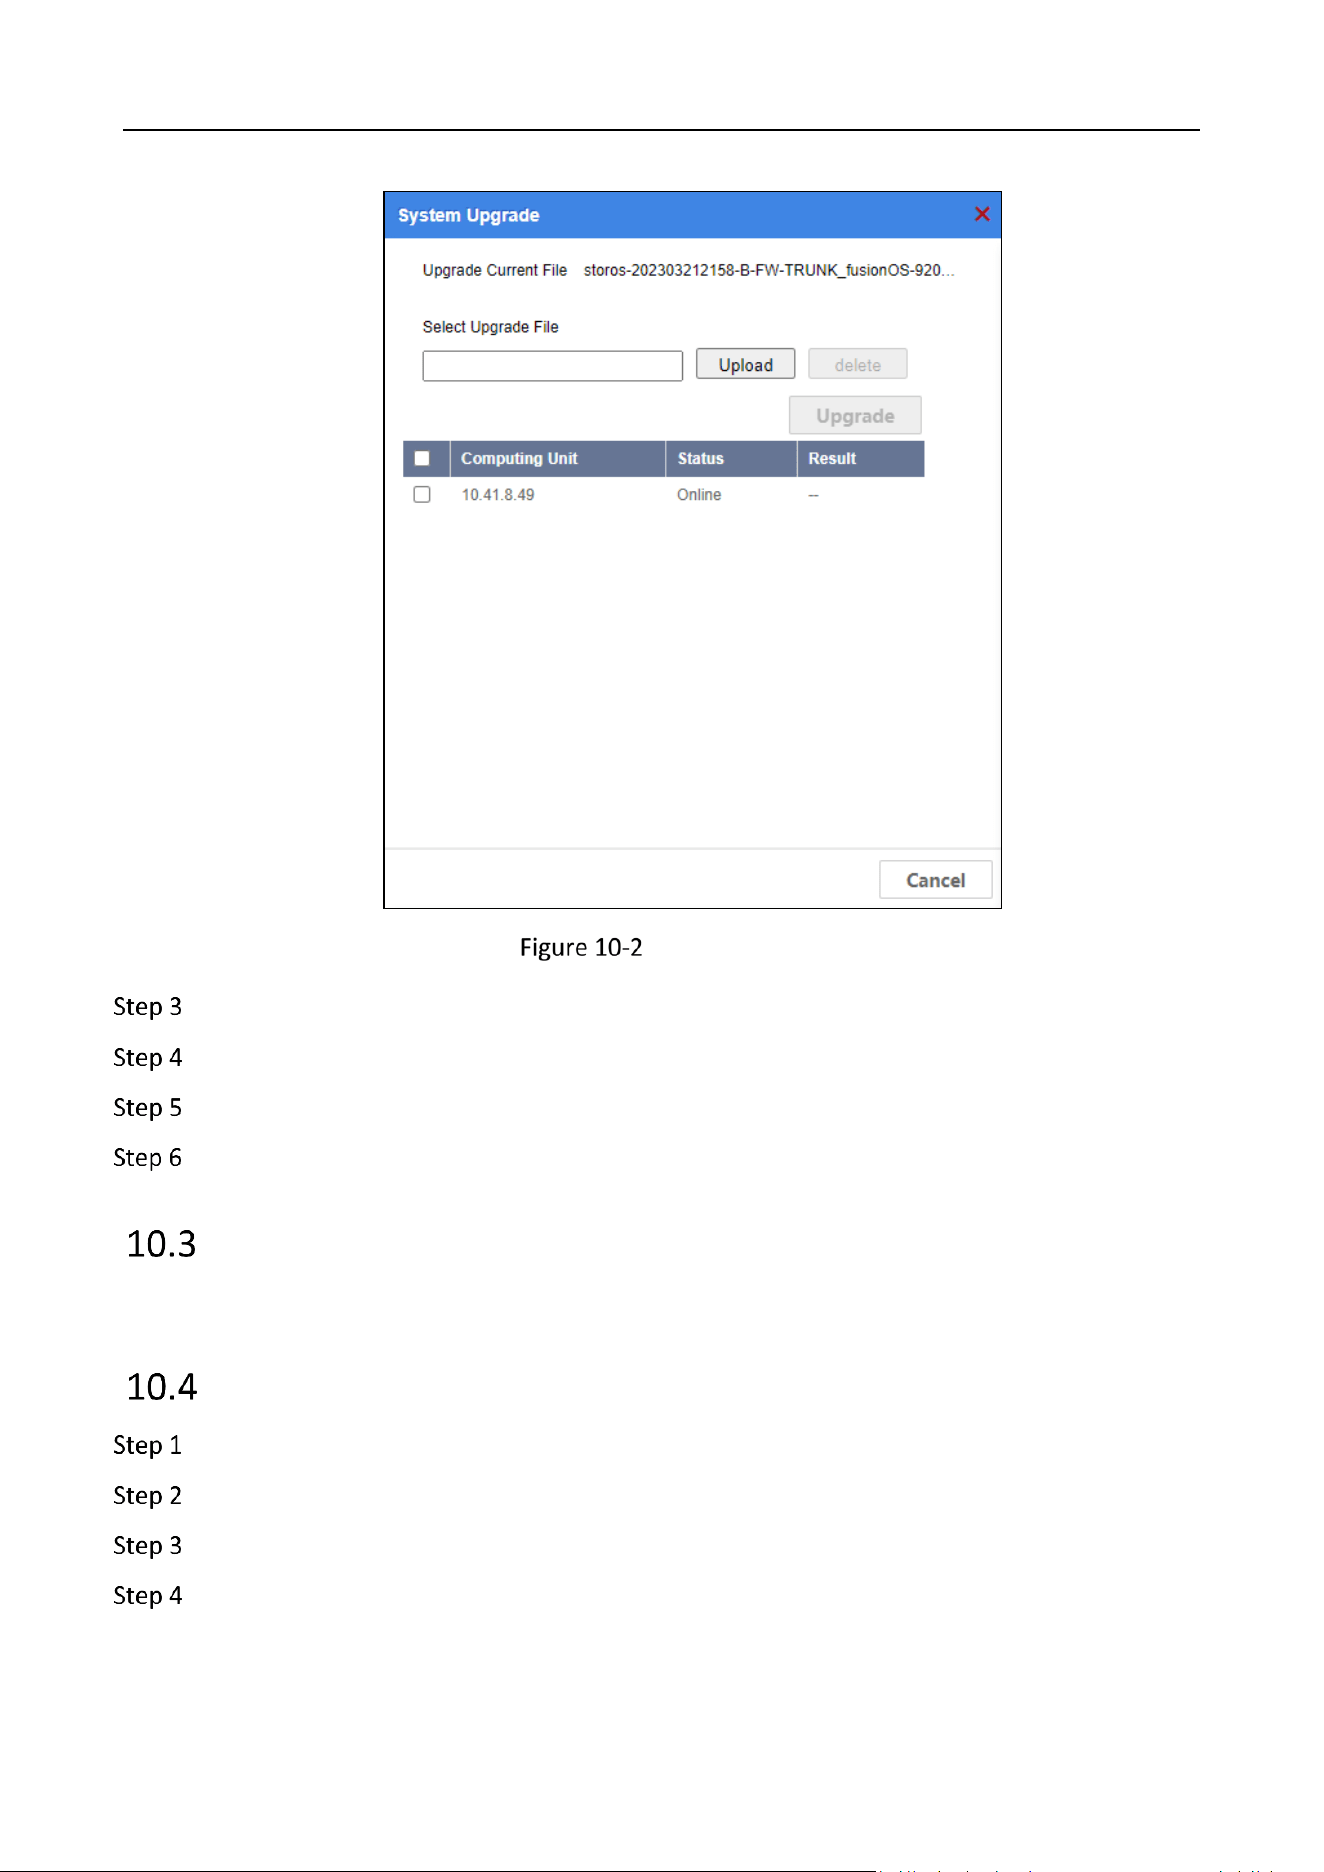
System Upgrade
Go to Maintenance.
Click Upgrade.
Storage Management System • User Manual
61
System Upgrade
Click Upload to select upgrade file.
Check the computing unit to upgrade.
Click Upgrade.
Reboot the computing unit after upgrade finishes.
Disk Management
For details, please refer to Manage Disk.
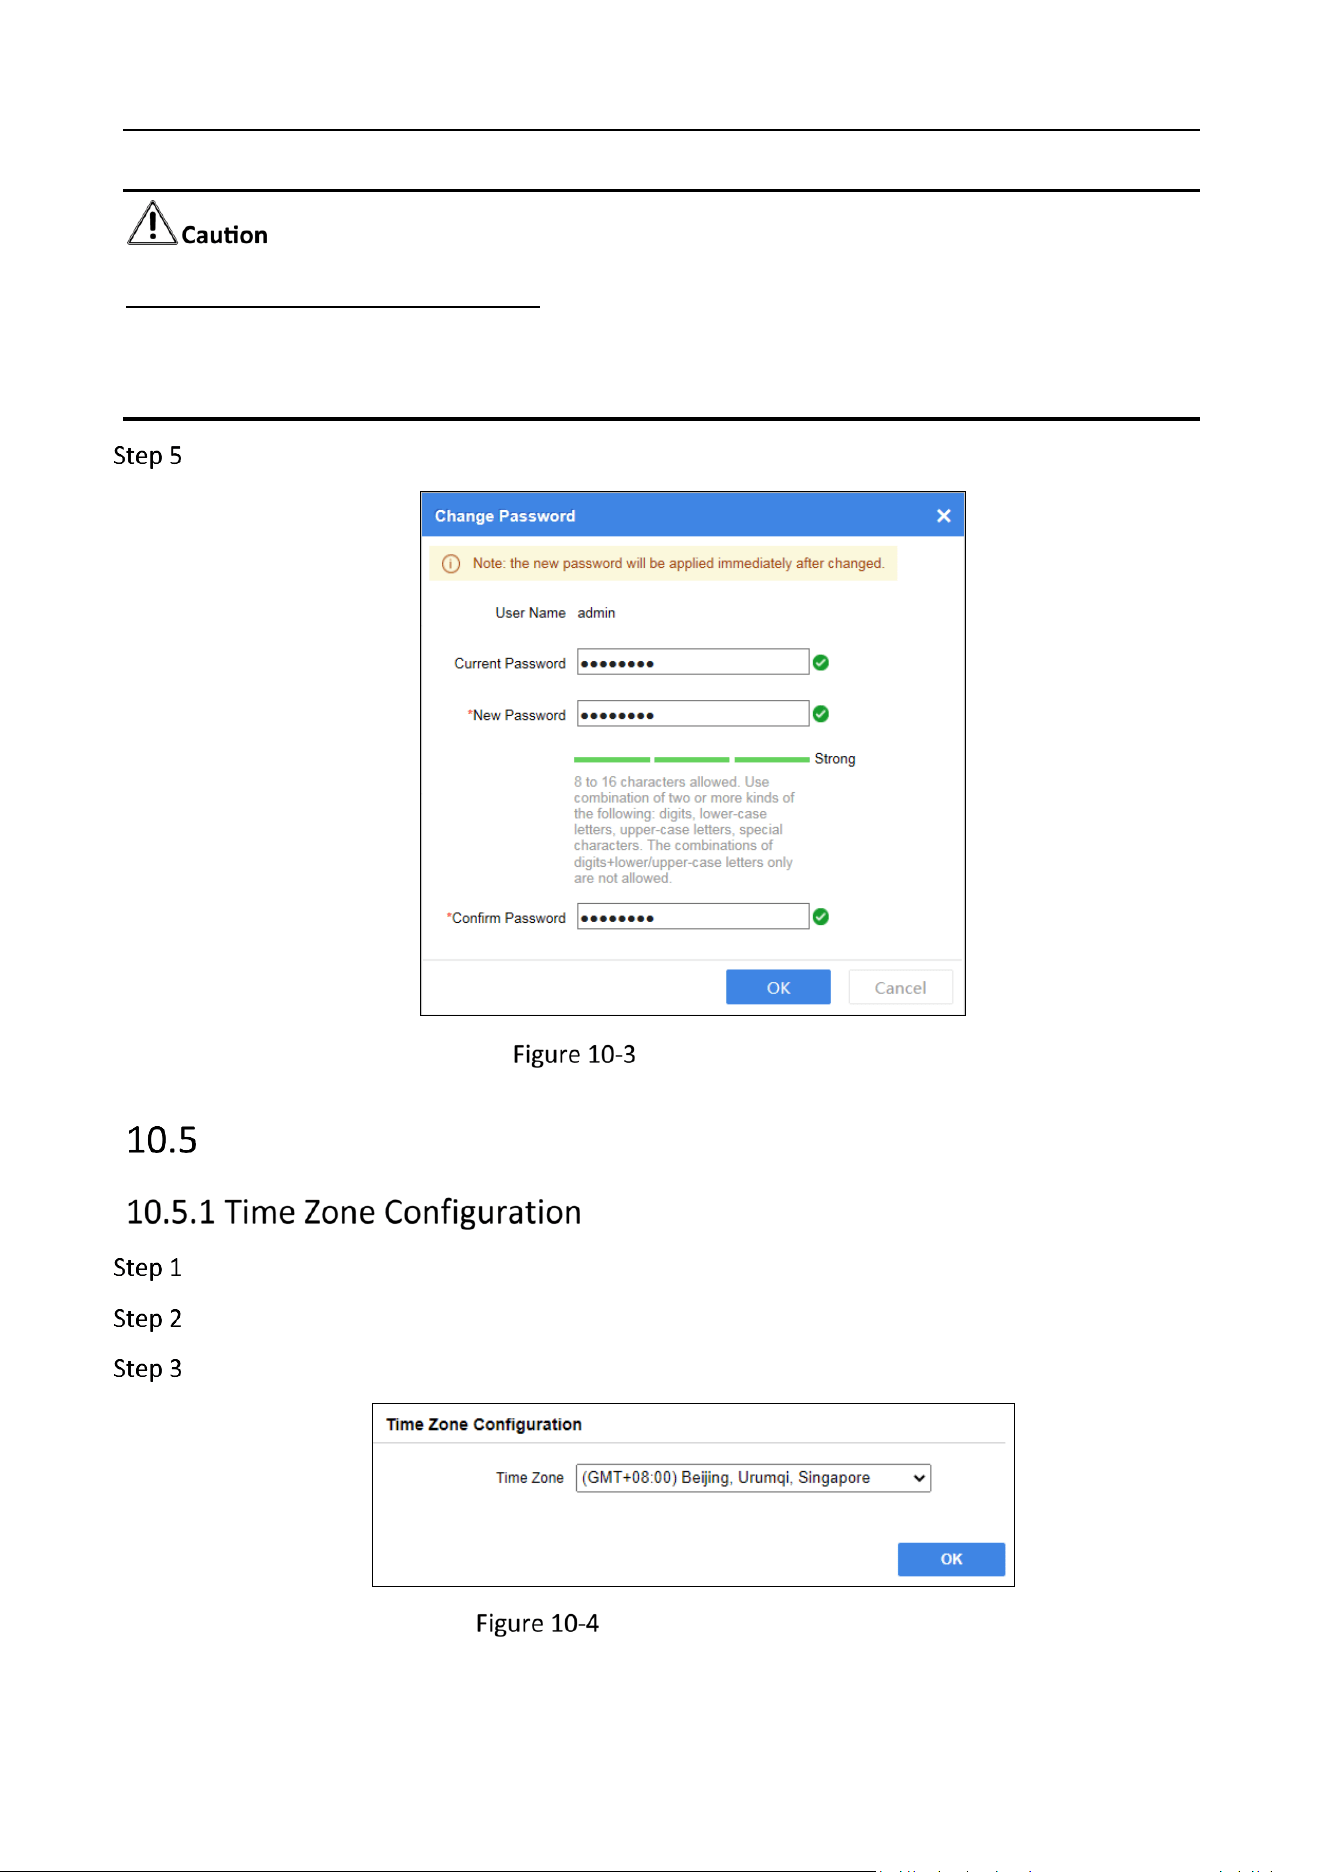
Password Management
Go to Maintenance.
Click Password Management.
Enter the Current Password.
Enter the same password in New Password and Confirm Password.
Storage Management System • User Manual
62
STRONG PASSWORD RECOMMENDED–We highly recommend you create a strong password of your
own choosing (Using a minimum of 8 characters, including at least three of the following categories:
upper case letters, lower case letters, numbers, and special characters.) in order to increase the
security of your product. And we recommend you reset your password regularly, especially in the
high security system, resetting the password monthly or weekly can better protect your product.
Click OK.
Change Password
Time Management
Go to Maintenance.
Click Time Management.
Select Time Zone in the drop-down box.
Time Zone Configuration
Storage Management System • User Manual
63
Click OK.
Synchronize Time Manually
Go to Maintenance.
Click Time Management.
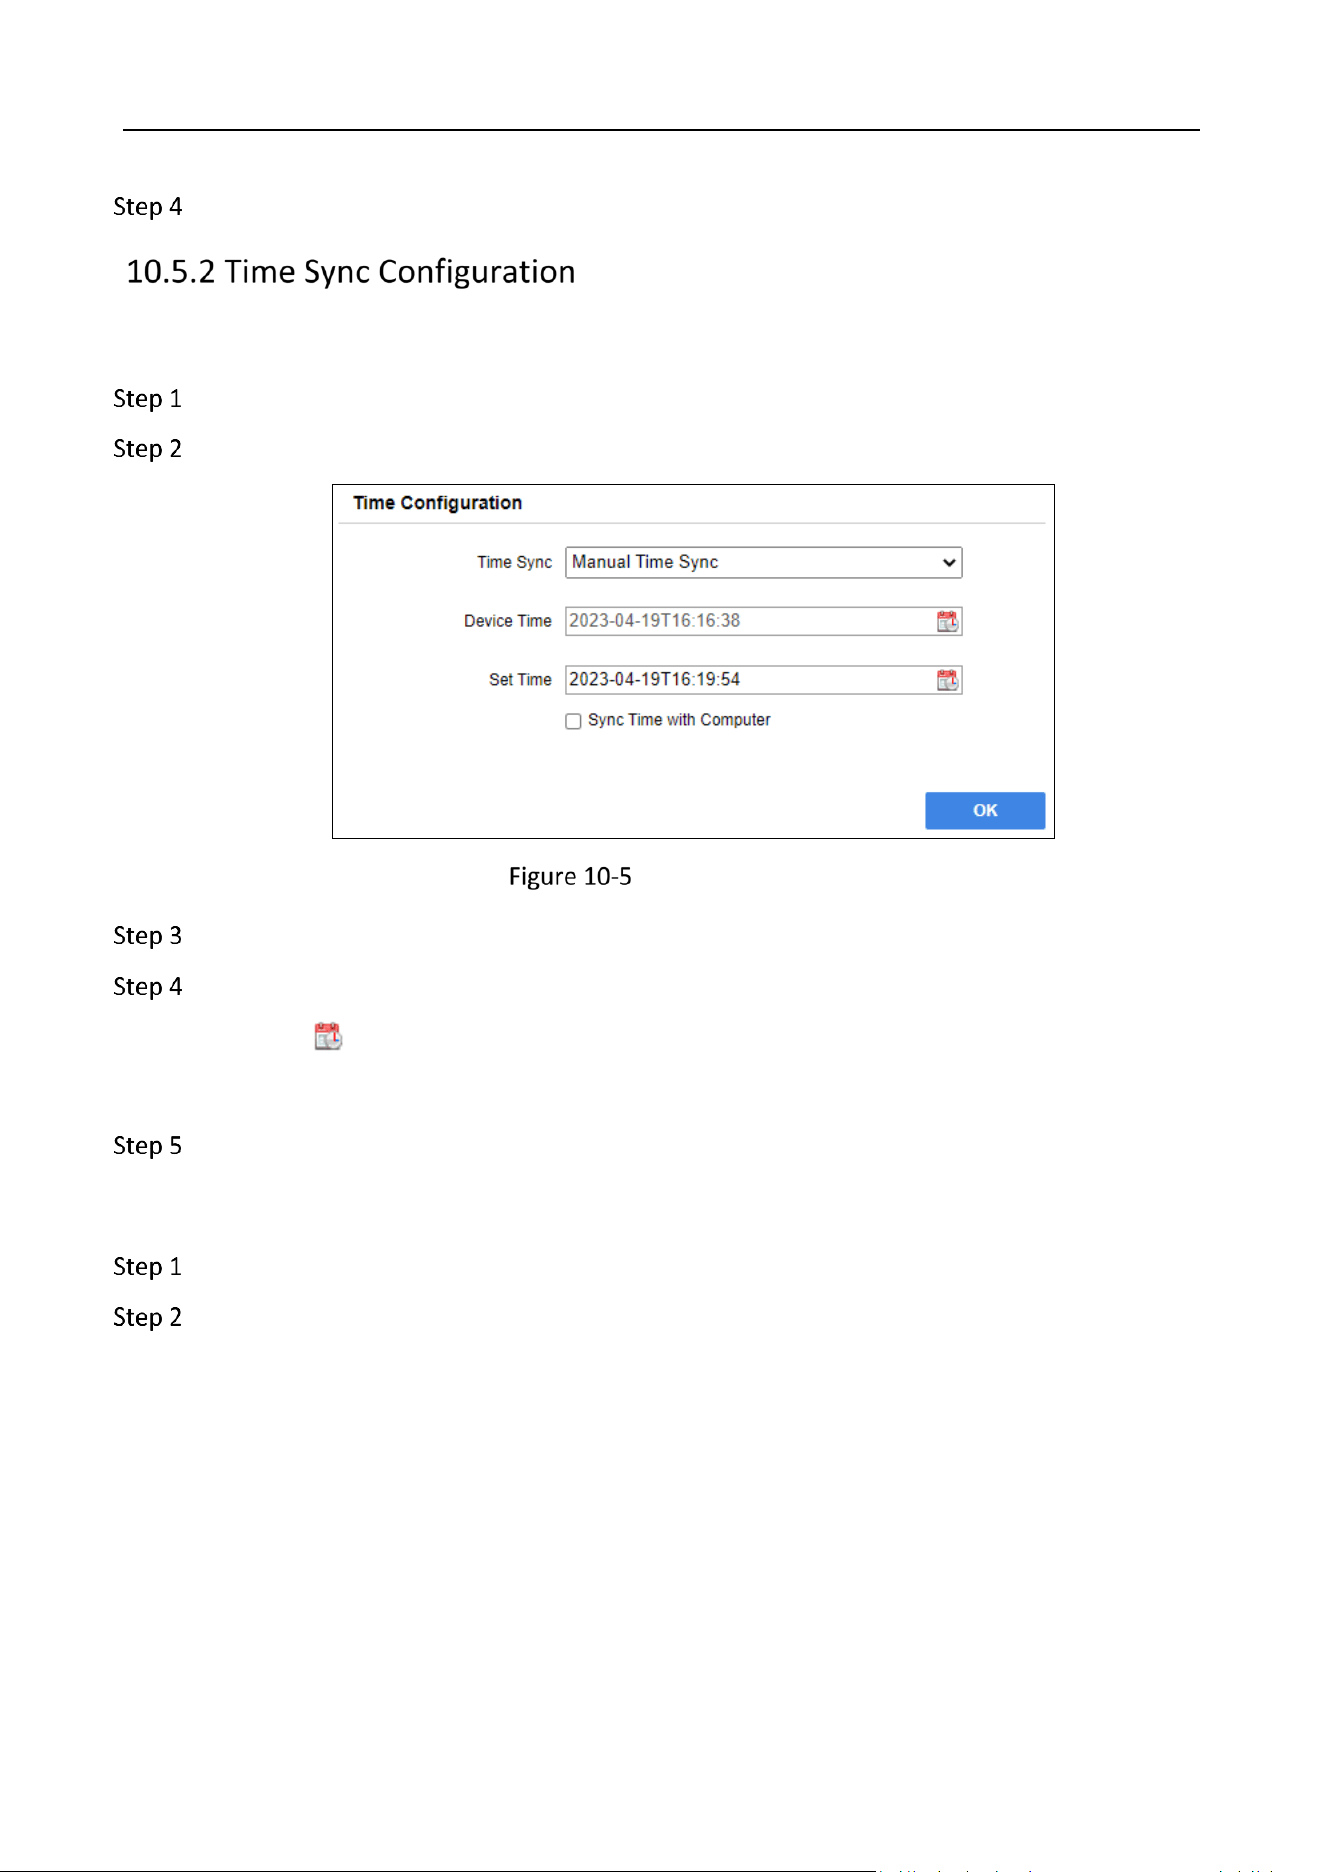
Manual Time Sync
Select Time Sync as Manual Time Sync.
Set time.
Click to set time manually.
Check Sync Time with Computer.
Click OK.
Synchronize Time by NTP
Go to Maintenance.
Click Time Management.
Storage Management System • User Manual
64
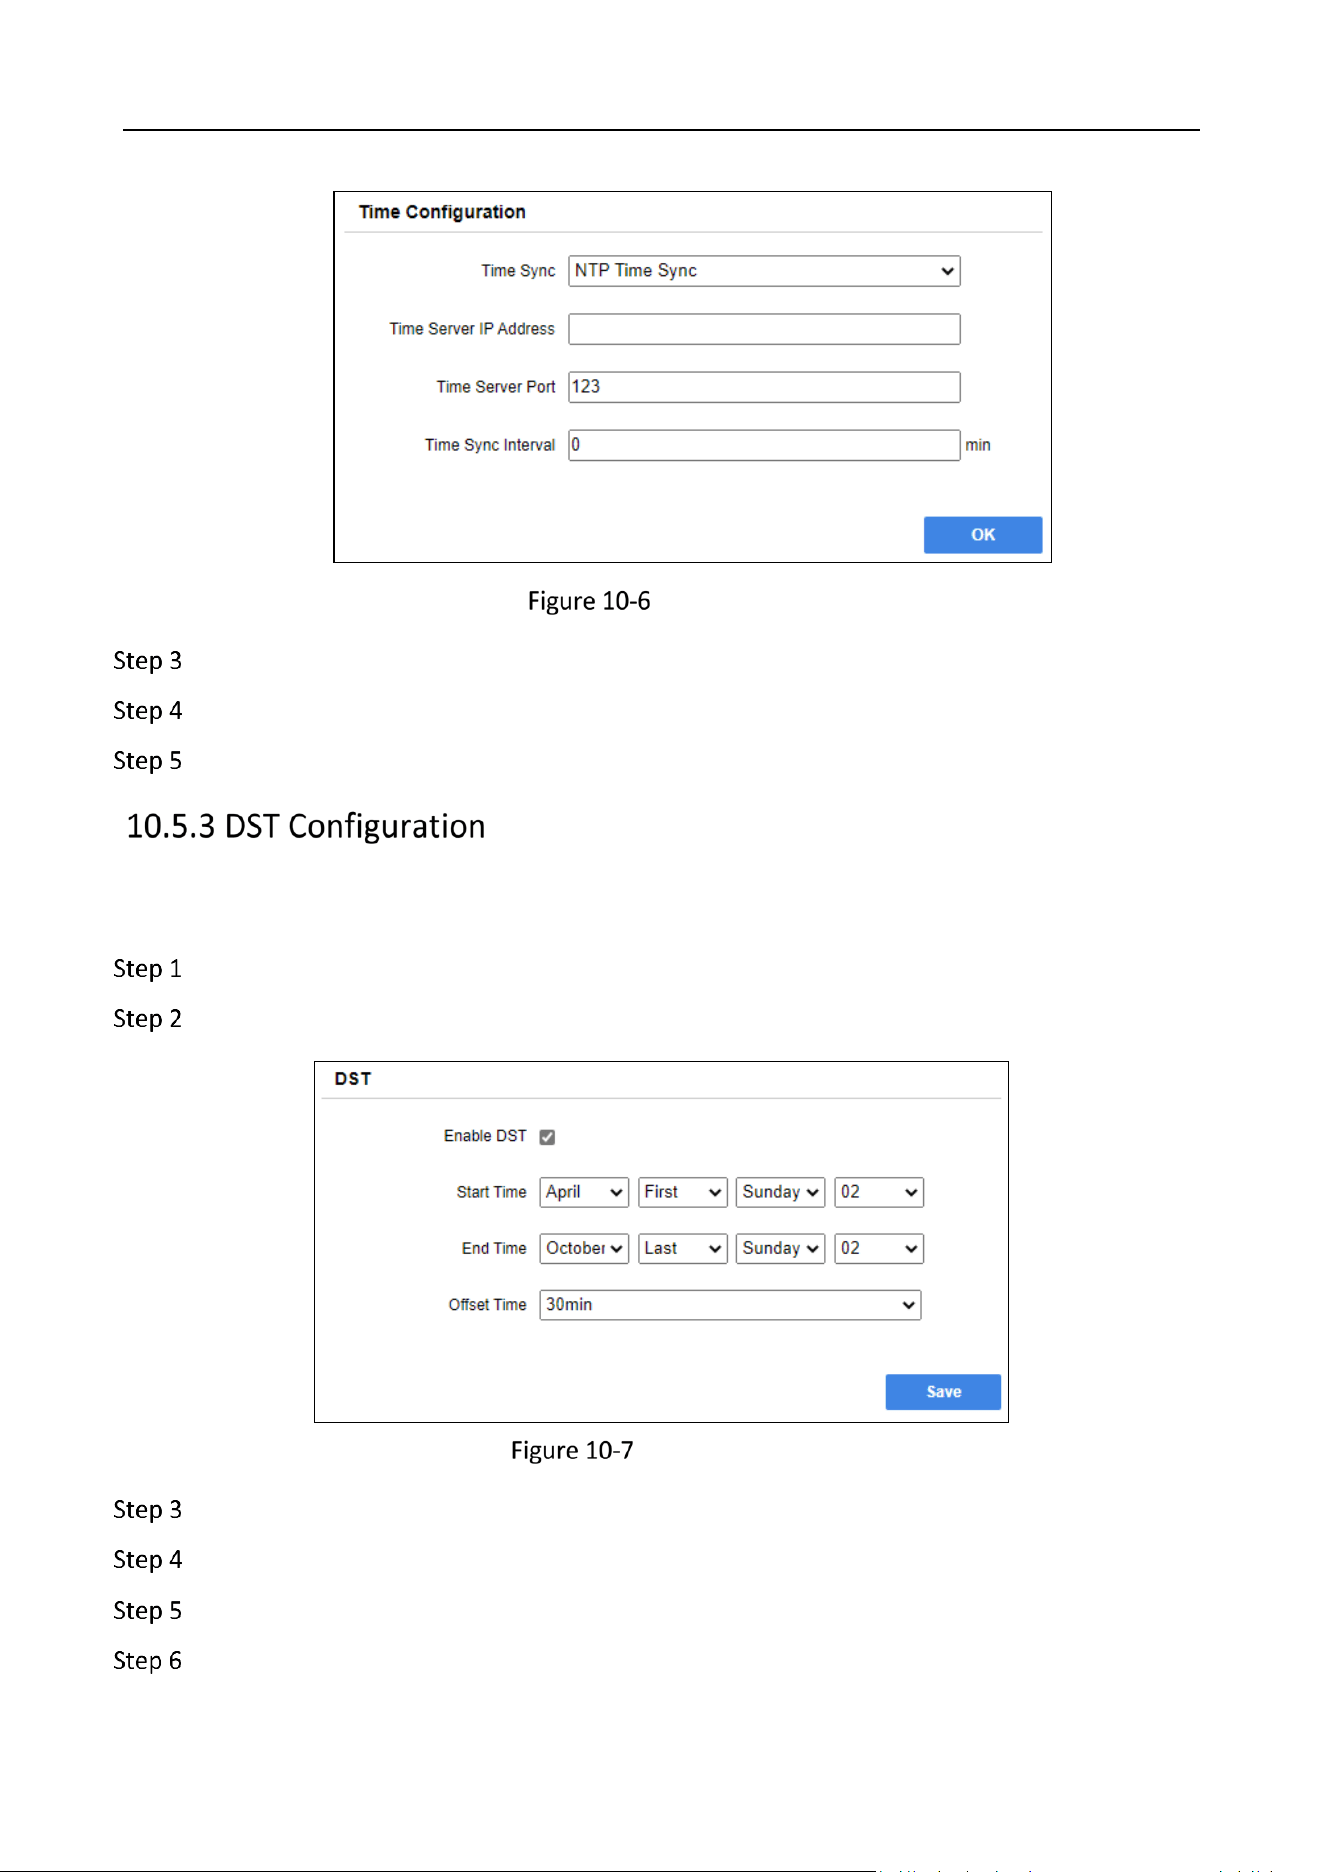
NTP Time Sync
Select Time Sync as NTP Time Sync.
Enter Time Server IP Address, Time Server Port, and Time Sync Interval.
Click OK.
Daylight Saving Time (DST) is the practice of setting the clocks forward a time period from standard
time during the set months
Go to Maintenance.
Click Time Management.
DST Configuration
Check Enable DST.
Set the Start Time and End Time of the DST.
Set the Offset Time from standard time.
Click Save.
Storage Management System • User Manual
65
Default Settings
Purpose:
Restore all parameters to default settings.
Go to Maintenance.
Click All system settings reset.
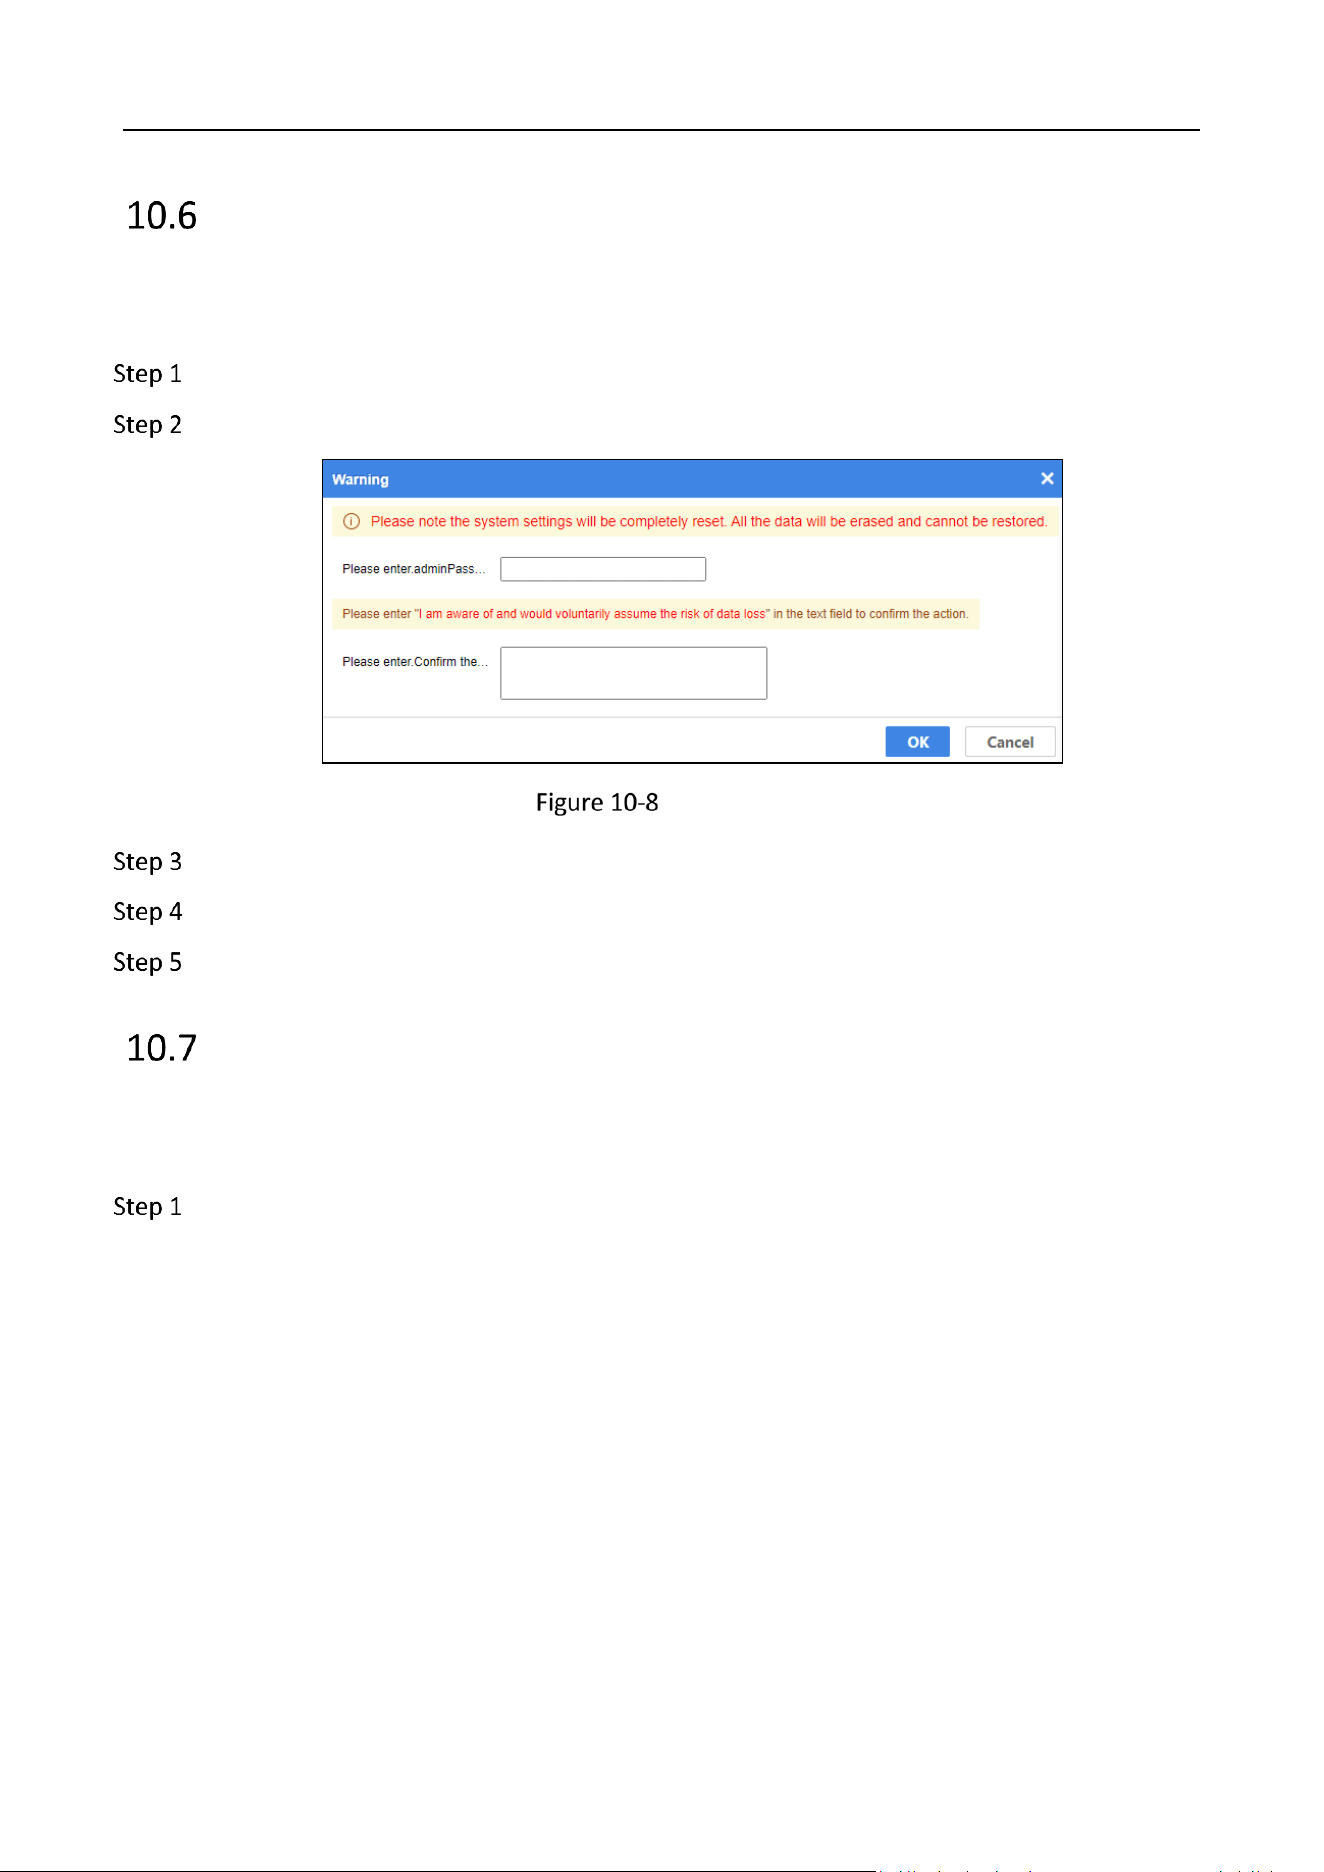
System Reset
Enter admin Password.
Enter the confirmed text in the pop-up window to confirm the action.
Click OK.
Snapshot Management
Purpose:
Create, restore, or delete snapshots.
Go to Maintenance > Snapshot Management.
Storage Management System • User Manual
66
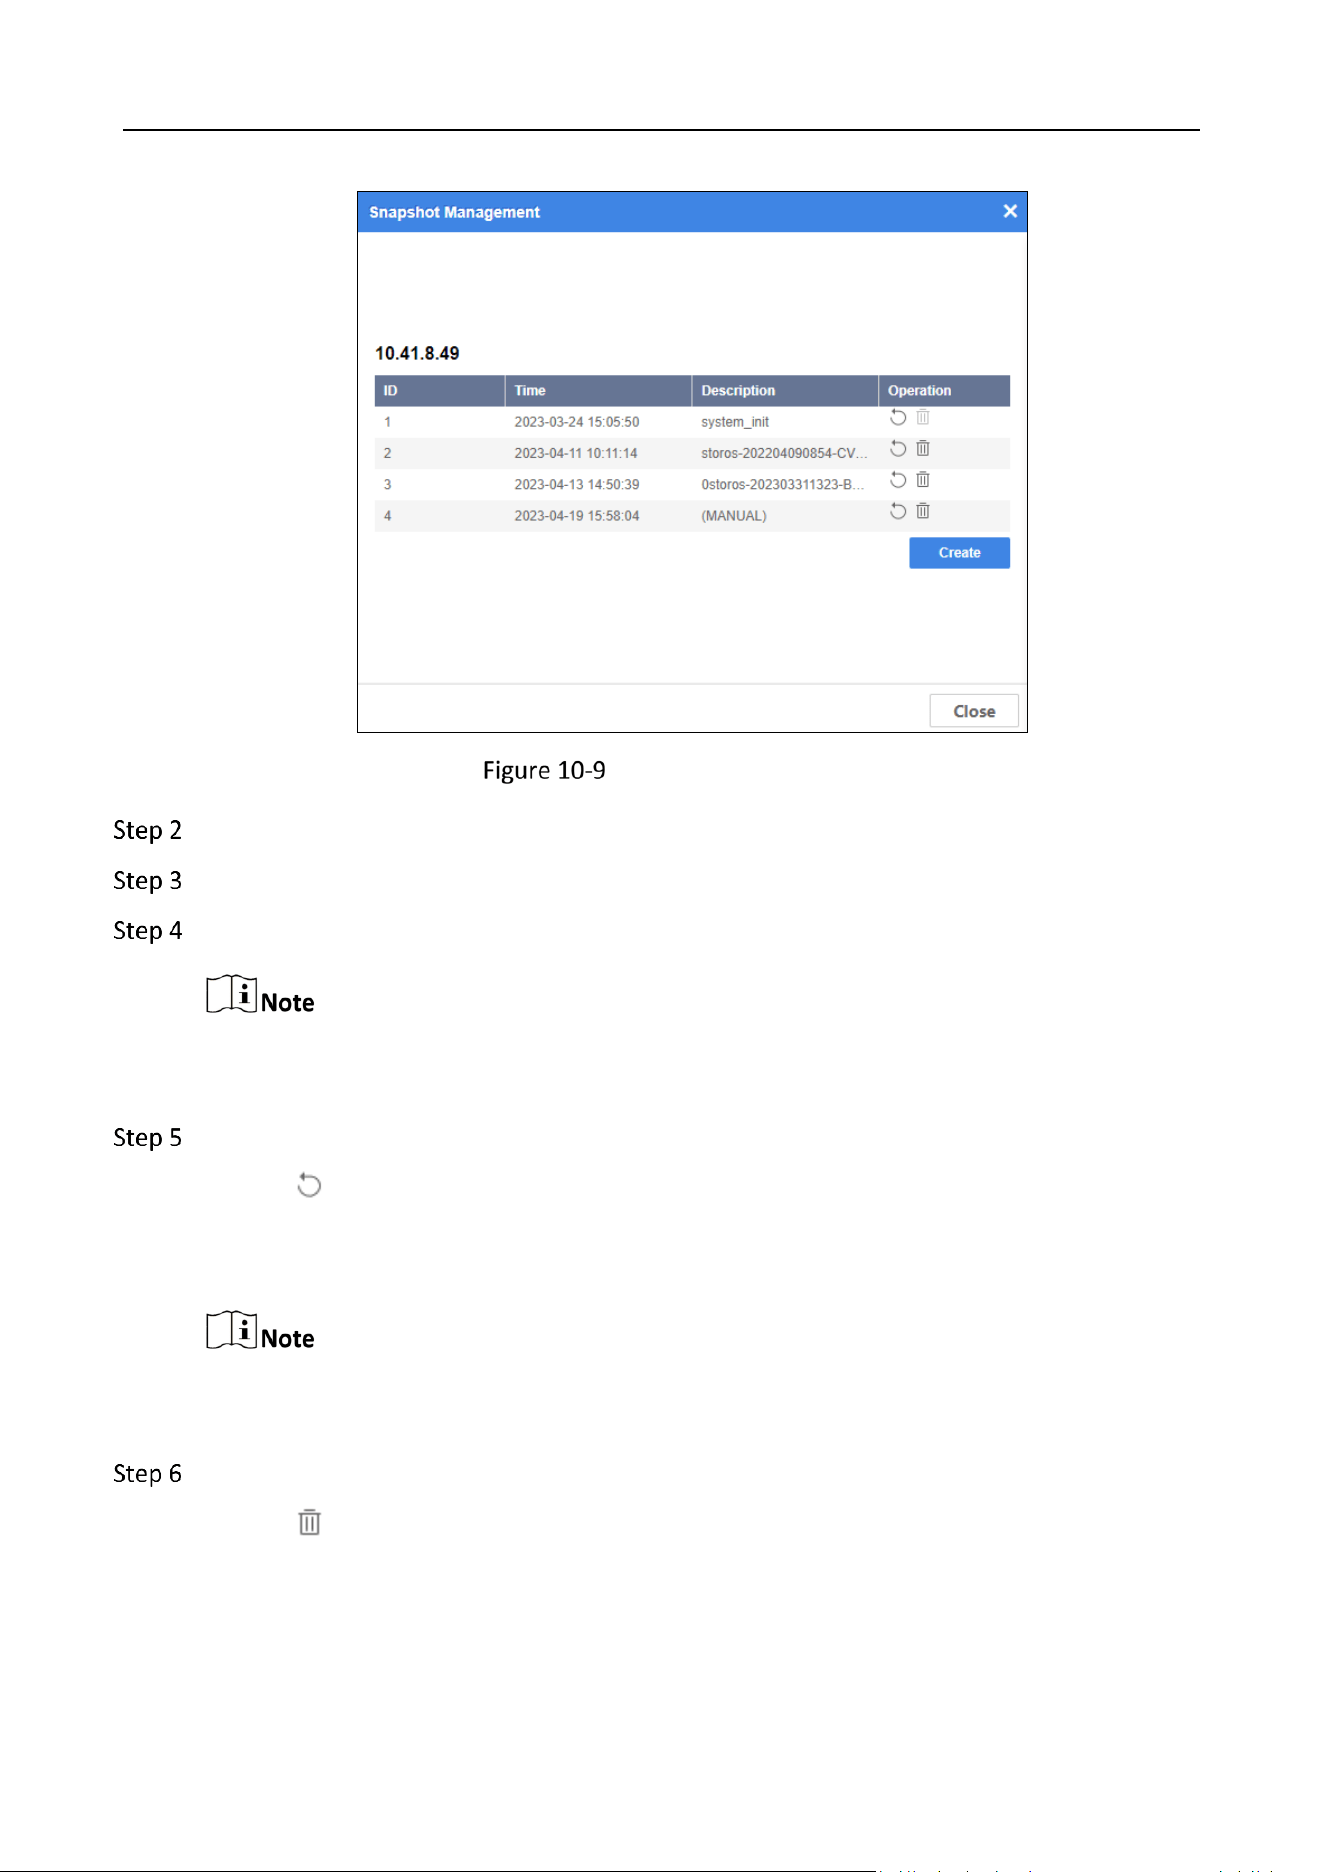
Snapshot Management
Click Create.
Enter the snapshot description.
Click OK.
Up to 4 snapshots can be created. The earliest snapshots will be automatically overwritten
when the number of snapshot exceeds 4.
(Optional) Restore snapshot.
1) Click .
2) Enter the Root Password and Verification Code to confirm the operation.
3) Click OK.
The current data will be lost after restoring snapshots. Restart your device after snapshots are
restored.
(Optional) Delete snapshot.
1) Click .
2) Enter the Admin Password and Verification Code to confirm the operation.
3) Click OK.
Storage Management System • User Manual
67
The deleted snapshots cannot be restored.
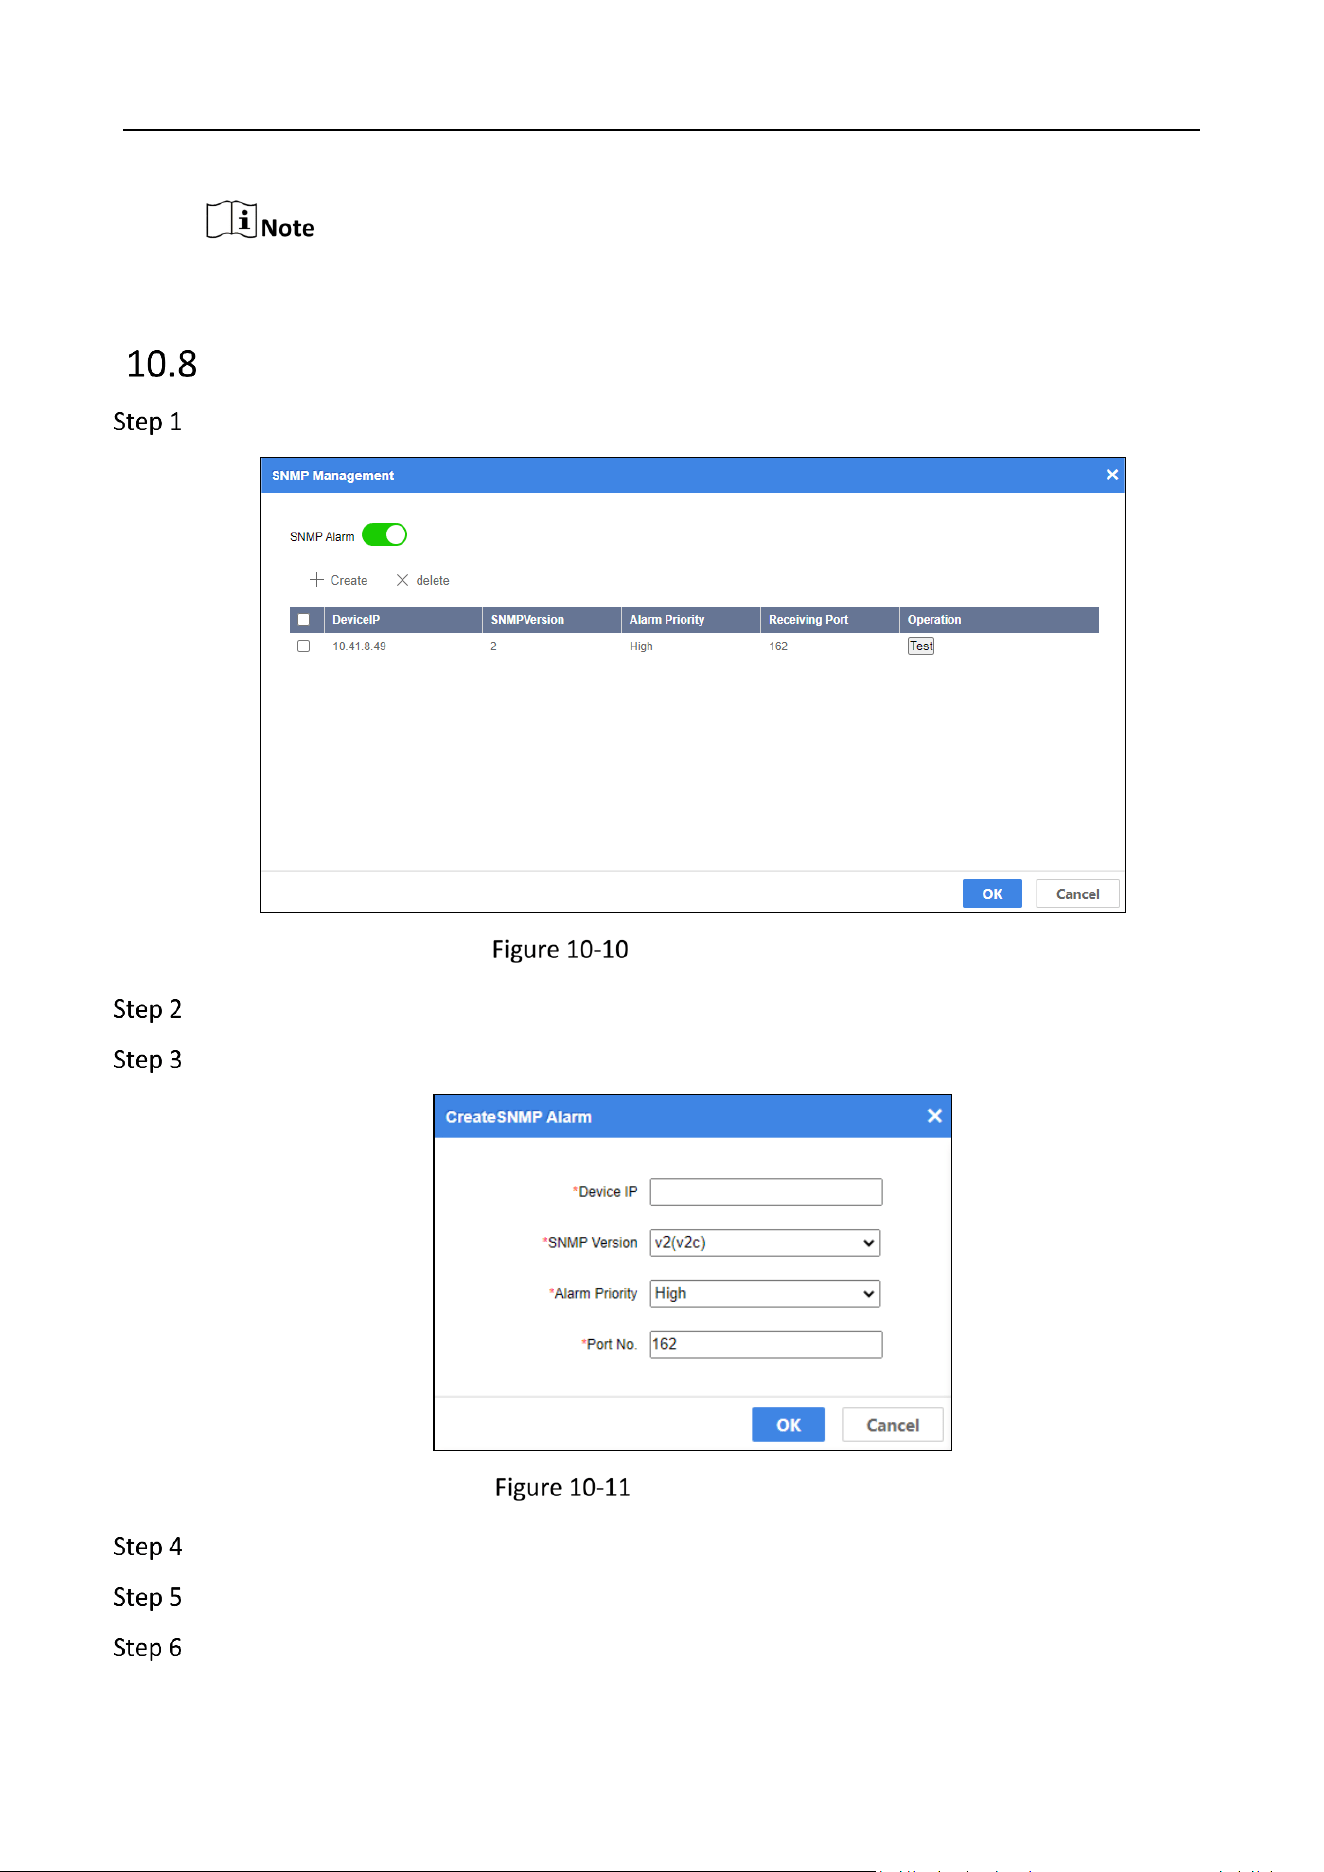
SNMP Management
Go to Maintenance > SNMP Management.
SNMP Management
Enable SNMP Alarm.
Click Create.
Create SNMP Alarm
Enter the Device IP, select the SNMP Version and Alarm Priority, and enter the Port No.
(Optional) Click Test.
(Optional) Delete SNMP alarm.
Storage Management System • User Manual
68
1) Check the SNMP alarm(s) to delete.
2) Click delete.
3) Click OK.
Click OK.
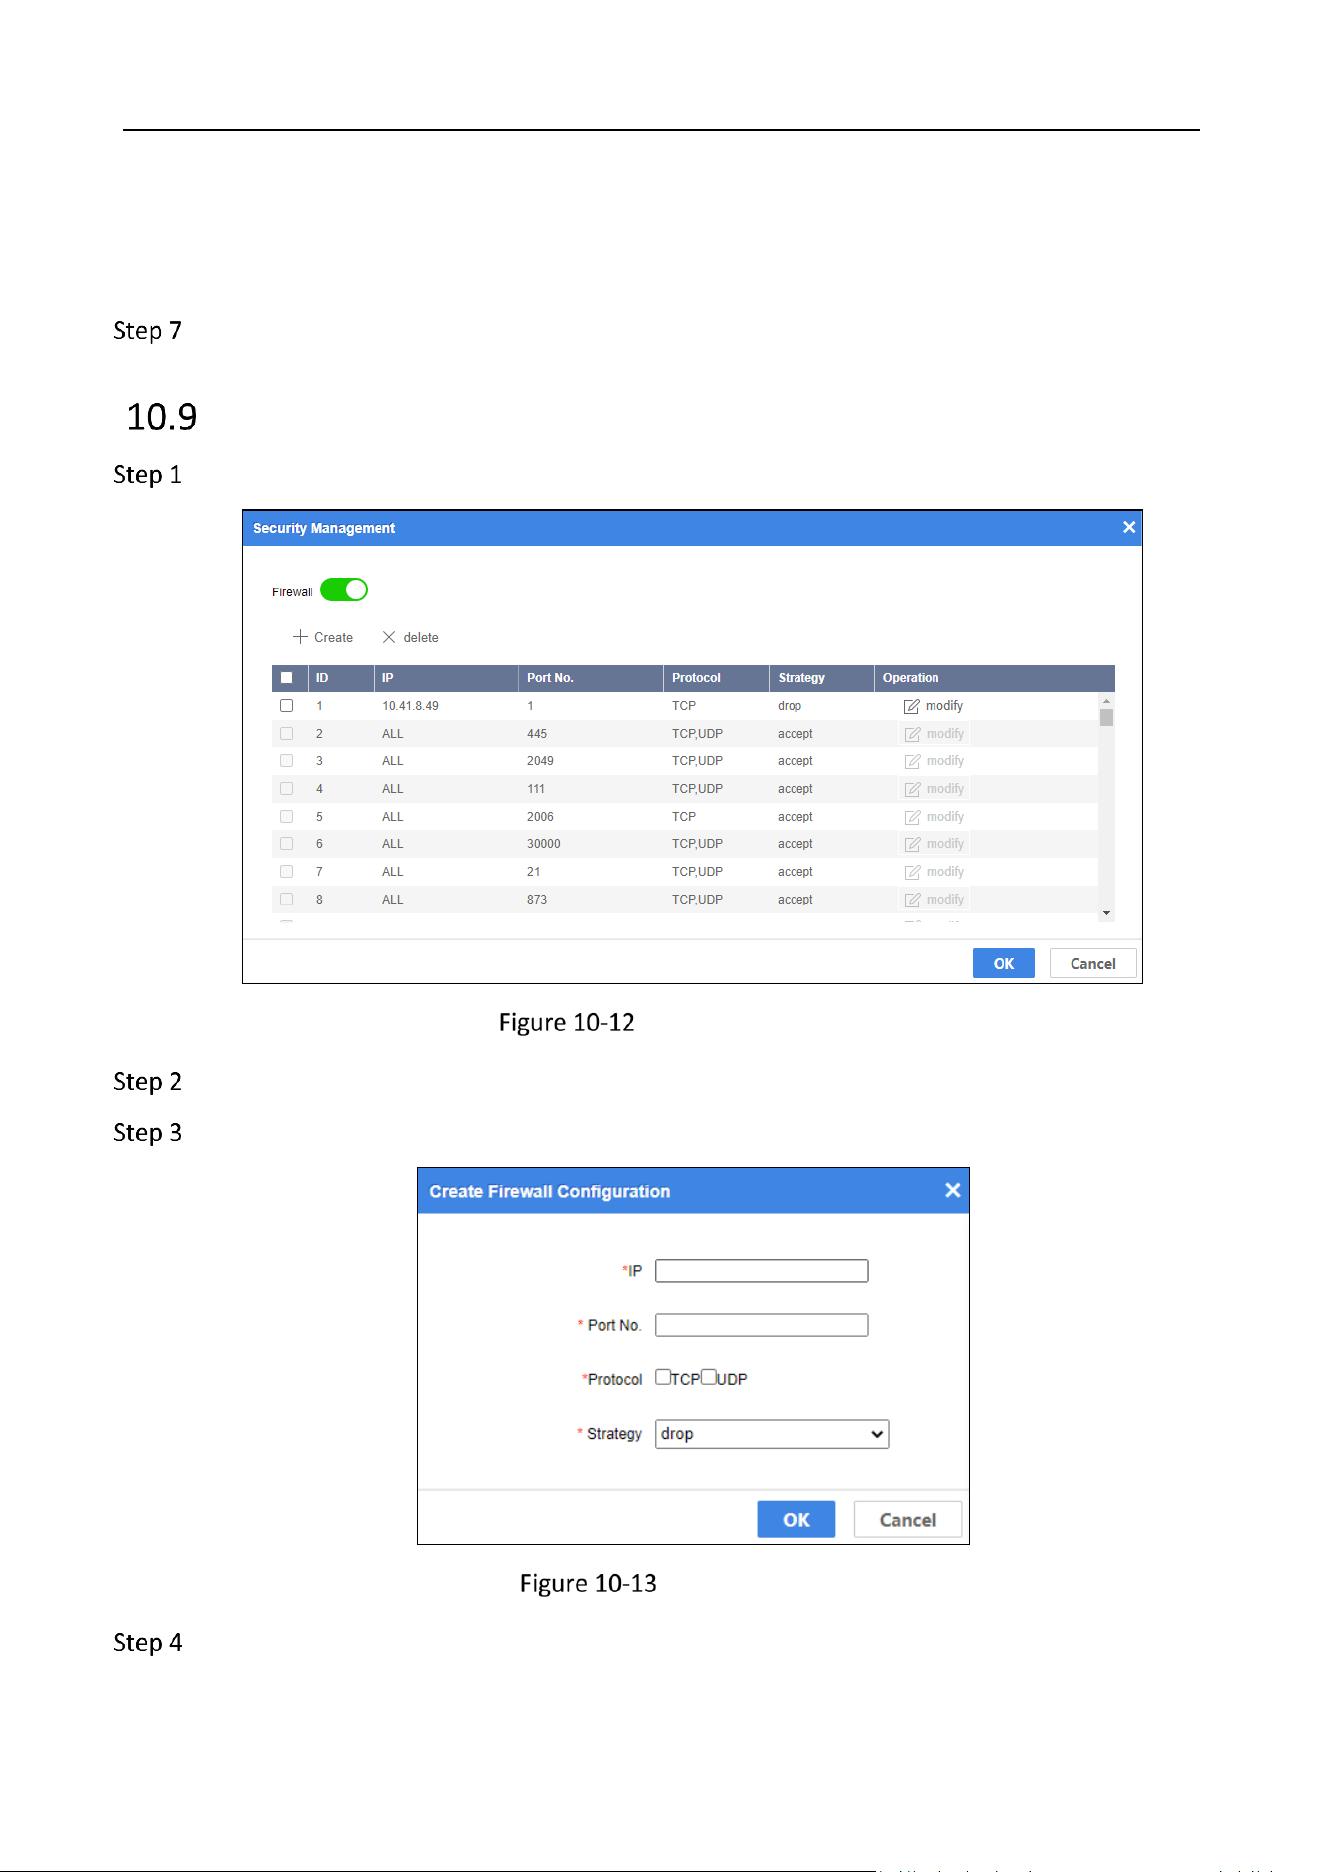
Security Management
Go to Maintenance > Security Management.
Network Detection
Enable Firewall.
Click Create to create a firewall.
Create Firewall
Enter IP and Port No. of the firewall.
Storage Management System • User Manual
69
Check the Protocol.
Select the Strategy.
Click OK.
(Optional) Modify or delete the direwall.
Click modify to modify the firewall.
Check the firewall(s) and click delete to delete the selected firewall(s).
Click OK.
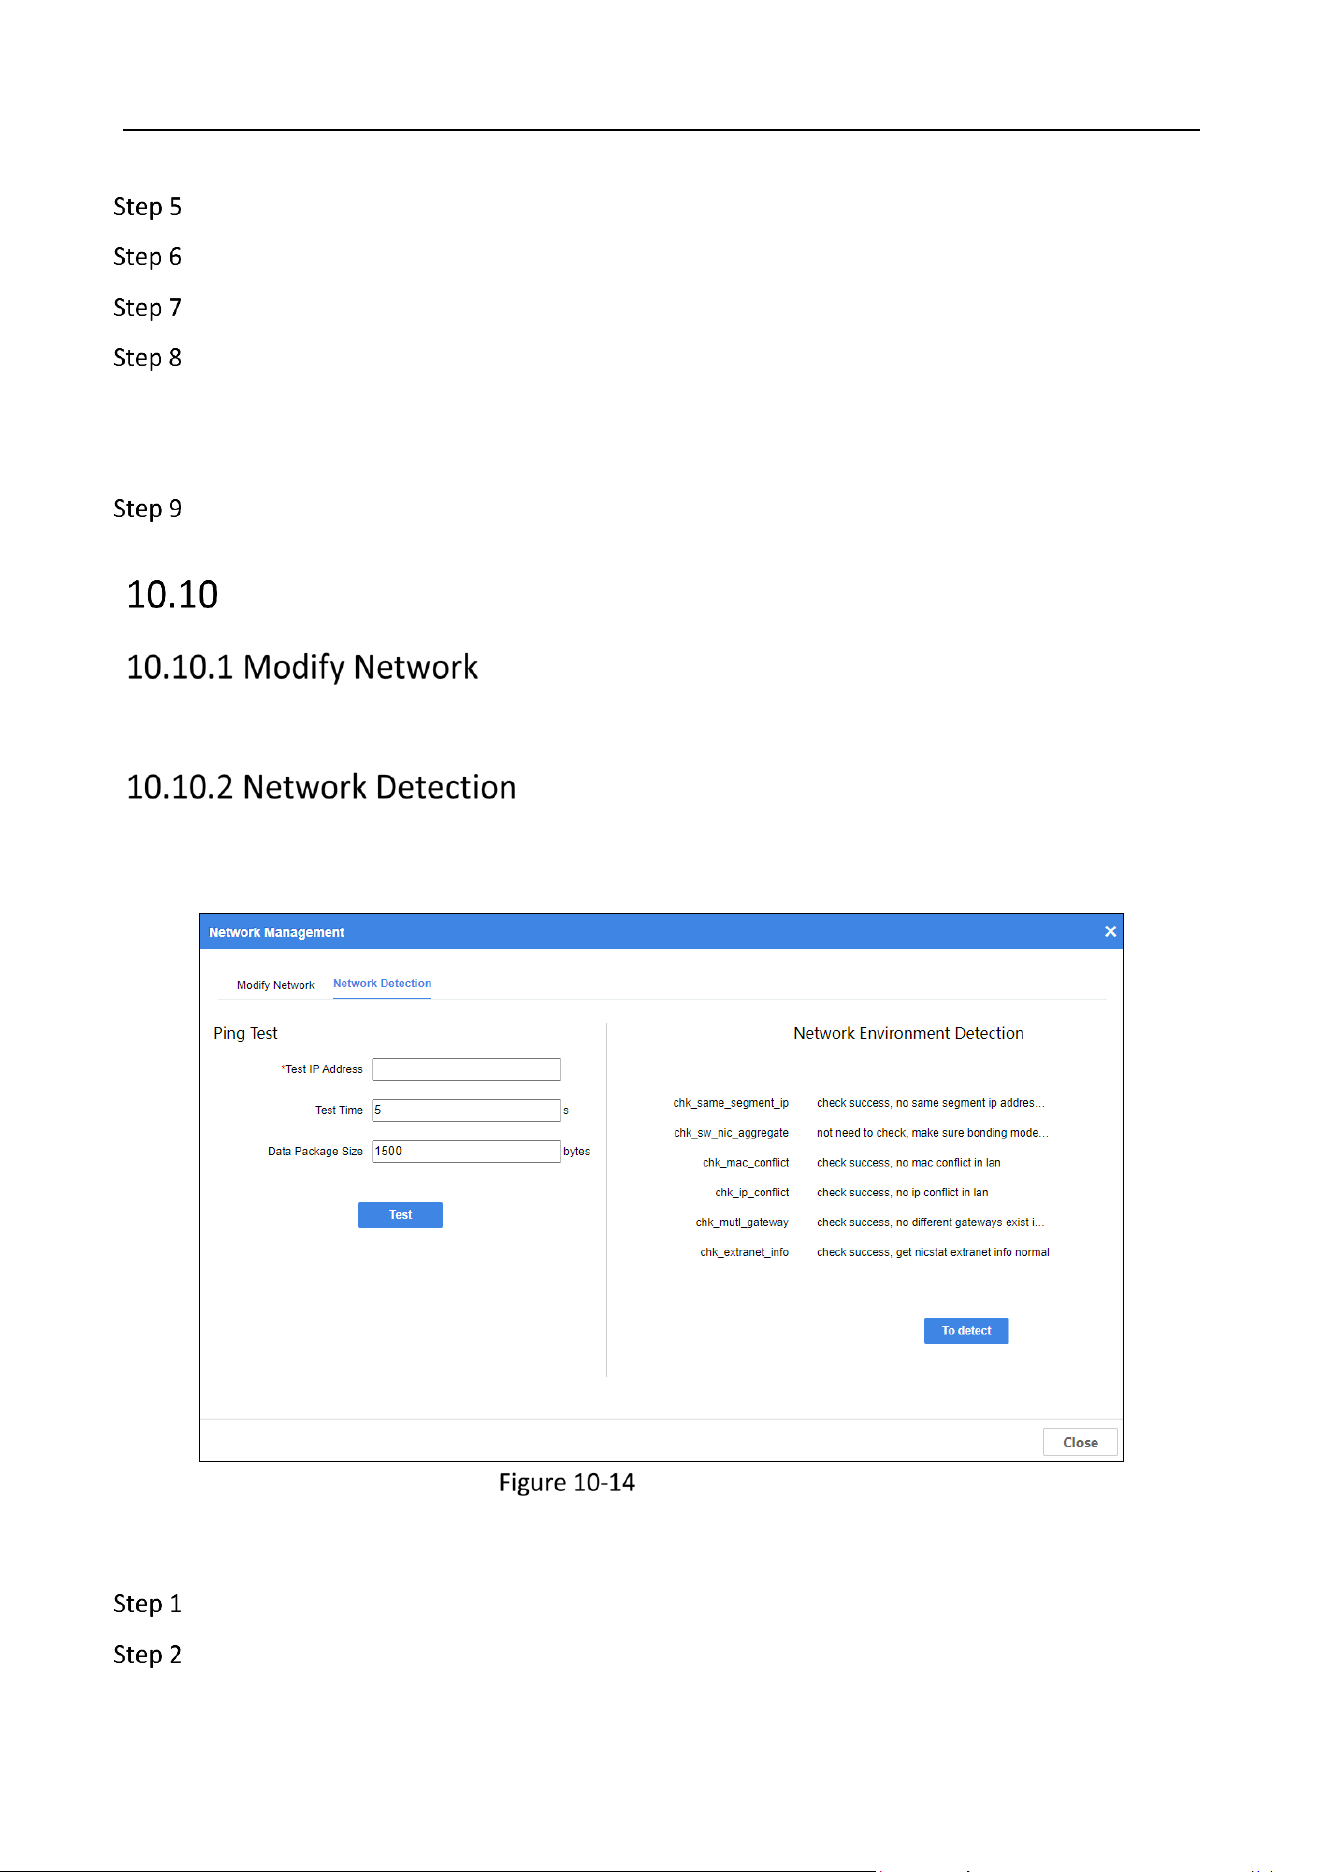
Network Management
For details, please refer to Modify Network.
Purpose:
Perform ping test and network environment detection.
Network Detection
Ping Test
Enter the Test IP Address, Test Time, and Data Package Size.
Click Test.

Storage Management System • User Manual
70
View the test results displayed on the interface.
Click Back.
Network Environment Detection
Go to Maintenance > Network Management > Network Detection.
Click To detect.

0
UD33222B