Interactive Flat Panel
User Manual

Interactive Flat Panel • User Manual
i
Legal Information
© 2023 Hangzhou Hikvision Digital Technology Co., Ltd. All rights reserved.
About this Manual
The Manual includes instructions for using and managing the Product. Pictures, charts, images and all other information
hereinafter are for description and explanation only. The information contained in the Manual is subject to change,
without notice, due to firmware updates or other reasons. Please find the latest version of this Manual at the Hikvision
website (https://www.hikvision.com/).
Please use this Manual with the guidance and assistance of professionals trained in supporting the Product.
Trademarks
and other Hikvision's trademarks and logos are the properties of Hikvision in
various jurisdictions.
Other trademarks and logos mentioned are the properties of their respective owners.
: The terms HDMI and HDMI High-Definition Multimedia Interface, and the HDMI Logo are
trademarks or registered trademarks of HDMI Licensing Administrator, Inc. in the United States and other countries.
Disclaimer
TO THE MAXIMUM EXTENT PERMITTED BY APPLICABLE LAW, THIS MANUAL AND THE PRODUCT DESCRIBED, WITH ITS
HARDWARE, SOFTWARE AND FIRMWARE, ARE PROVIDED "AS IS" AND "WITH ALL FAULTS AND ERRORS". HIKVISION
MAKES NO WARRANTIES, EXPRESS OR IMPLIED, INCLUDING WITHOUT LIMITATION, MERCHANTABILITY, SATISFACTORY
QUALITY, OR FITNESS FOR A PARTICULAR PURPOSE. THE USE OF THE PRODUCT BY YOU IS AT YOUR OWN RISK. IN NO
EVENT WILL HIKVISION BE LIABLE TO YOU FOR ANY SPECIAL, CONSEQUENTIAL, INCIDENTAL, OR INDIRECT DAMAGES,
INCLUDING, AMONG OTHERS, DAMAGES FOR LOSS OF BUSINESS PROFITS, BUSINESS INTERRUPTION, OR LOSS OF DATA,
CORRUPTION OF SYSTEMS, OR LOSS OF DOCUMENTATION, WHETHER BASED ON BREACH OF CONTRACT, TORT
(INCLUDING NEGLIGENCE), PRODUCT LIABILITY, OR OTHERWISE, IN CONNECTION WITH THE USE OF THE PRODUCT,
EVEN IF HIKVISION HAS BEEN ADVISED OF THE POSSIBILITY OF SUCH DAMAGES OR LOSS.
YOU ACKNOWLEDGE THAT THE NATURE OF THE INTERNET PROVIDES FOR INHERENT SECURITY RISKS, AND HIKVISION
SHALL NOT TAKE ANY RESPONSIBILITIES FOR ABNORMAL OPERATION, PRIVACY LEAKAGE OR OTHER DAMAGES
RESULTING FROM CYBER-ATTACK, HACKER ATTACK, VIRUS INFECTION, OR OTHER INTERNET SECURITY RISKS; HOWEVER,
HIKVISION WILL PROVIDE TIMELY TECHNICAL SUPPORT IF REQUIRED.
YOU AGREE TO USE THIS PRODUCT IN COMPLIANCE WITH ALL APPLICABLE LAWS, AND YOU ARE SOLELY RESPONSIBLE
FOR ENSURING THAT YOUR USE CONFORMS TO THE APPLICABLE LAW. ESPECIALLY, YOU ARE RESPONSIBLE, FOR USING
THIS PRODUCT IN A MANNER THAT DOES NOT INFRINGE ON THE RIGHTS OF THIRD PARTIES, INCLUDING WITHOUT
LIMITATION, RIGHTS OF PUBLICITY, INTELLECTUAL PROPERTY RIGHTS, OR DATA PROTECTION AND OTHER PRIVACY
RIGHTS. YOU SHALL NOT USE THIS PRODUCT FOR ANY PROHIBITED END-USES, INCLUDING THE DEVELOPMENT OR
PRODUCTION OF WEAPONS OF MASS DESTRUCTION, THE DEVELOPMENT OR PRODUCTION OF CHEMICAL OR
BIOLOGICAL WEAPONS, ANY ACTIVITIES IN THE CONTEXT RELATED TO ANY NUCLEAR EXPLOSIVE OR UNSAFE NUCLEAR
FUEL-CYCLE, OR IN SUPPORT OF HUMAN RIGHTS ABUSES.
IN THE EVENT OF ANY CONFLICTS BETWEEN THIS MANUAL AND THE APPLICABLE LAW, THE LATER PREVAILS.

Interactive Flat Panel • User Manual
ii
Preface
Applicable Models
This manual is applicable to Interactive Flat Panel.
Symbol Conventions
The symbols that may be found in this document are defined as follows.
Symbol
Description
Danger
Indicates a hazardous situation which, if not avoided, will or could result in death or
serious injury.
Caution
Indicates a potentially hazardous situation which, if not avoided, could result in
equipment damage, data loss, performance degradation, or unexpected results.
Provides additional information to emphasize or supplement important points of the
main text.

Interactive Flat Panel • User Manual
iii
Contents
Chapter 1 Introduction ............................................................................................................... 1
Chapter 2 Operation and Maintenance Precautions .................................................................... 2
Use of Power Cable ............................................................................................................................................... 3
Cleaning and Maintenance ................................................................................................................................... 3
Chapter 3 Connection and Installation ........................................................................................ 5
Precautions for Installation ................................................................................................................................... 5
Appearance and Interfaces ................................................................................................................................... 5
3.2.1 Front Panel and Interfaces ......................................................................................................................... 5
3.2.2 Interfaces on Main Board .......................................................................................................................... 7
3.2.3 Connection to Personal Computer (PC) ..................................................................................................... 7
Internal Computer Installation ............................................................................................................................. 8
Mounting .............................................................................................................................................................. 9
Chapter 4 Startup and Shutdown .............................................................................................. 13
Device Startup ..................................................................................................................................................... 13
4.1.1 Installed Without a Computer Box .......................................................................................................... 13
4.1.2 Installed with a Computer Box ................................................................................................................. 13
Eco Mode ............................................................................................................................................................ 13
Shutdown ............................................................................................................................................................ 14
Chapter 5 Menu Operations ..................................................................................................... 15
Basic Operations ................................................................................................................................................. 15
System Bar .......................................................................................................................................................... 16
Input Source ........................................................................................................................................................ 17
Network .............................................................................................................................................................. 17
Control Menu ...................................................................................................................................................... 17
5.5.1 Note ......................................................................................................................................................... 19
5.5.2 Screenshot ............................................................................................................................................... 19
5.5.3 Vote Machine ........................................................................................................................................... 20
Camera Functions ............................................................................................................................................... 22
5.6.1 Camera ..................................................................................................................................................... 22
5.6.2 Video ........................................................................................................................................................ 23
5.6.3 Set ............................................................................................................................................................ 24
Chapter 6 System Settings ........................................................................................................ 26
Network Settings ................................................................................................................................................ 26
6.1.1 Wired Network Settings ........................................................................................................................... 26
6.1.2 Wireless Network Settings ....................................................................................................................... 27
6.1.3 WLAN Hotspot Settings ............................................................................................................................ 28
Display Settings ................................................................................................................................................... 29
Audio Settings ..................................................................................................................................................... 31
Language and Input Settings ............................................................................................................................... 31
Time and Date Settings ....................................................................................................................................... 32
Application Management ................................................................................................................................... 32
Bluetooth ............................................................................................................................................................ 33
Intelligent Temperature Control ......................................................................................................................... 33
Advanced Settings............................................................................................................................................... 34
User Settings ..................................................................................................................................................... 37
Device Information ........................................................................................................................................... 38

Interactive Flat Panel • User Manual
iv
Negative Screens .............................................................................................................................................. 39
Chapter 7 Intelligent Applications ............................................................................................. 40
FileBrowser ......................................................................................................................................................... 40
Browser ............................................................................................................................................................... 41
Whiteboard ......................................................................................................................................................... 41
7.3.1 Toolbar Introduction ................................................................................................................................ 42
7.3.2 Manage Whiteboard ................................................................................................................................ 45
7.3.3 Save Whiteboard ..................................................................................................................................... 46
7.3.4 Share Whiteboard .................................................................................................................................... 47
7.3.5 More Functions ........................................................................................................................................ 47
WonderCastServer .............................................................................................................................................. 49
7.4.1 NFC Screen Mirroring ............................................................................................................................... 49
7.4.2 Other Screen Mirroring ............................................................................................................................ 49
System Pre-installed Applications ....................................................................................................................... 50
Chapter 8 Appendix A FAQs ...................................................................................................... 52

Interactive Flat Panel • User Manual
1
Chapter 1 Introduction
The Interactive Flat Panel (hereafter referred as ‘the device’) integrates functions of computers,
projectors, interactive whiteboards, sound boxes, advertising machines, and so on. The device is
empowered by multiple technologies like 4K display, infrared touch, human-machine interaction,
multi-media information processing, and network transmission, providing users with various
features such as writing, annotating, multi-screen sharing, and remote video call (optional).
The device is mainly used for events including remote video Interactives, trainings and guidance,
medical consulting, and others in places of offices, meeting rooms, multi-media classrooms,
exhibition halls, and so on.
Key Features
Ultra HD display with up to 3840 × 2160 resolution of input signal available.
20px ultra fine writing, and 2 mm diameter recognizable with the precision of 1 mm.
Supports USB 3.0.
Built-in Wi-Fi realizes screen mirroring without any cable connection.
Built-in interactive whiteboard system allows annotating and sharing by QR code.
Looping-out display available.
Various audio and video interfaces for device access.
Built-in network switch module saves a network switch.
Built-in Android system provides kinds of applications.
Compatible with OPS/OPS-C devices, realizing smooth switch between built-in systems.
Ultra-thin design with aluminum profile frame.
Recommendation for healthy use of the monitor (to prevent eye fatigue): It is recommended
that users do not start at the screen for a long time, and take a rest occasionally.
− After staring at the screen for more than 1 hour, you can relax your eyes by watching the
distant scenery;
− After staring at the screen for more than 1 hour, you can relax your eyes by doing eye
movements.

Interactive Flat Panel • User Manual
2
Chapter 2 Operation and Maintenance
Precautions
The LCD panel on the device is made by high-precision technology. However, tiny spots on the
screen that are always or never lit may be observed, or when observed from side, the color and
brightness may appear to be uneven. Yet the above phenomena are common among LCD displays
rather than faults and will not affect the performance of the device.
Not all blue lights are harmful. What is really harmful is blue light with a wavelength between 415
nm and 455 nm, while contrarily blue light between 480 nm and 500 nm is beneficial to the human
body because it can help to regulate human body’s biological rhythm in some way. Hikvision’s low
blue light technology is based on this fact. By adjusting the main blue peak of the LED, the energy
of this band is reduced basically, thus the proportion of harmful blue light the hardware emits is
effectively reduced. At the same time, by adjusting the design of the panel color film, Hikvision
independently develops the NiceBlue module, which can still ensure the ultimate perfect picture
quality in terms of color management, achieving good performance of both visual protection and
display effect.
Our company is not responsible for any fault caused by third-party when operating the device
and other failure or damage incurred.
Do not operate the device in an environment of dust, high humidity, or oil and steam
contacting to avoid the risk of fire and damage.
Do not place the device under direct sunlight or near strong light source.
Do not place the device near other equipment with strong radiation.
Do not expose the device to rain or humid environment.
Do not place the device on unstable or unsafe surface. Avoid strong impact, vibration or
vibration.
Do not operate the device near heating device or place of high temperature to avoid the risk
of fire.
After moving the device from low temperature environment to high temperature
environment, please do not turn on the device immediately and wait for the condensation to
evaporate.
Do not insert any object into the device.
Do not place heavy objects upon the device.
The device and its accessories are subject to change without prior notice.

Interactive Flat Panel • User Manual
3
The fragile materials of the display are vulnerable to falling and impact. Please hold with care.
Improper operations during debugging and operating may cause damage to the device.
Scratching or knocking the device with hard objects is strictly forbidden. Do not frequently
turn on/off the power of the device when operating to avoid the risk of damage and faults.
If smoke, odor or noise rise from the device, turn off the power at once and unplug the power
cable, and then please contact the service center.
Use of Power Cable
If the power cable is damaged or failed, contact service center. Make sure the power supply is
properly grounded and matches the requirements specified by the plate on the shell.
Do not expose the device to rain or humid environment. Disconnect power plug and antenna
in thunderstorm weather.
If the device will not be used for a long time. Shut down the power of the device and
disconnect the power supply.
Electric discharge may last for a short period of time after the power is shut down. Please wait
for two minutes after the power shut down to operate the device.
Only use the original power cable delivered with the device. Contact authorized dealer to
purchase power cable with same specifications.
Make sure the power supply is grounded.
Do not let dust or metal attachment adhere to the power plug and socket.
Do not modify the cable in any form.
Do not place heavy object on the cable.
Keep the cable away from heat.
Do not disconnect the power plug by pulling the cable.
Keep the power cable away from physical or mechanical damage.
The cable is applicable only to the Interactive Display. Do not use it on other devices.
Cleaning and Maintenance
The hole on the rear shell is for heat dissipation. Do not pour or spray liquid to the rear shell or
use wet cloth for cleaning.
Disconnect the power plug before cleaning.

Interactive Flat Panel • User Manual
4
Do not display images with high brightness on the screen for too long.
Use a dry, soft and dust-free cloth to clean the device.
Contact service center for internal cleaning.
Proper maintenance can avoid certain early-stage failures.
Clean the device on a regular basis to make the device look new.
Do not clean the device with water, spray cleaner or industrial chemical reagent. Prevent
foreign matters from entering the device.
Contact qualified service personnel for device maintenance. If the device is damaged, please
contact our company, do not carry out unauthorized maintenance.

Interactive Flat Panel • User Manual
5
Chapter 3 Connection and Installation
Precautions for Installation
Clean the device screen and back before installation for best performance.
For safety, only use the wall mount or base provided by the manufacturer.
Contact professional staff for wall mounting.
Check the accessories before the installation. Contact the dealer if anything is missing.
Do not install the device too tight. Otherwise the screen may be distorted.
Mount the device on load-bearing wall.
Place the device on a stable surface or fix the device steadily on the wall.
Install the device near an available AC power socket for easy power connection. Use the same
ground cable with other devices to prevent signal interference.
Do not place the device near mechanical vibration source.
Do not place the device in an environment where insects have easy access.
Do not let the device face the air conditioner directly to avoid condensing.
Do not place the device in strong electromagnetic field to avoid radio interference.
Appearance and Interfaces
The interfaces of Interactive Flat Panel are shown as followed.
Interfaces of the device vary from different types.
The following description is from the direction facing the screen.
Interactive Flat Panel • User Manual
6
Front Panel and Interfaces
Panel Description
No.
Description
No.
Description
1
Power supply interface
100 to 240 VAC
2/3
USB 3.0
4
Touch-USB interface supports
connecting an externally laptop
without driver program.
5
HDMI IN
6
Type-C interface supports DP,
USB 2.0 and charging functions.
7
Environmental light sensor
8
NFC
Operations refer to 7.4.1 NFC
Screen Mirroring.
9
Power button
Short press to turn to power-
saving status.
Press and hold to turn on or
turn off the device.
10
Lan Port × 2
11
Serial Port

Interactive Flat Panel • User Manual
7
Main Board’s Interfaces
Main Board Description
No.
Name
Description
No
.
Name
Description
1
SPDIF
Transmit digital
audio
2
Line OUT
Audio output interface
3
Line IN
Audio input
interface
4
VGA IN
Video devices connection
interface
5
TYPE-C
Type-C interface
6
DP IN
Display input interface
7
TOUCH-USB 2
Peripheral touch
interface
8
HDMI IN 2
HDMI 2 input interface
9
TOUCH-USB
Peripheral touch
interface
10
HDMI IN 1
HDMI 1 input interface
11
USB
USB interface
12
MULTI-USB
2
Multi-functional USB interface
13
MULTI-USB 1
Multi-functional
USB interface
14
HDMI OUT
HDMI output interface
The connection of PC and the device is shown as below.
Caution
The device must be disconnected from power supply before installation or disassembly.

Interactive Flat Panel • User Manual
8
Connect to PC
The Touch-USB interface is needed only when the user needs to touch operate the external PC
on the device.
Use high quality signal cable less than 10 meters in length for high HDMI signal transmission
quality.
USB cable is not contained in the product. Please purchase USB cable with Type-A connector
to Type-B connector.
Internal Computer Installation
Internal Computer Installation

Interactive Flat Panel • User Manual
9
The computer box is installed at the side slot of the device. When installing the box, make sure its
ventilation hole is facing the same direction with the rear panel as shown above. Fasten the screws
to fix the box into position.
The computer is an optional accessory.
To avoid potential device damage, the computer box can be removed only after the device is
disconnected from power.
Mounting
The device can be installed with wall mount or mobile mount, as shown below.
The accessories for wall mounting and mobile mounting are different. Do not mix them up.

Interactive Flat Panel • User Manual
10
Wall Mounting
Wall Mounting Rear View

Interactive Flat Panel • User Manual
11
Wall Mounting Side View
The wall mounting is mobile horizontally. Please leave a space no less than 6 cm at each side (or 12
cm at one side), and 5 mm at the top and bottom for maintenance service.

Interactive Flat Panel • User Manual
12
Mobile Mounting
Mobile Mounting

Interactive Flat Panel • User Manual
13
Chapter 4 Startup and Shutdown
Device Startup
Connect the device to power supply.
Turn on the power switch, and the power indicator on the front panel will turn red.
Push the power button on the front panel to start up the device, the indicator will turn blue.
Install the box when the device is disconnected from power and turn on the power switch after the
installation is finished. During the startup, the power indicator of the box will turn red and the fan
will start. After a beep sound, the power indicator will turn green and the computer is switched on.
Meanwhile, the power indicator on the front panel will turn blue which means the device is
switched on.
Eco Mode
Entering Eco Mode
Press the power button on the front panel to turn off the screen and enter Eco Mode.
Waking up the Device
Four ways to wake up the device:
Press the power button on the front panel.
Press the power-off button on the remote control.
Touch anywhere on the screen twice.
Say "Xiaohai, Xiaohai" to wake up the screen.

Interactive Flat Panel • User Manual
14
Shutdown
If the device is not installed with a computer box or the computer box is shut down, directly
switch off the power to shut down the device.
If the device is installed with a computer box which is powered on, tap Start and choose
Shutdown, or press the power button on the computer box to shut it down (press and hold
the power button to force shutdown). Then switch off the power to shut down the device.
Switching off the power of the device directly leads to force shutdown of the computer box.
Next time the device starts up, Windows may enter error recovery mode and screen touch will
be disabled. In this case, you need to connect a mouse and a keyboard to the device.
Press and hold the power-off button on the remote control.

Interactive Flat Panel • User Manual
15
Chapter 5 Menu Operations
Software interfaces and functions may vary with device models. All pictures in this manual are for
illustration purpose only.
Turn on the device and go to the main page. The shortcut menu is displayed at the bottom of the
screen.
Main Page
Press and hold the icons of applications on the main page to realize the following operations:
Move applications cross screen.
Open the application in the form of a window.
Merge applications into folders with other applications.
Basic Operations
Functions of the shortcut icons are described below.
Shortcuts

Interactive Flat Panel • User Manual
16
Shortcuts Description
No.
Function
No.
Function
1
Tap to hide the menu bar at the
bottom.
6
Tap to check or clear all the apps of
processes.
2
Tap to return to the previous page.
7
Tap to configure network parameters
and hotspot.
3
Tap to select the input source.
8
Tap to configure brightness and
volume.
4
Tap to check all the applications.
Press and hold to move the selected
application to display in split-screen
mode or window mode.
9
Tap to open the control menu.
5
Tap to return to the main page.
Up to 20 pens are allowed when lines with angled stroke is disabled, while only one when enabled.
After the bottom bar menu is hidden, it can be called out through .
Call Out Bottom Bar
System Bar
Press and hold the area of system bar to modify the layout of apps in the system bar.

Interactive Flat Panel • User Manual
17
Layout of System Bar
Click Customize, and move an icon to adjust its position.
Customize the Layout of System Bar
Input Source
Tap the icon of input source at the bottom, and set the input source of the device. System, HDMI
1, HDMI 2, Type-C, DP, and VGA are available.
Network
Set the detailed parameters of wired network, wireless network, and WLAN hotspot. Refer to
Network Settings for more details.
Control Menu
Tap at the bottom to show the control menu. The following operations are available.

Interactive Flat Panel • User Manual
18
Control Menu
Control Menu Descriptions
Tool
Description
Note
Take annotations on the current page.
Camera
Open the camera bound to the device.
Screenshot
Capture the current page.
Calculator
Enable the built-in calculator.
Stopwatch
Measure the amount of time.
Countdown
Count seconds backwards to zero.
Voting Machine
Set vote settings to vote.
Record Screen
Record the screen as a video.
Lock Screen
Tap to enable touch lock, and no touch operation on the locked page
is available. Tap the lock and exit, the touch function will return to
normal.
File Transfer
Transfer files.
Virtual Remote Controller
Enable the virtual controller. The hovering display remote control
menu supports up, down, left, right, confirm, return and home
buttons, and the hovering virtual remote control position can be
moved.

Interactive Flat Panel • User Manual
19
Go to → Note to take notes. You can add notes anywhere on the page by touching and moving
on the screen.
Take Notes
Icon Descriptions
Icon
Description
Pen color and size are customizable.
Enable angled stroke or not. Tap to have lines with angled stroke, and tap to
have lines without angled stroke.
Erase the desired notes.
Clear all the notes.
Save the current page.
Generate QR code of notes when flat panel connects to the LAN. Devices in the same
LAN can scan the QR code to download notes.
Exit note.
/
Collapse/Expand note toolbar.
Up to 20 pens are allowed when lines with angled stroke is disabled, while only one when enabled.
Interactive Flat Panel • User Manual
20
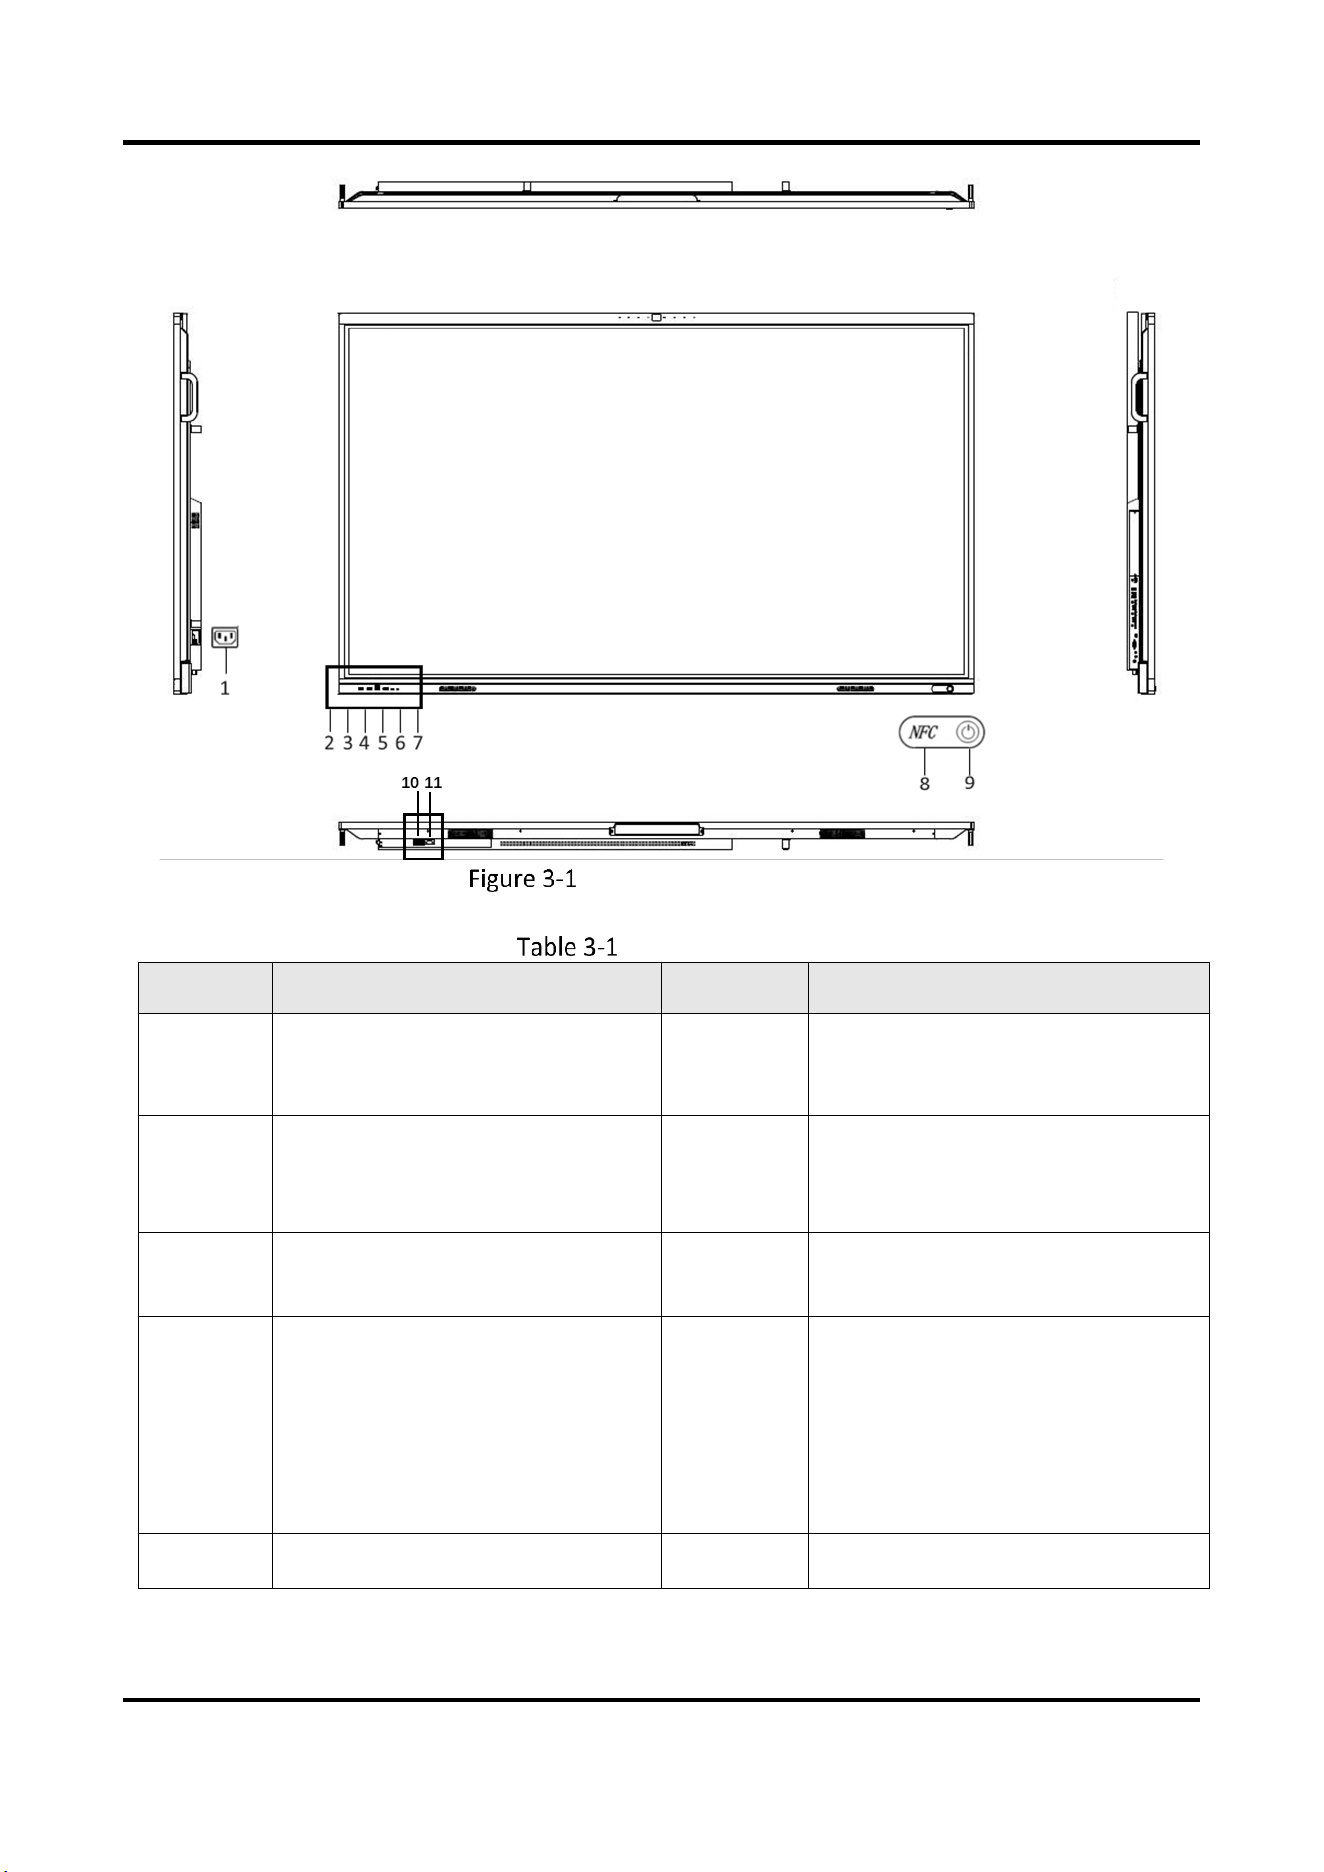
Go to → Screenshot, and a capture area pops up on the current page. Adjust the area by
tapping and dragging the four corners. The screenshot toolbar pops up on the lower right corner of
the area.
Screenshot
Screenshot Toolbar Descriptions
Icon
Description
Exit screenshot.
Capture the whole page.
Generate QR code from the screenshot, and devices in the same LAN can scan the QR code
to download the screenshot.
Save the screenshot in the capture area.
After the tablet is connected to the public network, click Vote in the Control Menu. You can choose
quick vote or vote according to options have been set.
Before You Start
Make sure the device is connected to the network.
Quick Vote
Click Quick to select the number of voting options.

Interactive Flat Panel • User Manual
21
Quick Vote
Configure the following parameters according to the actual needs.
Anonymous: Vote without name.
Multiple Selections: select multiple-options when voting.
Click Generate Vote Code to vote through scanning the code by mobile phone.
Vote by Mobile Phone
Click View Vote Results to end voting and check the details.
Optional: Click Scan to Download to download the voting results through mobile phone.

Interactive Flat Panel • User Manual
22
Advanced Vote
Click Advanced to set the vote through scanning QR code by mobile phone.
Advanced Vote
Configure the following parameters according to the actual needs.
Vote Theme/Vote Options: Custom configuration.
Anonymous: Vote without name.
Multiple Selections: select multiple-options when voting.
Click Launch Vote to vote through scanning code by mobile phone.
Click View Vote Results to end voting and check the details.
Optional: Click Scan to Download to download the voting results through mobile phone.
Camera Functions
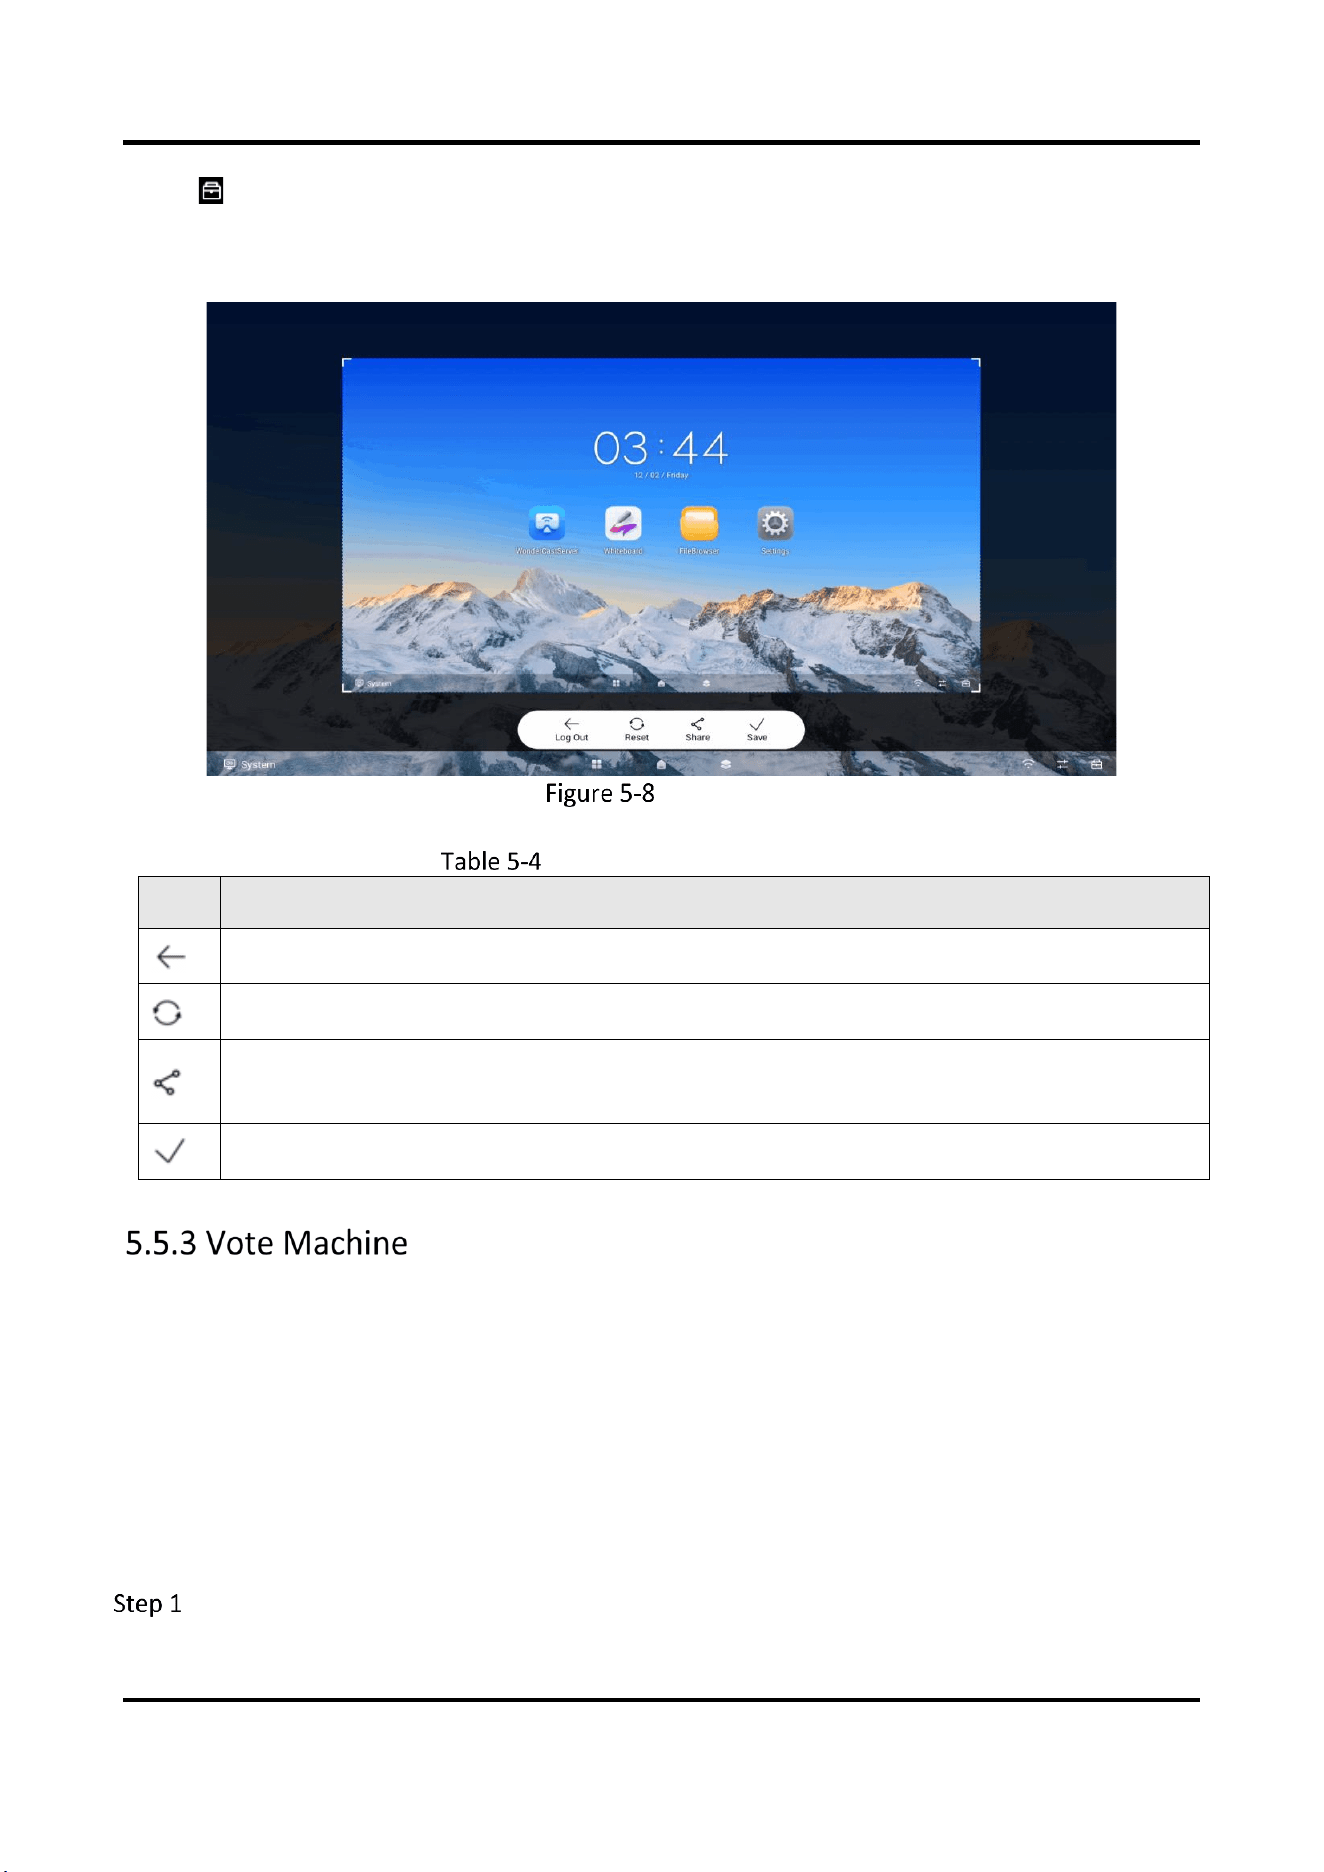
Click Camera to take a photo or video.
Interactive Flat Panel • User Manual
23
Camera
Screenshot Toolbar Descriptions
Icon
Description
Exit camera.
Delay taking pictures according to the selected delay time.
Take photos. You can import the photos to the whiteboard or save them to your phone.
After the mobile phone and the device are connected to the same LAN, you can control
the camera to take photos by scanning the code.

Interactive Flat Panel • User Manual
24
Video
Screenshot Toolbar Descriptions
Icon
Description
Exit video.
Start recording.
Click Set to configure the following parameters.
Set Camera

Interactive Flat Panel • User Manual
25
Camera Switch:
Click to switch camera between the system camera and the external camera.
Intelligent Application:
AutoFraming: After this function is enabled, the camera will automatically adjust and display
the detected face in the middle of the screen.
Speaker Follow: After this function is enabled, the camera will automatically follow the
detected speaker and display the speaker in the middle of the screen.
Image Mode
Click to select image mode, including Natural, Bright, and Backlight.

Interactive Flat Panel • User Manual
26
Chapter 6 System Settings
The screen displays the main page after the device is turned on. Slide the screen to the left of right
to view applications, device status, and help documents.
Network Settings
The network status is displayed at the bottom of the screen.
Different Network Status
Icon
Description
Connected to a wired network.
Connected to a wireless network.
No network connected.
Go to Settings → Network → Wired Network.
Enable Wired Network.
Wired Network Settings
Optional: Tap to enable Proxy or Static IP.

Interactive Flat Panel • User Manual
27
Proxy Settings
When proxy enabled, you need to set Proxy Host and Port No., and set the URLs that do not use
the proxy.
Proxy Settings
Static IP Settings
When static IP enabled, you need to set network parameters, such as Static IP, Gateway, Subnet
Mask, DNS1, and DNS2.
Static IP Settings
Go to Settings → Network → Wireless Network.
Enable WLAN, and you can add a new network or connect to an available network.

Interactive Flat Panel • User Manual
28
Connect to Available Networks
Tap the desired network in the available network list, and enter the password to connect.
Tap Connect, and network information page pops up. Tap Clear Network to delete the
information of the selected network. Tap Cancel to exit the page.
Wireless Network Information
Add Other Networks
Tap Add Other Networks.
Enter Wi-Fi name and select Security.
Add Other Network
Optional: Check Display Advanced Settings to select proxy and network IP type.
Tap Connect to connect the device to the added wireless network.
Interactive Flat Panel • User Manual
29
When the device is connected to the wired network, it can provide wireless network for other
devices with WLAN hotspot enabled.
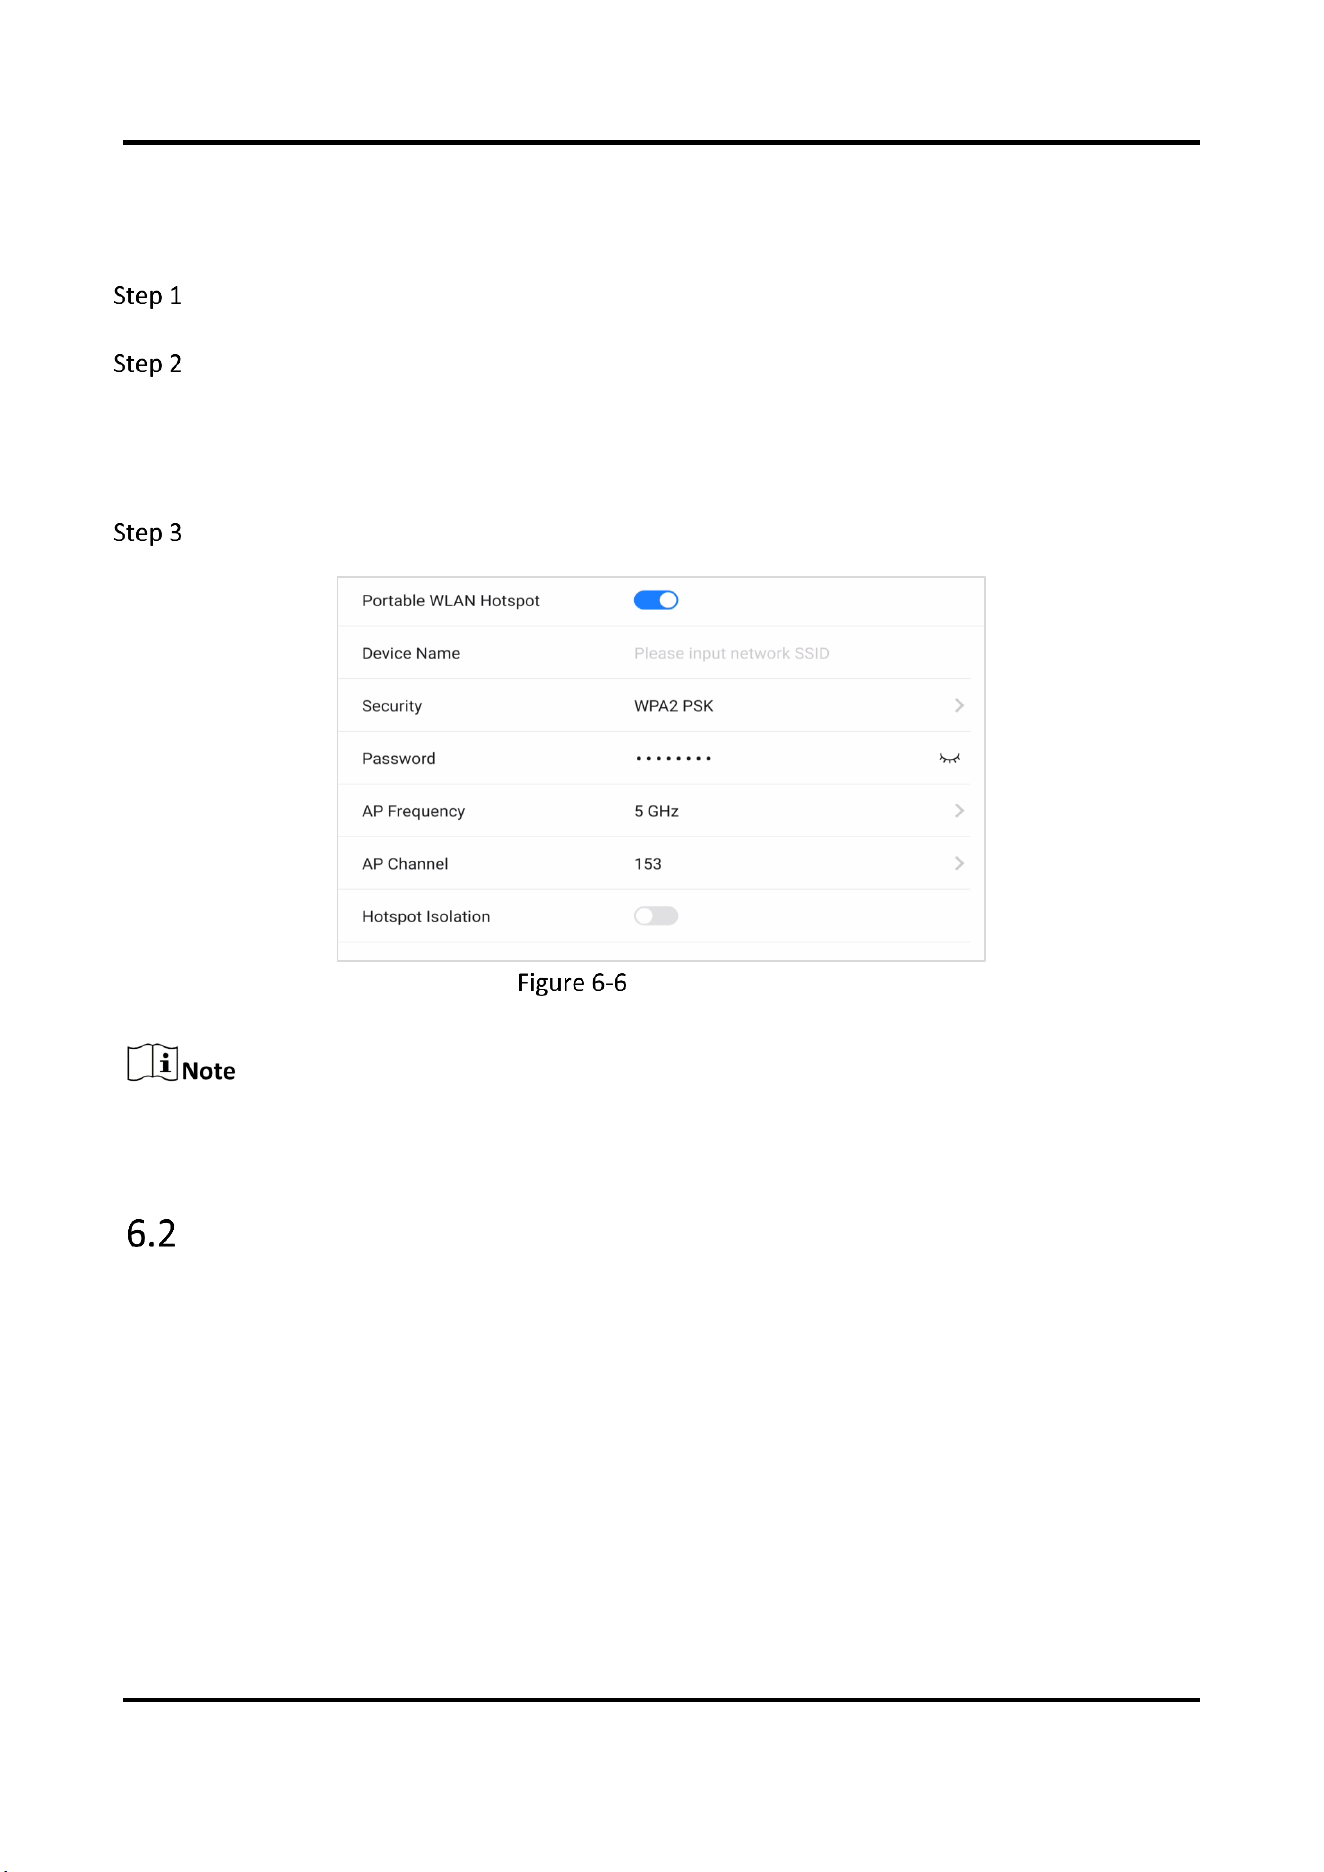
Go to Settings → Network → Hotspot.
Enable Portable WLAN Hotspot.
Hotspot Isolation: After enabling hotspot isolation, even if the device is connected to the LAN, it
cannot access resources such as websites in the LAN.
Set parameters in the pop-up page.
Hotspot Settings
If the device supports both 2.4 GHz and 5 GHz, set 5 GHz as AP Frequency, and recommended
channels as AP Channel for better experience functions such as wireless screen mirroring.
Display Settings
Go to Settings → Display to adjust parameters, such as brightness and sleeping time.

Interactive Flat Panel • User Manual
30
Display Settings
Auto Brightness
The device can adjust brightness according to the environment automatically when enabled.
Brightness Parameter
Slide the slider to adjust the brightness of the screen.
Bluelight Filter
Enable the function to protect your eyes by filtering blue light.
Theme
Set the device theme. Tap Settings to select a desired theme, and tap Apply.
Wallpaper
Tap Wallpaper to select a desired picture from wallpaper library or the system picture library as
wallpaper, or restore to the default wallpaper.
Sleep
Set an inactivity period for sleep mode.
Screensaver
Set an inactivity period for enabling screensaver.
Interactive Flat Panel • User Manual
31
Screensaver Configuration
Tap to select a screensaver picture in the pop-up page, and tap Live View to preview the effect. Tap
Apply to set the selected picture as the screensaver. The screensaver can also be customized.
You can add new screensaver pictures in Screensaver Configuration by tapping .
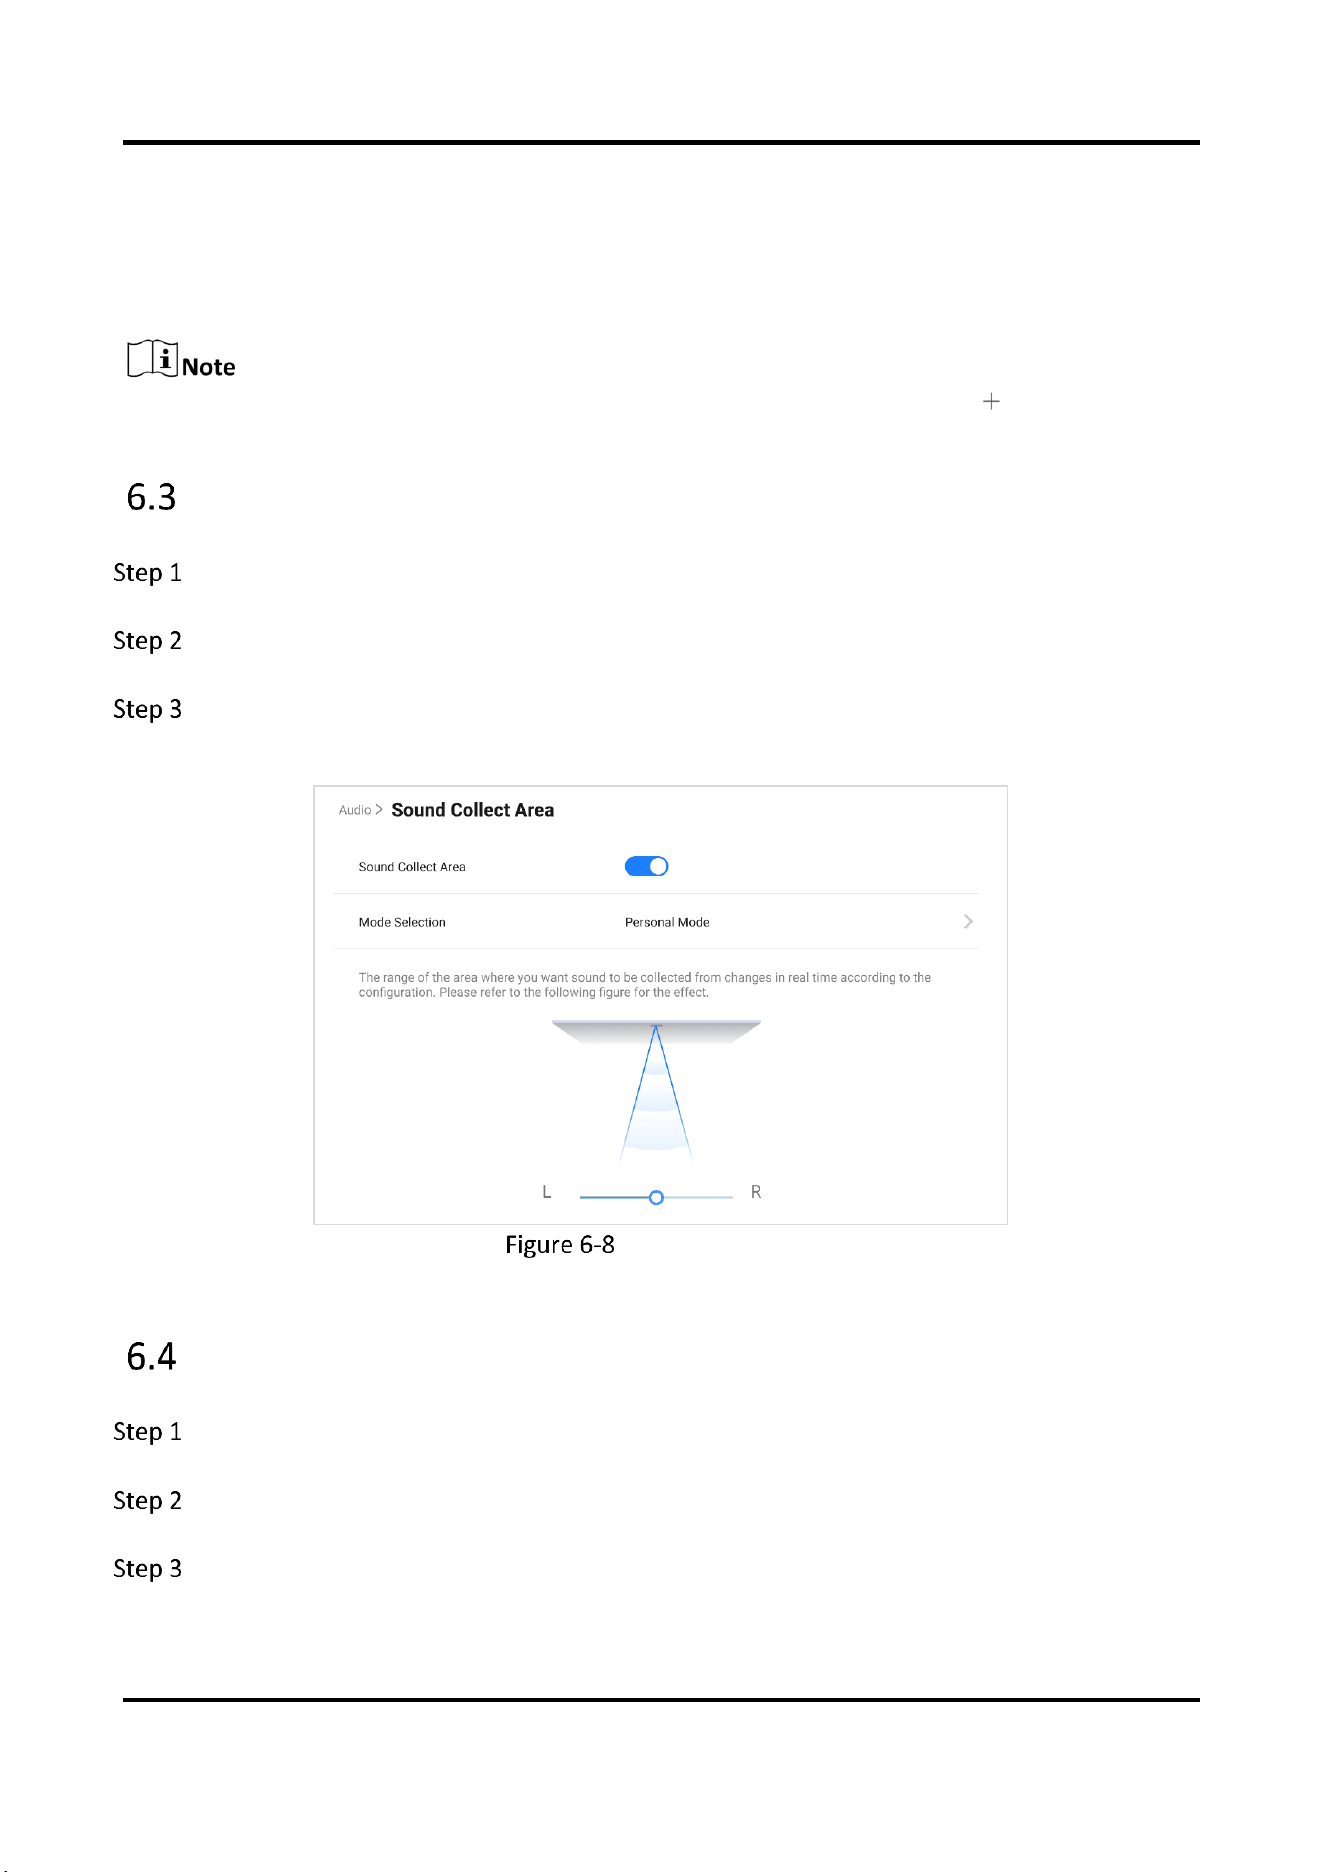
Audio Settings
Go to Settings → Audio to set audio parameters.
Adjust the Volume value.
(Optional) Sound Collect Area: The range of the area where you want sound to be collected
from changes in real time according to the configuration.
Sound Collect Area
Language and Input Settings
Go to Settings → Language & Input.
Tap Language to select the desired language.
Tap Input Method to select the desired input method.

Interactive Flat Panel • User Manual
32
Language and Input Settings
Time and Date Settings
Go Settings → Time & Date.
Date and Time Settings
Enable Time Sync.
Tap Select Time Zone to select the region.
Optional: Enable 24-Hour Format to display the time in 24-hour format.
If Time Sync is disabled, you can set date and time manually.
Application Management
Go to Settings → Application Management.
Tap the desired application to check details.

Interactive Flat Panel • User Manual
33
Application Details
The built-in applications cannot be uninstalled. You can tap the icon in Application
Details to open the application.
After the third-party application is installed, the 4K display can be enabled (effective
after the equipment is restarted).
Enable Auto-Launch. The selected application will be started automatically when the device
is powered on.
Bluetooth
The remote control, audio, keyboard, etc. can be connected through Bluetooth, and file transfer
can also be performed.
Enable Bluetooth to search the available devices nearby, and tap the desired one to connect.
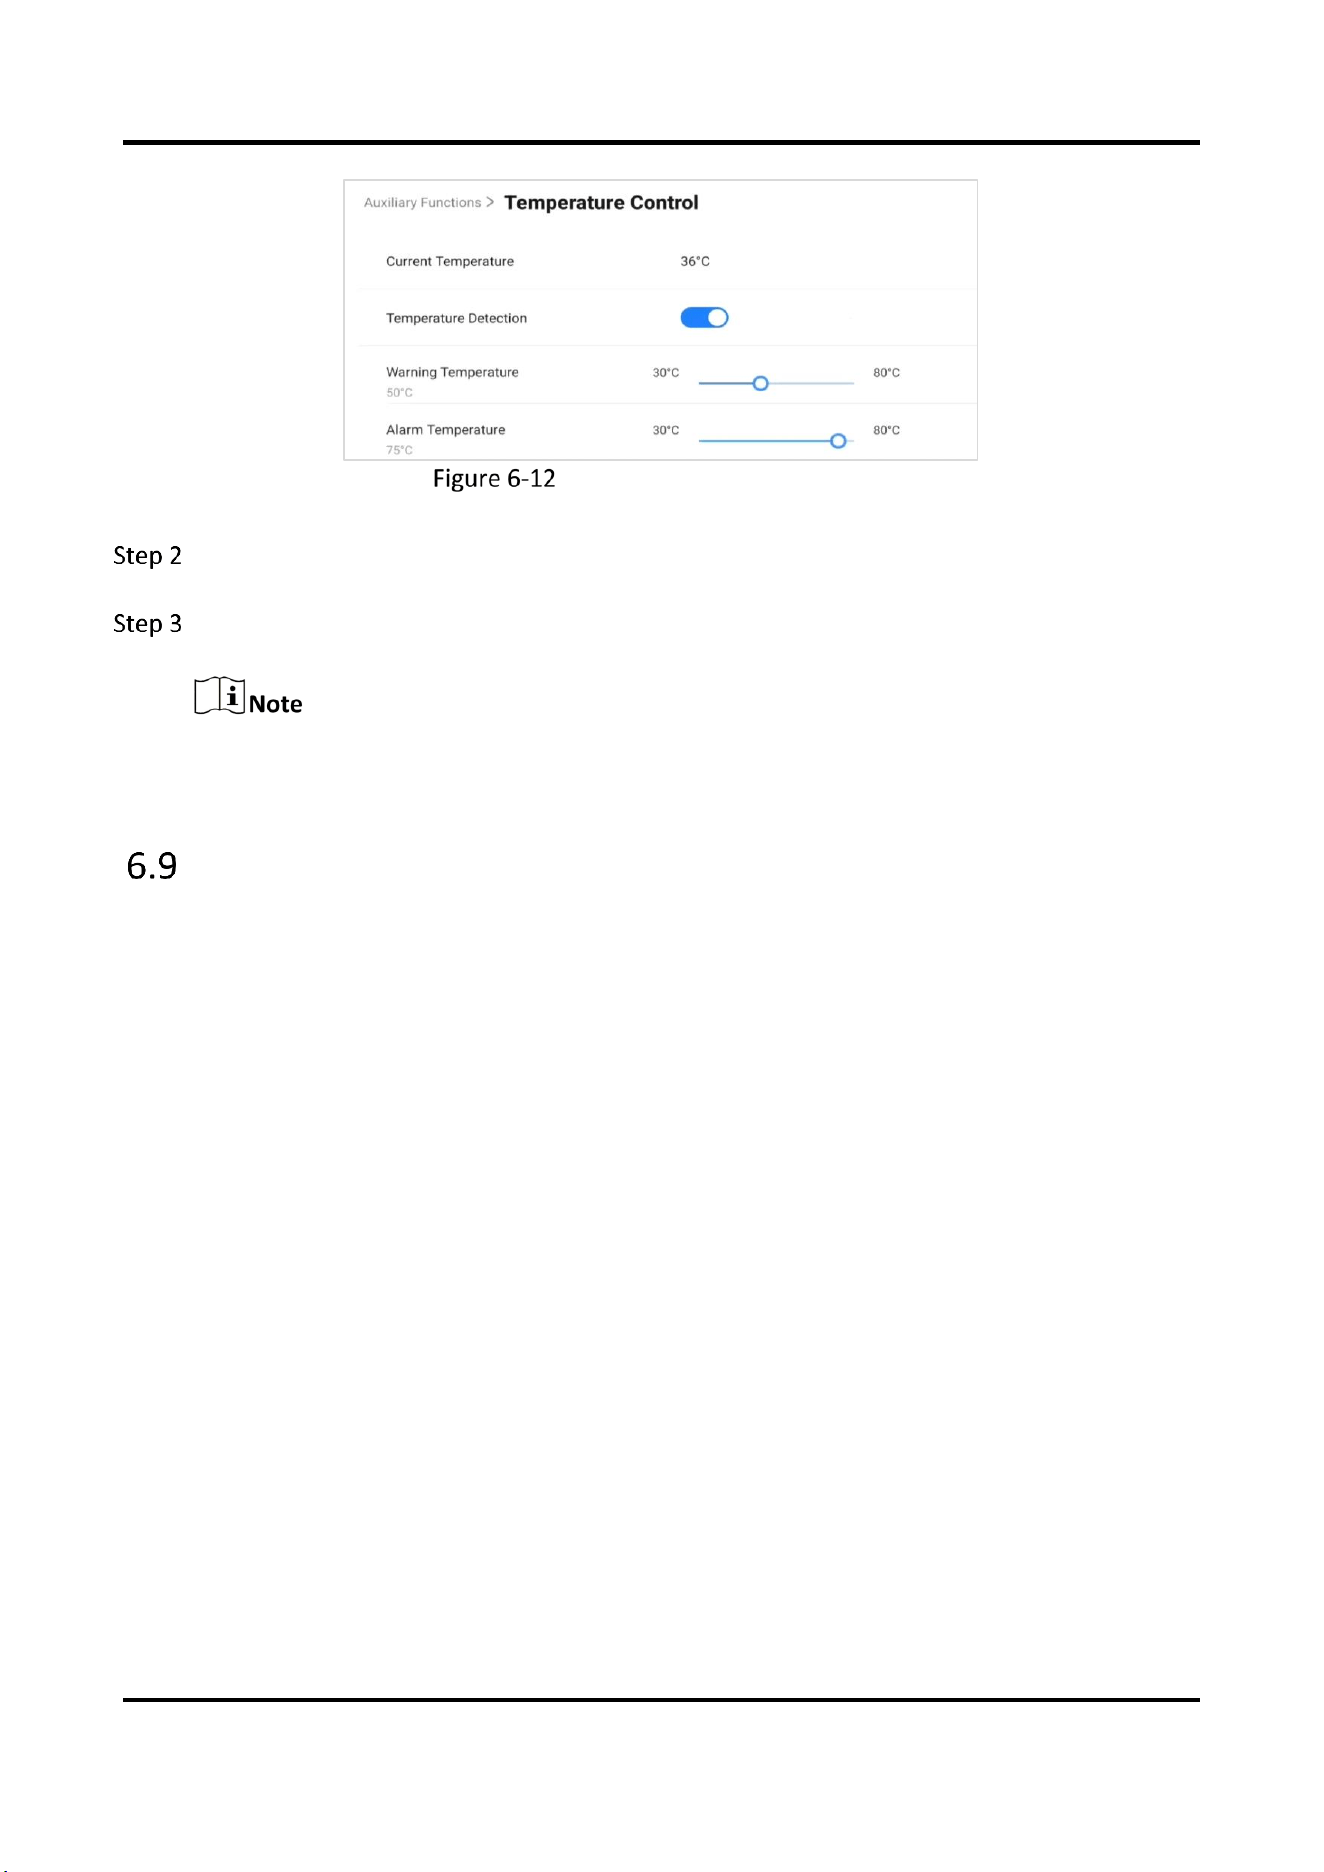
Intelligent Temperature Control
The device monitors inner temperature in real time. When the temperature exceeds the set
warning or alarming temperature, the device will display prompt messages for you to take
measures in a timely manner.
Go to Settings → Auxiliary Functions →Temperature Control.
Interactive Flat Panel • User Manual
34
Intelligent Temperature Control
Enable Temperature Detection.
Slide the slider to set Warning Temperature and Alarming Temperature.
When the temperature exceeds the set alarming temperature, the temperature information
pops up and prompts you to turn off the device.
Advanced Settings
Select Settings → Advanced Settings. You can set parameters as follows.

Interactive Flat Panel • User Manual
35
Advanced Settings
E-mail
Set the E-mail address for receiving shared contents from whiteboard.
Input Source Settings
Startup Input Source
Select the desired input source as the device starts up. You can select a built-in system, or an
external input source. The default boot input source is Android. Customize input source
names are supported.
Auto Switch When Connecting Signal Source
If this function is enabled, the system will switch to the newly-connected input source when
an external input source is connected.
Auto Switch When Disconnected from Signal Source
If this function is enabled, the system will switch to the configured input source as the device
is disconnected from the external input source.

Interactive Flat Panel • User Manual
36
External Camera
Select an external camera among those bound to the device.
Input Device
It supports external USB input audio devices, and can select audio input devices from multiple
devices.
Output Device
It supports external USB output audio devices, and can select audio output devices from multiple
devices.
Startup/Shutdown Settings
Startup Mode
Select Startup or Standby.
Scheduled On/Off
Set the schedule for startup and shutdown.
No-signal Shutdown
Set the time for auto-shutdown if no signal is accessible.
Device Permission Settings
Disable Wi-Fi
If Wi-Fi is disabled, the device cannot be connected to the wireless network.
Copy Permission Off
If copying from USB disk is disabled, the device cannot be read from external disks.
QR Code Sharing Settings
Share the content of whiteboard through a QR code with other devices in the same LAN.
Wakeup Settings
Wake from Serial Port
If this function is enabled, the device in standby status can be woken up by serial port
command.

Interactive Flat Panel • User Manual
37
Wake from Signal Source
HDMI signal wake-up is enabled by default. When the device is turned off, it can be turned on
through HDMI input.
If this function is disabled, the device in standby status can be waken up through the power
switch or remote control power switch, and cannot be turned on through the serial port and
HDMI.
EDID Version
Supports to select EDID’s version.
HDMI Output Settings
Connect the device through HDMI interface to share the contents. You can set the desired
resolution, and enable audio and HDCP.
To enable the HDCP function, the display connected to the flat panel must support the HDCP
function.
User Settings
Support having different accounts on a shared interactive flat panel, letting multiple people use
the same device, while giving every account their own sign-in info, plus access to their own files,
browser favorites, and settings.
Go to Settings → User Settings, and enable Multi-User Settings, you can manage accounts of the
device.

Interactive Flat Panel • User Manual
38
User Settings
Icon Description
Icon
Description
Add an account.
Set account name within 64 characters.
Set password within 4 to 6 digits.
Switch accounts. Enter the password of the corresponding account to login.
Edit your account’s information.
Edit your account’s password.
Delete the account. The data of this account will be deleted from the device as
well.
If a normal user forget the password, contact the administrator,
If the administrator forgets the password, try to unlock through a USB flash disk.
Administrator login supports setting login method as login with password or not.
Device Information
Go to Settings → About to check the device information. The device name is customizable, and
you can restore the device to the default settings.

Interactive Flat Panel • User Manual
39
Warning
All the data will be lost if the settings are restored to the default status.
Negative Screens
Slide from the left side of the screen to the right to call up the negative screens, where you can
view the device status and system help.
Negative Screens

Interactive Flat Panel • User Manual
40
Chapter 7 Intelligent Applications
FileBrowser
Tap FileBrowser on the main page. All the files under the current directory are shown by default.
Tap Image, Doc, AV, or Installation Package to view specified files.
Icons are described as follows.
File Management
Descriptions of File Management Icons
Icon
Description
Icon
Description
Back/Forward
Go to the
previous/next page.
Create
Create a new folder.
Grid/List
View the files in grid or
list mode.
Sort
Change the file order.
Edit
Edit the files.
--
--
Click to edit documents. More functions are described as follows.

Interactive Flat Panel • User Manual
41
Edit the Files
Descriptions of Editing Icons
Icon
Description
Icon
Description
Select All
Select all the files.
Copy To
Copy the selected file(s) to
another folder.
Move To
Move the selected file(s) to
another folder.
Delete
Delete the selected file(s).
Share
Share the selected file(s).
Press and hold the file to perform other operations.
Browser
Connect the device to the Internet, and tap Browser. Enter URL in the address bar to view texts,
pictures, audios and videos on the Internet.
Whiteboard
Whiteboard is an editing software that integrates functions such as touch writing, image insertion,
and content sharing. Users can add boards with different backgrounds for touch writing, erasing,

Interactive Flat Panel • User Manual
42
and page switching operations. It supports importing and editing images, and after the whiteboard
content is completed, it can be saved locally or shared via email.
By using the toolbar, you can write, erase, select, restore/undo, and take other operations on the
whiteboard.
Toolbar
Write
The writing function is used to write on a whiteboard. Tap on the toolbar to adjust parameters
such as brush type, color, thickness, etc.
Set Wrtiting Parameters
Erase
The erase function is used to erase the content written on the whiteboard. Tap on the toolbar
to select the following actions:
Partial Erase: Tap , click and drag the eraser on the area that needs to be deleted, and the
content of the covered area will be deleted. Supports sliding the slider to adjust the size of the
eraser.
Circle Erase: Tap to circle the area that needs to be deleted. The content of the trajectory
touched in the circle area will be deleted.
Erase All: Tap to clear all written content on the current whiteboard page.

Interactive Flat Panel • User Manual
43
Gesture Erasing: When your palm, back of hand, or two fingers come into close contact with
the screen, you can perform large-scale erasing operations.
Circle Selection
Tap on the toolbar to circle any shaped area ( ) or rectangular area ( ) and edit the content
in the area.
: Change the color of the content in the selected area uniformly.
: Delete the content within the selected area.
: Lock the content within the selected area. Long press on the area or tap to unlock.
: Copy the content of the area.
Support resizing, moving, and rotating the content in the selected area.
Tap outside the selected area to cancel the area selection.
Undo or Redo
When accidentally writing or erasing, the undo tool can be used to undo your operation.
: Click to undo the last action;
: Click to redo the previous action.
More Tools
Tap on the toolbar to call up the following tools:

Interactive Flat Panel • User Manual
44
More Tools

Interactive Flat Panel • User Manual
45
Tools Description
Icon
Name
Description
Shape
Insert rectangles, ellipses, circles, and lines.
Ruler
Use a ruler, protractor, square, or compass. Drag to adjust
size and angle.
Table
Insert a table.
Long press the table to add/delete rows or columns;
Drag the table to move or resize it;
Tap the table to choose to modify the color of the content
written in the table.
Flow Chart
You can select different shapes and lines to draw a
flowchart on the whiteboard.
Note
Insert a note. Support moving, resizing, copying notes, and
changing the color of notes.
Stopwatch
Open the stopwatch.
Countdown
Open the countdown.
Voting
Machine
Open the voter machine.
Calculator
Open the calculator.
Insert
Picture
After inserting a picture, you can lock, resize, move, rotate,
delete the picture, and modify the color of the content
written in the area.
Open Video
Play video files.
Open
Document
Open documents in PPT, PPTX, DOC, DOCX, and PDF for
display.
Browser
Call up the browser on the side of the whiteboard.
You can create a new whiteboard, switch whiteboards, and delete whiteboards.

Interactive Flat Panel • User Manual
46
Function Description
Function
Description
Add Whiteboard
Tap on the bottom right corner to add a whiteboard page.
Switch Whiteboard
Tap / to switch the whiteboard page.
Drag Whiteboard
A single whiteboard is infinitely large, and you can drag the whiteboard
page up, down, left, right with five fingers to extend writing space.
View Whiteboard
Tap on the page number area to display a thumbnail of the
whiteboard page. Swipe the thumbnail up and down, and tap a page
to jump to the displayed page.
Delete Whiteboard
Tap on the page number area and tap on the bottom right
corner of the page to delete that page.
All information will be reset after closing the whiteboard.
After the whiteboard content is completed, the page can be saved locally on the device for
reference or shared with others.
Tap on the bottom left of the whiteboard.
Save Whiteboard
Select a format.
Support saving the board as PNG format images, PDF format documents, or editable VWB
format files.

Interactive Flat Panel • User Manual
47
(Optional) Edit the name of the board.
Tap Save.
Users can share whiteboards with others via email or QR code.
Share via Email
Tap on the bottom left of the whiteboard and select Email.
Make sure the Email server has been configured before you start.
Share Via QC Code
Tap on the bottom left corner, mobile devices on the same LAN can scan the code to download
whiteboard content.
Share via QC Code
Tap on the bottom left corner of the whiteboard to achieve functions such as split-screen
writing and dual-color writing.

Interactive Flat Panel • User Manual
48
More Functions
Split-Screen Writing
Support whiteboard simultaneous writing on split screens.
Tap or switch between two or three screens.
Tap to exit split-screen writing mode.
When changing the number of split screens and exiting split-screen writing, the current content
will not be saved.
Dual-Color Writing
After enabling, different colors can be selected for writing on the tip and tail of the writing pen.
Long press the stroke support for adjusting the pen’s threshold.
Multi-Touch Writing
After enabling, the whiteboard supports multi finger touch, meaning that multiple fingers can
simultaneously edit the whiteboard.
Text Recognition
After enabling, the whiteboard can recognize the drawn text and correct it to the regular text.

Interactive Flat Panel • User Manual
49
Shape Recognition
After enabling, the whiteboard can recognize the drawn graphics and correct them to the regular
graphics.
The recognizable shapes include circles, triangles, rectangles, and lines.
Text recognition and shape recognition do not support simultaneous activation.
Menu Position
After enabling, the menu on the left and page numbers on the right of the whiteboard are
swapped for easy access to the function icons and menus.
Background
Set the background and shading of the whiteboard, and you can customize the whiteboard
background style as needed.
Open
Open the whiteboard file saved as a VWB format for editing again.
About
View the current version and open source agreement.
WonderCastServer
An Android phone with NFC can mirror its screen to the interactive flat panel (only when the
mobile phone has been installed with WonderCast and enabled NFC).
Connect the mobile phone and the Display to the same LAN, or connect the mobile phone to
the Display’s hotspot.
Stick the back of your mobile phone to the NFC area on the interactive flat panel, and the
screen can be mirrored after the prompt appears on your phone.

Interactive Flat Panel • User Manual
50
You can mirror the screen of your PC or mobile phone on the Interactive Flat Panel, or control the
Flat Panel through your PC or phone. Please scan the following QR code for more details about
WonderCastServer.
WonderCastServer
System Pre-installed Applications
The following table briefly describes the applications pre-installed in the system. Refer to the help
document of desired application, to get more details.
The system pre-installed applications vary from different device types.
Introduction of System Pre-installed Applications
Application
Introduction
Whiteboard
It is applied to draw and write. You can use it to save, move, zoom in, zoom
out, delete, and download the contents.
FileBrowser
Manage your files.
Browser
After the device is connected to the network, it can browse internet
information through a browser.
Gallery
It is used for viewing pictures in SD card and USB disk.
Upgrade
It provides remote upgrade and local upgrade, and upgrade of local
components.
WonderCastServer
An application used to connect flat panel, mobile phone, or PC for screen
mirroring.
Camera
It is used for taking picture by camera.

Interactive Flat Panel • User Manual
51
Ark
It is used for docking with the centralized control platform, so that devices
can be remotely managed through the platform, such as sending files and
upgrading remotely.
FocSign Player
It is used for releasing programs and schedules to the digital signage.

Interactive Flat Panel • User Manual
52
Chapter 8 Appendix A FAQs
Question
Cause and Solution
Why do the condensations appear
frequently on the screen?
Tempered glass is installed on the outer screen to provide
protection. There is a gap between the screen and the
tempered glass for air convection. The main reason is that
there is a temperature difference between the screen and
the outside. Hot air condenses on the glass surface at a
lower temperature, which results in condensations.
Condensations will evaporate after the device starts up
and will not affect the use of the device.
Why there is no sound coming from
my laptop after connection?
If only audio cable is accessed, both audio output and
image output will be unavailable.
Access HDMI cable.
Select the device as the audio output device in
Windows.
Why does the screen get hot after a
period of use?
Screen temperature rise is caused by heat dissipation and
is completely normal. Our heat dissipation design is
industrial-leading and is the formulator of the industry
standards, which is in accordance with the national health
standard.
Does long-time use damage the
eyes?
The recognition of flicker by human eyes is 50Hz. If the
frequency is lower than 50Hz, then the flicker will be
recognized and cause eye muscles fatigue. We use 60Hz
LCD screen, human eyes will not recognize the flicker of the
screen. Compared with other products of the same kind, it
can reduce eye fatigue to a large extent.
Why there is no image in screen nor
sound coming from the device?
Check if the power cable is connected.
Check if the socket works normally.
Check if the power switch is turned on.
Why does the device HDMI channel
have no input signal?
Check if the input source works normally.
Change HDMI interface or cable.
If PC is accessed, set HDMI output on your PC.
Why is wired network unstable?
Try to disable the auto network detection option.

UD343856B