RF8012HOOD
www.linarie.com.au
Redon
CONGRATULATIONS
TABLE OF CONTENTS
Congratulations and thank you for choosing Linärie to
introduce a new comfort of cooking in your home. We are
sure you will find your new appliance a pleasure to use and
a great asset to your kitchen.
This appliance complies with all relevant safety
requirements in Australia. Inappropriate use can, however,
lead to personal injury and damage to property.
In order to operate the unit correctly and safely, please read
this instruction manual carefully before installation and
usage. This user manual which provides you with all
required instructions related to safety, installation, use and
maintenance of the appliance.
For future reference, please store this booklet in a safe
place and ensure that all users are familiar with the
contents. Pass them on to any future owner of the
appliance.
Record Model & Serial Number
Model .............................................................................................................................
Serial Number .........................................................................................................
Register your product www.linarie.com.au
Correct Conditions of Use
The appliance is intended for use in the home and similar
environments only. It is not intended for commercial use.
The appliance is not suitable for outdoor use, non-stationary
installation.
This product is used for cooking and extracting.
The electricity connection must be made by a qualified
specialist. Installation must comply with the valid
standards, regulations and laws. All safety and
warning information and the operating and installation
instructions must be complied with.
Additional information on products, accessories,
warranty, replacement parts and services can be
found at www.linarie.com.au
Adherence to the directions for use in this manual is extremely
important for health and safety. Failure to strictly adhere to the
requirements in this manual may result in personal injury and
property damage.
Products must be used, installed and operated
in accordance with this manual. You may not be able to claim on
Linärie’s manufacturer’s warranty in the
event that your product fault
is due to failure to adhere this manual.
www.linarie.com.au
SAFETY INSTRUCTIONS ........................................................................................................................................ 2
PRODUCRT STRUCTURE ....................................................................................................................................... 4
HOW INDUCTION HEATING WORKS ..................................................................................................................... 4
INSTALLATION (EXTRACTION MODE) ........................................................................................................................... 5
Installation tips ............................................................................................................................................... 5
Preparing the unit for a built-in appliance ............................................................................................................ 5
Installing the appliance ................................................................................................................................... 6
INSTALLATION (RECIRCULATION MODE) ............................................................................................................................ 7
Installation tips ............................................................................................................................................... 7
Preparing the unit for a built-in appliance ............................................................................................................ 8
Installing the appliance ................................................................................................................................... 8
Electrical connection safety warning (recirculation & extraction mode) ............................................................. 10
Electrical connection (recirculation & extraction mode) .................................................................................... 10
Pots and pans and how to use them .............................................................................................................. 11
OPERATION ............................................................................................................................................................. 12
Using your Cooker Hood .................................................................................................................................. 12
Using your Induction Hob ................................................................................................................................. 13
Using Boost Function ........................................................................................................................................ 14
Using Child Lock Function ................................................................................................................................ 14
Using the Timer ................................................................................................................................................ 14
Using the timer as a Minute Minder ................................................................................................................... 14
Using the timer to switch off one or more cooking zones .................................................................................... 15
Using the Flexible zone function ........................................................................................................................ 16
Auto shutdown protection ................................................................................................................................. 16
MAINTENANCE AND CLEANING .............................................................................................................................. 17
Daily maintenance ........................................................................................................................................... 17
Cleaning techniques ......................................................................................................................................... 17
Replacing the motor ......................................................................................................................................... 18
TECHNICAL PARAMETER & CIRCUIT DIAGRAM .......................................................................................................... 19
Technical parameter ......................................................................................................................................... 19
TROUBLESHOOTING ......................................................................................................................................... 19
ENVIRONMENTAL PROTECTION ............................................................................................................................... 20
DISPOSAL OF THE APPLIANCE ..................................................................................................................... 20
WARRANTY & AFTER SALES SERVICE .......................................................................................................................... 21

2
SAFETY INSTRUCTIONS
Please read the following instructions carefully before using the appliance.
☆Especially important: The design of the induction cooker of this product complies with the EEC
Directive 89/336 guidelines. When the cooker is working, there is an electromagnetic field near it, and it
will not interfere with the use of other electrical equipment during normal use, but special attention should be
paid to the following conditions:
1. Those who use pacemakers must ensure that their pacemaker design meets the above guidelines. Please
contact your personal doctor for consultation to ensure that they are consistent with the pacemaker
manufacturer.
2. Those who use medical electronic equipment such as hearing aids must ensure that they comply with the
guidelines on electromagnetic interference.
☆This product is only suitable for household use, not suitable for barbecues, barbecue shops and other
commercial uses.
☆Please choose professionals to install this product in accordance with the instructions and local regulations.
☆If the product fails, to avoid danger, please find a local repair center for repair.
☆The installation and replacement of the power cord must be done by professionals.
☆Manufacturers and agents are not liable for injuries or property damage caused by improper installation,
improper use or improper maintenance.
☆Children shall not operate the appliance.
☆The disassembled packaging materials (plastic bags, foam, plastic, etc.) should be placed out of the reach
of children, as they may cause harm.
☆This hob comes with a cooling fan with air vent underneath the worktop itself. If there is a drawer under the
worktop, do not put any paper or small light objects in it as they could be sucked up by the fan, damaging it
or compromising its function.
☆Do not use aluminum foil to protect parts of the hob.
☆Do not leave the kitchen unattended when cooking foods where high contents of oil or fat are used, the oil
could catch fire. If the oil catches fire never put out with water. Immediately suffocate the fire with a lid and
turn off the hob.
☆Do not cook on the hob if the glass is broken. Water or cleaning products could filter through the breakage
and cause electrical shocks. Immediately contact qualified personnel as soon as you notice a breakage.
☆Keep the area around the hob free from combustible material (plastic, paper etc.) or flammable liquids,
these can catch fire.
☆Do not place metal objects (especially the air intake net and air intake hood) on the hob surface, as they
may be heated and cause burns.
☆There is residual heat on the glass surface of the hob after use, and the number of the heating unit will
display "H". At this time, do not touch the glass with your hands to avoid burns, and do not place objects on
the glass to avoid being heated by the residual heat of the glass.
☆After using the hob, you should use the control button to shut down. Do not rely on the hob to detect that
there is no pot and turn it off by itself.
☆Do not heat the unopened sealed or airtight container, because it may explode if heated.
☆The hob part of this product is equipped with a "child lock" button, which can avoid improper use by
children and others, and can also avoid accidentally starting the hob during cleaning.
☆Do not block the air inlet of the hood during use, and do not let water or soup flow into the air inlet box.
☆The filter screen of this product needs to be cleaned regularly to maintain a good suction effect. Please
make sure that the power has been cut off before cleaning.
☆The filter should be cleaned according to the method specified in the manual to avoid the risk of fire during
use.
☆The gas discharged from the hood of this product should not be discharged into the flue for discharging
www.linarie.com.au

3
coal gas or other fuels.
☆The appliance is not to be used by persons (including children) with reduced physical, sensory or mental
capabilities, or lack of experience and knowledge, unless they have been given supervision or instruction.
☆Children being supervised not to play with the appliance.
☆WARNING: If the surface is cracked, switch off the appliance to avoid the possibility of electric shock, for
hob surfaces of glass-ceramic or similar material which protect live parts.
☆Shall state a steam cleaner is not be used.
☆Metallic objects such as knives, forks, spoons and lids should not be placed on the hob surface since they
can get hot.
☆The instructions for hobs shall state that the appliance is not intended to be operated by means of external
timer or separated remote-control system.
☆Danger of fire: Do not store items on the cooking surfaces.
☆CAUTION: The cooking process has to be supervised. A short-term cooking process has to be supervised
continuously.
☆WARNING: Unattended cooking on a hob with fat or oil can be dangerous and may result in a fire.
☆If the supply cord is damaged, it must be replaced by the manufacturer, its service agent or similarly
qualified persons in order to avoid a hazard.
☆There shall be adequate ventilation of the room when the range hood is used at the same time as
appliances burning gas or other fuels (not applicable to appliances that only discharge the air back into the
room).
☆There is a fire risk if cleaning is not carried out in accordance with the instructions.
☆Do not flame under the range hood.
☆CAUTION: Accessible parts may become hot when used with cooking appliances.
☆The air must not be discharged into a flue that is used for exhausting fumes from appliances burning gas or
other fuels.
☆Regulations concerning the discharge of air have to be fulfilled.
☆Warning: Failure to install the screws or fixing device in accordance with these instructions may result in
electrical hazards.
☆This appliance can be used by children aged from 8 years and above and persons with reduced physical,
sensory or mental capabilities or lack of experience and knowledge if they have been given supervision or
instruction concerning use of the appliance in a safe way and understand the hazards involved.
☆Children shall not play with the appliance.
☆Cleaning and user maintenance shall not be made by children without supervision.
☆This appliance can be used by children aged from 8 years and above and persons with reduced physical,
sensory or mental capabilities or lack of experience and knowledge if they have been given supervision or
instruction concerning use of the appliance in a safe way and understand the hazards involved. Children
shall not play with the appliance. Cleaning and user maintenance shall not be made by children without
supervision.
☆WARNING: Unattended cooking on a hob with fat or oil can be dangerous and may result in fire. NEVER
try to extinguish a fire with water, but switch off the appliance and then cover flame e.g. with a lid or a fire
blanket.
☆WARNING: Danger of fire: do not store items on the cooking surfaces.
☆The instruction for hobs shall state that the appliance is not intended to be operated by means of an
external timer or separate remote-control system.
www.linarie.com.au
4
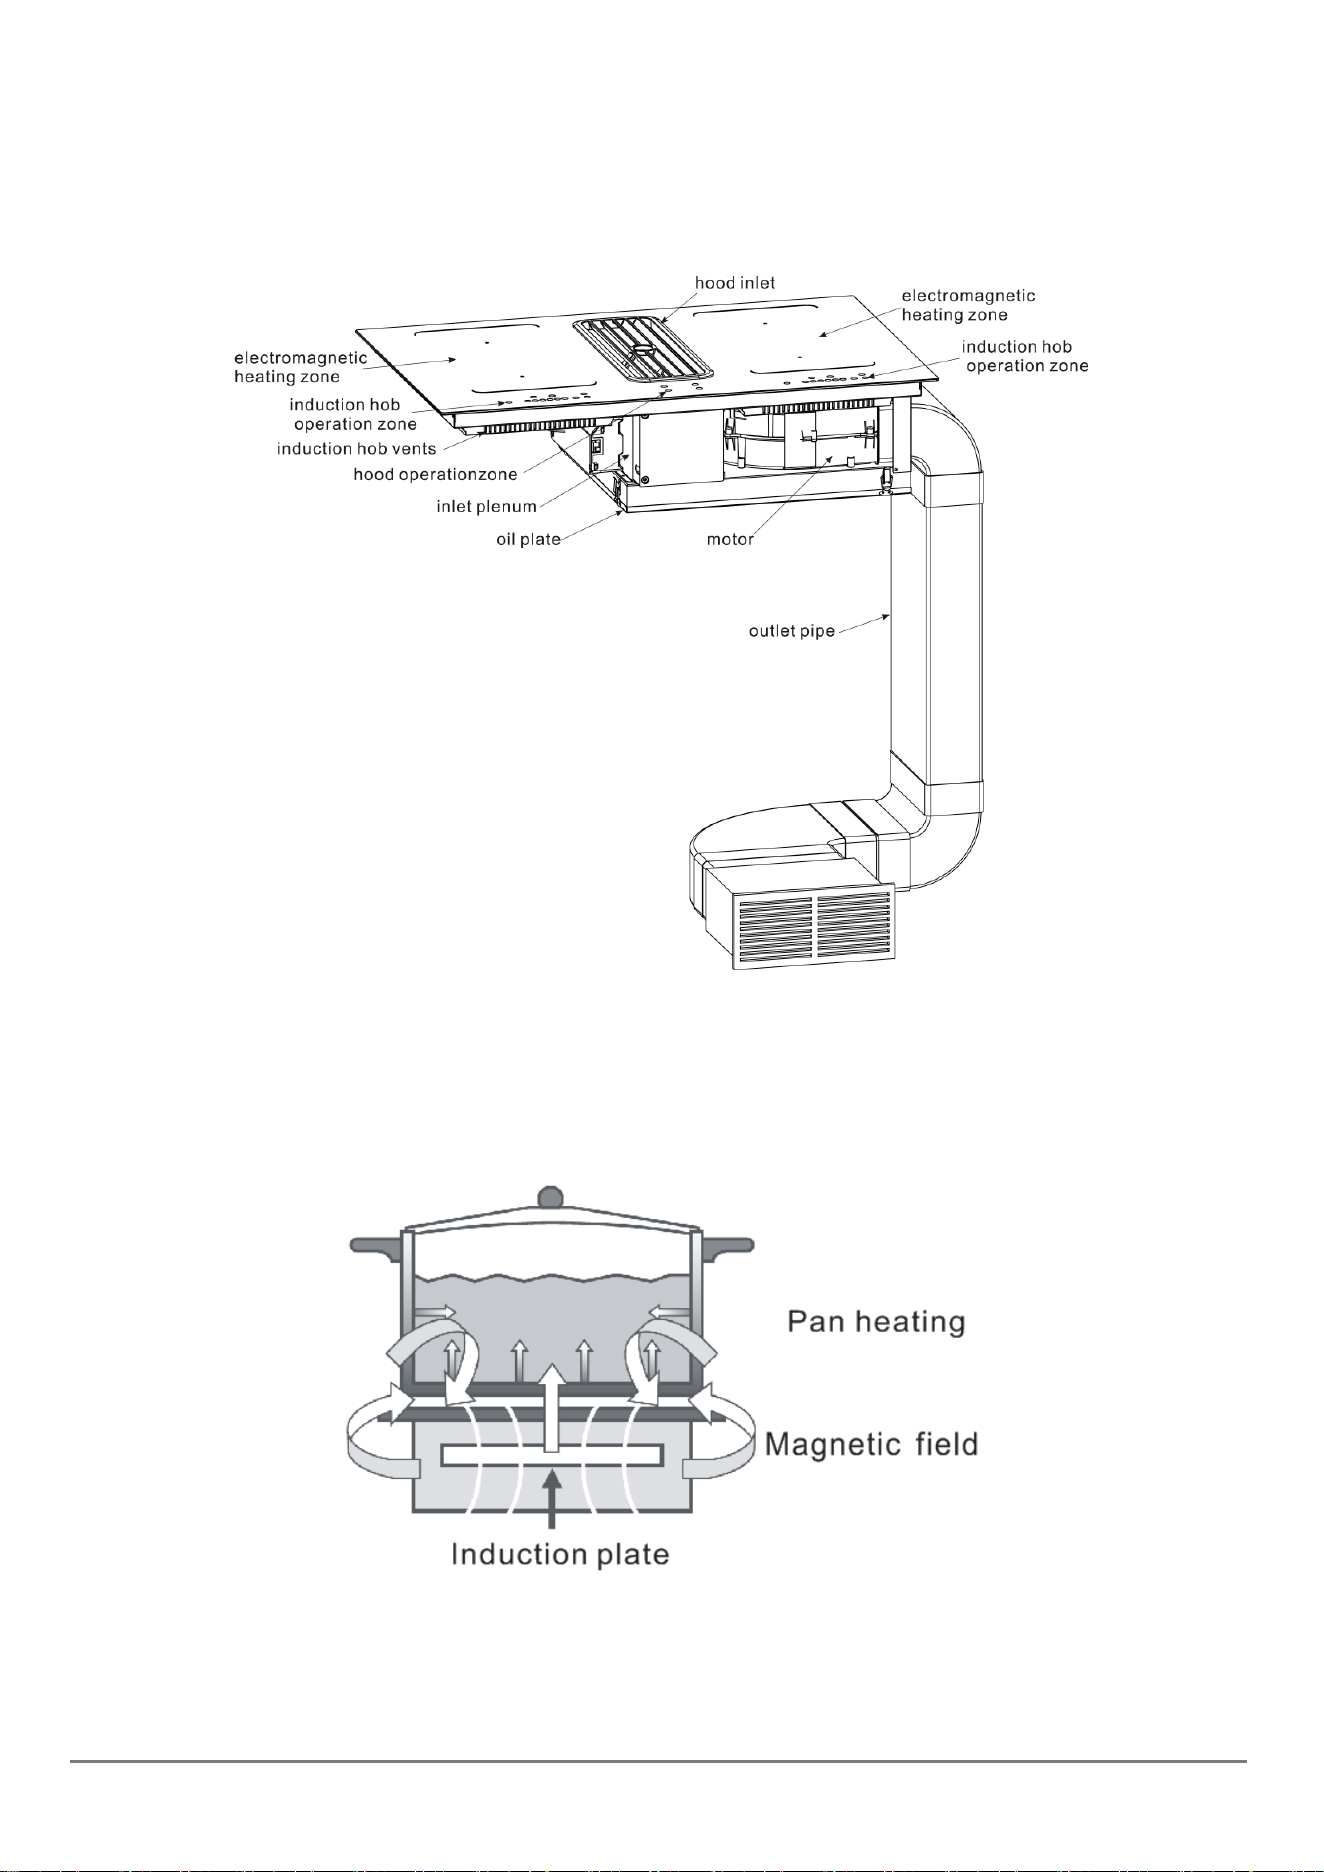
PRODUCRT STRUCTURE
For the product structure, refer to Pic below.
HOW INDUCTION HEATING WORKS
There is an electronic circuit inside the induction hob which powers and commands a coil. This creates a
magnetic field which activates when it comes into contact with suitable pots and pans (magnetic material).
The pan on the hob warms up instantly, while the hob remains cold. There is no loss of heat. The heat generated
in the pan lets you cook quickly, saving time and energy.
www.linarie.com.au
5
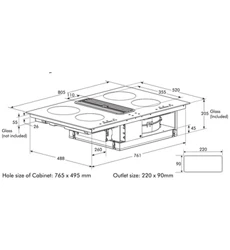
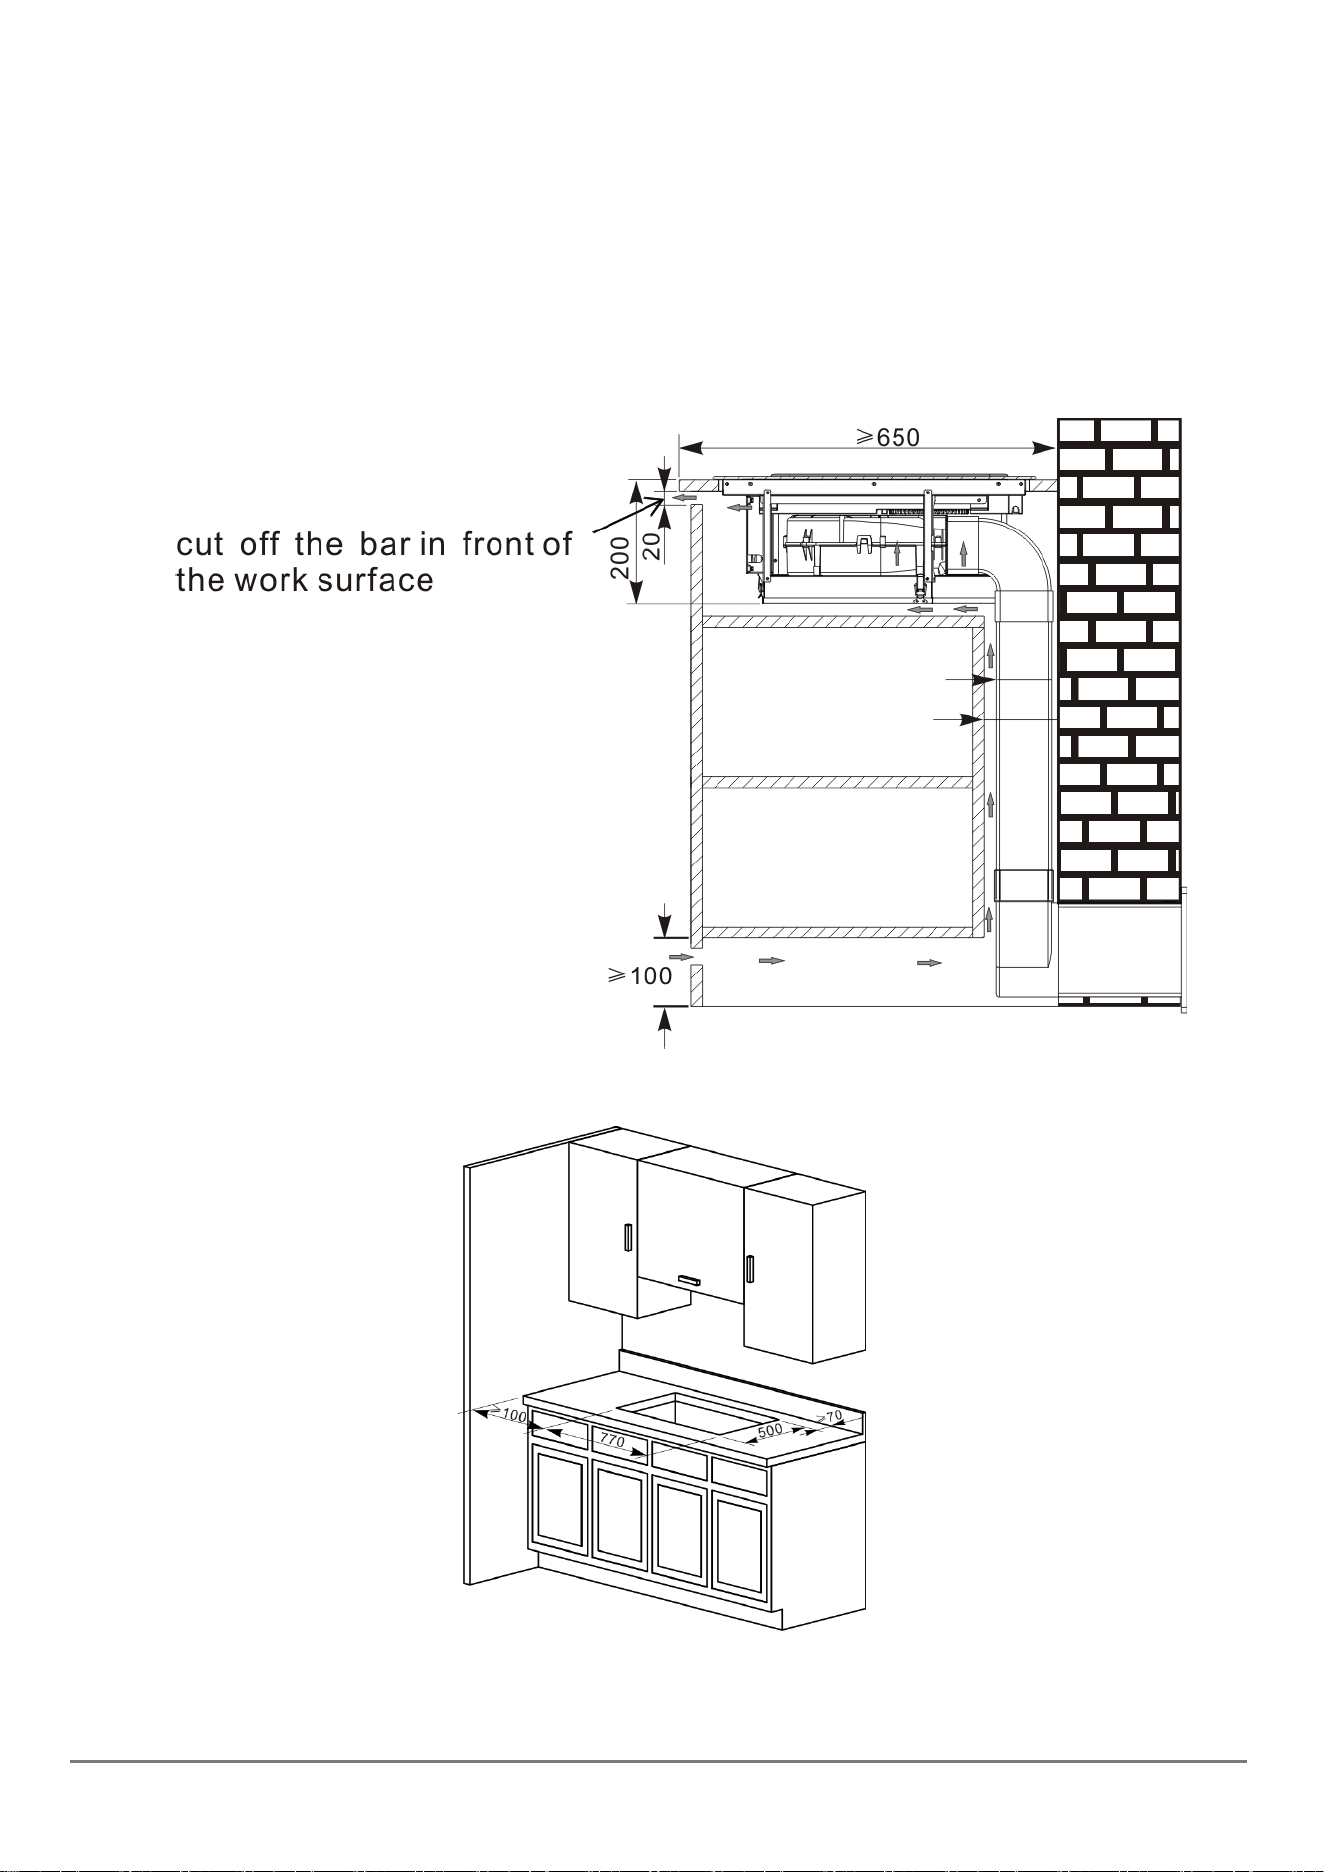
INSTALLATION (extraction mode)
➢ Installation tips
The hob can be installed on a top with a flat surface and thickness of between 30 and 40mm. The cupboard
underneath the top should leave enough sufficient area to accommodate inlet plenum, blower cavity, inlet
pipe, outlet pipe and so on, and this area should make sure good ventilation and heat dissipation is provided.
Refer to pic below.
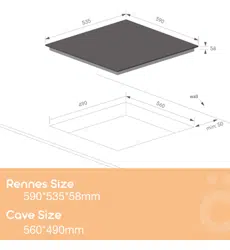
Preparing the unit for a built-in appliance
1. Make a square opening on the table surface with the size of 770*500mm, refer to Pic above for the
specification.
2. After drilling a hole on the table surface, carefully remove shavings or sawdust before inserting the appliance,
www.linarie.com.au
6
as they could be sucked up by the appliance and compromising its function.
3. Make sure the table surface is level and square and that no part interferes with the space required for
installation. The kitchen units that are in direct contact with the appliance must be heat-proof (min. 80℃).
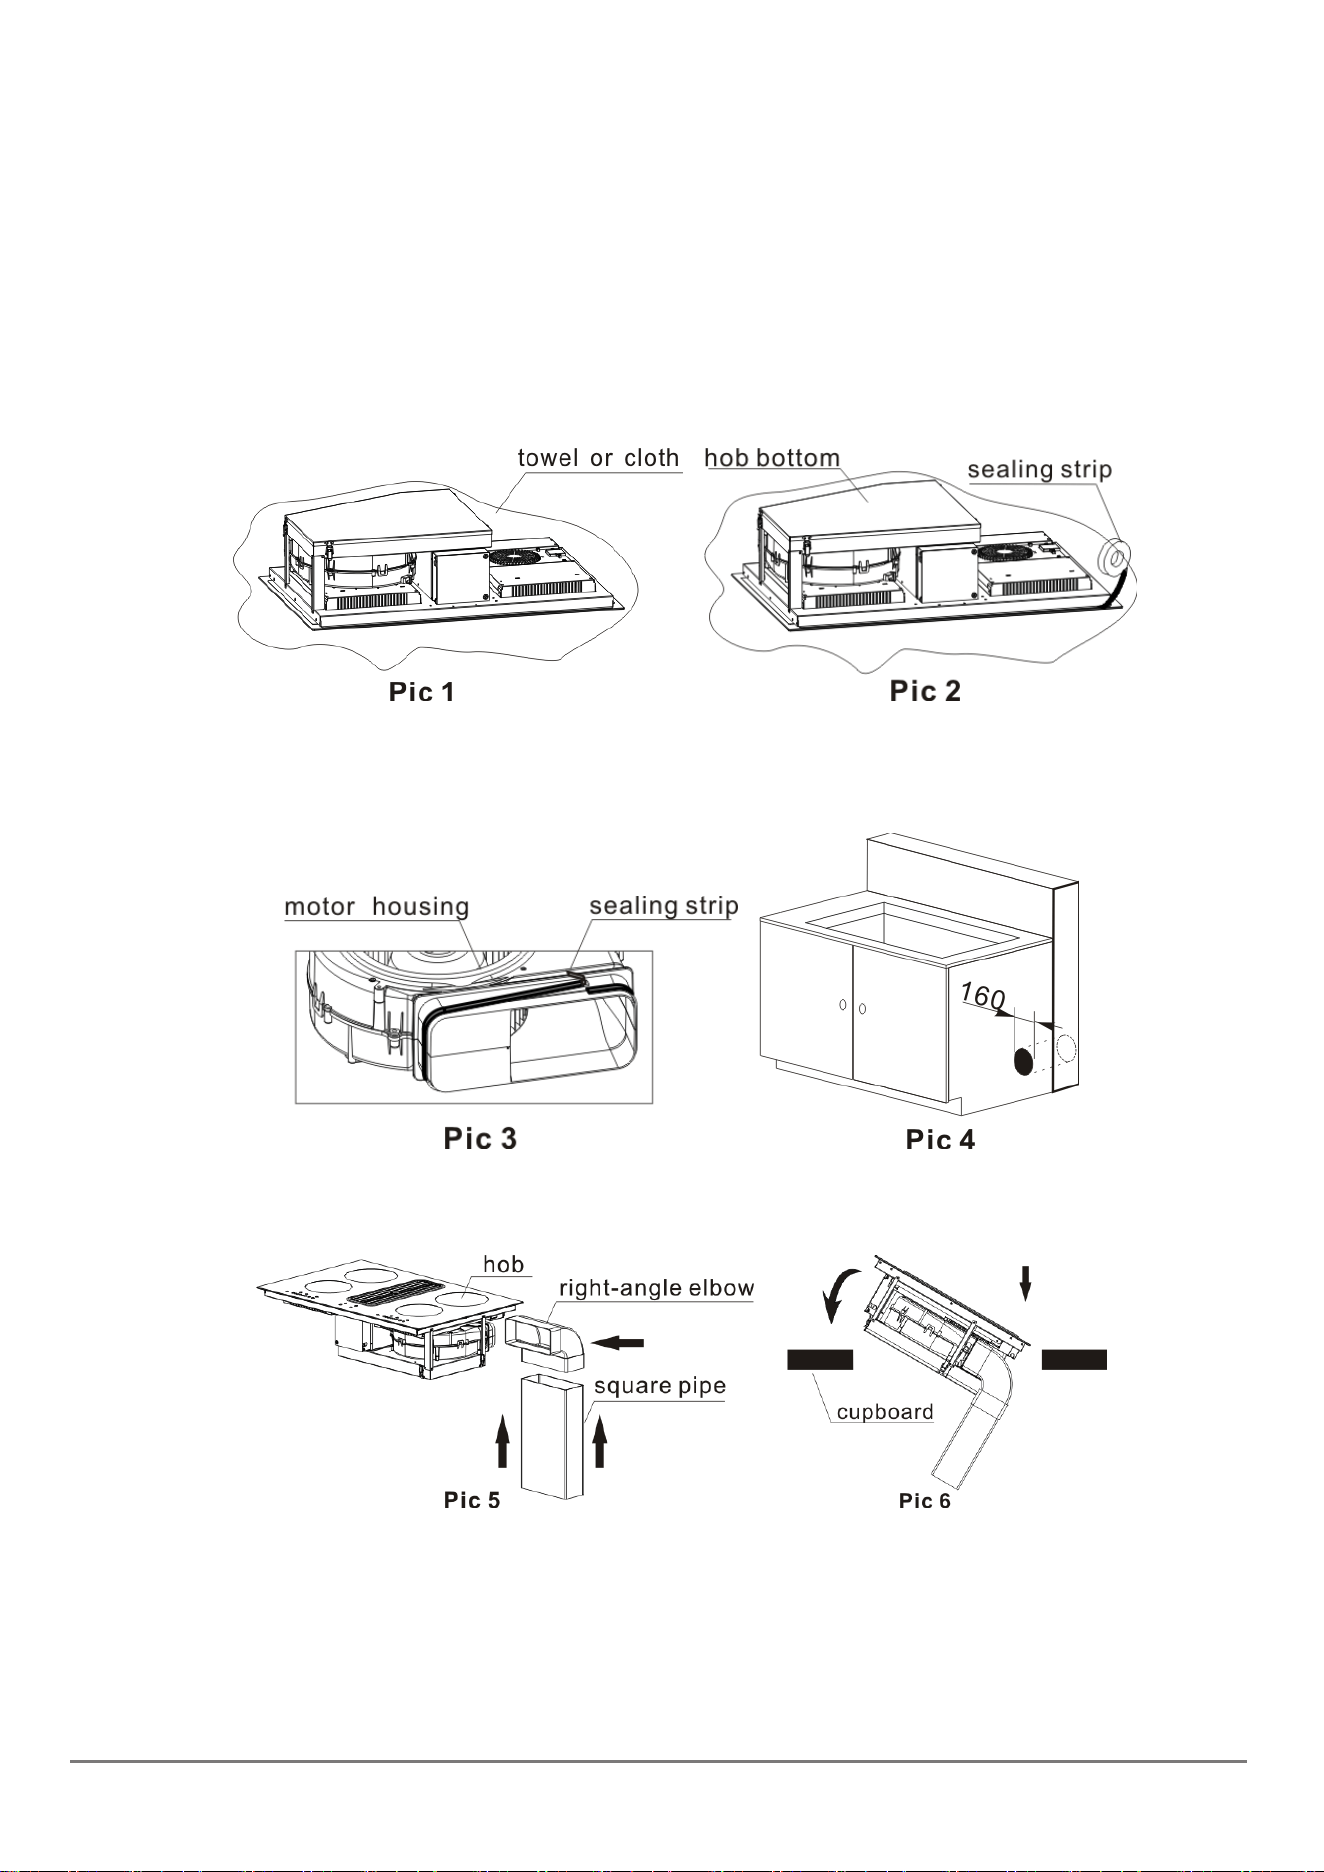
➢ Installing the appliance
1. Dismantle the package and take out the instruction manual.
2. Put a towel or cloth on the table surface. Place the glass face down on the protected surface. See pic 1.
3. Apply the sealing strip to the edge of the bottom of the hob, leaving about 3mm from the edge of the glass.
Apply the seal all around the circumference. Cut off the excess part and link the two ends of the sealing strip.
See pic 2.
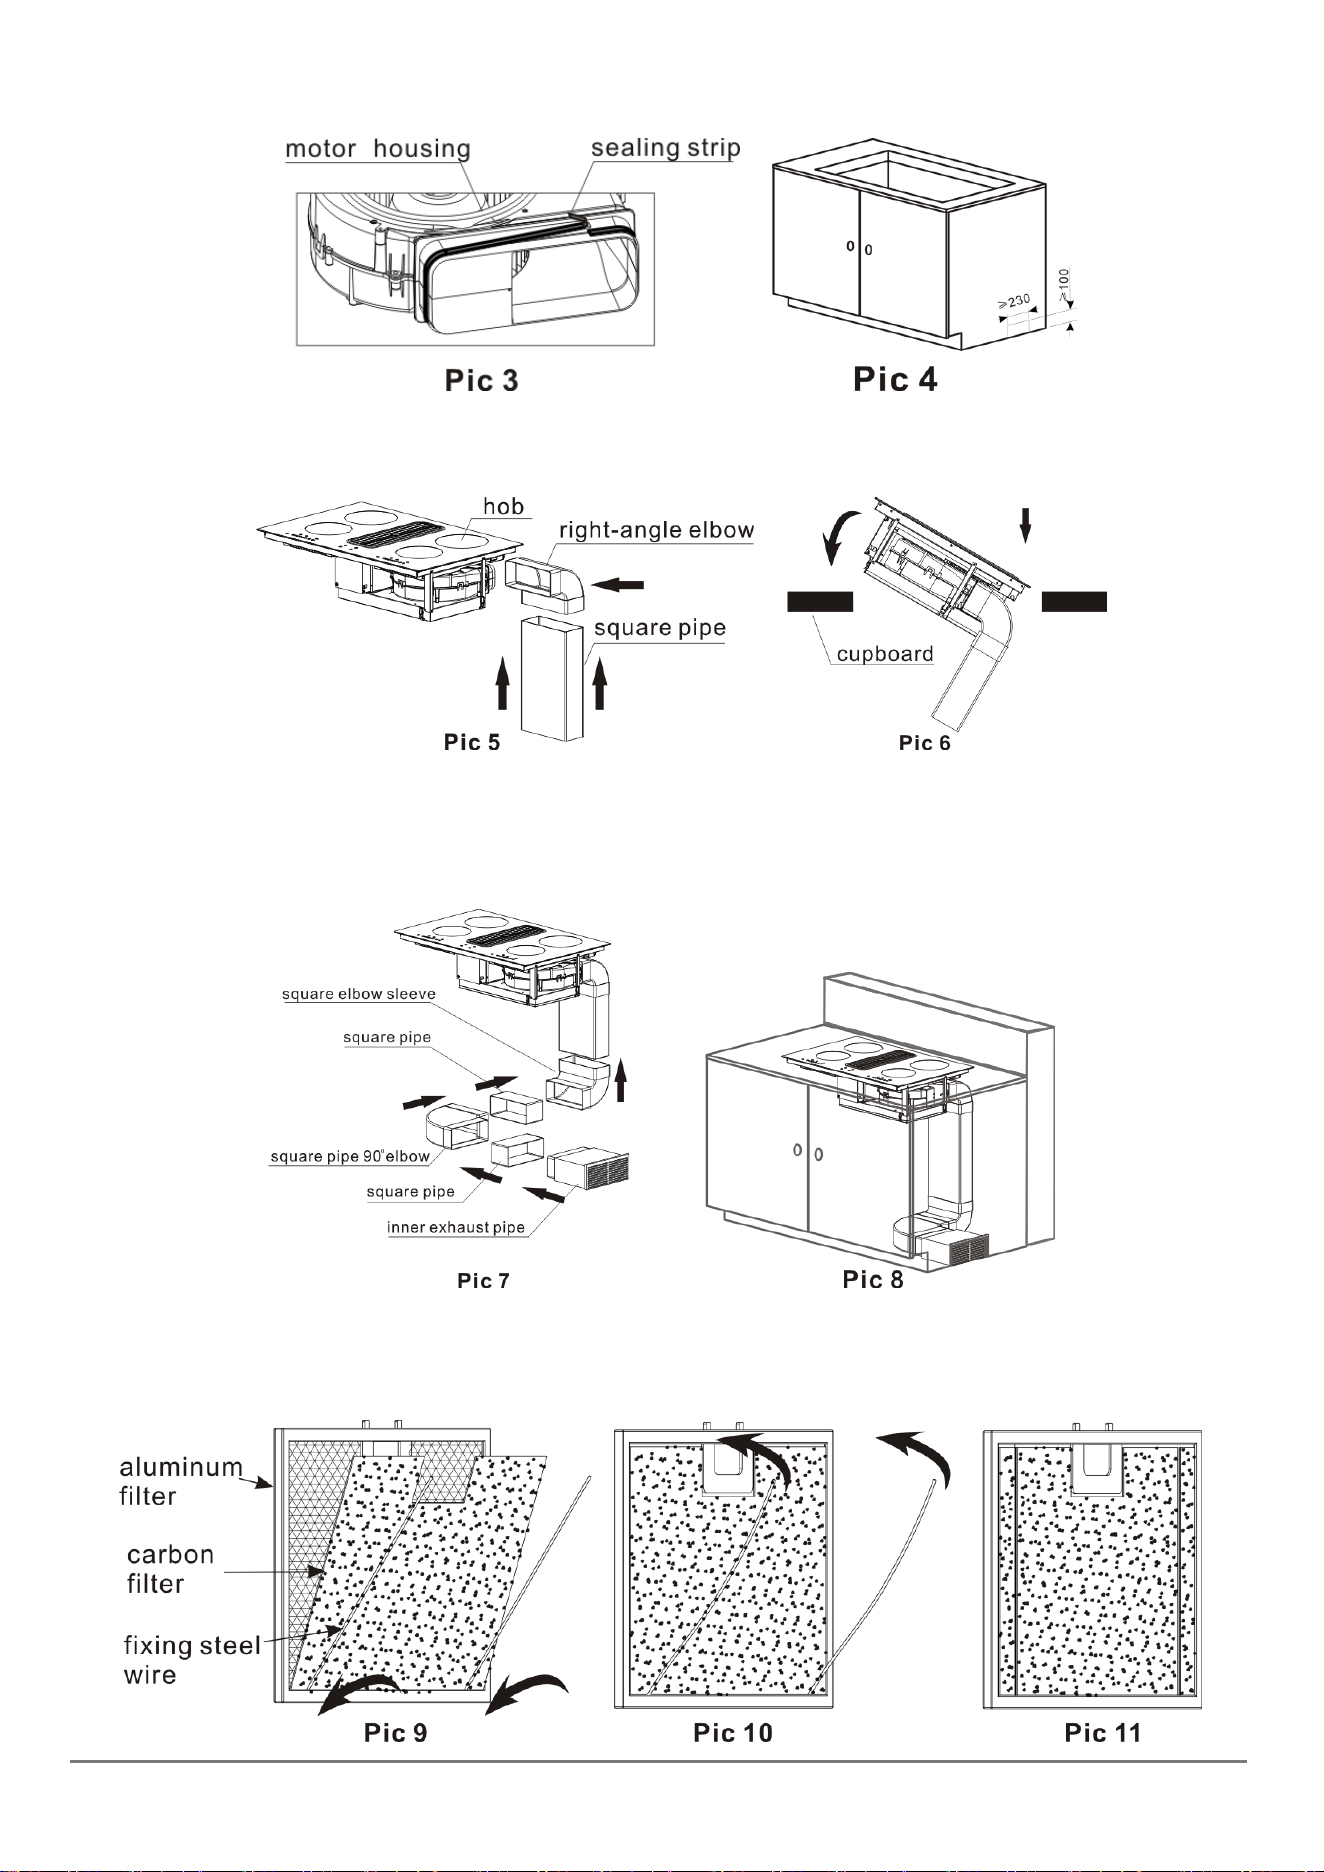
4. Clean the surface of the motor air outlet with a cloth, stick the sealing strip around the air outlet, cut off the
excess part and link the two ends of the sealing strip. See pic 3.
5. A hole with a size of about 160mm should be opened in the wall in the direction of the air outlet. See pic 4.
6. Put the right-angle elbow on the air outlet, and then put the square pipe into the right-angle elbow. See pic 5.
7. Tilt the hob into the cupboard at a certain angle. See pic 6.
8. Put the square to round adapter on the square pipe, and put the outer exhaust pipe on the square to round
adapter. See pic 7.
9. Installation is finished. See pic 8.
www.linarie.com.au
7
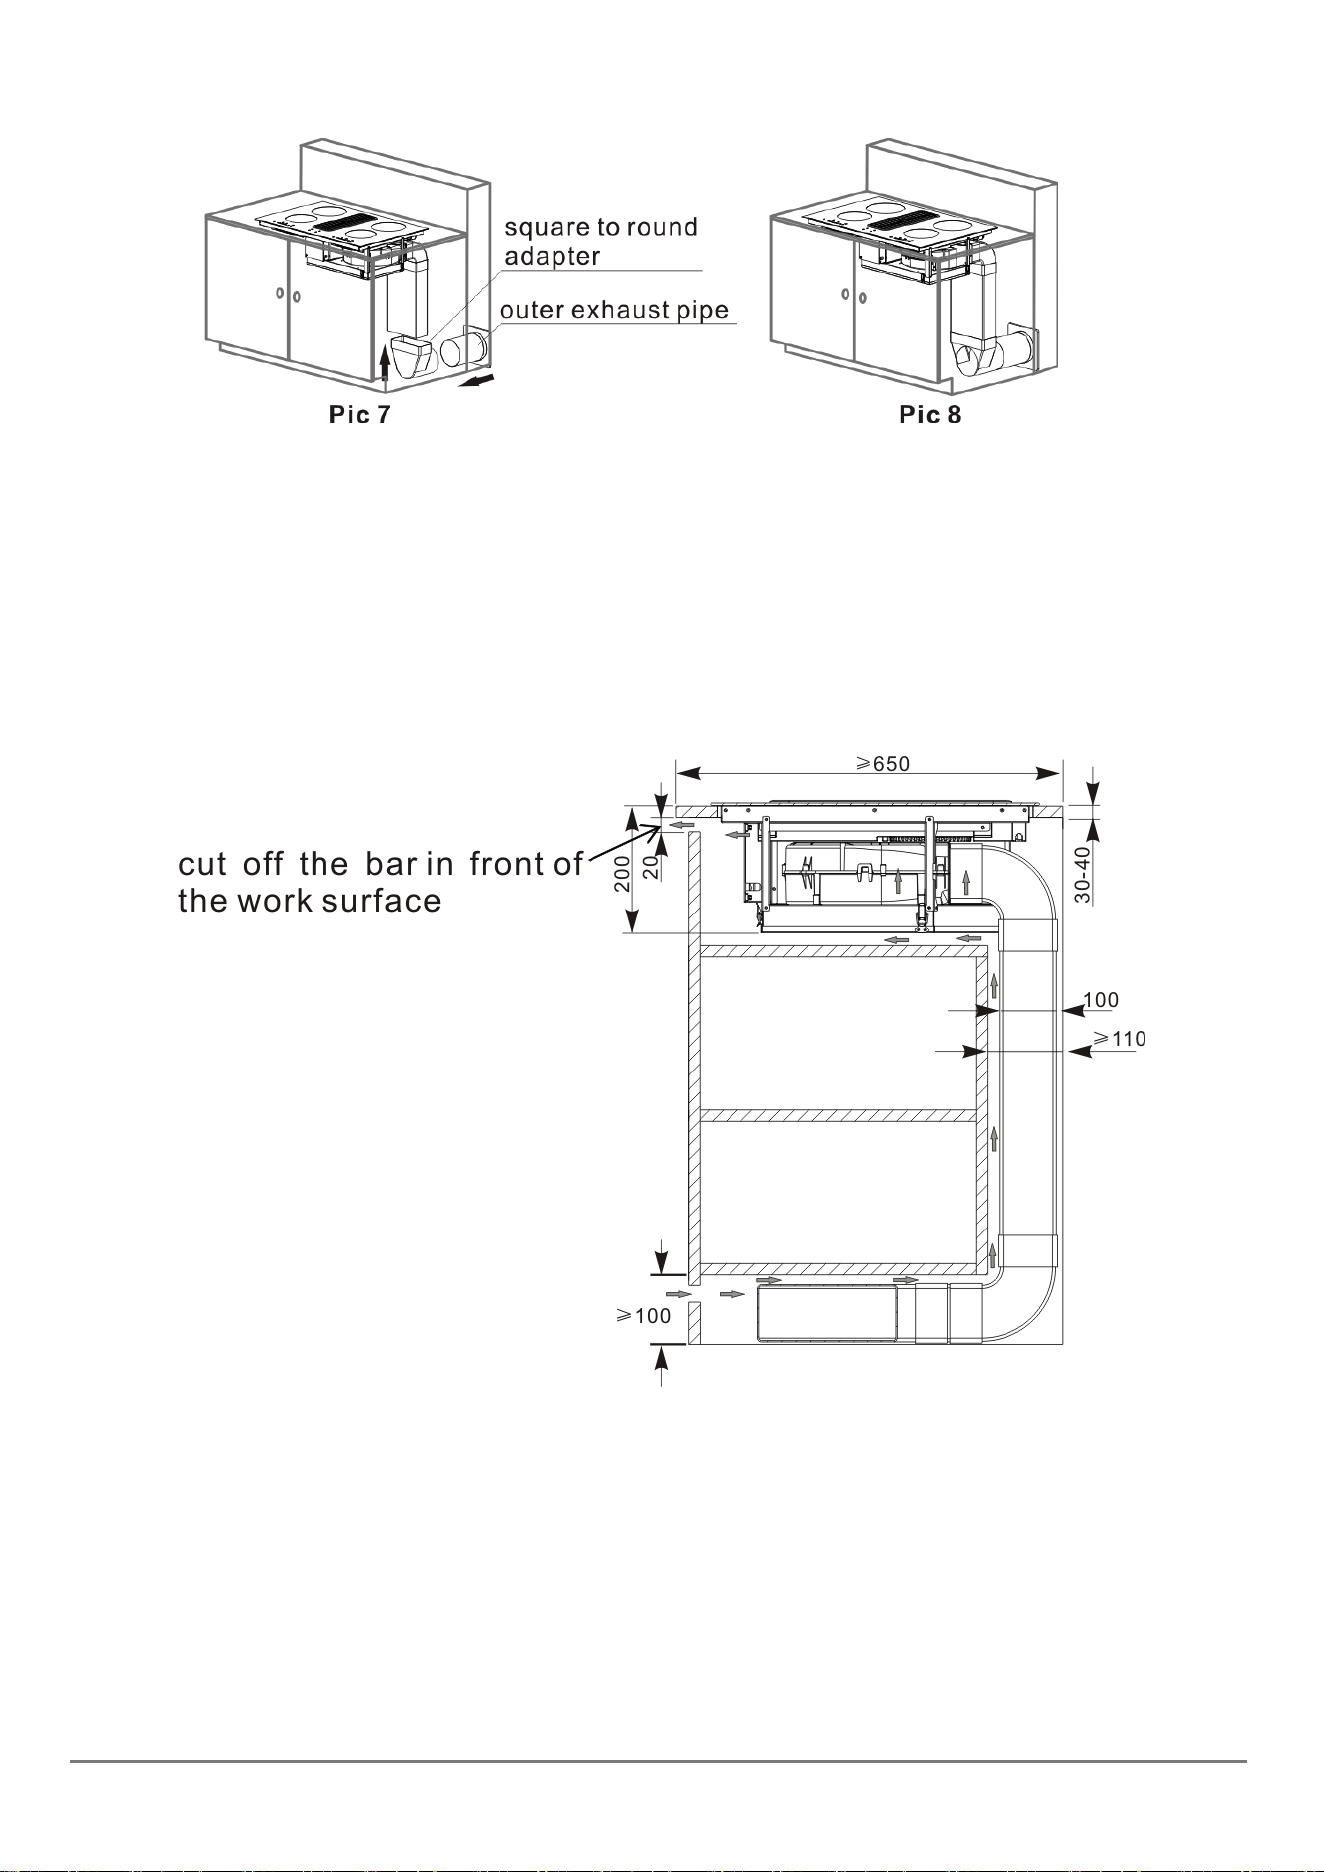
INSTALLATION (recirculation mode)
➢ Installation tips
The hob can be installed on a top with a flat surface and thickness of between 30 and 40mm.The cupboard
underneath the top should leave enough sufficient area to accommodate inlet plenum, blower cavity, inlet
pipe, outlet pipe and so on, and this area should make sure good ventilation and heat dissipation is provided.
Refer to Pic below.
www.linarie.com.au
8
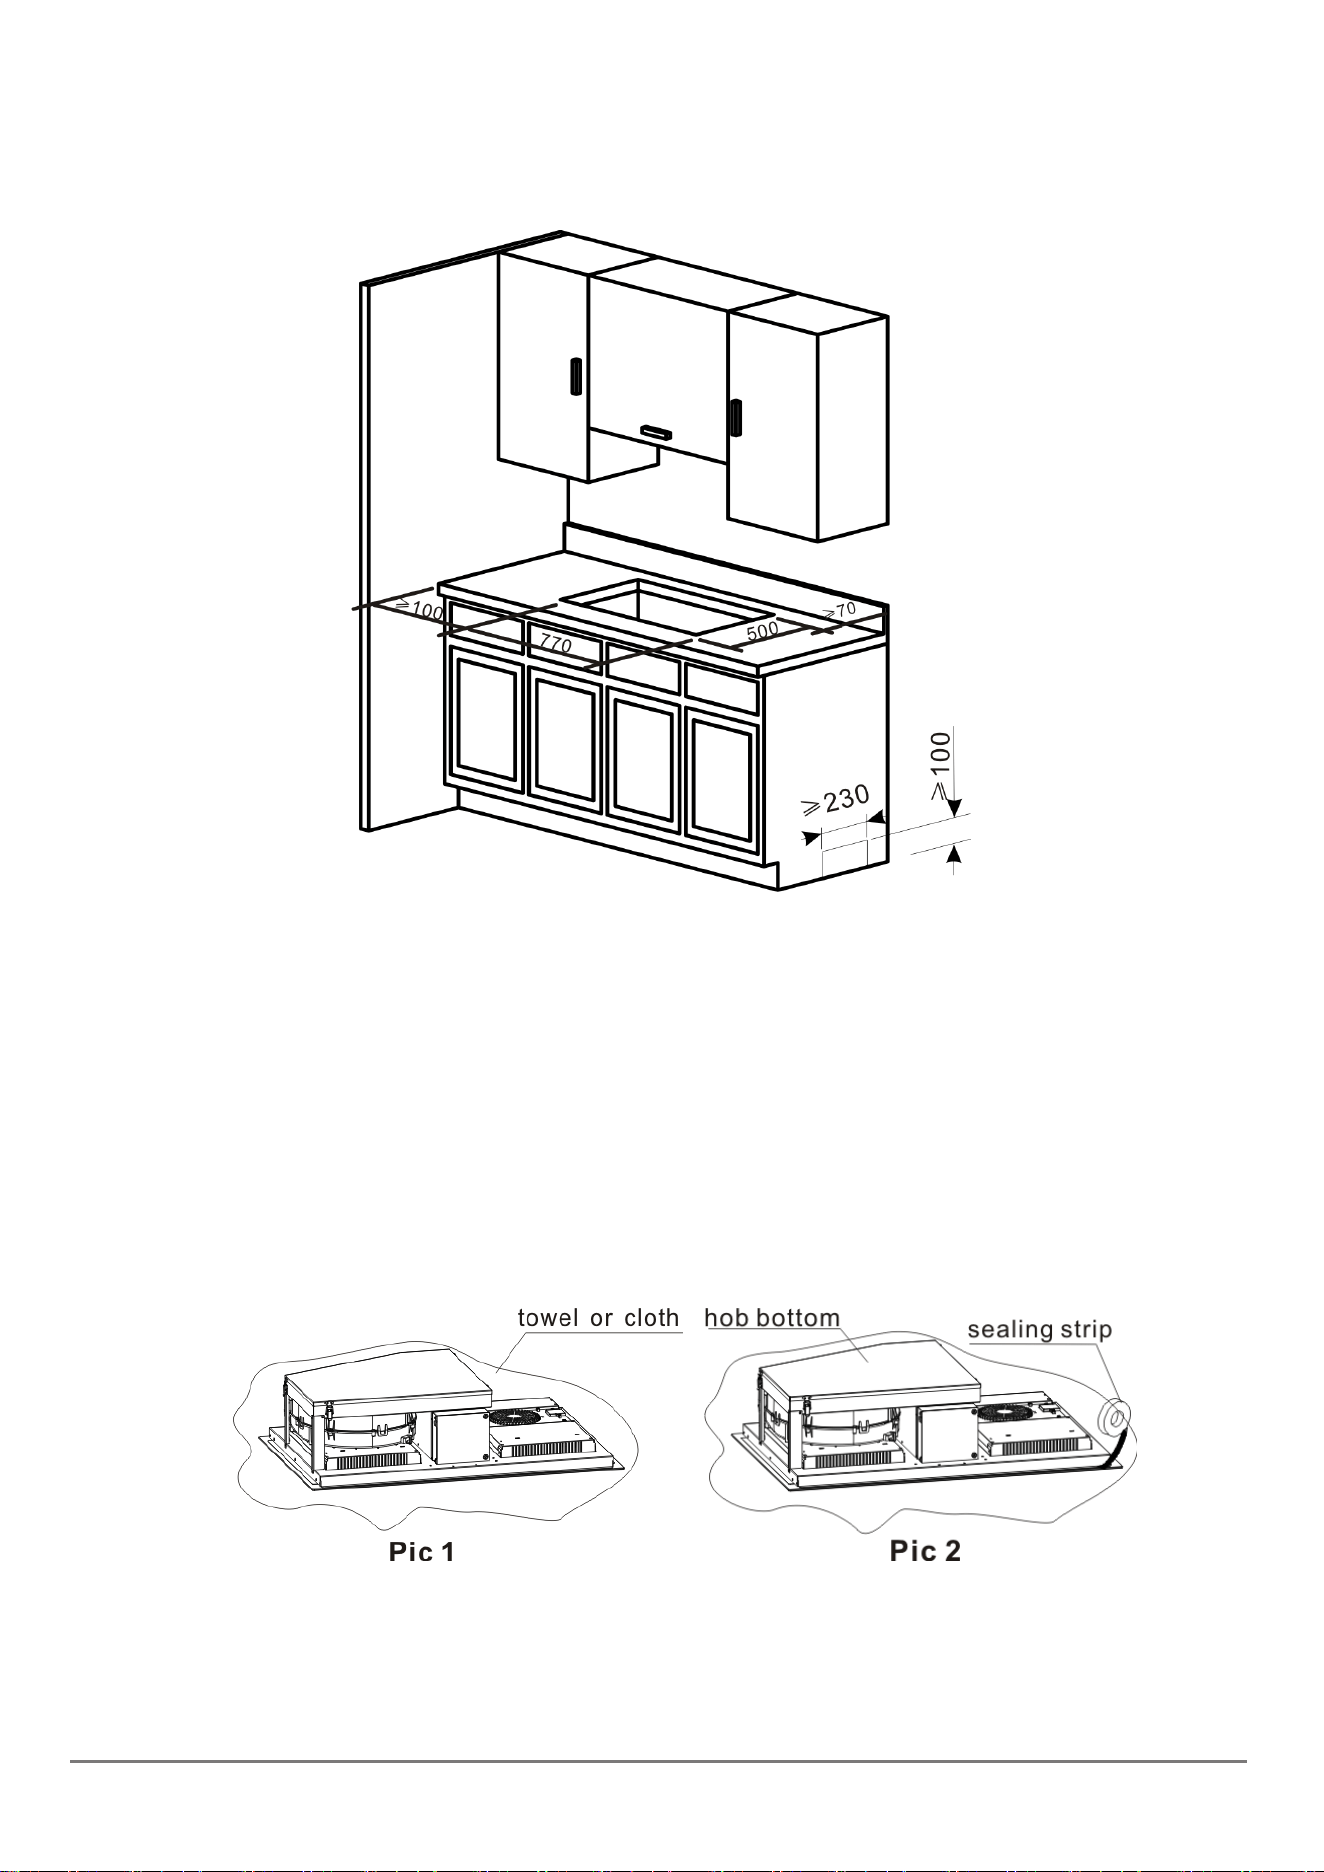
Preparing the unit for a built-in appliance
1. Make a square opening on the table surface with the size of 770*500mm, then make a square hole from the
beside of the cupboard, with diameter of about 230*100mm, refer to Pic above for the specification.
2. After drilling a hole on the table surface, carefully remove shavings or sawdust before inserting the appliance,
as they could be sucked up by the appliance and compromising its function.
3. Make sure the table surface is level and square and that no part interferes with the space required for
installation. The kitchen units that are in direct contact with the appliance must be heat-proof (min. 80℃).
➢ Installing the appliance
1. Dismantle the package and take out the instruction manual.
2. Put a towel or cloth on the table surface. Place the glass face down on the protected surface. See pic 1.
1. Apply the sealing strip to the edge of the bottom of the hob, leaving about 3mm from the edge of the glass.
Apply the seal all around the circumference. Cut off the excess part and link the two ends of the sealing strip.
See pic 2.
2. Clean the surface of the motor air outlet with a cloth, stick the sealing strip around the air outlet, cut off the
excess part and link the two ends of the sealing strip. See pic 3.
3. Open a 230*100mm square hole on the side of the cupboard in the direction of the air outlet. See pic 4.
www.linarie.com.au
9
4. Put the right-angle elbow on the air outlet, and then put the square pipe into the right-angle elbow. See pic 5.
5. Tilt the hob into the cupboard at a certain angle. See pic 6.
6. Put the square elbow sleeve, square pipe, square pipe 90° elbow, and inner exhaust pipe on the
corresponding pipes according to the pic 7.
7. Installation is finished. See pic 8.
8. Stick carbon filter cotton to the back of the aluminum filter, and then insert one end of the steel wire into the
side seam of the aluminum filter, see pic 9. Bending the steel wire by hand, insert the other end of the steel
wire into the side seam of the aluminum filter, see pic 10. Adjusting the surface of carbon filter cotton by hand,
see pic 11.
www.linarie.com.au
10
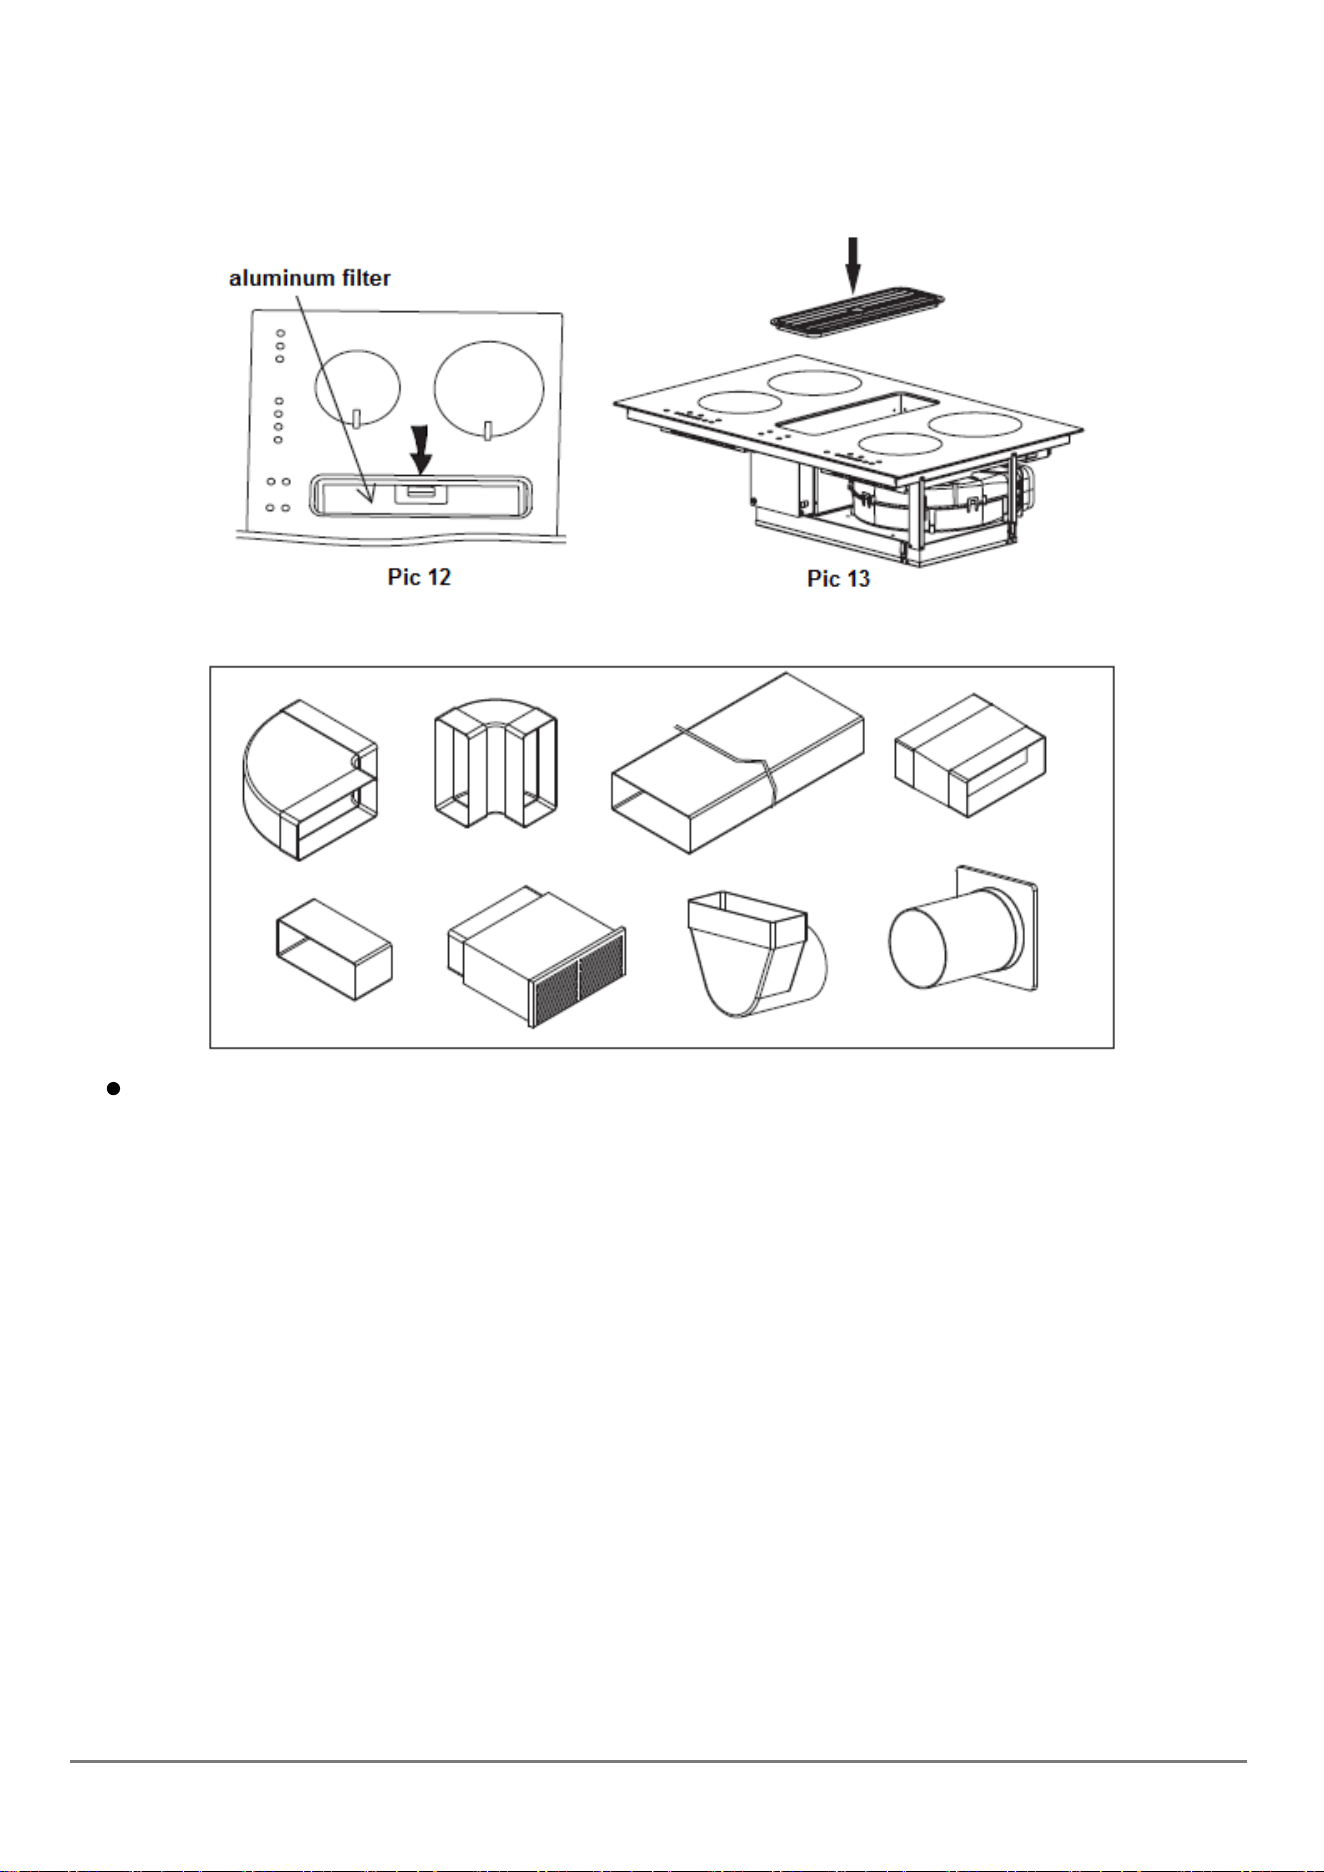
9. Install the aluminum filter. See pic 12.
10. Install the air inlet net. See pic 13.
All the pipes must pass under the base of the piece of furniture, inside the lift of the kitchen plinth.
➢ Electrical connection safety warning (recirculation & extraction mode)
1. Disconnect the appliance before any intervention. Disregard of this could cause electric shock and danger of
death.
2. The appliance must be installed by qualified personnel with all electrical installation requisites in compliance
with the local norms in force.
3. Make sure that the voltage of your electric network is the same voltage as indicated on the appliance rating
label.
4. The power supply cable must be long enough to allow the hob to be removed from the work surface and it
must be positioned in such a way as to prevent damage or overheating caused by contact with parts or
appliances underneath.
5. Grounding of the appliance is compulsory, for this reason all electrical wires and grounding must have a
suitable section. Ensure that grounding is efficient.
6. A multiple switch with 3mm contact separation or more must be foreseen when installing the hob.
7. No responsibility is accepted for damage to things or injury to persons if these result from non-observance of
these requisites.
➢ Electrical connection (recirculation & extraction mode)
1. If the appliance has a provided power supply cable, it can be used directly. Otherwise, the proper power
supply cable it can choose included:H05VV-F, H05RN-F, H05RR-F or 5 core cable with grounding. The
www.linarie.com.au
Please note that the extraction kit is not included
11
diameter of the cable must be at least 1.5mm².
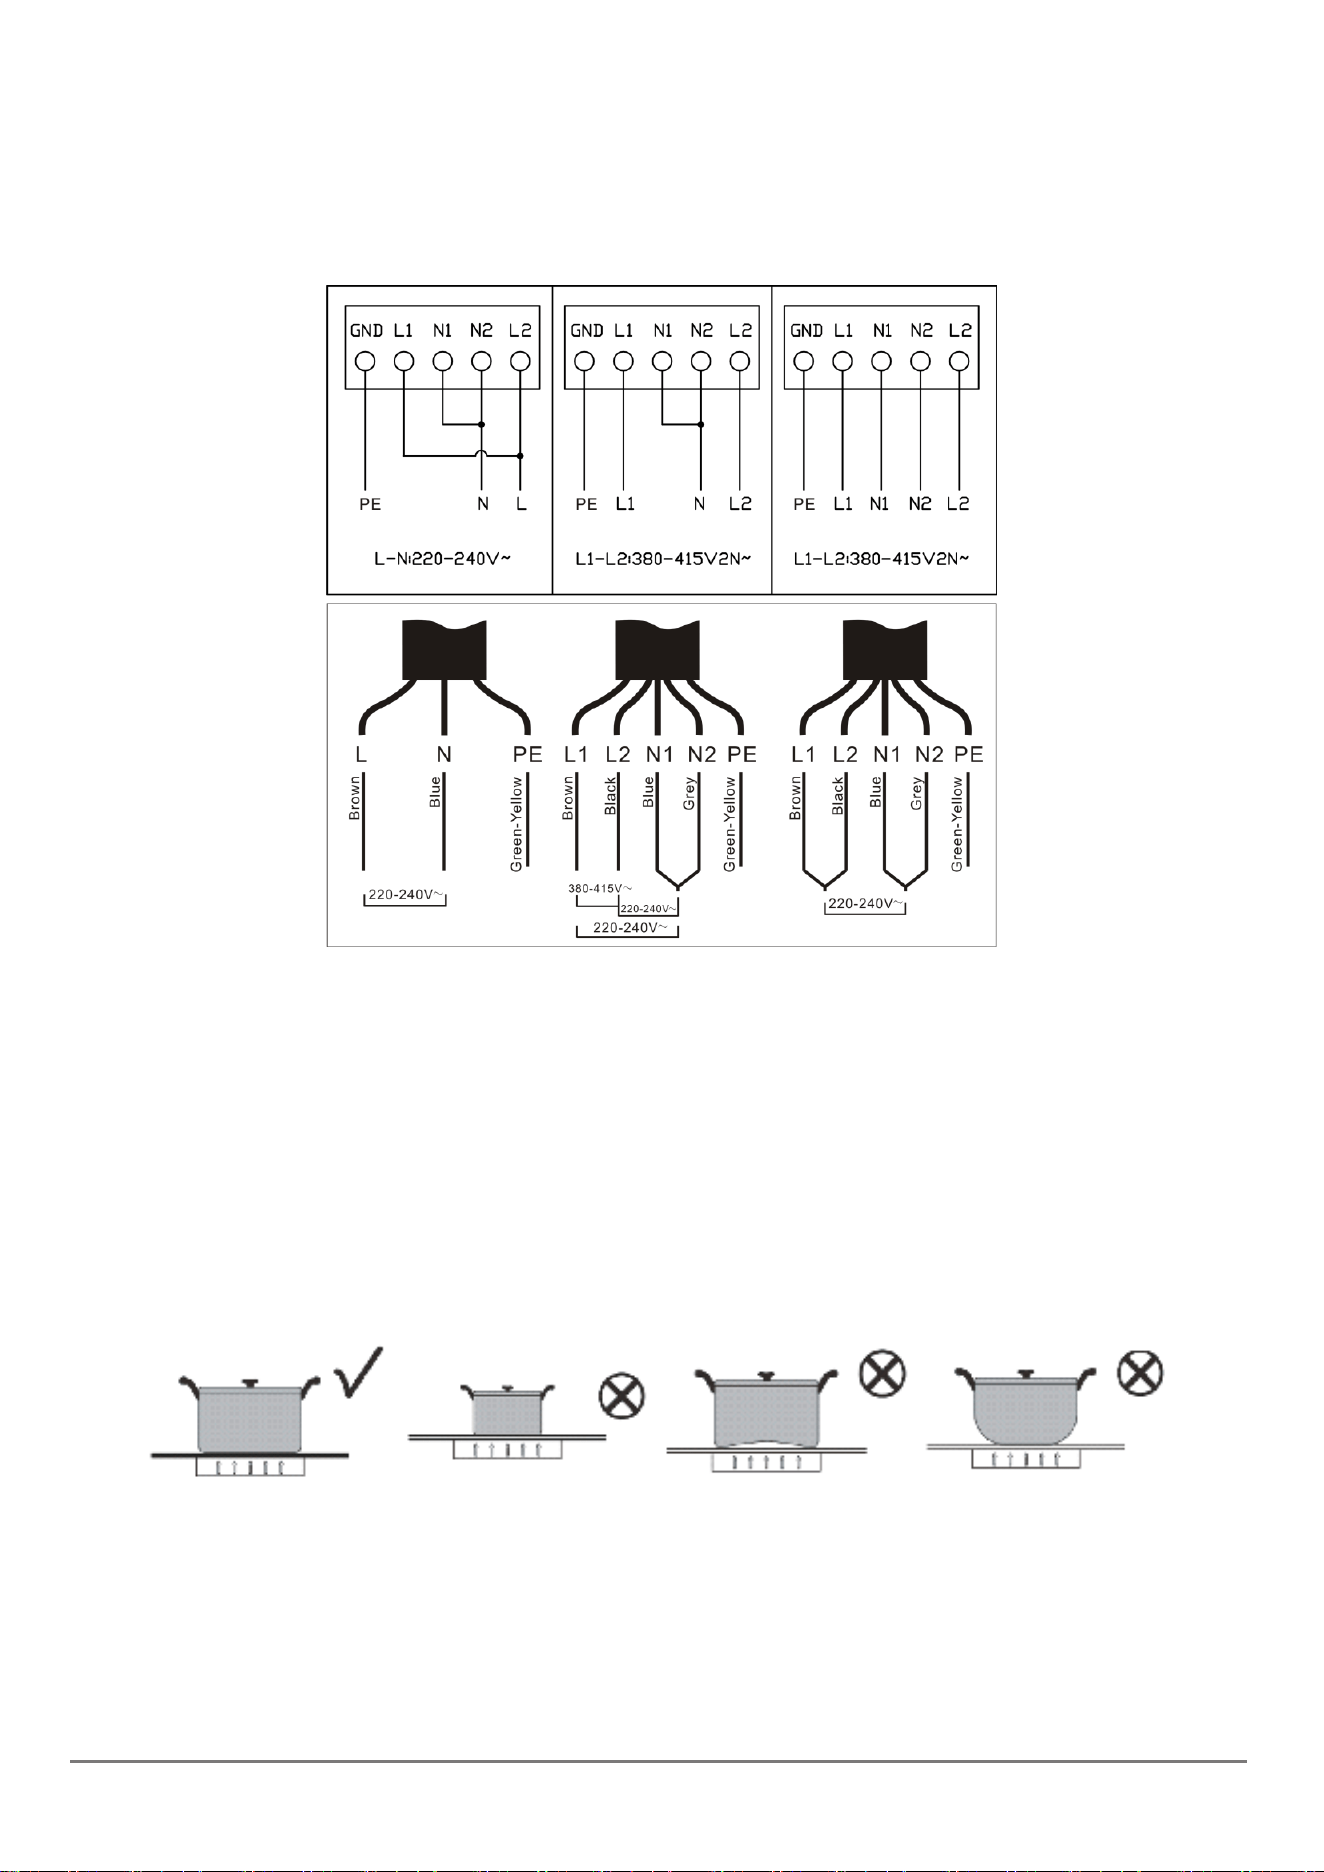
2. Make sure that the switch is off before wiring.
3. Install the power cord to the switch with a screwdriver according to the wiring diagram, as shown in the pic
below.
➢ Pots and pans and how to use them
◆ The pots and pans that can be used on this hob must be made of ferromagnetic material. They can be made
of enameled steel, cast iron or special pans of stainless steel for induction. The diameter of the pan should
be at least 11cm.
◆ To make sure a pan is suitable, try using a magnet to see if it sticks to the bottom of the pan. Never use
normal thin steel nor anything containing even just an amount of glass, terracotta, copper or aluminum.
◆ The display of the cooking area will show if the pan is suitable, if the power indicator flashes the pan is not
suitable or the diameter of the bottom is too small for the diameter of the cooking area.
◆ The pots and pans must be placed precisely in the middle of the cooking area.
◆ In some cooking areas an internal diameter is indicated, with a lighter outline, which advises the user to go
to a smaller cooking area, if available, with smaller diameter pan. This is to obtain optimum performance
and efficiency. You can however use pans with smaller diameters than this limit.
◆ Prevent the pot from dry burning during the heating process.
www.linarie.com.au
12
OPERATION
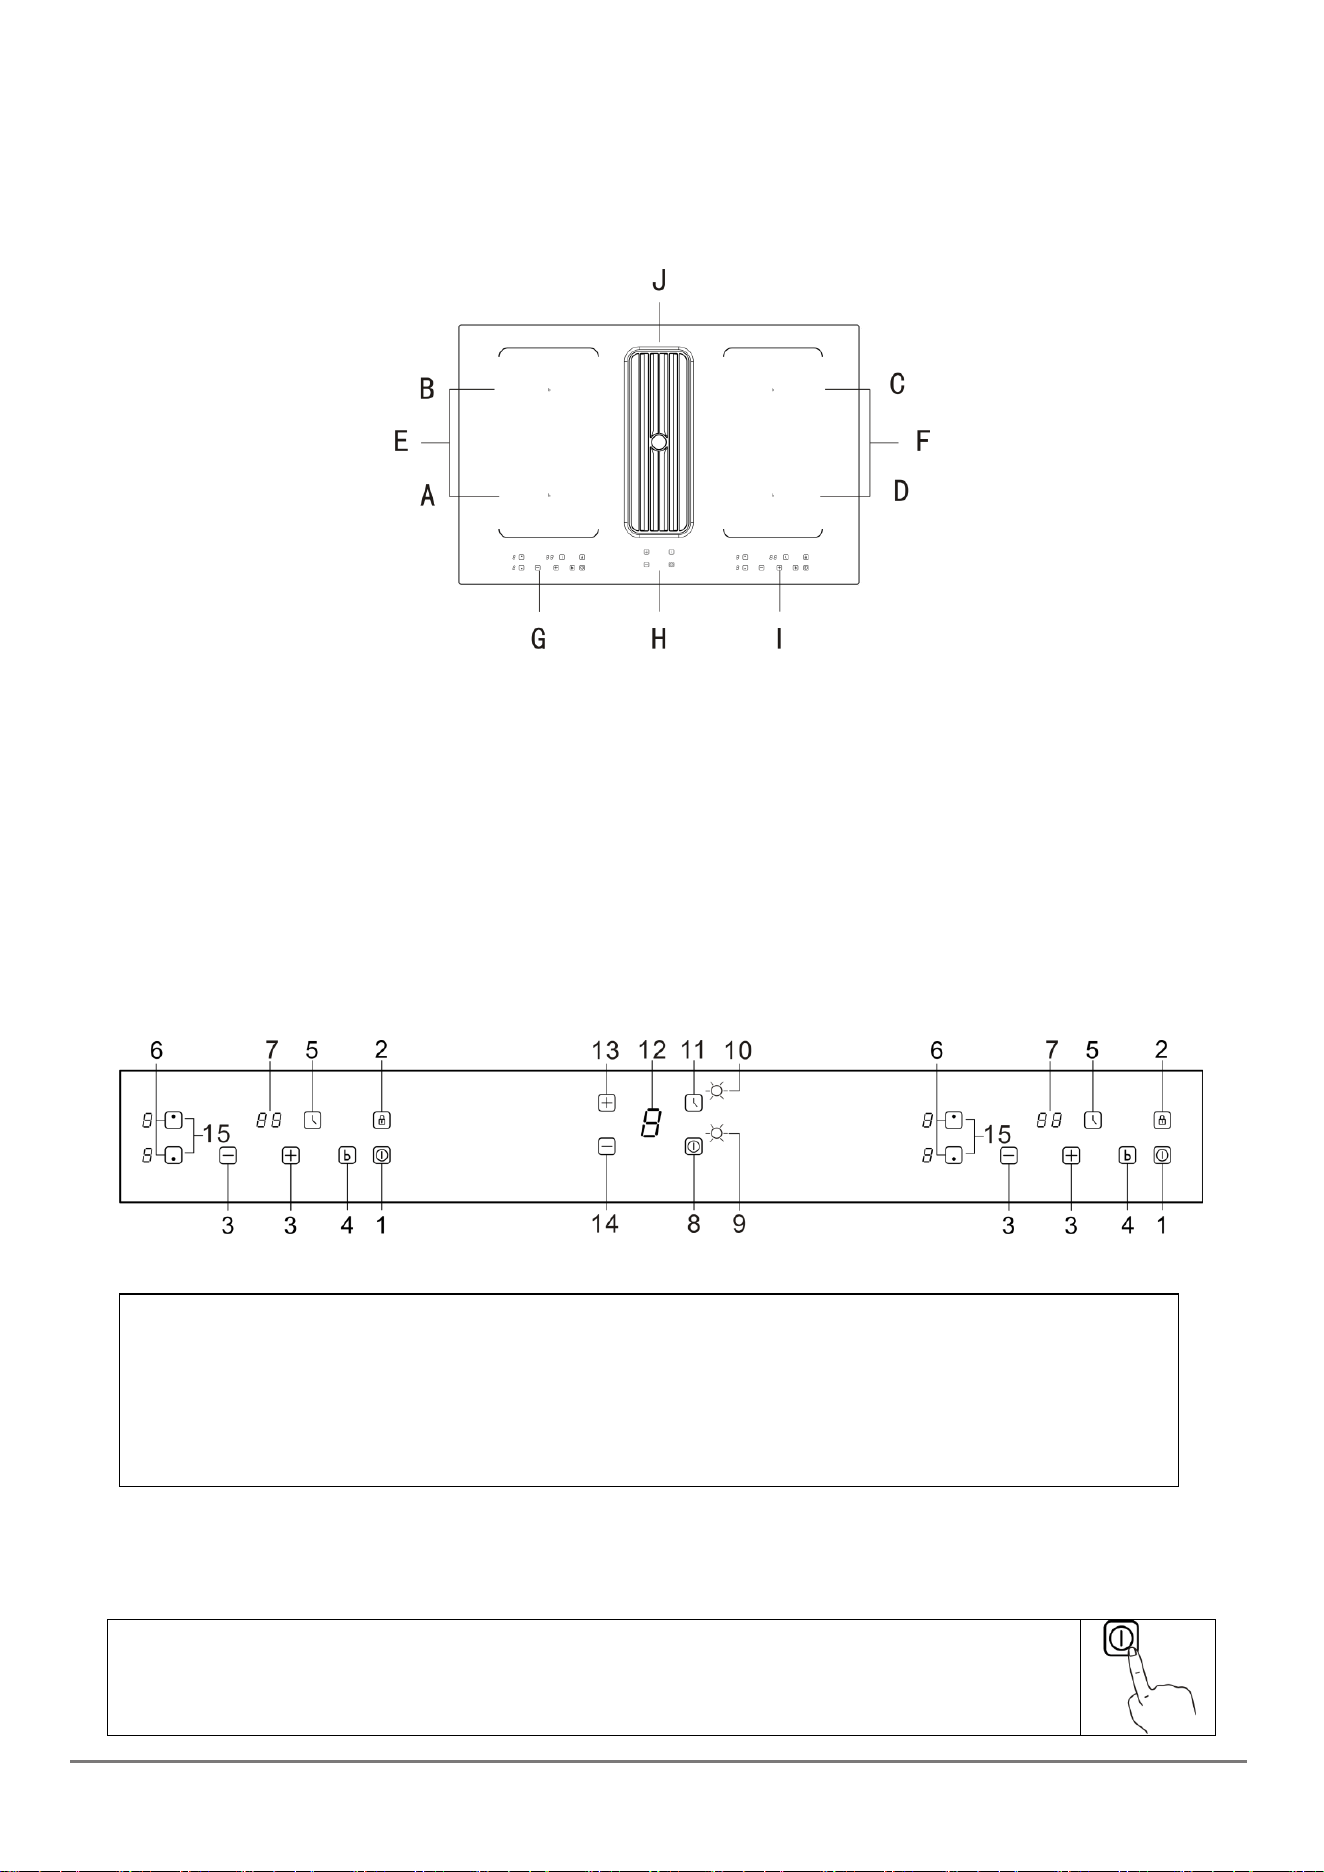
Top View
A: front left burner: Φ160mm, power 1500W
B: rear left burner: Φ180mm, power 2100W
C: rear right burner: Φ180mm, power 2100W
D: front right burner: Φ160mm, power 1500W
E: the left flexible zone :200× 380mm, power 3000W
F: the right flexible zone :200× 380mm, power 3000W
G: left induction hob control panel
H: cooker hood control panel
I: right induction hob control panel
J: inlet area
The Control Panel
Induction cooker:
1.ON/OFF 2. Child lock 3. Select power level 4. Boost control 5. Setting the timer
6. Select heating zone 7. Timer display 15. Flexible zone function
Cooker hood:
8. ON/OFF 9. On/off indicator light 10. Timer indicator light
11. Timer 12. Digital display 13. Plus, button 14. Minus button
Using your Cooker Hood
After connecting to power, the cooker hood buzzer will ring shortly for a sound, all indicator lights and digital
tube will light for 1s, then be off and the cooker hood is in stand-by mode.
1.On/off button: When the cooker hood is standby, press on/off button, theOn/off indicator light
will be on, the cooker hood will work at the first speed by default, and digital tube will display “1”;
Or, the cooker hood will work at the speed it works last time, and digital tube will display
corresponding speed level.
www.linarie.com.au
13
When the cooker hood is at work, press on/off button, cooker hood will be turn off, indicator lights
and digital tube will be off as well, the cooker hood enters to standby mode.
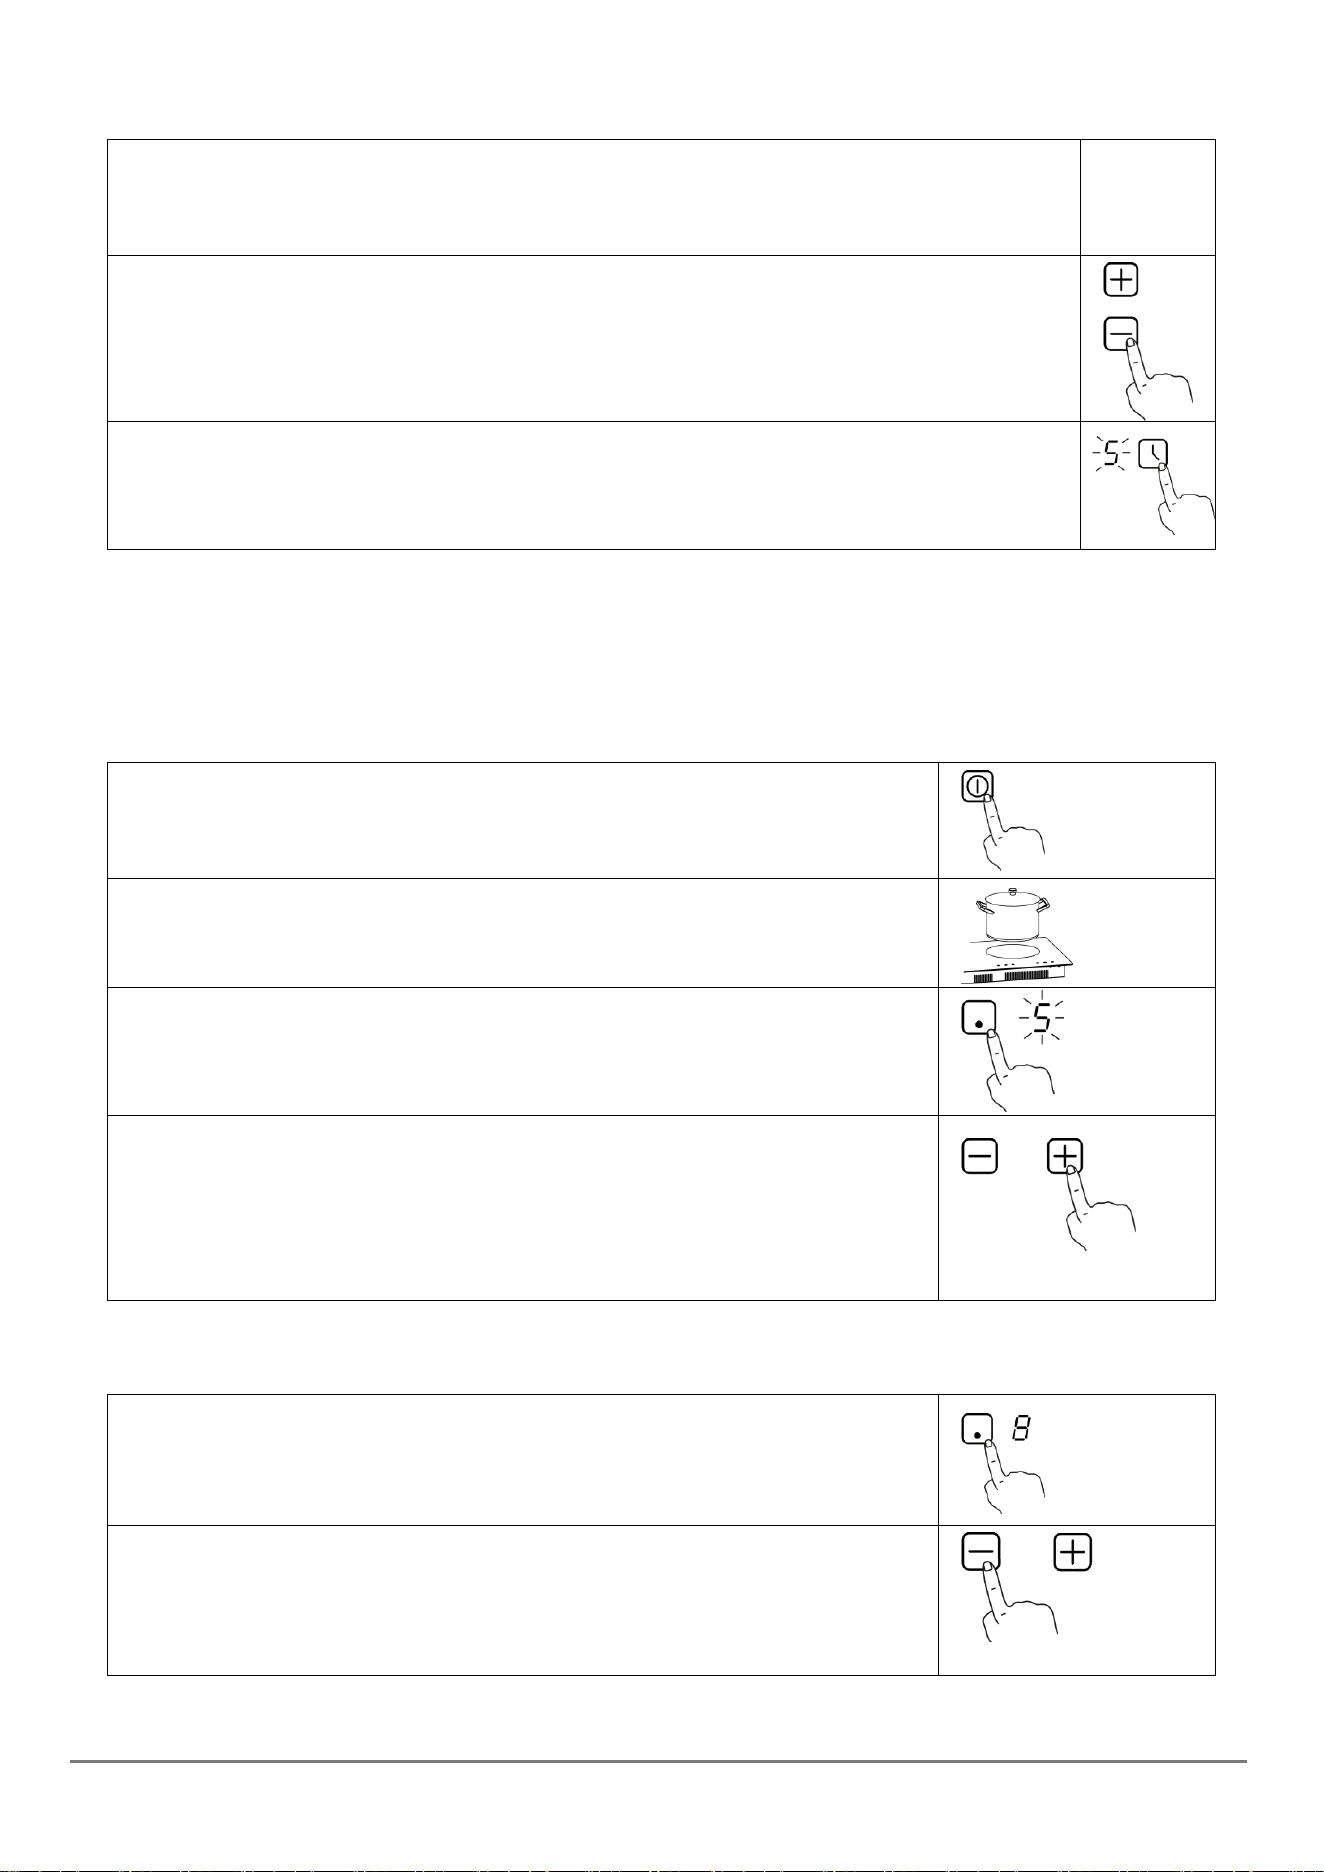
2. “+” /”-” button: The cooker hood has three operating speeds, low, medium and high. Press “+”
button in standby mode, cooker hood will work at low speed, every touching of “+” button will
make 1 speed increase, till the highest speed. Keep pressing “-” button when cooker hood is in use,
the speed will decrease one level till no speed will turn off.
3. Timer: When cooker hood is in use, press timer button, Timer indicator light will be lit, timing
function will start-up. The timer setting is 5mins by default and could be repeat setting. When the
time is up, the cooker hood will be turn off automatically. When the timer is set, if adjusting the
speeds, the cooker hood will go out of the timer function.
Using your Induction Hob
To Start Cooking
After power on, the buzzer beeps once, all the indicators light up for 1 second then go out, indicating that
the hob has entered the state of standby mode.
1. Touch the ON/OFF switch, all the indicators show ‘—’.
2. Place a suitable pan on the cooking zone that you wish to use. Make sure the
bottom of the pan and the surface of the cooking zone is clean and dry.
3. Touching the heating zone selection control, and an indicator next to the key will
flash.
4. Select a heat setting by touching the ‘+’, ‘-’.
·If you don’t choose a heat setting within 1 minute, the induction hob will
automatically switch off. You will need to start again at step 1.
·You can modify the heat setting at any time during cooking.
When you have finished cooking
1. Touch the heating zone selection that you wish to switch off.
2. Turn the cooking zone off by scrolling down to ‘0’. Make sure the display shows
‘0’.
www.linarie.com.au
14
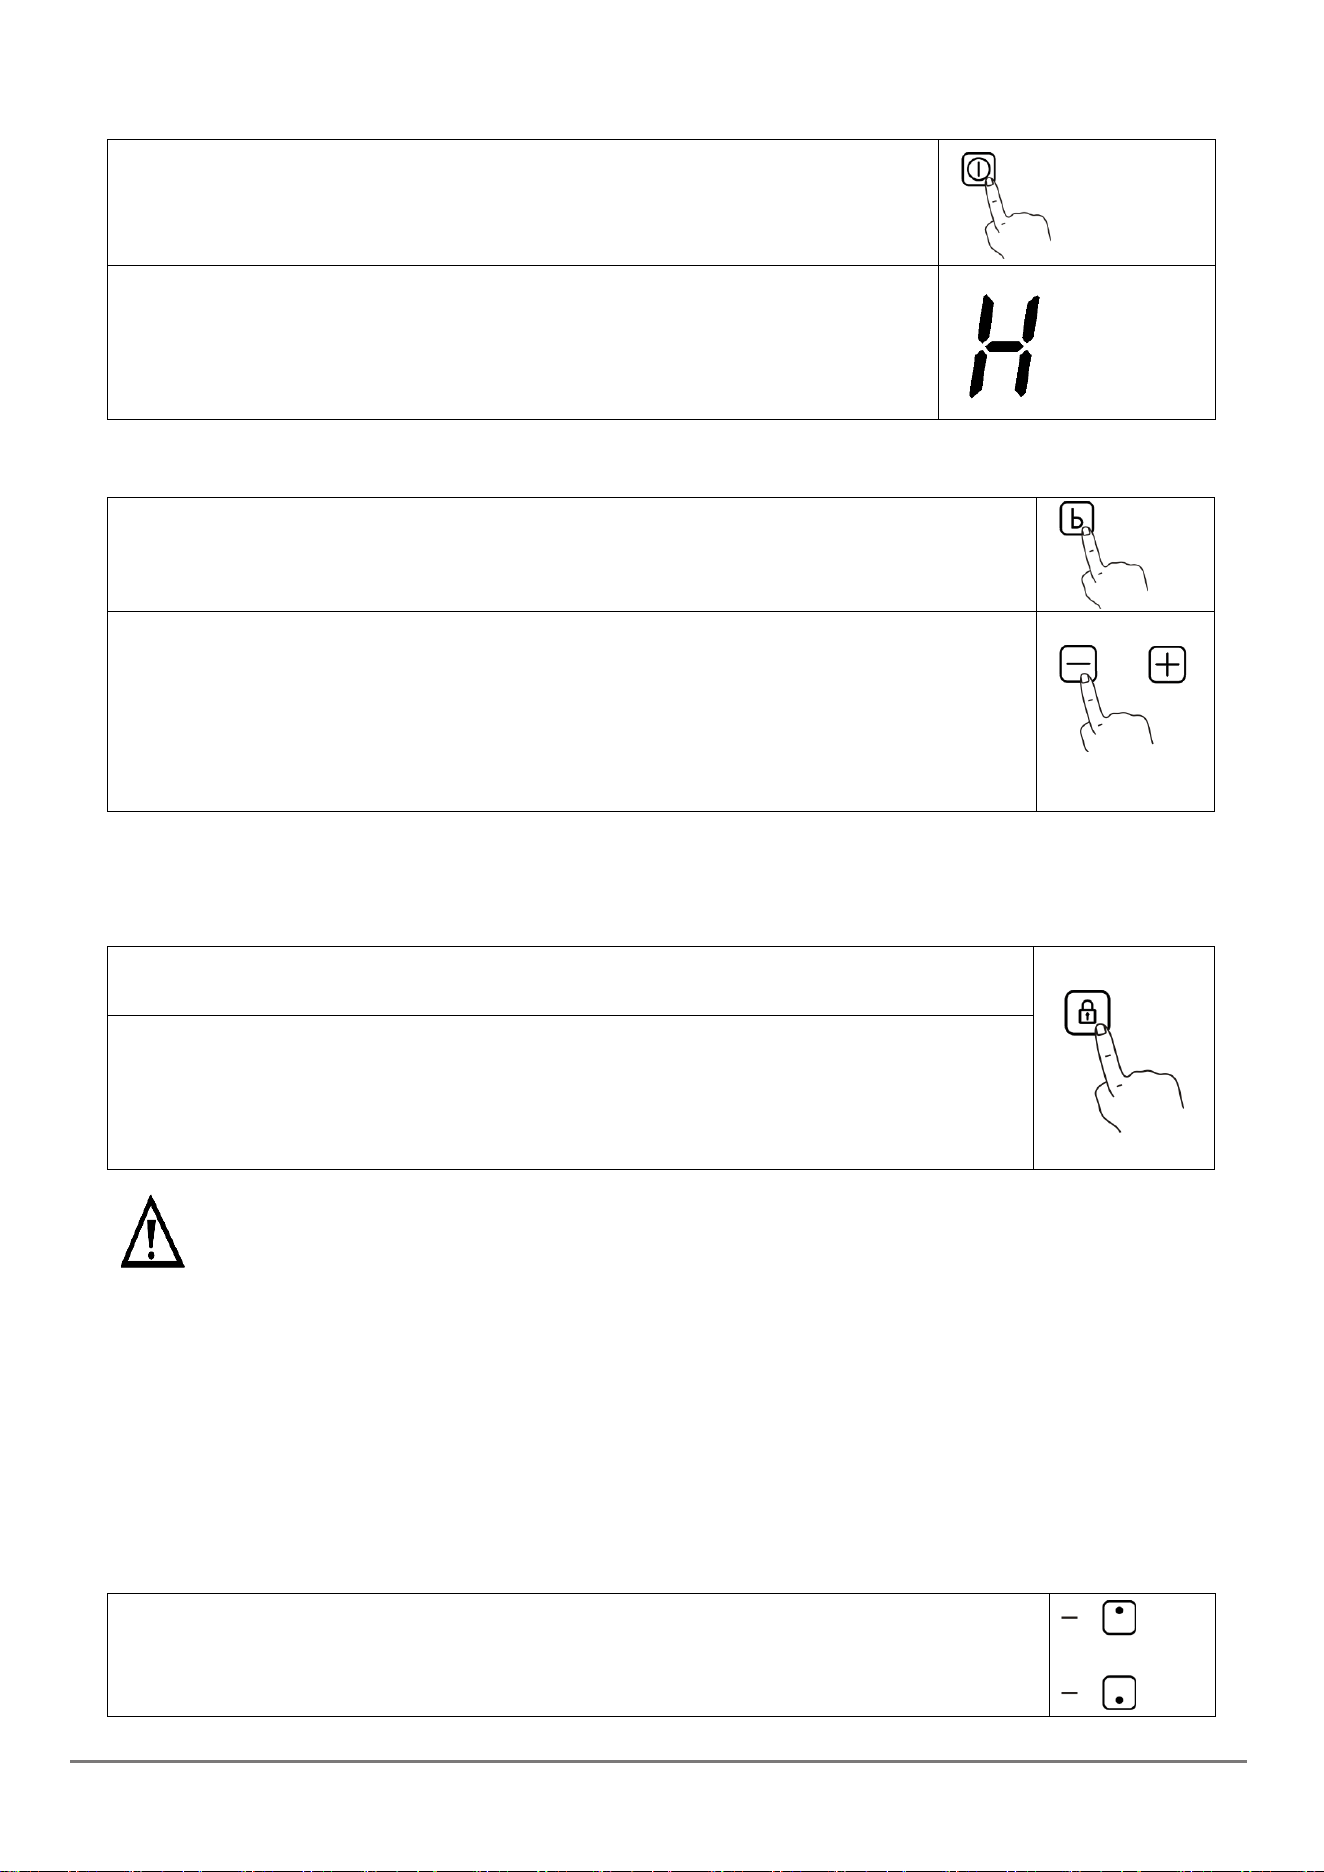
3. Turn the whole cooktop off by touching the ON/OFF control.
4. Beware of hot surface
‘H’ will show which means cooking zone is too hot to touch. It will disappear
when the surface has cooled down to a safe temperature. It can also be used as
an energy saving function if you want to heat further pans, use the hotplate that
is still hot.
Using Boost Function
- Activate the boost function
1. Select the zone with boost function.
2. Touching the ‘boost’ key, then the display shows ‘b’.
- Cancel boost function
1. Select the zone with boost function.
2. Touching the ‘minus’ key to cancel the Boost function, and select the level you want to set.
3. Boost function can only last for 5 minutes, after that the zone will go to level 9
automatically.
Using Child Lock Function
· You can lock the controls to prevent unintended use (for example children accidentally turning the
cooking zones on).
· When the controls are locked, all the controls except the ON/OFF control are disabled.
- To lock the controls
Touch the key lock control. The timer indicator will show ‘Lo’.
- To unlock the controls
1. Make sure the hob is turned on.
2. Touch and hold the key lock control for 3 seconds.
3. You can now start using your hob.
When the hob is in lock mode, all the controls are disabled except the ON/OFF, you can always turn the
hob off with the ON/OFF control in an emergency, but you shall unlock the hob first in the next
operation.
Using the Timer
You can use the timer in two different ways:
·You can use it as a minute minder. In this case, the timer will not turn any cooking zone off when the set time
is up.
·You can use I as cut-off timer to turn one or more cooking zones off after time is up.
·You can set the timer up to 99 minutes.
Using the timer as a Minute Minder
1. Make sure the cooktop is turned on. And zone selection key is not activated (zone indication
‘-’ is not blinking).
www.linarie.com.au
15
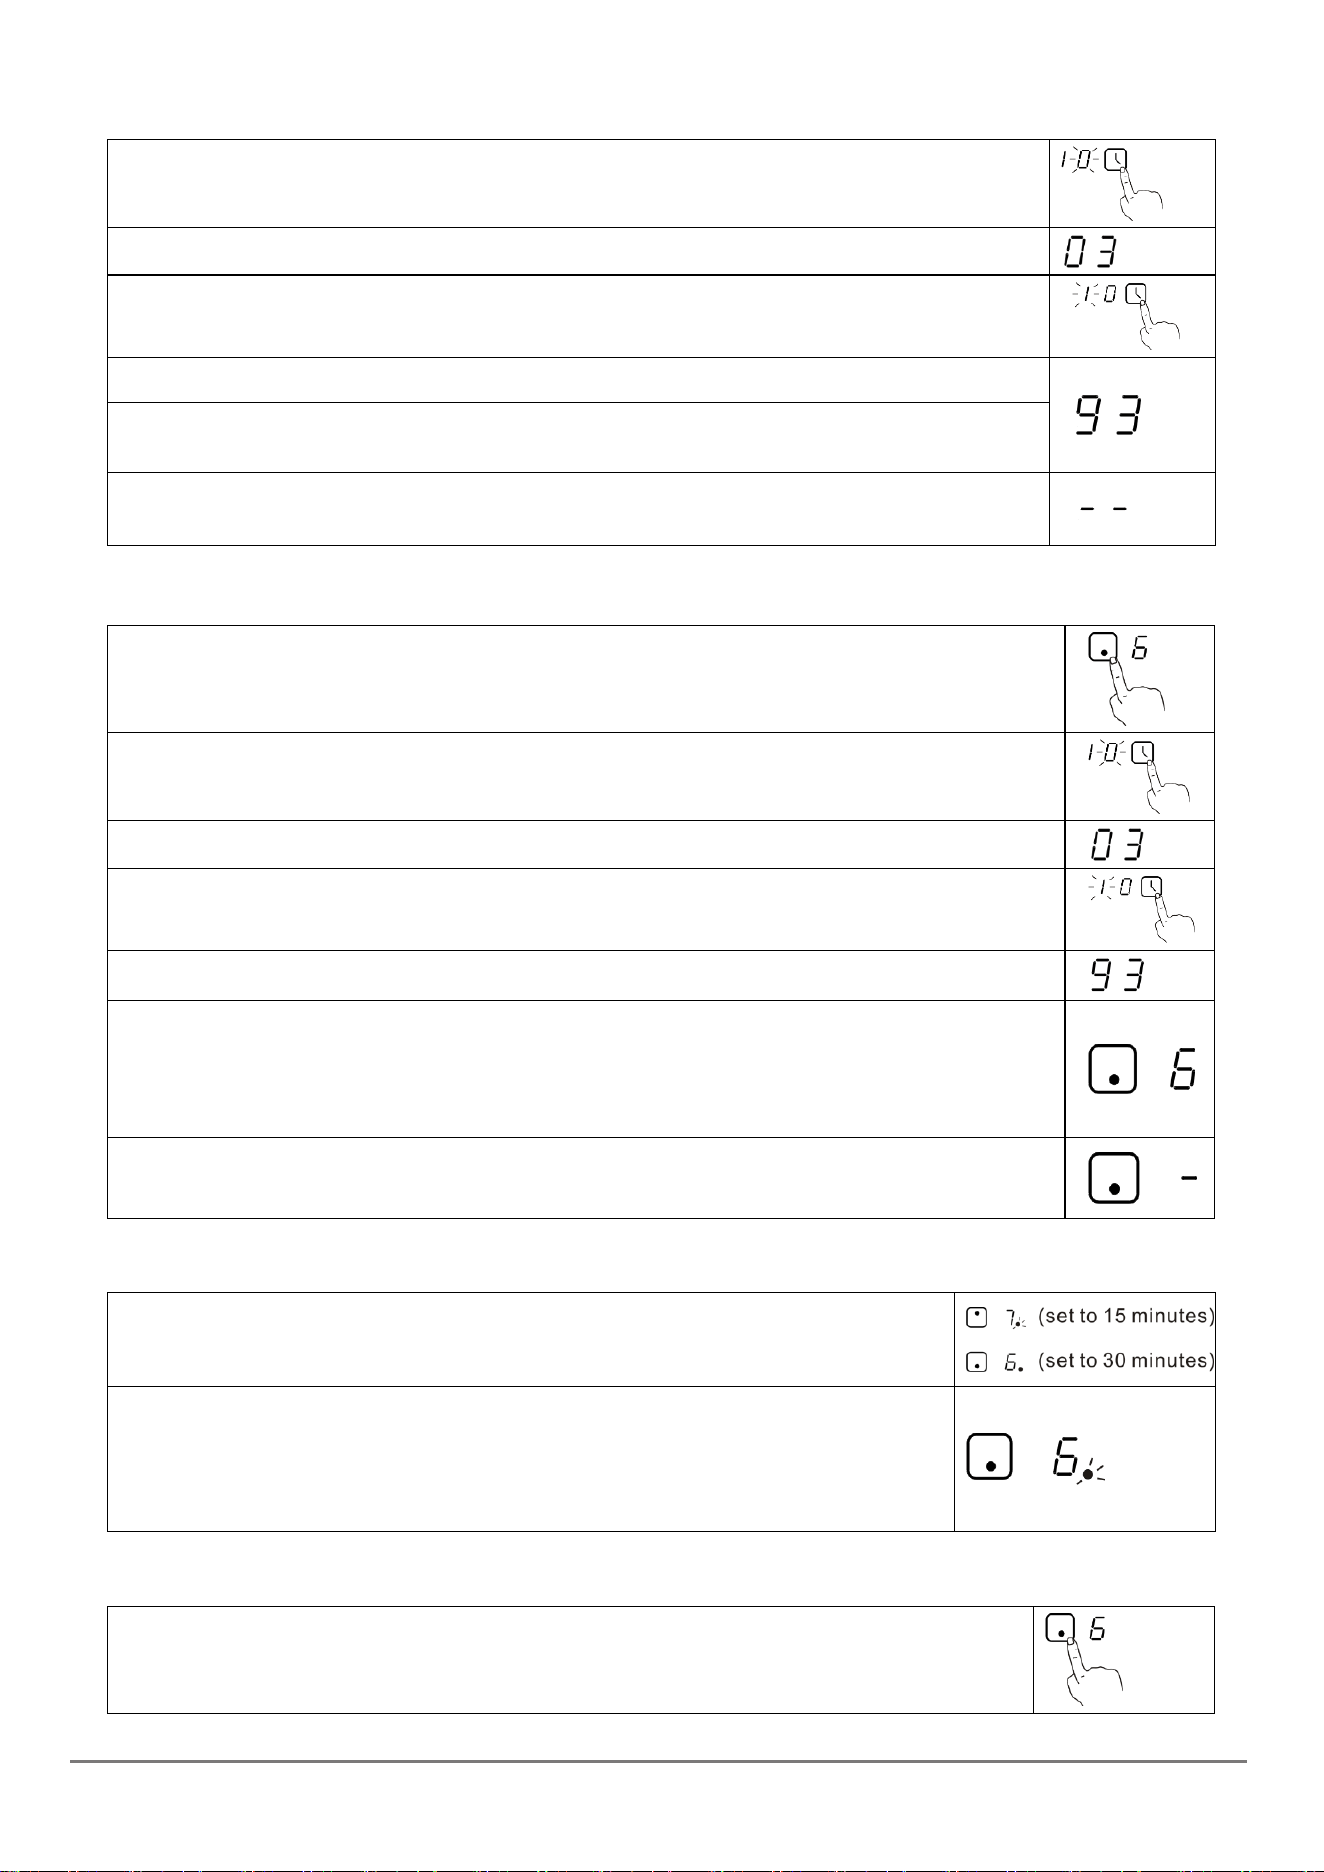
2. Touch timer key, ‘10’ will show in the timer display and ‘0’ will blink.
3. Set the time by touching the ‘slider’ control of timer.
4. Touch timer control again, then ‘1’ will flash.
5. Set the time by touching the ‘slider’ control.
6. When the timer is set, it will begin to count down immediately. The display will show the
remaining time.
7. Buzzer will beep for 30 seconds and the timer indicator shows ‘- -’ when the setting time
finished.
Using the timer to switch off one or more cooking zones
1. Touching the heating zone selection control that you want to set the timer for.
2. Touch timer control, the ‘10’will show in the timer display, and the ‘0’ flashes.
3. Set the time by touching the ‘slider’ control.
4. Touch timer control again, the ‘1’ will flash.
5. Set the time by touching the ‘slider’ control.
6. When the time is set, it will begin to count down immediately. The display will show the
remaining time.
NOTE: there will be a red dot in the right bottom corner of power level indication which
indicating that zone is selected.
7. When cooking timer expires, the corresponding cooking zone will be switch off automatically.
NOTE: other cooking zones will keep operating if they are turned on previously.
If the timer is set on more than one zone
11. When you set timer for several cooking zones, red dots of the relevant cooking
zones are indicated. The timer display shows the min. timer. The dot of the
corresponding zone blinks.
12. Once the countdown timer expires, the corresponding zone will switch off. Then it
will show the new min. tier and the dot of corresponding zone will flash.
NOTE: touch the heating zone selection control, the corresponding timer will be
shown in the timer indicator.
Cancelling the timer
1. Touching the heating zone selection control that you want to cancel the timer.
www.linarie.com.au
16
2. Touching the timer control, the indicator will flash.
3. Touch the ‘-’ or ‘slider’ control to set the timer to ‘00’, the timer is cancelled.
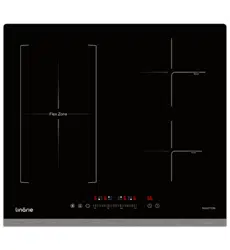
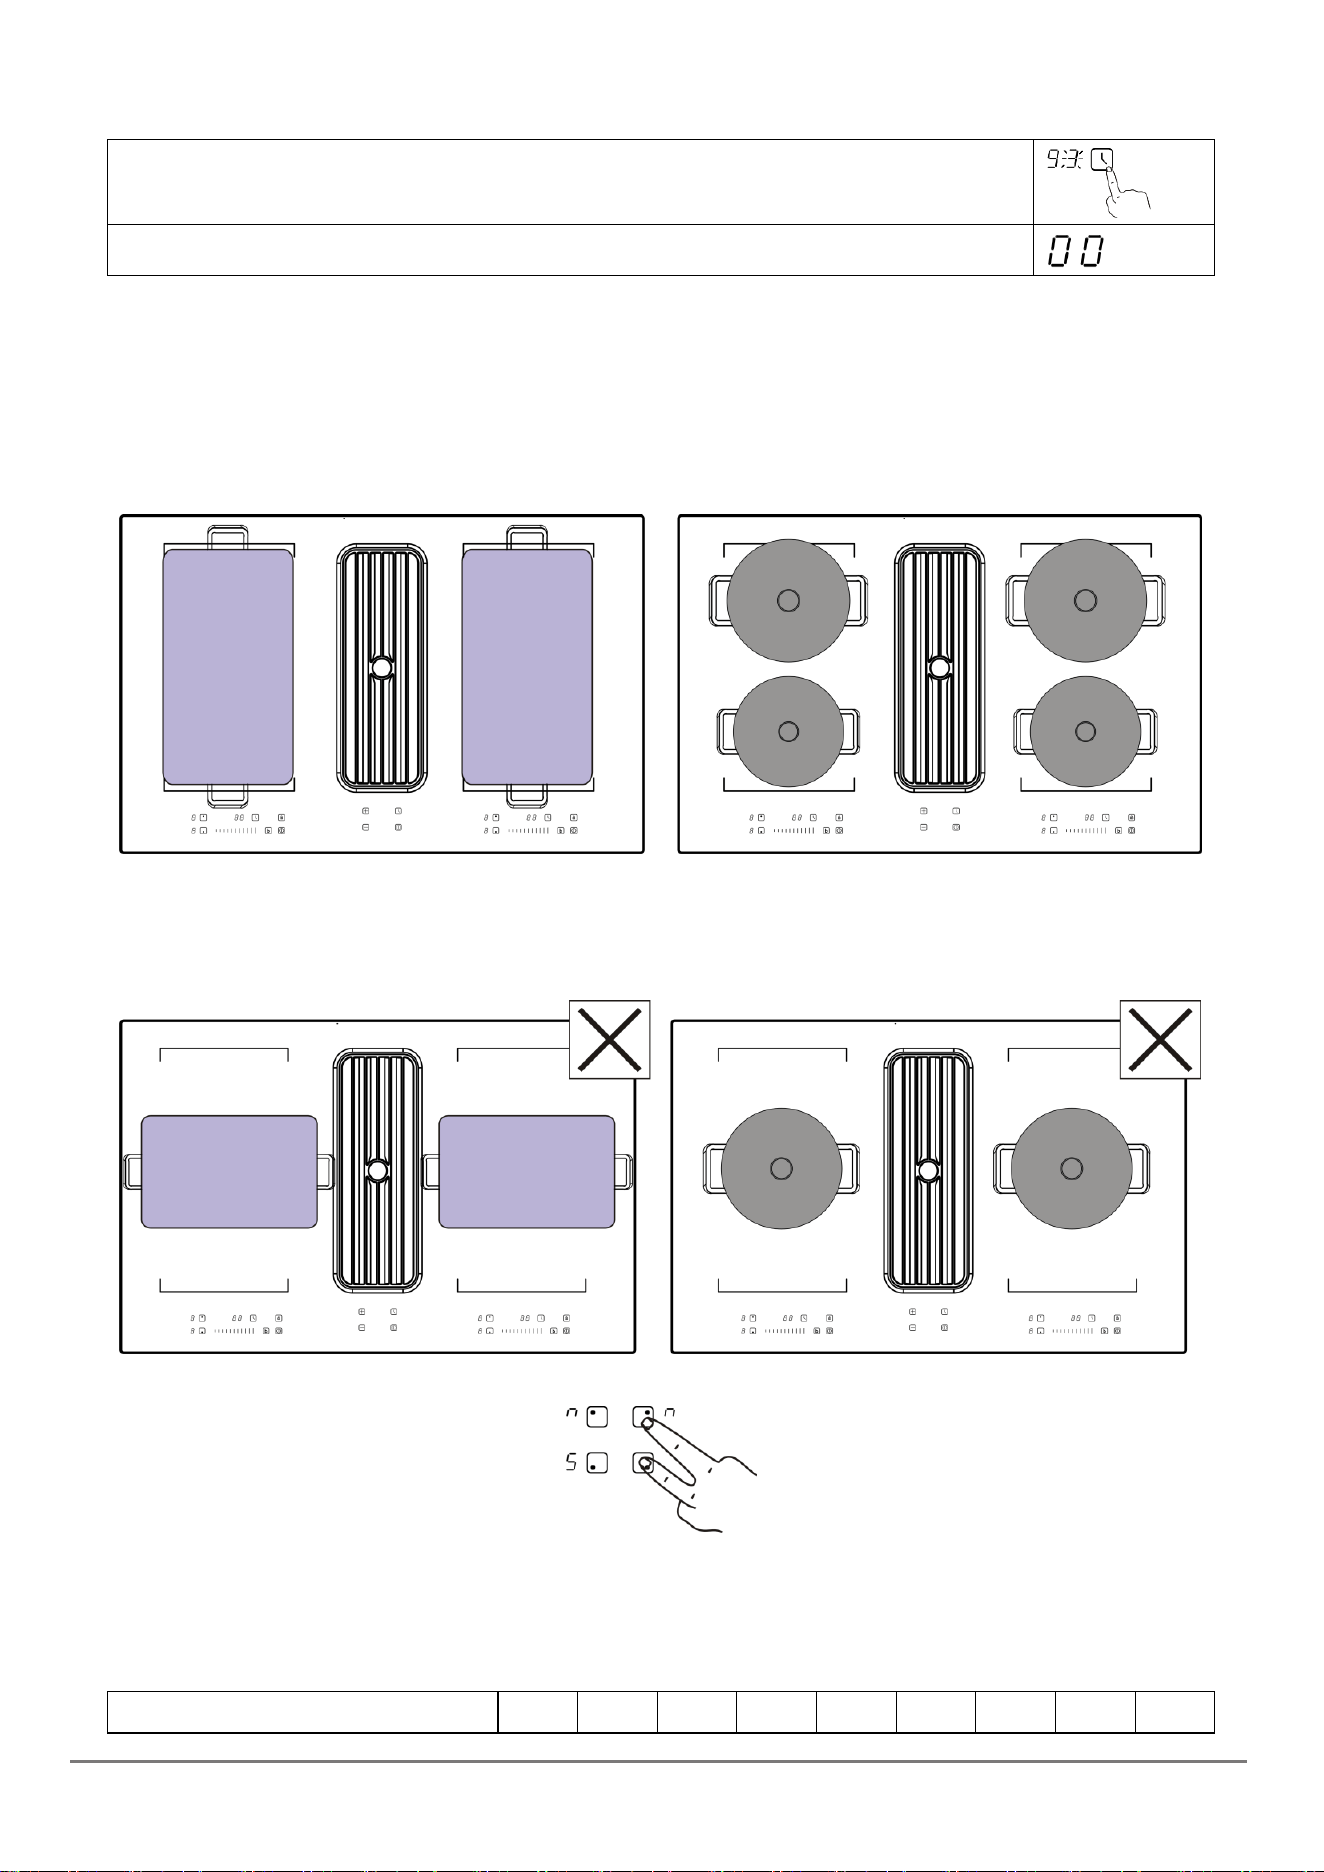
Using the Flexible zone function
1. This may be used as a single zone or two individual zones deepening on the cooking needs in each situation
2. It is made of two independent inductors that can be controlled separately. When the flexible zone is working,
only the zone covered by the cookware is activated.
3. To ensure that the cookware is detected and heat is distributed evenly, correctly center the cookware.
4. One hob with more than one flexible zone, it is not recommended to use several zones at the same time for a
single pan.
Make sure to place the cookware’s centered on the single cooking zone. The ideal recipe is an oval or
rectangular saucepan, or a saucepan.
5. Press the two-zone selected key at the same time, the flexible zone display will flash.
Auto shutdown protection
Auto shutdown is a safety protection function for your induction hob. This occurs whenever you forget to switch off
a cooking zone. The default shutdown times are shown in the table below:
Power level
1
2
3
4
5
6
7
8
9
www.linarie.com.au
17
Default working time (hour)
8
8
8
4
4
4
2
2
2
When the pot is removed, the induction hob can stop heating immediately and the hob automatically switch off
after 1 minute.
Residual heating warning
When the hob has been operating for some time, there will be some residual heat. The letter ‘H’ appears to
warm you to keep away from it.
Heat settings
Heat setting
Suitability
1 - 2
- delicate warming for small amounts of food
- melting chocolate, butter, and foods that burn quickly.
-gentle simmering
- slow warming
3 - 4
-reheating
-rapid simmering
-cooking rice
5 - 6
-pancakes
7 - 8
-sauteing
-cooking pasta
9
-stir-frying
-searing
-bringing soup to the boil
-boiling water
MAINTENANCE AND CLEANING
Daily maintenance
1. Periodically check that dust does not deposit under the fan or in the discharge openings, this could obstruct
ventilation for cooling the electronic system, reducing the efficiency of your hob.
2. The hob could be damaged if hard- and sharp-edged objects fall on it, it is recommended that such objects
be kept away from the hob where they cannot fall on it.
3. Do not put hot pans on the control area or on the edge of the hob, do not use pans with a raised design or
pattern on the base, they could scratch the hob.
4. Never use pan support or boiler cradle to avoid damaging the glass hob.
5. Never make the cleaning when the hob surface is in high temperature.
6. Steam cleaner or high-pressure cleaner is not to be used.
7. When cooker hood is in use, never block the inlet, moreover, food residue, soup, etc. cannot be inflow into
the inlet plenum.
Cleaning techniques
1. Please shut off the power and pull out the plug before cleaning of the appliance.
2. Clean the appliance until it cools down completely.
3. Cleaning the hob glass: Dry any splashes with a damp sponge or paper towel, rinse and dry. If any stains
remain, use some vinegar, rinse and dry. Or apply a small amount of cream detergent for hobs, when dry,
shine the surface with a soft cloth or paper.
4. When chemical products heat up they can corrode and damage the glass, moreover the fumes can be
dangerous for your health.
5. Do not use these products to clean the glass hob: Abrasive powders or detergents, spray products for ovens,
whitening products, sponges with abrasive surfaces, steel wool balls or synthetic ones. These products could
seriously damage your hob.
6. Clean the surface when it is completely cold except for the following: dried sugar, syrupy sugar, tomato sauce,
milk, these must be removed immediately with the scraper.
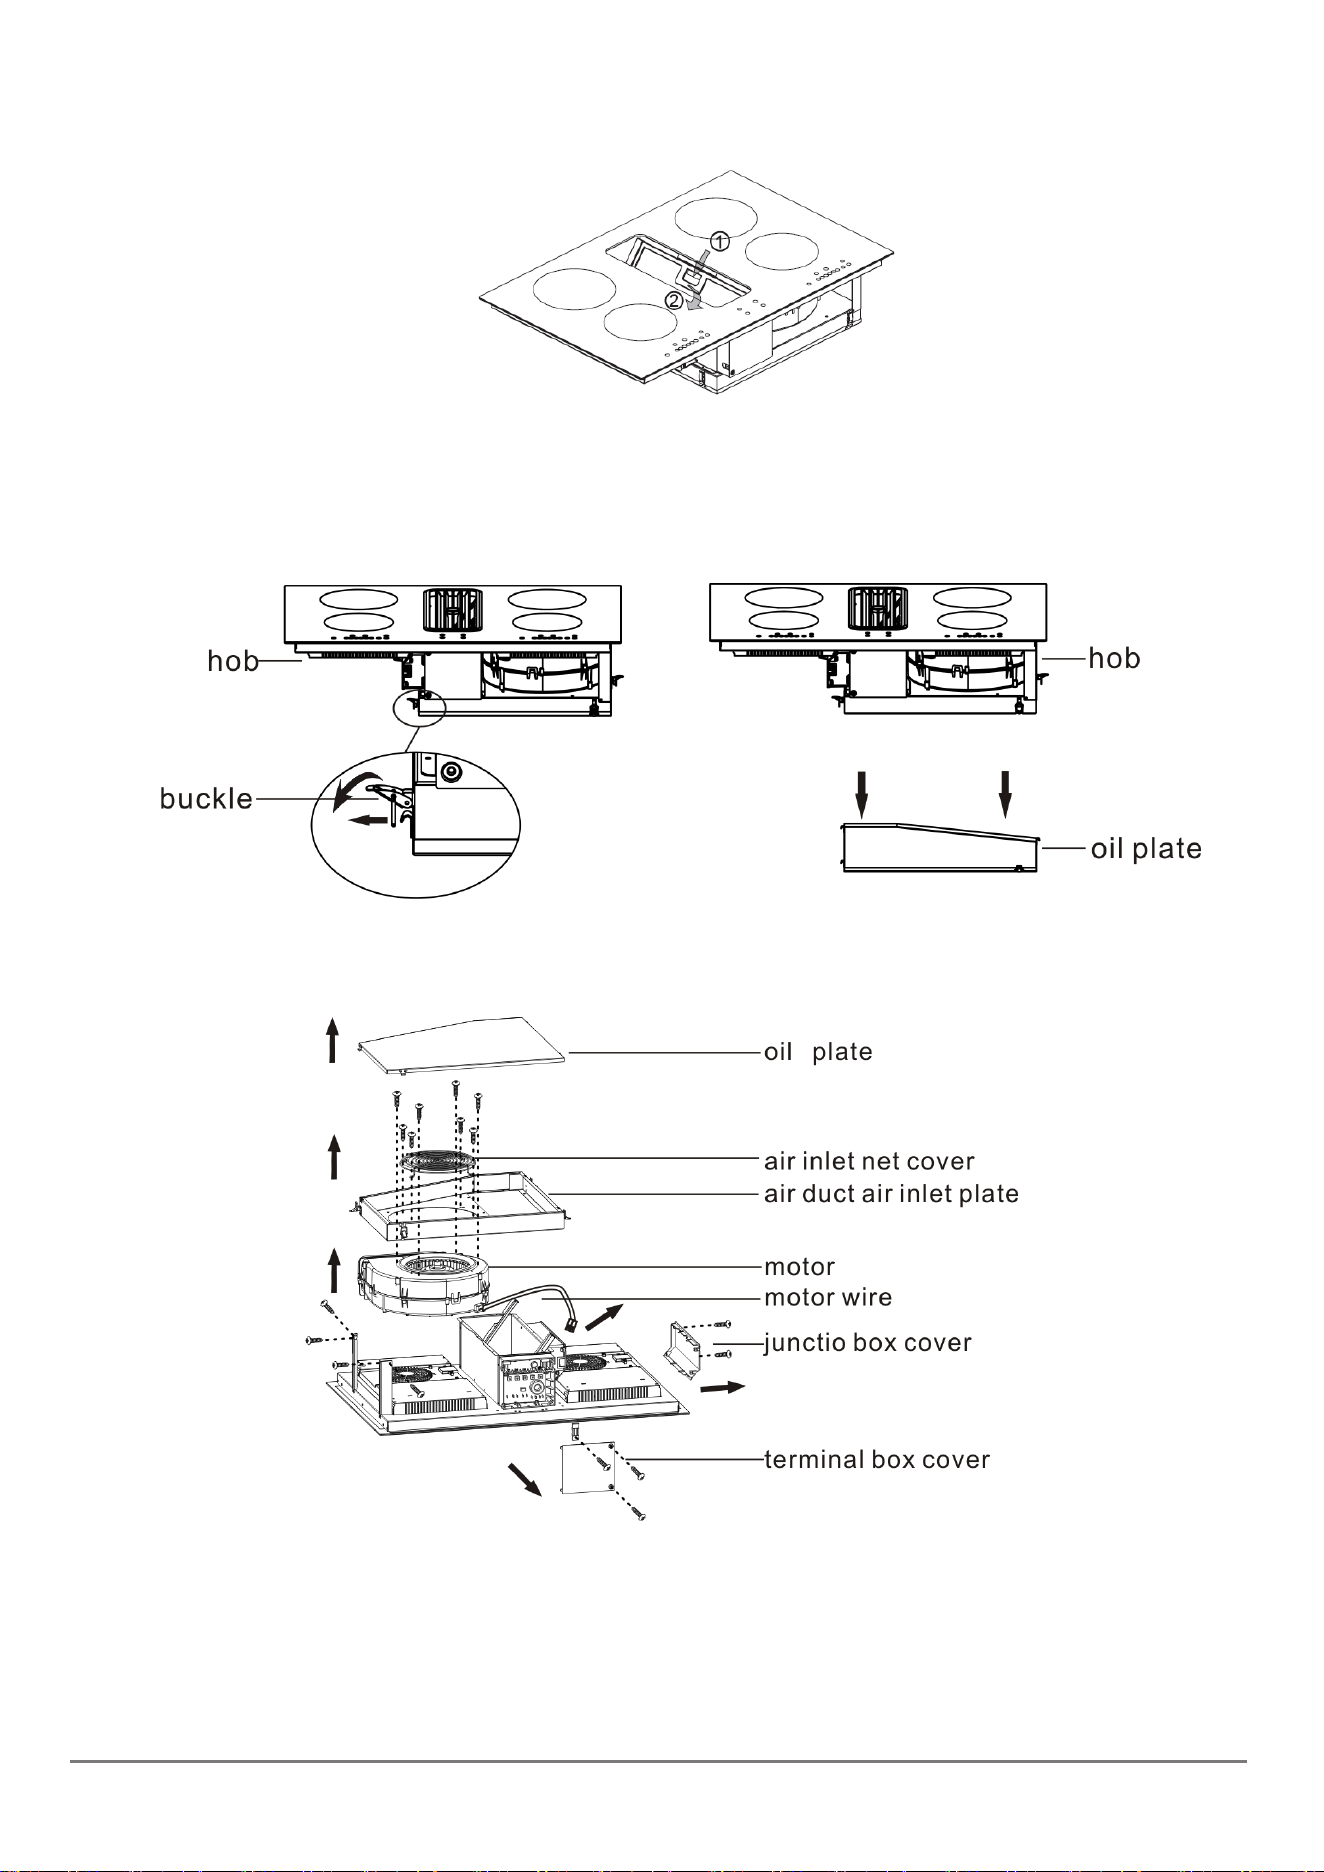
7. The mesh filters of the cooker hood must be cleaned and changed regularly, and the clean method is as
following:
A. Open and take down the filters referring to step ①&② below.
B. Put the filters into 40-50℃ water and soak them for about 2-3 minutes with a grease-loosening detergent
www.linarie.com.au
18
then brush it gently with a soft brush. Please do not apply too much pressure, avoid to damage it.
8. The oil plate of the cooker hood must be cleaned regularly, and the clean method is as following:
A. As shown in the pic below, open the four buckles on the hob by hand and remove the oil plate.
B. Put the oil plate into 40-50℃ water and soak them for about 2-3 minutes with a grease-loosening
detergent then brush it gently with a soft brush. Please do not apply too much pressure, avoid to
damage it.
9. The filter is metal products, it is advisable not to use rinse aid that will corrupt metals.
Replacing the motor
Use a screwdriver to remove the oil plate, air inlet net cover, air duct air inlet plate, motor, junction box cover, and
terminal box cover in sequence as shown in the pic below, and unplug the motor wire to replace the motor.
www.linarie.com.au
19
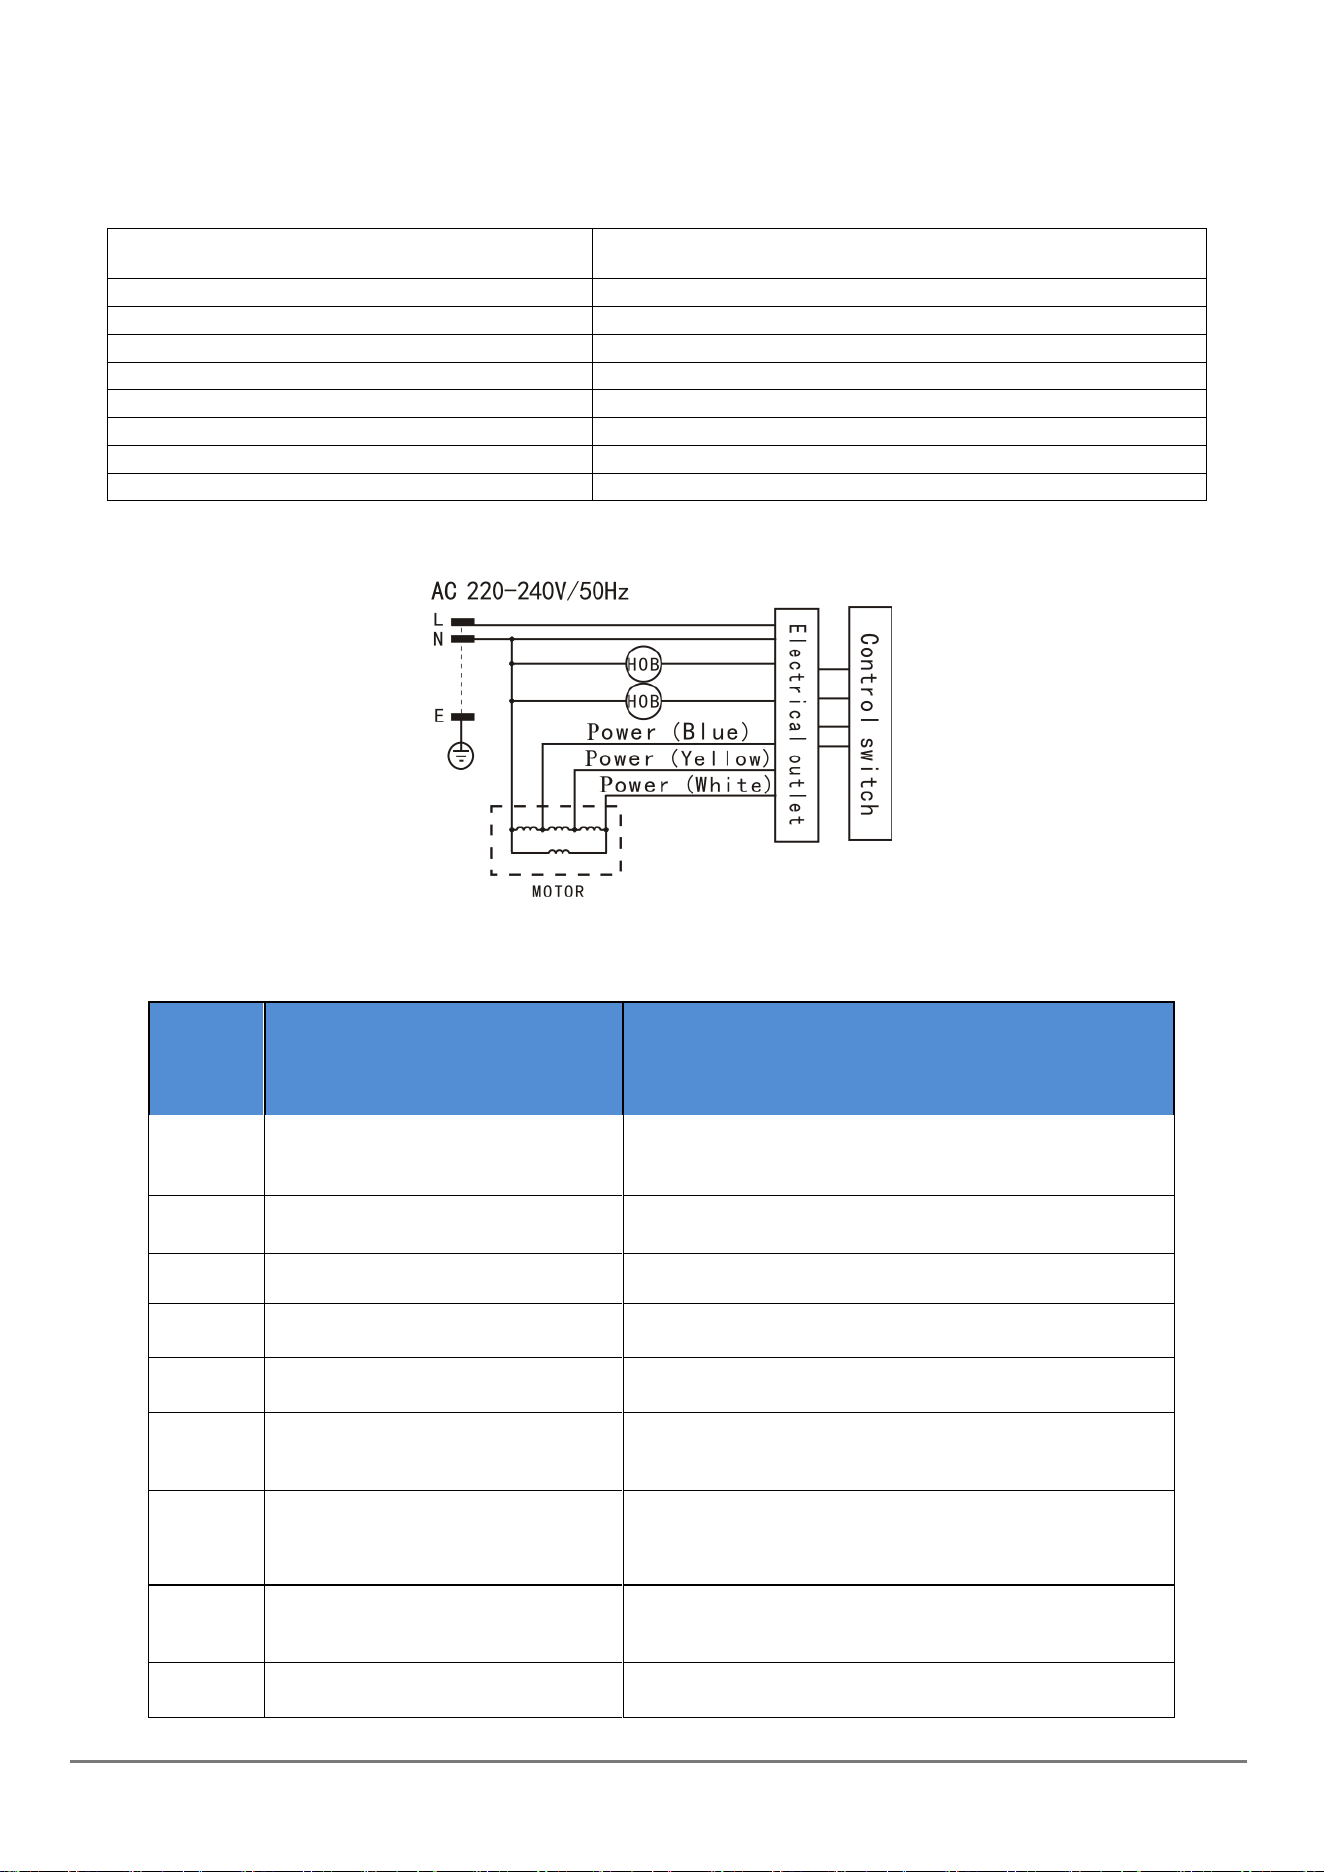
TECHNICAL PARAMETER & CIRCUIT DIAGRAM
Technical parameter
Product model
136A3 80cm
Voltage/frequency
AC220-240V/50Hz
Power consumption
7335W (induction hob 7200W & cooker hood 135W)
Cooker hood max air flow
600m³/h
Cooker hood wind pressure
≥292Pa
Noise
≤75db
Working environmental temperature
<45℃
Storage environmental temperature
-20℃~45℃
Storage environmental relative humidity
<90%
✓ Circuit diagram
TROUBLESHOOTING
Fault
Code
Possible Cause
Description
E1
Pan or pot fault
No pan or pot, or their size, material, etc. is not
suitable, or not placed precisely in the middle of the
cooking area.
E2
Voltage is too high
Higher than AC 265V.
E3
Voltage is too low
Lower than AC 185V.
E4
IGBT sensor open-circuit
When the IGBT sensor detects an open-circuit, the
IGBT sensor stops working.
E5
IGBT sensor short-circuit
When the IGBT sensor detects an short-circuit, the
IGBT sensor stops working.
E6
IGBT sensor over temperature
IGBT reaches 100± 5℃ for 3s (It can recover
automatically when temperature decrease 50℃-70℃).
E7
Hob surface sensor open-circuit
After 60 seconds of operation, IGBT stops working
when the temperature detection circuit of pot has
detected an open-circuit.
E8
Hob surface sensor short-circuit
IGBT stops working when the temperature detection
circuit of pot has detected an short-circuit.
E9
High temperature protection of pot
sensor
IGBT stops working when the temperature detection
circuit of the pot is detected to exceed a certain value.
www.linarie.com.au
20
EA
Pot sensor removal or failure
protection
When the pot sensor is moved out, and the whole
machine is heated for a period of time, the
corresponding area will detect the moving out state of
the cooker sensor, and the heating area will stop
heating.
EB
Communication fault
The power board does not receive a valid
communication signal from the display board for 90
seconds.
EC
Communication fault
The display board does not receive a valid
communication signal from the power board for 90
seconds.
H
Hob surface is of high
temperature.
After the hob is off, if the hob surface temperature is
too high, it will display "H", and the fan will delay
working for 2 minutes.
ENVIRONMENTAL PROTECTION
Note: Before discarding an old appliance, switch off and disconnect it from the power supply. Cut off and render
any plug useless. Cut the cable off directly behind the appliance to prevent misuse. This should be undertaken by
a competent person.
This appliance is marked according to the European directive 2002/96/EC on Waste electrical and Electronic
Equipment (WEEE). By ensuring this product is disposed of correctly, you will help prevent potential negative
consequences for the environment and human health, which could otherwise be caused by inappropriate waste
handling of this product.
The symbol on the product or on the documents accompanying the product
indicates that this appliance may not be treated as household waste. Instead, it shall be handed over to the
applicable collection point for the recycling of electrical and electronic equipment.
Disposal must be carried out in accordance with local environmental regulations for waste disposal. For more
detailed information about treatment, recovery and recycling of this product, please contact your local city office
or local waste management office.
The packaging materials that we use are environmentally friendly and can be recycled. Please discard all
packaging material with due regard for the environment.
➢ DISPOSAL OF THE APPLIANCE
Old appliances should not simply be disposed of with normal household waste, but should be
delivered to a collection and recycling center for electric and electronic equipment. A symbol
shown on the product, the instruction manual or the packaging shows that it is suitable for
recycling.
www.linarie.com.au

21
Materials used inside the appliance are recyclable and are lapelled with information concerning this by recycling
materials or other parts from used devices you are making a significant contribution to the protection of our
environment.
Information on appropriate disposal center for used devices can be provided by your local authority.
WARRANTY & AFTER SALES SERVICE
Register your product www.linarie.com.au
Replacement of spare parts
Incorrect components can lead to personal injury or
damage to the appliance. Use only genuine original
Linärie spare parts.
Modifications, additions or alterations to the appliance
can lead to safety risks. If spare parts or accessories from
other manufacturers are used, the warranty will be
invalidated, and Linärie cannot accept liability.
Please check www.linarie.com.au for more information.
Model:…………………………………………………………
Serial Number:.………………………………………………
Observe all safety and warning information during
operation (see the “General Safety Instructions” section).
In the event of a fault which you cannot remedy yourself,
please contact Linärie.
Warranty
The manufacturer’s warranty for this appliance is 2 years.
After sales service
The contact details for Linärie are given at the beginning
and of these instructions.
When contacting Linärie, please quote the model and
serial number of your appliance. These can be found on
the data plate, after removing the grease filter.
Record model & serial number
www.linarie.com.au

LIKE TO
KNOW MORE?
© Linärie
For further information on all Linärie appliances,
or to obtain detailed dimension and installation
information, phone or email our Customer Care
team or visit our website:
Australia
www.linarie.com.au
Follow Us
@Linarie.Appliances
www.linarie.com.au

Operating and installation instructions: Original √ Translation
Linärie Contact
www.linarie.com.au
The distribution and duplication of this document, as well as the use and disclosure of its contents
are prohibited unless expressly authorised.
These operating and installation instructions have been drawn up with the greatest of care. But it
cannot be ruled out that subsequent technical modifications have not yet been incorporated or
the relevant content has not yet been adapted. Please accept our apologies in this eventuality. An
updated version can be requested from our team. Subject to printing errors and mistakes.
© Linärie
All rights reserved.
Mart Online Services Pty Ltd.
ACN 657 824 050
www.linarie.com.au