
User Manual
43" Monitor

1
User's Manual
© 2020 Hangzhou Hikvision Digital Technology Co., Ltd. All rights reserved.
This Manual is the property of Hangzhou Hikvision Digital Technology Co., Ltd. or its af-
filiates (hereinafter referred to as “Hikvision”), and it cannot be reproduced, changed,
translated, or distributed, partially or wholly, by any means, without the prior written
permission of Hikvision. Unless otherwise expressly stated herein, Hikvision does not
make any warranties, guarantees or representations, express or implied, regarding to the
Manual, any information contained herein.
About this Manual
The Manual includes instructions for using and managing the Product. Pictures, charts,
images and all other information hereinafter are for description and explanation only. The
information contained in the Manual is subject to change, without notice, due to rmware
updates or other reasons. Please nd the latest version of this Manual at the Hikvision
website (https://www.hikvision.com/).
Please use this Manual with the guidance and assistance of professionals trained in sup-
porting the Product.
Trademarks Acknowledgement
and other Hikvision’s trademarks and logos are the properties of Hikvision in
various jurisdictions.
Other trademarks and logos mentioned are the properties of their respective owners.
The terms HDMI and HDMI High-Denition Multimedia Interface, and the HDMI
Logo are trademarks or registered trademarks of HDMI Licensing Administrator, Inc. in
the United States and other countries.
LEGAL DISCLAIMER
TO THE MAXIMUM EXTENT PERMITTED BY APPLICABLE LAW, THIS MANUAL AND THE PROD-
UCT DESCRIBED, WITH ITS HARDWARE, SOFTWARE AND FIRMWARE, ARE PROVIDED “AS
IS” AND “WITH ALL FAULTS AND ERRORS”. HIKVISION MAKES NO WARRANTIES, EXPRESS
OR IMPLIED, INCLUDING WITHOUT LIMITATION, MERCHANTABILITY, SATISFACTORY QUAL-
ITY, OR FITNESS FOR A PARTICULAR PURPOSE. THE USE OF THE PRODUCT BY YOU IS
AT YOUR OWN RISK. IN NO EVENT WILL HIKVISION BE LIABLE TO YOU FOR ANY SPECIAL,
CONSEQUENTIAL, INCIDENTAL, OR INDIRECT DAMAGES, INCLUDING, AMONG OTHERS,
DAMAGES FOR LOSS OF BUSINESS PROFITS, BUSINESS INTERRUPTION, OR LOSS OF DATA,
CORRUPTION OF SYSTEMS, OR LOSS OF DOCUMENTATION, WHETHER BASED ON BREACH
OF CONTRACT, TORT (INCLUDING NEGLIGENCE), PRODUCT LIABILITY, OR OTHERWISE, IN
CONNECTION WITH THE USE OF THE PRODUCT, EVEN IF HIKVISION HAS BEEN ADVISED OF
THE POSSIBILITY OF SUCH DAMAGES OR LOSS.
YOU ACKNOWLEDGE THAT THE NATURE OF INTERNET PROVIDES FOR INHERENT SECURITY
RISKS, AND HIKVISION SHALL NOT TAKE ANY RESPONSIBILITIES FOR ABNORMAL OPERA-
TION, PRIVACY LEAKAGE OR OTHER DAMAGES RESULTING FROM CYBER-ATTACK, HACKER
ATTACK, VIRUS INSPECTION, OR OTHER INTERNET SECURITY RISKS; HOWEVER, HIKVISION
WILL PROVIDE TIMELY TECHNICAL SUPPORT IF REQUIRED.
YOU AGREE TO USE THIS PRODUCT IN COMPLIANCE WITH ALL APPLICABLE LAWS, AND
YOU ARE SOLELY RESPONSIBLE FOR ENSURING THAT YOUR USE CONFORMS TO THE AP-
PLICABLE LAW. ESPECIALLY, YOU ARE RESPONSIBLE, FOR USING THIS PRODUCT IN A MAN-
NER THAT DOES NOT INFRINGE ON THE RIGHTS OF THIRD PARTIES, INCLUDING WITHOUT
LIMITATION, RIGHTS OF PUBLICITY, INTELLECTUAL PROPERTY RIGHTS, OR DATA PROTEC-
TION AND OTHER PRIVACY RIGHTS. YOU SHALL NOT USE THIS PRODUCT FOR ANY PROHIB-
ITED END-USES, INCLUDING THE DEVELOPMENT OR PRODUCTION OF WEAPONS OF MASS
DESTRUCTION, THE DEVELOPMENT OR PRODUCTION OF CHEMICAL OR BIOLOGICAL WEAP-
ONS, ANY ACTIVITIES IN THE CONTEXT RELATED TO ANY NUCLEAR EXPLOSIVE OR UNSAFE
NUCLEAR FUEL-CYCLE, OR IN SUPPORT OF HUMAN RIGHTS ABUSES.
IN THE EVENT OF ANY CONFLICTS BETWEEN THIS MANUAL AND THE APPLICABLE LAW, THE
LATER PREVAILS.
2
User's Manual
Regulatory Informaon
FCC Informaon
Please take aenon that changes or modificaon not expressly approved by the party
responsible for compliance could void the user’s authority to operate the equipment.
FCC compliance: This equipment has been tested and found to comply with the limits for
a Class A digital device, pursuant to part 15 of the FCC Rules. These limits are designed to
provide reasonable protecon against harmful interfere
nce when the equipment is
operated in a commercial environment. This equipment generates, uses, and can radiate
radio frequency energy and, if not installed and used in accordance with the instrucon
manual, may cause harmful interference to radio communicaons. Operaon of this
equipment in a residenal area is likely to cause harmful interference in which case the
user will be required to correct the interference
at his own expense.
FCC Condions
This device complies with part 15 of the FCC Rules. Operaon is subject to the following
two condions:
1. This device may not cause harmful interference.
2. This device must accept any interference received, including interference that may
cause undesired operaon.
EU Conformity Statement
This product and - if applicable - the supplied accessories too are marked with
"CE" and c
omply therefore with the applicable harmonized European standards
listed under the EMC Direcve 2014/30/EU, the LVD Direcve 2014/35/EU, the RoHS
Direcve 2011/65/EU.
2012/19/EU (WEEE direcve): Products marked with this symbol cannot be
disposed of as unsorted municipal waste in the European Union. For proper
recycling, return this product to your local supplier upon the purchase of
equivalent new equipment, or dispose o
f it at designated collecon points. For more
informaon see: www.recyclethis.info
2006/66/EC (baery direcve): This product contains a baery that cannot be
disposed of as unsorted municipal waste in the European Union. See the
product documentaon for specific baery informaon. The baery is marked
with this symbol, which may include leering to indicate cadmium (Cd), lead (Pb), or
mercury (Hg). For proper recycling, return the baery to your supplier or to a designated
collecon point. For
more informaon see: www.recyclethis.info
Industry Canada ICES-003 Compliance
This device meets the CAN ICES-3 (A)/NMB-3(A) standards requirements.
3
User's Manual
To prevent injury, this apparatus must be securely attached to the floor/wall in accordance
with the installation instructions.
Applicable Models
This manual is applicable to the model: LCD Monitor.
Symbol Conventions
The symbols that may be found in this document are defined as follows.
Symbol Description
Provides addional informaon to emphasize or supplement important points
of the main text.
Indicates a potenally hazardous situaon, which if not avoided, could result
in equipment damage, data loss, performance degradaon, or unexpected
results.
Indicates a hazard with a high level of risk, which if not avoided, will result in
death or serious injury.
This is a class A product and may cause radio interference in which case the
user may be required to take adequate measures.
WARNING: This equipment is compliant with Class A of EN55032/CISPR 32.
In a residential environment this equipment may cause radio interference.

4
User's Manual
TABLE OF CONTENTS
1. Safety instructions .....................................................................................5
1.1 Screen maintenance ........................................................................8
2. Operation Instructions ................................................................................9
2.1 Control panel .................................................................................... 9
2.2 Remote control ............................................................................... 10
3. Installation instructions ............................................................................. 11
3.1 Control button and joint ..................................................................12
3.2 How to adjust the settings ..............................................................13
3.3 Adjust the image settings ...............................................................14
4. Technical support (common problems) .....................................................17
5. Appendix ...................................................................................................19
5.1
Specication ................................................................................... 19
5.2 Comparison table of the preset frequencies of the original factory 20
5.3 Instructions of the joint pin ..............................................................21

5
User's Manual
1. Safety instructions
Pixel feature
This liquid crystal display product has ultrahigh color resolution. While it’s ef-
fective pixels are up to 99.999% or higher, it is still possible that a dark spot
or a bright spot (red, green or blue) constantly appears on the screen. This
is the structure property (within the general industrial standard) of the display
rather than a fault.
Safety
Please read and understand all instructions before using the monitor safety
. Damage resulting from nonobservance of the instructions is not covered by
the warranty.
Be careful of electric shock and re!
· Never make the monitor contact with rain or water. Never place a liquid
container (e.g., a vase) near or on the monitor. Please disconnect the
monitor’s power immediately if a liquid is spilled on the monitor’s surface
or inside. Please contact the customer service center before using it again.
· Never put a monitor, remote controller, or battery near an open ame
or other heat source (including direct sunlight). In order to avoid ame
spread, always keep candles or other open ames away from monitors,
remote controls, and batteries.
· Never insert any object into the ventilation slot or other openings on the
monitor.
· Please make sure that the power line is not taut. The tightening of the
power line will loose the power connections and produce sparks.
Beware of short circuit or re!
· Do not expose the remote controller or battery in rain, water or overheated
environment.
· Please avoid pulling the plug. Loose power plugs may spark or cause re.
Watch out for personal injury or monitor damage!

6
User's Manual
· It is suggested that the monitor be carried by two people.
· When installing the monitor on the stand, please use only the chassis
provided. Firmly x the frame on the monitor. Put the monitor on a at, at
surface that can withstand the total weight of the monitor and the chassis.
· When installing a monitor with wall mounting, please use only the wall
mount bracket that can bear the weight of the monitor. Fix the wall mount
mounting bracket on the wall that can withstand the total weight of the
monitor and the wall mount bracket.
The company is not responsible for the accident, personal injury or loss
caused by improper installation.
Be careful of hurting children!
Please follow the following precautions to avoid child injury due to monitor
falling:
· Never place the monitor on a surface covered with a cloth or other mate-
rial that can be pulled.
· Make sure that any part of the monitor is within the edge of the surface.
· When placing a monitor on a high furniture (such as a bookcase), the fur-
niture and monitor must be xed to the wall or the appropriate support.
· Tell children about the dangers of climbing furniture and touching monitors.
Beware of eating battery!
· The remote control of this product contains batteries. There is a risk that
children might eat the batteries. Please keep them out of reach of children.
Watch out for overheating!
· Never install the monitor in the enclosed space. Always leave at least 4
inches or 10 centimeters of space around the monitor for ventilation. Make
sure that curtains or other objects do not block the ventilation slot on the
monitor.
Be careful! Don’t break the monitor!
· Before you connect the monitor to the power outlet, make sure that the
power voltage matches the value printed on the back of the monitor. If the
voltage is different, don’t connect the monitor to the power outlet.
· If the monitor is not used for a long time, please cut off the power supply.
Be careful of personal injury, re or power line damage!
· Do not put the monitor or any object on the power line.
· As a disconnecting device, the power plug should be kept to operate con-
veniently.

7
User's Manual
· When the power line is disconnected, always hold the plug instead of pull-
ing the cable.
· Before the thunderstorm comes, disconnect the monitor from the power
outlet and the antenna. Never touch any part of a monitor, a power line, or
an antenna in a thunderstorm.
· The wired network antenna connected to the equipment must be isolated
from the protective grounding, otherwise it may cause re and other dan-
gers!
Watch out for hearing impairment!
· Avoid using headphones or earphones at high volume or for a long time.
Low temperature
· If the monitor is transported below 5°C, please open the package of the
monitor. Wait for the monitor to adapt to the room temperature, and then
connect the monitor to the power outlet.

8
User's Manual
1.1 Screen maintenance
Before using the monitor, please read and understand all the instructions.
Damage resulting from nonobservance of the instructions is not covered
by the warranty.
· Try to avoid still images. A still image means that an image stays on the
screen for a long time. Still image may cause permanent damage to the
monitor screen;
· the monitor screen to cause image blur, afterimage, local traces, and the
display is not within the scope of warranty
· Don’t display static images for more than 2 hours on the LCD
monitor, because it will cause the screen image blur. In order to avoid this
problem please reduce the brightness and contrast of the screen in the
display of a still image.
· When you watch 4:3 programs for a long time, you leave different marks
on the left and right sides of the screen and the edges of the image, so
please don’t use this mode for a long time.
· Image sticking may occur if playing video games or displaying still images
for a long time. It is caused by screen burn. Please reduce brightness and
contrast when appropriate.
· Pull out the monitor plug before cleaning.
· Use a soft dry cloth to wipe the monitor and frame. Do not use alcohol,
chemicals or household cleaning agent cleaning monitor.
· Watch out for damage to monitor screen! Do not use any object to contact,
push, rub or tap the screen.
· In order to avoid deformation and fading, please wipe water as soon as
possible.
9
User's Manual
2. Operation Instructions
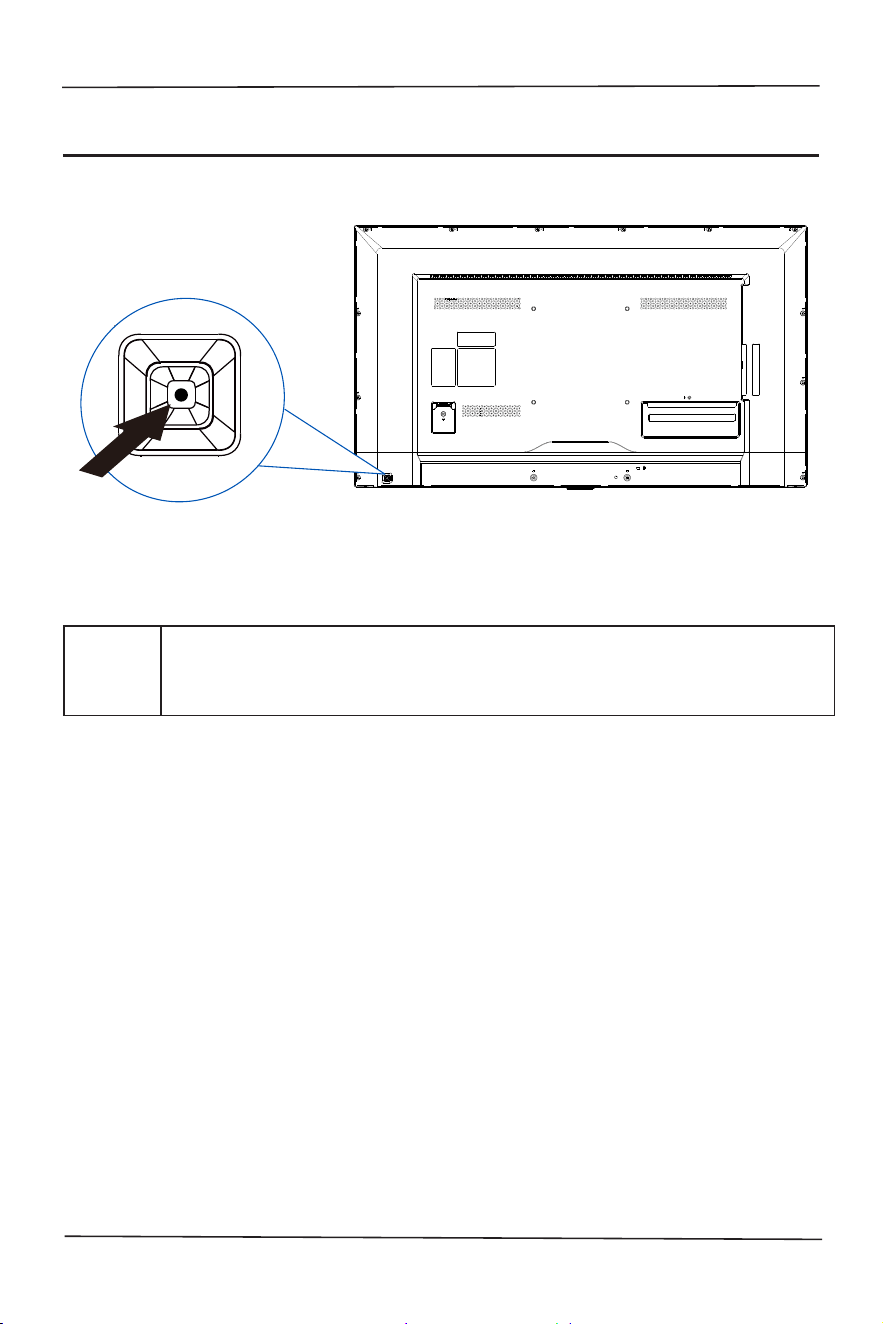
2.1 Control panel
(The shape of the product will vary between models, please take the actual
machine as the standard!)
Power/
Input
Press the Power key in the shutdown state.
Short-press to select VGA/HDMI and long-press to shut it off in the
power-on state.
10
User's Manual
2.2 Remote control
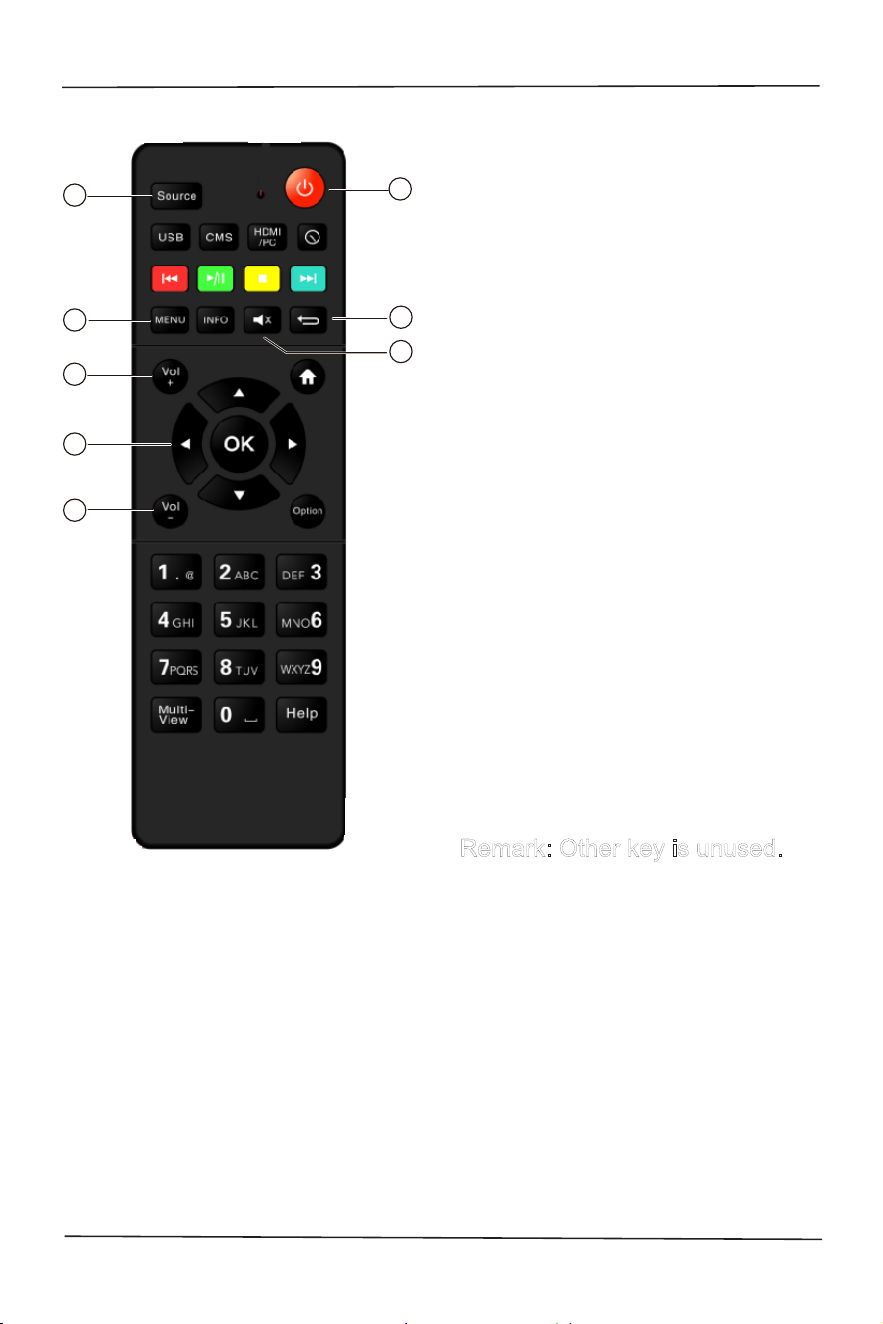
2
5
7
3
4
6
8
1
1. Standby-Power on
When the monitor boot, it can be
switched to standby.
The monitor can be power on
when it is in standby mode.
2. Signal source
Opens the signal source menu,
select the connected device.
3. Button
Up, down, left and right operation
key & confirmation key.
4. Return
4.1 Return to the last menu or
exit from the current application.
4.2 If image offset or noise
occurs, press Return can
automatic adjust again.
5. Homepage menu key
Enter the home page menu.
6. Mute
Mute/Unmute.
7/8. Volume key
Adjust the volume.
Remark: Other key is unused.
11
User's Manual
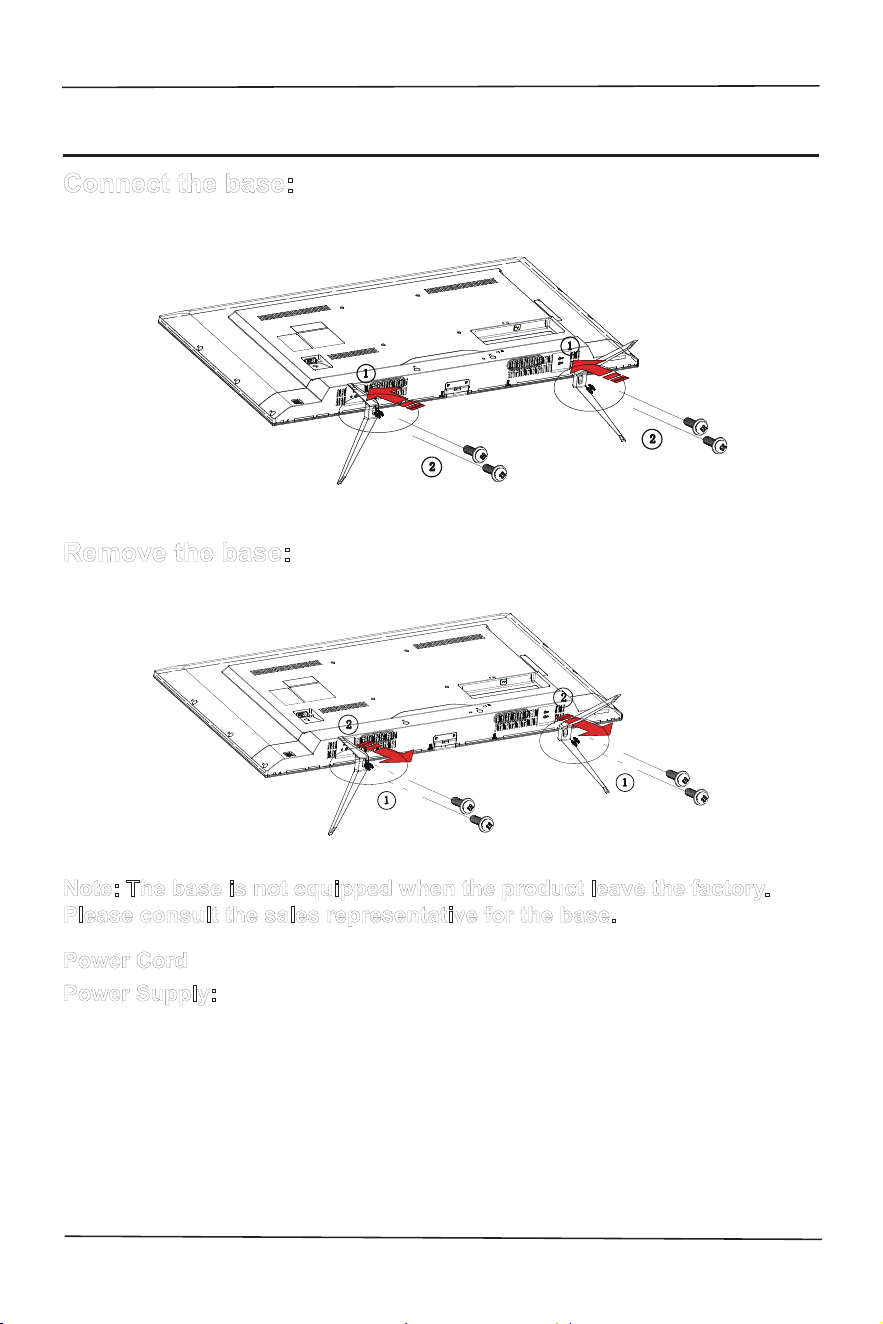
3. Installation instructions
Connect the base:
Remove the base:
Note: The base is not equipped when the product leave the factory.
Please consult the sales representative for the base.
Power Cord
Power Supply:
1. Please use the power cord applicable to the local region.
2. The LCD is internally configured with a power board, capable of
being used in regions with 100/120V AC or 220/240V AC voltage
(It is not necessary to perform adjustments by yourself).

12
User's Manual
3.1 Control button and joint
Signal wire
• Connect the VGA wire: Connect the 15 -pin VGA signal wire to the back
of the display and the VGA port of the computer or other devices.
• Connect the HDMI wire: Connect the 19 -pin HDMI signal wire to the
back of the display and the HDMI port of the computer or other devices.
• Connect power cord: Connect the power cord to the AC jack on the back
of the display.
1
2
3
4
RS232
HDMI
D-SUB
1.
Audio in
2. D-SUB
3.
HDMI signal input
4. RS232 (Serial port communication control)
When RS232 port is connected for control, please use the adapter specied
below and normal network cable to connect the 9-pin RS232 cable to the
PC port and the network cable to the RS232 terminal of the surveillance
camera.
RJ45
13
User's Manual
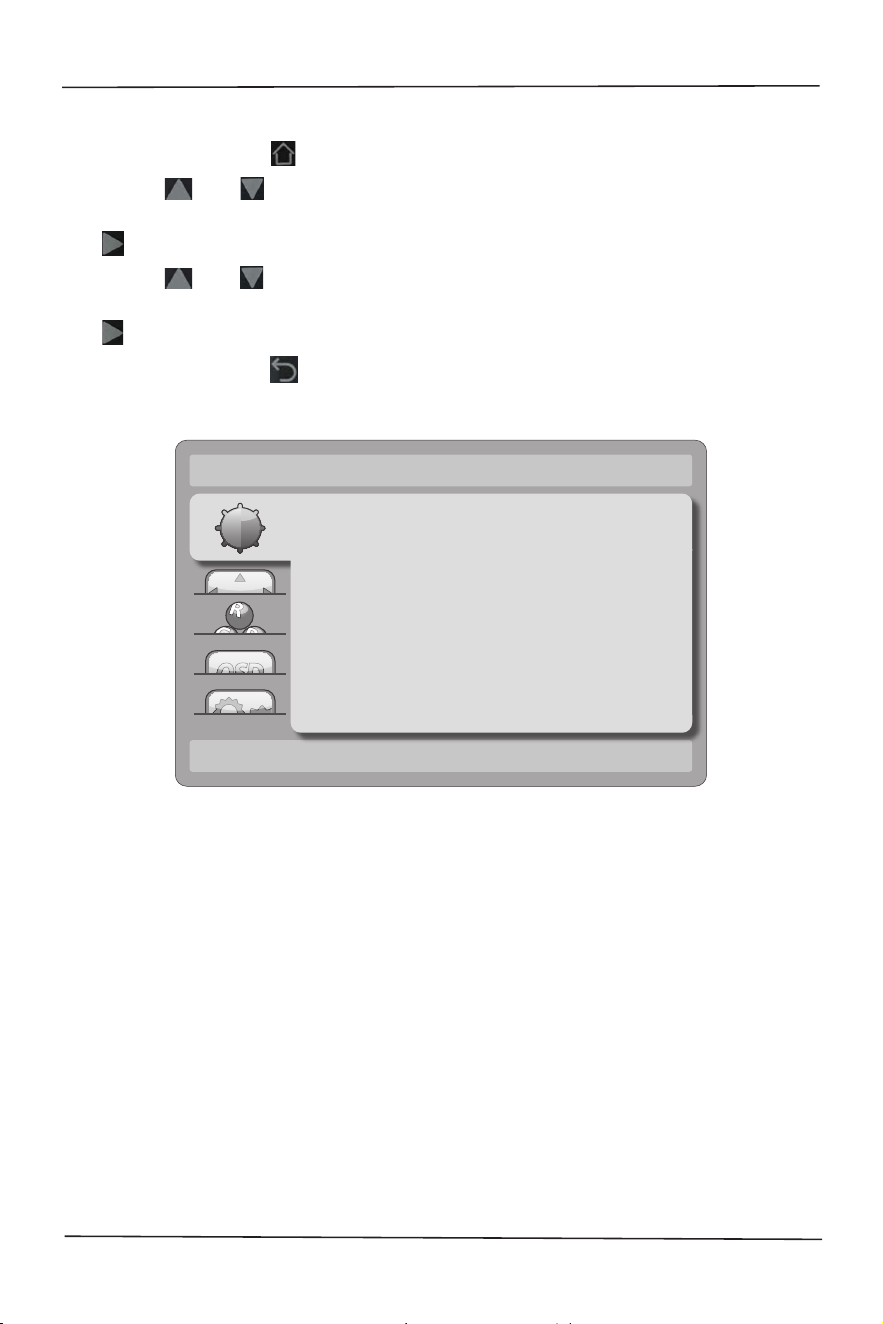
3.2 How to adjust the settings
1. Press the button “ ” to display the OSD options.
2. Press “ ” or “ ” to browse the menu items.
After reversing out the required item, press the button
“ ” to enter.
3. Press “ ” or “ ” again to browse the sub-menu.
After reversing out the required item, press the button
“ ” to make adjustments.
4. Press the button “ ” to save the adjustments and to exit. To adjust other
settings, please repeat steps 2-4.
Brightness
Contrast
Brightness
Eco Mode
DCR
50
100
Standard
Off
14
User's Manual
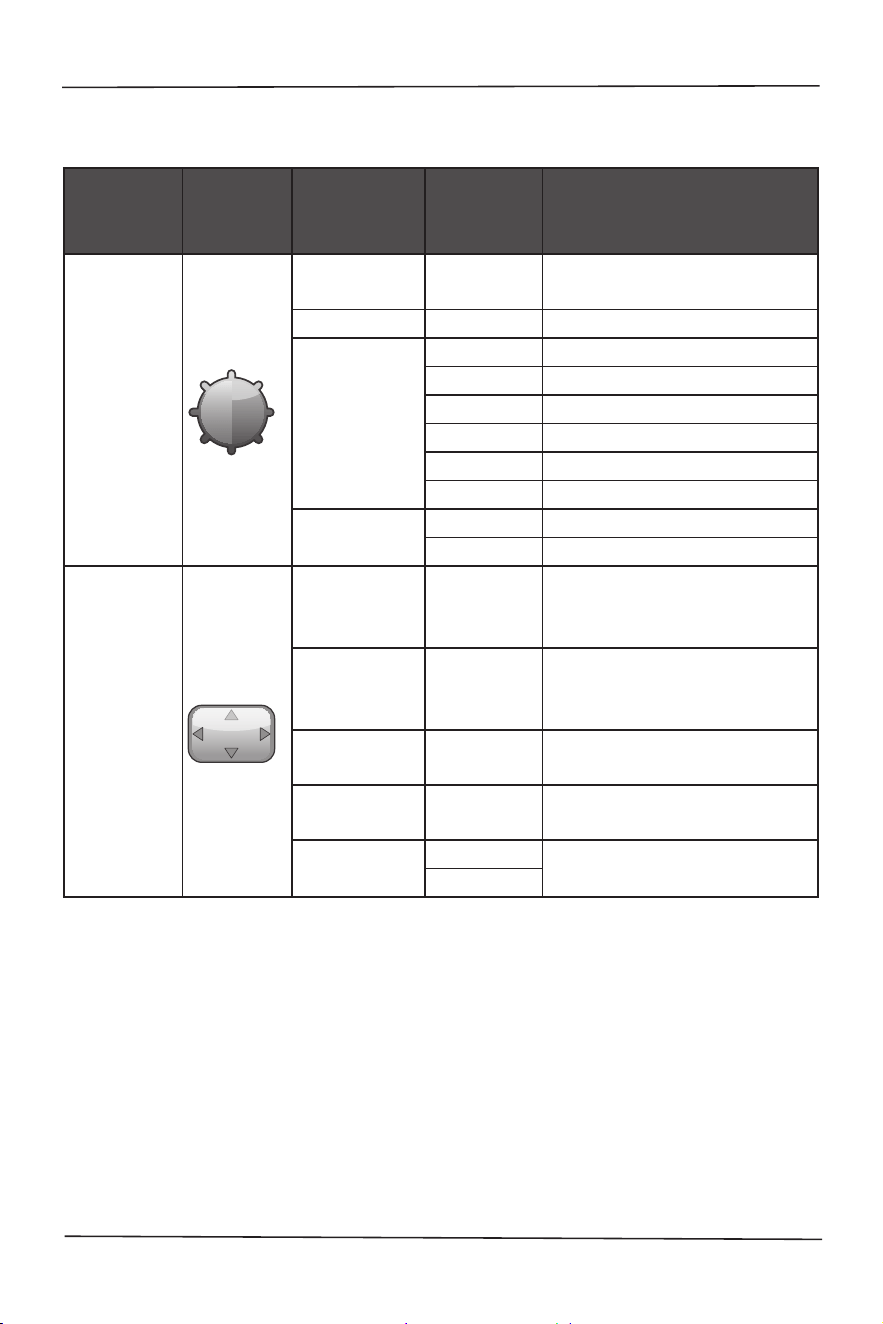
3.3 Adjust the image settings
Description of the functions of control button:
Main
menu
item
Main
menu
picture
Sub-menu
item
Sub-
menu
Description
Brightness
Contrast
-
Comparison of digital regis-
ter
Brightness
-
Backlight adjustment
Eco Mode
Standard Standard mode
Text Text mode
Internet Internet mode
Game Game mode
Movie Movie mode
Sports Sports mode
DCR
On Enable the DCR functions
Off Disable the DCR functions
Image
Setup
Clock
Adjust the image “Clock” to
reduce the noises on the
vertical line
Phase
Adjust the image “Phase”
to reduce the noises on the
horizontal line
H. Position
Adjust the horizontal posi-
tion of the image
V. Position
Adjust the vertical position
of the image
Image Ratio
Wide
Select the image ratio
4:3
15
User's Manual
Main
menu
item
Main
menu
picture
Sub-menu
item
Sub-
menu
Description
Color
Temp.
Warm
Called back from EEPROM
“Warn” setup
Normal
Called back from EEPROM
“Normal” setup
Cold
Called back from EEPROM
“Cold” setup
User
Red
Red gain of the digital
cache
Green
Green gain of the digital
cache
Blue
Blue gain of the digital
cache
OSD setup
H. Position
-
Adjust the horizontal direc-
tion of the OSD.
V. Position
-
Adjust the vertical direction
of the OSD.
Timeout
-
Adjust the display time of
the OSD.
Language
-
Select a language for the
OSD.
Extra
Input Select
Auto/D-SUB/
HDMI
Select the input source.
DDC/CI On or Off
“On/Off DDC/CI” support-
ing functions
Reset Yes or No Reset the menu by default
Information
-
Display the information
of the main image signal
source

16
User's Manual
3.4 Plug-and-play
Plug-and-play DDC2B function
This display is congured with the VESA DDC2B function in accordance with
the “VESA DDC standard”. According to the different DDC use grades, the
display can inform the host of its identication information and transmit other
related information of the display function.
The DDC2B is a double data channel based on the IC communication proto-
col. The host can require the EDID information through the DDC2B.
In the case of no video input signal, the functions of this panel cannot be
used. In order to normally operate the display, the video input signal is a
must.

17
User's Manual
4. Technical support (common problems)
Problems Feasible solution
“Plug-and-play” function does
not work
• Please check if the computer system
is compatible with “Plug-and-play”
function.
• Please check if the display adapter
is compatible with “Plug-and-play”
function.
Fuzzy image
• Please adjust the “Contrast” and
“Brightness”.
Jitterbug or ripple
• Remove electrical devices that can
cause electric interference.
Lacking one of the elementary
colors (red, green or blue)
• Inspect the video connecting wire of the
display, and determine if there is any
pin bent.
Image deviation from the
center of the display or size
error
• Adjust to the horizonal or vertical
position or press the hot key (auto).
Flawed image color (the white
color does not look white)
• Please adjust the RGB color or select
color temperature.
Poor brightness or contrast
• When the display fades in brightness
and affects the display function after
being used for a period of time, please
hand the display to a qualied repair
center for repair.
The display has horizontal or
vertical interference
• Adjust “Frequency” or “Phase” or press
Return on the remote control (Auto
button).
“Clock” (pixel frequency) can control the pixels scanned by a single
horizontal scanner. In the case of frequency error, vertical strips appear on
the display, and an abnormal image ratio will be caused.
“Phase” can be used to adjust the phase of the pixel frequency signal. In the
case of correcting the wrong phase, horizontal interference will appear in the
brighter image.

18
User's Manual
4.1 Error information and feasible solution
No signal
1. Please check if the signal wire is well connected. If the connector is loose,
please fasten the screw on the joint.
2. Please check whether the connecting pin of the signal wire is damaged.
Does not support input signal
Incorrect display mode setup of the computer. Please refer to the display
modes in the specication table to perform setting.
19
User's Manual
5. Appendix
5.1
Specication
LCD panel
Drive system 43” TFT color LCD
Dimension 108 cm diagonal line
Pixel distance 0.49mm(H) × 0.49mm(V)
Input
Video signal Digital/analog
Horizontal
frequency
30kHz – 83kHz
Vertical frequency 56 – 75Hz
Display color 16.7M
Maximum resolution 1920 x 1080@60Hz
Plug-and-play DDC 1/2B/CI or VESA DDC2B™
Power
consumption
Standby power
consumption
(standby)
< 0.5W
Shutdown power
consumption
(shutdown)
< 0.5W
Startup power
consumption
74W (max.)
50W (classic)
Input joint 15-pin D-Sub, 19-pin HDMI
Input video Digital/analog
Maximum display dimension
Horizontal: 940.896 mm
Vertical: 529.254 mm
Power Supply 100-240 VAC, 50/60Hz
Operating environmental
conditions
Operating temperature: 0˚ to 40
℃
Storage temperature: -20˚ to 60
℃
Operating humidity: 10% to 85%
Storage humidity: 5% to 80%
Dimension (W x H x D)
Without base: 968.18(W)x559.42(H)
x76.8(D) mm
With base: 968.18(W)x623.52(H)
x258.2(D) mm
Weight (net weight) 8.2kg
20
User's Manual
5.2 Comparison table of the preset frequencies of the
original factory
PC mode resolution
Standard Resolution Refresh rate
VGA 640 × 480 60Hz
SVGA 800 × 600 60Hz
XGA 1024 × 768 60Hz
WXGA 1280 × 720 60Hz
SXGA 1280 × 1024 60Hz
WXGA 1440 ×900 60Hz
UXGA 1600 ×900 60Hz
UXGA 1680 ×1050 60Hz
HD1080 1920 ×1080 60Hz
WXGA 1366 ×768 60Hz
HDMI video mode resolution
Standard Resolution Refresh rate
1080 P 59.94/60Hz 1920 × 1080 60Hz
1080 P 50Hz 1920 × 1080 50Hz
1080 P 29.97/30Hz 1920 × 1080 30Hz
1080 P 25Hz 1920 × 1080 25Hz
1080 P 23.97/24Hz 1920 × 1080 24Hz
720 P 50Hz 16:9 1280 × 720 50Hz
720 P 59.94/60Hz 1280 × 720 60Hz
576 P 50Hz 4:3 720 × 576 50Hz
576 P 50Hz 16:9 720 × 576 50Hz
480 P 59.94/60Hz 720 × 480 60Hz
480 P 59.94/60Hz 720 × 480 60Hz
21
User's Manual
5.3 Instructions of the joint pin
1 5
6
10
11 15
15-Pin colorful display signal wire
Pin No. Function Pin No. Function
1. Red 9. +5V Power supply
2. Green 10. Grounded
3. Blue 11. Grounded
4. Grounded 12. DDC-sequence data
5. Sensing wire 13. Horizontal synchronization
6. R-grounded 14. Vertical synchronization
7. G-grounded 15. DDC-sequence clock
8. B-grounded
19-Pin colorful display signal wire
Pin No. Function Pin No. Function
1. TMDS
data
2+ 11. TMDS
clock cover
2. TMDS
data
2
cover
12. TMDS
clock
3. TMDS
data
2 13. CEC
4. TMDS
data
1+ 14.
Reserved
(the device is not used)
5. TMDS
data
1
cover
15. SCL
6. TMDS
data
1 16. SDA
7. TMDS
data
0+ 17. DDC/CEC
ground
8. TMDS
data
0
cover
18. +5V
Power supply
9. TMDS
data
0 19.
Hot-plug test
10. TMDS
clock
+