INSTRUCTION MANUAL
EN
DRIP COFFEE MACHINE
MANUEL D’UTILISATION
FR
CAFETIÈRE FILTRE
MANUAL DE USO
ES
CAFETERA DE FILTRO
Important information for the user
Informations importantes pour l’utilisateur
Información importante para el usuario
Instructions / Instructions / Instrucciones
Description / Description / Descripción
Use / Usage / Uso
Cleaning and maintenance / Nettoyage et entretien / Limpieza y mantenimiento
Safety instructions / Directives de sécurité / Instrucciones de seguridad
Information / Informations / Información
Advice / Conseil / Recomendaciones

Dear Customer, Thank you for purchasing one of our appliances. Our products are unique because they combine iconic
style with innovative technical solutions. They match perfectly with other products in our range and work equally well as a
standalone design objects in your kitchen. We hope you enjoy using your new appliance! Best regards.
Cher client, merci beaucoup pour votre achat. Nos produits sont uniques car ils combinent une forte recherche esthétique
avec une conception technique innovante. Ils sont coordonnés avec d’autres produits de la gamme et peuvent constituer
des éléments d’ameublement et de design. En espérant que vous pourrez apprécier pleinement votre nouvel appareil
électroménager, nous vous adressons nos meilleures salutations.
Estimado cliente, gracias por comprar uno de nuestros aparatos. Nuestros productos son únicos porque combinan un estilo
icónico con soluciones técnicas innovadoras. Combinan perfectamente con otros productos de nuestra gama y funcionan
de igual manera como objetos de diseño independientes en su cocina. ¡Esperemos que disfrute de su nuevo aparato!
Reciba un cordial saludo.
SMEG S.p.A.
Model: DCF02
1
2
3
9
13
14
4
5
6
8
1510
12
11
16
7
17 18
21 19 20
9
22
24
23
25
A
D
B
C
1
EN
1
IMPORTANT SAFEGUARDS
WARNING: If the instructions contained in this manual are not fol-
lowed carefully, a fire or explosion may result causing property dam-
age, personal injury or death.
READ AND SAVE THESE INSTRUCTIONS
Your safety and the safety of others are very important.
We have provided many important safety messages throughout this manual and
on the appliance.
Read all the instructions before using the appliance and always obey all safety
messages.
RECOGNIZE SAFETY INFORMATION
This is a safety alert symbol. This symbol alerts you to potential hazards that can
result in severe personal injury or death.
UNDERSTAND SIGNAL WORDS
A signal word - DANGER, WARNING, or CAUTION - is used with the safety
alert symbol. DANGER denotes the most serious hazards. It means you could
be killed or seriously injured if you do not follow the instructions immediately.
WARNING means you could be killed or seriously injured if you do not follow
the instructions. CAUTION indicates a potentially hazardous situation, which, if
not avoided, could result in minor to moderate injury.
WARNING
• This appliance is intended for household use only.
• Use this appliance only for its intended purpose. The manufacturer
cannot be held liable for damage caused by the improper use of this
appliance.
• This appliance complies with current safety regulations. Improper use
can result in personal injury and material damage.
• Read all the instructions before installing or using the appliance for
the first time.
• Keep these operating instructions in a safe place and pass them on
to any future user.
22
IMPORTANT SAFEGUARDS
WARNING
• To reduce the risk of fire or electric shock, do not remove the cover
(or back).
• No user-serviceable parts inside!
• Repair should be done by authorized service personnel only.
The safety messages will inform you of potential hazards, on how to avoid the risk of injury
and what can occur if the instructions are not followed.
IMPORTANT: Observe all codes and ordinances in force.
WARNING: For your safety, the instructions contained in this manual must be followed
to minimize the risk of fire or explosion and to prevent property damage, personal
injury or death.
Do not store or use gasoline or other flammable vapors, liquids or materials near this or any
other appliance.
NOTE: This appliance is NOT designed for installation in manufactured
(mobile) homes or in recreational vehicles (RVs).
DO NOT install this appliance outdoors.
WARNING
To reduce the risk of fire, electrical shock, personal injury, or damage
when using the appliance, follow basic safety precautions, including
the following:

3
EN
3
IMPORTANT SAFEGUARDS
1 Safety
1.1 Essential safety information
Follow all the safety instructions in order to
use the appliance safely:
• Read this user manual carefully before
using the appliance.
• Do not immerse the appliance in water.
• Failure to observe these warnings can
lead to fire, electrocution or even death.
• If the plug or power cord becomes
damaged, have them replaced only by
an authorized service center in order to
avoid risks.
• Switch off the appliance immediately
after use.
• Always disconnect the appliance from
the electrical outlet before assembling
and disassembling components and
before cleaning.
• Unplug the coffee machine before
cleaning it and if you notice any fault.
• Let the appliance cool down before
cleaning.
• Do not use the appliance if there is no
water in the tank. Use cold, preferably
filtered, water. Do not use other liquids.
• Make sure that the lid is firmly closed.
• Danger of burns! Do not open the lid
while coffee is being brewed.
• Danger of burns! Do not touch hot
surfaces with your hands: use the handles
and buttons.
• Danger of burns! The keep warm plate
under the jug remains hot for a few minutes
after the coffee has been brewed. Do not
touch it.
• To protect against electric shock, do not
place cord, plugs, or appliance in water
or other liquid.
• Close supervision is necessary when any
appliance is used by or near children.
• Do not operate any appliance with
a damaged cord or plug or after the
appliance malfunctions, or has been
damaged in any manner. Return
appliance to an authorized service facility
for examination, repair or adjustment.
• Do not let cord hang over edge of table
or counter, or touch hot surfaces.
• To disconnect, turn any control to the
off position, then remove plug from wall
outlet.
• Do not use appliance for other than
intended use.
• The container is designed for use with
this appliance. It must never be used on
a range top.
• Do not use a cracked container or a
container having a loose or weakened
handle.
• Do not clean container with cleansers, steel
wool pads, or other abrasive material.
• Unplug from outlet when either the
appliance or display clock is not in use,
and before cleaning. Allow to cool
before putting on or taking off parts, and
before cleaning the appliance.
• Scalding may occur if the lid is removed
during the brewing cycles.
• The use of accessory attachments
not recommended by the appliance
manufacturer may result in fire, electric
shock or injury to persons.
• Do not use outdoors
• Do not let cord hang over edge of table
or counter, or touch hot surfaces.

44
IMPORTANT SAFEGUARDS
• Do not place on or near a hot gas or
electric burner, or in a heated oven.
• To disconnect, turn any control to “off,”
then remove plug from wall outlet.
• Do not set a hot container on a wet or
cold surface.
• Do not use the appliance or parts of it
with parts or accessories made by other
manufacturers.
• Only use original spare parts. The use
of spare parts not approved by the
manufacturer could lead to fires, electric
shocks or personal injury.
• Only place the appliance on level and
dry surfaces.
• Avoid getting the appliance wet and do
not spray liquids onto it. In the event of
contact with liquids, immediately switch
off the power at the outlet or main breaker
and dry the appliance thoroughly: Electric
shock hazard!
• Do not position the appliance near sinks
or taps.
• Do not use harsh detergents or sharp
objects to clean the drip coffee machine.
• Do not make any modifications to the
appliance.
• Never try to put out a fire or flames with
water: turn off the appliance, remove the
plug from the power outlet and smother
the flames with a fire blanket or other
appropriate cover.
• Prevent the power cord from coming into
contact with sharp edges.
• Never position the appliance above,
near electric or gas cooktop burners
when they are hot or in use, inside an
oven or near other heat sources.
• Before pouring the coffee, make sure that
the lid has been inserted firmly into the
top of the jug.
• Do not place the jug on a cooktop, in an
oven or in a microwave oven.
• Do not place the hot jug on cold or wet
surfaces.
• Do not use the jug if it is damaged or if the
handle is loose.
• Fill the water tank before inserting the
plug to the electrical outlet.
• Do not install the appliance in
environments in which the temperature is
0°C or less.
• This appliance is not intended for use by
persons (including children) with reduced
physical, sensory, or mental capabilities,
or lack of experience and knowledge,
unless they are closely supervised and
instructed concerning use of the appliance
by a person responsible for their safety.
Children should be supervised to ensure
that they do not play with the appliance.
• This manual contains instructions
for cleaning, maintenance and
recommendations from the manufacturer
to the customer. Any other intervention
should be carried out by an authorized
service center.
• Instructions for cleaning the appliance
can be found in section “4 Cleaning and
maintenance”.
5
EN
5
IMPORTANT SAFEGUARDS
1.2 Connecting the appliance
Make sure that the power supply voltage
and the frequency correspond to those
indicated on the data plate on the bottom
of the appliance.
1.3 Electrical Cord:
• A short power-supply cord (or detachable
power-supply cord) is provided to reduce
risks resulting from becoming entangled
in or tripping over a longer cord.
• Longer detachable power-supply cords
or extension cords are available and
may be used if care is exercised in their
use.
• If a long detachable power-supply cord
or extension cord is used:
1) The marked electrical rating of the
detachable power-supply cord or
extension cord should be at least as
great as the electrical rating of the
appliance;
2) If the appliance is of the grounded
type, the extension cord should be a
grounding-type 3-wire cord; and
3) The longer cord should be arranged
so that it will not drape over the counter
top or table top where it can be pulled
on by children or tripped over.
1.4 Intended use
• The appliance can be used to prepare
drip coffee. Every other use is considered
improper. Do not use the appliance for
anything other than its intended use.
• Do not use the appliance outdoors.
• The appliance must not be used inside a
piece of furniture.
• CAUTION: Do not use the appliance if
the surface is cracked.
The California Safe Drinking
Water and Toxic Enforcement
Act requires the Governor of
California to publish a list of
substances known to the State of
California to cause cancer, birth
defects or other reproductive
harm, and requires businesses
to warn customers of potential
exposure to such substances.
Warning
• This product contains a
chemical known by the State of
California to cause cancer, birth
defects or other reproductive
harm.
• This appliance can cause low-
level exposure to some of the
substances listed, including
benzene, formaldehyde,
carbon monoxide, toluene, and
soot.
66
IMPORTANT SAFEGUARDS
1.6 Disposal
Devices marked with this symbol
are subject to European Directive
2012/19/EU
• All waste electrical and electronic
appliances must be disposed of separately
from household waste and taken to
authorized waste disposal facilities.
Disposing of the used appliance correctly
will help to safeguard the environment
and human health. For further information
regarding the disposal of used appliances,
please contact your local authorities, the
waste disposal department or the store
where the appliance was purchased.
1.5 Manufacturer liability
The manufacturer shall not be liable for
injuries or property damage caused by:
• Use of the appliance other than that
specified
• Failure to read the user manual
• Tampering with any part of the appliance
• Use of non-original spare parts
• Failure to comply with the safety instructions
Please keep these instructions
carefully. If the appliance is
passed on to others, they should
also be given this instructions
booklet.
These instructions can be downloaded from
the Smeg website “www.smeg.com”.
SAVE THESE INSTRUCTIONS
7
EN
7
Description
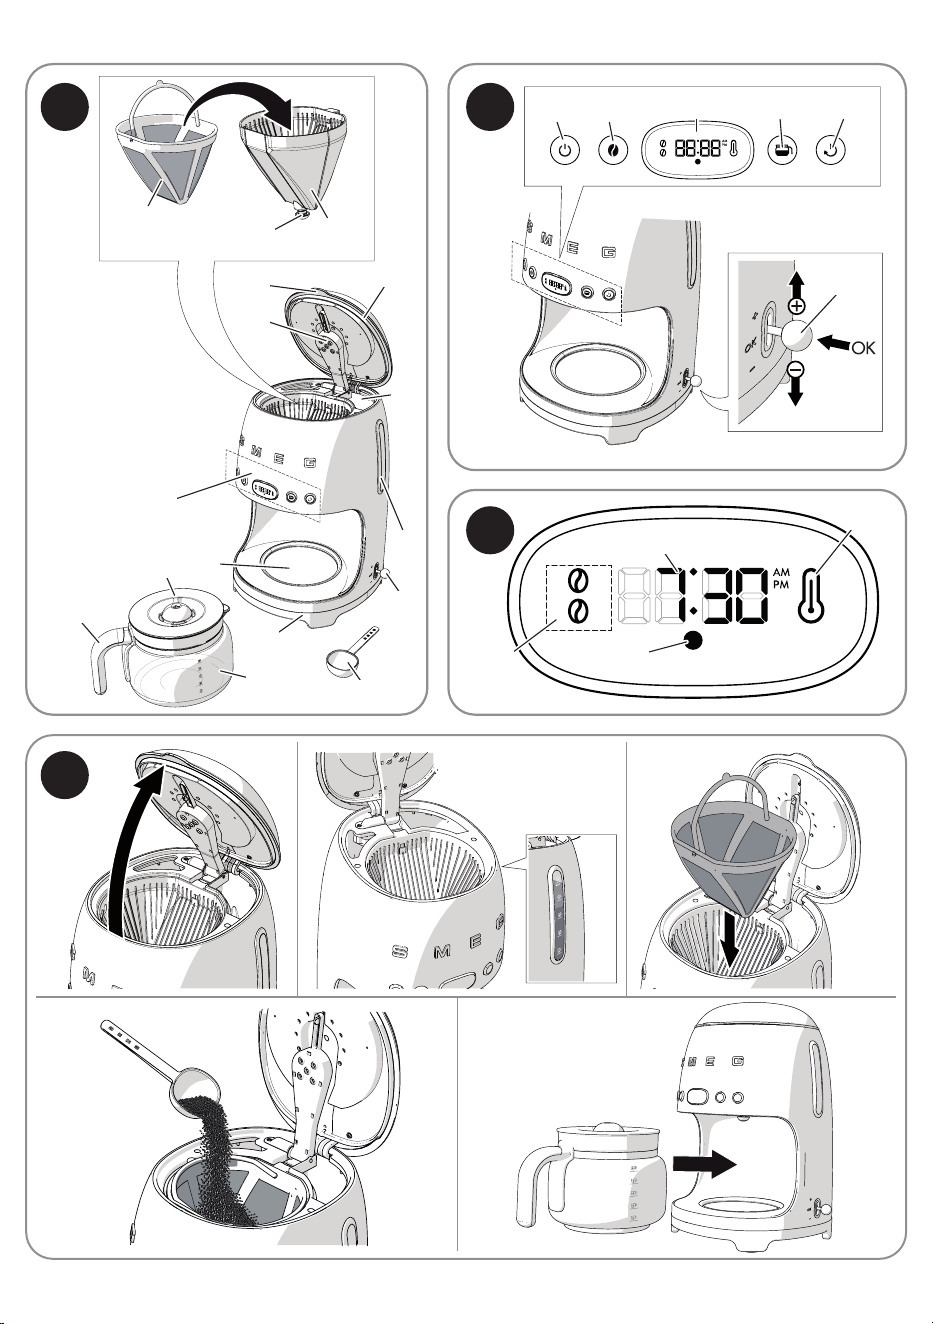
2 Appliance description
(Fig. A)
1) Lid
2) Tab
3) Water tank (1.4 liters)
4) Filter holder
5) Anti-drip valve
6) Permanent filter
7) Boiler outlet
8) Control panel and display
9) Time / timer setting lever
10) Jug lid
11) Jug (10 cups)
12) Jug handle
13) Water tank level indicator (max. 1.4
liters)
14) Scoop
15) Keep Warm plate
16) Base and non-slip feet
2.1 Identification plate
The identification plate bears the technical
data, serial number and brand name of the
appliance.
Do not remove the identification plate for
any reason.
2.2 Before first use
• Carefully unpack the appliance, remove
all packaging materials and remove the
label from the display.
• Thoroughly wash and dry the components
of the drip coffee machine (see section
“4 Cleaning and maintenance”).
Before use, make sure that all
components are intact and that
there are no cracks
2.3 Description of controls (Fig. B)
ON/OFF button (17)
Dispense button. When the button is
pressed, the machine starts brewing coffee
according to the preset functions. You can
stop brewing coffee at any time by pressing
the button again.
Aroma button (18)
Pressing the button allows you to select
between Delicate and Intense Aroma.
The intensity selection will be shown on the
display: one bean for Delicate Aroma or
two beans for Intense Aroma.
The aroma setting is maintained
for subsequent brewing cycles.
4-Cup button (19)
This button allows you to brew a small
amount of coffee, corresponding to
approximately 4 cups.
To activate the 4-cup function, see section
“4 cups function”.
Autostart button (20)
This button allows the appliance to be
programmed to switch on automatically to
prepare drip coffee at a time selected by
the user.
To set, activate and use this function, see the
section “Autostart function”.
Time / timer setting lever (9)
The lever at the side allows you to select
and set the machine settings such as:
• setting the time

88
Description
• selecting and setting the water hardness
• setting the sounds
For more details on the settings, see the
section “Machine settings”.
2.4 Display Description (Fig. C)
The display (21) allows the user to view the
functions set on the machine:
Icon Meaning
22
Delicate Aroma
Intense Aroma
23
Time
24
Red:
Descaling
recommended
25
Keep Warm
The KEEP WARM mode is
activated automatically after the
coffee has been brewed and
keeps the warming plate on for
60 minutes. In this way, the coffee
will remain hot for 60 minutes after
it has been brewed.
9
EN
9
Use
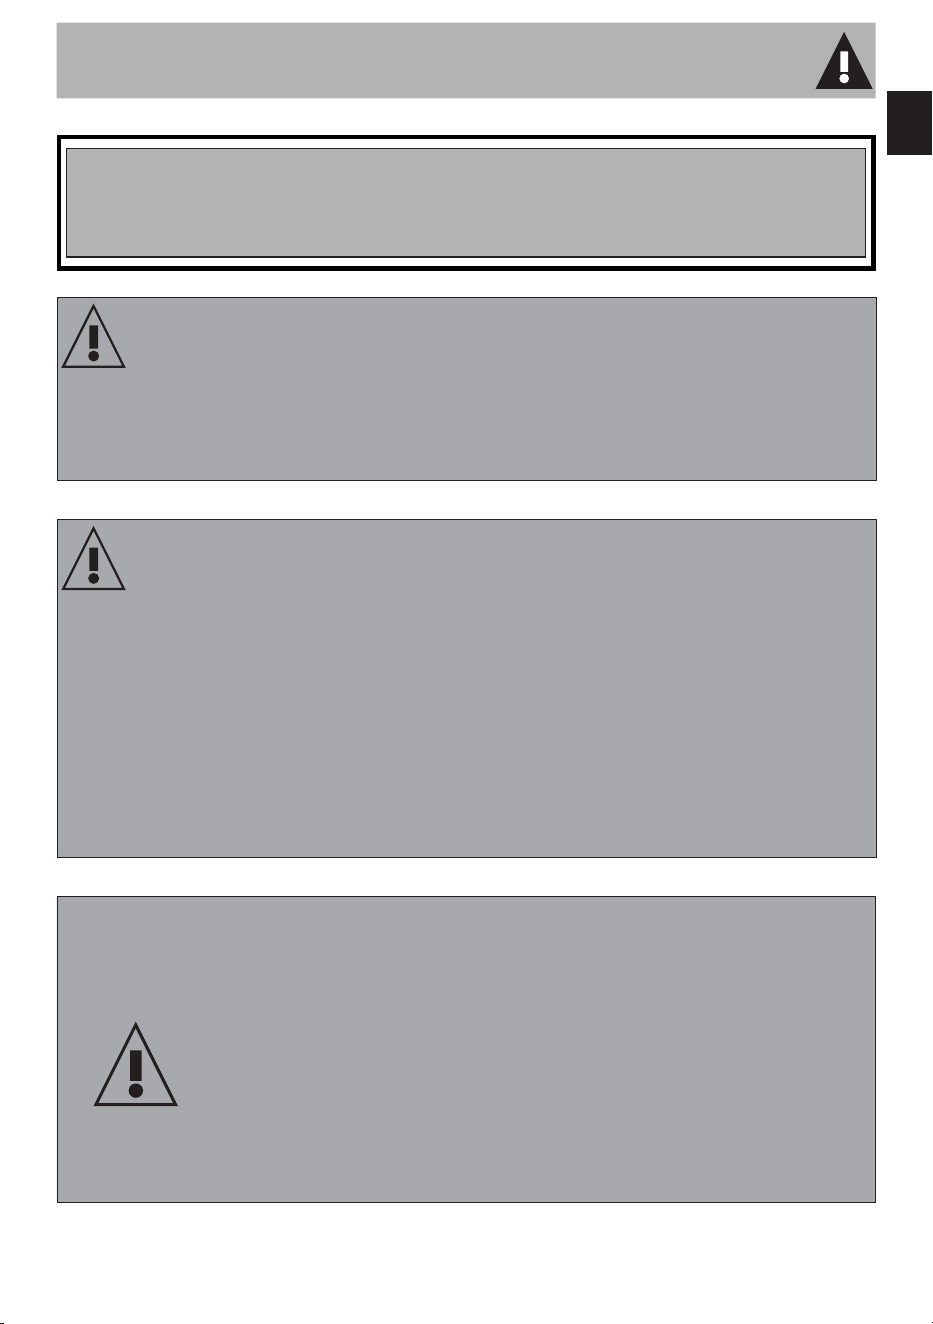
3 Use (Fig. D)
• Make sure that the plug is properly
inserted into the electrical outlet.
When you connect the machine
to the power supply, you are
prompted to set the time (see
section “Machine settings”)
• Lift the lid (1) by pulling the tab upwards
(2).
• Fill the tank (3) with fresh clean water,
taking care not to exceed the maximum
level shown on the level indicator (1.4
liters) (13). Exceeding the maximum level
may cause water to leak and irreparably
damage to the appliance.
To make it easier to fill the tank,
make sure that the lid is completely
open.
Caution
• Do not use the drip coffee
machine if the is no water in the
tank.
• Only put fresh clean water in
the tank.
• Do not use liquids other than
water.
The components intended to come
into contact with food are made
of materials that comply with the
provisions of current legislation.
• Hold the lid of the water tank open and
insert the permanent filter (6) into the filter
holder (4).
• Add the amount of coffee required,
according to the number of cups to be
prepared, using the scoop (14) provided.
• The permanent filter allows you
to prepare filter coffee without
using paper filters. However,
if you prefer, a paper filter #4
can be used instead.
• Place the paper filter in the filter
holder and add the required
amount of coffee.
• One level scoop of ground
coffee is approximately
equivalent to one cup of filter
coffee. However, the amount of
ground coffee to be used may
vary according to personal
taste.
• Use good quality medium
ground coffee.
• Close the lid by lowering the tab (2).
• Place the jug (11) with the lid (10) on the
keep warm plate (15). Make sure that
the lid (10) fits perfectly into the anti-drip
valve (5).
• Press the button (17)
to start brewing
coffee. The LED on the button (17)
lights up and flashes quickly for the entire
time the coffee is being brewed.
It is normal for steam to be
produced while the coffee is
being brewed.

1010
Use
Caution
Do not open the lid of the water
tank while the coffee is being
brewed.
• You can stop brewing coffee at any time
by pressing the button (17)
.
Caution
• Do not open the lid of the drip
coffee machine as soon as the
brewing cycle has finished.
Wait for at least 5 minutes after
the coffee has been brewed
before opening the lid.
• After 5 minutes, it is possible to
remove and clean the filter and
fill the tank again to brew more
coffee.
If the button (17) is not
pressed, coffee will continue
to be brewed according to the
automatic settings and fill the jug
completely (10 cups) or until there
is no water remaining in the tank.
The other buttons, even if pressed,
have no effect and do not stop
coffee from being brewed.
Caution
• The filter holder and the
permanent filter may be hot
after the coffee has been
brewed. Be careful when
removing them.
• The base of the jug may be
very hot after the coffee has
been brewed. Take care when
removing it and make sure that
you do not place the jug on a
heat-sensitive surface.
• The Keep Warm plate remains
warm after the coffee has been
brewed: be careful not to touch
it when removing the jug.
KEEP WARM mode
Once the coffee has been brewed,
the KEEP WARM
mode is activated
automatically and keeps the warming plate
on for 60 minutes. In this way, the coffee will
remain hot for 60 minutes after it has been
brewed.
In the KEEP WARM
mode, the LED of
button (17)
flashes slowly and the KEEP
WARM
icon lights up on the display.
At the end of the KEEP WARM
mode,
button (17)
turns off automatically.
The KEEP WARM
mode can be stopped
manually at any time by pressing button
(17)
: the LED of button (17) and
the KEEP WARM
icon turn off.
The KEEP WARM mode cannot
be activated if brewing is stopped
manually or if the 4 CUPS mode
is active.
11
EN
11
Use
4 cups function
Brews a small amount of coffee,
corresponding to approximately 4 cups:
• Press button (19)
to activate it, the
LED turns on.
• Press button (19)
again to deactivate
it.
Autostart function
The automatic start time has to be set
before the automatic start function can be
programmed.
Setting the Autostart time
• Make sure that the time displayed is
correct. Otherwise, set the correct time as
described in section “Machine settings”.
• Press and hold the button for 3 seconds to
set the time for the automatic start mode:
the LED of the button and the time display
(HH:MM) start to flash.
• Move the lever up (+) or down (-) to set
the time.
• Confirm the time by moving the lever to
the central position and press (OK): the
set time will be saved automatically and
will be used until it is modified.
Autostart function activation
• Press button (20)
: the LED of button
(20)
will light up and the hours and
minutes of the set start time for brewing
the coffee will flash for a few seconds on
the display. Then the current time will be
displayed.
You can also select the intensity
(Aroma button) and the 4-cup
function when using the Autostart
function. Press the relative buttons
to memorize the functions.
• The appliance remains in AUTOSTART
mode until the preset time is reached.
Coffee will be brewed automatically.
• Press button (20)
at any time to exit
from this mode.
Machine settings
The appliance allows you to personalize
some settings:
• clock settings
• time format
• water hardness
• activation / deactivation of the acoustic
signals
Setting the clock
The time has to be set when you use the
appliance for the first time:
• Plug the appliance into an electrical
outlet.
• The symbols on the display flash.
• Set the time by moving the lever up (+)
to increase the value or down (-) to
decrease it. Move the lever to the central
position and press (OK) to confirm.
• Set by following the same procedure.
• After confirming the minutes setting, the
appliance activates the CLOCK mode.
1212
Use
When the appliance is switched
on for the first time, the default
time will be shown in the 12 h
time format, indicating AM/PM.
To change the time format, see
the “Time format settings menu”
section.
Time format settings menu
The time format can be set to display the
time in a 12 h or an AM/PM format.
• Access the settings menu by pressing and
holding buttons (18)
and (19) at
the same time for 3 seconds. Select SE01
by moving the lever and pressing it to the
”OK” position.
• Move the lever to select the required
format (12 h or 24 h)
• Move the lever to the central position
and press (OK) to confirm the setting. The
format will flash for 2 seconds: the setting
is saved.
The time format only needs to be
set once and the setting is saved.
Modifying the time
• Make sure that the required format (12 h
or 24 h) has been set as indicated in the
previous section.
• Keep the lever (9) pressed in the central
position for 3 seconds: the display starts
to flash.
• Modify the hours and minutes as indicated
in the “Setting the clock” section.
Water hardness setting menu
The water hardness can be set by selecting
one of the 3 settings: HARD, MEDIUM and
SOFT.
• Access the settings menu by pressing and
holding buttons (18)
and (19) at
the same time for 3 seconds. Select SE02
by moving the lever: the display shows
HA02 by default (medium hardness).
• Move the lever up (+) or down (-) to set
the required level: HA01 (soft), HA02
(medium) and HA03 (hard).
• Move the lever to the central position
and press (OK) to confirm the setting.
The selection flashes for 2 seconds: the
setting is saved.
Sounds settings menu
The sounds can be enabled/disabled as
follows:
• Access the settings menu by pressing and
holding buttons (18)
and (19) at
the same time for 3 seconds. Select SE03
by moving the lever (9).
• Move the lever up or down until OFF
appears on the display to disable the
sounds or ON to enable them.
• Move the lever to the central position
and press (OK) to confirm the setting.
The selection flashes for 2 seconds: the
setting is saved.
13
EN
13
Cleaning and care
4 Cleaning and
maintenance
4.1 Instructions
Improper use
Danger of electrocution
• Unplug the drip coffee machine
before cleaning it.
• Do not immerse the drip coffee
machine in water or other
liquids.
• Allow the drip coffee machine
cool down before cleaning it.
Improper use
Risk of damage to surfaces
• Do not use steam jets to clean
the drip coffee machine.
• Do not use cleaning products
containing chlorine, ammonia
or bleach on parts with metal
surface finishes (e.g. anodized,
nickel- or chrome-plated).
• Do not use abrasive or corrosive
detergents (e.g. powder
products, stain removers and
metallic scourers).
• Do not use rough or abrasive
materials or sharp metal
scrapers.
4.2 Cleaning the body of the
machine
To keep the outer surface of the machine
in good condition, it should be cleaned
regularly after use. Let the appliance cool
down first. Clean with a soft, damp cloth.
4.3 Cleaning the drip coffee
machine components
The permanent filter and the filter holder can
be washed by hand under running water to
remove coffee residues or in a dishwasher.
The jug can be washed in hot soapy water
using a soft brush after emptying out any
coffee residues in order to prevent stains.
Always dry the components thoroughly
after cleaning.
Improper use
Do not wash the jug in a
dishwasher as it could become
permanently damaged
4.4 Rinsing the internal circuits
Rinse the internal circuits after filling the tank:
• Place the jug (11) on the Keep Warm
plate (15) WITHOUT putting ground
coffee into the filter.
• Press button (17)
.
• Wait for the cycle to finish and empty the
jug.
• The appliance is now ready for use.
1414
Cleaning and care
4.5 Descaling
Caution
• Coffee can be prepared even
if the DESCALING alarm is
active.
• Carry out a descaling cycle
when prompted to do so by the
appliance.
• Scale deposits can prevent
the appliance from working
correctly, especially if the
water is particularly hard.
Regularly descaling the appliance
helps to preserve the aroma of the
coffee and to keep the appliance
in good working order.
Danger of personal injury and
damage to the appliance
• The descaler contains acid
which can irritate the skin and
eyes.
• Follow the manufacturer's
instructions and safety warnings
on the pack to the letter; they
will also tell you what to do in
the event of contact with skin or
eyes.
• Use descaling products
recommended by Smeg to
avoid damaging the drip coffee
machine.
The appliance automatically indicates
when descaling should be carried out
according to the set water hardness (see
section “Water hardness setting menu”).
The DESCALING icon on the display starts
to flash.
To start the descaling cycle:
• Pour water and descaler into the water
tank up to the maximum level indicated
and using the amount recommended by
the descaler manufacturer.
• Press buttons (17)
and (20) at
the same time for 5 seconds to activate
the DESCALING mode: the LEDs of
buttons (17)
and (20) flash and
the DESCALING icon continues to flash
until the cycle finishes.
• At the end of the cycle, the display reverts
to CLOCK mode and the DESCALING
icon disappears from the display.
• Carry out a rinse cycle (see section “4.4
Rinsing the internal circuits”).
15
EN
15
Cleaning and care
4.6 What to do if...
Problem Possible causes Solution
Coffee does not come out
No water in tank. Fill the tank.
Scale build-up. Perform a descaling cycle.
Coffee takes a long time
to be dispensed
Scale build-up. Perform a descaling cycle.
The coffee has an acidic
taste
Possible stagnation of
coffee in the circuits.
Rinse as described in section
“4.5 Descaling”.
The drip coffee machine
overflows
The filter is not positioned
correctly.
Insert the filter correctly in the
filter holder.
The jug is not positioned
correctly on the base.
Make sure that the jug is
positioned correctly under the
boiler outlet.
There is no lid on the jug. Place the lid on the jug.
Excessive amount of coffee.
Place up to a maximum of 5
level scoops of ground coffee
into the permanent filter.
Coffee is too finely ground.
Use ground coffee for drip
coffee machines.
Only water comes out of
the drip coffee machine
No ground coffee in the
filter.
Put the required amount of
ground coffee into the filter.
If the problem has not been resolved or in the case of other types of fault, contact
your local technical support center.

The manufacturer reserves the right to make any changes deemed necessary for the improvement of its products without
prior notice. The illustrations and descriptions contained in this manual are therefore not binding and are merely indicative.
Le fabricant se réserve la faculté d’apporter, sans préavis, toutes les modifications qu’il jugera utiles pour l’amélioration de
ses produits. Les illustrations et les descriptions figurant dans ce manuel ne sont pas contraignantes et n’ont qu’une valeur
indicative.
El fabricante se reserva el derecho de realizar cualquier cambio que considere necesario para mejorar sus productos sin
previo aviso. Las ilustraciones y descripciones contenidas en este manual no son vinculantes y son meramente indicativas.