Installation Manual
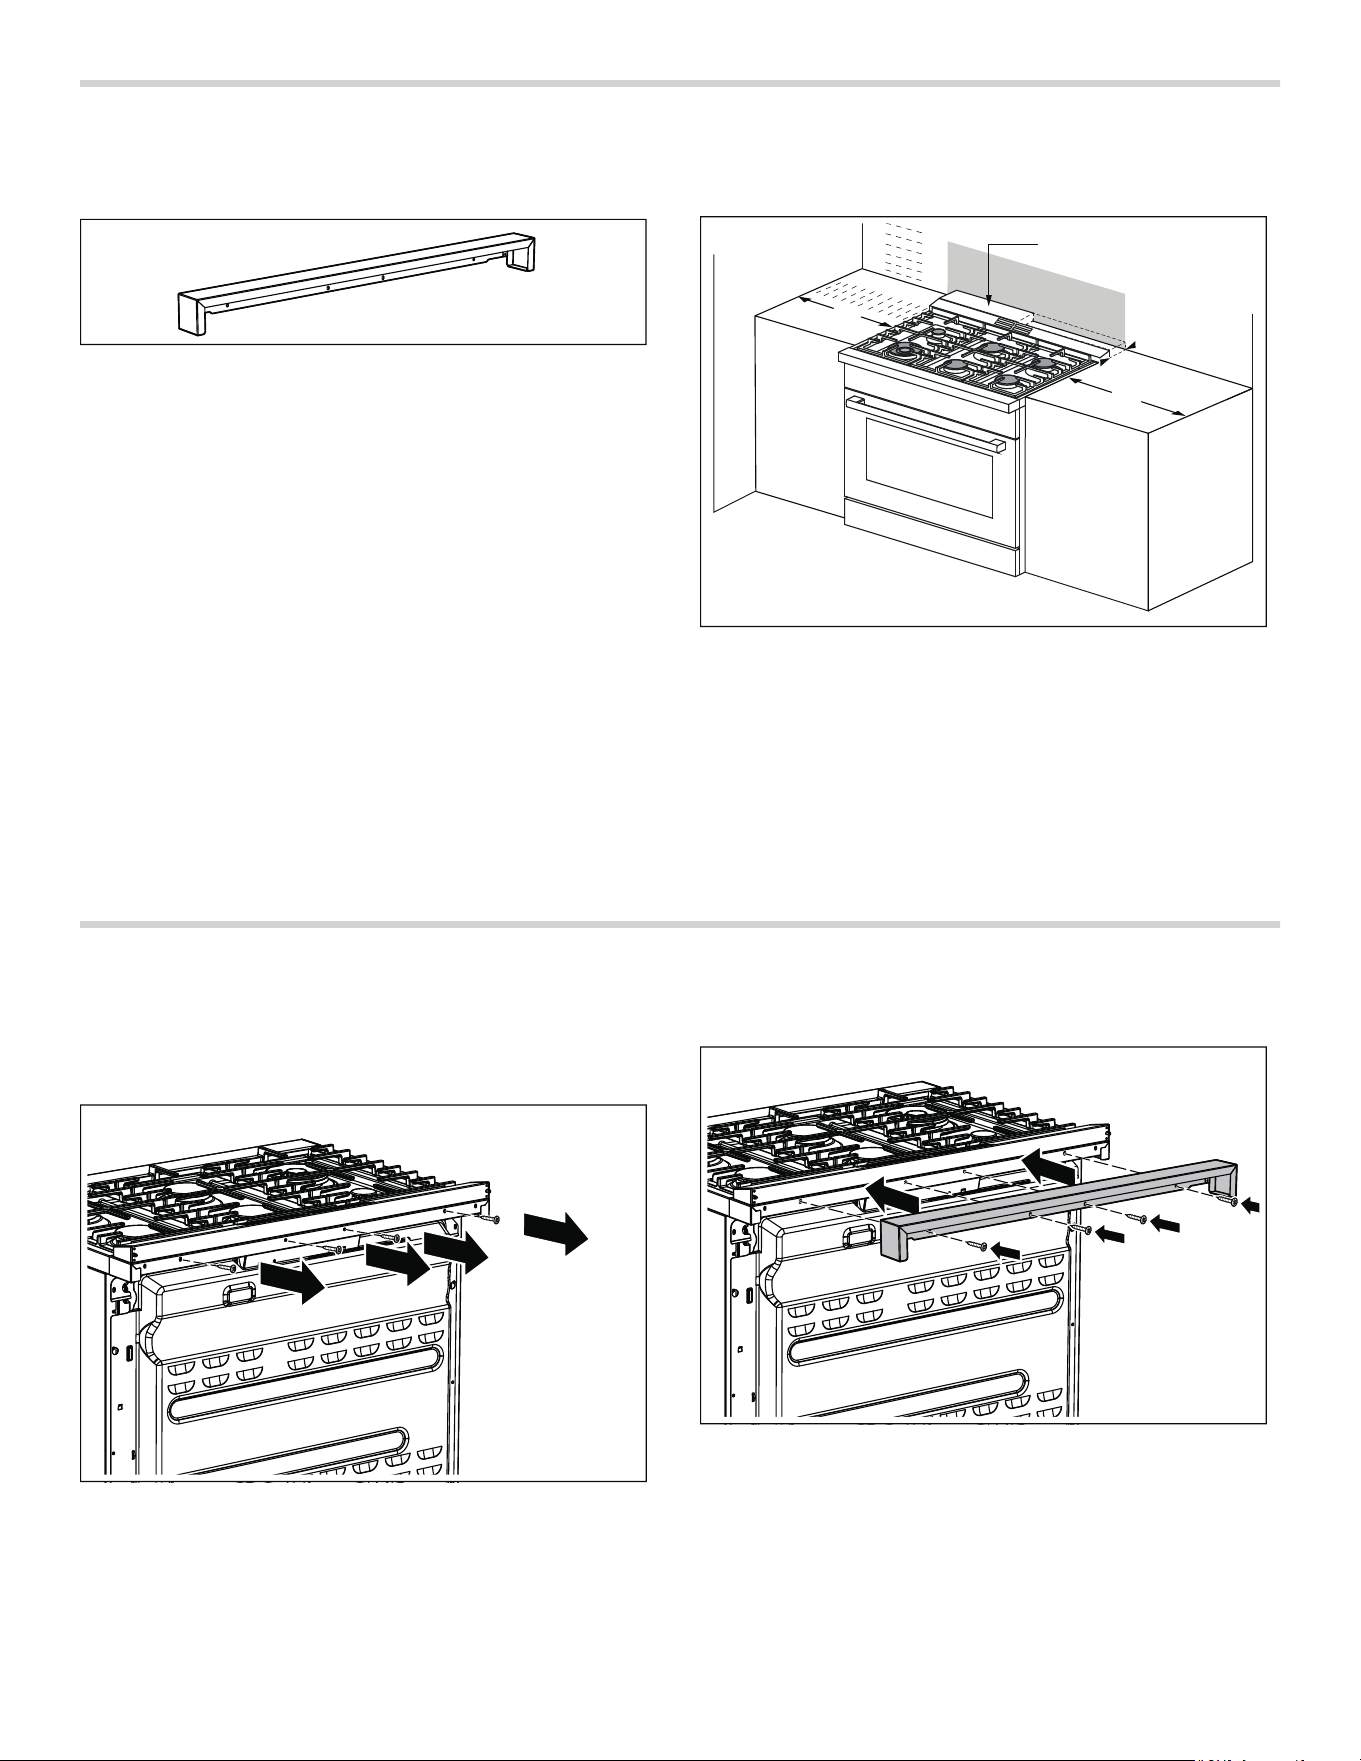
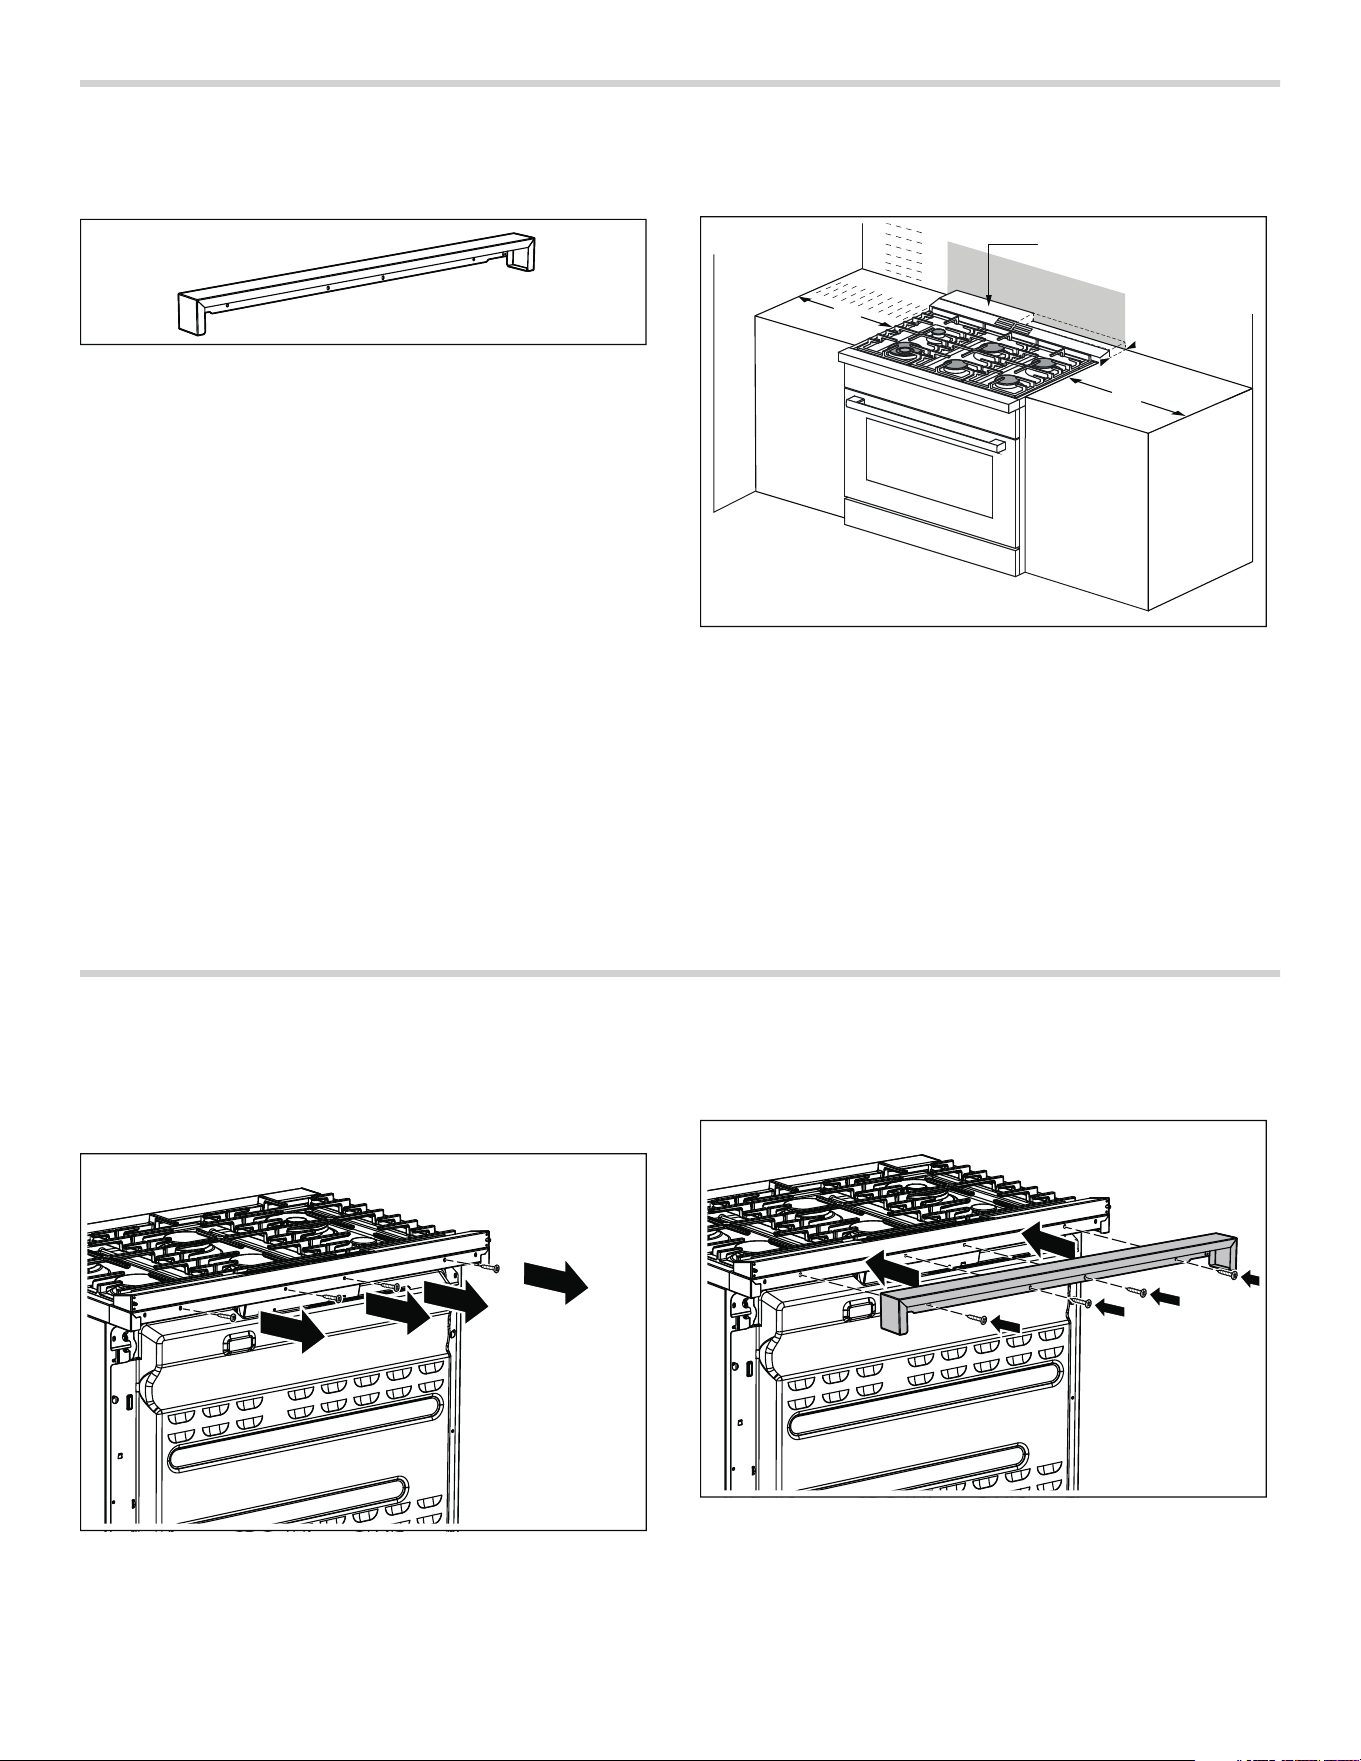
Island Trim
HEZ9ZZ30UC, HEZ9ZZ36UC, HEZ8ZZ30UC, HEZ8ZZ36UC


3
ö Installation Instructions
9 Safety Definitions ..................................................... 3
IMPORTANT SAFETY INSTRUCTIONS ........................ 4
Before You Begin .......................................................... 5
Parts Included ....................................................................... 5
Tools and Parts Needed ..................................................... 5
Cabinet Requirements ......................................................... 5
Installation Procedure ................................................... 5
STATEMENT OF LIMITED PRODUCT WARRANTY .... 6
What this Warranty Covers & Who it Applies to ............. 6
How Long the Warranty Lasts ............................................ 6
Repair/Replace as Your Exclusive Remedy ................... 6
Out of Warranty Product ..................................................... 6
Warranty Exclusions ............................................................ 6
Obtaining Warranty Service: ............................................... 7
Purpose
Thank you for purchasing an island trim accessory for
your Bosch Industrial Style Range.
The purpose of this trim piece is to cover the gap created
when an appliance is installed 3” from the rear wall of the
kitchen.
9 Safety Definitions
Safety Definitions
9 WARNING
This indicates that death or serious injuries may
occur as a result of non-observance of this warning.
9 CAUTION
This indicates that minor or moderate injuries may
occur as a result of non-observance of this warning.
NOTICE: This indicates that damage to the appliance or
property may occur as a result of non-compliance with
this advisory.
Note: This alerts you to important information and/or
tips.

9 IMPORTANT SAFETY INSTRUCTIONS
READ AND SAVE THESE INSTRUCTIONS
4
IMPORTANT SAFET Y I NS T RU CT I ONS RE AD AND SAVE THESE INSTRUCTIONS
Wear gloves to avoid cutting fingers on sharp edges
during Installation.
Hidden surfaces may have sharp edges.
Use caution when reaching behind or
under appliance.
5
Before You Begin
Before You Begin
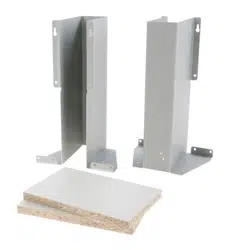
Parts Included
Tools and Parts Needed
▯ Phillips head screwdriver
▯ Gloves
Cabinet Requirements
▯ Option 1: A >= 12'' (305 mm) and B >= 28'' (711 mm)
▯ Option 2: A >= 28'' (711 mm) and B >= 12'' (305 mm)
* purchased separately
** Clearances from non-combustible materials are not
part of the ANSI Z21.1scope and are not certified by
“Intertek”. Clearances of less than 3'' (76 mm) should be
approved by the local codes and/or by the local authority
having jurisdiction.
Installation Procedure
Installation Procedure
1.
Remove any protective film.
2.
Remove the screws shown in the diagram below and
retain for step 3.
3.
Affix the trim with the 4screws removed in step 2.
PLQ
%
$

6
STATEMENT OF LIMITED PRODUCT WARRANTY
What this Warranty Covers & Who it
Applies to
The limited warranty provided by BSH Home Appliances
(“Bosch”) in this Statement of Limited Product Warranty
applies only to the Bosch appliance sold to you
(“Product”), provided that the Product was purchased:
• For your normal, household (non-commercial) use,
and has in fact at all times only been used for normal
household purposes.
• New at retail from a BSH authorized dealer or directly
from BSH (not a display, "as is", or previously returned
model), and not for resale, or commercial use.
• Within the United States or Canada, and has at all
times remained within the country of original
purchase.
The warranties stated herein apply to the original
purchaser of the product warranted herein and to each
succeeding owner of the product purchased for ordinary
home use during the term of the warranty.
Please make sure to register your Product; while not
necessary to effectuate warranty coverage, it is the best
way for Bosch to notify you in the unlikely event of a safety
notice or product recall.
How Long the Warranty Lasts
Bosch warrants that the Product is free from defects in
materials and workmanship for a period of three hundred
and sixty-five (365) days from the date of the original
delivery. The foregoing timeline begins to run upon the
date of the original delivery, and shall not be stalled,
tolled, extended, or suspended, for any reason
whatsoever. This Product is also warranted to be free from
cosmetic defects in material and workmanship (such as
scratches of stainless steel, paint/porcelain blemishes,
chips, dents, or other damage to the finish) of the Product,
for a period of thirty (30) days from the date of delivery or
closing date for new construction. This cosmetic warranty
excludes slight color variations due to inherent differences
in painted and porcelain parts, as well as differences
caused by kitchen lighting, product location, or other
similar factors. This cosmetic warranty specifically excludes
any display, floor, “As Is”, or “B” stock appliances.
Repair/Replace as Your Exclusive
Remedy
During this warranty period, Bosch or one of its authorized
service providers will repair your Product without charge
to you (subject to certain limitations stated herein) if your
Product proves to have been manufactured with a defect
in materials or workmanship. If reasonable attempts to
repair the Product have been made without success, then
Bosch will replace your Product (upgraded models may be
available to you, in Bosch’s sole discretion, for an
additional charge). Nothing in this warranty requires
damaged or defective parts to be replaced with parts of a
different type or design than the original part. All removed
parts and components shall become the property of Bosch
at its sole option. All replaced and/or repaired parts shall
assume the identity of the original part for purposes of
this warranty and this warranty shall not be extended with
respect to such parts. Bosch’s sole liability and
responsibility hereunder is to repair manufacturer-
defective Product only, using a Bosch authorized service
provider during normal business hours. For safety and
property damage concerns, Bosch highly recommends
that you do not attempt to repair the Product yourself, or
use a non-authorized service provider; Bosch will have no
responsibility or liability for damage resulting from repairs
or work performed by a non-authorized service provider.
Authorized service providers are those persons or
companies that have been specially trained on Bosch
products, and who possess, in Bosch’s opinion, a superior
reputation for customer service and technical ability (note
that they are independent entities and are not agents,
partners, affiliates or representatives of Bosch).
Nevertheless, taking your product to be serviced by
a repair shop that is not affiliated with or an authorized
dealer of Bosch will not void this warranty. Also, using
third-party parts will not void this warranty.
Notwithstanding the foregoing, Bosch will not incur any
liability, or have responsibility, for the Product if it is
located in a remote area (more than 100 miles from an
authorized service provider) or is reasonably inaccessible,
hazardous, threatening, or treacherous locale,
surroundings, or environment; in any such event, if you
request, Bosch would still pay for labor and parts and ship
the parts to the nearest authorized service provider, but
you would still be fully liable and responsible for any travel
time or other special charges by the service company,
assuming they agree to make the service call. Further, to
the extent you have installed the Product in a difficult-to-
access location or have otherwise installed temporary or
permanent fixtures that create barriers to accessing or
removing the Product, Bosch will not incur any liability for,
or have responsibility, for work or costs associated with
moving the Product or otherwise creating access to the
Product in order to repair or replace it. All such costs shall
be your sole responsibility.
Out of Warranty Product
Bosch is under no obligation, at law or otherwise, to
provide you with any concessions, including repairs,
prorates, or Product replacement, once this warranty has
expired.

7
Warranty Exclusions
The warranty coverage described herein excludes all
defects or damage that is not the direct fault of Bosch,
including without limitation, one or more of the following:
• Use of the Product in anything other than its normal,
customary and intended manner (including without
limitation, any form of commercial use, use or storage
of an indoor product outdoors, use of the Product in
conjunction with air or water-going vessels).
• Any party's willful misconduct, negligence, misuse,
abuse, accidents, neglect, improper operation, failure
to maintain, improper or negligent installation,
tampering, failure to follow operating instructions,
mishandling, unauthorized service (including self
performed "fixing" or exploration of the appliance’s
internal workings).
• Adjustment, alteration or modification of any kind.
• A failure to comply with any applicable state, local,
city, or county electrical, plumbing and/or building
codes, regulations, or laws, including failure to install
the product in strict conformity with local fire and
building codes and regulations.
• Ordinary wear and tear, spills of food, liquid, grease
accumulations, or other substances that accumulate
on, in, or around the Product.
• Any external, elemental and/or environmental forces
and factors, including without limitation, rain, wind,
sand, floods, fires, mud slides, freezing temperatures,
excessive moisture or extended exposure to humidity,
lightning, power surges, structural failures surrounding
the appliance, and acts of God.
• Service calls to correct the installation of your Product,
to instruct you how to use your Product, to replace
house fuses or correct house wiring or plumbing.
• Removal and replacement of trim or decorative panels
that interfere with servicing the Product.
• Damage or defects caused by labor or parts installed
by any non-authorized service provider, unless
approved by Bosch before service is performed.
In no event shall Bosch have any liability or responsibility
whatsoever for damage to surrounding property, including
cabinetry, floors, ceilings, and other structures or objects
around the Product. Also excluded from this warranty are
Products, on which the serial numbers have been altered,
defaced, or removed; service visits to teach you how to
use the Product, or visits where there is nothing wrong
with the Product; correction of installation problems (you
are solely responsible for any structure and setting for the
Product, including all electrical, plumbing or other
connecting facilities, for proper foundation/flooring, and
for any alterations including without limitation cabinetry,
walls, floors, shelving, etc.); and resetting of breakers or
fuses.
TO THE EXTENT ALLOWED BY LAW, THIS WARRANTY
SETS OUT YOUR EXCLUSIVE REMEDIES WITH RESPECT
TO PRODUCT, WHETHER THE CLAIM ARISES IN
CONTRACT OR TORT (INCLUDING STRICT LIABILITY, OR
NEGLIGENCE) OR OTHERWISE. THIS WARRANTY IS IN
LIEU OF ALL OTHER WARRANTIES, WHETHER EXPRESS
OR IMPLIED. ANY WARRANTY IMPLIED BY LAW,
WHETHER FOR MERCHANTABILITY OR FITNESS FOR A
PARTICULAR PURPOSE, OR OTHERWISE, SHALL BE
EFFECTIVE ONLY FOR THE PERIOD THAT THIS EXPRESS
LIMITED WARRANTY IS EFFECTIVE. IN NO EVENT WILL
THE MANUFACTURER BE LIABLE FOR
CONSEQUENTIAL, SPECIAL, INCIDENTAL, INDIRECT,
"BUSINESS LOSS", AND/OR PUNITIVE DAMAGES,
LOSSES, OR EXPENSES, INCLUDING WITHOUT
LIMITATION TIME AWAY FROM WORK, HOTELS AND/
OR RESTAURANT MEALS, REMODELLING EXPENSES IN
EXCESS OF DIRECT DAMAGES WHICH ARE
DEFINITIVELY CAUSED EXCLUSIVELY BY BOSCH, OR
OTHERWISE. SOME STATES DO NOT ALLOW THE
EXCLUSION OR LIMITATION OF INCIDENTAL OR
CONSEQUENTIAL DAMAGES, AND SOME STATES DO
NOT ALLOW LIMITATIONS ON HOW LONG AN IMPLIED
WARRANTY LASTS, SO THE ABOVE EXCLUSIONS OR
LIMITATIONS MAY NOT APPLY TO YOU. THIS
WARRANTY GIVES YOU SPECIFIC LEGAL RIGHTS, AND
YOU MAY ALSO HAVE OTHER RIGHTS WHICH VARY
FROM STATE TO STATE.
No attempt to alter, modify or amend this warranty shall
be effective unless authorized in writing by an officer of
BSH.
Obtaining Warranty Service
To obtain warranty service for your product, you should
contact Bosch Customer Service at 1-800-944-2904 to
schedule a repair.
Product information
For handy reference, copy the information below from the
rating plate. Keep your invoice and/or delivery documents
for warranty validation.
Model number (E-Nr.)
Production number (FD)
Date of delivery

8
Õ Instructions d’installation
9 Définitions de sécurité ............................................. 8
CONSIGNES DE SÉCURITÉ IMPORTANTES ............... 9
Avant de commencer .................................................. 10
Pièces comprises .............................................................. 10
Outils et pièces nécessaires ........................................... 10
Exigences pour les placards ........................................... 10
Procédure d'installation .............................................. 10
ÉNONCÉ DE LA GARANTIE LIMITÉE ........................ 11
Couverture de la garantie limitée ................................... 11
Durée de la garantie ......................................................... 11
Réparation ou remplacement : votre recours exclusif 11
Produit hors garantie ........................................................ 11
Exclusions de garantie ..................................................... 11
Comment obtenir une réparation sous garantie : ....... 12
But
Merci d'avoir acheté un accessoire d’installation en îlot
pour votre cuisinière Bosch de style industriel.
Le but de cette garniture est de couvrir l'espace créé
lorsque l’appareil est installé à 3 pouces de la paroi
arrière de la cuisine.
9 Définitions de sécurité
Définitions de sécurité
9 AVERTISSEMENT
Ceci indique que le non-respect de cet
avertissement peut entraîner des blessures graves,
voire la mort.
9 ATTENTION
Ceci indique que le non-respect de cet
avertissement peut entraîner des blessures légères
ou de gravité moyenne.
AVIS : Ceci indique que la non-conformité à cet avis de
sécurité peut entraîner des dégâts matériels ou
endommager l'appareil.
Remarque : Ceci vous signale des informations et/ou
indications importantes.

9
9 CONSIGNES DE SÉCURITÉ IMPORTANTES
LIRE ET CONSERVER CES INSTRUCTIONS
CONS I GNES DE SÉCURI TÉ IMPORTANTESLI RE ET CONSE R V E R CE S INSTRUCTIONS
Portez des gants pour éviter de vous couper les doigts
sur les bords tranchants pendant l'installation.
Certaines surfaces peuvent avoir des
bords tranchants. Faire attention en
étendant le bras derrière l’appareil ou en
dessous.
10
Avant de commencer
Avant de commencer
Pièces comprises
Outils et pièces nécessaires
▯ Tournevis à tête Phillips
▯ Gants
Exigences pour les placards
▯ Option 1 : A> = 12 po (305 mm) et B> = 28 po
(711 mm)
▯ Option 2 : A > = 28 po (711 mm) et B> = 12 po
(305 mm)
* acheté séparément
** Dégagements des matériaux incombustibles ne font
pas partie du domaine d'application ANSI Z21.1et ne
sont pas certifiés par « Intertek ». Les dégagements de
moins de 3 po (76 mm) doivent être approuvés par le et
/ ou par l'autorité locale compétente.
Procédure d'installation
Procédure d’installati on
1.
Retirer tout film protecteur.
2.
Retirer les 4vis indiquées sur le diagramme ci-
dessous et les conserver pour l’étape 3.
3.
Installer la paroi latérale à l'aide des 4vis retirées à
l'étape 2.
PLQ
%
$

11
ÉNONCÉ DE LA GARANTIE LIMITÉE
Couverture de la garantie limitée
La garantie limitée fournie par BSH Home Appliances («
Bosch ») dans cet énoncé de garantie limitée s’applique
seulement à l'appareil Bosch qui vous a été vendu
(« Produit »), pour autant que le produit ait été acheté :
• Pour une utilisation normale résidentielle (non-
commerciale), et qu’il a été utilisé en tout temps pour
un usage domestique normal.
• Neuf au détail auprès d'un revendeur agréé BSH ou
directement auprès de BSH (pas un présentoir, « tel
quel », ou un modèle précédemment retourné), et
non destiné à la revente ou à un usage commercial.
• Aux États-Unis ou au Canada et qu’il est demeuré en
tout temps dans son pays d’achat.
Les garanties aux présentes s’appliquent à l’acheteur
original du produit sous garantie et à tout propriétaire
successif du produit acheté pour une utilisation
résidentielle habituelle et la durée de la garantie.
Assurez-vous d'enregistrer votre produit ; bien qu'il ne
soit pas nécessaire pour appliquer la garantie, c'est le
meilleur moyen pour Bosch de vous informer dans le cas
peu probable d'un avis de sécurité ou d'un rappel de
produit.
Durée de la garantie
Bosch garantit que le produit est exempt de défauts de
matériaux et de fabrication pendant une période de trois
cent soixante-cinq (365) jours à compter de la date de
livraison initiale. La période susmentionnée commence à
partir de la date de livraison et ne doit pas être retenue,
retardée, prolongée, ou interrompue pour une raison
quelconque. Ce produit est également garanti exempt de
défauts cosmétiques de matériaux et de fabrication (tels
que des rayures sur l'acier inoxydable, des taches de
peinture/porcelaine, des éclats, des bosses ou d'autres
dommages à la finition) du produit, pendant une période
de trente (30) jours à compter de la date de livraison ou
de la date de clôture pour les nouvelles constructions. La
présente garantie cosmétique exclut les variations légères
de couleur causées par les différences inhérentes entre les
sections peintes et les sections en porcelaine, de même
que les différences causées par l'éclairage de la cuisine,
l'emplacement du produit et autres facteurs similaires. La
présente garantie cosmétique exclut spécifiquement tous
les appareils en montre, de plancher, « tel quel » et remis
à neuf.
Réparation ou remplacement : votre
recours exclusif
Pendant cette période de garantie, Bosch ou l’un de ses
centres de réparations autorisés réparera gratuitement
votre produit (sous réserve de certaines restrictions aux
présentes) si celui-ci présente des défauts de matériels ou
de fabrication. Si des tentatives raisonnables pour réparer
le produit sont vaines, alors Bosch remplacera le produit
(un modèle supérieur peut être offert, à la seule discrétion
de Bosch, moyennant des frais supplémentaires). Rien
dans cette garantie n’exige que les pièces endommagées
ou défectueuses soient remplacées par des pièces d’un
type ou d’une conception différent de la pièce d’origine.
Toutes les pièces ou les composants enlevés demeurent la
seule propriété de Bosch. Toute pièce remplacée ou
réparée doit être identique à la pièce d’origine aux fins de
la présente garantie et la garantie ne sera pas prolongée
en regard de telles pièces. La seule responsabilité de
Bosch est de faire réparer le produit défectueux
uniquement par un centre de réparation autorisé pendant
les heures de travail normales. Pour des raisons de
sécurité et de dommages matériels, Bosch vous
recommande fortement de ne pas essayer de réparer le
produit vous-même ou de faire appel à un prestataire de
services non agréé ; Bosch décline toute responsabilité en
cas de dommages résultant de réparations ou de travaux
effectués par un prestataire de services non agréé. Les
centres de réparation autorisés sont les personnes ou les
entreprises qui ont été spécialement formées sur les
produits Bosch et qui possèdent, selon l’opinion de Bosch,
une réputation supérieure pour le service après-vente et la
capacité technique (il est à noter qu’elles sont des entités
indépendantes et non des agents, partenaires, affiliés ou
représentants de Bosch). Néanmoins, le fait de confier
l'entretien de votre produit à un atelier de réparation non
affilié ou à un revendeur agréé Bosch n'annulera pas cette
garantie. De plus, l'utilisation de pièces tierces n'annulera
pas cette garantie. Nonobstant ce qui précède, Bosch ne
sera pas tenue responsable d’aucune façon si le produit
est situé dans une région éloignée (supérieure à 100 miles
d’un centre de réparation autorisé) ou n’est pas accessible
de façon raisonnable, dans un environnement ou un local
dangereux, menaçant ou périlleux; dans une telle
éventualité, à la demande du consommateur, Bosch
pourrait encore payer les frais de main-d’œuvre et de
pièces et expédier les pièces au centre de réparation
autorisé le plus près, mais le consommateur serait
entièrement responsable pour tous les frais de
déplacement et autres frais spéciaux encourus par le
centre de réparation, en autant qu’il accepte la demande
de réparation. En outre, dans la mesure où vous avez
installé le produit dans un endroit difficile d'accès ou si
vous avez installé des installations temporaires ou
permanentes qui créent des obstacles à l'accès ou au
retrait du produit, Bosch n'encourra aucune responsabilité
ou n'aura aucune responsabilité pour les travaux ou les
coûts associés au déplacement du Produit ou à la création
d'un accès au Produit afin de le réparer ou de le
remplacer. Tous ces frais seront à votre charge exclusive.
Produit hors garantie
Bosch n’a aucune obligation, aux termes de la loi ou
autrement, d’offrir toute concession, incluant réparation,
prorata ou remplacement de produit une fois la garantie
expirée.

12
Exclusions de garantie
La couverture de garantie décrite dans les présentes
exclut tous les défauts ou dommages pour lesquels Bosch
serait directement imputable, y compris, sans s'y limiter,
l'un ou plusieurs des cas suivants :
• Utilisation du produit autre qu’un usage normal,
habituel et de la façon destinée (incluant, sans s'y
limiter, toute forme d’utilisation commerciale,
d’utilisation ou de rangement d’un produit pour
l’intérieur à l’extérieur, d'utilisation du produit de
concert avec un transporteur aérien ou marin).
• Mauvaise conduite de toute partie, négligence,
mauvaise utilisation, abus, accidents, fonctionnement
inadéquat, mauvais entretien, installation inadéquate
ou négligente, altération, manquement d’observer les
instructions de fonctionnement, mauvaise
manipulation, service non autorisé (incluant réparation
par le consommateur ou exploration du
fonctionnement interne du produit).
• Réglage, modification ou altération de tout type.
• Non conformité aux normes fédérales, provinciales,
municipales ou électriques en vigueur au pays, aux
codes de plomberie ou du bâtiment, aux
réglementations ou aux lois, incluant le non respect
d’installer le produit en stricte conformité avec les
codes et les réglementations du bâtiment et
d’incendie locaux.
• Bris et usure normaux, déversements d’aliments ou de
liquides, accumulations de graisse ou d’autres
substances dans, sur ou autour du Produit.
• Toute force ou tout facteur externe, élémentaire et /
ou environnemental, incluant sans limitation, la pluie,
le vent, le sable, les inondations, les incendies, les
coulées de boue, le gel, l’humidité excessive ou
l’exposition prolongée à l’humidité, la foudre, les
surtensions, les problèmes de structure autour de
l’appareil et les désastres naturels.
• Demandes de service visant à corriger l'installation de
votre Produit, à obtenir des conseils à propos de son
utilisation, à remplacer les fusibles de votre maison ou
à réparer l'installation électrique ou la plomberie de
votre foyer.
• Retrait et remplacement de la garniture ou des
panneaux de décoration qui entravent l’entretien du
produit.
• Dommages ou défauts résultant de la main-d'œuvre
ou de pièces installées par un centre de réparation
non autorisé, à moins d'être approuvé par Bosch
avant de procéder à sa réparation.En aucun cas, Bosch
ne sera tenue responsable de dommages survenus à
la propriété environnantes, incluant les armoires, les
planchers, les plafonds et les autres objets ou
structures situés autour du produit. Également exclus
de la garantie sont les Produits dont les numéros de
série ont été modifiés, effacés ou enlevés;les
demandes de réparations pour enseigner le
fonctionnement du Produit ou les visites où il n’y a
aucun problème avec le produit; la correction de
problèmes d’installation (le consommateur est seul
responsable pour toute structure et tout réglage du
Produit, incluant l’électricité, la plomberie et les autres
raccordements nécessaires, pour une fondation /
plancher approprié[e], et pour toute modification
incluant, sans limitation, armoires, murs, planchers,
tablettes, etc.) et le réenclenchement de disjoncteurs
ou le remplacement de fusibles.
DANS LA MESURE AUTORISÉE PAR LOI, LA PRÉSENTE
GARANTIE PRÉCISE LES RECOURS EXCLUSIFS DONT
VOUS DISPOSEZ À L'ÉGARD DU PRODUIT, QUE LA
DEMANDE SOIT FONDÉE SUR UN CONTRAT OU DÉLIT
(Y COMPRIS RESPONSABILITÉ ABSOLUE OU
NÉGLIGENCE) OU AUTRE. LA PRÉSENTE GARANTIE
REMPLACE TOUTES LES AUTRES GARANTIES,
EXPRESSES OU IMPLICITES. TOUTES GARANTIES
IMPLICITES AUX TERMES DE LA LOI, QUE SE SOIT LES
GARANTIES DE QUALITÉ MARCHANDE OU D’APTITUDE
À UN USAGE PARTICULIER, OU AUTRES, SONT
LIMITÉES DANS LE TEMPS À LA DURÉE DE CETTE
GARANTIE LIMITÉE EXPRESSE. LE FABRICANT NE SERA
EN AUCUN CAS RESPONSABLE DE DOMMAGES
CONSÉCUTIFS, SPÉCIAUX, ACCESSOIRES, INDIRECTS
OU DE « PERTES COMMERCIALES » ET / OU DE
DOMMAGES PUNITIFS, DE PERTES OU DE DÉPENSES, Y
COMPRIS SANS S'Y LIMITER, ABSENCE DU TRAVAIL,
FRAIS D'HÔTEL ET / OU FRAIS DE RESTAURANT, FRAIS
DE REMANIEMENT EN EXCÉDENT DES DOMMAGES
DIRECTS QUI SONT DÉFINITIVEMENT CAUSÉS
EXCLUSIVEMENT PAR BOSCH, OU AUTREMENT.
CETAINS ÉTATS N'AUTORISENT PAS L'EXCLUSION OU
LA LIMITATION DE DOMMAGES ACCESSOIRES OU
CONSÉCUTIFS, ET CERTAINS ÉTATS N'AUTORISENT PAS
LA LIMITATION DE LA DURÉE DES GARANTIES
IMPLICITES. PAR CONSÉQUENT, LES EXCLUSIONS OU
LES LIMITES SUSMENTIONNÉES POURRAIENT NE PAS
VOUS CONCERNER. LA PRÉSENTE GARANTIE VOUS
DONNE DES DROITS PRÉCIS RECONNUS PAR LA LOI ET
VOUS POUVEZ ÉGALEMENT AVOIR D'AUTRES DROITS
QUI VARIENT D'UN ÉTAT À L'AUTRE.
Aucune tentative de modifier, changer ou amender la
présente garantie ne peut être valide sans le
consentement écrit autorisé par un dirigeant de BSH.
Obtention du service de garantie
Pour obtenir le service de garantie de votre produit, vous
devez contacter le service client Bosch au 1-800-944-2904
pour planifier une réparation.
Information sur le produit
Pour référence pratique, copiez l’information ci-après de
la plaque signalétique. Conservez votre facture et/ou vos
documents de livraison pour la validation de la garantie.
Numéro de modèle (E-Nr.)
Numéro de fabrication (FD)
Date de livraison


1901 Main Street, Suite 600 • Irvine, CA 92614 • 800-944-2904
www.bosch-home.com • © 2022 BSH Home Appliances
*9001555730*
9001555730
021024