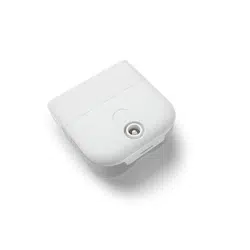
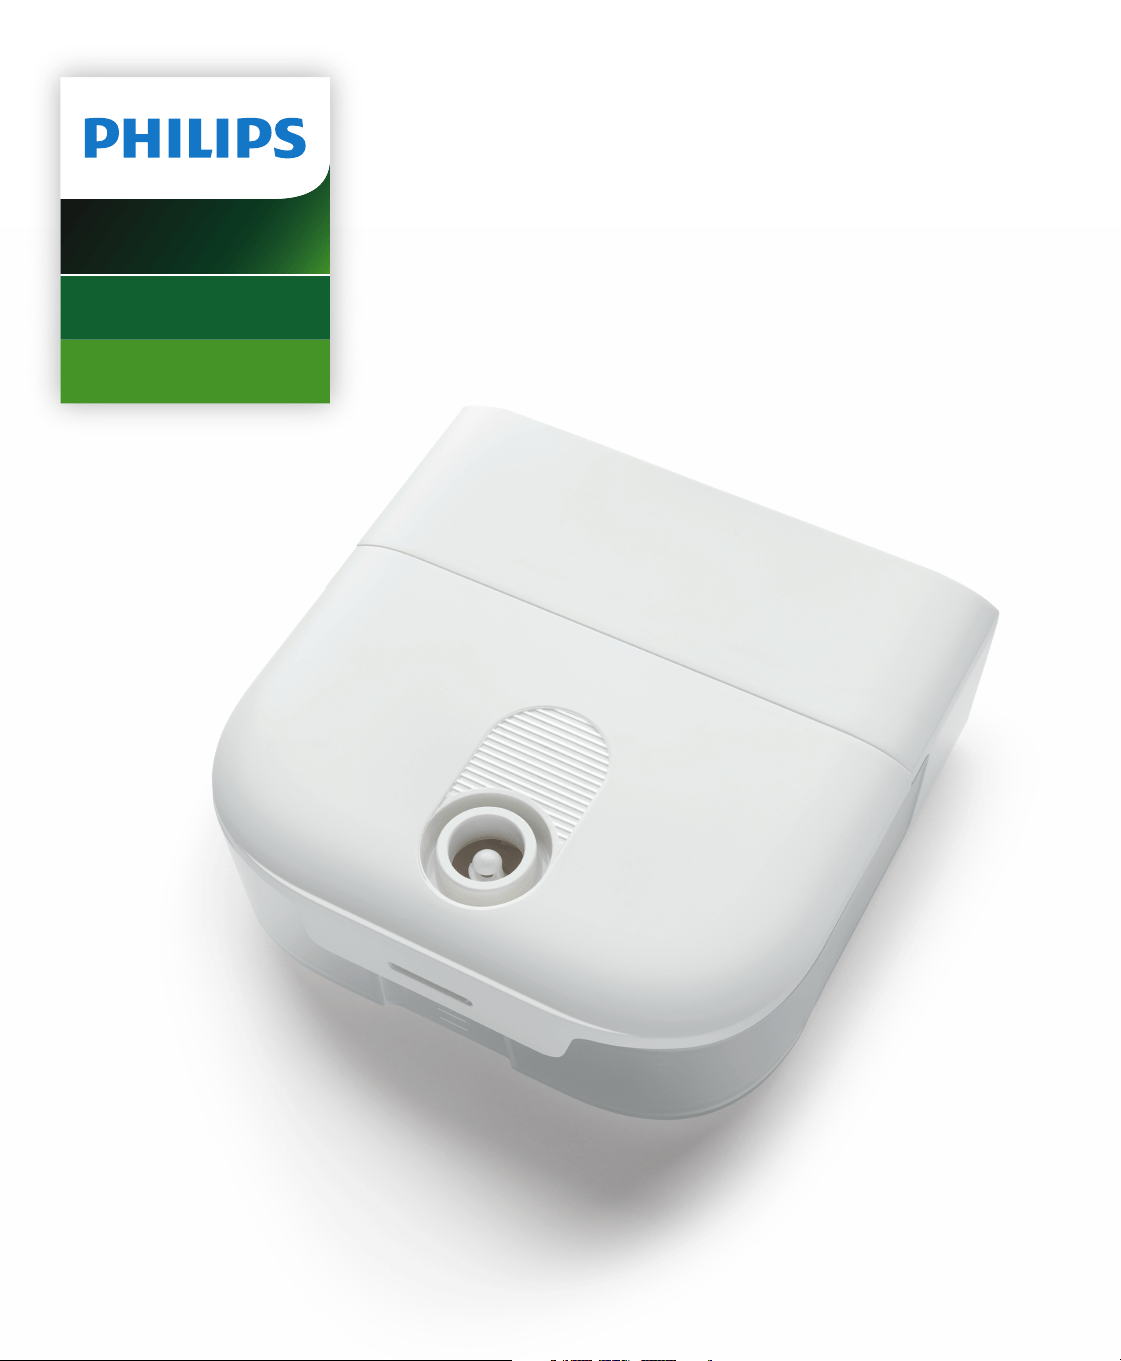
Heated Humidier
DreamStation Go
User manual
Instructions for use

ii
© Koninklijke Philips N.V., 2022. All rights reserved.
Table of contents
1. Safety information .............................................................................................................................. 1
2. System overview ................................................................................................................................ 4
3. Connecting and setting up the humidier .....................................................................................5
4. Daily use .............................................................................................................................................. 8
5. Cleaning for Home Use .....................................................................................................................11
Cleaning the Humidier Exterior .................................................................................................................................... 11
Cleaning the water tank base .......................................................................................................................................... 11
Cleaning the tank lid and components....................................................................................................................... 12
6. Cleaning & Disinfection for Hospitals/Institutions ....................................................................13
Cleaning the water tank base ......................................................................................................................................... 13
Cleaning the water tank lid and components .......................................................................................................... 14
Disinfecting the water tank base, water tank lid, and components ................................................................. 15
7. Maintenance instructions ................................................................................................................ 16
Maintaining the water tank base ...................................................................................................................................16
Maintaining the humidier base....................................................................................................................................16
8. Troubleshooting ................................................................................................................................16
9. Additional notes ...............................................................................................................................18
10. DreamStation Go Heated Humidier specications ................................................................19
Environmental......................................................................................................................................................................19
Physical ..................................................................................................................................................................................19
Service life .............................................................................................................................................................................19
Standards compliance ..................................................................................................................................................... 19
IEC 60601-1 classication ...............................................................................................................................................20
Electrical (when the heated humidier is used with the DreamStation Go therapy device) ................. 20
Maximum recommended pressure .............................................................................................................................20
Water capacity ....................................................................................................................................................................20
Heater plate .........................................................................................................................................................................20
Inhalation pressure drop of humidier....................................................................................................................... 20
Exhalation pressure drop of humidier .....................................................................................................................20
Humidity ................................................................................................................................................................................20
Declared dual-number noise emissions values (in accordance with ISO 4871) .........................................20
Pressure accuracy ............................................................................................................................................................... 21
Maximum ow rate (typical) ........................................................................................................................................... 21
1
1. Safety information
Intended use
The DreamStation Go Heated Humidier is an accessory for the Philips Respironics DreamStation Go therapy devices
to provide moisture to the patient circuit. It is intended for use in spontaneously breathing patients weighing over 30
kg (66 lbs), in the home or hospital/institutional environment, who use mask-applied positive pressure ventilation
therapy.
Warnings
A warning indicates the possibility for injury to the user or the operator.
Warning: Use only the cleaning methods outlined in your user manual. Cleaning and disinfection
methods using Ozone-based products are not approved or recommended, and may adversely aect
your device safety and performance.
Note
Any damage caused by unapproved ozone cleaning and disinfection methods or other unapproved cleaning
and disinfection methods will not be covered by the Philips Limited Warranty.
MR Unsafe - Projectile hazard. Keep outside of MRI scan room (Zone IV).
• The DreamStation Go Heated Humidier is specied for use with Philips Respironics DreamStation Go therapy
devices only. Use the humidier only for its intended use as described in this manual. Use only with masks and
connectors recommended by Philips Respironics.
• Periodically inspect the humidier for signs of wear or damage. Never operate the humidier if any parts
are damaged, if it is not working properly, or if the humidier has been dropped or mishandled. Do not use
the humidier if the water tank is leaking or damaged in any way. Have any damaged parts replaced before
continuing use.
• Periodically inspect the therapy device power cord for signs of wear or damage. If it becomes worn or damaged,
contact Philips Respironics or your provider for a replacement.
• The humidier must always be positioned below the breathing circuit connection at the mask. The humidier must
be level for proper operation.
• Allow the humidier heater plate and water to cool down for approximately 15 minutes before removing the water
tank. A burn may result from: touching the heater plate, coming in contact with the heated water, or touching the
tank pan.
• This equipment is not suitable for use in the presence of a ammable anesthetic mixture with air or with oxygen
or nitrous oxide.
• Do not use the humidier outside of the environmental operating conditions listed in the specication section of
this manual.
• Do not heat the tubing or cover with a blanket as this can aect the quality of the therapy or injure the patient.
• When installing the water tank, do not allow any water to spill into the humidier or therapy device.
• If you notice any unexplained changes in the performance of this device, if it is making unusual or harsh sounds,
if it has been dropped or mishandled, or if the enclosure is broken, disconnect the power cord from the therapy
device and discontinue use. Contact your provider.
• Before cleaning the humidier, always remove from the therapy device.
• Empty and clean the water tank daily to prevent mold and bacteria growth.
• Repairs and adjustments must be performed by Philips Respironics-authorized service personnel only.
Unauthorized service could cause injury, invalidate the warranty, or result in costly damage.
• Do not use any accessories, detachable parts, and materials not recommended by Philips Respironics.
Incompatible parts or accessories can result in degraded performance.
Note: Please see the Limited warranty section of this manual for information on warranty coverage.

2
Cautions
A caution indicates the possibility of damage to the device.
• U.S. federal law restricts this device to sale by or on the order of a physician.
• Clean the water tank before the rst use. Refer to the Home cleaning instructions and Care instructions sections
later in this manual.
• Do not wash the tank lid in a dishwasher. Hand wash only.
• Empty, rinse, and rell the water tank daily.
• Do not place the humidier directly onto carpet, fabric, or other ammable materials.
• Do not place the device in or on any container that can collect or hold water. Take precautions to protect furniture
from water damage.
• Do not ll the water tank above the maximum ll line. If the water tank is overlled, water may leak into the
therapy device, humidier, or onto your furniture. Damage to the humidier or therapy device may occur.
• Philips Respironics recommends using room temperature distilled water, if available, to prevent mineral build up
on the humidier tank base. In a clinical environment, distilled water must be used.
• Never use water from a biologically unsafe source such as a lake, river, stream, or well.
• Do not put any chemicals or additives into the water. Possible airway irritation or damage to the water tank may
result.
• Remove the tank, empty all water, and replace the empty tank before transporting the humidifier base.
• Do not attempt to ll the water tank while it is still inside the humidier.
• To avoid spilling, do not disconnect the humidier from the therapy device with water in the tank. Remove the
water tank from the humidier before disconnecting the therapy device.
• Do not turn the humidier on without the water tank installed. The Humidier setting must be “0” (o) if there is
no water in the water tank.
• Do not move the humidier while the water tank has water in it.
• Use a mild liquid dishwashing detergent only for either hand washing or when using a dishwasher.
• Only the hospital and institution cleaning procedures listed in this manual are recommended by Philips
Respironics. Use of other cleaning and disinfecting processes, not specied by Philips Respironics, may aect the
performance of the product.
Note
The DreamStation Go Heated Humidier is specied for use with Philips Respironics DreamStation Go therapy
devices only.
Important
Read and understand the entire manual for your therapy device before attempting to use this humidier.
Contraindications
Studies have shown that the following pre-existing conditions may contraindicate the use of CPAP therapy for some
patients:
• Bullous Lung Disease
• Pathologically Low Blood Pressure
• Bypassed Upper Airway
• Pneumothorax
• Pneumocephalus has been reported in a patient using nasal Continuous Positive Airway Pressure. Caution should
be used when prescribing CPAP for susceptible patients such as those with: cerebral spinal uid (CSF) leaks,
abnormalities of the cribriform plate, prior history of head trauma, and/or pneumocephalus. (Chest 1989; 96:1425-
1426)
The use of positive airway pressure therapy may be temporarily contraindicated if you exhibit signs of a sinus
or middle ear infection. Not for use with patients whose upper airways are bypassed. Contact your health care
professional if you have any questions concerning your therapy.
Refer to the instructions for use that accompanied your therapy device for any additional contraindications that may
be specic to the use of that device.
3
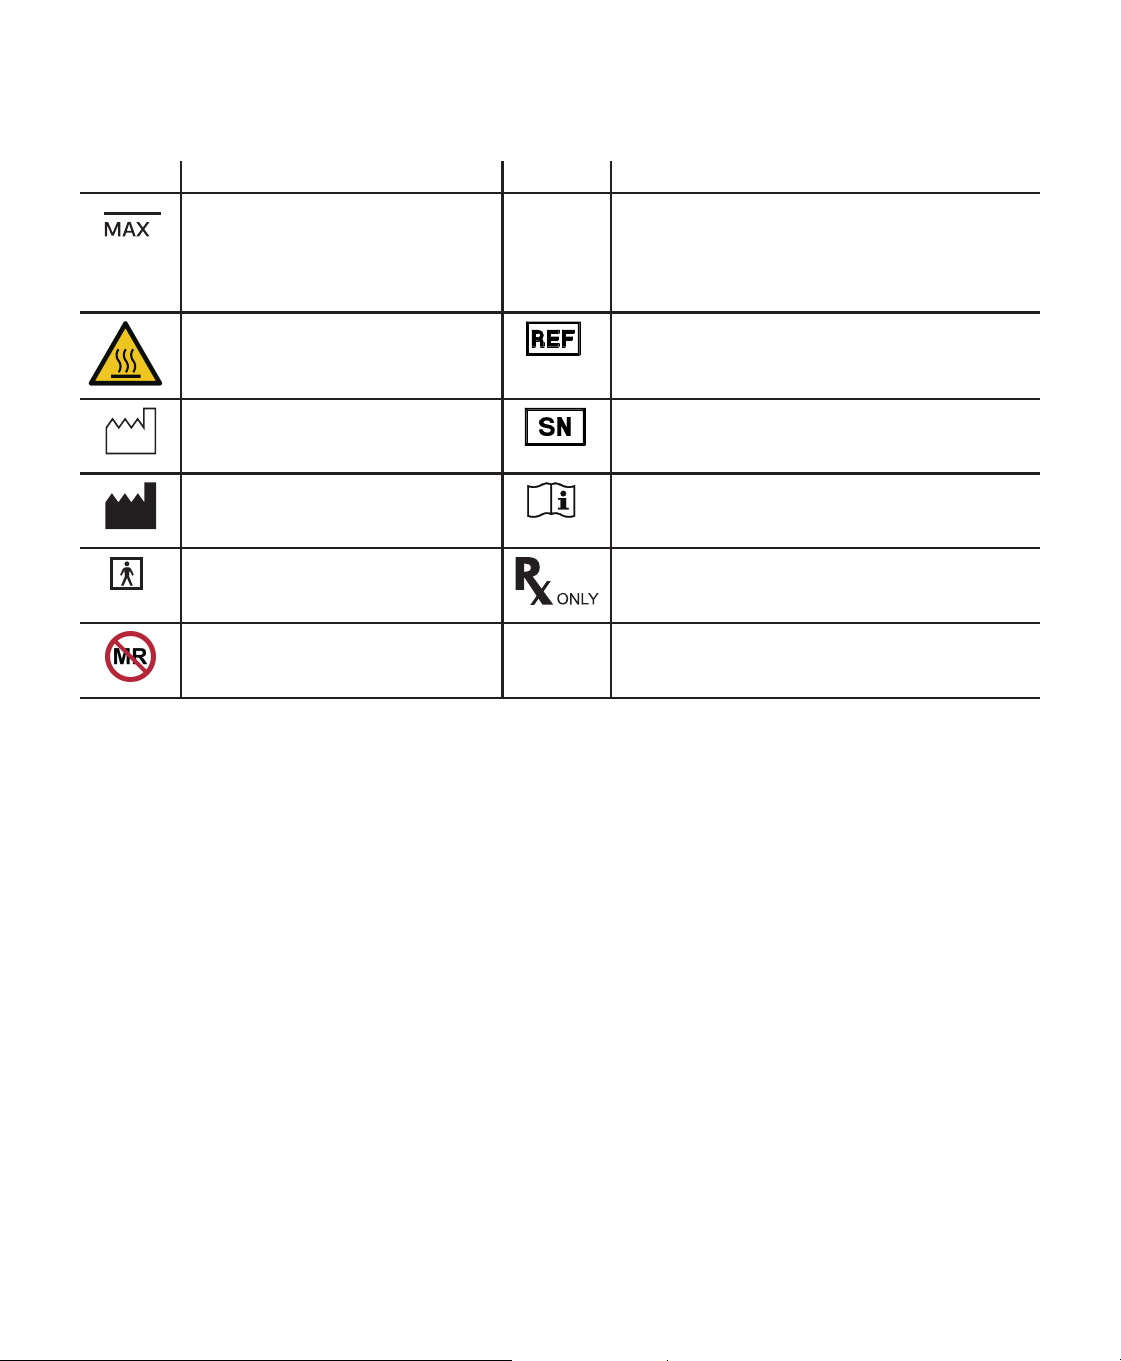
Symbols Glossary
The following symbols may appear on the device. Refer to http://www.symbols.philips.com for a description of
additional symbols used on this device and its packaging.
Symbol Denition Symbol Denition
Maximum ll line
IP22
Drip Proof Equipment
Protection against ingress of solid foreign objects ≥
12.5 mm diameter.
Protection against ingress of water with harmful
eects dripping (15° tilted)
Warning: Hot surface Reorder number
Indicated the manufacturer’s catalogue number so
the medical device can be identied.
Date of manufacture
Indicates the date when the medical
device was manufactured.
Serial number
Identify the manufacturer’s serial number for the
medical device.
Manufacturer
Indicates the medical device
manufacturer.
Operator’s manual; operating instructions
Consult instructions for use.
Type BF applied part
To identify a type BF applied part
complying with IEC 60601-1.
Prescription device
Caution: U. S. federal law restricts this device to
sale by or on the order of a physician.
MR unsafe
Do not use device in a Magnetic
Resonance (MR) environment.
How to contact Philips Respironics
Should you experience trouble with this equipment or require assistance setting up, using, or maintaining the device
or accessories, please contact your provider. If you need to contact Philips Respironics directly, call the Philips
Respironics Customer Service department at 1-800-345-6443 or 1-724-387-4000. You can also use the following
address:
Respironics, Inc.
1001 Murry Ridge Lane
Murrysville, PA 15668, United States

4
2. System overview
The DreamStation Go Heated Humidier attaches to the therapy device and provides an air outlet port to connect
a breathing circuit. The breathing circuit is composed of patient tubing, a mask, and in some instances a separate
exhalation device. The patient tubing is 12 mm performance tubing. For information related to the mask to be used,
including any need for a separate exhalation device, consult the instructions for use that accompany both the mask
and therapy device.
Note
The DreamStation Go Heated Humidier should not be used with a battery. Only use the provided power
supply when the CPAP and humidier are connected together to receive therapy.
The DreamStation Go Heated Humidier is designed to deliver humidication for added comfort during therapy. This
humidication level is controlled through the output of the heated humidier.
The DreamStation Go Heated Humidier is composed of the following components:
• Heated humidier - The heated humidier is the primary source of humidication. Humidication is controlled by
adjusting the temperature of the heater plate. The heater plate is then used to heat water found in the water tank.
This manual includes instructions that explain how to set up and take care of the heated humidier.
• Water tank - The water tank stores the water that will be used by the heated humidier. This manual includes
instructions that cover how to use and take care of the water tank.
System features and contents
The gure below illustrates many of the device features and contents. In addition to the features shown below, your
humidier system may include a humidier user manual.
12
10
11
13
5
15
14
1 Heated humidier 9 Water tank lid
2 Air outlet port 10 Manifold
3 Water tank lid tab 11 Bae
4 CPAP air inlet 12 Humidier release latch
5 CPAP Seal 13 Therapy device
6 15mm/22mm tube adapter 14 Humidier air inlet
7 Water tank base 15 Heater plate
8 Maximum ll line
5
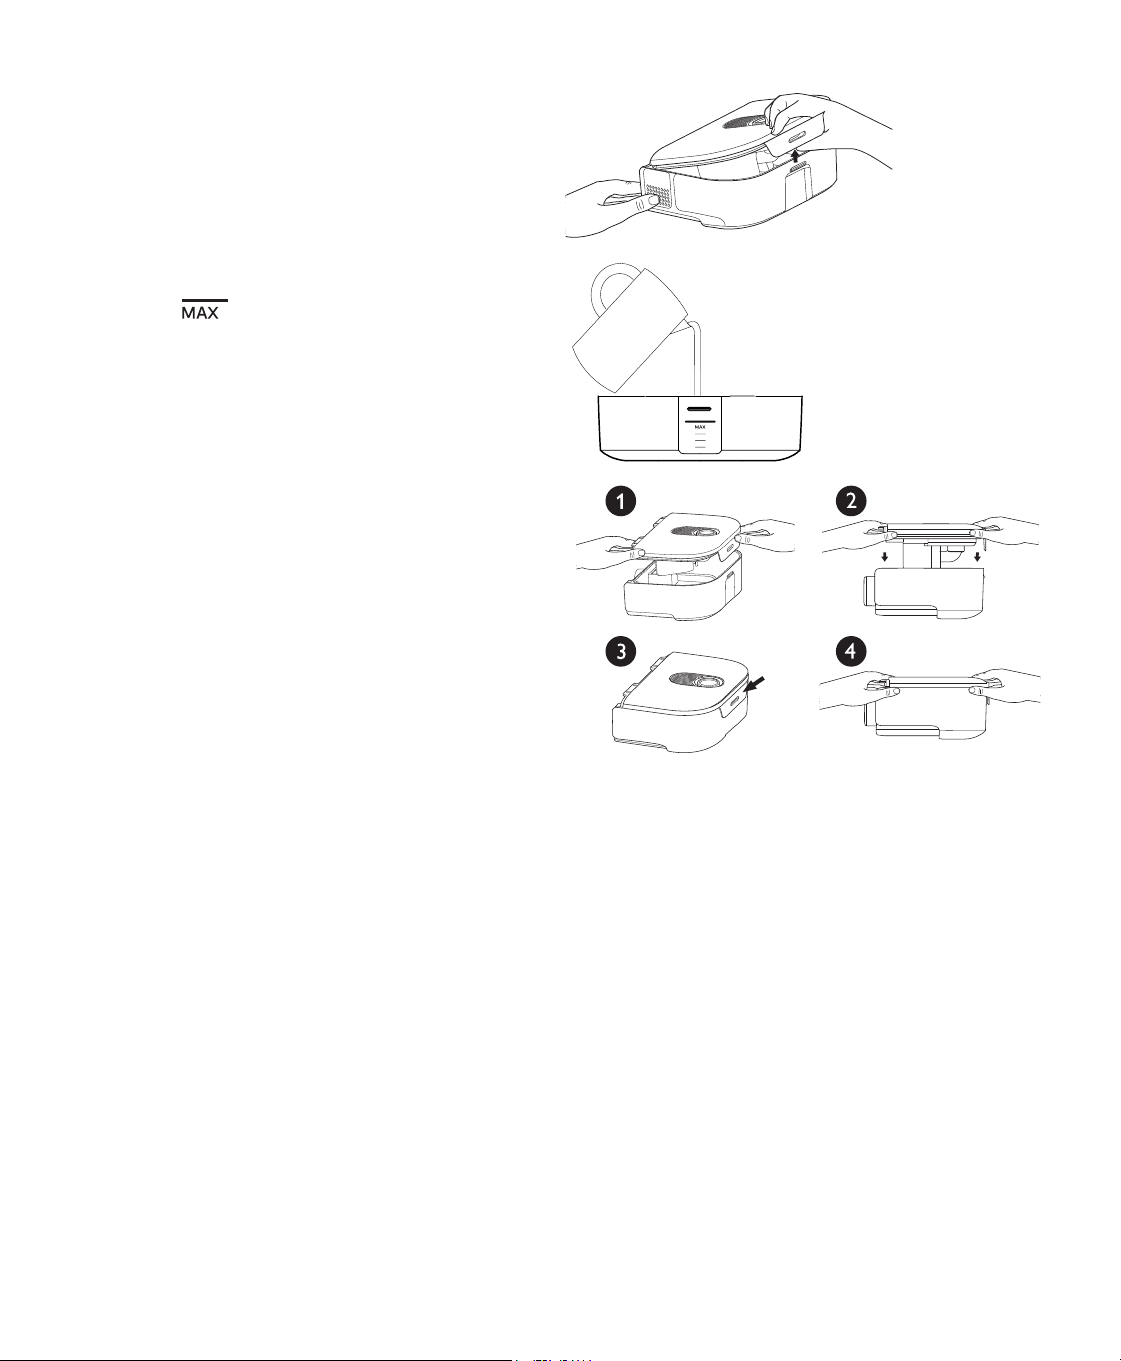
3. Connecting and setting up the humidier
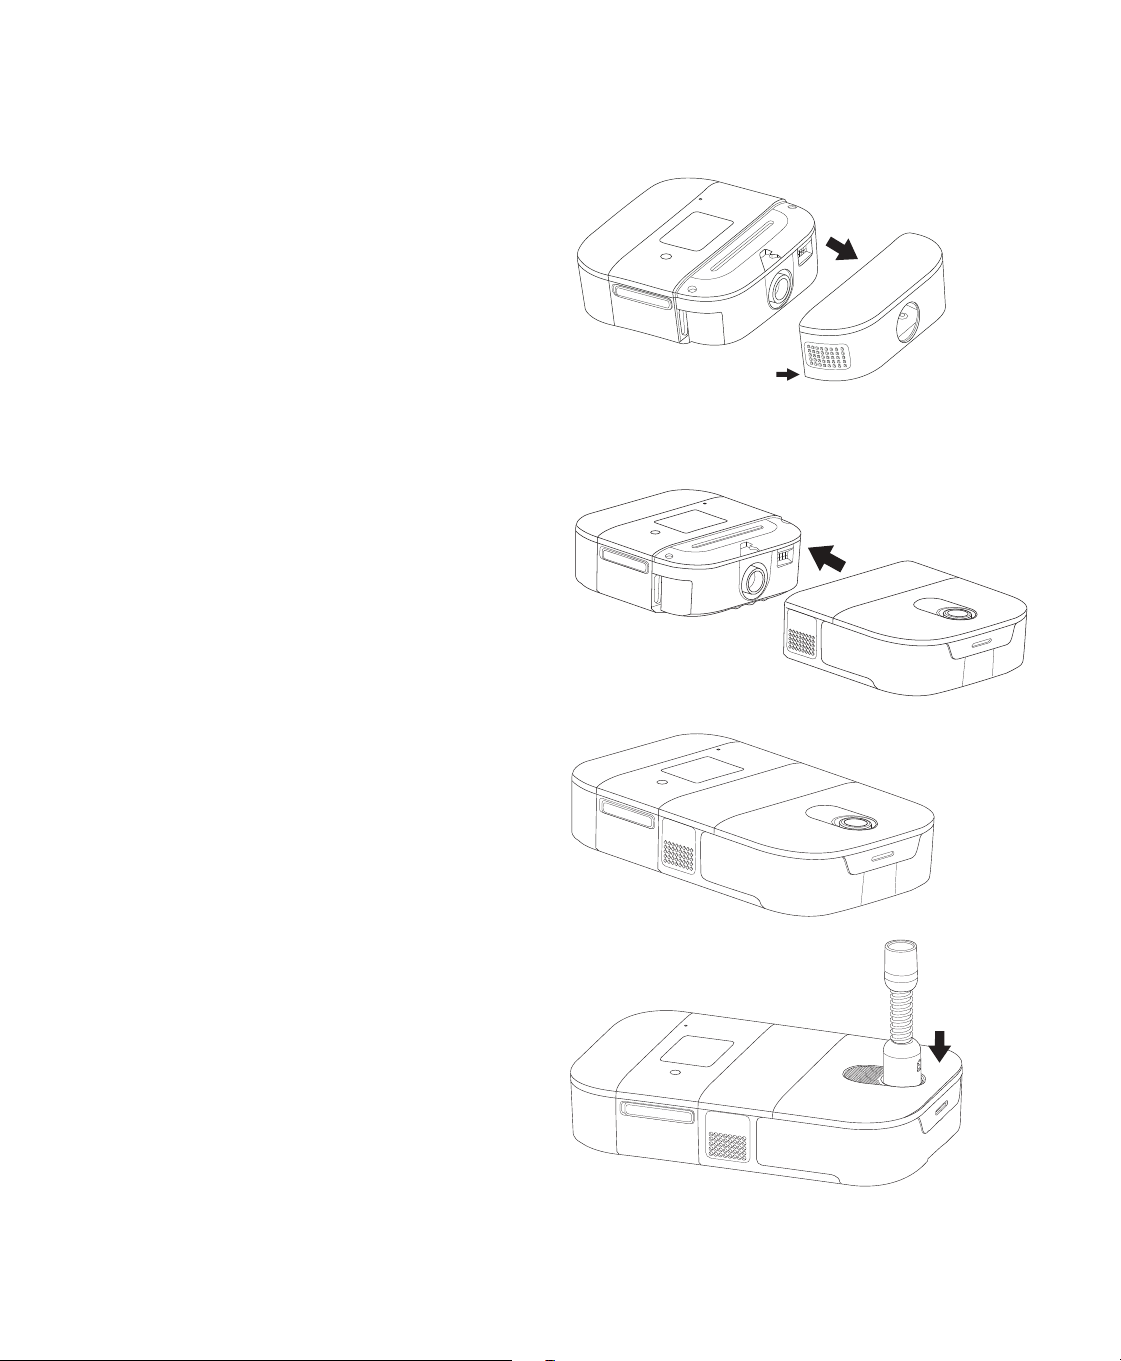
Connecting to the therapy device
1. Remove the humidier beauty panel from the
therapy device by pulling from either side of the
panel.
Pull here
2. Place the therapy device and heated humidier (with
an empty water tank) on a rm, at surface.
Caution
Do not move the humidier while the water tank has
water in it.
3. Line up the front of the therapy device to the front of
the humidier. Make sure the air outlet port on the
therapy device lines up with the air inlet port on the
humidier.
4. Slide the therapy device and humidier together
until they snap into place.
5. Make sure that the therapy device and the humidier
are completely connected to each other.
6. Attach the tube to the heated humidier. Line up
the connector at the top of the tube to the top of
the air outlet port on the humidier after lling the
humidier. Refer to the “Daily use” section. If you are
not using a 12mm tube, use the 15mm/22mm tube
adapter.
7. Press the tubing connector into place over the air
outlet port until the tube clicks into place in the slots
on the sides of the outlet port.
6
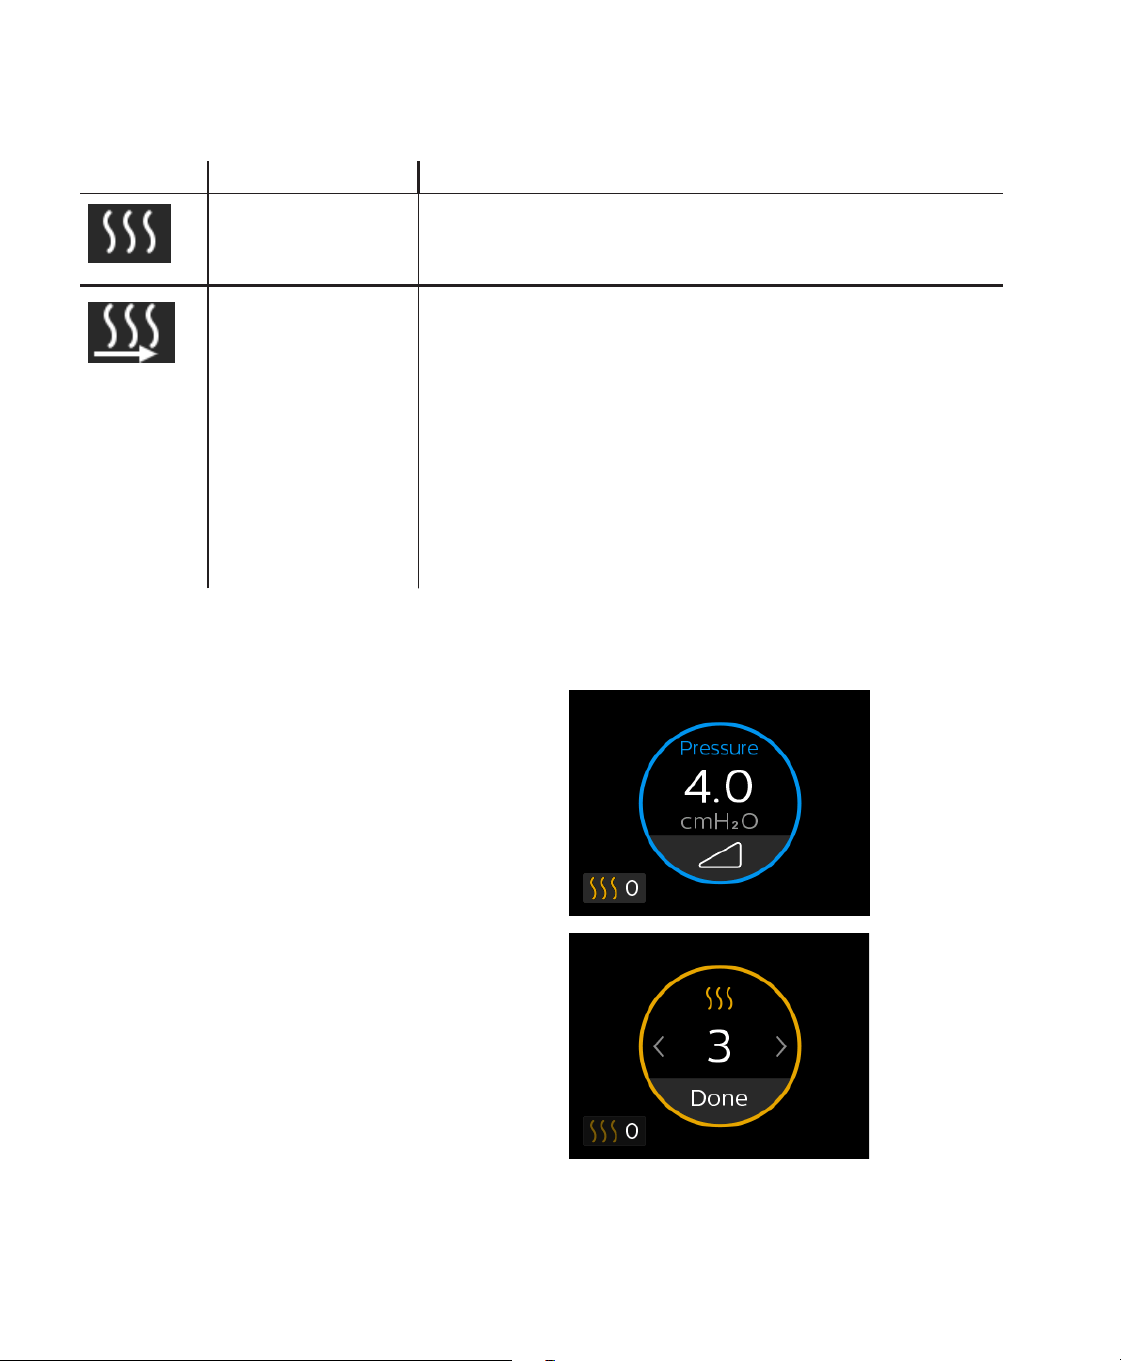
Setting humidication mode and target time
To access the humidier settings in the Therapy O menu, navigate to the My Comfort menu. From here you can view
or adjust the following humidier settings.
Icon Text Description
Humidication This displays the humidication mode being used. You can choose
between Fixed or Adaptive humidication.
Target Time This allows you to set the estimated amount of time you will use the
device each night. The device will then adjust the humidication to
ensure enough water remains in the water tank. You can select O,
Auto, or 4 to 10 hours in 0.5 hour increments. This setting is only
available when the humidier is set to Adaptive humidication mode.
When set to Auto, the device automatically sets the target time based
on your past device usage hours.
Note
Many factors impact water consumption, including: the ambient
temperature and humidity in your bedroom, your humidier settings,
the level of mask leak, and the duration of your sleep session.
Adjusting the humidier setting from the “Therapy On” menu
While the device is delivering therapy with the humidier attached, you can adjust the humidier setting by following
the steps below.
1. Tap the humidier icon on the bottom left of the
touchscreen.
2. Tap the left arrow or swipe left on the touchscreen to
decrease the humidier setting. Tap the right arrow
or swipe right on the touchscreen to increase the
humidier setting. The setting can be adjusted from
0 to 5. When the setting is 0 the humidier is turned
o.
3. Tap Done to save and apply the new humidier
setting.
7
Humidier pop-up messages
Device pop-ups are messages that show up on the user interface screen.
Condition Icon Description Possible
Cause
Action
Humidication
Error
Humidier error (only
when humidier is
present).
Humidier heater
plate error
or humidier
not properly
connected to
therapy device.
Turn o the device and
disconnect it from power.
Detach the humidier,
visually check that
electrical contacts are
clear, then reconnect
humidier and power
cord. If the alert continues,
contact your provider.
Humidier
and Battery
Unsupported
Therapy is not
available when
both the battery
and humidier are
connected to the
CPAP device.
Therapy was
started when both
the battery and
humidier were
connected.
Remove the battery to
enable therapy with
humidication.
Humidier Water
Tank Inserted
Incorrectly
Displayed when the
humidier water
tank is not inserted
correctly.
The humidier
water tank is not
making contact
with the heater
plate.
Tap to clear the error.
Disconnect and reconnect
the humidier water tank
to make sure that it is fully
and properly connected.
8
4. Daily use
Warnings
Allow the humidier heater plate and water to cool down for approximately 15 minutes before removing the
water tank. A burn may result from: touching the heater plate, coming in contact with the heated water, or
touching the tank pan.
Inspect the optional humidier for signs of damage. Replace any damaged parts.
Cautions
— Do not attempt to ll the water tank while it is still inside the humidier.
— Do not put any chemicals or additives into the water. Possible airway irritation or damage to the water tank may
result.
— Philips Respironics recommends using room temperature distilled water, if available, to prevent mineral build up
on the humidier tank base. In a clinical environment, distilled water must be used.
— Never use water from an untreated source such as a lake, river, stream, or well.
— Do not ll the water tank above the maximum ll line. If the water tank is overlled, water may leak into the
therapy device, humidier, or onto your furniture. Damage to the humidier or therapy device may occur.
Notes
— Clean the water tank before rst use. Refer to the Home cleaning instructions and Care instructions sections later
in this manual.
— Empty, rinse, and rell the water tank daily.
1. Place the connected therapy device with humidier
on a rm, at surface lower than your sleeping
position.
Warning
The humidier must always be positioned below
the breathing circuit connection at the mask. The
humidier must be level for proper operation.
Cautions
— Do not place the humidier directly onto carpet,
fabric, or other ammable materials.
— Do not place the device in or on any container
that can collect or hold water. Take precautions
to protect furniture from water damage.
2. Disconnect the tubing by pulling the tubing
connector away from the outlet port.
3. Remove the water tank by sliding the tank away
from the therapy device.
9
4. Remove the tank lid by pulling up on the tank lid tab
while holding the tank base. Pour out any remaining
water and rinse the tank base.
5. Place the tank base on a rm, at surface. Fill the
tank base with water no higher than the maximum
ll line .
Note
The water level may rise in the tank base when the
tank lid is attached.
6. Reassemble the water tank. Align the tank lid with
the tank base (1). Push down on the tank lid (2) until
the tab on the tank lid snaps securely over the hook
on the tank base (3). When the tank lid is attached
correctly there should be no gap between the tank
lid and the tank base (4).
4
7. Slide the water tank back into the humidier. Ensure
that it is fully connected before proceeding.
Note:
A pop-up message will appear if the water
tank is not fully connected.
Warning
When installing the tank, do not allow any water
to spill into the humidier or therapy device.
8. Attach the tubing connector to the air outlet port. If you are not using a 12mm tube, use the 15mm/22mm tube
adapter.
9. Supply power to your therapy device. Refer to the manual included with your therapy device.
10. Put on your mask assembly. Refer to the instructions supplied with your mask.
11. Turn on the airow on your device and begin
therapy. Refer to the manual included with your
therapy device for instructions on how to turn
therapy on and o.
Caution
Do not turn the humidier on without the water tank
installed. The humidier setting must be “0” (o) if
there is no water in the water tank.
Note
If you are having trouble with your mask, refer to the
instructions included with the mask.
10
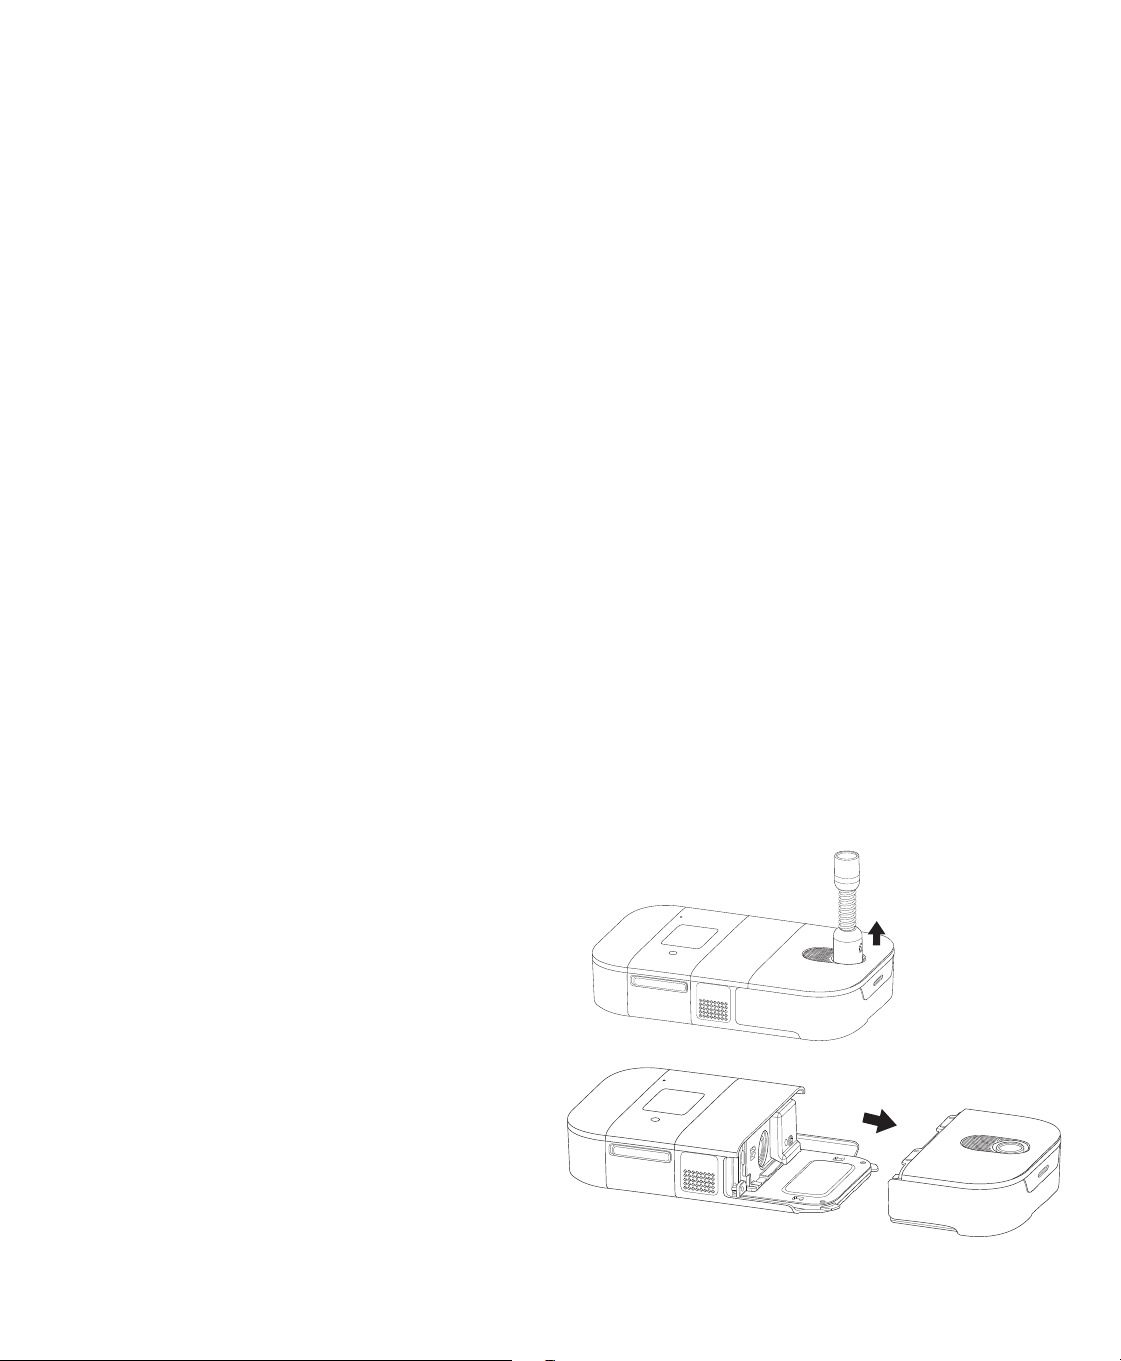
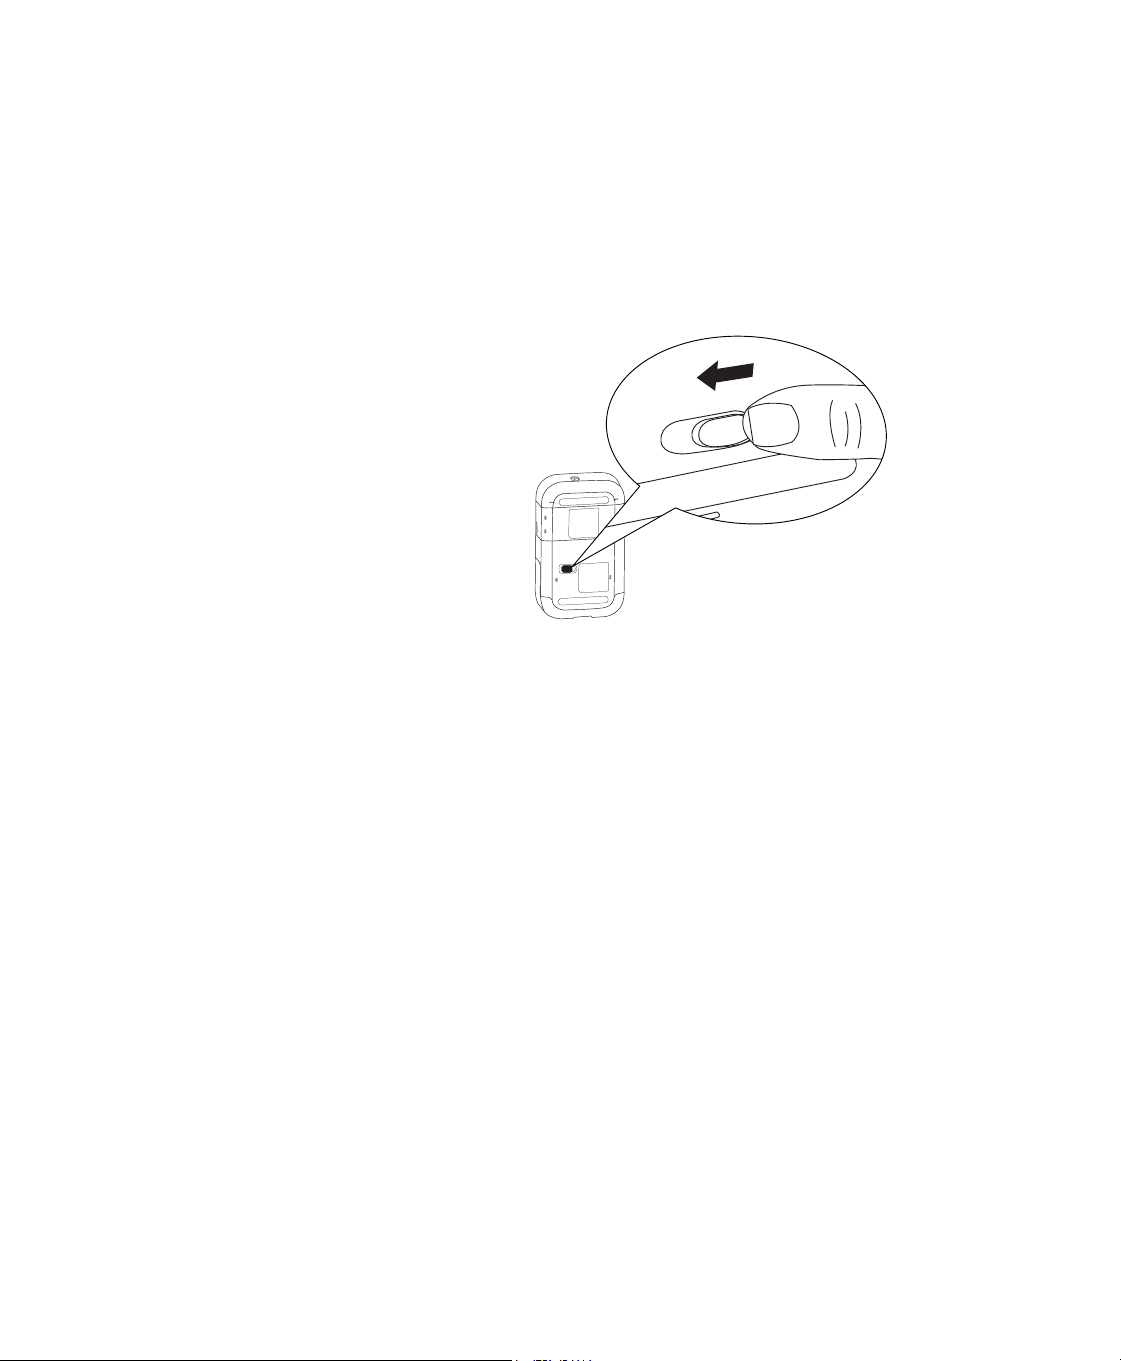
Disconnecting the humidier
Caution
To avoid spilling, do not disconnect the humidier from the therapy device with water in the tank. Remove
the water tank from the humidier before disconnecting the therapy device.
1. Disconnect power to the therapy device and
tubing.
2. Remove the water tank from the humidier.
3. Pick up the system.
4. Remove the humidier by sliding the latch on
the bottom of the humidier, and pulling the
humidier away from the therapy device.

11
5. Cleaning for Home Use
Warning
Allow the humidier heater plate and water to cool down for approximately 15 minutes before removing the
water tank. A burn may result from: touching the heater plate, coming in contact with the heated water, or
touching the tank pan.
Caution
Allow the humidier to dry completely before reconnecting to the power source.
Cleaning the Humidier Exterior
Every two weeks of use, inspect your humidier to see if it needs care.
1. Turn the device o and disconnect from the power source. Remove any cables attached to the device or
battery pack.
2. Wipe for 1 minute with a lint-free cloth dampened with a cleaning solution (1 teaspoon [5 ml] of mild liquid
dish washing detergent [such as Dawn® Ultra Dishwashing Liquid]
1
per gallon [3.8 liters] of warm potable
water) to clean the exterior of the humidier.
3. Pay close attention to all corners and crevices of the device’s exterior surfaces. Be sure all visible soil is
removed.
4. Wipe with a lint-free cloth dampened (not dripping) with warm potable water for 1 minute, turning the cloth
frequently to remove all detergent residue.
5. Let everything air dry completely.
6. After cleaning, inspect the device, humidier, battery pack, and all circuit parts (lter, tube, and mask) for
damage such as cracks, tears, or broken pieces. If any parts are damaged, contact Philips Respironics
Customer Service. Replace any damaged parts.
Notes
Refer to the DreamStation Go therapy device user manual for adapter cleaning instructions.
The expected service life of the optional humidier base is 5 years.
Cleaning the water tank base
Hand washing can be performed daily. Dishwashing can be performed weekly.
Warning
Clean the tank base daily to prevent mold and bacteria growth.
1. Remove the water tank from the device and then remove the tank lid.
Caution
Use a mild liquid dishwashing detergent (such as Dawn Ultra Dishwashing Liquid) for hand washing or a
mild dishwasher detergent when using a dishwasher.
2. Wash the tank base in the dishwasher (top shelf only) or in a cleaning solution (1 teaspoon [5 ml] of mild liquid
dish washing detergent [such as Dawn® Ultra Dishwashing Liquid]
1
per gallon [3.8 liters] of warm potable water).
Rinse with clean potable water. Wipe the top and bottom of the tank base. Allow the tank base to air dry.
3. Inspect the tank base for damage and ensure that the CPAP seal is in place. If the tank base shows signs of wear
or damage, contact your provider for a replacement.
Note
The expected service life of the water tank base is 1 year.
1 Dawn is a registered trademark of Procter & Gamble.
12
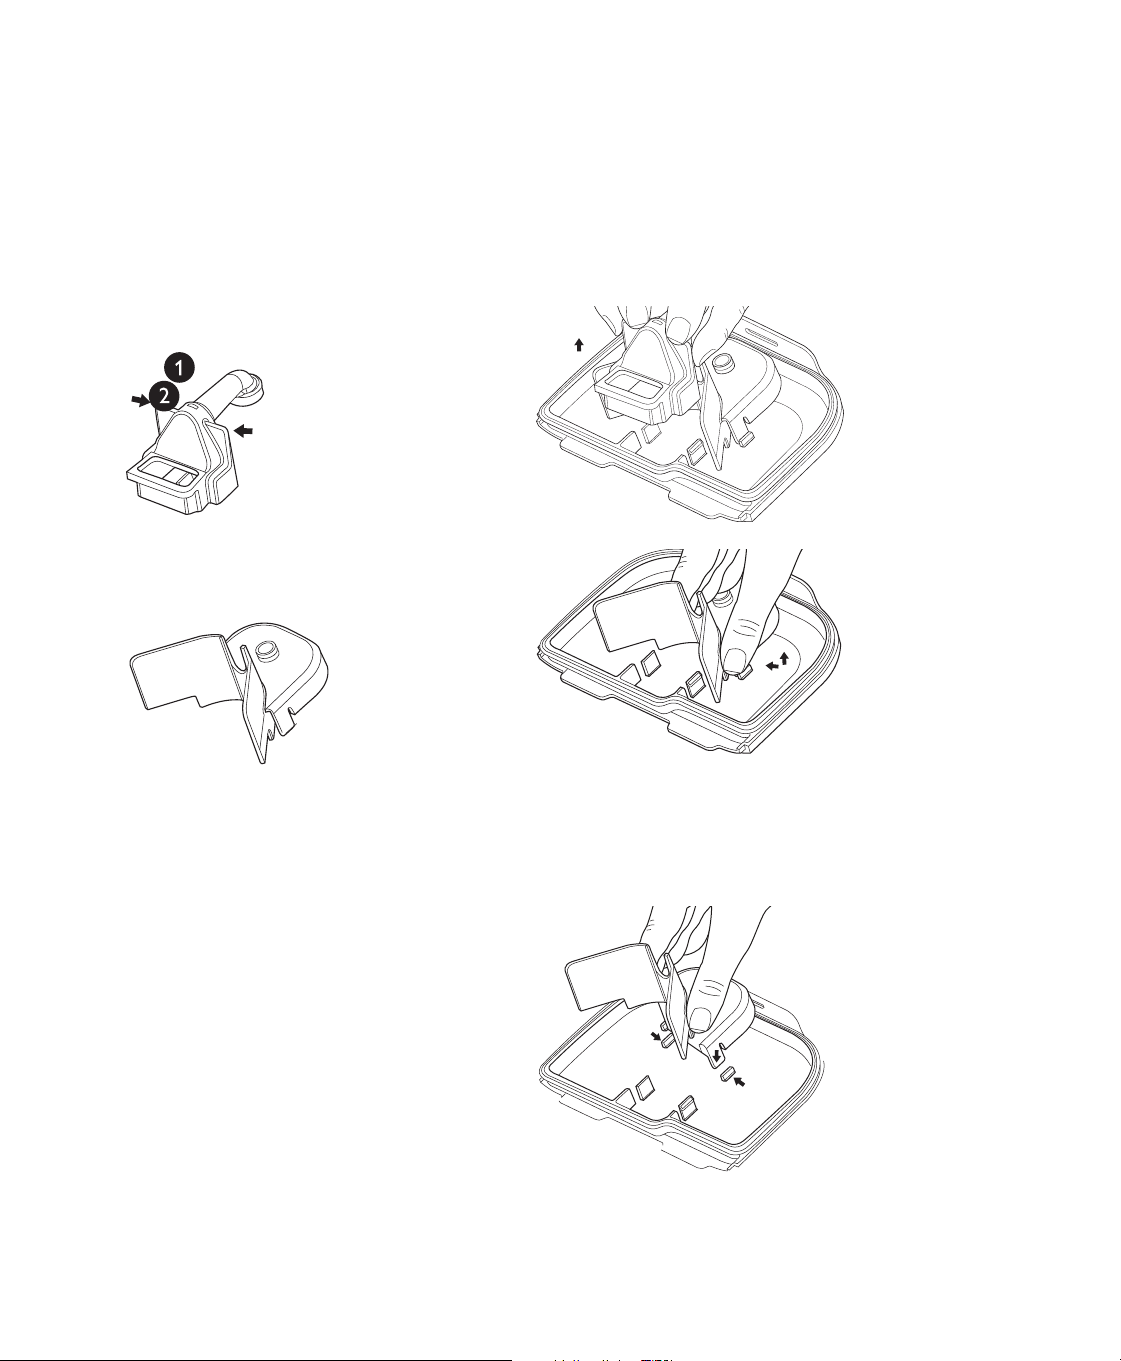
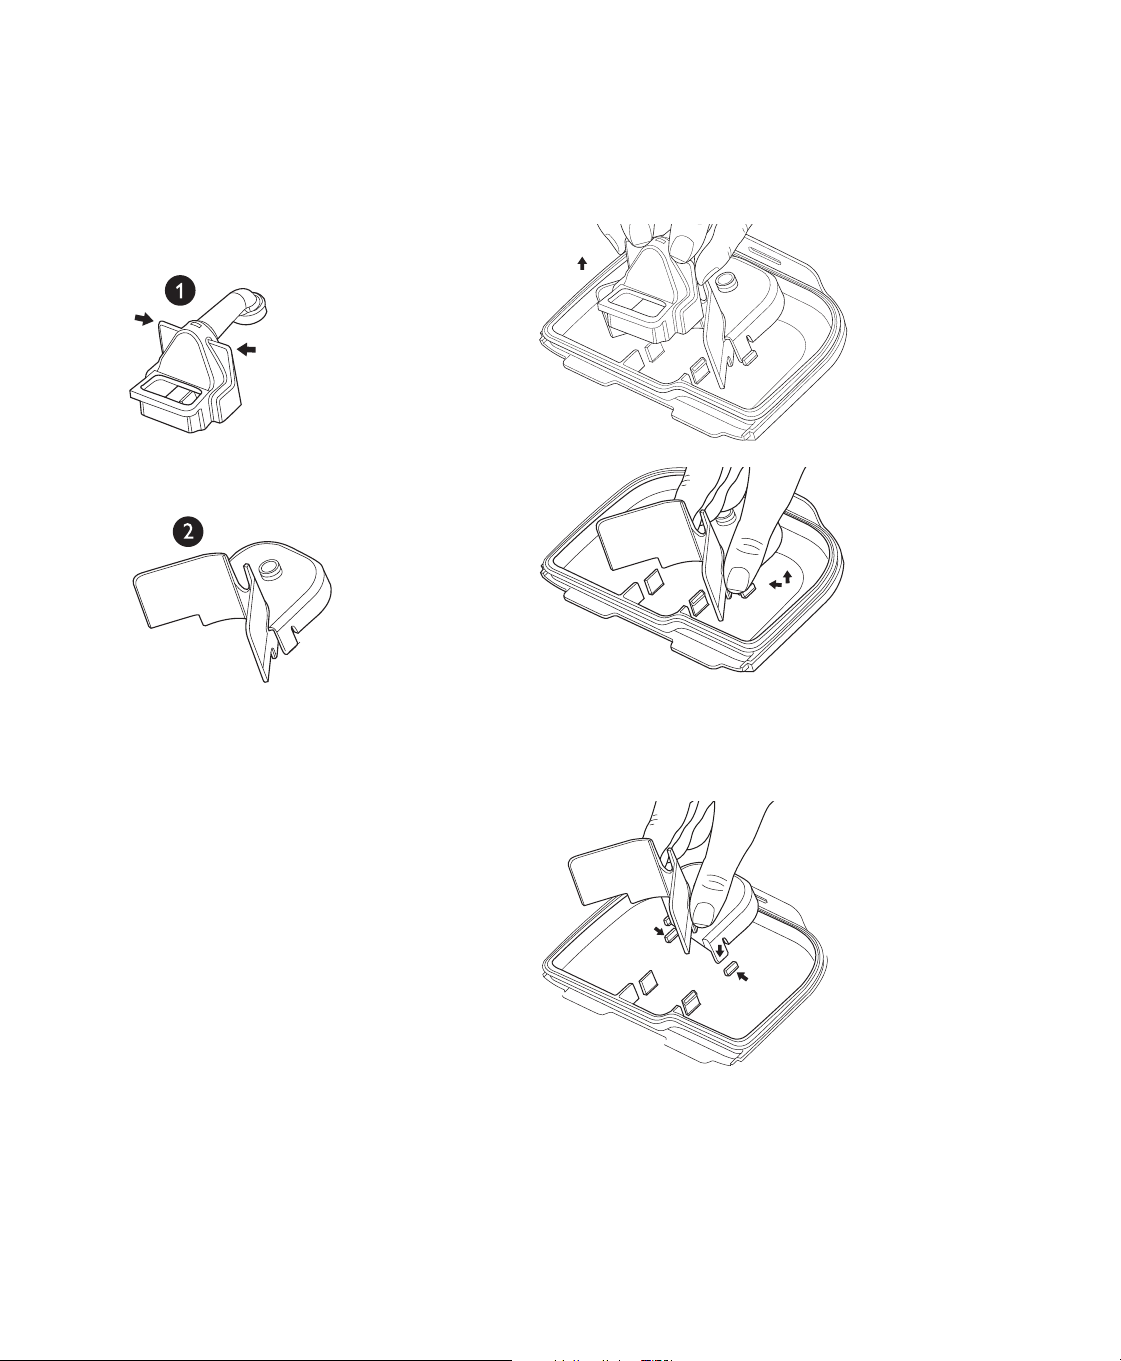
Cleaning the tank lid and components
Warning
Clean the tank lid and its components daily to prevent mold and bacteria growth.
Cautions
— Use a mild liquid dishwashing detergent (such as Dawn Ultra Dishwashing Liquid) for hand washing.
— Do not wash the tank lid in a dishwasher. Hand wash only.
1. Remove the manifold (1) by pulling up on both
manifold tabs.
2. Remove the bae (2) by pressing in on the side
tabs and pulling up on the bae.
3. Wash the lid and components in a cleaning solution (1 teaspoon [5 ml] of mild liquid dishwashing detergent
[such as Dawn Ultra Dishwashing Liquid] per gallon [3.8 liters] of warm potable water). Rinse for 1 minute with
warm potable water to remove detergent residue.
4. Allow components to air dry.
5. Reassemble the bae. Align the tabs on the
bae with the hooks on the tank lid. Press
down until the tabs on each side of the bae
snap into place.
13
6. Reassemble the manifold. Align the manifold
with the hooks on the tank lid. Gently press
down on both manifold blocks until they snap
into place.
7. Gently press down on the manifold tube until it
snaps into the bae.
6. Cleaning & Disinfection for Hospitals/Institutions
If you are using the water tank base, water tank lid, and lid components on multiple patients, complete the following
steps to clean and disinfect between each new user.
Caution
Only the hospital and institution cleaning and disinfection procedures listed in this manual are recommended by
Philips Respironics. Use of other cleaning and disinfecting processes, not specied by Respironics, may aect the
performance of the product.
Cleaning the water tank base
1. Remove the water tank from the device and then remove the tank lid.
Caution
Use a mild liquid dishwashing detergent (such as Dawn Ultra Dishwashing Liquid) for hand washing or a
mild dishwasher detergent when using a dishwasher.
2. Wash the tank base in the dishwasher (top shelf only) or in a cleaning solution (1 teaspoon [5 ml] of mild liquid
dish washing detergent [such as Dawn® Ultra Dishwashing Liquid]
per gallon [3.8 liters] of warm potable water).
Rinse with clean potable water. Wipe the top and bottom of the tank base. Allow the tank base to air dry.
3. Inspect the tank base for damage and ensure that the CPAP seal is in place. If it shows signs of wear or damage,
contact your provider for a replacement.
Note
The expected service life of the water tank base is 1 year.
14
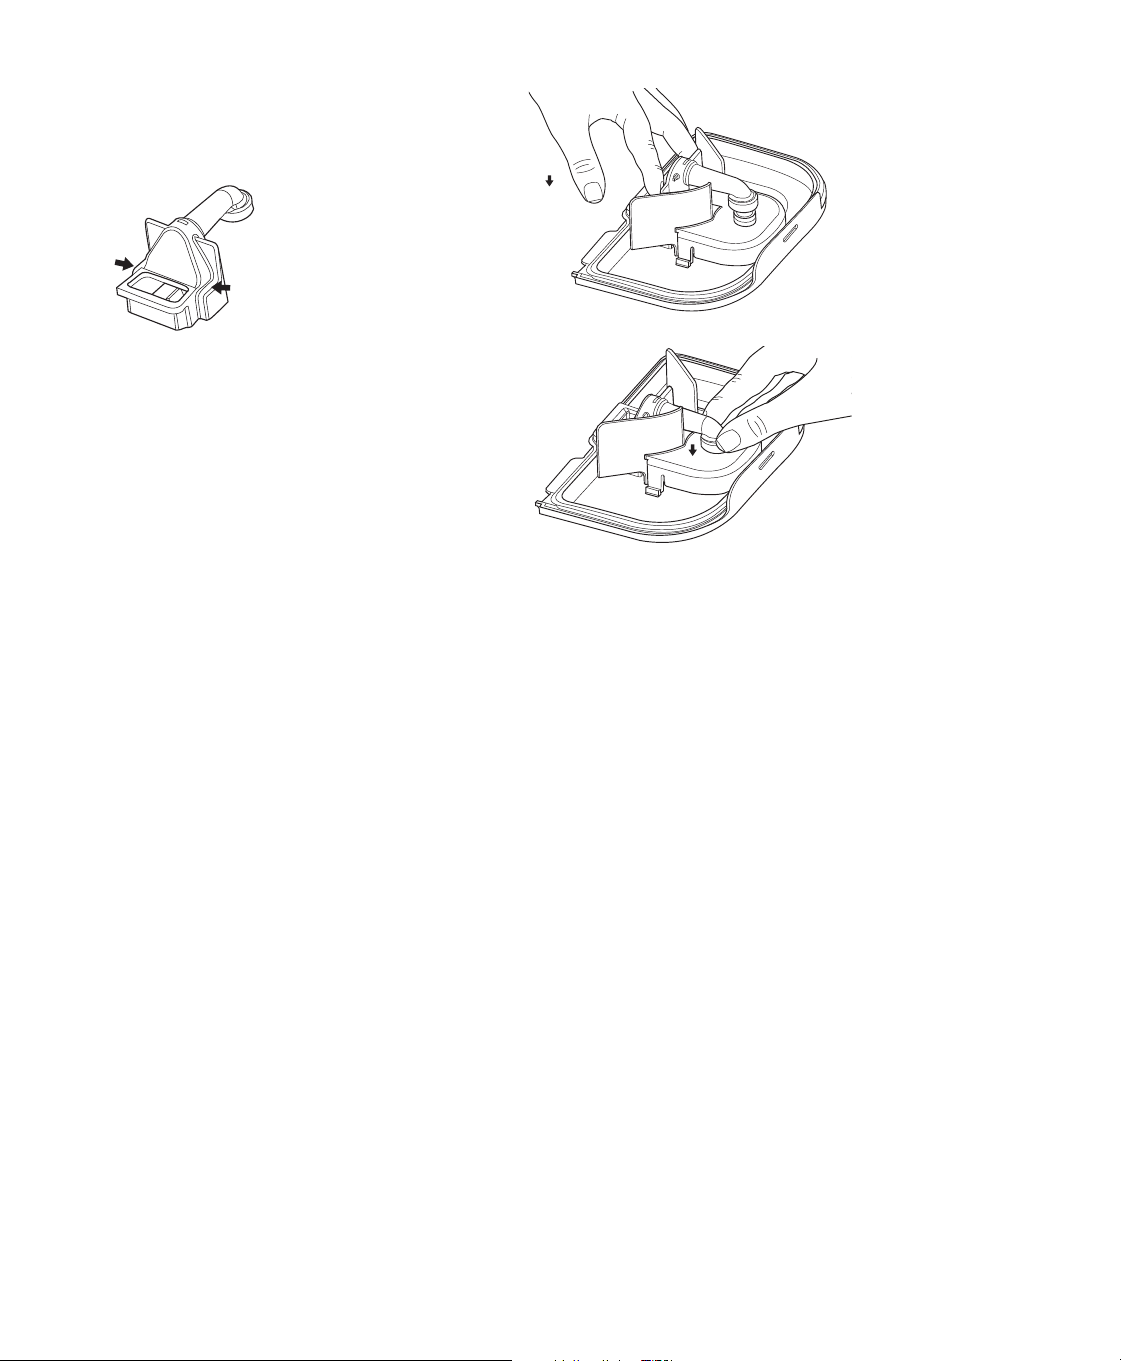
Cleaning the water tank lid and components
Cautions
— Use a mild liquid dishwashing detergent (such as Dawn Ultra Dishwashing Liquid) for hand washing.
— Hand wash only.
1. Remove the manifold (1) by pulling up on both
manifold tabs.
2. Remove the bae (2) by pressing in on the side
tabs and pulling up on the bae.
3. Wash the lid and components in a cleaning solution (1 teaspoon [5 ml] of mild liquid dishwashing detergent
[such as Dawn Ultra Dishwashing Liquid] per gallon [3.8 liters] of warm potable water). Rinse for 1 minute with
warm potable water to remove detergent residue.
4. Allow components to air dry.
5. Reassemble the bae. Align the tabs on the
bae with the hooks on the tank lid. Press
down until the tabs on each side of the bae
snap into place.

15
6. Reassemble the manifold. Align the manifold
with the hooks on the tank lid. Gently press
down on both manifold blocks until they snap
into place.
7. Gently press down on the manifold tube until it
snaps into the bae.
Disinfecting the water tank base, water tank lid, and components
Prerequisite
Before disinfecting the water tank base, water tank lid, or components, be sure you have cleaned them
as instructed above. If you are disinfecting the water tank lid and components, make sure they are
disassembled before disinfection.
1. After cleaning, immerse the tank base in a 75°C sterile water bath for 30 minutes.
2. Air dry. Inspect the tank base for damage or wear. Discard and replace as necessary.

16
7. Maintenance instructions
Warning
Allow the humidier heater plate and water to cool down for approximately 15 minutes before removing the
water tank. A burn may result from: touching the heater plate, coming in contact with the heated water, or
touching the tank pan.
Maintaining the water tank base
If you use tap water in your humidier water tank, follow the steps below to maintain the tank base. Perform these
steps monthly or more frequently, as needed.
1. Remove the water tank from the humidier.
2. Remove the lid from the water tank.
3. Wash in a solution of warm potable water and a cleaning solution (1 teaspoon [5 ml] of mild liquid dishwashing
detergent [such as Dawn Ultra Dishwashing Liquid] per gallon [3.8 liters] of warm potable water). Wash for 1
minute. Rinse for 1 minute with warm potable water to remove detergent residue.
4. Fill the tank base with undiluted white vinegar (5% acetic acid) and soak for four hours or until the tank base is
visually clear of mineral build up.
5. Empty the vinegar from the tank base.
6. Thoroughly rinse the tank base with potable water for 1 minute.
7. Allow to air dry completely.
8. Inspect the tank base for any damage and replace it if necessary.
Maintaining the humidier base
Perform these steps bi-weekly or more frequently, as needed.
1. Remove the water tank from the humidier.
2. Disconnect the humidier from the therapy device.
3. Wipe the humidier base and heater plate with a damp cloth. Allow the platform to air dry before reconnecting to
the therapy device.
4. Inspect the humidier base for any damage and replace it if necessary.
8. Troubleshooting
The table below lists some of the problems you may experience with your humidier and possible solutions.
Problem Why it happened What to do
The humidier and/
or components are
cracked or damaged.
The humidier
was dropped or
mishandled.
If the humidier does not operate properly after being dropped or
mishandled, contact your provider or Philips Respironics.
The therapy device
is operating but the
humidier’s airow is
low or stopped.
The humidier has an
airow obstruction.
Contact your provider or Philips Respironics. If the problem cannot
be resolved, return the humidier to your provider to determine the
problem.

17
Problem Why it happened What to do
High Leak The tubing is not
connected correctly
and doesn’t seal
properly.
Remove your mask and tubing and check for kinks or tears. If it is
torn or damaged, contact your provider or Philips Respironics for
replacement tubing and/or mask.
If the tubing is not damaged, reattach your tubing, turn on the
airow, and check to make sure you do not still feel air coming out of
the port area.
The therapy device is
not seated correctly
against the humidier.
Remove the therapy device from the humidier and reconnect. Make
sure the air inlet port on the humidier connects securely to the air
outlet port on the device.
If high leak persists, issue may be caused by a missing, misaligned or
damaged seal. Verify that the tank lid is properly seated. If needed,
gently press around the perimeter of the tank lid to reseat it.
The humidier tank is
not properly seated in
the humidier.
Remove the water tank from the humidier base, and then place the
tank back in the humidier, making sure it is completely seated.
If high leak persists, issue may be caused by a misaligned or
damaged seal. Ensure that the CPAP seal is present. If a seal has
come loose, gently press around the edges of the seal to reseat it.
Excessive
condensation in the
tubing.
The humidity level
setting is too high.
Reduce the humidity level setting or set the humidier to adaptive
humidication.
The humidier is
positioned incorrectly.
Verify that the humidier and therapy device are away from air
conditioning equipment.
The humidier has
fallen o your table or
night stand.
The humidier
may not have been
properly seated on
the night stand, or
the placement of
the tubing may have
caused the device to
fall.
Always make sure your humidier is placed on a hard, at surface
so the rubber feet on the bottom of the humidier base can adhere
to the surface (make sure there is no fabric under the base). The
humidier must be level for proper operation.
Also, place the humidier away from the edge of the night stand or
table, so it doesn’t accidentally get knocked o the table.
If the humidier falls and water gets into the therapy device, drain all
water out of the therapy device. Allow it to air dry to make sure it is
completely dry before reapplying power.
If the placement of the tubing causes the humidier to fall, make
sure that you use proper hose management when setting up your
device. Route the tubing behind the bed’s headboard.
If the humidier does not operate correctly after falling, contact your
provider or Philips Respironics.
I’m having diculty
adjusting the heated
humidier setting.
The blower is not
turned on, or the
humidier is not fully
connected.
The humidier setting can only be adjusted when therapy is turned
ON. Conrm that the blower is turned on, and that the humidier
icon appears on the left side of the screen, then adjust to desired
comfort. If the blower is on but the humidier settings are not
displayed on the Therapy ON screen, then unplug the device.
Conrm that the humidier electrical contacts are not obstructed or
damaged. Then reconnect the humidier and reconnect the device’s
power supply. Turn the blower on; if the settings are still not visible,
contact your provider or Philips Respironics for assistance.

18
Problem Why it happened What to do
The water in the water
tank runs out before
morning.
Water tank was
not full at start of
session. Mask leak is
excessively high. The
ambient conditions
are very dry/cool.
Under most conditions, a full water tank should last for a typical
sleep session. However, many factors impact water consumption,
including: the ambient temperature and humidity in your bedroom,
your humidier settings, the level of mask leak, and the duration of
your sleep session.
First, make sure that the water tank is lled to the maximum ll line
at the start of your sleep session. Check that your mask is tted
properly, and adjust as needed to reduce mask leak to normal levels.
You may use the Check Mask Fit function to evaluate your mask t.
Also, conrm that the device, humidier, humidier seals, and tube
are connected properly and not leaking. You may also choose to
lower your humidier settings, change the humidication mode from
Fixed to Adaptive humidication mode, or adjust the Target Time
setting to increase the time that your humidier water will last.
I hear a leak or
whistling sound
coming from my
therapy device or
humidier (not related
to mask leak).
The therapy device
air inlet may be
obstructed. The
humidier or tube is
not fully connected.
The humidier seals
are not fully seated or
are missing.
Check therapy device air inlet is not obstructed and lters are clean
and properly inserted. Conrm that the device, humidier, and tube
are connected properly and not leaking. Conrm that the humidier
tank lid is properly seated; if needed, gently press around the
perimeter of the tank lid to reseat it.
I accidentally spilled
water into my
humidier base.
The water tank has
been lled beyond
the maximum ll line.
A small amount of water spilled on the base of the humidier will not
harm your device. A small spill in the humidier will evaporate under
normal humidier use. However, too much water in the humidier
water tank could spill over the tank lid and might damage your
furniture.
Disconnect power from the device. Remove the water tank, pour out
any excess water until the water level is at or below the maximum ll
line and set the water tank aside. Separate the humidier from the
therapy device, and pour out the spilled water. Once the heater plate
has cooled, wipe the humidier with a paper towel or soft cloth. If
needed, dry the underside of the humidier and conrm that your
table top is dry. Reconnect the humidier and power supply, and
reinstall the water tank.
Note
For information on troubleshooting your therapy device, see the manual included with your therapy device.
9. Additional notes
Traveling with the system
1. Remove the water tank and empty all water and allow to air dry.
2. Put the empty water tank back into the device.
3. Pack your humidier in your carry-on luggage.
Caution
Do not move the humidier while the water tank has water in it.

19
When you are traveling, the optional carrying case for your therapy device can be used for carry-on luggage only. The
carrying case will not protect the humidier if it is put through checked baggage.
For your convenience at airport security stations, there is a note on the bottom of the humidier stating that it is
medical equipment. It may be helpful to bring this manual along with you to help security personnel understand the
device.
If you are traveling to a country with a line voltage dierent than the one you are currently using with the therapy
device, a dierent power cord or an international plug adapter may be required to make your power cord compatible
with those where you visit. Contact your provider for additional information.
Service
The humidier does not require routine servicing. If any part of the humidier is worn or damaged, contact Philips
Respironics or your provider. See the Troubleshooting section in this manual for additional information.
Disposal
Dispose of this device in accordance with local regulations.
10. DreamStation Go Heated Humidier specications
Environmental
Operating Temperature Device: 5° to 35°C (41° to 95°F)
Storage Temperature -20° to 60°C (-4° to 140°F)
Relative Humidity (operating & storage) 15 to 95% (non-condensing)
Atmospheric Pressure: Device: 101 to 77 kPa (0 - 2286 m / 0 - 7500 ft)
Physical
Dimensions with therapy device 253 mm L x 151 mm W x 59 mm H (9.96 in L x 5.95 in W x 2.32 in H)
Weight (empty water tank with therapy device
and power supply)
1259 g (2.8 lbs)
Service life
The expected service life of the DreamStation Go heated humidier is ve (5) years.
The expected service life of the DreamStation Go heated humidier water tank is one (1) year.
Standards compliance
This device is designed to conform to the following standards:
• IEC 60601-1 General Requirements for Basic Safety and Essential Performance of Medical Electrical Equipment
• IEC 60601-1-11 General Requirements for Basic Safety and Essential Performance in the Home Healthcare
Environment
• IEC 60601-1-6 General Requirements for Safety - Usability
• IEC 62366-1 Application of Usability Engineering in Medical Devices
• IEC 62304 Medical Device Software – Software Life-cycle Processes
• ISO 8185 General Requirements for Humidication Systems
• ISO 80601-2-70 Sleep Apnea Breathing Therapy Equipment
• ISO 80601-2-74 Respiratory Humidifying Equipment
• EN 60601-1-2 Electromagnetic Compatibility
• RTCA/DO-160G section 21, category M; Emission of Radio Frequency Energy

20
IEC 60601-1 classication
Type of Protection
Against Electric Shock
Class II Equipment/Internally Powered
Degree of Protection
Against Electric Shock
Type BF Applied Part
Degree of Protection
Against Ingress of Water
Device: Drip Proof, IP22
First characteristic numeral (2); Protection against ingress of solid foreign objects ≥ 12.5 mm
diameter.
Explanation: Protected against access to hazardous parts with a nger and protected
against solid foreign objects of 12.5 mm diameter and greater.
Second characteristic numeral (2); Protection against ingress of water with harmful eects
dripping (15° tilted).
Explanation: Protected against vertically falling water drops when enclosure tilted up to 15°.
Mode of Operation Continuous
Electrical (when the heated humidier is used
with the DreamStation Go therapy device)
AC Power Consumption: 100–240 VAC, 50/60 Hz, 2.0-1.0 A
Maximum recommended pressure 20 cm H
2
O
Water capacity 240 ml (8 oz.) at recommended water level
Heater plate Max Temperature: 68°C (154°F)
Inhalation pressure drop of humidier Max: 2.1 cmH
2
O at 60 LPM Flow
Exhalation pressure drop of humidier Max: 2.8 cmH
2
O at 20 LPM Flow
Humidity Humidity
min
Output: ≥ 12 mg H
2
O/L
Measured @ expected leak across therapy pressures, 17.5-35° C,
15% RH, for all compatible tubes
Maximum delivered gas temperature <43°C (109.4°F)
Declared dual-number noise emissions values (in accordance with ISO 4871)
Tube Size Sound Pressure
Level (L)
Uncertainty (K) Sound Power
Level
Uncertainty
(K)
12 (mm) tubing type 34 dB(A) 2 dB 42 dB(A) 2 dB
15 (mm) tubing type 34 dB(A) 2 dB 42 dB(A) 2 dB
22 (mm) tubing type 34 dB(A) 2 dB 42 dB(A) 2 dB
Note
Values determined according to noise test code given in ISO 80601-2-70:2015, using the basic standards ISO 3744
and ISO 4871.

21
Pressure accuracy
Pressure Increments: 4-20cm H
2
O (in 0.5 cm H
2
O increments)
Maximum static pressure accuracy, according to ISO 80601-2-70:2015:
Tube Type Pressure Accuracy
12 (mm) tubing type 10 cm H
2
O ± 1.0 cm H
2
O
15 (mm) tubing type 10 cm H
2
O ± 0.55 cm H
2
O
22 (mm) tubing type 10 cm H
2
O ± 0.55 cm H
2
O
Static pressure accuracy has a measurement uncertainty of 3.8%
Maximum dynamic pressure variation, according to ISO 80601-2-70:2015:
Tube Type 10 BPM 15 BPM 20 BPM
12 (mm) tubing type 1.20 cm H
2
O 1.51 cm H
2
O 1.67 cm H
2
O
15 (mm) tubing type 0.99 cm H
2
O 1.34 cm H
2
O 1.31 cm H
2
O
22 (mm) tubing type 0.89 cm H
2
O 1.26 cm H
2
O 1.38 cm H
2
O
Dynamic pressure accuracy has a measurement uncertainty of 3.6%.
Maximum ow rate (typical)
Tube Type Flow
Test pressures (cm H
2
O)
4 8 12 16 20
12 (mm) tubing type Average ow at the patient
connection port (l/min)
104 102 104 100 92
15 (mm) tubing type Average ow at the patient
connection port (l/min)
103 103 102 103 104
22 (mm) tubing type Average ow at the patient
connection port (l/min)
104 106 104 104 103

22
Respironics, Inc., a Philips company (“Philips Respironics”) provides this non-transferable, limited warranty for the
DreamStation Go therapy device and optional humidier (not including the water tank) (“Product”) to the customer
who originally purchased the Product directly from Philips Respironics.
What this warranty covers: Philips Respironics warrants each new Product will be free from defects in materials
and workmanship and will perform in accordance with the Product specications under normal and proper use and
maintenance in accordance with applicable instructions, subject to the exclusions below.
How long does this warranty last: 2 years from the longer of the date of shipment to the purchaser or date of setup
by purchaser for the end user, except:
a. The warranty period for the battery pack included with the Product is 1 year from the date of shipment to the
original purchaser.
b. The warranty period for accessories, replacement parts, and disposables including, but not limited to,
travel kits, lters, tubing, power cord, and beauty panels, is 90 days from the date of shipment to the original
purchaser.
What this warranty does not cover: This warranty does not apply to any software included with the Product as the
software warranty is included in the software license. This warranty does not cover damage or injury whether to the
Products, personal property, or persons caused by accident, misuse, abuse, Acts of God, water ingress, unapproved
ozone cleaning and disinfection methods, other unapproved cleaning and disinfection methods, repair or alteration
by anyone other than Philips Respironics or its authorized service center, failure to operate in accordance with the
terms of the operating manual and instructions, lack of reasonable care, the discontinuance of a network (e.g., 2G, 3G,
etc.) by a carrier (e.g., ATT, Verizon, etc.), or other defects not related to material or workmanship. This warranty is not
transferable. If Philips Respironics nds that a Product returned for service or the issue raised is not covered under
this limited warranty, Philips Respironics may charge an evaluation fee and return shipping.
What Philips Respironics will do: If a Product does not meet the warranty above in the rst 90 days after the original
shipment date, Philips Respironics will replace the device with a new Product. Thereafter, if a Product fails to conform
to the warranties set forth above during the applicable warranty period, Philips Respironics will repair or replace
the Product or refund the original purchase price, in Philips Respironics sole discretion. Philips Respironics may
use new or remanufactured assemblies, components, and parts in repair and new or recertied refurbished devices
for replacement. The balance of the original warranty period will apply to any Product or component of a Product
repaired or replaced under this warranty.
Warranty Disclaimer; Limitation of Liability: EXCEPT AS SET FORTH IN THIS LIMITED WARRANTY, PHILIPS
RESPIRONICS MAKES NO WARRANTIES, EXPRESSED OR IMPLIED, STATUTORY OR OTHERWISE, REGARDING THE
PRODUCT OR ITS QUALITY OR PERFORMANCE. PHILIPS RESPIRONICS SPECIFICALLY DISCLAIMS THE IMPLIED
WARRANTY OF MERCHANTABILITY AND THE IMPLIED WARRANTY OF FITNESS FOR A PARTICULAR PURPOSE. IN
NO EVENT WILL PHILIPS RESPIRONICS MAXIMUM LIABILITY UNDER THESE WARRANTIES EXCEED THE ORIGINAL
PURCHASE PRICE OR WILL PHILIPS RESPIRONICS BE LIABLE FOR ANY ECONOMIC LOSS, LOSS OF PROFITS,
OVERHEAD, OR SPECIAL, INCIDENTAL, OR CONSEQUENTIAL DAMAGES. Repair, replacement, or return of purchase
price by Philips Respironics is the original purchaser’s sole and exclusive remedy under this warranty.
This warranty gives you specic legal rights, and you may also have other rights that vary from state to state. Some
states do not allow the exclusion or limitation of incidental or consequential damages, so the above exclusion and
limitations may not apply to you.
How to get warranty support: Patients, contact your local authorized Philips Respironics dealer. Dealers, contact
Respironics, Inc. at:
1001 Murry Ridge Lane
Murrysville, Pennsylvania 15668-8550
+1-724-387-4000
Limited Warranty

23

1140901
1140901 R05
JDW 10/26/2022
EN-CA
Respironics Inc.
1001 Murry Ridge Lane
Murrysville, PA 15668 USA
Respironics Deutschland GmbH & Co. KG
Gewerbestrasse 17
82211 Herrsching, Germany
1140901
