THIS INSTRUCTION BOOKLET CONTAINS IMPORTANT SAFETY INFORMATION. PLEASE READ AND KEEP FOR FUTURE REFERENCE.
EN DE FR ES IT PL
USER'S MANUAL/HANDBUCH
/MANUEL DE L'UTILISATEUR/MANUAL DEL USUARIO
/MANUALE UTENTE/INSTRUKCJA OBSŁUGI
HZ10079NA
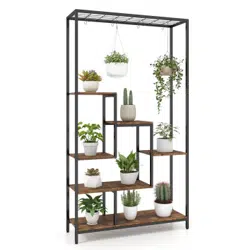
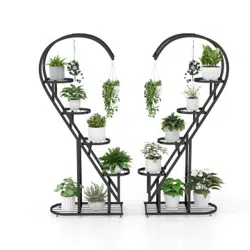
Plant Stand / Pflanzentreppe
/ Étagère pour Plantes / Estantería para Plantas /
Supporto per Vaso di Fiori / Regał na kwiaty
EN
DE
FR
ES
IT
PL
With your inspiring rating, COSTWAY will be more consistent to offer you EASY
SHOPPING EXPERIENCE, GOOD PRODUCTS and EFFICIENT SERVICE!
Mit Ihrer inspirierenden Bewertung wird COSTWAY konsistenter sein, um Ihnen EIN
SCHÖNES EINKAUFSERLEBNIS, GUTE PRODUKTE und EFFIZIENTEN SERVICE zu
bieten!
Avec votre évaluation inspirante, COSTWAY continuera à fournir une EXPÉRIENCE
D’ACHAT PRATIQUE, des PRODUITS DE QUALITÉ et un SERVICE EFFICACE !
Con su calificación inspiradora, COSTWAY será más consistente para ofrecerle
EXPERIENCIA DE COMPRA FÁCIL, BUENOS PRODUCTOS y SERVICIO EFICIENTE.
Con la tua valutazione incoraggiante, COSTWAY sarà più coerente per offrirti
ESPERIENZA DI ACQUISTO FACILE, BUONI PRODOTTI e SERVIZIO EFFICIENTE!
Dzięki twojej opinii COSTWAY będzie mógł oferować jeszcze WYGODNIEJSZE
ZAKUPY, LEPSZE PRODUKTY i SPRAWNIEJSZĄ OBSŁUGĘ KLIENTA.
US office: Fontana UK office: Ipswich AU office: Truganina
DE office: FDS GmbH, Neuer Höltigbaum 36, 22143 Hamburg, Deutschland
FR office: Saint Vigor d'Ymonville
PL office: Gdańsk
02
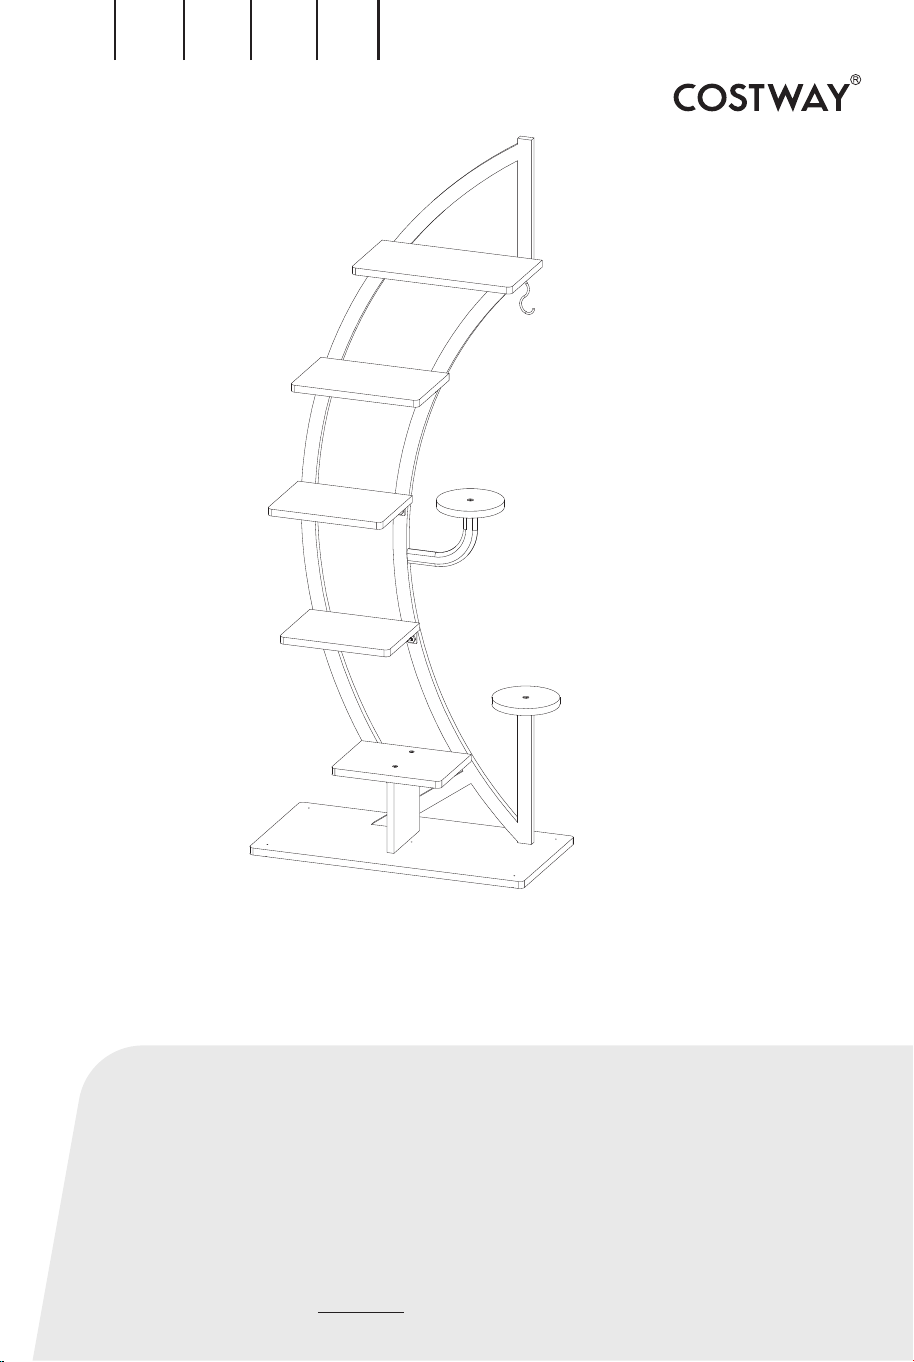
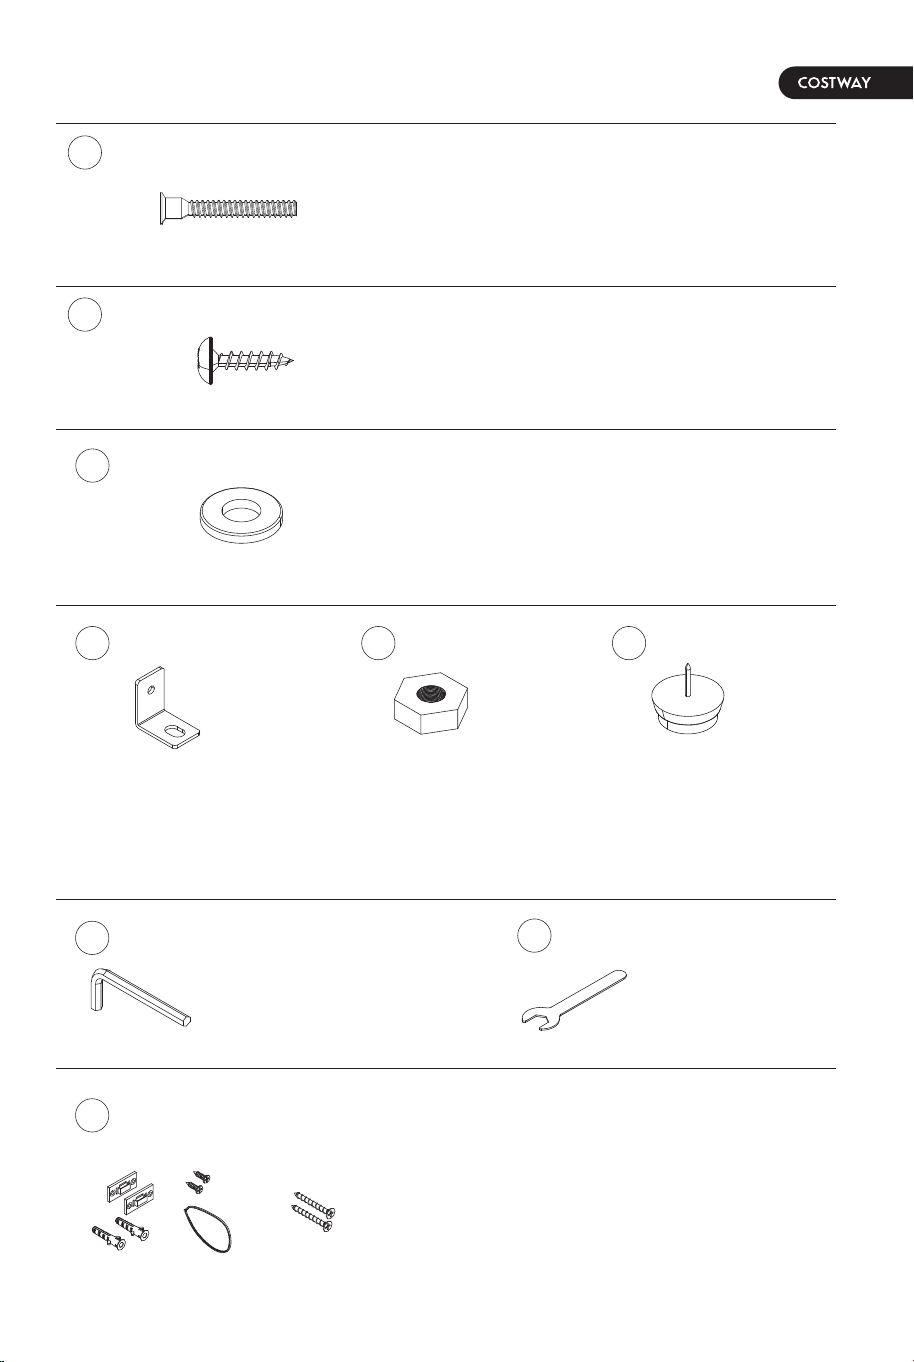
A B C
D E F x2
G H I J
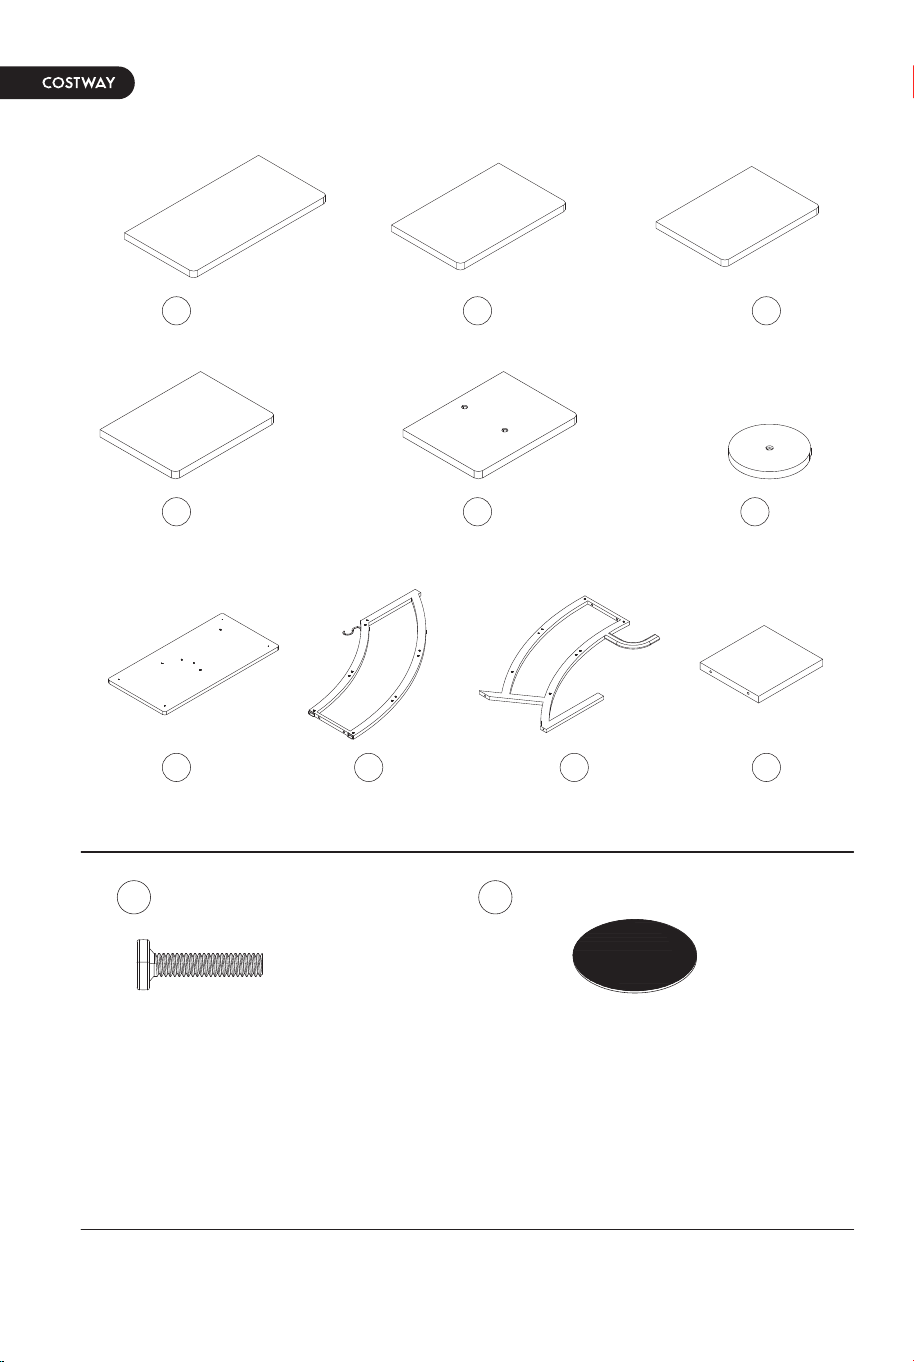
SCREW-spare:1
Schraube-Ersatzteil: 1
VIS-Pièce de rechange: 1
TORNILLO-de recambio: 1
VITE-di ricambio:1
ŚRUBA-zapasowa:1
M6*25mm
1
X14
2
X4
PERFECT STICKERS/
Aufkleber/
AUTOCOLLANTS PARFAITS/
ADHESIVO PERFECTO/
ADESIVO PERFETTO/
ZAŚLEPKA
Ø21mm
3
X14
SCREW-spare:1
Schraube-Ersatzteil: 1
VIS-Pièce de rechange: 1
TORNILLO-de recambio: 1
VITE-di ricambio:1
ŚRUBA-zapasowa:1
FLAT PAD spare:1
Unterlegscheibe Ersatzteil: 1
RONDELLE PLAT-Pièce de rechange : 1
ARANDELA PLANA-de recambio: 1
RONDELLA-di ricambio:1
PODKŁADKA PŁASKA-zapasowa: 1
Ø6.3*40mm
5
X10
6
X8
9
11
X1
7
X8
10
X1
8
X5
SCREW/Schraube/
VIS/TORNILLO/
VITE/WKRĘT
SCREW/Schraube/
VIS/TORNILLO/
VITE/WKRĘT
4
X8
Ø4*14mm
Ø18* (Ø8)
*1.5mm
BRACKET/Winkelverbinder/
SUPPORT/SOPORTE/
STAFFA/WSPORNIK
28*28*20mm
NUT/Mutter/ÉCROU/
TUERCA/DADO/
NAKRĘTKA
M6
FOOT PAD/Fußpolster/
COUSSIN DE PIED/
ALMOHADILLA DE PIE/
PIEDINO/NÓŻKA
Ø22*13.5mm
HEX KEY/Inbusschlüssel/
CLÉ ALLEN/
LLAVE HEXAGONAL/
CHIAVE A BRUGOLA/
KLUCZ IMBUSOWY
4*65mm
WRENCH/
Schraubenschlüssel/
CLÉ/LLAVE/CHIAVE/
KLUCZ
ANTI-TIPPING HARDWARE/
Kippsicherung/
ACCESSOIRES ANTI BASCULE/
ACCESORIO ANTIVUELCO/
ACCESSORI ANTIRIBALTAMENTO/
ZESTAW CZĘŚCI MOCUJACYCH DO ŚCIANY
Ø3.5*14mm
X1 set/juego/zestaw
Ø4*30mm
03
02
A B C
D E F x2
G H I J
SCREW-spare:1
Schraube-Ersatzteil: 1
VIS-Pièce de rechange: 1
TORNILLO-de recambio: 1
VITE-di ricambio:1
ŚRUBA-zapasowa:1
M6*25mm
1
X14
2
X4
PERFECT STICKERS/
Aufkleber/
AUTOCOLLANTS PARFAITS/
ADHESIVO PERFECTO/
ADESIVO PERFETTO/
ZAŚLEPKA
Ø21mm
3
X14
SCREW-spare:1
Schraube-Ersatzteil: 1
VIS-Pièce de rechange: 1
TORNILLO-de recambio: 1
VITE-di ricambio:1
ŚRUBA-zapasowa:1
FLAT PAD spare:1
Unterlegscheibe Ersatzteil: 1
RONDELLE PLAT-Pièce de rechange : 1
ARANDELA PLANA-de recambio: 1
RONDELLA-di ricambio:1
PODKŁADKA PŁASKA-zapasowa: 1
Ø6.3*40mm
5
X10
6
X8
9
11
X1
7
X8
10
X1
8
X5
SCREW/Schraube/
VIS/TORNILLO/
VITE/WKRĘT
SCREW/Schraube/
VIS/TORNILLO/
VITE/WKRĘT
4
X8
Ø4*14mm
Ø18* (Ø8)
*1.5mm
BRACKET/Winkelverbinder/
SUPPORT/SOPORTE/
STAFFA/WSPORNIK
28*28*20mm
NUT/Mutter/ÉCROU/
TUERCA/DADO/
NAKRĘTKA
M6
FOOT PAD/Fußpolster/
COUSSIN DE PIED/
ALMOHADILLA DE PIE/
PIEDINO/NÓŻKA
Ø22*13.5mm
HEX KEY/Inbusschlüssel/
CLÉ ALLEN/
LLAVE HEXAGONAL/
CHIAVE A BRUGOLA/
KLUCZ IMBUSOWY
4*65mm
WRENCH/
Schraubenschlüssel/
CLÉ/LLAVE/CHIAVE/
KLUCZ
ANTI-TIPPING HARDWARE/
Kippsicherung/
ACCESSOIRES ANTI BASCULE/
ACCESORIO ANTIVUELCO/
ACCESSORI ANTIRIBALTAMENTO/
ZESTAW CZĘŚCI MOCUJACYCH DO ŚCIANY
Ø3.5*14mm
X1 set/juego/zestaw
Ø4*30mm
03

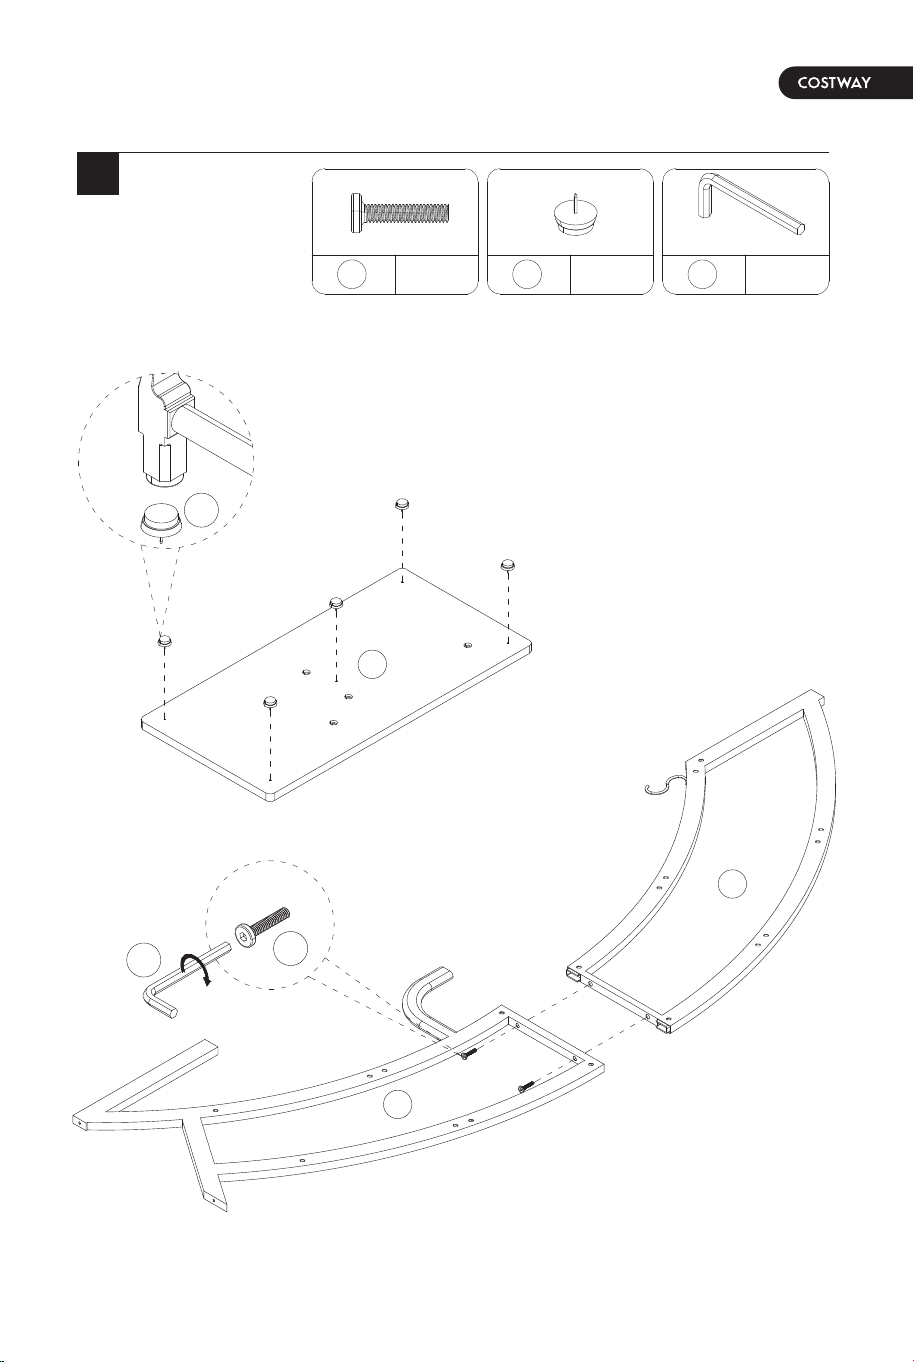
04 05
A
B
C
D
E
G
J
I
F
F
H
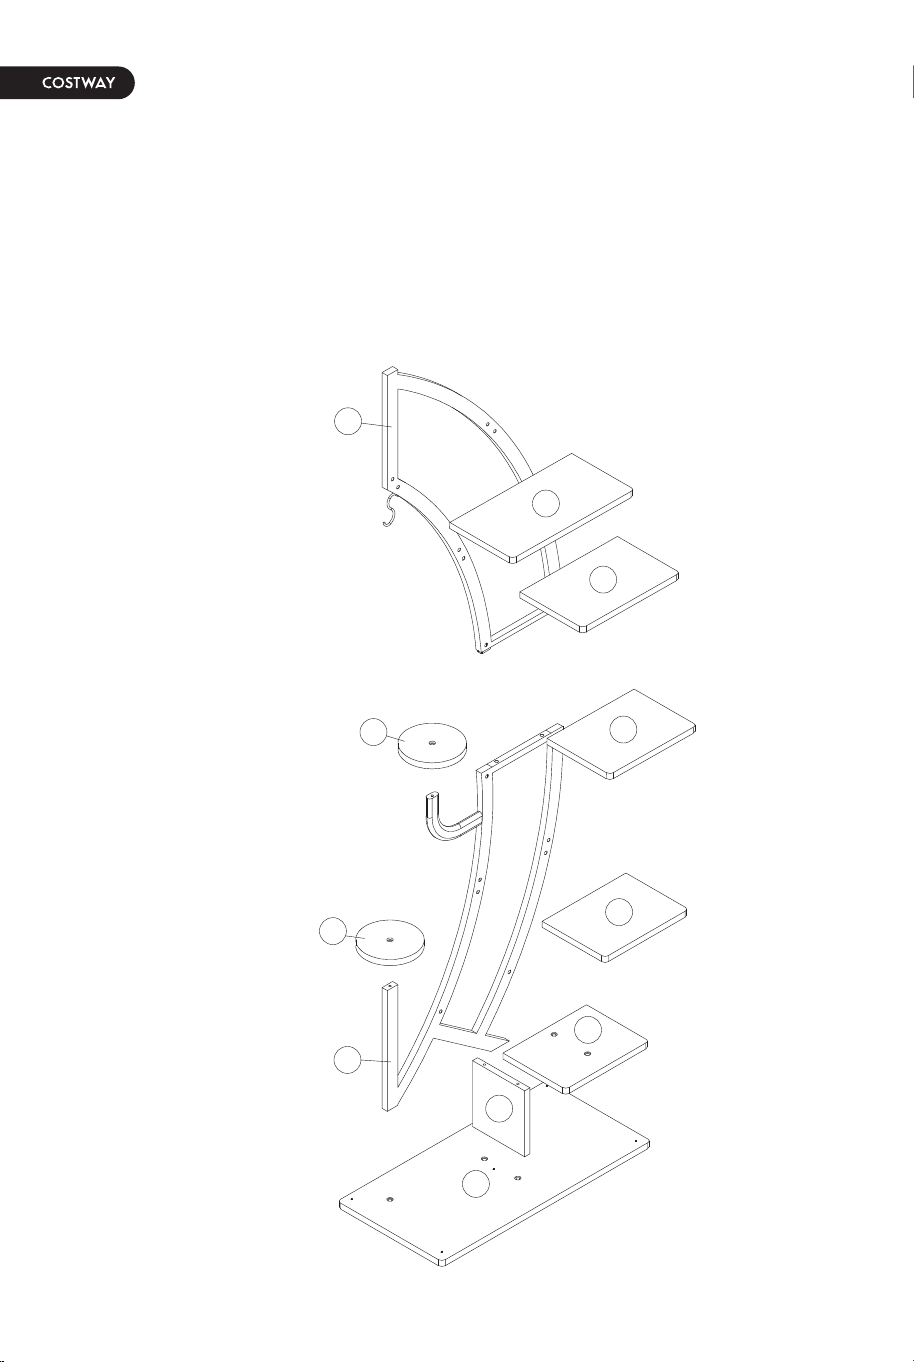
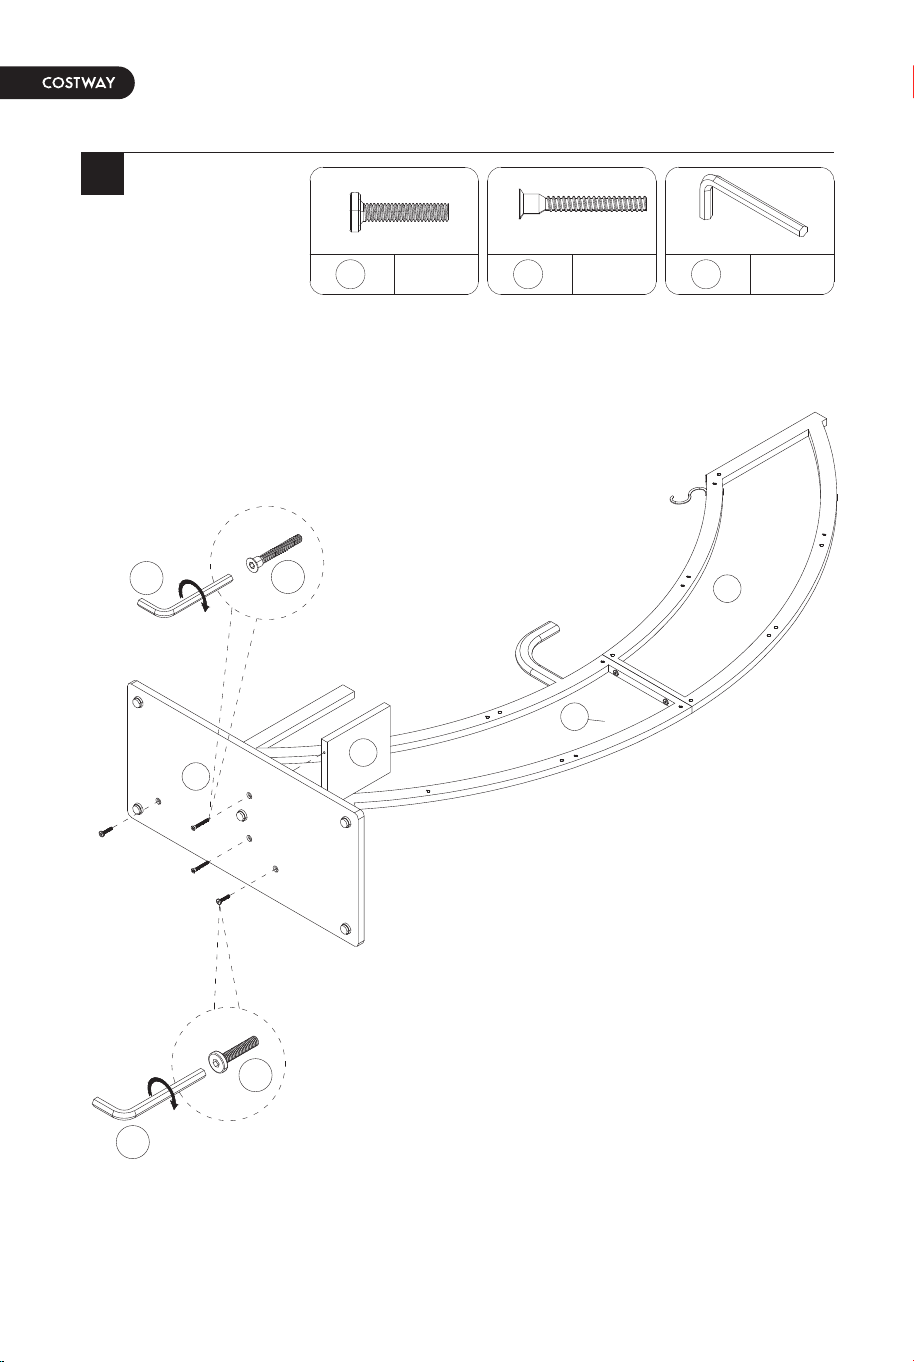
ASSEMBLY PLAN 1 (LEFT)/Montageanleitung 1 (Links)/
ASSEMBLAGE 1 (GAUCHE)/MONTAJE 1 (IZQUIERDA)/
MONTAGGIO 1 (SINISTRO)/
PIERWSZY WARIANT MONTAŻU (LEWY)
X2
1
X5
8
X1
9
M6*25mm
8
1
9
G
H
I
1
04 05
A
B
C
D
E
G
J
I
F
F
H
ASSEMBLY PLAN 1 (LEFT)/Montageanleitung 1 (Links)/
ASSEMBLAGE 1 (GAUCHE)/MONTAJE 1 (IZQUIERDA)/
MONTAGGIO 1 (SINISTRO)/
PIERWSZY WARIANT MONTAŻU (LEWY)
X2
1
X5
8
X1
9
M6*25mm
8
1
9
G
H
I
1
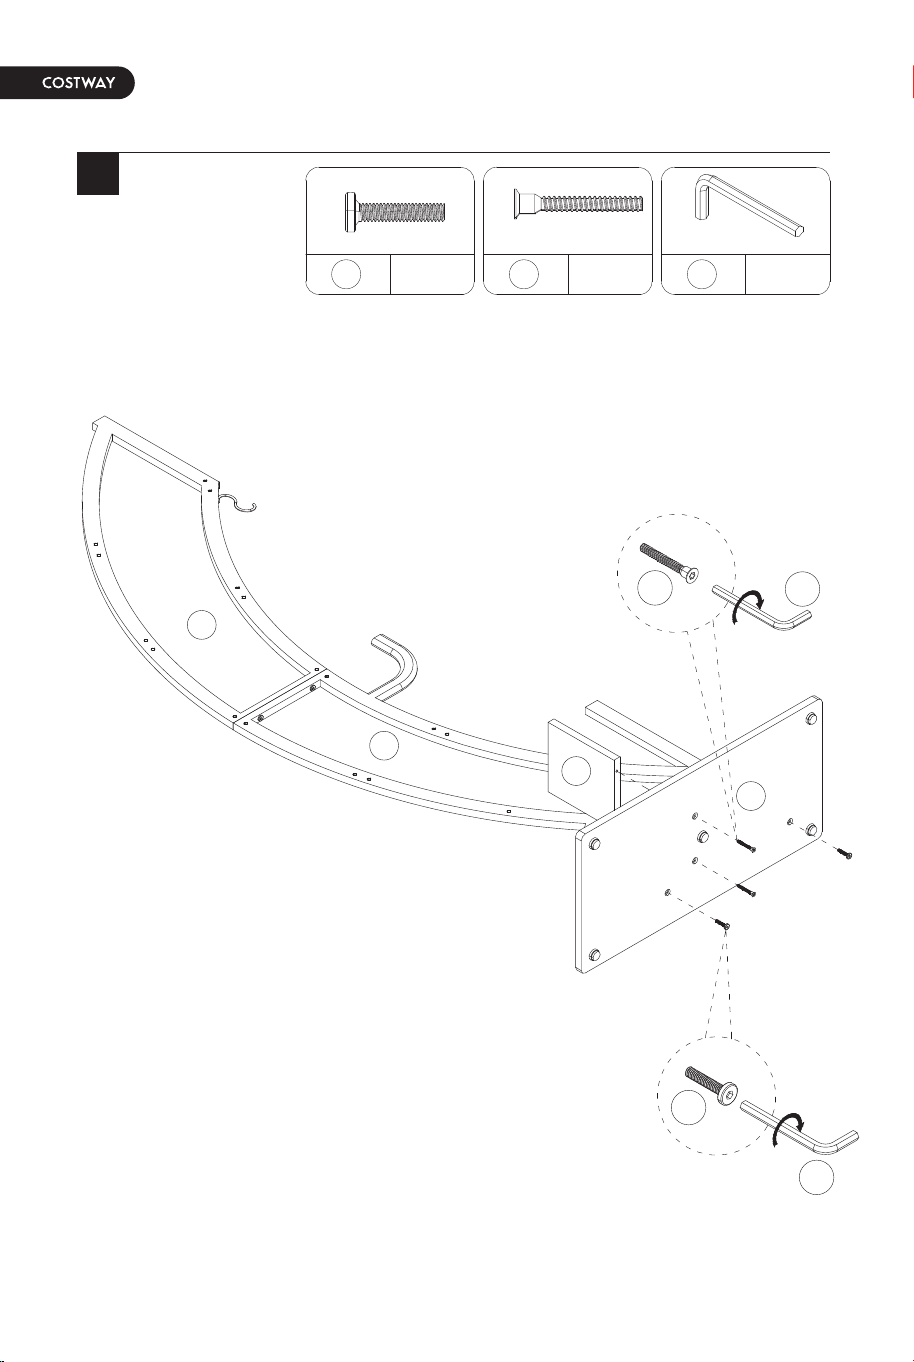
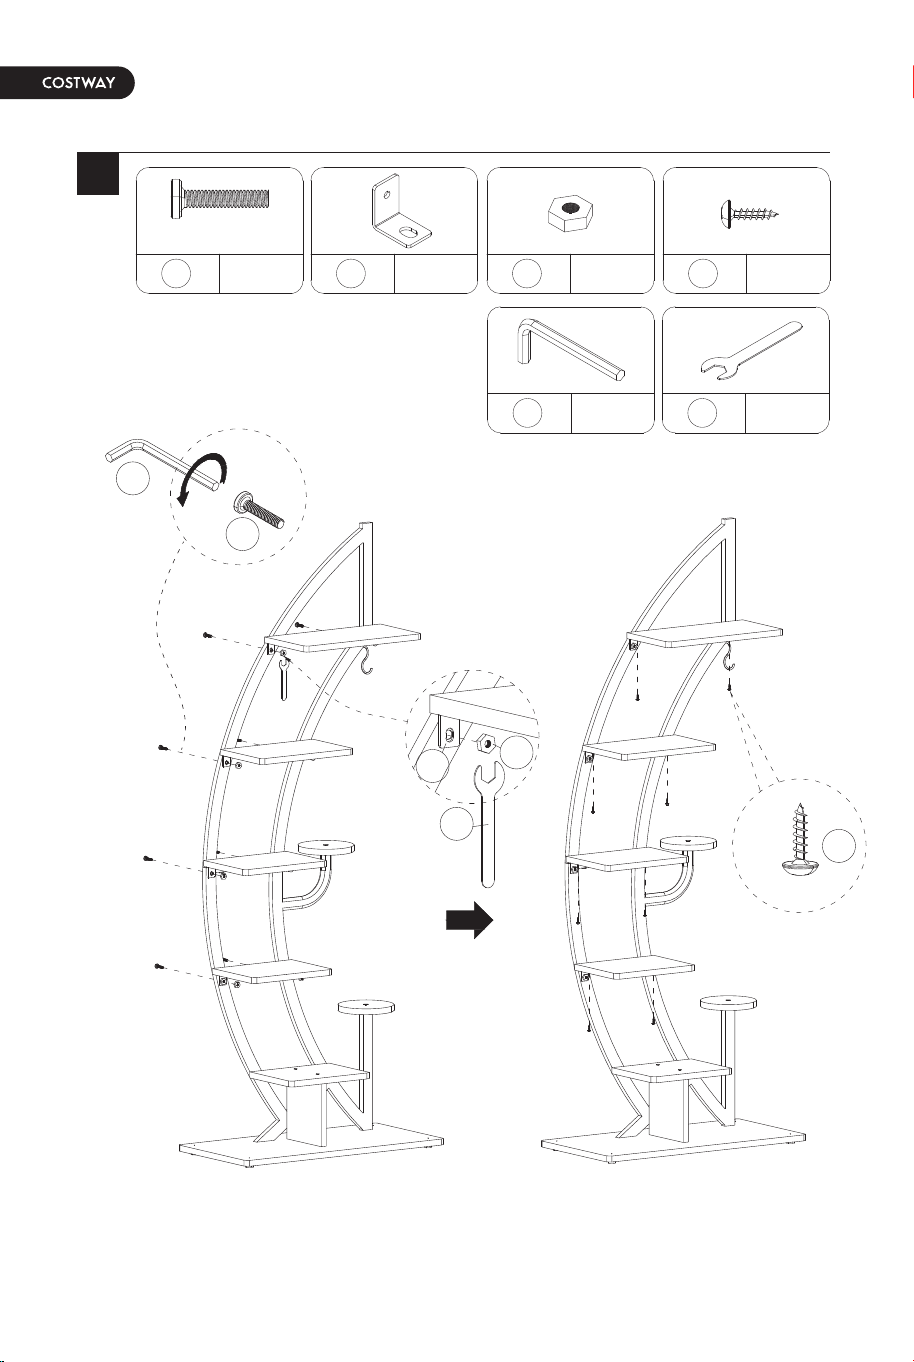
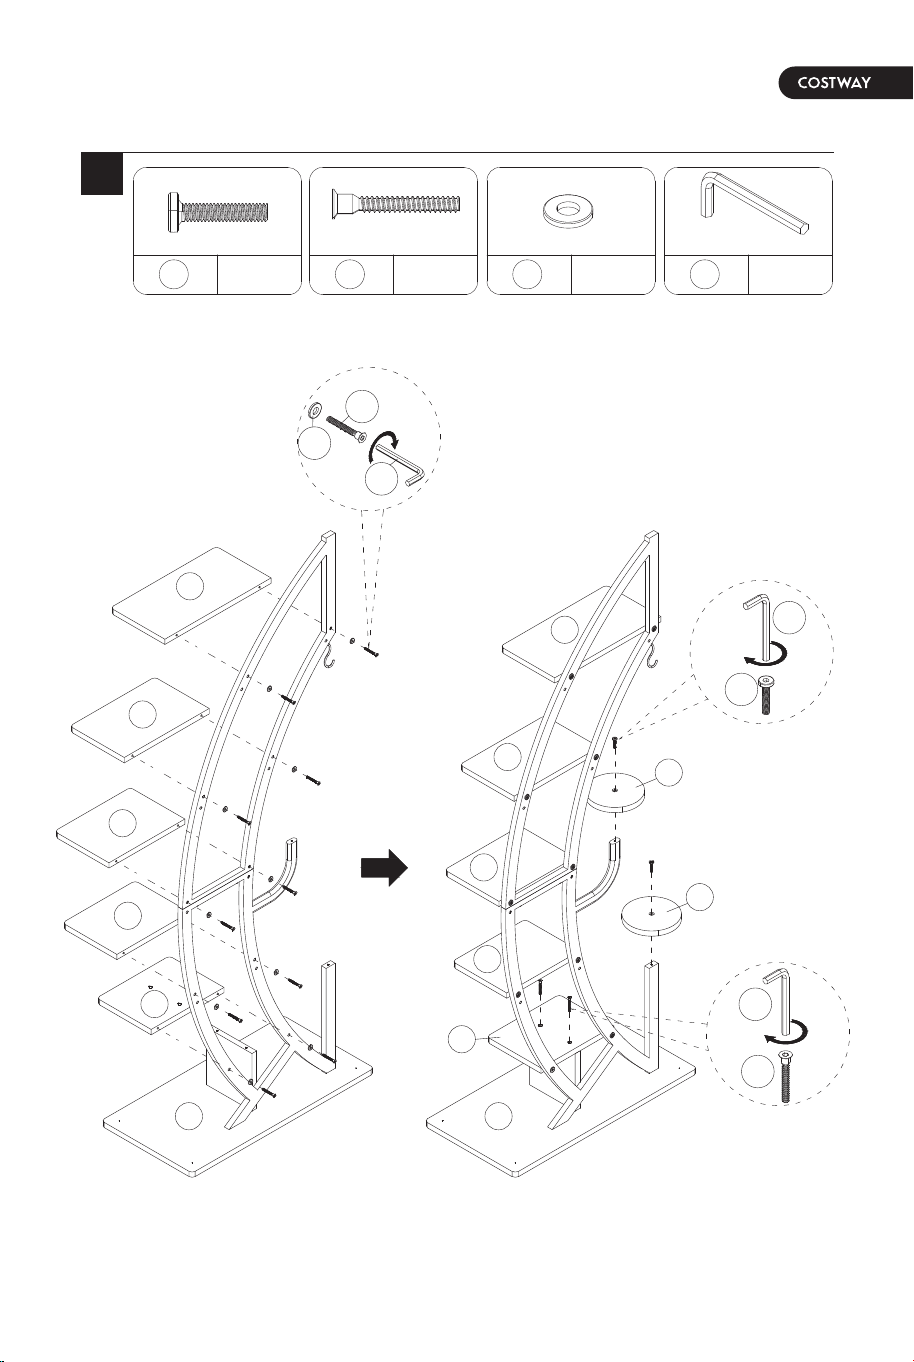
06 07
2
X2
1
X2
3
M6*25mm
X1
9
Ø6.3*40mm
G
J
1
9
3
9
H
I
3
X12
3
X10
5
X1
9
Ø6.3*40mm
X2
1
M6*25mm
A
B
C
D
E
G
9
3
5
1
9
A
B
C
D
E
3
9
G
H
I
F
F
06 07
2
X2
1
X2
3
M6*25mm
X1
9
Ø6.3*40mm
G
J
1
9
3
9
H
I
3
X12
3
X10
5
X1
9
Ø6.3*40mm
X2
1
M6*25mm
A
B
C
D
E
G
9
3
5
1
9
A
B
C
D
E
3
9
G
H
I
F
F
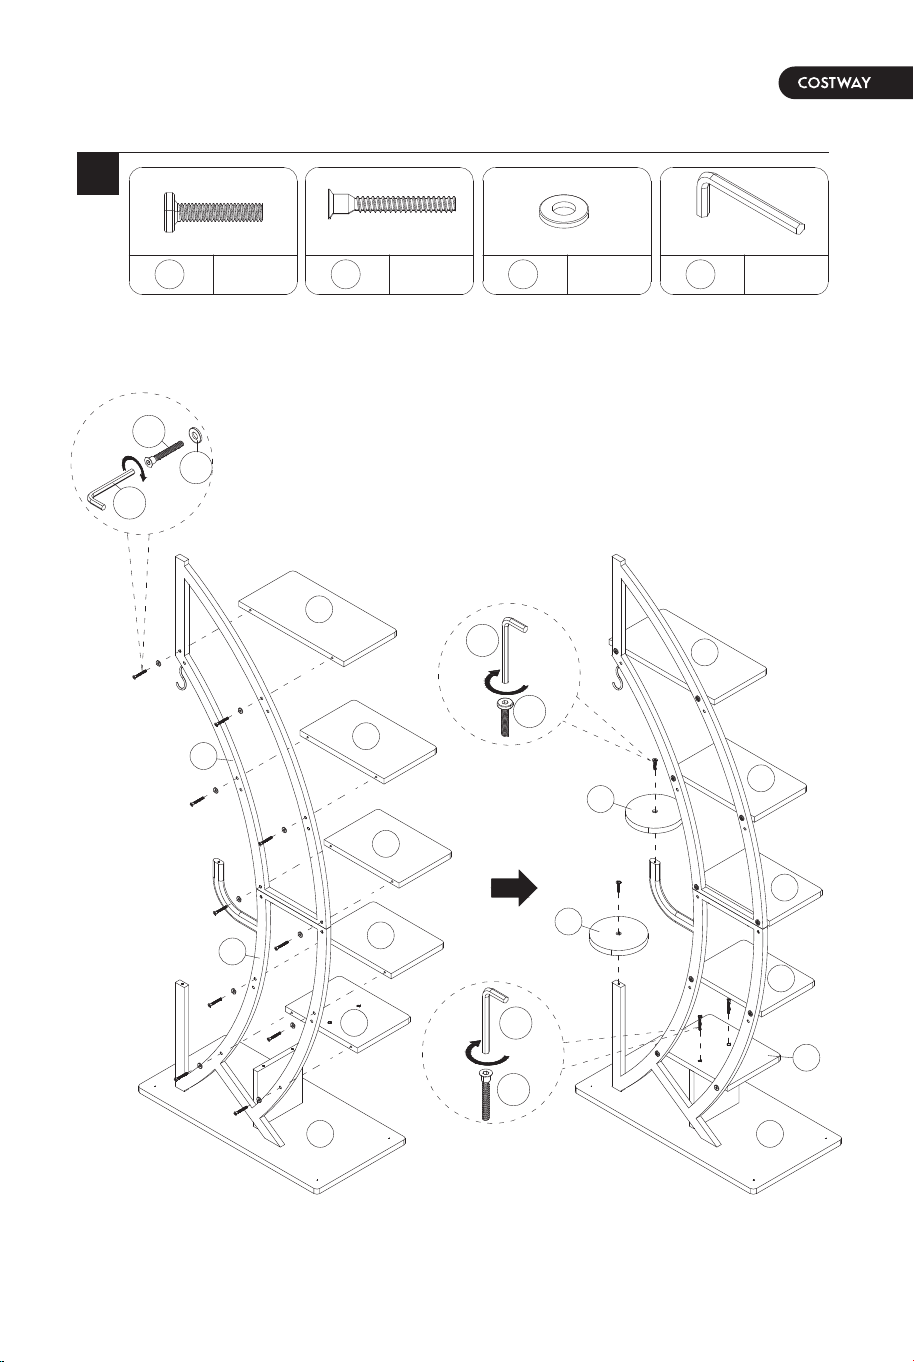
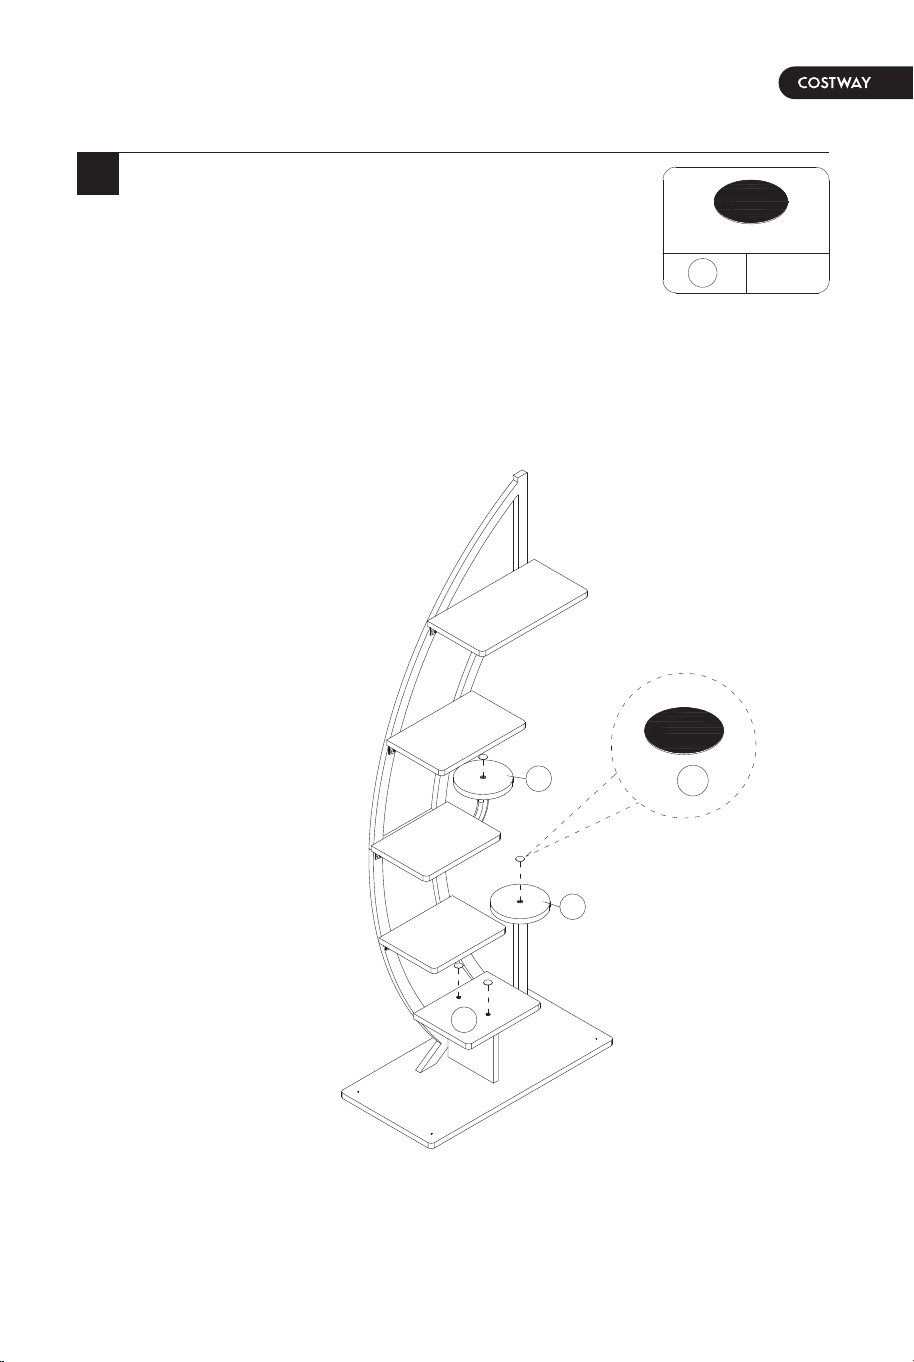
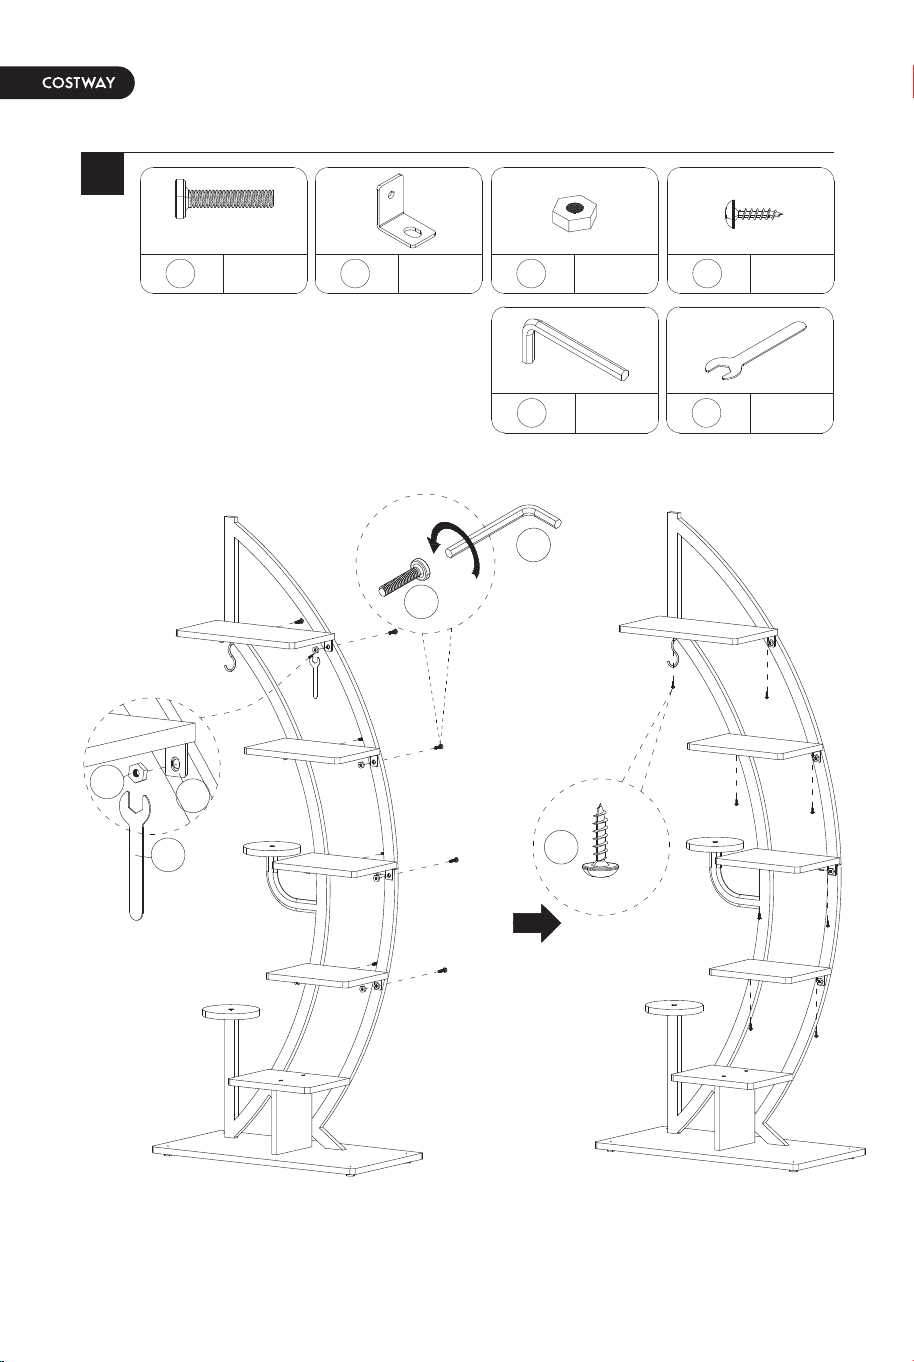
08 09
X8
6
X8
7
X8
4
X8
1
M6*25mm
X1
9
X1
10
Ø4*14mm
4
5
7
10
1
9
6
4
X4
2
2
F
F
E
08 09
X8
6
X8
7
X8
4
X8
1
M6*25mm
X1
9
X1
10
Ø4*14mm
4
5
7
10
1
9
6
4
X4
2
2
F
F
E
ASSEMBLY PLAN 1 (LEFT)/
Montageanleitung 2 (Rechts)/
ASSEMBLAGE 1 (DROITE)/
MONTAJE 2 (DERECHA)/MONTAGGIO 2 (DESTRO)
DRUGI WARIANT MONTAŻU (PRAWY)
10 11
A
B
C
D
E
G
J
I
F
F
H
X2
1
X5
8
X1
9
M6*25mm
1
8
1
9
G
H
I
ASSEMBLY PLAN 1 (LEFT)/
Montageanleitung 2 (Rechts)/
ASSEMBLAGE 1 (DROITE)/
MONTAJE 2 (DERECHA)/MONTAGGIO 2 (DESTRO)
DRUGI WARIANT MONTAŻU (PRAWY)
10 11
A
B
C
D
E
G
J
I
F
F
H
X2
1
X5
8
X1
9
M6*25mm
1
8
1
9
G
H
I
12 13
2
X2
1
X2
3
M6*25mm
X1
9
Ø6.3*40mm
3
X12
3
X10
5
X1
9
Ø6.3*40mm
X2
1
M6*25mm
G
J
1
9
3
9
H
I
A
B
C
D
E
G
9
3
5
1
9
A
B
C
D
E
3
9
G
F
F
12 13
2
X2
1
X2
3
M6*25mm
X1
9
Ø6.3*40mm
3
X12
3
X10
5
X1
9
Ø6.3*40mm
X2
1
M6*25mm
G
J
1
9
3
9
H
I
A
B
C
D
E
G
9
3
5
1
9
A
B
C
D
E
3
9
G
F
F
14 15
X8
6
X8
7
X8
4
X8
1
M6*25mm
X1
9
X1
10
Ø4*14mm
4
5
X4
2
1
9
7
10
6
4
2
F
F
E
14 15
X8
6
X8
7
X8
4
X8
1
M6*25mm
X1
9
X1
10
Ø4*14mm
4
5
X4
2
1
9
7
10
6
4
2
F
F
E
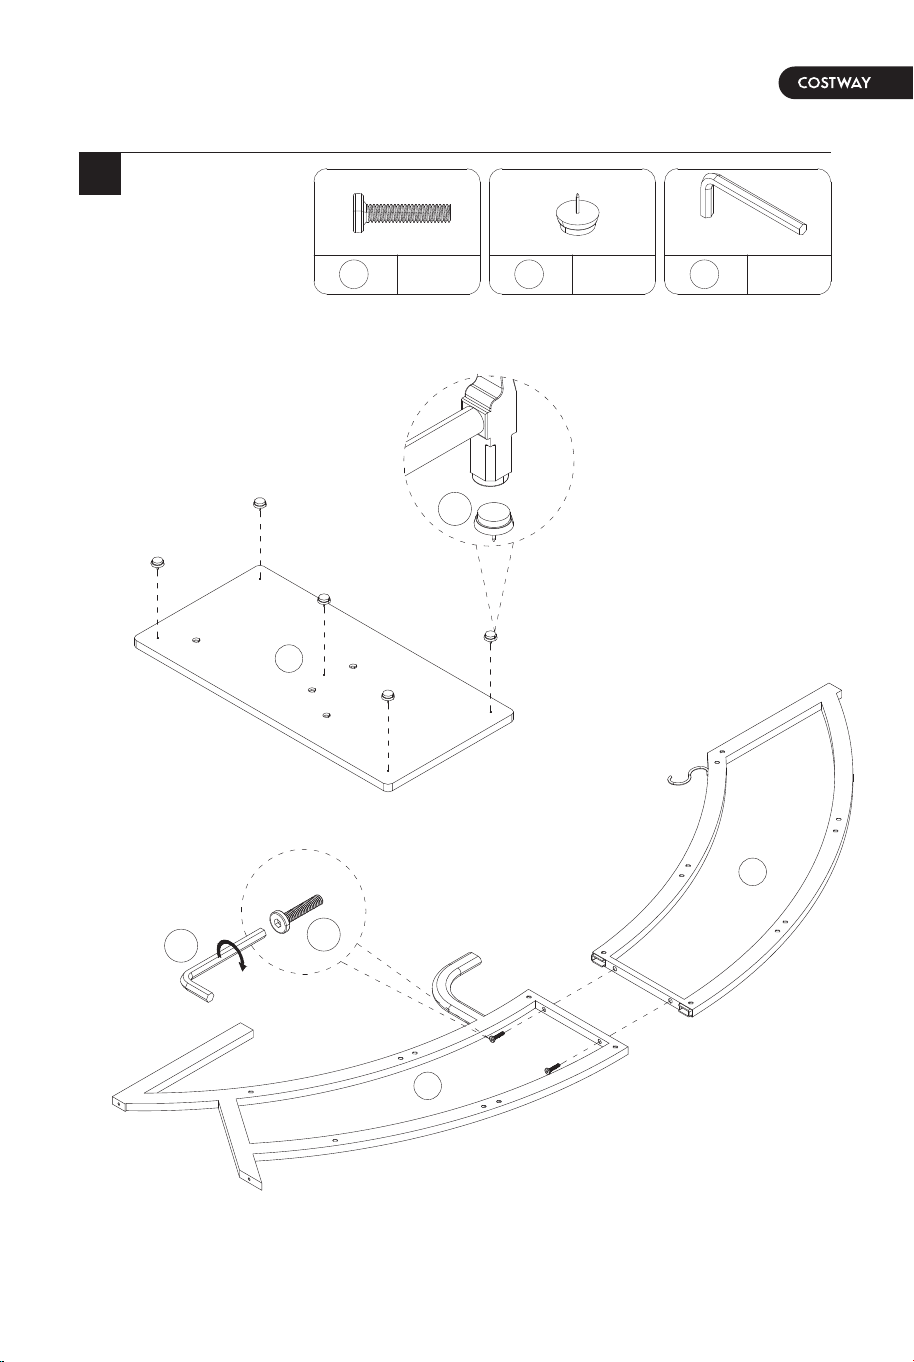
16 17
6 EN
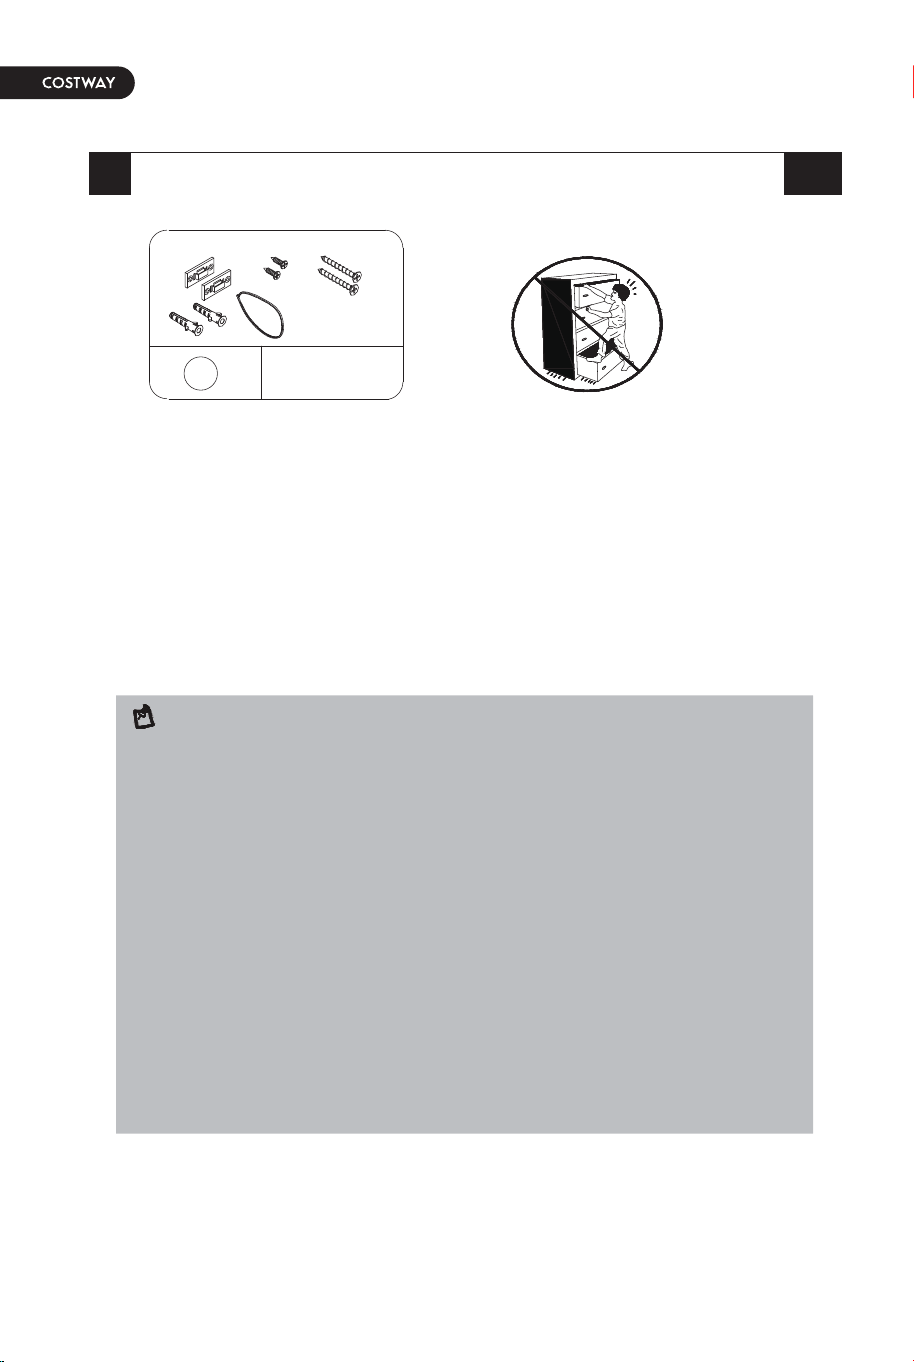
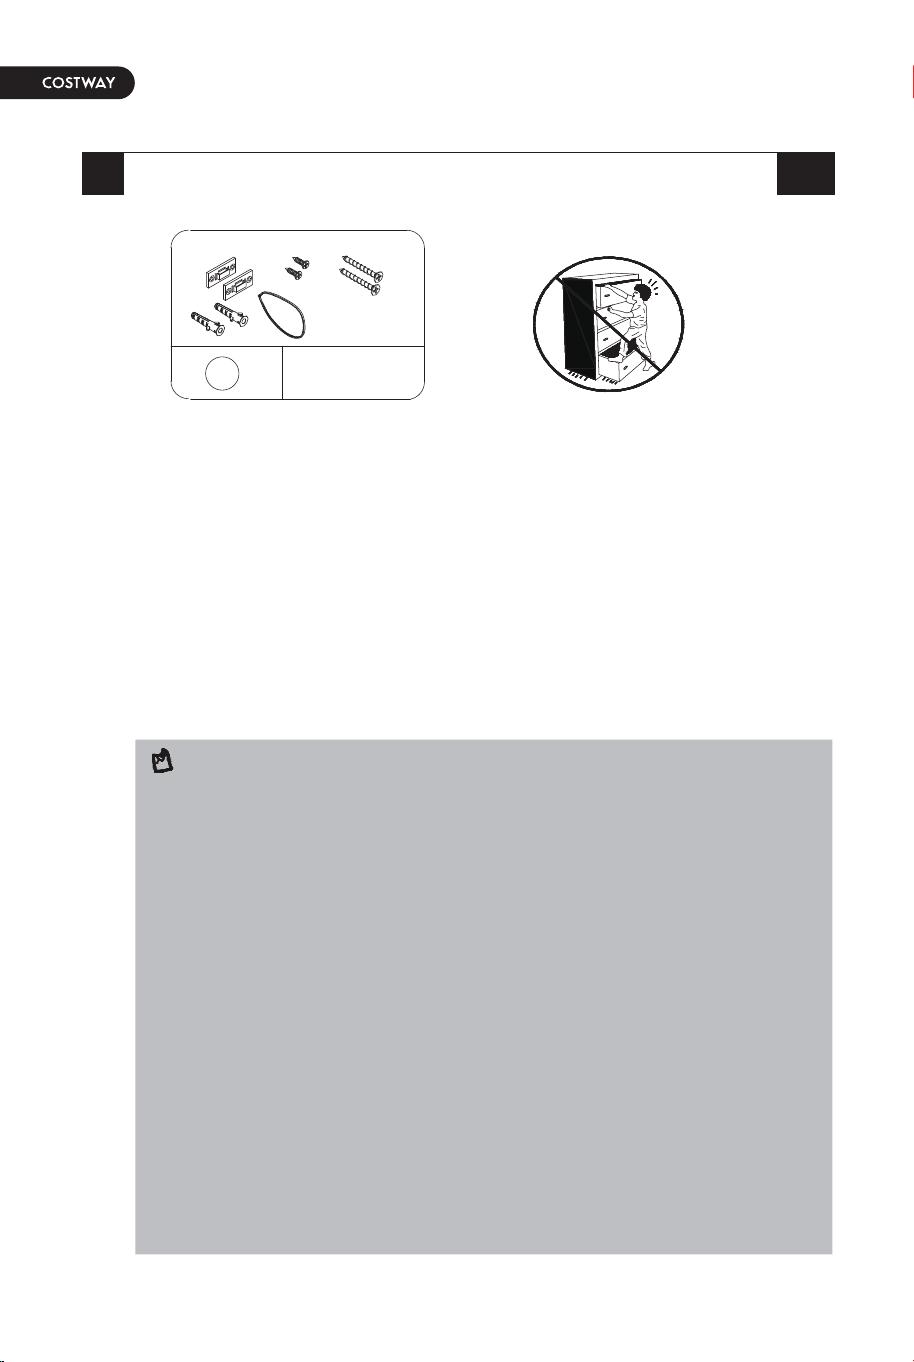
Ø3.5*14mm
11 X1 set
Ø4*30mm
We have included a set of tipping restraint hardware for this
unit. You must install this hardware to prevent accidents or
injuries that can result from the unit falling.
When properly installed, this restraint can provide protection
against the unexpected tipping of the unit due to small
tremors, bumps or climbing. We strongly recommend
mounting this hardware to a wall stud and your unit.
NOTE: The tipping restraint hardware included is for
wooden stud wall construction. It must be attached to a
wall stud. Depending upon your wall construction,
different anchor hardware may be required. Please
contact your local hardware store for assistance. Young
children can be seriously injured by tipping furniture. You
must install the tipping restraint hardware with the unit to
prevent the unit from tipping, causing any accidents or
damage. The tipping restraints are intended only as a
deterrent and are not a substitute for proper adult
supervision. The tipping restraints are not earthquake
restraints. If you wish to add the extra security of
earthquake restraints, they must be purchased and
installed separately.
1
WALL
2
4
5
6
WALL
WALL
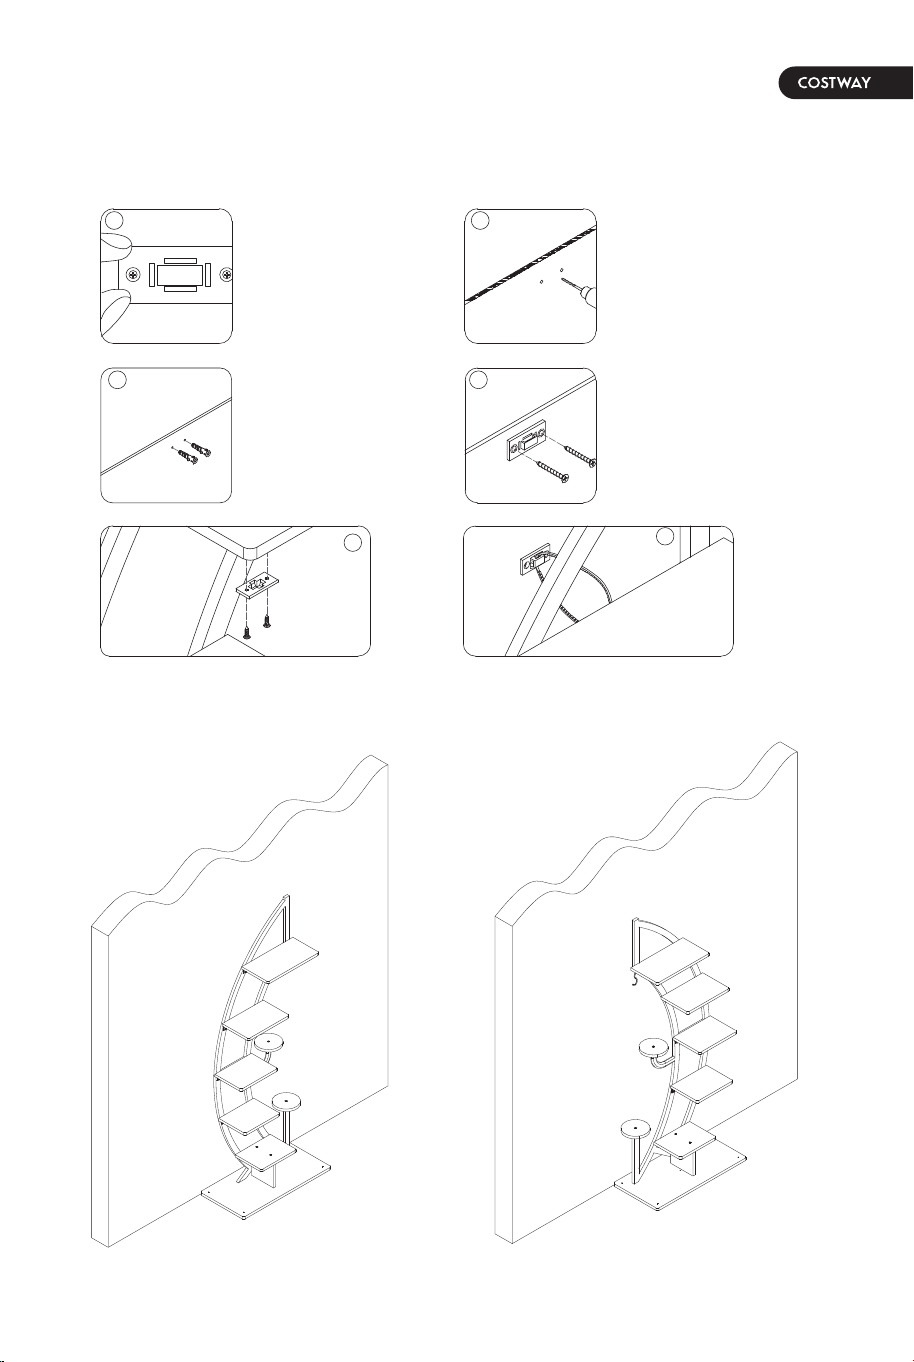
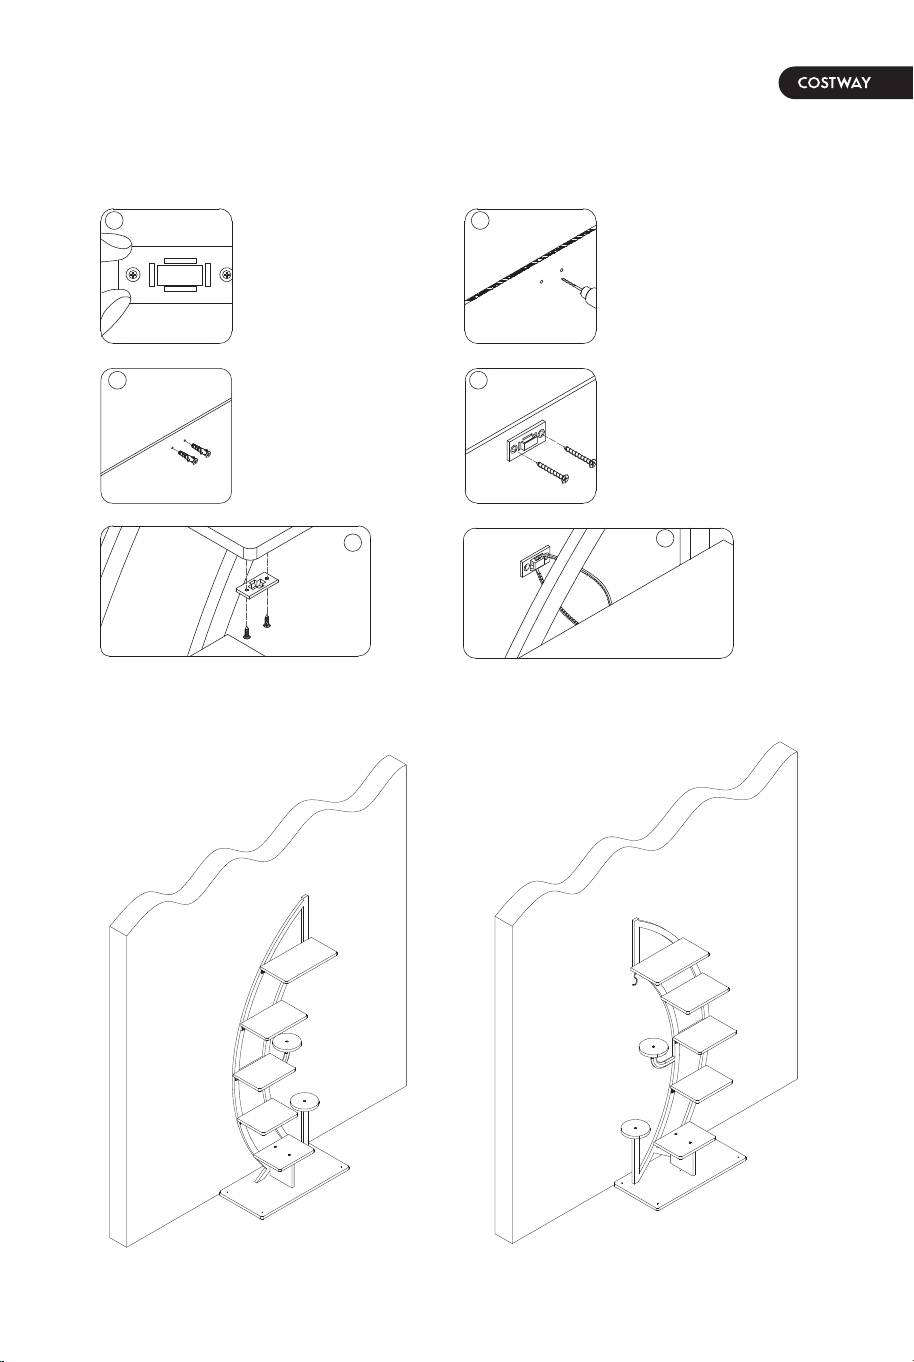
Install the tipping restraint hardware
Make marks
on the wall .
Drill two φ6 holes
in the wall.
Put two anchors
in the holes.
Use short screws to fix
the device on the back
of the board (A) .
Fix the device on
the wall with long
screws.
WALL
3
WALL

16 17
6 EN
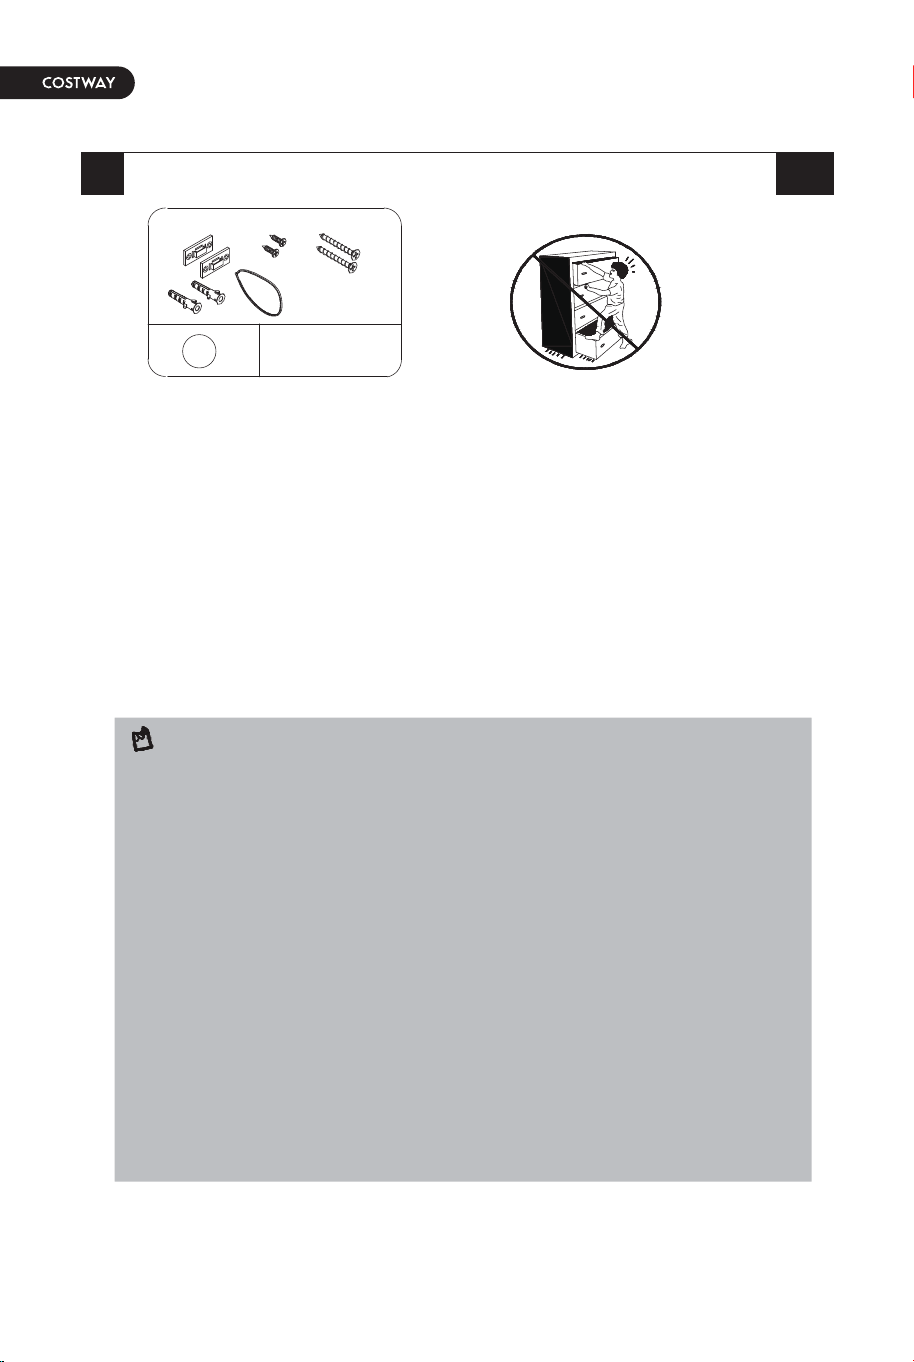
Ø3.5*14mm
11 X1 set
Ø4*30mm
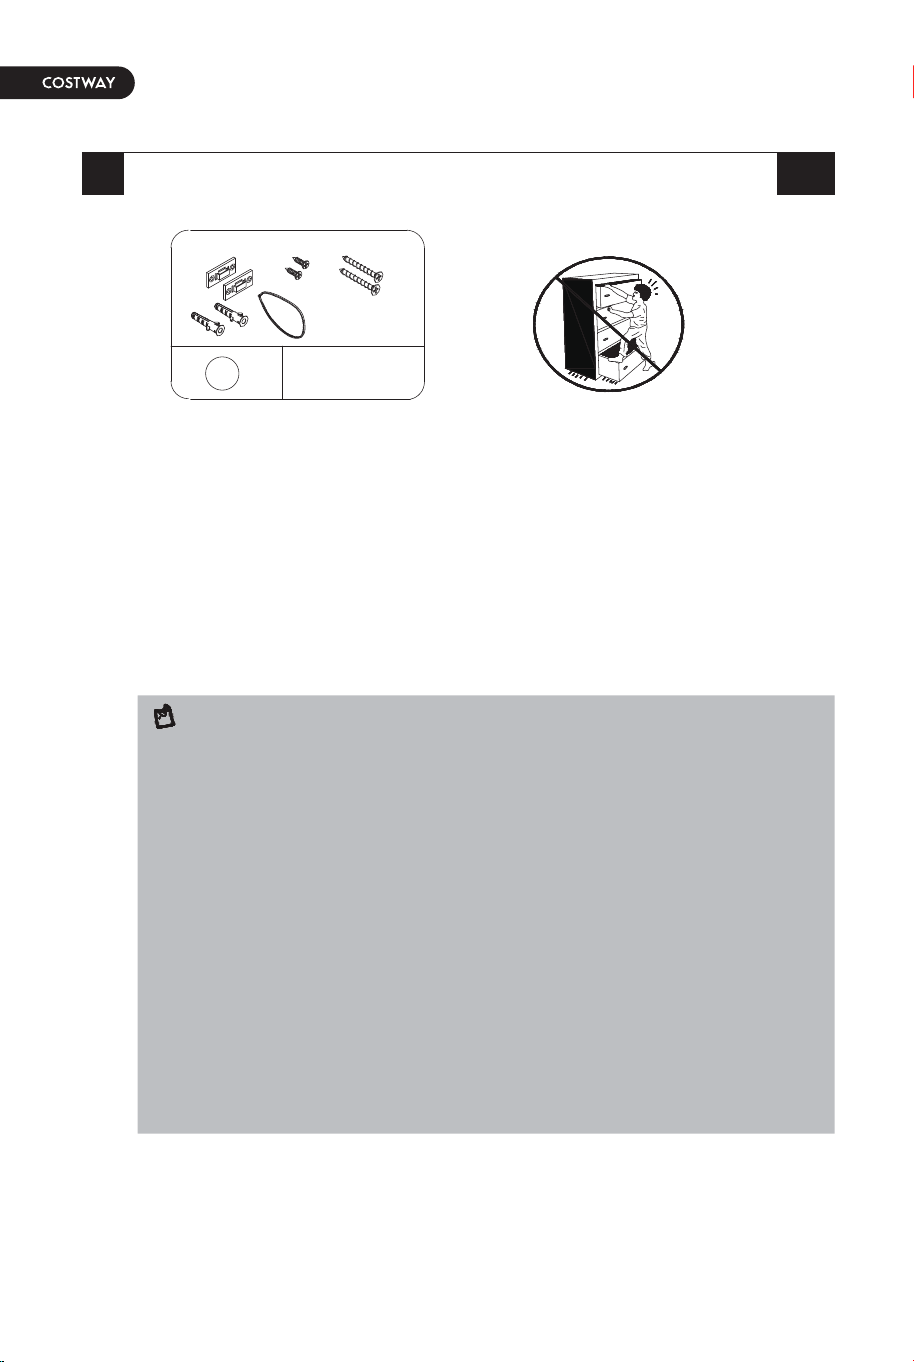
We have included a set of tipping restraint hardware for this
unit. You must install this hardware to prevent accidents or
injuries that can result from the unit falling.
When properly installed, this restraint can provide protection
against the unexpected tipping of the unit due to small
tremors, bumps or climbing. We strongly recommend
mounting this hardware to a wall stud and your unit.
NOTE: The tipping restraint hardware included is for
wooden stud wall construction. It must be attached to a
wall stud. Depending upon your wall construction,
different anchor hardware may be required. Please
contact your local hardware store for assistance. Young
children can be seriously injured by tipping furniture. You
must install the tipping restraint hardware with the unit to
prevent the unit from tipping, causing any accidents or
damage. The tipping restraints are intended only as a
deterrent and are not a substitute for proper adult
supervision. The tipping restraints are not earthquake
restraints. If you wish to add the extra security of
earthquake restraints, they must be purchased and
installed separately.
1
WALL
2
4
5
6
WALL
WALL
Install the tipping restraint hardware
Make marks
on the wall .
Drill two φ6 holes
in the wall.
Put two anchors
in the holes.
Use short screws to fix
the device on the back
of the board (A) .
Fix the device on
the wall with long
screws.
WALL
3
WALL
18 19
Ø3.5*14mm
11 X1 set
Ø4*30mm
Wir haben für diesen Artikel einen Satz
Kippsicherungselemente beigelegt. Sie müssen diese Teile
anbringen, um Unfälle oder Verletzungen zu vermeiden, die
durch das Herunterfallen des Geräts entstehen können.
Bei ordnungsgemäßer Montage kann diese Sicherung einen
Schutz gegen das unerwartete Umkippen des Geräts
aufgrund von kleinen Erschütterungen, Stößen oder Klettern
bieten. Es wird dringend empfohlen, diese Halterung an
einem Wandpfosten und an Ihrem Gerät zu befestigen.
HINWEIS: Die mitgelieferte Kippsicherung ist für
Holzständerwände gedacht. Sie muss an einem
Wandständer befestigt werden. Je nach Ihrer
Wandkonstruktion sind möglicherweise andere
Verankerungselemente erforderlich. Bitte wenden Sie sich
an Ihren örtlichen Baumarkt. Kleine Kinder können durch
kippende Möbel schwer verletzt werden. Sie müssen die
Kippsicherung zusammen mit dem Möbelstück montieren,
um zu verhindern, dass das Möbelstück kippt und Unfälle
oder Schäden verursacht. Die Kippsicherungen dienen nur
als Abschreckung und sind kein Ersatz für die Aufsicht
durch Erwachsene. Die Kippsicherungen sind keine
Erdbebensicherungen. Wenn Sie die zusätzliche Sicherheit
von Erdbebensicherungen wünschen, müssen diese
separat erworben und montiert werden.
6 DE
1
Wand
2
4
5
6
Wand
Montieren Sie die Beschläge für die Kippsicherung
Markierungen
an der Wand
anbringen.
Bohren Sie zwei
φ6-Löcher in die
Wand.
Stecke zwei
Dübel in die
Löcher.
Verwenden Sie kurze
Schrauben, um das Zubehör
auf der Rückseite der Platte zu
befestigen (A).
Befestigen Sie
das Zubehör mit
langen Schrauben
an der Wand.
Wand
3
Wand
Wand
6
Ø3.5*14mm
11 X1 set
Ø4*30mm
Nous avons inclus un ensemble d'éléments anti-basculement
pour cet appareil. Vous devez fixer ces pièces pour éviter les
accidents ou les blessures pouvant résulter de la chute du
produit. Lorsqu'il est correctement installé, cet accessoire
peut fournir une protection contre le renversement inattendu
de l'appareil en raison de petites vibrations, de chocs ou
d'escalade. Il est fortement recommandé de fixer ce support
à un poteau mural et à votre appareil.
REMARQUE: La protection anti-basculement fournie est
destinée aux murs à ossature bois. Il doit être fixé à un
poteau mural. Selon la construction du mur, un accessoire
d'ancrage différent peut être requis. Veuillez contacter
votre quincaillerie locale pour obtenir de l'aide. Les petits
enfants peuvent être gravement blessés par le
renversement des meubles. Il est nécessaire d'installer le
dispositif anti-basculement avec le meuble pour éviter
que celui-ci ne bascule, provoquant des accidents ou des
dommages. Les dispositifs anti-bascule ne sont utilisés
qu'à titre dissuasif et ne remplacent pas la surveillance
appropriée d'un adulte. Les accessoires de basculement
ne sont pas des accessoires antisismiques. Si vous voulez
la sécurité supplémentaire de la protection contre les
tremblements de terre, ceux-ci doivent être achetés et
installés séparément.
FR
1
MUR
2
4
5
6
MUR
Installer les ferrures pour la protection anti-basculement
Faire des
marques sur
le mur.
Percez deux trous
φ6 dans le mur.
Mettez deux
chevilles dans
les trous.
Utilisez des vis courtes
pour fixer l'accessoire à
l'arrière de la plaque (A)
Fixez l'accessoire
au mur avec de
longues vis.
MUR
3
20 21
MUR
MUR

6
Ø3.5*14mm
11 X1 set
Ø4*30mm
Nous avons inclus un ensemble d'éléments anti-basculement
pour cet appareil. Vous devez fixer ces pièces pour éviter les
accidents ou les blessures pouvant résulter de la chute du
produit. Lorsqu'il est correctement installé, cet accessoire
peut fournir une protection contre le renversement inattendu
de l'appareil en raison de petites vibrations, de chocs ou
d'escalade. Il est fortement recommandé de fixer ce support
à un poteau mural et à votre appareil.
REMARQUE: La protection anti-basculement fournie est
destinée aux murs à ossature bois. Il doit être fixé à un
poteau mural. Selon la construction du mur, un accessoire
d'ancrage différent peut être requis. Veuillez contacter
votre quincaillerie locale pour obtenir de l'aide. Les petits
enfants peuvent être gravement blessés par le
renversement des meubles. Il est nécessaire d'installer le
dispositif anti-basculement avec le meuble pour éviter
que celui-ci ne bascule, provoquant des accidents ou des
dommages. Les dispositifs anti-bascule ne sont utilisés
qu'à titre dissuasif et ne remplacent pas la surveillance
appropriée d'un adulte. Les accessoires de basculement
ne sont pas des accessoires antisismiques. Si vous voulez
la sécurité supplémentaire de la protection contre les
tremblements de terre, ceux-ci doivent être achetés et
installés séparément.
FR
1
MUR
2
4
5
6
MUR
Installer les ferrures pour la protection anti-basculement
Faire des
marques sur
le mur.
Percez deux trous
φ6 dans le mur.
Mettez deux
chevilles dans
les trous.
Utilisez des vis courtes
pour fixer l'accessoire à
l'arrière de la plaque (A)
Fixez l'accessoire
au mur avec de
longues vis.
MUR
3
20 21
MUR
MUR
1
PARED
2
4
5
6
PARED
Para instalar los accesorios de retención de vuelco
Haga marcas
en la pared.
Perfore dos
agujeros Ø6 en la
pared.
Coloque dos
tacos en los
agujeros.
Fije el accesorio en la parte
posterior del panel (A) con
los tornillos cortos.
Fije el accesorio a
la pared con los
tornillos largos.
PARED
3
6
Ø3.5*14mm
11 X1 juego
Ø4*30mm
Hemos incluido un juego de accesorios de retención de
vuelco para este producto. Debe instalar estos accesorios
para evitar accidentes o lesiones que puedan resultar de la
caída del producto.
Cuando se instala correctamente, este sistema de retención
puede proporcionar protección contra el vuelco inesperado
del producto debido a pequeños temblores, golpes o
escalada. Recomendamos encarecidamente que monte este
juego de accesorios en un montante de la pared y en el
producto.
NOTA: El juego de accesorios de retención de vuelco que
se incluye es para la construcción de paredes con
montantes de madera. Debe ser fijado a un montante de
la pared. Dependiendo de la construcción de su pared, es
posible que se necesiten diferentes accesorios de anclaje.
Póngase en contacto con su ferretería local para obtener
ayuda. Los niños pequeños pueden resultar gravemente
heridos por el vuelco de los muebles. Debe instalar los
accesorios de retención de vuelco con el producto para
evitar que el producto se vuelque, causando cualquier
accidente o daño. Los accesorios de retención de vuelco
están pensados únicamente como disuasión y no
sustituyen a la supervisión adecuada de un adulto. Los
accesorios de retención de vuelco no son dispositivos
antisísmicos. Si desea añadir la seguridad adicional de los
retenedores antisísmicos, debe comprarlos e instalarlos
por separado.
ES
22 23
PARED
PARED

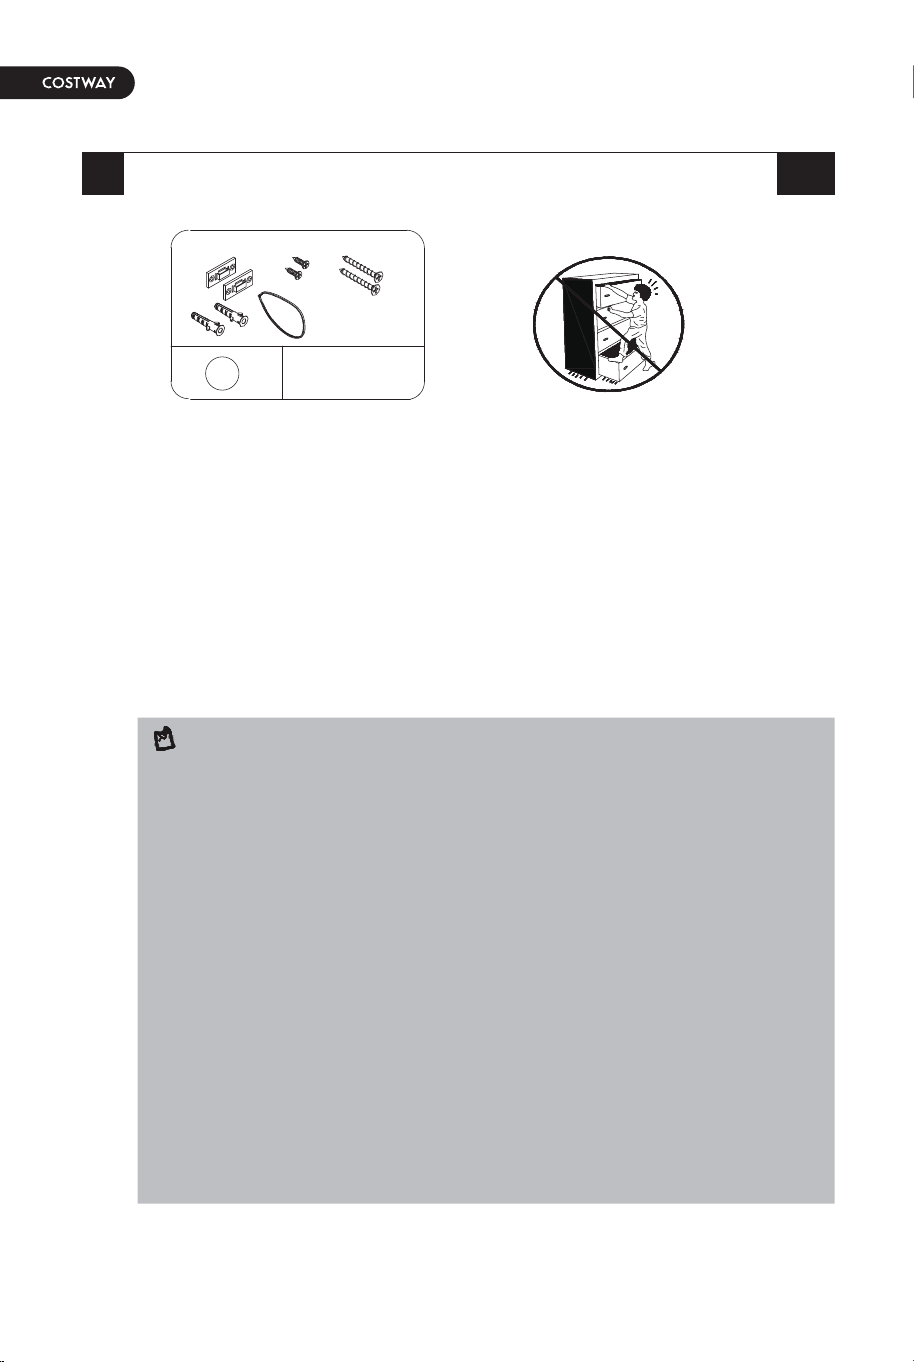
6
Ø3.5*14mm
11 X1 set
Ø4*30mm
Abbiamo incluso un set di accessori di contenimento del
ribaltamento per questo prodotto. È necessario installare
questo accessorio per prevenire incidenti o lesioni che
possono derivare dalla caduta del prodotto. Se installato
correttamente, questo accessorio può fornire protezione
contro il ribaltamento imprevisto del prodotto a causa di
piccole scosse, urti o arrampicate. Raccomandiamo
vivamente di montare questo accessorio su un perno della
parete e sul prodotto.
ATTENZIONE: L’accessorio di contenimento del
ribaltamento incluso è per la costruzione di pareti di
legno. Deve essere attaccato a un perno del muro. A
seconda della costruzione del muro, potrebbe essere
necessaria un accessorio di ancoraggio diversa. Si prega
di contattare il negozio di ferramenta locale per
assistenza.
I bambini piccoli possono essere gravemente feriti dal
ribaltamento dei mobili. È necessario installare
l’accessorio di contenimento del ribaltamento con il
prodotto per evitare che il prodotto si ribalti, causando
incidenti o danni. Gli accessori di ribaltamento sono intesi
solo come un deterrente e non sono un sostituto per una
corretta supervisione degli adulti. Gli accessori di
ribaltamento non sono accessori antisismici. Se si
desidera aggiungere la sicurezza extra dei accessori
antisismici, questi devono essere acquistati e installati
separatamente.
IT
1
PARETE
2
4
5
6
PARETE
Installare l’accessorio di ribaltamento
Fare un
segno sulla
parete.
Praticare due fori
Ø6 sulla parete.
Mettere due
tasselli nei fori.
Fissare l’accessorio sul
retro del pannello (A)
con viti corte.
Fissare
l’accessorio alla
parete con le viti
lunghe.
PARETE
3
24 25
PARETE
PARETE

6
Ø3.5*14mm
11 X1 set
Ø4*30mm
Abbiamo incluso un set di accessori di contenimento del
ribaltamento per questo prodotto. È necessario installare
questo accessorio per prevenire incidenti o lesioni che
possono derivare dalla caduta del prodotto. Se installato
correttamente, questo accessorio può fornire protezione
contro il ribaltamento imprevisto del prodotto a causa di
piccole scosse, urti o arrampicate. Raccomandiamo
vivamente di montare questo accessorio su un perno della
parete e sul prodotto.
ATTENZIONE: L’accessorio di contenimento del
ribaltamento incluso è per la costruzione di pareti di
legno. Deve essere attaccato a un perno del muro. A
seconda della costruzione del muro, potrebbe essere
necessaria un accessorio di ancoraggio diversa. Si prega
di contattare il negozio di ferramenta locale per
assistenza.
I bambini piccoli possono essere gravemente feriti dal
ribaltamento dei mobili. È necessario installare
l’accessorio di contenimento del ribaltamento con il
prodotto per evitare che il prodotto si ribalti, causando
incidenti o danni. Gli accessori di ribaltamento sono intesi
solo come un deterrente e non sono un sostituto per una
corretta supervisione degli adulti. Gli accessori di
ribaltamento non sono accessori antisismici. Se si
desidera aggiungere la sicurezza extra dei accessori
antisismici, questi devono essere acquistati e installati
separatamente.
IT
1
PARETE
2
4
5
6
PARETE
Installare l’accessorio di ribaltamento
Fare un
segno sulla
parete.
Praticare due fori
Ø6 sulla parete.
Mettere due
tasselli nei fori.
Fissare l’accessorio sul
retro del pannello (A)
con viti corte.
Fissare
l’accessorio alla
parete con le viti
lunghe.
PARETE
3
24 25
PARETE
PARETE
1
ŚCIANA
2
4
5
6
ŚCIANA
Montaż części zabezpieczających przed przewróceniem
Zaznacz na
ścianie miejsca
na wywiercenie
otworów.
Wywierć dwa
otwory o średnicy
6 mm.
Umieść w
otworach dwa
kołki rozporowe.
Zamocuj płytkę na spodzie
półki (A) za pomocą
krótkich wkrętów.
Zamocuj płytkę
na ścianie przy
użyciu długich
wkrętów.
ŚCIANA
3
6
Ø3.5*14mm
11 X1 zestaw
Ø4*30mm
Zestaw zawiera komplet części mocujących do ściany. Jego
użycie jest konieczne, by zapobiec wypadkom. Wstrząsy,
przypadkowe uderzenie czy wspinające się dziecko mogą
spowodować przewrócenie się mebla i urazy u osób
znajdujących się w pobliżu. Zaleca się zamocowanie mebla do
ściany zgodnie z instrukcją, by uniknąć wyżej opisanych
sytuacji.
UWAGA: Dołączony komplet części mocujących
przeznaczony jest wyłącznie do ścian z drewnianymi
belkami konstrukcyjnymi. W przypadku ściany o innej
konstrukcji może być konieczne zastosowanie innego typu
kołków. W razie wątpliwości poproś o poradę sprzedawcę
w sklepie budowlanym. Przewrócenie mebla może
spowodować poważne obrażenia u dzieci. Podkreślamy, iż
montaż do ściany nie gwarantuje pełnego bezpieczeństwa
i nie może zastąpić nadzoru rodzicielskiego. Dołączony
komplet części nie stanowi wystarczającego
zabezpieczenia w przypadku silnego wstrząsu. Jeśli chcesz
zabezpieczyć mebel na wypadek silnego wstrząsu, musisz
zakupić i zainstalować osobne części, odpowiednie w
powyższej sytuacji.
PL
26 27
ŚCIANA
ŚCIANA

THIS INSTRUCTION BOOKLET CONTAINS IMPORTANT SAFETY INFORMATION. PLEASE READ AND KEEP FOR FUTURE REFERENCE.
EN DE FR ES IT PL
USER'S MANUAL/HANDBUCH
/MANUEL DE L'UTILISATEUR/MANUAL DEL USUARIO
/MANUALE UTENTE/INSTRUKCJA OBSŁUGI
HZ10079NA
Plant Stand / Pflanzentreppe
/ Étagère pour Plantes / Estantería para Plantas /
Supporto per Vaso di Fiori / Regał na kwiaty
EN
DE
FR
ES
IT
PL
With your inspiring rating, COSTWAY will be more consistent to offer you EASY
SHOPPING EXPERIENCE, GOOD PRODUCTS and EFFICIENT SERVICE!
Mit Ihrer inspirierenden Bewertung wird COSTWAY konsistenter sein, um Ihnen EIN
SCHÖNES EINKAUFSERLEBNIS, GUTE PRODUKTE und EFFIZIENTEN SERVICE zu
bieten!
Avec votre évaluation inspirante, COSTWAY continuera à fournir une EXPÉRIENCE
D’ACHAT PRATIQUE, des PRODUITS DE QUALITÉ et un SERVICE EFFICACE !
Con su calificación inspiradora, COSTWAY será más consistente para ofrecerle
EXPERIENCIA DE COMPRA FÁCIL, BUENOS PRODUCTOS y SERVICIO EFICIENTE.
Con la tua valutazione incoraggiante, COSTWAY sarà più coerente per offrirti
ESPERIENZA DI ACQUISTO FACILE, BUONI PRODOTTI e SERVIZIO EFFICIENTE!
Dzięki twojej opinii COSTWAY będzie mógł oferować jeszcze WYGODNIEJSZE
ZAKUPY, LEPSZE PRODUKTY i SPRAWNIEJSZĄ OBSŁUGĘ KLIENTA.
US office: Fontana UK office: Ipswich AU office: Truganina
DE office: FDS GmbH, Neuer Höltigbaum 36, 22143 Hamburg, Deutschland
FR office: Saint Vigor d'Ymonville
PL office: Gdańsk