
Operator’s Manual
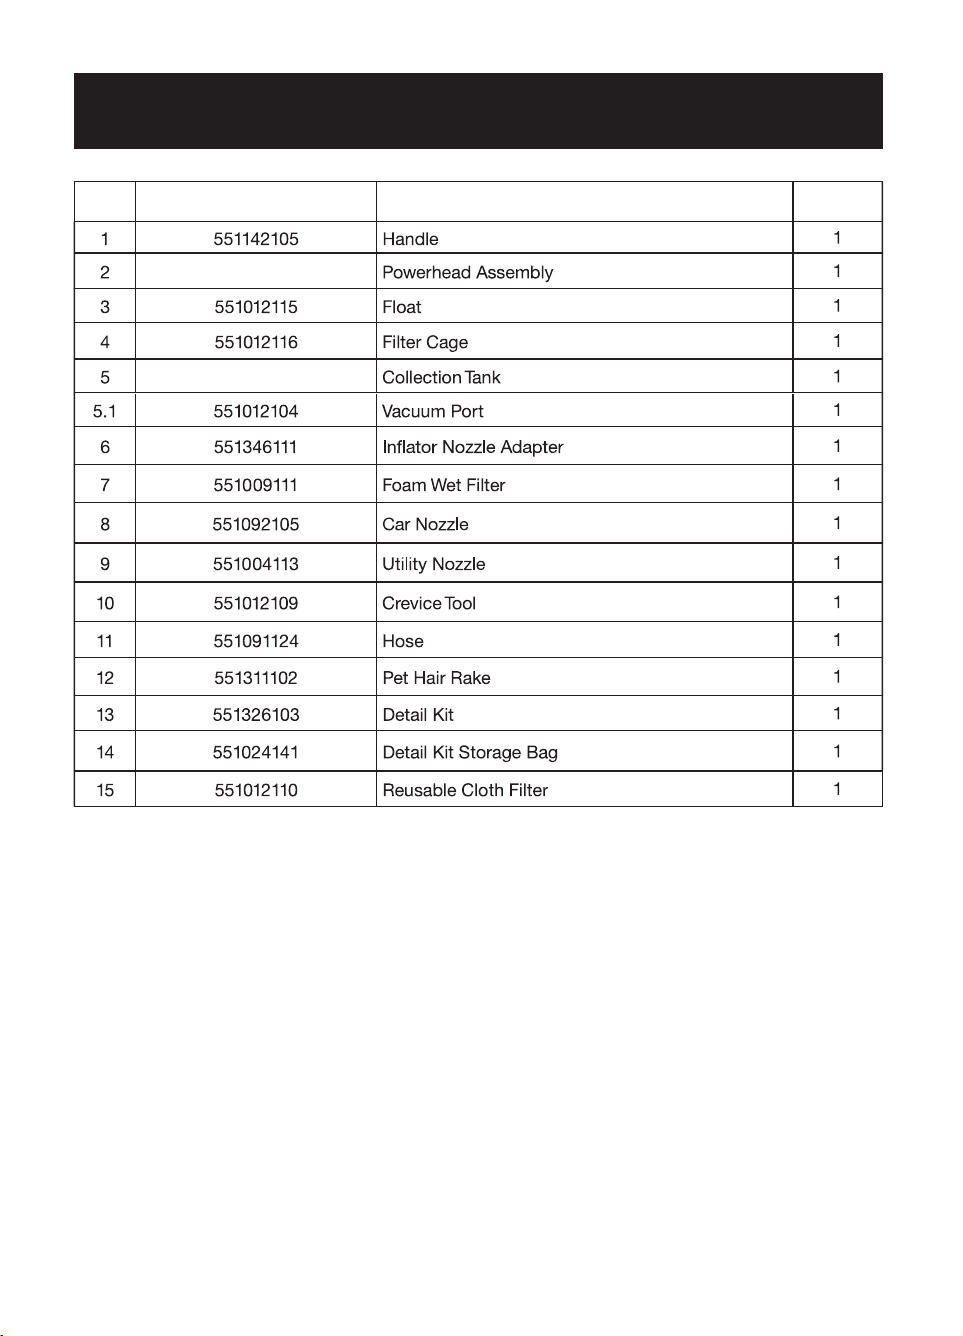
Manuel d’utilisation
Manual del usuario
2.5 Gallon / 10 L / 2.5 Galones
Model No. • Référence de modèle • N° de modelo
VOM205P 0903
Wet/Dry Vacuum
Aspirateur Sec et Humide
Aspiradora en Mojado/Seco
EN
FR
ES
P. 02
P. 19
P. 39
FOR YOUR SAFETY:
Read and understand this manual before use. Keep this manual for future reference.
POUR GARANTIR VOTRE SÉCURITÉ:
Lisez et comprenez ce manuel avant toute utilisation de l’appareil. Conservez le présent
PARA SU SEGURIDAD:
Lea y entienda este manual antes de usar. Guarde este manual para futura referencia.
Distributed By / Distribué par / Distribuido por
Cleva North America
601 Regent Park Court
Greenville, SC 29607
1-866-384-8432
©2023 Energizer Auto. Armor All is a trademark of Energizer Auto and is used under
license by Cleva North America, Inc.
©2023 Energizer Auto. Armor All est une marque déposée de Energizer Auto qui est
utilisée sous licence par Cleva North America, Inc.
©2023 Energizer Auto. Armor All es marca registrada de Energizer Auto y se utiliza bajo
licencia de Cleva North America, Inc.
2
TABLE OF CONTENTS
SECTION
Page
Warranty ...............................................................................................................................................
Important Safety Instructions ................................................................................................................
Double Insulation Instructions ..............................................................................................................
Extension Cords ...................................................................................................................................
Symbols ................................................................................................................................................
Unpacking & Checking Carton Contents ..............................................................................................
General Assembly Instructions .............................................................................................................
Dry Vacuum Operation .........................................................................................................................
Liquid Vacuum Operation .....................................................................................................................
Blower Operation ..................................................................................................................................
Maintenance .........................................................................................................................................
Installing & Cleaning Reusable Cloth Filter ..........................................................................................
Installing & Cleaning Foam Wet Filter ..................................................................................................
Troubleshooting ....................................................................................................................................
Exploded View ......................................................................................................................................
Parts List ...............................................................................................................................................
Thank you for purchasing this Armor All
®
wet/dry vacuum cleaner. Feel confident that with
our Armor All
®
wet/dry vac you are obtaining a high-quality product engineered for optimal
performance. This vacuum is capable of picking up liquids and dry materials.
IMPORTANT INFORMATION
GALLONS
PEAK HP
"Peak Horsepower" is a term used in the wet-dry vac industry for consumer comparison purposes. It
does not denote the operational horsepower output of a wet-dry vac, but rather the horsepower output
of a motor, including the motor’s inertial contribution, achieved in laboratory testing. In actual use,
motors do not operate at the peak horsepower shown.
3
3
5
6
6
7
8
9
10
12
13
14
15
15
16
17
18
EN
FOR YOUR SAFETY: CAREFULLY READ AND UNDERSTAND ALL INSTRUCTIONS.
3
WARRANTY
We take pride in producing a high-quality, durable product. This vac carries a limited two (2) year warranty
against defects in workmanship and materials from date of purchase under normal household use. Please
other rights, which vary from state to state. For customer service please call 1-866-384-8432.
Not Covered by Warranty:
• Any part that has become inoperative due to misuse, negligence, direct/indirect abuse, accidents,
improper maintenance, repairs or alterations;
• Normal wear and tear of parts and attachments, such as hose, nozzles, or casters;
• Any product where serial number/data label is tampered with or removed;
• Any product purchased from an unauthorized retailer.
IMPORTANT SAFETY INSTRUCTIONS
READ AND UNDERSTAND ALL INSTRUCTIONS BEFORE USING
THIS VACUUM.
Read and understand this operator’s manual and all labels on the vacuum cleaner before operating.
Safety is a combination of common sense, staying alert and knowing how your vacuum works. Use
this vacuum only as described in this manual. To reduce the risk of personal injury or damage to your
vacuum, use only manufacturer recommended accessories.
SAVE THIS MANUAL
WARNING:
FOR FUTURE REFERENCE.
TO REDUCE THE RISK OF FIRE, ELECTRIC SHOCK, OR INJURY:
When using a vacuum, basic precautions should always be followed including the following.
• Do not run vacuum unattended.
in areas where they may be present.
•
gas, hydrogen, or explosive dust like coal dust, magnesium dust, grain dust, or
4
• To reduce the risk of health hazards from vapors or dust, do not vacuum toxic
materials.
• Do not use or store near hazardous materials.
• Do not pick up anything that is burning or smoking, such as cigarettes, matches,
or hot ashes.
• Do not expose to rain. Store indoors.
• If vacuum is not working as it should, has been dropped, damaged, left
outdoors, or dropped into water, return it to a service center.
• Do not unplug by pulling on cord. To unplug, grasp the plug, not the cord.
• Do not use with damaged cord or plug.
• Do not pull or carry by cord, use cord as a handle, close a door on cord, or pull
cord around sharp edges or corners.
• Keep cord away from heated surfaces.
• Do not run the vacuum over cord.
• Do not handle plug or vacuum with wet hands.
• Do not allow to be used as a toy. Close attention is necessary when used by or
near children.
• To reduce the risk of injury from accidental starting, unplug power cord before
• Do not leave vacuum when plugged in. Unplug from outlet when not in use and
before servicing.
• Unplug before connecting or disconnecting hose, or any other accessories.
• Do not put any object into openings. Do not use with any opening blocked; keep
moving parts.
• Use extra care when cleaning on stairs.
• Use only as described in this manual. Use only manufacturer’s recommended
attachments.
• This vacuum is provided with double insulation. Use only identical replacement
parts. See DOUBLE INSULATION INSTRUCTIONS.
CAUTION:
To reduce the risk of injury from moving parts -
Unplug before servicing.
WARNING:
To reduce the risk of electric shock - Unplug
before cleaning or servicing.
5
SAVE THESE INSTRUCTIONS
For Household Use Only
When using as blower:
• Direct air discharge only at work area.
• Do not use Wet/Dry Vacuum as a sprayer.
• Do not direct air at bystanders.
• Keep children away when blowing.
• Wear safety goggles.
WARNING:
TO REDUCE THE RISK OF ELECTRIC SHOCK - DO NOT EXPOSE
TO RAIN. STORE INDOORS.
WARNING:
FOR YOUR OWN SAFETY, READ AND UNDERSTAND THE
OPERATOR’S MANUAL. DO NOT RUN UNATTENDED. DO NOT PICK UP HOT ASHES,
COALS, TOXIC, FLAMMABLE OR OTHER HAZARDOUS MATERIALS. DO NOT USE
AROUND EXPLOSIVE LIQUIDS OR VAPORS.
CAUTION:
DO NOT VACUUM DRYWALL DUST, FIREPLACE SOOT, OR ASH
WITH STANDARD WET/DRY FILTER. THIS TYPE OF DUST IS VERY FINE WHICH
MAY NOT BE CAPTURED BY THE FILTER AND CAUSE DAMAGE TO MOTOR. WHEN
VACUUMING FINE DUST USE A FINE DUST FILTER.
WARNING:
SERVICING OF DOUBLE-INSULATED WET/DRY VACUUMS
WITH A DOUBLE-INSULATED WET/DRY VACUUM, TWO SYSTEMS OF INSULATION
ARE PROVIDED INSTEAD OF GROUNDING. NO GROUNDING MEANS IS PROVIDED
ON A DOUBLE-INSULATED APPLIANCE, NOR SHOULD A MEANS FOR GROUNDING
BE ADDED. SERVICING A DOUBLE-INSULATED WET/DRY VACUUM REQUIRES
EXTREME CARE AND KNOWLEDGE OF THE SYSTEM AND SHOULD BE DONE
ONLY BY QUALIFIED SERVICE PERSONNEL. REPLACEMENT PARTS FOR A
DOUBLE-INSULATED WET/DRY VACUUM MUST BE IDENTICAL TO THE PARTS
THEY REPLACE. YOUR DOUBLE-INSULATED WET/DRY VAC IS MARKED WITH THE
WORDS ‘DOUBLE INSULATED’ AND THE SYMBOL (SQUARE WITHIN A SQUARE)
MAY ALSO BE MARKED ON THE APPLIANCE.
DOUBLE INSULATION INSTRUCTIONS
This Wet/Dry Vacuum is double insulated, eliminating the need for a separate grounding system.
Use only identical replacements parts. Read the instructions for Servicing Double-Insulated Wet/Dry
Vacuums before servicing. Use this vacuum as described in this manual.
Observe the following warnings that appear on the motor housing of your vacuum.
DOUBLE INSULATED - GROUNDING NOT REQUIRED - WHEN SERVICING USE ONLY
IDENTICAL REPLACEMENT PARTS.
6
EXTENSION CORDS
SYMBOLS
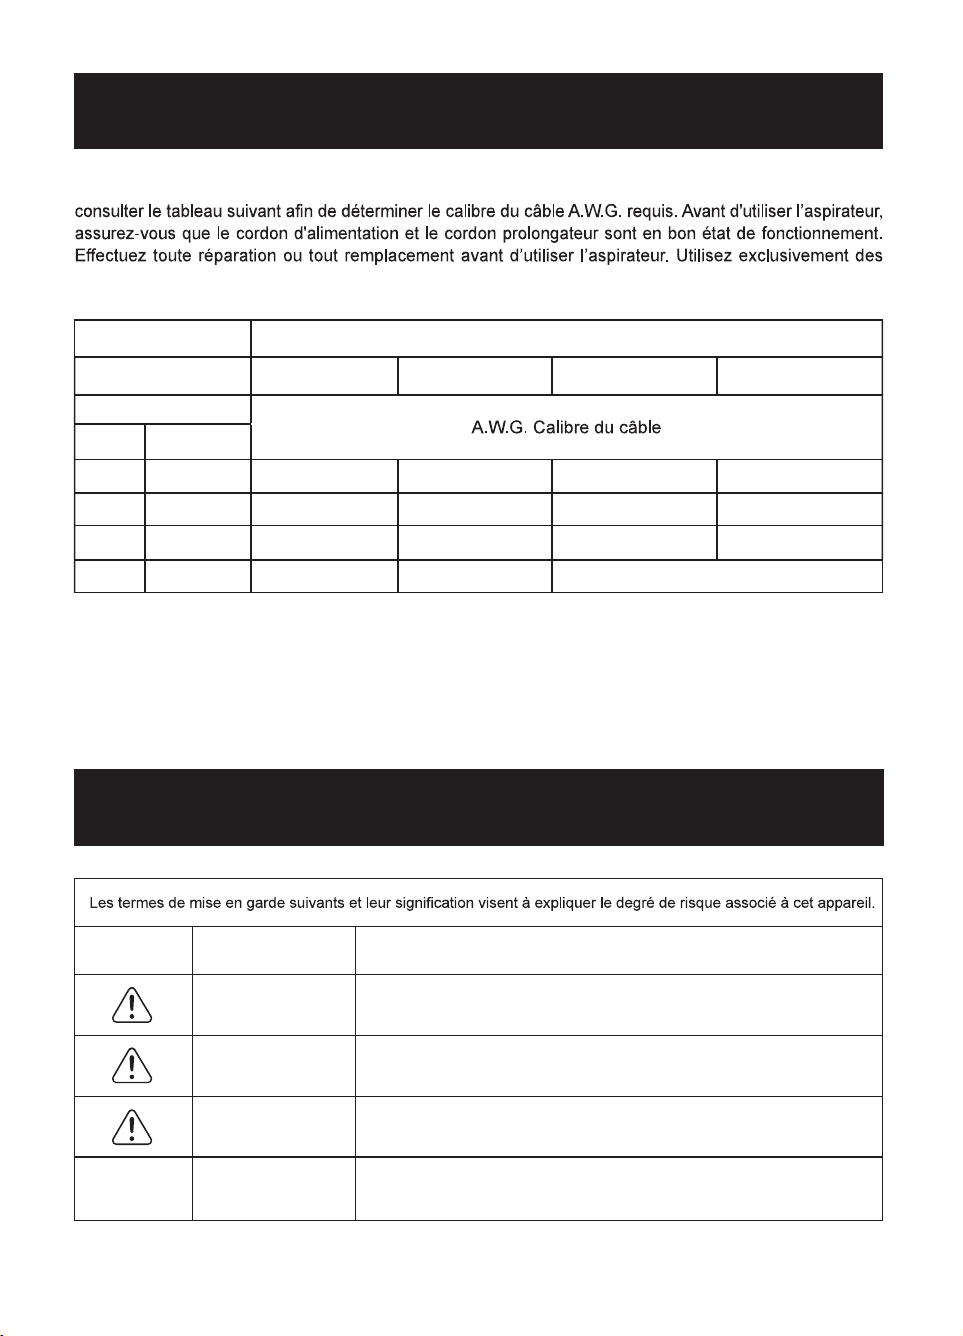
When using an extension cord with your Wet/Dry Vacuum refer to the following table to determine the
required A.W.G. wire size. Before using the cleaner make sure the power cord and extension cord are
in good working condition. Make repairs or replacements before using the vacuum cleaner. Only use
extension cords that are rated for outdoor use.
The following signal words and meanings are intended to explain the levels of risk associated with
this product.
SYMBOL SIGNAL MEANING
DANGER
Indicates an imminently hazardous situation, which, if not
avoided, will result in death or serious injury.
WARNING
Indicates a potentially hazardous situation, which, if not avoided,
could result in death or serious injury.
CAUTION
Indicates a potentially hazardous situation, which, if not avoided,
may result in minor or moderate injury.
NOTICE
(Without Safety Alert Symbol) Indicates a situation that may
result in property damage.
Length of Extension Cord
120V 25ft (7.62m) 50ft (15.24m) 100ft (30.48m) 150ft (45.72m)
Ampere rating
A.W.G. Wire Size
More than Not more than
0 6 18 16 16 14
6 10 18 16 14 12
10 12 16 16 14 12
12 16 14 12 Not recommended
7
G H I
L M
JF
K
D
C
A B
E
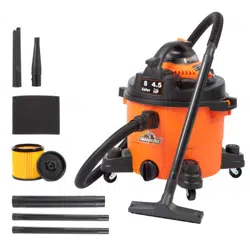
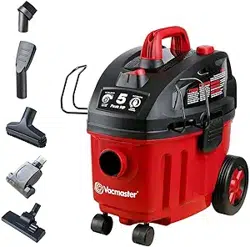
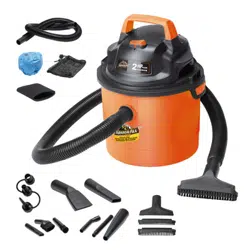
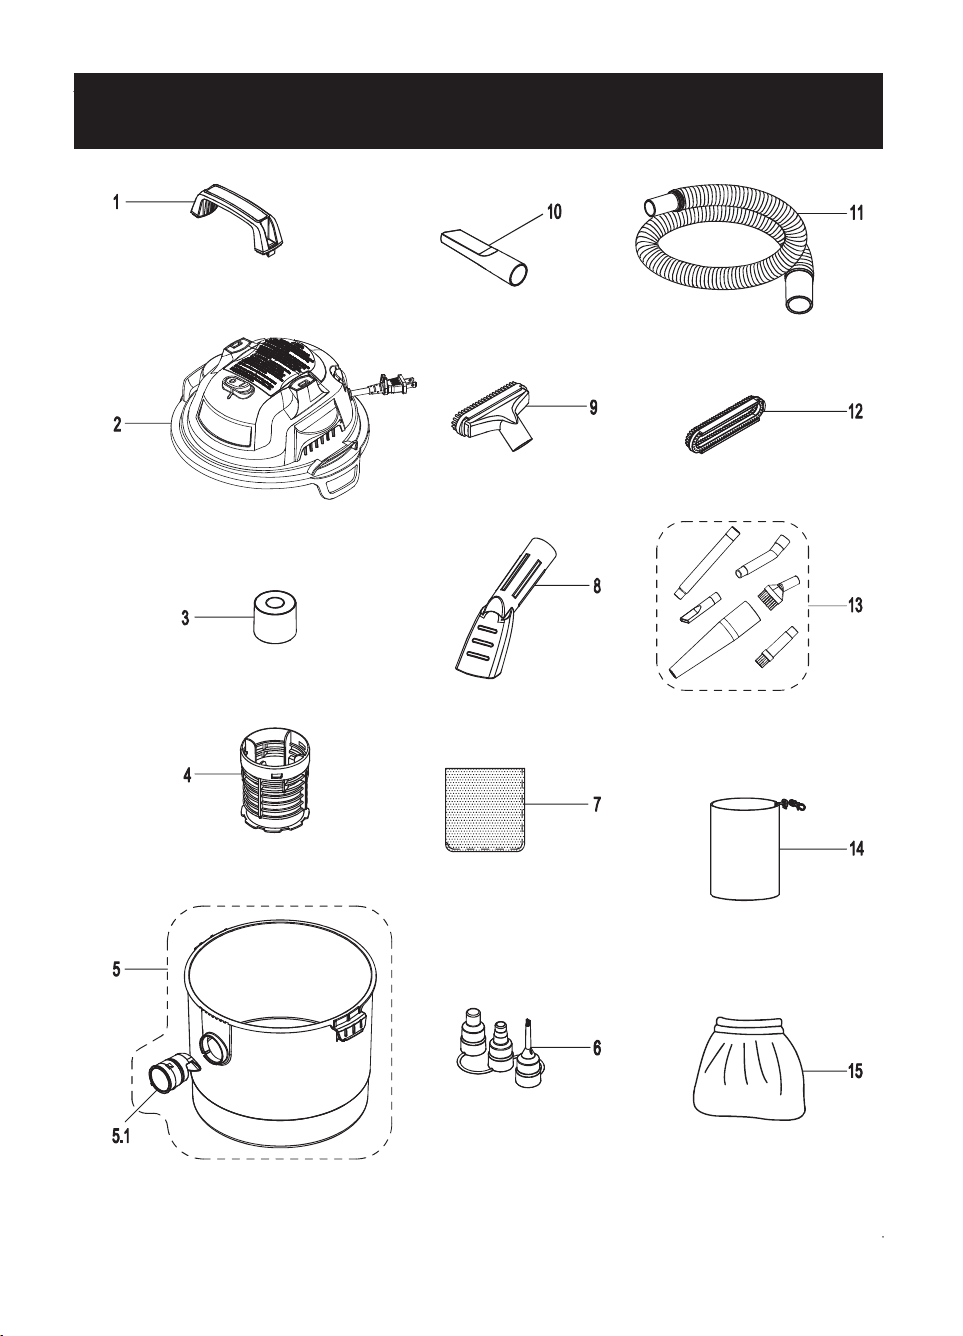
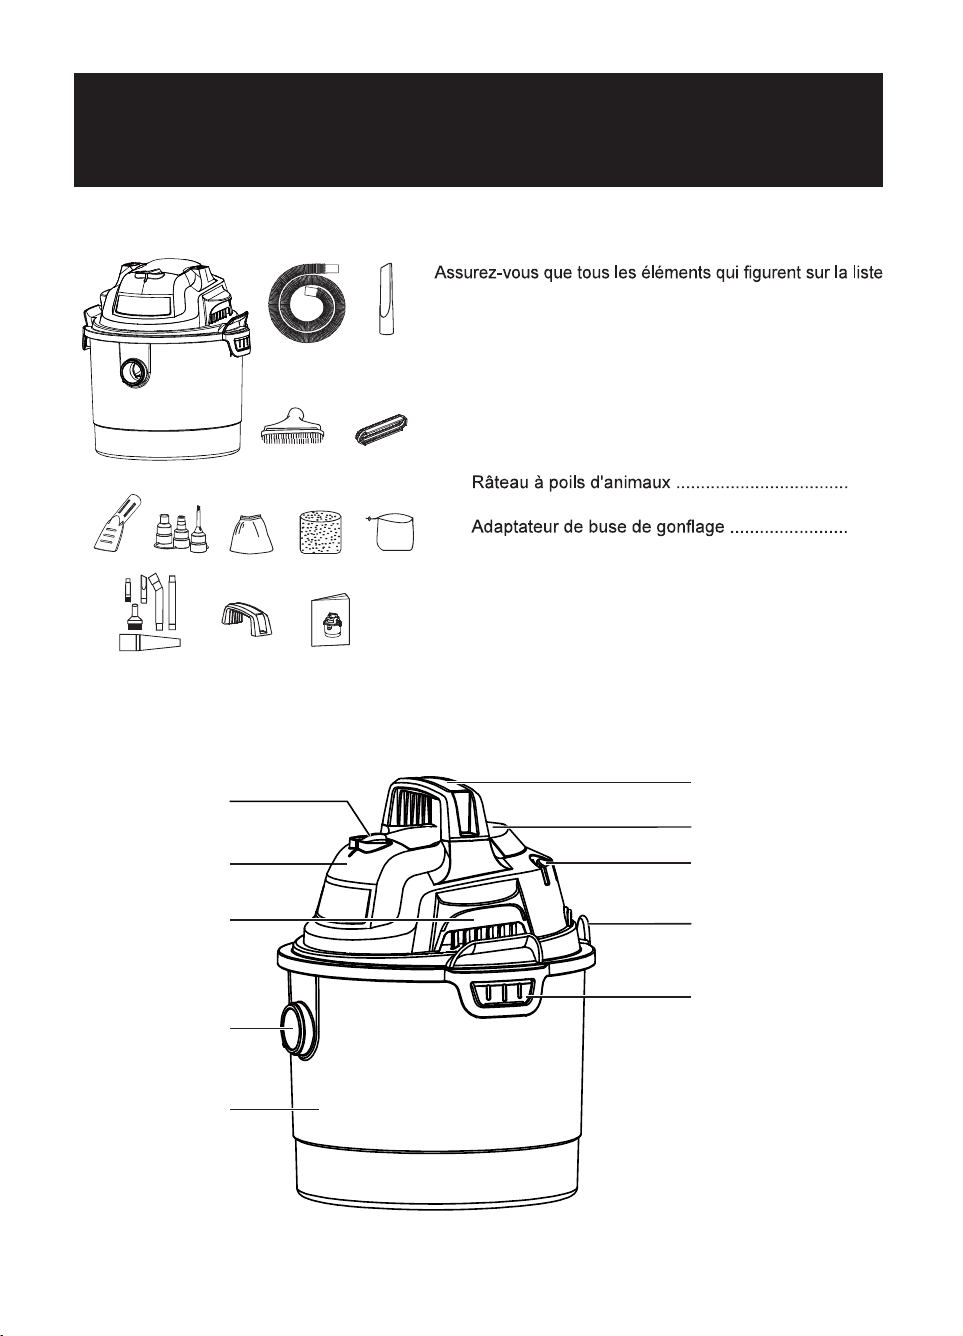
UNPACKING & CHECKING CARTON CONTENTS
Remove all contents from the box. Remove the
powerhead and take out any contents inside the
collection tank. Check each item against the carton
contents list.
Carton Contents List:
Key
A
B
C
D
E
F
G
H
I
J
K
L
M
Description
Vacuum Assembly ....................................
Hose .........................................................
Crevice Tool ..............................................
Utility Nozzle .............................................
Pet Hair Rake ................…….........……....
Car Nozzle .............................…………….
Reusable Cloth Filter ..................………...
Foam Wet Filter ...............................…......
Detail Kit Storage Bag ..............................
Detail Kit (6 pc) .........................................
Handle ......................................................
Operator’s Manual ....................................
Qty
1
1
1
1
1
1
1
1
1
1
1
1
1
NOTE: The hose and accessories for this
vacuum are 1-1/4'' (32 mm) diameter.
Accessory Storage
Power Cord Hook
Blower Port
Handle
Powerhead
Hose Organization
On/Off Switch
Vacuum Port
Collection Tank
Latch
8
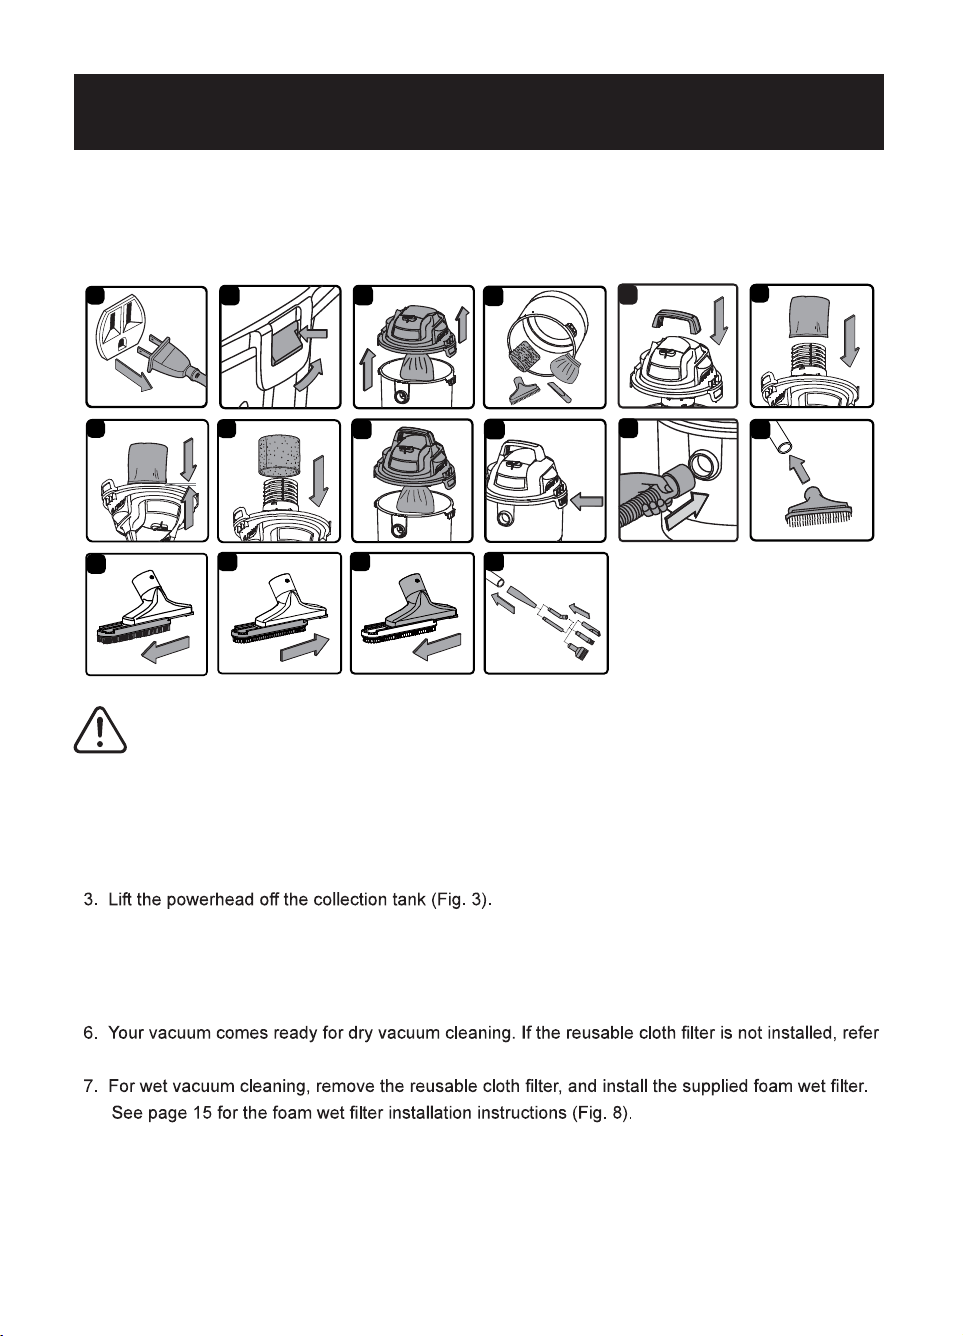
GENERAL ASSEMBLY INSTRUCTIONS
UNPACKING YOUR WET/DRY VACUUM & GENERAL ASSEMBLY
1. Verify that the power cord is disconnected from the outlet (Fig. 1).
2. Undo the latches (Fig. 2).
4. Remove the contents from inside the collection tank; make sure you have all contents as listed on
page 7 (Fig. 4).
5. Insert the handle into the slots located on the top of the powerhead. Apply force to lock the handle
into place (Fig. 5).
to page 15 for installation instructions (Fig. 6 & 7).
8. Place the powerhead back on the collection tank aligning the top section with the latches, and
snap into place (Fig. 9 & 10).
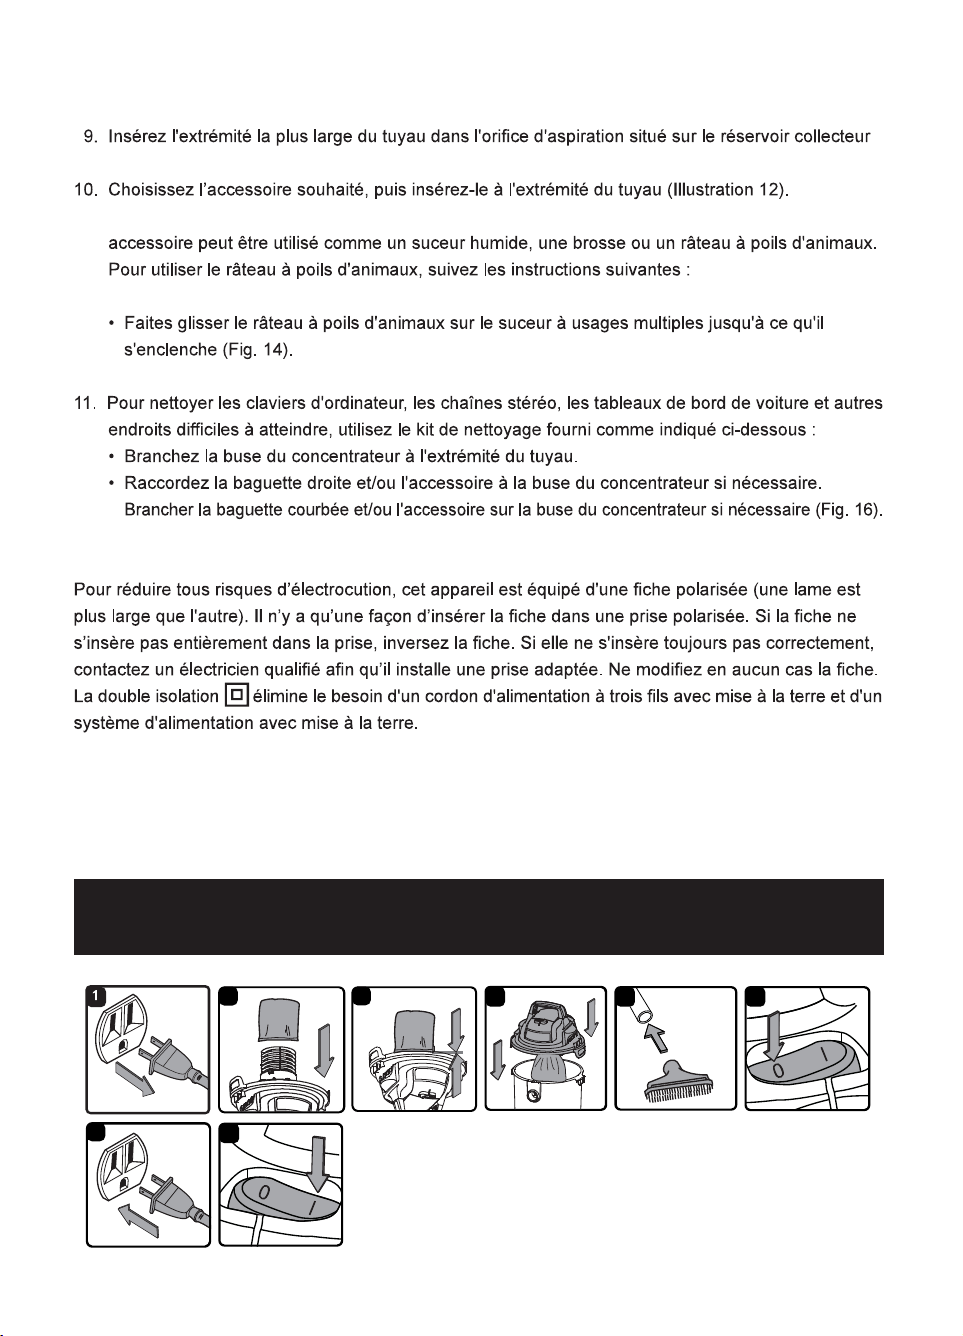
9. Insert the larger end of the hose into the vacuum port on the collection tank (Fig. 11).
10. Choose the desired accessory and insert onto the end of the hose (Fig. 12).
Before beginning assembly of product, make sure all parts are present. Compare parts with package
contents list and diagram. If any part is missing or damaged, do not attempt to assemble the product.
Contact customer service for replacement parts.
4
32
1
2
12
11
9
10
5
9
1
13
14
8
6
7
15 16
WARNING:
DO NOT PLUG THE POWER CORD INTO A POWER OUTLET. MAKE
SURE THE PLUG IS DISCONNECTED BEFORE ASSEMBLING THE WET/DRY VACUUM.
TO REDUCE THE RISK OF ELECTRIC SHOCK, DO NOT EXPOSE TO RAIN.
9
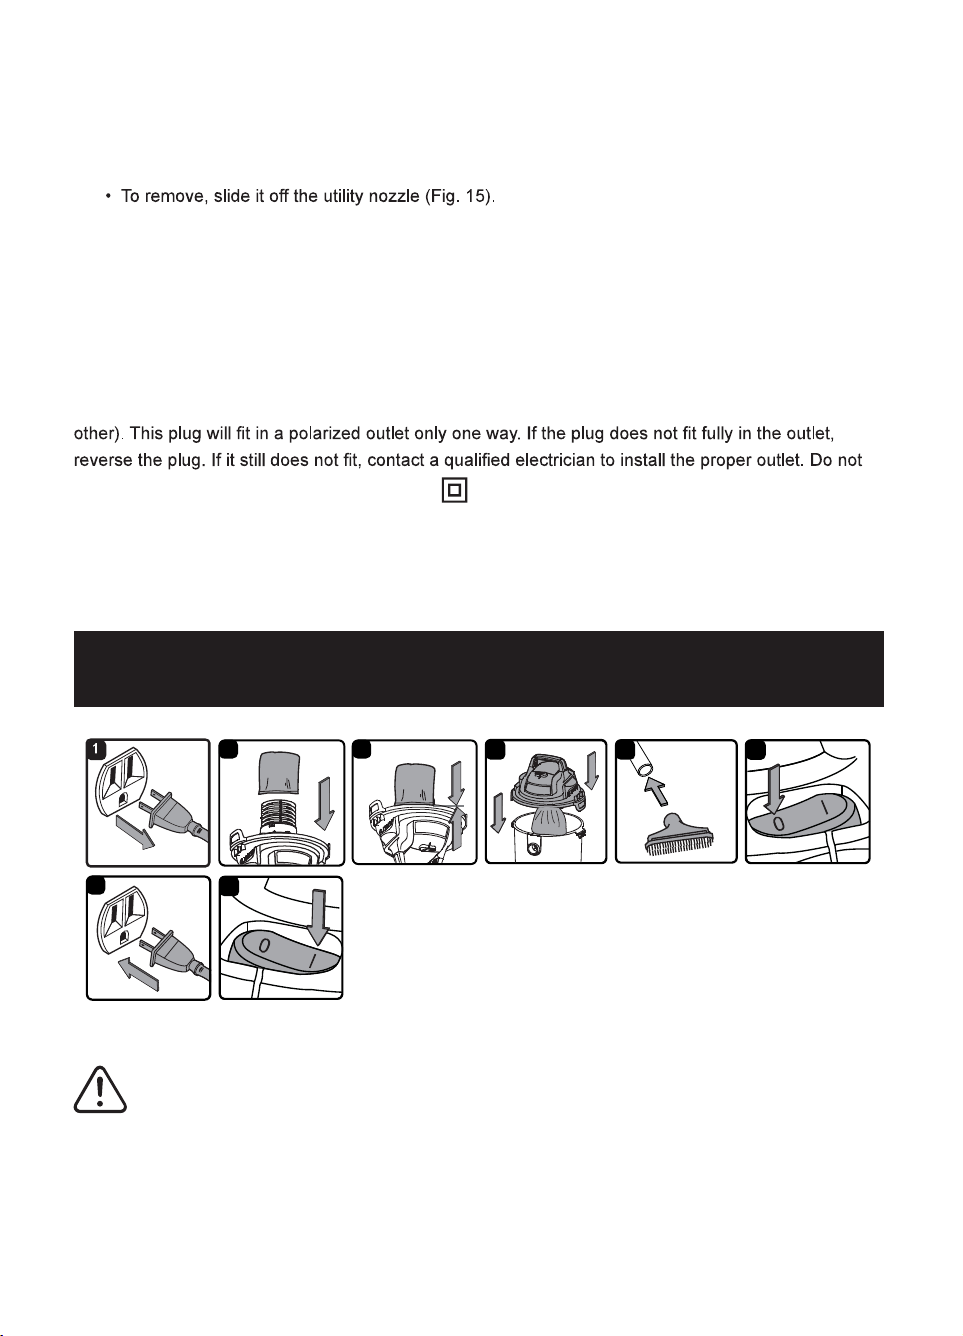
NOTE: This wet/dry vacuum comes with a utility nozzle. This accessory can be used as a wet nozzle,
a brush, or a pet hair rake. To use the pet hair rake, follow these instructions:
• Remove the brush from the utility nozzle (Fig. 13).
• Slide the pet hair rake onto the utility nozzle until it clicks into place (Fig. 14).
11. For cleaning computer keyboards, stereos, car dashboards and other hard to reach places, use
the supplied detail kit as listed below:
• Connect the concentrator nozzle onto the end of the hose.
• Connect the straight wand and/or accessory onto the concentrator nozzle if required.
• Connect the curved wand and/or accessory onto the concentrator nozzle if required (Fig. 16).
POLARIZED PLUG
To reduce the risk of electrical shock, this appliance has a polarized plug (one blade wider than the
change the plug in any way. Double insulation eliminates the need for the three-wire grounded
power cord and grounded power supply system.
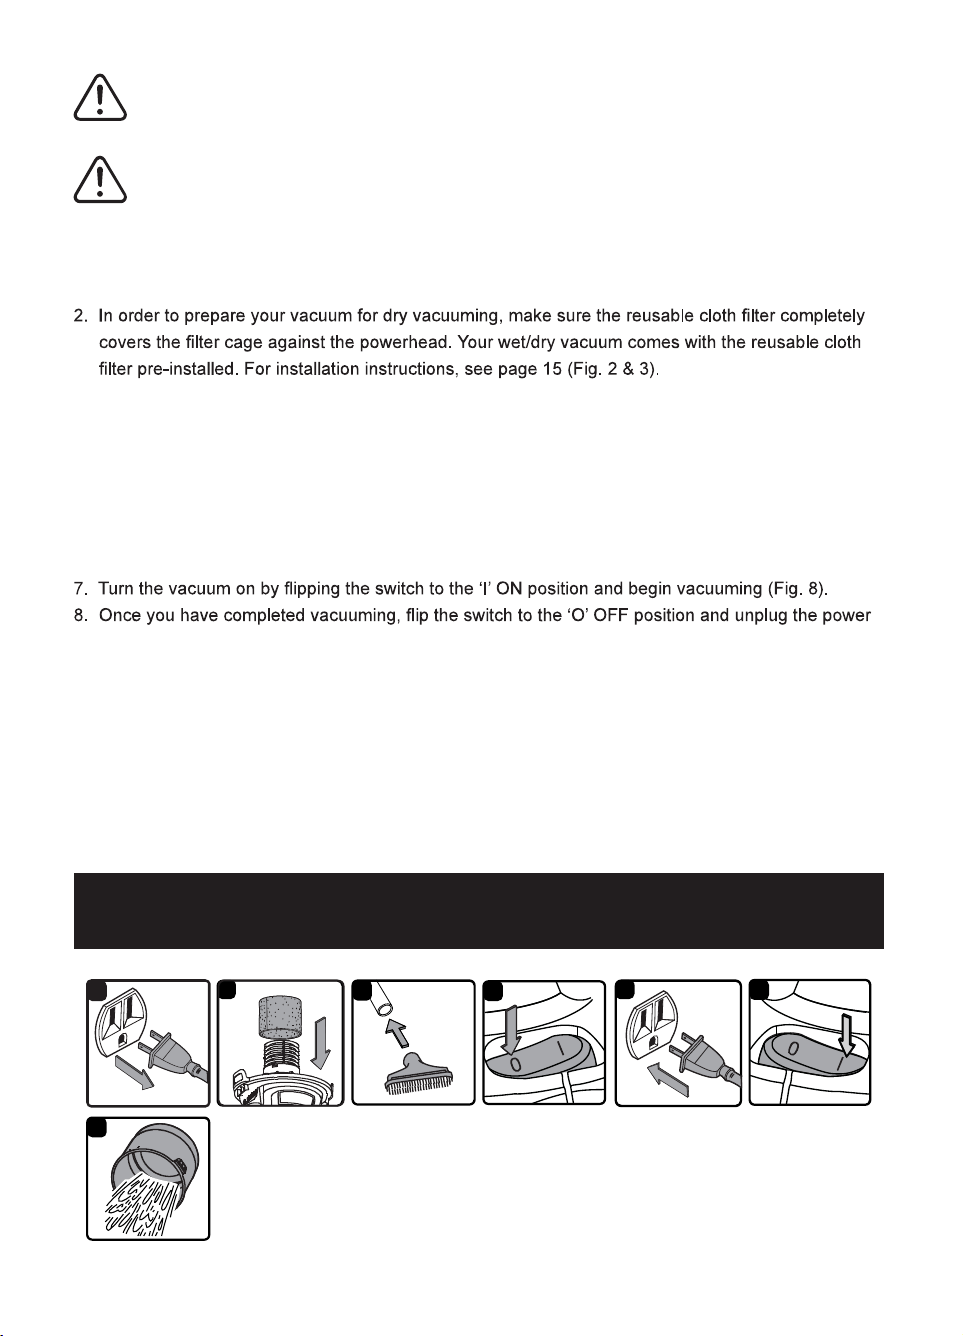
DRY VACUUM OPERATION
8
87
2 3
4 5
6
DRY VACUUMING
WARNING:
BE SURE TO READ, UNDERSTAND, AND APPLY INFORMATION
ENTITLED “IMPORTANT SAFETY INSTRUCTIONS”. DO NOT VACUUM IN AREAS WITH
FLAMMABLE GASES, VAPORS, OR EXPLOSIVE DUST IN THE AIR. FLAMMABLE
GASES OR VAPORS INCLUDE BUT ARE NOT LIMITED TO: LIGHTER FLUID, SOLVENT
TYPE CLEANERS, OIL-BASED PAINTS, GASOLINE, ALCOHOL, OR AEROSOL SPRAYS.
EXPLOSIVE DUST INCLUDE BUT ARE NOT LIMITED TO: COAL, MAGNESIUM, GRAIN,
OR GUN POWDER. TO REDUCE THE RISK OF HEALTH HAZARDS FROM VAPORS OR
DUST, DO NOT VACUUM TOXIC MATERIALS.
10
1. Verify that the power cord is disconnected from the outlet (Fig. 1).
3. Place the powerhead back on the collection tank and secure it in place using the latches (Fig. 4).
OPERATING INSTRUCTIONS: DRY VACUUMING
4. Insert the larger end of the hose into the vacuum port on the collection tank.
5. Push the required accessory onto the free end of the hose (Fig. 5).
6. Verify that the switch is in the ‘O’ OFF position before plugging the power cord into the power outlet.
Plug the power cord into the outlet (Fig. 6 & 7).
cord from the outlet.
O = OFF I = ON
DO NOT USE THE REUSABLE CLOTH FILTER FOR LIQUID VACUUMING.
WARNING:
DO NOT PLUG THE POWER CORD INTO A POWER OUTLET. MAKE
SURE THE PLUG IS DISCONNECTED BEFORE CHANGING THE FILTERS.
CAUTION:
DO NOT VACUUM DRYWALL DUST, FIREPLACE SOOT, OR ASH
WITH STANDARD WET/DRY FILTER. THIS IS A VERY FINE DUST WHICH WILL NOT BE
CAPTURED BY THE FILTER AND MAY CAUSE DAMAGE TO MOTOR. WHEN VACUUMING
FINE DUST USE A FINE DUST FILTER.
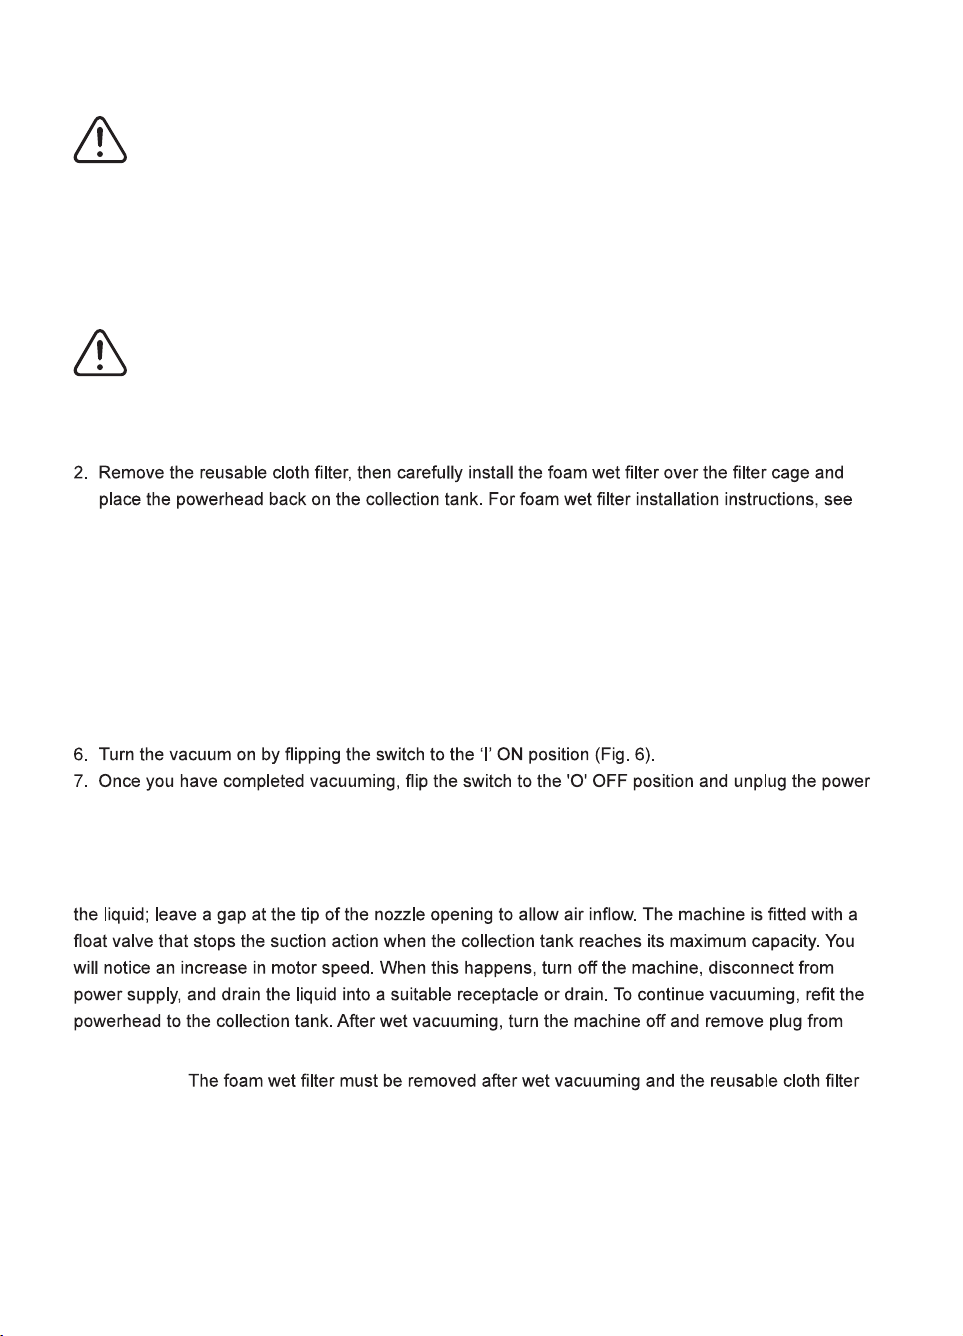
LIQUID VACUUM OPERATION
6
7
8
5
2 31
6
11
LIQUID VACUUMING
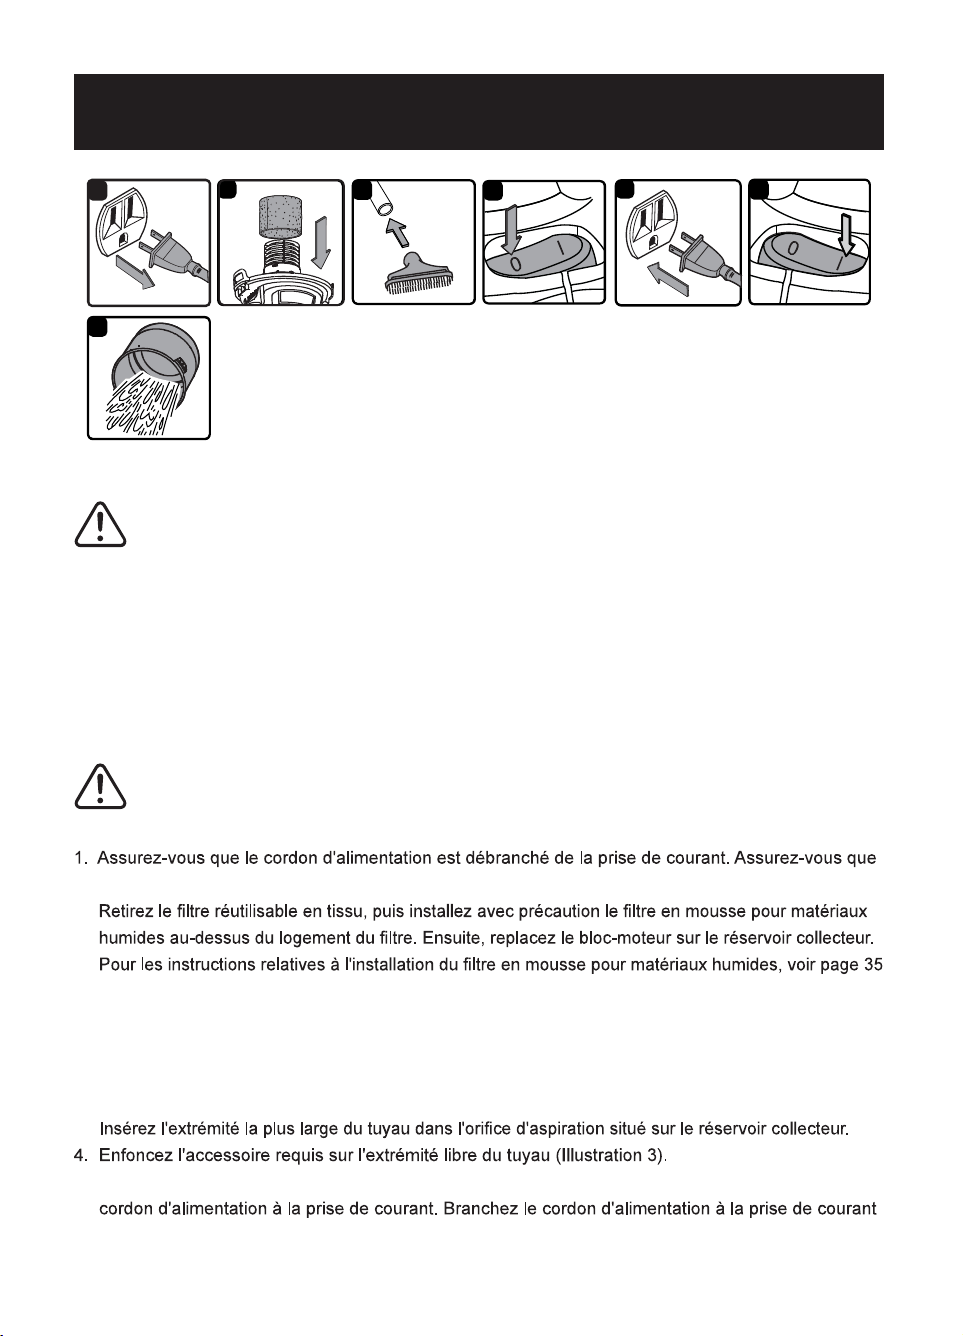
1. Verify that the power cord is disconnected from the outlet. Make sure that the collection tank is
clean and free of dust and dirt (Fig. 1).
page 15 (Fig. 2).
DO NOT USE THE REUSABLE CLOTH FILTER FOR LIQUID VACUUMING.
OPERATING INSTRUCTIONS: WET VACUUMING
3. Insert the larger end of the hose into the vacuum port on the collection tank.
4. Push the required accessory onto the free end of the hose (Fig. 3).
5. Verify that the switch is in the ‘O’ OFF position before plugging the power cord into the power outlet.
Plug the power cord into the outlet (Fig. 4 & 5).
cord from the outlet.
8. After use, empty the collection tank, clean and dry the inside and outside before storage (Fig. 7).
IMPORTANT! When vacuuming large quantities of liquids, do not immerse the nozzle completely in
power supply. Empty the collection tank, clean and dry the inside and outside before storage.
REMEMBER!
must be installed before dry vacuuming again.
WARNING:
BE SURE TO READ, UNDERSTAND, AND APPLY INFORMATION
ENTITLED “IMPORTANT SAFETY INSTRUCTIONS ”. DO NOT VACUUM IN AREAS
WITH FLAMMABLE GASES, VAPORS, OR EXPLOSIVE DUST IN THE AIR. FLAMMABLE
GASES OR VAPORS INCLUDE BUT ARE NOT LIMITED TO: LIGHTER FLUID, SOLVENT
TYPE CLEANERS, OIL-BASED PAINTS, GASOLINE, ALCOHOL, OR AEROSOL SPRAYS.
EXPLOSIVE DUST INCLUDE BUT ARE NOT LIMITED TO: COAL, MAGNESIUM, GRAIN,
OR GUN POWDER. TO REDUCE THE RISK OF HEALTH HAZARDS FROM VAPORS OR
DUST, DO NOT VACUUM TOXIC MATERIALS.
WARNING:
DO NOT PLUG THE POWER CORD INTO A POWER OUTLET. MAKE
SURE PLUG IS DISCONNECTED BEFORE CHANGING THE FILTERS.
12
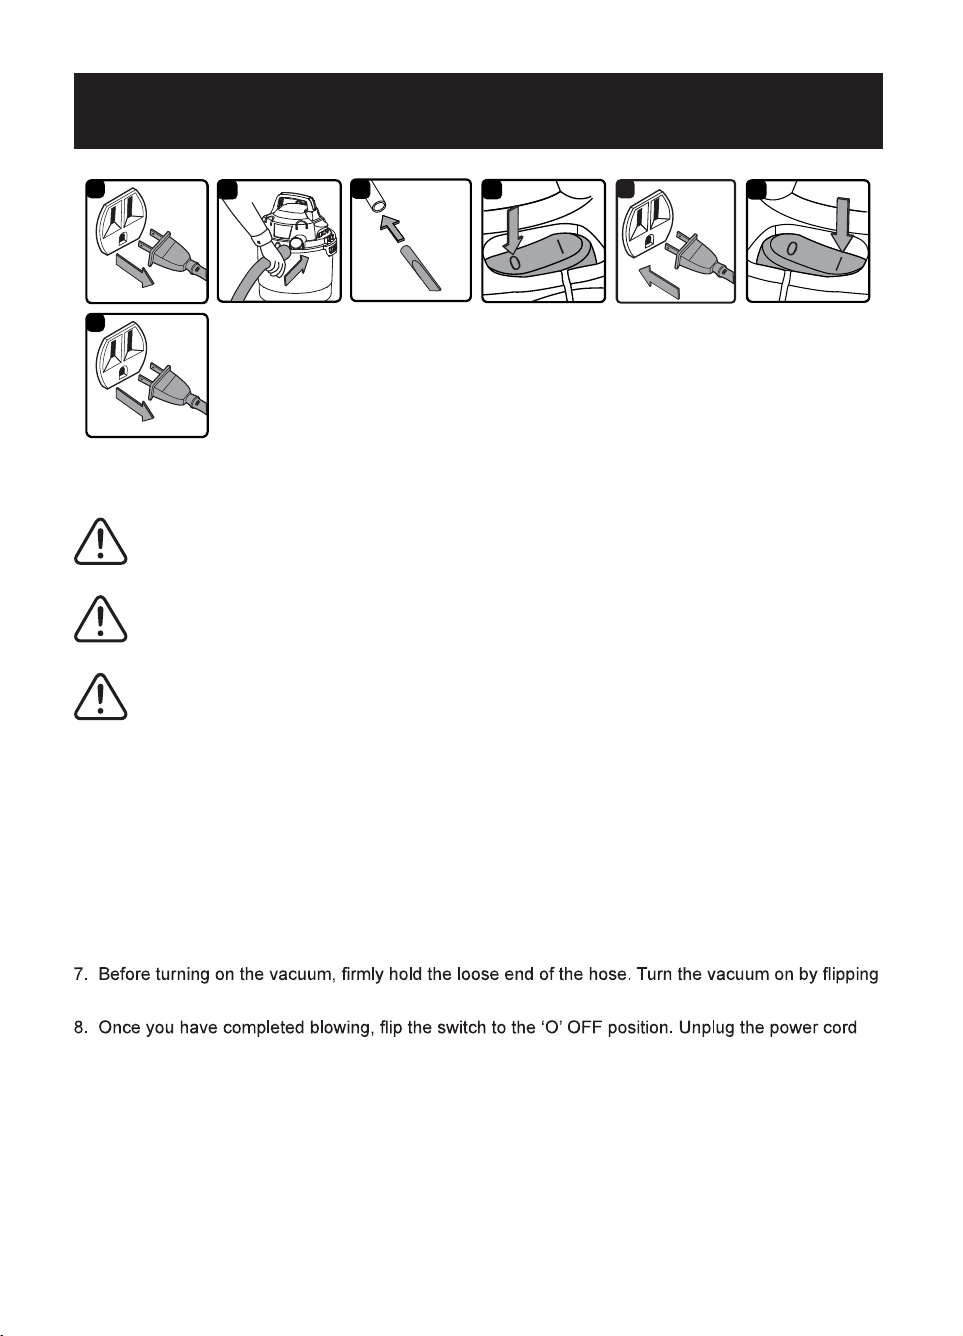
BLOWER OPERATION
2
6
2
1
2
7
5
3
4
This Wet/Dry Vacuum has blowing capabilities. To use the blower feature, follow the instructions listed.
1. Verify that the power cord is disconnected from the outlet (Fig. 1).
2. Make sure the collection tank is empty before using as a blower. Clear all dirt and debris from the
hose and collection tank.
3. Remove the hose from the vacuum port.
4. Insert the larger end of the hose into the blower port on the back side of the powerhead (Fig. 2).
5. Choose the desired accessory and insert onto the end of the hose (Fig. 3).
6. Verify that the switch is in the ‘O’ OFF position before plugging the power cord into the power outlet.
Plug the power cord into the outlet (Fig. 4 & 5).
the switch to the ‘I’ ON position (Fig. 6).
from the outlet (Fig. 7).
WARNING:
ALWAYS WEAR SAFETY GOGGLES COMPLYING WITH ANSI Z87.1
(OR IN CANADA, CSAZ94.3) BEFORE USING BLOWER.
WARNING:
WEAR A DUST MASK IF BLOWING CREATES DUST THAT MIGHT BE
INHALED.
CAUTION:
KEEP BYSTANDERS CLEAR FROM BLOWING DEBRIS.
13
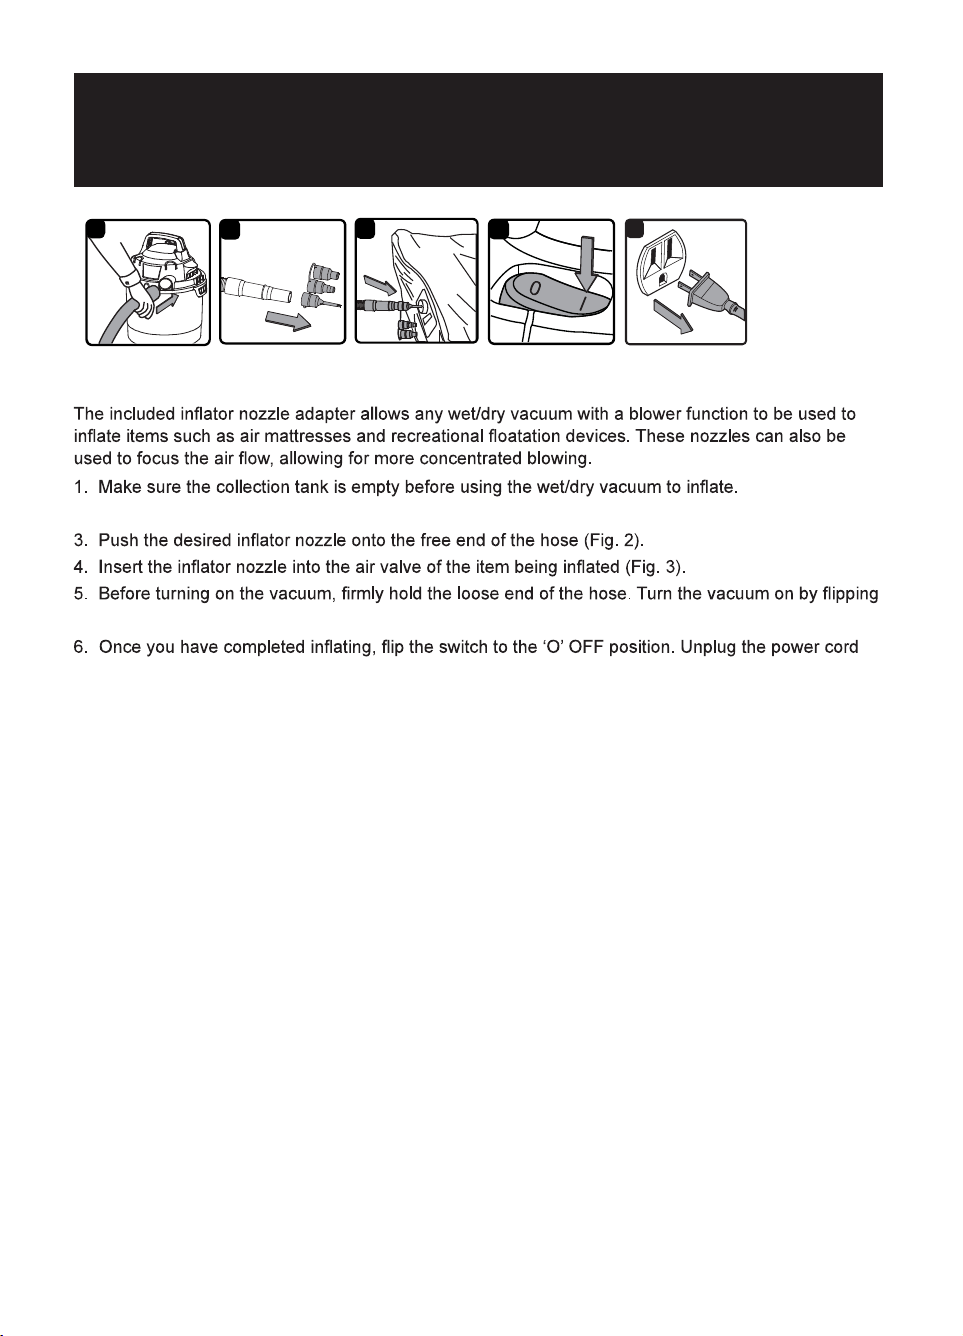
INFLATOR NOZZLE ADAPTER
OPERATION
2
2
1
5
3
4
INFLATING AN OBJECT
2. Insert the larger end of the hose into the blower port on the back side of the powerhead (Fig. 1).
the switch to the ‘I’ ON position (Fig. 4).
from the outlet (Fig. 5).
14
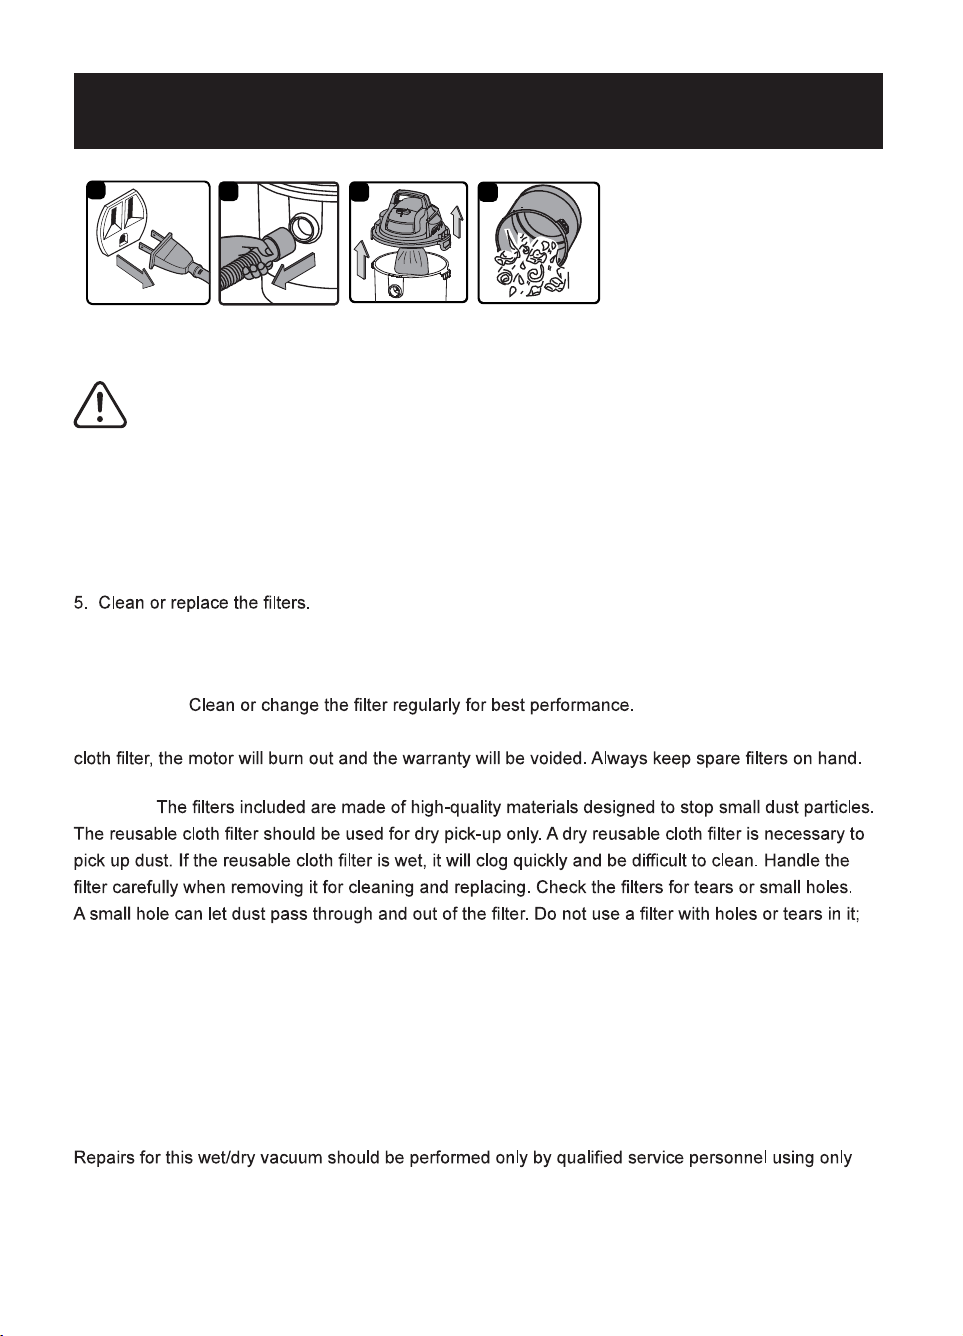
MAINTENANCE
2
4
1
3
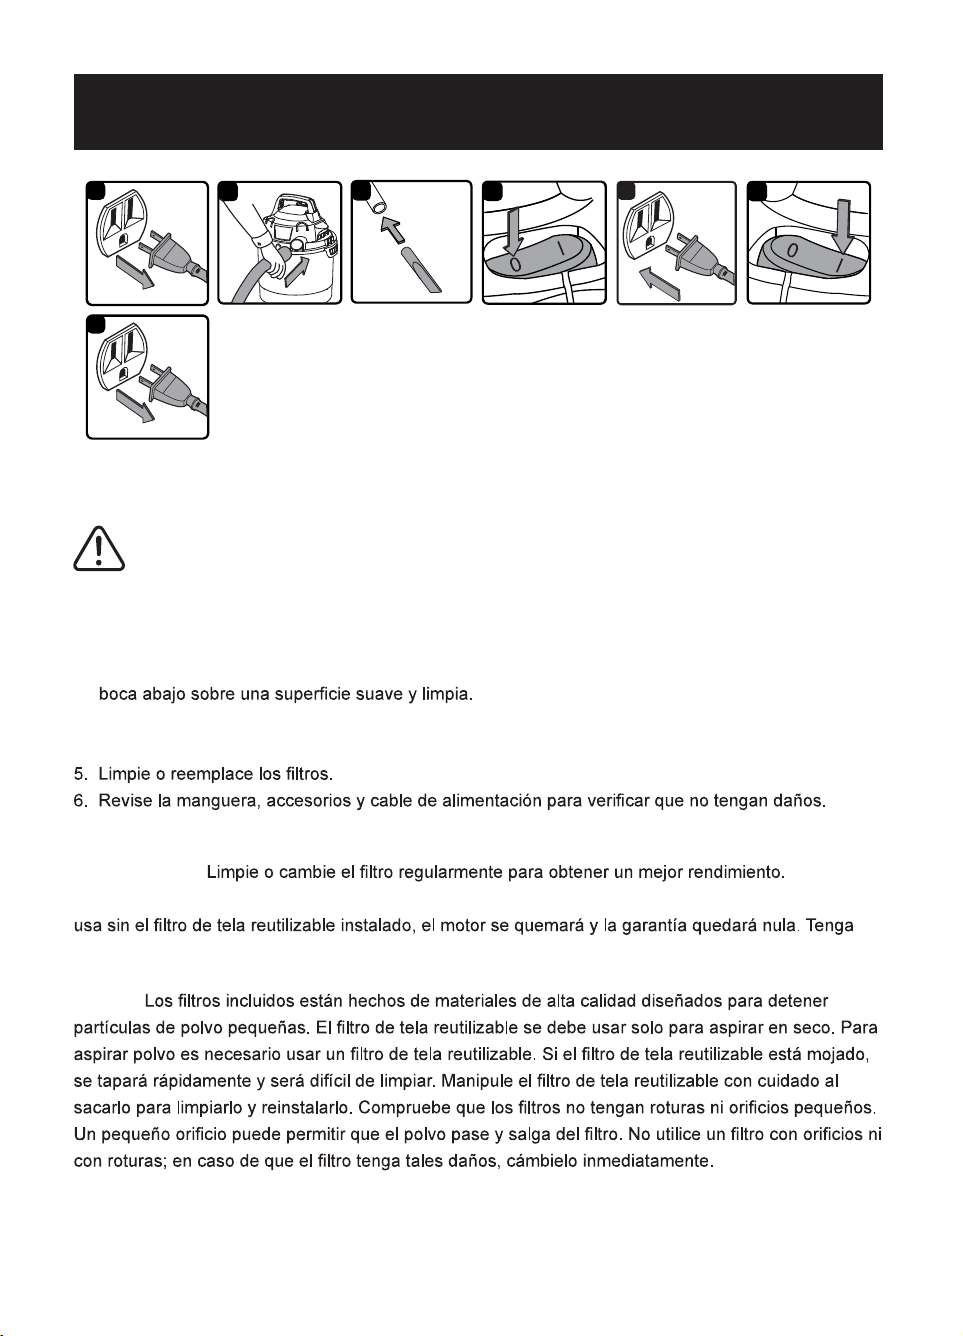
1. Verify that the power cord is disconnected from the outlet (Fig. 1).
2. Disconnect the hose from the vacuum (Fig. 2).
3. Undo the latches and remove the powerhead from the collection tank (Fig. 3). Place powerhead on
a soft, clean surface upside down.
4. Clear all dirt or debris from the collection tank and hose into a proper waste container (Fig. 4).
6. Check the hose, accessories, and power cord to verify that they have not been damaged.
7. Place the powerhead back on collection tank and secure latches.
IMPORTANT! ALWAYS USE THE
REUSABLE CLOTH FILTER FOR DRY VACUUMING. If the machine is used without the reusable
NOTICE!
replace it immediately.
STORAGE
Before storing your vacuum, the collection tank should be emptied and cleaned. The accessories
should be cleaned and stored so they can be readily available when needed. Store the wet/dry vacuum
indoors.
REPAIRS
identical replacement parts.
EMPTYING THE COLLECTION TANK
WARNING:
ALWAYS DISCONNECT THE PLUG FROM THE POWER OUTLET
BEFORE REMOVING THE POWERHEAD FROM COLLECTION TANK.
15
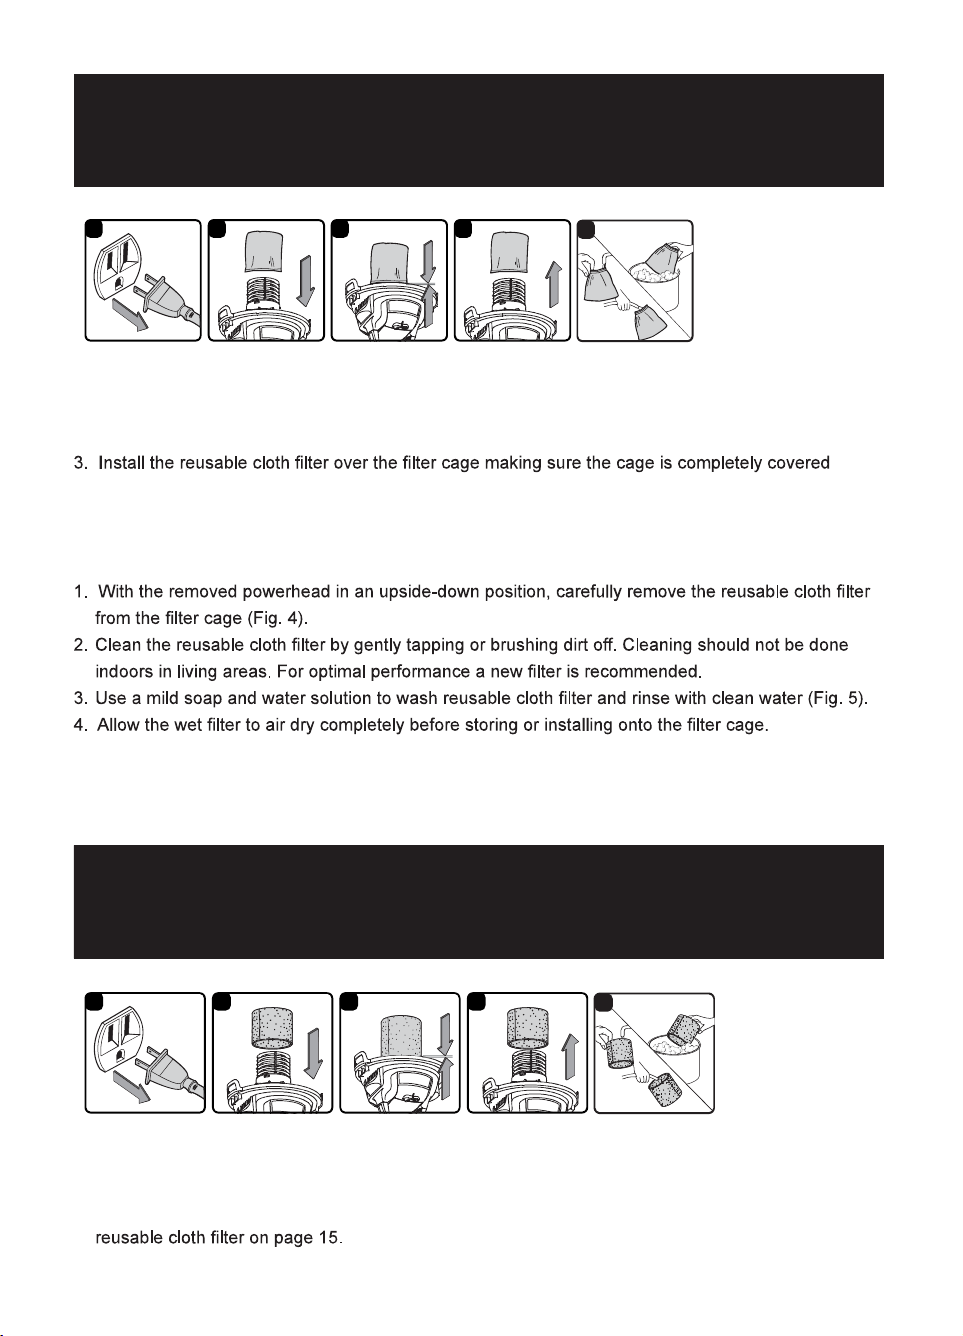
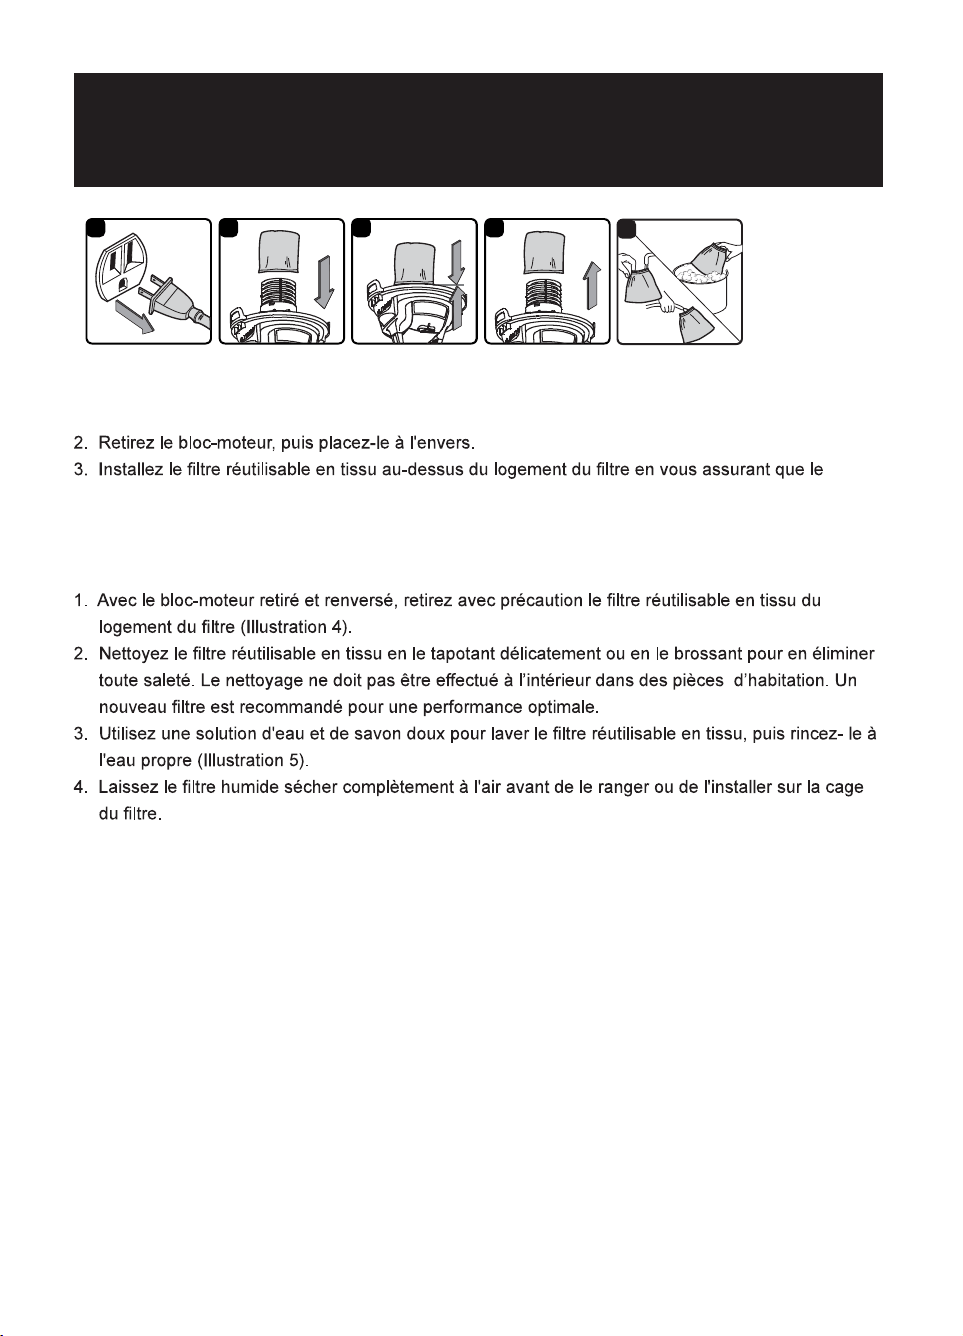
INSTALLING & CLEANING REUSABLE
CLOTH FILTER
1 2 4
5
3
INSTALLING REUSABLE CLOTH FILTER
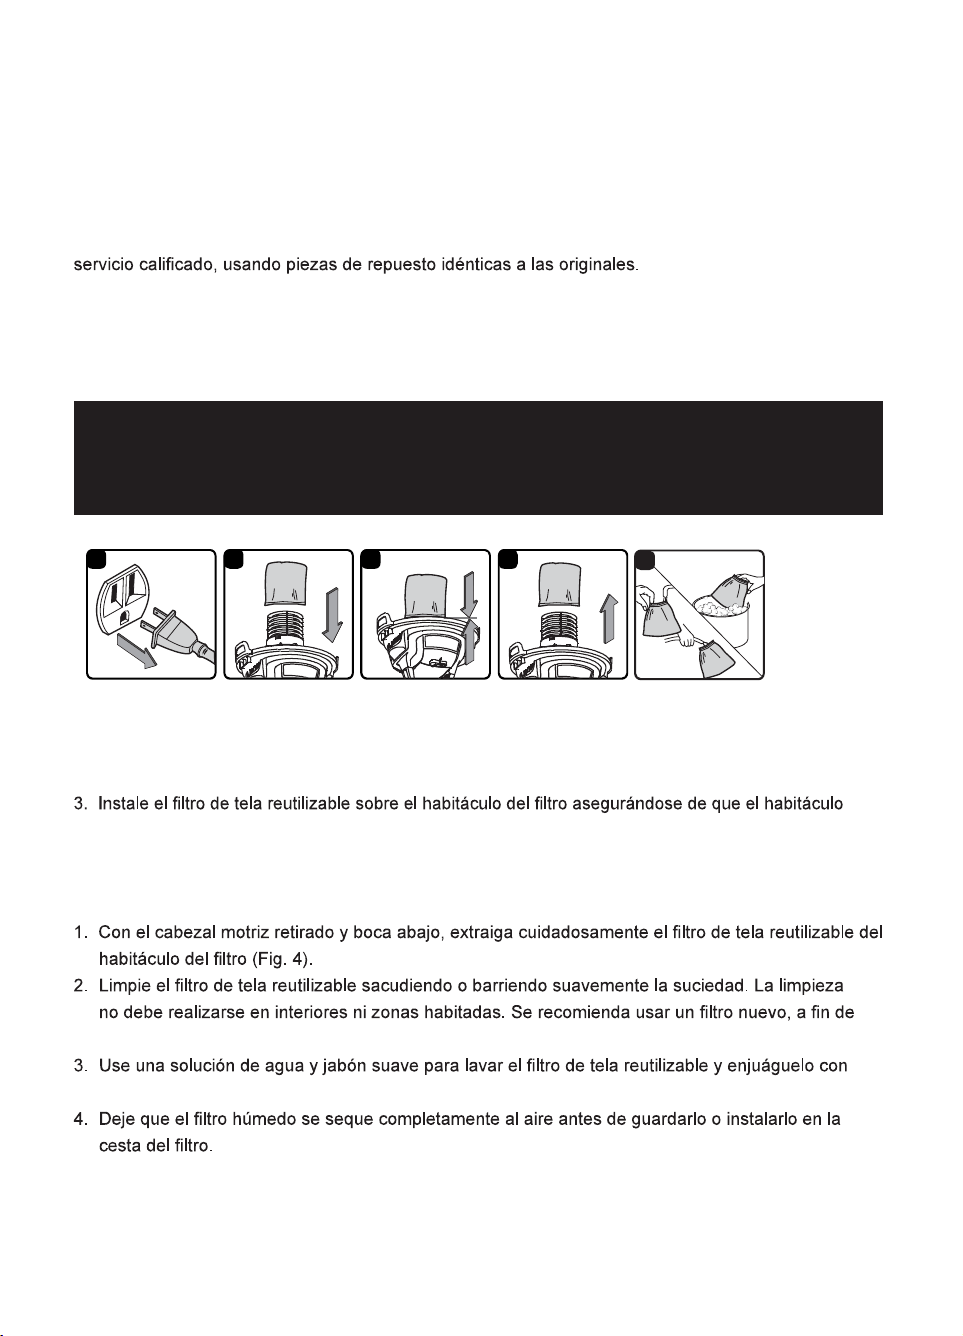
1. Verify that the power cord is disconnected from the outlet (Fig.1).
2. Remove the powerhead and place it in an upside-down position.
(Fig. 2 & 3).
4. Place the powerhead back onto the collection tank.
REMOVING & CLEANING REUSABLE CLOTH FILTER
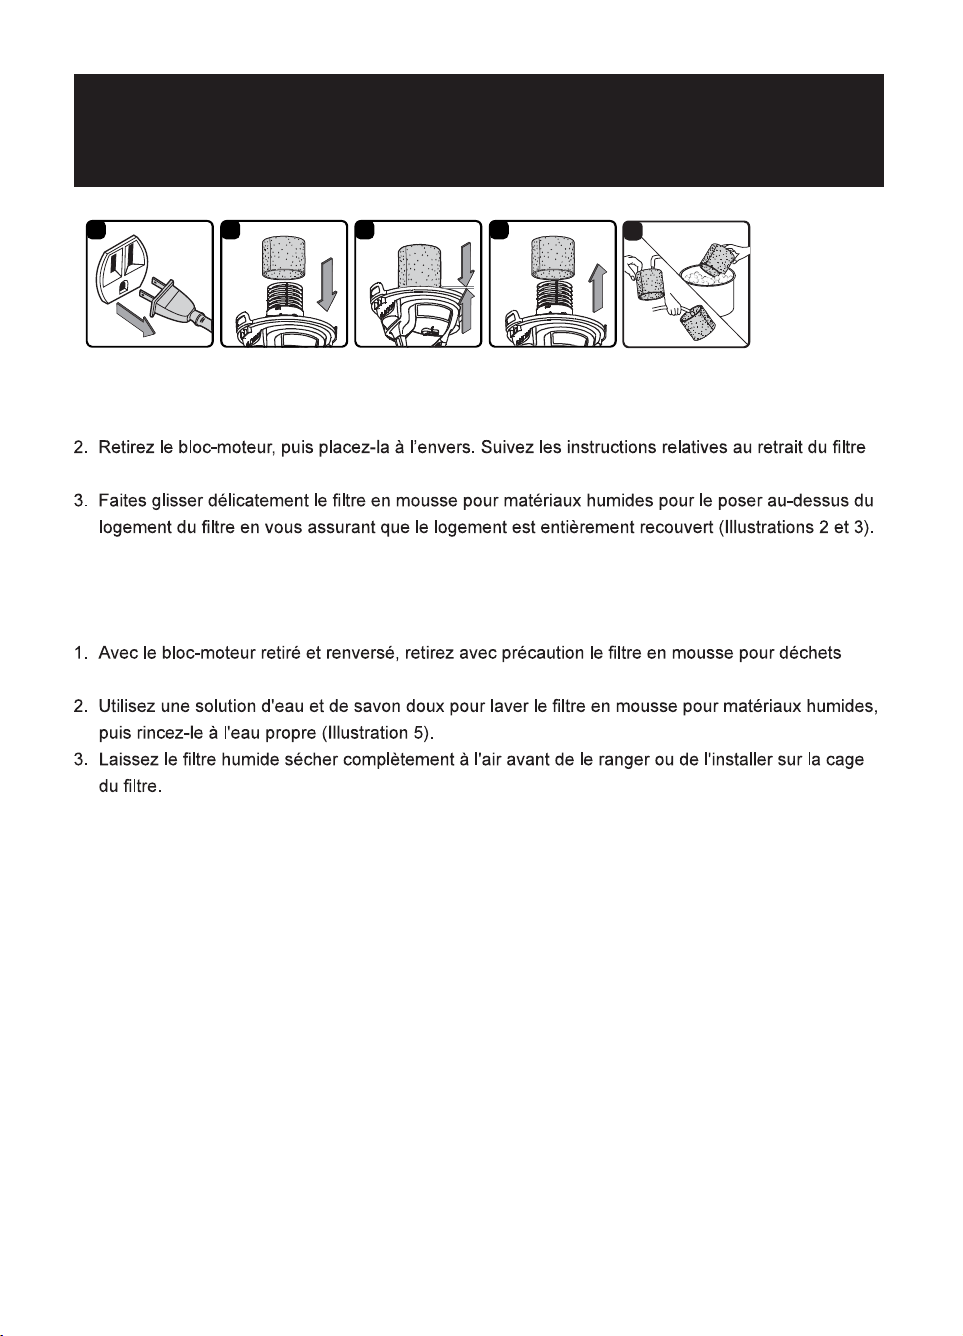
INSTALLING & CLEANING FOAM
WET FILTER
1 2 3 4
5
INSTALLING FOAM WET FILTER
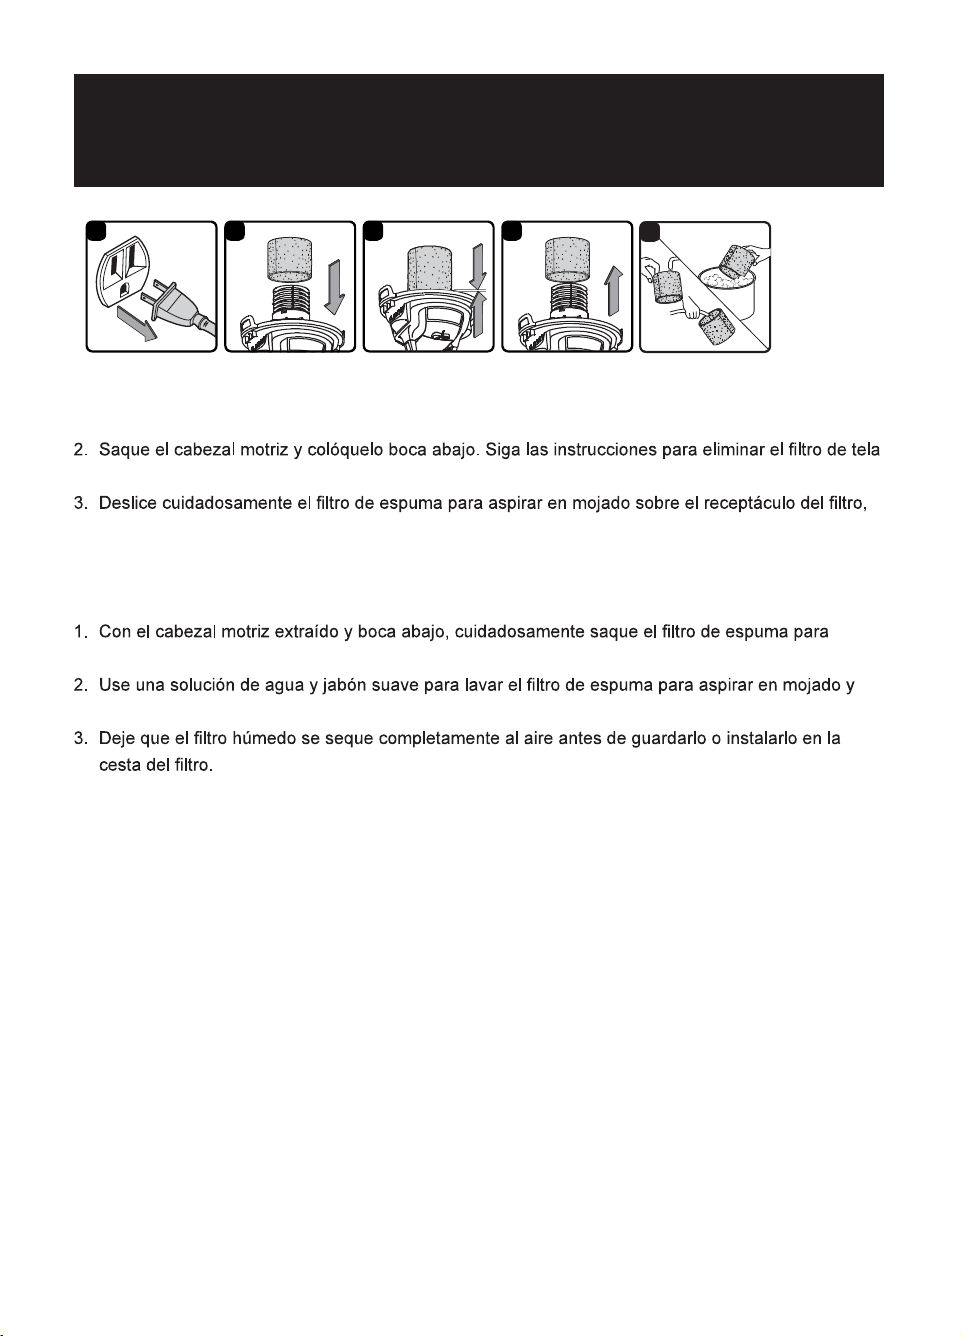
1. Verify that the powercord is disconnected from the outlet (Fig. 1).
2. Remove the powerhead and place in an upside-down position. Follow instructions to remove the
16
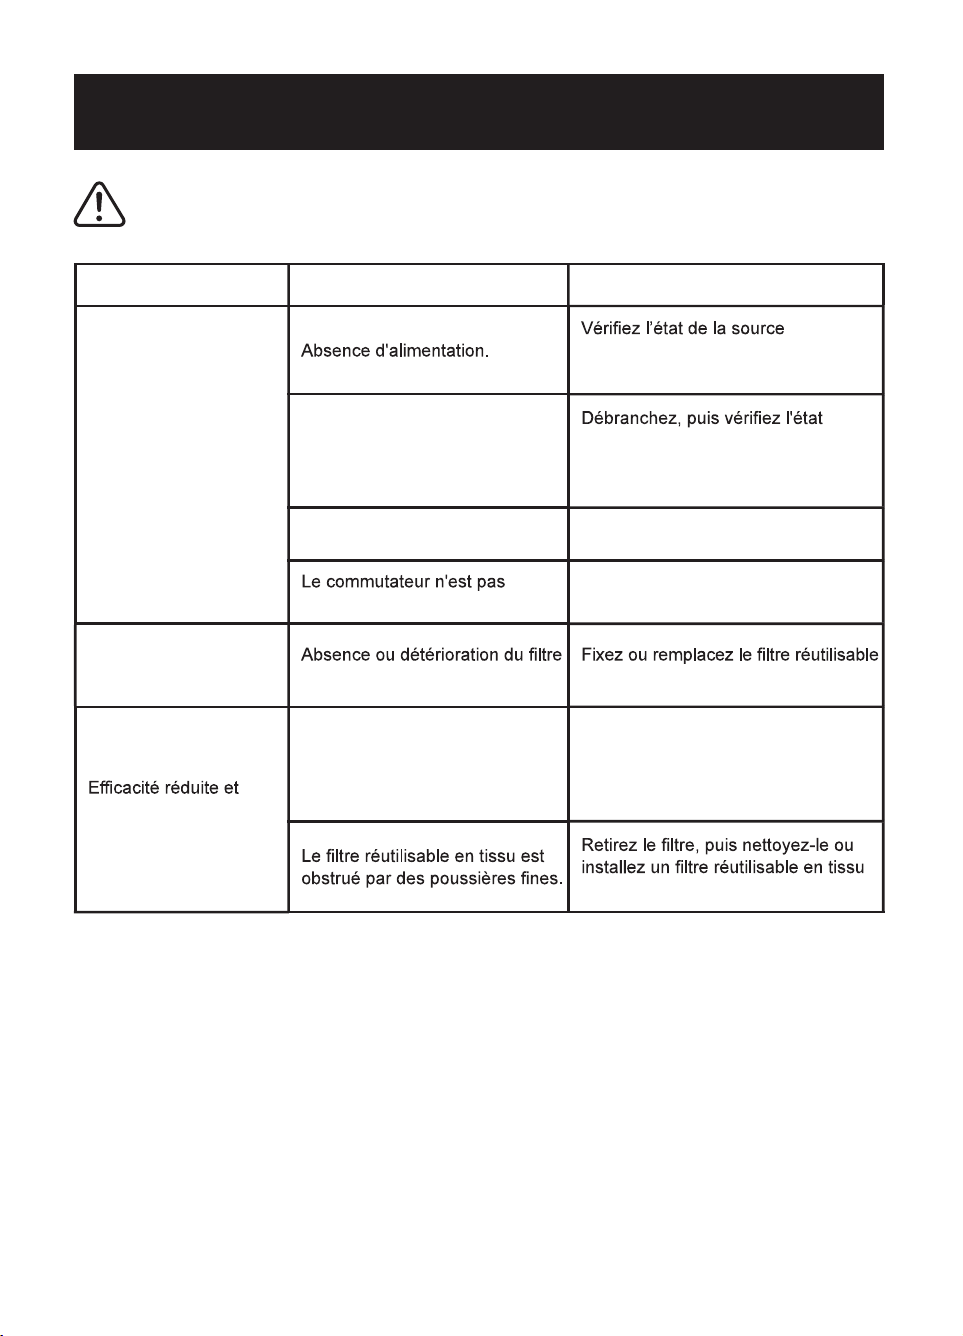
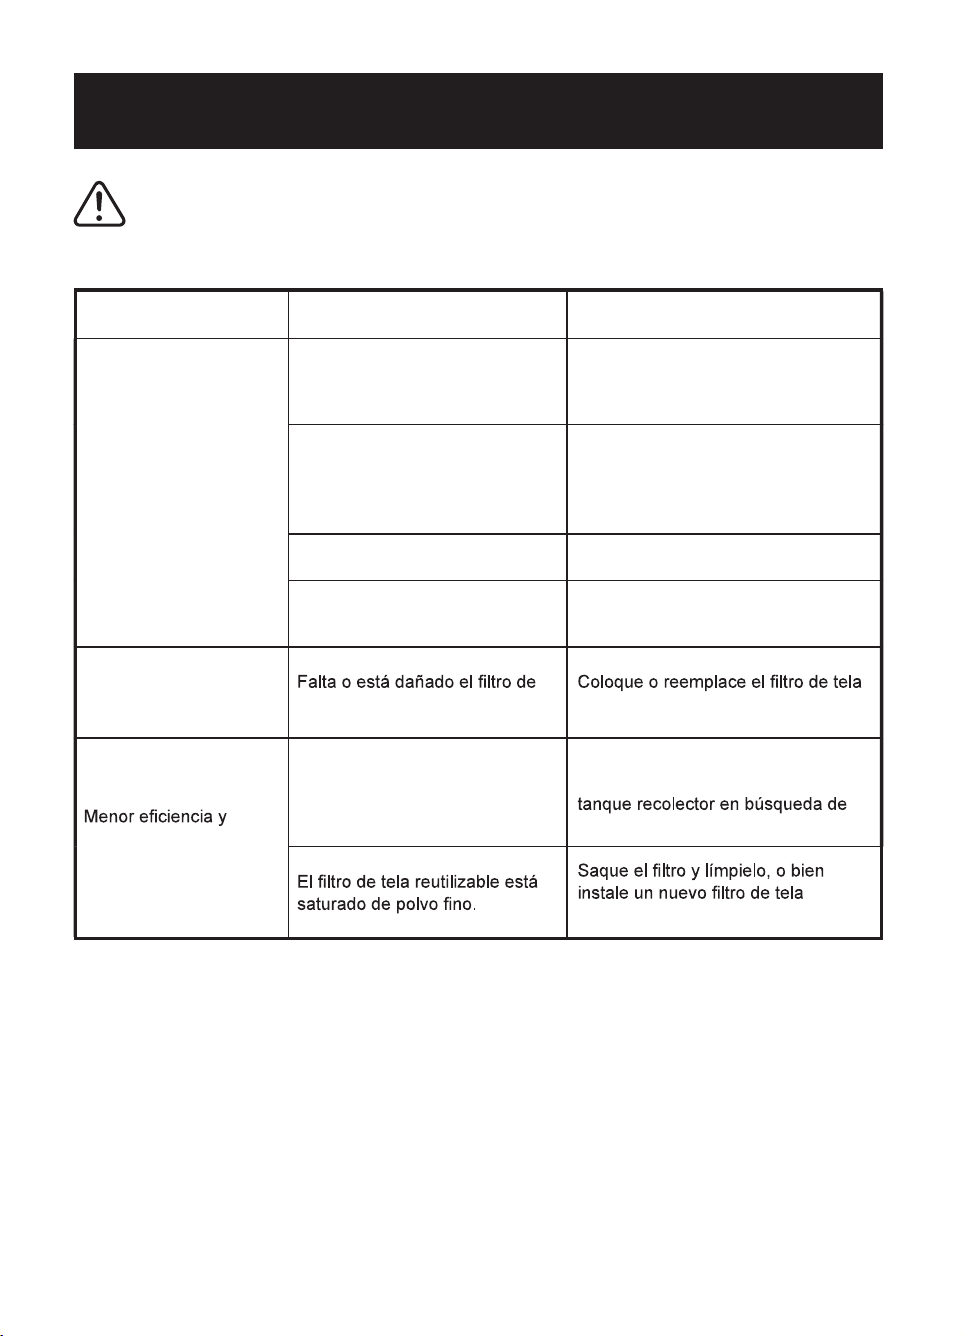
PROBLEM POSSIBLE CAUSE SOLUTION
The wet/dry vacuum will
not operate.
No power supply.
Check the power supply, cord,
breakers, and fuses.
Faulty power cord.
Unplug and check the power cord.
If damaged, have it repaired by a
professional.
Collection tank is full. Empty the collection tank.
Switch in the wrong position.
Press the ON ‘I’ button on the
powerhead.
The dust comes out from
the motor cover. or damaged.
Attach or replace the reusable cloth
motor/speed vibration.
There are blockages in the
nozzle, hose, or the collection
tank inlets.
Unplug and check nozzle, hose and
collection tank inlets for blockages.
TROUBLESHOOTING
WARNING:
TO REDUCE THE RISK OF ELECTRIC SHOCK, UNPLUG BEFORE TROUBLESHOOTING.
(Fig. 2 & 3).
4. Place the powerhead onto the collection tank.
CLEANING FOAM WET FILTER
17
EXPLODED VIEW
18
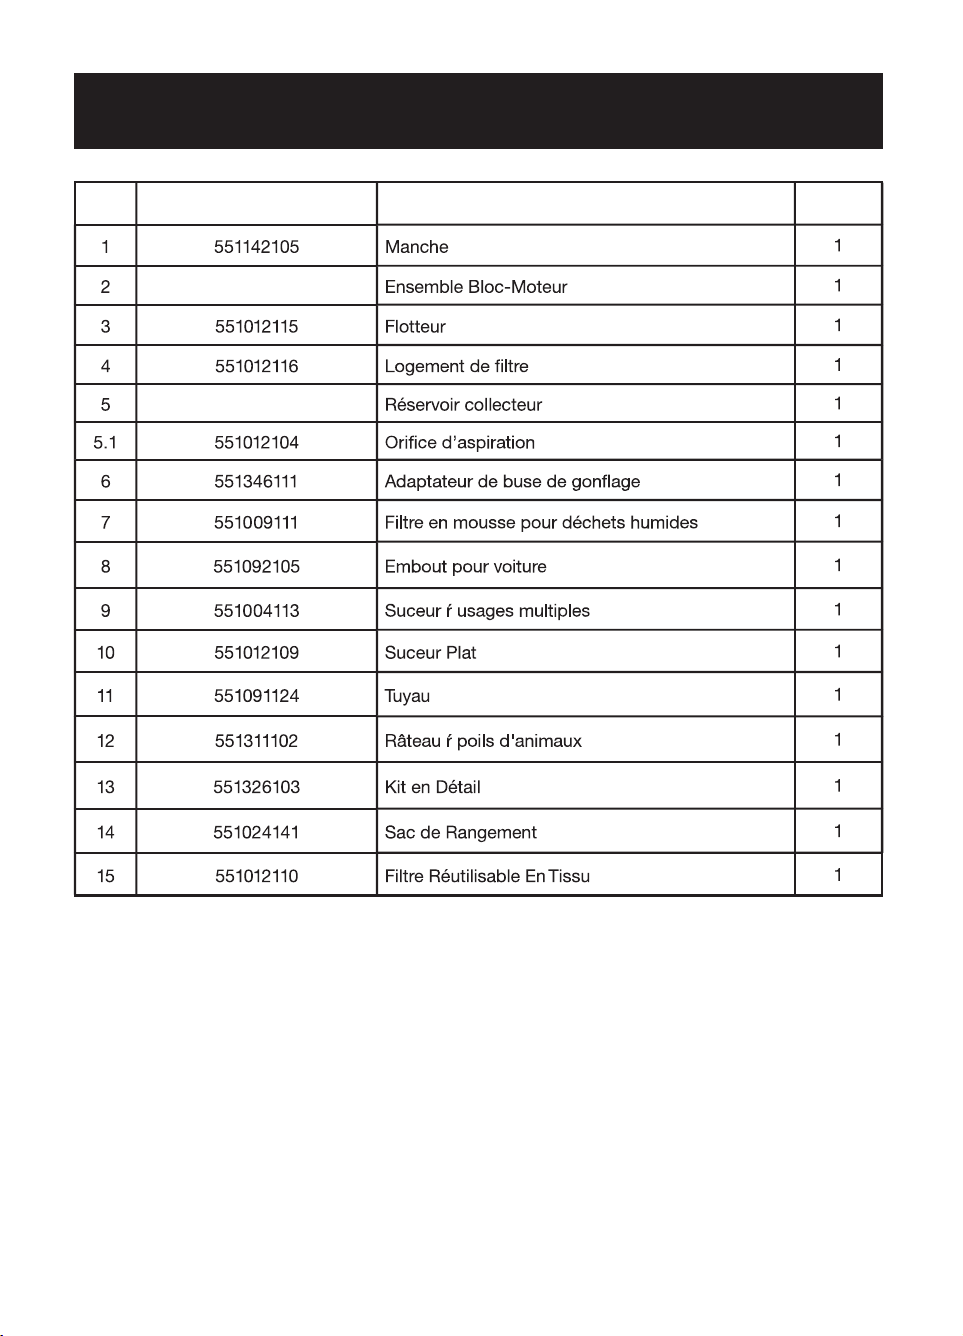
PARTS LIST
Part Part Number Description Quantity
19
SOMMAIRE
SECTION Page
Garantie ................................................................................................................................................
Consignes Importantes de Sécurité ......................................................................................................
Instructions Relatives À La Double Isolation .........................................................................................
Cordons Prolongateurs .........................................................................................................................
Symboles ..............................................................................................................................................
Instructions Relatives au Montage Général ...........................................................................................
Utilisation De L’Aspirateur D’Atelier Sec ................................................................................................
Aspiration de Liquides ...........................................................................................................................
Entretien ................................................................................................................................................
Installation Et Nettoyage Du Filtre Réutilisable En Tissu ......................................................................
Installation Et Nettoyage Du Filtre En Mousse Pour Matériaux Humides ...............................................
Dépannage ...........................................................................................................................................
Vue Éclatée ...........................................................................................................................................
Liste Des Pièces ....................................................................................................................................
Nous vous remercions pour l'acquisition de cet aspirateur d’atelier sec et humide Armor All
®
.
Soyez assuré(e) qu'avec Armor All
®
, vous obtenez un produit de qualité supérieure conçu pour
poussières et liquides.
POUR GARANTIR VOTRE SÉCURITÉ : VEUILLEZ LIRE ET ASSIMILER TOUTES LES CONSIGNES.
20
20
23
24
24
25
26
27
29
31
32
33
34
35
36
37
38
INFORMATIONS IMPORTANTES
GALLONS
disponible en fonctionnement.
PUISSANCE MAX.
La «PUISSANCE MAXIMALE» est un treme utilisé dans le secteur des aspirateurs pour matières
opérationnelle d’un aspirateur pour matières sèches et liquides, mais plutôt la puissance du moteur,
y compris l’apport d’inertie du moteur, atteinte en laboratoire. En utilisation réelle, les moteurs ne
fonctionnent pas à la puissance maximale indiquée.
FR
20
GARANTIE
une garantie limitée de deux (2) ans contre tout défaut de fabrication et défaillance matérielle à compter
veuillez composer le numéro: 1-866-384-8432.
Non Couverts par la Garantie :
•
Toute pièce devenue inopérante suite à une mauvaise utilisation, une négligence, une utilisation abusive
• Usure normale de pièces et accessoires, notamment tuyaux, suceurs ou roulettes;
intempéries;
• Tout produit dont le numéro de série/la plaque signalétique a été manipulé(e) frauduleusement ou
retiré(e);
• Tout produit acheté auprès d’un revendeur non agréé.
CONSIGNES IMPORTANTES DE
SÉCURITÉ
VEILLEZ À LIRE ET ASSIMILER TOUTES LES CONSIGNES
AVANT TOUTE UTILISATION DU PRÉSENT ASPIRATEUR.
VEUILLEZ CONSERVER LE PRÉSENT MANUEL AFIN DE
POUVOIR VOUS Y RÉFÉRER ULTÉRIEUREMENT.
avant toute utilisation. La sécurité est une combinaison de bon sens, de vigilance et de familiarisation avec
le fonctionnement de votre aspirateur. Utilisez cet aspirateur exclusivement conformément aux descriptions
détérioration de votre aspirateur, utilisez exclusivement les accessoires recommandés par le fabricant.
L’utilisation d’un aspirateur exige le respect de certaines mesures de sécurité élémentaires, notamment
les suivantes. Le non-respect des avertissements et consignes ci-dessous peut entraîner des risques
AVERTISSEMENT :
AFIN DE RÉDUIRE TOUS RISQUES D’INCENDIE,
D’ÉLECTROCUTION OU DE BLESSURES :
21
•
notamment de l’essence, et ne pas l’utiliser dans des endroits où ces substances
peuvent être présentes.
charbon, la poussière de magnésium, la poussière de céréales ou la poudre à
canon. Les étincelles à l’intérieur du moteur peuvent déclencher des vapeurs ou
n’aspirez pas de matières toxiques.
• Ne pas utiliser ni entreposer l’aspirateur à proximité de matériaux dangereux.
• Ne pas aspirer de matières en combustion ou qui dégagent de la fumée, telles
que des cigarettes, des allumettes ou des cendres chaudes.
• En cas de dysfonctionnement, de chute, de détérioration, d’abandon à l’extérieur,
ou de chute dans de l’eau, de l’aspirateur, ramenez celui-ci à un centre de réparation.
• Ne pas débrancher l’appareil en tirant sur le cordon. Pour débrancher le produit,
•
• Maintenez le cordon à l’écart de toutes surfaces chaudes.
• Ne pas faire passer l’aspirateur sur le cordon.
•
est utilisé par des enfants ou si des enfants se trouvent à proximité.
•
• Ne pas laisser l’aspirateur branché. Pensez à le débrancher de la prise lorsque
• Coupez toutes les commandes de l’appareil avant de le débrancher.
• Débranchez le produit avant de raccorder ou de détacher le tuyau ou tous autres
accessoires.
•
de poussières, peluches, cheveux ou de toute autre objet susceptible de gêner
• Maintenez vos cheveux, vêtements amples, doigts et toutes parties du corps à
22
• Faites très attention lorsque vous nettoyez des escaliers.
• Utilisez cet appareil exclusivement conformément aux descriptions fournies
dans le présent manuel d’utilisation. Utilisez exclusivement les accessoires
recommandés par le fabricant.
•
Cet aspirateur est livré doté d’une double isolation. Utilisez exclusivement des pièces
de rechange identiques aux pièces d’origine. Voir la section « INSTRUCTIONS
RELATIVES À LA DOUBLE ISOLATION ».
• Orientez le rejet d’air vers la zone de travail exclusivement.
• Ne pas utiliser l’Aspirateur D’Atelier Sec Et Humide en guise de pulvérisateur.
• Ne pas orienter le rejet d’air vers les personnes se trouvant à proximité.
• Portez des lunettes de sécurité.
VEUILLEZ CONSERVER LES PRÉSENTES CONSIGNES
Conçu pour une utilisation domestique exclusivement.
ATTENTION :
AVERTISSEMENT :
Afin de réduire tous risques d’électrocution,
23
AVERTISSEMENT :
ENTRETIEN OU RÉPARATION DE L'ASPIRATEUR
D’ATELIER SEC ET HUMIDE À DOUBLE ISOLATION
AVEC UN ASPIRATEUR D’ATELIER SEC ET HUMIDE À DOUBLE ISOLATION, DEUX
SYSTÈMES D'ISOLATION SONT PRÉVUS À LA PLACE DE LA MISE À LA TERRE.
AUCUNE MISE À LA TERRE N'EST FOURNIE SUR UN APPAREIL À DOUBLE ISOLATION
ET IL NE CONVIENT PAS D'EN AJOUTER UNE. LA RÉPARATION D'UN ASPIRATEUR
D’ATELIER SEC ET HUMIDE À DOUBLE ISOLATION REQUIERT UNE PRUDENCE
EXTRÊME ET UNE BONNE CONNAISSANCE DU SYSTÈME; ELLE DOIT DONC ÊTRE
EXCLUSIVEMENT EFFECTUÉE PAR UN PERSONNEL D'ENTRETIEN QUALIFIÉ. LES
PIÈCES DE RECHANGE D'UN ASPIRATEUR D’ATELIER SEC ET HUMIDE À DOUBLE
ISOLATION DOIVENT ÊTRE IDENTIQUES AUX PIÈCES REMPLACÉES. VOTRE
ASPIRATEUR D’ATELIER SEC ET HUMIDE À DOUBLE ISOLATION PORTE LA MENTION
« DOUBLE ISOLATION », ET LE SYMBOLE (CARRÉ DANS UN CARRÉ) PEUT
ÉGALEMENT ÊTRE GRAVÉ SUR L'APPAREIL.
INSTRUCTIONS RELATIVES À LA
DOUBLE ISOLATION
AVERTISSEMENT :
AFIN DE RÉDUIRE TOUS RISQUES D’ÉLECTROCUTION:
NE PAS EXPOSER CE PRODUIT À LA PLUIE. VEILLEZ À LE RANGER À L'INTÉRIEUR.
AVERTISSEMENT :
POUR VOTRE PROPRE SÉCURITÉ, VEILLEZ À LIRE
ET À ASSIMILER LE MANUEL D'UTILISATION. NE PAS FAIRE FONCTIONNER L'APPAREIL
SANS SURVEILLANCE. NE PAS ASPIRER DE CENDRES CHAUDES, DE CHARBONS OU
TOUS AUTRES MATÉRIAUX TOXIQUES, INFLAMMABLES OU DANGEREUX. NE PAS
UTILISER EN PRÉSENCE DE LIQUIDES OU DE VAPEURS EXPLOSIVES.
ATTENTION :
NE PAS ASPIRER DE LA POUSSIÈRE DE PLACOPLÂTRE, DE
LA SUIE OU DES CENDRES DE CHEMINÉE À L’AIDE D’UN FILTRE POUR MATÉRIAUX
HUMIDES/À POUSSIÈRE ORDINAIRES. CE TYPE DE POUSSIÈRE EST TRÈS FIN
ET NE PEUT ÊTRE CAPTURÉ PAR LE FILTRE ET RISQUE D’ENDOMMAGER LE
MOTEUR. LORSQUE VOUS ASPIREZ DES POUSSIÈRES FINES UTILISEZ UN FILTRE À
POUSSIÈRES FINES.
de mise à la terre distinct. Utilisez exclusivement des pièces de rechange identiques aux pièces d’origine.
aux descriptions fournies dans le présent manuel.
Respectez les avertissements suivants qui sont apposés sur le boîtier du moteur de votre aspirateur.
DOUBLE ISOLATION : MISE À LA TERRE NON NÉCESSAIRE : LORS DE L'ENTRETIEN
OU DE LA RÉPARATION DU PRODUIT, UTILISEZ EXCLUSIVEMENT DES PIÈCES DE
RECHANGE IDENTIQUES AUX PIÈCES D’ORIGINE.
24
CORDONS PROLONGATEURS
SYMBOLE SIGNAL SIGNIFICATION
DANGER
Indique une situation de danger immédiat qui, si elle n’est pas
évitée, provoquera des blessures graves, voire la mort.
AVERTISSEMENT
Indique une situation de danger potentiel qui, si elle n’est pas
évitée, peut provoquer des blessures graves, voire la mort.
ATTENTION
Indique une situation de danger potentiel qui, si elle n’est pas
évitée, pourrait provoquer des blessures mineures ou modérées.
REMARQUE
(Sans symbole d’alerte de sécurité) Indique une situation
pouvant entraîner des dommages matériels.
SYMBOLES
Lors de l’utilisation d’un cordon prolongateur avec votre Aspirateur D’Atelier Sec Et Humide, veuillez
cordon prolongateurs conçus pour une utilisation à l’extérieur.
Longueur du Cordon Prolongateur
120V 25 pieds (7,62 m) 50 pieds (15,24 m) 100 pieds (30,48 m) 150 pieds (45,72 m)
Ampérage
Plus de Pas plus de
0 6 18 16 16 14
6 10 18 16 14 12
10 12 16 16 14 12
12 16 14 12 Déconseillé
25
DÉBALLAGE ET VÉRIFICATION DU
CONTENU DU CARTON
Retirez tout le contenu de la boîte. Retirez le bloc-moteur,
puis enlevez tout le contenu du réservoir collecteur.
du contenu de la boîte en carton sont bien présents.
Liste du Contenu de la Boîte en Carton :
G H I
L M
JF
K
D
C
A B
E
Emplacement de
rangement des accessoires
Crochet D’Enroulement
du Cordon D’Alimentation
Orifice de soufflage
Manche
Bloc-moteur
Commutateur On/Off
(Marche/Arrêt)
Loquet
Organisation
des Tuyaux
Réservoir collecteur
Orifice d’aspiration
Clé
A
B
C
D
E
F
G
H
I
J
K
L
M
Description
Ensemble aspirateur ...........................................
Tuyau ..................................................................
Suceur Plat .……………..…..…..................….....
Suceur à usages multiples .................................
Embout pour voiture ...........................................
Filtre réutilisable en tissu ....................................
Filtre en mousse pour déchets humides ............
Sac de rangement ..............................................
Kit en détail (6 pzs) .............................................
Manche................................................................
Manuel d’utilisation .............................................
Qté
1
1
1
1
1
1
1
1
1
1
1
1
1
REMARQUE : Diamètre du tuyau et des accessoires
de cet aspirateur : 1-1/4 po (32 mm).

26
INSTRUCTIONS RELATIVES AU
MONTAGE GÉNÉRAL
4
32
1
2
12
11
9
10
5
9
1
13
14
8
6
7
15 16
Avant de commencer le montage du produit, assurez-vous que toutes les pièces sont disponibles.
manquantes ou endommagées, ne pas tenter de monter le produit.
Contactez le service clientèle pour vous procurer des pièces de rechange.
AVERTISSEMENT :
NE PAS BRANCHER LE CORDON D'ALIMENTATION À
UNE PRISE DE COURANT. ASSUREZ-VOUS QUE LA FICHE EST DÉBRANCHÉE AVANT
DE MONTER L'ASPIRATEUR D’ATELIER SEC ET HUMIDE. AFIN DE RÉDUIRE TOUS
RISQUES D’ÉLECTROCUTION, NE PAS EXPOSER CE PRODUIT À LA PLUIE.
DÉBALLAGE DE VOTRE ASPIRATEUR D’ATELIER SEC ET HUMIDE ET MONTAGE GÉNÉRAL
1. Assurez-vous que le cordon d’alimentation est débranché de la prise de courant (Illustration 1).
2. Dégagez les loquets (Illustration 2).
3. Soulevez le bloc-moteur pour le détacher du réservoir collecteur (Illustration 3).
contenu énuméré en page 25 (Illustration 4).
5. Insérez le manche dans les fentes situées dans la partie supérieure du bloc-moteur. Exercez une
6.
mousse pour matériaux humides (Illustration 8).
27
8. Replacez le bloc-moteur sur le réservoir collecteur en alignant la partie supérieure sur les loquets,
puis enclenchez-la en place (Illustrations 9 et 10).
(Illustration 11).
REMARQUE : Cet aspirateur sec et humide est livré avec un suceur à usages multiples. Cet
• Retirez la brosse du suceur à usages multiples (Fig. 13).
• Pour le retirer, faites-le glisser hors du suceur à usages multiples (Fig. 15).
•
FICHE POLARISÉE
UTILISATION DE L’ASPIRATEUR D’ATELIER SEC
8
87
2 3
4 5
6

28
ASPIRATION DE POUSSIÈRES
1. Assurez-vous que le cordon d’alimentation est débranché de la prise de courant (Illustration 1).
(Illustration 4).
INSTRUCTIONS D’UTILISATION : ASPIRATION DE POUSSIÈRES
6.
Assurez-vous que le commutateur est positionné sur « O » (OFF [Arrêt]) avant de brancher le
(Illustrations 6 et 7).
à aspirer (Illustration 8).
puis débranchez le cordon d’alimentation de la prise de courant.
O = OFF (Arrêt) I = ON (Marche)
NE PAS UTILISER LE FILTRE EN TISSU RÉUTILISABLE POUR L’ASPIRATION DE LIQUIDES.
AVERTISSEMENT :
VEILLEZ À LIRE, À ASSIMILER ET À METTRE
EN APPLICATION LES CONSIGNES INTITULÉES « CONSIGNES IMPORTANTES DE
SÉCURITÉ ». NE PAS UTILISER L'ASPIRATEUR DANS DES ZONES OÙ L'AIR CONTIENT
DES GAZ ET VAPEURS INFLAMMABLES OU DES POUSSIÈRES EXPLOSIVES. LES GAZ
OU VAPEURS INFLAMMABLES COMPRENNENT, SANS POUR AUTANT S’Y LIMITER :
L’ESSENCE POUR BRIQUETS, LES PRODUITS DE NETTOYAGE DE TYPE SOLVANTS,
LA PEINTURE À L'HUILE, L’ESSENCE, L'ALCOOL OU LES SPRAYS AÉROSOLS. LES
POUSSIÈRES EXPLOSIVES COMPRENNENT, SANS POUR AUTANT S’Y LIMITER : LE
CHARBON, LE MAGNÉSIUM, LES GRAINS OU LA POUDRE À CANON. AFIN DE RÉDUIRE
LES RISQUES POUR LA SANTÉ PROVENANT DES VAPEURS OU POUSSIÈRES,
N’ASPIREZ PAS DE MATIÈRES TOXIQUES.
AVERTISSEMENT :
NE PAS BRANCHER LE CORDON D’ALIMENTATION À
UNE PRISE DE COURANT. ASSUREZ-VOUS QUE LA FICHE EST DÉBRANCHÉE AVANT
DE REMPLACER LES FILTRES.
ATTENTION :
NE PAS ASPIRER DE LA POUSSIÈRE DE PLACOPLÂTRE, DE
LA SUIE OU DES CENDRES DE CHEMINÉE À L’AIDE D’UN FILTRE POUR MATÉRIAUX
HUMIDES/À POUSSIÈRE ORDINAIRES. CES POUSSIÈRES SONT TRÈS FINES ET
NE SERONT PAS RETENUES PAR LE FILTRE, CE QUI POURRAIT ENTRAÎNER DES
DOMMAGES DU MOTEUR. POUR L’ASPIRATION DE POUSSIÈRES FINES, UTILISEZ UN
FILTRE À POUSSIÈRES FINES.
29
ASPIRATION DE LIQUIDES
6
7
8
5
2 31
6
ASPIRATION DE LIQUIDES
AVERTISSEMENT :
VEILLEZ À LIRE, À ASSIMILER ET À METTRE
EN APPLICATION LES CONSIGNES INTITULÉES « CONSIGNES IMPORTANTES DE
SÉCURITÉ ». NE PAS UTILISER L'ASPIRATEUR DANS DES ZONES OÙ L'AIR CONTIENT
DES GAZ ET VAPEURS INFLAMMABLES OU DES POUSSIÈRES EXPLOSIVES. LES GAZ
OU VAPEURS INFLAMMABLES COMPRENNENT, SANS POUR AUTANT S’Y LIMITER :
L’ESSENCE POUR BRIQUETS, LES PRODUITS DE NETTOYAGE DE TYPE SOLVANTS,
LA PEINTURE À L'HUILE, L’ESSENCE, L'ALCOOL OU LES SPRAYS AÉROSOLS. LES
POUSSIÈRES EXPLOSIVES COMPRENNENT, SANS POUR AUTANT S’Y LIMITER : LE
CHARBON, LE MAGNÉSIUM, LES GRAINS OU LA POUDRE À CANON. AFIN DE RÉDUIRE
LES RISQUES POUR LA SANTÉ PROVENANT DES VAPEURS OU POUSSIÈRES,
N’ASPIREZ PAS DE MATIÈRES TOXIQUES.
AVERTISSEMENT :
NE PAS BRANCHER LE CORDON D’ALIMENTATION À
LA PRISE DE COURANT. ASSUREZ-VOUS QUE LA FICHE EST DÉBRANCHÉE AVANT DE
REMPLACER LES FILTRES.
le réservoir collecteur est propre et exempt de poussières et de saletés (Illustration 1).
2.
(Illustration 2).
NE PAS UTILISER LE FILTRE RÉUTILISABLE EN TISSU POUR EFFECTUER TOUTE ASPIRATION
DE LIQUIDES.
INSTRUCTIONS D’UTILISATION : ASPIRATION DE LIQUIDES
3.
5. Assurez-vous que le commutateur est positionné sur « O » (OFF [Arrêt]) avant de brancher le
(Illustrations 4 et 5).
30
(Illustration 6).
puis débranchez le cordon d’alimentation de la prise de courant.
rangement (Illustration 7).
IMPORTANT! Lors de l’aspiration d’importantes quantités de liquides, ne pas plonger le suceur
collecteur atteint sa capacité maximale. Vous remarquerez une accélération de la vitesse du moteur.
l’aspiration, replacez le bloc-moteur sur le réservoir collecteur. Après aspiration de déchets humides,
collecteur, nettoyez, puis séchez l’intérieur et l’extérieur avant rangement du produit.
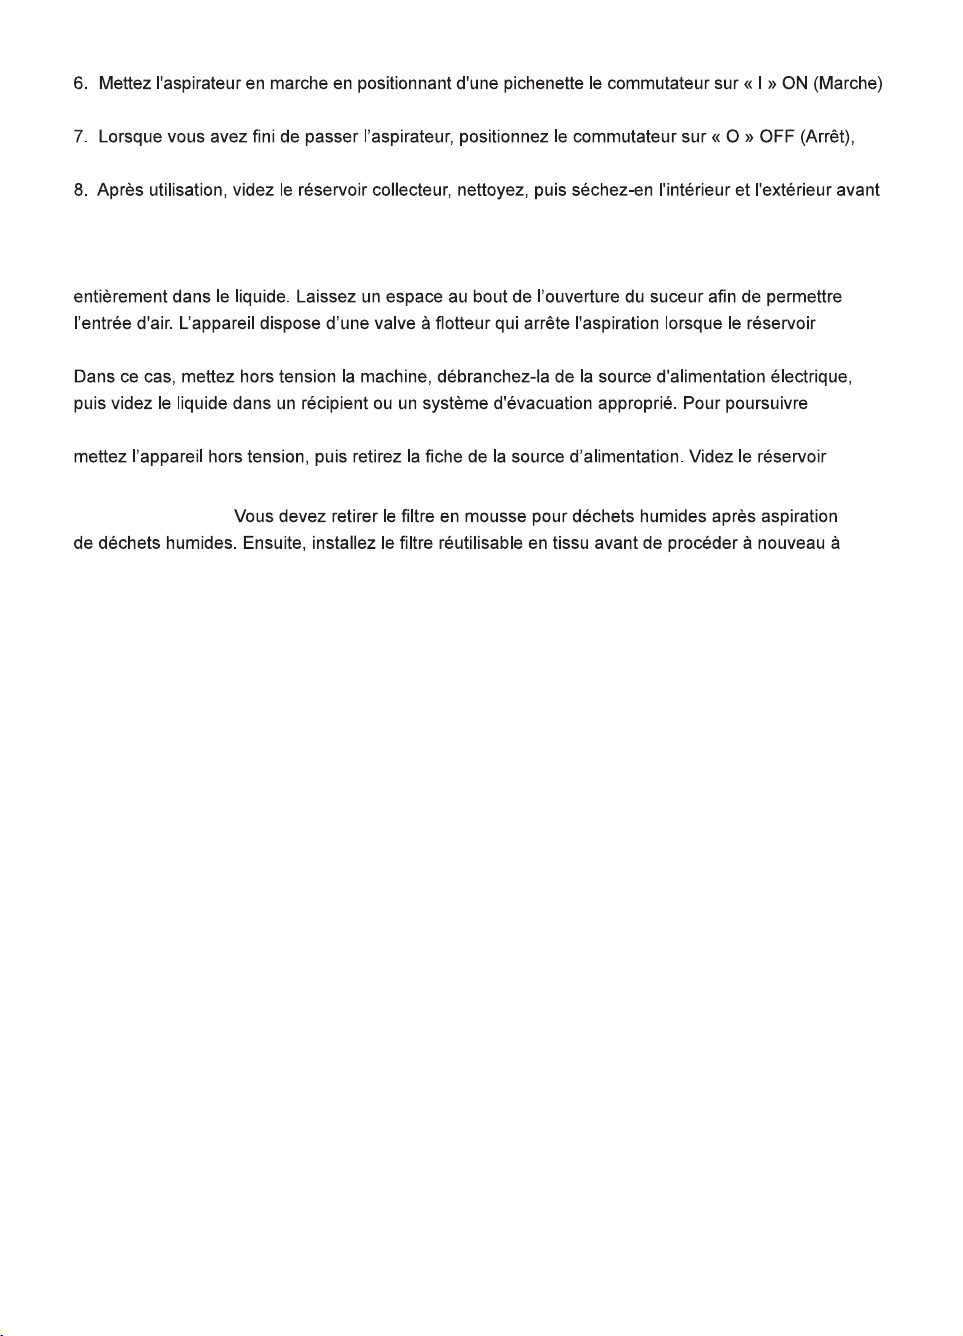
NE PAS OUBLIER!
l’aspiration de déchets secs.
31
UTILISATION DU SOUFFLEUR
2
6
2
1
2
7
5
3
4
Retirez toutes les poussières ou tous les débris du réservoir collecteur et du tuyau.
(Illustration 2).
prise de courant (Illustrations 4 et 5).
en marche en positionnant le commutateur sur « I » ON (Marche) (Illustration 6).
AVERTISSEMENT :
TOUJOURS PORTER DES LUNETTES DE PROTECTION
CONFORMES À LA NORME ANSI Z87.1 (OU AU CANADA, CSAZ94.3) AVANT D’UTILISER
LE SOUFFLEUR.
AVERTISSEMENT :
PORTEZ UN MASQUE ANTI-POUSSIÈRES SI LE
SOUFFLAGE CRÉE DES POUSSIÈRES SUSCEPTIBLES D'ÊTRE INHALÉES.
ATTENTION :
VEILLEZ À CE QUE LES DÉBRIS NE SOIENT PAS SOUFFLÉS
VERS LES PERSONNES SE TROUVANT À PROXIMITÉ.
32
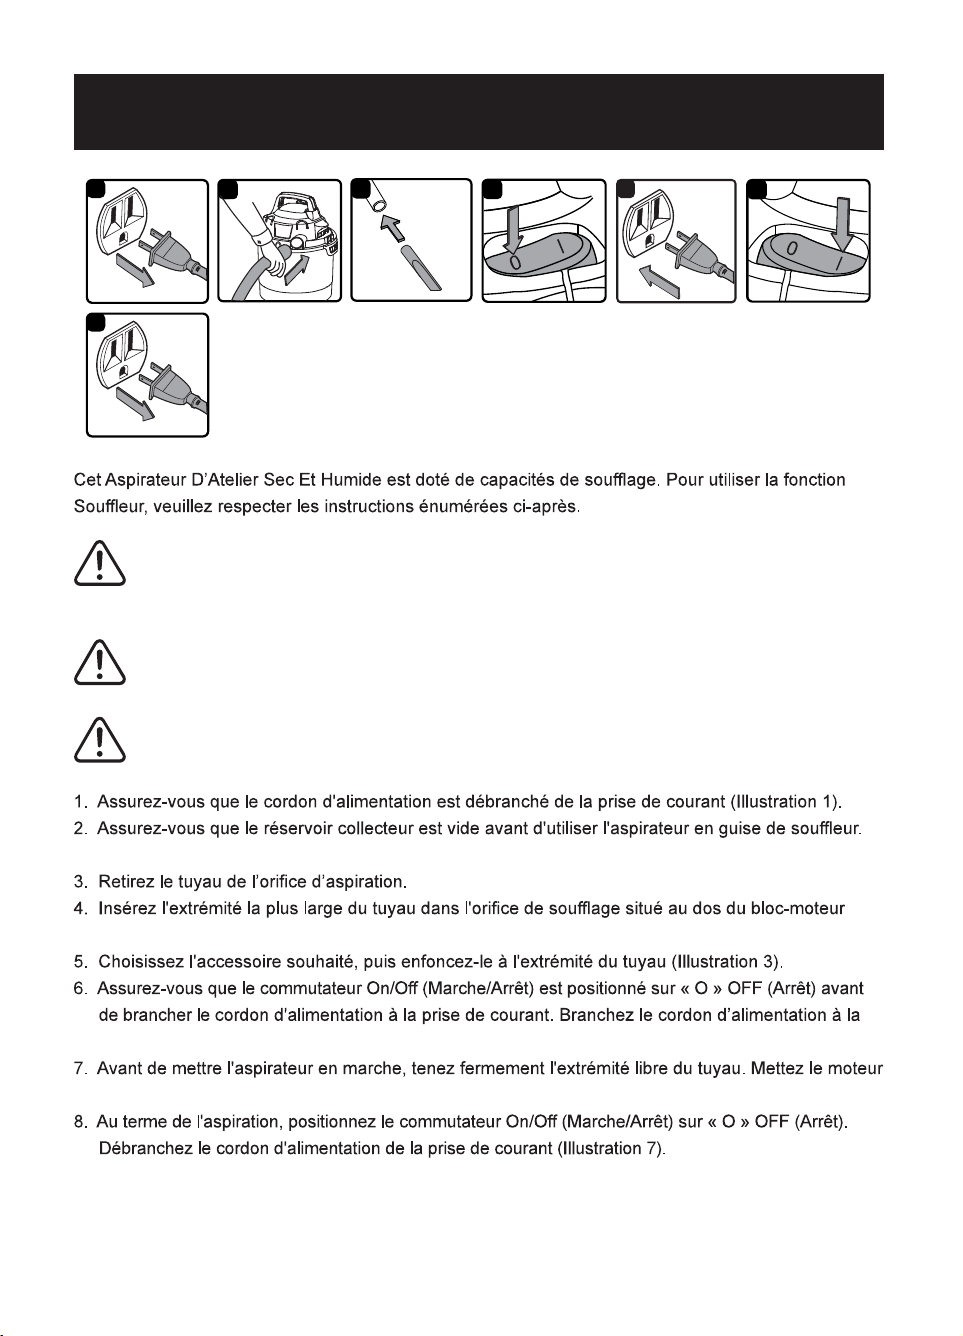
UTILISATION DE L'ADAPTATEUR
DE BUSE DE GONFLAGE
2
2
1
5
3
4
GONFLER UN OBJET
(Illustration 1).
(Illustration 4).
débranchez le cordon d’alimentation de la prise de courant (Illustration 5).
33
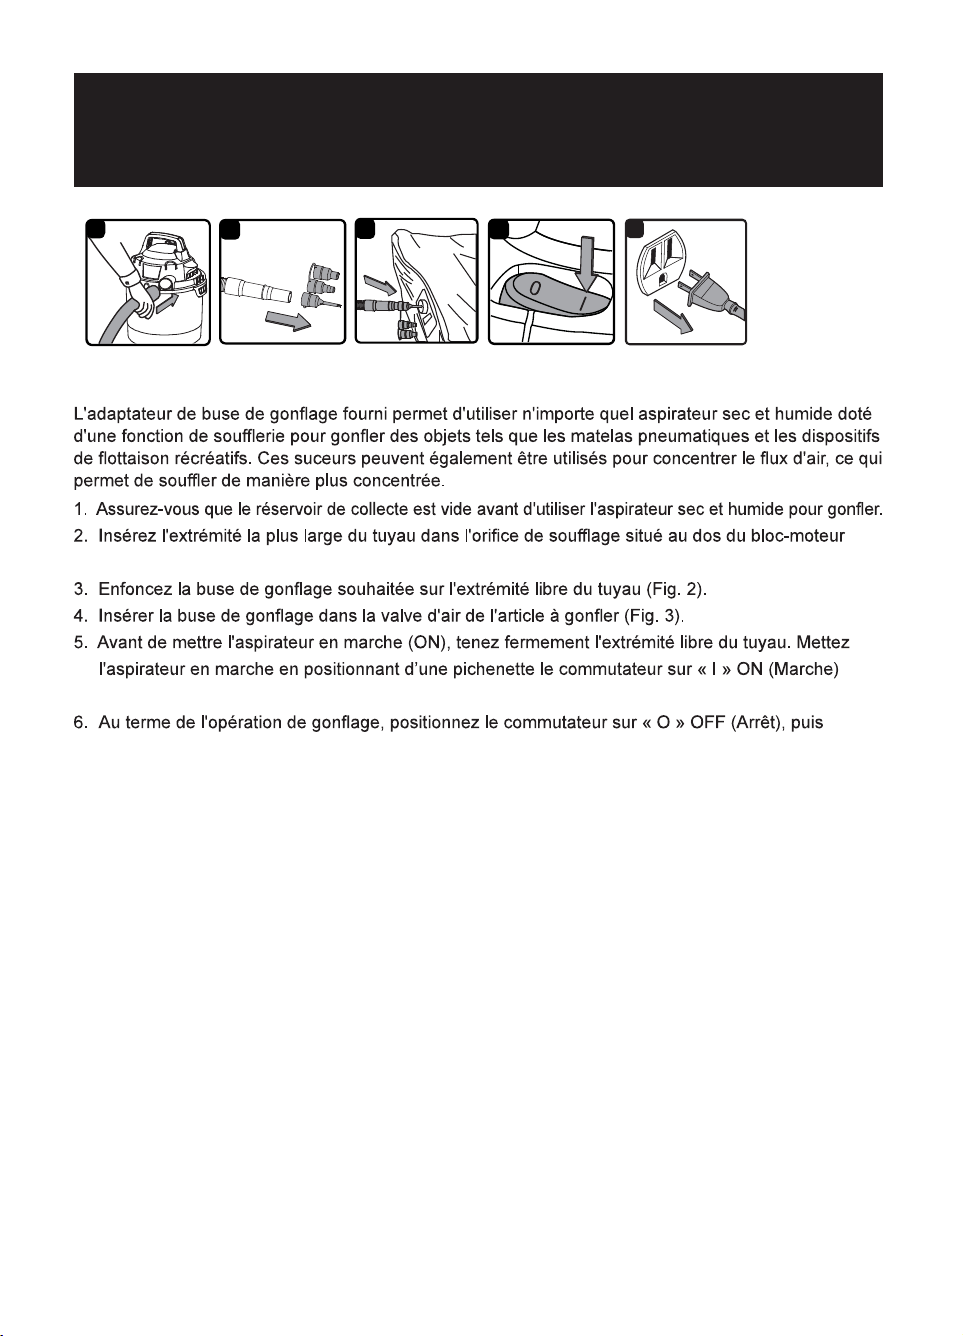
ENTRETIEN
2
4
1
3
1. Assurez-vous que le cordon d’alimentation est débranché de la prise de courant (Illustration 1).
2. Détachez le tuyau de l’aspirateur (Illustration 2).
3. Desserrez les loquets, puis retirez le bloc-moteur du réservoir collecteur (Illustration 3). Placez la
4. Éliminez toutes les saletés ou tous les débris du réservoir collecteur et du tuyau dans un contenant
à déchets approprié (Illustration 4).
pas endommagés.
IMPORTANT!
UTILISEZ TOUJOURS LE FILTRE RÉUTILISABLE EN TISSU POUR L’ASPIRATION DE POUSSIÈRES.
REMARQUE!
signes d’usure ou de petits trous éventuels. Un petit trou peut laisser passer la poussière à travers le
RANGEMENT
Avant de ranger votre aspirateur, le réservoir collecteur doit être vidé et nettoyé. Les accessoires doivent
RÉPARATIONS
VIDANGE DU RÉSERVOIR COLLECTEUR
AVERTISSEMENT :
DÉBRANCHEZ TOUJOURS LA FICHE DE LA PRISE DE
COURANT AVANT DE RETIRER LE BLOC-MOTEUR DU RÉSERVOIR COLLECTEUR.
34
INSTALLATION ET NETTOYAGE DU
FILTRE RÉUTILISABLE EN TISSU
1 2 4
5
3
INSTALLATION DU FILTRE RÉUTILISABLE EN TISSU
1. Assurez-vous que le cordon d’alimentation est débranché de la prise de courant (Illustration 1).
logement est entièrement recouvert (Illustrations 2 et 3).
4. Replacez le bloc-moteur sur le réservoir collecteur.
RETRAIT ET NETTOYAGE DU FILTRE RÉUTILISABLE EN TISSU
35
INSTALLATION ET NETTOYAGE DU FILTRE
EN MOUSSE POUR MATÉRIAUX HUMIDES
1 2 3 4
5
INSTALLATION DU FILTRE EN MOUSSE POUR MATÉRIAUX HUMIDES
1. Assurez-vous que le cordon d’alimentation est débranché de la prise de courant (Illustration 1).
réutilisable en tissu en page 34.
4. Placez le bloc-moteur sur le réservoir collecteur.
NETTOYAGE DU FILTRE EN MOUSSE POUR MATÉRIAUX HUMIDES
humides (Illustration 4).
36
PROBLÈME CAUSE POSSIBLE SOLUTION
Impossible de faire
fonctionner l’aspirateur
d’atelier sec et humide.
d’alimentation, du cordon, des
disjoncteurs, et des fusibles.
Cordon d’alimentation
défectueux.
du cordon d’alimentation. S’il est
endommagé, faites-le réparer par un
professionnel.
Le réservoir collecteur est plein. Videz le réservoir collecteur.
correctement positionné.
Appuyez sur la touche « I » On
(Marche) située sur le bloc-moteur.
De la poussière
s’échappe par le
couvercle du moteur.
réutilisable en tissu. en tissu.
vibrations du moteur/en
vitesse.
Présence d’obstructions dans le
suceur ou dans le tuyau ou dans
l’entrée du réservoir collecteur.
Débranchez et assurez-vous que
les entrées du suceur, du tuyau et
du réservoir collecteur ne sont pas
bouchées.
neuf.
DÉPANNAGE
AVERTISSEMENT :
AFIN DE RÉDUIRE TOUS RISQUES D’ÉLECTROCUTION,
DÉBRANCHEZ L’APPAREIL AVANT DE PROCÉDER À SON DÉPANNAGE.

37
VUE ÉCLATÉE
38
LISTE DES PIÈCES
Pièce Numéro de plan Description Quantité
39
ES
Gracias por comprar esta aspiradora en mojado/seco Armor All
®
. Confíe en que con Armor All
®
obtendrá un producto de alta calidad diseñado para un rendimiento óptimo. Esta aspiradora es
capaz de recoger materiales líquidos y secos.
POR SU SEGURIDAD: LEA DETENIDAMENTE Y ASEGÚRESE DE QUE COMPRENDE TODAS
LAS INSTRUCCIONES.
TABLA DE CONTENIDOS
SECCIÓN PÁGINA
Garantía .................................................................................................................................................
Instrucciones de seguridad importantes ................................................................................................
Instrucciones sobre el aislamiento doble ...............................................................................................
Cables de extensión ..............................................................................................................................
Símbolos................................................................................................................................................
Desempaque y revisión del contenido de la caja ..................................................................................
Instrucciones generales de ensamblaje ................................................................................................
Operación de aspirado en seco .............................................................................................................
Operación de aspirado en mojado ........................................................................................................
Operación de soplado ...........................................................................................................................
Mantenimiento........................................................................................................................................
Resolución de problemas ......................................................................................................................
Vista expandida .....................................................................................................................................
Lista de partes ...…...……………………………………..............................……..................……….........
40
40
42
43
43
44
45
47
48
50
51
52
53
54
55
56
57
INFORMACIÓN IMPORTANTE
GALONES
operación.
HP PICO
“PICO HP” es un término que se utiliza en la industria de aspiradoras seco/mojado para propósitos de
comparación. No denota la potencia en caballos de fuerza operativos de una aspiradora seco/mojado,
sino más bien la potencia en caballos de fuerza de un motor, incluida la contribución inercial del motor
lograda en pruebas de laboratorio. En uso real, motores no operan al máximo de caballos de fuerza
indicados.
40
GARANTÍA
Nos sentimos orgullosos de ofrecer a usted un producto de alta calidad y durabilidad. Esta aspiradora
tiene una garantía limitada de dos (2) años contra defectos de mano de obra y materiales a partir de
la fecha de compra en uso doméstico normal. Guarde su boleta como prueba de su compra. Esta
otros derechos adicionales). Para comunicarse con servicio al cliente, llame al 1-866-384-8432.
No cubierto por la garantía:
• Cualquier parte que deje de funcionar debido a un mal uso, negligencia, abuso directo/indirecto,
accidentes, mantenimiento, reparaciones o alteraciones inadecuadas;
• Desgaste y rotura normal de piezas y accesorios, como mangueras, boquillas o ruedecillas;
• Deterioro normal del acabado exterior debido al uso o exposición;
• Cualquier producto adquirido en un punto de ventas no autorizado.
PARA FUTURA REFERENCIA.
Al usar una aspiradora es necesario seguir precauciones básicas, incluidas las siguientes.
No seguir las advertencias e instrucciones puede provocar explosiones, incendios o lesiones
graves.
PARA REDUCIR EL RIESGO DE INCENDIO, DESCARGA ELÉCTRICA
O LESIONES:
INSTRUCCIONES DE SEGURIDAD
IMPORTANTES
Lea y comprenda este manual del usuario y todas las etiquetas de la aspiradora antes de utilizarla. La
Use esta aspiradora solo como se describe en este manual. Para reducir el riesgo de lesiones personales
o daños a su aspiradora, use solo los accesorios recomendados por el fabricante.
• No deje la aspiradora funcionando sin supervisión.
•
donde puedan existir tales elementos.
•
combustibles, líquido de encendedores, limpiadores, pinturas de base oleosa, gas natural, hidrógeno o
polvos explosivos como aquellos de carbón, magnesio, granos o pólvora. Las chispas en el interior del
41
• No la use ni almacene cerca de materiales peligrosos.
• No aspire elementos que estén en llamas o humeando, tales como cigarrillos, fósforos o cenizas
calientes.
• No exponer a la lluvia. Almacenar en interiores.
• Si la aspiradora no funciona como debería, si se ha caído, dañado, dejado en exteriores o si se ha
caído al agua, entréguela en un centro de servicio.
• No desconecte tirando del cable. Para desconectarlo tire de la clavija, no del cable.
• No la utilice si la clavija o el cable están dañados.
• No tire o transporte el aparato utilizando el cable como a modo de empuñadura, no apriete el cable
• No use la aspiradora sobre su cable.
• No sujete el enchufe ni aspire con las manos mojadas.
• No permita que se utilice como un juguete. Se debe prestar estricta atención cuando el aparato lo
usen niños o cuando se use cerca de ellos.
• Para reducir el riesgo de lesiones provocadas por un encendido accidental, desconecte el cable
cuando no esté en uso y antes de realizar el mantenimiento.
• Apague todos los controles antes de desconectar el dispositivo.
• Desconéctela antes de colocar o quitar la manguera o cualquier otro accesorio.
cuidado que no haya polvo, cabellos, pelusas en las aberturas o cualquier cosa que pueda reducir el
• Mantenga su cabello, ropas holgadas, dedos y partes de su cuerpo lejos de las aberturas y piezas
móviles del producto.
• Tenga precaución adicional al limpiar en escaleras.
• Utilice el producto solo como se describe en este manual. Utilice solo los accesorios recomendados
por el fabricante.
• Esta aspiradora está provista de doble aislamiento. Utilice solo piezas de repuesto idénticas.
Consulte INSTRUCCIONES SOBRE EL AISLAMIENTO DOBLE.
Al usar como sopladora:
• Descargue aire directamente solo sobre la zona de trabajo.
• No use la aspiradora en mojado/seco como pulverizador.
• No dirija el aire hacia personas.
• Mantenga a los niños alejados mientras utilice la aspiradora como sopladora.
• Use gafas de seguridad.
GUARDE ESTAS INSTRUCCIONES
Solo para uso doméstico
PRECAUCIÓN:
Para reducir el riesgo de lesiones provocadas por las piezas
móviles, desconecte el producto antes de realizarle mantenimiento.
ADVERTENCIA:
Para evitar el riesgo de sufrir descargas eléctricas,
desconecte la aspiradora antes de limpiarla o realizarle mantenimiento.
42
ADVERTENCIA:
REPARACIÓN DE ASPIRADORAS EN MOJADO/SECO
CON AISLAMIENTO DOBLE
LAS ASPIRADORAS EN MOJADO/SECO CON DOBLE AISLACIÓN POSEEN DOS
SISTEMAS DE AISLACIÓN EN LUGAR DE CONEXIÓN A TIERRA. NO SE INCLUYEN
CONEXIONES A TIERRA PARA LOS APARATOS CON DOBLE AISLAMIENTO, POR
LO QUE TAMPOCO DEBE AGREGARSE UNA CONEXIÓN A TIERRA A DICHOS
APARATOS. LA REPARACIÓN DE UNA ASPIRADORA EN MOJADO/SECO CON
AISLAMIENTODOBLE REQUIERE EXTREMO CUIDADO Y CONOCIMIENTO DEL
SISTEMA, POR LO QUE DEBE REALIZARSE SOLO MEDIANTE PERSONAL
DE SERVICIO CALIFICADO. LAS PIEZAS DE REPUESTO UTILIZADAS EN UNA
ASPIRADORA EN MOJADO/SECO DE AISLACIÓN DOBLE DEBEN SER IGUALES A
LAS ORIGINALES. SU ASPIRADORA EN MOJADO/SECO CON DOBLE AISLAMIENTO
ESTÁ MARCADA CON LAS PALABRAS “DOBLE AISLAMIENTO” Y EL SÍMBOLO
(UN CUADRADO DENTRO DE OTRO CUADRADO) TAMBIÉN PODRÍA ESTAR
INDICADO EN EL ELECTRODOMÉSTICO.
PRECAUCIÓN:
NO ASPIRE EL POLVO DE PANELES DE YESO-CARTÓN,
HOLLÍN DE CHIMENEAS O CENIZAS CON UN FILTRO ESTÁNDAR PARA MOJADO/
SECO. ESTE TIPO DE POLVO ES MUY FINO, POR LO QUE PODRÍA NO SER ATRAPADO
POR EL FILTRO Y ASÍ DAÑAR AL MOTOR. AL ASPIRAR POLVO FINO, USE UN FILTRO
PARA POLVO FINO.
INSTRUCCIONES SOBRE EL
AISLAMIENTO DOBLE
ADVERTENCIA:
PARA REDUCIR EL RIESGO DE DESCARGA ELÉCTRICA,
NO EXPONGA EL PRODUCTO A LA LLUVIA. ALMACENAR EN INTERIORES.
ADVERTENCIA:
POR SU PROPIA SEGURIDAD, LEA Y COMPRENDA EL
MANUAL DEL USUARIO. NO UTILIZAR SIN SUPERVISIÓN. NO ASPIRE CENIZAS
CALIENTES, CARBÓN, ELEMENTOS TÓXICOS O INFLAMABLES NI OTROS
MATERIALES PELIGROSOS. NO UTILIZAR CERCA DE LÍQUIDOS O VAPORES
EXPLOSIVOS.
Esta Aspiradora en Mojado/Seco posee un aislamiento doble, lo que elimina la necesidad de usar un
sistema de conexión a tierra separado. Utilice solo piezas de repuesto idénticas. Lea estas instrucciones
de reparación de aspiradoras en mojado/seco con aislamiento doble antes de repararlas. Use esta
aspiradora como se describe en este manual.
Tenga en cuenta las siguientes advertencias que aparecen en la carcasa del motor de su aspiradora.
AISLAMIENTO DOBLE: NO REQUIERE CONEXIÓN A TIERRA - AL REPARAR, UTILIZAR
SOLO PIEZAS DE REPUESTO IDÉNTICAS.
43
CABLES DE EXTENSIÓN
Al usar un cable de extensión con su aspiradora en mojado/seco, consulte la siguiente table para conocer
alargador estén en buena condición operativa. Realice las reparaciones o cambios de piezas antes de
a este producto.
SÍMBOLO SEÑAL SIGNIFICADO
PELIGRO
Indica una situación peligrosa inminente la cual, de no evitarse,
podría causar la muerte o lesiones severas.
ADVERTENCIA
Indica una situación potencialmente peligrosa la cual, de no
evitarse, podría causar la muerte o lesiones severas.
PRECAUCIÓN
Indica una situación potencialmente peligrosa, la cual, de no
evitarse, podría causar una lesión menor o moderada.
AVISO
(Sin símbolo de alerta de seguridad) Indica una situación que
podría causar daños a la propiedad.
SÍMBOLOS
Largo del cable de extensión
120V 25 pies (7,62 m) 50 pies (15,24 m) 100 pies (30,48 m) 150 pies (45,72 m)
Amperaje
A.W.G. Tamaño del cable
Más de No más de
0 6 18 16 16 14
6 10 18 16 14 12
10 12 16 16 14 12
12 16 14 12 No recomendado
44
DESEMPAQUE Y REVISIÓN DEL
CONTENIDO DE LA CAJA
Elimine todo el contenido de la caja. Retire el cabezal motriz
y extraiga el contenido del tanque recolector. Revise cada
artículo en contraste con la lista de contenidos de la caja.
Lista de contenidos de la caja:
G H I
L M
JF
K
D
C
A B
E
Almacenamiento de
accesorios
Soporte para el cordón
Puerto de soplido
Empuñadura
Cabezal motriz
Almacenamiento
Interruptor de
encendido / a
pagado
Puerto de aspirado
Tanque recolector
Seguro
Llave
A
B
C
D
E
F
G
H
I
J
K
L
M
Descripción
Ensamblaje de vacío ............................................
Manguera .....................................……...…….......
Herramienta para hendiduras ...........……...……...
Boquilla utilitaria ......................…...…..……..........
Peine de Pelo de Mascotas ..….………..…...........
Boquilla para coche .....................………..............
Filtro de tela reutilizable ..............………..…..…....
Filtro de espuma para aspirar en mojado .............
Bolso de almacenamiento ....................................
Kit de detalles (6 pièces) ......................................
Empuñadura .........................................................
Manual del usuario.....……..……………..………...
Cant.
1
1
1
1
1
1
1
1
1
1
1
1
1
NOTA: la manguera y los accesorios de esta aspiradora
tienen un diámetro de 1-1/4 pulgadas (32 mm).
45
con la lista del contenido del paquete y el diagrama. No intente ensamblar el producto si falta alguna
pieza o si éstas están dañadas. Póngase en contacto con el Departamento de Servicio al Cliente para
obtener las piezas de repuesto.
INSTRUCCIONES GENERALES
DE ENSAMBLAJE
4
32
1
2
12
11
9
10
5
9
1
13
14
8
6
7
15 16
DESEMPAQUE DE SU ASPIRADORA EN MOJADO/SECO Y ENSAMBLAJE GENERAL
1. Compruebe que el cable de alimentación esté desconectado de la toma de corriente (Fig. 1).
2. Abra los seguros (Fig. 2).
3. Levante el cabezal motriz sacándolo del tanque recolector (Fig. 3).
4.
la página 44 (Fig. 4).
5.
Inserte la empuñadura en las ranuras de la parte superior del cabezal motriz. Aplique presión hasta
que la empuñadura calce en posición (Fig. 5).
instalado, consulte la página 53 para ver sus instrucciones de instalación (Fig. 6 y 7).
espuma para aspirar en mojado (Fig. 8).
ADVERTENCIA:
NO CONECTE EL CABLE DE ALIMENTACIÓN A UNA TOMA
DE CORRIENTE. ASEGÚRESE DE QUE EL ENCHUFE ESTÉ DESCONECTADO ANTES
DE ENSAMBLAR LA ASPIRADORA EN MOJADO/SECO. PARA REDUCIR EL RIESGO DE
DESCARGA ELÉCTRICA, NO EXPONGA EL PRODUCTO A LA LLUVIA.
46
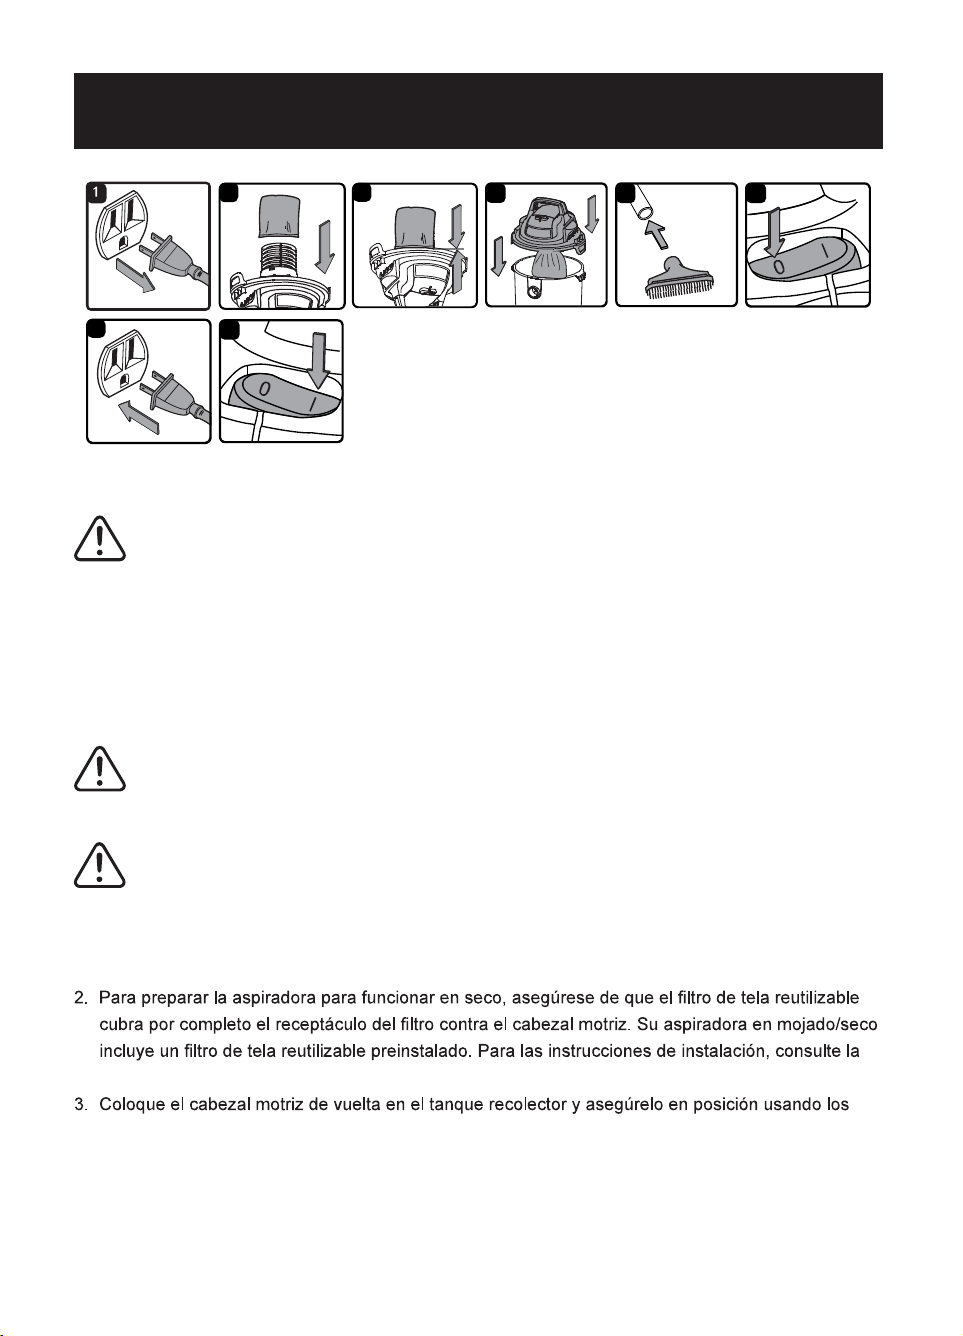
8. Coloque el cabezal motriz de vuelta en el tanque recolector alineando la sección superior con los
seguros, y hágalo calzar en posición (Fig. 9 y 10).
9. Inserte el extremo más grande de la manguera en el puerto de aspirado del tanque recolector
(Fig. 11) .
10. Elija el accesorio deseado e insértelo en el extremo de la manguera (Fig. 12).
NOTA: Esta aspiradora en mojado/seco viene con una boquilla utilitaria. Este accesorio se puede
utilizar como una boquilla para área mojada, un cepillo o un rastrillo para el pelo de mascotas.
Para usar el peine de pelo de mascotas, siga estas instrucciones:
• Retire el cepillo de la boquilla utilitaria (Fig. 13).
•
Deslice el peine de pelo de mascotas sobre la boquilla utilitaria hasta que encaje en su lugar (Fig. 14).
• Para quitar, deslícela fuera de la boquilla utilitaria (Fig. 15).
11. Para limpiar teclados de computadoras, equipos de sonido, tableros de automóviles y otros lugares
de difícil acceso, utilice el kit de detalles suministrado tal como se indica a continuación:
• Conecte la boquilla del concentrador sobre el extremo de la manguera.
• Si es necesario, conecte la varilla y/o el accesorio rectos a la boquilla del concentrador.
• Conecte la varilla y/o el accesorio curvos a la boquilla del concentrador si es necesario (Fig. 16).
ENCHUFE POLARIZADO
Para reducir el riesgo de descarga eléctrica, este aparato tiene un enchufe polarizado (una clavija
más ancha que la otra). Este enchufe calzará en la toma de corriente de pared polarizado solo en una
usar un cable de tres puntas y un sistema de alimentación con conexión a tierra.
47
OPERACIÓN DE ASPIRADO EN SECO
8
87
2 3
4 5
6
ASPIRADO EN SECO
1. Compruebe que el cable de alimentación esté desconectado de la toma de corriente (Fig. 1).
página 53 (Fig. 2 y 3).
seguros (Fig. 4).
INSTRUCCIONES DE USO: ASPIRADO EN SECO
4. Inserte el extremo más grande de la manguera en el puerto de aspirado del tanque recolector.
5. Empuje el accesorio requerido en el extremo libre de la manguera (Fig. 5).
ADVERTENCIA:
ASEGÚRESE DE LEER, COMPRENDER Y APLICAR LA
INFORMACIÓN TITULADA “INSTRUCCIONES DE SEGURIDAD IMPORTANTES”. NO ASPIRE
EN ZONAS CON GASES, VAPORES O POLVOS INFLAMABLES EN EL AIRE. ENTRE LOS
GASES O VAPORES INFLAMABLES SE INCLUYEN, SIN LIMITACIÓN A, LOS SIGUIENTES:
FLUIDO DE ENCENDEDOR, LIMPIADORES TIPO SOLVENTES, PINTURAS EN BASE A ÓLEO,
BENCINA, ALCOHOL O SPRAYS DE AEROSOLES. ENTRE LOS POLVOS EXPLOSIVOS SE
INCLUYEN, SIN LIMITACIÓN A, LOS SIGUIENTES: CARBÓN, MAGNESIO Y GRÁNULOS O
PÓLVORA DE ARMAS. PARA REDUCIR LOS RIESGOS A LA SALUD PROVOCADOS POR
VAPORES O POLVOS, NO ASPIRE MATERIALES TÓXICOS.
ADVERTENCIA:
NO CONECTE EL CABLE DE ALIMENTACIÓN A UNA TOMA
DE CORRIENTE. ASEGÚRESE DE QUE LA CLAVIJA ESTÉ DESCONECTADA ANTES DE
CAMBIAR LOS FILTROS.
PRECAUCIÓN:
NO ASPIRE EL POLVO DE PANELES DE YESO-CARTÓN, HOLLÍN
DE CHIMENEAS O CENIZAS CON UN FILTRO ESTÁNDAR PARA MOJADO/SECO. ESTE TIPO
DE POLVO ES MUY FINO, POR LO QUE PODRÍA NO SER ATRAPADO POR EL FILTRO Y
DAÑAR AL MOTOR. AL ASPIRAR POLVO FINO, USE UN FILTRO PARA POLVO FINO.
48
6.
clavija a la toma de corriente. Conecte el cable de alimentación a la toma de corriente (Fig. 6 y 7).
7. Ponga el interruptor en la posición "I" (Encendido) para encender la aspiradora y comenzar a
aspirar (Fig. 8).
8. Una vez que haya terminado de aspirar, coloque el interruptor en la posición “O” OFF (Apagado) y
desenchufe el cable de alimentación de la toma de corriente.
O = APAGADO I = ENCENDIDO
NO USE EL FILTRO DE TELA REUTILIZABLE PARA ASPIRAR LÍQUIDOS.
OPERACIÓN DE ASPIRADO EN MOJADO
6
7
8
5
2 31
6
ASPIRADO EN MOJADO
ADVERTENCIA:
ASEGÚRESE DE LEER, COMPRENDER Y APLICAR LA
INFORMACIÓN TITULADA “INSTRUCCIONES DE SEGURIDAD IMPORTANTES”. NO
ASPIRE EN ZONAS CON GASES, VAPORES O POLVOS INFLAMABLES EN EL AIRE.
ENTRE LOS GASES O VAPORES INFLAMABLES SE INCLUYEN, SIN LIMITACIÓN A, LOS
SIGUIENTES: FLUIDO DE ENCENDEDOR, LIMPIADORES TIPO SOLVENTES, PINTURAS
EN BASE A ÓLEO, BENCINA, ALCOHOL O SPRAYS DE AEROSOLES. ENTRE LOS
POLVOS EXPLOSIVOS SE INCLUYEN, SIN LIMITACIÓN A, LOS SIGUIENTES: CARBÓN,
MAGNESIO Y GRÁNULOS O PÓLVORA DE ARMAS. PARA REDUCIR LOS RIESGOS A LA
SALUD PROVOCADOS POR VAPORES O POLVOS, NO ASPIRE MATERIALES TÓXICOS.
ADVERTENCIA:
NO CONECTE EL CABLE DE ALIMENTACIÓN EN LA TOMA
DE ALIMENTACIÓN. ASEGÚRESE DE QUE EL ENCHUFE ESTÁ DESCONECTADO ANTES
DE CAMBIAR LOS FILTROS.

49
que el tanque recolector esté limpio y libre de polvo y suciedad (Fig. 1).
2.
espuma para aspirar en mojado, vea la página 54 (Fig. 2).
NO USE EL FILTRO DE TELA REUTILIZABLE PARA ASPIRAR LÍQUIDOS.
INSTRUCCIONES DE USO: ASPIRADO EN MOJADO
3.
Inserte el extremo más grande de la manguera en el puerto de aspirado del tanque recolector.
4. Empuje el accesorio requerido en el extremo libre de la manguera (Fig. 3).
clavija a la toma de corriente. Conecte el cable de alimentación a la toma de corriente (Fig. 4 y 5).
6. Ponga el interruptor en la posición "I" (Encendido) para encender la aspiradora (Fig. 6).
7. Una vez que haya terminado de aspirar, coloque el interruptor en la posición “O” OFF (Apagado) y
desenchufe el cable de alimentación de la toma de corriente.
8. Después de usar, vacíe el tanque de recolección, limpie y seque el interior y el exterior antes de
guardar (Fig. 7).
¡IMPORTANTE! Al aspirar grandes cantidades de líquido, no sumerja la boquilla completamente en
el líquido; deje una brecha en la punta de la abertura de la boquilla para permitir el ingreso de aire.
capacidad máxima. Sentirá un incremento en la velocidad del motor. Cuando esto suceda, apague la
máquina, desconéctela de la energía y drene el líquido en un receptáculo apto o drenaje. Para seguir
aspirando, reinstale el cabezal motriz en el tanque recolector. Tras aspirar, apague la máquina y saque
la clavija de la toma de corriente. Vacíe el tanque recolector; luego, limpie y seque tanto el interior
como el exterior antes de almacenarlo.
¡RECUERDE!
50
OPERACIÓN DE SOPLADO
2
6
2
1
2
7
5
3
4
Esta aspiradora en mojado/seco puede usarse como sopladora. Para utilizar la función de sopladora,
siga estas instrucciones.
ADVERTENCIA:
SIEMPRE USE GAFAS DE SEGURIDAD QUE CUMPLAN CON
ANSI Z87.1 (O EN CANADÁ, CSAZ94.3) ANTES DE UTILIZAR EL SOPLADOR.
PRECAUCIÓN:
MANTENGA A LAS PERSONAS ALEJADAS DE LOS
SEDIMENTOS QUE SOPLE LA ASPIRADORA.
ADVERTENCIA:
UTILICE UNA MÁSCARA ANTIPOLVO SI EL SOPLIDO CREA
POLVOS QUE SE PUEDAN INHALAR.
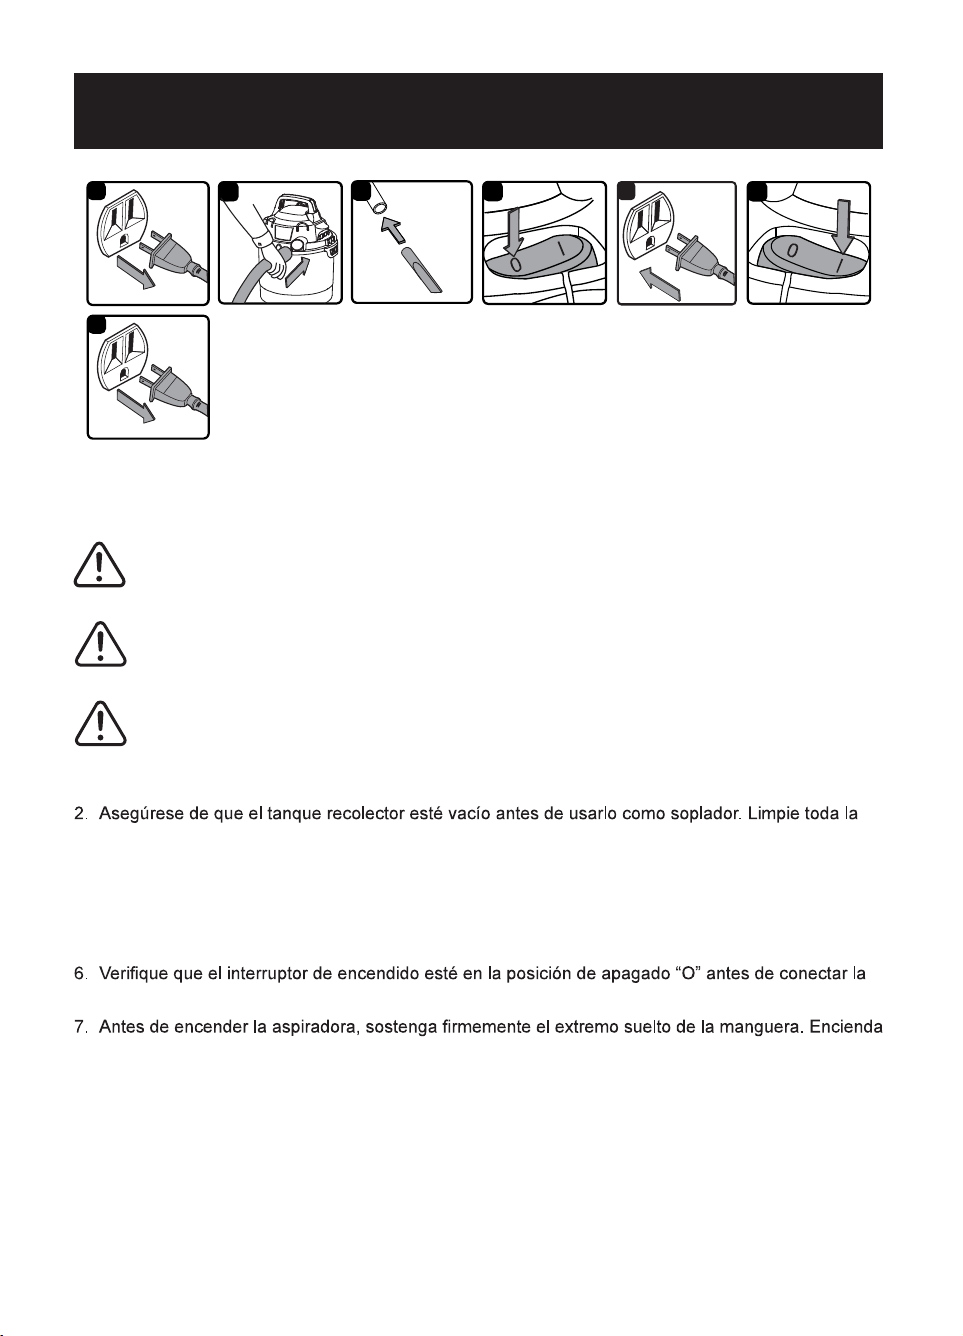
1. Compruebe que el cable de alimentación esté desconectado de la toma de corriente (Fig. 1).
suciedad y los restos de la manguera y el tanque recolector.
3. Extraiga la manguera del puerto de aspirado.
4. Inserte el extremo más grande de la manguera en el puerto de soplido de la parte posterior del
cabezal motriz (Fig. 2).
5. Elija el accesorio deseado e insértelo en el extremo de la manguera (Fig. 3).
clavija a la toma de corriente. Conecte el cable de alimentación a la toma de corriente (Fig. 4 y 5).
el motor moviendo el interruptor a la posición de encendido “I” (Fig. 6).
8. Tras haber terminado de soplar, coloque el interruptor en la posición “O” OFF (Apagado) y
desenchufe el cable de alimentación de la toma de corriente (Fig. 7).
51
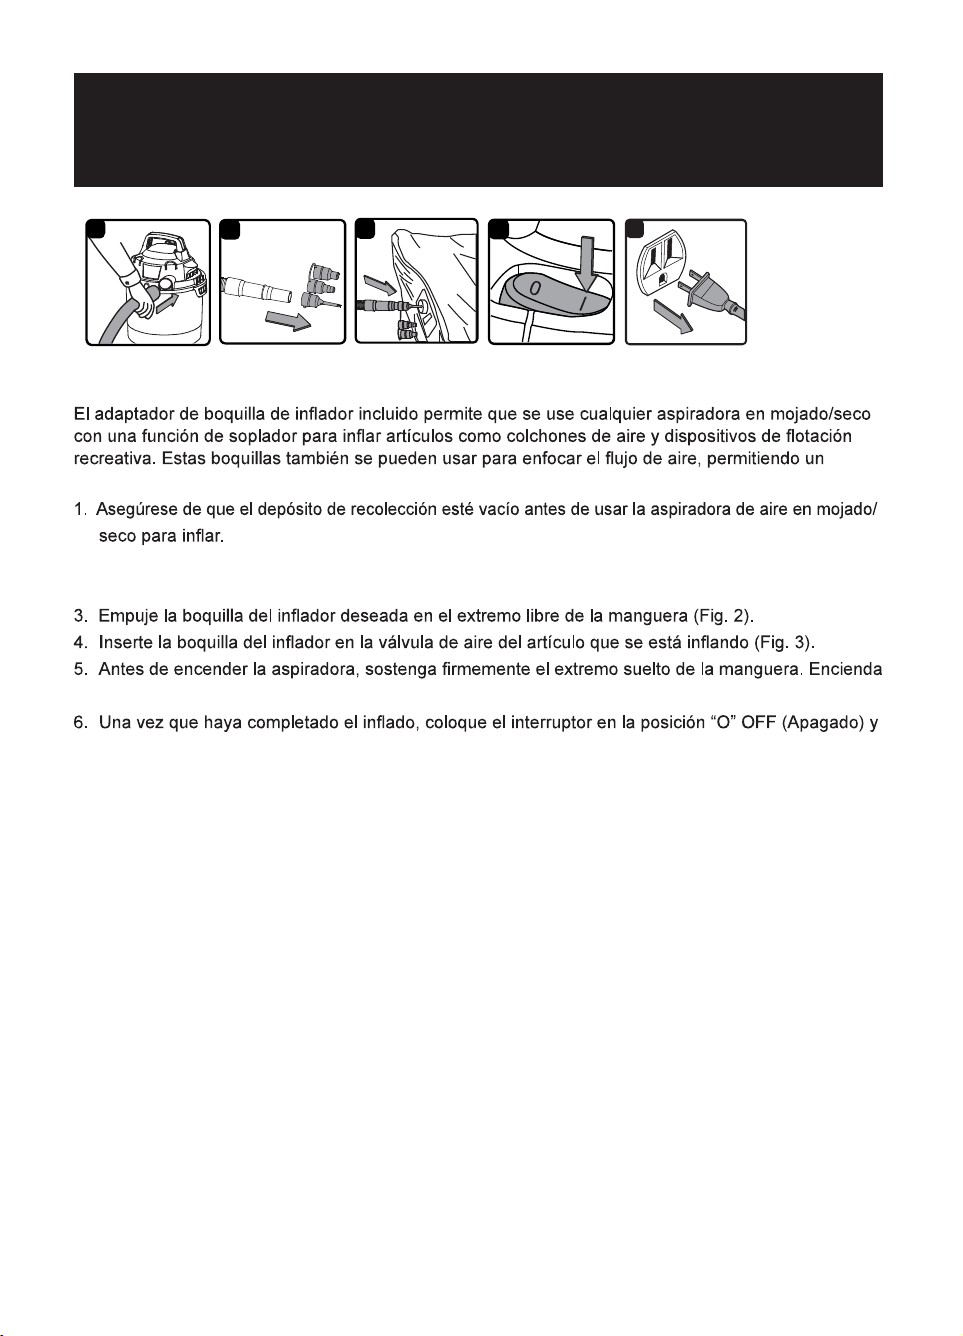
FUNCIONAMIENTO DEL ADAPTADOR
DE LA BOQUILLA DEL INFLADOR
2
2
1
5
3
4
CÓMO INFLAR UN OBJETO
soplado más concentrado.
2. Inserte el extremo más grande de la manguera en el puerto de soplido de la parte posterior del
cabezal motriz (Fig. 1).
el motor moviendo el interruptor a la posición de encendido “I” (Fig. 4).
desenchufe el cable de alimentación de la toma de corriente (Fig. 5).
52
MANTENIMIENTO
2
6
2
1
2
7
5
3
4
VACIADO DEL TANQUE RECOLECTOR
ADVERTENCIA:
DESCONECTE SIEMPRE LA CLAVIJA DE LA TOMA DE
ALIMENTACIÓN ANTES DE SACAR EL CABEZAL MOTRIZ DEL TANQUE RECOLECTOR.
1. Compruebe que el cable de alimentación esté desconectado de la toma de corriente (Fig. 1).
2. Desconecte la manguera de la aspiradora (Fig. 2).
3. Abra los seguros y saque el cabezal motriz del tanque recolector (Fig. 3). Coloque el cabezal motriz
4. Limpie toda la suciedad o los residuos del tanque recolector y la manguera en un contenedor de
desechos adecuado (Fig. 4).
7. Coloque el cabezal motriz de vuelta en el tanque recolector y fíjelo usando los seguros.
¡IMPORTANTE! USE
SIEMPRE EL FILTRO DE TELA REUTILIZABLE PARA ASPIRAR EN SECO. Si la máquina se
cartuchos de repuesto siempre a mano.
¡AVISO!
53
INSTALACIÓN Y LIMPIEZA DEL FILTRO DE
TELA REUTILIZABLE
1 2 4
5
3
INSTALACIÓN DEL FILTRO DE TELA REUTILIZABLE
1. Compruebe que el cable de alimentación esté desconectado de la toma de corriente (Fig. 1).
2. Saque el cabezal motriz y colóquelo boca abajo.
quede completamente cubierto (Fig. 2 & 3).
4. Coloque el cabezal motriz de vuelta en el tanque recolector.
ELIMINACIÓN Y LIMPIEZA DEL FILTRO DE TELA REUTILIZABLE
obtener un rendimiento óptimo.
agua limpia (Fig. 5).
ALMACENAMIENTO
Antes de guardar su aspiradora, el tanque recolector debe vaciarse y limpiarse. Los accesorios
deben limpiarse y almacenarse de manera tal que puedan estar disponibles cuando sean necesarios.
Almacene la aspiradora en mojado/seco en interiores.
REPARACIONES
Las reparaciones de esta aspiradora en mojado/seco deben ser realizadas solo por personal de
54
INSTALACIÓN Y LIMPIEZA DEL FILTRO
DE ESPUMA PARA ASPIRAR EN MOJADO
1 2 3 4
5
INSTALACIÓN DE FILTRO DE ESPUMA PARA ASPIRAR EN MOJADO
1. Compruebe que el cable de alimentación esté desconectado de la toma de corriente (Fig. 1).
reutilizable en la página 53.
asegurándose de que el receptáculo que totalmente cubierto (Fig. 2 y 3).
4. Coloque el cabezal motriz de vuelta en el tanque recolector.
LIMPIEZA DEL FILTRO DE ESPUMA PARA ASPIRAR EN MOJADO
aspirar en mojado (Fig. 4).
enjuáguelo con agua limpia (Fig. 5).
55
PROBLEMA POSSIBLE CAUSE SOLUTION
La aspiradora en
mojado/seco no
funcionará.
No hay energía.
Compruebe el suministro de
alimentación, cable, disyuntores y
fusibles.
Cable de alimentación
defectuoso.
Desconecte y revise el cable de
alimentación. Si hay daños, lleve
el producto a reparación con un
profesional.
El tanque recolector está lleno. Vacíe el tanque recolector.
El interruptor está en la posición
incorrecta.
Presione el botón de encendido “I”
del cabezal motriz.
El polvo se escapa
desde la carcasa del
motor.
tela reutilizable. reutilizable.
vibración del motor/
velocidad.
Hay bloqueos en la boquilla,
manguera o entradas del tanque
recolector.
Desenchufe e inspeccione la
boquilla, manguera y entradas del
bloqueos.
reutilizable.
RESOLUCIÓN DE PROBLEMAS
ADVERTENCIA:
PARA EVITAR EL RIESGO DE SUFRIR DESCARGAS
ELÉCTRICAS, DESCONECTE EL APARATO ANTES DE INTENTAR SOLUCIONAR
CUALQUIER PROBLEMA.

56
VISTA EXPANDIDA