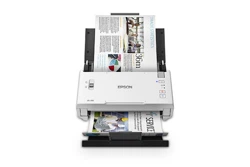
DS-800WN/DS-900WN User's Guide


3
Contents
DS-800WN/DS-900WN User's Guide ........................................................................................................ 13
Product Basics .......................................................................................................................................... 14
Product Features................................................................................................................................ 14
Available Software ............................................................................................................................. 16
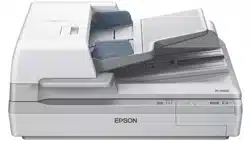
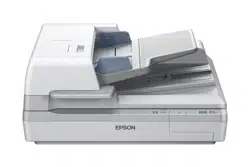
Product Parts Locations ..................................................................................................................... 18
Product Parts - Front ..................................................................................................................... 19
Product Parts - Inside .................................................................................................................... 20
Product Parts - Back...................................................................................................................... 21
Paper Alignment Plate........................................................................................................................ 21
Attaching the Paper Alignment Plate ............................................................................................. 22
Removing the Paper Alignment Plate............................................................................................ 24
Inserting and Removing an External USB Drive................................................................................. 24
Optional Accessories and Replacement Parts ................................................................................... 25
Using the Control Panel ..................................................................................................................... 26
Control Panel Buttons and Lights .................................................................................................. 27
LCD Screen................................................................................................................................... 28
Status Icon Information.................................................................................................................. 28
Navigating the LCD Screen ........................................................................................................... 30
Entering Characters on the LCD Screen ....................................................................................... 30
Viewing Animations ....................................................................................................................... 31
Customizing the Control Panel Display ......................................................................................... 32
Registering Presets................................................................................................................... 33
Presets Menu Options .............................................................................................................. 35
Customizing the Home Screen ................................................................................................. 35
Adjusting the Screen Brightness.................................................................................................... 38
Adjusting Control Panel Sounds .................................................................................................... 39
Changing LCD Screen Language.................................................................................................. 39
Selecting the Date and Time ......................................................................................................... 39
Changing the Keyboard Layout ..................................................................................................... 40
Adjusting the Operation Time Out Setting ..................................................................................... 41

4
Preventing PC Connection via USB .............................................................................................. 41
Setting Direct Power On ................................................................................................................ 41
Changing Regular Cleaning Alert Settings .................................................................................... 42
Changing Roller Replacement Alert Settings ................................................................................ 42
Setting Up Epson Connect Services.............................................................................................. 43
Using Power Saving Settings ............................................................................................................. 43
Changing the Sleep Timer Settings ............................................................................................... 43
Changing the Power Off Timer Settings ........................................................................................ 44
Using the Epson Smart Panel Mobile App.......................................................................................... 44
Wi-Fi or Wired Networking........................................................................................................................ 45
Network Security Recommendations ................................................................................................. 45
Connecting to an Existing Wi-Fi Network .......................................................................................... 46
Selecting Wireless Network Settings from the Control Panel ........................................................ 47
Wi-Fi Direct (Simple AP) Mode Setup ................................................................................................ 48
Connecting to a Mobile Device ...................................................................................................... 49
Modifying the Wi-Fi Direct (Simple AP) Settings............................................................................ 49
Setting Up Wireless Scanning from a Smart Device Using Epson Smart Panel ............................ 50
Wi-Fi Protected Setup (WPS)............................................................................................................. 52
Using WPS to Connect to a Network ............................................................................................. 52
Using WPS PIN Mode to Connect to a Network ............................................................................ 53
Setting Up Network Scanning ............................................................................................................ 53
Determining the Product's IP Address ........................................................................................... 56
Configuring Email Server Settings...................................................................................................... 56
Email Server Settings .................................................................................................................... 57
Changing or Updating Network Connections ..................................................................................... 58
Changing a USB Connection to a Wi-Fi Connection...................................................................... 58
Changing a Wi-Fi Connection to a Wired Network Connection...................................................... 59
Connecting to a New Wi-Fi Router ................................................................................................ 59
Disabling Wi-Fi Features ............................................................................................................... 60
Disabling Wi-Fi Direct Features ..................................................................................................... 60
Loading Originals...................................................................................................................................... 61
Loading Originals in the Input Tray..................................................................................................... 61
Loading Large Originals ................................................................................................................ 69

5
Loading Long Paper ...................................................................................................................... 73
Loading Multiple Sizes of Originals in the Input Tray ..................................................................... 77
Original Document Specifications.................................................................................................. 80
Loading Plastic and Laminated Cards in the Input Tray ..................................................................... 85
Plastic and Laminated Card Specifications ................................................................................... 89
Loading Special Originals................................................................................................................... 90
Special Original Specifications ...................................................................................................... 97
Carrier Sheet Specifications ........................................................................................................ 100
Scanning .................................................................................................................................................. 103
Starting a Scan................................................................................................................................. 103
Starting a Scan Using the Product Control Panel ........................................................................ 103
Scanning to a Connected Computer............................................................................................ 105
PC-Free Scanning with ScanWay ............................................................................................... 106
Setting Up and Scanning to a Network Folder or FTP Server ................................................. 107
Creating a Shared Network Folder.......................................................................................... 107
Registering Contacts for Email, Network, or FTP Scanning - Control Panel ........................... 109
Registering Contacts for Email, Network, or FTP Scanning - Web Config .............................. 110
Scanning to a Network Folder or FTP Server.......................................................................... 112
Scanning to an Email .............................................................................................................. 113
Scanning to the Cloud............................................................................................................. 115
Scanning to an External USB Device...................................................................................... 115
Control Panel Scanning Options ............................................................................................. 117
Setting Up a WSD Port (Windows 7) ........................................................................................... 119
Adding a WSD Scan Device ................................................................................................... 120
Scanning Using WSD - Windows Only.................................................................................... 121
Scanning Using Presets .............................................................................................................. 121
Adding and Assigning Scan Jobs with Document Capture Pro - Windows .................................. 122
Adding and Assigning Scan Jobs with Document Capture - Mac ................................................ 125
Starting a Scan Using the Epson Scan 2 Icon ............................................................................. 126
Starting a Scan from a Scanning Program................................................................................... 128
Starting a Scan from a Smartphone or Tablet.............................................................................. 130
Entering a User ID and Password for Scanning........................................................................... 130
Scanning with Document Capture Pro or Document Capture...................................................... 131

6
Scanning with Simple Scan in Document Capture Pro - Windows.......................................... 131
Scanning with Job Scan in Document Capture Pro - Windows ............................................... 133
Scanning with Document Capture - Mac................................................................................. 134
Scanning in Epson Scan 2........................................................................................................... 137
Additional Scanning Settings - Main Settings Tab................................................................... 141
Additional Scanning Settings - Advanced Settings Tab .......................................................... 142
Saving Scanned Documents as a Searchable PDF Using Epson Scan 2............................... 143
Scanning Settings for Special Documents .............................................................................. 144
Image Format Options ............................................................................................................ 145
Scan Resolution Guidelines.................................................................................................... 146
Scanning Special Projects........................................................................................................... 147
Scanning Two Originals onto One Sheet (Stitching Images) - Windows................................. 147
Scanning Multi-Page Originals as Separate Files - Windows ................................................. 150
Saving a Scan as an Office Format File - Windows ................................................................ 153
Saving a Scan as an Office Format File - Mac ........................................................................ 155
Scanning to a SharePoint Server or Cloud Service - Windows ............................................... 158
Scanning to a SharePoint Server or Cloud Service - Mac....................................................... 160
Scanning Using Automatic Feeding Mode................................................................................... 161
Using Mopria Scan ...................................................................................................................... 162
Scanning with AirPrint ................................................................................................................. 163
Scanning Using a Chromebook .................................................................................................. 163
Using the Control Panel Menus.............................................................................................................. 165
Basic Settings Menu......................................................................................................................... 165
Scanner Settings Menu .................................................................................................................... 167
Edit Home Menu............................................................................................................................... 169
User Settings Menu.......................................................................................................................... 170
Network Settings Menu .................................................................................................................... 170
Web Service Settings Menu ............................................................................................................. 172
Document Capture Pro Menu........................................................................................................... 172
Contacts Manager Menu .................................................................................................................. 172
System Administration Menu............................................................................................................ 173
Device Information Menu ................................................................................................................. 175
Scanner Maintenance Menu ............................................................................................................ 176

7
Roller Replacement Alert Setting ..................................................................................................... 177
Regular Cleaning Alert Settings ....................................................................................................... 177
Cleaning and Transporting Your Product ............................................................................................. 178
Cleaning Your Product ..................................................................................................................... 178
Cleaning Inside Your Product........................................................................................................... 178
Checking the Roller Counter ............................................................................................................ 190
Replacing the Rollers ....................................................................................................................... 192
Resetting the Roller Counter ....................................................................................................... 198
Updating Applications and Firmware................................................................................................ 198
Transporting Your Product ............................................................................................................... 200
Administering Your Product................................................................................................................... 202
Notes on the Administrator Password .............................................................................................. 202
System Administration Settings........................................................................................................ 203
Connecting the Product to the Network............................................................................................ 206
Before Connecting to the Network............................................................................................... 206
IP Address Assignment ............................................................................................................... 208
DNS Server and Proxy Server..................................................................................................... 208
Assigning the IP Address from the Control Panel ........................................................................ 209
Setting the Proxy Server.............................................................................................................. 210
Connecting to a Wired Network ................................................................................................... 210
Accessing the Web Config Utility...................................................................................................... 210
Changing the Administrator Password in Web Config ................................................................. 212
Using Epson Device Admin Configuration Software......................................................................... 212
Registering an Email Server............................................................................................................. 213
Email Server Settings .................................................................................................................. 213
Checking an Email Server Connection ........................................................................................ 214
Mail Server Connection Test Messages ...................................................................................... 215
Configuring Product Settings............................................................................................................ 217
Setting a Password and Locking the Control Panel ..................................................................... 217
Logging in to the Product from the Control Panel ........................................................................ 219
Checking Status Information ....................................................................................................... 219
Configuring Email Notification ..................................................................................................... 220
Adjusting Power Saving Settings................................................................................................. 221

8
Managing the Network Connection.............................................................................................. 221
Restricting Application Access .................................................................................................... 222
Enabling Program Verification on Start Up .................................................................................. 222
Updating Firmware Using Web Config ........................................................................................ 222
Restoring Default Product Settings.............................................................................................. 223
Importing and Exporting Product Settings ........................................................................................ 223
Exporting Settings Using Web Config.......................................................................................... 223
Importing Settings Using Web Config.......................................................................................... 224
Restricting Features Available for Users .......................................................................................... 225
Locking the Control Panel Using Web Config.............................................................................. 225
Setting User Feature Restrictions (Access Control) .................................................................... 225
Configuring User Feature Restrictions......................................................................................... 226
Disabling the External Interface ....................................................................................................... 227
Disabling Network Scanning ............................................................................................................ 227
Disabling WSD Scan........................................................................................................................ 228
Using Your Product on a Secure Network ........................................................................................ 228
Configuring Protocols and Services in Web Config ..................................................................... 229
Protocol Settings ......................................................................................................................... 229
Using a Digital Certificate ............................................................................................................ 231
About Digital Certification........................................................................................................ 232
Obtaining and Importing a CA-signed Certificate .................................................................... 232
CSR Setup Settings ................................................................................................................ 233
CSR Import Settings ............................................................................................................... 234
Deleting a CA-signed Certificate............................................................................................. 236
Updating a Self-signed Certificate........................................................................................... 236
Importing a CA Certificate....................................................................................................... 237
Deleting a CA Certificate......................................................................................................... 237
Configuring SSL/TLS Communication......................................................................................... 238
Configuring SSL/TLS Settings ................................................................................................ 238
Configuring a Server Certificate for the Product...................................................................... 238
Configuring IPsec/IP Filtering ...................................................................................................... 239
About IPsec/IP Filtering .......................................................................................................... 239
Configuring the Default IPsec/IP Filtering Policy..................................................................... 239

9
Configuring the Group IPsec/IP Filtering Policies ................................................................... 240
IPsec/IP Filtering Policy Settings ............................................................................................ 241
IPsec/IP Filtering Configuration Examples.............................................................................. 246
Configuring an IPsec/IP Filtering Certificate ........................................................................... 247
Connecting the Product to an IEEE 802.1X Network................................................................... 247
Configuring an IEEE 802.1X Network ..................................................................................... 248
IEEE 802.1X Network Settings ............................................................................................... 248
Configuring a Certificate for an IEEE 802.1X Network ............................................................ 249
Epson Open Platform Overview .................................................................................................. 250
Configuring Epson Open Platform .......................................................................................... 250
Validating Epson Open Platform ............................................................................................. 251
Connecting an Authentication Device.......................................................................................... 251
Solving Problems .................................................................................................................................... 253
Product Status Messages ................................................................................................................ 253
Solving Scanning Problems ............................................................................................................. 256
Product Does Not Turn On or Turns Off Unexpectedly................................................................ 256
Forgot the Administrator Password ............................................................................................. 256
Scanner Button Does Not Work as Expected .............................................................................. 257
Scanning Software Does Not Operate Correctly ......................................................................... 257
Cannot Start Epson Scan 2..................................................................................................... 259
Cannot Start Document Capture Pro (Windows) or Document Capture (Mac) ....................... 259
Paper Feeding Problems............................................................................................................. 260
Paper Jam Problems ................................................................................................................... 261
Paper Protection Does Not Work Correctly ................................................................................. 265
Paper Ejection Problems ............................................................................................................. 265
Scanning is Slow ......................................................................................................................... 265
Cannot Send Scans to a Cloud Service....................................................................................... 266
Cannot Send Scans to an Email.................................................................................................. 267
Solving Network Scanning Problems ............................................................................................... 267
Cannot Scan Over a Network ...................................................................................................... 267
Product Cannot Connect to a Wireless Router or Access Point .................................................. 269
Cannot Access Web Config......................................................................................................... 270
Network Software Cannot Find Product on a Network................................................................. 271

10
Wired Network Connection Becomes Unstable........................................................................... 272
Cannot Save a Scan to a Shared Folder Over a Network............................................................ 273
Solving Scanned Image Quality Problems ....................................................................................... 274
Back of Original Image Appears in Scanned Image .................................................................... 274
Scanned Characters are Blurry ................................................................................................... 275
Characters are not Recognized During Conversion to Editable Text (OCR) ............................... 275
Ripple Patterns Appear in an Image............................................................................................ 276
Uneven Colors Appear in Scanned Image................................................................................... 276
Spots or Lines Appear in All Scanned Images............................................................................. 277
Scanned Image is Cropped ......................................................................................................... 277
Cannot Solve Problems in the Scanned Image ........................................................................... 278
Updating Applications and Firmware................................................................................................ 278
Resetting the Epson Scan 2 Settings .............................................................................................. 280
Uninstall Your Product Software....................................................................................................... 281
Uninstalling Product Software - Windows.................................................................................... 281
Uninstalling Product Software - Mac............................................................................................ 282
Where to Get Help (U.S. and Canada) ............................................................................................. 282
Where to Get Help (Latin America)................................................................................................... 283
Technical Specifications ........................................................................................................................ 286
Windows System Requirements ...................................................................................................... 286
Mac System Requirements .............................................................................................................. 287
General Specifications ..................................................................................................................... 287
Dimension Specifications ................................................................................................................. 288
Electrical Specifications ................................................................................................................... 289
Environmental Specifications ........................................................................................................... 291
Network Interface Specifications ...................................................................................................... 291
USB Device Specifications............................................................................................................... 293
Safety and Approvals Specifications ................................................................................................ 294
Port Settings..................................................................................................................................... 295
Notices ..................................................................................................................................................... 298
Important Safety Instructions............................................................................................................ 298
Wireless Connection Safety Instructions.......................................................................................... 300
Restrictions on Copying ................................................................................................................... 301

11
Default Delay Times for Power Management for Epson Products.................................................... 301
Binding Arbitration and Class Waiver ............................................................................................... 302
Trademarks...................................................................................................................................... 305
Copyright Notice............................................................................................................................... 305
libTIFF Software Acknowledgment.............................................................................................. 306
A Note Concerning Responsible Use of Copyrighted Materials................................................... 306
Copyright Attribution.................................................................................................................... 307


13
DS-800WN/DS-900WN User's Guide
Welcome to the DS-800WN/DS-900WN User's Guide.
For a printable PDF copy of this guide, click here.
Note: Illustrations used in this guide are for reference only. Although they may differ slightly from the
actual product, the operating methods are the same. Availability of products in this guide varies by
country.

14
Product Basics
See these sections to learn about the basic features of your product.
Product Features
Available Software
Product Parts Locations
Paper Alignment Plate
Inserting and Removing an External USB Drive
Optional Accessories and Replacement Parts
Using the Control Panel
Using Power Saving Settings
Using the Epson Smart Panel Mobile App
Product Features
Your product includes the following special features.
• "ScanWay" PC-Free Scanning
PC-free scanning allows you to scan and distribute documents directly from the product's control
panel without having to use a computer. You can send the scanned image to a selected destination,
such as a network folder, email, cloud service, or USB drive.
• Customizable Home Screen Display
You can customize the screen display to suit your scanning needs. By changing the icon and colors on
the screen display, you can easily find your preferred scanning setting. This feature is useful when
sharing the scanner with multiple users.
• Secure Scanning Environment
Depending on your environment, you can build an authentication system to manage multiple Epson
devices using a server (Epson Print Admin), or you can use the product's built-in authentication
feature which provides standalone authentication without the need for a server (Epson Print Admin
Serverless).
Note: A license key is required to use Epson Print Admin and Epson Print Admin Serverless. Contact
your Epson dealer for more information.
• Document Protection

15
When the Paper Protection option is enabled (Epson Scan 2 Utility > Scanner Setting tab > Paper
Protection), scanning stops immediately when the following conditions are detected:
• A paper feed error has occurred
• An original is fed at an angle
• The combination of the original and the scanner position does not match
Note: Some feed errors may not be accurately detected. If detection does not work correctly, try
changing the settings. If no errors are detected, select On-High to increase the sensitivity. If errors are
detected incorrectly, select On-Low to decrease the sensitivity. Select On-Medium to detect stapled
originals and skewed originals that the lower setting could not detect.
• Glass Surface Stain Detection
When the Detect Glass Dirt setting is enabled (Epson Scan 2 Utility > Scanner Setting tab >
Detect Glass Dirt), the scanner detects any stains on the glass surface inside the scanner and
displays a notification on the LCD screen. When this notification is displayed, clean the glass surface
inside the scanner with a genuine Epson cleaning kit or a soft cloth.
Note: Some stains may not be accurately detected. If detection does not work correctly, try changing
the settings. If no stains are detected, select On-High. If stains are detected incorrectly, select On-
Low or Off.
• Double-feed Detection
You can set the timing to stop operations when a double feed is detected (Epson Scan 2 Utility >
Scanner Setting tab > Double Feed Stop Timing). Select Immediate to stop scanning immediately
after any double feed is detected. Select After Eject to stop scanning the next document.
• Image Quality Adjustment Options
• Color Optimization
You can use Image Type settings to automatically detect the color of the original before scanning
(Epson Scan 2 > Main Settings tab > Image Type > Auto). When scanning from the control panel,
select Color/Grayscale/B&W, Color/Black & White, or Color/Grayscale as the Image Type
setting. The Image Type setting that can be selected differs depending on the feature used and the
file format to be saved.
Note: When using Epson Smart Panel, setting Image Type to Auto allows you to scan the image in
Color or Gray.

16
• Text Enhancement
You can use Text Enhancement settings (Epson Scan 2 > Advanced Settings tab > Text
Enhancement > Settings) to emphasize light letters and remove dotted patterns in the background
of difficult to read originals.
Note: When using Document Capture Pro (Windows) or Document Capture (Mac), you can open
the Epson Scan 2 screen by clicking the Detailed Settings button on the Scan Settings screen.
• Edge Correction
You can use Edge Correction settings (Epson Scan 2 > Advanced Settings tab > Edge
Correction > Settings) to correct scanned images when the corners or edges of the original are
folded or torn, or when a shadow appears around the scanned image. The missing edges or corners
will be automatically filled with the color of the original document.
• Mobile Scanning using Epson Smart Panel
You can use the Epson Smart Panel app to scan from your iOS or Android device over a direct Wi-Fi
connection. You can save the scanned data to your smart device, upload it to a cloud service, or send
it by email. You can also configure Wi-Fi settings and troubleshoot errors directly from your smart
device.
Parent topic: Product Basics
Related tasks
Scanning to a Network Folder or FTP Server
Scanning to an Email
Scanning to the Cloud
Scanning to an External USB Device
Using the Epson Smart Panel Mobile App
Starting a Scan from a Smartphone or Tablet
Related topics
Customizing the Control Panel Display
Available Software
The table below provides an overview of the software available for your product.
You can download and install the necessary software from the Epson website using the instructions on
the Start Here sheet.

17
Note: An Internet connection is required to obtain the product software. Please note that some options,
such as Epson Print Admin and Epson Print Admin Server, require the purchase of a license and are
only available through your Epson dealer.
Software Description
Document Capture Pro
(Windows) or Document
Capture (Mac)
Allows you to easily and efficiently digitize originals if you want to save
scanned data to your computer. You can register a set of operations,
such as Scan-Save-Send, as a “job” and assign the job to the scanner's
control panel so you can perform the operation by simply selecting the
job on the LCD screen. See the software help for detailed information
on using the application.
Epson Scan 2 Scanner driver that allows you to control the scanner. You can adjust
the size, resolution, brightness, contrast, and quality of the scanned
image. See the software help for more information on using the
application.
Note: For Windows Server operating systems, make sure the Desktop
Experience feature is installed.
Epson Smart Panel An app that allows you to scan documents using devices such as iOS or
Android smart phones and tablets. You can save the scanned data in
smart devices or cloud services, and send by e-mail. Download and
install Epson Smart Panel from the App Store or Google Play.
Epson Software Updater Periodically checks for software updates and then notifies you and
installs the software if an update is available. You can select the interval
for update checks and make settings for receiving update notifications.
In addition to driver updates, also allows you to update product firmware
and previously installed applications, and install additional software that
is compatible with your product.
Note: Windows Server operating systems are not supported.
Web Config Pre-installed software that allows you to access your scanner from a
web browser via a network, and perform administrative functions such
as updating firmware and configuring network and advanced security
settings. To use Web Config, connect the scanner and the computer or
smart device to the same network.
EpsonNet Config Allows you to set network interface addresses and protocols. See the
software help for more information on using the application.

18
Software Description
Epson Device Admin Allows you to monitor and manage your product on a network and
perform administrative functions such as updating firmware and running
detailed status reports. See the software help for more information on
using the application.
EpsonNet SetupManager Optional software that allows the administrator to create unique
software packages (such as a driver package for a simpler scanner
installation, etc.) and distribute them among groups. Visit the Epson
website for more information.
Epson Print Admin Optional software that allows you to build an authentication system
using a server for authentication. A variety of authentication methods
are available including logging into the scanner with an ID card. To
achieve a secure scanning environment, the scanning functions and
destination settings are displayed on the control panel for each user to
prevent accidental operations, and a usage log management function is
used. You can enhance the scanning functionality using the EPA
Advanced Workflows option.
Note: A license key is required to use Epson Print Admin and EPA
Advanced Workflows. Contact your Epson dealer for more information.
Epson Print Admin Serverless Allows you to use the product's built-in authentication function to
perform authenticated scanning without the need for a server.
Note: An activation key is required to use Epson Print Admin
Serverless. Contact your Epson dealer for more information.
Parent topic: Product Basics
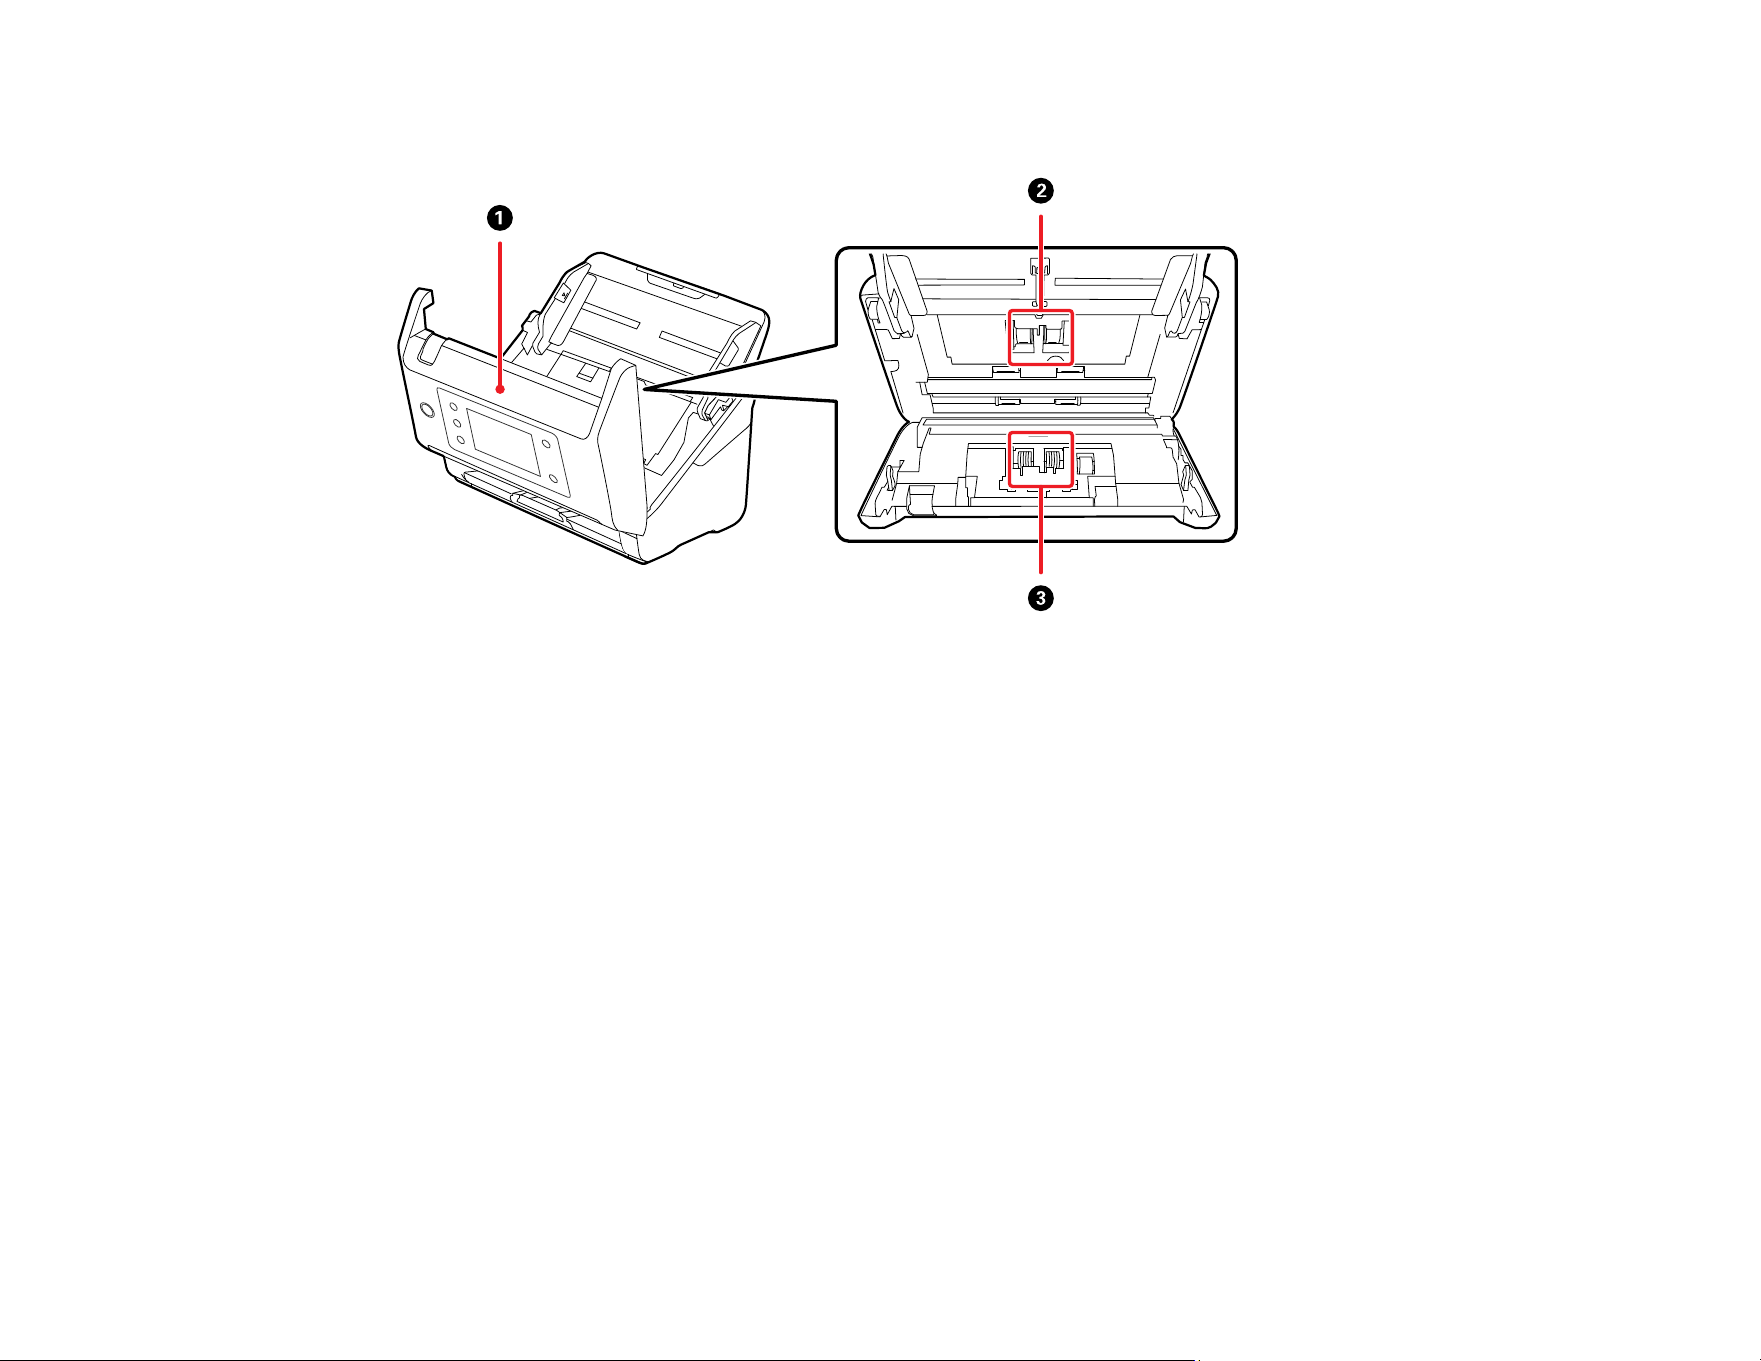
Product Parts Locations
See these sections to identify the parts on your product.
Product Parts - Front
Product Parts - Inside
Product Parts - Back
Parent topic: Product Basics
21
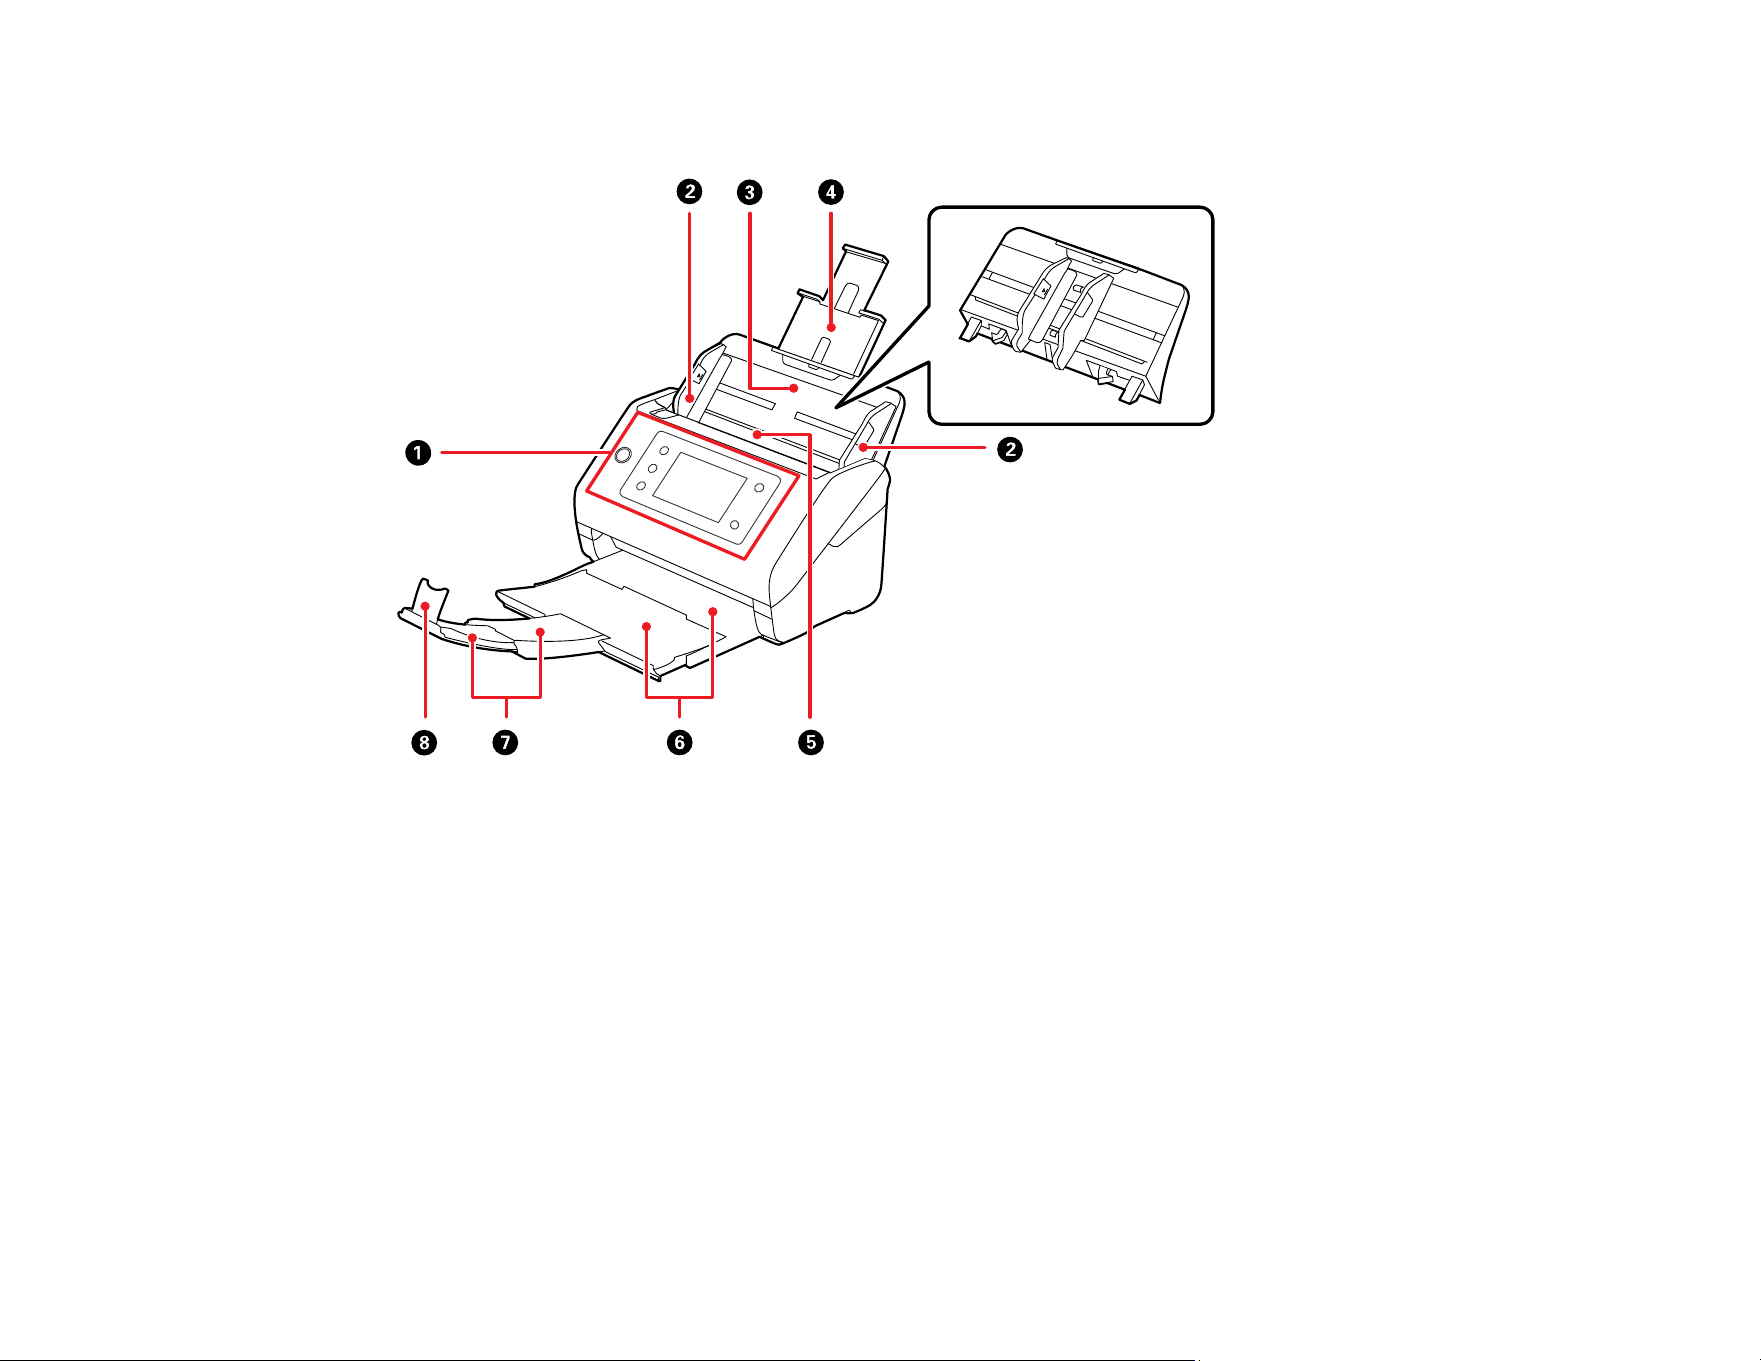
Product Parts - Back
1 Security slot
2 USB port
3 External interface USB port (for connecting an external USB or authentication device)
4 LAN port
5 DC inlet
Parent topic: Product Parts Locations
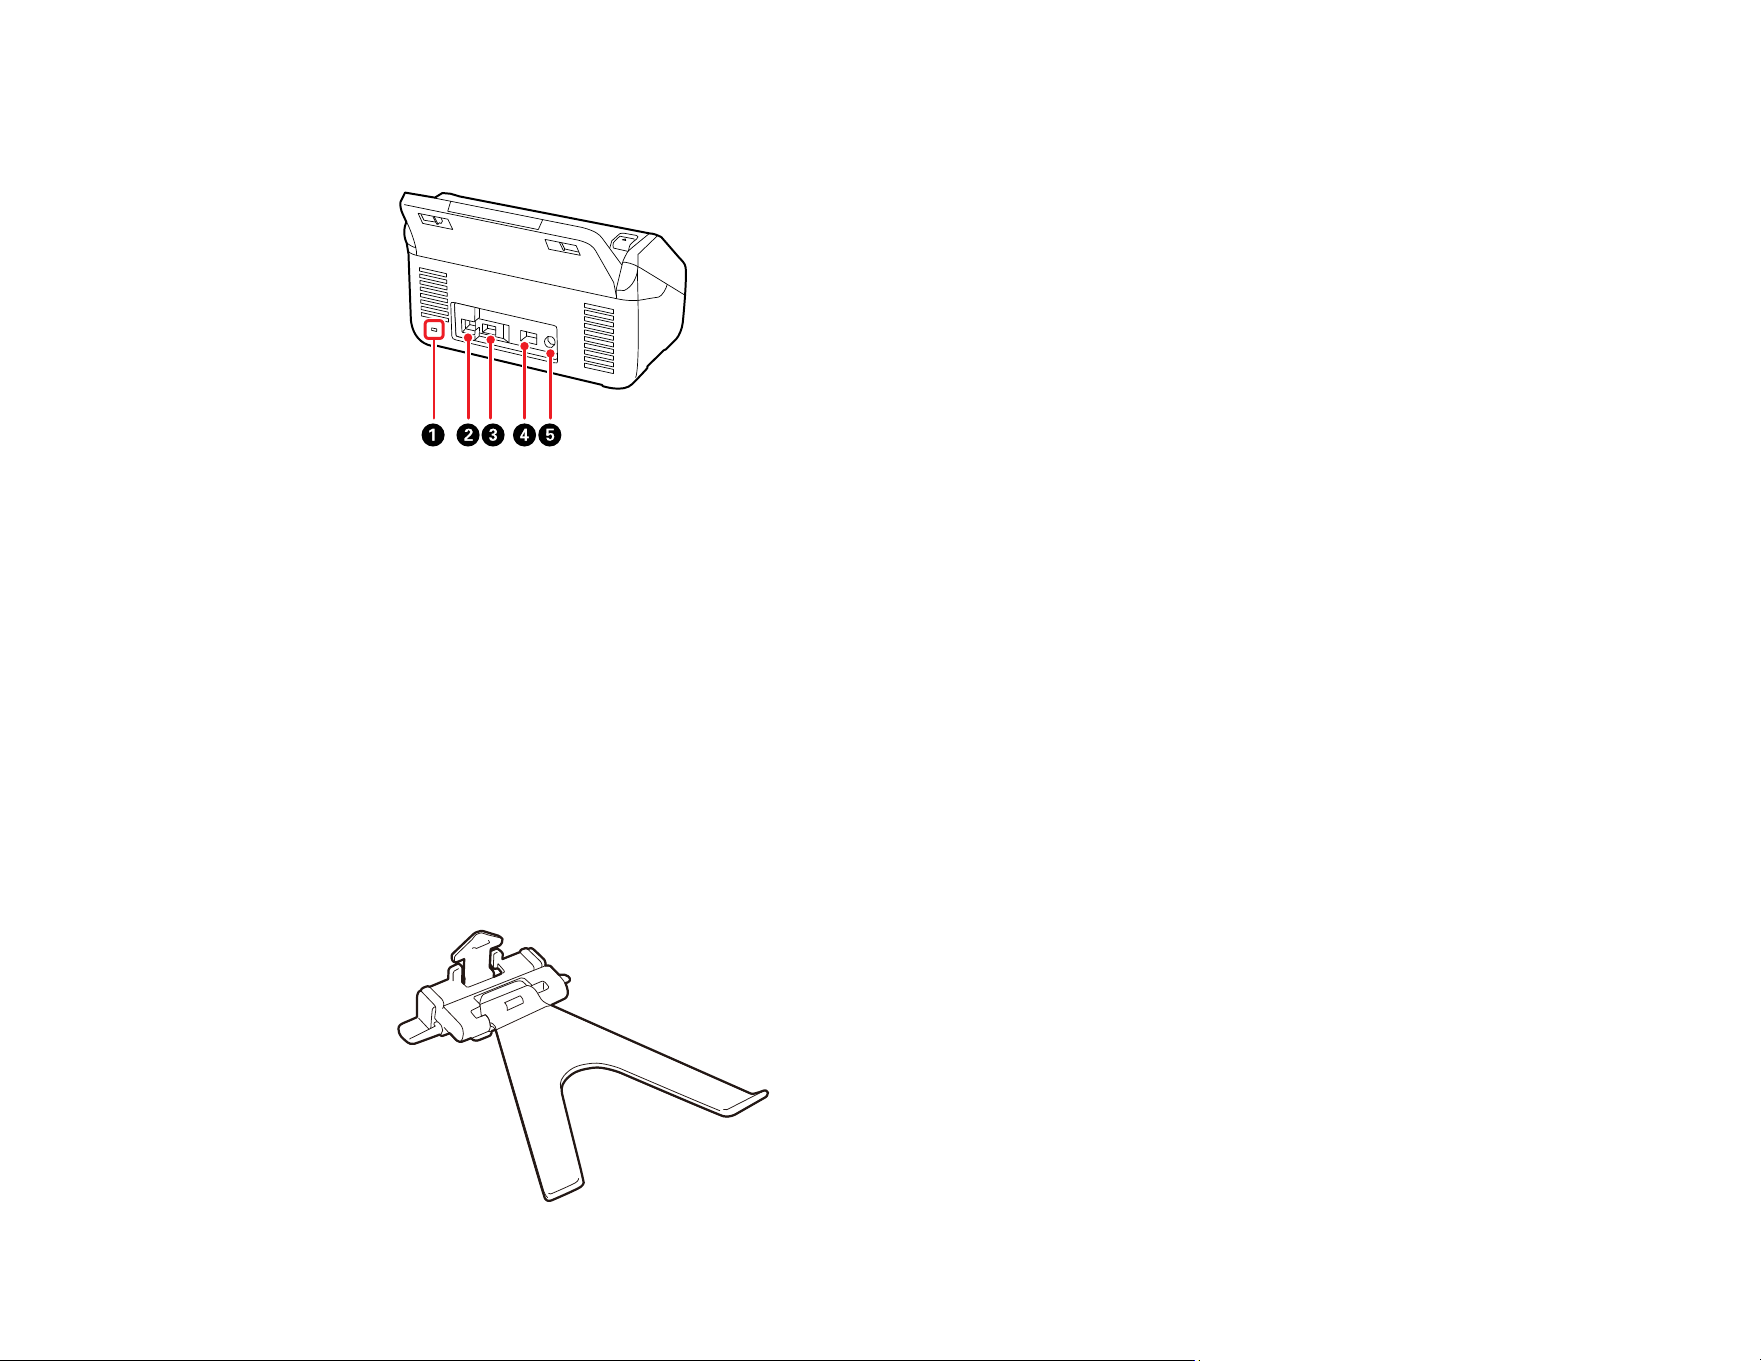
Paper Alignment Plate
The paper alignment plate serves as a guide to ensure that scanned originals are ejected correctly and
consistently. This is useful when scanning originals that are a mixture of different sizes.
22
Note: The paper alignment plate can be purchased as an option for the DS-800WN model; it is included
with the DS-900WN model.
See these sections for instructions on attaching and removing the paper alignment plate.
Attaching the Paper Alignment Plate
Removing the Paper Alignment Plate
Parent topic: Product Basics
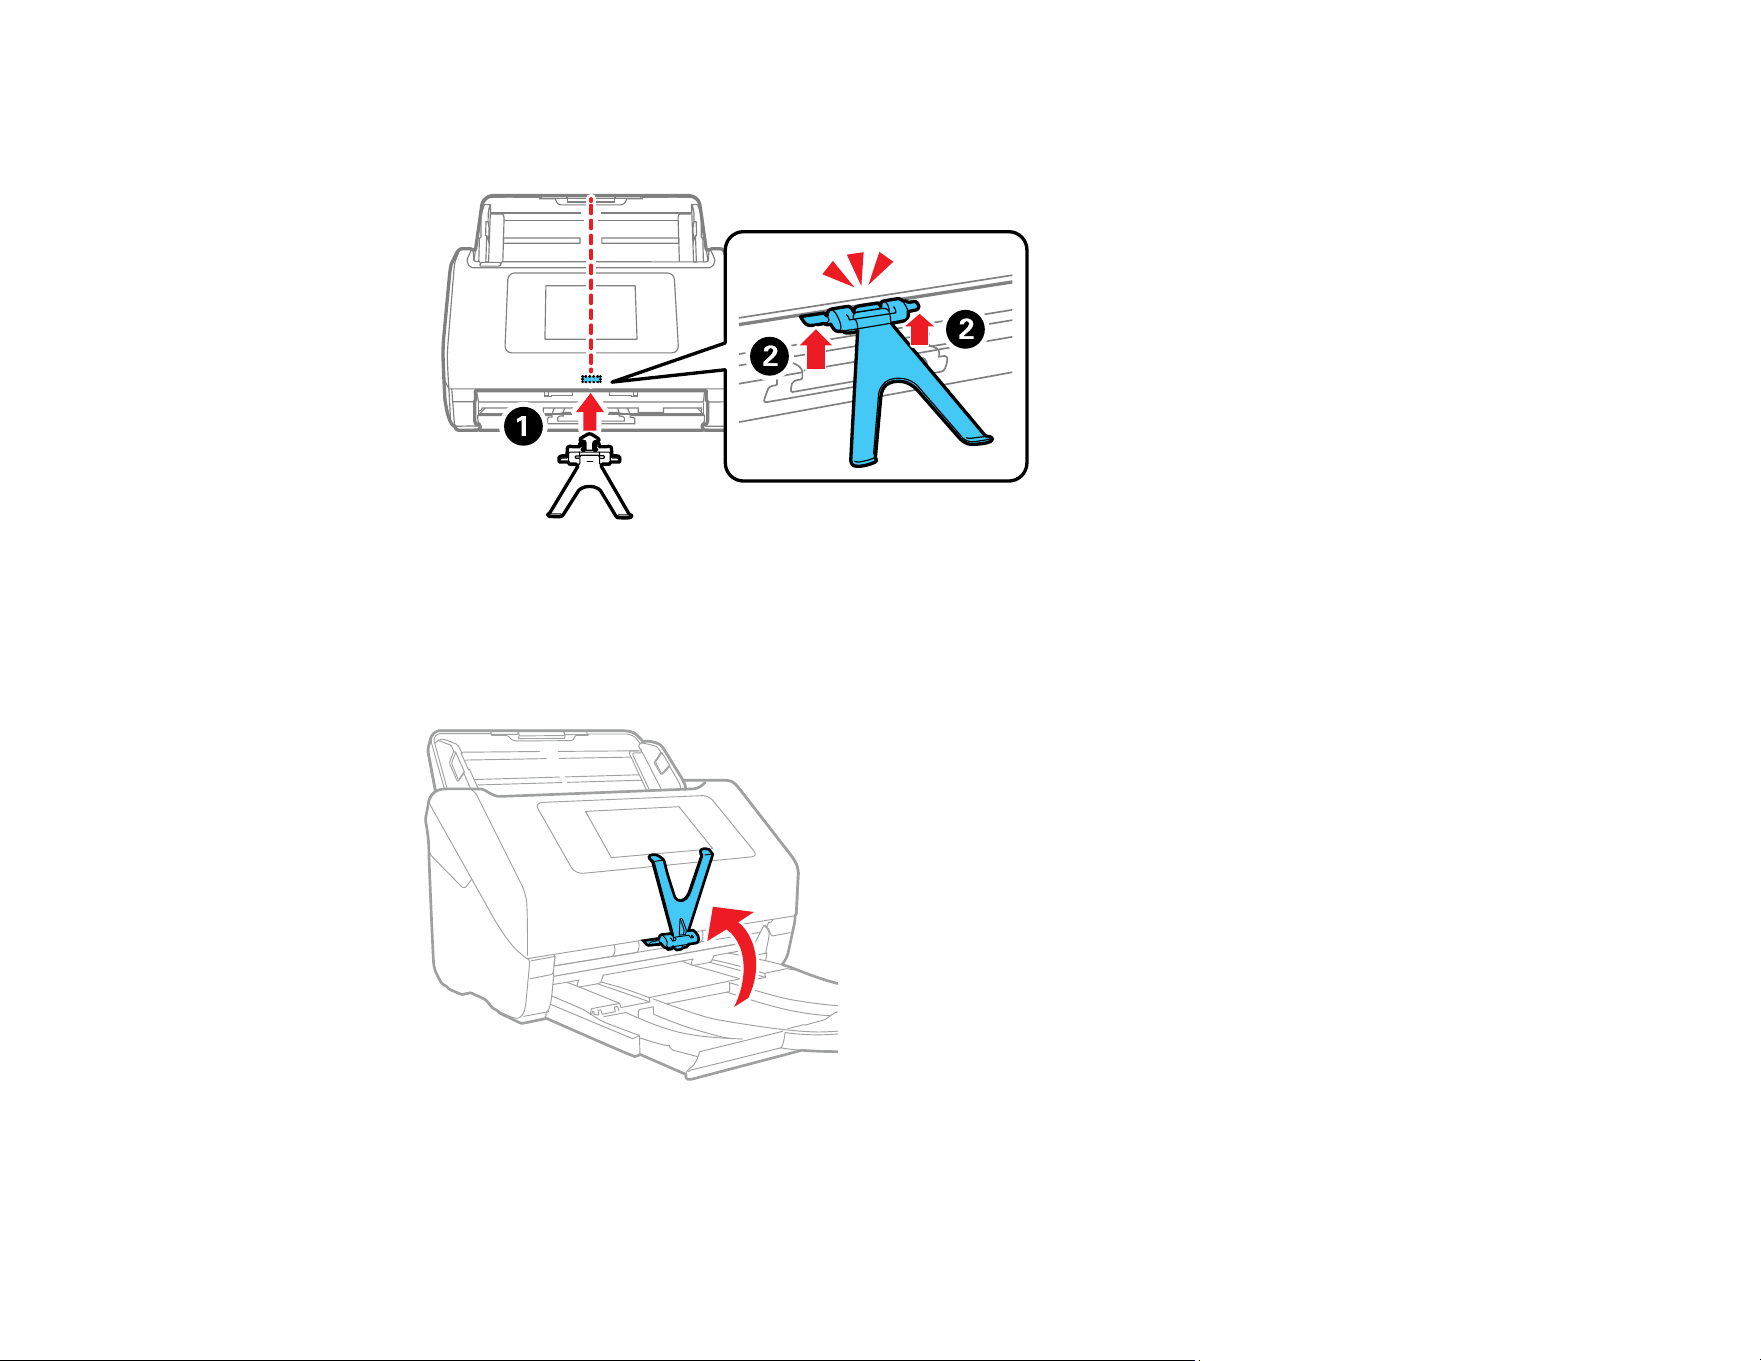
Attaching the Paper Alignment Plate
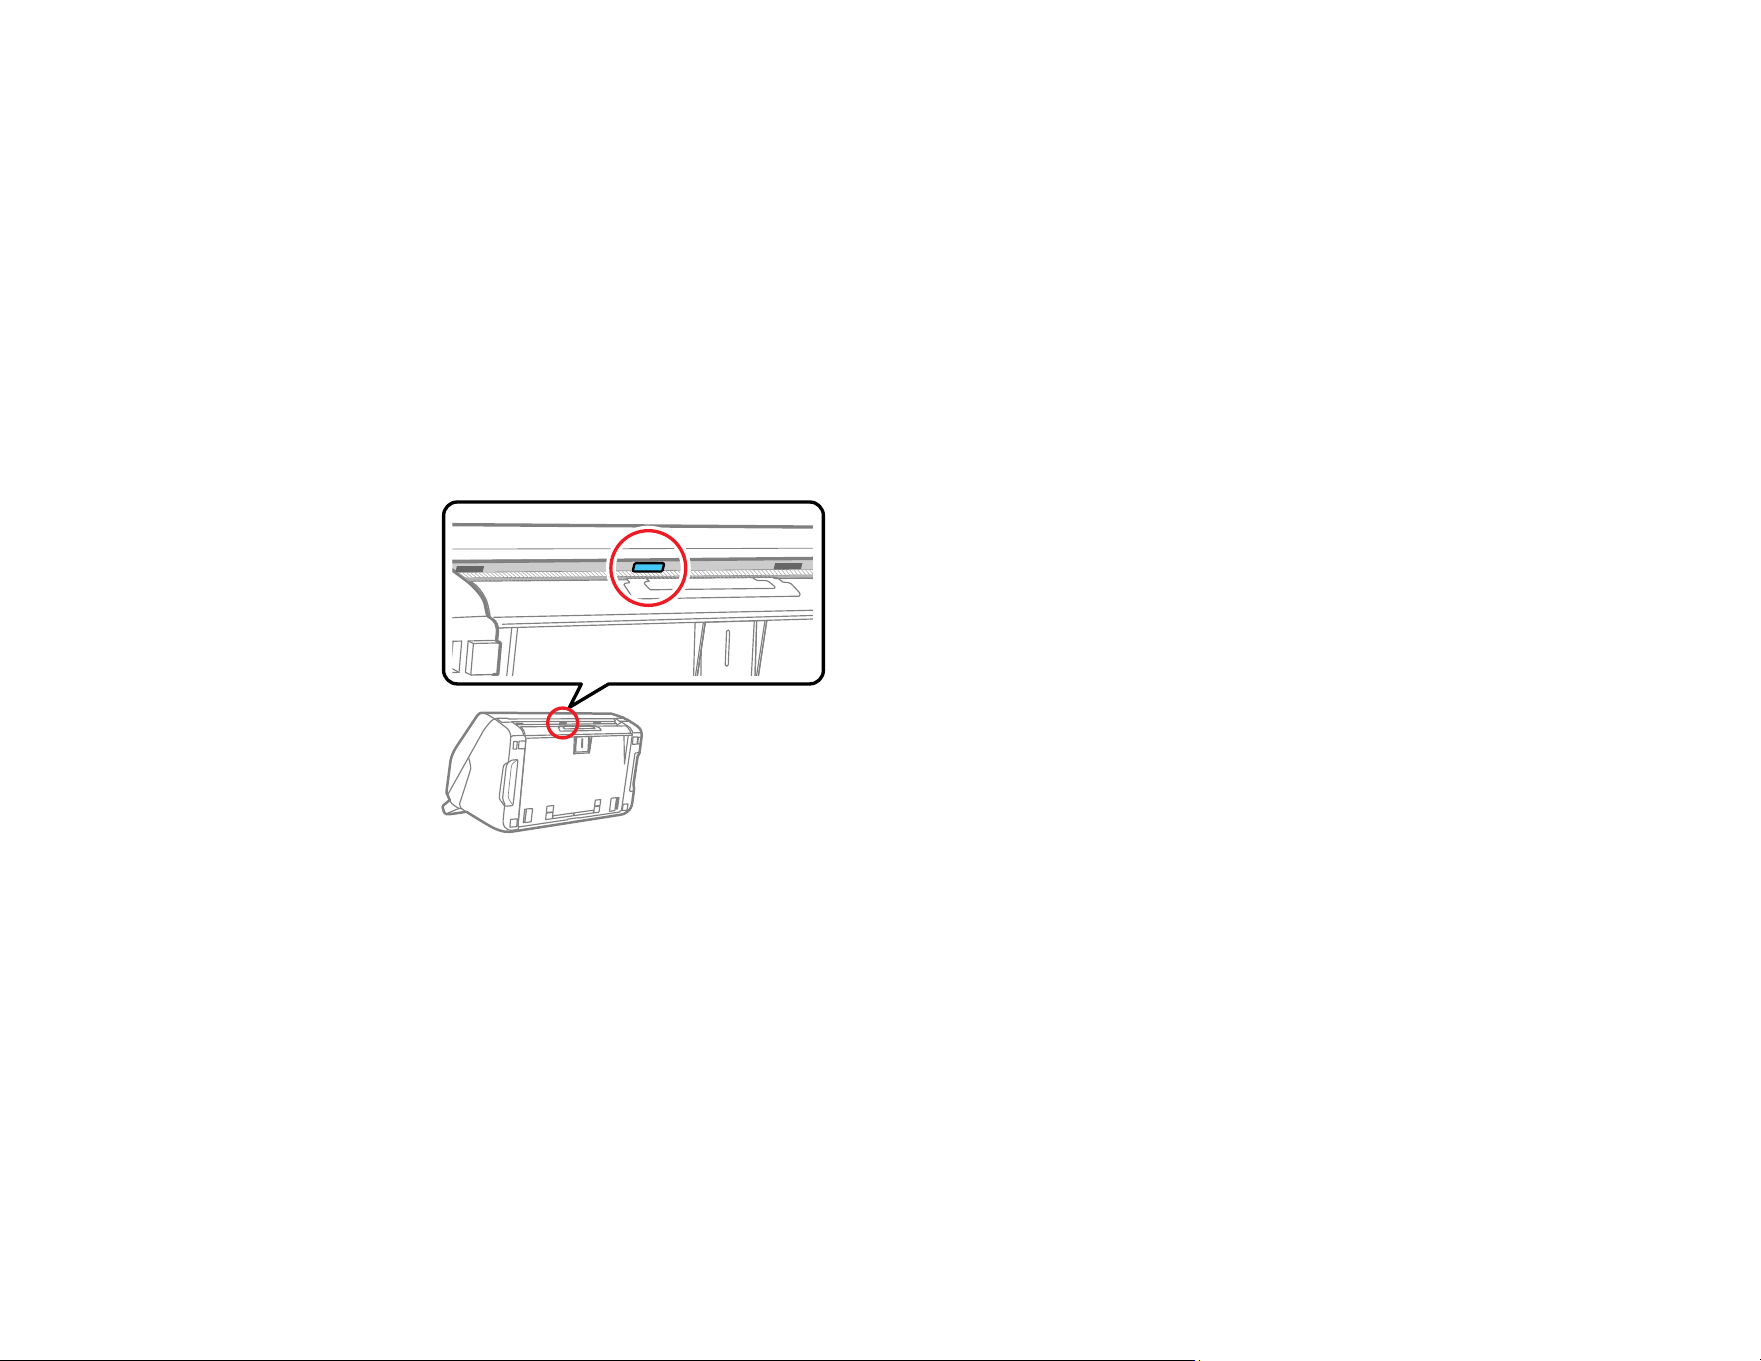
Follow the steps below to attach the paper alignment plate.
1. Locate the installation slot at the bottom center of the control panel.
24
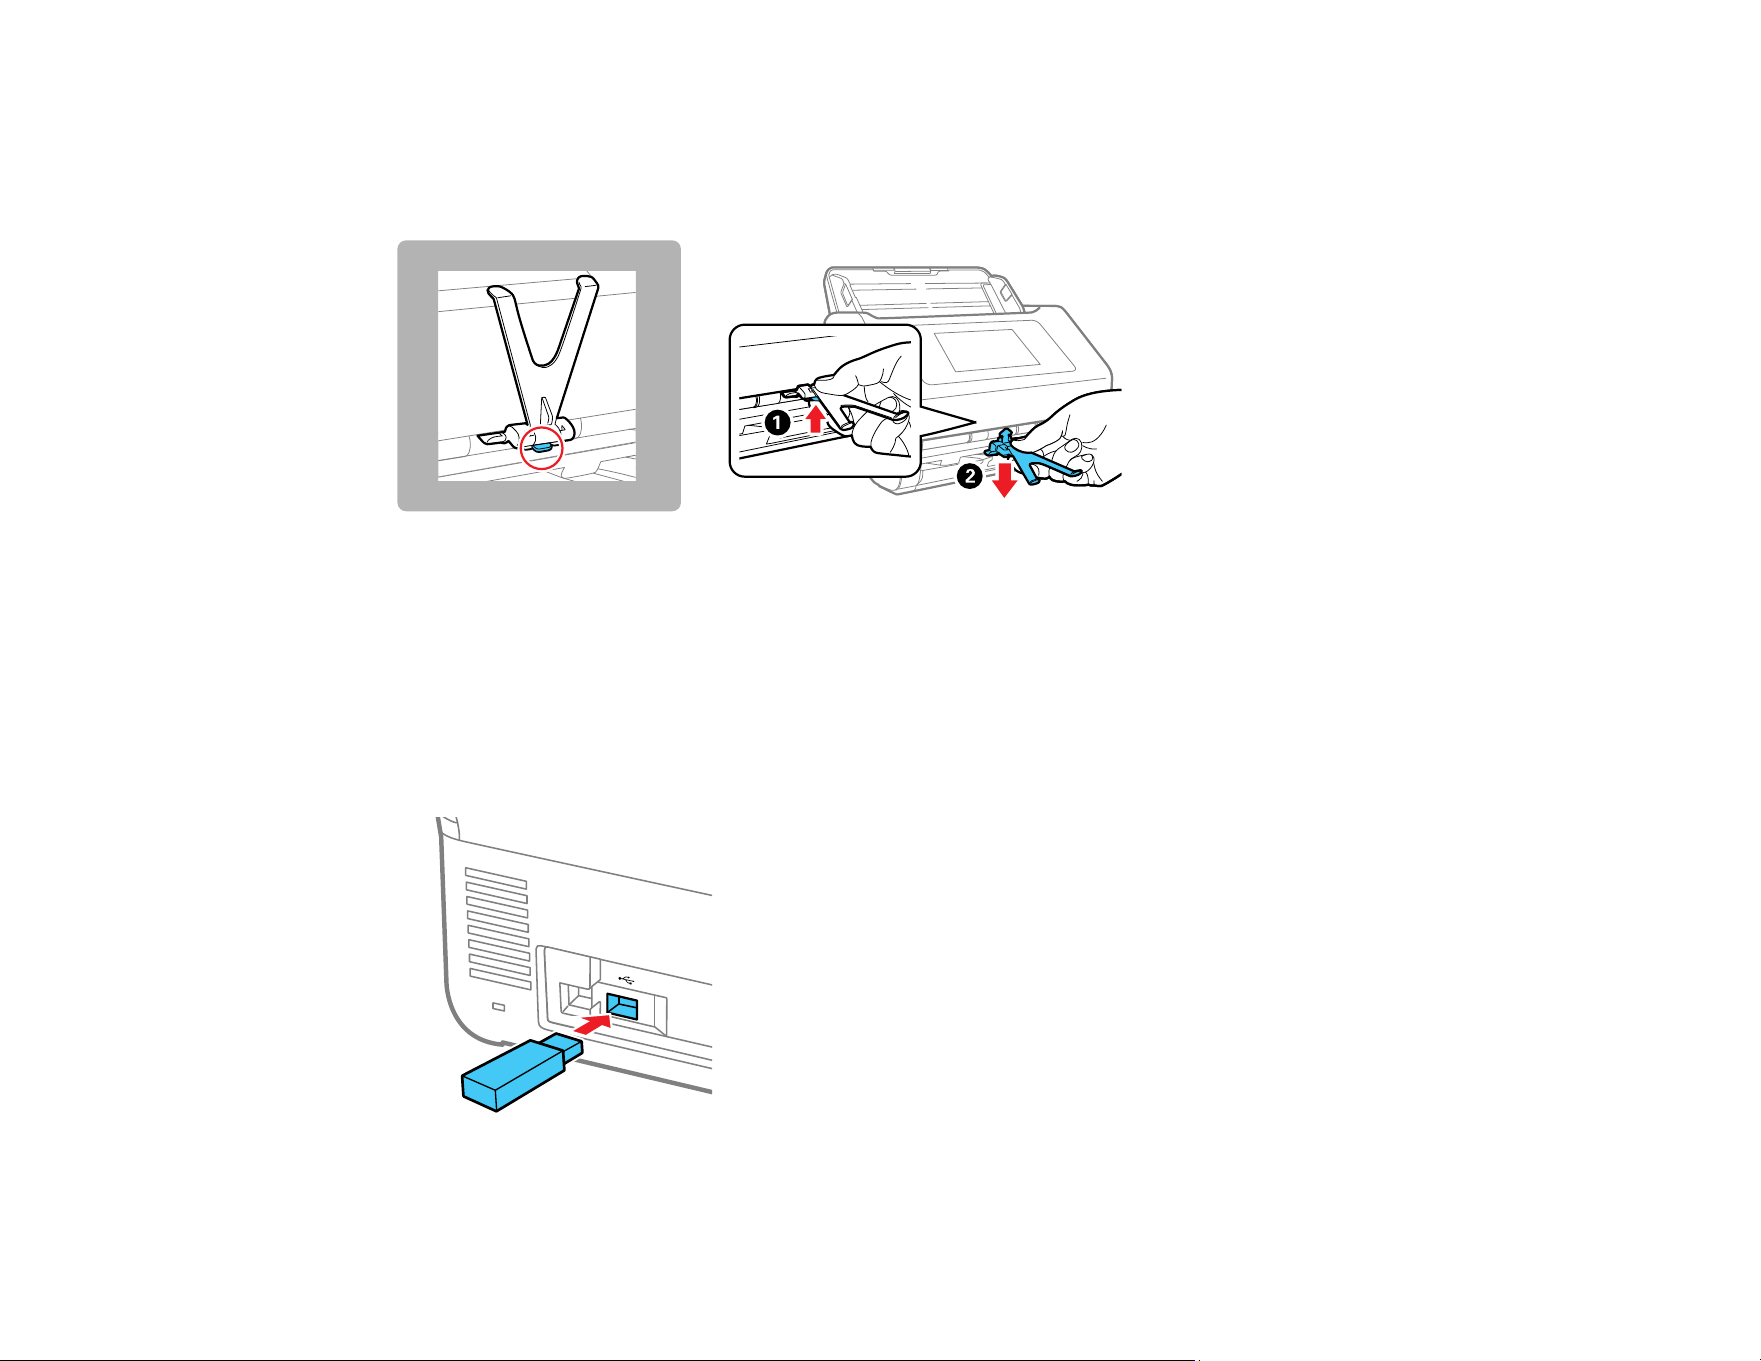
Removing the Paper Alignment Plate
To remove the paper alignment plate, push in the hook at the bottom of the plate, then pull the plate out
of the slot at the bottom of the control panel.
Parent topic: Paper Alignment Plate
Inserting and Removing an External USB Drive
Insert a USB device into the external interface USB port on the back of the product.
Note: If you connect an authentication device to the external interface USB port, you cannot use the port
to connect a USB drive to save a scanned image.

25
Perform the step in reverse order to remove the external USB device.
CAUTION: A message displays on the control panel while data is transferring to the external USB
device. If you remove the external USB device while transferring data, the data on the external USB
device may be lost.
Data may be lost or corrupted in the following situations:
• If the device is affected by static electricity or electrical noise
• If the device is used incorrectly
• If the device is broken or repaired
• If the device is damaged by a natural disaster
Note: Epson cannot guarantee the compatibility of your device. Make sure the files on the device are
compatible with the product.
Parent topic: Product Basics
Optional Accessories and Replacement Parts
U.S. and Canada: You can purchase optional accessories and replacement parts at epson.com (U.S.
sales) or epson.ca (Canadian sales). You can also purchase accessories from an Epson authorized
reseller. To find the nearest one, call 800-GO-EPSON (800-463-7766) in the U.S. or 800-807-7766 in
Canada.
Latin America: You can purchase optional accessories and replacement parts from an Epson
authorized reseller. To find the nearest reseller, go to latin.epson.com. Or you can contact your nearest
sales office as described in "Where to Get Help".
Note: Availability of accessories varies by country.
Part Part number
Carrier sheet (5) B12B819051
Roller assembly kit B12B819711
Paper alignment plate B12B819691
Cleaning kit B12B819291

26
Note: Use only the carrier sheets specified above. You can only use the carrier sheet when scanning
from a computer, or when scanning from the product's control panel using the Computer option. You
cannot use a carrier sheet when scanning from the product's control panel using the following options:
• Network Folder/FTP
• Email
• Cloud
• USB Drive
• WSD
• Scan to My Email (when using Epson Print Admin/Epson Print Admin Serverless)
• Scan to My Folder (when using Epson Print Admin/Epson Print Admin Serverless)
• Scan Presets (when using Epson Print Admin)
Parent topic: Product Basics
Using the Control Panel
See these sections to learn about the control panel and select control panel settings.
Control Panel Buttons and Lights
LCD Screen
Status Icon Information
Navigating the LCD Screen
Entering Characters on the LCD Screen
Viewing Animations
Customizing the Control Panel Display
Adjusting the Screen Brightness
Adjusting Control Panel Sounds
Changing LCD Screen Language
Selecting the Date and Time
Changing the Keyboard Layout
Adjusting the Operation Time Out Setting
Preventing PC Connection via USB
Setting Direct Power On
Changing Regular Cleaning Alert Settings
27
Changing Roller Replacement Alert Settings
Setting Up Epson Connect Services
Parent topic: Product Basics
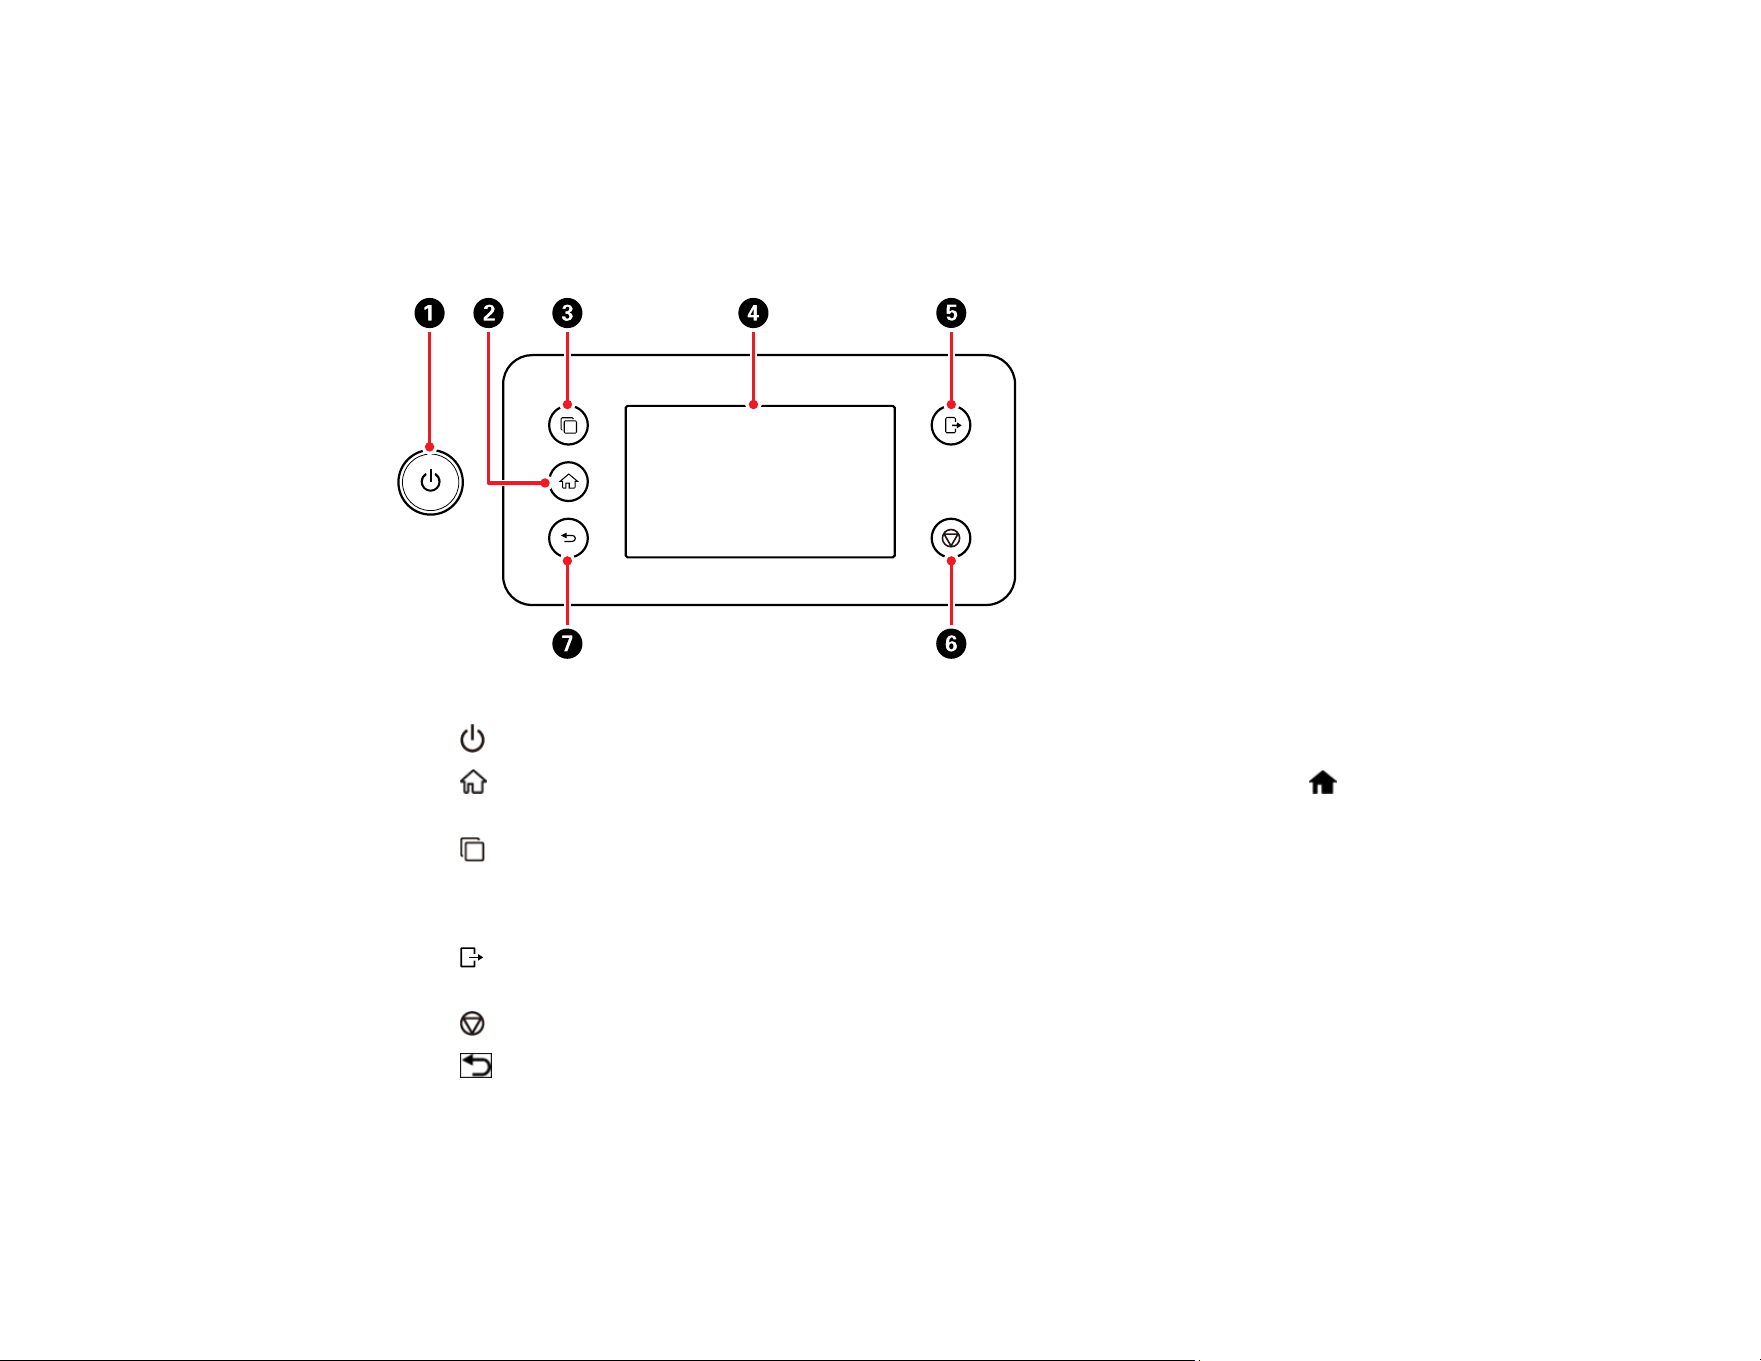
Control Panel Buttons and Lights
1
power button and light; turns the product on and off
2
home button; returns to the home screen (i you are on the home screen, the home icon
displays in the top left corner of the screen)
3
switch ISV integration button; toggles between integrations with third-party software platforms
when two solutions are configured and active on the device
4 LCD screen; tap the screen to select menus or make settings
5 logout button; logs authenticated users out of the scanner (only available when Lock Setting,
Access Control, or an authentication system is enabled)
6
stop button; stops the current operation
7
back button; returns to the previous screen
Parent topic: Using the Control Panel
28
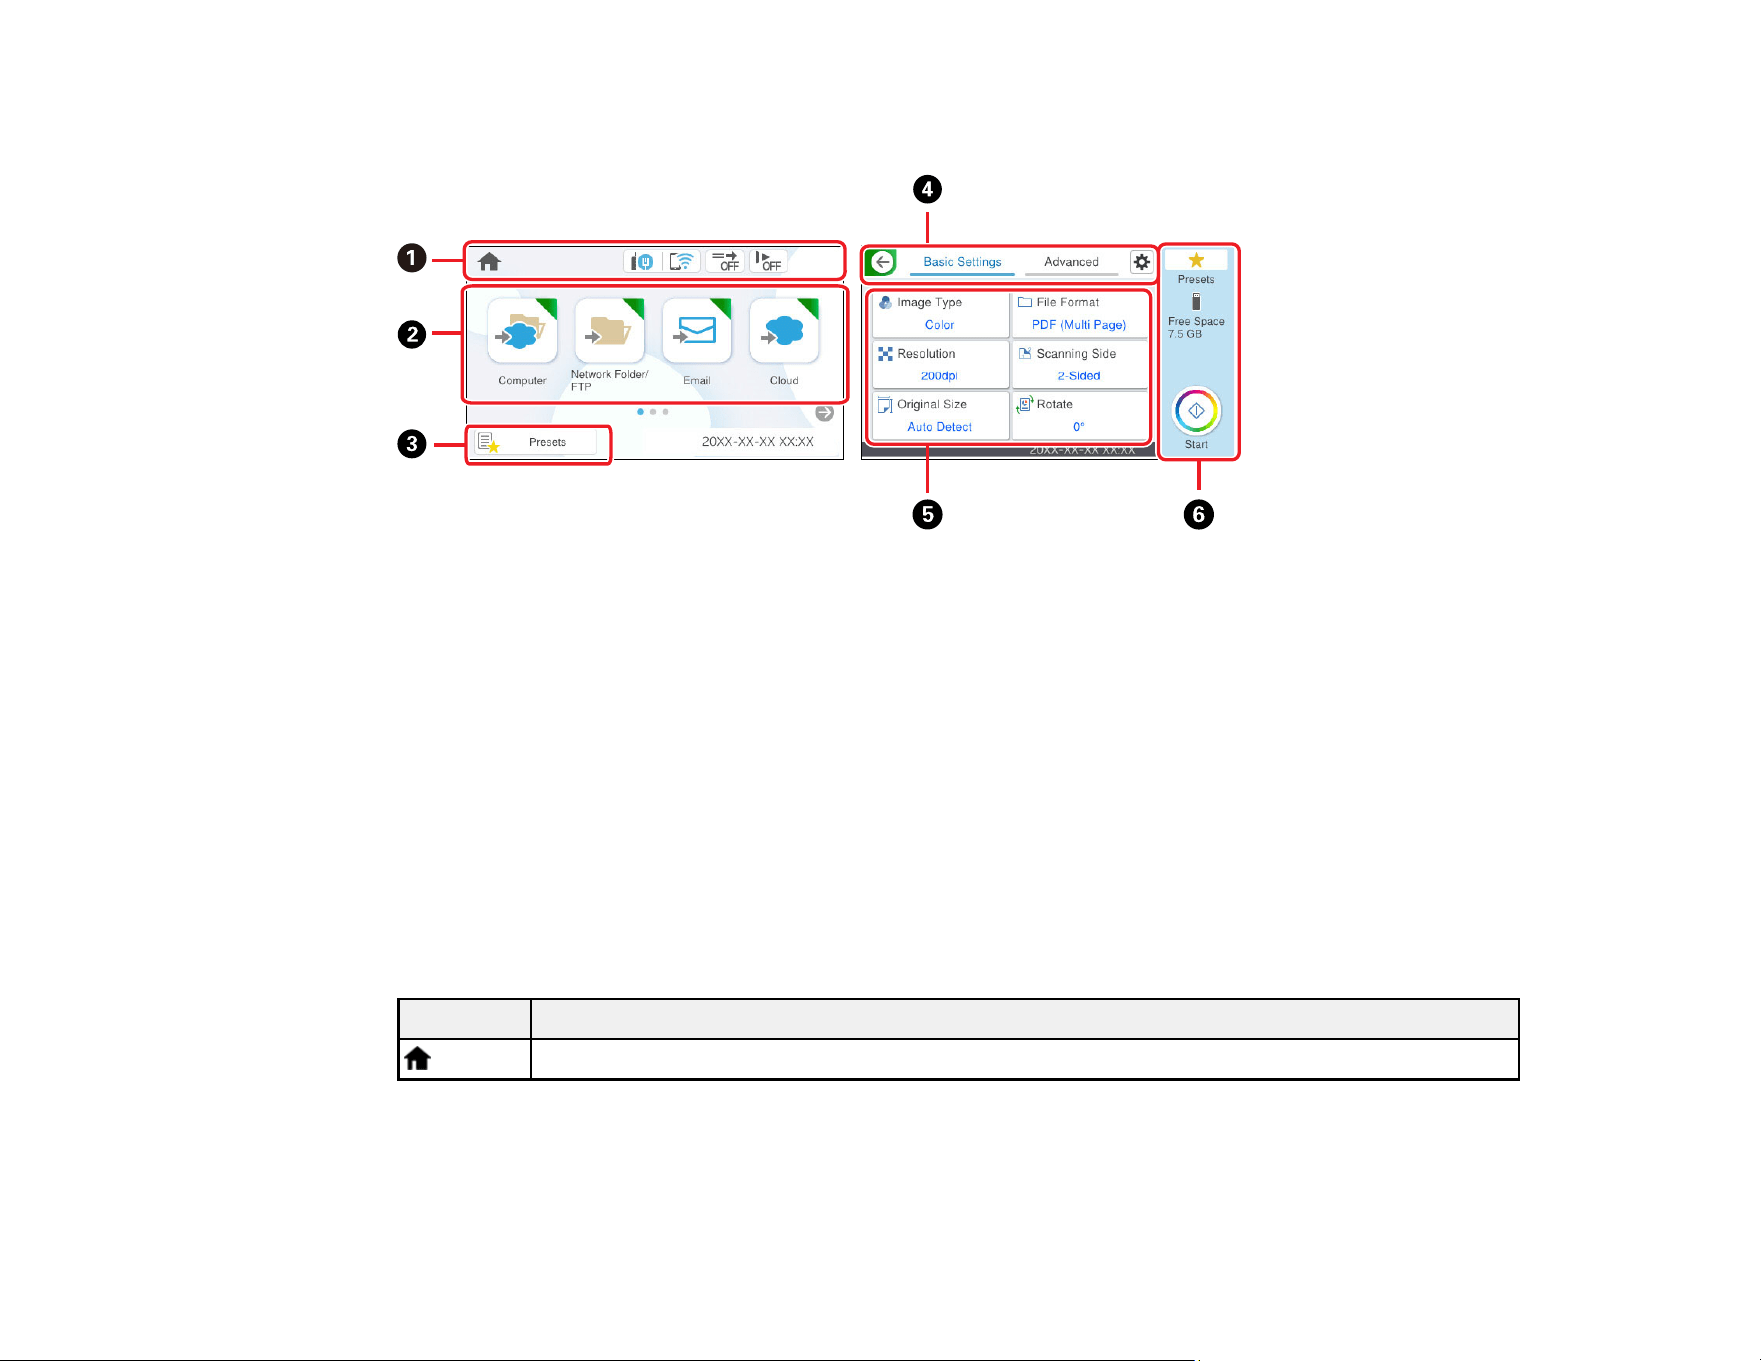
LCD Screen
1 Displays status information; select an icon to check its status or adjust its settings
2 Menu options
3 Displays the presets list; load your presets and register new presets
4 Select a tab to view different options and settings
5 Setting options; select an item to change the settings (grayed-out items are not available)
6 Select to start scanning using current settings
Parent topic: Using the Control Panel
Status Icon Information
Your product displays status icons on the LCD screen for certain product status conditions.
Icons Description
Indicates that you are on the home screen.

29
Icons Description
Displays the network connection status; select the icon to set up or change your network
connection.
• The product is not connected to a wired (Ethernet) network.
• The product is connected to a wired (Ethernet) network.
• The product is not connected to a wireless network.
• The product is searching for a network name (SSID) or experiencing a wireless
network connection issue.
• The product is connected to a wireless network; the number of bars indicates the
connection's signal strength.
• Wi-Fi Direct (Simple AP) is not enabled.
• Wi-Fi Direct (Simple AP) is enabled.
The DFDS Function (Double Feed Detection Skip Function) is enabled or disabled. Select
the icon to change the setting. When enabled, the icon is displayed.
This function skips double feed detection once and continues scanning. Enable the DFDS
Function to scan originals (such as plastic cards or envelopes) that are detected as double
feeds.
The Slow function is enabled or disabled. Select the icon to change the setting. When
enabled, the icon is displayed.
This function slows down the scanning speed. Enable this function to scan originals (such
as thin paper) that are likely to jam.
Indicates that the user restriction feature is enabled. Select this icon to log in to the
scanner. You need to select a user name and enter a password. Contact your
administrator for login information. When a user with access permission is logged in, the
icon is displayed. Select the icon to logout.
Displays the previous screen.
Indicates that the settings have been changed from the user default or the factory default.
Displays additional information or instructions; select the icon to display the information.
There is a problem with the indicated setting; select the icon for information on resolving
the problem.
30
Parent topic: Using the Control Panel
Related tasks
Setting a Password and Locking the Control Panel
Navigating the LCD Screen
Follow these guidelines to navigate and use the menus on the LCD screen.
Tap or press the screen to select an item or icon
Flick the screen to scroll swiftly
Slide your finger across the screen to move items
To change a setting, tap anywhere on the setting.
To enter a value in a field, tap the field to display the on-screen keyboard.
Parent topic: Using the Control Panel
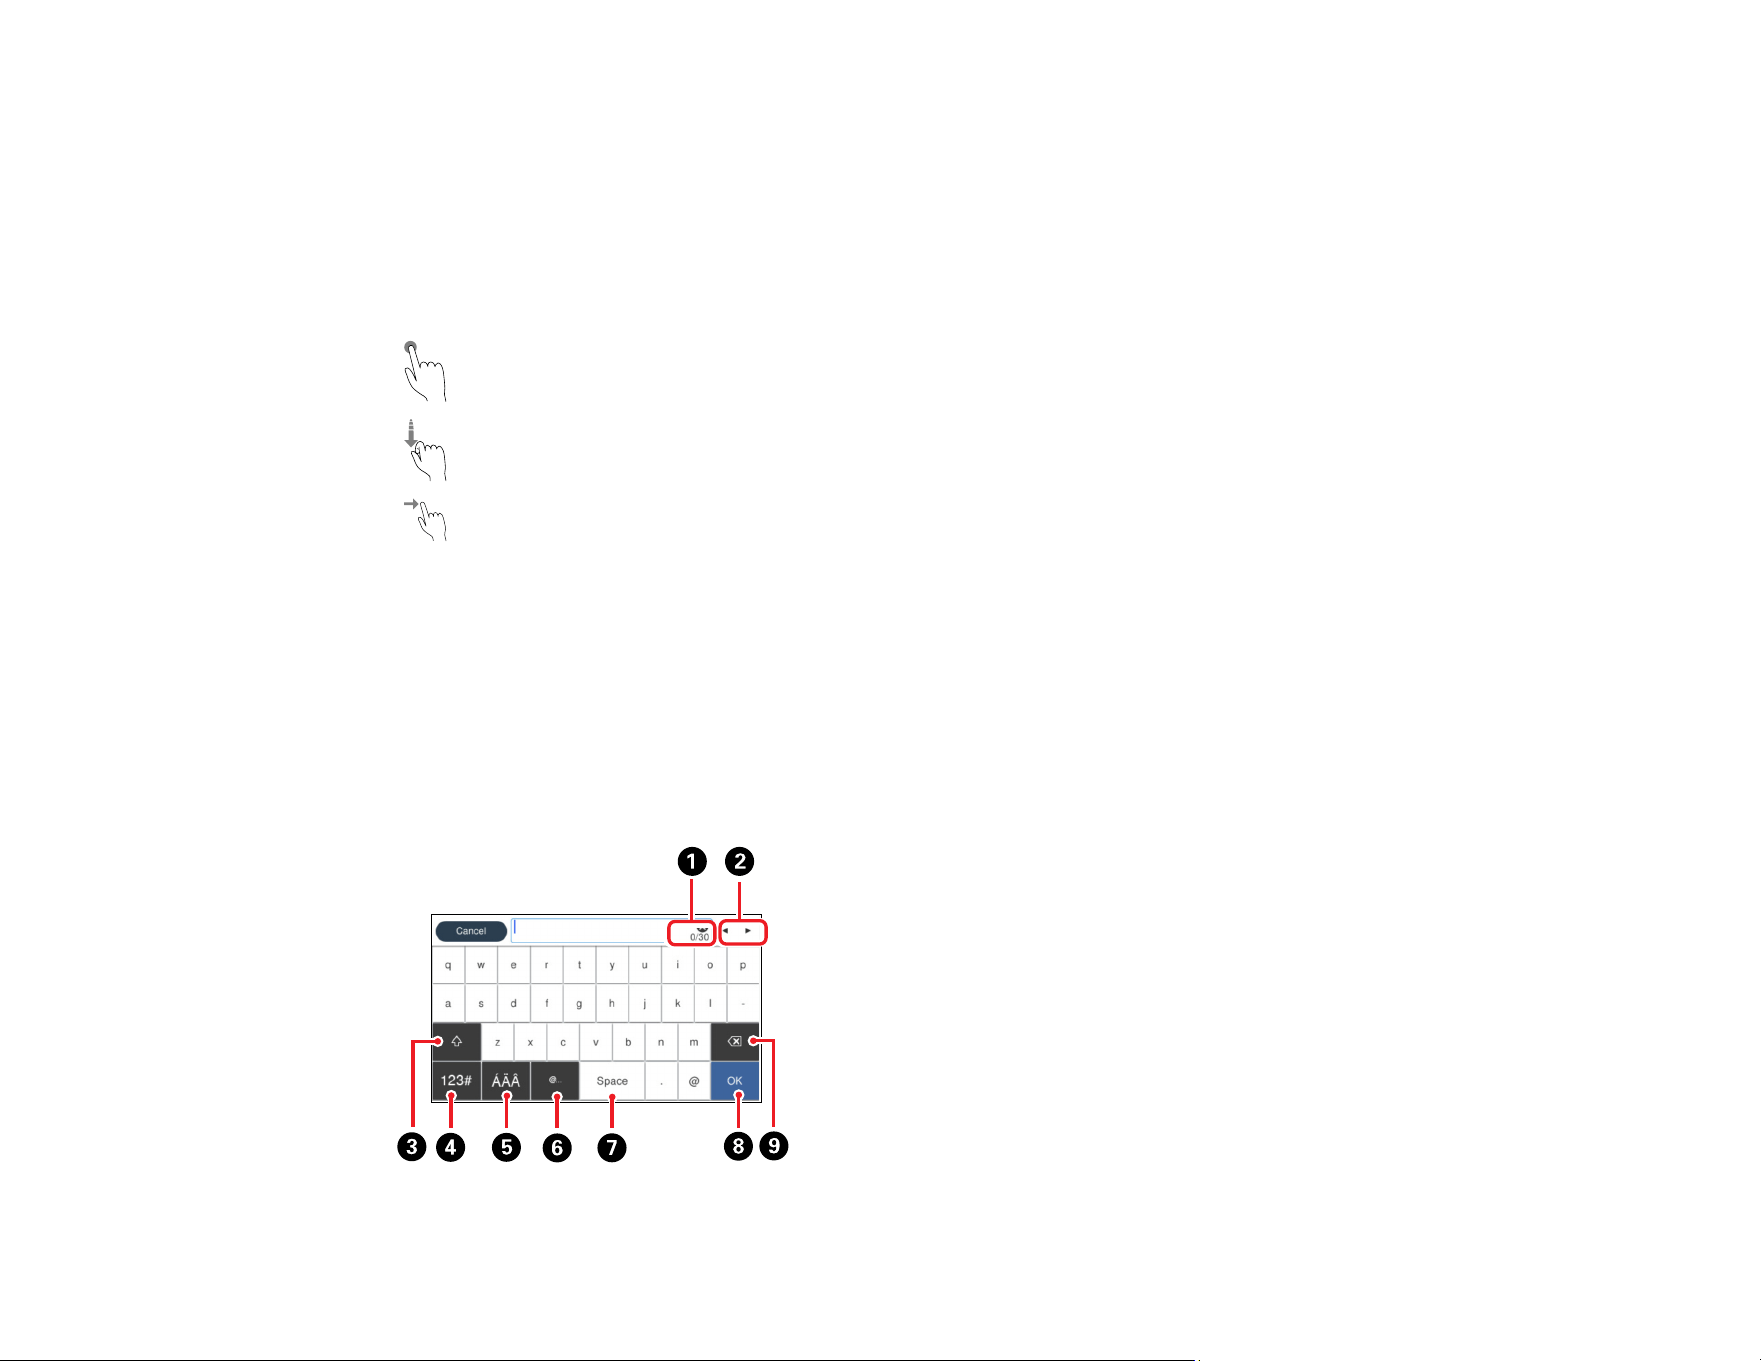
Entering Characters on the LCD Screen
Follow these guidelines to enter characters for passwords and other settings.
On-screen keyboard

31
1 Displays the character count
2 Moves the cursor left or right
3 Switches between uppercase and lowercase letters
4 Switches the character type
To enter numbers or symbols, select
To enter letters, select
5 Enters special characters such as letters with umlauts and accents
6 Displays a list of common domain names to choose from
7 Enters a space
8 Select when you are finished
9 Deletes the previous character
Parent topic: Using the Control Panel
Viewing Animations
You can view animations on the LCD screen to help guide you with a procedure or to troubleshoot a
problem.
1. Select Help on the control panel to display the help screen.
2. Select How To to view instructions on common procedures.
3. Select a topic from the list of available topics and follow the on-screen instructions.
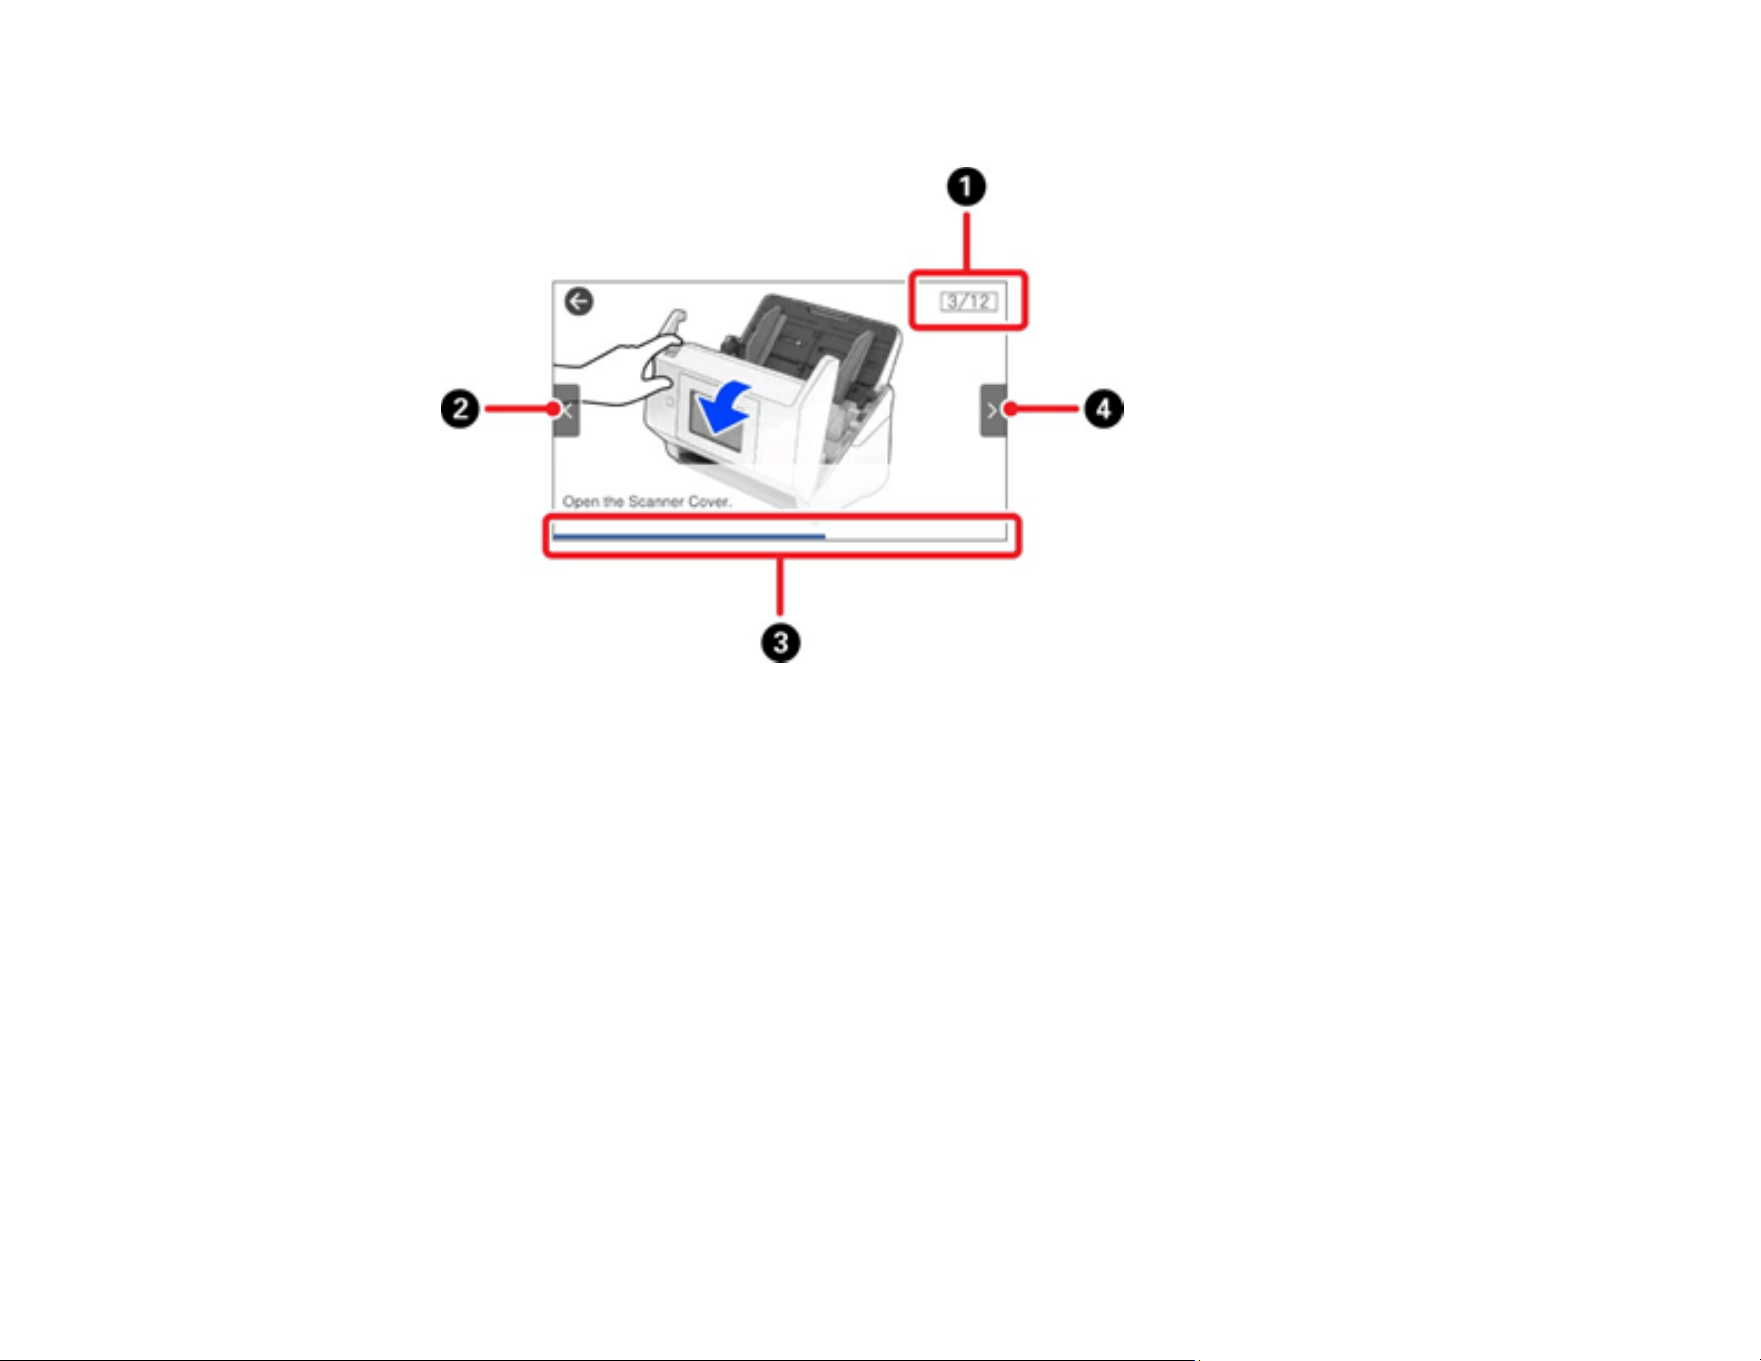
32
While viewing the topics, you may see screens like this:
1 Displays the current step number and the total number of steps
2 Select the left arrow to view the previous step
3 Indicates your overall progress through the animation
4 Select the right arrow to view the next step
Parent topic: Using the Control Panel
Customizing the Control Panel Display
You can register up to 48 frequently used scanning settings as Presets and add the icon of the
registered preset to the home screen. See these sections to learn about how to customize the control
panel display.
Registering Presets
Presets Menu Options
Customizing the Home Screen
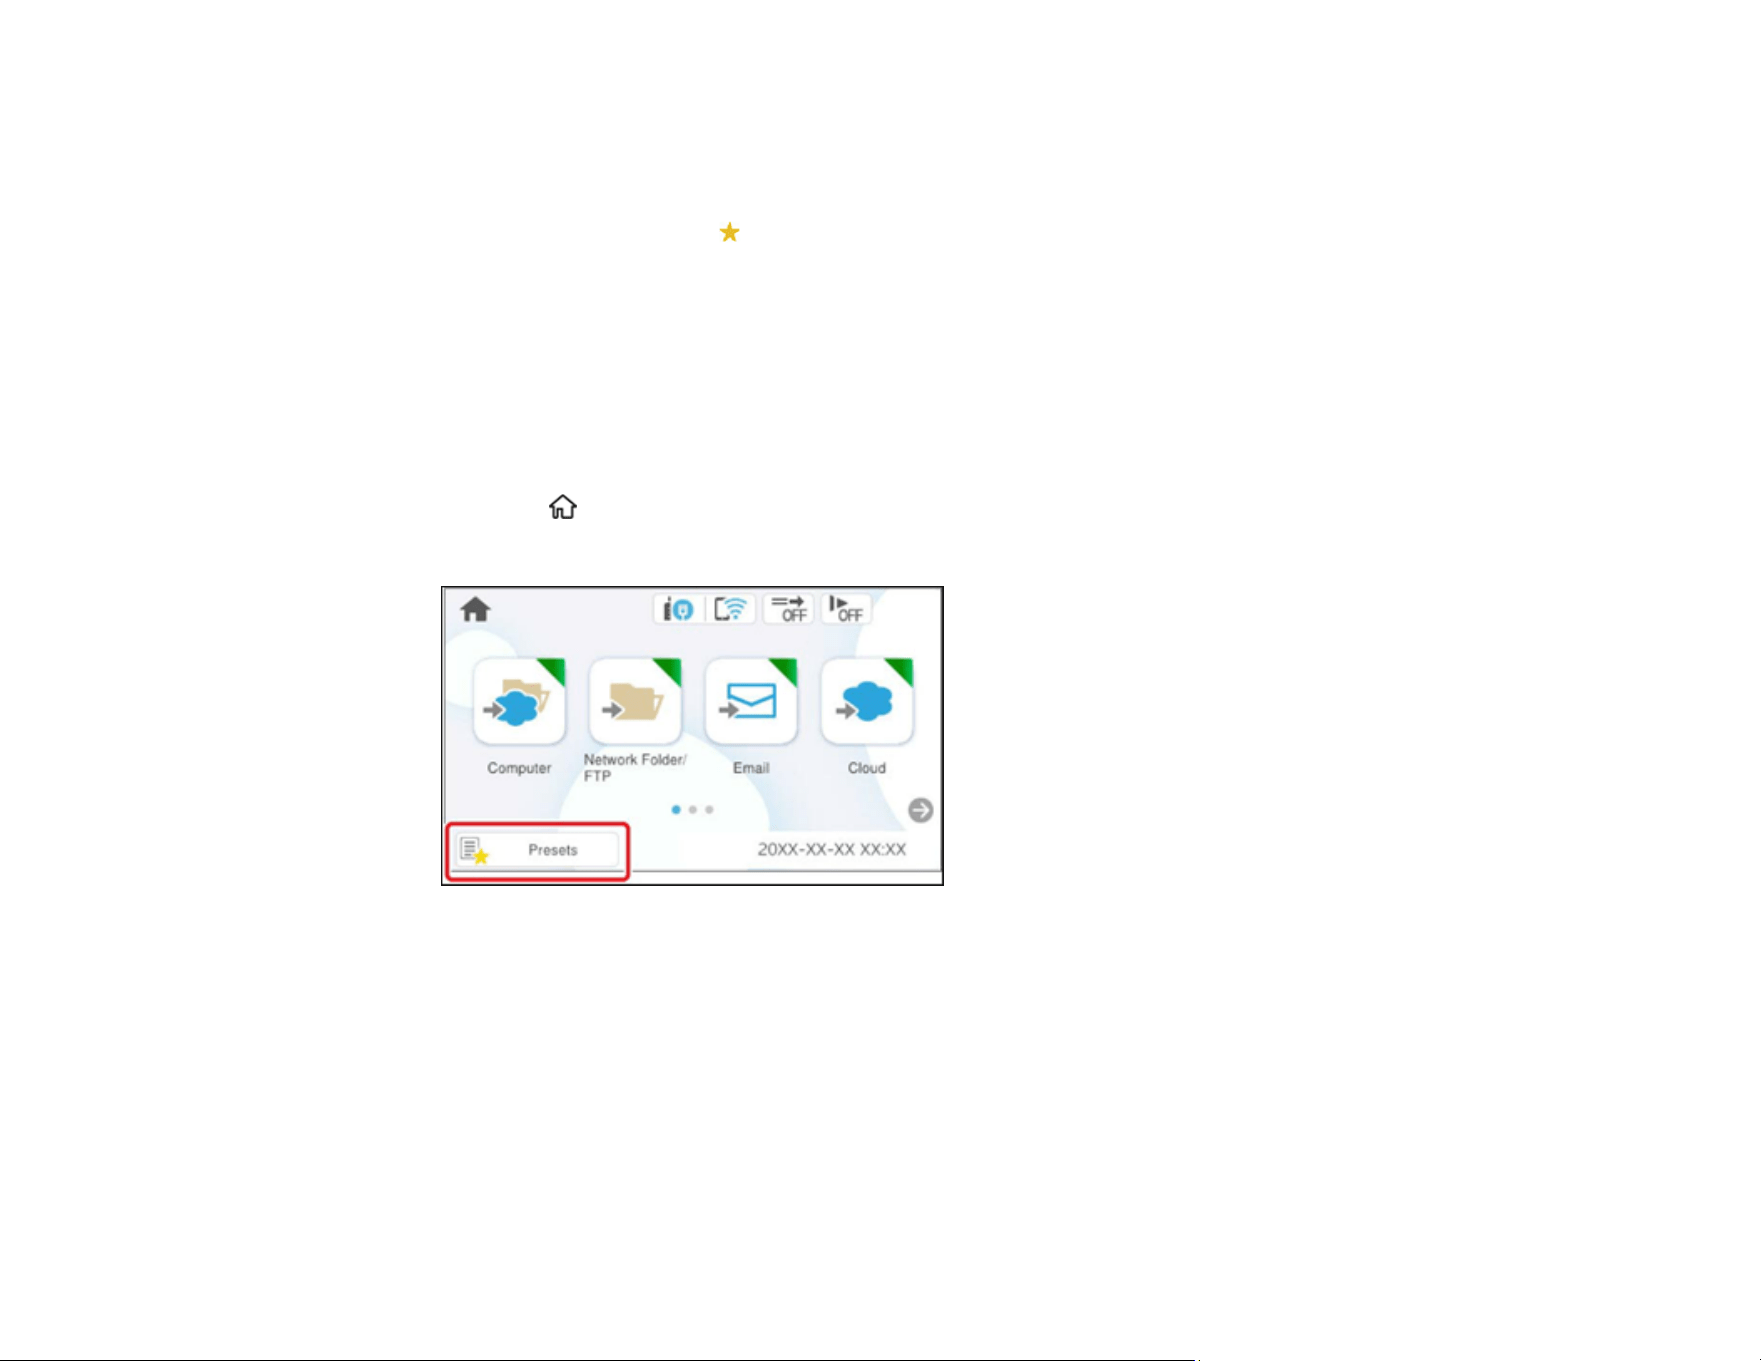
33
Parent topic: Using the Control Panel
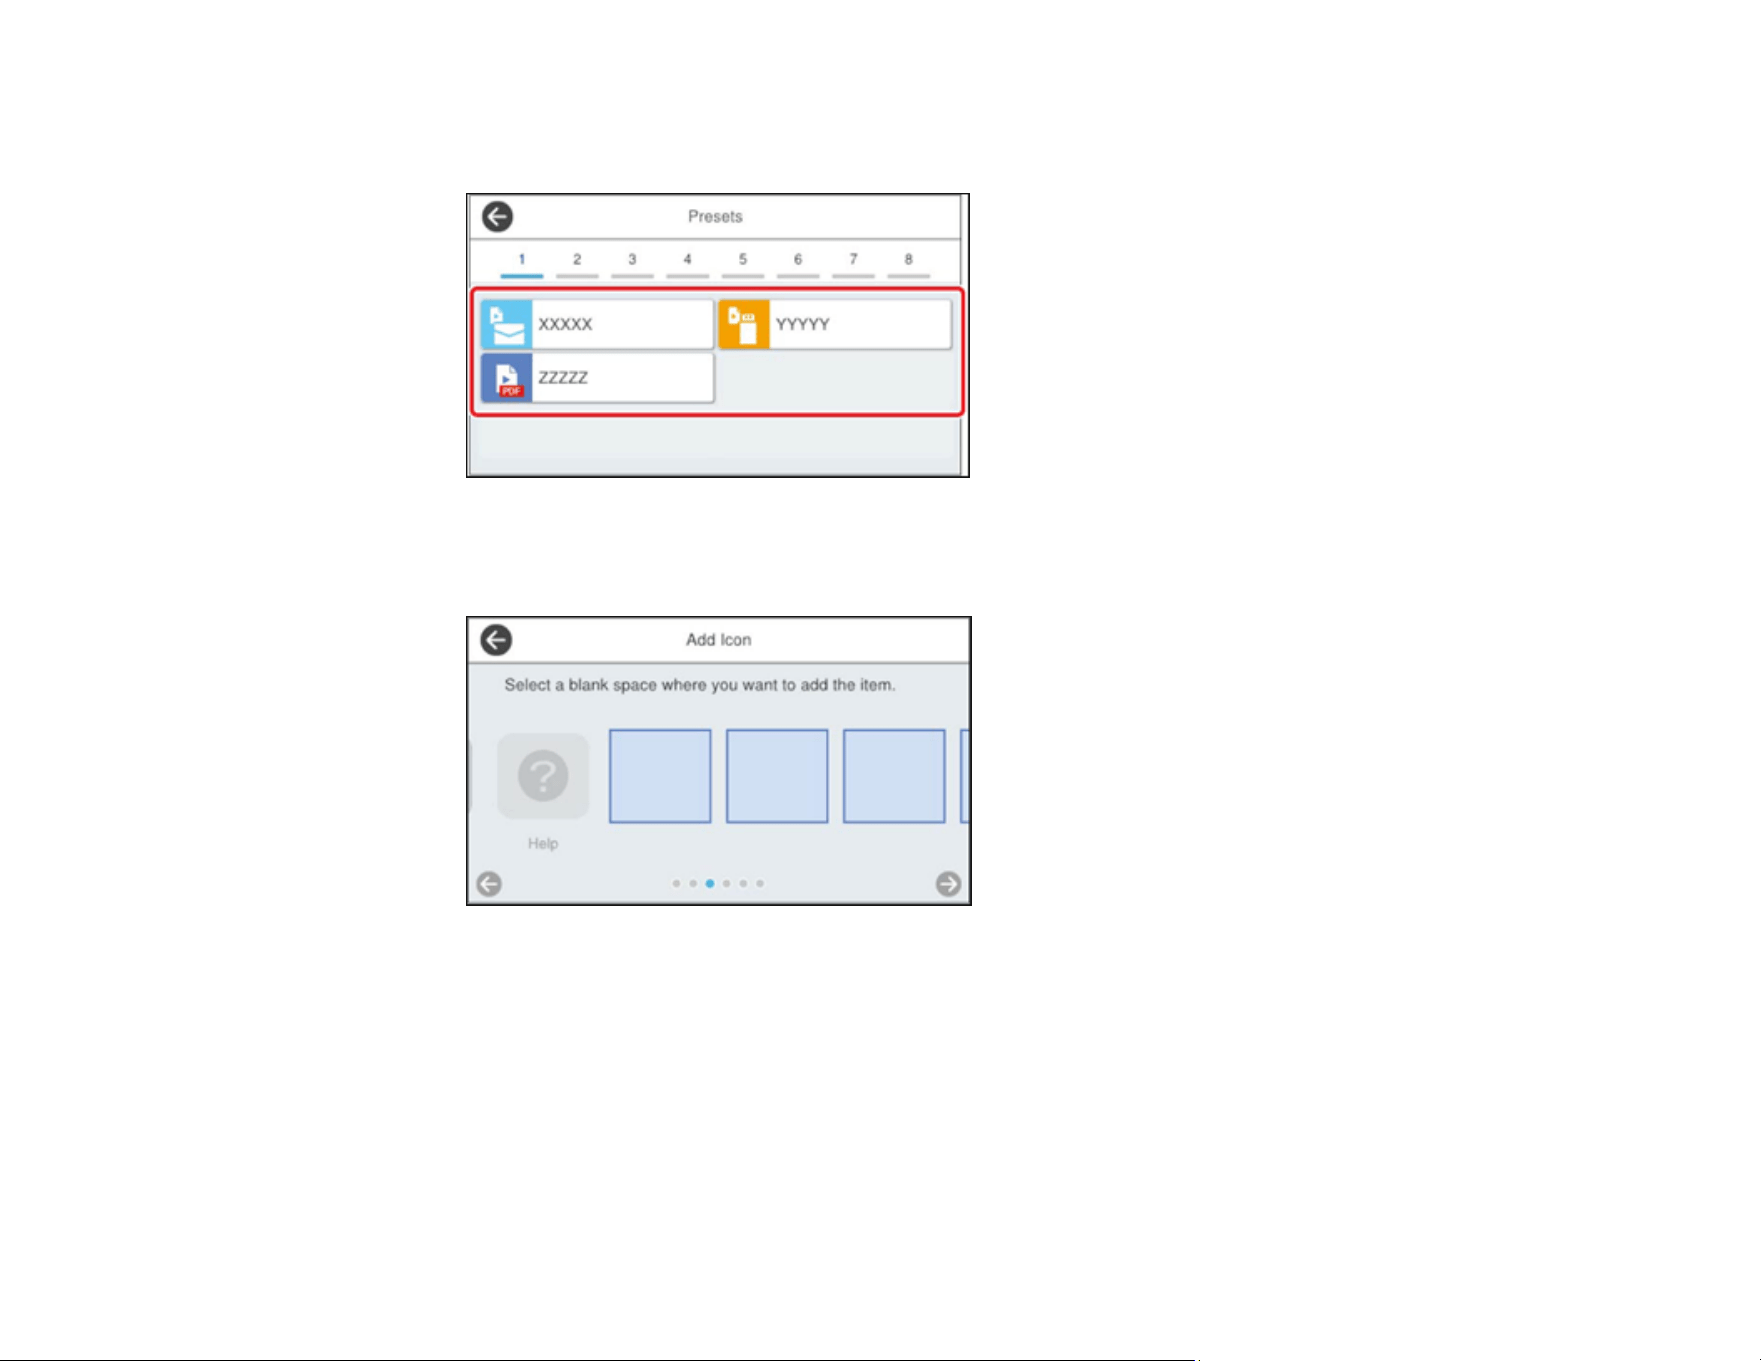
Registering Presets
You can register up to 48 frequently used scanning settings as presets. You can register the current
scan settings by selecting the presets icon on the start scanning screen.
Note:
• This setting can be locked by an administrator. (If Lock Setting is enabled on the control panel, only
the administrator can register Presets.) If you cannot access or change this setting, contact your
administrator for assistance.
• To register presets using Web Config, select Presets on the Scan tab and follow the instructions on
the screen.
1. Press the home button, if necessary.
2. Select Presets on the home screen.

34
3. Select a icon.
4. Select the scanning option you want to register as a preset.
Note: For some scanning options (such as email contacts or network folders), it is best to configure
the destination information before registering the preset. You can still configure the destination
information while registering the preset, but if it is configured beforehand, you can simply make your
selections from the existing list.
5. Tap the Register icon to register the preset.
Note: For the Scan to Computer option, select the computer on which Document Capture Pro
(Windows) or Document Capture (Mac) is installed, and then select a registered job. This option is
available only for a computer connected over a network.

35
6. Enter the following settings:
• Name: Enter a name for the preset.
• Set Icon: Select an icon and background color for the preset.
• Quick Send Setting: Select On to start scanning immediately when the preset is selected.
• Contents: Change scan settings as necessary.
7. Select OK to save the preset settings.
Parent topic: Customizing the Control Panel Display
Presets Menu Options
Select the arrow next to each preset to change its settings.
Change Name
Changes the preset name.
Change Icon
Changes the icon image and color of the preset.
Quick Send Setting
Immediately starts scanning without confirmation when the preset is selected.
Change Position
Changes the display order of the presets.
Delete
Deletes the preset.
Add or Remove Icon on Home
Adds or deletes the preset icon from the home screen.
Confirm Details
Displays the preset scan settings. You can load the preset by selecting Use This Setting.
Parent topic: Customizing the Control Panel Display
Customizing the Home Screen
You can use the Edit Home option to customize the layout and appearance of the home screen and add
icons to the presets.
Note: This setting can be locked by an administrator. If you cannot access or change this setting,
contact your administrator for assistance.
1. Press the home button, if necessary.
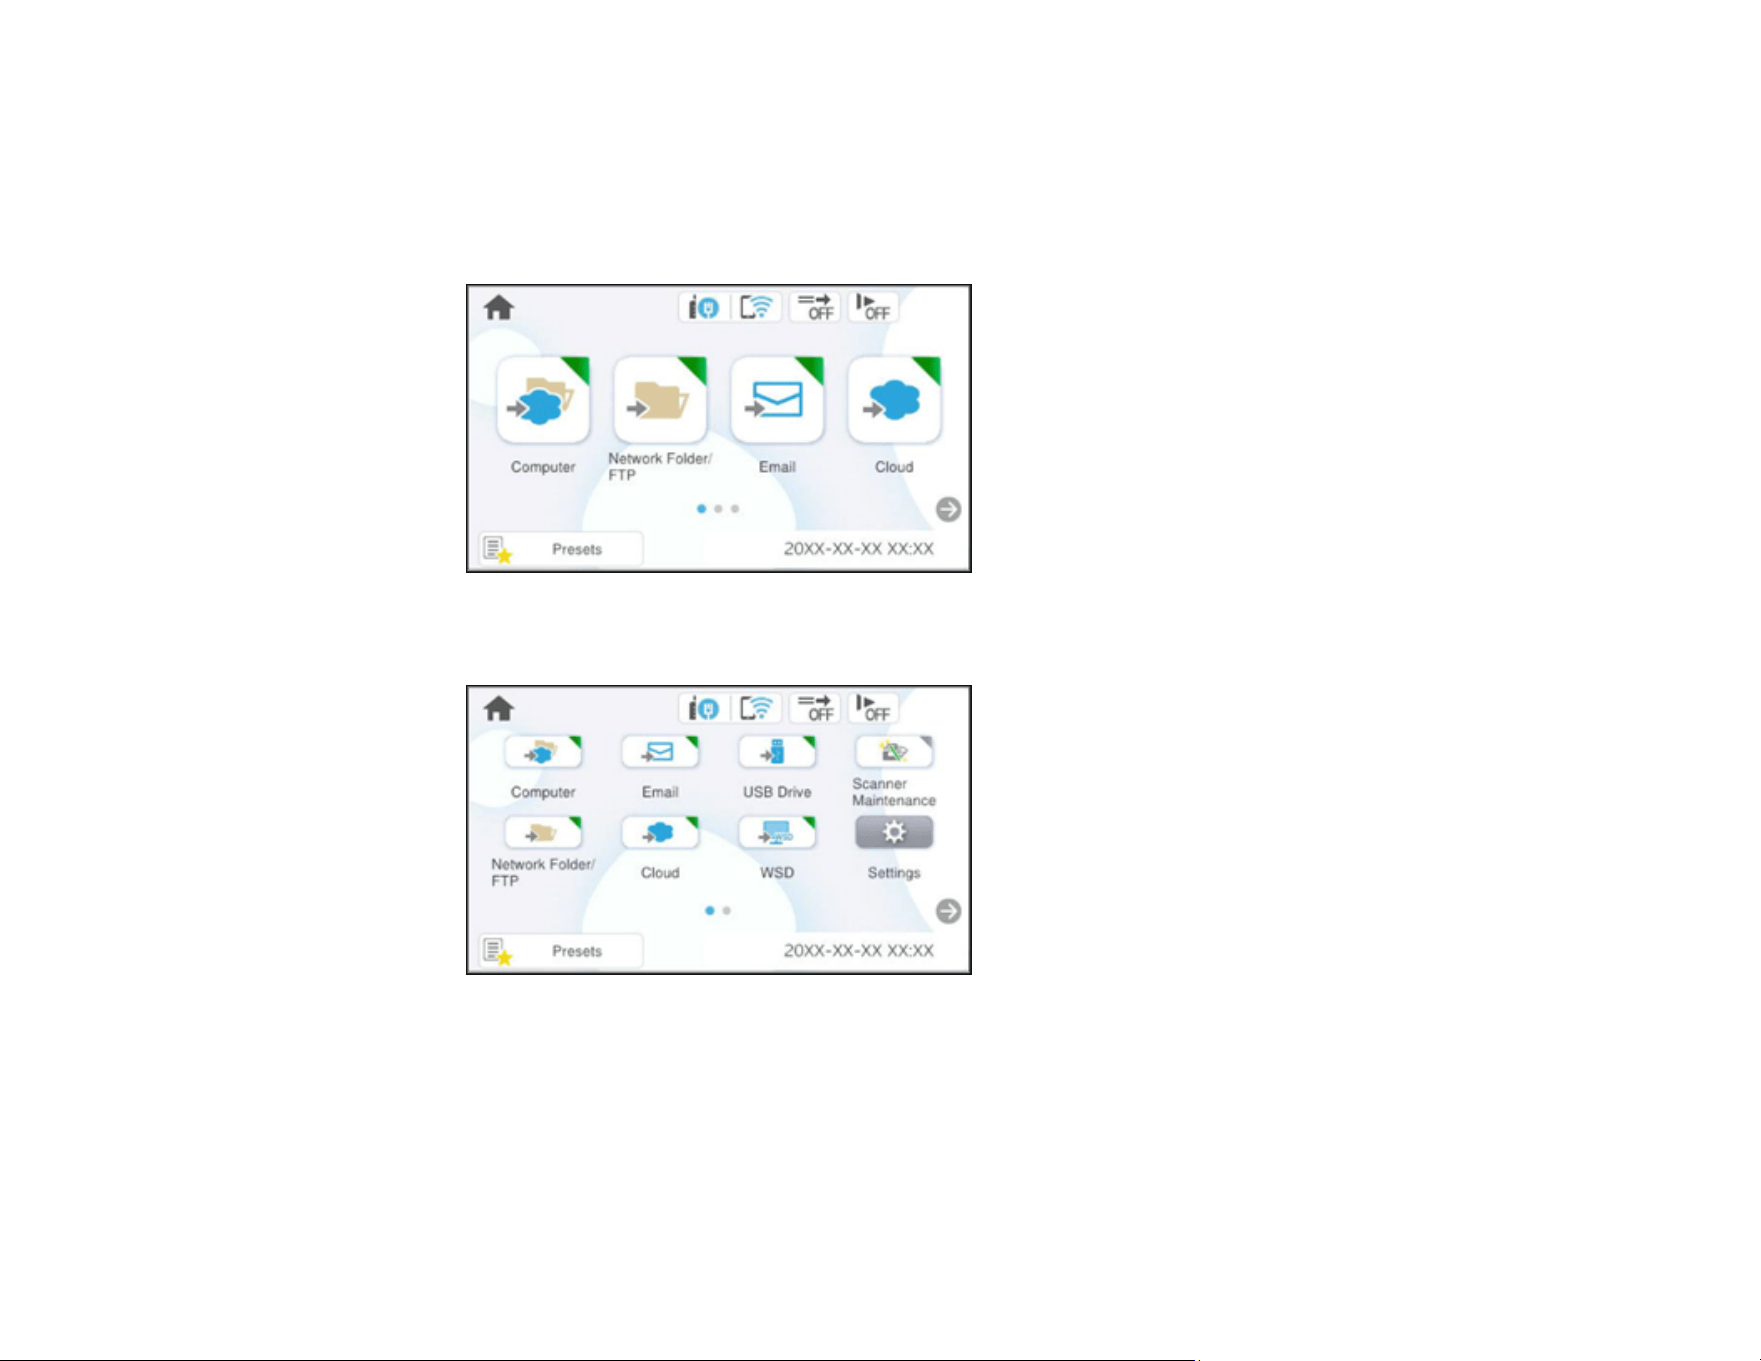
36
2. Select Settings > Edit Home.
3. Choose from the following:
• Select Layout to change the layout of the home screen.
Select Line to display the icons in a horizontal line across the home screen.
Select Matrix to display the icons in a matrix on the home screen.
37
• Select Add Icon and choose Function to display icons for the default scanner functions, or
Presets to display icons for the registered presets on the home screen.
Select the blank space where you want to add the icon. If you want to add multiple icons, repeat
these steps.
• Select Remove Icon and select the preset you want to remove from the home screen. Select Yes
to confirm.

38
• Select Move Icon to reorder presets on the home screen. Select the icon you want to move, and
then select the icon that is occupying the space you want to move the new icon to. The icons
switch positions.
4. When you are finished customizing the home screen, press the home button to return to the
home screen and view your changes.
Parent topic: Customizing the Control Panel Display
Adjusting the Screen Brightness
You can adjust the brightness of the LCD screen.
1. Press the home button, if necessary.
2. Select Settings > Basic Settings.

39
3. Select LCD Brightness.
4. Select the – or + icon to decrease or increase the brightness.
5. Select OK to exit.
Parent topic: Using the Control Panel
Adjusting Control Panel Sounds
You can adjust the sound level heard when you press buttons on the control panel.
1. Press the home button, if necessary.
2. Select Settings > Basic Settings.
3. Select Sounds.
4. Do one of the following:
• To mute all control panel sounds, select Button Press and tap the icon to decrease the level until
it is off.
• To adjust the sound level for scanner errors, select Error Tone and tap the icons to select the
desired level.
5. Select OK to exit.
Parent topic: Using the Control Panel
Changing LCD Screen Language
You can change the language used on the LCD screen.
1. Press the home button, if necessary.
2. Select Settings > Basic Settings.
3. Scroll down and select Language.
4. Select a language.
Parent topic: Using the Control Panel
Selecting the Date and Time
Select the current date, time, and daylight saving phase in your area, and choose your preferred date
and time format.
1. Press the home button, if necessary.

40
2. Select Settings > Basic Settings.
3. Select Date/Time Settings.
4. Select Daylight Saving Time.
5. Select the setting that applies to your area.
• Off: it is winter or your region does not use Daylight Saving Time (DST)
• Summer: it is spring or summer and your region uses Daylight Saving Time (DST)
Note: If your region uses Daylight Saving Time (DST), you must change this setting to match the
season. When you change from Off to Summer, your product automatically sets its clock ahead one
hour. When you change from Summer to Off, it sets its clock back one hour.
6. Select Date/Time.
7. Select the date format you want to use.
8. Use the numeric keypad to enter the current date, then select OK.
9. Select the time format you want to use.
10. Use the numeric keypad to enter the current time, then select OK.
11. Select Time Difference.
12. Use the + and - buttons to enter the time difference between your time zone and UTC (Coordinated
Universal Time), then select OK.
Parent topic: Using the Control Panel
Changing the Keyboard Layout
You can change the layout of the keyboard on the control panel.
1. Press the home button, if necessary.
2. Select Settings > Basic Settings.
3. Select Keyboard.
4. Select the layout you want to use.
Parent topic: Using the Control Panel

41
Adjusting the Operation Time Out Setting
The Operation Time Out setting causes the LCD screen to return to the home screen after a few minutes
of inactivity. This feature is enabled by default, but you can turn it off.
Note: If you are logged in to the control panel as an administrator when the non-operation timer is set,
you are logged out when the screen returns to the home screen.
1. Press the home button, if necessary.
2. Select Settings > Basic Settings.
3. Scroll down and select Operation Time Out.
4. Tap the setting to toggle it On or Off (On is the default).
5. If you want to increase or decrease the number of minutes, tap the + and – icons to set the desired
number.
6. Select OK to exit.
Parent topic: Using the Control Panel
Preventing PC Connection via USB
You can disable access to your product from a USB-connected computer. This restricts non-network
access to the product.
1. Press the home button, if necessary.
2. Select Settings > Basic Settings.
3. Scroll down and select PC Connection via USB.
4. Select Disable.
5. Select Yes to restart the product.
Parent topic: Using the Control Panel
Setting Direct Power On
You can turn on the product directly when the product is connected to the power source, without
pressing the power button.
Note: This setting can be locked by an administrator. If you cannot access or change this setting,
contact your administrator for assistance.

42
1. Press the home button, if necessary.
2. Select Settings > Basic Settings.
3. Scroll down and select Direct power on.
4. Select On.
Parent topic: Using the Control Panel
Changing Regular Cleaning Alert Settings
You can set an alert to appear to remind you to perform regular cleaning after a certain number of scans.
Note: This setting can be locked by an administrator. If you cannot access or change this setting,
contact your administrator for assistance.
1. Press the home button, if necessary.
2. Select Settings > Regular Cleaning Alert Settings.
3. Do the following:
• Set the Warning Alert Setting to On to receive a notification when it is time to clean inside the
scanner.
• On the Count Alert Setting screen, use the + and – icons to change the number of scans (1,000
to 255,000) before the notification appears.
4. Select OK to exit.
Parent topic: Using the Control Panel
Changing Roller Replacement Alert Settings
You can set an alert to appear to remind you to replace the roller after a certain number of scans.
Note: This setting can be locked by an administrator. If you cannot access or change this setting,
contact your administrator for assistance.
1. Press the home button, if necessary.
2. Select Settings > Roller Replacement Alert Setting.
3. Select Count Alert Setting.
4. Use the + and – icons to change the number of scans (1,000 to 200,000) before the notification
appears.

43
5. Select OK to exit.
Parent topic: Using the Control Panel
Setting Up Epson Connect Services
If you did not activate your product's email address for use with Epson Connect when you set up your
product, you can activate it using the product control panel.
1. Press the home button, if necessary.
2. Select Settings.
3. Select Web Service Settings.
4. Select Epson Connect Services.
5. Select Register.
6. Follow the instructions on the screen to activate your product's email address.
Parent topic: Using the Control Panel
Using Power Saving Settings
Your product enters sleep mode automatically and turns off the LCD screen if it is not used for a period
of time. You can make the time period shorter to save energy and resources.
Changing the Sleep Timer Settings
Changing the Power Off Timer Settings
Parent topic: Product Basics
Changing the Sleep Timer Settings
You can adjust the time period before your product enters sleep mode and turns off the LCD screen.
Note: This setting can be locked by an administrator. If you cannot access or change this setting,
contact your administrator for assistance. To change the sleep timer settings using Web Config, select
Power Saving > Sleep Timer on the Device Management tab and follow the instructions on the screen.
1. Press the home button, if necessary.
2. Select Settings > Basic Settings.
3. Select Sleep Timer.

44
4. Select the + and – icons to increase or decrease the number of minutes.
Note: You can also press the minutes field and use the displayed numeric keypad to enter the
number of minutes.
5. Select OK to exit.
Parent topic: Using Power Saving Settings
Changing the Power Off Timer Settings
You can have the product turn off automatically if it is not used for a specified period of time.
1. Press the home button, if necessary.
2. Select Settings > Basic Settings.
3. Select Power Off Timer.
4. Select a time period between 30minutes and 12h (12 hours).
Parent topic: Using Power Saving Settings
Using the Epson Smart Panel Mobile App
Use this free Apple and Android app to scan with networked Epson products.
1. Connect your product to your wireless network. See the link below.
2. Visit epson.com/connect (U.S.), epson.ca/connect (Canada), or latin.epson.com/connect (Latin
America) to learn more about Epson Smart Panel and check the compatibility of your mobile device.
3. Download Epson Smart Panel from the Apple App Store or Google Play.
4. Connect your mobile device to the same wireless network as your product.
5. Open Epson Smart Panel and select your Epson product, if necessary.
Now you are ready to scan with your mobile device and your Epson product.
Parent topic: Product Basics
Related concepts
Connecting to an Existing Wi-Fi Network

45
Wi-Fi or Wired Networking
See these sections to use your scanner on a Wi-Fi or wired network.
Network Security Recommendations
Connecting to an Existing Wi-Fi Network
Wi-Fi Direct (Simple AP) Mode Setup
Wi-Fi Protected Setup (WPS)
Setting Up Network Scanning
Configuring Email Server Settings
Changing or Updating Network Connections
Network Security Recommendations
To help deter unauthorized access to your product over a network, you should protect your network
environment using appropriate security measures.
Security measures such as these can help deter threats such as loss of user data, use of telephone and
fax lines, and other intrusions:
• Enable security on your wireless LAN
Enable the appropriate security on the wireless LAN you plan to use with your product. Network
security such as a network password can deter interception of traffic over the wireless LAN. Your
router may already have a default password enabled by your Internet service provider (ISP). See your
ISP and router documentation for instructions on how to change the default password and better
secure your network.
• Connect your product only to a network protected by a firewall
Connecting your product directly to the Internet may leave it vulnerable to security threats. Instead,
connect it to a router or other network connection protected by a firewall. Your router may already
have a firewall set up by your Internet service provider; check with your ISP for confirmation. For best
results, set up and use a private IP address for your network connection.
• Change the default administrator password on your product
If your product has an option to set an administrator password, change the default administrator
password to deter access by unauthorized users to personal data stored on your product, such as IDs,
passwords, and contact lists.
Parent topic: Wi-Fi or Wired Networking
46
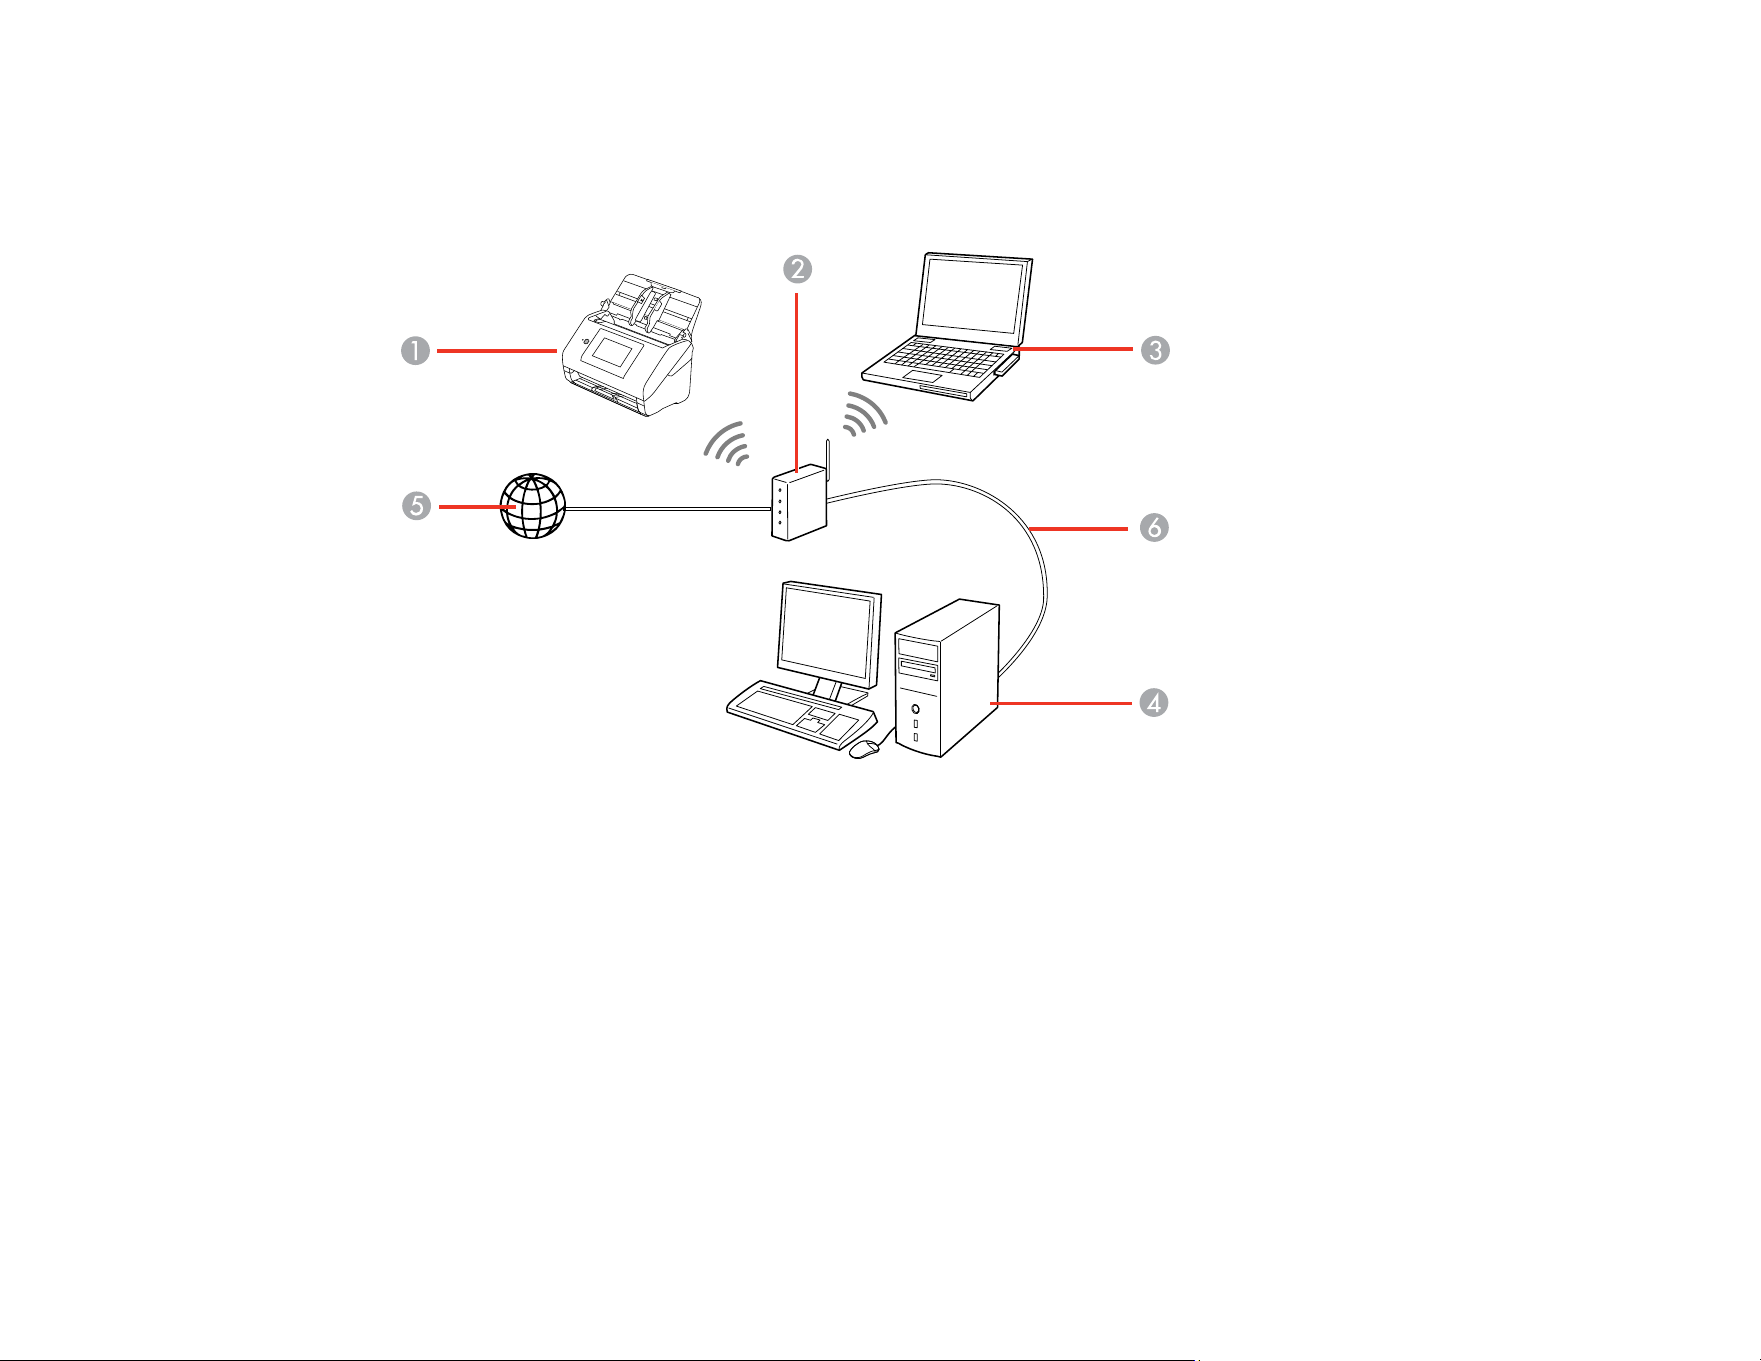
Connecting to an Existing Wi-Fi Network
You can set up your product to communicate with your computer using a wireless router or access point.
The wireless router or access point can be connected to your computer over a wireless or wired network.
1 Epson product
2 Wireless router or access point
3 Computer with a wireless interface
4 Computer
5 Internet
6 Ethernet cable (used only for wired connection to the wireless router or access point)
Selecting Wireless Network Settings from the Control Panel
Parent topic: Wi-Fi or Wired Networking

47
Selecting Wireless Network Settings from the Control Panel
You can select or change wireless network settings using your product control panel.
To install your product on a wireless network, follow the instructions on the Start Here sheet and install
the necessary software by downloading it from the Epson website. The installer program guides you
through network setup.
1. Press the home button, if necessary.
2. Select the Wi-Fi icon.
3. Select Router.
4. Select Start Setup or Change Settings.
5. Select Wi-Fi Setup Wizard.
6. Select the name of your wireless network or select Enter Manually to enter the name manually. Use
the displayed keypad to enter your network name.
7. Select the Password field and enter your wireless password using the on-screen keyboard.
Note: The network name and password are case sensitive. Be sure to correctly enter uppercase and
lowercase letters, and numeric or special characters.
8. Select OK when you finish entering your password.
9. Confirm the displayed network settings and select Start Setup to save them.
10. Press the home button to return to the home screen.
You see the icon on the LCD screen and should be able to connect to your product directly from
your computer or device, and then scan. If you are scanning from a computer, make sure you
installed the network software.
Note: If you see an error message, you may have selected the wrong network name or entered the
password incorrectly. Select Re-enter and enter the password again.
Parent topic: Connecting to an Existing Wi-Fi Network
Related concepts
Connecting to an Existing Wi-Fi Network
Related tasks
Setting Up Network Scanning
48
Related topics
Using the Control Panel
Wi-Fi Direct (Simple AP) Mode Setup
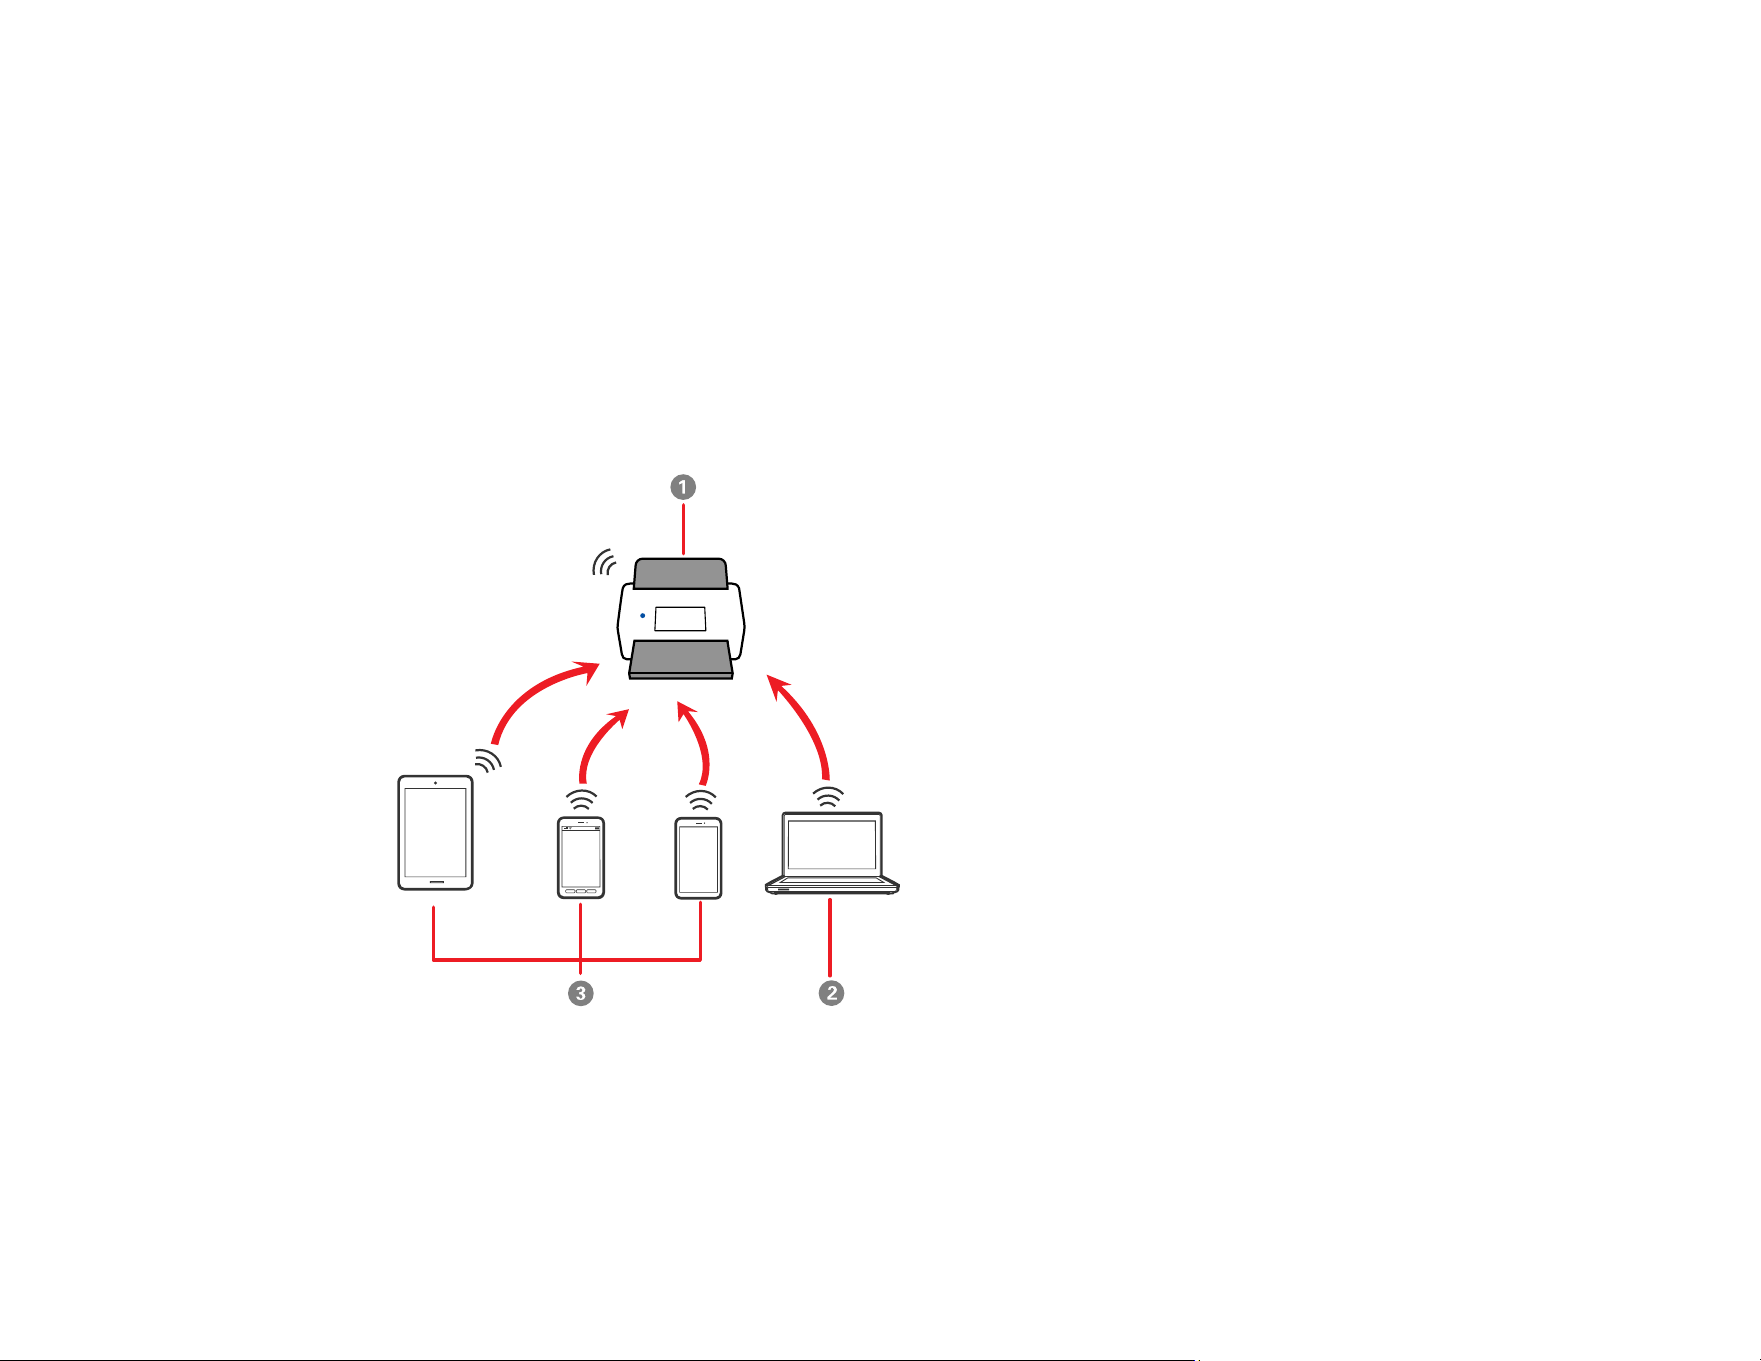
You can set up your product to communicate directly with your computer or another device without
requiring a wireless router or access point. In Wi-Fi Direct (Simple AP) Mode, the product itself acts as a
network access point for up to 8 devices.
Note: Your product can be connected by Wi-Fi or Ethernet, and Wi-Fi Direct (Simple AP)
simultaneously, however, if you start a Wi-Fi Direct (Simple AP) connection while connected to Wi-Fi, the
Wi-Fi is temporarily disconnected.
1 Epson product
2 Computer with a wireless interface
3 Other wireless devices

49
Note: Devices directly connected to the product cannot communicate with each other through the
product.
Connecting to a Mobile Device
Modifying the Wi-Fi Direct (Simple AP) Settings
Setting Up Wireless Scanning from a Smart Device Using Epson Smart Panel
Parent topic: Wi-Fi or Wired Networking
Related tasks
Selecting Wireless Network Settings from the Control Panel
Connecting to a Mobile Device
You can connect a mobile device directly to the product without a wireless router or access point.
Note: Make sure the Epson Smart Panel app is installed on your mobile device before connecting to the
product.
1. Press the home button, if necessary.
2. Select the Wi-Fi icon.
3. Select Wi-Fi Direct.
4. Select Start Setup.
5. Open the Epson Smart Panel app on your mobile device.
6. Select your product and follow the instructions displayed in the app to complete Wi-Fi Direct setup.
7. Select Complete on your product's control panel.
Parent topic: Wi-Fi Direct (Simple AP) Mode Setup
Modifying the Wi-Fi Direct (Simple AP) Settings
You can modify Wi-Fi Direct settings such as the name and password to create a more descriptive and
secure Wi-Fi Direct network.
1. Press the home button, if necessary.
2. Select the Wi-Fi icon.
3. Select Wi-Fi Direct.
4. Select Start Setup.

50
5. Select Change.
6. Select one of the following:
• To change the Wi-Fi Direct network name (SSID), select Change Network Name and select Yes.
Select Change, then use the on-screen keyboard to enter the new network name.
Note: Your network name must be no more than 22 characters long.
• To change the Wi-Fi Direct password, select Change Password and select Yes. Use the on-
screen keyboard to enter your new Wi-Fi Direct password.
Note: Your password must be at least 8 and no more than 22 characters long.
Note: If you have already connected devices or computers to your product via Wi-Fi Direct, they will
be disconnected when you change the network name or password.
7. When entering your Wi-Fi Direct network name or password, do the following:
• To move the cursor, press the left or right arrows.
• To change the case of letters, press .
• To delete the previous character, press .
• To enter numbers and symbols, press 123#.
• To finish entering your network name or password, select OK.
8. Use your computer or wireless device to select the Wi-Fi network name (SSID) displayed on the
LCD screen, then enter the password shown.
Note: Make a note of the SSID and password that appear.
Computers and wireless devices can now access your product using the new network name and
password.
Parent topic: Wi-Fi Direct (Simple AP) Mode Setup
Setting Up Wireless Scanning from a Smart Device Using Epson Smart Panel
You can use the Epson Smart Panel app to connect your Epson product to a wireless network or
connect your smart device directly to the product. Epson Smart Panel is available on iOS and Android
devices.

51
Make sure you have the following:
• A device that is connected to a wireless network
• The Epson Smart Panel app installed on the device
• The wireless network name (SSID) and password
1. Make sure the product is turned on and is ready to scan.
Note: You must perform initial setup before setting up wireless scanning.
2. Open the Epson Smart Panel app on your device.
3. Do one of the following:
• If the app automatically recognizes the product, follow the on-screen instructions to set up the
wireless connection.
• If the app does not automatically recognize the product, select the + icon and continue with the
next step.
4. On the next screen, select Connect to a New Product.
5. Select your product from the list.
Note: If your product is not listed, move closer to the product and try again. If the product is still not
shown, connect your scanner to the wireless network again and then select Connect to Existing
Product in the Epson Smart Panel app and follow the on-screen instructions. See the link below for
wireless setup instructions.
6. Select Next to select the current wireless network.
Note: If you want to connect the product to a different wireless network, select Change another Wi-
Fi SSID.
7. Enter the password for the wireless network and select OK.
The app starts configuring the product.
Your product is now connected to a wireless network and set up for use with the Epson Smart Panel
app.
Parent topic: Wi-Fi Direct (Simple AP) Mode Setup
Related tasks
Using the Epson Smart Panel Mobile App

52
Starting a Scan from a Smartphone or Tablet
Wi-Fi Protected Setup (WPS)
If your network uses a WPS-enabled wireless router or access point, you can quickly connect your
product to the network using Wi-Fi Protected Setup (WPS).
Note: To check if your router or access point is WPS-enabled, look for a button labeled WPS on your
router. If there is no hardware button, there may be a WPS setting in the software for the device. Check
your network product documentation for details.
Using WPS to Connect to a Network
Using WPS PIN Mode to Connect to a Network
Parent topic: Wi-Fi or Wired Networking
Using WPS to Connect to a Network
If you have a WPS-enabled wireless router or access point, you can use Wi-Fi Protected Setup (WPS) to
connect your product to the network.
1. Press the home button, if necessary.
2. Select the Wi-Fi icon.
3. Select Router.
4. Select Start Setup.
If the network connection is already set up, the connection details are displayed. Tap Change to Wi-
Fi connection or Change Settings to change the settings.
5. Select Push Button Setup(WPS).
6. Follow the instructions on the LCD screen to complete WPS setup.
Note: Make sure you press Start Setup within two minutes of activating WPS on your router.
The Wi-Fi icon displayed on the LCD screen indicates your wireless connection status. If the product
is not connected to the network, repeat these steps to try again.
Parent topic: Wi-Fi Protected Setup (WPS)
Related tasks
Setting Up Network Scanning

53
Using WPS PIN Mode to Connect to a Network
If you have a WPS-enabled wireless router that supports PIN mode, you can use Wi-Fi Protected Setup
(WPS) PIN mode to connect your product to the network.
1. Press the home button, if necessary.
2. Select the Wi-Fi icon.
3. Select Router.
4. Select Start Setup.
If the network connection is already set up, the connection details are displayed. Tap Change to Wi-
Fi connection or Change Settings to change the settings.
5. Select Others.
6. Select PIN Code Setup(WPS).
7. Follow the instructions on the LCD screen to complete WPS setup.
Note: Make sure you press Start Setup within two minutes of activating WPS on your router.
The Wi-Fi icon displayed on the LCD screen indicates your wireless connection status. If the product
is not connected to the network, repeat these steps to try again.
Parent topic: Wi-Fi Protected Setup (WPS)
Setting Up Network Scanning
You can set up network scanning to your product through a direct connection to your product.
First, manually configure your product to connect to your network. Then follow the instructions here to
set up your computer for network scanning using the Epson Scan 2 Utility. Your product must be turned
on and connected to the network.
Note: Make a note of the IP address or host name of the product so you can enter it in these steps.
1. Do one of the following to start the Epson Scan 2 Utility:
• Windows 11: Click , then search for Epson Scan 2 Utility and select it.
• Windows 10: Click > EPSON > Epson Scan 2 Utility.
• Windows 8.x: Navigate to the Apps screen and select Epson Scan 2 Utility.
54
• Windows 7: Click > All Programs > EPSON > Epson Scan 2 > Epson Scan 2 Utility.
2. Select Settings from the Scanner drop-down list.
You see a screen like this:
Note: If you see an Enable Editing button (Windows) or the lock icon (Mac), click it so that you can
modify the product settings.
3. Select your product and click Add.
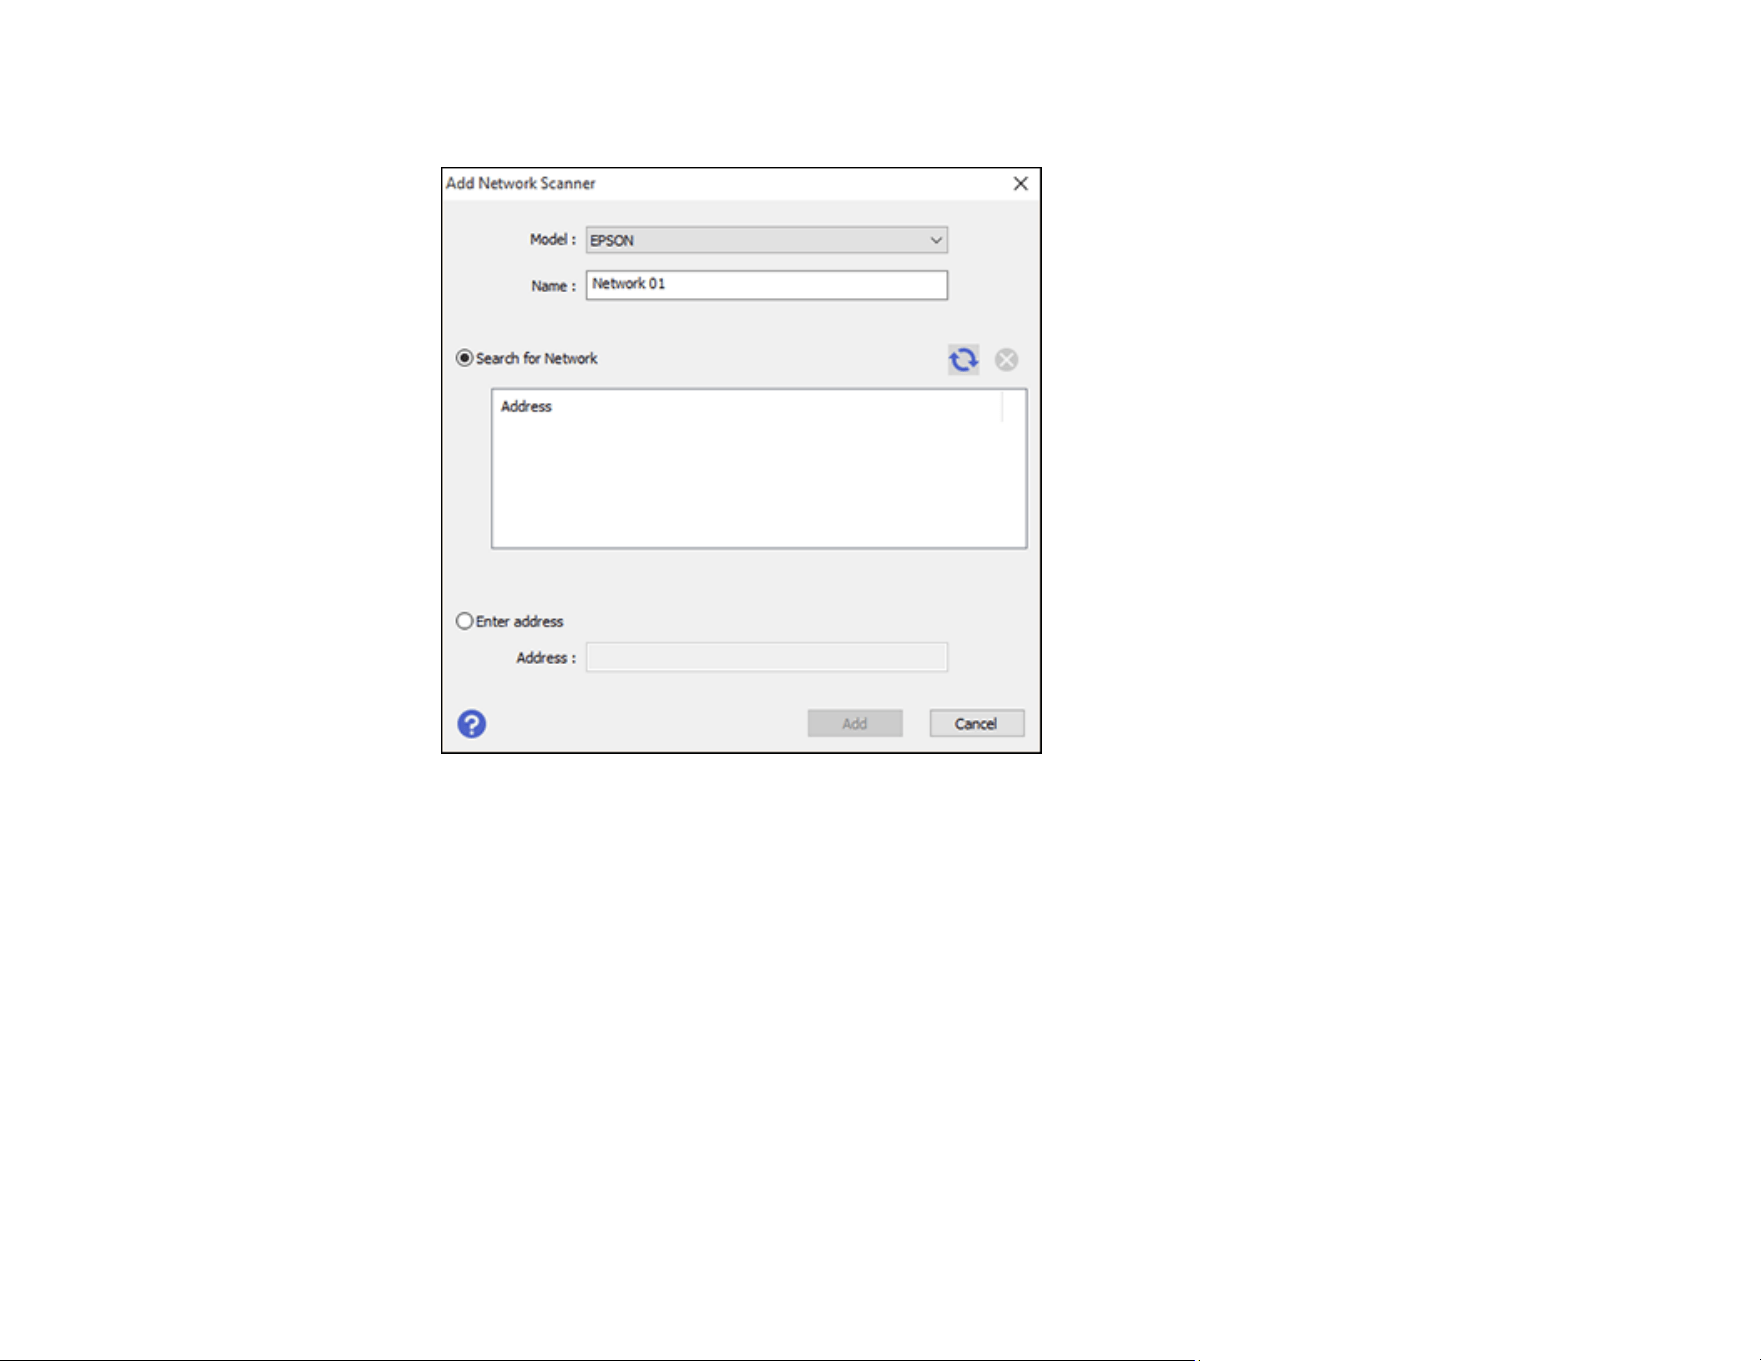
55
You see a screen like this:
4. Do one of the following:
• Under Search for Network, select the IP address of your Epson product and click Add.
• Select the Enter address setting, type in the IP address or host name of your Epson product, and
click Add.
5. Click OK to check the connection.
You see a confirmation message.
6. Click OK to save your settings and close the Epson Scan 2 Utility.
Determining the Product's IP Address
Parent topic: Wi-Fi or Wired Networking
Related tasks
Selecting Wireless Network Settings from the Control Panel
56
Determining the Product's IP Address
If you have multiple products on your network, you need to know the IP address of the product when
setting up network scanning.
1. Do one of the following to start EpsonNet Config:
• Windows 11: Click , then search for EpsonNet Config and select it.
• Windows 10: Click > EpsonNet > EpsonNet Config.
• Windows 8.x: Navigate to the Apps screen and select EpsonNet Config.
• Windows 7: Click , and select All Programs. Select EpsonNet > EpsonNet Config >
EpsonNet Config.
• Mac: Open the Applications folder and select Epson Software > EpsonNet > EpsonNet Config
> EpsonNet Config.
2. Locate your product in the list and write down the IP address.
Parent topic: Setting Up Network Scanning
Configuring Email Server Settings
If you want to send a scanned file by email, you need to configure the email server. You can select
settings for the email server using the product's control panel.
Note: Before configuring the email server, make sure the product is connected to the network. If you are
using an Internet-based email server, check the setting information from the provider or website.
Note: These settings can be locked by an administrator. If you cannot access these settings, contact
your administrator for assistance.
1. Press the home button, if necessary.
2. Select Settings.
3. Select Network Settings > Advanced > Email Server > Server Settings.
4. Select an authentication method, then select the settings you want to use. Contact your Internet
service provider if necessary to confirm the authentication method for the email server.
5. Select Proceed to save your settings.
6. Select Close to exit.

57
Email Server Settings
Parent topic: Wi-Fi or Wired Networking
Related tasks
Scanning to an Email
Registering an Email Server
Email Server Settings
Setting name Available options Description
Authentication
Method
Off
SMTP-AUTH
POP before SMTP
Specify the authentication method for the product to
access the mail server.
SMTP-AUTH: authenticates on the SMTP server
(outgoing mail server) when sending the email. The mail
server needs to support SMTP authentication.
POP before SMTP authenticates on the POP3 server
(receiving mail server) before sending the email. When
you select this option, set the POP3 server.
Authenticated
Account
—
Enter a user name or email address for the mail server.
If you select SMTP-AUTH or POP before SMTP as the
authentication method, enter the authenticated account
name.
Authenticated
Password
— Enter a password for the authenticated account. If you
select SMTP-AUTH or POP before SMTP as the
authentication method, enter the authenticated password.
Sender's Address —
Enter the email address to be displayed to the sender.
You can use an existing email address, however, we
recommend that you set up a dedicated email address so
that it can be distinguished from emails sent from the
product.
SMTP Server
Address
— Enter the address of the SMTP server
SMTP Server Port
Number
— Enter the port number of the SMTP server. The default
port is 25.

58
Setting name Available options Description
Secure
Connection
None
SSL/TLS
STARTTLS
Specify the secure connection method for the email
server.
If you select POP before SMTP as the authentication
method, set the connection method to None.
Certificate
Validation (Web
Config only)
Enable
Disable
Determines whether the CA Certificate is validated. You
must import a CA certificate to use this setting. We
recommend setting this to Enable when the Secure
Connection setting is set to anything other than None.
POP3 Server
Address
— Lets you enter the address of the POP3 server using IPv4
or FQDN format.
POP3 Server Port
Number
— Lets you enter the port number of the POP3 server. The
default port is 25.
Parent topic: Configuring Email Server Settings
Changing or Updating Network Connections
See these sections to change or update how your product connects to a network.
Changing a USB Connection to a Wi-Fi Connection
Changing a Wi-Fi Connection to a Wired Network Connection
Connecting to a New Wi-Fi Router
Disabling Wi-Fi Features
Disabling Wi-Fi Direct Features
Parent topic: Wi-Fi or Wired Networking
Changing a USB Connection to a Wi-Fi Connection
If you have already connected your product to your computer using a USB connection, you can change
to a Wi-Fi connection.
1. Disconnect the USB cable from your product.
2. Uninstall your product software.
3. Download and install your product software from the Epson website.
4. Follow the instructions in the installer to setup a Wi-Fi connection.

59
Parent topic: Changing or Updating Network Connections
Related tasks
Disabling Wi-Fi Features
Changing a Wi-Fi Connection to a Wired Network Connection
If you have already connected your product to your computer wirelessly, you can change to a wired
network connection if necessary.
1. Press the home button, if necessary.
2. Select Settings > Network Settings > Wired LAN Setup > Start Setup.
The Wi-Fi connection is disabled and a confirmation message appears. Select OK and then press
the home button to exit.
3. Connect one end of an Ethernet network cable to the product's LAN port.
4. Connect the other end to any available LAN port on your router or access point.
Parent topic: Changing or Updating Network Connections
Connecting to a New Wi-Fi Router
If you change the wireless router you have been using on your network, you need to update your
product's Wi-Fi connection to the new router.
Note: If your router uses a single network name (SSID) for both the 2.4 GHz and 5 GHz band, give each
band its own network name (SSID) instead, such as Home Network 2.4 GHz and Home Network 5 GHz.
See your router documentation for instructions.
1. Do one of the following:
• Windows: Uninstall your product software.
• Mac: Go to the next step.
2. Download and install your product software from the Epson website.
Parent topic: Changing or Updating Network Connections
Related tasks
Uninstalling Product Software - Windows

60
Disabling Wi-Fi Features
You may need to disable your product's Wi-Fi features if you change your network connection type or
need to solve a problem with your network connection.
1. Press the home button, if necessary.
2. Select the Wi-Fi icon.
3. Select Router.
4. Select Change Settings.
5. Select Others.
6. Select Disable Wi-Fi.
7. Select Start Setup to disable Wi-Fi.
Parent topic: Changing or Updating Network Connections
Related tasks
Accessing the Web Config Utility
Preventing PC Connection via USB
Disabling Wi-Fi Direct Features
You may need to disable your product's Wi-Fi Direct features if you change your connection type or need
to solve a problem with your Wi-Fi Direct connection.
Note: When Wi-Fi Direct is disabled, all computers and devices connected to the product via Wi-Fi
Direct will be disconnected.
1. Press the home button, if necessary.
2. Select the Wi-Fi icon.
3. Select Wi-Fi Direct > Start Setup > Change > Disable Wi-Fi Direct.
4. Select Disable the settings.
Parent topic: Changing or Updating Network Connections

61
Loading Originals
Follow the instructions here to load your originals into the product.
Note: The illustrations are for reference only. Although they may differ slightly from the actual product,
the steps are the same unless otherwise noted.
Loading Originals in the Input Tray
Loading Plastic and Laminated Cards in the Input Tray
Loading Special Originals
Loading Originals in the Input Tray
You can load originals that meet the document specifications in the input tray.
CAUTION: Do not load photos (without a carrier sheet), or valuable original documents or artwork,
directly into the input tray. This may wrinkle or damage the original. Load these originals using an
optional carrier sheet.
Note: Photos scanned using a document scanner may not have the same color depth as the original.
Use a flatbed photo scanner to achieve the best color reproduction of photos.
The steps below describe loading originals of the same size. To load originals of multiple sizes at once,
see the link at the end of these steps.
1. Pull up the input tray extension.
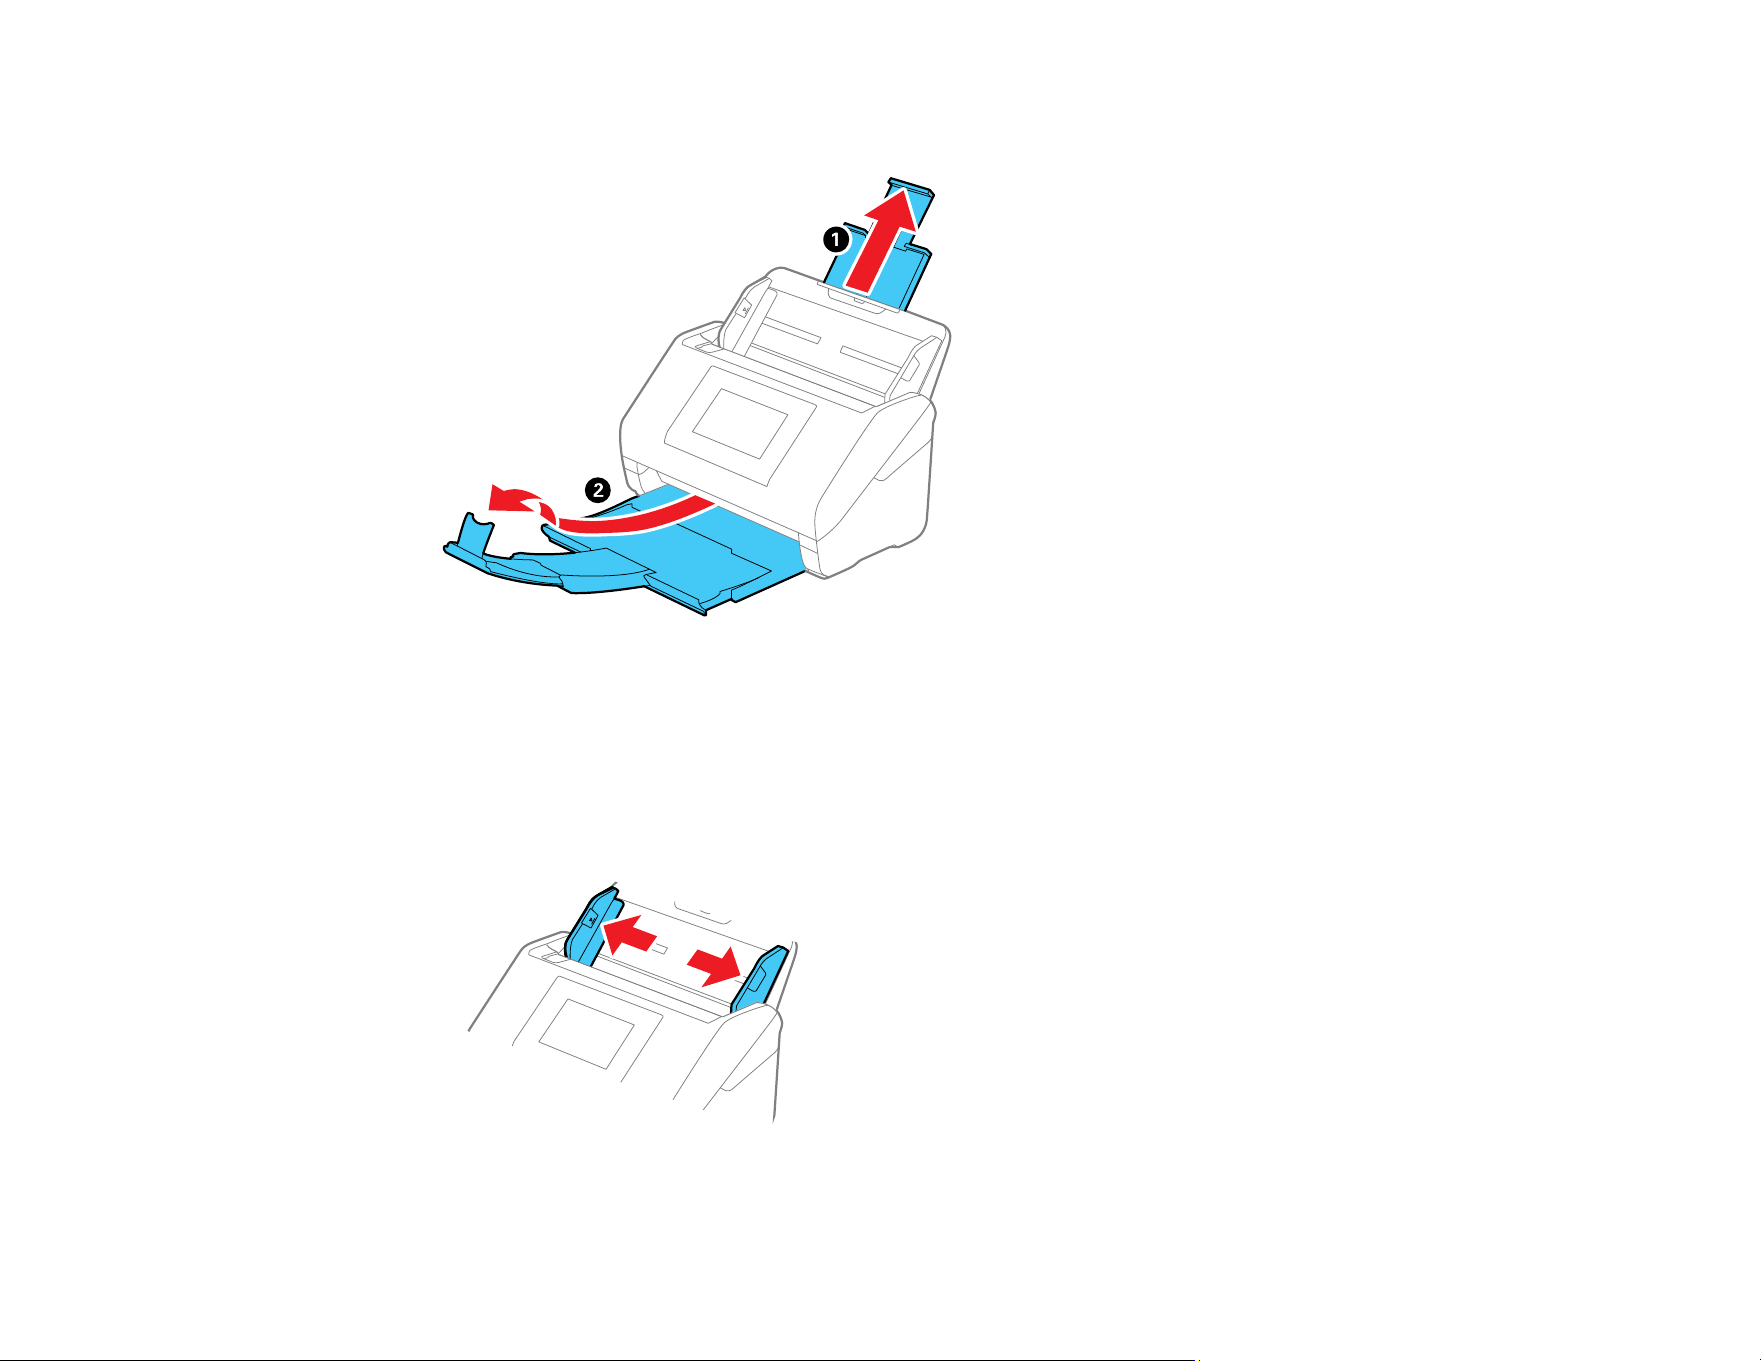
62
2. Pull out the output tray and its extension, and open the stopper.
Note: Make sure you pull out and extend the output tray extensions so that they are a little bit longer
than the length of the original, and raise the stopper so that the ejected originals are stacked
comfortably on the output tray.
3. Slide the input tray edge guides all the way out.

63
4. If you are loading a multi-page original, fan your stack of originals.
Note: If you are loading an original that is 15.5 inches (393.7 mm) or longer, load only one sheet at a
time.
5. Stack the originals with the printed side facing down and slide the stack so the leading edge is at an
angle as shown.
6. Do one of the following to load originals:
• Load standard originals into the input tray printed side down and top edge first, and guide them in
until they meet resistance.
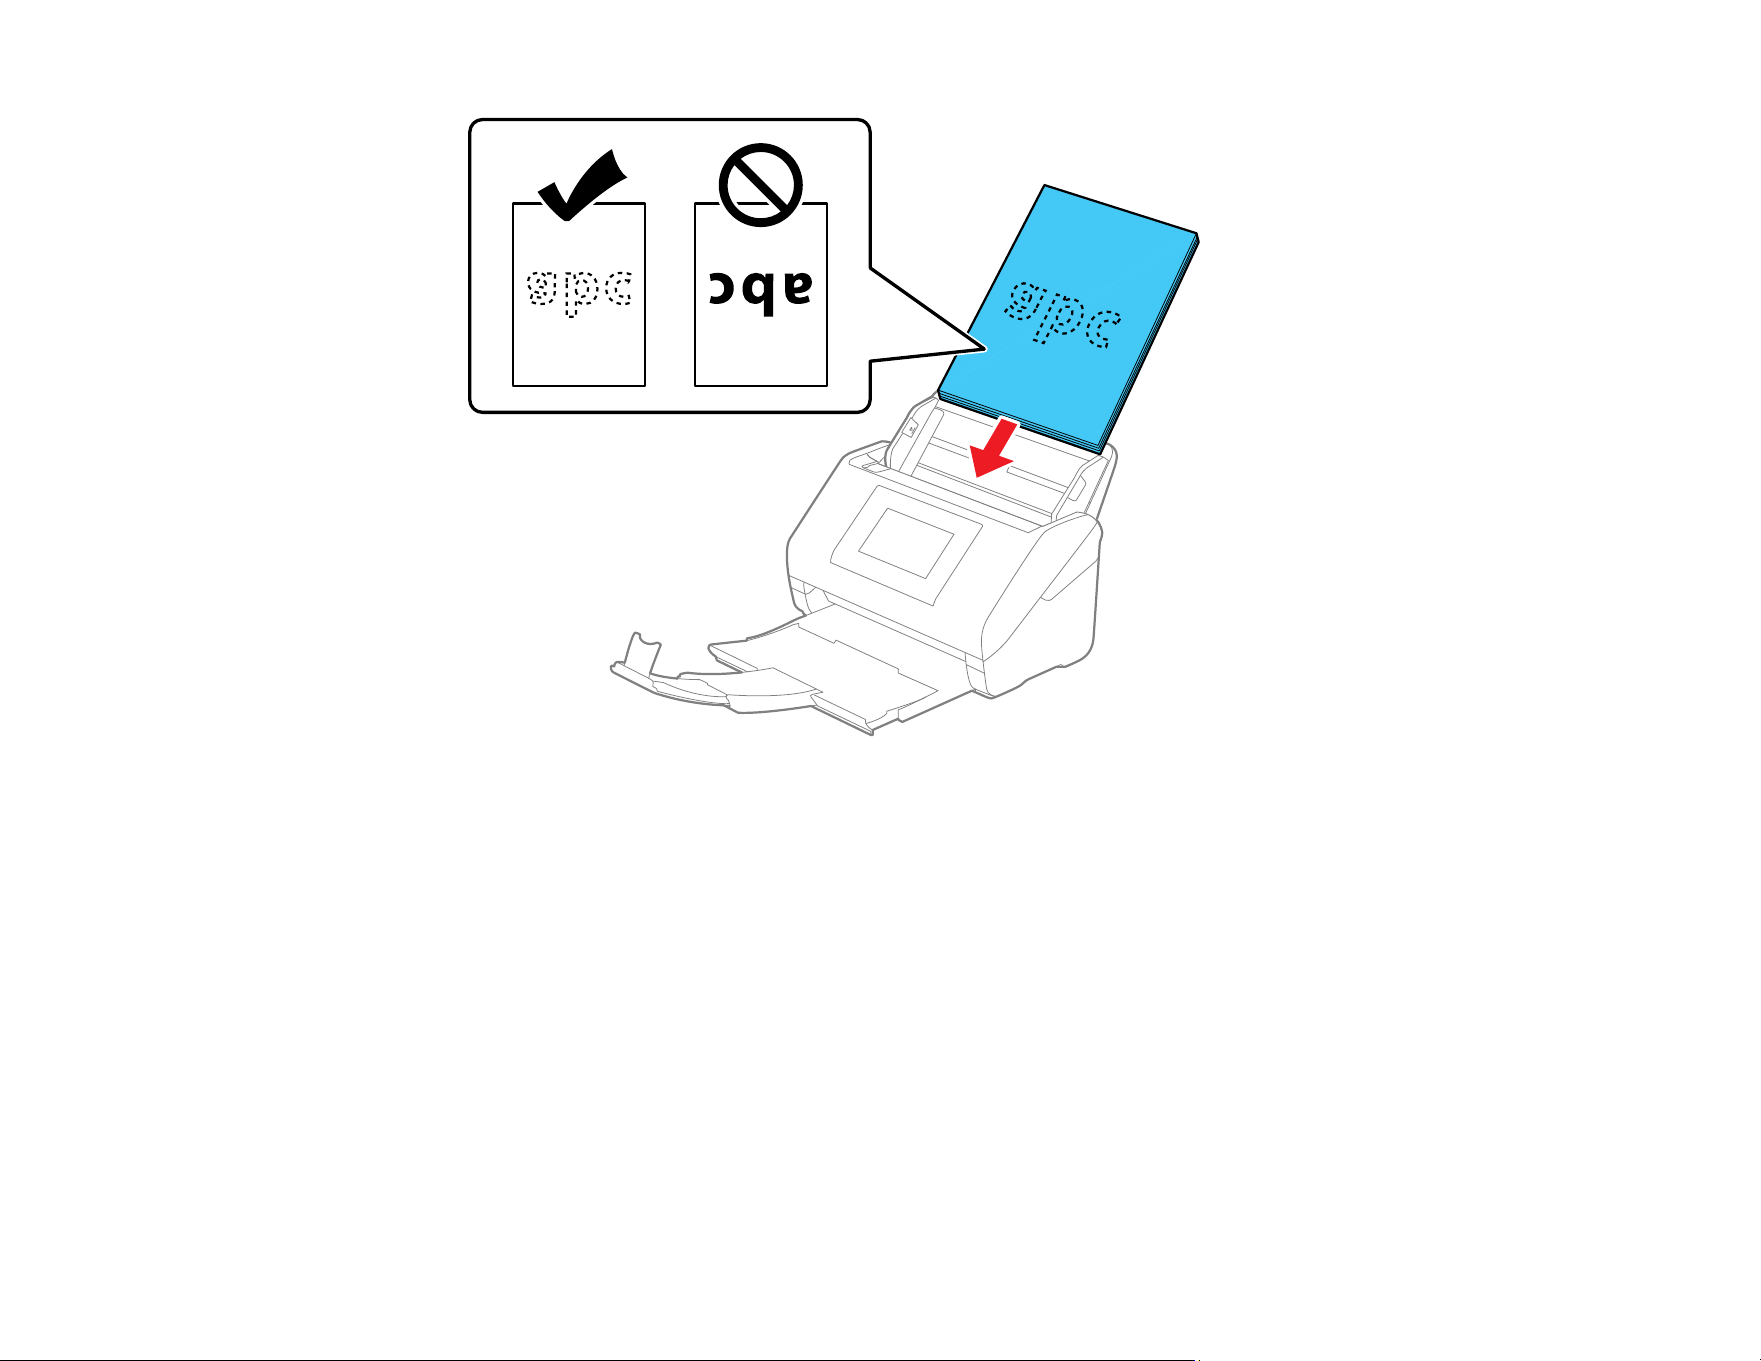
64
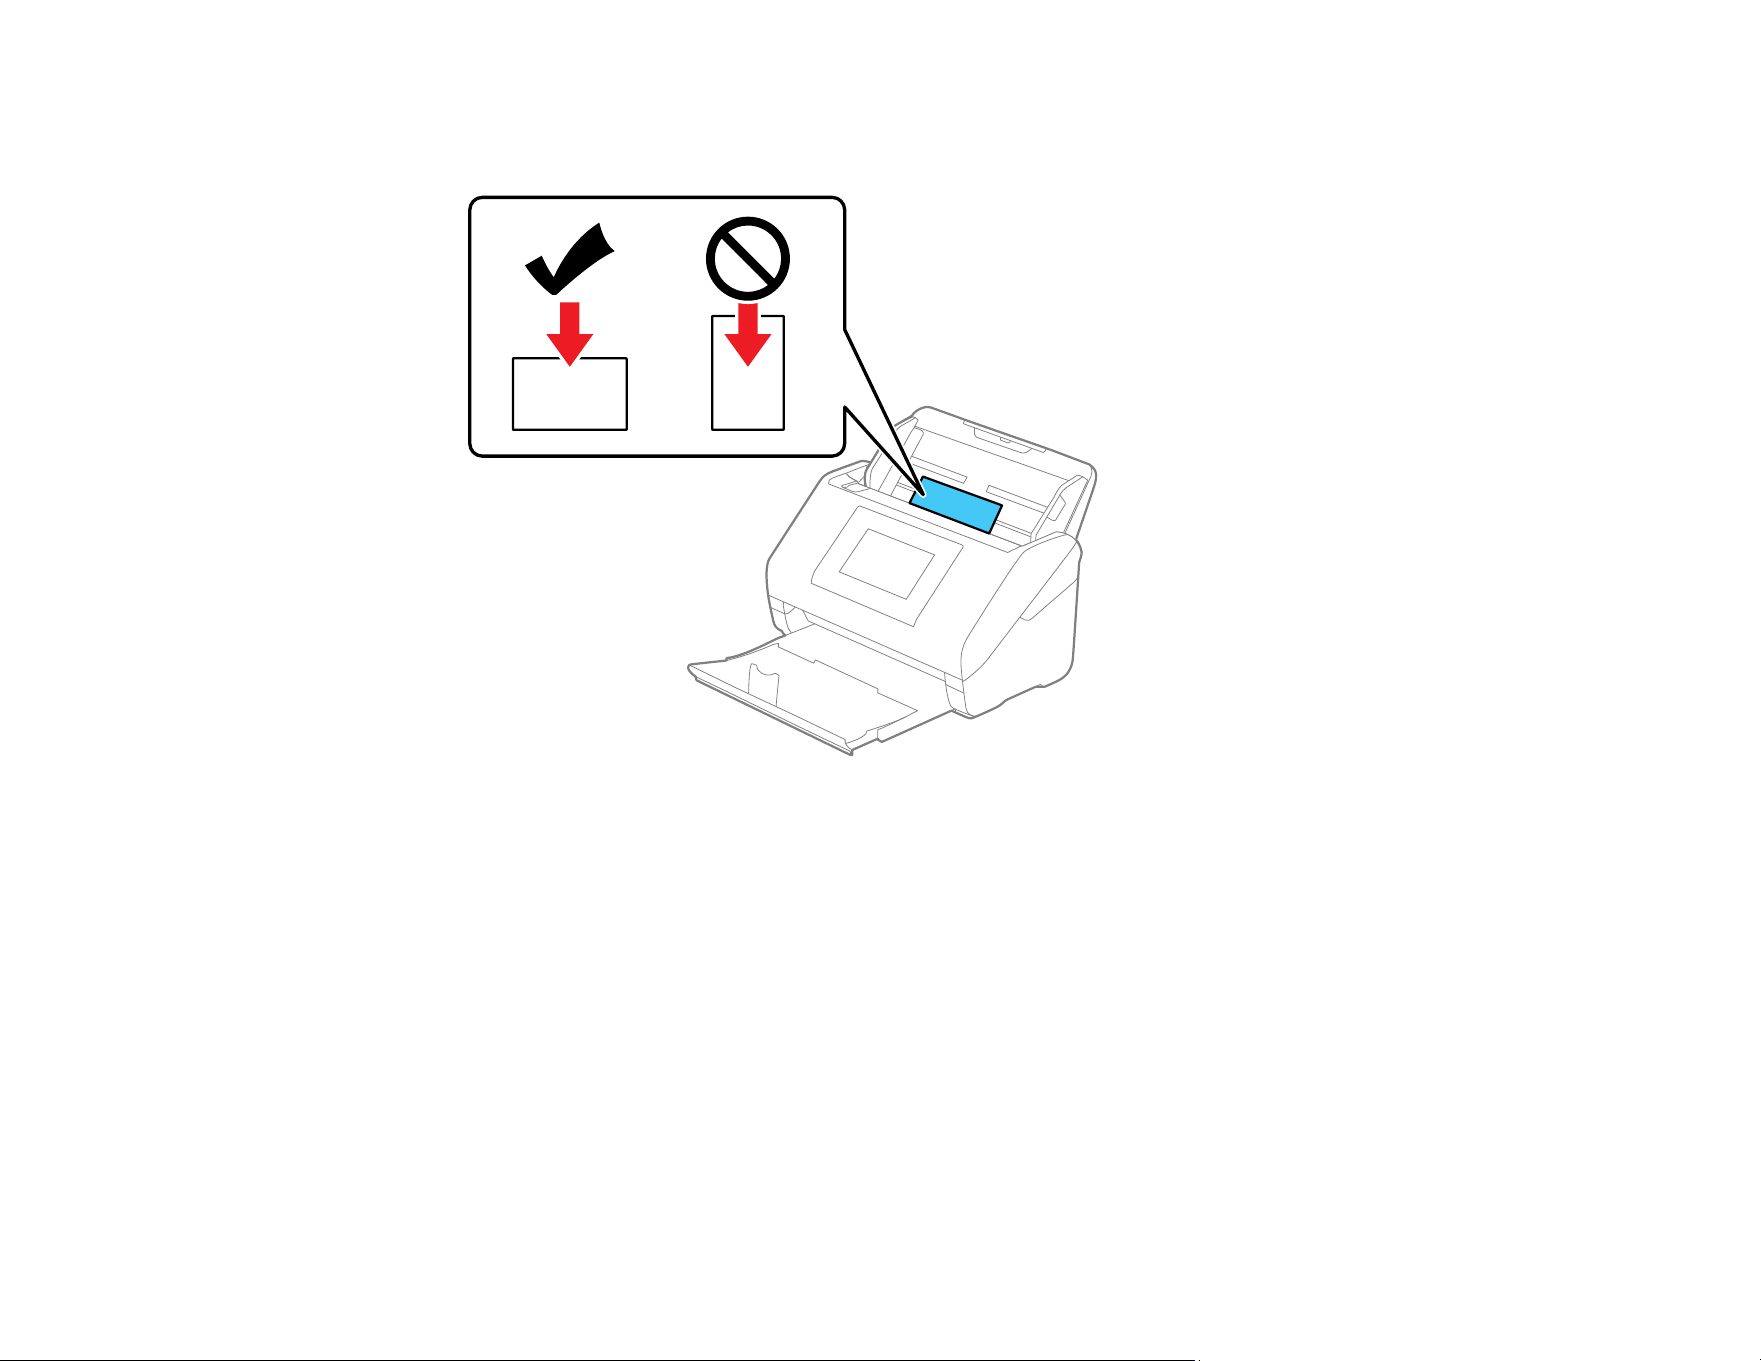
65
• If you are loading paper business cards, load up to 30 cards (printed side down and long edge
first) into the input tray horizontally, and slide them in until they meet resistance.

66
• If you are loading hole-punched originals, load them with the holes facing down or to the side as
shown. The holes must be within 1.2 inches (30 mm) of the edge of the originals.

67
7. Slide the edge guides against the edges of the original.
Note: If you are scanning originals that are 15.5 inches (393.7 mm) or longer, support the original as
it enters into and ejects from the product as shown and use the following resolutions:
• 15.5 to 53 inches (393.7 to 1346.2 mm): 600 dpi or less
• 53 to 215 inches (1346.2 to 5461 mm): 300 dpi or less
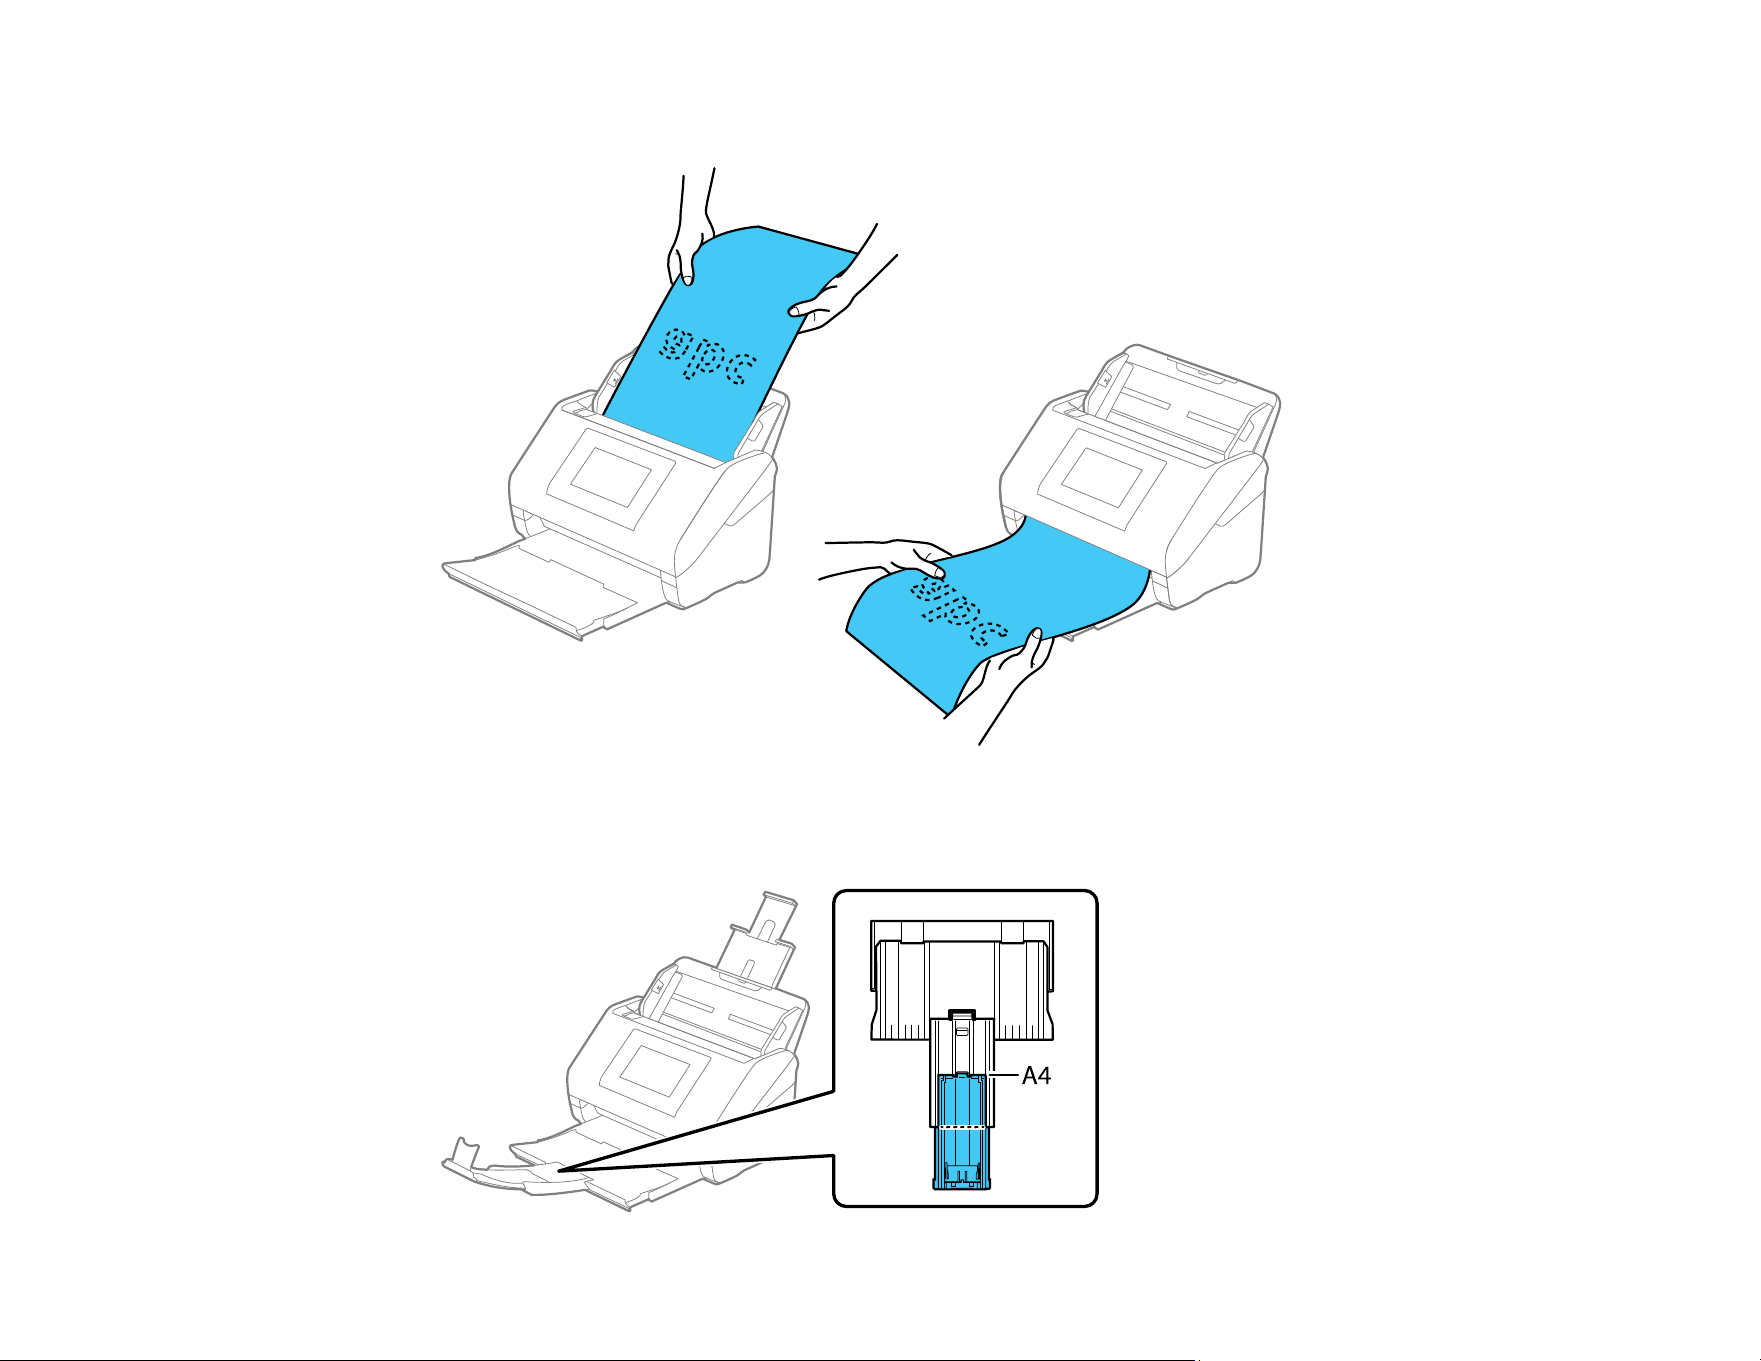
68
• 215 to 240 inches (5461 to 6096 mm): 200 dpi or less
8. If necessary during scanning, adjust the position of the stopper on the output tray extension to fit the
ejected originals.

69
Note: If thicker paper does not eject properly or falls from the output tray, push in the output tray and
allow the originals to eject freely onto the surface below the product. If the scanned images are
affected by the originals ejecting below the product, try placing the product on the edge of a table
where the ejected originals can drop freely.
If scanning thin or wrinkled paper causes frequent paper jams or double feeds, slow down the feeding
speed by selecting Settings > Scanner Settings > Slow > On on the LCD screen.
If your scanned original contains staples, a paper feed error is detected and the Paper Protection feature
stops the scanning process automatically to reduce damage to the original. Remove the original from the
product, remove the staples, and try scanning again. If a paper jam still occurs, change the Paper
Protection detection level by selecting Settings > Scanner Settings > Paper Protection on the LCD
screen and selecting the desired level.
Note: The Paper Protection feature does not prevent all documents from being damaged. Paper feed
errors may not be detected depending on the paper feeding conditions.
Loading Large Originals
Loading Long Paper
Loading Multiple Sizes of Originals in the Input Tray
Original Document Specifications
Parent topic: Loading Originals
Related references
Optional Accessories and Replacement Parts
Original Document Specifications
Plastic and Laminated Card Specifications
Special Original Specifications
Related topics
Scanning
Loading Large Originals
You can load large originals up to A2 (16.5 × 23.4 inches [420 × 594 mm]) size. Make sure the original
meets the specifications before loading it. Also make sure there is enough space in front of the scanner
for the ejected originals.
Note: Originals larger than A3 (11.7 × 16.5 inches [297 × 420 mm]) must be folded in half. You can scan
both sides of the original and stitch the images together using Document Capture Pro or Epson Scan 2.
70
Note: To combine the scanned images, open Document Capture Pro and click the Detailed Settings
button on the Scan Settings screen. Then, select Double-Sided as the Scanning Side setting and
select Left & Right as the Stitch Images setting in the Epson Scan 2 window. See the software help for
details.
1. Pull up the input tray extension.
2. Pull out the output tray and its extension, and open the stopper.
3. Slide the input tray edge guides all the way out.

71
4. Fold the original in half so that the side to be scanned is facing out, then place your original in an
optional carrier sheet as shown.
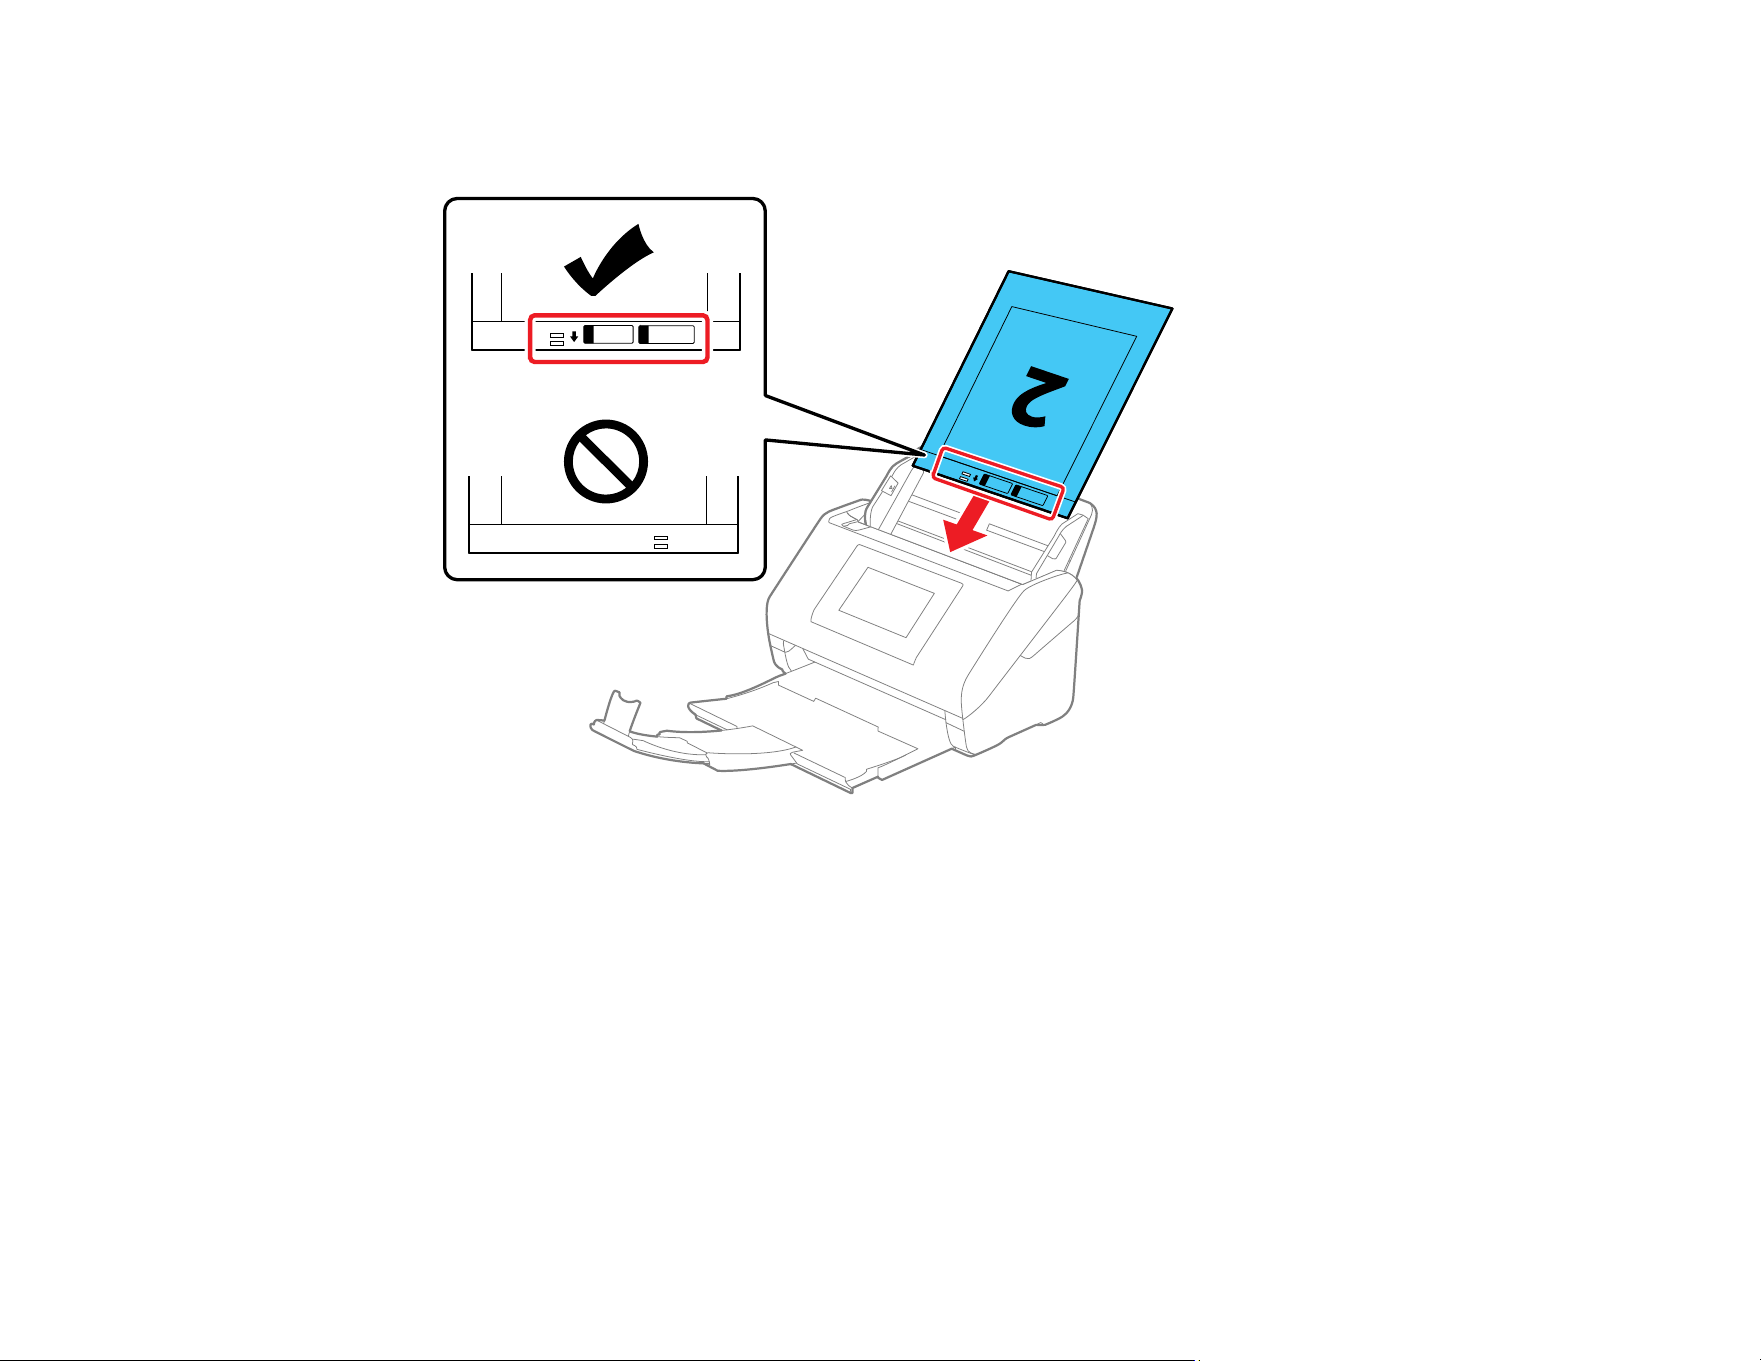
72
5. Load the carrier sheet in the input tray with page 2 facing up as shown, then guide it in until it meets
resistance.

73
6. Adjust the edge guides to fit the edges of the carrier sheet so that there are no gaps. Otherwise, the
original may skew.
7. Turn off the Detect Double Feed setting on the Main Settings tab in Epson Scan 2.
Note: When using Document Capture Pro, you can open the Epson Scan 2 screen by clicking the
Detailed Settings button on the Scan Settings screen.
When scanning with a carrier sheet, select Auto Detect as the Document Size setting in Epson Scan 2
and Paper Skew as the Correct Document Skew setting.
The leading edge of the original must be placed at the binding edge of the carrier sheet when scanning
an original approximately 11.7 inches (297 mm) long. Otherwise, the length of the scanned image may
be longer than intended as the scanner scans to the end of the carrier sheet when you select Auto
Detect as the Document Size setting in the Epson Scan 2 window.
Only use a carrier sheet designed for your product. The carrier sheet is automatically recognized by the
product by detecting two small rectangular holes on the leading edge. Keep the holes in the carrier sheet
clean and uncovered. Do not use a carrier sheet that is scratched or has been scanned more than 3,000
times.
Parent topic: Loading Originals in the Input Tray
Loading Long Paper
You can load long paper up to 240 inches (6096 mm) long in the input tray. Make sure the original meets
the specifications before loading it.
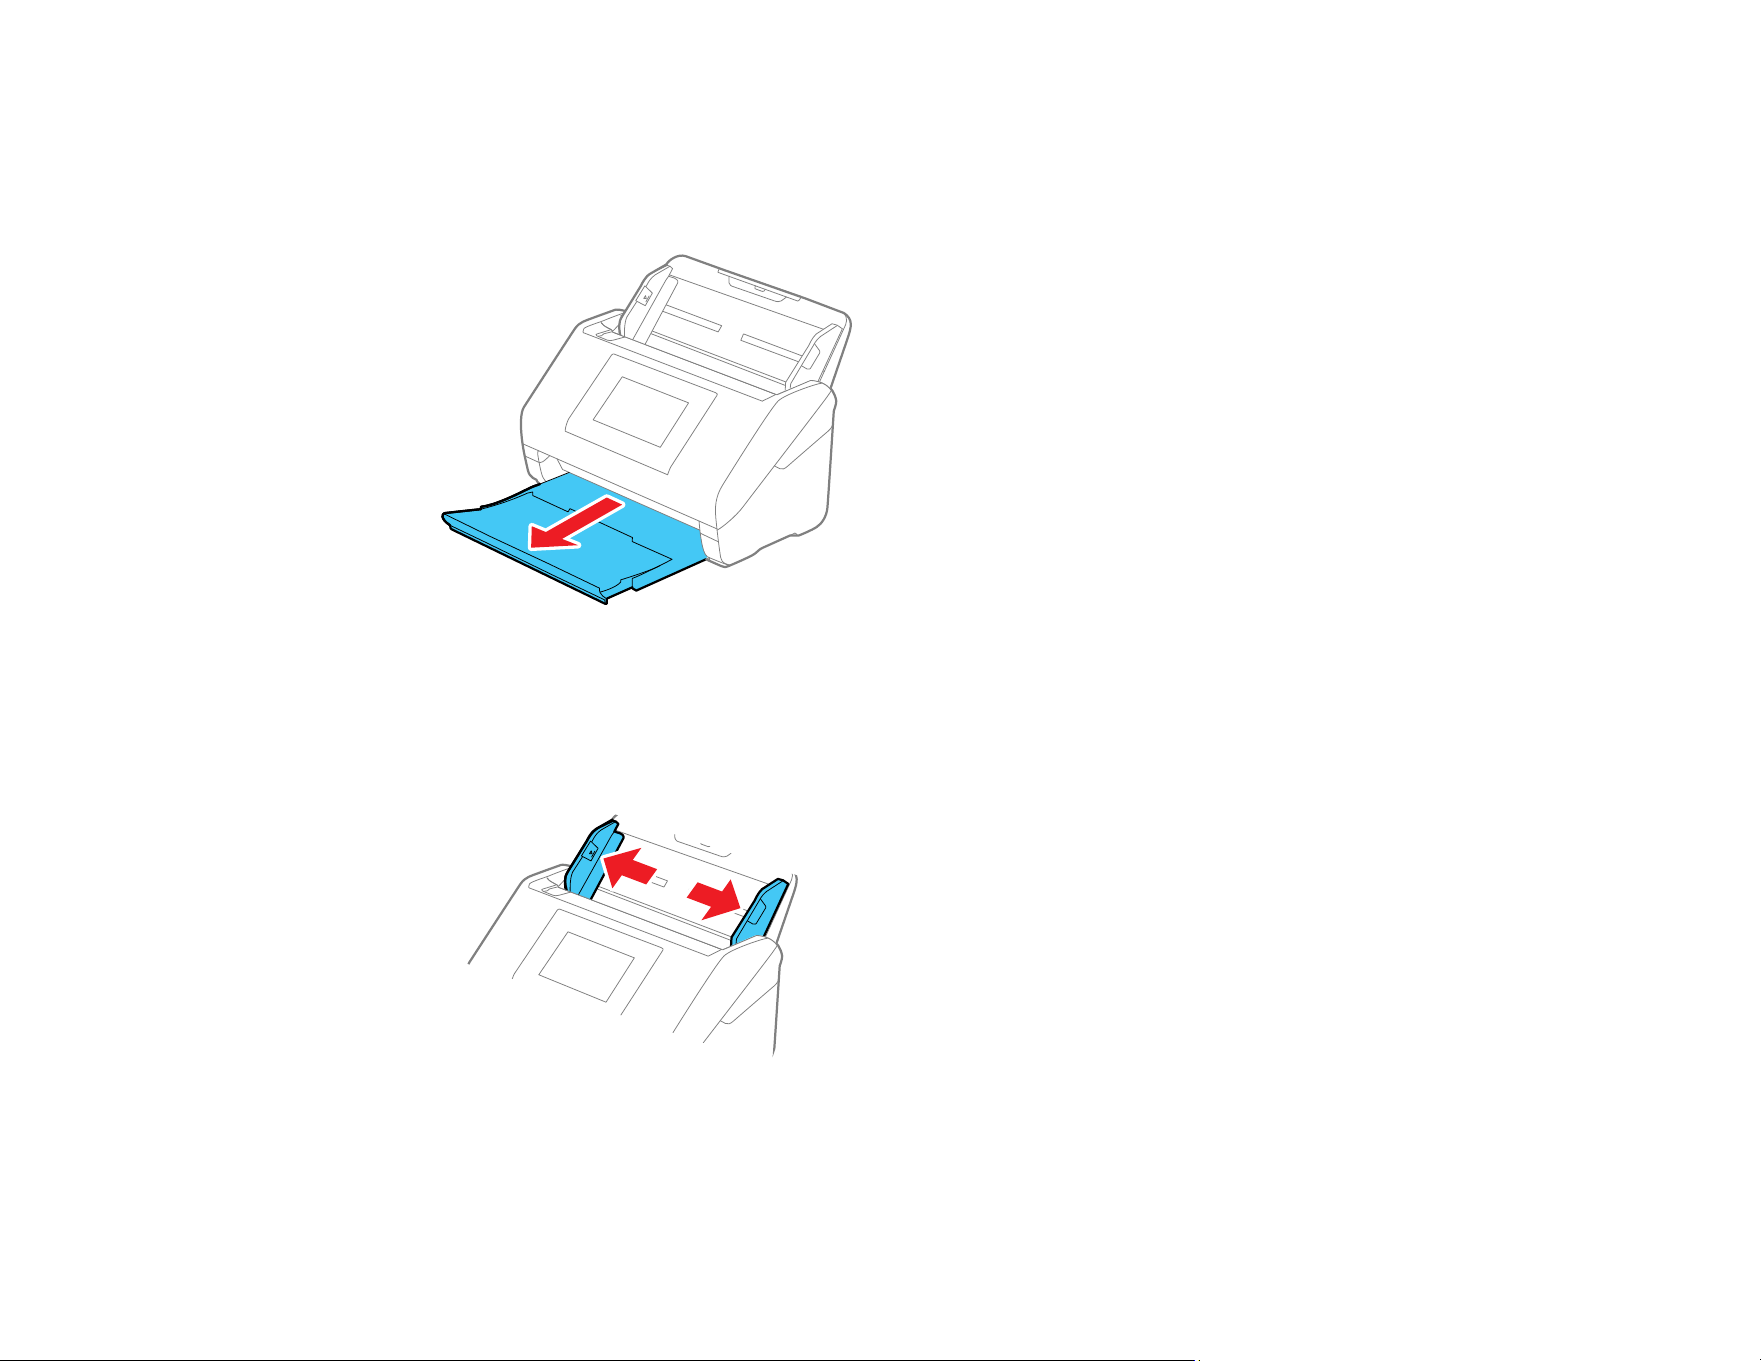
74
Note: The scanning speed is slower when scanning long paper. You cannot scan long paper using
Epson Smart Panel.
1. Open the output tray.
Note: Do not pull out the input or output tray extensions and do not open the stopper.
2. Slide the edge guides all the way out.
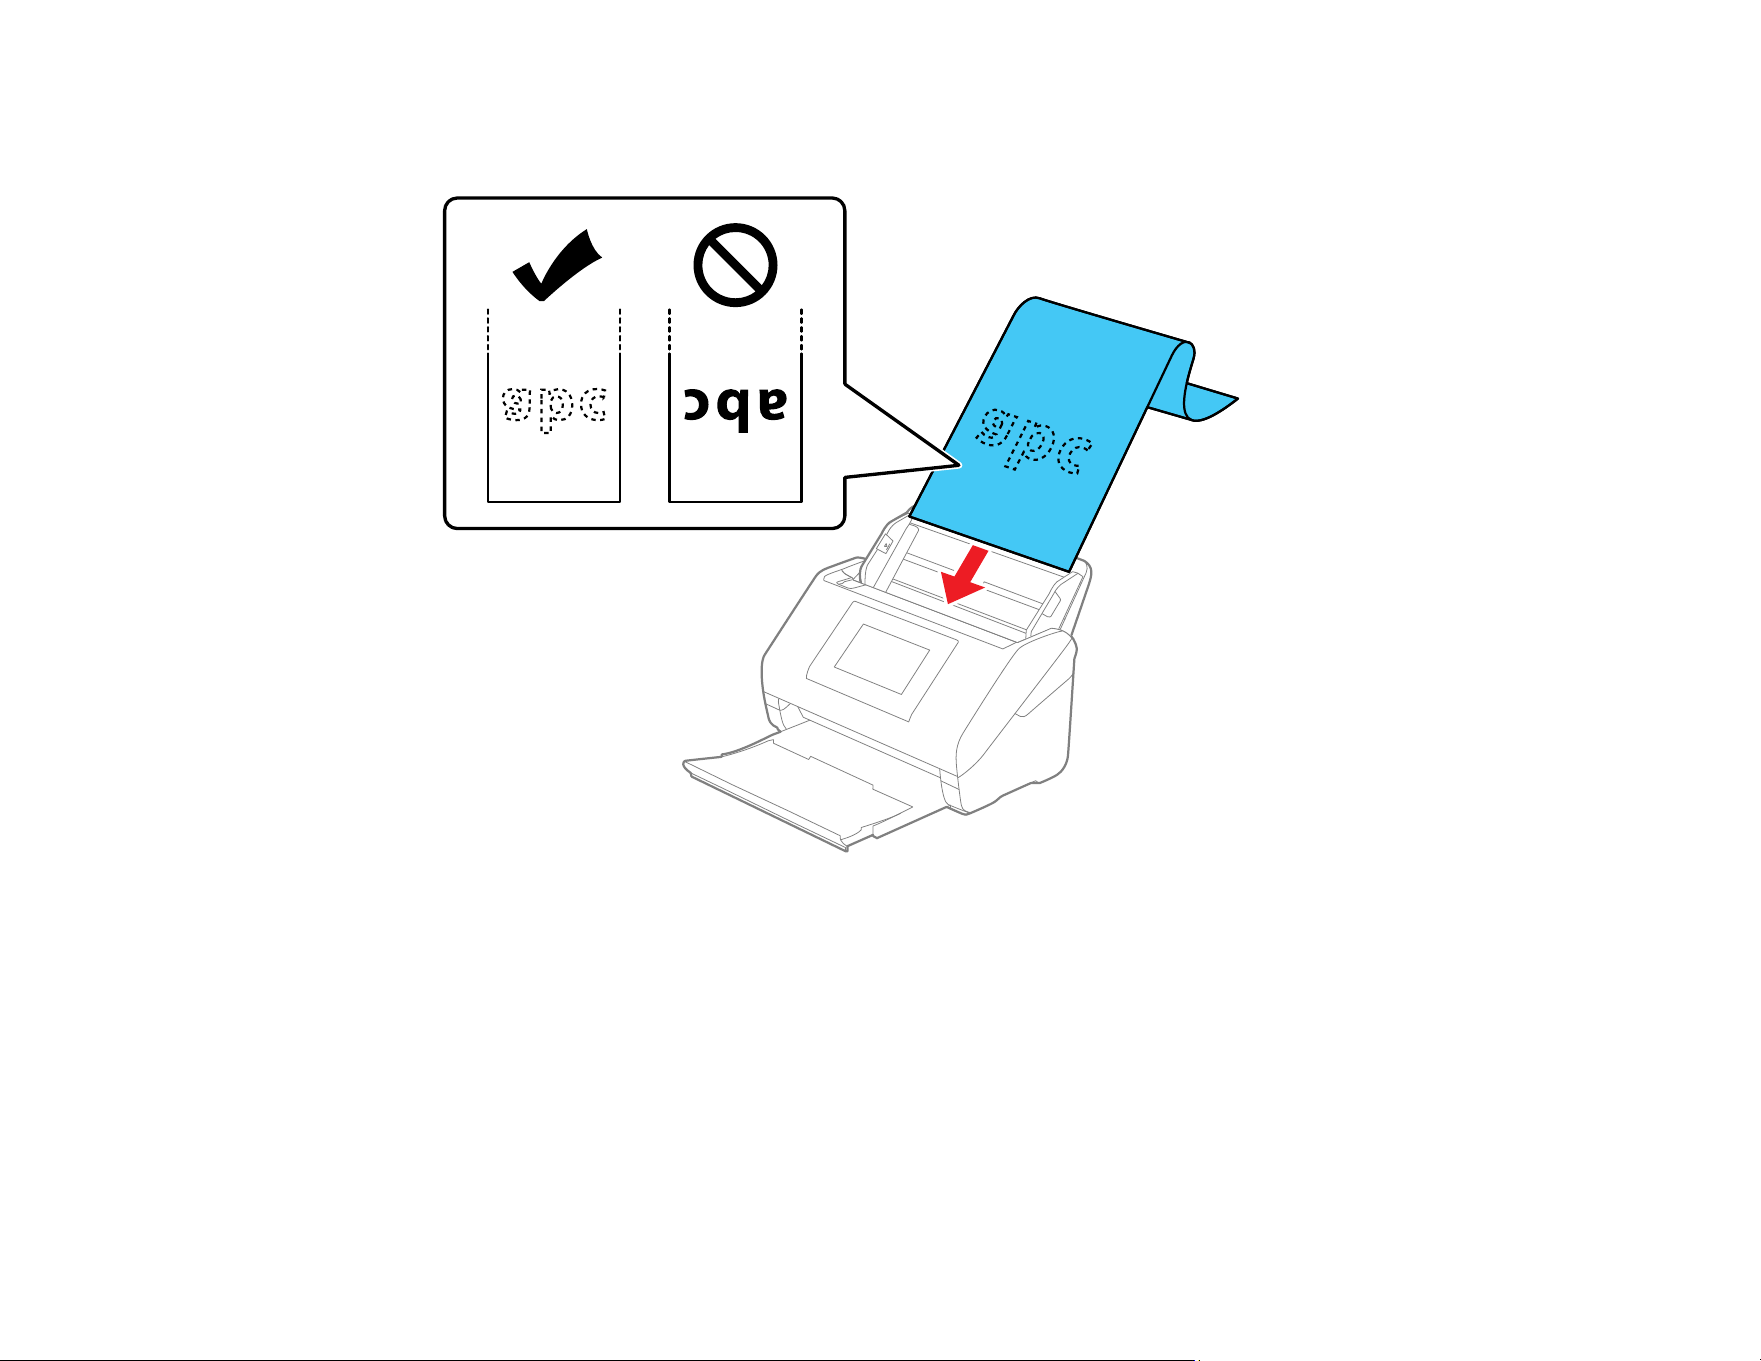
75
3. Load the original into the input tray printed side down and top edge first, and guide it in until it meets
resistance.
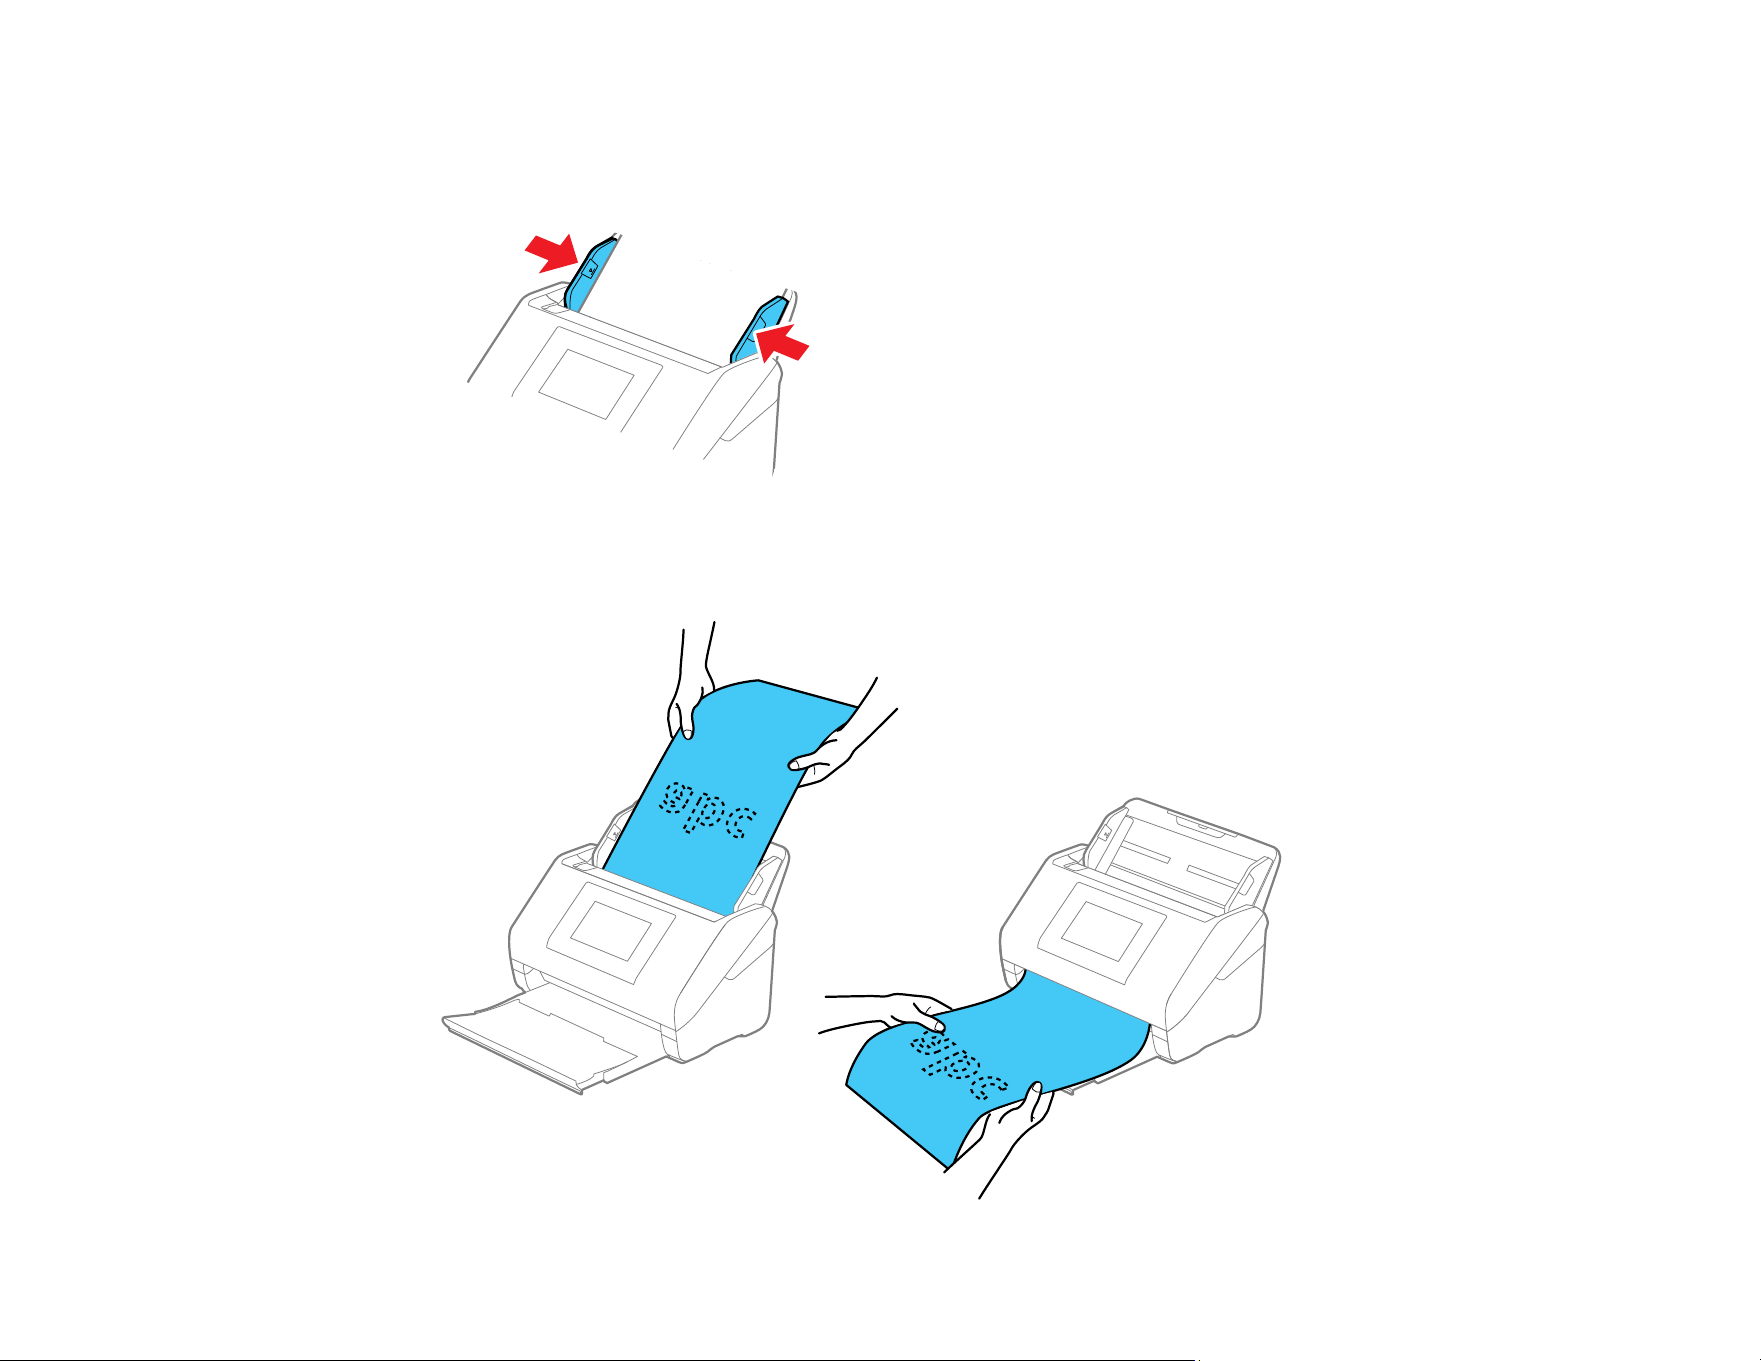
76
4. Adjust the edge guides to fit the edges of the original so that there are no gaps. Otherwise, the
original may skew.
When loading long paper, support it at the input side so that it does not drop out of the ADF, and the
output side so that the ejected paper does not get jammed.

77
5. Specify the paper size in the Epson Scan 2 window using these guidelines:
• If the paper length is 120 inches (3048 mm) or less, you can select Auto Detect (Long Paper) to
detect the size automatically.
• If the paper length is more than 120 inches (3048 mm), you need to select Customize and enter
the size of the paper.
• If the paper length is 215 inches (5461 mm) or less, you can use Detect paper length instead of
entering the paper height. If the paper is longer than 215 inches (5461 mm), you need to enter the
width and height of the paper.
Note: When using Document Capture Pro, you can open the Epson Scan 2 screen by clicking the
Detailed Settings button on the Scan Settings screen.
Parent topic: Loading Originals in the Input Tray
Loading Multiple Sizes of Originals in the Input Tray
You can load originals of different sizes (from 2.0 × 2.0 in. (50.8 × 50.8 mm) to Letter- or A4-size), paper
types, and thicknesses at one time in the input tray. Just make sure they meet the original document
specifications.
You can improve the alignment of ejected originals by using the optional (DS-800WN) or supplied (DS-
900WN) paper alignment plate.
CAUTION: Do not load photos, or valuable original documents or artwork, directly into the input tray.
This may wrinkle or damage the original. Load these originals using an optional carrier sheet.
Note: Photos scanned using a document scanner may not have the same color depth as the original.
Use a flatbed photo scanner to achieve the best color reproduction of photos.
1. Pull up the input tray extension.

78
2. Pull out the output tray and its extension, and open the stopper.
Note: If you are loading originals that are 15.5 inches (393.7 mm) or longer, do not pull out the input
or output tray extensions and do not open the stopper.
3. Slide the input tray edge guides all the way out.

79
4. Load the originals in the center of the input tray in descending order of paper size with the widest at
the back and the narrowest at the front. Slide them in until they meet resistance. Make sure the
printed sides are facedown and the top edges are slightly angled in the input tray.
5. Slide the edge guides against the edges of the widest original.
6. If necessary during scanning, adjust the position of the stopper on the output tray extension to fit the
ejected originals.
Note: If thicker paper does not eject properly or falls from the output tray, push in the output tray and
allow the originals to eject freely onto the surface below the product. If the scanned images are
affected by the originals ejecting below the product, try placing the product on the edge of a table
where the ejected originals can drop freely.
If scanning thin or wrinkled paper causes frequent paper jams or double feeds, slow down the feeding
speed by selecting Settings > Scanner Settings > Slow > On on the LCD screen.

80
If your scanned original contains staples, a paper feed error is detected and the Paper Protection feature
stops the scanning process automatically to reduce damage to the original. Remove the original from the
product, remove the staples, and try scanning again. If a paper jam still occurs, change the Paper
Protection detection level by selecting Settings > Scanner Settings > Paper Protection on the LCD
screen and selecting the desired level.
Note: The Paper Protection feature does not prevent all documents from being damaged. Paper feed
errors may not be detected depending on the paper feeding conditions.
You can also scan originals of multiple sizes by loading them one by one using the Automatic Feeding
Mode setting in Epson Scan 2.
Parent topic: Loading Originals in the Input Tray
Related topics
Scanning
Original Document Specifications
You can load original documents that meet these specifications in your product.

81
Paper type Paper size Paper weight Loading capacity
1
Plain paper
Fine paper
Recycled paper
Letter (8.5 × 11 inches
[216 × 279 mm])
7 to 110 lb
(27 to 413 g/m²)
Thickness of the originals
stack: under 0.47 in. (12
mm)
21 lb (80 g/m²): 100
sheets
24 lb (90 g/m²): 86 sheets
28 lb (104 g/m²): 74
sheets
34 lb (127 g/m²): 62
sheets
42 lb (157 g/m²): 50
sheets
56 lb (209 g/m²): 38
sheets
68 lb (256 g/m²): 30
sheets
110 lb (413 g/m²): 18
sheets
Loading capacity varies
depending on the paper
type.
A4 (8.3 × 11.7 inches
[210 × 297 mm])
A5 (5.8 × 8.2 inches
[148 × 210 mm])
A6 (4.1 × 5.8 inches
[105 × 148 mm])
B5 (7.2 × 10.1 inches
[182 × 257 mm])
B6 (5 × 7.2 inches
[128 × 182 mm])
A8 (2.1 × 2.9 inches
[52 × 74 mm])
34 to 110 lb
(127 to 413 g/m²)
Width: 2.0 to 8.5 inches (50.8
to 215.9 mm)
Height: 15.5 to 240 inches
(393.7 to 6096 mm)*
13 to 35 lb
(50 to 130 g/m²)
1 sheet

82
Paper type Paper size Paper weight Loading capacity
1
Plain paper
Fine paper
Recycled paper
Legal (8.5 × 14 inches
[216 × 356 mm])
7 to 110 lb
(27 to 413 g/m²)
Thickness of the originals
stack: under 0.47 in. (12
mm)
21 lb (80 g/m²): 80 sheets
24 lb (90 g/m²): 69 sheets
28 lb (104 g/m²): 59
sheets
34 lb (127 g/m²): 50
sheets
42 lb (157 g/m²): 40
sheets
56 lb (209 g/m²): 30
sheets
68 lb (256 g/m²): 24
sheets
110 lb (413 g/m²): 14
sheets
Loading capacity varies
depending on the paper
type.
Long paper Maximum width: 8.5 in. (215.9
mm)
Maximum length: 240 in. (6096
mm)
2
13 to 35 lb
(50 to 130 g/m²)
1 sheet
Business cards 2.1 × 3.4 inches (55 × 89 mm) Up to 56 lb
(210 g/m²)
Thickness of the originals
stack: under 0.47 in. (12
mm)
30 cards loaded
horizontally
1
You can refill the originals up to the maximum capacity during scanning
2
Using Epson Print Admin/Epson Print Admin Serverless

83
Specifications for Long Paper
Note: The scanning speed is slower when scanning long paper. Epson Smart Panel does not support
scanning for originals that are 15.5 inches (393.7 mm) or longer.
Scanning Option Resolution Maximum Length
Scanning from a computer
Scanning from the control panel
using the Computer option
50 to 200 dpi 240 inches (6096 mm)
201 to 300 dpi 215 inches (5461 mm)
301 to 600 dpi 53 inches (1346 mm)
Scanning from the control panel
using the following options:
• Network Folder/FTP
• Email
• Cloud
• USB Drive
• Scan to My Email
1
• Scan to My Folder
1
200 dpi
300 dpi
36 inches (914 mm)
600 dpi Not supported
Scanning from the control panel
using the WSD option
100 dpi
300 dpi
Not supported
Scanning with Epson Smart Panel 200 dpi
300 dpi
600 dpi
Not supported
1
Using Epson Print Admin/Epson Print Admin Serverless
Specifications for Multiple Sizes
You can load a mixture of originals from 2.0 × 2.0 in. (50.8×50.8 mm) to Letter- or A4-size. You can also
load a mixture of paper types or thicknesses.
You can improve the alignment of ejected originals by using the optional (DS-800WN) or supplied (DS-
900WN) paper alignment plate.

84
Note: When loading originals that are a mixture of different types and sizes, note the following:
• Originals of different sizes may be fed askew if not all of the originals are supported by edge guides
• Originals may jam or be fed askew if the types and sizes of the originals vary too greatly (such as thick
paper and thin paper or Letter/A4-size paper and business cards)
If paper jams or misfeeds occur, enabling Slow mode or loading the originals one-by-one using
Automatic Feeding Mode may solve the problem.
Types of Originals that Require Attention
The following types of originals may not be successfully scanned or may require special attention:
• Originals with uneven surfaces, such as embossed documents or letterhead
• Originals with wrinkles or fold lines
• Perforated originals
• Originals with labels or stickers
• Carbonless paper
• Curled originals
• Coated paper
Warning: Carbon-less paper contains chemical substances that may damage the rollers inside the
scanner. Make sure you clean the pickup roller and the separation rollers regularly. Scanning carbon-
less paper may reduce the service life of the rollers compared with scanning plain paper.
Note: When attempting to scan these types of originals, note the following:
• Lightly wrinkled paper may scan better if you slow down the feeding speed during scanning or smooth
out the wrinkles before loading.
• Try to flatten curled originals as much as possible.
• Do not feed valuable artwork or important documents into the scanner directly. Misfeeding may
wrinkle or damage the original. When scanning these types of originals, use an optional carrier sheet.
• If originals are incorrectly detected as double feeds, set the DFDS Function to On on the control
panel, or select Off as the Detect Double Feed setting in Epson Scan 2.
• Labels or stickers must be firmly adhered to the scanned original with no exposed glue.
• When scanning an original with labels or stickers that look like they might come off easily, use a carrier
sheet (not included).

85
• For originals with folds, flatten the original so that the height of the fold is 0.2 inches (5 mm) or less
before loading.
Warning: Do not load the following types of originals directly in the product, or they may be damaged or
may damage the product:
• Photos (without a carrier sheet)
• Booklets or passports
• Fabric or other non-paper originals
• Originals containing staples or paper clips
• Originals with wet ink or glue
• Ripped originals
• Heavily wrinkled or curled originals
• Transparencies
• Originals with carbon paper backing
• Originals with attached sticky notes
Parent topic: Loading Originals in the Input Tray
Loading Plastic and Laminated Cards in the Input Tray
You can load plastic and laminated cards that meet the card specifications in the input tray.
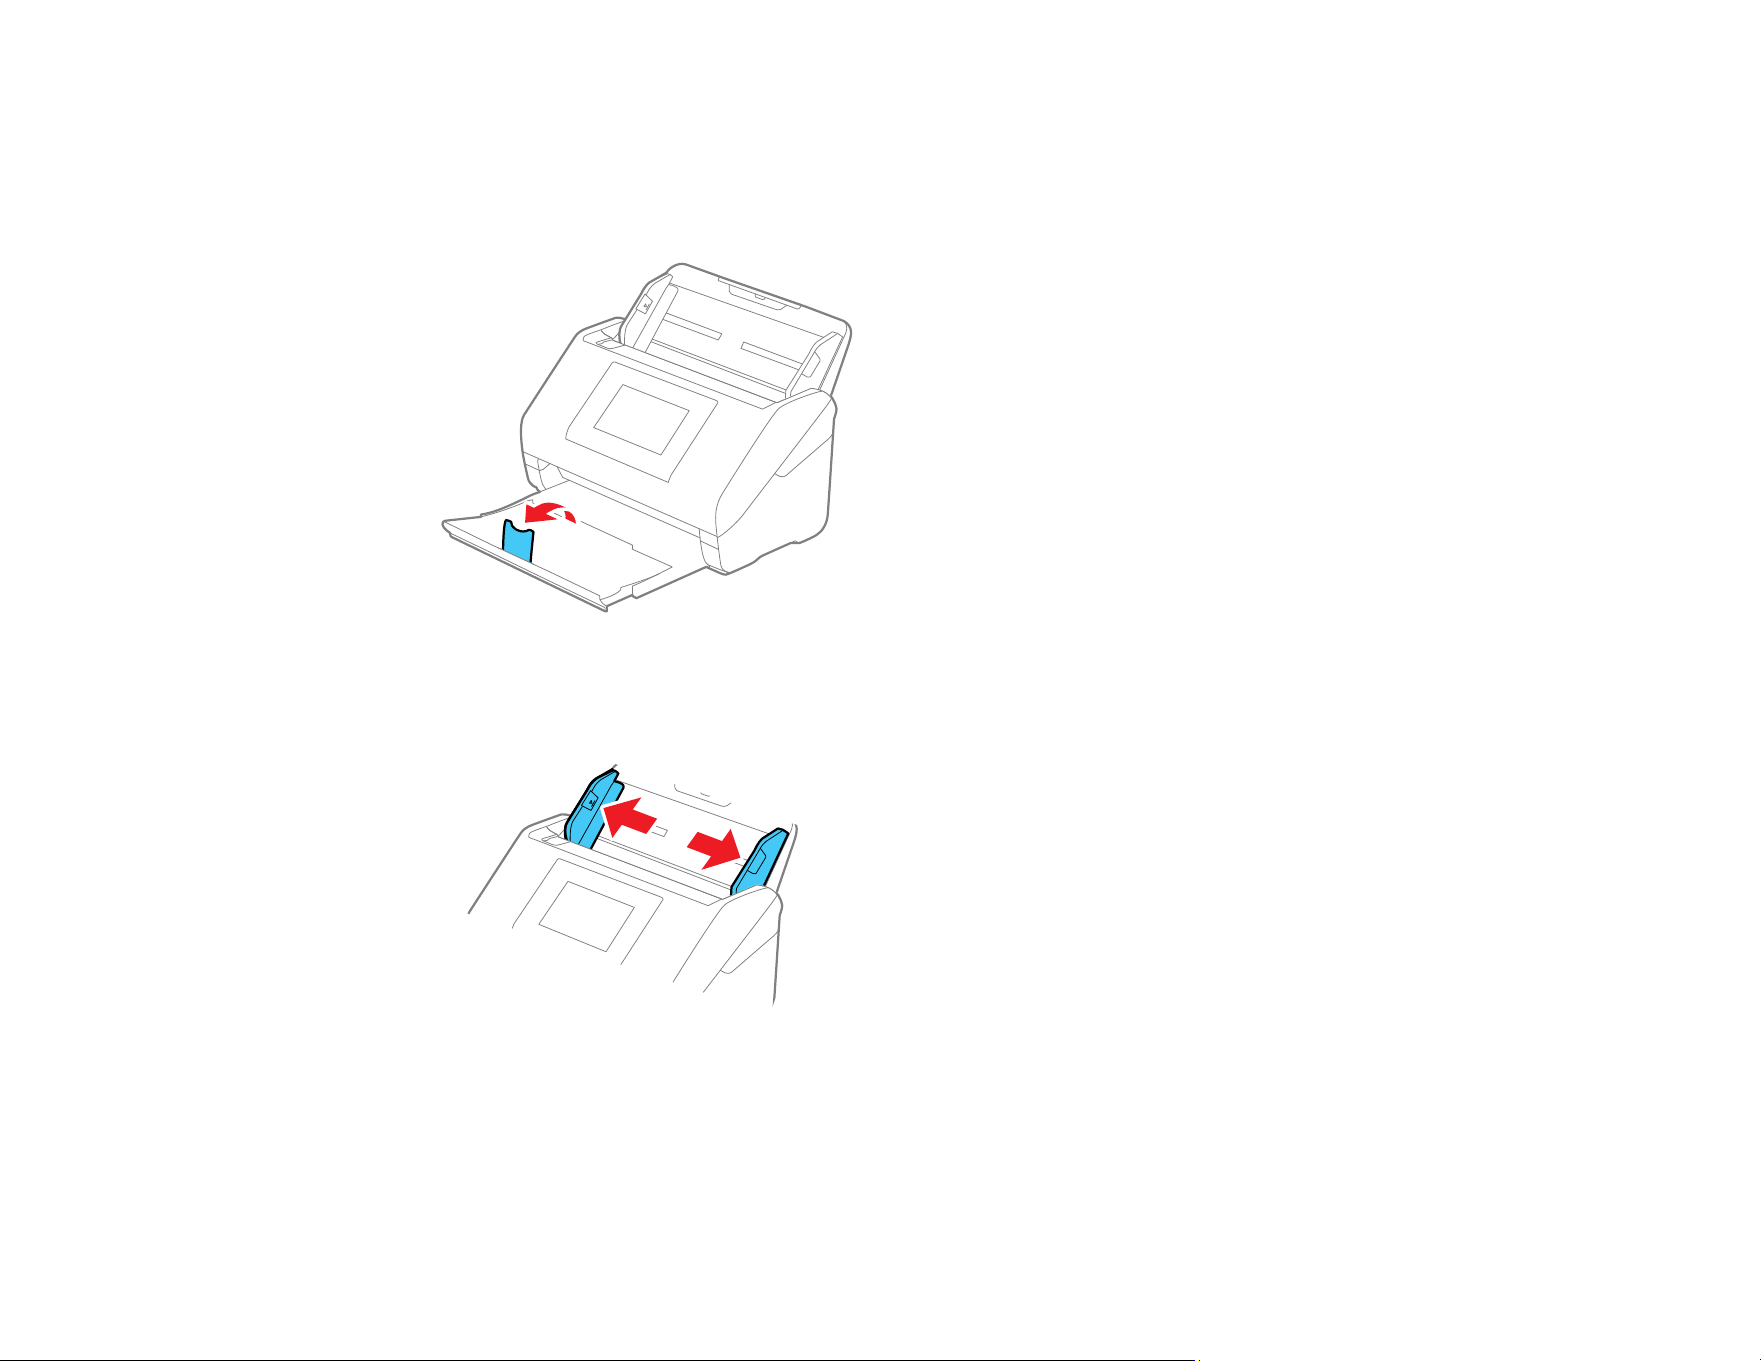
86
1. Pull out the output tray and open the stopper. Do not pull out the extensions.
2. Slide the input tray edge guides all the way out.
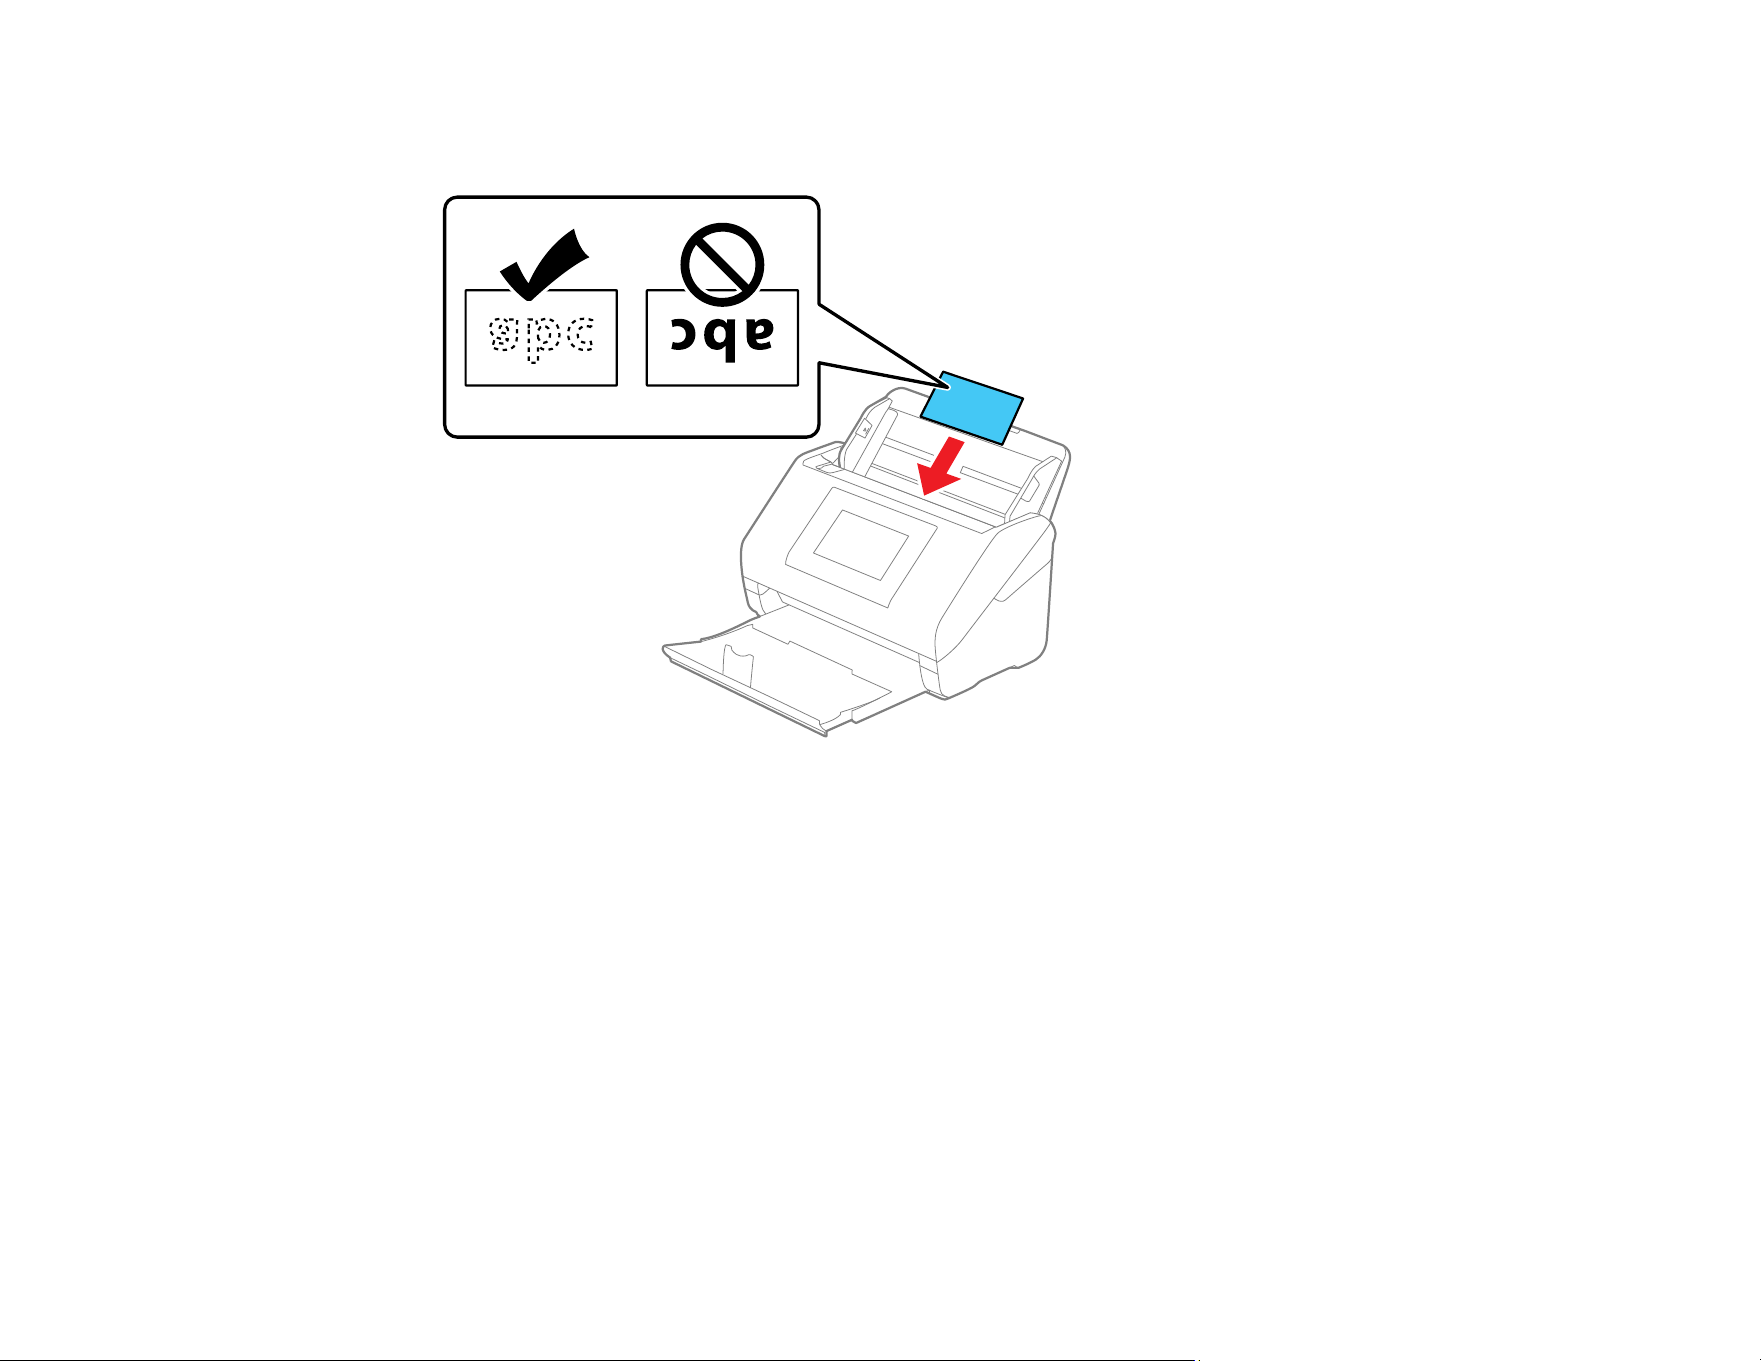
87
3. Load plastic or laminated cards (printed side down and long edge first) into the input tray
horizontally, and slide them in until they meet resistance.
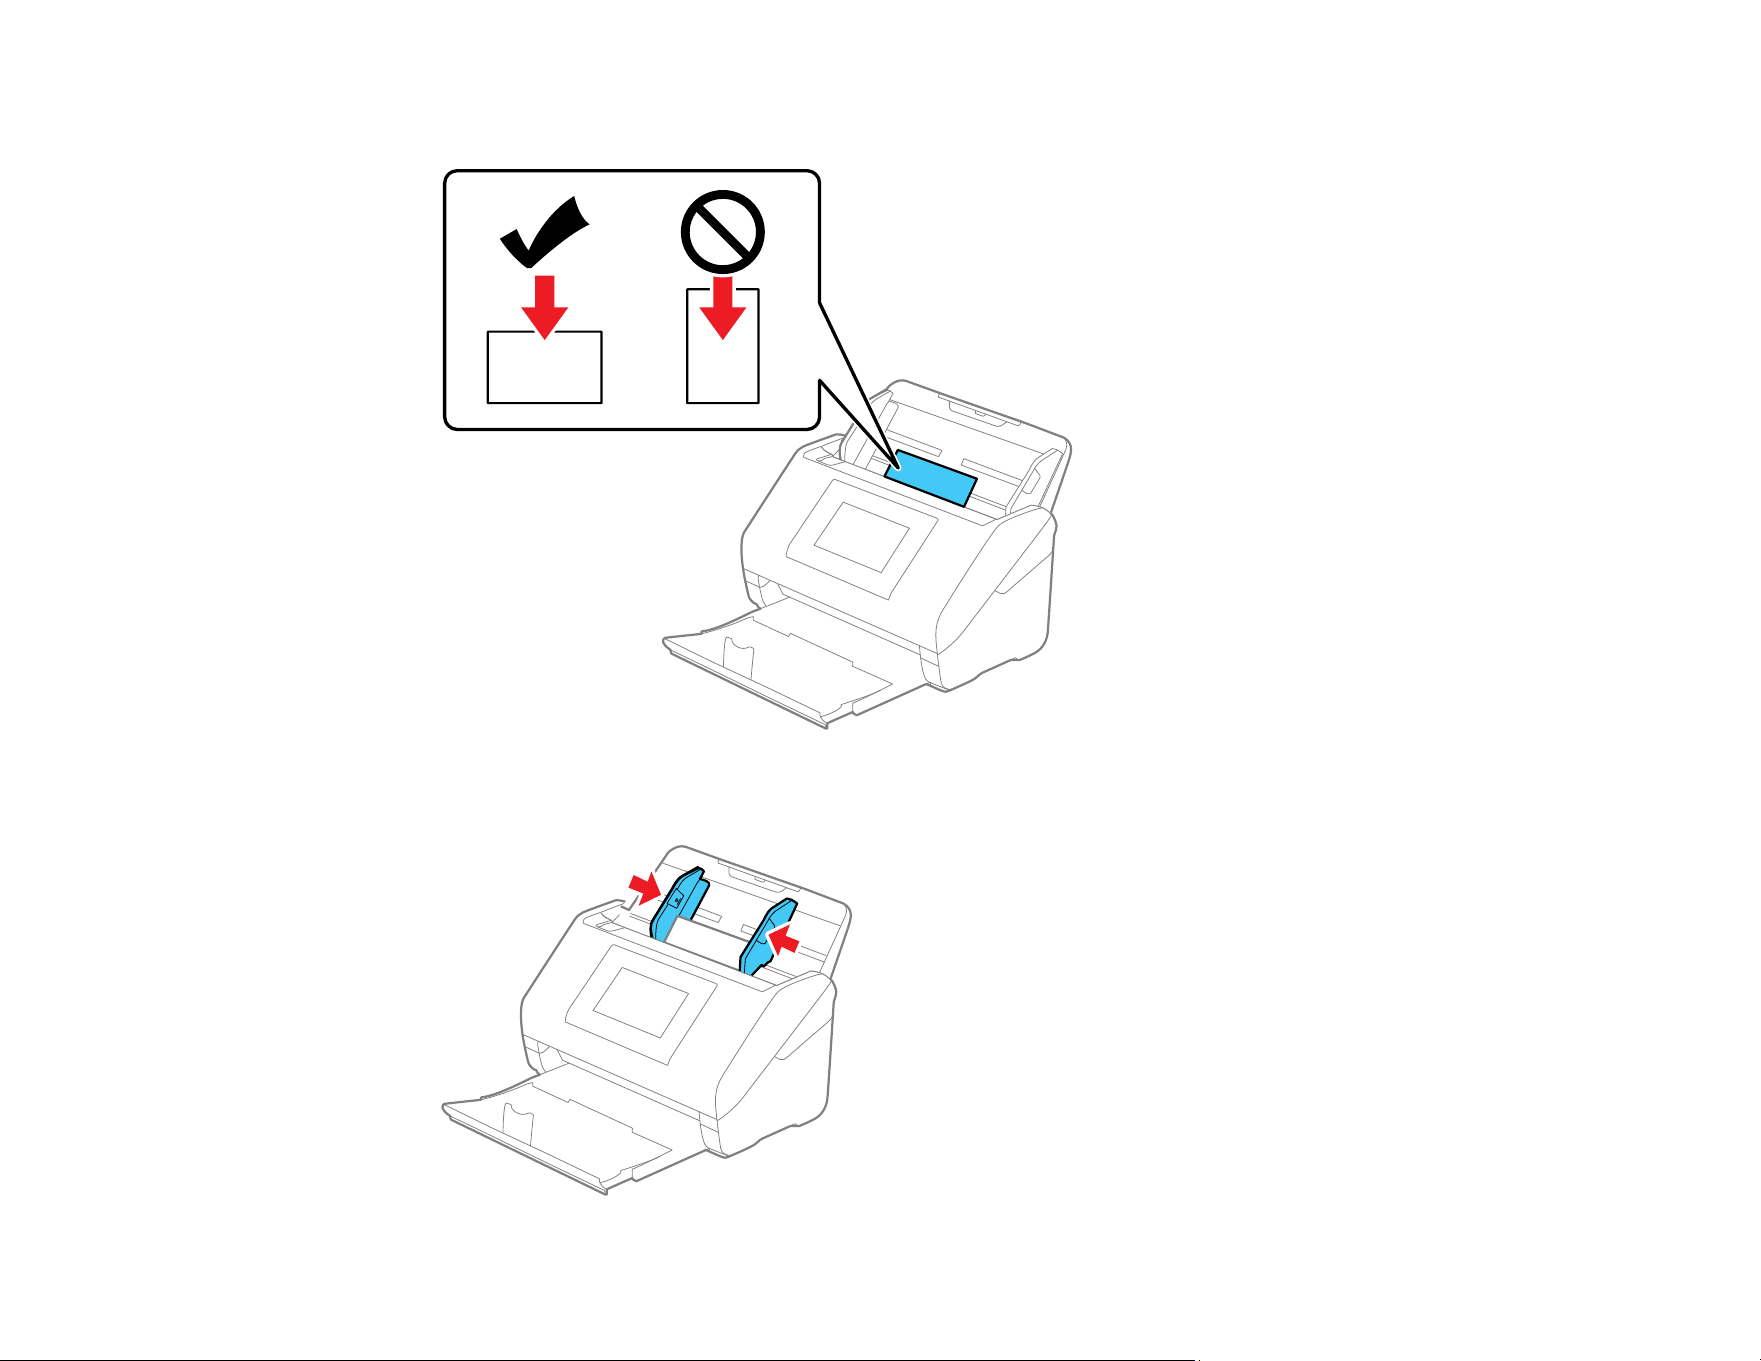
88
Note: Do not load plastic cards vertically.
4. Slide the edge guides against the edges of the card.

89
5. Turn off the Detect Double Feed setting on the Main Settings tab in Epson Scan 2 when scanning
the cards.
Note:
• When using Document Capture Pro, you can open the Epson Scan 2 screen by clicking the
Detailed Settings button on the Scan Settings screen.
• If you do not disable the Detect Double Feed setting and a double feed error occurs, remove the
plastic or laminated card from the input tray and reload it. Select Settings > Scanner Settings >
DFDS Function on the LCD screen and set it to On to disable the Detect Double Feed setting for
the next scan. The DFDS Function setting only disables the Detect Double Feed setting for one
scan.
Plastic and Laminated Card Specifications
Parent topic: Loading Originals
Related topics
Scanning
Plastic and Laminated Card Specifications
You can load original plastic and laminated cards that meet these specifications in your scanner.
Paper type Paper size Paper thickness Loading capacity
Plastic cards,
embossed (ISO 7810
ID-1 compliant)
2.1 × 3.3 in. (54 × 85.6 mm) 0.05 in. (1.24 mm)
maximum
1 card (horizontal)
Plastic cards, standard
(ISO 7810 ID-1
compliant)
0.03 in. (0.76 mm) to
0.04 in. (1.1 mm)
1
5 cards (horizontal)
Smaller than 0.03 in.
(0.76 mm)
Laminated cards 4.7 × 5.9 in. (120 × 150 mm)
or smaller
0.03 in. (0.8 mm) or
less
1 card
1
You can scan these cards only when the resolution is 300 dpi or less, and Slow mode is disabled.
Note: Plastic cards with glossy surfaces may not scan properly. You cannot scan laminated cards using
Epson Smart Panel

90
Parent topic: Loading Plastic and Laminated Cards in the Input Tray
Loading Special Originals
You can load photos or large, thick, or folded originals in the input tray using one or more carrier sheets.
You can also load envelopes. Make sure the originals meet the specifications for special originals before
loading them.
Note: Photos scanned using a document scanner may not have the same color depth as the original.
Use a flatbed photo scanner to achieve the best color reproduction of photos.
1. Pull up the input tray extension.
2. Pull out the output tray and its extension, and open the stopper.
Note: If you are loading originals that are 15.5 inches (393.7 mm) or longer, do not pull out the input
or output tray extensions and do not open the stopper.

91
3. Slide the input tray edge guides all the way out.
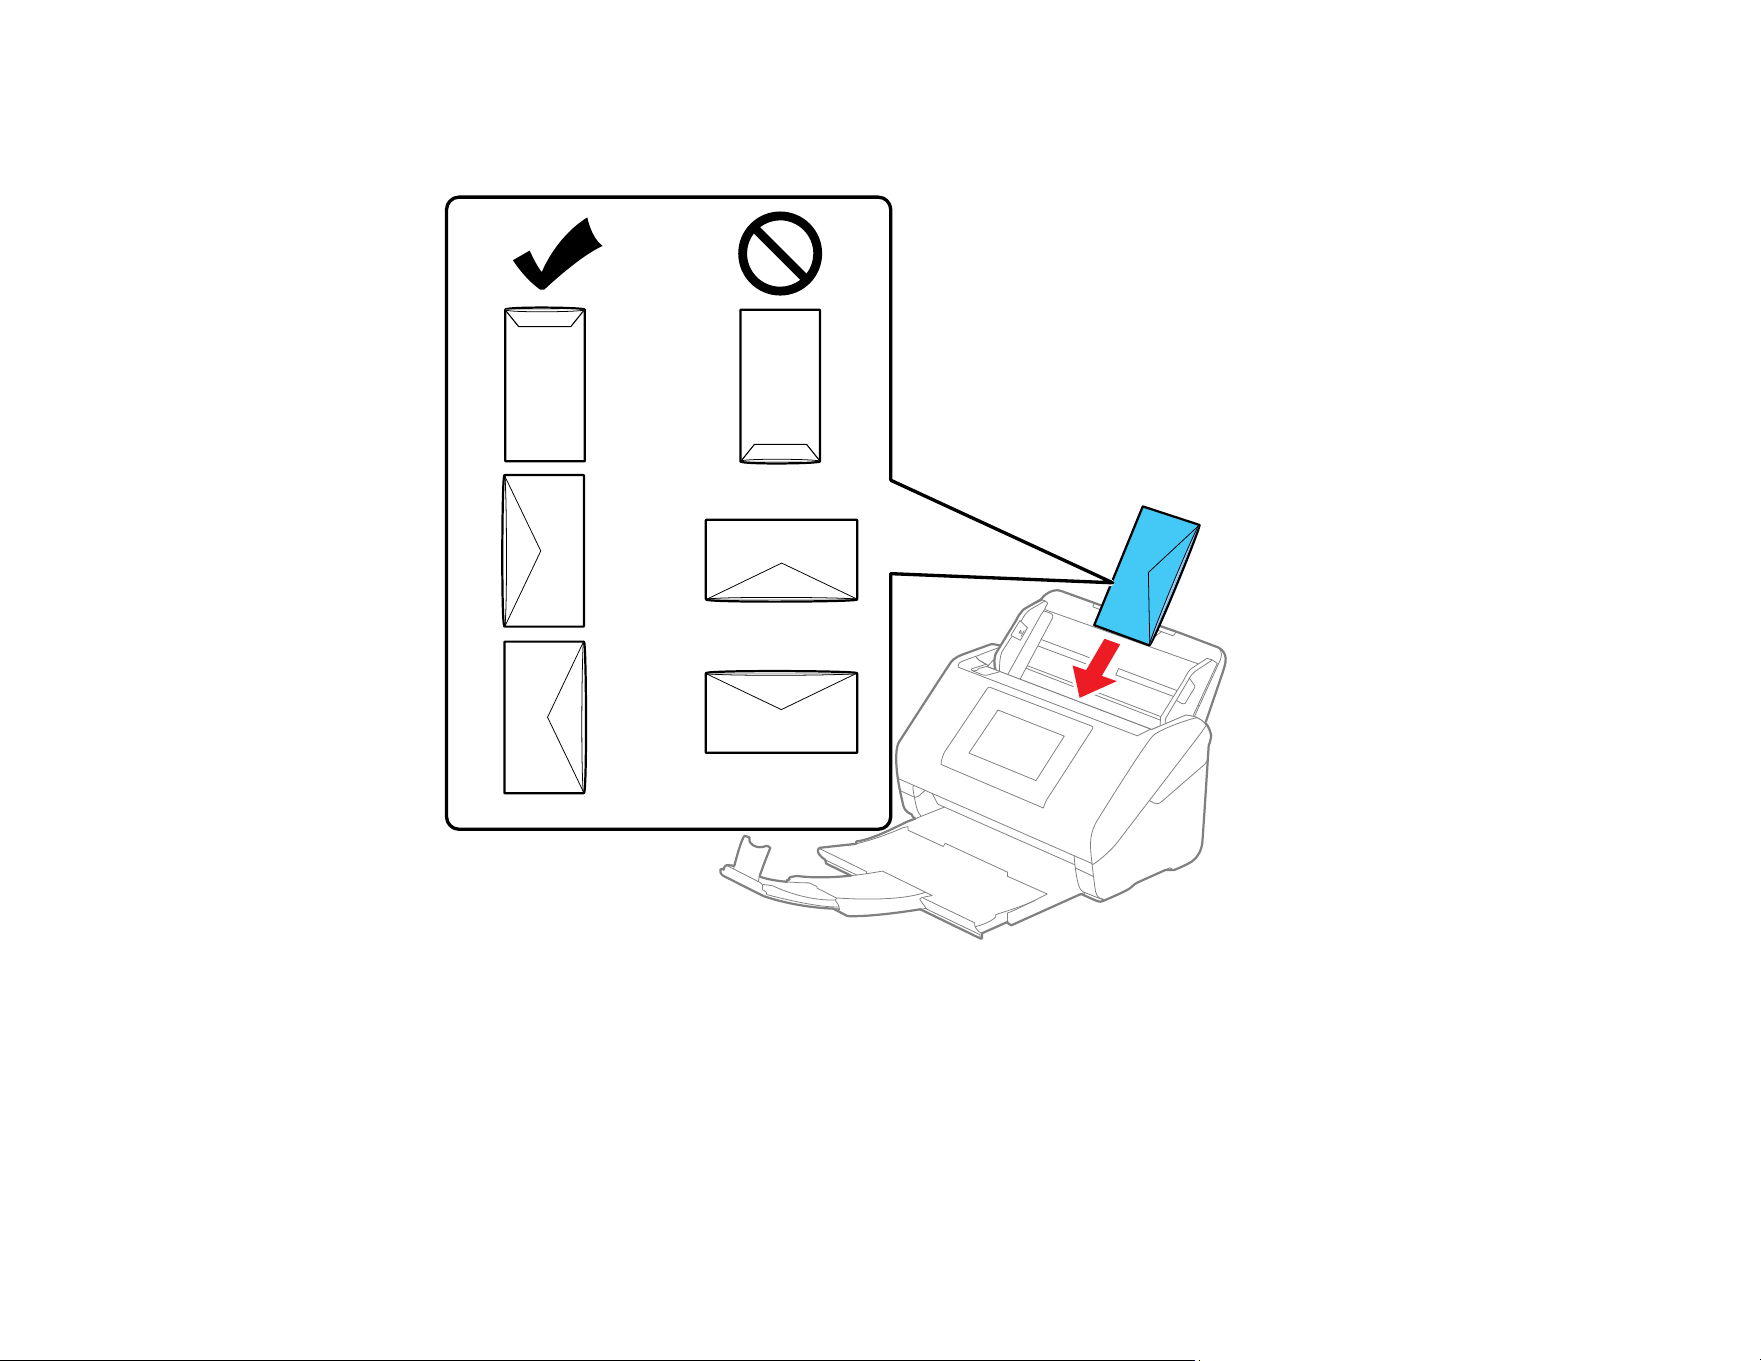
92
4. Load envelopes vertically in the input tray with the printed side down and the flap facing as shown.
Slide in the envelopes until they meet resistance. Skip to step 7.
5. Do one of the following to load photos, or folded or irregularly shaped originals using a carrier sheet:
Note: Use only the carrier sheet designed for your product. The carrier sheet is automatically
recognized by the product by the two small rectangular holes on the front edge, as shown. Keep the
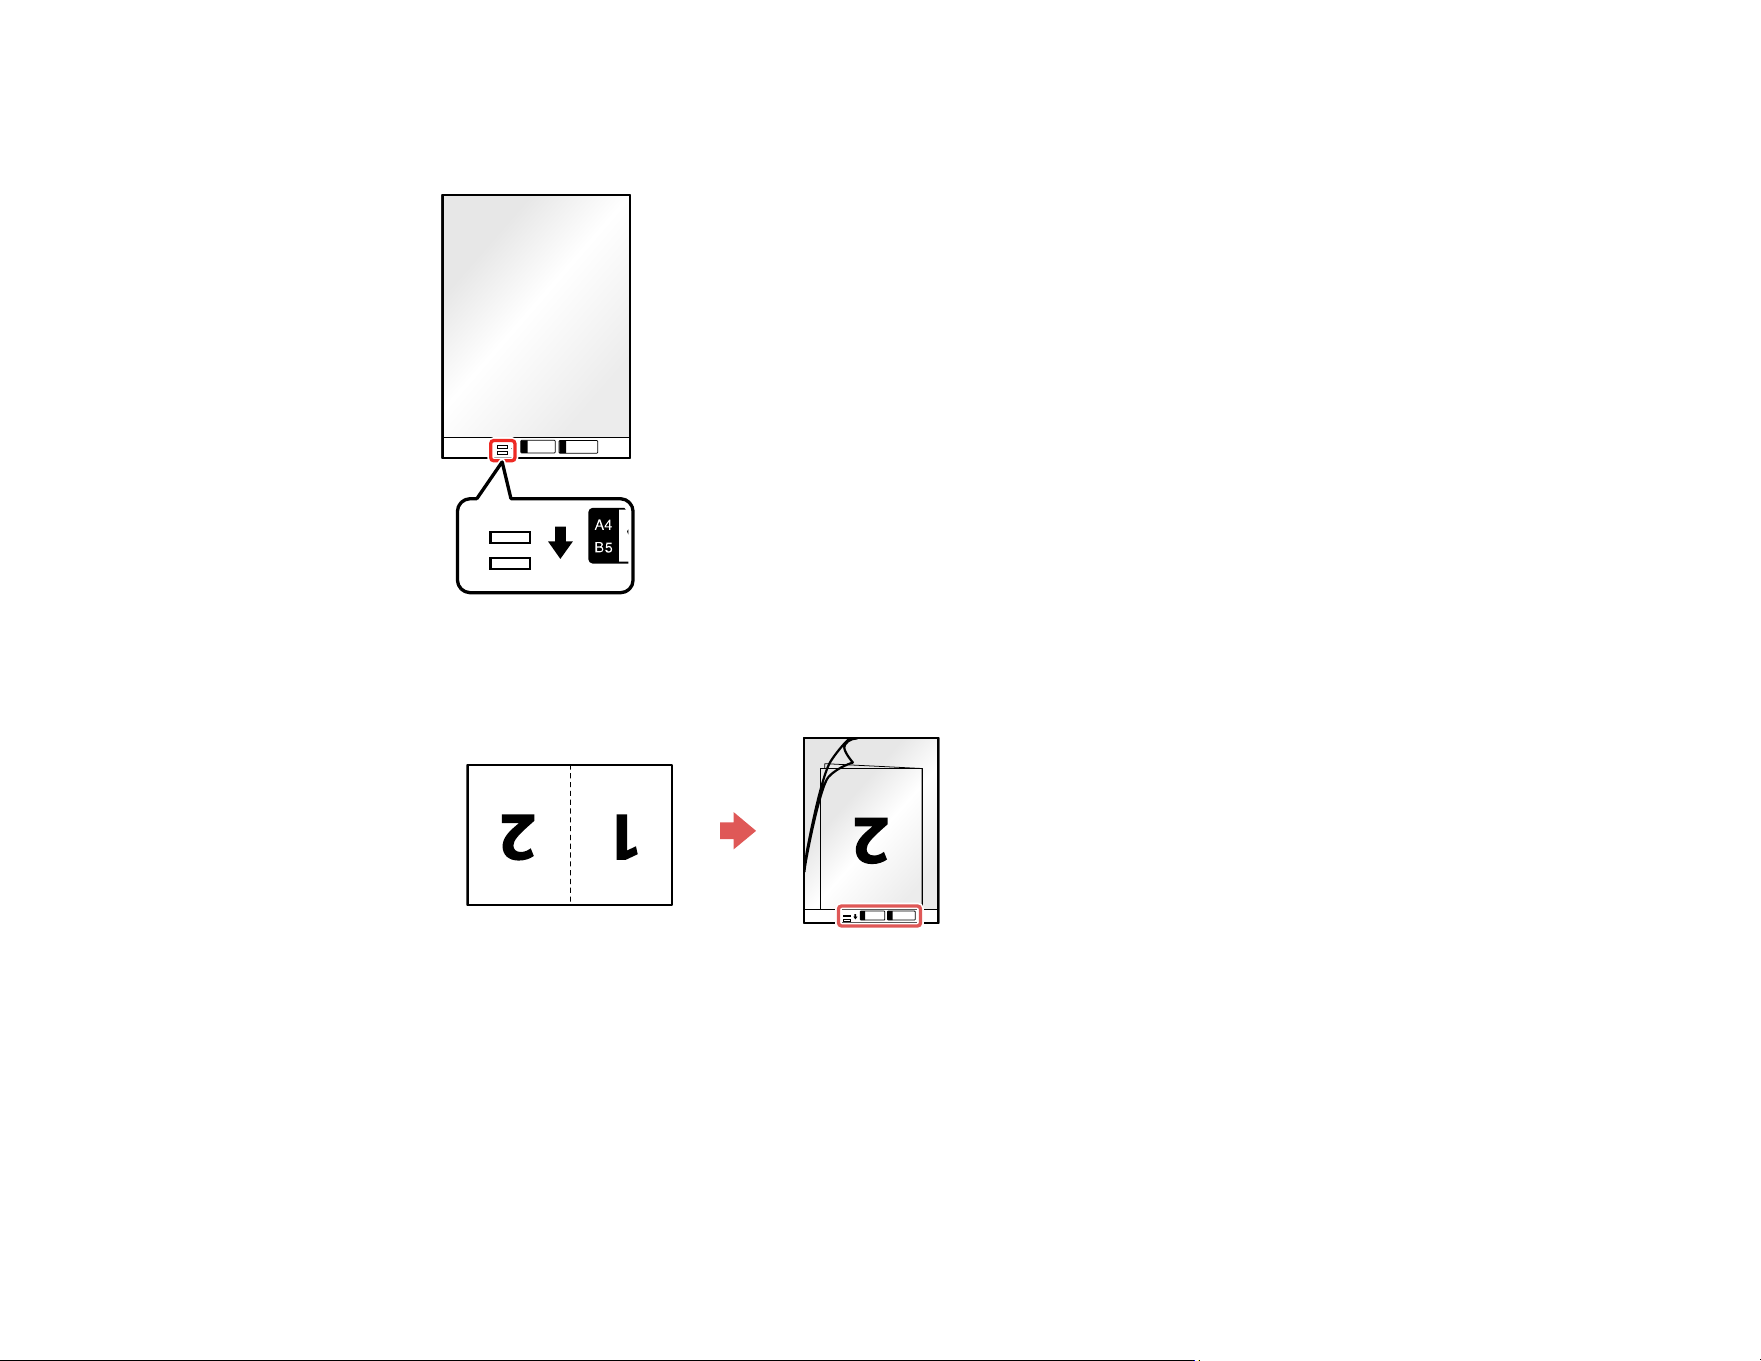
93
holes clean and not covered. Do not load a carrier sheet that has scratches on it or one that has
been scanned more than 3,000 times.
• For a Letter- or A4-size or larger original, fold it as shown and place it in the center of an optional
carrier sheet. Make sure the illustration on the front edge of the carrier sheet is facing up.
To scan both sides and stitch them together, set the appropriate setting in Epson Scan 2.
• For a photo or an irregularly shaped original, load it in the center of an optional carrier sheet with
the printed side face down. Make sure the illustration on the front edge of the carrier sheet is
facing up. If you are loading originals that are 11.7 inches (297 mm) or shorter, place the leading
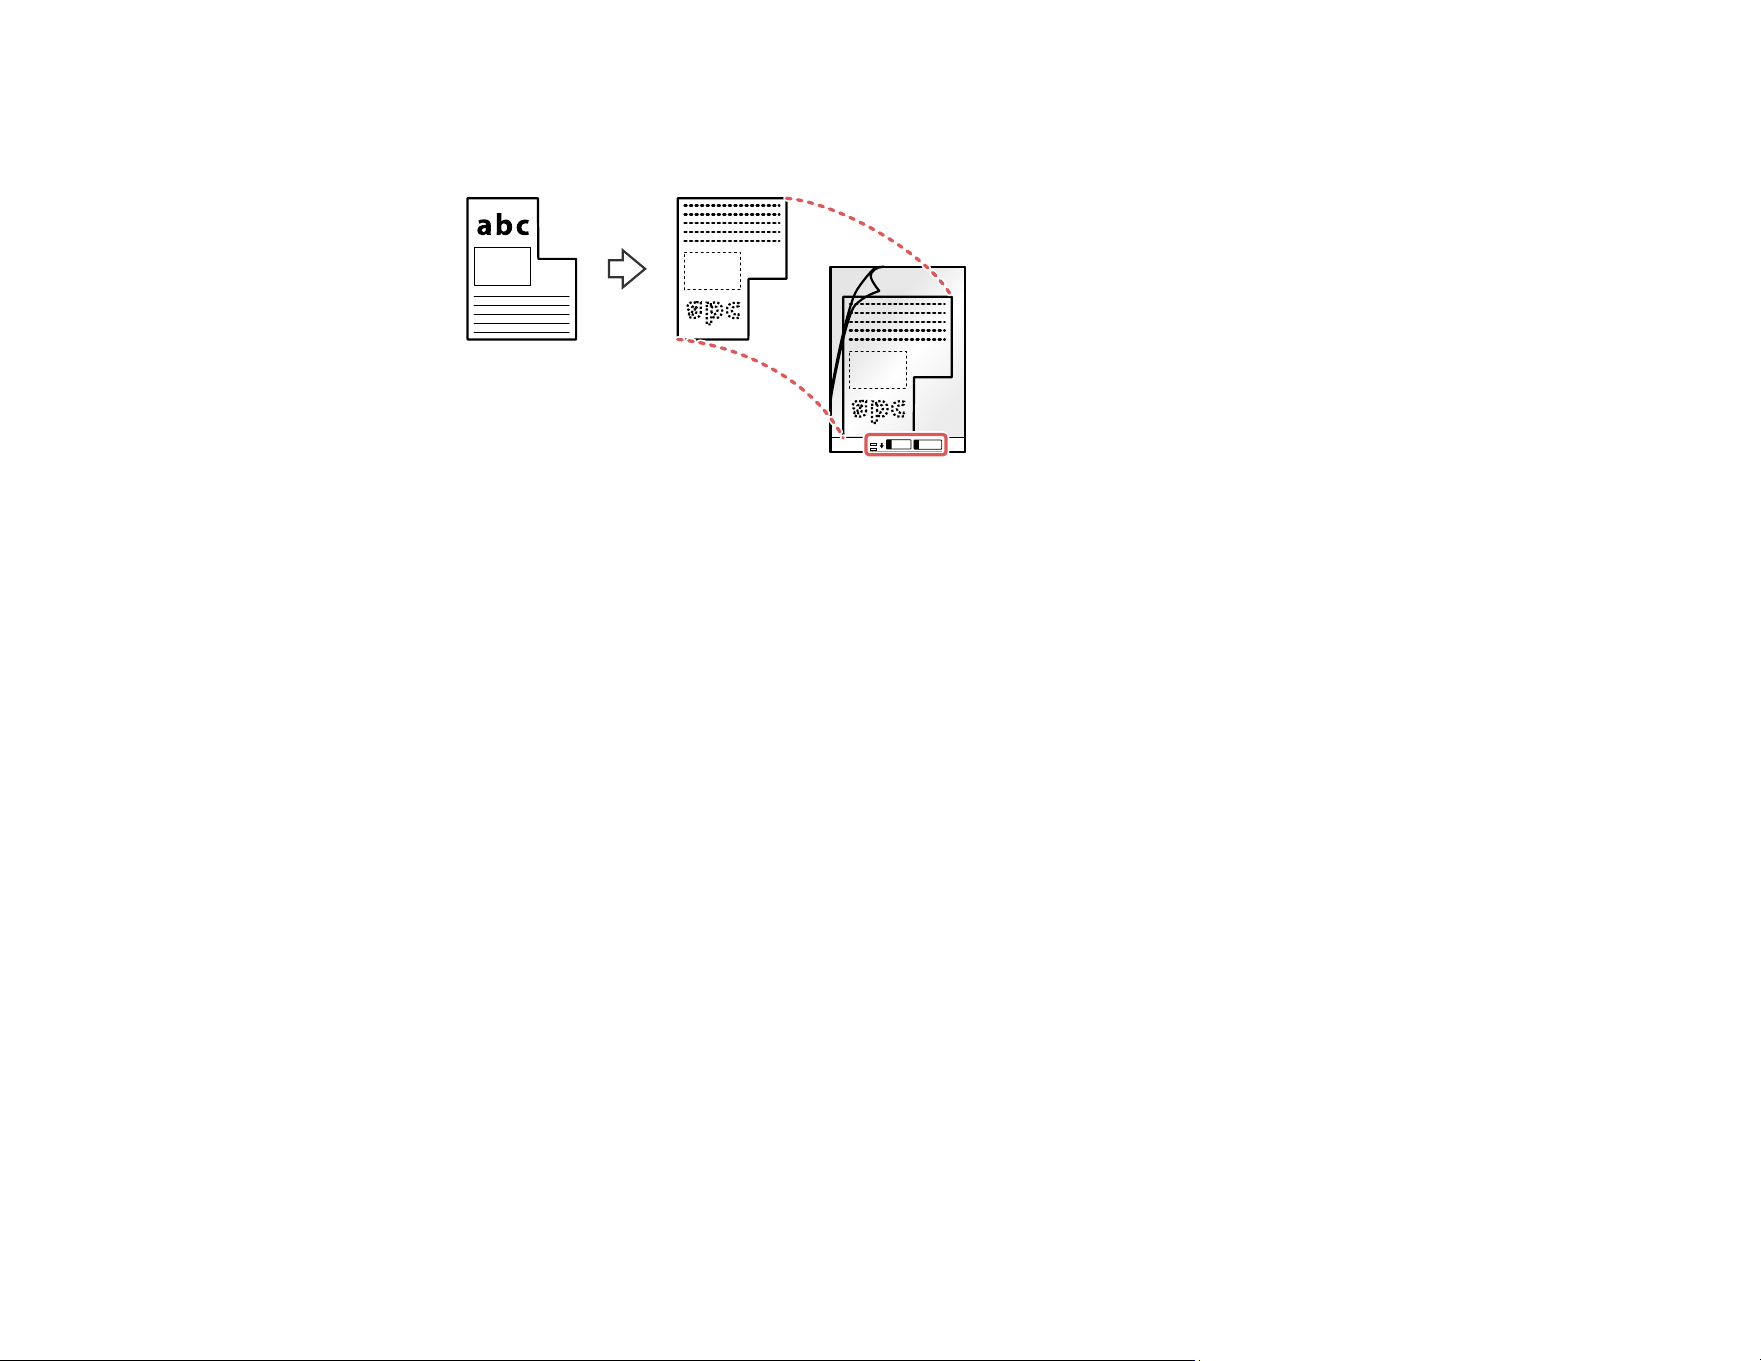
94
edge of the original against the binding of the carrier sheet, as shown. Otherwise, the product may
not detect the correct length of the original.
Note: Photos scanned using a document scanner may not have the same color depth as the
original. Use a flatbed photo scanner to achieve the best color reproduction of photos.
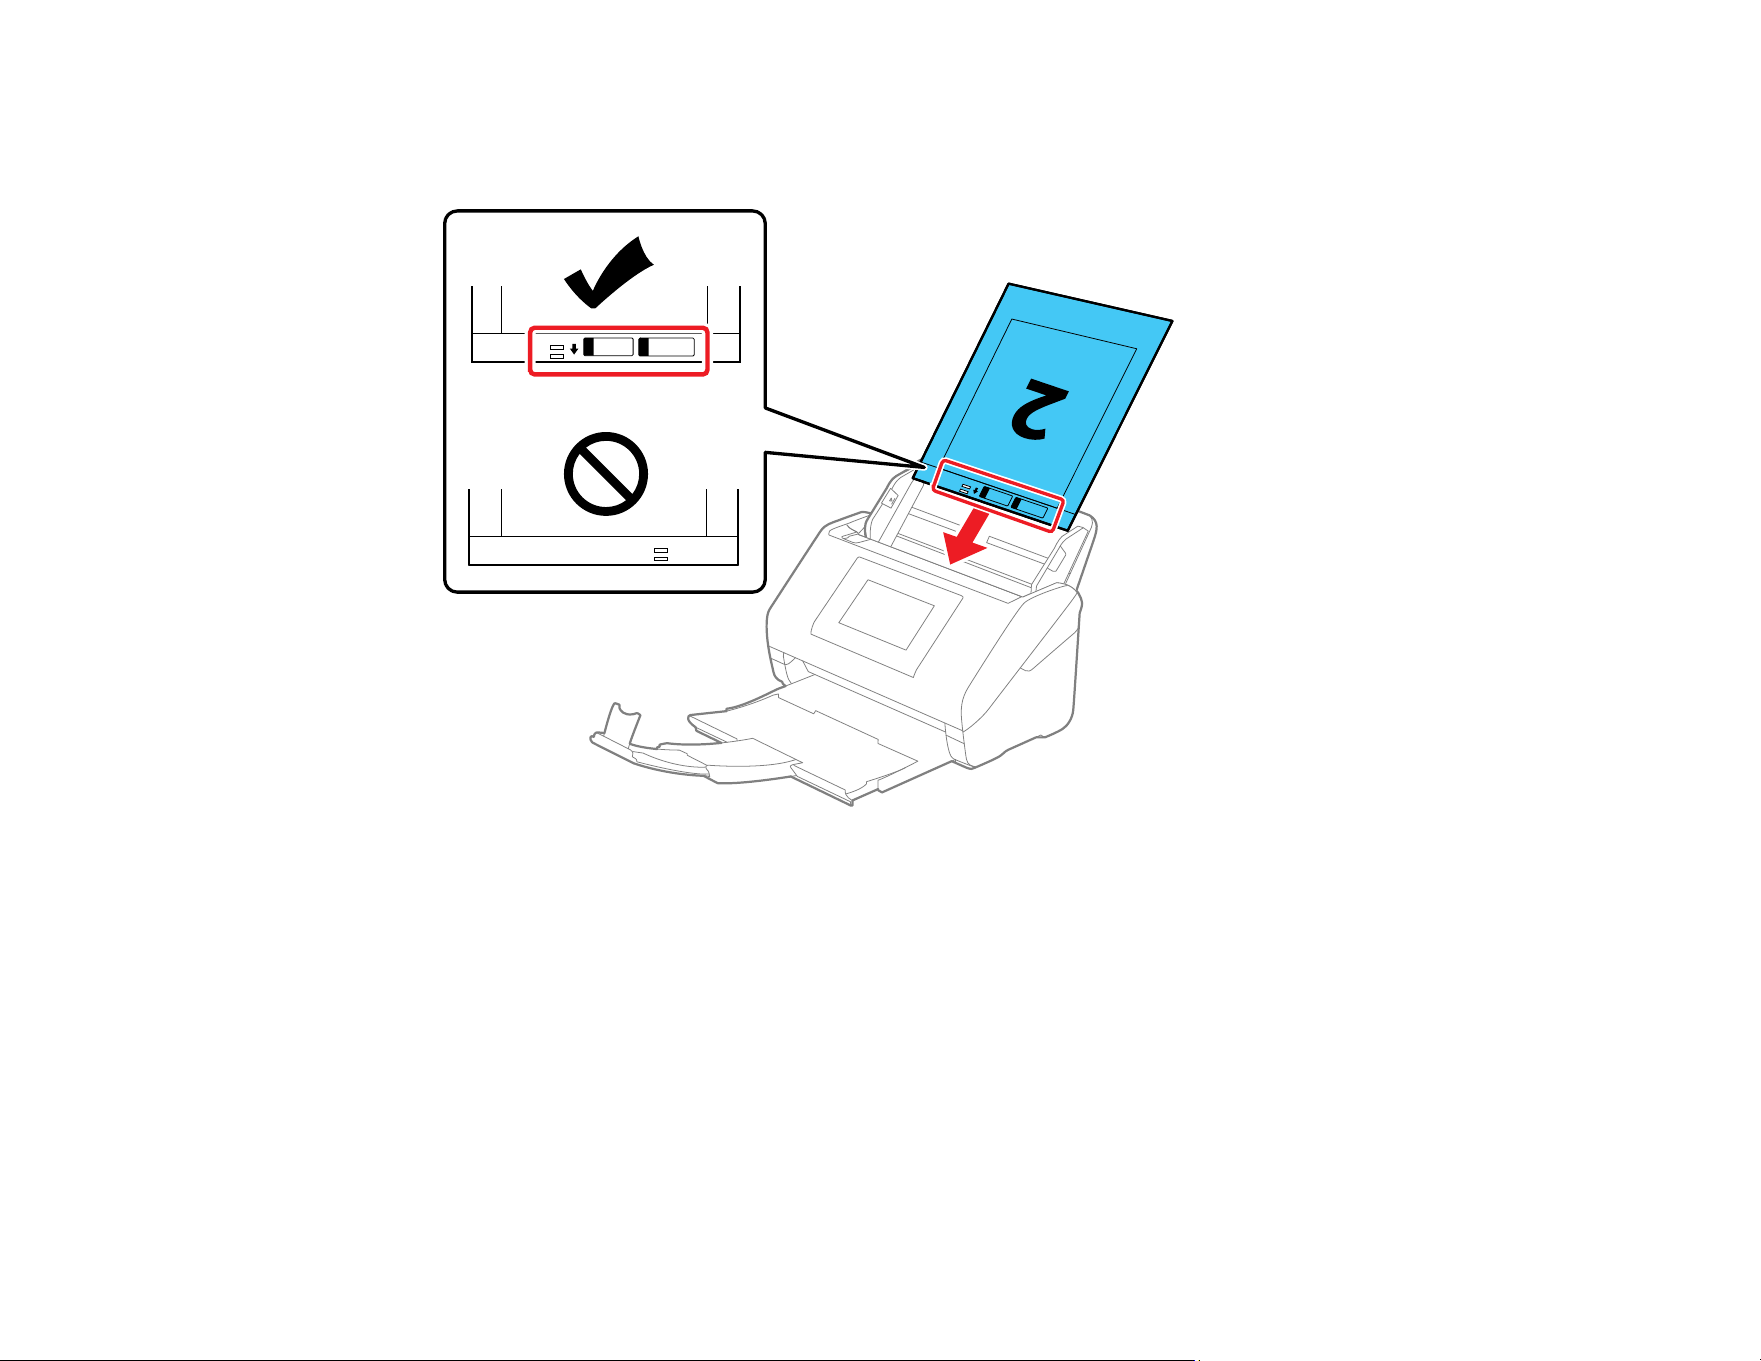
95
6. Load the carrier sheet in the input tray as shown until it meets resistance.
Folded original
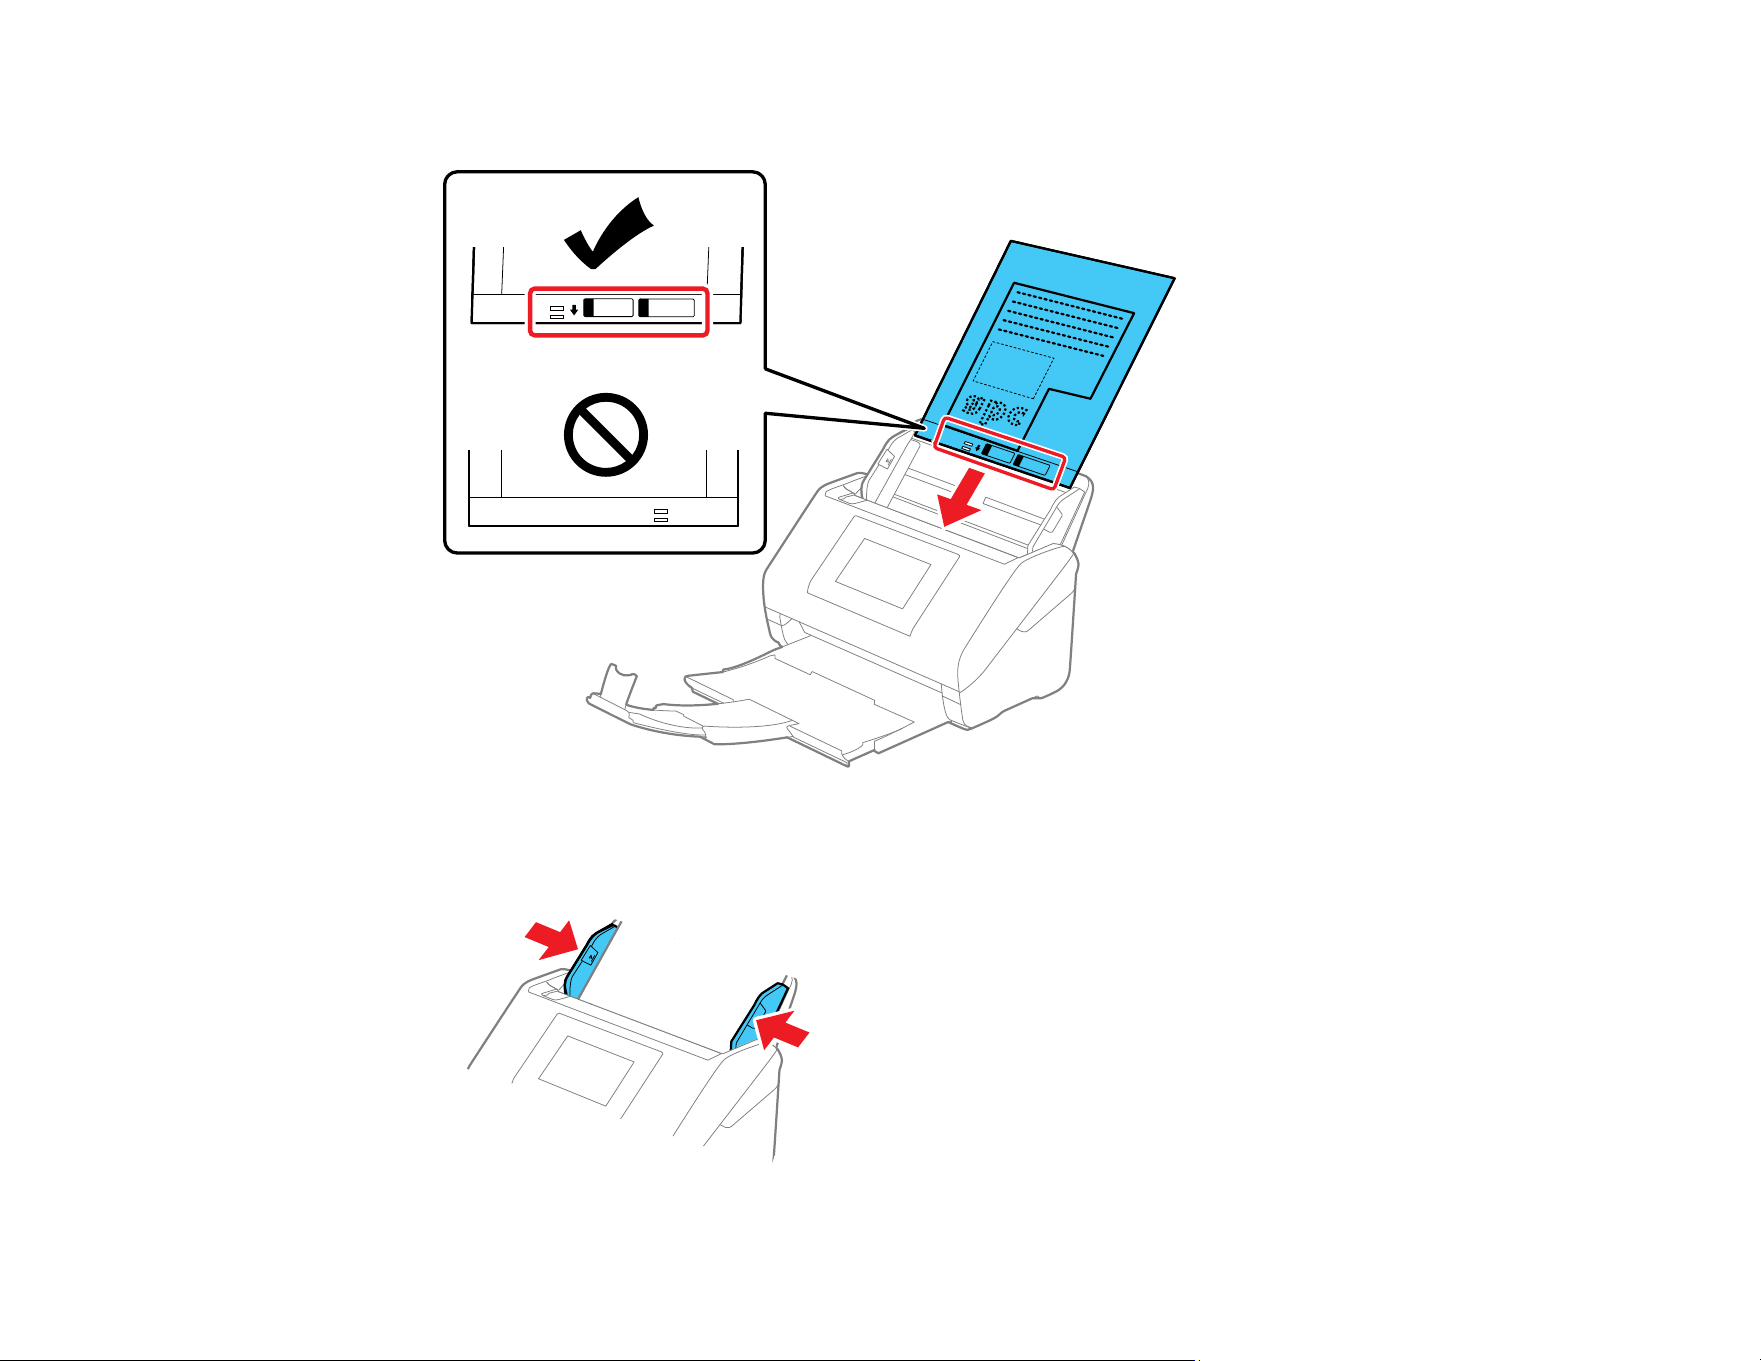
96
Photo or irregularly shaped original
7. Slide the edge guides against the edges of the envelope or carrier sheet.

97
8. Turn off the Detect Double Feed setting on the Main Settings tab in Epson Scan 2 when scanning
special originals.
Note: If the Document Size setting on the Main Settings tab in Epson Scan 2 is set to Auto Detect,
Paper Skew is automatically selected as the Correct Document Skew setting.
9. If necessary during scanning, adjust the position of the stopper on the output tray extension to fit the
ejected originals.
Note:
• You may need to stop using a carrier sheet that is scratched or has been scanned more than
3,000 times.
• If you cannot find an appropriate size for the original you want to scan in the Document Size list,
select Auto Detect. When scanning a carrier sheet using Auto Detect as the Document Size
setting, the Paper Skew option in the Correct Document Skew setting is automatically enabled.
When using Epson Scan 2, you can also select Customize to create a custom document size.
• If thicker paper does not eject properly or falls from the output tray, push in the output tray and
allow the originals to eject freely onto the surface below the product. If the scanned images are
affected by the originals ejecting below the product, try placing the product on the edge of a table
where the ejected originals can drop freely.
Special Original Specifications
Carrier Sheet Specifications
Parent topic: Loading Originals
Related references
Optional Accessories and Replacement Parts
Related topics
Scanning
Special Original Specifications
You can use carrier sheets to load photos or large, thick, or folded originals that meet these
specifications in your product.

98
Paper type Paper size Paper thickness Loading capacity
Large originals (plain
paper, fine paper, or
recycled paper)
Up to this size: A3 (11.7 × 16.5
inches [297 × 420 mm])
0.012 in. (0.3 mm) or
less (excluding the
thickness of the carrier
sheet)
10 carrier sheets
Irregularly shaped
originals
Up to this size: A4 (8.3 × 11.7
inches [210 × 297 mm])
0.012 in. (0.3 mm)
maximum
(excluding the
thickness of the carrier
sheet)
10 carrier sheets
Photos

99
Paper type Paper size Paper thickness Loading capacity
Originals that cannot
be loaded directly into
the scanner (such as
paper that is wrinkled,
torn, stapled, etc.)
Letter (8.5 × 11 inches
[216 × 279 mm])
Legal (8.5 × 14 inches
[216 × 356 mm])
1
A2 (16.5 × 23.4 inches
[420 × 594 mm])
1
A3 (11.7 × 16.5 inches
[297 × 420 mm])
1
A4 (8.3 × 11.7 inches
[210 × 297 mm])
B4 (13.9 × 9.84 inches
[353 × 250 mm])
1
B5 (7.2 × 10.1 inches
[182 × 257 mm])
A5 (5.8 × 8.2 inches
[148 × 210 mm])
B6 (5 × 7.2 inches
[128 × 182 mm])
A6 (4.1 × 5.8 inches
[105 × 148 mm])
A8 (2.1 × 2.9 inches
[52 × 74 mm])
Custom sizes up to 17 in.
(431.8 mm) wide
2
and 11.7 in.
(297 mm) long
3
0.01 in. (0.3 mm) or
less
(excluding the
thickness of the carrier
sheet)
1 carrier sheet
Envelopes 4.49 × 6.38 in. (114 × 162 mm)
(C6)
0.015 in. (0.38 mm) or
less
10 envelopes
4.33 × 8.66 in. (110 × 220 mm)
(DL)
1
Fold in half to load
2
Originals that are wider than 8.5 in. (215.9 mm) need to be folded in half

100
3
The leading edge of the original must be placed at the binding part of the carrier sheet when scanning
originals longer than 11.7 in. (297 mm)
Parent topic: Loading Special Originals
Related references
Optional Accessories and Replacement Parts
Carrier Sheet Specifications
You can scan originals that are larger than Letter (8.5 × 11 inches [216 × 279 mm]) or A4 (8.3 × 11.7
inches [210 × 297 mm]) size using an optional carrier sheet.

101
Paper type Paper size Paper thickness Loading capacity
Originals that cannot
be loaded directly into
the scanner
Letter (8.5 × 11 inches
[216 × 279 mm])
Legal (8.5 × 14 inches
[216 × 356 mm])
1
A2 (16.5 × 23.4 inches
[420 × 594 mm])
1
A3 (11.7 × 16.5 inches
[297 × 420 mm])
1
A4 (8.3 × 11.7 inches
[210 × 297 mm])
A5 (5.8 × 8.2 inches
[148 × 210 mm])
A6 (4.1 × 5.8 inches
[105 × 148 mm])
A8 (2.1 × 2.9 inches
[52 × 74 mm])
B4 (13.9 × 9.84 inches
[353 × 250 mm])
1
B5 (7.2 × 10.1 inches
[182 × 257 mm])
B6 (5 × 7.2 inches
[128 × 182 mm])
Custom sizes up to 17 in.
(431.8 mm) wide
2
and 11.7 in.
(297 mm) long
3
0.01 in. (0.3 mm) or
less
(excluding the
thickness of the carrier
sheet)
1 sheet
1
Fold in half to load
2
Originals that are wider than 8.5 in. (215.9 mm) need to be folded in half
3
The leading edge of the original must be placed at the binding part of the carrier sheet when scanning
originals longer than 11.7 in. (297 mm)
Note: You cannot use a carrier sheet scanning with Epson Smart Panel on a smart device.


103
Scanning
You can scan your originals and save them as digital files.
Starting a Scan
Starting a Scan
After placing your originals on your product for scanning, start scanning using one of these methods.
Note: You can also scan using Document Capture Pro (Windows) or Document Capture (Mac).
Starting a Scan Using the Product Control Panel
Scanning to a Connected Computer
PC-Free Scanning with ScanWay
Setting Up a WSD Port (Windows 7)
Scanning Using Presets
Adding and Assigning Scan Jobs with Document Capture Pro - Windows
Adding and Assigning Scan Jobs with Document Capture - Mac
Starting a Scan Using the Epson Scan 2 Icon
Starting a Scan from a Scanning Program
Starting a Scan from a Smartphone or Tablet
Entering a User ID and Password for Scanning
Scanning with Document Capture Pro or Document Capture
Scanning in Epson Scan 2
Scanning Special Projects
Scanning Using Automatic Feeding Mode
Using Mopria Scan
Scanning with AirPrint
Scanning Using a Chromebook
Parent topic: Scanning
Starting a Scan Using the Product Control Panel
You can scan an image to a variety of destinations using your product's control panel.

104
1. Make sure you installed the product software and connected the product to your computer or
network.
Note: Restart your computer after installing the product software to enable scanning from the control
panel.
2. Place your original on the product for scanning.
3. Press the home button, if necessary.
4. Select one of the following options from the home screen:
• Computer lets you scan to a connected computer using your saved scan settings.
• Network Folder/FTP saves your scanned file to a pre-defined folder on a network computer or
FTP server. To use this feature, you must first create a shared network folder or obtain the FTP
site address, and optionally register the location to your product's contact list.
• Email lets you send scanned files through a pre-defined email server.
• Cloud sends your scanned files to a destination that you have registered with Epson Connect.
• USB Drive lets you save the scanned file directly to a USB device connected to the product.
• WSD lets you manage network scanning in Windows 11, Windows 10, Windows 8.x, or Windows
7. To use this feature on Windows 7, you must first set up a WSD (Web Services for Devices) port
on your computer (the port is set up automatically on Windows 11, Windows 10, and Windows
8.x).
5. Follow the instructions in the links below to complete your scan.
Parent topic: Starting a Scan
Related tasks
Scanning to a Connected Computer
Scanning to a Network Folder or FTP Server
Scanning to an Email
Scanning to the Cloud
Scanning to an External USB Device
Scanning Using WSD - Windows Only
Related topics
Loading Originals

105
Scanning to a Connected Computer
You can scan originals from the control panel using jobs created in Document Capture Pro (Windows) or
Document Capture (Mac). The computer must be connected using a USB cable or connected to the
same network as your product.
Note: Before scanning, create a job and assign it to the control panel. Otherwise, you can use the preset
job that saves scanned images as PDF.
1. Make sure Document Capture Pro (Windows) or Document Capture (Mac) is installed on your
computer or network.
Note: Restart your computer after installing the product software to enable scanning from the control
panel.
2. Place your original on the product for scanning.
3. Press the home button, if necessary.
4. Select Computer on the home screen.
5. If the Select Computer screen is displayed, select the computer on which you created the jobs in
Document Capture Pro or Document Capture.
Note: The product’s control panel displays up to 111 computers on which Document Capture Pro is
installed.
6. If the Select Job screen is displayed, select the job you want to use.
Note: If you have not created a job, your product will default to the preset job that saves scanned
images as PDF; you do not need to select the job.
7. If you want to change the scan settings, tap the icon and select from the following options:
• To slow down the scanning speed, set the Slow setting to On.
• To stop scanning when a double feed is detected, select Double Feed Stop Timing and select a
timing option.
• To skip double feed detection when scanning originals such as envelopes or plastic cards, set the
DFDS Function setting to On.

106
• To stop scanning when an original containing staples is detected, select Paper Protection and
select the setting you want to use.
Note: Turning this function on will not always prevent damage to your originals.
• To detect dirt on the glass surface inside the product, select Glass Dirt Detection and select the
setting you want to use.
8. Select the back icon to view the job settings and confirm the computer and the job you selected.
9. Tap the Presets icon if you want to save your settings as a preset.
Note: Presets can be locked by an administrator. If you cannot access or change this setting,
contact your administrator for assistance.
10. Select the start icon to start scanning.
Document Capture Pro opens and your product scans the original and sends the scanned file to the
connected computer.
Parent topic: Starting a Scan
Related tasks
Scanning Using Presets
Scanning to the Cloud
Entering Characters on the LCD Screen
Related topics
Loading Originals
PC-Free Scanning with ScanWay
ScanWay PC-free scanning allows you to scan and distribute documents directly from your product's
control panel without having to use a computer. You can send the scanned image to a selected
destination, such as a network folder, email, cloud service, or USB drive.
Setting Up and Scanning to a Network Folder or FTP Server
Creating a Shared Network Folder
Registering Contacts for Email, Network, or FTP Scanning - Control Panel
Registering Contacts for Email, Network, or FTP Scanning - Web Config
Scanning to a Network Folder or FTP Server
Scanning to an Email

107
Scanning to the Cloud
Scanning to an External USB Device
Control Panel Scanning Options
Parent topic: Starting a Scan
Setting Up and Scanning to a Network Folder or FTP Server
Before you can scan to a network folder on your computer or on an FTP server, you need to create a
shared folder and optionally register its location to your product's Contacts list. Select the links below as
necessary to create and register the folder, and to scan to it over the network.
Parent topic: PC-Free Scanning with ScanWay
Creating a Shared Network Folder
You can create a shared network folder on your computer or an FTP site and register its location to your
product's Contacts list.
Note: If you are creating a shared network folder on a Mac, see your Mac documentation for instructions
on creating the folder. The instructions here are for Windows.
First make sure you connected your product and computer to the same network.
Note: If you are running a Home version of the Windows operating system, you cannot create a shared
folder on your Windows desktop or in the Documents or Pictures folder unless you have created a Home
Group Configuration for sharing. You can, however, create a shared folder in the root of the C: drive on
your system.
If you want to scan to a folder on an FTP server, contact the FTP server administrator for the server
address and authentication access to a shared folder on the server.
1. If you are scanning to a network folder on your computer, do one of the following to check the format
of your computer name:
• Windows 11, Windows 10, or Windows 8.x: Hold down the Windows key on your keyboard and
press the X key. Select System from the list that appears. Check the Computer Name or Device
Name listed for your computer on the System window.
• Windows 7: Click , right-click Computer, and select Properties. Check the Computer Name
listed for your computer on the System window.
Note: The settings in these steps may vary, depending on your version of Windows. See Windows
Help for details on your operating system.

108
2. If the computer's name uses any characters that are not alphanumeric (letters or numbers), do one
of the following to change the computer's name:
• Windows 11, Windows 10, or Windows 8.x: Select Rename this PC and follow the on-screen
prompts.
• Windows 7: Select Change Settings, change the computer's name, and click OK. (See Windows
Help for instructions, if necessary.)
Note: You need to be logged into Windows as an administrator to change the computer's name.
After changing the name, restart your computer.
3. Click the Windows start button, then select Windows System > Control Panel.
4. On the Control Panel, click Network and Internet > Network and Sharing Center > Change
advanced sharing settings.
The network profile is displayed.
Make sure that Turn on file and printer sharing is selected under File and Printer Sharing for the
network profile (current profile). If already selected, click Cancel to close the window. If you change
the settings, click Save Changes and close the window.
5. Start File Explorer or Windows Explorer.
6. Create a folder on the Windows desktop with a folder name of 12 characters or less; otherwise, your
product may not be able to access the folder.
Note: You need to be logged into Windows as an administrator to access the desktop folder and the
document folder under each User folder.
7. Right-click the folder you created and select Properties.
8. On the General tab, deselect the Read-only checkbox to allow users to access the folder over the
network.
9. Select the Sharing tab and click the Advanced Sharing button.
Note: You need to be logged into Windows as an administrator to select the Advanced Sharing
button.
10. On the Advanced Sharing screen, select the Share this folder checkbox.
11. Click the Permissions button and select the following on the Share Permissions tab:
• Select Everyone under Group or user names.

109
• Select the checkbox in the Allow column for the Change setting.
12. Click OK to save the settings, then click OK again to close the Advanced Sharing window.
13. Select the Security tab and check that the Group or user names list at the top includes the current
computer user and the administrators who can now access the folder.
14. Select the Sharing tab again and write down the Network Path listed under Network File and Folder
Sharing at the top. This is the path you will register to your product's Contacts list so you can select it
for network scanning.
15. Click OK or Close.
Now you can register the folder path to your product's Contacts list.
Parent topic: PC-Free Scanning with ScanWay
Related tasks
Entering Characters on the LCD Screen
Registering Contacts for Email, Network, or FTP Scanning - Control Panel
Registering Contacts for Email, Network, or FTP Scanning - Web Config
Scanning to a Network Folder or FTP Server
Registering Contacts for Email, Network, or FTP Scanning - Control Panel
You can register a list of contacts for scanning to email or to a network folder or FTP server using your
product's control panel.
Note: You can also register the contacts using Web Config.
1. Press the home button, if necessary.
2. Select Settings.
3. Select Contacts Manager. Enter the administrator password, if necessary.
4. Select Register/Delete.
5. Select Add Entry.
6. Select Add Contact.
7. Do one of the following:
• To create a contact for scanning to email, select Email.
• To create a location for scanning to a network folder or FTP, select Network Folder/FTP.
8. Select the Registry Number you want to use for the contact you are adding.

110
9. Select the Name field, use the displayed keyboard to enter the contact name (up to 30 characters),
and select OK.
10. Select the Index Word field, use the displayed keyboard to enter a word to use when searching for
an entry (up to 30 characters), and select OK. (This field is optional.)
11. Do the following as necessary for your contact:
• If you want to identify the contact as a frequently used address, select the Assign to Frequent
Use field and select On. This makes it quicker to select the contact when you scan.
• For an email contact, select the Email Address (Required) field, use the displayed keyboard to
enter the address, and press OK.
• For a network folder or FTP location, select the Communication Mode field and select Network
Folder (SMB) or FTP. Then select the Location (Required) field, use the displayed keyboard to
enter the network path to the shared folder, and select OK.
Enter the folder path name for the Location setting in one of the following formats depending on
the Communication Mode setting you selected:
• Network Folder (SMB): \\host name\folder name
• FTP: ftp://host name/folder name
• FTPS: ftps://host name/folder name
• WebDAV (HTTPS): https://host name/folder name
• WebDAV (HTTP): http://host name/folder name
• For a network folder or FTP location with a password, select the User Name field and use the
displayed keyboard to enter the user name. Then select the Password field and enter the
password.
• For an FTP location, enter the FTP server port number in the Port Number field. If there is a
firewall between the product and FTP server, select the Connection Mode field and select
Passive Mode.
12. Select OK.
Parent topic: PC-Free Scanning with ScanWay
Related tasks
Registering Contacts for Email, Network, or FTP Scanning - Web Config
Registering Contacts for Email, Network, or FTP Scanning - Web Config
You can register a list of contacts for scanning to email or to a network folder or FTP server using Web
Config and your computer's internet browser.

111
Note: You can also register the contacts using the product's control panel.
Before you begin, make a note of the IP address or host name of the scanner so you can enter it in these
steps.
Note: These instructions use Internet Explorer as an example browser.
1. Start Internet Explorer on a computer that is using the same network as your product.
2. Type your product's IP address into the address bar and press Enter.
3. Click More Information.
4. Click Go on to the webpage (not recommended).
5. In the upper right corner of the screen, click Log in and enter the Administrator password.
6. Click on the Scan tab, then click Contacts.
7. Select the number you want to use for the contact you are adding and click Edit.
8. Do one of the following:
• To create a contact for scanning to email, select Email as the Type setting.
• To create a location for scanning to a network folder or FTP, select Network Folder (SMB) or FTP
as the Type setting.
Note: You cannot change the Type option after registration is complete. If you want to change the
type, delete the destination and then register again.
9. Enter the following information as necessary for your contact:
• Name: The name to display in your product's contact list.
• Index Word: Enter a word to identify this entry when searching for it (up to 30 characters). This
field is optional.
• Assign to Frequent Use: If you want to identify the contact as a frequently used address, select
On. This makes it quicker to select the contact when you scan.
• Email Address: For an email contact, the contact's email address.
• Save to: For a network folder or FTP location, the network path to the shared folder.
Enter the folder path name in one of the following formats depending on the Type setting you
selected:
• Network Folder (SMB): \\host name\folder name

112
• FTP: ftp://host name/folder name
• FTPS: ftps://host name/folder name
• WebDAV (HTTPS): https://host name/folder name
• WebDAV (HTTP): http://host name/folder name
• User Name and Password: Enter only if you have set up a password on your computer.
• Connection Mode: For FTP locations, select Passive Mode if there is a firewall between the
product and FTP server.
• Port Number: For FTP locations, enter the port number.
• Proxy Server Settings: Select whether or not to use a proxy server.
10. Click Apply.
After a moment, you see a message telling you that contact registration is complete.
11. Close your web browser.
Parent topic: PC-Free Scanning with ScanWay
Related tasks
Registering Contacts for Email, Network, or FTP Scanning - Control Panel
Determining the Product's IP Address
Accessing the Web Config Utility
Scanning to a Network Folder or FTP Server
You can scan an image and save it to a specified network folder or FTP server using your product's
control panel. You can either enter the folder path directly on the product's control panel or select a
folder from the Contacts list. Make sure to configure a network folder or FTP server before scanning. To
check the destination before scanning, select Settings > Scanner Settings, and enable the Confirm
Recipient setting.
Note: Make sure that the Date/Time and Time Difference settings are correct.
1. Place your original on the product for scanning.
2. Press the home button, if necessary.
3. Select Network Folder/FTP.
4. Do one of the following to enter a folder location:
• To select frequently used addresses, tap the icons displayed on the screen.

113
• To enter the folder path directly, select Keyboard > Communication Mode, and enter the folder
path in the Location (Required) field. Select other options, as necessary.
• To select a contact from the Contacts list, select Contacts, select a contact, and then select
Close. You can search for a folder from the Contacts list. Enter the search keyword into the box at
the top of the screen.
5. Select the Scan Settings tab, and select the desired settings.
6. Tap the Presets icon if you want to save your settings as a preset.
Note: Presets can be locked by an administrator. If you cannot access or change this setting,
contact your administrator for assistance.
7. Tap the icon and check the product's settings or make changes, if necessary.
8. Select the start icon to start scanning.
Your product scans your original and saves it in the selected location.
Parent topic: PC-Free Scanning with ScanWay
Related tasks
Creating a Shared Network Folder
Registering Contacts for Email, Network, or FTP Scanning - Control Panel
Registering Contacts for Email, Network, or FTP Scanning - Web Config
Selecting the Date and Time
Scanning to an Email
You can scan an original and email the scanned file directly from the product's control panel. You need
to configure the email server settings before you can scan to email. You can enter email addresses
directly on the product's control panel or select them from the Contacts list.
Note: Make sure the Date/Time and Time Difference settings are set correctly so the time stamps on
your emails are accurate.
1. Place your original on the product for scanning.
2. Press the home button, if necessary.
3. Select Email.
4. Select a destination.

114
5. Do one of the following:
• To select frequently used addresses, tap the icons displayed on the screen.
• To enter the email address directly, select Keyboard, enter an email address, and select OK.
• To select a contact from the Contacts list, select Contacts, select a contact or group, and then
select Close. You can search for a contact in the Contacts list by entering the search keyword into
the box at the top of the screen.
• To select a recently used contact, select History, select a contact, and then select Close.
Note: The number of recipients you selected is displayed on the right side of the screen. You can
send emails to up to 10 contacts and groups. If groups are included in the Contacts list, you can
select up to 200 individual addresses in total, taking addresses within the groups into account.
Select the address box at the top of the screen to display the list of selected addresses.
6. Select the Scan Settings tab, and select the desired settings.
7. Tap the Presets icon if you want to save your settings as a preset.
Note: Presets can be locked by an administrator. If you cannot access or change this setting,
contact your administrator for assistance.
8. Tap the icon and check the product's settings or make changes, if necessary.
9. Select the start icon to start scanning.
Your product scans your original and sends the scanned file to the recipient's email address.
Parent topic: PC-Free Scanning with ScanWay
Related tasks
Entering Characters on the LCD Screen
Configuring Email Server Settings
Registering Contacts for Email, Network, or FTP Scanning - Control Panel
Registering Contacts for Email, Network, or FTP Scanning - Web Config
Registering an Email Server
Scanning Using Presets
Selecting the Date and Time
Related topics
Loading Originals

115
Scanning to the Cloud
You can use the control panel to send your scanned files to a destination that you have registered with
Epson Connect.
Note: Make sure to set up your product using Epson Connect before using this option.
1. Place your original on the product for scanning.
2. Press the home button, if necessary.
3. Select Cloud.
Note: You must register your product with Epson Connect to select a destination.
4. Tap the + icon at the top of the screen to select a destination.
5. Change any of the displayed settings on the Basic Settings tab as necessary.
6. Select the Advanced tab to view and change additional scan settings, if necessary.
7. Tap the Presets icon if you want to save your settings as a preset.
Note: Presets can be locked by an administrator. If you cannot access or change this setting,
contact your administrator for assistance.
8. Tap the icon and check the product's settings or make changes, if necessary.
9. Select the start icon to start scanning.
Your product scans your original and saves the scanned file to the selected destination.
Parent topic: PC-Free Scanning with ScanWay
Related tasks
Scanning Using Presets
Setting Up Epson Connect Services
Related topics
Loading Originals
Scanning to an External USB Device
You can scan an original and save the scanned image to an external USB device.
1. Place your original on the product for scanning.
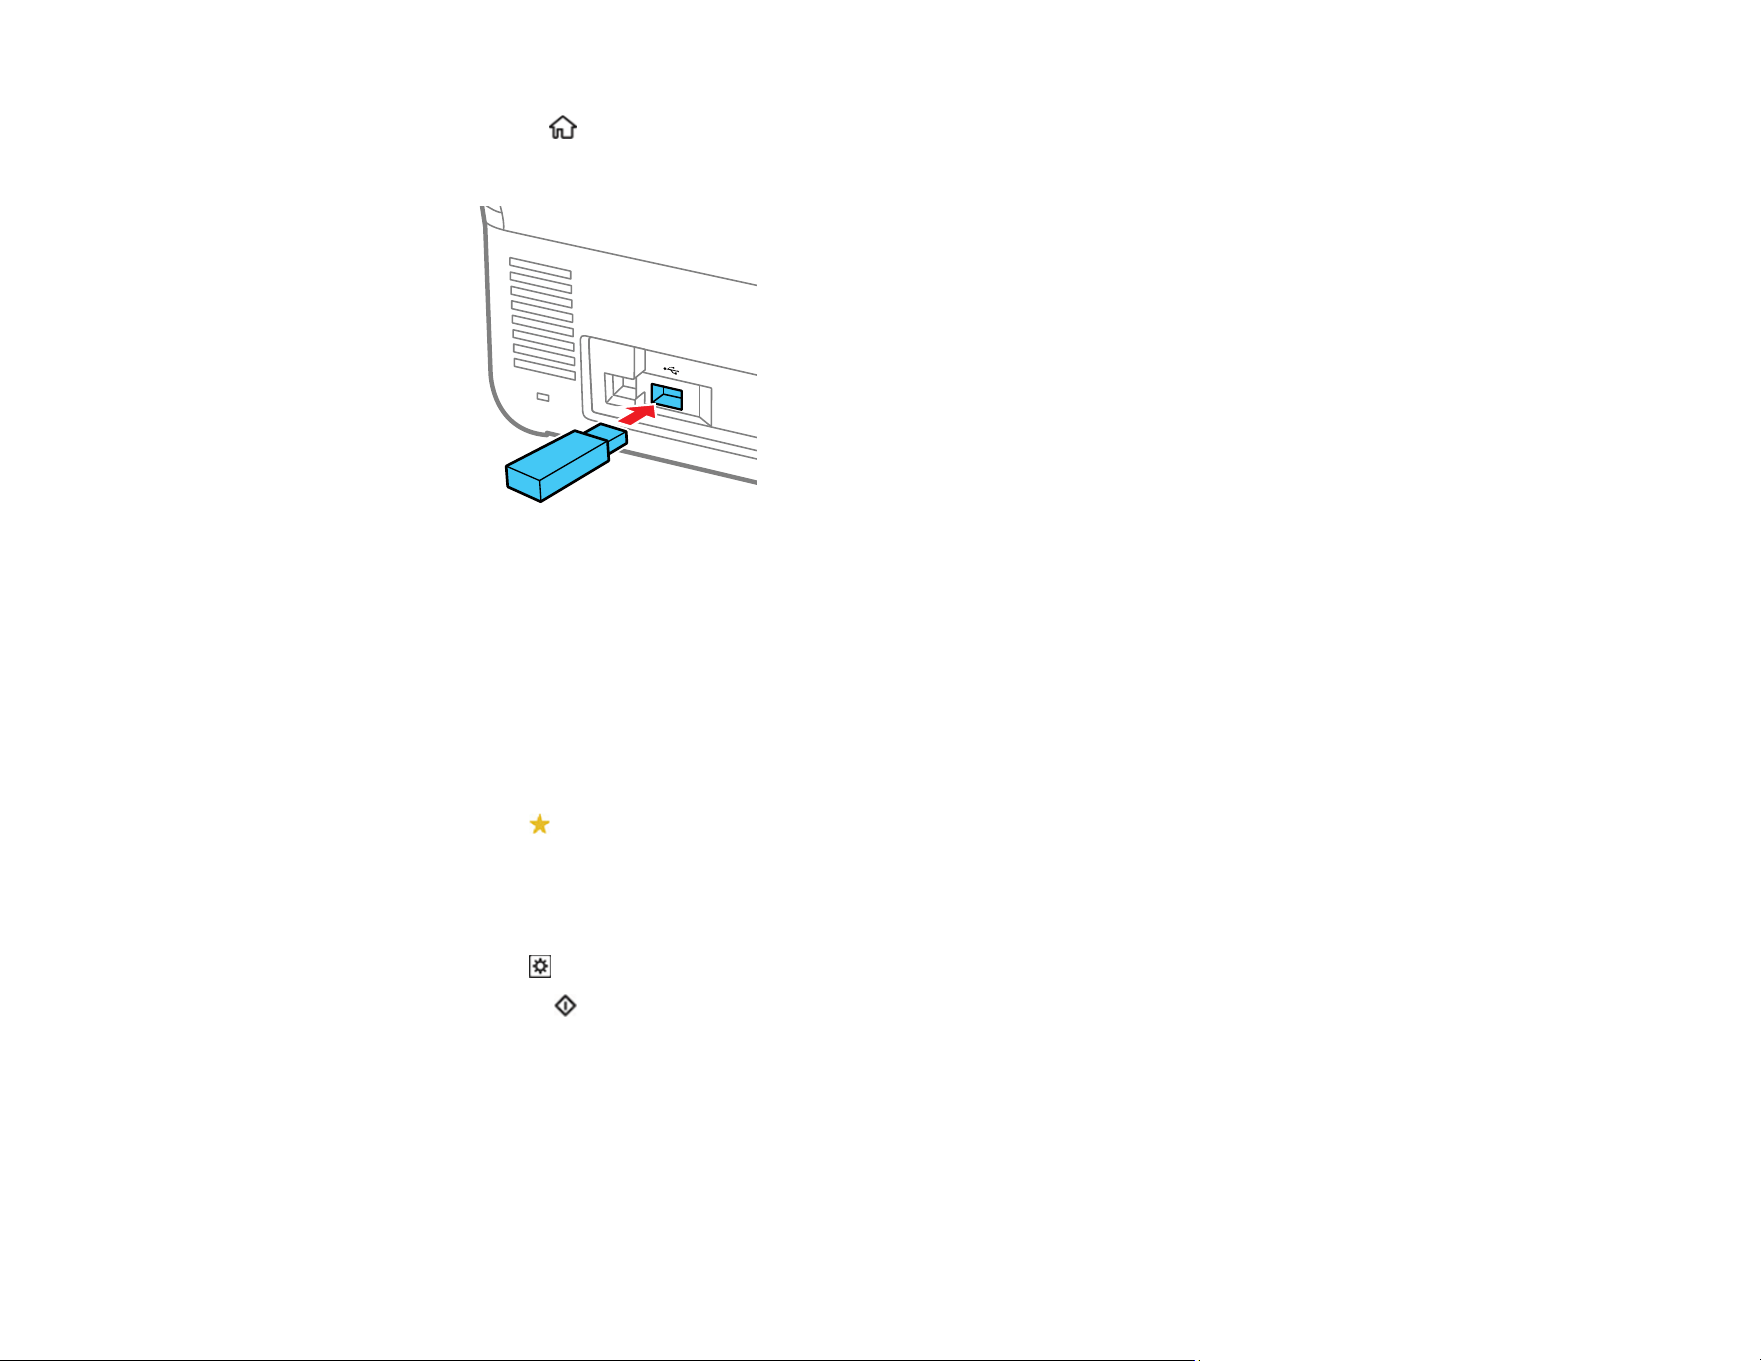
116
2. Press the home button, if necessary.
3. Insert a USB device into the product's external interface USB port.
Note: Your USB device must meet the following maximum capacity specification: 2 TB (formatted in
FAT, FAT32, or exFAT). Devices with security settings (such as password or encryption), or those
requiring a dedicated driver cannot be used.
4. Select USB Drive on the product's control panel.
5. Change any of the displayed settings on the Basic Settings tab as necessary.
6. Select the Advanced tab to view and change additional scan settings, if necessary.
7. Tap the Presets icon if you want to save your settings as a preset.
Note: Presets can be locked by an administrator. If you cannot access or change this setting,
contact your administrator for assistance.
8. Tap the icon and check the product's settings or make changes, if necessary.
9. Select the start icon to start scanning.
Your product scans your original and saves the scanned file to the external USB device.
Parent topic: PC-Free Scanning with ScanWay
Related tasks
Scanning Using Presets
117
Related topics
Loading Originals
Control Panel Scanning Options
Select the options you want to use for scanning.
Note: Not all options or settings may be available, depending on the Scan to option selected.
Option Available settings Description
Image Type Color/Grayscale/B&W Select to scan images in 24-bit color, 8-bit gray,
or monochrome; adjust the sensitivity to
determine whether the original is grayscale or
monochrome when scanning a non-color original
Color/Black & White Select to scan images in 24-bit color or
monochrome
Color/Grayscale Select to scan images in 24-bit color or 8-bit gray
File Format PDF (Single Page) Select whether to save all originals as one file
(multi-page) or save each original separately
(single page)
You can also select the Compression Ratio
and PDF Settings.
PDF (Multi Page)
PDF/A (Single Page)
PDF/A (Multi Page)
TIFF (Single Page) Select for scanned files that you can print from a
device. Multi Page TIFF documents are scanned
in black and white.
TIFF (Multi Page)
Scanning Side Binding(Original) Select the binding direction of the original
Double-Sided Select when scanning 2-sided originals
Resolution 200dpi Select if the scanned image will be displayed on
the screen or emailed
300dpi Select when using Optical Character
Recognition (OCR) or creating a text searchable
PDF
600dpi Select when printing using a printer or sending
by fax
118
Option Available settings Description
Original Size Crop Margins for Size
"Auto"
Adjust the cropping area when selecting Auto
Detect
Scan laminated card Select when scanning laminated originals;
transparent areas around the edges are also
scanned
Text Enhancement Emphasize light letters /
Remove background
Select to set the level of correction between text
and background
Remove spot noise Select to remove black dots in the background of
the original that cannot be removed by lightening
the background
Rotation Varying degrees Select the rotation angle depending on the
original you want to scan
Density Varying levels Adjust the lightness or darkness of scanned
images
Remove Background Varying levels Select the darkness of the background
Remove Shadow Off Erase the shadows that appear in the center of a
document when scanning a book (Center) or the
shadows that appear around a document when
scanning thick paper (Frame)
On
Correct Document
Skew
Off Correct skew in the scanned image
On
Skip Blank Pages Off Select to skip blank pages when scanning; if the
result is not what you expected, adjust detection
level
Note: Some pages may be incorrectly detected
as blank pages. This feature is not available
when scanning double-sided originals that are
stitched.
On
119
Option Available settings Description
Automatic Feeding
Mode
On (Full-Auto) Select to start scanning originals automatically
when they are loaded in the ADF; you can scan
originals continuously by adding documents in
the ADF.
On (Semi-Auto) Select to start scanning the first original
automatically when it is loaded in the ADF; click
the Start Scanning button to scan the next
original.
Detect Double Feed Various sizes Select Length to detect a double feed by the
length; when the length of the next original
scanned is different from the first, a double feed
is detected
File Name — Enter a prefix, the date, and the time to the file
name for your scanned file
Clear All Settings — Restore scan settings to their factory default
Parent topic: PC-Free Scanning with ScanWay
Setting Up a WSD Port (Windows 7)
You can scan to a networked Windows computer using WSD (Web Services for Devices). You must first
set up a WSD port on your Windows 7 system (the port is set up automatically on Windows 11, Windows
10, and Windows 8.x).
Before you set up a WSD port, make sure you installed your product software, and connected your
product and computer to the same network.
1. Turn on your product.
2. Click and select Computer.
3. On the left side of the window, select Network.
4. Locate your product on the Network screen, right-click it, and select Install.
5. When you see the User Account Control screen, click Continue.
Note: If you see an Uninstall screen, click Uninstall and repeat these steps as necessary.

120
6. When you see the message Your device is ready to use in the Windows taskbar, click the
message.
7. On the Driver Software Installation screen, make sure your product is listed as Ready to use. Then
click Close.
8. Click and select Devices and Printers.
9. Make sure that an icon appears for your product's name on the network.
When you use WSD, select your product name to scan over the network.
Adding a WSD Scan Device
Scanning Using WSD - Windows Only
Parent topic: Starting a Scan
Adding a WSD Scan Device
Depending on your environment, you may need to add a WSD scan device on your computer.
The following steps use Windows 10 as an example. The steps may differ depending on your
environment.
1. Turn on your product, if necessary.
2. Open the start menu and select Settings > Devices > Printers & scanners.
3. Select Add a printer or scanner.
4. Select your product and click Add device.
Note: If you do not know the device name of your product, you can check the name on the product's
control panel (select Settings > Network Settings > Network Status, and then select the active
connection method status to check the Device Name).
Your product is added to the device list.
If you want to change the WSD scan event, click the device you added, and then click Manage >
Scanner properties > Properties > Events.
To add a WSD scan device from the Windows control panel, select Control Panel > Hardware and
Sound > View devices and printers, and then click Add a device.
Parent topic: Setting Up a WSD Port (Windows 7)

121
Scanning Using WSD - Windows Only
You can scan originals to a computer from the product control panel using WSD (Web Services for
Devices) for network scanning in Windows.
Note: To use this feature on Windows 7, you must first set up WSD on the computer. See Windows help
for instructions.
1. Make sure you installed the product software and connected the product to your computer or
network.
2. Place your original on the product for scanning.
3. Press the home button, if necessary.
4. Select WSD.
5. Select a computer.
6. Select the start icon.
7. Follow the on-screen instructions when the WSD Scan Device screen is displayed on your
computer.
Parent topic: Setting Up a WSD Port (Windows 7)
Related tasks
Setting Up a WSD Port (Windows 7)
Scanning Using Presets
You can select a registered preset and use it to scan images.
1. Press the home button, if necessary.
2. Do one of the following:
• Select Presets on the home screen, and select a setting from the list.
• Select the Presets icon on the Scan Settings menu, select Load Presets, and then select a
preset from the list.
• If you added the preset icon to the home screen, select the icon.
3. If you see a loading confirmation screen, select Close.
Note: If you enabled the Quick Send setting for the selected preset, loading is skipped and
scanning starts immediately.

122
4. Verify the settings for the selected preset and select the start icon to start scanning.
Parent topic: Starting a Scan
Related tasks
Registering Presets
Adding and Assigning Scan Jobs with Document Capture Pro - Windows
You can add scan jobs that contain specific scan settings and use the jobs when you scan from your
product control panel or the Job Scan option in Document Capture Pro. You can save up to 30 scan
jobs.
Note: Settings may vary depending on the software version you are using. Click the Help icon in
Document Capture Pro at any time for more information.
1. Do one of the following to start Document Capture Pro:
• Windows 11: Click , then search for Document Capture Pro and select it.
• Windows 10: Click and select Epson Software > Document Capture Pro.
• Windows 8.x: Navigate to the Apps screen and select Document Capture Pro.
• Windows (other versions): Click or Start, and select All Programs or Programs. Select
Epson Software > Document Capture Pro.
You see the Document Capture Pro window.
2. Select the Job Scan tab.

123
You see a screen like this:
3. Click the Job Settings button.
You see a screen like this:
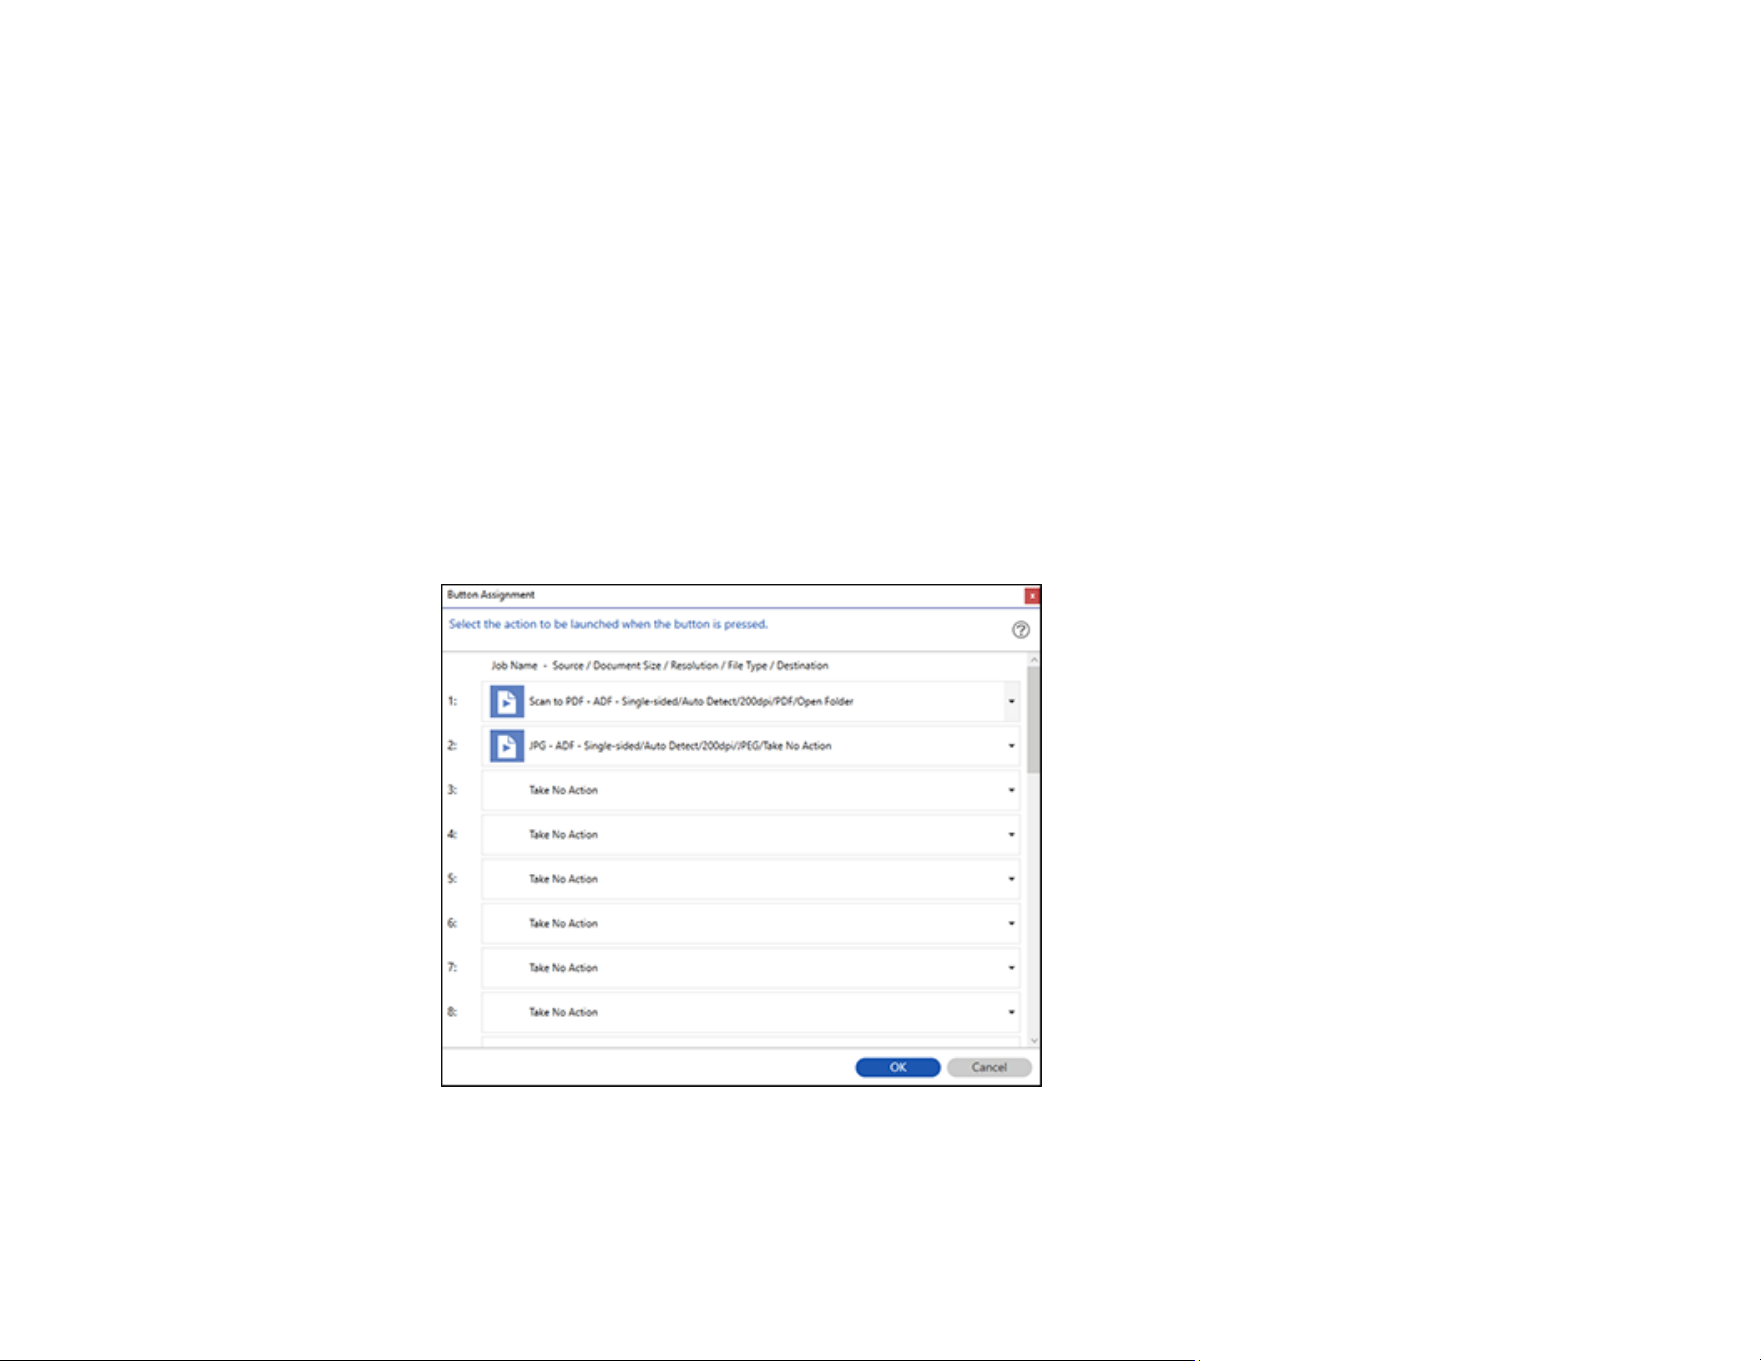
124
4. To add a scan job, click the New Job icon.
5. Enter a name for the new job, and select any settings as necessary from the following options:
• Scan: select the size, color, or resolution
• Save: select the file name, file type, or destination folder
• Index: enable the index setting and choose output options for an index file
• Send: select the destination for the scanned file, or choose to email or print the file
• Confirm/Test: select the job button icon and color, choose display settings, and run a test scan if
necessary
6. Click Save when you are finished.
The new job appears in the Job Scan window.
7. To assign a scan job to the product control panel, click the Button Assignment icon.
You see a screen like this:

125
8. Select the jobs that you want to assign to the product control panel using any of the pull-down
menus.
Note: The number of pull-down menus available may vary, depending on your product and any
connected options.
9. Click OK, then click Back.
You can now use the added scan jobs when you scan from the product control panel.
Parent topic: Starting a Scan
Adding and Assigning Scan Jobs with Document Capture - Mac
You can add scan jobs that contain specific scan settings and use the jobs when you scan from your
product control panel or Document Capture. You can save up to 30 scan jobs.
Note: Settings may vary depending on the software version you are using. See the Help menu in
Document Capture at any time for more information.
1. Start Document Capture on a computer connected to the product.
2. Click the Manage Job icon from the toolbar at the top of the window.
You see a window showing the current scan job list.
3. To add a scan job, click the + icon, enter a name for the new job, select settings as necessary, and
click OK.
You can now use the new scan job when you scan with Document Capture.
4. To assign a scan job to the product control panel, click the or settings icon at the
bottom of the window and click Event Settings.
5. Select the jobs that you want to assign to the product control panel using any of the pull-down
menus.
Note: The number of pull-down menus available may vary, depending on your product and any
connected options.
6. Click OK, then click OK again.
You can now use the added scan jobs when you scan from the product control panel.
Parent topic: Starting a Scan

126
Starting a Scan Using the Epson Scan 2 Icon
You can start the Epson Scan 2 program to select scan settings, scan, and save the scanned image to a
file.
Note: If you are using your Epson product with the Windows 10 S operating system, you cannot use the
software described in this section. You also cannot download and install any Epson product software
from the Epson website for use with Windows 10 S; you must obtain software only from the Windows
Store.
• Windows 11: Click , then search for Epson Scan 2 and select it.
• Windows 10: Click and select EPSON > Epson Scan 2.
• Windows 8.x: Navigate to the Apps screen and select Epson Scan 2.
• Windows (other versions): Click or Start, and select All Programs or Programs. Select EPSON
> Epson Scan 2 > Epson Scan 2.
• Mac: Open the Applications folder, open the Epson Software folder, and select Epson Scan 2.
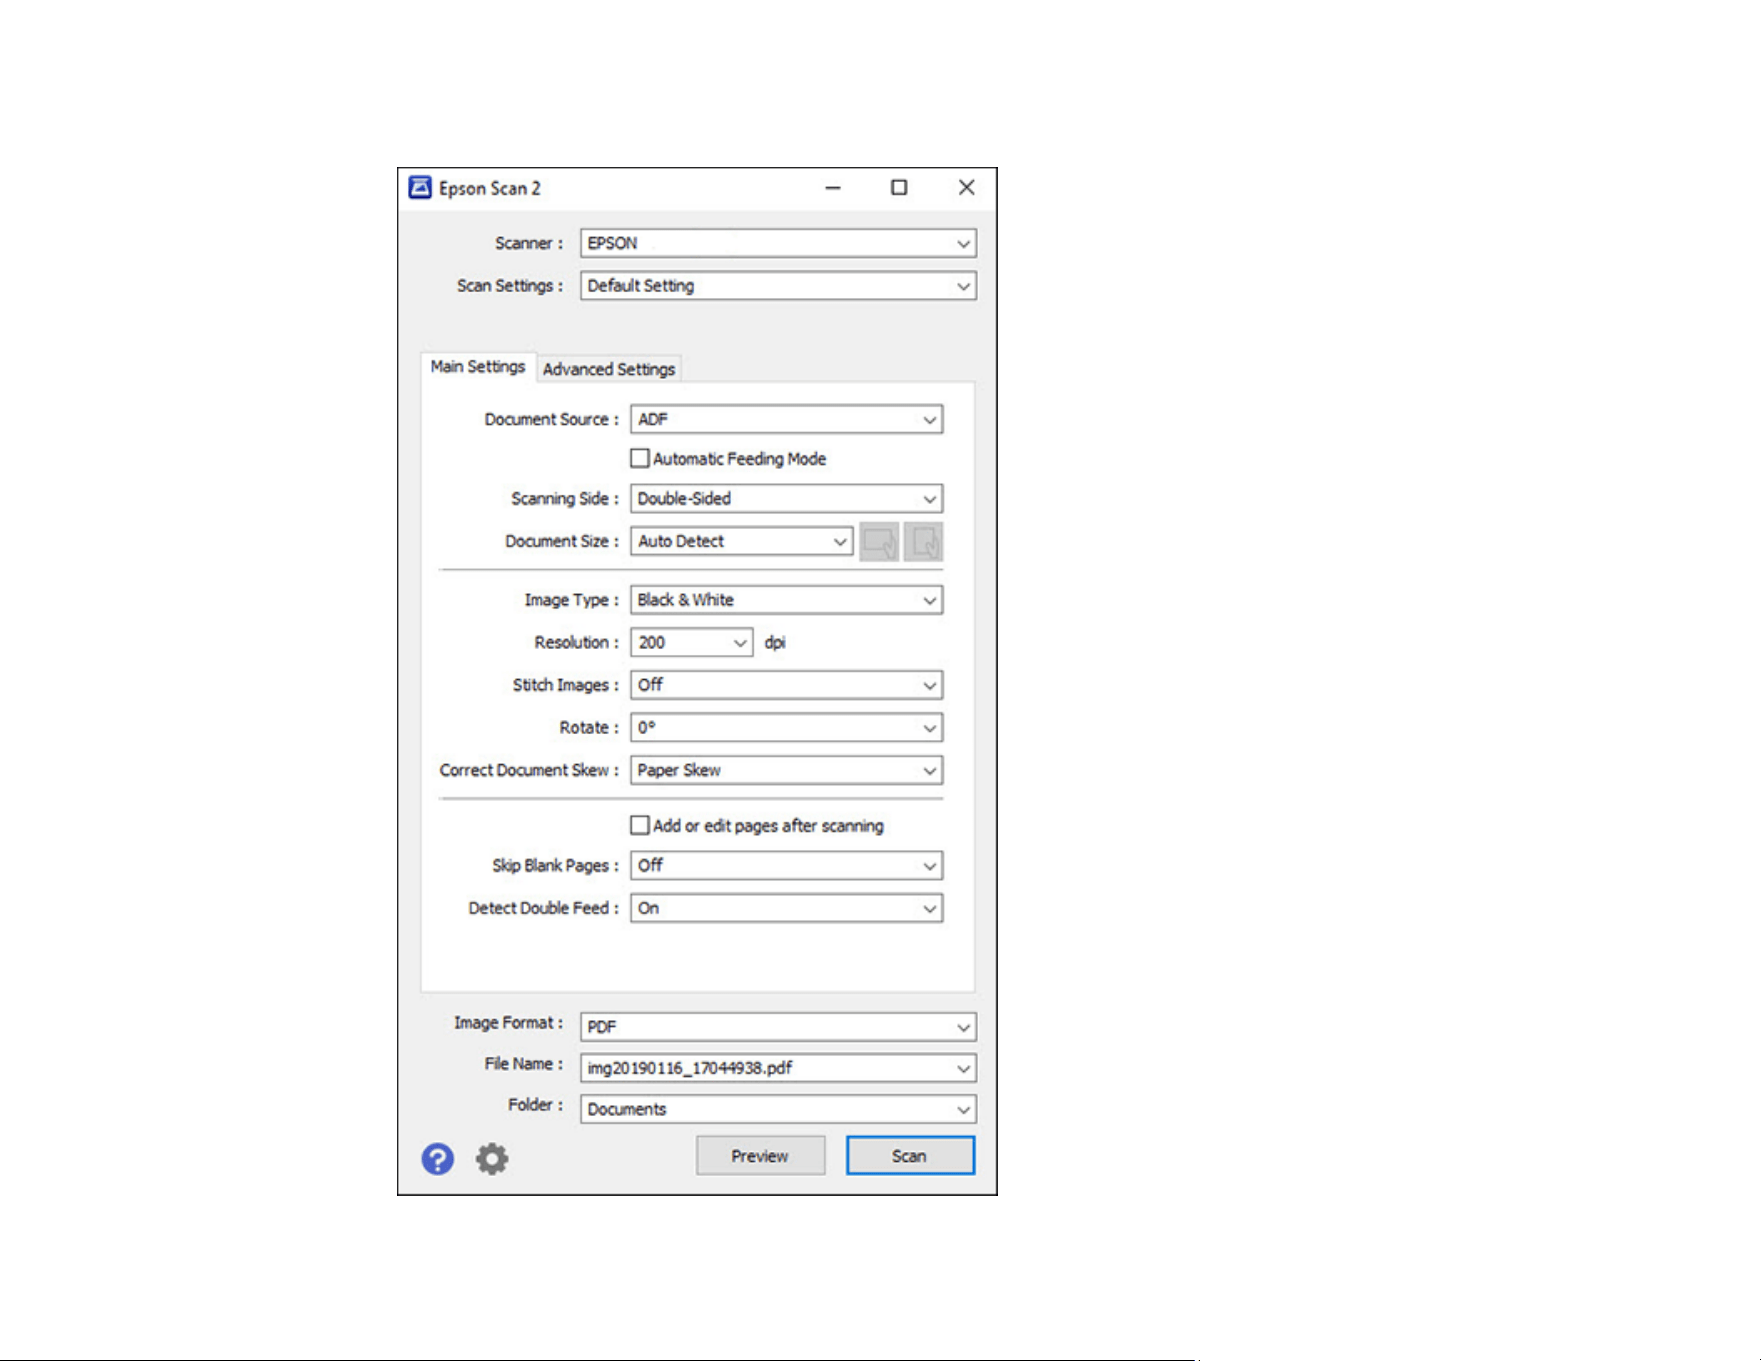
127
You see an Epson Scan 2 window like this:

128
Parent topic: Starting a Scan
Starting a Scan from a Scanning Program
You can start Epson Scan 2 from a TWAIN-compliant scanning program to select scan settings, scan,
and open the scanned image in the program.
Note: If you are using your Epson product with the Windows 10 S operating system, you cannot use the
software described in this section. You also cannot download and install any Epson product software
from the Epson website for use with Windows 10 S; you must obtain software only from the Windows
Store.
1. Open your scanning program and select its scanning option. (See your scanning program help for
instructions.)
2. Select your product.
Note: In certain programs, you may need to select your product as the "source" first. If you see a
Select Source option, choose it and select your product. With Windows, do not select a WIA option
for your product; not all scan functions will be available.
129
You see an Epson Scan 2 window like this:

130
Parent topic: Starting a Scan
Starting a Scan from a Smartphone or Tablet
You can use the Epson Smart Panel app to scan from a network scanner to an iOS or Android device
over a direct Wi-Fi connection.
Note: Epson Smart Panel does not support scanning with a carrier sheet, or scanning originals longer
than 15.5 inches (393.7 mm).
1. Download the Epson Smart Panel app from your device's app store or from Epson's website. See
the link below.
2. Place your original on the product for scanning.
3. Open the Epson Smart Panel app and select a scan menu on the home screen.
4. Follow the on-screen instructions to scan and save your original.
Note: If the size of your original does not appear in the list, select Auto.
Parent topic: Starting a Scan
Related tasks
Using the Epson Smart Panel Mobile App
Entering a User ID and Password for Scanning
If you enabled Access Control on your product, a user ID and password may be required to scan. You
can enter the user ID and password in Epson Scan 2.
Note: If you do not know the user ID or password, contact your administrator for assistance.
1. Start Epson Scan 2.
2. Make sure your product is selected, then select Settings from the Scanner drop-down list.
3. Select Access Control.
4. Enter your user name and password.
5. Click OK.
Parent topic: Starting a Scan

131
Scanning with Document Capture Pro or Document Capture
When you scan with Document Capture Pro (Windows) or Document Capture (Mac), the program
automatically saves your scanned file on your computer in the folder you specify. You can preview and
edit the scanned file, change the scanned file settings, and send to a destination if necessary.
Scanning with Simple Scan in Document Capture Pro - Windows
Scanning with Job Scan in Document Capture Pro - Windows
Scanning with Document Capture - Mac
Parent topic: Starting a Scan
Scanning with Simple Scan in Document Capture Pro - Windows
You can use the Simple Scan option in Document Capture Pro to quickly scan an original.
Note: Settings may vary depending on the software version you are using. Click the Help icon in
Document Capture Pro at any time for more information.
1. Load your original in the product.
2. Do one of the following to start Document Capture Pro:
• Windows 11: Click , then search for Document Capture Pro and select it.
• Windows 10: Click and select Epson Software > Document Capture Pro.
• Windows 8.x: Navigate to the Apps screen and select Document Capture Pro.
• Windows (other versions): Click or Start, and select All Programs or Programs. Select
Epson Software > Document Capture Pro.
You see the Document Capture Pro window.
Note: You may need to select your scanner from the list, if necessary.
3. Select the Simple Scan tab.
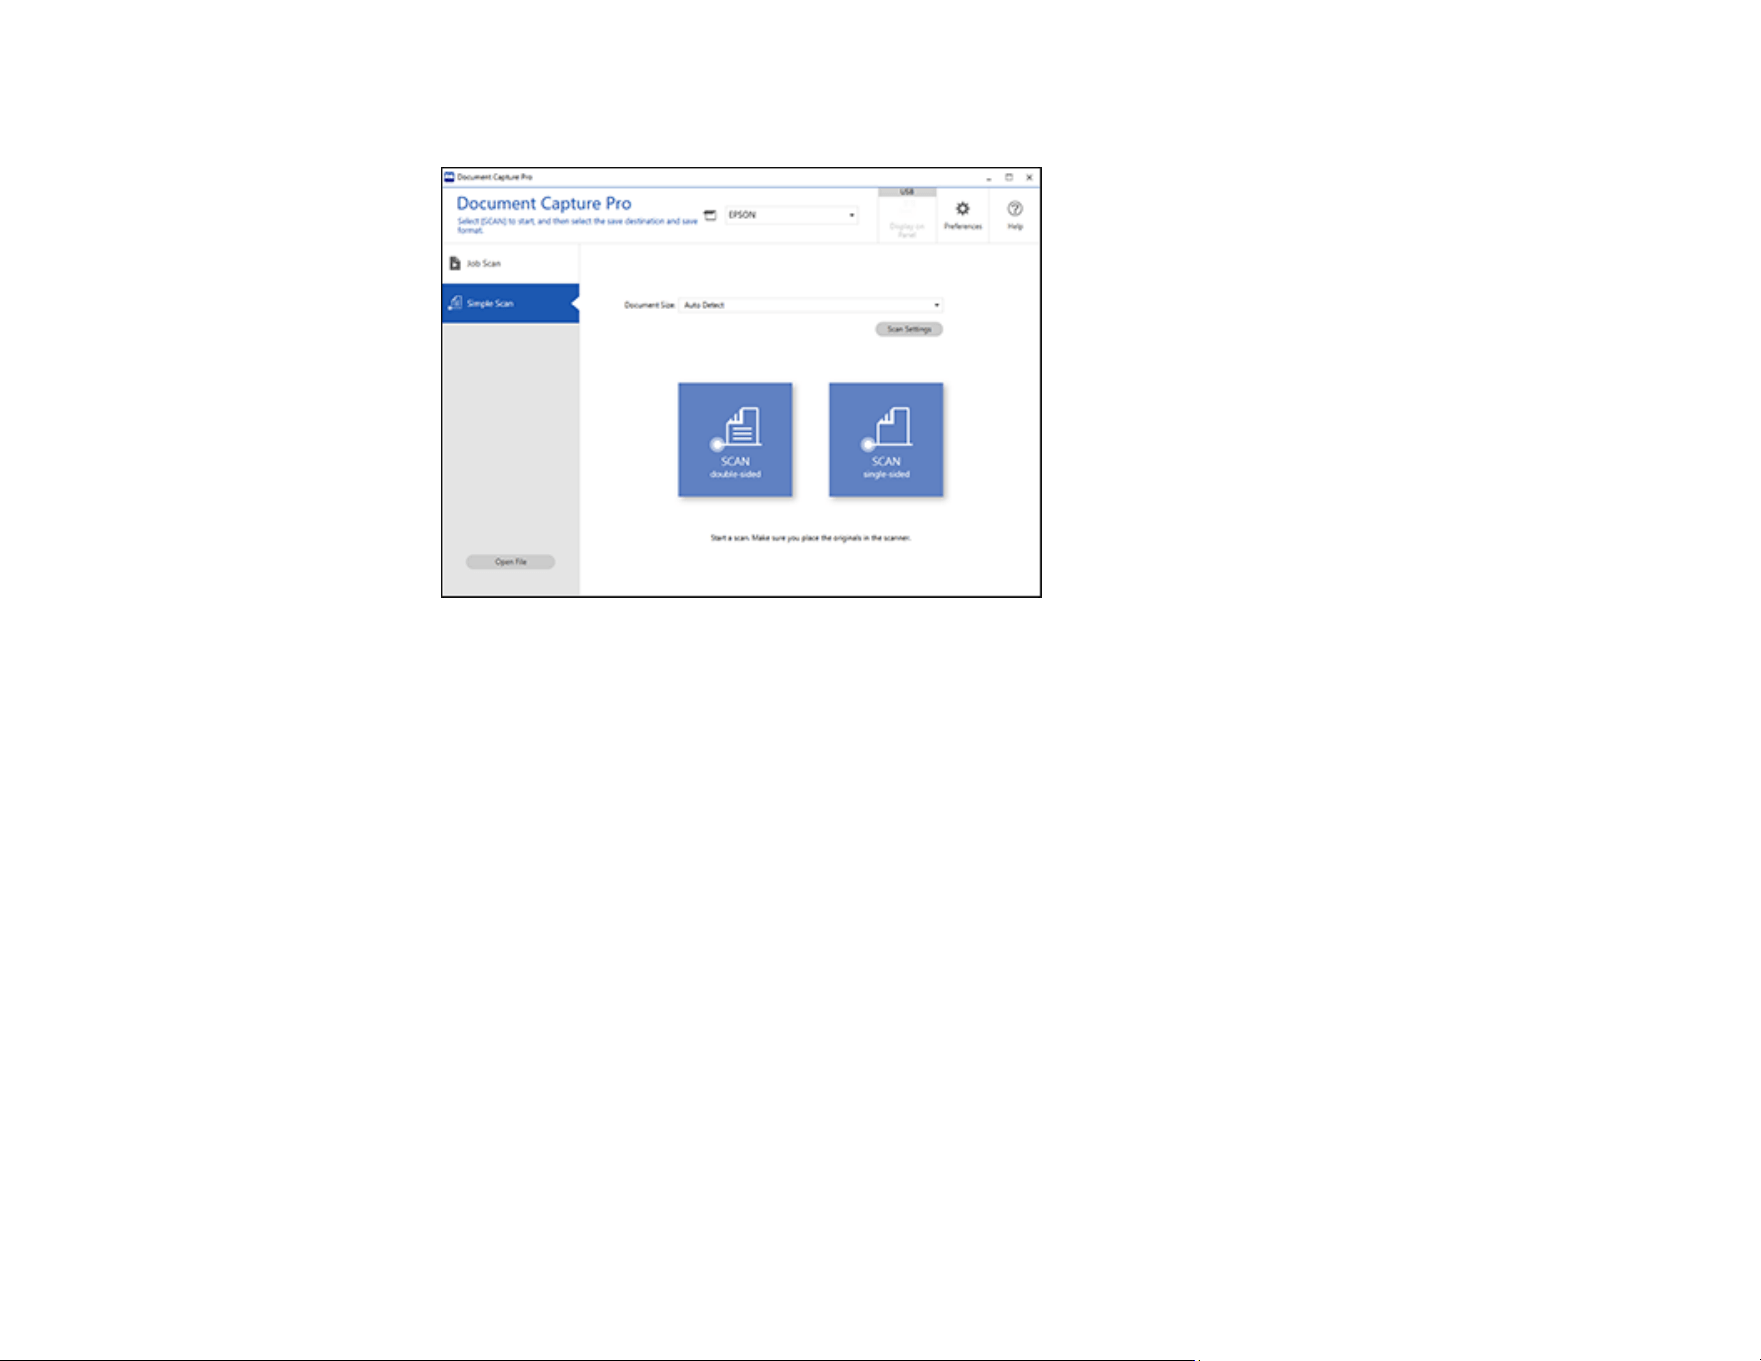
132
You see a window like this:
4. Select the size of your original from the Document Size menu.
5. If you want to change specific settings for the scan, click the Scan Settings button. Change any of
the settings as necessary and click OK. For additional settings, click the Detailed Settings button
on the Scan Settings screen.
6. Do one of the following:
• To scan both sides of an original, select SCAN double-sided.
• To scan the front side of an original, select SCAN single-sided.
Your product scans the original and the image appears in the Edit Scanned Results window.
7. Review and edit the scanned image as necessary and click Next when you are finished.
8. Select a destination for the scanned image, change any settings as necessary, and click Complete.
Note: If you are sending the scanned image to a server or cloud destination, you need to enter your
login information.
Parent topic: Scanning with Document Capture Pro or Document Capture

133
Scanning with Job Scan in Document Capture Pro - Windows
You can create scan jobs in Document Capture Pro and use them to quickly scan originals and save
them to various destinations.
Note: Settings may vary depending on the software version you are using. Click the Help icon in
Document Capture Pro at any time for more information.
1. Load your original in the product.
2. Do one of the following to start Document Capture Pro:
• Windows 11: Click , then search for Document Capture Pro and select it.
• Windows 10: Click and select Epson Software > Document Capture Pro.
• Windows 8.x: Navigate to the Apps screen and select Document Capture Pro.
• Windows (other versions): Click or Start, and select All Programs or Programs. Select
Epson Software > Document Capture Pro.
You see the Document Capture Pro window.
Note: You may need to select your scanner from the list, if necessary.
3. Select the Job Scan tab.
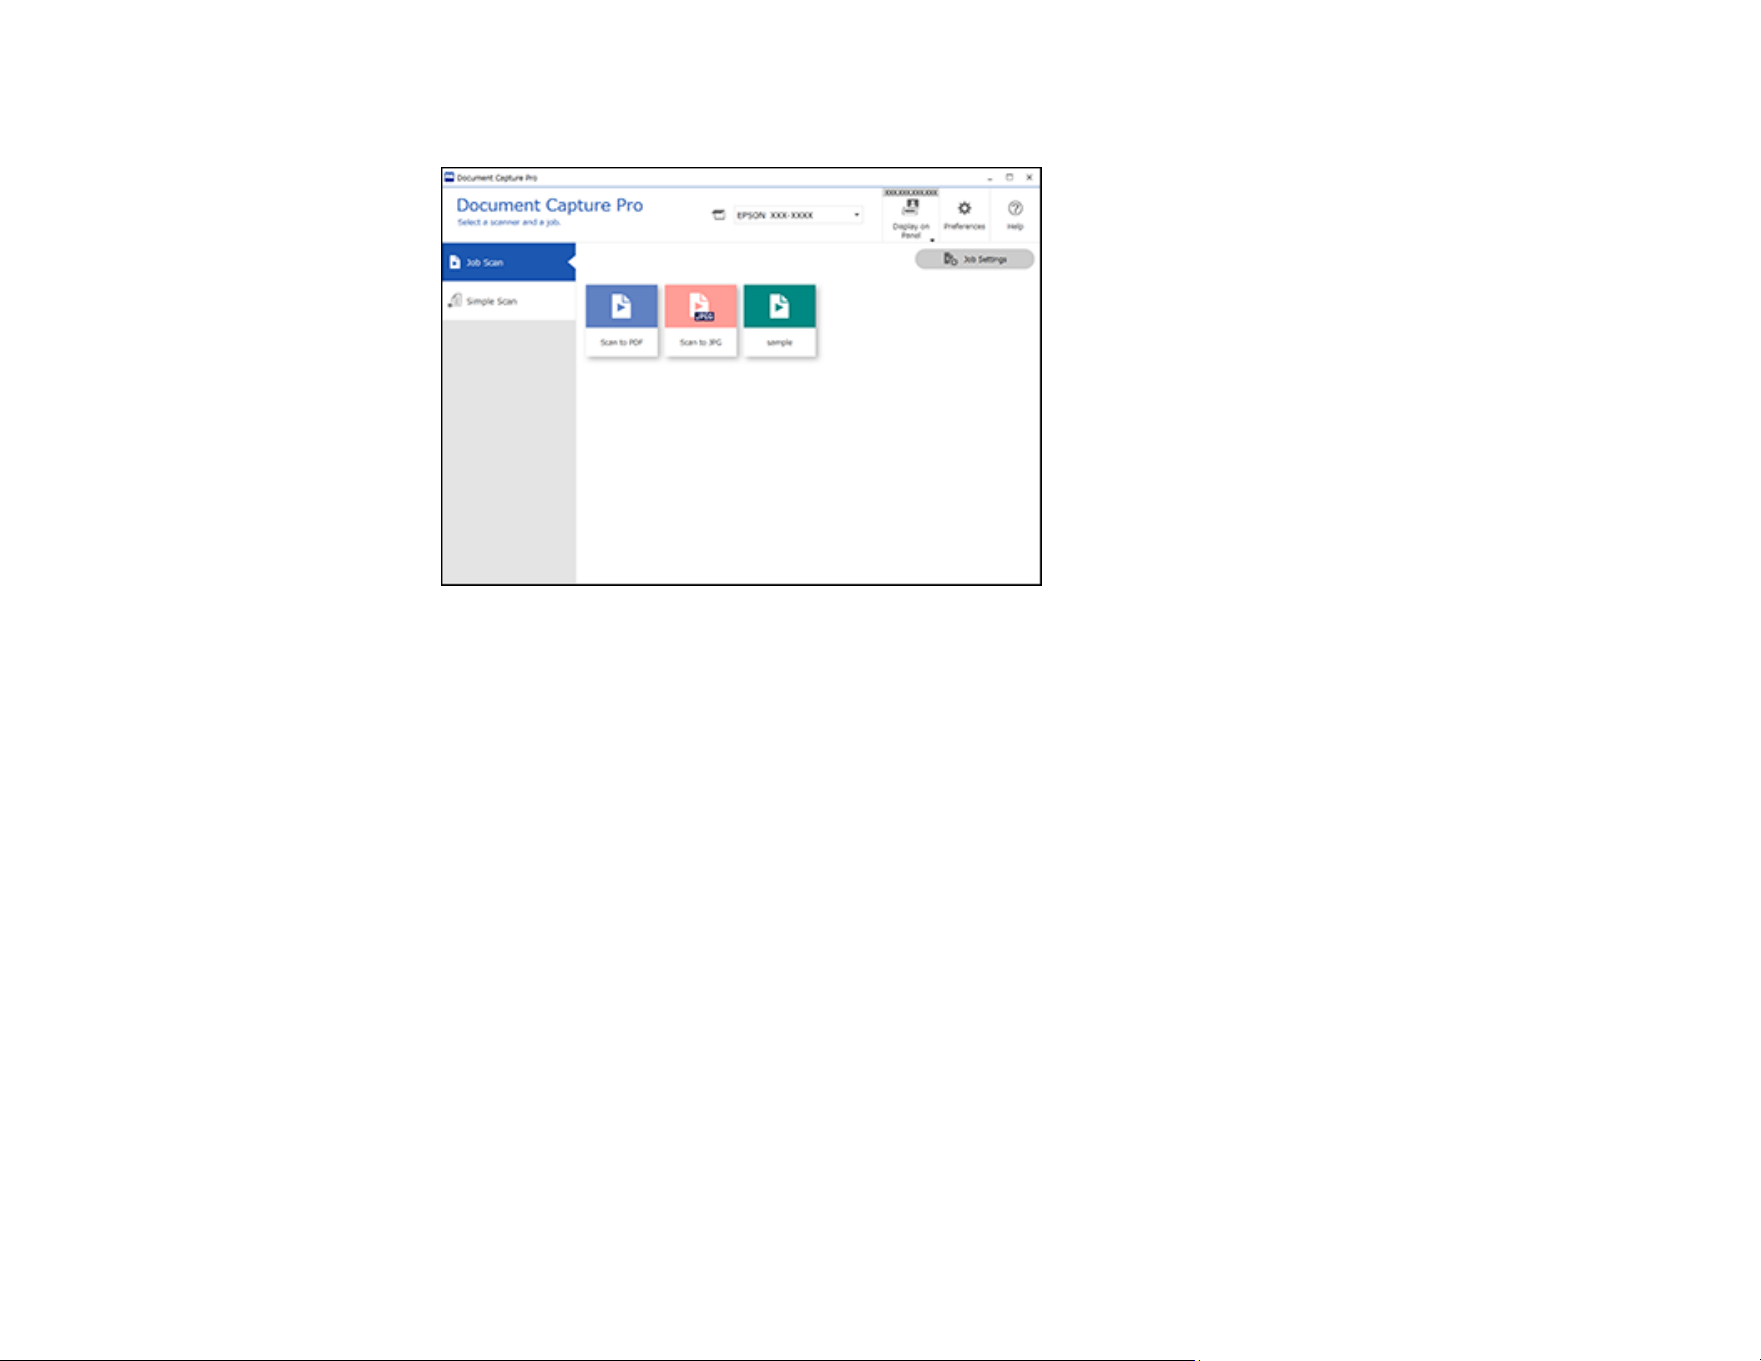
134
You see a window like this:
4. Select one of the scan jobs (or click Job Settings to create a new scan job).
The product scans the loaded original and saves it according to the job settings.
5. Depending on the settings for the scan job you selected, you may be able to view and edit the pages
before saving them. If so, click Complete when finished.
The scanned image is saved according to the job settings.
Parent topic: Scanning with Document Capture Pro or Document Capture
Scanning with Document Capture - Mac
When you scan with Document Capture, the program automatically saves your scanned file on your
computer in the folder you specify. You can select settings, preview, and change the scanned file
settings as necessary. Document Capture also allows you to send the scanned file directly to an email
address or printer, or upload it to a server or cloud destination.
Note: Settings may vary depending on the software version you are using. See the Help menu in
Document Capture at any time for more information.
1. Load your original in the product.
2. Open the Applications folder, open the Epson Software folder, and select Document Capture.
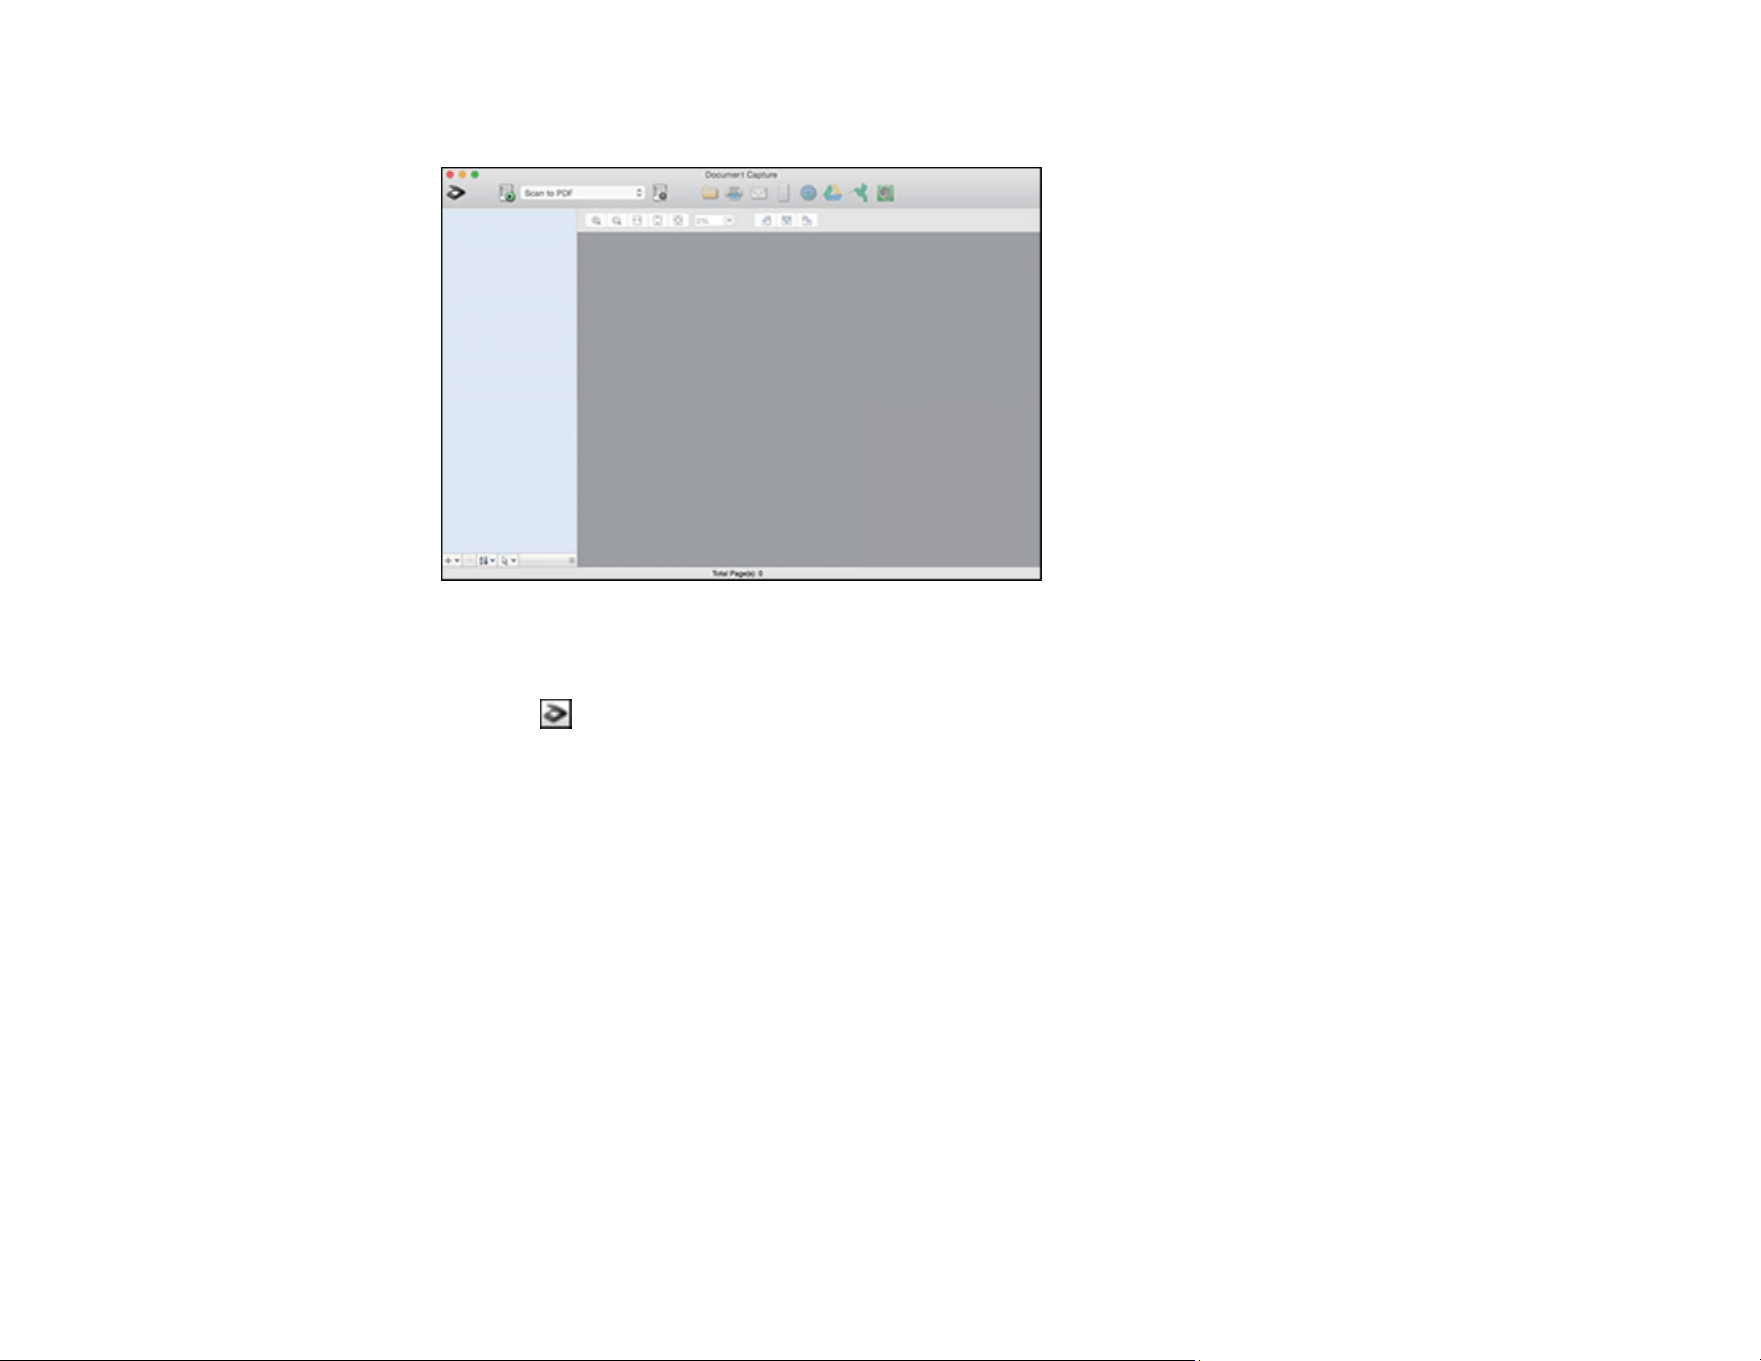
135
You see a window like this:
Note: You may need to select your product from the drop-down list.
3. Click the scan icon.
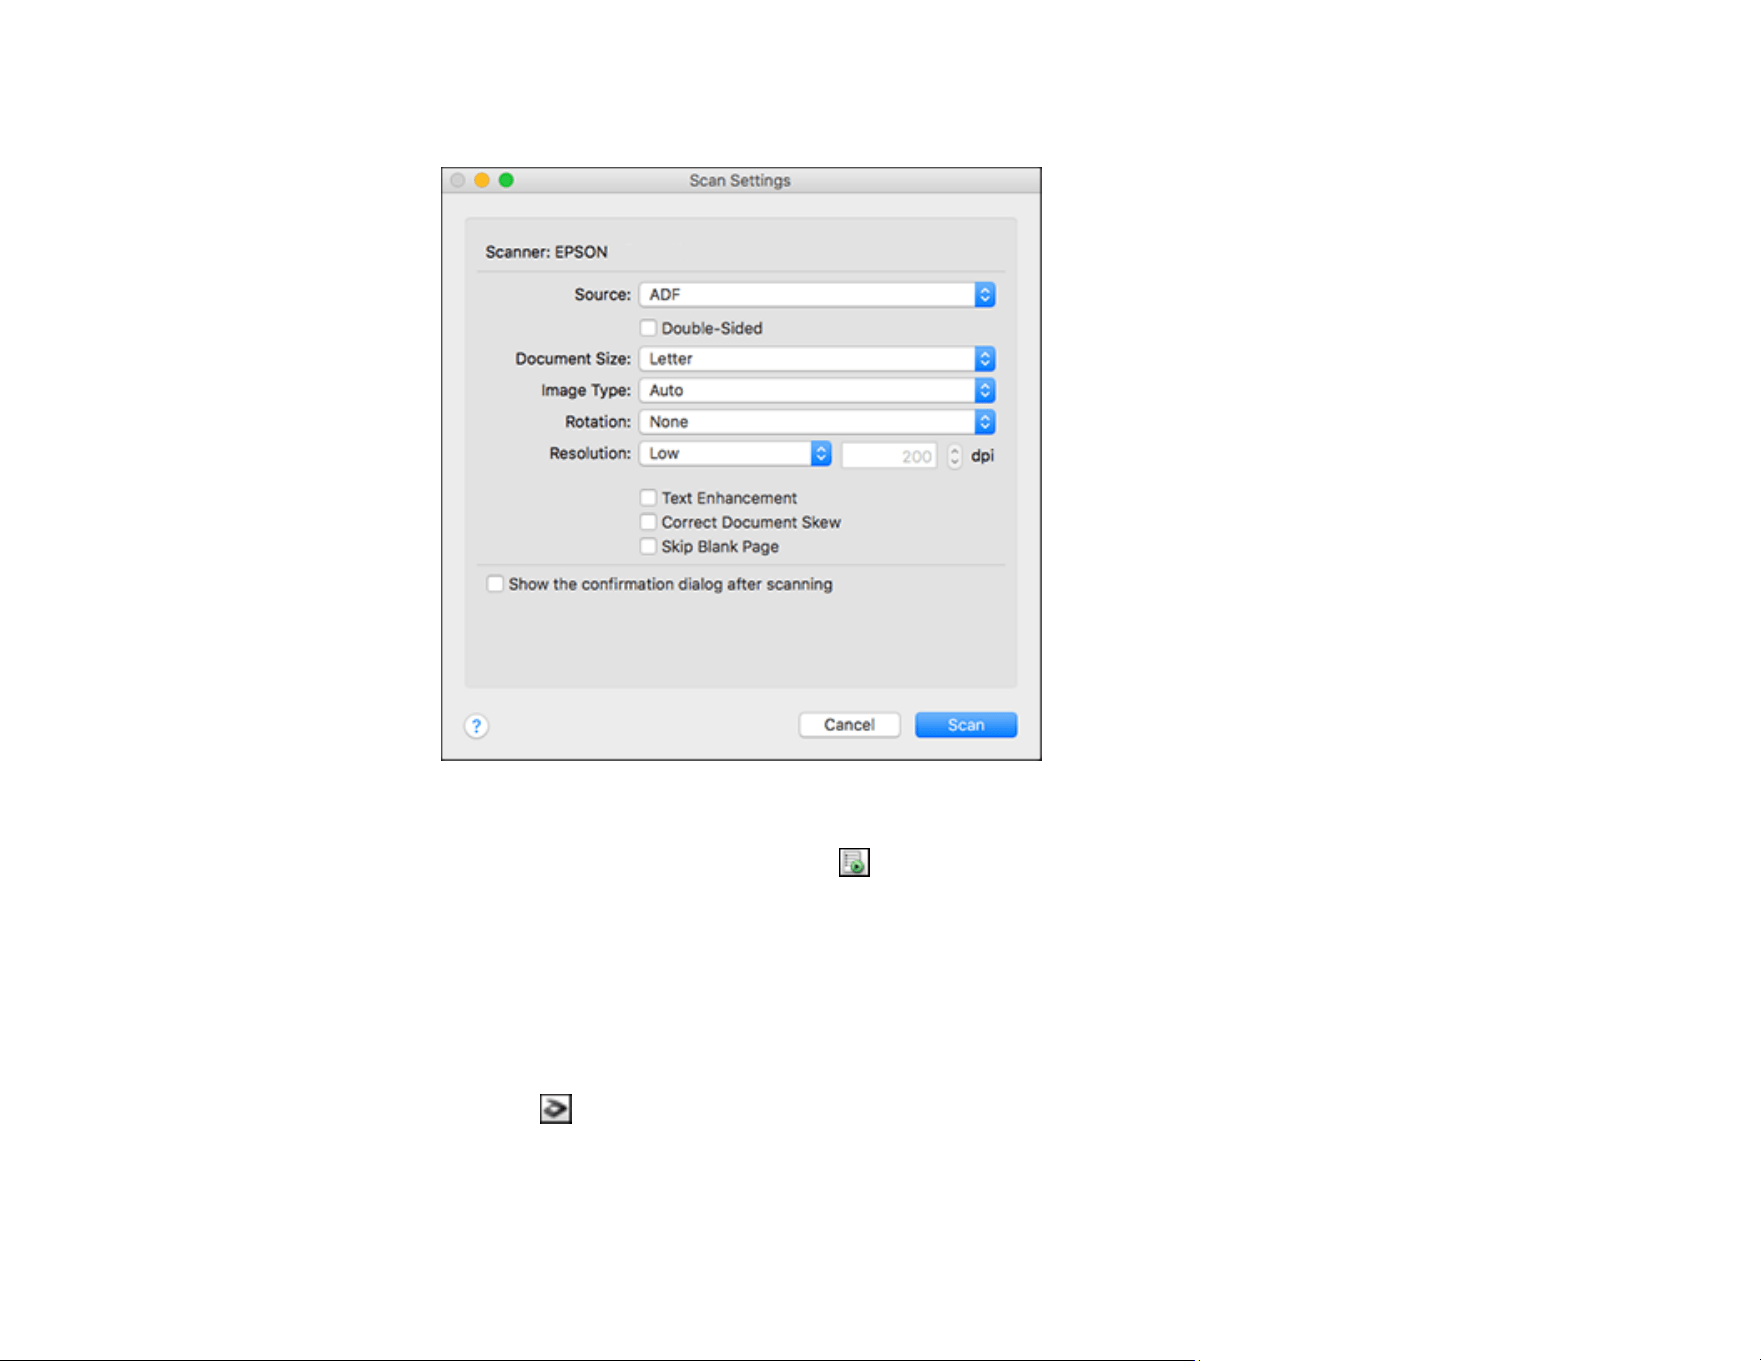
136
You see a window like this:
Note: If you want to use a scan job that you created instead, select it from the Job list in the
Document Capture window, click the Start Job button, and skip the rest of these steps.
4. Select any displayed scan settings you want to use.
Note: See the Help information in Document Capture for details.
5. If you want to select detailed scan settings, close the Scan Settings window, open the Scan menu at
the top of the Mac desktop, and select Displays the EPSON Scan Setup Screen.
6. Click the Scan icon and select any detailed scan settings you want to use from the Epson Scan 2
window.
7. Click Scan.
137
You see a preview of your scan in the Document Capture window.
Note: You may have to close the Epson Scan 2 window to view your scan in the Document Capture
window.
8. If you would like to scan additional originals and add them to the current captured images, click the +
icon, select Acquire from Scanner, and repeat the previous steps.
9. Check the scanned images and edit them as necessary.
10. Click one of the destination icons to choose where to send your scanned files. (If you cannot see all
of the icons, click the arrow next to the icons.) Change any settings as necessary.
Note: If you are sending the scanned image to a server or cloud destination, you need to enter your
login information. If you want to use Evernote as the destination, download the Evernote application
from the Evernote Corporation website and install it before scanning.
11. Depending on the destination you chose, click OK, Print, or Send to complete the operation.
Parent topic: Scanning with Document Capture Pro or Document Capture
Scanning in Epson Scan 2
Epson Scan 2 gives you access to basic and advanced scanning features. You can scan your document
and save the scanned image in various file formats in your operating system's Documents or My
Documents folder, or open it in your scanning program. You can preview the scanned image and select
or change settings as necessary.
1. Load your original in the product.
2. Start Epson Scan 2.

138
You see this window:

139
Note: The Document Source setting is automatically set to ADF for your product.
3. If you want to scan different size originals by loading them into the input slot one by one, check the
Automatic Feeding Mode checkbox and click Scan. Scanning begins as soon as you load each
original.
Note: Select Settings > Document Source Settings > Automatic Feeding Mode Timeout
(minutes) and enter a value to set the number of minutes before the scanner exits Automatic
Feeding Mode.
4. Select the Scanning Side setting that matches the sides of the original that you want to scan.
5. Select the Document Size setting that matches the size of your original, or select Auto Detect to
have Epson Scan 2 automatically detect the size. You can select Customize to enter a custom size,
if necessary.
6. Click on one of the orientation icons, if applicable.
7. Select your original image type and how you want it scanned as the Image Type setting, or select
Auto to have Epson Scan 2 automatically detect the image type.
8. Select the Resolution setting you want to use for your scan.
9. Select any of the additional settings that you want to use on the Main Settings tab.
10. Click the Advanced Settings tab and select any settings that you want to use.
11. To see a preview of your scan with the settings you selected, click the Preview button.
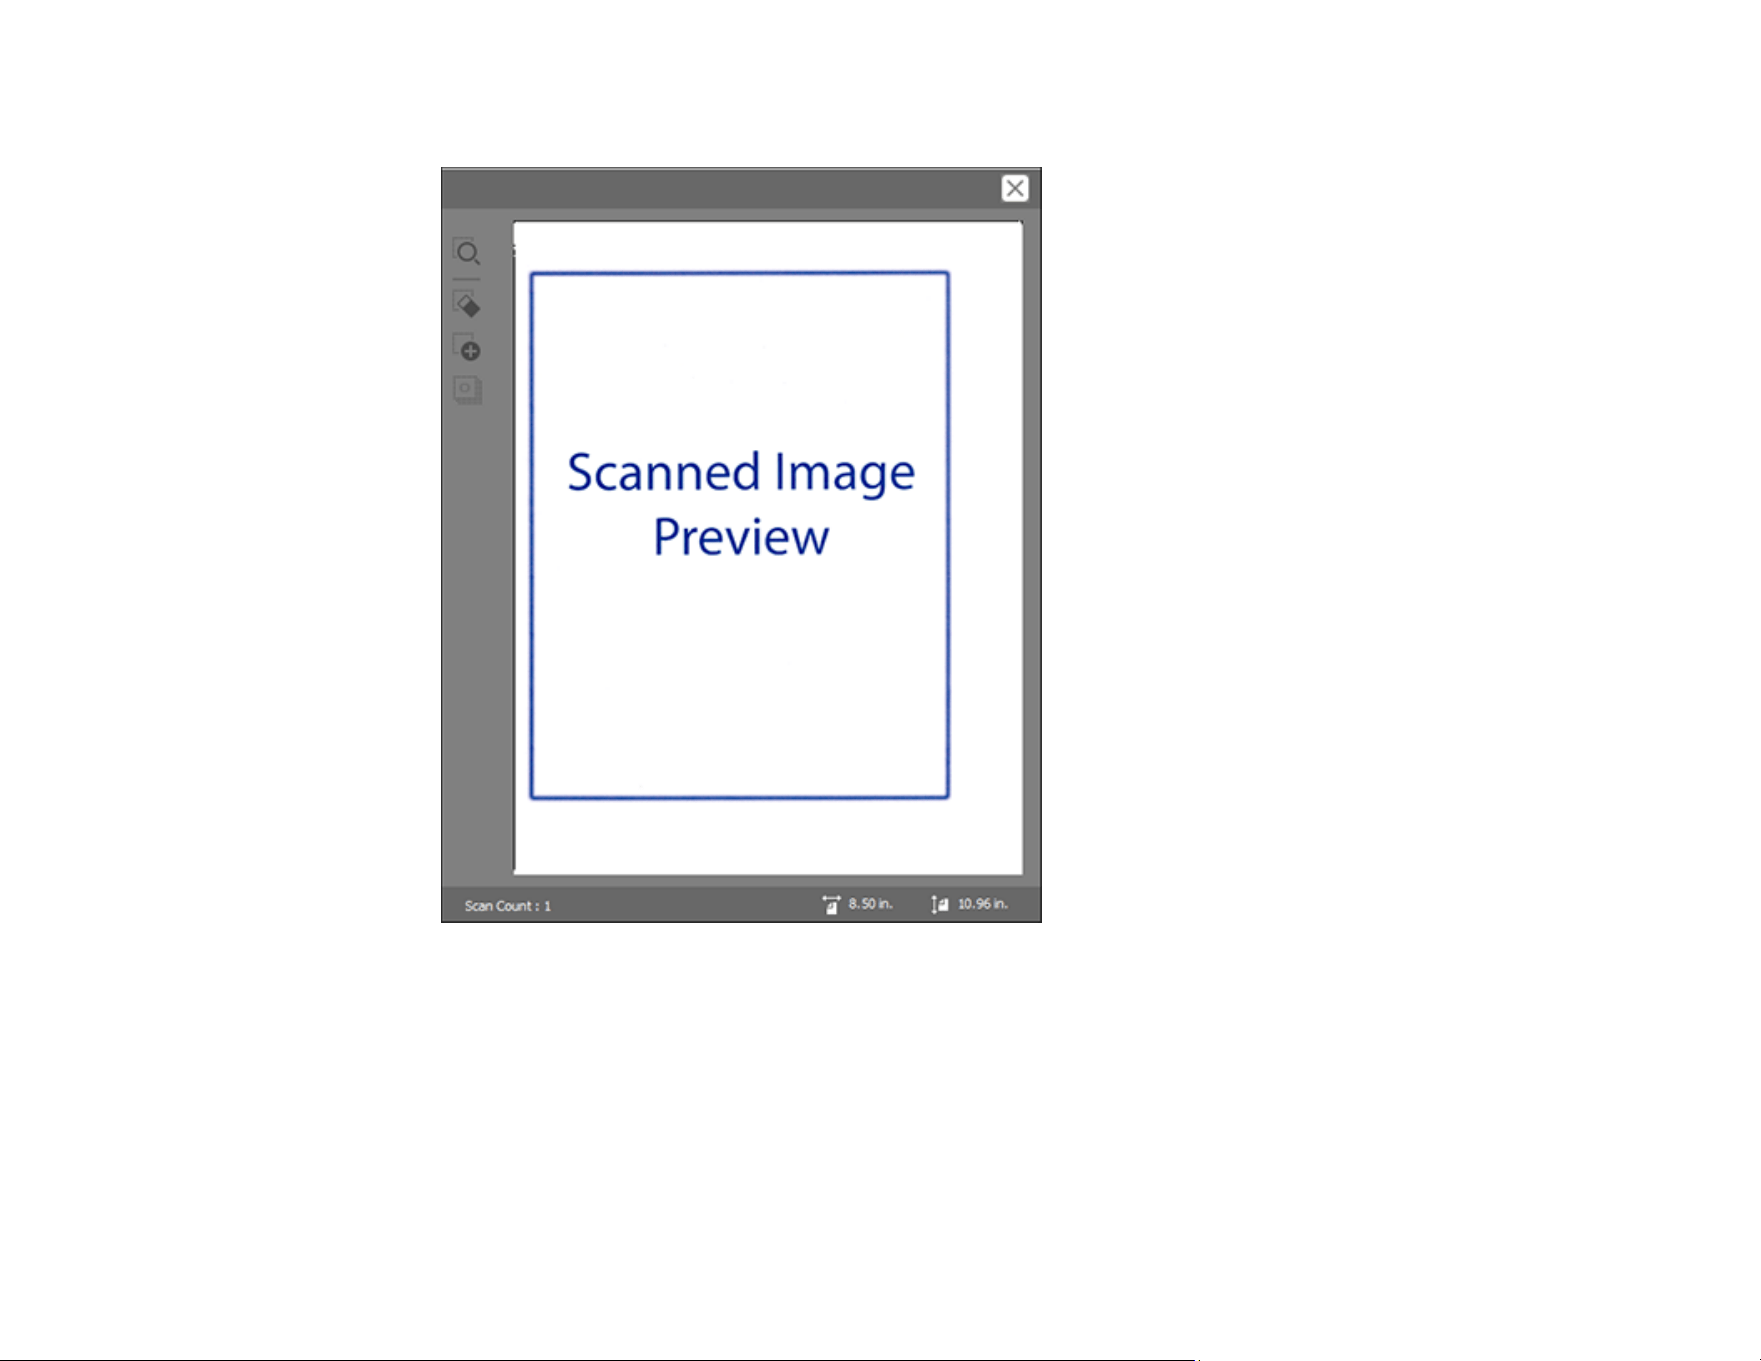
140
Epson Scan 2 previews your original and displays the results in the Epson Scan 2 window.
12. Reinsert your original into the ADF.
13. If scanning an original in a carrier sheet or other special original, see the link at the end of this
section for other setting requirements for special documents.
14. Select the format in which you want to save your scanned file as the Image Format setting. If
necessary, select Options and select any desired format options.
15. Select Settings to modify the file name settings. Enter the file name for your scanned file in the File
Name field.

141
16. Select the location in which you want to save your scanned file as the Folder setting. If necessary,
select Select to choose an alternate folder or create a new folder.
17. Click Scan.
The product scans your original and saves the scanned file in the location you specified.
18. If you selected the Automatic Feeding Mode setting, place your next original in the ADF for
scanning. When you finish scanning originals, click Finish.
Additional Scanning Settings - Main Settings Tab
Additional Scanning Settings - Advanced Settings Tab
Saving Scanned Documents as a Searchable PDF Using Epson Scan 2
Scanning Settings for Special Documents
Image Format Options
Scan Resolution Guidelines
Parent topic: Starting a Scan
Related topics
Loading Originals
Additional Scanning Settings - Main Settings Tab
You can select these additional scanning settings on the Epson Scan 2 Main Settings tab.
Stitch Images
When scanning double-sided originals, lets you lay out images from both sides of the original onto
one scanned page.
Rotate
Rotates the original image clockwise to the desired angle before scanning it. Select Auto to allow
your product to automatically rotate the image based on the orientation of the text (may take longer to
scan).
Correct Document Skew
Corrects skewed originals, image contents, or both.
Add or edit pages after scanning
Lets you add, remove, or edit the pages in a scan, including rotating pages and changing the page
order.
Note: To save multiple pages in a single file, you must select a file format that supports multiple
pages such as PDF or Multi-TIFF. If you select another file format, each scanned image or page is
saved as a separate file.

142
Skip Blank Pages
If the scanner detects marks from the other side of a blank page and adds the marks to the scanned
image, adjust this setting to prevent this.
Detect Double Feed
Detects a double-feed paper error in the ADF. If you are scanning an original envelope or plastic card,
select Off.
Parent topic: Scanning in Epson Scan 2
Additional Scanning Settings - Advanced Settings Tab
You can select these additional scanning settings on the Epson Scan 2 Advanced Settings tab. Not all
adjustment settings may be available, depending on other settings you have chosen.
Remove Background
Removes the background of the originals.
Text Enhancement
Sharpens the appearance of letters in text documents.
Auto Area Segmentation
Makes black and white images clearer and text recognition more accurate by separating the text from
the graphics.
Dropout
The scan will not pick up the color you select. This setting is available only if you select Grayscale or
Black & White as the Image Type setting.
Color Enhance
Enhances the shades of the color you select in the scanned image. This setting is available only if you
select Grayscale or Black & White as the Image Type setting.
Brightness
Adjusts the overall lightness and darkness of the scanned image.
Contrast
Adjusts the difference between the light and dark areas of the overall scanned image.
Gamma
Adjusts the midtone density of the scanned image.
Unsharp Mask
Makes the edges of certain image areas clearer. Turn off this option to leave softer edges.

143
Descreening
Removes the ripple pattern that might appear in subtly shaded image areas, such as skin tones. This
option improves results when scanning magazines or newspapers. (The results of descreening do not
appear in the preview image, only in your scanned image.)
Threshold
Adjusts the level at which black areas in text and line art are delineated, improving text recognition in
OCR (Optical Character Recognition) programs.
Edge Fill
Corrects shadowing around the edges of the image by filling the shadows with black or white.
Remove Punch Holes
Removes the shadows caused by holes on the edges of the original.
Parent topic: Scanning in Epson Scan 2
Saving Scanned Documents as a Searchable PDF Using Epson Scan 2
You can scan a document and save the text in a searchable PDF. In a searchable PDF, text is
recognized using Optical Character Recognition (OCR) and then embedded in the scanned original.
Note: The required Epson Scan 2 OCR Component is installed automatically when you install your
product software. If you install your product software programs individually, be sure to also install this
component if you want to perform OCR.
1. Load your original in the product for scanning.
2. Start Epson Scan 2.
3. Select your scan settings.
4. Click Preview and adjust the area you want to scan, if necessary.
5. Reload the ejected original in the scanner.
6. Select Searchable PDF as the Image Format setting.
7. Select Options from the Image Format list.
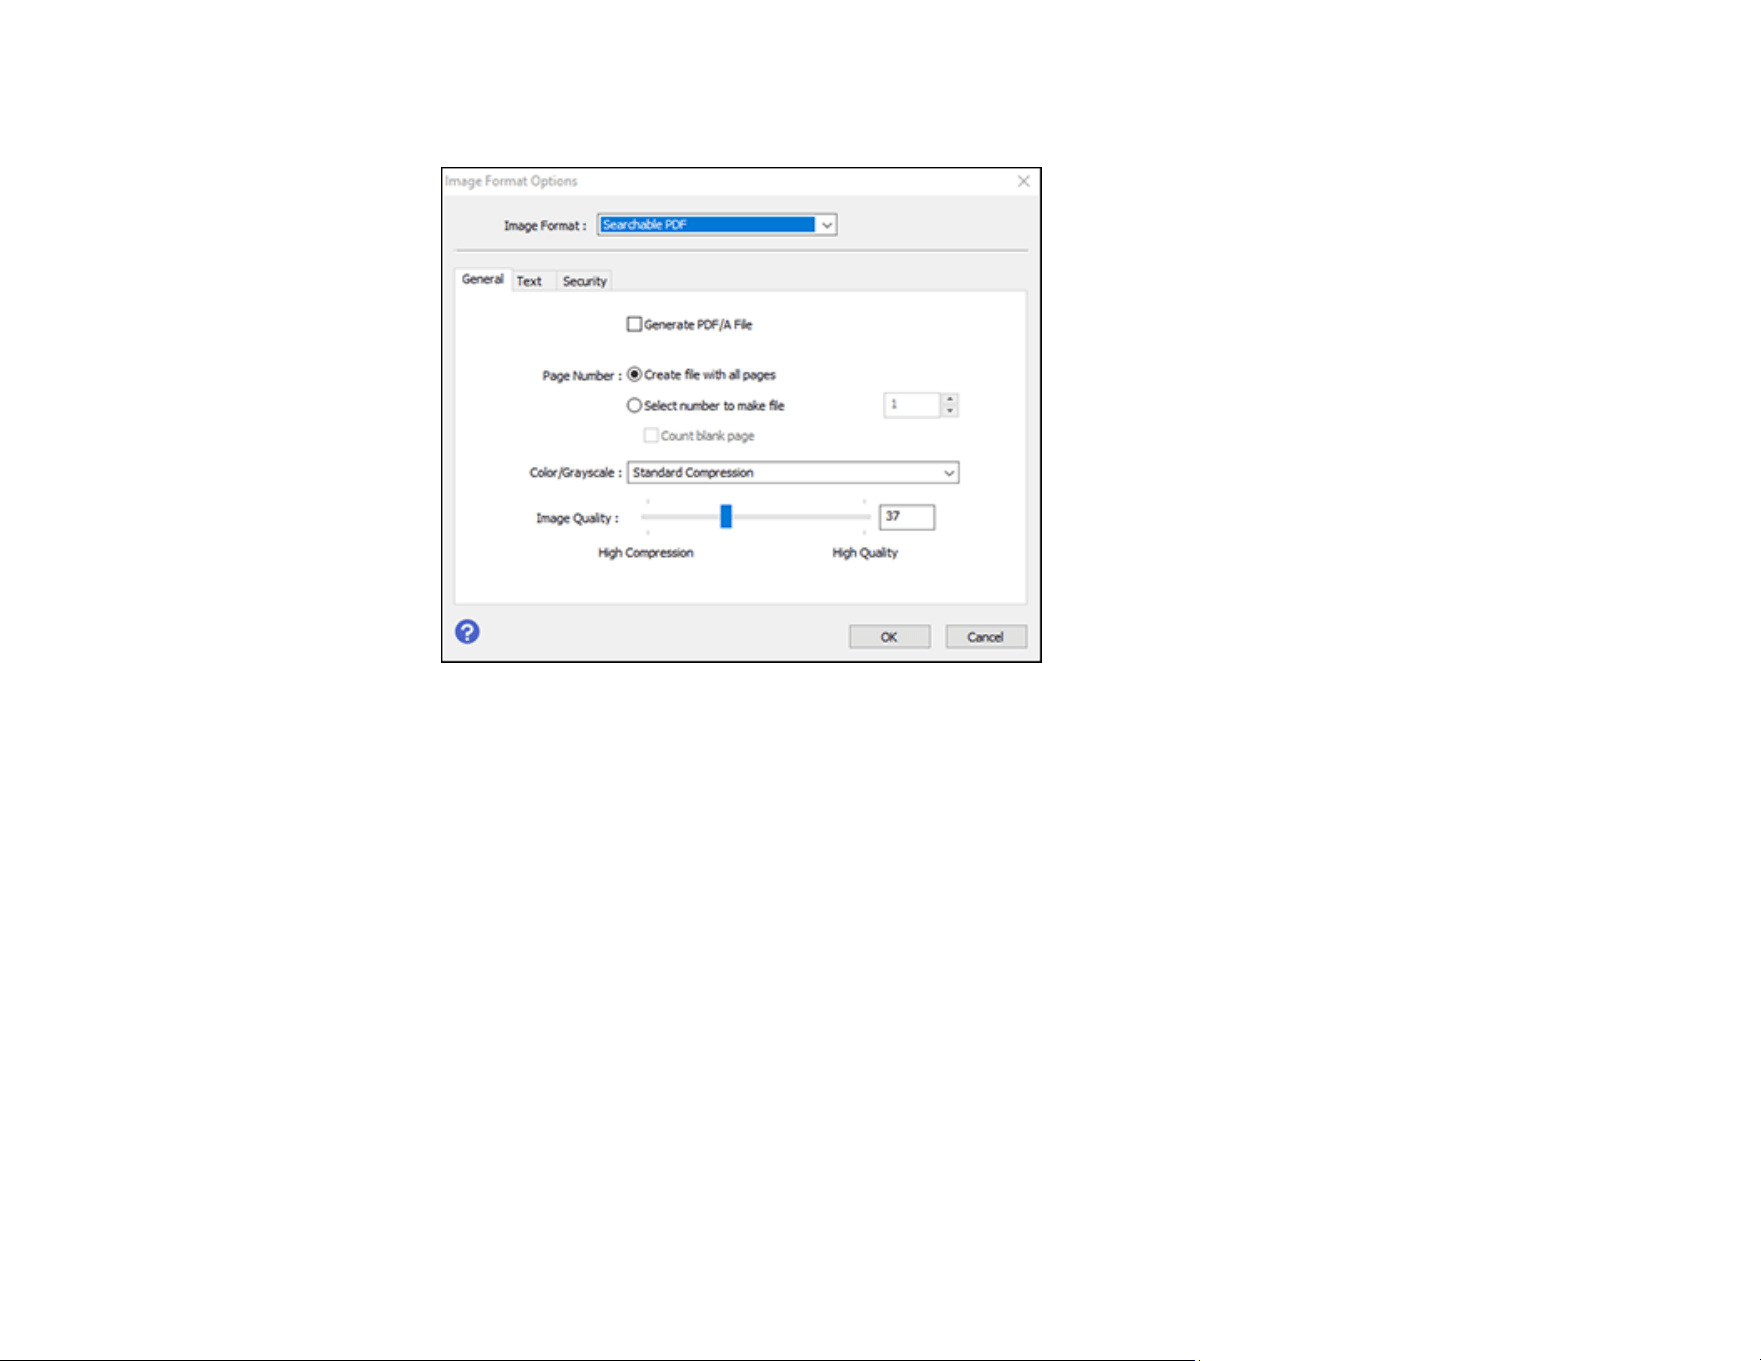
144
You see this window:
8. Select any of the options on the General tab.
9. Select the Text tab.
10. Make sure the language used in the document text is selected as the Text Language setting.
11. Select the Security tab if you want to add a password to the PDF or protect printing or editing
properties.
12. Click OK.
13. Confirm the File Name setting and select a Folder setting for your document.
14. Click Scan.
The scanned image is saved as a searchable PDF.
Parent topic: Scanning in Epson Scan 2
Scanning Settings for Special Documents
You need to select specific options on the Main Settings tab in Epson Scan 2 when scanning special
originals.

145
Note: When using Document Capture Pro, open the Epson Scan 2 screen by clicking the Detailed
Settings button on the Scan Settings screen.
Type of original Required settings
Envelope Select Off as the Detect Double Feed setting.
Plastic card Select Plastic Card as the Document Size setting or select
Off as the Detect Double Feed setting.
Carrier sheet If you select Auto Detect as the Document Size setting,
paper skew is automatically corrected even if the Correct
Document Skew setting is set to Off.
If you select a setting other than Auto Detect as the
Document Size setting, you can only use Contents Skew
as the Correct Document Skew setting. As paper skew is
not applied in this case, only contents skew is corrected
when you select the Paper and Contents Skew setting.
Large originals If the Document Size list does not contain the document
size you want to scan, select Customize to create a custom
size.
Long paper If the Document Size list does not contain the document
size you want to scan, select Customize to create a custom
size.
Laminated cards To scan any transparent areas around the edges of the
card, select Settings as the Document Size setting and
either select the Scan laminated card checkbox or create a
custom size.
Parent topic: Scanning in Epson Scan 2
Image Format Options
You can select different image formats and related options. For details on available options, click the ?
icon on the Epson Scan 2 Image Format Options window. Not all image formats have options.
BITMAP (*.bmp)
A standard image file format for most Windows programs.

146
JPEG (*.jpg)
An image format that lets you highly compress image data. However, the higher the compression, the
lower the image quality. (The TIFF format is recommended when you need to modify or retouch your
scanned image.)
PNG (*.png)
An image format that does not lose quality during editing.
TIFF (*.tif)
A file format created for exchanging data between many programs, such as graphic and DTP
software.
Multi-TIFF (*.tif)
A TIFF file format when multiple pages are saved to the same file, allowing you to edit the images
using a compatible program.
PDF (*.pdf)
A document format that is readable by Windows and Mac systems using Adobe Reader, Acrobat, or
other programs. You can save multi-page documents in one PDF file.
Searchable PDF (*.pdf)
A document format that is readable by Windows and Mac systems using Adobe Reader, Acrobat, or
other programs. You can save multi-page documents in one PDF file. Recognized text in the scanned
document can be searched.
Parent topic: Scanning in Epson Scan 2
Scan Resolution Guidelines
The resolution setting in your scanning software, measured in dpi (dots per inch), controls the amount of
detail captured in your scans. Increasing the resolution raises the amount of detail captured but comes
with the following disadvantages:
• Larger file sizes
• It takes longer to scan your originals, send/receive your scans by email or fax, and to print your scans
• The image may become too large to fit on your display or print on paper
If you plan to enlarge a scanned image so you can print it at a larger size, you may need to increase the
resolution from the default resolution set by the software. Follow these guidelines to determine the
resolution setting you need:
• You will scan the image at its original size but enlarge it later in an image-editing program.
Increase the resolution setting in your scanning software. Increase the resolution by the same amount
you will increase the image size to retain a high image quality. For example, if the resolution is 300 dpi
(dots per inch) and you will double the image size later, change the resolution setting to 600 dpi.

147
• You will scan the image at 100% or smaller size.
Select the resolution setting based on how you will use the scanned image:
• Email/view on a computer screen/post on the web: 96 to 200 dpi
• Print/fax/convert to editable text (OCR)/create searchable PDF: 200 to 300 dpi
Parent topic: Scanning in Epson Scan 2
Scanning Special Projects
Your product's scanning software offers various options to help you quickly complete special scan
projects.
Scanning Two Originals onto One Sheet (Stitching Images) - Windows
Scanning Multi-Page Originals as Separate Files - Windows
Saving a Scan as an Office Format File - Windows
Saving a Scan as an Office Format File - Mac
Scanning to a SharePoint Server or Cloud Service - Windows
Scanning to a SharePoint Server or Cloud Service - Mac
Parent topic: Starting a Scan
Scanning Two Originals onto One Sheet (Stitching Images) - Windows
You can scan both sides of a double-sided or folded original in Document Capture Pro and combine
them into a single image with the Epson Scan 2 Stitch Images setting (not available for all products).
Note: Settings may vary depending on the software version you are using. Click the Help icon in
Document Capture Pro at any time for more information.
1. Load your original in the product.
Note: Use an optional carrier sheet when scanning a folded original or damage to the original may
occur. Place the original into the carrier sheet with the folded edge against the right side of the
carrier sheet. Make sure to insert the carrier sheet into your product with the white edge facing down.
2. Do one of the following to start Document Capture Pro:
• Windows 11: Click , then search for Document Capture Pro and select it.
• Windows 10: Click and select Epson Software > Document Capture Pro.
• Windows 8.x: Navigate to the Apps screen and select Document Capture Pro.
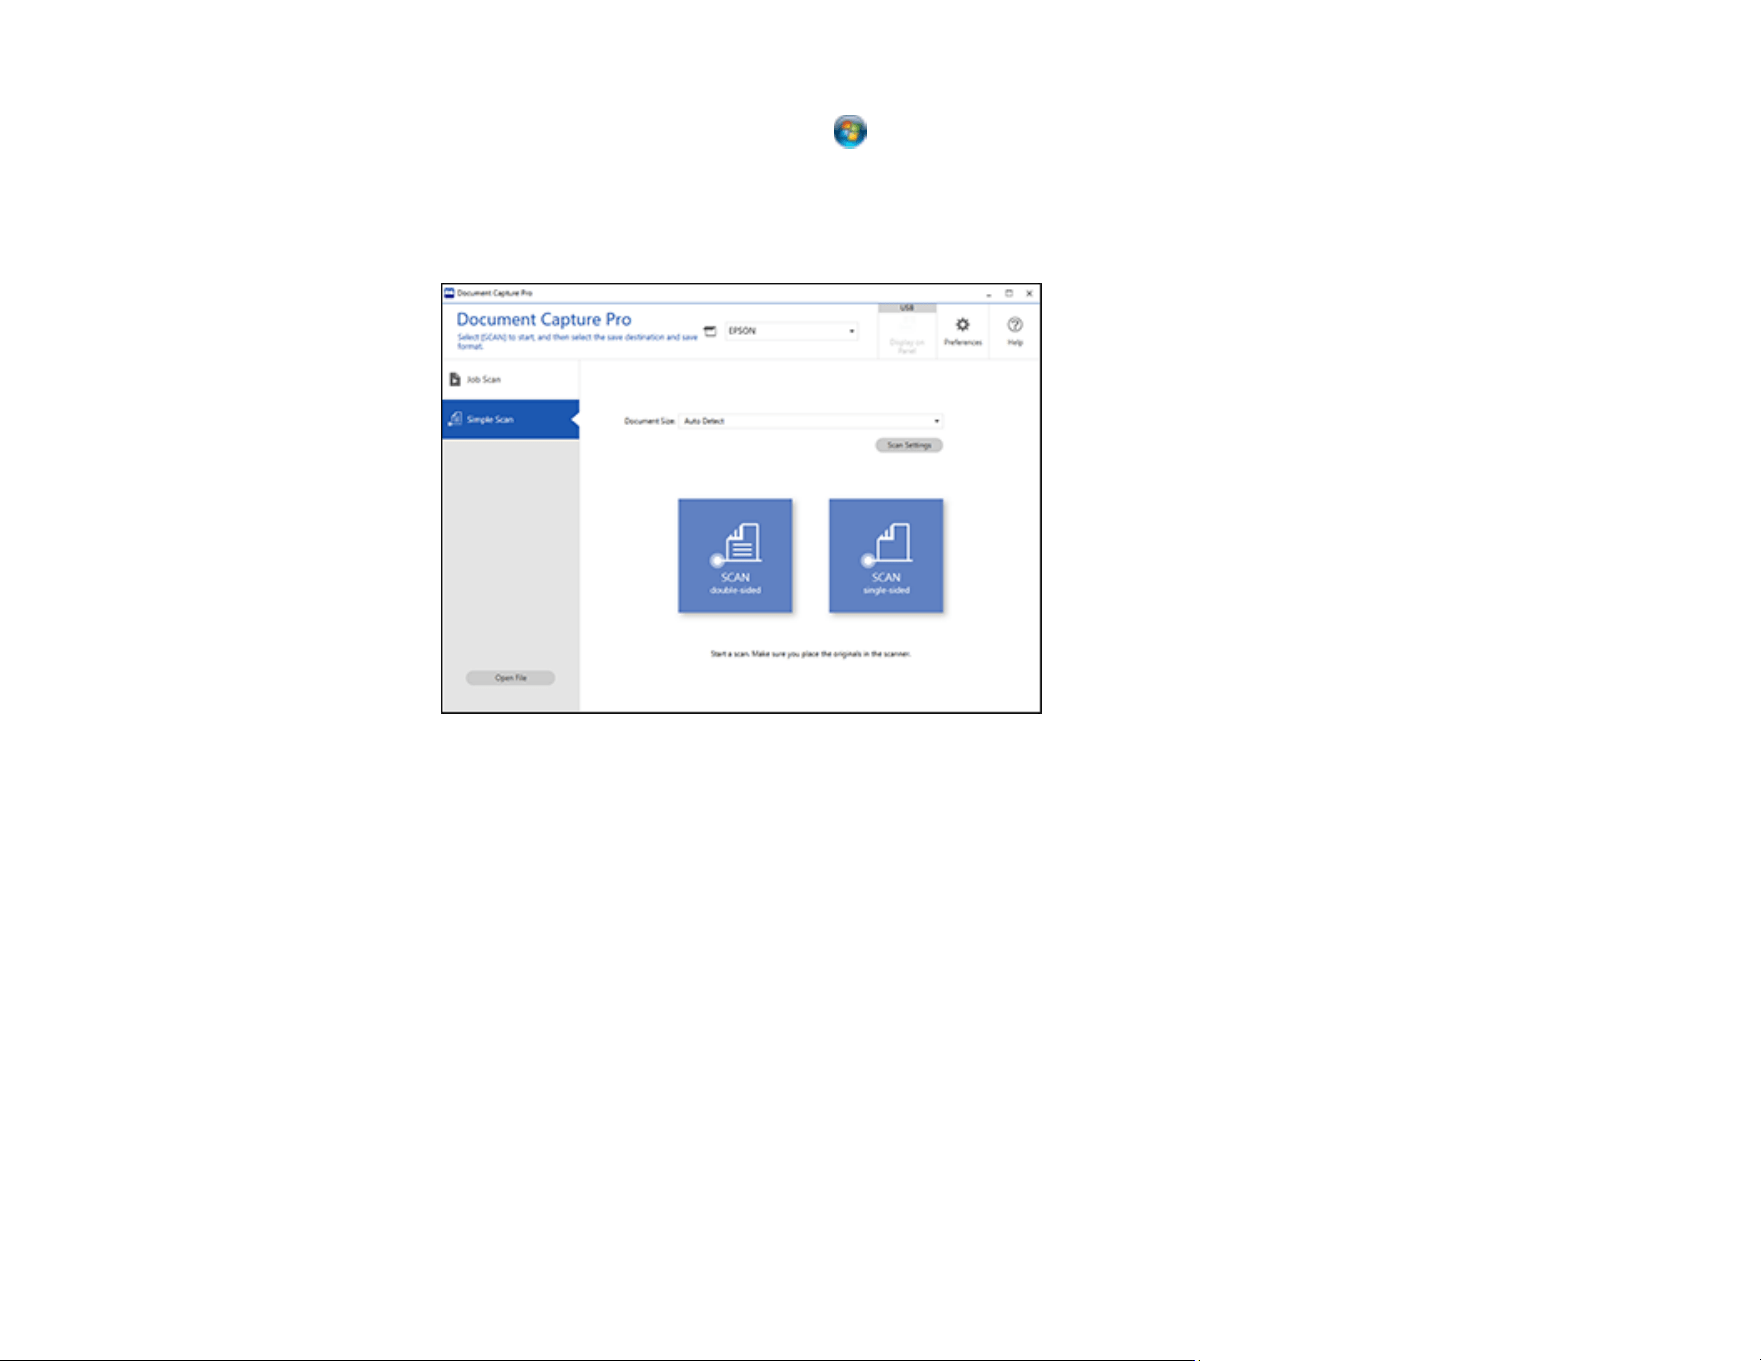
148
• Windows (other versions): Click or Start and select All Programs or Programs. Select
Epson Software > Document Capture Pro.
3. Select the Simple Scan tab.
You see a window like this:
4. Click Scan Settings > Detailed Settings.

149
You see an Epson Scan 2 window like this:

150
5. Select Double-Sided as the Scanning Side setting.
6. Select the original document size or Auto Detect as the Document Size setting.
7. Select one of the following as the Stitch Images setting:
• Top & Bottom: Places the scanned images one above the other.
• Left & Right: Places the scanned images side by side.
8. Select the Advanced Settings tab and verify that the Edge Fill setting is set to None.
9. Click Save.
10. Click OK.
11. Click SCAN double-sided.
Your product scans the original and the image appears in the Edit Scanned Results window.
Note: If the scanned images are not stitched together in the correct orientation, click Scanning Side
on the Epson Scan 2 window, select Settings, set the Binding Edge to Left or Top, and rescan the
document.
12. Review and edit the scanned pages as necessary and click Next when you are finished.
13. Select a destination and any settings as necessary and click Complete.
Parent topic: Scanning Special Projects
Scanning Multi-Page Originals as Separate Files - Windows
You can use Document Capture Pro to scan multi-page originals as separate scanned files. You can
indicate how the separate files are created by defining a maximum page count per file or by inserting
blank pages, barcodes, or characters that can be detected by the software as separation markers.
Note: Settings may vary depending on the software version you are using. Click the Help icon in
Document Capture Pro at any time for more information.
1. Load your multi-page original in the product.
2. Do one of the following to start Document Capture Pro:
• Windows 11: Click , then search for Document Capture Pro and select it.
• Windows 10: Click and select Epson Software > Document Capture Pro.
• Windows 8.x: Navigate to the Apps screen and select Document Capture Pro.
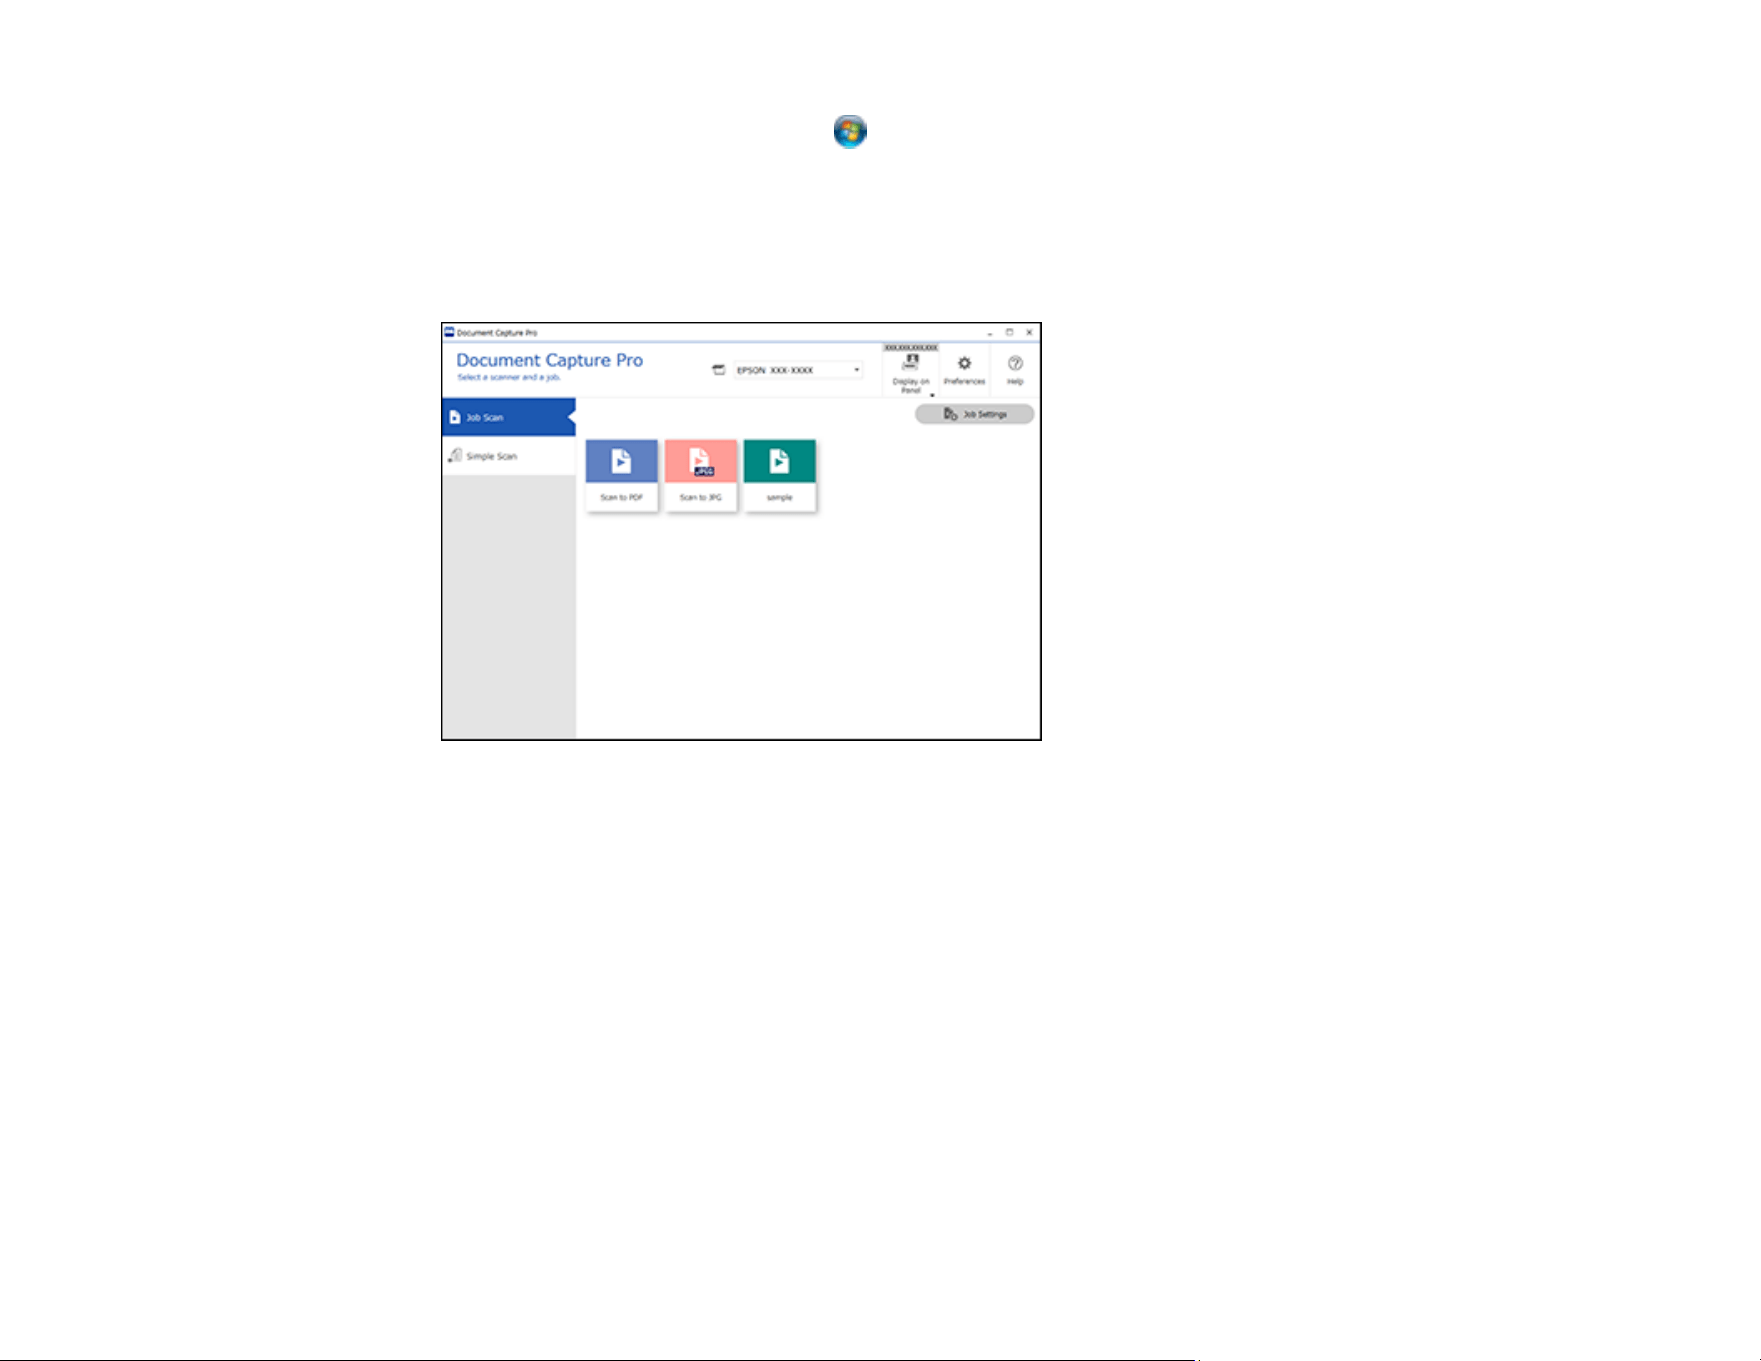
151
• Windows (other versions): Click or Start, and select All Programs or Programs. Select
Epson Software > Document Capture Pro.
You see the Document Capture Pro window.
3. Select the Job Scan tab.
You see a window like this:
4. Click the Job Settings button.
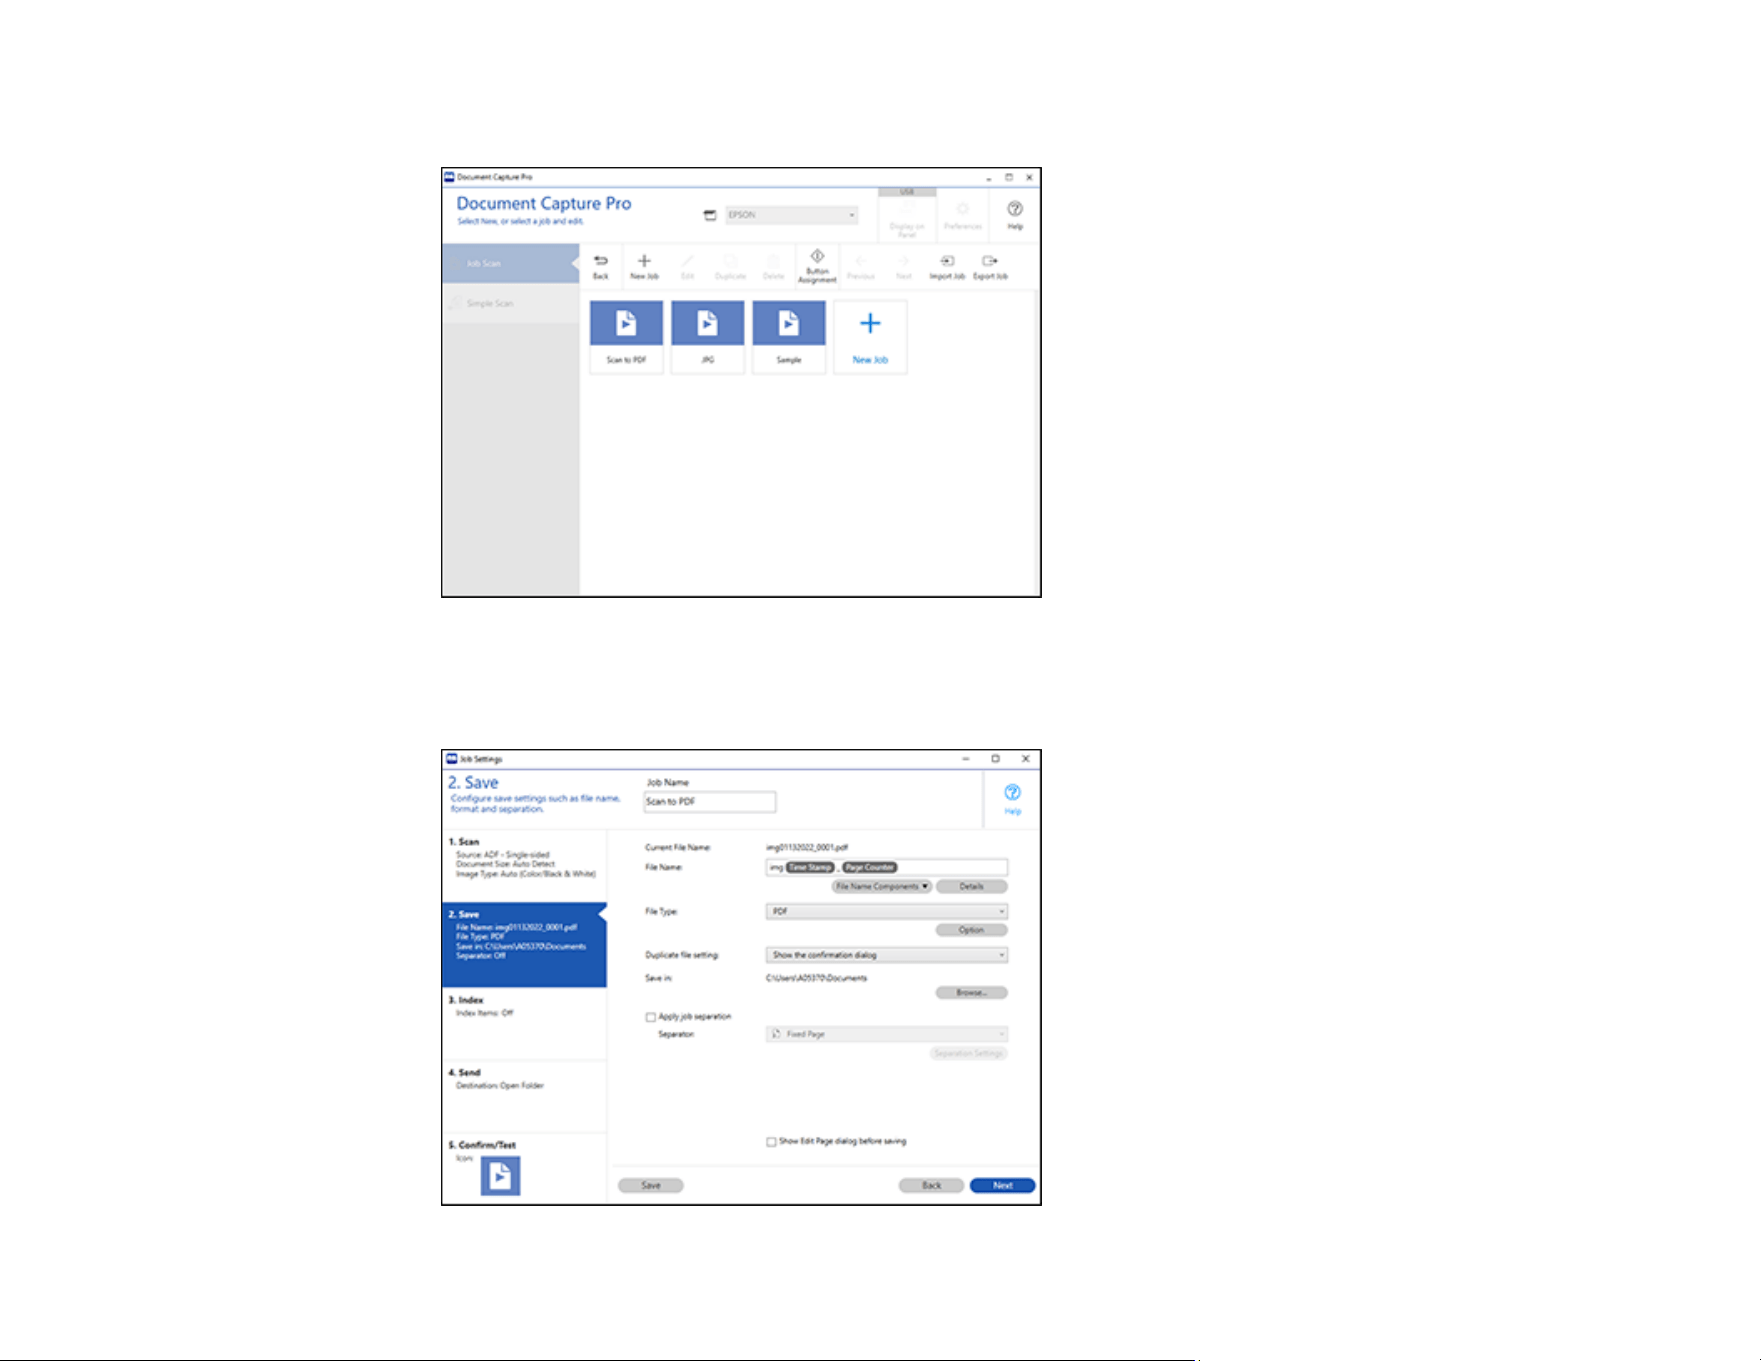
152
You see a window like this:
5. Select New Job and select the scan settings. Click Next when finished.
You see a window like this:

153
6. Select the Apply job separation checkbox.
7. Select the method you want to use to separate the originals as the Separator setting. Click
Separation Settings to specify the settings for the selected option.
8. Finish creating the new scan job and click Save.
9. Click Back on the Job Settings screen.
Your originals are saved into separate files and folders as specified when the job is run.
Parent topic: Scanning Special Projects
Saving a Scan as an Office Format File - Windows
You can use Document Capture Pro (Windows) to save your scans in one of the following Microsoft
Office file formats: Microsoft Word (.docx), Microsoft Excel (.xlsx), or Microsoft PowerPoint (.pptx).
Note: The settings may vary, depending on the software version you are using. See the help information
in Document Capture Pro for details.
1. Load your original in the product.
2. Do one of the following to start Document Capture Pro:
• Windows 11: Click , then search for Document Capture Pro and select it.
• Windows 10: Click and select Epson Software > Document Capture Pro.
• Windows 8.x: Navigate to the Apps screen and select Document Capture Pro.
• Windows (other versions): Click or Start, and select All Programs or Programs. Select
Epson Software > Document Capture Pro.
3. Select the Simple Scan tab.

154
You see a window like this:
4. If you want to select specific scan settings for the scan, click the Scan Settings button, select any
displayed settings you want to use, and click OK.
Note: See the help information in Document Capture Pro for details.
5. Do one of the following:
• To scan the front side of an original, select SCAN single-sided.
• To scan both sides of an original, select SCAN double-sided.
Your product starts scanning and you see the Edit Scanned Results window.
6. View and edit the scanned pages as necessary and click Next when you are finished.
Note: See the help information in Document Capture Pro for details.
7. Click one of the destination icons (except Print) to choose where to send your scanned files. You
see the settings window.
8. Select the Office format file you want to use from the File Type drop-down list.
9. Click Option to display additional settings.

155
10. Select any additional settings as necessary and click OK.
Note: See the help information in Document Capture Pro for details.
11. Confirm your settings and click Complete.
Your originals are saved in the Office file format you selected.
Parent topic: Scanning Special Projects
Saving a Scan as an Office Format File - Mac
You can use Document Capture (Mac) to save your scans in one of these Microsoft Office file formats:
Microsoft Word (.docx) and Microsoft Excel (.xlsx).
Note: The settings may vary, depending on the software version you are using. See the Help information
in Document Capture for details.
1. Load your original in the product for scanning.
2. Open the Applications folder, open the Epson Software folder, and select Document Capture.
You see a window like this:
Note: You may need to select your scanner from the scanner list.
156
3. Click the Scan icon.
You see a window like this:
Note: If you want to use a scan job that you created instead, select it from the Job list in the
Document Capture window, click the Start Job button, and skip the rest of these steps.
4. Select any displayed scan settings you want to use.
Note: See the Help information in Document Capture for details.
5. If you want to select detailed scan settings, close the Scan Settings window, open the Scan menu at
the top of the Mac desktop, and select Displays the EPSON Scan Setup Screen.
6. Click the Scan icon and select any detailed scan settings you want to use from the Epson Scan 2
window.
157
7. Click Scan.
You see a preview of your scan in the Document Capture window.
Note: You may have to close the Epson Scan 2 window to view your scan in the Document Capture
window.
8. If you would like to scan additional originals and add them to the current captured images, click the +
icon, select Acquire from Scanner, and repeat the previous steps.
9. Check the scanned images and edit them as necessary.
10. Open the File menu at the top of the Mac desktop and select Save As.
11. Select DOCX (Word) or XLSX (Excel) as the File Type setting.
Note: The first time you select an Office file type setting in Document Capture, you see a prompt to
download a necessary plug-in for Microsoft Office files. Select Yes and follow the on-screen
instructions to download and install the plug-in to continue.
12. Click the Options button, select any necessary Office file type options, and click OK.
158
13. Click one of the Destination icons to choose where to send your scanned file. (If you cannot see all
of the icons below, click the arrow next to the icons.)
14. Depending on the destination you chose, click OK or Send to complete the operation.
Parent topic: Scanning Special Projects
Scanning to a SharePoint Server or Cloud Service - Windows
You can use Document Capture Pro to upload scanned images to a SharePoint server or a cloud
service.
Note: The settings may vary, depending on the software version you are using. See the help information
in Document Capture Pro for details.
1. Load your original in the product.
2. Do one of the following to start Document Capture Pro:
• Windows 11: Click , then search for Document Capture Pro and select it.
• Windows 10: Click and select Epson Software > Document Capture Pro.
• Windows 8.x: Navigate to the Apps screen and select Document Capture Pro.
• Windows (other versions): Click or Start, and select All Programs or Programs. Select
Epson Software > Document Capture Pro.
You see the Document Capture Pro window.
3. Select the Simple Scan tab.

159
You see a window like this:
4. If you want to select specific scan settings for the scan, click the Scan Settings button, select any
displayed settings you want to use, and click OK.
Note: See the help information in Document Capture Pro for details.
5. Do one of the following:
• To scan both sides of an original, select SCAN double-sided.
• To scan the front side of an original, select SCAN single-sided.
Your product starts scanning and you see the Edit Scanned Results window.
6. View and edit the scanned pages as necessary and click Next when you are finished.
Note: See the help information in Document Capture Pro for details.
7. Click one of the cloud server or service destination icons. You see the settings window.
8. Enter any required information to set up the destination. You may need to log in to your cloud service
to authenticate the connection and allow Document Capture Pro to access the cloud service.
160
9. Adjust any settings and click Complete.
Note: See the help information in Document Capture Pro for details.
Your originals are uploaded to the indicated server or cloud service.
Parent topic: Scanning Special Projects
Scanning to a SharePoint Server or Cloud Service - Mac
You can use Document Capture to upload scanned images to a SharePoint server or a cloud service.
Note: The screen shown may vary, depending on your OS version.
1. Open the Applications folder, open the Epson Software folder, and select Document Capture.
You see a window like this:
Note: You may need to select your product from the drop-down list.
2. Click the scan icon.
3. Select any displayed scan settings you want to use.
Note: See the Help information in Document Capture for details.

161
4. Click Scan.
You see a preview of your scan in the Document Capture window.
5. Click one of the cloud service Destination icons to choose where to save your scanned file. (If you
cannot see all of the icons, the service software may not be installed, the service may not be
available on your platform, or you need to click the arrow next to the icons.)
You see the Transfer Settings window.
6. Enter any required information to set up the destination. You may need to log in to your cloud service
to authenticate the connection and allow Document Capture to access the cloud service. If you have
previously created a saved setting for the destination, select it from the drop-down list.
7. Adjust any save settings, then click OK or Send, depending on the destination.
Your originals are scanned and uploaded to the indicated server or cloud service.
Parent topic: Scanning Special Projects
Scanning Using Automatic Feeding Mode
In Automatic Feeding Mode, scanning starts automatically when originals are loaded into the ADF. This
is useful when you want to scan originals one by one, or add originals to the current scanning process.
You can also use Automatic Feeding Mode when you are using Document Capture Pro.
1. Make sure you installed the product software and connected the product to your computer or
network.
2. Start Epson Scan 2.
Note: If you are using Document Capture Pro, you can open the Epson Scan 2 window by clicking
the Detailed Settings button on the scan settings screen.
3. Select Automatic Feeding Mode on the Main Settings tab.
4. Select other scan settings in the Epson Scan 2 main window, as necessary.
5. Click Scan.
Automatic Feeding Mode starts.
Note: If you are using Document Capture Pro, click Save to save the scan settings. Automatic
Feeding Mode will start when you start scanning.
6. Click Finish on the confirmation screen.

162
7. Place the original in the ADF and adjust the edge guides.
Scanning starts automatically.
Note: You can select Scanner Settings on the product's control panel to change the settings before
scanning.
8. After scanning stops, place the next original in the ADF. Repeat this procedure until you have
scanned all originals.
Parent topic: Starting a Scan
Using Mopria Scan
Mopria Scan enables scanning from Mopria certified multifunction printers and scanners from many
manufacturers. You can use the Mopria Scan app to scan from your Android phone or tablet (Android
v4.4 or later) to your Epson product or any Mopria Scan certified product from other manufacturers. The
Mopria Scan app is available on the Google Play Store.
Note: For details and support on Mopria Scan, click here. Some Amazon Fire tablets also use Mopria
Scan.
1. Connect your Epson product to your wireless network. See the link at the end of this section.
2. Place the originals.
3. On your Android device, download and install the Mopria Scan app from Google Play.
4. Connect your Android device to the same wireless network as your product.
5. Now you are ready to scan. From an Android application such as Chrome or Gmail, tap Attach,
Open, or Add, and then tap Scan using Mopria. Select your Epson product, select your scan
settings, and tap Scan. Tap Done to send the scan to your app.
Parent topic: Starting a Scan
Related concepts
Connecting to an Existing Wi-Fi Network

163
Scanning with AirPrint
AirPrint enables instant scanning from a Mac without the need to install drivers or download software.
Note: You can only scan using AirPrint on a macOS system. The iOS operating system does not support
scanning with AirPrint.
1. Load your originals.
2. Connect the product to the same network that your Mac is connected to, or connect the product to
your Mac with a USB cable.
3. On the System Preferences screen on your Mac, click Printers & Scanners.
4. Select your scanner from the list, then click Open Scanner.
5. Select scan settings as needed, then start scanning.
Note: For details, see the macOS User Guide.
Parent topic: Starting a Scan
Related topics
Loading Originals
Scanning Using a Chromebook
You can scan using a Chromebook.
1. Load your originals.
2. Connect your product to the same network that your Chromebook is connected to, or connect the
product to your Chromebook with a USB cable.
3. Open the Scan app on your Chromebook.
Select the time in the bottom-right of the screen > click the Settings icon > select Advanced in the
bottom-left of the screen > select Printers and scanners > select Scan.
4. Select your scanner from the list.

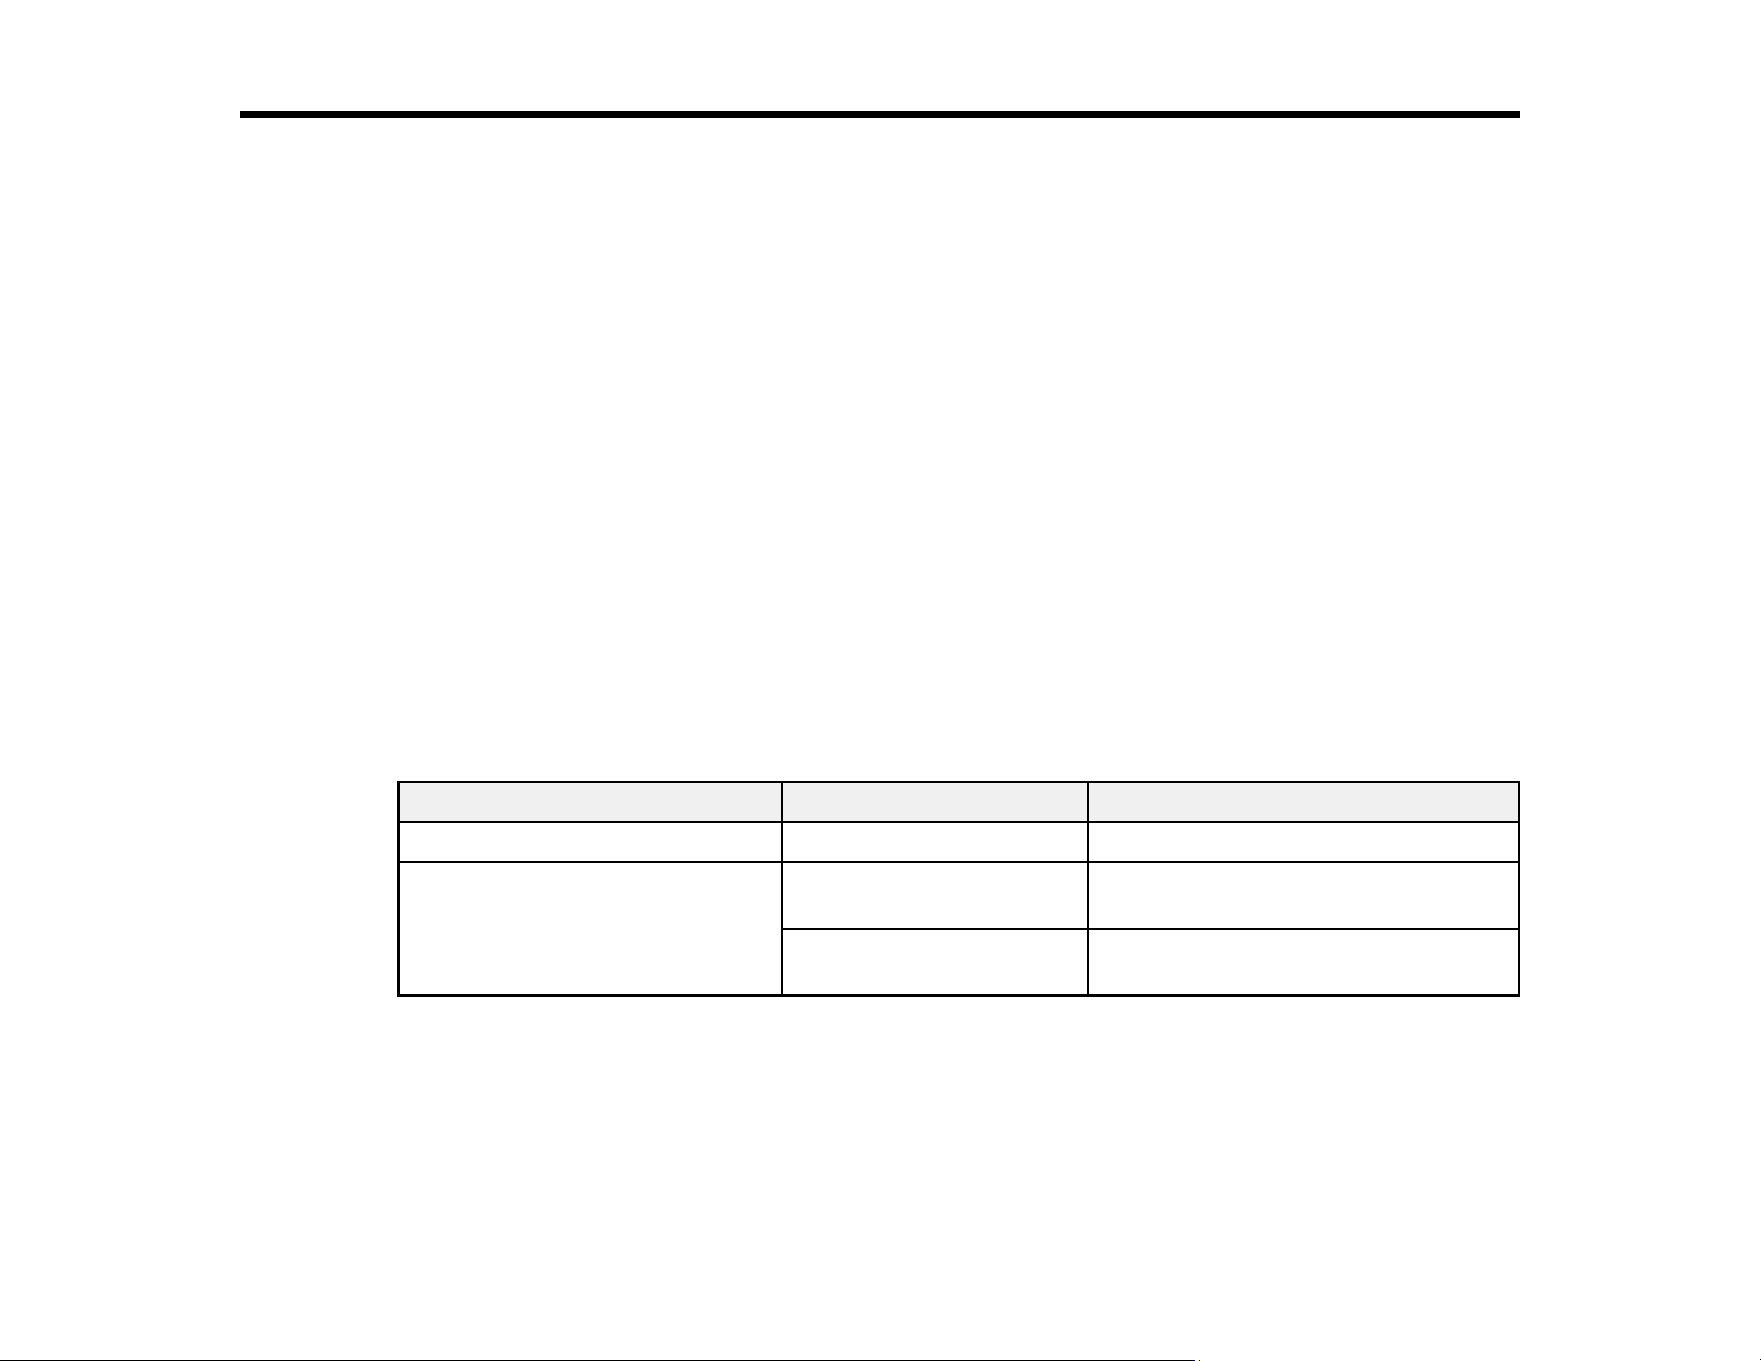
165
Using the Control Panel Menus
Follow the instructions in these sections to access the control panel menus and select settings.
Basic Settings Menu
Scanner Settings Menu
Edit Home Menu
User Settings Menu
Network Settings Menu
Web Service Settings Menu
Document Capture Pro Menu
Contacts Manager Menu
System Administration Menu
Device Information Menu
Scanner Maintenance Menu
Roller Replacement Alert Setting
Regular Cleaning Alert Settings
Basic Settings Menu
Select the Basic Settings menu to customize various display and power settings.
Setting Options Description
LCD Brightness 1 to 9 Adjusts LCD screen brightness
Sounds Button Press Adjusts the volume of control panel
sounds
Error Tone Adjusts the volume of error or
authentication failure notifications

166
Setting Options Description
Sleep Timer 1 to 60 minutes Adjusts the time period for entering
sleep mode when the product has not
performed any operations; the LCD
screen turns black when sleep mode is
enabled
Note: If you are logged in to the
control panel as an administrator, you
will be logged out when the product
enters sleep mode.
Power Off Settings or Power Off
Timer
Note: Setting varies by region.
Off
30min - 12h
Adjusts the time period for
automatically powering off the product
when it has not performed any
operations
Select Power Off If Inactive to turn
the product off automatically if it is not
used for a specified period of time.
Select Power Off If Disconnected to
turn the product off after a specified
period of time when all ports including
the USB port are disconnected.
Note: This setting may not be
available in all regions.
Direct power on Enable
Disable
Select Enable to turn on the product
directly when the product is connected
to the power source without pressing
the power button
Date/Time Settings Date/Time Enter the current date and time
Daylight Saving Time Select the daylight saving option in
your area
Time Difference Set the time difference for coordinated
universal time (UTC)
Language Various languages Select the language used on the LCD
screen

167
Setting Options Description
Keyboard Various options Change the layout of the keyboard
displayed on the LCD screen
Operation Time Out Off
On
Causes the LCD screen to return to
the home screen after a specified
period of inactivity
Note: If you are logged in as an
administrator, you will be logged out
when the product returns to the home
screen.
PC Connection via USB Enable
Disable
Select Disable to restrict access to
your product from a USB-connected
computer
Parent topic: Using the Control Panel Menus
Scanner Settings Menu
Select the Scanner Settings menu to customize scanning options.
Setting Options Description
Slow Off
On
Slows down the scanning speed during
scanning
Select On when scanning originals that are
likely to jam (such as thin paper) or when
scanning different types or sizes of originals at
once.
Double Feed Stop Timing Immediate
After Eject
Set the timing to stop operations when a
double feed is detected
Select Immediate to stop scanning
immediately after any double feed is detected.
Select After Eject to stop scanning the next
original.

168
Setting Options Description
DFDS Function Off
On
Skips double feed detection once and
continues scanning
Select On when scanning originals (such as
plastic cards or envelopes) that are frequently
detected as double feeds.
Paper Protection Off
On-Low
On-Medium
On-High
Stops scanning immediately when the
following conditions are detected:
• A paper feed error has occurred
• An original is fed at an angle
• The combination of the original and the
scanner position does not match
If no errors are detected, select On-High to
increase the sensitivity.
If errors are detected incorrectly, select On-
Low to decrease the sensitivity.
Select On-Medium to detect stapled originals
and skewed originals that the lower setting
could not detect.
Select Off to disable the feature when
scanning plastic cards or thick paper.
Note: Some feed errors may not be
accurately detected. If detection does not
work correctly, try changing the settings.
Glass Dirt Detection Off
On-Low
On-High
Detects dirt on the glass surface inside the
scanner
If no stains are detected, select On-High.
If stains are detected incorrectly, select On-
Low or Off
Note: Some stains may not be accurately
detected. If detection does not work correctly,
try changing the settings.
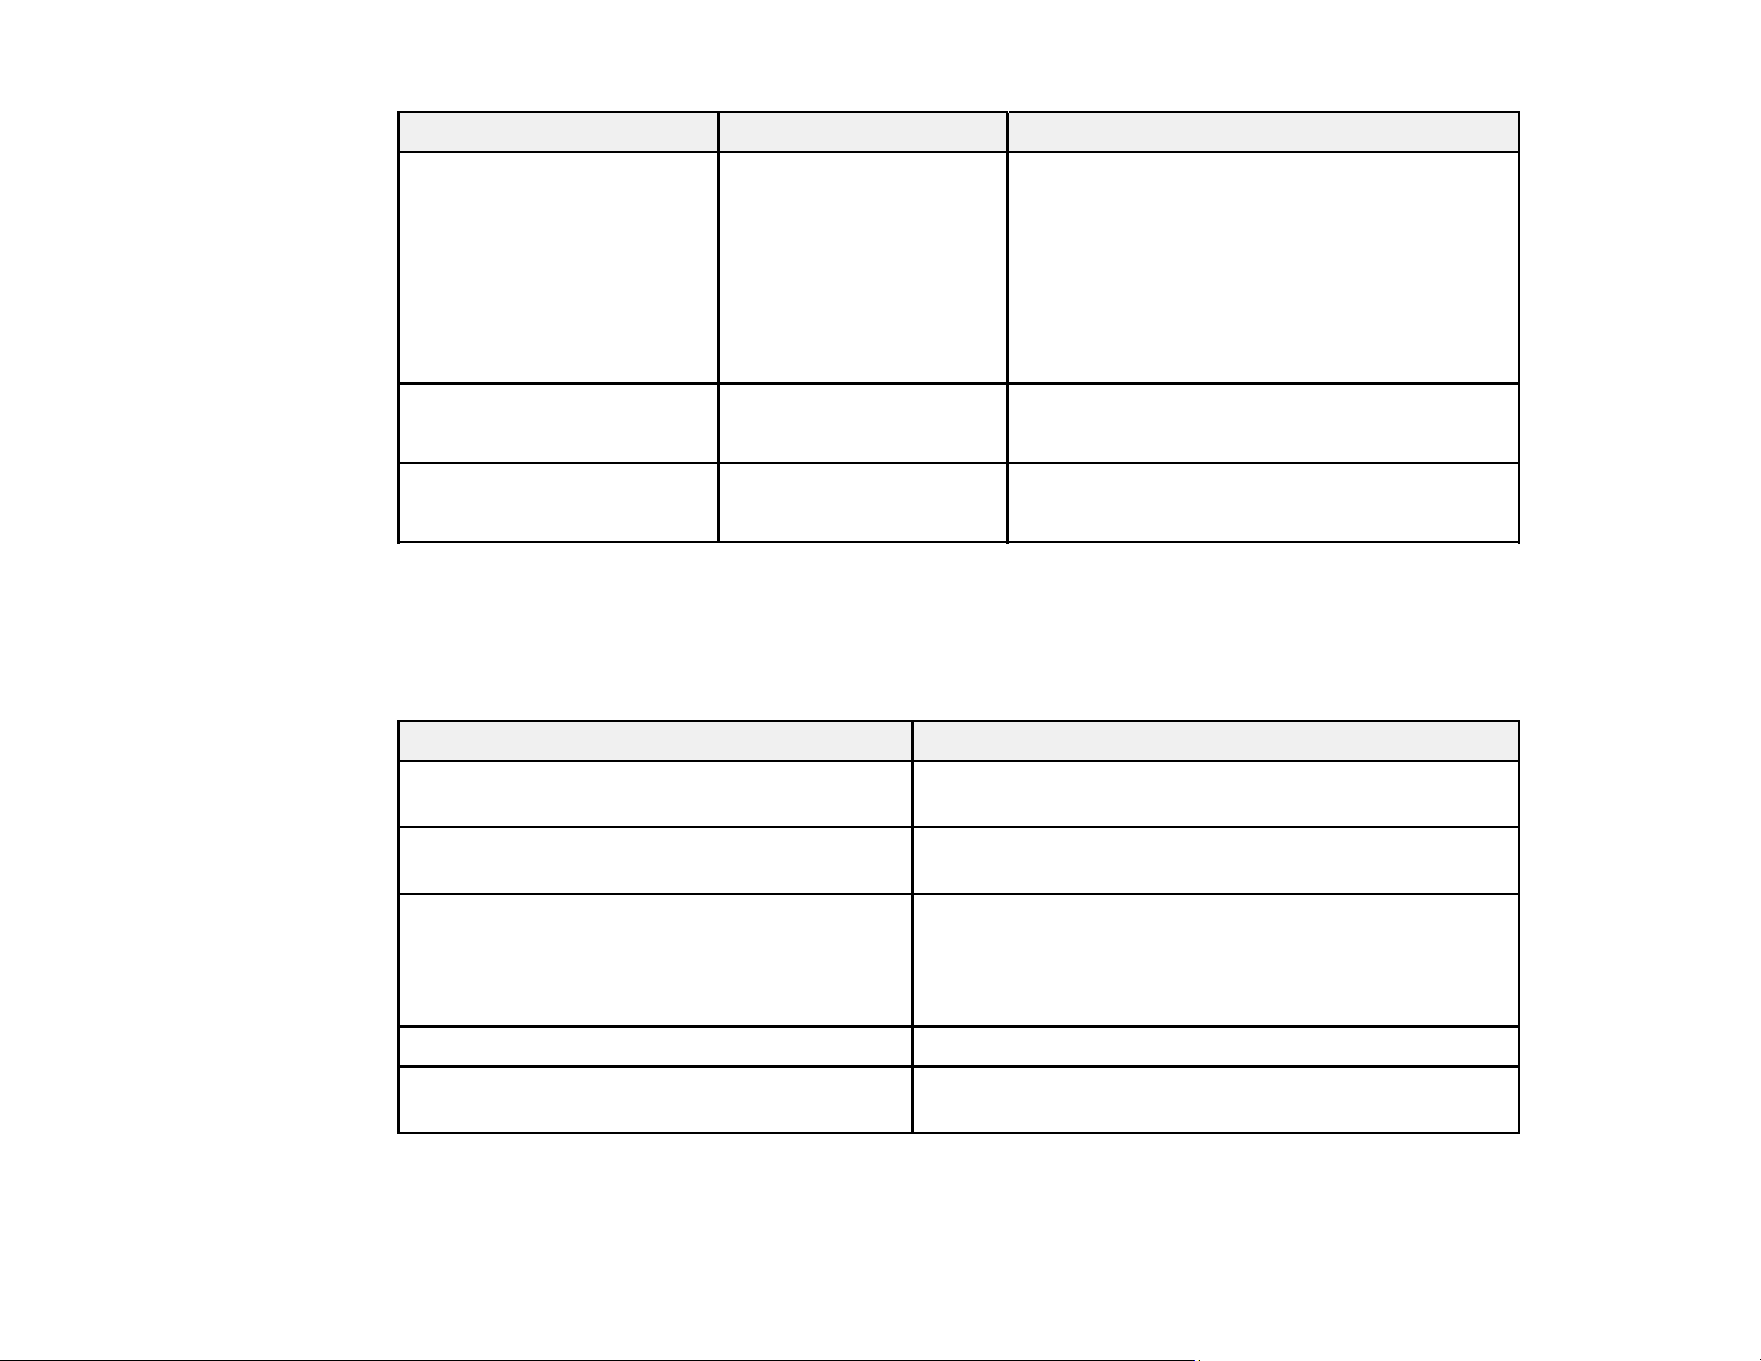
169
Setting Options Description
Ultrasonic Double Feed
Detection
Off
On
Detects a double feed error when multiple
originals are fed and stops scanning
Note: Some originals, such as envelopes,
plastic cards, and originals with labels or
stickers, may not be accurately detected. If
detection does not work correctly, try
changing the settings.
Automatic Feeding Mode
Timeout
Off
10sec - 300sec
Set the timeout period when using Automatic
Feeding Mode
Confirm Recipient Off
On
Check the destination before scanning
Parent topic: Using the Control Panel Menus
Edit Home Menu
Select the Edit Home menu to customize the home screen display.
Setting Description
Layout Allows you to change the layout of the icons on the
home screen
Add Icon Allows you to add icons to Presets, or restore icons
that were previously removed from the screen
Remove Icon Allows you to remove selected icons from the home
screen
To restore removed icons, select Add Icon or Restore
Default Icon Display.
Move Icon Allows you to rearrange the icons on the home screen
Restore Default Icon Display Allows you to restore the default display settings for the
home screen
Parent topic: Using the Control Panel Menus

170
Related topics
Customizing the Control Panel Display
User Settings Menu
Select the User Settings menu to change the initial scanning settings for the following functions:
• Scan to Network Folder/FTP
• Scan to Email
• Scan to USB Drive
• Scan to Cloud
Parent topic: Using the Control Panel Menus
Network Settings Menu
Select the Network Settings menu to configure your product's network settings.

171
Setting Options Description
Wi-Fi Setup Router Displays the available Wi-Fi connection methods
Select Router to access the following menus:
• Wi-Fi Setup Wizard
• Push Button Setup(WPS)
• Others (PIN Code Setup(WPS), Wi-Fi Auto
Connect, Disable Wi-Fi)
Wi-Fi Direct Displays the Wi-Fi Direct (Simple AP) settings
Select Start Setup > Change to change the following
settings:
• Change Network Name: Changes the Wi-Fi Direct
network name (SSID)
• Change Password: Changes the Wi-Fi Direct
password
• Change Frequency Range: Changes the frequency
range (2.4 GHz or 5 GHz) used for connecting to the
scanner (this setting may not be available in all
regions)
• Disable Wi-Fi Direct: Disables Wi-Fi Direct (all
devices connected to the product via Wi-Fi Direct will
be disconnected)
• Restore Default Settings: Restores all Wi-Fi Direct
settings to their defaults
Wired LAN Setup — Allows you to change from a Wi-Fi connection to a
wired LAN connection
Network Status Wired LAN/Wi-Fi
Status
Displays current communication status and connection
settings
Wi-Fi Direct Status Displays the number of connected devices and
connection settings
Email Server Status Displays current status and connection settings for the
email server
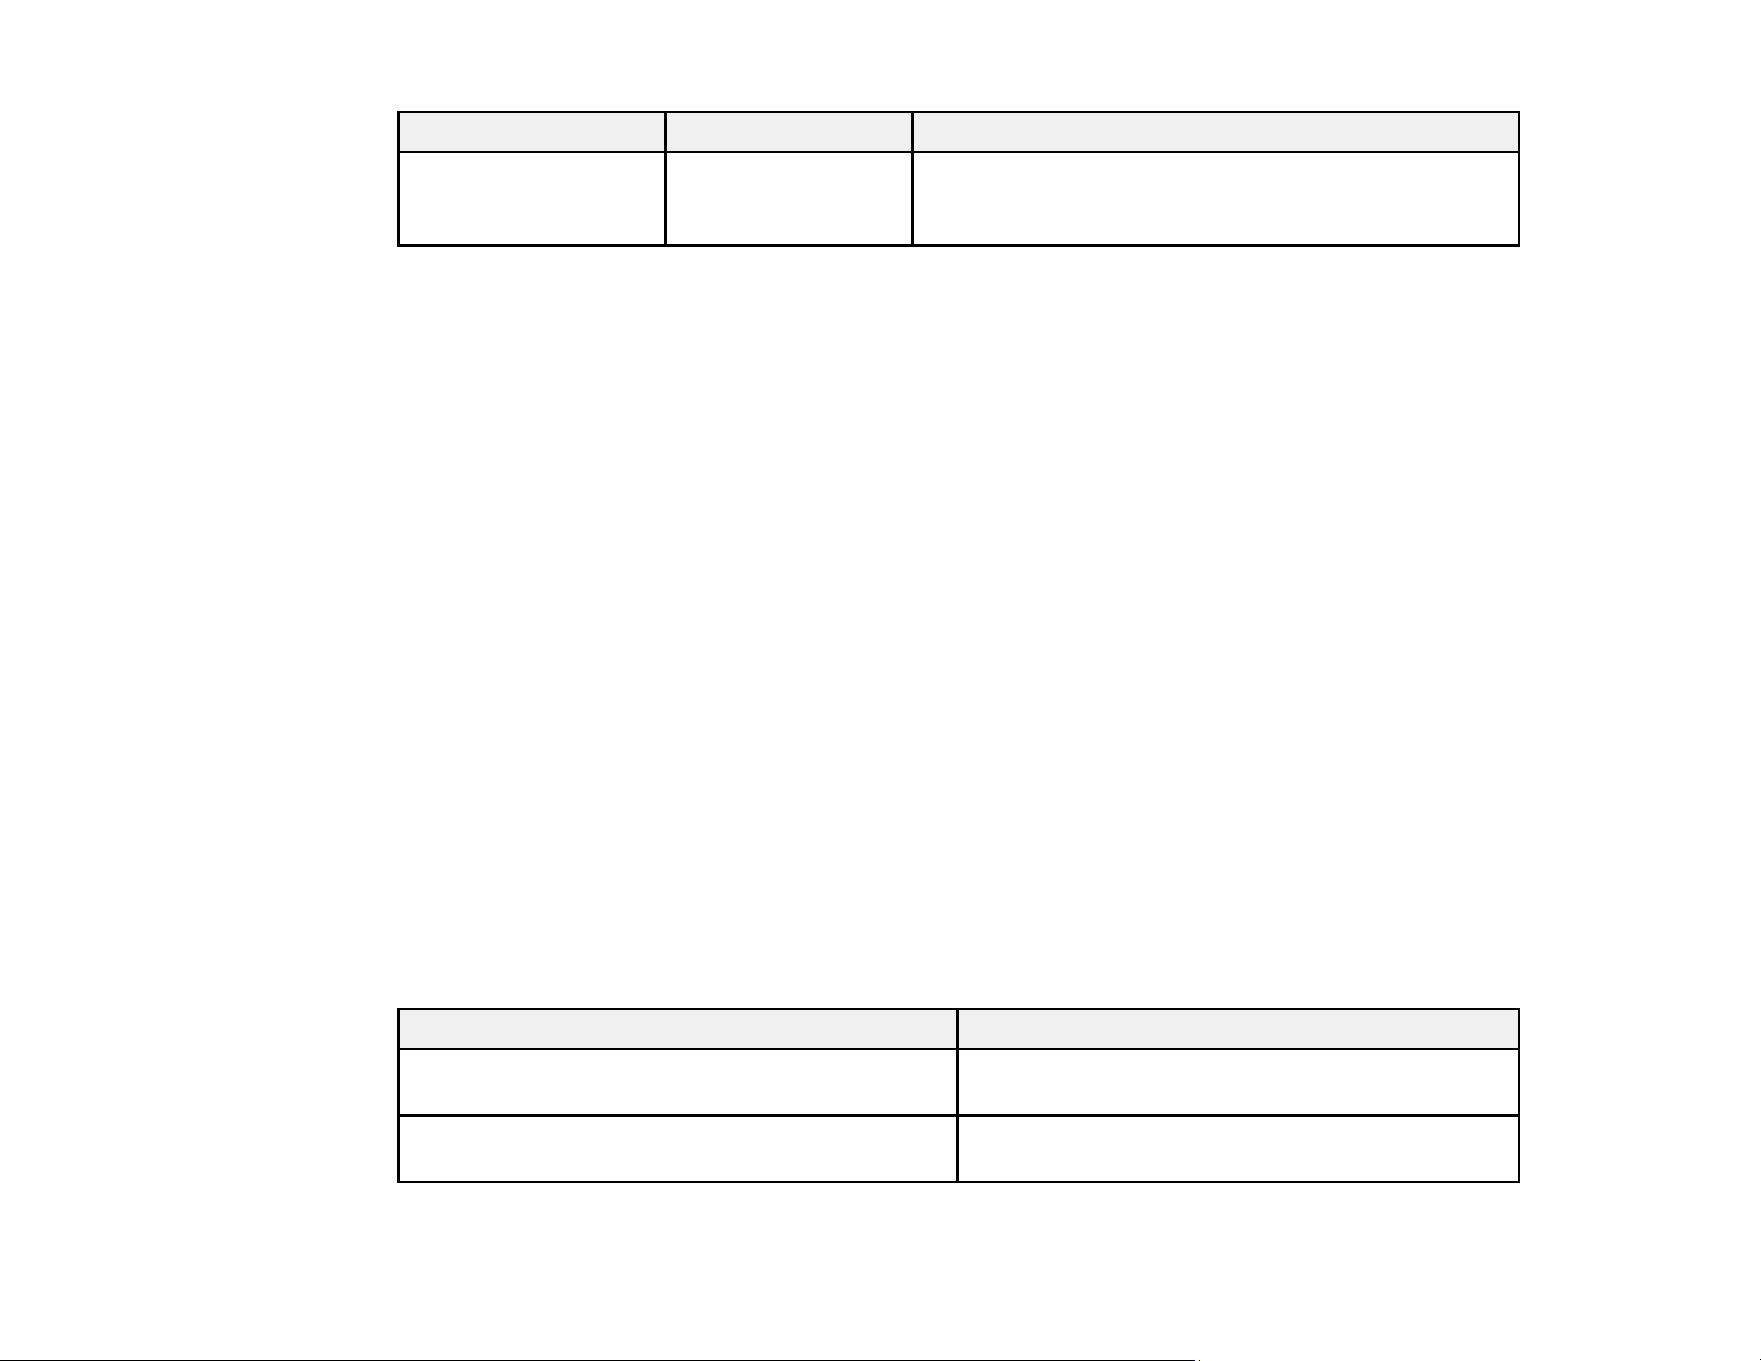
172
Setting Options Description
Advanced Various settings Displays advanced information, such as TCP/IP
settings. You can enable or disable other network
settings.
Parent topic: Using the Control Panel Menus
Related topics
Wi-Fi or Wired Networking
Web Service Settings Menu
You can set up Epson Connect services via the Web Service Settings menu. See the link below for
more information
Parent topic: Using the Control Panel Menus
Related tasks
Setting Up Epson Connect Services
Document Capture Pro Menu
Select the Document Capture Pro menu to create and manage groups of settings related to scanning
and document processing tasks.
Parent topic: Using the Control Panel Menus
Related tasks
Adding and Assigning Scan Jobs with Document Capture Pro - Windows
Adding and Assigning Scan Jobs with Document Capture - Mac
Contacts Manager Menu
Select the Contacts Manager menu to customize your contacts list.
Setting Description
Register/Delete Allows you to add, edit, or delete scanning email
and network folder/FTP contacts
Frequent Allows you to register frequently used contacts for
easy access
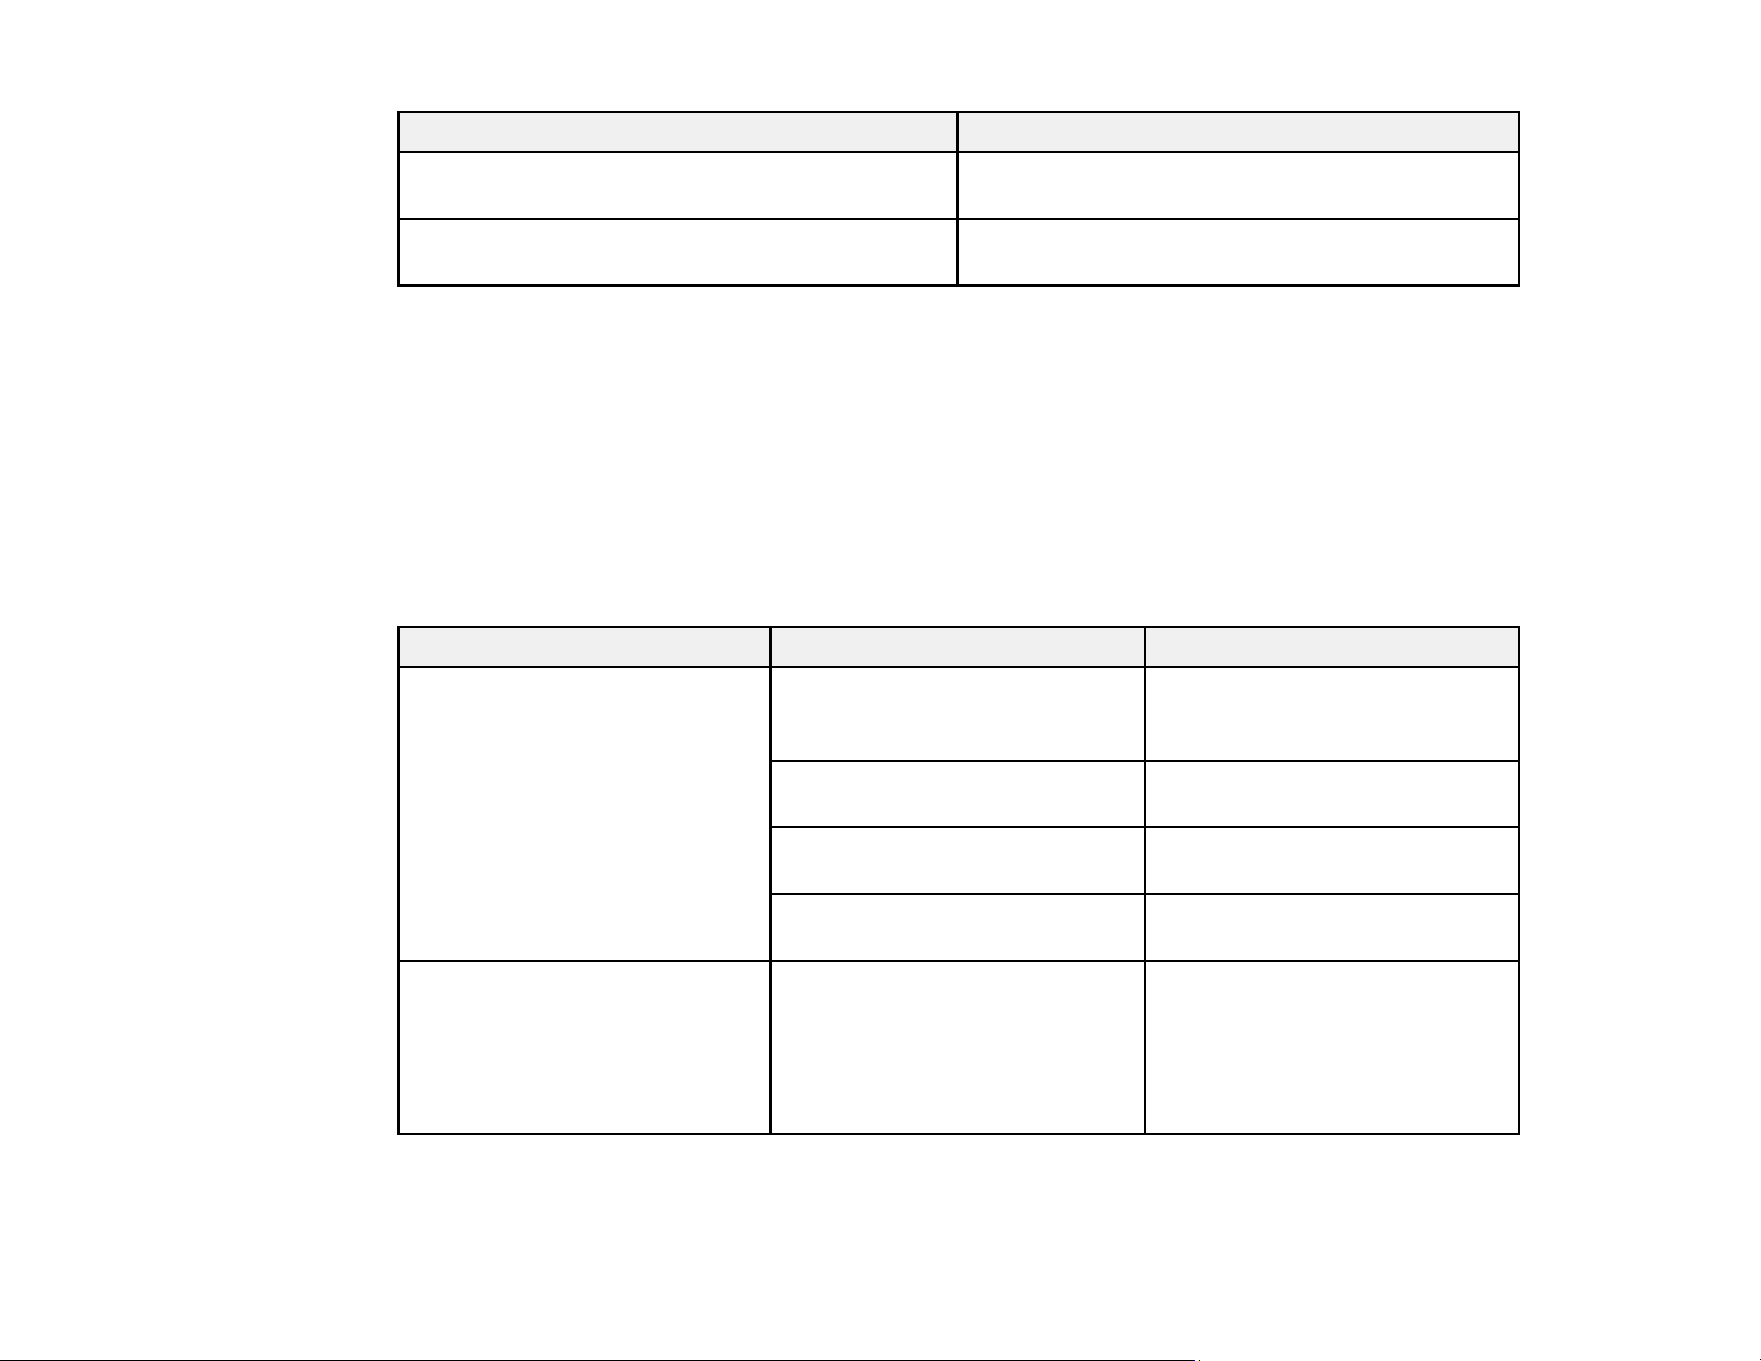
173
Setting Description
View Options Allows you to change the way the contact list is
displayed
Search Options Allows you to select the criteria to use when
searching for contacts
Parent topic: Using the Control Panel Menus
Related tasks
Registering Contacts for Email, Network, or FTP Scanning - Control Panel
Registering Contacts for Email, Network, or FTP Scanning - Web Config
Scanning to a Network Folder or FTP Server
System Administration Menu
Select the System Administration menu to configure security settings and update firmware.
Setting Options Description
Contacts Manager Register/Delete Lets you add, edit, or delete
scanning email and network
folder/FTP contacts
Frequent Registers frequently used
contacts for easy access
View Options Selects whether to display
contacts in
Search Options Determines the criteria to use
when searching for contacts
Admin Settings Admin Password
Lock Setting
Lets you add or change the
administrator password. If you
choose to add a password, set
the Lock Setting to On to enable
password entry for certain
features and settings.

174
Setting Options Description
Restrictions Access to Register/Delete
Contacts
Allows users to register new
contacts or edit and delete
existing contacts
Access to Recent of Scan to
Email
Controls the display of the recent
Scan to Email entries
Access to Language Allows users to change the
display language on the control
panel
Protection of Personal Data Controls the display of potentially
sensitive contact information
(such as IP addresses) for non-
administrators. When enabled,
displays hidden information as
****.
Access Control Access Control Select On to restrict product
features; users must authenticate
before they can access features
Accept Unknown User Jobs Select whether or not to allow
jobs that do not have the
necessary authentication
information
Password Encryption Off
On
Encrypts your password
Program Verification on Start
Up
Off
On
At start up, the scanner checks if
unauthorized third parties have
tampered with the program. If
any issues are detected, the
scanner does not start.
Customer Research — Select Approve to provide
product usage information such
as the number of scans to Epson
WSD Settings Enable
Disable
Enable or disable the Web
Service for Devices (WSD)
feature
175
Setting Options Description
Restore Default Settings Network Settings Select Yes to restore all network
settings to their defaults
All Except Network Settings Select Yes to restore all settings
to their defaults (except network
settings)
All Settings Select Yes to restore all settings
to their defaults
Note: All data registered to the
product including the contacts
will be deleted. You cannot
restore deleted settings.
Firmware Update Update Updates to the latest firmware
Notification Select On to receive a
notification whenever a firmware
update is available
Parent topic: Using the Control Panel Menus
Device Information Menu
Settings on the Device Information menu let you display information about the product's settings.
Setting Description
Serial Number Displays the serial number of the scanner
Current Version Displays the current firmware version
Total Number of Scans Displays the total number of scans
Number of 1-Sided Scans Displays the number of single-sided scans
Number of 2-Sided Scans Displays the number of double-sided scans
Number of Scans of Carrier Sheet Displays the number of scans using a carrier sheet
176
Setting Description
Number of Scans After Replacing Roller Displays the number of scans after replacing the
roller assembly kit
To reset the roller counter, select Device
Information > Number of Scans After Replacing
Roller > Yes.
Number of Scans After Regular Cleaning Displays the number of scans after performing
regular cleaning
To reset the roller counter, select Device
Information > Number of Scans After Regular
Cleaning > Yes.
Authentication Device Status Displays the status of the authentication device
Epson Open Platform Information Displays the status of the Epson Open Platform
Parent topic: Using the Control Panel Menus
Scanner Maintenance Menu
Select the Scanner Maintenance menu to run nozzle checks, cleaning cycles, and other maintenance
operations.
CAUTION: Follow the instructions in the topic links below the table to use these menu settings correctly.
Setting Description
Roller Cleaning Displays how to clean the roller inside the scanner
Roller Replacement Displays how to replace the roller assembly kit
Regular Cleaning Displays how to clean the inside of the scanner
Glass Cleaning Displays how to clean the glass surface inside the
scanner
Parent topic: Using the Control Panel Menus
Related tasks
Cleaning Inside Your Product
Replacing the Rollers
177
Roller Replacement Alert Setting
Select the Roller Replacement Alert Setting menu if you want to set an alert to appear to remind you to
replace the roller after a certain number of scans. Select Count Alert Setting to set the number of scans
before the notification appears.
Parent topic: Using the Control Panel Menus
Related tasks
Changing Roller Replacement Alert Settings
Regular Cleaning Alert Settings
Select the Regular Cleaning Alert Settings menu to set an alert to appear to remind you to perform
regular cleaning after a certain number of scans.
Setting Description
Warning Alert Setting Sends a notification when it is time to clean inside
the product
Count Alert Setting Changes the number of scans before the
notification appears
Parent topic: Using the Control Panel Menus
Related tasks
Changing Regular Cleaning Alert Settings

178
Cleaning and Transporting Your Product
See these sections if you need to clean or transport your product.
Cleaning Your Product
Cleaning Inside Your Product
Checking the Roller Counter
Replacing the Rollers
Updating Applications and Firmware
Transporting Your Product
Cleaning Your Product
To keep your product working at its best, you should clean it several times a year.
CAUTION: Do not use a hard brush, alcohol, or paint thinner to clean the product or you may damage it.
Do not use oil or other lubricants inside the product or let water get inside it. Do not open the product's
outer case.
1. Turn off the scanner and unplug the AC adapter.
2. Disconnect any connected cables.
3. Clean the outer case with a soft, dry cloth. Do not use liquid or chemical cleansers.
Note: If the outer case still requires additional cleaning, use a slightly damp cloth to wipe the outer
case. Then wipe the case with a soft, dry cloth.
4. Clean the LCD screen with a soft, dry cloth.
Parent topic: Cleaning and Transporting Your Product
Cleaning Inside Your Product
Clean your product regularly to make sure that no dust builds up on the glass scanning surfaces. Dust
can cause spots or lines in your scanned images. Clean the inside of the product every 5,000 scans. You
can check the latest number of scans using the Epson Scan 2 Utility.
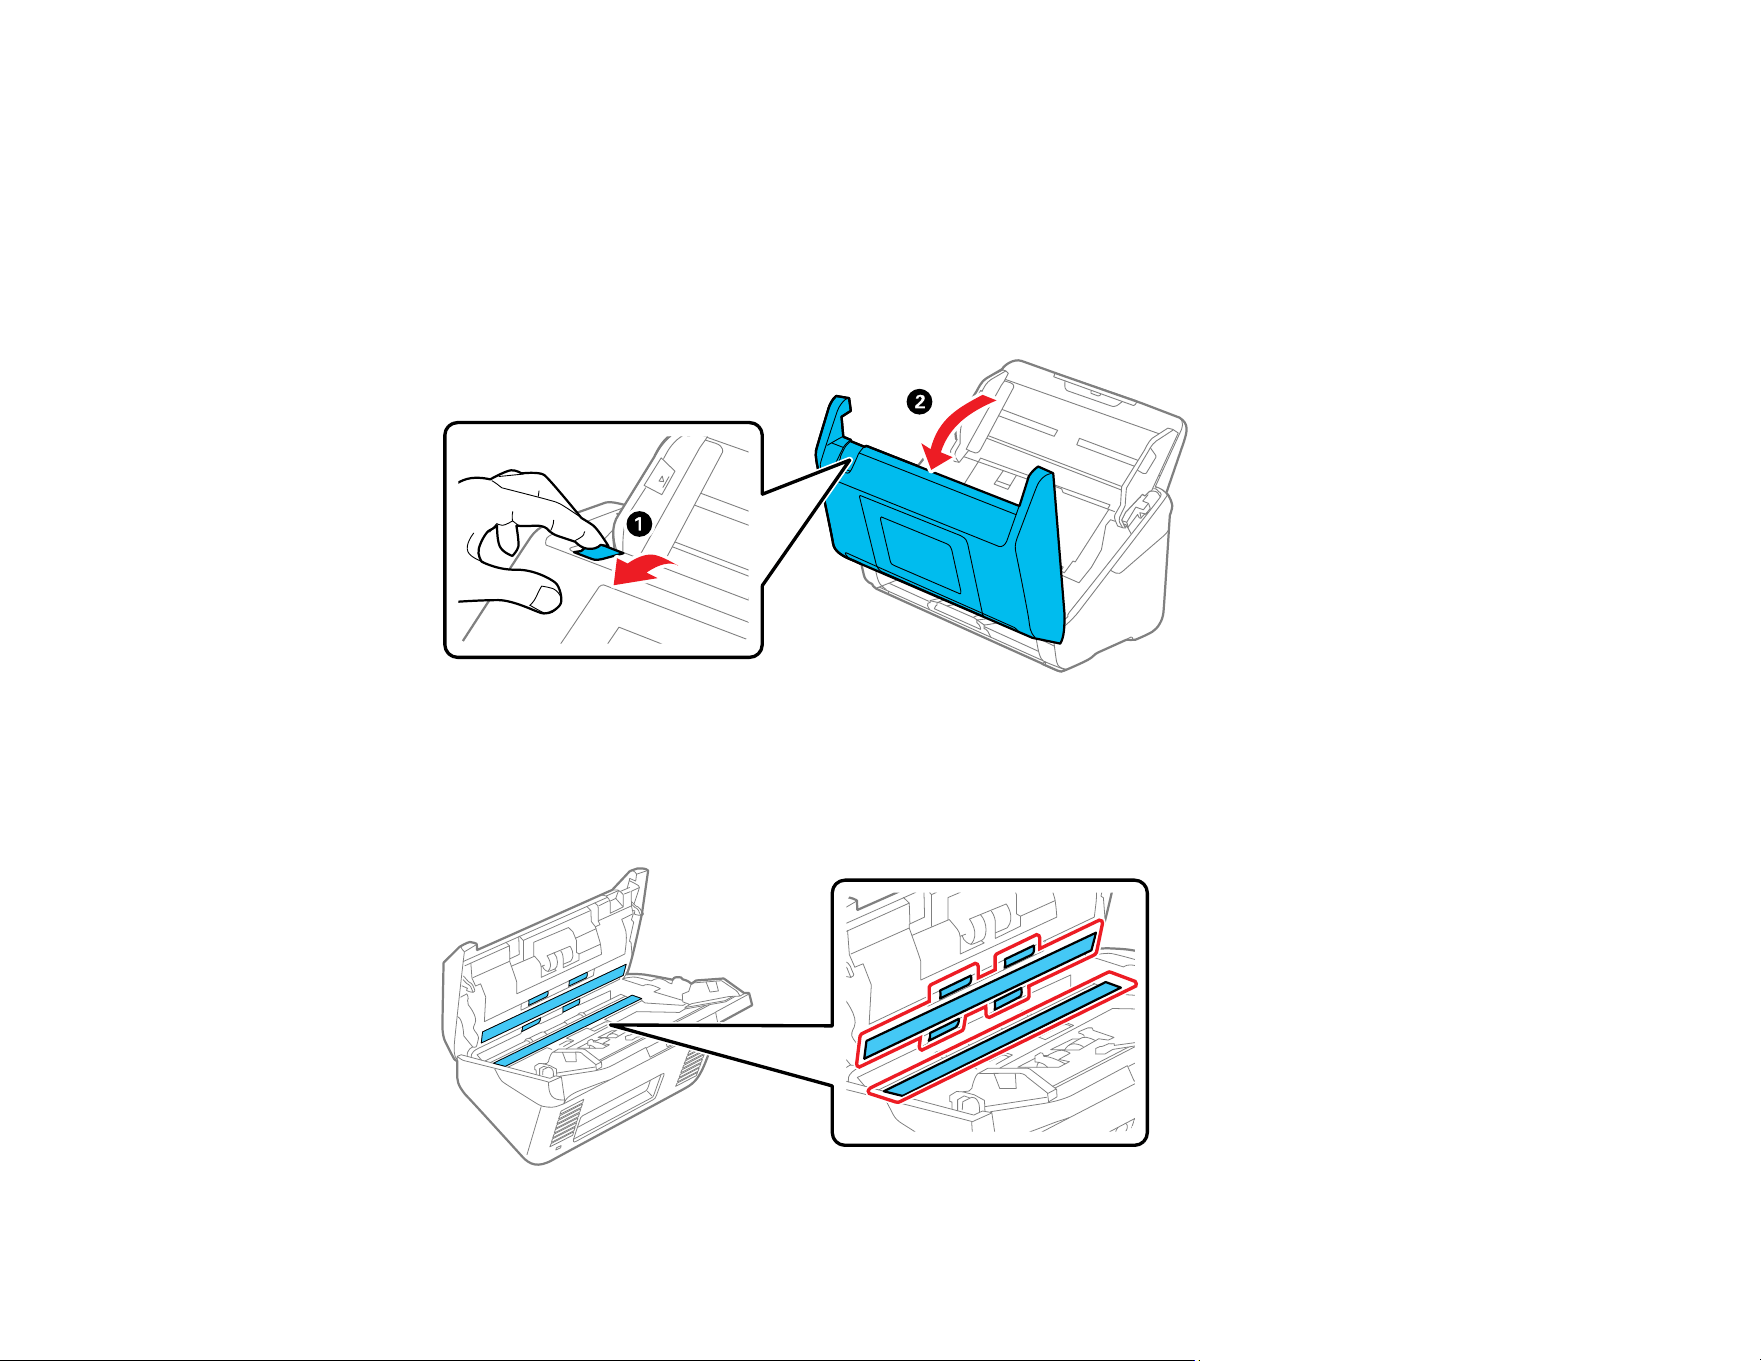
179
CAUTION: Do not use a hard brush, alcohol, or paint thinner to clean the product or you may damage it.
Do not use oil or other lubricants inside the product or let water get inside it. Do not open the product's
outer case.
1. Turn off the product and unplug the AC adapter.
2. Disconnect any connected cables.
3. Pull down on the cover open lever and open the scanner cover.
4. Use a genuine Epson cleaning kit or a soft cloth to wipe off any dust or dirt on the glass scanning
surfaces and the rollers inside the scanner cover. If the glass surface is stained with grease or some
other hard-to-remove material, use a genuine Epson cleaning kit to remove stains. Use a small
amount of cleaner on the cleaning cloth to remove the stains. Wipe off all remaining liquid.
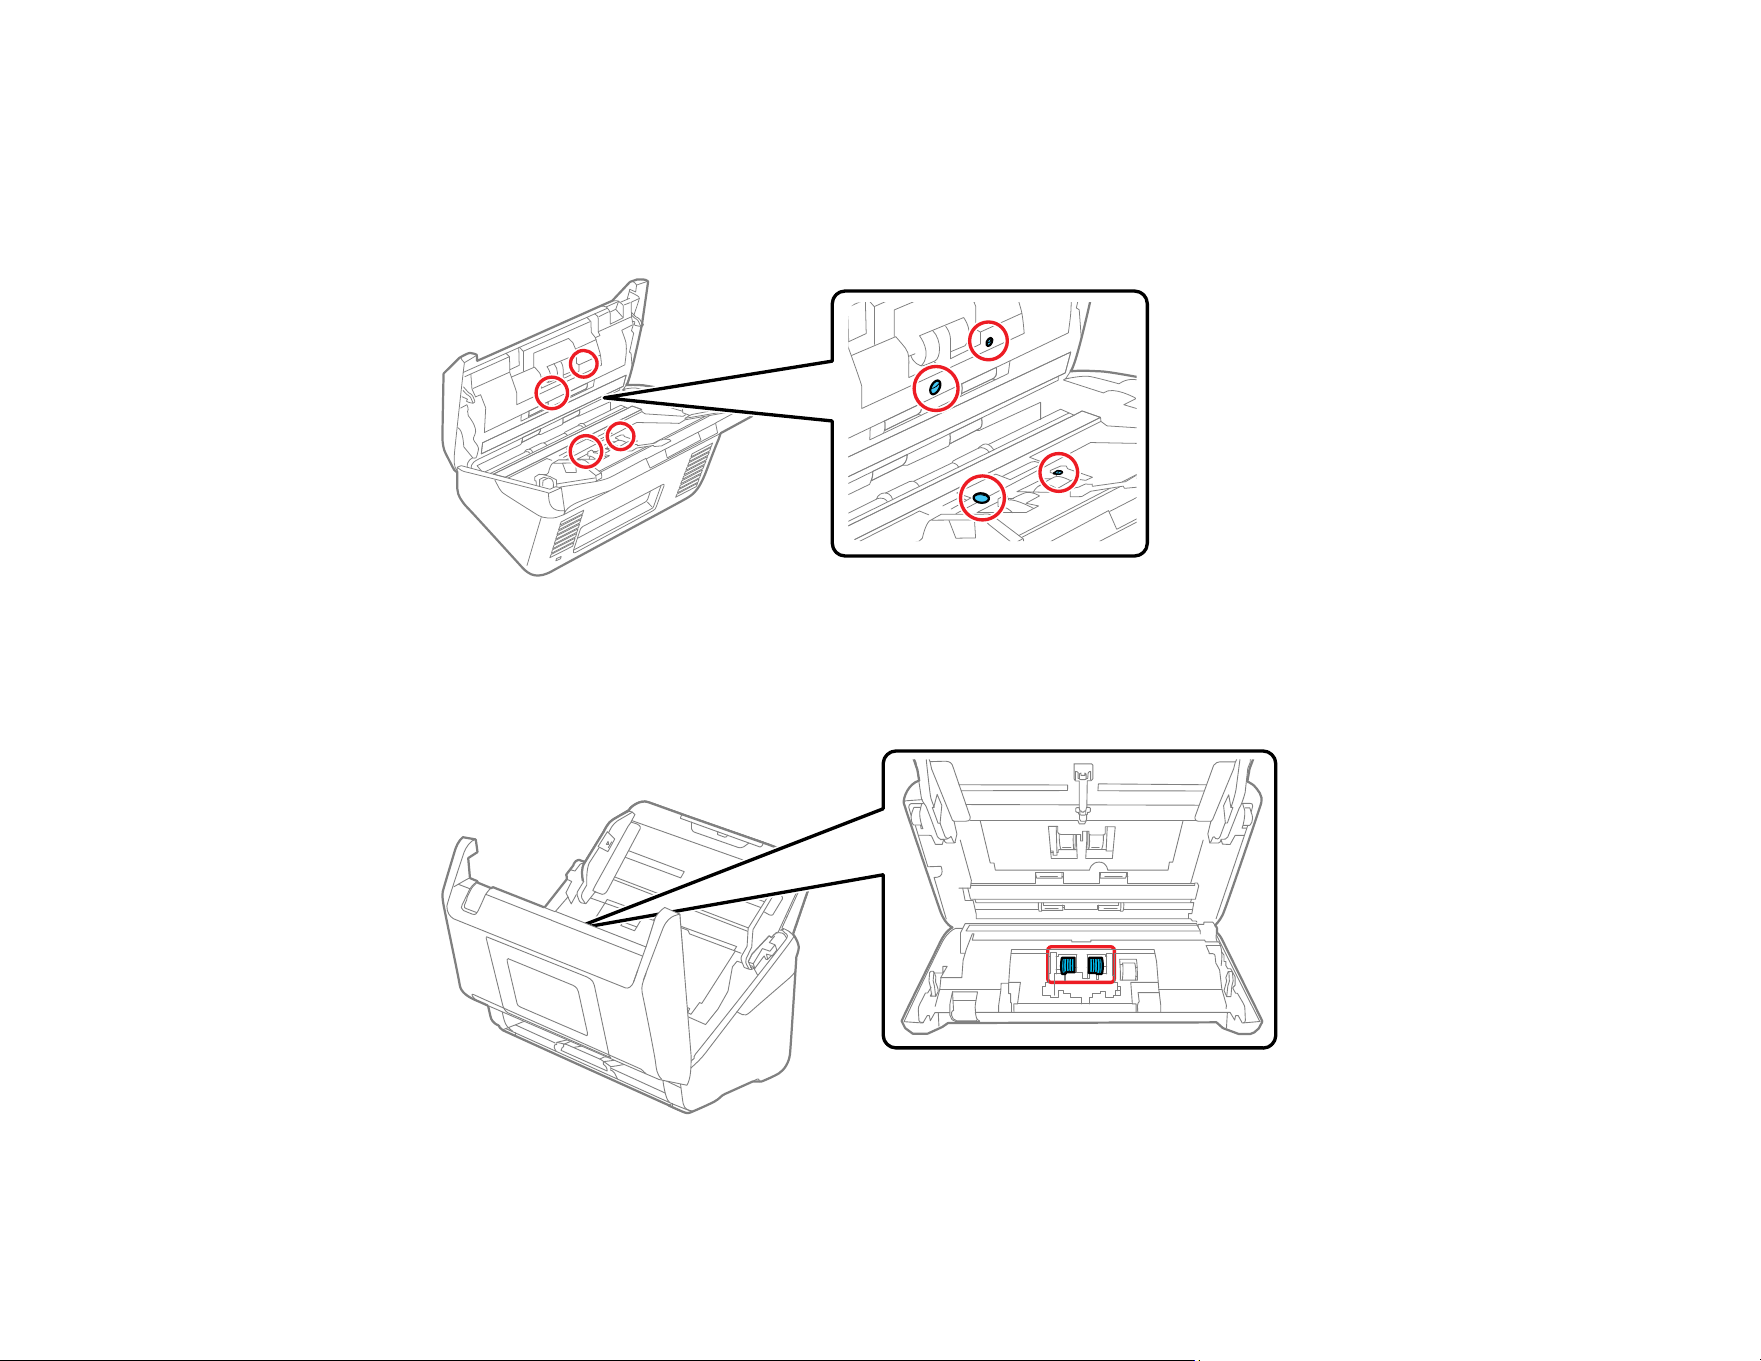
180
CAUTION: Do not spray glass cleaner directly on the scanning surfaces. Be careful not to place too
much force on the glass. Do not use a brush or a hard tool. Any scratches on the glass may affect
the scan quality.
5. Use a cotton swab to wipe off any dust or dirt on the sensors shown here.
CAUTION: Do not use liquid or glass cleaner on the cotton swab.
6. Locate the separation roller.
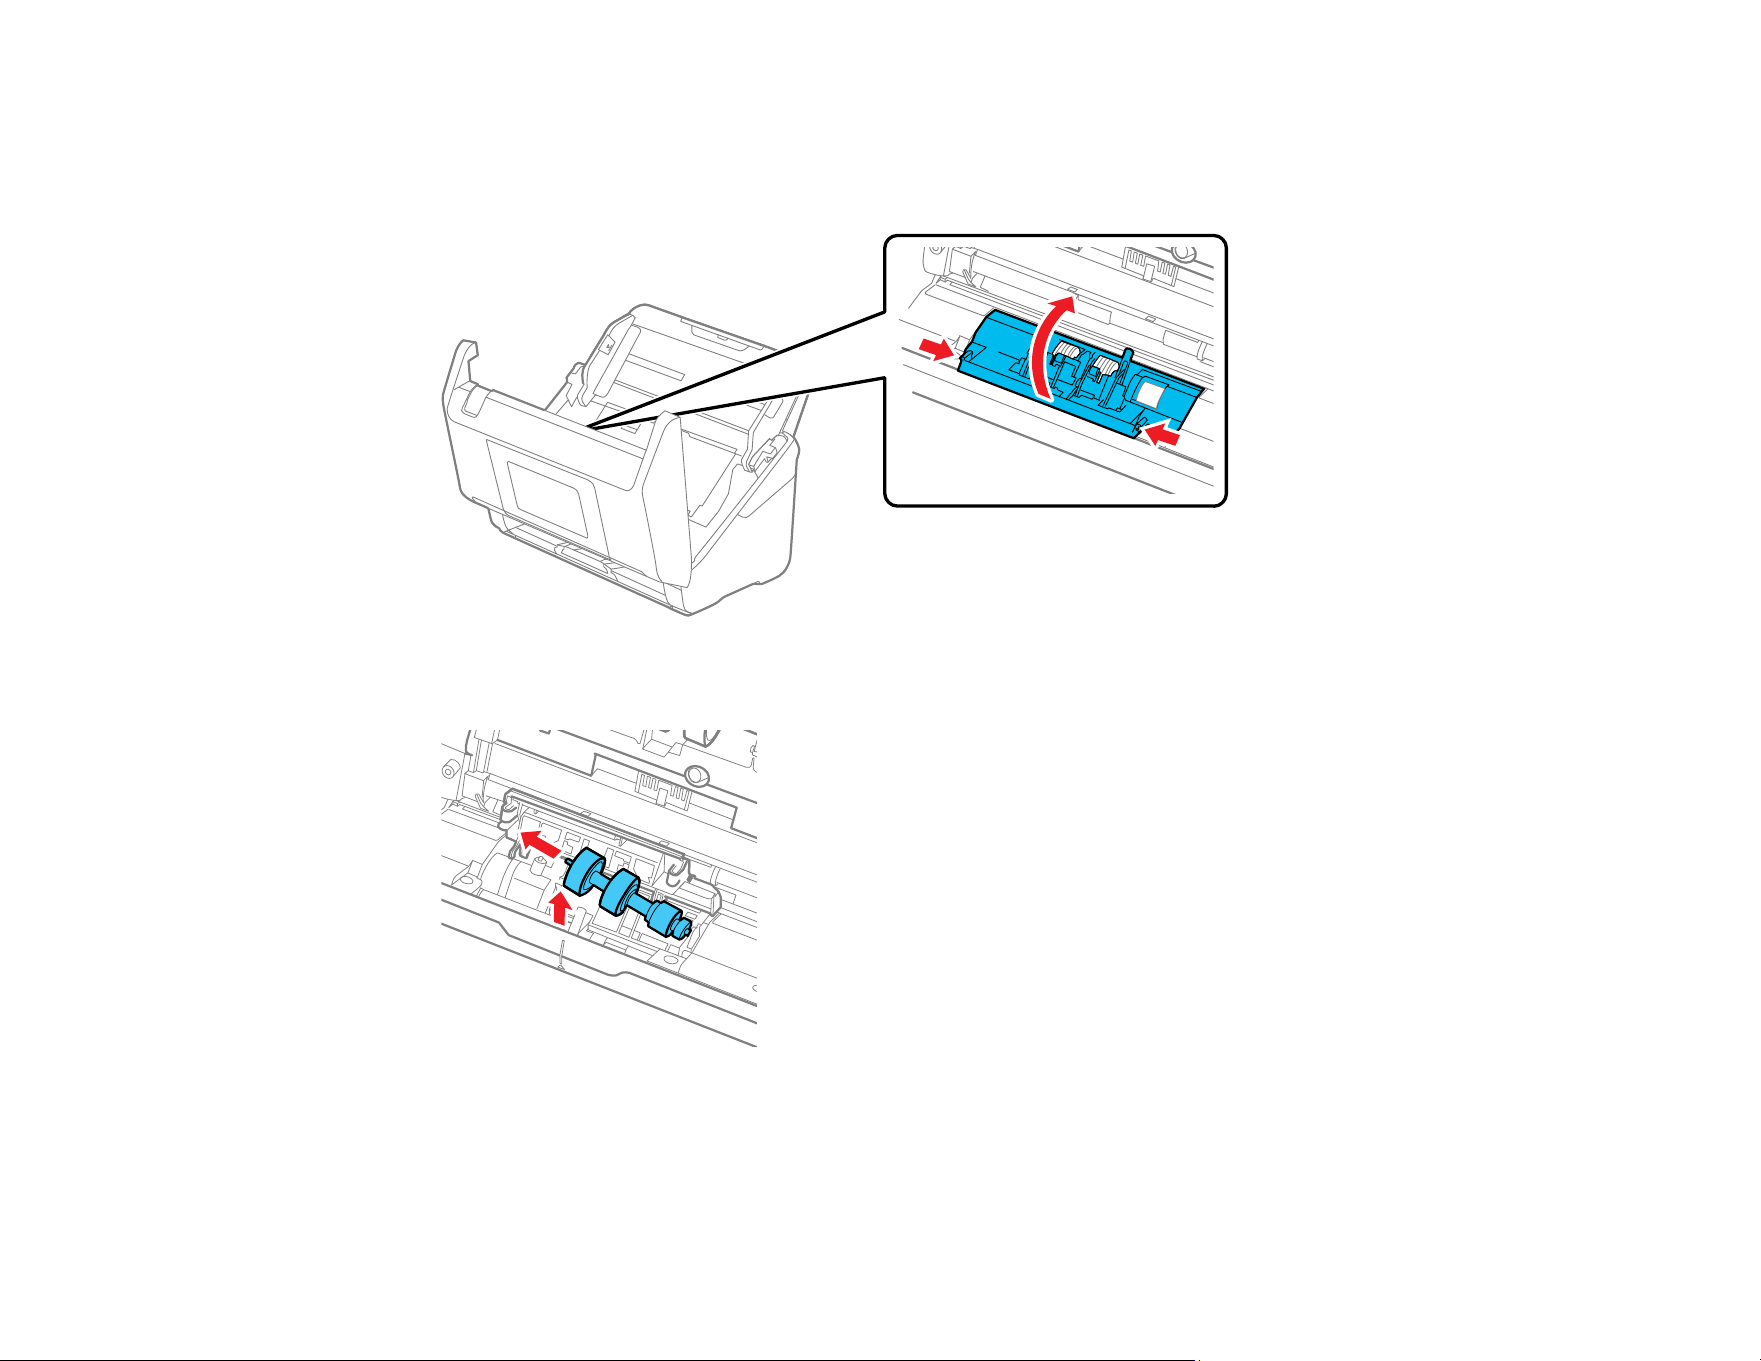
181
7. Squeeze the tabs on the sides of the separation roller cover and open the cover.
CAUTION: Be careful not to apply too much force when opening the cover.
8. Slide the separation roller to the left and remove it.
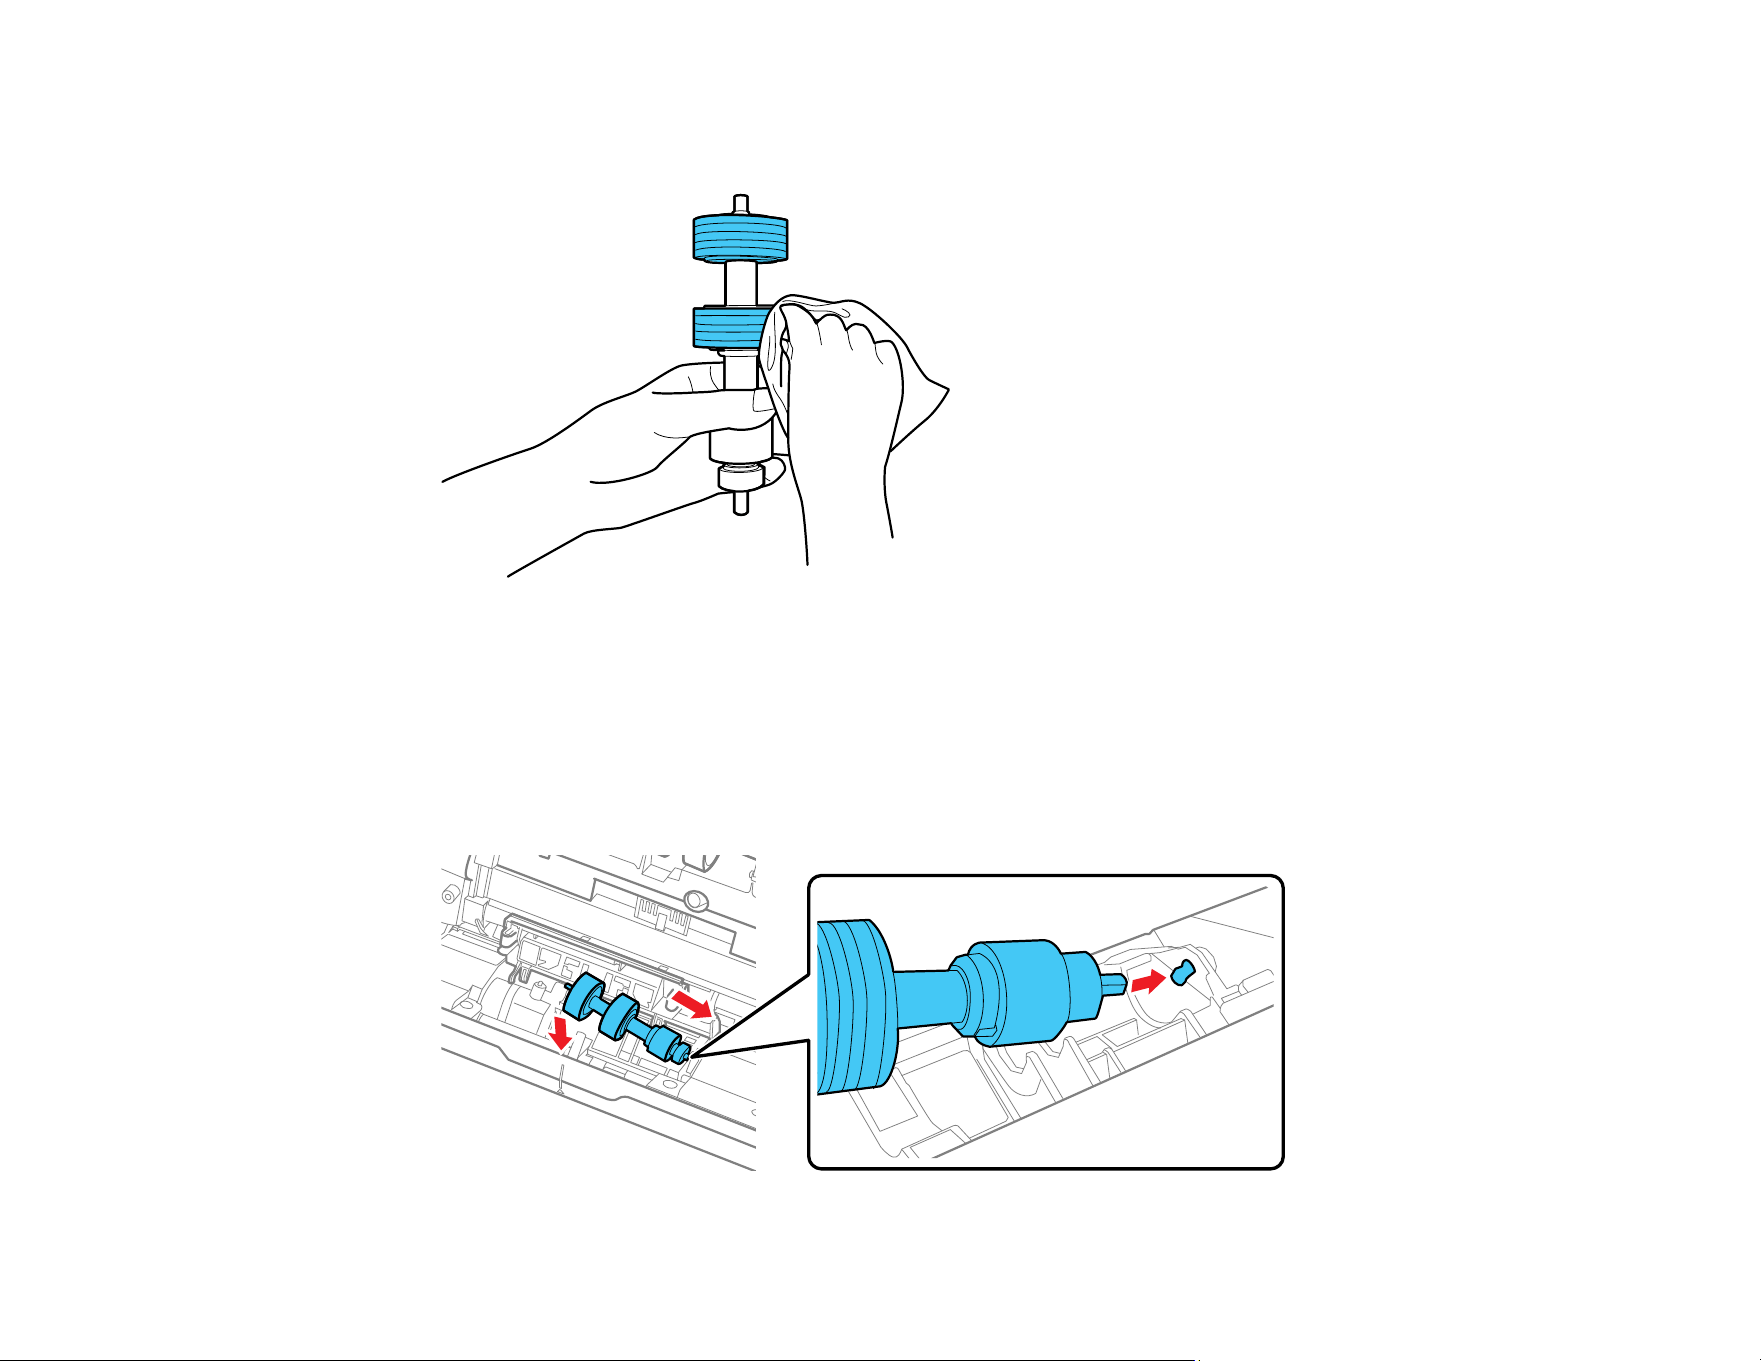
182
9. Wipe off any dust or dirt on the separation roller using a genuine Epson cleaning kit or a soft, moist
cloth.
CAUTION: Use only a genuine Epson cleaning kit or soft, moist cloth to clean the roller; using a dry
cloth may damage the surface of the roller. Do not spray cleaners directly inside the product; always
spray cleaners on a cleaning cloth to slightly dampen the cloth. Wipe off any excess cleaner with a
dry, lint-free cloth.
10. To replace the separation roller, insert the end of the roller into the hole on the right side and lower
the other end of the roller into place.
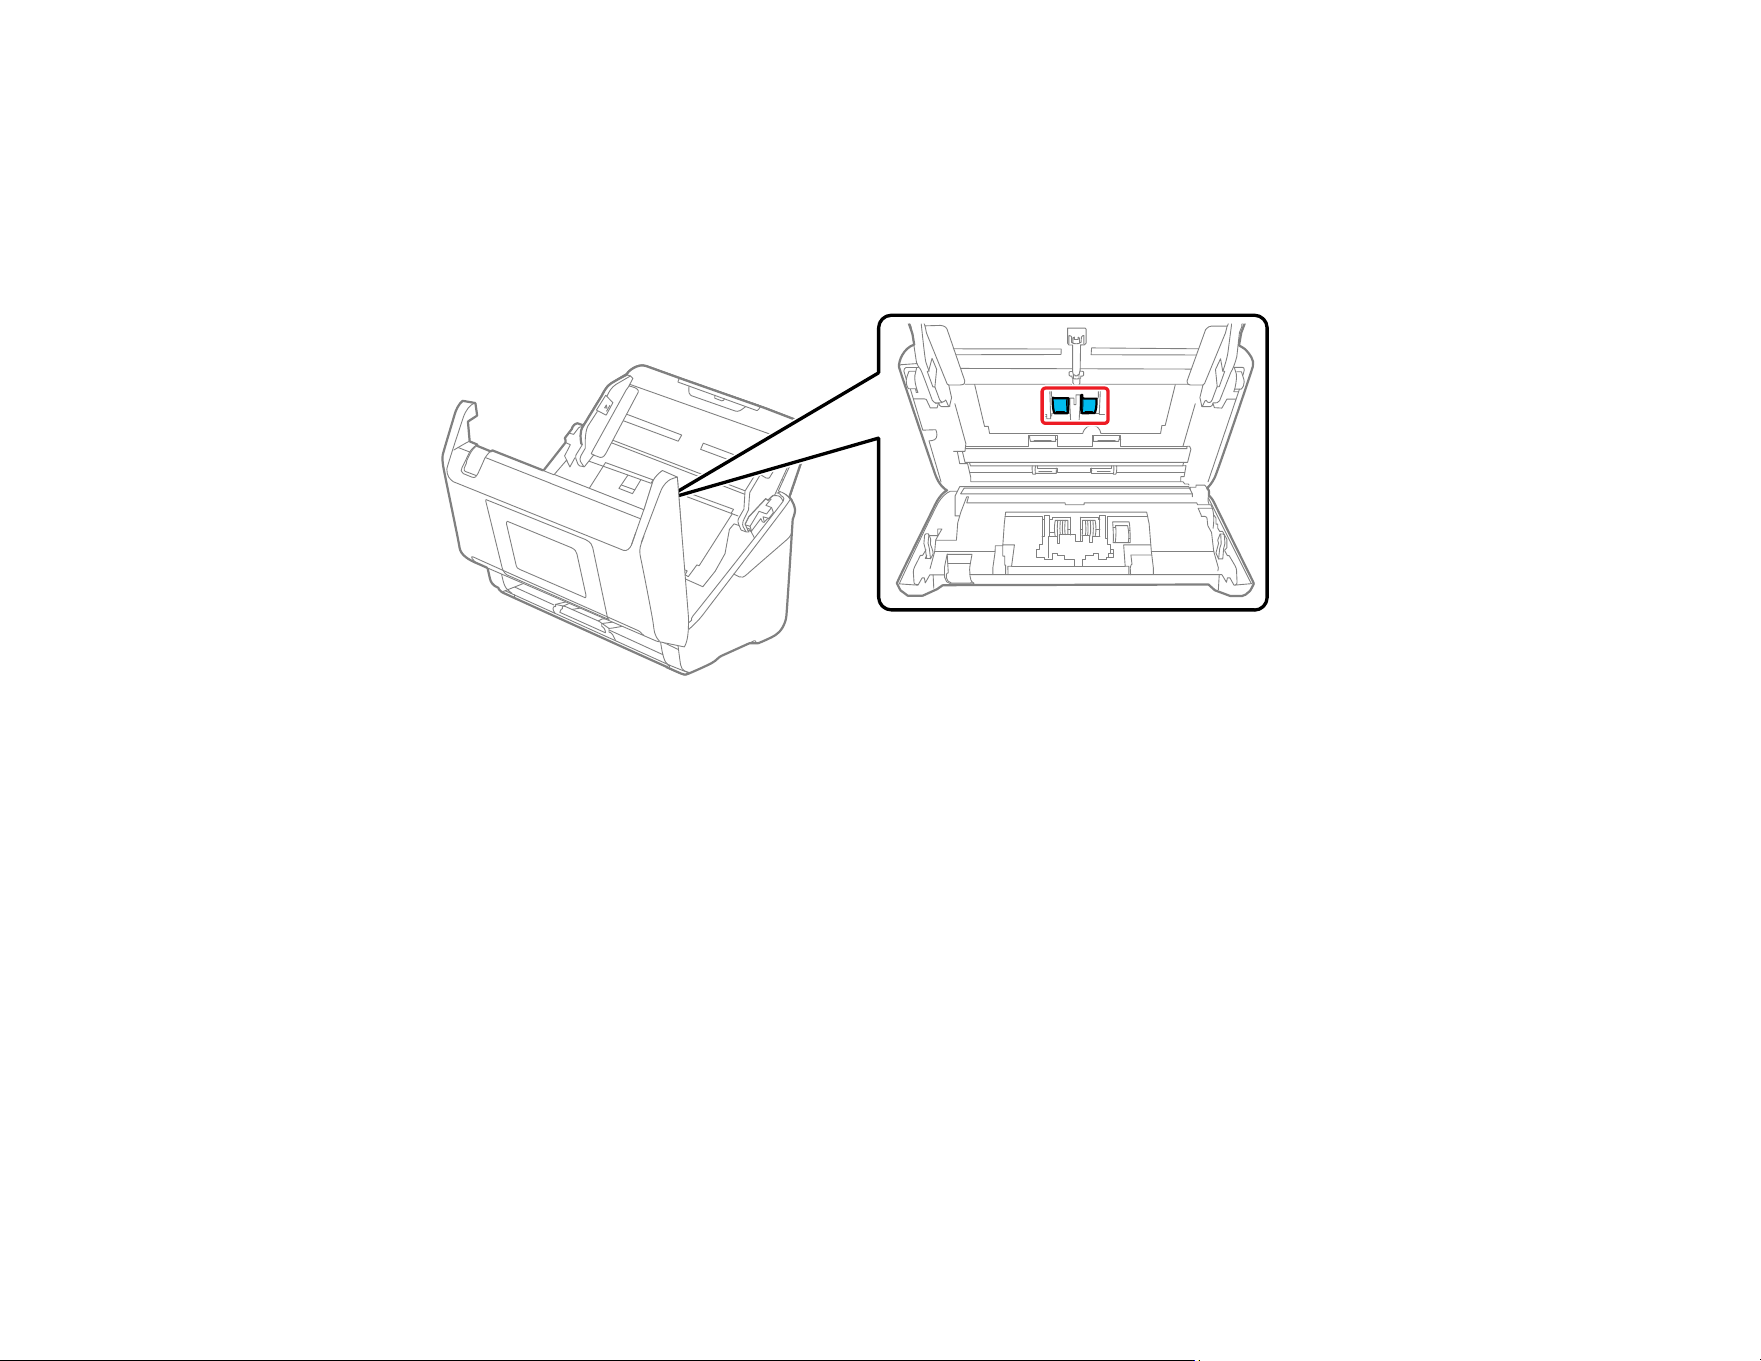
183
11. Close the separation roller cover until you hear it click into place.
Note: If you are not able to close the cover, the roller is not installed correctly. Remove the roller and
reinstall it, then try to close the cover again.
12. Locate the pickup roller.
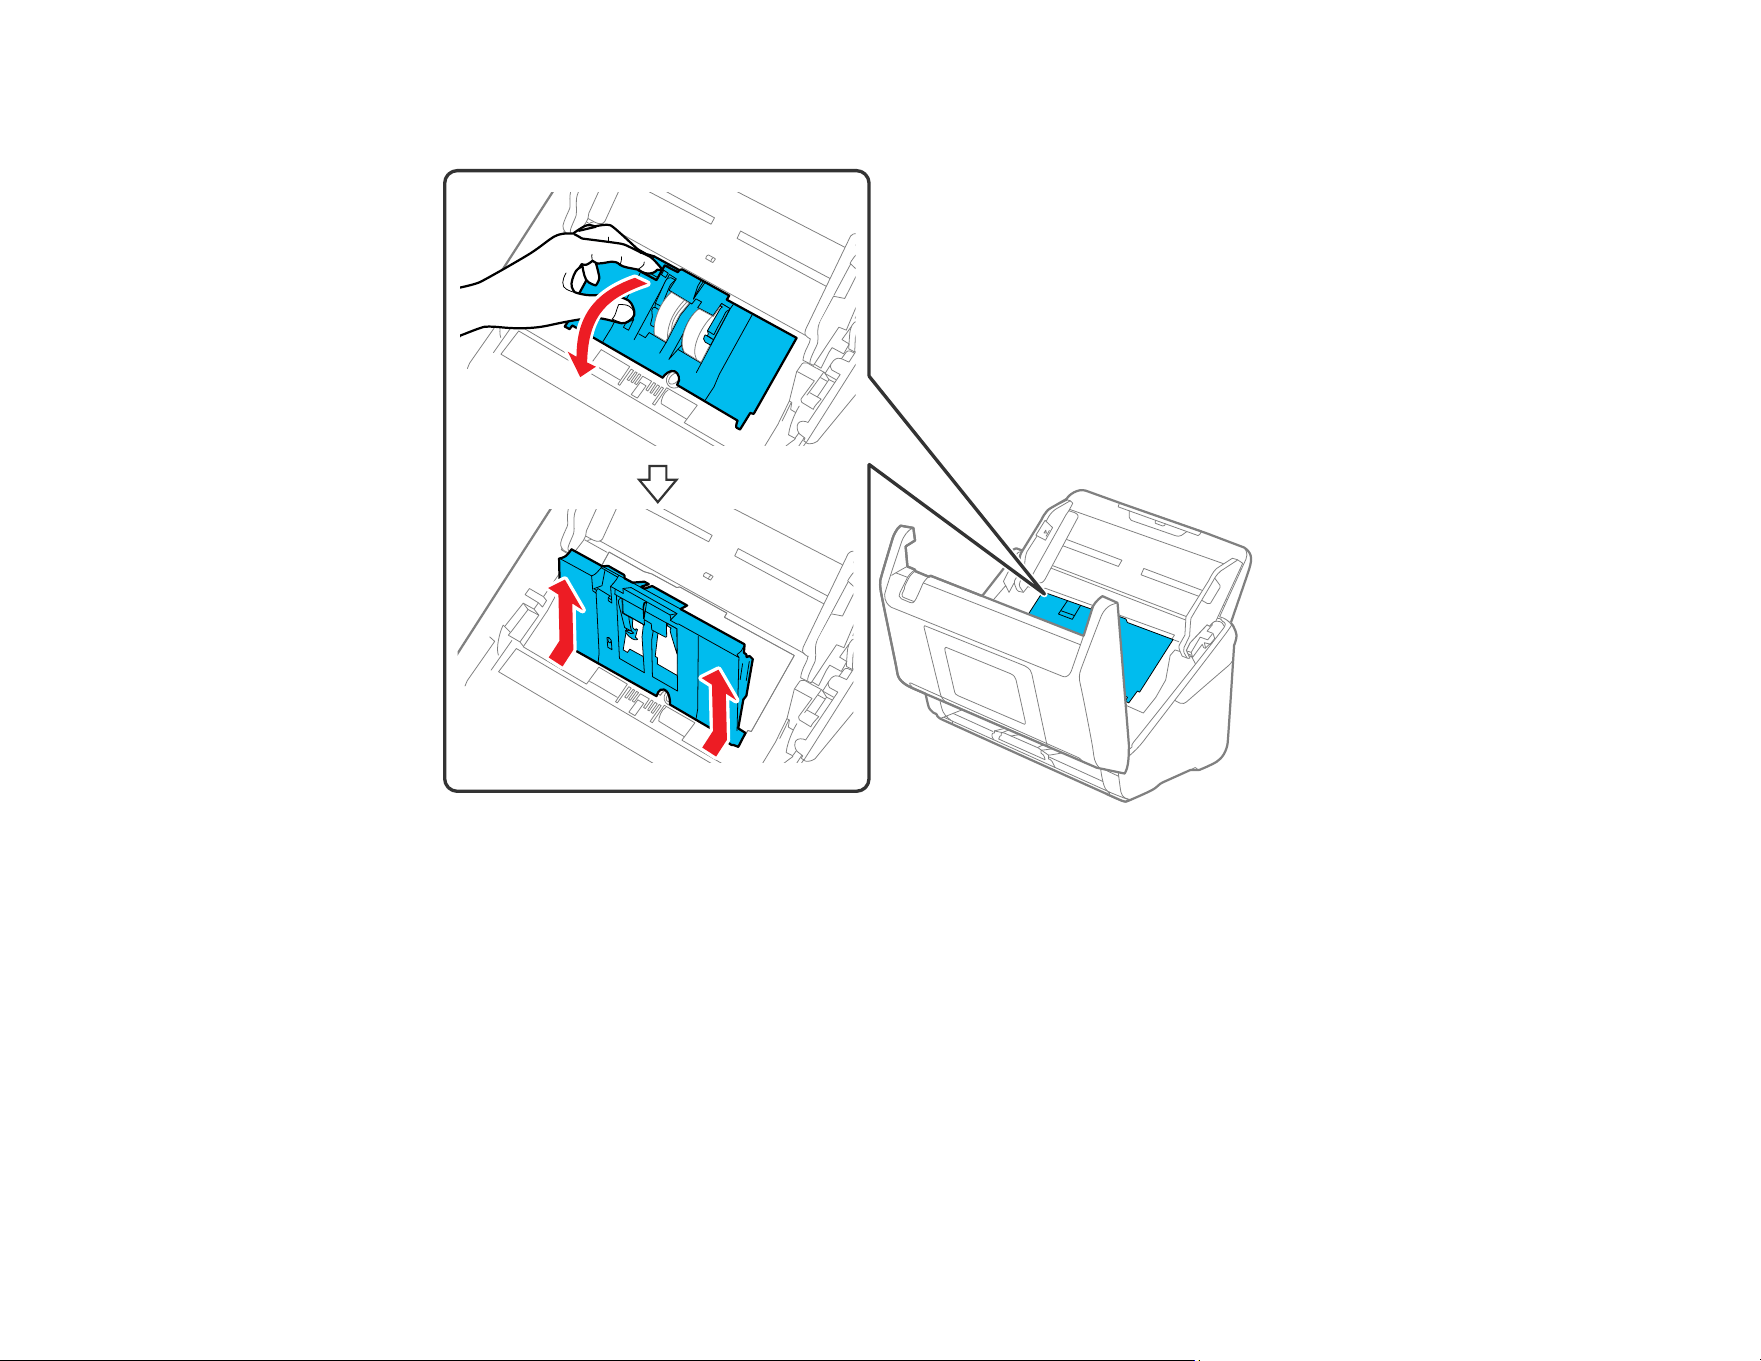
184
13. Press down on the pickup roller cover latch and pull up the cover to remove it.
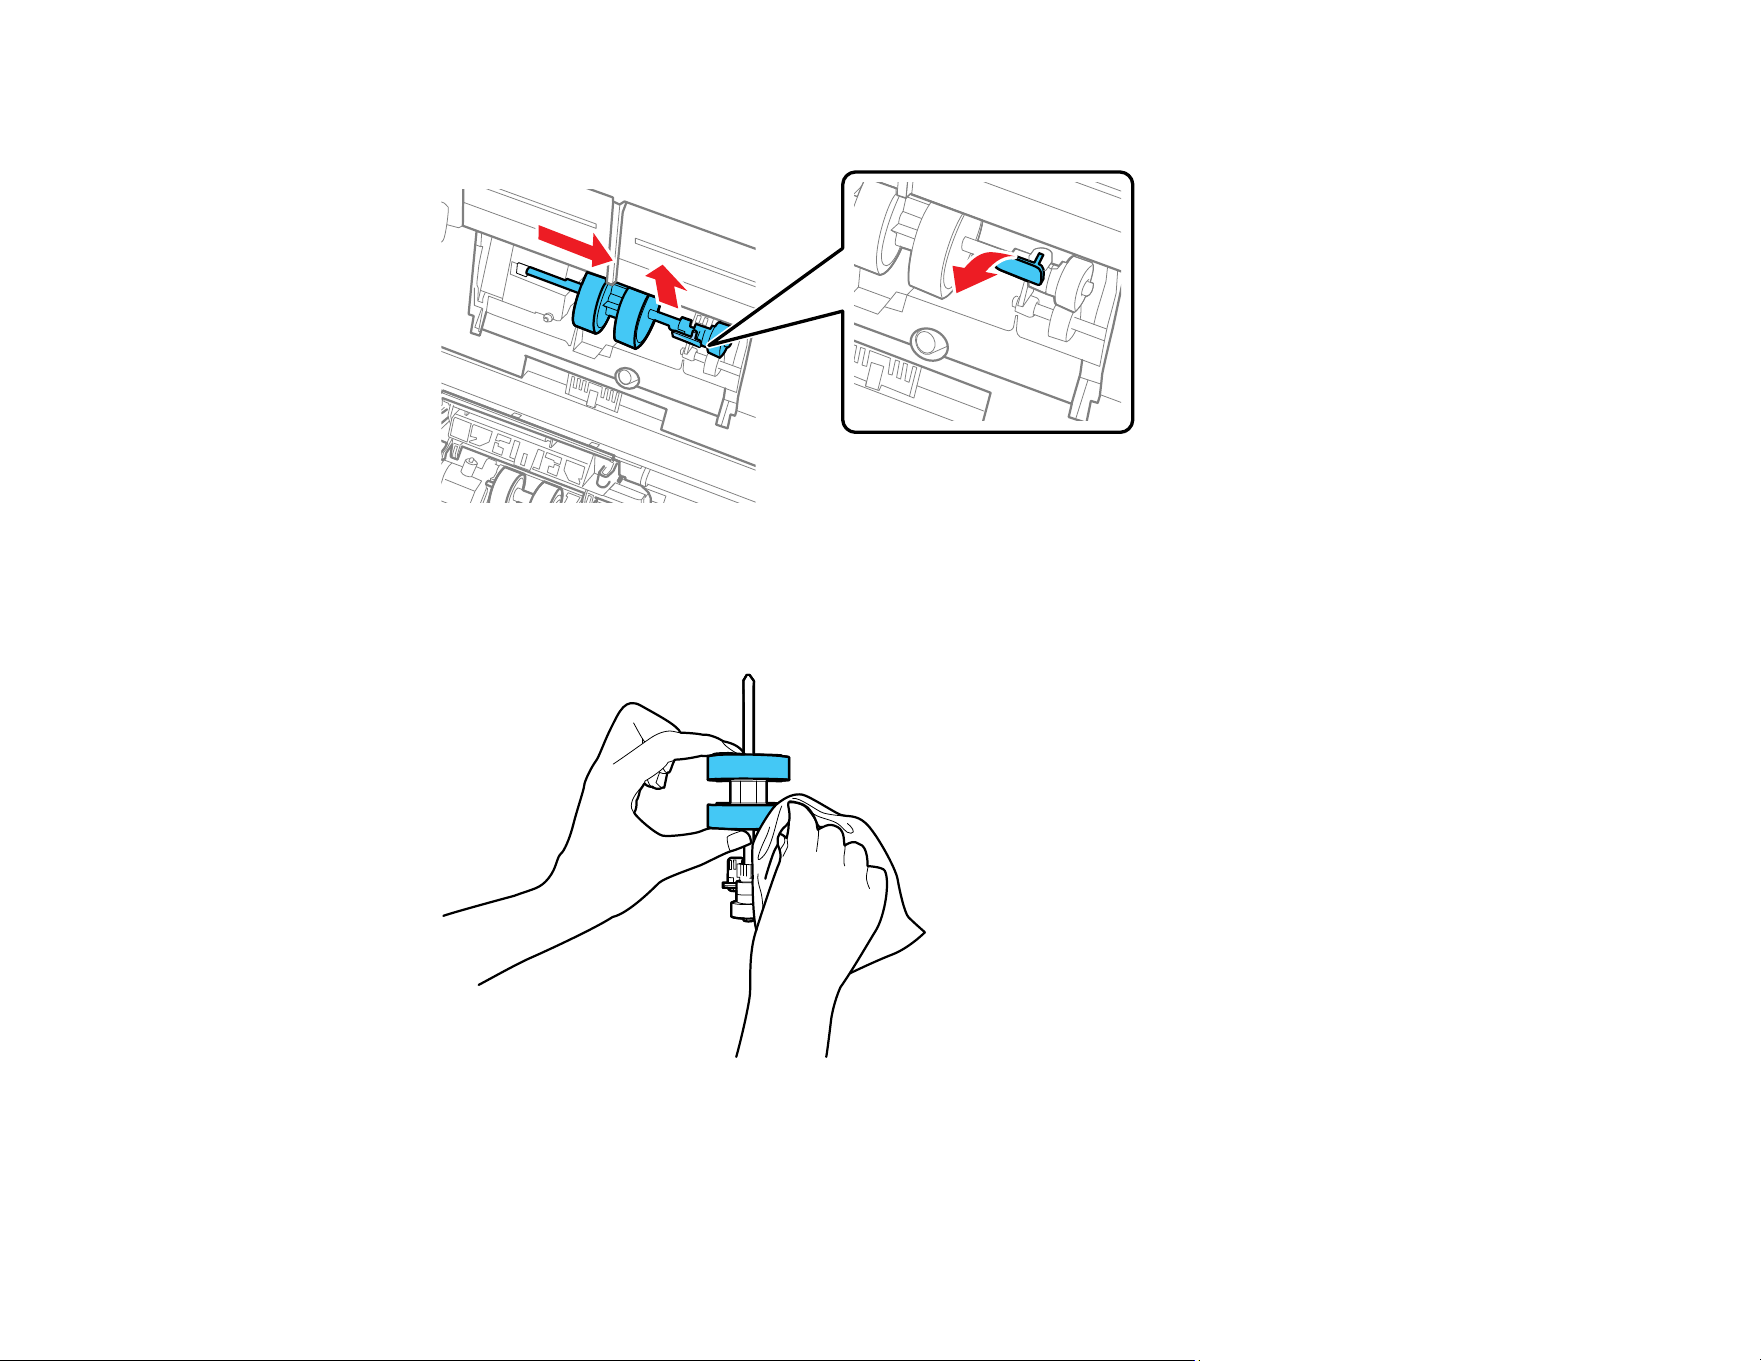
185
14. Pull down the tab on the pickup roller and slide the roller to the right to remove it.
Note: Do not use force to pull out the pickup roller; doing so may damage the inside of the product.
15. Wipe off any dust or dirt on the pickup roller using a genuine Epson cleaning kit or a soft, moist cloth.
CAUTION: Use only a genuine Epson cleaning kit or soft, moist cloth to clean the roller; using a dry
cloth may damage the surface of the roller.
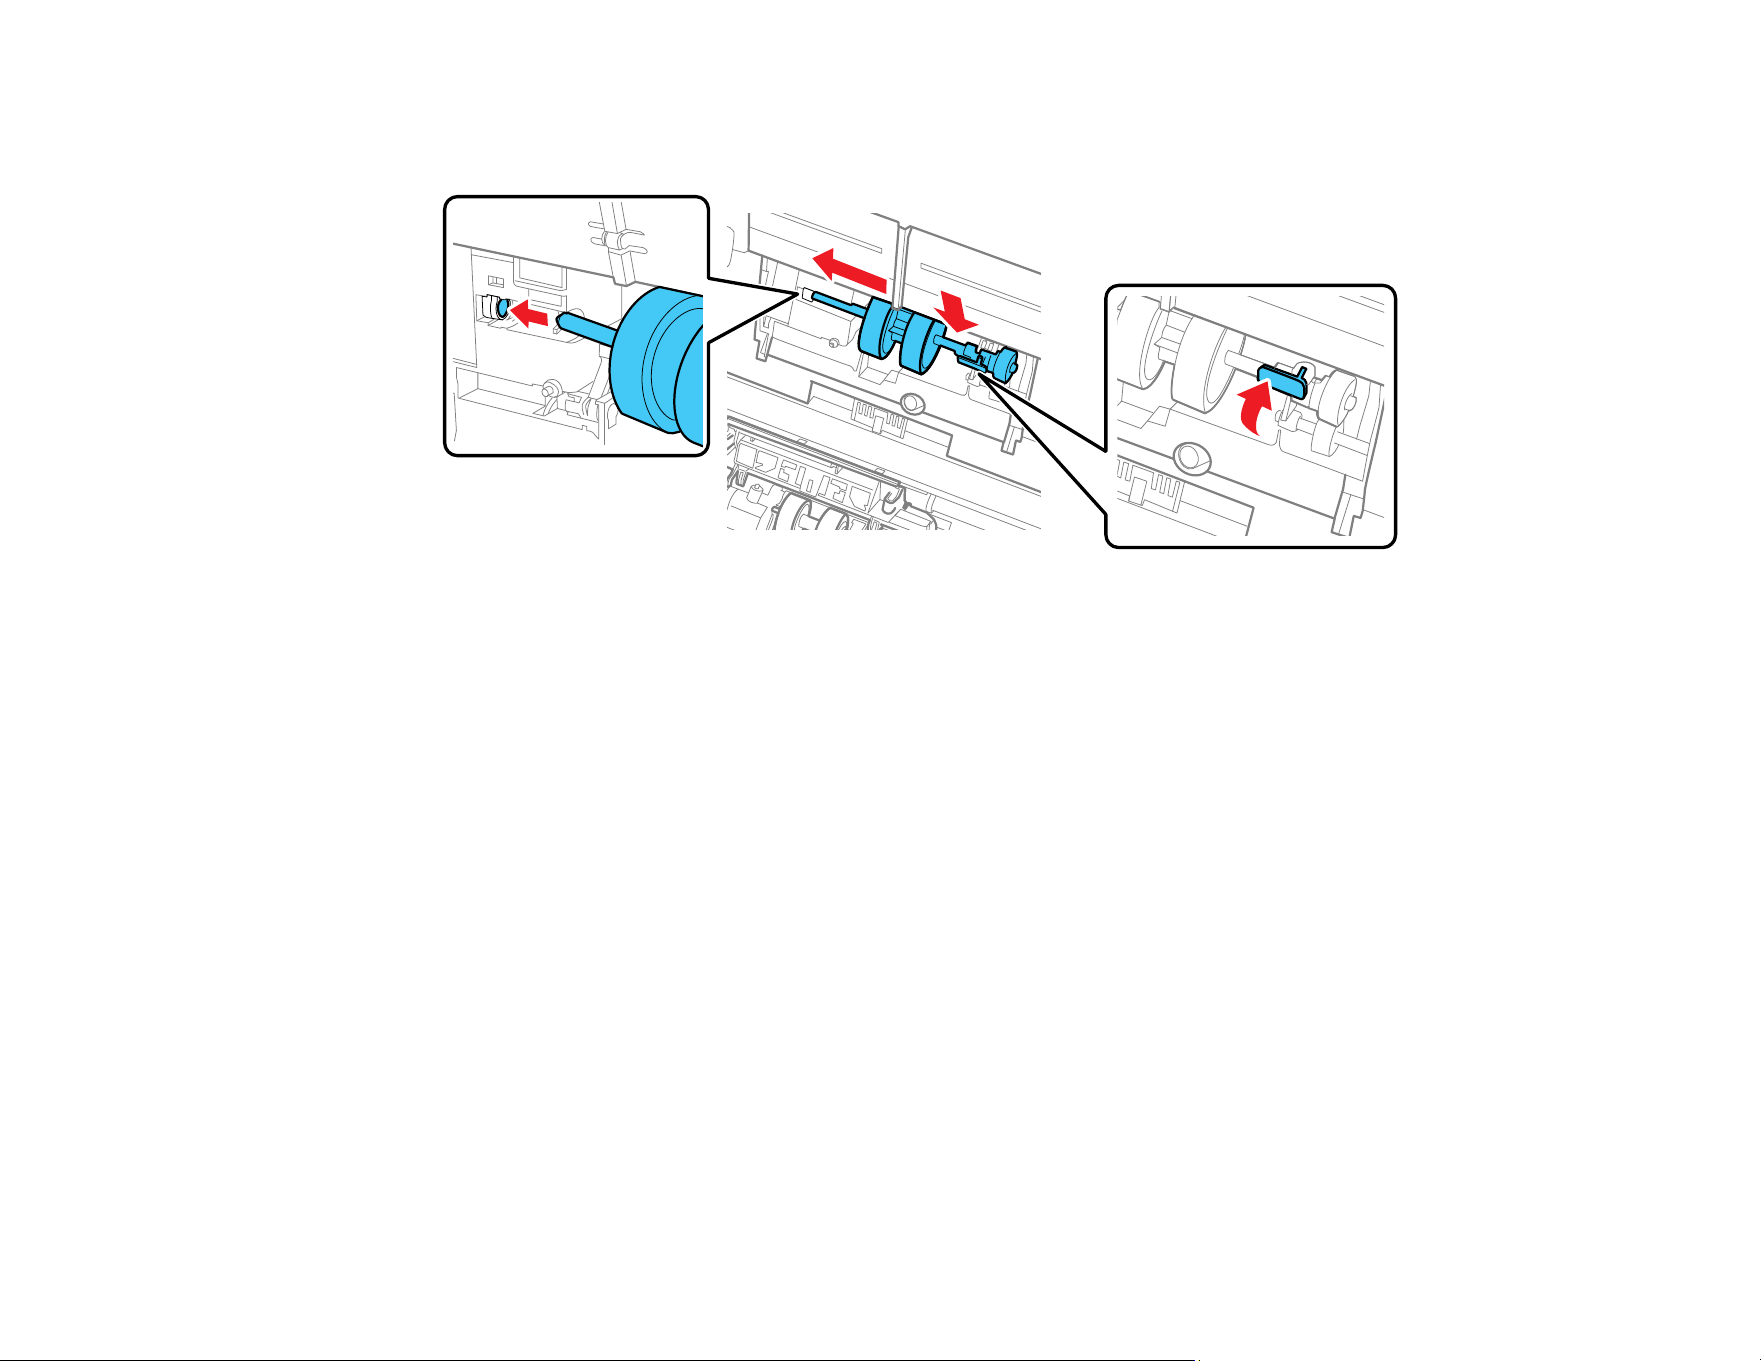
186
16. To replace the pickup roller, align the notches on the roller unit and slide it to the left. Press up on the
tab to secure the roller.
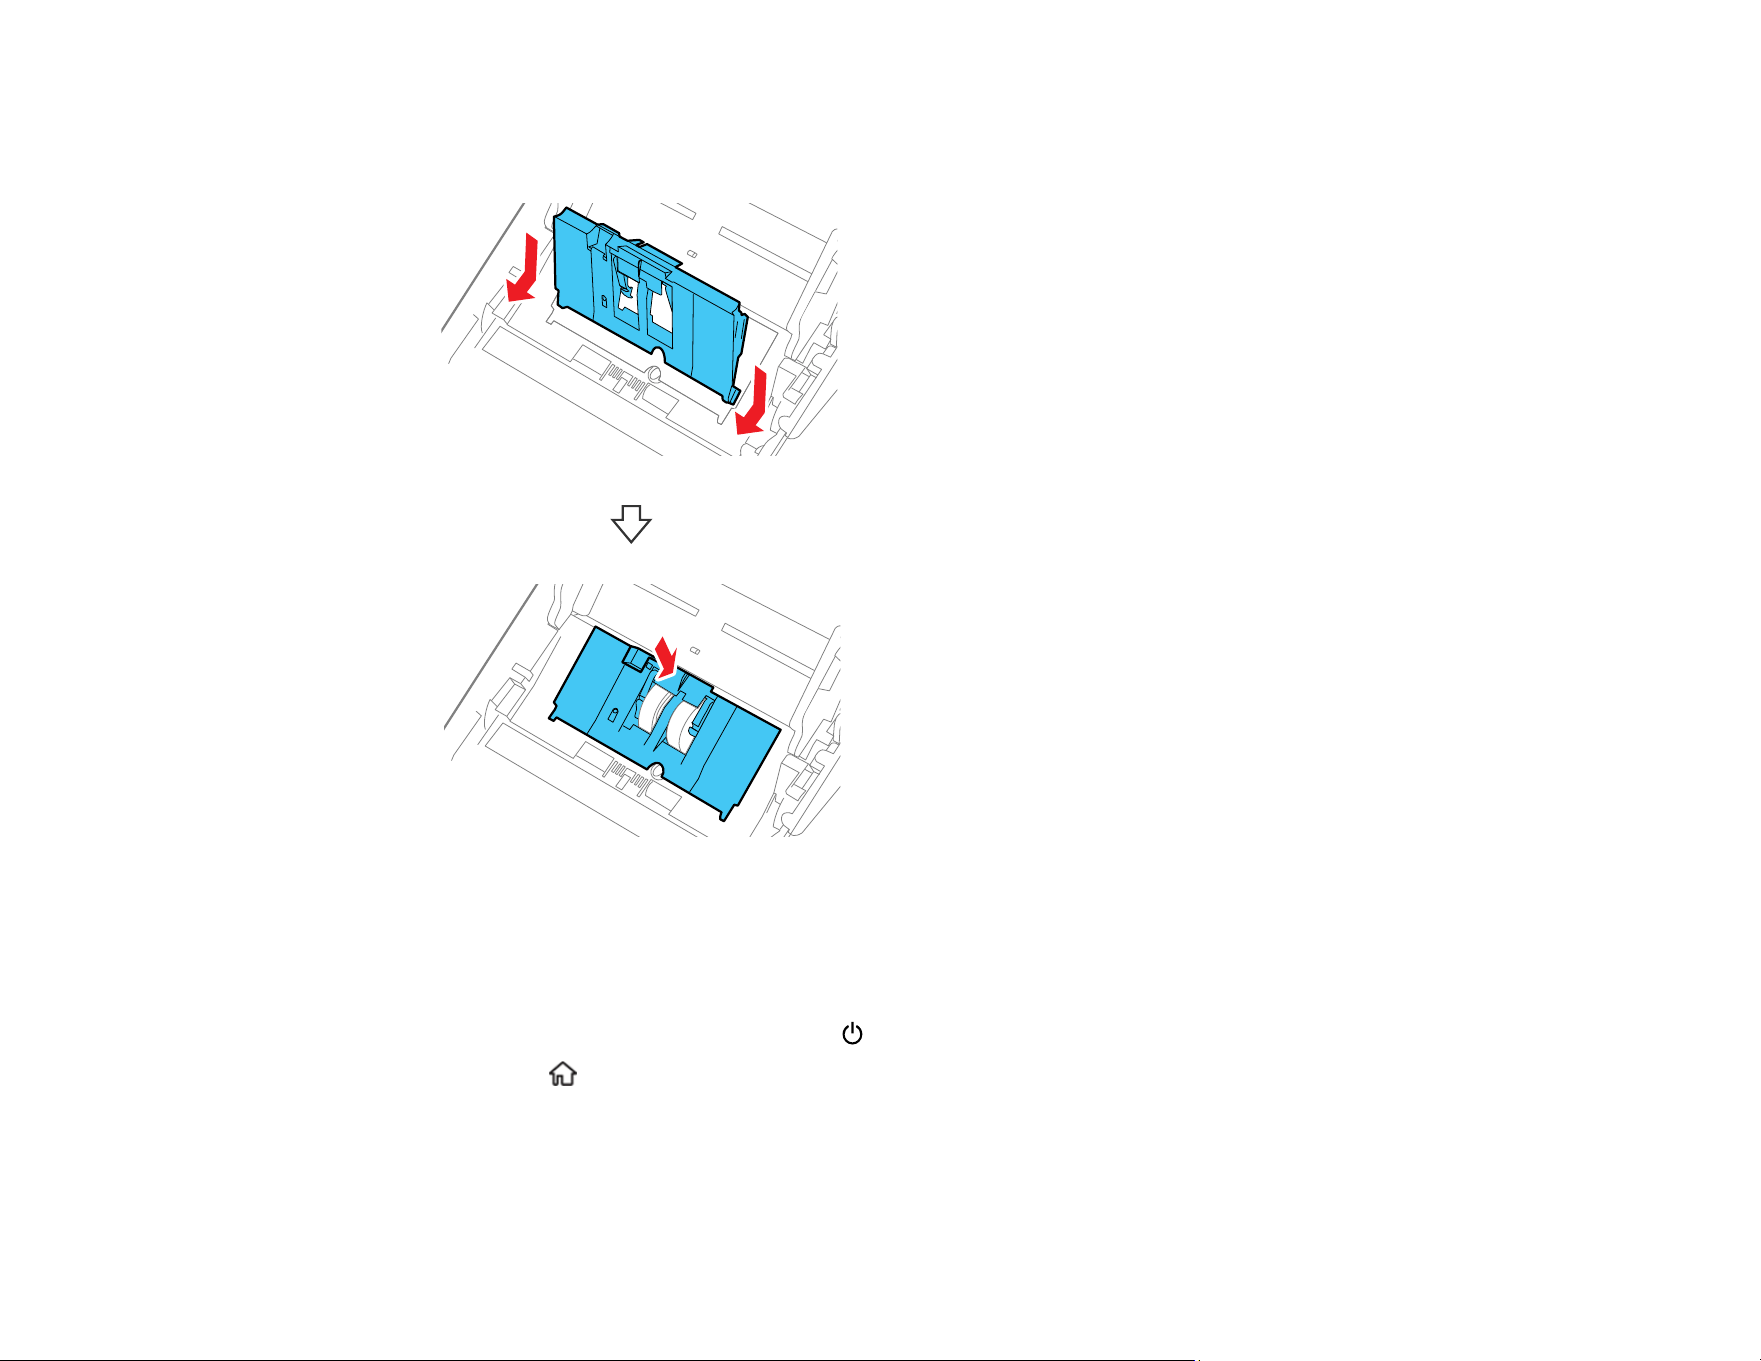
187
17. Align the bottom edge of the pickup roller cover into the notches as shown and press it down until it
clicks into place.
Note: If you are not able to close the cover, the roller is not installed correctly. Remove the roller unit
and reinstall it, then try to close the cover again.
18. Close the scanner cover.
19. Plug in the AC adapter and press the power button to turn on the product.
20. Press the home button, if necessary, and select Scanner Maintenance.
21. Select Roller Cleaning.
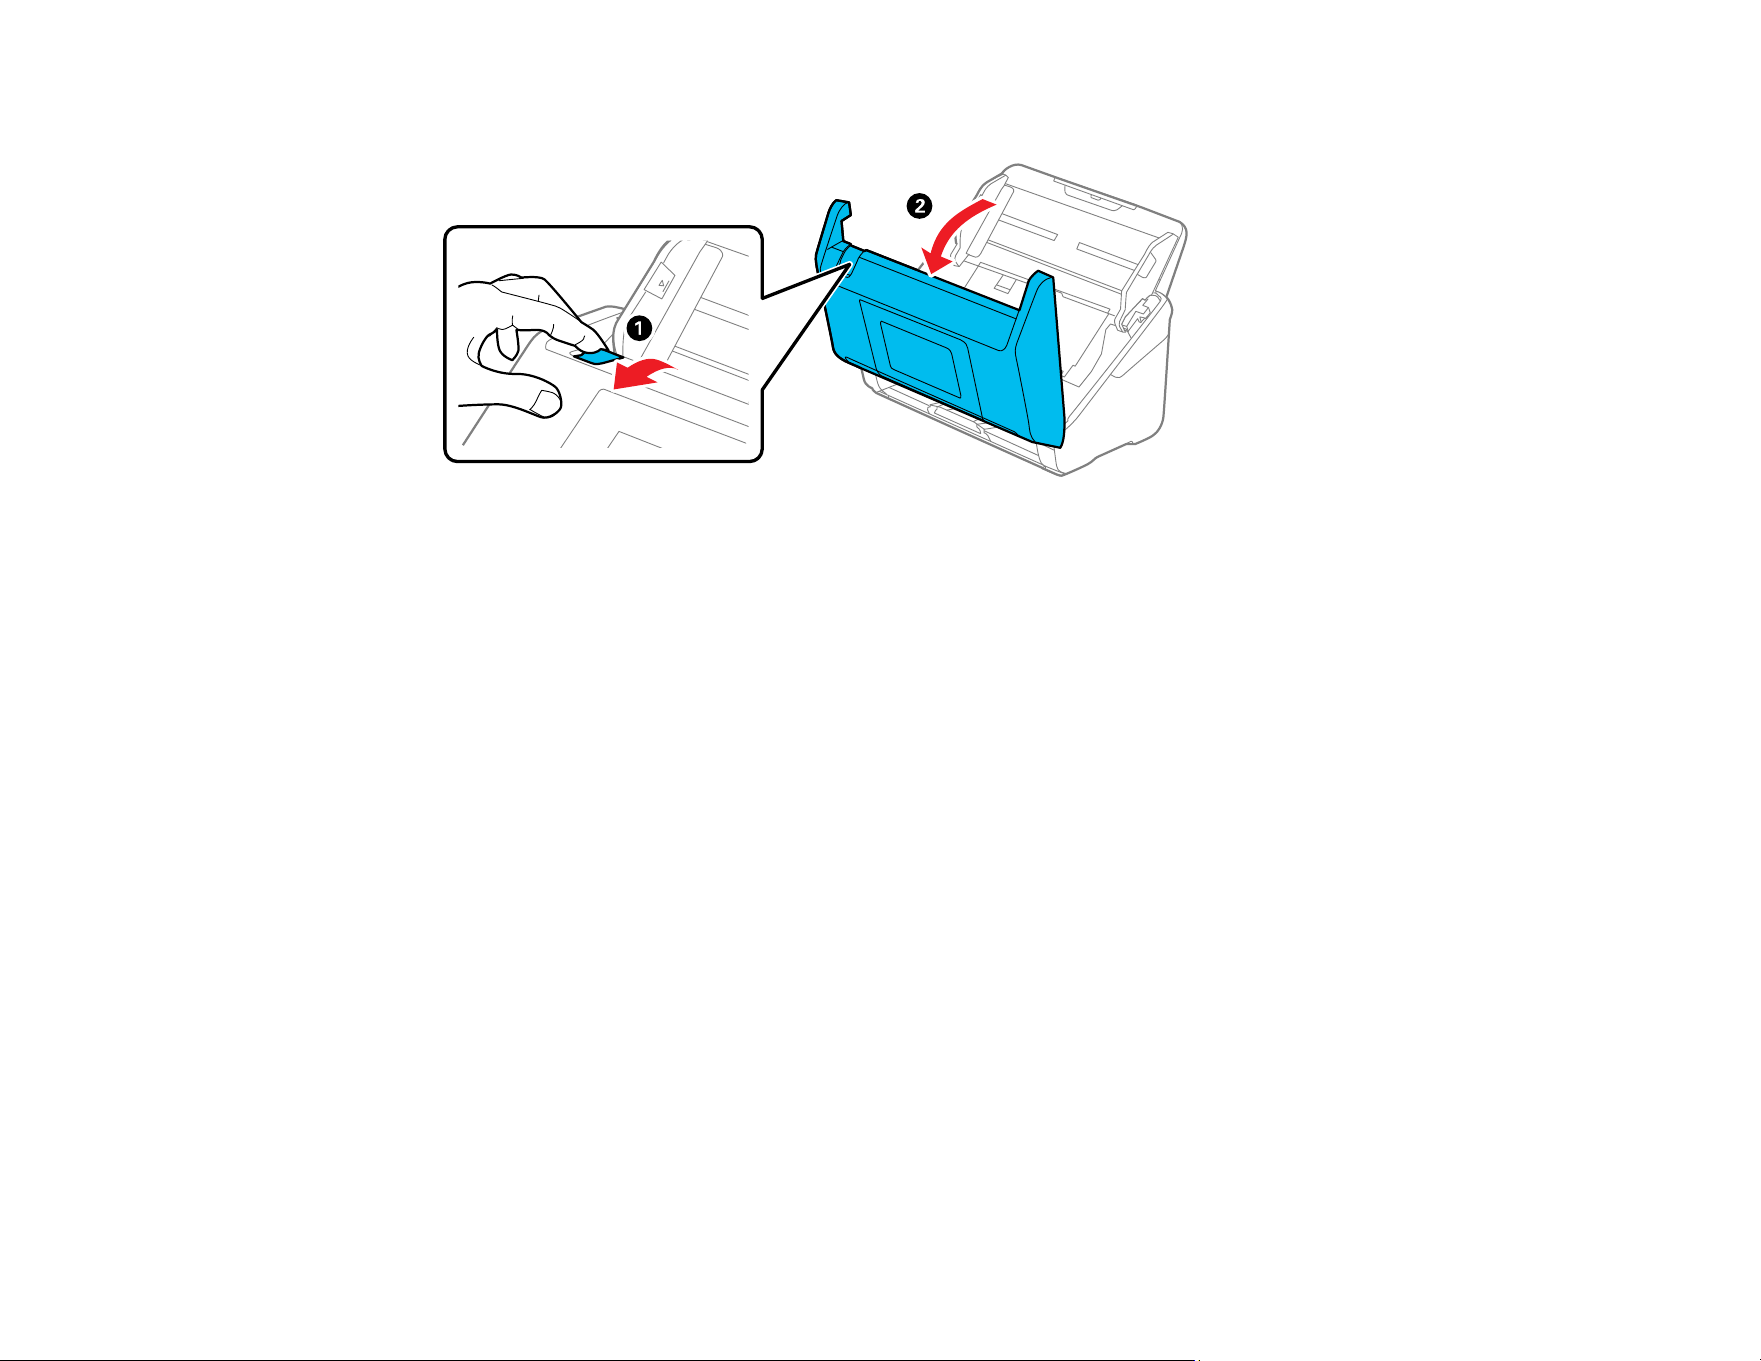
188
22. Pull down on the cover open lever and open the scanner cover.
The product enters roller cleaning mode.
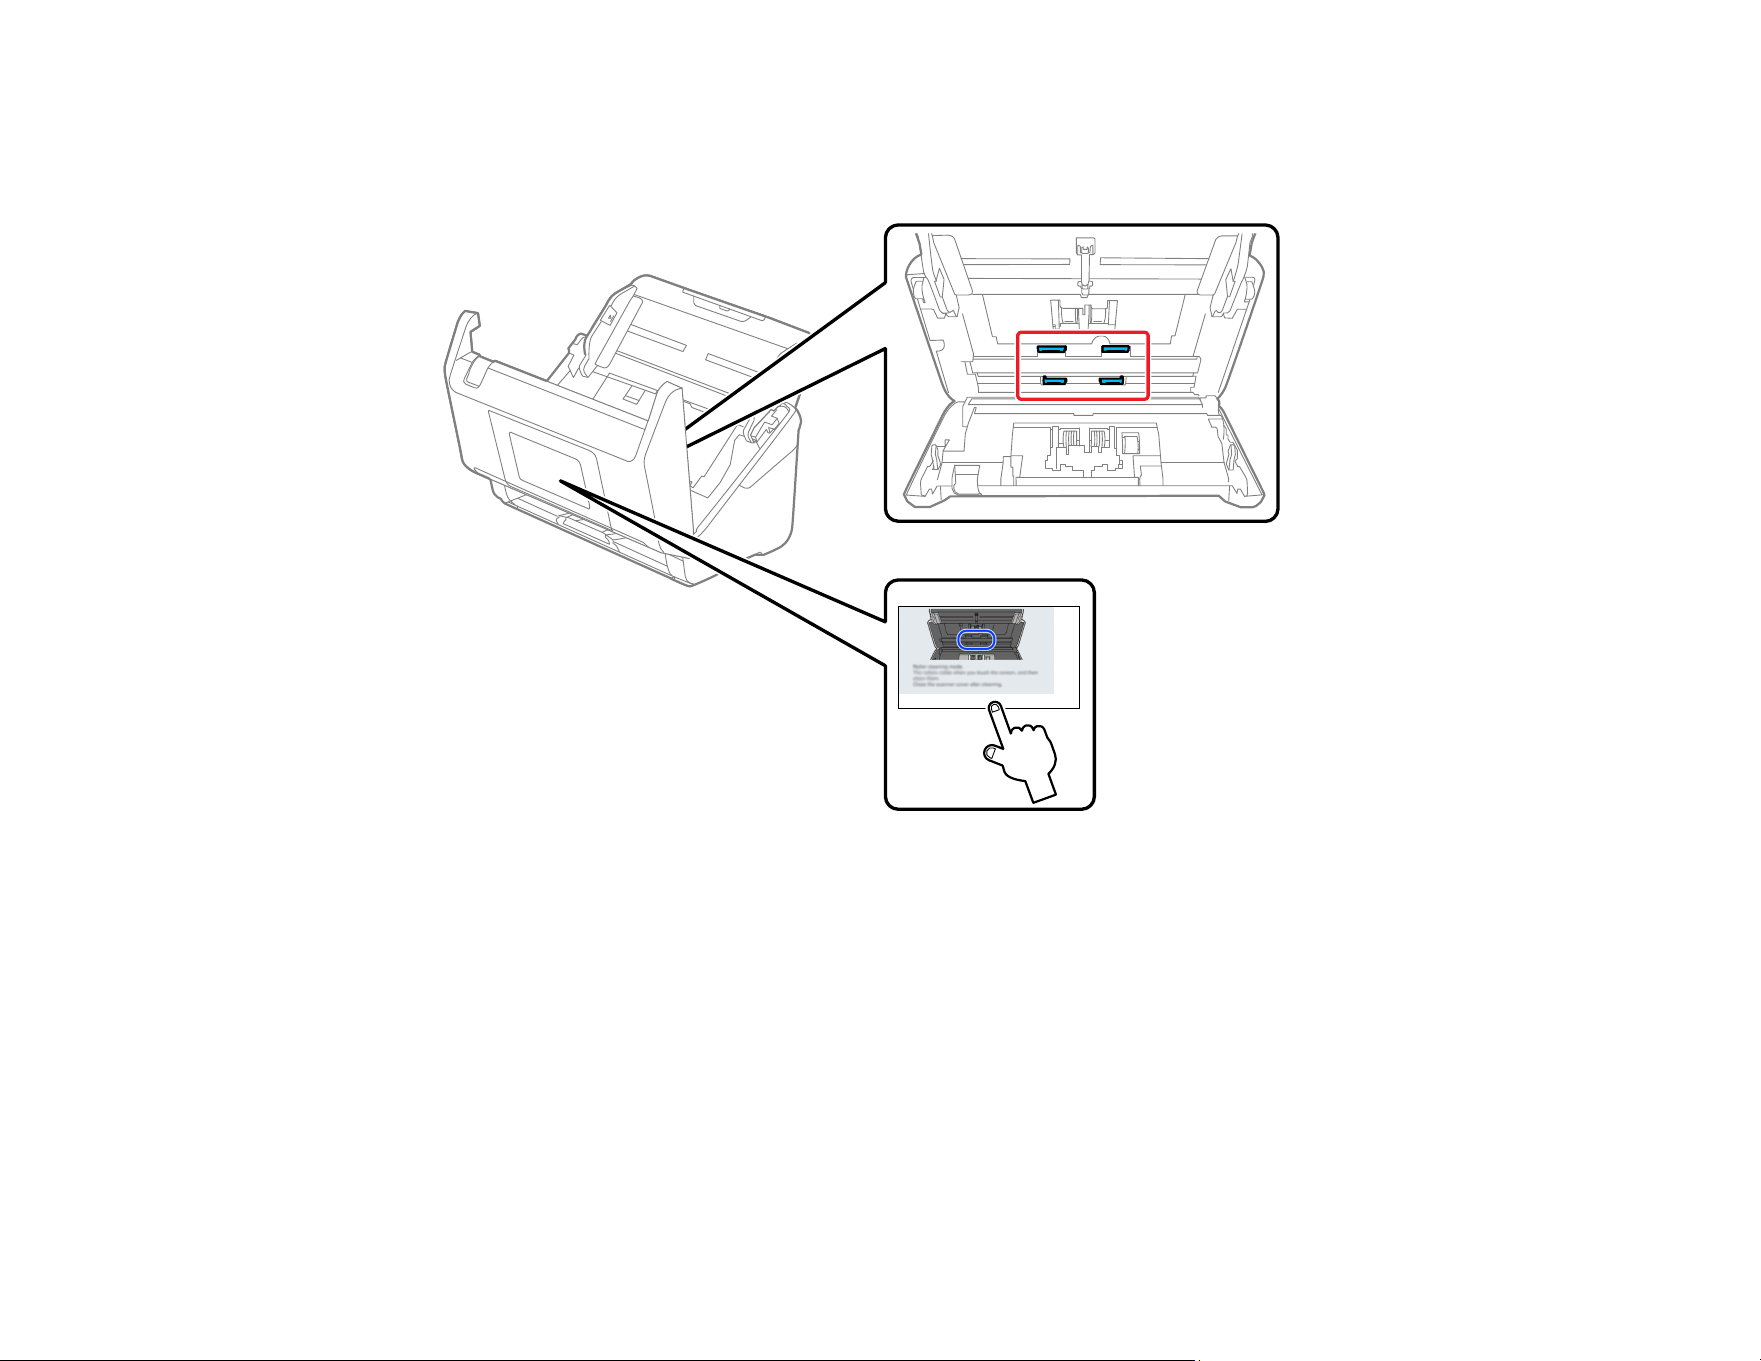
189
23. Slowly rotate the rollers shown here by tapping anywhere on the LCD screen. Use a genuine Epson
cleaning kit or a soft, moist cloth to wipe off any dust or dirt on the rollers as they rotate. Repeat this
step until the rollers are clean.
CAUTION: Be careful not to get your hands or hair caught in the rollers as they rotate.
24. Close the scanner cover.
The product automatically exits roller cleaning mode.
Parent topic: Cleaning and Transporting Your Product
Related references
Optional Accessories and Replacement Parts

190
Checking the Roller Counter
Check the product's roller counter to determine when your rollers need to be replaced. When you
replace the rollers, reset the roller counter so you know when you may need to replace the rollers again.
Note: To check the roller counter from the product's control panel, press the home button, if
necessary, and select Scanner Maintenance > Roller Replacement.
1. Make sure the product is turned on and connected to your computer.
2. Do one of the following to open the Epson Scan 2 Utility:
• Windows 11: Click , then search for Epson Scan 2 Utility and select it.
• Windows 10: Click and select EPSON > Epson Scan 2 Utility.
• Windows 8.x: Navigate to the Apps screen and select Epson Scan 2 Utility.
• Windows 7: Click > All Programs > EPSON > Epson Scan 2 Utility.
• Mac: Open the Applications folder, click Epson Software, and click Epson Scan 2 Utility.
3. Click the Counter tab.
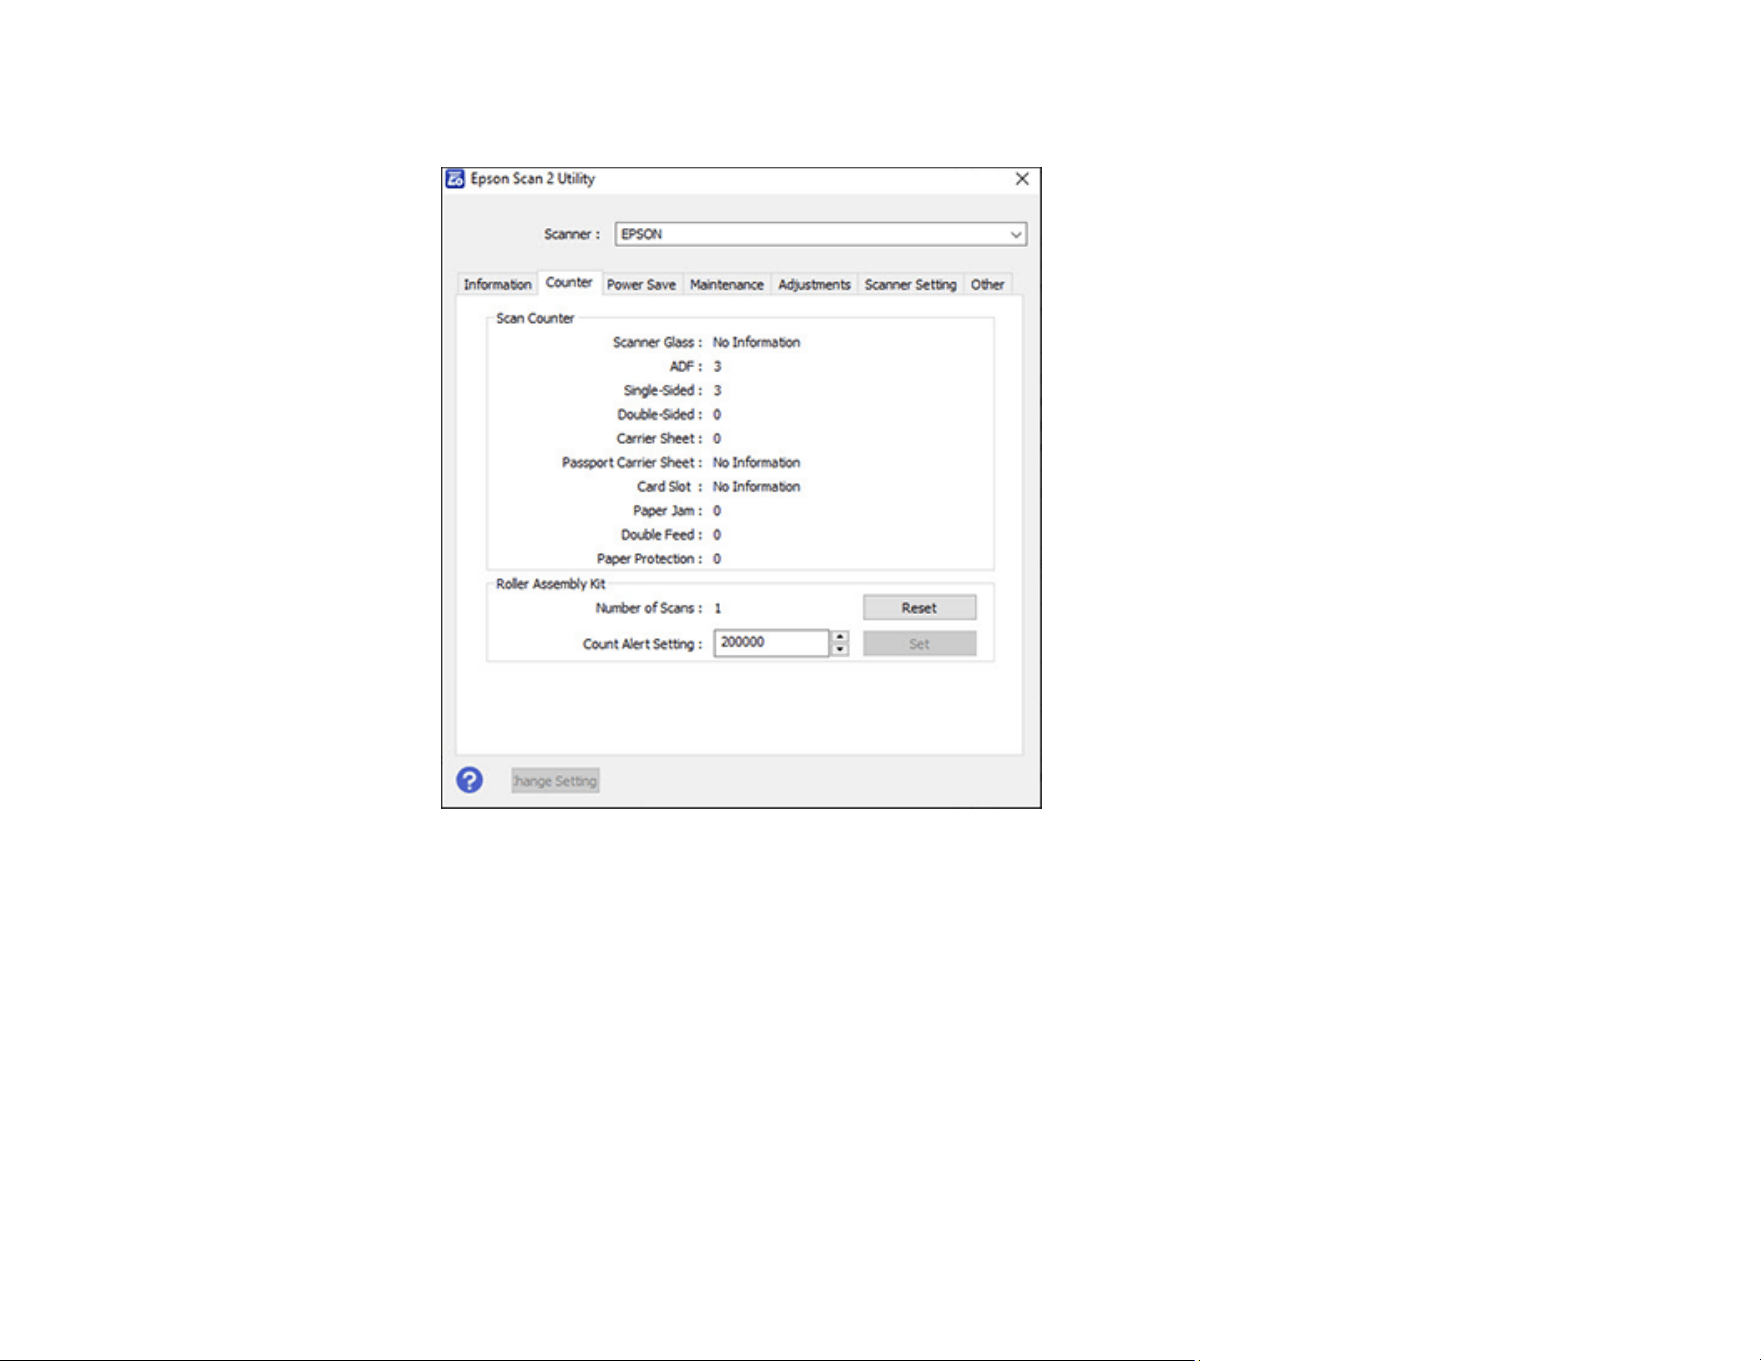
191
You see a screen like this:
4. If the number in the Number of Scans field exceeds the life cycle of the rollers, it is time to replace
the rollers.
Note: In the above screen, the life cycle of the rollers is the default number displayed in the Count
Alert Setting field. The life cycle may vary depending on the paper type.
5. Close the Epson Scan 2 Utility.
Parent topic: Cleaning and Transporting Your Product
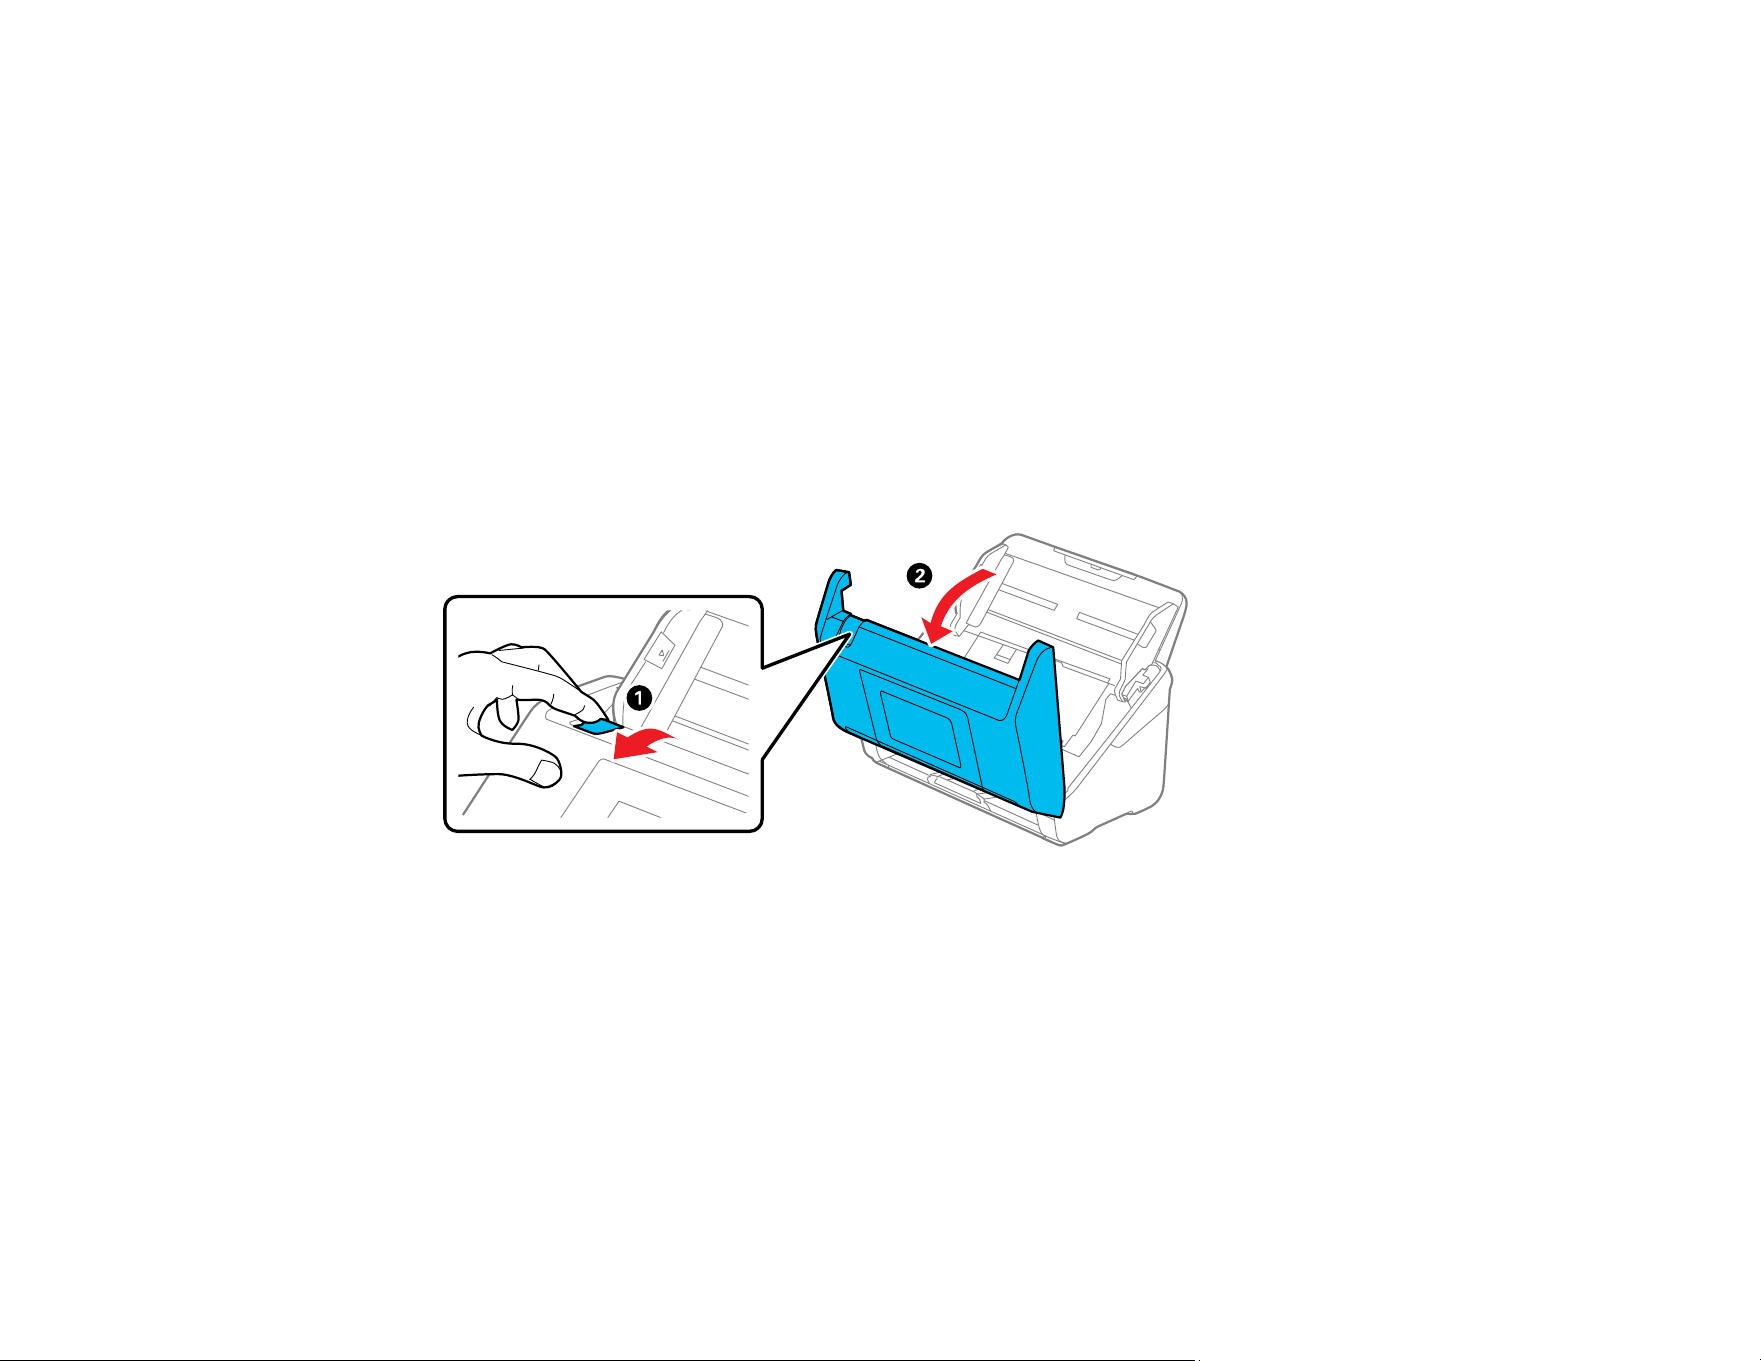
192
Replacing the Rollers
Replace the product's rollers when the number of scans exceeds the life cycle of the rollers. Check the
roller counter to see when you need to replace the rollers.
Note: Frequent use of textured media may cause premature wear on the rollers. If frequent paper jams
occur before the life cycle of the rollers is exceeded, try cleaning the rollers. In some cases, the rollers
may need to be replaced before the number of scans exceeds the life cycle of the rollers.
1. Turn off the product.
2. Unplug the AC adapter.
3. Disconnect any connected cables.
4. Pull down on the cover open lever and open the scanner cover.

193
5. Press down on the pickup roller cover latch and pull up the cover to remove it.
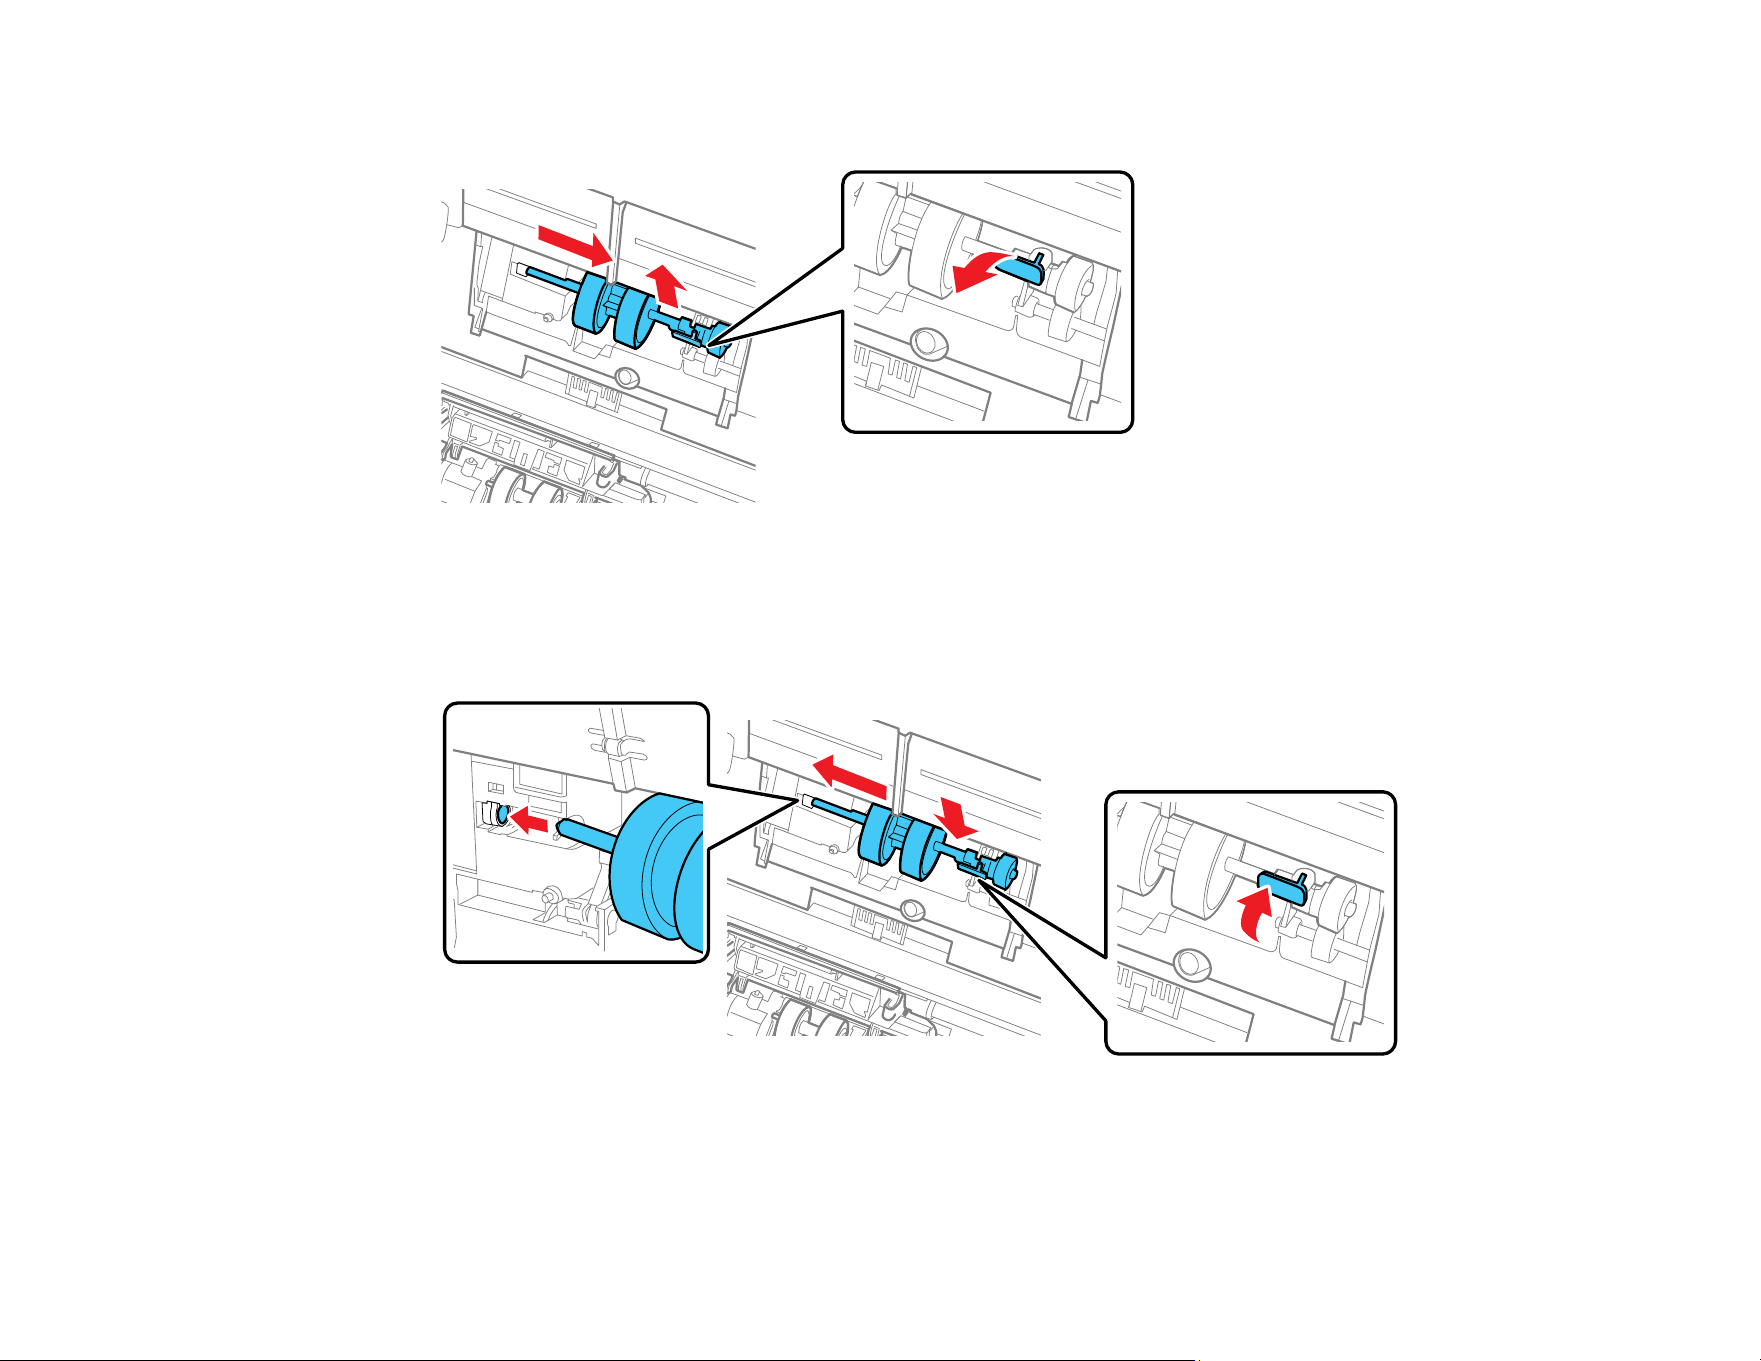
194
6. Pull down the tab on the pickup roller and slide the roller to the right to remove it.
Note: Do not use force to pull out the pickup roller; doing so may damage the inside of the product.
7. To install the new pickup roller, align the notches on the roller unit and slide it to the left. Press up on
the tab to secure the roller.
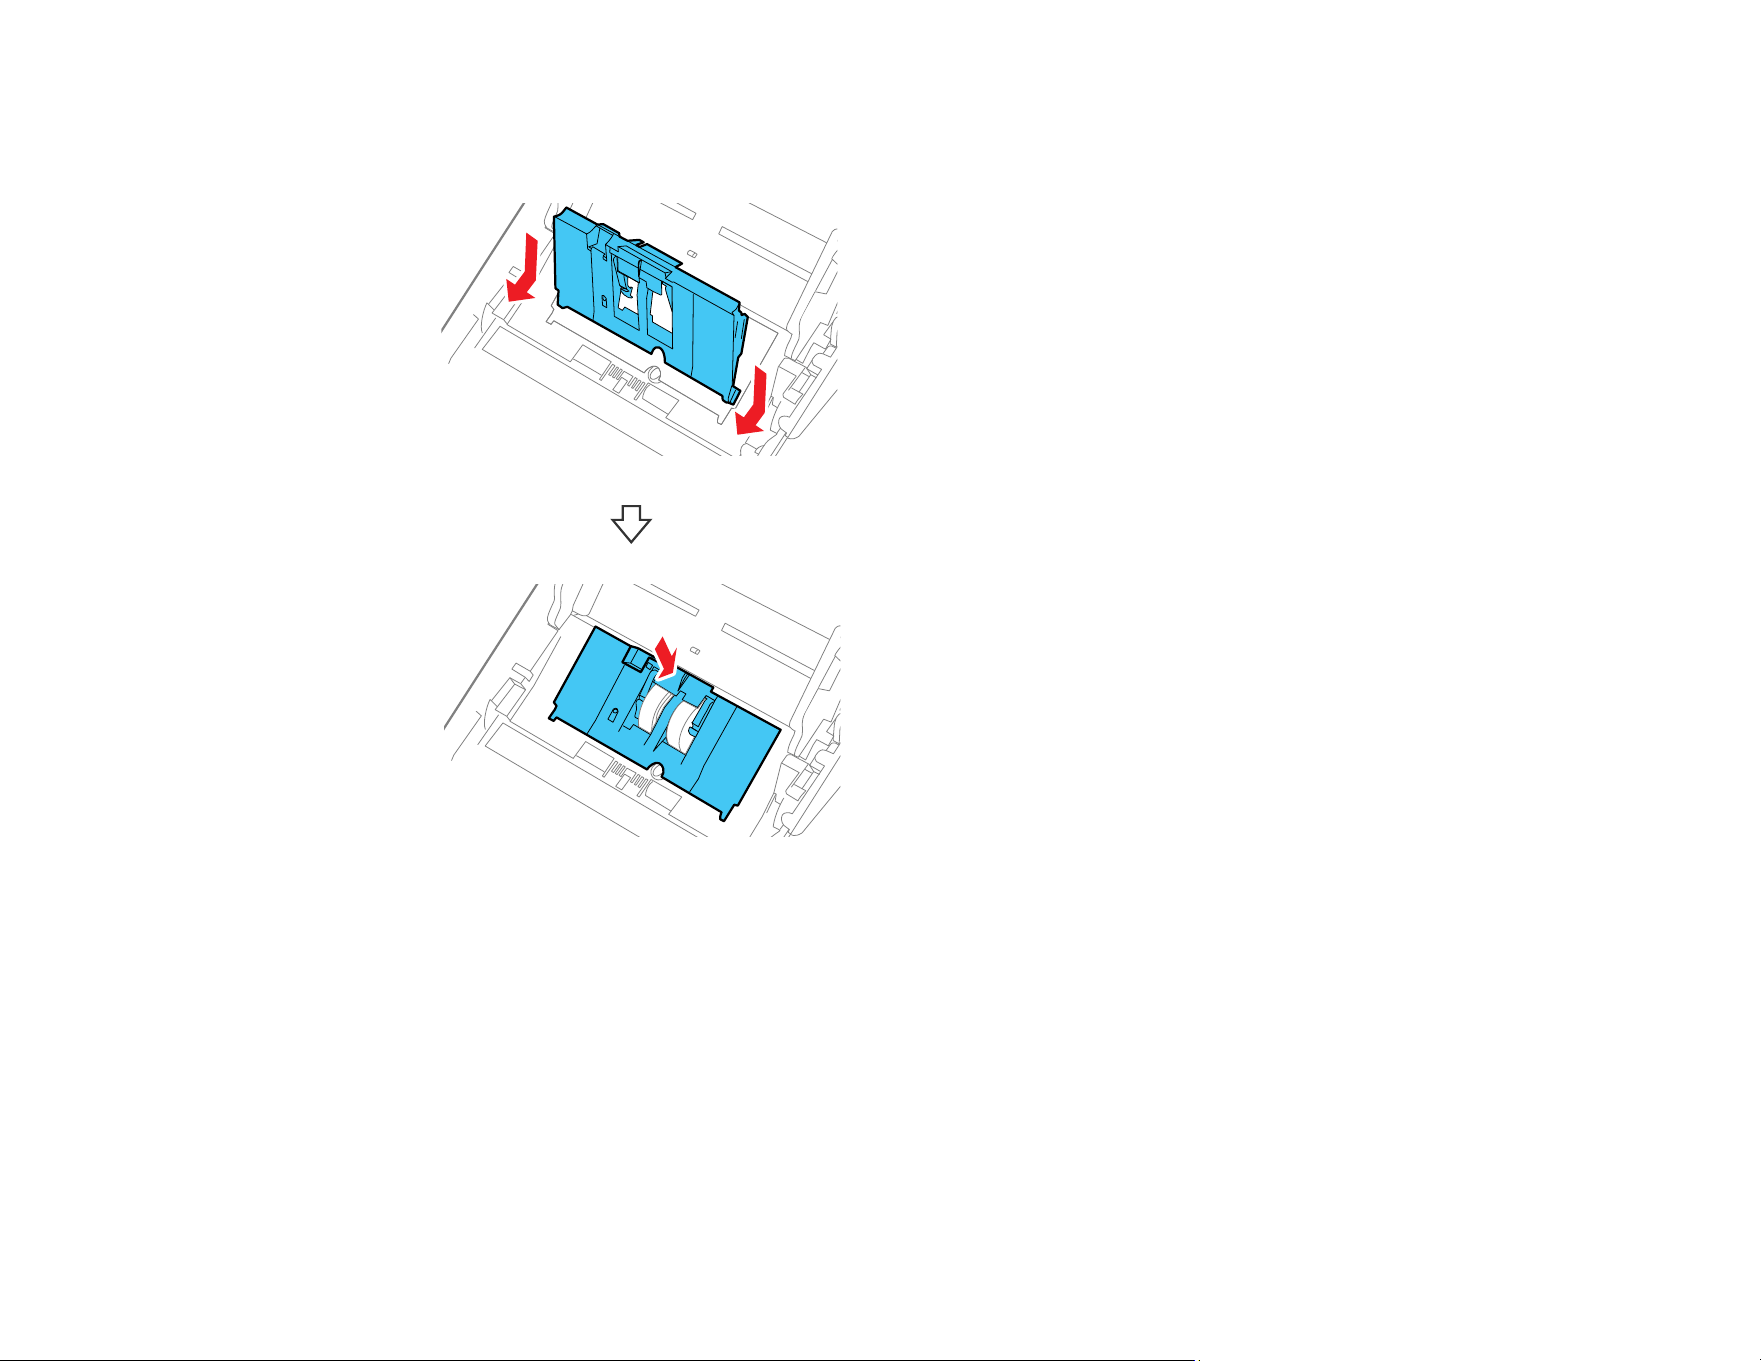
195
8. Align the bottom edge of the pickup roller cover into the notches as shown and press it down until it
clicks into place.
Note: If you are not able to close the cover, the pickup roller is not installed correctly. Remove the
roller unit and reinstall it, then try to close the cover again.

196
9. Squeeze the tabs on the sides of the separation roller cover and open the cover.
CAUTION: Be careful not to apply too much force when opening the cover.
10. Slide the separation roller to the left and remove it.
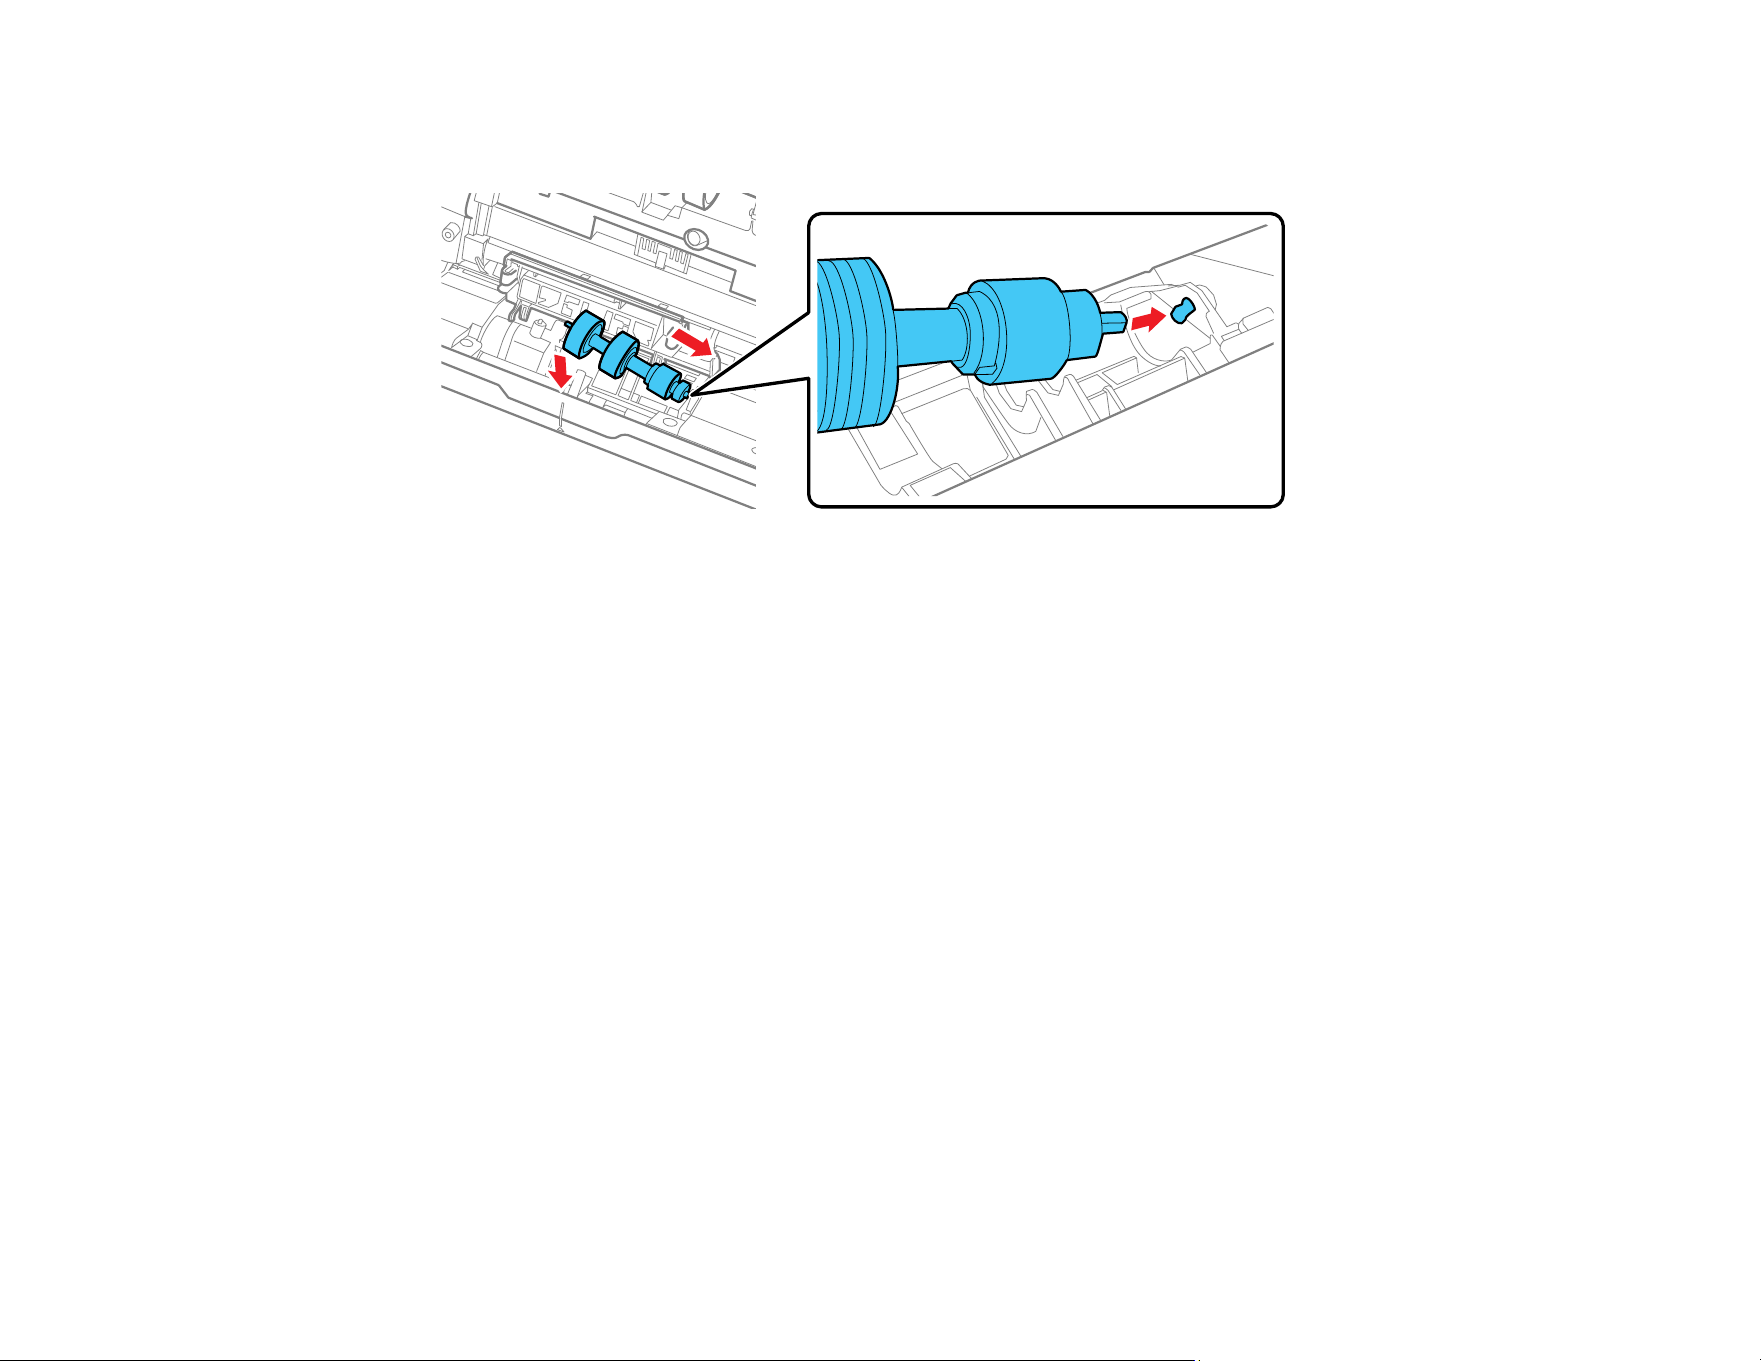
197
11. To install a new separation roller, insert the end of the roller into the hole on the right side and lower
the other end of the roller into place.
12. Close the separation roller cover until you hear it click into place.
Note: If you are not able to close the cover, the roller is not installed correctly. Remove the roller and
reinstall it, then try to close the cover again.
13. Close the scanner cover.
14. Connect any disconnected cables.
15. Plug in the AC adapter and turn on the product.
16. Reset the roller counter.
Note: Make sure to dispose of the pickup roller and the separation roller following the rules and
regulations of your local authority. Do not disassemble them.
Resetting the Roller Counter
Parent topic: Cleaning and Transporting Your Product
Related references
Optional Accessories and Replacement Parts
198
Resetting the Roller Counter
When you replace the product's rollers, reset the roller counter so you know when you may need to
replace the rollers again.
1. Press the home button, if necessary.
2. Select Scanner Maintenance > Roller Replacement > Reset the Number of Scans > Number of
Scans After Replacing Roller > Yes.
Note: To reset the roller counter from your computer using the Epson Scan 2 Utility, open the Epson
Scan 2 Utility, click the Counter tab and select Roller Assembly Kit > Reset.
Parent topic: Replacing the Rollers
Updating Applications and Firmware
You may be able to solve certain problems and improve or add functions by updating the applications
and firmware to the latest version.
CAUTION: Do not turn off the computer or the scanner while updating.
1. Make sure that the scanner and the computer are connected, and that the computer is connected to
the internet.
2. Start EPSON Software Updater and update the applications or firmware.
• Windows 11: Click , then search for EPSON Software Updater and select it.
• Windows 10: Click , then select Epson Software > EPSON Software Updater.
• Windows 8.x: Enter the application name in the search charm, and then select the displayed icon.
• Windows 7: Click the start button, and then select All Programs or Programs > Epson Software >
EPSON Software Updater.
• Mac OS: Select Finder > Go > Applications > Epson Software > EPSON Software Updater.
Note: If you cannot find the application you want to update in the list, you cannot update the application
using the EPSON Software Updater. Check for the latest versions of the applications on the Epson
support website.

199
Updating the Firmware using the Control Panel
If the product can be connected to the Internet, you can also update the product's firmware using the
control panel and set the product to regularly check for firmware updates and notify you if any are
available.
1. Select Settings on the home screen.
2. Select System Administration > Firmware Update > Update.
Note: Select Notification > On to set the scanner to regularly check for available firmware updates.
3. Check the message displayed on the screen and start searching for available updates.
4. If a message is displayed on the LCD screen informing you that a firmware update is available, follow
the on-screen instructions to start the update.
CAUTION: Do not turn off or unplug the product until the update is complete; otherwise, a malfunction
may occur.
Note: If the firmware update is unsuccessful, the product does not start up normally and "Recovery
Mode" is displayed on the LCD screen the next time the product is turned on. In this case, you need to
update the firmware again using a computer. Connect the product to the computer with a USB cable and
download the latest firmware from the Epson website. Then follow the on-screen instructions to update
the firmware. (You cannot update the firmware over a network connection if "Recovery Mode" is still
displayed on the LCD screen.)
Updating Firmware without Connecting to the Internet
You can download the product's firmware from the Epson website on the computer, and then connect
the product and the computer via USB cable to update the firmware. If you cannot update over the
network, try this method.
Note: Make sure Epson Scan 2 is installed on your computer. If Epson Scan 2 is not installed, download
the software from the Epson website and install it on your computer.
1. Download the latest firmware from the Epson website.
2. Connect your product to the computer using a USB cable.
3. Double-click the downloaded .exe file to start the Epson Firmware Updater.
4. Follow the on-screen instructions to update the firmware.
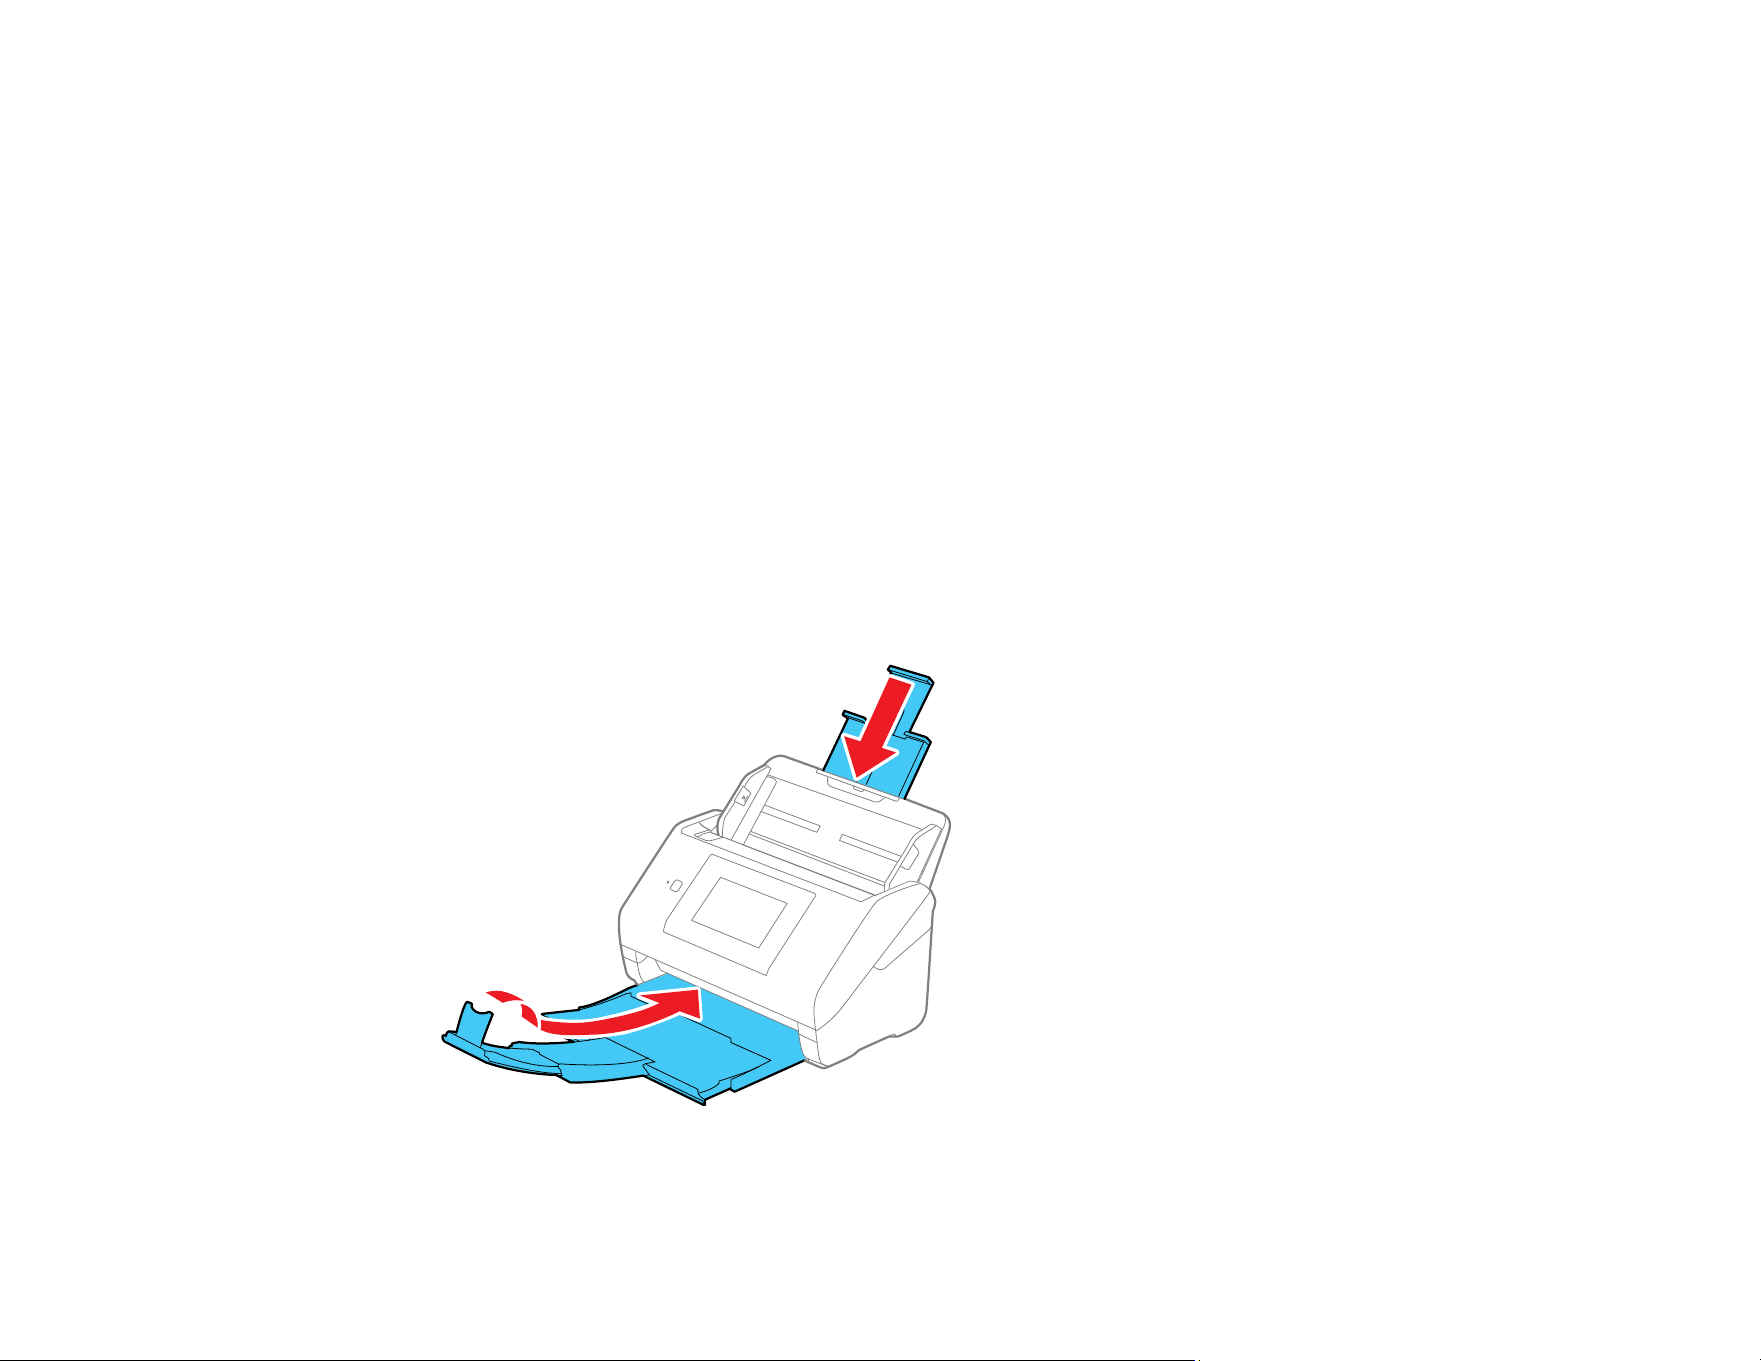
200
Updating the Firmware Using Web Config
To update the firmware using Web Config, select the Device Management tab > Firmware Update,
check the displayed message, and then click Start.
Note: You can also update the firmware using Epson Device Admin. You can visually confirm the
firmware information on the device list. See the Epson Device Admin guide or help for more details.
Parent topic: Cleaning and Transporting Your Product
Transporting Your Product
If you need to ship your product, transport it a long distance, or store it for an extended period, prepare it
for transportation as described here.
1. Turn off the product and unplug the AC adapter.
2. Disconnect any connected cables.
3. Remove the paper alignment plate, if attached.
4. Close the input tray extension and the output tray.
Note: Make sure the output tray is securely closed.
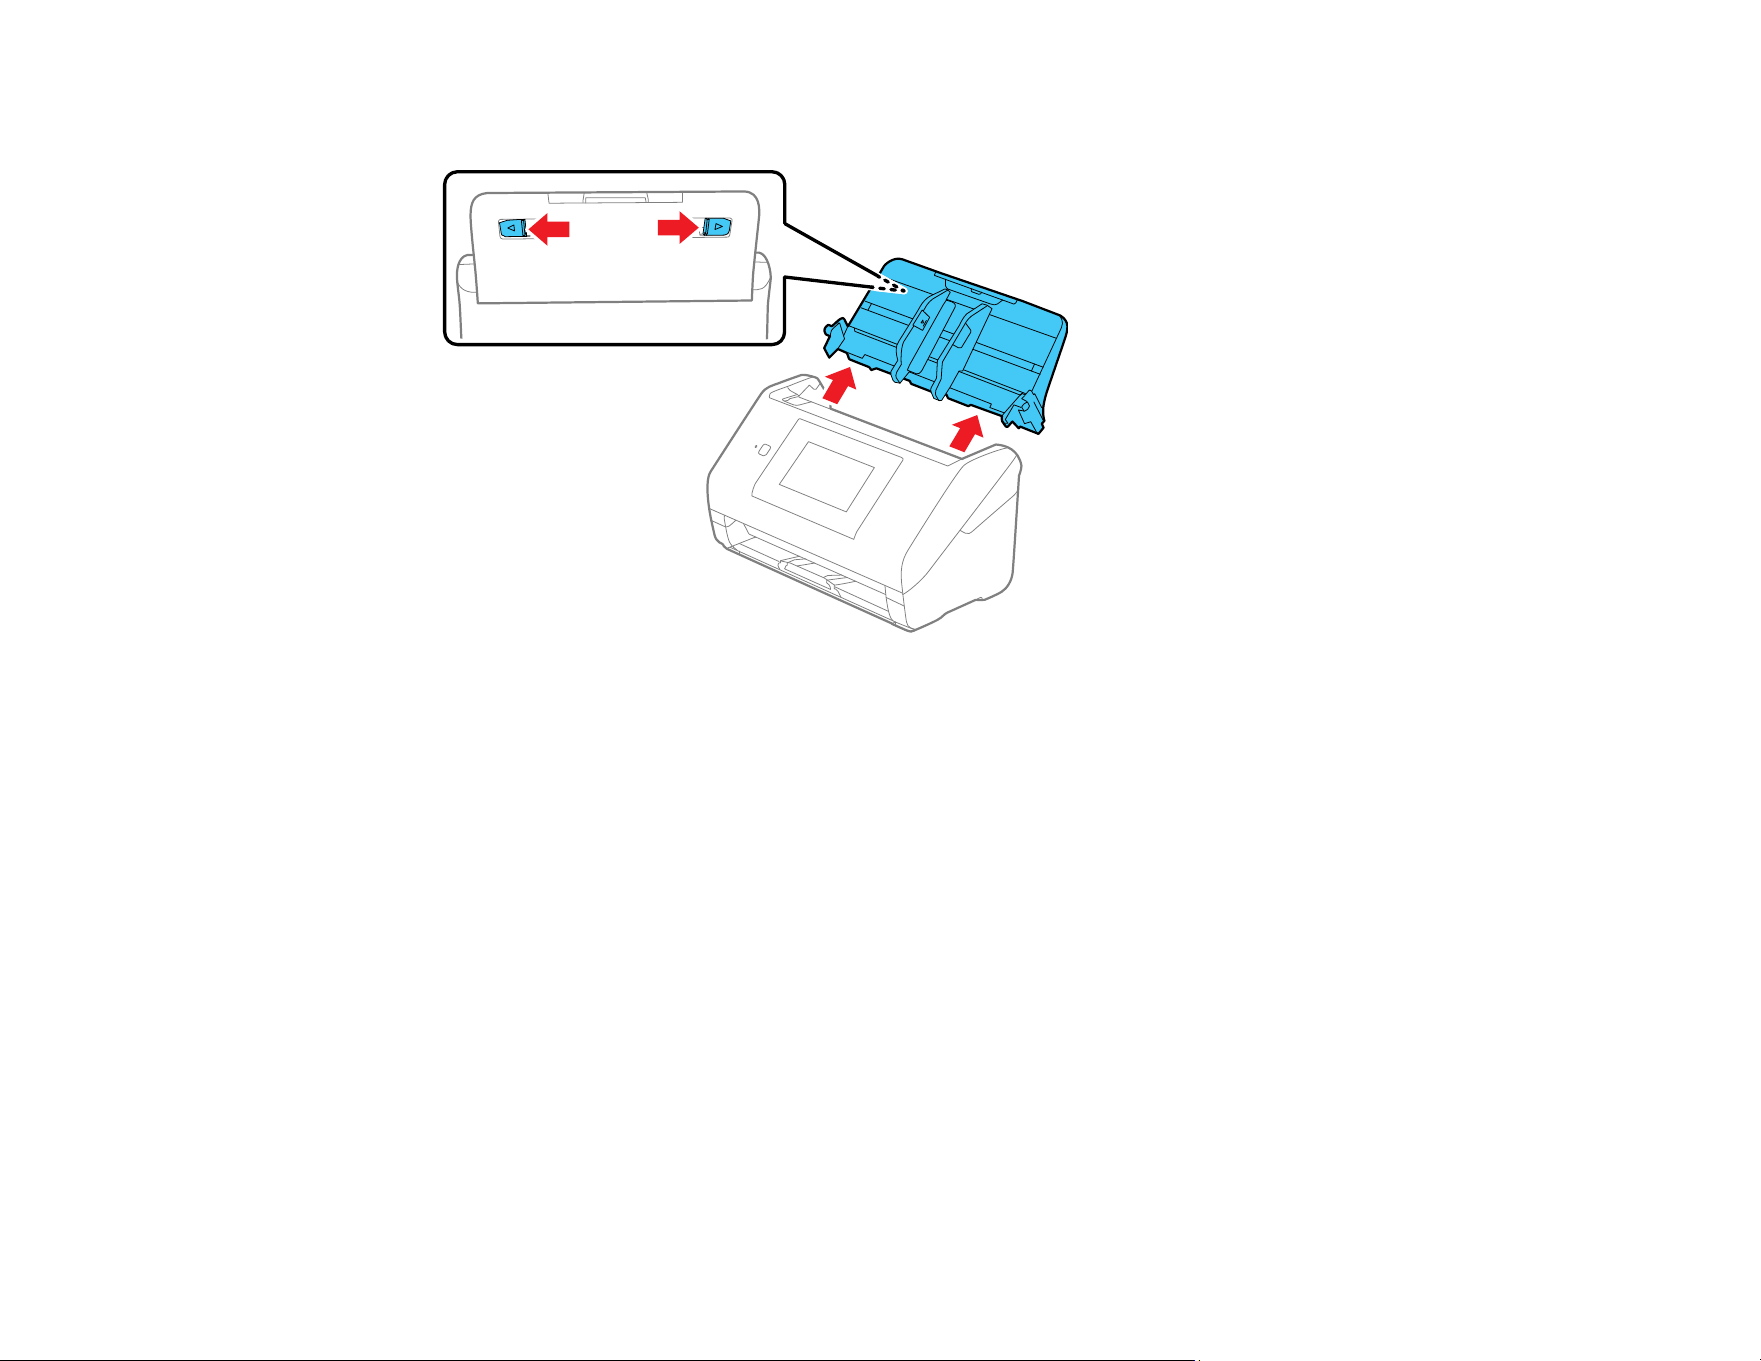

202
Administering Your Product
Follow the instructions in these sections to configure your product's administrator settings using the Web
Config software.
Note: Before you can configure system administration settings, you must connect the product to a
network.
Notes on the Administrator Password
System Administration Settings
Connecting the Product to the Network
Accessing the Web Config Utility
Using Epson Device Admin Configuration Software
Registering an Email Server
Configuring Product Settings
Importing and Exporting Product Settings
Restricting Features Available for Users
Disabling the External Interface
Disabling Network Scanning
Disabling WSD Scan
Using Your Product on a Secure Network
Related topics
Wi-Fi or Wired Networking
Notes on the Administrator Password
This product allows you to set an administrator password to prevent unauthorized third parties from
accessing or changing the product settings or the network settings stored in the product when it is
connected to a network.
If you set an administrator password, you need to enter the password when changing settings in
configuration software such as Web Config.
The initial administrator password is set on the product, but you can change it to a password of your
choice. The default value of the administrator password is printed on the product's label. The label is
located on the side, the back, or the bottom, depending on the product. If there is no "PASSWORD" label
203
attached, enter the serial number from the label attached to the back of the product for the default
administrator password. (No user name is set as default.)
You must enter the administrator password when performing the following operations:
• Accessing the advanced settings in Web Config
• Updating your product's firmware from a computer or smart device
• Using applications that can change the product's settings
• Selecting a menu on the control panel that has been locked by an administrator
• Changing or resetting the administrator password
You can change the administrator password from the product's control panel or Web Config. The new
password must be 8 to 20 characters long and only contain single-byte alphanumeric characters and
symbols.
You can restore the administrator password to the default setting from the product's control panel or
Web Config. If you have forgotten the password and cannot restore it to the default settings, contact
Epson for help.
Parent topic: Administering Your Product
System Administration Settings
You can make the following system administration settings using the product's control panel or Web
Config.
Connecting the Product to the Network
Function Required settings
Connecting the product to the network Set up your product for network scanning
Connecting the product to a new
computer
Configure the network settings for your product on a new
computer
Configuring Scanning Settings
Function Required settings
Sending scanned images by email
(Scan to Email)
• Register the email server
• Register the recipient's email address in Contacts
(optional)
204
Function Required settings
Saving scanned images to a folder on
the network (Scan to Network
Folder/FTP)
• Create a folder on the network where you want to save the
images
• Register the path to the folder in Contacts (optional)
Saving scanned images to a cloud
service (Scan to Cloud)
• Set up Epson Connect
• Register a user account for the online storage service you
want to link to
Customizing the Control Panel Display
Function Required settings
Setting up the icons displayed on the
control panel
Select Presets on the home screen to add frequently used
scanning settings to the product's control panel
Select Settings > Edit Home to change the layout of the
displayed options
Configuring Basic Security Functions
Function Required settings
Preventing users from changing
system settings
Set an administrator password
Preventing USB-connected devices
from accessing the product
Disable the external interface
Configuring Advanced Security Functions
Function Required settings
Managing security protocols Enable or disable protocols
Encrypting communication over the
network
• Set up digital certificate
• Set up SSL/TLS communication
205
Function Required settings
Using encrypted communication
(IPsec)
Set up policies for filtering traffic
Using the software from a specific
computer (IP filtering)
Using the product in an IEEE802.1X
network
Set up IEEE802.1X for the product
Configuring Authentication
Function Required settings
Synchronizing the product with an
authentication system
Obtain a product key from the dedicated website and activate
Epson Open Platform on your product
Using an authentication option (Epson
Print Admin/Epson Print Admin
Serverless)
Obtain a license key for the option
Note: You cannot use Epson Print Admin Serverless when the
system is synchronized with Epson Open Platform.
Parent topic: Administering Your Product
Related tasks
Scanning to a Connected Computer
Scanning to an Email
Scanning to the Cloud
Scanning to a Network Folder or FTP Server
Restricting Application Access
Preventing PC Connection via USB
Configuring Protocols and Services in Web Config
Configuring an IEEE 802.1X Network
Configuring Epson Open Platform
Connecting an Authentication Device
Related topics
Connecting the Product to the Network
Customizing the Control Panel Display
206
Configuring IPsec/IP Filtering
Connecting the Product to the Network
Follow the instructions in these sections to connect the product to the network.
Before Connecting to the Network
IP Address Assignment
DNS Server and Proxy Server
Assigning the IP Address from the Control Panel
Setting the Proxy Server
Connecting to a Wired Network
Parent topic: Administering Your Product
Before Connecting to the Network
Before connecting the product to the network, configure the necessary settings for the connection type in
advance.
Connection type Settings Description
Device connection Ethernet Determine how the product will connect to
the network
For Wired LAN (Ethernet) connections,
connect to the LAN switch
Wi-Fi For Wi-Fi connections, connect to the
network (SSID) of the access point
LAN connection IP address Determine the IP address to assign to the
product
When assigning a static IP address, you
need to configure the IP address settings
directly on the product or through a network
configuration interface.
When assigning a dynamic IP address using
the DHCP function, connection information
is not required because it is set
automatically.
Subnet mask
Default gateway

207
Connection type Settings Description
Wi-Fi connection SSID Determine the SSID (network name) and the
password of the access point to which the
product will connect.
If MAC address filtering has been set,
register the MAC address of the scanner in
advance to register the scanner. See
"Network Interface Specifications" for the
supported standards.
Password
DNS server IP address for primary DNS Setting the IP address is required when
specifying DNS servers
The secondary DNS is set when the system
has a redundant configuration and there is a
secondary DNS server. If you are in a small
organization and do not set the DNS server,
set the IP address of the router.
IP address for secondary
DNS
Proxy server Proxy server name Enter the proxy server name if your network
environment uses a proxy server to access
the internet from the intranet
The product directly connects to the internet
for the following functions:
• Epson Connect Services
• Cloud services
• Firmware updating
• Sending scanned images to SharePoint
(WebDAV)
Port number information Port number to release Check the port number used by the product
and computer, then release the port that is
blocked by a firewall, if necessary.
Parent topic: Connecting the Product to the Network
Related references
Port Settings

208
IP Address Assignment
You can select the type of IP address to assign to the product.
Static IP address
A static IP address is fixed and does not change when the device connects to the network. The
settings required to connect to the network (subnet mask, default gateway, DNS server, etc.) need to
be configured manually. Use a static IP address when you want to manage the device on a network
that many computers access. Also, when using security features such as IPsec/IP filtering, assign a
static IP address to ensure that the IP address does not change.
Dynamic IP address
A dynamic IP address is automatically assigned to your product by a DHCP (Dynamic Host
Configuration Protocol) server whenever it connects to a network. The settings required to connect to
the network (subnet mask, default gateway, DNS server, etc.) are set automatically, so you can easily
connect the device to the network. If the device or the router is turned off, or depending on the DHCP
server settings, the IP address may change when re-connecting.
Note: If you use the IP address reservation function of the DHCP, you can assign the same IP
address to the devices at any time.
Parent topic: Connecting the Product to the Network
DNS Server and Proxy Server
DNS Server
A DNS server translates domain names (such as www.example.com) into IP addresses which are
used by computers to identify each other on the network.
When you type a domain name into a web browser, your computer sends a request to a DNS server
to find the corresponding IP address. This process is called name resolution. If the DNS server
doesn't have the information cached, it will query other DNS servers until it finds the correct IP
address or determines that the domain doesn't exist. Name resolution is necessary for the scanner to
communicate using the email function or Internet connection function. If you use those functions,
configure the DNS server settings. When you assign the scanner's IP address using the DHCP
function of the DHCP server or router, it is automatically set.
Proxy Server
A proxy server filters content based on predefined rules, blocks malicious websites, and enforces
security policies. It can also provide firewall capabilities to protect internal networks from external
threats.
The proxy server is placed at the gateway between a client (such as a user's computer) and another
server (such as a web server) to process and forward requests. When you connect to a website

209
through a proxy server, your request first goes to the proxy server, which then forwards it to the
destination server. The response from the destination server then returns to the proxy server, which
sends it back to you. The destination server communicates only with the proxy server. Therefore,
scanner information (such as the IP address and port number) is hidden and increased security is
expected. When you connect to the Internet via a proxy server, configure the proxy server on the
scanner.
Parent topic: Connecting the Product to the Network
Assigning the IP Address from the Control Panel
You can set up a static IP address using the product's control panel.
1. Turn on the product.
2. Press the home button, if necessary.
3. Select Settings > Network Settings > Advanced > TCP/IP.
4. Select Manual for Obtain IP Address.
Note: If you set the IP address automatically using DHCP, select Auto and skip to step 7.
5. Enter and confirm the IP address.
6. Set up the Subnet Mask and Default Gateway.
Note: Make sure you enter the information correctly. If the combination of the IP Address, Subnet
Mask and Default Gateway is incorrect, you cannot proceed with the settings.
7. Enter and confirm the IP address for the primary DNS server.
Note: When you select Auto for the IP address assignment, you can select the DNS server settings
from Manual or Auto. If you cannot obtain the DNS server address automatically, select Manual
and enter the DNS server address. Then, enter the secondary DNS server address directly. If you
select Auto, skip to step 9.
8. Enter and confirm the IP address for the secondary DNS server.
9. Select Start Setup.
Parent topic: Connecting the Product to the Network

210
Setting the Proxy Server
You can set up a proxy server if the product is connecting directly to the internet via the cloud or Epson
Connect.
1. Press the home button, if necessary.
2. Select Settings > Network Settings > Advanced.
3. Select Proxy Server .
4. Select Use as the Proxy Server Settings option.
5. Enter the address for the proxy server in IPv4 or FQDN format.
6. Enter the port number for the proxy server.
7. Select Start Setup.
Parent topic: Connecting the Product to the Network
Connecting to a Wired Network
You can connect your product to a wired network using an Ethernet (LAN) cable.
Note: To connect your product via Wi-Fi, see the links at the end of this section.
1. Connect one end of an Ethernet network cable to the product's LAN port.
2. Connect the other end to any available LAN port on your router or access point.
3. Select the icon on the product's control panel.
4. Select Router.
5. Make sure that the Connection and IP Address settings are correct.
6. Select Close..
Parent topic: Connecting the Product to the Network
Related concepts
Connecting to an Existing Wi-Fi Network
Accessing the Web Config Utility
You can select your product's network settings and confirm its operating status using a web browser.
You do this by accessing your product's built-in Web Config utility from a computer or other device that is
connected to the same network as your product.

211
Note: You can also access the Web Config utility from the product information area in the Epson Smart
Panel app.
1. Check your product's network status on the LCD screen (Settings > Network Settings > Network
Status). Then select the active connection method (Wired LAN/Wi-Fi Status or Wi-Fi Direct
Status).
2. Note your product's IP address.
3. On a computer or other device connected to the same network as your product, open a web
browser.
4. Enter your product's IP address into the address bar.
You see the available Web Config utility options.
Note: If a warning screen is displayed in your browser, you can safely ignore the warning and
display the web page (Web Config). Since the scanner uses a self-signed certificate when accessing
HTTPS, a warning is displayed on the browser when you start Web Config; this does not indicate a
problem and can be safely ignored. Depending on your browser, you may need to click on
Advanced Settings to view the web page.
5. To change scanner settings, you need to log in as a Web Config administrator. Click Log in at the
top-right of the screen. Enter the User Name and Current password, then click OK.
The default values for the Web Config administrator information are as follows:
• User name: none (blank)
• Password: If there is a "PASSWORD" label attached to the back of the product, enter the 8-digit
number shown on the label. If there is no "PASSWORD" label attached, enter the serial number
on the label attached to the back of the product.
Note: If Log out is displayed at the top-right of the screen, you are already logged in as an
administrator. You will be logged out automatically after approximately 20 minutes of inactivity.
Changing the Administrator Password in Web Config
Parent topic: Administering Your Product
Related tasks
Determining the Product's IP Address
Checking Status Information

212
Changing the Administrator Password in Web Config
You can set an administrator password using your product's control panel, Web Config, or EpsonNet
Config. You use the same administrator password in all cases.
Note: If you forget your administrator password, contact Epson for support.
1. Access Web Config and select the Product Security tab.
2. Select Change Administrator Password.
3. Enter a user name, if necessary.
4. Do one of the following:
• If you have set an administrator password before, enter the current password, then enter and
confirm the new password in the fields provided.
• If you have not set an administrator password before, enter the default password, then enter a
new password and confirm it in the fields provided.
Note: Be sure to remember the administrator password you set. If you forget your password, you
will not be able to reset it and you will need to contact Epson.
5. Click OK.
Note: To restore the administrator password to the default value, select Restore Default Settings on
the Change Administrator Password screen.
Parent topic: Accessing the Web Config Utility
Related tasks
Accessing the Web Config Utility
Setting a Password and Locking the Control Panel
Using Epson Device Admin Configuration Software
Epson Device Admin is a multifunctional application that allows you to manage devices on a network.
With Windows, you can discover and monitor remote devices and use configuration templates to apply
unified settings to multiple scanners on a network, making it suitable for installing and managing multiple
scanners. See the Epson Device Admin help for instructions.

213
To install Epson Device Admin, download the software from the support page at epson.com/support
(U.S.), epson.ca/support (Canada), or latin.epson.com/support (Latin America) and follow the on-screen
instructions.
Parent topic: Administering Your Product
Registering an Email Server
If you want to send a scanned file by email, you need to register the email server first. You can select
settings for the email server using Web Config.
Note: Before registering the email server, make sure the product is connected to the network. If you are
using an Internet-based email server, check the setting information from the provider or website.
1. Access Web Config.
2. Select the Network tab.
3. Select Email Server > Basic.
4. Select an authentication method, then select the settings you want to use. Contact your internet
service provider if necessary to confirm the authentication method for the email server.
5. Select Proceed to save your settings.
6. Select Close to exit.
Email Server Settings
Checking an Email Server Connection
Mail Server Connection Test Messages
Parent topic: Administering Your Product
Related tasks
Configuring Email Server Settings
Email Server Settings
You can configure these email server settings in Web Config.
Setting Options/Description
Authentication Method Select the authentication method that matches your email
server

214
Setting Options/Description
Authenticated Account Enter the authenticated account name from 1 to 255
characters long in ASCII
Authenticated Password Enter the authenticated password from 1 to 20 characters long
in ASCII using A-Z, a-z, 0-9, and these characters:
! # $ % ' * + - . / = ? ^ _ { ! } ~ @
Note: You may be required to use an App password rather
than your email login password. Check with your email service
provider.
Sender's Email Address Enter the sender's email address from 1 to 255 characters
long in ASCII; do not use a period (.) as the first character or
use these characters: ( ) < > [ ] ;
SMTP Server Address Enter the SMTP server address from 1 to 255 characters long
using A-Z, a-z, 0-9, and "-" in IPv4 or FQDN format
SMTP Server Port Number Enter the SMTP server port number between 1 and 65535
Secure Connection Select the security method for the email server; available
choices depend on the Authentication Method setting
Certificate Validation (Web Config
only)
Enable checking for a valid certificate; recommended value is
Enable
POP3 Server Address Enter the POP server address from 1 to 255 characters long
using A-Z, a-z, 0-9, and "-" in IPv4 or FQDN format
POP3 Server Port Number Enter the POP server port number between 1 and 65535
Parent topic: Registering an Email Server
Checking an Email Server Connection
You can check an email server connection using the product's control panel or Web Config.
1. Choose one of the following to open the connection test menu:
• Using Web Config: Select the Network tab > Email Server > Connection Test > Start.
• Using the product's control panel: Select Settings > Network Settings > Advanced > Email
Server > Connection Check.
The mail server connection test is started.

215
2. Check the test results.
If the connection test is successful, a confirmation message displays. If an error message displays,
follow the instructions to clear the error.
Parent topic: Registering an Email Server
Mail Server Connection Test Messages
The table below lists some common causes for mail server connection test messages.
Note: You may be required to use an App password rather than your email login password. Check with
your email service provider.
Message Cause
SMTP server communication error.
Check the following. - Network
Settings
• The scanner is not connected to a network
• The SMTP server is down
• The network connection is disconnected while communicating
with the SMTP server
• Data received is incomplete
POP3 server communication error.
Check the following. - Network
Settings
• The scanner is not connected to a network
• The POP3 server is down
• The network connection is disconnected while communicating
with the POP3 server
• Data received is incomplete
An error occurred while connecting
to SMTP server. Check the
followings. - SMTP Server Address
- DNS Server
• Connecting to a DNS server failed
• Name resolution for an SMTP server failed
An error occurred while connecting
to POP3 server. Check the
followings. - POP3 Server Address
- DNS Server
• Connecting to a DNS server failed
• Name resolution for a POP3 server failed

216
Message Cause
SMTP server authentication error.
Check the followings. -
Authentication Method -
Authenticated Account -
Authenticated Password
SMTP server authentication failed
POP3 server authentication error.
Check the followings. -
Authentication Method -
Authenticated Account -
Authenticated Password
POP3 server authentication failed
Unsupported communication
method. Check the followings. -
SMTP Server Address - SMTP
Server Port Number
Communication method contained unsupported protocols
Connection to SMTP server failed.
Change Secure Connection to
None.
An SMTP mismatch occurred between a server and a client, or the
server does not support SMTP secure connection (SSL
connection).
Connection to SMTP server failed.
Change Secure Connection to
SSL/TLS.
An SMTP mismatch occurred between a server and a client, or the
server requested to use an SSL/TLS connection for an SMTP
secure connection
Connection to SMTP server failed.
Change Secure Connection to
STARTTLS.
An SMTP mismatch occurred between a server and a client, or the
server requested to use a STARTTLS connection for an SMTP
secure connection
The connection is untrusted.
Check the following. - Date and
Time
The product’s date and time settings are incorrect, or the
certificate has expired
The connection is untrusted.
Check the following. - CA
Certificate
The scanner does not have a root certificate corresponding to the
server or a CA Certificate has not been imported
The connection is not secured. The obtained certificate is damaged
SMTP server authentication failed.
Change Authentication Method to
SMTP-AUTH.
An authentication method mismatch occurred between a server
and a client; the server supports SMTP AUTH.
217
Message Cause
SMTP server authentication failed.
Change Authentication Method to
POP before SMTP.
An authentication method mismatch occurred between a server
and a client; the server does not support SMTP AUTH
Sender's Email Address is
incorrect. Change to the email
address for your email service.
The specified sender’s email address is incorrect
Cannot access the product until
processing is complete.
The scanner is busy
Parent topic: Registering an Email Server
Configuring Product Settings
Follow the instructions in these sections to configure your product's control panel settings using the Web
Config software.
Setting a Password and Locking the Control Panel
Logging in to the Product from the Control Panel
Checking Status Information
Configuring Email Notification
Adjusting Power Saving Settings
Managing the Network Connection
Restricting Application Access
Enabling Program Verification on Start Up
Updating Firmware Using Web Config
Restoring Default Product Settings
Parent topic: Administering Your Product
Setting a Password and Locking the Control Panel
You can set an administrator password to lock the following settings and prevent them from being
changed:
• Start-up Screen
• Basic Settings
• Scanner Settings

218
• User Settings
• Network Settings
• Web Service Settings
• Contacts Manager
• System Administration
• Reset the Number of Scans
• Roller Replacement Alert Setting
• Regular Cleaning Alert Settings
You can change the password using the product control panel. To change the password using Web
Config, select Change Administrator Password on the Product Security tab and enter the necessary
information.
Note: You must know the current administrator password in order to change it. If you forget the
password or inadvertently set it, contact Epson for assistance.
1. Press the home button, if necessary.
2. Select Settings.
3. Select System Administration.
4. Select Admin Settings.
5. Select Admin Password > Change.
6. Enter your current password.
Note: If there is a password label attached to the back of the product, enter the number on the label.
Otherwise, enter the product's serial number. To locate the serial number, check the label attached
to the back of your product. If you restore the product to default settings, the administrator password
resets to the product serial number.
7. Enter a new password.
8. Enter the new password again to confirm it.
Note: Keep a copy of your password in a safe place.

219
9. Select Lock Setting > On to enable access restriction.
Note: To set the lock setting using Web Config, select Control Panel on the Device Management
tab and select Panel Lock > On.
When the control panel is locked, you must enter the password to access any of the locked settings. You
can reset the administrator password by selecting Reset on the Admin Password screen. To disable
access restriction, select Settings > System Administration > Admin Settings > Lock Setting > Off.
Parent topic: Configuring Product Settings
Logging in to the Product from the Control Panel
When Lock Setting or Access Control is enabled, the icon is displayed on the control panel, and the
functions are restricted.
When the control panel is locked, you must enter the password to access any of the locked settings.
Note: Contact your administrator for the user and password information.
1. Tap the icon at the top right of the screen.
2. When the Select User screen is displayed, select the user.
3. Enter the password to log in.
A login confirmation message appears, and then the home screen is displayed on the touchscreen.
To log out of the product, tap the icon at the top right of the screen or press the button on the
control panel.
Parent topic: Configuring Product Settings
Checking Status Information
You can check information about the scanner using Web Config.
Note: Depending on the features of your product, not all of the options below may be available. Some
options are not available unless you are logged in to Web Config.
1. Access Web Config and log in using the administrator name and password.
2. Select the Status tab and choose one of the following options:
• Select Product Status to view product information.
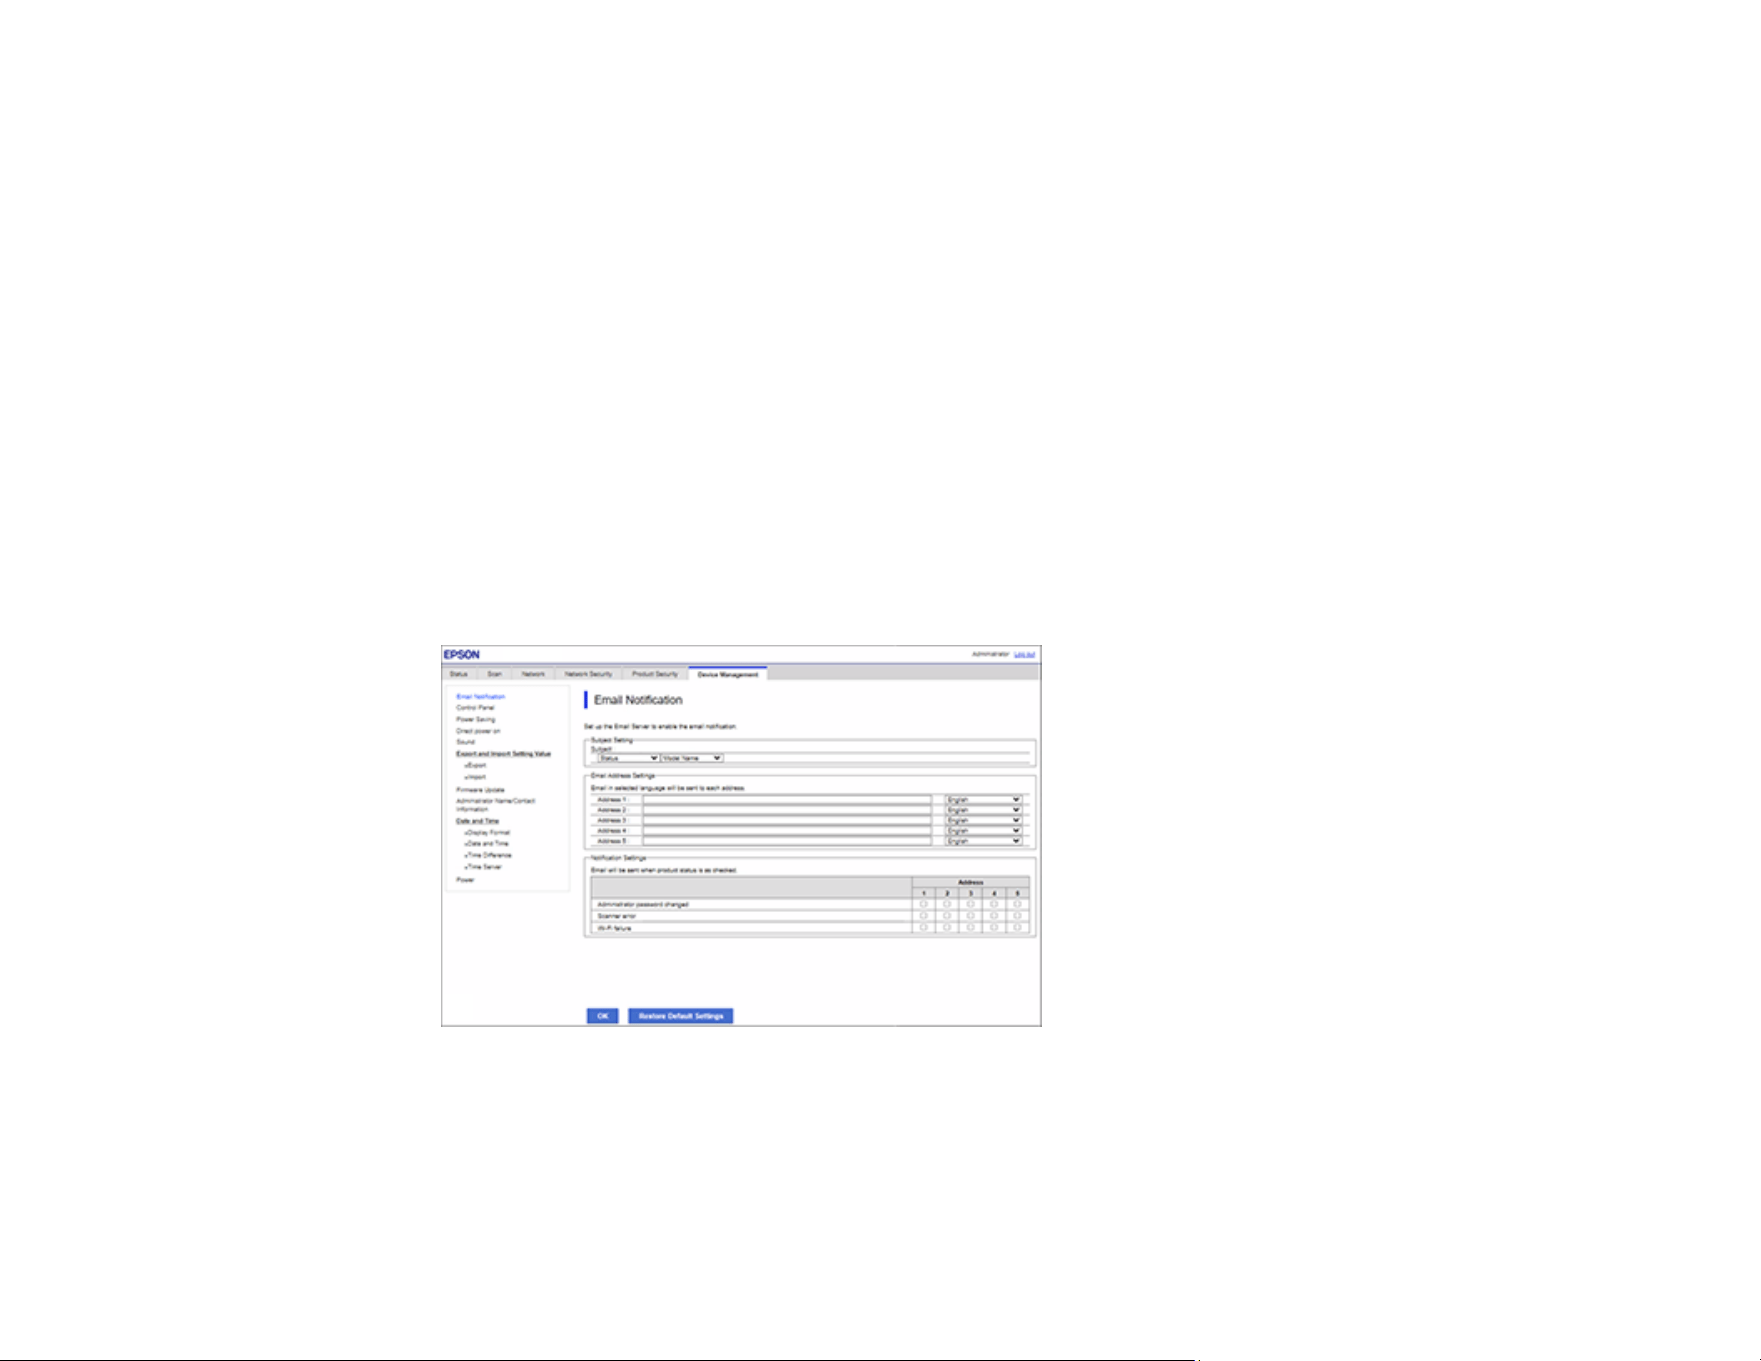
220
• Select Network Status to view network information such as the IP address and network
connection status.
• Select Usage Status to view information about the number of scans and historical information
about the product.
• Select Hardware Status to view information about the product functions.
• Select Panel Snapshot to view a image of the current LCD screen.
Parent topic: Configuring Product Settings
Configuring Email Notification
You can configure email notifications using Web Config so you can receive alerts by email when certain
events occur on the product. You can register up to 5 email addresses and select the events for which
you want to be notified.
1. Access Web Config and select the Device Management tab.
2. Select Email Notification.
You see a window like this:
3. Select the subject contents from the two drop-down menus.
4. Enter email addresses in the Address fields as necessary, and select a language for each.

221
5. Select the checkboxes to indicate the events for which you want each address to receive email
notifications.
6. Click OK.
Parent topic: Configuring Product Settings
Related tasks
Accessing the Web Config Utility
Scanning to an Email
Adjusting Power Saving Settings
The product can automatically enter sleep mode or turn off after it has not been used for a while. You
can set the delay before the product enters sleep mode or turns off.
1. Log in to the Web Config interface as an administrator.
2. Select the Device Management tab, then select the Power setting.
3. Set Sleep Mode to the number of minutes before the product enters a low-power mode.
4. Select Power Off Timer to set the amount to time of inactivity before the product turns off.
Note: If you are using the fax feature, select None.
Parent topic: Configuring Product Settings
Managing the Network Connection
You can check or update the network information for your product using the Web Config interface.
1. Access Web Config and select the Network tab.
2. Select Basic.
3. Check or update the settings as necessary.
4. Select Next to see a summary of the network settings.
5. Select OK to accept the changes.
Note: The network connection will be temporarily interrupted to enable the new settings.
Parent topic: Configuring Product Settings

222
Related tasks
Accessing the Web Config Utility
Restricting Application Access
You can restrict applications from accessing the product using the Web Config interface.
1. Log in to the Web Config interface as an administrator.
2. Select the Product Security tab, then select the Applications setting.
3. If you do not want an application to access the product, clear the checkbox next to the application
name. The list of applications depends on the product model.
Parent topic: Configuring Product Settings
Enabling Program Verification on Start Up
You can check whether unauthorized third parties have tampered with the program when the product
starts up using the Web Config interface.
1. Log in to the Web Config interface as an administrator.
2. Select the Product Security tab, then select the Program Verification on Start Up setting.
3. Select ON and then select OK to apply the setting.
Parent topic: Configuring Product Settings
Updating Firmware Using Web Config
If your product is connected to the Internet, you can update the product firmware using Web Config.
Note: Make sure the product is not in use and clear any errors on the LCD screen before starting the
update.
You can also update the firmware using Epson Device Admin. See the Epson Device Admin help for
more details.
1. Access Web Config and select the Device Management tab.
2. Select Firmware Update.
3. Click Start to check for the latest firmware.
4. If there is a firmware update, click Start to begin the update.
Note: Do not turn off the computer or the scanner while updating.

223
Parent topic: Configuring Product Settings
Related tasks
Accessing the Web Config Utility
Restoring Default Product Settings
You can reset the product to the default settings using the Web Config interface.
1. Log in to the Web Config interface as an administrator.
2. Select the Device Management tab, then select the Restore Default Settings setting.
3. Select an option from the drop-down list. You can either restore network settings or all data and
settings.
4. Select Execute and confirm your selection to restore the product settings
You can restore the administrator password to the default setting from the product's control panel
(Settings > System Administration > Restore Default Settings > All Settings) or Web Config. If
you have forgotten the password and cannot restore it to the default settings, contact Epson for help.
Note: Resetting the administrator password also resets the user name.
Parent topic: Configuring Product Settings
Importing and Exporting Product Settings
Follow the instructions in these sections to import and export your product's settings using the Web
Config software.
Exporting Settings Using Web Config
Importing Settings Using Web Config
Parent topic: Administering Your Product
Exporting Settings Using Web Config
You can export your product's settings and optionally encrypt the settings file with a password.
1. Access Web Config and select the Device Management tab.
2. Under Export and Import Setting Value, select Export.

224
3. Select the settings you want to export.
Note: If you select a parent category, the child categories are also selected. By default, items that
are unique on the network, such as IP address, cannot be selected. If you want to export these
items, select Enable to select the individual settings of device. It is recommended that you
export only unique items when replacing a product on the network, otherwise you may encounter
conflicts on the network.
4. Enter and confirm an encryption password, if desired.
Note: You will need the password to import the file. Leave this blank if you do not want to encrypt the
file.
5. Click Export and save the file.
Parent topic: Importing and Exporting Product Settings
Related tasks
Accessing the Web Config Utility
Changing the Administrator Password in Web Config
Importing Settings Using Web Config
You can import the product settings file that was previously exported. If encryption was used when the
settings were exported, obtain the necessary password before you import.
Note: When importing values that include individual information such as a scanner name or IP address,
make sure the same IP address does not exist on the same network.
1. Access Web Config and select the Device Management tab.
2. Under Export and Import Setting Value, select Import.
3. Click Browse and select the exported settings file.
4. If necessary, enter the decryption password.
5. Click Next.
6. Select the settings to import and click Next.
7. Click OK.
The selected settings are imported to the product.

225
Parent topic: Importing and Exporting Product Settings
Related tasks
Accessing the Web Config Utility
Restricting Features Available for Users
Follow the instructions in these sections to restrict users from using certain product features and create
an administrator password to lock the restrictions using the Web Config software.
Locking the Control Panel Using Web Config
Setting User Feature Restrictions (Access Control)
Configuring User Feature Restrictions
Parent topic: Administering Your Product
Locking the Control Panel Using Web Config
You can lock the control panel to prevent users from changing system settings.
1. Access Web Config and select the Device Management tab.
2. Select Control Panel.
3. Select ON for the Panel Lock setting.
4. Click OK to save your setting.
Parent topic: Restricting Features Available for Users
Related tasks
Accessing the Web Config Utility
Setting User Feature Restrictions (Access Control)
You can use Web Config Access Control Settings to restrict product features for individual users to
prevent misuse of the product. When Access Control is enabled, the user must enter an ID and
password on the product control panel in order to access the scanning functions. A restricted user
cannot scan if they do not log in.
After you setup user restrictions, you must enable them using the product control panel.
1. Press the home button, if necessary.
2. Select Settings > System Administration > Access Control.
3. Select On.

226
4. Enable Accept Unknown User Jobs to allow users to print from generic drivers or use the WSD
scanning function.
Parent topic: Restricting Features Available for Users
Configuring User Feature Restrictions
You can create up to 10 user accounts and restrict access to control panel features separately for each
one.
Note: If you are using an authentication system, it uses the number one user account. If you create other
user accounts, use the number two to number 10 user accounts.
1. Access Web Config and select the Product Security tab > Access Control Settings > Basic.
2. Select the Enables Access Control checkbox.
3. If you have configured the product for an LDAP server or IEEE 802.1x network, you can deselect the
Allow printing and scanning without authentication information from a computer checkbox to
prevent the product from receiving jobs sent from these sources:
• The default operating system driver
• A PCL or PostScript printer driver
• Web services such as Epson Connect
• Smartphones and other mobile devices
4. Click OK.
5. Select User Settings.
6. Click Add.
7. Enter a name for a user in the User Name field following the guidelines on the screen. Use ASCII
(0x20-0x7E) characters.
8. Enter a password for the user in the Password field following the guidelines on the screen.
Note: If you need to reset a password, leave the password field blank.
9. Select the checkbox for each function you want the user to be able to perform, and deselect the
checkbox for each function you want to restrict access to.

227
10. Click Apply.
Note: When you edit a completed user account, you see a Delete option. Click it to delete a user, if
necessary.
Note: You can import and export a list of user features using EpsonNet Config. See the help utility in the
software for instructions.
Parent topic: Restricting Features Available for Users
Disabling the External Interface
You can restrict the ability to connect from a computer using a USB connection or accessing a
connected USB device.
Note: Depending on your product features, not all of the options listed below may be available.
1. Access Web Config and select the Product Security tab.
2. Select External Interface.
3. Select the interface you want to disable and do one of the following:
• Select Disable to prevent a connection
• Select Enable to allow a connection
4. Click OK to save your setting.
Parent topic: Administering Your Product
Disabling Network Scanning
You can make the following settings in Web Config to disable network scanning using Epson Scan 2
from your computer.
1. Access Web Config and select the Scan tab.
2. Select Network Scan.
3. Under Epson Scan 2, deselect the Enable scanning check box.
4. Click Next.
5. Click OK to confirm your setting.
Parent topic: Administering Your Product

228
Related tasks
Accessing the Web Config Utility
Disabling WSD Scan
If you do not want your computer to configure the scanner as a WSD scanning device, follow the steps
below to disable the WSD settings.
1. Access Web Config and select the Network Security tab.
2. Select Protocol.
3. Under WSD Settings, deselect the Enable WSD check box.
4. Click Next.
5. Click OK to confirm your setting.
Note: If your computer still configures the scanner as a WSD scanning device, select the Scan tab >
Network Scan, and then clear the Enable scanning check box in AirPrint.
If AirPrint is disabled, Mopria scanning from Chromebooks, Windows, and the Mopria Scan app is also
disabled.
Parent topic: Administering Your Product
Related tasks
Accessing the Web Config Utility
Setting Up a WSD Port (Windows 7)
Scanning Using WSD - Windows Only
Using Your Product on a Secure Network
Follow the instructions in these sections to configure security features for your product on the network
using the Web Config software.
Configuring Protocols and Services in Web Config
Protocol Settings
Using a Digital Certificate
Configuring SSL/TLS Communication
Configuring IPsec/IP Filtering
Connecting the Product to an IEEE 802.1X Network
Epson Open Platform Overview

229
Connecting an Authentication Device
Parent topic: Administering Your Product
Configuring Protocols and Services in Web Config
You can enable or disable protocols using Web Config.
1. Access Web Config and select the Network Security tab.
2. Select Protocol.
3. Select or deselect the checkbox next to the service name to enable or disable a protocol.
4. Configure any other available protocol settings.
5. Click Next.
6. Click OK.
After the protocols restart, the changes are applied.
Parent topic: Using Your Product on a Secure Network
Related tasks
Accessing the Web Config Utility
Protocol Settings
Protocols
Name Description
Bonjour Bonjour is used to search for devices and AirPrint
SLP SLP is used for push-scanning and network searching in
EpsonNet Config
WSD Add WSD devices, or print and scan from the WSD port
LLTD Displays the product on the Windows network map
LLMNR Use name resolution without NetBIOS even if you cannot use
DNS
SNMPv1/v2c Remotely set up and monitor your product
SNMPv3 Remotely set up and monitor your product with the SNMPv3
protocol

230
Bonjour Settings
Setting Options/Description
Use Bonjour Search for or use devices through Bonjour
Bonjour Name Displays the Bonjour name
Bonjour Service Name Displays the Bonjour service name
Location Displays the Bonjour location name
Wide-Area Bonjour Enables the Wide-Area Bonjour protocol; register all products
on the DNS server to locate them over the segment
SLP Settings
Setting Options/Description
Enable SLP Enable the SLP function to use the Push Scan function and
network searching in EpsonNet Config
WSD Settings
Setting Options/Description
Enable WSD Enable adding devices using WSD, and printing and scanning
from the WSD port
Scanning Timeout (sec) Enter the communication timeout value for WSD scanning
between 3 and 3,600 seconds
Device Name Displays the WSD device name
Location Displays the WSD location name
LLTD Settings
Setting Options/Description
Enable LLTD Enable LLTD to display the product in the Windows network
map
Device Name Displays the LLTD device name
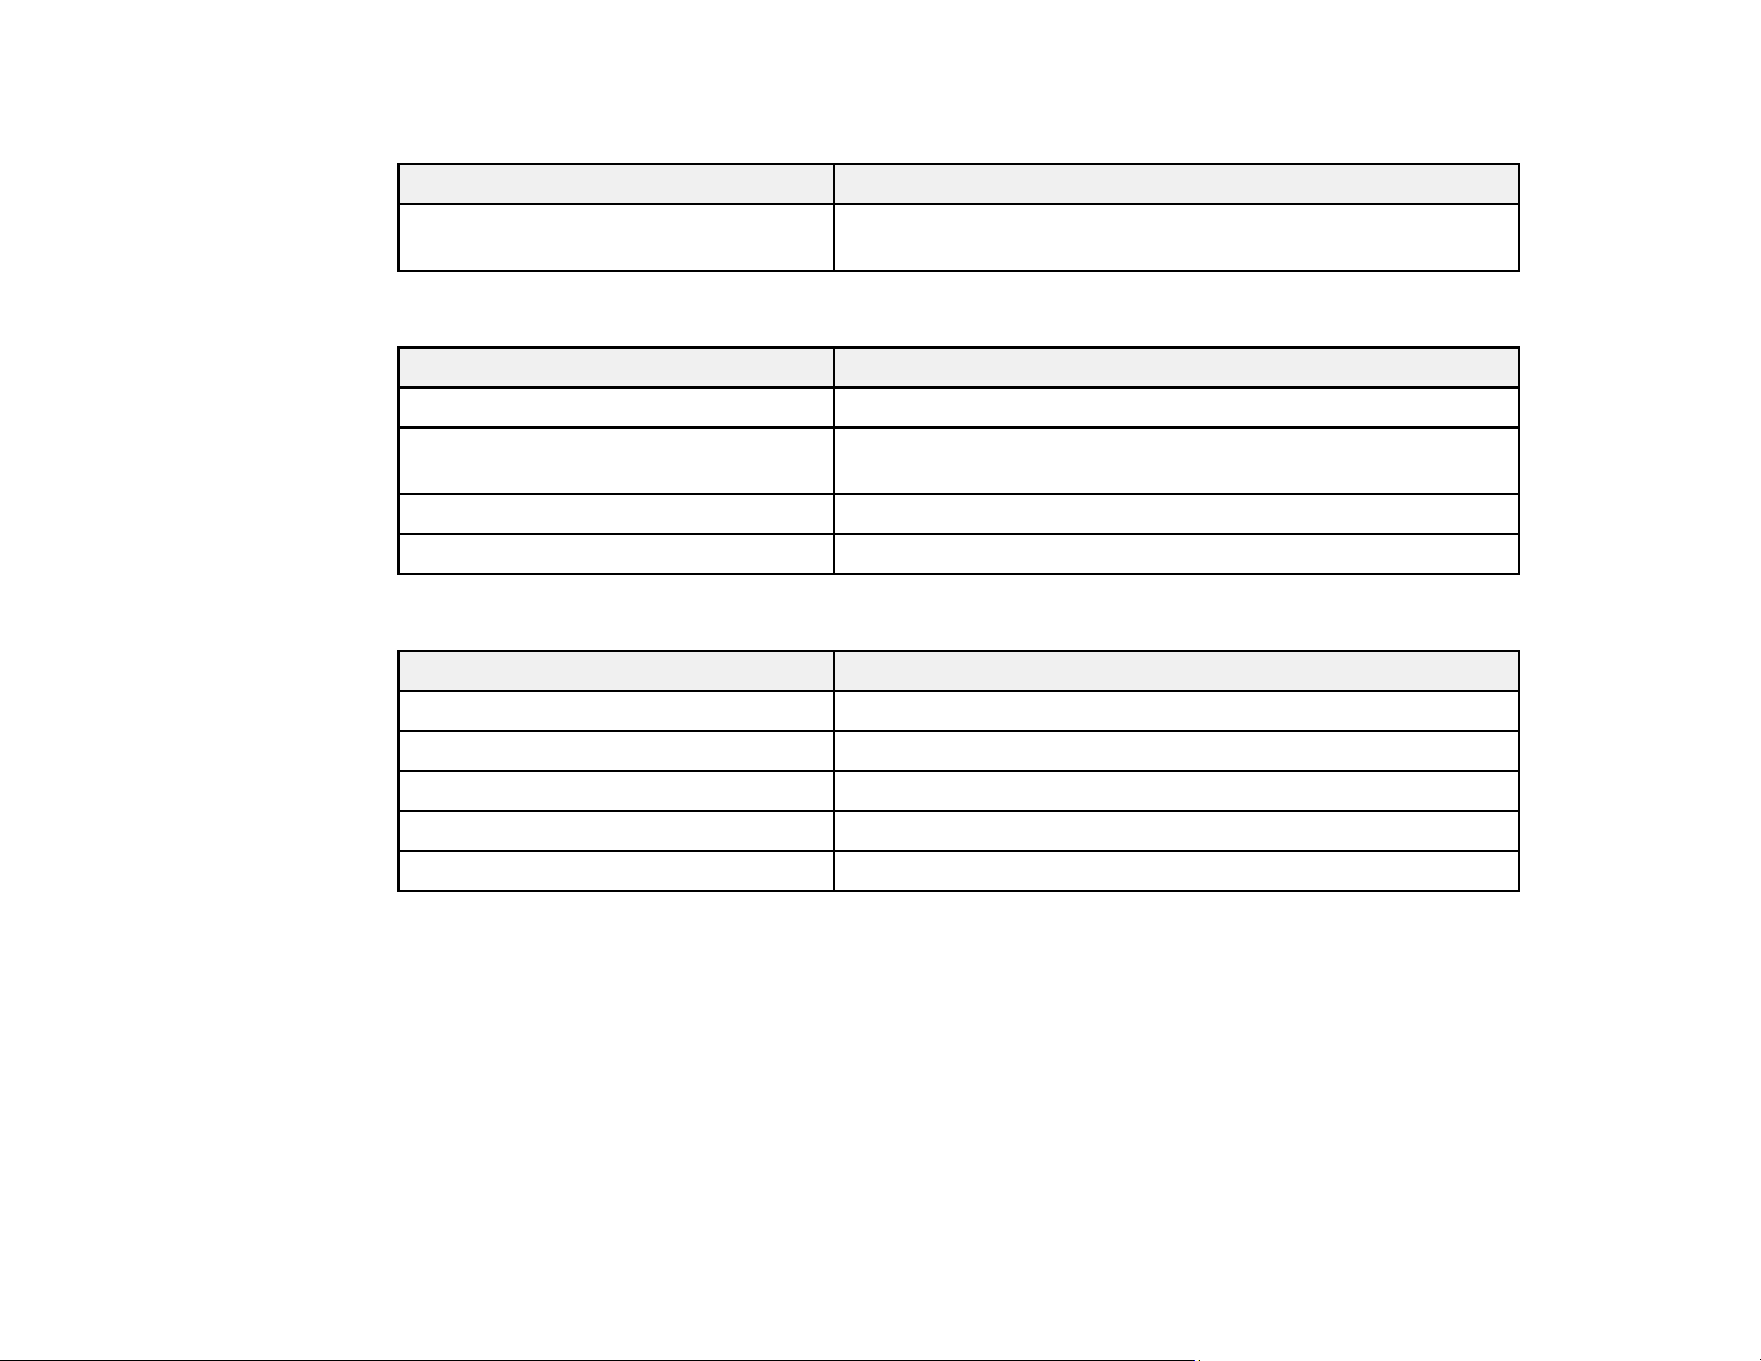
231
LLMNR Settings
Setting Options/Description
Enable LLMNR Enable LLMNR to use name resolution without NetBIOS, even
if you cannot use DNS
SNMPv1/v2c Settings
Setting Options/Description
Enable SNMPv1/v2c Enable SNMPv1/v2c for products that support SNMPv3
Access Authority Set the access authority when SNMPv1/v2c is enabled to
Read Only or Read/Write
Community Name (Read Only) Enter 0 to 32 ASCII characters
Community Name (Read/Write) Enter 0 to 32 ASCII characters
SNMPv3 Settings
Setting Options/Description
Enable SNMPv3 Enable SNMPv3 for products that support SNMPv3
User Name Enter 1 to 32 characters
Authentication Settings Select an algorithm and set a password for authentication
Encryption Settings Select an algorithm and set a password for encryption
Context Name Enter 1 to 32 characters in Unicode (UTF-8)
Parent topic: Using Your Product on a Secure Network
Using a Digital Certificate
Follow the instructions in these sections to configure and use digital certificates using Web Config.
About Digital Certification
Obtaining and Importing a CA-signed Certificate
CSR Setup Settings
CSR Import Settings
Deleting a CA-signed Certificate

232
Updating a Self-signed Certificate
Importing a CA Certificate
Deleting a CA Certificate
Parent topic: Using Your Product on a Secure Network
About Digital Certification
You can configure the following digital certificates for your network using Web Config:
CA-signed Certificate
You can ensure secure communications using a CA-signed certificate for each security feature. The
certificates must be signed by and obtained from a CA (Certificate Authority).
CA Certificate
A CA certificate indicates that a third party has verified the identity of a server. You need to obtain a
CA certificate for server authentication from a CA that issues it.
Self-signed Certificate
A self-signed certificate is issued and signed by the product itself. You can use the certificate for only
SSL/TLS communication, however security is unreliable and you may see a security alert in the
browser during use.
Parent topic: Using a Digital Certificate
Obtaining and Importing a CA-signed Certificate
You can obtain a CA-signed certificate by creating a CSR (Certificate Signing Request) using Web
Config and submitting it to a certificate authority. The CSR created in Web Config is in PEM/DER format.
You can import one CSR created from Web Config at a time.
1. Access Web Config and select the Network Security tab.
2. Select one of the following network security options and corresponding certificates:
• SSL/TLS and select Certificate
• IPsec/IP Filtering and select Client Certificate
• IEEE802.1X and select Client Certificate
3. In the CSR section, select Generate.
4. Select the CSR setting options you want to use.
5. Click OK.
You see a completion message.
6. Select the Network Security tab and select your network security option and corresponding
certificate again.

233
7. In the CSR section, click the Download option that matches the format specified by your certificate
authority to download the CSR.
CAUTION: Do not generate another CSR or you may not be able to import a CA-signed certificate.
8. Submit the CSR to the certificate authority following the format guidelines provided by that authority.
9. Save the issued CA-signed certificate to a computer connected to the product.
Before proceeding, make sure the time and date settings are correct on your product.
10. In the CA Certificate section, click Import.
11. Select the format of the certificate as the Server Certificate setting.
12. Select the certificate import settings as necessary for the format and the source from which you
obtained it.
13. Click OK.
You see a confirmation message.
14. Click Confirm to verify the certificate information.
Parent topic: Using a Digital Certificate
Related references
CSR Setup Settings
CSR Import Settings
Related tasks
Accessing the Web Config Utility
CSR Setup Settings
You can select these settings when setting up a CSR in Web Config.
Note: The available key length and abbreviations vary by certificate authority, so follow the rules of that
authority when entering information in the CSR.
Setting Options/Description
Key Length Select a key length for the CSR
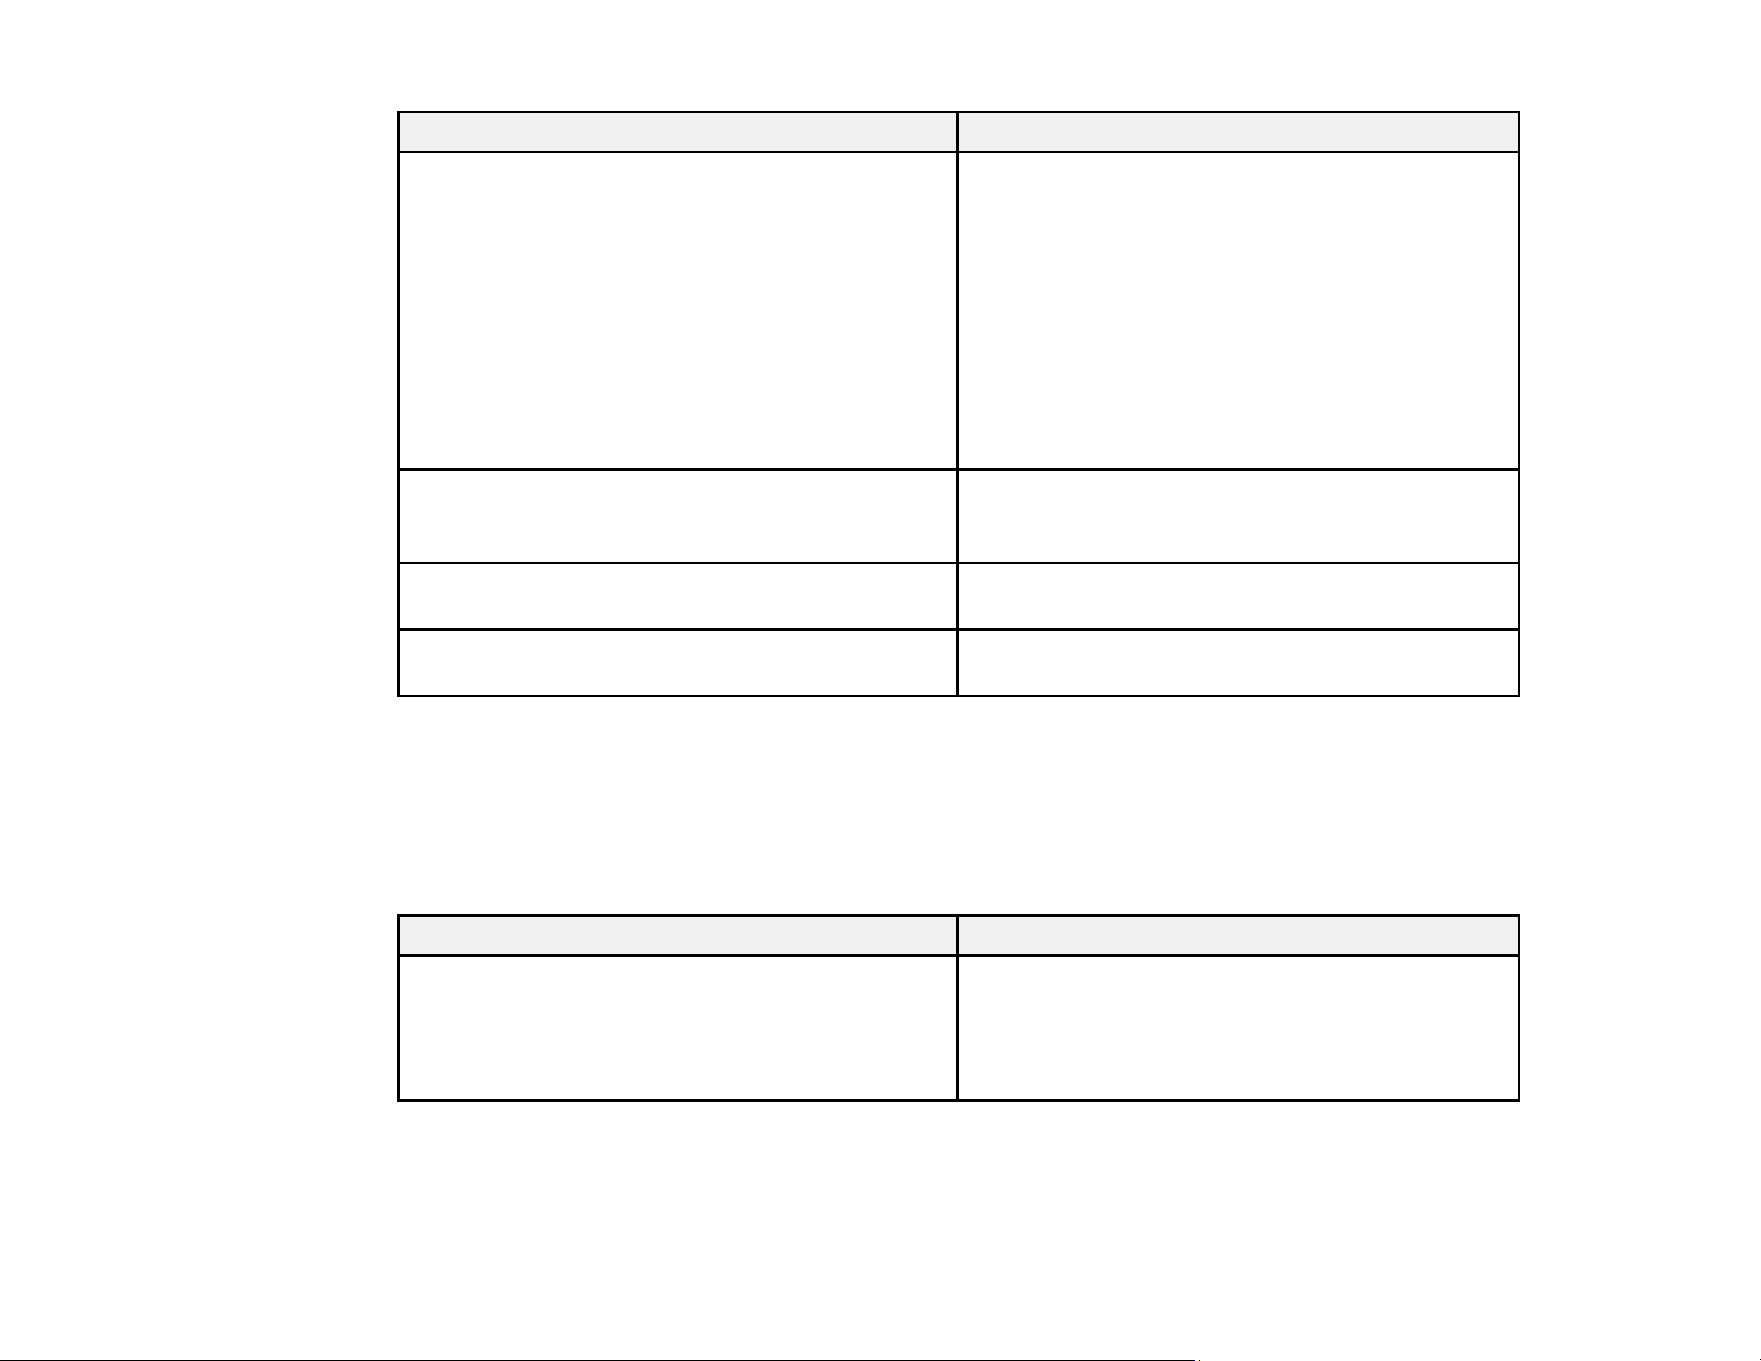
234
Setting Options/Description
Common Name Enter a name or static IP address from 1 to 128
characters long.
The first element is stored to the common name,
and other elements are stored to the alias field of
the certificate subject. For example:
Scanner's IP address: 192.0.2.123, Scanner
name: EPSONA1B2C3
Common Name:
EPSONA1B2C3,EPSONA1B2C3.local,192.0.2.12
3
Organization, Organizational Unit, Locality,
State/Province
Enter information in each field as necessary, from
0 to 64 characters long in ASCII; separate any
multiple names with commas
Country Enter a two-digit country code number as specified
by the ISO-3166 standard
Sender's Email Address Enter the sender's email address for the mail
server setting
Parent topic: Using a Digital Certificate
CSR Import Settings
You can configure these settings when importing a CSR in Web Config.
Note: The import setting requirements vary by certificate format and how you obtained the certificate.
Certificate format Setting descriptions
PEM/DER format obtained from Web Config Private Key: Do not configure because the
product contains a private key
Password: Do not configure
CA Certificate 1/CA Certificate 2: Optional

235
Certificate format Setting descriptions
PEM/DER format obtained from a computer Private Key: Configure a private key
Password: Do not configure
CA Certificate 1/CA Certificate 2: Optional
PKCS#12 format obtained from a computer Private Key: Do not configure
Password: Optional
CA Certificate 1/CA Certificate 2: Do not
configure
CA-signed Certificate Import Settings
Setting Description
Server Certificate or Client Certificate Select the certificate format.
For an SSL/TLS connection, the Server Certificate
is displayed.
For an IPsec/IP Filtering, IEEE802.1x, or S/MIME
connection, the Client Certificate is displayed.
Note: Depending on your product, not all
connection types may be available.
Private Key If you obtain a certificate of the PEM/DER format
by using a CSR created from a computer, specify a
private key file that matches the certificate.
Password If the file format is Certificate with Private Key
(PKCS#12), enter the password for encrypting the
private key that is set when you obtain the
certificate.
CA Certificate 1 If your certificate’s format is Certificate
(PEM/DER), import a certificate from a certificate
authority that issues a CA-signed Certificate to be
used as the server certificate. Specify a file if
necessary.
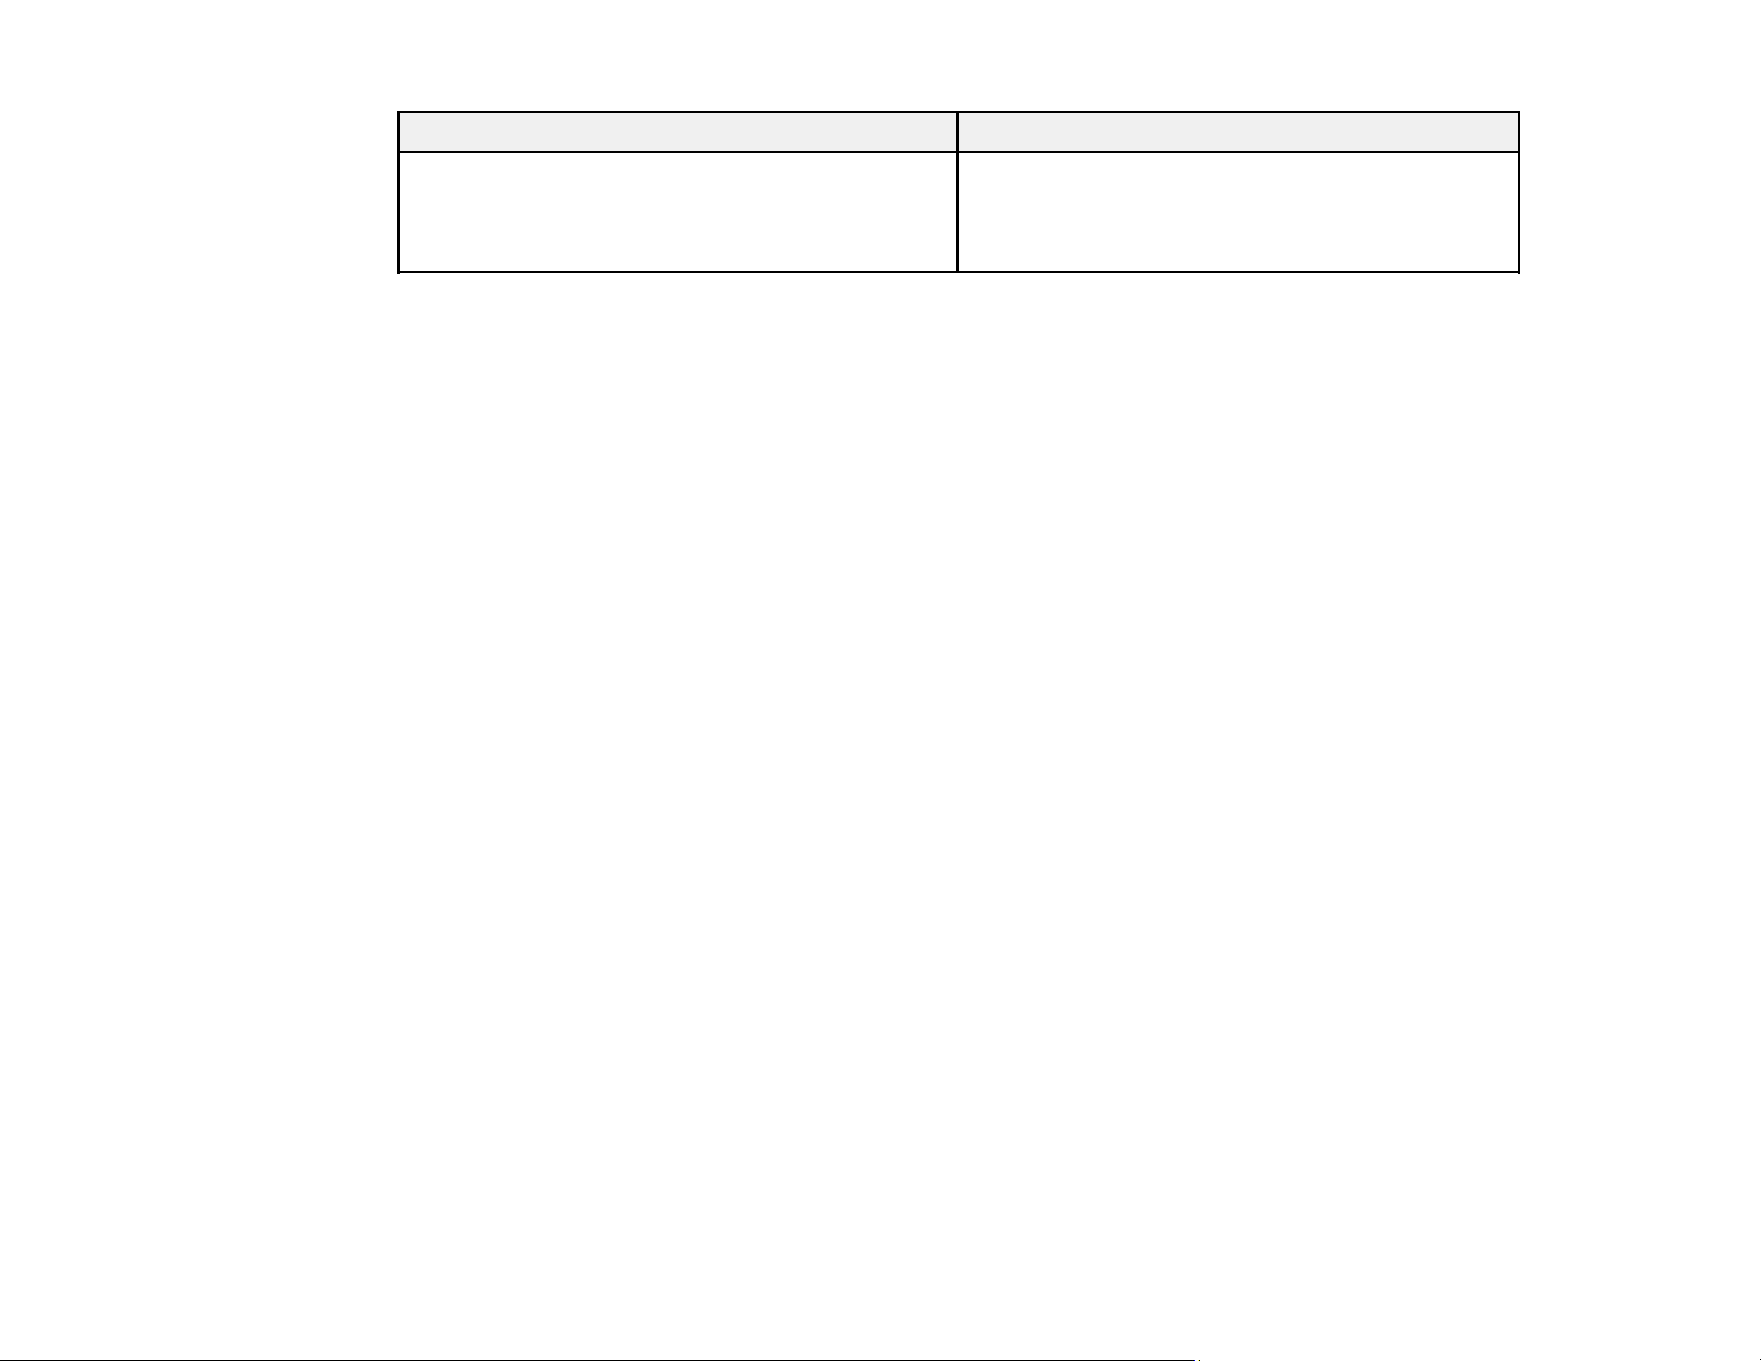
236
Setting Description
CA Certificate 2 If your certificate’s format is Certificate
(PEM/DER), import a certificate from the same
certificate authority that issued CA Certificate 1.
Specify a file if necessary.
Parent topic: Using a Digital Certificate
Deleting a CA-signed Certificate
You can delete an imported CA-signed certificate with Web Config when the certificate expires or if you
have no more need for an encrypted connection.
Note: If you obtained a CA-signed certificate from Web Config, you cannot import a deleted certificate;
you must obtain and import a new certificate.
1. Access Web Config and select the Network Security tab.
2. Select one of the following network security options and corresponding certificate:
• SSL/TLS and select Certificate
• IPsec/IP Filtering and select Client Certificate
• IEEE802.1X and select Client Certificate
3. Click Delete.
You see a completion message.
4. Click OK.
Parent topic: Using a Digital Certificate
Related tasks
Accessing the Web Config Utility
Updating a Self-signed Certificate
If your product supports the HTTPS server feature, you can update a self-signed certificate using Web
Config.
1. Access Web Config and select Network Security, select SSL/TLS, and select Certificate.
2. Click Update.

237
3. Enter an identifier for your product from 1 to 128 characters long in the Common Name field.
Note: You can add up to 5 IPv4 addresses, IPv6 addresses, host names, or FQDNs; separated by
commas. The first value is assigned to the Common Name field, and the rest are added to the Alias
field of the certificate subject. You cannot enter a space before or after a comma.
4. Select a validity period for the certificate as the Certificate Validity (year) setting.
5. Click Next.
You see a completion message.
6. Click OK.
7. Click Confirm to verify the certificate information.
Parent topic: Using a Digital Certificate
Related tasks
Accessing the Web Config Utility
Importing a CA Certificate
You can import a CA certificate using Web Config.
1. Access Web Config and select Network Security.
2. Select CA Certificate.
3. Select Import.
4. Select the CA certificate you want to import.
5. Click OK.
When you see the CA Certificate page and the imported certificate is displayed, the import is finished.
Parent topic: Using a Digital Certificate
Deleting a CA Certificate
You can delete an imported CA certificate with Web Config when the certificate expires or if you have no
more need for an encrypted connection.
1. Access Web Config and select Network Security.
2. Select CA Certificate.
3. Locate the certificate you want to remove and click the Delete button next to it.
4. Click OK to confirm the deletion.

238
5. Click Reboot Network, and then check that the deleted CA Certificate is not listed on the updated
screen.
Parent topic: Using a Digital Certificate
Related tasks
Accessing the Web Config Utility
Configuring SSL/TLS Communication
Follow the instructions in these sections to configure SSL/TLS communication using Web Config.
Configuring SSL/TLS Settings
Configuring a Server Certificate for the Product
Parent topic: Using Your Product on a Secure Network
Configuring SSL/TLS Settings
If your product supports HTTPS, you can configure SSL/TLS to encrypt communications with your
product.
1. Access Web Config and select the Network Security tab.
2. Select SSL/TLS > Basic.
3. Select one of the options for the Encryption Strength setting.
4. Select Enable or Disable for the Redirect HTTP to HTTPS setting as necessary.
5. Click Next.
You see a confirmation message.
6. Click OK.
Parent topic: Configuring SSL/TLS Communication
Related tasks
Accessing the Web Config Utility
Configuring a Server Certificate for the Product
You can configure a server certificate for your product.
1. Access Web Config and select the Network Security tab.
2. Under SSL/TLS, select Certificate.

239
3. Select one of the following options:
• CA-signed Certificate: Select Import if you have obtained a CA-signed certificate. Choose the
file to import and click OK.
• Self-signed Certificate: Select Update if you have not obtained a CA (Certificate Authority)-
signed certificate and want the product to generate a self-signed certificate.
4. Click Next.
You see a confirmation message.
5. Click OK.
Parent topic: Configuring SSL/TLS Communication
Related tasks
Accessing the Web Config Utility
Configuring IPsec/IP Filtering
Follow the instructions in these sections to configure IPsec/IP traffic filtering using Web Config.
About IPsec/IP Filtering
Configuring the Default IPsec/IP Filtering Policy
Configuring the Group IPsec/IP Filtering Policies
IPsec/IP Filtering Policy Settings
IPsec/IP Filtering Configuration Examples
Configuring an IPsec/IP Filtering Certificate
Parent topic: Using Your Product on a Secure Network
About IPsec/IP Filtering
You can filter traffic to the product over the network based on IP address, service, and port by
configuring a default policy that applies to every user or group connecting to the product. For control of
individual users or user groups, you can configure group policies.
Note: IPsec is supported only by computers running Windows Vista or later, or Windows Server 2008 or
later.
Parent topic: Configuring IPsec/IP Filtering
Configuring the Default IPsec/IP Filtering Policy
You can configure the default policy for IPsec/IP traffic filtering using Web Config.

240
1. Access Web Config and select the Network Security tab.
2. Under IPsec/IP Filtering, select Basic.
3. Select Enable to enable IPsec/IP filtering.
4. Select the filtering options you want to use for the default policy.
5. Click Next.
You see a confirmation message.
6. Click OK.
Parent topic: Configuring IPsec/IP Filtering
Related tasks
Accessing the Web Config Utility
Configuring the Group IPsec/IP Filtering Policies
You can configure group policies for IPsec/IP traffic filtering using Web Config.
1. Access Web Config and select the Network Security tab.
2. Under IPsec/IP Filtering, select Basic.
3. Click a tab number for the policy number you want to configure.
4. Select the Enable this Group Policy checkbox.
5. Select the filtering options you want to use for this group policy.
6. Click Next.
You see a confirmation message.
7. Click OK.
8. If you want to configure additional group policies, click the next tab number and repeat the
configuration steps as necessary.
Parent topic: Configuring IPsec/IP Filtering
Related tasks
Accessing the Web Config Utility
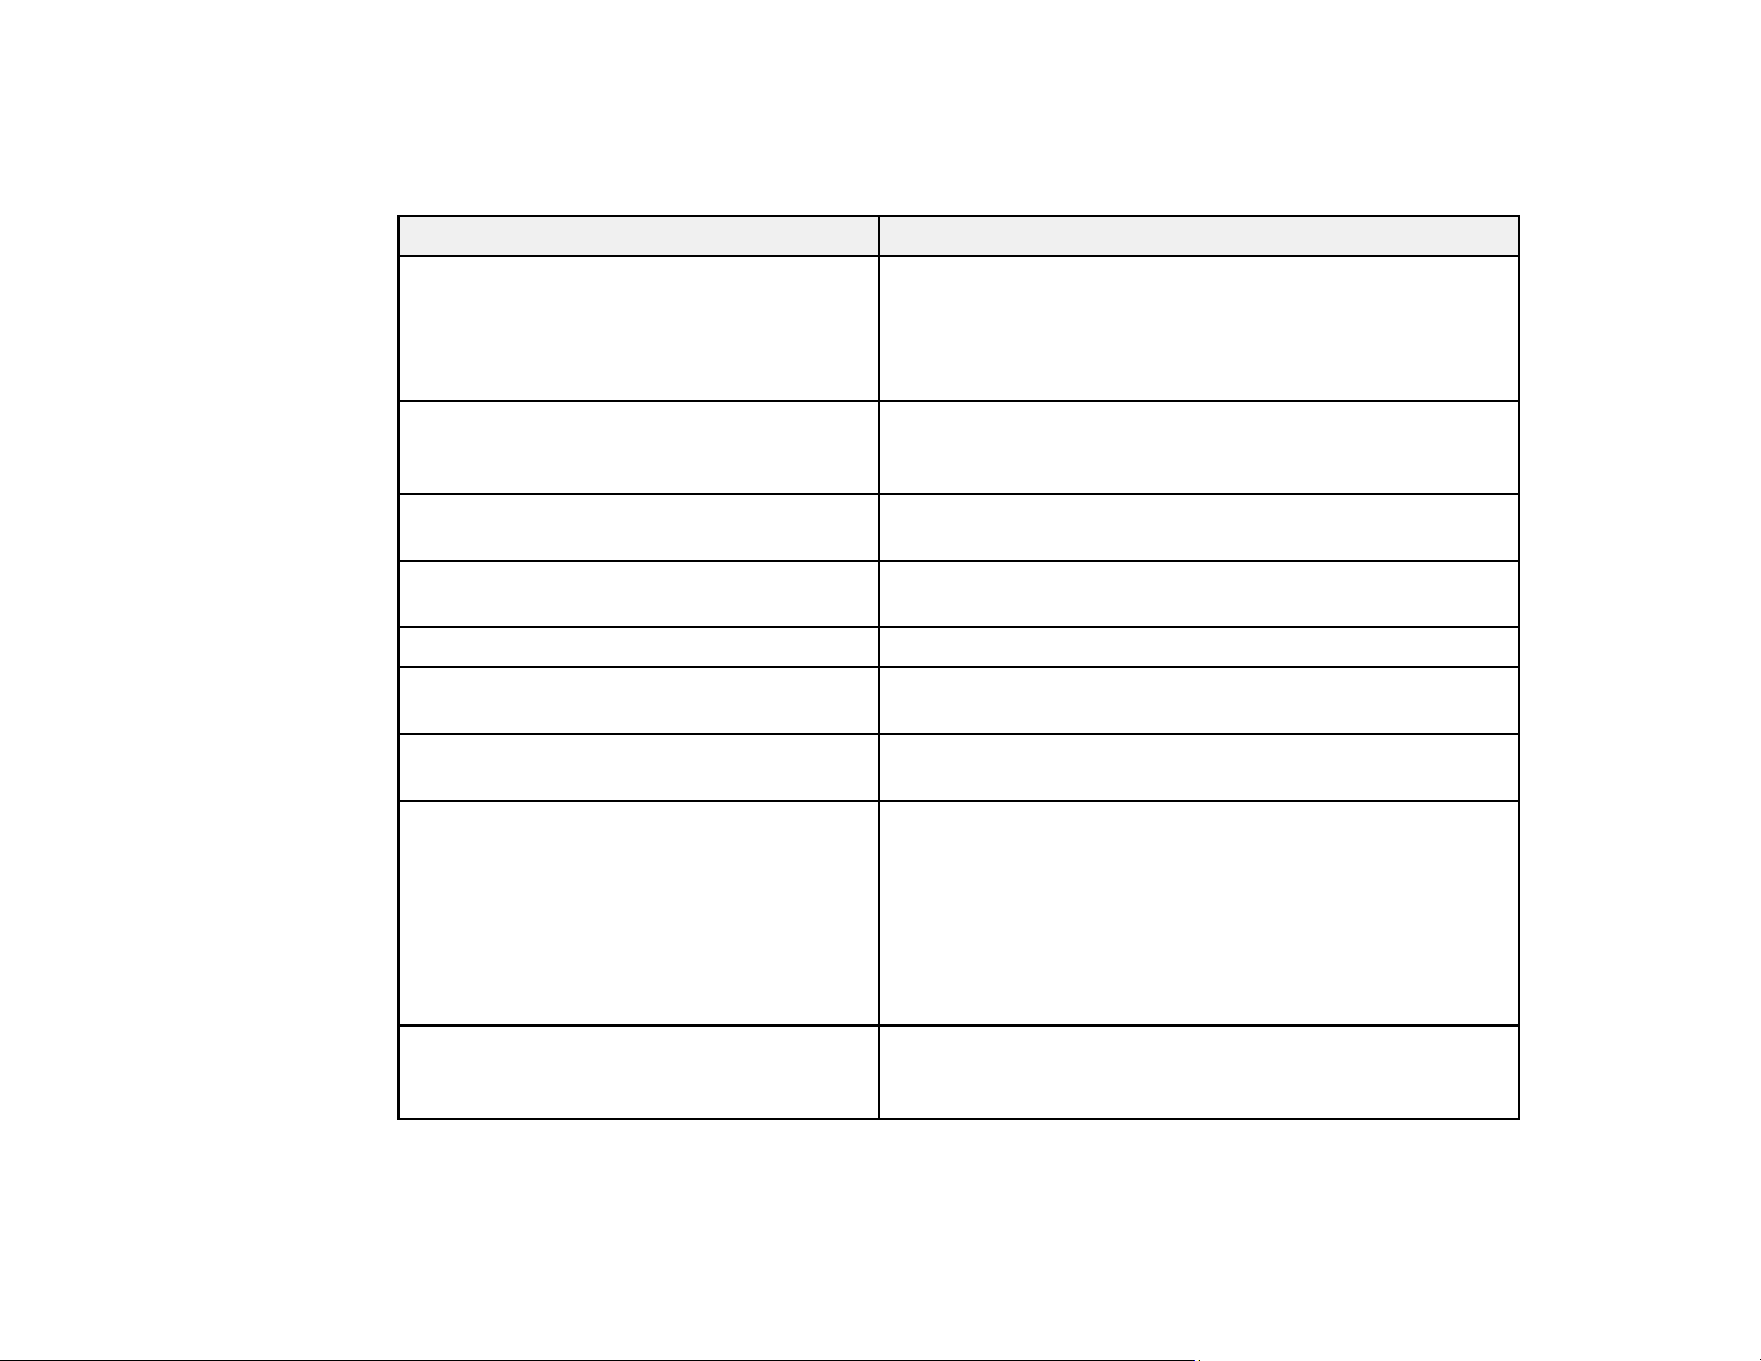
241
IPsec/IP Filtering Policy Settings
Default Policy Settings
Setting Options/Description
Access Control Permit Access to permit IP packets to pass through
Refuse Access to prevent IP packets from passing
through
IPsec to permit IPsec packets to pass through
IKE Version Select the version of the Internet Key Exchange (IKE)
protocol (IKEv1 or IKEv2) that matches your network
environment
Authentication Method Select an authentication method, or select Certificate if
you have imported a CA-signed certificate
Pre-Shared Key If necessary, enter a pre-shared key between 1 and 127
characters long
Confirm Pre-Shared Key Confirm the pre-shared key you entered
ID Type If you selected IKEv2 as the IKE Version setting, select
the ID type from the list.
ID If you selected IKEv2 as the IKE Version setting, enter
the necessary ID information
Encapsulation If you selected IPsec as the Access Control option,
select one of these encapsulation modes:
Transport Mode: if you are using the product on the
same LAN; IP packets of layer 4 or later are encrypted
Tunnel Mode: if you are using the product on an Internet-
capable network, such as IPsec-VPN; the header and
data of IP packets are encrypted
Remote Gateway(Tunnel Mode) If you selected Tunnel Mode as the Encapsulation
option, enter a gateway address between 1 and 39
characters long

242
Setting Options/Description
Security Protocol If you selected IPsec as the Access Control option,
select one of these security protocols:
ESP: to ensure the integrity of authentication and data,
and encrypt data
AH: to ensure the integrity of authentication and data; if
data encryption is prohibited, you can use IPsec
Algorithm Settings Select the encryption algorithm settings for the security
protocol you selected
Group Policy Settings
Setting Options/Description
Access Control Permit Access to permit IP packets to pass through
Refuse Access to prevent IP packets from passing
through
IPsec to permit IPsec packets to pass through
Local Address(Scanner) Select an IPv4 or IPv6 address that matches your network
environment; if the IP address is assigned automatically,
select Use auto-obtained IPv4 address
Remote Address(Host) Enter the device's IP address (between 0 and 43
characters long) to control access, or leave blank to
control all addresses; if the IP address is assigned
automatically, such as by DHCP, the connection may be
unavailable, so configure a static address instead
Method of Choosing Port Select the method you want to used for specifying ports
Service Name If you selected Service Name as the Method of
Choosing Port option, select a service name option here;
see the next table for more information

243
Setting Options/Description
Transport Protocol If you selected Port Number as the Method of Choosing
Port option, select one of these encapsulation modes:
Any Protocol
TCP
UDP
ICMPv4
See the Group Policy Guidelines table for more
information.
Local Port If you selected Port Number as the Method of Choosing
Port option, and TCP or UDP for the Transport Protocol
option, enter the port numbers that control receiving
packets (up to 10 ports), separated by commas, for
example 25,80,143,5220; leave this setting blank to
control all ports; see the next table for more information
Remote Port If you selected Port Number as the Method of Choosing
Port option, and TCP or UDP for the Transport Protocol
option, enter the port numbers that control sending
packets (up to 10 ports), separated by commas, for
example 25,80,143,5220; leave this setting blank to
control all ports; see the next table for more information
IKE Version Select IKEv1 or IKEv2 depending on the device that the
product is connected to
Authentication Method If you selected IPsec as the Access Control option,
select an authentication method here
Pre-Shared Key If you selected Pre-Shared Key as the Authentication
Method option, enter a pre-shared key between 1 and
127 characters long here and in the Confirm Pre-Shared
Key field
ID Type If you selected IKEv2 as the IKE Version setting, select
the ID type from the list
ID If you selected IKEv2 as the IKE Version setting, enter
the necessary ID information
244
Setting Options/Description
Encapsulation If you selected IPsec as the Access Control option,
select one of these encapsulation modes:
Transport Mode: if you are using the product on the
same LAN; IP packets of layer 4 or later are encrypted
Tunnel Mode: if you are using the product on an Internet-
capable network, such as IPsec-VPN; the header and
data of IP packets are encrypted
Remote Gateway(Tunnel Mode) If you selected Tunnel Mode as the Encapsulation
option, enter a gateway address between 1 and 39
characters long
Security Protocol If you selected IPsec as the Access Control option,
select one of these security protocols:
ESP: to ensure the integrity of authentication and data,
and encrypt data
AH: to ensure the integrity of authentication and data; if
data encryption is prohibited, you can use IPsec
Algorithm Settings Select the encryption algorithm settings for the security
protocol you selected
Combinations of Local Address (Scanner) and Remote Address (Host) on Group Policy
Setting of Local Address (Scanner)
Setting of Remote
Address (Host)
IPv4 IPv6
2
Any addresses
3
IPv4
1
Yes — Yes
IPv6
1, 2
— Yes Yes
Blank Yes Yes Yes
1
If you selected IPsec as the Access Control option, you cannot specify a prefix length
2
If you selected IPsec as the Access Control option, you can select a link-local address (fe80::), but the
group policy will be disabled.
3
You cannot use IPv6 link-local addresses.

245
Group Policy Guidelines
Service name Protocol type Local/Remote port
number
Controls these operations
Any — — All services
ENPC UDP 3289/Any port Searching for a product from
applications such as Epson Device
Admin and the scanner driver
SNMP UDP 161/Any port Acquiring and configuring MIB from
applications such as Epson Device
Admin and the scanner driver
WSD TCP Any port/5357 Controlling WSD
WS-Discovery UDP 3702/Any port Searching for a product from WSD
Network Scan TCP 1865/Any port Forwarding scan data from
Document Capture Pro
Network Push Scan TCP Any port/2968 Acquiring job information on push
scanning from Document Capture
Pro
Network Push Scan
Discovery
UDP 2968/Any port Searching for a computer from
scanner
FTP Data (Remote) TCP Any port/20 FTP client (forwarding scanned data)
This can control only an FTP server
that uses remote port number 20.
FTP Control
(Remote)
TCP Any port/21 FTP client (controlling forwarded
scanned data)
CIFS (Remote) TCP Any port/445 CIFS client (forwarding scanned data
to a folder)
NetBIOS Name
Service (Remote)
UDP Any port/137
NetBIOS Datagram
Service (Remote)
UDP Any port/138
NetBIOS Session
Service (Remote)
TCP Any port/139
246
Service name Protocol type Local/Remote port
number
Controls these operations
HTTP (Local) TCP 80/Any port Forwarding Web Config and WSD
data to a HTTP or HTTPS server
HTTPS (Local) TCP 443/Any port
HTTP (Remote) TCP Any port/80 Firmware update and root certificate
update on a HTTP or HTTPS client
HTTPS (Remote) TCP Any port/443
Parent topic: Configuring IPsec/IP Filtering
IPsec/IP Filtering Configuration Examples
You can configure IPsec and IP filtering in a variety of ways, as shown in the examples here.
Receiving IPsec Packets Only
Use this example only for configuring a default policy.
• IPsec/IP Filtering: Enable
• Access Control: IPsec
• Authentication Method: Pre-Shared Key
• Pre-Shared Key: Enter a key up to 127 characters long
Receiving Scanning Data and Scanner Settings
Use this example to allow communication of printing data and printer settings from specified services.
Default policy:
• IPsec/IP Filtering: Enable
• Access Control: Refuse Access
Group policy:
• Enable this Group Policy: Select
• Access Control: Permit Access
• Remote Address(Host): Client IP address
• Method of Choosing Port: Service Name
• Service Name: Select ENPC, SNMP, HTTP (Local), HTTPS (Local), and Network Scan

247
Receiving Access from a Specified IP Address only
In these examples, the client will be able to access and configure the product in any policy configuration.
Default policy:
• IPsec/IP Filtering: Enable
• Access Control: Refuse Access
Group policy:
• Enable this Group Policy: Select
• Access Control: Permit Access
• Remote Address (Host): Administrator's client IP address
Note: Regardless of policy configuration, the client will be able to access and configure the scanner.
Parent topic: Configuring IPsec/IP Filtering
Configuring an IPsec/IP Filtering Certificate
You can configure a certificate for IPsec/IP traffic filtering using Web Config.
1. Access Web Config and select the Network Security tab.
2. Under IPsec/IP Filtering, select Client Certificate.
3. Click Import to add a new client certificate and enter any necessary settings.
4. Click OK.
Parent topic: Configuring IPsec/IP Filtering
Related tasks
Accessing the Web Config Utility
Connecting the Product to an IEEE 802.1X Network
Follow the instructions in these sections to connect the product to an IEEE 802.1X network using Web
Config.
Configuring an IEEE 802.1X Network
IEEE 802.1X Network Settings
Configuring a Certificate for an IEEE 802.1X Network
Parent topic: Using Your Product on a Secure Network

248
Configuring an IEEE 802.1X Network
If your product supports IEEE 802.1X, you can use it on a network with authentication provided by a
RADIUS server with a hub as an authenticator using Web Config.
1. Access Web Config and select the Network Security tab.
2. Under IEEE802.1X, select Basic.
3. Select the IEEE 802.1X setting options you want to use. To use the product on a Wi-Fi network, click
Wi-Fi Setup and select or enter an SSID.
4. Click Next.
You see a confirmation message.
5. Click OK.
Parent topic: Connecting the Product to an IEEE 802.1X Network
Related tasks
Accessing the Web Config Utility
IEEE 802.1X Network Settings
You can configure these IEEE 802.1X network settings in Web Config.
Setting Options/Description
IEEE802.1X (Wired LAN) You can enable or disable settings of the page (IEEE802.1X >
Basic) for IEEE802.1X (Wired LAN).
IEEE802.1X (Wi-Fi) Displays the IEEE802.1X (Wi-Fi) connection status
Connection Method Displays the current network connection method
EAP Type Select one of these authentication methods for connections
between the product and a RADIUS server:
EAP-TLS or PEAP-TLS: You must obtain and import a CA-
signed certificate
PEAP/MSCHAPv2 or EAP-TTLS: You must configure a
password
User ID Enter an ID between 1 and 128 ASCII characters for
authentication on a RADIUS server

249
Setting Options/Description
Password Enter a password between 1 and 128 ASCII characters for
authentication of the product. If you are using Windows as a
RADIUS server, enter up to 127 ASCII characters.
Confirm Password Enter the authentication password again
Server ID Enter a server ID between 1 and 128 ASCII characters for
authentication on a specified RADIUS server; server ID is
verified in the "subject/subjectAltName" field of a server
certificate sent from the RADIUS server
Certificate Validation (Wired LAN) Select a valid certificate regardless of the authentication
method; import the certificate using the CA Certificate option
Anonymous Name If you selected EAP-TTLS, PEAP-TLS or PEAP/MSCHAPv2
as the Authentication Method setting, you can configure an
anonymous name between 1 and 128 ASCII characters
instead of a user ID for phase 1 of a PEAP authentication
Encryption Strength Select one of the following encryption strengths:
High for AES256/3DES
Middle for AES256/3DES/AES128/RC4
Parent topic: Connecting the Product to an IEEE 802.1X Network
Configuring a Certificate for an IEEE 802.1X Network
If your product supports IEEE 802.1X, you can configure a certificate for the network using Web Config.
1. Access Web Config and select the Network Security tab.
2. Under IEEE802.1X, select Client Certificate.
3. Click Import to add a new client certificate.
Note: If you have already imported a certificate published by a Certification Authority, you can copy
the certificate and use it in IEEE802.1X. To copy, select the certificate from Copy From, and then
click Copy.
4. Click OK.
Parent topic: Connecting the Product to an IEEE 802.1X Network

250
Related tasks
Accessing the Web Config Utility
Epson Open Platform Overview
Epson Open Platform is a platform that allows you to use authentication systems with your product.
It can be used with Epson Print Admin (Epson Authentication System) or a third-party authentication
system. You can acquire logs by device and user, configure devices that users and groups can use, and
set limits for functions.
If you connect an authentication device, you can also perform user authentication using an ID card. To
ensure a secure scanning environment, different preset settings can be registered on each user’s panel
display to prevent misuse of the product. When authentication is enabled on the product, user
authentication is required in order to start scanning.
Configuring Epson Open Platform
Validating Epson Open Platform
Parent topic: Using Your Product on a Secure Network
Configuring Epson Open Platform
Enable Epson Open Platform so that you can use your product from the authentication system.
Note: You cannot use Epson Print Admin Serverless when the system is synchronized with Epson Open
Platform.
1. Obtain a product key from the dedicated website.
Note: See the Epson Open Platform manual for more information.
2. Access Web Config and select the Epson Open Platform tab.
3. Select Product Key or License Key.
4. Confirm and set these options:
• Serial Number: The serial number of the device is displayed.
• Epson Open Platform Version: Select the version of Epson Open Platform. The corresponding
version varies depending on the authentication system.
• Product Key or License Key: Enter the product key you obtained.
5. Click Next.

251
The setting confirmation screen is displayed.
6. Click OK.
The settings are applied to the scanner.
Parent topic: Epson Open Platform Overview
Validating Epson Open Platform
You can check the validity of Epson Open Platform using Web Config or the product's control panel.
• Web Config: Check that a product key has been entered (Epson Open Platform tab > Product Key
or License Key) and the authentication system (Epson Open Platform tab > Authentication
System) is displayed on the left of the menu tree.
• Control Panel: Check that the product key is displayed in Settings > Device Information > Epson
Open Platform Information.
Parent topic: Epson Open Platform Overview
Connecting an Authentication Device
You can connect an authentication device such as an IC card reader using a USB cable, and check the
functionality of the reader using the Web Config interface.
1. Connect the card reader’s USB cable to the external interface USB port on the product.
2. Access Web Config and log in using the administrator name and password.
Note: You can also check the card reader status on the product control panel by selecting Settings
> Device Information > Authentication Device Status.

252
3. Select Device Management > Card Reader.
4. Set the card reader parameters as necessary.
5. Select Check to verify the connection status of the authentication device.
Note: To confirm that the authentication device can recognize an authentication card, hold the card
over the reader while you select Check.
6. Click Next.
7. Click OK to confirm the settings.
Parent topic: Using Your Product on a Secure Network

253
Solving Problems
Check these sections for solutions to problems you may have using your product.
Product Status Messages
Solving Scanning Problems
Solving Network Scanning Problems
Solving Scanned Image Quality Problems
Updating Applications and Firmware
Resetting the Epson Scan 2 Settings
Uninstall Your Product Software
Where to Get Help (U.S. and Canada)
Where to Get Help (Latin America)
Product Status Messages
You can often diagnose problems with your product by checking the messages on its LCD screen. You
can also select Help to see help information and how-to instructions on the screen.
Note: If the LCD screen is dark, tap the screen to wake the product from sleep mode.
LCD screen message Condition/solution
Check the following if a computer
is not found. - Connection between
the scanner and the computer
(USB or network) - Installation of a
necessary application - Application
version - Power supply to the
computer - Firewall and security
software settings - Group settings
of a scanner and Document
Capture Pro - Execution of re-
searching For details, see your
documentation.
Try the following:
• Make sure the product is connected correctly and the latest
versions of Epson Scan 2 and Document Capture Pro
(Windows) or Document Capture (Mac) are installed on your
computer.
• Make sure the AC adapter is securely connected to the product
and an electrical outlet. Check that the outlet is working properly
by plugging another electrical device into it.
• Check the firewall settings for Epson software.
• Make sure the Group setting is the same for the computer and
the product.
• Search for the computer again.

254
LCD screen message Condition/solution
The combination of the IP address
and the subnet mask is invalid.
See your documentation for more
details.
There is a problem with the network connection to your product.
Check the solutions in this guide.
RECOVERY MODE A firmware update has failed. Connect your product using a USB
cable and try updating the firmware again. If you still receive this
error message, contact Epson for support.
DNS error. Check DNS settings. A communication error during scanning to a shared folder over a
network has occurred. Try the following:
• Make sure the computer you are scanning to is turned on and
not in sleep mode.
• Temporarily disable the computer's firewall and security
software, then try saving a scan over the network again. If
successful, check your security software settings.
• Check the computer's network type to make sure it is not set to
Public; you cannot save a scan to a shared folder over a public
network.
• Make sure the shared folder path matches the path registered to
your product contacts list.
• Make sure the IP address of the computer is correct. If using
DHCP, obtain the IP address again. If using a static IP address,
change the computer name in the shared folder path to the IP
address and try again. (For example, change \\EPSON02\SCAN
to \\192.168.xxx.xxx\SCAN)
• Make sure the DNS setting is correct, and that the computer
name and IP address match when the DNS server management
table is updated. Contact your network administrator.
Authentication error. Check the
location, user name and password.
An authentication error during scanning to a shared folder over a
network has occurred. Make sure the computer's user name and
password are correct and match those registered to your product
contacts list. Also make sure the password has not expired.

255
LCD screen message Condition/solution
Communication error. Check the
Wi-Fi/network connection.
A wireless communication error during scanning to a shared folder
over a network has occurred. Try the following:
• Make sure the path to the shared folder matches the path
registered to your product's contact list.
• Make sure you enabled access rights to the shared folder in the
folder Properties when you created the shared folder. See the
link below for instructions on creating a shared folder using the
correct properties.
• Windows: Make sure the Use Microsoft network sharing
setting is enabled in Web Config. Select Network > MS
Network to access the setting. See the link below for
instructions on accessing Web Config.
The file name is already in use.
Rename the file and scan again.
A file of the same name already exists in the shared network folder
you are trying to scan to. Change the file name, or move or deleted
files as necessary and try scanning to the shared folder again.
Scanned file(s) are too large. Only
XX page(s) have been sent. Check
if the destination has enough
space.
The storage on the computer you are trying to scan to does not
have enough space to store your scan. Try the following:
• Increase the storage space in the specified folder.
• Reduce the number of documents.
• Lower the scanning resolution or increase the compression ratio
to reduce the size of the scanned image.
Parent topic: Solving Problems
Related references
Where to Get Help (U.S. and Canada)
Where to Get Help (Latin America)
Related tasks
Cleaning Inside Your Product
Replacing the Rollers
Accessing the Web Config Utility
Setting a Password and Locking the Control Panel
Creating a Shared Network Folder

256
Solving Scanning Problems
Check these solutions if you have problems scanning with your product.
Product Does Not Turn On or Turns Off Unexpectedly
Forgot the Administrator Password
Scanner Button Does Not Work as Expected
Scanning Software Does Not Operate Correctly
Paper Feeding Problems
Paper Jam Problems
Paper Protection Does Not Work Correctly
Paper Ejection Problems
Scanning is Slow
Cannot Send Scans to a Cloud Service
Cannot Send Scans to an Email
Parent topic: Solving Problems
Product Does Not Turn On or Turns Off Unexpectedly
If the product does not turn on or if it turns off unexpectedly, try these solutions:
• Make sure the AC adapter is securely connected to the product and to a working electrical outlet.
• If the product turns off unexpectedly, you may need to adjust the Sleep Timer and Power Off Timer
settings on the control panel.
Parent topic: Solving Scanning Problems
Related tasks
Changing the Sleep Timer Settings
Changing the Power Off Timer Settings
Forgot the Administrator Password
If you forget the password or inadvertently set it, contact Epson for assistance.
Note: In most cases, the default password is the product's serial number. If there is a "Password" label
attached to the back of the product, enter the 8-digit number shown on the label. If there is no
"Password" label attached, enter the serial number on the label attached to the back of the product for
the initial administrator password. If you restore the product to default settings, the administrator
password resets to the initial setting.

257
Parent topic: Solving Scanning Problems
Related tasks
Setting a Password and Locking the Control Panel
Scanner Button Does Not Work as Expected
If the scanner button does not start the correct program or perform the correct action, try these solutions:
• Make sure your scanner is turned on and any interface cables are securely connected at both ends.
• Check the USB cable connection between the computer and scanner if you are connecting via USB.
• Check that the correct scanner is selected using the Epson Scan 2 Utility.
• In Windows, be sure that the scanner is listed under Imaging Devices in the Device Manager.
• Make sure Document Capture Pro (Windows) or Document Capture (Mac) is installed correctly. If
necessary, uninstall and reinstall it.
• Make sure you have assigned the correct job to the scanner button and change it, if necessary.
• Check the status of the lights and make sure the scanner is ready to scan.
• If you are connecting your scanner over a network, make sure the Wi-Fi connection is working
correctly. Try turning the wireless router off and on again, and make sure the router cable is securely
connected.
• If you are connecting your scanner via USB, use only the USB cable that came with the scanner.
Make sure it is connected directly to your computer and not to a USB hub.
• Make sure your scanner is not connected to another computer via USB. A USB connection takes
priority over a Wi-Fi connection.
• Make sure Epson Scan 2 and other applications are installed correctly. If necessary, uninstall and
reinstall it.
Parent topic: Solving Scanning Problems
Scanning Software Does Not Operate Correctly
If your scanning software does not operate correctly, try these solutions:
• Make sure your computer has adequate memory and meets the system requirements for your
operating system.
• Make sure your computer is not running in a power-saving mode, such as sleep or standby. If so,
wake your system and restart your scanning software.
• Make sure the product is turned on.

258
• Make sure the scanning software is installed.
• Make sure the connection between the product and your computer is secure.
• If you upgraded your operating system but did not reinstall your scanning software, try reinstalling it.
• In Windows, be sure that the product is listed under Imaging Devices in the Device Manager.
• Check that the correct product is selected using the Epson Scan 2 Utility.
• Check that the correct setting is assigned to the scanner button in Document Capture Pro (Windows)
or Document Capture (Mac).
• Connect the product directly to the computer. The product may not work properly when connected
through a USB hub/switch.
• Document Capture Pro (Windows) does not support Windows Vista or Windows Server, so use Epson
Scan 2 for scanning instead.
• If you are using a TWAIN-compliant program, make sure that the correct product is selected as the
Scanner or Source setting.
• Make sure the PC Connection via USB setting is not disabled on the control panel.
• Check that the Wi-Fi connection is working correctly. Try turning the wireless router off and on.
• If you are using the product over a network, make sure the network cable is securely connected.
• Make sure another computer is not connected to the product using a USB cable. A USB connection
takes priority over a Wi-Fi connection. If another computer is connected by USB, disconnect it.
• If you are using a Mac computer, make sure you select the network that has priority on it.
Cannot Start Epson Scan 2
Cannot Start Document Capture Pro (Windows) or Document Capture (Mac)
Parent topic: Solving Scanning Problems
Related references
Windows System Requirements
Mac System Requirements
Related tasks
Uninstalling Product Software - Windows
Uninstalling Product Software - Mac

259
Cannot Start Epson Scan 2
If you cannot start Epson Scan 2, try these solutions:
• Make sure your scanner appears in the Epson Scan 2 Utility.
• Make sure your scanner is turned on and any interface cables are securely connected at both ends.
• Make sure your computer is not running in a power-saving mode, such as sleep or standby. If so,
wake your system and restart Epson Scan 2.
• If you connected the scanner using a USB cable, make sure it is connected directly to your computer
or through only one USB hub.
• If you are using the scanner over a network, make sure the network cable is securely connected.
• If you are using the scanner over a network, make sure your scanner is displayed in the Scanner
Settings screen. If your scanner is not displayed in the list, click Enable Editing and click Add. Add
your scanner on the Add Network Scanner screen.
• Make sure the PC Connection via USB setting is not disabled on the control panel.
• If you upgraded your operating system but did not reinstall Epson Scan 2, try reinstalling it.
• If you are using a TWAIN-compliant program, make sure that the correct product is selected as the
Scanner or Source setting.
Parent topic: Scanning Software Does Not Operate Correctly
Cannot Start Document Capture Pro (Windows) or Document Capture (Mac)
If you cannot start Document Capture Pro (Windows) or Document Capture (Mac), try these solutions:
• Make sure Document Capture Pro (Windows) or Document Capture (Mac), Epson Scan 2, and Epson
Event Manager are installed.
• Make sure the correct setting is assigned to the scanner button in Document Capture Pro (Windows)
or Document Capture (Mac).
• Make sure to use the USB cable that came with the scanner.
• Make sure your scanner is turned on and any interface cables are securely connected at both ends.
• Connect the scanner directly to the computer. The scanner may not work properly when connected
through a USB hub.
• If you upgraded your operating system but did not reinstall Document Capture Pro, try reinstalling it.
• Make sure the status light stops flashing, indicating that the scanner is ready to scan.
Parent topic: Scanning Software Does Not Operate Correctly

260
Paper Feeding Problems
If you have problems feeding originals in your product, try these solutions:
• If there is a jammed original inside the product, open the product cover and remove the original.
• If multiple pages feed at once, try the following:
• Remove the originals, fan the edges to separate the sheets, if necessary, and reload them.
• Load fewer originals at a time.
• Load only originals that meet the specifications for your product.
• Select Slow on the control panel to slow down the scanning speed.
• Clean inside the product and clean the rollers. If the rollers were previously removed for cleaning,
make sure they were properly reinstalled.
• Use Automatic Feeding Mode in Epson Scan 2 and scan originals one at a time.
• If you see a double feed error in the Epson Scan 2 window or the Document Capture Pro window
(Windows only), start Epson Scan 2, select the Main Settings tab, select the Detect Double Feed
setting, and select Off.
Note: If you are using Document Capture Pro, you can open the Epson Scan 2 window by pressing
the Detailed Settings button on the Scan Settings screen.
Parent topic: Solving Scanning Problems
Related references
Optional Accessories and Replacement Parts
Original Document Specifications
Plastic and Laminated Card Specifications
Special Original Specifications
Plastic and Laminated Card Specifications
Special Original Specifications
Related tasks
Cleaning Inside Your Product
Related topics
Loading Originals
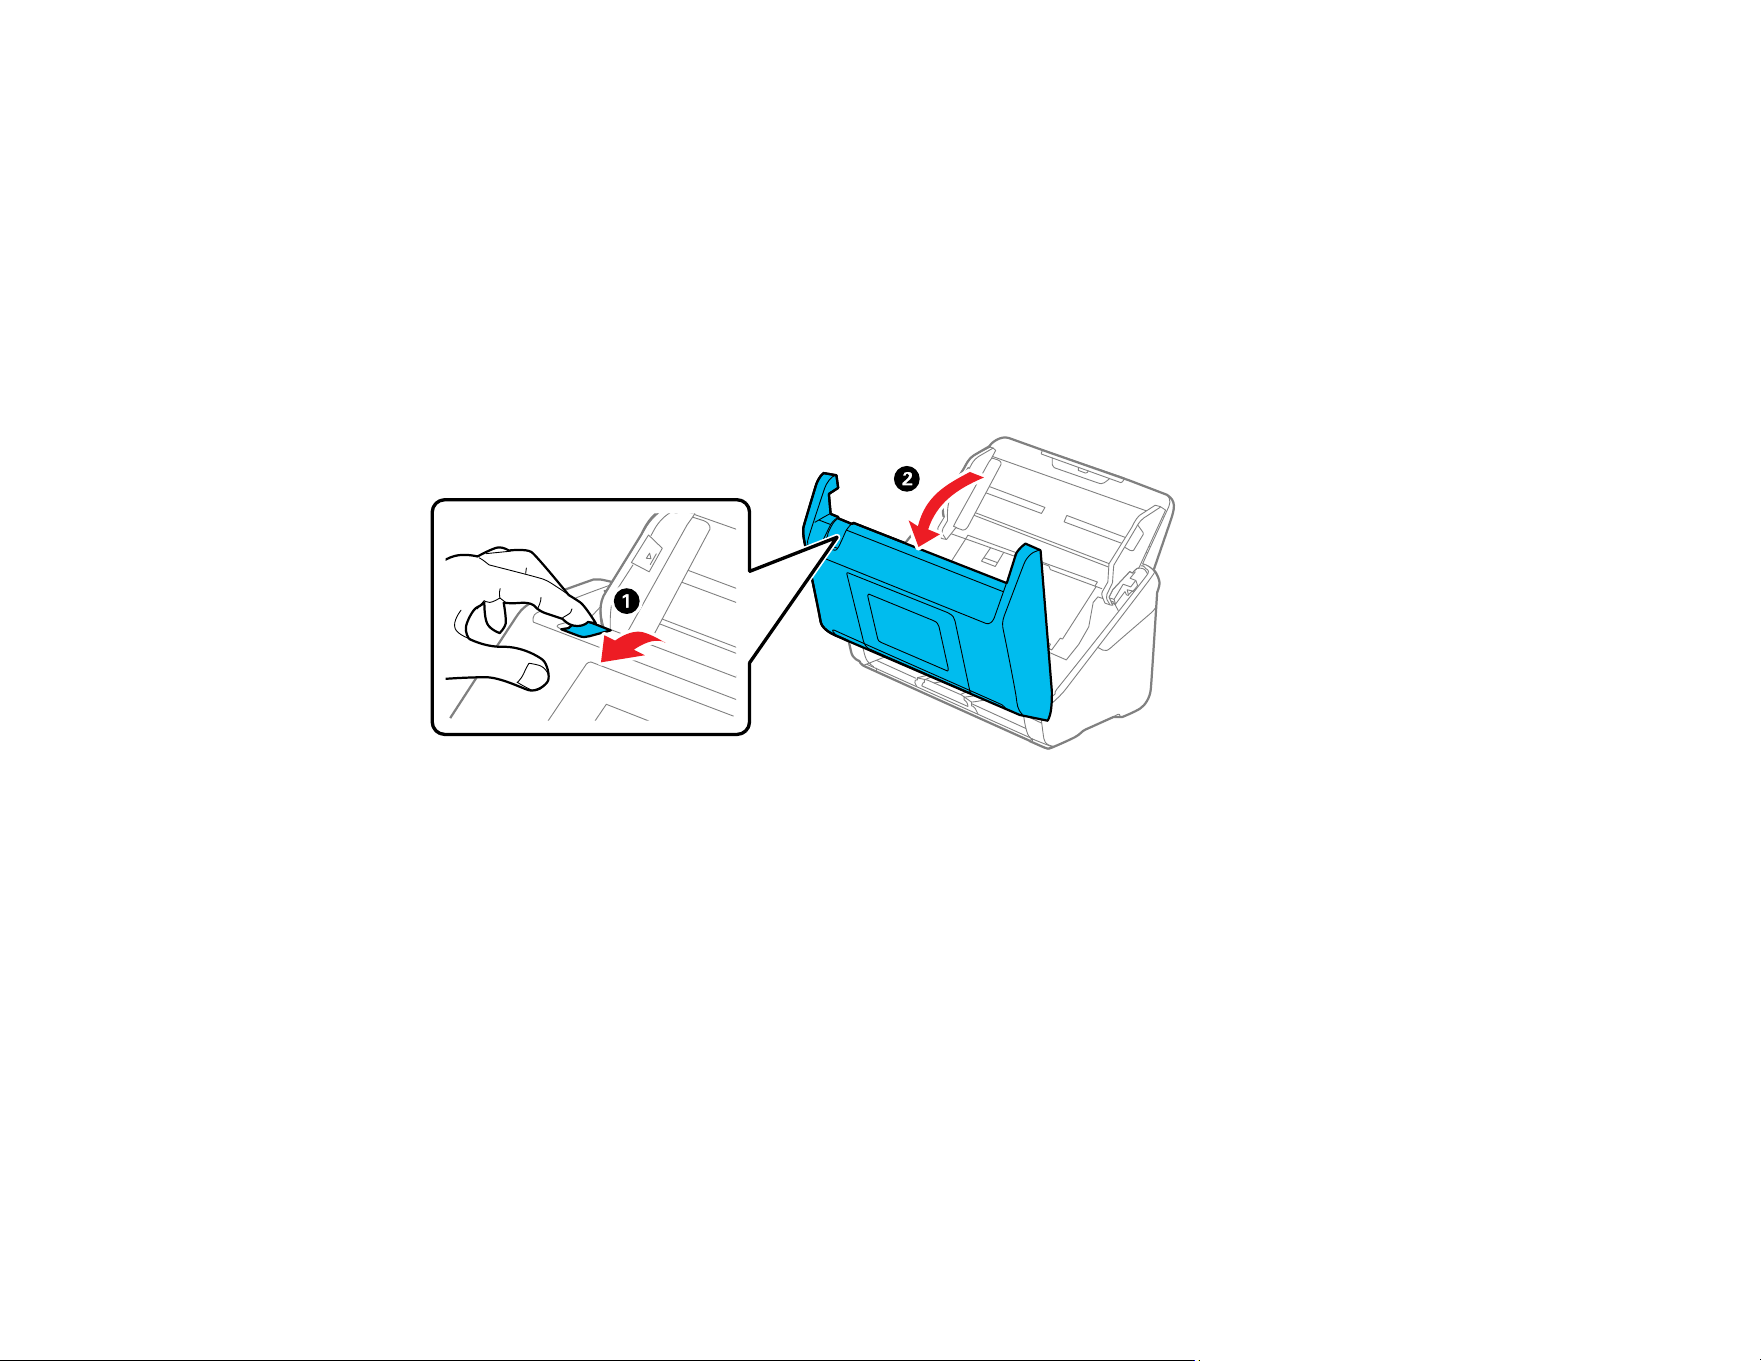
261
Paper Jam Problems
If an original is jammed in the scanner, clear the jam according to the procedure for the scanner position.
Note: Epson Smart Panel does not support scanning originals more than 15.5 inches (393.7 mm) in
length.
1. Turn off your product.
2. Remove all originals from the input tray.
3. Pull the lever to open the scanner cover.
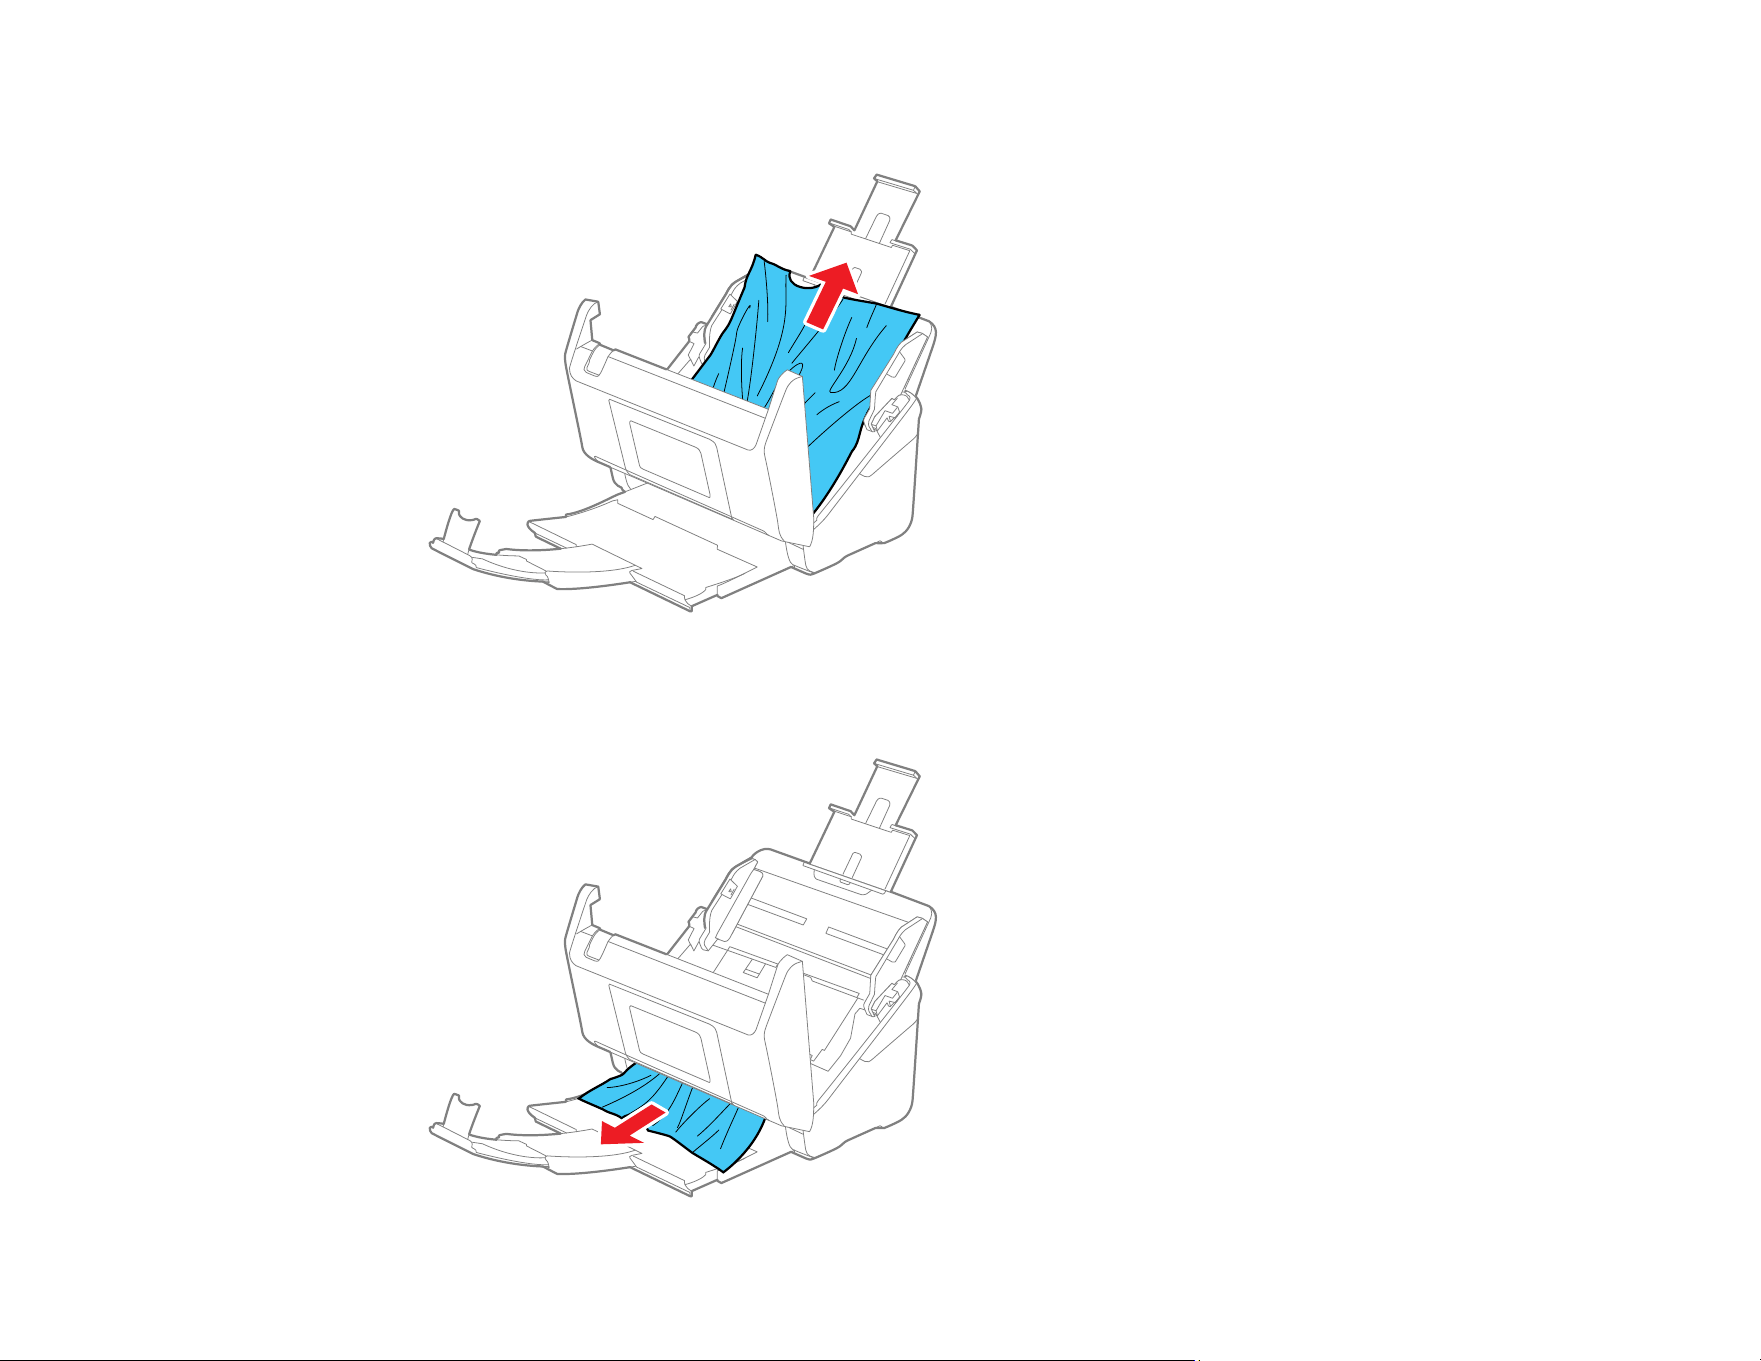
262
4. Gently pull out any jammed originals from inside the product.
5. If you cannot pull originals straight up, carefully pull out any jammed originals from the output tray in
the direction of the arrow.
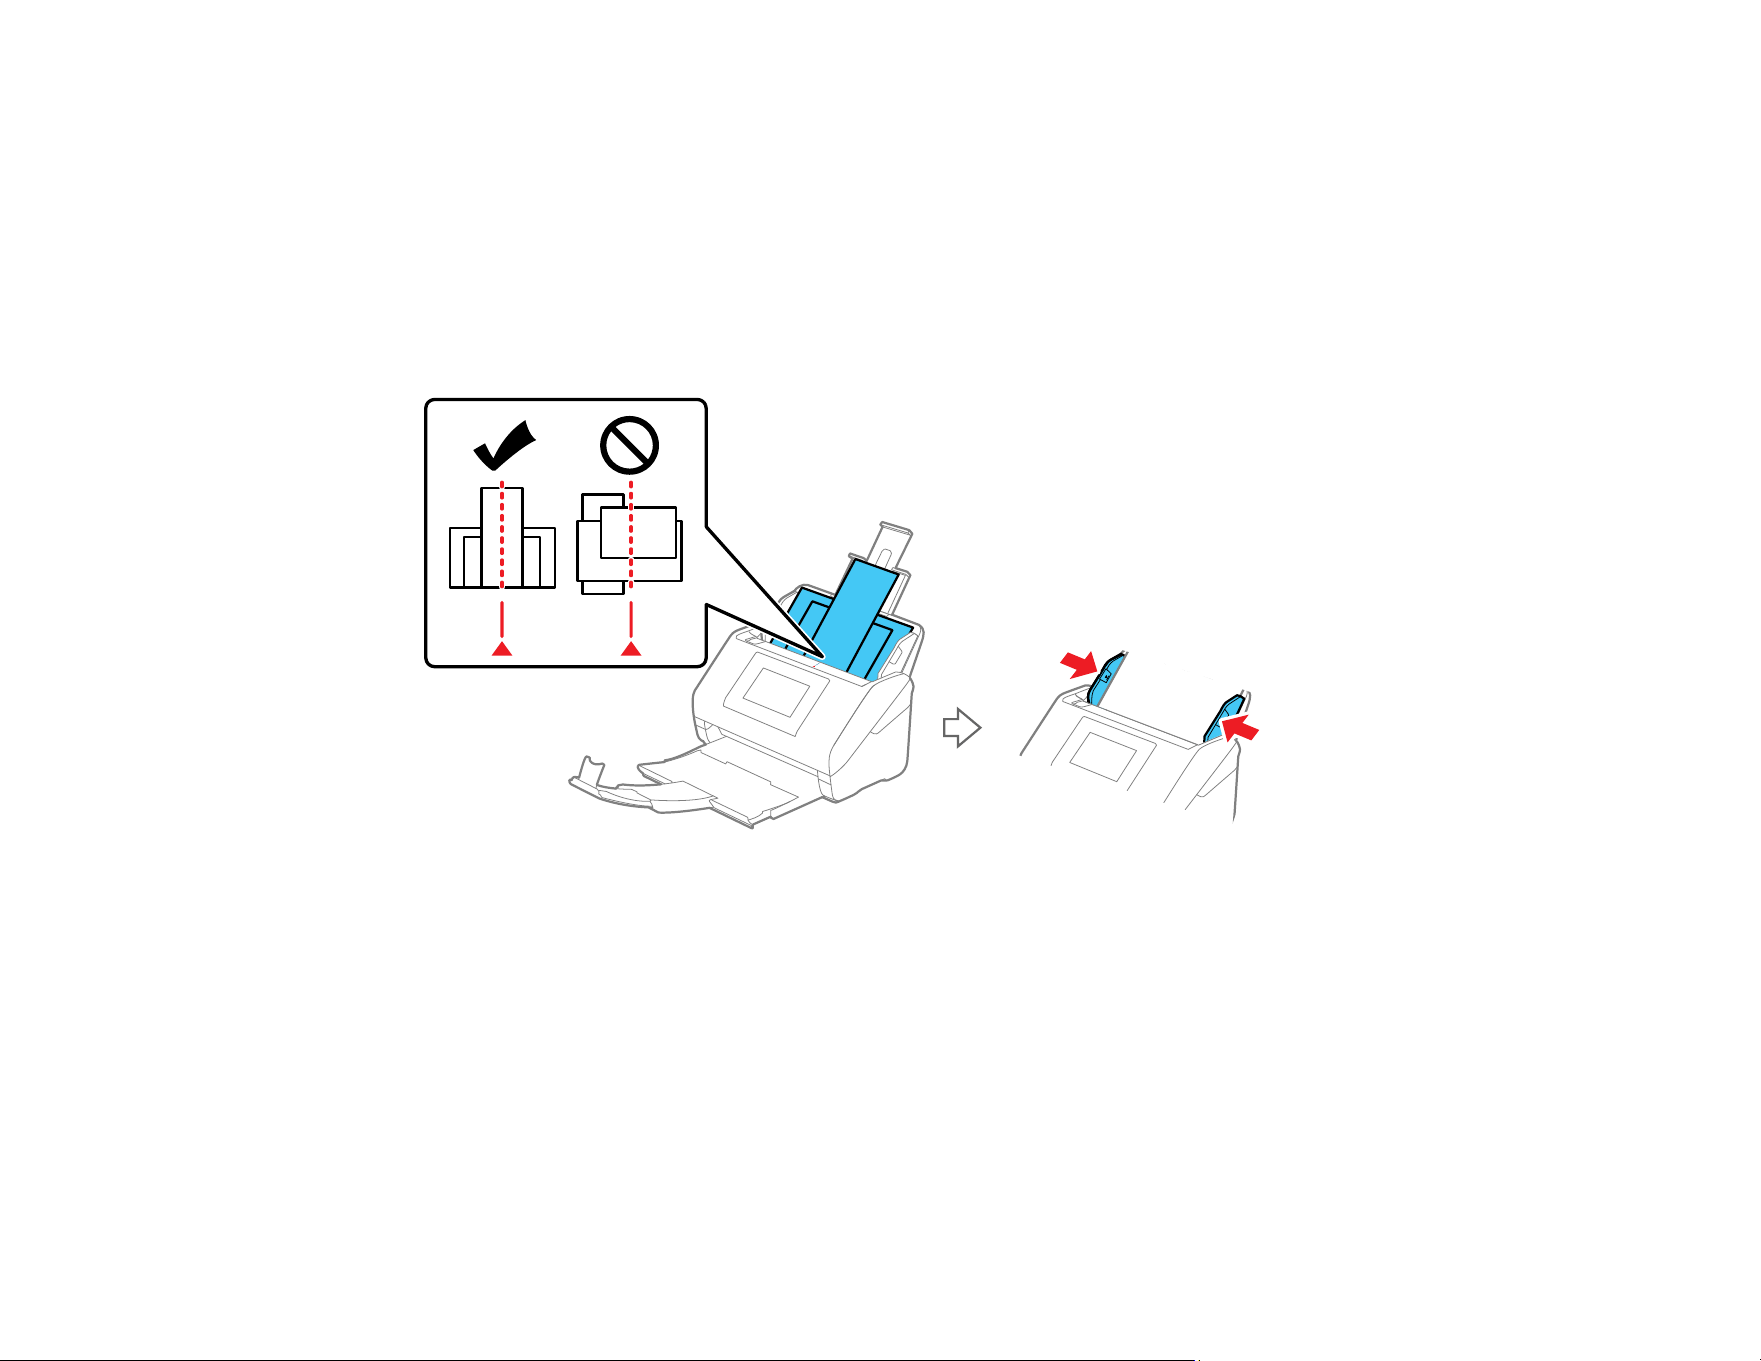
263
Note: Make sure there is no paper inside the scanner.
6. Carefully follow all loading instructions when you reload originals.
If originals jam in the product frequently, try the following:
• For originals with folds or that are curled, flatten the original before loading.
• When loading originals with a mixture of different sizes, load the originals with the side to be scanned
facing up and in descending order of paper size with the widest at the back and the narrowest at the
center of the input tray. Next, slide the edge guides to align them with the widest originals.
If the problem is not solved, try scanning the originals at each size separately, or scan the originals
one by one. Align the edge guides to the width of the originals each time you load them. You can use
the following methods to scan the originals multiple times separately and then save them to one file.
Align the edge guides to the width of the originals each time you load them.
• If you are using Epson Scan 2, select the Add or edit pages after scanning checkbox, and then
scan the original. You can add different originals or edit (rotate, move, and delete) the scanned
pages after scanning. See the Epson Scan 2 help for details.
• If you are using Document Capture Pro, you can add and edit pages after scanning on the Edit
Scanned Results screen. See the Document Capture Pro help for details.

264
• If you are using Epson Smart Panel, load the next original, and then tap +Scan after scanning the
first page to display the Edit screen. You can rotate, move, and delete pages on the Edit screen.
• If you are scanning from the control panel (using the "Scan to" options), set Automatic Feeding
Mode to On (Semi-Auto), and then scan the originals in the order you want to save them. However,
if you scan the originals and save to computer (Scan to Computer), you need to select the job
settings. See the Document Capture Pro help for details.
• Enable Slow Mode to slow down the scanning speed (Settings > Scanner Settings > Slow > On).
• Clean inside the product and clean the rollers. If the rollers were previously removed for cleaning,
make sure they were properly reinstalled.
• Check the number of sheets scanned by the pickup roller. If the number of scans exceeds the pickup
roller's service life (200,000 sheets), replace the roller assembly kit with a new one. Even if the number
of scans does not exceed the pickup roller's service life, we recommend replacing the roller assembly
kit with a new one if the surface of the roller is worn out.
Note: You can check the number of sheets scanned by the pickup roller on the control panel or in the
Epson Scan 2 Utility. To check from the control panel, select Scanner Maintenance > Roller
Replacement on the home screen, and then check the number of scans displayed under Roller
Replacement. To check from the Epson Scan 2 Utility, start the Epson Scan 2 Utility, click the Counter
tab, and then check the Number of Scans under Roller Assembly Kit.
• After scanning, remove the original from the output tray.
Parent topic: Solving Scanning Problems
Related references
Original Document Specifications
Plastic and Laminated Card Specifications
Special Original Specifications
Where to Get Help (U.S. and Canada)
Where to Get Help (Latin America)
Related tasks
Cleaning Inside Your Product
Related topics
Loading Originals

265
Paper Protection Does Not Work Correctly
To reduce damage to the original, the Paper Protection feature immediately stops scanning if a paper
feed error is detected. If the Paper Protection feature does not work correctly, try these solutions:
• If your scanned original is damaged, make sure that the Paper Protection feature is enabled. Increase
the detection level, if necessary.
• If misdetection occurs frequently, lower the Paper Protection detection level.
• Set the Paper Protection feature to Off on the LCD screen (Settings > Scanner Settings > Paper
Protection > Off) when scanning plastic cards and thick originals.
• When scanning multiple originals, make sure that the leading edges of the documents are aligned. If
the leading edges of the documents are not aligned, they may be mistakenly detected as a paper feed
error even if they are scanned correctly.
• Make sure you align the edge guides with the original to avoid scanning at an angle.
Parent topic: Solving Scanning Problems
Paper Ejection Problems
If ejected originals do not stack neatly on the output tray, try these solutions:
• Extend the output tray extensions so that they are a little bit longer than the length of the originals, and
raise the stopper so that the ejected originals can be stacked neatly on the output tray.
• Adjust the position of the stopper on the output tray extension to fit the ejected originals.
• If thicker paper does not eject properly or falls from the output tray, push in the output tray and allow
the originals to eject freely onto the surface below the product. If the scanned images are affected by
the originals ejecting below the product, try placing the product on the edge of a table where the
ejected originals can drop freely.
• When scanning originals that are a mixture of different sizes, you can improve the alignment of ejected
originals by using the paper alignment plate. (The paper alignment plate is included with DS-900WN; it
is an option for DS-800WN.)
Parent topic: Solving Scanning Problems
Scanning is Slow
If scanning becomes slow, try these solutions:
• Scan your original at a lower resolution, if possible.

266
• Make sure your system meets the requirements for your operating system. If you are scanning a high-
resolution image, you may need more than the minimum requirements. If necessary, increase your
system's memory or reduce the resolution.
• The scanning speed may be reduced depending on the image adjustment features in Epson Scan 2.
• If scanning becomes slower after scanning continuously with the ADF for a long time, the scanner may
have automatically slowed down to protect the scanner mechanism from overheating or becoming
damaged. Let the scanner rest with the power on for 30 minutes, then try scanning again.
• Make sure the Slow setting is turned off on the scanner control panel. (The icon displays on the
control panel when slow mode is off.)
• If you are running virus protection or other security software, exclude the TWAIN.log files from
monitoring or set the TWAIN.log file as read only. See your virus protection or security software
instructions for details. The TWAIN.log file is saved in C:\Users\(user name)\AppData\Local\Temp.
Note: You may need to unhide system folders to view files in that location.
• If you are scanning over a network, factors such as interference, network traffic, or weak signal
strength may affect your scanning speed.
• Computers with USB 3.0 (SuperSpeed) or USB 2.0 (Hi-Speed) ports can scan faster than those with
USB 1.1 ports. If you are using a USB 3.0 or 2.0 port with the scanner, make sure it meets the system
requirements.
Parent topic: Solving Scanning Problems
Related references
Windows System Requirements
Mac System Requirements
Cannot Send Scans to a Cloud Service
If you cannot send a scan to a cloud service, try these solutions:
• Make sure your computer is connected to the internet.
• Make sure the login information you entered for the cloud service is correct.
• Make sure the cloud service is not down for system maintenance. Check the cloud service website for
more information.
Parent topic: Solving Scanning Problems

267
Cannot Send Scans to an Email
If you cannot send a scan to an email address, try these solutions:
• Make sure the destination email address is working.
• Make sure the email server settings are correct.
• Contact the email server administrator to make sure the server is running.
Parent topic: Solving Scanning Problems
Solving Network Scanning Problems
Check these solutions if you have problems scanning over a network.
Cannot Scan Over a Network
Product Cannot Connect to a Wireless Router or Access Point
Cannot Access Web Config
Network Software Cannot Find Product on a Network
Wired Network Connection Becomes Unstable
Cannot Save a Scan to a Shared Folder Over a Network
Parent topic: Solving Problems
Cannot Scan Over a Network
If you have problems scanning over a network, try these solutions:
• Check the product control panel for error messages. If you have the notification email set when the
events occur, you can promptly learn the status.
• Make sure the computer and product are connected to the same network (or network subnet/VLAN).
• If the product and computer cannot communicate and are connected to the same network (or network
subnet/VLAN), check if your router or access point uses the privacy separator and disable it, if
necessary. Follow the instructions in your router or access point documentation to disable the privacy
separator.
• Move the product and computer or smart device closer to the router or access point.
• If you cannot scan from the start button on the product, make sure you restarted your computer
after installing the scanning software. Also start Epson Scan 2 before scanning with the start button.
• If you are scanning a large original at a high resolution, a network communication error may occur. Try
scanning again at a lower resolution.

268
• If network communication was interrupted while starting Epson Scan 2, exit Epson Scan 2, wait a few
seconds, and restart the program. If Epson Scan 2 cannot restart, turn off your product, turn it back on,
and try starting Epson Scan 2 again.
• Check the network connection setting in the Epson Scan 2 Utility.
• You may need to temporarily disable the firewall and any anti-virus software on your wireless router or
access point.
• If you see the message "Network product is not available: currently being used by user", there may be
a communication error between the product and computer. Restart the product.
• Epson Scan 2 does not support networks that use only IPv6. Use Epson Scan 2 on a network that
supports IPv4.
• If the Firewall function is active, the product may not be discovered by the Epson Scan 2 Utility. Open
the Epson Scan 2 Utility, enter the IP address for your product, and click Add.
• Restart the product and check the IP address on the product control panel.
• Make sure the router, switch, or hub is turned on.
• Restart the router, switch, or hub, wait for approximately one minute after restarting, then check the
connection again.
• The order in which the router, access point, switch, or hub and product are turned on may cause a
temporary connection error. Restart the product, wait for approximately one minute after restarting,
then check the connection again.
• Make sure the Ethernet cable is securely connected to your product and to your router, switch, or hub.
Check to see if the LED for the port to which your product is connected is on or flashing. If the link LED
is off, try connecting your product to a different port on the router, switch, or hub or try changing the
Ethernet cable.
• If you see a message telling you the product is not available, there may be a communication error
between the product and computer. Restart the product.
• If there is an IP address conflict, the network connection may become unavailable. Check the IP
address for each device and assign unique IP addresses.
• Restart the computer.
Parent topic: Solving Network Scanning Problems
Related tasks
Starting a Scan Using the Product Control Panel
Starting a Scan from a Smartphone or Tablet
Starting a Scan Using the Epson Scan 2 Icon

269
Starting a Scan from a Scanning Program
Determining the Product's IP Address
Related topics
Scanning with Document Capture Pro or Document Capture
Product Cannot Connect to a Wireless Router or Access Point
If your product has trouble finding or connecting to a wireless router or access point, try these solutions:
• If you are connecting the product via Wi-Fi Protected Setup (WPS), make sure you activate WPS on
your product within 2 minutes of activating WPS discovery mode on the router by pressing the WPS
button or enabling the WPS setting in your router firmware.
• Make sure to place your product within contact range of your router or access point. Avoid placing
your product near a microwave oven, 2.4 GHz cordless phone, or large metal object, such as a filing
cabinet.
• Verify that your router or access point is operating correctly by connecting to it from your computer or
another device.
• You may need to temporarily disable your firewall and any anti-virus software on your wireless router
or access point. Then try scanning again. You can also unblock your product driver or network
address in your firewall or anti-virus software.
• Check to see if access restrictions, such as MAC address filtering, are set on the router or access
point. If access restrictions are set, add your product's MAC address to your router's address list. To
obtain your product's MAC address, check the label on the back or bottom of your product. Then
follow the instructions in your router or access point documentation to add the address to the list.
• If your router or access point does not broadcast its network name (SSID), follow the instructions that
came with your product to enter your wireless network name manually.
• If your router or access point has security enabled, determine the kind of security it is using and any
required password or passphrase for connection. Then make sure to enter the exact WEP key or WPA
passphrase correctly.
• Check if your computer is restricting the available wireless channels. If so, verify that your wireless
access point is using one of the usable channels and change to a usable channel, if necessary.
• The product may not be able to communicate with a computer with both Ethernet and Wi-Fi adapters
enabled. Disable all network interfaces except for the interface connected to the product.
• Turn off all of the devices you are trying to connect to the network. Wait about 10 seconds, and then
turn on the devices in the following order; wireless router, computer or smart device, scanner. Move
the scanner and computer or smart device closer to the wireless router, and then try to make network
settings again.

270
• If you are using multiple wireless routers at the same time or the wireless router has multiple SSIDs
and devices are connected to different SSIDs, you cannot connect to the wireless router. Connect the
computer or smart device to the same SSID as the scanner.
• Enable the DHCP function on the router or access point.
• Check that the product's IP address is set correctly.
• If you cannot start scanning from a smart device, make sure the product and smart device are
connected correctly. Use the Epson Smart Panel to check the connection status for the smart device
and the product.
Parent topic: Solving Network Scanning Problems
Related concepts
Wi-Fi Direct (Simple AP) Mode Setup
Related tasks
Selecting Wireless Network Settings from the Control Panel
Using the Epson Smart Panel Mobile App
Related topics
Wi-Fi or Wired Networking
Cannot Access Web Config
If you cannot access Web Config on your product, try these solutions:
• Make sure your product is turned on and connected to your network using the correct IP address.
Verify the connection using your product control panel.
• Make sure your browser supports the Encryption Strength for SSL/TLS. If you selected High as the
Encryption Strength setting in Web Config, your browser must support AES (256-bit) or 3DES (168-
bit) encryption. Check your browser's encryption support or select a different Encryption Strength
option.
• Check to see if your CA-signed Certificate is expired. If there is a problem with the expiration date of
the certificate, "The certificate has expired" is displayed when connecting to Web Config with SSL/TLS
communication (https). If the message appears before its expiration date, make sure that the
scanner's date is configured correctly.
• If the common name of the certificate and the scanner do not match, the message "The name of the
security certificate does not match" is displayed when accessing Web Config using SSL/TLS
communication (https). For Self-signed Certificate, update the certificate. For CA-signed Certificate,
take the certificate again for the scanner.

271
• If you are using a proxy server with your product, configure the browser's proxy settings as follows:
• Windows 11: Click , then search for Proxy Settings and select it. Scroll down and set Use a
proxy server to On.
• Windows 10: Click > Settings > Network and Internet > Proxy. Scroll down and set Use a
proxy server to On. Select Don't use proxy server for local (Intranet) addresses.
• Windows 8.x: Navigate to the Apps screen and select PC Settings > Network > Proxy. Scroll
down and set Use a proxy server to On. Select Don't use proxy server for local (Intranet)
addresses.
• Windows (other versions): Click or Start and select Control Panel > Network and Internet >
Internet Options > Connections > LAN settings > Proxy server > Bypass proxy server for
local addresses.
• Mac: Select System Preferences > Network > Advanced > Proxies. Register the local address
under Bypass proxy settings for these Hosts & Domains. For example, 192.168.1.*: Local
address 192.168.1.XXX, subnet mask 255.255.255.0.
Parent topic: Solving Network Scanning Problems
Network Software Cannot Find Product on a Network
If EpsonNet Setup cannot find your product on a network, try these solutions:
• Make sure your product is turned on and connected to your network. Verify the connection using your
product control panel.
• Check if your network name (SSID) contains non-ASCII characters. Your product cannot display non-
ASCII characters.
• Make sure your product is not connected to a guest network.
• If necessary, reinstall your software and try running EpsonNet Setup again:
1. Reset your product's network settings to their factory defaults.
2. Windows only: Uninstall your product software.
3. Restart your router following the instructions in your router documentation.
Note: If you are reading these instructions online, you will lose your Internet connection when you
restart your router, so note the next step before restarting it.
4. Download your product software from the Epson website using the instructions on the Start Here
sheet.

272
• If you have replaced your router, reinstall your product software to connect to the new router.
• Check to see if your wireless router or access point has an enabled Privacy Separator function that is
preventing detection of your device over the network. See your router or access point documentation
for instructions on disabling the Privacy Separator function.
Parent topic: Solving Network Scanning Problems
Related concepts
Wi-Fi Direct (Simple AP) Mode Setup
Related tasks
Uninstalling Product Software - Windows
Uninstalling Product Software - Mac
Wired Network Connection Becomes Unstable
When you connect your product to a wired network using a router or access point that supports IEEE
802.3az (Energy Efficient Ethernet), the connection may become unstable, you may be unable to
connect to the product, and the communication speed may become slow. If you experience any of these
issues, follow the steps below to disable IEEE 802.3az and then connect your product again.
1. Disconnect the Ethernet cables connected to the computer and your product.
2. Disable IEEE 802.3az for the computer's network adapter if it is enabled (check your operating
system's Ethernet connection settings).
3. Connect the computer and your product directly with an Ethernet cable.
4. Check the product's IP address on the LCD screen (Settings > Network Settings > Network
Status > Wired LAN/Wi-Fi Status > IP Address).
5. On the computer, open a web browser and enter your product's IP address.
6. Select Network > Wired LAN.
7. Select OFF for IEEE 802.3az. and click Next.
8. Click OK and remove the Ethernet cable connecting the computer and your product.
9. If you disabled IEEE 802.3az for your computer's network adapter, enable it.
10. Reconnect the Ethernet cables from the router or access point to your computer and product.
If problems still occur, other devices on the network may be causing them.
Parent topic: Solving Network Scanning Problems

273
Cannot Save a Scan to a Shared Folder Over a Network
If you cannot save a scan to a shared folder when scanning over a network, or saving takes a very long
time, try these solutions:
• Make sure that the computer is turned on and is not running in a power-saving mode, such as sleep or
standby.
• Make sure you created a shared folder on your computer (Windows).
• Make sure the network folder does not already contain a file of the same name. If so, rename the file
and try again.
• Make sure you added the correct user permissions.
• If you registered the shared folder path to your product's control panel contact list or entered the path
manually to scan, make sure you used the correct path.
• Make sure the address in your product's control panel contact list and the address of the shared folder
are the same.
• Make sure the user name and password are correct on the computer and product's control panel
Contacts list. Also, make sure that the password has not expired.
• If you are using a laptop and the IP address is set to DHCP, the IP address may change when
reconnecting to the network. Obtain the IP address again.
• Make sure your network type is not set to Public network. You cannot scan to a shared folder when
using a public network. Set the forward settings for each port.
• If saving your scan to a shared folder takes a very long time, make sure the DNS setting and the DNS
domain name are correct. Contact your network administrator for instructions.
• Temporarily disable the computer's Firewall and security software. If this clears the error, check the
settings in the security software.
• Make sure the access rights for the user in the contacts list are added on the Sharing tab and Security
tab of the shared folder's properties. Also, the permissions for the user should be set to "allowed".
• Make sure there is enough disk space on the computer. Increase the free space on the computer, if
necessary.
Parent topic: Solving Network Scanning Problems
Related tasks
Creating a Shared Network Folder
Registering Contacts for Email, Network, or FTP Scanning - Control Panel
Registering Contacts for Email, Network, or FTP Scanning - Web Config

274
Selecting the Date and Time
Solving Scanned Image Quality Problems
Check these sections if a scanned image on your computer screen has a quality problem.
Note: For solutions when using Document Capture Pro (Windows) or Document Capture (Mac)
software, see the Document Capture Pro (Windows) or Document Capture (Mac) help utility.
Back of Original Image Appears in Scanned Image
Scanned Characters are Blurry
Characters are not Recognized During Conversion to Editable Text (OCR)
Ripple Patterns Appear in an Image
Uneven Colors Appear in Scanned Image
Spots or Lines Appear in All Scanned Images
Scanned Image is Cropped
Cannot Solve Problems in the Scanned Image
Parent topic: Solving Problems
Back of Original Image Appears in Scanned Image
If an image from the back of a thin original appears in your scanned image, make sure you selected the
correct Image Type setting for your original and select the Text Enhancement setting in Epson Scan 2.
You can also select the Remove Background setting in Epson Scan 2.
Note: If you select Color as the Image Type setting, you can change the level from Standard to High to
remove more of the background.
If the image is still visible, you can also try setting a lower level for Edge Enhancement or a higher level
for Noise Reduction.
Parent topic: Solving Scanned Image Quality Problems
Related references
Image Format Options
Related tasks
Scanning in Epson Scan 2

275
Scanned Characters are Blurry
If characters in your scanned images are blurry, try these solutions:
• Make sure you do not move the product or original while scanning.
• Operate the product on a flat, stable surface.
• Make sure the originals are ejecting properly.
• Adjust these Epson Scan 2 settings (if available) and try scanning again:
• Select the Text Enhancement setting.
• If the Image Type setting is Black & White, adjust the Threshold setting or change the Edge
Enhancement and Noise Reduction Level settings or click Settings and adjust the slider for
Emphasize light letters / Remove background, turn off Remove spot noise, or set the level to
Low.
• Increase the Resolution setting.
• Set the Image Type to Grayscale.
• If you are scanning in JPEG format, change the compression level. Click Options in the Image
Format menu and change the Image Quality setting.
Parent topic: Solving Scanned Image Quality Problems
Related references
Image Format Options
Related tasks
Scanning in Epson Scan 2
Characters are not Recognized During Conversion to Editable Text (OCR)
If characters in your scanned images are not recognized during OCR conversion, try these solutions:
• Make sure your original is loaded straight on your product.
• Use an original with clear text.
• Adjust these Epson Scan 2 settings (if available) and try scanning again:
• Select the correct Image Type setting.
• If the Image Type is set to Black & White, select Text Enhancement. If the Image Type is set to
Color or Grayscale, change the Text Enhancement setting to High.
• If the Image Type is set to Black & White, adjust the Threshold setting.

276
• Set the Image Type to Grayscale.
• Set the scanning resolution between 200 and 600 dpi.
• If the original document is in landscape mode, set the Rotate setting to Auto in Epson Scan 2.
• If you are using OCR software, check the manual for any additional adjustments.
• Scan thermal paper receipts as soon as possible. They may deteriorate due to age or friction.
• When saving to Microsoft Office or Searchable PDF files, check that the correct languages are
selected. Check the language in each save setting window.
Parent topic: Solving Scanned Image Quality Problems
Related references
Image Format Options
Related tasks
Scanning in Epson Scan 2
Ripple Patterns Appear in an Image
You may see a ripple pattern (called a moiré) in scanned images of printed documents. This is caused
by interference from differing pitches in the scanner's screen and your original's halftone screen. To
reduce this effect, adjust these Epson Scan 2 settings (if available) and try scanning again:
• Select the Descreening setting on the Advanced Settings tab.
• Select a lower Resolution setting.
Parent topic: Solving Scanned Image Quality Problems
Related references
Image Format Options
Related tasks
Scanning in Epson Scan 2
Uneven Colors Appear in Scanned Image
If colors in your scanned images look uneven, try these solutions:
• Change the orientation of the product so that light is not falling directly on the front of the product.
• Move the product to a location where it will not be subjected to strong light sources or direct sunlight.
Parent topic: Solving Scanned Image Quality Problems

277
Spots or Lines Appear in All Scanned Images
If spots or lines appear in all your scanned images, try the following solutions:
• Clean the rollers and glass scanning surfaces inside your product using a genuine Epson cleaning kit
or a soft, moist cloth.
• Remove any dirt from your original.
• Enable the Detect Glass Dirt setting in the Epson Scan 2 Utility. You can also enable Glass Dirt
Detection on the product's control panel (Settings > Scanner Settings > Glass Dirt Detection > On-
Low or On-High).
Note: If glass dirt detection does not work correctly, adjust the setting. If the glass dirt alert screen
appears after cleaning the inside of the product, check the glass surface again (scratches on the glass
may be detected as a glass dirt).
Parent topic: Solving Scanned Image Quality Problems
Related tasks
Cleaning Inside Your Product
Scanned Image is Cropped
If the edges of a scanned image are cropped, try the following solutions:
• Select Auto Detect or Auto Detect (Long Paper) as the Document Size setting in Epson Scan 2,
Document Capture Pro.
• If the document size is not detected correctly using the Auto Detect setting, select the size of your
original from the Document Size list.
Note: If the size you want to scan is not on the list, select Customize to create it manually (Windows
only).
• In Epson Scan 2, select the Main Settings tab. Select Document Size > Settings and adjust the
cropping area shown in the Crop Margins for Size "Auto" setting. In Document Capture Pro, select
Detailed Settings from the Scan window. Click Configuration and select the Document tab. Adjust
the cropping area shown in the Crop Margins for Size "Auto" setting.
• In Epson Scan 2, select the Advanced Settings tab. Make sure the Edge Fill setting is set to None.
• Document Capture Pro (Windows): Select Detailed Settings from the Scan window. Select
Document Size > Settings and then adjust the cropping area shown in the Crop Margins for Size
"Auto" setting.

278
• Document Capture (Mac): Click the Scan button and select Main Settings from the Scan
window. Select Document Size and then adjust the cropping area shown in the Crop Margins for
Size "Auto" setting.
Parent topic: Solving Scanned Image Quality Problems
Related tasks
Scanning in Epson Scan 2
Cannot Solve Problems in the Scanned Image
If you have tried all of the solutions and have not solved the problem, initialize the scanner driver (Epson
Scan 2) settings using Epson Scan 2 Utility.
Note: Epson Scan 2 Utility is one of the applications supplied with the scanner software.
1. Start Epson Scan 2 Utility
• Windows 11: Click , then search for Epson Scan 2 Utility and select it.
• Windows 10: Click , and select EPSON > Epson Scan 2 Utility.
• Windows 8.x: Enter the application name in the search charm, and then select the displayed icon.
• Windows 7: Click the start button, and then select All Programs or Programs > EPSON > Epson
Scan 2 > Epson Scan 2 Utility.
• Mac OS: Select Go > Applications > Epson Software > Epson Scan 2 Utility.
2. Select the Other tab.
3. Click Reset.
Note: If initialization does not solve the problem, uninstall and re-install the scanner driver (Epson
Scan 2).
Parent topic: Solving Scanned Image Quality Problems
Updating Applications and Firmware
You may be able to solve certain problems and improve or add functions by updating the applications
and firmware to the latest version.

279
CAUTION: Do not turn off the computer or the scanner while updating.
1. Make sure that the scanner and the computer are connected, and that the computer is connected to
the internet.
2. Start EPSON Software Updater and update the applications or firmware.
Note: Windows Server operating systems are not supported.
• Windows 11: Click , then search for EPSON Software Updater and select it.
• Windows 10: Click , then select Epson Software > EPSON Software Updater.
• Windows 8.x: Enter the application name in the search charm, and then select the displayed icon.
• Windows 7: Click the start button, and then select All Programs or Programs > Epson Software >
EPSON Software Updater.
• Mac OS: Select Finder > Go > Applications > Epson Software > EPSON Software Updater.
Note: If you cannot find the application you want to update in the list, you cannot update the application
using the EPSON Software Updater. Check for the latest versions of the applications on the Epson
support website.
Updating the Firmware using the Control Panel
If the product can be connected to the Internet, you can also update the product's firmware using the
control panel and set the product to regularly check for firmware updates and notify you if any are
available.
1. Select Settings on the home screen.
2. Select System Administration > Firmware Update > Update.
Note: Select Notification > On to set the scanner to regularly check for available firmware updates.
3. Check the message displayed on the screen and start searching for available updates.
4. If a message is displayed on the LCD screen informing you that a firmware update is available, follow
the on-screen instructions to start the update.
CAUTION: Do not turn off or unplug the product until the update is complete; otherwise, a malfunction
may occur.

280
Note: If the firmware update is unsuccessful, the product does not start up normally and "Recovery
Mode" is displayed on the LCD screen the next time the product is turned on. In this case, you need to
update the firmware again using a computer. Connect the product to the computer with a USB cable and
download the latest firmware from the Epson website. Then follow the on-screen instructions to update
the firmware. (You cannot update the firmware over a network connection if "Recovery Mode" is still
displayed on the LCD screen.)
Updating Firmware without Connecting to the Internet
You can download the product's firmware from the Epson website on the computer, and then connect
the product and the computer via USB cable to update the firmware. If you cannot update over the
network, try this method.
Note: Make sure Epson Scan 2 is installed on your computer. If Epson Scan 2 is not installed, download
the software from the Epson website and install it on your computer.
1. Download the latest firmware from the Epson website.
2. Connect your product to the computer using a USB cable.
3. Double-click the downloaded .exe file to start the Epson Firmware Updater.
4. Follow the on-screen instructions to update the firmware.
Updating the Firmware Using Web Config
To update the firmware using Web Config, select the Device Management tab > Firmware Update,
check the displayed message, and then click Start and follow the on-screen instructions.
Note: You can also update the firmware using Epson Device Admin. You can visually confirm the
firmware information on the device list. It is useful when you want to update multiple devices' firmware.
See the Epson Device Admin guide or help for more details.
Parent topic: Solving Problems
Resetting the Epson Scan 2 Settings
If you continue to experience image quality problems after trying all possible solutions, you may need to
reset the Epson Scan 2 settings using the Epson Scan 2 Utility.
1. Do one of the following to start the Epson Scan 2 Utility:
• Windows 11: Click , then search for Epson Scan 2 Utility and select it.

281
• Windows 10: Click > EPSON > Epson Scan 2 Utility.
• Windows 8.x: Navigate to the Apps screen and select Epson Scan 2 Utility.
• Windows 7: Click , and select All Programs. Select EPSON > Epson Scan 2 > Epson Scan
2 Utility.
• Mac: Open the Applications folder, open the Epson Software folder, and select Epson Scan 2
Utility.
2. Click the Other tab.
3. Click Reset and confirm your choice.
Note: If resetting the Epson Scan 2 settings does not solve your problem, uninstall your scanner
software and re-install it.
Parent topic: Solving Problems
Uninstall Your Product Software
If you have a problem that requires you to uninstall and re-install your software, follow the instructions for
your operating system.
Uninstalling Product Software - Windows
Uninstalling Product Software - Mac
Parent topic: Solving Problems
Uninstalling Product Software - Windows
You can uninstall and then re-install your product software to solve certain problems.
1. Turn off the product.
2. Disconnect any interface cables.
3. Do the following to uninstall each of your scanning software programs and follow any on-screen
instructions:
• Windows 10: Click and select (Settings) > Apps > Apps & features. Select the product
software program and click Uninstall.
• Windows 8.x: Navigate to the Apps screen and select Control Panel > Programs > Programs
and Features. Select the product software program and click Uninstall/Change.
4. Restart your computer, then see the Start Here sheet to re-install your software.

282
Note: If you find that re-installing your product software does not solve a problem, contact Epson.
Parent topic: Uninstall Your Product Software
Uninstalling Product Software - Mac
In most cases, you do not need to uninstall your product software before re-installing it. However, you
can download the Uninstaller utility from the Epson support website to uninstall your product software as
described here.
1. To download the Uninstaller utility, visit epson.com/support (U.S.), epson.ca/support (Canada), or
latin.epson.com/support (Latin America) and select your product.
2. Follow the instructions on the screen to install the Uninstaller utility.
3. Quit all applications currently running on your Mac.
4. Double-click the Uninstaller icon.
5. In the Epson Uninstaller screen, select the checkbox for each software program you want to
uninstall.
6. Click Uninstall.
7. Follow the on-screen instructions to uninstall the software.
8. To reinstall your product software, see the Start Here sheet for instructions.
Note: If you find that re-installing your product software does not solve a problem, contact Epson.
Parent topic: Uninstall Your Product Software
Where to Get Help (U.S. and Canada)
If you need to contact Epson for technical support services, use the following support options.
Internet Support
Visit Epson's support website at epson.com/support (U.S.) or epson.ca/support (Canada) and select
your product for solutions to common problems with your product. You can download utilities and
documentation, get FAQs and troubleshooting advice, or e-mail Epson with your questions.
Speak to a Support Representative
Before you call Epson for support, please have the following information ready:
• Product name

283
• Product serial number (located on a label on the product)
• Proof of purchase (such as a store receipt) and date of purchase
• Computer configuration
• Description of the problem
Then call:
• U.S.: (562) 276-4300, 7 AM to 4 PM, Pacific Time, Monday through Friday
• Canada: (905) 709-3839, 7 AM to 4 PM, Pacific Time, Monday through Friday
Days and hours of support are subject to change without notice. Toll or long distance charges may
apply.
Note: For help using any other software on your system, see the documentation for that software for
technical support.
Purchase Supplies and Accessories
You can purchase genuine Epson accessories at epson.com (U.S. sales) or epson.ca (Canadian sales).
You can also purchase accessories from an Epson authorized reseller. To find the nearest one, call 800-
GO-EPSON (800-463-7766) in the U.S. or 800-807-7766 in Canada.
Parent topic: Solving Problems
Where to Get Help (Latin America)
If you need to contact Epson for technical support services, use the following support options.
Internet Support
Visit Epson's support website at latin.epson.com/support and select your product for solutions to
common problems with your product. You can download utilities and documentation, get FAQs and
troubleshooting advice, or e-mail Epson with your questions.
Speak to a Support Representative
Before you call Epson for support, please have the following information ready:
• Product name
• Product serial number (located on a label on the product)
• Proof of purchase (such as a store receipt) and date of purchase
• Computer configuration

284
• Description of the problem
Then call:
Country Telephone
Argentina (54 11) 5167-0300
0800-288-37766
Bolivia* 800-100-116
Brazil State capitals and metropolitan areas: 3004-6627
Other areas: 0800-377-6627 / 0800-EPSONBR
Chile (56 2) 2484-3400
Colombia Bogota: (57 1) 602-4751
Other cities: 01-8000-915235
Costa Rica 800-377-6627
Dominican Republic* 1-888-760-0068
Ecuador* 1-800-000-044
El Salvador* 800-6570
Guatemala* 1-800-835-0358
Mexico Mexico City: (52 55) 1323-2052
Other cities: 800-087-1080
Nicaragua* 00-1-800-226-0368
Panama* 00-800-052-1376
Paraguay 009-800-521-0019
Peru Lima: (51 1) 418-0210
Other cities: 0800-10126
Uruguay 00040-5210067
* Contact your local phone company to call this toll-free number from a mobile phone.
If your country does not appear in the list, contact the sales office in the nearest country. Toll or long
distance charges may apply.

285
Note: For help using any other software on your system, see the documentation for that software for
technical support.
Purchase Supplies and Accessories
You can purchase genuine Epson accessories from an Epson authorized reseller. To find the nearest
reseller, visit latin.epson.com or call your nearest Epson sales office.
Parent topic: Solving Problems

286
Technical Specifications
These sections list the technical specifications for your product.
Note: Epson offers a recycling program for end of life Epson products. Please go to this site (U.S.) or
this site (Canada) for information on how to return your Epson products for proper disposal.
Windows System Requirements
Mac System Requirements
General Specifications
Dimension Specifications
Electrical Specifications
Environmental Specifications
Network Interface Specifications
USB Device Specifications
Safety and Approvals Specifications
Port Settings
Windows System Requirements
To use your product and its software, your computer should use one of these Microsoft operating
systems:
• Windows 11 or later
• Windows 10
• Windows Server 2008 or later
Note: For the latest product software available for your operating system, visit the Epson support site at
epson.com/support (U.S.), epson.ca/support (Canada), or latin.epson.com/support (Latin America),
select your product, and select Downloads.
Parent topic: Technical Specifications

287
Mac System Requirements
To use your product and its software, your Mac should use one of these operating systems:
• macOS 14.x
• macOS 13.x
• macOS 12.x
• macOS 11.x
• macOS 10.15.x
• macOS 10.14.x
Note: The UNIX File System (UFS) for OS X and Fast User Switching on OS X is not supported.
For the latest product software available for your operating system, visit the Epson support site at
epson.com/support (U.S.), epson.ca/support (Canada), or latin.epson.com/support (Caribbean), select
your product, and select Downloads.
Parent topic: Technical Specifications
General Specifications
Scanner type Sheet feed, one pass duplex, color
Photoelectric device CIS
Effective pixels 5100 × 9300 pixels at 600 dpi
2550 × 64,500 pixels at 300 dpi
Light source RGB LED
Scanning resolution 600 dpi (main scan)
600 dpi (sub scan)
Output resolution 50 to 1200 dpi in 1 dpi increments (when scanning with a computer)
Note: Available resolutions may vary depending on the scanning
method.

288
Document size Maximum: 8.5 × 240 inches (215.9 × 6096 mm)
Minimum: 2 × 2 inches (50.8 × 50.8 mm)
Note: Maximum length may vary depending on the scanning method
and resolution.
Paper input Facedown loading
Paper output Facedown ejection
Paper capacity 100 sheets of paper at 21 lb (80 g/m
2
) weight
Color Depth Color:
30 bits per pixel internal (10 bits per pixel per color)
24 bits per pixel external (8 bits per pixel per color)
Grayscale:
10 bits per pixel internal
8 bits per pixel external
Black-and-white:
10 bits per pixel internal
1 bit per pixel external
Interface SuperSpeed USB 3.0 (backward-compatible with USB 1.1)
Hi-speed USB (Host)
IEE802.11b/g/n or IEEE802.11a/b/g/n/ac
Note: Available Wi-Fi interfaces vary depending on your region.
Ethernet 1000BASE-T/100BASE-TX/10BASE-T
Parent topic: Technical Specifications
Dimension Specifications
Height 6.6 inches (167 mm)
Width 11.7 inches (296 mm)

289
Depth 6.7 inches (169 mm)
Weight 8.2 lb (3.7 kg)
Note: Dimensions do not include projecting parts.
Parent topic: Technical Specifications
Electrical Specifications
Scanner
Note: Check the label on the product and the AC adapter for voltage information. Power consumption
varies depending on operating conditions or whether an option is installed.
Rated DC input power supply
voltage
DC 24 V
Rated DC input current 1 A

290
Power consumption USB Connection:
Operating:
• DS-900WN: 19 W (approximate)
• DS-800WN: 18 W (approximate)
Ready mode: 5.6 W (approximate)
Sleep mode: 1.2 W (approximate)
Power off mode: 0.1 W (approximate)
Wi-Fi Connection:
Operating: 19 W (approximate)
Ready mode: 5.8 W (approximate)
Sleep mode: 1.4 W (approximate)
Power off mode: 0.1 W (approximate)
Ethernet Connection:
Operating:
• DS-900WN: 20 W (approximate)
• DS-800WN: 19 W (approximate)
Ready mode: 6.1 W (approximate)
Sleep mode: 1.2 W (approximate)
Power off mode: 0.1 W (approximate)
AC Adapter
AC adapter model 100 to 240 V model: A461H
220 to 240 V model: A462E
Rated input current 1 A
Rated frequency range 50 to 60 Hz
Rated output power supply
voltage
DC 24 V
Rated output current 1 A

291
Parent topic: Technical Specifications
Environmental Specifications
Temperature Operating: 41 to 95 °F (5 to 35 °C)
Storage: –13 to 140 °F (–25 to 60 °C)
Humidity
(non-condensing)
Operating: 15 to 80% RH
Storage: 15 to 85% RH
Operating conditions Ordinary office or home conditions
Note: Avoid operating the product in direct sunlight, near a strong light source, or in extremely dusty
conditions.
Parent topic: Technical Specifications
Network Interface Specifications
Wi-Fi
Standards IEEE802.11a/b/g/n/ac; IEEE802.11n available only on the 20 MHz
channel
Frequency ranges IEEE802.11b/g/n: 2.4 GHz
IEEE802.11a/n/ac: 5 GHz
Wi-Fi channels 2.4 GHz:
1/2/3/4/5/6/7/8/9/10/11
5 GHz:
W52 (36/40/44/48)
W53 (52/56/60/64)
W56 (100/104/108/112/116/132/136/140)
W58 (149/153/157/161/165)

292
Wi-Fi Direct channels 2.4 GHz:
1/2/3/4/5/6/7/8/9/10/11/12/13
5 GHz:
W52 (36/40/44/48)
W58 (149/153/157/161/165)
Connection modes Infrastructure mode
Wi-Fi Direct (Simple AP); not supported for IEEE802.11b
Note: Infrastructure and Wi-Fi Direct modes or an Ethernet
connection can be used simultaneously.
Wireless security protocols WEP (64/128 bit)
WPA2-PSK (AES); complies with WPA2 standards with support for
WPA/WPA2 Personal
WPA3-SAE (AES)
WPA2/WPA3-Enterprise
Note: Wi-Fi Direct supports only WPA2-PSK (AES).
Ethernet
Standards IEEE802.3i (10BASE-T)
1
IEEE802.3u (100BASE-TX)
1
IEEE802.3ab (1000BASE-T)
1
Note: To prevent risk of radio interference, use a Category-5e or
higher shielded twisted pair cable.
IEEE802.3az (Energy Efficient Ethernet); connected device should
be IEEE802.3az compliant
Communication mode Auto, 10 Mbps Full duplex, 10Mbps Half duplex, 100 Mbps Full
Duplex, 100 Mbps Half duplex
Connector RJ-45

293
1
Use a category 5e or higher STP (Shielded twisted pair) cable to prevent risk of radio interference.
Security Protocol
• IEEE802.1 X IEEE802.1X (requires a connected device compliant with IEEE802.1X)
• IPsec/IP Filtering
• SSL/TLS; HTTPS Server/Client
• SMTPS; STARTTLS and SSL/TLS
• SNMPv3
Network Features and IPv4/IPv6 Support
Epson Scan 2 IPv4, IPv6
Document Capture
Pro/Document Capture
IPv4
Epson Connect (Scan to Cloud) IPv4
AirPrint IPv4, IPv6
Parent topic: Technical Specifications
USB Device Specifications
USB Memory Device 2 TB (formatted in FAT, FAT32, or exFAT)
Note: Devices with security settings (such as a password or
encryption) and devices requiring a dedicated driver are not
supported. Epson cannot guarantee the operation of externally
connected devices.
Parent topic: Technical Specifications

294
Safety and Approvals Specifications
Scanner
United States EMC: FCC part 15 Subpart B class B
Canada EMC: CAN ICES-3 (B)/NMB-3 (B)
AC Adapter (A461H)
United States Safety: UL60950-1
EMC: FCC part 15 Subpart B class B
Canada Safety: CAN/CSA C22.2 No. 60950-1
EMC: CAN ICES-3 (B)/NMB-3 (B)
This equipment contains the following wireless module:
• Manufacturer: Seiko Epson Corporation.
• Type: J26H005
This product conforms to Part 15 of the FCC Rules and RSS of the IC Rules. Epson cannot accept
responsibility for any failure to satisfy the protection requirements resulting from a non-recommended
modification of the product. Operation is subject to the following two conditions: (1) this device may not
cause harmful interference, and (2)this device must accept any interference received, including
interference that may cause undesired operation of the device.
To prevent radio interference to the licensed service, this device is intended to be operated indoors and
away from windows to provide maximum shielding. Equipment (or its transmit antenna) that is installed
outdoors is subject to licensing.
This equipment complies with FCC/IC radiation exposure limits set forth for an uncontrolled environment
and meets the FCC radio frequency (RF) Exposure Guidelines in Supplement C to OET65 and RSS-102
of the IC radio frequency (RF) Exposure rules. This equipment should be installed and operated so that
the radiator is kept at least 7.9 inches (20 cm) or more away from a person’s body (excluding extremities:
hands, wrists, feet and ankles).
Notice for Mexico
Operation is subject to the following two conditions: (1) this device may not cause harmful interference,
and (2) this device must accept any interference received, including interference that may cause
undesired operation of the device.

295
Product Model: DS-800WN (J382J)/DS-900WN (J382J)
WLAN Module Model: J26H005
Brand: EPSON
IFT Certification Number: RCPEPJ219-2102
Notice for Paraguay
Imported by:
Fastrax, S.A.
Av. Perú esq. Río de Janeiro, Barrios Las Mercedes, Asunción, Paraguay
Imported by:
Sol Control S.R.L.
Av. Gral. Bernardino Caballero 810 esq. Celsa Speratti, Asunción, Paraguay
Notice for Peru
Product Model: DS-800WN (J382J)/DS-900WN (J382J)
Brand: EPSON
This product uses the following WLAN module:
WLAN Module Model: J26H005
FCC ID: BKMFBJ26H005
Product Manufacturer: Seiko Epson Corporation
Address: 3-3-5 Owa Suwa-shi, Nagano-Ken 392-8502, Japan
Parent topic: Technical Specifications
Port Settings
The following port settings should be made available by the system administrator as necessary.

296
When the Sender (Client) is the Scanner
Purpose Destination
(Server)
Protocol Port Number
Sending files using the scan to
network folder option on the
scanner
FTP/FTPS
server
FTP/FTPS (TCP) 20
21
File server SMB (TCP) 445
NetBIOS (UDP) 137
138
NetBIOS (TCP) 139
WebDAV server Protocol HTTP (TCP) 80
Protocol HTTPS (TCP) 443
Sending emails using the scan to
email option on the scanner
SMTP server SMTP (TCP) 25
SMTP SSL/TLS (TCP) 465
SMTP STARTTLS (TCP) 587
POP before SMTP connection using
the scan to email option on the
scanner
POP server POP3 (TCP) 110
Scanning using Epson Connect Epson Connect
Server
HTTPS 443
XMPP 5222
Collecting user information using
the contacts on the scanner
LDAP server LDAP (TCP) 389
LDAP SSL/TLS (TCP) 636
LDAP STARTTLS (TCP) 389
User authentication when collecting
user information using the contacts
on the scanner
User authentication when using the
scan to network folder (SMB) option
on the scanner
KDC server Kerberos 88
Controlling WSD Client computer WSD (TCP) 5357
297
Purpose Destination
(Server)
Protocol Port Number
Searching the computer when push
scanning to an application
Client computer Network Push Scan
Discovery
2968
When the Sender (Client) is the Client Computer
Purpose Destination
(Server)
Protocol Port Number
Discovering the scanner from an
application such as EpsonNet
Config or the scanner driver
Scanner ENPC (UDP) 3289
Collecting and setting up the MIB
information from an application such
as EpsonNet Config or the scanner
driver
Scanner SNMP (UDP) 161
Searching WSD scanner Scanner WS-Discovery (UDP) 3702
Forwarding the scan data from an
application
Scanner Network Scan (TCP) 1865
Collecting the job information when
push scanning from an application
Scanner Network Push Scan 2968
Using Web Config Scanner HTTP (TCP) 80
HTTPS (TCP) 443
Parent topic: Technical Specifications

298
Notices
Check these sections for important notices about your product.
Note: Epson offers a recycling program for end of life Epson products. Please go to this site (U.S.) or
this site (Canada) for information on how to return your Epson products for proper disposal.
Important Safety Instructions
Wireless Connection Safety Instructions
Restrictions on Copying
Default Delay Times for Power Management for Epson Products
Binding Arbitration and Class Waiver
Trademarks
Copyright Notice
Important Safety Instructions
Follow these safety instructions when setting up and using the product.
• Read all these instructions, and follow all warnings and instructions marked on the product. Some of
the symbols used on your product and options are to ensure safety and proper use of the product.
• Place the product close enough to the computer for the interface cable to reach it easily.
• Do not place or store the product outdoors, in a car, near excessive dirt or dust, water, heat sources,
or in locations subject to shocks, vibrations, condensation, high temperature or humidity, direct
sunlight, strong light sources, or rapid changes in temperature or humidity.
• Do not use with wet hands.
• When connecting this product to a computer or other device with a cable, ensure the correct
orientation of the connectors. Each connector has only one correct orientation. Inserting a connector
in the wrong orientation may damage both devices connected by the cable.
• Do not insert objects into any opening as they may touch dangerous voltage points or short out parts.
Beware of electrical shock hazards.
• Place the product on a flat, stable surface that extends beyond the base of the product in all directions.
If you place the product by the wall, leave at least 3.9 inches (10 cm) between the back of the product
and the wall.

299
• After replacing consumable parts, dispose of them correctly following the rules of your local authority.
Do not disassemble them.
• Never disassemble, modify, or attempt to repair the product or a product option by yourself except as
specifically explained in this guide.
CAUTION: Radio waves from this product may adversely affect the operation of medical equipment,
airplanes, or automatically controlled devices, such as pacemakers, automatic doors, or fire alarms.
When using this product near such devices or inside a medical facility, follow the directions from
authorized staff members at the facility, and follow all posted warnings and directions on the device to
avoid causing an accident.
AC Adapter
• Do not place or store the AC adapter outdoors, in a car, near excessive dirt or dust, water, heat
sources, or in locations subject to shocks, vibrations, condensation, high temperature or humidity,
direct sunlight, strong light sources, or rapid changes in temperature or humidity.
• Place the product and the AC adapter near an electrical outlet where the adapter can be easily
unplugged.
• The AC power cord should be placed to avoid abrasions, cuts, fraying, crimping, and kinking.
• Do not place objects on top of the AC power cord and do not allow the AC adapter or the power cord
to be stepped on or run over. Be particularly careful to keep the AC power cord straight at the end and
the point where it enters the AC adapter.
• Use only the AC adapter that comes with your product. Using any other adapter could cause fire,
electrical shock, or injury.
• Use only the power cord that comes with your product. Use of another cord may cause fires or shock.
Do not use the cord with any other equipment.
• The AC adapter is designed for use with the product with which it was included. Do not attempt to use
it with other electronic devices unless specified.
• Avoid using outlets on the same circuit as photocopiers or air control systems that regularly switch on
and off.
• If you use an extension cord with the product, make sure the total ampere rating of the devices
plugged into the extension cord does not exceed the cord's ampere rating. Also, make sure the total
ampere rating of all devices plugged into the wall outlet does not exceed the wall outlet's ampere
rating.
• Never disassemble, modify, or attempt to repair the AC adapter, product, or product options by
yourself except as specifically explained in the product's guides.

300
• If damage occurs to the plug, replace the cord set or consult a qualified electrician. If there are fuses in
the plug, make sure you replace them with fuses of the correct size and rating.
• Unplug the product, options, and the AC adapter, and refer servicing to qualified service personnel
under the following conditions: The AC adapter or plug is damaged; liquid has entered the product,
options, or the AC adapter; the product or the AC adapter has been dropped or the case has been
damaged; the product or the AC adapter does not operate normally or exhibits a distinct change in
performance. (Do not adjust controls that are not covered by the operating instructions.)
• Unplug the product and the AC adapter before cleaning. Clean with a damp cloth only. Do not use
liquid or aerosol cleaners except as specifically explained in the product's guides.
• If you are not going to use the product for a long period, be sure to unplug the AC adapter from the
electrical outlet.
LCD Screen
• The LCD screen may have uneven brightness or a few small bright or dark spots. This is normal and
does not indicate damage.
• Use only a dry, soft cloth to clean the LCD screen. Do not use liquid or chemical cleansers.
• If the LCD screen is damaged, contact Epson. If the liquid crystal solution gets on your hands, wash
them thoroughly with soap and water. If the liquid crystal solution gets into your eyes, flush them
immediately with water. If discomfort or vision problems remain after a thorough flushing, see a doctor
immediately.
• Do not press too hard on the LCD screen or subject it to heavy impacts.
• Do not use a pointy or sharp object, such as a pen or your fingernail, to operate the LCD screen.
• If the LCD screen chips or cracks, do not touch or attempt to remove the broken pieces; contact Epson
for support.
• Do not subject your product to sudden changes in temperature or humidity; this may cause
condensation to develop inside the LCD screen and degrade its performance.
Parent topic: Notices
Wireless Connection Safety Instructions
Radio waves from this product may adversely affect the operation of medical equipment or automatically
controlled devices, such as pacemakers, automatic doors or fire alarms. When using this product near
such devices or inside a medical facility, follow the directions from authorized staff members at the
facility, and follow all posted warnings and directions on the device to avoid causing an accident.

301
If you dispose of this product or give it to someone else, make sure to erase all the personal information
stored in the product’s memory by selecting Settings > System Administration > Restore Default
Settings > All Settings on the product control panel.
Parent topic: Notices
Restrictions on Copying
Observe the following restrictions to ensure responsible and legal use of your scanner.
Copying of the following items is prohibited by law:
• Bank bills, coins, government-issued marketable securities, government bond securities, and
municipal securities
• Unused postage stamps, pre-stamped postcards, and other official postal items bearing valid postage
• Government-issued revenue stamps, and securities issued according to legal procedure
Exercise caution when copying the following items:
• Private marketable securities (stock certificates, negotiable notes, checks, etc.), monthly passes,
concession tickets, etc.
• Passports, driver's licenses, warrants of fitness, road passes, food stamps, tickets, etc.
Note: Copying these items may also be prohibited by law.
Restriction on disassembling and decompiling
You may not disassemble, decompile, or otherwise attempt to derive the source code of any software
included with this product.
Parent topic: Notices
Default Delay Times for Power Management for Epson Products
This product will enter sleep mode after a period of nonuse. This is to ensure that the product meets
Energy Star standards of energy efficiency. More energy savings can be achieved by setting the time to
sleep to a shorter interval.
Parent topic: Notices

302
Binding Arbitration and Class Waiver
1. DISPUTES, BINDING INDIVIDUAL ARBITRATION, AND WAIVER OF CLASS ACTIONS AND
CLASS ARBITRATIONS
1.1 Disputes. The terms of this Section 1 shall apply to all Disputes between you and Epson. The term
"Dispute" is meant to have the broadest meaning permissible under law and includes any dispute, claim,
controversy or action between you and Epson arising out of or relating to this Agreement, Epson
branded products (hardware and including any related software), or other transaction involving you and
Epson, whether in contract, warranty, misrepresentation, fraud, tort, intentional tort, statute, regulation,
ordinance, or any other legal or equitable basis. "DISPUTE" DOES NOT INCLUDE IP CLAIMS, or more
specifically, a claim or cause of action for (a) trademark infringement or dilution, (b) patent infringement,
(c) copyright infringement or misuse, or (d) trade secret misappropriation (an "IP Claim"). You and Epson
also agree, notwithstanding Section 1.6, that a court, not an arbitrator, may decide if a claim or cause of
action is for an IP Claim.
1.2 Binding Arbitration. You and Epson agree that all Disputes shall be resolved by binding arbitration
according to this Agreement. ARBITRATION MEANS THAT YOU WAIVE YOUR RIGHT TO A JUDGE
OR JURY IN A COURT PROCEEDING AND YOUR GROUNDS FOR APPEAL ARE LIMITED.
Pursuant to this Agreement, binding arbitration shall be administered by JAMS, a nationally recognized
arbitration authority, pursuant to its code of procedures then in effect for consumer related disputes, but
excluding any rules that permit joinder or class actions in arbitration (for more detail on procedure, see
Section 1.6 below). You and Epson understand and agree that (a) the Federal Arbitration Act (9 U.S.C.
§1, et seq.) governs the interpretation and enforcement of this Section 1, (b) this Agreement
memorializes a transaction in interstate commerce, and (c) this Section 1 shall survive termination of this
Agreement.
1.3 Pre-Arbitration Steps and Notice. Before submitting a claim for arbitration, you and Epson agree to
try, for sixty (60) days, to resolve any Dispute informally. If Epson and you do not reach an agreement to
resolve the Dispute within the sixty (60) days), you or Epson may commence an arbitration. Notice to
Epson must be addressed to: Epson America, Inc., ATTN: Legal Department, 3131 Katella Ave., Los
Alamitos, CA 90720 (the "Epson Address"). The Dispute Notice to you will be sent to the most recent
address Epson has in its records for you. For this reason, it is important to notify us if your address
changes by emailing us at [email protected] or writing us at the Epson Address above. Notice of
the Dispute shall include the sender's name, address and contact information, the facts giving rise to the
Dispute, and the relief requested (the "Dispute Notice"). Following receipt of the Dispute Notice, Epson
and you agree to act in good faith to resolve the Dispute before commencing arbitration.
1.4 Small Claims Court. Notwithstanding the foregoing, you may bring an individual action in the small
claims court of your state or municipality if the action is within that court's jurisdiction and is pending only
in that court.

303
1.5 WAIVER OF CLASS ACTIONS AND CLASS ARBITRATIONS. YOU AND EPSON AGREE THAT
EACH PARTY MAY BRING DISPUTES AGAINST THE OTHER PARTY ONLY IN AN INDIVIDUAL
CAPACITY, AND NOT AS A PLAINTIFF OR CLASS MEMBER IN ANY CLASS OR
REPRESENTATIVE PROCEEDING, INCLUDING WITHOUT LIMITATION FEDERAL OR STATE
CLASS ACTIONS, OR CLASS ARBITRATIONS. CLASS ACTION LAWSUITS, CLASS-WIDE
ARBITRATIONS, PRIVATE ATTORNEY-GENERAL ACTIONS, AND ANY OTHER PROCEEDING
WHERE SOMEONE ACTS IN A REPRESENTATIVE CAPACITY ARE NOT ALLOWED.
ACCORDINGLY, UNDER THE ARBITRATION PROCEDURES OUTLINED IN THIS SECTION, AN
ARBITRATOR SHALL NOT COMBINE OR CONSOLIDATE MORE THAN ONE PARTY'S CLAIMS
WITHOUT THE WRITTEN CONSENT OF ALL AFFECTED PARTIES TO AN ARBITRATION
PROCEEDING.
1.6 Arbitration Procedure. If you or Epson commences arbitration, the arbitration shall be governed by
the rules of JAMS that are in effect when the arbitration is filed, excluding any rules that permit arbitration
on a class or representative basis (the "JAMS Rules"), available at http://www.jamsadr.com or by calling
1-800-352-5267, and under the rules set forth in this Agreement. All Disputes shall be resolved by a
single neutral arbitrator, and both parties shall have a reasonable opportunity to participate in the
selection of the arbitrator. The arbitrator is bound by the terms of this Agreement. The arbitrator, and not
any federal, state or local court or agency, shall have exclusive authority to resolve all disputes arising
out of or relating to the interpretation, applicability, enforceability or formation of this Agreement,
including any claim that all or any part of this Agreement is void or voidable. Notwithstanding this broad
delegation of authority to the arbitrator, a court may determine the limited question of whether a claim or
cause of action is for an IP Claim, which is excluded from the definition of "Disputes" in Section 1.1
above. The arbitrator shall be empowered to grant whatever relief would be available in a court under
law or in equity. The arbitrator may award you the same damages as a court could, and may award
declaratory or injunctive relief only in favor of the individual party seeking relief and only to the extent
necessary to provide relief warranted by that party's individual claim. In some instances, the costs of
arbitration can exceed the costs of litigation and the right to discovery may be more limited in arbitration
than in court. The arbitrator's award is binding and may be entered as a judgment in any court of
competent jurisdiction.
You may choose to engage in arbitration hearings by telephone. Arbitration hearings not conducted by
telephone shall take place in a location reasonably accessible from your primary residence, or in Orange
County, California, at your option.
a) Initiation of Arbitration Proceeding. If either you or Epson decides to arbitrate a Dispute, both parties
agree to the following procedure:
(i) Write a Demand for Arbitration. The demand must include a description of the Dispute and the amount
of damages sought to be recovered. You can find a copy of a Demand for Arbitration at
http://www.jamsadr.com ("Demand for Arbitration").
(ii) Send three copies of the Demand for Arbitration, plus the appropriate filing fee, to: JAMS, 500 North
State College Blvd., Suite 600 Orange, CA 92868, U.S.A.

304
(iii) Send one copy of the Demand for Arbitration to the other party (same address as the Dispute
Notice), or as otherwise agreed by the parties.
b) Hearing Format. During the arbitration, the amount of any settlement offer made shall not be disclosed
to the arbitrator until after the arbitrator determines the amount, if any, to which you or Epson is entitled.
The discovery or exchange of non-privileged information relevant to the Dispute may be allowed during
the arbitration.
c) Arbitration Fees. Epson shall pay, or (if applicable) reimburse you for, all JAMS filings and arbitrator
fees for any arbitration commenced (by you or Epson) pursuant to provisions of this Agreement.
d) Award in Your Favor. For Disputes in which you or Epson seeks $75,000 or less in damages exclusive
of attorney's fees and costs, if the arbitrator's decision results in an award to you in an amount greater
than Epson's last written offer, if any, to settle the Dispute, Epson will: (i) pay you $1,000 or the amount
of the award, whichever is greater; (ii) pay you twice the amount of your reasonable attorney's fees, if
any; and (iii) reimburse you for any expenses (including expert witness fees and costs) that your attorney
reasonably accrues for investigating, preparing, and pursuing the Dispute in arbitration. Except as
agreed upon by you and Epson in writing, the arbitrator shall determine the amount of fees, costs, and
expenses to be paid by Epson pursuant to this Section 1.6d).
e) Attorney's Fees. Epson will not seek its attorney's fees and expenses for any arbitration commenced
involving a Dispute under this Agreement. Your right to attorney's fees and expenses under Section
1.6d) above does not limit your rights to attorney's fees and expenses under applicable law;
notwithstanding the foregoing, the arbitrator may not award duplicative awards of attorney's fees and
expenses.
1.7 Opt-out. You may elect to opt-out (exclude yourself) from the final, binding, individual
arbitration procedure and waiver of class and representative proceedings specified in this
Agreement by sending a written letter to the Epson Address within thirty (30) days of your assent
to this Agreement (including without limitation the purchase, download, installation of the
Software or other applicable use of Epson Hardware, products and services) that specifies (i)
your name, (ii) your mailing address, and (iii) your request to be excluded from the final, binding
individual arbitration procedure and waiver of class and representative proceedings specified in
this Section 1. In the event that you opt-out consistent with the procedure set forth above, all
other terms shall continue to apply, including the requirement to provide notice prior to litigation.
1.8 Amendments to Section 1. Notwithstanding any provision in this Agreement to the contrary, you
and Epson agree that if Epson makes any future amendments to the dispute resolution procedure and
class action waiver provisions (other than a change to Epson's address) in this Agreement, Epson will
obtain your affirmative assent to the applicable amendment. If you do not affirmatively assent to the
applicable amendment, you are agreeing that you will arbitrate any Dispute between the parties in
accordance with the language of this Section 1 (or resolve disputes as provided for in Section 1.7, if you
timely elected to opt-out when you first assented to this Agreement).

305
1.9 Severability. If any provision in this Section 1 is found to be unenforceable, that provision shall be
severed with the remainder of this Agreement remaining in full force and effect. The foregoing shall not
apply to the prohibition against class or representative actions as provided in Section 1.5. This
means that if Section 1.5 is found to be unenforceable, the entire Section 1 (but only Section 1)
shall be null and void.
Parent topic: Notices
Trademarks
EPSON
®
and Epson Smart Panel
®
are registered trademarks, the EPSON logo is a registered logomark,
and Epson Connect
TM
is a trademark of Seiko Epson Corporation.
Apple, Mac, macOS, OS X, and AirPrint
TM
are trademarks of Apple Inc., registered in the U.S. and other
countries. App Store is a service mark of Apple Inc.
Google
®
is a registered trademark and Android
TM
and Google Play
TM
are trademarks of Google LLC.
Microsoft and Windows are trademarks of the Microsoft group of companies.
The Mopria
TM
word mark and the Mopria
TM
Logo are registered and/or unregistered trademarks of Mopria
Alliance, Inc. in the United States and other countries. Unauthorized use is strictly prohibited.
Wi-Fi Direct
®
is a registered trademark of Wi-Fi Alliance
®
.
General Notice: Other product names used herein are for identification purposes only and may be
trademarks of their respective owners. Epson disclaims any and all rights in those marks.
Parent topic: Notices
Copyright Notice
All rights reserved. No part of this publication may be reproduced, stored in a retrieval system, or
transmitted in any form or by any means, electronic, mechanical, photocopying, recording, or otherwise,
without the prior written permission of Seiko Epson Corporation. The information contained herein is
designed only for use with this Epson product. Epson is not responsible for any use of this information as
applied to other products.
Neither Seiko Epson Corporation nor its affiliates shall be liable to the purchaser of this product or third
parties for damages, losses, costs, or expenses incurred by purchaser or third parties as a result of:
accident, misuse, or abuse of this product or unauthorized modifications, repairs, or alterations to this
product, or (excluding the U.S.) failure to strictly comply with Seiko Epson Corporation's operating and
maintenance instructions.

306
Seiko Epson Corporation shall not be liable for any damages or problems arising from the use of any
options or any consumable products other than those designated as Original Epson Products or Epson
Approved Products by Seiko Epson Corporation.
Seiko Epson Corporation shall not be held liable for any damage resulting from electromagnetic
interference that occurs from the use of any interface cables other than those designated as Epson
approved Products by Seiko Epson Corporation.
This information is subject to change without notice.
libTIFF Software Acknowledgment
A Note Concerning Responsible Use of Copyrighted Materials
Copyright Attribution
Parent topic: Notices
libTIFF Software Acknowledgment
Copyright © 1988-1997 Sam Leffler
Copyright © 1991-1997 Silicon Graphics, Inc.
Permission to use, copy, modify, distribute, and sell this software and its documentation for any purpose
is hereby granted without fee, provided that (I) the above copyright notices and this permission notice
appear in all copies of the software and related documentation, and (ii) the names of Sam Leffler and
Silicon Graphics may not be used in any advertising or publicity relating to the software without the
specific, prior written permission of Sam Leffler and Silicon Graphics.
THE SOFTWARE IS PROVIDED "AS-IS" AND WITHOUT WARRANTY OF ANY KIND, EXPRESS,
IMPLIED OR OTHERWISE, INCLUDING WITHOUT LIMITATION, ANY WARRANTY OF
MERCHANTABILITY OR FITNESS FOR A PARTICULAR PURPOSE.
IN NO EVENT SHALL SAM LEFFLER OR SILICON GRAPHICS BE LIABLE FOR ANY SPECIAL,
INCIDENTAL, INDIRECT OR CONSEQUENTIAL DAMAGES OF ANY KIND, OR ANY DAMAGES
WHATSOEVER RESULTING FROM LOSS OF USE, DATA OR PROFITS, WHETHER OR NOT
ADVISED OF THE POSSIBILITY OF DAMAGE, AND ON ANY THEORY OF LIABILITY, ARISING OUT
OF OR IN CONNECTION WITH THE USE OR PERFORMANCE OF THIS SOFTWARE.
Parent topic: Copyright Notice
A Note Concerning Responsible Use of Copyrighted Materials
Epson encourages each user to be responsible and respectful of the copyright laws when using any
Epson product. While some countries' laws permit limited copying or reuse of copyrighted material in
certain circumstances, those circumstances may not be as broad as some people assume. Contact your
legal advisor for any questions regarding copyright law.