Whirlpools, Air Baths, Combination Tubs, Drift Baths and Soaking Tubs
OWNER’S MANUAL
For your installation, operation,
and maintenance needs.
A Water Test MUST be performed prior to install.
Please see page 5 for more details.

2
Laurel Mountain | Owner's Manual & Installation Guide
www.laurelmountain.com
About This Owner’s Manual
Laurel Mountain has gained popularity by the wide selection of high quality, whirlpools, bathtubs and showers.
This manual covers the installation, operation, and maintenance needs for Laurel Mountain Whirlpools, Air Baths,
Combination baths, Drift Baths and Soaking tubs. If you have any questions or need additional information on
your Laurel Mountain bath, you can contact our customer service department at 1-800-930-0050 between
6:00 am and 6:00 pm EST Monday – Friday.
INSTALLATION SAFETY WARNING
Your Laurel Mountain bathtub has been water tested prior to shipment. However, due to transportation and
potential on-the-job conditions, you should NOT install this tub until performing a water test. A second water test
should also be performed once the tub is in its final location prior to completing the install. The water test should
include operation of any and all systems, jets, controls, etc.
Building material & wiring should be routed away from the pump or other heat producing parts of this tub.
Please follow these instructions to insure an easy and safe installation process. Any deviations, additions, or deletions to
your Laurel Mountain tub or it’s hardware will void the warranty of this product if written approval is not obtained from the
manufacturer.
Use this tub for its intended purposes described in the manual. The manufacturer does not recommend using any attachments
not specifically approved in this manual. DO NOT allow any electrical appliances near the bath tub. DO NOT use alcohol,
drugs, or medication as this will greatly increase your risk of hypothermia or drowning. DO NOT allow children to use the
bathtub without adult supervision. DO NOT use options NOT installed by the manufacturer. Do not use if you are or think
you are pregnant, consult your physician before using the bath tub.
Specifications
Your tub was constructed from an acrylic shell cast. It was then reinforced with a mixture of chopped fiberglass in a resin applied to the
backside of the shell. The base of your unit was designed to give uniform support to the tub floor and has been pre-leveled. It meets
or exceeds load-bearing and impact resistance requirements of the listed standard without evidence of crazing or cracking and with
minimal deflection when installed in accordance to Laurel Mountain printed instructions.

3
Laurel Mountain | Owner’s Manual & Installation Guide
www.laurelmountain.com
Contents
About This Owner’s Manual 2
Installation Safety Warning 2
Specifications 2
Table of Contents 3
Framing Diagrams 4
Installation Warning 5
Prior To Installation 5
Installation Instructions 5
Framing & Installation Procedures 5
Framing & Installation Procedures for Drop-Ins and Islands 5
Integrally Skirted / Alcove Tub Installation 6
Electrical & Wiring Instructions 7
Plumbing Installation 8
Final Water Test & Clean-Up 8
Operation Instructions 9
Important Safety Instructions 9
Whirlpool Operation 10
Air Bath Operation 12
Combination Bath Operation 13
Drift Bath Operation 16
Care & Cleaning Instructions 17
Laurel Mountain Warranty 17
Troubleshooting Common Issues 18
4
Laurel Mountain | Owner's Manual & Installation Guide
www.laurelmountain.com
Island Drop-In
Tile Bed
Wood Shim
Wall Stud
Tile
Tub
Tile bed
100% Silicone
Sealant
Tile
Tub
Alcove-Integral Skirted Models
ISLANDS
ALCOVES
OVAL MODELS
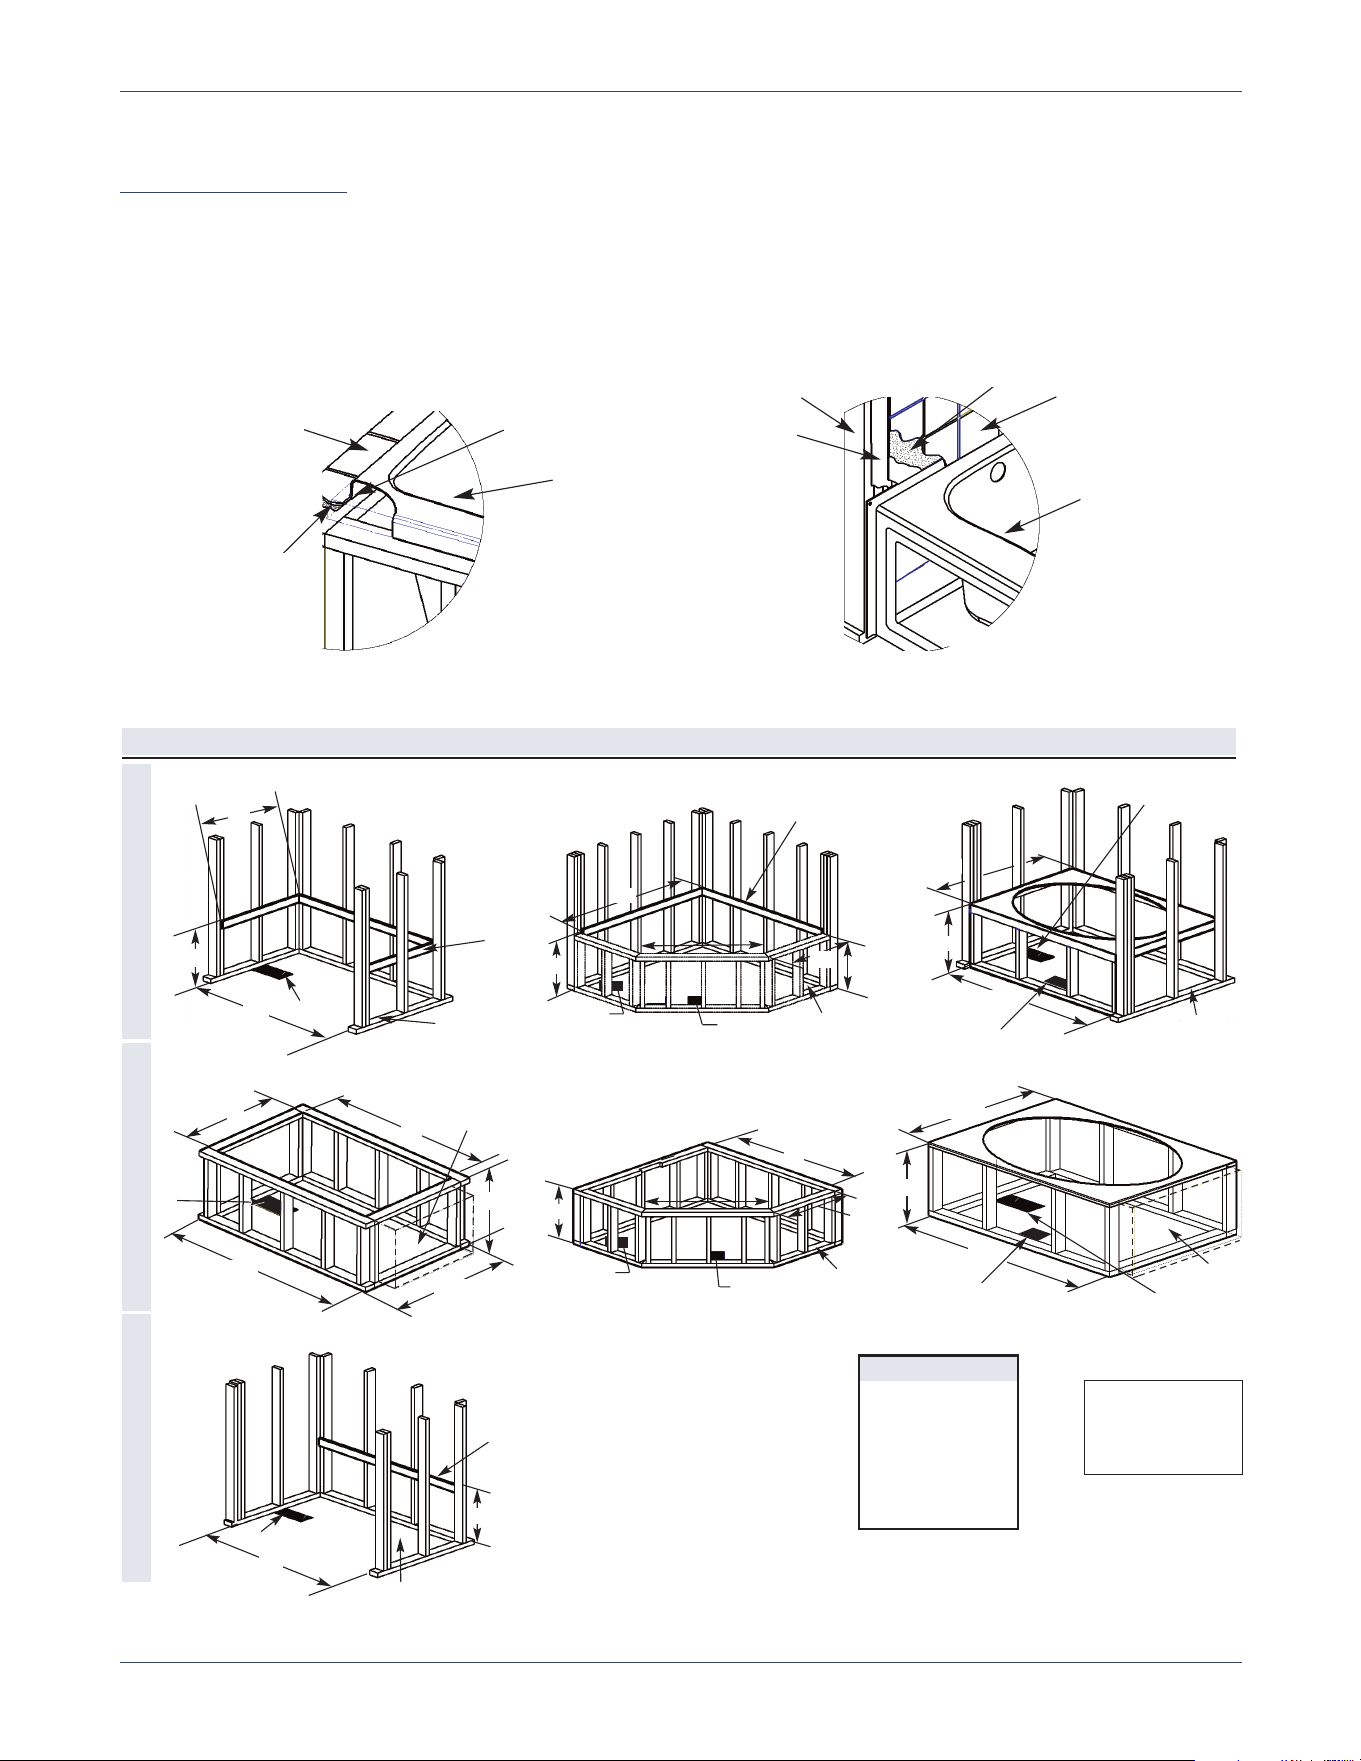
A- 6" x 12" Box-outs
B - Leveled Supports
1" x 3" Ledgers
C - 24" x 16" minimum access
on pump end
CORNER MODELSRECTANGULAR MODELS
A
C
ID
As Desired
As Desired
DH
IW
B
A
AW
LH
LD
C
C
A
DH
As Desired
As
Desired
1
A
2
C
A
2
IW
DH
ID
C
A
DH
A
2
1
C
As
Desired
As
Desired
DH
A
2
LH
B
LD
AW
Note: For Skirt Installation
disregard front framing
A
1
=
end drain
A
2
= center drain
LEGEND
AW Overall Width
DH Deck Height
ID Inner Depth
IW Inner Width
LH Ledger Height
LD Ledger Depth
A
1
A
1
C
INTEGRALLY SKIRTED MODELS
A
C
B
LH
AW
Dimension guides are also available at Lowes.com.
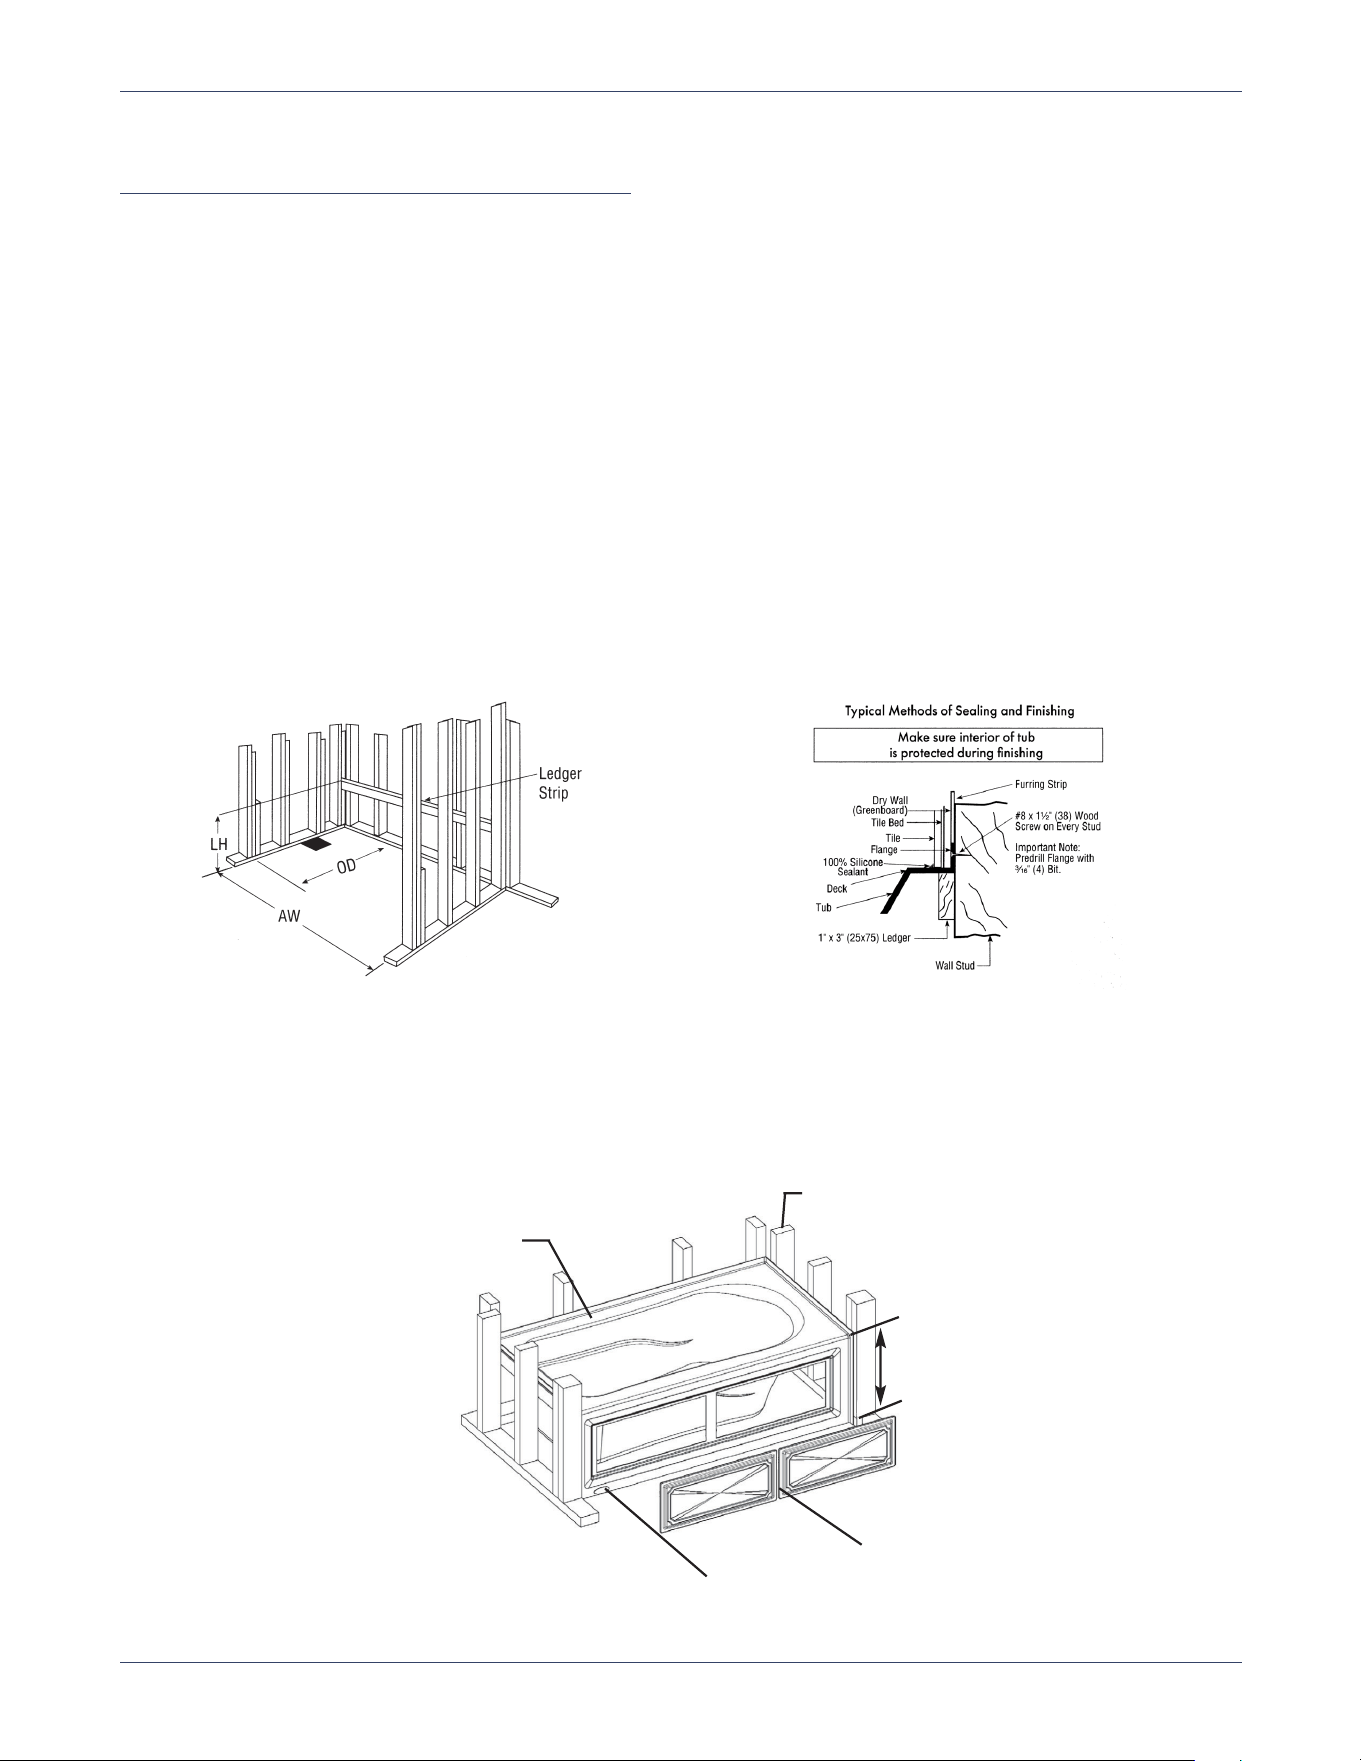
Framing Diagrams
1. Protect interior of tub throughout installation process.
2. Framing and supports will vary according to the model and type of installation selected.
3. Please refer back to the unit’s Technical Data sheet for specific dimensions located at www.laurelmountianbath.com.
5
Laurel Mountain | Owner’s Manual & Installation Guide
www.laurelmountain.com
Prior To Installation
Immediately inspect your tub upon arrival for any cosmetic defects or damage. If any problems or concerns are discovered, contact Laurel
Mountain on how to proceed. DO NOT remove the bath from its shipping container until you are ready to water-test and install. When you
are prepared to remove the tub from its carton DO NOT LIFT the tub out by its plumbing. We also recommend cutting cardboard from the
shipping container to place inside the tub to protect its floor. Even though your tub has been inspected and water tested prior to shipment,
it is very important that you perform a water test of your own to ensure all of the fittings and connections were not damaged during transit.
Take your tub to an area where you can fill it up, run electrical components, and drain it. Fill your tub to the overflow and if you have a
pump and/or blower, operate it and all components (chromatherapy, heater, etc.) for 15 minutes. Inspect the entire unit during and after for
leaks. Any defects that are discovered MUST be reported at this time to qualify for warranty coverage. Qualified plumbers and electricians
MUST be used for all tub connections to ensure all local codes are followed and permits acquired. NEVER LIFT the unit by any portion of
the plumbing or stand in the unit during installation as this may cause serious damage to the unit.
INSTALLATION INSTRUCTIONS
INSTALLATION WARNING
Your Laurel Mountain bathtub has been water tested prior to shipment. However, due to transportation and
potential on-the-job conditions, you should NOT install this tub until performing a water test. A second water test
should also be performed once the tub is in its final location prior to completing the install. The water test should
include operation of any and all systems, jets, controls, etc.
Building material & wiring should be routed away from the pump or other heat producing parts of this tub.
Framing & Installation Procedures for Drop-Ins and Islands
DANGER - RISK OF ELECTRIC SHOCK When using electrical products, basic precautions should always be followed, including the
following: Connect only to a circuit protected by a Ground-Fault Circuit-Interrupter (GFCI).
Install to permit access for servicing.
1. Install outlet(s) per electrical requirements. The outlet must be accessible through the access panel.
2. Place the bath in the location for installation. Check that the bath is level (length and width). A carpenter’s level is recommended.
If necessary, place shims under support legs. Make measurements for framework construction. Remove bath from location.
3. Construct framework.
• Ensure that construction materials comply with applicable code requirements for
the installation site.
• All framing must be square, level and designed to provide
structural support.
• Do not allow tub rim to support any of the bath weight.
4. An access panel, 24” x 16” minimum, must be provided to allow access to the
pump blower, electrical connections, and other accessories. Adequate access is
required for any warranty work and future maintenance.
5. ALL MODELS WITH LEVELING FEET – The following procedure is recommended
for pre-leveled bottoms. Lift unit by the rim and place in alcove or framework. If
necessary, shim feet until unit just rests on leveled ledges or framework. Secure the
unit by fastening the bottom feet to the subfloor with any construction adhesive caulk.
The use of casting plaster or plaster of paris is suggested by not mandatory as a
foundation support between floor and bottom of unit to suppress noise and give a
solid and stable feel for the user.
6. The rim of the bath is not designed to support weight. If finished material is to overlap
or contact the bath, the added weight must be fully self-supporting.
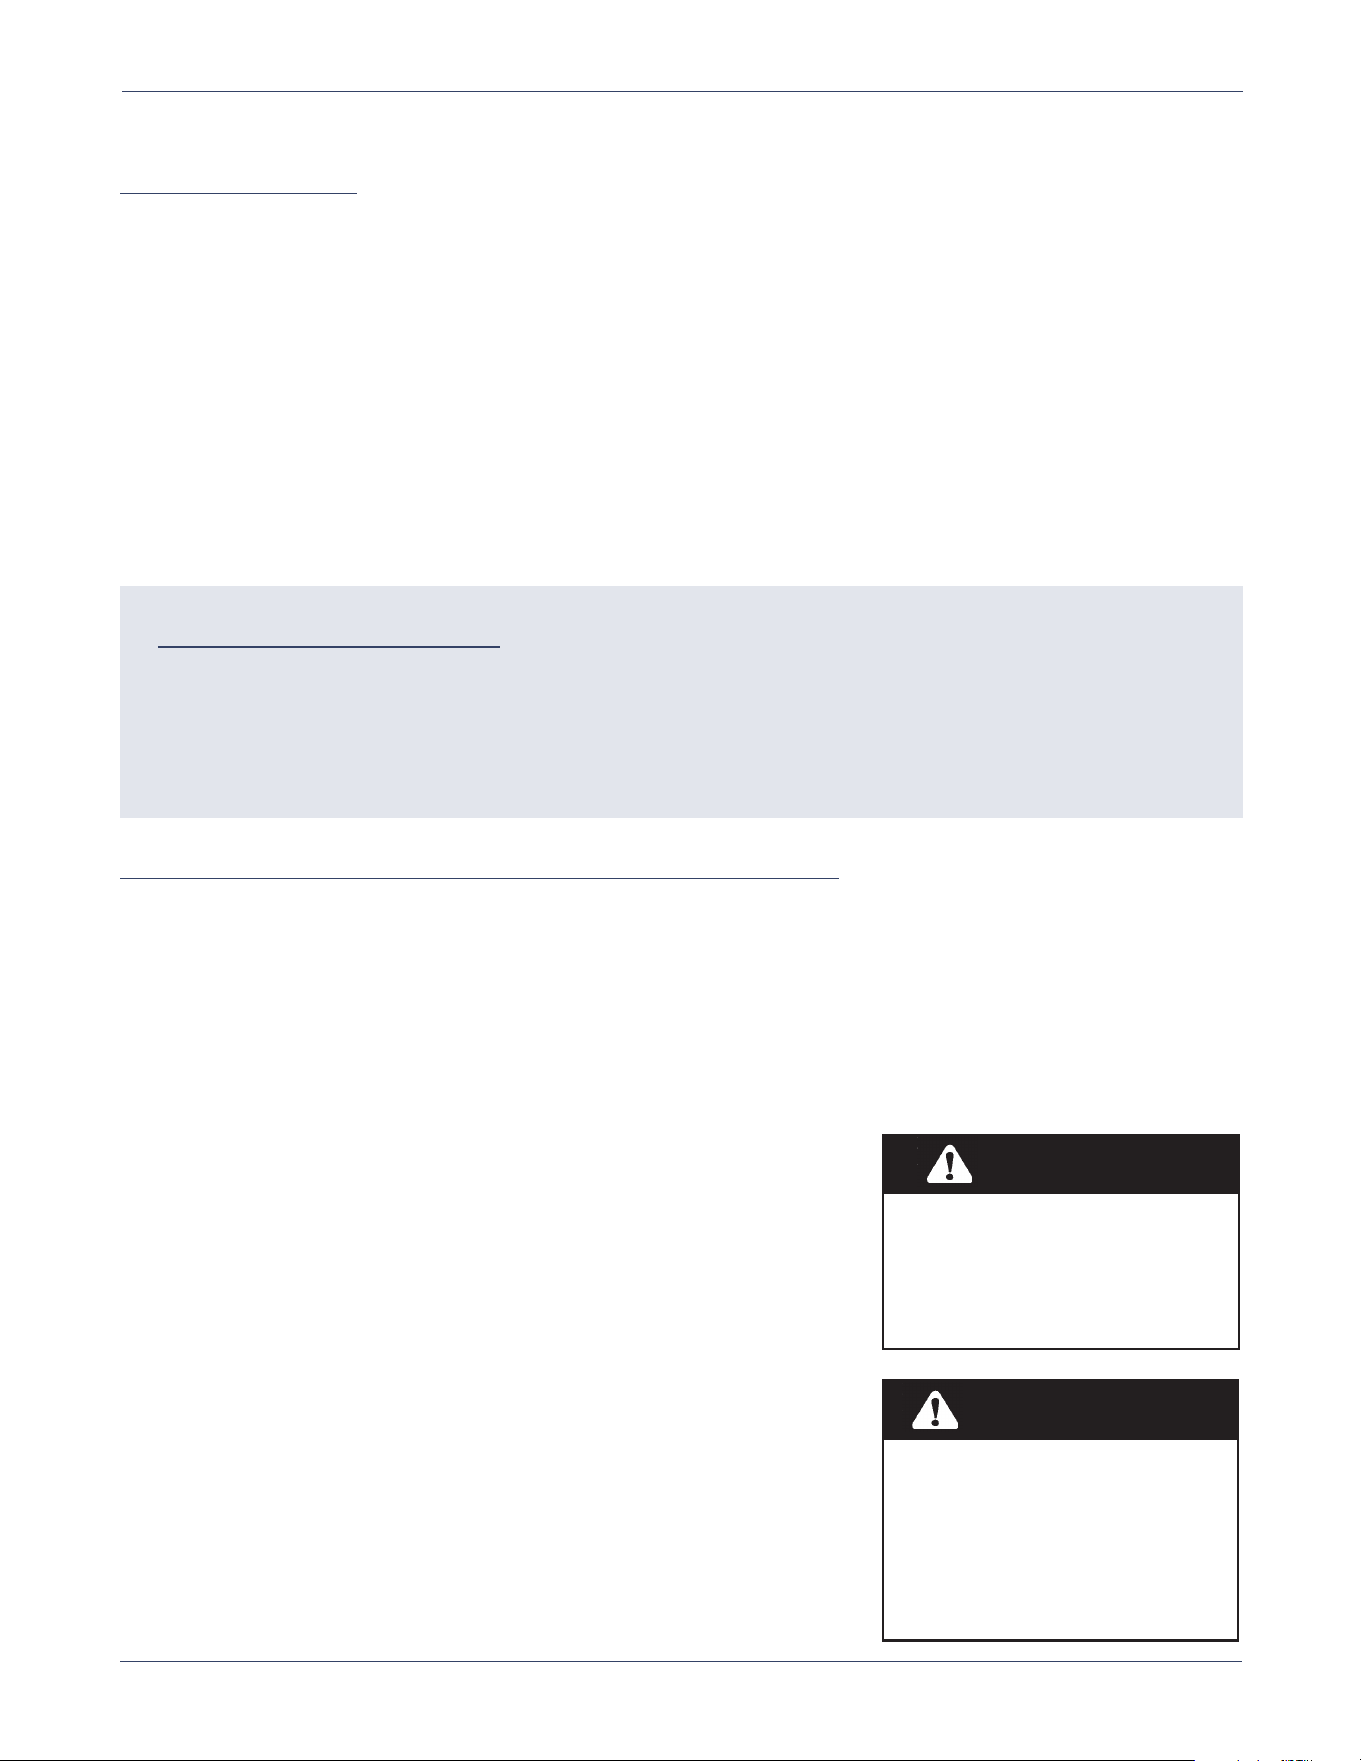
WARNING
Installation Recommendation
Use two or more people to move and
install whirlpools/airbaths. Failure to
do so can result in back or other injury.
IMPORTANT
Whirlpool & Combo Install
When installing a whirlpool or a
combination tub, make sure the clear
plastic hose that connects the pump to
the On/Off button does not get
pinched or kinked.
6
Laurel Mountain | Owner's Manual & Installation Guide
www.laurelmountain.com
Acrylic Tub
Framing
Skirt Frame (a)
STANDARD
Removable panels
(b)
Removable Access Panel For Alcove / Skirted Models
These models are offered with removable access panels. They provide a flush-to-wall installation (sheet rock overlaps skirt while still
providing access). The skirt features a decorative removable panel enabling easy access to pump blower and electrical hookups.
IMPORTANT: Before installation of the panel, fill the unit, test the whirlpool/air bath systems for proper operation and check for leaks,
then drain.
Integrally Skirted/Alcove Tub Installation
1. To avoid obstructions during installation, make sure water lines, spout pipes and valve plumbing do not project into alcove.
2. Ledger Strip: Fasten a 1" x 3” ledger strip along rear for alcove and along both sides in corner installations at Dimension LH. (see
diagram 1A)
3. Mix a 3 gallon bucket of plaster and water to a paste. Place three or four mounds of plaster away from drain hole in a line or
square, approximately twice as high as the cavity under the tub bottom.
4. Place tub into alcove with front skirt firmly on floor and depress cement mounds. Make certain that back ledge of tub rests firmly on
ledger strip. (see diagram 1A)
5. Using 1
11
⁄22" washer head screws: (a) spot-fasten the two bottom corners and the two top corners of the vertical side nailing flanges. (b)
Fasten at each stud through the top sides flanges and back flange, working from both ends toward back center. (c) Complete fastening
vertical side flanges.
6. When other than scratch coat is used, furring strips as thick as nailing flanges are recommended for installation on studs above the
installed tub to assure drywall will be flush.
7. See and follow the Sealing & Finishing Diagram (diagram 1B).
8. See and follow Final WATER Test and Clean-Up on page 8.
1A 1B
Integrally Skirted Acrylic Whirlpool Air Bath

7
Laurel Mountain | Owner’s Manual & Installation Guide
www.laurelmountain.com
Electrical & Wiring Instructions
Rough in the wiring on a single 120VAC, 15-20 amp, GFCI protected dedicated circuit for each whirlpool, air system,
or heater installed on the tub.
WARNINGS:
1. All electrical connections must be made by a licensed certified electrician in accordance with the requirements of the
National Electrical Code and applicable state and local codes and procedures.
2. All circuits connected to this unit must be equipped with Ground Fault Circuit Interrupter (GFCI) protection. It is the tub
installer’s responsibility to wire the circuit with GFCI.
3. All bathtubs equipped with an inline heater require two dedicated circuits. One for the whirlpool system and one for
optional inline heater. The heater has a piggyback outlet that should remain empty.
4. DO NOT splice a longer cord to the power supply cord and DO NOT connect to an extension cord.
All whirlpool, air systems, and heaters are equipped with a molded plug on the end of a power supply core. One or two outlet boxes
will be factory installed to accommodate tubs with three plugs. Electric power may be supplied to the outlet boxes OR install a separate,
dedicated 120VAC, 15-20 Amp GFCI protected electrical wall plug outlet inside the access panel for each pump, blower, and heater
equipped on the tub. For example, if the tub is equipped with a whirlpool system only, then one GFCI wall plug outlet is necessary. If the
tub is equipped with both whirlpool system and a heater then two separate circuits with GFCI wall plug outlets are required. Be sure to
count the number of accessories before installing the GFCI wall outlets. Also, the power supply cords equipped with each accessory
are only 2.5’ long, so locate the GFCI wall outlet within 1.5’ of the intended accessory. Note: If using the outlet boxes installed by our
factory, the double outlet box is a “split” box & a separate 15-20 Amp circuit electric line must be run to both the top & bottom outlet.
Electrical Requirements
Pump: Small Tubs (60”x36” or smaller) – 120V, 9 Amps Whirlpool Heater: 120V, 12 Amps
Pump: Large Tubs – 120V, 13 Amps Air / Soaker Heater: 120V, 13.4 Amps
Pump: Silent – 120V, 11.5 Amps Music, Lights, Vibe: 120V, 1.0 Amp
Air Blower: 120V, 9.5 Amps Chromatherapy: 120V, 0.6 Amps
Please note, that when sizing the electrical circuits to power the unit, you should always check the rating labels on equipment because
there could be changes.
Packages Dedicated GFCI’s Required
Whirlpool (Pump) 1, 20amp GFCI
Whirlpool Deluxe (Pump & Whirlpool Heater) 2, 20amp GFCI’s
Whirlpool Illumination (Silent Pump & Chromatherapy) 1, 20amp GFCI
Whirlpool Sound (Pump, Whirlpool Heater & Music, Lights, Vibe) 2, 20amp GFCI’s
Air Bath (Air Blower & Air Heater) 2, 20amp GFCI’s
Combo Bath (Pump & Air Blower) 2, 20amp GFCI’s
Combo Bath Deluxe (Pump, Whirlpool Heater, & Air Blower) 3, 20amp GFCI’s
Combo Bath Illumination (Silent Pump, Chromatherapy, & Air Blower) 2, 20amp GFCI’s
Drift Bath (Silent Pump & Chromatherapy) 1, 20amp GFCI

8
Laurel Mountain | Owner's Manual & Installation Guide
www.laurelmountain.com
Plumbing Installation
Install fill valves and spout in the desired locations. Note, due to various possible fill valve and spout locations, the holes are not drilled
at the factory. Make certain that the spout is long enough to clear the interior rim of the tub. If installing fill valves on the deck of the tub,
be sure that you have enough clearance for connections of valve to tub and water connections before drilling/cutting into tub. Seal
the joints under the tub rim and against the wall with a water resistant seal. Then install a standard 1.5” trap to the drain and overflow.
Before proceeding, make a Final Water Test (see page 9).
Final Water Test & Clean-Up
Water Test:
To test system for leaks, follow these steps in order listed:
1. Fill clean tub with water to minimum 4” above air channels or 1” above the whirlpool jets.
2. CAUTION: BEFORE USE OF THE PUMP, TEST THE GFCI FOR PROPER OPERATION. THE PUMP SHOULD TURN OFF
WHEN THE GFCI “TEST” BUTTON IS PUSHED.
To test the Ground-Fault Circuit-Interrupter (GFCI), push the test button. The GFCI should interrupt power. Push the reset button.
Power should be restored. If the GFCI fails to operate in this manner, there is a ground current flowing, indicating the possibility of
a lethal electric shock. Do not use this unit. Disconnect the unit and have the problem corrected by a licensed electrician before
using.
3. Push on/off button.
4. Allow system to run a full 10-minutes.
5. Through access door or removable skirt, check for leaks in the whirlpool/air bath plumbing system. If leakage is occurring at any
other points, notify Laurel Mountain.
6. If any electrical malfunctions occur, consult electrician. Malfunctions of the whirlpool/air bath controls or the circulating system
should be reported to Laurel Mountain.
Clean-Up:Clean-Up:
1. Remove all construction residue and foreign materials. Wipe unit clean with a damp rag, otherwise staining
may occur.
2. Plaster may be removed by scraping with the edge of a piece of wood or rigid plastic. Do not use metal scraper. For spots left by
plaster or grout: rub lightly with a liquid detergent (Spic-N-Span
®
or similar) on damp cloth or sponge.
3. DO NOT use abrasive cleaners, scouring powders, steel wool, wire brushes or anything else that may harm or dull the surface.
4. Paint, tar, or stubborn stains may be removed with rubbing alcohol. To avoid discoloration, cleaners containing petroleum distillates
must not remain on surfaces. NEVER use lacquer thinner or chlorinated solvents.
5. Dulled areas can be restored to a high gloss with white or a non-abrasive automotive rubbing compound, followed by application
of carnauba wax or white or cream automotive paste wax and buffing.
6. Major gouges require professional repair. Contact Laurel Mountain to arrange factory-authorized repair services.

9
Laurel Mountain | Owner’s Manual & Installation Guide
www.laurelmountain.com
DO
Ensure your qualified electrician supplies a
Ground Fault Circuit Interrupter (GFCI) during
installation. This offers necessary protection to
your unit and should be tested periodically. To
test, simply push the <TEST BUTTON> and power
should be interrupted. Then push the <RESET
BUTTON> and power should be restored. If not,
DO NOT use the unit as this indicates there is
a ground current flowing and that a possibility
of ELECTRIC SHOCK exists. Disconnect the unit
at once and call a qualified electrician before
further operation.
Use this tub for its intended purposes described
in this manual. The manufacturer does not
recommend using any attachements not
specifically approved in this manual.
DO NOT
Allow any electrical appliances near the bathtub.
Use alcohol, drugs or medication. This will greatly
increase your risk of hypothermia or drowning.
Use this tub if you think or know you are preg-
nant. Consult your physician first.
Allow children to use the bathtub without adult
supervision.
Operate the whirlpool without the suction cover.
Insert any objects into any of the openings.
Use options NOT installed by the manufacturer.
OPERATION INSTRUCTIONS
Save These Important Safety Instructions
Laurel Mountain will not be held responsible for water damage of any kind in connection with the installation and/or operation of
one of our bathtubs. All whirlpool jets must be completely submerged below water before starting the pump. Do not operate the
pump without water as damage may occur. Do not block the overflow drain and allow water to reach the controls as they are not
waterproof and leaks to the floor may occur.
WARNING - Prolonged Immersions in Hot Water May Induce Hyperthermia
Hyperthermia occurs when the internal temperature of the body reaches a level several degrees above the normal body temperature of
98.6o F. The symptoms of hyperthermia include an increase in the internal temperature of the body, dizziness, lethargy, drowsiness, and
fainting. The effects of hyperthermia include (1) failure to perceive heat, (2) failure to recognize the need to exit the tub, (3) unaware-
ness of impending hazard, (4) fetal damage in pregnant women, (5) physical inability to exit the tub, (6) unconsciousness resulting in the
danger of drowning.
WARNING - THE USE OF ALCOHOL, DRUGS, OR MEDICATION CAN GREATLY INCREASE THE RISK OF FATAL HYPERTHERMIA.
Important Safety Instructions
10
Laurel Mountain | Owner's Manual & Installation Guide
www.laurelmountain.com
Whirlpool Operation
If your bath has a whirlpool system, simply pushing the on/off button located on the tub will turn the tub on or off. The dial next to it will
cycle through the various speeds of the pump (low, medium, and high). Jets may be adjusted by turning the jet ring/trim counterclockwise
and the water flow will increase, while turning the jet trim clockwise will decrease the water flow. The jets can be closed if turned far
enough clockwise. The whirlpool system requires a 20 amp dedicated circuit, 120V.
Whirlpool Deluxe Package
The whirlpool deluxe package includes the whirlpool system and whirlpool inline heater. Simply pushing the on/off button located on
the tub will turn the whirlpool system & heater on or off. The heater runs automatically with the whirlpool system. The inline heater requires
a 2nd 20 amp dedicated circuit.
The inline heater is designed to MAINTAIN the temperature of the bath water between
101-104 degrees Fahrenheit. These limits cannot be increased or decreased. The Heater
is operated by a pressure switch which is programmed into the heater. This switch allows
the heater to operate only when there is sufficient water flowing through the system.
This heater is equipped with a molded plug on the end of a supply cord. Check your local
codes and install a 120VAC 20amp GFCI protected dedicated circuit wall outlet within 1.5’
from the heater unit. Plug the cord into the outlet. Every time the whirlpool unit is activated, the heater will
activate as well, and will MAINTAIN the water’s temperature between 101-104° F. The heater will not
increase the water temperature and will not heat up cold water.
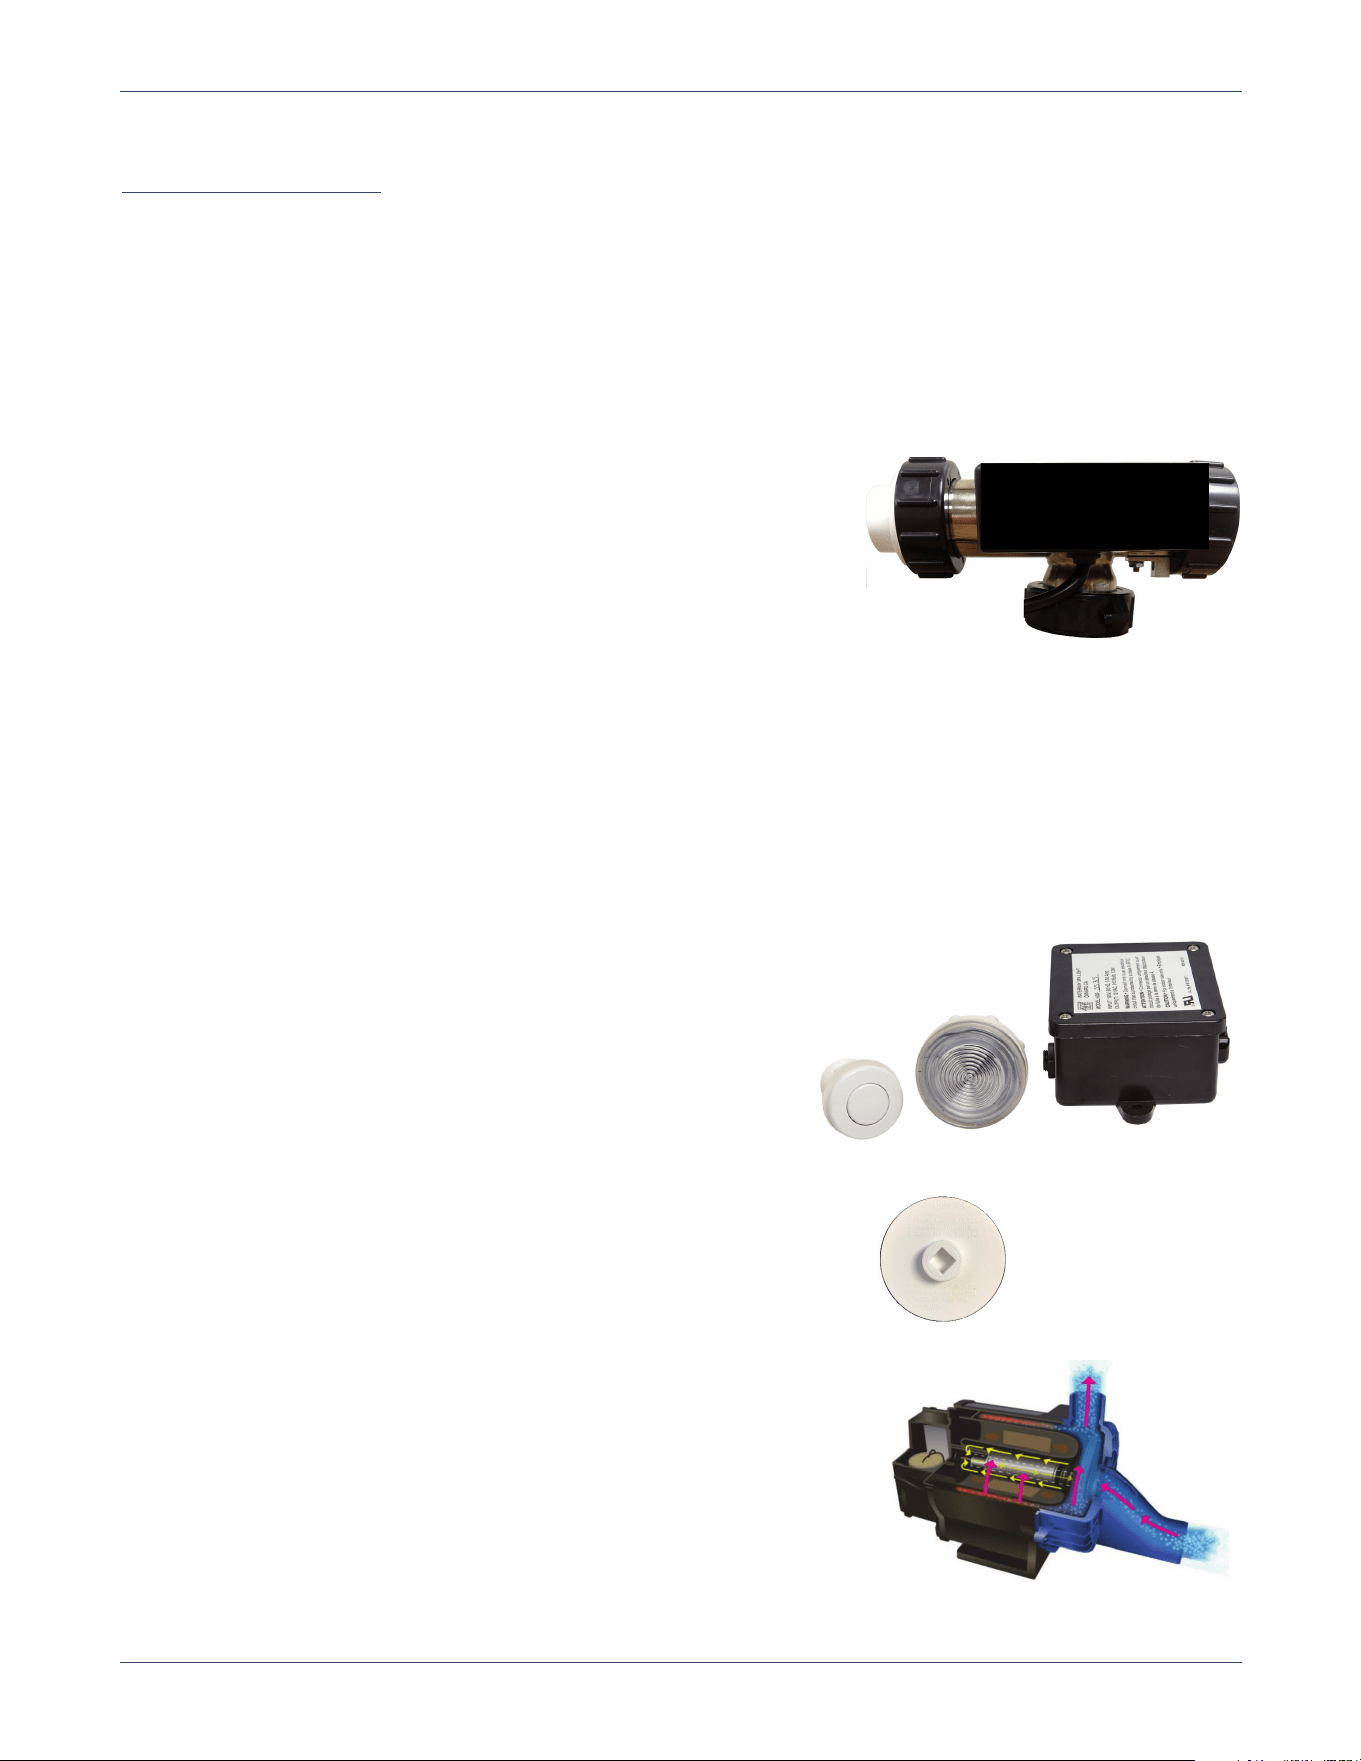
Whirlpool Illumination Package
The Illumination package includes the Chromatherapy Mood Light and Silent Pump that has a built-in heater. The Chromotherapy Mood
Light is activated and deactivated by a single press of the button. It also comes pre-programmed with 12 light modes. To change modes,
quickly double press the button.
QUICK DOUBLE PRESS #1 – Fast wash, all colors
QUICK DOUBLE PRESS #2 – Disco, all colors
QUICK DOUBLE PRESS #3 – Faster Disco, all colors
QUICK DOUBLE PRESS #4 – Fastest Disco, all colors
QUICK DOUBLE PRESS #5 – Alternating slow wash, blue to green
QUICK DOUBLE PRESS #6 – White / Pink
QUICK DOUBLE PRESS #7 – Blue / Pink
QUICK DOUBLE PRESS #8 – Pink
QUICK DOUBLE PRESS #9 – Blue / Green
QUICK DOUBLE PRESS #10 – Blue
QUICK DOUBLE PRESS #11 – Turquoise
QUICK DOUBLE PRESS #12 – Green
The Silent Pump has a simple, push-button operation. It does not include a 3-speed control like
the standard pump. However, all the whirlpool jets can be individually adjusted for intensity.
With it’s revolutionary design, the heat energy generated by the pump is released into the
water. This not only keeps the motor cool, it also generates “free heat” back into your
water for a whirlpool experience that stays warm longer without the use of an additional
heater. And once you’ve finished your bathing experience, it’s easy to empty your tub
with our self-draining, single stage, centrifugal motor pump.
The Silent Pump is also extremely energy efficient. It consumes 60% less energy than traditional
pumps with an electrical heater and generates more than 15% more water flow than the closest competitor.
Whirlpool Inline Heater
Chromotherapy Mood Light
Mood Light Lens Tool
Silent Pump
11
Laurel Mountain | Owner’s Manual & Installation Guide
www.laurelmountain.com
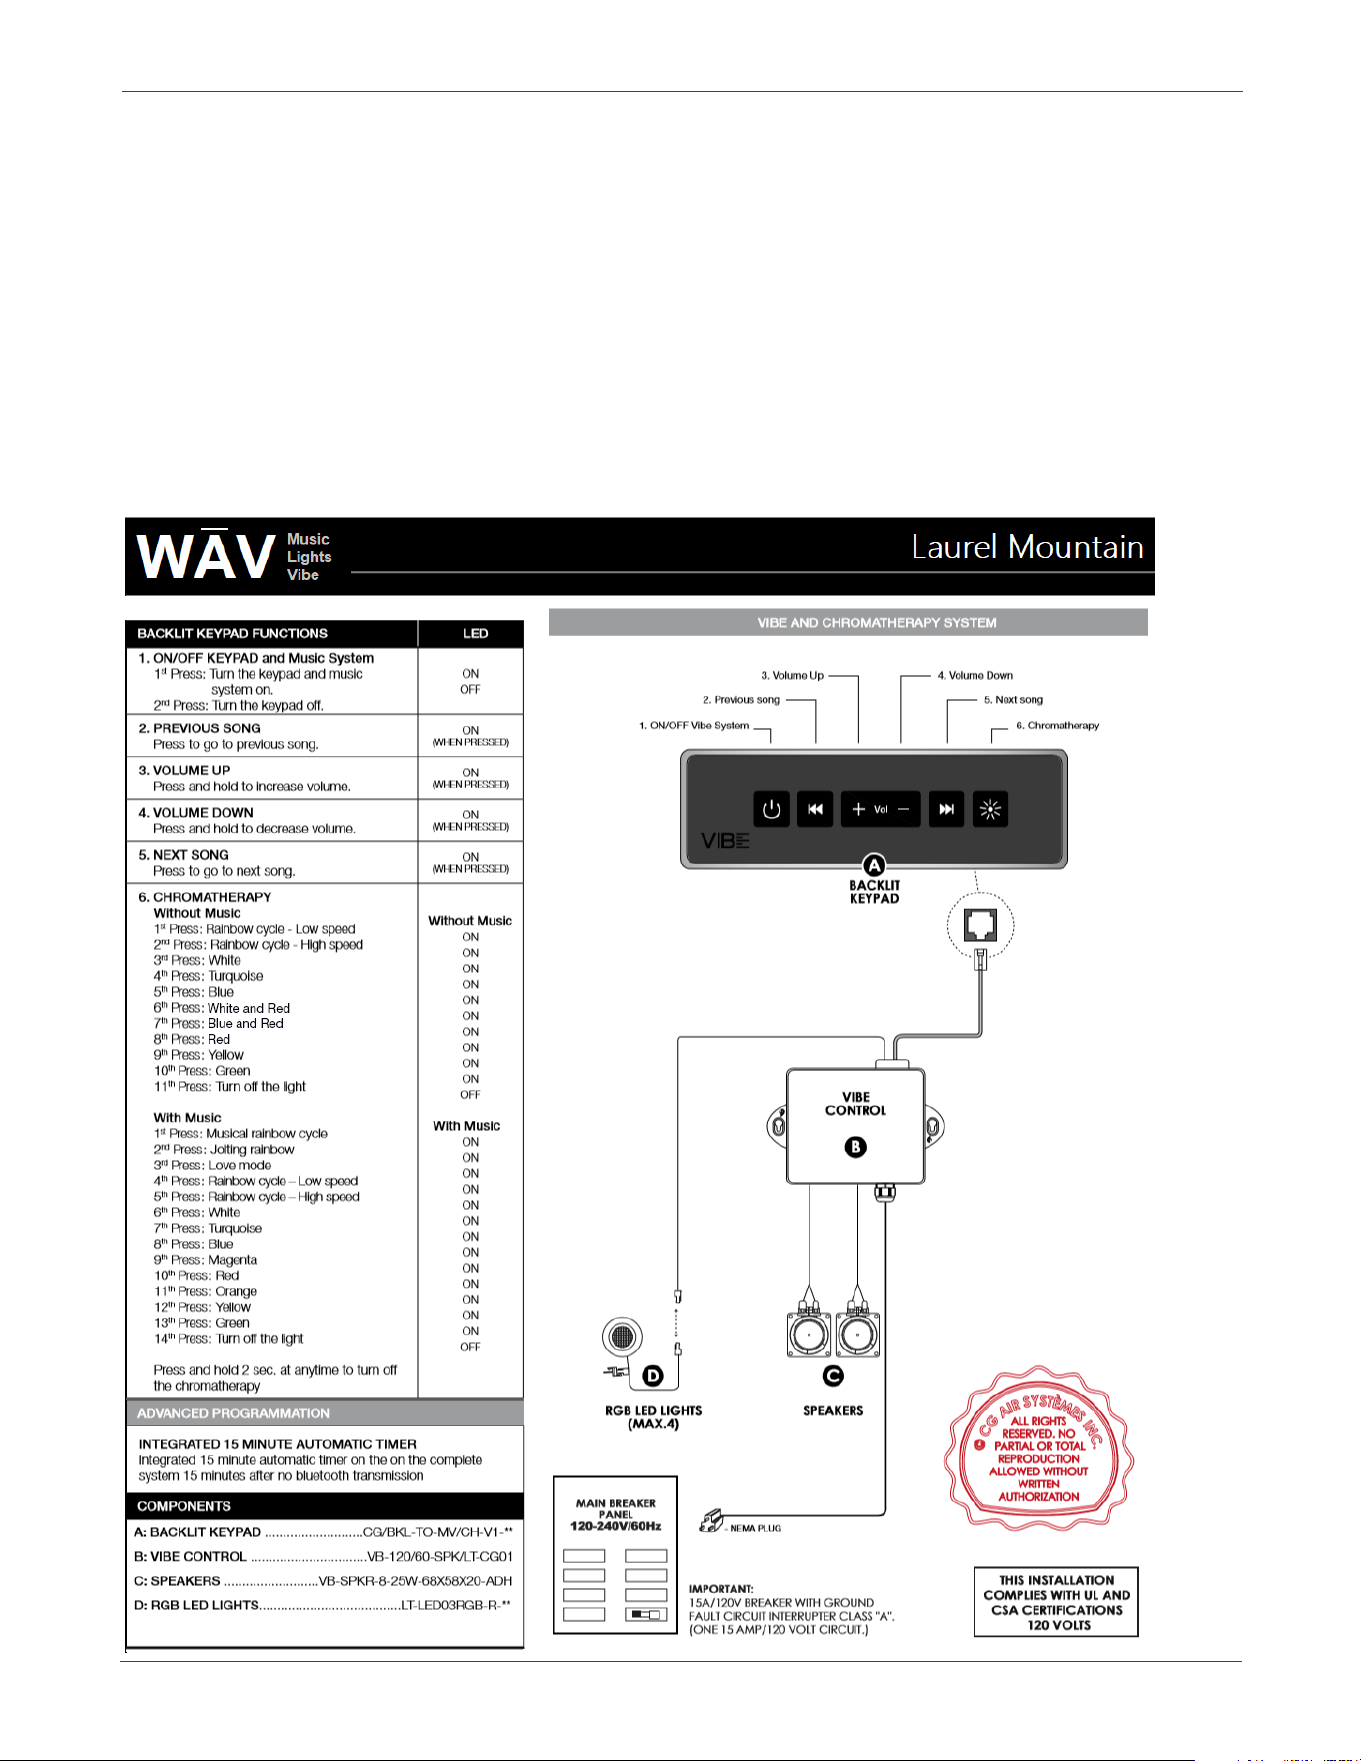
Whirlpool Sound Package
The Whirlpool Sound package includes the whirlpool pump, inline heater, and the Music, Lights, Vibe system. Simply pushing the on/
off button located on the tub will turn the whirlpool system & heater on or off. The heater runs automatically with the whirlpool system. The
dial next to it will cycle through the various speeds of the pump (low, medium, and high). Jets may be adjusted by turning the jet ring/
trim counterclockwise and the water flow will increase, while turning the jet trim clockwise will decrease the water flow. The jets can be
closed if turned far enough clockwise. The whirlpool system requires a 20 amp dedicated circuit, 120V and the inline heater requires a
2nd 20 amp dedicated circuit. See the previous page for more information about the Inline Heater.
Music. Lights. Vibe.
To Connect to Bluethooth, press the On/Off button on the Keypad, then go to the Bluetooth settings in your smart device to locate
“Vibe” and connect to it.
To sync to the music & lights, start the music, then activate the lights. The first 3 lights settings below can be synced with music.
12
Laurel Mountain | Owner's Manual & Installation Guide
www.laurelmountain.com
Air Bath Operation
The air bath system includes an air blower, heater, and lateral turbo air ports spaced around the lower side walls of the tub. The air
blower is designed to provide a gentle or vigorous massage. It is not designed to heat the air or water. The air blower and heater
require 2, 20amp dedicated circuits, 120V (one for each). Check your local codes. Make sure the GFCI protected dedicated circuit
wall outlets are located within 1.5’ from the air blower and heater.
The on/off button push button activates/deactivates the heater. The heater is designed to reduce heat loss and will not increase the
water temperature. These temperatures are preset and cannot be adjusted.
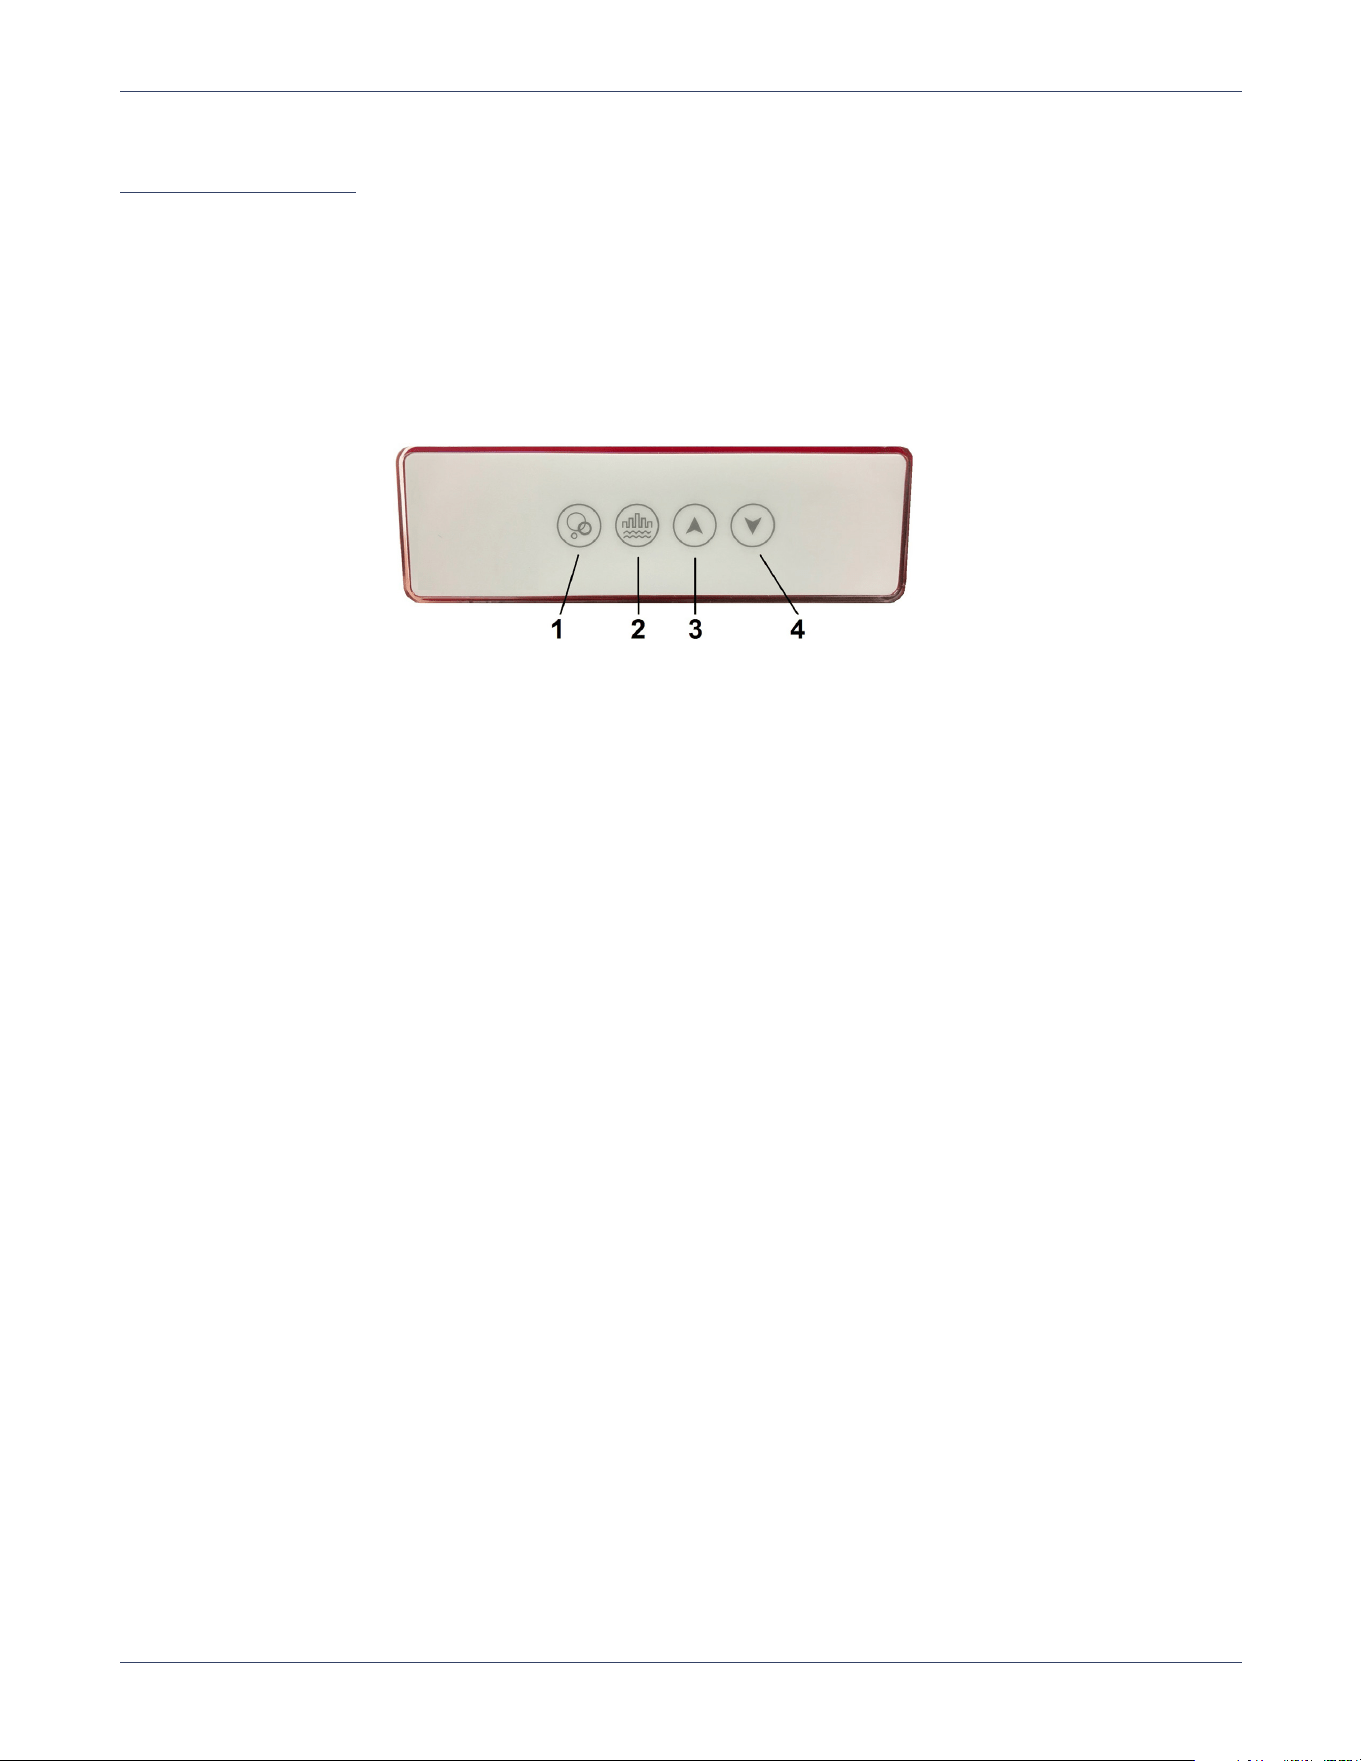
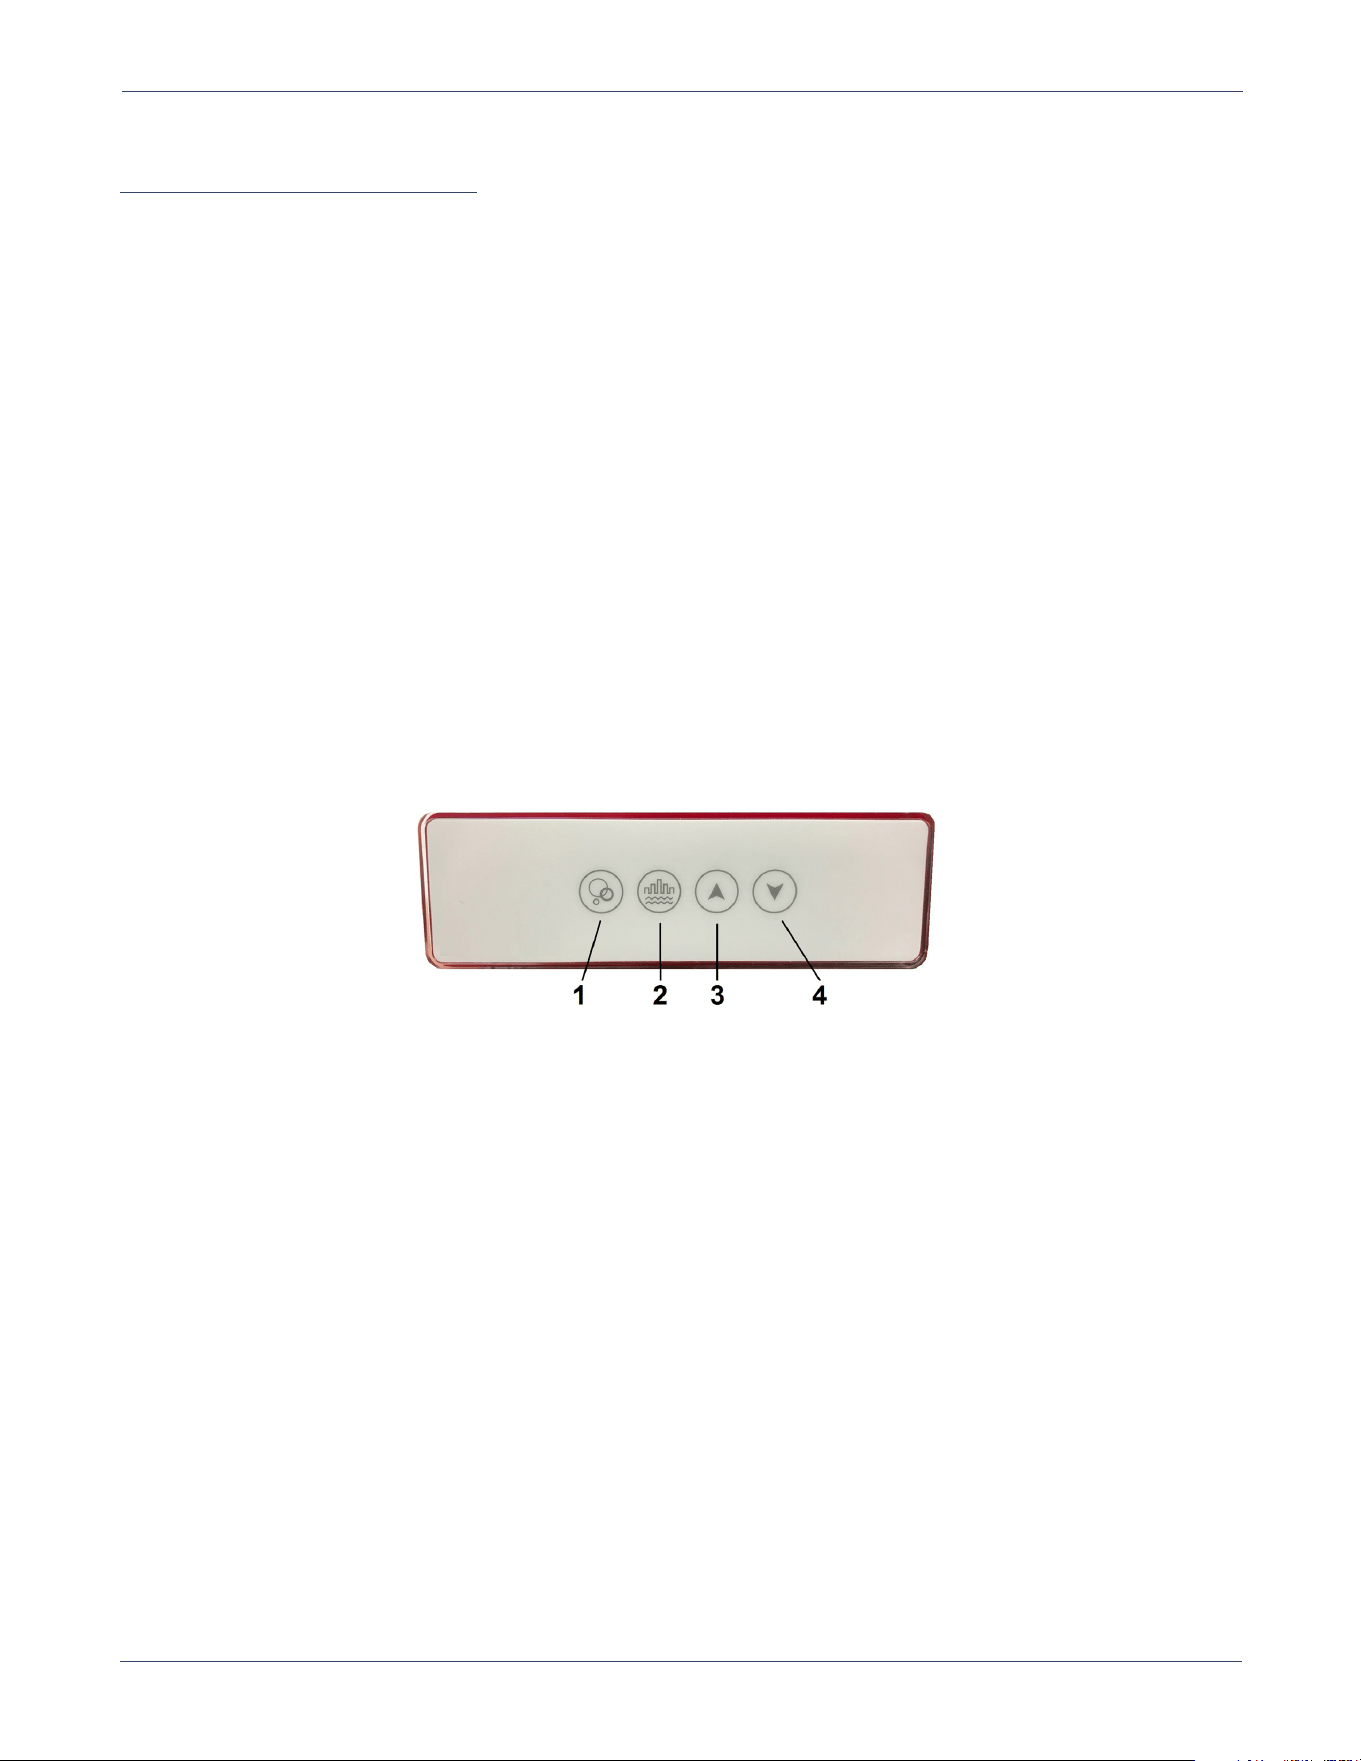
The air bath is operated by touching the control pad pictured below.
1. ON/OFF – Press to start, press again to stop
2. PULSE CYCLES - Pressing this button once will turn on Wave Mode which fluctuates the blower from minimum to maximum power.
Pressing the button again changes to Pulse Mode. In Pulse Mode, the blower will release air in short, intense bursts. Pressing the
button again will return the blower to normal.
3. INCREASE SPEED – Press and hold to increase the speed of air flow. Release when desired speed is reached.
4. DECREASE SPEED – Press and hold to decrease the speed of air flow. Release when desired speed is reached.
An automatic drying cycle will start 20 minutes after the blower is turned off. The blower LED blinks while waiting for the purge cycle. For
a manual cycle, hold the #1 button for three seconds for an immediate purge.
13
Laurel Mountain | Owner’s Manual & Installation Guide
www.laurelmountain.com
Combination Bath Operation
Combination Bath Standard Package Operation
The Combination Bath Includes the Whirlpool system and Air Bath.
Whirlpool
To operate the standard whirlpool system, simply pushing the on/off button located on the tub will turn the tub on or off. The dial next to
it will cycle through the various speeds of the pump (low, medium, and high). Jets may be adjusted by turning the jet ring/trim counter-
clockwise and the water flow will increase, while turning the jet trim clockwise will decrease the water flow. The jets can be closed if
turned far enough clockwise. The whirlpool system requires a 20 amp dedicated circuit, 120V.
Air Bath
The air bath system includes an air blower, heater, and lateral turbo air ports spaced around the lower side walls of the tub. The air
blower is designed to provide a gentle or vigorous massage. It is not designed to heat the air or water. The air blower and heater
require 2, 20amp dedicated circuits, 120V (one for each). Check your local codes. Make sure the GFCI protected dedicated circuit
wall outlets are located within 1.5’ from the air blower and heater.
The on/off button push button activates/deactivates the heater. The heater is designed to reduce heat loss and will not increase the
water temperature. These temperatures are preset and cannot be adjusted.
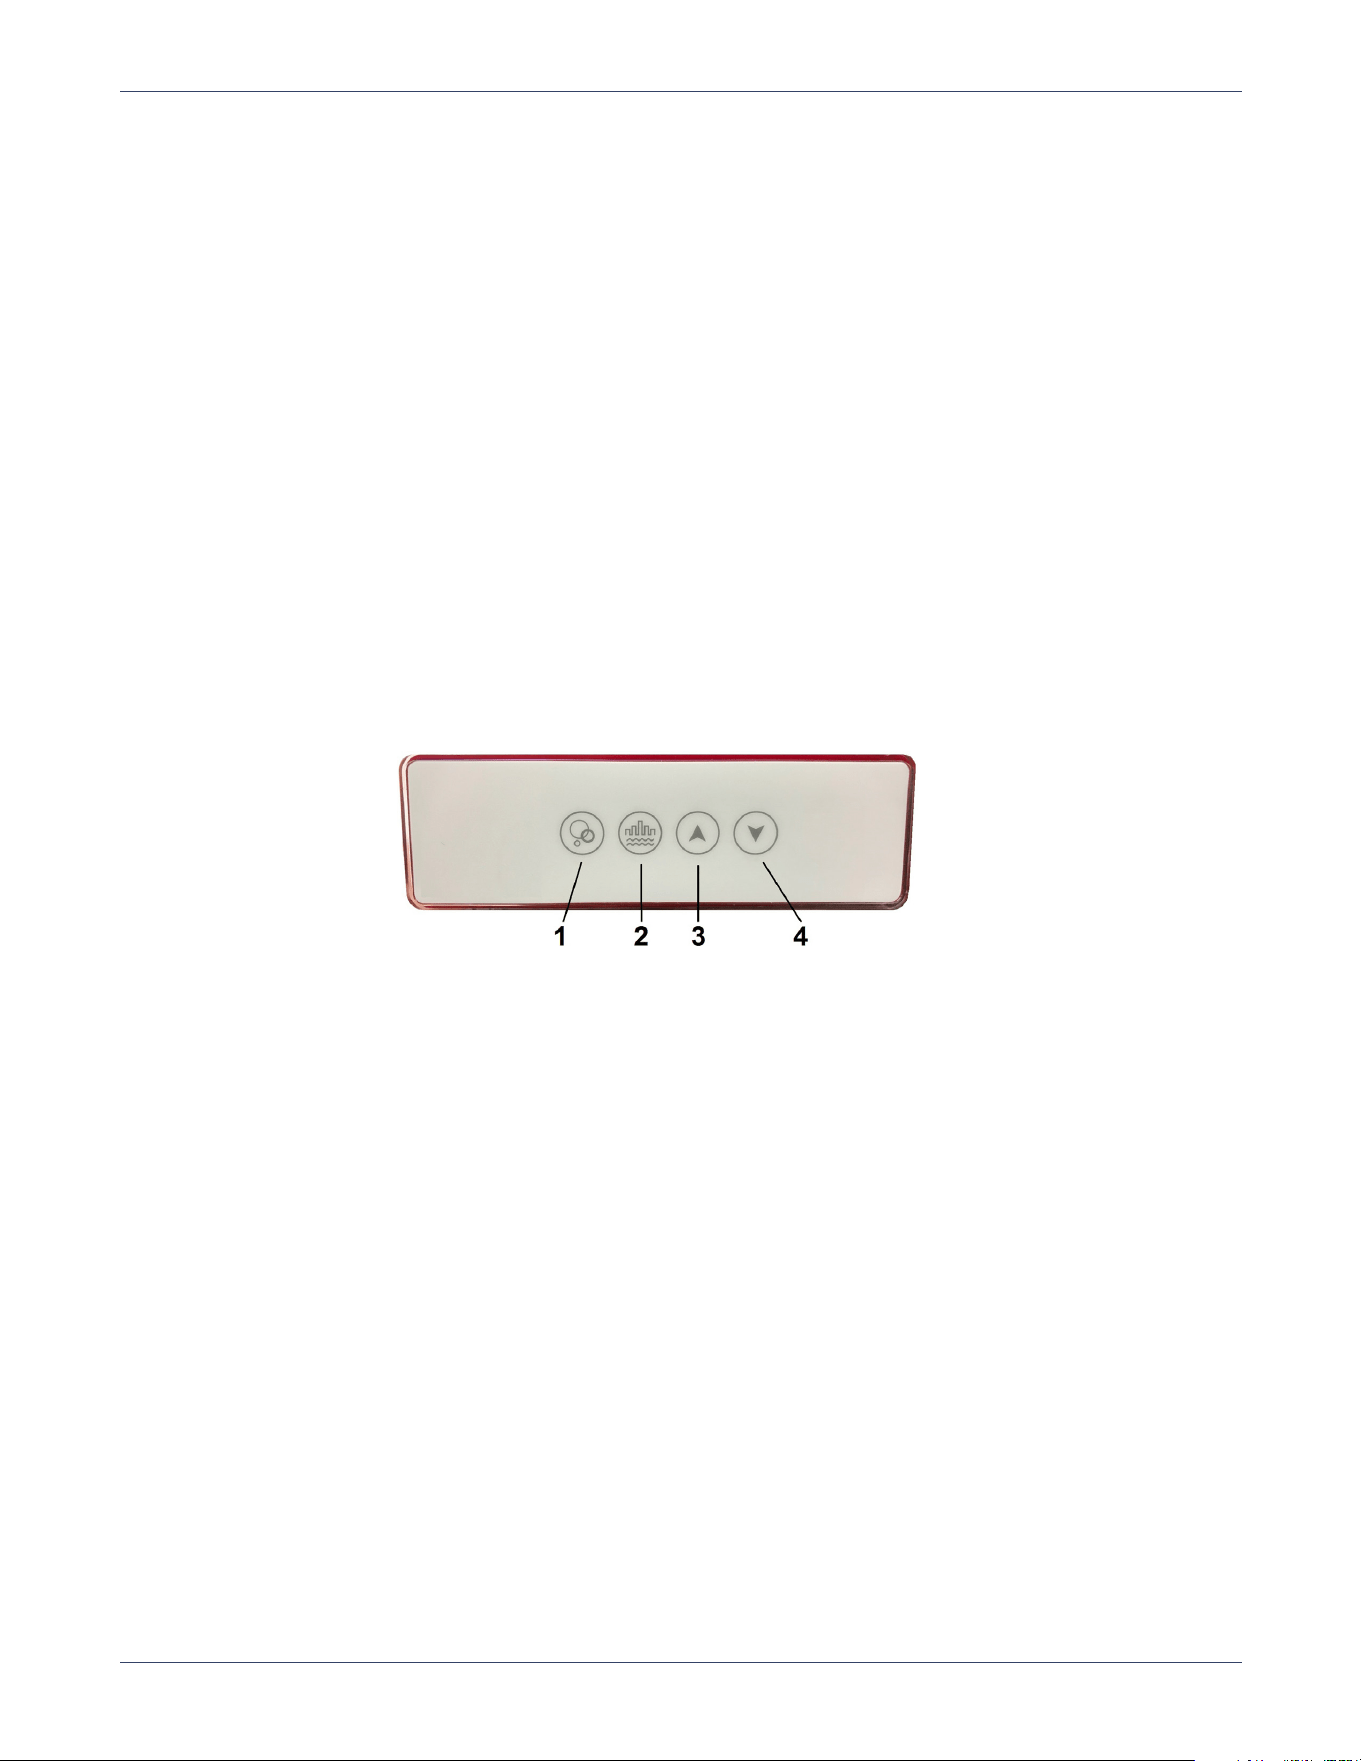
The air bath is operated by touching the control pad shown below.
1. ON/OFF – Press to start, press again to stop.
2. PULSE CYCLES - Pressing this button once will turn on Wave Mode which fluctuates the blower from minimum to maximum power.
Pressing the button again changes to Pulse Mode. In Pulse Mode, the blower will release air in short, intense bursts. Pressing the
button again will return the blower to normal.
3. INCREASE SPEED – Press and hold to increase the speed of air flow. Release when desired speed is reached.
4. DECREASE SPEED – Press and hold to decrease the speed of air flow. Release when desired speed is reached.
An automatic drying cycle will start 20 minutes after the blower is turned off. The blower LED blinks while waiting for the purge cycle. For
a manual cycle, hold the #1 button for three seconds for an immediate purge.
14
Laurel Mountain | Owner's Manual & Installation Guide
www.laurelmountain.com
Combination Bath Deluxe Package Operation
The Combination Bath Deluxe Package includes the whirlpool system and air bath discussed above, and also the Whirlpool inline
heater. The Combination Bath Deluxe Package requires 3, 20amp Dedicated GFCI
Whirlpool
To operate the standard whirlpool system, simply pushing the on/off button located on the tub will turn the tub on or off. The dial next to
it will cycle through the various speeds of the pump (low, medium, and high). Jets may be adjusted by turning the jet ring/trim counter-
clockwise and the water flow will increase, while turning the jet trim clockwise will decrease the water flow. The jets can be closed if
turned far enough clockwise. The whirlpool system requires a 20 amp dedicated circuit, 120V.
Air Bath
The air bath system includes an air blower, heater, and lateral turbo air ports spaced around the lower side walls of the tub. The air
blower is designed to provide a gentle or vigorous massage. It is not designed to heat the air or water. The air blower and heater
require 2, 20amp dedicated circuits, 120V (one for each). Check your local codes. Make sure the GFCI protected dedicated circuit
wall outlets are located within 1.5’ from the air blower and heater.
The on/off button push button activates/deactivates the heater. The heater is designed to reduce heat loss and will not increase the
water temperature. These temperatures are preset and cannot be adjusted.
The air bath is operated by touching the control pad shown below.
1. ON/OFF – Press to start, press again to stop
2. PULSE CYCLES - Pressing this button once will turn on Wave Mode which fluctuates the blower from minimum to maximum power.
Pressing the button again changes to Pulse Mode. In Pulse Mode, the blower will release air in short, intense bursts. Pressing the
button again will return the blower to normal.
3. INCREASE SPEED – Press and hold to increase the speed of air flow. Release when desired speed is reached.
4. DECREASE SPEED – Press and hold to decrease the speed of air flow. Release when desired speed is reached.
An automatic drying cycle will start 20 minutes after the blower is turned off. The blower LED blinks while waiting for the purge cycle. For
a manual cycle, hold the #1 button for three seconds for an immediate purge.
Inline Heater
The inline heater is designed to MAINTAIN the temperature of the bath water between 101-104 degrees Fahrenheit. These limits cannot
be increased or decreased. The Heater is operated by a pressure switch which is programmed into the heater. This switch allows the
heater to operate only when there is sufficient water flowing through the system. This option is equipped with a molded plug on the end
of a supply cord. Check your local codes and install a 120VAC 20amp GFCI protected dedicated circuit wall outlet within 1.5’ from
the heater unit. Plug the cord into the outlet. Every time the whirlpool unit is activated, the heater will activate as well, and will MAINTAIN
the water’s temperature between 101-104 F.
*Note: The heater has a piggyback outlet that should ONLY be used to plug in the mood light or Music. Lights. Vibe system.
15
Laurel Mountain | Owner’s Manual & Installation Guide
www.laurelmountain.com
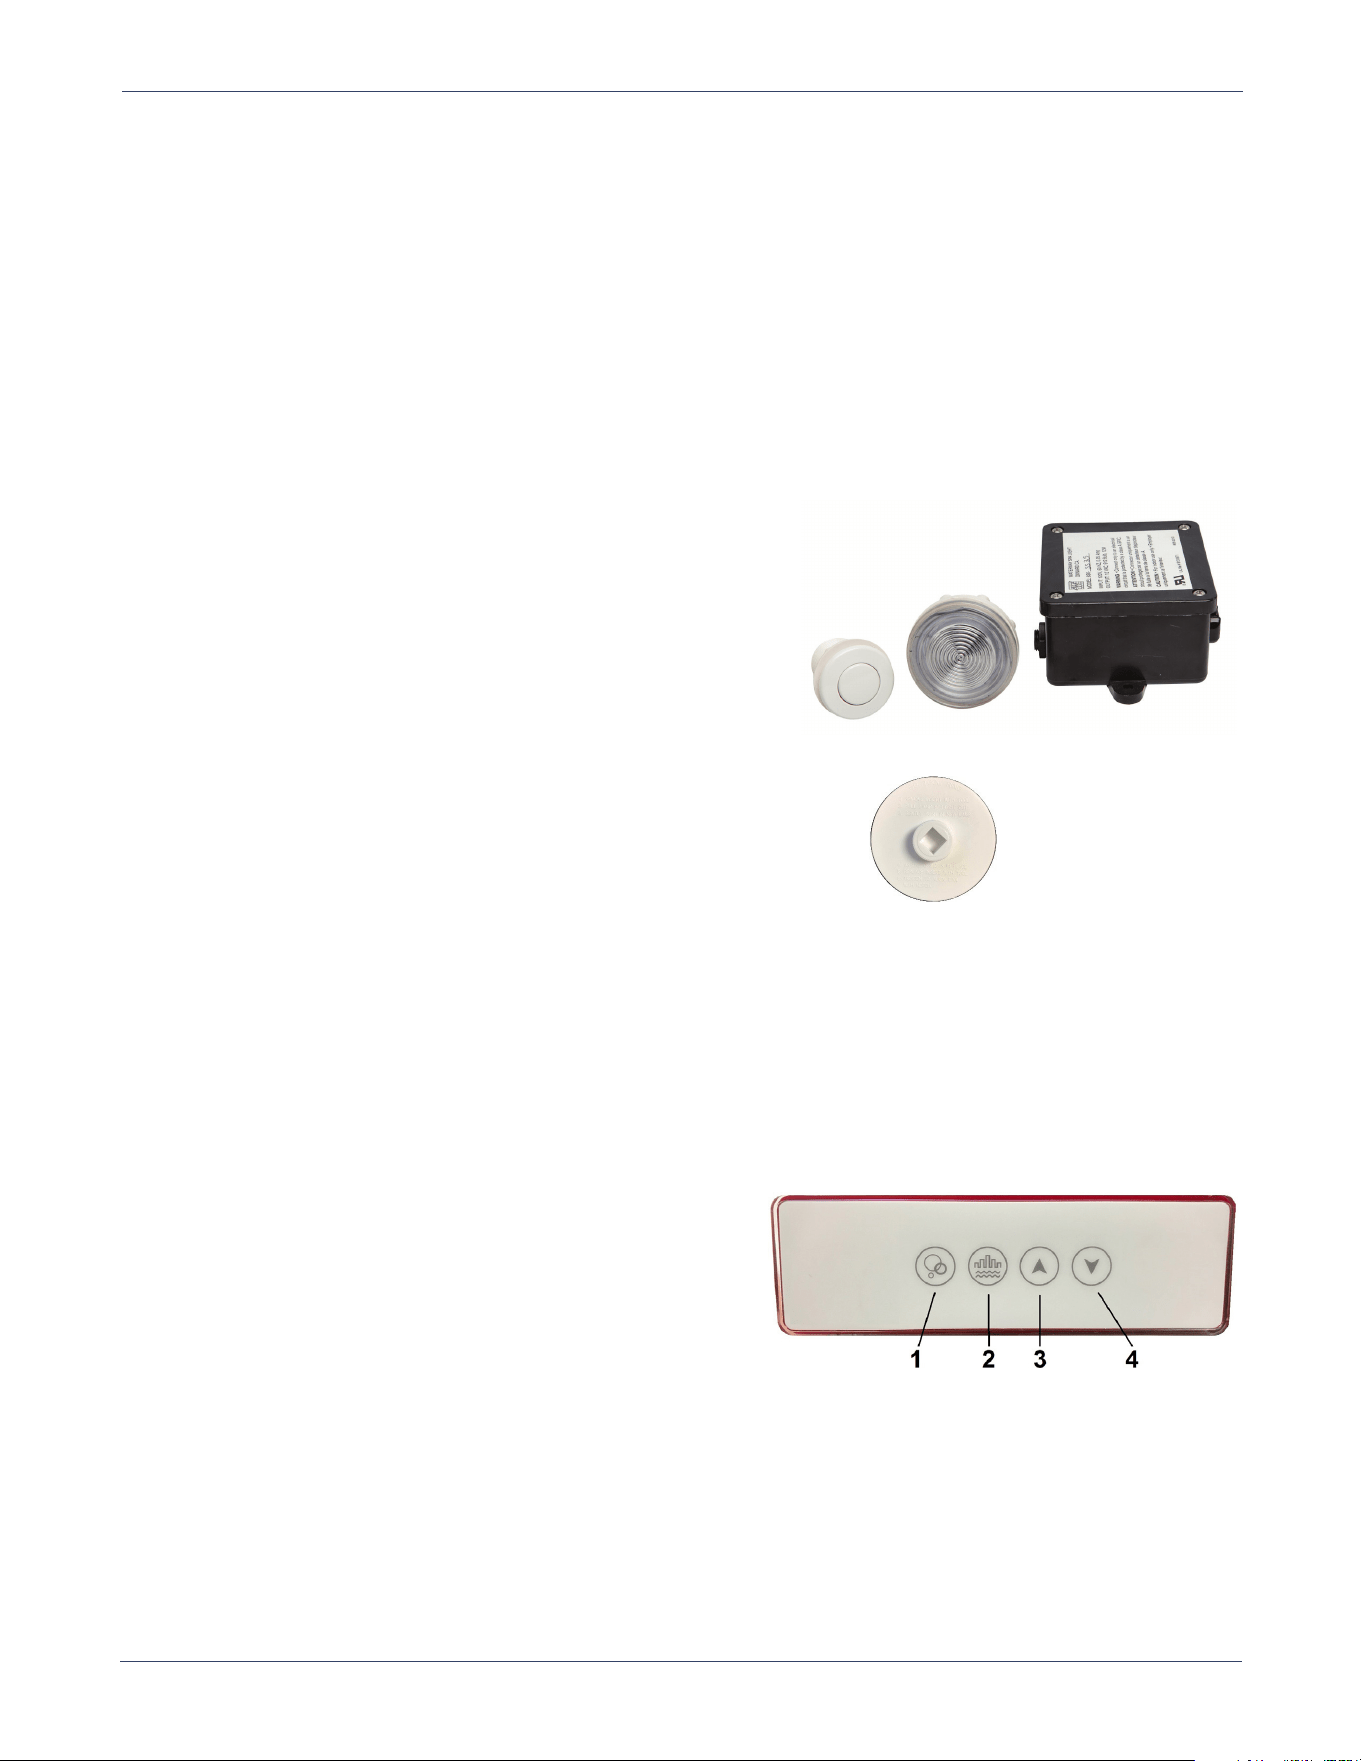
Combination Bath Illumination Package Operation
Includes Silent Pump Whirlpool System, Chromatherapy Mood Light, and Air Bath.
Silent Pump Whirlpool System
The Silent pump has a simple, push-button operation. It does not include a 3-speed control like the standard pump. However, all the
whirlpool jets can be individually adjusted for intensity. With it’s revolutionary design, the heat energy generated by the pump is released
into the water. This not only keeps the motor cool, it also generates “free heat” back into your water for a bath or whirlpool experience
that stays warm longer without the use of an additional heater. And once you’ve finished your bathing experience, it’s easy to empty
your tub with our self-draining, single stage, centrifugal motor pump.
Chromotherapy Mood Light
The Chromotherapy mood light is activated & deactivated by a single press of the button. It also comes
pre-programmed with 12 light modes. To change modes, quickly double press the button.
QUICK DOUBLE PRESS #1 – Fast wash, all colors
QUICK DOUBLE PRESS #2 – Disco, all colors
QUICK DOUBLE PRESS #3 – Faster Disco, all colors
QUICK DOUBLE PRESS #4 – Fastest Disco, all colors
QUICK DOUBLE PRESS #5 – Alternating slow wash, blue to green
QUICK DOUBLE PRESS #6 – White / Pink
QUICK DOUBLE PRESS #7 – Blue / Pink
QUICK DOUBLE PRESS #8 – Pink
QUICK DOUBLE PRESS #9 – Blue / Green
QUICK DOUBLE PRESS #10 – Blue
QUICK DOUBLE PRESS #11 – Turquoise
QUICK DOUBLE PRESS #12 – Green
Air Bath
The air bath system includes an air blower, heater, and lateral turbo air ports spaced around the lower side walls of the tub. The air
blower is designed to provide a gentle or vigorous massage. It is not designed to heat the air or water. The air blower and heater
require 2, 20amp dedicated circuits, 120V (one for each). Check your local codes. Make sure the GFCI protected dedicated circuit
wall outlets are located within 1.5’ from the air blower and heater.
The on/off button push button activates/deactivates the heater. The heater is designed to reduce heat loss and will not increase the
water temperature. These temperatures are preset and cannot be adjusted.
The air bath is operated by touching this control pad.
1. ON/OFF – Press to start, press again to stop
2. PULSE CYCLES - Pressing this button once will turn on Wave Mode
which fluctuates the blower from minimum to maximum power. Pressing
the button again changes to Pulse Mode. In Pulse Mode, the blower
will release air in short, intense bursts. Pressing the button again will
return the blower to normal.
3. INCREASE SPEED – Press and hold to increase the speed of air flow. Release when desired speed is reached.
4. DECREASE SPEED – Press and hold to decrease the speed of air flow. Release when desired speed is reached.
An automatic drying cycle will start 20 minutes after the blower is turned off. The blower LED blinks while waiting for the purge cycle. For
a manual cycle, hold the #1 button for three seconds for an immediate purge.
Chromotherapy Mood Light
Mood Light Lens Tool
16
Laurel Mountain | Owner's Manual & Installation Guide
www.laurelmountain.com
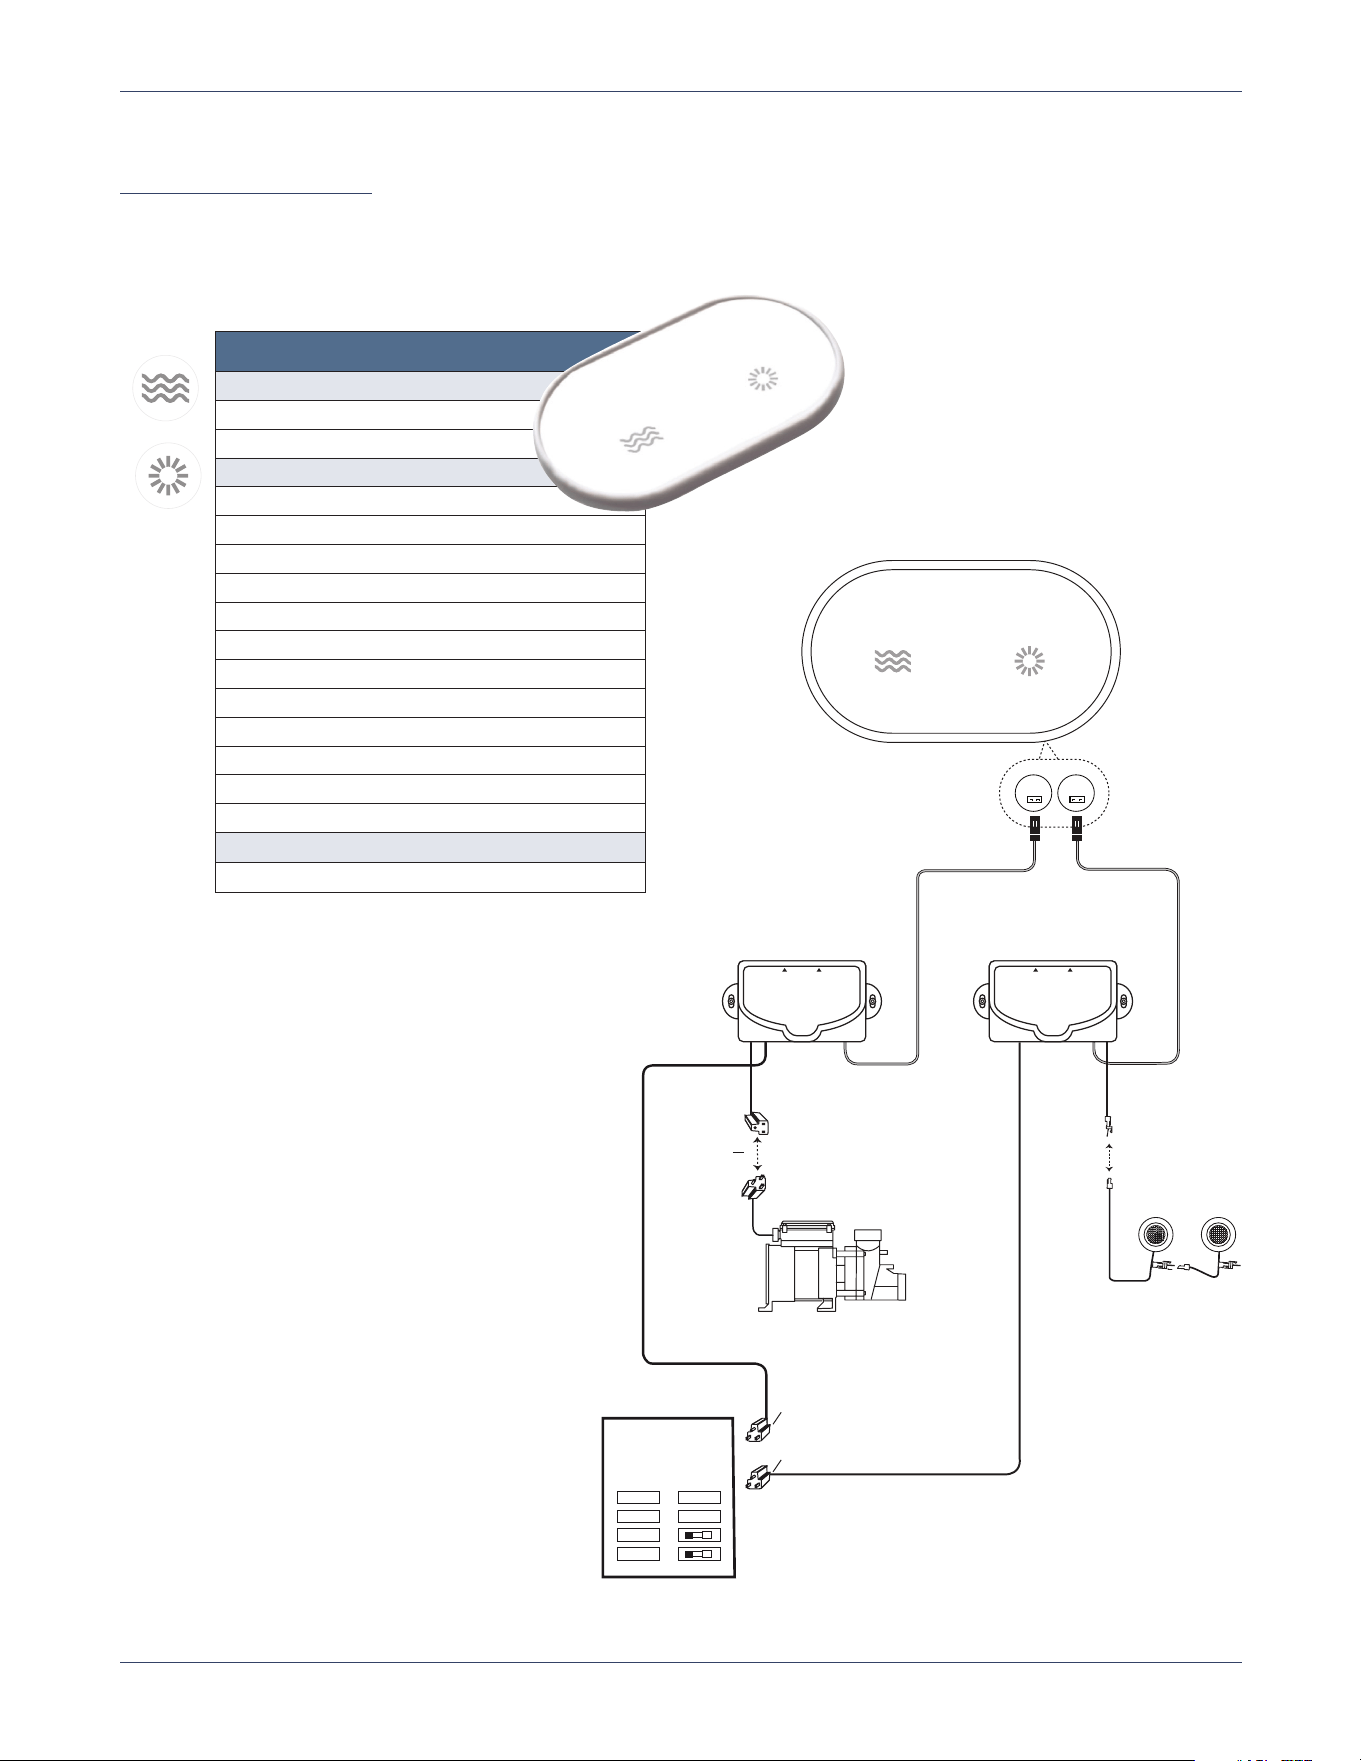
Drift Bath Operation
The Drift bath includes the silent pump and 4 LED lights.
Bath-Side On/Off Controls
Electronic Keypad
KeyPad Functions
1: On/Off Pump
1st Press: The pump starts
2nd Press: The pump stops
2: Chromatherapy
1st Press: Turn on the light in white
2nd Press: Rainbow cycle – Low speed
3rd Press: Rainbow cycle – High speed
4th Press: Turquoise
5th Press: Blue
6th Press: Magenta
7th Press: Red
8th Press: Orange
9th Press: Yellow
10th Press: Green
11th Press: Back to Rainbow cycle – Low speed
(Press and hold 2 seconds at any time to turn off the light.)
ADVANCED PROGRAMMING
Integrated 20 minutes pump shut-off automatic timer
MAIN BREAKER
PANEL
120V-240V/60Hz
NEMA PLUG
PUMP
LIGHT
CONTROL
BOX
PUMP CONTROL
BOX
NEMA PLUG
KEYPAD
OUTPUT
INTPUT
UP/HAUT
W/D
KEYPADAUX
B
OUTPUT
INTPUT
UP/HAUT
W/D
KEYPADAUX
C
LED LIGHTS
IMPORTANT:
15A/120V DOUBLE POLE BREAKER WITH
GROUND FAULT CIRCUIT INTERRUPTER CLASS "A".
(TWO 15 AMPS/120 VOLTS CIRCUIT.)
NEMA PLUG

17
Laurel Mountain | Owner’s Manual & Installation Guide
www.laurelmountain.com
Care & Cleaning Instructions
Whirlpool
Prior to using the whirlpool, the tub and its system(s) should be thoroughly cleaned and disinfected. DO NOT use abrasive cleaners
on the high-gloss acrylic finish. Use a non-abrasive cleaner and rinse thoroughly after cleaning. To remove the labels on the tub, we
recommend using fingernail polish remover if they do not come off easily. To clean the whirlpool system, fill the tub up with water at
least 2” above the highest jet, then add 2 tsp. of low sudsing dishwashing detergent and no more than 8 oz. of household bleach.
Operate your whirlpool for 5-10 minutes and then drain the tub. Refill the tub with water and run the system for another 5 minutes,
then drain. Repeat every 30 days.
All Tubs
Your bath has an acrylic finish and will retain its high luster for years with proper care. Never use an abrasive cleaner or pad to clean
your bathtub. Always use a soft cloth or sponge along with a spray liquid non-abrasive bath cleaner/disinfectant. On the metallic finish,
use only a soft cloth and warm soapy water.
Laurel Mountain Warranty
This Laurel Mountain bath is warranted to the original purchaser to be free from defects in material and workmanship for the following
periods. The bathtub shell carries a limited lifetime warranty. The pump, blower and heater have a limited 10 year warranty. All other
parts have a limited 5 year warranty. Proof of purchase is required.
This warranty is issued to the original purchaser and shall be effective from the date of purchase as shown on purchaser’s receipt. Laurel
Mountain will repair or replace (at their choice) any unit which proves to be defective in material or workmanship under normal use
and service, having been properly installed. This warranty is the only express warranty made by Laurel Mountain and is limited to the
duration of this warranty. Any labor charges and/or damage incurred in installation, repair or replacement as well as incidental and
consequential damages connected therewith are excluded and will not be paid by Laurel Mountain. Some states do not allow the
exclusion or limitation of incidental or consequential damages, so the above limitation or exclusion may not apply to you. This warranty
is void for any damage to the bath due to abuse, misuse, neglect, accident, improper installation, any use violating instructions furnished
by us, or repair not authorized in writing by Laurel Mountain.

Customer Service: 800-930-0050 • laurelmountain.com
REV. 01.23
Troubleshooting Common Issues
WHIRLPOOL/DRIFT BATH
PROBLEM SOLUTION
On/Off Button
Won’t depress Remove trim ring and plunger. Clean
interior, lubricate with small amount
of vasoline.
Pump
Won’t start Check that all plugs are installed.
Check electric power supply. Reset
the circuit breaker or replace fuse if
necessary.
Check ground fault circuit interrupter.
Reset if tripped.
Confirm both ends of the clear
plastic on/off air switch tubes are
securely connected and is not
pinched or kinked.
Motor hums Check to see if highest jet is
clogged.
Check to see that water is at a high
enough level for pump to prime.
Check for air leak in suction line.
Slightly loosen pump union & then
retighten by hand.
Check for obstruction in piping
system.
Leaks
Pump unions
Pump o-ring or seal
Loosen pump unions and inspect
o-ring for proper sealing. Retighten.
Pipe to jet Call Laurel Mountain Whirlpools
customer service at 1-800-930-
0050.
Jet
Low/no water pressure Turn the trim ring around the jet. This
will open/close the jet.
See Laurel Mountain Jet video on
YouTube.
AIR BATH
PROBLEM SOLUTION
Blower
Fails to operate Check electric power supply. Reset
the circuit breaker or replace fuse if
necessary.
Check ground fault circuit interrupter.
Reset if tripped.
If the system has been functioning
for an extended period of time, it is
possible that the thermic protection
has shut off the motor. Allow to cool
off for at least 30 minutes before
further use.
Turns on by itself This is part of the 24 Hour Program-
mable Drying Cycle. Deactivation is
covered on Page 13 of the manual.
Runs but no air is blown
through jets
Verify that the main air hose from the
manifold to the blower is properly
connected. If necessary, reconnect
and tighten clamps.
Air Heater
Does not appear to be
working
Let the blower run for 5 minutes to
warm up the piping before filling
the tub. Carefully feel the flexible
connection hose where it connects
to blower. The hose and its immedi-
ate area should feel warm to the
touch, if not, call Laurel Mountain
Whirlpools.
If your tub is installed against 2
outside walls, adequate insulation is
recommended to minimize heat loss.