Before using your new product, please read these instructions to prevent any damage.
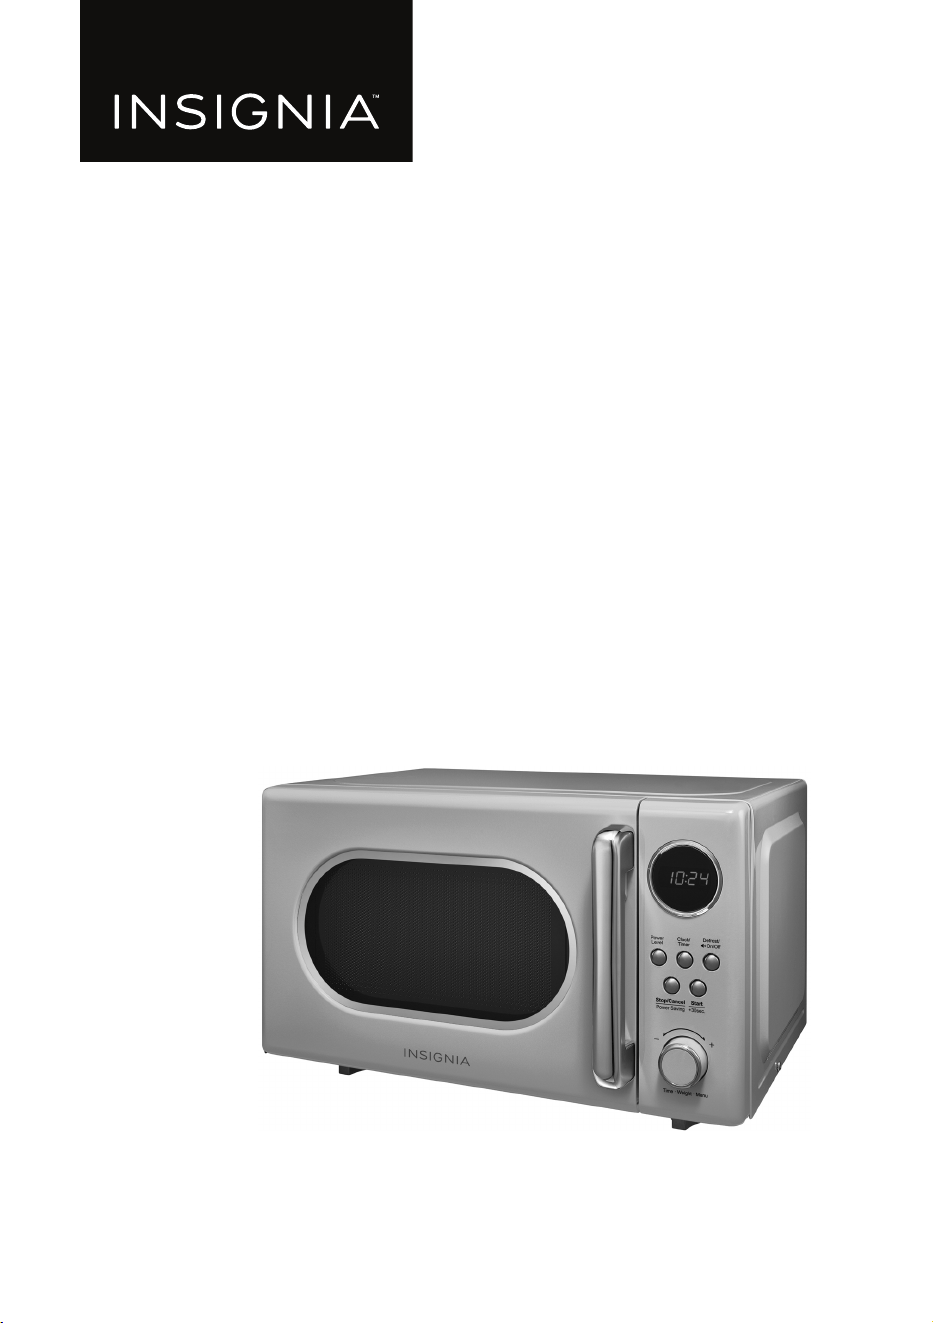
USER GUIDE
.7 Cu. Ft. Retro Compact
Microwave
NS-MW7RM5/NS-MW7RM5-C/
NS-MW7RR5/NS-MW7RR5-C/
NS-MW7RC5/NS-MW7RC5-C

www.insigniaproducts.com
2
Contents
SAFETY INFORMATION . . . . . . . . . . . . . . . . . . . . . . . . . . . . . . . . . . . . . . . . . . . . . . . . . . . . . . . . . 3
GROUNDING INSTRUCTIONS . . . . . . . . . . . . . . . . . . . . . . . . . . . . . . . . . . . . . . . . . . . . . . . 5
RADIO INTERFERENCE . . . . . . . . . . . . . . . . . . . . . . . . . . . . . . . . . . . . . . . . . . . . . . . . . . . . . . 5
Cookware and cooking materials . . . . . . . . . . . . . . . . . . . . . . . . . . . . . . . . . . . . . . . . . . . 6
Materials you can use . . . . . . . . . . . . . . . . . . . . . . . . . . . . . . . . . . . . . . . . . . . . . . . . . . . . . . 6
Materials to be avoided . . . . . . . . . . . . . . . . . . . . . . . . . . . . . . . . . . . . . . . . . . . . . . . . . . . . 7
Package contents . . . . . . . . . . . . . . . . . . . . . . . . . . . . . . . . . . . . . . . . . . . . . . . . . . . . . . . . . . . . . . 7
Features . . . . . . . . . . . . . . . . . . . . . . . . . . . . . . . . . . . . . . . . . . . . . . . . . . . . . . . . . . . . . . . . . . . . . . . 7
Microwave. . . . . . . . . . . . . . . . . . . . . . . . . . . . . . . . . . . . . . . . . . . . . . . . . . . . . . . . . . . . . . . . . 8
Control panel . . . . . . . . . . . . . . . . . . . . . . . . . . . . . . . . . . . . . . . . . . . . . . . . . . . . . . . . . . . . . . 9
Setting up your microwave . . . . . . . . . . . . . . . . . . . . . . . . . . . . . . . . . . . . . . . . . . . . . . . . . . . .10
Installing the turntable . . . . . . . . . . . . . . . . . . . . . . . . . . . . . . . . . . . . . . . . . . . . . . . . . . . . 11
Setting the clock and the timer . . . . . . . . . . . . . . . . . . . . . . . . . . . . . . . . . . . . . . . . . . . . . . . . 12
Setting the clock . . . . . . . . . . . . . . . . . . . . . . . . . . . . . . . . . . . . . . . . . . . . . . . . . . . . . . . . . . 12
Using the kitchen timer . . . . . . . . . . . . . . . . . . . . . . . . . . . . . . . . . . . . . . . . . . . . . . . . . . . 12
Cooking in your microwave . . . . . . . . . . . . . . . . . . . . . . . . . . . . . . . . . . . . . . . . . . . . . . . . . . . .13
Microwave cooking . . . . . . . . . . . . . . . . . . . . . . . . . . . . . . . . . . . . . . . . . . . . . . . . . . . . . . . 13
Cooking quickly. . . . . . . . . . . . . . . . . . . . . . . . . . . . . . . . . . . . . . . . . . . . . . . . . . . . . . . . . . . 14
Cooking with the auto menus . . . . . . . . . . . . . . . . . . . . . . . . . . . . . . . . . . . . . . . . . . . . . 14
Using multi-stage cooking . . . . . . . . . . . . . . . . . . . . . . . . . . . . . . . . . . . . . . . . . . . . . . . . 15
Muting the sound . . . . . . . . . . . . . . . . . . . . . . . . . . . . . . . . . . . . . . . . . . . . . . . . . . . . . . . . .16
Using the energy saving (Eco) mode . . . . . . . . . . . . . . . . . . . . . . . . . . . . . . . . . . . . . . . 16
Defrosting in your microwave. . . . . . . . . . . . . . . . . . . . . . . . . . . . . . . . . . . . . . . . . . . . . . . . . . 16
Defrosting by weight. . . . . . . . . . . . . . . . . . . . . . . . . . . . . . . . . . . . . . . . . . . . . . . . . . . . . . 16
Defrosting by time . . . . . . . . . . . . . . . . . . . . . . . . . . . . . . . . . . . . . . . . . . . . . . . . . . . . . . . .17
Changing other microwave settings. . . . . . . . . . . . . . . . . . . . . . . . . . . . . . . . . . . . . . . . . . . . 17
Checking the time and power level . . . . . . . . . . . . . . . . . . . . . . . . . . . . . . . . . . . . . . . . 17
Using the child-lock . . . . . . . . . . . . . . . . . . . . . . . . . . . . . . . . . . . . . . . . . . . . . . . . . . . . . . .17
Resetting the turntable. . . . . . . . . . . . . . . . . . . . . . . . . . . . . . . . . . . . . . . . . . . . . . . . . . . . 17
Troubleshooting . . . . . . . . . . . . . . . . . . . . . . . . . . . . . . . . . . . . . . . . . . . . . . . . . . . . . . . . . . . . . . 17
Maintaining your microwave. . . . . . . . . . . . . . . . . . . . . . . . . . . . . . . . . . . . . . . . . . . . . . . . . . . 18
Obtaining replacement parts . . . . . . . . . . . . . . . . . . . . . . . . . . . . . . . . . . . . . . . . . . . . . . . . . . 19
Specifications . . . . . . . . . . . . . . . . . . . . . . . . . . . . . . . . . . . . . . . . . . . . . . . . . . . . . . . . . . . . . . . . . 19
ONE-YEAR LIMITED WARRANTY . . . . . . . . . . . . . . . . . . . . . . . . . . . . . . . . . . . . . . . . . . . . . . . . 20

3
.7 Cu. Ft. Retro Compact Microwave
www.insigniaproducts.com
SAFETY INFORMATION
PRECAUTIONS TO AVOID POSSIBLE
EXPOSURE TO EXCESSIVE MICROWAVE
ENERGY:
1 Do not attempt to operate this microwave with the door open because this can result
in harmful exposure to microwave energy. It is important not to defeat or tamper
with the safety interlocks.
2 Do not place any object between the microwave front face and the door or allow soil
or cleaner residue to accumulate on sealing surfaces.
3 Do not operate the microwave if it is damaged. It is particularly important that the
microwave door closes properly and that there is no damage to the:
(a) DOOR (bent)
(b) HINGES and LATCHES (broken or loosened)
(c) DOOR SEALS and SEALING SURFACES
4 The microwave should not be adjusted or repaired by anyone except properly
qualified service personnel.
IMPORTANT SAFETY INSTRUCTIONS
1 Read all instructions before using the microwave.
2 Read and follow the specific: PRECAUTIONS TO AVOID POSSIBLE EXPOSURE TO
EXCESSIVE MICROWAVE ENERGY: found on page 3.
3 As with any cooking appliances, close supervision is necessary to reduce the risk of a
fire in the microwave cavity or when used by children.
4 To reduce the risk of fire in the microwave cavity:
• Do not overcook food. Carefully attend the microwave when paper, plastic, or other
combustible materials are placed inside the microwave to facilitate cooking.
• Remove wire twist-ties and metal handles from paper or plastic containers/bags
before placing them in the microwave.
• If materials inside the microwave ignite, keep the microwave door closed. Turn the
microwave off and unplug the microwave or shut off power at the fuse or circuit
breaker panel.
• Do not use the microwave cavity for storage purposes. Do not leave paper
products, cooking utensils, or food in the cavity when not in use.
5 This microwave must be grounded. Connect only to a properly grounded outlet. See
GROUNDING INSTRUCTIONS found on page 5.
6 Install or locate this appliance only in accordance with the provided installation
instructions.
WARNING: To reduce the risk of burns, electric shock, fire, injury to persons, or
exposure to excessive microwave energy when using your microwave, follow
these basic safety precautions.
4
www.insigniaproducts.com
7 Some products, such as whole eggs and sealed containers (for example closed glass
jars), are able to explode and should not be heated in this microwave.
8 Use this microwave only for its intended purpose, as described in this manual. Do not
use corrosive chemicals or vapors in this microwave. This microwave is specifically
designed to heat, cook, or dry food. It is not designed for industrial or laboratory use.
9 HOT CONTENTS CAN CAUSE SEVERE BURNS. DO NOT ALLOW CHILDREN TO USE THE
MICROWAVE. Use caution when removing hot items. Do not operate this microwave
if it has a damaged cord or plug, if it is not working properly, or if it has been
damaged or dropped.
10 This microwave should be serviced only by qualified service technicians. Contact the
nearest authorized service facility for examination, repair, or adjustment.
11 Do not cover or block any openings on the microwave.
12 Do not store or use this microwave outdoors.
13 Do not use this microwave near water (for example, near a kitchen sink, in a wet
basement, near a swimming pool, or similar locations).
14 Do not immerse the cord or plug in water.
15 Keep the cord away from heated surfaces.
16 Do not let the cord hang over the edge of a table or counter.
17 When cleaning the surfaces of the door and the microwave that come together on
closing the door, use only mild, nonabrasive soaps or detergents applied with a
sponge or soft cloth.
18 Liquids, such as water, coffee, or tea can be overheated beyond the boiling point
without appearing to be boiling. Visible bubbling or boiling when the container is
removed from the microwave is not always present. THIS COULD RESULT IN VERY HOT
LIQUIDS SUDDENLY BOILING OVER WHEN THE CONTAINER IS DISTURBED OR A
SPOON OR OTHER UTENSIL IS INSERTED INTO THE LIQUID.
• Do not overheat the liquid.
• Stir the liquid both before and halfway through heating it.
• Do not use straight-sided containers with narrow necks.
• After heating, allow the container to stand in the microwave for a short time before
removing the container.
• Use extreme care when inserting a spoon or other utensil into the container.
SAVE THESE INSTRUCTIONS
WARNING: Handling the power cord on this microwave, or cords associated
with accessories sold with this microwave, will expose you to lead, a chemical
known to the state of California to cause cancer and birth defects or other
reproductive harm.
Wash your hands after handling.
5
.7 Cu. Ft. Retro Compact Microwave
www.insigniaproducts.com
GROUNDING INSTRUCTIONS
This appliance must be grounded. In the event of an electrical short circuit,
grounding reduces the risk of electric shock by providing an escape wire for the
electric current. This appliance is equipped with a cord having a grounding wire
with a grounding plug. The plug must be plugged into an outlet that is properly
installed and grounded.
1 A short power supply cord is provided to reduce the risks resulting from becoming
entangled in or tripping over a longer cord.
2 Longer cord sets or extension cords are available and may be used if care is exercised
in their use.
3 If a long cord or extension cord is used:
• The marked electrical rating of the cord set or extension cord should be at least as
great as the electrical rating of the appliance.
• The extension cord must be a grounding-type 3-wire cord.
• The longer cord should be arranged so that it will not drape over the counter top or
tabletop where it can be pulled on by children or tripped over unintentionally.
RADIO INTERFERENCE
1 Operation of the microwave may cause interference to your radio, TV, or similar
equipment.
2 When there is interference, it may be reduced or eliminated by taking the following
measures:
• Clean the door and the sealing surface of the microwave.
• Reorient the receiving antenna of the radio or television.
• Relocate the microwave with respect to the receiver.
• Move the microwave away from the receiver.
• Plug the microwave into a different outlet so that the microwave and receiver are
on different branch circuits.
• This device complies with part 18 of the FCC Rules (US versions only).
DANGER - Electric Shock Hazard
Touching some of the internal components can cause serious
personal injury. Do not disassemble this appliance.
WARNING - Electric Shock Hazard
Improper use of the grounding plug can result in electric shock. Do
not plug into an outlet until the appliance is properly installed and
grounded.
Consult a qualified electrician or serviceman if the grounding
instructions are not completely understood, or if doubt exists as to
whether the appliance is properly grounded.
6
www.insigniaproducts.com
Cookware and cooking materials
Cookware and other materials must fit on the turntable. Always use oven mitts or pot
holders because cookware may become hot.
Refer to the Materials you can use
on page 6 and Materials to be avoided on page 7
tables as a guide, then test before using.
There may be certain non-metallic utensils that are not safe to use for microwaving. If in
doubt, you can test the utensil in question following the procedure below.
Utensils test
1 Fill a microwave-safe container with 1 cup (250 ml) of cold water, along with the
utensil in question.
2 Cook on maximum power for one minute. Do not exceed one minute cooking time.
3 Carefully feel the utensil. If the empty utensil is warm, do not use it for microwave
cooking.
4 To prevent the risk of fire, do not put hot pads, blankets, clothes, or other textiles in
the microwave.
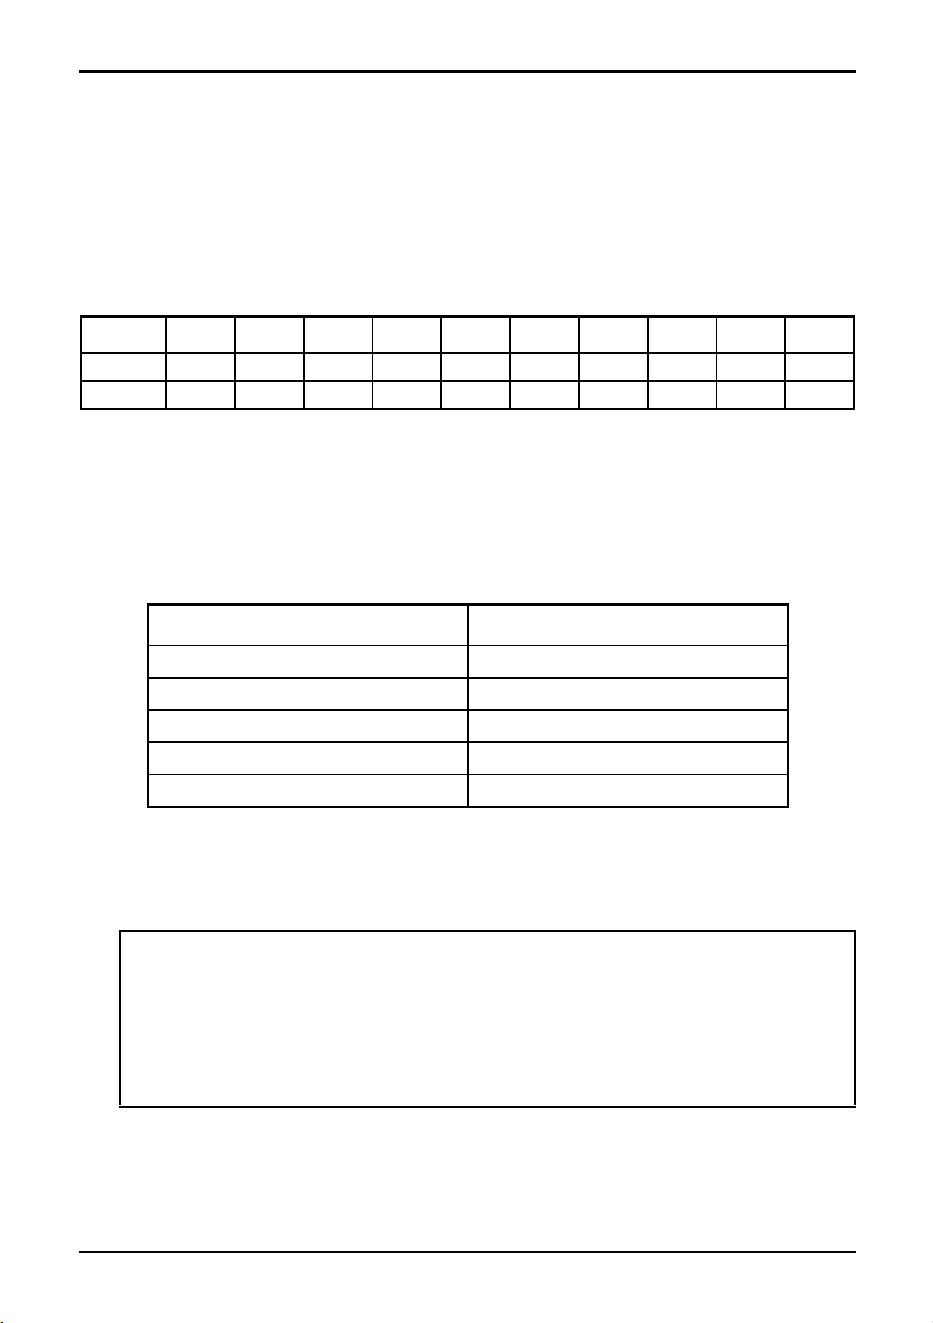
Materials you can use
WARNING: Personal Injury Hazard
Tightly-closed containers could explode. Closed containers should be opened and
plastic pouches should be pierced before cooking.
MATERIAL REMARKS
Browning dish Follow the manufacturer’s instructions. The bottom of the browning dish
must be at least 3/16-in. (5 mm) above the turntable. Incorrect usage may
cause the turntable to break.
Dinnerware Use microwave-safe only. Follow the manufacturer's instructions. Do not
use cracked or chipped dishes.
Glass jars Always remove the lid. Use only to heat food until just warm. Most glass
jars are not heat resistant and may break.
Glassware Use heat-resistant oven glassware only. Make sure that there is no metallic
trim. Do not use cracked or chipped dishes.
Oven cooking
bags
Follow the manufacturer’s instructions. Do not close with a metal tie. Make
slits to let steam escape.
Paper plates and
cups
Use for short–term cooking/warming only. Do not leave your microwave
unattended while cooking.
Paper towels Use to cover food for reheating and absorbing fat. Use with supervision for
short-term cooking only.
Parchment paper Use as a cover to prevent splattering or a wrap for steaming.
Plastic Use only if labeled “Microwave Safe.” Follow the manufacturer’s
instructions. Some plastic containers soften as the food inside gets hot.
“Boiling bags” and tightly closed plastic bags should be slit, pierced, or
vented, as indicated on the package.
Plastic wrap Use microwave-safe only. Use to cover food during cooking to retain
moisture. Do not let plastic wrap touch food.
7
.7 Cu. Ft. Retro Compact Microwave
www.insigniaproducts.com
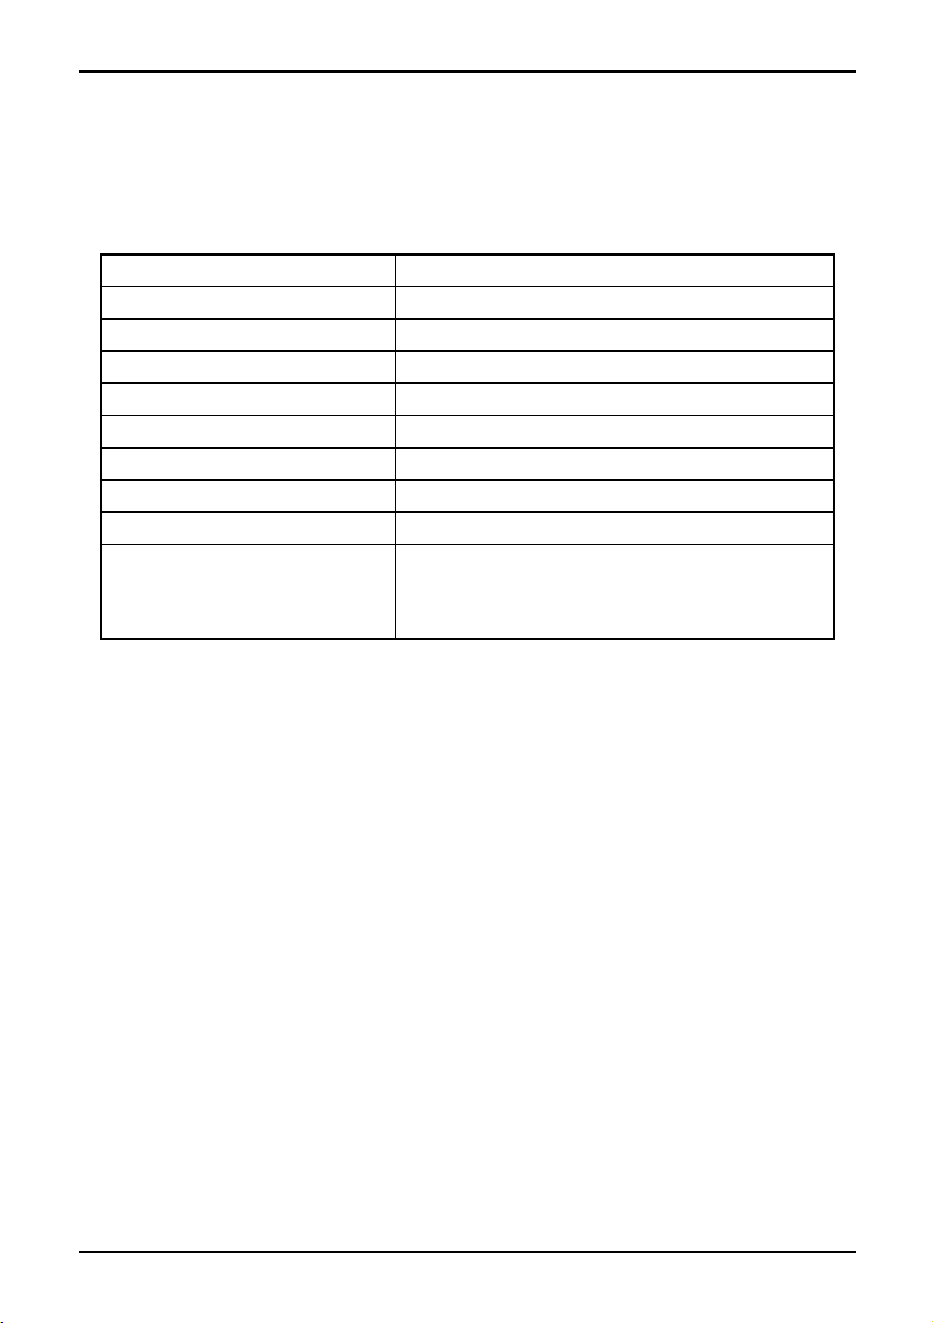
Materials to be avoided
Package contents
• .7 Cu. Ft. Retro Compact Microwave
• Glass turntable
• Turntable ring assembly
• User Guide
Features
• Cook or reheat meat, vegetables, pasta, and more, at the touch of a button using 700
watts
• Mint green, red, or cream color, round viewing window, and chrome details provide a
fun retro touch
• Compact design fits on your countertop or kitchen cart while the 3.28 ft (1 m) cord
reaches nearby outlets
• 9 preset cooking functions easily cook, heat, or defrost your favorites
• 10 power levels heat food to your exact preferences
• 10-inch (25.4 cm) glass turntable rotates to evenly heat food
• Internal light shows food while it’s cooking
Thermometers Use microwave-safe only (such as meat and candy thermometers).
Wax paper Use as a cover to prevent splattering and retain moisture.
MATERIAL REMARKS
Aluminum foil May cause an electric spark. Transfer food into microwave-safe dish.
Aluminum tray May cause an electric spark. Transfer food into microwave-safe dish.
Food carton with
metal handle
May cause an electric spark. Use a microwave-safe dish instead.
Metal or metal
trimmed utensils
Metal shields the food from microwave energy. The metal trim may cause
arcing.
Metal twist ties May cause an electric spark and could cause a fire in your microwave.
Paper bags May cause a fire in your microwave.
Plastic foam Plastic foam may melt or contaminate the liquid inside when exposed to
high temperature.
Textiles Hot pads, blankets, clothes, or other fabric items maycause burns or a fire.
Wood Wood will dry out when used in your microwave and may split or crack.
MATERIAL REMARKS
8
www.insigniaproducts.com
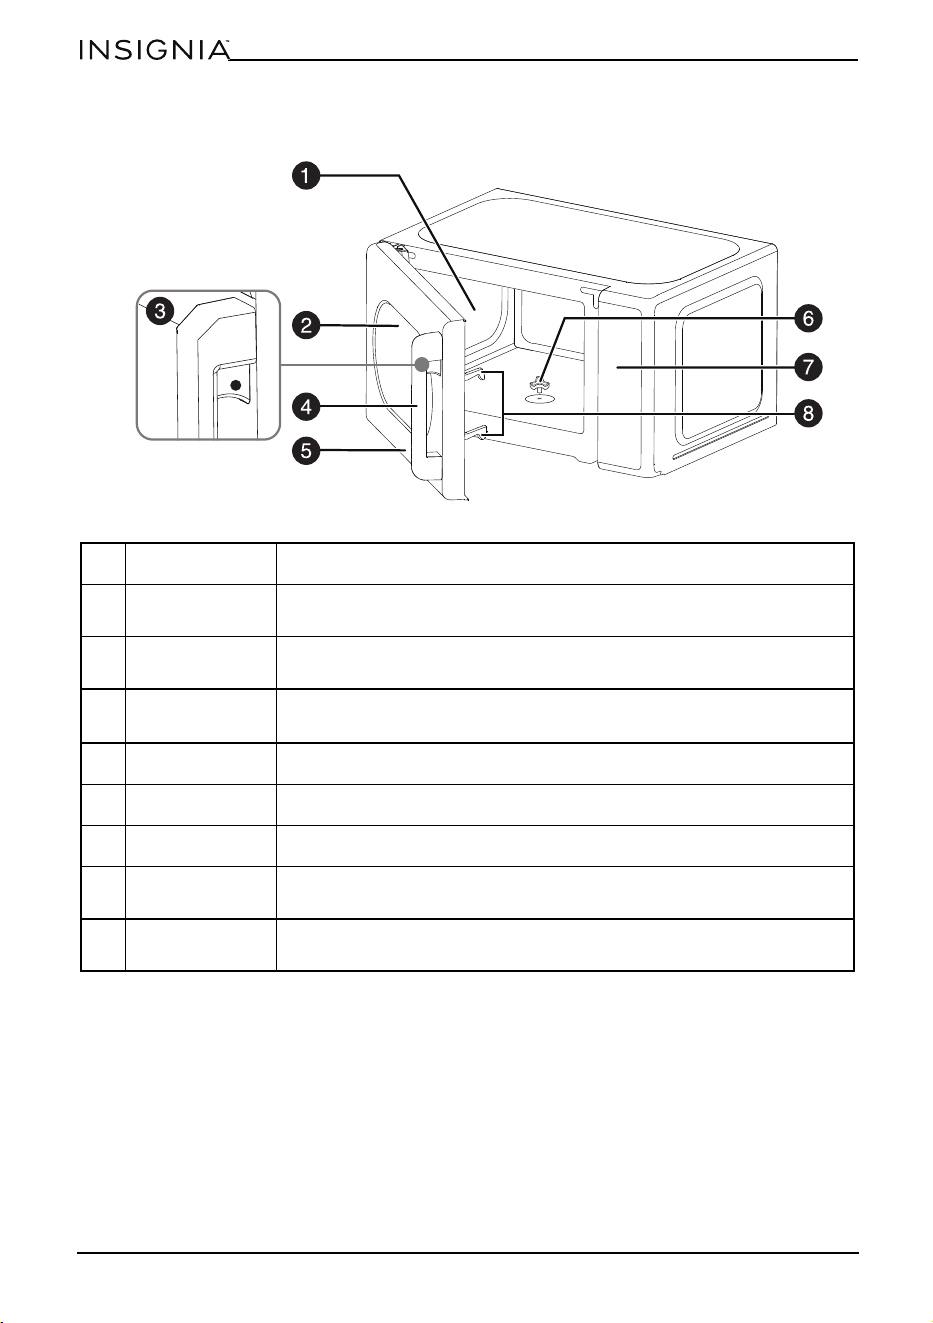
Microwave
Opening the door for the first time
1 Press upward on the button on the inside top of the door handle.
2 Pull the door outward to swing open from right to left.
# ITEM DESCRIPTION
1
Microwave
interior
Place the food inside the microwave to defrost or cook it.
2
Observation
window
Lets you see the food cooking.
3
Door handle
release
Press to release the door, then pull the handle to open.
4
Door handle Grip and pull to open the door, after pressing the release button.
5
Microwave door Close to defrost or cook your food.
6
Turntable shaft Turns the turntable to cook your food evenly.
7
Control panel Displays the current time and cooking details. Press the buttons to
program your microwave.
8
Door safety
interlock
Latches the door closed and prevents the microwave from turning
on when the door is open.
9
.7 Cu. Ft. Retro Compact Microwave
www.insigniaproducts.com
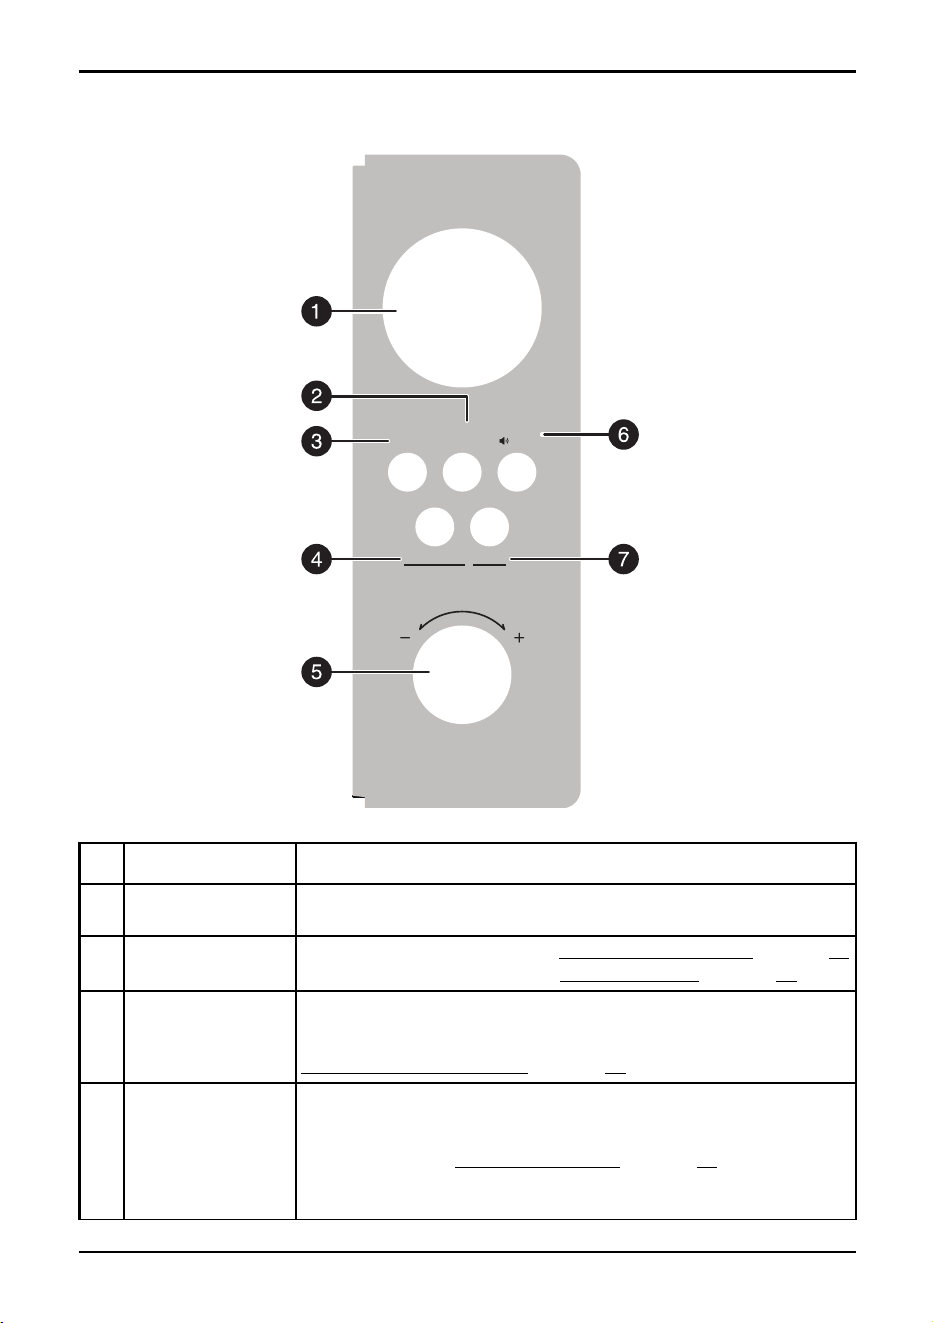
Control panel
# ITEM DESCRIPTION
1 Display
In standby mode, displays the time. In cooking mode, displays
cooking time, weight, and other information.
2 Clock/Timer
Press once to set the timer. See Using the kitchen timer
on page 12.
Press twice to set the time. See Setting the clock
on page 12.
3Power Level
Press repeatedly to select the power level. You can select between
100% and 10%. The power levels (PL10, PL9, PL8, PL7, PL6, PL5,
PL4, PL3, PL2, and PL1) appear in sequence on the display. See
Cooking in your microwave
on page 13.
4
Stop/Cancel/
Power Saving
Press to stop the cooking process. Press again to clear the cooking
operation.
In standby mode, press and hold for three seconds or more to set
the child lock. See Using the child-lock
on page 17.
In standby mode, press once to turn off the display. Press any key
or open the door to turn the display back on.
Power
Level
Clock/
Timer On/Off
Defrost/
Time · Weight · Menu
Stop/Cancel
Power Saving
Start
+30sec.
10
www.insigniaproducts.com
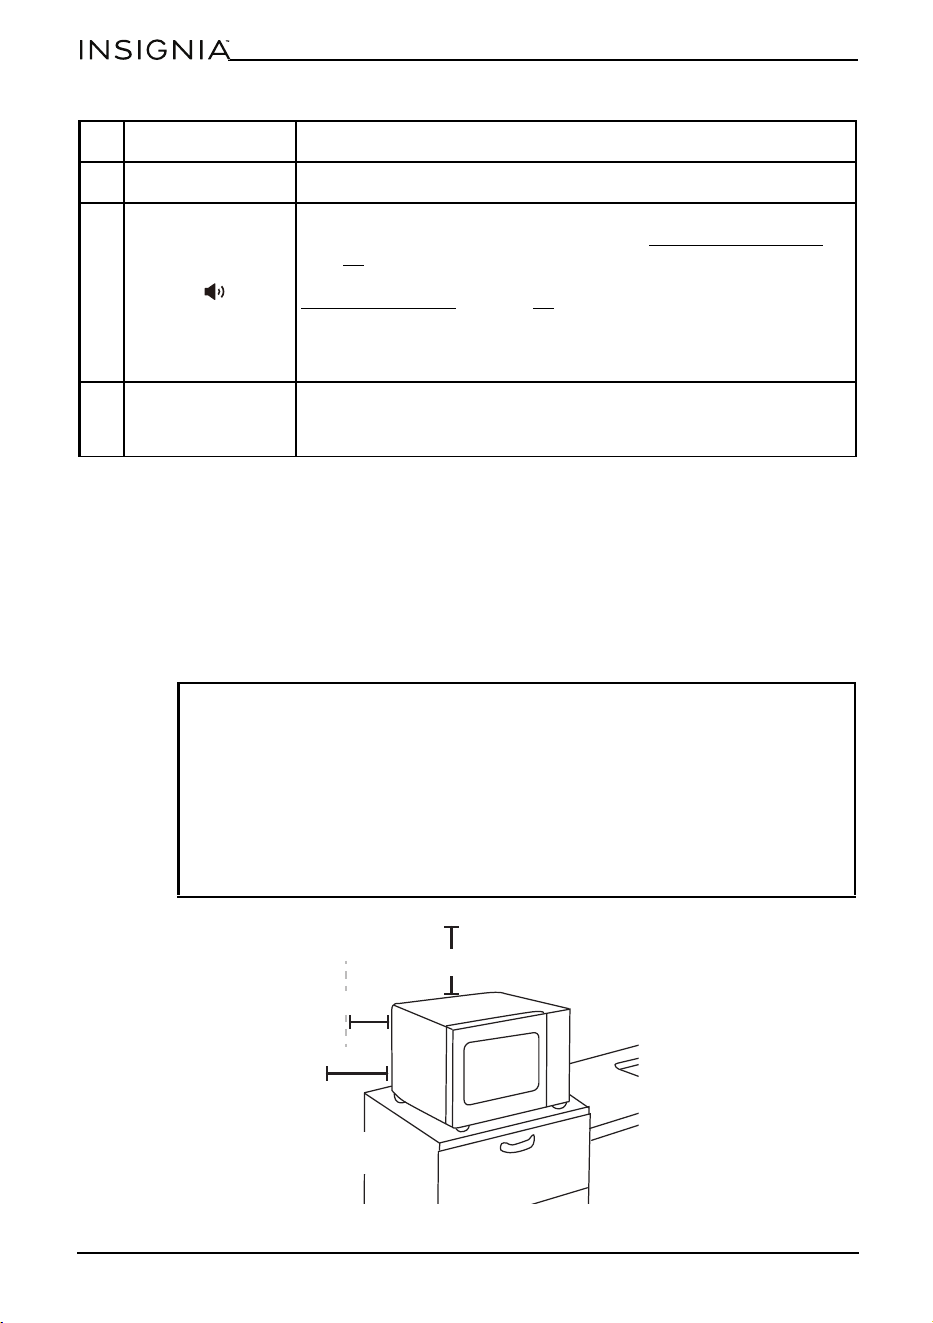
Setting up your microwave
1 Remove all packing material, protective film, and accessories. Do not remove the
cream-colored plastic cover that is attached to the interior wall to protect the
magnetron.
2 Check for any damage such as dents or a broken door. Do not use your microwave if it
is damaged.
3 Select a level surface that provides enough open space for the vents.
4 Plug your microwave into a power outlet.
5 (adjustment) knob Turn to select cooking time, item weight, or Auto Menu preset.
6Defrost/ On/Off
Press once, then enter the weight of the item you want to defrost.
The cooking time is set automatically. See Defrosting by weight on
page16.
Press twice, then enter the amount of time you want to defrost. See
Defrosting by time
on page 17.
Press and hold for three seconds to mute the buzzer.
Press and hold for an additional three seconds to reactivate the
buzzer.
7
Start/
+30sec.
Press to begin cooking.
In the standby mode, press one or more times to specify the cook
time in 30 second increments. Maximum time is 95 minutes.
CAUTIONS:
• Do not install your microwave over a range cooktop or other heat-producing
appliance. Installing over a heat source can damage your microwave and void
your warranty.
• One side of your microwave must be unrestricted (open).
• Do not remove the feet from your microwave.
• Do not block intake or outlet openings.
• Place your microwave as far away from radios and TVs as possible, as it may
cause interference.
• The accessible surface may be hot during operation.
# ITEM DESCRIPTION
12 in. (30.5 cm)
3 in. (7.5 cm)
3 in. (7.5 cm)
One side open
Minimum height = 3 ft.
(91.4 cm)
11
.7 Cu. Ft. Retro Compact Microwave
www.insigniaproducts.com
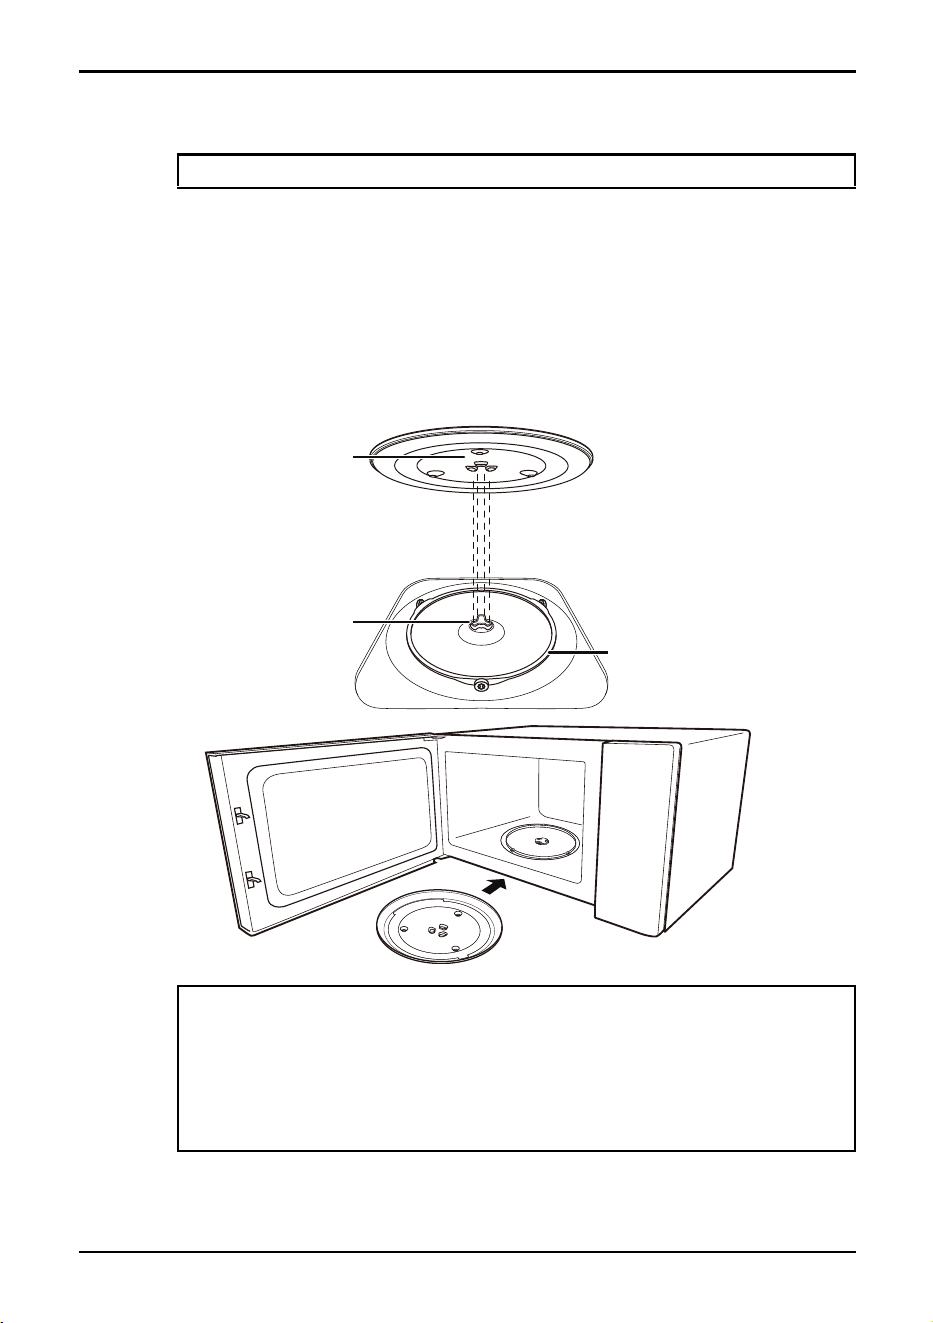
Installing the turntable
1 Remove all packing materials from your microwave, then remove the shipping tape
from the turntable shaft.
2 Clean the cooking compartment and the accessories.
3 Place the turntable ring assembly into the round depression in the bottom of your
microwave so that it turns freely.
4 Place the glass turntable (flat side up) on the turntable ring so that the hub engages
the turntable shaft in the bottom of your microwave. The glass turntable should not
turn freely when it is correctly installed.
Note: The turntable is shipped inside your microwave’s cavity.
Notes:
• Never use your microwave without the glass turntable and turntable ring.
• Never place the glass tray into your microwave upside down. The glass tray
should never be restricted.
• Always place all food and containers of food on the glass tray for cooking.
• Do not restrict the movement of the turntable.
• If the glass tray or turntable ring cracks or breaks, contact your nearest
authorized service center.
Glass turntable
Turntable ring assembly
Turntable shaft
12
www.insigniaproducts.com
Setting the clock and the timer
Setting the clock
1 Plug the power cord into an outlet.
2 Press the Clock/Timer or Start/+30sec. button, 12:00 flashes on the display.
3 Turn the adjustment knob to select the hour. You can select from 1 to 12. The hour
you select appears on the display.
4 Press the Clock/Timer button to confirm. The minutes flash on the display.
5 Turn the adjustment knob to select the minutes. You can select from 0 to 59. The
minutes you select appear on the display.
6 Press the Start/+30sec. or Clock/Timer button to confirm the setting.
Using the kitchen timer
1 Press the Clock/Timer button twice. 0:00 flashes on the display.
2 Turn the adjustment knob to select the amount of time. You can select from 00:05 to
00:95 minutes. The time you select appears on the display.
• Press the Start/+30sec. button to confirm the setting. The timer starts counting down.
When the time reaches 0, the buzzer beeps and the current time will be displayed if the
clock is set. If clock is not set, the display shows “:”.
Notes:
• The buzzer sounds once when you begin turning the knob.
•The Start/+30sec. button must be pressed to continue cooking if the door is
opened during cooking.
• Once the cooking program has been set, if the Start/+30sec. button is not pressed
within 30 seconds the setting will be canceled and the current time will be displayed
if the clock is set. If clock is not set, the display shows “:”.
• The buzzer sounds once when your button press is accepted.
• The buzzer beeps to remind you when cooking is finished.
Note: If the clock isn’t set, it won’t function when powered. During the process of
setting up the clock, if you press the Stop/Clear/Power Saving button or make no
changes within five minutes, the microwave exits the setting.
13
.7 Cu. Ft. Retro Compact Microwave
www.insigniaproducts.com
Cooking in your microwave
Microwave cooking
1 Press the Power Level button. PL10 appears in the display.
2 Press the Power Level button repeatedly or turn the adjustment knob to select the
power level. You can select between 100% and 10%. The power levels (PL10, PL9, PL8,
PL7, PL6, PL5, PL4, PL3, PL2, and PL1) appear in sequence on the display.
The available power levels are:
3 Press the Start/+30sec. button to confirm the setting.
4 Turn to adjust the cooking time between 00:05 and 95:00.
When you turn the knob to set the cooking time, each click of the knob adds a
specific amount of time.
When you start turning the knob, each click adds 5 seconds.
When you reach one minute on the timer, each click adds 10 seconds.
After the timer reaches five minutes, each click adds 30 seconds.
5 Press the Start/+30sec. button to confirm and start cooking. When cooking is
complete, there will be a beep and "End" will appear on the display. If the door is not
opened or the Stop/Cancel button is not pressed within nine minutes, your
microwave will sound two beeps every three minutes. After nine minutes, your
microwave will return to standby mode.
LEVEL10987654321
Power 100% 90% 80% 70% 60% 50% 40% 30% 20% 10%
Display PL10 PL9 PL8 Pl7 PL6 PL5 PL4 PL3 PL2 PL1
AMOUNT OF TIME TIME ADDED WITH EACH CLICK
0 to 1 minutes 5 seconds
1 to 5 minutes 10 seconds
5 to 10 minutes 30 seconds
10 to 30 minutes 1 minute
30 to 95 minutes 5 minutes
Notes:
• Press Power Level at any time to change the power setting. Enter the number of the
new power setting you want, then press Start/+30sec. to confirm. Your microwave
cooks at the new power setting for the remainder of the cook time. You cannot
change the power setting for auto-menu items.
• When setting your microwave, if you press the Stop/Cancel/Power Saving button
or if you don’t enter a setting within 30 seconds, your microwave goes back to the
former setting automatically.

14
www.insigniaproducts.com
Cooking quickly
1 In standby mode, press the Start/+30sec. button to cook at 100% power for 30
seconds. Each time you press the Start/+30sec. button, the time increases by 30
seconds. The maximum cooking time is 95 minutes.
2 In standby mode, turn the adjustment knob left to select the cooking time, then
press the Start/+30sec. button to start cooking. When cooking is complete, there
will be a beep and "End" will appear on the display. If the door is not opened or the
Stop/Cancel button is not pressed within nine minutes, your microwave will sound
two beeps every three minutes. After nine minutes, your microwave will return to
standby mode.
3 While your microwave is cooking or when you are using the time defrost function,
press the Start/+30sec. button to increase the cooking time.
Cooking with the auto menus
Your microwave has nine pre-programmed cooking modes.
1 In standby mode, turn the adjustment knob right to choose Auto Menu. A-1 will be
displayed.
2 Continue to turn the adjustment knob to select the program from A-1 to A-9. The
auto menu number appears in the display.
3 Press the Start/+30sec. button to confirm your menu selection.
4 Turn the adjustment knob to select the weight of food you are cooking.
5 Press the Start/+30sec. button to start cooking. When cooking is complete, there will
be a beep and "End" will appear on the display. If the door is not opened or the
Stop/Cancel button is not pressed within nine minutes, your microwave will sound
two beeps every three minutes. After nine minutes, your microwave will return to
standby mode.
Auto menus
Notes:
• In cooking state or the defrosting-by-time state, each time you press the
Start/+30sec. button increases the cooking time/defrost time by 30 seconds.
• When using the auto menu or defrost by weight function, you can't increase the
cooking time.
MENU AMOUNT DISPLAY
A-1
Popcorn
3.0 oz.
3.5 oz.
1.75 oz.
3.0
–
3.5
–
1.75
A-2
Beverage
1cup (120 ml/cup)
2 cups (240 ml/cup)
3 cups (360 ml/cup)
1–
2–
3–
A-3
Fresh vegetable
4 oz.
8 oz.
16 oz.
4
–
8
–
16
–
A-4
Meat
9 oz.
12 oz.
16 oz.
9
–
12
–
16
–

15
.7 Cu. Ft. Retro Compact Microwave
www.insigniaproducts.com
Popping popcorn in your microwave
1 When selecting 3.0 or 3.5 oz. of popcorn, we suggest that you fold down a triangle on
each corner of the bag before cooking, as shown.
2 When the popcorn bag expands and no longer rotates properly, press the
Stop/Cancel button once, open the microwave door, then adjust the bag position to
ensure even cooking.
3 Press the Start/+30sec. button to resume cooking. When cooking is complete, there
will be a beep and "End" will appear on the display. If the door is not opened or the
Stop/Cancel button is not pressed within nine minutes, your microwave will sound
two beeps every three minutes. After nine minutes, your microwave will return to
standby mode.
Using multi-stage cooking
You can set up a two-stage cycle to cook your food. For example, you can defrost a meal,
then cook it. The buzzer sounds after the first stage is complete, then the second stage
begins.
A-5
Pizza
4 oz.
8 oz.
14 oz.
4
–
8
–
14
–
A-6
Potato
1 (about 8 oz.)
2
3
1
2
3
A-7
Pasta
1.75 oz. (with 450 ml cold water)
3.5 oz. (with 800 ml cold water)
1.75
3.5
–
A-8
Soup
1 cup (8 oz.)
2 cups (16 oz.)
3 cups (24 oz.)
1–
2–
3–
A-9
Reheat
9 oz.
12 oz.
18 oz.
9
–
12
–
18
–
MENU AMOUNT DISPLAY
16
www.insigniaproducts.com
In this example, the food is defrosted for five minutes, then 80% power for 7 minutes.
1 Press the Defrost/ On/Off button twice. dEF2 appears on the display.
2 Turn the adjustment knob to set the defrost time to five minutes.
3 Press the Power Level button once. PL10 appears on the display.
4 Turn the adjustment knob to set the power level to 80%. PL8 appears on the display.
5 Press the Start/+30sec. button to confirm.
6 Turn the adjustment knob to set the cooking time to seven minutes.
7 Press the Start/+30sec. button to start cooking. When cooking is complete, there will
be a beep and "End" will appear on the display. If the door is not opened or the
Stop/Cancel button is not pressed within nine minutes, your microwave will sound
two beeps every three minutes. After nine minutes, your microwave will return to
standby mode.
Muting the sound
1 In standby mode, press and hold the Defrost/ On/Off button for three seconds. A
long beep sounds and the buzzer is turned off.
2 To turn the buzzer back on, press and hold the Defrost/ On/Off button for three
seconds. A long beep sounds and the buzzer is turned back on.
Using the energy saving (Eco) mode
Energy saving (Eco) mode turns off the LED display to save power.
• In standby mode, press the Stop/Cancel button for less than three seconds. The
display turns off and your microwave enters power saving mode.
• To exit the power saving mode, press any button, then open the door. The display
turns on and the buzzer beeps once.
Defrosting in your microwave
Defrosting by weight
1 Press the Defrost/ On/Off button once. dEF1 appears on the display.
2 Turn the adjustment knob to select the weight of the food. The weight range is 4 to
54 oz.
3 Press the Start/+30sec. button to start defrosting. When cooking is complete, there
will be a beep and "End" will appear on the display. If the door is not opened or the
Stop/Cancel button is not pressed within nine minutes, your microwave will sound
two beeps every three minutes. After nine minutes, your microwave will return to
standby mode.
Notes:
• Auto Menu cannot be used with multi-stage cooking.
• If one stage is defrost, it will automatically be the first stage.
• Press the Start/+30sec. button to increase cooking during multi-stage cooking
(except for defrosting by weight).
Note: Energy saving mode only works if the door is closed and the child lock function is
turned off.
17
.7 Cu. Ft. Retro Compact Microwave
www.insigniaproducts.com
Defrosting by time
1 Press the Defrost/ On/Off button twice. dEF2 appears on the display.
2 Turn the adjustment knob to select the defrost time.
3 Press the Start/+30sec. button to start defrosting. When cooking is complete, there
will be a beep and "End" will appear on the display. If the door is not opened or the
Stop/Cancel button is not pressed within nine minutes, your microwave will sound
two beeps every three minutes. After nine minutes, your microwave will return to
standby mode.
Changing other microwave settings
Using the child-lock
• To lock your microwave — Press and hold the Stop/Cancel/Power Saving button for
three seconds. Your microwave sounds a long beep and appears on the
display to indicate that the lock is turned on.
• To unlock your microwave — When your microwave is locked, press and hold the
Stop/Cancel/Power Saving button for three seconds. Your microwave sounds a long
beep to indicate that lock is turned off.
Checking the time and power level
• While cooking, press the Power Level button. The current power level appears on the
display for five seconds.
Resetting the turntable
Use this function if you want the turntable in its initial position when cooking is done.
Troubleshooting
If you have a problem with your microwave, review the following chart for a possible
solution. If your microwave still doesn’t work correctly, contact the nearest authorized
service center.
Notes:
• The defrost power level is PL 3. You can’t change it.
• The buzzer will sound to remind you to turn the food over during the defrost
operation. If no action is taken, cooking continues.
Notes:
• The turntable reset function only works at the end of a completed cooking cycle. If
you pause cooking or open the door, the function doesn’t work.
• If cooking time is less than five minutes, the accuracy of the turntable reset is within
30°.
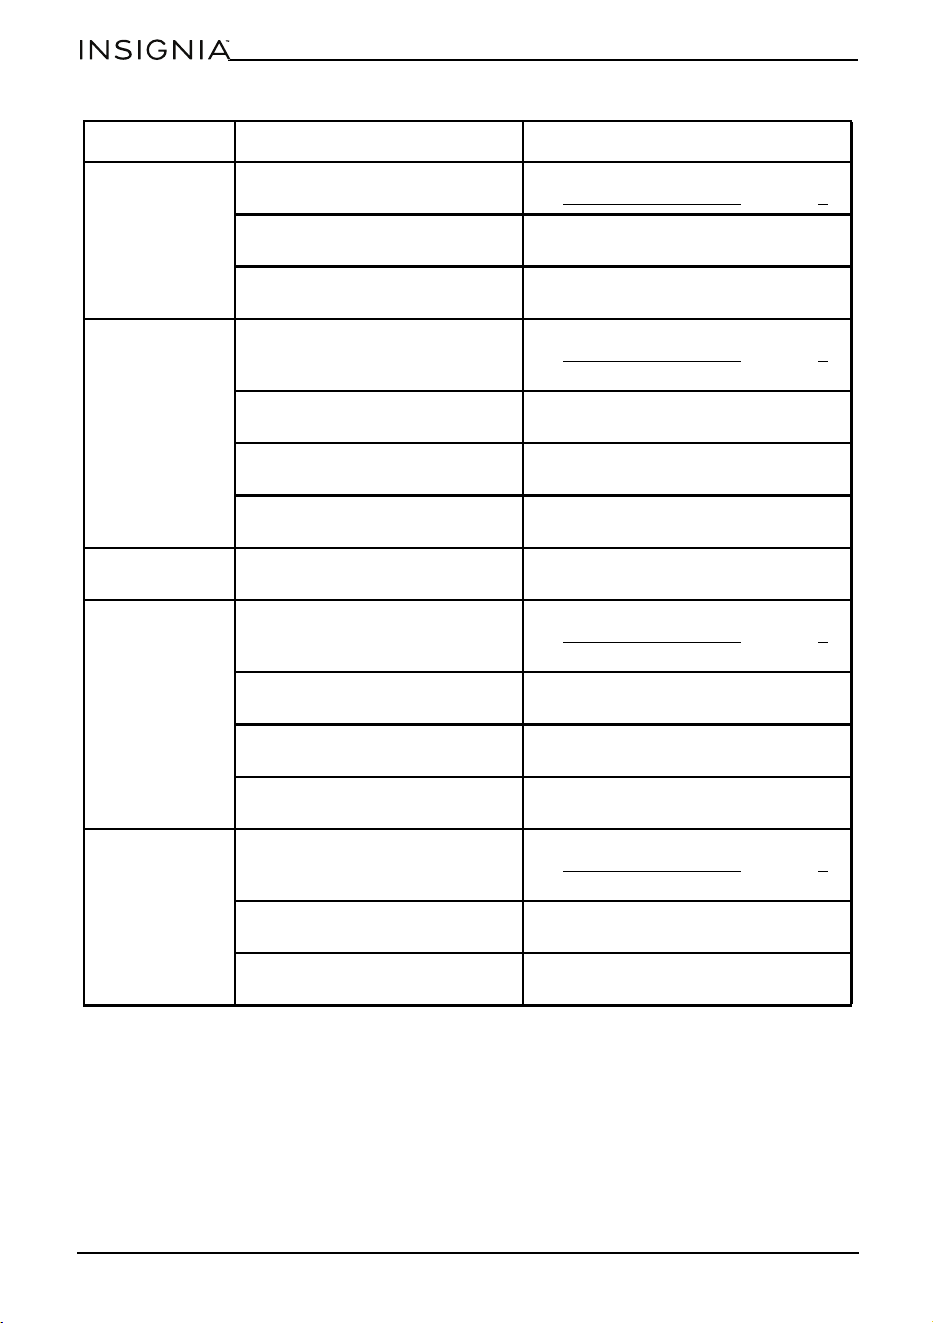
PROBLEM POSSIBLE CAUSE POSSIBLE SOLUTION
My microwave
won’t start
The power cord isn’t plugged in. Plug the electrical cord into a power
outlet.
The door is open. Close the door and try again.
18
www.insigniaproducts.com
Maintaining your microwave
Keep your microwave clean, especially the interior.
• Clean the exterior with a damp cloth or sponge. Don’t let water or cleaning solution
drip into the air vents.
• Clean the interior with a damp cloth or sponge.
Arching or
sparking in my
microwave
You’re using incorrect materials in
your microwave.
Use only microwave-safe materials.
See Materials you can use
on page 6.
You’re trying to use your
microwave when it’s empty.
Don’t operate your microwave when
it’s empty.
Spilled food remains in your
microwave.
Clean your microwave with a wet
towel.
Unevenly
cooked foods
You’re attempting to use
incorrect materials in your
microwave.
Use only microwave-safe materials.
See Materials you can use
on page 6.
The food isn’t defrosted
completely.
Defrost the food completely before
cooking it.
The cooking time or power level
isn’t adequate to cook the food.
Use the correct cooking time and
power level.
The food isn’t turned or stirred. Turn or stir the food intermittently to
ensure even cooking.
Overcooked
foods
The cooking time or power level
isn’t adequate to cook the food.
Use the correct cooking time and
power level.
Undercooked
foods
You’re attempting to use
incorrect materials in your
microwave.
Use only microwave-safe materials.
See Materials you can use on page 6.
The food isn’t defrosted
completely.
Defrost the food completely before
attempting to cook it.
The cooking time or power level
isn’t adequate to cook the food.
Use the correct cooking time and
power level.
Your microwave air vents are
blocked or restricted.
Make sure that the air vents aren’t
blocked or restricted.
Incorrect
defrosting
You’re attempting to use
incorrect materials in your
microwave.
Use only microwave-safe materials.
See Materials you can use
on page 6.
The cooking time or power level
isn’t adequate to cook the food.
Use the correct cooking time and
power level.
The food isn’t turned or stirred. Turn or stir the food intermittently to
ensure even cooking.
PROBLEM POSSIBLE CAUSE POSSIBLE SOLUTION
19
.7 Cu. Ft. Retro Compact Microwave
www.insigniaproducts.com
Obtaining replacement parts
Call Insignia Customer Service at 1-877-467-4289.
Specifications
Rated voltage 120VAC, 60Hz
Rated input power (microwave) 1,050W
Rated output power (microwave) 700W
Microwave capacity .7 cu. ft.
Turntable diameter 10-inch (25.5 cm)
External dimensions (H×W×D) 10.2 x 17.3 x 14.19 in. (25.82 x 43.95 x 36.05 cm)
Internal dimensions (H×W×D) 8.07 x 12.04 x 12.1 in. (20.52 x 30.6 x 30.74 cm)
Certifications UL for US model and CUL for CA model
Power cord length 39.4 in. (1 m)
Net weight NS-MW7RM5/NS-MW7RR5/NS-MW7RC5 net weight
is 20.7 lb. (9.41 kg)
NS-MW7RM5-C/NS-MW7RR5-C/NS-MW7RC5-C net
weight is 20.9 lb. (9.47 kg)

20
www.insigniaproducts.com
ONE-YEAR LIMITED WARRANTY
Definitions:
The Distributor* of Insignia branded products warrants to you, the original purchaser of this new
Insignia-branded product (“Product”), that the Product shall be free of defects in the original
manufacturer of the material or workmanship for a period of one (1) year from the date of your
purchase of the Product (“Warranty Period”).
For this warranty to apply, your Product must be purchased in the United States or Canada from a
Best Buy branded retail store or online at www.bestbuy.com
or www.bestbuy.ca and is packaged
with this warranty statement.
How long does the coverage last?
The Warranty Period lasts for 1 year (365 days) from the date you purchased the Product. Your
purchase date is printed on the receipt you received with the Product.
What does this warranty cover?
During the Warranty Period, if the original manufacture of the material or workmanship of the
Product is determined to be defective by an authorized Insignia repair center or store personnel,
Insignia will (at its sole option): (1) repair the Product with new or rebuilt parts; or (2) replace the
Product at no charge with new or rebuilt comparable products or parts. Products and parts replaced
under this warranty become the property of Insignia and are not returned to you. If service of
Products or parts are required after the Warranty Period expires, you must pay all labor and parts
charges. This warranty lasts as long as you own your Insignia Product during the Warranty Period.
Warranty coverage terminates if you sell or otherwise transfer the Product.
How to obtain warranty service?
If you purchased the Product at a Best Buy retail store location or from a Best Buy online website
(www.bestbuy.com or www.bestbuy.ca), please take your original receipt and the Product to any
Best Buy store. Make sure that you place the Product in its original packaging or packaging that
provides the same amount of protection as the original packaging.
To obtain warranty service, in the United States and Canada call 1-877-467-4289. Call agents may
diagnose and correct the issue over the phone.
Where is the warranty valid?
This warranty is valid only in the United States and Canada at Best Buy branded retail stores or
websites to the original purchaser of the product in the country where the original purchase was
made.
What does the warranty not cover?
This warranty does not cover:
• Food, beverage, and/or medicine loss/spoilage.
• Customer instruction/education
•Installation
•Set up adjustments
• Cosmetic damage
• Damage due to weather, lightning, and other acts of God, such as power surges
• Accidental damage
•Misuse
•Abuse
•Negligence
• Commercial purposes/use, including but not limited to use in a place of business or in
communal areas of a multiple dwelling condominium or apartment complex, or otherwise used
in a place of other than a private home.
• Modification of any part of the Product, including the antenna
• Display panel damaged by static (non-moving) images applied for lengthy periods (burn-in).
• Damage due to incorrect operation or maintenance

21
.7 Cu. Ft. Retro Compact Microwave
www.insigniaproducts.com
• Connection to an incorrect voltage or power supply
• Attempted repair by any person not authorized by Insignia to service the Product
• Products sold “as is” or “with all faults”
• Consumables, including but not limited to batteries (i.e. AA, AAA, C etc.)
• Products where the factory applied serial number has been altered or removed
• Loss or Theft of this product or any part of the product
• Display panels containing up to three (3) pixel failures (dots that are dark or incorrectly
illuminated) grouped in an area smaller than one tenth (1/10) of the display size or up to five (5)
pixel failures throughout the display. (Pixel based displays may contain a limited number of
pixels that may not function normally.)
• Failures or Damage caused by any contact including but not limited to liquids, gels or pastes.
REPAIR REPLACEMENT AS PROVIDED UNDER THIS WARRANTY IS YOUR EXCLUSIVE REMEDY FOR
BREACH OF WARRANTY. INSIGNIA SHALL NOT BE LIABLE FOR ANY INCIDENTAL OR CONSEQUENTIAL
DAMAGES FOR THE BREACH OF ANY EXPRESS OR IMPLIED WARRANTY ON THIS PRODUCT,
INCLUDING, BUT NOT LIMITED TO, LOST DATA, LOSS OF USE OF YOUR PRODUCT, LOST BUSINESS OR
LOST PROFITS. INSIGNIA PRODUCTS MAKES NO OTHER EXPRESS WARRANTIES WITH RESPECT TO
THE PRODUCT, ALL EXPRESS AND IMPLIED WARRANTIES FOR THE PRODUCT, INCLUDING BUT NOT
LIMITED TO ANY IMPLIED WARRANTIES OF AND CONDITIONS OF MERCHANTABILITY AND FITNESS
FOR A PARTICULAR PURPOSE, ARE LIMITED IN DURATION TO THE WARRANTY PERIOD SET FORTH
ABOVE AND NO WARRANTIES, WHETHER EXPRESS OR IMPLIED, WILL APPLY AFTER THE WARRANTY
PERIOD. SOME STATES, PROVINCES AND JURISDICTIONS DO NOT ALLOW LIMITATIONS ON HOW
LONG AN IMPLIED WARRANTY LASTS, SO THE ABOVE LIMITATION MAY NOT APPLY TO YOU. THIS
WARRANTY GIVES YOU SPECIFIC LEGAL RIGHTS, AND YOU MAY ALSO HAVE OTHER RIGHTS, WHICH
VARY FROM STATE TO STATE OR PROVINCE TO PROVINCE.
Contact Insignia:
1-877-467-4289
www.insigniaproducts.com
INSIGNIA is a trademark of Best Buy and its affiliated companies.
*Distributed by Best Buy Purchasing, LLC
7601 Penn Ave South, Richfield, MN 55423 U.S.A
©2024 Best Buy. All rights reserved.

www.insigniaproducts.com
1-877-467-4289 (U.S. and Canada)
INSIGNIA is a trademark of Best Buy and its affiliated companies.
Distributed by Best Buy Purchasing, LLC
7601 Penn Ave South, Richfield, MN 55423 U.S.A.
©2024 Best Buy. All rights reserved.
V4 ENGLISH
23-0578