
U s e r M a n u a l
H50
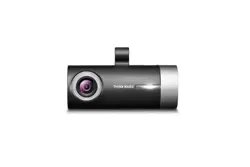
This Dashboard Camera (dash cam) is a specialized onboard device that continuously records video while the vehicle is in use.
Some features may not be available depending on installation, driving conditions, and vehicle type. The video quality might vary
for each device as a result of installed rmware.
The device DOES NOT guarantee video recording of all accidents as built-in impact sensor may not be activated due to combina-
tion of user settings and the level of impact during the collision.
ACMA-021KAM101


C o n t e n t s
Before Using THINKWARE DASH CAM
TM
H50 2
FCC Statement 2
Caution 3
Getting Started
1-1. In the Package 4
1-2. Optional Accessories 4
1-3. Product Overview 5
1-4. Inserting a Memory Card 6
1-5. Vehicle Installation 7
Basic Operations
2-1. Turning the Device Power On/O 9
2-2. Date/Time Settings 10
2-3. Connecting External GPS Receiver(Optional Accessory) 12
2-4. Recorded Files 13
2-5. Recording Videos While Driving 14
2-6. Recording Videos While Parked (Optional Accessory) 15
2-7. Manual Recording 16
2-8. Voice Recording 16
2-9. Formatting MicroSD Card 17
2-10. Upgrading Firmware 17
PC Application
3-1. Thinkware Dash Cam PC Viewer 18
3-2. PC ViewerSetting 22
Device Information
4-1. Specications 23
01
02
03
04

2
Before Using THINKWARE DASH CAM™ H50
Under the copyright laws, this manual may not be copied, in whole or in part, without the written consent
of THINKWARE.
Every eort has been made to ensure this Guide's accuracy. However, we cannot guarantee the accuracy of
the contents in this document as there may be technical errors, omissions, and/or future changes.
THINKWARE reserves the right to change or modify the product and the content of this manual at any time
without prior notice for product improvements.
Images contained in this user guide are illustrations for instructional purposes only and may dier from the
actual product.
Users do not reserve the right to use the product for purposes other than as specied in this user guide.
According to the Personal Information Protection Act and other related regulations, the user/owner may be
held liable if the video and/or conversation recorded by the device are distributed without their consent.
Thus, special attention should be paid in using this product.
The MicroSD memory card should be tested for errors on a regular basis and as the memory card is a con-
sumable item, it will need to be replaced periodically.
THINKWARE shall NOT be responsible for any problems and/or damages that may occur from the use of
disingenuous, modied, or unauthorized parts and accessories.
The device and the recorded videos are intended for personal use and the recorded videos should be
used for reference only.
The device does NOT guarantee video recording of all accidents as built-in impact sensor may not be
activated due to combination of user settings and the level of impact during the collision.
FCC Statement
This device complies with Part 15 of the FCC Rules. Operation is subject to the following two conditions: (1)
this device may not cause harmful interference, and (2) this device must accept any interference received,
including interference that may cause undesired operation.
This equipment has been tested and found to comply with the limits for a Class B digital device, pursuant to
Part 15 of the FCC Rules. These limits are designed to provide reasonable protection against harmful inter-
ference in a residential installation. This equipment generates, uses and can radiate radio frequency energy
and, if not installed and used in accordance with the instructions, may cause harmful interference to radio
communications. However, there is no guarantee that interference will not occur in a particular installation. If
this equipment does cause harmful interference to radio or television reception, which can be determined by
turning the equipment o and on, the user is encouraged to try to correct the interference by one or more of
the following measures:
Reorient or relocate the receiving antenna.
Increase the separation between the equipment and receiver.
Connect the equipment into an outlet on a circuit dierent from that to which the receiver is connected.
Consult the dealer or an experienced radio/TV technician for help.
FCC CAUTION: Any changes or modications to the equipment not expressly approved by the party responsi-
ble for compliance could void your authority to operate the equipment.
This Class A digital apparatus complies with Canadian ICES-003.

3
Caution
Depending on the make and model of your car,
the power may be constantly supplied to the
dash cam even with the ignition turned o. This
may result in vehicle battery discharge.
This device is designed to record video while the
vehicle is in operation. The quality of the video
might be aected by weather conditions and the
road environment such as day or night, presence
of street lighting, entering/exiting tunnels, and
the surrounding temperature.
THINKWARE is NOT responsible for the loss of any
recorded video during operation.
Although designed to withstand high impact of
car collision, THINKWARE does NOT guarantee re-
cording of accidents where the impact may cause
the device to be damaged.
Keep the windshield clean for optimal video qual-
ity.
If a foreign substance (e.g. ngerprints) is at-
tached to the lens, it may reduce the quality of the
recorded videos. Keep the lens clean all the time.
The specied operating temperature of this prod-
uct is -10°C to 60°C (14°F to 140°F) and storage
temperature is -20°C to 70°C (-4°F to 158°F). En-
sure that the device is kept within these tempera-
ture ranges; otherwise, the device may not func-
tion as designed and at extreme temperatures,
permanent physical damage can result which is
not covered by warranty.
Avoid placing the device under direct sunlight.
Avoid using the device in extreme conditions
where the Product is exposed to high tempera-
ture and/or humidity.
Only use genuine accessories and peripherals
from THINKWARE or authorized THINKWARE deal-
er. THINKWARE does not warrant the safety and
compatibility from use of peripherals from other
stop after 'manufacturers'. Use genuine parts sup-
plied by THINKWARE.
Do not apply excessive force when pushing the
buttons on the device.
Do not clean the Product using chemical cleaner
or solvents as it may damage plastic components.
Use soft, clean, dry fabric to gently wipe the Prod-
uct.
Do not place or store the device where it can be
accessible by children and pets.
Do not disassemble the Product as it will void
product warranty and may also damage the prod-
uct.
Handle with care. Drop, shock, and mishandling
the Product may result in malfunction and/or
damage to the device.
Do not operate this device while driving.
Install this device in a location where it has unob-
structed view of the road but does not interfere
with the driver’s view. Check with your local and
regional laws before mounting to windshield.
The device and/or installation parts have moving
parts and may shift in extreme road conditions
such as unpaved road. Check frequently to ensure
the device is positioned as instructed in this guide.
Do not operate or handle power cable with wet
hands.
Do not use a damaged power cable.
Keep the power cable away from heaters or other
hot objects.
Check that power cable with correct connector is
used and the connections are secure and rmly in
place.
Do not pull, insert, or bend the power cable using
excessive force.
Do not place heavy objects on the device and the
power cable.
Do not modify or cut the power cable.
THINKWARE does not guarantee that devices or
peripherals not authorized by THINKWARE will be
compatible with its Product.
Do not attempt to insert foreign objects into the
device or power cable.
Do not spill or spray liquid into the device as it
may cause malfunction, re, or electric shock.
This device is intended to be used inside the ve-
hicle only.
4
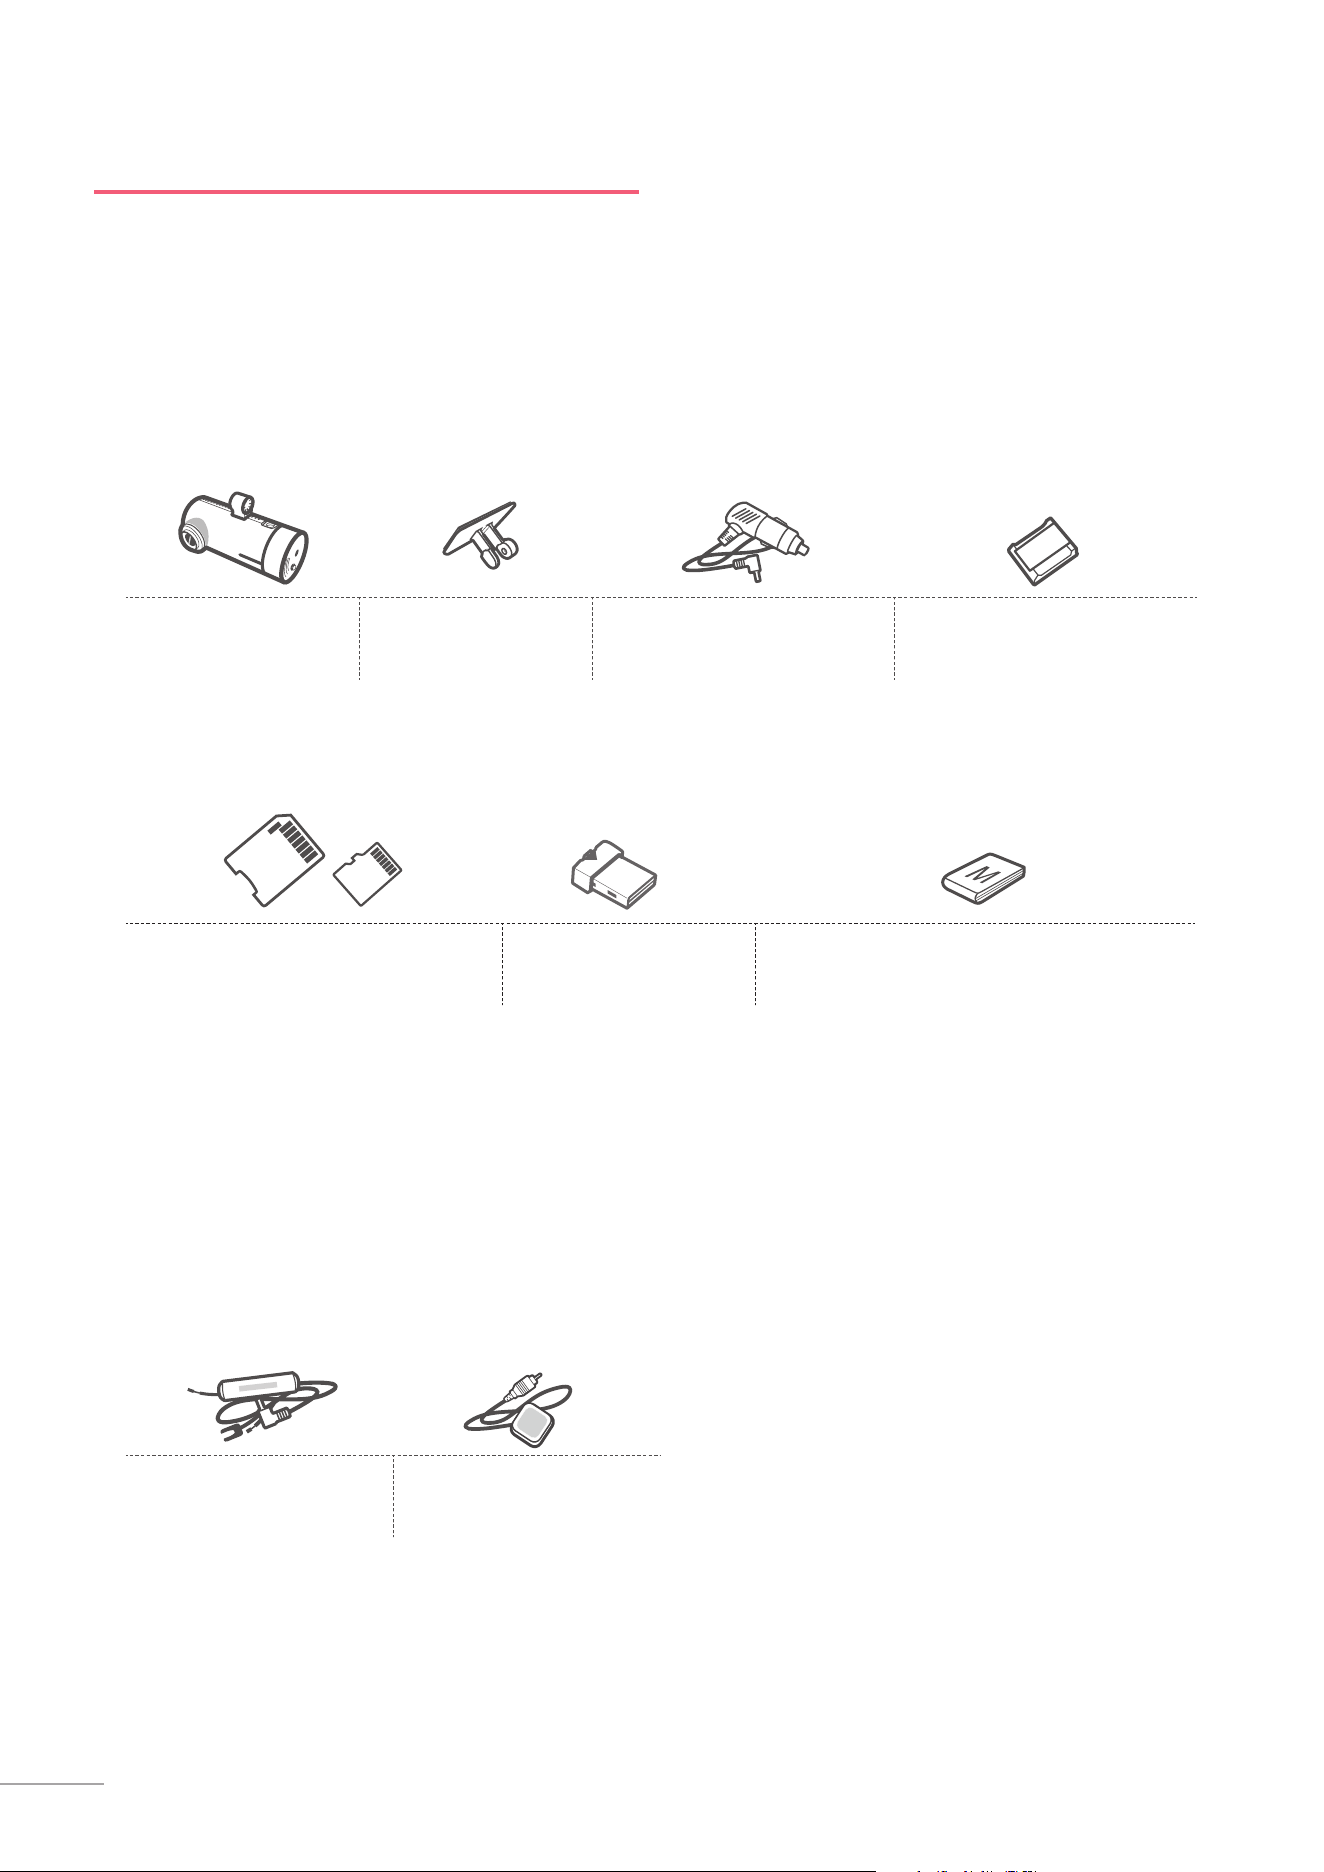
Main Dash Cam Unit
Mount with 3M tape
(1ea)
Car Charger
Adhesive Cable Holder
(5ea)
Hardwiring Cable External GPS Receiver
MicroSD memory card with adapter
(consumable)
USB MicroSD card
reader
Quick Start Guide/Warranty/
User Manual (stored in the MicroSD card)
1. Getting Started
This unit was tested with shielded cables on the peripheral devices.
Shielded cables must be used with the unit to insure compliance.
1-1. In the Package
1-2. Optional Accessories
5
Getting Started
01
0,&
0,&
0,&
0,&
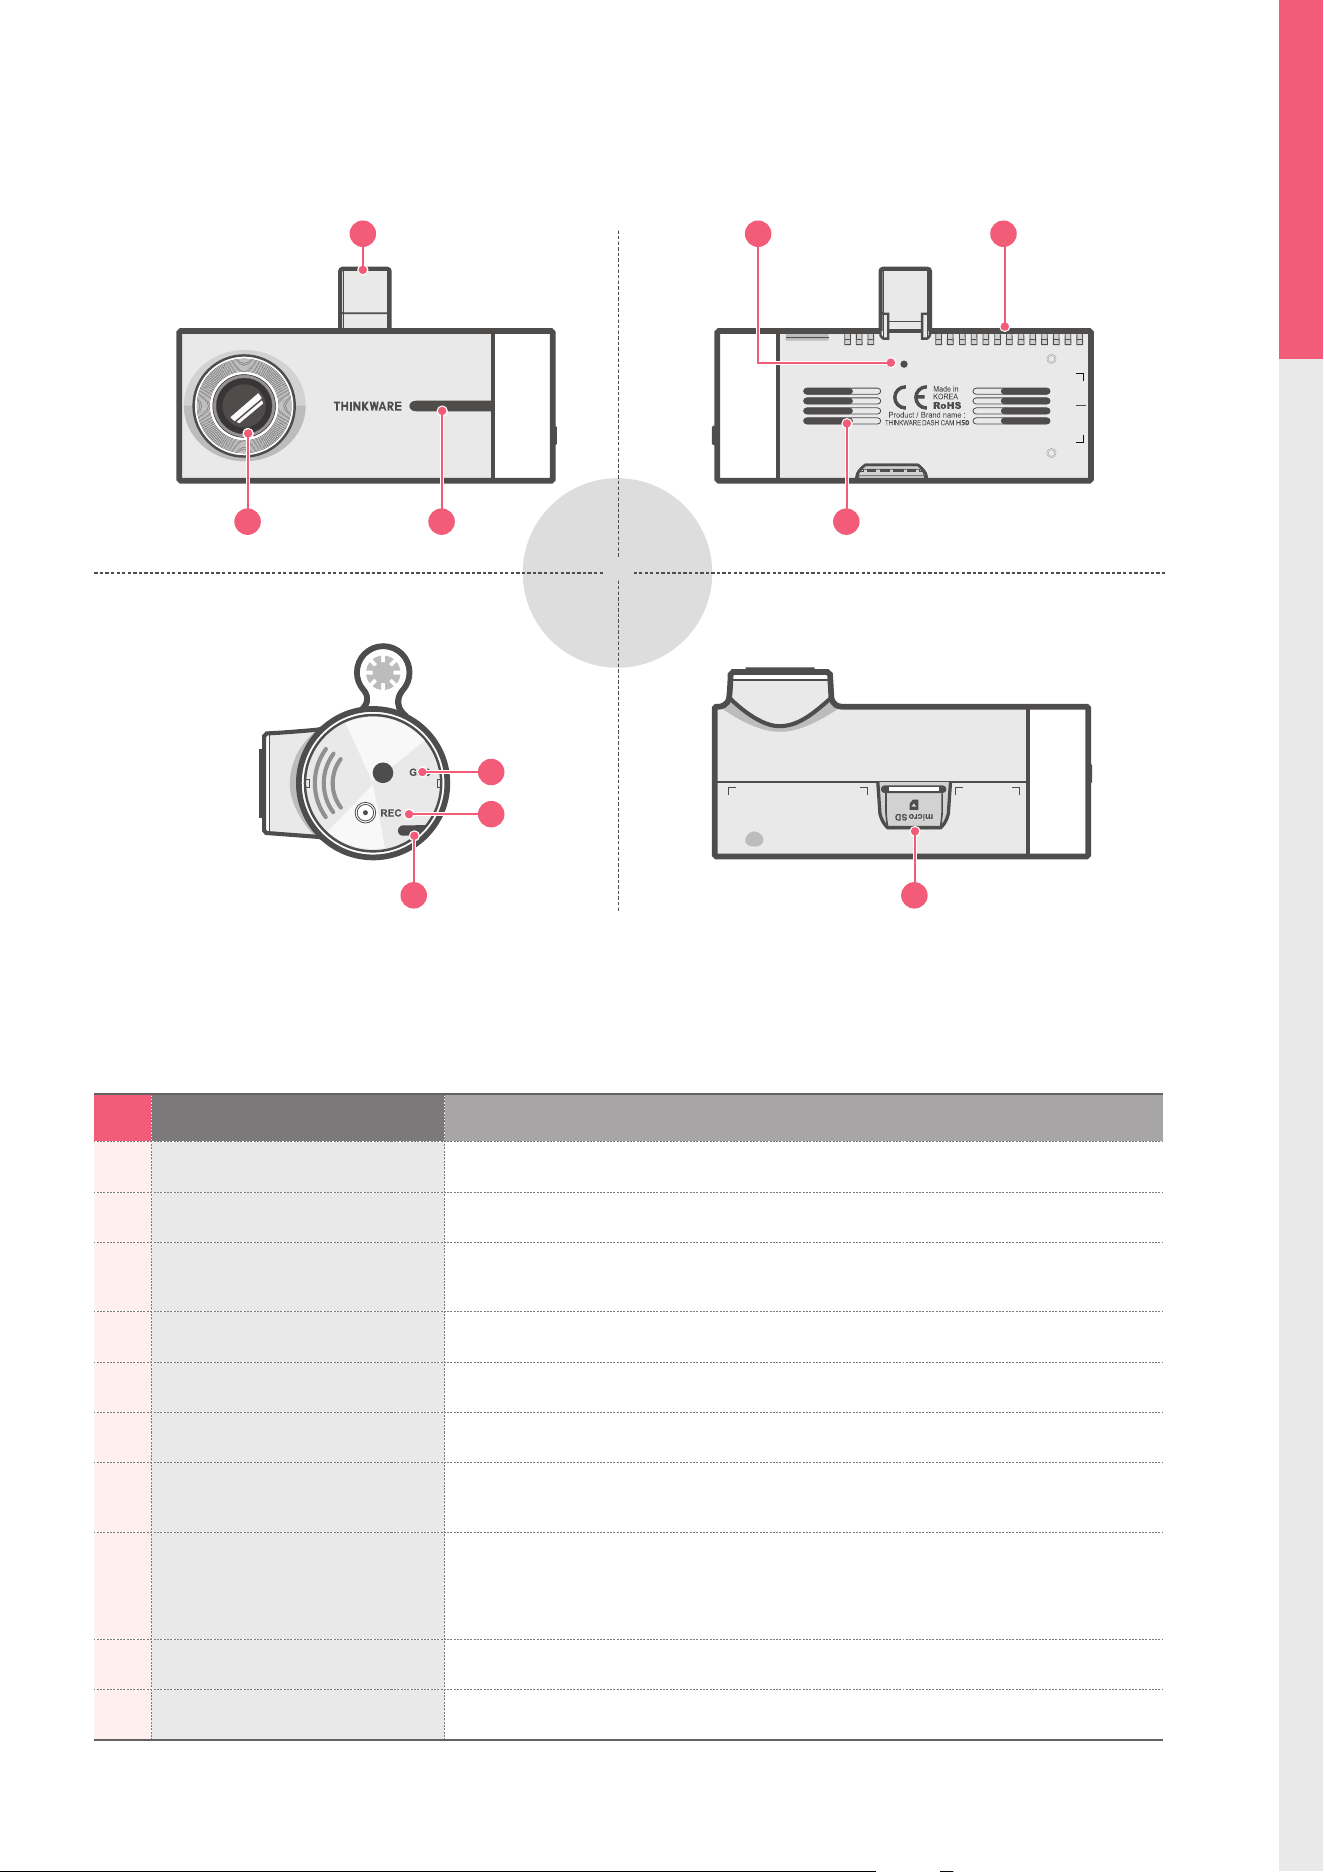
No. Name Description
1 Camera Lens Front facing camera for video recording
2 Mount Connector Connects to the windshield mount (refer to installation)
3 Security LED
Operation indicator lights that are used to visually indicate that the vehi-
cle is equipped with a dash cam
4 DC-IN Connects to power cable
5 Microphone Records audio along with video
6 Speaker Outputs voice guidance and alert/notication sounds
7 GPS Receiver Socket
Connects to external GPS receiver
(optional accessory that requires separate purchase)
8 REC Button
Short Press : Starts manual recording
Press and hold for 3 seconds : Audio recording ON/OFF
Press and hold for 5 seconds : Memory card format
9 Operation Status LED Indicates the device operating status
10 Memory Card Slot Location for the MicroSD memory card
1-3. Product Overview
Front view
Left view
Rear view
Under view
42
3
9 10
1 6
7
8
5
6
0,&
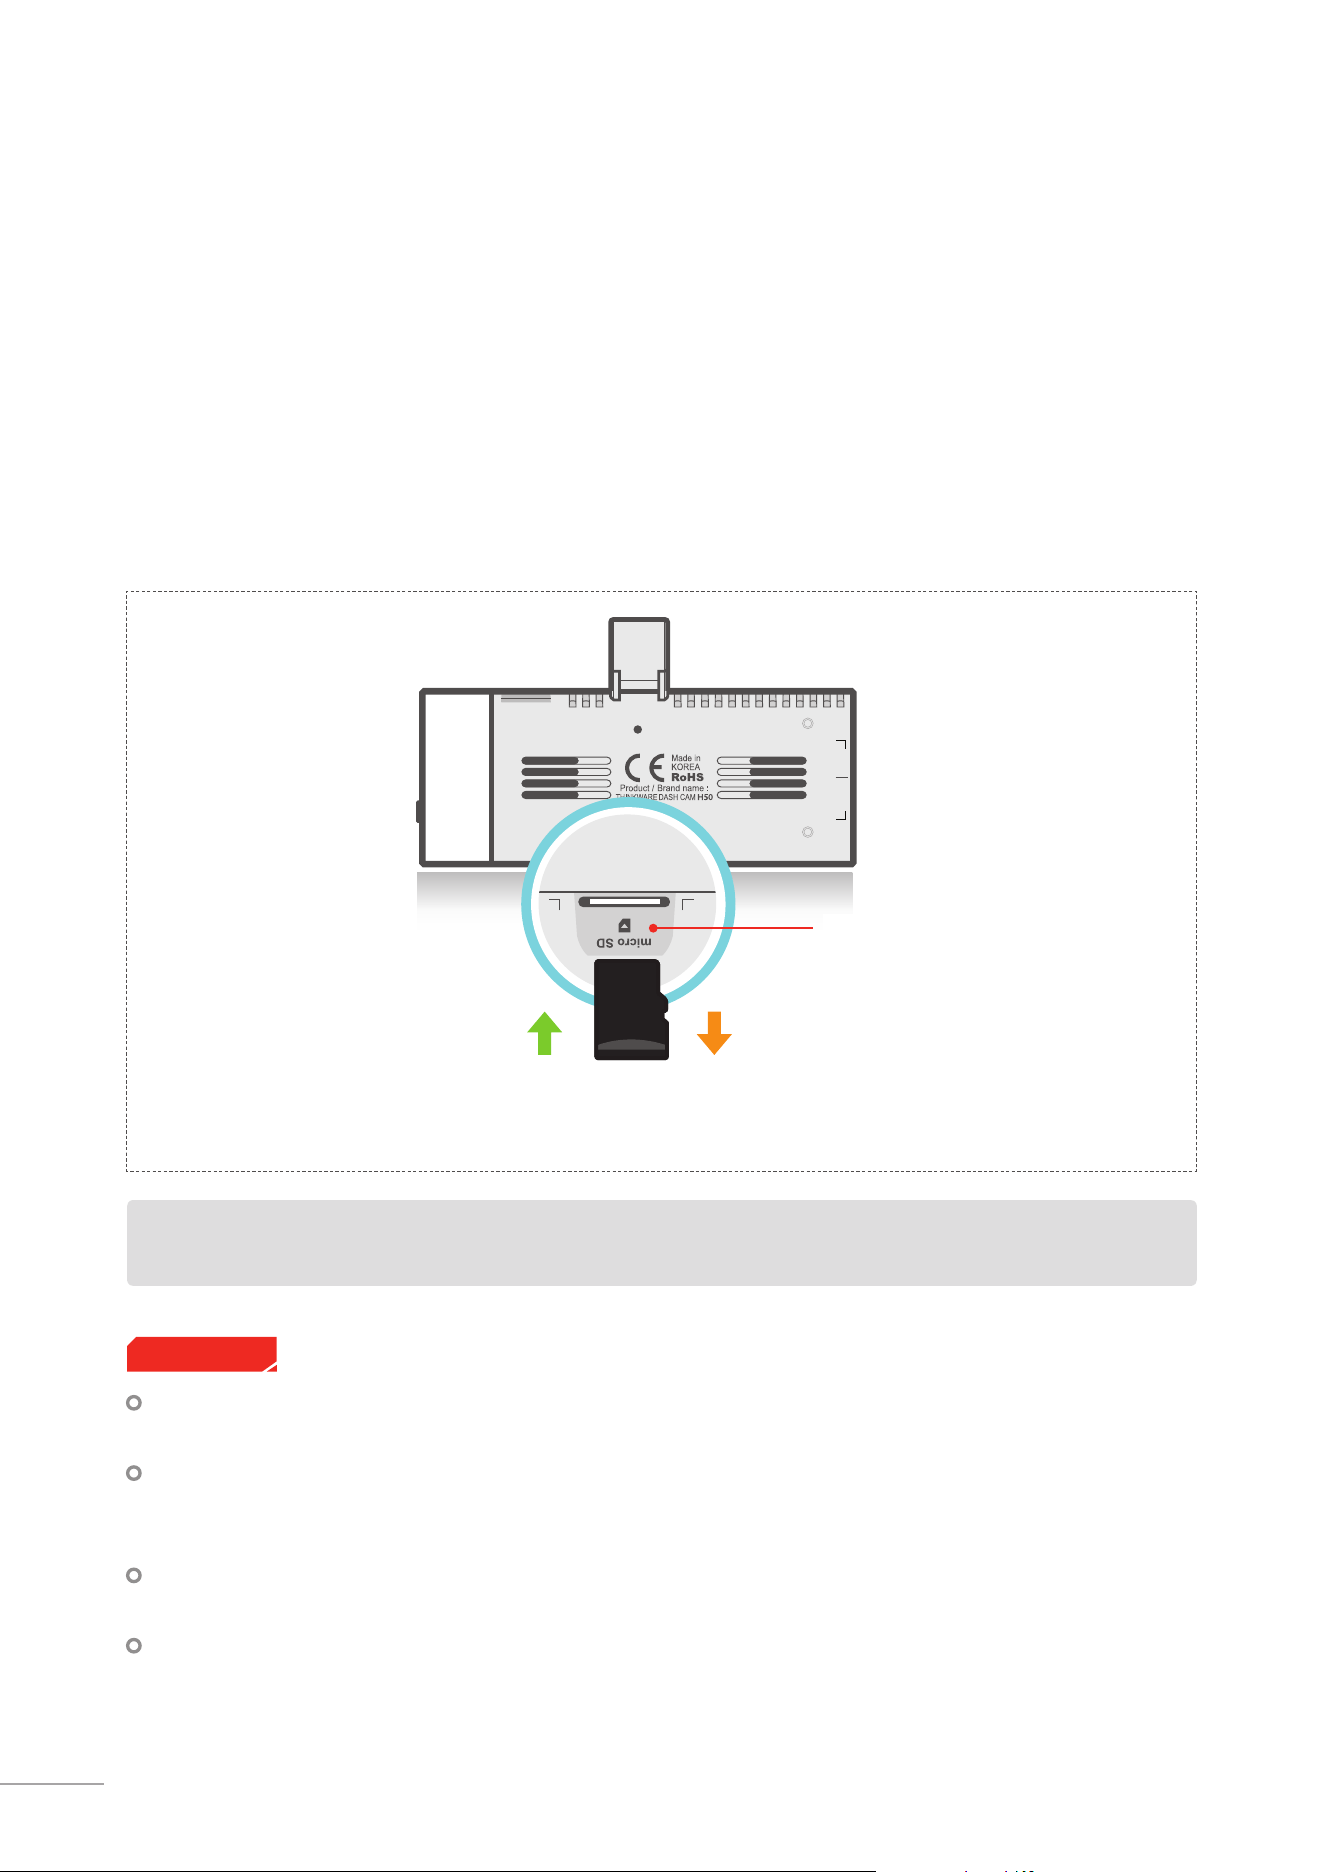
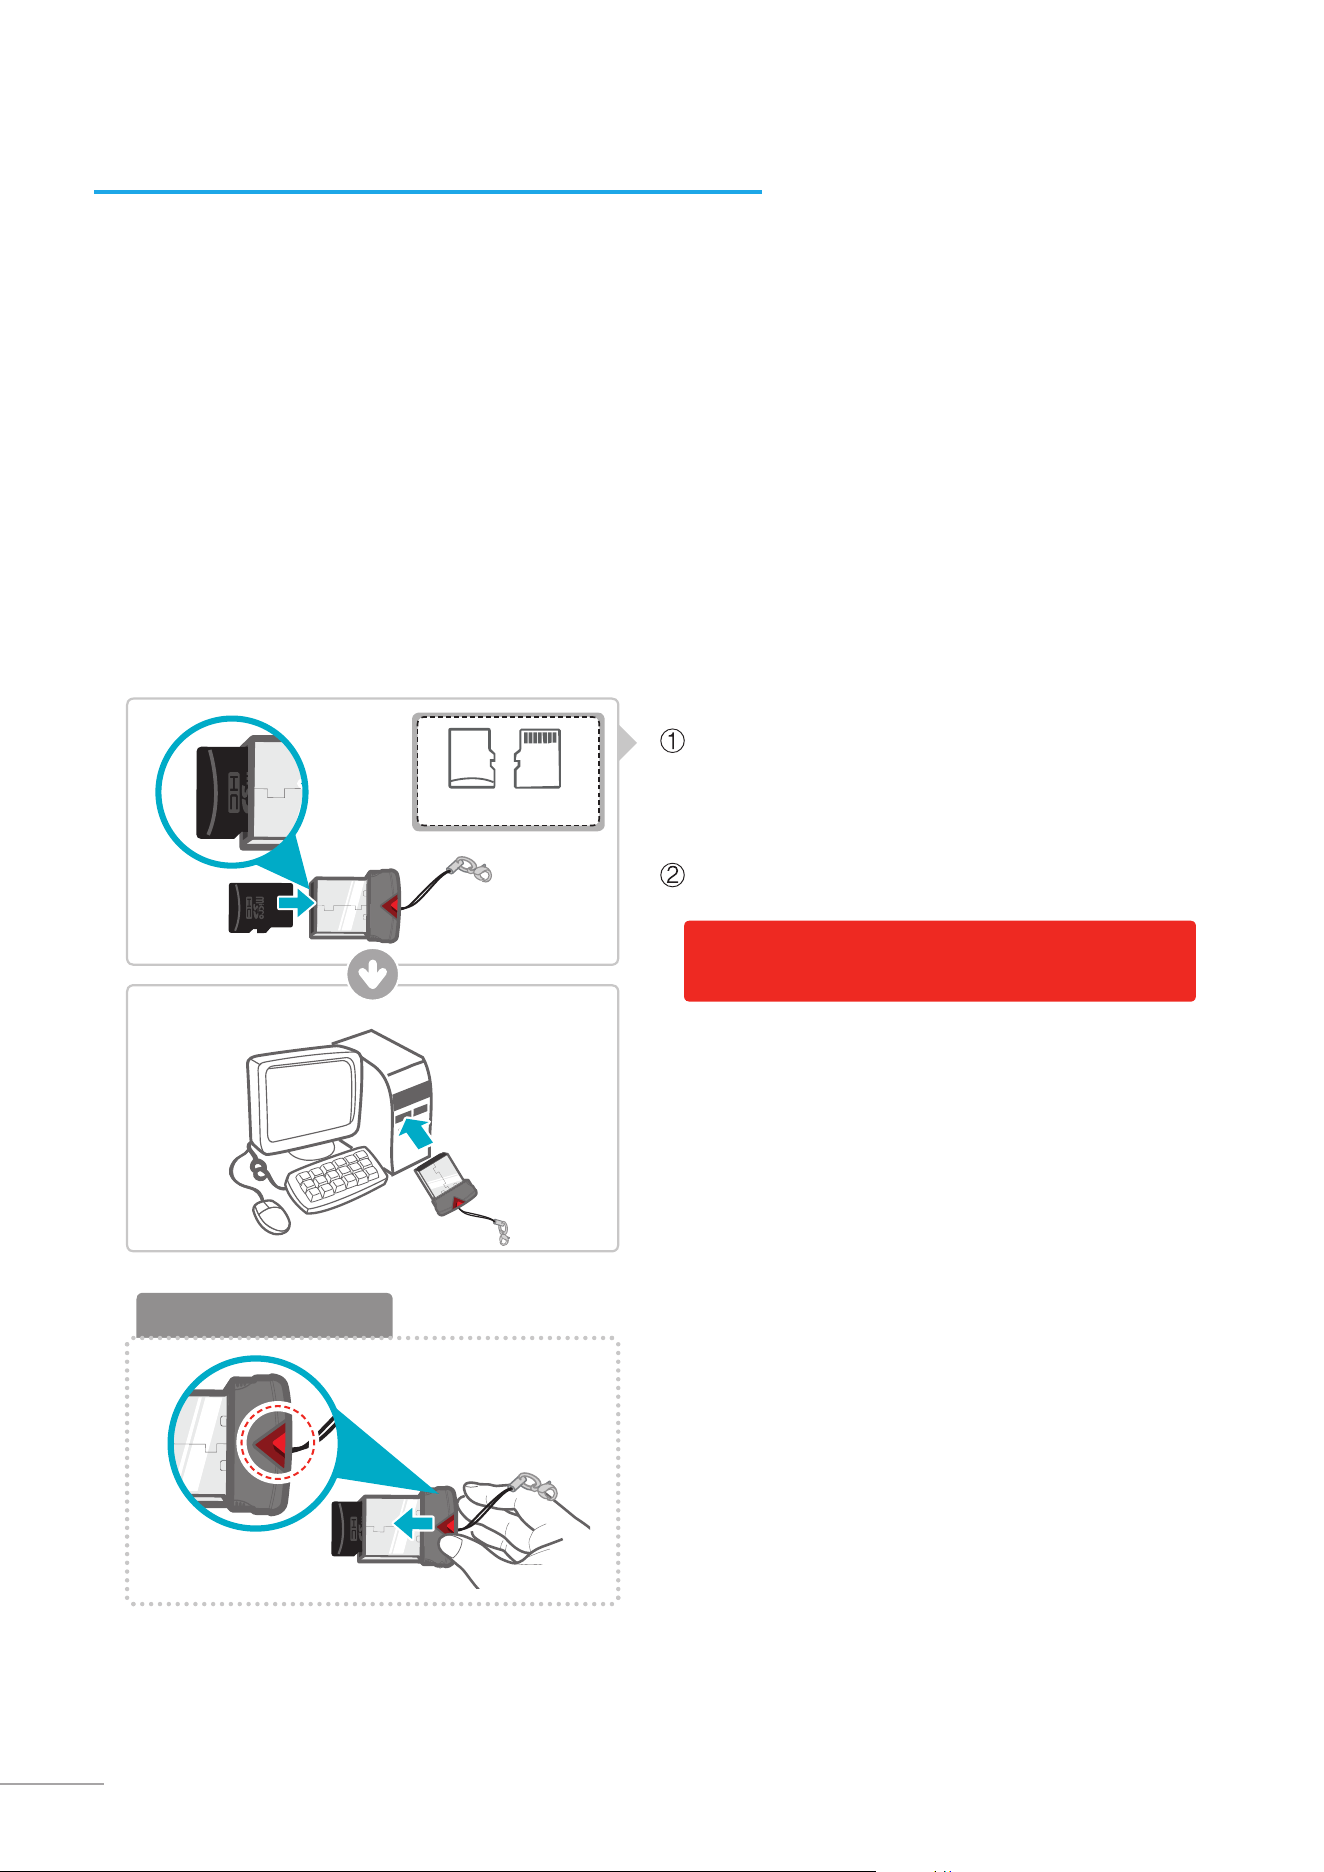
1-4-2. Installing a MicroSD Card
Do not apply excessive force on the MicroSD card or attempt to insert it in the wrong direction as it may
cause damage to the MicroSD card and the card slot.
Removing the
memory card
MicroSD card
1-4. Inserting a Memory Card
1-4-1. About Memory Cards
Class 10 MicroSD card must be used with a storage capacity of 8GB, 16GB, or 32GB.
It is strongly recommended that minimum 8GB memory card is used for HD recording.
The MicroSD card should be formatted every 2 weeks to maximize the lifetime of the memory card.
The MicroSD card should be tested for errors on a regular basis and as the memory card is a consumable
item, it should be replaced periodically.
THINKWARE shall NOT be responsible for any problems and/or damages that may occur from not using
genuine or authorized parts and accessories. It is strongly recommended that THINKWARE memory cards
are used to minimize memory card error.
Ensure that the device is completely o before removing the MicroSD card to avoid damages to the
memory card.
To prevent loss of important data, frequently copy recorded videos from MicroSD card to another storage
device such as personal computer for back up.
Cautions
Inserting the
memory card
Insert the MicroSD card into
the slot with the metal contacts
facing up toward the mount
connector and push until it locks
into place.
Press the end of MicroSD card
until it clicks out from the slot and
pull out the MicroSD card.
7
Getting Started
01
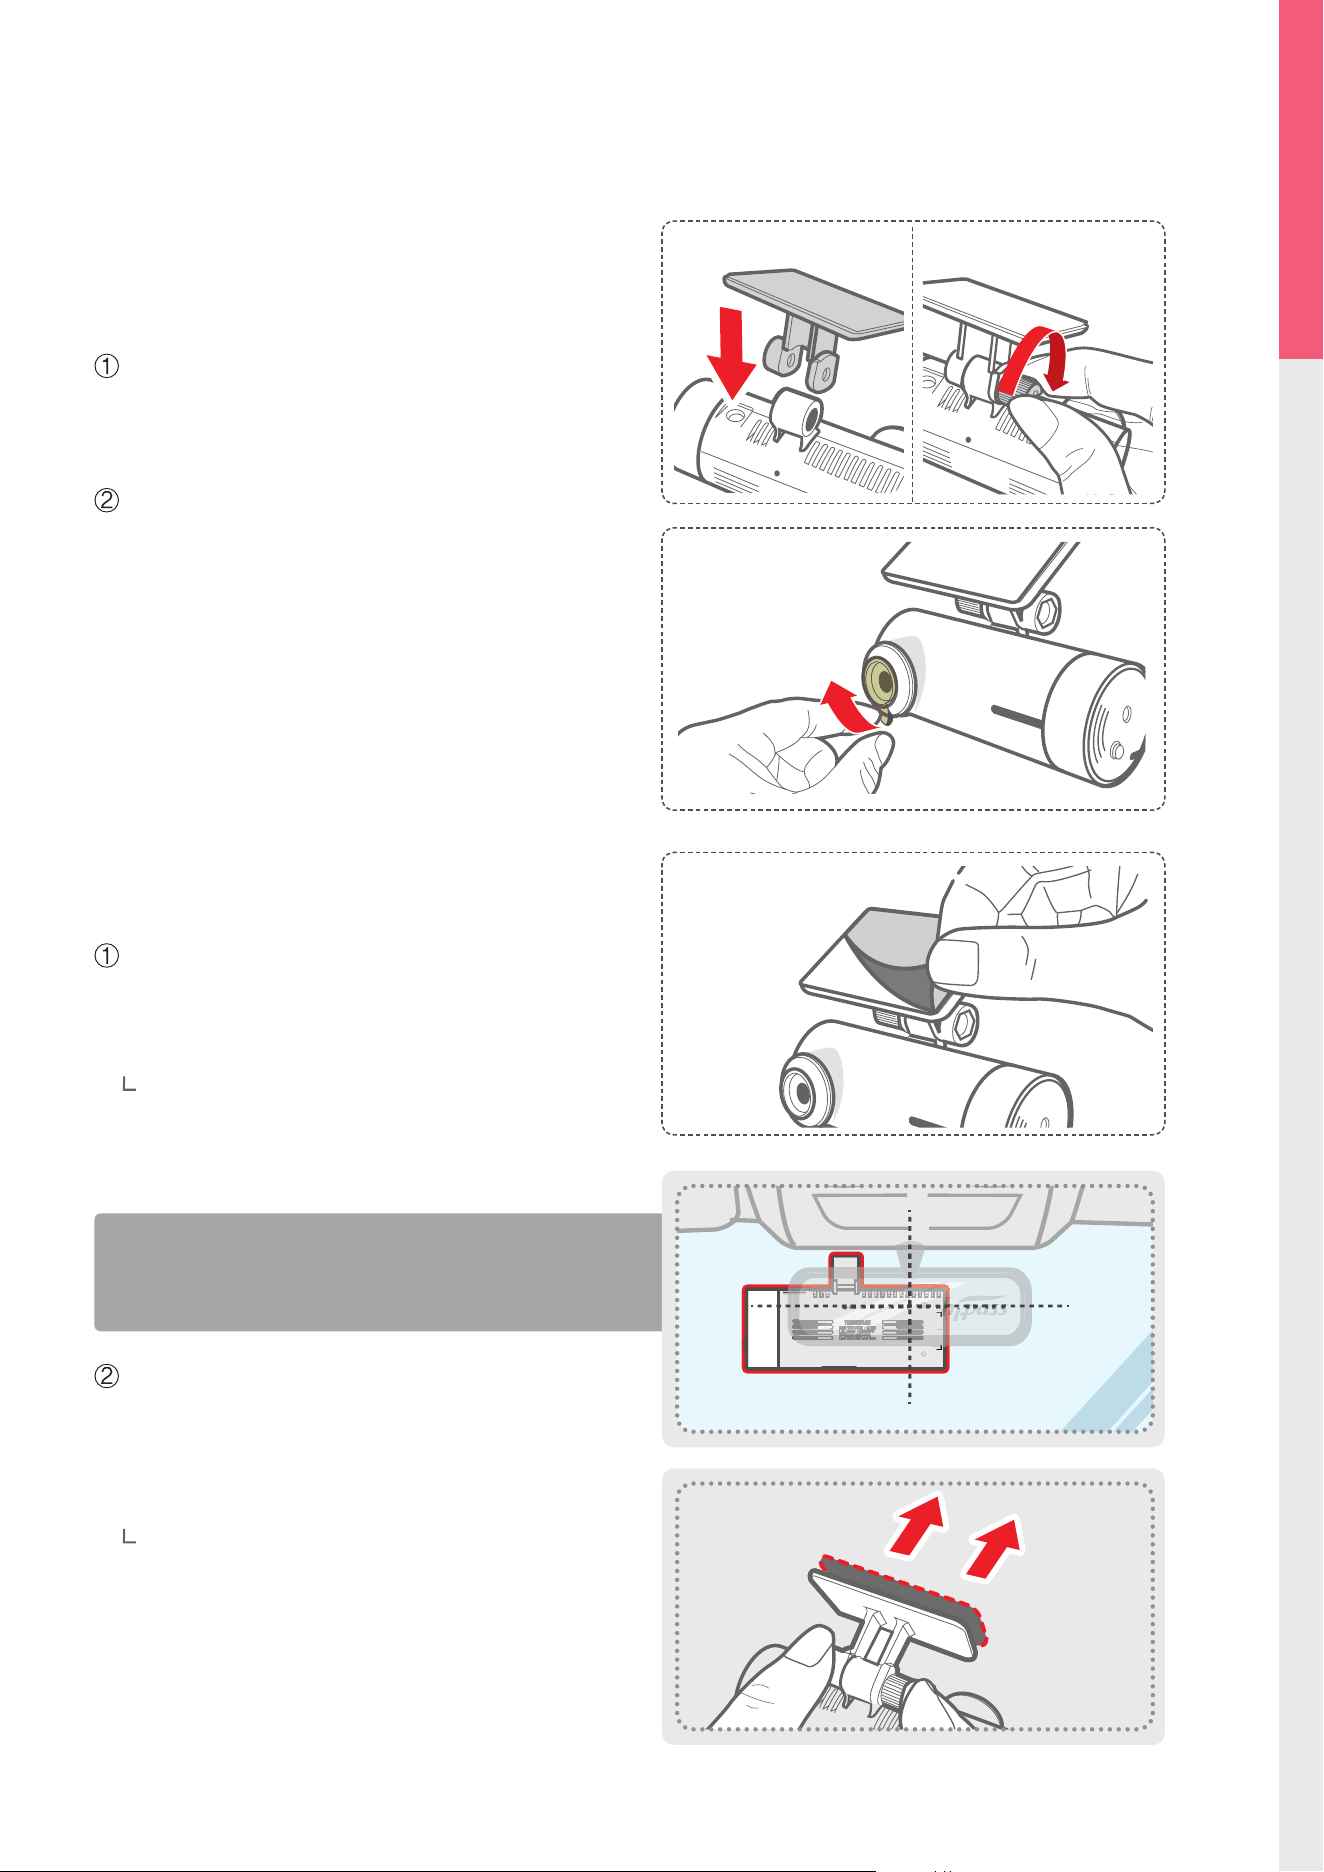
1-5-1. Connecting the Device and the
Mount
Insert the mounting connector of the dash cam
between the connector brackets of the mount.
Use the screw to attach the dash cam to the mount.
Remove the protective lm from the camera lens.
1-5. Vehicle Installation
1-5-2. Installing the Device
Remove the protective cover from adhesive mount
and attach mount on the windshield where it has
unobstructed view of the road but does not inter-
fere with the driver’s view.
Select the location on the windshield where
buttons are accessible and clean the area before
securing the mount with attached 3M tape
To ensure that the mount is safely secured, sepa rate
the device from the mount after installation. Press
the mount towards the windshield to allow the ad-
hesive on the mount to set before connecting the
dash cam.
Attach the dash cam to the mount once the
mount has been securely attached
The camera is located on the left side of the main unit
so install the dash cam on the right of center behind the
rearview mirror.
TIP
8
After installation, run the dash cam to record videos and
check the videos using Thinkware Dash Cam Viewer to
verify camera position. Adjust the camera angle if neces-
sary.
TIP
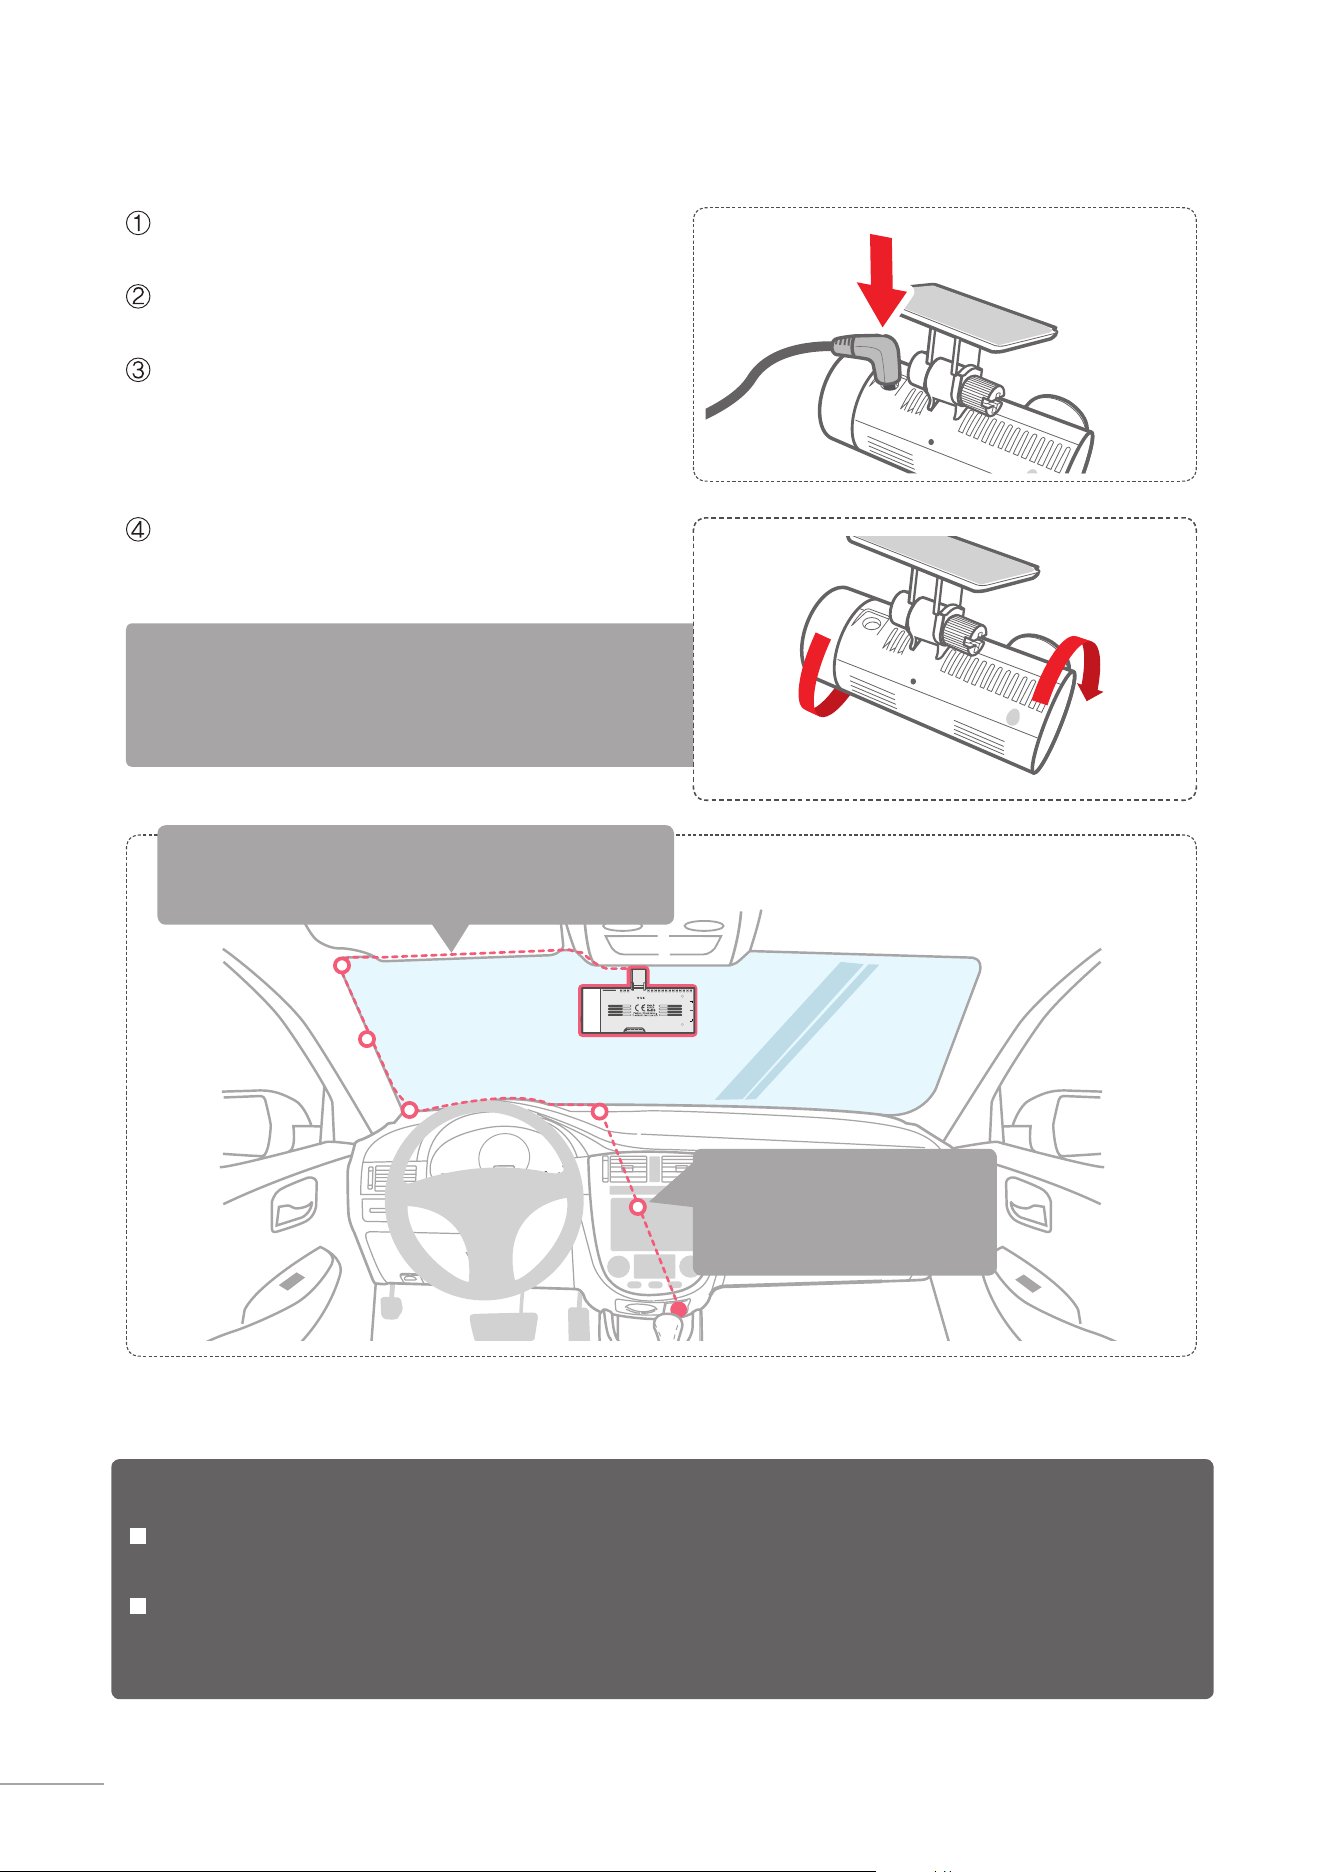
1-5-3. Connecting to power
Connect the power cable to DC-IN socket of
the device.
Plug the car charger adapter end of the power
cable into a 12V DC vehicle power socket.
Arrange the wire by using the adhesive cable
holders as shown below.
Adjust the camera so that the dash cam is facing
forward and is level with the road.
Preventing Vehicle Battery Discharge
Depending on the make and model of your car, the power may be supplied to the dash cam
even with the ignition turned off. This may result in vehicle battery discharge.
Some vehicles with multiple power sockets might be equipped with at least 1 outlet that does
not shut off the power with the ignition. Test each power outlet to ensure you connect to an out-
let that shuts off with vehicle ignition.
For more information on the power cable routing instruction, please visit Thinkware homepage.
(www.thinkware.com)
Hide the power cable by placing (tucking) it in the space
between the vehicle ceiling and headliner at the top of the
windshield
Recommended locations for
attaching adhesive wire clips
to arrange the power cable are
illustrated in the diagram

9
Basic Operations
02
2. Basic Operations
2-1. Turning the Device Power On/O
Once connected to the vehicle, the device will automatically turn on and o with vehicle ignition.
Power cable for vehicle
Orange Light ON
Operation LED
10
2-2. Date/Time Settings
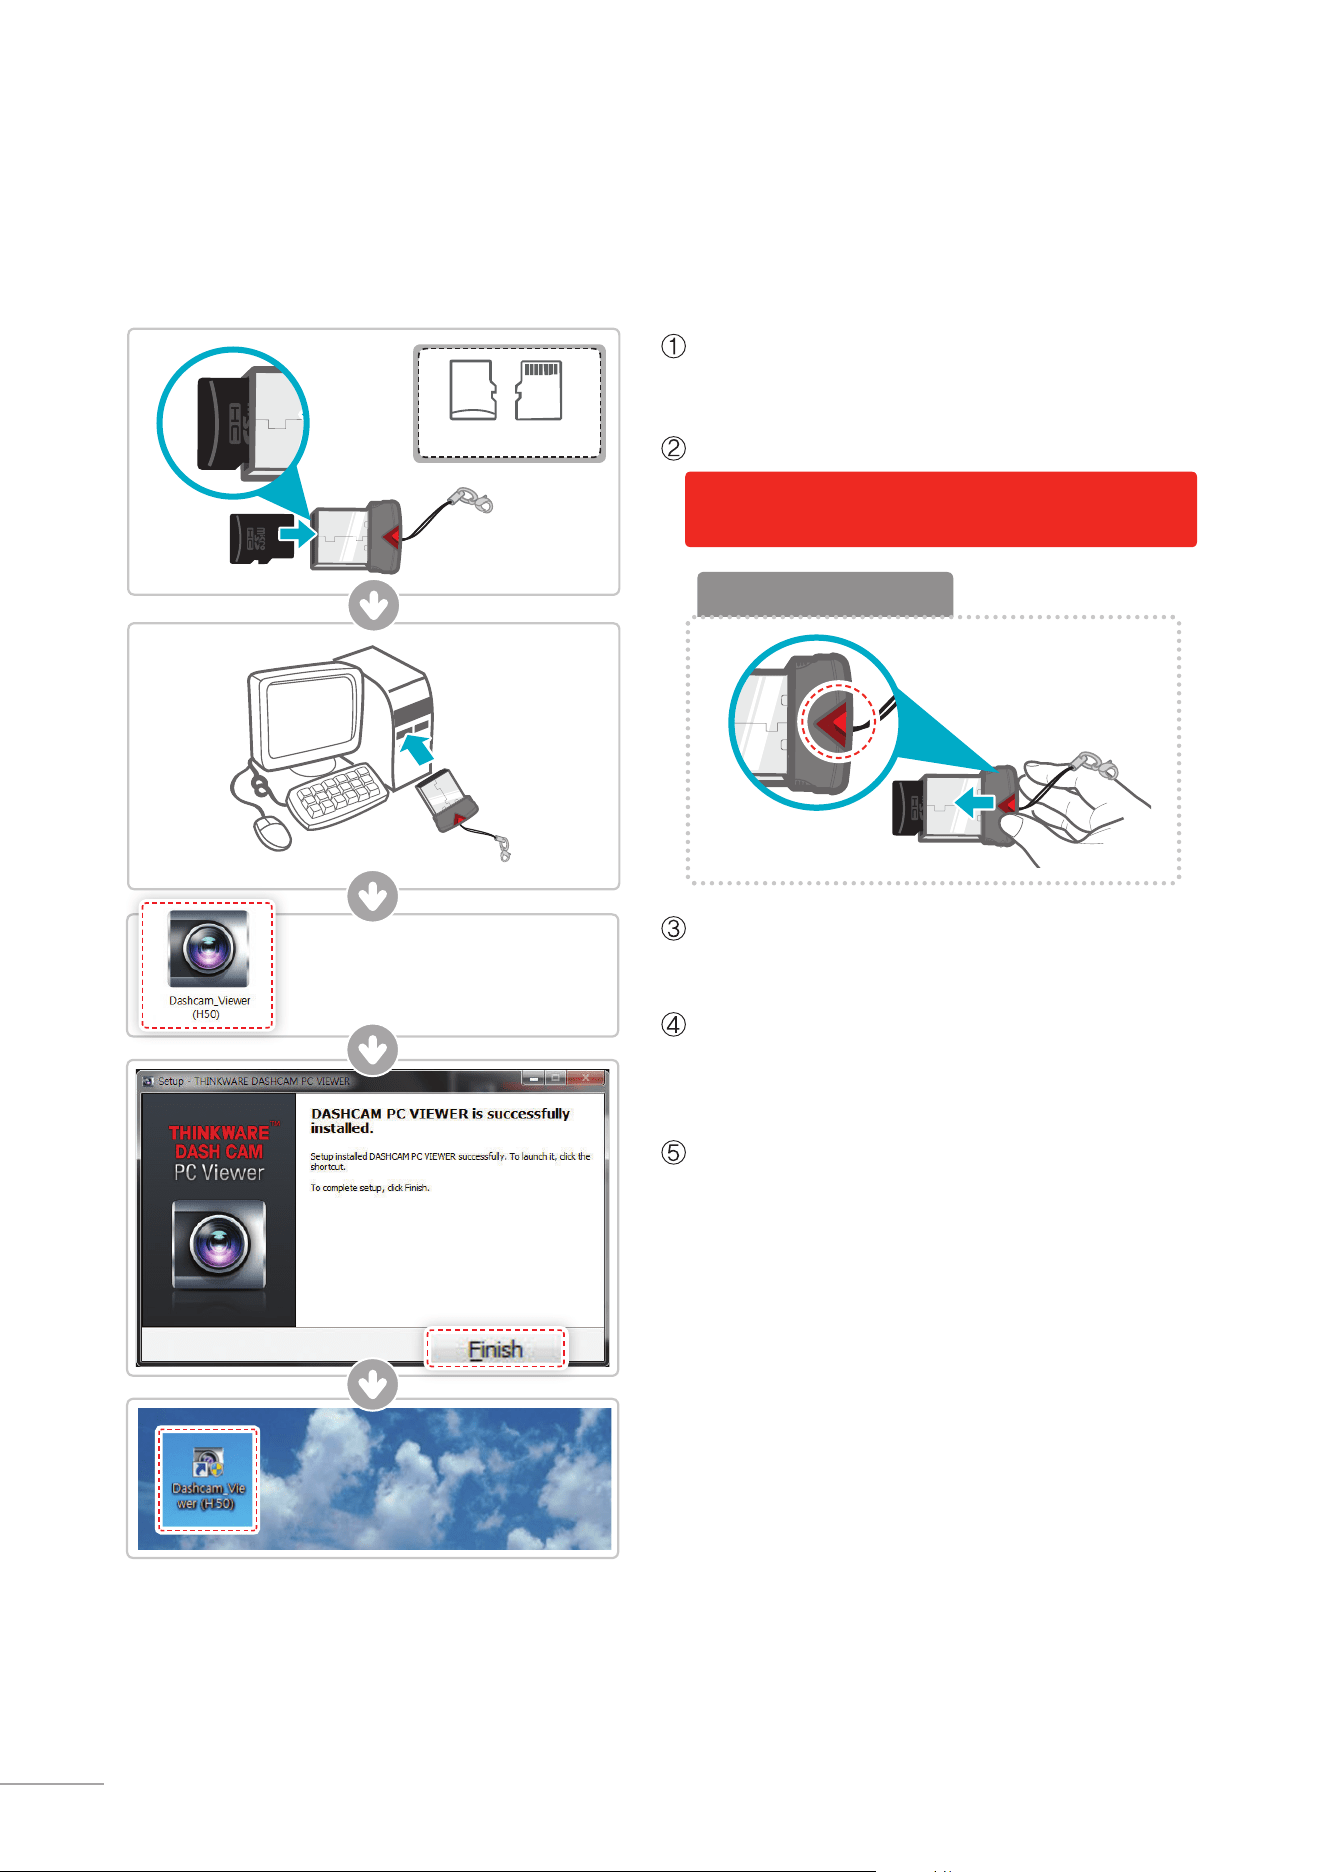
It is strongly recommended that the correct date/time and time zone are set before using the device
Ensure that the USB card reader is correctly orient
-
ed when inserting it into the USB drive
Removing MicroSD card
Insert the MicroSD card into the USB MicroSD card
reader (included in the package) with front side
facing up as shown in the illustration.
Connect the USB MicroSD card reader to the PC.
Double-click the Dash Cam Viewer(H50).exe le
saved in the MicroSD card and install the program.
Double-click the Thinkware Dash Cam Viewer icon
after installation completes. The Viewer application
screen will then appear.
Leave the MicroSD card in the USB port of the PC.
If another MicroSD card is to be used for recording
videos in the dash cam, insert this memory card
into the USB port of the PC.
Front Rear
MicroSD card

11
Basic Operations
02
Select Setting ( ) icon from the PC Viewer.
Select Dash Cam Setting > Set time zone and Get
current time of your location.
User congured settings will be stored in the
MicroSD card. The settings will be automatically
applied to the dash cam when the MicroSD card is
inserted into the dash cam and powered on.
Once the correct time has been set, insert the Mi-
croSD card immediately back in the dashcam and
start the device to apply the changed settings.
12
2-3. Connecting External GPS Receiver(Optional Accessory)
THINKWARE shall NOT be responsible for any problems and/or damages that may occur from not using
genuine or authorized parts and accessories. It is strongly recommended that THINKWARE external GPS
receiver is used.
Turn the device o completely before connecting the GPS receiverto avoid damages.
Cautions
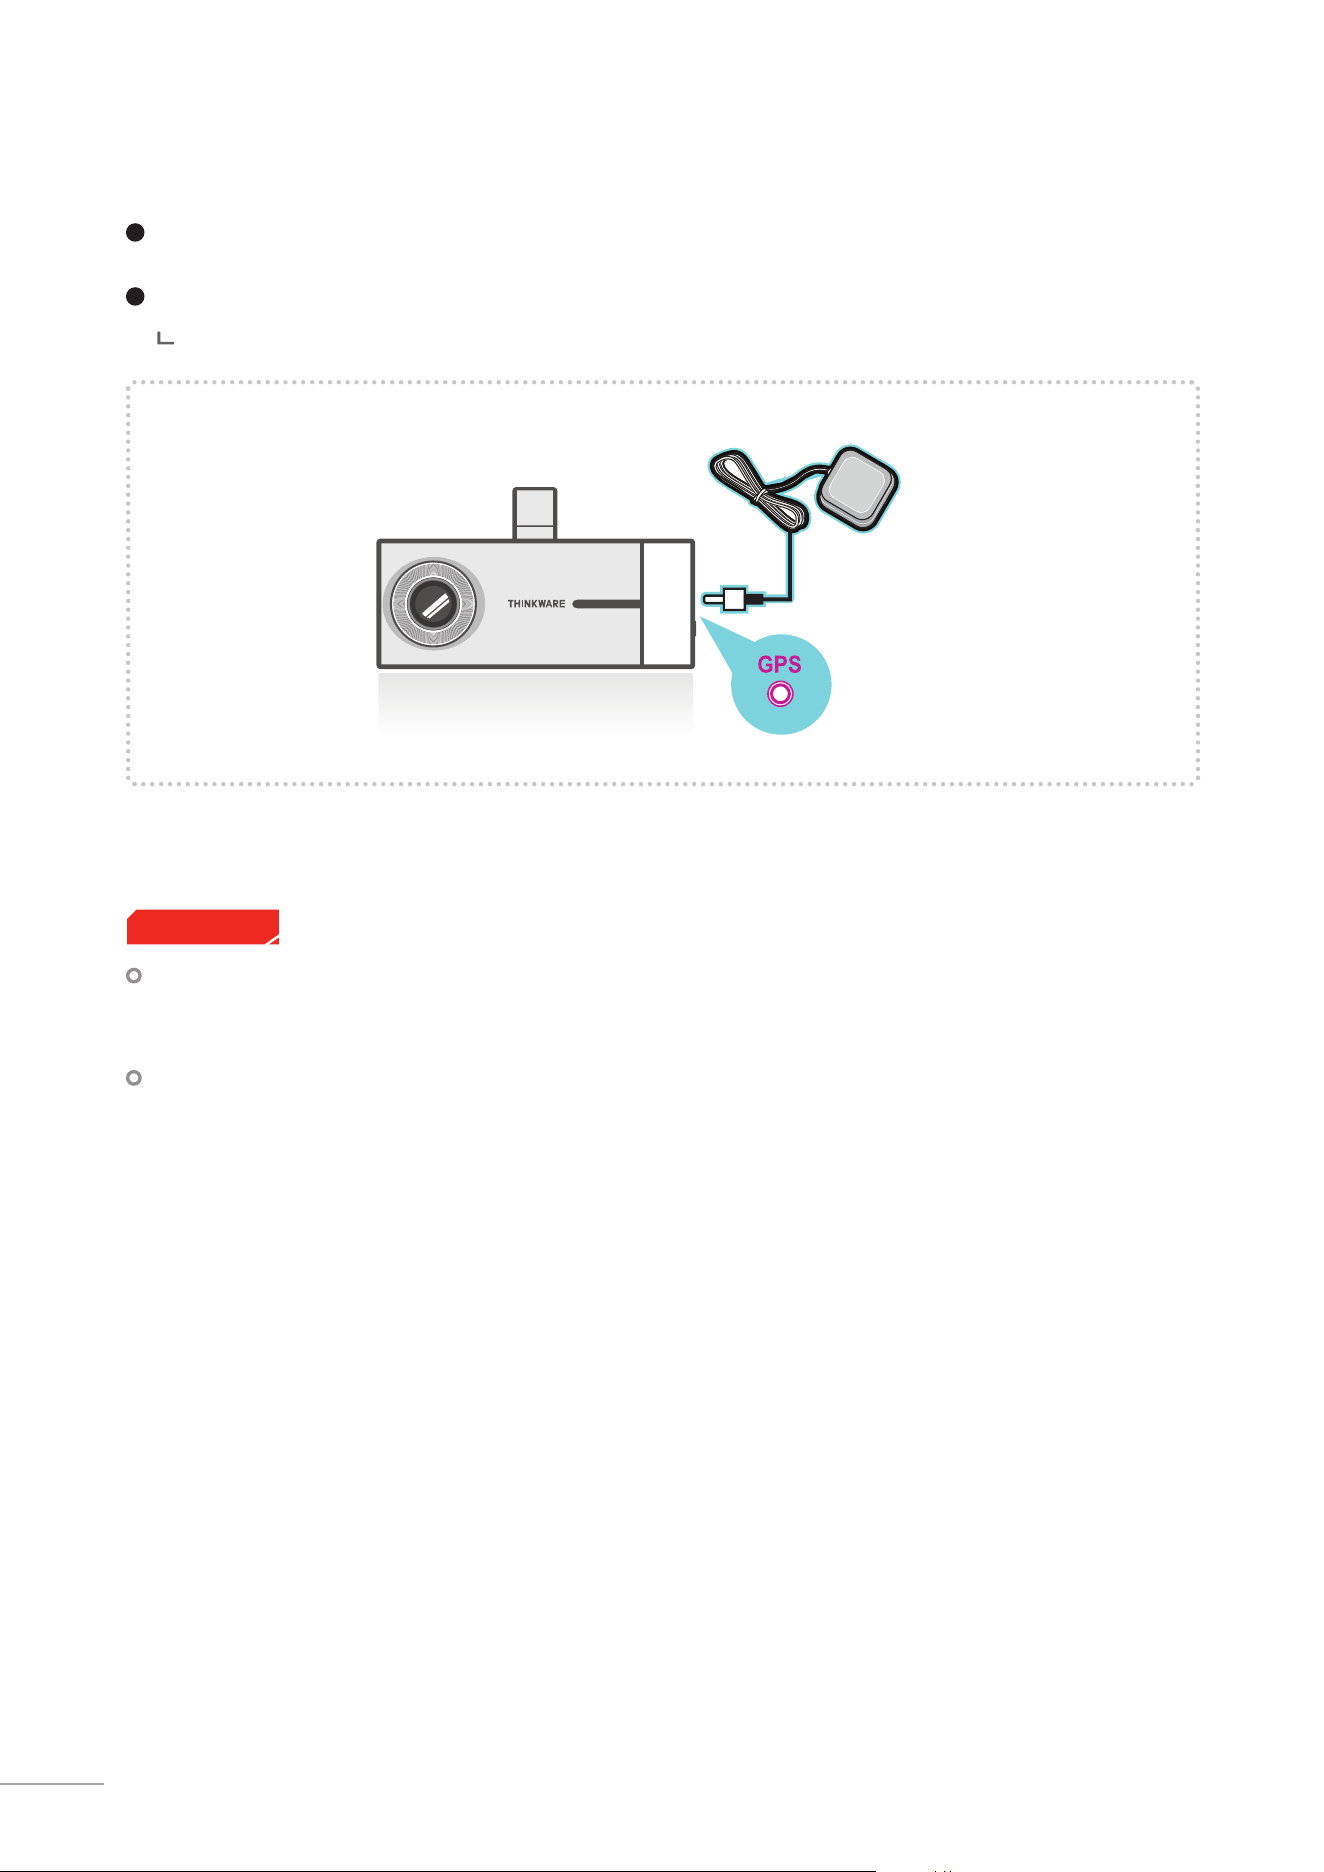
External GPS Receiver is available as an optional accessory that can be purchased from Thinkware autho-
rized dealers.
External GPS Receiver enables recording of vehicle locations in the video le for driving route tracking.
Connect external GPS Receiver to the GPS port of the dash cam.
13
Basic Operations
02
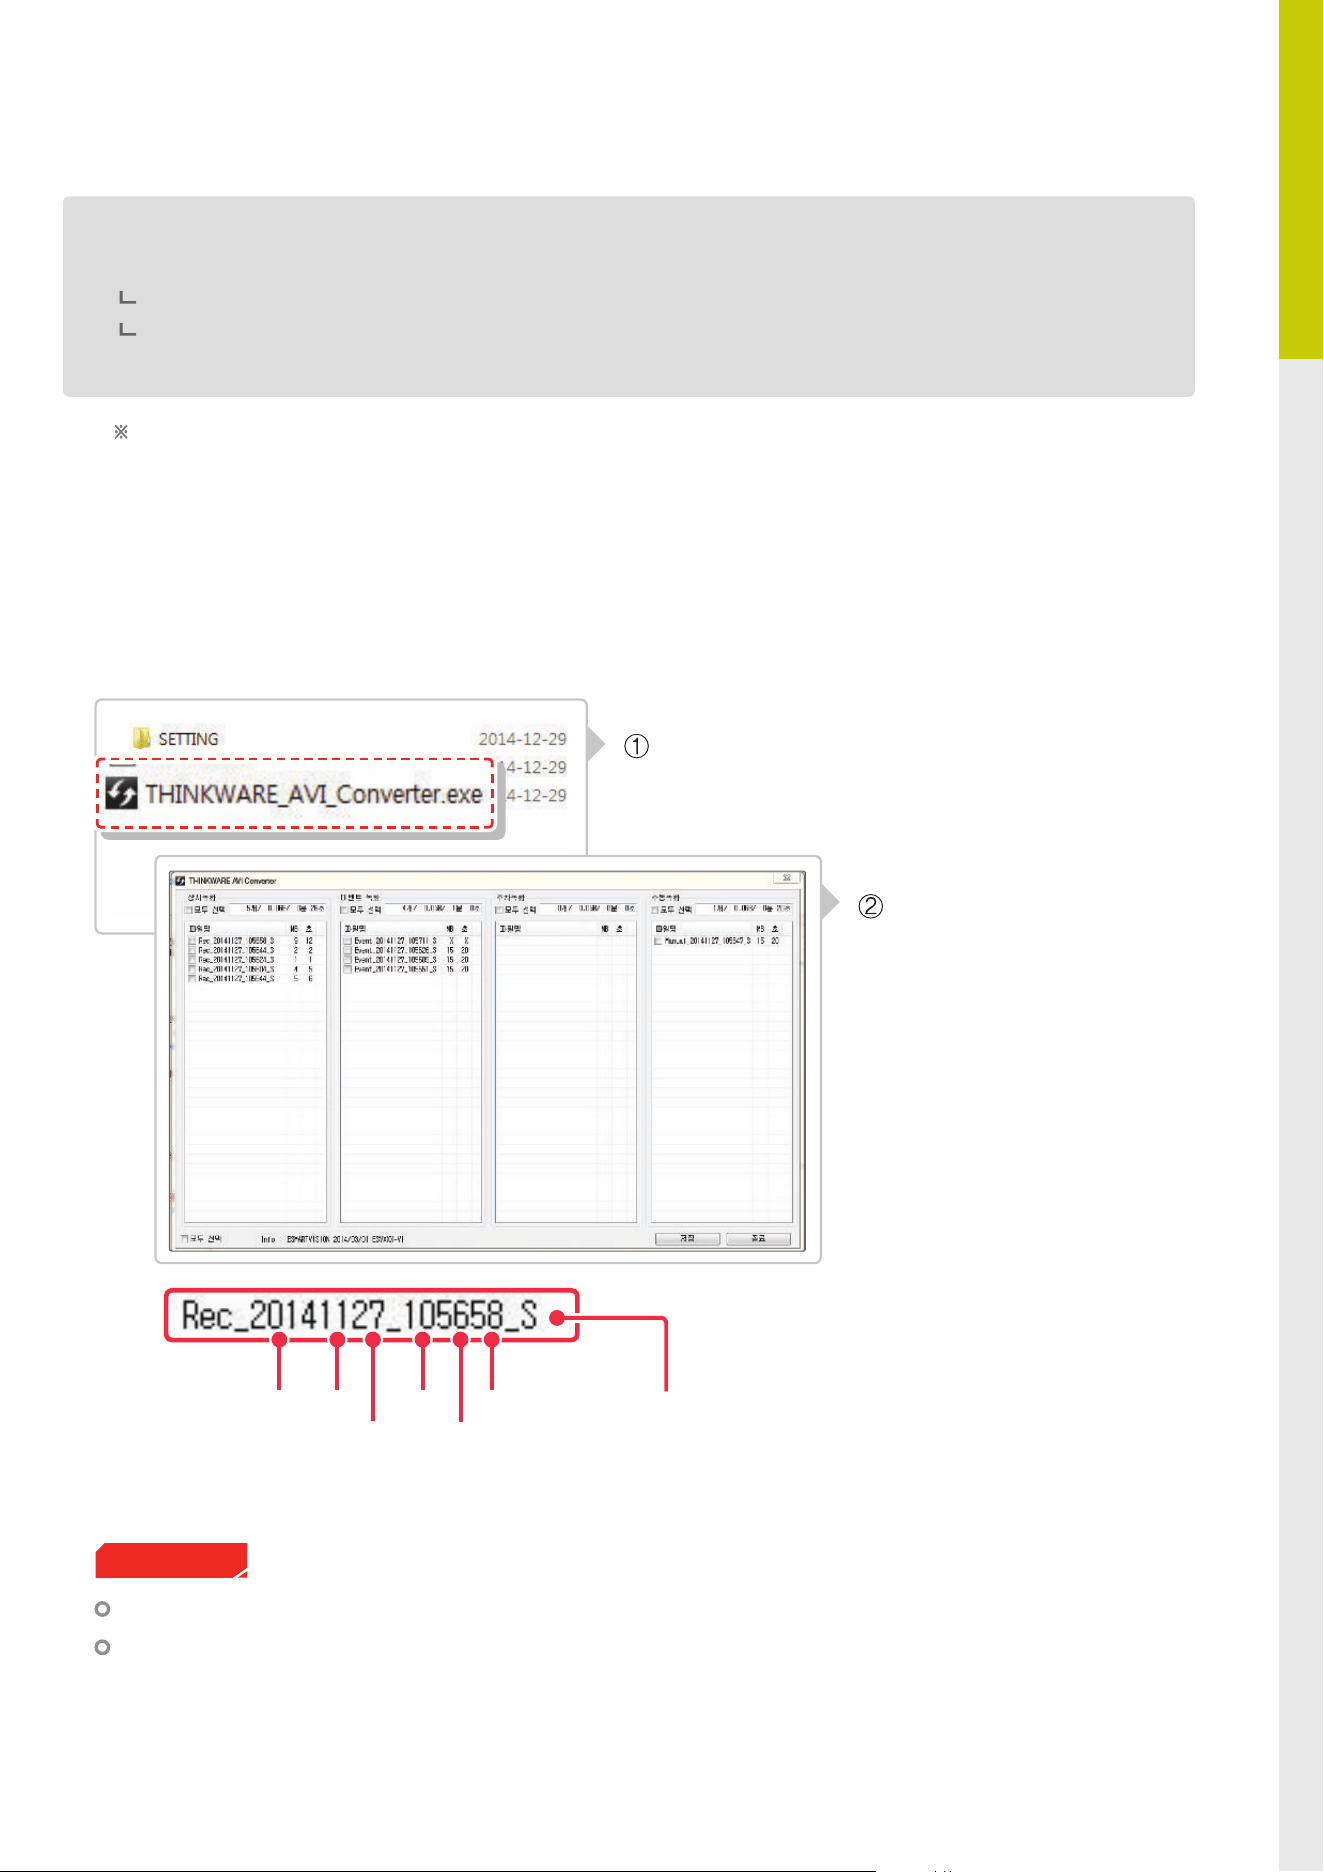
2-4-1. THINKWARE AVI Converter for H50
Do not use the MicroSD card as an external storage device.
Do not tamper with the system les within the in the MicroSD card. This may result in unexpected behav-
ior during operation.
Cautions
Front view
recording
Year Month
Day
Hour
Minute
Second
2-4. Recorded Files
H50 uses proprietary le format technology for optimal performance and reliability and therefore,
THINKWARE AVI Converter or Thinkware PC Viewer MUST be used for video playback.
The videos cannot be viewed using smartphone and/or tablets due to unrecognized le format
The available disk space for the memory card will NOT be correctly displayed when viewed using Windows
Explorer. This is due to FormatFree™ Technology and NOT a memory card problem.
Insert the MicroSD card into the USB MicroSD card
reader (included in the package) and launch the
THINKWARE AVI Converter.exe.
Select videos using THINK-
WARE AVI Converter the
videos to AVI le and down-
load to the PC. (File format
converting/downloading
may take long time depend-
ing on the number of les
selected for conversion)
FormatFree™ Technology
FormatFree™ is a Thinkware proprietary technology that had been developed to eliminate disk fragmentation when writing/
overwriting recorded video les on the memory card. This allows the dash cam to increase performance and reliability and
most importantly, it eliminates the need to periodically format the memory card. This technology uses proprietary le type
which can only be viewed using dedicated THINKWARE AVI Converter or Thinkware PC Viewer. Both THINKWARE AVI Con-
verter or Thinkware PC Viewer are available for download at Thinkware homepage (www.thinkware.com) and also included
in the MicroSD card in the package.
14
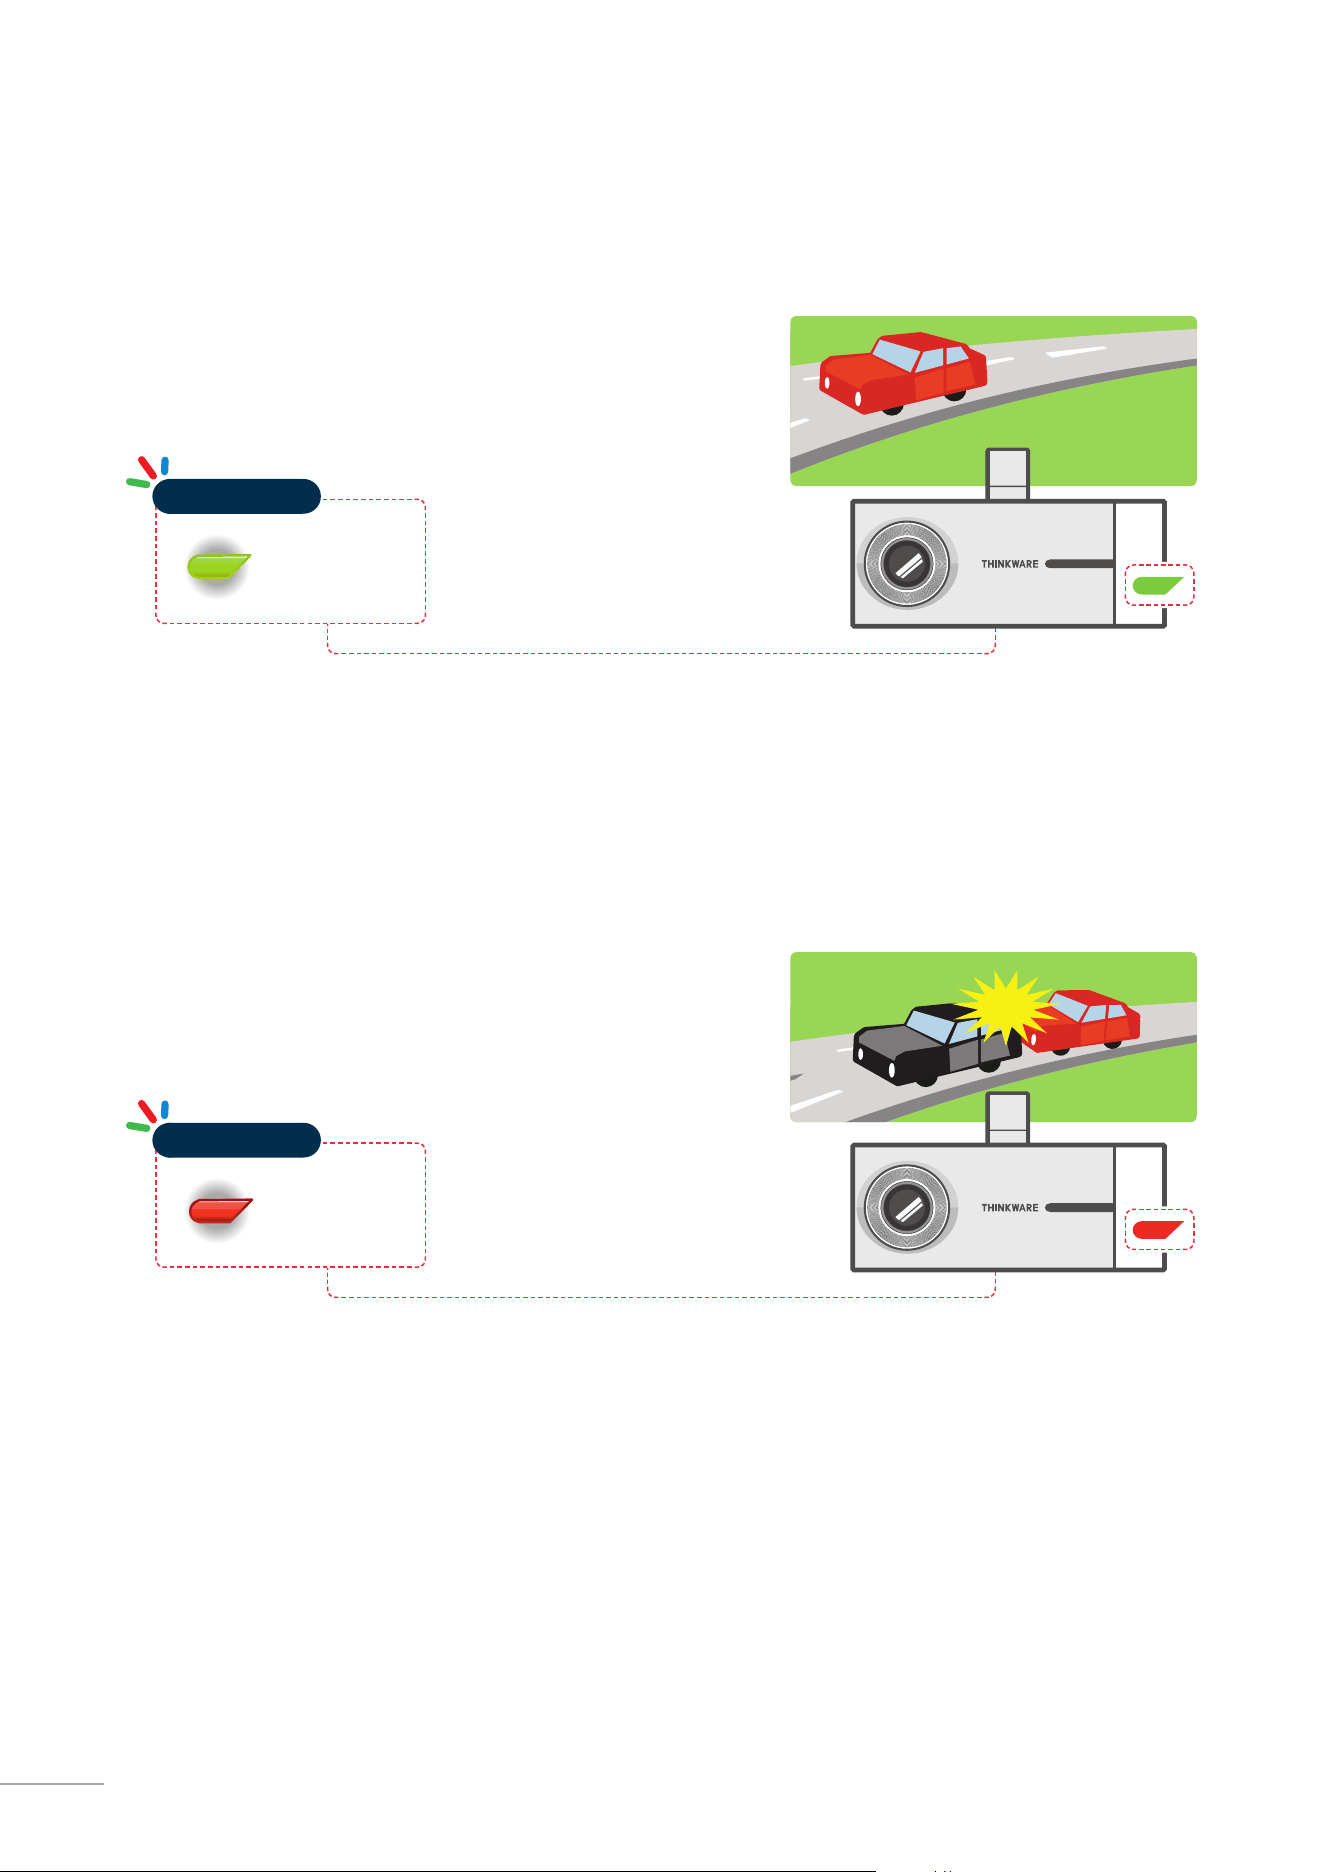
2-5. Recording Videos While Driving
2-5-2. Incident Recording During Continuous Recording Mode
When the dash cam detects an impact, it will immediately
store the 10 seconds prior and after the impact.
The 20-second impact recording is saved at a designated
location for event recording in the MicroSD card.
2-5-1. Continuous Recording Mode
Videos are recorded in 1 minute segments and saved at a des-
ignated location for continuous recording in the MicroSD card.
Red Light ON
Operation LED
0,&
Green Light ON
Operation LED
0,&
15
Basic Operations
02
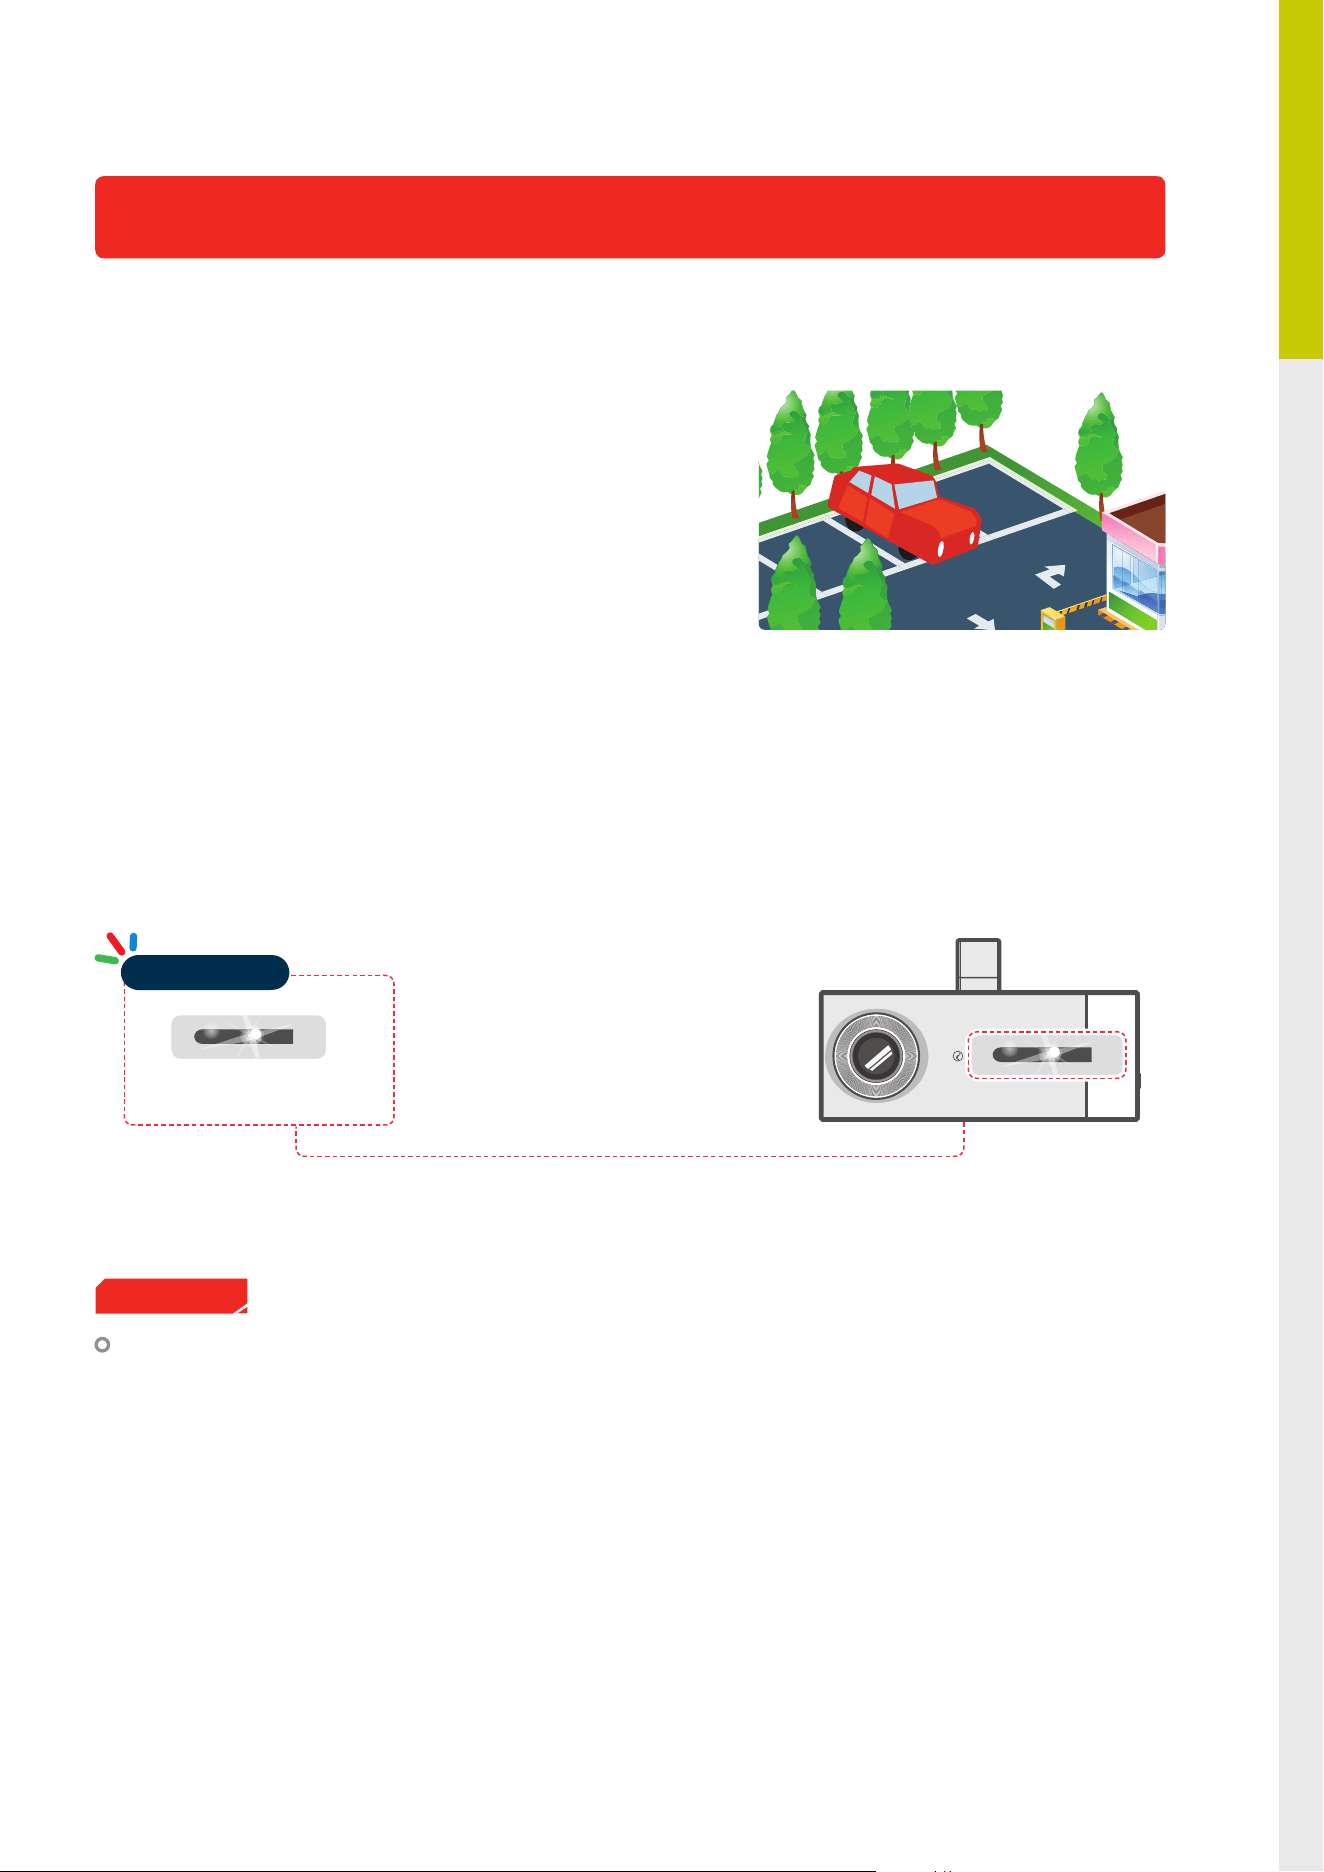
2-6-2. Motion Detection Recording
When the dash cam detects motion while parked, it will immediately store the previous 10 seconds prior to
the activation of motion detection start recording video for the next 10 seconds.
The 20-second motion detection recording is saved at a designated location for parking recording in the
MicroSD card.
2-6-1. Incident Recording
When the dash cam detects an impact, it will immediately
store the 10 seconds prior and after the impact.
The 20-second impact recording is saved at a designated
location for event recording in the MicroSD card.
2-6. Recording Videos While Parked (Optional Accessory)
This feature is available only when the dash cam has been hardwired directly to the vehicle battery.
Separate purchase for the hardwiring cable accessory and professional installation is required.
White Light Blinking
Security LED
The device can record up to 1 minute for continuous impacts in the case of multiple collisions.
Cautions
16
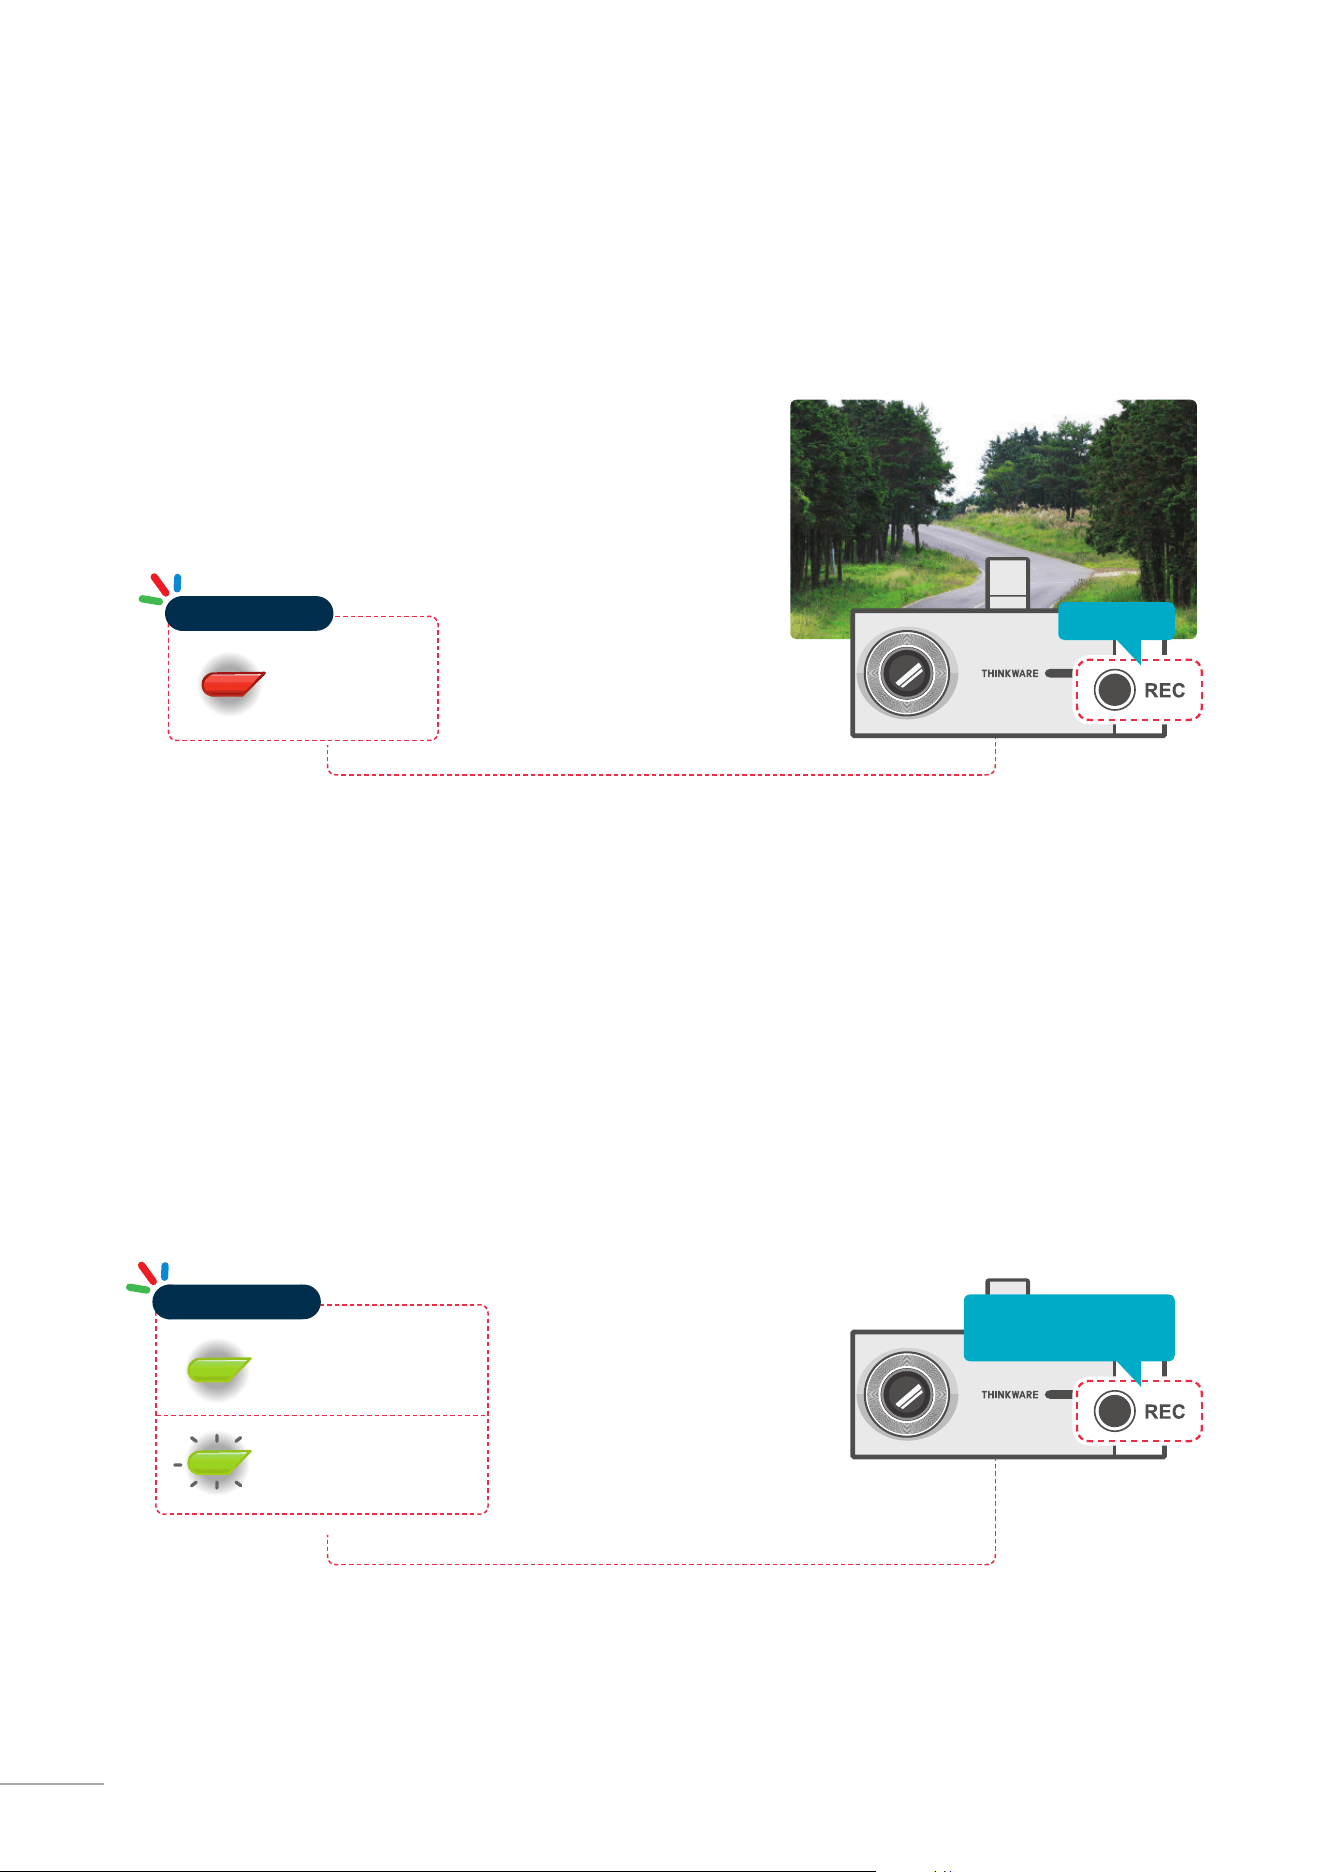
Briey press the REC button to start recording. The device
will record video for 1 minute (10 seconds be fore and 50
seconds after) as of the time when the button is pressed.
The recorded video will be saved at a designated location
for manual recording in the MicroSD card.
2-7. Manual Recording
In addition to recording accidents, the dash cam allows the user to initiate manual recording mode to cap-
ture scenery and/or places while driving. This feature can also be used to save video as witness where the
installed vehicle is not directly involved in an accident. Video les saved during manual recording mode are
stored in a separate location on the memory card and will be protected from video overwriting in continuous
recording mode.
Red Light ON
Operation LED
2-8. Voice Recording
Press and hold the REC button for more than 3 seconds to turn the voice recording ON/OFF
Green Light ON
(Voice Recording ON)
Green Light Blinking
(Voice Recording OFF)
Operation LED
0,&
Press and hold for 3
seconds
0,&
Press briey

17
Basic Operations
02
Press and hold REC button for 5 seconds to initiate memory card format
2-9. Formatting MicroSD Card
The system will automatically be updated if the MicroSD card contains
the rmware upgrade le.
The device restarts automatically after the upgrade has been com-
pleted.
Make sure your device is always up to date with latest rmware. Please
check back frequently at THINKWARE website (www.thinkware.com) for
the latest rmware updates.
2-10. Upgrading Firmware
0,&
Red Light Blinking
Operation LED
Red Light Blinking
Operation LED
Press and hold for 5
seconds
18
3. PC Viewer Software
3-1. Thinkware Dash Cam PC Viewer
Thinkware Dash Cam Viewer for Windows is provided which can be used to watch videos recorded with the
dash cam. The video les recorded by the dash cam are in one minute segments and the PC viewer allows the
user to watch these segments as a single continuous video.
The setup le for the Thinkware Dash Cam PC Viewer is included in the MicroSD card within the package.
Please check THINKWARE homepage(www.thinkware.com) for the latest Dash Cam PC Viewer
application.
3-1-1. Thinkware Dash Cam PC Viewer Software
Insert the MicroSD card into the USB MicroSD card
reader (included in the package) with front side
facing up as shown in the illustration.
Connect the USB MicroSD card reader to the PC.
Front Rear
MicroSD card
Ensure that the USB card reader is correctly
oriented when inserting it into the USB drive
Removing MicroSD card
19
PC Application
03
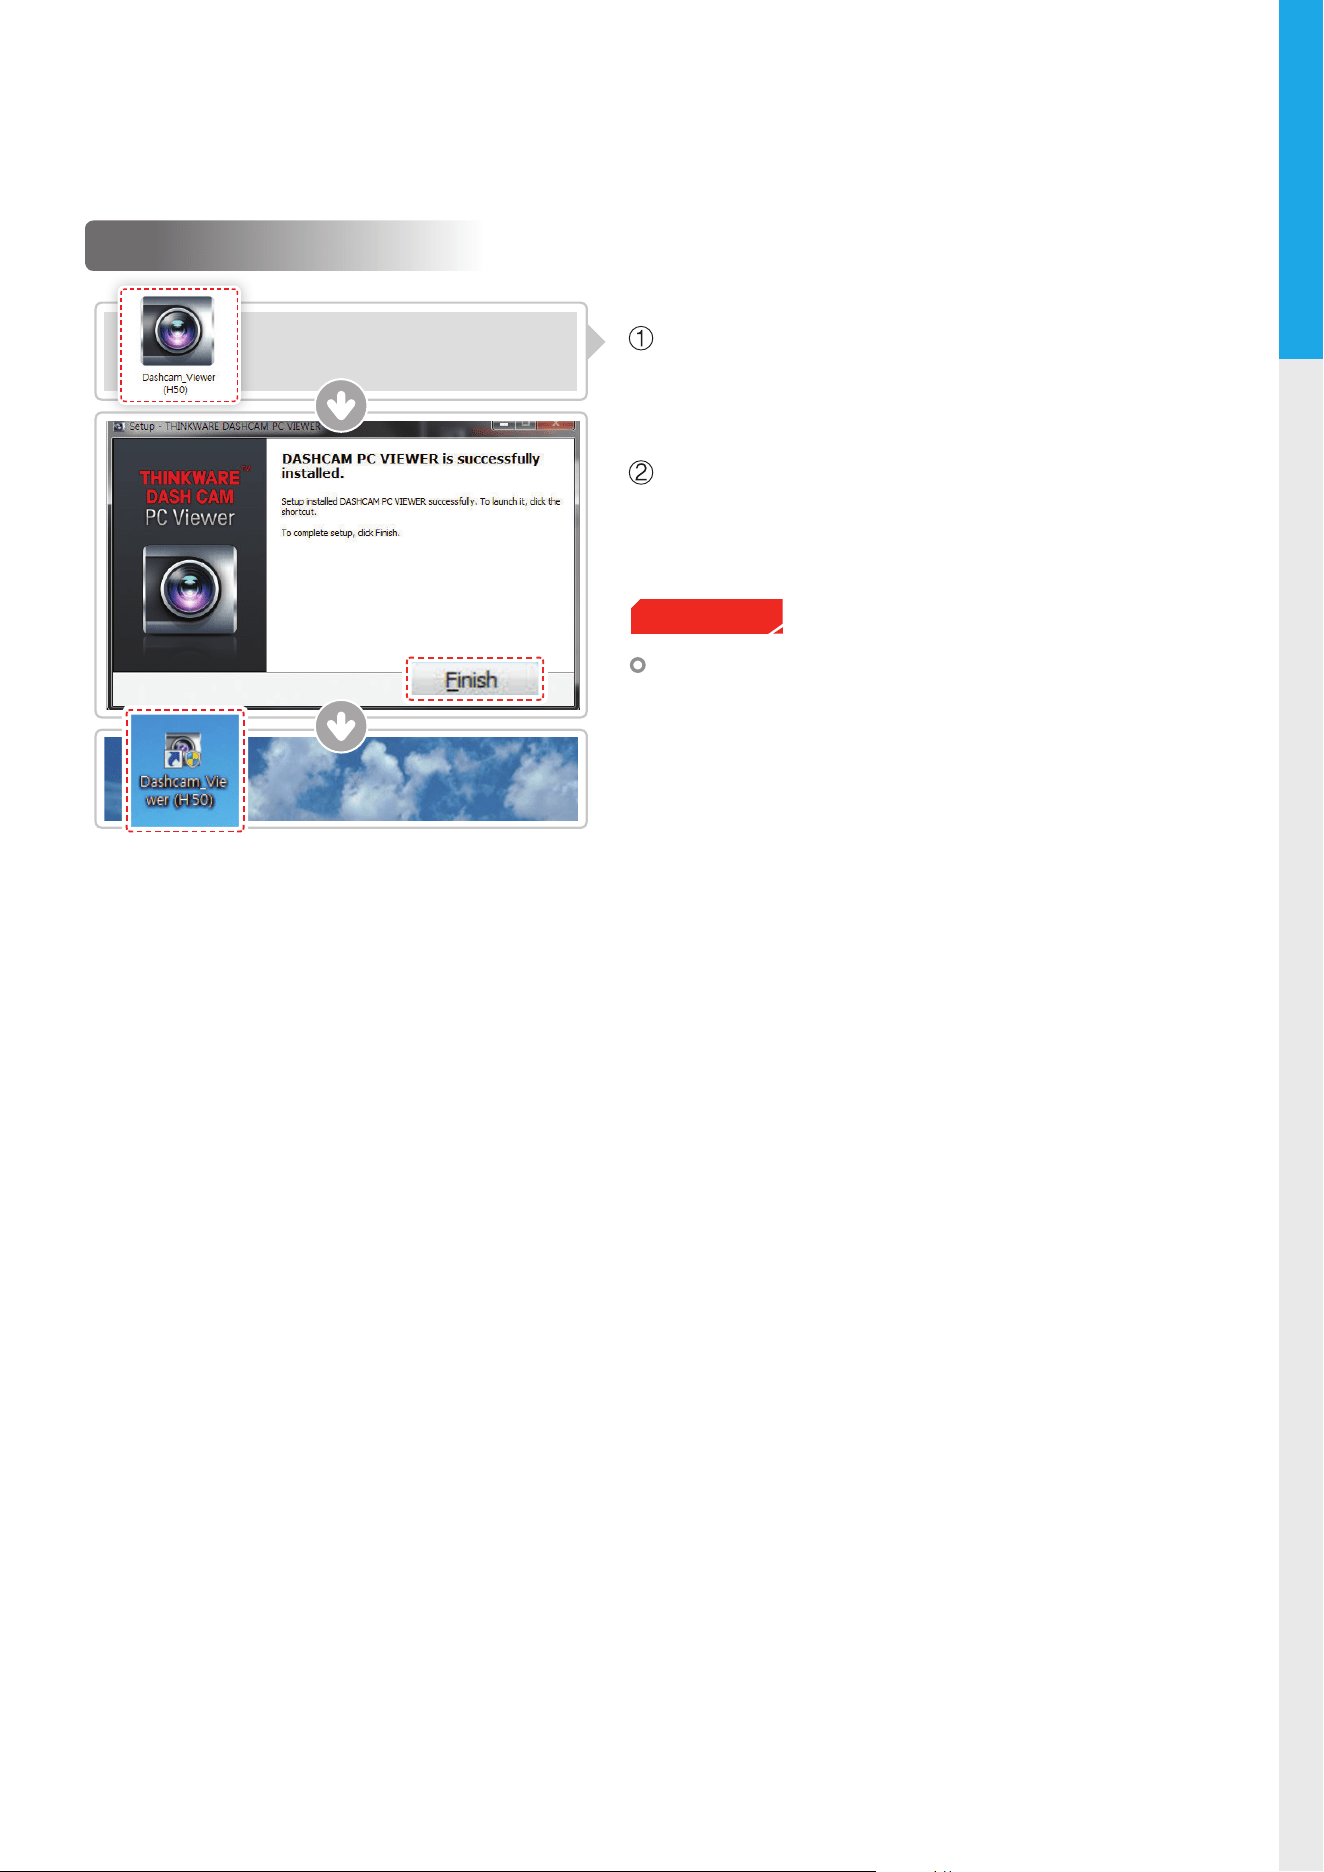
3-1-2. Installing Thinkware Dash Cam Viewer
Windows
Double-click the Dash Cam Viewer(H50).exe le
saved in the MicroSD card to initiate program instal-
lation.
Double-click the application icon once PC Viewer
installation completes and the application main
screen will then appear.
System requirements :
Windows XP (32 bit), Windows 7 (32/64 bit),
Windows 8.x (32/64 bit)
Cautions

20
3-1-3. Select the Device Drive for H50
The MicroSD card will not be recognized by the software until it has been initialized in the dash cam.
It is recommended that the user record at least one video clip on the MicroSD card with the dash cam
unit before accessing the Thinkware Dash Cam PC Viewer.
Cautions
Insert the MicroSD card with recorded videos into
the USB port of the PC using USB MicroSD card
reader.
Select the video from the video le list and double
click the le or select Play icon to start the video
playback.
or
21
PC Application
03
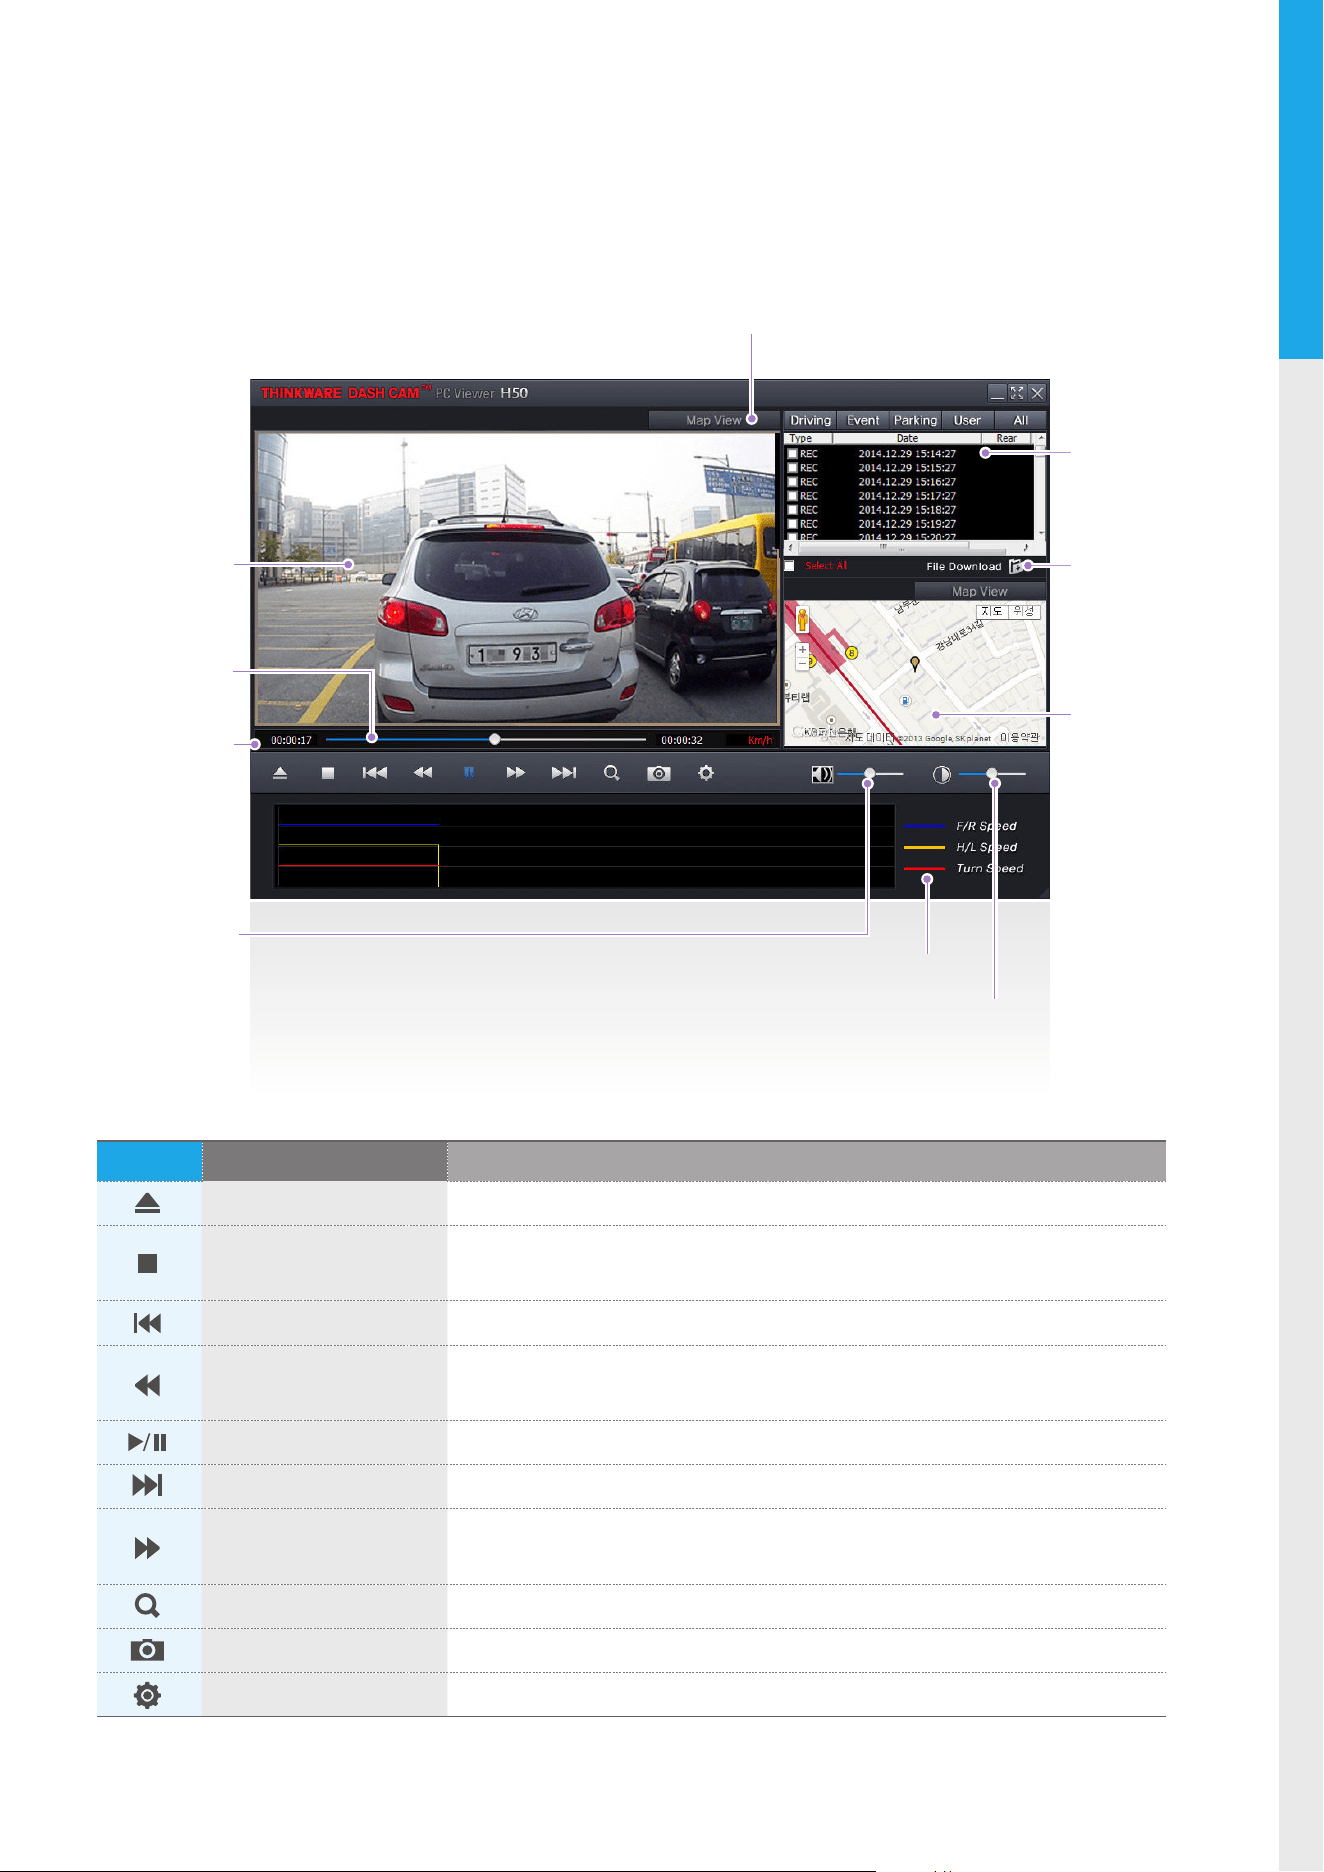
Playlist
File download
to PC
(It may take long
time depending
on the number of
les selected for PC
download)
Switch to Map View
Viewing screen
Playback
Progress
Current play time/
Total play time
G-sensor values
Volume control
MAP
Displays location
information for the
video being played
(Must be connected
to Internet for the
location informa-
tion to be displayed
on the map)
Adjust video brightness
3-1-4. Thinkware Dash Cam Viewer Overview
No. Name Description
File Open Retrieves video le list
Stop
Stops the current video playback. Playback progress will be reset to the begin-
ning of the video
Previous Play the previous video le from the list
Rewind 10 seconds
Rewind 10 seconds from current video playback location (press and hold for
continuous rewind by 10 seconds)
Play / Pause Video playback / pause
Next Play the next video le from the list
Fast forward 10 seconds
Fast forward 10 seconds from current video playback location (press and hold
for continuous fast forward by 10 seconds)
Zoom Zoom in to expand the video
Still image capture Capture still image from video playback
Settings Congure dash cam settings
22
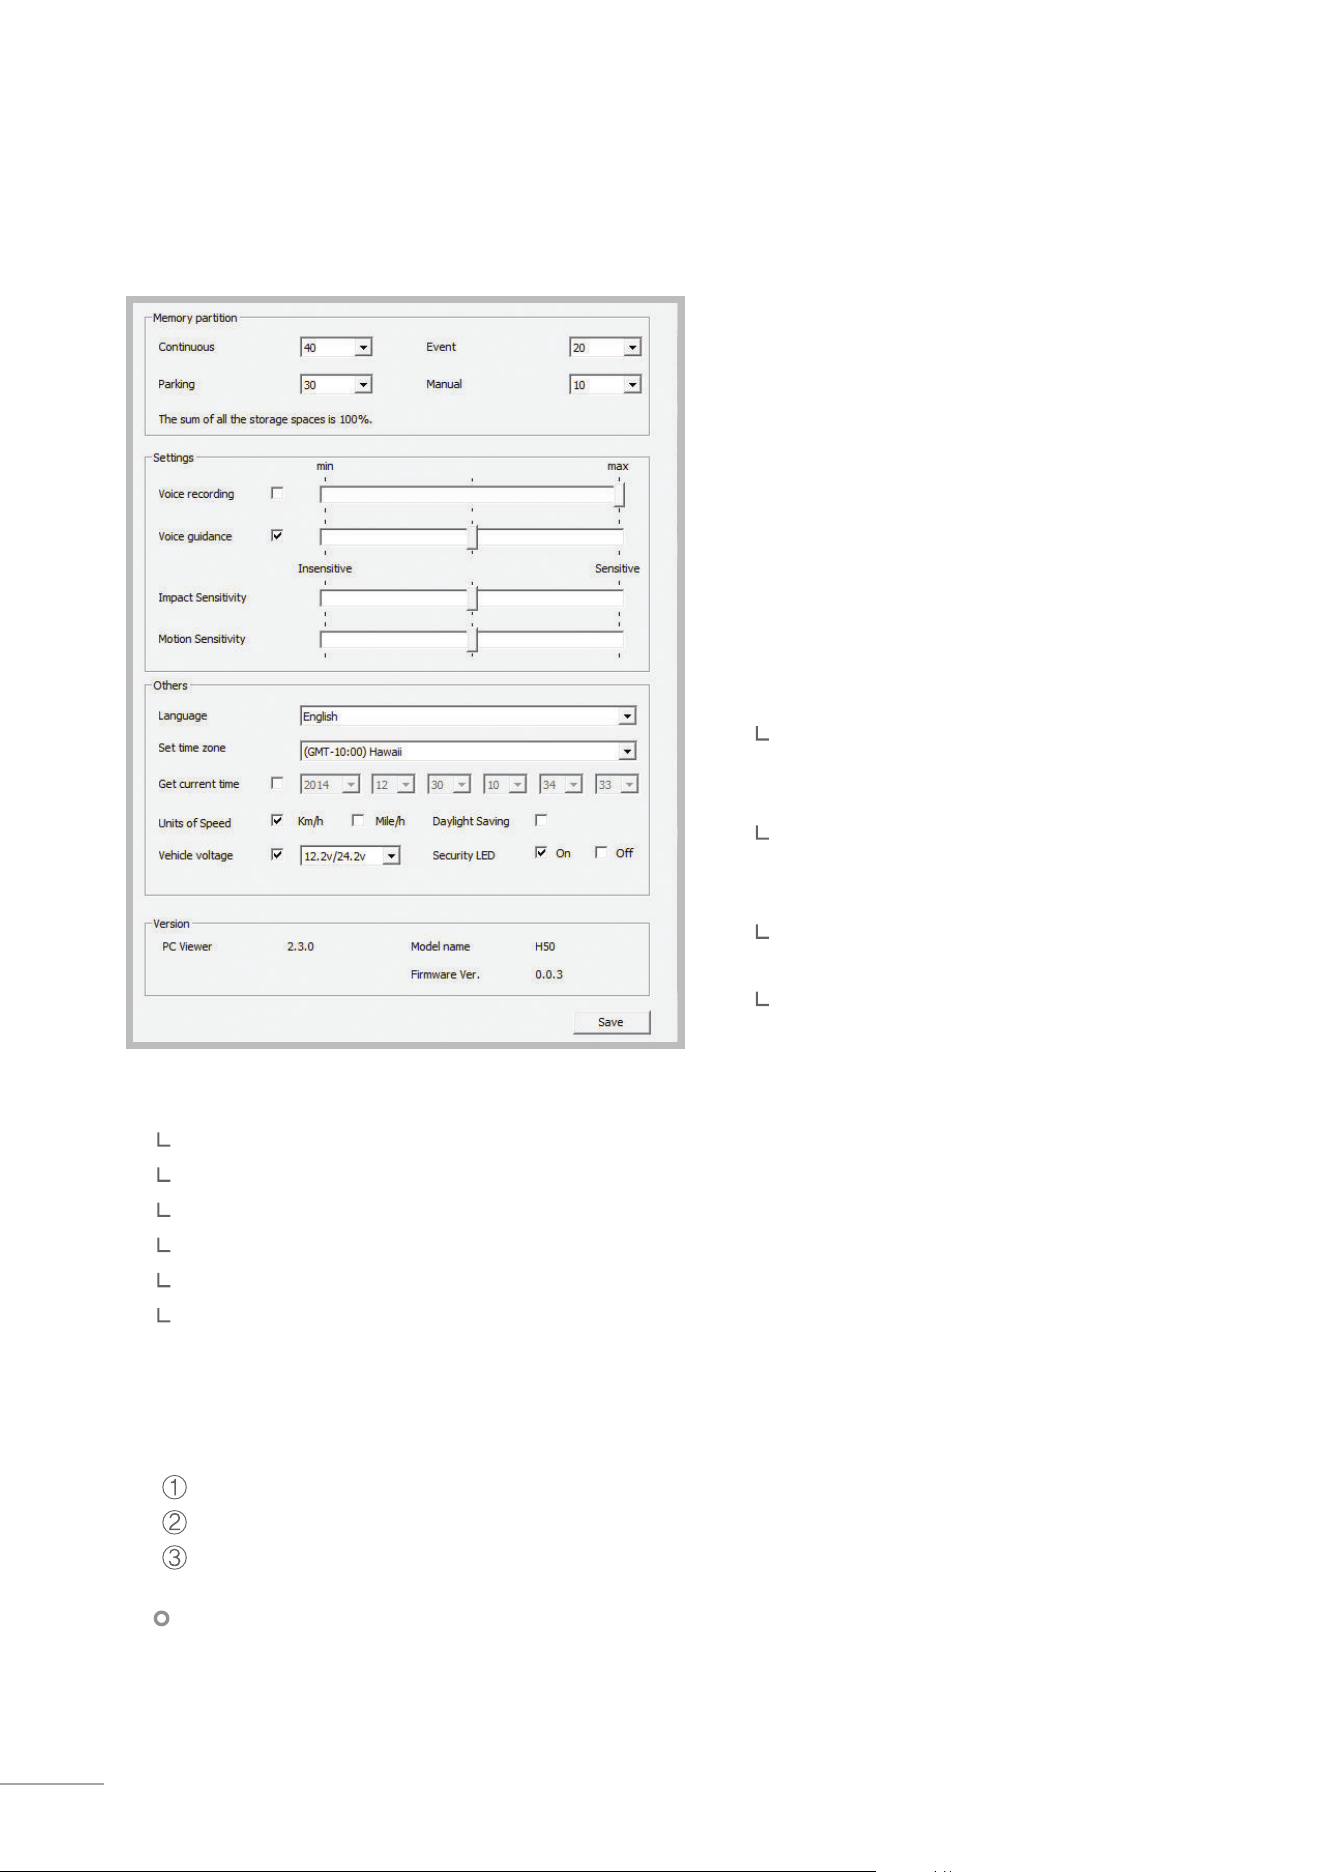
3-2-1. Setting
3-2. PC ViewerSetting
Others
Language : Sets the system language
Set time zone : Sets the time zone
Date/Time : Sets the date/time
Get current time : Retrieves the current time from the PC
Units of Speed : Sets the unit for the vehicle speed
Vehicle voltage : Sets the voltage level for the dash cam to automatically shut down in order to prevent
the vehicle battery from draining
Version : Version information for the device and its rmware
Save
Press Save button to store the new configuration on the MicroSD card and apply the changed settings
Saved configuration is stored in blackbox.cfg file located in MicroSD card under Settings folder
Insert the MicroSD card with changed settings to apply the changes to the device
Memory partition :
Sets how storage space on the memory
card will be allotted for each recording
mode
Settings
Voice Recording :
Sets the voice recording on/o and
recording volume
Voice Guidance :
Sets the voice guidance on/o and the
volume
Impact Sensitivity :
Sets the impact sensitivity of the G-Sensor
Motion Sensitivity :
Sets the sensitivity of the motion detection
sensor
Deleting/Removing blackbox.cfg le using PC le explorer will disable the use of PC Viewer. In such
case, insert the MicroSD card and power on the device which automatically generates blackbox.cfg
le with default settings to enable use of PC Viewer.

23
Device Information
04
4. Specications
4-1. Specications
The specications of this product may change without prior notice for product improvements.
Item Standard Note
Model H50
Size/weight
76 x 30.5 x 38.4mm / 36.8g
3.0 x 1.2 x 1.51inches / 0.08lbs
Capacity
MicroSD card
8GB /16GB/32GB
Recording mode
Continuous Recording Mode Records in 1 minute segment
Incident Recording Mode
10 seconds before/after incident
(total 20 seconds)
Manual Recording Mode
Parking Surveillance Mode
Optional hardwiring cable and installa-
tion are required for continuous supply of
power when vehicle ignition is o.
Audio Recording
Video quality
Choose from one of three dierent modes
(low/mid/high)
Total recording time varies depending on
the partition type.
Camera 2.0 Megapixel CMOS Sensor
Viewing angle Approximately 120° (diagonally)
Video HD (1280X720) / H.264 / extension AVI
Frame rate 1 channel (Front view) : up to 30 fps
Audio PCM (Pulse code modulation)
Acceleration sensor 3-axis acceleration sensor (3D, ±3G) Adjustable impact sensitivity (10 levels)
GPS
External GPS Receiver
(Stereo jack 2.5Ø)
Optional accessory that requires separate
purchase
Input power source DC 12/24V
Current consumption 2.1W (Max)
Indicator LED Front : Security LED / Rear : Status LED
Warning sound Embedded speaker Voice (buzzer sound) guidance
Operation/Storage
Temperature
-10°C to 60°C/ -20°C to 70°C
14°F to 140°F/ -4°F to 158°F
