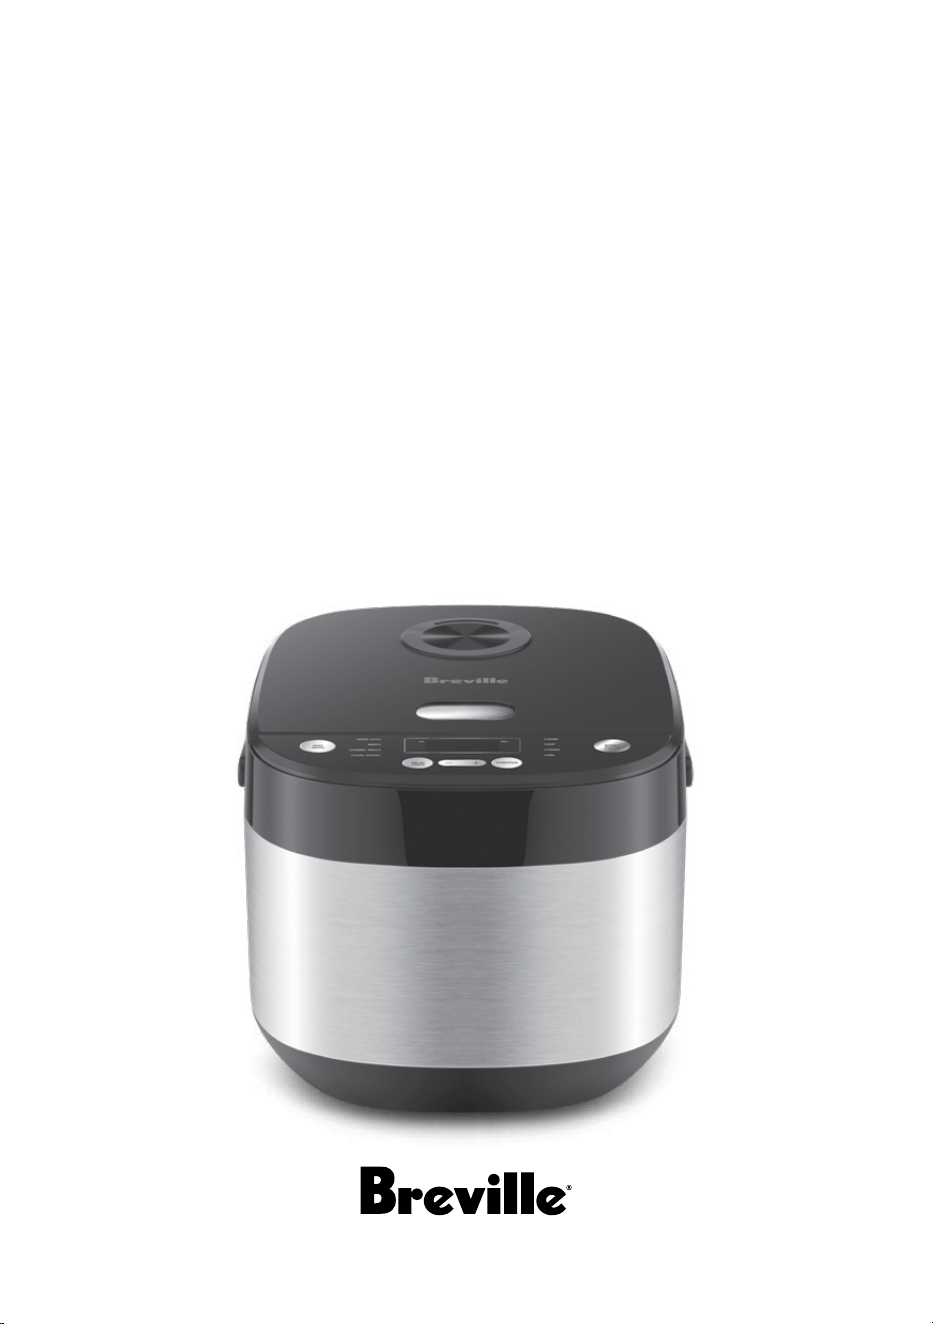
the Rice Box
TM
Pro
Instruction Book - LRC470

2
Limited Product
Warranty
Breville's warranty for this product
covers the repair or replacement if
it’s found to be defective due to faulty
materials, workmanship, or function
within the warranty period. All legal
warranty rights under applicable
national legislation will be respected and
will not be impaired by our warranty. For
details on length of warranty, to obtain
a printed copy or to read full terms and
conditions please scan
the QR code or visit
www.breville.com.
Alternatively, call the
Breville Service Centre
(see back cover for
contact details).
QR149
BREVILLE
RECOMMENDS
SAFETY FIRST
At Breville we are very safety
conscious. We design and
manufacture consumer
products with the safety of you,
our valued customer, foremost
in mind. In addition we ask
that you exercise a degree of
care when using any electrical
appliance and adhere to the
following precautions.
IMPORTANT
SAFEGUARDS
READ ALL
INSTRUCTIONS BEFORE
USE AND SAVE FOR
FUTURE REFERENCE
• Remove and safely
discard any packaging
material and promotional
labels before using the
rice cooker for the
first time.
• Do not place the rice
cooker near the edge of
a bench or table during
operation. Ensure that
8 Components
10 Functions
14 Rice Cooking Guide
17 Steaming Guide
18 Care & Cleaning
19 Troubleshooting
Contents

3
the surface is level, clean
and free of water and
other substances.
• Position the lid so that
the steam vent is directed
away from you. Lift and
open the lid carefully
to avoid scalding from
escaping steam.
• Always ensure the
rice cooker is properly
assembled before use.
Follow the instructions
provided in this book.
• Always operate the rice
cooker on a stable and
heat resistant surface.
• Use the removable
cooking bowl supplied
with the rice cooker.
Do not use any other
bowl inside the rice
cooker housing.
• Do not use a damaged
or dented removable
cooking bowl. If damaged
or dented, replace bowl
before using.
• Do not operate the
rice cooker on a sink
drain board.
• Do not place anything
on top of the lid when
assembled, when in use
and when stored.
• Do not touch hot surfaces.
Use the handle for lifting
and carrying the
rice cooker.
• Keep the rice cooker
clean. Follow the cleaning
instructions provided in
this book.
• Never plug in or switch
on the rice cooker without
having the removable
cooking bowl placed
inside the rice
cooker housing.
• Do not place food or
liquid in the rice cooker
housing. Only the
removable cooking bowl
is designed to contain
food or liquid.
• Never operate the rice
cooker without food and
liquid in the removable
cooking bowl.

4
• Do not touch hot surfaces,
use oven mitts to open
the lid and or remove
the removable cooking
bowl. Lift the lid carefully
to avoid scalding from
escaping steam.
• Do not allow water from
the lid to drip into the rice
cooker housing, only into
the removable
cooking bowl.
• Do not leave the rice
cooker unattended when
in use.
• Extreme caution must be
used when the rice cooker
contains hot food and
liquids. Do not move the
appliance during cooking.
• The temperature of
accessible surfaces will be
high when the rice cooker
is operating and for some
time after use.
• Always insert the
connector end of the
power cord into the
appliance inlet before
inserting power plug
into the power outlet and
switching on appliance.
Ensure the appliance inlet
is completely dry before
inserting the connector
end of the power cord.
• To prevent scratching the
non-stick surface of the
removable cooking bowl,
always use wooden or
plastic utensils.
• Ensure the removable
cooking bowl is correctly
positioned in the rice
cooker base before you
commence cooking.
• Care should be taken
when handling the rice
cooker after cooking,
ensuring that the rice
cooker body and parts are
not touched as these may
still be hot due to
residual heat.
• The appliance connector
and power cord must be
removed before the rice
cooker is cleaned and the
inlet must be dry
before use.

5
• To prevent damage to the
rice cooker do not use
alkaline cleaning agents
when cleaning, use a soft
cloth and mild detergent.
• Do not use chemicals,
steel wool, metal scouring
pad or abrasive cleaners
to clean the outside of the
rice cooker housing or
cooking bowl as these can
damage the housing or
the coating of the
cooking bowl.
• Keep the rice cooker
clean. Follow the cleaning
instructions provided in
this book.
IMPORTANT
SAFEGUARDS
FOR ALL
ELECTRICAL
APPLIANCES
• Fully unwind the power
cord before use.
• Connect only to a 230V
or 240V power outlet.
• Do not let the power cord
hang over the edge of a
bench or table, touch
hot surfaces or
become knotted.
• To protect against electric
shock, do not immerse
the power cord, power
plug or appliance in water
or any other liquid or
allow moisture to come
in contact with the part,
unless it is recommended
in the cleaning
instructions.
• The appliance is not
intended for use by
persons (including
children) with reduced
physical, sensory or
mental capabilities,
or lack of experience
and knowledge, unless
they have been given
supervision or instruction
concerning use of the
appliance by a person
responsible for
their safety.

6
• Children should be
supervised to ensure that
they do not play with
the appliance.
• It is recommended to
regularly inspect the
appliance. To avoid a
hazard, do not use the
appliance if power cord,
power plug or appliance
becomes damaged in
any way. Return the
entire appliance to
the nearest authorised
Breville Service Centre for
examination
and/or repair.
• Any maintenance other
than cleaning should
be performed at an
authorised Breville
Service Centre.
• This appliance is for
household use only.
Do not use this appliance
for anything other than
its intended use. Do not
use in moving vehicles
or boats. Do not use
outdoors. Misuse may
cause injury.
• The installation of
a residual current
device (safety switch)
is recommended to
provide additional safety
protection when using
electrical appliances.
It is advisable that a
safety switch with a rated
residual operating current
not exceeding 30mA be
installed in the electrical
circuit supplying the
appliance. See your
electrician for
professional advice.
• Always turn the appliance
to the OFF position,
switch o at the power
outlet and unplug at the
power outlet when the
appliance is not in use.
• Before cleaning, always
turn the appliance to the
OFF position, switch o at
the power outlet, unplug
at the power outlet and
remove the power cord,
if detachable, from the
appliance and allow all
parts to cool.

7
• Do not place this
appliance on or near
a heat source, such as hot
plate, oven or heaters.
• Position the appliance at
a minimum distance of
20cm away from walls,
curtains and other heat or
steam sensitive materials
and provide adequate
space above and on all
sides for air circulation.
FOR HOUSEHOLD USE ONLY
SAVE THESE INSTRUCTIONS
8
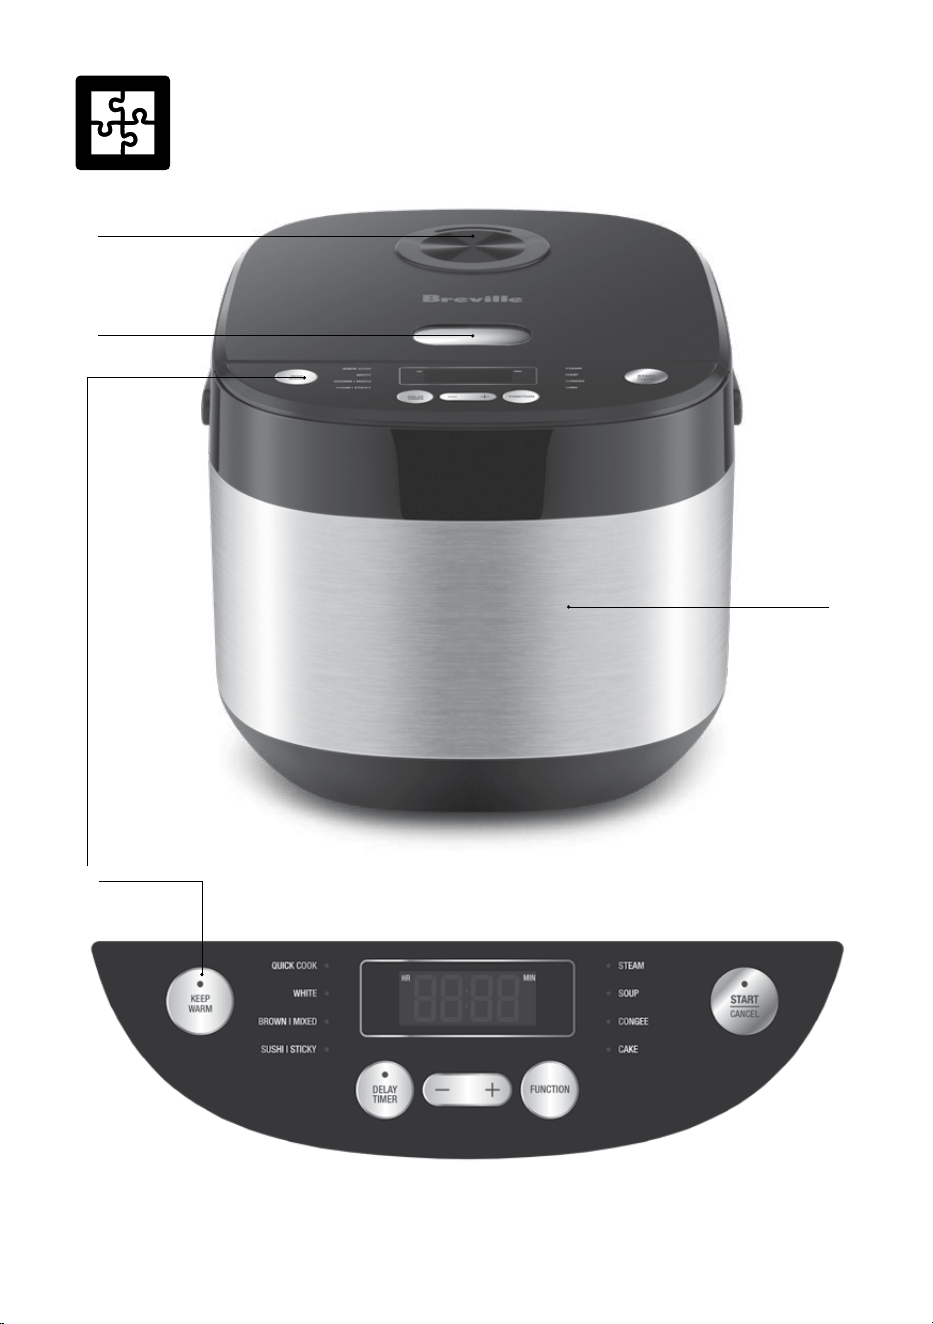
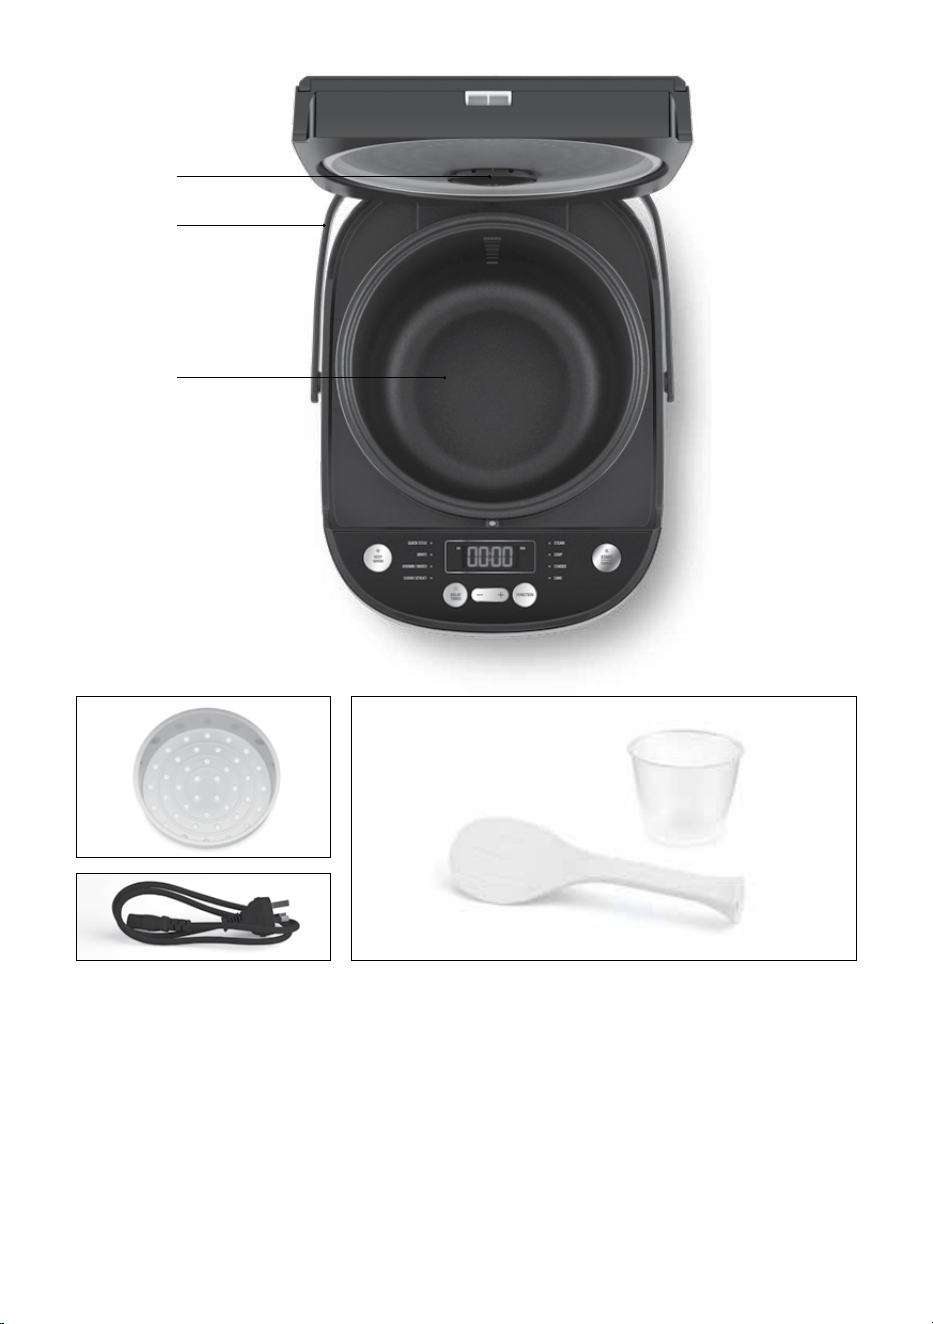
Components
D
A
B
C
9
A. Removable steam vent
B. Lid release button
C. 10 cup rice capacity
D. Control panel with 8 pre-set cooking functions
- Quick cook - Steam
- White rice - Soup
- Brown/mixed rice - Congee
- Sushi/sticky rice - Cake
E. Steam vent inner part
F. Carry handle
E
G
F
H
J
K
I
G. Removable non-stick coated
cooking bowl
H. Steaming basket
I. Removable power cord
J. Serving spoon
K. Measuring cup

10
Functions
BEFORE FIRST USE
Remove all promotional labels and any
packaging materials from the rice cooker.
Ensure that you have all parts and accessories
listed before discarding the packaging.
Wash the cooking bowl, steam vent, steaming
basket, measuring cup, and serving spoon in
hot, soapy water, rinse and dry thoroughly.
USING THE RICE COOKER
Ensure that the rice cooker housing and the
exterior of the cooking bowl are clean and clear
of any debris before placing the cooking bowl
into the bowl cavity. This will ensure proper
contact with the inner cooking surface.
Always ensure the steam vent is properly
attached to the lid before cooking (instructions
to install and remove the steam vent are on
page 18).
Insert the connector end of the power cord
into the inlet on the right hand side of the rice
cooker. Plug the power plug into a 230V or
240V power outlet and switch on. The rice
cooker will beep once and the screen will
illuminate.
COOKING FUNCTIONS
The Rice Box
TM
Pro has 8 pre-set cooking
functions; use the FUNCTION button to
navigate between functions. The LED light
next to the function on the control panel will
illuminate when a function is selected.
The cooking time cannot be adjusted on
the rice cooking functions as the timing is
determined by the Fuzzy Logic Technology.
For the steam, soup and congee functions the
LED screen will display the default cooking
time. The cooking time can be adjusted for
these functions.
To adjust the cooking time use the timer
increase (+) and decrease (-) buttons until the
desired time is displayed on the LED screen.
To confirm the function, press the START/
CANCEL button. The function light button will
remain illuminated to indicate that the cooking
function has commenced.
FUNCTION
DEFAULT
TIME
VARIABLE
TIME
PRE-SET
AVAILABLE
AUTOMATIC
KEEP WARM
MAX
CAPACITY
Quick cook N/A N/A
10 cups *
White rice N/A N/A
10 cups*
Brown/Mixed rice N/A N/A
6 cups*
Sushi/Sticky rice N/A N/A
6 cups*
Steam 10 minutes 1 – 60 minutes
6 cups* liquid
Soup 1 hour 30 minutes 1 hour – 4 hours
Level 10 marking for
white rice
Congee 1 hour 1 hour – 4 hours
1.5 cups*
Cake 45 minutes 30 minutes - 1 hour
Level 2 marking for
white rice
* Using the measuring cup provided
11
USING THE RICE FUNCTIONS (White,
Brown/Mixed, Sushi/Sticky, Quick Cook)
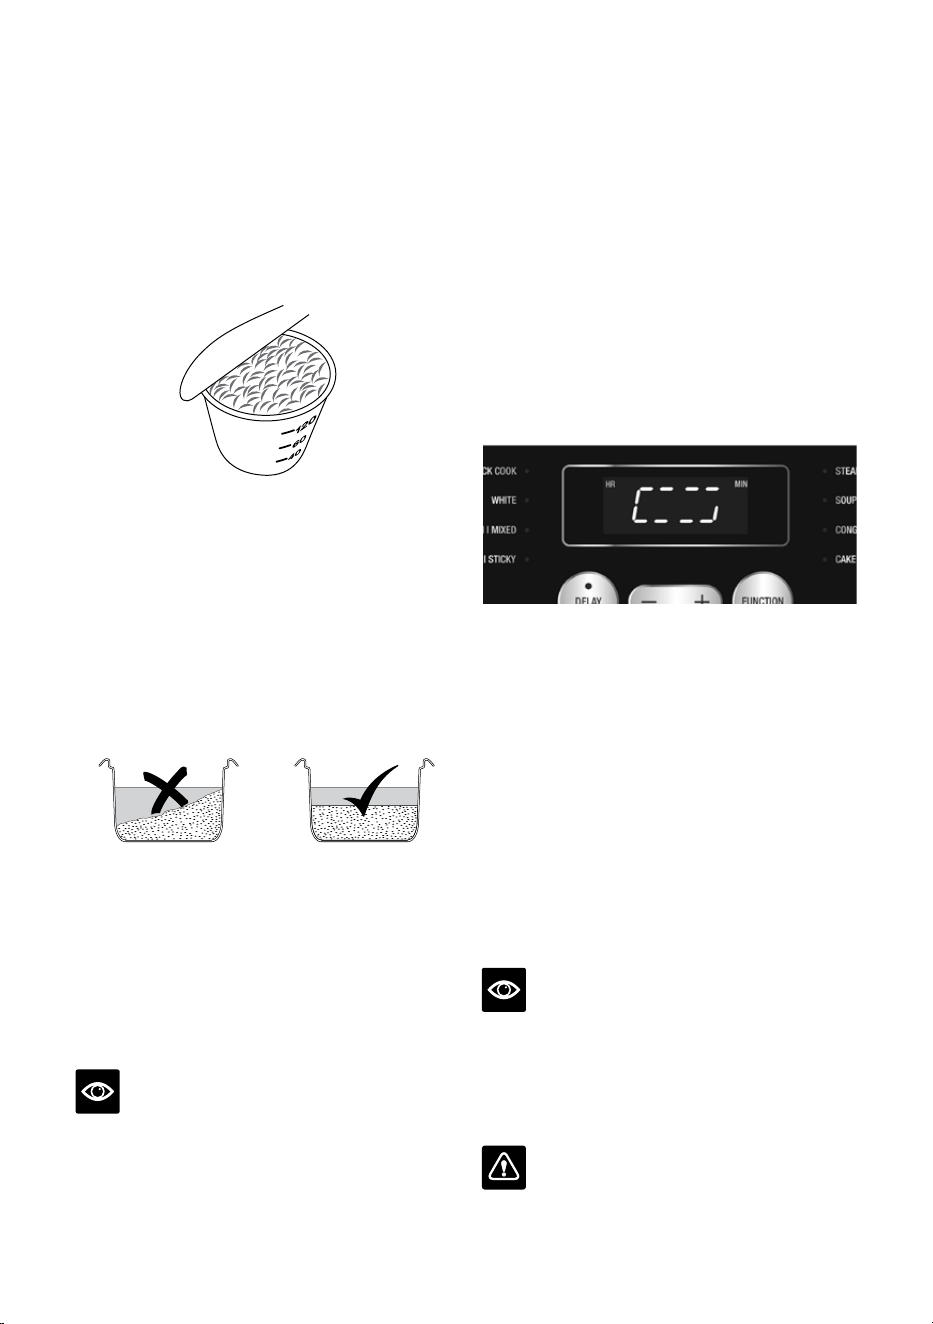
1. Use the provided measuring cup to
measure the required quantities of rice.
When using the cup, always ensure to
measure a level cup, not a heaped one (see
Fig 1). The provided measuring cup holds
approximately 150g of rice or 180ml
of water.
Fig. 1
2. Wash the rice by placing it in a sieve under
cold running water. This will remove any
excess starch. The rice is ready when the
water runs clear from the sieve. Drain the
rice well before cooking.
3. Place the rice into the removable cooking
bowl, ensuring that it is evenly spread
across the bottom of the cooking bowl
(Fig 2).
Fig. 2
4. Add the required quantity of water to the
cooking bowl, following the below ratios:
White rice = 1 measuring cup rice :
Cup level marking on cooking bowl
Brown/Mixed rice = 1 measuring cup rice :
Cup level marked on cooking bowl
(Refer to cooking tables on page 14 for more
information.)
NOTE
Always ensure that the lid seal assembly is
properly attached to the lid before cooking.
5. Close the lid, pressing down firmly to ensure
the lid securely clicks into place.
6. Press the FUNCTION button until the light
illuminates next to the required setting. Press
the START/CANCEL button to confirm the
function and the rice cooker will commence
cooking.
7. Whilst cooking, the LED light beside the
selected cooking function will remain
illuminated. The LED screen will display a
rotating loop (Fig 3). This indicates that the
Fuzzy Logic Technology is evaluating the
contents of the cooking bowl and determining
the required cooking time.
Fig. 3
8. Once the rice cooker reaches the final stages
of cooking the LED screen will display a
countdown timer showing the remaining
cooking time.
9. Once the timer has completed its countdown,
the rice cooker will beep before automatically
switching into KEEP WARM mode. The
KEEP WARM light will illuminate and
the LED display will commence counting
upwards. If desired, the rice can be rested for
an additional 10 minutes on KEEP WARM
mode for extra fluy rice.
10. Press the lid release button and use the rice
serving spoon to flu up the rice before serving.
NOTE
The QUICK COOK function is ideal for quickly
preparing white rice. When cooking brown/
mixed rice, it's advisable to allow the rice to rest
on the KEEP WARM mode for an extra
10 minutes after cooking has finished.
CAUTION
Use caution when opening the lid after cooking
to avoid scalding from escaping steam.

12
11. Keep the rice warm in the cooker using the
KEEP WARM mode, or turn o the rice
cooker by pressing the START/CANCEL
button and then switching it o at the
power outlet before removing the plug.
NOTE
The rice cooker can be left on KEEP WARM for
up to 12 hours, but for optimal quality, it should
only be left for no longer than 4 hours.
USING THE STEAM FUNCTION
Steamed foods retain most of their nutritional
value. Food may be steamed by placing it in
the steaming basket over stock or water in the
cooking bowl and closing the lid.
1. Place 4-6 measuring cups of water or stock
into the removable cooking bowl. Place
the removable cooking bowl into the rice
cooker housing.
2. Place the food being steamed directly into
the steaming basket.
3. Press the FUNCTION button until the
LED light next to the STEAM function is
illuminated. The default cooking time will
be displayed on the LED screen. Adjust
the steaming time by pressing the + and -
buttons. To start heating press the START/
CANCEL button. It will take approximately
12 minutes for the water to start boiling.
4. Once the preheating is finished and the unit
emits three beeps, the countdown timer will
initiate automatically. Place your steaming
basket into the rice cooker and close the lid.
5. The unit will emit five beeps to signal the
completion of the cooking/set time.
6. Press the lid release button and carefully
open the lid to check if the steamed food
is ready.
7. If further cooking is required, check the
liquid levels in the removable cooking bowl
and if required, top up with hot liquid before
restarting the STEAM function. If no further
cooking is required, turn the rice cooker o
at the power outlet and unplug the
power cord.
8. For further information on steaming, refer to
the Steaming Guide on page 17.
NOTE
The lid should be kept closed during the
cooking process to ensure that the steam
does not escape as this will prolong the
cooking time.
USING THE SOUP / CONGEE
FUNCTIONS
1. Place the ingredients in the removable
cooking bowl ensuring that the food is
evenly spread out across the bottom of the
cooking bowl.
2. Close the lid, pressing down firmly until the
lid locks into place.
3. Press the FUNCTION button until the
LED light next to the CONGEE function
is illuminated. The default cooking time
will be displayed on the LED screen. Adjust
the cooking time by pressing the + and -
buttons. To start cooking, press the START/
CANCEL button.
4. Once the timer reaches zero, the rice cooker
will beep and automatically change to
KEEP WARM mode.

13
USING THE CAKE FUNCTION
1. Place all combined ingredients into the
removable cooking bowl, ensuring an even
distribution over the base of the bowl. Place
the removable cooking bowl into the rice
cooker housing.
2. Close the lid, pressing down firmly until the
lid locks into place.
3. Press the FUNCTION button until the
LED light next to the CAKE function is
illuminated. Press the START / CANCEL
button to begin.
4. Once complete, use heat-proof mitts to
remove the cooking bowl. Turn the bowl
upside down to remove the cake. Place the
cake on a cooling rack to cool.
• The cooking bowl will make 1 x 21cm
round cake.
• Cake batter should not exceed the 2 CUP
white rice level marking on the inside of the
cooking bowl.
NOTE
Lightly spray the inside of the removable
cooking bowl with cooking spray, then wipe
with paper towel before adding cake batter.
USING THE KEEP WARM FUNCTION
Upon completion of the cooking process, all
functions of this rice cooker will automatically
transition to KEEP WARM mode. During this
time, the LED display will count upwards.
The rice cooker is designed to remain in KEEP
WARM mode for a maximum duration of 12
hours. However, for the best quality of cooked
food, it is not recommended to use KEEP
WARM mode for more than 4 hours.
USING THE DELAY TIME FUNCTION
The DELAY TIME option can be used on all
functions, except for CAKE. The DELAY TIME
option allows you to set the rice cooker to
finish cooking by a specified time.
To set the timer, choose your desired cooking
function and then press DELAY TIME. Utilise
the + and - buttons to fine-tune the timing
displayed on the screen (note that the set time
corresponds to the finishing time). Afterwards,
select START/CANCEL, and the rice cooker
will initiate the countdown.
For example: On the CONGEE function,
setting 1 hour and 30 minutes, means that the
rice cooker will complete the cooking cycle and
the congee will be ready to serve in 1 hour and
30 minutes.
14
Rice Cooking Guide
The included measuring cup with the Rice Box
TM
Pro is utilised in the cooking tables below. This
measuring cup equates to approximately 150g of rice or 180ml of water.
White Rice
CUPS OF
UNCOOKED RICE
FILL WITH
WATER TO
CUPS OF
COOKED
RICE
(APPROX.)
COOKING TIME
ON WHITE
FUNCTION
(APPROX)
COOKING TIME
ON QUICK COOK
(APPROX.)
2 2 level WHITE RICE marking 5 40 – 50 minutes 30 – 40 minutes
4 4 level WHITE RICE marking 10 40 – 50 minutes 35 – 45 minutes
6 6 level WHITE RICE marking 15 40 – 50 minutes 35 – 45 minutes
8 8 level WHITE RICE marking 20 50 – 60 minutes 35 – 45 minutes
10 10 level WHITE RICE marking 25 50 – 60 minutes 45 – 55 minutes
Brown/Mixed Rice
CUPS OF
UNCOOKED RICE
FILL WITH
WATER TO
CUPS OF
COOKED
RICE
(APPROX.)
COOKING TIME
ON BROWN
FUNCTION
(APPROX)
COOKING TIME
ON QUICK COOK
(APPROX.)
2 2 level BROWN / MIXED
marking
4 60 – 70 minutes 40 – 50 minutes
4 4 level BROWN / MIXED
marking
8 65 – 75 minutes 50 – 60 minutes
6 6 level BROWN / MIXED
marking
14 70 – 80 minutes 55 – 65 minutes
NOTE
Utilise the designated line markings inside the bowl while preparing white rice, brown/mixed rice,
and congee.
15
Sushi/Sticky Rice
CUPS OF
UNCOOKED RICE
FILL WITH
WATER TO
CUPS OF COOKED
RICE (APPROX.)
COOKING TIME ON SUSHI/
STICKY FUNCTION (APPROX.)
2 2 level BROWN / MIXED
marking
4 40 – 50 minutes
4 4 level BROWN / MIXED
marking
8 40 – 50 minutes
6 6 level BROWN / MIXED
marking
12 55 – 65 minutes
NOTE
The Quick Cook function is not applicable when preparing sushi/sticky rice.
Congee
CUPS OF
UNCOOKED RICE
FILL WITH
WATER TO
SERVES COOKING TIME ON
CONGEE FUNTION (APPROX.)
0.5 0.5 level CONGEE marking 2 – 4 serves 1 hour
1 1 level CONGEE marking 4 – 6 serves 1 hour
1.5 1.5 level CONGEE marking 5 – 8 serves 1 hour
The ratios mentioned above serve as a reference; you can adjust the liquid levels according to your
personal preference.
NOTE
Keep Warm for 10 min post cooking completion for brown/mixed rice.

16
SUSHI RICE
INGREDIENTS
2 cups medium grain white rice
Water to be level with the 2 cup
BROWN / MIXED marking
¼ cup tablespoons rice vinegar
3 tsp caster sugar
¼ tsp salt
METHOD
1. Rinse the rice and place into the removable
cooking bowl with the water. Close the lid,
select the SUSHI / STICKY function and
press the START / CANCEL button.
2. Place the rice vinegar, sugar and salt into a
small bowl and stir until the sugar and salt
is dissolved.
3. Once the cooking process has finished,
open the lid and stir the rice vinegar
mixture through the rice.
4. Transfer the rice to a large, shallow dish and
spread to cool.
5. Use immediately as required in sushi
recipes.
STICKY RICE
INGREDIENTS
2 cups glutinous rice
1 litre water (for soaking)
METHOD
1. Soak rice in water overnight.
2. Drain and rinse the rice. Place the rice into
the removable cooking bowl, add water to
the 2 cup BROWN/MIXED marking and
close the lid.
3. Select the SUSHI / STICKY function then
press the START / CANCEL button.
4. Once the cooking process has finished,
allow the rice to rest on KEEP WARM for 5
minutes before serving.
TIPS
• Add a little bit extra water for fluer rice or
a little bit less water for firmer rice, this will
depend on personal preference.
• Washed rice will have some extra water
after rinsing, this extra water may lead to an
increased cooking time. Reduce the measured
amount of water added, if necessary.
• Some rice varieties may require more water
for cooking, such as wild rice blends, Arborio
rice or short grain rice. Follow the directions
on the pack or use the brown rice cooking
table as a guide.
• Do not fill the removable cooking bowl above
the MAX level marking indicated.
RICE VARIATIONS
• Savoury rice: prepare rice in the rice cooker
as specified, but substitute water with
the same volume of chicken, beef, fish or
vegetable stock.
• Sweet rice: prepare rice in the rice cooker
as specified, substituting half the water with
apple, orange or pineapple juice.
• Saron rice: Add ½ teaspoon of threads to
every 2 cups of water. Follow the white rice
cooking table and mix well when cooking
is complete.
• Arborio rice: follow the brown rice
cooking tables.
• Jasmine rice: follow the white rice cooking
tables.
• Basmati rice: follow the white rice
cooking tables.
• Wild rice: It is not recommended to cook
wild rice alone in the rice cooker as it requires
substantial amounts of water. Blend wild rice
with white or brown rice for best results.

17
The provided tables are formulated using 6 measuring cups of water, which will require around 12
minutes to reach boiling point. Please note that this time is not factored into the cooking
durations mentioned.
Steaming Vegetables:
• Smaller pieces will steam faster compared to larger pieces.
• To ensure consistent cooking results, vegetables should be of uniform size.
• Both fresh and frozen vegetables can be steamed, but note that frozen ones will take longer to
cook. If using frozen vegetables, there is no need to thaw them before cooking.
• Depending on the size, shape of vegetables, and personal preference, you might need to adjust
the recommended cooking times. To achieve a softer vegetable texture, you may need to extend
the cooking duration.
• Make sure the water or stock in the removable cooking bowl does not reach the steaming tray.
FOOD TYPE COOKING TIME (APPROX.) QUANTITY PREPARATION AND TIPS
Green vegetables 3-6 minutes 250g Fresh
Peas - frozen 4-8 minutes 1 cup Frozen
Corn 10-15 minutes 2 small cobs Whole corn cobs
Root vegetables 10-15 minutes 200-400g Peel and cut into 3-5cm pieces
Chicken
Breast 10-20 minutes 250g Place the thickest part
towards the outside of the
steaming basket
Thigh 20-30 minutes
Drumstick 20-40 minutes
Fish
Fillets 8-20 minutes 250g Steam until opaque and easy to
flake. A cutlet is cooked when
the centre bone is able to be
easily removed
Whole 20-35 minutes
Cutlets 15-25 minutes
Dumplings - Frozen 10-15 minutes Single layer in
steaming basket
Cook from frozen
Dumplings – Fresh 15-20 minutes Single layer in
steaming basket
Lightly spray the
steaming basket
Steaming Guide
18
Care & Cleaning
Switch the rice cooker o at the power outlet
and unplug the cord.
WARNING
Allow all parts of the rice cooker to cool before
disassembling and cleaning.
WARNING
The detachable power cord must be removed
from both the power outlet and rice cooker
before the rice cooker is cleaned.
1. Ensure that all parts of the rice cooker have
completely cooled before attempting to
disassemble or clean the rice cooker.
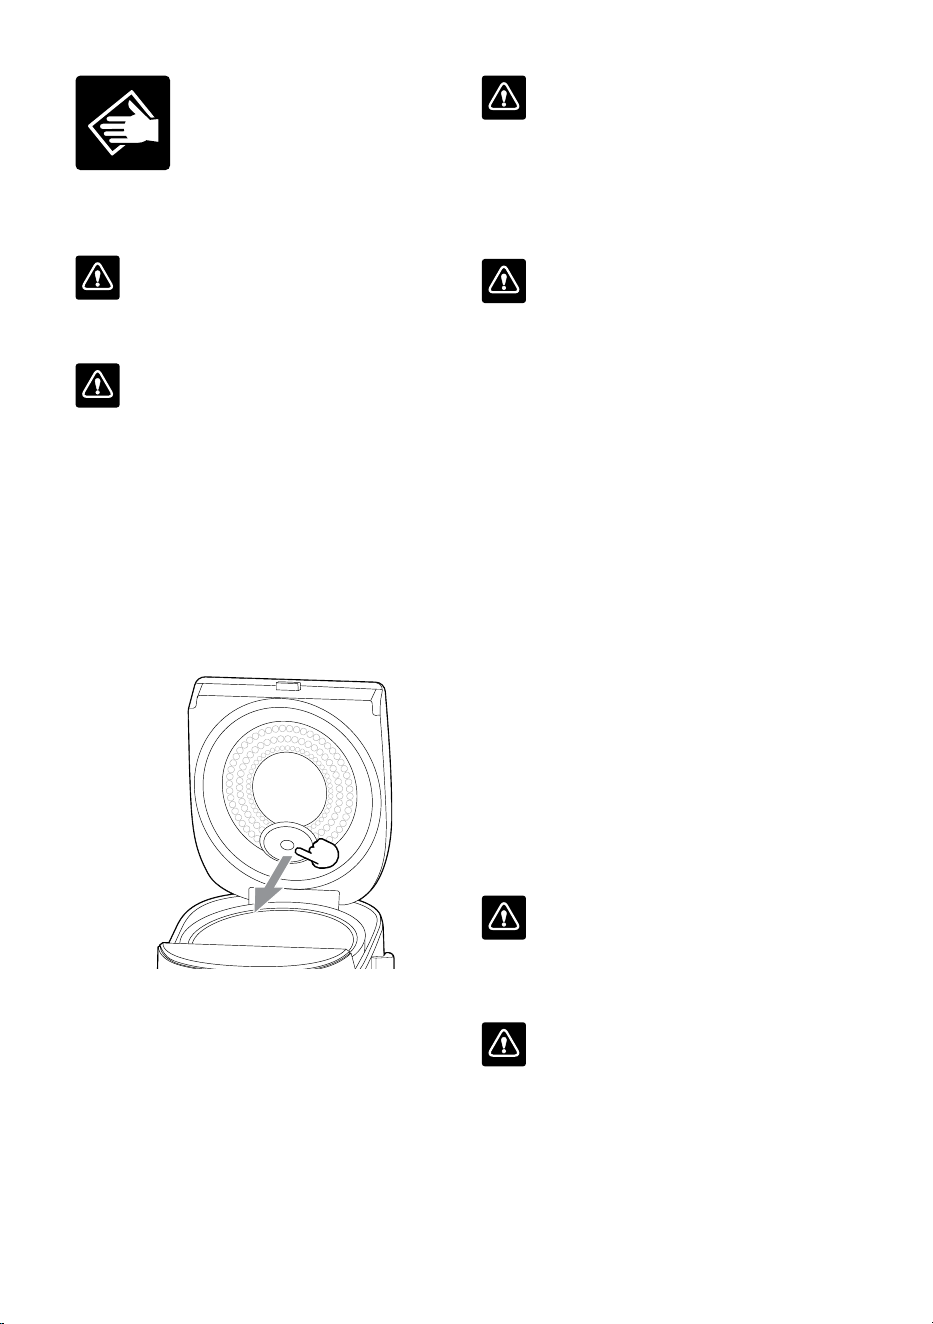
2. Open the rice cooker lid and detach the
steam vent inner part. Use one hand to pull
outwards to detach from the lid
(Fig 4).
Fig. 4
3. Use an absorbent sponge or paper towel
to wipe the moat around the cooking bowl
cavity for any liquid that may have collected
during the cooking process.
4. Open the lid of the rice cooker and remove
the removable cooking bowl from the bowl
cavity. Wash the removable cooking bowl,
steam vent, steaming tray, serving spoon
and measuring cup in hot, soapy water,
rinse and dry thoroughly.
WARNING
Do not wash any parts of the Rice Box
TM
Pro in the dishwasher. Dishwashers use
harsh cleaning detergents and high water
temperatures that could damage or distort
parts of the rice cooker.
WARNING
Do not use abrasive cleaners, steel wool or
metal scouring pads to clean the removable
cooking bowl, as they will damage the cooking
surface. If rice or other food has cooked onto
the removable cooking bowl, fill the bowl with
hot, soapy water and leave to stand for
10 minutes before cleaning.
5. Once fully dried, place the removable
cooking bowl into the bowl cavity in the rice
cooker housing then reattach the
steam vent.
6. Reassemble the steam vent, ensuring the
parts are locked into place. Place the steam
vent into the hole on the inside of the lid of
the rice cooker. Press down on the steam
vent until it clips securely into place.
7. Use a soft, damp cloth to wipe over the
outer housing of the rice cooker then
dry thoroughly.
8. Once all parts are clean and dry, store the
accessories, steaming tray and power cord
in the rice cooker and close the lid.
WARNING
Do not immerse the rice cooker housing or
power cord in water or any other liquid as this
may cause electrocution.
WARNING
Do not use chemicals, steel wool, metal
scouring pads or abrasive cleaners to clean the
rice cooker as these can damage the housing.
19
Troubleshooting
POSSIBLE PROBLEM POSSIBLE REASON SOLUTION
F1 appears on the screen Bottom sensor open
circuit protection
•
Switch the unit o and contact the Breville
Customer Service Centre
F2 appears on the screen Bottom sensor short
circuit protection
•
Switch the unit o and contact the Breville
Customer Service Centre
F3 appears on the screen Top sensor open
circuit protection
•
Switch the unit o and contact the Breville
Customer Service Centre
F4 appears on the screen Top sensor short
circuit protection
•
Switch the unit o and contact the Breville
Customer Service Centre
Cooking incomplete
and unit appears to
have turned o (no heat
emitting from cooking
bowl and no lights on the
control panel)
There is no power in
the house
Malfunctioning
power outlet
Heating element or
PCB failure
•
Verify the presence of electrical power within
the household. If power is absent, switch the
unit o and contact the Breville Customer
Service Centre
•
Reset the Rice Cooker: Switch it o at the
power outlet, wait a few seconds, and then
switch it back on
•
Verify the presence of electrical power within
the household. If there is power, check if the
power outlet where the rice cooker is plugged
in is functioning properly. Try plugging
another device into the same outlet to
confirm if it is supplying power
•
If the problem persists after performing these
checks, contact the Breville Customer
Service Centre
•
Contact the Breville Customer Service Centre
The shape of the cooking
bowl has altered due to
the cooking process
Faulty operation
•
Contact the Breville Customer Service Centre
Food splatter The steam vent, inner lid,
sealing ring, or heating
plate have not been
adequately cleaned
•
Adhere to the provided cleaning instructions
There is rice stuck to the
rim of the inner pot and/
or seal
•
Adhere to the provided cleaning instructions

20
POSSIBLE PROBLEM POSSIBLE REASON SOLUTION
Uneven placement of
cooking bowl
•
Ensure that the removable bowl is placed
correctly prior to cooking
Rice has not been rinsed
thoroughly enough
•
Rinse rice until water runs clear prior
to cooking
Incorrect rice to water ratio
•
Ensure that water is filled to the correct line
marking prior to cooking
Steam is being released
from the rim
There is rice stuck to the
rim of the inner pot and/
or seal
•
Adhere to the provided cleaning instructions
The lid might not have
been closed during the
cooking process
•
Ensure the lid is closed completely prior
to cooking
The sensor, heating
element, outer surface of
the cooking bowl, or inner
pot might not have been
properly cleaned
•
Adhere to the provided cleaning instructions
Steam vent, inner lid, seal
ring or heating plate is
not clean
•
Adhere to the provided cleaning instructions
Delay timer not working
(cooking finishes earlier
or later than expected)
The delay time set could
be shorter than fuzzy
logic calculated or preset
cooking function time. For
example, delay time set for
1:00 hour, cooking time
required is 2:30 hours
•
Be certain to establish a delay time that
surpasses the cooking duration. The delay
time signifies that the unit will conclude
cooking precisely at the designated
delay time
Delay timer cooking
complete delay
The rice quantity might
have exceeded the amount
of water used
•
The rice and water might not have been
accurately measured. Check water to rice ratio
using line markings provided in
cooking bowl
The start or cancel
function is not
operational
The inner pot and
appliance connector might
not have been
correctly inserted
•
Follow assembly instruction

21
POSSIBLE PROBLEM POSSIBLE REASON SOLUTION
A noise is generated
while cooking
Water might be present
at the base of the cooking
bowl or heating plate
•
Make sure the heating plate is devoid of water
and clean before operating. Turn o the unit,
disconnect from the power source, allow it to
cool down, and then clean it
Unable to close lid
completely
There could be a gap
present around the area
where the lid latch
is assembled
•
Thoroughly clean the area using a cotton bud

22
Notes

23
Notes

Breville and the Breville Logo are trademarks of Breville Pty Ltd (“Breville”) and
Breville's products are distributed in Australia and New Zealand under license.
Copyright Breville Pty. Ltd. 2023.
Due to continued product improvement, the products illustrated/photographed
in this booklet may vary slightly from the actual product.
LRC470 ANZ - D23
Web: www.breville.comWeb: www.breville.com
Australian Customers
Phone:
1300 139 798
New Zealand Customers
Phone:
0800 273 845
Breville Customer Service Centre