


EN
FR
DE
IT
ES
JA
ZH
English
France:Français
Deutschland:Deutsch
Italia:Italiano
España:Español
日本:日本語
中文:简体中文

Readthisrst
ReadthroughthisInstallationGuidecarefullybefore
installingtheproduct.KeeptheInstallationGuidefor
futurereference.
Legalconsiderations
Videoandaudiosurveillancecanberegulatedbylaws
thatvaryfromcountrytocountry.Checkthelaws
inyourlocalregionbeforeusingthisproductfor
surveillancepurposes.
Liability
Everycarehasbeentakeninthepreparationofthis
document.PleaseinformyourlocalAxisofceof
anyinaccuraciesoromissions.AxisCommunications
ABcannotbeheldresponsibleforanytechnicalor
typographicalerrorsandreservestherighttomake
changestotheproductandmanualswithoutprior
notice.AxisCommunicationsABmakesnowarranty
ofanykindwithregardtothematerialcontained
withinthisdocument,including,butnotlimitedto,
theimpliedwarrantiesofmerchantabilityandtness
foraparticularpurpose.AxisCommunicationsAB
shallnotbeliablenorresponsibleforincidental
orconsequentialdamagesinconnectionwiththe
furnishing,performanceoruseofthismaterial.This
productisonlytobeusedforitsintendedpurpose.
Intellectualpropertyrights
AxisABhasintellectualpropertyrightsrelatingto
technologyembodiedintheproductdescribedinthis
document.Inparticular,andwithoutlimitation,these
intellectualpropertyrightsmayincludeoneormoreof
thepatentslistedataxis.com/patentandoneormore
additionalpatentsorpendingpatentapplicationsin
theUSandothercountries.
Equipmentmodications
Thisequipmentmustbeinstalledandusedin
strictaccordancewiththeinstructionsgivenin
theuserdocumentation.Thisequipmentcontains
nouser-serviceablecomponents.Unauthorized
equipmentchangesormodicationswillinvalidateall
applicableregulatorycerticationsandapprovals.
Trademarkacknowledgements
AXISCOMMUNICATIONS,AXISandVAPIXare
registeredtrademarksortrademarkapplicationsof
AxisABinvariousjurisdictions.Allothercompany
namesandproductsaretrademarksorregistered
trademarksoftheirrespectivecompanies.
Apple,Apache,Bonjour,Ethernet,InternetExplorer,
Linux,Microsoft,Mozilla,Real,SMPTE,QuickTime,
UNIX,Windows,andWWWareregisteredtrademarks
oftherespectiveholders.JavaandallJava-based
trademarksandlogosaretrademarksorregistered
trademarksofOracleand/oritsafliates.TheUPnP
WordMarkandUPnPLogoaretrademarksofOpen
ConnectivityFoundation,Inc.intheUnitedStatesor
othercountries.
Regulatoryinformation
Europe
Thisproductisrestrictedtoindooruseonly.
ThisproductcomplieswiththeapplicableCEmarking
directivesandharmonizedstandards:
•ElectromagneticCompatibility(EMC)Directive
2014/30/EU.SeeElectromagneticcompatibility
(EMC)onpage4.
•RadioEquipmentDirective(RED)2014/53/EU.See
Radiotransmissiononpage5.
•LowVoltageDirective(LVD)2014/35/EU.See
Safetyonpage6.
•RestrictionofHazardousSubstances(RoHS)
Directive2011/65/EU,includinganyamendments,
updatesorreplacements.SeeDisposaland
recyclingonpage6.
Acopyoftheoriginaldeclarationofconformity
maybeobtainedfromAxisCommunicationsAB.See
Contactinformationonpage6.
Electromagneticcompatibility(EMC)
Thisequipmenthasbeendesignedandtestedtofulll
applicablestandardsfor:
•Radiofrequencyemissionwheninstalled
accordingtotheinstructionsandusedinits
intendedenvironment.
•Immunitytoelectricalandelectromagnetic
phenomenawheninstalledaccordingtothe
instructionsandusedinitsintendedenvironment.
USA
Thisdevicecomplieswithpart15oftheFCCRules.
Operationissubjecttothefollowingtwoconditions:
1.Thisdevicemaynotcauseharmfulinterference,
and
2.thisdevicemustacceptanyinterferencereceived,
includinginterferencethatmaycauseundesired
operation.
Usinganunshieldednetworkcable(UTP)–This
equipmenthasbeentestedusinganunshielded
networkcable(UTP)andfoundtocomplywiththe
limitsforaClassAdigitaldevice,pursuanttopart15
oftheFCCRules.Theselimitsaredesignedtoprovide
reasonableprotectionagainstharmfulinterference
whentheequipmentisoperatedinacommercial
environment.Thisequipmentgenerates,uses,andcan
radiateradiofrequencyenergyand,ifnotinstalledand
usedinaccordancewiththeinstructionmanual,may
causeharmfulinterferencetoradiocommunications.
Operationofthisequipmentinaresidentialareais
likelytocauseharmfulinterferenceinwhichcasethe
userwillberequiredtocorrecttheinterferenceathis
ownexpense.
Usingashieldednetworkcable(STP)–This
equipmenthasalsobeentestedusingashielded
networkcable(STP)andfoundtocomplywiththe
limitsforaClassBdigitaldevice,pursuanttopart15
oftheFCCRules.Theselimitsaredesignedtoprovide
reasonableprotectionagainstharmfulinterferencein
aresidentialinstallation.Thisequipmentgenerates,
usesandcanradiateradiofrequencyenergyand,
ifnotinstalledandusedinaccordancewiththe
instructions,maycauseharmfulinterferencetoradio
communications.However,thereisnoguaranteethat
interferencewillnotoccurinaparticularinstallation.
Ifthisequipmentdoescauseharmfulinterferenceto
radioortelevisionreception,whichcanbedetermined
byturningtheequipmentoffandon,theuseris
encouragedtotrytocorrecttheinterferencebyone
ormoreofthefollowingmeasures:
•Reorientorrelocatethereceivingantenna.
•Increasetheseparationbetweentheequipment
andreceiver.

•Connecttheequipmentintoanoutletona
circuitdifferentfromthattowhichthereceiver
isconnected.
•Consultthedealeroranexperiencedradio/TV
technicianforhelp.
Tobeusedinaresidentialareaorademanding
electricalenvironment,theproductshallbeconnected
usingashieldednetworkcable(STP)thatisproperly
grounded.
Contactinformation
AxisCommunicationsInc.
300ApolloDrive
Chelmsford,MA01824
UnitedStatesofAmerica
Tel:+19786142000
Canada
Thisdigitalapparatuscomplieswith
CANICES-3(ClassB).Theproductshallbe
connectedusingashieldednetworkcable(STP)that
isproperlygrounded.Cetappareilnumériqueest
conformeàlanormeCANNMB-3(classeB).Leproduit
doitêtreconnectéàl'aided'uncâbleréseaublindé
(STP)quiestcorrectementmisàlaterre.
Europe
ThisdigitalequipmentfulllstherequirementsforRF
emissionaccordingtotheClassAlimitofEN55032.
Theproductshallbeconnectedusingashielded
networkcable(STP)thatisproperlygrounded.Notice!
ThisisaClassAproduct.Inadomesticenvironment
thisproductmaycauseRFinterference,inwhichcase
theusermayberequiredtotakeadequatemeasures.
Australia/NewZealand
Thisdigitalequipmentfulllstherequirements
forRFemissionaccordingtotheClassBlimitof
AS/NZSCISPR32.Theproductshallbeconnected
usingashieldednetworkcable(STP)thatisproperly
grounded.
Japan
この装置は、クラスB機器です。この装置は、
住宅環境で使⽤することを⽬的としています
が、この装置がラジオやテレビジョン受信機
に近接して使⽤されると、受信障害を引き起
こすことがあります。取扱説明書に従って正
しい取り扱いをして下さい。VCCI‒B
本製品は、シールドネットワークケーブル
(STP)を使⽤して接続してください。また適切
に接地してください。
Korea
이기기는가정용(B급)전자파적합기기로서주
로가정에서사용하는것을목적으로하며,모
든지역에서사용할수있습니다.적절히접지
된STP(shieldedtwistedpair)케이블을사용하
여제품을연결하십시오.
Radiotransmission
Thisradioequipmentoperatesat2.4and5.2GHz,
withamaximumoutputpowerof100and200mW
respectively.
Thisproductisrestrictedtoindooruseonly.
Thisequipmentmaygenerateoruseradiofrequency
energy.Theusercouldlosetheauthoritytooperate
thisequipmentifanunauthorizedchangeor
modicationismade.
USA
ThisproductcomplieswithFCCradiationexposure
limitsforanuncontrolledenvironment.Thisequipment
shallbeinstalledandoperatedwithaminimum
distanceof20cm(7.9in)betweentheuserandthe
device.
Canada
ThisdevicecomplieswithIndustryCanada
licence-exemptRSSstandard(s).Operationissubject
tothefollowingtwoconditions:(1)thisdevicemay
notcauseinterference,and(2)thisdevicemustaccept
anyinterference,includinginterferencethatmay
causeundesiredoperationofthedevice.
ThisproductcomplieswithICradiationexposurelimits
foranuncontrolledenvironment.Thisequipmentshall
beinstalledandoperatedwithaminimumdistanceof
20cm(7.9in)betweentheuserandthedevice.This
deviceforoperationinthefrequencyband5150-5250
MHzisonlyforindoorusetoreducethepotentialfor
harmfulinterferencetoco-channelmobilesatellite
systems.
LeprésentappareilestconformeauxCNRd'Industrie
Canadaapplicablesauxappareilsradioexempts
delicence.L'exploitationestautoriséeauxdeux
conditionssuivantes:(1)l'appareilnedoitpasproduire
debrouillage,et(2)l'utilisateurdel'appareildoit
acceptertoutbrouillageradioélectriquesubi,même
silebrouillageestsusceptibled'encompromettrele
fonctionnement.
Ceproduitestconformeauxlimitesd'expositionaux
radiationsICpourunenvironnementnoncontrôlé.
L’équipementdoitêtreinstalléetfonctionnéàune
distanceminimumde20cm(7,9po)entrel’utilisateur
etledispositif.Danslabandedefréquencesde5
150à5250MHz,cetappareildoituniquement
êtreutiliséàl’intérieuranderéduirelerisquede
brouillagepréjudiciabledesystèmesdeservicemobile
parsatellitesetrouvantdanslemêmecanal.
Europe
Hereby,AxisCommunicationsABdeclaresthat
thisproductisincompliancewiththeessential
requirementsandotherrelevantprovisionsofDirective
2014/53/EU.
FR
ParlaprésenteAxisCommunicationsABdéclareque
l’appareilceproduitestconformeauxexigences
essentiellesetauxautresdispositionspertinentesde
ladirective2014/53/CE.
DE
HiermiterklärtAxisCommunicationsAB,dass
sichdiesesProduktinÜbereinstimmungmitden
grundlegendenAnforderungenunddenanderen
relevantenVorschriftenderRichtlinie2014/53/EG
bendet.
IT
ConlapresenteAxisCommunicationsABdichiarache
questoprodottoèconformeairequisitiessenzialied
allealtredisposizionipertinentistabilitedalladirettiva
2014/53/CE.
ES
PormediodelapresenteAxisCommunicationsAB
declaraqueelesteproductocumpleconlosrequisitos
esencialesycualesquieraotrasdisposicionesaplicables
oexigiblesdelaDirectiva2014/53/CE.
FI
AxisCommunicationsABvakuuttaatätenettätämä
tuotetyyppinenlaiteondirektiivin2014/53/EY
oleellistenvaatimustenjasitäkoskeviendirektiivin
muidenehtojenmukainen.
NL
HierbijverklaartAxisCommunicationsABdathet
toestelinovereenstemmingismetdeessentiële
eisenendeandererelevantebepalingenvanrichtlijn
2014/53/EG.
SV
HärmedintygarAxisCommunicationsABattdenna
produktståriöverensstämmelsemeddeväsentliga
egenskapskravochövrigarelevantabestämmelsersom
framgåravdirektiv2014/53/EG.
DA
UndertegnedeAxisCommunicationsABerklærer
herved,atfølgendeudstyroverholderdevæsentlige
kravogøvrigerelevantekravidirektiv2014/53/EF.
PT
AxisCommunicationsABdeclaraqueesteproduto
estáconformecomosrequisitosessenciaiseoutras
disposiçõesdaDirectiva2014/53/CE.
EL
ΜΕΤΗΝΠΑΡΟΥΣΑAxisCommunications
ABΔΗΛΩΝΕΙΟΤΙαυτότοπροϊόν
ΣΥΜΜΟΡΦΩΝΕΤΑΙΠΡΟΣΤΙΣΟΥΣΙΩΔΕΙΣ
ΑΠΑΙΤΗΣΕΙΣΚΑΙΤΙΣΛΟΙΠΕΣΣΧΕΤΙΚΕΣ
ΔΙΑΤΑΞΕΙΣΤΗΣΟΔΗΓΙΑΣ2014/53/EK.
Thisequipmentcanbeusedinthefollowing
countries:
AT,BE,BG,CH,CY,CZ,DE,DK,EE,EL,ES,FI,FR,HR,
HU,IE,IS,IT,LI,LT,LU,LV,MT,NL,NO,PL,PT,RO,SE,
SI,SK,TR,UK
Safety
ThisproductcomplieswithIEC/EN/UL60950-1,Safety
ofInformationTechnologyEquipment.
Ifitsconnectingcablesareroutedoutdoors,the
productshallbegroundedeitherthroughashielded
networkcable(STP)orotherappropriatemethod.
Thepowersupplyusedwiththisproductshallfulll
oneofthefollowingrequirements:
•SafetyExtraLowVoltage(SELV)accordingto
clause2.2ofIEC/EN/UL60950-1andLimited
PowerSource(LPS)accordingtoclause2.5of
IEC/EN/UL60950-1orCEC/NECClass2source
ofsupplyasdenedintheCanadianElectrical
Code,CSAC22.1andNationalElectricalCode,
ANSI/NFPA70
•Class1electricalenergysource(ES1)and
Class2powersource(PS2)ratedoutput
powerlimitedto≤100Waccordingto
IEC/EN/UL62368-1
Disposalandrecycling
Whenthisproducthasreachedtheendofits
usefullife,disposeofitaccordingtolocallawsand
regulations.Forinformationaboutyournearest
designatedcollectionpoint,contactyourlocal
authorityresponsibleforwastedisposal.Inaccordance
withlocallegislation,penaltiesmaybeapplicablefor
incorrectdisposalofthiswaste.
Europe
Thissymbolmeansthattheproductshallnotbe
disposedoftogetherwithhouseholdorcommercial
waste.Directive2012/19/EUonwasteelectrical
andelectronicequipment(WEEE)isapplicablein
theEuropeanUnionmemberstates.Toprevent
potentialharmtohumanhealthandtheenvironment,
theproductmustbedisposedofinanapproved
andenvironmentallysaferecyclingprocess.For
informationaboutyournearestdesignatedcollection
point,contactyourlocalauthorityresponsiblefor
wastedisposal.Businessesshouldcontacttheproduct
supplierforinformationabouthowtodisposeofthis
productcorrectly.
Thisproductcomplieswiththerequirementsof
Directive2011/65/EUand2015/863ontherestriction
oftheuseofcertainhazardoussubstancesinelectrical
andelectronicequipment(RoHS).
China
Thisproductcomplieswiththerequirements
ofSJ/T11364-2014,Markingfortherestrictionof
hazardoussubstancesinelectricalandelectronic
products.
有毒有害物质或元素
部
件
名
称
铅
(Pb)
汞
(Hg)
镉
(Cd)
六
价
铬
(Cr-
(VI))
多
溴
联
苯
(PB-
B)
多
溴
二
苯
醚
(PB-
DE)
电
气
实
装
部
分
X
00000
0:表示该有毒有害物质在该部件均质材料
中的含量均在GB/T26572标准规定的限量要
求以下。
X:表示该有毒有害物质至少在该部件的某一
均质材料中的含量超出GB/T26572标准规定的
限量要求。
Contactinformation
AxisCommunicationsAB
Emdalavägen14
22369Lund
Sweden
Tel:+46462721800
Fax:+4646136130
axis.com

Support
Shouldyourequireanytechnicalassistance,please
contactyourAxisreseller.Ifyourquestionscannotbe
answeredimmediately,yourresellerwillforwardyour
queriesthroughtheappropriatechannelstoensurea
rapidresponse.IfyouareconnectedtotheInternet,
youcan:
•downloaduserdocumentationandsoftware
updates
•ndanswerstoresolvedproblemsintheFAQ
database,searchbyproduct,category,orphrase
•reportproblemstoAxissupportstaffbylogging
intoyourprivatesupportarea
•chatwithAxissupportstaff
•visitAxisSupportataxis.com/support
Learnmore!
VisitAxislearningcenteraxis.com/academyforuseful
trainings,webinars,tutorialsandguides.


AXIST8415WirelessInstallationTool
Safetyinformation
Hazardlevels
DANGER
Indicatesahazardoussituationwhich,ifnotavoided,willresultindeathorseriousinjury.
WARNING
Indicatesahazardoussituationwhich,ifnotavoided,couldresultindeathorseriousinjury.
CAUTION
Indicatesahazardoussituationwhich,ifnotavoided,couldresultinminorormoderate
injury.
NO NO
NO
TICE TICE
TICE
Indicatesasituationwhich,ifnotavoided,couldresultindamagetoproperty.
Othermessagelevels
Important
Indicatessignicantinformationwhichisessentialfortheproducttofunctioncorrectly.
Note
Indicatesusefulinformationwhichhelpsingettingthemostoutoftheproduct.
9
EN

AXIST8415WirelessInstallationTool
Safetyinstructions
NO NO
NO
TICE TICE
TICE
•TheAxisproductshallbeusedincompliancewithlocallawsandregulations.
•Axisrecommendsusingashieldednetworkcable(STP).
•StoretheAxisproductinadryandventilatedenvironment.
•AvoidexposingtheAxisproducttoshocksorheavypressure.
•AvoidexposingtheAxisproducttovibration.
•UseonlyapplicabletoolswheninstallingtheAxisproduct.Usingexcessiveforcewith
powertoolscouldcausedamagetotheproduct.
•Donotusechemicals,causticagents,oraerosolcleaners.
•Useacleanclothdampenedwithpurewaterforcleaning.
•Useonlyaccessoriesthatcomplywiththetechnicalspecicationofyourproduct.These
canbeprovidedbyAxisorathirdparty.AxisrecommendsusingAxispowersource
equipmentcompatiblewithyourproduct.
•UseonlysparepartsprovidedbyorrecommendedbyAxis.
•Donotattempttorepairtheproductyourself.ContactAxissupportoryourAxisreseller
forservicematters.
Lead-AcidBattery
TheAxisproductusesaLead-Acidbatteryasthepowersupply.
NO NO
NO
TICE TICE
TICE
•Duetotheself-dischargecharacteristicsofthistypeofbattery,itisimperativethatthey
bechargedwithin6monthsofstorage,otherwisepermanentlossofcapacitymightoccur
asaresultofsulfation.
•Useonlythesuppliedcharger.
CAUTION
Neverchargeordischargeabatteryinahermeticallysealedenclosure.Batteriesgenerate
amixtureofgasesinternally.Giventherightsetofcircumstances,suchasextreme
overchargingorshortingofthebattery,thesegasesmightventintotheenclosureand
createthepotentialforanexplosionwhenignitedbyaspark.
CAUTION
•Neverdisposeofthebatteryinareasitmaycausethemtoexplodeorgeneratea
toxicgas.
•Donotattempttodisassemblethebatteryasitcouldcauseleakageofsulfuricacid
thatcouldcauseinjury.
10

AXIST8415WirelessInstallationTool
NO NO
NO
TICE TICE
TICE
Disposeofusedbatteriesaccordingtolocalregulationsorthebatterymanufacturer's
instructions.
11
EN

12
AXIST8415WirelessInstallationTool
InstallationGuide
ThisInstallationGuideprovidesinstructionsforAXIST8415WirelessInstallationTool.This
installationtoolsupportboththeuseofalaptoporanappforinstallationofcameras.Forbest
performanceandexperienceitisrecommendedtousetheapp.
Forotheraspectsofusingtheproduct,seetheUserManualavailableatwww.axis.com
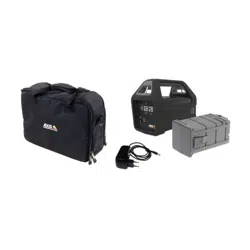
Packagecontents
•MainUnit
•Charger
•Battery
•Strap
•Printedmaterials
-InstallationGuide(thisdocument)
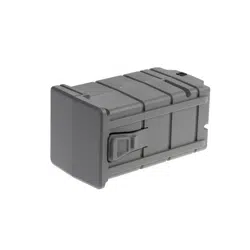
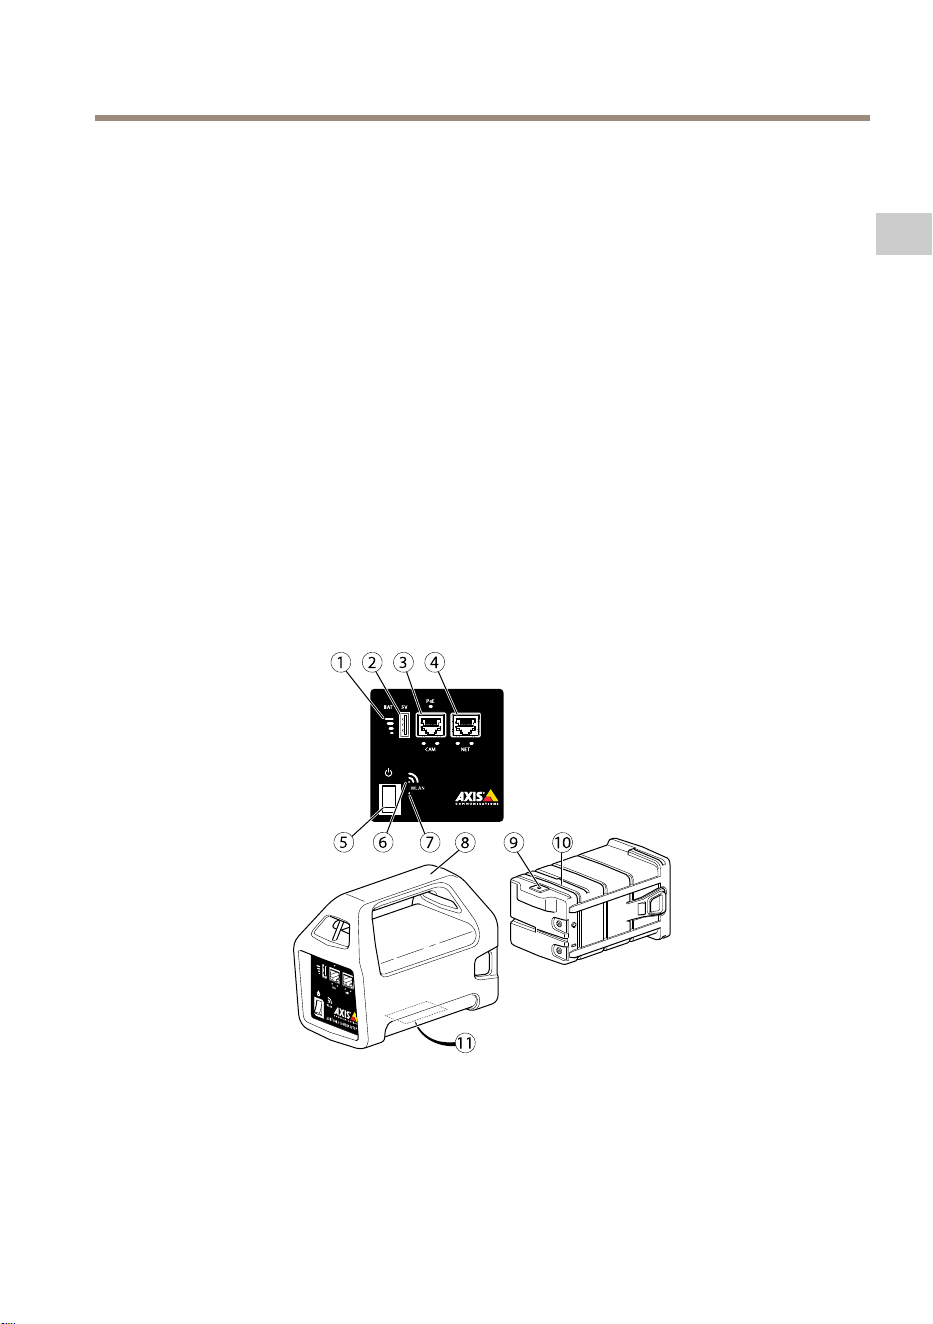
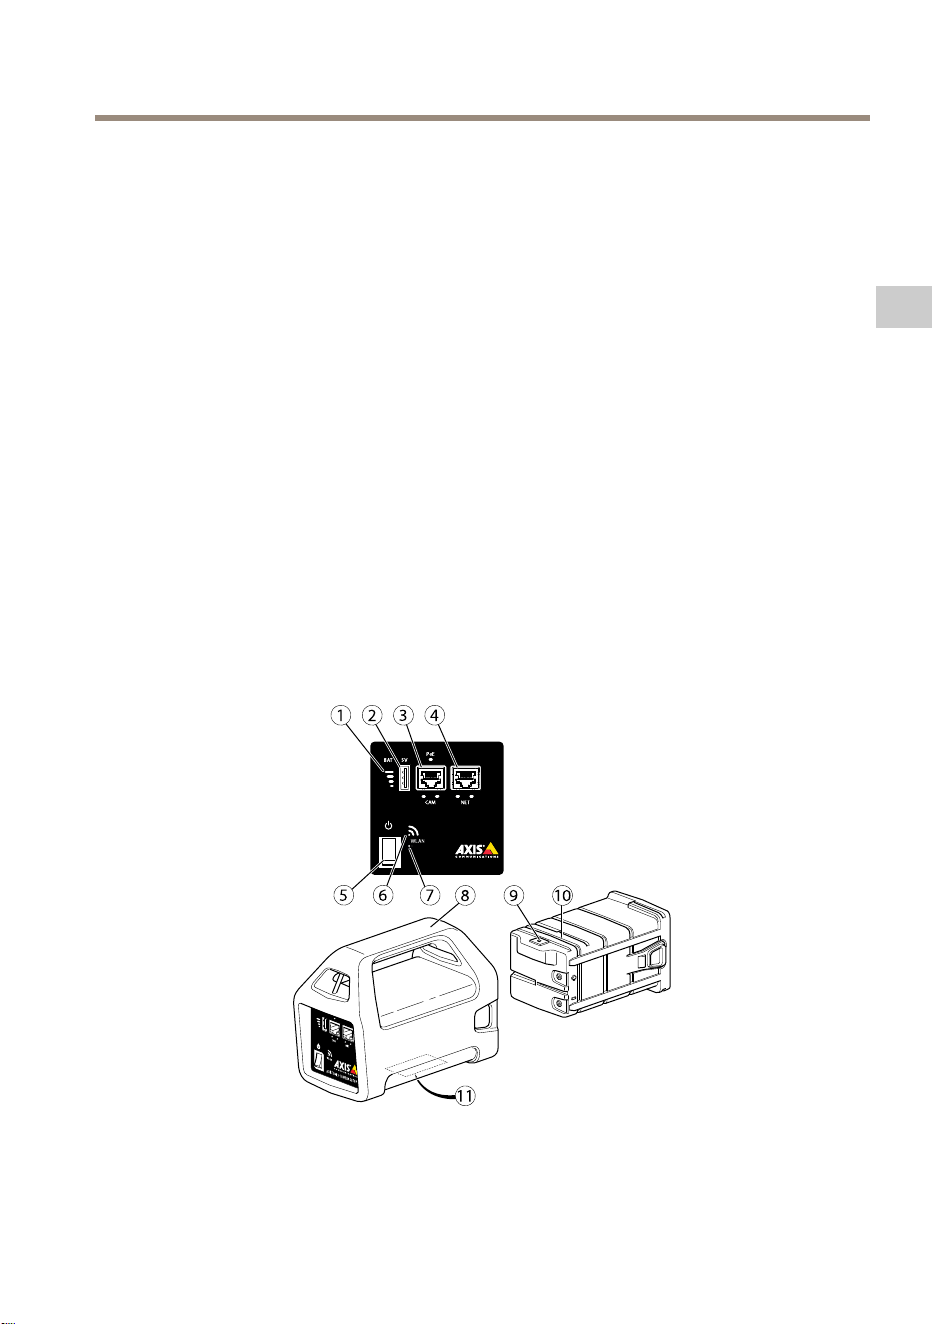
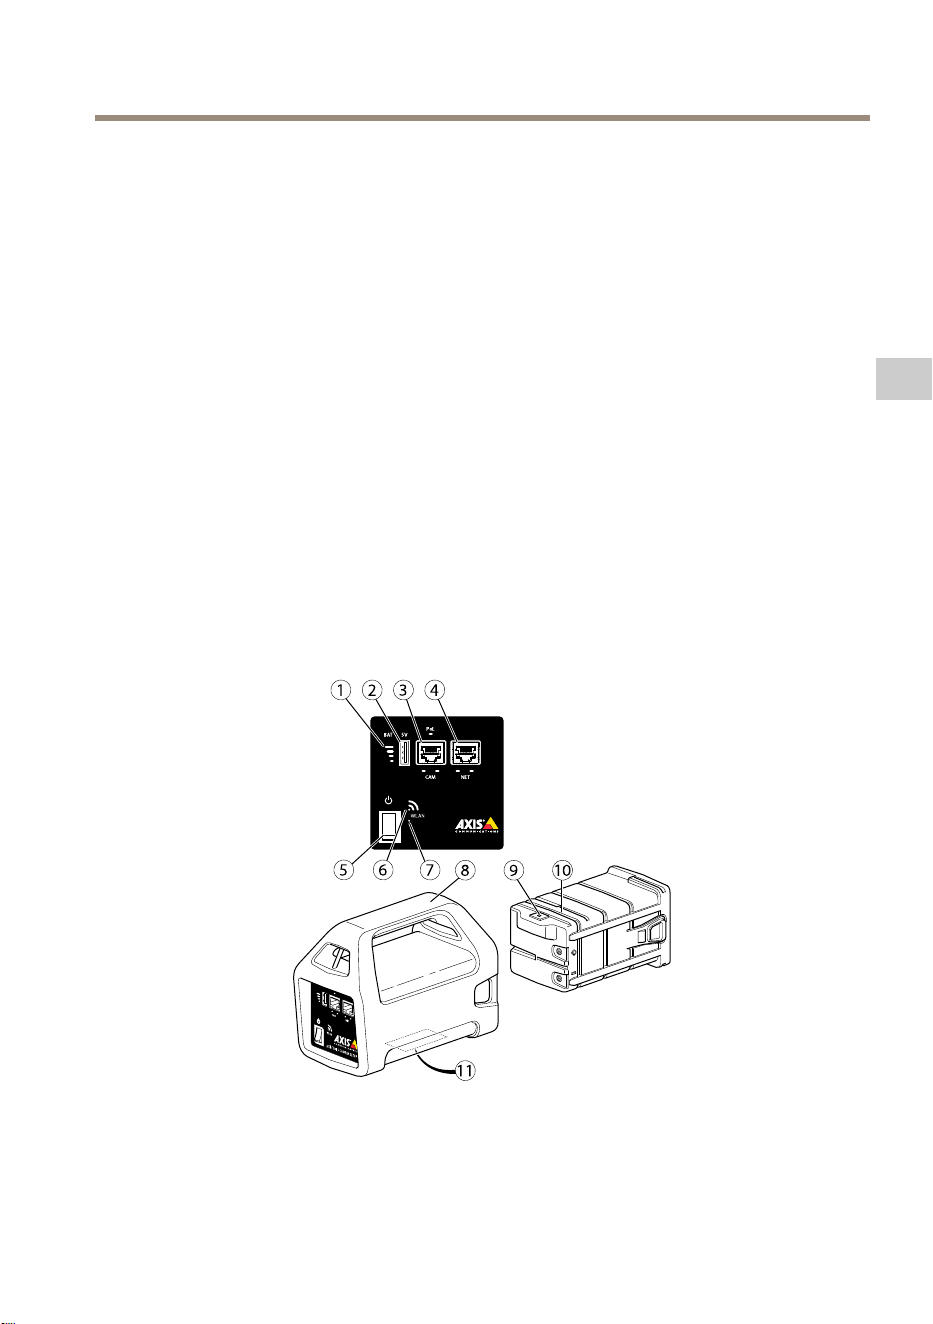
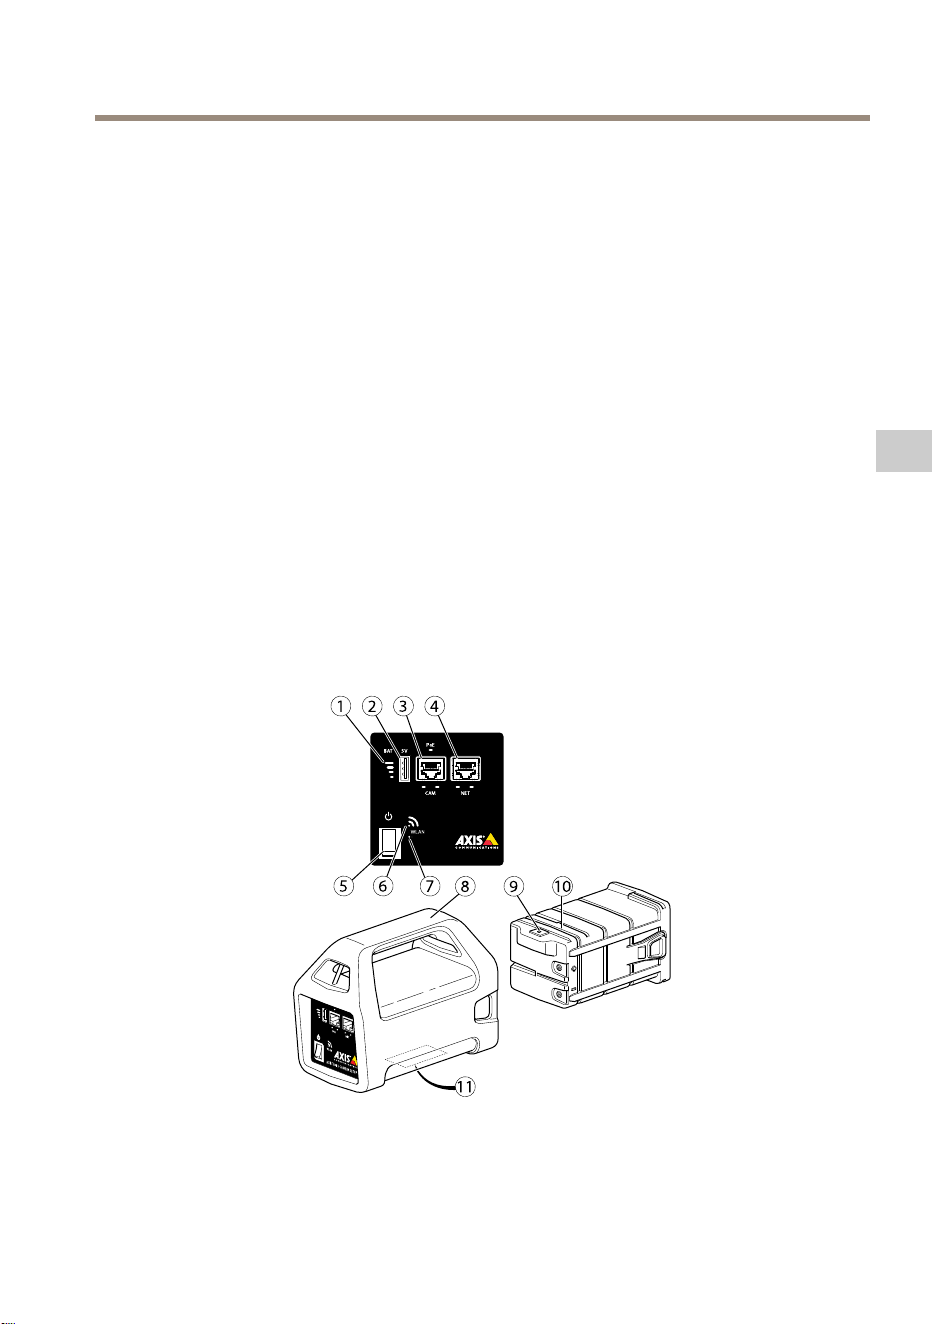
Hardwareoverview
1
Batteryindicator
2
USBchargingport(non-data)
3
RJ45PoE(CAM)
4
RJ45non-PoE(NET)
5
On-Offswitch
13
EN
AXIST8415WirelessInstallationTool
6
WLANindicator
7
Resetbutton
8
MainUnit
9
BatteryChargerconnector
10
Battery
11
Label(networksettings)
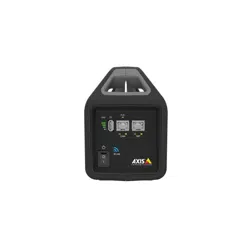
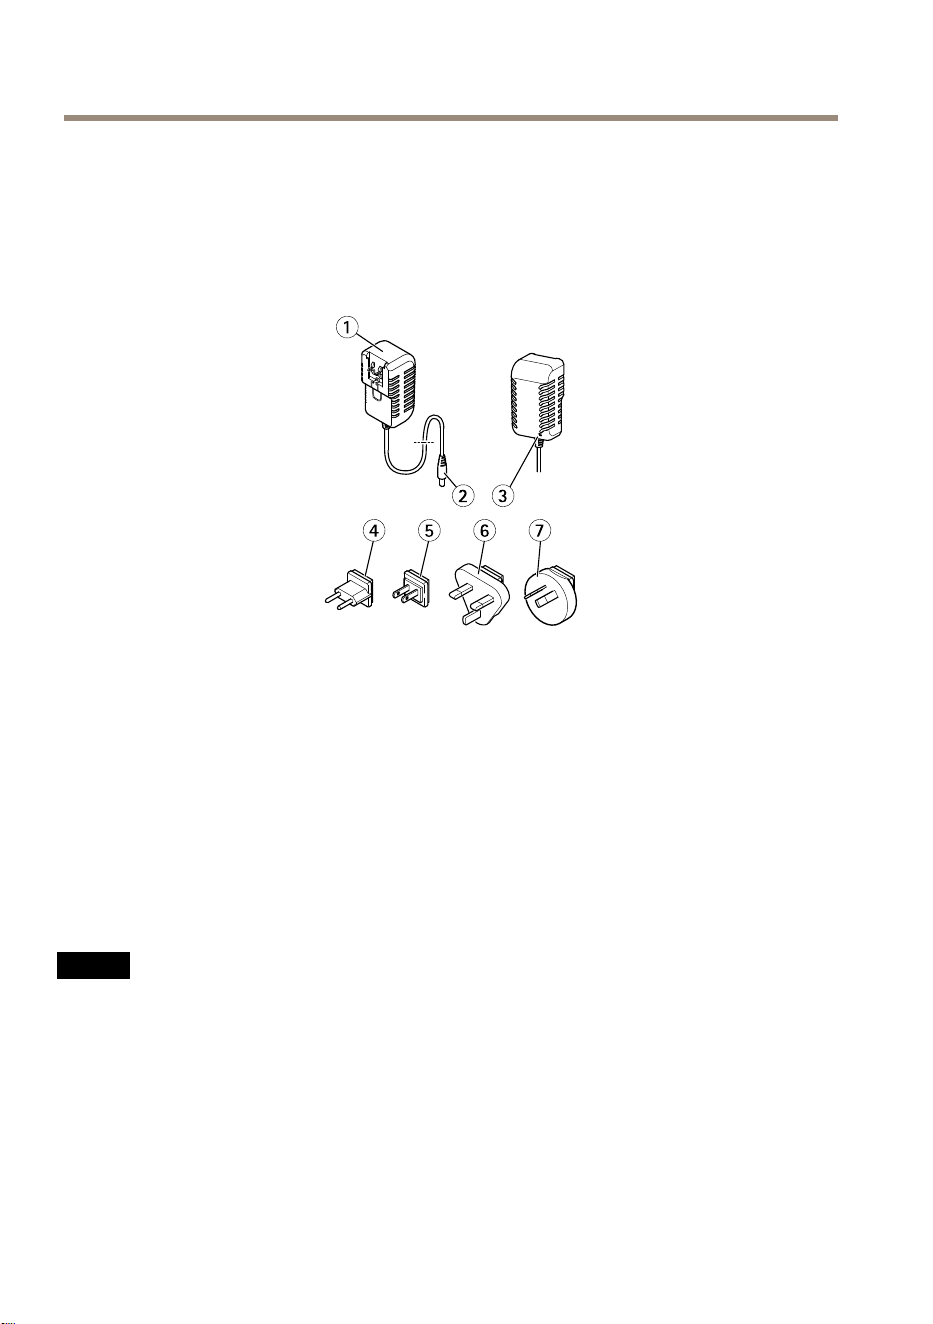
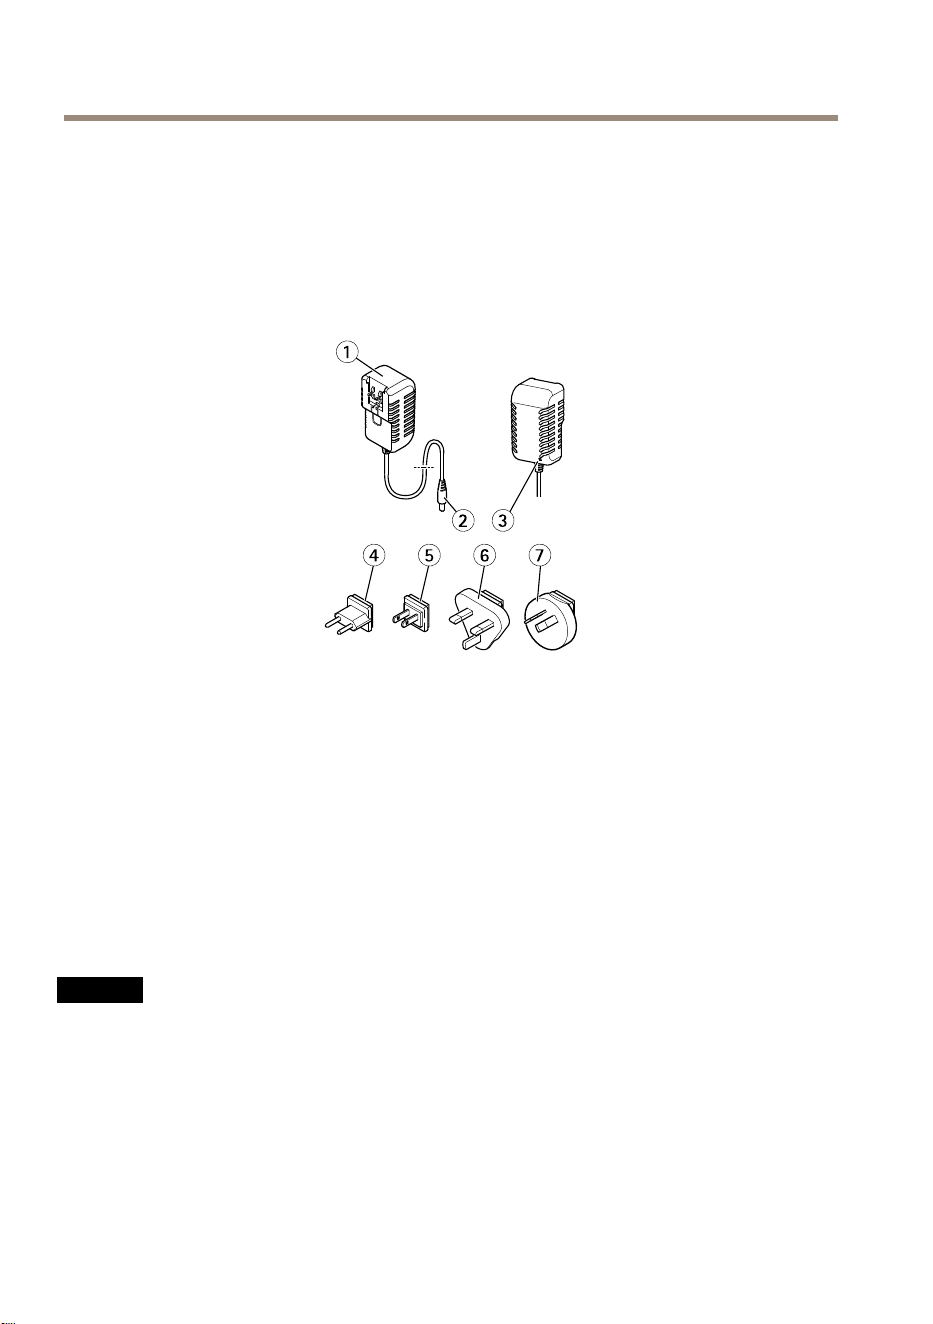
1
Charger
2
Chargermaleconnector
3
ChargerLED
4
Powercordplug(EU)
5
Powercordplug(US)
6
Powercordplug(UK)
7
Powercordplug(AU)
Networkconnector
RJ45Ethernetconnector.
RJ45EthernetconnectorwithPoweroverEthernetPlus(PoE+).
NO NO
NO
TICE TICE
TICE
Duetolocalregulationsortheenvironmentalandelectricalconditionsinwhichtheproduct
istobeused,ashieldednetworkcable(STP)maybeappropriateorrequired.Allcables
connectingtheproducttothenetworkandthatareroutedoutdoorsorindemanding
electricalenvironmentsshallbeintendedfortheirspecicuse.Makesurethatthenetwork
devicesareinstalledinaccordancewiththemanufacturer’sinstructions.Forinformation
aboutregulatoryrequirements,seeElectromagneticcompatibility(EMC)onpage4.
14
AXIST8415WirelessInstallationTool
USBConnector
AXIST8415isequippedwithaUSBconnector(non-data).Thisconnectorcanbeusedforcharging
anycompatiblehandhelddevice(5V,2.1A).
Note
•AXIST8415mustbepoweredonwhenchargingahandhelddevice.
•Chargingahandhelddeviceaffectstheunitsbattery.Whenitreachesacriticallow
levelitwillnolongerchargethehandhelddevice,SeeHardwareoverviewonpage13
Batteryindicatorforstatusofthebattery.Inordertocontinuechargingreplacethe
batterywithanewlychargedone,seeChangetheBatteryonpage18.
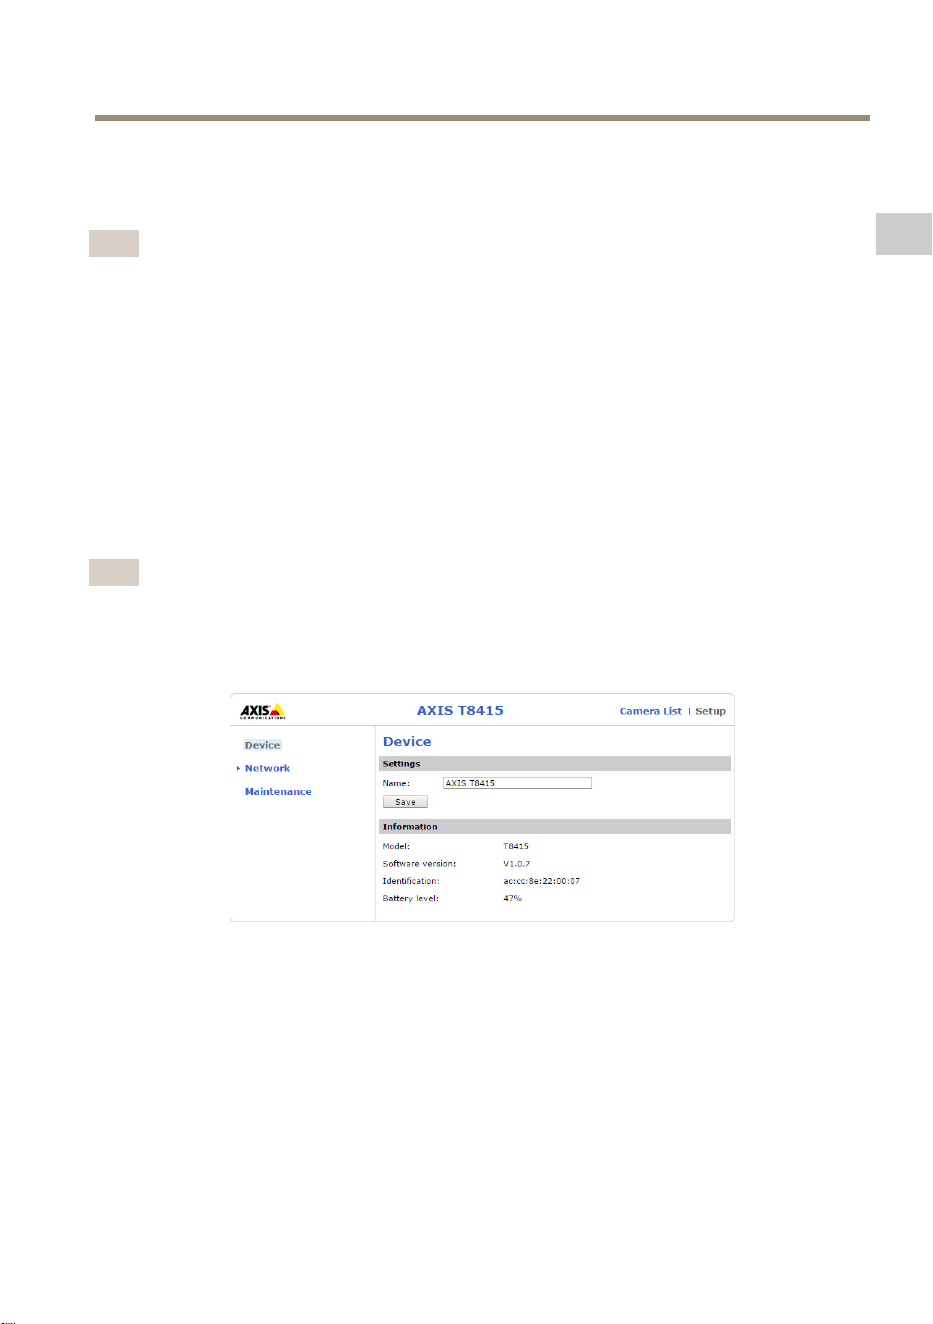
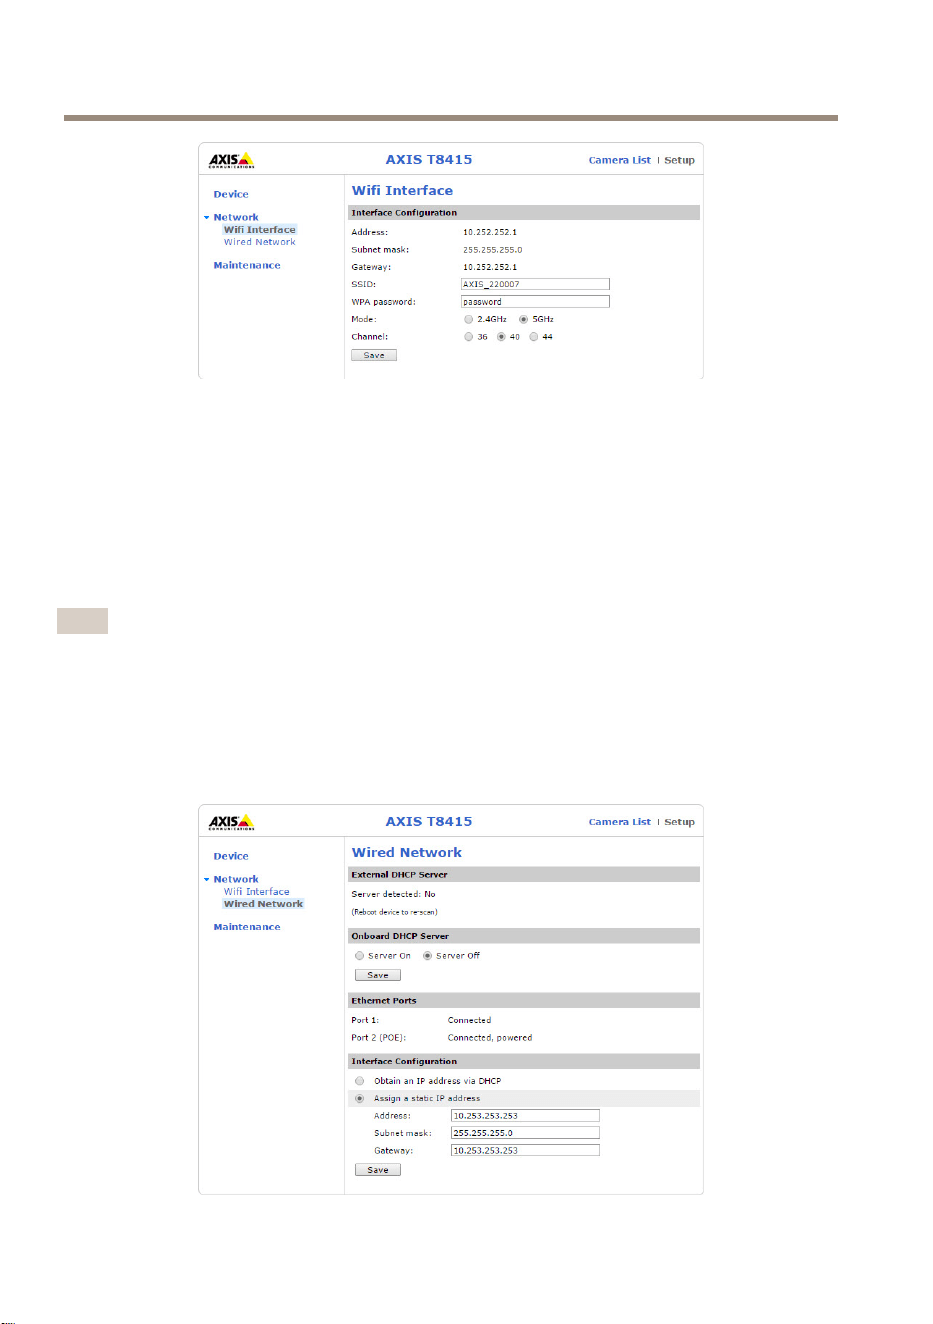
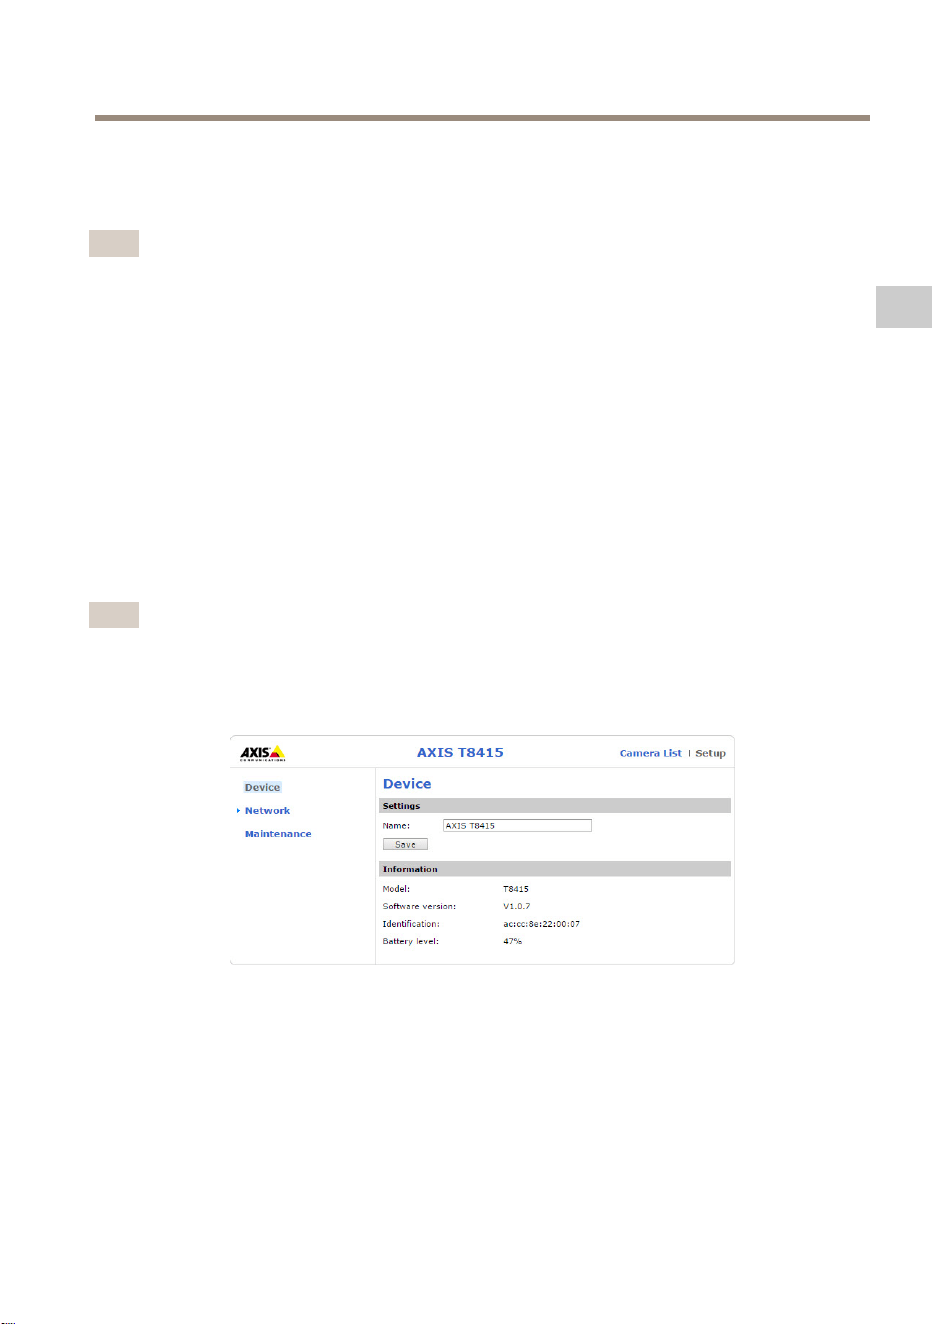
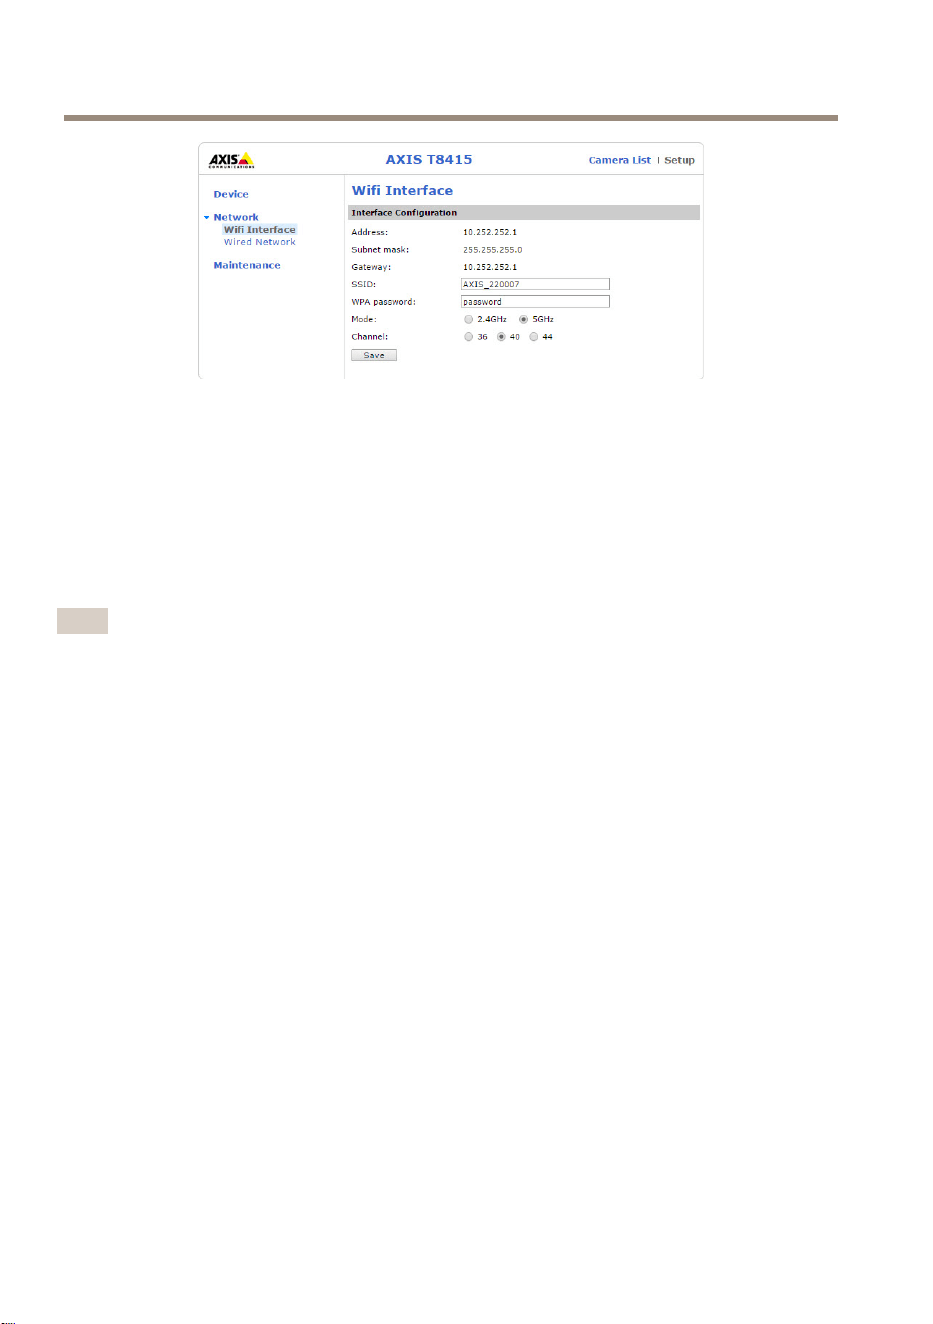
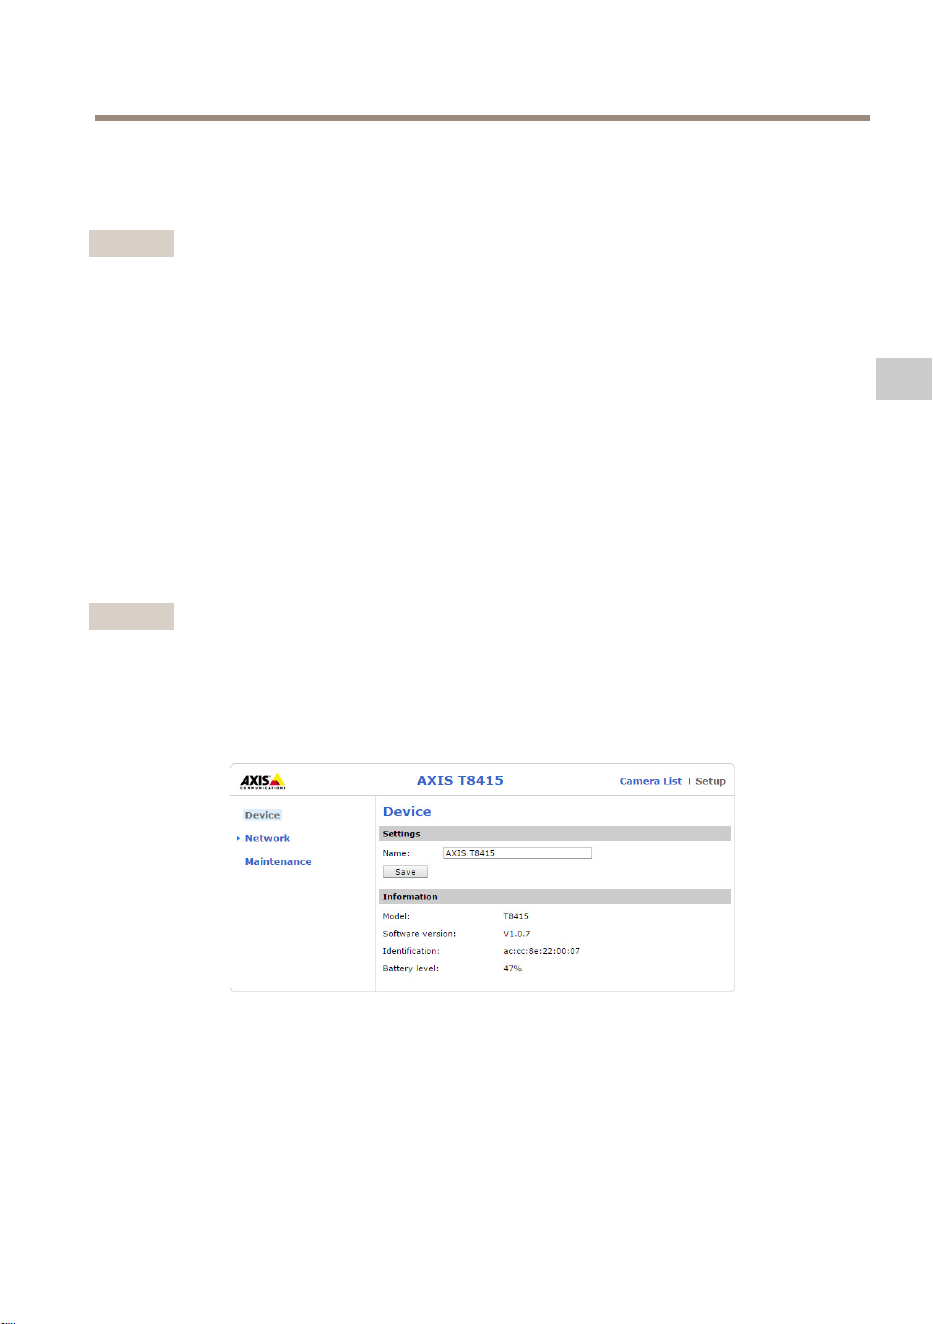
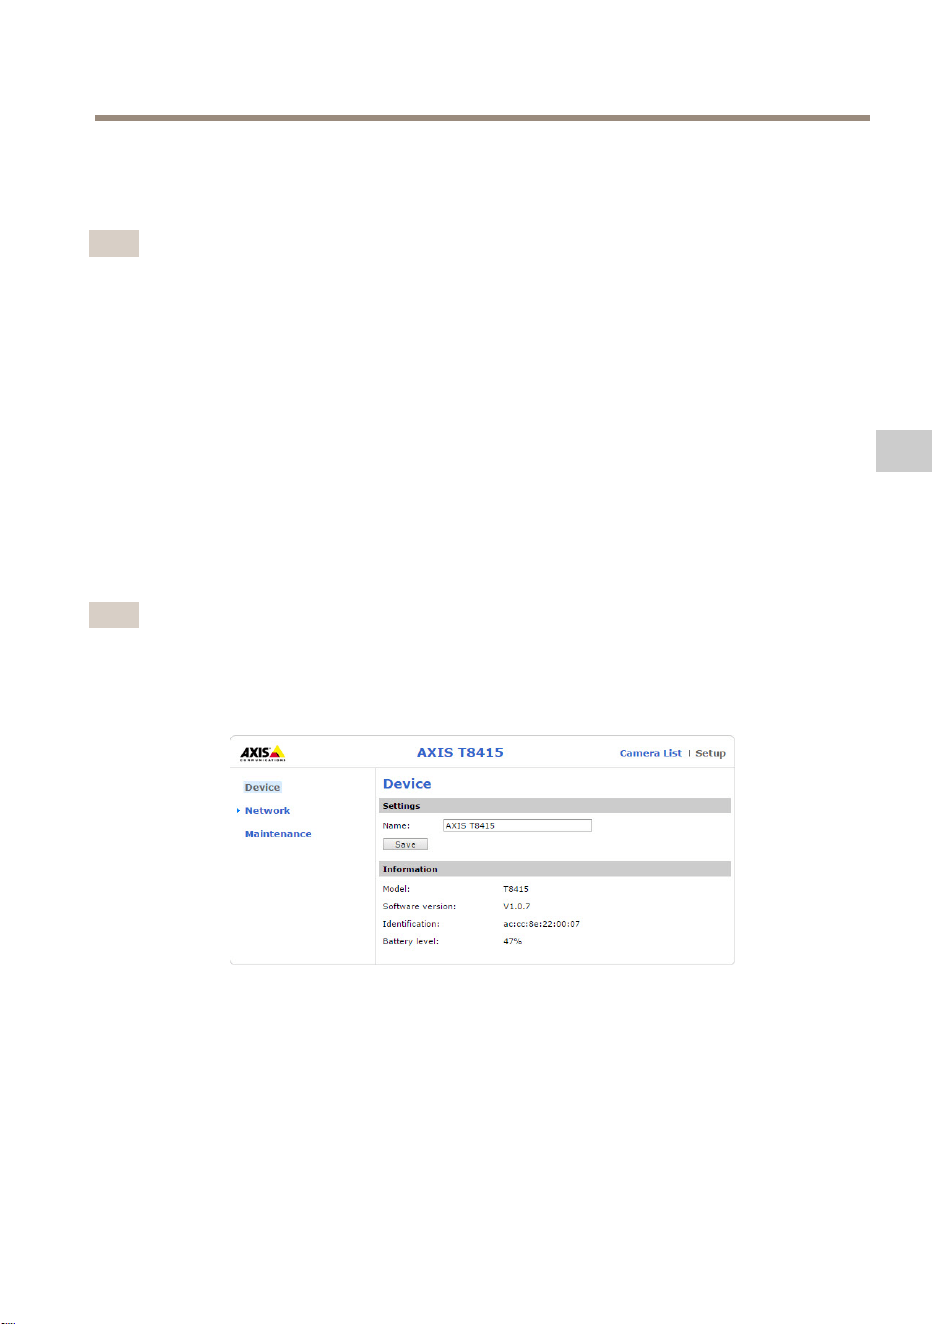
AXIST8415WebInterface
InAXIST8415webinterfaceitispossibletoeditnetworksettingsandupgradethermware.
AccessthewebinterfacebytypingintheunitsIP-addressinabrowser.TheIP-addresscanbe
foundonthelabellocatedonthemainunit.
Note
•ActualscreenshotsmaychangeuponnewFirmwarereleases.
•AXIST8415havetwoIP-addresses.OneforconnectionviaWiFiandoneforconnection
viawirednetwork.
•Name:Namefortheunit,canbechanged.
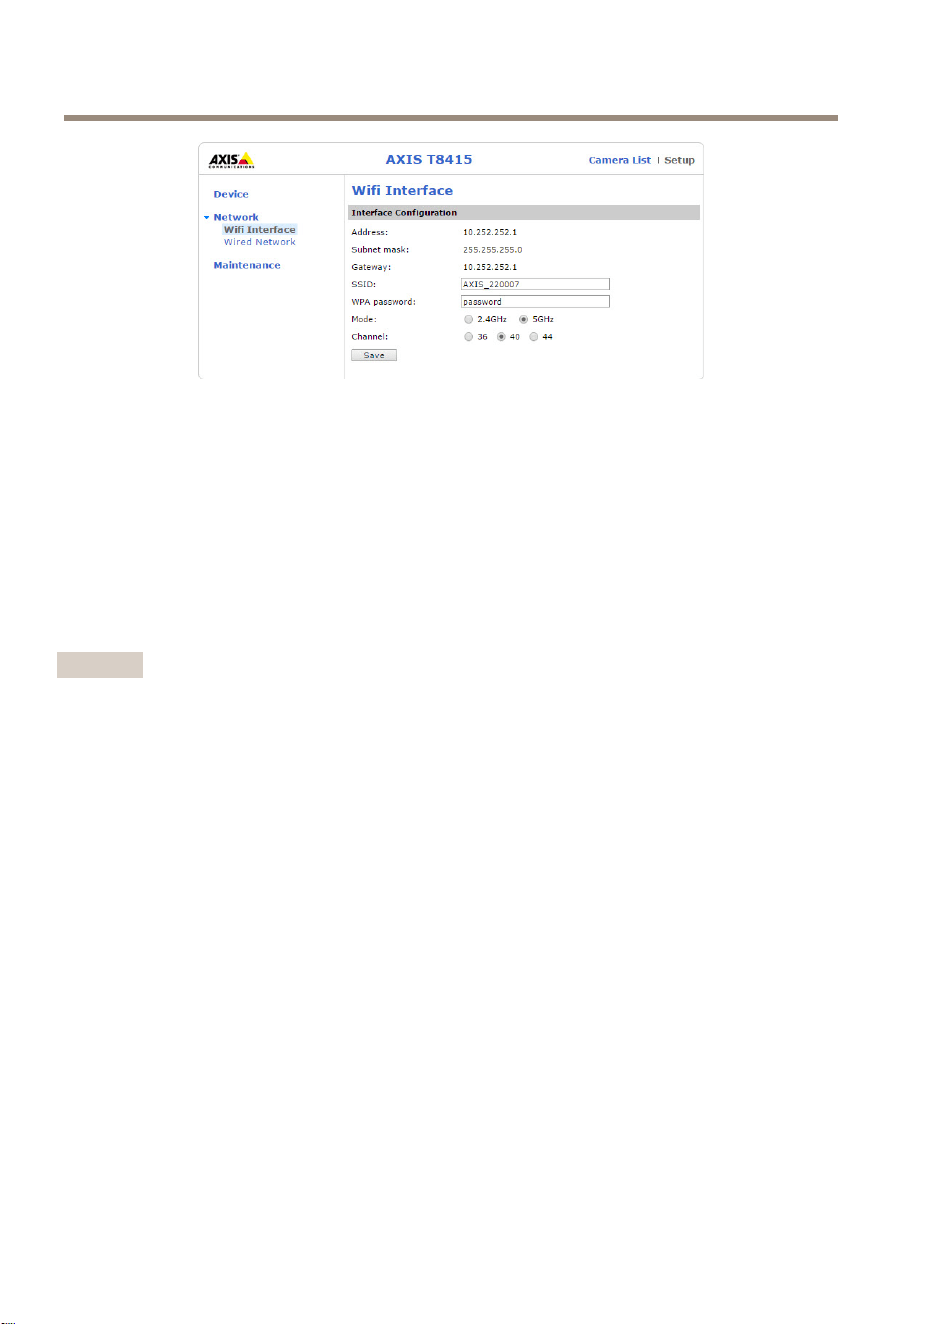
Network- -
-
WiInterface
15
EN
AXIST8415WirelessInstallationTool
•Address:TheIP-addressfortheunit.
•Subnetmask:Thesubnet-maskfortheunit.
•Gateway:Defaultgatewayfortheunit.
•SSID:Nameofthewirelessnetwork,canbechanged.
•WPApassword:Passwordforthewirelessnetwork,canbechanged.
•Mode:Setfrequencymodeforwirelessnetwork.Selecteither2.4GHzor5GHz.
•Channel:Setchannelforwirelessnetwork.
Note
•DefaultSSIDandpasswordcanbefoundonthelabel,locatedonthemainunit.If
changedinthewebinterfacethelabelisnolongervalid.
•AXIST8415supportsboth2.4GHzand5GHz.
•Channelsmightvarydependingoncountry.
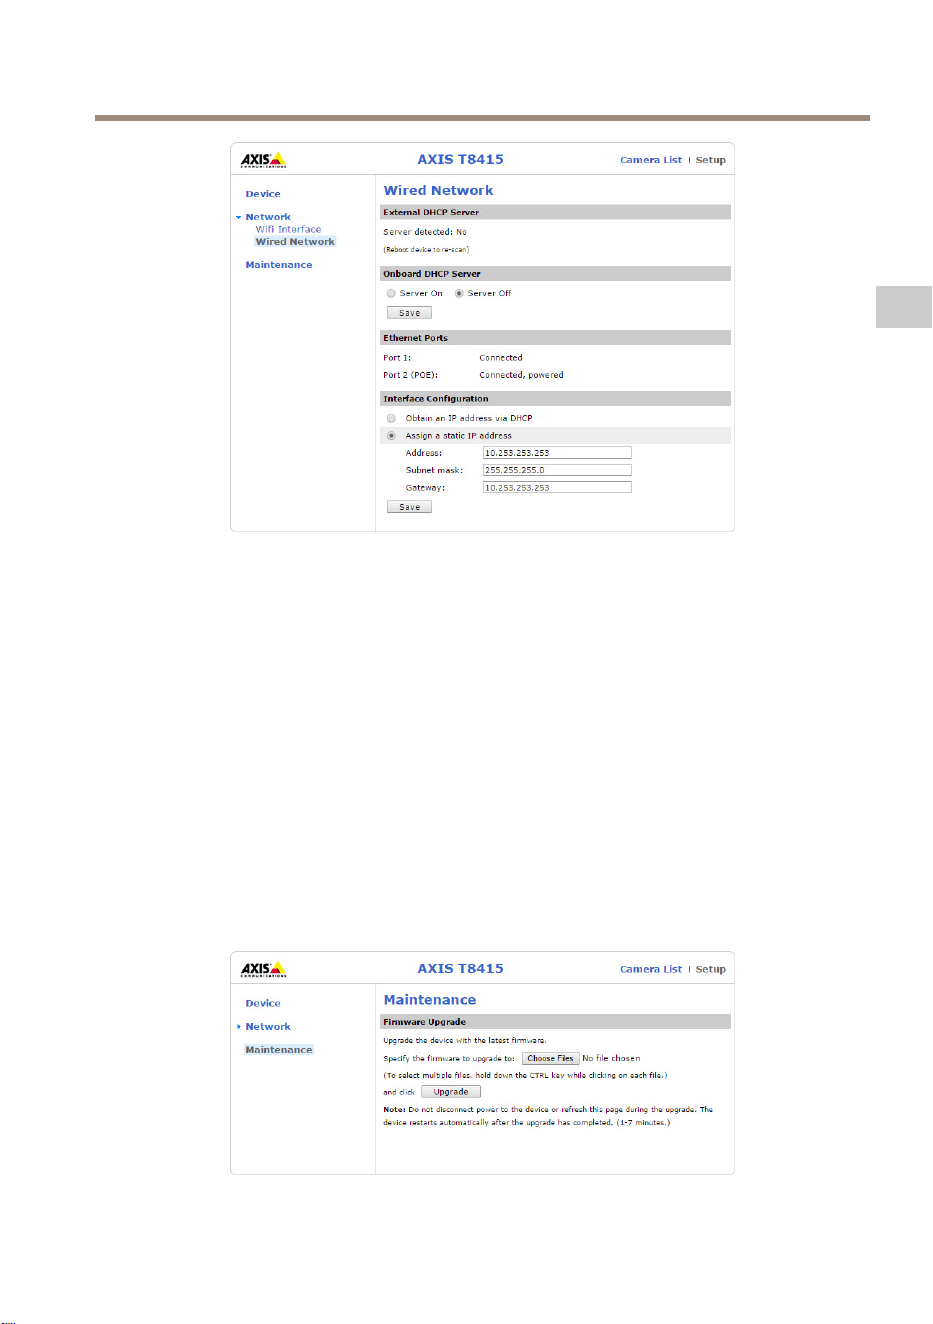
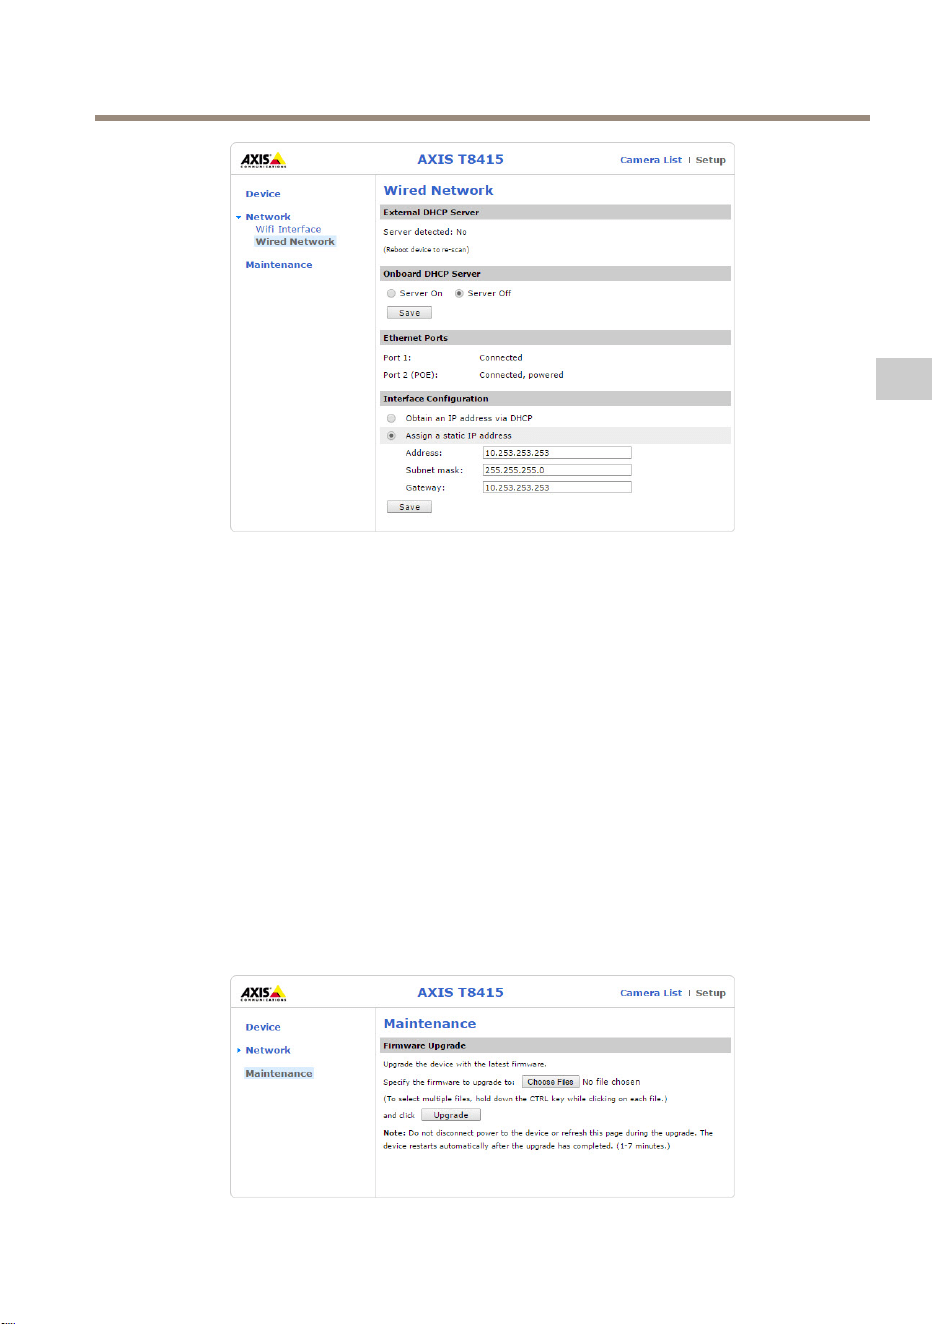
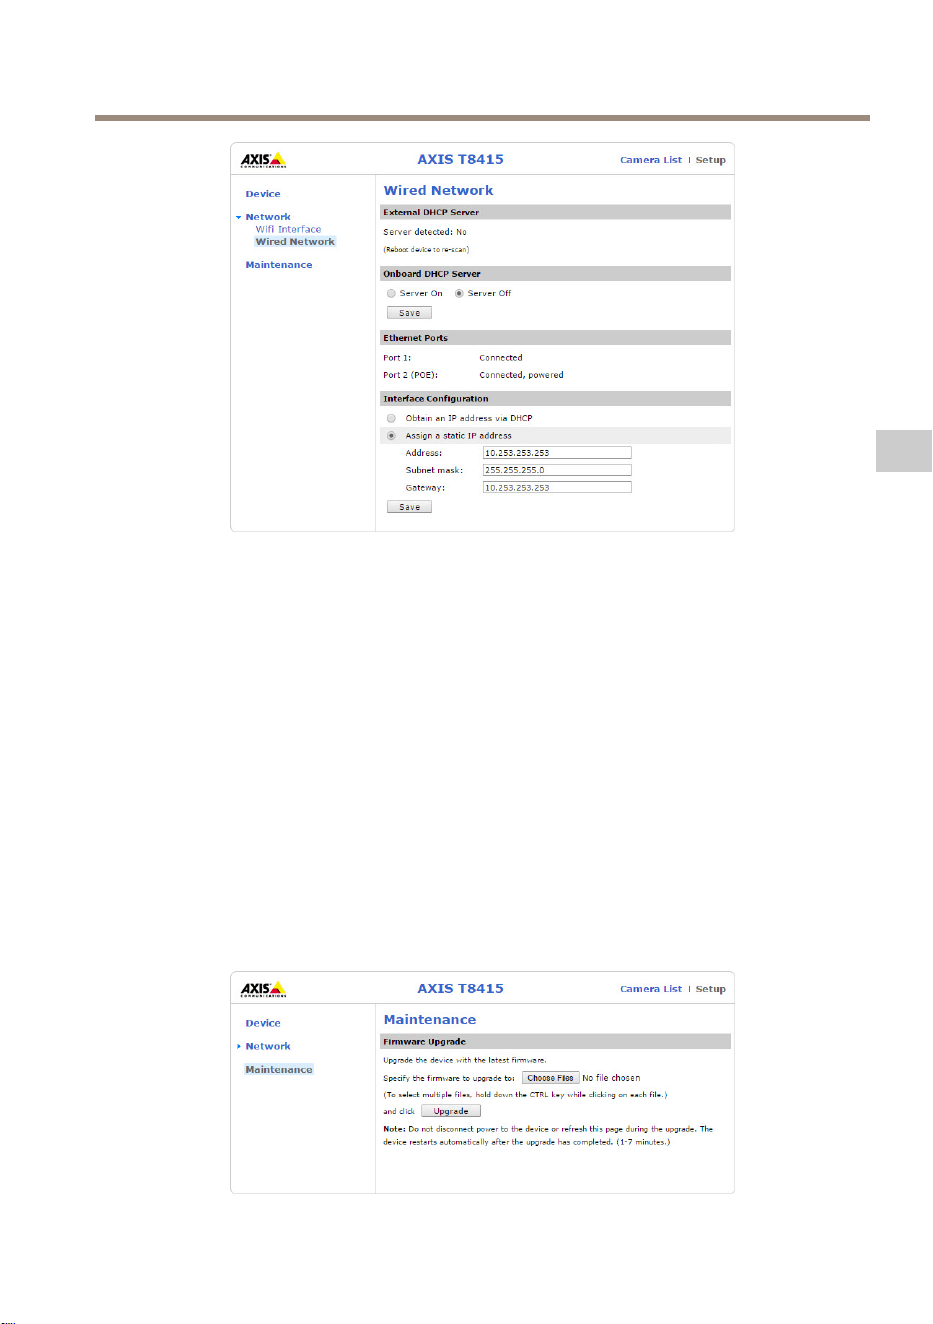
Network- -
-
WiredNetwork
16
AXIST8415WirelessInstallationTool
•ExternalDHCPServer:DetectionofanexternalDHCPserver.
•OnboardDHCPServer:
-On:InternalDHCPserveron
-Off:InternalDHCPserveroff
•EthernetPorts:Statusoftheethernetports:
-Connected:Camera/laptopconnectedtoethernetport
-Unconnected:Nocamera/laptopconnectedtoethernetport
•InterfaceConguration:SetIP-addressmanuallyorgetIP-addressfromaDHCPserver.
•Address:TheIP-addressfortheunit.
•Subnetmask:Thesubnet-maskfortheunit.
•Gateway:Defaultgatewayfortheunit.
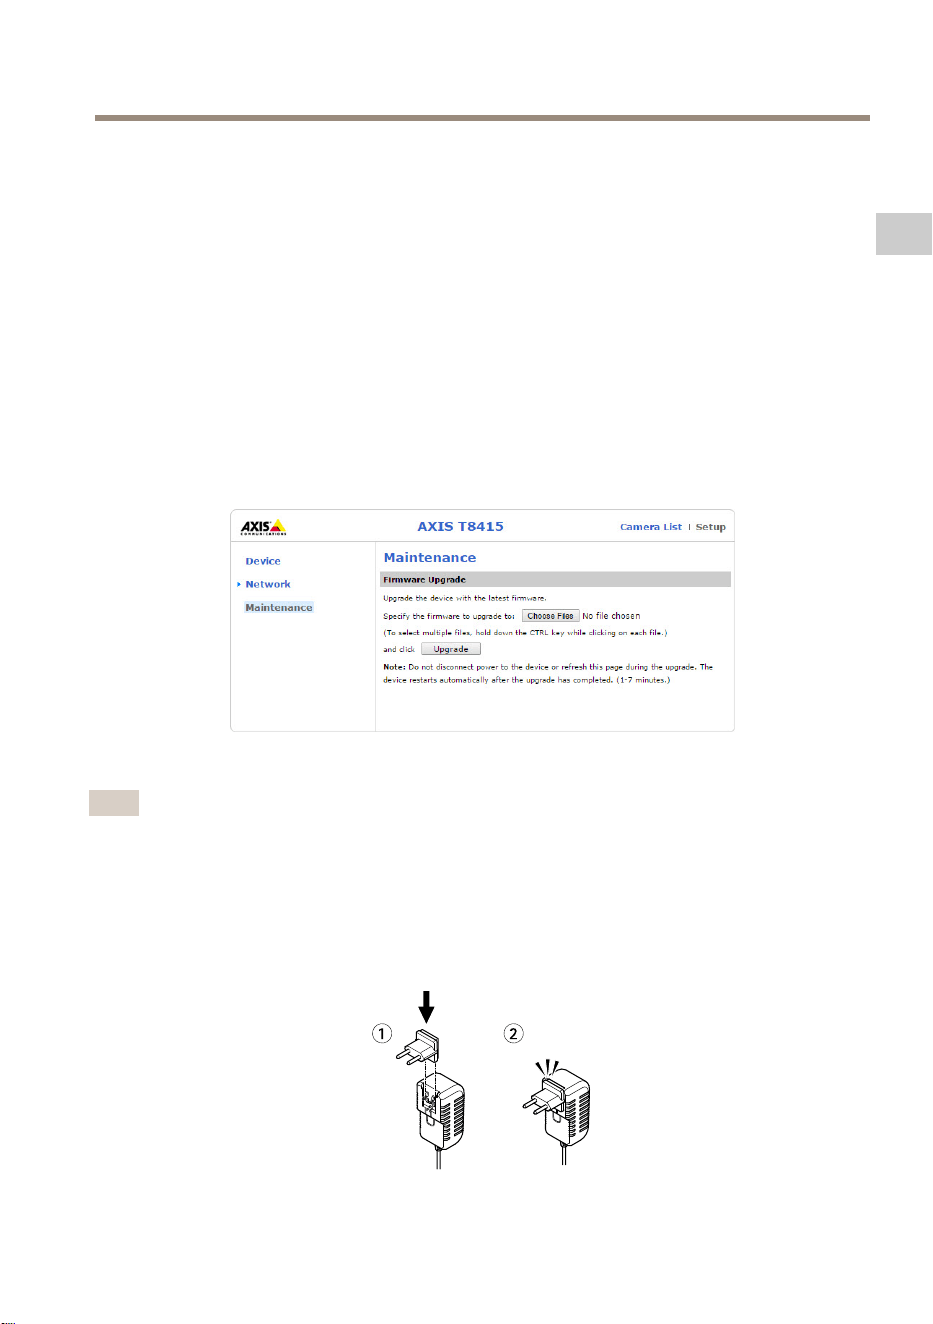
Maintenance
UpgradethermwareforAXIST8415.
Note
Thelatestrmwarecanbefoundatwww.axis.com
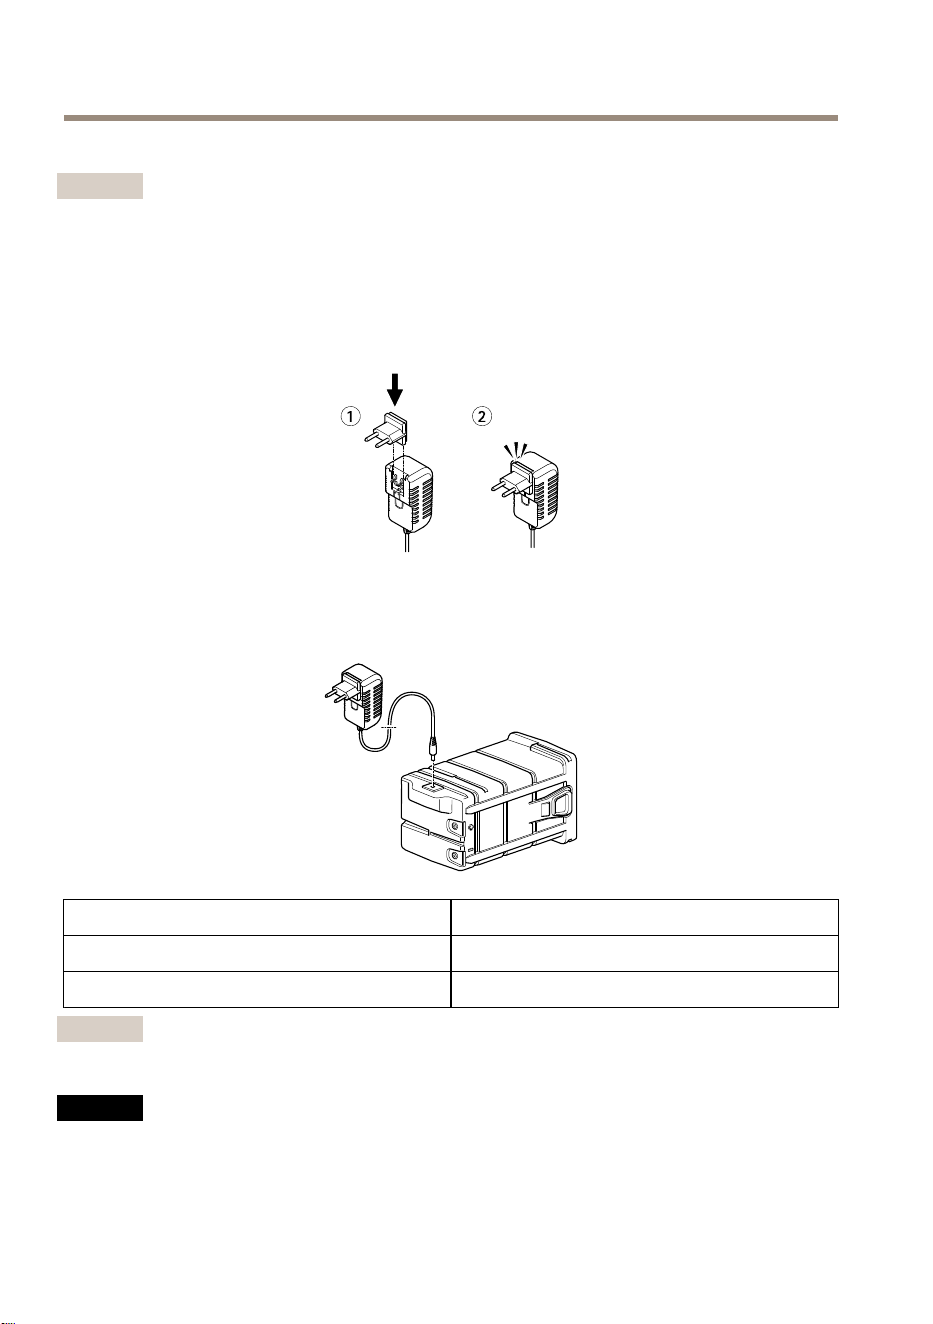
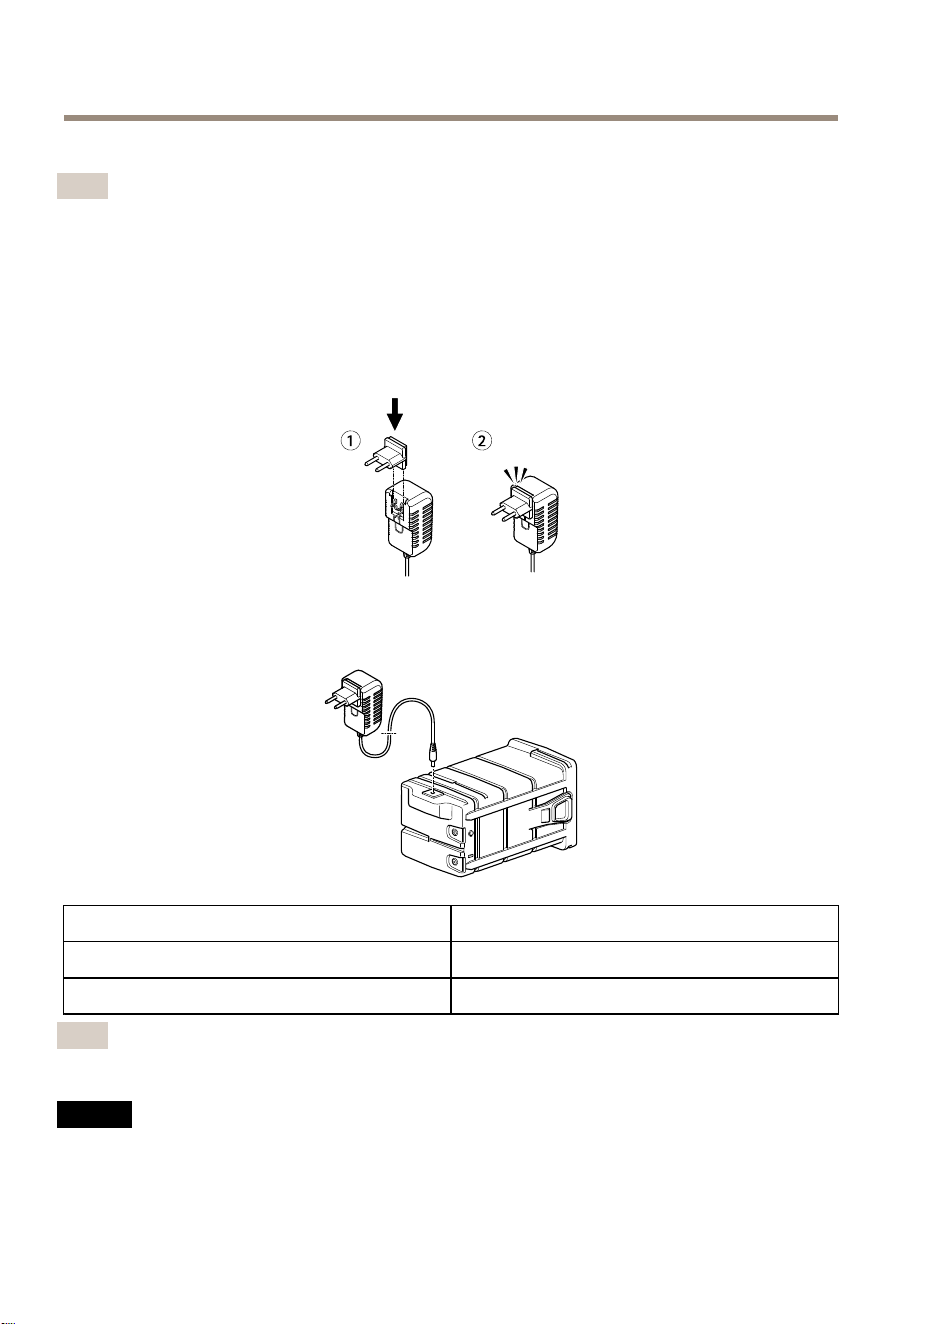
ChargetheBattery
Attachthecountryspecicpowercordplugtothecharger.Seebelowimage.
17
EN
AXIST8415WirelessInstallationTool
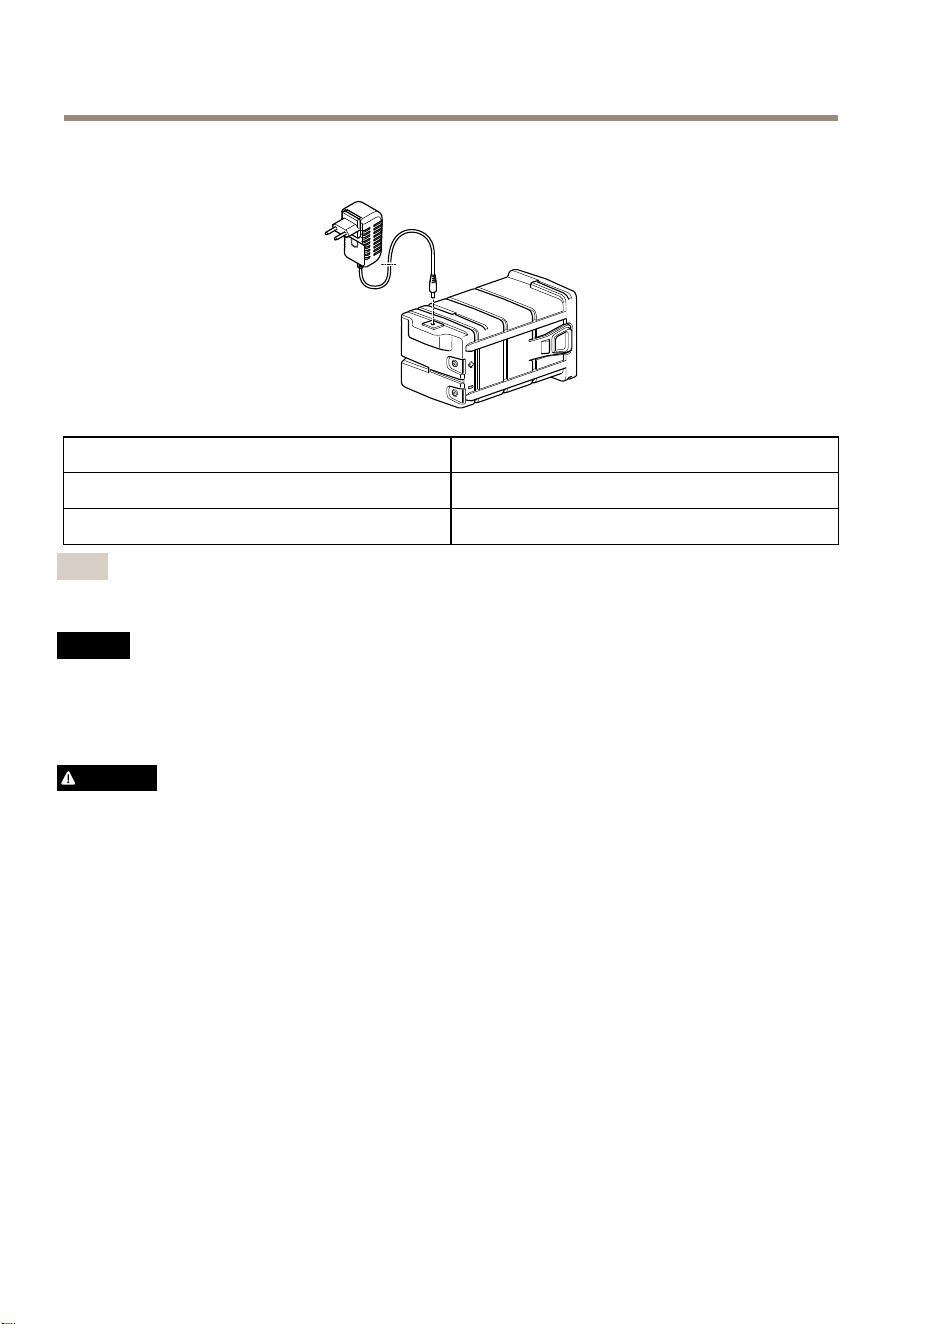
Connectthebatterychargertothebattery(seebelowimage)andtothepoweroutlet.
LEDBehavior
RedBatterycharging
Green
Batteryfullycharged
Note
ThechargerLEDislocatedonthefrontsideofthecharger,seeHardwareoverviewon
page13
NO NO
NO
TICE TICE
TICE
•Duetotheself-dischargecharacteristicsofthistypeofbattery,itisimperativethatthey
bechargedwithin6monthsofstorage,otherwisepermanentlossofcapacitymightoccur
asaresultofsulfation.
•Useonlythesuppliedcharger.
CAUTION
Neverchargeordischargeabatteryinahermeticallysealedenclosure.Batteriesgenerate
amixtureofgasesinternally.Giventherightsetofcircumstances,suchasextreme
overchargingorshortingofthebattery,thesegasesmightventintotheenclosureand
createthepotentialforanexplosionwhenignitedbyaspark.
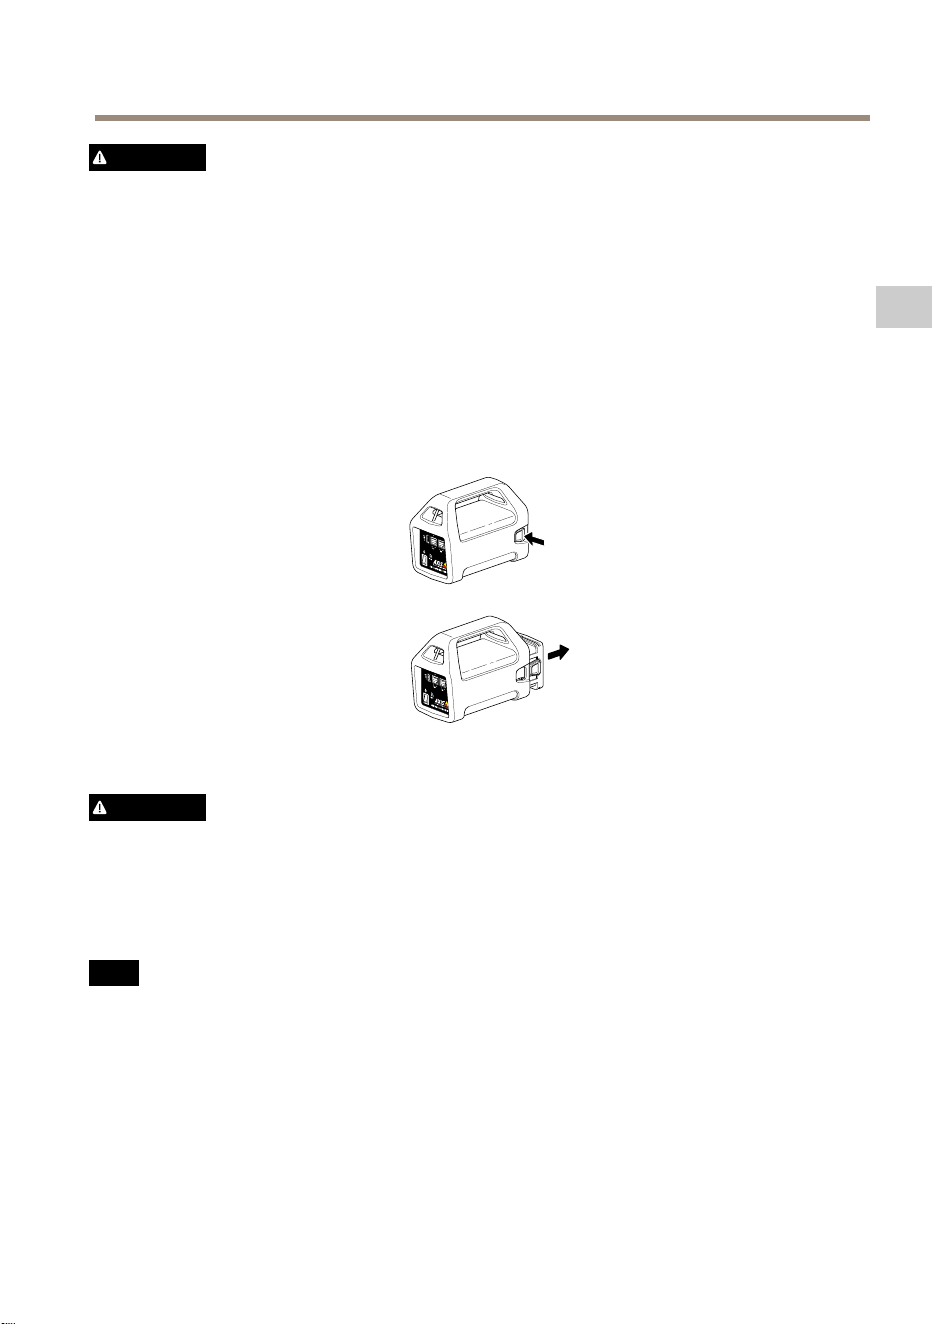
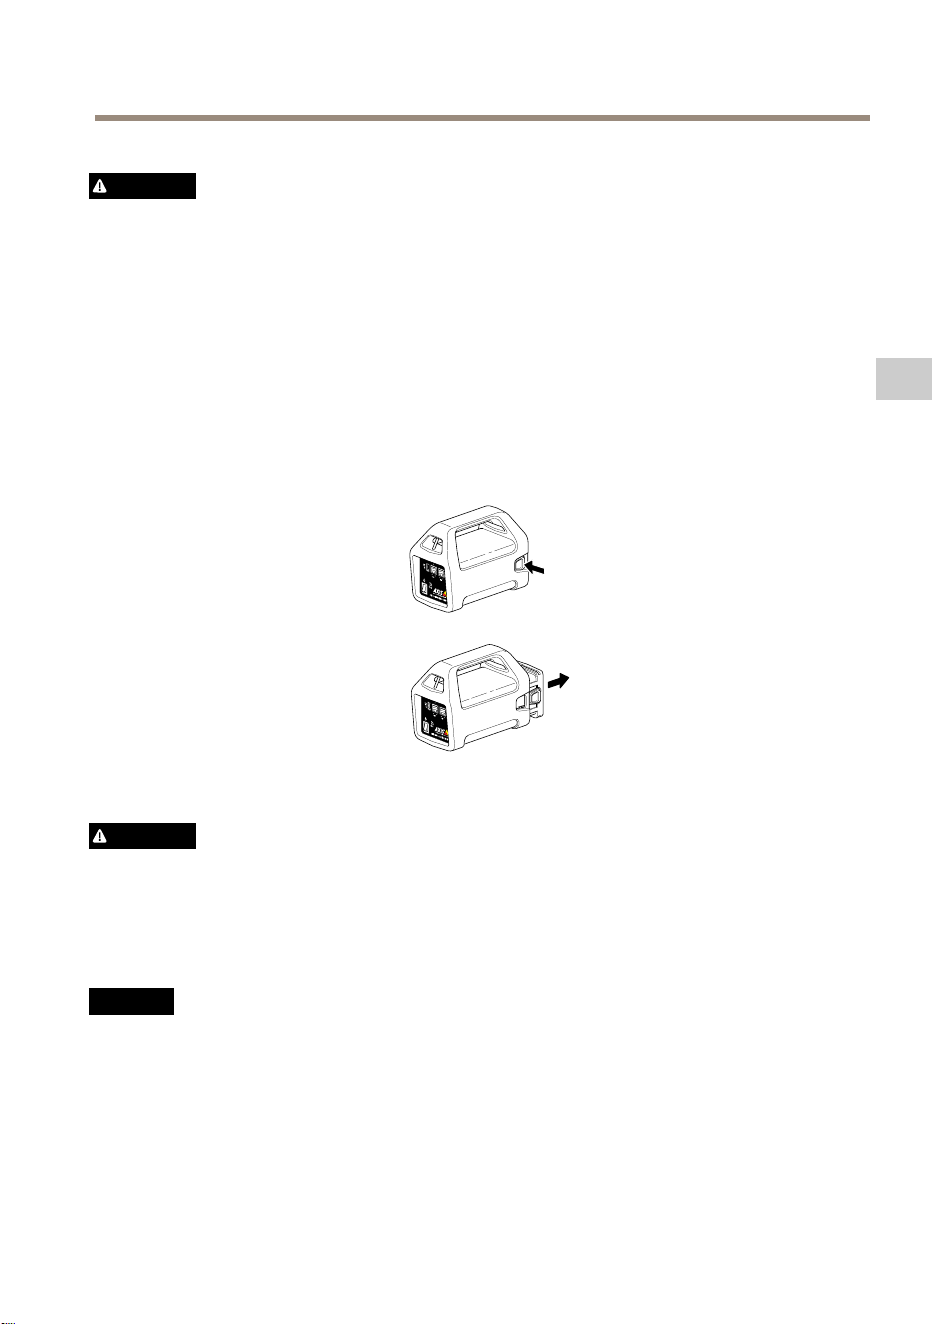
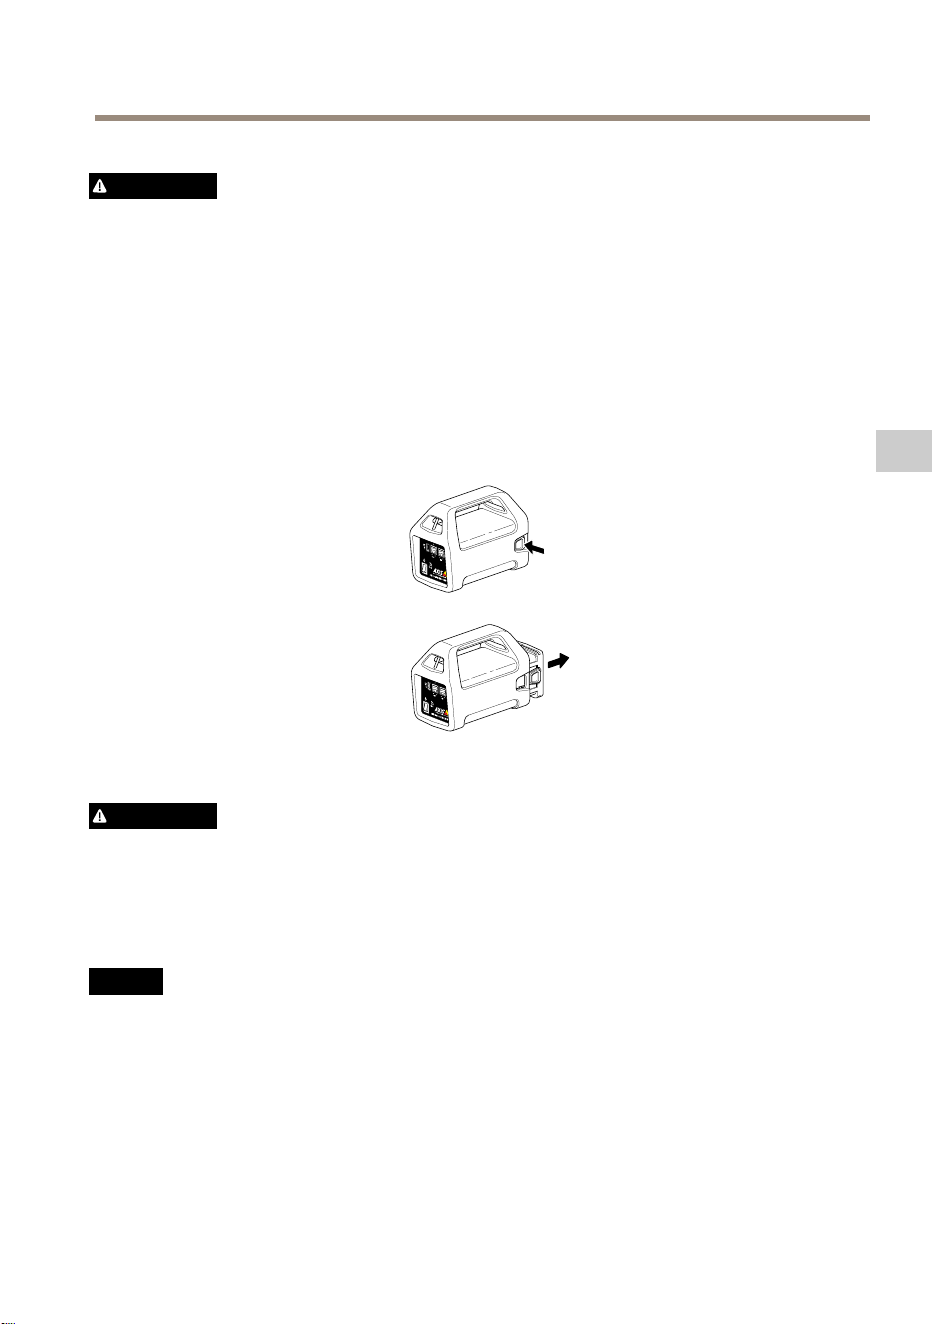
ChangetheBattery
Seebelowimageforhowtochangethebattery.
18
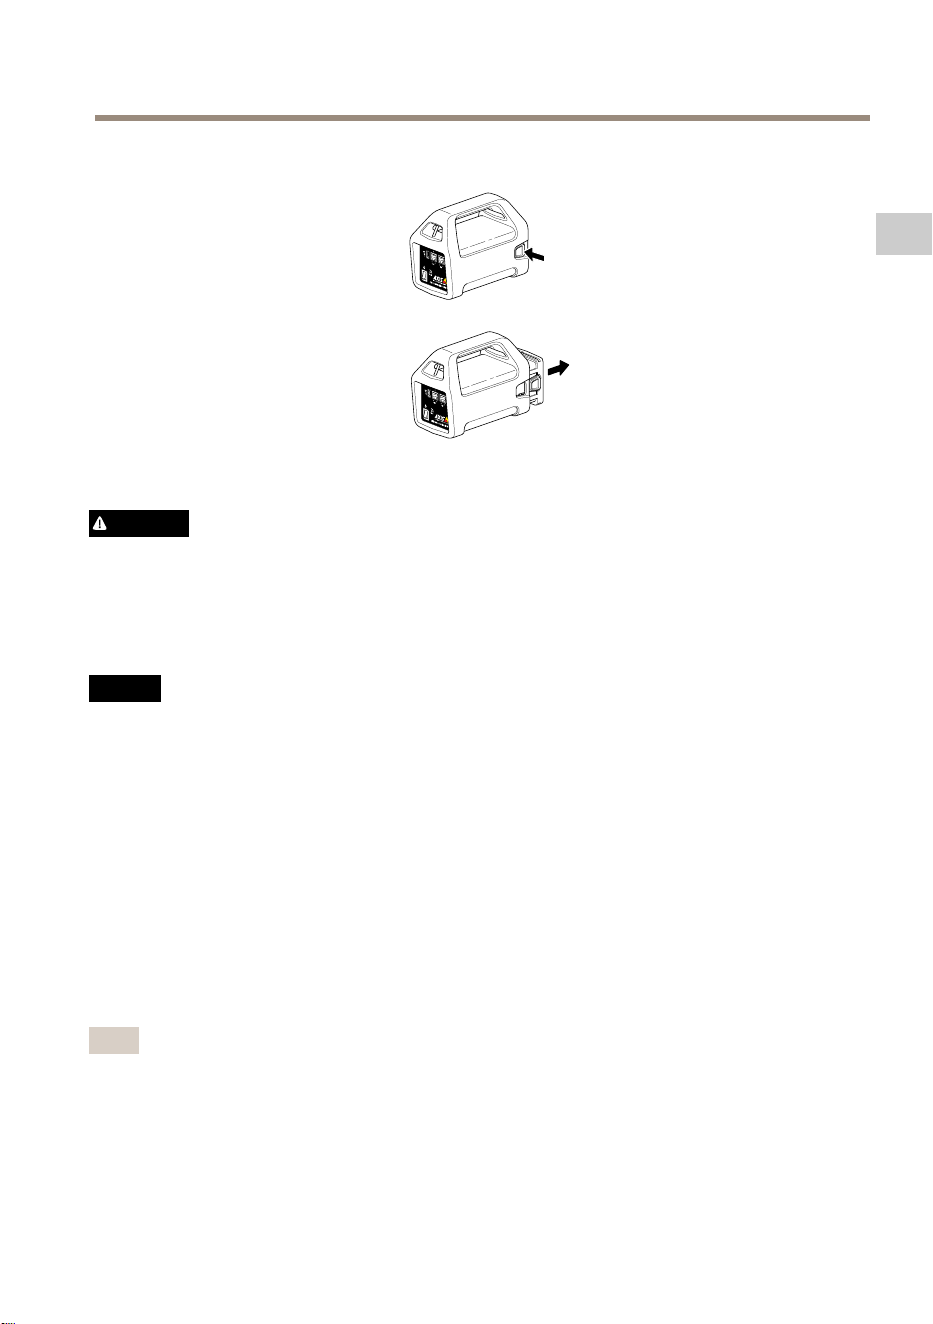
AXIST8415WirelessInstallationTool
CAUTION
•Neverdisposeofthebatteryinareasitmaycausethemtoexplodeorgeneratea
toxicgas.
•Donotattempttodisassemblethebatteryasitcouldcauseleakageofsulfuricacid
thatcouldcauseinjury.
•Ifthebatteryisdisassembledthewarrantyisvoid.
NO NO
NO
TICE TICE
TICE
Disposeofusedbatteriesaccordingtolocalregulationsorthebatterymanufacturer's
instructions.
InstallationPreparations
WithAXIST8415WirelessInstallationToolitispossibletoperformcamerainstallationswith
ahandhelddeviceoralaptop.Itisrecommendedtouseahandhelddeviceandtheapp
AXISWirelessInstallationToolforbestperformance.
•Makesurethatthebatteryisfullychargedbeforeuse.SeeChargetheBatteryonpage17
•IfusingtheappAXISWirelessInstallationToolMakesureitisdownloadedtothe
handhelddevicebeforeconnectingtoAXIST8415WiFinetwork.
•Makesurepowerisonbeforeconnectingthecameratothemainunit.
Note
TheappAXISWirelessInstallationToolcanbedownloadedfromAppStoreorGooglePlay.
ConnecttoAXIST8415WiFi
Handhelddevice
19
EN
AXIST8415WirelessInstallationTool
1.TurnonWiFionthehandhelddevice.
2.SelectTheSSIDoftheunit.
3.Enterpassword
Laptop
1.TurnonWiFionthecomputer.
2.SelectTheSSIDoftheunit.
3.Enterpassword
Important
MakesurethecomputerisconguredsothatitwillobtainanIP-addressfroma
DHCPserver.
Note
DefaultSSIDandpasswordareprintedonthelabellocatedonthemainunit.
CameraInstallation-AXISWirelessInstallationToolapp
1.ConnectthecameratotheCAMport(PoE)onthemainunit.
2.VerifythatthePoEindicatorislit.
3.ConnecttoAXIST8415WiFi,seeConnecttoAXIST8415WiFionpage19
4.StarttheappAXISWirelessInstallationTool
Note
Thestart-uptimeforcamerasvariesfordifferentproducts.Itmaytakeafewminutes
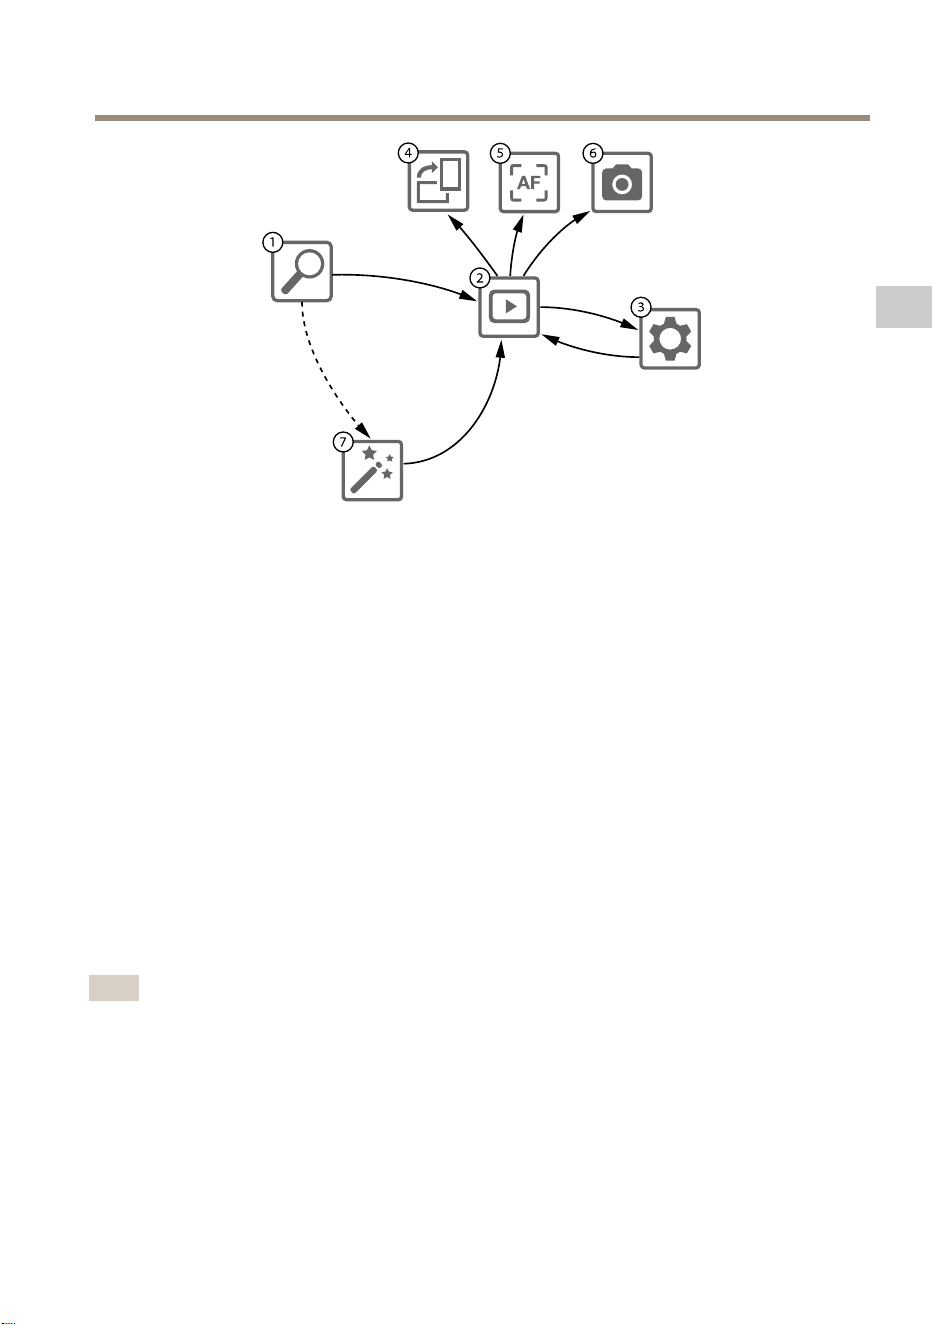
beforethecameraisvisibleinthecameralistintheapp.
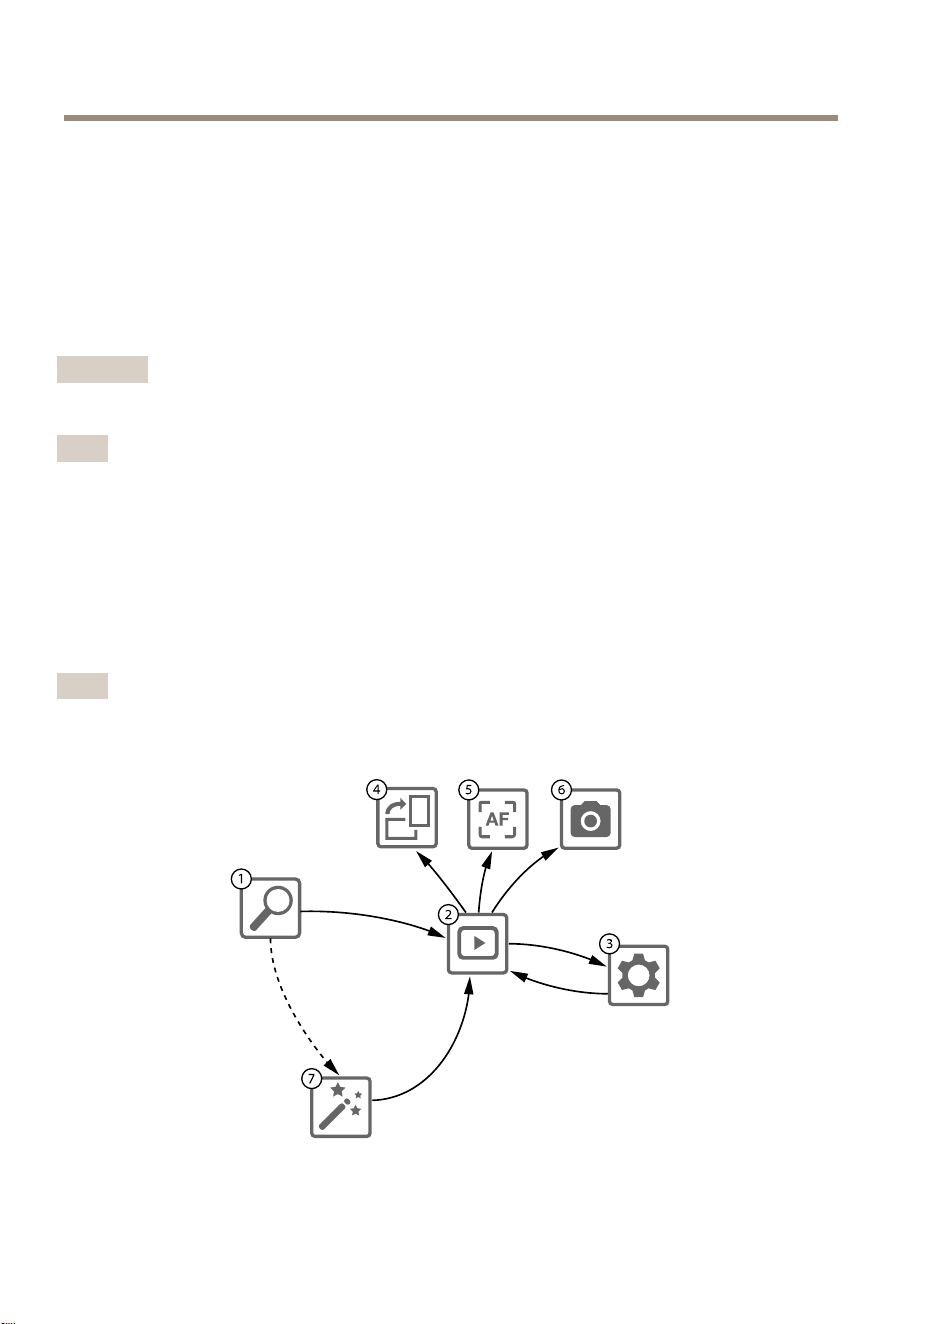
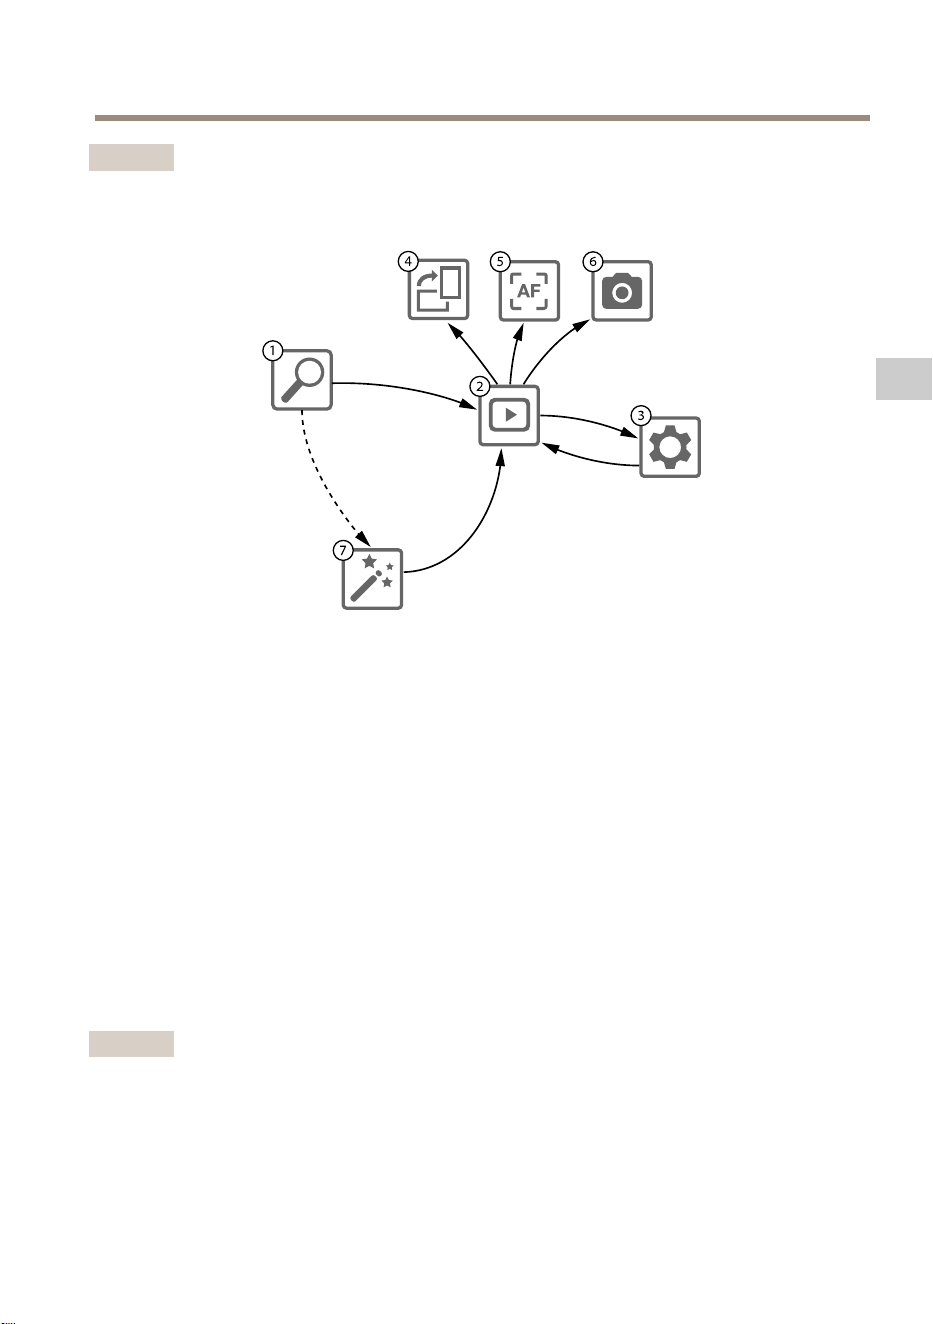
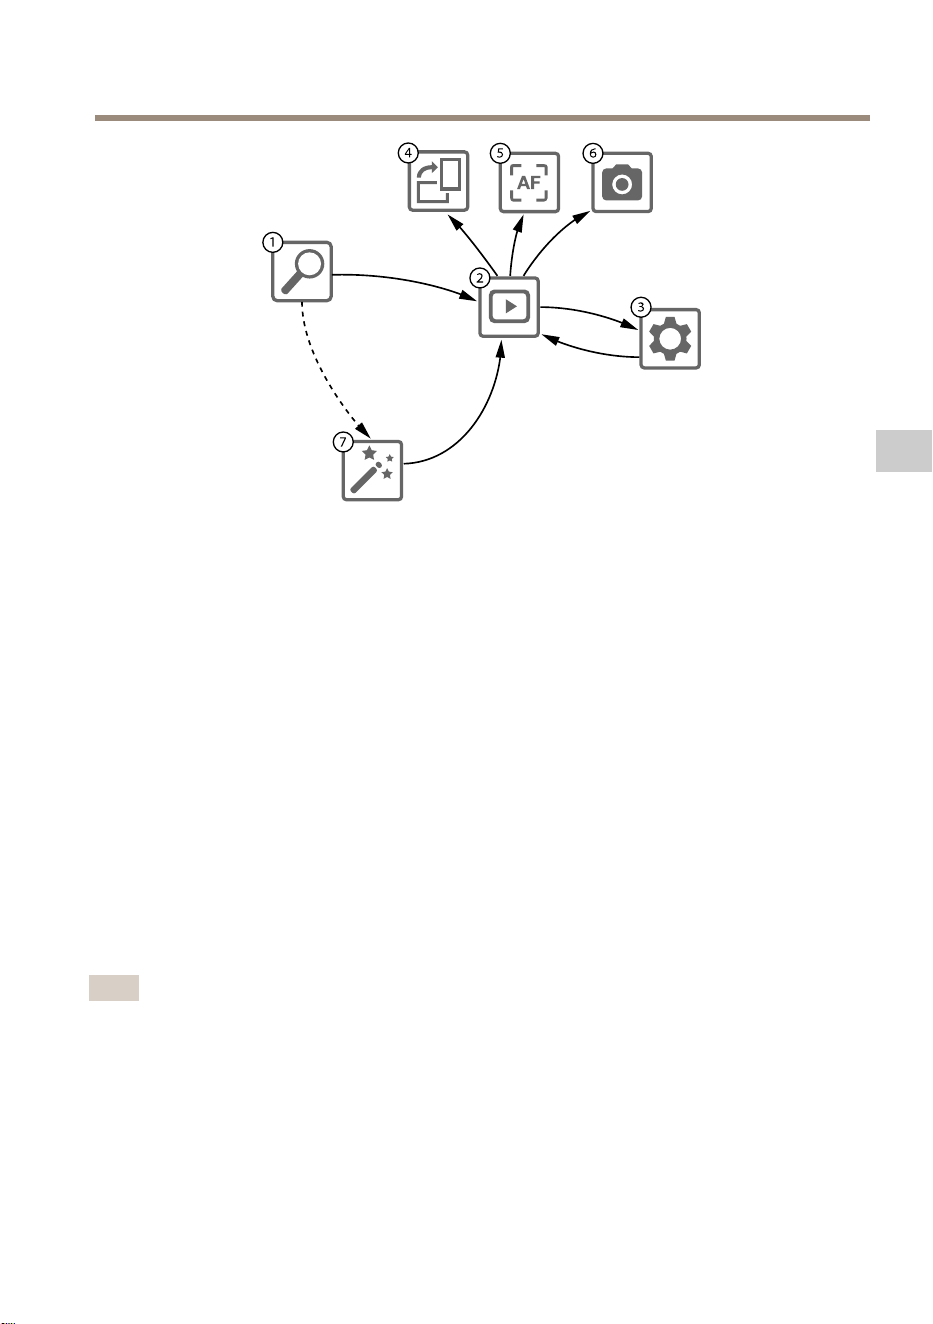
1
CameraList
2
Liveview
20

AXIST8415WirelessInstallationTool
3
Settings
4
Rotateimage
5
Autofocus
6
Snapshot
7
Wizard
Tocongureacamera
Selectcamerain1CameraList.Ifrequiredtypeinpasswordinordertocontinue.
In2Liveviewitispossibletoaccesstheactionbuttons(4,5and6)bypressandholdonthescreen.
Select4Rotateimagetorotatetheimage.
Select5Autofocustoperformasearchfortheidealfocuspoint.
Note
•Autofocuswillonlybeavailableifthecamerasupportsthisfunctionality.
•Autofocusmaytakeafewminutestoperform,duringthistimeitisimportantthatthe
cameraisstill.
Select6Snapshottotakeasnapshotofthevideoimage.
Select3Settingstoeditnetworksettingsfortheproduct.
Number7Wizard.ThiswizardstartsthersttimeanAxisproductisaccessedorafteraresetto
factorydefault.
Note
InformationaboutsettingsintheWizardcanbefoundintheproductsUserManualavailable
atwww.axis.com
Note
FormoreinformationaboutcamerasettingsforrespectiveAxisproduct,seetheproducts
UserManualavailableatwww.axis.com
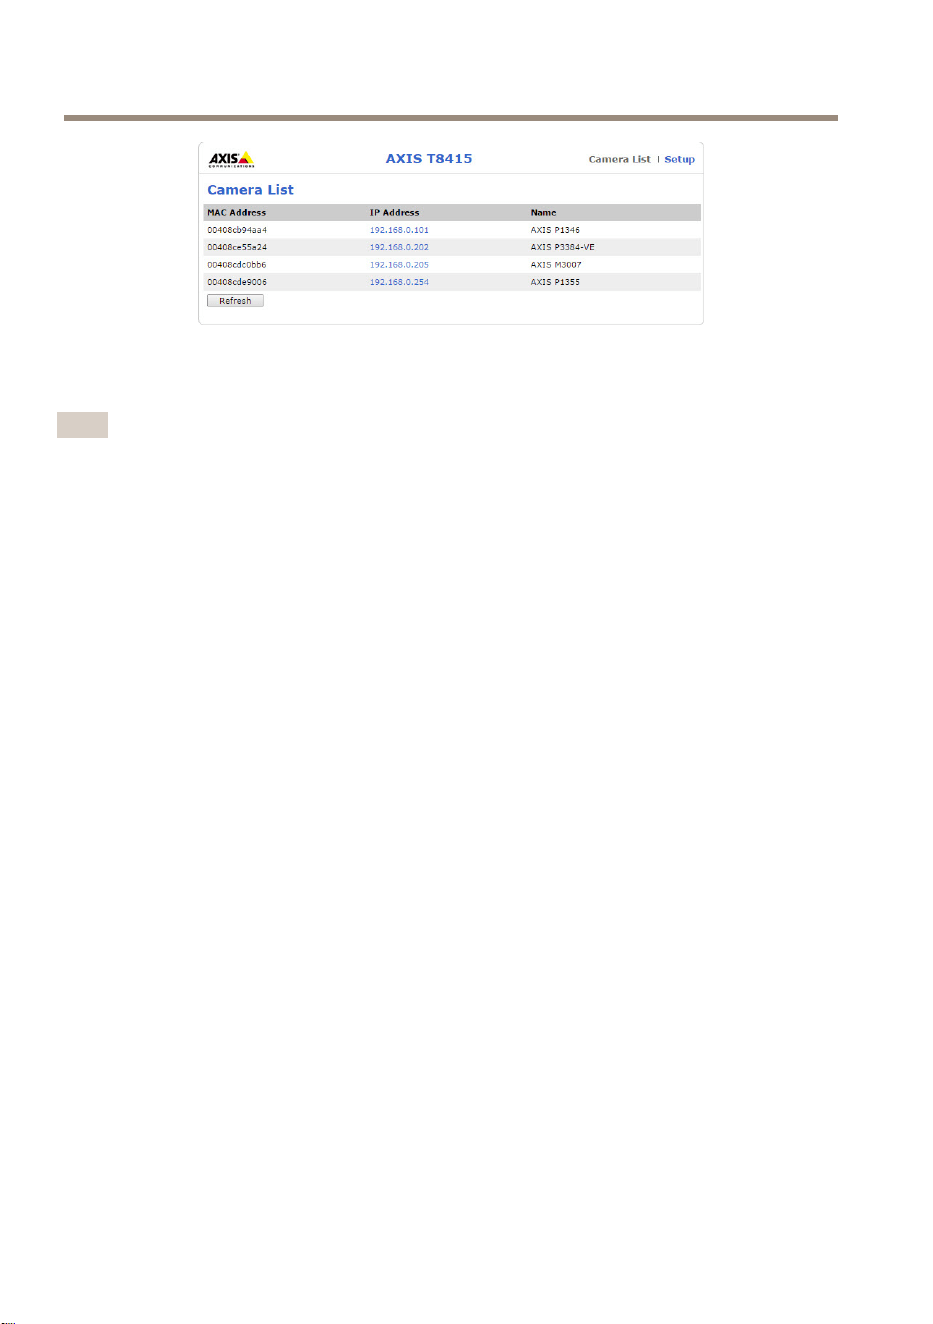
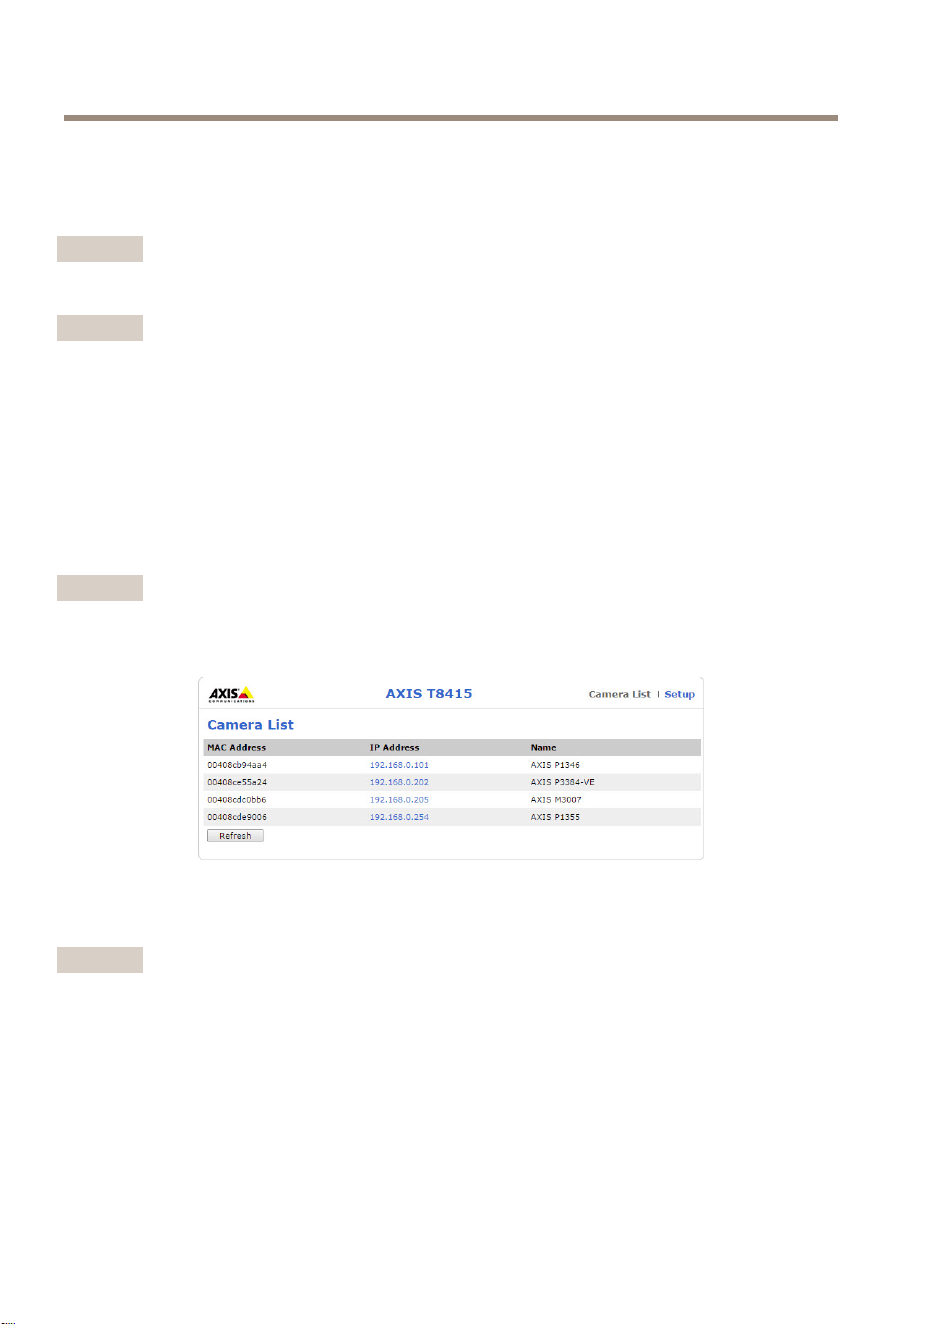
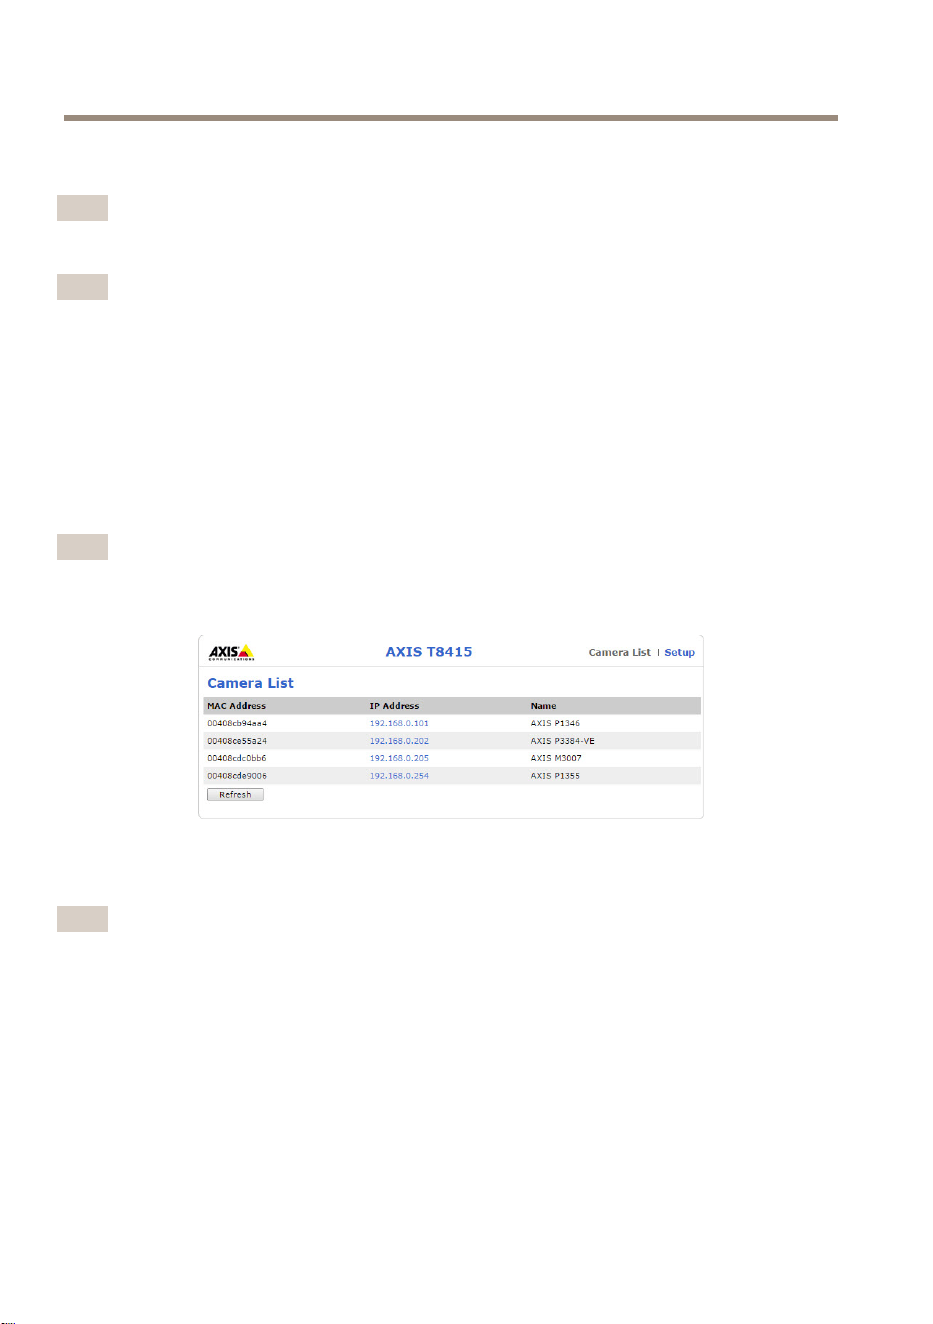
CameraInstallation-Laptop
1.ConnectthecameratotheCAMport(PoE)onthemainunit.
2.VerifythatthePoEindicatorislit.
3.ConnectthelaptoptoNETport(non-PoE)onthemainunit.
4.GotothewebinterfaceandpressCameraList
Note
SeeAXIST8415WebInterfaceonpage15forhowtoaccessAXIST8415Webinterface
21
EN
AXIST8415WirelessInstallationTool
5.SelectcamerabyclickingontheIP-address.
6.Theselectedcamerawillnowopeninabrowser.
Note
•FormoreinformationaboutcamerasettingsforrespectiveAxisproduct,seetheproducts
UserManualavailableatwww.axis.com
•Thestart-uptimeforcamerasvariesfordifferentproducts.Itmaytakeafewminutes
beforethecameraisvisibleinthecameralistinthewebinterface.
Troubleshooting
•CannotndSSID.
-CheckthattheWLANindicatorislit.
-Selectadifferentchannel.
-Makesurethehandhelddevicesupports5GHzmode,ifnotswitchto
2.4GHzmodeonAXIST8415.
•Nocameraintheappcameralist
-CheckthattheWLANindicatorislit.
-Thestart-uptimeforcamerasvariesfordifferentproducts.Itmaytakeafew
minutesbeforethecameraisvisible.PressRefreshtoupdatetheCamera
listpage.
-MakesureBonjourisactivatedontheAxisproduct.
-MakesurethecameradonothaveanIP-addressintherange10.252.252.X
•CannotlogintoAXIST8415webinterfacewhenusingnetworkcableandaPC.
-Makesurethenetworkcableisconnectedtothecorrectport(NET).
•NocamerainCameraList(webinterface),whenusinglaptopforinstallation.
-Makesurethenetworkcablesareconnectedtocorrectports:
CAM:Connecttocamera
NET:Connecttolaptop
-MakesurethecameraandAXIST8415areonthesameIP-addressrange.
-MakesurethatAXIST8415isusedasdefaultgateway.
-MakesurethecameradonothaveanIP-addressintherange10.252.252.X
22

AXIST8415WirelessInstallationTool
•Lowfpsintheimagewhenusingtheapp.
-ChecktheWLANindicatoronthehandhelddeviceforsignalstrength.
-Makesurethewirelessnetworkissetto5GHz
-Selectadifferentchannel.
Belowlistisapplicablewhentryingtodiscoveranon-AxiscamerawithOnvifsupport.
•ThecameraissettodynamicIP-addressbutthereisnoDHCPserveronthenetwork.
-ActivatetheonboardDHCPserveronAXIST8415.
•ThecameraissettodynamicIP-addressandthereisaDHCPserveronthenetwork.
-CongureAXIST8415fordynamicIPaddress.
•ThecamerahaveaxedIP-address.
-CongureAXIST8415tohaveanIP-addressonthesamerangeasthecamera.
ResettoFactoryDefault
Important
•Resettofactorydefaultshouldbeusedwithcaution.Aresettofactorydefaultwillreset
allsettingstothefactorydefaultvalues.
•MakesuretheWLANindcatoriscontinuouslylitbeforeperformingafactoryreset.
Toresettheproducttothefactorydefaultsettings:
1.PressandholdtheResetbuttonfor10seconds.
2.AXIST8415nowre-startswithallvaluesresettofactorydefault.
Note
SeeHardwareoverviewonpage13forlocationoftheResetbutton.
Warrantyinformation
ForinformationaboutAxis’productwarrantyandtheretorelatedinformation,goto
axis.com/warranty
23
EN

24

AXIST8415WirelessInstallationTool
Informationssurlasécurité
Niveauxderisques
DANGER
Indiqueunesituationdangereusequi,siellen'estpasévitée,entraîneraledécèsoudes
blessuresgraves.
AVERTISSEMENT
Indiqueunesituationdangereusequi,siellen'estpasévitée,pourraitentraînerledécès
oudesblessuresgraves.
ATTENTION
Indiqueunesituationdangereusequi,siellen'estpasévitée,pourraitentraînerdes
blessureslégèresoumodérées.
A A
A
VIS VIS
VIS
Indiqueunesituationqui,siellen'estpasévitée,pourraitendommagerl'appareil.
Autresniveauxdemessage
Important
Indiquelesinformationsimportantes,nécessairespourassurerlebonfonctionnementde
l’appareil.
Note
Indiquelesinformationsutilesquipermettrontd’obtenirlefonctionnementoptimalde
l’appareil.
25
FR

AXIST8415WirelessInstallationTool
Consignesdesécurité
A A
A
VIS VIS
VIS
•LeproduitAxisdoitêtreutiliséconformémentauxloisetréglementationslocales.
•Axisrecommanded'utiliseruncâbleréseaublindé(STP).
•ConserverceproduitAxisdansunenvironnementsecetventilé.
•NepasexposerceproduitAxisauxchocsouauxfortespressions.
•NepasexposerceproduitAxisauxvibrations.
•Utiliseruniquementdesoutilsrecommandéspourl'installationdel'appareilAxis.
L'applicationd'uneforceexcessivesurl'appareilavecdesoutilspuissantspourrait
l'endommager.
•Nepasutiliserdeproduitschimiques,desubstancescaustiquesoudenettoyants
pressurisés.
•Utiliserunchiffonpropreimbibéd'eaupurepourlenettoyage.
•Utiliseruniquementdesaccessoiresconformesauxcaractéristiquestechniquesdevotre
produit.IlspeuventêtrefournisparAxisouuntiers.Axisrecommanded'utiliserun
équipementd'alimentationAxiscompatibleavecvotreproduit.
•UtiliseruniquementlespiècesderechangefourniesourecommandéesparAxis.
•Nepasessayerderéparervous-mêmeceproduit.Contacterl'assistancetechniqued'Axis
ouvotrerevendeurAxispourdesproblèmesliésàl'entretien.
Batterieauplomb-acide
LeproduitAxisutiliseunebatterieauplomb-acidecommealimentation.
A A
A
VIS VIS
VIS
•Enraisondescaractéristiquesd’autodéchargedecetypedebatterie,ilestimpératif
quelabatteriesoitrechargéedansles6moisdestockage,sinonunepertedecapacité
pourraitsurvenirsuiteàunsulfatage.
•Utilisezuniquementlechargeurfourni.
ATTENTION
Nejamaischargeroudéchargerunebatteriedansuneenceintehermétiquementfermée.
Lesbatteriesgénèrentunmélangegazeuxeninterne.Selonlescirconstances,telle
qu’unesurchargeextrêmeouuncourt-circuitdelabatterie,cesgazpeuvents’évacuer
dansl’enceinteetcréerlesconditionspotentiellesd’uneexplosionencasd’expositionà
uneétincelle.
ATTENTION
•Nejamaisjeterlabatterieaufeu,carcelapourraitprovoqueruneexplosionouune
émanationdegaztoxique.
26

AXIST8415WirelessInstallationTool
•Nepastenterdedémonterlabatterie,carcelapourraitprovoquerunefuited’acide
sulfuriquesusceptibled’entraînerdesblessures.
A A
A
VIS VIS
VIS
Mettezaurebutlesbatteriesusagéesconformémentauxréglementationslocalesouaux
instructionsdufabricantdelabatterie.
27
FR

28
AXIST8415WirelessInstallationTool
Guided’installation
CeGuided’installationfournitdesinstructionspourl’installationde
l’AXIST8415WirelessInstallationTool.Cetoutild’installationprendencharge
l’utilisationd’unordinateurportableoud’uneapplicationpourl’installationdecaméras.Pour
obtenirdesperformancesetuneexpérienceoptimisées,ilestrecommandéd’utiliserl’application.
Pourtouteautreinformationrelativeàl’utilisationduproduit,consultezlemanueldel’utilisateur
disponiblesurlesitewww.axis.com
Contenudel’emballage
•Unitéprincipale
•Chargeur
•Batterie
•Sangle
•Documentsimprimés
-Guided’installation(cedocument)
Aperçudumatériel
1
Voyantdelabatterie
2
PortdechargeUSB(neservantpasàlatransmissiondesdonnées)
3
RJ45PoE(CAM)
29
FR

AXIST8415WirelessInstallationTool
4
RJ45non-PoE(NET)
5
CommutateurMarche/Arrêt
6
VoyantWLAN
7
ToucheReset
8
Unitéprincipale
9
Connecteurduchargeurdebatterie
10
Batterie
11
Étiquette(paramètresréseau)
1
Chargeur
2
Connecteurmâleduchargeur
3
Voyantduchargeur
4
Fichedecordond’alimentation(UE)
5
Fichedecordond’alimentation(US)
6
Fichedecordond’alimentation(RU)
7
Fichedecordond’alimentation(AU)
Connecteurréseau
ConnecteurEthernetRJ45.
ConnecteurEthernetRJ45avecl'alimentationparEthernetPlus(PoE+).
A A
A
VIS VIS
VIS
Lesréglementationslocalesoulesconditionsenvironnementalesetélectriquesdans
lesquellesleproduitestutilisépeuventnécessiterl’utilisationd’uncâbleréseaublindé
(STP).Touslescâblesréseauquisontacheminésàl'extérieuroudansdesenvironnements
électriquesexigeantsdoiventêtredestinésàleurusagespécique.Assurez-vousqueles
périphériquesréseausontinstallésconformémentauxinstructionsdufabricant.Pourplus
d’informationssurlesexigencesréglementaires,consultezElectromagneticcompatibility
(EMC)onpage4.
30
AXIST8415WirelessInstallationTool
ConnecteurUSB
L’AXIST8415estéquipéd’unconnecteurUSB(neservantpasàlatransmissiondesdonnées).Ce
connecteurpeutêtreutilisépourchargertoutappareilportablecompatible(5V,2,1A).
Note
•L’AXIST8415doitêtrealimentélorsdelamiseenchargedel’appareilportable.
•Lamiseencharged’unappareilportableaffectelabatteriedel’unité.Lorsqu’elleatteint
unniveaubascritique,ellenechargeplusl’appareilportable.VoirAperçudumatériel
page29Voyantdelabatteriepourconnaîtrel’étatdelabatterie.Andepoursuivre
lamiseencharge,remplacezlabatterieparunebatterienouvellementrechargée,cf.
Changementdelabatteriepage35.
InterfaceWebAXIST8415
L’interfaceWebAXIST8415permetdemodierlesparamètresréseauetdemettreàjourle
micrologiciel.
Accédezàl’interfaceWebensaisissantl’adresseIPdel’appareildansunnavigateur.Voustrouverez
cetteadresseIPsurl’étiquetteapposéesurl’unitécentrale.
Note
•Lescopiesd’écranpeuventdifférerselonlaversiondumicrologiciel.
•LemoniteurAXIST8415estdotédedeuxadressesIP.L’uneestréservéeàlaconnexion
Wi-Fietl’autreàlaconnexionauréseaucâblé.
•Name(Nom):nomdel’appareilquipeutêtremodié.
Network(Réseau)- -
-
WiInterface(InterfaceWi-Fi)
31
FR
AXIST8415WirelessInstallationTool
•Address(Adresse):adresseIPdel’appareil.
•Subnetmask(Masquedesous-réseau):masquedesous-réseaudel’appareil.
•Gateway(Passerelle):passerellepardéfautdel’appareil.
•SSID:nomduréseausanslquipeutêtremodié.
•WPApassword(MotdepasseWPA):motdepasseduréseausanslquipeutêtremodié.
•Mode(Mode):modedefréquenceduréseausansl.Choisissezentre2.4GHzou5GHz.
•Channel(Canal):canalduréseausansl.
Note
•VoustrouverezleSSIDetmotdepassepardéfautsurl’étiquetteapposéesurl’unité
centrale.Sicesinformationsontétémodiéessurl’interfaceWeb,lesdonnéesde
l’étiquettenesontplusvalables.
•L’AXIST8415prendenchargelesfréquences2,4GHzet5GHz.
•Lescanauxvarientenfonctiondespays.
Network(Réseau)- -
-
WiredNetwork(Réseaucâblé)
32
AXIST8415WirelessInstallationTool
•ExternalDHCPServer(ServeurDHCPexterne):détectiond’unserveurDHCPexterne.
•OnboardDHCPServer(ServeurDHCPinterne):
-On(Activé):serveurDHCPinterneactivé
-Off(Désactivé):serveurDHCPinternedésactivé
•EthernetPorts(PortsEthernet):Statusoftheethernetports(ÉtatdesportsEthernet):
-Connected(Connecté):caméra/portableconnectéauportEthernet.
-Unconnected(Déconnecté):caméra/portablenonconnectéauportEthernet.
•InterfaceConguration(Congurationdel’interface):congurationmanuellede
l’adresseIPouobtentiond’uneadresseIPparl’intermédiaired’unserveurDHCP.
•Address(Adresse):adresseIPdel’appareil.
•Subnetmask(Masquedesous-réseau):masquedesous-réseaudel’appareil.
•Gateway(Passerelle):passerellepardéfautdel’appareil.
Maintenance(Maintenance)
33
FR

AXIST8415WirelessInstallationTool
CettepagepermetdemettreàjourlemicrologicieldumoniteurAXIST8415.
Note
LaversionlaplusrécentedumicrologicielsetrouvesurlesiteWebwww.axis.com
Miseenchargedelabatterie
Fixezlachedecordond’alimentationspéciqueaupaysauchargeur.Voirl’imageci-dessous.
Branchezlachargeurdebatterieàlabatterie(voirl’imageci-dessous)etàlaprisesecteur.
VoyantDEL
Comportement
RougeBatterieencharge
VertBatterieentièrementrechargée
Note
LevoyantDELestsituésurlafaceavantduchargeur,voirAperçudumatérielpage29
A A
A
VIS VIS
VIS
•Enraisondescaractéristiquesd’autodéchargedecetypedebatterie,ilestimpératif
quelabatteriesoitrechargéedansles6moisdestockage,sinonunepertedecapacité
pourraitsurvenirsuiteàunsulfatage.
•Utilisezuniquementlechargeurfourni.
34
AXIST8415WirelessInstallationTool
ATTENTION
Nejamaischargeroudéchargerunebatteriedansuneenceintehermétiquementfermée.
Lesbatteriesgénèrentunmélangegazeuxeninterne.Selonlescirconstances,telle
qu’unesurchargeextrêmeouuncourt-circuitdelabatterie,cesgazpeuvents’évacuer
dansl’enceinteetcréerlesconditionspotentiellesd’uneexplosionencasd’expositionà
uneétincelle.
Changementdelabatterie
Reportez-vousàl’imageci-dessouspoursavoircommentchangerlabatterie.
ATTENTION
•Nejamaisjeterlabatterieaufeu,carcelapourraitprovoqueruneexplosionouune
émanationdegaztoxique.
•Nepastenterdedémonterlabatterie,carcelapourraitprovoquerunefuited’acide
sulfuriquesusceptibled’entraînerdesblessures.
•Ledémontagedelabatterieannulelagarantie.
A A
A
VIS VIS
VIS
Mettezaurebutlesbatteriesusagéesconformémentauxréglementationslocalesouaux
instructionsdufabricantdelabatterie.
Préparatifsàl’installation
Avecl’AXIST8415WirelessInstallationToolilestpossiblederéaliserdesinstallationsdecamérasà
l’aided’unappareilportableoud’unordinateurportable.Ilestrecommandéd’utiliserunappareil
portableetl’applicationAXISWirelessInstallationToolpourobtenirlesmeilleuresperformances.
35
FR

AXIST8415WirelessInstallationTool
•Assurez-vousquelabatterieestchargéeà100%avantutilisation.Cf.Miseenchargede
labatteriepage34
•Sivousutilisezl’applicationAXISWirelessInstallationTool,assurez-vousqu’elleest
téléchargéesurl’appareilportableavantdevousconnecterauréseauWi-FiAXIST8415.
•Assurez-vousquel’appareilestsoustensionavantdebrancherlacaméraàl’unité
principale.
Note
L’applicationAXISWirelessInstallationToolpeutêtretéléchargéedepuisl’AppStoreou
GooglePlay.
ConnexionauWi-FiAXIST8415
Appareilportable
1.ActivezleWi-Fisurl’appareilportable.
2.SélectionnezleSSIDdel’unité.
3.Saisissezlemotdepasse.
Ordinateurportable
1.ActivezleWi-Fisurl’ordinateur.
2.SélectionnezleSSIDdel’unité.
3.Saisissezlemotdepasse.
Important
Assurez-vousquel’ordinateurestcongurédefaçonàobteniruneadresseIPd’unserveur
DHCP.
Note
LeSSIDetlemotdepassepardéfautsontimpriméssurl’étiquetteapposéesurl’unité
centrale.
Installationdelacaméra-ApplicationAXISWirelessInstallationTool
1.ConnectezlacaméraauportCAM(PoE)del’unitéprincipale.
2.VériezqueletémoinPoEestallumé.
3.Connectez-vousauWi-FiAXIST8415,voirConnexionauWi-FiAXIST8415page36
4.Démarrezl’applicationAXISWirelessInstallationTool.
Note
Laduréededémarragedescamérasvarieenfonctiondesproduits.Celapeutprendre
quelquesminutesavantquelacaméran’apparaissedanslalistedescamérasde
l’application.
36
AXIST8415WirelessInstallationTool
1
CameraList(Listedecaméras)
2
Liveview(Visualisationendirect)
3
Settings(Paramètres)
4
Rotateimage(Rotationdel’image)
5
Autofocus(Miseaupointautomatique)
6
Snapshot(Instantané)
7
Wizard(Assistant)
Pourcongurerunecaméra
Sélectionnezunecaméradans1CameraList(Listedescaméras).Lecaséchéant,saisissezun
motdepassepourcontinuer.
Dans2Liveview(Visualisationendirect),ilestpossibled’accéderauxboutonsd’action(4,5et
6)enmaintenantledoigtappuyésurl’écran.
Sélectionnez4Rotateimage(Rotationdel’image)pourpivoterl’image.
Sélectionnez5Autofocus(Miseaupointautomatique)pourrechercherunpointsurlequel
effectuerlamiseaupoint.
Note
•Lamiseaupointautomatiqueestdisponibleuniquementsilacaméraprendencharge
cettefonction.
•Lamiseaupointautomatiqueprendquelquesminutes,etilestimportantquelacaméra
nebougepaspendantcelapsdetemps.
Sélectionnez6Snapshot(Instantané)pourcaptureruneimagedelavidéo.
Sélectionnez3Paramètrespourmodierlesparamètresréseauduproduit.
37
FR

AXIST8415WirelessInstallationTool
Numéro7Wizard(Assistant).Cetassistantdémarredèsquevousaccédezpourlapremièrefoisà
unproduitAxisouaprèsuneréinitialisationauxparamètrespardéfaut.
Note
Poursavoircommentparamétrerl’Assistant,consultezlemanueldel’utilisateurdevotre
produit,disponiblesurlesitewww.axis.com
Note
PoursavoircommentparamétrerlacaméraAxis,consultezlemanueldel’utilisateurcorre-
spondant,disponiblesurlesitewww.axis.com
Installationdelacaméra-Portable
1.ConnectezlacaméraauportCAM(PoE)del’unitéprincipale.
2.VériezqueletémoinPoEestallumé.
3.ConnectezleportableauportNET(nonPoE)del’unitéprincipale.
4.Accédezàl’interfaceWebetappuyezsurCameraList(Listedescaméras).
Note
VoirInterfaceWebAXIST8415page31poursavoircommentaccéderà
l’InterfaceWebAXIST8415.
5.Sélectionnezlacaméraencliquantsurl’adresseIP.
6.Lacamérasélectionnées’ouvredansunnavigateur.
Note
•PoursavoircommentparamétrerlacaméraAxis,consultezlemanueldel’utilisateur
correspondant,disponiblesurlesitewww.axis.com.
•Laduréededémarragedescamérasvarieenfonctiondesproduits.Celapeutprendre
quelquesminutesavantquelacaméran’apparaissedanslalistedescamérasdel’interface
Web.
Dépannage
•ImpossibledetrouverleSSID.
-VériezqueletémoinWLANestallumé.
38

AXIST8415WirelessInstallationTool
-Sélectionnezunautrecanal.
-Assurez-vousquel’appareilportableprendenchargelemode5GHz,sinon,
passezaumode2.4GHzsurAXIST8415.
•Pasdecaméradanslalistedescaméras
-VériezqueletémoinWLANestallumé.
-Laduréededémarragedescamérasvarieenfonctiondesproduits.Celapeut
prendrequelquesminutesavantquelacaméran’apparaisse.Appuyezsur
Refresh(Actualiser)pourmettreàjourlapagedelalistedescaméras.
-Assurez-vousqueBonjourestactivésurleproduitAxis.
-Assurez-vousquelacaméran’apasuneadresseIPcomprisedanslaplage
10.252.252.X
•Impossibledeseconnecteràl’interfaceWebAXIST8415enutilisantuncâbleréseau
etunordinateur.
-Vériezquelecâbleréseauestbranchésurleportquiconvient(NET).
•PasdecaméradanslaListedescaméras(interfaceWeb)lorsdel’utilisationd’un
ordinateurportablepourl’installation.
-Vériezquelescâblesréseausontbranchéssurlesportsquiconviennent:
CAM:branchezàlacaméra
NET:branchezàl’ordinateurportable
-Assurez-vousquelacaméraetl’AXIST8415sontsurlamêmeplage
d’adressesIP.
-Assurez-vousquel’AXIST8415estutilisécommepasserellepardéfaut.
-Assurez-vousquelacaméran’apasuneadresseIPcomprisedanslaplage
10.252.252.X
•Faibleipsdansl’imagelorsdel’utilisationdel’application.
-VériezlevoyantWLANsurl’appareilportablepourconnaîtrelaforcedu
signal.
-Vériezqueleréseausanslestréglésur5GHz.
-Sélectionnezunautrecanal.
Lalisteci-dessousestapplicablesivousessayezdedécouvrirunecaméraautrequeAxisavec
lesupportOnvif.
•LacaméraestrégléesuruneadresseIPdynamique,maisiln’yapasdeserveur
DHCPsurleréseau.
-ActivezleserveurDHCPintégrésurl’AXIST8415.
•LacaméraestrégléesuruneadresseIPdynamiqueetilyaunserveurDHCPsur
leréseau.
-Congurezl’AXIST8415pouruneadresseIPdynamique.
•LacaméraauneadresseIPxe.
39
FR

AXIST8415WirelessInstallationTool
-Congurezl’AXIST8415pouravoiruneadressesIPsurlamêmeplagequela
caméra.
Réinitialisationauxparamètresd’usinepardéfaut
Important
•Laréinitialisationauxparamètrespardéfautdoitêtreutiliséeavecprudence.Cette
opérationreconguretouslesparamètresauxvaleursd’usinepardéfaut.
•Assurez-vousquelevoyantWLANestalluméencontinuavantdeprocéderàune
réinitialisationauxparamètresd’usine.
Pourréinitialiserl’appareilauxparamètresd’usinepardéfaut:
1.MaintenezleboutonResetenfoncépendant10secondes.
2.L’AXIST8415redémarreavectouteslesvaleursréinitialiséesauxparamètresd’usine
pardéfaut.
Note
VoirAperçudumatérielpage29poursavoiroùsetrouveleboutonReset.
Informationssurlagarantie
Pourplusd'informationssurlagarantieduproduitAxisetlesinformationsconnexes,rendez-vous
suraxis.com/warranty
40

AXIST8415WirelessInstallationTool
Sicherheitsinformationen
Gefährdungsstufen
GEFAHR
WeistaufeinegefährlicheSituationhin,welche,fallsnichtverhindert,zuTododer
schwerenVerletzungenführenkann.
WARNUNG
WeistaufeinegefährlicheSituationhin,welche,fallsnichtverhindert,zuTododer
schwerenVerletzungenführenkann.
VORSICHT
WeistaufeinegefährlicheSituationhin,welche,fallsnichtverhindert,zugeringfügiger
odermäßigerVerletzungführenkann.
HINWEIS HINWEIS
HINWEIS
WeistaufeinegefährlicheSituationhin,welche,fallsnichtverhindert,zuSachschäden
führenkann.
AndereMeldeebenen
Wichtig
WeistaufwichtigeInformationenhin,diedenrichtigenBetriebdesProduktsgewährleisten.
Beachten
WeistaufnützlicheInformationenhin,diedieoptimaleVerwendungdesProdukts
unterstützen.
41
DE

AXIST8415WirelessInstallationTool
Sicherheitsanweisungen
HINWEIS HINWEIS
HINWEIS
•DasAxis-ProduktmussunterBeachtungdergeltendenGesetzeundBestimmungen
betriebenwerden.
•Axisempehlt,einabgeschirmtesNetzwerkkabel(STP)zuverwenden.
•LagernSiedasAxisProduktineinertrockenenundbelüftetenUmgebung.
•DasAxis-ProduktwederStößennochstarkemDruckaussetzen.
•DasAxis-ProduktkeinenSchwingungenaussetzen.
•VerwendenSiebeiderInstallationdesAxisProduktsausschließlichpassendeWerkzeuge.
EinzugroßerKraftaufwandmitelektrischenWerkzeugenkanndasProduktbeschädigen.
•VerwendenSiekeinechemischen,ätzendenoderaerosolhaltigenReinigungsmittel.
•VerwendenSiezumReinigeneinsauberes,mitdestilliertemWasserangefeuchtetesTuch.
•VerwendenSienurZubehör,dasdentechnischenVorgabenIhresProduktsentspricht.
DiesesistvonAxisoderDrittanbieternerhältlich.AxisempehltdiemitIhremProdukt
kompatibleStromversorgungvonAxis.
•VerwendenSieausschließlichErsatzteiledievonAxisangebotenoderempfohlenwerden.
•VersuchenSienicht,diesesProduktselbsttätigzureparieren.WendenSiesichbezüglich
ReparaturundWartungandenAxisSupportoderIhrenAxisHändler.
Blei-Säure-Batterie
DiesesAxisProduktverwendeteineBlei-Säure-BatteriezurStromversorgung.
HINWEIS HINWEIS
HINWEIS
•WegenderSelbstentladungseigenschaftendiesesBatterietypsmussdieBatterienach
sechsmonatigerLagerungunbedingtaufgeladenwerden,ansonstenkannesaufgrundvon
SulfatierungzueinemdauerhaftenKapazitätsverlustkommen.
•VerwendenSieausschließlichdasmitgelieferteLadegerät.
VORSICHT
LadenoderentladenSieBatterienniemalsineinemhermetischabgedichtetenGehäuse.
InnerhalbvonBatterienentstehenGasmischungen.UnterentsprechendenBedingungen,
wiebeispielsweiseeinerextremenÜberladungodereinemKurzschließenderBatterie,
könnendieseGaseinsGehäusegelangenundbeiFunkenbildungeinExplosionsrisiko
darstellen.
VORSICHT
•EntsorgenSiedieBatterieniemalsineinemFeuer,daansonstendieGefahreinerExplosion
bestehtodertoxischeGaseentstehenkönnen.
•VersuchenSienicht,dieBatteriezuzerlegen,daSchwefelsäureaustretenunddies
Verletzungenverursachenkann.
42

AXIST8415WirelessInstallationTool
HINWEIS HINWEIS
HINWEIS
VerbrauchteBatteriensindgemäßdenörtlichenVorschriftenoderdenAnweisungendes
Herstellerszuentsorgen.
43
DE

44
AXIST8415WirelessInstallationTool
Installationsanleitung
DieseInstallationsanleitungenthältAnweisungenfürdasAXIST8415Wireless-Installations-Tool.
MitdiesemInstallationstoolkönnenKamerasmithilfeeinesLaptopsodereinerAppinstalliert
werden.FüreineoptimaleLeistungundFunktionwirddieVerwendungderAppempfohlen.
WeitereInformationenzurNutzungdiesesProduktsndenSieimBenutzerhandbuchunter
www.axis.com.
Lieferumfang
•Haupteinheit
•Ladegerät
•Batterie
•Riemen
•GedruckteDokumente
-Installationsanleitung(diesesDokument)
ÜbersichtüberdieHardware
1
Batterieanzeige
2
USB-Ladeport(nichtDatenführend)
3
RJ-45-PoE(CAM)
4
RJ-45ohnePoE(NET)
45
DE
AXIST8415WirelessInstallationTool
5
Ein/Aus-Schalter
6
WLAN-Anzeige
7
Reset-Taste
8
Haupteinheit
9
AnschlussfürBatterieladegerät
10
Batterie
11
Etikett(Netzwerkeinstellungen)
1
Ladegerät
2
SteckerdesLadegeräts
3
Ladegerät-LED
4
Netzkabelstecker(EU)
5
Netzkabelstecker(USA)
6
Netzkabelstecker(GB)
7
Netzkabelstecker(AU)
Netzwerkanschluss
RJ45-Ethernetanschluss.
RJ45-EthernetanschlussmitPoweroverEthernetPlus(PoE+).
HINWEIS HINWEIS
HINWEIS
AufgrundörtlicherVorschriftenbzw.jenachUmgebungoderelektrischerAnlage,in/mitder
dasProduktverwendetwird,kanneinabgeschirmtesNetzwerkkabel(STP)empfehlenswert
odernotwendigsein.AlleNetzwerkkabeldesProdukts,dieimAußenbereichoderin
anspruchsvollenelektrischenUmgebungenverlegtwerden,müssenhierfürausgelegt
sein.StellenSiesicher,dassdieNetzwerkgerätegemäßdenAnweisungendesHerstellers
installiertwurden.InformationenzugesetzlichenBestimmungenndenSieunter
Electromagneticcompatibility(EMC)onpage4.
46
AXIST8415WirelessInstallationTool
USB-Anschluss
DasAXIST8415verfügtübereinenUSB-Anschluss(nichtDatenführend).ÜberdiesenAnschluss
könnenkompatibleHandgeräte(5V,2,1A)aufgeladenwerden.
Beachten
•DasAXIST8415musswährenddesAuadenseinesHandgerätseingeschaltetsein.
•DasAuadenvonHandgerätenbelastetdieBatteriederEinheit.Wenndiese
einenkritischenNiedrigstanderreicht,werdenHandgerätenichtweiteraufgeladen.
InformationenzumBatteriestatusndenSieunterÜbersichtüberdieHardwareaufSeite
45Batterieanzeige.UmdenLadevorgangfortzusetzen,müssenSiedieBatteriedurcheine
vollaufgeladeneersetzen,sieheAustauschderBatterieaufSeite51.
AXIST8415Weboberäche
ÜberdieAXIST8415WeboberächekönnenNetzwerkeinstellungenbearbeitetunddieFirmware
aktualisiertwerden.
GebenSiefürdenZugriffaufdieWeboberächedieIP-AdressederEinheitineinenBrowserein.
DieIP-AdressebendetsichaufdemEtikettaufderHaupteinheit.
Beachten
•DieBildschirmfotosstimmenmöglicherweisenichtmitdenneuestenFirmware-Versionen
überein.
•AXIST8415verfügtüberzweiIP-Adressen:EinefürdieVerbindungüberWiFiundeinefür
dieVerbindungübereinverkabeltesNetzwerk.
•Name:NamederEinheit,kanngeändertwerden.
Netzwerk– –
–
WiFi-Oberäche
47
DE
AXIST8415WirelessInstallationTool
•Address(Adresse):DieIP-AdressefürdieEinheit.
•Subnetmask(Subnetzmaske):DieSubnetzmaskefürdieEinheit.
•Gateway:StandardgatewayfürdieEinheit.
•SSID:NamedesdrahtlosenNetzwerks,kanngeändertwerden.
•WPApassword(WPA-Kennwort):KennwortfürdasdrahtloseNetzwerk,kanngeändert
werden.
•Mode(Modus):EinstellendesFrequenzmodusfürdasDrahtlosnetzwerk.WählenSie
2,4GHzoder5GHz.
•Channel(Kanal):EinstellendesKanalsfürdasDrahtlosnetzwerk.
Beachten
•Standard-SSIDundKennwortbendensichaufdemEtikettaufderHaupteinheit.Wenn
SiedieseüberdieWeboberächeändern,verliertdasEtikettseineGültigkeit.
•AXIST8415unterstütztsowohl2,4GHzalsauch5GHz.
•DieKanäleunterscheidensichjenachLand.
Netzwerk– –
–
VerkabeltesNetzwerk
48
AXIST8415WirelessInstallationTool
•ExternalDHCPServer(ExternerDHCP-Server):ErfassungeinesexternenDHCP-Servers.
•OnboardDHCPServer(IntegrierterDHCP-Server):
-On(An):InternerDHCP-Serveristaktiviert
-Off(Aus):InternerDHCP-Serveristdeaktiviert
•EthernetPorts(Ethernet-Ports):StatusderEthernet-Ports:
-Connected(Verbunden):Kamera/LaptopistmitdemEthernet-Portverbunden
-Unconnected(Nichtverbunden):MitdemEthernet-PortistkeineKamera/kein
Laptopverbunden.
•InterfaceConguration(Schnittstellenkonguration):IP-Adressemanuelleinstellenoder
voneinemDHCP-Serverabrufen.
•Address(Adresse):DieIP-AdressefürdieEinheit.
•Subnetmask(Subnetzmaske):DieSubnetzmaskefürdieEinheit.
•Gateway:StandardgatewayfürdieEinheit.
Wartung
49
DE
AXIST8415WirelessInstallationTool
AktualisierenderFirmwarefürAXIST8415.
Beachten
DieaktuelleFirmwarendenSieunterwww.axis.com.
AuadenderBatterie
SteckenSiedenlandesspezischenNetzsteckerindasLadegerät,wieuntendargestellt.
SchließenSie(wieuntendargestellt)dasBatterieladegerätandieBatterieanundsteckenSie
esindieSteckdose.
LEDVerhalten
RotBatteriewirdaufgeladen
Grün
Batterievollaufgeladen
Beachten
DieLadegerät-LEDbendetsichvorneamLadegerät,sieheÜbersichtüberdieHardwareauf
Seite45.
HINWEIS HINWEIS
HINWEIS
•WegenderSelbstentladungseigenschaftendiesesBatterietypsmussdieBatterienach
sechsmonatigerLagerungunbedingtaufgeladenwerden,ansonstenkannesaufgrundvon
SulfatierungzueinemdauerhaftenKapazitätsverlustkommen.
50
AXIST8415WirelessInstallationTool
•VerwendenSieausschließlichdasmitgelieferteLadegerät.
VORSICHT
LadenoderentladenSieBatterienniemalsineinemhermetischabgedichtetenGehäuse.
InnerhalbvonBatterienentstehenGasmischungen.UnterentsprechendenBedingungen,
wiebeispielsweiseeinerextremenÜberladungodereinemKurzschließenderBatterie,
könnendieseGaseinsGehäusegelangenundbeiFunkenbildungeinExplosionsrisiko
darstellen.
AustauschderBatterie
WechselnSiedieBatteriewieuntendargestellt.
VORSICHT
•EntsorgenSiedieBatterieniemalsineinemFeuer,daansonstendieGefahreinerExplosion
bestehtodertoxischeGaseentstehenkönnen.
•VersuchenSienicht,dieBatteriezuzerlegen,daSchwefelsäureaustretenunddies
Verletzungenverursachenkann.
•WenndieBatteriezerlegtwird,erlischtdieGewährleistung.
HINWEIS HINWEIS
HINWEIS
VerbrauchteBatteriensindgemäßdenörtlichenVorschriftenoderdenAnweisungendes
Herstellerszuentsorgen.
51
DE

AXIST8415WirelessInstallationTool
VorbereitungenzurInstallation
DasAXIST8415Wireless-Installations-ToolermöglichtKamerainstallationenübereinHandgerät
odereinenLaptop.FüreineoptimaleLeistungwirddieVerwendungeineHandgerätsunddieApp
AXISWireless-Installations-Toolempfohlen.
•StellenSiesicher,dassdieBatterievorderVerwendungvollaufgeladenwurde.Siehe
AuadenderBatterieaufSeite50
•WennSiedieAppAXISWireless-Installations-Toolverwenden,stellenSiesicher,dass
diesevordemHerstelleneinerVerbindungzumAXIST8415WiFi-Netzwerkaufdas
Handgerätheruntergeladenwurde.
•DasGerätmussvorAnschlussderKameraandieHaupteinheiteingeschaltetwerden.
Beachten
DieAppAXISWireless-Installations-ToolkannvomAppStoreodervon
GooglePlayheruntergeladenwerden.
HerstelleneinerVerbindungzumAXIST8415WiFi
Handgerät
1.AktivierenSieWiFiaufdemHandgerät.
2.WählenSiedieSSIDderEinheitaus.
3.GebenSiedasKennwortein.
Laptop
1.AktivierenSieWiFiaufdemComputer.
2.WählenSiedieSSIDderEinheitaus.
3.GebenSiedasKennwortein.
Wichtig
StellenSiesicher,dassderComputersokonguriertist,dassereineIP-Adressevoneinem
DHCP-Servererhält.
Beachten
Standard-SSIDundKennwortbendensichaufdemEtikettaufderHaupteinheit.
Kamerainstallation–AppAXISWireless-Installations-Tool
1.SchließenSiedieKameraamCAM-Port(PoE)derHaupteinheitan.
2.ÜberprüfenSie,obdiePoE-Statusanzeigeleuchtet.
3.StellenSieeineVerbindungzumAXIST8415WiFiher,sieheHerstelleneinerVerbindung
zumAXIST8415WiFiaufSeite52.
4.StartenSiedieAppAXISWireless-Installations-Tool.
52
AXIST8415WirelessInstallationTool
Beachten
DieInbetriebnahmevonKamerasdauertjenachProduktunterschiedlichlang.Eskann
einigeMinutendauern,bisdieKamerainderKameralistederAppangezeigtwird.
1
Kameraliste
2
Live-Ansicht
3
Einstellungen
4
Bilddrehen
5
Autofokus
6
Schnappschuss
7
Assistent
SokongurierenSieeineKamera
WählenSiedieKamerainder1Kameralisteaus.GebenSieggf.IhrKennwortein,umfortzufahren.
Inder2Live-AnsichterhaltenSieZugangzudenAktionsschaltächen(4,5und6),indemSie
dieseaufdemBildschirmgedrückthalten.
WählenSie4Bilddrehen,umdasBildzudrehen.
WählenSie5Autofokus,umnachdemidealenFokussierungspunktzusuchen.
Beachten
•DerAutofokusistnurverfügbar,wenndieKameradieseFunktionalitätunterstützt.
•DerAutofokus-VorgangkanneinigeMinutendauern.IndieserZeitisteswichtig,dass
dieKameranichtbewegtwird.
WählenSie6Schnappschuss,umeinenSchnappschussdesVideobildsaufzunehmen.
53
DE
AXIST8415WirelessInstallationTool
WählenSie3Einstellungen,umdieNetzwerkeinstellungenfürdasProduktzubearbeiten.
7Assistent.DieserAssistentstartetbeimerstenZugriffaufdasAxisProduktodernachdem
ZurücksetzenaufdiewerksseitigenStandardeinstellungen.
Beachten
WeitereInformationenüberdieEinstellungenimAssistentenndenSieim
Benutzerhandbuchunterwww.axis.com.
Beachten
WeitereInformationenüberdieKameraeinstellungendesjeweiligenAxisProduktsnden
SieimBenutzerhandbuchunterwww.axis.com.
Kamerainstallation–Laptop
1.SchließenSiedieKameraamCAM-Port(PoE)derHaupteinheitan.
2.ÜberprüfenSie,obdiePoE-Statusanzeigeleuchtet.
3.SchließenSiedenLaptopamNET-Port(ohnePoE)derHaupteinheitan.
4.RufenSiedieWeboberächeaufunddrückenSieaufKameraliste.
Beachten
InformationenzumZugriffaufdieAXIST8415WeboberächendenSieunterAXIST8415
WeboberächeaufSeite47.
5.WählenSiedieKameraaus,indemSieaufdieIP-Adresseklicken.
6.DieausgewählteKamerawirdjetztineinemBrowsergeöffnet.
Beachten
•WeitereInformationenüberdieKameraeinstellungendesjeweiligenAxisProduktsnden
SieimBenutzerhandbuchunterwww.axis.com.
•DieInbetriebnahmevonKamerasdauertjenachProduktunterschiedlichlang.Eskann
einigeMinutendauern,bisdieKamerainderKameralistederWeboberächeangezeigt
wird.
Fehlerbehebung
•DieSSIDkannnichtgefundenwerden.
54

AXIST8415WirelessInstallationTool
-ÜberprüfenSie,obdieWLAN-Statusanzeigeleuchtet.
-WählenSieeinenanderenKanalaus.
-ÜberprüfenSie,obdasHandgerätden5-GHz-Modusunterstützt.Wennnicht,
schaltenSiedasAXIST8415inden2,4-GHz-Modus.
•InderKameralistederAppwirdkeineKameraangezeigt.
-ÜberprüfenSie,obdieWLAN-Statusanzeigeleuchtet.
-DieInbetriebnahmevonKamerasdauertjenachProduktunterschiedlich
lang.EskanneinigeMinutendauern,biseineKameraangezeigtwird.Über
Refresh(Aktualisieren)aktualisierenSiedieSeitemitderKameraliste.
-ÜberprüfenSie,obBonjouraufdemAxisProduktaktiviertwurde.
-StellenSiesicher,dassdieKameranichtübereineIP-AdresseimBereich
10.252.252.Xverfügt.
•DieAnmeldungaufderAXIST8415WeboberächeistmiteinemNetzwerkkabel
undeinemPCnichtmöglich.
-StellenSiesicher,dassdasNetzwerkkabelamrichtigenPort(NET)
angeschlossenist.
•BeiVerwendungeinesLaptopsfürdieInstallationwirdinderKameralisteaufder
WeboberächekeineKameraangezeigt.
-StellenSiesicher,dassdieNetzwerkkabelandenrichtigenPortsangeschlossen
sind.
CAM:Kameraanschluss
NET:Laptopanschluss
-StellenSiesicher,dassdieKameraunddasAXIST8415imgleichen
IP-Adressbereichsind.
-StellenSiesicher,dassdasAXIST8415alsStandardgatewayverwendetwird.
-StellenSiesicher,dassdieKameranichtübereineIP-AdresseimBereich
10.252.252.Xverfügt.
•BildrateundAuösungsindbeiVerwendungderAppzuniedrig.
-ÜberprüfenSiedieSignalstärkeinderWLAN-AnzeigeaufdemHandgerät.
-StellenSiesicher,dassdasDrahtlosnetzwerkauf5GHzeingestelltist.
-WählenSieeinenanderenKanalaus.
DiefolgendeListegilt,wenneineKameravoneinemanderenHerstelleralsAxismit
Onvif-Unterstützungerfasstwerdensoll.
•AufderKamerawurdeeinedynamischeIP-Adresseeingestellt,esistjedochkein
DHCP-ServerimNetzwerkvorhanden.
-AktivierenSiedenintegriertenDHCP-ServeraufdemAXIST8415.
•AufderKamerawurdeeinedynamischeIP-AdresseeingestelltundimNetzwerk
isteinDHCP-Servervorhanden.
-KongurierenSiedasAXIST8415füreinedynamischeIP-Adresse.
55
DE

AXIST8415WirelessInstallationTool
•DieKamerahateinestatischeIP-Adresse.
-KongurierenSiedasAXIST8415so,dassdieIP-AdresseimgleichenBereich
wiediederKameraliegt.
ZurücksetzenaufwerksseitigeStandardeinstellungen
Wichtig
•DasZurücksetzenaufdiewerksseitigenStandardeinstellungensolltemitVorsicht
verwendetwerden.BeimZurücksetzenaufdiewerksseitigenStandardeinstellungen
werdenalleWerteaufdieWerkseinstellungenzurückgesetzt.
•StellenSievordemZurücksetzenaufdieWerkseinstellungensicher,dassdie
WLAN-Anzeigedauerhaftleuchtet.
SowirddasProduktaufdiewerksseitigenStandardeinstellungenzurückgesetzt:
1.HaltenSiedieReset-Taste10Sekundenlanggedrückt.
2.DasAXIST8415wirdneugestartetundalleWertewerdenaufdiewerksseitigen
Standardeinstellungenzurückgesetzt.
Beachten
UnterÜbersichtüberdieHardwareaufSeite45istdargestellt,wosichdie
Reset-Tastebendet.
Gewährleistungsinformationen
InformationenzurGewährleistungfürAxis-ProdukteundandereindiesemZusammenhang
relevanteInformationenndenSieunteraxis.com/warranty
56

AXIST8415WirelessInstallationTool
Informazionidisicurezza
Livellidipericolo
PERICOLO
Indicaunasituazionepericolosache,senonevitata,provocamorteolesionigravi.
AVVERTENZA
Indicaunasituazionepericolosache,senonevitata,potrebbeprovocarelamorteolesioni
gravi.
ATTENZIONE
Indicaunasituazionepericolosache,senonevitata,potrebbeprovocarelesionimedie
ominori.
A A
A
VVISO VVISO
VVISO
Indicaunasituazioneche,senonevitata,potrebbedanneggiarelaproprietà.
Altrilivellidimessaggio
Importante
Indicainformazioniimportanti,essenzialiperilcorrettofunzionamentodeldispositivo.
Nota
Indicainformazioniutilicheaiutanoaottenereilmassimodaldispositivo.
57
IT

AXIST8415WirelessInstallationTool
Informazionidisicurezza
A A
A
VVISO VVISO
VVISO
•IldispositivoAxisdeveessereutilizzatoinconformitàalleleggieallenormativelocali.
•Axisconsiglial'usodiuncavodireteschermato(STP).
•ConservareildispositivoAxisinunambienteasciuttoeventilato.
•EvitarediesporreildispositivoAxisaurtiopressionieccessive.
•EvitarediesporreildispositivoAxisavibrazione.
•UtilizzaresolostrumentiapplicabiliquandosiinstallaildispositivoAxis.Sesiutilizzauna
forzaeccessivaconstrumentinonadattièpossibilecausaredannialdispositivo.
•Nonutilizzaresostanzechimiche,agenticausticiodetergentiaerosol.
•Utilizzareunpannopulitoinumiditoinacquapuraperlapulizia.
•Utilizzaresoloaccessoricompatibiliconlespecichetecnichedeldispositivo.Questi
possonoesserefornitidaAxisodaterzeparti.Axisconsiglial'usodell'apparecchiaturadi
alimentazioneAxiscompatibileconildispositivo.
•UtilizzaresolopartidiricambioforniteoconsigliatedaAxis.
•Nontentarediriparareildispositivodasoli.Contattarel'assistenzaoilrivenditoreAxis
perquestionirelativeallamanutenzione.
Batteriaalpiomboacido
IldispositivoAxisutilizzaunabatteriaalpiomboacidocomealimentazione.
A A
A
VVISO VVISO
VVISO
•Acausadellecaratteristichediscaricamentoautomaticodiquestotipodibatteria,è
imperativochelabatteriavengamantenutacaricaentro6mesiquandoriposta,altrimenti
puòvericarsiunaperditapermanentedellacapacitàacausadellasolfatazione.
•Utilizzaresoloilcaricabatteriefornito.
ATTENZIONE
Noncaricareoscaricareunabatteriainuncontenitoreermeticamentechiuso.Lebatterie
generanounamisceladigasinternamente.Inpresenzadideterminatecircostanze,ad
esempiounsovraccaricointensoouncortocircuitodellabatteria,questigaspossono
inammarsinelcontenitoreecreareipresuppostidiun'esplosioneseinnescatadauna
scintilla.
ATTENZIONE
•Nongettaremailebatterienelfuocoinquantopossonoprovocareesplosioniogenerare
gastossici.
•Nontentaredismontarelabatteriainquantosipotrebberocausareperditediacido
solforicochepuòprovocarelesioni.
58

AXIST8415WirelessInstallationTool
A A
A
VVISO VVISO
VVISO
Smaltirelebatterieusateinbaseallenormativelocalioalleistruzionidelproduttore
dellabatteria.
59
IT

60
AXIST8415WirelessInstallationTool
Guidaall'installazione
Lapresenteguidaall'installazionefornisceleistruzioniperl'installazionedi
AXIST8415WirelessInstallationTool.Questostrumentodiinstallazionesupportal'utilizzodiun
computerportatileodiun'applicazioneperl'installazionedelletelecamere.Perottimizzarele
prestazioniel'esperienzasiconsigliadiutilizzarel'applicazione.
Perulterioriinformazionisull'utilizzodeldispositivo,consultarelaguidaperl'utentedisponibile
all'indirizzowww.axis.com
Contenutodellaconfezione
•Unitàprincipale
•Caricabatterie
•Batteria
•Cinghia
•Materialistampati
-Guidaall'installazione(questodocumento)
Panoramicadell'hardware
1
Indicatoredellabatteria
2
PortadiricaricaUSB(nondati)
3
RJ45PoE(CAM)
61
IT

AXIST8415WirelessInstallationTool
4
RJ45nonPoE(NET)
5
Interruttoreaccensione/spegnimento
6
IndicatoreWLAN
7
Pulsantediripristino
8
Unitàprincipale
9
Connettoredelcaricabatterie
10
Batteria
11
Etichetta(impostazionidirete)
1
Caricabatterie
2
Connettoremaschiodelcaricabatterie
3
LEDdelcaricabatterie
4
Spinadialimentazione(EU)
5
Spinadialimentazione(USA)
6
Spinadialimentazione(UK)
7
Spinadialimentazione(AU)
Connettoredirete
ConnettoreEthernetRJ45.
ConnettoreEthernetRJ45conPoweroverEthernetPlus(PoE+).
A A
A
VVISO VVISO
VVISO
Acausadinormativelocaliocondizioniambientaliedelettricheincuiilprodottodeve
essereutilizzato,puòessereopportunoonecessariol'utilizzodiuncavodireteschermato
(STP).Tuttiicavidiretedeldispositivoposizionatiall'apertooinambientielettriciin
condizionidifcilisonodestinatiallorousospecico.Accertarsicheidispositividirete
sianoinstallatisecondoleistruzionidelproduttore.Permaggioriinformazionisuirequisiti
normativi,consultareElectromagneticcompatibility(EMC)onpage4.
62
AXIST8415WirelessInstallationTool
ConnettoreUSB
AXIST8415èdotatodiunconnettoreUSB(nondati).Questoconnettorepuòessereutilizzatoper
ricaricarequalsiasidispositivoportatilecompatibile(5V,2,1A).
Nota
•AXIST8415deveessereaccesoquandosiricaricaundispositivoportatile.
•Laricaricadiundispositivoportatileinuiscesullabatteriadell'unità.Quandoraggiunge
unlivellominimocriticol'unitàsmettediricaricareildispositivoportatile.Consultare
Panoramicadell'hardwareallapagina61Indicatoredellabatteriaperlostatodella
batteria.Percontinuareacaricare,sostituirelabatteriaconunaappenaricaricata,vedere
Cambiarelabatteriaallapagina67.
InterfacciaWebdiAXIST8415
Nell'interfacciaWebdiAXIST8415èpossibilemodicareleimpostazionidireteeaggiornareil
rmware.
Accedereall'interfacciaWebdigitandol'indirizzoIPdelleunitàinunbrowser.L'indirizzoIPsitrova
sull'etichettadell'unitàprincipale.
Nota
•Leschermateeffettivepotrebberocambiareconigliaggiornamentidelrmware.
•AXIST8415hadueindirizziIP.UnoperlaconnessionetramiteWiFieunoperla
connessionetramiteretecablata.
•Name(Nome):nomedell'unità,puòesseremodicato.
Network(Rete)- -
-
WiInterface(InterfacciaWi)
63
IT

AXIST8415WirelessInstallationTool
•Address(Indirizzo):indirizzoIPdell'unità.
•Subnetmask:subnetmaskdell'unità.
•Gateway:gatewaypredenitodell'unità.
•SSID:nomedellaretewireless,puòesseremodicato.
•WPApassword(PasswordWPA):passworddellaretewireless,puòesseremodicata.
•Mode(Modalità):impostarelamodalitàdifrequenzaperlaretewireless.Selezionare
2,4GHzo5GHz.
•Channel(Canale):impostareilcanaleperlaretewireless.
Nota
•IlSSIDelapasswordpredenitisitrovanosull'etichettadell'unitàprincipale.Sevengono
modicatinell'interfacciaWeb,l'etichettanonèpiùvalida.
•AXIST8415supporta2,4GHze5GHz.
•Icanalipossonovariareasecondadelpaese.
Network(Rete)- -
-
WiredNetwork(Retecablata)
64
AXIST8415WirelessInstallationTool
•ExternalDHCPServer(ServerDHCPesterno):rilevamentodiunserverDHCPesterno.
•OnboardDHCPServer(ServerDHCPsuscheda):
-On(Acceso):serverDHCPinternoacceso
-Off(Spento):serverDHCPinternospento
•EthernetPorts(PorteEthernet):statodelleporteEthernet.
-Connected(Connesso):telecamera/portatileconnessoallaportaethernet
-Unconnected(Nonconnesso):telecamera/portatilenonconnessoallaporta
ethernet
•InterfaceConguration(Congurazioneinterfaccia):impostarel'indirizzoIP
manualmenteoottenerel'indirizzoIPdalunserverDHCP.
•Address(Indirizzo):indirizzoIPdell'unità.
•Subnetmask:subnetmaskdell'unità.
•Gateway:gatewaypredenitodell'unità.
Manutenzione
65
IT
AXIST8415WirelessInstallationTool
AggiornareilrmwareperAXIST8415.
Nota
Ilrmwarepiùrecenteèdisponibileall'indirizzowww.axis.com
Caricarelabatteria
Collegareilcavodialimentazionespecicodelpaesealcaricabatterie.Vederel'illustrazione
seguente.
Collegareilcaricabatteriaallabatteria(vederel'immagineseguente)eallapresadicorrente.
LED
Stato
Rosso
Caricamentodellabatteria
Verde
Caricamentodellabatteriacompletato
Nota
IlLEDdelcaricabatteriesitrovasullatoanterioredelcaricabatterie,vederePanoramica
dell'hardwareallapagina61
A A
A
VVISO VVISO
VVISO
•Acausadellecaratteristichediscaricamentoautomaticodiquestotipodibatteria,è
imperativochelabatteriavengacaricaentro6mesidall'immagazzinamento,altrimenti
puòvericarsiunaperditapermanentedellacapacitàacausadellasolfatazione.
66
AXIST8415WirelessInstallationTool
•Utilizzaresoloilcaricabatteriefornito.
ATTENZIONE
Noncaricareoscaricareunabatteriainuncontenitoreermeticamentechiuso.Lebatterie
generanounamisceladigasinternamente.Inpresenzadideterminatecircostanze,ad
esempiounsovraccaricointensoouncortocircuitodellabatteria,questigaspossono
sfogarenelcontenitoreecreareipresuppostidiun'esplosioneseinnescatadaunascintilla.
Cambiarelabatteria
Perinformazionisucomecambiarelabatteria,fareriferimentoall'immagineseguente.
ATTENZIONE
•Nongettaremailebatterienelfuocoinquantopossonoprovocareesplosioniogenerare
gastossici.
•Nontentaredismontarelabatteriainquantosipotrebberocausareperditediacido
solforicochepuòprovocarelesioni.
•Selabatteriavienesmontatalagaranziaènulla.
A A
A
VVISO VVISO
VVISO
Smaltirelebatterieusateinbaseallenormativelocalioalleistruzionidelproduttore
dellabatteria.
Preparazioneall'installazione
ConAXIST8415WirelessInstallationToolèpossibileeseguirel'installazionedellatelecameracon
uncomputeroundispositivoportatile.Perottimizzareleprestazionisiconsigliadiutilizzareun
dispositivoportatileel'applicazioneAXISWirelessInstallationTool.
67
IT

AXIST8415WirelessInstallationTool
•Assicurarsidicaricarecompletamentelabatteriaprimadell'utilizzo.ConsultareCaricare
labatteriaallapagina66
•Quandosiutilizzal'applicazioneAXISWirelessInstallationTool,assicurarsidiscaricarla
inundispositivoportatileprimadellaconnessioneallareteWiFidiAXIST8415.
•Assicurarsichel'alimentazionesiaattivaprimadicollegarelatelecameraall'unità
principale.
Nota
L'applicazioneAXISWirelessInstallationToolpuòesserescaricatadaAppStoreo
GooglePlay.
EseguirelaconnessioneallareteWiFidiAXIST8415
Dispositivoportatile
1.AccendereilWiFideldispositivoportatile.
2.SelezionareilSSIDdell'unità.
3.Immetterelapassword
Computerportatile
1.AccendereilWiFidelcomputer.
2.SelezionareilSSIDdell'unità.
3.Immetterelapassword
Importante
AssicurarsicheilcomputersiaconguratoinmododaottenereunindirizzoIPdaun
serverDHCP.
Nota
IlSSIDelapasswordpredenitisonostampatisull'etichettadell'unitàprincipale.
Installazionedellatelecamera-ApplicazioneAXISWirelessInstallationTool
1.CollegarelatelecameraallaportaCAM(PoE)sull'unitàprincipale.
2.Vericarechel'indicatorePoEsiaacceso.
3.EseguirelaconnessioneaAXIST8415WiFi,vedereEseguirelaconnessioneallarete
WiFidiAXIST8415allapagina68
4.Avviarel'applicazioneAXISWirelessInstallationTool
Nota
Iltempodiavviodellatelecameravariaasecondadeldispositivo.Potrebbero
trascorrerealcuniminutiprimachelatelecamerasiavisibilenell'elencodelletelecamere
dell'applicazione.
68
AXIST8415WirelessInstallationTool
1
CameraList(Elencodelletelecamere)
2
Liveview(Immaginidalvivo)
3
Settings(Impostazioni)
4
Rotateimage(Ruotaimmagine)
5
Autofocus(Messaafuocoautomatica)
6
Snapshot(Istantanea)
7
Wizard(Proceduraguidata)
Percongurareunatelecamera
Selezionarelatelecamerain1CameraList(Elencodelletelecamere).Serichiesto,digitare
lapasswordpercontinuare.
In2Liveview(Immaginidalvivo)èpossibileaccedereaipulsantidiazione(4,5e6)tenendoli
premutisulloschermo.
Selezionare4Rotateimage(Ruotaimmagine)perruotarel'immagine.
Selezionare5Autofocus(Messaafuocoautomatica)pereseguirelaricercadellamessaafuoco
ideale.
Nota
•Lamessaafuocoautomaticaèdisponibilesoloselatelecamerasupportatalefunzionalità.
•Lamessaafuocoautomaticapuòdurarealcuniminutiduranteiqualièimportantechela
telecamerarestiimmobile.
Selezionare6Snapshot(Istantanea)peracquisireun'istantaneadell'immaginevideo.
Selezionare3Settings(Impostazioni)permodicareleimpostazionidiretedeldispositivo.
69
IT
AXIST8415WirelessInstallationTool
Numero7Wizard(Proceduraguidata).Laproceduraguidatavieneavviatalaprimavoltachesi
accedeaundispositivoAxisodopolareimpostazionedelleimpostazionipredenitedifabbrica.
Nota
Leinformazionisulleimpostazionidellaproceduraguidatasonodisponibilinella
Guidaperl'utentedeldispositivoall'indirizzowww.axis.com
Nota
PerulterioriinformazionisulleimpostazionidellatelecameraperundispositivoAxis,
consultarelaGuidaperl'utentedeldispositivodisponibilesulsitoWebwww.axis.com
Installazionedellatelecamera-Computerportatile
1.CollegarelatelecameraallaportaCAM(PoE)sull'unitàprincipale.
2.Vericarechel'indicatorePoEsiaacceso.
3.CollegareilcomputerportatileallaportaNET(nonPoE)sull'unitàprincipale.
4.Passareall'interfacciaWebepremereCameraList(Elencodelletelecamere)
Nota
VedereInterfacciaWebdiAXIST8415allapagina63perinformazionisucomeaccedere
all'interfacciaWebdiAXIST8415
5.Selezionarelatelecamerafacendoclicsull'indirizzoIP.
6.Latelecameraselezionatavienevisualizzatainunbrowser.
Nota
•PerulterioriinformazionisulleimpostazionidellatelecameraperundispositivoAxis,
consultarelaGuidaperl'utentedeldispositivodisponibilesulsitoWebwww.axis.com
•Iltempodiavviodellatelecameravariaasecondadeldispositivo.Potrebbero
trascorrerealcuniminutiprimachelatelecamerasiavisibilenell'elencodelletelecamere
dell'interfacciaWeb.
Risoluzionedeiproblemi
•ImpossibiletrovareilSSID.
-Vericarechel'indicatoreWLANsiaacceso.
70

AXIST8415WirelessInstallationTool
-Selezionareuncanaledifferente.
-Assicurarsicheildispositivoportatilesupportilamodalitàa5GHz,incaso
contrariopassareallamodalitàa2,4GHzsuAXIST8415.
•Nessunatelecameranell'elencodelletelecameredell'applicazione
-Vericarechel'indicatoreWLANsiaacceso.
-Iltempodiavviodellatelecameravariaasecondadeldispositivo.Potrebbero
trascorrerealcuniminutiprimachelatelecamerasiavisibilenell'elenco.
PremereRefresh(Aggiorna)peraggiornarelapaginadell'elencodelle
telecamere.
-AssicurarsicheBonjoursiaattivatosuldispositivoAxis.
-AssicurarsichelatelecameranonabbiaunindirizzoIPcompresonell'intervallo
10.252.252.X
•Impossibileaccedereall'interfacciaWebdiAXIST8415quandosiutilizzauncavodi
reteeunPC.
-Assicurarsicheilcavodiretesiacollegatoallaportacorretta(NET).
•Nessunatelecameranell'elencodelletelecamere(interfacciaWeb),quandosiutilizza
uncomputerportatileperl'installazione.
-Assicurarsicheicavidiretesianocollegatialleportecorrette:
CAM:collegareallatelecamera
NET:collegarealcomputerportatile
-AssicurarsichelatelecameraeAXIST8415sianonellostessointervallodi
indirizziIP.
-AssicurarsicheAXIST8415siautilizzatocomegatewaypredenito.
-AssicurarsichelatelecameranonabbiaunindirizzoIPcompresonell'intervallo
10.252.252.X
•Bassavelocitàfpsnell'immaginequandosiutilizzal'applicazione.
-Controllarel'indicatoreWLANsuldispositivoportatileperl'intensitàdel
segnale.
-Assicurarsichelaretewirelesssiaimpostatasu5GHz
-Selezionareuncanaledifferente.
IlseguenteelencosiapplicaquandositentadiindividuareunatelecameranonAxisconilsupporto
Onvif.
•Latelecameraèimpostatasull'indirizzoIPdinamicomanonèpresenteunserver
DHCPnellarete.
-AttivareilserverDHCPinAXIST8415.
•Latelecameraèimpostatasull'indirizzoIPdinamicoedèpresenteunserver
DHCPnellarete.
-CongurareAXIST8415perl'indirizzoIPdinamico.
•LatelecamerahaunindirizzoIPsso.
71
IT

AXIST8415WirelessInstallationTool
-CongurareAXIST8415inmodocheabbial'indirizzoIPnellostessointervallo
dellatelecamera.
Ripristinareivaloripredenitidifabbrica
Importante
•Ilripristinodelleimpostazionidifabbricadeveessereusatoconcautela.Unripristino
delleimpostazionidifabbricaconsentiràdiripristinareleimpostazionidifabbricaper
tuttiiparametri.
•Assicurarsichel'indicatoreWLANsiasempreaccesoprimadieseguireunripristinodi
fabbrica.
Perripristinareildispositivoalleimpostazionipredenitedifabbrica:
1.Tenerepremutoilpulsantediripristinopercirca10secondi.
2.AXIST8415vieneriavviatocontuttiivalorireimpostatisuivaloripredenitidifabbrica.
Nota
ConsultarePanoramicadell'hardwareallapagina61perl'ubicazionedel
pulsantediripristino.
Informazionisullagaranzia
PerinformazionisullagaranziadeldispositivoAxiseinformazioniadessorelative,consultarela
paginaaxis.com/warranty/
72

AXIST8415WirelessInstallationTool
Informacióndeseguridad
Nivelesdepeligro
PELIGRO
Indicaunasituaciónpeligrosaque,sinoseevita,provocarálesionesgravesolamuerte.
ADVERTENCIA
Indicaunasituaciónpeligrosaque,sinoseevita,puedeprovocarlesionesgravesola
muerte.
ATENCIÓN
Indicaunasituaciónpeligrosaque,sinoseevita,puedeprovocarlesionesmoderadaso
leves.
A A
A
VISO VISO
VISO
Indicaunasituaciónpeligrosaque,sinoseevita,puedeprovocardañosmateriales.
Otrosnivelesdemensaje
Importante
Indicainformaciónimportantequeesfundamentalparaqueelproductofuncione
correctamente.
Nota
Indicainformaciónútilqueayudaaaprovecharelproductoalmáximo.
73
ES

AXIST8415WirelessInstallationTool
Instruccionesdeseguridad
A A
A
VISO VISO
VISO
•EsteproductodeAxisdebeutilizarsedeconformidadconlasleyesynormativaslocales.
•Axisrecomiendautilizaruncablederedblindado(STP).
•AlmaceneelproductodeAxisenunentornosecoyventilado.
•EvitelaexposicióndelproductodeAxisachoquesoaunafuertepresión.
•EvitelaexposicióndelproductodeAxisavibraciones.
•UtilicesololasherramientascorrespondientescuandoinstaleelproductodeAxis.La
aplicacióndeunafuerzaexcesivaconherramientaseléctricaspuedeprovocardaños
enelproducto.
•Noutilicelimpiadoresenaerosol,agentescáusticosniproductosquímicos.
•Limpieconunpañolimpiohumedecidoconaguapura.
•Utilicesoloaccesoriosquecumplanconlasespecicacionestécnicasdesuproducto.
EstosaccesorioslospuedeproporcionarAxisountercero.Axisrecomiendautilizarun
equipodesuministrodealimentacióndeAxiscompatibleconsuproducto.
•UtilicesolopiezasderepuestoproporcionadasorecomendadasporAxis.
•Nointenterepararelproductoustedmismo.Póngaseencontactoconelserviciode
asistenciatécnicadeAxisoconsudistribuidordeAxisparatratarasuntosdereparación.
Bateríadeácido-plomo
EsteproductodeAxisutilizaunabateríadeácido-plomocomofuentedealimentación.
A A
A
VISO VISO
VISO
•Acausadelascaracterísticasdeautodescargadeestetipodebaterías,esmuyimportante
cargarlasantesdequesecumplanlosseismesesdealmacenamiento;encasocontrario,
podríanperdercapacidaddeformapermanentecomoresultadodelasulfatación.
•Utiliceúnicamenteelcargadorproporcionado.
ATENCIÓN
Nuncacarguenidescargueunabateríaenunacarcasaherméticamentesellada.Lasbaterías
generanunamezcladegasesinternamente.Bajodeterminadascircunstancias,comouna
sobrecargaextremaouncortocircuitodelabatería,estosgasespodríandescargarseenla
carcasaygenerarelpotencialparaunaexplosiónsiseprendenconunachispa.
ATENCIÓN
•Nuncadesechelasbateríasenelfuego,yaquepodríanexplotarogenerargastóxico.
•Nointentedesmontarlasbaterías,yaqueesposiblequeseproduzcanfugasdeácido
sulfúricoquepodríancausarlesiones.
74

AXIST8415WirelessInstallationTool
A A
A
VISO VISO
VISO
Desechelasbateríasusadasenconformidadconlanormativalocalolasinstrucciones
delfabricante.
75
ES

76
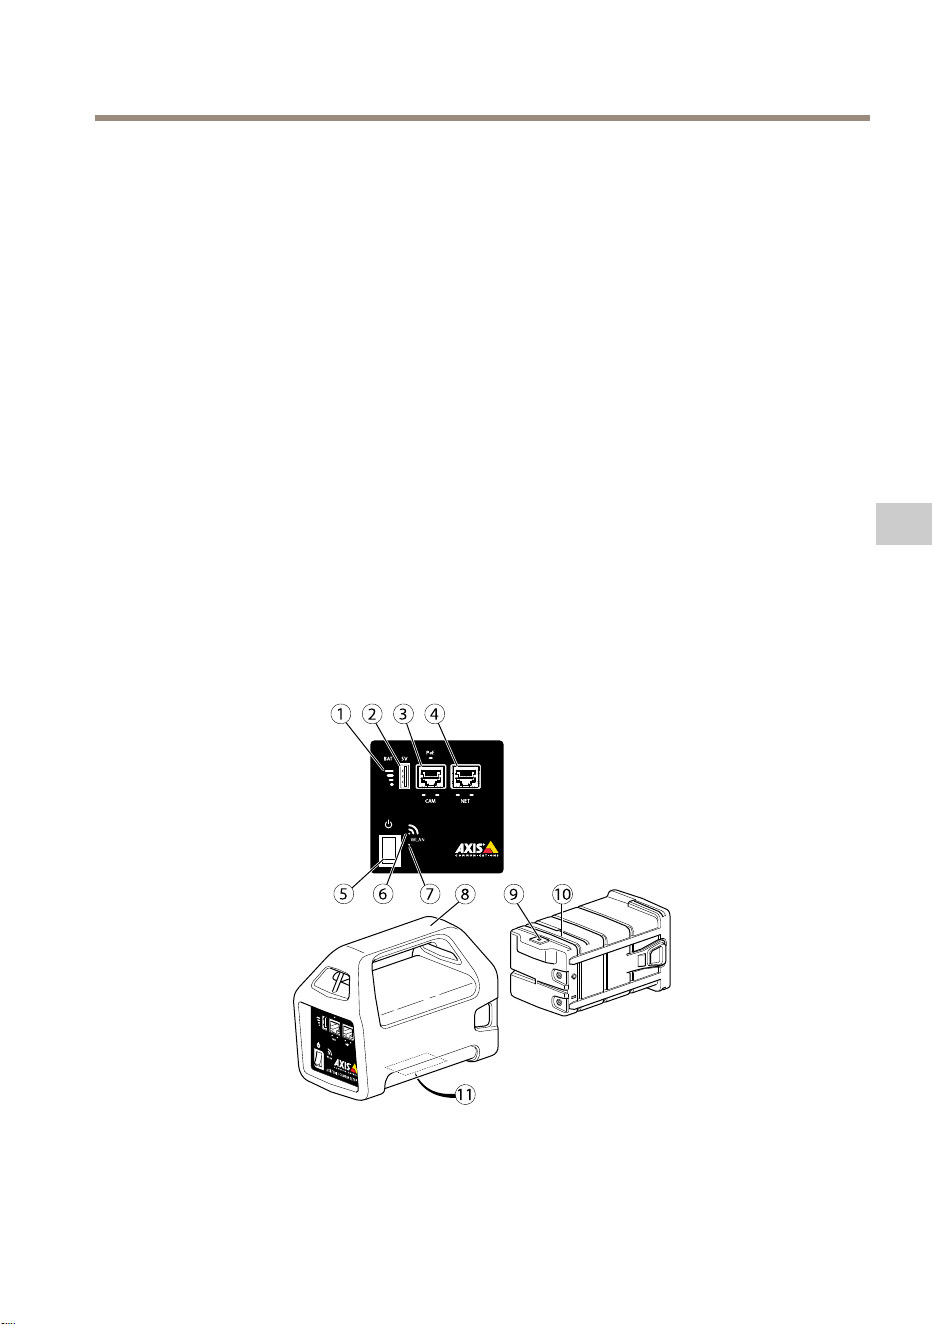
AXIST8415WirelessInstallationTool
Guíadeinstalación
EstaguíadeinstalaciónincluyeinstruccionesparainstalarlaAXIST8415WirelessInstallationTool.
Laherramientadeinstalaciónsepuedeusartantoenportátilescomoatravésdeunaaplicación
paralainstalacióndecámaras.Paraconseguirunrendimientoyunaexperienciaóptimos,se
recomiendautilizarlaaplicación.
Paraconocerotrosaspectosdeusodelproducto,veaelmanualdelusuariodisponibleen
www.axis.com.
Contenidodelpaquete
•Unidadprincipal
•Cargador
•Batería
•Correa
•Materialesimpresos
-Guíadeinstalación(estedocumento)
Informacióngeneraldelhardware
1
Indicadordelabatería
2
PuertodecargaUSB(nollevadatos)
3
RJ45PoE(CAM)
77
ES
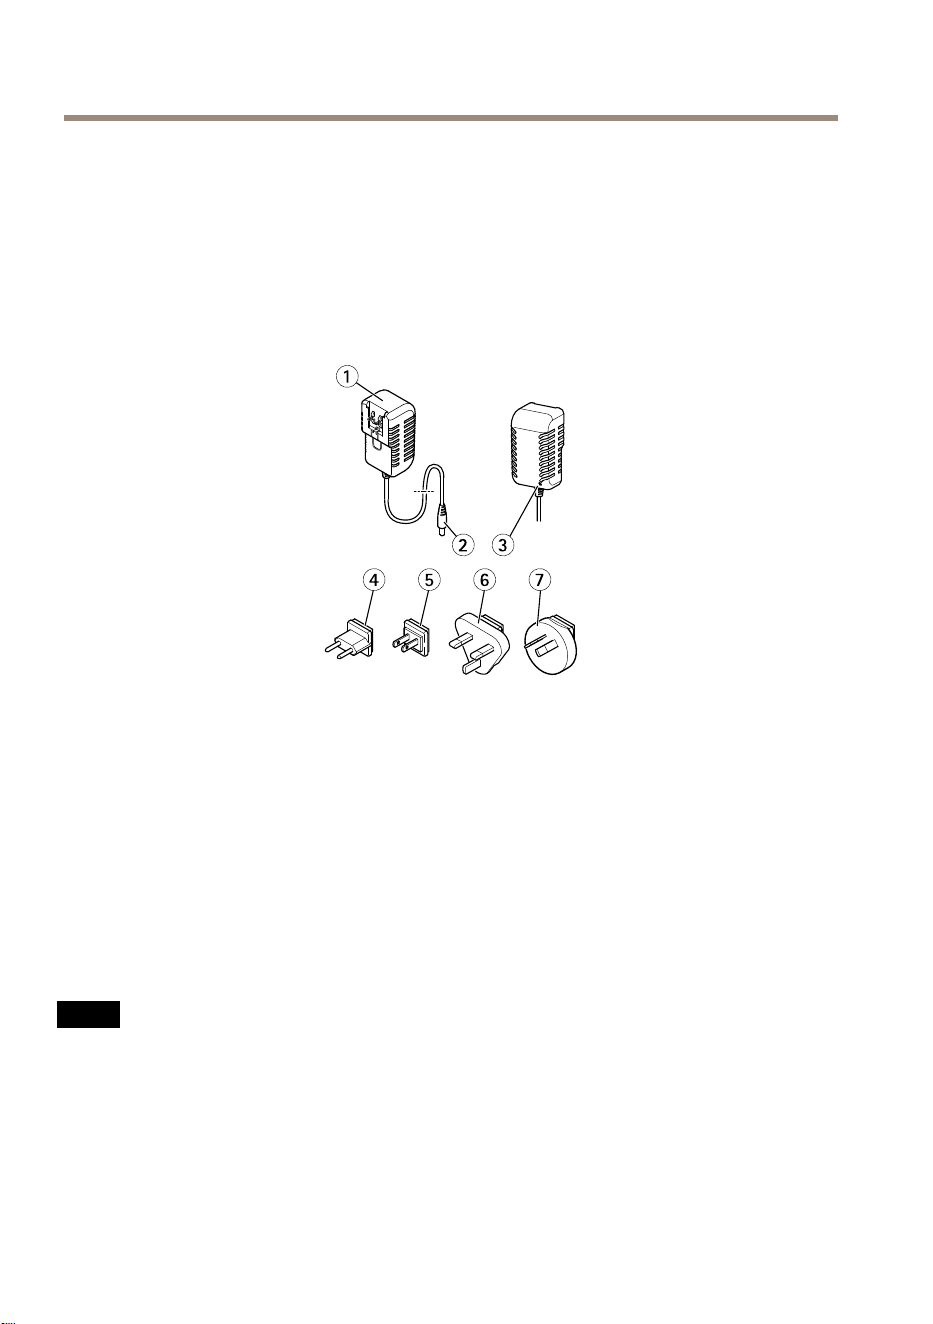
AXIST8415WirelessInstallationTool
4
RJ45noPoE(NET)
5
Interruptordeencendido/apagado
6
IndicadorWLAN
7
Botónderestablecimiento
8
Unidadprincipal
9
Conectordelcargadordelabatería
10
Batería
11
Etiqueta(conguracióndelared)
1
Cargador
2
Conectormachodelcargador
3
LEDdelcargador
4
Enchufedelcabledealimentación(UE)
5
Enchufedelcabledealimentación(EE.UU.)
6
Enchufedelcabledealimentación(RU)
7
Enchufedelcabledealimentación(AU)
Conectordered
ConectorEthernetRJ45.
ConectorEthernetRJ45conalimentaciónatravésdeEthernetPlus(PoE+).
A A
A
VISO VISO
VISO
Debidoalanormativalocaloalascondicionesambientalesyeléctricasenlasquese
vayaautilizarelproducto,puedequeseaadecuadouobligatorioelusodeuncablede
redblindado(STP).Todosloscablesqueconectanelproductoalaredyqueseutilicenen
exterioresoenentornoseléctricosexigentesdeberánestarblindadosydiseñadosparasu
usoespecíco.Asegúresedequelosdispositivosderedesténinstaladosdeconformidad
conlasinstruccionesdelfabricante.Paraobtenerinformaciónsobrelosrequisitos
normativos,veaElectromagneticcompatibility(EMC)onpage4.
78
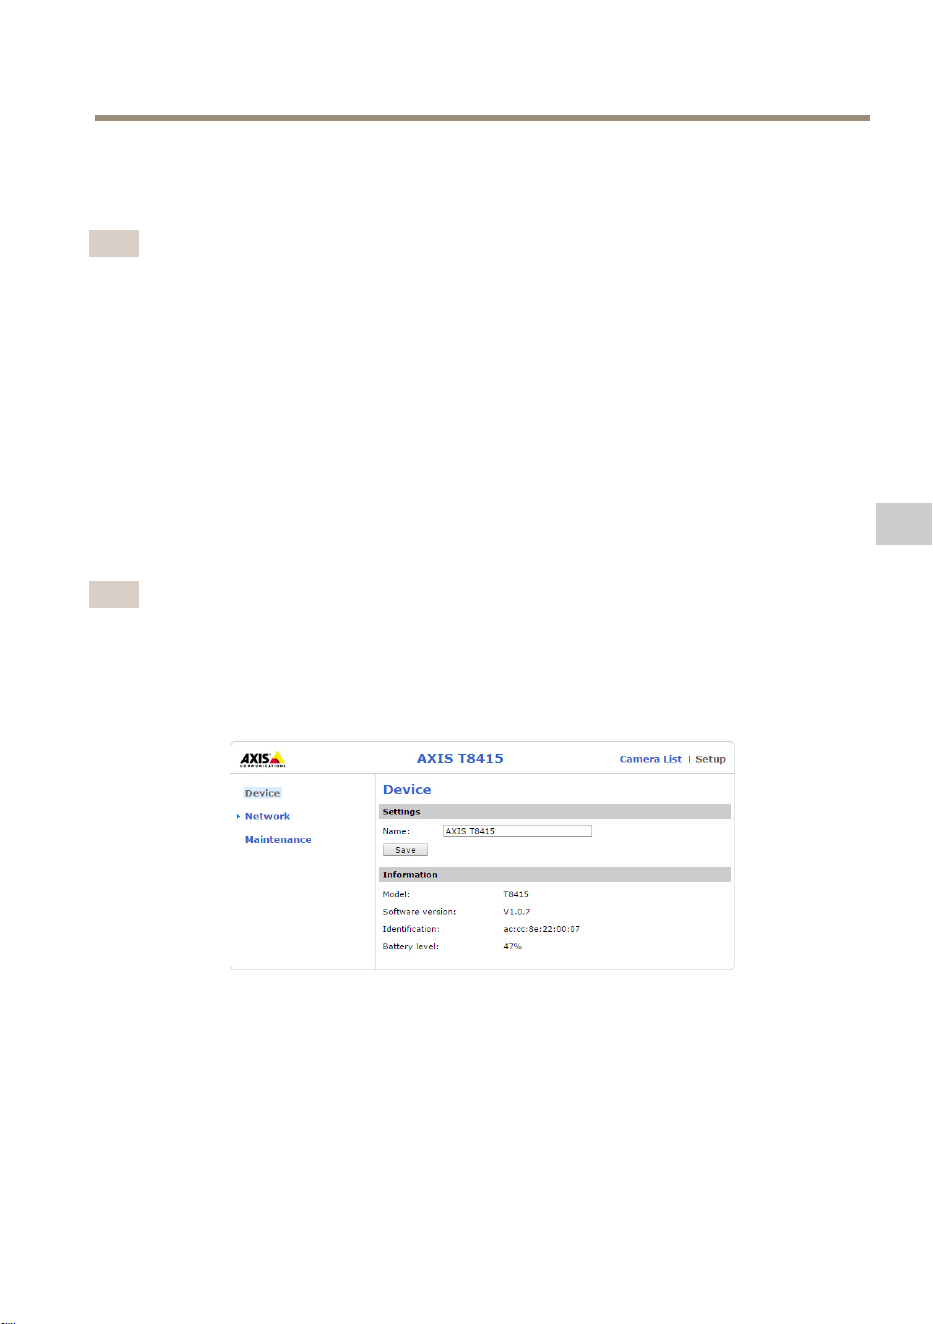
AXIST8415WirelessInstallationTool
ConectorUSB
LaAXIST8415estáequipadaconunconectorUSB(sindatos).Esteconectorpuedeutilizarsepara
cargarcualquierdispositivomanualcompatible(5V,2,1A).
Nota
•LaAXIST8415debeestarencendidaalcargarundispositivomanual.
•Lacargadedispositivosmanualesinuyeenlabateríadelasunidades.Cuandolleguea
unnivelcríticamentebajo,eldispositivomanualdejarádecargarse.VeaelInformación
generaldelhardwareenlapágina77indicadordelabateríaparaconocerelestadode
labatería.Sideseacontinuarconlacarga,sustituyalabateríaporunanuevaqueesté
cargada.VeaCambiodelabateríaenlapágina83.
InterfazwebdeAXIST8415
EnlainterfazwebdeAXIST8415esposibleeditarlaconguracióndelaredyactualizarelrmware.
Paraaccederalainterfazweb,escribaladirecciónIPdelasunidadesenunnavegador.La
direcciónIPseencuentraenlaetiquetadelaunidadprincipal.
Nota
•Lascapturasdepantallarealespuedencambiartraslaaparicióndenuevasversionesde
rmware.
•LaAXIST8415tienedosdireccionesIP:unaparalaconexiónmediantewiyotraparala
conexiónporcablealared.
•Name(Nombre):elnombredelaunidad(sepuedecambiar).
Red- -
-
Interfazwi
79
ES
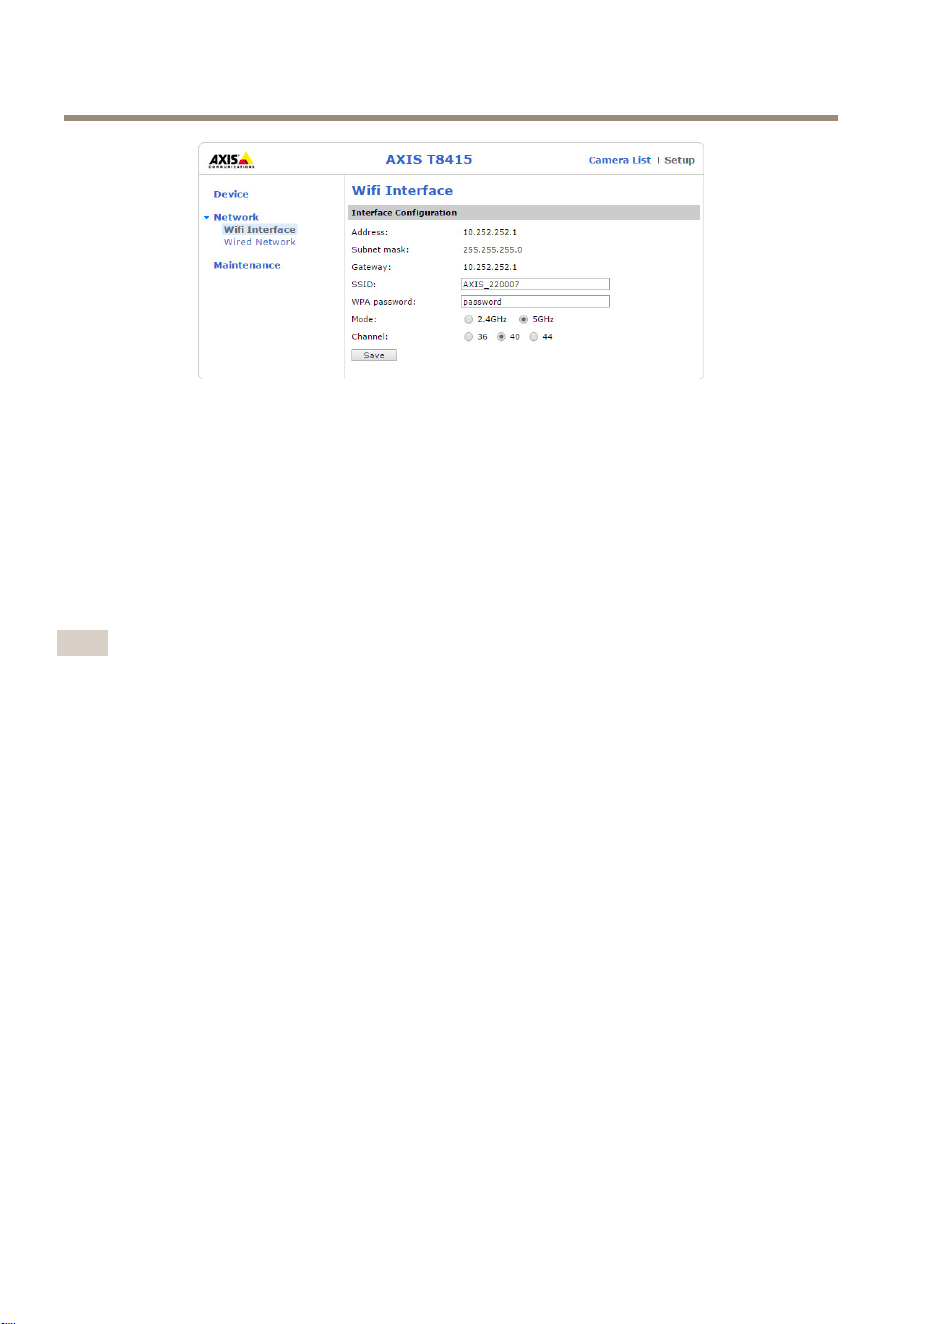
AXIST8415WirelessInstallationTool
•Address(Dirección):ladirecciónIPdelaunidad.
•Subnetmask(Máscaradesubred):lamáscaradesubreddelaunidad.
•Gateway(Puertadeenlace):lapuertadeenlacepredeterminadadelaunidad.
•SSID:elnombredelaredinalámbrica(sepuedecambiar).
•WPApassword(ContraseñaWPA):lacontraseñadelaredinalámbrica(sepuedecambiar).
•Mode(Modo):mododefrecuenciaestablecidoparalaredinalámbrica.Seleccione
2.4GHzo5GHz.
•Channel(Canal):canalestablecidoparalaredinalámbrica.
Nota
•ElSSIDylacontraseñapredeterminadosseencuentranenlaetiquetadelaunidad
principal.Sisecambianenlainterfazweb,laetiquetadejarádeserválida.
•LaAXIST8415admite2,4GHzy5GHz.
•Loscanalespuedenvariarsegúnelpaís.
Red- -
-
Conexiónporcable
80

AXIST8415WirelessInstallationTool
•ExternalDHCPServer(ServidorDHCPexterno):deteccióndeunservidorDHCPexterno.
•OnboardDHCPServer(ServidorDHCPintegrado):
-On(Encendido):elservidorDHCPinternoestáencendido.
-Off(Apagado):elservidorDHCPinternoestáapagado.
•EthernetPorts(PuertosEthernet):estadodelospuertosEthernet:
-Connected(Conectado):lacámaraoelportátilestánconectadosalpuerto
Ethernet.
-Unconnected(Desconectado):nohayningunacámaraoportátilconectadosal
puertoEthernet.
•InterfaceConguration(Conguracióndelainterfaz):direcciónIPestablecida
manualmenteuobtenidadeunservidorDHCP.
•Address(Dirección):ladirecciónIPdelaunidad.
•Subnetmask(Máscaradesubred):lamáscaradesubreddelaunidad.
•Gateway(Puertadeenlace):lapuertadeenlacepredeterminadadelaunidad.
Mantenimiento
81
ES
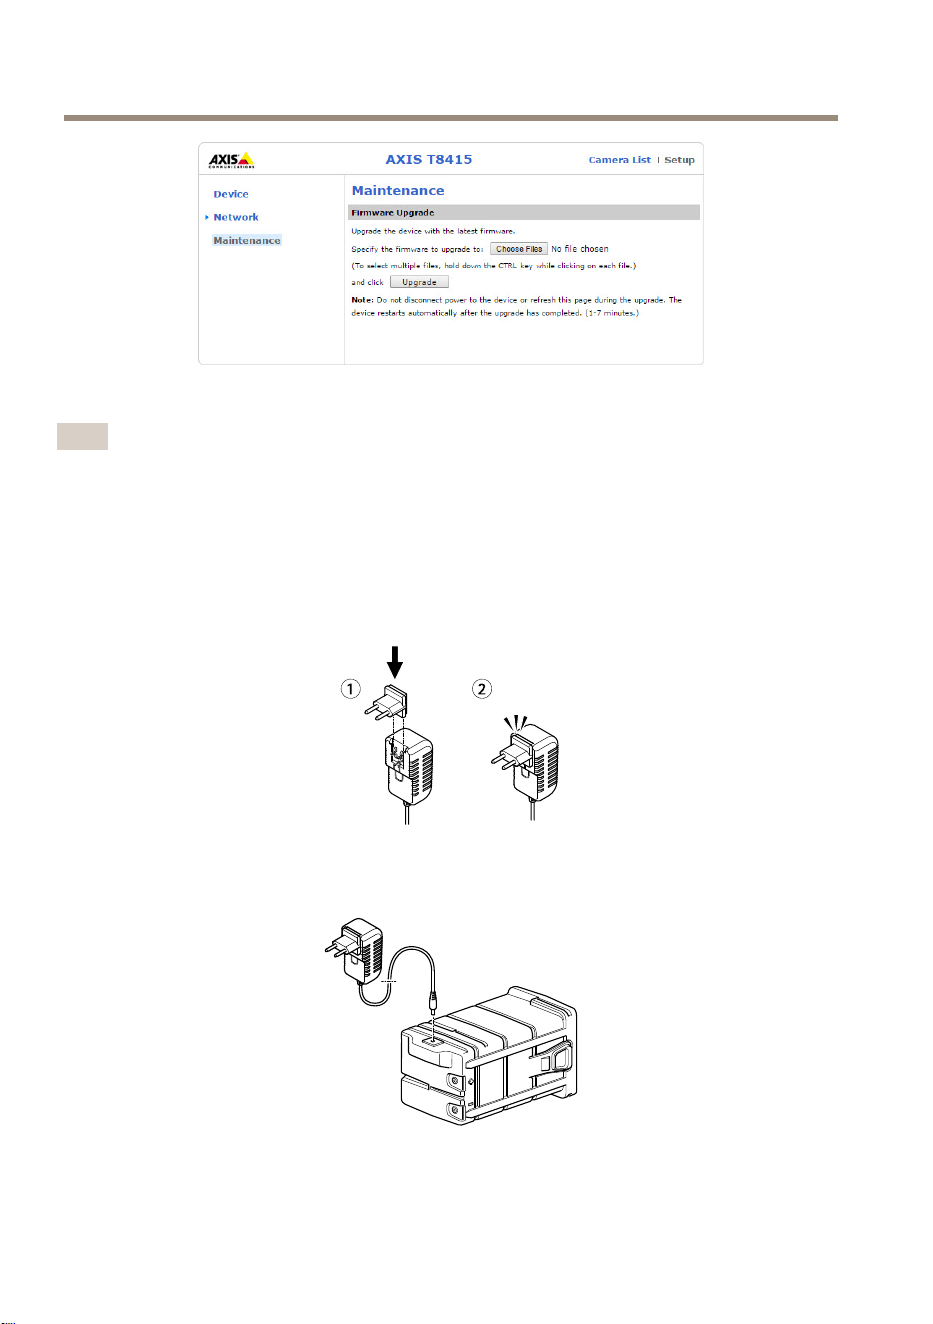
AXIST8415WirelessInstallationTool
ActualiceelrmwaredeAXIST8415.
Nota
Elrmwaremásrecienteseencuentraenwww.axis.com
Cargadelabatería
Conecteelenchufedelcabledealimentaciónespecícodelpaísalcargador.Vealasiguiente
imagen.
Conecteelcargadoralabatería(vealasiguienteimagen)yalatomadecorriente.
82
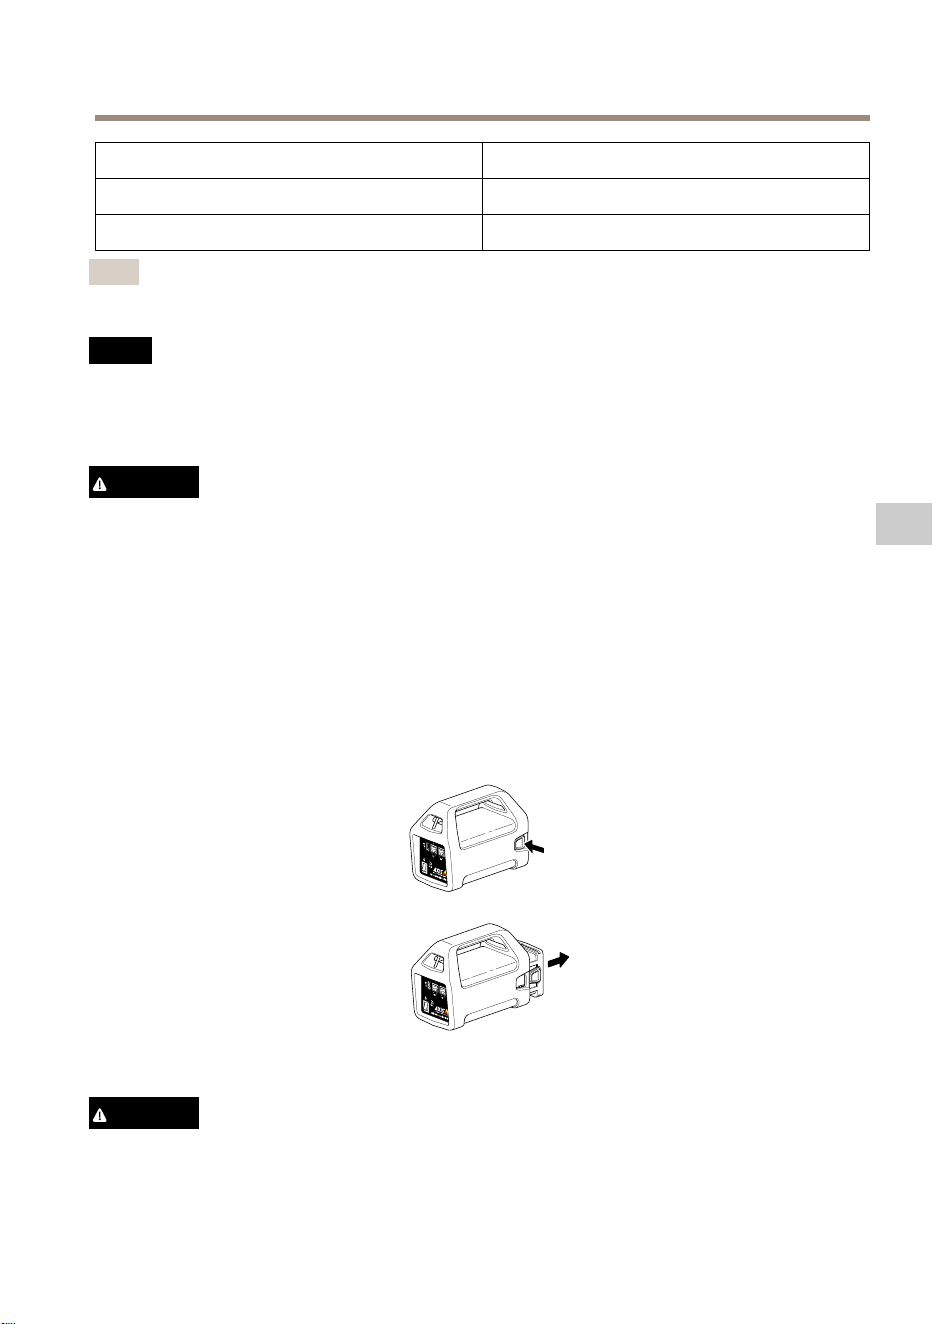
AXIST8415WirelessInstallationTool
LED
Comportamiento
RojoBateríacargando
VerdeBateríatotalmentecargada
Nota
ElLEDdelcargadorseencuentraenlapartedelanteradelcargador.VeaInformación
generaldelhardwareenlapágina77
A A
A
VISO VISO
VISO
•Acausadelascaracterísticasdeautodescargadeestetipodebaterías,esmuyimportante
cargarlasantesdequesecumplanlosseismesesdealmacenamiento;encasocontrario,
podríanperdercapacidaddeformapermanentecomoresultadodelasulfatación.
•Utiliceúnicamenteelcargadorproporcionado.
ATENCIÓN
Nuncacarguenidescargueunabateríaenunacarcasaherméticamentesellada.Lasbaterías
generanunamezcladegasesinternamente.Bajodeterminadascircunstancias,comouna
sobrecargaextremaouncortocircuitodelabatería,estosgasespodríandescargarseenla
carcasaygenerarelpotencialparaunaexplosiónsiseprendenconunachispa.
Cambiodelabatería
Vealasiguienteimagenparaobtenerinformaciónsobrecómocambiarlabatería.
ATENCIÓN
•Nuncadesechelasbateríasenelfuego,yaquepodríanexplotarogenerargastóxico.
83
ES

AXIST8415WirelessInstallationTool
•Nointentedesmontarlasbaterías,yaqueesposiblequeseproduzcanfugasdeácido
sulfúricoquepodríancausarlesiones.
•Sisedesmontalabatería,seanulalagarantía.
A A
A
VISO VISO
VISO
Desechelasbateríasusadasenconformidadconlanormativalocalolasinstrucciones
delfabricante.
Preparativosparalainstalación
ConlaAXIST8415WirelessInstallationTool,puedeinstalarcámarasconunportátilo
undispositivomanual.Esrecomendableutilizarundispositivomanualylaaplicación
AXISWirelessInstallationToolparaconseguirunrendimientoóptimo.
•Asegúresedequelabateríaestétotalmentecargadaantesdeutilizarla.VeaCargadela
bateríaenlapágina82.
•SivaautilizarlaAXISWirelessInstallationTool,asegúresededescargarlaenel
dispositivomanualantesdeconectarsealaredwideAXIST8415.
•Asegúresedequelaalimentaciónestéencendidaantesdeconectarlacámaraala
unidadprincipal.
Nota
PuededescargarlaAXISWirelessInstallationTooldesdeAppStoreoGooglePlay.
ConexiónawideAXIST8415
Dispositivodemano
1.Activelawieneldispositivomanual.
2.SeleccioneelSSIDdelaunidad.
3.Introduzcalacontraseña.
Portátil
1.Activelawienelordenador.
2.SeleccioneelSSIDdelaunidad.
3.Introduzcalacontraseña.
Importante
AsegúresedequeelordenadorestéconguradoparaobtenerunadirecciónIPdeun
servidorDHCP.
Nota
ElSSIDylacontraseñapredeterminadosestánimpresosenlaetiquetadelaunidad
principal.
84
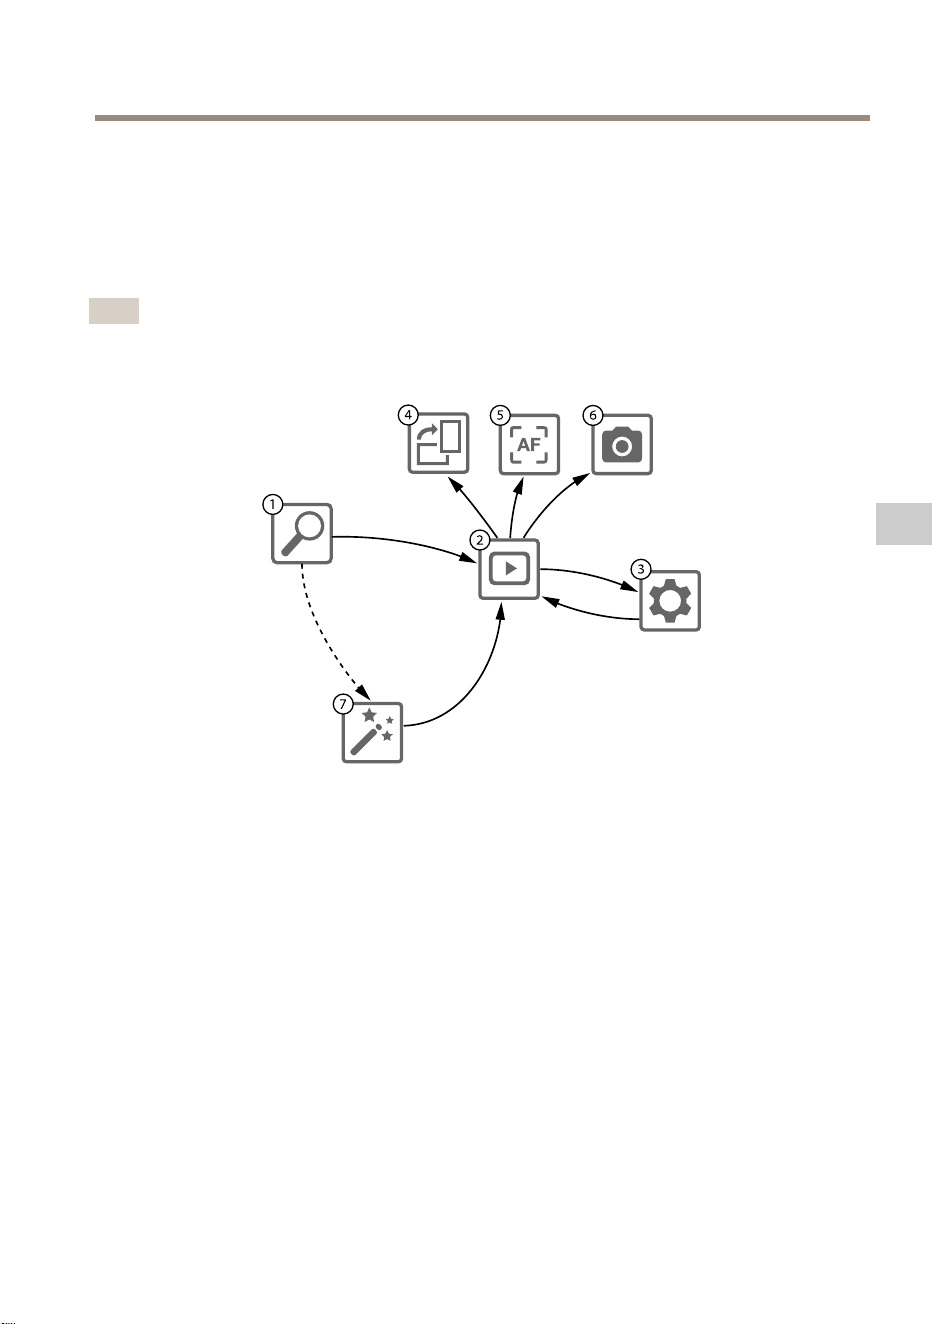
AXIST8415WirelessInstallationTool
Instalacióndelacámara:aplicaciónAXISWirelessInstallationTool
1.ConectelacámaraalpuertoCAM(PoE)delaunidadprincipal.
2.CompruebequeelindicadorPoEestéencendido.
3.ConectelaopciónwideAXIST8415.VeaConexiónawideAXIST8415enlapágina84
4.InicielaaplicaciónAXISWirelessInstallationTool.
Nota
Eltiempodearranquenecesarioparalascámarasvaríaencadaproducto.Puedenpasar
variosminutosantesdequelacámaraaparezcaenlalistadecámarasdelaaplicación.
1
Listadecámaras
2
Vistaendirecto
3
Conguración
4
Girarimagen
5
Enfoqueautomático
6
Captura
7
Asistente
Paracongurarunacámara
Seleccioneunacámaraen1Listadecámaras.Encasonecesario,escribalacontraseñapara
continuar.
En2Vistaendirecto,puedeaccederalosbotonesdeacción(4,5y6)manteniéndolospulsados
enlapantalla.
Seleccione4Girarimagenparagirarlaimagen.
Seleccione5Enfoqueautomáticoparabuscarelpuntodeenfoqueideal.
85
ES
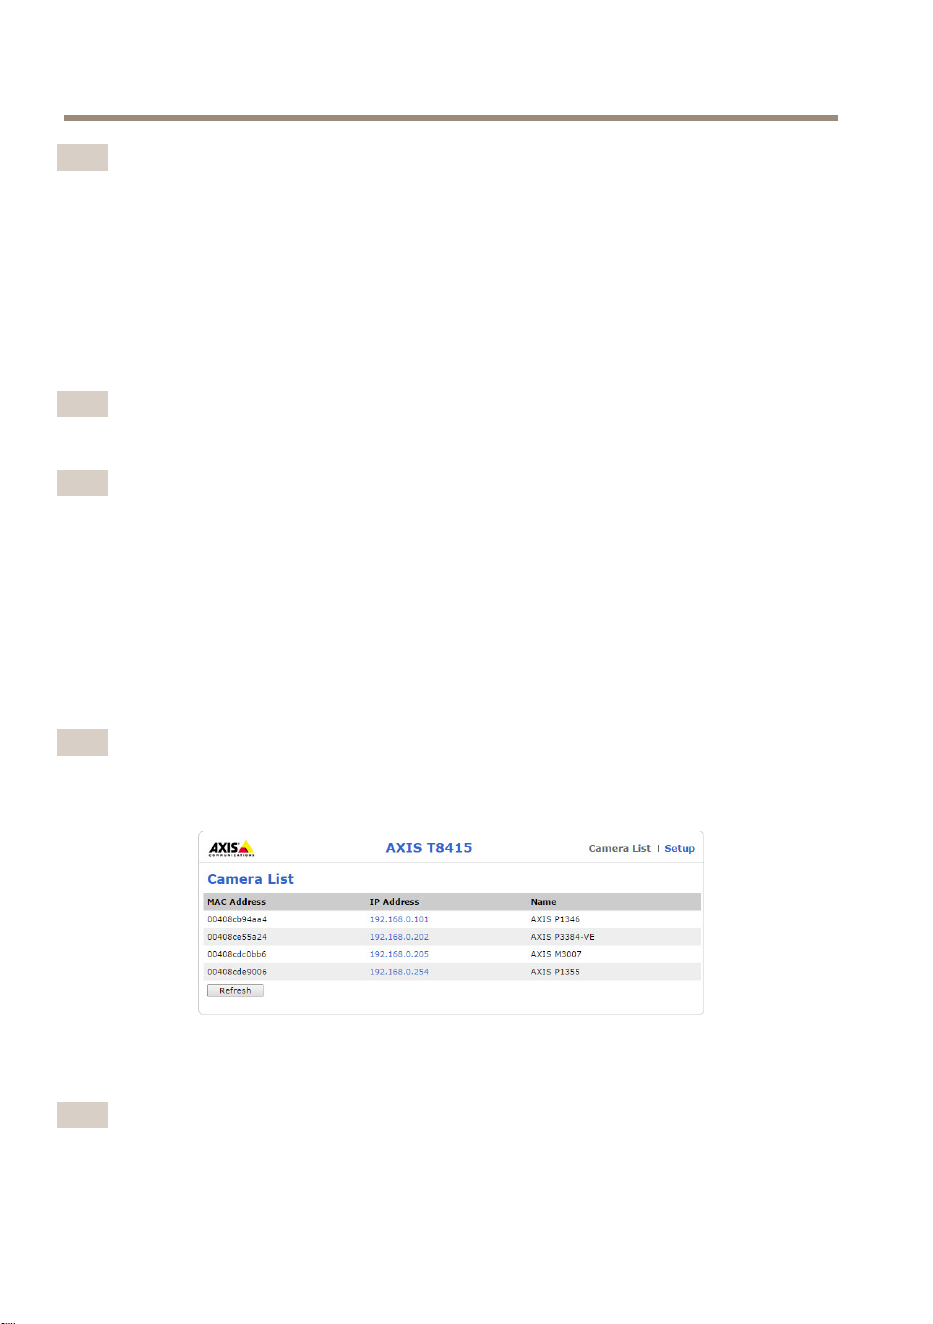
AXIST8415WirelessInstallationTool
Nota
•Elenfoqueautomáticosoloestarádisponiblesilacámaraadmiteestafuncionalidad.
•Elenfoqueautomáticopuedetardarunosminutosenrealizarse(esimportantequela
cámarapermanezcainmóvilduranteestetiempo).
Seleccione6Capturaparatomarunacapturadelaimagendevídeo.
Seleccione3Conguraciónparaeditarlaconguracióndereddelproducto.
Elnúmero7eselAsistente.Esteasistenteseinicialaprimeravezqueseaccedeaunproductode
Axisotrasrestablecerlosvalorespredeterminadosdefábrica.
Nota
LainformaciónsobrelaconguracióndelAsistenteseencuentraenel
manualdelusuariodelosproductos,disponibleenwww.axis.com
Nota
ParaobtenermásinformaciónsobrelaconguracióndelacámaradelproductodeAxis
correspondiente,veaelmanualdelusuario,disponibleenwww.axis.com.
Instalacióndelacámara:portátil
1.ConectelacámaraalpuertoCAM(PoE)delaunidadprincipal.
2.CompruebequeelindicadorPoEestéencendido.
3.ConecteelportátilalpuertoNET(noPoE)delaunidadprincipal.
4.VayaalainterfazwebypulseListadecámaras.
Nota
VeaInterfazwebdeAXIST8415enlapágina79paraobtenerinformaciónsobrecómo
accederalainterfazwebdeAXIST8415.
5.SeleccioneunacámarahaciendoclicenladirecciónIP.
6.Lacámaraseleccionadaseabriráenunnavegador.
Nota
•ParaobtenermásinformaciónsobrelaconguracióndelacámaradelproductodeAxis
correspondiente,veaelmanualdelusuario,disponibleenwww.axis.com.
86

AXIST8415WirelessInstallationTool
•Eltiempodearranquenecesarioparalascámarasvaríaencadaproducto.Puedenpasar
variosminutosantesdequelacámaraaparezcaenlalistadecámarasdelainterfazweb.
Solucióndeproblemas
•NoseencuentraelSSID.
-CompruebequeelindicadorWLANestéencendido.
-Seleccioneuncanaldiferente.
-Asegúresedequeeldispositivomanualseacompatibleconelmodo5GHz;en
casocontrario,cambiealmodo2.4GHzenlaAXIST8415.
•Nohayningunacámaraenlalistadecámarasdelaaplicación.
-CompruebequeelindicadorWLANestéencendido.
-Eltiempodearranquenecesarioparalascámarasvaríaencadaproducto.
Puedenpasarvariosminutosantesdequeaparezcalacámara.Pulse
Refresh(Actualizar)paraactualizarlapáginaCameralist(Listadecámaras).
-AsegúresedequeBonjourestéactivadoenelproductodeAxis.
-AsegúresedequeladirecciónIPdelacámaranoseencuentreenelrango
10.252.252.X
•NosepuedeiniciarsesiónenlainterfazwebdeAXIST8415siseutilizauncable
deredyunordenador.
-Asegúresedequeelcablederedestéconectadoalpuertocorrecto(NET).
•NohayningunacámaraenCameraList(Listadecámaras)(interfazweb)alutilizar
unportátilparalainstalación.
-Asegúresedequeloscablesderedesténconectadosalospuertoscorrectos:
CAM:conectadoalacámara.
NET:conectadoalportátil.
-AsegúresedequelacámaraylaAXIST8415esténenelmismointervalode
direccionesIP.
-AsegúresedequeseutiliceAXIST8415comopuertadeenlacepredeterminada.
-AsegúresedequeladirecciónIPdelacámaranoseencuentreenelrango
10.252.252.X
•Pocasimágenesporsegundoenlaimagenalutilizarlaaplicación.
-ObserveelindicadorWLANeneldispositivomanualparacomprobarla
intensidaddelaseñal.
-Asegúresedequelaredinalámbricaestéestablecidaen5GHz.
-Seleccioneuncanaldiferente.
LasiguientelistaseaplicasiseintentedetectarunacámaradeotrofabricantedistintodeAxis
compatibleconOnvif.
87
ES

AXIST8415WirelessInstallationTool
•LacámaraestáestablecidaenunadirecciónIPdinámica,peronohayningúnservidor
DHCPenlared.
-ActiveelservidorDHCPintegradoenAXIST8415.
•LacámaraestáestablecidaenunadirecciónIPdinámicayhayunservidorDHCPen
lared.
-CongurelaAXIST8415paraqueutiliceunadirecciónIPdinámica.
•LacámaracuentaconunadirecciónIPja.
-CongurelaAXIST8415paraquesudirecciónIPseencuentreenelmismo
intervaloqueeldelacámara.
Restablecimientodelosvalorespredeterminadosdefábrica
Importante
•Esprecisotenercuidadosisevaarestablecerlaconguraciónpredeterminadadefábrica.
Todoslosvaloresserestableceránalaconguraciónpredeterminadadefábrica.
•AsegúresedequeelindicadorWLANestéencendidodeformacontinuaantesde
restablecerlosvaloresdefábrica.
Pararestablecerelproductoalaconguraciónpredeterminadadefábrica:
1.Mantengapulsadoelbotónderestablecimientodurantediezsegundos.
2.LaAXIST8415sereiniciarácontodoslosvaloresrestablecidosalosvalores
predeterminadosdefábrica.
Nota
VeaInformacióngeneraldelhardwareenlapágina77paraobtenerinformaciónsobre
cómolocalizarelbotónderestablecimiento.
Informacióndegarantía
ParaobtenermásdetallessobrelagarantíadelproductoAxisylainformaciónrelacionadacon
ella,visiteaxis.com/warranty.
88

AXIST8415WirelessInstallationTool
安 安
安
全 全
全
情 情
情
報 報
報
危 危
危
険 険
険
レ レ
レ
ベ ベ
ベ
ル ル
ル
危険
回避しない場合、死亡または重傷につながる危険な状態を⽰します。
警告
回避しない場合、死亡または重傷につながるおそれのある危険な状態を
⽰します。
注意
回避しない場合、軽傷または中程度の怪我につながるおそれのある危険
な状態を⽰します。
注 記
回避しない場合、器物の破損につながるおそれのある状態を⽰します。
そ そ
そ
の の
の
他 他
他
の の
の
メ メ
メ
ッ ッ
ッ
セ セ
セ
ー ー
ー
ジ ジ
ジ
レ レ
レ
ベ ベ
ベ
ル ル
ル
重要
製品を正しく機能させるために不可⽋な重要情報を⽰します。
注意
製品を最⼤限に活⽤するために役⽴つ有⽤な情報を⽰します。
89
JA

AXIST8415WirelessInstallationTool
安 安
安
全 全
全
⼿ ⼿
⼿
順 順
順
注 記
•本製品は、お使いになる地域の法律や規制に準拠して使⽤してください。
•Axisは、シールドネットワークケーブル(STP)の使⽤を推奨します。
•本製品は乾燥した換気のよい環境に保管してください。
•本製品に衝撃または強い圧⼒を加えないでください。
•本製品に振動を加えないでください。
•本製品を設置する際には、適切な⼯具のみを使⽤してください。電動⼯具を
使⽤して過剰な⼒をかけると、製品が損傷することがあります。
•化学薬品、腐⾷剤、噴霧式クリーナーは使⽤しないでください。
•清掃には、きれいな⽔に浸した清潔な布を使⽤してください。
•製品の技術仕様に準拠したアクセサリーのみを使⽤してください。これらの
アクセサリーは、Axisまたはサードパーティから⼊⼿できます。Axisは、ご使
⽤の製品と互換性のあるAxis給電ネットワークスイッチの使⽤を推奨します。
•Axisが提供または推奨する交換部品のみを使⽤してください。
•製品を⾃分で修理しないでください。修理については、Axisサポートまたは
販売代理店にお問い合わせください。
鉛 鉛
鉛
酸 酸
酸
バ バ
バ
ッ ッ
ッ
テ テ
テ
リ リ
リ
ー ー
ー
本製品は、電源に鉛酸バッテリーを使⽤しています。
注 記
•このタイプのバッテリーは⾃⼰放電特性を有しているため、6か⽉以内に充
電を⾏う必要があります。そのようにしないと、硫酸化により電池容量が永
続的に失われる可能性があります。
•付属のチャージャーのみを使⽤してください。
注意
密閉容器内でのバッテリーの充電または放電は絶対に⾏わないでください。
バッテリーの内部では混合ガスが⽣成されます。過充電やバッテリーの
ショートなど⼀定の状況が重なると、これらのガスが容器内に放出され、⽕
花による着⽕時に爆発を引き起こす可能性があります。
注意
•爆発したり有害ガスを⽣成したりする恐れがあるため、バッテリーを絶対に
⽕気のある場所に廃棄しないでください。
•負傷の原因となる硫酸が漏洩する可能性があるため、バッテリーの分解は⾏
わないでください。
90

AXIST8415WirelessInstallationTool
注 記
使⽤済みバッテリーは、地域の規制またはバッテリーメーカーの指⽰に
従って廃棄してください。
91
JA

92

AXIST8415WirelessInstallationTool
イ イ
イ
ン ン
ン
ス ス
ス
ト ト
ト
ー ー
ー
ル ル
ル
ガ ガ
ガ
イ イ
イ
ド ド
ド
このインストールガイドでは、AXIST8415WirelessInstallatinToolをインストールす
る⼿順について説明します。このインストールツールでは、ノートPCおよびカメラ
のインストール⽤アプリの使⽤に対応しています。最⾼のパフォーマンスと経験を
得るために、アプリを使⽤することをお勧めします。
製品の使⽤の詳細については、
www .axis.com
で⼊⼿できるユーザーズマニュア
ルを参照してください
パ パ
パ
ッ ッ
ッ
ケ ケ
ケ
ー ー
ー
ジ ジ
ジ
の の
の
内 内
内
容 容
容
•メインユニット
•チャージャー
•バッテリー
•ストラップ
•印刷物
-インストールガイド(本書)
ハ ハ
ハ
ー ー
ー
ド ド
ド
ウ ウ
ウ
ェ ェ
ェ
ア ア
ア
の の
の
概 概
概
要 要
要
1
バ ッ テ リ ー イ ン ジ ケ ー タ ー
2
USB 充 電 ポ ー ト ( デ ー タ 転 送 不 可 )
3
RJ45 PoE CAM( カ メ ラ 側 )
93
JA

AXIST8415WirelessInstallationTool
4
RJ45 PoE ⾮ 対 応 NET( ネ ッ ト ワ ー ク 側 )
5
オ ン / オ フ ス イ ッ チ
6
WLAN イ ン ジ ケ ー タ ー
7
リ セ ッ ト ボ タ ン
8
メ イ ン ユ ニ ッ ト
9
バ ッ テ リ ー チ ャ ー ジ ャ ー コ ネ ク タ
10
バ ッ テ リ ー
11
ラ ベ ル ( ネ ッ ト ワ ー ク 設 定 )
1
チ ャ ー ジ ャ ー
2
チ ャ ー ジ ャ ー ( オ ス コ ネ ク タ )
3
チ ャ ー ジ ャ ー LED
4
電 源 コ ー ド プ ラ グ (EU)
5
電 源 コ ー ド プ ラ グ ( ⽇ 本 / ⽶ 国 )
6
電 源 コ ー ド プ ラ グ ( 英 国 )
7
電 源 コ ー ド プ ラ グ ( オ ー ス ト ラ リ ア )
ネ ネ
ネ
ッ ッ
ッ
ト ト
ト
ワ ワ
ワ
ー ー
ー
ク ク
ク
コ コ
コ
ネ ネ
ネ
ク ク
ク
タ タ
タ
RJ45イーサネットコネクタ。
RJ45イーサネットコネクタ、PoweroverEthernetPlus(PoE+)対応。
注 記
本製品を使⽤する場所の地域条例、環境、電気的条件によっては、シールド
ネットワークケーブル(STP)の使⽤が推奨または必須になります。本製品を
ネットワークに接続して屋外または電気的に厳しい環境に配線する場合は、
⽤途に合ったネットワークケーブルを使⽤してください。ネットワーク装置
がメーカーの指⽰どおりに設置されていることを確認します。法的要件につ
いては、
Electromagnetic compatibility (EMC) on page 4
を参照してください。
94

AXIST8415WirelessInstallationTool
USB USB
USB
コ コ
コ
ネ ネ
ネ
ク ク
ク
タ タ
タ
AXIST8415にはUSBコネクタ(データ転送不可)が搭載されています。このコネクタを
使⽤して、互換性のある携帯型デバイス(5V、2.1A)を充電することができます。
注意
•携帯型デバイスを充電する場合は、AXIST8415の電源をオンにする必要が
あります。
•携帯型デバイスの充電はユニットのバッテリーに影響します。バッテリー
の残量が⾮常に低いレベルに到達すると、携帯型デバイスを充電しなくな
ります。バッテリーの状態については、
93 ペ ー ジ の 、 ハ ー ド ウ ェ ア の 概 要
バッテリーインジケーターを参照してください。充電を継続するには、新
しく充電されたバッテリーと交換します。
99 ペ ー ジ の 、 バ ッ テ リ ー を 交 換
す る
を参照してください。
AXIS AXIS
AXIS
T8415 T8415
T8415
Web Web
Web
イ イ
イ
ン ン
ン
タ タ
タ
ー ー
ー
フ フ
フ
ェ ェ
ェ
ー ー
ー
ス ス
ス
AXIST8415Webインターフェースでは、ネットワーク設定の編集とファームウェア
のアップグレードが可能です。
ブラウザーにユニットのIPアドレスを⼊⼒して、Webインターフェースにアクセスし
ます。IPアドレスはメインユニットのラベルで確認することができます。
注意
•実際のスクリーンショットは、新しいファームウェアのリリースによって変
更される場合があります。
•AXIST8415には2つのIPアドレスがあります。1つはWiFi経由の接続⽤で、
もう1つは有線ネットワーク経由の接続⽤です。
•名前:ユニットの名前は変更することができます。
ネ ネ
ネ
ッ ッ
ッ
ト ト
ト
ワ ワ
ワ
ー ー
ー
ク ク
ク
- -
-
Wi Wi
Wi
イ イ
イ
ン ン
ン
タ タ
タ
ー ー
ー
フ フ
フ
ェ ェ
ェ
ー ー
ー
ス ス
ス
95
JA
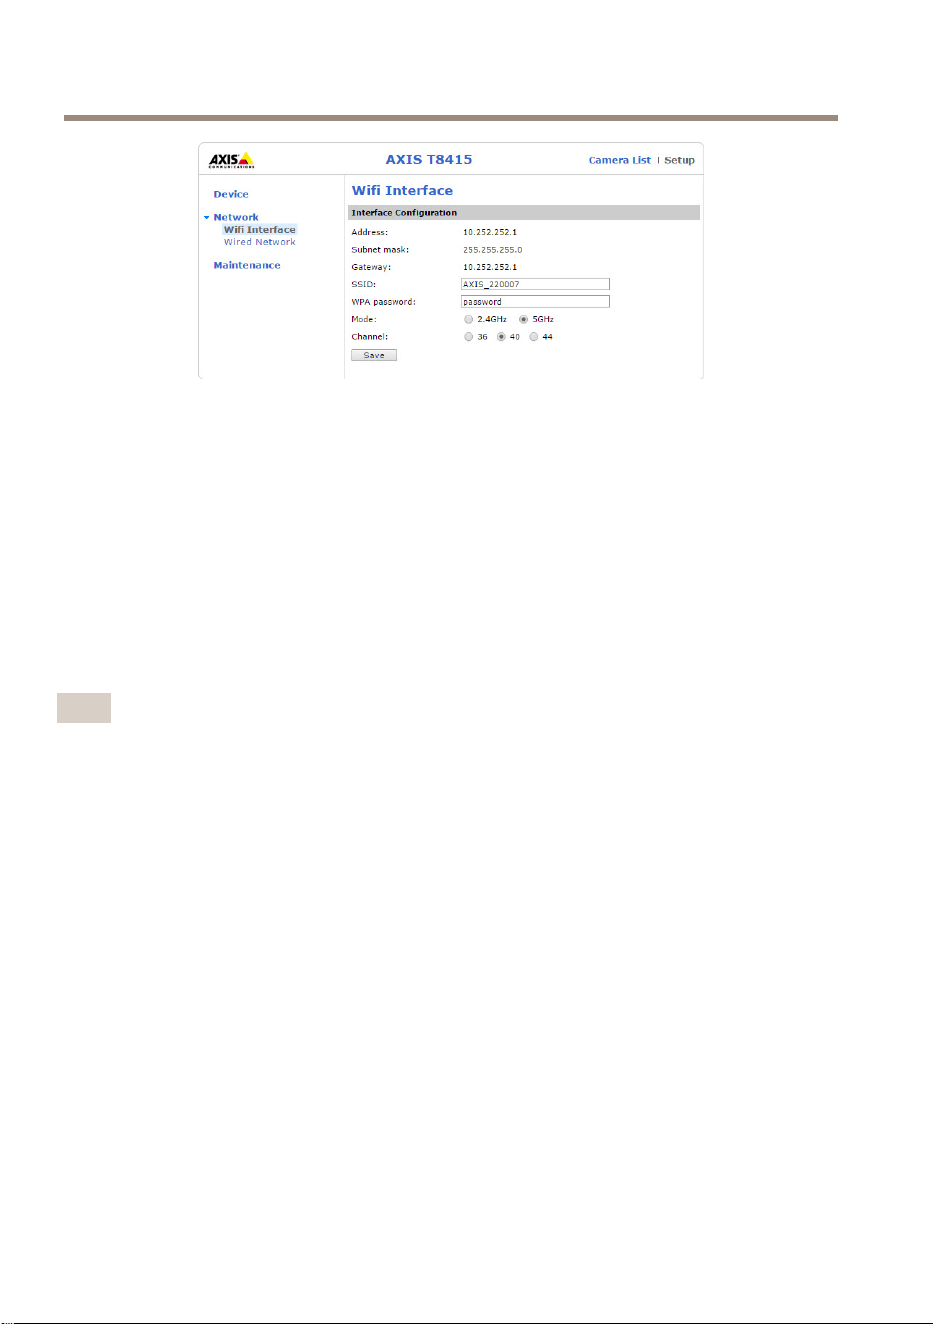
AXIST8415WirelessInstallationTool
•Address(アドレス):ユニットのIPアドレスです。
•Subnetmask(サブネットマスク):ユニットのサブネットマスクです。
•Gateway(ゲートウェイ):ユニットのデフォルトゲートウェイです。
•SSID:ワイヤレスネットワークの名前は変更することができます。
•WPApassword(WPAパスワード):ワイヤレスネットワークのパスワードは
変更することができます。
•Mode(モード):ワイヤレスネットワークの周波数モードを設定します。
2.4GHzか5GHzのどちらかを選択します。注:5GHzは屋内専⽤です。屋外
で使⽤する場合は2.4GHzを選択してください。
•チャンネルは国によって異なる場合があります。5GHzは屋内のみでお使い
ください。屋外で作業する場合は2.4GHzのみお使いいただけます。
注意
•デフォルトのSSIDおよびパスワードは、メインユニットにあるラベルで確
認することができます。Webインターフェースで変更する場合、ラベル
は無効になります。
•AXIST8415は、2.4GHzと5GHzの両⽅をサポートしています。
•チャンネルは国によって異なる場合があります。
ネ ネ
ネ
ッ ッ
ッ
ト ト
ト
ワ ワ
ワ
ー ー
ー
ク ク
ク
- -
-
有 有
有
線 線
線
ネ ネ
ネ
ッ ッ
ッ
ト ト
ト
ワ ワ
ワ
ー ー
ー
ク ク
ク
96
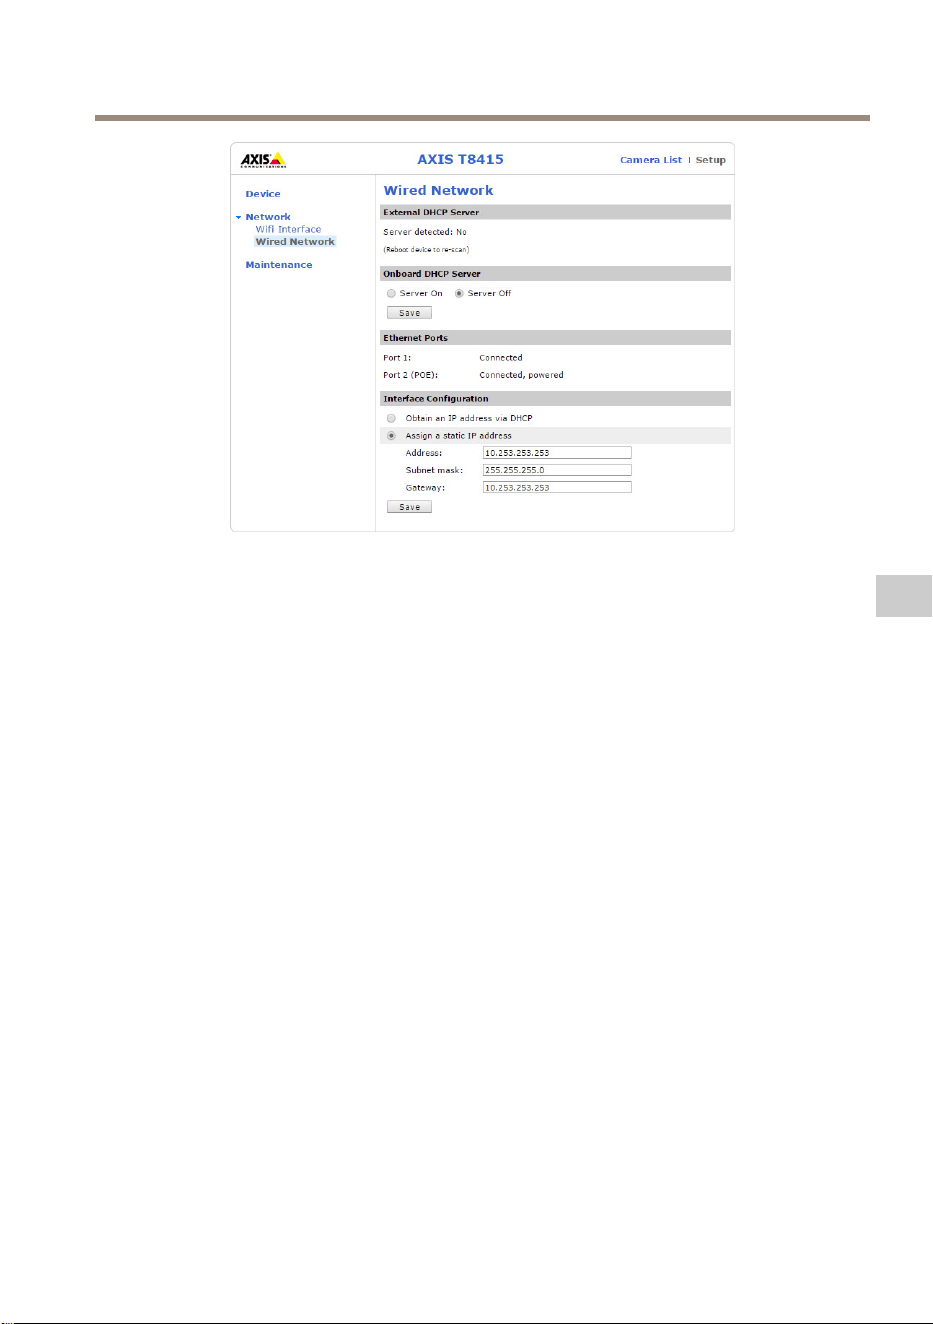
AXIST8415WirelessInstallationTool
•ExternalDHCPServer(外部DHCPサーバー):外部DHCPサーバーの検出状
況です。
•OnboardDHCPServer(オンボードDHCPサーバー):
-On(オン):内部DHCPサーバーをオンにします
-Off(オフ):内部DHCPサーバーをオフにします
•EthernetPorts(イーサネットポート):イーサネットポートのステータス
を表⽰します。
-Connected(接続):カメラ/ノートPCがイーサネットポートに接続
されています
-Unconnected(未接続):カメラ/ノートPCがイーサネットポート
に接続されていません
•InterfaceConguration(インターフェースの設定):IPアドレスを⼿動で設定
するか、DHCPサーバーからIPアドレスを取得します。
•Address(アドレス):ユニットのIPアドレスです。
•Subnetmask(サブネットマスク):ユニットのサブネットマスクです。
•Gateway(ゲートウェイ):ユニットのデフォルトゲートウェイです。
メ メ
メ
ン ン
ン
テ テ
テ
ナ ナ
ナ
ン ン
ン
ス ス
ス
97
JA
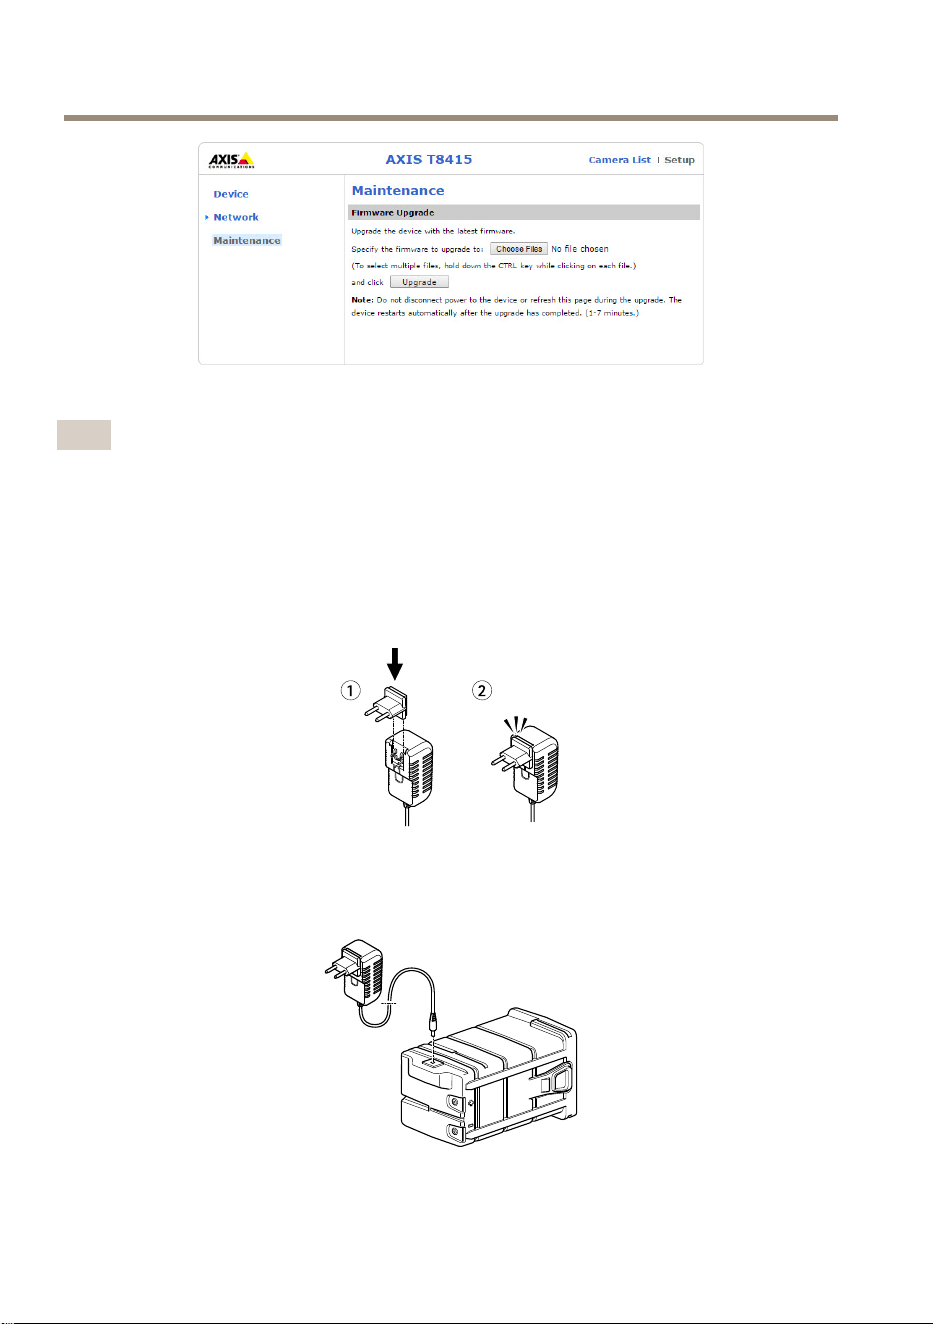
AXIST8415WirelessInstallationTool
AXIST8415のファームウェアをアップグレードします。
注意
最新のファームウェアは
www .axis.com
で⼊⼿できます
バ バ
バ
ッ ッ
ッ
テ テ
テ
リ リ
リ
ー ー
ー
を を
を
充 充
充
電 電
電
す す
す
る る
る
各国ごとの電源コードプラグをチャージャーに取り付けます。下の図を参照し
てください。
バッテリーチャージャーをバッテリーに取り付け(下の図を参照)、コンセントに
接続します。
98

AXIST8415WirelessInstallationTool
LED LED
LED
挙 挙
挙
動 動
動
⾚
バッテリー充電中
緑
バッテリー充電完了
注意
チャージャーLEDは、チャージャーの正⾯にあります(
93 ペ ー ジ の 、 ハ ー ド
ウ ェ ア の 概 要
を参照)
注 記
•このタイプのバッテリーは⾃⼰放電特性を有しているため、6か⽉以内に充
電を⾏う必要があります。そのようにしないと、硫酸化により電池容量が永
続的に失われる可能性があります。
•付属のチャージャーのみを使⽤してください。
注意
密閉容器内でのバッテリーの充電または放電は絶対に⾏わないでください。
バッテリーの内部では混合ガスが⽣成されます。過充電やバッテリーの
ショートなど⼀定の状況が重なると、これらのガスが容器内に放出され、⽕
花による着⽕時に爆発を引き起こす可能性があります。
バ バ
バ
ッ ッ
ッ
テ テ
テ
リ リ
リ
ー ー
ー
を を
を
交 交
交
換 換
換
す す
す
る る
る
バッテリーの交換については、下の図を参照してください。
注意
•爆発したり有害ガスを⽣成したりする恐れがあるため、バッテリーを絶対に
⽕気のある場所に廃棄しないでください。
99
JA

AXIST8415WirelessInstallationTool
•負傷の原因となる硫酸が漏洩する可能性があるため、バッテリーの分解は⾏
わないでください。
•バッテリーを分解すると、保証の対象外となります。
注 記
使⽤済みバッテリーは、地域の規制またはバッテリーメーカーの指⽰に
従って廃棄してください。
イ イ
イ
ン ン
ン
ス ス
ス
ト ト
ト
ー ー
ー
ル ル
ル
の の
の
準 準
準
備 備
備
AXIST8415WirelessInstallatinToolを使⽤すれば、携帯型デバイスやノートPCでカメ
ラをインストールすることができます。最⾼のパフォーマンス得るために、携帯型
デバイスとAXISWirelessInstallatinToolアプリを使⽤することをお勧めします。
•使⽤前にバッテリーが完全に充電されていることを確認します。
98 ペ ー ジ
の 、 バ ッ テ リ ー を 充 電 す る
を参照してください
•AXISWirelessInstallatinToolアプリを使⽤する場合は、AXIST8415WiFiネッ
トワークに接続する前にアプリを携帯型デバイスにダウンロードするよ
うにしてください。
•カメラをメインユニットに接続する前に、電源がオンになっていること
を確認します。
注意
AXISWirelessInstallatinToolは、AppStoreまたはGooglePlayからダウンロード
できます。
AXIS AXIS
AXIS
T8415 T8415
T8415
WiFi WiFi
WiFi
に に
に
接 接
接
続 続
続
す す
す
る る
る
携 携
携
帯 帯
帯
型 型
型
デ デ
デ
バ バ
バ
イ イ
イ
ス ス
ス
1.携帯型デバイスのWiFiをオンにします。
2.ユニットのSSIDを選択します。
3.パスワードを⼊⼒します
ノ ノ
ノ
ー ー
ー
ト ト
ト
PC PC
PC
1.コンピューターのWiFiをオンにします。
2.ユニットのSSIDを選択します。
3.パスワードを⼊⼒します
重要
コンピューターがDHCPからIPアドレスを取得するよう設定されていること
を確認します。
注意
デフォルトのSSIDおよびパスワードは、メインユニットのラベルに印刷
されています。
100
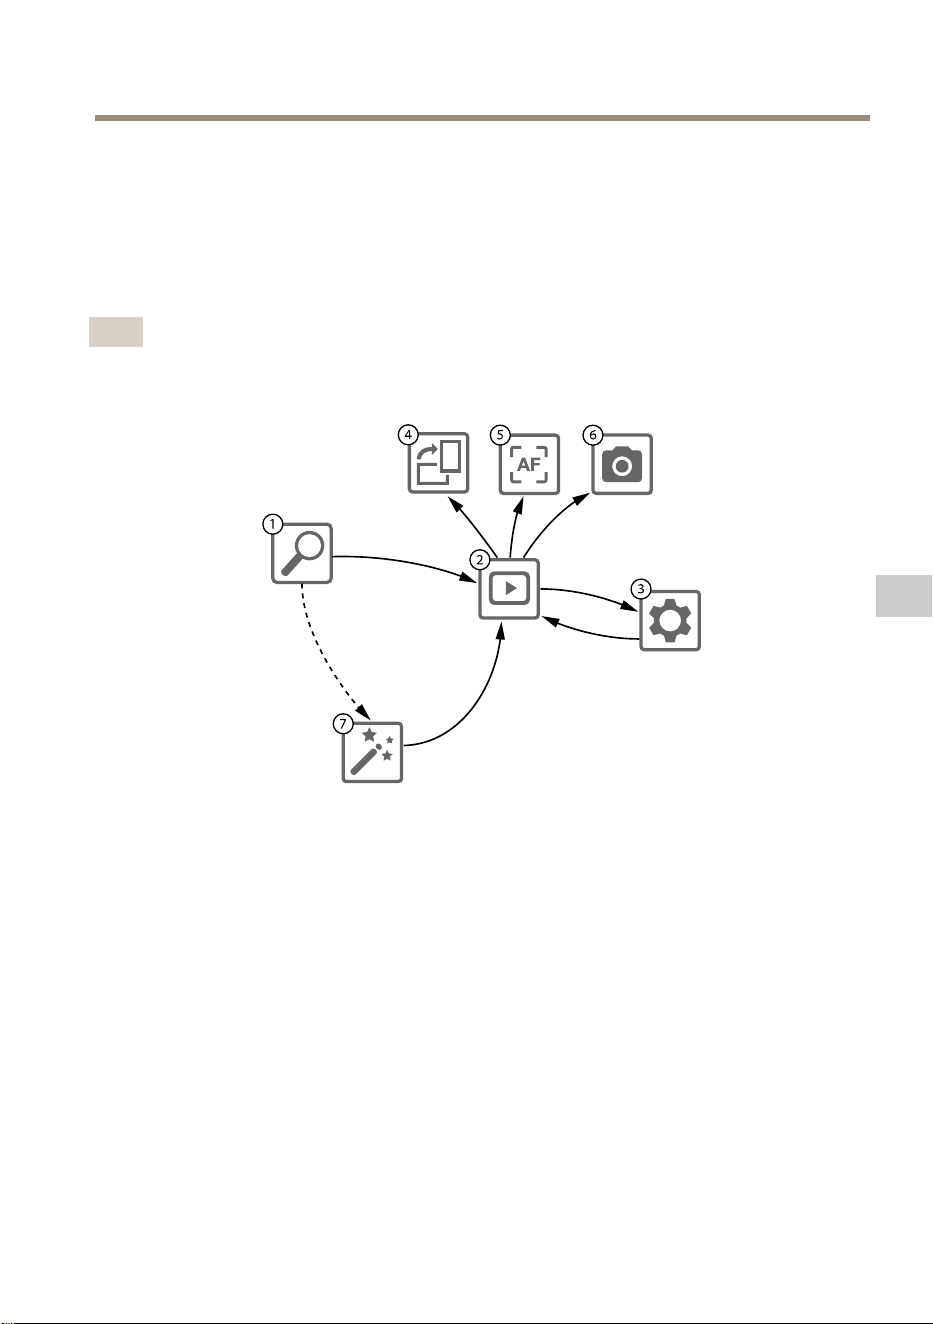
AXIST8415WirelessInstallationTool
カ カ
カ
メ メ
メ
ラ ラ
ラ
の の
の
設 設
設
置 置
置
- -
-
AXIS AXIS
AXIS
Wireless Wireless
Wireless
Installatin Installatin
Installatin
T T
T
ool ool
ool
ア ア
ア
プ プ
プ
リ リ
リ
1.カメラをメインユニットのCAMポート(PoE)に接続します。
2.PoEインジケーターが点灯していることを確認します。
3.AXIST8415WiFiに接続します(
100 ペ ー ジ の 、 AXIS T8415 WiFi に 接 続 す る
を参照)
4.AXISWirelessInstallatinToolアプリを起動します
注意
カメラの起動時間は製品によって異なります。カメラがアプリのカメラリス
トに表⽰されるまで数分かかる場合があります。
1
カ メ ラ リ ス ト
2
ラ イ ブ ビ ュ ー
3
設 定
4
画 像 を 回 転
5
オ ー ト フ ォ ー カ ス
6
ス ナ ッ プ シ ョ ッ ト
7
ウ ィ ザ ー ド
カ カ
カ
メ メ
メ
ラ ラ
ラ
を を
を
設 設
設
定 定
定
す す
す
る る
る
に に
に
は は
は
1 1
1
カ カ
カ
メ メ
メ
ラ ラ
ラ
リ リ
リ
ス ス
ス
ト ト
ト
でカメラを選択します。必要に応じて、続⾏するためにパスワー
ドを⼊⼒します。
2 2
2
ラ ラ
ラ
イ イ
イ
ブ ブ
ブ
ビ ビ
ビ
ュ ュ
ュ
ー ー
ー
では、画⾯を押し続けることでアクションボタン(4 4
4
、5 5
5
、および6 6
6
)
にアクセスできます。
画像を回転させるには、4 4
4
画 画
画
像 像
像
を を
を
回 回
回
転 転
転
を選択します。
101
JA
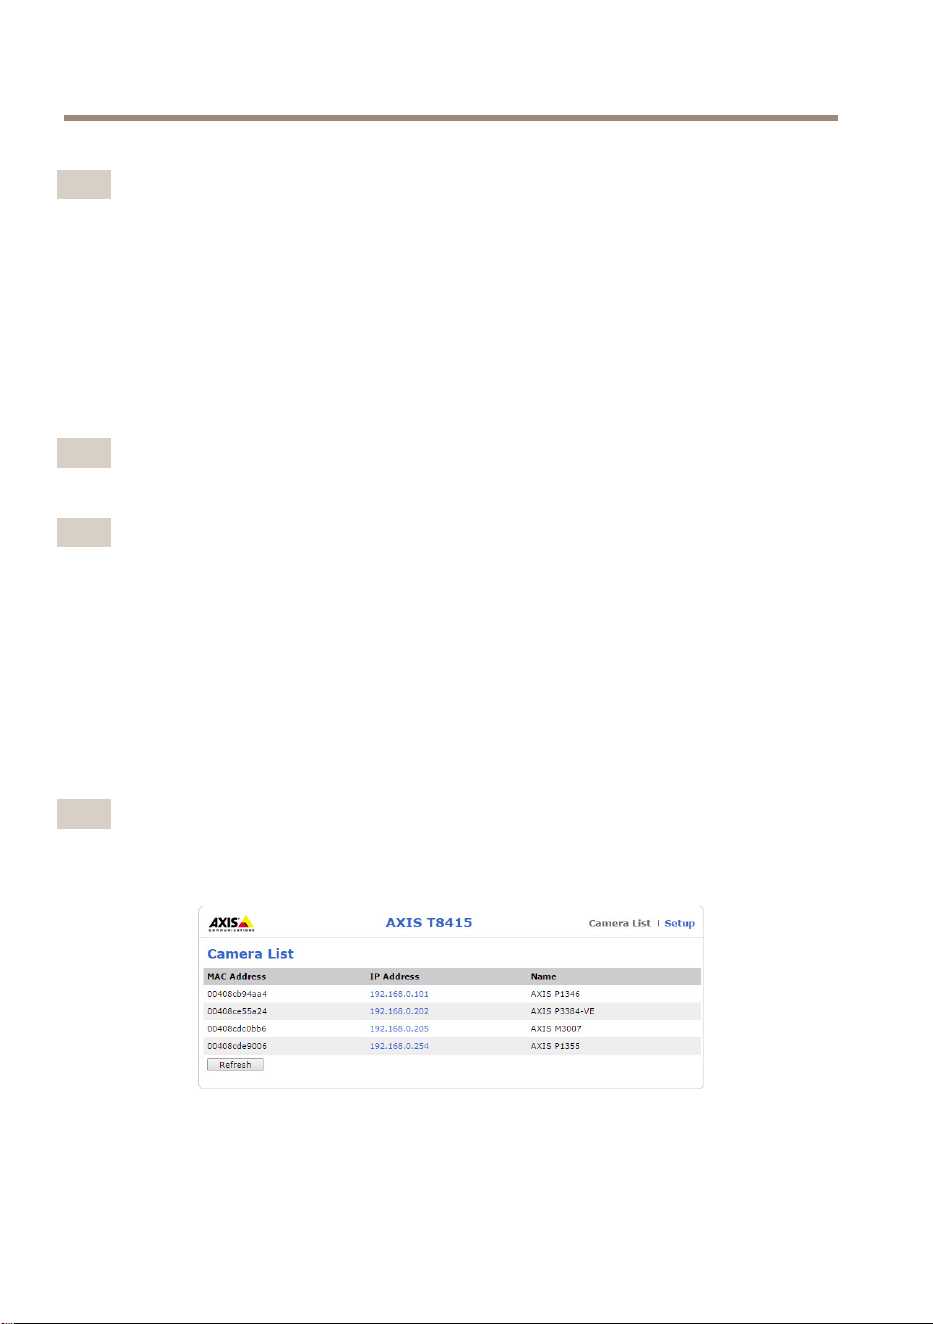
AXIST8415WirelessInstallationTool
理想的なフォーカスポイントを検索するには、5 5
5
オ オ
オ
ー ー
ー
ト ト
ト
フ フ
フ
ォ ォ
ォ
ー ー
ー
カ カ
カ
ス ス
ス
を選択します。
注意
•オートフォーカスは、カメラがこの機能をサポートしている場合にのみ
利⽤できます。
•オートフォーカスの実⾏には数分かかる場合があります。この時間中はカ
メラを動かさないようにすることが重要です。
ビデオ画像のスナップショットを撮るには、6 6
6
ス ス
ス
ナ ナ
ナ
ッ ッ
ッ
プ プ
プ
シ シ
シ
ョ ョ
ョ
ッ ッ
ッ
ト ト
ト
を選択します。
製品のネットワーク設定を編集するには、3 3
3
設 設
設
定 定
定
を選択します。
7 7
7
番⽬はウ ウ
ウ
ィ ィ
ィ
ザ ザ
ザ
ー ー
ー
ド ド
ド
です。このウィザードは、初めてAxis製品にアクセスしたとき、
または⼯場出荷時の設定へのリセットを⾏った後に開始します。
注意
ウ ウ
ウ
ィ ィ
ィ
ザ ザ
ザ
ー ー
ー
ド ド
ド
の設定については、
www .axis.com
で⼊⼿できる製品
のユーザーズマニュアルを参照してください
注意
各Axis製品のカメラ設定の詳細については、
www .axis.com
で⼊⼿できる製品
のユーザーズマニュアルを参照してください
カ カ
カ
メ メ
メ
ラ ラ
ラ
の の
の
設 設
設
置 置
置
- -
-
ノ ノ
ノ
ー ー
ー
ト ト
ト
PC PC
PC
1.カメラをメインユニットのCAMポート(PoE)に接続します。
2.PoEインジケーターが点灯していることを確認します。
3.ノートPCをメインユニットのNETポート(PoE⾮対応)に接続します。
4.Webインターフェースに移動して、[Camera [Camera
[Camera
List] List]
List]
( (
(
カ カ
カ
メ メ
メ
ラ ラ
ラ
リ リ
リ
ス ス
ス
ト ト
ト
) )
)
を押
します。
注意
AXIST8415Webインターフェースにアクセスする⽅法については、
95 ペ ー ジ
の 、 AXIS T8415 Web イ ン タ ー フ ェ ー ス
を参照してください
5.IPアドレスをクリックしてカメラを選択します。
6.選択したカメラがブラウザーで開きます。
102

AXIST8415WirelessInstallationTool
注意
•各Axis製品のカメラ設定の詳細については、
www .axis.com
で⼊⼿できる製
品のユーザーズマニュアルを参照してください
•カメラの起動時間は製品によって異なります。カメラがWebインターフェー
スのカメラリストに表⽰されるまで数分かかる場合があります。
ト ト
ト
ラ ラ
ラ
ブ ブ
ブ
ル ル
ル
シ シ
シ
ュ ュ
ュ
ー ー
ー
テ テ
テ
ィ ィ
ィ
ン ン
ン
グ グ
グ
•SSID SSID
SSID
が が
が
⾒ ⾒
⾒
つ つ
つ
か か
か
り り
り
ま ま
ま
せ せ
せ
ん ん
ん
。 。
。
-WLANインジケーターが点灯していることを確認します。
-別のチャンネルを選択します。
-携帯型デバイスが5GHzモードに対応していることを確認しま
す。対応していない場合は、AXIST8415で2.4GHzモードに切
り替えます。
•ア ア
ア
プ プ
プ
リ リ
リ
の の
の
カ カ
カ
メ メ
メ
ラ ラ
ラ
リ リ
リ
ス ス
ス
ト ト
ト
に に
に
カ カ
カ
メ メ
メ
ラ ラ
ラ
が が
が
表 表
表
⽰ ⽰
⽰
さ さ
さ
れ れ
れ
ま ま
ま
せ せ
せ
ん ん
ん
-WLANインジケーターが点灯していることを確認します。
-カメラの起動時間は製品によって異なります。カメラが表⽰さ
れるまで数分かかる場合があります。[Refresh](更新)を押して、
[CameraList](カメラリスト)ページを更新します。
-本製品でBonjourが有効になっていることを確認します。
-カメラのIPアドレスが10.252.252.Xの範囲になっていないことを
確認します。
•ネ ネ
ネ
ッ ッ
ッ
ト ト
ト
ワ ワ
ワ
ー ー
ー
ク ク
ク
ケ ケ
ケ
ー ー
ー
ブ ブ
ブ
ル ル
ル
と と
と
PC PC
PC
を を
を
使 使
使
⽤ ⽤
⽤
す す
す
る る
る
と と
と
、 、
、
AXIS AXIS
AXIS
T8415 T8415
T8415
Web Web
Web
イ イ
イ
ン ン
ン
タ タ
タ
ー ー
ー
フ フ
フ
ェ ェ
ェ
ー ー
ー
ス ス
ス
に に
に
ロ ロ
ロ
グ グ
グ
イ イ
イ
ン ン
ン
で で
で
き き
き
ま ま
ま
せ せ
せ
ん ん
ん
。 。
。
-ネットワークケーブルが適切なポート(NET)に接続されているこ
とを確認します。
•イ イ
イ
ン ン
ン
ス ス
ス
ト ト
ト
ー ー
ー
ル ル
ル
に に
に
ノ ノ
ノ
ー ー
ー
ト ト
ト
PC PC
PC
を を
を
使 使
使
⽤ ⽤
⽤
す す
す
る る
る
際 際
際
、 、
、
カ カ
カ
メ メ
メ
ラ ラ
ラ
リ リ
リ
ス ス
ス
ト ト
ト
( (
(
Web Web
Web
イ イ
イ
ン ン
ン
タ タ
タ
ー ー
ー
フ フ
フ
ェ ェ
ェ
ー ー
ー
ス ス
ス
) )
)
に に
に
カ カ
カ
メ メ
メ
ラ ラ
ラ
が が
が
表 表
表
⽰ ⽰
⽰
さ さ
さ
れ れ
れ
ま ま
ま
せ せ
せ
ん ん
ん
。 。
。
-ネットワークケーブルが適切なポートに接続されていることを
確認します。
CAM: CAM:
CAM:
カメラに接続
NET NET
NET
: :
:
ノートPCに接続
-カメラとAXIST8415のIPアドレスが同じ範囲になっていることを
確認します。
-AXIST8415がデフォルトゲートウェイとして使⽤されているこ
とを確認します。
-カメラのIPアドレスが10.252.252.Xの範囲になっていないことを
確認します。
•ア ア
ア
プ プ
プ
リ リ
リ
を を
を
使 使
使
⽤ ⽤
⽤
す す
す
る る
る
と と
と
、 、
、
画 画
画
像 像
像
の の
の
フ フ
フ
レ レ
レ
ー ー
ー
ム ム
ム
/ /
/
秒 秒
秒
が が
が
低 低
低
下 下
下
し し
し
ま ま
ま
す す
す
。 。
。
-携帯型デバイスのWLANインジケーターで信号強度を確認します。
103
JA

AXIST8415WirelessInstallationTool
-ワイヤレスネットワークが5GHzに設定されていることを確認し
ます。
-別のチャンネルを選択します。
以下のリストは、ONVIF対応の社外製カメラを発⾒する際に適⽤されます。
•カ カ
カ
メ メ
メ
ラ ラ
ラ
は は
は
動 動
動
的 的
的
IP IP
IP
ア ア
ア
ド ド
ド
レ レ
レ
ス ス
ス
に に
に
設 設
設
定 定
定
さ さ
さ
れ れ
れ
て て
て
い い
い
ま ま
ま
す す
す
が が
が
、 、
、
ネ ネ
ネ
ッ ッ
ッ
ト ト
ト
ワ ワ
ワ
ー ー
ー
ク ク
ク
上 上
上
に に
に
DHCP DHCP
DHCP
サ サ
サ
ー ー
ー
バ バ
バ
ー ー
ー
が が
が
あ あ
あ
り り
り
ま ま
ま
せ せ
せ
ん ん
ん
。 。
。
-AXIST8415でオンボードDHCPサーバーをアクティブにします。
•カ カ
カ
メ メ
メ
ラ ラ
ラ
が が
が
動 動
動
的 的
的
IP IP
IP
ア ア
ア
ド ド
ド
レ レ
レ
ス ス
ス
に に
に
設 設
設
定 定
定
さ さ
さ
れ れ
れ
て て
て
お お
お
り り
り
、 、
、
ネ ネ
ネ
ッ ッ
ッ
ト ト
ト
ワ ワ
ワ
ー ー
ー
ク ク
ク
上 上
上
に に
に
DHCP DHCP
DHCP
サ サ
サ
ー ー
ー
バ バ
バ
ー ー
ー
が が
が
あ あ
あ
り り
り
ま ま
ま
す す
す
。 。
。
-AXIST8415で動的IPアドレスを設定します。
•カ カ
カ
メ メ
メ
ラ ラ
ラ
に に
に
固 固
固
定 定
定
IP IP
IP
ア ア
ア
ド ド
ド
レ レ
レ
ス ス
ス
が が
が
あ あ
あ
り り
り
ま ま
ま
す す
す
。 。
。
-IPアドレスがカメラと同じ範囲になるようにAXIST8415を設定し
ます。
⼯ ⼯
⼯
場 場
場
出 出
出
荷 荷
荷
時 時
時
の の
の
設 設
設
定 定
定
に に
に
リ リ
リ
セ セ
セ
ッ ッ
ッ
ト ト
ト
す す
す
る る
る
重要
•⼯場出荷時の設定へのリセットは慎重に⾏ってください。⼯場出荷時の設定
へのリセットを⾏うと、すべての設定が⼯場出荷時の値にリセットされます。
•⼯場出荷時の設定へのリセットを実⾏する前に、WLANインジケーターが点
灯し続けていることを確認します。
本製品を⼯場出荷時の設定にリセットするには、以下の⼿順を実⾏します。
1.リセットボタンを10秒間押し続けます。
2.AXIST8415が再起動し、すべての値が⼯場出荷時の設定にリセットされま
す。
注意
リセットボタンの位置については、
93 ペ ー ジ の 、 ハ ー ド ウ ェ ア の 概 要
を
参照してください。
保 保
保
証 証
証
情 情
情
報 報
報
Axisの製品保証と関連情報については、
axis.com/warranty
をご覧ください
104

AXIST8415WirelessInstallationTool
安 安
安
全 全
全
信 信
信
息 息
息
危 危
危
险 险
险
等 等
等
级 级
级
危险
表示如果不避免则会导致死亡或严重伤害的危险情况。
警告
表示如果不避免则可能导致死亡或严重伤害的危险情况。
小心
表示如果不避免则可能导致轻微或中度伤害的危险情况。
注 意
表示如果不避免则可能导致财产损失的情况。
其 其
其
他 他
他
消 消
消
息 息
息
等 等
等
级 级
级
重要
表示产品正常工作所必需的重要信息。
备注
表示有助于充分利用产品的有用信息。
105
ZH

AXIST8415WirelessInstallationTool
安 安
安
全 全
全
说 说
说
明 明
明
注 意
•使用安讯士产品时应遵守当地法律和法规。
•安讯士推荐使用屏蔽网络电缆(STP)。
•在干燥通风的环境中存放安讯士产品。
•避免将安讯士产品暴露在冲击或高压环境下。
•避免将安讯士产品暴露在振动环境下。
•安装安讯士产品时,仅使用适用的工具。使用电动工具过度施力可能导致
产品损坏。
•请勿使用化学品、腐蚀剂或气雾剂。
•使用蘸纯净水的干净布进行清洁。
•仅使用符合产品技术规格的附件。这些附件可由安讯士或第三方提供。安讯
士推荐使用与产品兼容的安讯士电源设备。
•仅使用安讯士提供或推荐的备件。
•请勿尝试自行维修产品。有关服务事项,请联系安讯士支持部门或安讯
士经销商。
铅 铅
铅
酸 酸
酸
电 电
电
池 池
池
本安讯士产品使用铅酸电池作为电源。
注 意
•由于这种电池具有自放电特征,因此这些电池需要在存放后6个月内进行充
电,否则硫酸盐化作用可能使电池永久失去容量。
•仅使用随附的充电器。
小心
切勿在密封的外壳内对电池进行充电或放电。电池内部会产生混合气体。在
特定情况下,如电池极度过度充电或短路,这些气体可能泄漏到外壳内,
从而引发火花致爆炸的潜在风险。
小心
•切勿将电池丢入燃火内,因为这会使电池爆炸或产生有毒气体。
•切勿拆卸电池,因为这会导致硫酸泄漏,从而造成伤害。
注 意
请按照当地法规或电池制造商的说明来处理废旧电池。
106

AXIST8415WirelessInstallationTool
安 安
安
装 装
装
指 指
指
南 南
南
本安装指南提供了AXIST8415无线安装工具的说明。本安装工具支持使用笔记本电脑
和应用安装摄像机。为实现优异安装,推荐使用本应用。
有关使用该产品的其他信息,请参见用户手册,网址:
www.axis.com
包 包
包
装 装
装
内 内
内
容 容
容
•主单元
•充电器
•电池
•带
•印刷资料
-安装指南(本文档)
硬 硬
硬
件 件
件
概 概
概
览 览
览
1
电 池 指 示 灯
2
USB 充 电 端 口 ( 非 数 据 )
3
RJ45 PoE (CAM)
4
RJ45 非 PoE (NET)
5
通 断 开 关
6
WLAN 指 示 灯
107
ZH
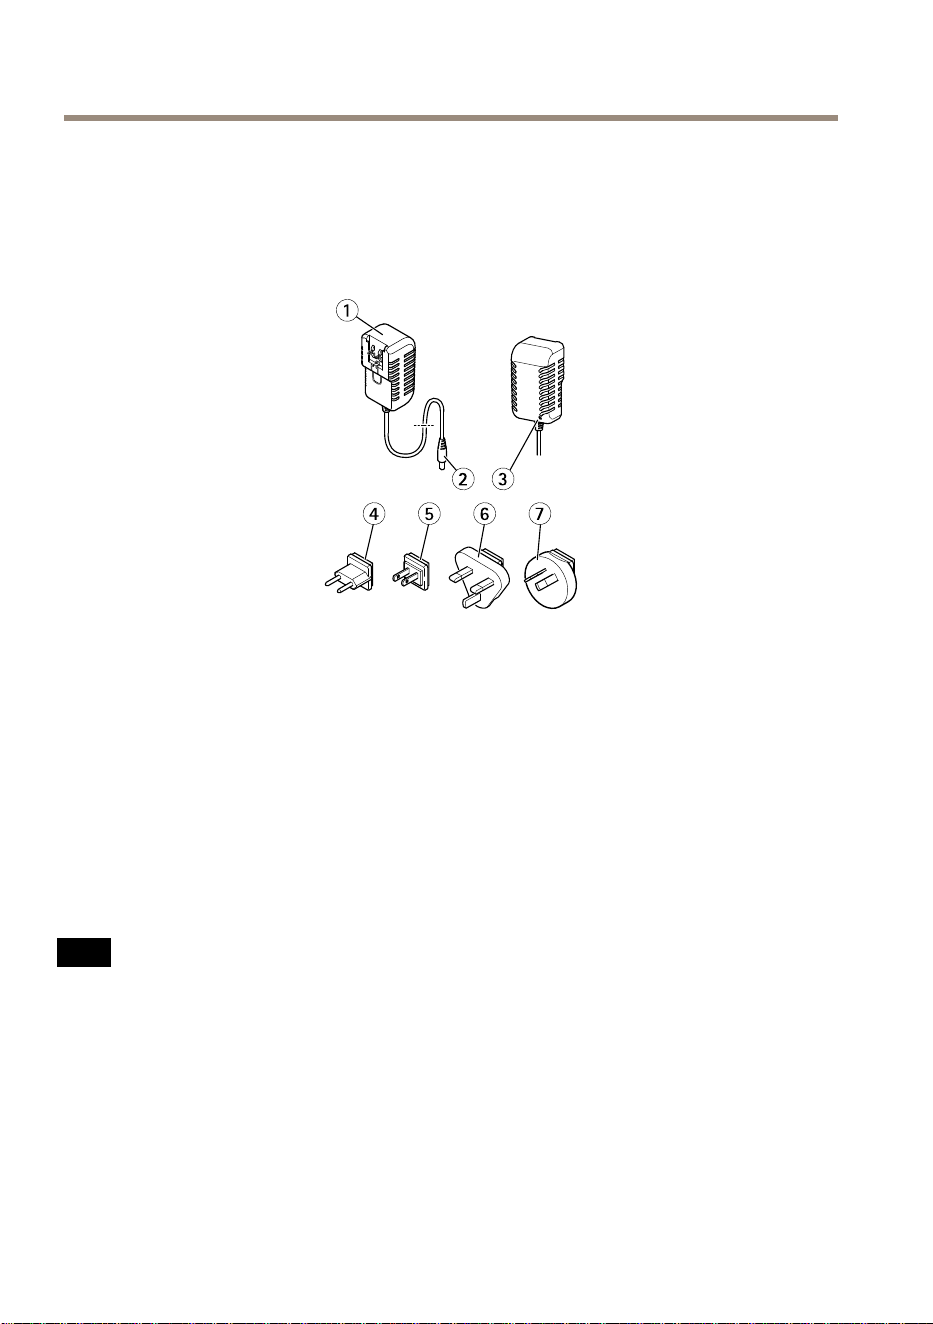
AXIST8415WirelessInstallationTool
7
重 置 按 钮
8
主 单 元
9
电 池 充 电 器 接 口
10
电 池
11
标 签 ( 网 络 设 置 )
1
充 电 器
2
充 电 器 公 头 接 口
3
LED 充 电 器 指 示 灯
4
电 源 线 插 头 ( 欧 洲 )
5
电 源 线 插 头 ( 美 国 )
6
电 源 线 插 头 ( 英 国 )
7
电 源 线 插 头 ( 澳 大 利 亚 )
网 网
网
络 络
络
连 连
连
接 接
接
器 器
器
RJ45以太网连接器。
采用以太网供电增强版(PoE+)的RJ45以太网连接器。
注 意
由于当地法规或产品使用场所的环境和电气条件,可能需要使用屏蔽网络电缆
(STP)。将产品连接到网络的电缆以及在室外或恶劣电气环境中布放的电缆应专
用于其特定用途。确保根据制造商的说明安装网络设备。有关法规要求的信
息,请参见
Electromagnetic compatibility (EMC) on page 4
。
USB USB
USB
接 接
接
口 口
口
AXIST8415配有USB接口(非数据)。该接口可用于对不同兼容的手持设
备(5V,2.1A)进行充电。
108
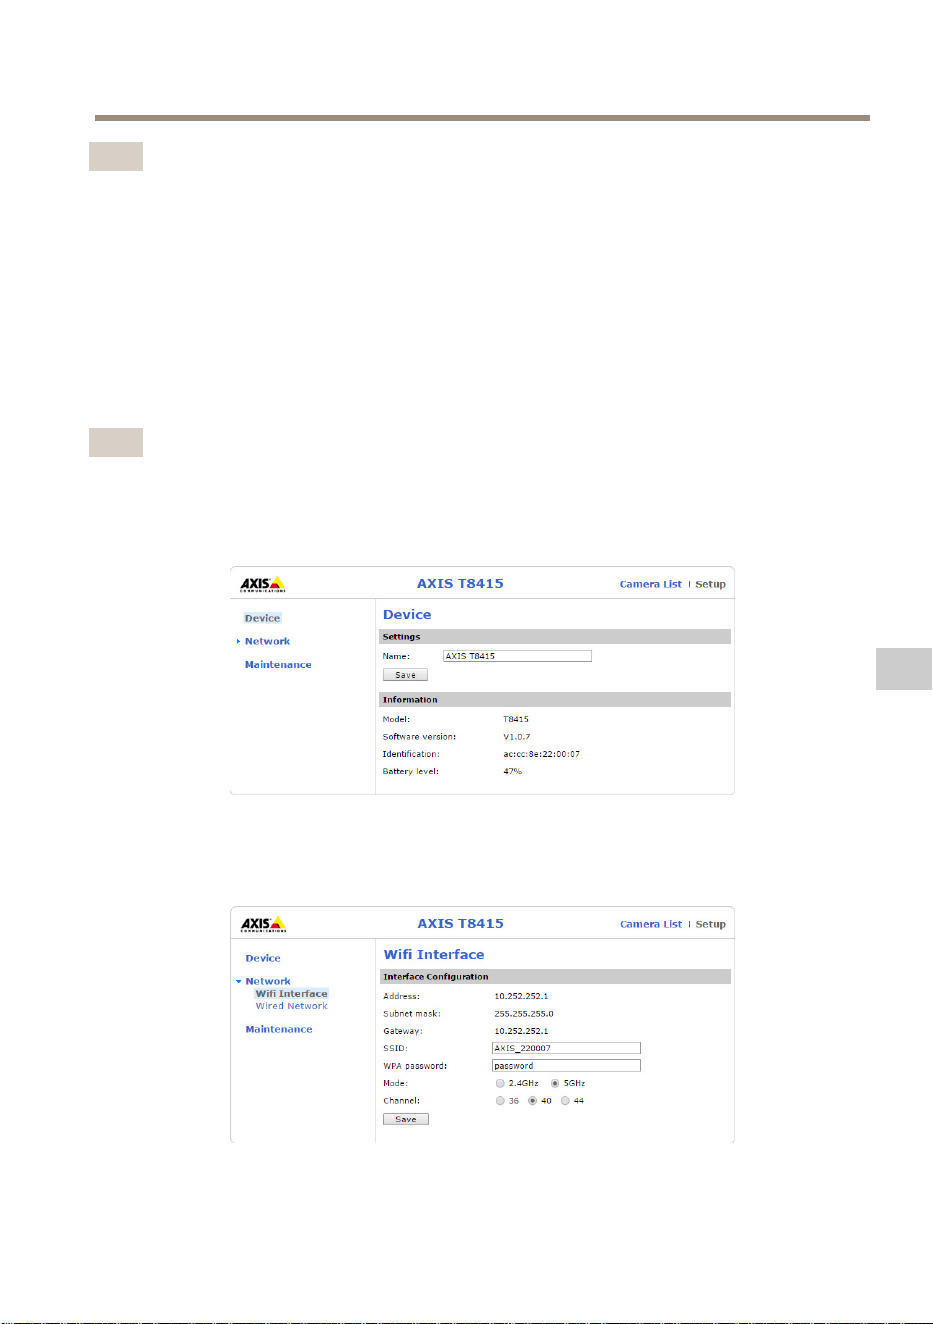
AXIST8415WirelessInstallationTool
备注
•在对手持设备充电时,AXIST8415必须开启。
•对手持设备充电会影响单元电池。在达到临界的低电平时,它会停止对手持设
备充电,请参见
硬 件 概 览 在 第 107 页
电池指示灯了解电池状态。为继续充电,
请使用新充电的电池替换已有电池,参见
更 换 电 池 在 第 112 页
。
AXIS AXIS
AXIS
T8415 T8415
T8415
Web Web
Web
界 界
界
面 面
面
在AXIST8415Web界面中,可以编辑网络设置和升级固件。
在浏览器中键入单元IP地址,访问Web界面。IP地址位于主单元的标签上。
备注
•对于新固件版本,实际屏幕截图可能变化。
•AXIST8415具有两个IP地址。一个用于通过WiFi连接,一个用于通过有线
网络连接。
•名称:单元名称可以修改。
网 网
网
络 络
络
- -
-
Wifi Wifi
Wifi
界 界
界
面 面
面
•地址:单元的IP地址。
109
ZH
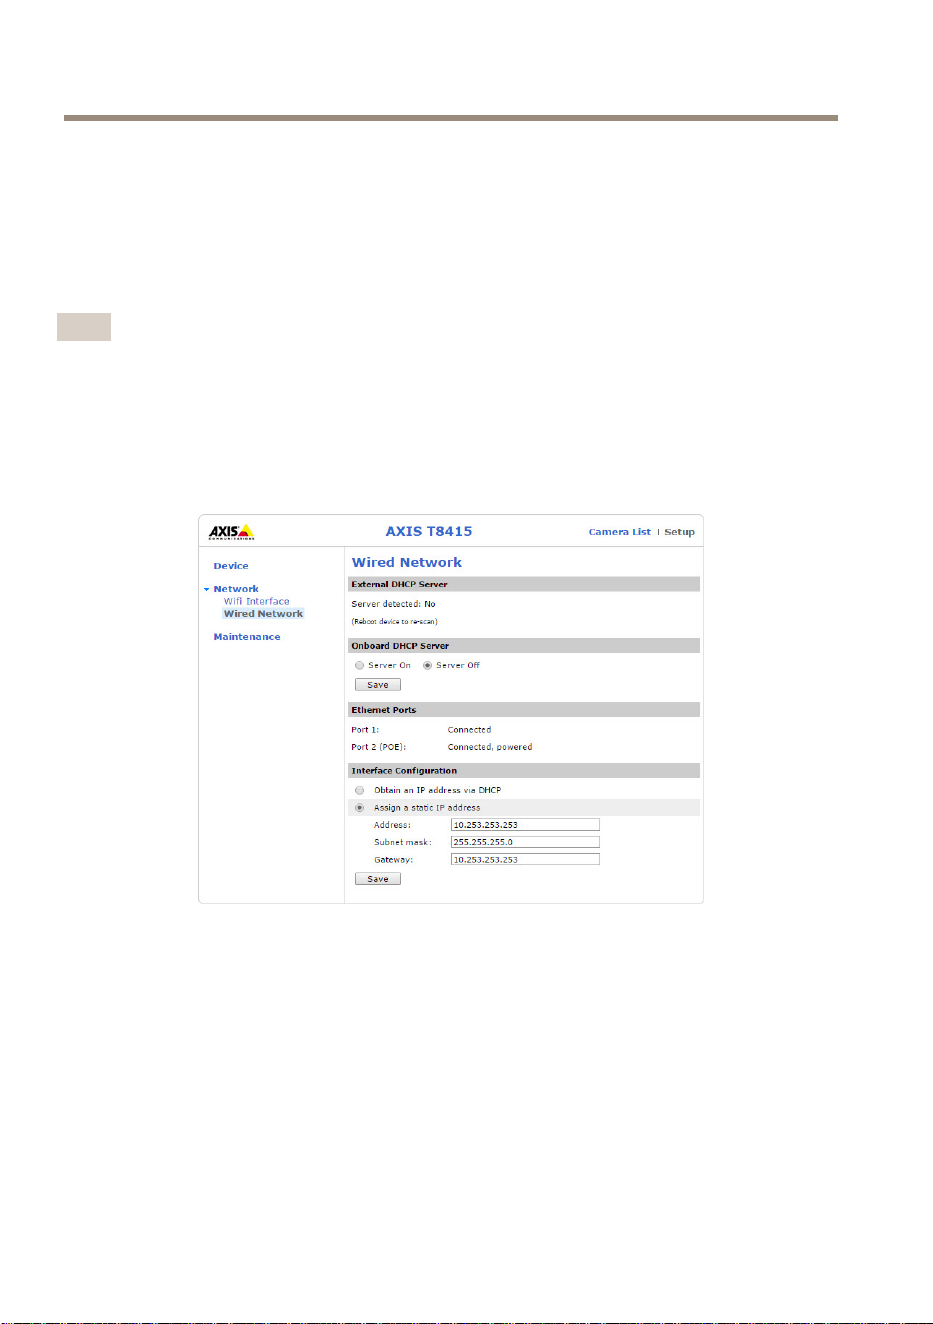
AXIST8415WirelessInstallationTool
•子网掩码:单元的子网掩码。
•网关:单元的默认网关。
•SSID:无线网络名称可以修改。
•WPA密码:无线网络密码可以修改。
•模式:设置无线网络的频率模式。选择2.4GHz或5GHz。
•通道:设置无线网络的通道。
备注
•默认SSID和密码位于主单元的标签上。如果在Web界面中进行更改,标签
不再有效。
•AXIST8415支持2.4GHz和5GHz。
•通道可能因国家和地区而不同。
网 网
网
络 络
络
- -
-
有 有
有
线 线
线
网 网
网
络 络
络
•外部DHCP服务器:外部DHCP服务器检测。
•板载DHCP服务器:
-开启:内部DHCP服务器开启
-关闭:内部DHCP服务器关闭
•以太网端口:以太网端口状态:
-已连接:摄像机/笔记本电脑已连接至以太网端口
-未连接:摄像机/笔记本电脑未连接至以太网端口
•界面配置:手动设置IP地址,或从DHCP服务器中获取IP地址。
•地址:单元的IP地址。
110
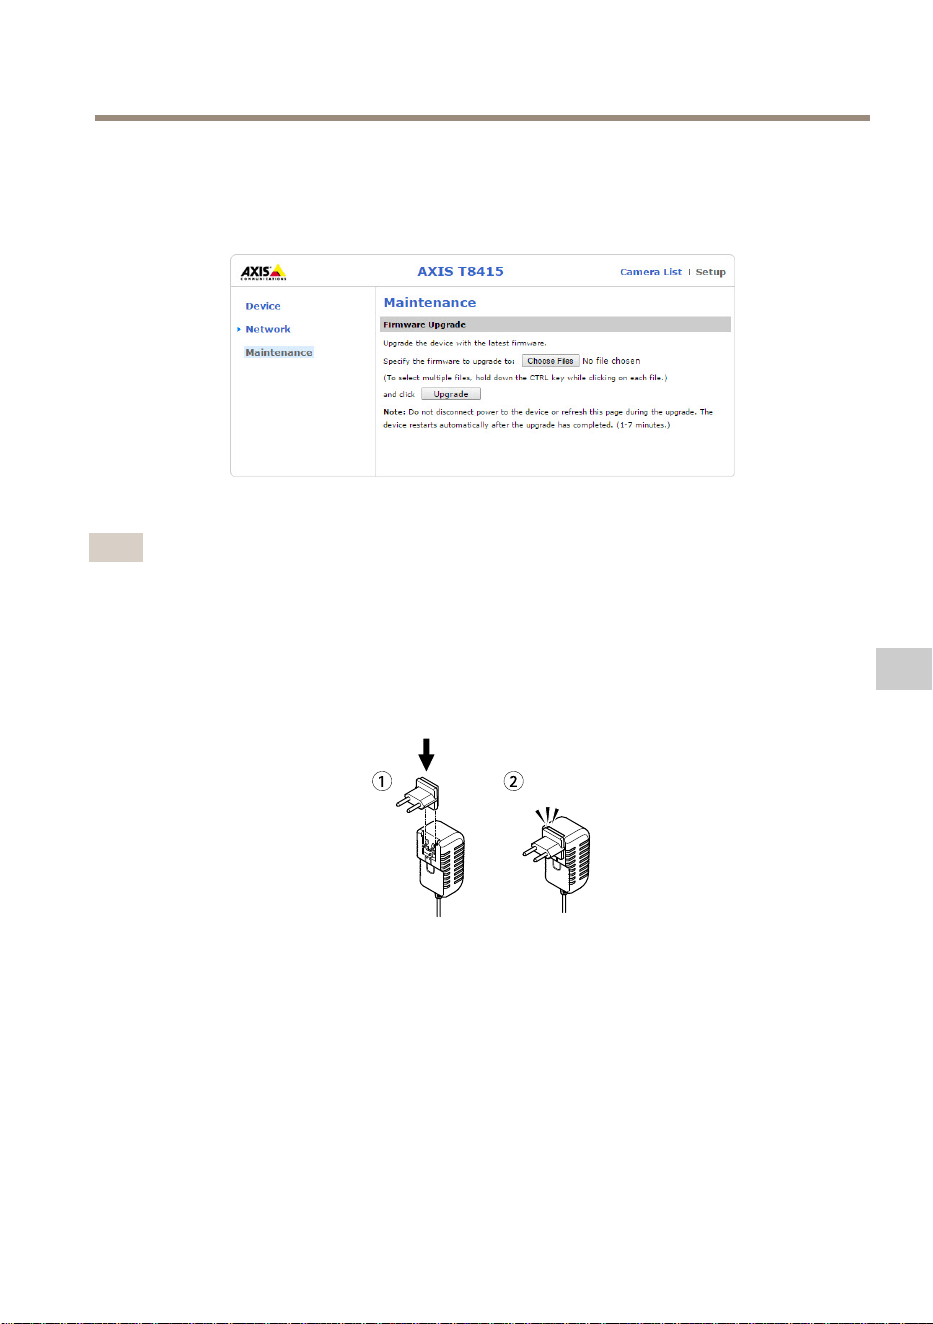
AXIST8415WirelessInstallationTool
•子网掩码:单元的子网掩码。
•网关:单元的默认网关。
维 维
维
护 护
护
升级AXIST8415的固件。
备注
最新固件发布于
www.axis.com
为 为
为
电 电
电
池 池
池
充 充
充
电 电
电
将特定国家/地区的电源线插头连接至充电器。见下图。
将电池充电器连接至电池(见下图)和电源插座。
111
ZH
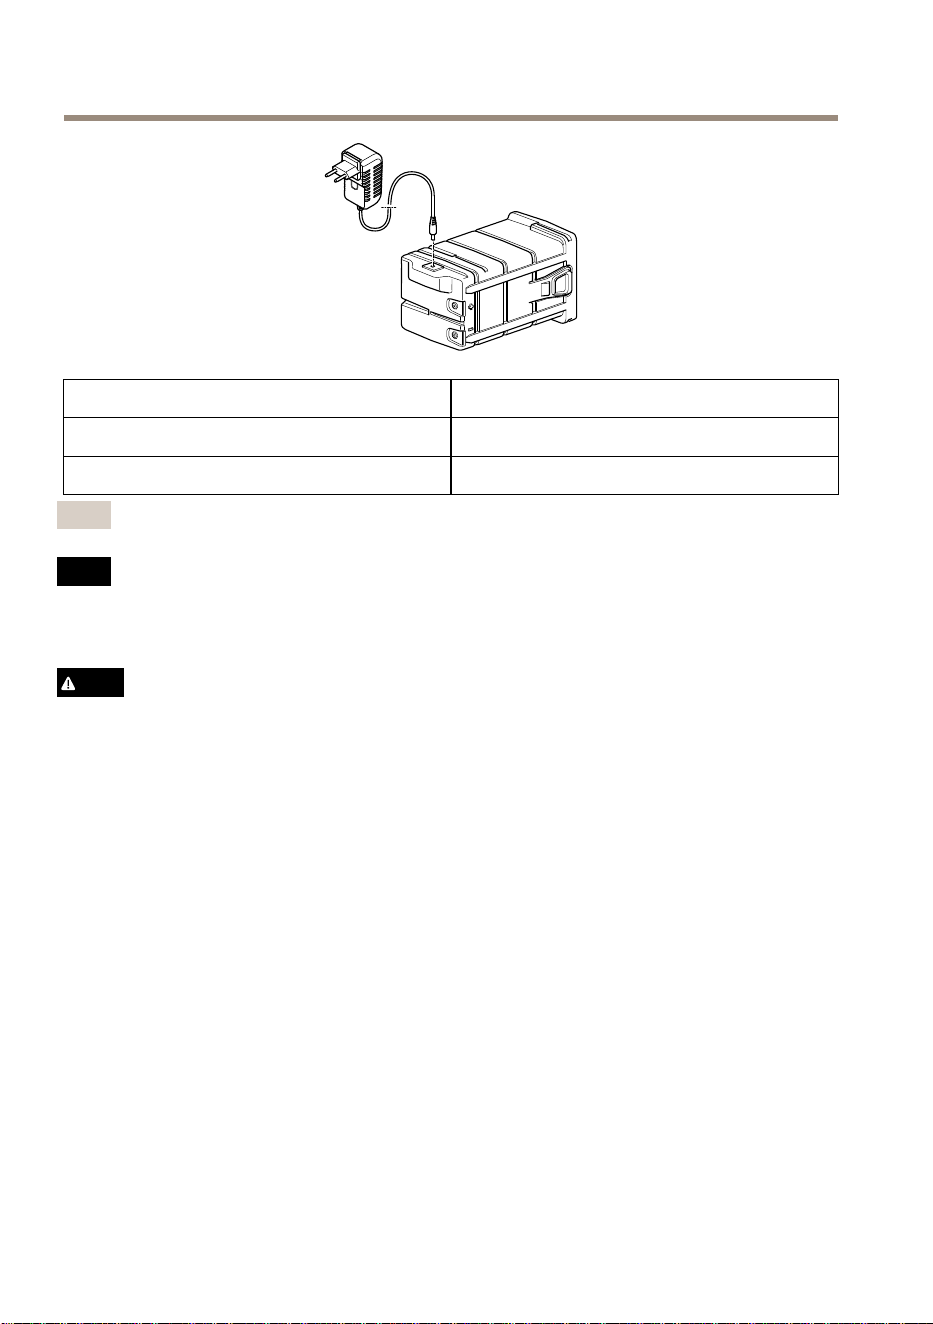
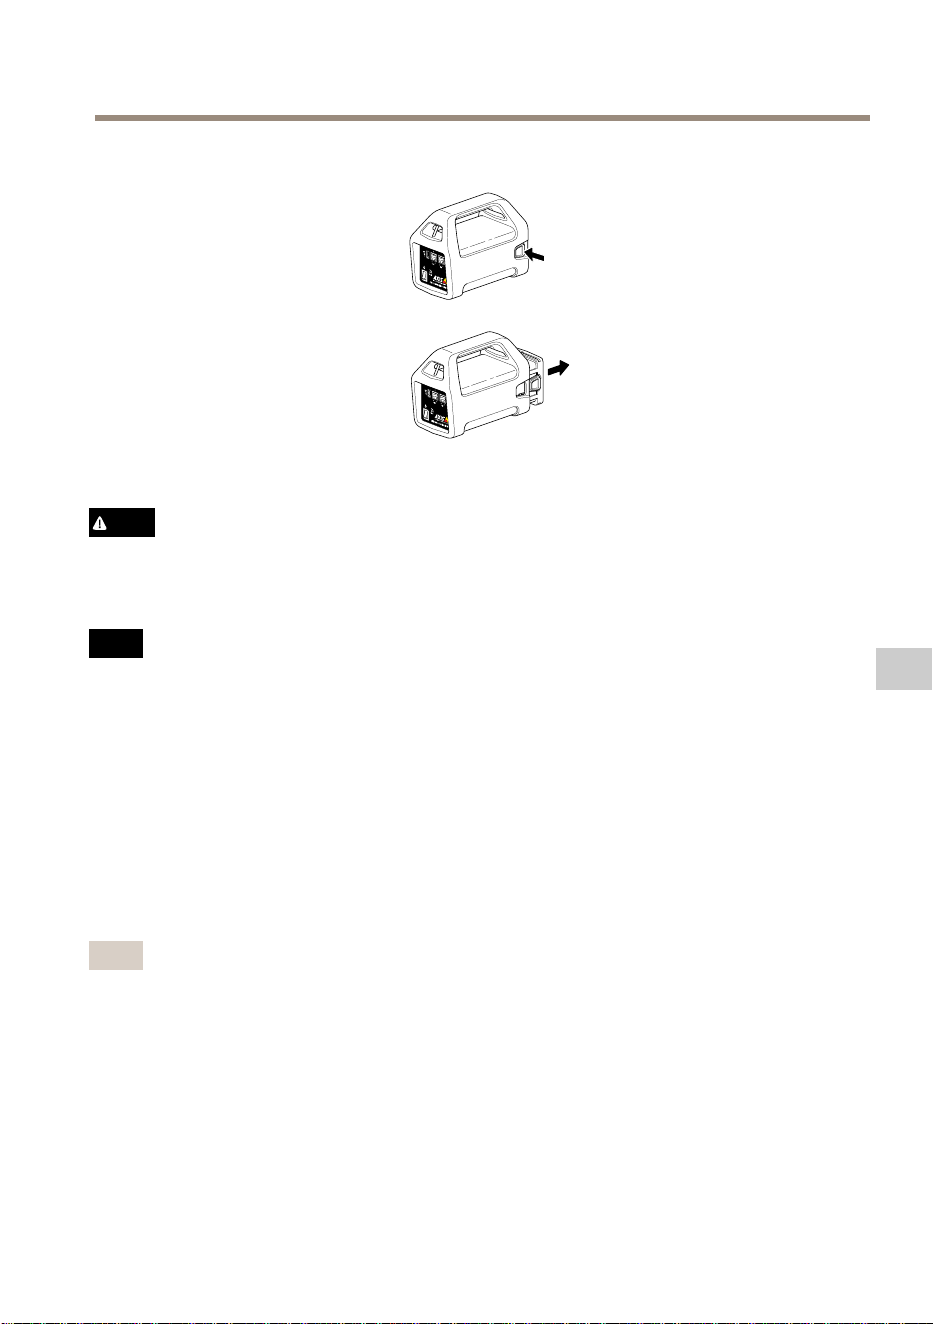
AXIST8415WirelessInstallationTool
小心
•切勿将电池丢入燃火内,因为这会使电池爆炸或产生有毒气体。
•切勿拆卸电池,因为这会导致硫酸泄漏,从而造成伤害。
•如果电池被拆卸,保修无效。
注 意
请按照当地法规或电池制造商的说明来处理废旧电池。
安 安
安
装 装
装
准 准
准
备 备
备
借助AXIST8415无线安装工具,可使用手持设备或笔记本电脑安装摄像机。推荐使用
手持设备和应用安讯士无线安装工具以实现优异安装。
•确保电池在使用前已充满电。参见
为 电 池 充 电 在 第 111 页
•如果使用应用安讯士无线安装工具,请先确保它下载至手持设备,然后连接
至AXIST8415WiFi网络。
•确保将摄像机连接至主单元之前,电源已开启。
备注
应用安讯士无线安装工具可从AppStore或GooglePlay中下载。
连 连
连
接 接
接
至 至
至
AXIS AXIS
AXIS
T8415 T8415
T8415
WiFi WiFi
WiFi
手 手
手
持 持
持
设 设
设
备 备
备
1.打开手持设备上的WiFi
2.选择单元的SSID。
3.输入密码
113
ZH
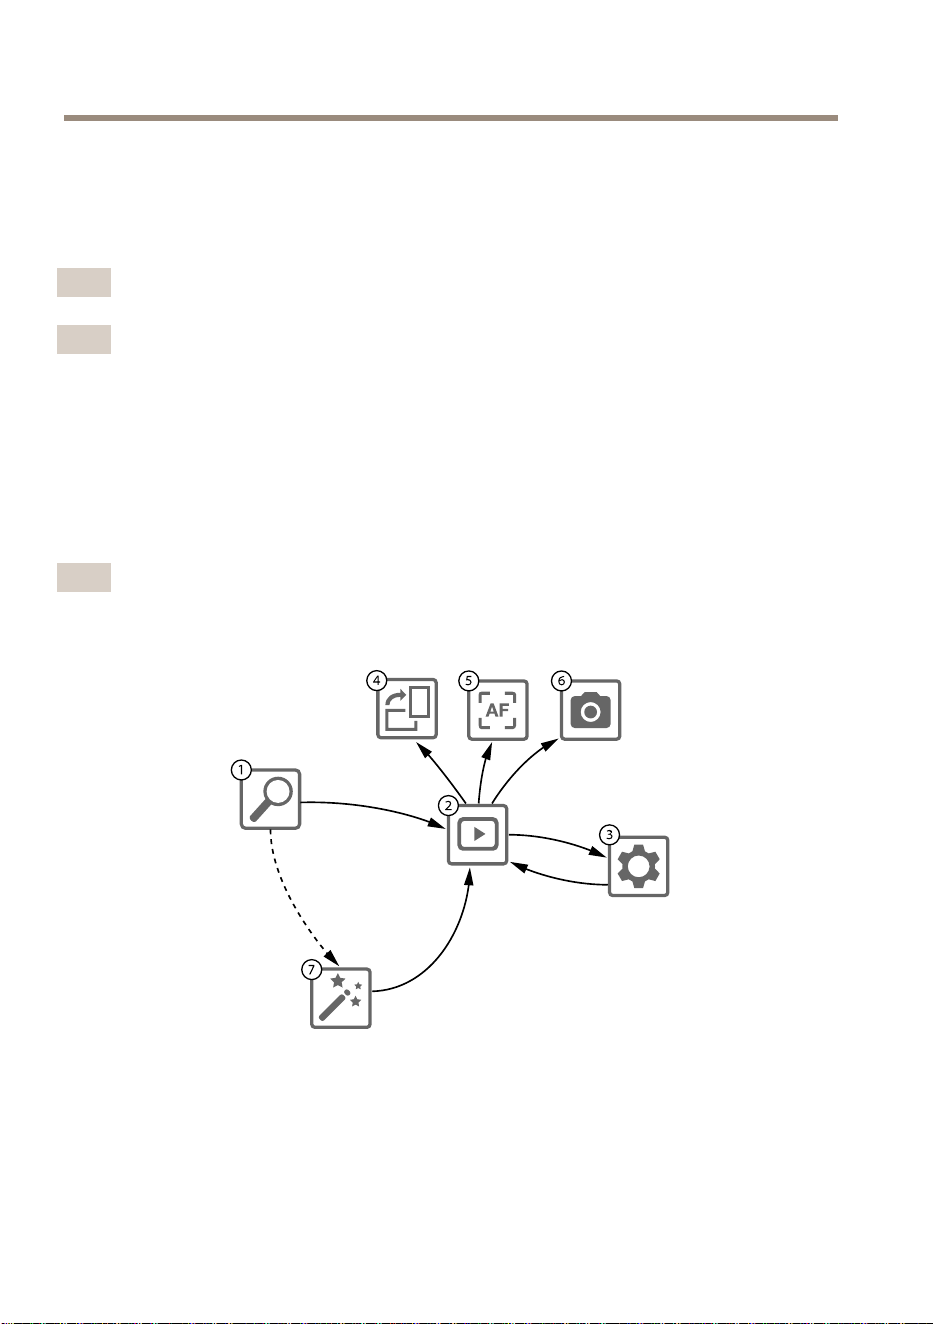
AXIST8415WirelessInstallationTool
笔 笔
笔
记 记
记
本 本
本
电 电
电
脑 脑
脑
1.打开电脑上的WiFi。
2.选择单元的SSID。
3.输入密码
重要
确保电脑经配置可从DHCP服务器获取IP地址。
备注
默认SSID和密码打印在主单元的标签上。
摄 摄
摄
像 像
像
机 机
机
安 安
安
装 装
装
- -
-
安 安
安
讯 讯
讯
士 士
士
无 无
无
线 线
线
安 安
安
装 装
装
工 工
工
具 具
具
应 应
应
用 用
用
1.将摄像机连接至主单元上的CAM端口(PoE)。
2.检查确认PoE指示灯已亮起。
3.连接至AXIST8415WiFi,参见
连 接 至 AXIS T8415 WiFi 在 第 113 页
4.启动应用安讯士无线安装工具
备注
摄像机的启动时间因产品而异。摄像机显示在该应用的摄像机列表中可能需
要花费几分钟时间。
1
摄 像 机 列 表
2
实 时 视 图
3
设 置
4
旋 转 图 像
5
自 动 对 焦
6
快 照
114
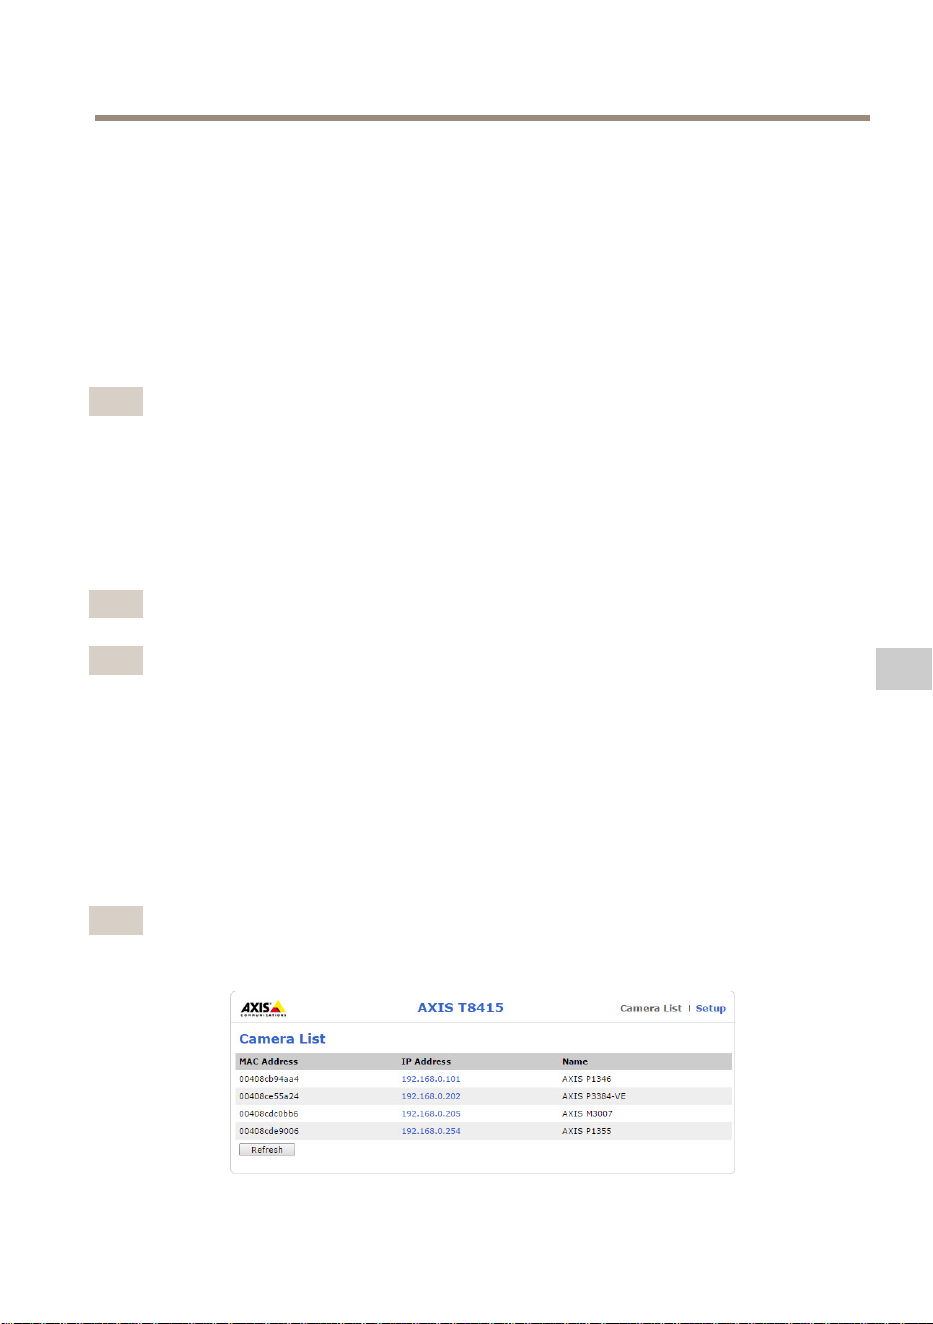
AXIST8415WirelessInstallationTool
7
向 导
配 配
配
置 置
置
摄 摄
摄
像 像
像
机 机
机
选择1 1
1
摄 摄
摄
像 像
像
机 机
机
列 列
列
表 表
表
中的摄像机。若需要,键入密码以继续。
在2 2
2
实 实
实
时 时
时
视 视
视
图 图
图
中,通过按住屏幕可以访问操作按钮(4 4
4
、5 5
5
和6 6
6
)。
选择4 4
4
旋 旋
旋
转 转
转
图 图
图
像 像
像
,旋转图像。
选择5 5
5
自 自
自
动 动
动
对 对
对
焦 焦
焦
,搜索理想的对焦点。
备注
•自动对焦仅用于支持该功能的摄像机。
•自动对焦可能需要几分钟完成,在这一时间内,摄像机需要保持静止。
选择6 6
6
快 快
快
照 照
照
,拍摄视频图像的快照。
选择3 3
3
设 设
设
置 置
置
,编辑产品的网络设置。
编号7 7
7
向 向
向
导 导
导
。该向导会在安讯士产品首次被访问时或出厂默认设置重置后启动。
备注
有关向 向
向
导 导
导
中设置的信息,请参见产品用户手册,网址:
www.axis.com
备注
有关各安讯士产品摄像机设置的更多信息,请参见产品用户手册,网
址:
www.axis.com
摄 摄
摄
像 像
像
机 机
机
安 安
安
装 装
装
- -
-
笔 笔
笔
记 记
记
本 本
本
电 电
电
脑 脑
脑
1.将摄像机连接至主单元上的CAM端口(PoE)。
2.检查确认PoE指示灯已亮起。
3.将笔记本电脑连接至主单元上的NET端口(非PoE)。
4.访问Web界面,并按下摄 摄
摄
像 像
像
机 机
机
列 列
列
表 表
表
备注
参见
AXIS T8415 Web 界 面 在 第 109 页
了解如何访问AXIST8415Web界面
115
ZH

AXIST8415WirelessInstallationTool
5.单击IP地址,选择摄像机。
6.所选摄像机现在会在浏览器中打开。
备注
•有关各安讯士产品摄像机设置的更多信息,请参见产品用户手册,网
址:
www.axis.com
•摄像机的启动时间因产品而异。摄像机显示在Web界面的摄像机列表中
可能需要花费几分钟时间。
故 故
故
障 障
障
排 排
排
除 除
除
•无 无
无
法 法
法
找 找
找
到 到
到
SSID SSID
SSID
。 。
。
-检查确认WLAN指示灯已亮起。
-选择不同的通道。
-确保手持设备支持5GHz模式(如果无法切换至AXIST8415的
2.4GHz模式。
•应 应
应
用 用
用
摄 摄
摄
像 像
像
机 机
机
列 列
列
表 表
表
中 中
中
没 没
没
有 有
有
摄 摄
摄
像 像
像
机 机
机
-检查确认WLAN指示灯已亮起。
-摄像机的启动时间因产品而异。摄像机显示可能需要花费几分钟时
间。按下Refresh(刷新)更新摄像机列表页面。
-确保该安讯士产品上的Bonjour激活。
-确保摄像机的IP地址不在10.252.252.X范围内。
•使 使
使
用 用
用
网 网
网
线 线
线
和 和
和
PC PC
PC
时 时
时
无 无
无
法 法
法
登 登
登
录 录
录
AXIS AXIS
AXIS
T8415 T8415
T8415
Web Web
Web
界 界
界
面 面
面
。 。
。
-确保网线连接至正确的端口(NET)。
•使 使
使
用 用
用
笔 笔
笔
记 记
记
本 本
本
电 电
电
脑 脑
脑
进 进
进
行 行
行
安 安
安
装 装
装
时 时
时
, ,
,
摄 摄
摄
像 像
像
机 机
机
列 列
列
表 表
表
( (
(
Web Web
Web
界 界
界
面 面
面
) )
)
中 中
中
没 没
没
有 有
有
摄 摄
摄
像 像
像
机 机
机
。 。
。
-确保网线连接至正确的端口:
CAM CAM
CAM
: :
:
连接至摄像机
NET NET
NET
: :
:
连接至笔记本电脑
-确保摄像机和AXIST8415位于相同的IP地址范围
-确保AXIST8415用作默认网关。
-确保摄像机的IP地址不在10.252.252.X范围内。
•使 使
使
用 用
用
该 该
该
应 应
应
用 用
用
时 时
时
图 图
图
像 像
像
fps fps
fps
较 较
较
低 低
低
。 。
。
-检查手持设备上的WLAN指示灯,了解信号强度。
-确保无线网络设置为5GHz。
-选择不同的通道。
以下列表适用于发现支持Onvif的非安讯士摄像机。
•摄 摄
摄
像 像
像
机 机
机
设 设
设
置 置
置
为 为
为
动 动
动
态 态
态
IP IP
IP
地 地
地
址 址
址
, ,
,
但 但
但
网 网
网
络 络
络
上 上
上
没 没
没
有 有
有
DHCP DHCP
DHCP
服 服
服
务 务
务
器 器
器
-激活AXIST8415上的板载DHCP服务器。
116

AXIST8415WirelessInstallationTool
•摄 摄
摄
像 像
像
机 机
机
设 设
设
置 置
置
为 为
为
动 动
动
态 态
态
IP IP
IP
地 地
地
址 址
址
, ,
,
而 而
而
且 且
且
网 网
网
络 络
络
上 上
上
有 有
有
DHCP DHCP
DHCP
服 服
服
务 务
务
器 器
器
-将AXIST8415进行动态IP地址配置。
•该 该
该
摄 摄
摄
像 像
像
机 机
机
具 具
具
有 有
有
固 固
固
定 定
定
的 的
的
IP IP
IP
地 地
地
址 址
址
。 。
。
-将AXIST8415配置为具有与摄像机在相同范围的IP地址。
重 重
重
置 置
置
为 为
为
出 出
出
厂 厂
厂
默 默
默
认 认
认
设 设
设
置 置
置
重要
•重置为出厂默认设置应慎用。重置为出厂默认设置将把所有设置重置为出
厂默认值。
•确保WLAN指示灯在实施出厂重置前连续亮起。
要将产品重置为出厂默认设置,请执行以下操作:
1.按住Reset(重置)按钮10秒。
2.AXIST8415现在重启时所有值都已重置为出厂默认设置。
备注
参见
硬 件 概 览 在 第 107 页
查看Reset(重置)按钮的位置。
质 质
质
保 保
保
信 信
信
息 息
息
有关安讯士产品质保的信息及相关信息,请转到
axis.com/warranty
117
ZH

InstallationGuide
Ver.M7.2
AXIST8415WirelessInstallationTool
Date:March2020
©AxisCommunicationsAB,2015-2020
PartNo.2149053