User's Guide
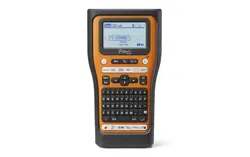
PT-E310BT
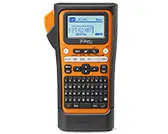
PT-E510
PT-E560BT
© 2023 Brother Industries, Ltd. All rights reserved.
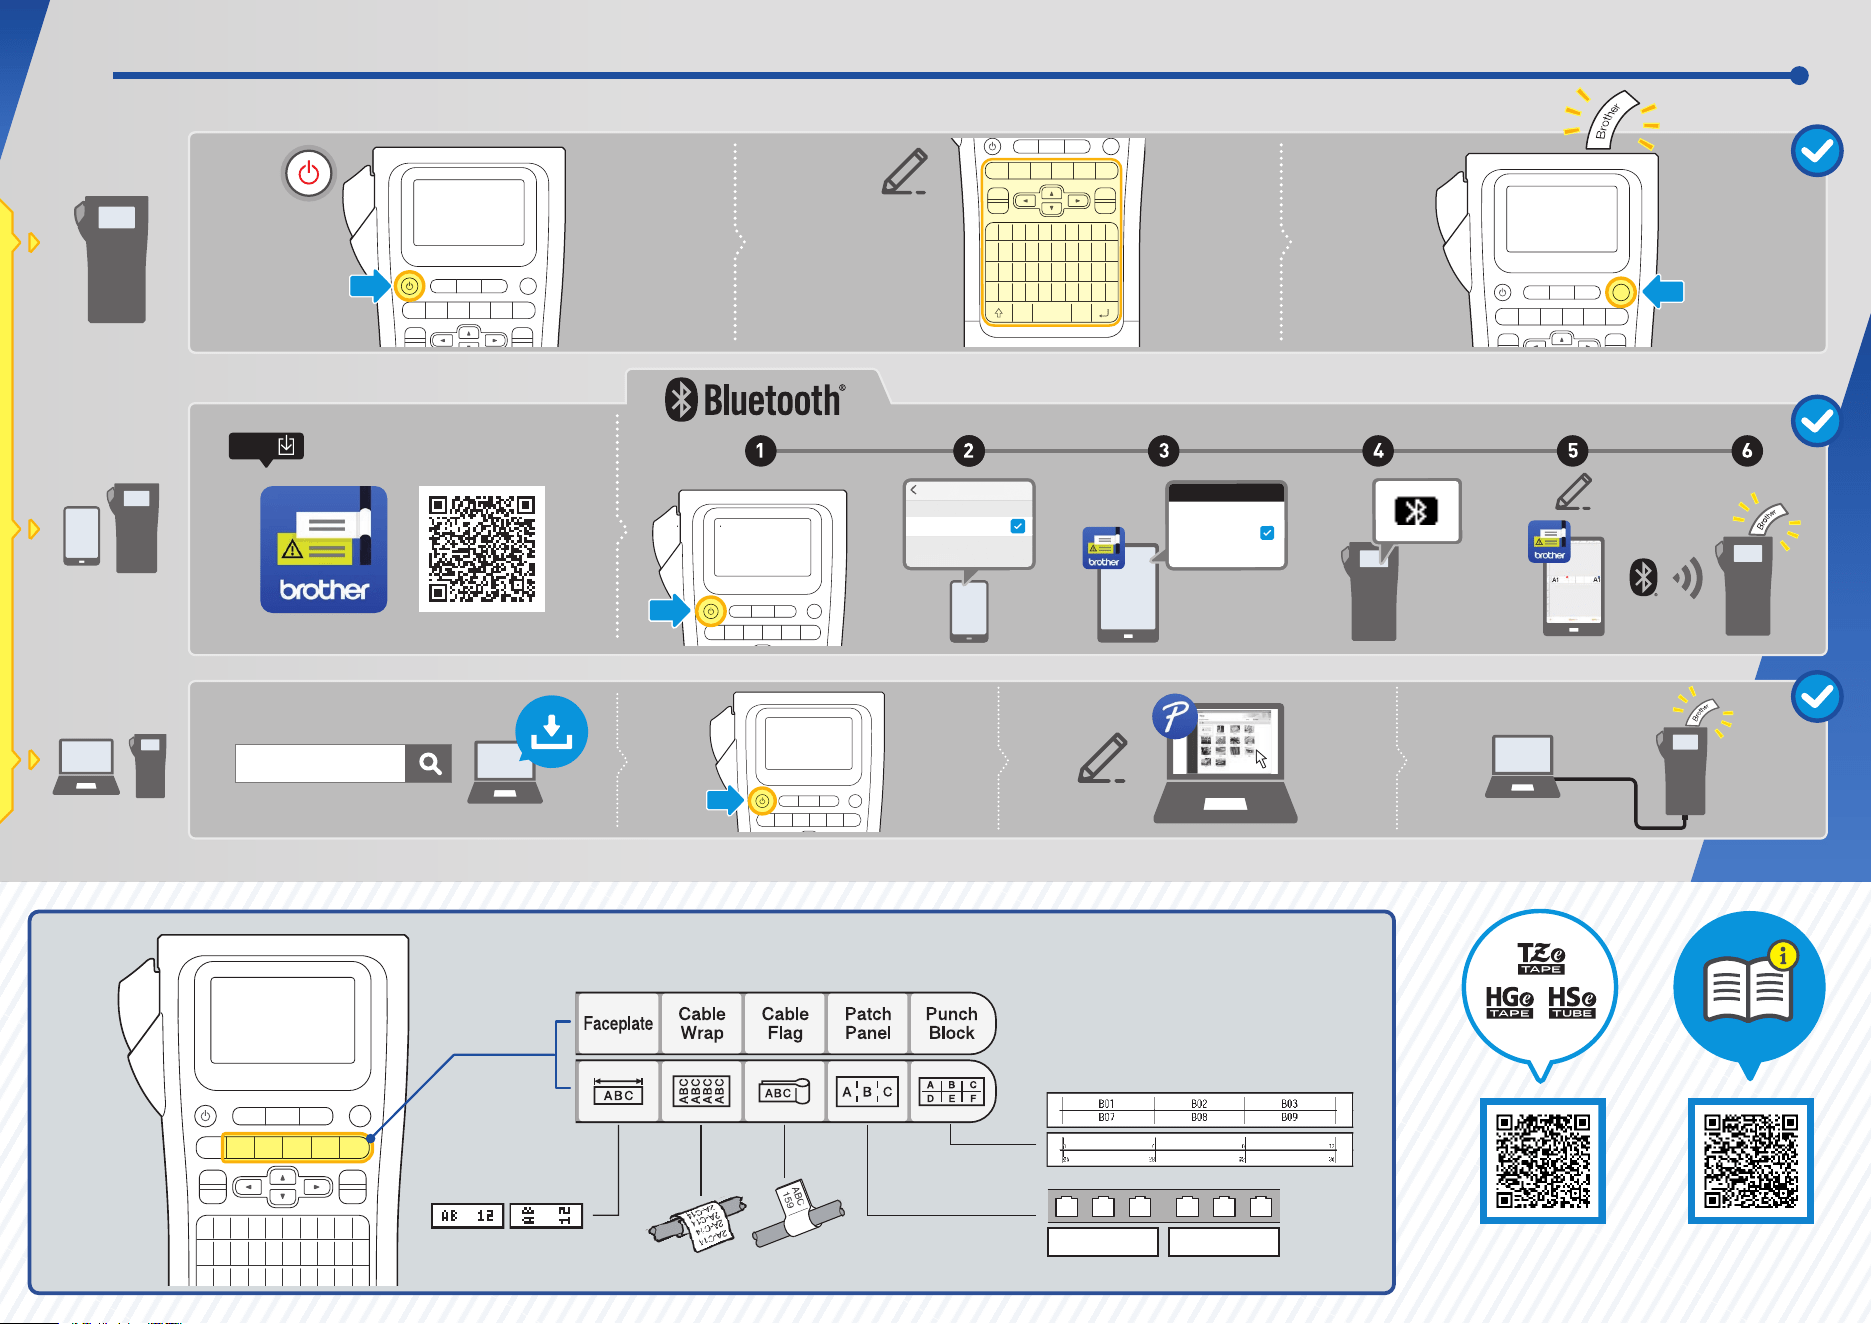
Table of Contents
Before You Use Your Labeling System ............................................................................................... 1
Definitions of Notes ........................................................................................................................................ 2
General Precautions ...................................................................................................................................... 3
Trademarks and Licenses.............................................................................................................................. 4
Open Source Licensing Remarks .................................................................................................................. 5
Important Note ............................................................................................................................................... 6
Set Up Your Labeling System .............................................................................................................. 7
Parts Description............................................................................................................................................ 8
LCD Overview .............................................................................................................................................. 10
Keyboard Overview...................................................................................................................................... 14
Attach the Support Strap.............................................................................................................................. 23
Install the Rechargeable Li-ion Battery ........................................................................................................ 26
Remove the Rechargeable Li-ion Battery .......................................................................................... 28
Connect the Labeling System to an External Power Source ....................................................................... 30
Charge the Rechargeable Li-ion Battery...................................................................................................... 32
Insert the Tape Cassette .............................................................................................................................. 34
Turn the Labeling System On/Off................................................................................................................. 36
Set Language............................................................................................................................................... 37
Set Measurement Units................................................................................................................................ 38
Set Auto Power-Off Time ............................................................................................................................. 39
Enable or Disable Bluetooth......................................................................................................................... 40
Feed Tape .................................................................................................................................................... 41
Adjust LCD Contrast .................................................................................................................................... 42
Turn the Backlight On/Off............................................................................................................................. 43
Install Software.................................................................................................................................... 44
Install the Printer Driver and Software on a Computer (Windows)............................................................... 45
Available Applications......................................................................................................................... 46
Connect the Labeling System to a Computer .............................................................................................. 47
Connect the Labeling System to a Computer Using a USB Type-C Cable ........................................ 48
Edit Labels ........................................................................................................................................... 49
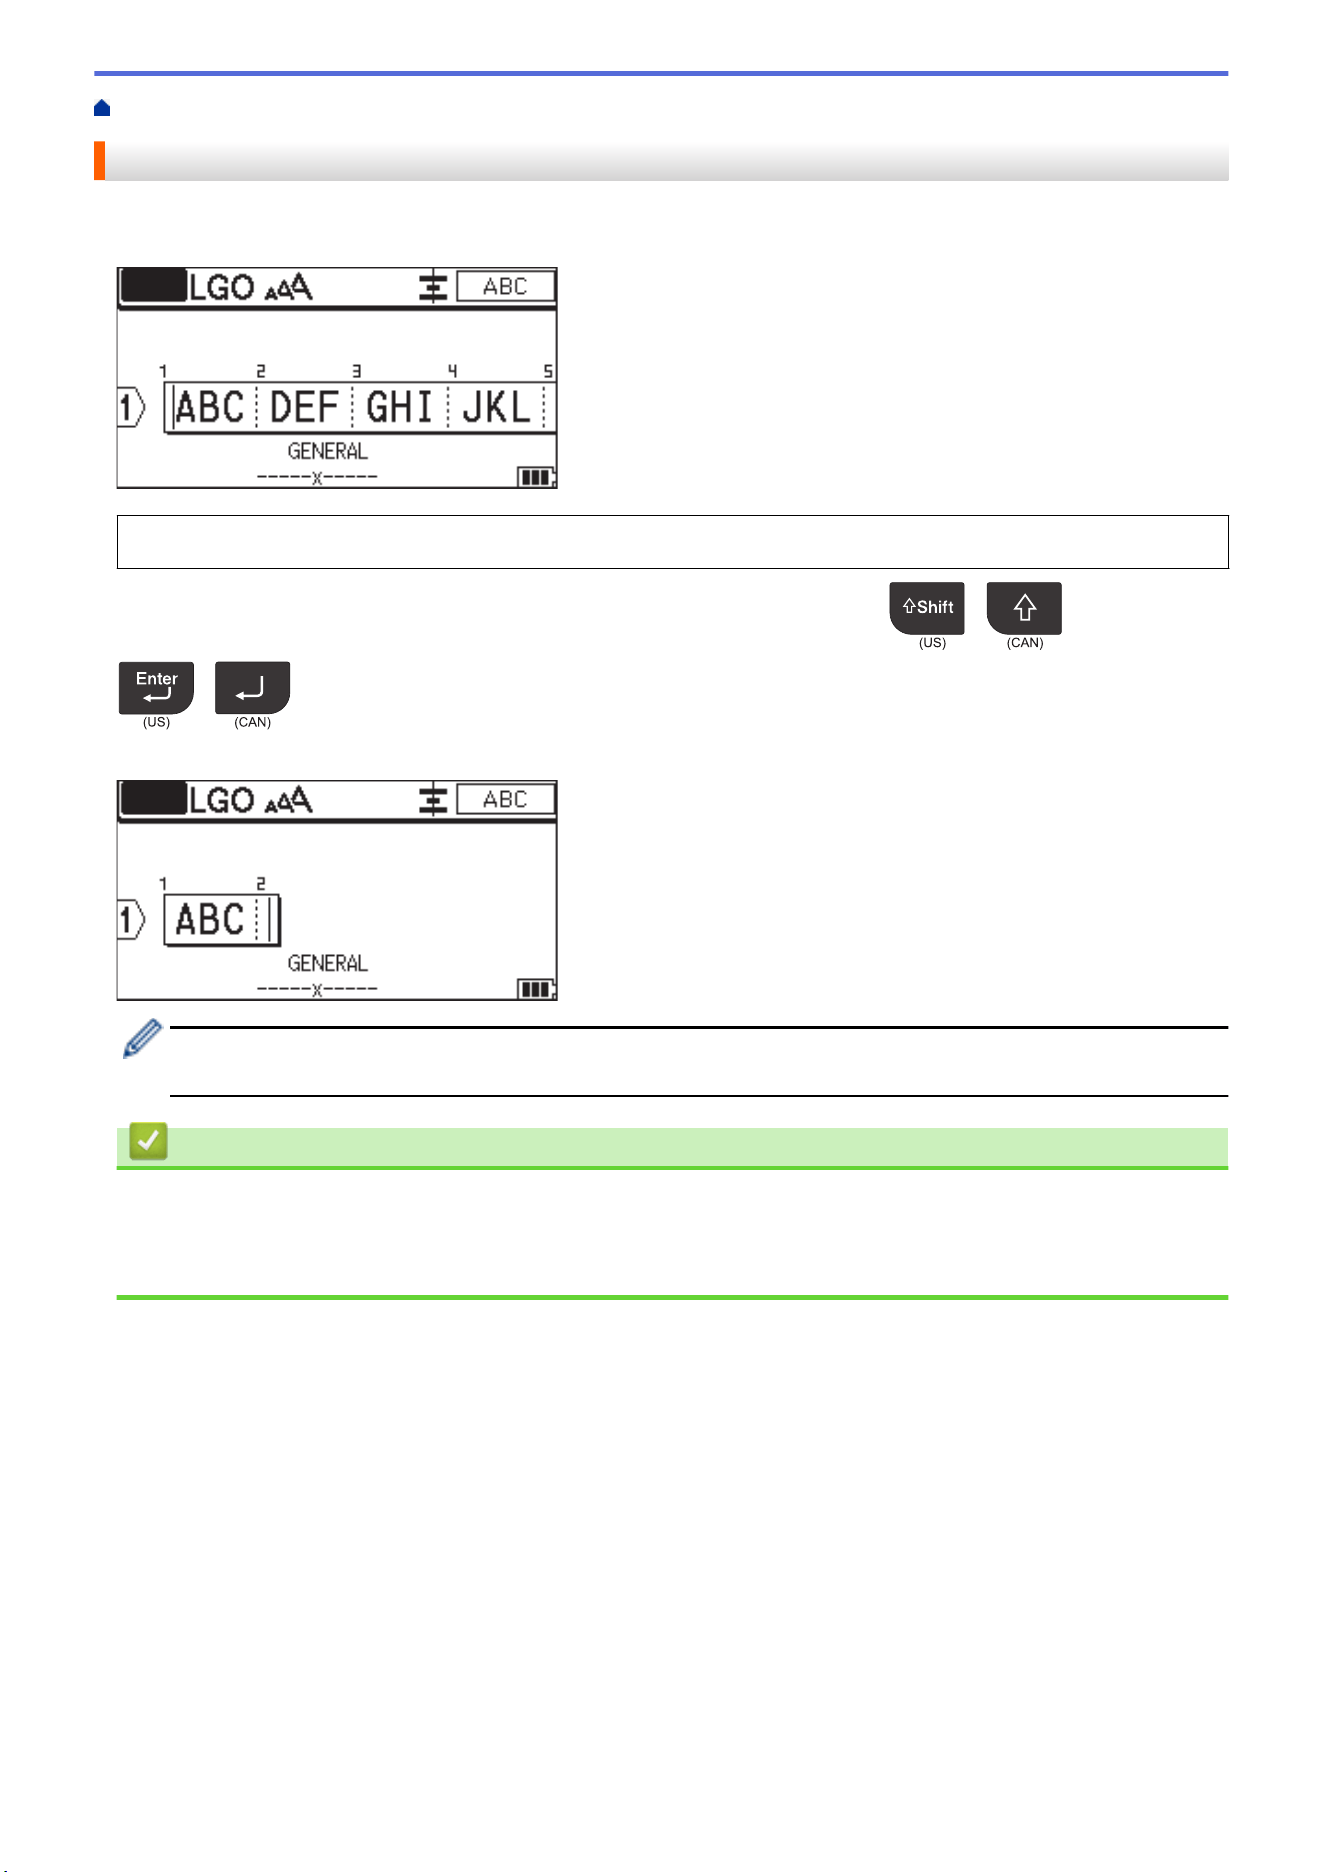
Add Text to Your Label ................................................................................................................................. 50
Add a New Line of Text to Your Label .......................................................................................................... 51
Add a New Block of Text to Your Label ........................................................................................................ 52
Move the Cursor........................................................................................................................................... 53
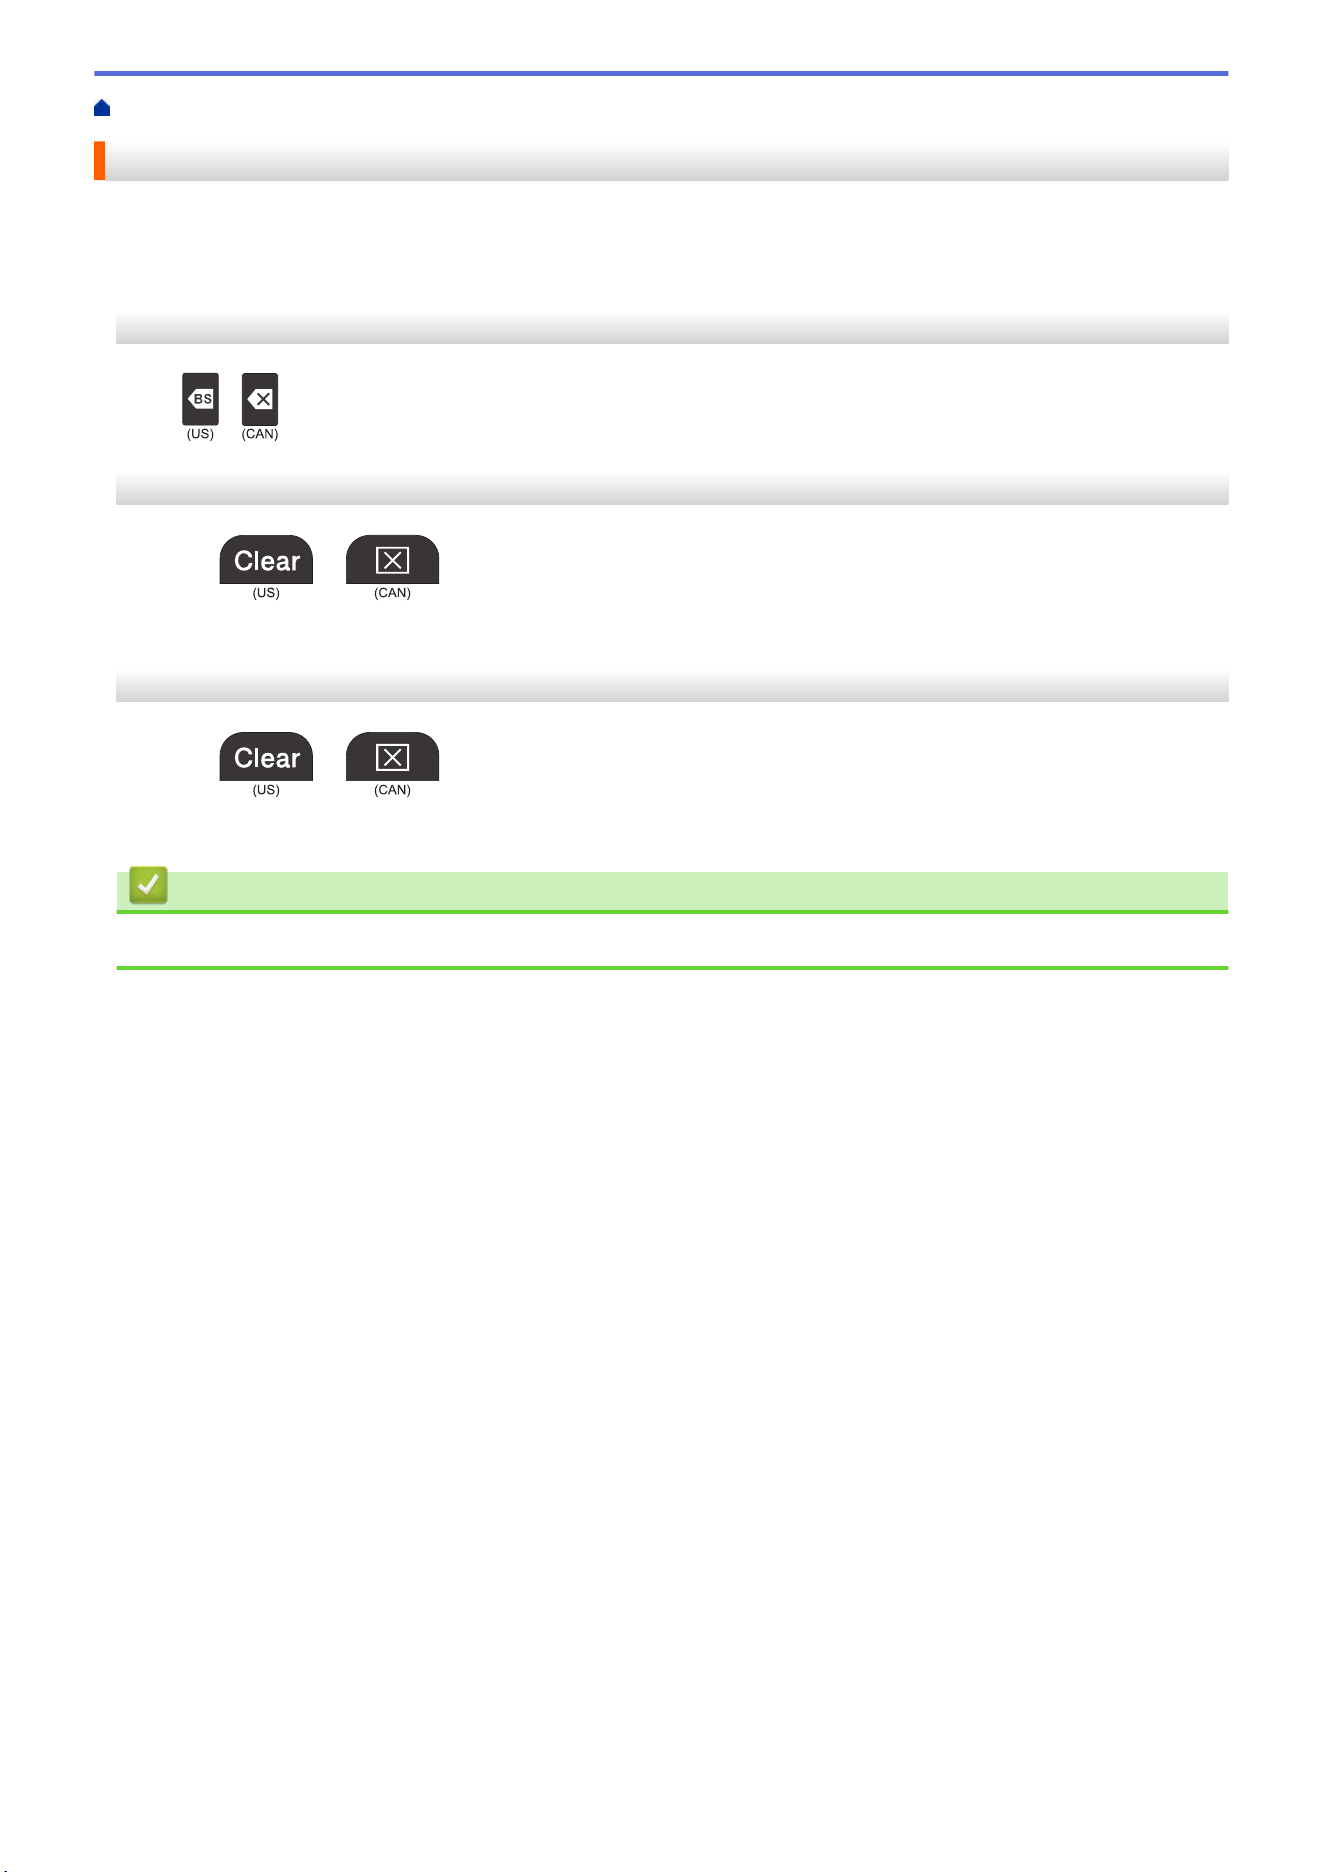
Delete Text ................................................................................................................................................... 54
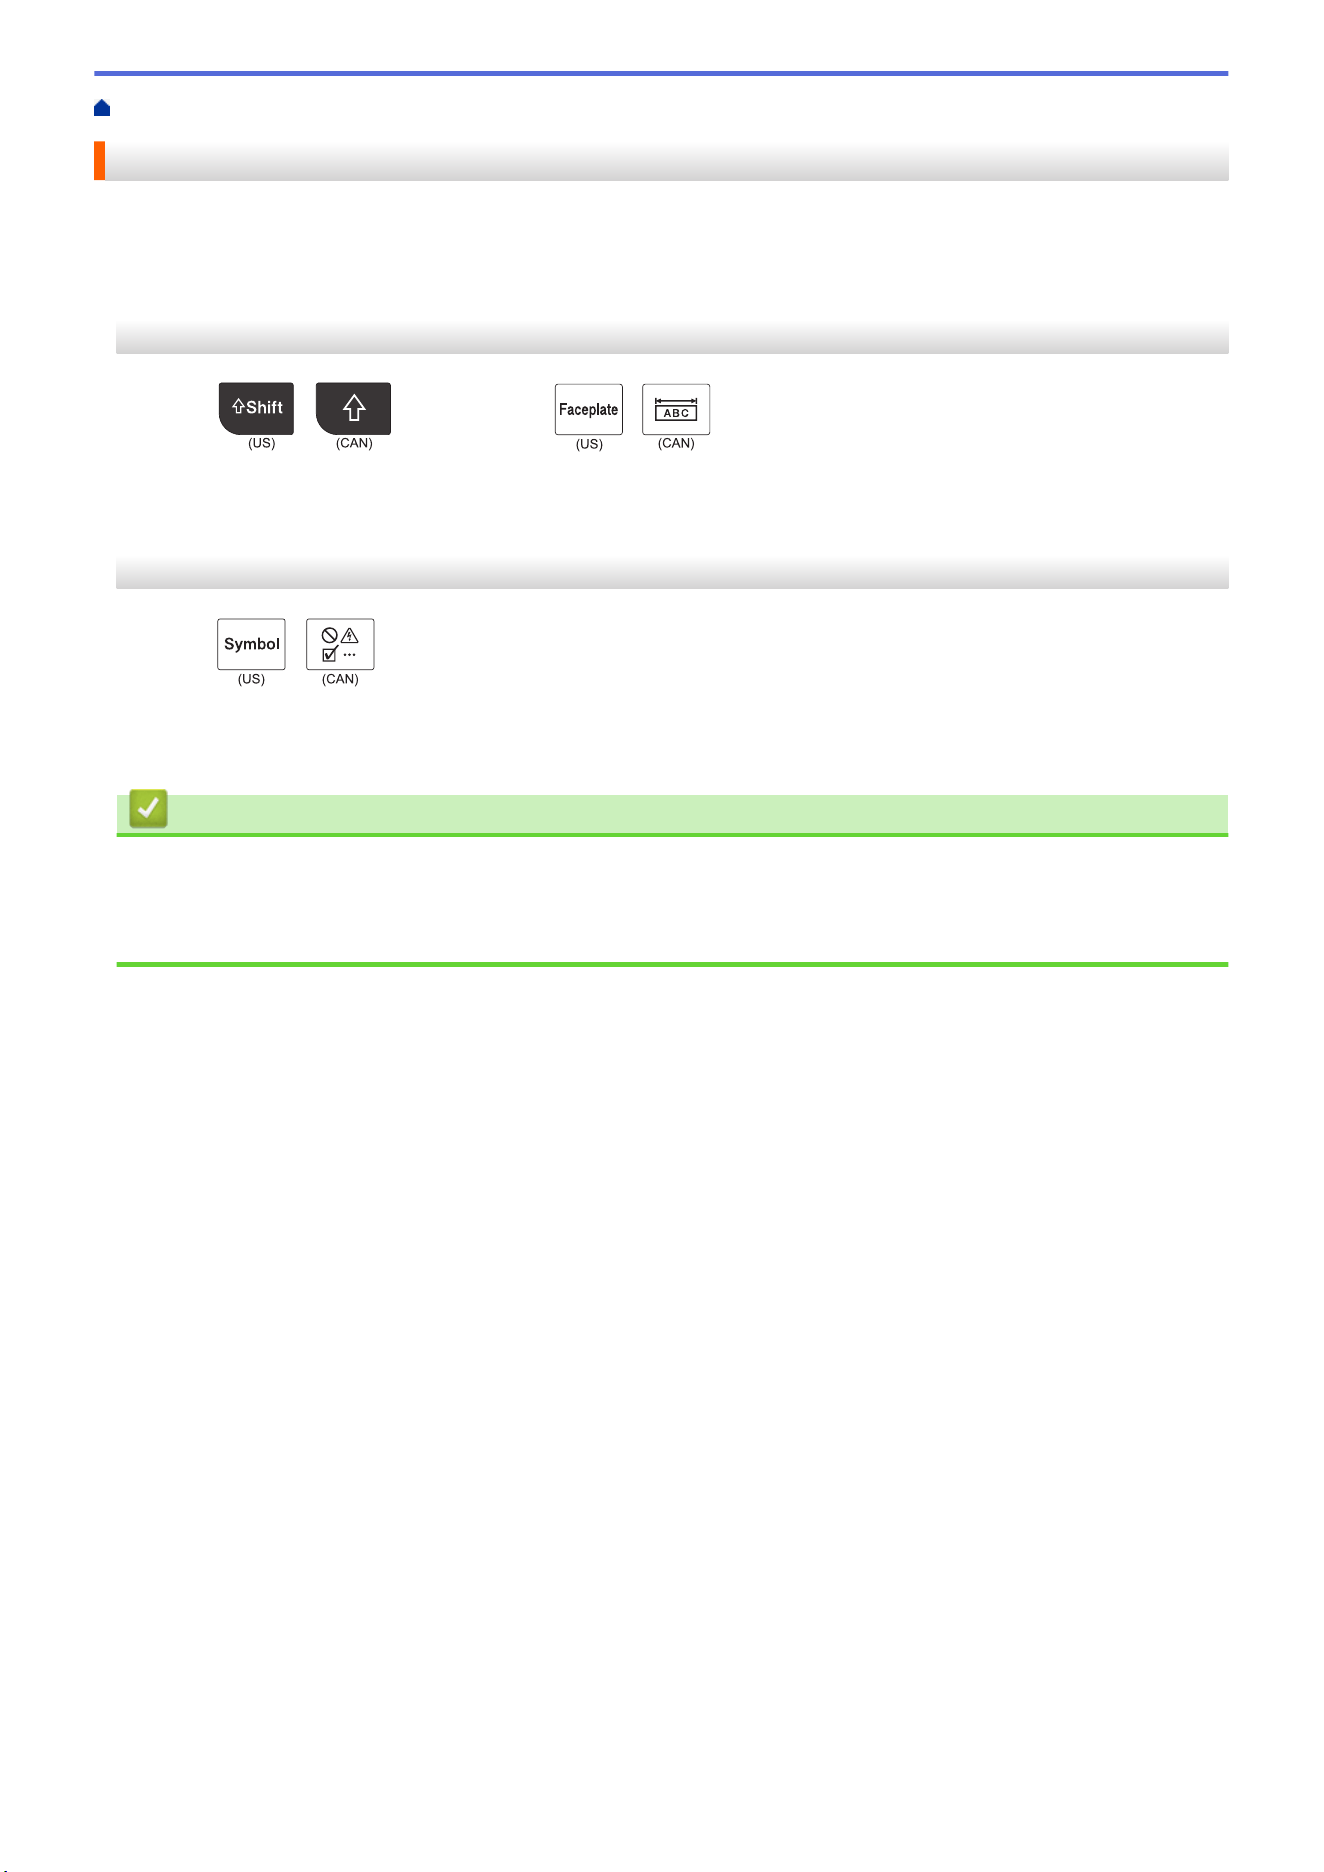
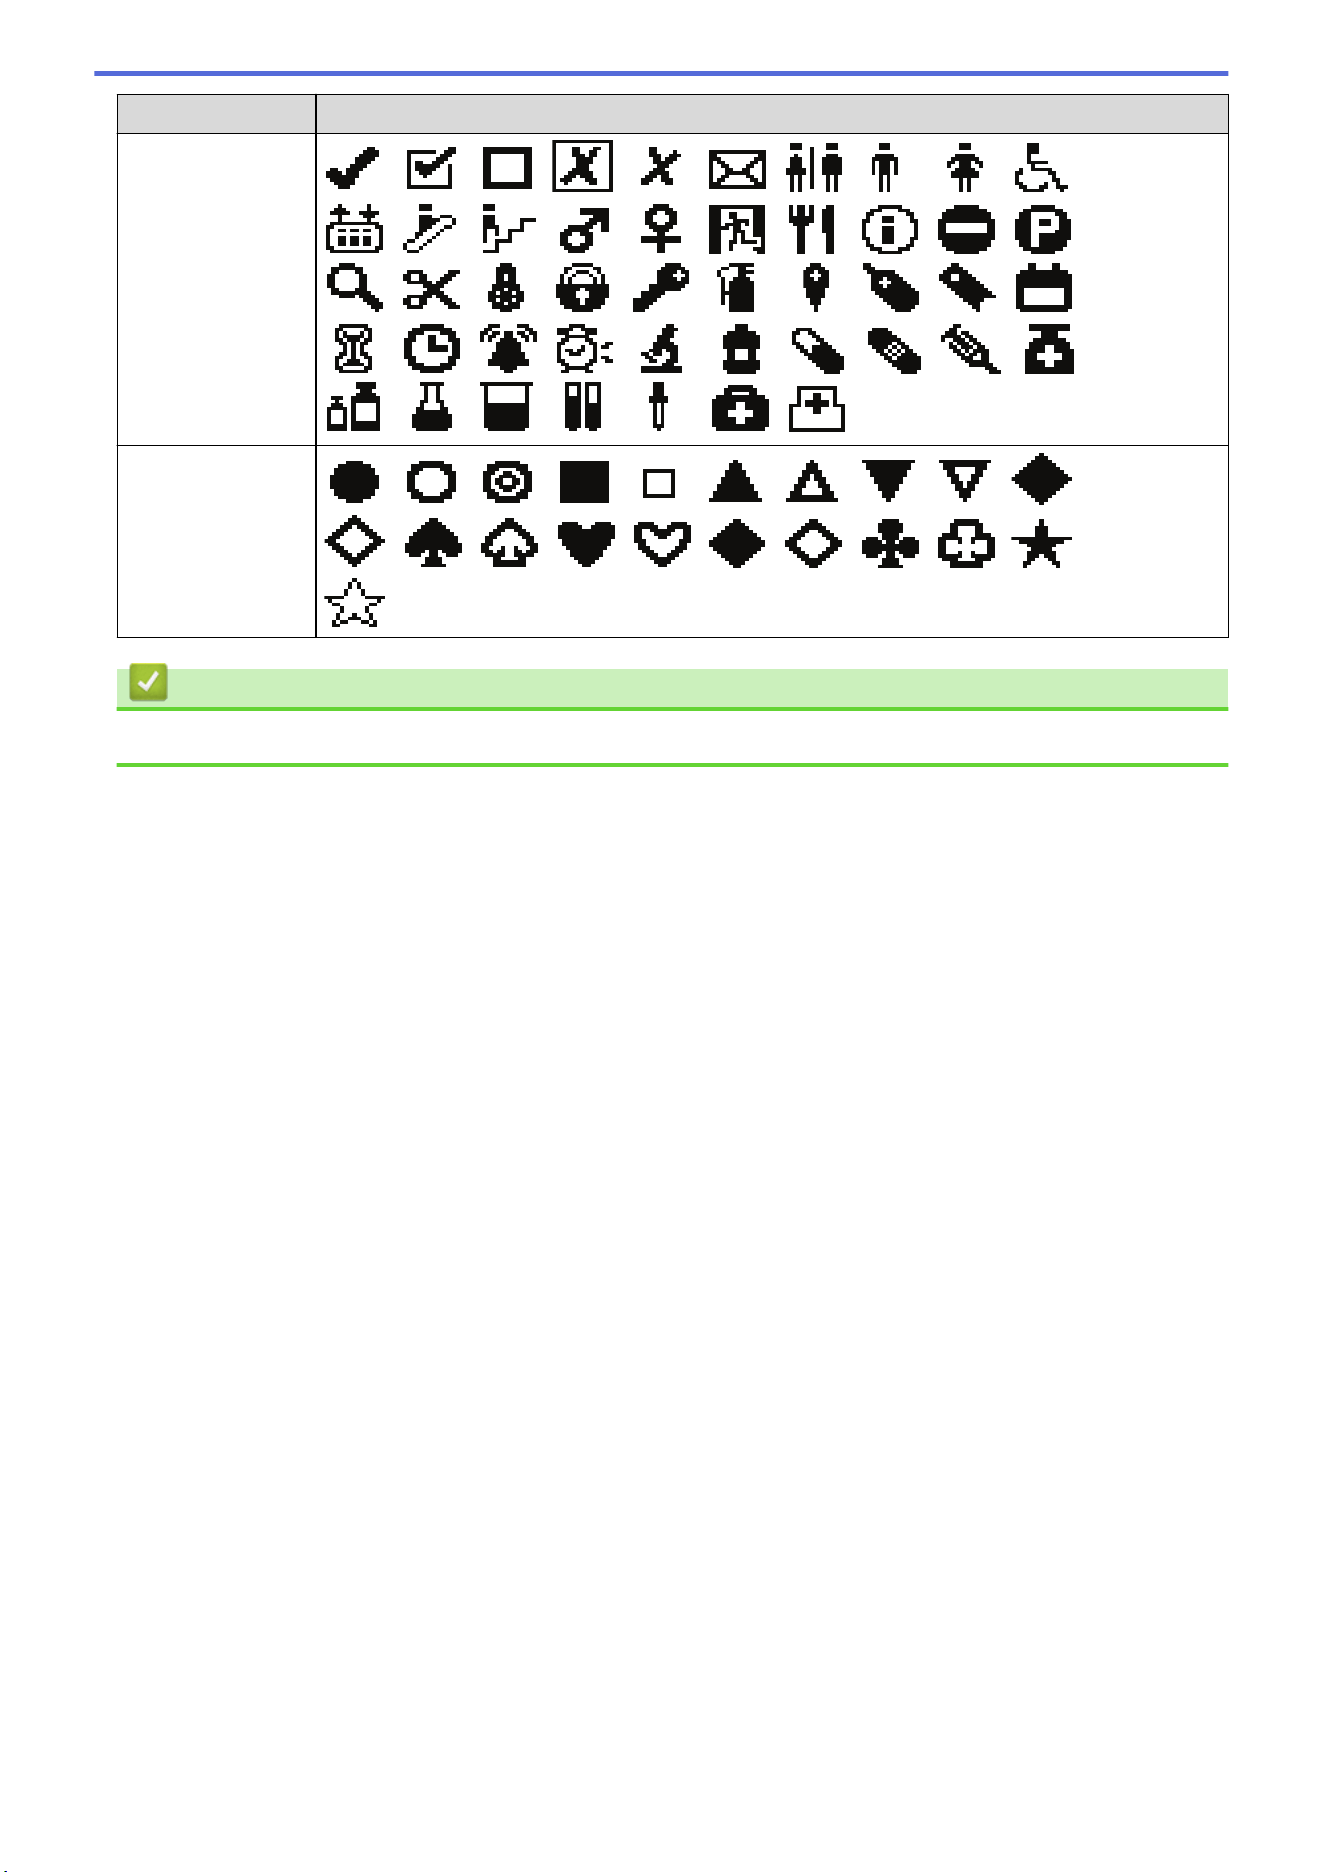
Enter Symbols.............................................................................................................................................. 55
Enter Symbols Using the Symbol Function ........................................................................................ 56
Set Symbol History............................................................................................................................. 57
Symbol Options .................................................................................................................................. 58
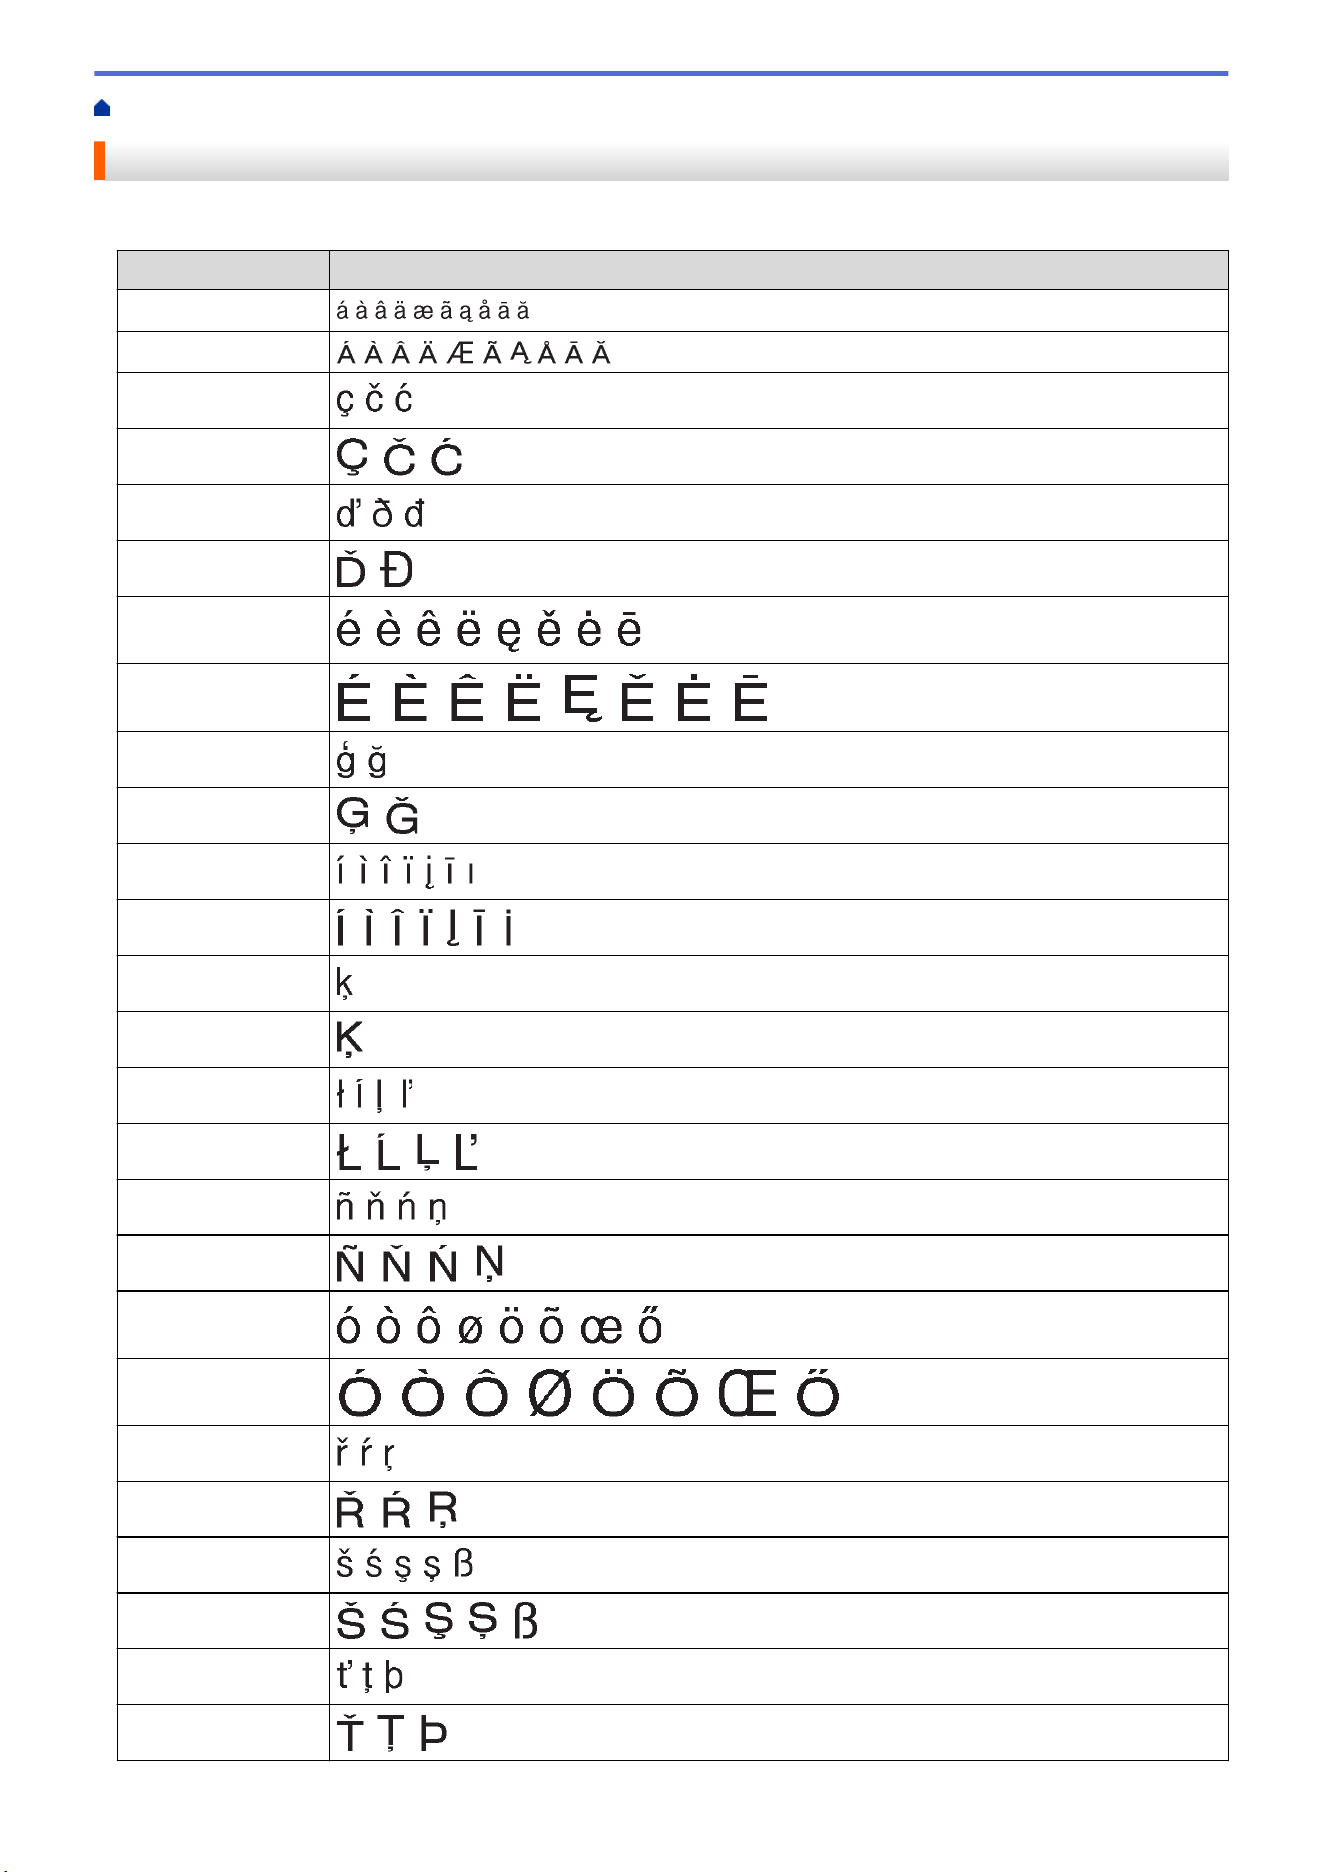
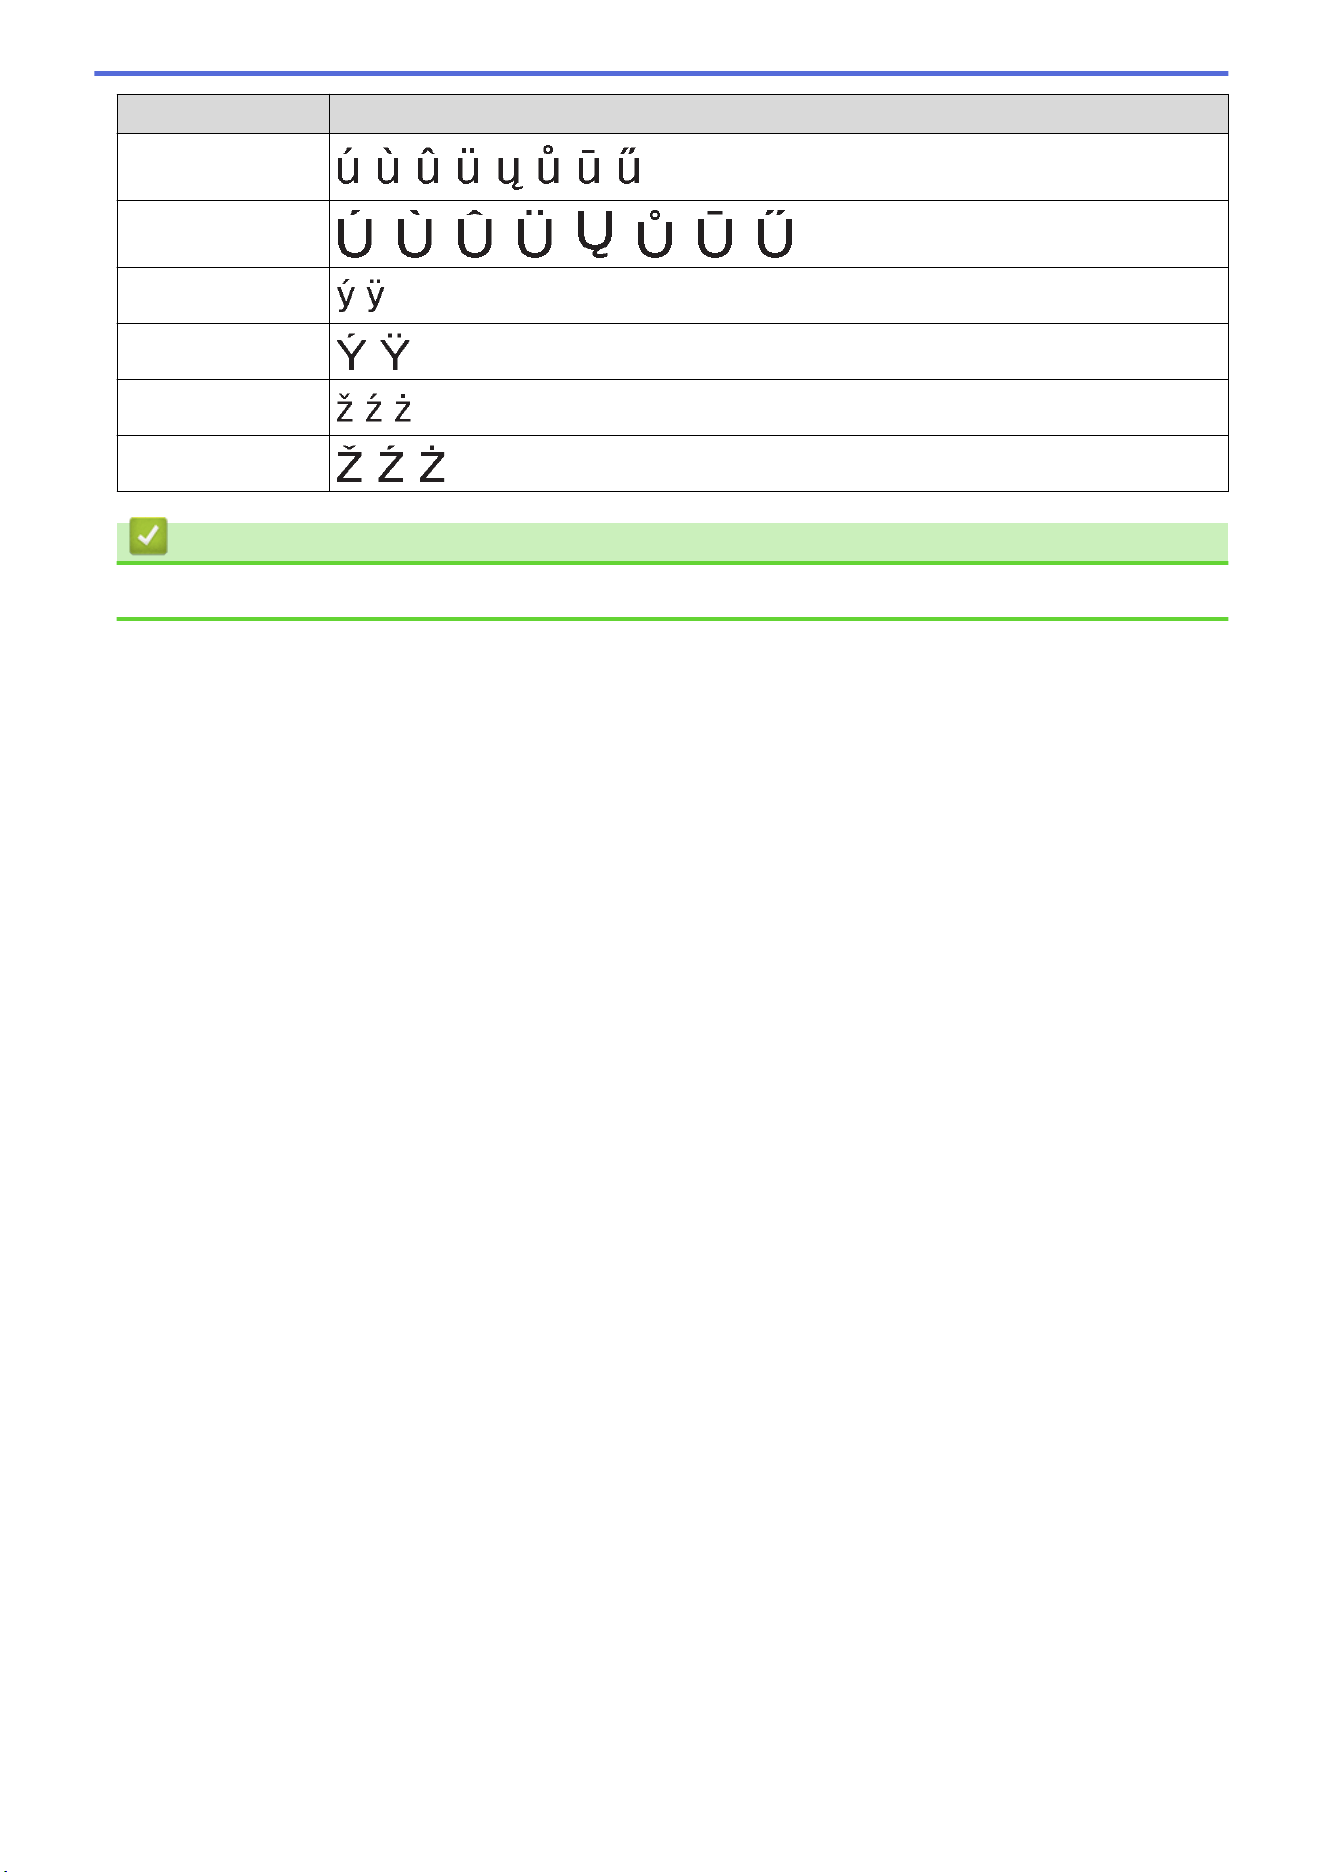
Enter Accented Characters .......................................................................................................................... 61
Accented Character Options .............................................................................................................. 62
Set Character Attributes............................................................................................................................... 64
Apply Character Attributes ................................................................................................................. 65
Apply Character Attributes to a Line of Text ....................................................................................... 66
Attribute Setting Options .................................................................................................................... 67
Home > Table of Contents
i

Set Auto Fit Style................................................................................................................................ 70
Set Frames................................................................................................................................................... 71
Frame Options.................................................................................................................................... 72
Create Labels Using Labeling Application Type........................................................................................... 73
General Mode..................................................................................................................................... 74
Faceplate Mode.................................................................................................................................. 75
Cable Wrap Mode............................................................................................................................... 76
Cable Flag Mode ................................................................................................................................ 77
Patch Panel Mode .............................................................................................................................. 78
Punch Block Mode ............................................................................................................................. 79
Create Labels Using Special Tapes for Wrapping Around Cables ..................................................... 80
Create a Cross-ID Label..................................................................................................................... 83
Create Barcode Labels ................................................................................................................................ 85
Create and Print Barcodes ................................................................................................................. 86
Edit or Delete a Barcode and Barcode Data ...................................................................................... 90
Create Serialized Labels .............................................................................................................................. 91
Serialization Options .......................................................................................................................... 92
Create Labels with a Single Serialized Range ................................................................................... 93
Create Labels with Two Serialized Ranges........................................................................................ 95
Create Advanced Serialized Labels ................................................................................................... 97
Print Labels........................................................................................................................................ 100
Preview Labels........................................................................................................................................... 101
Print Labels ................................................................................................................................................ 102
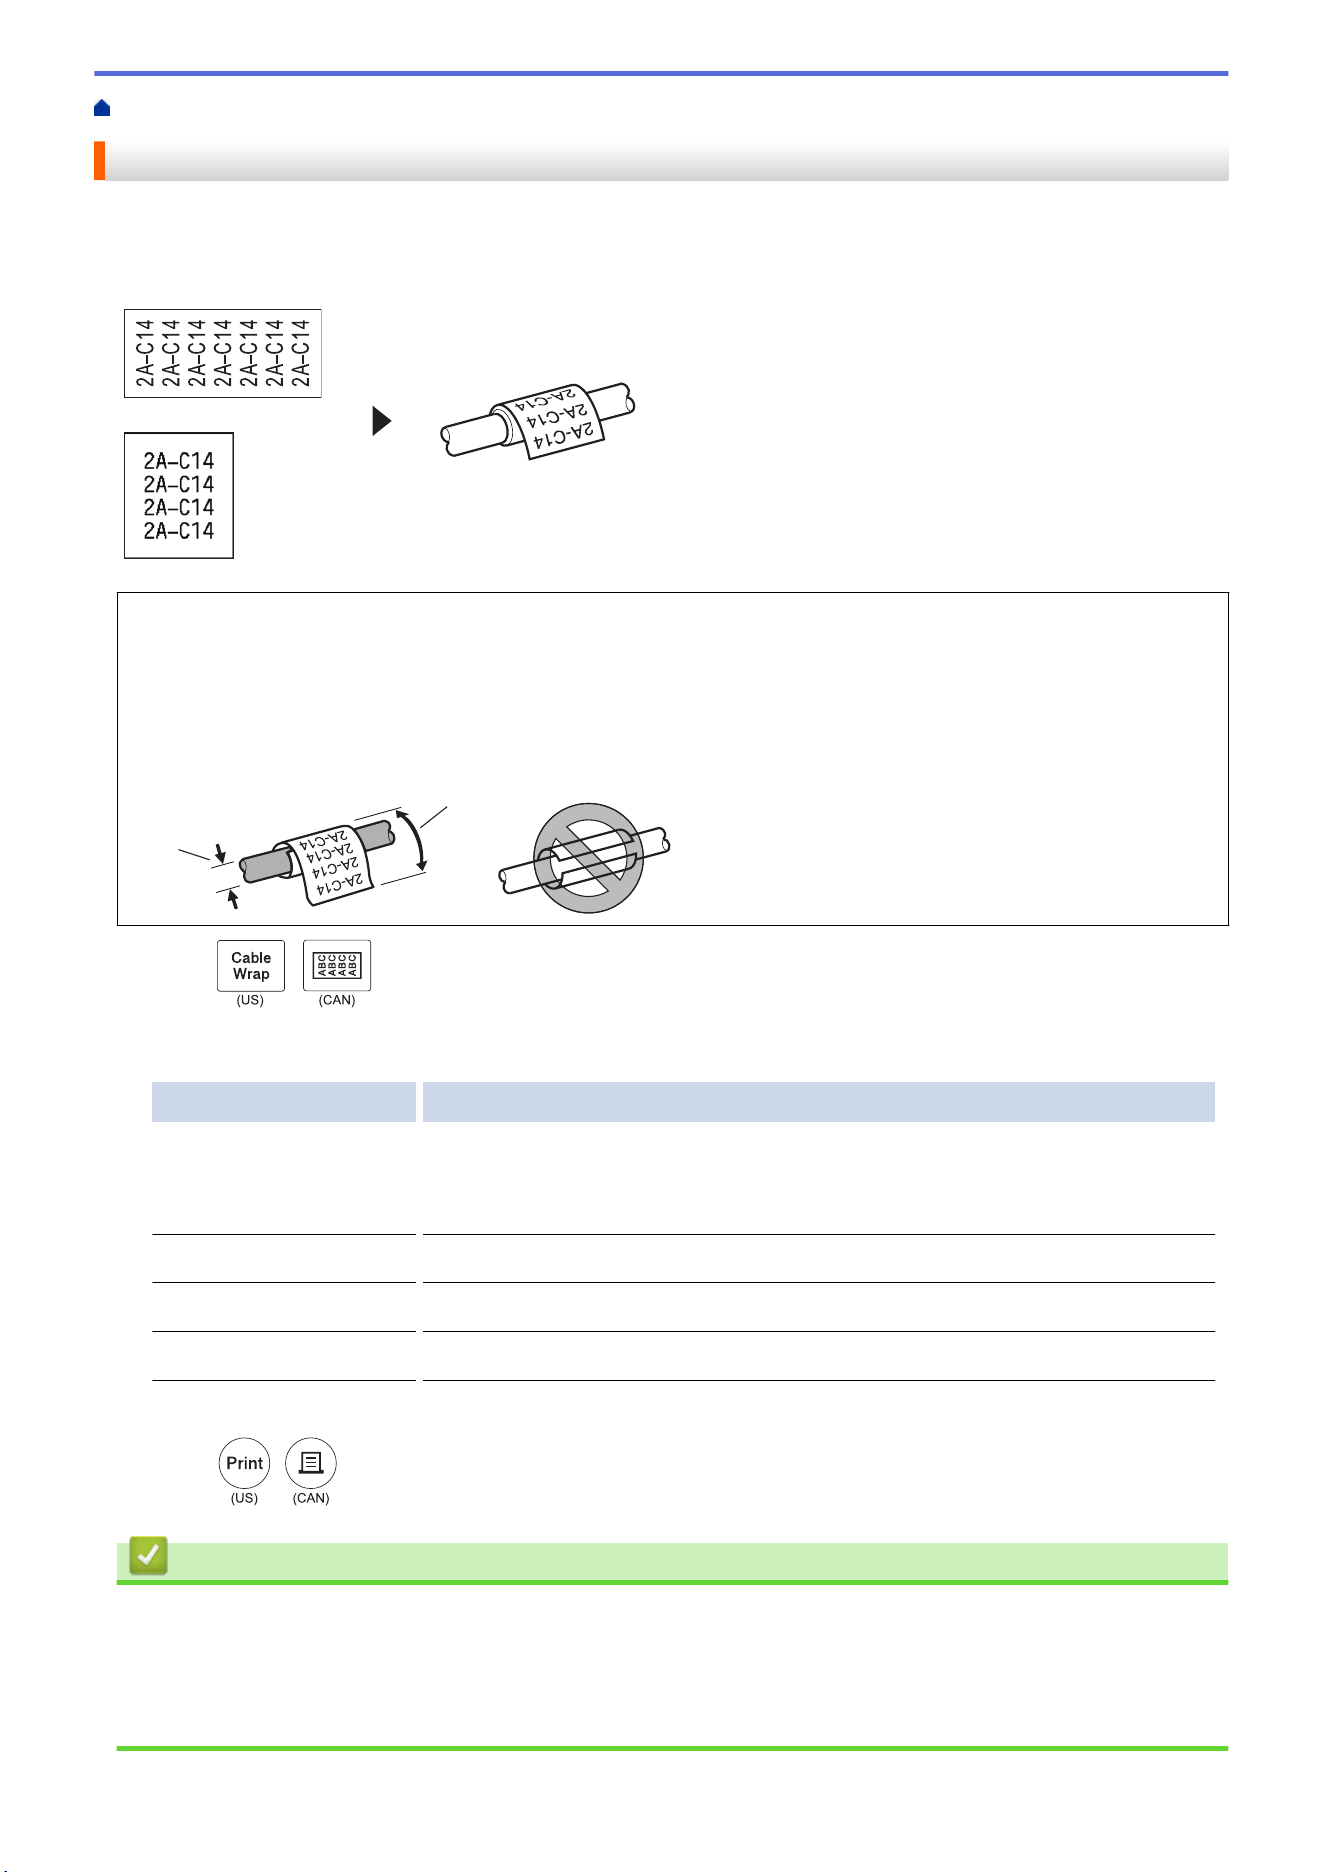
Print Options..................................................................................................................................... 103
Select a Cut Option (PT-E310BT) .............................................................................................................. 104
Select a Cut Option (PT-E510/PT-E560BT) ............................................................................................... 106
Print Transferred Templates....................................................................................................................... 108
Edit and Print Transferred Templates ............................................................................................... 109
Print Transferred Templates from a Database.................................................................................. 110
Delete a Transferred Template ......................................................................................................... 112
Print Transferred Database Data ............................................................................................................... 113
Edit a Transferred Database ............................................................................................................ 115
Delete a Transferred Database ........................................................................................................ 118
Use the File Memory ..........................................................................................................................119
Save a Label File ....................................................................................................................................... 120
Print, Open, or Delete a Saved Label File.................................................................................................. 121
Create and Print Labels Using Your Computer .............................................................................. 122
Create and Print Labels Using P-touch Editor (Windows) ......................................................................... 123
Main Window of P-touch Editor (Windows) ...................................................................................... 124
Create and Print Labels Using P-touch Editor (Mac) ................................................................................. 125
Main Window of P-touch Editor (Mac).............................................................................................. 126
Print Labels Using the Printer Driver (Windows)........................................................................................ 127
Transfer Templates to the Printer Using Your Computer (Windows) ........................................... 128
Notes on Using Transfer Functions (Windows).......................................................................................... 129
Transfer a Template or Other Data from the Computer to the Printer (Windows)...................................... 130
Transfer Multiple Items from the Computer to the Printer (Windows) .............................................. 132
Back up Templates or Other Data Saved in the Printer to Your Computer (Windows) .............................. 133
Home > Table of Contents
ii

Delete Printer Data from Your Computer (Windows) ................................................................................. 134
Create Transfer Files or Transfer Package Files (Windows) ..................................................................... 135
Print Labels Using Mobile Devices.................................................................................................. 137
Install Mobile Apps ..................................................................................................................................... 138
Create Labels and Print Them Using a Mobile Device .............................................................................. 139
Transfer Templates Created on a Computer to the Printer Using a Mobile Device ................................... 140
Update ................................................................................................................................................ 141
Update P-touch Editor................................................................................................................................ 142
Update the Firmware.................................................................................................................................. 143
Routine Maintenance ........................................................................................................................ 144
Maintenance............................................................................................................................................... 145
Troubleshooting ................................................................................................................................ 147
If You Are Having Difficulty with Your Labeling System ............................................................................. 148
Error and Maintenance Messages ............................................................................................................. 150
Adjust the Label Length ............................................................................................................................. 151
Check the Version Information ................................................................................................................... 152
Reset the Labeling System ........................................................................................................................ 153
Reset Using the LCD........................................................................................................................ 154
Appendix............................................................................................................................................ 155
Specifications ............................................................................................................................................. 156
Brother Help and Customer Support.......................................................................................................... 159
Home > Table of Contents
iii

Home > Before You Use Your Labeling System > Definitions of Notes
Definitions of Notes
We use the following symbols and conventions throughout this User's Guide:
DANGER
DANGER indicates an imminently hazardous situation which, if not avoided, will
result in death or serious injuries.
WARNING
WARNING indicates a potentially hazardous situation which, if not avoided, could
result in death or serious injuries.
CAUTION
CAUTION indicates a potentially hazardous situation which, if not avoided, may
result in minor or moderate injuries.
IMPORTANT
IMPORTANT indicates a potentially hazardous situation which, if not avoided, may
result in damage to property or loss of product functionality.
NOTE
NOTE specifies the operating environment, conditions for installation, or special
conditions of use.
The tips icon indicates helpful hints and supplementary information.
Bold Bold style identifies buttons on the machine's control panel or computer screen.
Italics Italicized style emphasizes an important point or refers you to a related topic.
Courier New
Courier New font identifies messages shown on the machine's LCD.
Related Information
• Before You Use Your Labeling System
2

Home > Before You Use Your Labeling System > General Precautions
General Precautions
Rechargeable Li-ion Battery
• At the time of purchase, the Rechargeable Li-ion Battery is slightly charged. Before you use the Labeling
System for the first time, you must fully charge the Rechargeable Li-ion Battery.
• If the Labeling System will not be used for a long period of time, remove the battery and disconnect the cord
before storing.
• If you notice anything unusual about the Rechargeable Li-ion Battery the first time it is used, for example
overheating or rust, immediately stop using the Rechargeable Li-ion Battery. Contact Brother Customer
Service.
Labeling System
• Depending on the area, material, and environmental conditions, the label may unpeel or become
permanently affixed, and the color of the label may change or be transferred to other objects. Before affixing
the label, check the environmental conditions and the material. Test the label by affixing a small piece of it to
an inconspicuous area of the intended surface.
• DO NOT use the machine, components, or supplies in any way or for any purpose not described in this
guide. Doing so may result in accidents or damage.
• Use only Brother TZe tape, HGe tape, or HSe tube with this Labeling System. DO NOT use tapes that do not
have the
/ / logo. For more information about Heat Shrink Tube, visit your local Brother
website. You cannot print frames or use certain font settings when using Heat Shrink Tube. Printed
characters may also be smaller than when using TZe tape.
• (PT-E310BT) DO NOT apply excessive pressure to the Tape Cutter Lever.
• Use a soft wipe to clean the Print Head; never touch the Print Head.
• DO NOT try to print if the cassette is empty; it will damage the Print Head.
• DO NOT pull the tape while printing or feeding; it will damage the tape and the Label Maker.
• Any data stored in the printer's memory will be lost due to failure, repair of the printer, or if the batteries
discharge completely.
• Printed characters may look different than previewed, as your device's or computer’s screen may have a
higher resolution than the printer.
• The displayed label length may differ from the actual length of the printed label.
• Be sure to read the instructions provided with the Fabric Iron-On Tapes, Extra Strength Adhesive Tapes, or
other special tapes and observe all precautions noted in the instructions.
• A protective clear plastic film is placed on the LCD during manufacturing and shipping. Remove this film prior
to use.
• DO NOT leave any rubber or vinyl products on the Labeling System for an extended period of time.
Otherwise, they may leave marks or residue on the Labeling System.
• DO NOT transport the Labeling System while a USB Type-C cable or the AC Adapter is connected to the
USB port. The port could become damaged.
Related Information
• Before You Use Your Labeling System
3

Home > Before You Use Your Labeling System > Trademarks and Licenses
Trademarks and Licenses
• App Store, Mac, Macintosh, iPad, iPhone, iPod touch are trademarks of Apple Inc., registered in the U.S. and
other countries.
• Android is a trademark of Google LLC.
• The Bluetooth
®/MD
word mark and logos are registered trademarks owned by Bluetooth SIG, Inc. and any
use of such marks by Brother Industries, Ltd. is under license. Other trademarks and trade names are those
of their respective owners.
• QR Code is a registered trademark of DENSO WAVE INCORPORATED.
• USB Type-C
®
is a registered trademark of USB Implementers Forum.
• Wi-Fi
®
is a registered trademark of Wi-Fi Alliance
®
.
• Adobe
®
and Reader
®
are either registered trademarks or trademarks of Adobe Systems Incorporated in the
United States and/or other countries.
• BarStar Pro Encode Library (PDF417, Micro PDF417, DataMatrix, MaxiCode, AztecCode, GS1 Composite,
GS1 Databar, Code93, MSI/Plessey, POSTNET, Intelligent Mail Barcode)
Copyright © 2007 AINIX Corporation. All rights reserved.
• QR Code Generating Program Copyright © 2008 DENSO WAVE INCORPORATED.
Each company whose software title is mentioned in this manual has a Software License Agreement specific to its
proprietary programs.
Any trade names and product names of companies appearing on Brother products, related documents
and any other materials are all trademarks or registered trademarks of those respective companies.
Related Information
• Before You Use Your Labeling System
4

Home > Before You Use Your Labeling System > Open Source Licensing Remarks
Open Source Licensing Remarks
This product includes open source software.
To see the Open Source Licensing Remarks, go to your model's Manuals page on the Brother support website
at support.brother.com/manuals.
Related Information
• Before You Use Your Labeling System
5

Home > Before You Use Your Labeling System > Important Note
Important Note
• The contents of this document and the specifications of this Labeling System are subject to change without
notice.
• Brother reserves the right to make changes without notice in the specifications and materials contained
herein and shall not be responsible for any damages (including consequential) caused by the reliance on the
materials presented, including, but not limited to, typographical and other errors relating to the publications.
• This Labeling System does not support Wi-Fi connection.
• Screen images in this document may differ depending on your computer's operating system, your product
model, and software version.
• Before using the Labeling System, make sure you read all the documents included with it for information
about safety and operation.
• The Labeling System shown in the illustrations may be different from your Labeling System.
• The available supplies may vary depending on your country or region.
• We recommend using the latest version of P-touch Editor. For the latest version, go to your model's
Downloads page at
support.brother.com/downloads.
• To keep your Labeling System's performance up to date, visit support.brother.com/downloads to check for the
latest firmware updates. Otherwise, some of your Labeling System's functions may not be available.
• Before giving your Labeling System to anyone else, replacing it, or disposing of it, we strongly recommend
resetting it to its factory settings to remove all personal information.
Related Information
• Before You Use Your Labeling System
6

Home > Set Up Your Labeling System
Set Up Your Labeling System
• Parts Description
• LCD Overview
• Keyboard Overview
• Attach the Support Strap
• Install the Rechargeable Li-ion Battery
• Connect the Labeling System to an External Power Source
• Charge the Rechargeable Li-ion Battery
• Insert the Tape Cassette
• Turn the Labeling System On/Off
• Set Language
• Set Measurement Units
• Set Auto Power-Off Time
• Enable or Disable Bluetooth
• Feed Tape
• Adjust LCD Contrast
• Turn the Backlight On/Off
7
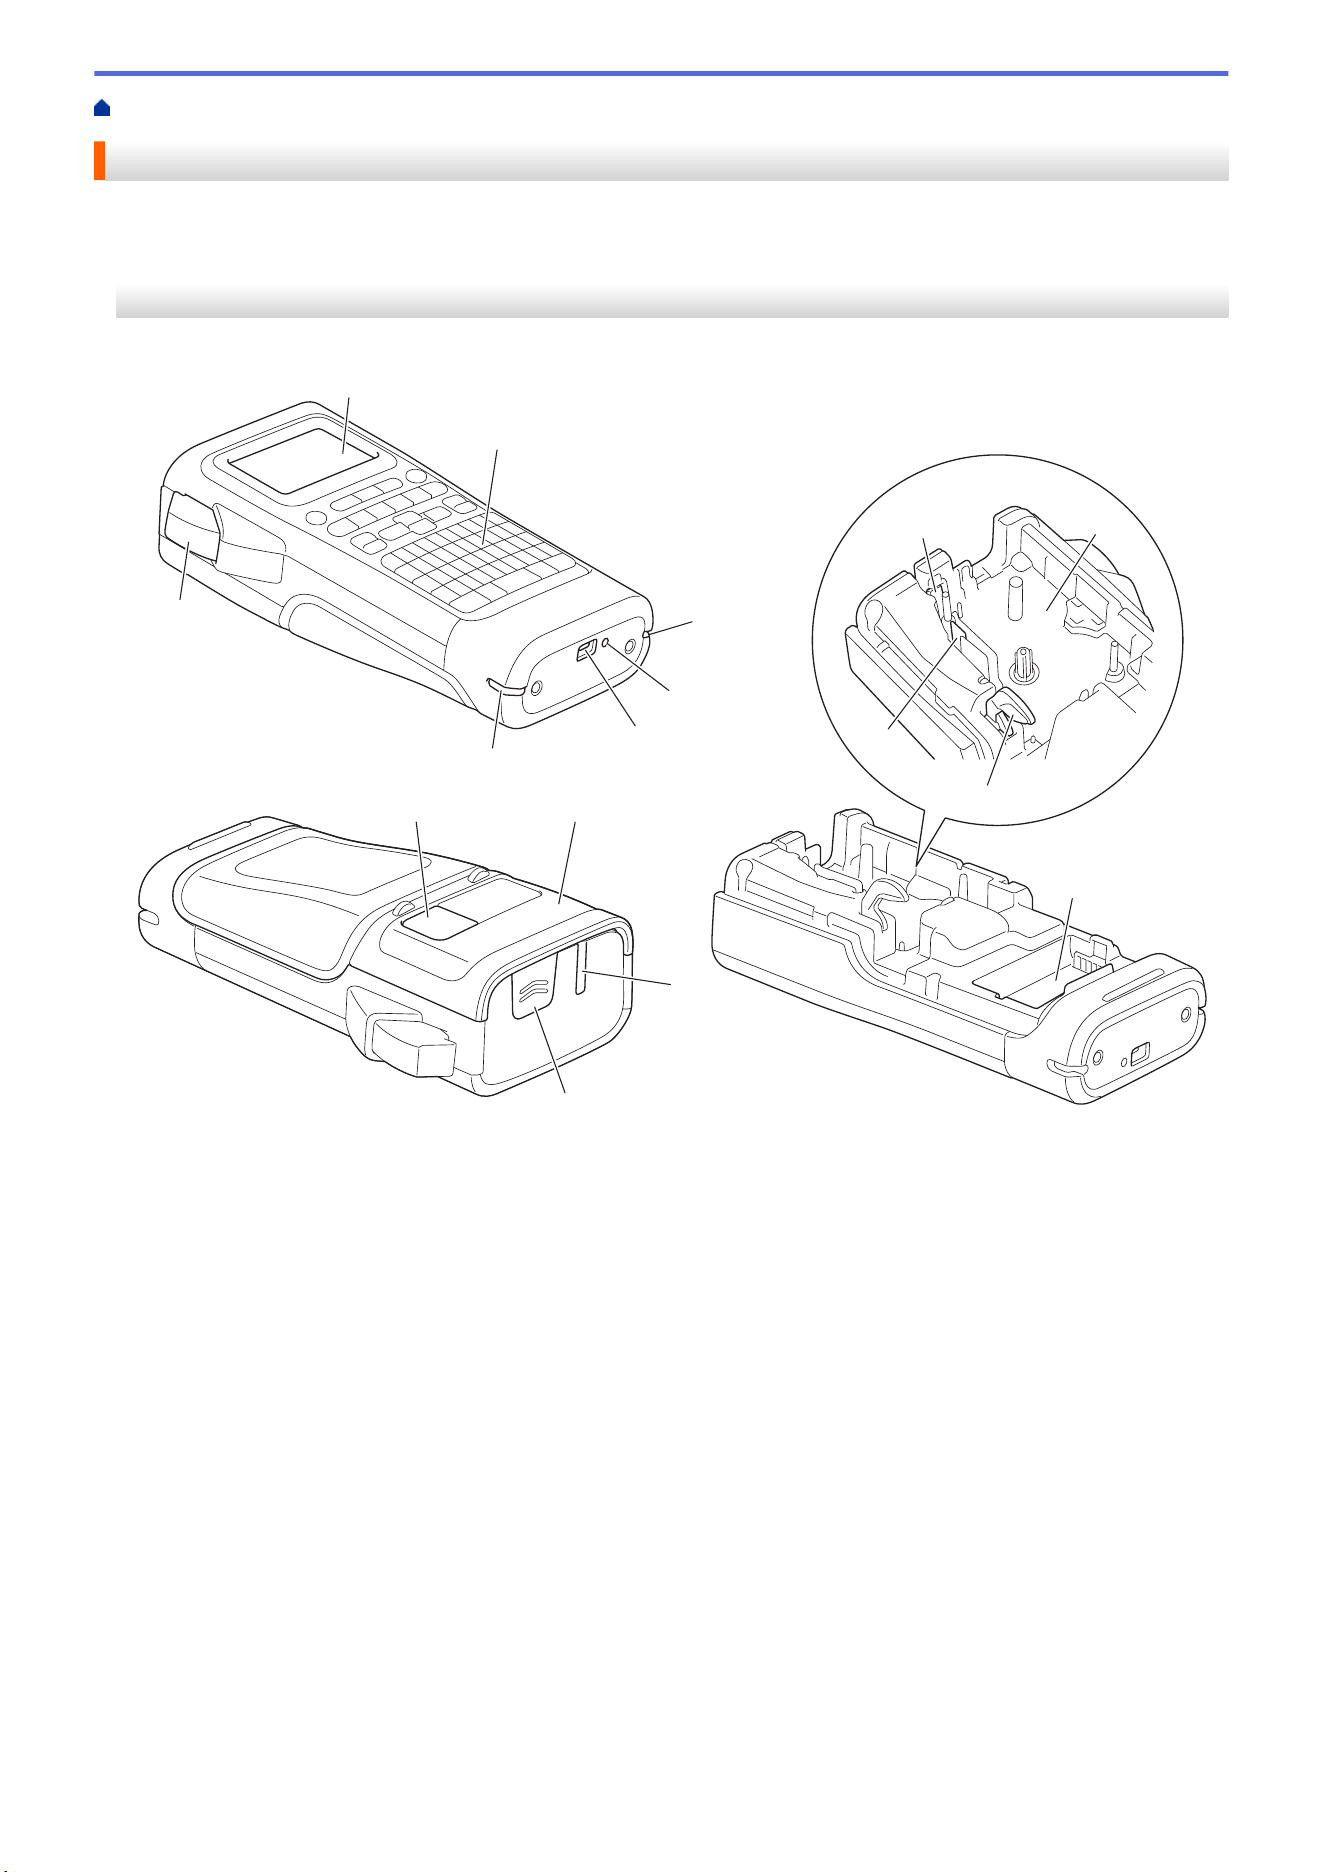
Home > Set Up Your Labeling System > Parts Description
Parts Description
>> PT-E310BT
>> PT-E510/PT-E560BT
PT-E310BT
11 12
13
7 8
15
9
10
14
1
2
3
4
5
3
6
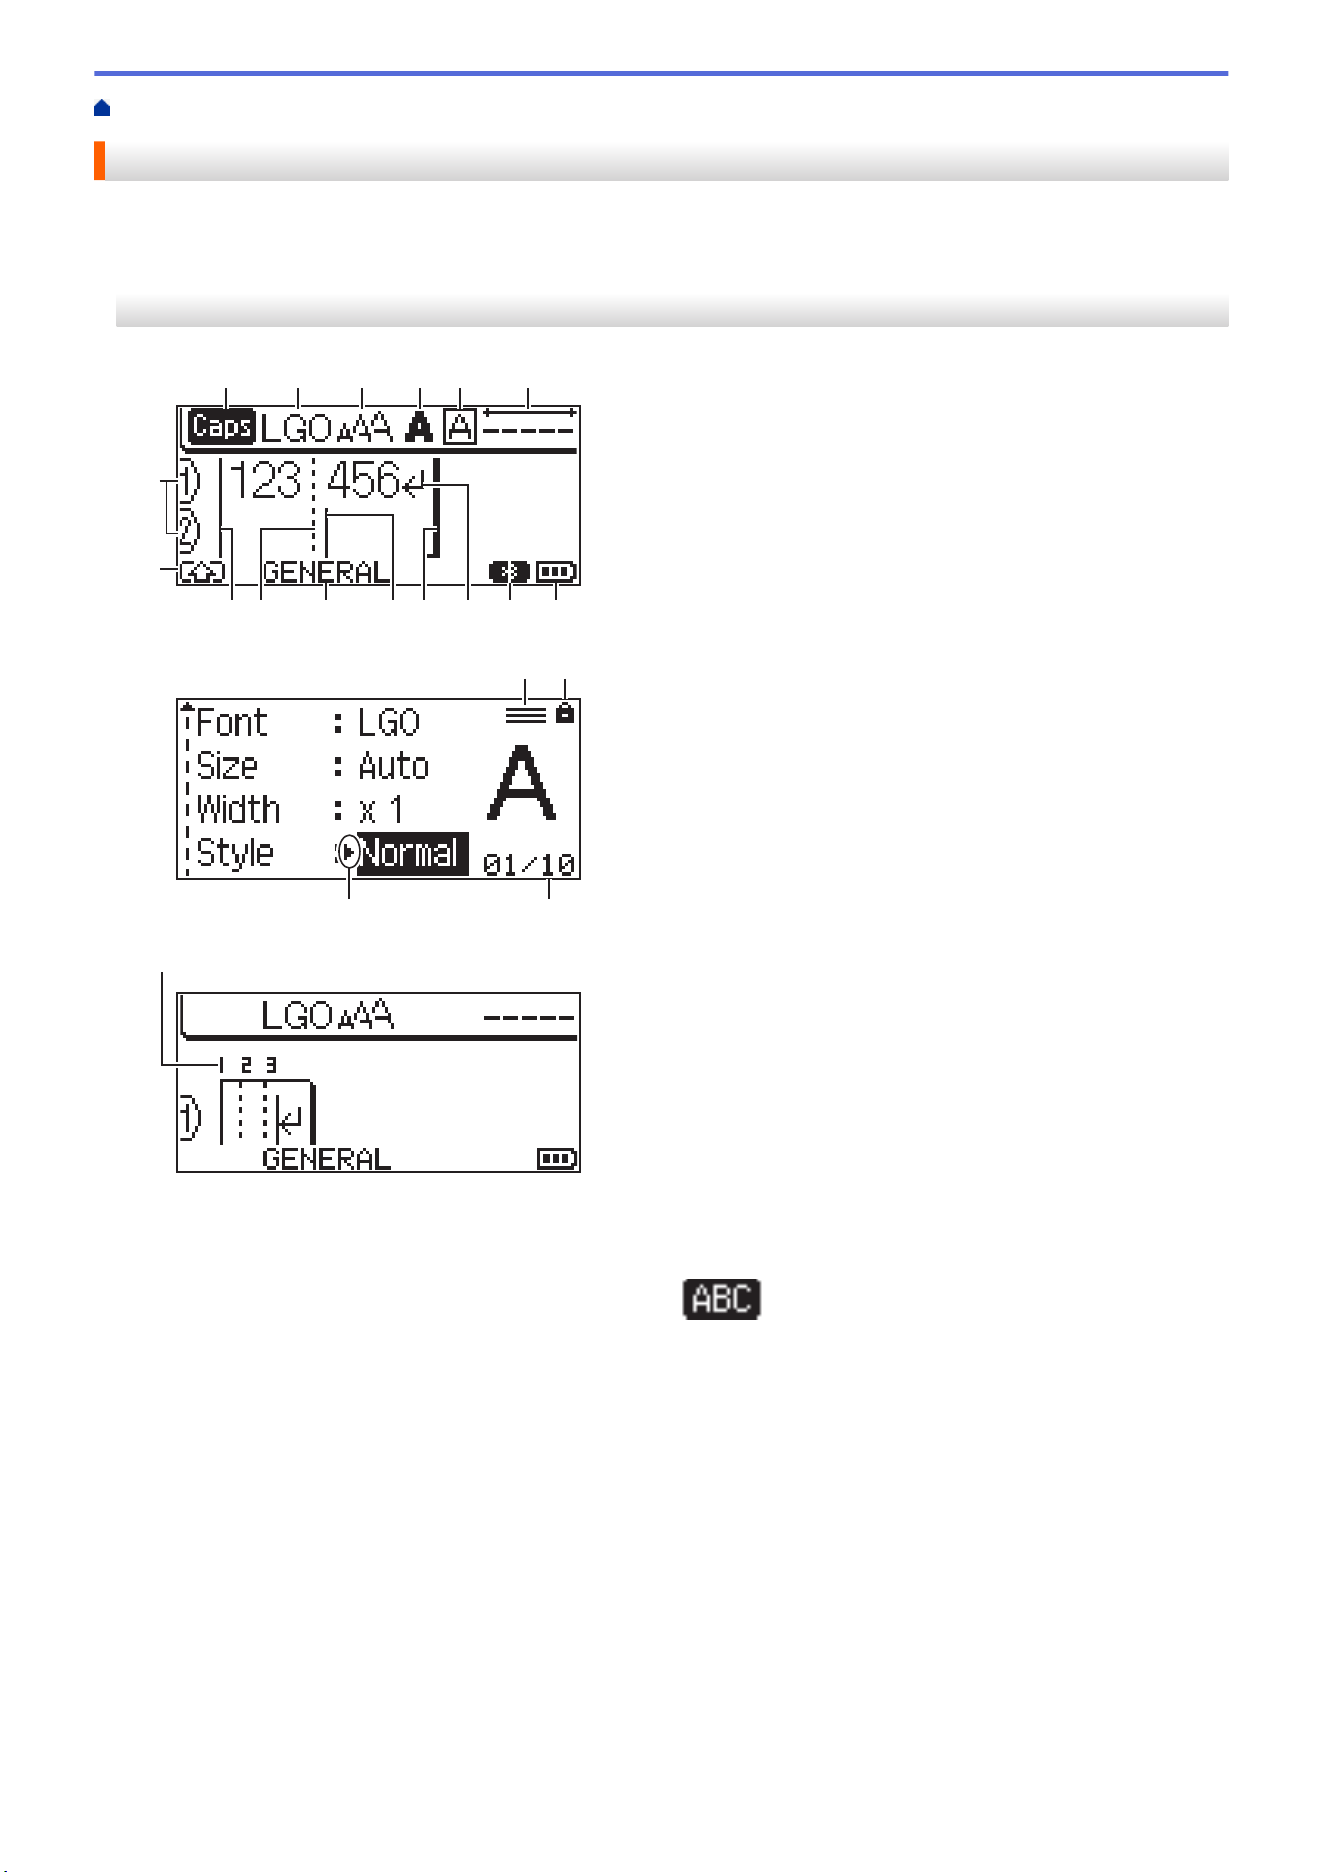
1. Liquid Crystal Display (LCD)
2. Keyboard
3. Strap Hole
4. LED
5. USB Type-C Port
6. Tape Cutter Lever
7. Tape Viewer
8. Rear Cover
9. Tape Exit Slot
10. Cover Latch
11. Tape Cutter
12. Tape Cassette Compartment
13. Release Lever
14. Print Head
15. Battery Compartment
8
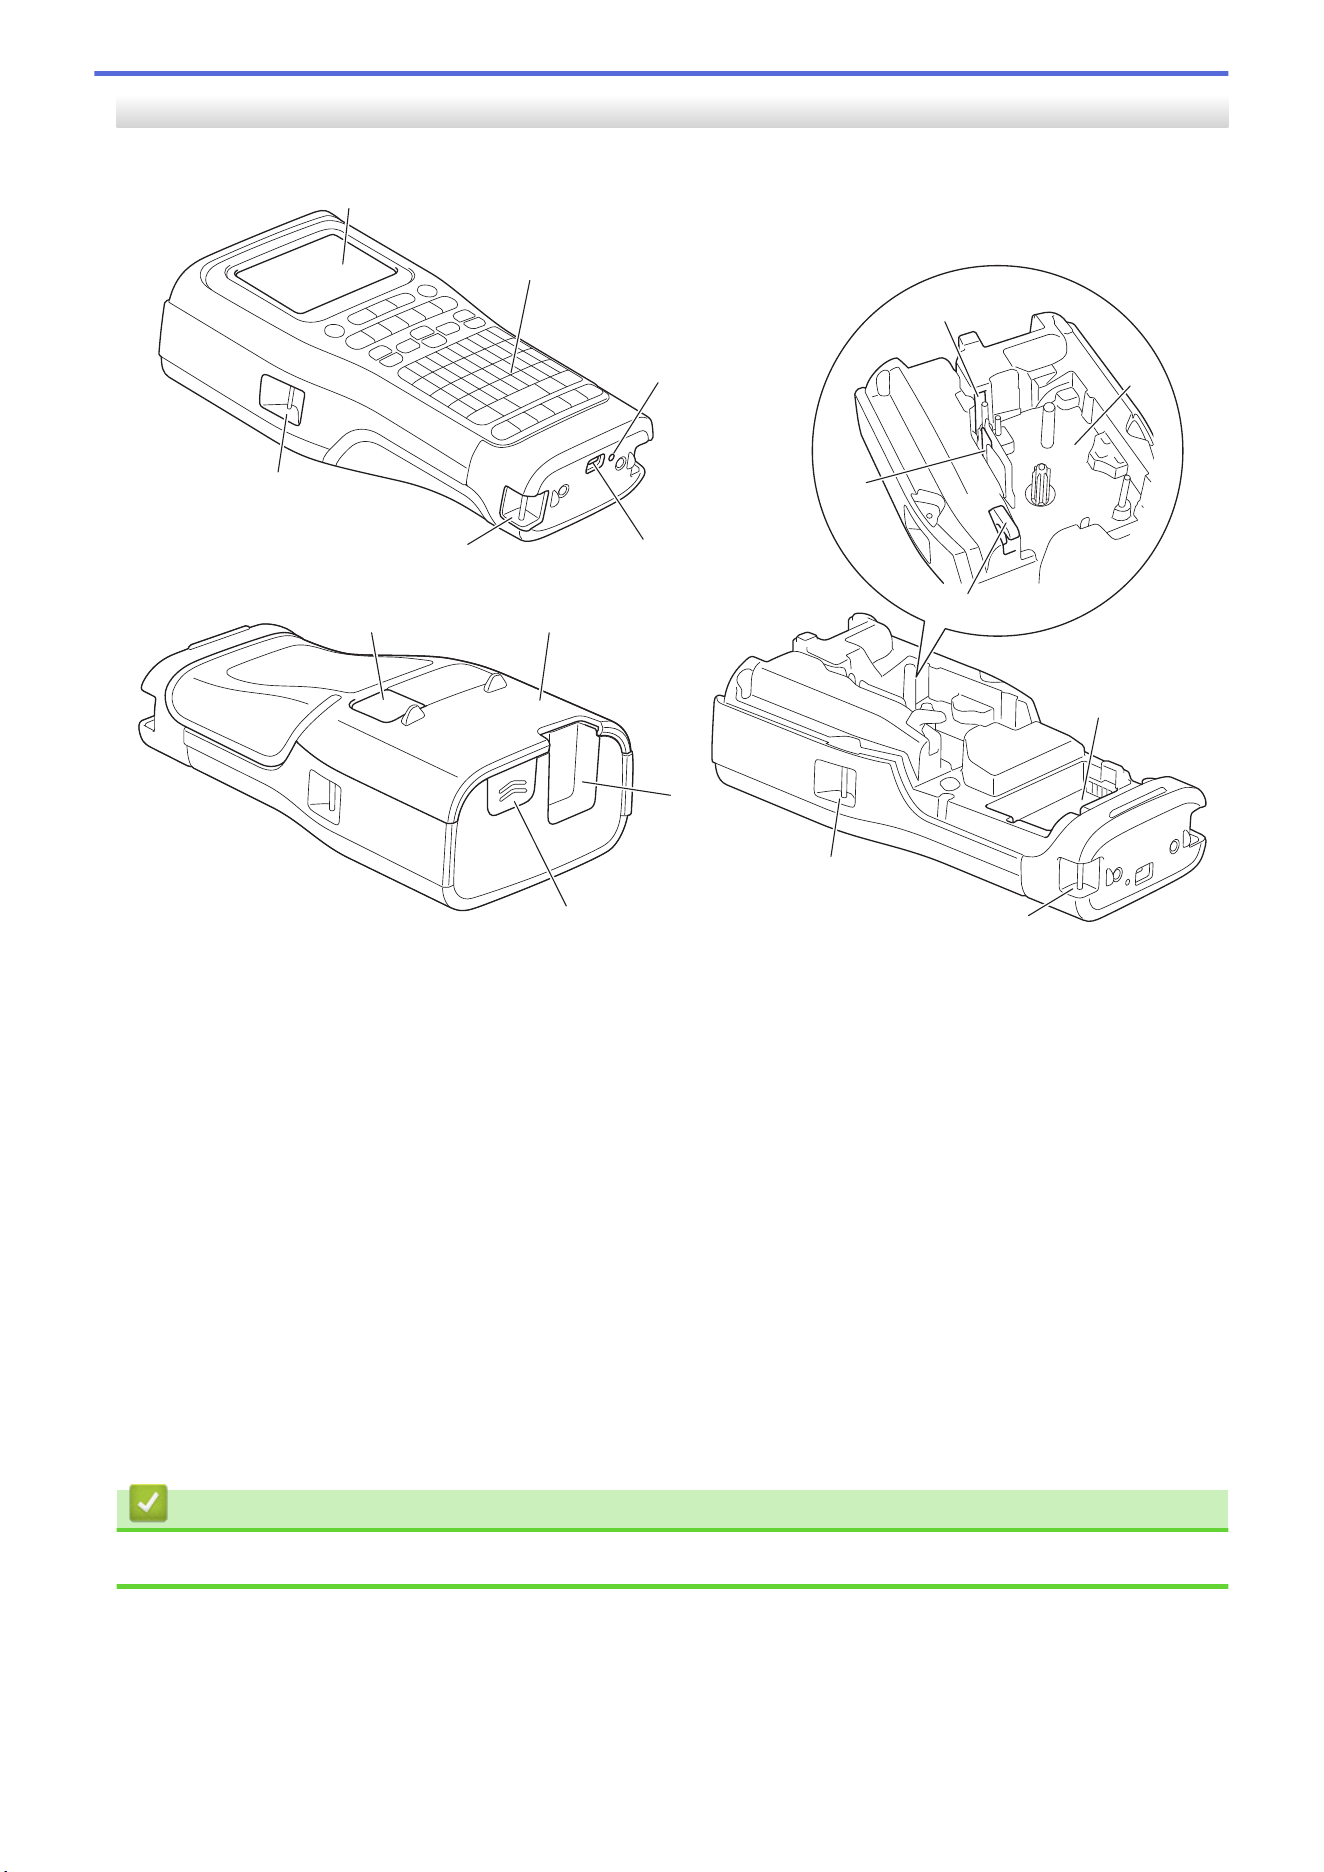
PT-E510/PT-E560BT
10
11
12
6 7
14
8
9
13
1
2
3
4
5
5
5
5
1. Liquid Crystal Display (LCD)
2. Keyboard
3. LED
4. USB Type-C Port
5. Strap Hole
6. Tape Viewer
7. Rear Cover
8. Tape Exit Slot
9. Cover Latch
10. Tape Cutter
11. Tape Cassette Compartment
12. Release Lever
13. Print Head
14. Battery Compartment
Related Information
• Set Up Your Labeling System
9
Home > Set Up Your Labeling System > LCD Overview
LCD Overview
>> PT-E310BT
>> PT-E510/PT-E560BT
PT-E310BT
1 2 3 4 5 6
7812 111314 910
16
15
20
18
19
17
21
1. Caps mode
Indicates if Caps lock mode is enabled. (For Canada,
appears.)
2. Current font
Indicates the current font.
3. Character size
Indicates the current character size.
4. Character style
Indicates the current character style.
5. Frame
Indicates if a frame is set.
6. Tape length
Indicates the tape length for the text entered.
7. Battery level
Indicates the remaining battery level. Displays only when using a Rechargeable Li-ion Battery.
10

Icon Description
Battery charge is full.
Battery charge is half-full.
Battery charge is low.
8. Bluetooth
Indicates Bluetooth connection. It blinks while the Labeling System is waiting for the Bluetooth connection. It
stays lit once the Bluetooth connection is completed.
9. Return mark
Indicates the end of a line of text.
10. End line
Indicates the end line.
The area between the start and end line will be printed.
11. Cursor
Indicates the current data entry position.
New characters appear to the left of the cursor.
12. Labeling application type
Indicates current labeling application type.
13. Block separator line
Indicates the end of a block of text.
14. Start line
Indicates the start line.
The area between the start and end line will be printed.
15. Shift mode
Indicates shift mode is on.
16. Line number
Indicates line numbers within the label layout.
17. Specified line mark
Indicates that separate settings are made for each line.
18. Lock mark
Indicates that some settings cannot be changed.
19. Counter
Indicates currently selected number/selectable number.
20. Cursor selection
Indicates the current cursor position.
Press a or b to select menu items, and then press d or c to change the settings.
21. Block number
Indicates the block number.
11
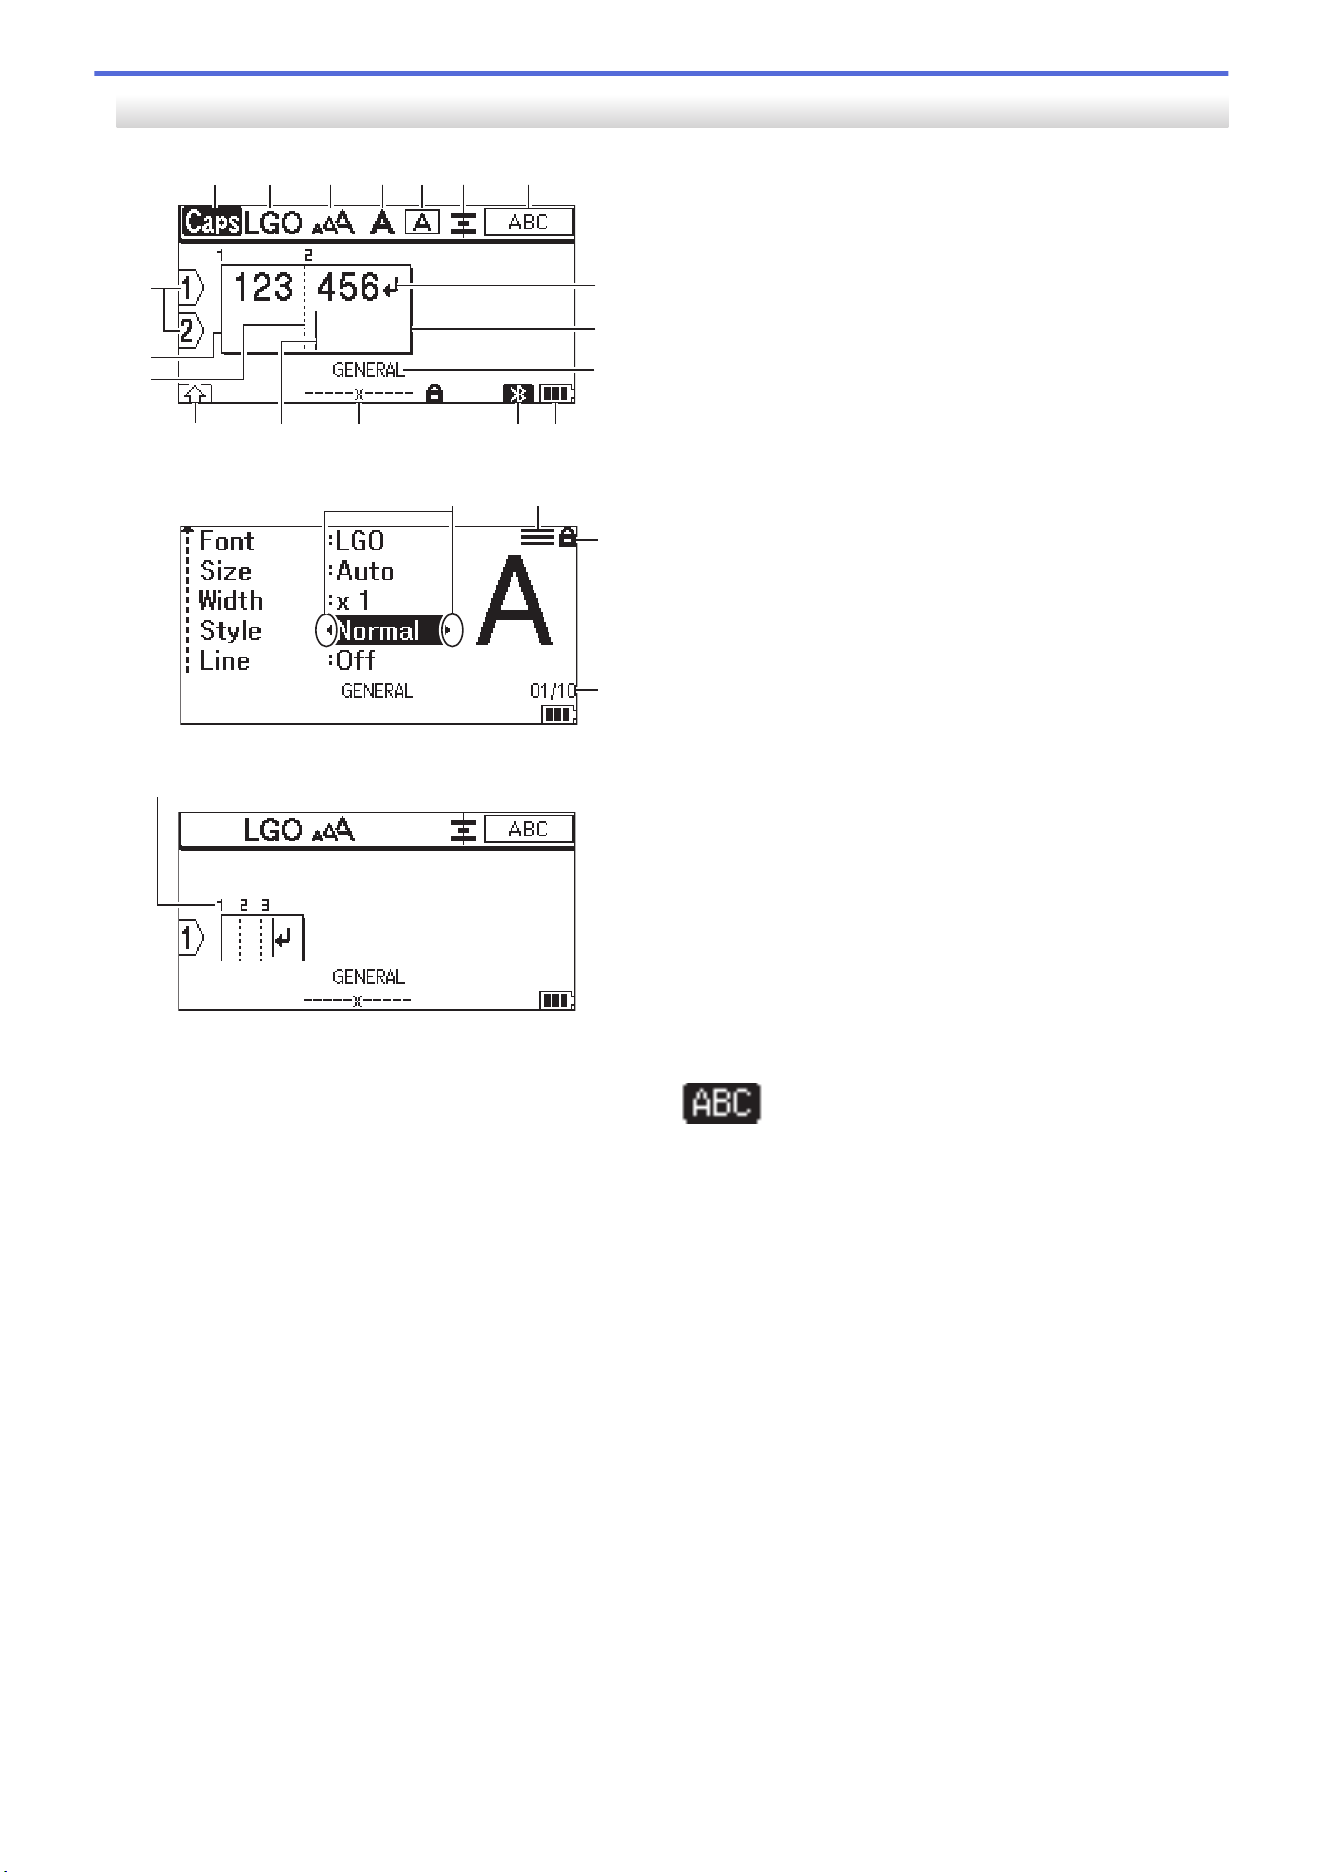
PT-E510/PT-E560BT
14
1 2 3 4 6 7
15
11
5
1213
18
17
16
8
9
10
22
20
21
19
23
1. Caps mode
Indicates if Caps lock mode is enabled. (For Canada, appears.)
2. Current font
Indicates the current font.
3. Character size
Indicates the current character size.
4. Character style
Indicates the current character style.
5. Frame
Indicates if a frame is set.
6. Align
Indicates the text alignment.
The alignment guidance may not be displayed depending on the selected labeling application type.
7. Layout guidance
Indicates the orientation, layout, separator, reverse, and repeated text settings. The displayed items vary
according to the selected labeling application type.
8. Return mark
Indicates the end of a line of text.
9. End line
Indicates the end line.
12
The area between the start and end line will be printed.
10. Labeling application type
Indicates current labeling application type.
11. Battery level
Indicates the remaining battery level. Displays only when using a Rechargeable Li-ion Battery.
Icon Description
Battery charge is full.
Battery charge is half-full.
Battery charge is low.
12. Bluetooth (PT-E560BT)
Indicates Bluetooth connection. It blinks while the Labeling System is waiting for the Bluetooth connection. It
stays lit once the Bluetooth connection is completed.
13. Tape width x Label length
Indicates the tape width and label length.
The displayed label length may slightly differ from the actual length of the printed label due to printing
tolerance.
If the label length has been specified,
appears.
14. Cursor
Indicates the current data entry position.
New characters appear to the left of the cursor.
15. Shift mode
Indicates shift mode is on.
16. Block separator line
Indicates the end of a block of text.
17. Start line
Indicates the start line.
The area between the start and end line will be printed.
18. Line number
Indicates line numbers within the label layout.
19. Cursor selection
Indicates the current cursor position.
Press a or b to select menu items, and then press d or c to change the settings.
20. Specified line mark
Indicates that separate settings are made for each line.
21. Lock mark
Indicates that some settings cannot be changed.
22. Counter
Indicates currently selected number/selectable number.
23. Block number
Indicates the block number.
Related Information
• Set Up Your Labeling System
13
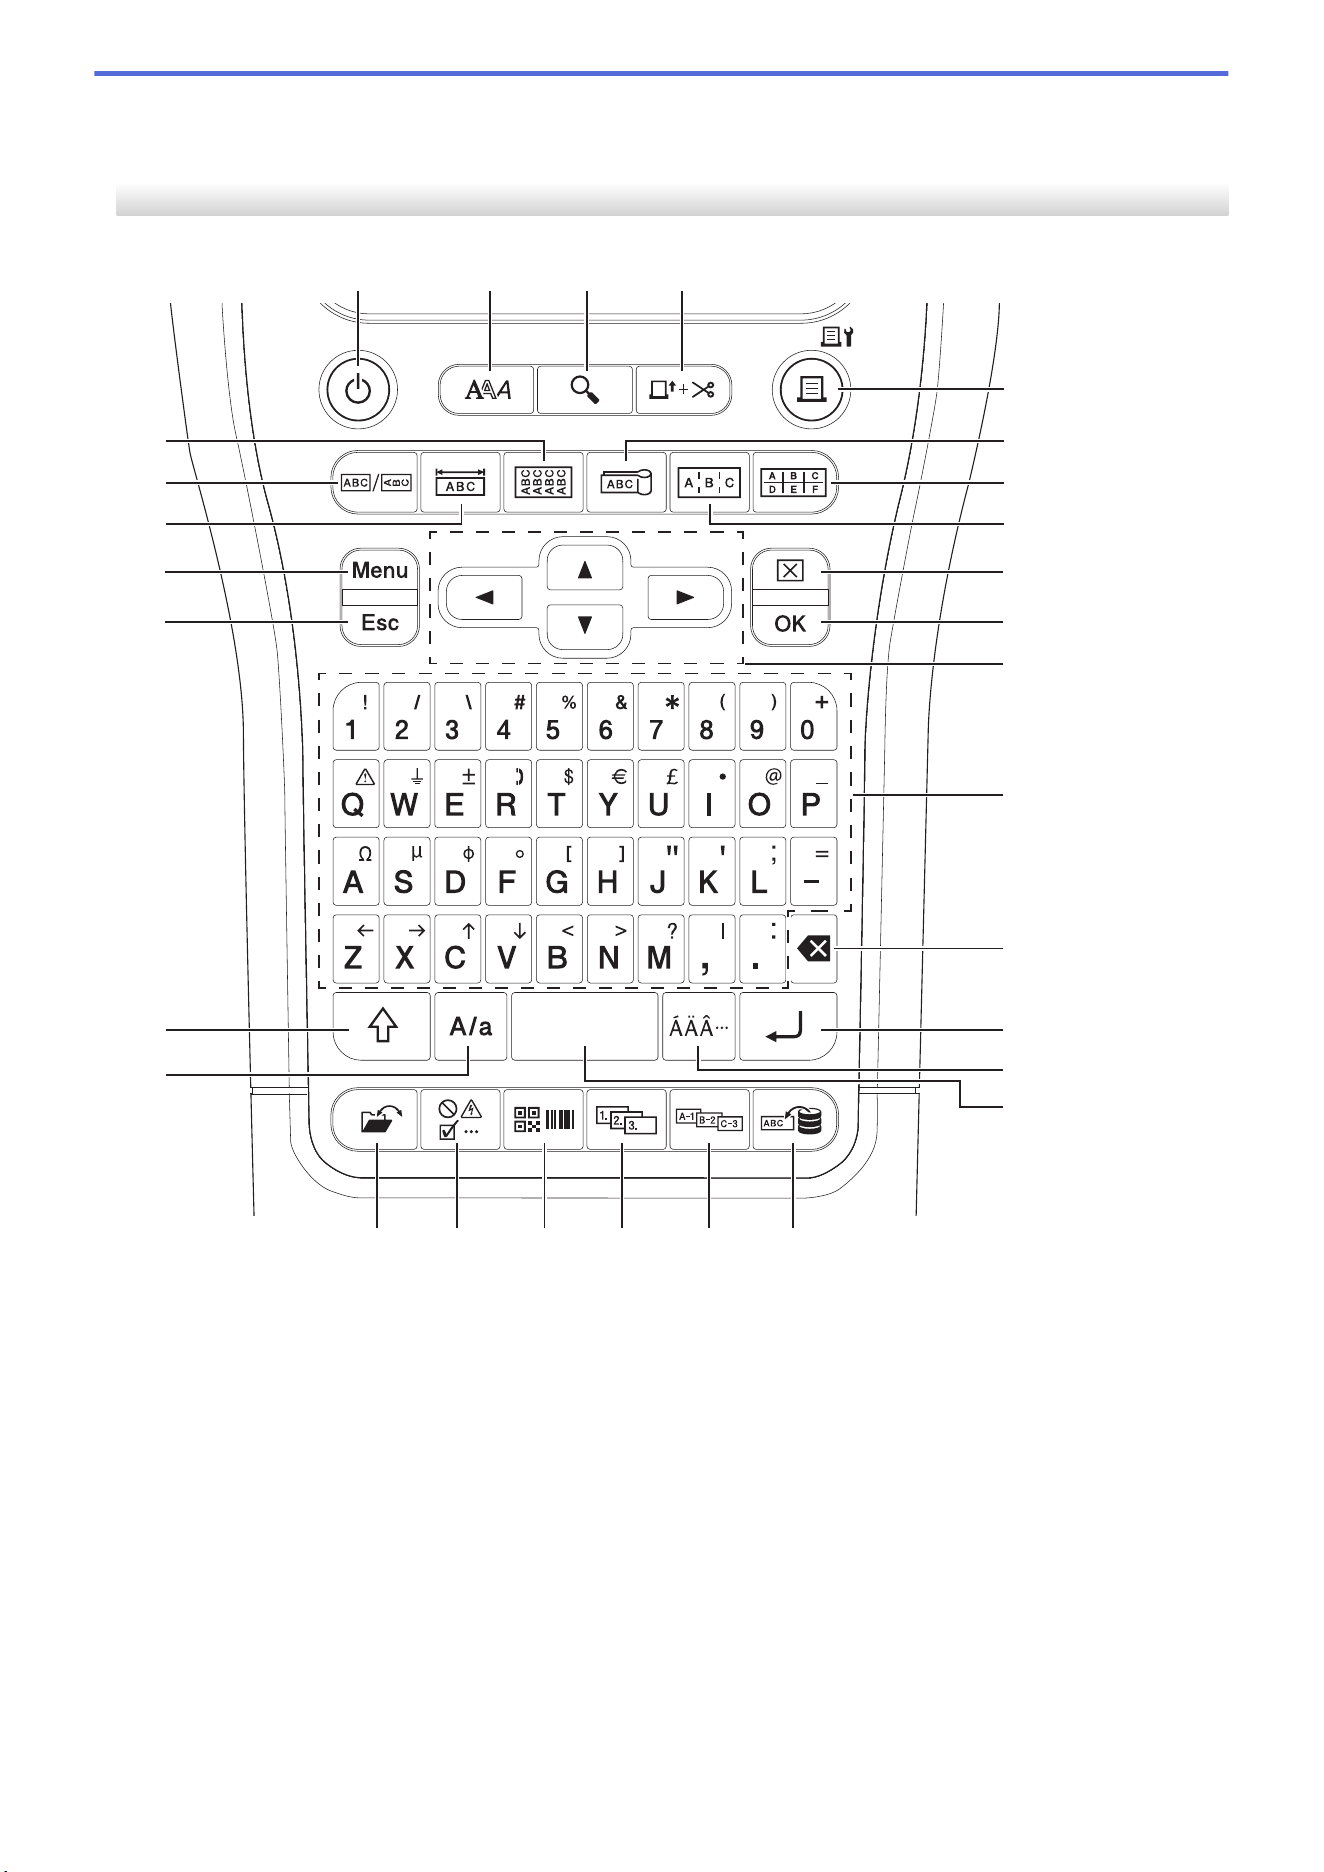
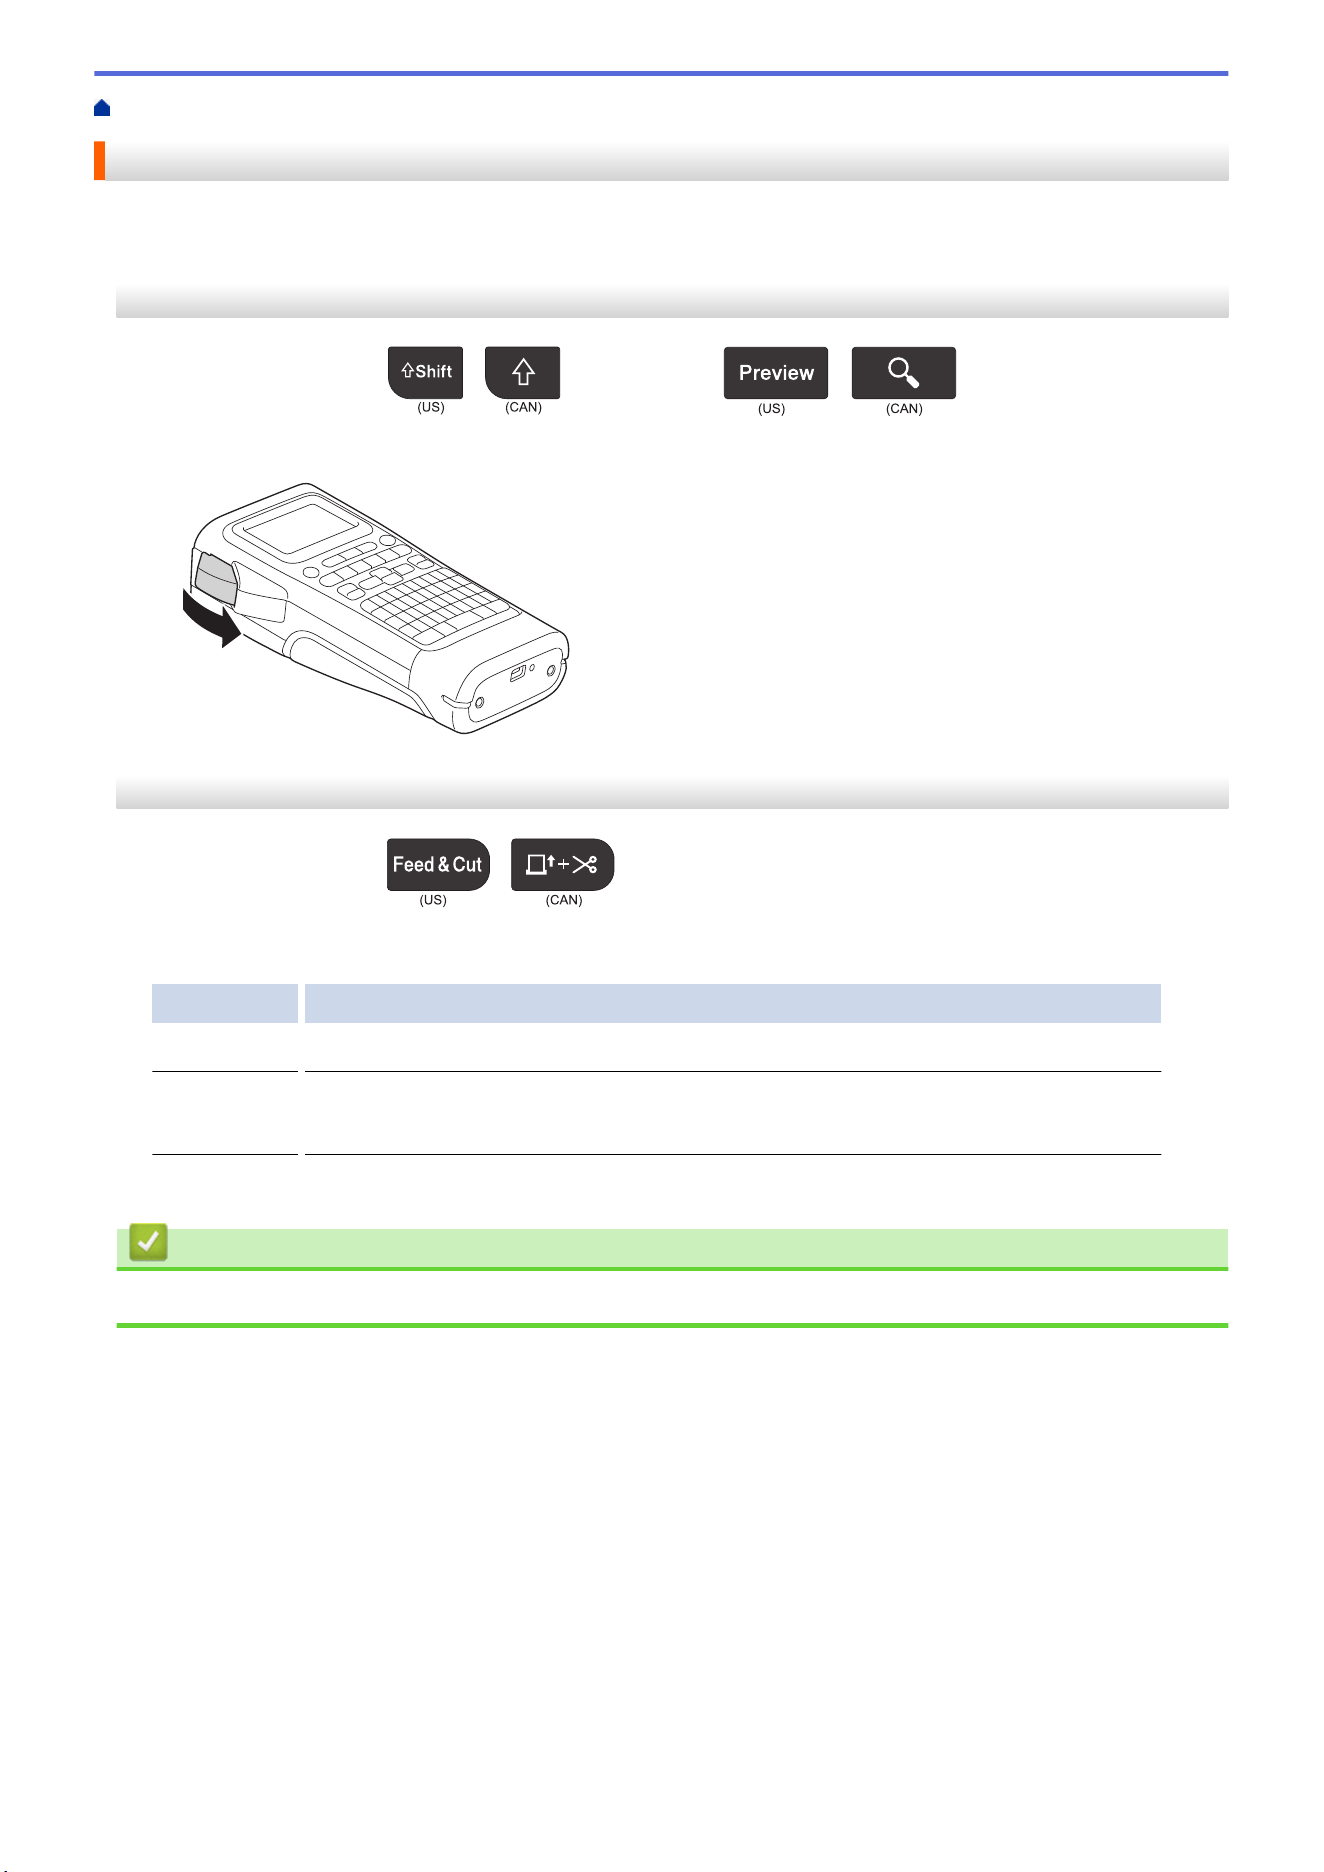
Home > Set Up Your Labeling System > Keyboard Overview
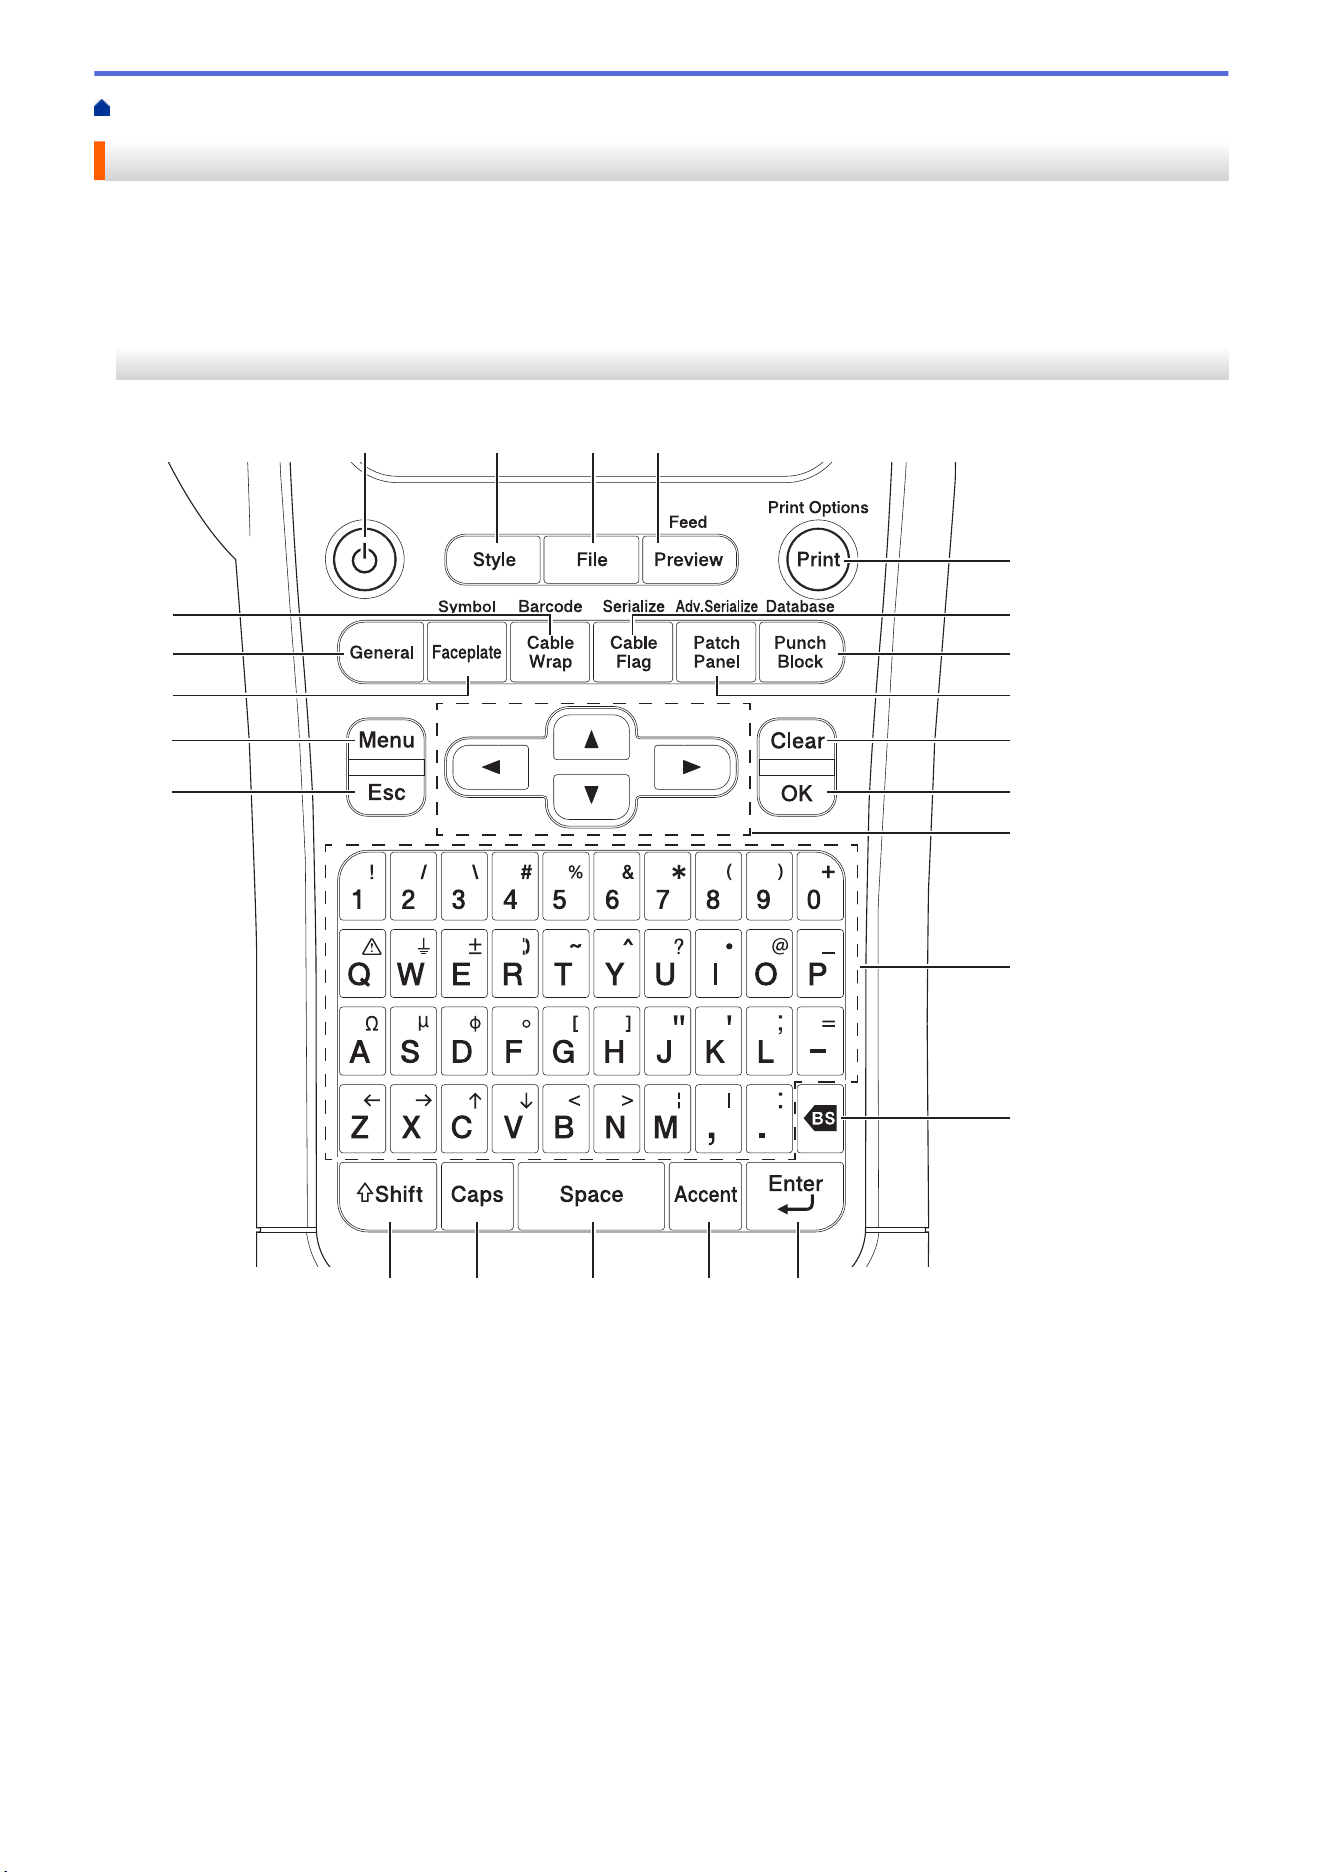
Keyboard Overview
>> PT-E310BT (For USA)
>> PT-E310BT (For Canada)
>> PT-E510/PT-E560BT (For USA)
>> PT-E510/PT-E560BT (For Canada)
PT-E310BT (For USA)
1019
20
7
8
6
23
22
21
11
12
9
5
4321
13
18 17 16 15 14
1. Power
Press to turn on or off the Labeling System.
2. Style
Press to set character and label attributes.
3. File
Press to retrieve data saved in the printer's memory.
4. Preview/Feed
Press to view an image of the label before printing.
To feed the tape, press the Shift key once, and then press the Preview/Feed key.
5. Print/Print Options
Press to print.
To set Print Options, press the Shift key once, and then press the Print/Print Options key.
14

6. Cable Flag/Serialize
Press to create cable flag labels.
To create serialized labels, press the Shift key once, and then press the Cable Flag/Serialize key.
7. Punch Block/Database
Press to create labels for punch-down blocks with up to two lines drawn.
To create labels using the selected range of records in the downloaded database, press the Shift key once,
and then press the Punch Block/Database key.
8. Patch Panel/Adv.Serialize
Press to create single or multiple line labels for a group of ports on a patch panel.
To create advanced serialized labels, press the Shift key once, and then press the Patch Panel/
Adv.Serialize key.
9. Clear
Press to clear all text and format settings.
10. OK
Press to select the displayed option.
11. Cursor
Press to move the cursor in the direction of the arrow.
12. Letter
Press to enter letters or numbers.
You can enter uppercase letters and symbols using these keys in combination with the Caps key.
13. Backspace
Press to delete any character to the left of the cursor.
14. Enter
Press to enter a new line when entering text.
If you select the General mode for label application type and want to enter a new block of text, press the Shift
key, and then press the Enter key.
15. Accent
Press to select an accented character.
16. Space
Press to insert a blank space.
Press to return to the default value.
17. Caps
Press to turn Caps mode on and off.
18. Shift
Press to enter the symbol marked on the key.
19. Escape
Press to cancel the current operation.
20. Menu
Press to select a function menu.
21. Faceplate/Symbol
Press to create labels for faceplates, nameplates, and single port applications.
To select a symbol from the symbols menus, press the Shift key once, and then press the Faceplate/
Symbol key.
22. General
Press to create general purpose labels.
23. Cable Wrap/Barcode
Press to create labels that wrap around a cable or wire.
To open the Barcode Setup screen, press the Shift key once, and then press the Cable Wrap/Barcode key.
15

PT-E310BT (For Canada)
1019
20
7
8
6
23
22
21
11
12
9
5
4321
13
18 17 16 15 14
1. Power
Press to turn on or off the Labeling System.
2. Style
Press to set character and label attributes.
3. File
Press to retrieve data saved in the printer's memory.
4. Preview/Feed
Press to view an image of the label before printing.
To feed the tape, press the Shift key once, and then press the Preview/Feed key.
5. Print/Print Options
Press to print.
To set Print Options, press the Shift key once, and then press the Print/Print Options key.
6. Cable Flag/Serialize
Press to create cable flag labels.
To create serialized labels, press the Shift key once, and then press the Cable Flag/Serialize key.
7. Punch Block/Database
Press to create labels for punch-down blocks with up to two lines drawn.
To create labels using the selected range of records in the downloaded database, press the Shift key once,
and then press the Punch Block/Database key.
16

8. Patch Panel/Adv.Serialize
Press to create single or multiple line labels for a group of ports on a patch panel.
To create advanced serialized labels, press the Shift key once, and then press the Patch Panel/
Adv.Serialize key.
9. Clear
Press to clear all text and format settings.
10. OK
Press to select the displayed option.
11. Cursor
Press to move the cursor in the direction of the arrow.
12. Letter
Press to enter letters or numbers.
You can enter uppercase letters and symbols using these keys in combination with the Caps key.
13. Backspace
Press to delete any character to the left of the cursor.
14. Enter
Press to enter a new line when entering text.
If you select the General mode for label application type and want to enter a new block of text, press the Shift
key, and then press the Enter key.
15. Accent
Press to select an accented character.
16. Space
Press to insert a blank space.
Press to return to the default value.
17. Caps
Press to turn Caps mode on and off.
18. Shift
Press to enter the symbol marked on the key.
19. Escape
Press to cancel the current operation.
20. Menu
Press to select a function menu.
21. Faceplate/Symbol
Press to create labels for faceplates, nameplates, and single port applications.
To select a symbol from the symbols menus, press the Shift key once, and then press the Faceplate/
Symbol key.
22. General
Press to create general purpose labels.
23. Cable Wrap/Barcode
Press to create labels that wrap around a cable or wire.
To open the Barcode Setup screen, press the Shift key once, and then press the Cable Wrap/Barcode key.
17

PT-E510/PT-E560BT (For USA)
11
25
26
7
8
6
29
27
28
10
12
9
5
432
1
13
24
23
14
15
16
22 21 20 19 18 17
1. Power
Press to turn on or off the Labeling System.
2. Style
Press to set character and label attributes.
3. Preview
Press to view an image of the label before printing.
4. Feed&Cut
Press to feed 0.89" (22.7 mm) of blank tape then cut the tape.
5. Print/Print Options
Press to print.
To set Print Options, press the Shift key once, and then press the Print/Print Options key.
6. Cable Flag
Press to create cable flag labels.
7. Punch Block
Press to create labels for punch-down blocks with up to three lines drawn.
18

8. Patch Panel
Press to create single or multiple line labels for a group of ports on a patch panel.
9. Clear
Press to clear all text and format settings.
10. OK
Press to select the displayed option.
11. Cursor
Press to move the cursor in the direction of the arrow.
12. Letter
Press to enter letters or numbers.
You can enter uppercase letters and symbols using these keys in combination with the Caps key.
13. Backspace
Press to delete any character to the left of the cursor.
14. Enter
Press to enter a new line when entering text.
If you select the General mode for label application type and want to enter a new block of text, press the Shift
key, and then press the Enter key.
15. Accent
Press to select an accented character.
16. Space
Press to insert a blank space.
Press to return to the default value.
17. Database
Press to create labels using the selected range of records in the downloaded database.
18. Adv.Serialize
Press to create advanced serialized labels.
19. Serialize
Press to create serialized labels.
20. Barcode
Press to open the Barcode Setup screen.
21. Symbol
Press to select and insert a symbol from the symbols menus.
22. File
Press to retrieve data saved in the printer's memory.
23. Caps
Press to turn Caps mode on and off.
24. Shift
Press to enter the symbol marked on the key.
25. Escape
Press to cancel the current operation.
26. Menu
Press to select a function menu.
27. Faceplate
Press to create labels for faceplates, nameplates, and single port applications.
28. General
Press to create general purpose labels.
19
29. Cable Wrap
Press to create labels that wrap around a cable or wire.
PT-E510/PT-E560BT (For Canada)
11
25
26
7
8
6
29
27
28
10
12
9
5
432
1
13
24
23
14
15
16
22 21 20 19 18 17
1. Power
Press to turn on or off the Labeling System.
2. Style
Press to set character and label attributes.
3. Preview
Press to view an image of the label before printing.
4. Feed&Cut
Press to feed 0.89" (22.7 mm) of blank tape then cut the tape.
5. Print/Print Options
Press to print.
To set Print Options, press the Shift key once, and then press the Print/Print Options key.
6. Cable Flag
Press to create cable flag labels.
20

7. Punch Block
Press to create labels for punch-down blocks with up to three lines drawn.
8. Patch Panel
Press to create single or multiple line labels for a group of ports on a patch panel.
9. Clear
Press to clear all text and format settings.
10. OK
Press to select the displayed option.
11. Cursor
Press to move the cursor in the direction of the arrow.
12. Letter
Press to enter letters or numbers.
You can enter uppercase letters and symbols using these keys in combination with the Caps key.
13. Backspace
Press to delete any character to the left of the cursor.
14. Enter
Press to enter a new line when entering text.
If you select the General mode for label application type and want to enter a new block of text, press the Shift
key, and then press the Enter key.
15. Accent
Press to select an accented character.
16. Space
Press to insert a blank space.
Press to return to the default value.
17. Database
Press to create labels using the selected range of records in the downloaded database.
18. Adv.Serialize
Press to create advanced serialized labels.
19. Serialize
Press to create serialized labels.
20. Barcode
Press to open the Barcode Setup screen.
21. Symbol
Press to select and insert a symbol from the symbols menus.
22. File
Press to retrieve data saved in the printer's memory.
23. Caps
Press to turn Caps mode on and off.
24. Shift
Press to enter the symbol marked on the key.
25. Escape
Press to cancel the current operation.
26. Menu
Press to select a function menu.
27. Faceplate
Press to create labels for faceplates, nameplates, and single port applications.
21


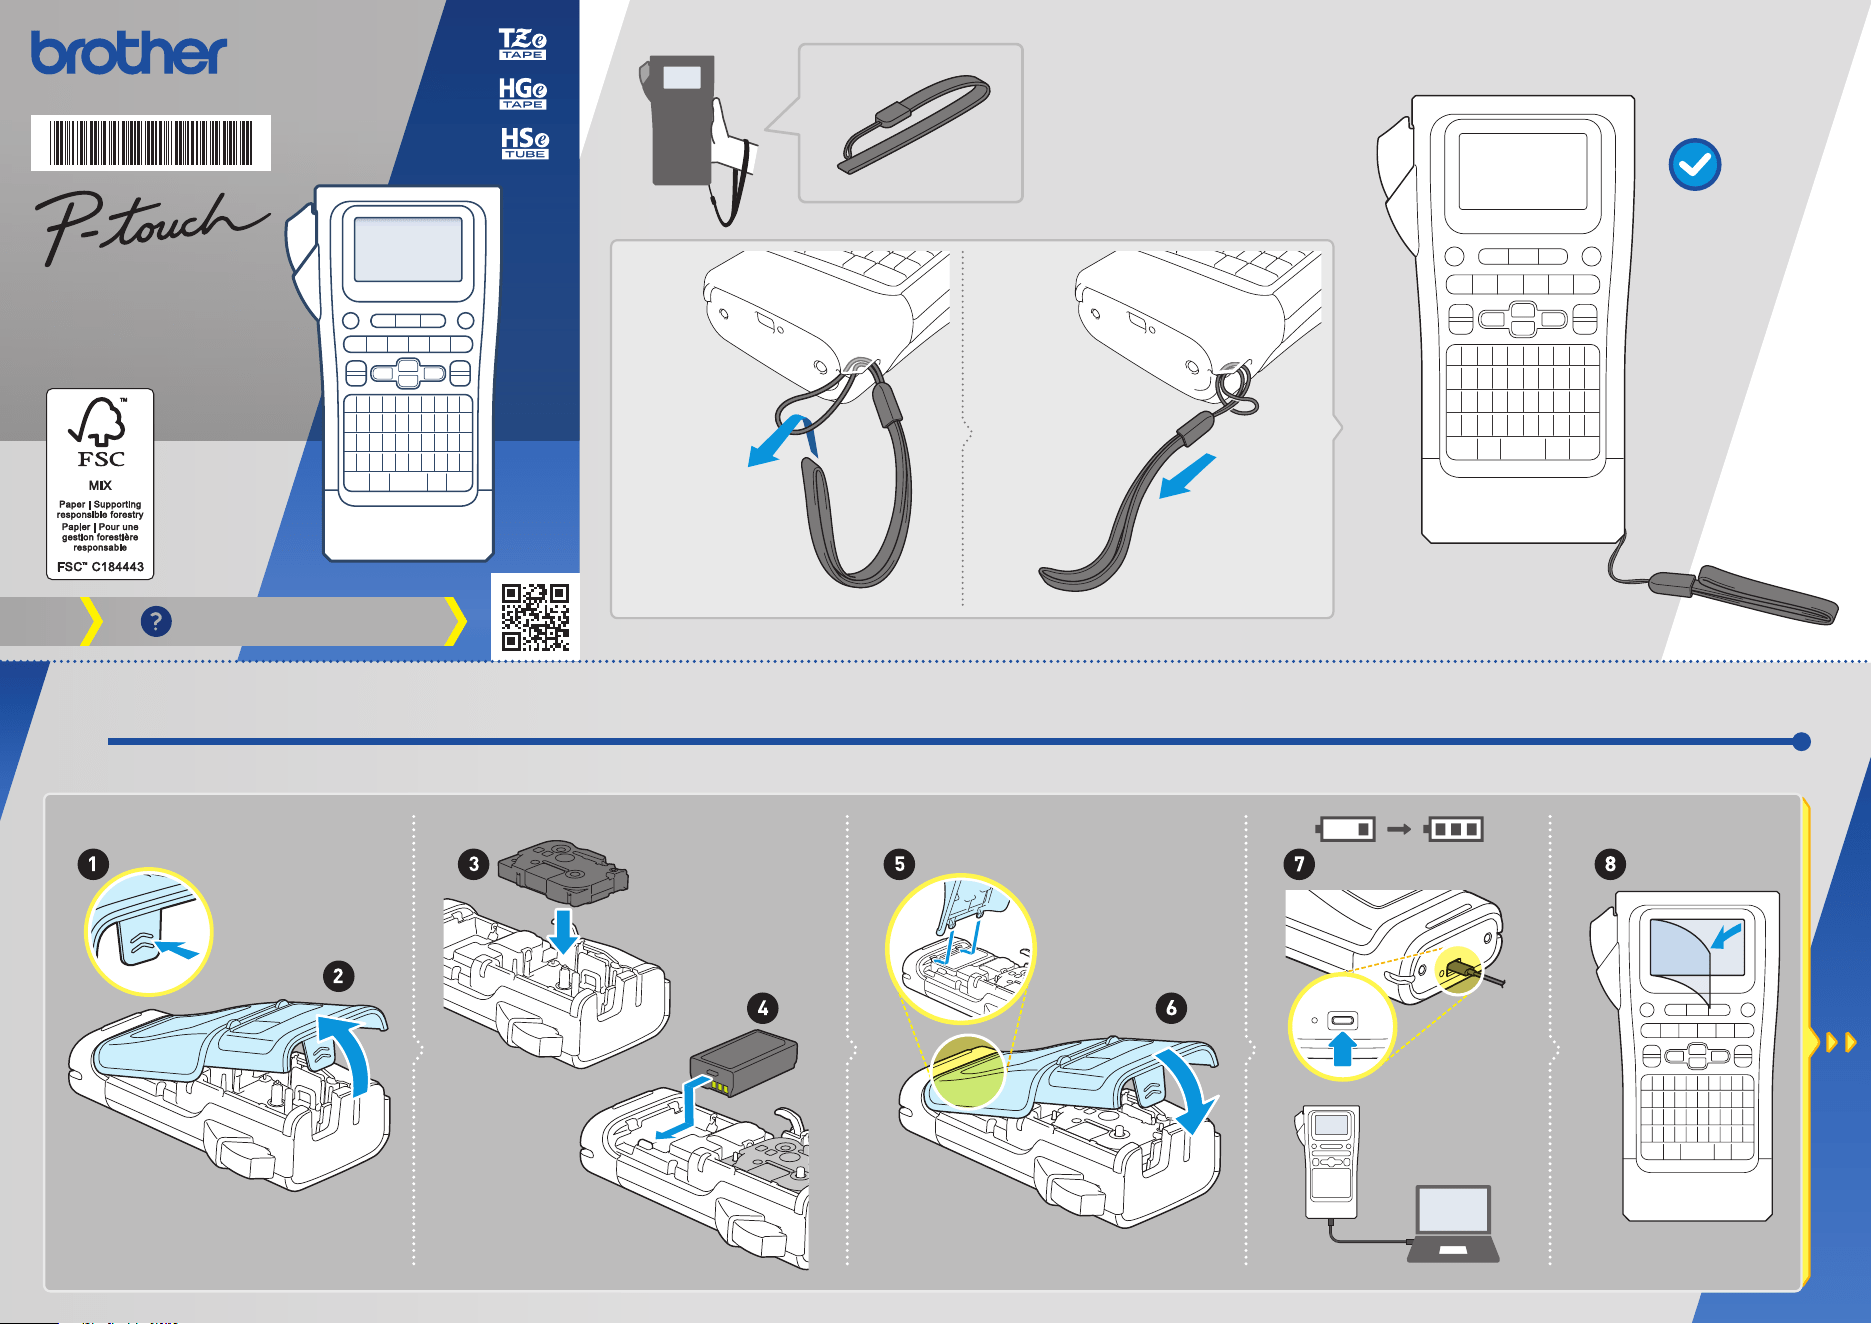
Home > Set Up Your Labeling System > Attach the Support Strap
Attach the Support Strap
>> PT-E310BT
>> PT-E510/PT-E560BT
PT-E310BT
These instructions describe how to attach the support strap to the base on either the left or right side of the
Labeling System.
1. Make sure you have the support strap that was included with your Labeling System.
2. Attach the support strap to the left or right strap hole at the base of your printer, as shown.
23
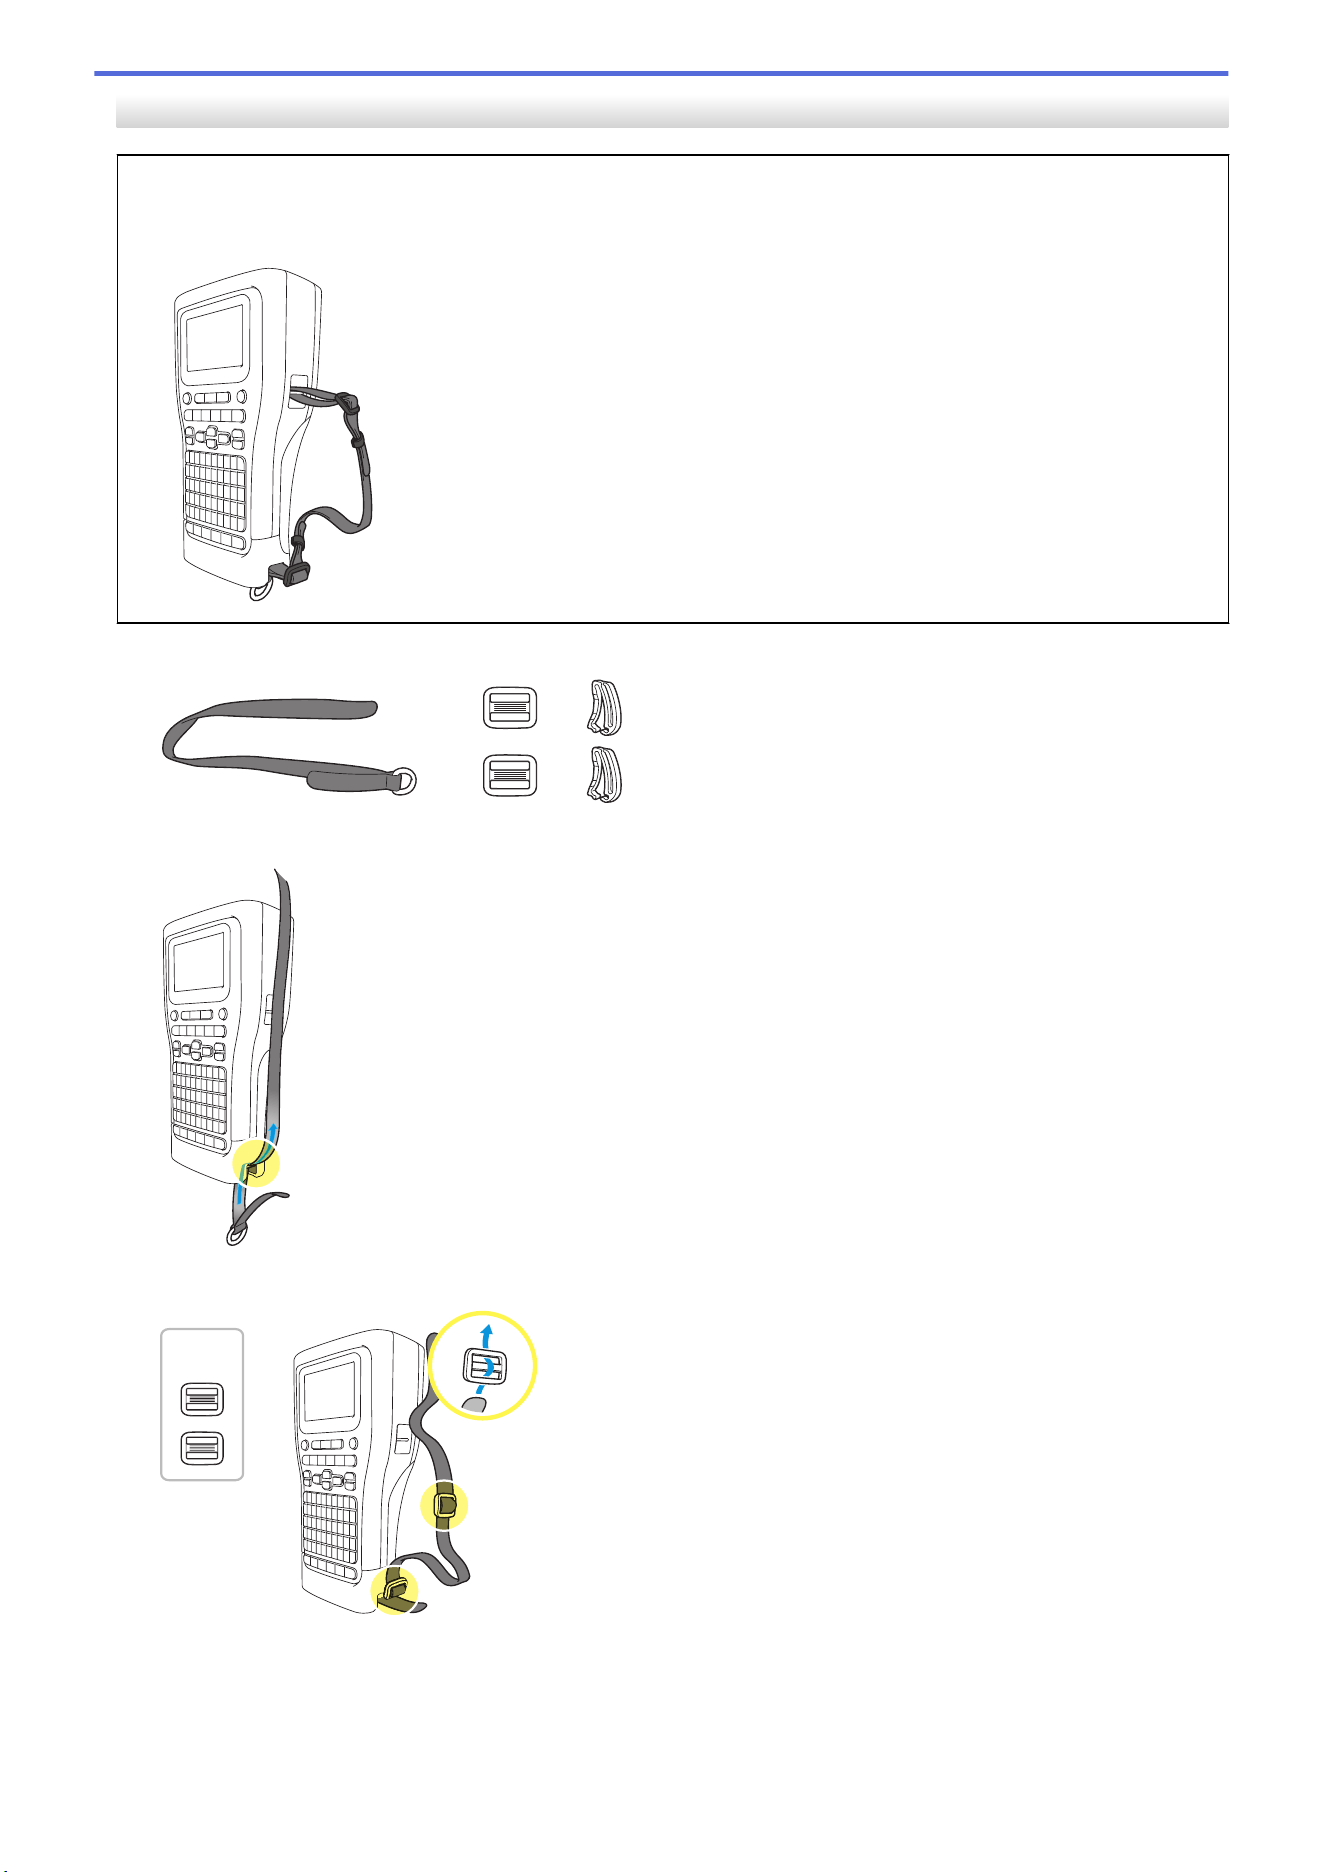
PT-E510/PT-E560BT
These instructions describe how to attach the support strap to the right side of the Labeling System so you can
hold it with your right hand. You can also attach the support strap to the left side of Labeling System and hold
with your left hand.
1. Make sure you have the support strap, buckles and clips that were included with your Labeling System.
2. Thread the support strap through the hole at the base of the Labeling System, as shown.
3. Attach the buckles (1) to the support strap in two locations, as shown.
(1)
24
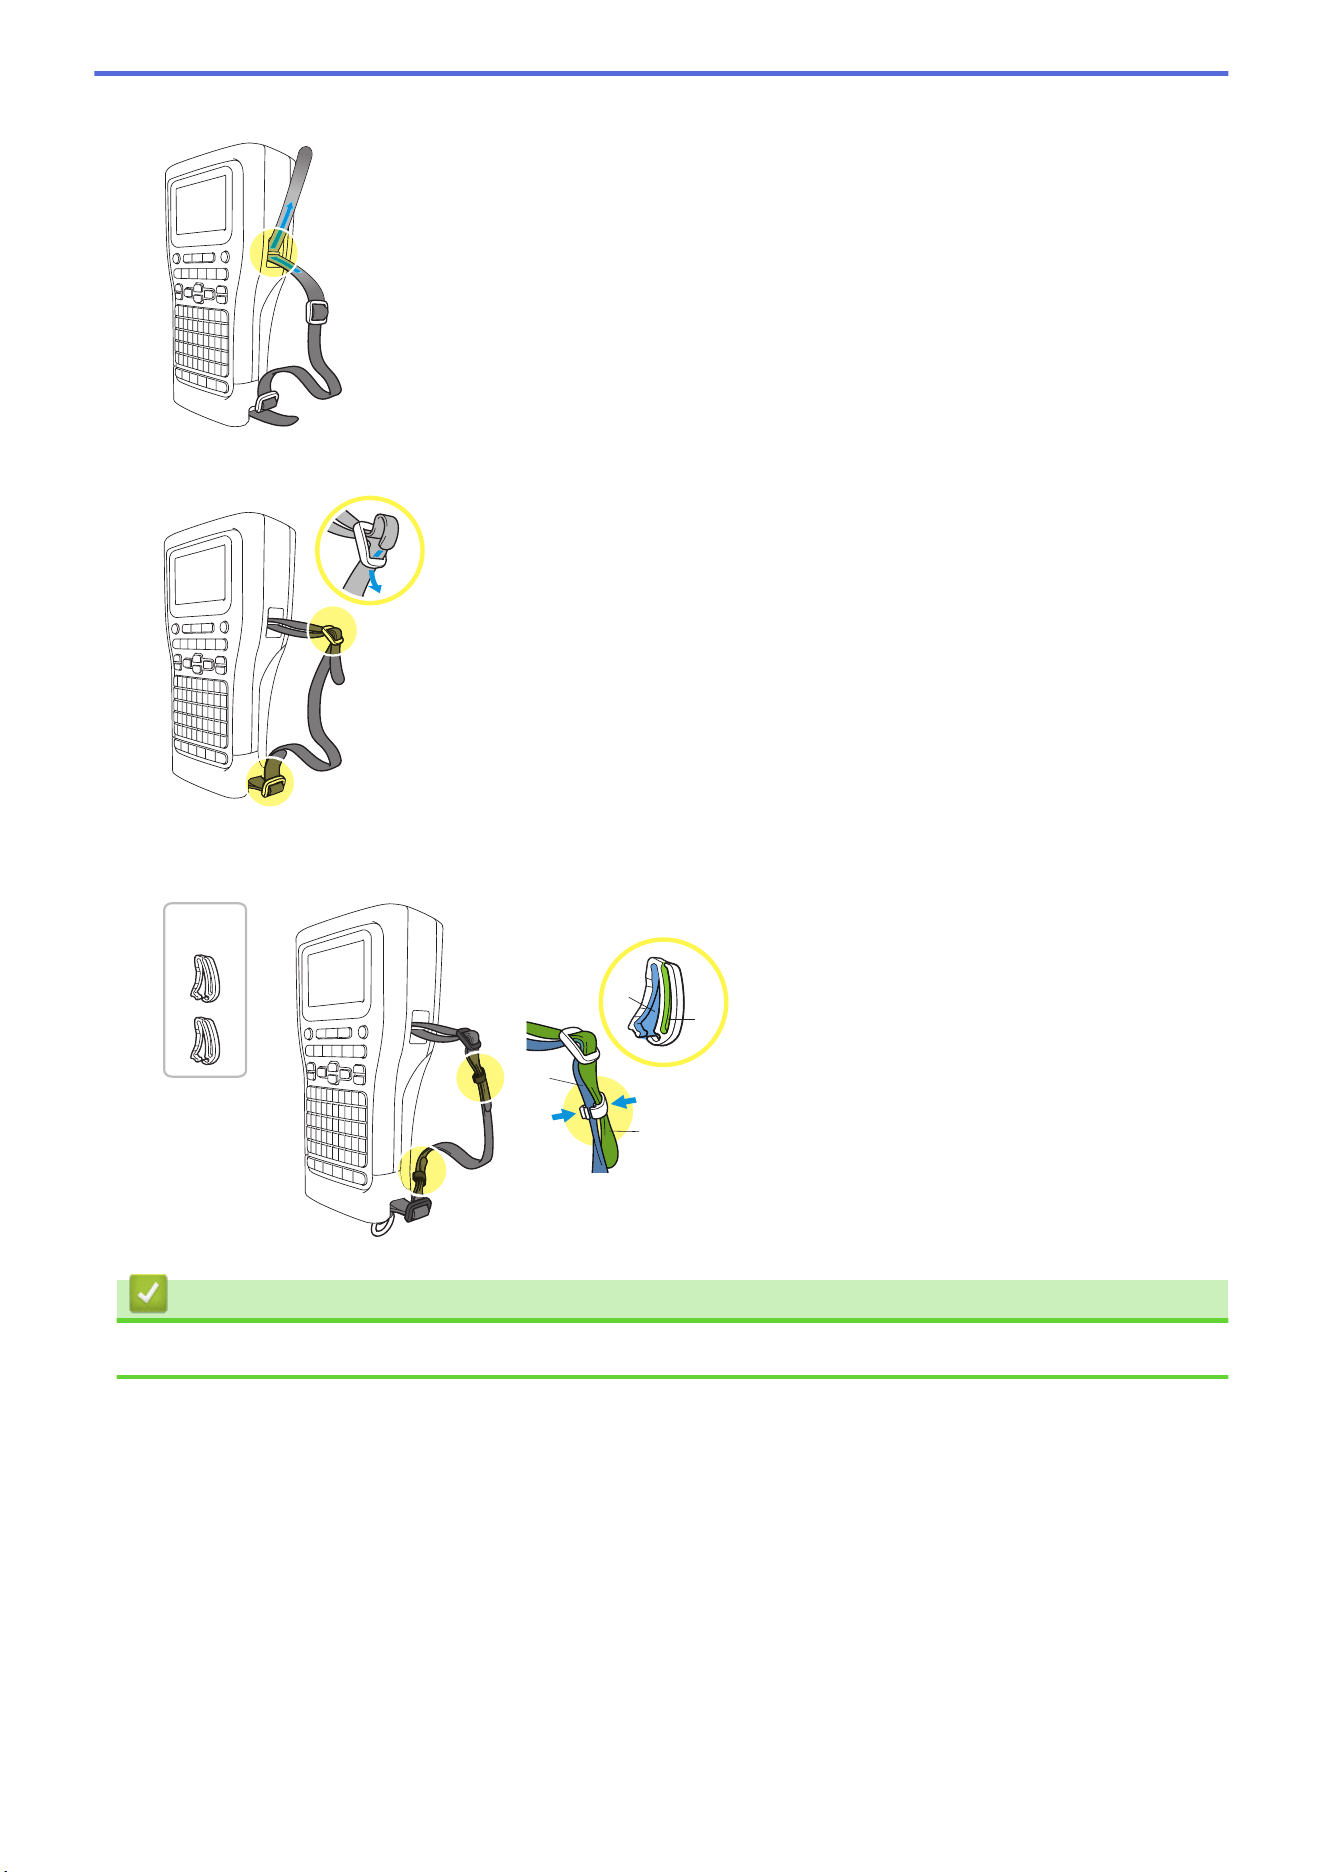
4. Thread the support strap through the hole at the side of the Labeling System, as shown.
5. Thread the support strap ends into each buckle (1) that you attached in step 3.
6. Attach the strap clips (2) near the support strap ends as shown, and then press the sides of the clips firmly to
close.
A
B
B
A
(2)
Related Information
• Set Up Your Labeling System
25
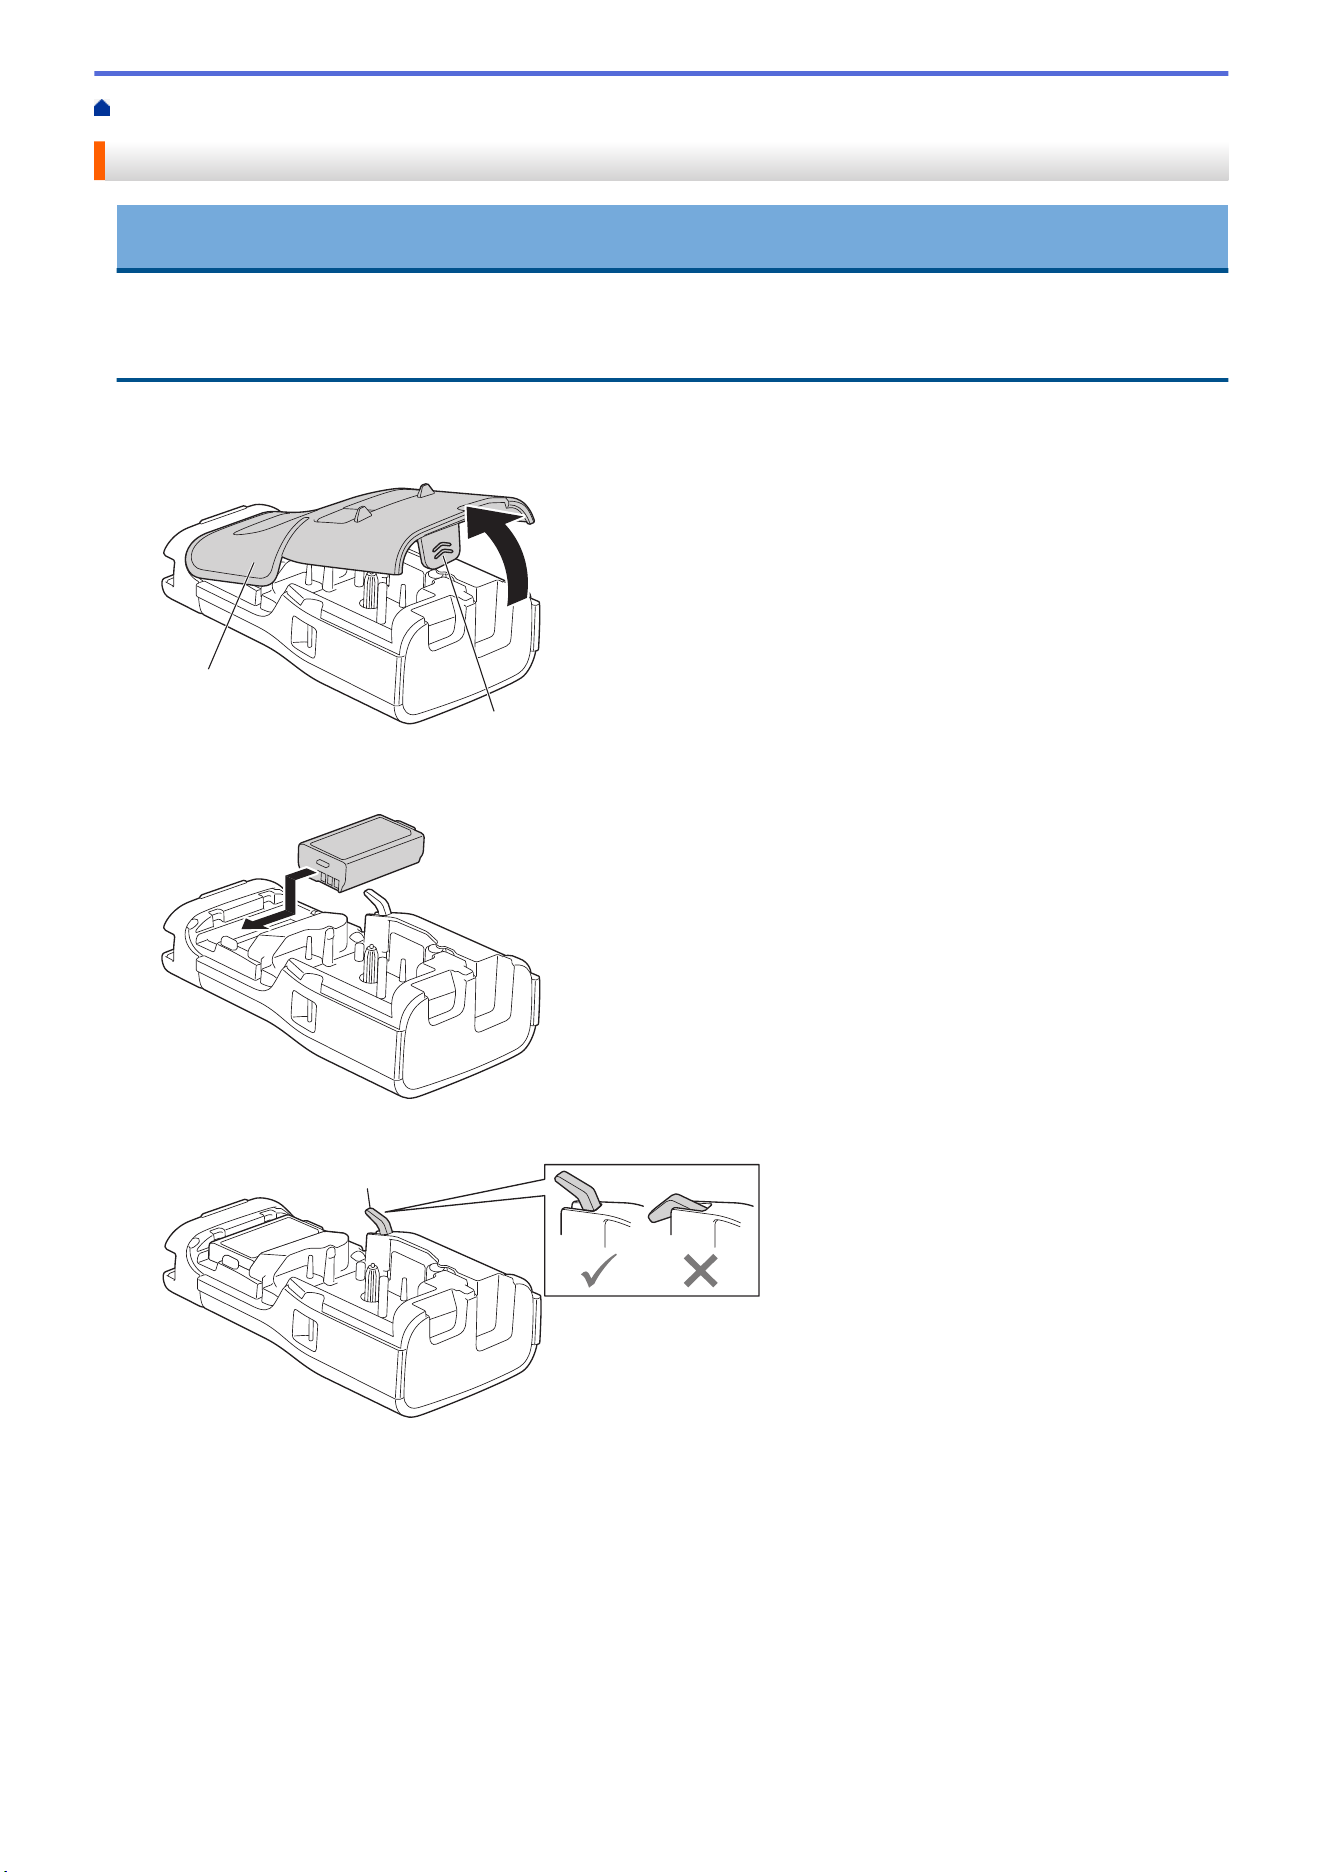
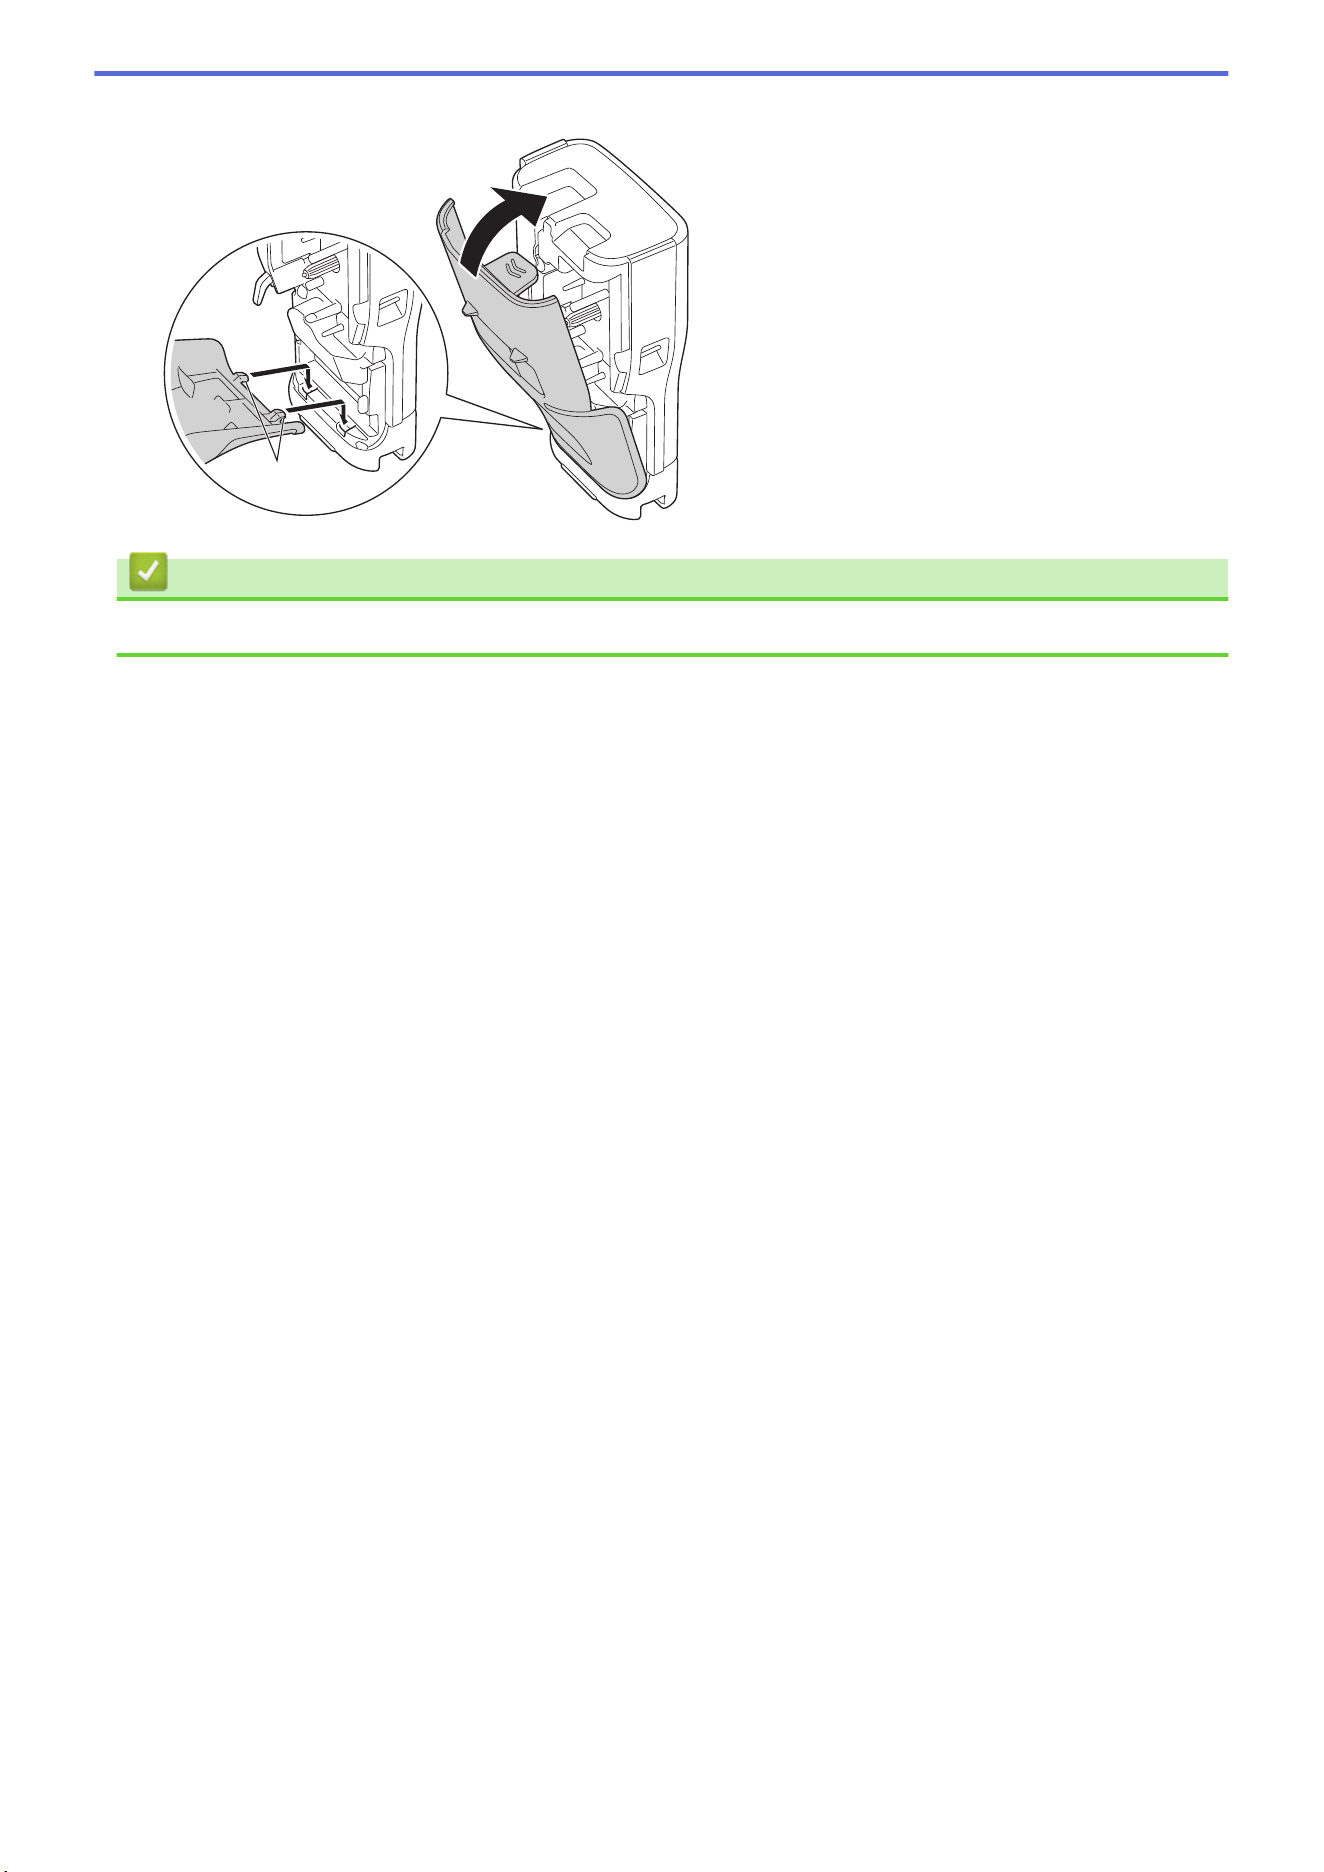
Home > Set Up Your Labeling System > Install the Rechargeable Li-ion Battery
Install the Rechargeable Li-ion Battery
IMPORTANT
To safeguard your files and back up the Labeling System’s memory when the Labeling System is
disconnected from an external power source, we recommend keeping the Rechargeable Li-ion Battery
installed in the Labeling System.
1. Make sure the Labeling System is turned off.
2. Rest the printer face down on a flat surface. Press the Cover Latch (1) and remove the Rear Cover (2).
1
2
3. Install the Rechargeable Li-ion Battery, as shown by the arrow.
4. Make sure the Release Lever (1) is in the raised position, as shown.
1
26
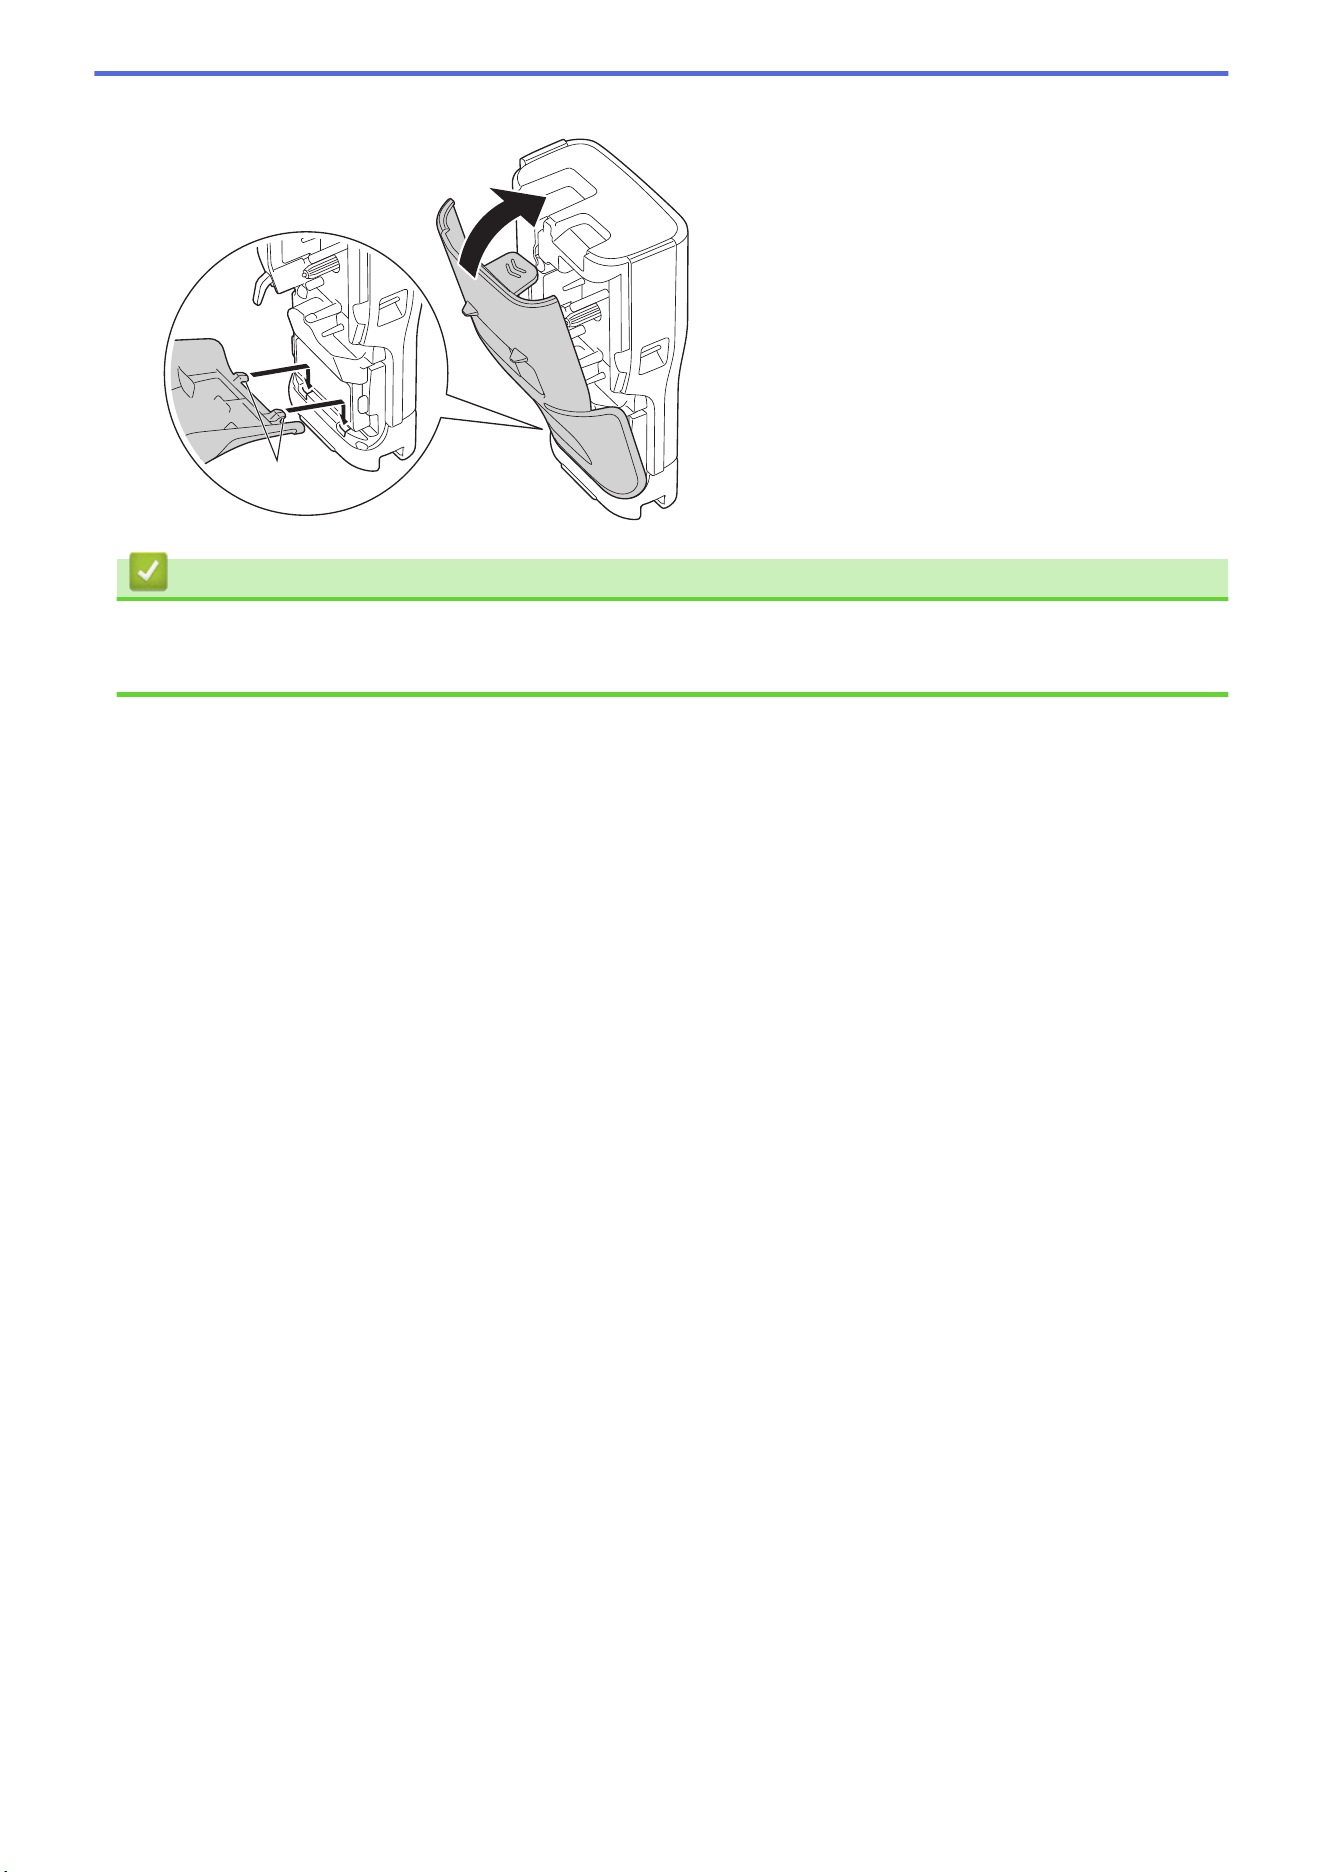
Home > Set Up Your Labeling System > Install the Rechargeable Li-ion Battery > Remove the
Rechargeable Li-ion Battery
Remove the Rechargeable Li-ion Battery
1. Make sure the Labeling System is turned off. If the Labeling System is turned on, press and hold to
turn off it.
2. Rest the printer face down on a flat surface. Press the Cover Latch (1) and remove the Rear Cover (2).
1
2
3. Remove the Rechargeable Li-ion Battery, as shown by the arrow.
4. Make sure the Release Lever (1) is in the raised position, as shown.
1
28
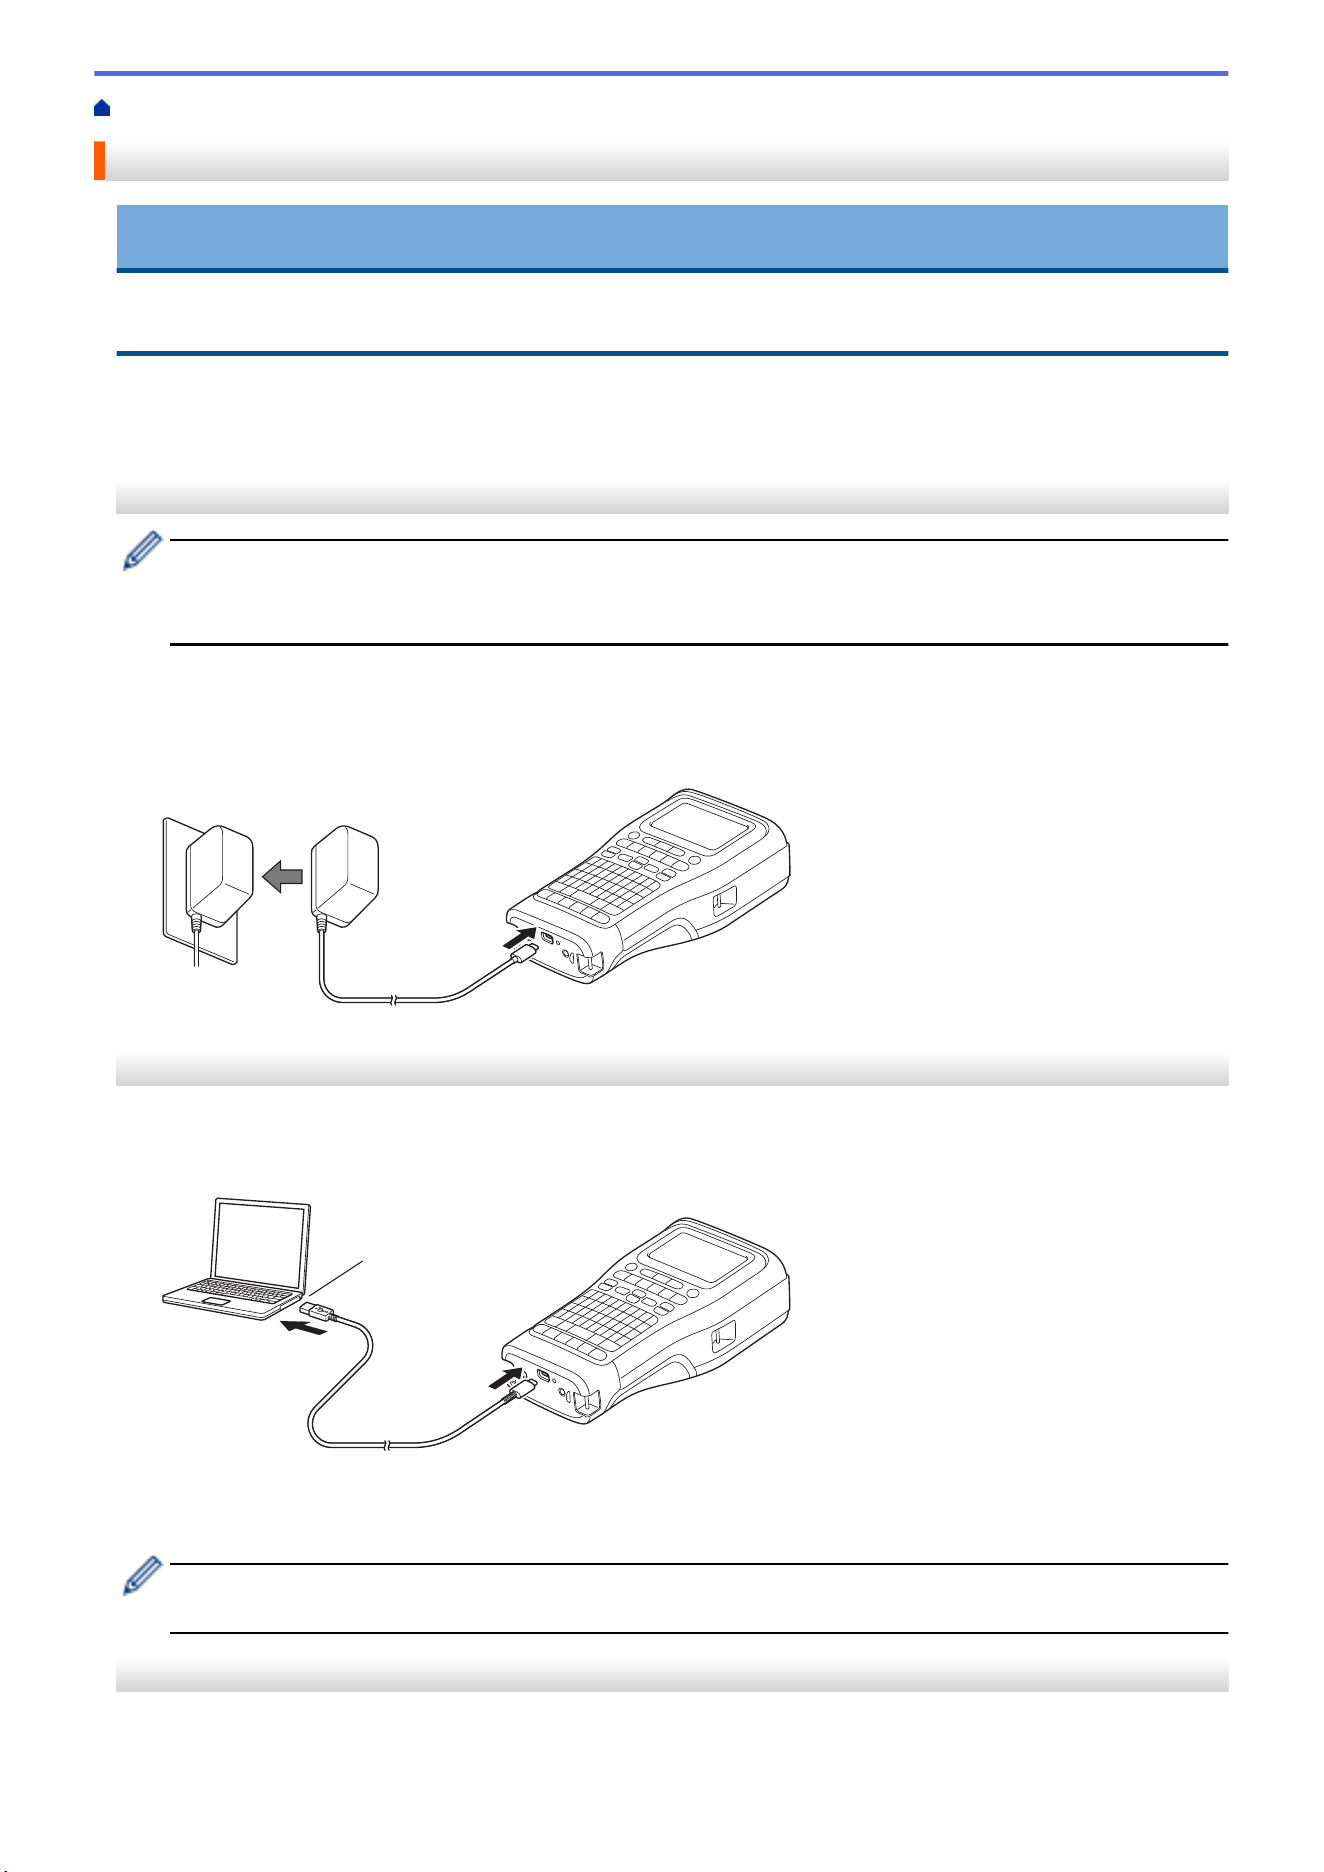
Home > Set Up Your Labeling System > Connect the Labeling System to an External Power Source
Connect the Labeling System to an External Power Source
IMPORTANT
To safeguard and back up the Labeling System's memory, DO NOT disconnect the Labeling System from the
external power source if you are using it without a battery.
>> Connect to an AC Power Outlet Using the AC Adapter for USB Type-C (Optional)
>> Connect to a Computer Using a USB Type-C Cable
>> Connect to a USB Charger Using a USB Type-C Cable
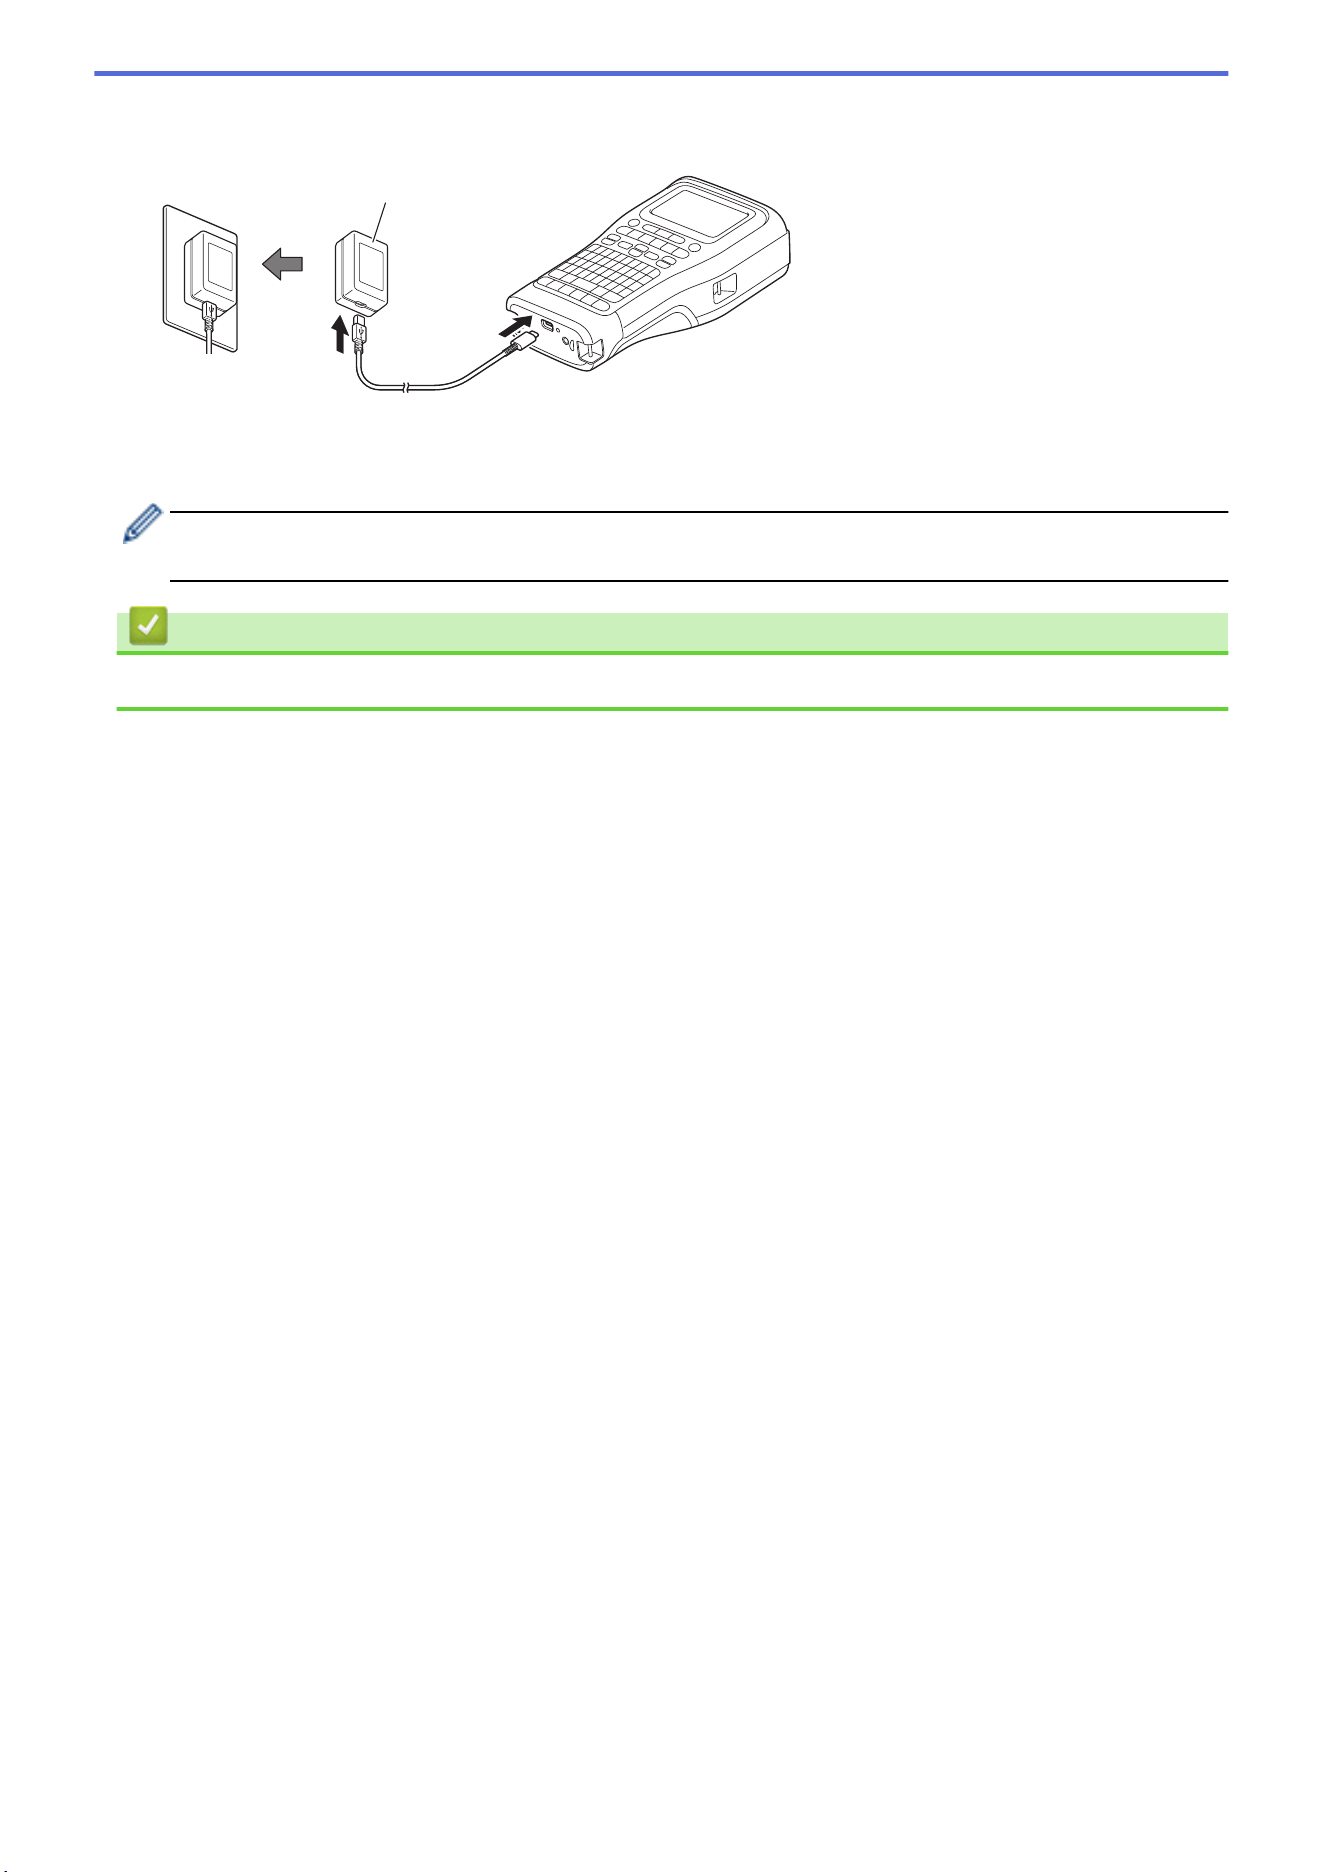
Connect to an AC Power Outlet Using the AC Adapter for USB Type-C (Optional)
• The AC Adapter for USB Type-C is an optional accessory.
• We recommend using the Brother AC Adapter for USB Type-C to ensure high performance. This AC
Adapter is configured to the exact voltage and current requirements of this Brother machine.
1. Connect the AC Adapter for USB Type-C to the Labeling System.
2. Connect the AC Adapter plug to a nearby AC power outlet (AC 100 - 240 V, 50/60 Hz).
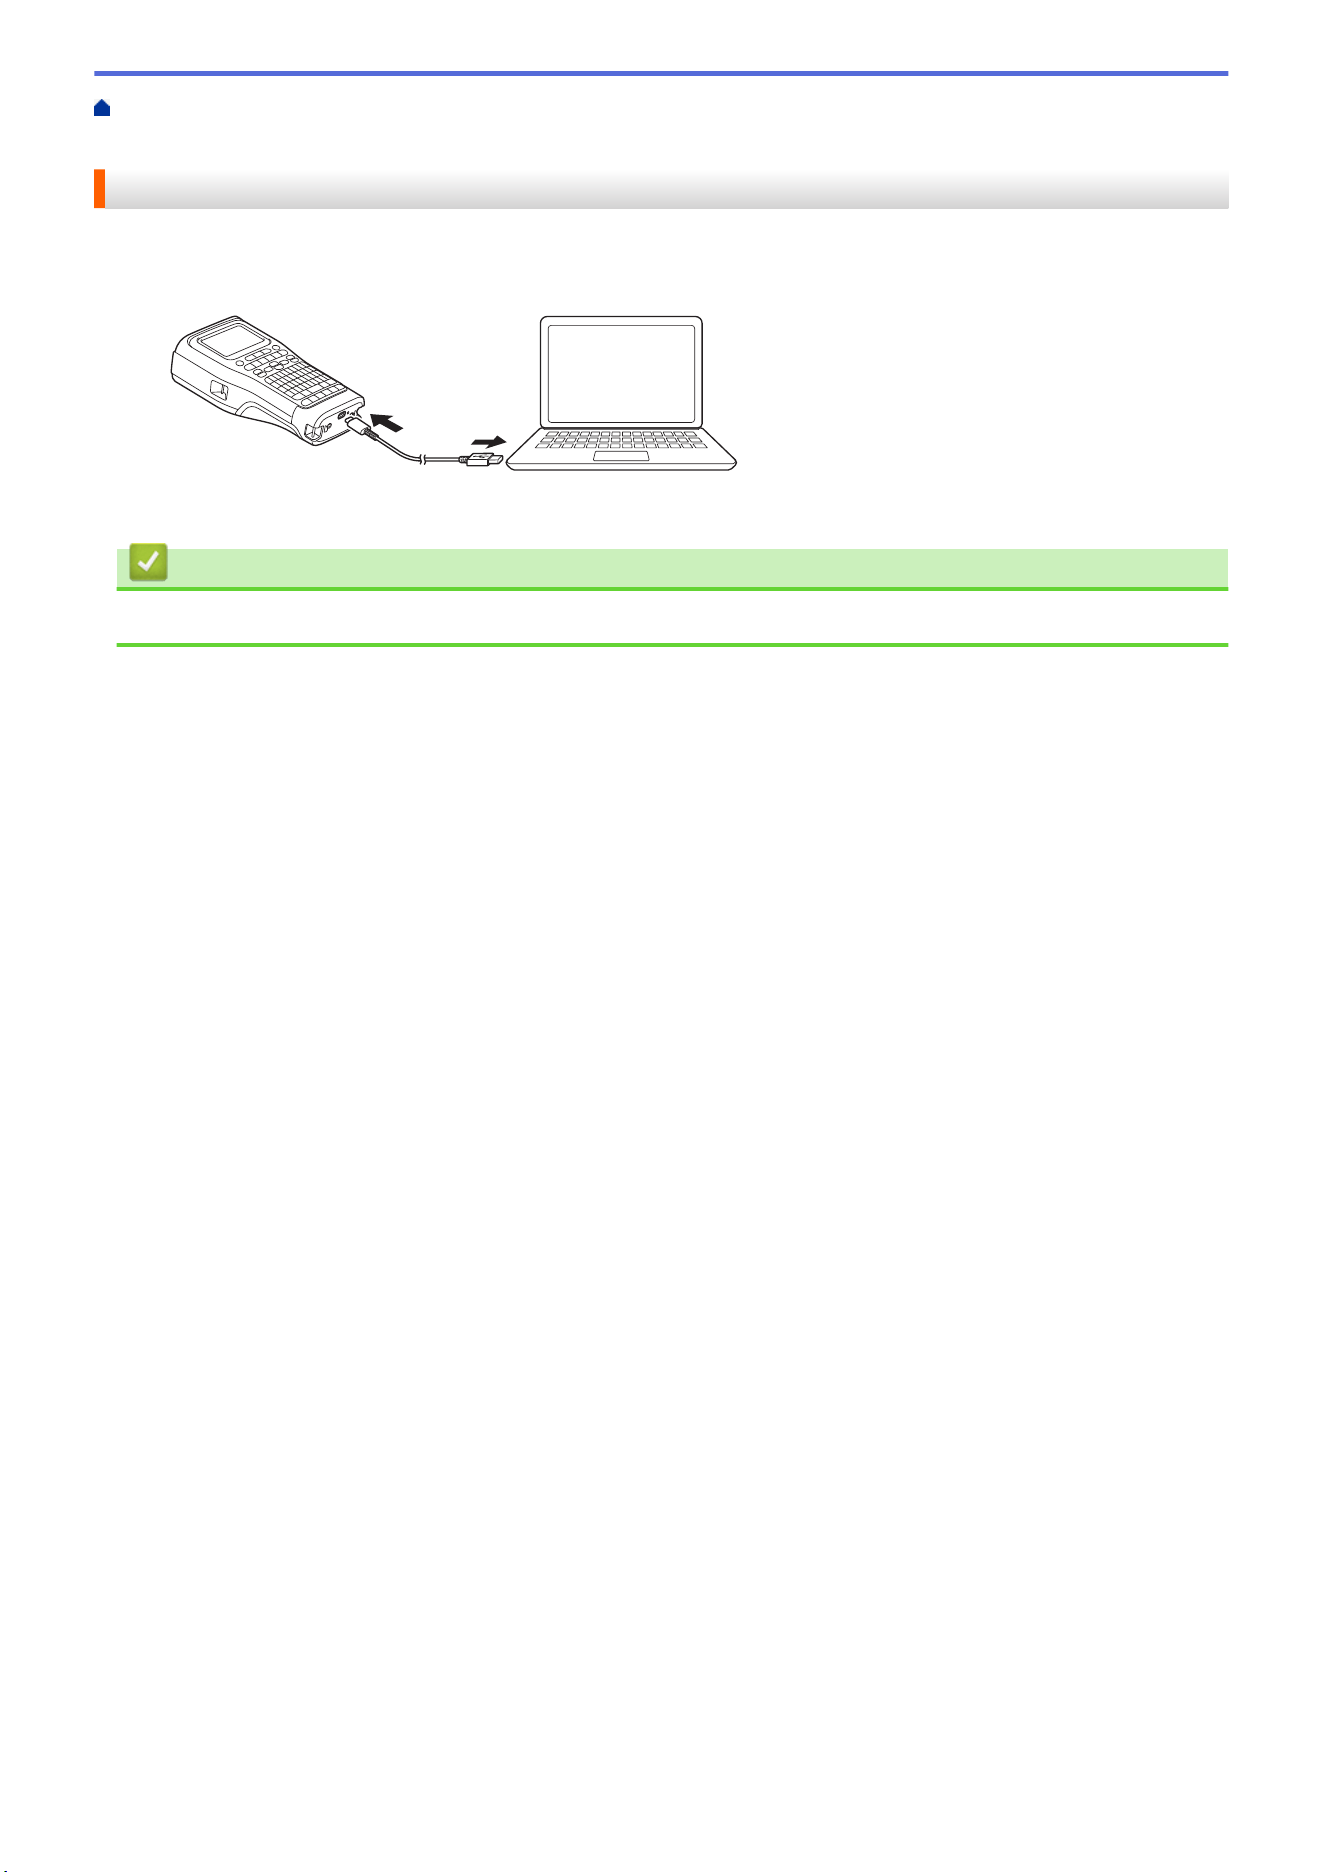
Connect to a Computer Using a USB Type-C Cable
1. Make sure the computer is on.
2. Connect the Labeling System to the computer using the USB Type-C cable (included).
a
a. Computer USB Port
5 V DC, 0.5 A or higher
To print labels, a Rechargeable Li-ion Battery must be installed and the printer must be connected to an
external power source.
Connect to a USB Charger Using a USB Type-C Cable
1. Connect the USB cable to the Labeling System.
30
2. Connect the USB cable to a USB charger (not included) and plug the charger into a power source.
a
a. USB Charger (not included)
5 V DC, 0.5 A or higher
To print labels, a Rechargeable Li-ion Battery must be installed and the printer must be connected to an
external power source.
Related Information
• Set Up Your Labeling System
31
Home > Set Up Your Labeling System > Charge the Rechargeable Li-ion Battery
Charge the Rechargeable Li-ion Battery
>> Tips on Using the Rechargeable Li-ion Battery
>> Charge the Rechargeable Li-ion Battery
>> Stop Charging the Rechargeable Li-ion Battery
Tips on Using the Rechargeable Li-ion Battery
Fully charge the Rechargeable Li-ion Battery before use.
• Charge the Rechargeable Li-ion Battery in an environment with a temperature between 50°F and 95°F
(10°C and 35°C), otherwise the battery will not charge.
• To prevent deterioration of the Rechargeable Li-ion Battery, charging will not occur when the remaining
charge in the battery is sufficient, even if an external power source is connected.
To ensure the highest performance and longest life from the Rechargeable Li-ion Battery:
• Do not use or store the Rechargeable Li-ion Battery in a location exposed to extremely high or low
temperatures, as it may deteriorate more quickly.
• Remove the Rechargeable Li-ion Battery from the Labeling System when storing it for long periods of time.
• Store the Rechargeable Li-ion Batteries in a cool dry place and out of direct sunlight.
• Recharge the Rechargeable Li-ion Battery every six months if it is stored for long periods of time.
Charge the Rechargeable Li-ion Battery
Charge the Rechargeable Li-ion Battery as soon as you set up your Labeling System.
1. Turn off the Labeling System.
2. Make sure the Rechargeable Li-ion Battery is installed correctly.
3. Do one of the following:
• Use the AC Adapter for USB Type-C to connect the Labeling System to an AC power outlet.
• Use a USB Type-C cable to connect the Labeling System to your computer or a compatible USB charger.
• The AC Adapter for USB Type-C is not included.
• Charging with a USB Type-C cable will take longer than the AC Adapter for USB Type-C.
• The USB charger must be 5 V 0.5 A or higher.
When the battery is fully charged, the LED turns off.
4. Disconnect the printer from the power source.
• When using the dedicated adapter, charge the Rechargeable Li-ion Battery for three hours to fully
charge the battery.
• DO NOT remove the Rechargeable Li-ion Battery while you are using the Labeling System with a USB
connection (USB Type-C cable or the AC Adapter for USB Type-C). Doing this may cause the Labeling
System to shut down unexpectedly.
32

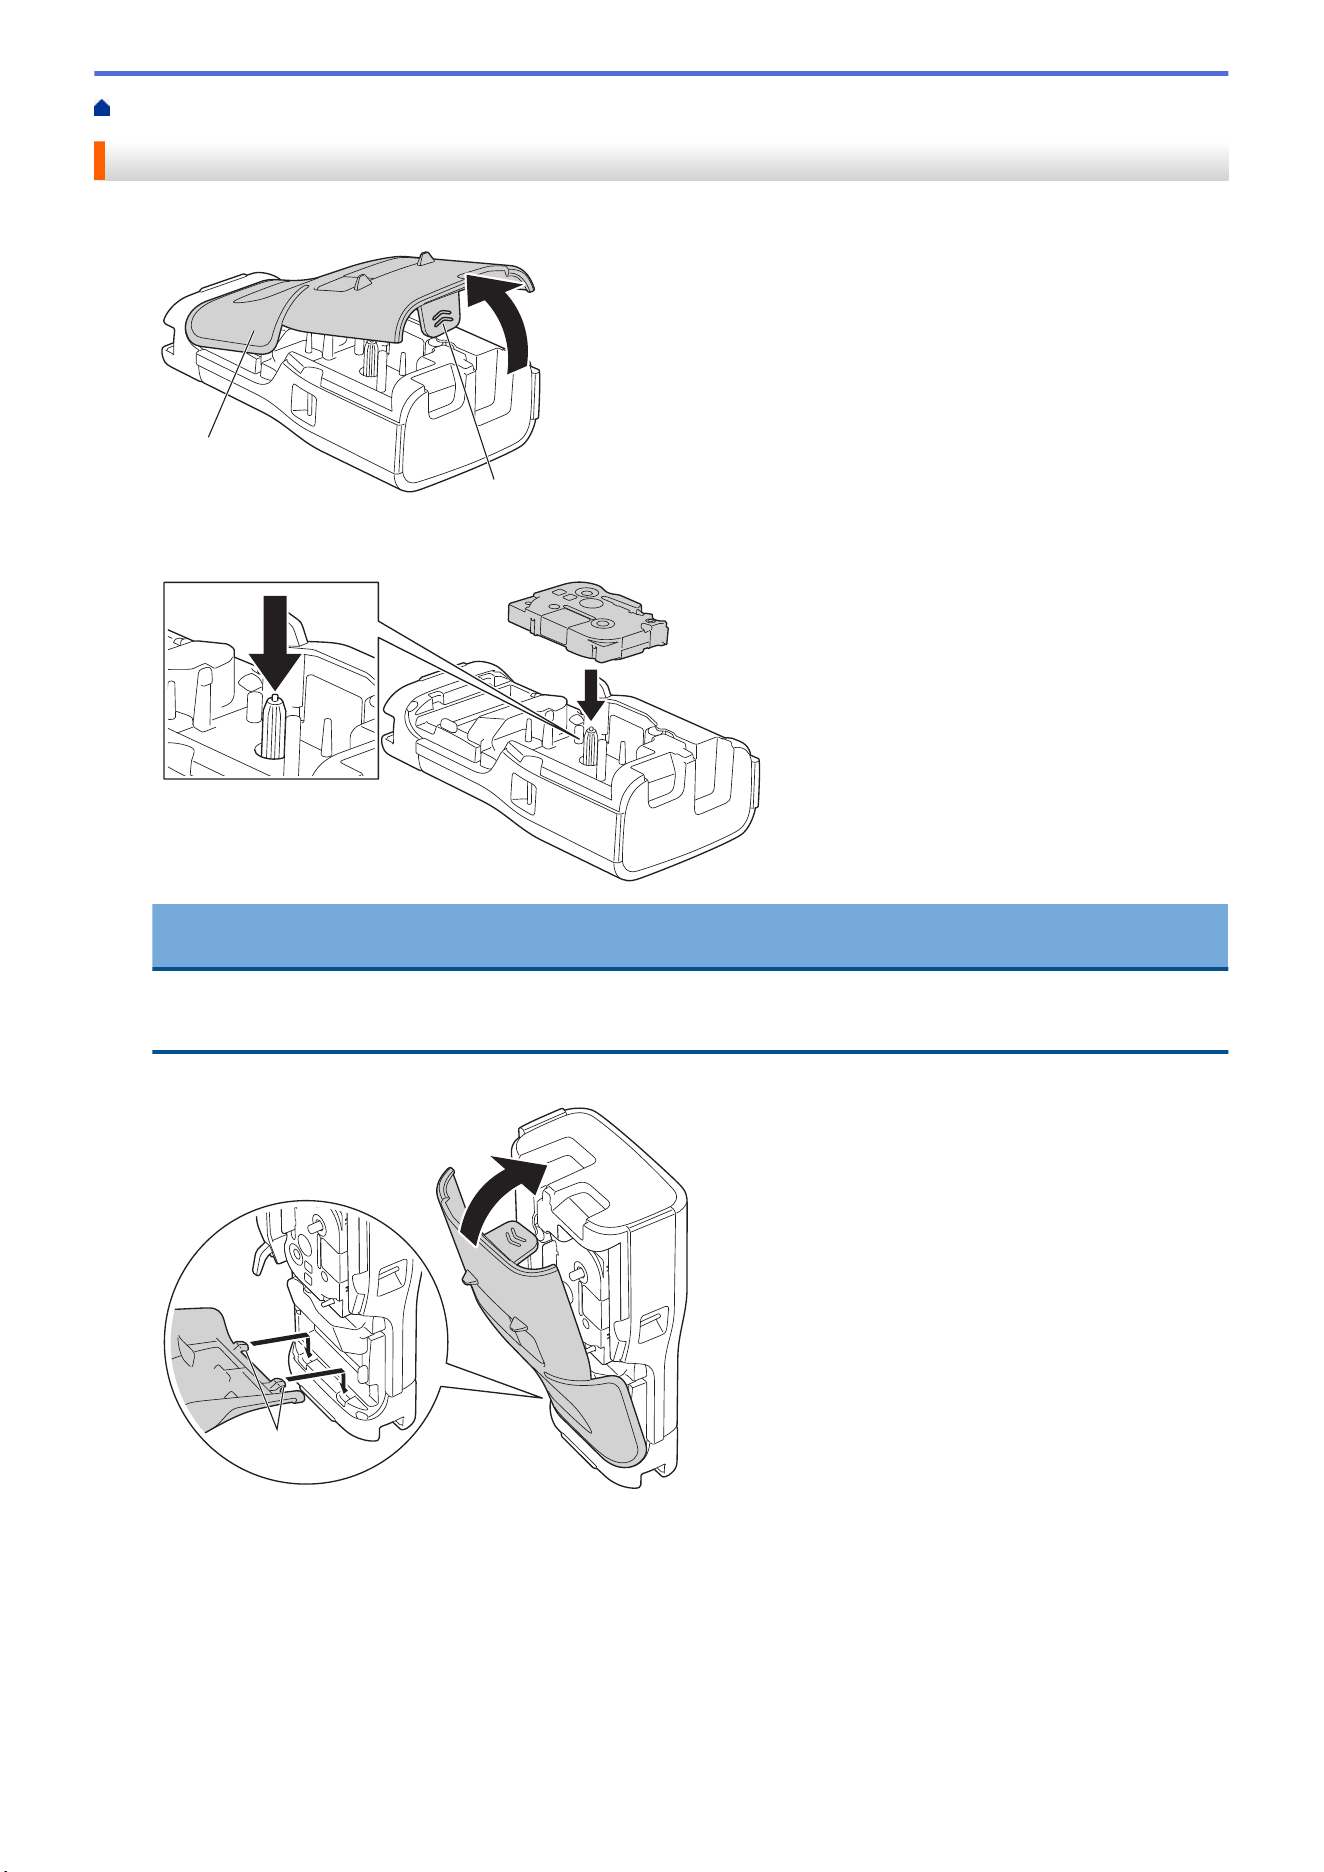
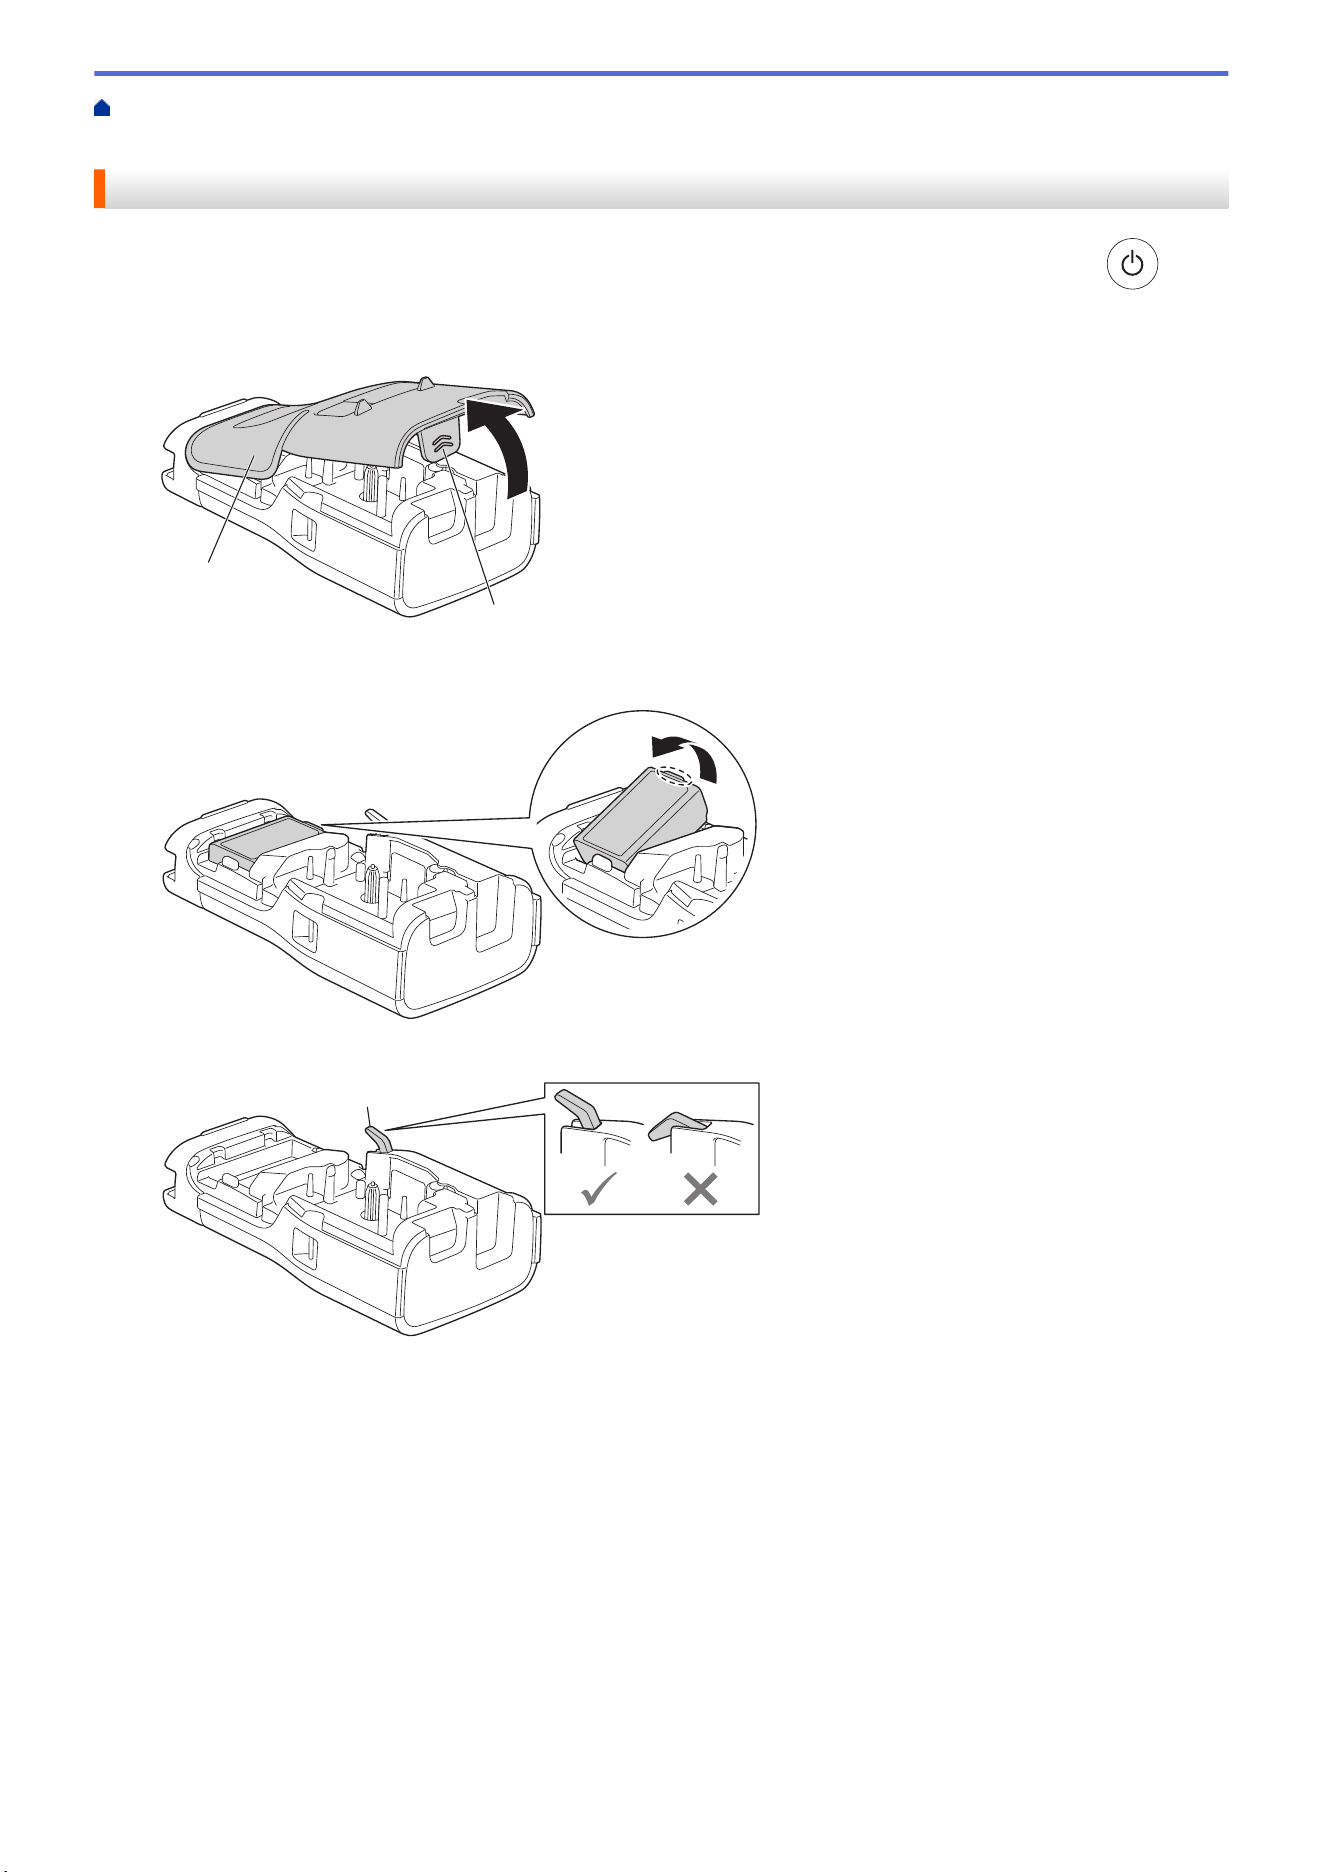
Home > Set Up Your Labeling System > Insert the Tape Cassette
Insert the Tape Cassette
1. Rest the printer face down on a flat surface. Press the Cover Latch (1) and remove the Rear Cover (2).
1
2
2. Insert the Tape Cassette, as shown.
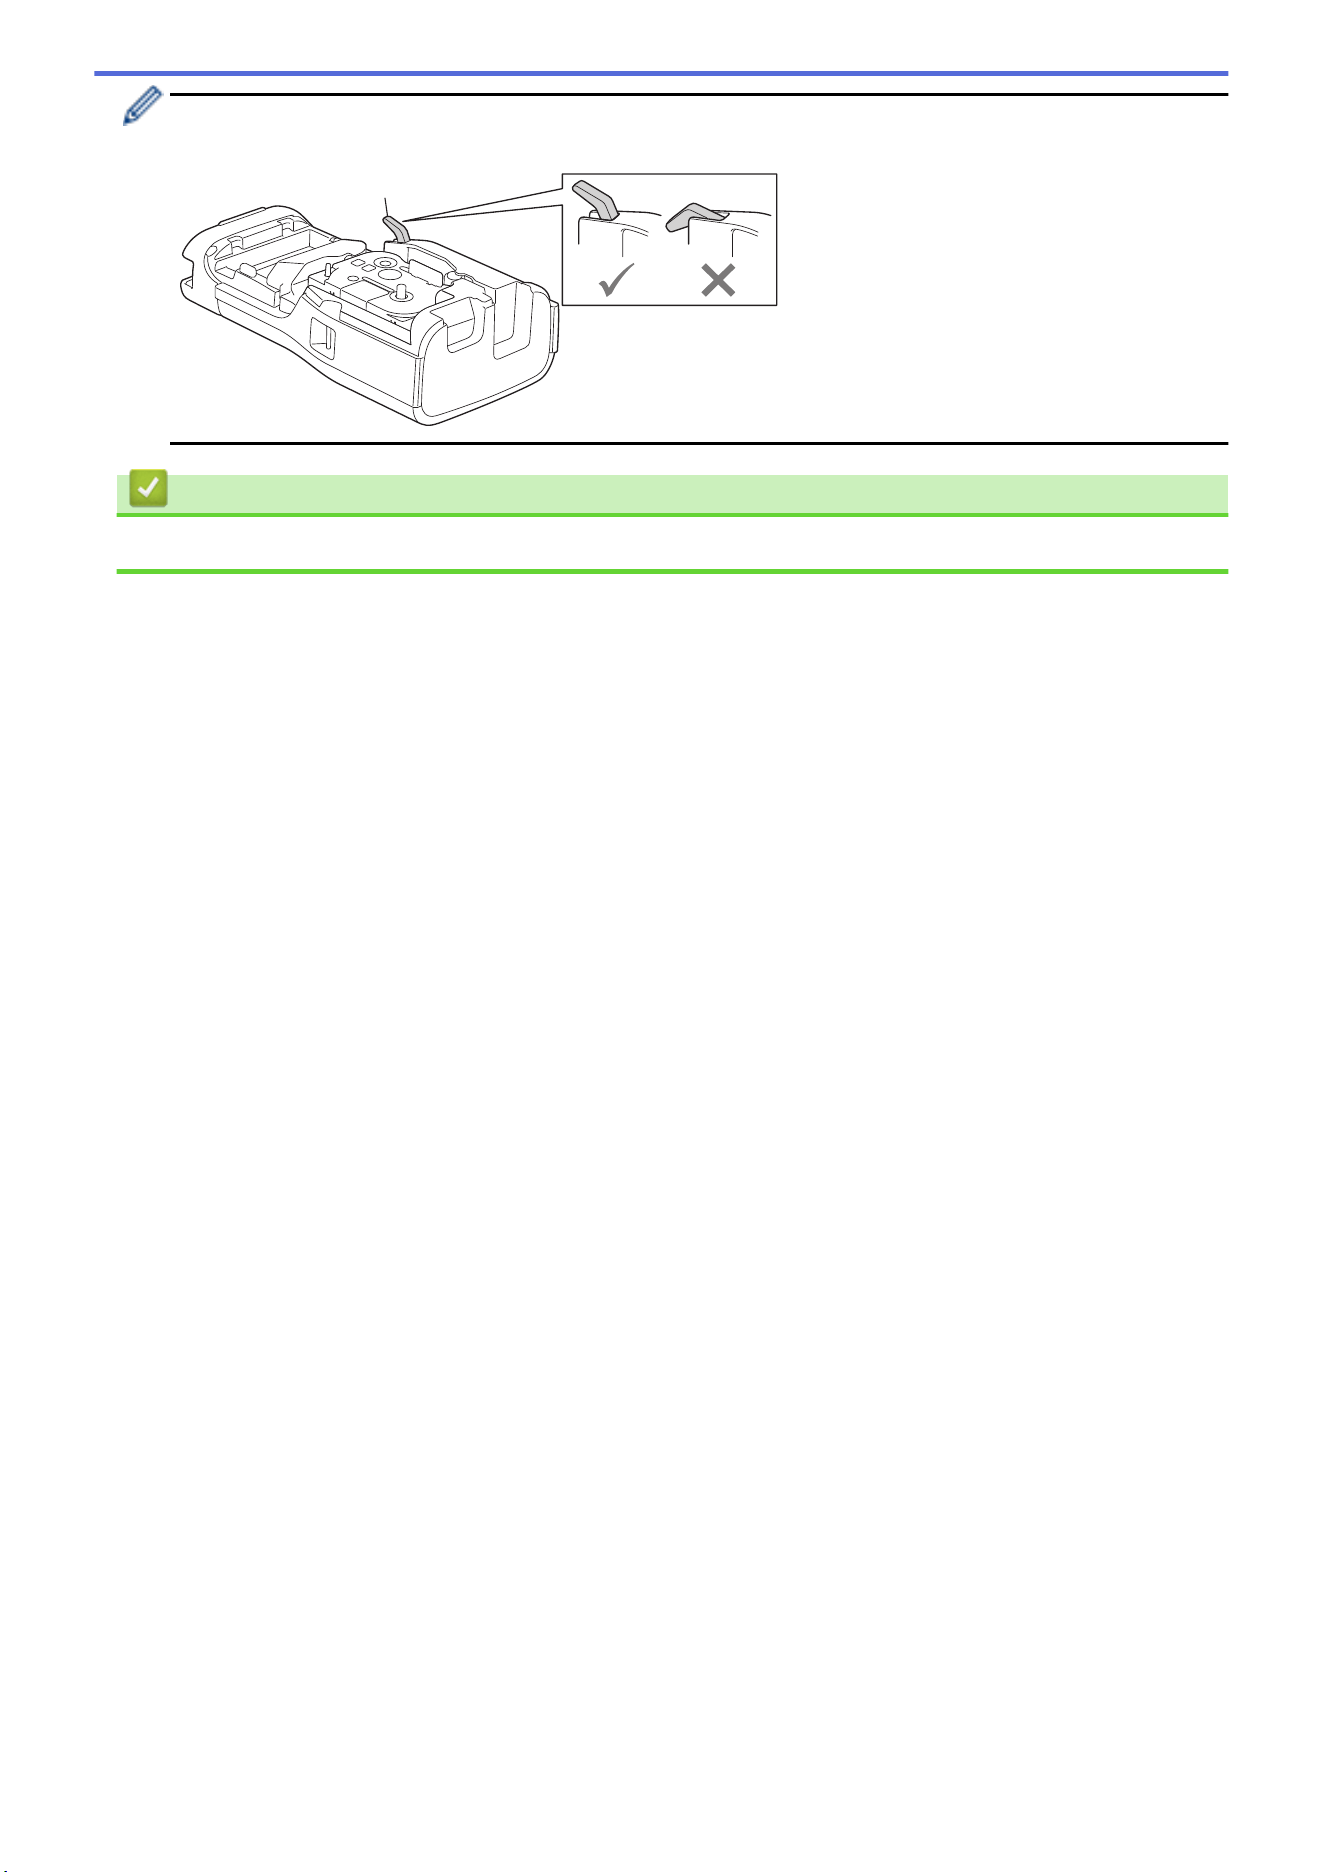
IMPORTANT
When inserting the Tape Cassette, make sure the tape does not catch on the Print Head. To avoid
damaging the tape or ink ribbon, insert the Tape Cassette horizontally.
3. Make sure the Rear Cover Hooks (1) are correctly inserted, and then close the Rear Cover.
1
34

Home > Set Up Your Labeling System > Turn the Labeling System On/Off
Turn the Labeling System On/Off
1. To turn on the Labeling System, press and hold .
2. To turn off the Labeling System, press and hold .
To save power and turn off the Labeling System automatically after a specific amount of time, use the Auto
Power-Off function.
Related Information
• Set Up Your Labeling System
Related Topics:
• Set Auto Power-Off Time
• Specifications
36


Home > Set Up Your Labeling System > Set Auto Power-Off Time
Set Auto Power-Off Time
Your Labeling System has a powersaving function that automatically turns it off if no key is pressed within a
certain time, under certain operating conditions. Regardless of whether you use the AC Adapter or the batteries,
you can change the automatic powering-off time.
1. Press Menu.
2. Press a or b to display [Auto Power Off], and then press OK.
3. Press a, b, d, or c to select the options you want, and then press OK.
Option Description
USB Charger
Off, 10min., 20min., 30min., 40min., 50min., 1hr., 2hr., 4hr., 8hr., 12hr.
Li-ion Battery
Off, 10min., 20min., 30min., 40min., 50min., 1hr.
4. Press OK.
Related Information
• Set Up Your Labeling System
39
Home > Set Up Your Labeling System > Enable or Disable Bluetooth
Enable or Disable Bluetooth
Related Models: PT-E310BT/PT-E560BT
1. Press Menu.
2. Press a or b to display [Bluetooth], and then press OK.
3. Press a or b to display [Bluetooth (On/Off)], and then press OK.
4. Press a or b to select [On] or [Off], and then press OK.
When you select [On], the Bluetooth icon appears on the LCD.
Set the Automatic Reconnection mode for Bluetooth to On when you connect the Labeling System to your
mobile device.
Related Information
• Set Up Your Labeling System
40
Home > Set Up Your Labeling System > Feed Tape
Feed Tape
>> PT-E310BT
>> PT-E510/PT-E560BT
PT-E310BT
1. To feed the tape, press
/
and then press
/
.
2. To cut the tape, press down the Tape Cutter Lever as shown by the arrow.
PT-E510/PT-E560BT
1. To feed the tape, press
/
.
2. Press a or b to select one of the following options:
Option Description
Feed & Cut
Select to feed and cut the tape automatically.
Feed Only
Select to feed, but not cut, the tape.
Recommended when using Fabric Iron-On Tapes, which should be cut using scissors.
3. Press OK.
Related Information
• Set Up Your Labeling System
41

Home > Set Up Your Labeling System > Adjust LCD Contrast
Adjust LCD Contrast
The LCD Contrast default setting is [0].
1. Press Menu.
2. Press a or b to display [LCD Contrast], and then press OK.
3. Press a or b to select your preference, [-2 - +2], and then press OK.
Related Information
• Set Up Your Labeling System
42
Home > Set Up Your Labeling System > Turn the Backlight On/Off
Turn the Backlight On/Off
Save power by turning off the backlight.
1. Press Menu.
2. Press a or b to display [Backlight], and then press OK.
3. Press a, b, d, or c to select the options you want, and then press OK.
Option Description
USB Charger
1min., 5min., 10min., Off
Li-ion Battery
10sec., 30sec., 1min., Off
NOTE
• The backlight automatically turns off if the printer is idle for the duration you specified.
• The backlight turns off when printing.
Related Information
• Set Up Your Labeling System
43

Home > Install Software > Install the Printer Driver and Software on a Computer (Windows)
Install the Printer Driver and Software on a Computer (Windows)
To print from your Windows computer, install the printer driver and the Brother P-touch Editor software on your
computer.
1. Open your preferred web browser and type install.brother in the address bar.
http://install.brother
2. Click the Download button to download the Software/Documentation Installer.
3. Navigate to your computer's Downloads folder, double-click the downloaded installer file, and follow the on-
screen instructions.
NOTE
(PT-E310BT/PT-E560BT)
• Make sure you enable Bluetooth on your computer.
• Press the required button on the Labeling System for Bluetooth pairing when you confirm the
passcode.
Related Information
• Install Software
• Available Applications
45
Home > Install Software > Install the Printer Driver and Software on a Computer (Windows) > Available
Applications
Available Applications
Windows
Application
Features
P-touch Editor Allows you to design and print custom labels using built-in drawing tools to create various font
and text styles, import images, and insert barcodes. You can also transfer templates and other
data to the Labeling System.
P-touch Transfer
Manager
1
Allows you to transfer templates and other data to the Labeling System and save backups of
your data on the computer.
This application must be installed using P-touch Editor 5.4, which may be an earlier version of
P-touch Editor than you are currently using. To download the P-touch Editor 5.4, search for the
applicable FAQs & Troubleshooting tip at support.brother.com.
P-touch Update
Software
1
Updates software and firmware to the latest version, and allows you to transfer templates to the
Labeling System.
1
Available with the USB connection only.
Mac
Application
Features
P-touch Editor Allows you to design and print custom labels using built-in drawing tools to create various font
and text styles, import images, and insert barcodes.
Transfer Express
1
Updates firmware to the latest version.
1
Available with the USB connection only.
Related Information
• Install the Printer Driver and Software on a Computer (Windows)
46

Home > Install Software > Connect the Labeling System to a Computer > Connect the Labeling System to a
Computer Using a USB Type-C Cable
Connect the Labeling System to a Computer Using a USB Type-C Cable
1. Make sure the Labeling System is turned off before connecting the USB Type-C cable.
2. Connect the USB Type-C cable to the USB port on the Labeling System, and then to your computer.
3. Turn on the Labeling System.
Related Information
• Connect the Labeling System to a Computer
48

Home > Edit Labels
Edit Labels
• Add Text to Your Label
• Add a New Line of Text to Your Label
• Add a New Block of Text to Your Label
• Move the Cursor
• Delete Text
• Enter Symbols
• Enter Accented Characters
• Set Character Attributes
• Set Frames
• Create Labels Using Labeling Application Type
• Create Barcode Labels
• Create Serialized Labels
49

Home > Edit Labels > Add Text to Your Label
Add Text to Your Label
Type the text or symbols you want (alphanumeric characters, including spaces and punctuation marks).
NOTE
To print a slashed zero, follow these steps:
1. Press Menu.
2. Press a or b to display [Use Slashed Zero], and then press OK.
3. Press a or b to select [On] or [Off], and then press OK.
Printed Label Result: [On]
Printed Label Result: [Off]
Related Information
• Edit Labels
50
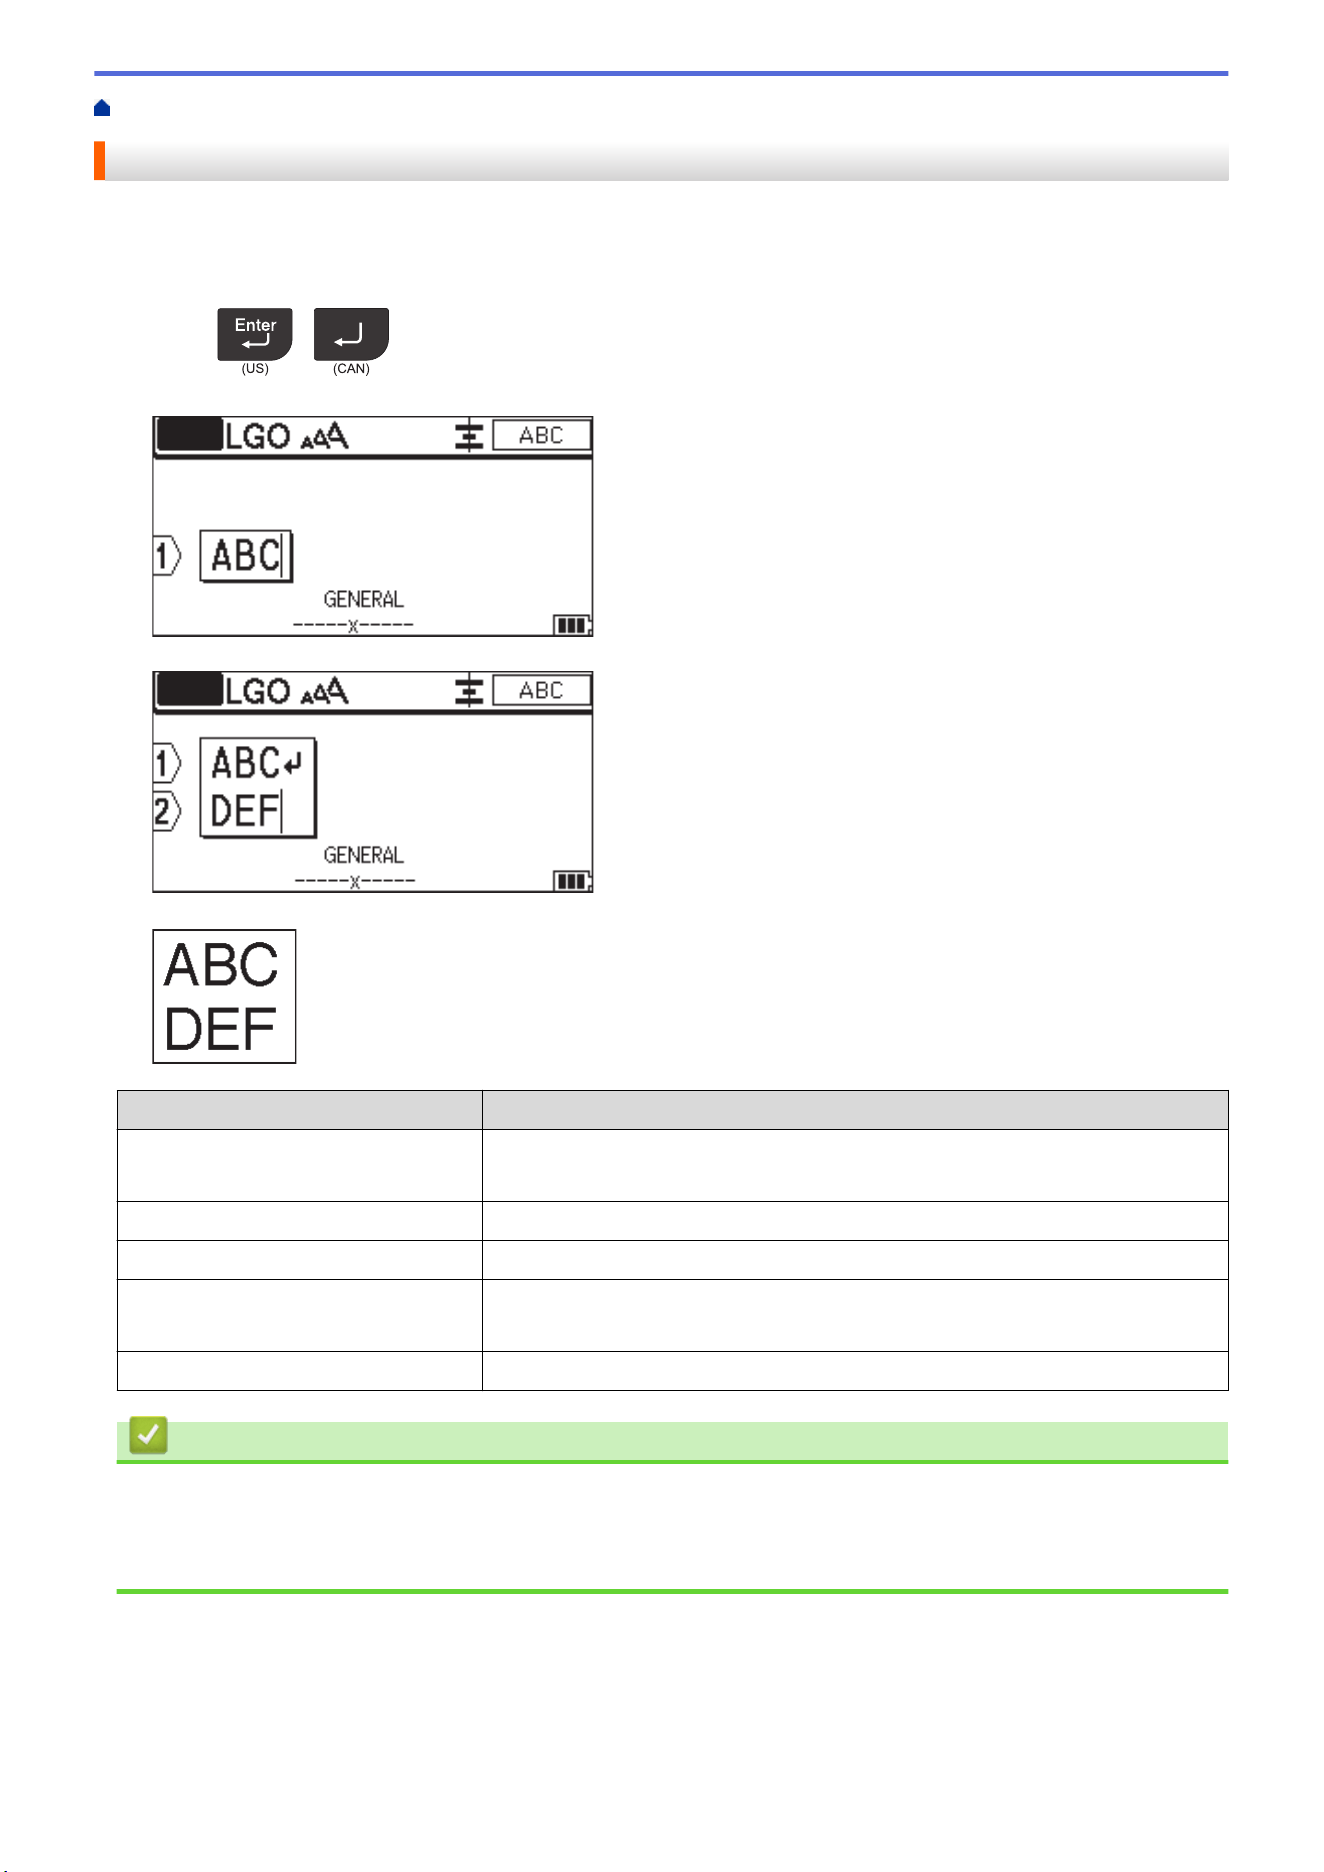
Home > Edit Labels > Add a New Line of Text to Your Label
Add a New Line of Text to Your Label
You can add several lines to your labels, depending on the tape you are using. For more information, see
Related Topics.
1. When finished typing the first line of text, make sure the cursor is at the end of the current line.
2. Press
/
to create the second line.
Line 1
Line 2
Printed Label Result
Max Lines
Tape Width
7 lines
(PT-E510/PT-E560BT)
0.94" (24 mm)
5 lines 0.70" (18 mm)
3 lines 0.47" (12 mm)
2 lines 0.35" (9 mm)
0.23" (6 mm)
1 line 0.13" (3.5 mm)
Related Information
• Edit Labels
Related Topics:
• Specifications
51
Home > Edit Labels > Add a New Block of Text to Your Label
Add a New Block of Text to Your Label
To print labels with multiple, but separate, sections of text, you can insert up to 99 different text blocks within the
same label.
This feature is available only for the "GENERAL" label application type.
To add a new block of text or blank lines to the right of your current text, press
/
, and then press
/
.
The cursor moves to the start of the new block.
To change the character attributes for a block of text, follow the steps for changing character attributes for a
line of text. See Related Information.
Related Information
• Edit Labels
Related Topics:
• Apply Character Attributes to a Line of Text
52
Home > Edit Labels > Move the Cursor
Move the Cursor
To move the cursor around within your label, do any of the following:
- Press a, b, d, or c to move the cursor one space or line.
- To position the cursor to the start or end of the current line or block, press
/
and then press d
or c.
- To position the cursor to the start or end of the label, or beginning of the previous or next block, press
/
and then press a or b.
- To insert additional text into an existing line, position the cursor to the right of the character where you want to
edit, and then add the text.
Related Information
• Edit Labels
Related Topics:
• Add a New Line of Text to Your Label
• Add a New Block of Text to Your Label
53
Home > Edit Labels > Delete Text
Delete Text
>> To delete one character at a time:
>> To delete all characters but not format settings:
>> To delete all characters and all format settings:
To delete one character at a time:
Press
/
.
To delete all characters but not format settings:
1. Press
/
.
2. Press a or b to display [Text Only], and then press OK.
To delete all characters and all format settings:
1. Press
/
.
2. Press a or b to display [Text & Format], and then press OK.
Related Information
• Edit Labels
54

Home > Edit Labels > Enter Symbols > Enter Symbols Using the Symbol Function
Enter Symbols Using the Symbol Function
For a list of all symbols, see Related Topics:Symbol Options.
>> PT-E310BT
>> PT-E510/PT-E560BT
PT-E310BT
1.
Press
/
and then press
/
.
2. Press a or b to select a category, and then press OK.
3. Press a, b, d, or c to select a symbol, and then press OK.
PT-E510/PT-E560BT
1. Press
/
.
2. Press a or b to select a category, and then press OK.
3. Press a, b, d, or c to select a symbol, and then press OK.
Related Information
• Enter Symbols
Related Topics:
• Symbol Options
56

Home > Edit Labels > Enter Symbols > Set Symbol History
Set Symbol History
The Symbol History can store recently used symbols. By default, the Symbol History feature is set to [On].
1. Press Menu.
2. Press a or b to display [Symbol History], and then press OK.
3. Press a or b to select [On] or [Off], and then press OK.
Related Information
• Enter Symbols
57
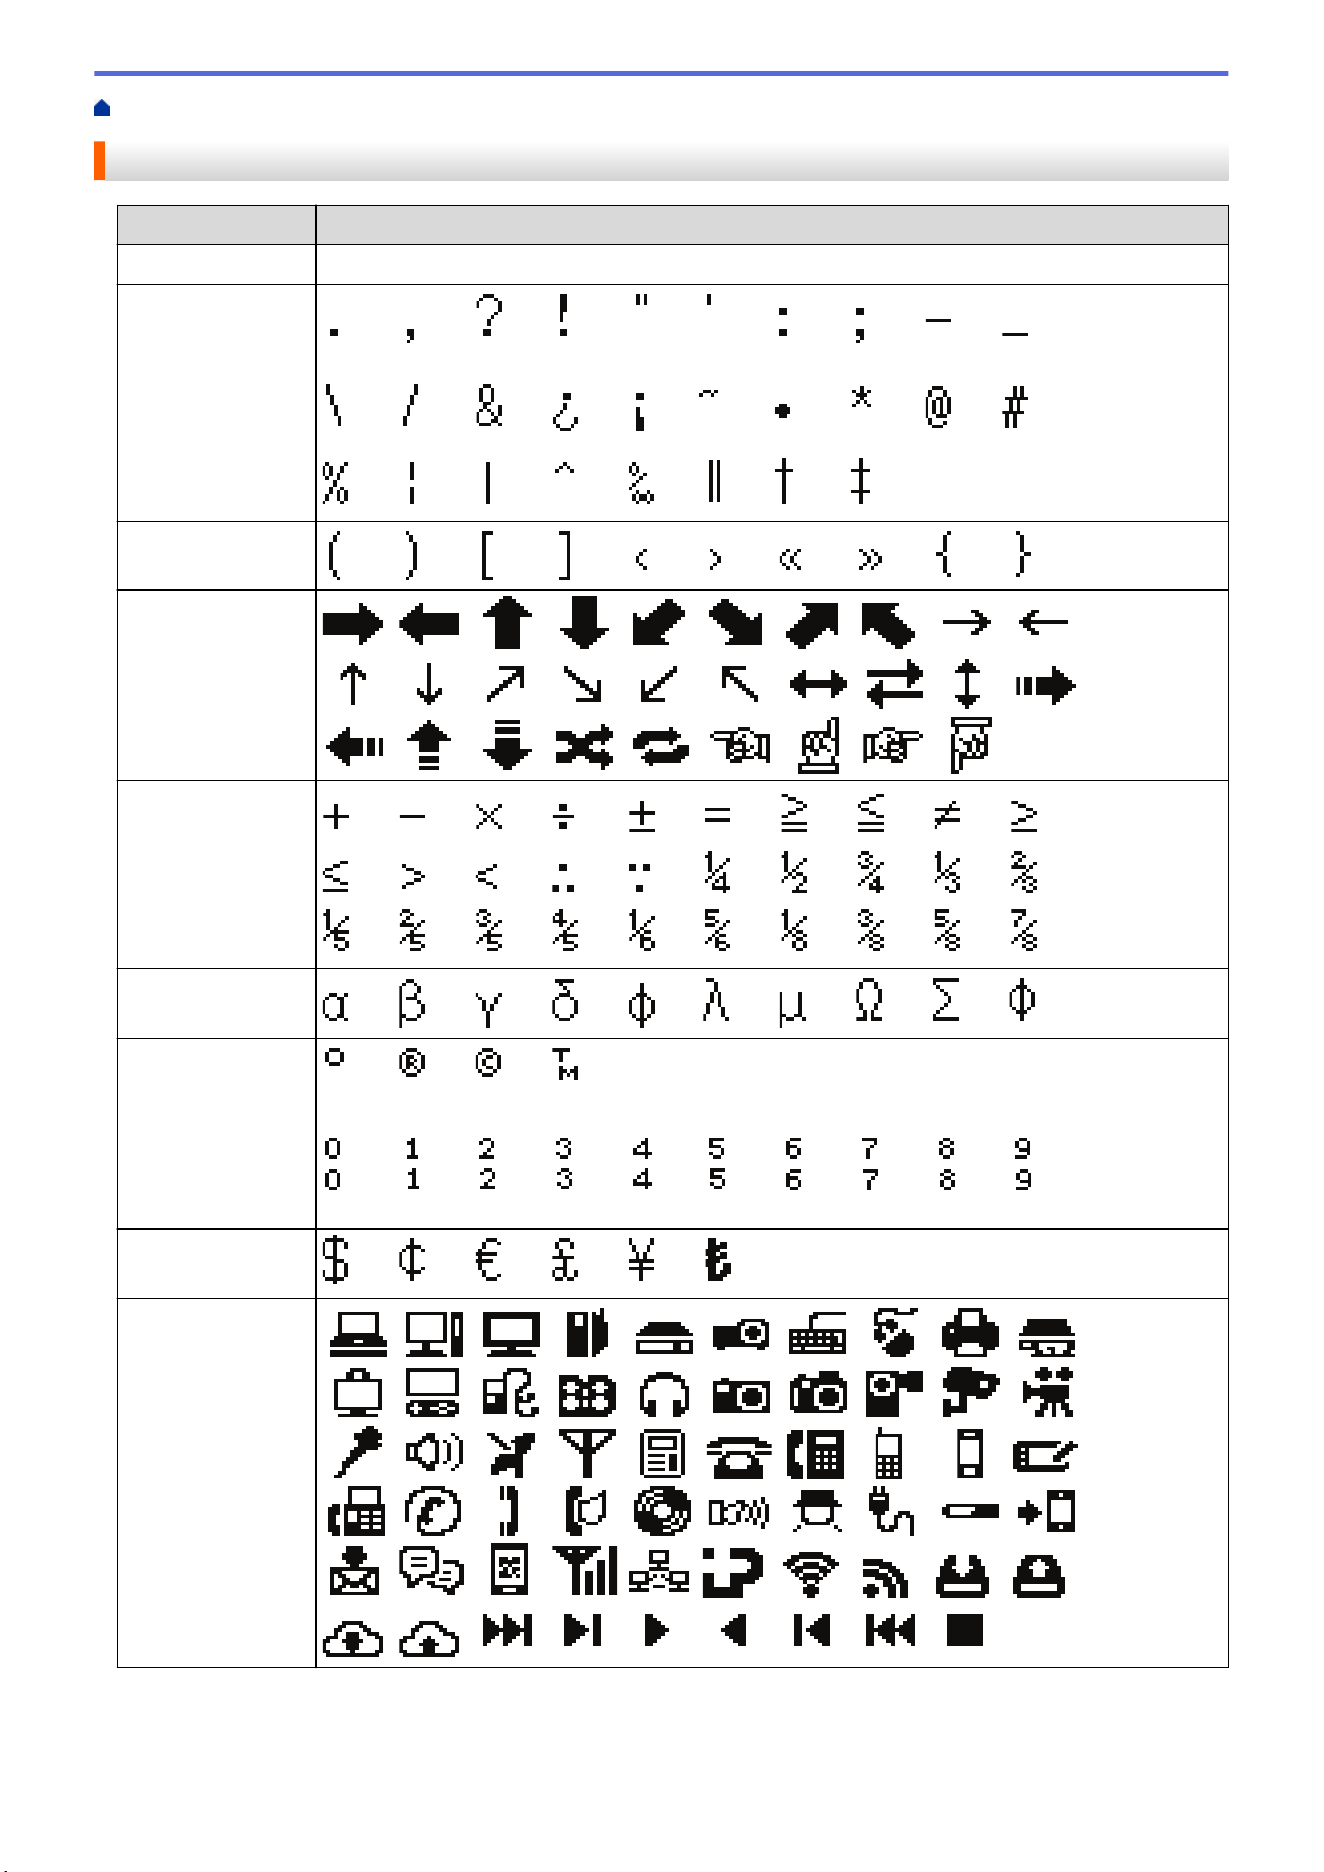
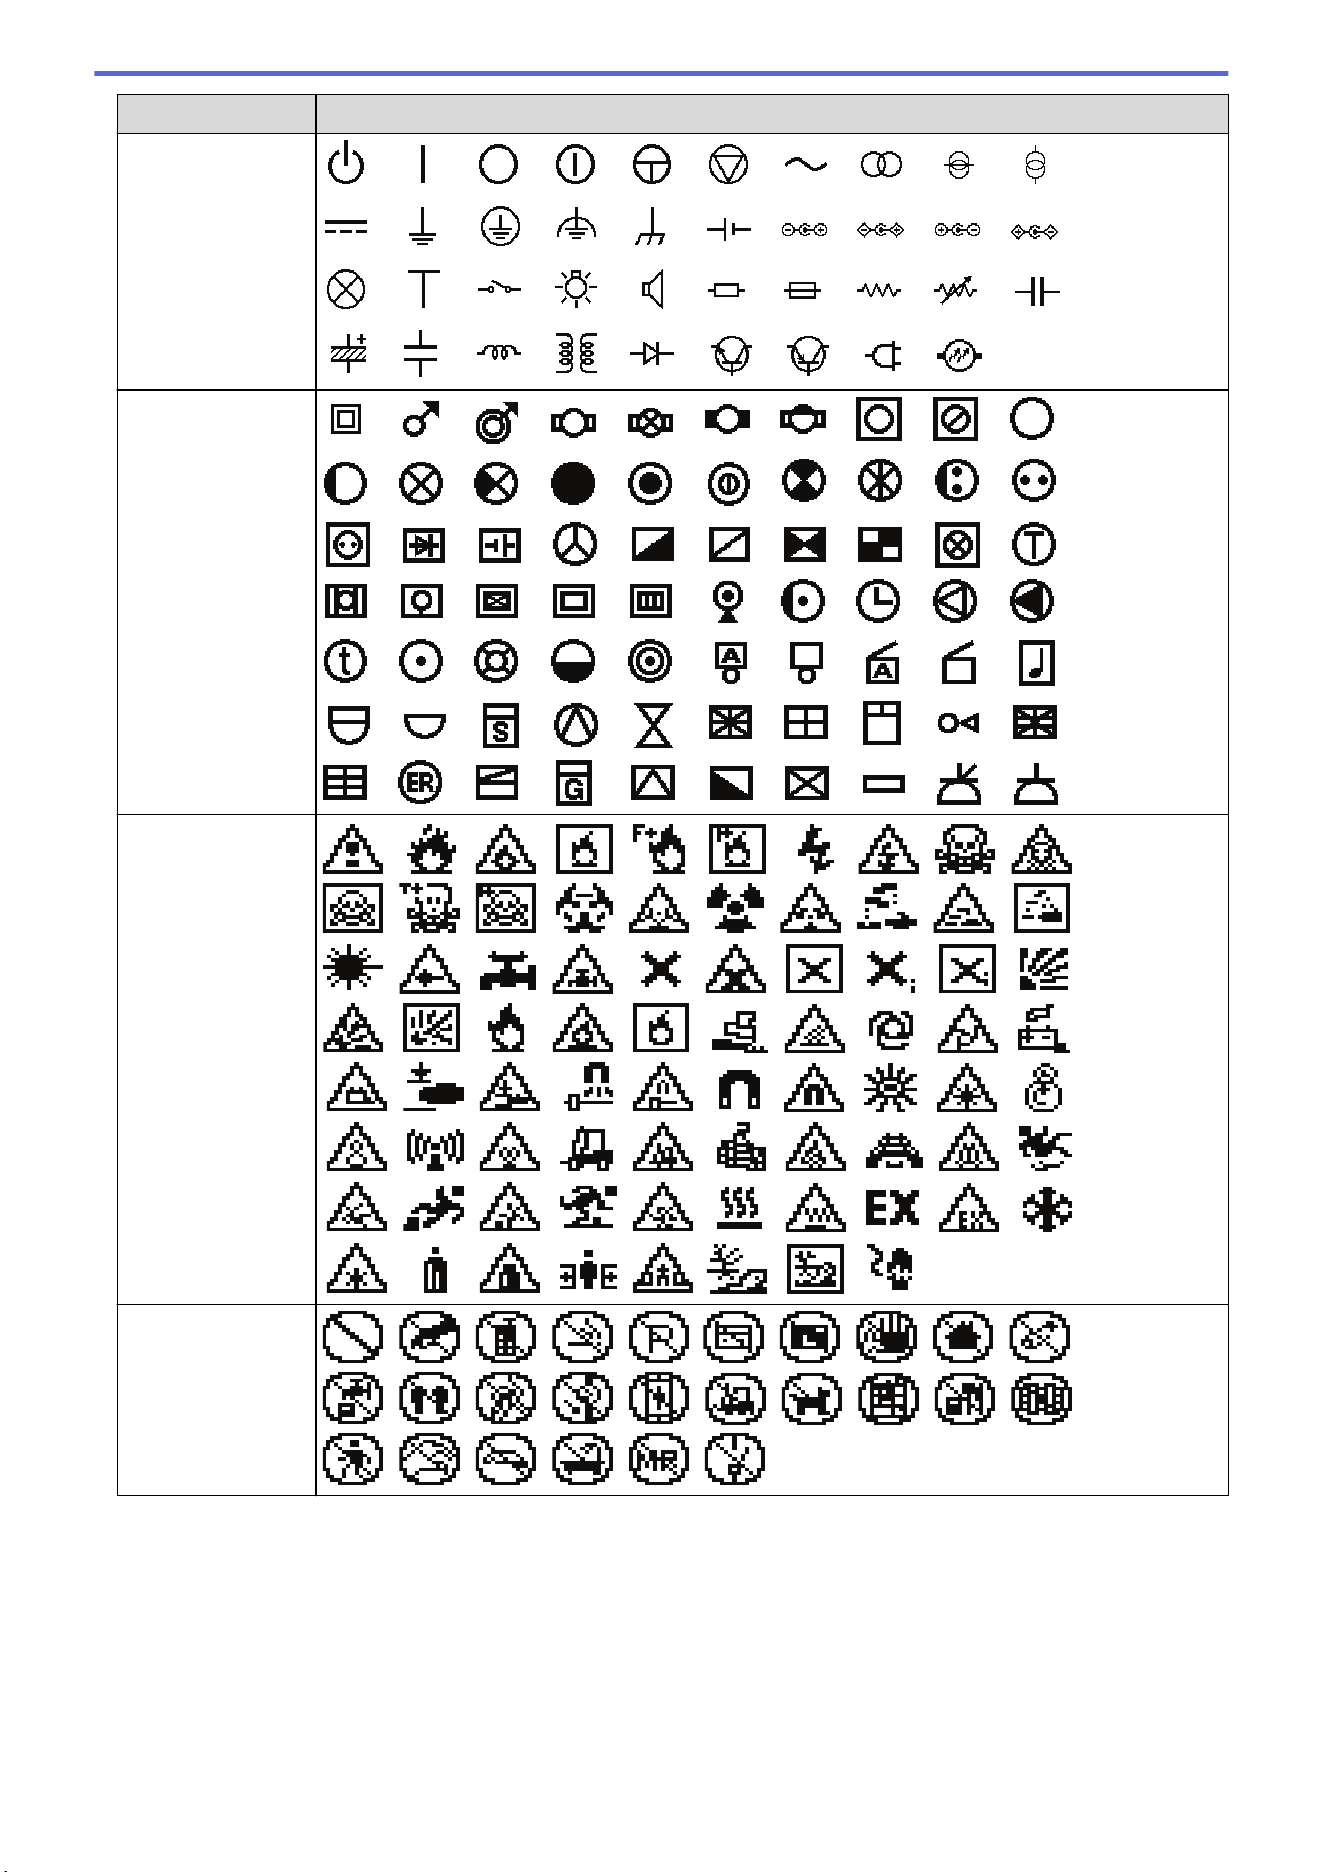
Category Symbols
Electrical 1
Electrical 2
Safety
Prohibited
59


Home > Edit Labels > Set Character Attributes > Apply Character Attributes
Apply Character Attributes
When formatting your text, you can preview your character attribute selections on the LCD.
1. Type the text you want.
2. Press
/
.
3. Press a or b to select an attribute.
4. Press d or c to set a value for that attribute, and then press OK.
Related Information
• Set Character Attributes
Related Topics:
• Attribute Setting Options
65
Home > Edit Labels > Set Character Attributes > Apply Character Attributes to a Line of Text
Apply Character Attributes to a Line of Text
If you add multiple lines in your label, you can format each line of text to look different.
1. Type the lines of characters or text you want on your label.
2. Press a or b to move the cursor to the line whose character attributes you want to change.
3. Press
/
and then press
/
to display the available formatting
attributes.
Three black lines in the upper right corner of the LCD indicate that you are now applying the attribute to that
specific line only.
4. Press a or b to select an attribute.
5. Press d or c to set a value for that attribute, and then press OK.
When different attribute values are set for each line, the value appears as ***** when you press
/
.
Related Information
• Set Character Attributes
Related Topics:
• Attribute Setting Options
66

Home > Edit Labels > Set Character Attributes > Attribute Setting Options
Attribute Setting Options
Font
PT-E310BT
Value
LCD Message Result
Letter Gothic
LGO
Helsinki
HEL
Brussels
BRU
Los Angeles
LA
Atlanta
ATL
Adams
ADM
Sofia
SOF
PT-E510/PT-E560BT
Value
LCD Message Result
Letter Gothic
LGO
Helsinki
HEL
Brussels
BRU
US
US
Los Angeles
LA
San Diego
SGO
Florida
FLO
Calgary
CAL
Belgium
BEL
Atlanta
ATL
Adams
ADM
Brunei
BRN
Sofia
SOF
Germany
GER
67
Font Size
Available Sizes:
Auto, 6 pt, 9 pt, 12 pt, 18 pt, 24 pt, 36 pt, 42 pt, (PT-E510/PT-E560BT) 48 pt
When Auto is selected, the text is automatically adjusted to print in the largest size available in the font
settings for each tape width.
Width
Value
Result
x 1
x 3/2
x 2
x 1/2
x 2/3
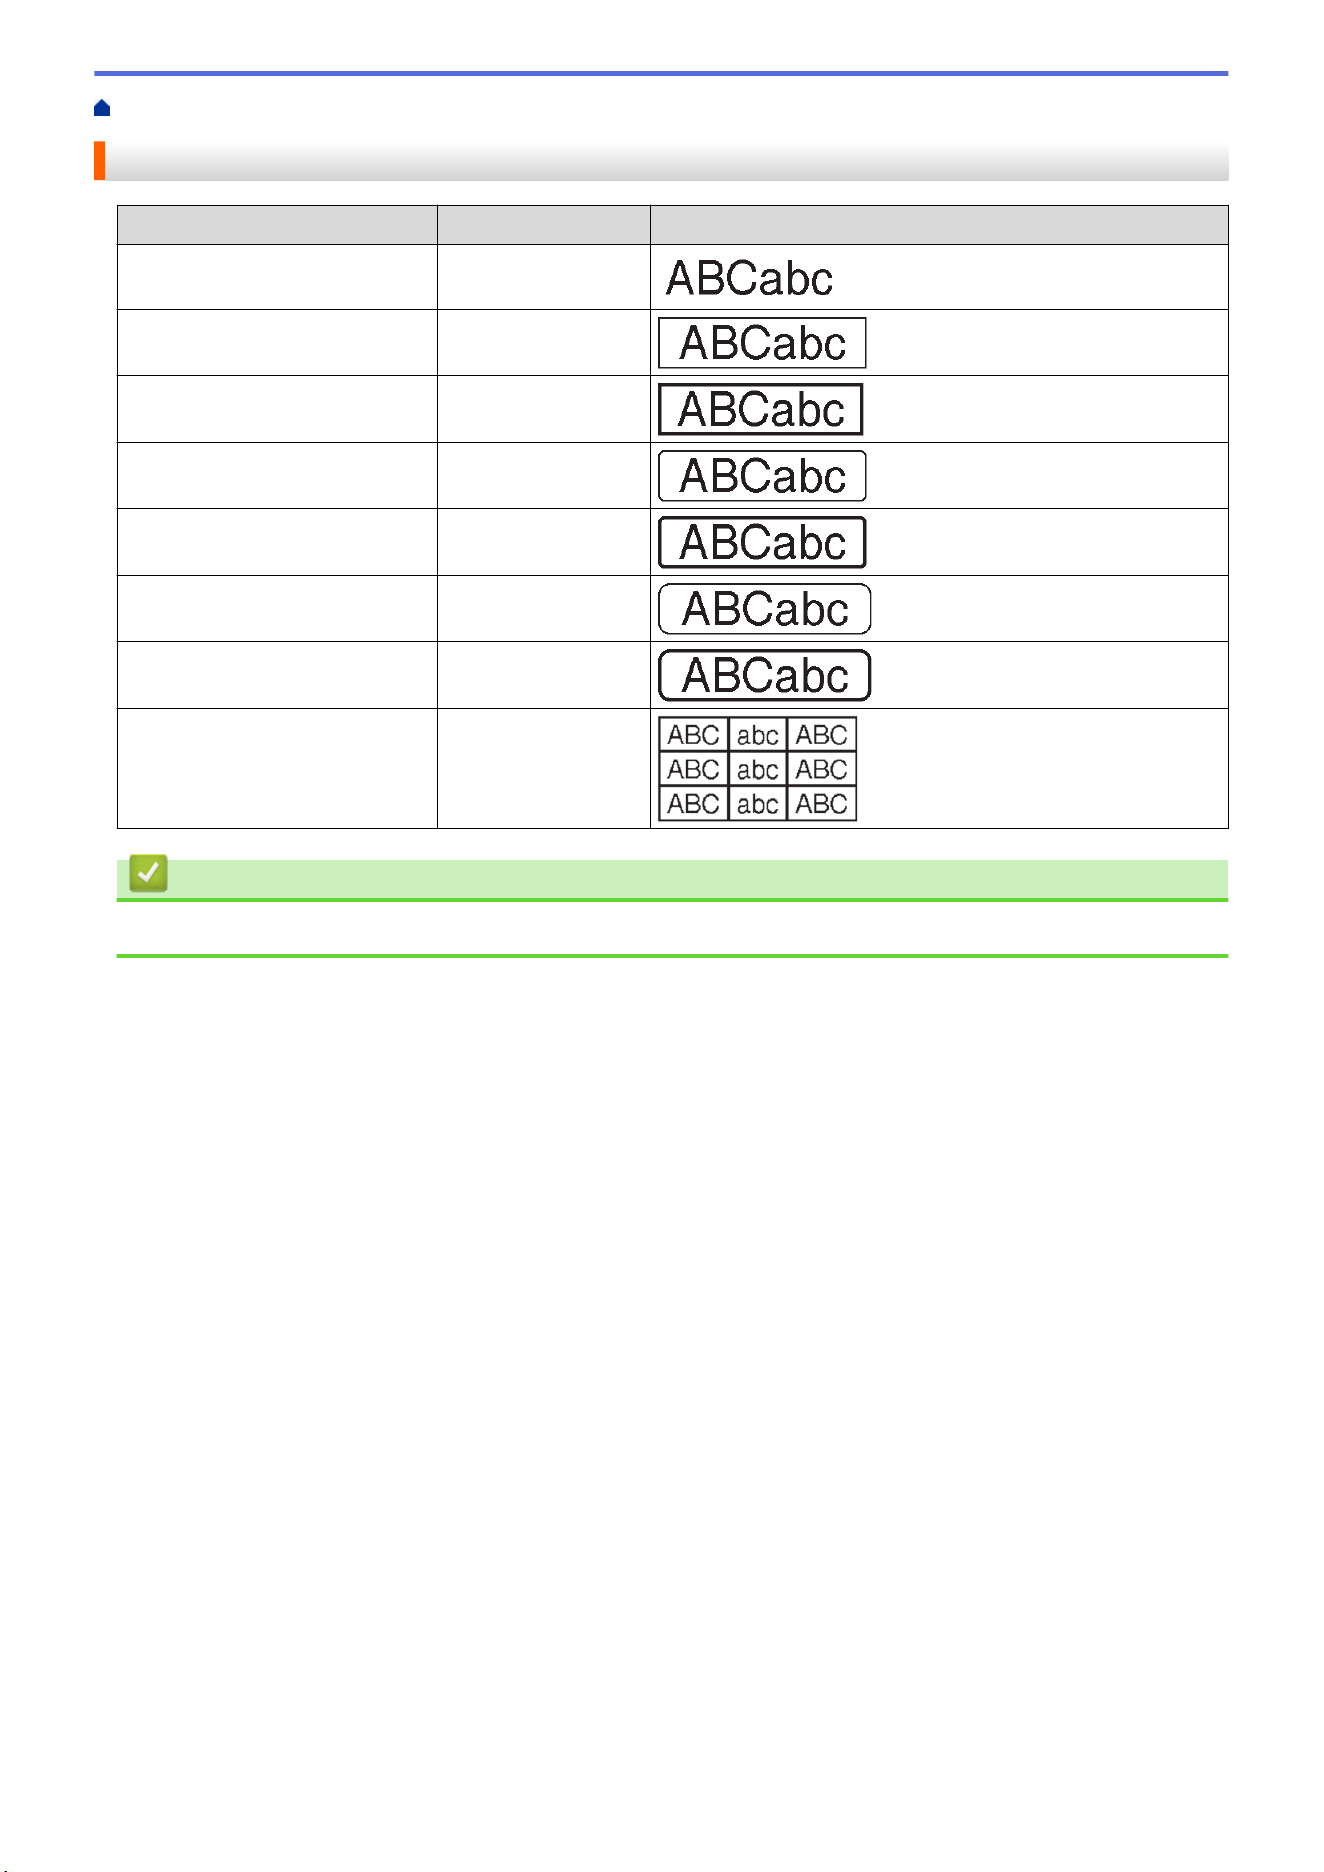
Font Style
Value
LCD Message Result
Normal
Normal
Bold
BLD
Outline
OUT
Shadow
SHD
Solid
SLD
Italic
ITA
Italic Bold
I+BLD
Italic Outline
I+OUT
Italic Shadow
I+SHD
Italic Solid
I+SLD
Line
Value
LCD Message Result
Off
Off
Underline
UND
Strikethrough (Single Line)
STR
Strikethrough (Double Lines)
D.STR
68
Home > Edit Labels > Set Character Attributes > Set Auto Fit Style
Set Auto Fit Style
You can reduce the text size to fit within the length of your label.
Make sure [Size] in
/
is set to [Auto] and the label length is specified before using
this function.
1. Press Menu.
2. Press a or b to display [Auto Fit Style], and then press OK.
3. Press a or b to select one of following options:
Option Description
Text Size
The total text size is reduced to fit within the label.
Text Width
The text width is reduced to the size of the x 1/2 or x 2/3 setting to fit within the label.
For the expected output, see Related Topics.
4. Press OK.
Related Information
• Set Character Attributes
Related Topics:
• Attribute Setting Options
70


Home > Edit Labels > Create Labels Using Labeling Application Type
Create Labels Using Labeling Application Type
• General Mode
• Faceplate Mode
• Cable Wrap Mode
• Cable Flag Mode
• Patch Panel Mode
• Punch Block Mode
• Create Labels Using Special Tapes for Wrapping Around Cables
• Create a Cross-ID Label
73
Home > Edit Labels > Create Labels Using Labeling Application Type > General Mode
General Mode
Create labels for general purposes using General mode.
Horizontal
Vertical
1. Press
/
.
2. Press a, b, d, or c to select the options you want, and then press OK.
Option Description
Label Length
(PT-E310BT)
Select the printed label length.
Auto, 1.0" (25 mm) to 39.0" (999 mm)
Label Length
(PT-E510/PT-E560BT)
Select the printed label length.
Auto, 0.4" (10 mm) to 39.0" (999 mm)
Orientation
Select the orientation (horizontal or vertical) of your text.
3. Enter the text you want.
4. Press
/
.
Related Information
• Create Labels Using Labeling Application Type
74
Home > Edit Labels > Create Labels Using Labeling Application Type > Faceplate Mode
Faceplate Mode
Create identification labels for various faceplates using Faceplate mode. When printing in this mode, each block
of text is the same size and evenly spaced.
1 block
3 blocks
1. Press
/
.
2. Press a, b, d, or c to select the options you want, and then press OK.
Option Description
Label Length
(PT-E310BT)
Select the printed label length.
1.0" (25 mm) to 39.0" (999 mm)
Label Length
(PT-E510/PT-E560BT)
Select the printed label length.
0.4" (10 mm) to 39.0" (999 mm)
# of Blocks
Select the number of blocks (up to 5 blocks).
Orientation
Select the orientation (horizontal or vertical) of your text.
3. Enter the text you want.
4. Press
/
.
Related Information
• Create Labels Using Labeling Application Type
75
Home > Edit Labels > Create Labels Using Labeling Application Type > Cable Wrap Mode
Cable Wrap Mode
Create labels to be wrapped around a cable or wire using Cable Wrap mode. In Cable Wrap mode, the text is
printed as shown so that when it's wrapped, the label can be read from all angles.
Custom
Rot.90
• (PT-E310BT) We recommend using Flexible ID Tape for Cable Wrap labels.
(PT-E510/PT-E560BT) We recommend using Flexible ID Tape or Self-Laminating Tape for Cable Wrap
labels.
• Flexible ID Tape is not designed for use as electrical insulation. When wrapping Flexible ID Tape labels
around objects, the diameter of the object (1) should be 0.12" (3 mm) or more. The overlapping ends of the
label or the label flag (2) should be 0.2" (5 mm) or more.
2
1
1. Press
/
.
2. Press a, b, d, or c to select the options you want, and then press OK.
Option Description
UOM
Select one of the following units of measurement:
Dia(Ø) (Custom Diameter), Length (Custom Length), CAT5/6, CAT6A,
COAX, AWG, Rot.90 (Rotated 90°)
Value
The available values differ depending on the units of measurement you select.
Repeat
Repeat the text you enter so it prints as many times as needed.
Cross-ID
Select this setting when you create Cross-ID labels. See Related Information.
3. Enter the text you want.
4. Press
/
.
Related Information
• Create Labels Using Labeling Application Type
Related Topics:
• Create a Cross-ID Label
• Create Labels Using Special Tapes for Wrapping Around Cables
76
Home > Edit Labels > Create Labels Using Labeling Application Type > Cable Flag Mode
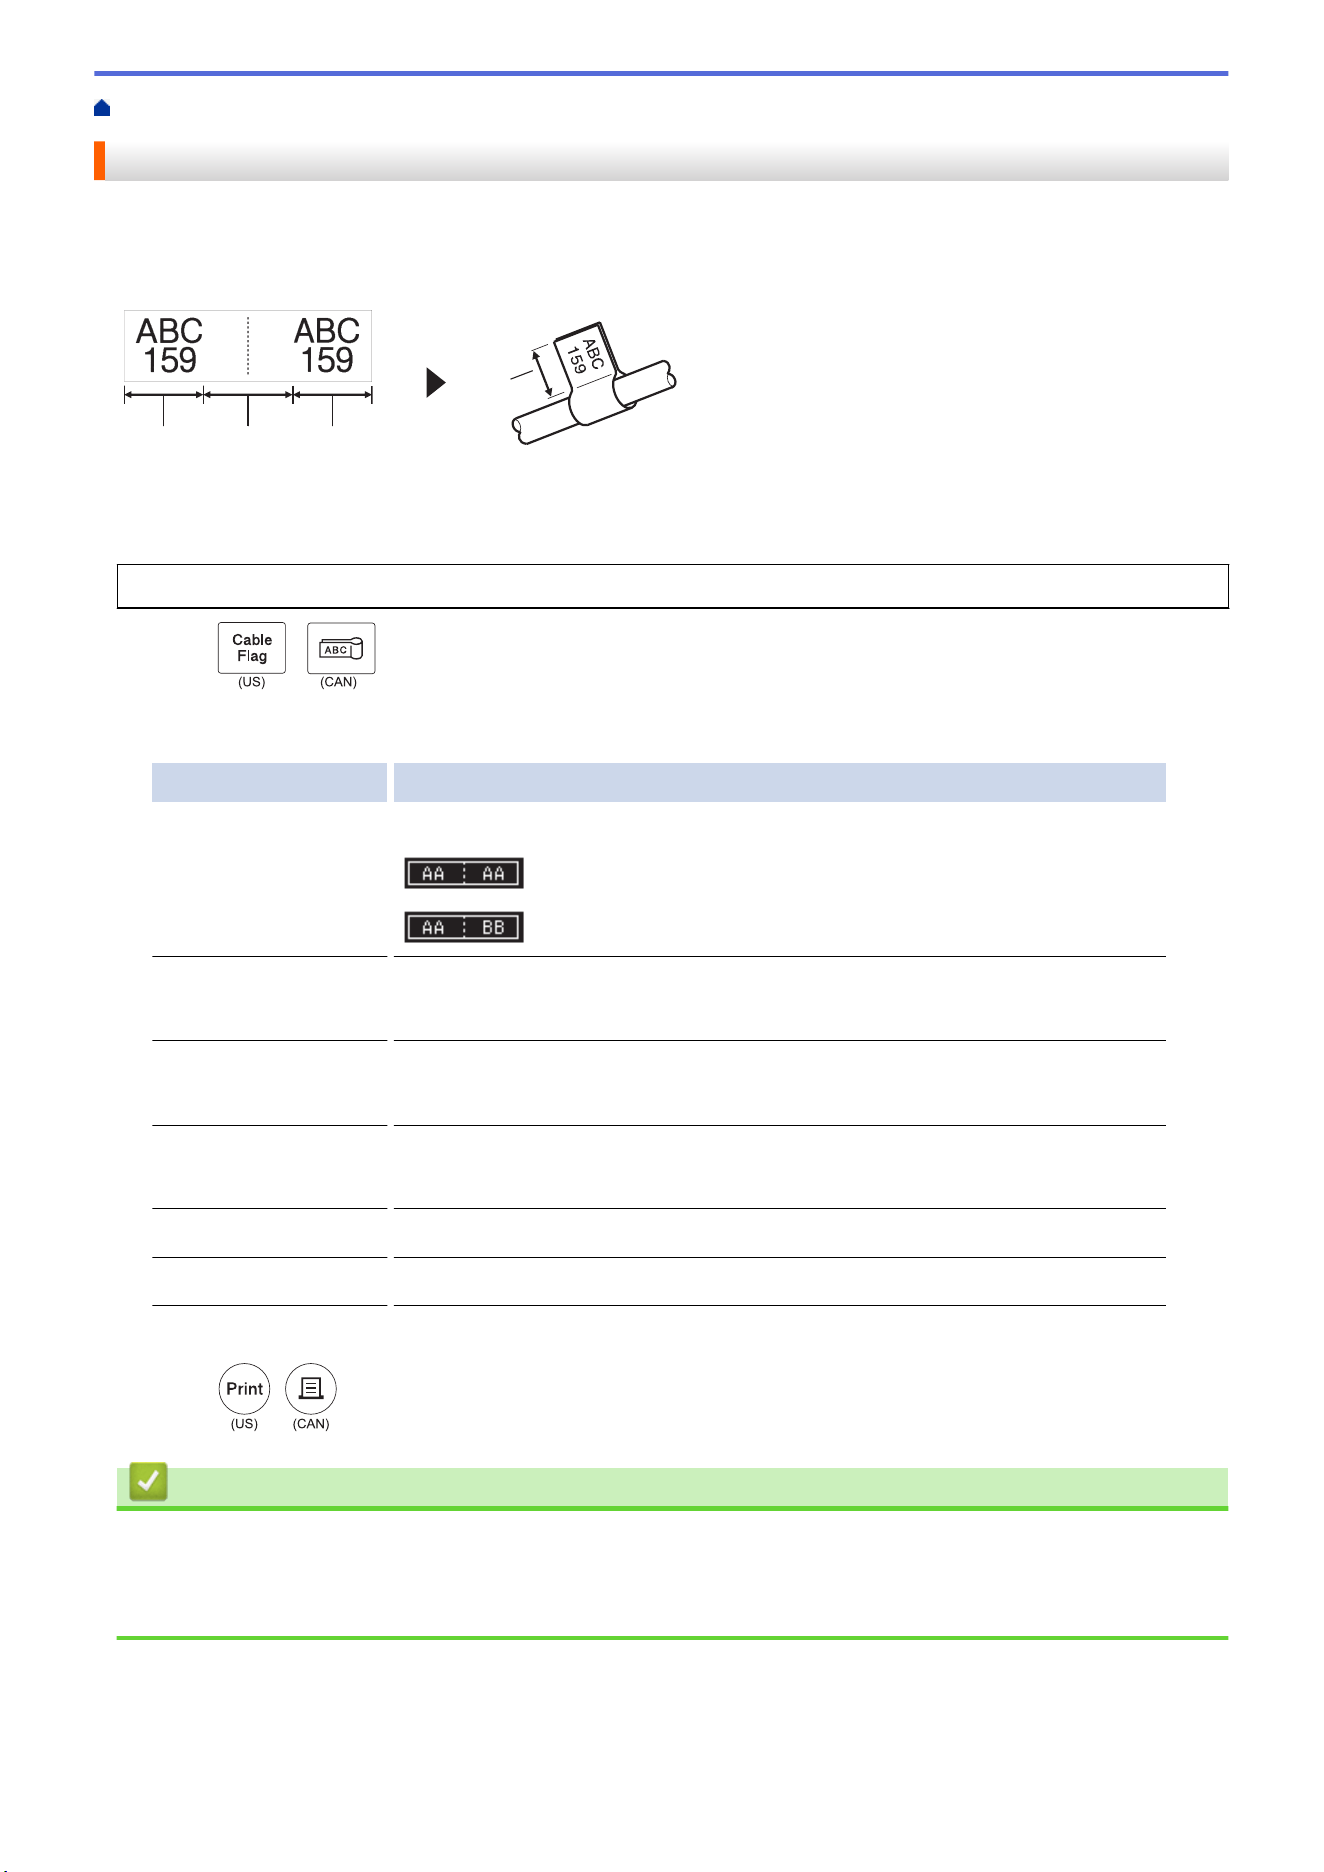
Cable Flag Mode
Using Cable Flag mode, create labels to be wrapped around a cable or wire, and stuck together so that both
label ends form a flag. In Cable Flag mode, the text is printed on both label ends and a blank space is left in the
middle that wraps around the cable.
1 12
1
1. Flag length
2. Cable circumference
We recommend using Flexible ID Tape for Cable Flag labels.
1. Press
/
.
2. Press a, b, d, or c to select the options you want, and then press OK.
Option Description
Layout
Select the layout you want:
The same text is printed on each block.
Two different texts are printed on each block.
Flag Length
(PT-E310BT)
Select the flag length of your printout.
0.6" (15 mm) to 8.0" (200 mm)
Flag Length
(PT-E510/PT-E560BT)
Select the flag length of your printout.
0.4" (10 mm) to 8.0" (200 mm)
Cable Diameter
Select the cable diameter.
0.12" (3 mm) to 3.5" (90 mm)
Orientation
Select the orientation (horizontal or vertical) of your text.
Cross-ID
Select this setting when you create Cross-ID labels. See Related Information.
3. Enter the text you want.
4. Press
/
.
Related Information
• Create Labels Using Labeling Application Type
Related Topics:
• Create a Cross-ID Label
77
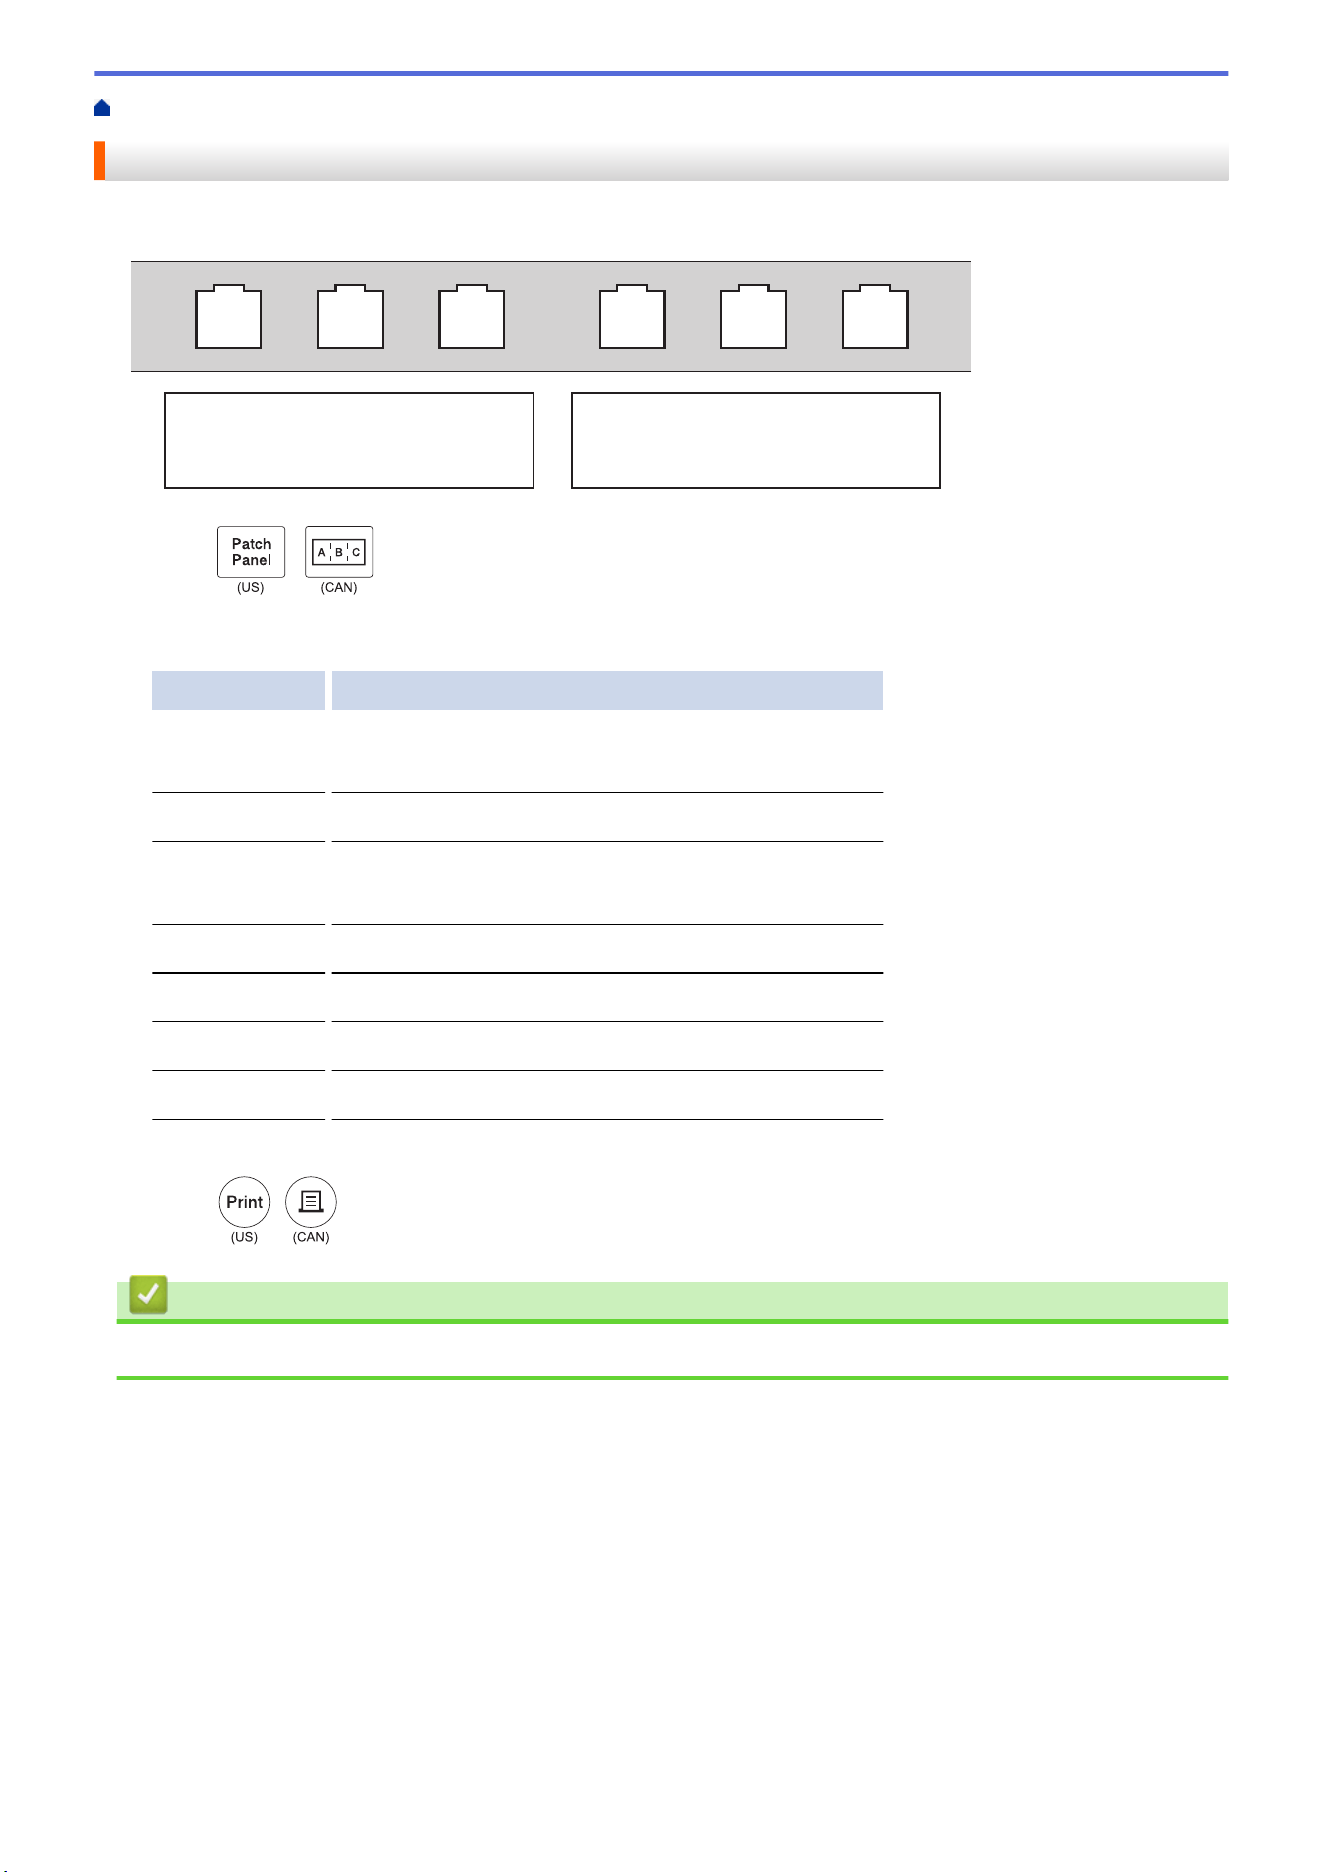
Home > Edit Labels > Create Labels Using Labeling Application Type > Patch Panel Mode
Patch Panel Mode
Create labels to identify various type of panels using Patch Panel mode.
IP01(1) IP02(1) IP03(1) IP03(1) IP02(1) IP01(1)
1. Press
/
.
2. Press a, b, d, or c to select the options you want, and then press OK.
Option Description
Block Length
Select the block length.
0.20" (5 mm) to 12.0" (300 mm)
# of Blocks
Select the number of blocks (up to 99 blocks).
Separator
Select the separator layout:
Tic, Dash, Line, Bold, Frame, None
Orientation
Select the orientation (0°, 90°, 180°, 270°) of your text.
Reverse
Print blocks in reverse order.
Advanced
Adjust block lengths independently.
No Margins
Set the margin of both ends of each label to 0" (0 mm).
3. Enter the text you want.
4. Press
/
.
Related Information
• Create Labels Using Labeling Application Type
78
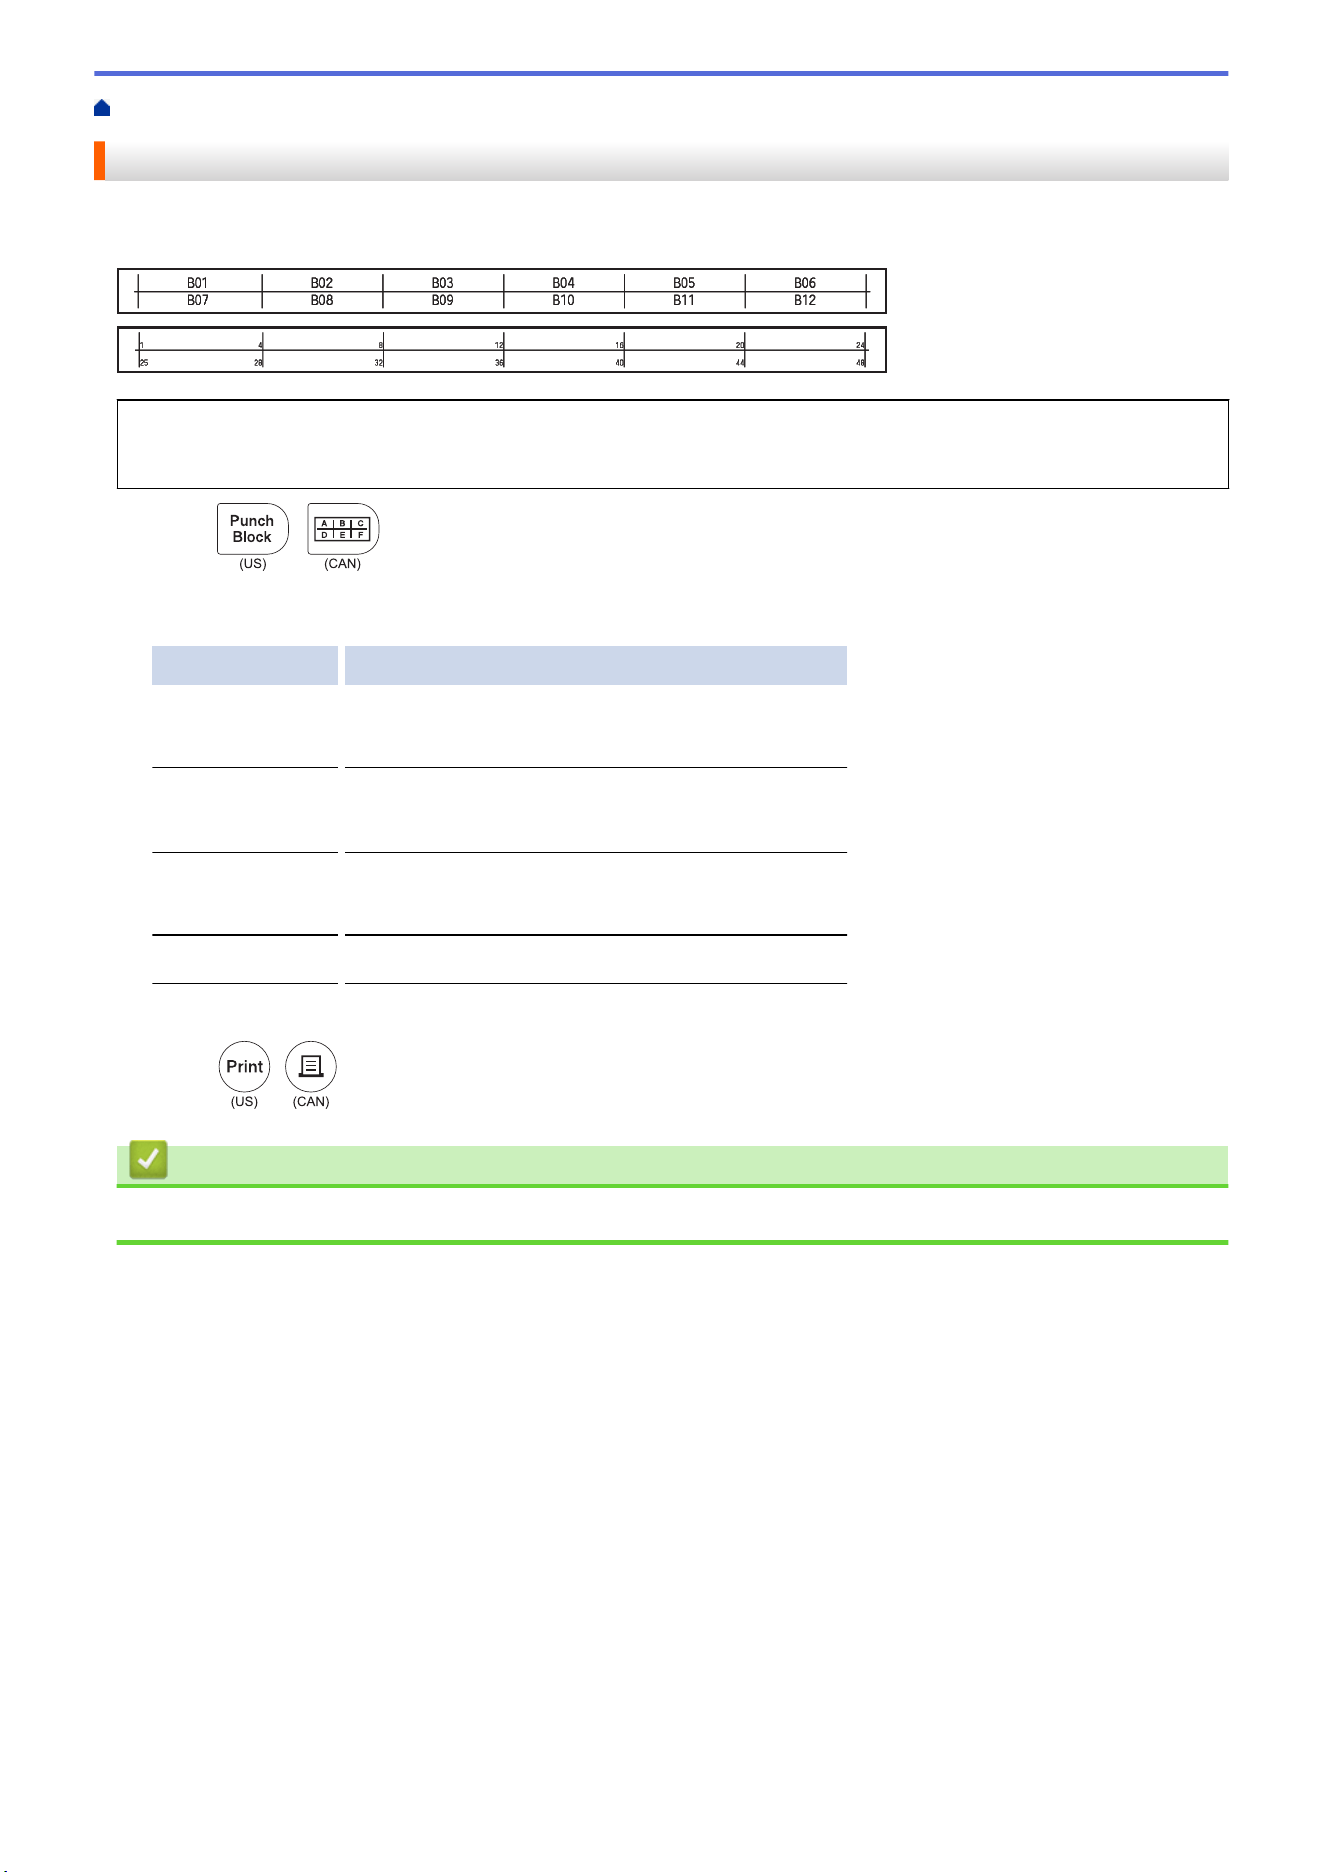
Home > Edit Labels > Create Labels Using Labeling Application Type > Punch Block Mode
Punch Block Mode
Create labels to identify a type of electrical connection often used in telephony using Punch Block (Punch-Down
Block) mode.
• (PT-E310BT) Up to two lines can be entered in each block.
• (PT-E510/PT-E560BT) Up to three lines can be entered in each block.
1. Press
/
.
2. Press a, b, d, or c to select the options you want, and then press OK.
Option Description
Module Width
Select the module width.
2.0" (50 mm) to 12.0" (300 mm)
Block Type
Select the block type:
2 Pairs, 3 Pairs, 4 Pairs, 5 Pairs, Blank
Sequence Type
Select the sequence type:
None, Horizontal, Backbone
Start Value
Select the start value (Up to 99999).
3. Enter the text you want.
4. Press
/
.
Related Information
• Create Labels Using Labeling Application Type
79

Home > Edit Labels > Create Labels Using Labeling Application Type > Create Labels Using Special Tapes
for Wrapping Around Cables > Heat Shrink Tube
Heat Shrink Tube
When you insert a Heat Shrink Tube cassette into the printer and then press any of the labeling application type
keys, the Heat Shrink Tube setting screen appears on the LCD.
1. Press a, b, d, or c to select the options you want, and then press OK.
Option Description
Label Length
Select the printed label length.
1.0" (25 mm) to 39.0" (999 mm)
Cross-ID
Select this setting when you create Cross-ID labels. See Related Information.
2. Enter the text you want.
3. Press
/
.
Related Information
• Create Labels Using Special Tapes for Wrapping Around Cables
Related Topics:
• Create a Cross-ID Label
81
Home > Edit Labels > Create Labels Using Labeling Application Type > Create Labels Using Special Tapes
for Wrapping Around Cables > Self-Laminating Tape
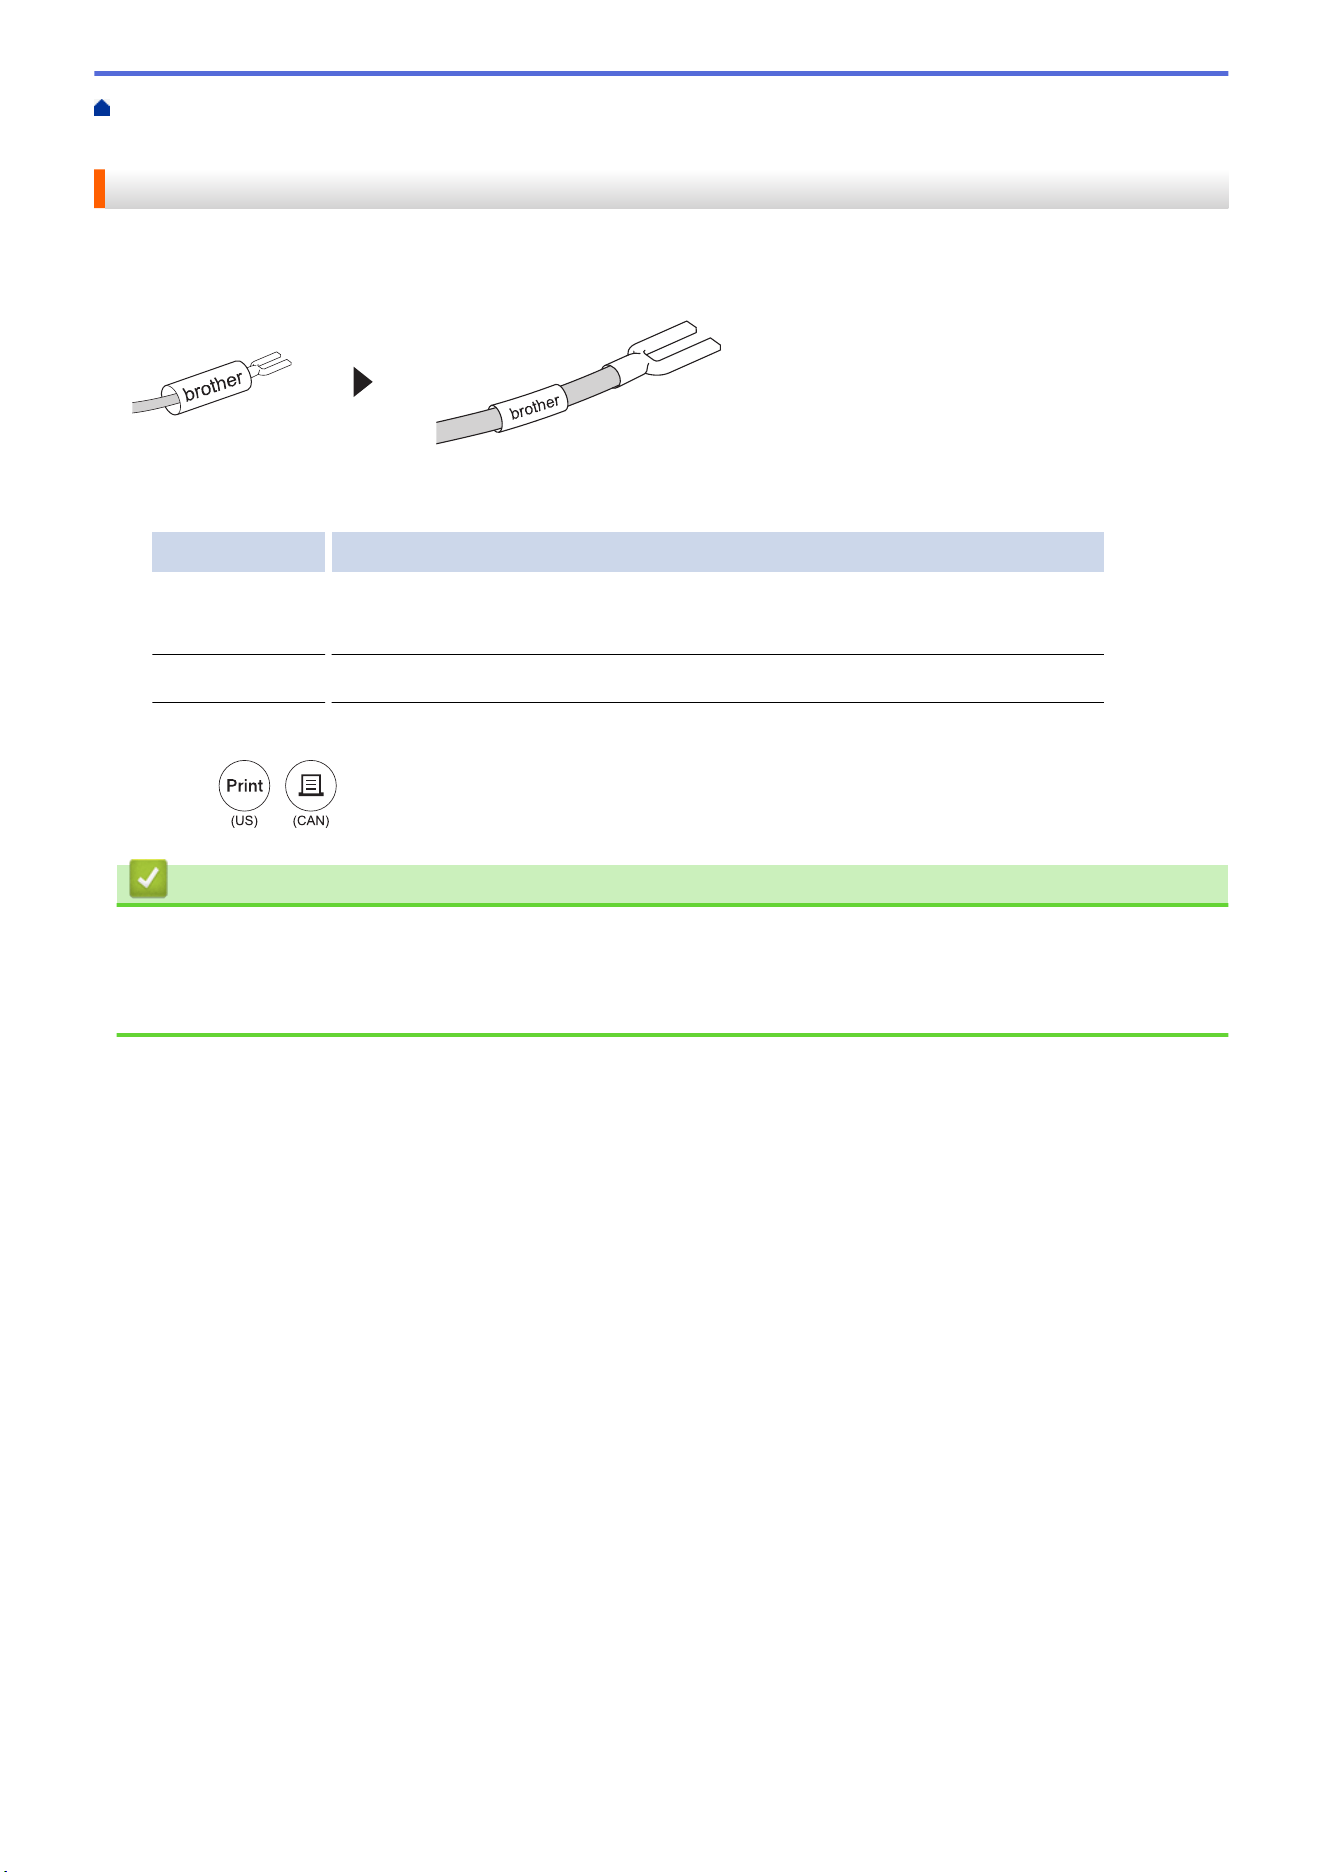
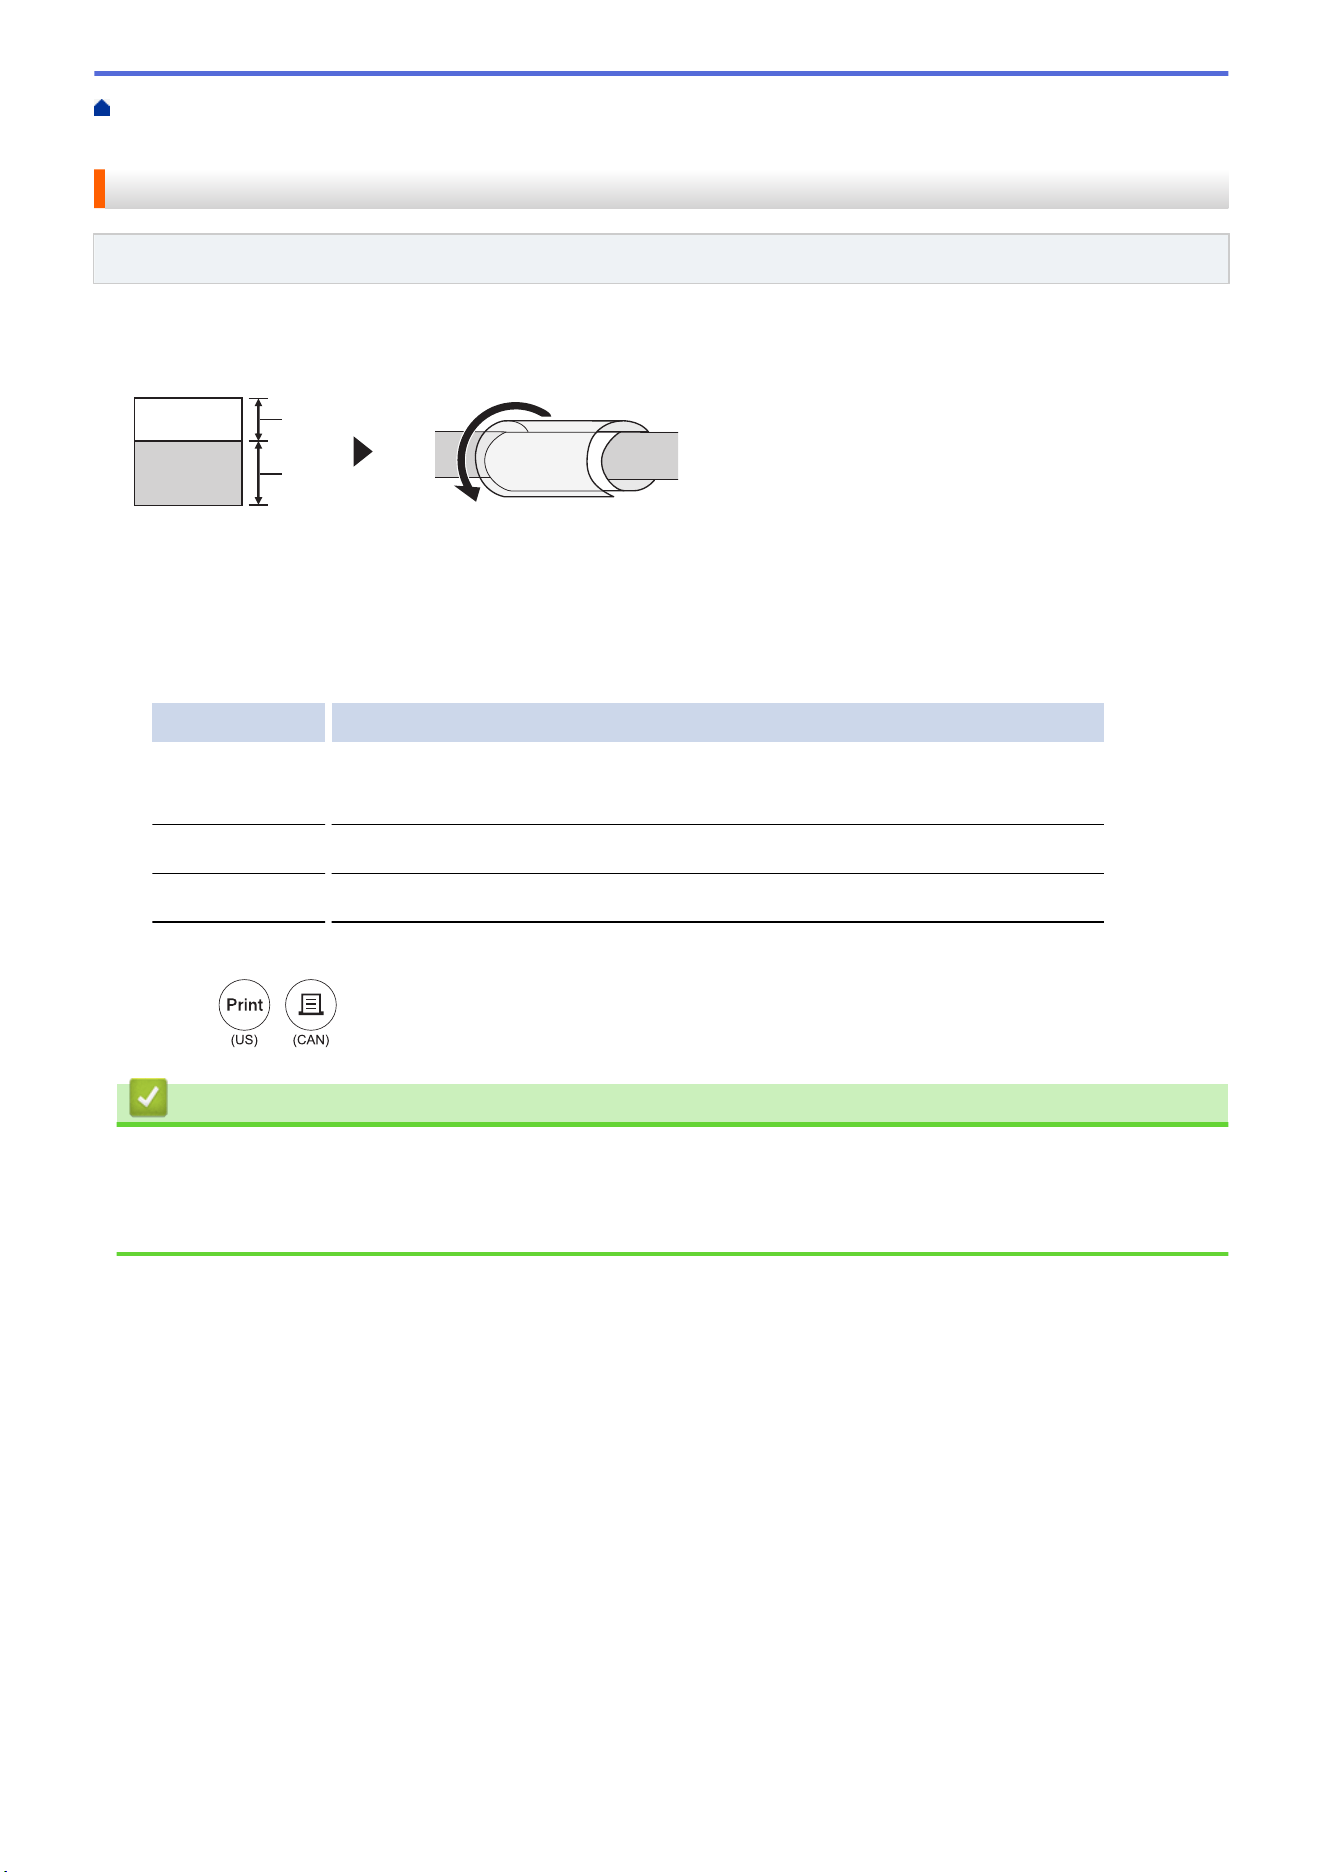
Self-Laminating Tape
Related Models: PT-E510/PT-E560BT
When you insert a Self-Laminating Tape cassette into the printer and then press any of the labeling application
type keys, the Self-Laminating Tape setting screen appears on the LCD.
brother
1
2
brother
1. Printed area
2. Laminating area
1. Press a, b, d, or c to select the options you want, and then press OK.
Option Description
Label Length
Select the printed label length.
0.6" (15 mm) to 12.0" (300 mm)
V.Offset
Adjust the vertical position of the text.
Cross-ID
Select this setting when you create Cross-ID labels. See Related Information.
2. Enter the text you want.
3. Press
/
.
Related Information
• Create Labels Using Special Tapes for Wrapping Around Cables
Related Topics:
• Create a Cross-ID Label
82

Home > Edit Labels > Create Labels Using Labeling Application Type > Create a Cross-ID Label
Create a Cross-ID Label
Use the [Cross-ID] feature to print labels in which the text order is reversed.
• 1 line Cross-ID label
When you insert a trigger character ("/" or "\") in the text, the label is printed in reverse order, as shown in the
example.
1 line (using Cable Flag mode)
• Multiple lines Cross-ID label
When you enter multiple lines of text, each line is switched, as shown in the examples.
2 lines (using Cable Flag mode)
5 lines (using Cable Flag mode)
1. Press
/
or
/
.
2. Press a or b to select [Cross-ID].
3. Press d or c to select the option you want, and then press OK.
Option Description
Off
Disable Cross-ID settings.
Pair
Print multiple serialized Cross-ID labels in each pair.
Group
Print multiple serialized Cross-ID labels in each group.
When you print a single Cross-ID label, the print result is the same regardless of whether you select
[Pair] or [Group].
4. Enter the text you want.
5. Select the Serialize setting, if needed.
6. Press
/
.
Related Information
• Create Labels Using Labeling Application Type
83


Home > Edit Labels > Create Barcode Labels > Create and Print Barcodes
Create and Print Barcodes
The Labeling System is not designed exclusively for creating barcode labels. Always confirm that barcode labels
can be read by a barcode reader.
For best results, print barcode labels in black ink on white tape. Some barcode readers may not be able to read
barcode labels created using colored tape or ink.
You can print up to five barcodes on a single label.
NOTE
• The number of characters or lines you can add varies depending on the tape width.
• Use the [Large] setting for [Width] or [Size] whenever possible. Some barcode readers may not be
able to read barcode labels created using the [Small] setting.
• Continuously printing a large number of labels with barcodes can overheat the Print Head, which may
affect the print quality.
• Symbols are available for the CODE39, CODE128, CODABAR, or GS1-128 protocols.
• The "C.Digit" (Check Digit) attribute is available for the CODE39, I-2/5, and CODABAR protocols.
>> PT-E310BT
>> PT-E510/PT-E560BT
PT-E310BT
1. Press
/
and then press
/
.
2. Press a, b, d, or c to select an attribute, and then press OK.
For more information, see Related Information.
3. Enter the barcode data.
4. To select a character, press
/
and then press
/
. Press a or b to select the
character you want, and then press OK.
5. Press OK.
PT-E510/PT-E560BT
1. Press
/
.
2. Press a, b, d, or c to select an attribute, and then press OK.
For more information, see Related Information.
3. Enter the barcode data.
4. To select a character, press
/
. Press a or b to select the character you want, and then
press OK.
5. Press OK.
Related Information
• Create Barcode Labels
86

Home > Edit Labels > Create Barcode Labels > Create and Print Barcodes > Barcode Options
Barcode Options
Protocol Attribute Value
CODE39, CODE128, EAN-8,
EAN-13, GS1-128 (UCC/EAN-128),
UPC-A, UPC-E, I-2/5 (ITF),
CODABAR
Width Small, Large
Under#
(Characters printed below the
barcode)
On, Off
C.Digit
(Check Digit)
Off, On
(Available only for the CODE39, I-2/5,
and CODABAR protocols)
QR Code Model Model 1, Model 2, Micro
Size Small, M Small, Medium, M Large,
Large
ECC Level 7%, 15%, 25%, 30%
Data Matrix Model Square, Rect. (Rectangular)
Size Small, M Small, Medium, M Large,
Large
Special Character Options
CODE39
Special Character
(SPACE)
CODABAR
Special Character
88
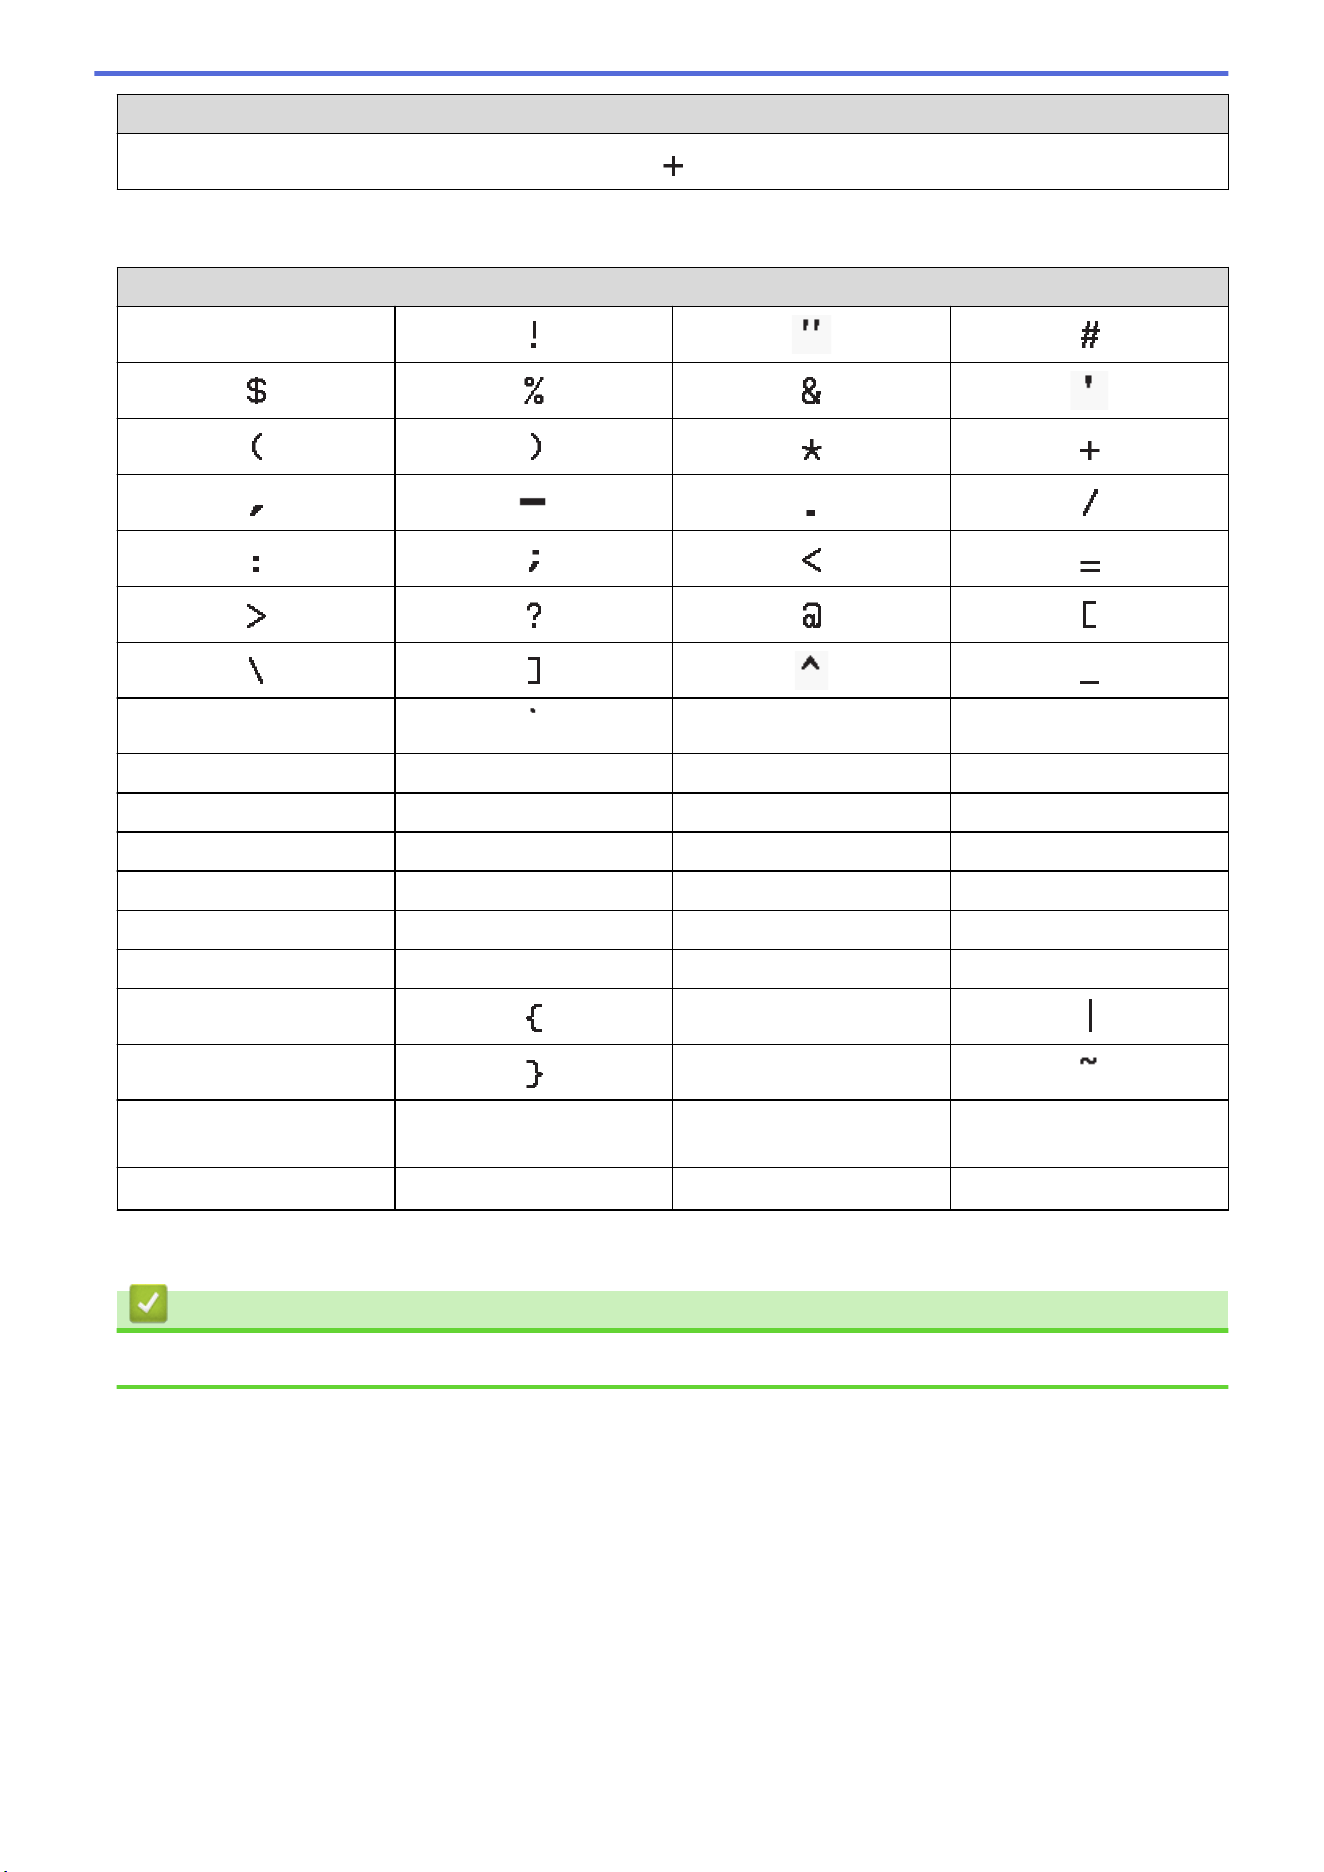
Special Character
CODE128, GS1-128 (UCC / EAN-128), QR Code, Data Matrix
Special Character
(SPACE)
NUL SOH STX
ETX EOT ENQ ACK
BEL BS HT LF
VT FF CR SO
SI DLE DC1 DC2
DC3 DC4 NAK SYN
ETB CAN EM SUB
ESC FS
GS RS
US DEL
FNC3
1
FNC2
1
FNC4
1
FNC1
1
1
Not available for QR Code or Data Matrix.
Related Information
• Create and Print Barcodes
89
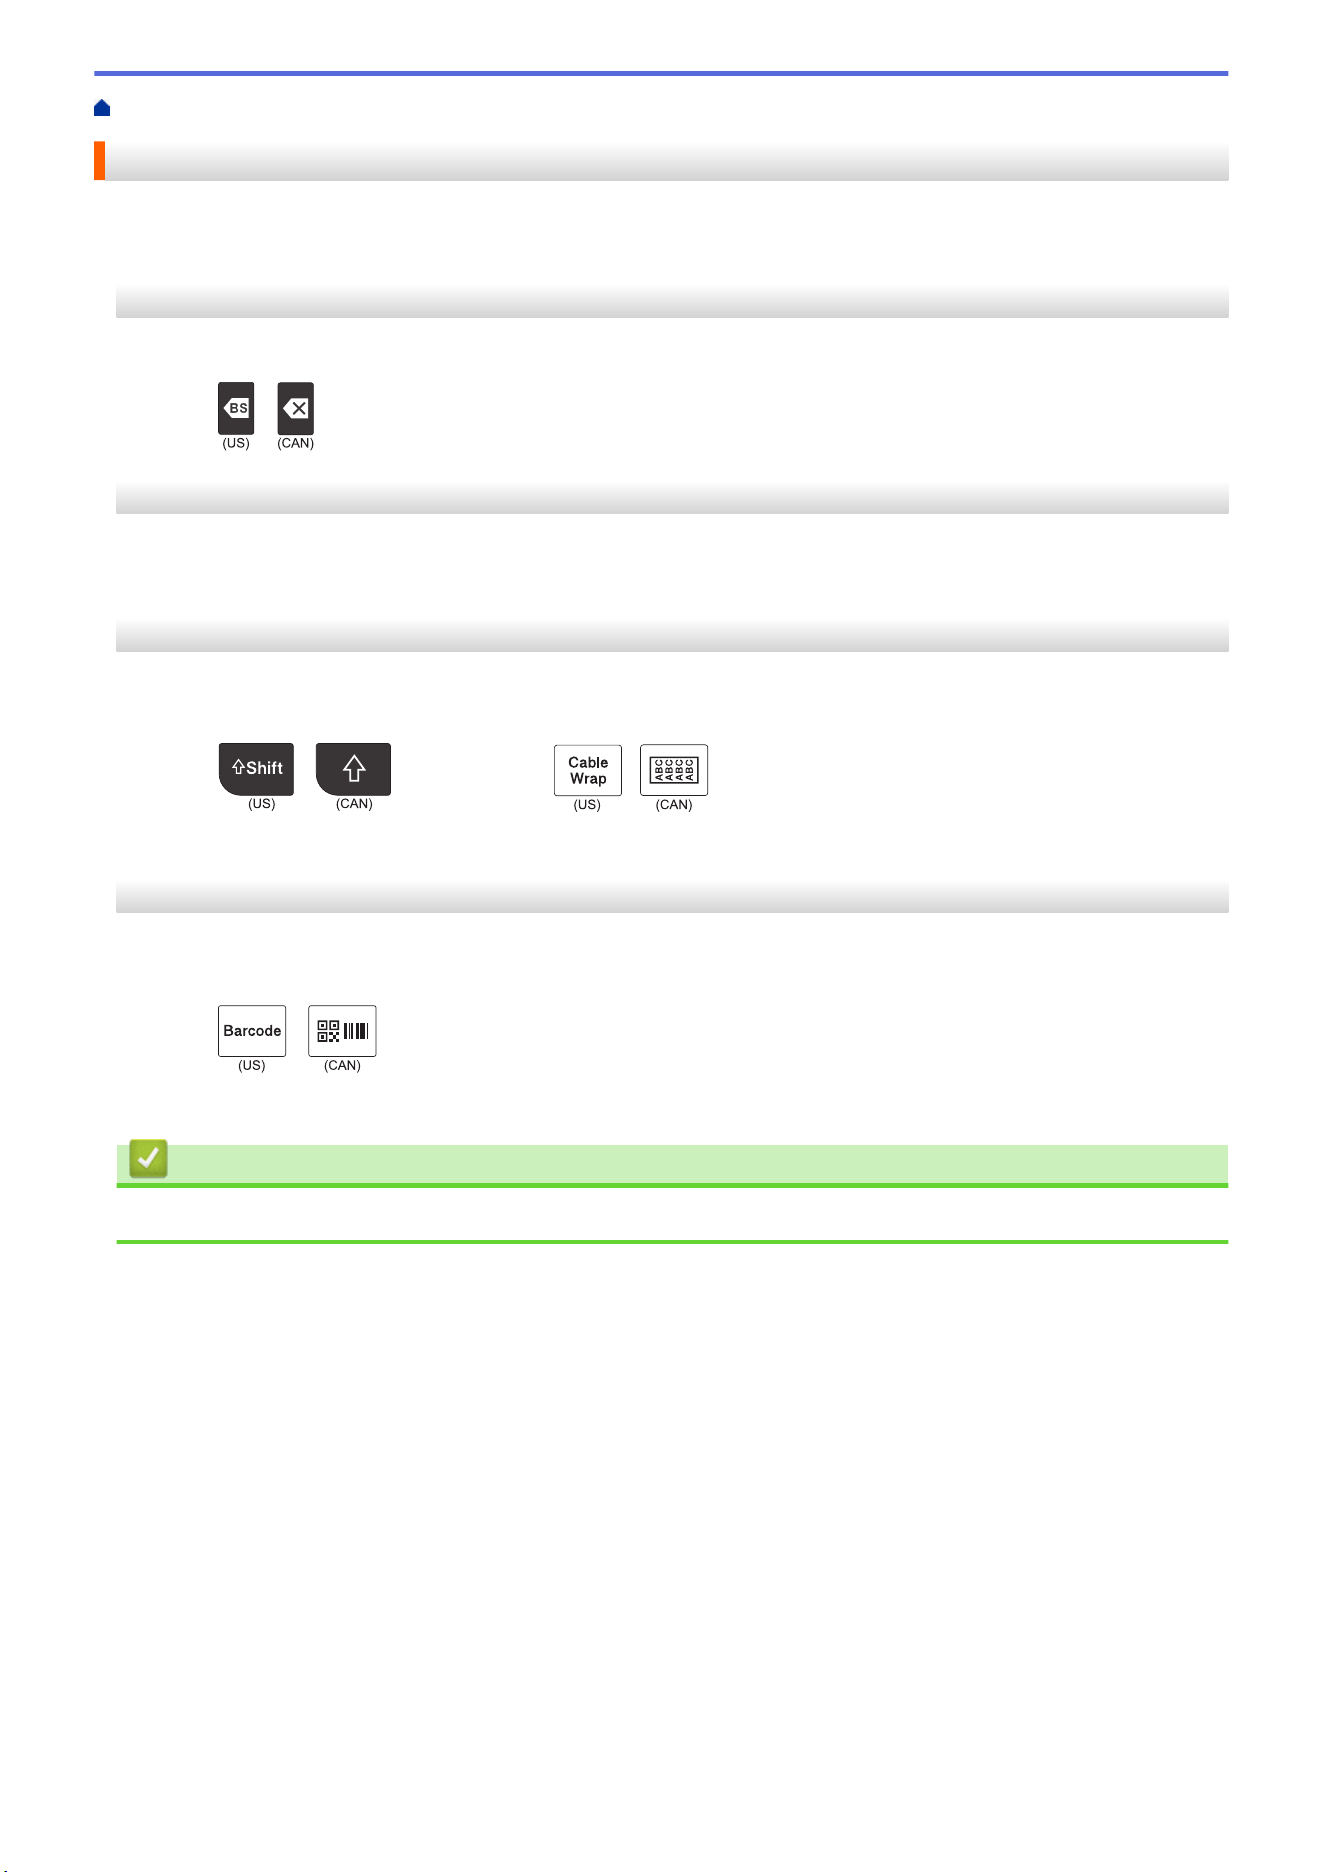
Home > Edit Labels > Create Barcode Labels > Edit or Delete a Barcode and Barcode Data
Edit or Delete a Barcode and Barcode Data
>> Delete a barcode from a label
>> Edit Barcode Data
Delete a barcode from a label
1. Position the cursor to the right of the barcode on the data entry screen.
2. Press
/
.
Edit Barcode Data
>> PT-E310BT
>> PT-E510/PT-E560BT
PT-E310BT
1. To edit barcode attributes and barcode data, position the cursor to the left of the barcode on the data entry
screen.
2. Press
/
and then press
/
.
The Barcode Setup screen appears on the LCD.
PT-E510/PT-E560BT
1. To edit barcode attributes and barcode data, position the cursor to the left of the barcode on the data entry
screen.
2. Press
/
.
The Barcode Setup screen appears on the LCD.
Related Information
• Create Barcode Labels
90

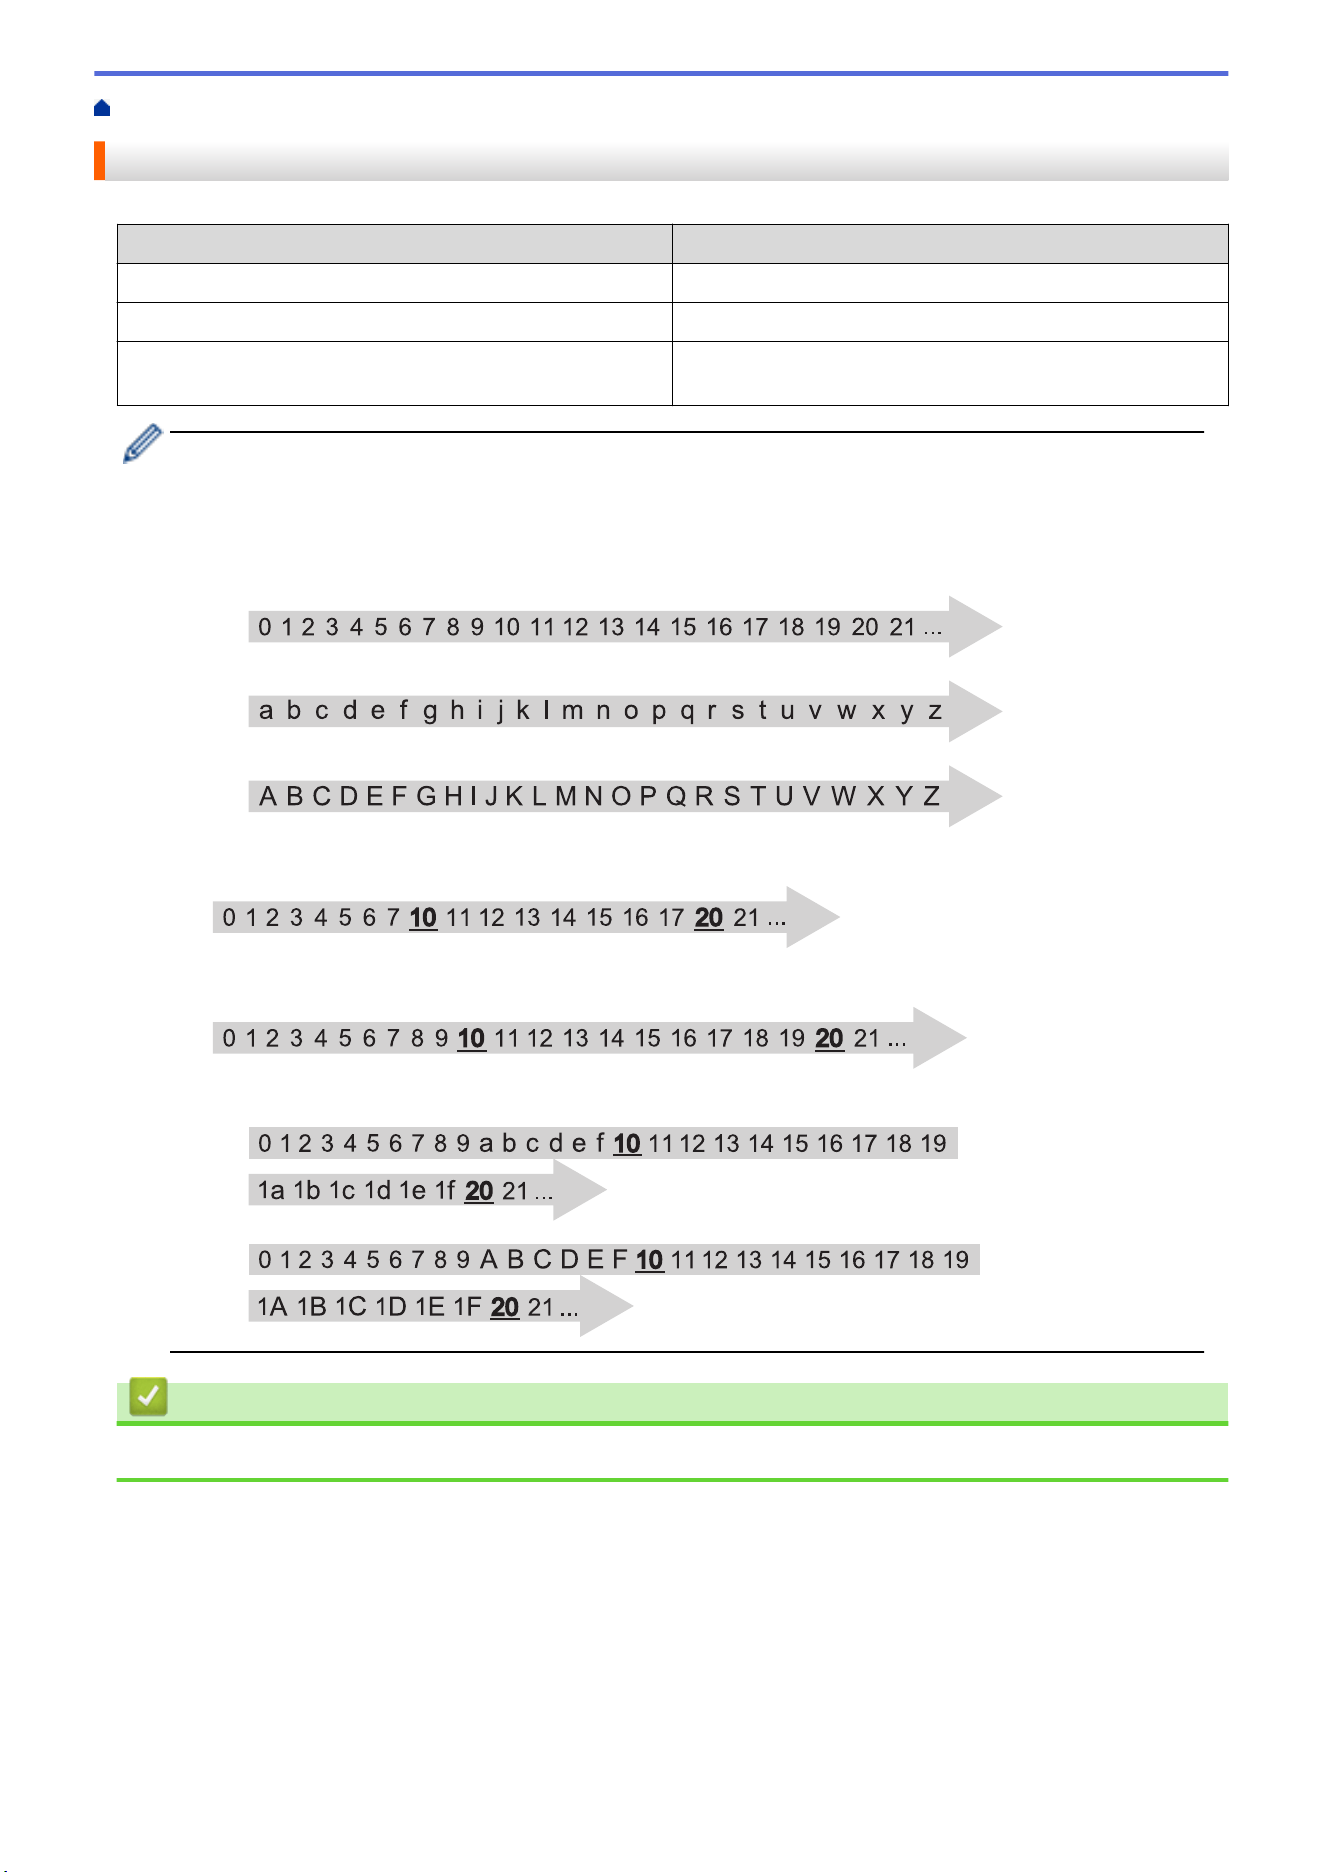
Home > Edit Labels > Create Serialized Labels > Serialization Options
Serialization Options
Option Description
Count
Select the number of labels you want to create.
Incremented by
Select the increment value for a number or letter.
Type
Select the serialization type. For details, see the
examples below.
• In the [Type] option, you can select [Norm / Normal], [Octal], [Dec / Decimal], or [Hex].
• [Octal], [Dec / Decimal], and [Hex] are not available for barcodes.
• Incremental changes to numbers or letters based on the selected [Type] option:
[Norm / Normal]
-
-
-
[Octal]
[Dec / Decimal]
[Hex]
-
-
Related Information
• Create Serialized Labels
92
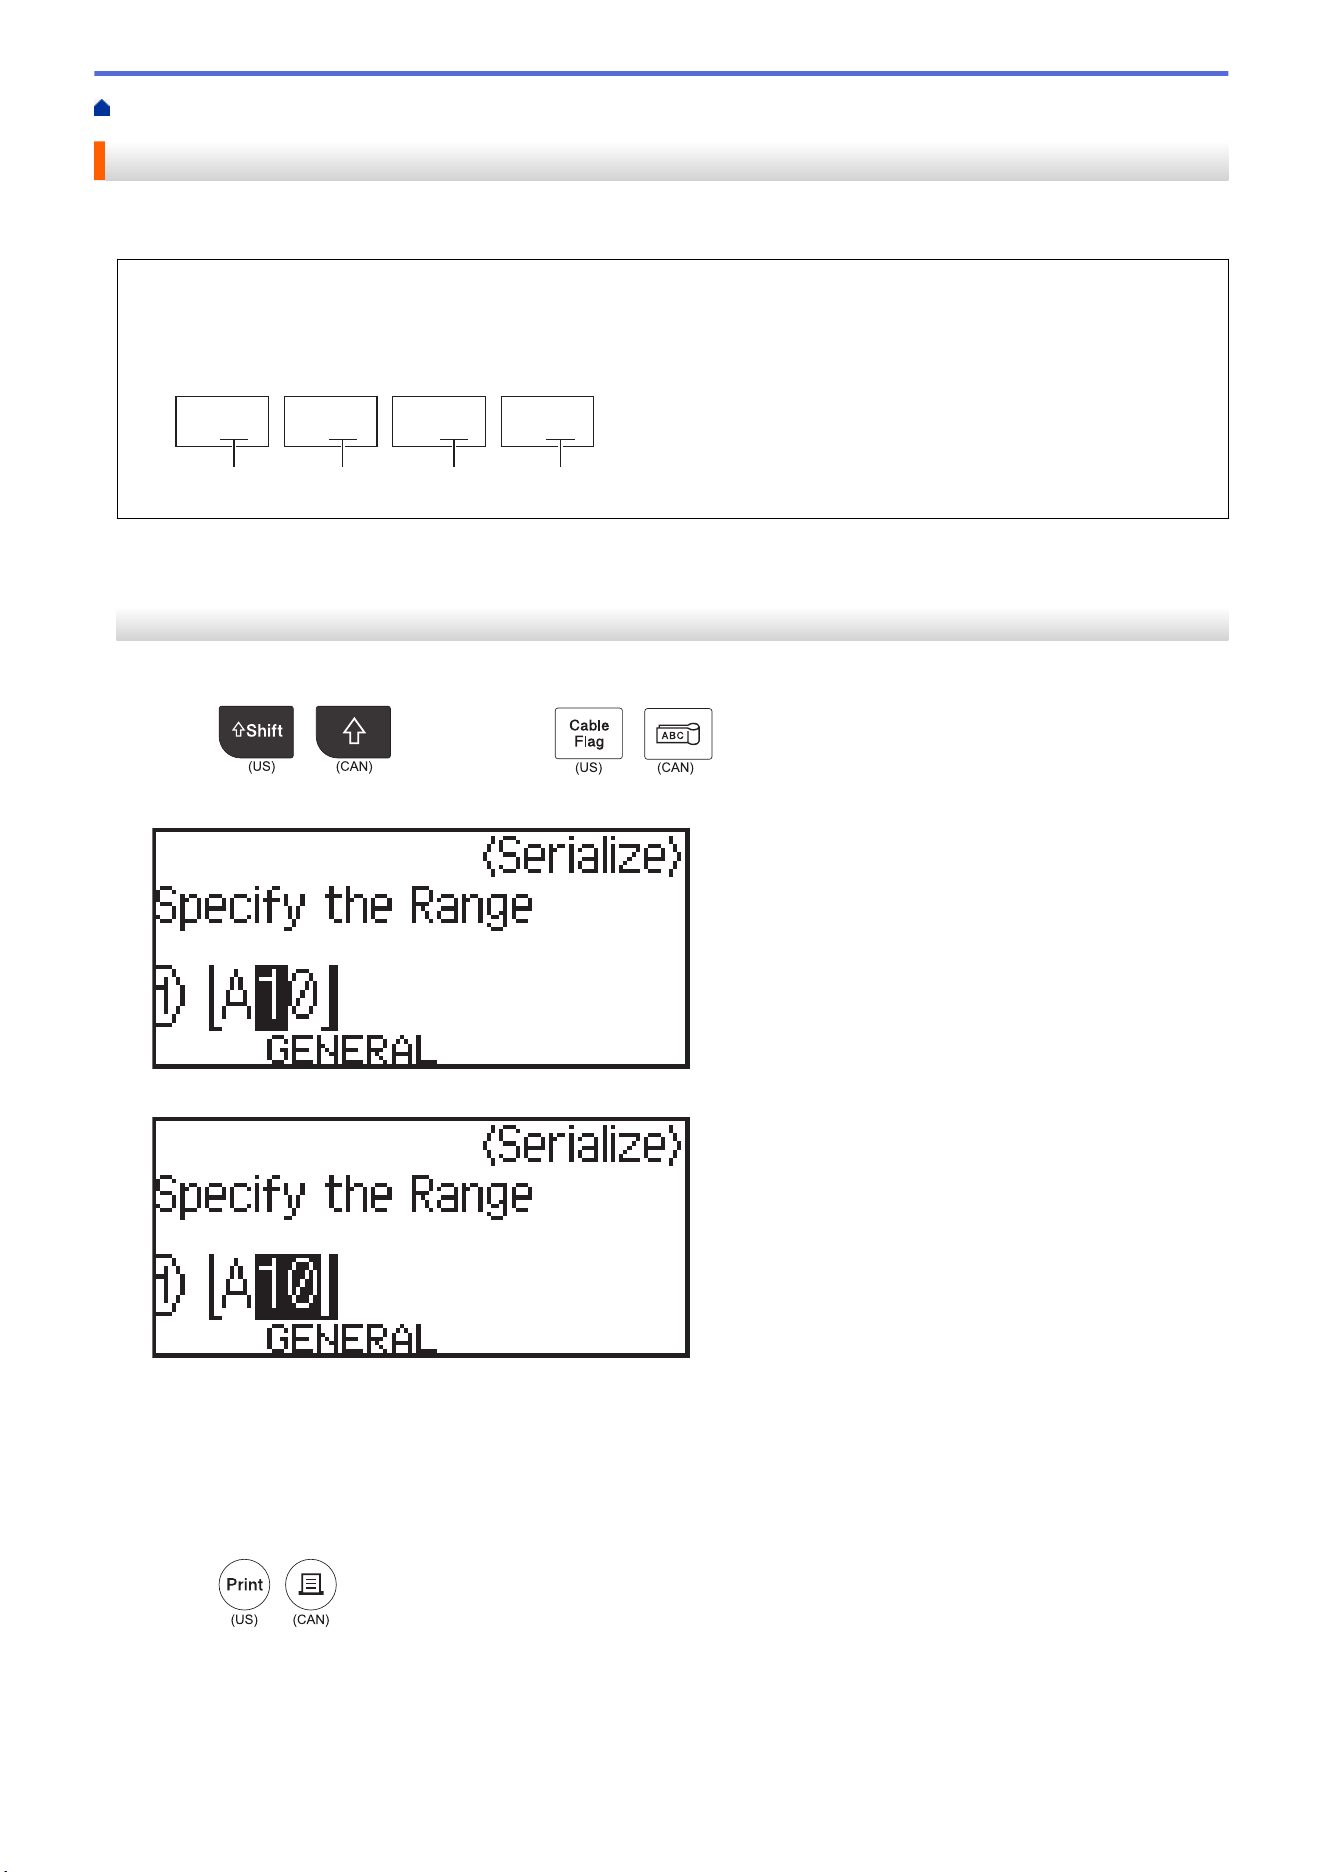
Home > Edit Labels > Create Serialized Labels > Create Labels with a Single Serialized Range
Create Labels with a Single Serialized Range
Create labels with a single serialized range by entering only one pattern text, as shown.
• Entering Text Pattern: A10
• Serialized Range: (1)
• Printed Label Result:
A10 A11 A12 A13
(1)
(1) (1) (1)
>> PT-E310BT
>> PT-E510/PT-E560BT
PT-E310BT
1. Type "A10" using the keyboard.
2. Press
/
and then press
/
.
3. Position the cursor to the left of the first character in the range you want to serialize, and then press OK.
4. Press d or c to select the last character in the range you want to serialize, and then press OK.
5. Press a, b, d, or c to set the following parameters (for this example):
• Set "4" in the [Count] menu.
• Set "1" in the [Incremented by] menu.
• Select [Norm] from the [Type] menu.
When you set them all, press OK.
6. Press
/
.
You can select [All], [Current], or [Range] for the print option.
93
PT-E510/PT-E560BT
1. Type "A10" using the keyboard.
2. Press
/
.
3. Position the cursor to the left of the first character in the range you want to serialize, and then press OK.
4. Press d or c to select the last character in the range you want to serialize, and then press OK.
5. Press a, b, d, or c to set the following parameters (for this example):
• Set "4" in the [Count] menu.
• Set "1" in the [Incremented by] menu.
• Select [Normal] from the [Type] menu.
When you set them all, press OK.
6. Press
/
.
You can select [All], [Current], or [Range] for the print option.
Related Information
• Create Serialized Labels
Related Topics:
• Serialization Options
94
Home > Edit Labels > Create Serialized Labels > Create Labels with Two Serialized Ranges
Create Labels with Two Serialized Ranges
Create labels with two serialized ranges by entering the pattern text, as shown.
• Entering Text Pattern: A-W10
• Serialized Range: (1) and (2)
• Printed Label Result:
A-W10 B-W11 C-W12 D-W13
(1)
(2) (2) (2) (2)(1) (1) (1)
>> PT-E310BT
>> PT-E510/PT-E560BT
PT-E310BT
1. Type "A-W10" using the keyboard.
2. Press
/
and then press
/
.
3. Press a or b to select [Simultaneous], and then press OK.
4. Specify the first range (1) you want to serialize.
a. Position the cursor to the left of the first character of the range, and then press OK.
b. Press d or c to select the last character of the range, and then press OK.
(For (1) in this example, position the cursor to the left of "A" and press OK twice since the first and last
characters are the same.)
(1)
5. Repeat the previous step to specify the second range (2) you want to serialize.
(2)
6. Press a, b, d, or c to set the following parameters (for this example):
• Set "4" in the [Count] menu.
• Set "1" in the [Incremented by] menu.
• Select [Norm] from the [Type] menu.
When you set them all, press OK.
7. Press
/
.
You can select [All], [Current], or [Range] for the print option.
95
PT-E510/PT-E560BT
1. Type "A-W10" using the keyboard.
2. Press
/
.
3. Press a or b to select [Simultaneous], and then press OK.
4. Specify the first range (1) you want to serialize.
a. Position the cursor to the left of the first character of the range, and then press OK.
b. Press d or c to select the last character of the range, and then press OK.
(For (1) in this example, position the cursor to the left of "A" and press OK twice since the first and last
characters are the same.)
(1)
5. Repeat the previous step to specify the second range (2) you want to serialize.
(2)
6. Press a, b, d, or c to set the following parameters (for this example):
• Set "4" in the [Count] menu.
• Set "1" in the [Incremented by] menu.
• Select [Normal] from the [Type] menu.
When you set them all, press OK.
7. Press
/
.
You can select [All], [Current], or [Range] for the print option.
Related Information
• Create Serialized Labels
Related Topics:
• Serialization Options
96
Home > Edit Labels > Create Serialized Labels > Create Advanced Serialized Labels
Create Advanced Serialized Labels
Create advanced labels with two serialized label ranges by entering the text pattern, as shown.
• Entering Text Pattern: W10-A
• Serialized Range: (1) and (2)
• Printed Label Result:
W10-A W11-A W12-A W13-A
W10-B W11-B W12-B W13-B
(1) (2) (1) (2) (1) (2) (1) (2)
>> PT-E310BT
>> PT-E510/PT-E560BT
PT-E310BT
1. Type "W10-A" using the keyboard.
2. Press
/
and then press
/
.
3. Press a or b to select [Advanced], and then press OK.
4. Specify the first range (1) you want to serialize, and then select the count and increment for the first range.
a. Position the cursor to the left of the first character of the range, and then press OK.
b. Press d or c to select the last character of the range, and then press OK.
(1)
c. Press a, b, d, or c to set the following parameters (for this example):
• Set "4" in the [Count] menu.
• Set "1" in the [Incremented by] menu.
• Select [Norm] from the [Type] menu.
When you set them all, press OK.
5. Specify the second range (2) you want to serialize, and then select the count and increment for the second
range.
a. Position the cursor to the left of the first character of the range, and then press OK.
b. Press d or c to select the last character of the range, and then press OK.
(For (2) in this example, position the cursor to the left of "A" and press OK twice since the first and last
characters are the same.)
97
(2)
c. Press a, b, d, or c to set the following parameters (for this example):
• Set "2" in the [Count] menu.
• Set "1" in the [Incremented by] menu.
• Select [Norm] from the [Type] menu.
When you set them all, press OK.
6. Press
/
.
You can select [All], [Current], or [Range] for the print option.
PT-E510/PT-E560BT
1. Type "W10-A" using the keyboard.
2. Press
/
.
3. Press a or b to select [Advanced], and then press OK.
4. Specify the first range (1) you want to serialize, and then select the count and increment for the first range.
a. Position the cursor to the left of the first character of the range, and then press OK.
b. Press d or c to select the last character of the range, and then press OK.
(1)
c. Press a, b, d, or c to set the following parameters (for this example):
• Set "4" in the [Count] menu.
• Set "1" in the [Incremented by] menu.
• Select [Normal] from the [Type] menu.
When you set them all, press OK.
5. Specify the second range (2) you want to serialize, and then select the count and increment for the second
range.
a. Position the cursor to the left of the first character of the range, and then press OK.
b. Press d or c to select the last character of the range, and then press OK.
(For (2) in this example, position the cursor to the left of "A" and press OK twice since the first and last
characters are the same.)
98
(2)
c. Press a, b, d, or c to set the following parameters (for this example):
• Set "2" in the [Count] menu.
• Set "1" in the [Incremented by] menu.
• Select [Normal] from the [Type] menu.
When you set them all, press OK.
6. Press
/
.
You can select [All], [Current], or [Range] for the print option.
Related Information
• Create Serialized Labels
Related Topics:
• Serialization Options
99

Home > Print Labels > Preview Labels
Preview Labels
You can preview labels before printing to make sure they are correct.
1. Press
/
.
2. Do one of the following:
• Press d, c, a, or b to scroll the preview left, right, up, or down.
• Press
/
to zoom the preview in and out.
• Press
/
and d, c, a, or b to jump directly to the left, right, top, or bottom border.
Related Information
• Print Labels
101
Home > Print Labels > Print Labels
Print Labels
(PT-E310BT) To cut the label, press the Tape Cutter Lever on the top left corner of the Labeling System.
• (PT-E310BT) To prevent damage to the tape, do not press the Cutter Lever while the message
[Printing... Copies] or [Feeding tape... Please wait] appears on the LCD.
• Do not pull the label while it is emerging from the Tape Exit Slot. Doing so will cause the ink ribbon to be
ejected with the tape, making the tape unusable.
• Do not block the Tape Exit Slot during printing. Doing so will cause the tape to jam.
1. After creating your label, press
/
.
2. If you print serialized labels, specify the labels you want to print using the a and b keys to select an option on
the LCD.
Option Description
All
Print all labels.
Current
Print the label where the cursor is positioned.
Range
Specify the first and last label to print.
3. To change other print options, press
/
and then press
/
.
NOTE
• When you print multiple labels, a confirmation message appears after each label is printed.
(PT-E510/PT-E560BT) To disable this confirmation message, follow these steps:
a. Press Menu.
b. Press a or b to display [Cut Pause], and then press OK.
c. Press a or b to select [Off], and then press OK.
• If the battery runs out and the print job stops, you can resume printing by following these steps (not
available when using a USB or Bluetooth connection):
a. Fully charge the battery, turn the printer on, and press
/
.
b. Follow the instructions on the LCD, select the page range, and resume printing.
Related Information
• Print Labels
• Print Options
102
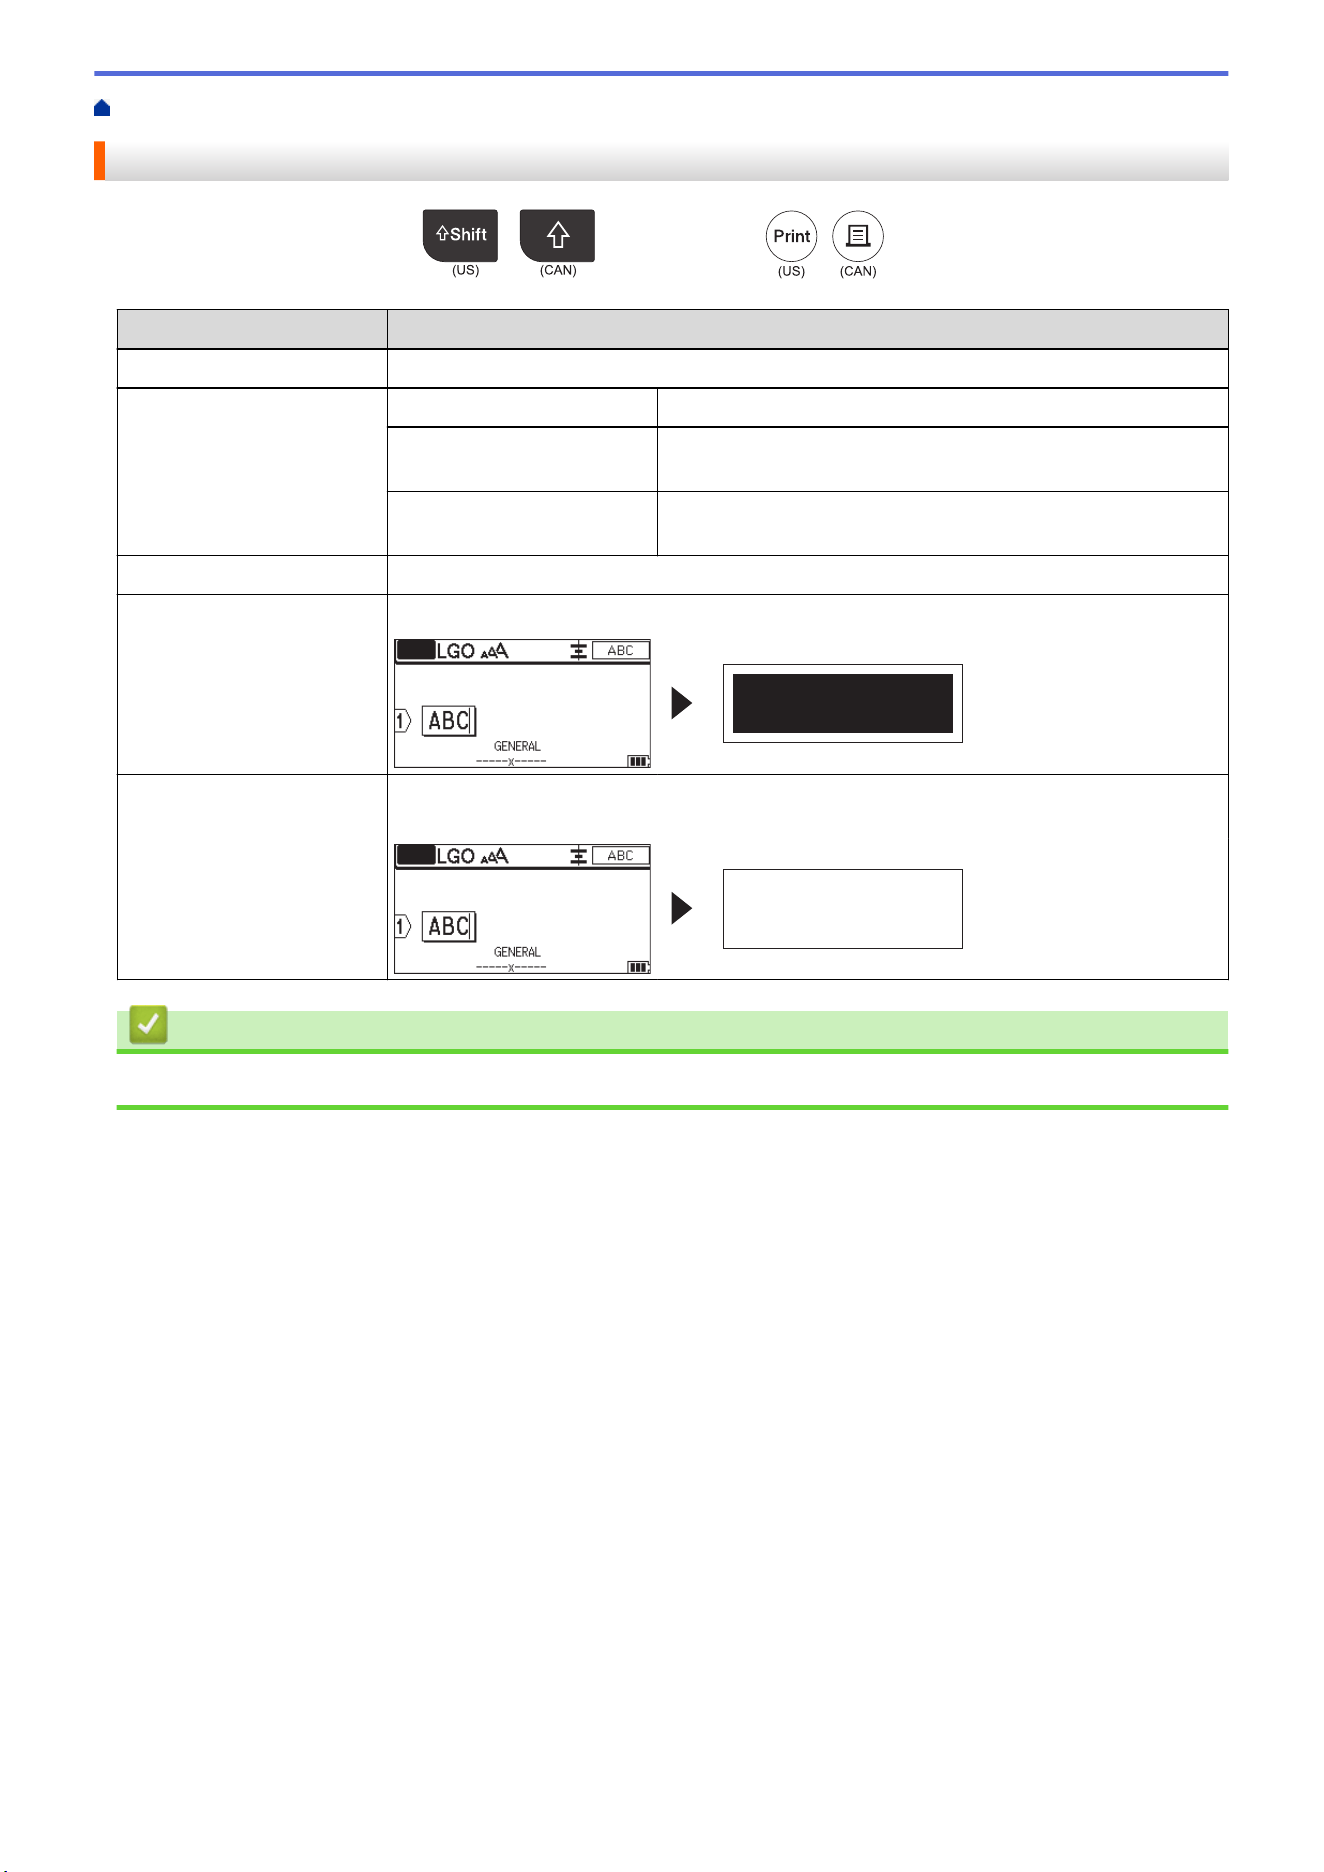
Home > Print Labels > Print Labels > Print Options
Print Options
To change print options, press
/
, and then press
/
.
Option Description
Copies
Select the number of copies (1-99) you want.
Page All
When you print serialized labels, print all labels.
Current
When you print serialized labels, print only the label where
the cursor is positioned.
Range
When you print serialized labels, specify the first and last
label to print.
Order
When you print multiple copies of serialized labels, print them in sorted or stacked order.
Invert
Invert the character color and the background color on the label.
ABC
Mirror
Use clear tape when using this option, so the label can be read correctly from the
opposite side when attached to glass, windows, or other transparent surfaces.
ABC
Related Information
• Print Labels
103
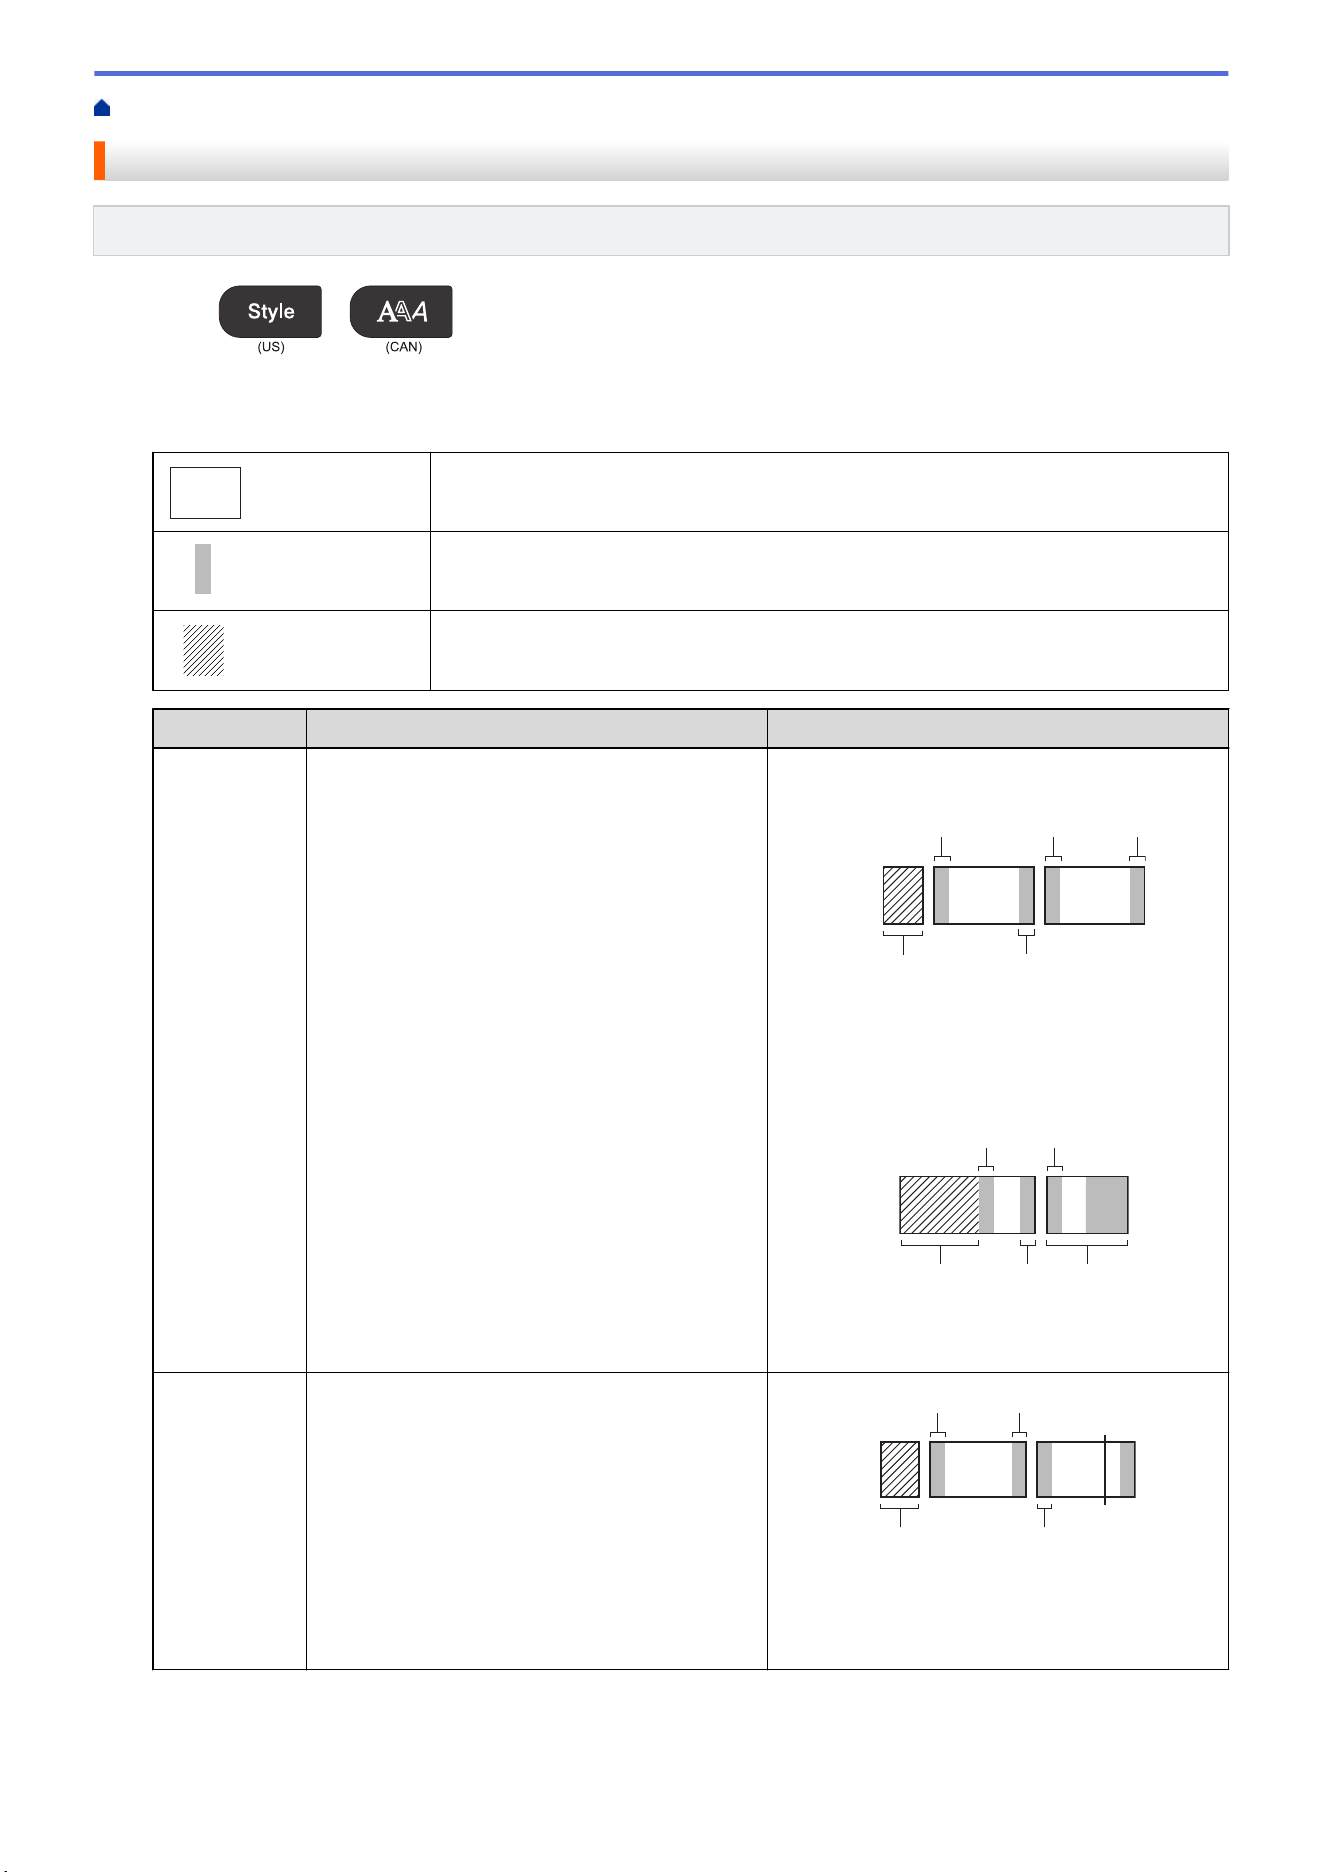
Home > Print Labels > Select a Cut Option (PT-E310BT)
Select a Cut Option (PT-E310BT)
Related Models: PT-E310BT
1. Press
/
.
2. Press a or b to display [Cut Option], and then press d or c to select the option you want.
In the tables below, these visual patterns represent parts of your label, as illustrated in the Example column.
ABC
Print area
Margin
Laminate margin
Setting Description Example
Small
Margin
The tape automatically feeds 0.9" (23 mm) first,
and then each label is printed, leaving a margin
of 0.08" (2 mm) before and after the text.
• When each label length is approximately
0.9" (23 mm) or more
ABC ABC
a b
b b b
a. Approximately 0.9" (23 mm)
b. 0.08" (2 mm)
• When each label length is approximately
0.9" (23 mm) or less
A A
b
b aa
b
a. Approximately 0.9" (23 mm)
b. 0.08" (2 mm)
Chain
• Select this setting when printing several
labels with minimum margins.
• A margin of 0.9" (23 mm) is printed first, and
then each label is printed, leaving a margin
of 0.08" (2 mm) before and after the text.
• Feed the tape before using the Tape Cutter,
otherwise part of the text may get cut off. Do
not try to pull the tape as this may damage
the Tape Cassette.
ABC ABC
b b
b
c
a
a. Approximately 0.9" (23 mm)
b. 0.08" (2 mm)
c. Tape Stop Position
104
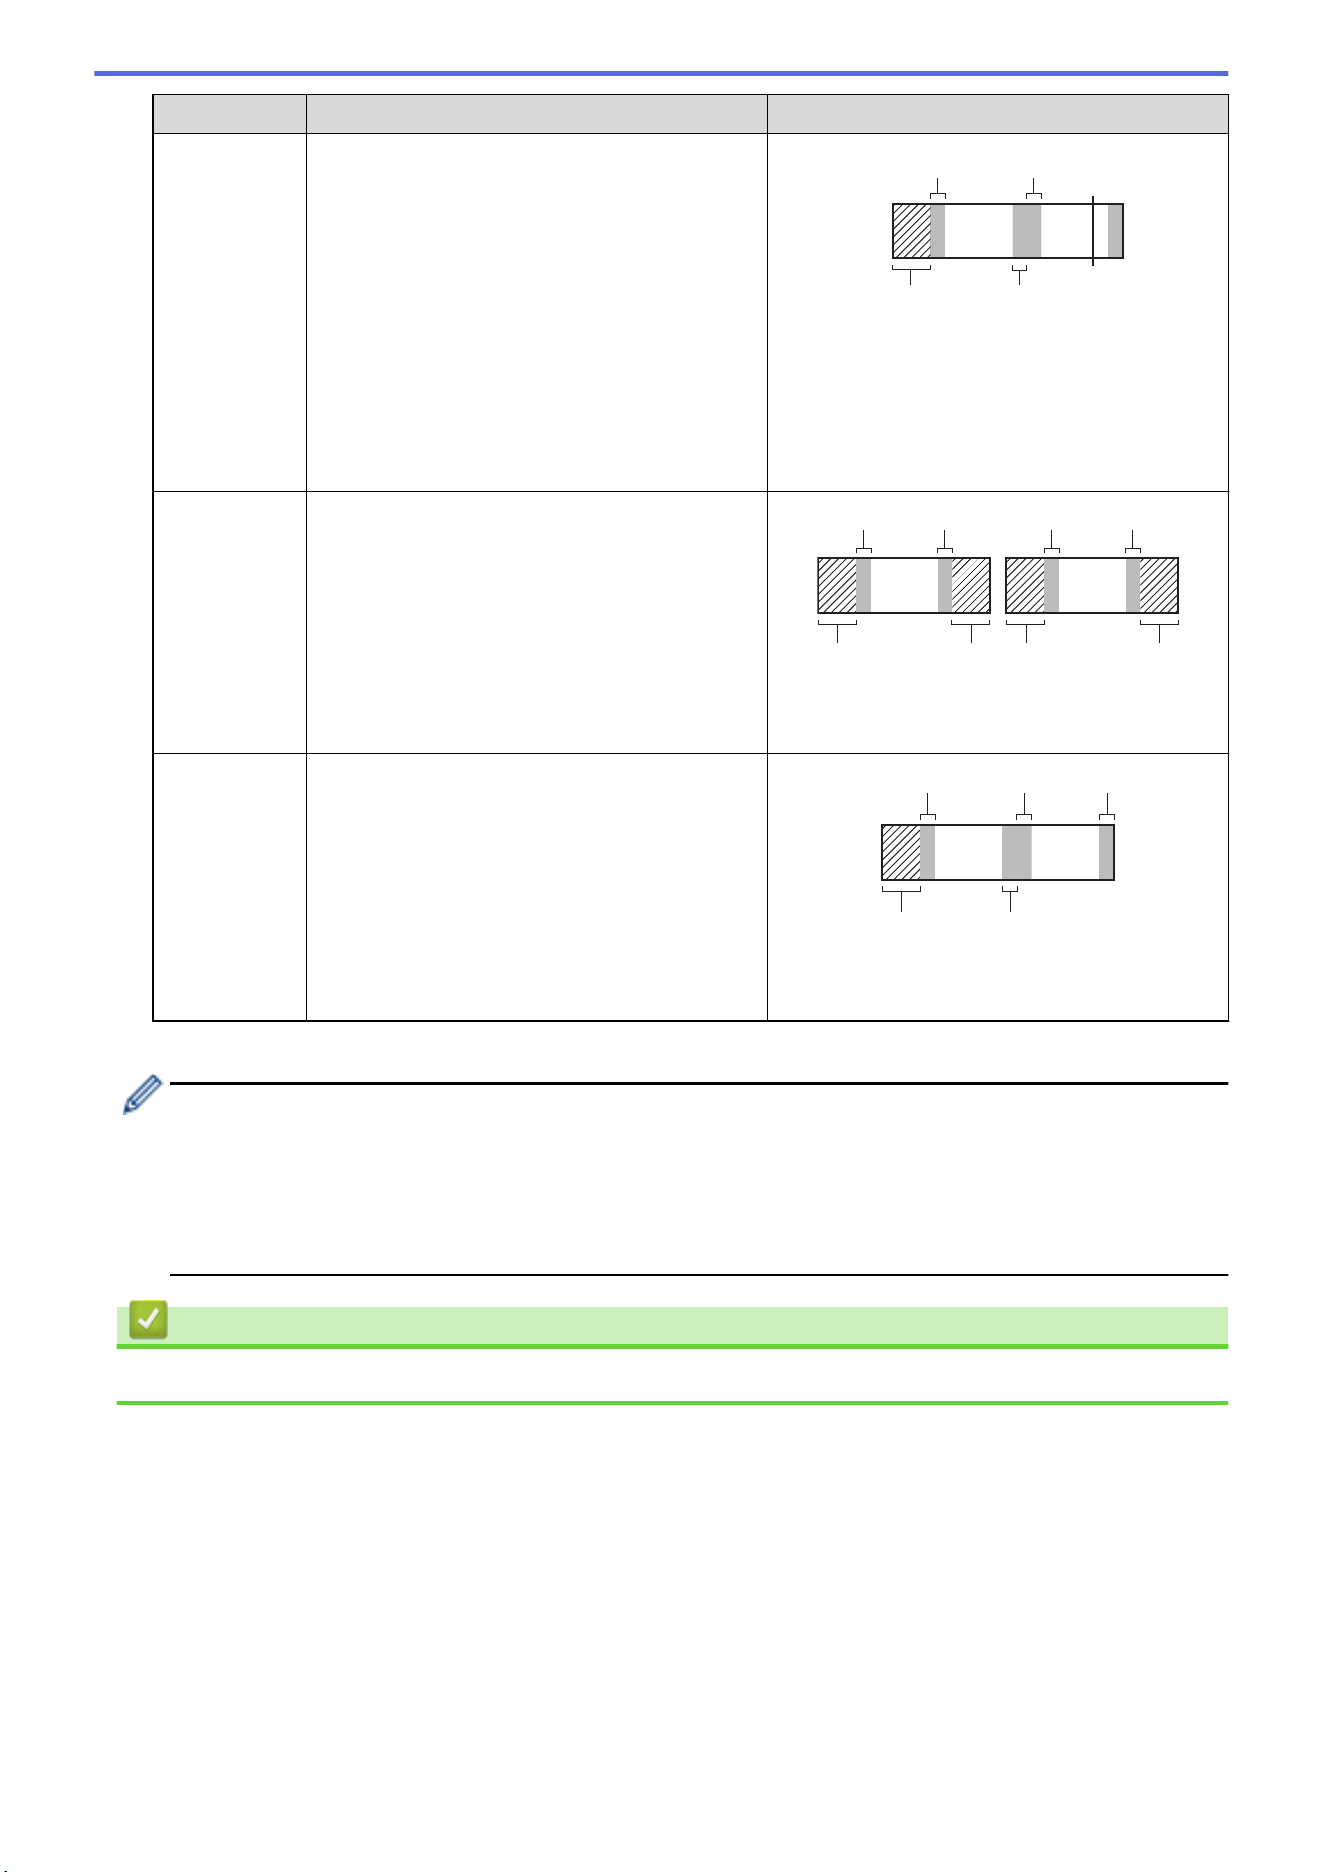
Setting Description Example
No Cut
• Select this setting when printing multiple
copies of a label or when using Heat Shrink
Tube or any other tapes that cannot be cut
using the Tape Cutter and instead must be
cut with scissors.
• Feed the tape before using the Tape Cutter,
otherwise part of the text may get cut off. Do
not try to pull the tape as this may damage
the Tape Cassette.
• When using any tapes that cannot be cut
using the Tape Cutter, remove the Tape
Cassette after printing, and use scissors to
cut the tape.
ABC ABC
b b
a b
c
a. Approximately 0.9" (23 mm)
b. 0.08" (2 mm)
c. Tape Stop Position
Large
Margin
The total margin (laminate margin + label
margin) is 0.98" (25 mm) on either side of the
label.
ABC ABC
b
b
b
b
a
a a
a
a. Approximately 0.9" (23 mm)
b. 0.08" (2 mm)
Special
Tape
• Select this setting when using any special
tape.
• When using Fabric Iron-On Tapes or Heat
Shrink Tube, set Special Tape for Cut
Option before printing. After printing,
remove the Tape Cassette from the Labeling
System and use scissors to cut the tape.
ABC ABC
b b b
ba
a. Approximately 0.9" (23 mm)
b. 0.08" (2 mm)
3. Press OK.
• When you set the cut option to [No Cut] or [Chain], the cut position is set in the middle of printing
area after the last label is printed. When [Start feeding?] appears on the LCD, press OK to feed
the tape. Press Esc to return to the text entry screen.
• When you set the cut option to [Large Margin], [Small Margin], or [Chain], the message
[Cut tape or press Enter to continue.] appears after printing, and the Labeling System
enters Cut Pause Mode.
Related Information
• Print Labels
105
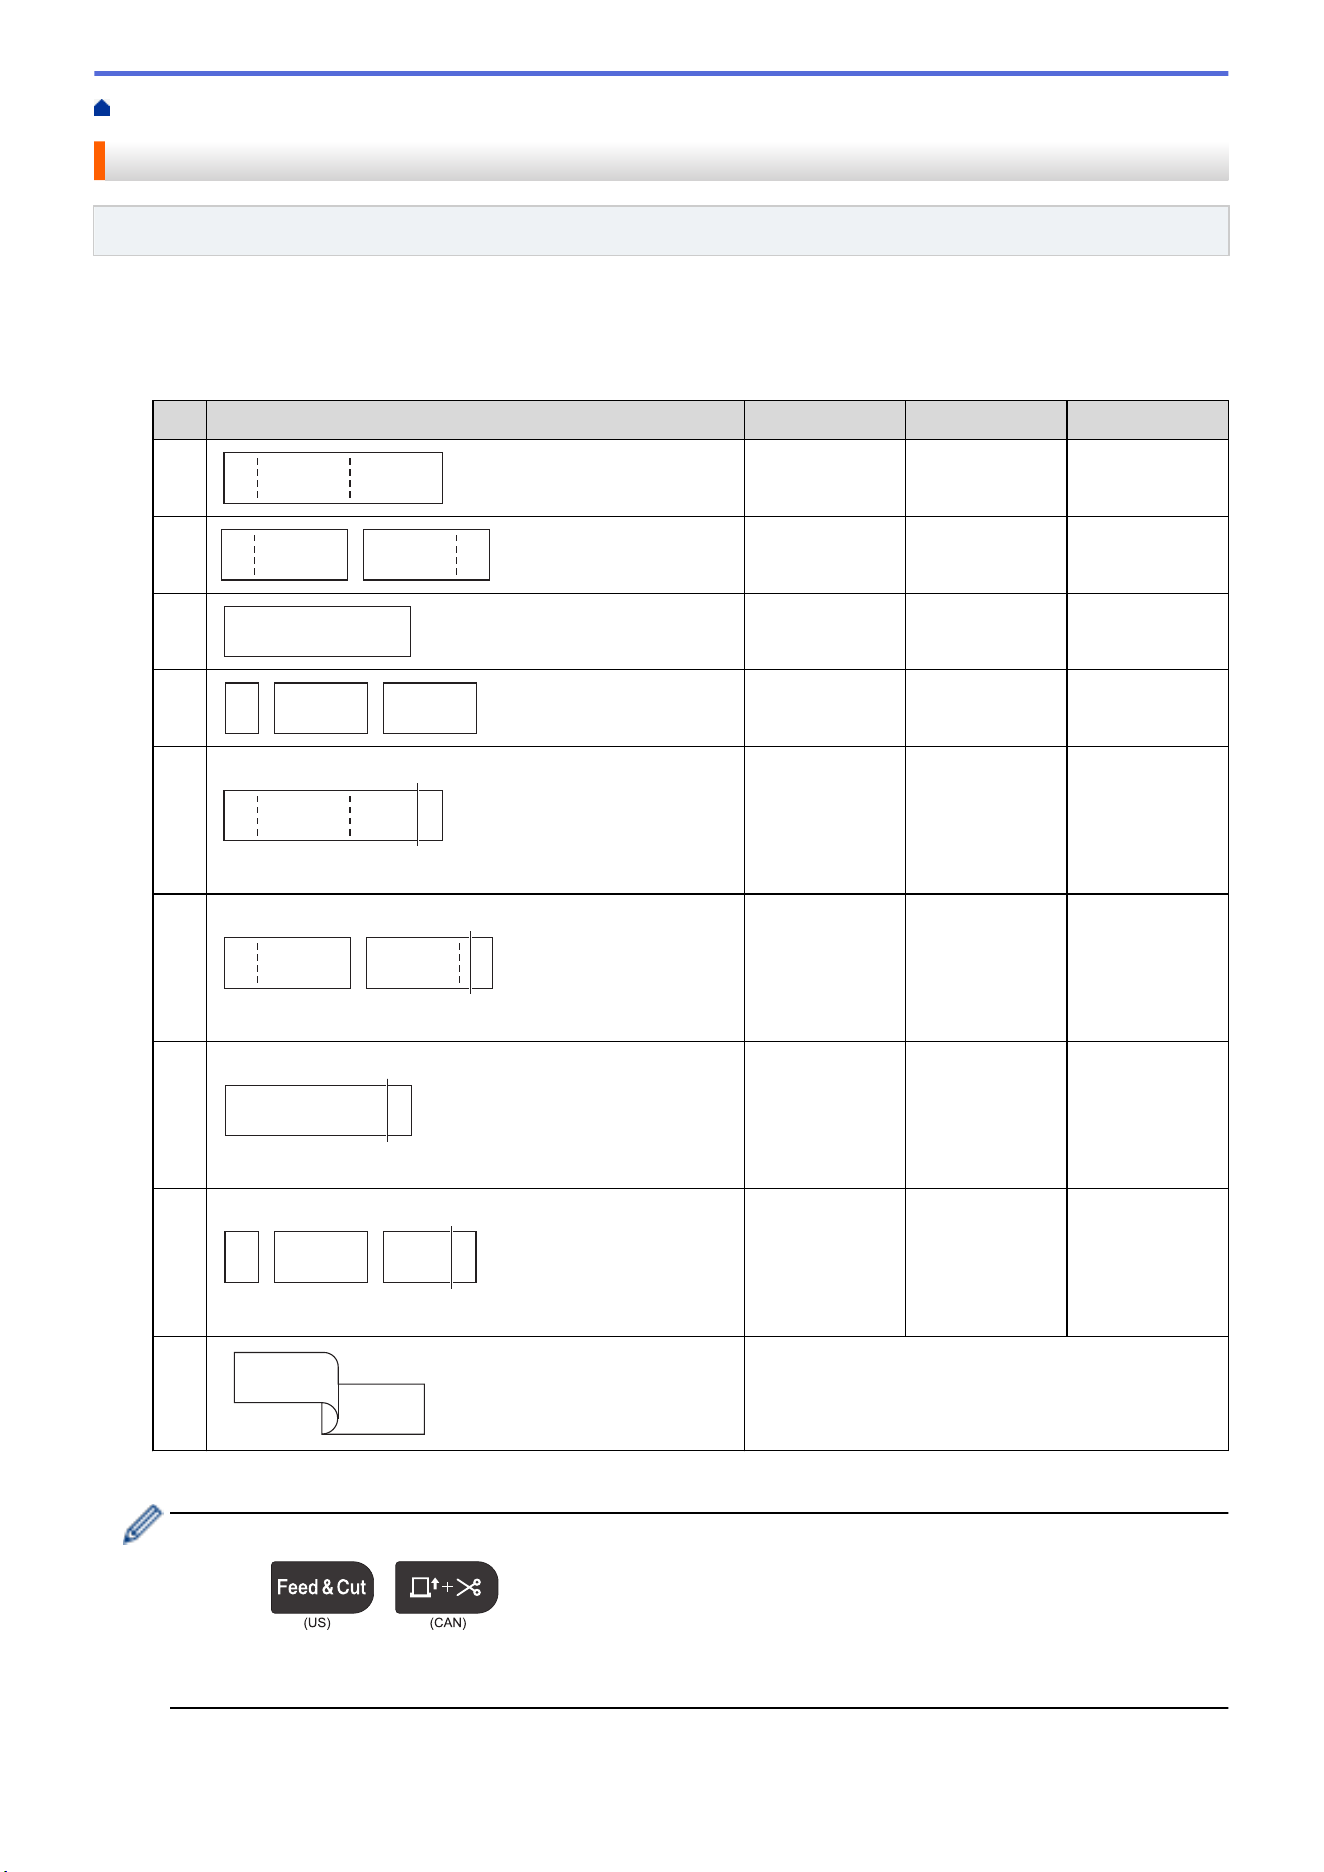
Home > Print Labels > Select a Cut Option (PT-E510/PT-E560BT)
Select a Cut Option (PT-E510/PT-E560BT)
Related Models: PT-E510/PT-E560BT
1. Press Menu.
2. Press a or b to select [Cut Option], and then press OK.
3. Press a or b to select the option you want.
No
Example Full Cut Half Cut Chain
1
ABC ABC
No Yes No
2
ABC ABC
Yes Yes No
3
ABC ABC
No No No
4
ABC ABC
Yes No No
5
ABC ABC
1
1. Tape Stop Position
No Yes Yes
6
ABC
ABC
1
1. Tape Stop Position
Yes Yes Yes
7
ABC ABC
1
1. Tape Stop Position
No No Yes
8
ABC
ABC
1
1. Tape Stop Position
Yes No Yes
9
ABC
ABC
For special tape
4. Press OK.
• The Chain setting neither feeds nor cuts the tape when the last label is printed.
Press
/
to feed and cut the tape.
• The Half Cut setting becomes unavailable when using Fabric Iron-On Tapes, Heat Shrink Tube, or Non-
Laminated Tapes.
106

Home > Print Labels > Print Transferred Templates
Print Transferred Templates
You can transfer templates created in P-touch Editor to your Labeling System, customize your text, and then print
the updated labels.
1. Press
/
.
2. Press a or b to display [Transferred Templates], and then press OK.
3. Press a or b to select the template you want to print, and then press OK.
4. Press a or b to display [Print], and then press OK.
If you have not yet transferred templates from P-touch Editor, [Transferred Templates] will not
appear in the list of options.
For more information, see Related Topics.
Related Information
• Print Labels
• Edit and Print Transferred Templates
• Print Transferred Templates from a Database
• Delete a Transferred Template
Related Topics:
• Transfer Templates to the Printer Using Your Computer (Windows)
108
Home > Print Labels > Print Transferred Templates > Edit and Print Transferred Templates
Edit and Print Transferred Templates
1. Press
/
.
2. Press a or b to display [Transferred Templates], and then press OK.
3. Press a or b to select the template you want to edit, and then press OK.
4. Press a or b to display [Edit Label (Not Saved)], and then press OK.
5. Press a or b to select the object in the template you want to edit, and then press OK.
6. Edit the object, and then press OK.
You cannot add or delete a line break when editing a transferred template.
7. Press Esc to return to the previous screen.
8. Press a or b to display [Print], and then press OK.
You cannot save your changes to a transferred template.
Related Information
• Print Transferred Templates
109
Home > Print Labels > Print Transferred Templates > Print Transferred Templates from a Database
Print Transferred Templates from a Database
You can transfer templates linked from a database created in P-touch Editor to your Labeling System, customize
your text, and then print the updated labels.
1. Press
/
.
2. Press a or b to display [Transferred Templates], and then press OK.
3. Press a or b to select the template you want to print, and then press OK.
4. Press a or b to display [Print from Database], and then press OK.
5. Press d, c, a, or b to select the first record in the range you want to print, and then press OK.
The first record line is highlighted on the LCD.
6. Press a or b to select the last record line in the range you want to print.
7. Press OK.
The templates are printed.
Related Information
• Print Transferred Templates
• Find Specific Information within a Template in a Database
Related Topics:
• Transfer Templates to the Printer Using Your Computer (Windows)
110
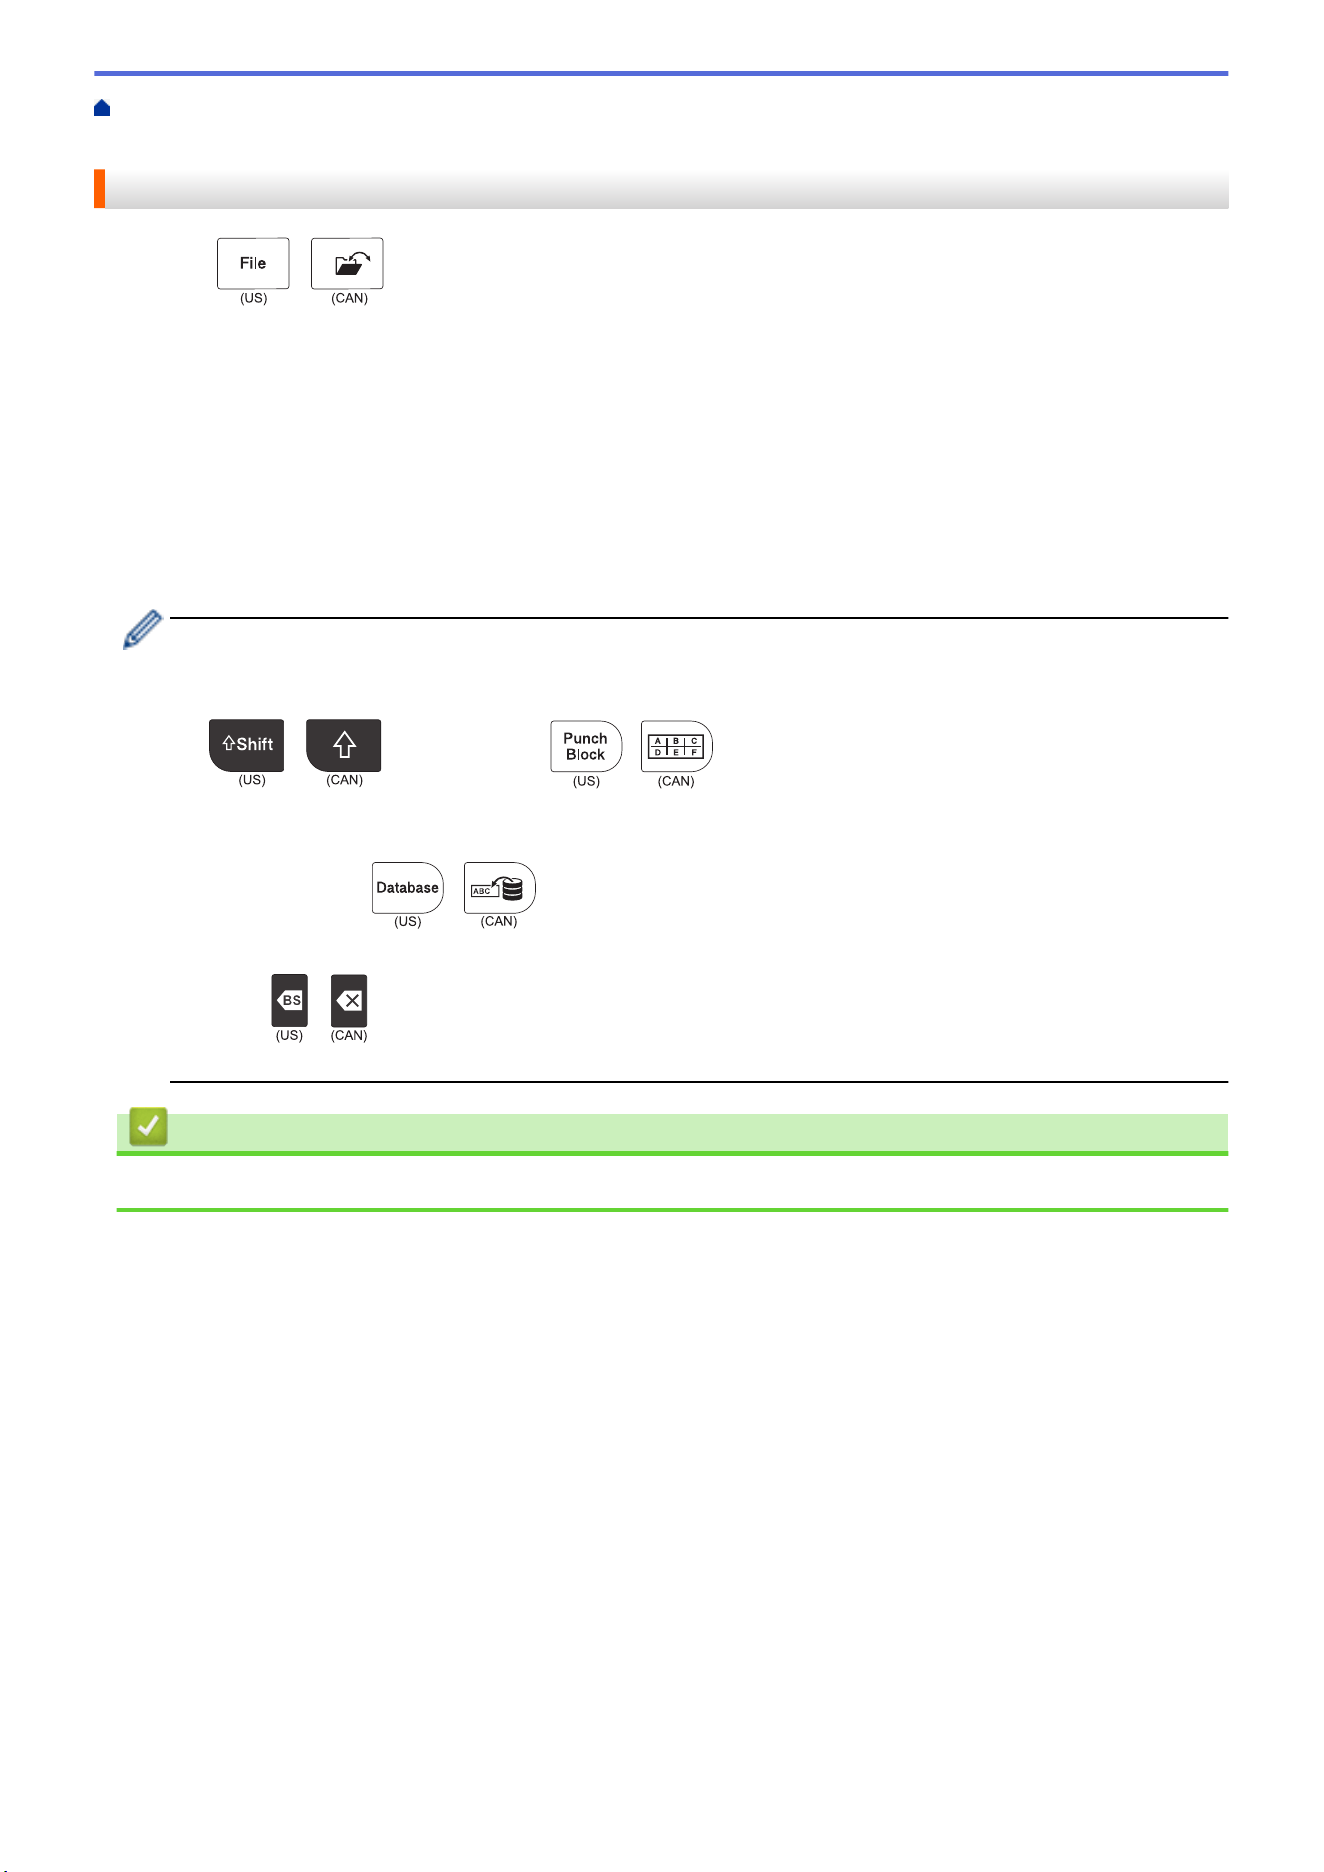
Home > Print Labels > Print Transferred Templates > Print Transferred Templates from a Database > Find
Specific Information within a Template in a Database
Find Specific Information within a Template in a Database
1. Press
/
.
2. Press a or b to display [Transferred Templates], and then press OK.
3. Press a or b to select the template you want to print, and then press OK.
4. Press a or b to display [Print from Database], and then press OK.
The selected database appears on the LCD.
5. Type the data or name you want to find.
For example, type 'B' to find any character strings containing 'B'. Type 'BR' to find any character strings
containing 'BR'.
Type as many letters or numbers as needed.
• If a string contains the character you typed, the cursor on the LCD moves to that content and highlights
it. If the content does not exist, the cursor remains in its current position.
• (PT-E310BT) If the character you are searching for is contained in multiple fields in the database, press
/
, and then press
/
to move to the next field containing the character.
The character is highlighted in the field.
• (PT-E510/PT-E560BT) If the character you are searching for is contained in multiple fields in the
database, press
/
to move to the next field containing the character. The character is
highlighted in the field.
• Press
/
to delete the last character in your search data. The cursor moves to the next field
containing the remaining search characters.
Related Information
• Print Transferred Templates from a Database
111
Home > Print Labels > Print Transferred Templates > Delete a Transferred Template
Delete a Transferred Template
When you delete a transferred template, it is deleted only from your Labeling System. It is not deleted from P-
touch Editor or from your database.
1. Press
/
.
2. Press a or b to display [Transferred Templates], and then press OK.
3. Press a or b to select the template you want to delete, and then press OK.
4. Press a or b to display [Delete], and then press OK.
The [Delete?] message appears.
5. Press OK.
Related Information
• Print Transferred Templates
112
Home > Print Labels > Print Transferred Database Data
Print Transferred Database Data
You can transfer a database converted to a CSV file to your Labeling System, customize your text, and then print
the updated labels.
• Make sure the database you transfer to your Labeling System does not have a template assigned to it.
• The database data is imported into each labeling application type, according to the number of blocks and
labels set for each type.
• If the selected database range is larger than the number of blocks and labels set for each labeling
application type, the data is imported until its maximum number is reached.
The table below shows the printed results for each labeling application type when the databases such as the
following examples are imported.
Example 1
Example 2
1A-B01
1A-B02
1A-B03
1A-B04
1A-B05
1A-B06
1A-B07
1A-B08
1A-B09
AA
AB
AC
AD
AE
AF
AG
AH
AI
a
b
c
d
e
f
g
h
i
10
20
30
40
50
60
70
80
90
#008
#009
#010
#011
#012
#013
#014
#015
#016
number name type length Block No.
(1)
1A-B01
1A-B02
1A-B03
1A-B04
1A-B05
1A-B06
1A-B07
1A-B08
1A-B09
AA
AB
AC
AD
AE
AF
AG
AH
AI
a
b
c
d
e
f
g
h
i
10
20
30
40
50
60
70
80
90
#008
#009
#010
#011
#012
#013
#014
#015
#016
number name type length Block No.
(2)
1,2 Selected range in database
Labeling
Application Type
Data Import
Method
Printed Result
< Example 1 >
Printed Result
< Example 2 >
General For each label
separately
AA AB AC AD
AA a AB b
Faceplate For each label
separately
(When 2 blocks are set per label)
AA AB AC AD
(When 2 blocks are set per label)
AA a AB b
Cable Wrap For each label
separately
AA
AA
AA
AB
AB
AB
AC
AC
AC
AD
AD
AD
AA
AA
AA
a
a
a
b
b
b
AB
AB
AB
Cable Flag For each label
separately
AA AA AB AB
AA AA a a
For each block
separately
AA AB AC AD
AA a AB b
Patch Panel For each block
separately
AA AB AC
AD AE AF
AA a AB
b AC c
Punch Block For each block
separately
AA AB AC AD AE AF
AG
AA a
d
AB b AC c
AD
>> PT-E310BT
>> PT-E510/PT-E560BT
PT-E310BT
1. Press the button for the labeling application type you want to print.
113
2. Press
/
, and then press
/
.
3. Press a or b to select the database you want to print, and then press OK.
The selected database appears on the LCD.
4. Press d, c, a, or b to select the first record in the range you want to print, and then press OK.
5. Press d, c, a, or b to select the last record in the range you want to print, and then press OK.
The records in the selected range are highlighted on the LCD.
6. Press
/
.
PT-E510/PT-E560BT
1. Press the labeling application type button you want to print.
2. Press
/
.
3. Press a or b to select the database you want to print, and then press OK.
The selected database appears on the LCD.
4. Press d, c, a, or b to select the first record in the range you want to print, and then press OK.
5. Press d, c, a, or b to select the last record in the range you want to print, and then press OK.
The records in the selected range are highlighted on the LCD.
6. Press
/
.
Related Information
• Print Labels
• Edit a Transferred Database
• Delete a Transferred Database
Related Topics:
• Create Labels Using Labeling Application Type
• Transfer Templates to the Printer Using Your Computer (Windows)
114
Home > Print Labels > Print Transferred Database Data > Edit a Transferred Database
Edit a Transferred Database
>> PT-E310BT
>> PT-E510/PT-E560BT
PT-E310BT
1. Press
/
, and then press
/
.
2. Press a or b to select the database you want to edit, and then press OK.
The selected database appears on the LCD.
3. Press a or b to select the cell you want to edit, and then press and hold OK.
4. Edit the cell, and then press OK. To cancel editing, press Esc, and then press OK.
• You can add or delete a line break.
• The number of available symbols you can use is limited.
• Each cell can contain up to five lines.
5. Press Esc.
Your changes to the database is saved.
PT-E510/PT-E560BT
1. Press
/
.
2. Press a or b to select the database you want to edit, and then press OK.
The selected database appears on the LCD.
3. Press a or b to select the cell you want to edit, and then press and hold OK.
4. Edit the cell, and then press OK. To cancel editing, press Esc, and then press OK.
• You can add or delete a line break.
• The number of available symbols you can use is limited.
• Each cell can contain up to seven lines.
5. Press Esc.
Your changes to the database is saved.
Related Information
• Print Transferred Database Data
• Find Specific Information within a Database
115
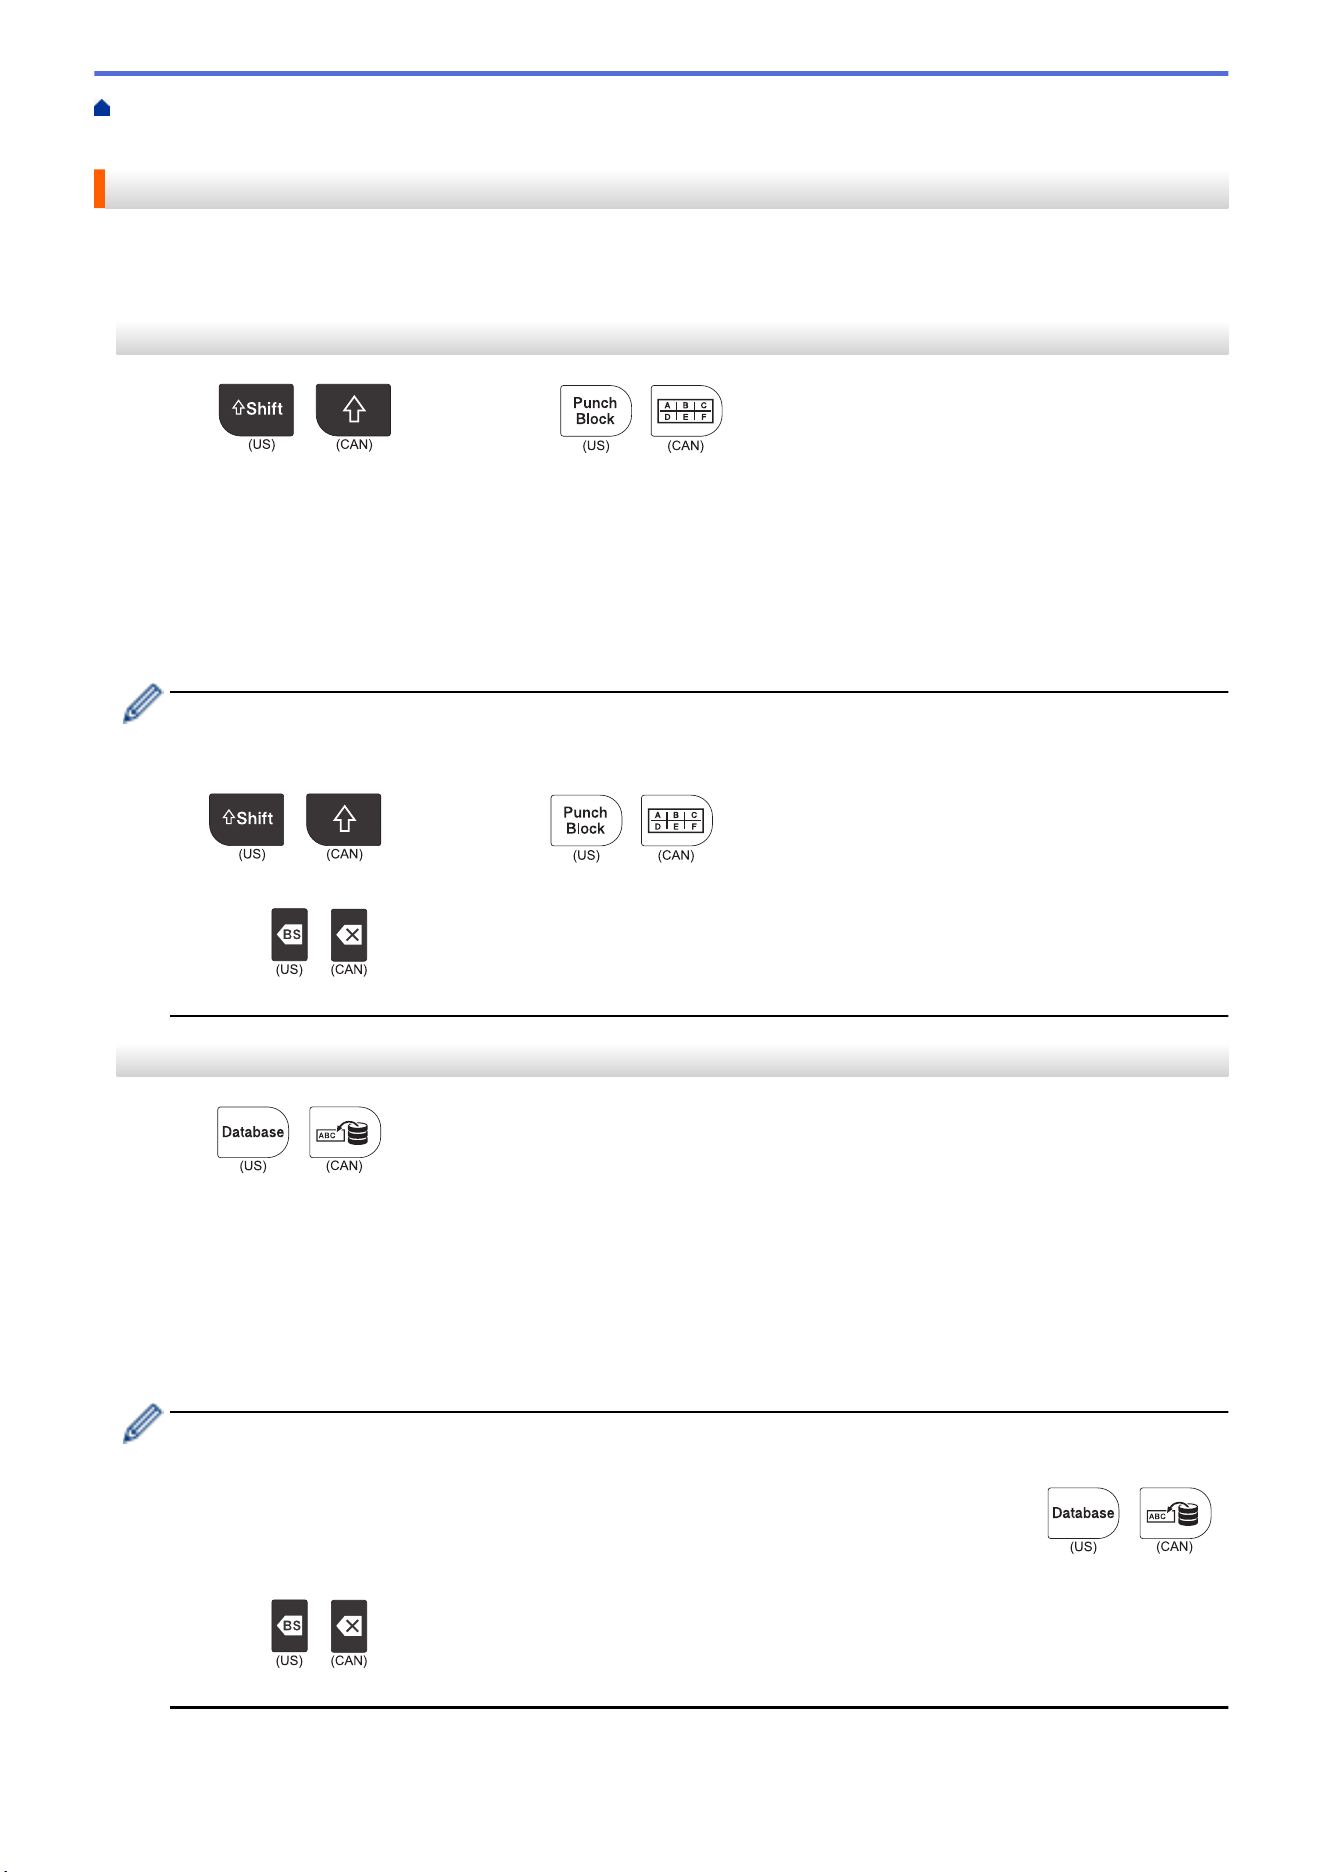
Home > Print Labels > Print Transferred Database Data > Edit a Transferred Database > Find Specific
Information within a Database
Find Specific Information within a Database
>> PT-E310BT
>> PT-E510/PT-E560BT
PT-E310BT
1. Press
/
, and then press
/
.
2. Press a or b to select the database you want to print, and then press OK.
The selected database appears on the LCD.
3. Type the data or name you want to find.
For example, type 'B' to find any character strings containing 'B'. Type 'BR' to find any character strings
containing 'BR'.
Type as many letters or numbers as needed.
• If a string contains the character you typed, the cursor on the LCD moves to that content and highlights
it. If the content does not exist, the cursor remains in its current position.
• If the character you searched for is contained in multiple fields in the database, press
/
, and then press
/
to move to the next field containing the character.
The character is highlighted in the field.
• Press
/
to delete the last character in your search data. The cursor moves to the next field
containing the remaining search characters.
PT-E510/PT-E560BT
1. Press
/
.
2. Press a or b to select the database you want to print, and then press OK.
The selected database appears on the LCD.
3. Type the data or name you want to find.
For example, type 'B' to find any character strings containing 'B'. Type 'BR' to find any character strings
containing 'BR'.
Type as many letters or numbers as needed.
• If a string contains the character you typed, the cursor on the LCD moves to that content and highlights
it. If the content does not exist, the cursor remains in its current position.
• If the character you searched for is contained in multiple fields in the database, press
/
to move to the next field containing the character. The character is highlighted in the field.
• Press
/
to delete the last character in your search data. The cursor moves to the next field
containing the remaining search characters.
116

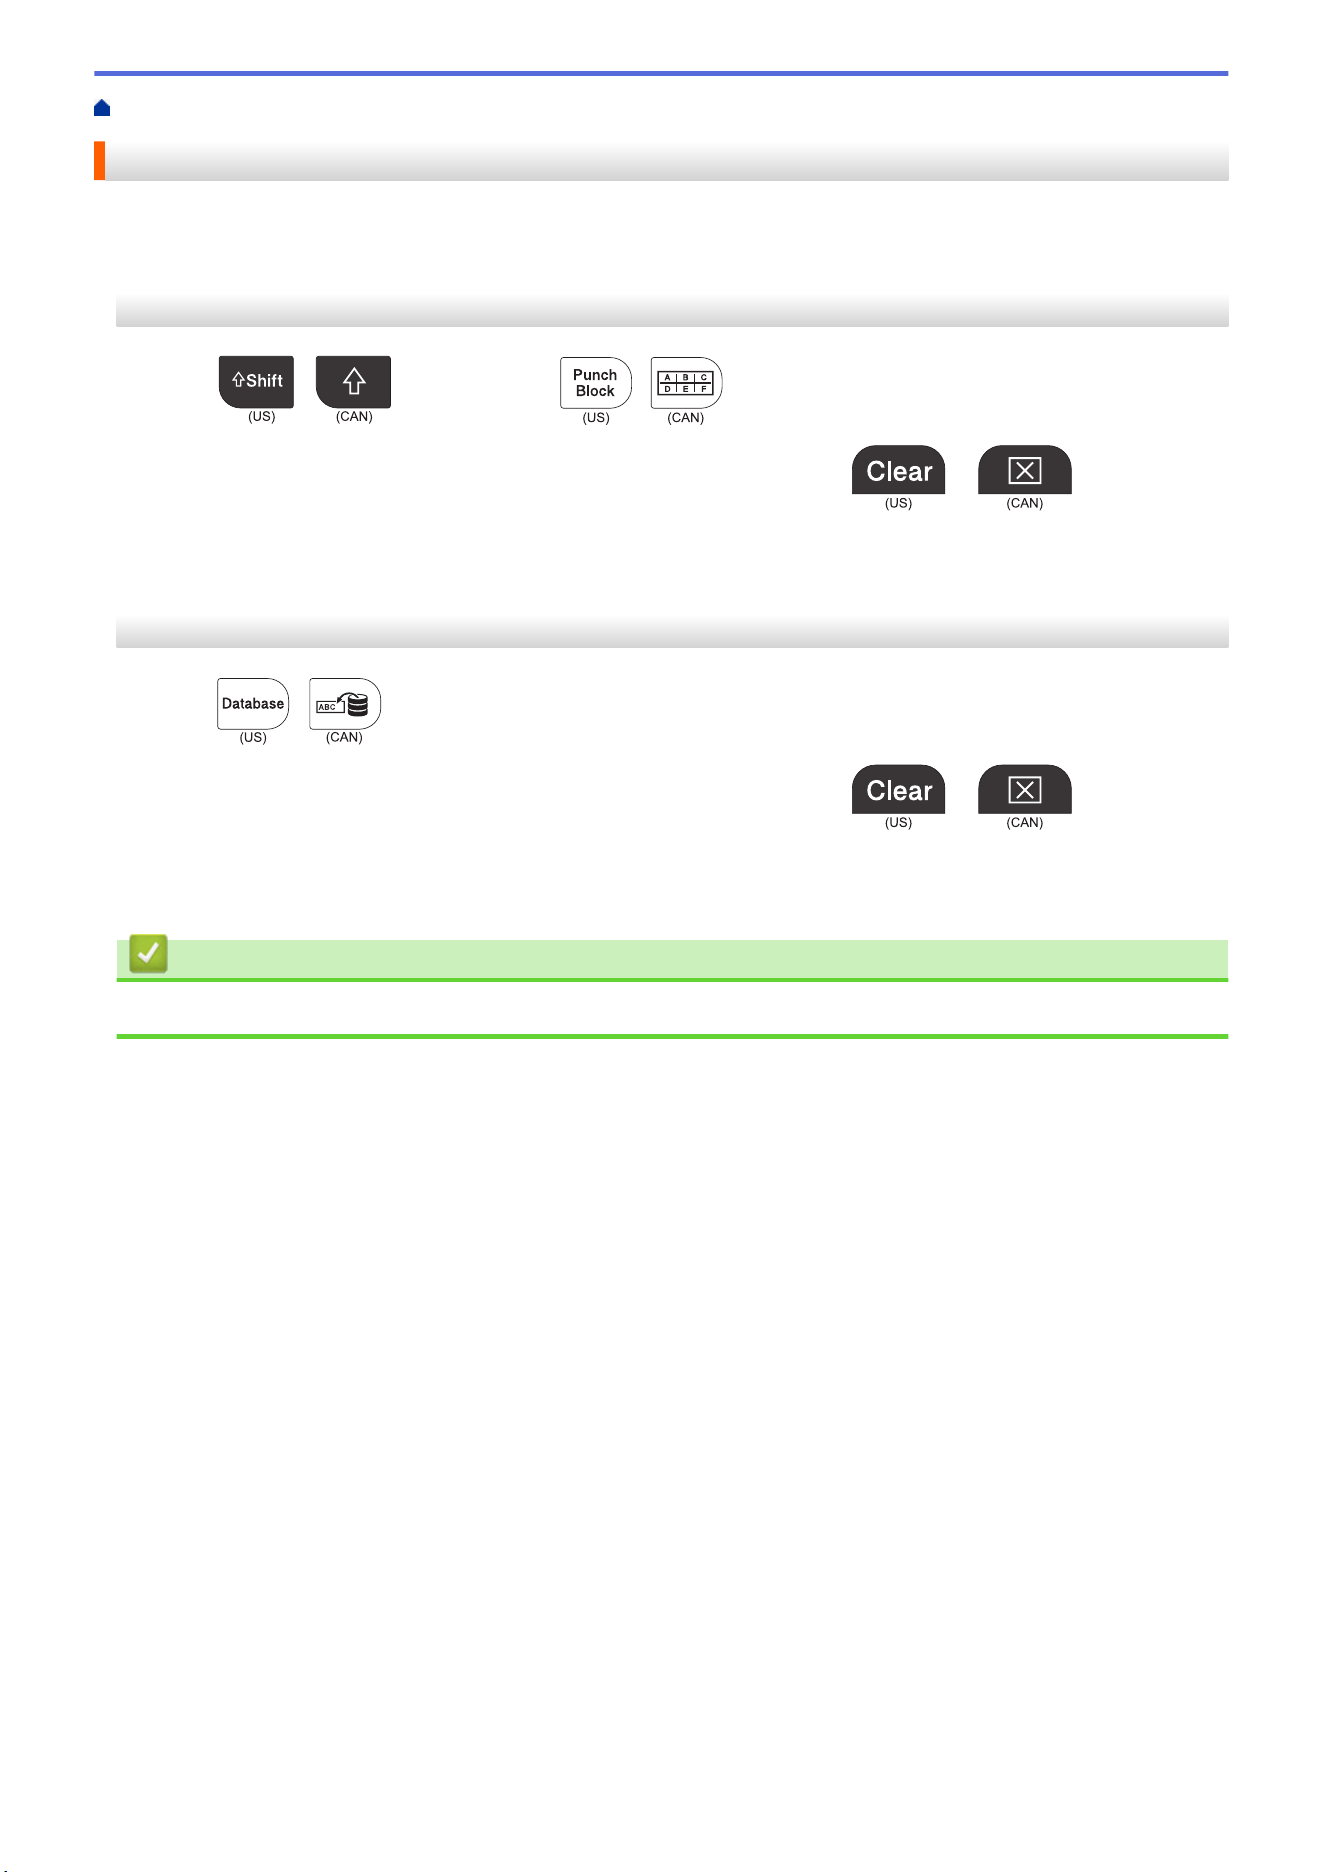
Home > Print Labels > Print Transferred Database Data > Delete a Transferred Database
Delete a Transferred Database
>> PT-E310BT
>> PT-E510/PT-E560BT
PT-E310BT
1. Press
/
, and then press
/
.
2. Press a or b to select the database you want to delete, and then press
/
.
The [Delete?] message appears.
3. Press OK.
PT-E510/PT-E560BT
1. Press
/
.
2. Press a or b to select the database you want to delete, and then press
/
.
The [Delete?] message appears.
3. Press OK.
Related Information
• Print Transferred Database Data
118

Home > Use the File Memory > Save a Label File
Save a Label File
You can save up to 99 label files and recall them for printing at a later date. You can edit and overwrite saved
labels.
1. Enter the text and format your label.
2. Press
/
.
3. Select [Local Files], if it appears.
4. Press a or b to display [Save], and then press OK.
5. Press a or b to select a file, and then press OK.
6. Enter the file name, and then press OK.
NOTE
To confirm the available space in the file memory, do the following:
a. Press Menu.
b. Press a or b to display [Memory Usage], and then press OK.
c. Press a or b to select [Local Content], and then press OK.
Related Information
• Use the File Memory
120
Home > Use the File Memory > Print, Open, or Delete a Saved Label File
Print, Open, or Delete a Saved Label File
1. Press
/
.
2. Select [Local Files], if it appears.
3. Do one of the following:
Option Description
Print
a. Press a or b to display Print, and then press OK.
b. Press a or b to select a file, and then press OK.
c. If the selection screen appears, select All or Range, and then press OK.
Open
a. Press a or b to display Open, and then press OK.
b. Press a or b to select a file, and then press OK.
Delete
a. Press a or b to display Delete, and then press OK.
b. Press a or b to select a file, and then press OK.
The Delete? message appears.
c. Press OK.
Related Information
• Use the File Memory
121


Home > Create and Print Labels Using Your Computer > Create and Print Labels Using P-touch Editor
(Windows)
Create and Print Labels Using P-touch Editor (Windows)
To use your Labeling System with your Windows computer, install your model's printer driver and P-touch Editor
on your computer.
For the latest drivers and software, go to your model's Downloads page at support.brother.com/downloads.
1. Start P-touch Editor
.
Click Start > Brother P-touch > P-touch Editor, or double-click the P-touch Editor icon on the desktop.
*Depending on your computer's operating system, the Brother P-touch folder may or may not be created.
2. Make sure your model's name is selected on the Home screen.
3. Do one of the following:
• To create a new layout, click the New Label tab, and then click the New Label button (1).
• To create a new layout using a preset layout, click the New Label tab, and then click a category button
(2), select a template, and then click Create (3).
• To open an existing layout, click Open (4).
1
4
2
3
4. Click the
Print icon.
5. Select the print settings you want, and then click Print.
To change how P-touch Editor starts, open P-touch Editor and click File > Options. Select the Mode option
on the left side of the screen, and then select the Home/Office or Electrical/Network option. Click OK to
apply the setting.
Related Information
• Create and Print Labels Using Your Computer
• Main Window of P-touch Editor (Windows)
123
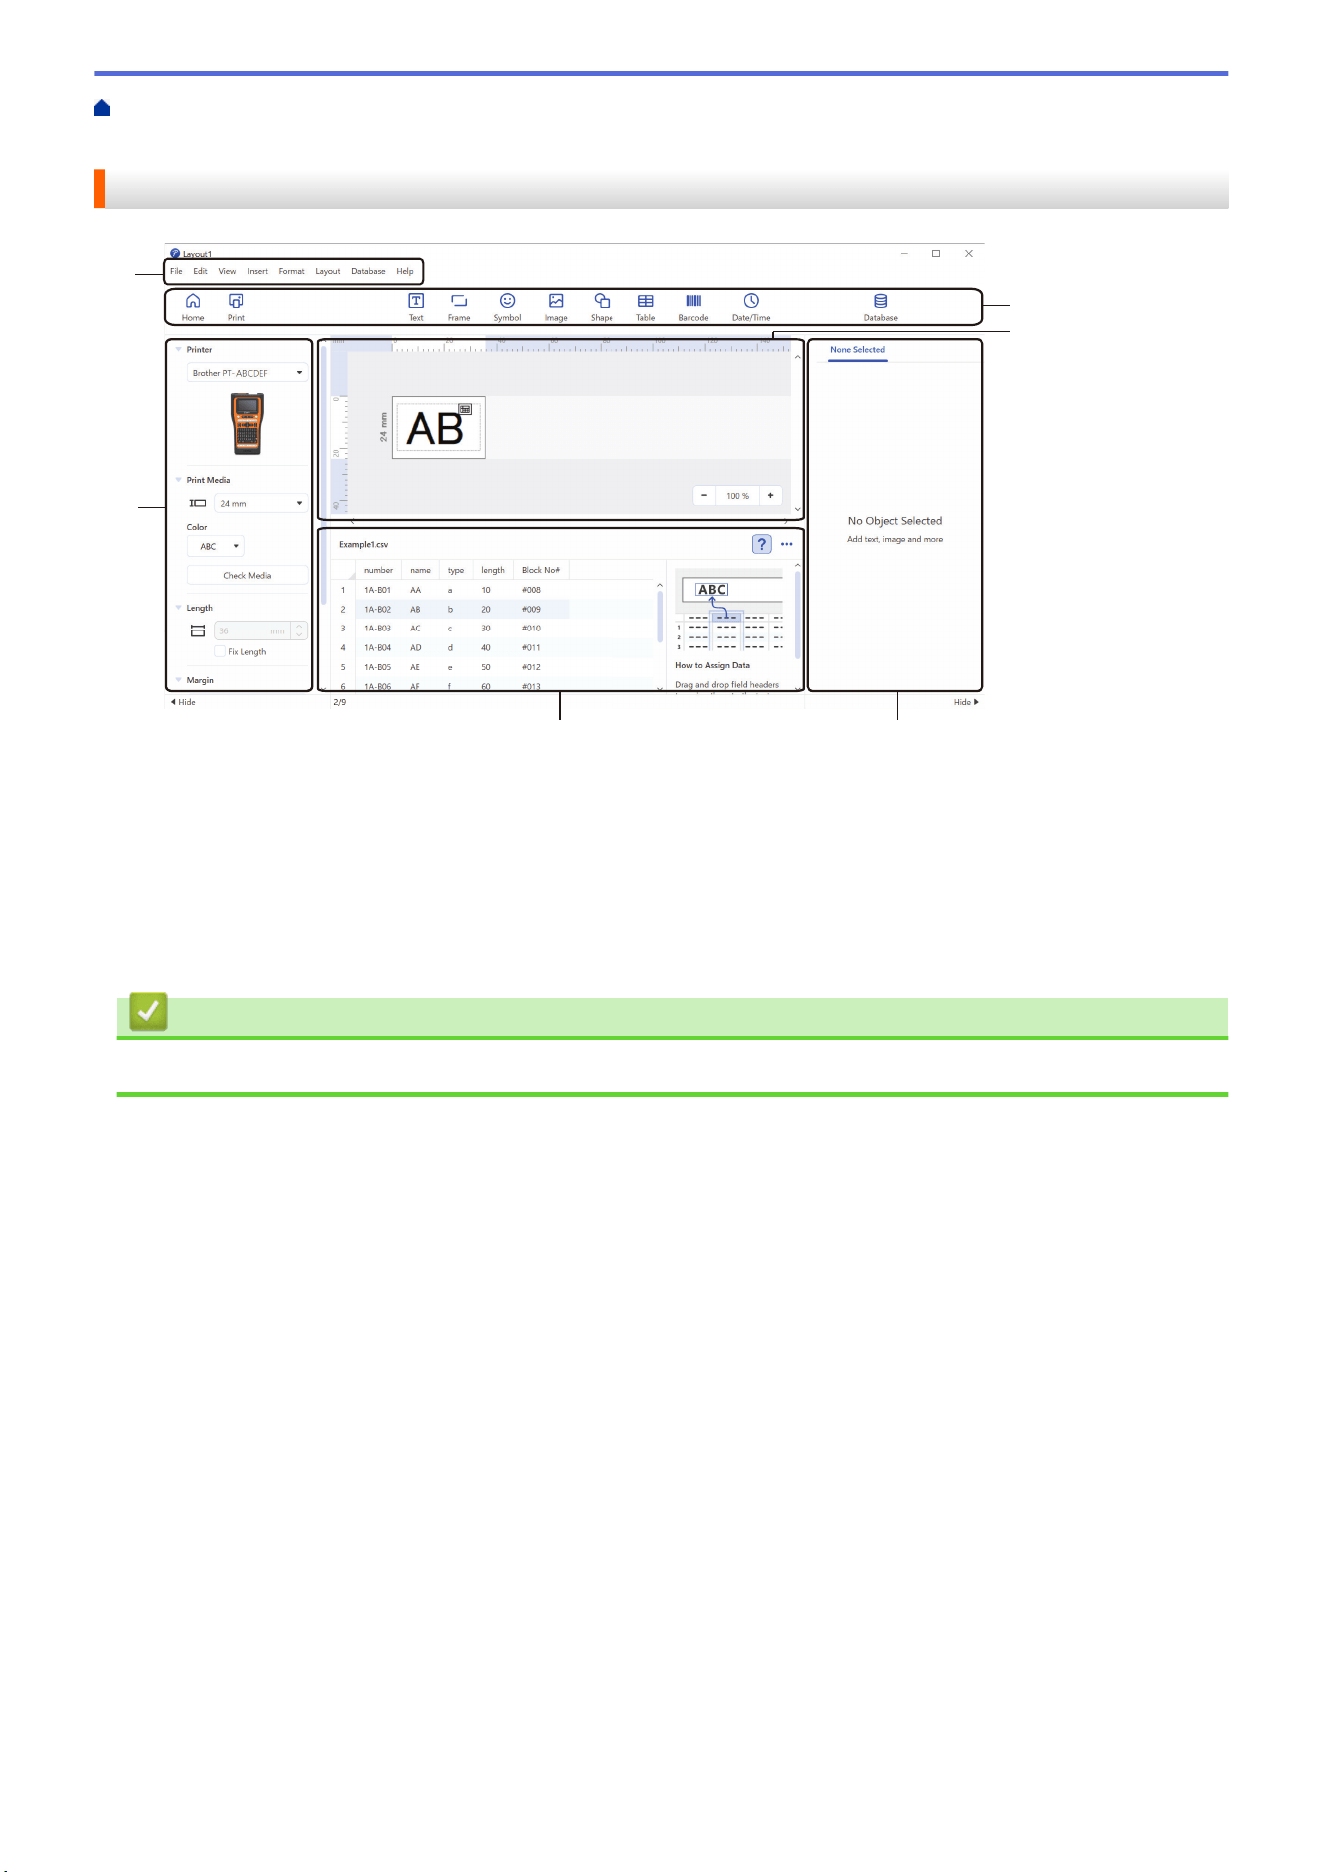
Home > Create and Print Labels Using Your Computer > Create and Print Labels Using P-touch Editor
(Windows) > Main Window of P-touch Editor (Windows)
Main Window of P-touch Editor (Windows)
1
6
5
4
2
3
1. Menu Bar
2. Toolbar
3. Layout Window
4. Object Inspector
5. Database Connection Area
6. Label Inspector
Related Information
• Create and Print Labels Using P-touch Editor (Windows)
124
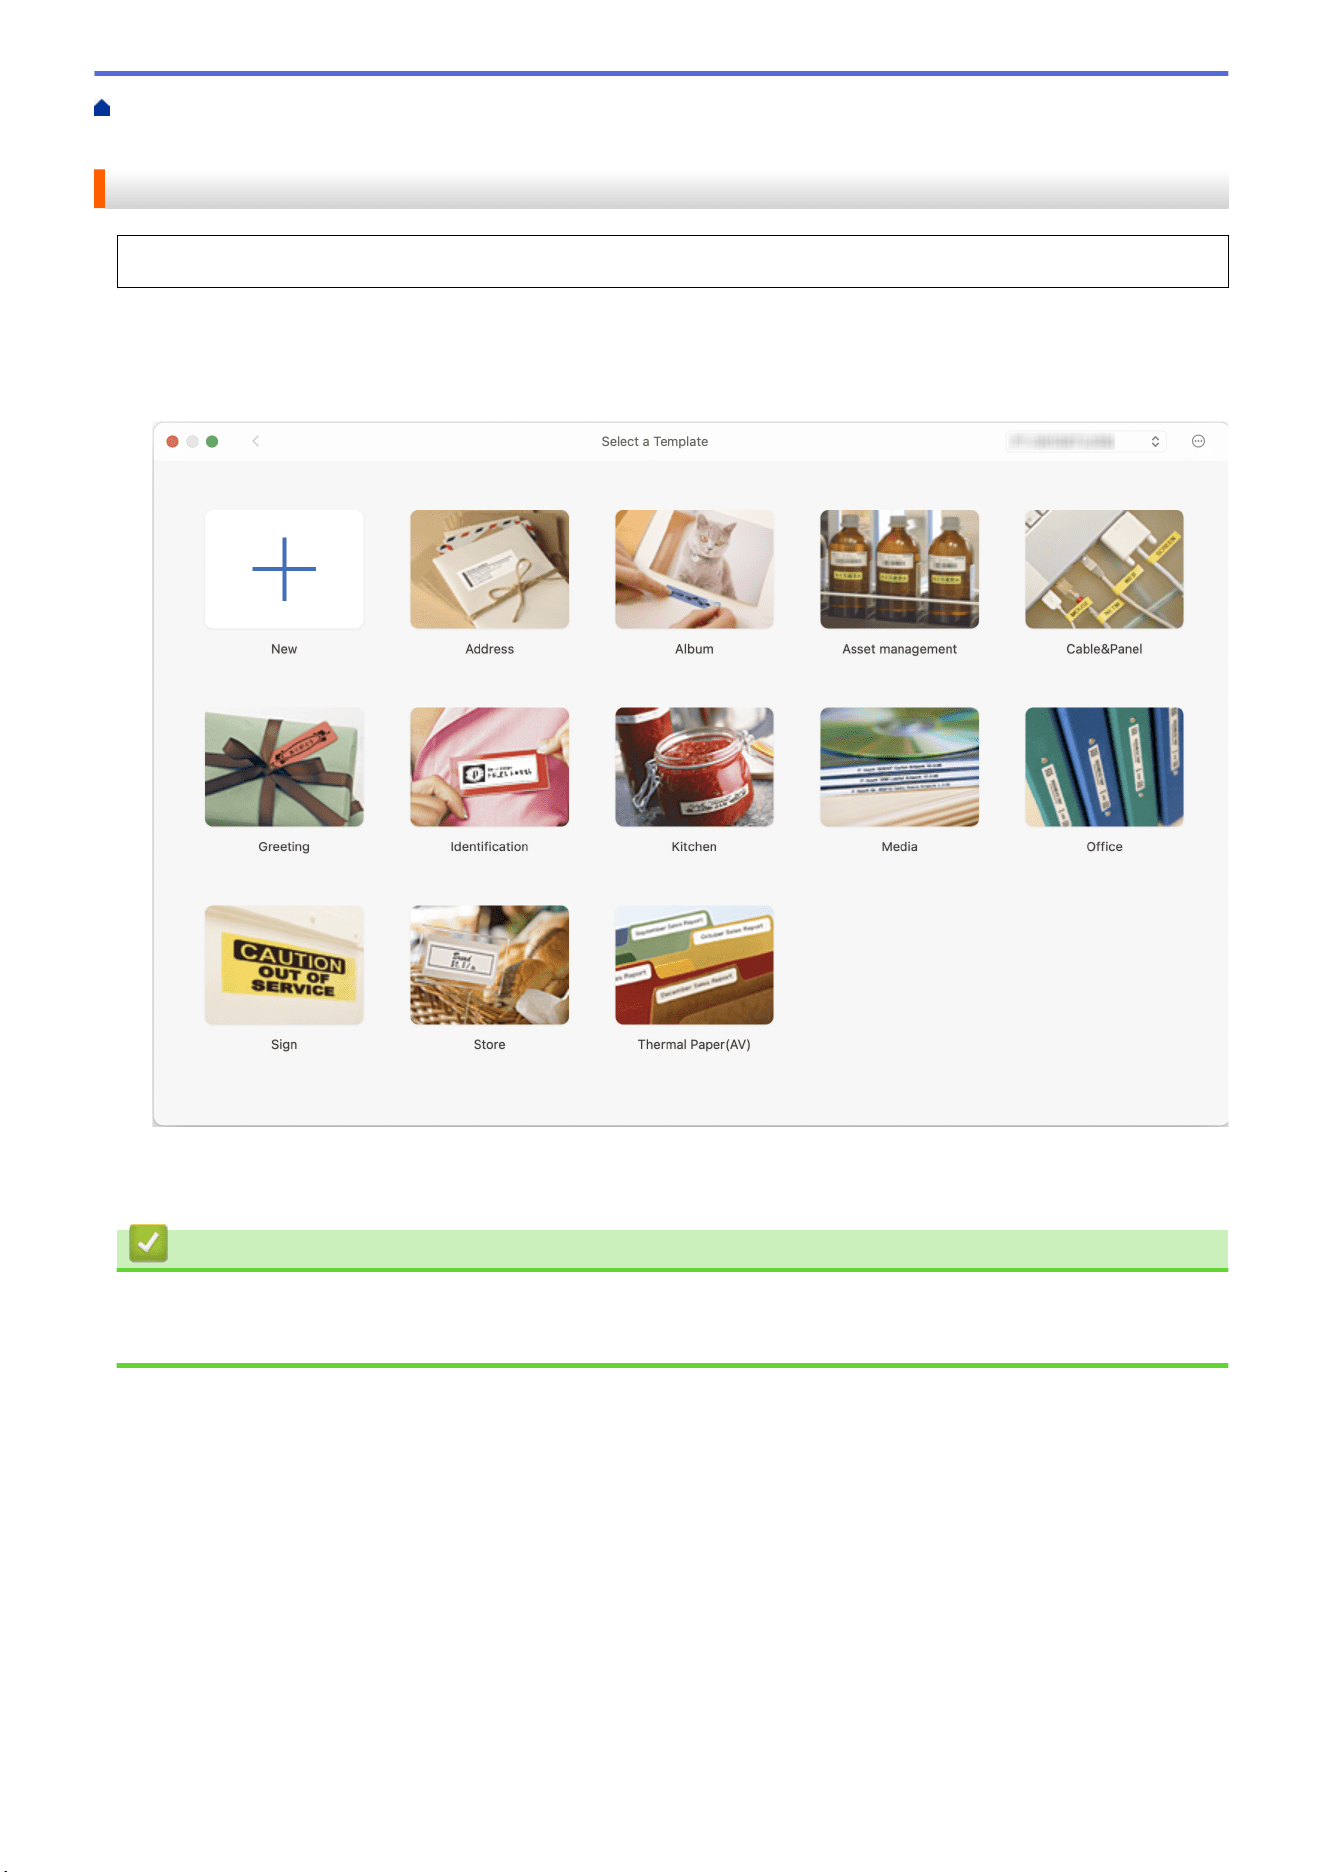
Home > Create and Print Labels Using Your Computer > Create and Print Labels Using P-touch Editor
(Mac)
Create and Print Labels Using P-touch Editor (Mac)
Download and install P-touch Editor from the App Store on your Mac.
To use your Labeling System with your Mac computer, install P-touch Editor.
1. Double-click Macintosh HD > Applications, and then double-click the Brother P-touch Editor icon.
2. When P-touch Editor starts, click New to select a template, create a new layout, or open an existing layout.
3. Click the
Print icon.
4. Select the print settings you want, and then click Print.
Related Information
• Create and Print Labels Using Your Computer
• Main Window of P-touch Editor (Mac)
125
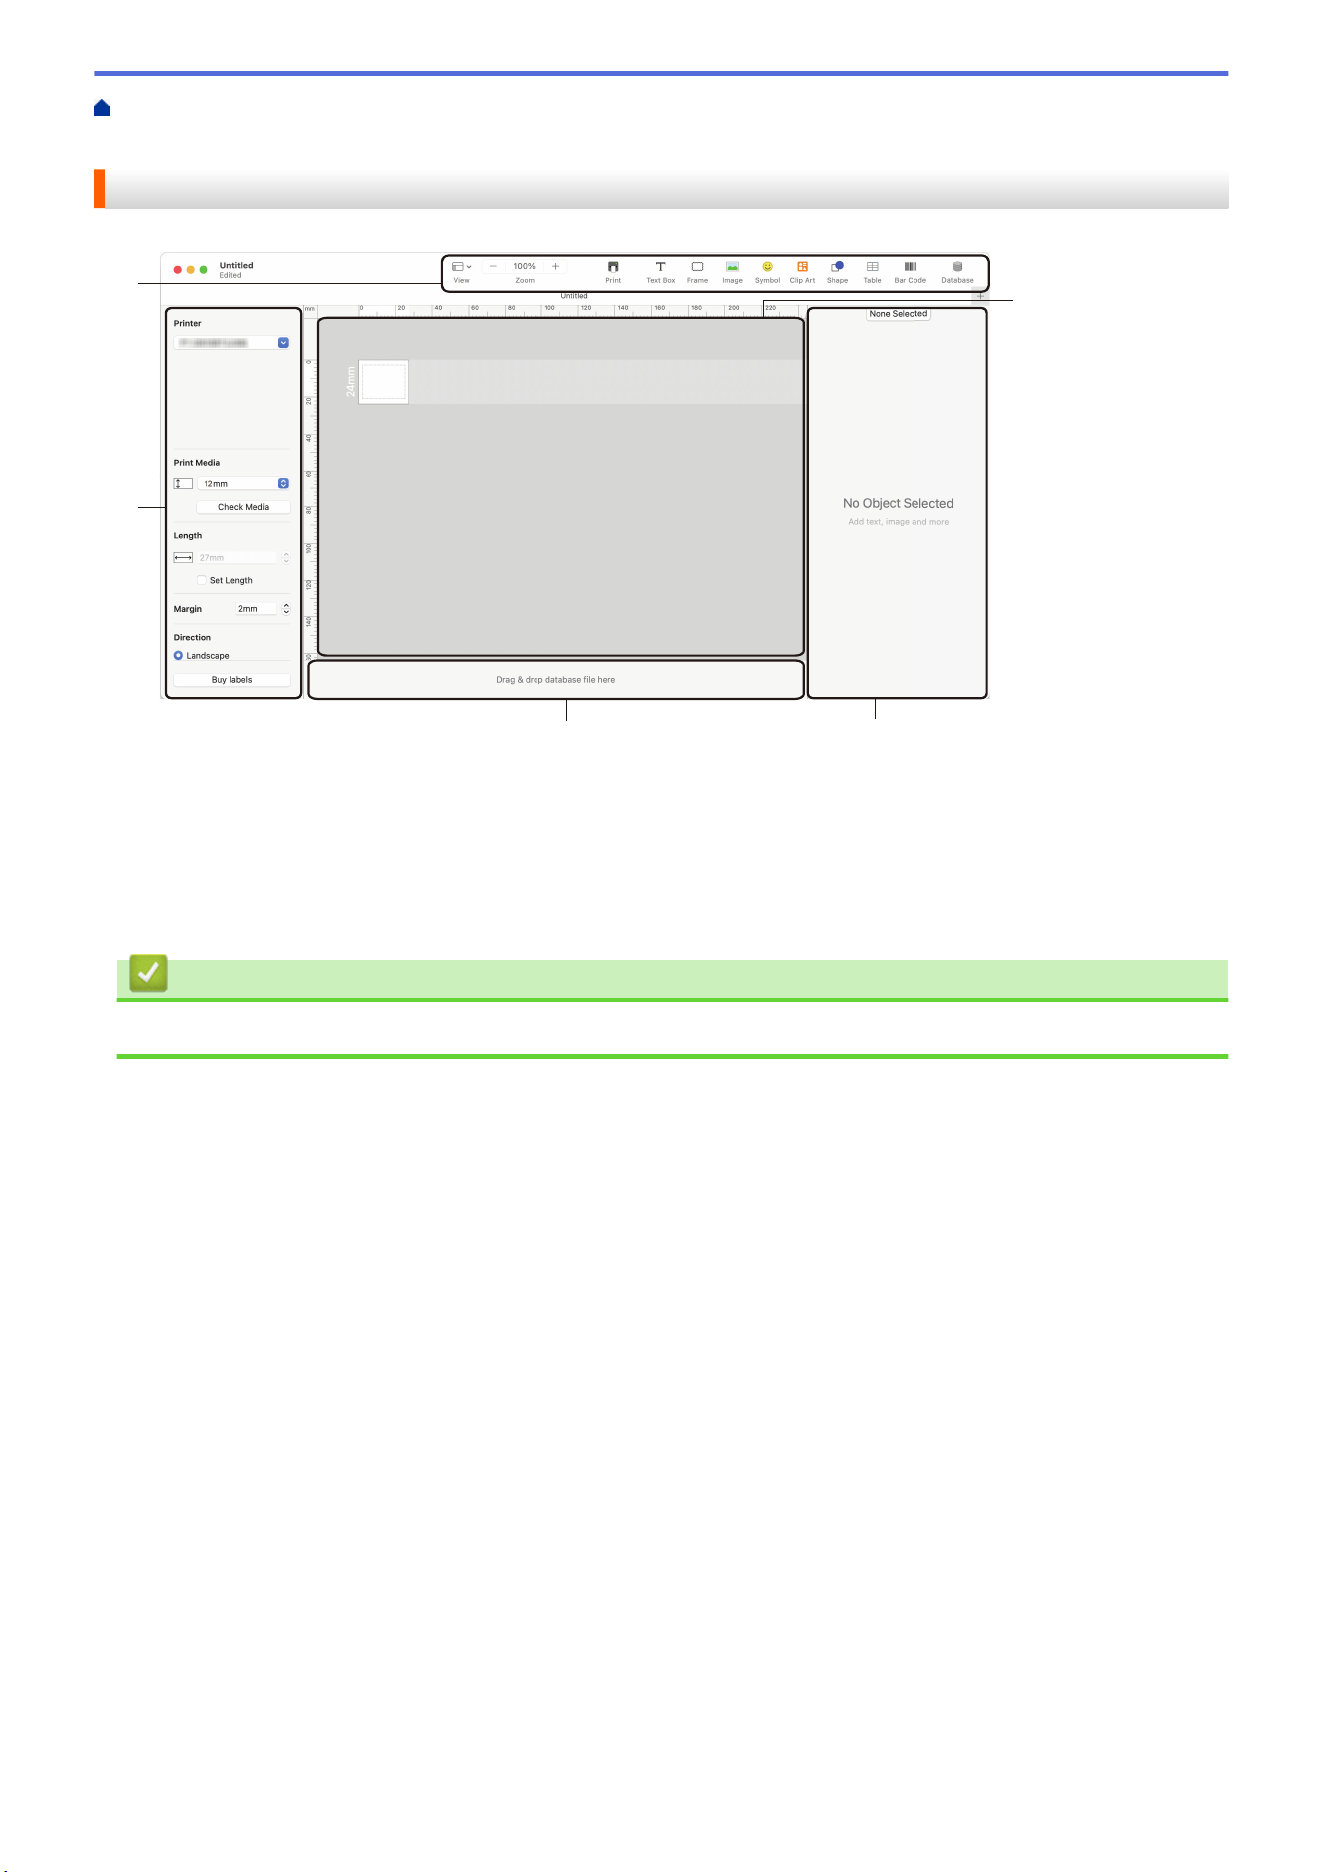
Home > Create and Print Labels Using Your Computer > Create and Print Labels Using P-touch Editor
(Mac) > Main Window of P-touch Editor (Mac)
Main Window of P-touch Editor (Mac)
1
4
3
2
5
1. Toolbar
2. Object Inspector
3. Database Connection Area
4. Label Inspector
5. Layout Window
Related Information
• Create and Print Labels Using P-touch Editor (Mac)
126
Home > Create and Print Labels Using Your Computer > Print Labels Using the Printer Driver (Windows)
Print Labels Using the Printer Driver (Windows)
Make sure you have installed the printer driver.
For the latest drivers and software, go to your model's Downloads page at support.brother.com/downloads.
1. Connect the Labeling System to a computer.
2. Open the document you want to print.
3. Select the print command in your application.
4. Select your Labeling System, and then click the printer's properties or preferences button.
The printer driver window appears.
5. Change the printer driver settings, if needed.
6. Click OK.
7. Complete your print operation.
Related Information
• Create and Print Labels Using Your Computer
Related Topics:
• Connect the Labeling System to a Computer Using a USB Type-C Cable
• Enable or Disable Bluetooth
• Install the Printer Driver and Software on a Computer (Windows)
127

Home > Transfer Templates to the Printer Using Your Computer (Windows)
Transfer Templates to the Printer Using Your Computer (Windows)
• Notes on Using Transfer Functions (Windows)
• Transfer a Template or Other Data from the Computer to the Printer (Windows)
• Back up Templates or Other Data Saved in the Printer to Your Computer (Windows)
• Delete Printer Data from Your Computer (Windows)
• Create Transfer Files or Transfer Package Files (Windows)
128

Home > Transfer Templates to the Printer Using Your Computer (Windows) > Notes on Using Transfer
Functions (Windows)
Notes on Using Transfer Functions (Windows)
Some P-touch Editor functions are not available with the printer, so keep the following points in mind when using
P-touch Editor to create templates.
You can preview created templates before they are transferred to the printer.
Creating Templates
• Some of the text in the templates transferred to the printer may be printed using similar fonts and character
sizes loaded in the printer. As a result, the printed label may differ from the image of the template created in
P-touch Editor.
• Depending on the text object setting, the character size may be automatically reduced or some of the text
may not be printed. If this occurs, change the Text Object setting.
• Although character styles can be applied to individual characters in P-touch Editor, styles can be applied to a
block of text only from the printer. In addition, some character styles are not available on the printer.
• Backgrounds specified in P-touch Editor are not compatible with the printer.
• The P-touch Editor layout using the split printing function (enlarging the label and printing it on two or more
labels) cannot be transferred.
• Only the portion of the label within the printable area is printed.
Transferring Templates
• The printed label may differ from the image in the preview area of P-touch Editor.
• If a two-dimensional barcode that the printer does not support is transferred to the printer, the barcode is
converted into an image. The image of the converted barcode cannot be edited. This printer supports only a
QR code or Data Matrix.
• A QR code or Data Matrix must be created using standard alphanumeric characters and numbers. If the
barcode includes special characters when it is transferred, the printer cannot create the barcode correctly.
• All transferred objects that cannot be edited by the printer are converted into images.
• Grouped objects are converted into a single bitmap.
• If objects overlap, only the bottom object is printed.
Transferring Data Other Than Templates
If the number or order of fields in a database is changed and only the database (CSV file) is transferred to
update it, the database may not link correctly to the template. The first line of data in the transferred file must be
recognized by the printer as "field names."
Transferring a Template and Database Together
The latest P-touch Editor supports LBXS files with which a template and database can be transferred as a single
file.
Related Information
• Transfer Templates to the Printer Using Your Computer (Windows)
129
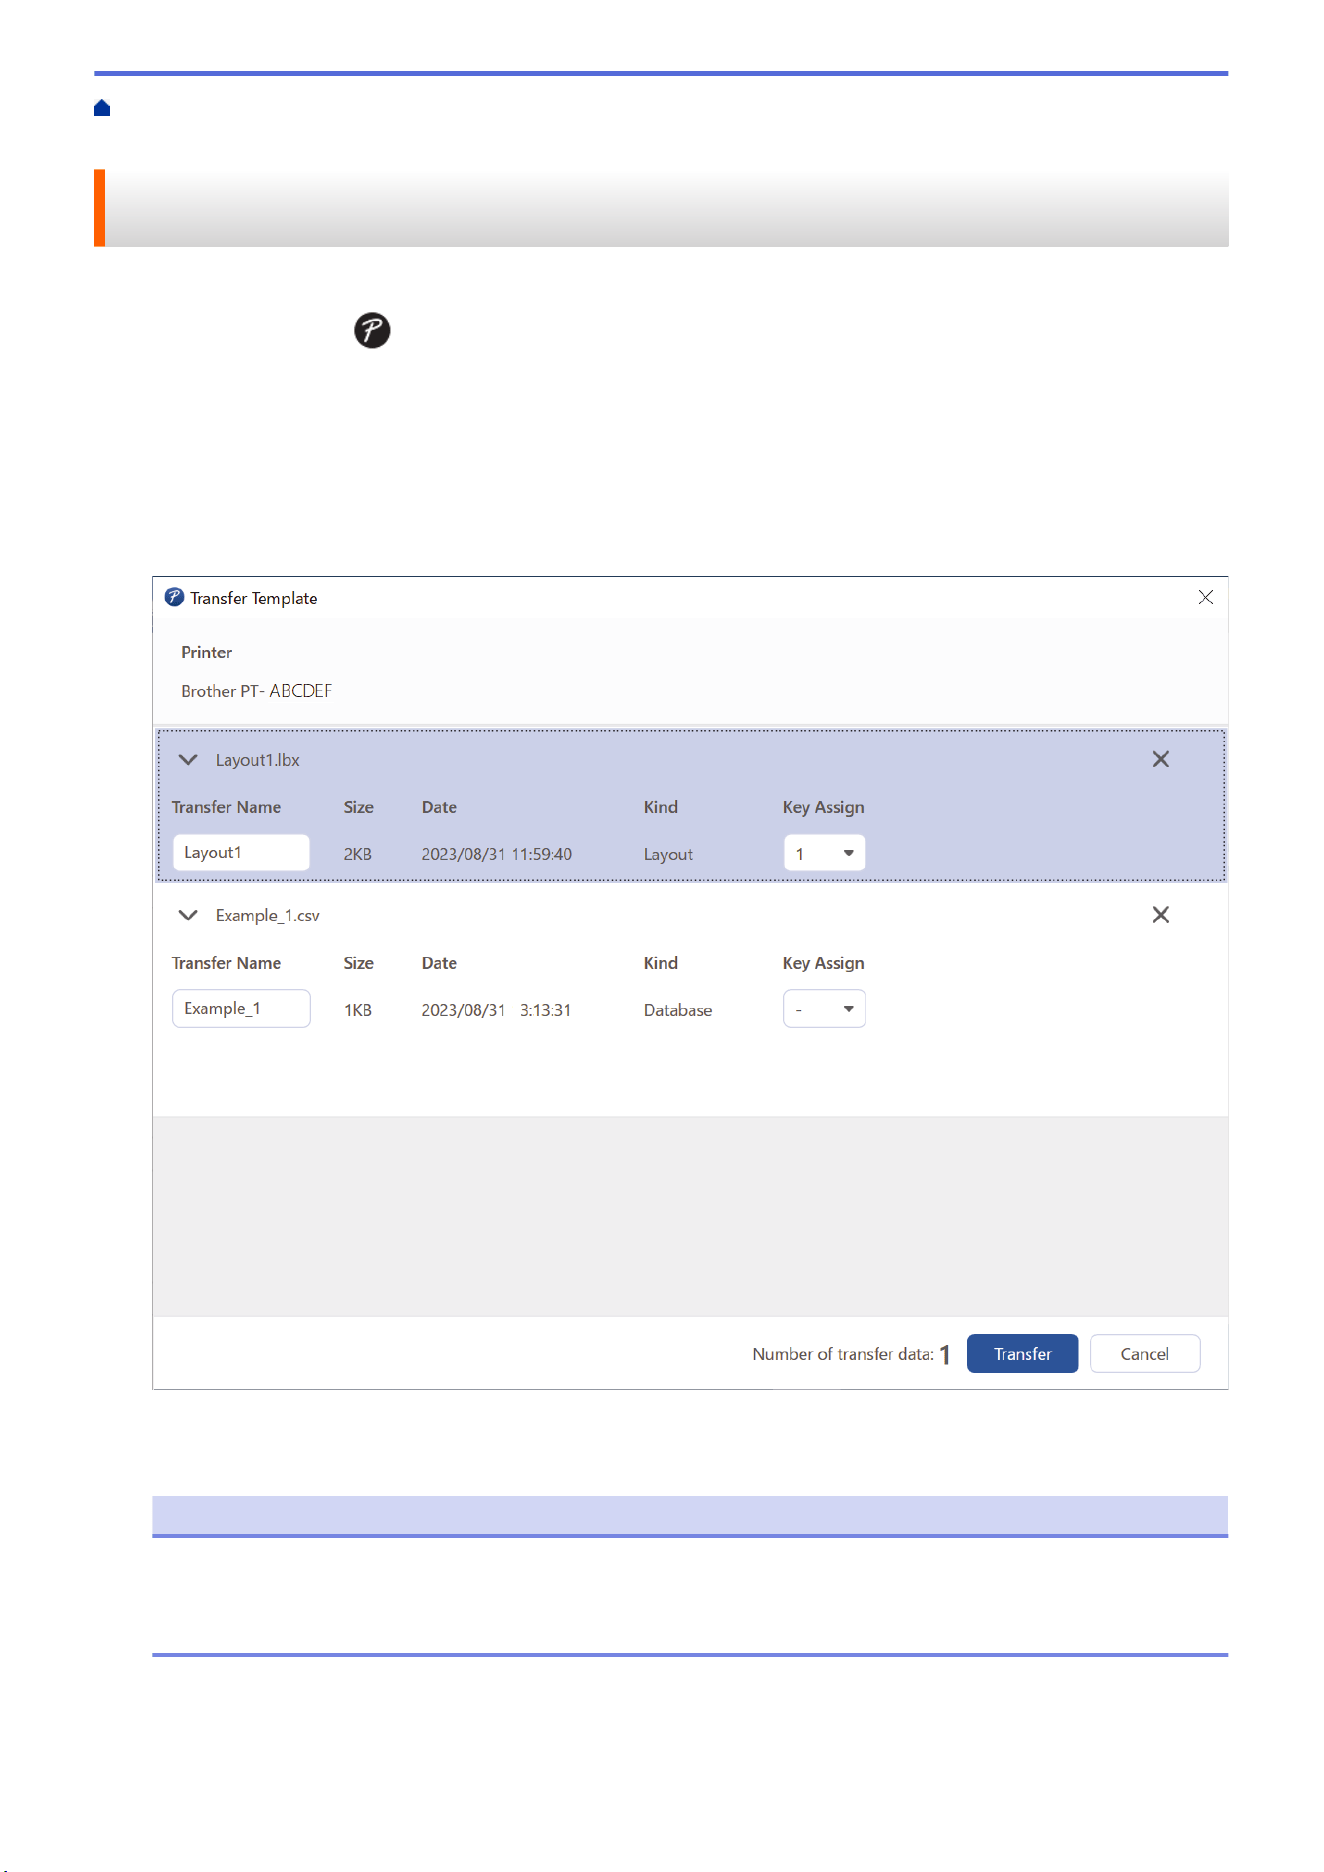
Home > Transfer Templates to the Printer Using Your Computer (Windows) > Transfer a Template or Other
Data from the Computer to the Printer (Windows)
Transfer a Template or Other Data from the Computer to the Printer
(Windows)
1. Connect the printer to the computer using a USB cable, and then turn on the printer.
2. Start P-touch Editor .
Click Start > Brother P-touch > P-touch Editor, or double-click the P-touch Editor icon on the desktop.
*Depending on your computer's operating system, the Brother P-touch folder may or may not be created.
3. Make sure your model's name is selected on the Home screen.
4. Open the template you want or create a new layout.
5. Click File > Transfer Template.
The Transfer window appears. The template is listed in the window.
6. To change the Key Assign number (memory location in the printer) assigned to an item, click the item you
want, and then select the number.
NOTE
• The database is not assigned a Key Assign number.
• The printer will overwrite any previously saved template that has the same key number as a new
template being transferred to it.
7. To change the transfer name of the template or other data, click the item you want, and then type the new
name.
The number of characters differs depending on the printer model.
130

8. Make sure the template or other data you want to transfer is selected in the file list, and then click Transfer.
9. Click OK.
The selected items are transferred to the printer.
You can transfer multiple templates or other data at the same time. For more information, see Related
Information.
Related Information
• Transfer Templates to the Printer Using Your Computer (Windows)
• Transfer Multiple Items from the Computer to the Printer (Windows)
Related Topics:
• Print Transferred Templates
• Print Transferred Templates from a Database
• Print Transferred Database Data
131
Home > Transfer Templates to the Printer Using Your Computer (Windows) > Transfer a Template or Other
Data from the Computer to the Printer (Windows) > Transfer Multiple Items from the Computer to the Printer
(Windows)
Transfer Multiple Items from the Computer to the Printer (Windows)
When you transfer multiple items using P-touch Editor, follow these guidelines.
Data type
Maximum number of
transferable items
Details
Template 99 • Each template can contain a maximum of 50 objects.
• The maximum number of lines that can contain each object
differs depending on your printer model.
Database 99 • Only CSV files can be transferred.
• Each CSV file can contain a maximum of 255 fields and 65,000
records.
1. Connect the printer to the computer using a USB cable, and then turn on the printer.
2. Start P-touch Editor .
Click Start > Brother P-touch > P-touch Editor, or double-click the P-touch Editor icon on the desktop.
*Depending on your computer's operating system, the Brother P-touch folder may or may not be created.
3. Make sure your model's name is selected on the Home screen, and then click Transfer.
4. In the Transfer window, click Browse... and specify the items you want to transfer.
The specified items appear in the file list.
5. Make sure the items you want to transfer are selected in the file list, and then click Transfer.
6. Click OK.
The selected items are transferred to the printer.
Related Information
• Transfer a Template or Other Data from the Computer to the Printer (Windows)
Related Topics:
• Print Transferred Templates
• Print Transferred Templates from a Database
• Print Transferred Database Data
132
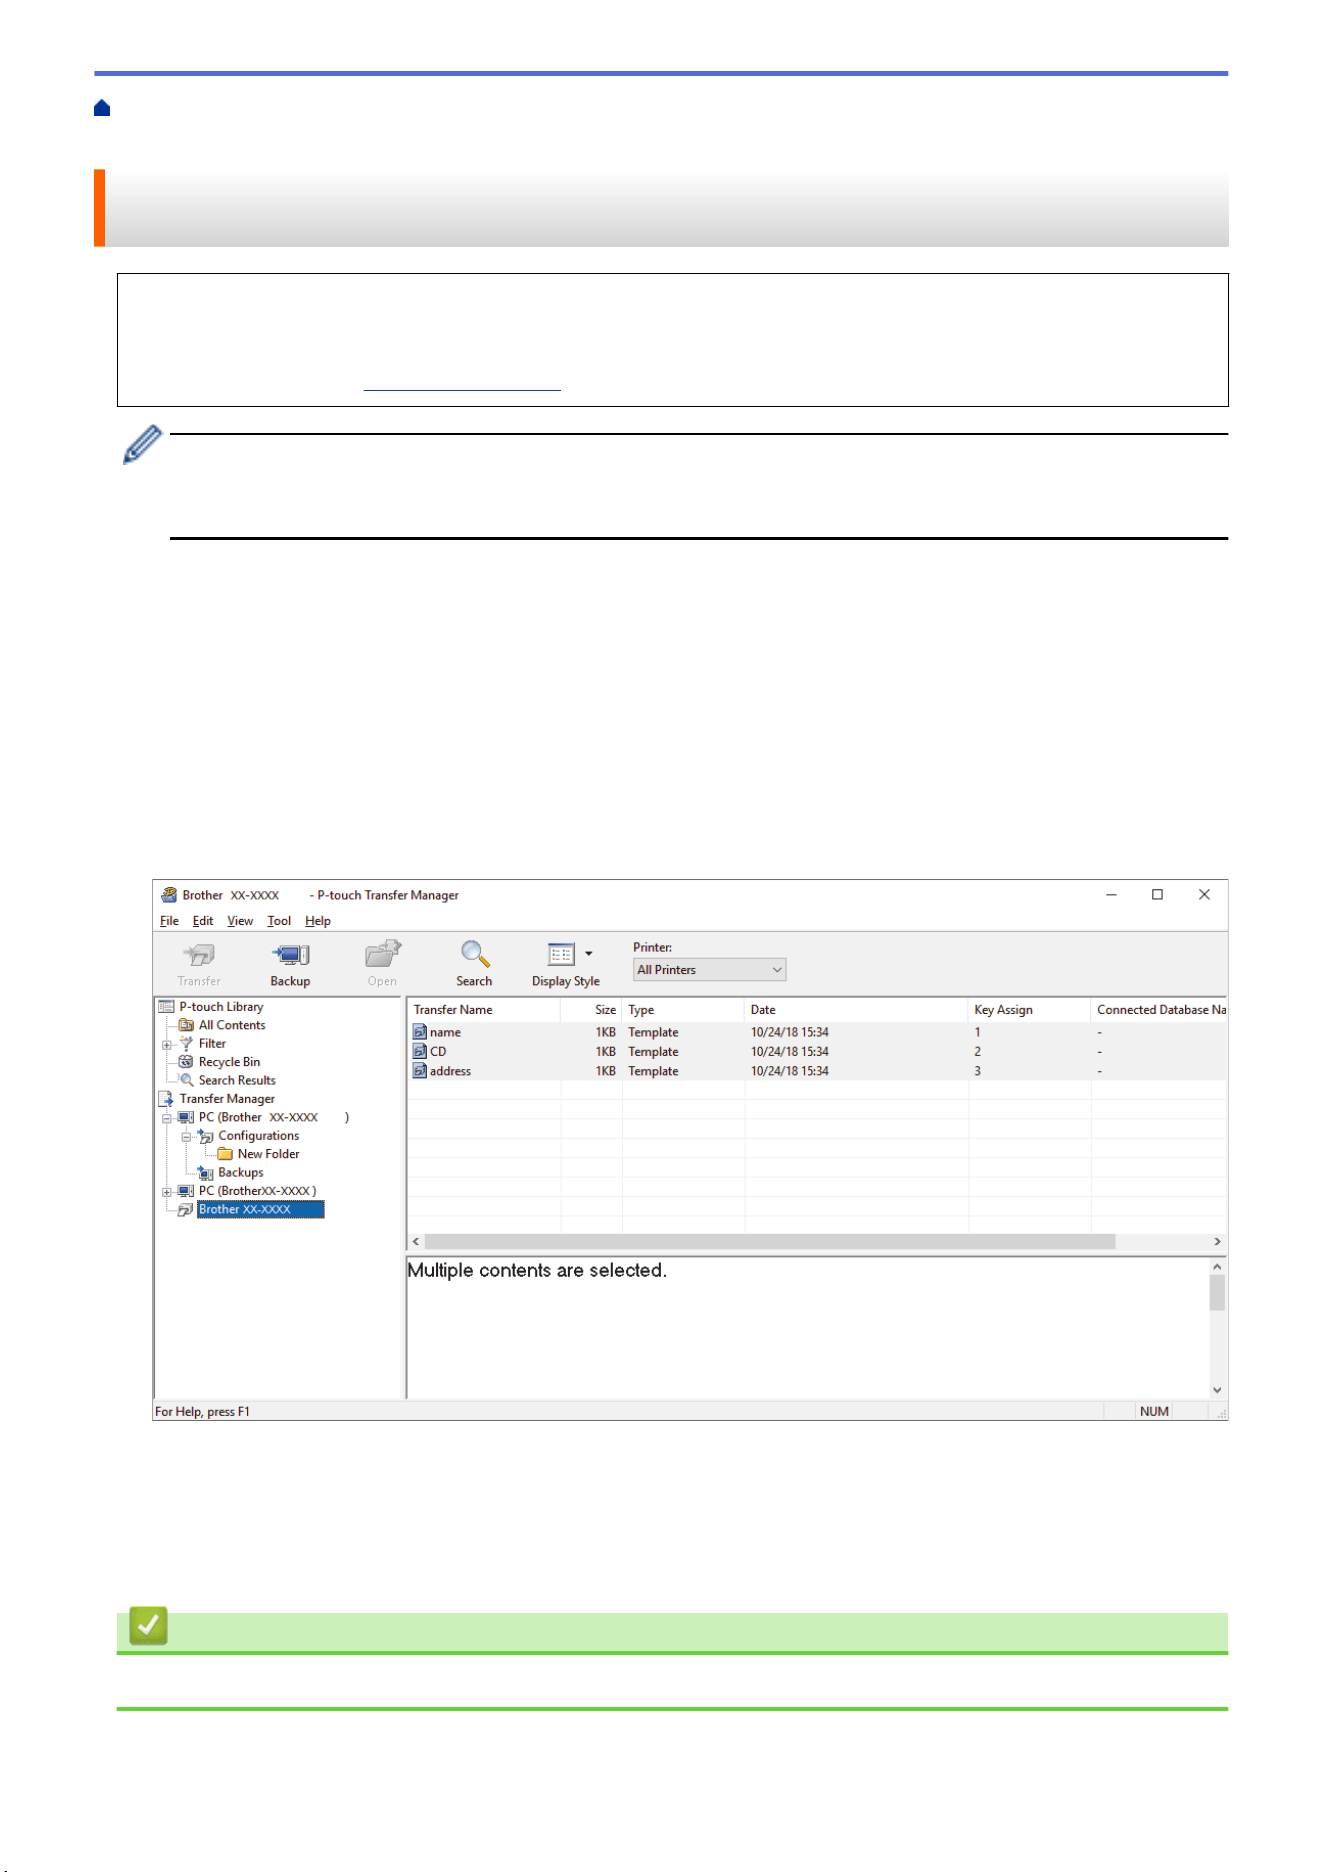
Home > Transfer Templates to the Printer Using Your Computer (Windows) > Back up Templates or Other
Data Saved in the Printer to Your Computer (Windows)
Back up Templates or Other Data Saved in the Printer to Your Computer
(Windows)
Use P-touch Transfer Manager to back up templates or other data saved in the printer to your computer. P-
touch Transfer Manager is installed with P-touch Editor 5.4, which may be an earlier version of P-touch Editor
than you are currently using. To download P-touch Editor 5.4, search for the applicable FAQs &
Troubleshooting tip at support.brother.com.
• Backed-up templates and other data cannot be edited on the computer.
• Depending on the printer model, backed-up templates and data may not be transferable between
different models.
1. Start P-touch Editor 5.4.
Click Start > Brother P-touch > P-touch Editor, or double-click the P-touch Editor icon on the desktop.
*Depending on your computer's operating system, the Brother P-touch folder may or may not be created.
2. Open the P-touch Transfer Manager window.
Click File > Transfer Template > Transfer.
3. Connect your computer to the Labeling System and turn on the Labeling System.
The printer model name appears next to a printer icon in the folder view of the P-touch Transfer Manager
window.
4. Select the printer to back up from, and then click Backup.
A confirmation message appears.
5. Click OK.
A new folder is created under the printer in the folder view. The folder name is based on the date and time of
the backup. All of the printer's templates and other data are transferred to the new folder and saved on your
computer.
Related Information
• Transfer Templates to the Printer Using Your Computer (Windows)
133
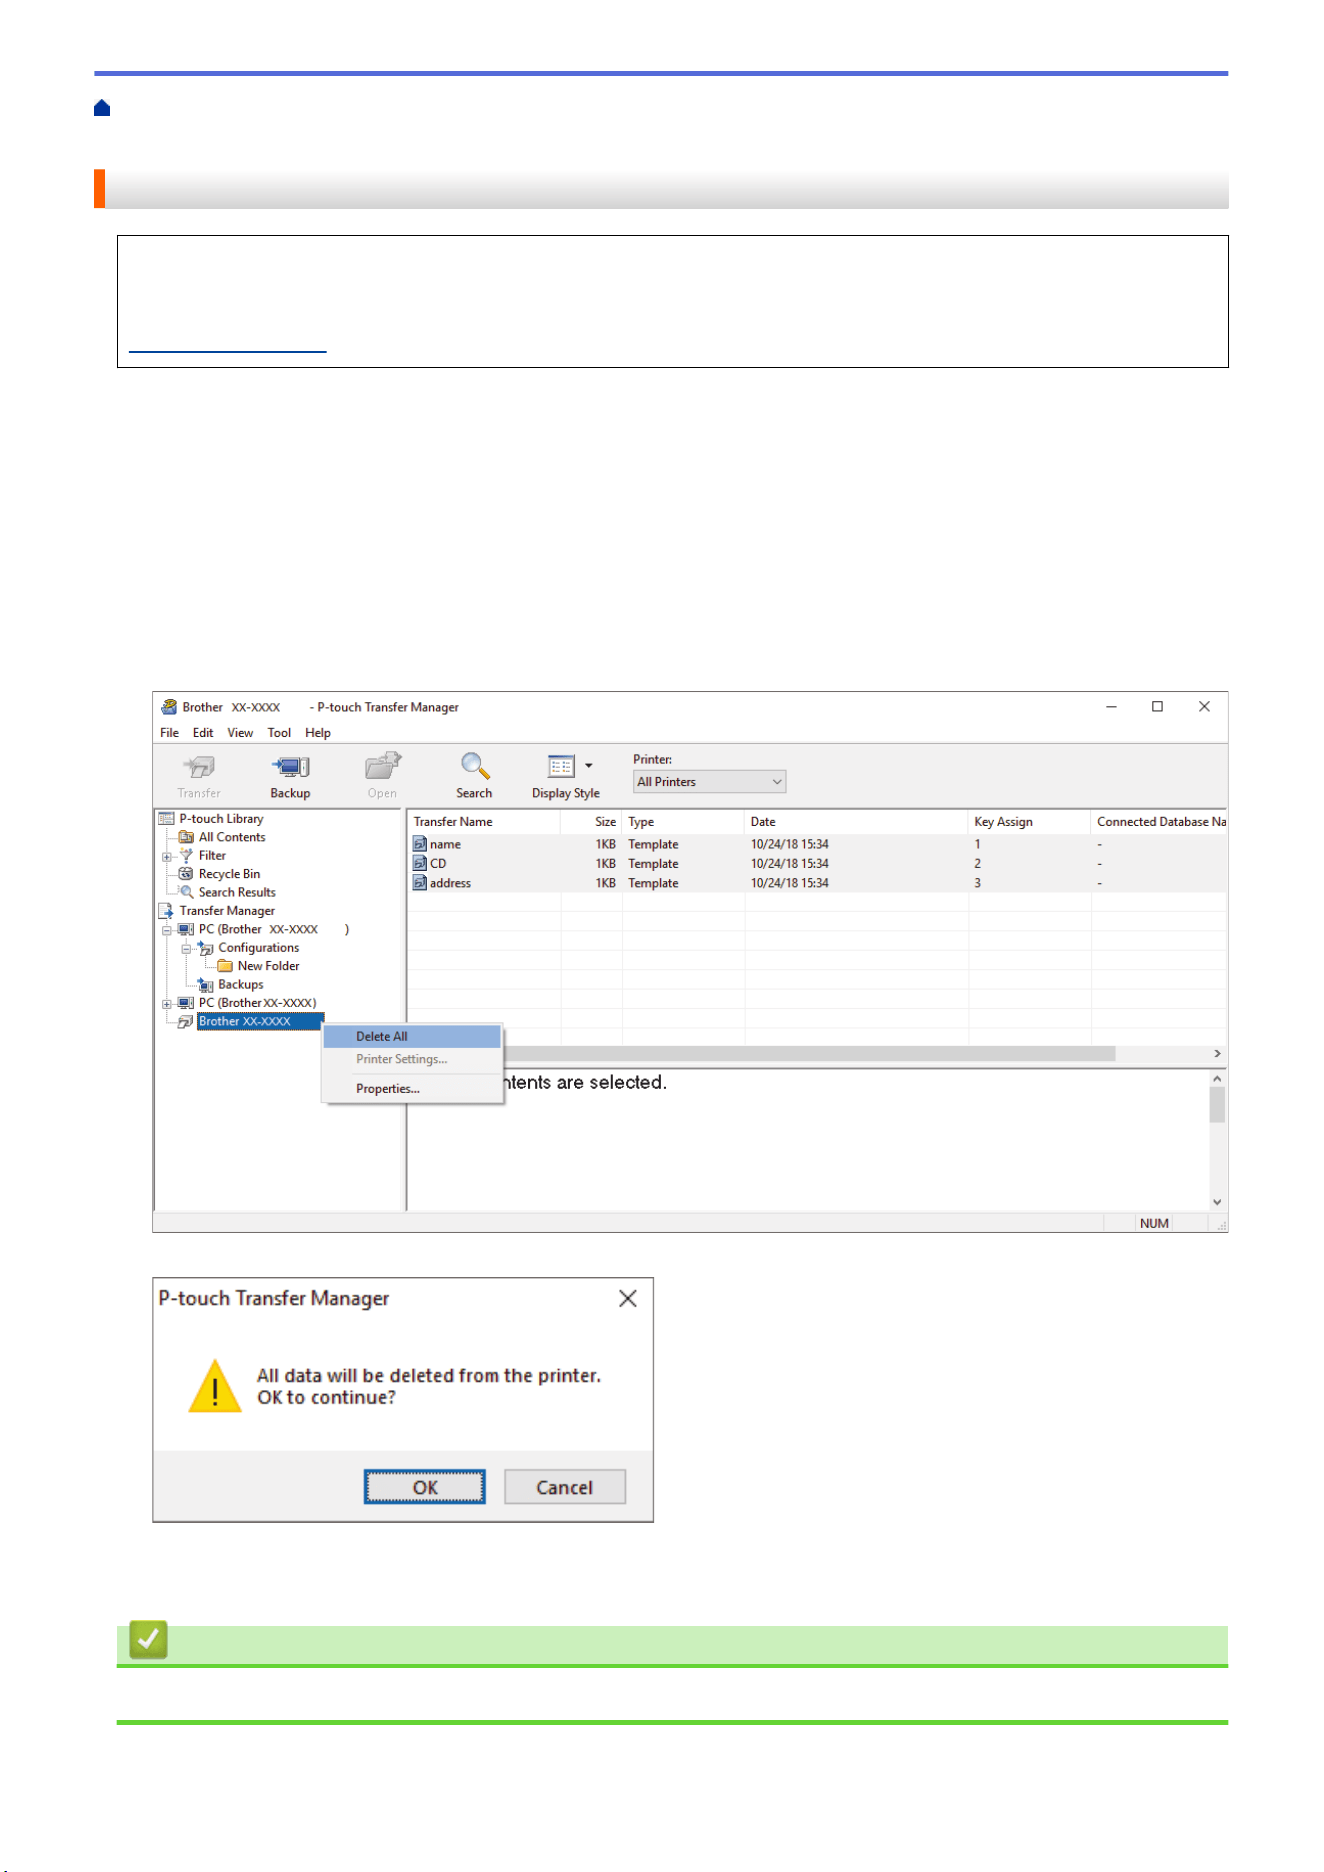
Home > Transfer Templates to the Printer Using Your Computer (Windows) > Delete Printer Data from Your
Computer (Windows)
Delete Printer Data from Your Computer (Windows)
Use P-touch Transfer Manager to delete printer data from your computer. P-touch Transfer Manager is
installed with P-touch Editor 5.4, which may be an earlier version of P-touch Editor than you are currently
using. To download P-touch Editor 5.4, search for the applicable FAQs & Troubleshooting tip at
support.brother.com.
1. Start P-touch Editor 5.4.
Click Start > Brother P-touch > P-touch Editor, or double-click the P-touch Editor icon on the desktop.
*Depending on your computer's operating system, the Brother P-touch folder may or may not be created.
2. Open the P-touch Transfer Manager window.
Click File > Transfer Template > Transfer.
3. Connect your computer to the Labeling System and turn on the Labeling System.
The printer model name appears next to a printer icon in the folder view of the P-touch Transfer Manager
window.
4. Right-click the printer, and then select the Delete All menu.
A confirmation message appears.
5. Click OK.
All templates and other data saved on the printer are deleted.
Related Information
• Transfer Templates to the Printer Using Your Computer (Windows)
134
Home > Transfer Templates to the Printer Using Your Computer (Windows) > Create Transfer Files or
Transfer Package Files (Windows)
Create Transfer Files or Transfer Package Files (Windows)
Create transfer files (BLF) or transfer package files (PDZ) with templates enclosed, so that these templates can
be used on other remote printers.
Use P-touch Transfer Manager to create transfer files or transfer package files. P-touch Transfer Manager is
installed with P-touch Editor 5.4, which may be an earlier version of P-touch Editor than you are currently
using. To download the P-touch Editor 5.4, search for the applicable FAQs & Troubleshooting tip at
support.brother.com.
Template Transfer Method
File Format
From a computer P-touch Update Software PDZ
From a mobile device Mobile Transfer Express BLF
1. Start P-touch Editor 5.4.
Click Start > Brother P-touch > P-touch Editor, or double-click the P-touch Editor icon on the desktop.
*Depending on your computer's operating system, the Brother P-touch folder may or may not be created.
2. Create a template using P-touch Editor 5.4.
3. Open the P-touch Transfer Manager window from the P-touch Editor 5.4.
Click File > Transfer Template > Transfer.
The P-touch Transfer Manager window appears. The template is transferred to the Configurations folder.
135
4. Without connecting the Labeling System to the computer, select the Configurations folder in the P-touch
Transfer Manager window, and then select the template you want to save.
You can select multiple templates at the same time.
5. Click File > Save Transfer File.
NOTE
The Save Transfer File button appears when the Labeling System is disconnected from the computer or
it is offline.
• If you click the Save Transfer File button after selecting the Configurations folder, all templates in the
folder are saved as a Transfer file (BLF) or Transfer Package file (PDZ).
• You can combine multiple templates into a single Transfer file (BLF) or Transfer Package file (PDZ).
6. In the Save as type field, select the transfer file format you want, and then type the name and save the
template.
7. When using your computer to transfer the transfer package file (PDZ) to your Labeling System, use P-touch
Update Software.
a. Click Start > Brother P-touch > P-touch Update Software, or double-click the P-touch Update
Software icon on the desktop.
b. Click Firmware update.
c. Click the Printer drop-down list, select your printer, and then click OK.
d. Click File > Open, and specify the file you want to transfer.
e. Select the specified file from the file list, and then click the Transfer button.
8. When using your mobile device to transfer the Transfer file (BLF), see Related Topics: Transfer Templates
Created on a Computer to the Printer Using a Mobile Device.
Related Information
• Transfer Templates to the Printer Using Your Computer (Windows)
Related Topics:
• Transfer Templates Created on a Computer to the Printer Using a Mobile Device
136

Home > Print Labels Using Mobile Devices > Install Mobile Apps
Install Mobile Apps
Related Models: PT-E310BT/PT-E560BT
Use Brother applications to print directly from your iPhone, iPad, iPod touch, and Android
™
mobile devices, and
to transfer data including templates, symbols, and databases created using a computer, to your printer via
Bluetooth.
App
Features
Brother Pro Label Tool Create labels for telecoms, datacoms, or electrical identifications on demand.
Mobile Transfer Express Transfer compatible label templates, databases, and images to your printer using P-
touch Transfer Manager (Windows).
For more information about the mobile apps available for your printer, visit https://support.brother.com/g/d/f5f9.
Related Information
• Print Labels Using Mobile Devices
138

Home > Print Labels Using Mobile Devices > Create Labels and Print Them Using a Mobile Device
Create Labels and Print Them Using a Mobile Device
Related Models: PT-E310BT/PT-E560BT
1. Start the label printing app on your mobile device.
2. Select a label template or design.
You can also select a previously designed label or image and print it.
3. Select the print menu in the label printing app to print your label.
Related Information
• Print Labels Using Mobile Devices
139
Home > Print Labels Using Mobile Devices > Transfer Templates Created on a Computer to the Printer
Using a Mobile Device
Transfer Templates Created on a Computer to the Printer Using a
Mobile Device
Related Models: PT-E310BT/PT-E560BT
Use P-touch Transfer Manager to save template data created using P-touch Editor 5.4 in either BLF or PDZ
format. Use Mobile Transfer Express to send the saved file from your mobile device to the printer and print it.
• P-touch Transfer Manager is installed with P-touch Editor 5.4, which may be an earlier version of P-touch
Editor than you are currently using. To download the P-touch Editor 5.4, search for the applicable FAQs &
Troubleshooting tip at support.brother.com.
• Make sure Mobile Transfer Express is installed on your mobile device.
1. Save the template data using P-touch Transfer Manager.
For more information, see Related Topics: Create Transfer Files or Transfer Package Files (Windows)
2. Do one of the following:
• Save the file to a cloud storage service, and then share it using the Mobile Transfer Express app on your
mobile device.
• Send the file as an email attachment from your computer to a mobile device, and then save the file to the
mobile device.
3. Connect the printer to your mobile device, and then start Mobile Transfer Express.
The template data appears.
4. Select the template you want to print, and then tap Transfer to transfer the template to the printer.
Related Information
• Print Labels Using Mobile Devices
Related Topics:
• Create Transfer Files or Transfer Package Files (Windows)
140

Home > Update > Update P-touch Editor
Update P-touch Editor
Before updating P-touch Editor, install the printer driver.
>> Windows
>> Mac
Windows
1. Start P-touch Editor .
Click Start > Brother P-touch > P-touch Editor, or double-click the P-touch Editor icon on the desktop.
*Depending on your computer's operating system, the Brother P-touch folder may or may not be created.
2. Click the New Label tab, and then click the New Label button to open the main window.
3. Click Help > Check for Updates.
4. If the update is available, a confirmation message will appear. Click Download.
Mac
To update P-touch Editor for Mac, visit App Store and check if the update is available.
Related Information
• Update
142
Home > Update > Update the Firmware
Update the Firmware
• Do not turn off the power or disconnect the cable when transferring data or updating firmware.
• If any other application is running, exit the application.
>> Windows
>> Mac
Windows
Before updating the firmware, you must first install the printer driver.
1. Turn on the Labeling System and connect the USB cable.
2. Make sure your computer is connected to the Internet.
3. Start the P-touch Update Software.
Click Start > Brother P-touch > P-touch Update Software, or double-click the P-touch Update Software
icon on the desktop.
4. Click the Firmware update icon.
5. Click the Printer drop-down list, select your printer, and then click OK.
6. Select Language from the drop-down list.
7. Select the checkbox next to the firmware you want to update, and then click Transfer.
8. Click Start.
The firmware update begins.
NOTE
You may need to re-establish Bluetooth connection after firmware updates. Delete the Bluetooth connection
information, and perform pairing again.
Mac
Download and install Transfer Express from the App Store to update the firmware.
1. Turn on the Labeling System and connect the USB cable.
2. Make sure your computer is connected to the Internet.
3. Double-click Macintosh HD > Applications, and then double-click the Transfer Express icon.
4. Click the Choose a printer pop-up menu, and then select your printer from the printer list.
5. Click the Download and Update button.
The firmware update begins.
NOTE
You may need to re-establish Bluetooth connection after firmware updates. Delete the Bluetooth connection
information, and perform pairing again.
Related Information
• Update
143

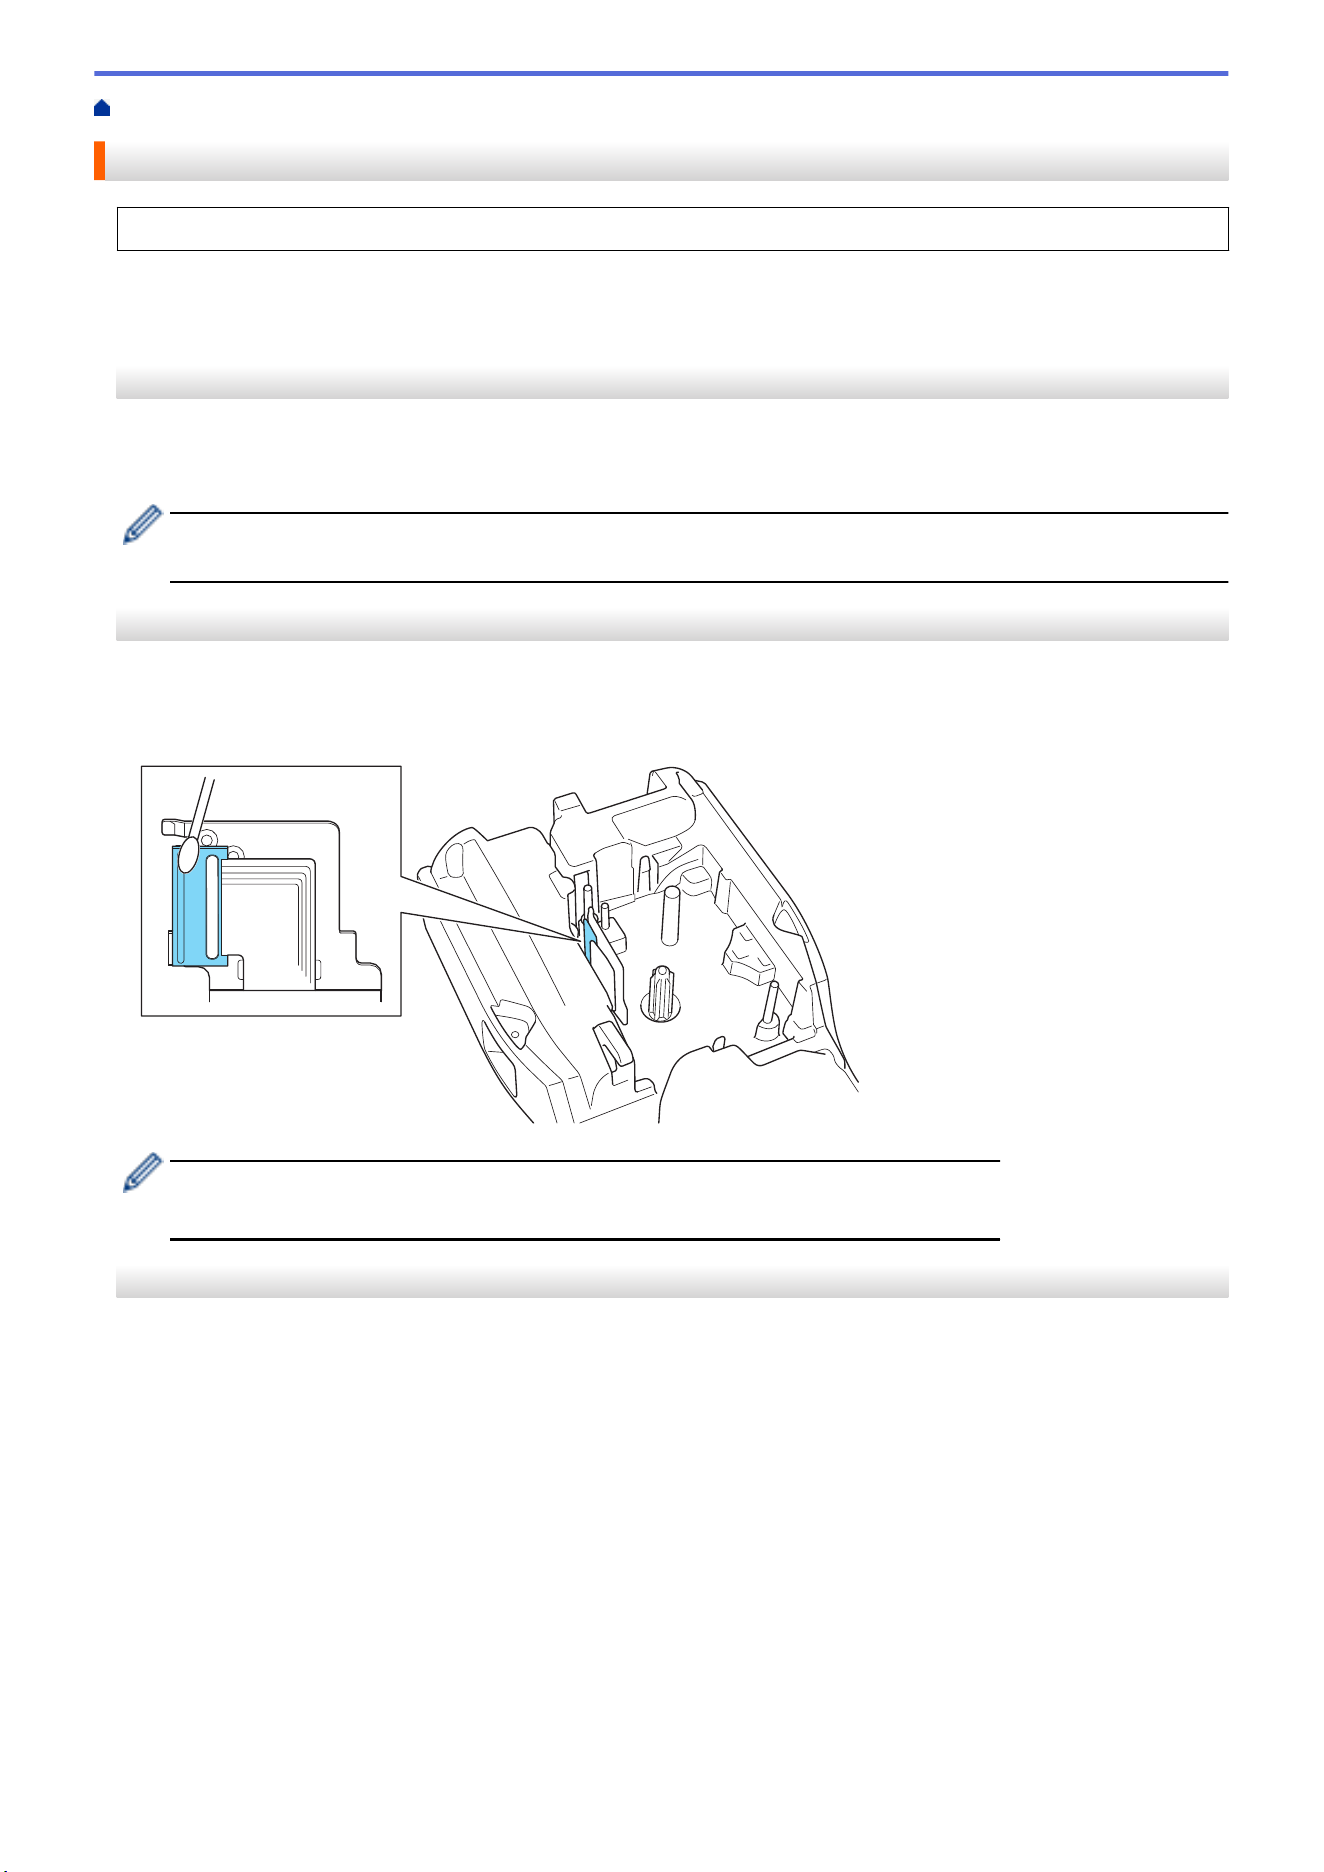
Home > Routine Maintenance > Maintenance
Maintenance
Always remove the battery and disconnect the AC Adapter before cleaning the Labeling System.
>> Clean the Unit
>> Clean the Print Head
>> Clean the Tape Cutter
Clean the Unit
1. Wipe any dust and marks from the Labeling System using a soft, dry cloth.
2. Use a slightly dampened cloth on difficult to remove marks.
Do not use paint thinner, benzene, alcohol, or any other organic solvent. These may deform or damage the
case of your Labeling System.
Clean the Print Head
Streaks or poor quality characters on printed labels generally indicate that the Print Head is dirty.
Clean the Print Head using a cotton swab or the optional Print Head Cleaning Cassette (TZe-CL4).
- Do not touch the Print Head directly with your bare hands.
- Read and follow the instructions provided with the Print Head Cleaning Cassette.
Clean the Tape Cutter
Tape adhesive can build up on the cutter blade after repeated use, taking the edge off the blade, which may
result in the tape jamming in the cutter.
145
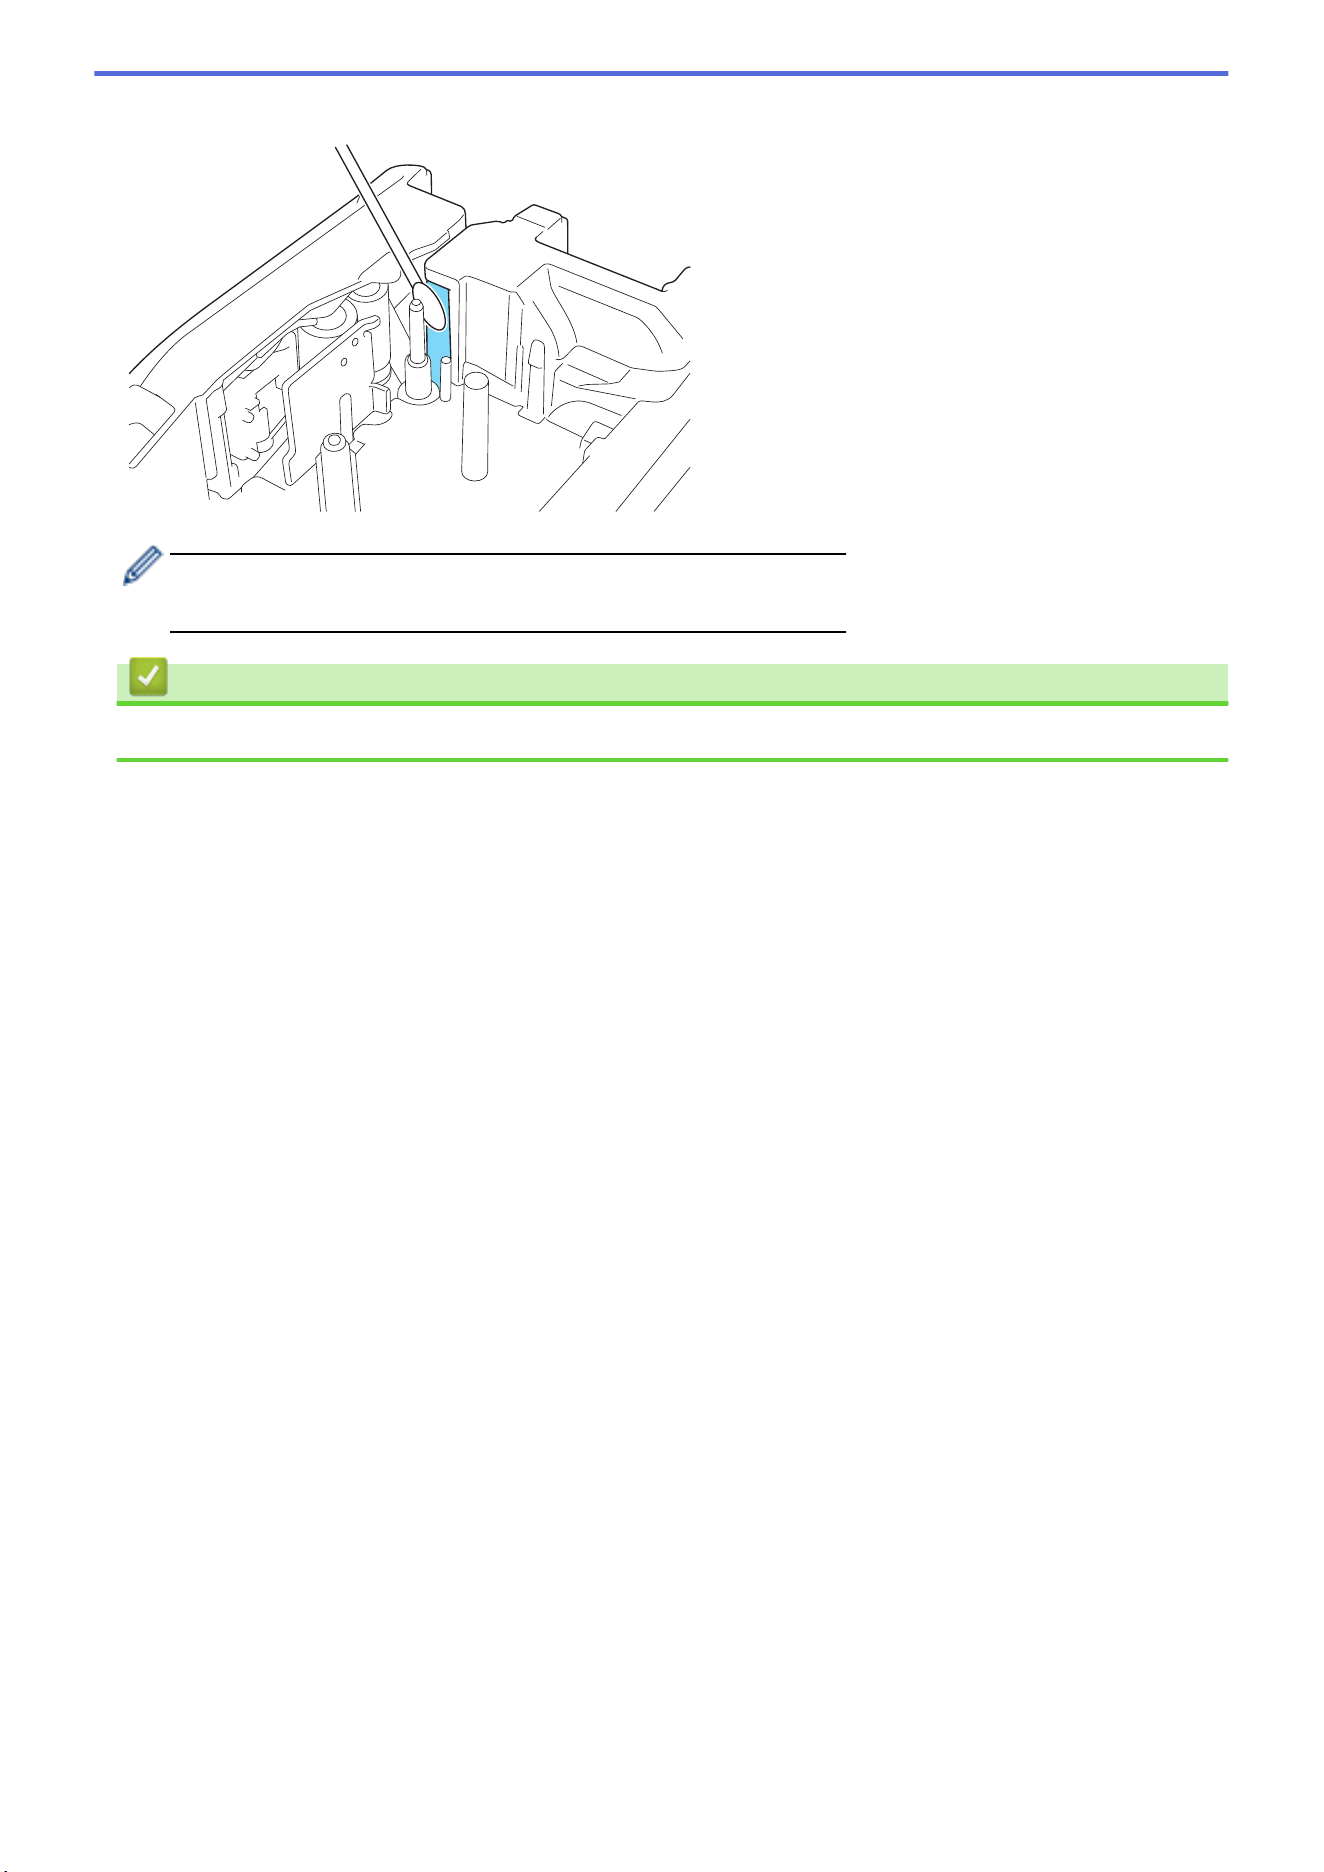

Home > Troubleshooting > If You Are Having Difficulty with Your Labeling System
If You Are Having Difficulty with Your Labeling System
This chapter explains how to resolve typical problems you may encounter when using the Labeling System.
If you still have problems, see Related Information. If after reading the topics you are unable to resolve the
problem, visit the Brother support website at support.brother.com/faqs.
Problem Solution
The Labeling System does
not print.
• Check that the Tape Cassette is inserted correctly.
• (For USA) If the Tape Cassette is empty, replace it. To order supplies and
accessories, visit www.brother-usa.com.
(For Canada) If the Tape Cassette is empty, replace it. To order supplies and
accessories, visit www.brother.ca.
• Check that the Rear Cover is securely closed.
• Check that the Labeling System is on.
• (Supported models only) Check that the computer’s or mobile device’s Bluetooth
setting is on.
• (Supported models only) Check that the Labeling System is connected to the
computer or your mobile device via Bluetooth.
• (Supported models only) Check that your Labeling System is selected in the Brother
mobile app.
• (Supported models only) Check that the Labeling System is not paired with another
device via Bluetooth.
• (Supported models only) Make sure the Labeling System and your mobile device or
computer are close enough to communicate wirelessly.
• (Supported models only) Check that the Bluetooth is not set to automatically
reconnect with another computer or mobile device.
• Make sure no devices that emit radio waves (for example, a microwave oven) are
located nearby.
• Check that the correct printer driver is installed when printing from a computer.
• Connect the Labeling System to your computer using the USB Cable (included)
when printing from a computer.
• If the Print Head is dirty, clean it with a cotton swab or optional Print Head Cleaning
Cassette (TZe-CL4).
• The tape does not feed
correctly.
• The tape gets stuck
inside the Labeling
System.
• If the tape is bent, cut off the bent section.
• If the tape is jammed, remove the Tape Cassette, remove the jammed tape, and
then cut off any damaged tape. To avoid tape jams, clean the Tape Cutter. See
Related Topics.
• Check that the end of the tape exits through the Tape Guide.
• Confirm that the tape is pointed at the Tape Exit Slot.
• Remove the Tape Cassette and reinstall it.
An error occurred when
using a mobile app.
Go to your mobile application’s settings menu and select Support > FAQs &
Troubleshooting.
The LCD is not responding. Disconnect the AC Adapter and remove the battery for at least 10 minutes.
The LCD remains blank
after turning the power on.
Check that the battery is correctly installed and the AC Adapter is correctly connected.
The LCD messages are
displayed in a foreign
language.
Set the LCD language you want. For more information, see Related Topics.
The Labeling System stops
while printing a label.
• If striped tape is visible, this indicates that you have reached the end of the tape.
Replace the Tape Cassette.
• Replace the battery or connect the AC Adapter directly to the Labeling System.
• I cannot install the
Printer Driver even if I
If you cannot use your Labeling System even though you have installed the Printer
Driver:
148

Problem Solution
follow the correct
procedure. (Windows)
• I cannot see my printer
listed in P-touch Editor
even though I have
installed the Printer
Driver. (Windows)
1. Download the Printer Driver Uninstaller from your model’s Downloads page at
support.brother.com.
2. Use the Printer Driver Uninstaller to remove the printer information.
3. Run the Printer Driver Installer again and follow the on-screen instructions to
proceed with the installation.
The ink ribbon is separated
from the ink roller.
If the ink ribbon is damaged, replace the Tape Cassette. If it is not damaged, leave the
tape uncut and carefully remove the Tape Cassette, and then wind the loose ink ribbon
back onto the spool.
Printed barcodes or QR
codes cannot be read.
• Change the tape. (Recommended: Black on white tape)
• Enlarge the barcodes or QR codes using your barcode application, if possible.
I do not know the version
number of the firmware for
the Labeling System.
You can confirm the firmware version number and other information on the LCD. For
more information, see Related Topics.
When the label is printed,
there is too much space
(wide margin) on both sides
of the text.
Change the cut option to a smaller margin.
See Related Topics.
The font size cannot be
increased.
The font is already the maximum size for the width of the label, or the label length has
been set, so there is a limit on the font size to prevent exceeding the set length.
When multiple labels are
printed, the last label is cut
incorrectly.
When the Chain setting is enabled, feed and cut the last printed label.
See Related Topics.
I cannot update the printer’s
firmware using the P-touch
Update Software or
Transfer Express.
Restart the printer and then try to update the firmware again. Do not press any buttons
during the firmware update until the Home Screen is displayed automatically.
The Labeling System does
not operate normally.
• Reset the printer to its factory settings. For more information, see Related Topics.
• Disconnect the AC Adapter and remove the battery for at least 10 minutes.
Related Information
• Troubleshooting
Related Topics:
• Reset the Labeling System
• Set Language
• Check the Version Information
• Select a Cut Option (PT-E310BT)
• Select a Cut Option (PT-E510/PT-E560BT)
• Maintenance
149
Home > Troubleshooting > Error and Maintenance Messages
Error and Maintenance Messages
Message Cause/Remedy
Barcode error
Record: XXXXX
Field : XXXXX
There was an attempt to print barcode labels from a database.
The Labeling System displays this message when the selected range of the database
includes invalid characters or numbers not supported by the barcode protocol.
Barcode too wide
Reduce the barcode data, or try to use wider tape.
Battery damaged.
Replace Li-ion
Battery.
The Rechargeable Li-ion Battery is damaged. Replace the battery or use an AC
adapter.
Battery empty
The battery has run out of charge. Recharge the Li-ion Battery.
Check no. of digits
entered
The number of digits entered in the barcode data does not match the number of digits
set in the barcode parameters. Enter the correct number of digits.
Cooling... wait ##
mins and restart
machine
The printer is too hot and needs to cool down. Wait for the number of minutes listed in
the message, and then try again.
Cutter error
If the tape is jammed in the Cutter unit, remove the tape. Turn the Labeling System off
and then on again before continuing.
Hi-Res Print not
supported with this
media
The tape currently installed cannot print in high resolution mode.
Length limit
The printed label length using the text entered is longer than 39.37" (999 mm). Edit the
text so that the label length is less than 39.37" (999 mm).
Low Battery
The battery level is low. Recharge the Li-ion Battery.
Memory full
reduce file size to
proceed
The total data size exceeds the free space in the printer's memory after you have edited
database records. Reduce the data size if you want to edit.
System error XX
Contact Brother Customer Service.
Text too long
The printed label length using the text entered is longer than the length setting. Edit the
text to fit within the set length or change the length setting.
Related Information
• Troubleshooting
150

Home > Troubleshooting > Adjust the Label Length
Adjust the Label Length
When the Tape Cassette is almost empty, the printed label length may be less accurate. In this case, adjust the
label length manually.
Approximately 1% of the total label length is adjusted by one level.
1. Press Menu.
2. Press a or b to display [Adjust Label Length].
3. Press d or c to display [-3 - +3], and then press OK.
Related Information
• Troubleshooting
151

Home > Troubleshooting > Check the Version Information
Check the Version Information
You can confirm the firmware version number and other information on your printer's LCD. You may need this
information if you contact Brother with a query or regarding the warranty.
1. Press Menu.
2. Press a or b to display [Version Information], and then press OK.
Related Information
• Troubleshooting
152

Home > Troubleshooting > Reset the Labeling System > Reset Using the LCD
Reset Using the LCD
1. Press Menu.
2. Press a or b to display [Reset], and then press OK.
3. Press a or b to display the reset option you want, and then press OK.
A message appears asking you to confirm your reset option.
4. Press OK.
If using the [Reset All Settings] or [Factory Settings] reset options, you will need to set your
preferred default language again after the reset.
Reset Options Details
Reset All Settings
File memory is NOT cleared.
Settings data is cleared and all settings are reset to the factory settings.
Erase All Content
File memory is cleared.
Settings data is NOT cleared and settings remain as currently configured.
Factory Settings
File memory, labels, and customized settings are reset to the factory settings.
Related Information
• Reset the Labeling System
154

Home > Appendix > Specifications
Specifications
>> Printing
>> Size
>> Interface
>> Environment
>> Power Supply
>> Media
>> Memory
>> Compatible Operating Systems
Printing
Print Speed
1
Using AC Adapter
2
• PT-E310BT
Up to 0.78" (20 mm)/sec.
• PT-E510/PT-E560BT
Up to 1.18" (30 mm)/sec.
Using Battery • PT-E310BT
Up to 0.78" (20 mm)/sec.
• PT-E510/PT-E560BT
Up to 0.78" (20 mm)/sec.
Print Resolution • PT-E310BT
112 dot / 180 dpi
• PT-E510/PT-E560BT
128 dot / 180 dpi
Maximum Print Height
3
• PT-E310BT
Up to 0.62" (15.8 mm) (when using 0.70"/18 mm
tape)
• PT-E510/PT-E560BT
Up to 0.71" (18.0 mm) (when using 0.94"/24 mm
tape)
1
Actual print speed varies depending on the conditions.
2
When using the AC Adapter for USB Type-C (PA-AD-004 / Optional)
3
The actual character size may be smaller than the maximum print height.
Size
Weight
• PT-E310BT
Approximately 1.73 lb. (Approximately 785 g) (without battery and Tape Cassette)
• PT-E510/PT-E560BT
Approximately 2.31 lb. (Approximately 1050 g) (without battery and Tape Cassette)
Dimensions • PT-E310BT
Approximately 5.31" (W) x 9.27" (D) x 2.77" (H) (Approximately 135 mm (W) x 235.5 mm (D) x
70.3 mm (H))
• PT-E510/PT-E560BT
Approximately 5.19" (W) x 9.61" (D) x 3.15" (H) (Approximately 132 mm (W) x 244 mm (D) x
80 mm (H))
LCD
• PT-E310BT
15 characters x 2 lines (128 dot x 56 dot)
• PT-E510/PT-E560BT
17 characters x 2 lines (240 dot x 120 dot)
156
Interface
USB USB Ver.2.0 (Full Speed) (Type C)
USB class: Printer class
Bluetooth
(PT-E310BT/PT-E560BT)
Bluetooth Ver.5.0
Supported profile: SPP
Supported protocol: iAP
Environment
Operating
Temperature
Between 50°F and 95°F (Between 10°C and 35°C)
Operating
Humidity
Between 20% and 80%
Maximum wet bulb temperature: 80.6°F (27°C)
Power Supply
Battery
Rechargeable Li-ion Battery: 7.2 V
Model Name: BA-E001
Adapter
(Optional)
AC Adapter for USB Type-C: 12 V
Model Name: PA-AD-004
Charging Time
1
Approximately 3 hours
1
When using the AC Adapter for USB Type-C (PA-AD-004 / Optional)
Media
Tape Width
Standard TZe Tape
Cassette
• PT-E310BT
0.13" (3.5 mm), 0.23" (6 mm), 0.35" (9 mm), 0.47" (12 mm), 0.70" (18
mm)
• PT-E510/PT-E560BT
0.13" (3.5 mm), 0.23" (6 mm), 0.35" (9 mm), 0.47" (12 mm), 0.70" (18
mm), 0.94" (24 mm)
HGe Tape Cassette
• PT-E310BT
0.23" (6 mm), 0.35" (9 mm), 0.47" (12 mm), 0.70" (18 mm)
• PT-E510/PT-E560BT
0.23" (6 mm), 0.35" (9 mm), 0.47" (12 mm), 0.70" (18 mm), 0.94" (24
mm)
HSe Tube Cassette
(2:1 heat shrink
ratio)
• PT-E310BT
0.23" (5.8 mm), 0.34" (8.8 mm), 0.46" (11.7 mm), 0.69" (17.7 mm)
• PT-E510/PT-E560BT
0.23" (5.8 mm), 0.34" (8.8 mm), 0.46" (11.7 mm), 0.69" (17.7 mm),
0.93" (23.6 mm)
HSe Tube Cassette
(3:1 heat shrink
ratio)
• PT-E310BT
0.20" (5.2 mm), 0.35" (9.0 mm), 0.44" (11.2 mm)
• PT-E510/PT-E560BT
0.20" (5.2 mm), 0.35" (9.0 mm), 0.44" (11.2 mm), 0.82" (21.0 mm)
No. of Lines • PT-E310BT
0.70" (18 mm) tape: 1 - 5 lines
0.47" (12 mm) tape: 1 - 3 lines
0.35" (9 mm) tape: 1 - 2 lines
157
0.23" (6 mm) tape: 1 - 2 lines
0.13" (3.5 mm) tape: 1 line
• PT-E510/PT-E560BT
0.94" (24 mm) tape: 1 - 7 lines
0.70" (18 mm) tape: 1 - 5 lines
0.47" (12 mm) tape: 1 - 3 lines
0.35" (9 mm) tape: 1 - 2 lines
0.23" (6 mm) tape: 1 - 2 lines
0.13" (3.5 mm) tape: 1 line
Memory
File Memory
Text Buffer Maximum 1800 characters
File Storage Maximum 99 files
Transferred Data Memory 6 MB
Compatible Operating Systems
For the latest list of compatible software, visit
support.brother.com/os.
Related Information
• Appendix
158
Home > Appendix > Brother Help and Customer Support
Brother Help and Customer Support
IMPORTANT
For technical help, you must call the country where you bought the machine. Calls must be made from
within that country.
>> FAQs (Frequently Asked Questions)
>> For Customer Service
>> Ordering Accessories and Supplies
FAQs (Frequently Asked Questions)
For more information on your Brother machine, visit the Brother support website at support.brother.com. For
additional help and tips, go to your model's FAQs & Troubleshooting page; for the latest drivers and software,
go to your model's Downloads page.
For Customer Service
In USA:
www.brother-usa.com/support (Self-Service/Email/Chat)
1-877-BROTHER (1-877-276-8437)
In Canada:
www.brother.ca/support
(Self-Service Videos, Email, Chat, Facebook and Twitter Help)
Service Center Locator (USA only)
For the location of a Brother authorized service center, call 1-877-BROTHER (1-877-276-8437) or visit
www.brother-usa.com/support.
Service Center Locations (Canada only)
For the location of a Brother authorized service center, visit www.brother.ca/support.
Ordering Accessories and Supplies
We recommend Genuine Brother supplies, which are available at most Brother retailers. If you cannot find the
supplies you need and have a Visa, MasterCard, Discover, American Express credit card, or PayPal account,
you can order directly from Brother. Visit us online for a complete selection of the Brother accessories and
supplies that are available for purchase.
NOTE
In Canada, only Visa and MasterCard are accepted.
In USA:
1-877-BROTHER (1-877-276-8437)
www.brother-usa.com/support
In Canada:
www.brother.ca
159


USA/CAN
Version 0