Loading ...
IMPORTANT SAFEGUARDS
FEATURES
VISIPURE
®
FILTER VIEWING WINDOW
Your Holmes
®
Air Purifier includes Aer1
®
Total-Air
Filter(s), specially designed to deliver cleaner air allowing
you to dust less often!! The Aer1
®
Total-Air filter(s) last 4
months. See back panel for other filter options.
The Visipure
®
Filter Viewing Window (Fig. 1 - C) is a lens
which allows you to get a clear view of the dirt being
collected in the filter and see if the filter needs
replacement. The Filter Reminder Dial (Fig. 1 - D) helps
you keep track of when to change the filter.
BEFORE USE
1. Carefully unpack your Air Purifier and remove all
packaging materials from the unit. Select a firm level
place where there are no obstructions to the air inlet
or filtered air outlet.
2. Remove the air inlet grill (Fig. 1 - I) and check if the
filter is covered by a plastic bag. If it is, remove
plastic bag before use and place filters into unit.
Reinstall the air inlet grill.
3. This unit is equipped with a filter that lasts 4 months.
Please set the left Filter Change Reminder Dial
to the current month you are replacing the new
filter(s). Set the right Filter Change Reminder Dial
to 4 months from the date you replaced the filter. If
you have purchased a replacement filter that has a
12 month life, set the right dial to 12 months from
date of replacing the new filter(s). This will serve as a
reminder for when filter replacement is needed.
NOTE: Make sure air purifier is placed at least 1 foot
away from wall or large objects.
OPERATING INSTRUCTIONS
1. Plug into a 120V AC electrical outlet.
2. Select the desired operating speed; HI (3), MEDIUM
(2), LOW (1), by turning Speed Control Switch to the
appropriate setting. For optimum air filtration, it is
recommended to operate the air purifier continuously.
Its rugged motor has been designed to give many
years of use.
3. To release negative ions into the filtered air, press
the ionizer button ( ) to ON and the button will
illuminate in blue.
NOTE: The ionizer will not work unless the unit is running.
POWER CORD INSTRUCTIONS
• The length of cord used on this appliance was
selected to reduce tangling or tripping hazards.
• If a longer cord is necessary, an approved extension
cord may be used. The electrical rating of the
extension cord must be equal to or greater than the
electrical rating of the air purifier (see rating label
marked on bottom of the product).
• Care must be taken to arrange the extension cord so
that it will not drape over the countertop or tabletop
where it can be pulled on by children or accidentally
tripped over.
GET TO KNOW YOUR AIR PURIFIER
This unit is compatible with all Aer1
®
Filters. This allows
you to choose the filter that is just right for you. Below is
information on each filter:
TOTAL AIR - Advanced Dust Eliminating Technology
ODOR ELIMINATOR - 10x the odor fighting power
ALLERGEN REMOVER - 99.97% True HEPA technology
improves air quality for allergy sufferers
ALLERGEN PERFORMANCE PLUS - 99.99% True HEPA
technology improves air quality for allergy sufferers.
SMOKE GRABBER - 99% effective at removing smoke
from the air steam (*as small as 0.3 microns from air
passing through the filter)
IONIZER
This appliance has an optional ionizer feature which,
when turned on, releases negative ions into outgoing
filtered air to help the air purification process.
What Are Ions?
Ions are tiny particles that carry a positive or negative
charge. They exist naturally around us: in the air, water,
and ground. Both positive and negative ions are colorless,
odorless, and harmless.
How Does The Ionizer Work?
Negative ions help air purification by attaching
themselves to very small airborne particles in the room.
These particles take on a negative charge and may join
with positively charged particles such as dust, pollen,
smoke, and pet dander to form larger particles. These
larger particles are then more easily captured by the
filter system.
Important Notes:
Your ionizer may produce an occasional popping or
cracking sound. This is normal and occurs when a small
buildup of ions is discharged.
After extended use, you may notice dust around the grills
or front panel. This is caused by negative ions exiting the
air outlet, evidence of the ionizer’s air cleaning
effectiveness. You can remove the dust with a soft brush
or clean, damp cloth.
Larger particles may be attracted to positively charged
surfaces throughout the home, like walls or floors.
• This may occur more frequently when the filter is
nearing the end of its usable product life and is
unable to capture as many charged particles.
• Excessive amounts of pet dander, dust, or smoke may
decrease the life expectancy of the filter and
interfere with the ionization process.
To help prevent particles from attracting to surfaces
throughout your home:
• You may want to run the ionizer less often.
• Check the condition of the filter(s) more frequently.
CAUTION: The ionizer in this appliance produces less
ozone than the UL established limits of 50ppb. However,
in high concentrations, ozone can be harmful to birds and
small pets. To prevent ozone buildup, we suggest using
the ionizer in well ventilated areas with the air purifier
fan on.
HIGH, MEDIUM AND LOW SPEED
SETTINGS
For optimum air filtration, operate your Holmes
®
air
purifier continuously on the MEDIUM (2) setting. Its
rugged motor has been designed to give many years of
use. For quieter operation (such as in a bedroom), select
the LOW (1) setting. When high levels of air pollution are
present, select the HIGH (3) setting to quickly circulate
and filter the air in the room.
When using electrical appliances, basic safety precautions
should always be followed to reduce the risk of fire, electric
shock, and injury to persons. These precautions include:
1. Read all instructions before using the appliance.
2. To reduce the risk of fire or electric shock, plug the
appliance directly into a 120V AC electrical outlet.
3. If the Filter is covered by a bag when shipped,
remove plastic bag before use.
4. Keep the cord out of heavy traffic areas. To avoid
fire hazard, NEVER put the cord under rugs, near
heat registers, radiators, stoves, or heaters.
5. DO NOT immerse the appliance in water or other
liquids. Do not use near water.
6. Close supervision is necessary when any appliance is
used by or near children, or disabled persons.
7. Always unplug the air purifier before moving or
cleaning the unit, opening the grill, changing the
filter and whenever the unit is not in use. To
disconnect the unit, be sure to pull the plug and not
the cord.
8. NEVER drop or insert any objects into the openings of
the unit.
9. DO NOT operate any appliance with a damaged cord
or plug. If the motor fan fails to operate or the unit
has been dropped or damaged in any manner, return
appliance to manufacturer for examination and/or
repair.
10. Use appliance only for intended household use as
described in this manual. Any other use not
recommended by the manufacturer may cause fire,
electric shock, or injury to persons. The use of
attachments not recommended or sold by Jarden
Consumer Solutions may cause injuries.
11. DO NOT use outdoors.
12. NEVER place on a soft surface such as a bed or sofa
as this could cause the unit to tip over and block the
air inlet or outlet grills.
13.
Keep unit away from heated surfaces and open flames.
14. DO NOT attempt to repair or adjust any electrical or
mechanical functions on this unit. Doing so may
cause injuries and void your warranty. The inside of
the unit contains no user serviceable parts. All
servicing should be performed by Jarden Consumer
Solutions or an authorized Jarden Consumer
Solutions Center.
15. DO NOT place anything on top of unit.
16. Always turn the appliance off before unplugging it.
17.
The ionizer in this appliance produces less ozone than
the UL established limits of 50ppb (parts per billion).
However, in high concentrations, ozone can be harmful
to birds and small pets. To prevent ozone buildup, we
suggest using the ionizer in well ventilated areas with
the fan on.
18. This appliance should only be used in a room with
temperatures between 40° F and 110° F.
19. To reduce the risk of fire or electric shock, DO NOT
use this appliance with any solid-state speed control
device.
SAVE THESE
INSTRUCTIONS
FEATURES - OPERATIONS
CLEANING/MAINTENANCE
FILTER REPLACEMENT
THIS APPLIANCE HAS A POLARIZED PLUG (one blade is wider than the
other). To reduce the risk of electric shock, this plug is intended to fit in a
polarized outlet only one way. If the plug does not fit fully in the outlet,
reverse the plug. If it still does not fit, contact a qualified electrician to
install the proper outlet.
DO NOT ATTEMPT TO MODIFY THIS PLUG OR DEFEAT THIS
SAFETY FEATURE IN ANY WAY.
CLEANING/MAINTENANCE INSTRUCTIONS
1. Turn the air purifier off and unplug it before cleaning.
2. The outside of the air purifier can be cleaned with a
soft, clean damp cloth.
3. The air inlet grill (reference Fig. 1) can be removed
and washed in warm soapy water (not dishwasher
safe). Dry before replacing in the unit.
4. Remove prefilter and wash in warm soapy water.
Air dry and then assemble to air inlet grill.
5. The filtered air outlet can be cleaned of dust with a
small, soft brush.
6. If you wish to clean the inside filter chamber of the air
purifier, please only use a dry, soft cloth to wipe it down.
WARNING: Do not allow moisture to come in
contact with internal components.
FILTER REPLACEMENT INSTRUCTIONS
IMPORTANT:
• DO NOT attempt to wash and re-use the Aer1
®
Filters.
• If the filters are enclosed in plastic bags, remove
them before use.
NOTE:
Every few weeks, check the condition of filter(s). The
Visipure
®
Filter Viewing Window is a lens which allows you
to get a clear view of the dirt being collected in the filter.
The Filter Reminder Dial also helps you keep track of when
to change the filters. Filter life will vary, depending on air
quality and usage (see below). Filters that have
accumulated a layer of particles and present discoloration
can reduce the air purifier performance and need to be
exchanged for new filters. Under normal conditions of
continuous use, the Aer1
®
Total Air, Odor and Smoke
Filters will last 4 months while the Allergen and Allergen
Performance Plus Filters will last 12 months.
After approximately 4 months of operation, check the
condition of the filter through the Visipure
®
Filter Viewing
Window to see how much dust has been accumulated on
the filters and use Filter Reminder Dial to keep track on
how long a filter has been in use.
• Filters with a 4 month filter life: Wash the foam
pre-filter and replace the Aer1
®
filter(s) after 4
months of operation.
• Filters with a 12 month filter life: After 4 months of
operation, it is recommended to wash the foam
pre-filter and check the condition of your filter(s)
through the Visipure
®
Filter Viewing Window. The
filters must be replaced after 12 months of operation.
To replace your filter(s):
1. Turn off and unplug the air purifier.
2. Open the air inlet grill and examine the black foam
prefilter. Remove prefilter from air inlet grill.
Remove any dust or lint and wash in warm soapy
water. Rinse, air dry and place back into grill inlet.
3. Remove the used Aer1
®
filter(s) from the unit by pulling it
gently towards you and discard it. DO NOT attempt to
clean the Aer1
®
filters.
4. Install the new Aer1
®
filter(s) into the unit model
utilizes a hang.
5. Align the clip(s) on the side
of Aer1
®
filter(s) with rails
on the inside of the purifier
unit. Gently slide the filter(s)
onto the rail. (Fig. 2)
6. Replace air inlet grill.
7. Turn the left Filter Change
Reminder Dial to select the current month you are
replacing the new filter(s). Turn the right Filter Change
Reminder Dial to 4 months from the date filter(s) was
replaced. will serve as reference for when filter
replacement is needed. If you have purchased a filter
that has a 12 month life, set the right dial to 12
months from date of replacing the new filter(s). This
will serve as a reminder for when filter replacement is
needed.
Fig. 2
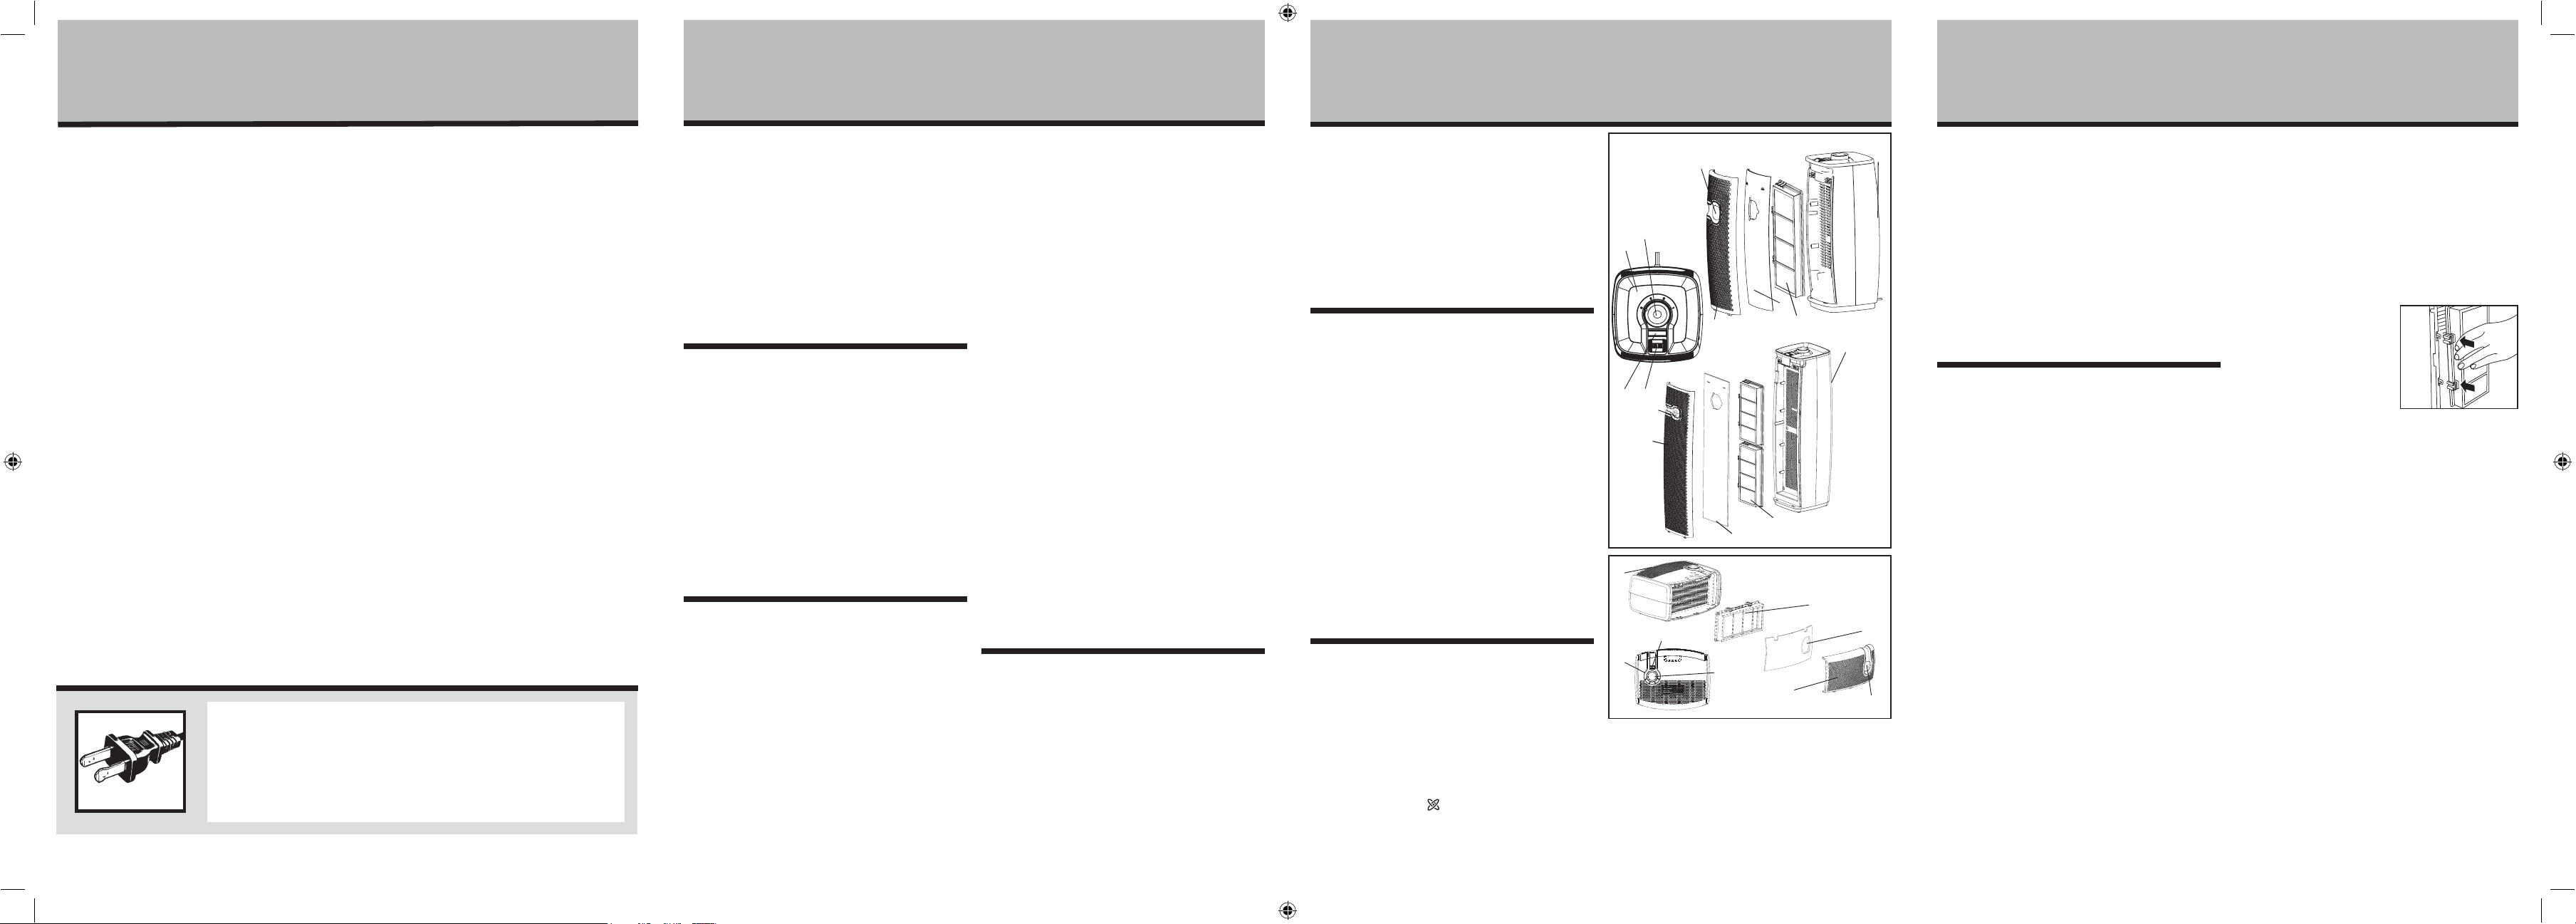
Fig. 1
A. Control Panel
B. Speed Control
Switch
C. Visipure
®
Filter
Viewing Window
D. Filter Reminder Dial
(For HAP9413 &
HAP9425 only)
E. Ionizer Button
F. Filtered Air Outlet
G. Aer1
®
Filter(s)
H. Washable Foam
Pre-Filter
I. Air Inlet Grill
E
B
H
I
F
G
G
C
A
F
H
I
F
C
I
H
G
E
C
D
B
A
HAP9241_HAP9413_HAP9425_16EM2.indd 2 9/16/16 4:12 PM