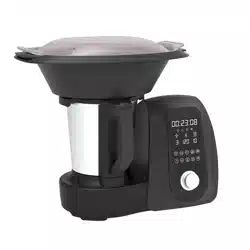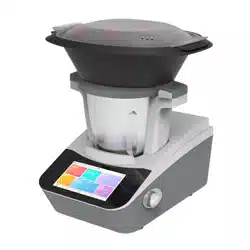
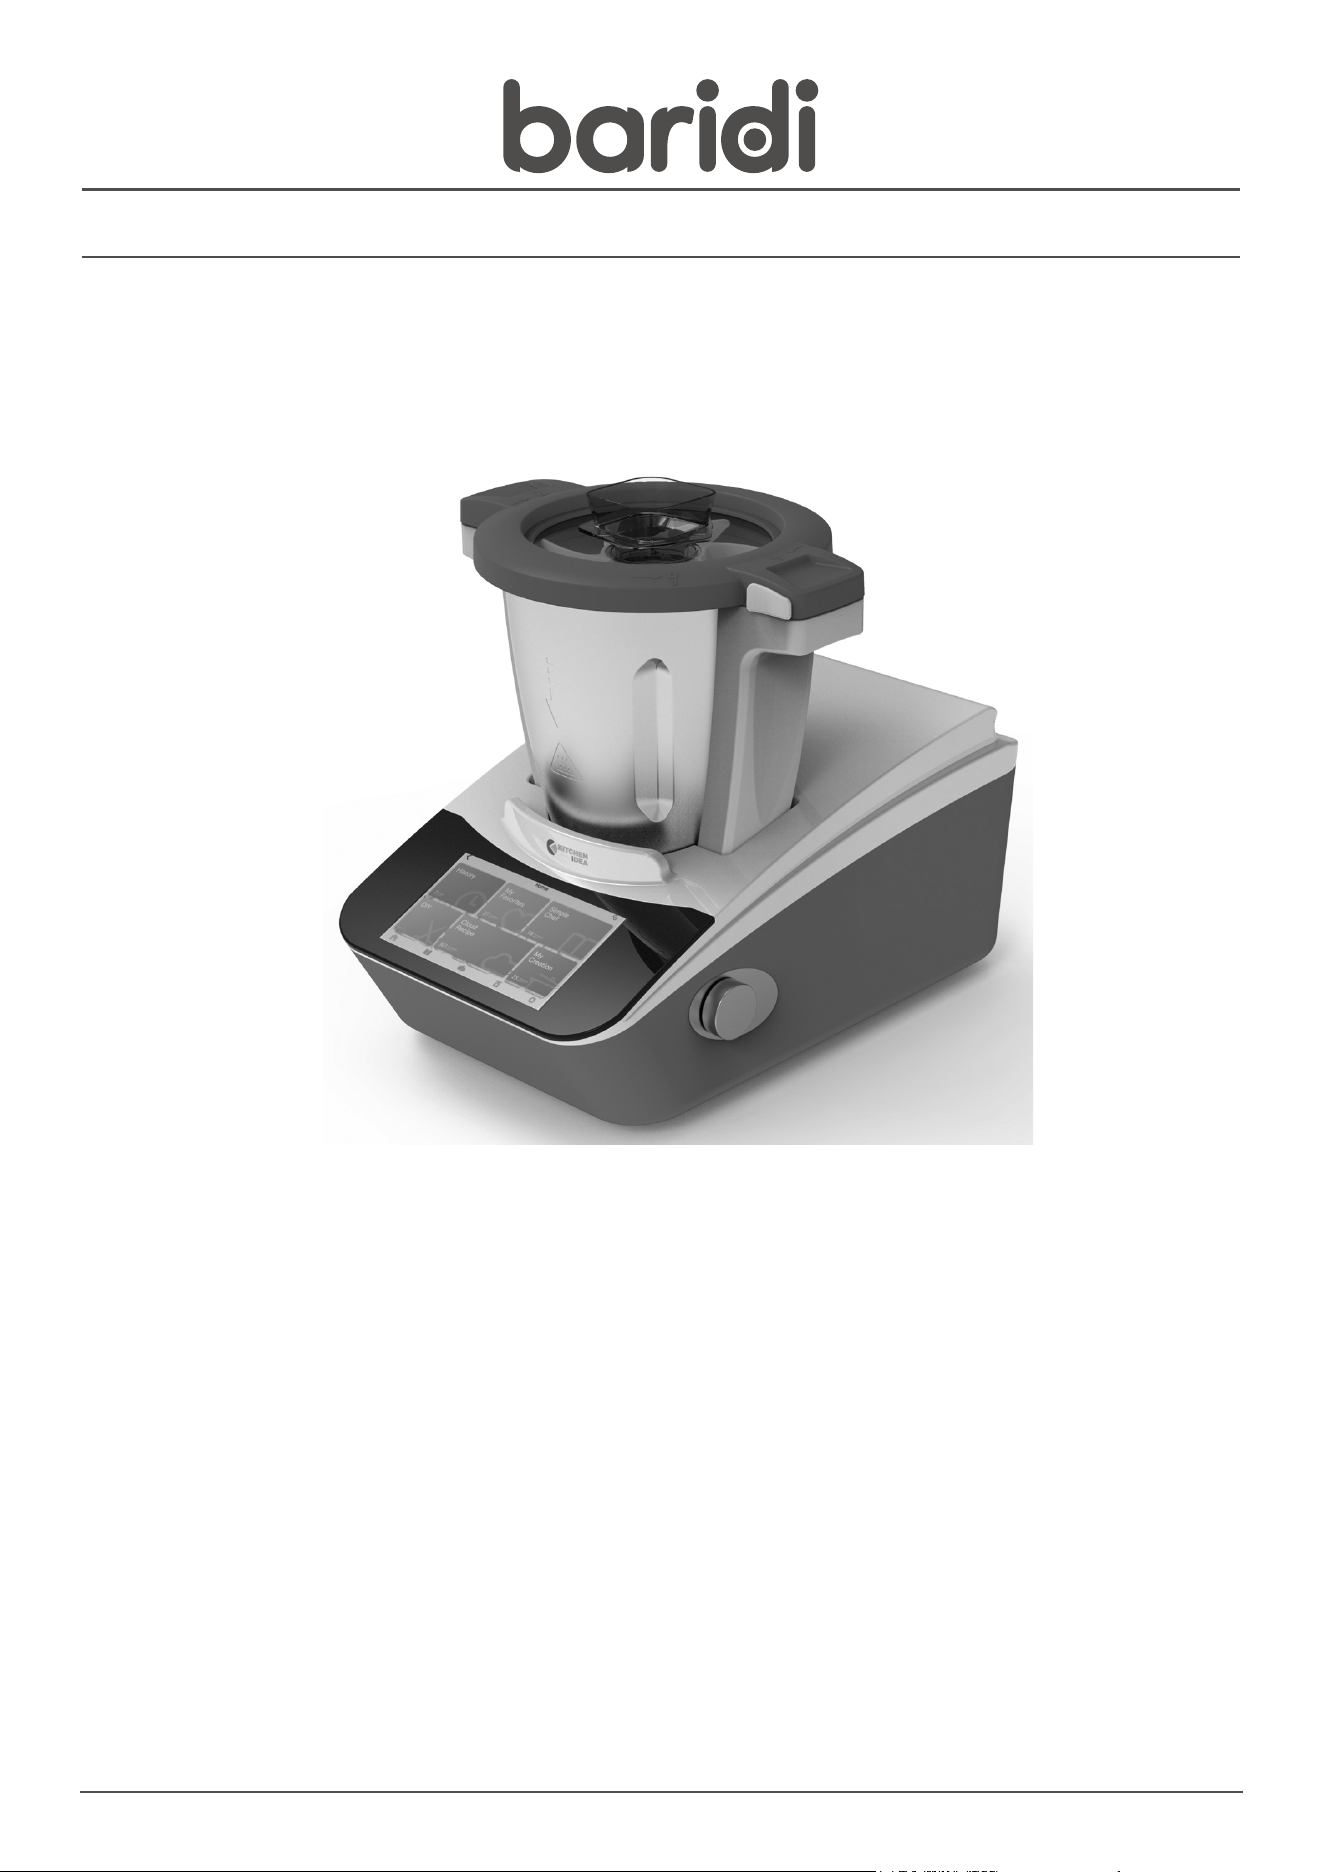
Baridi Smart Thermo Cooker, 18 Preset Functions, 7” Touch
Screen, App Guided Recipes, White
Model No. DH189
Thank you for purchasing a Dellonda product. Manufactured to a high standard, this product will, if used according to these instructions, and properly
maintained, give you years of trouble free performance.
www.dellonda.co.uk
DH189 Issue:1 11/01/23
2
Important Information
Please read these instructions carefully and note any safe operational requirements, warnings & cautions. Use the product correctly and with
care for the purpose for which it is intended. Failure to do so may cause damage and/or personal injury and will invalidate the warranty. Keep
these instructions safe for future use.
Refer to
instruction
manual
Warning:
Hot
Surface
SAFETY INSTRUCTIONS
• ELECTRICAL SAFETY
• WARNING! It is the user’s responsibility to check the following:
• Check all electrical equipment and appliances to ensure that they are safe before using. Inspect power supply leads, plugs and all electrical
connections for wear and damage. Baridi recommend that an RCD (Residual Current Device) is used with all electrical products. You may obtain
an RCD by contacting your local domestic stockist. If the product is used in the course of business duties, it must be maintained in a safe
condition and routinely PAT (Portable Appliance Test) tested.
• Electrical safety information: It is important that the following information is read and understood.
• Ensure that the insulation on all cables and on the appliance is safe before connecting it to the power supply.
• Regularly inspect power supply cables and plugs for wear or damage and check all connections to ensure that they are secure.
• Important: Ensure that the voltage rating on the appliance suits the power supply to be used and that the plug is tted with the correct fuse - see
fuse rating in these instructions.
• DO NOT pull or carry the appliance by the power cable.
• DO NOT pull the plug from the socket by the cable.
• DO NOT use worn or damaged cables, plugs or connectors.
• Ensure that any faulty item is repaired or replaced immediately by a qualied electrician.
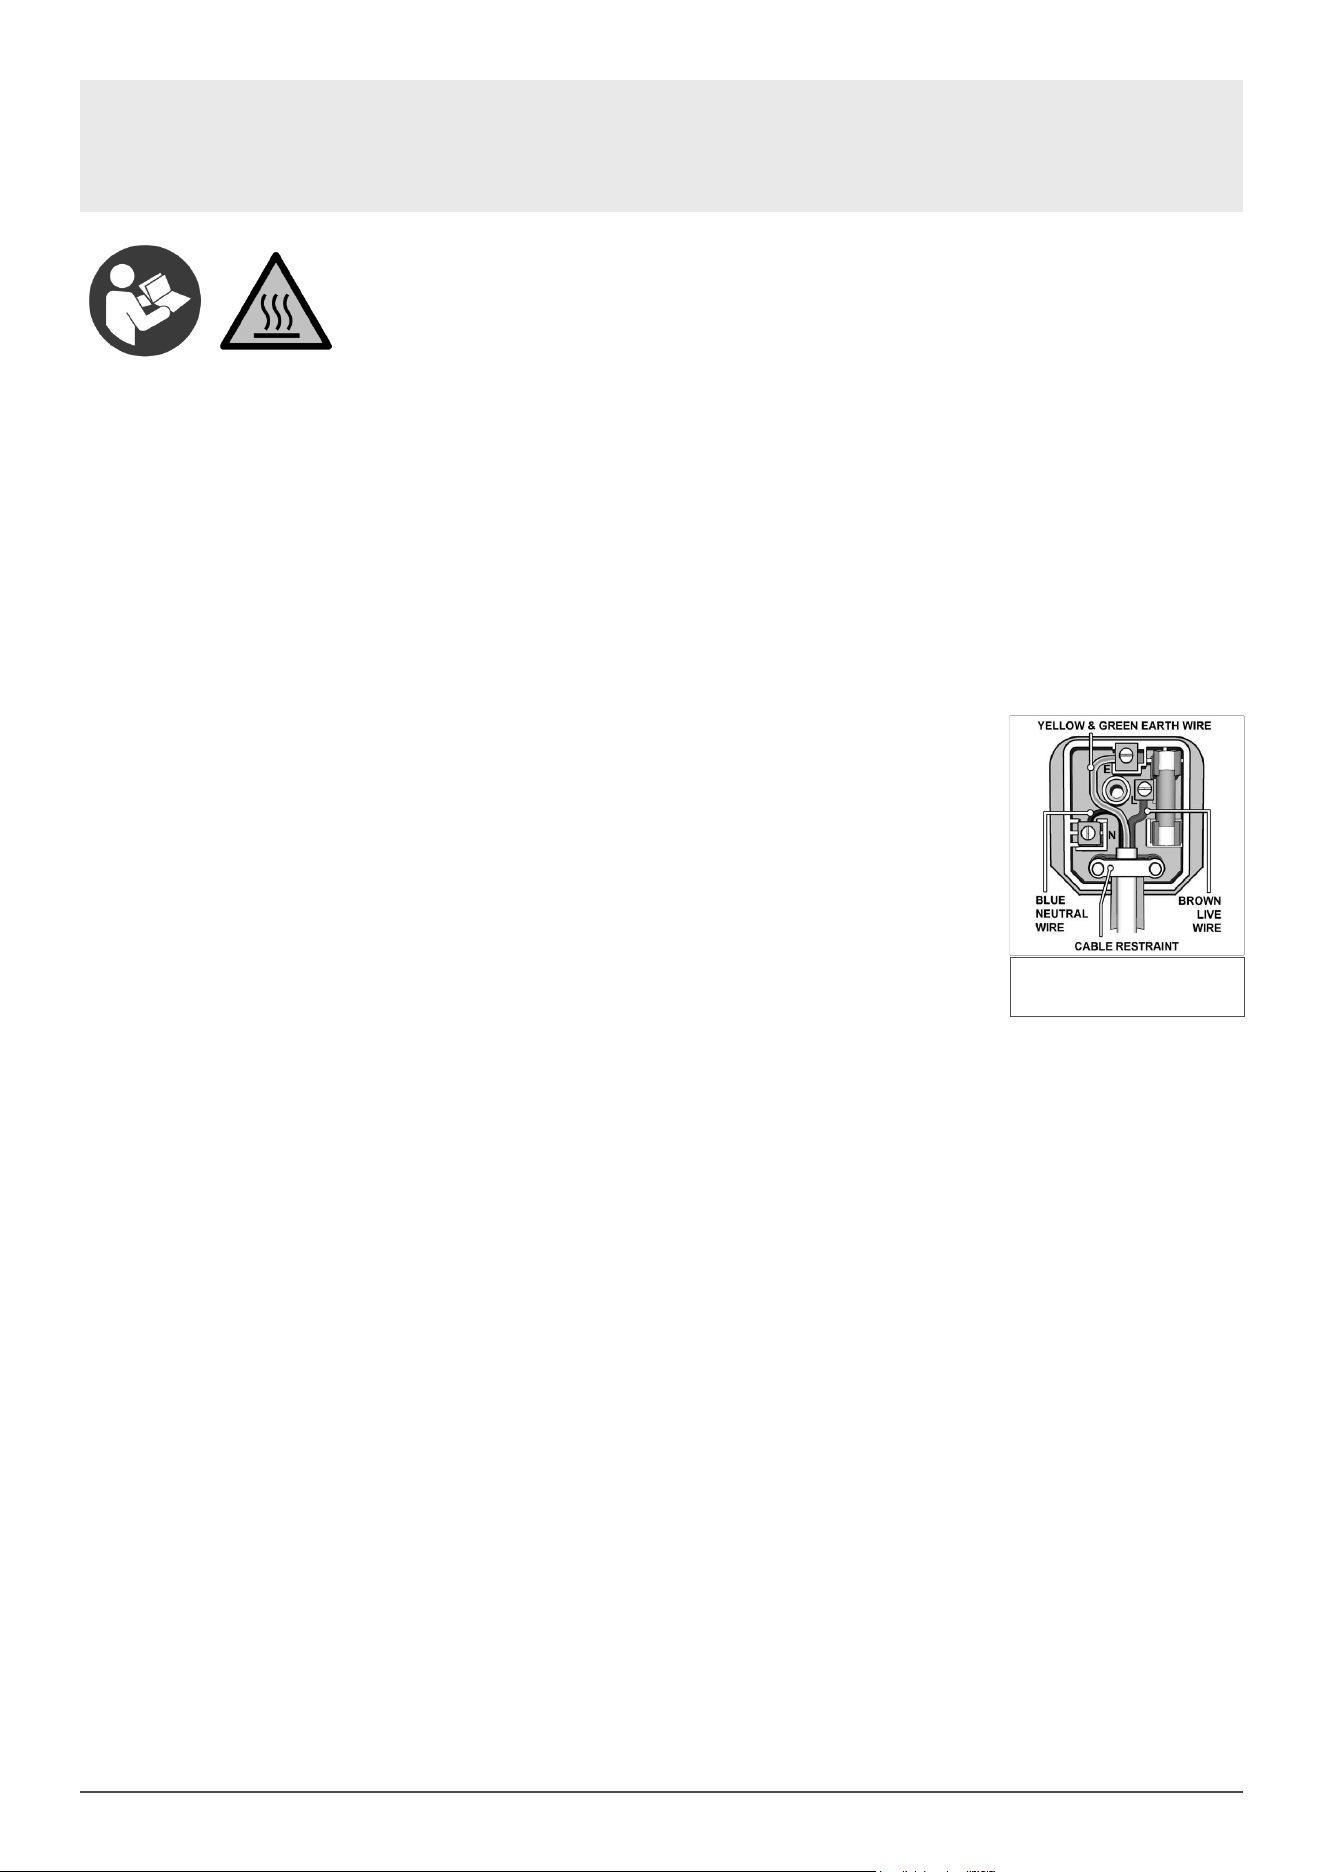
• This product is tted with a BS1363/A 3 pin plug. If the cable or plug is damaged
during use, switch off the electricity supply and remove from use. Ensure that repairs are
carried out by a qualied electrician.
• Replace a damaged plug with a BS1363/A 3 pin plug. If in doubt contact a qualied electrician.
A) Connect the GREEN/YELLOW earth wire to the earth terminal ‘E’.
B) Connect the BROWN live wire to the live terminal ‘L’.
C) Connect the BLUE neutral wire to the neutral terminal ‘N’.
• Ensure that the cable outer sheath extends inside the cable restraint and that the restraint is tight.
• Dellonda recommend that installation and repairs are carried out by a qualied electrician.
• GENERAL SAFETY INSTRUCTIONS
• Read and Save These Instructions
• When using electrical appliances, in order to reduce the risk of re, electric shock and/or injury, these basic safety precautions should always
be followed:
• When using electrical appliances, basic safety precautions should always be followed, including the following:
• Before using this Thermo Cooker, read and follow all warnings and instructions in this manual, even if you are familiar with this product.
• Keep appliance out of reach of young children.
• This appliance is not intended for use by persons (including children) with reduced physical, sensory or mental capabilities, or lack of experience
and knowledge, unless they have been given supervision or instruction concerning use of the appliance by a person responsible for their safety.
• Children should be supervised to ensure that they do not play with the appliance.
• Ensure children and babies do not play with plastic bags or any packaging materials.
• This Thermo Cooker is heavy. Care should be taken when moving it. Turn off and unplug before moving.
• Do not attempt to modify this product in any way.
• This Thermo Cooker must be Earthed.
• Do not plug into the power socket before set up is completed.
• Keep Power Cord away from trafc areas and wet areas.
• VERY IMPORTANT:
• Ensure the outside of the appliance does not get wet (water splashes etc.).
• Do not use appliance with wet hands.
• Do not immerse appliance in water or other liquids or use near sinks, baths or showers.
• Always operate the appliance from a power source of the same voltage, frequency and rating as indicated on the product identication plate.
• Position the power supply lead properly so that it will not be walked on, pinched by items placed on or against it or have the appliance resting on
it.
• This Thermo Cooker is intended to be used in household and similar applications such as:
• – staff kitchen areas in shops, ofces and other working environments
• – farmhouses and by clients in hotels, motels and other residential type environments
• – bed and breakfast type environments
• – catering and similar non-retail applications
• WARNING: Keep ventilation openings clear of obstruction.
• Avoid contacting moving parts. Keep hands, hair, clothing as well as spatulas and other
• utensils away during operation to prevent injury and/or damage to the appliance.
• Switch off the appliance and disconnect from supply before changing accessories or
• approaching parts that move in use.
• Always unplug the appliance from the power supply if it is left unattended, and before assembling, disassembling or cleaning.
Replacement fuse rating:
13A

3
• Be careful if hot liquid is poured into the food processor or blender as it can be ejected out of the appliance due to a sudden steaming.
• The appliance is only to be used with the stand provided.
• The heating element surface is subject to residual heat after use.
• For cleaning, please refer to “Clean” section.
• For the operating times and speed settings for accessories, please refer to “Suggested Speed and Capacity for each Accessory” section.
• Caution, hot surface. Care must be taken. The surfaces are liable to get hot during use.
• Operate on a at level surface only. Operating on sinks, draining boards or uneven surfaces must be avoided.
• Keep hands and utensils out of the jar while in use. A rubber scraper may be used when the appliance is turned off and unplugged.
• Always operate the appliance with the Lid in place.
• Never bypass the safety interlocking devices.
• Do Not attempt to open the lid or remove the jar when in use.
• Pay attention to the high-temperature food when you open the jar lid.
• Always insert the measuring cup / Lid Plug correctly in the hole in the top of the jar lid when processing food.
• Do not exceed 2 minutes of use when set to the highest speed levels 8, 9 or 10 as the motor can overheat. Switch off and allow the unit to cool
down for at least 1 minute, then continue again.
• CAUTION: When blending / stirring hot liquids, (Never blend hot oil or fat), pour through the special removable cap on the Lid of the jar. Begin
processing at a lower speed. Keep hands and other exposed skin away from the cover to prevent possible burns.
• Injury can result if moving blades accidentally become exposed.
• Do not leave the appliance unattended when running.
• Do not use the jar for storing foods or beverages.
• Do not use appliance for mixing paints or other ammable liquids or in a location contaminated with ammable gases or vapours.
• Avoid spillage of food or liquids onto the power connector in the jar recess. If there is a spill, immediately turn off and unplug, allow the spillage to
cool, then clean.
• Make sure that the blade sealing ring is tted correctly and the blade assembly is assembled securely in the jar base before use.
• The failure of correct assembly will cause the food leakage which will damage the appliance.
• Take care after using the heating function as the surfaces of components will stay hot for some time after use.
• Ensure the jar, jar lid and steamer tray are assembled correctly when using the steamer accessories.
• When in use, do not touch any part of the steamer accessory except its handles.
• Do not use the steamer without the jar lid in place.
• When opening the steamer lid, be careful not to be scalded by escaping hot steam.
• When using any other the heating functions, take care to avoid any injury by escaping hot steam.
• Ensure that the vent hole in the steamer lid is unblocked during use.
• Take care not to knock the steamer tray off the top of the jar either during or after use.
• Do not reach for an appliance that has fallen into water. Switch ‘OFF’ at the power point and unplug immediately.
• Do not let the power cord hang over the edge of a table or counter, or touch hot surfaces.
• Do not use appliance if it has been dropped or any part of appliance (including cord or plug) has been damaged.
• If the supply cord is damaged, it must be replaced by the manufacturer, its service agent or similarly qualied persons in order to avoid a hazard.
• The use of accessories not intended for use with this appliance may cause injuries to the user or damage to the appliance.
• Do not install the unit on other appliances, on uneven surfaces or where it could be subject to: heat sources (e.g., radiators or stoves), direct
sunlight, excessive dust or mechanical vibrations.
• Appliance should not be used outdoors, placed near a hot gas or electrical burner or placed in a heated oven.
• Do not install near any heat sources such as radiators, heat registers, stoves, or other apparatus that produce heat.
• Do not operate appliance underneath or near ammable or combustible materials (e.g., curtains).
• Any type of servicing, apart from ordinary cleaning, must be carried out by qualied electrical person only. There are no user serviceable parts in
this appliance.
• If this appliance is used by a third party, please supply the instruction manual with it.
• Do not misuse the power cord. Never carry or pull the appliance by the power cord or pull to disconnect it from the outlet. Instead, grasp the plug
body and pull to disconnect.
• Do not use the unit in very hot or humid places, or under direct sunlight.
• It is not recommended to use this appliance with an extension cord or power board.
• Do not place any other appliances on top of the appliance.
• This appliance is designed for domestic use only.
• This product has not been designed for any uses other than those specied in this instruction manual.
• Contact your local council for proper instructions for disposing of the unused appliance.
• No liability can be accepted for any damage caused by non-compliance with these instructions or any other improper use or mishandling of
appliance.
• CAUTION: To prevent damage to the appliance do not use alkaline cleaning agents when cleaning, use a soft cloth and a mild detergent.
• IMPORTANT: Care is needed when handling the Multifunction Blade, emptying the Jar and especially during cleaning.
• Do not touch the sharp edge of the blades. Only handle the top part when you assemble, remove and clean the blade.
• Misuse of this Thermo Cooker may result in serious injury. Only use your Thermo Cooker for its intended domestic use.
• CAUTION: In order to avoid a hazard due to inadvertent resetting of the thermal cut-out, this Thermo Cooker must not be supplied through an
external switching device, such as a timer, or connected to a circuit that is regularly switched on and off by the utility.
4
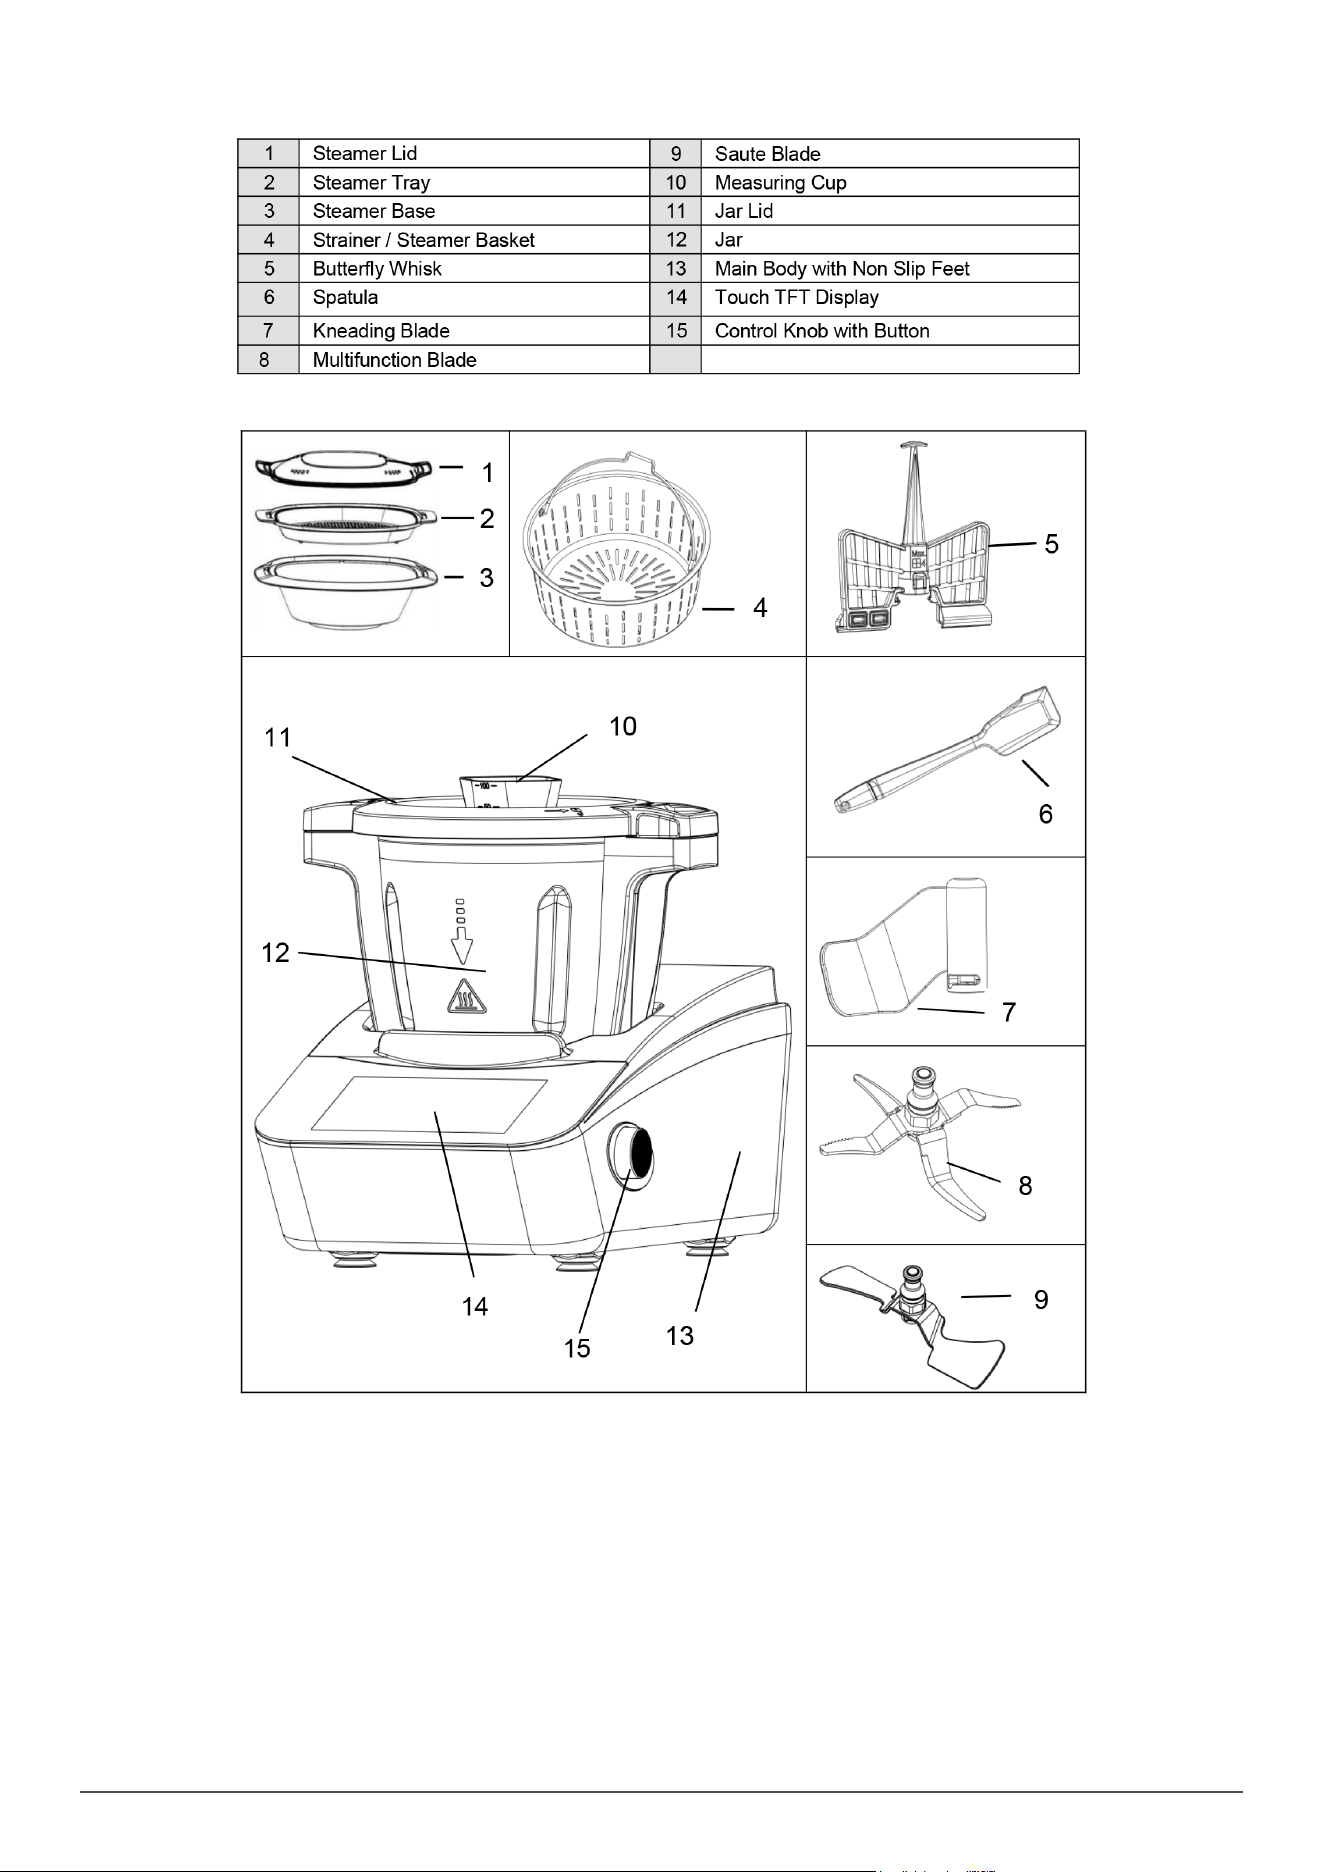
COMPONENTS
INSTALLATION
• Place the Thermo Cooker on a strong, at and level surface.
• Place your Thermo Cooker where there is no heat source nearby or direct sunlight. Splashing water on the appliance may cause a short circuit.
• For good ventilation keep enough space between the side walls and your appliance.
• Leave at least a 100mm gap between the back and sides of the Appliance and any wall.
• Leave ample space above to access the jar lid and steamer.
BEFORE FIRST USE
UNPACKING:
• Remove all packaging materials and dispose of properly and thoughtfully.
• Before using your appliance and accessories, it is strongly advised to clean components thoroughly. Refer to CLEANING section.
5
ASSEMBLY AND USE OF ACCESSORIES
• With the Appliance fully unpacked and placed in a suitable position as described previously, you are now ready to use your appliance.
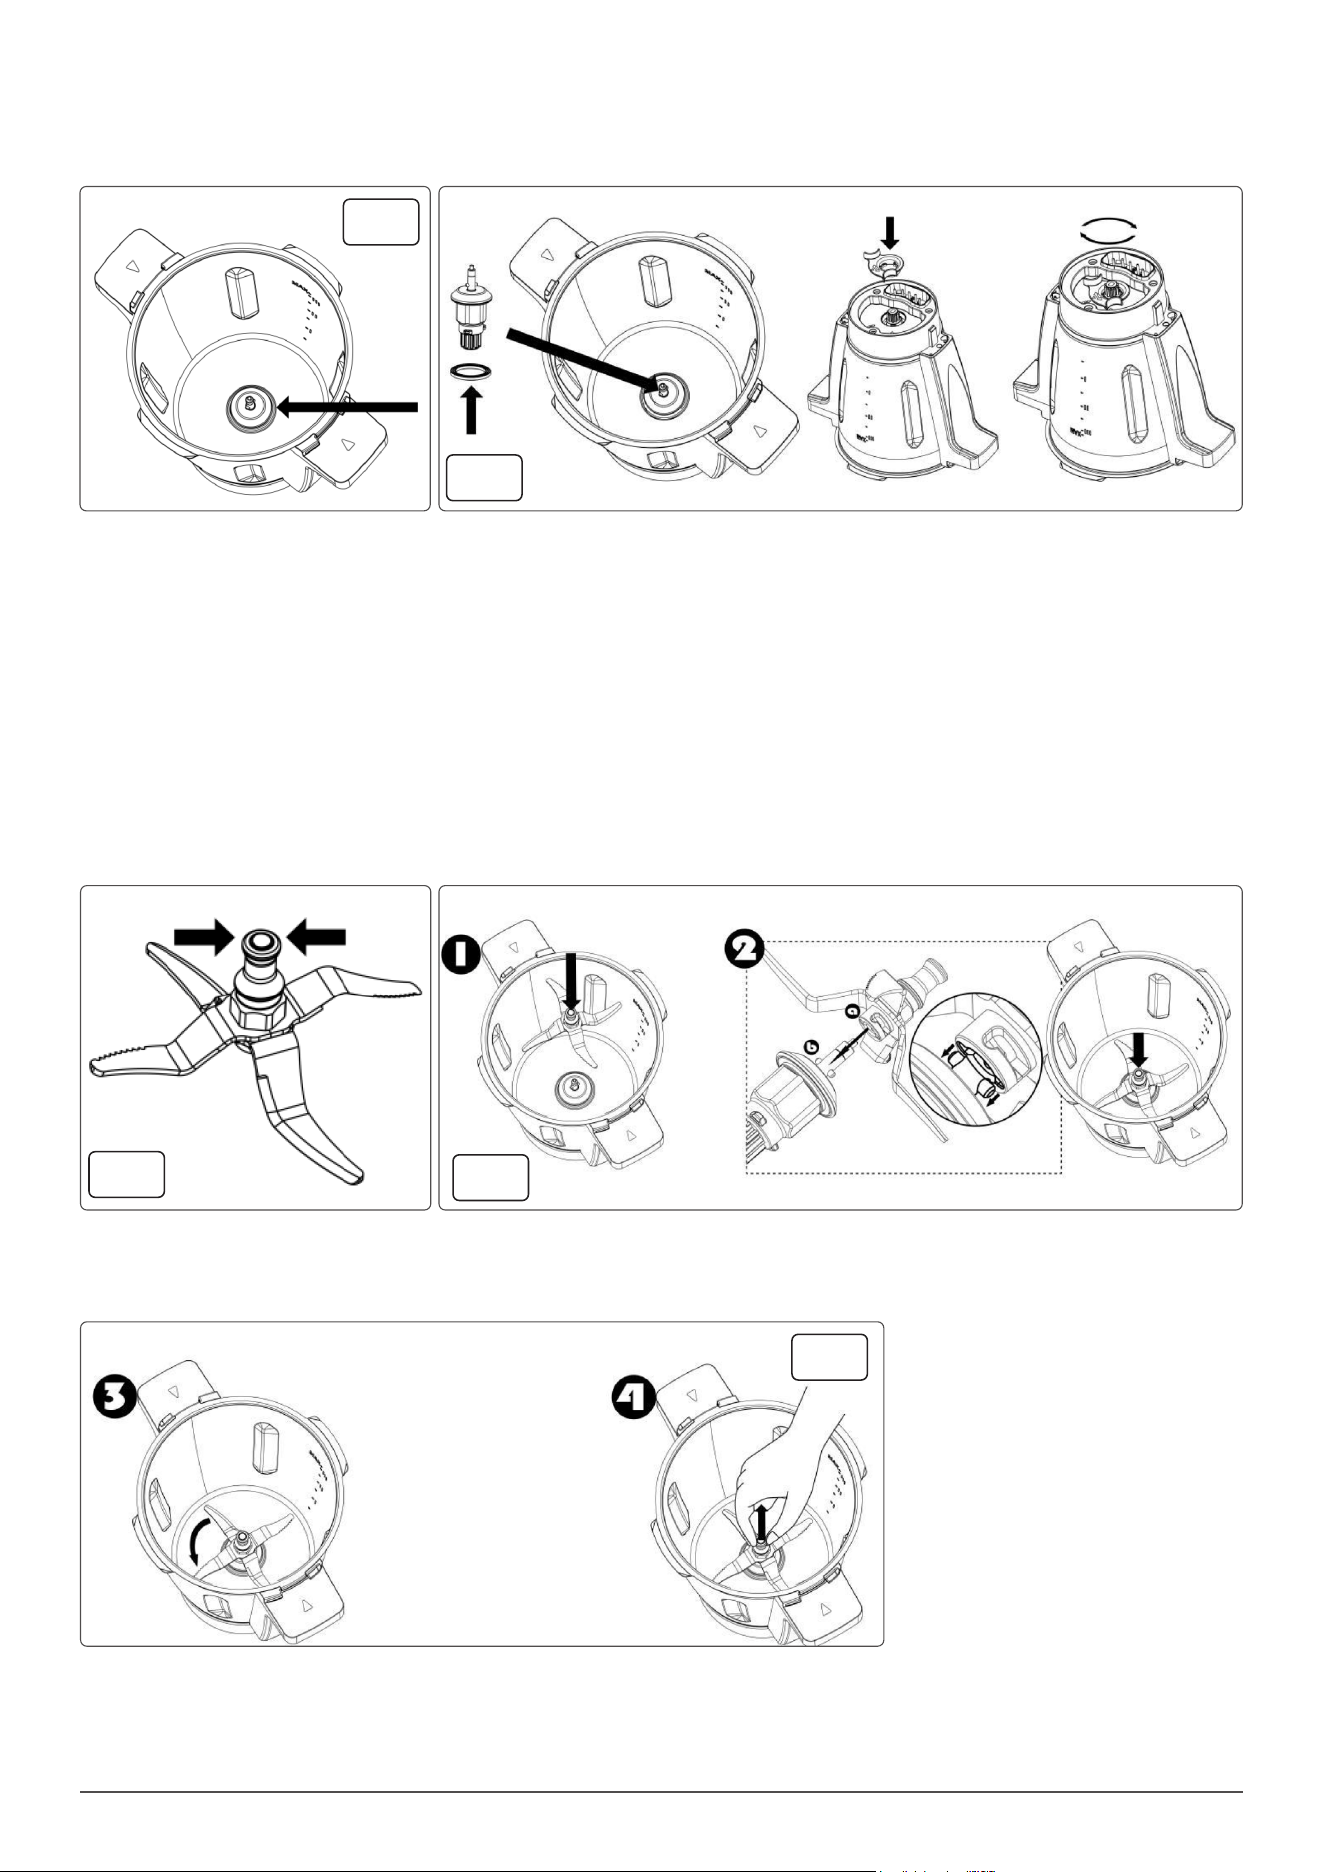
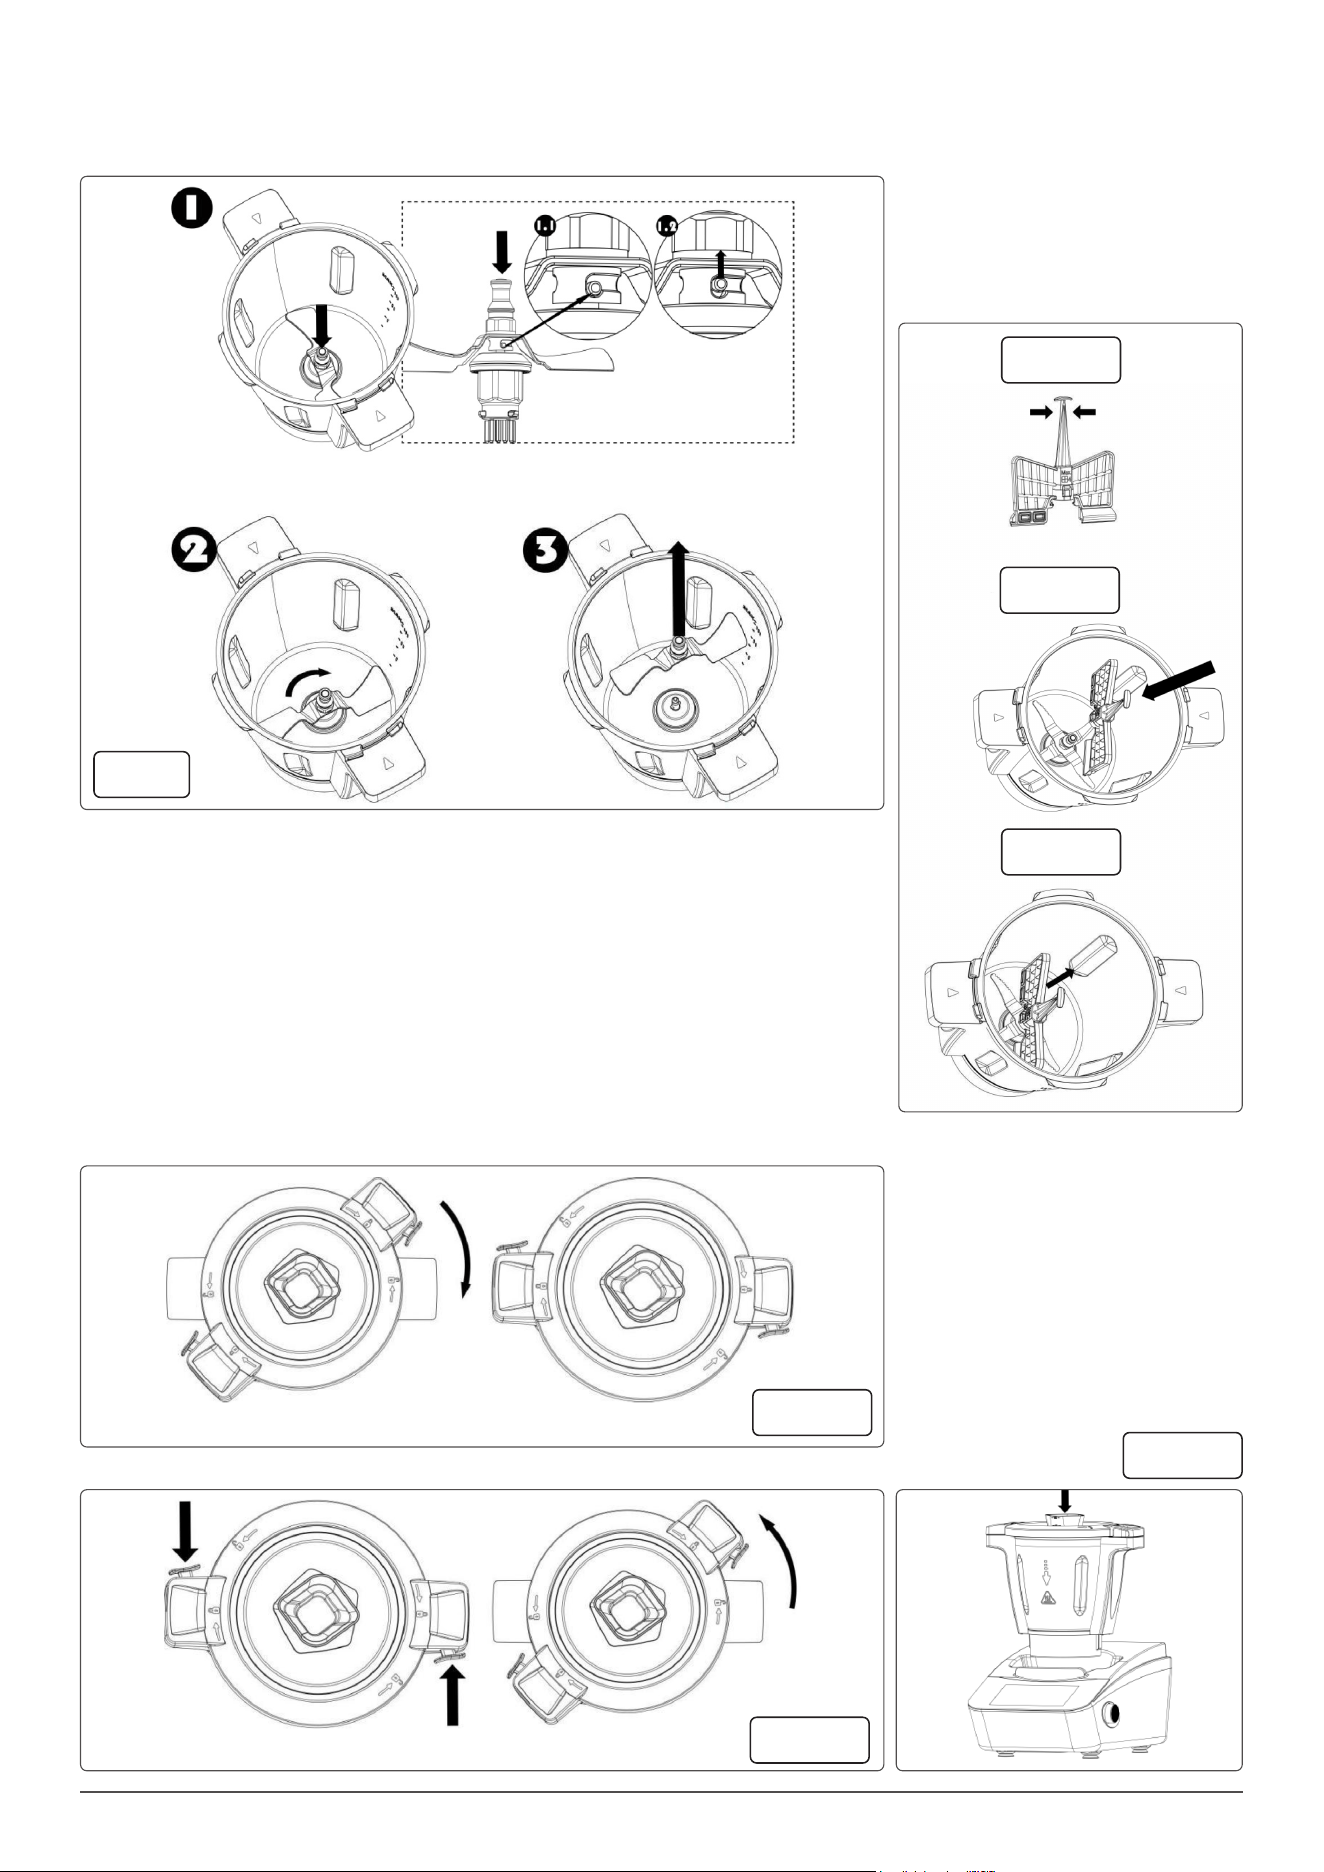
DRIVE COUPLING
• If not already tted to the bottom of the jar, the drive coupling and rubber sealing gasket must be tted and secured properly.
• To do this, take the drive coupling and ensure the rubber gasket is tted over the bottom of the coupling as shown in g.1.
• Failure to t the rubber sealing gasket will allow liquids to escape out the bottom of the jar.
• From the top of the jar, lower the drive coupling down and through the hexagonal hole in the bottom of the jar g.2.
• NOTE: The drive coupling can only be fully inserted into the hexagonal hole in three positions. Not six positions of the hexagonal hole. So, if the
drive coupling cannot be inserted all the way into the hole, rotate the drive coupling one notch and push in.
• Whilst holding the drive coupling in place, ip the jar upside down.
• Take the locking collet with your other hand and with the arrow on the collet aligned with the Unlocked Padlock symbol on the base of the jar,
push the locking collet down, then with some force, rotate clockwise until the arrow is aligned with the Locked Padlock symbol to seal and lock
the Drive Coupling in place g.2.
MULTIFUNCTION BLADE FIG.3
• The Multifunction Blade is used primarily for chopping food items.
• IMPORTANT: Take extra care when handling this accessory as the blades are very sharp and may cause injury if mishandled.
• To install the Multifunction Blade, follow the steps below:
• 1. Place the jar onto the main body in the correct orientation and seat it properly.
• 2. Grasp the top of the blade post.
• DO NOT grasp or touch the sharp blade edges.
• Lower the Multifunction Blade over the top of the Drive Coupling in the bottom of the jar, ensuring to align the tabs on the drive coupling with the
slots in the bottom of the blade, then push down rmly and rotate anticlockwise until it seats in place g.4.1 & 4.2.
• Pull to ensure blade locked safely g.5.3 & 5.4.
• IMPORTANT: The jar must sit on the main body properly, or you will fail to install blade.
To remove the Multifunction Blade, follow the steps below in g.6:
1. Place the jar onto the main body in the correct orientation and seat it properly.
2. Grasp the top of the blade post, push down rmly and rotate clockwise, then pull it straight up and out.
• IMPORTANT: The jar must sit on the main body properly, or you will fail to remove blade.
fig.1
fig.2
fig.3
fig.4
fig.5
6
KNEADING BLADE FIG.7 & 8
• The Kneading Blade is used primarily for kneading dough. IMPORTANT: Do not use the Kneading Blade above speed setting 3.
• To install the Kneading Blade, follow the steps below:
• 1. Place the jar onto the main body in the correct orientation and seat it properly.
• 2. Grasp the top of the blade post.
• 3. Lower the Kneading Blade over the top of the Drive Coupling in the bottom of the jar, ensuring to align the tabs on the drive coupling with the
slots in the bottom of the blade, then push down rmly and rotate anticlockwise until it seats in place.
• 4. Pull to ensure blade locked safely.
• IMPORTANT: The jar must sit on the main body properly, or you will fail to install blade.
fig.6
fig.7
fig.8
7
• To remove the Kneading Blade, follow the steps below in g.9:
• 1. Place the jar onto the main body in the correct orientation and seat it properly.
• 2. Grasp the top of the blade post, push down rmly and rotate clockwise, then pull it straight up and out.
• IMPORTANT: The jar must sit on the main body properly, or you will fail to remove blade.
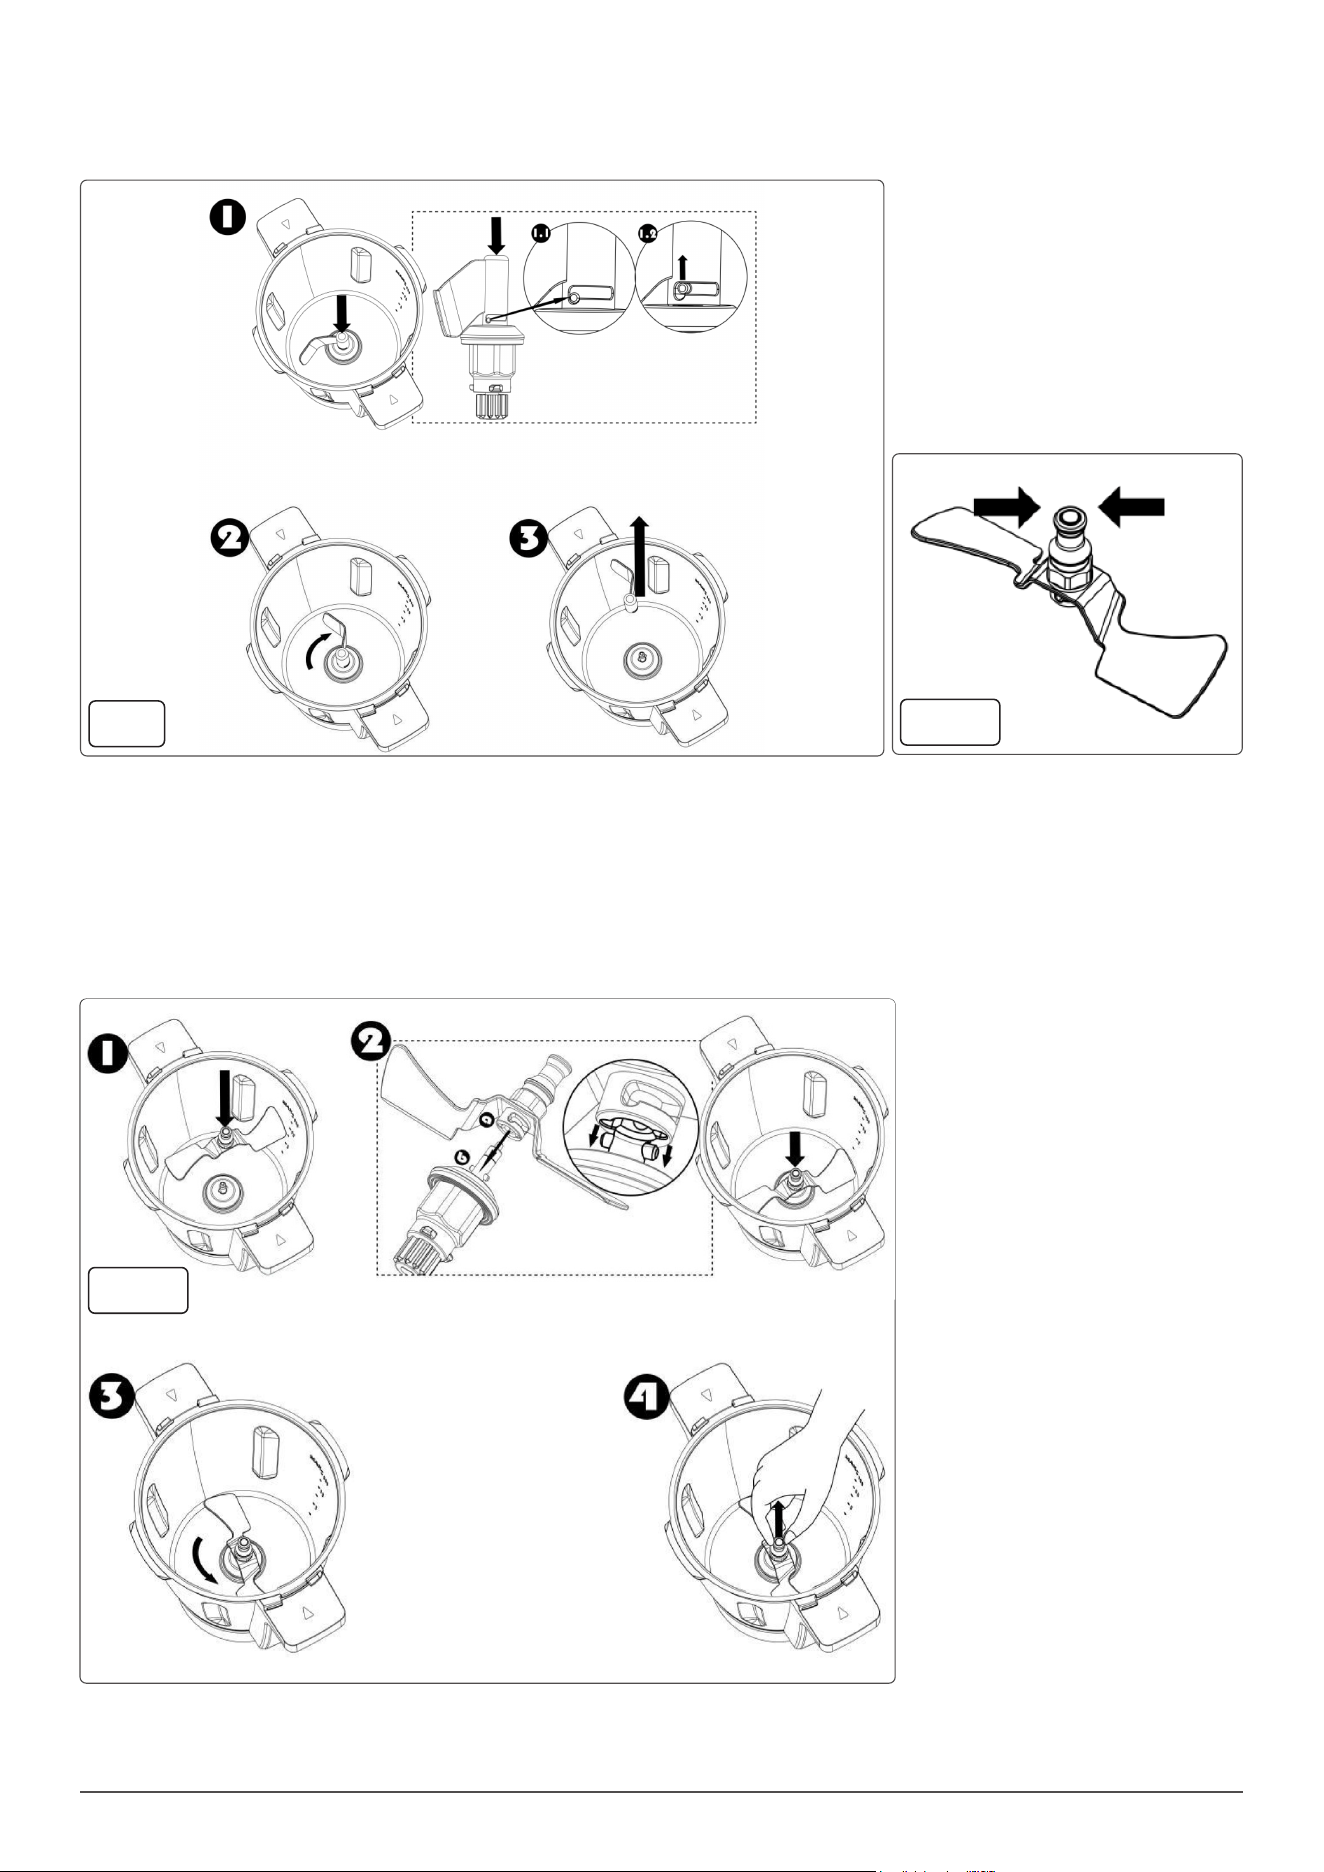
SAUTE BLADE FIG.10
• The Saute Blade is used primarily for sauteing and mixing.
• IMPORTANT: Do not use the Saute Blade above speed setting 2.
• To install the Saute Blade, follow the steps below in g.11:
• 1. Place the jar onto the main body in the correct orientation and seat it properly.
• 2. Grasp the top of the blade post.
• 3. Lower the Saute Blade over the top of the Drive Coupling in the bottom of the jar, ensuring to align the tabs on the drive coupling with the slots
in the bottom of the blade, then push down rmly and rotate anticlockwise until it seats in place.
• 4. Pull to ensure blade locked safely.
• IMPORTANT: The jar must sit on the main body properly, or you will fail to install blade.
fig.9
fig.10
fig.11
8
• To remove the Saute Blade, follow the steps below:
• 1. Place the jar onto the main body in the correct orientation and seat it properly.
• 2. Grasp the top of the blade post, push down rmly and rotate clockwise, then pull it straight up and out.
• IMPORTANT: The jar must sit on the main body properly, or you will fail to remove blade.
BUTTERFLY WHISK FIG.13
• The Buttery Whisk is used primarily for stirring and whisking food items.
• IMPORTANT: Do not use the Buttery Whisk above speed setting 4.
• Do Not add ingredients into the jar when the appliance is working with the buttery whisk,
• as the buttery whisk may get jammed and damaged.
• To install the Buttery Whisk, grasp the top of the buttery whisk g.13.A.
• Align the base of the Buttery Whisk with the top of the Multifunction Blade, push the
• Buttery Whisk down rmly until it sits in place g.13.B.
• To remove the Buttery Whisk, pull it straight up and out g.13.C.
JAR AND LID ASSEMBLY
• There are jar capacity marks on one side, inside the jar.
• The Max capacity for blending and heating is 3L.
• To attach the lid, position the lid on the top of the jar, press the lid down rmly so that it
sits at on the jar edge, then rotate the lid clockwise to lock the lid onto the jar g.14.A.
• NOTE: Unless the lid is tted and locked correctly, the Thermo Cooker cannot be started.
• To remove the lid, press the lock release button and rotate the lid anticlockwise, then lift the lid straight up and off.
• Place the jar onto the main body in the correct orientation and seat it properly.
fig.12
fig.13A
fig.14A
fig.14B
fig.14C
fig.13B
fig.13C
9
• NOTE: Unless the jar is tted and seated correctly, the Thermo Cooker can not be started.
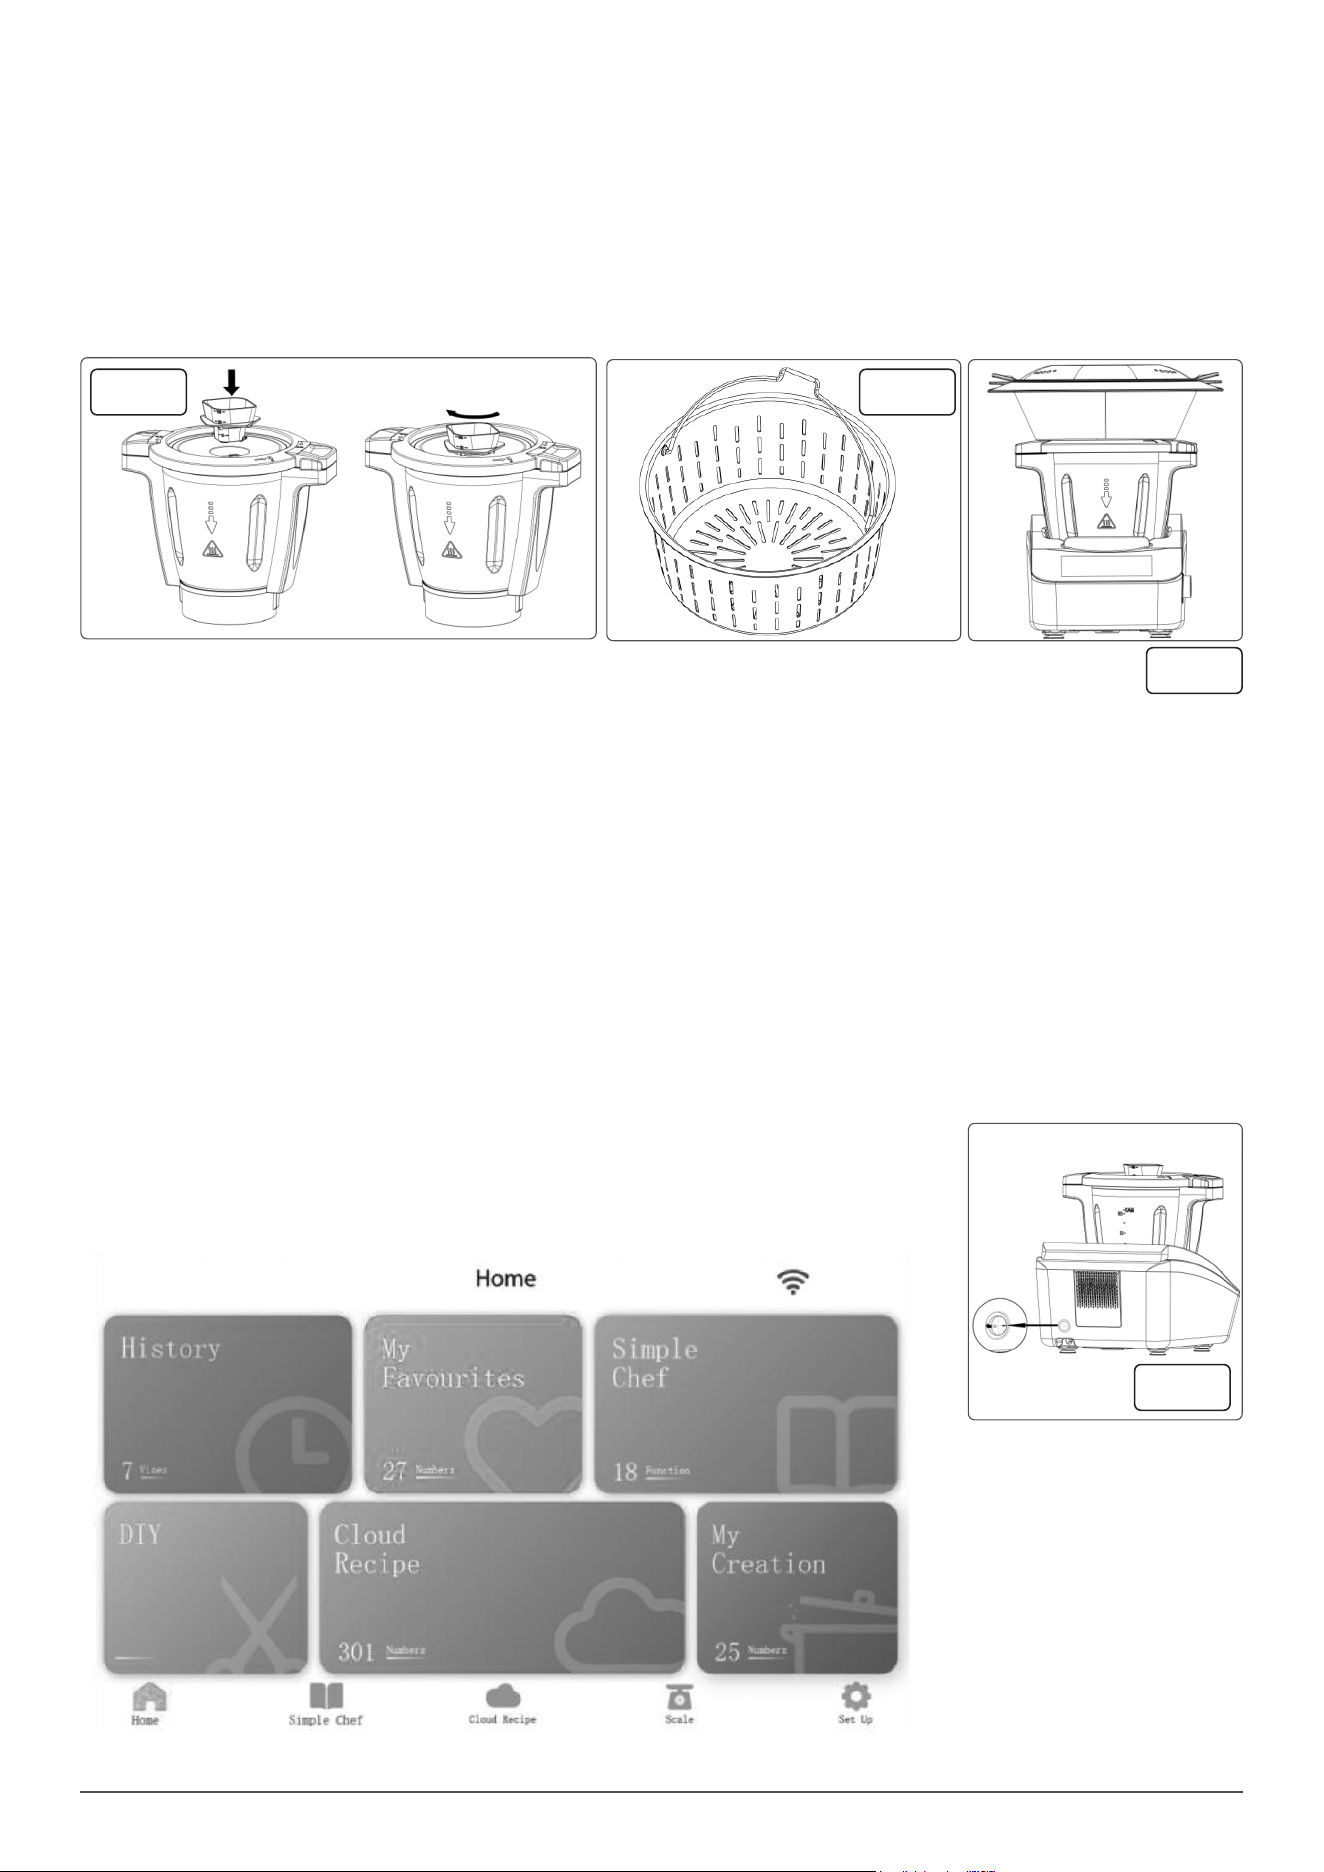
MEASURING CUP g.15
• Measuring cup not only prevents food from being ejected from the hole in the lid, it is also a convenient measuring cup.
• To assemble the Measuring Cup to the lid, place the measuring cup into the hole, rotate clockwise to lock in place.
• To remove, rotate anticlockwise and lift straight up and out.
• IMPORTANT: The measuring cup is the only component / item which must be used to cover / block off the round hole in the Jar lid
• Do Not cover / block the hole in the Jar lid by any other items such as a towel, paper cups, dishes etc. as it could lead to injury or damage to the
appliance.
SPATULA
• The spatula is used to scrape the food and liquids from inside the jar.
• Do not use any other utensil as they may cause damage to the inside surface of the jar.
• Only use the spatula when the appliance is turned off and the Jar Lid removed.
STRAINER BASKET g.16
• The Strainer / Steamer Basket can be used to strain out fruit / vegetable juice after processing.
• Insert the Strainer into the jar and hold in place while you pour out the juice.
• It can also be used to hold soft food such as pasta or noodles while cooking, and can be used to cook side dishes, such as rice and potatoes.
STEAMER ASSEMBLY FIG.17
• The Steamer accessory is used for steaming vegetables, sh, and any other food items that you prefer to be steamed.
• To set up the Steamer, the Jar Lid needs to be tted to the Jar and lock on, then the Measuring Cup needs to be removed.
• The Steamer is then placed on top of the Jar Lid ensuring it seats properly.
• Please make sure that the steamer is covered properly with the Steamer Lid before heating and steaming.
• NOTE: The steamer components cannot be used in a microwave oven or in / on any other electrical appliance.
• Do Not touch any part of the steamer, other than the handles, when in use as you may be burnt.
• Keep well clear of the steam vent holes in the steamer lid to avoid injury by hot steam.
• Do Not cover or block the holes in the steamer lid as the steam will nd another escape path and may cause serious injury or damage to
surrounding items.
INSTRUCTIONS FOR USE
• NOTE: When rst using the Thermo Cooker, you may notice an electrical smell from the motor which is quite normal. After a period of use, this
smell will gradually disappear.
• IMPORTANT: Before use, READ ALL the notes under the headings “Important Safeguards” and “Methods of Safe Installation”.
• Failure to read and understand the safe operation and installation of this appliance may cause serious Injury.
ON/OFF SWITCH g.18
• The switch is on the back of appliance. Use this switch to switch the appliance on or off.
• The TFT touch screen will turn on and illuminate with the start-up screen.
fig.15 fig.16
fig.17
fig.18
10
• NOTE: No functions will work unless the Jar is installed and the lid tted and locked. Except for the Scale Function and Heating Function.
• When the jar lid is not tted, heating can be started, but the motor cannot start working until the jar lid is tted and locked in position.
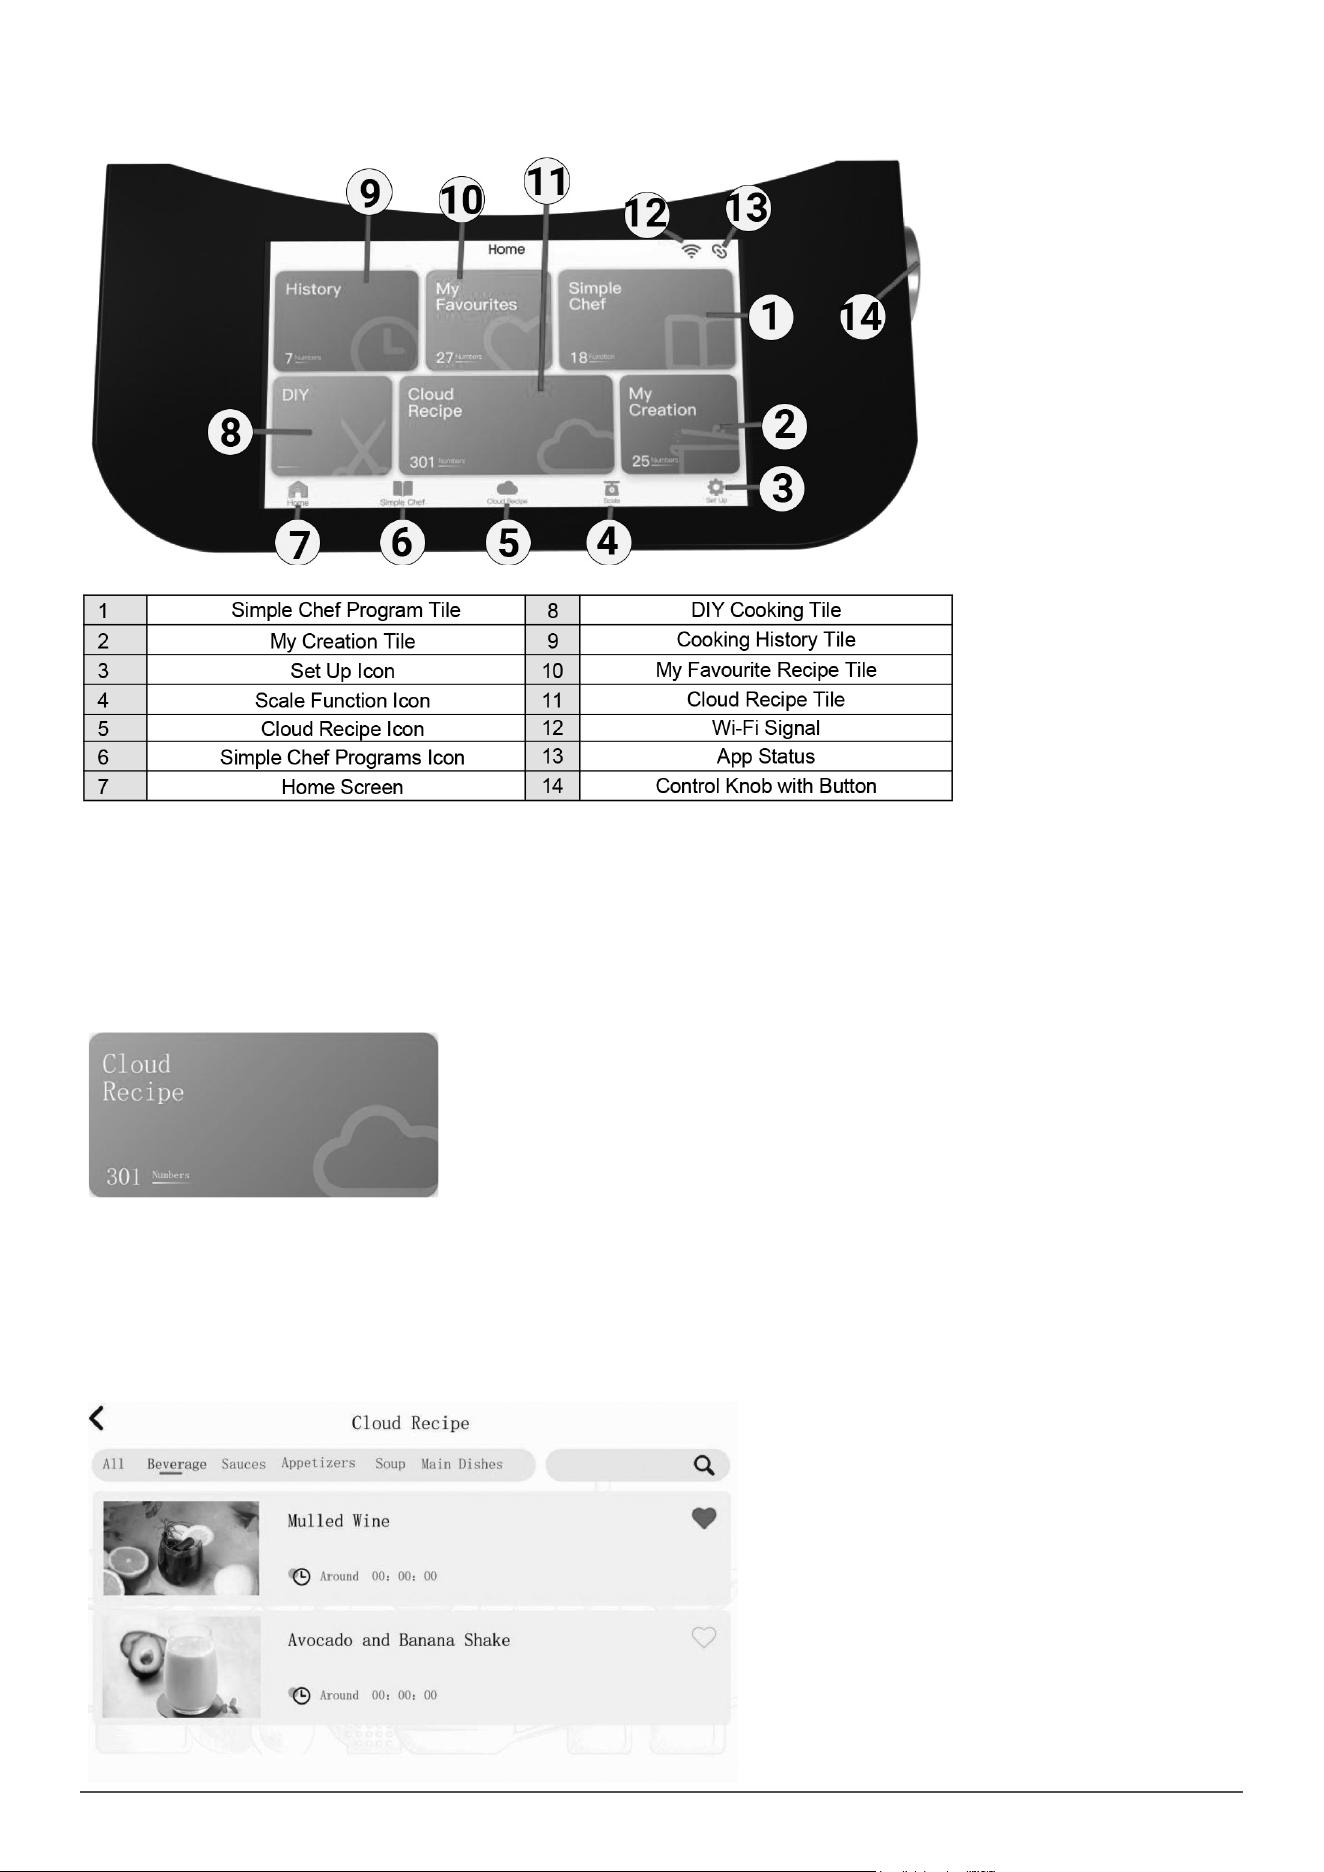
TOUCH SCREEN DISPLAY
WI-FI CONNECTION
• 1. Once the appliance has started up, the home screen will display and a notication will appear that states “Wi-Fi is not connected, please go to
setting to connect Wi-Fi”.
• NOTE: To gain access to the cloud recipes, the appliance must be connected to an active Wi-Fi connection.
• 2. Select the “Connect to Wi-Fi” option which will display the list of active Wi-Fi connections.
• 3. Select your active Wi-Fi connection and enter your password.
• Note: If the Wi-Fi connection doesn’t display in the list, ensure that the connection is not 5G or is a network with WEP, as its not supported.
• 4. Once you have connected your appliance to the Wi-Fi, you can start to explore the different pages located on the TFT display.
TFT DISPLAY OVERVIEW
CLOUD RECIPE
• The Cloud Recipe section is located on the home screen or at the bottom menu bar which displays the cloud recipes list.
• 1. Press the Cloud Recipe the following categories will display once you have selected cloud recipes; beverage, basics, desserts, main dishes,
soup, appetizers and sauces.
• 2. Press one of the category options to begin scrolling through the cloud recipes.
• Once you have selected your category, a line of headings will appear above the recipes. You can ick through the different categories or
alternatively select the “all” option to display all of the recipes at once.
• 3. Once you have selected a recipe, it will display the ingredients list required and show the steps required to make the recipe.
NOTE: There is a search bar located at the top right corner of
the cloud recipes menu, press on it to manually search for a
recipe using the keyboard on the touch screen.
NOTE: Only when your phone is connected with the Thermo
Cooker, cloud recipes time will show on the screen( refer to
“Link My App” section ).
NOTE: The time to load the cloud recipes will depend on the
speed of your internet connection.

11
MY FAVOURITES
• The My Favourites tile is on the home screen which displays
your favourite recipes saved.
• To add a cloud recipe to My Favourites, follow the steps
below:
• 1. Press the Cloud Recipe on the home screen.
• 2. Scroll through the cloud recipes and select the one that
you want to add to the My Favourites page. There is a heart
shaped icon located next to the recipe name. Press the
heart shaped icon.
• 3. The recipe will now be added to the My Favourites page.
You can now access these recipes which are conveniently
stored.
• 4. To remove the recipe from My Favourites list, press the My Favourites option on the home screen and press the heart shaped icon located next
to the recipe name.
HISTORY
• The History section is located on the home screen which
displays your previous cloud recipes made. It will display the
time and date that the recipe was made.
• To remove the recipe from history, swipe recipe left to
access symbol then press it.
• Press symbol at the top right corner of screen to clear the
history.
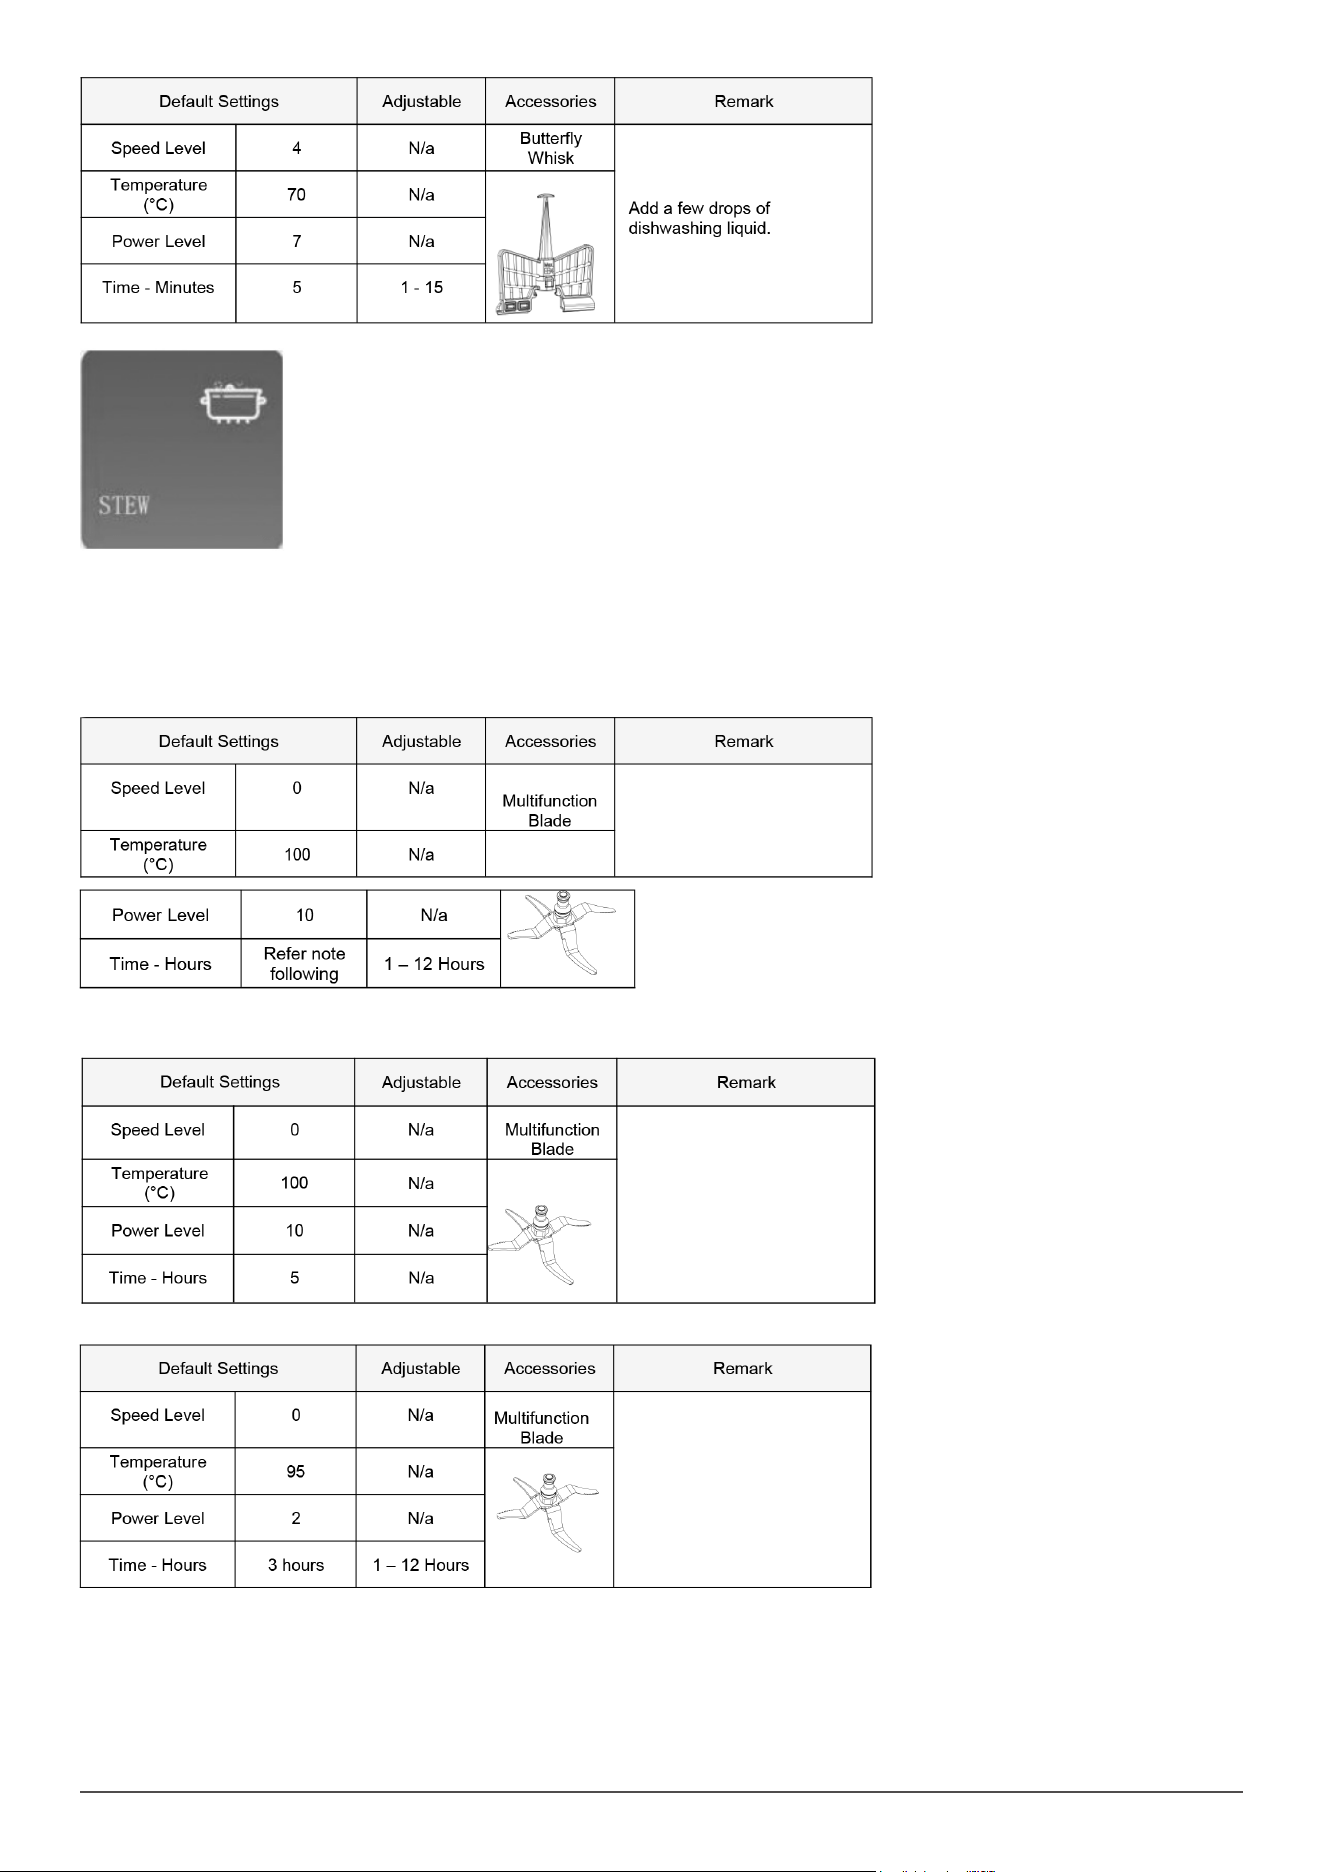
SIMPLE CHEF
• Simple Chef is where you can nd your preset cooking programs. It has 18 programs available, 16 cooking and 2 cleaning programs. Press the
purple Simple Chef option or the icon at the bottom of the home screen to access the Simple Chef programs.
1. CLEAN: This is a cleaning program for the inside of the jar.
• Assemble the buttery whisk.
• Add 500ml of clean water and 1 - 2 drops of dishwashing liquid.
• Attach and ensure the jar lid and measuring cup are secure and locked in place.
• Press the Start to begin
12
2. STEW: The traditional stews that require long cooking processes can be achieved with this appliance. Slow cooking + long hours = the best
avours.
• Add your ingredients.
• Attach and ensure the jar lid and measuring cup are secure and locked in place.
• Press the Start to begin.
• Note: There are three steps to this program.
STEP 1
• NOTE: The program presets 3 hours, this is for the total combined time for all Steps and time is adjustable at Step 3.
STEP 2
STEP 3
13
3. SMOOTHIE: Mince vegetables, meat, spices and crush ice easily in just a few seconds.
• Prepare milk shakes, sauces, dips, creams with smooth and silky texture.
• Assemble the Multifunction Blade.
• Add your ingredients.
• Attach and ensure the jar lid and measuring cup are secure and locked in place.
• Press the Start to begin.
4. WARM: Keeps your food warm until they are served.
• Assemble the Multifunction Blade.
• Ensure the jar lid and measuring cup are secure and locked in place.
• Press the Start to begin.
•
5. FRESH RECOVERY (WASHING): Scientic refresh cleaning method at 50°C can clean away meat blood foam and vegetable / fruit pesticide
residue, etc.
• Assemble the Multifunction Blade.
• Add 1.5 Litres of cool (not hot and not fridge cold) water to the Jar.
• Insert the Strainer Basket.
• Put the ingredients into the basket.
• Attach and ensure the jar lid and measuring cup are secure and locked in place.
• Press the Start to begin.
14
6. REHEAT
• Assemble the Multifunction Blade.
• Add your pre-cooked ingredients to the jar.
• NOTE: Only add thawed foods and not frozen foods.
• Ensure the jar lid and measuring cup are secure and locked in place.
• Press the Start to begin.
•
7. QUICK SOUP: Crush rst, then cook.
• Assemble the Multifunction Blade.
• Attach and ensure the jar lid and measuring cup are secure and locked in place.
• Press the Start to begin.
• NOTE: There are three steps to this program. The unit will automatically change to the next Step after the previous step has completed.
• NOTE: The program needs 32 minutes and 30 seconds in total and time is adjustable at Step 3.
STEP 1
15
STEP 2
STEP 3
8. BOIL: Pour enough water into the jar so as to cover all the ingredients.
• Add your ingredients to the jar
• Attach and ensure the jar lid and measuring cup are secure and locked in place.
• Press the Start to begin.
9. CHOP: Chops all kinds of ingredients, from meat or sh to fruit or vegetables.
• Assemble the Multifunction Blade.
• Add your ingredients.
• Attach and ensure the jar lid and measuring cup are secure and locked in place.
• Press the Start to begin.
16
10. YOGHURT: Prepare homemade yoghurt easily. The Thermo Cooker will keep the mixture at fermenting temperature so that the next morning
yoghurt is ready to cool and eat.
• Assemble the Multifunction Blade.
• Add your ingredients to the jar.
• Attach and ensure the jar lid and measuring cup are secure and locked in place.
• Press the Start to begin
• NOTE: There are two steps to this program, total time is 8 hours, time is adjustable between 3 and 12 hours during Step 2. The unit will
automatically change to Step 2 after Step 1 has completed.
STEP 1
STEP 2
11. SAUTE: Cook all types of dishes, such as stews, chicken with almonds or ratatouille.
• Assemble the Saute Blade.
• Add your ingredients.
• Attach and ensure the jar lid and measuring cup are secure and locked in place
• Press the Start to begin.
17
12. RISOTTO: COOK RISOTTO. Adjust the water as you desire.
• Assemble the Multifunction Blade.
• Add the suggested amounts of rice and water to the jar.
• Ensure the jar lid and measuring cup are secure and locked in place.
• Press the Start to begin.
• NOTE: There are two steps to this program. The unit will automatically change to the next Step after the previous step has completed.
STEP 1
STEP 2
13. STIR: Stirs food stuffs as it cooks them to ensure uniform heating and to achieve professional textures. Cook delicious risottos, pasta salads,
custard or prepare hot chocolate.
• Assemble the Buttery Whisk.
• Attach and ensure the jar lid and measuring cup are secure and locked in place.
• Press the Start Button to begin.
18
14. PORRIDGE: Use this setting to make softer foods such as beans or porridge. This is ideal for foods that require milk or water to be cooked.
• Assemble the Multifunction Blade.
• Add your ingredients to the jar
• Attach and ensure the jar lid and measuring cup are secure and locked in place.
• Press the Start to begin.
15. KNEAD: For preparing bread dough.
• Assemble the Kneading Blade.
• Add your ingredients.
• Attach and ensure the jar lid and measuring cup are secure and locked in place.
• Press the Start to begin.
16. CONGEE: This program can make the perfect rice porridge / congee.
• Assemble the Multifunction Blade.
• Add your ingredients to the jar
• Attach and ensure the jar lid and measuring cup are secure and locked in place.
• Press the Start to begin.
• NOTE: There are two steps to this program. The unit will automatically change to Step 2 after Step 1 has completed, total time is 46 minutes and
30 seconds.
19
STEP 2
17. STEAM: This function is ideal for steaming the healthiest recipes. It saves time thanks to its 2-level steamer, as you can cook more than 1 dish
at once.
• Assemble the Steamer.
• Add your ingredients.
• Add no more than 1.5 Litres of cool (not hot and not fridge cold) water to the Jar
• Attach and ensure the jar lid is secure and locked in place.
• Remove the Measuring cup from the Jar lid if tted.
• Place Steamer on top of Jar lid, and ensure the Steamer lid is also tted.
• Press the Start to begin.
18. THICK SOUP: Slow cooking for absolute control over temperature and time for perfectly cooked and tender results.
• Assemble the Multifunction Blade.
• Attach and ensure the jar lid and measuring cup are secure and locked in place.
• Press the Start Button to begin.
• NOTE: There are eight steps to this program. The unit will automatically change to the next Step after the previous step has completed.
STEP 1
STEP 2
20
STEP 3
• NOTE: Step 3 will continue to run until the ingredients have reduce temperature to 90C or less and will then change automatically to Step 4.
• There is no set time for Step 3 as it depends on the ambient temperature, the type of ingredients and how much ingredients, as they will cool
down at different rates.
STEP 4
STEP 5
STEP 6
STEP 7
21
STEP 8
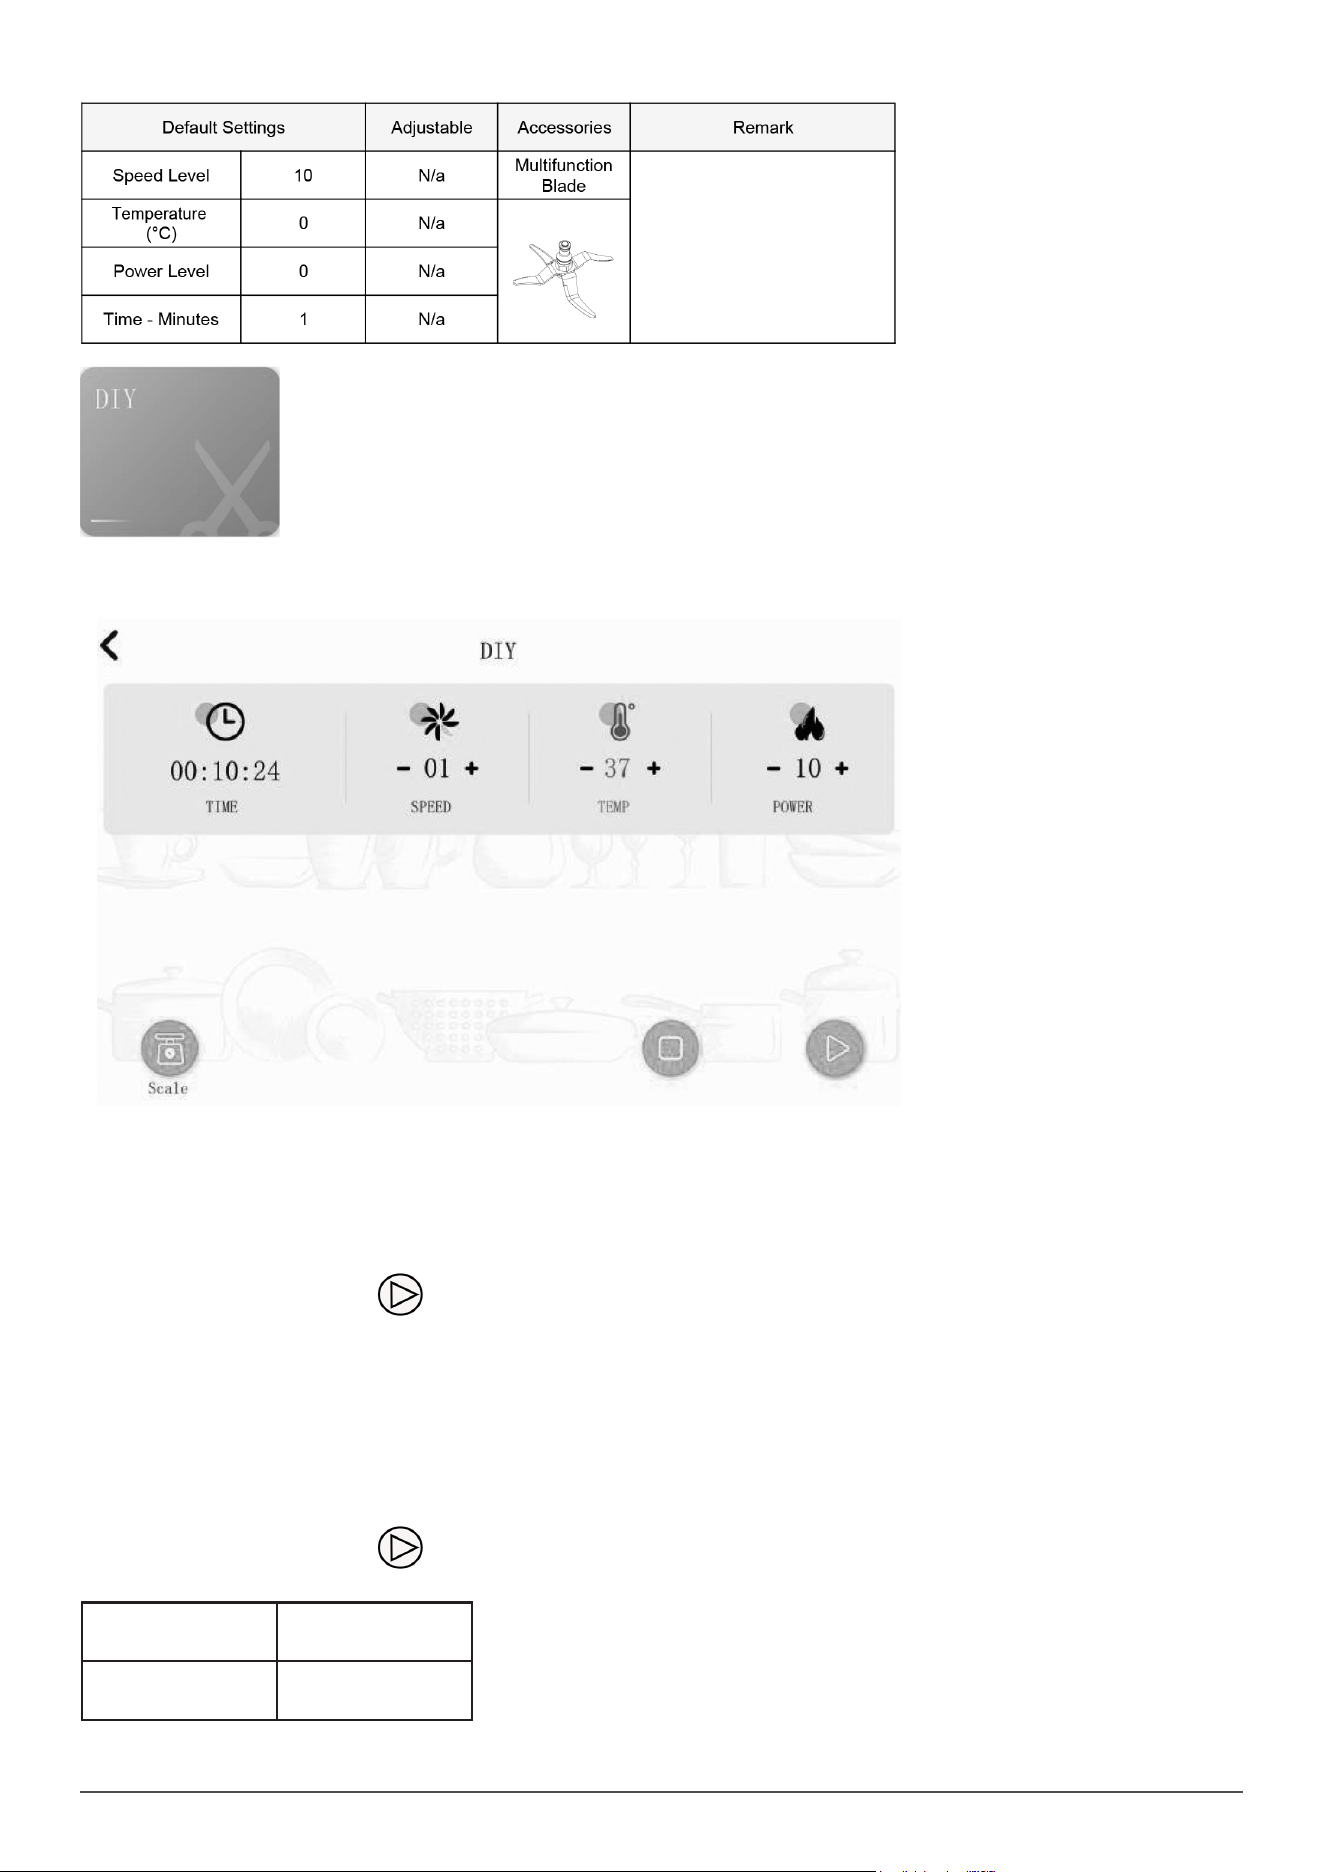
DIY COOKING (MANUAL COOKING)
The DIY cooking section is located on the home screen which allows you to manually adjust the timer, speed, temperature and heating power when
operating the appliance. This is the perfect way to freestyle your cooking.
TIMER
• The display will show hour, minutes and seconds.
• 1. Press the hour, minutes or seconds shown on the screen timer to select your desired time.
• 2. When you press the hours, the screen will display a scroll menu from 00-12, allowing you to set the hours required for cooking. To select your
desired time you can either use the touch screen or the control knob.
• 3. To use the control knob, turn the knob clockwise to go down the list. Turn the control knob anticlockwise to go back up the list.
• 4. Once you have chosen your desired time, press the “OK” option.
• 5. Repeat for minutes and seconds.
• NOTE: During operation, press the located in the bottom right corner of the device and the device will start counting down automatically.
• NOTE: The amount of time shown on the timer display reects the cooking time only.
• Any food preparation time is additional.
SPEED
• The display will allow you to adjust the speed of the blades in the cooking jar.
• 1. Press the SPEED option to select your desired speed.
• 2. When you press the speed function, the screen will display a scroll down menu from 0-10. “0” being low and “10” being high. This allows you to
set the speed of the blades required for cooking. To select your desired speed you can either use the touch screen or the control knob.
• 3. To use the control knob, turn the knob clockwise to go down the list. Turn the control knob anticlockwise to go back up the list.
• 3. Once you have chosen your desired speed press the “OK” option.
• NOTE: During operation, press the located in the bottom right corner of the device and the device will start counting down automatically.
• If the timer has not been set in DIY mode for speed, the preset time will operate as follows:
Speeds 1-4 Max. time set up to
1 hr
Speeds 5-10 Max. time set up to 5
minutes
22
TEMPERATURE
• The display will allow you to adjust the temperature settings.
• 1. Press the TEMPERATURE option to select your desired cooking temperature.
• 2. When you press the temperature function, the screen will display a scroll down menu from 37-120°C. This allows you to set the temperature
required for cooking. To select your desired temperature you can either use the touch screen or the control knob.
• 3. To use the control knob, turn the knob clockwise to go down the list. Turn the control knob anticlockwise to go back up the list.
• 3. Once you have chosen your desired temperature, press the “OK” option.
• NOTE: During operation, press the located in the bottom right corner of the device and the device will start counting down automatically.
• NOTE: The temperature icon will change to blue colour when the appliance reaches the set temperature.
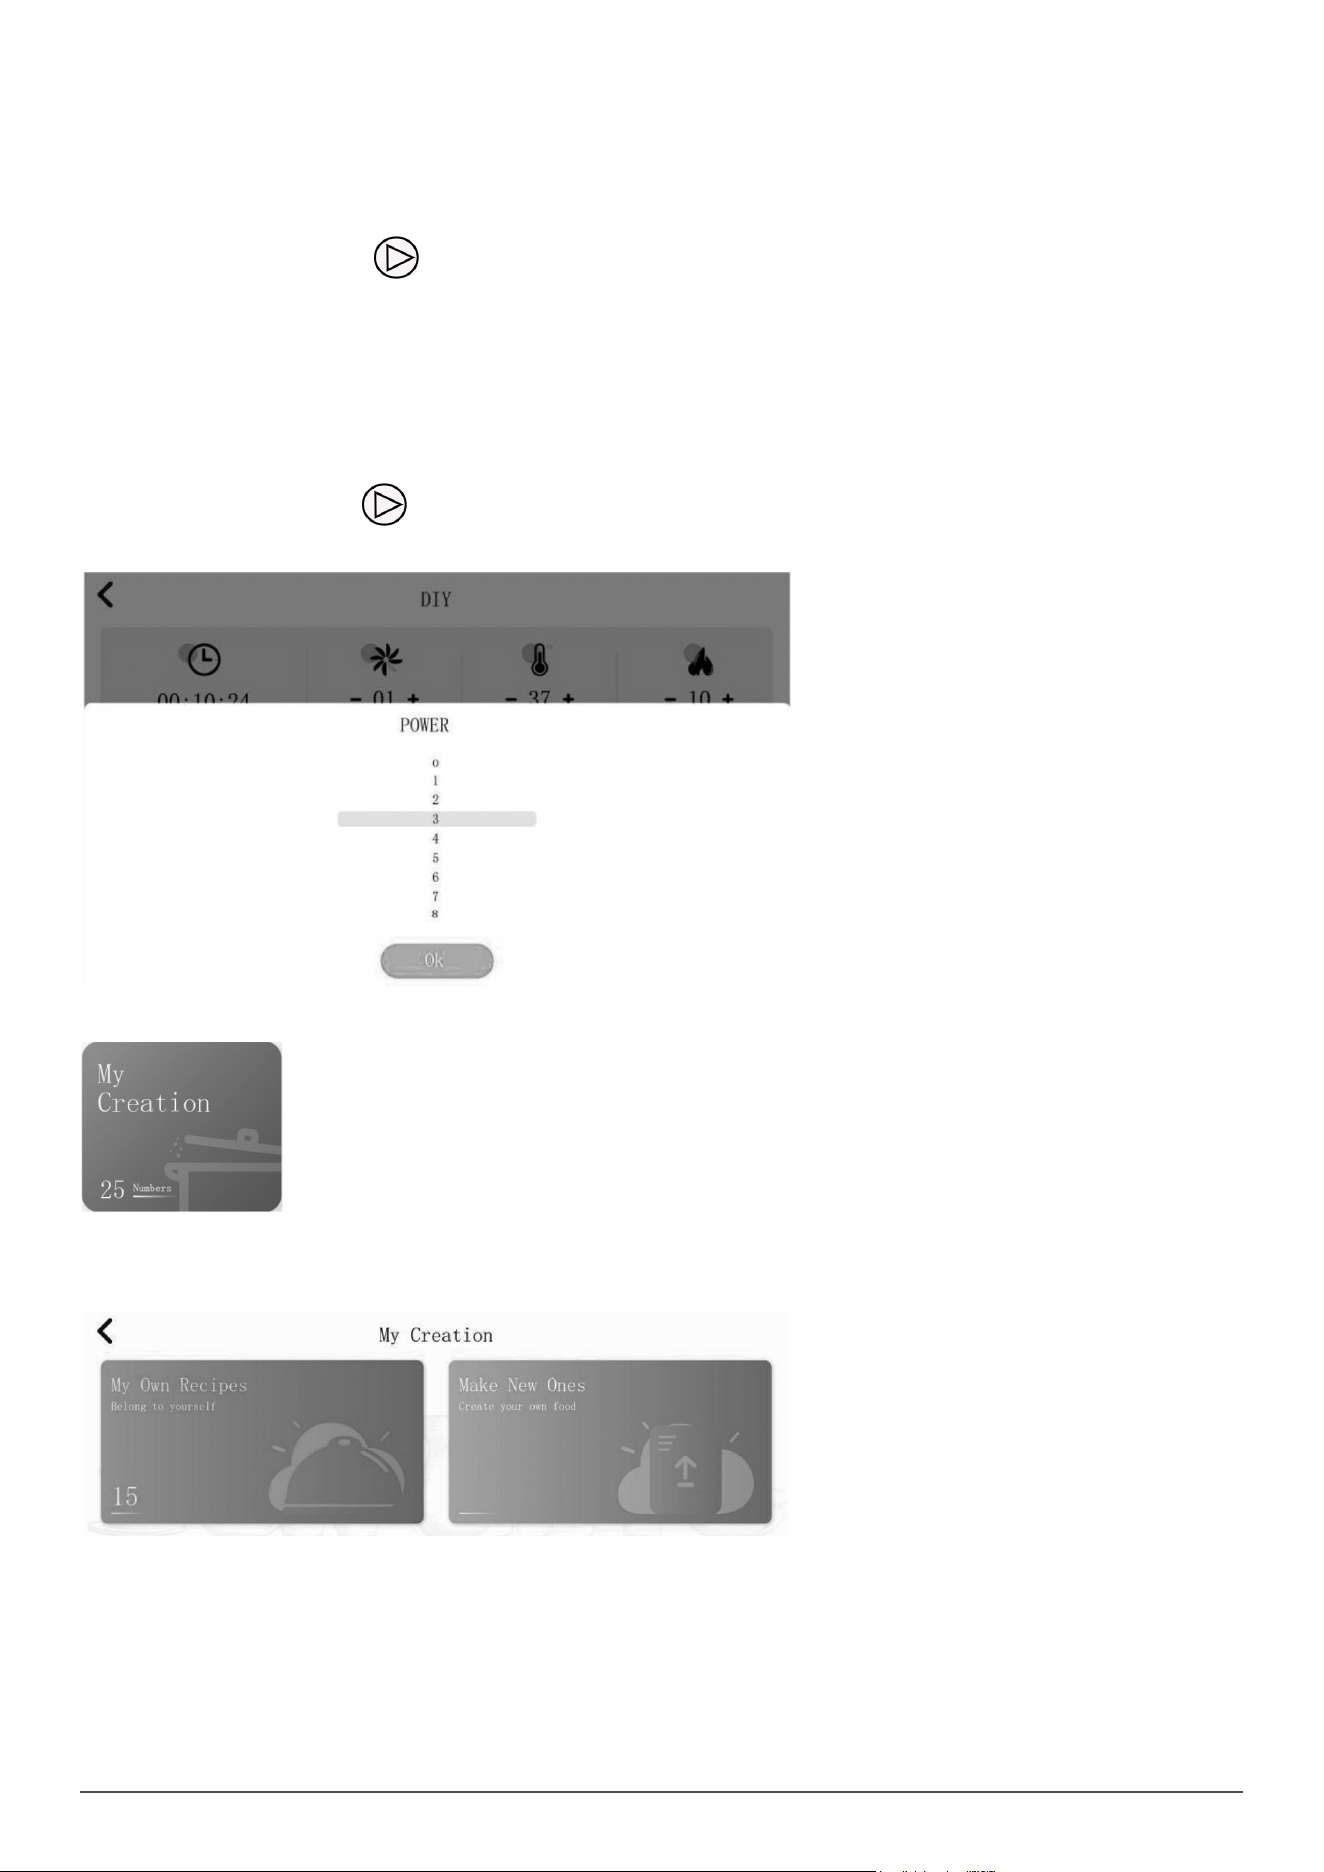
HEATING POWER
• The display will allow you to adjust the heating power of the appliance.
• 1. Press the POWER option to select your desired heating power.
• 2. When you press the power function, the screen will display a scroll down menu from 0-10.
• “0” being low and “10” being high. This allows you to set the heating power required for cooking. To select your desired heating power you can
either use the touch screen or the control knob.
• 3. To use the control knob, turn the knob clockwise to go down the list. Turn the control knob anticlockwise to go back up the list.
• 4. Once you have chosen your desired heating power press the “OK” option.
• NOTE: During operation, press the located in the bottom right corner of the device and the device will start counting down automatically.
• NOTE: It is suggested to choose low heating power when cooking fatty foods to avoid burning.
• NOTE: The heating power function will not activate unless the temperature is set.
MY CREATION
The My Creation tile is on the home screen which displays recipes you created in the Thermo Cooker.
MAKE NEW ONES
• To create your own new recipes in the Thermo Cooker, follow the steps Below:
• 1. Press “ Make New Ones” option to enter “ Brieng For New Recipe” menu.
• 2. Then you can ll in title, Creative time, Created by, Accessories, Serve Persons and Brieng For Recipes as your desired.
• 3. Press “+” option under the “ Ingredients”, a window will pop up, you need to input ingredient in this windows, then press “Yes” option to save the
ingredient. Repeat for all ingredients.
• 4. Press “ Next” option at the bottom right corner of screen to enter “Add Step” menu.
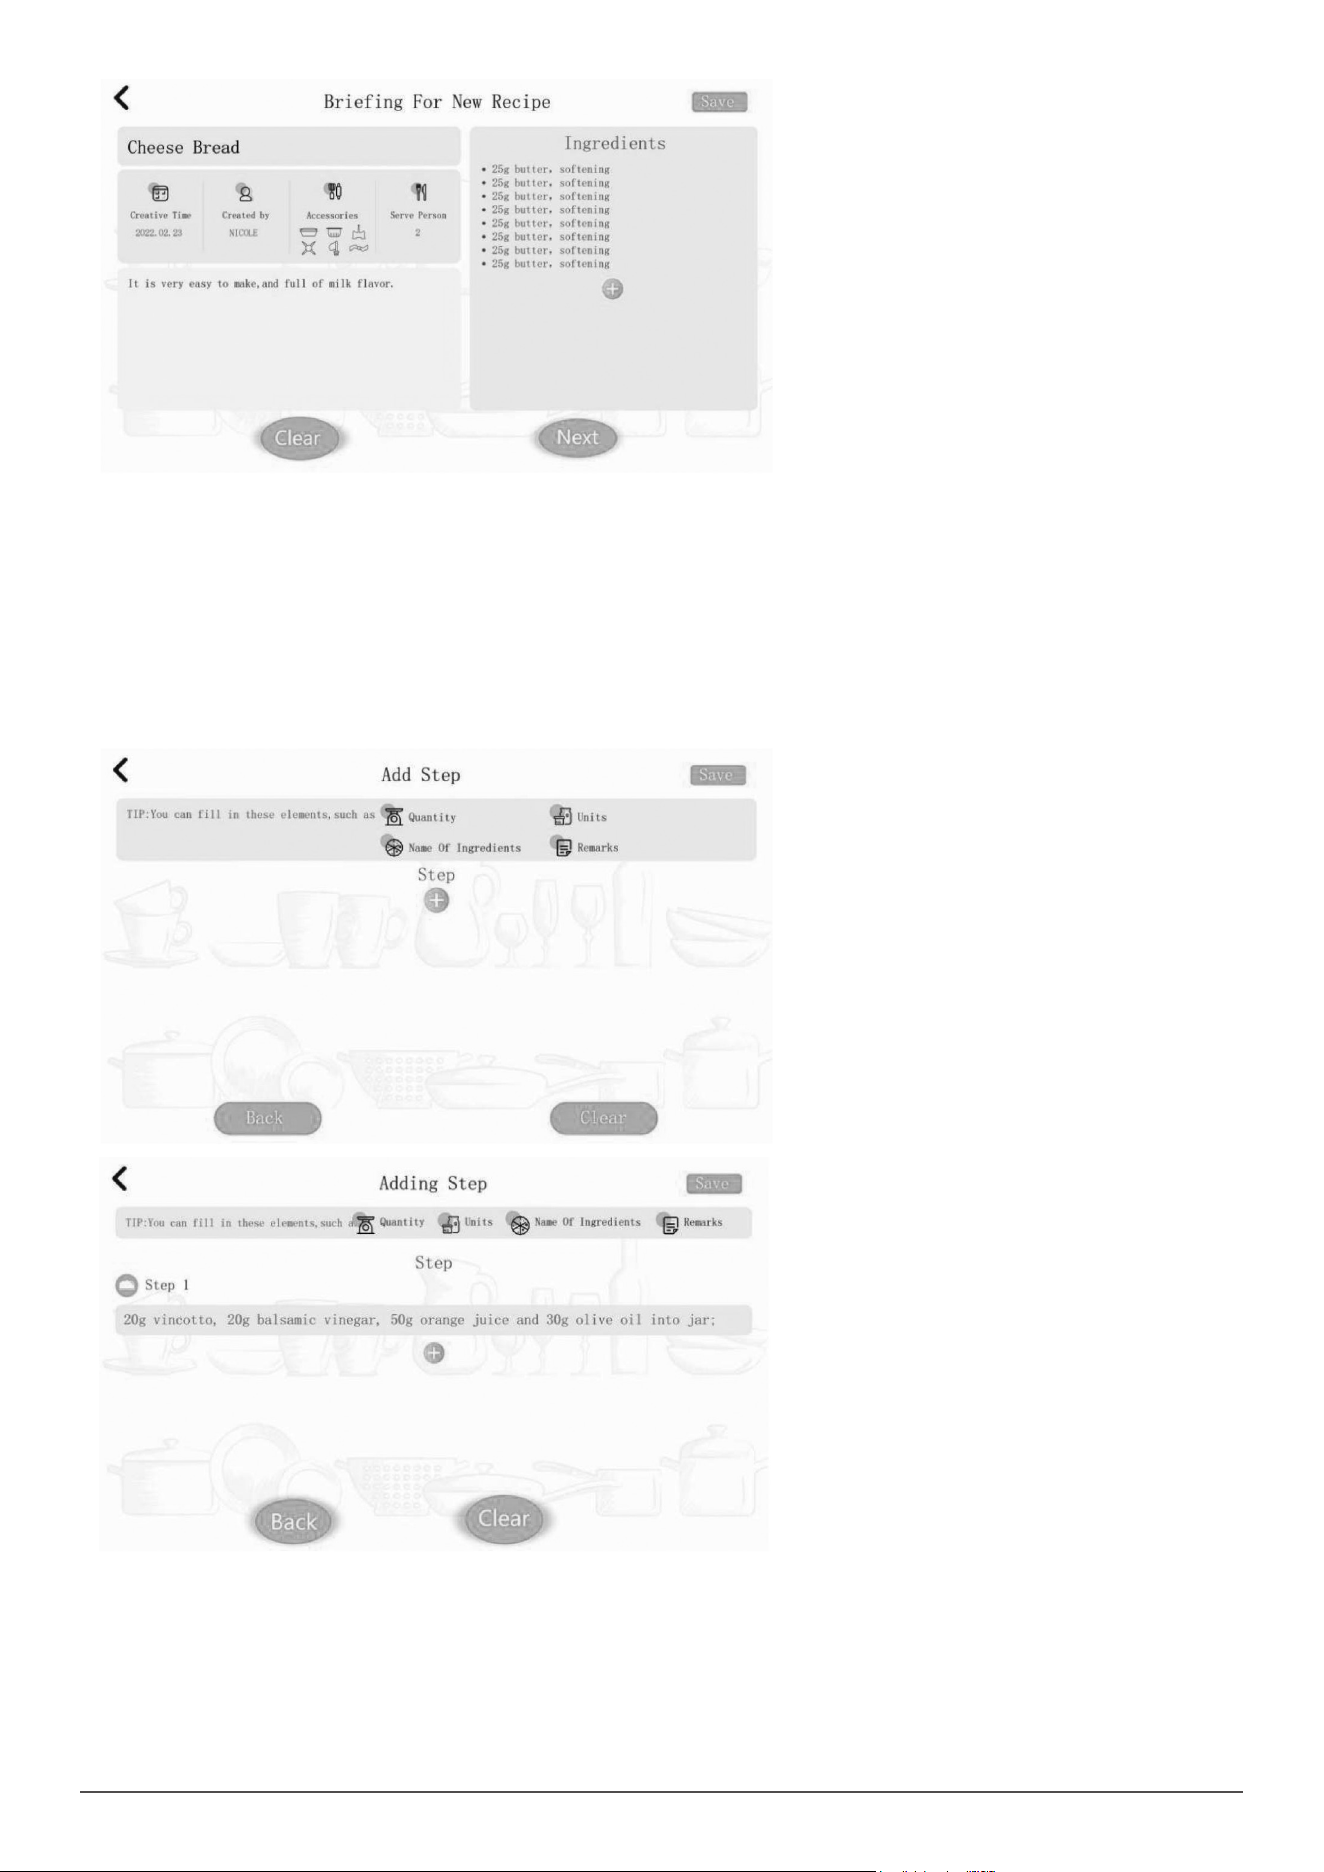
23
• 5. Press “+” option under the “Step”, a window will pop up stated “ Adding Ingredient” and “ Add Action”. Press “ Adding Ingredient”, there will be a
input box, press the input box, a window will pop up, you need to input ingredient in this windows, then press “Yes” option to save the ingredient;
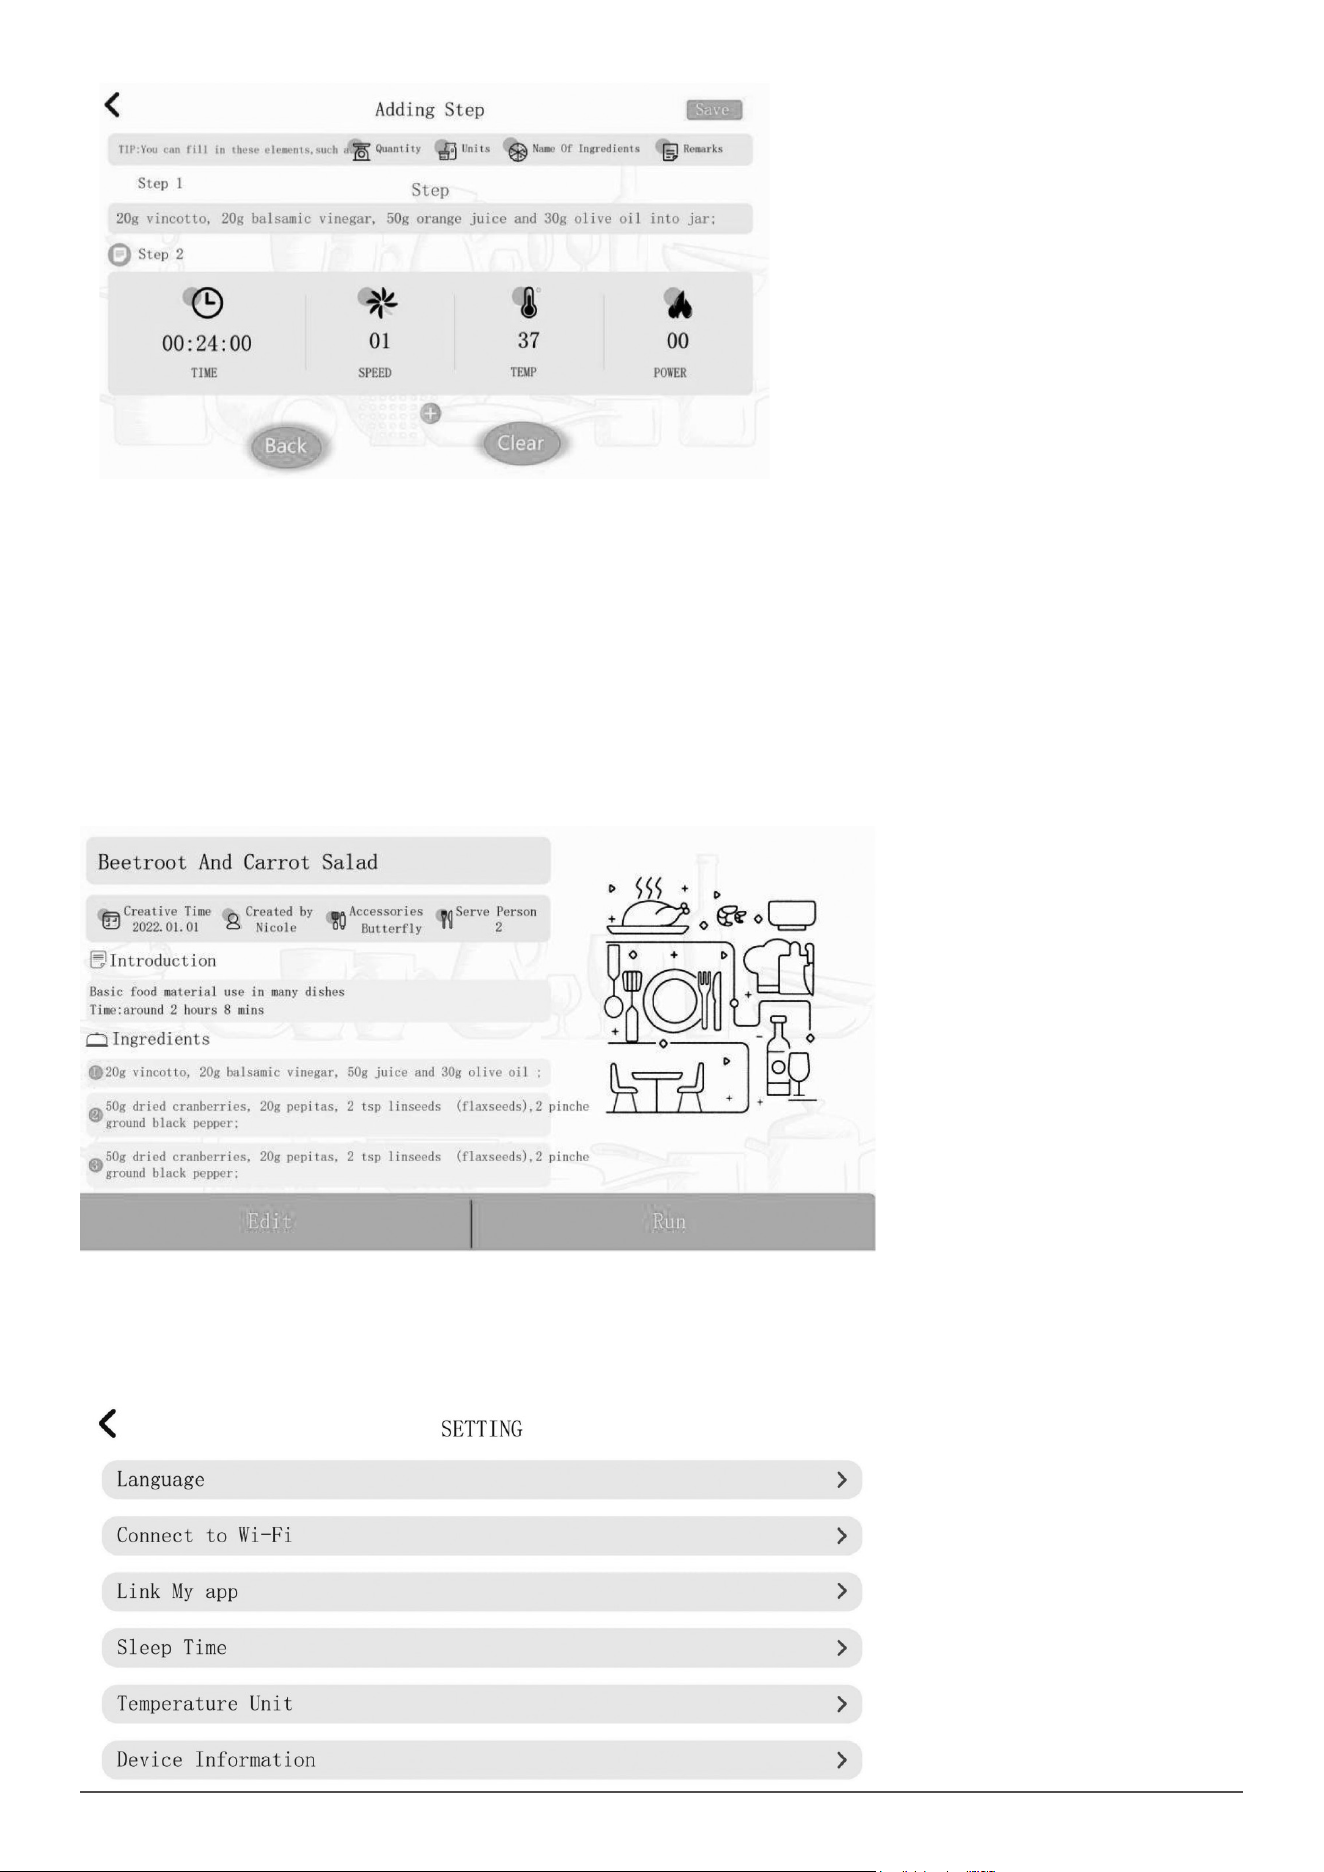
Press “Adding Action”, you can set time, speed, temperature and heating power as you want. Repeat for all steps. Note: We recommend you to
add ingredient for the step 1.
• NOTE: Adding ingredient and Adding Action are independent step, you need to input ingredients in one step and set speed, temperature, time and
heat power in other step.
• 6. Press “ Save” option to save the recipe, then you can nd the recipe in “ My Own Recipes” option.
• NOTE: Before you save the recipe, the title of recipe is necessary, or you will fail to save the recipe.
• Note: Press “Back” option at the left bottom of screen, you will enter previous page.
• NOTE: Press “Clear” option at the right botton of screen, all inputted information and data be cleared.
• NOTE: We recommend you to save recipe in time, in case data missing.
24
• NOTE: We recommend you to add ingredient for the step 1.
• NOTE: Adding ingredient and Adding Action are independent step, you need to input ingredients in one step and set speed, temperature, time and
heat power in other step.
• 6. Press “ Save” option to save the recipe, then you can nd the recipe in “ My Own Recipes” option.
• NOTE: Before you save the recipe, the title of recipe is necessary, or you will fail to save the recipe.
• NOTE: Press “Back” option at the left bottom of screen, you will enter previous page.
• NOTE: Press “Clear” option at the right bottom of screen, all inputted information and data be cleared.
• NOTE: We recommend you to save recipe in time, in case data missing.
MY OWN RECIPES
• My Own Recipes will record all recipes you saved in “Make New Ones”.
• Press “My Own Recipes” , you will see all saved recipes, press one of them, you will enter it.
• Press “Run” option, the thermo Cooker will run the recipe.
• Press “Edit”, you can continue to edit your recipe, for editing, refer to “Make New Ones” section.
• Press the ‘DUSTBIN’ * icon at the top right corner of screen, it will delete the recipe.
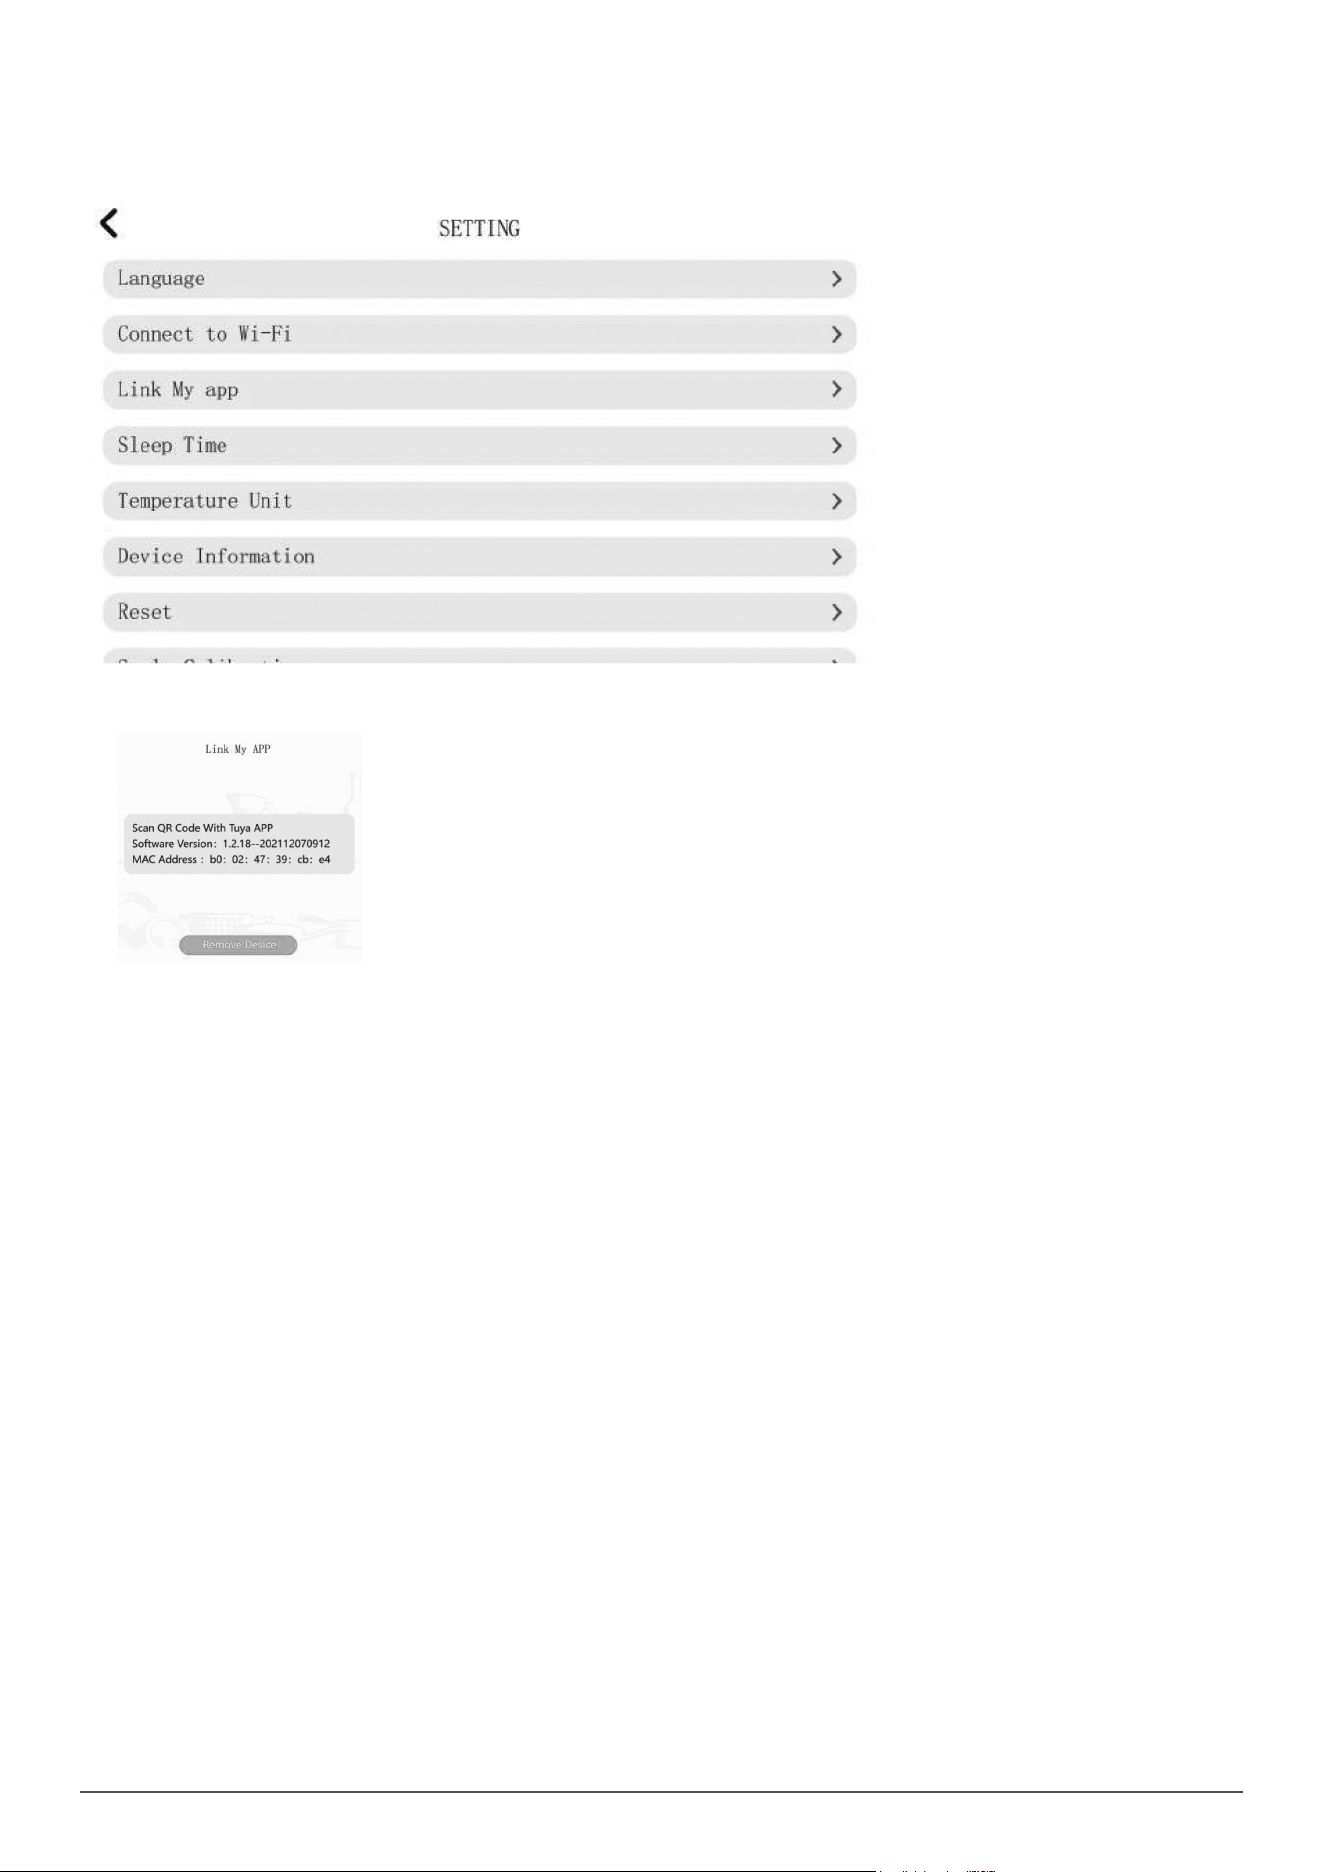
SET UP
• Press the Setup option located in the bottom right corner of the touch screen to access the setup and settings menu.
• The setup options will display as follows:
•
25
LANGUAGE
• The default language is set to English, press the Language option if you need to change the default language to Spanish, French, German, etc.
CONNECT TO WI-FI
• Displays the Wi-Fi network connection, see “6.2 Wi-Fi connection” section. for instructions on how to set up and connect to the Wi-Fi.
LINK MY APP
• The control application must be downloaded to a smart device in order to control the Thermo Cooker remotely.
• The application requires an active Wi-Fi connection to operate the Thermo Cooker.
• NOTE: The device does not support 5G connection or networks with WEP encryption.
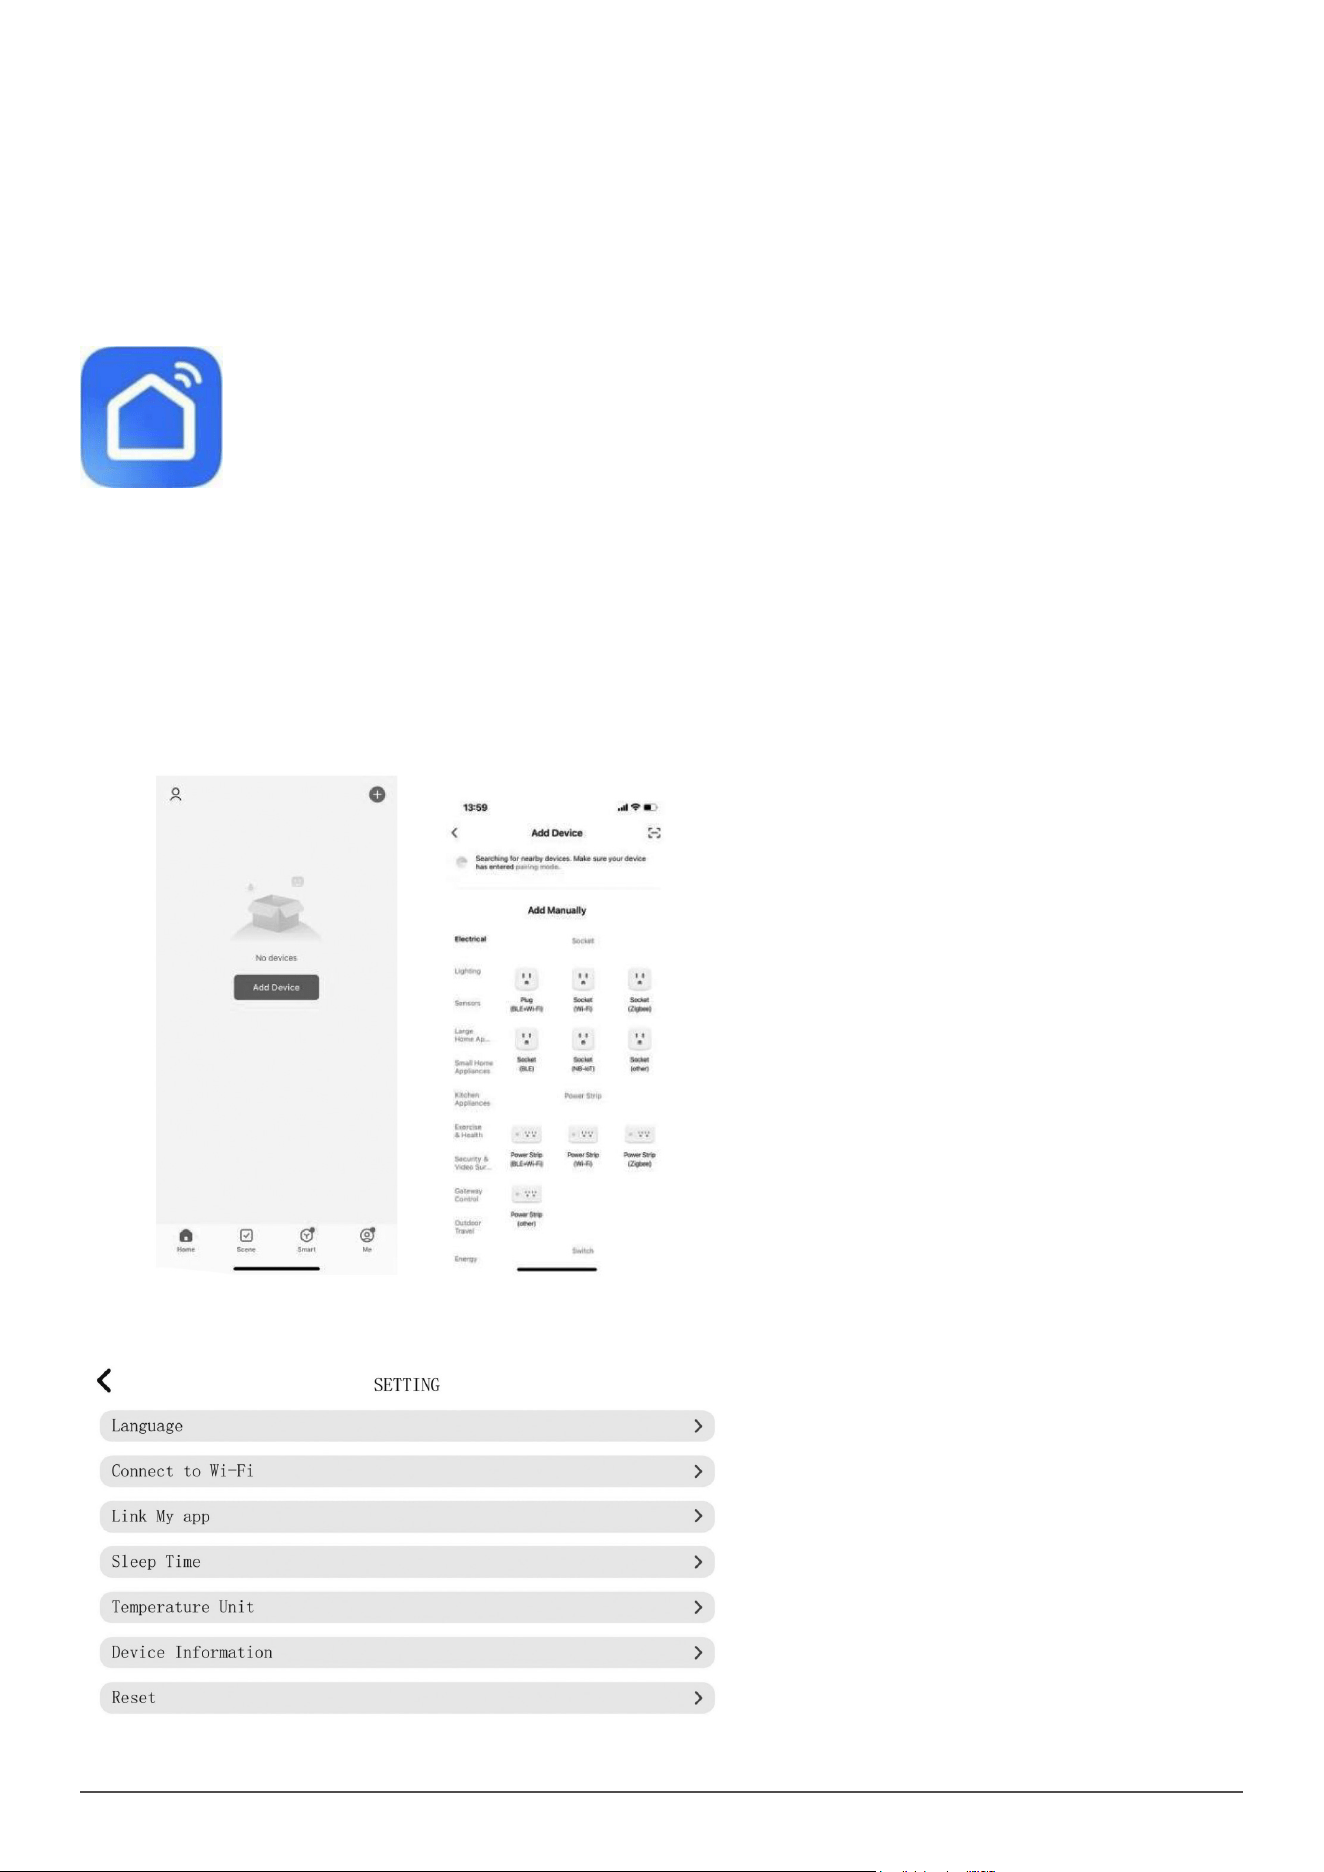
INSTALL APP
• 1. Open the Apple® App Store or Google Play Store.
• 2. In the search eld, type “Smart Life”.
• 3. Download the application showing the Smart Life icon.
CONNECTING YOUR SMART DEVICE
To connect the Thermo Cooker to the control application via Wi-Fi, follow the steps below:
• 1. Open the control application “Smart Life” on your smart device and select the “sign up” option to create an account.
• 2. Press the “Agree” option once you have read and understood the user agreement and privacy policy.
• 3.Enter a valid email address or mobile number to create an account name and press the “Get Verication Code” option for a verication code to
be sent to your email address.
• 4. A verication code will be sent to you by email or SMS. Enter the code to continue.
• 5. Create a password which must have a minimum of 6 characters and contain at least one letter and one number. Press the “Done” option once
you have entered your selected password.
• 6. Once logged into your account, press the “+ Add Device” option found in the top right corner of the control application home screen. You will
then be directed to the next screen with additional instructions.
• 7. Press the “Manual Scan” option located in the top right corner of the control Application.
• 8. Press the “Setup” option located in the bottom right corner of the touch screen on the Thermo Cooker. Then press the “Link My App” which will
display a QR code for scanning.
26
• Once you have selected “Manual Scan” on your smart device, hold your camera directly over the QR code located on the Thermo Cooker for it to
scan.
• 10. The app will begin adding the device and may take up to 2 minutes, you will get a notication saying “added successfully” once completed.
11. Once the control application has nished loading, you will now be able to control the Thermo Cooker via your smart device.
• NOTE: Only one smart device can be connected at a time to the Thermo Cooker.
• NOTE: Thermo Cooker will only operate via the control application when the smart device is connected to the Wi-Fi.
INSTRUCTION FOR APP
27
REMOVE YOUR SMART DEVICE
To remove the current smart device connected to the Thermo Cooker, follow the steps below:
• 1. Press the “Setup” option located in the bottom right corner of the touch screen on the Thermo Cooker.
• 2. Press the “Link My App” option which will display the current smart device connected.
3. Press the “Remove Device” option located at the bottom of the touch screen on the Thermo Cooker.
SLEEP TIME
The Thermo Cooker has a sleep time setting which is the same as stand by mode. The sleep time setting is adjustable depending on your personal
preference. Please see the instructions below:
• Press the “Sleep Time” option to change the standby time for the Thermo Cooker.
• NOTE: The default standby time is set at 10 minutes.
TEMPERATURE UNIT
The Thermo Cooker has temperature unit setting, there are two options: ℃ and ℉, it is adjustable depending on your personal preference. Please
see the instructions below:
• Press the “Temperature Unit” option to change the temperature unit for the Thermo Cooker.
• NOTE: The default temperature unit is ℃.
DEVICE INFORMATION
• This displays the current motherboard version, software version, Mac address and Android Version of the Thermo Cooker.
RESET
This function will Restore Factory Defaults, please see the instructions below:
• Press the “Reset” option, a notication will appear that states “ Do you want to reset this device”, press “Yes” option, the Thermo Cooker will reset,
press “ No”, it will quit.
• NOTE: All data and information in the Thermo Cooker will be cleared after reset.
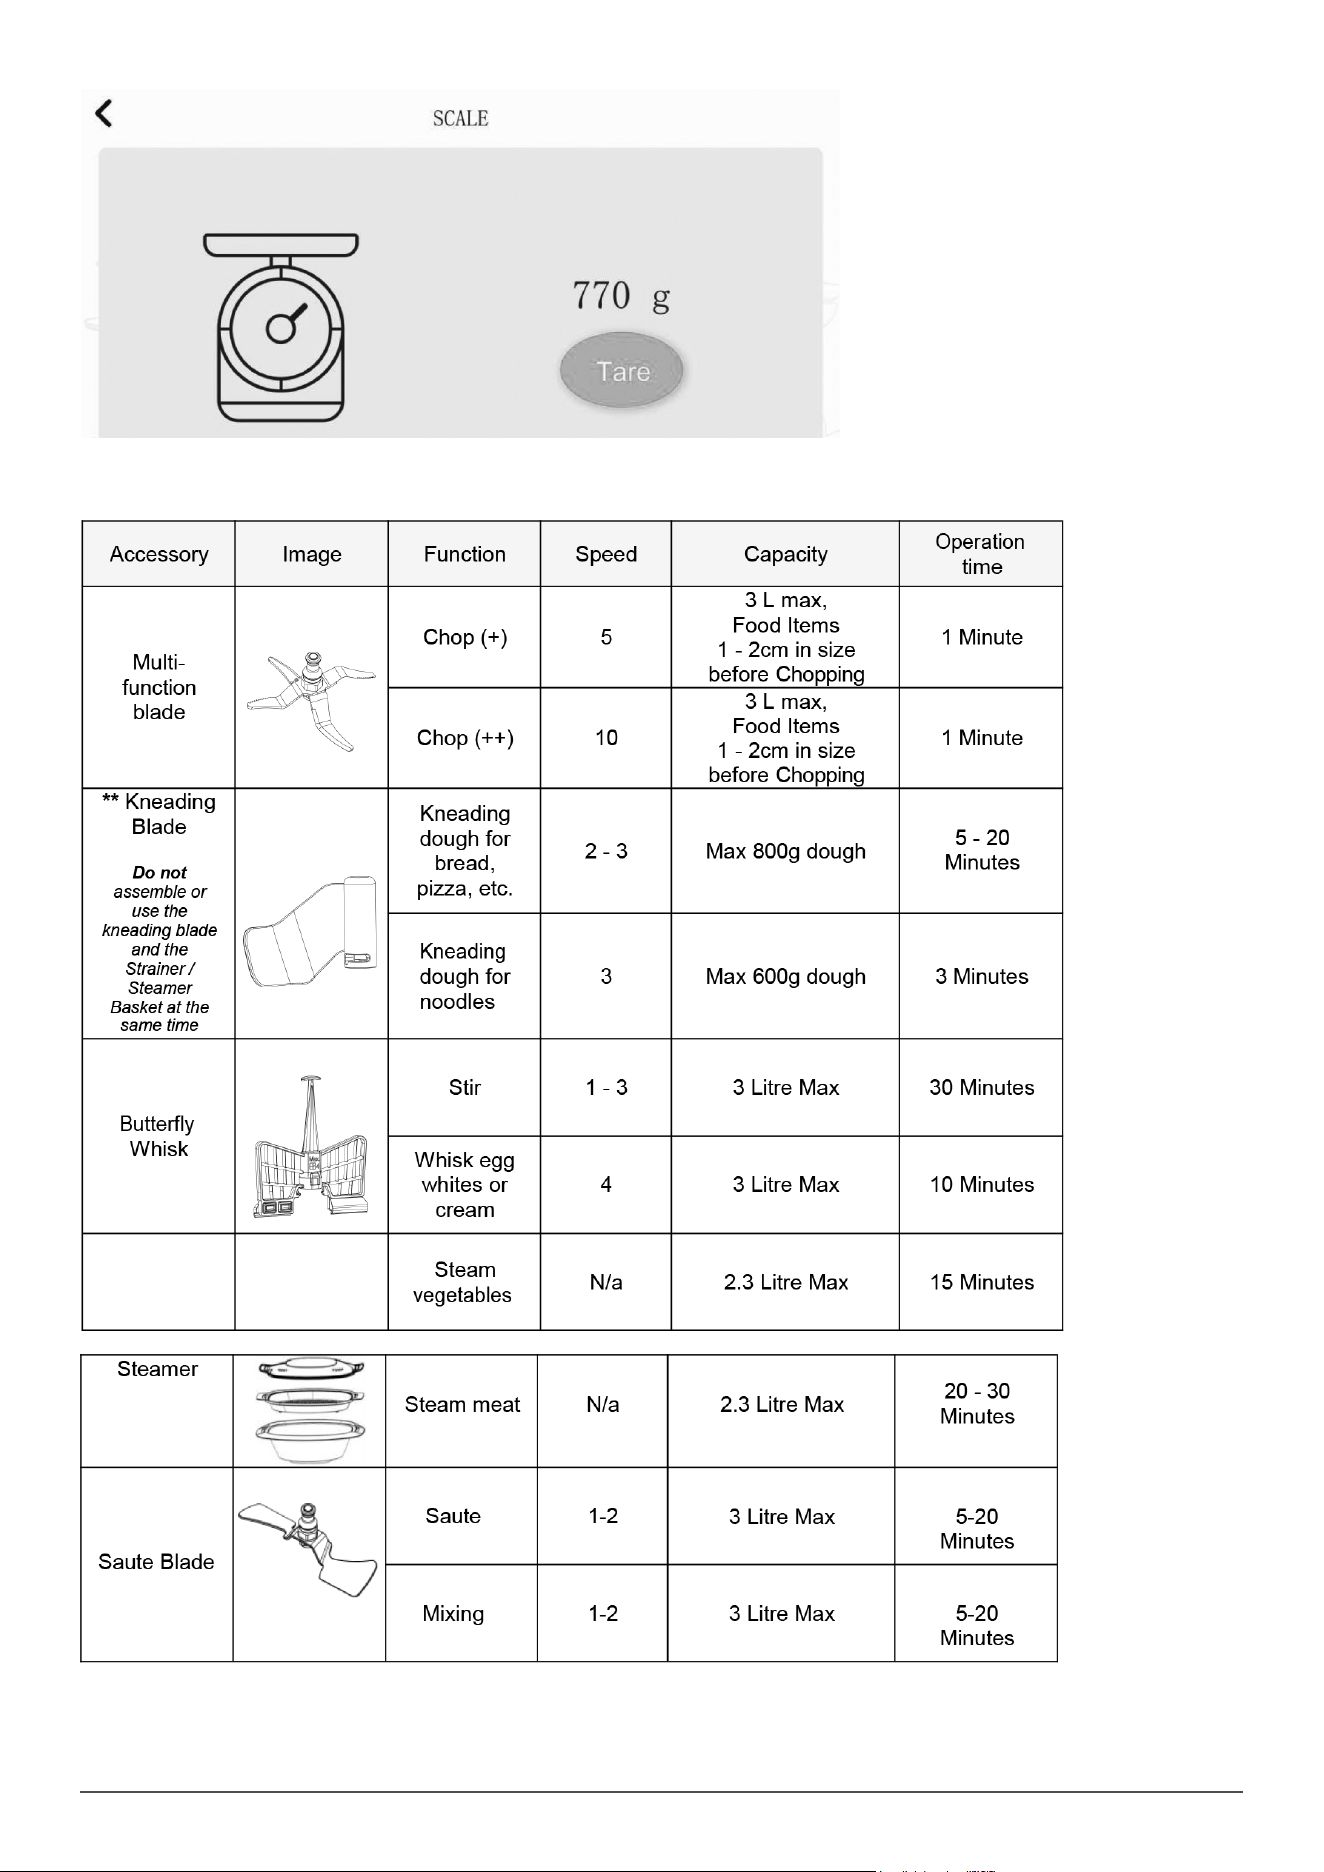
SCALES
The Thermo Cooker has inbuilt weighing scales and can weight from 1 to 4,999 grams in 1-gram increments.
• NOTE: The Scale Function will only function when the jar lid is not tted to the jar and locked in place.
• If the Jar lid is tted to the Jar, remove the lid.
• The Thermo Cooker must be paused or in standby mode to use the scale function.
• Press the Scale icon to enter the Scale function.
• The ingredients will be weighed as they are added in the jar, and the display shows the value in grams.
• NOTE: If there are ingredients already inside the jar and new ones are added, the scale will add both values and the display will show the total
weight in the jar.
• NOTE: Adding ingredients after exiting the scale function and re-entering will not display the combined weight. It will only show the weight of the
newly added ingredients and only whilst in the Scale Mode.
• Therefore: the display might show negative values when food is removed from the inside of the jar.
• NOTE: as soon as the jar lid is tted and locked onto the jar, and the jar is tted to the appliance, the scale function will disappear.
28
SUGGESTED SPEED AND CAPACITY FOR EACH ACCESSORY
**WARNING: DO NOT ASSEMBLE OR USE THE KNEADING BLADE AND THE STRAINER / STEAMER BASKET AT THE SAME TIME.
29
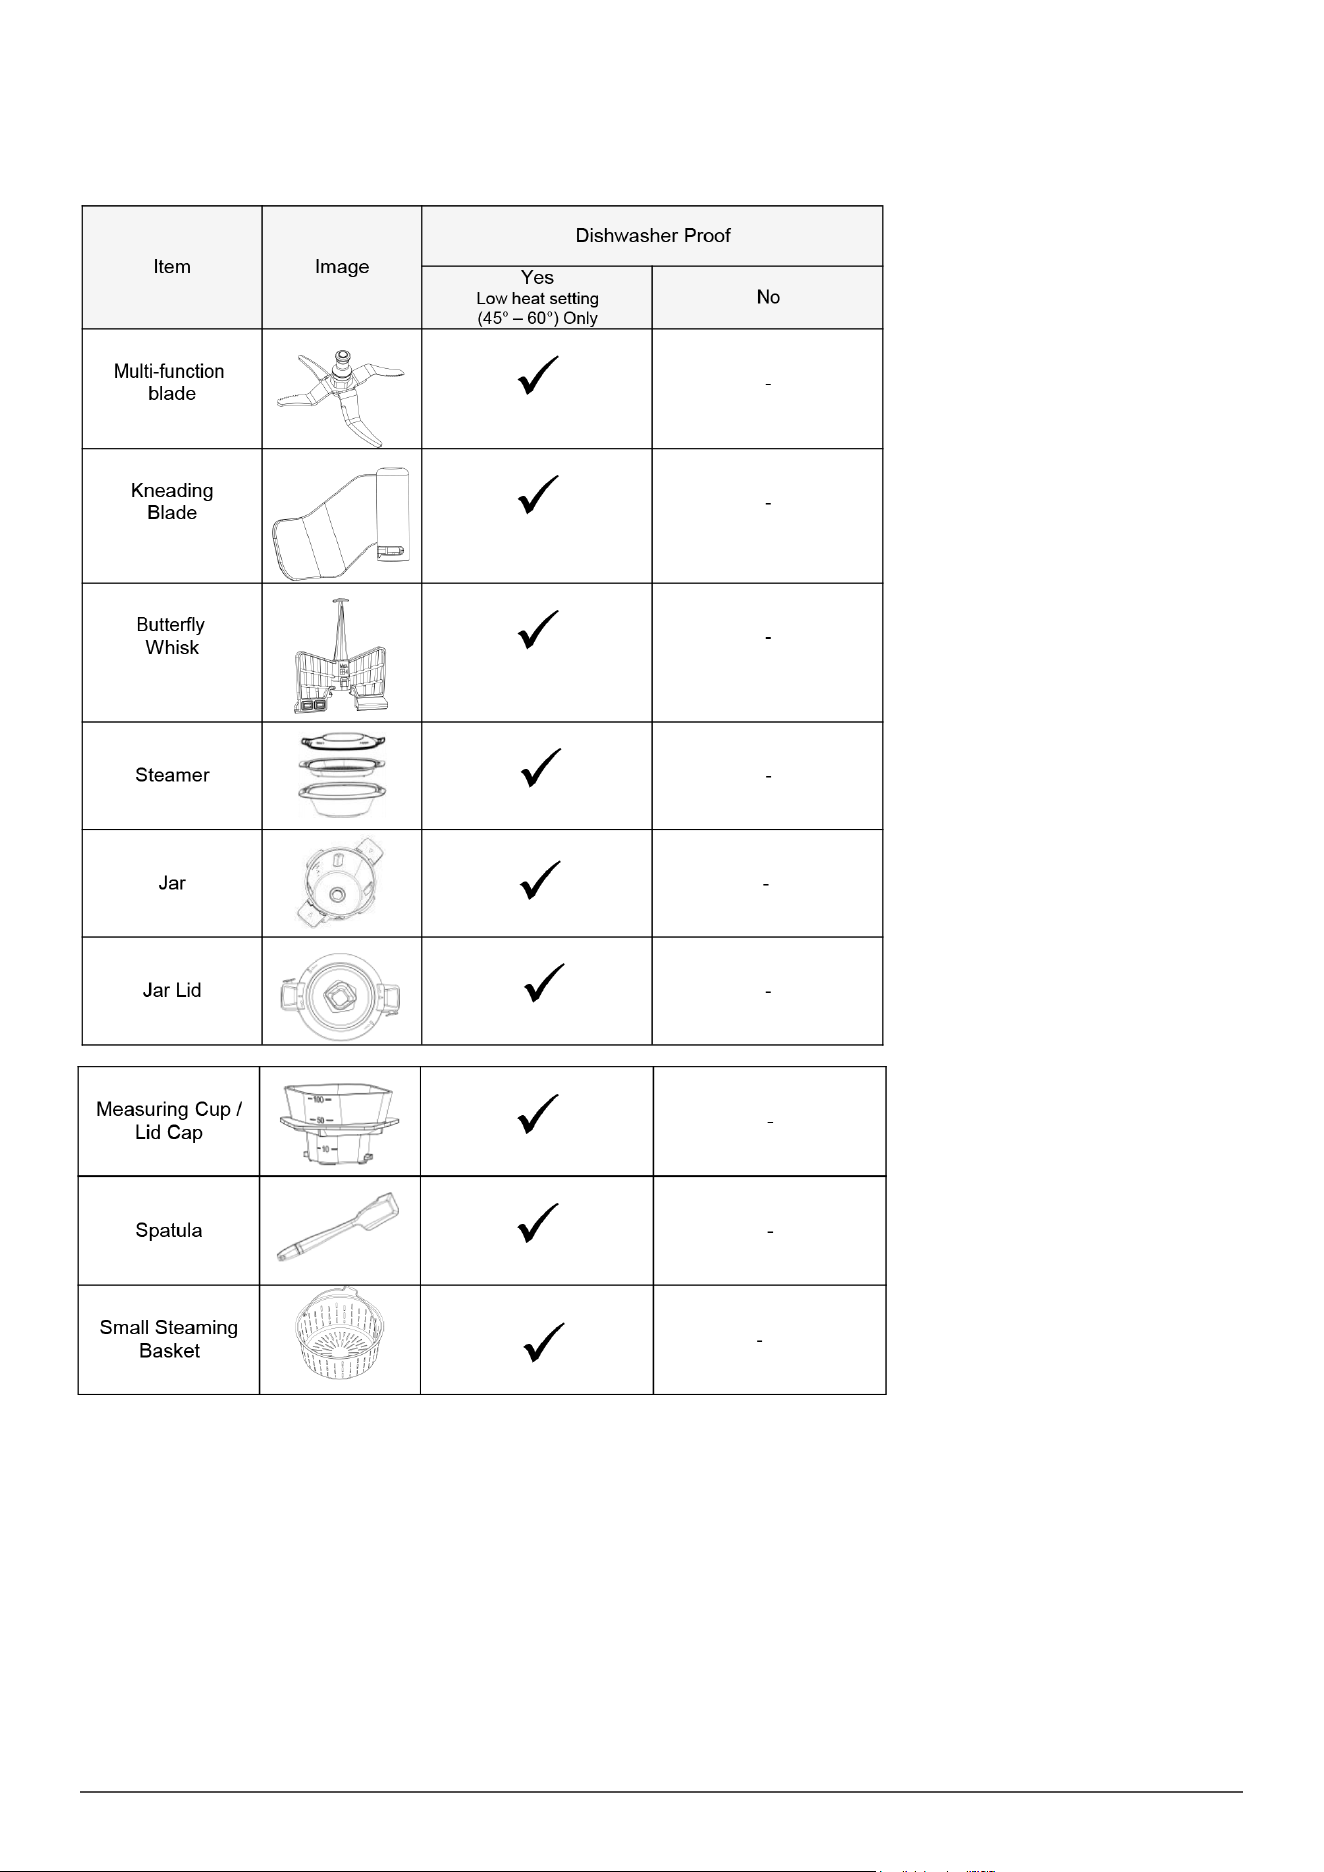
CLEAN
• Wipe the Motor Base over with a slightly damp cloth and mild detergent and then dry off, ensuring the electrical contact area is perfectly dry. Dry
with a dry soft cloth.
• Cleaning the parts immediately after use ensures a faster clean up time, and this will prolong the life of your appliance & accessories and reduce
staining on the plastic parts.
30
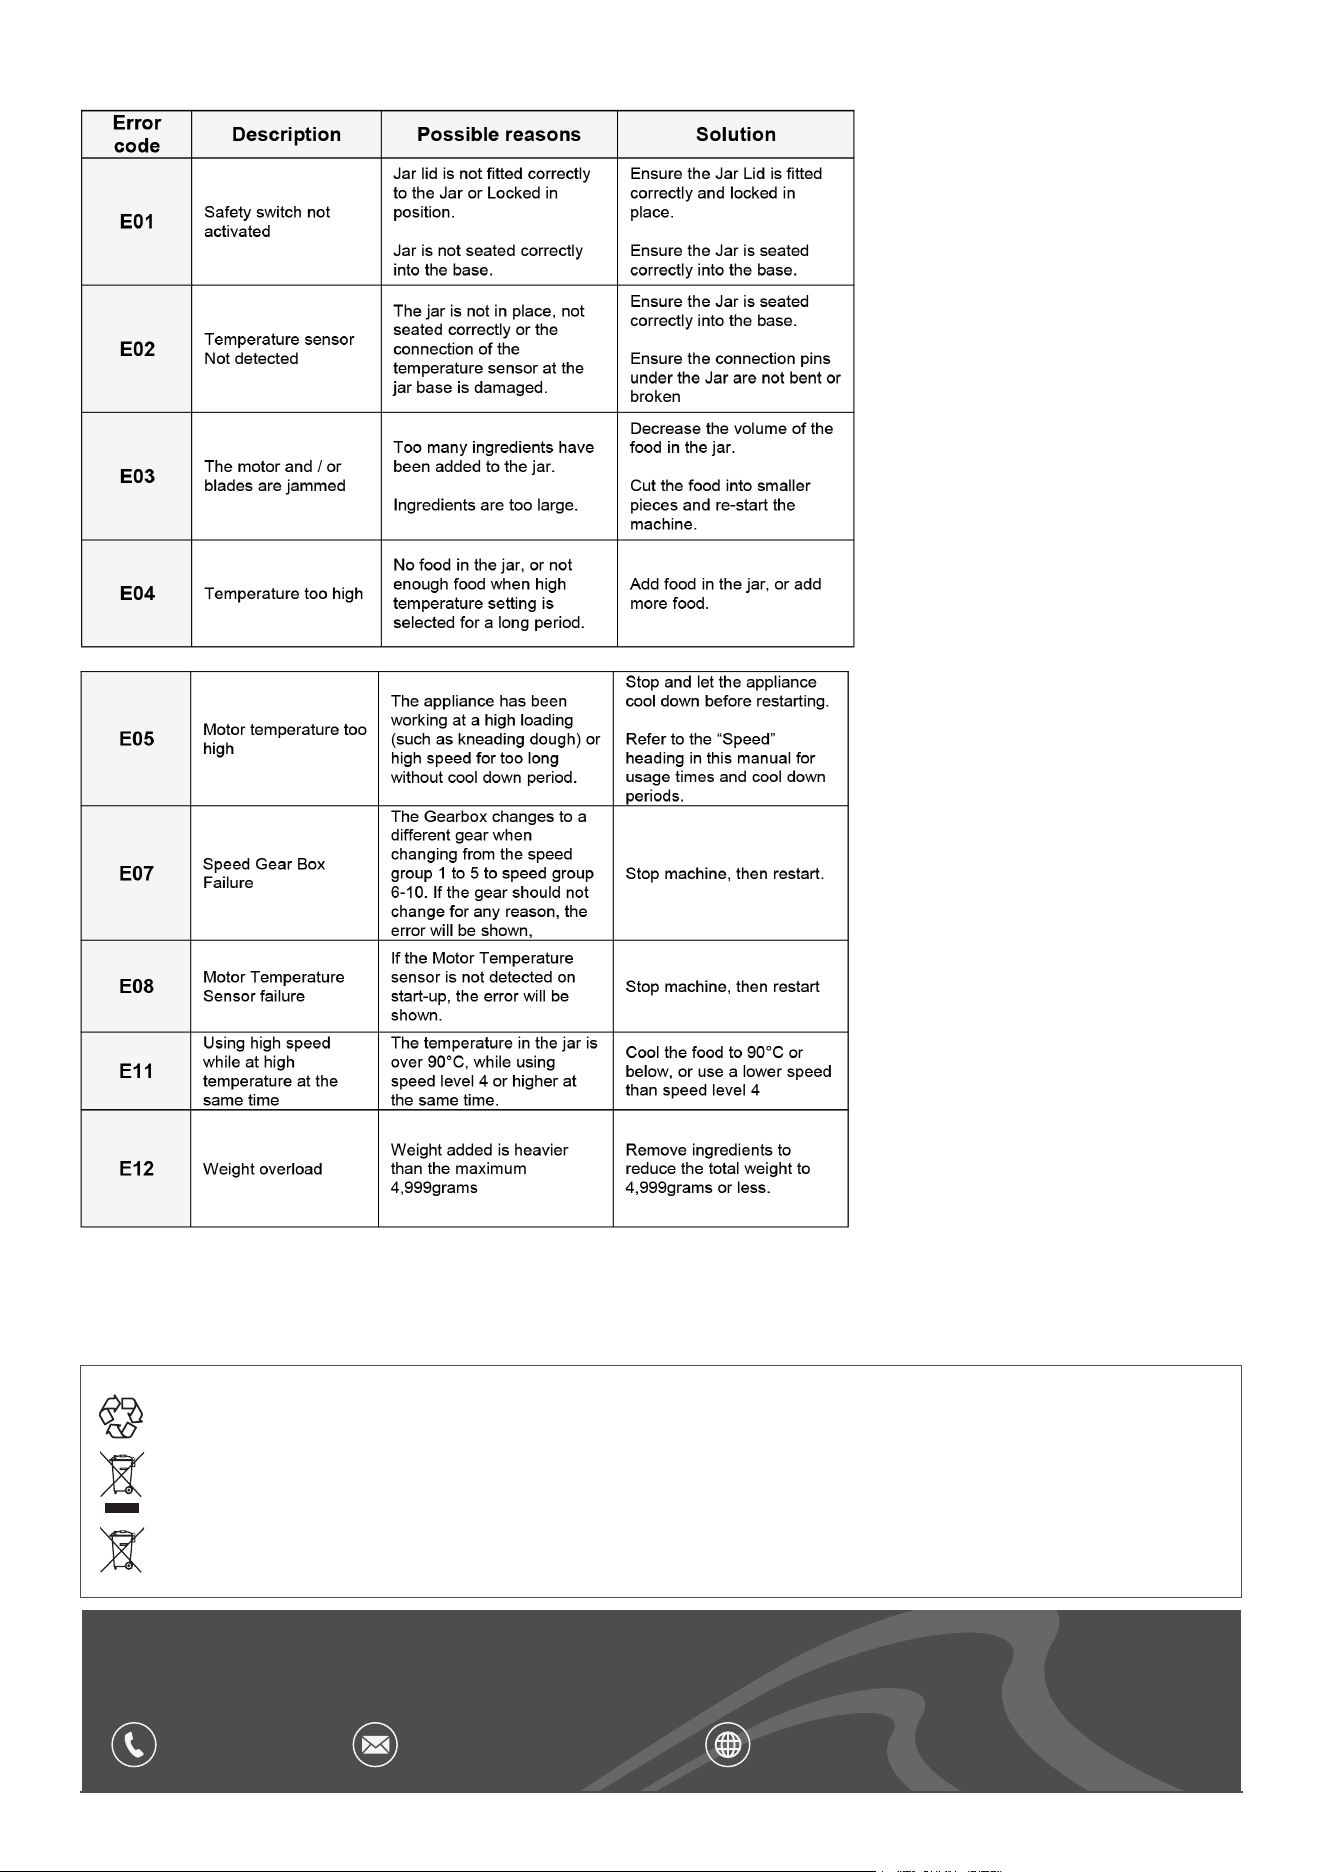
TROUBLESHOOTING
Dellonda Limited, Sole UK Distributor of Baridi
Kempson Way, Suffolk Business Park, Bury St Edmunds, Suffolk. IP32 7AR
01284 757575 suppor[email protected] www.dellonda.co.uk
Environment Protection, Waste Electrical and Waste Electronic Equipment Regulations
(WEEE)
Recycle unwanted packaging materials. When this product is no longer required, or has reached the end of its useful life, please dispose
of in an environmentally friendly way. Drain any uids (if applicable) into approved containers, in accordance with local waste regulations.
Please note that this product contains one or more batteries. It is our policy to continually improve products and we reserve the right to
alter data, specications and parts without prior notice. No liability is accepted for incorrect use of this product. Guarantee is 12 months
from purchase date, proof of which is required for any claim.