
MANUALE D’USO
INSTRUCTION MANUAL

ENFRES
USER MANUAL
MILK FROTHER
MANUEL DE L’UTILISATEUR
CHOCOLATIÈRE
MANUAL DE USO
VAPORIZADOR DE LECHE

Important information for the user
Informations importantes pour l’utilisateur
Información importante para el usuario
Instructions / Instructions / Instrucciones
Description / Description / Descripción
Use / Utilisation / Uso
Cleaning and care / Nettoyage et entretien / Limpieza y cuidado
Safety instructions / Consignes de sécurité / Instrucciones de seguridad
Information / Informations / Información
Advice / Conseil / Recomendaciones

Dear Customer, Thank you for choosing this special edition Smeg – Dolce&Gabbana, Blu Mediterraneo small domestic
appliance. Smeg and Dolce&Gabbana have combined their artistic talents to create a unique collection, made in Italy
by Smeg with unmistakeable Dolce&Gabbana design touches. We hope you enjoy using your new appliance! Kindest
regards.
Cher client, Nous vous remercions d’avoir acheté un petit appareil électroménager de l’édition spéciale Smeg –
Dolce&Gabbana, Blu Mediterraneo. Smeg et Dolce&Gabbana associent leurs veines artistiques donnant vie à une
collection unique, originale Made in Italy, réalisée par Smeg avec une créativité unique signée Dolce&Gabbana. Nous
espérons que vous pourrez apprécier pleinement votre appareil électroménager, nous vous présentons nos salutations
les plus cordiales.
SMEG S.p.A.
Estimado/a cliente, Le agradecemos por haber escogido un pequeño electrodoméstico de la edición especial Smeg –
Dolce&Gabbana, Blu Mediterraneo. Smeg y Dolce&Gabbana unen sus espíritus artísticos, dando vida a una colección
única, original «Made in Italy», realizada por Smeg con la inconfundible expresividad creativa de Dolce&Gabbana.
Deseamos que disfrute al máximo de todas las funciones de su electrodoméstico, le enviamos nuestros saludos
más
cordiales.
START
STOP
7
Fig. “1”
Abb.
2
5
8
1
3
4
6
3a
220-240V~ 50/60Hz
500 W
EN - 1
EN
Important instructions
Important instructions
WARNING: If the instructions contained in this manual are not
followed precisely, re or explosion may result causing prop-
erty damage, personal injury or death.
READ AND SAVE THESE INSTRUCTIONS - Your safety and the
safety of others are very important.
We have provided many important safety messages throughout this
manual and on the appliance.
Read all the instructions before using the appliance and always obey all
safety messages.
WARNING
• To reduce the risk of re or electric shock, do
not remove the cover (or back).
• No user-serviceable parts inside!
• Repair should be done by authorized service
personnel only.
2 - EN
Important instructions
RECOGNIZE SAFETY INFORMATION
This is a safety alert symbol. This symbol alerts you to potential hazards that can result
in severe personal injury or death.
UNDERSTAND SIGNAL WORDS
A signal word - DANGER, WARNING or CAUTION - is used with the safety alert symbol. DANGER denotes the most
serious hazards. It means you could be killed or seriously injured if you do not immediately follow the instructions.
WARNING means you could be killed or seriously injured if the instructions are not followed. CAUTION indicates a poten-
tially hazardous situation, which, if not avoided, could result in minor to moderate injury.
WARNING
• This appliance is intended for household use only.
• Use this appliance only for its intended purpose. The manufactu-
rer cannot be held liable for damage caused by improper use of
this appliance.
• This appliance complies with current safety regulations. Impro-
per use of this appliance can result in personal injury and mate-
rial damage.
• Read all the instructions before installing or using the appliance
for the rst time.
• Keep these operating instructions in a safe place and pass them
on to any future user.
The safety messages will inform you of potential hazards, on how to avoid the risk of injury
and what can occur if the instructions are not followed.
IMPORTANT: Observe all codes and ordinances in force.
WARNING: For your safety, the instructions contained in this manual
must be followed to minimize the risk of re or explosion and to prevent
property damage, personal injury or death.
Do not store or use gasoline or other ammable vapors, liquids or materials near
this or any other appliance.
NOTE : This appliance is NOT designed for installation in manufac-
tured (mobile) homes or in recreational vehicles (RVs).
DO NOT install this appliance outdoors.
EN - 3
EN
Important Safeguards
Follow all safety precautions to ensure safe use
of the appliance.
• Read all instructions.
• Do not use the appliance outdoors.
• This appliance is for household use only.
• Do not use the appliance for other than its
intended use.
• Misuse could lead to res, electric shocks
or personal injury.
• Do not allow children to use the appliance.
• Children should not play with the appliance.
Keep the appliance out of the reach of
children.
• Keep the packaging material (plastic bags,
expanded polystyrene) out of the reach of
children.
• Close supervision is necessary when any
appliance is used by or near children.
• Turn off the appliance immediately after use.
• Do not leave the appliance unattended
while it is running.
• Disconnect the appliance from the wall
outlet before assembly, disassembly,
cleaning and after each use.
• To disconnect, turn any control to the off
position, then remove plug from wall outlet.
• Unplug from outlet when the appliance is
not in use, and before cleaning. Allow to
cool before putting on or taking off parts,
and before cleaning the appliance.
• To protect against re, electrical shock
and personal injury, do not immerse the
appliance, the power cord or plug in water
or any other liquid.
• Do not touch the appliance or the plug with
wet hands.
• Never try to extinguish a ame/re with
water: turn off the appliance, unplug it from
the outlet and cover the ame with a lid or
a re blanket.
• Do not use the appliance if the power cord
or plug is damaged or if the appliance has
been dropped or damaged in any way.
• Do not let cord hang over edge of table or
counter, or touch hot surfaces.
• Do not operate any appliance with a
damaged cord or plug or after the appliance
malfunctions, or has been damaged in any
manner. Return appliance to an authorized
service facility for examination, repair or
adjustment.
• Make sure the power cord does not come
in contact with sharp edges.
• Do not pull on the cord to remove the plug
from the socket.
• Do not place on or near a hot gas or electric
burner, or in a heated oven.
SAVE THESE INSTRUCTIONS
WARNING
When using electrical appliances, basic safety pre-
cautions should always be followed to reduce the
risk of re, electric shock, and/or injury to persons
including the following:

4 - EN
Important Safeguards
• Do not touch hot surfaces. Use handles and
knobs.
• Do not place the appliance near faucets or
sinks.
• Never attempt to repair the appliance
yourself or without the help of a qualied
technician. Failing to do this will void the
warranty.
• In case of malfunction, have the appliance
repaired by a qualied technician.
• Do not make any changes to the appliance.
• Make sure that the power outlet used is
always freely accessible, because only
in this way can it be unplugged when
necessary.
• To remove the plug from the power outlet,
operate directly on the plug. Never pull the
cable, it could be damaged.
• If the appliance should break down, do not
attempt to repair it.
Switch the appliance off, remove the plug
from the power outlet and contact the
Technical After-sales centre.
• If the plug or power supply cable are
damaged, have them replaced exclusively
by the Technical After-sales centre, so as to
prevent all risks.
• Scalding may occur if the lid is removed
during the brewing cycles.
• This appliance is not intended for use by
persons (including children) with physical,
sensory or mental impairments, or lack of
experience and knowledge, unless they
have been given supervision or instruction
concerning use of the appliance by a
person responsible for their safety.
• Danger of burns! The surface of the jug
during and after use is hot. Do not touch it.
• Do not use the appliance without liquid.
Always ll at least up to the MIN level and
not over the MAX level. Both shown inside
the jug.
• The milk foam disks can pose a risk of
suffocation. Keep disks out of the reach of
children.
SAVE THESE INSTRUCTIONS

EN - 5
EN
Important Safeguards
SAVE THESE INSTRUCTIONS
For this appliance
• The jug warms up during operation. Do not
touch the hot surfaces, always pick up the
jug using the handle.
• The appliance shall not be placed in a
cabinet when in use.
• Leave a space of 10 cm around the
appliance.
• Make sure the lid is rmly closed.
• Do not open the lid during the use.
• Do not use the appliance in combination
with parts or accessories from other
manufacturers.
• The use of accessory attachments
not recommended by the appliance
manufacturer may result in re, electric
shock or injury to persons.
• Place the appliance on a at, dry surface.
• Avoid wetting or spraying liquid on the
appliance. In case of contact with liquid,
immediately unplug the cord from the
electrical outlet and dry thoroughly: Risk of
electric shock!
• Do not use abrasive cleaners or sharp
objects to clean the appliance.
• The use of an accessory not evaluated for
use with this appliance may cause injuries.
• Do not install the appliance in environments
with a temperature less than or equal to
0°C.
• Do not place the appliance on or in
proximity of electric or gas cookers, or in
a heated oven.
• Verify that there are no foreign objects inside
the appliance.
• People who have pacemakers or other
similar devices tted must make sure that the
operation of these devices is not affected
by the induction eld, the frequency range
of which is between 20 and 50 kHz.
Electrical Cord:
a) A short power-supply cord is provided
to reduce risks resulting from becoming
entangled in or tripping over a longer cord.
b) Longer detachable power-supply cords or
extension cords are available and may be
used if care is exercised in their use.
c) If a long detachable power-supply cord or
extension cord is used:
1. The marked electrical rating of the
detachable power-supply cord or
extension cord should be at least as
great as the electrical rating of the
appliance;
2. If the appliance is of the grounded
type, the extension cord should be a
grounding-type 3-wire cord; and
3. The longer cord should be arranged so
that it will not drape over the counter top
or table top where it can be pulled on
by children or tripped over.
Connect the appliance
Make sure that the mains voltage corresponds
with that indicated on the data plate on the
bottom of the appliance.
Connect the appliance only to a power outlet
installed perfectly with minimum capacity of
10A and with an efcient earth.
If the plug and power outlet are incompatible,
have the power outlet replaced with a suitable
type by qualied staff.
6 - EN
Important Instructions
SAVE THESE INSTRUCTIONS
This user’s manual
This user’s manual is an integral part of
the appliance and must be kept intact and
available to the user throughout its life cycle.
Use compliant with destination
This appliance is designed to heat and disc
milk and to prepare hot chocolate; Do not
use the product for purposes other than its
intended use.
This appliance is intended for domestic use
only.
Manufacturer’s liability
The manufacturer declines all liability for
damage undergone by persons and objects
due to:
• use of the appliance different from that
envisioned;
• user manual has not been read;
• tampering of individual parts of the
appliance;
• use of non-original spare parts;
• failure to comply with safety
recommendations.
Identication plate
The identification plate lists the technical
data, serial number and brand name. The
identication plate must never be removed.
Disposal
Power voltage.
Risk of electric shock.
• Unplug the appliance.
• Unplug the cord from the wall outlet.
• Old electrical equipment must not
be disposed of with household
waste! In accordance with the law in
force, electrical appliances at the end
of their life should be taken to separate
collection facilities for electrical and
electronic waste. This is so that valuable
materials from old appliances can be
recycled and the environment can be
protected. For more information, please
contact your local authorities or recycling
center employees.
Note that non-polluting and recyclable materials
are used for packaging the appliance.
• Dispose of the packaging materials at
appropriate differentiated waste collection
centers.
Plastic packaging.
Risk of suffocation.
• Do not leave the packaging or any part
of it unattended.
• Do not allow children to play with the
plastic packaging bags.
EN - 7
EN
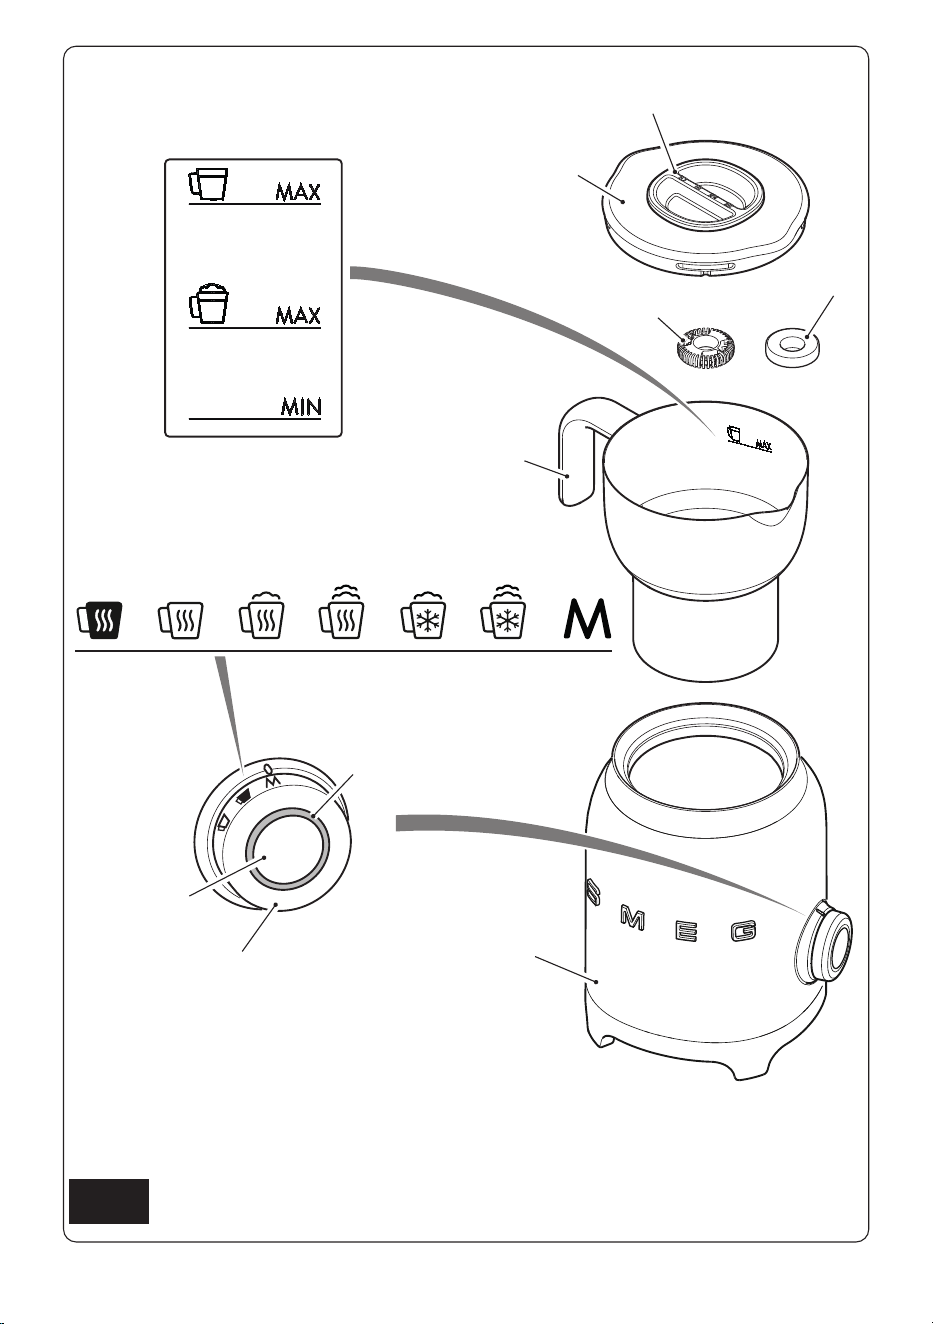
DESCRIPTION OF THE
APPLIANCE (Fig.1)
1 Motor base
2 Jug
3 Notched whisk (for frothing milk or
chocolate)
3a Smooth whisk (for hot milk function)
4 Lid
5 Measuring cap
6 START/STOP button
7 Program selection knob
8 LEDs
IDENTIFICATION PLATE
The identication plate states the technical
data, serial number, and marking. The identi-
cation plate must never be removed.
BEFORE FIRST USE
(Fig.1)
• Carefully unpack the appliance and remove
all packing materials and any labels and
stickers.
• Clean the motor base (1) with a damp cloth.
Wash all the components and dry thorough-
ly (see par. “Cleaning and Maintenance”).
Before use, check that all the com-
ponents are intact.
ASSEMBLY OF COMPONENTS
(Fig. 1)
• Place the jug (2) on the motor base (1).
• Place the whisk (3) inside the jug (2) by
inserting it into the pin.
• Place the lid (4) on the jug (2) and press it
downwards.
DESCRIPTION OF CONTROLS
(Fig. 1)
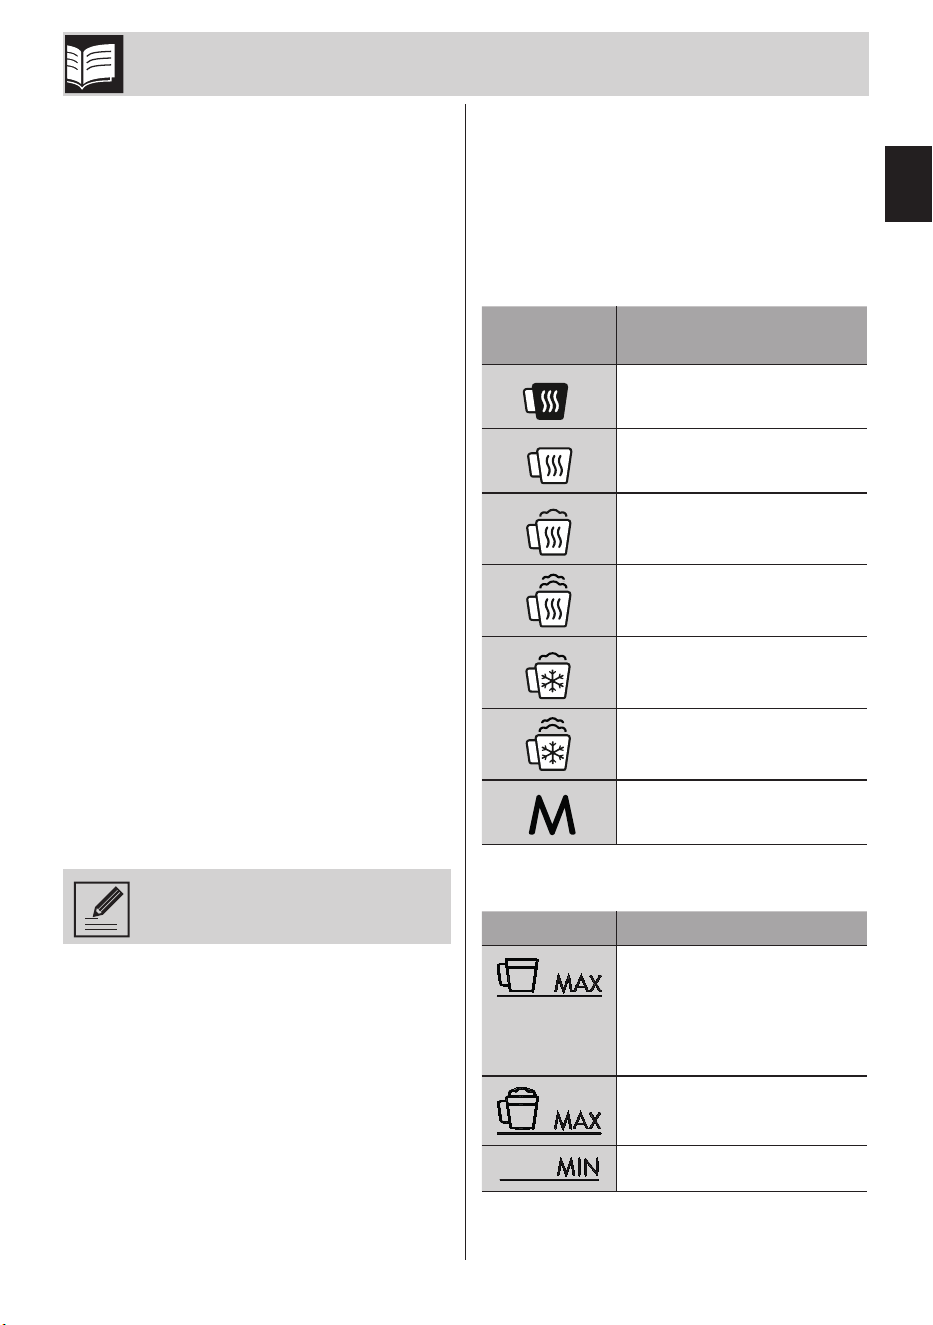
Program selection knob (7)
The appliance is equipped with 6 preset pro-
grams and a manual function, which can be
selected using the knob (7).
Knob
icon
Program
Hot chocolate
Hot milk
Hot milk with light froth
Hot milk with thick froth
Cold milk with light froth
Cold milk with thick froth
Manual
Liquid level indications
Symbol Description
Maximum milk lling level
for heating function and
chocolate preparation
(including the amount of
chocolate).
Maximum milk lling level to
be mounted.
Minimum level.
Description / Assembly
8 - EN
USE (Fig. 1)
Recommendations for use
The result of the milk mount function
can be inuenced by the ingredients
used.
Use whole milk for best results,
removing it from the fridge immedi-
ately before pouring it into the jug
(2).
After a rst heating cycle, wait for
the appliance to cool before starting
a second one.
Do not use the appliance without
liquids. Starting the appliance with-
out liquids could damage the jug.
Always ll up to the MIN level and
not beyond the MAX level, both
indicated inside the jug.
The appliance is in error status when
the LED on the knob ashes and
three acoustic signals are repeated
twice.
The appliance displays an error
status if the jug or whisk is not
installed, the jug is removed during
preparation or the cycle is started
with an empty jug.
In the rst two cases the cycle fails to
start, while in the last two the cycle
starts but stops after a few seconds.
• Insert the plug into the power outlet.
• The LED (8) ashes, after about 120 sec-
onds of inactivity the appliance positions
itself in stand-by and the LED turns off.
Heat or froth the milk
• Remove the lid (4) and pour cold milk into
the jug (2), referring to the level indications
printed inside the jug itself.
• Ret the lid (4).
• Select the desired program by turning the
knob (7) in correspondence with the red
mark positioned on the knob ring.
The appliance passes from standby
to the work phase.
• Press the START/STOP button (6) to start the
cycle, the LED (8) lights up with a xed light.
• An acoustic signal and the turning off of the
LED (8) indicate the end of the cycle.
• It is possible to stop the cycle before the time
set by pressing the START/STOP button (6).
• Remove the lid (4) holding it by the side
aps.
• Remove the jug (2) and pour the milk with
the aid of a spoon.
It is best to add any sugar or sweet-
ening syrups (e.g. honey, agave or
maple juice, etc.) at the end of the
cycle.
Preparing hot chocolate
• Remove the lid (4) and pour the chocolate
ingredients into the jug (2), referring to the
level instructions printed inside the jug and
the recommendations provided by the Smeg
recipe.
• Select the relative program and proceed in
the same way as for milk.
Powder ingredients can be added
during the work phase by removing
the measuring cap (5).
Add the ingredients gradually and in
small amounts a few moments after
the start of the cycle so that the milk
Use
EN - 9
EN
warms up. Adding the ingredients
too quickly or in large amounts
could cause the whisk to stop or
detach from its housing.
Manual function
• Remove the lid (4) and pour the milk into
the jug (2), referring to the level indications
printed inside the jug.
• Ret the lid (4).
You can select a hot cycle or a cold cycle.
Hot Manual:
• Start the Manual Program (M), with heating
function, by pressing the START/STOP but-
ton, the LED (8) lights up steadily; the speed
of the whisk and the temperature increase
proportionally to the duration of the cycle.
The user can interrupt the cycle by pressing
the START/STOP button whenever obtaining
the desired result.
Cold Manual:
• Keeping the START/STOP button pressed
for about 3 seconds, the whisk starts to froth
the milk without heating it and the LED (8)
ashes for the entire duration of the cycle.
The user can interrupt the cycle by pressing
the START/STOP button whenever obtaining
the desired result.
• In both cases, after a certain time,
the manual function will automati-
cally stop to preserve the safety and
functionality of the product.
• An acoustic signal and the turning
off of the LED (8) indicate the end
of the cycle.
• Then proceed as described for milk.
Cleaning and maintenance
You can remove the measuring cap
(5) to add any powder ingredients
(example: instant coffee, soluble
cappuccino, soluble tea, etc.) dur-
ing the work cycle.
CLEANING AND
MAINTENANCE (Fig. 1)
Before cleaning, ALWAYS discon-
nect the plug from the socket and
allow the appliance to cool down.
Never immerse the motor base (1)
in water or other liquids.
The instruction manual contains appropriate
instructions and provisions for cleaning, main-
tenance and operations recommended by the
manufacturer to the customer. Any other inter-
vention must be performed by an authorized
service representative.
• Remove the whisk (3).
• Remove the jug (2) from the motor base.
• The whisk (3), the lid (4), the measuring cap
(5) and the jug (2) can be washed in the
dishwasher.
• The motor base (1) can be cleaned by rst
using a damp cloth and then a dry one. Do
not use detergents or abrasive materials.
10 - EN
Cookbook
HOT CHOCOLATE
Quantity for two cups
Ingredients
- Whole milk 250 ml
- Dark chocolate
in akes 90 gr
Instructions
• Pour the milk into the jug.
• Add the chocolate akes.
• Close the lid.
• Select the hot chocolate program ( ).
• Press the START/STOP button and wait for
the program to nish.
CAPPUCCINO
Quantity for two cups
Ingredients
- Whole milk 200 ml
- Coffee 80 ml
or strong coffee 40 ml
Instructions
• Dispense coffee from a coffee machine and
pour it into a cup.
• Pour the milk into the milk frother jug.
• Close the lid.
• Select the hot milk program with thick froth
( ).
• Press the START/STOP button and wait for
the program to nish.
• Pour the milk froth onto the coffee.
• Add a teaspoon of sugar or sweetening
syrup as desired.
EXPRESSO ICE COFFEE
Quantity for two cups
Ingredients
- Whole milk 200 ml
- Coffee 80 ml
- Ice cubes 4
Instructions
• Put the ice cubes in 2 glasses.
• Dispense coffee from a coffee machine and
pour it on ice in glasses.
• Add a teaspoon of sugar or sweetening
syrup as desired.
• Pour the milk into the milk frother jug.
• Close the lid.
• Select the cold milk program with thick froth
or light froth depending on result desider
(
/ ).
• Press the START/STOP button and wait for
the program to nish.
• Pour the milk froth into glasses with coffee
and ice.
EN - 11
EN
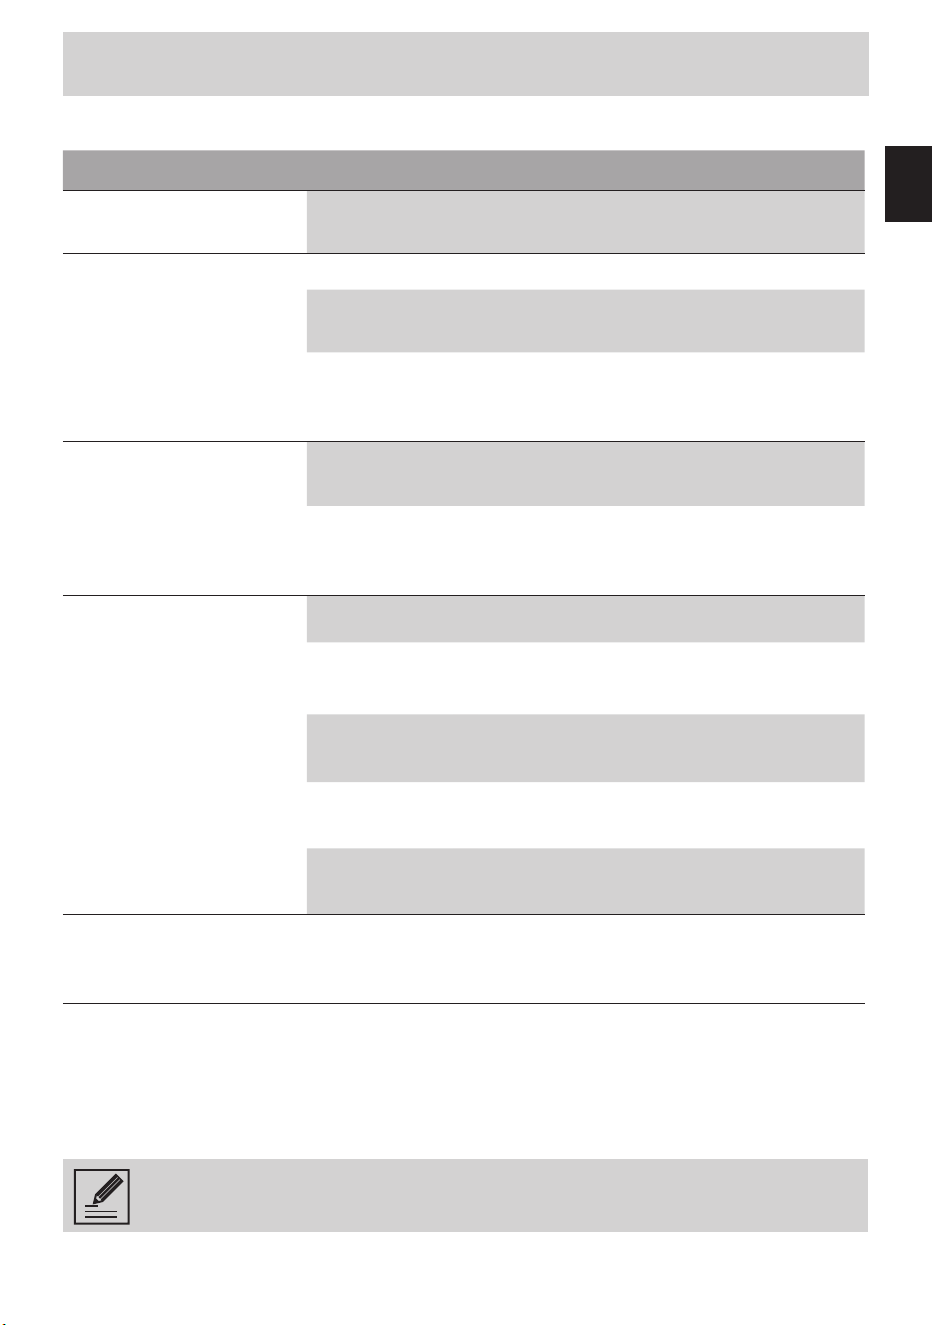
What To Do If.....
What To Do If......
Problem Possible causes Solution
The appliance does not
work.
Plug not connected. Connect the plug.
The appliance stops dur-
ing operation.
The jug is empty. Fill the jug.
The jug was removed dur-
ing preparation.
Reposition the jug in the
specic site.
Ingredients too thick or too
large like large chocolate
chips.
Use ner ingredients.
The cycle does not start.
The jug has not been tted. Place the jug in the appropri-
ate site.
The whisk has not been
tted.
Check that the whisk has
been installed and posi-
tioned properly.
The milk fails to froth.
Milk is not cold. Use cold milk.
The jug contains residual
water or is dirty.
Make sure the jug is dry and
clean.
The whisk used is not cor-
rect.
Assemble the serrated whisk.
Use of already frothed or
heated milk.
Do not use milk that was
frothed or heated.
Use of low-fat milk. Use the proper type of milk.
The ingredients do not
dissolve.
The ingredients are
too thick or
too much.
Chop the ingredients before
inserting them or check the
preparation tips.
Contact local technical support if the problem is not solved or in case of other types
of faults.

The manufacturer reserves the right to make any changes deemed useful for improvement of its products without prior
notice. The illustrations and descriptions contained in this manual are therefore not binding and are merely indicative.
Le fabricant se réserve la faculté d’apporter, sans préavis, toutes les modications qu’il jugera utiles pour l’amélioration
de ses produits. Les illustrations et les descriptions gurant dans ce manuel ne sont pas contraignantes et n’ont qu’une
valeur indicative.
El fabricante se reserva el derecho a aportar sin aviso previo todas las modicaciones que considere útiles para la
mejora de sus propios productos. Las ilustraciones y las descripciones contenidas en este manual no comprometen, por
tanto, al fabricante y tienen un valor meramente indicativo.