Washing Machine / User Manual
EN
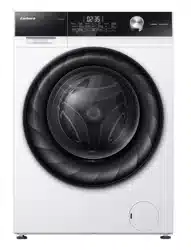
E-CLAV7149XT

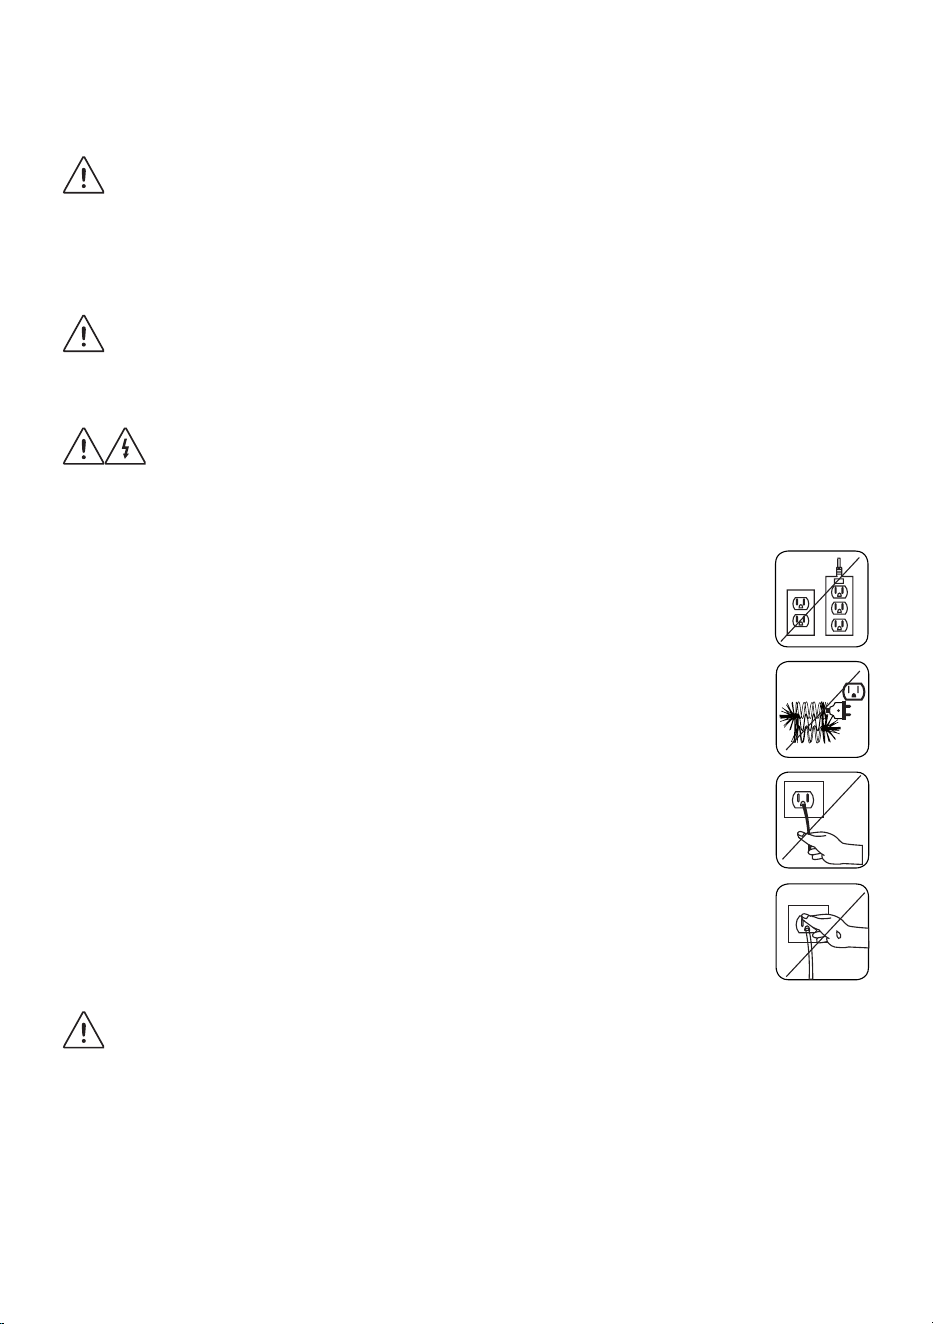
Icon Type Meaning
WARNING Serious injury or death risk
RISK OF ELECTRIC SHOCK Dangerous voltage risk
FIRE Warning; Risk of fire / flammable materials
CAUTION Injury or property damage risk
IMPORTANT / NOTE Operating the system correctly
Thank you for choosing this product.
This User Manual contains important safety information and instructions on the operation
and maintenance of your appliance.
Please take the time to read this User Manual before using your appliance and keep this
book for future reference.

CONTENTS
1. SAFETY INSTRUCTIONS ................................................................................ ................1
1.1 General Safety Warnings ...............................................................................................2
1.2 During Use ....................................................................................................................6
1.3 Packaging and Environment...........................................................................................7
1.4 Savings Information ........................................................................................................7
2. TECHNICAL SPECIFICATIONS ....................................................................... ................9
2.1 General Appearance.......................................................................................................9
2.2 Technical Specifications .................................................................................................9
3. INSTALLATION ............................................................................................... ................10
3.1 Removing the Transit Bolts...........................................................................................10
3.2 Adjusting the Feet / Adjusting Adjustable Stays............................................................10
3.3 Electrical Connection ....................................................................................................10
3.4 Water Inlet Hose Connection ........................................................................ ................11
3.5 Water Discharge Connection ........................................................................................12
4. CONTROL PANEL OVERVIEW ...................................................................... ................12
4.1 Detergent Drawer .........................................................................................................12
4.2 Sections ...................................................................................................................13
4.3 Program Dial.................................................................................................................13
4.4 Electronic Display ......................................................................................... ................13
5. USING YOUR WASHING MACHINE .............................................................. ................14
5.1 Preparing Your Laundry ................................................................................ ................14
5.2 Putting Laundry in the Machine .................................................................... ................14
5.3 Adding Detergent to the Machine .................................................................................15
5.4 Operating Your Machine ...............................................................................................15
5.5 Selecting a Programme ................................................................................ ................15
5.6 Half-Load Detection System .........................................................................................16
5.7 Additional Functions ....................................................................................................16
5.8 Cancelling the Programme ........................................................................... ................19
5.9 Programme End ...........................................................................................................19
6. PROGRAMME TABLE .................................................................................... ................20
6.1 Important Informations..................................................................................................22
7. CLEANING AND MAINTENANCE ................................................................. ................23
7.1 Warning ...... .............................................................................................................23
7.2 Water Inlet Filters .........................................................................................................23
7.3 Pump Filter ............ .......................................................................................................24
7.4 Detergent Drawer .........................................................................................................24
8. FLUSH STOPPER / BODY / DRUM ............................................................... ................25
9. TROUBLESHOOTING .................................................................................... ................26
10. AUTOMATIC FAULT WARNINGS AND WHAT TO DO ............................... ................27
11. DESCRIBING THE ENERGY LABEL AND SAVING ENERGY.................... ................28

EN - 1
1. SAFETY INSTRUCTIONS
Operating voltage / frequency (V/Hz) (220-240)
V~/50Hz
Total current (A) 10
Water pressure (Mpa) Maximum 1 Mpa /
Minimum 0. 1Mpa
Total power (W) 2200
Maximum washing capacity
(dry laundry) (kg)
7.0
• Do not install your machine on a carpet or such
grounds that would prevent the ventilation of its
base.
• The appliance is not intended for use by people
(including children) with reduced physical, sensory
or mental capabilities, or lack of experience and
knowledge unless they have been given supervision
or instruction concerning use of the appliance by a
person responsible for their safety.
• Children of less than 3 years should be kept away
unless continuously supervised.
• Call the nearest authorized service centre for a
replacement if the power cord malfunctions.
• Use only the new water inlet hose coming with your
machine when making water inlet connections to
your machine. Never use old, used or damaged
water inlet hoses.
• Children should not play with the appliance.
Cleaning and user maintenance should not be made
by children without supervision.

EN - 2
NOTE: For a softcopy of this user manual, please
contact the following address: “washingmachine@
standardtest. info”. In your e-mail, please provide the
model name and serial number (20 digits) which you
can find on the appliance door.
Read this user manual carefully.
Your machine is for domestic use only.
Using it for commercial purposes will cause
your warranty to be cancelled.
This manual has been prepared for more than
one model therefore your appliance may not have
some of the features described within. For this
reason, it is important to pay particular attention to
any figures whilst reading the operating manual.
1.1 General Safety Warnings
• Thenecessaryambienttemperatureforoperationof
yourWashingMachineis15-25°C.
• Wherethetemperatureisbelow0°C,hosesmay
splitortheelectroniccardmaynotoperatecorrectly.
• Pleaseensurethatgarmentsloadedintoyour
WashingMachinearefreefromforeignobjectssuch
asnails,needles,lightersandcoins.
• It is recommended that for your first wash,
you select the 90˚ Cotton programme without
laundry and half fill compartment II of the
detergent drawer with a suitable detergent.
• Residuemaybuildupondetergentandsofteners
exposedtoairforalongperiodoftime.Onlyput
softenerordetergentinthedraweratthebeginning
of each wash.
• UnplugyourWashingMachineandswitchoffthe

EN - 3
watersupplyiftheWashingMachineisleftunused
foralongtime.Wealsorecommendthatyouleave
thedooropentopreventbuildupofhumidityinside
theWashingMachine.
• SomewatermaybeleftinyourWashingMachine
asaresultofqualitychecksduringproduction.
ThiswillnotaffecttheoperationofyourWashing
Machine.
• Thepackagingofthemachinecouldbehazardous
tochildren.Donotallowchildrentoplaywiththe
packagingorsmallpartsfromtheWashingMachine.
• Keepthepackagingmaterialsinaplacewhere
childrencannotreachthem,ordisposeofthem
appropriately.
• Usepre-washprogramsonlyforverydirtylaundry.
Neveropenthedetergentdrawerwhilethemachine
isrunning.
• Intheeventofabreakdown,unplugthemachine
fromthemainssupplyandturnthewatersupply
off.Donotattempttocarryoutanyrepairs.Always
contactanauthorisedserviceagent.
• Donotexceedthemaximumloadforthewashing
programme you have chosen.
NeverforcethedooropenwhenyourWashing
Machineisrunning.
• Washinglaundrycontainingflourmaydamageyour
machine.
• Pleasefollowthemanufacturers’instructions
regardingtheuseoffabricconditioneroranysimilar
productsthatyouintendtouseinyourWashing
Machine.
• Make sure that the door of your Washing Machine is
not restricted and can be opened fully.
EN - 4
• Install your machine in a location that can be
fully ventilated and preferably has constant air
circulation.
Read these warnings. Follow the advice given
to protect yourself and others from risks and fatal
injuries.
RISK OF BURNS
Do not touch the drain hose or any discharged
water while your Washing Machine is running. The
high temperatures involved pose a burn risk.
RISK OF DEATH FROM ELECTRICAL
CURRENT
• DonotconnectyourWashingMachinetothemains
electricitysupplyusinganextensionlead.
• Donotinsertadamagedplugintoasocket.
• Never remove the plug from the socket by
pullingthecord.Alwaysholdtheplug.
• Nevertouchthepowercord/plugwithwet
handsasthiscouldcauseashortcircuitor
electricshock.
• DonottouchyourWashingMachineifyour
hands or feet are wet.
• Adamagedpowercord/plugcancausefireor
giveyouanelectricshock.Whendamagedit
mustbereplaced,thisshouldonlybedoneby
qualifiedpersonnel.
Risk of flooding
• Checkthespeedofwaterflowbeforeplacingthe
drainhoseinasink.
• Take necessary measures to prevent the hose from
slipping.
• Waterflowmaydislodgethehoseifitisnotproperly
EN - 5
secured.Makesurethepluginyoursinkdoesnot
block the plug hole.
Danger of Fire
• Donotstoreinflammableliquidsnearyourmachine.
• Thesulphurcontentofpaintremoversmaycause
corrosion.Neverusepaintremovingmaterialsin
yourmachine.
• Neveruseproductsthatcontainsolventsinyour
machine.
• Pleaseensurethatgarmentsloadedintoyour
WashingMachinearefreefromforeignobjectssuch
asnails,needles,lightersandcoins.
Risk of fire and explosion
Risk of falling and injury
• DonotclimbonyourWashingMachine.
• Makesurehosesandcablesdonotcauseatrip
hazard.
• DonotturnyourWashingMachineupsidedownor
onitsside.
• DonotliftyourWashingMachineusingthedooror
detergent drawer.
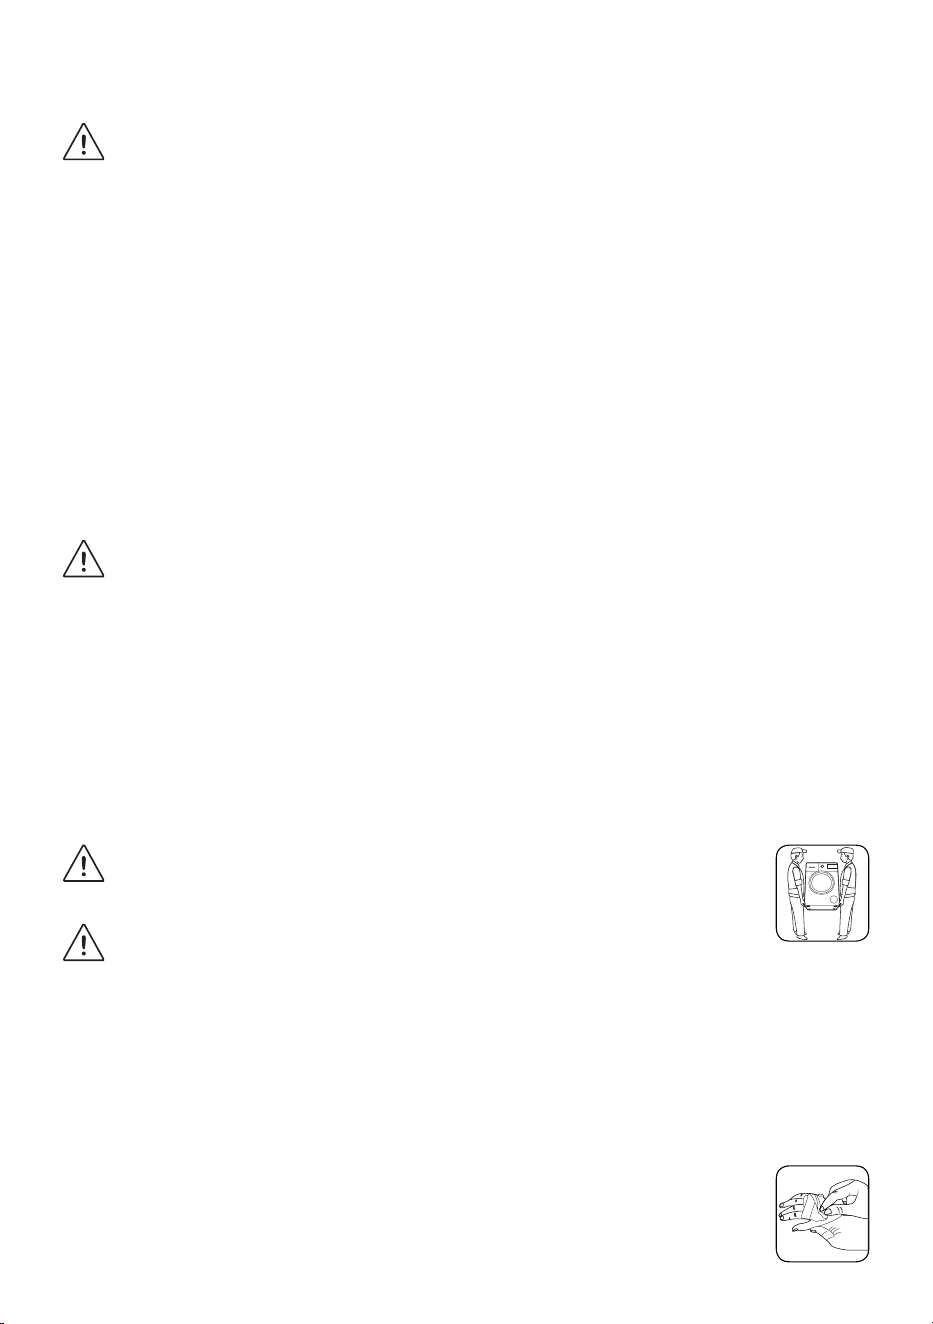
The machine must be carried by at least 2
people.
Child safety
• Donotleavechildrenunattendednearthemachine.
Childrenmightlockthemselvesinthemachine
resultinginriskofdeath.
• Donotallowchildrentotouchtheglassdoorduring
operation.Thesurfacebecomesextremelyhotand
maycausedamagetoskin.
• Keeppackagingmaterialawayfromchildren.
• Poisoningandirritationmayoccurifdetergent

EN - 6
andcleaningmaterialsareconsumedorcome
intocontactwiththeskinandeyes.Keepcleaning
materialsoutofthereachofchildren.
1.2 During Use
• Keeppetsawayfromyourmachine.
• Pleasecheckthepackagingofyourmachinebefore
installationandtheoutersurfaceofthemachine
oncethepackaginghasbeenremoved.Donot
operatethemachineifitappearsdamagedorifthe
packaginghasbeenopened.
• Yourmachinemustonlybeinstalledbyan
authorisedserviceagent.Installationbyanyone
otherthananauthorisedagentmaycauseyour
warrantytobevoid.
• This appliance can be used by children aged
8 years and above and persons with reduced
physical, sensory or mental capabilities or lack of
experience and knowledge if they have been given
supervision or instruction concerning use of the
appliance in a safe way and understand the hazards
involved. Children shall not play with the appliance.
Cleaning and user maintenance shall not be done
by children without supervision.
• Onlyuseyourmachineforlaundrythatislabelledas
suitableforwashingbythemanufacturer.
• Before operating the washing machine, remove
the 4 transit bolts and rubber spacers from
the rear of the machine. If the bolts are not
removed they may cause heavy vibration, noise
and malfunction of the machine and cause the
guarantee to be void.
• Your warranty does not cover damage caused by
externalfactorssuchasfire,floodingandother

EN - 7
sources of damage.
• Pleasedonotthrowawaythisusermanual;keepit
forfuturereferenceandpassitontothenextowner.
NOTE: Specificationsforthemachinemayvary
dependingontheproductpurchased.
1.3 Packaging and Environment
Removal of packaging materials
Packagingmaterialsprotectyourmachinefromany
damagethatmightoccurduringtransportation.The
packagingmaterialsareenvironmentallyfriendlyas
theyarerecyclable.Useofrecycledmaterialreduces
rawmaterialconsumptionanddecreaseswaste
production.
1.4 Savings Information
Someimportantinformationtogetthemostefficient
useoutofyourmachine:
• Donotexceedthemaximumloadforthewashing
programmeyouhavechosen.Thiswillallowyour
machinetoruninenergysavingmode.
• Donotusethepre-washfeatureforlightlysoiled
laundry.Thiswillhelpyousaveontheamountof
electricityandwaterconsumed.

EN - 8
CE Declaration of conformity
WedeclarethatourproductsmeettheapplicableEuropeanDirectives,Decisionsand
Regulationsandtherequirementslistedinthestandardsreferenced.
Disposal of your old machine
Thesymbolontheproductoronitspackagingindicatesthatthisproduct
maynotbetreatedashouseholdwaste.Insteaditshallbehandedoverto
theapplicablecollectionpointfortherecyclingofelectricalandelectronic
equipment.Byensuringthisproductisdisposedofcorrectly,youwillhelp
preventpotentialnegativeconsequencesfortheenvironmentandhuman
health,whichcouldotherwisebecausedbyinappropriatewastehandlingof
thisproduct.Formoredetailedinformationaboutrecyclingofthisproduct,
pleasecontactyourlocalcityoffice,yourhouseholdwastedisposalserviceortheshop
where you purchased the product.
EN - 9
2. TECHNICAL SPECIFICATIONS
123
4
5
6
7
8
9
10
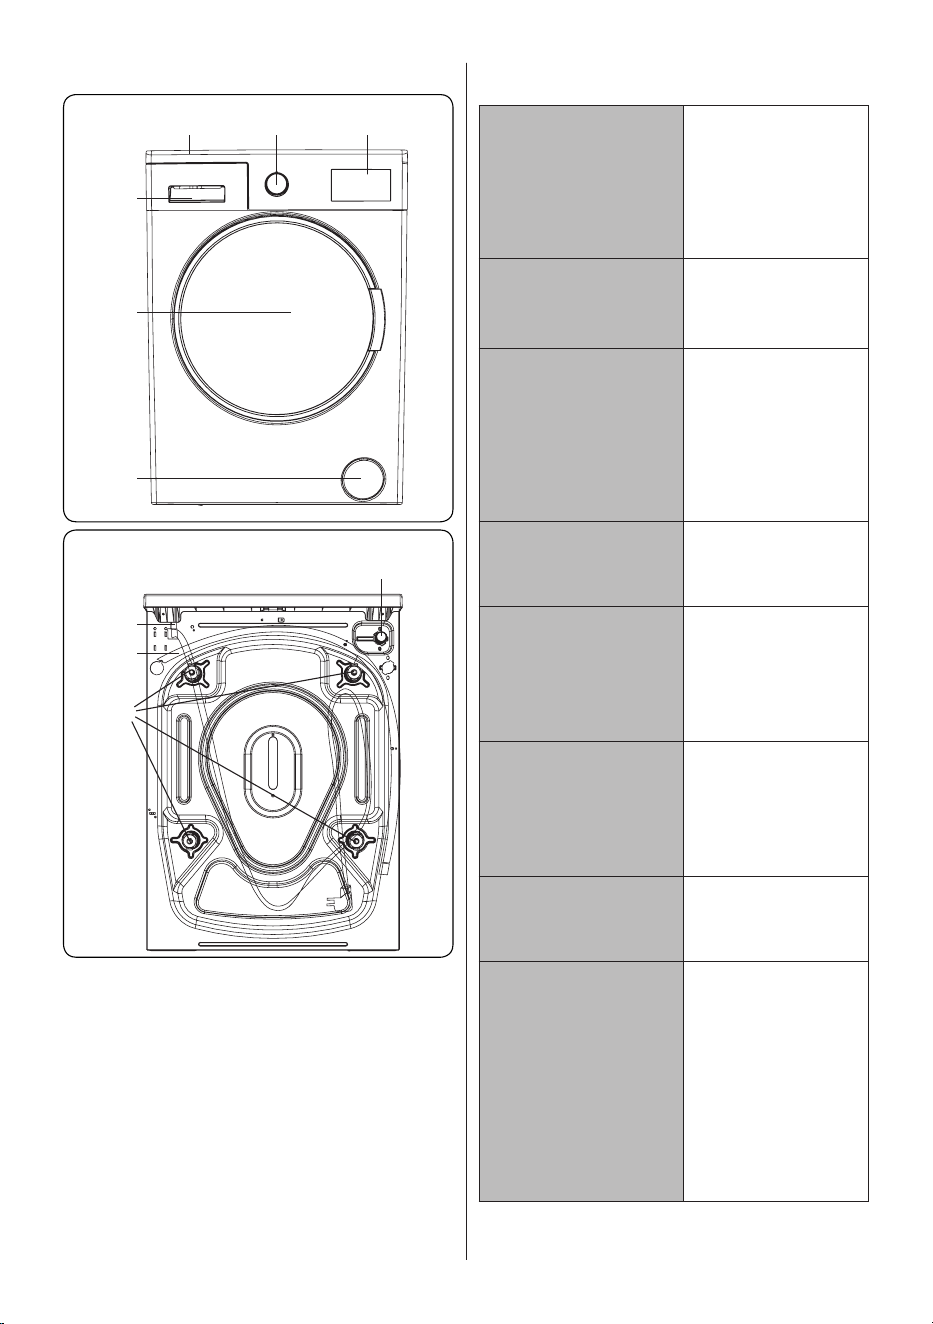
2.1 General Appearance
1. ElectronicDisplay
2. ProgrammeDial
3. Upper Tray
4. Detergent Drawer
5. Drum
6. PumpFilterCover
7. Water Inlet Valve
8. Power Cable
9. DischargingHose
10. TransitBolts
2.2 Technical Specifications
Operating
voltage /
frequency
(V/Hz)
(220-240)
V~/50Hz
Total current
(A)
10
Water
pressure
(Mpa)
Maximum:
1 Mpa
Minimum:
0. 1 Mpa
Total power
(W)
2200
Maximum
dry laundry
capacity(kg)
7,0
Spinning
revolution
(rev/min)
1400
Programme
number
15
Dimensions
(mm)
Height
Width
Depth
845
597
527
EN - 10
3. INSTALLATION
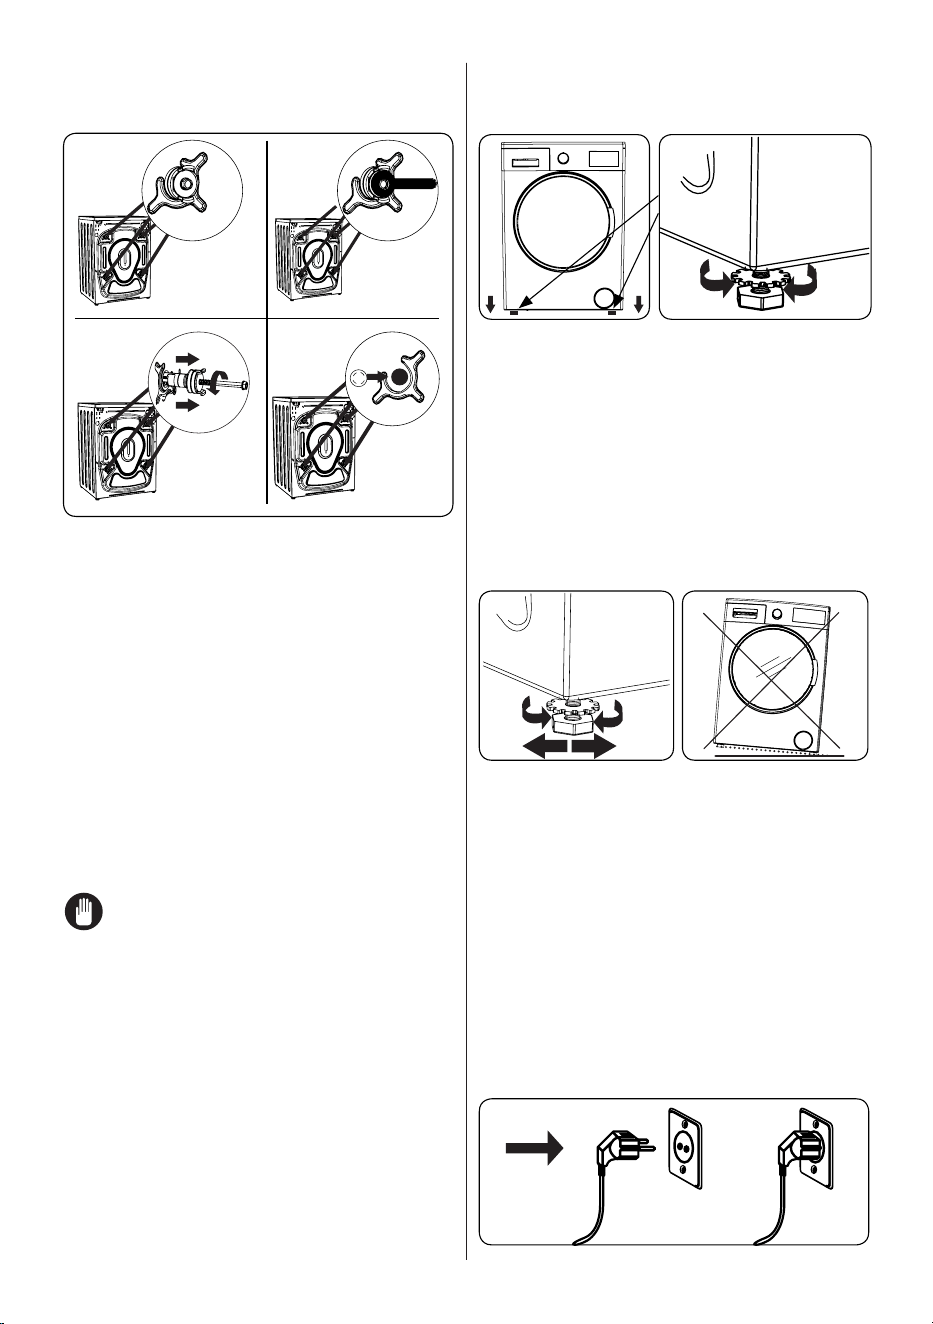
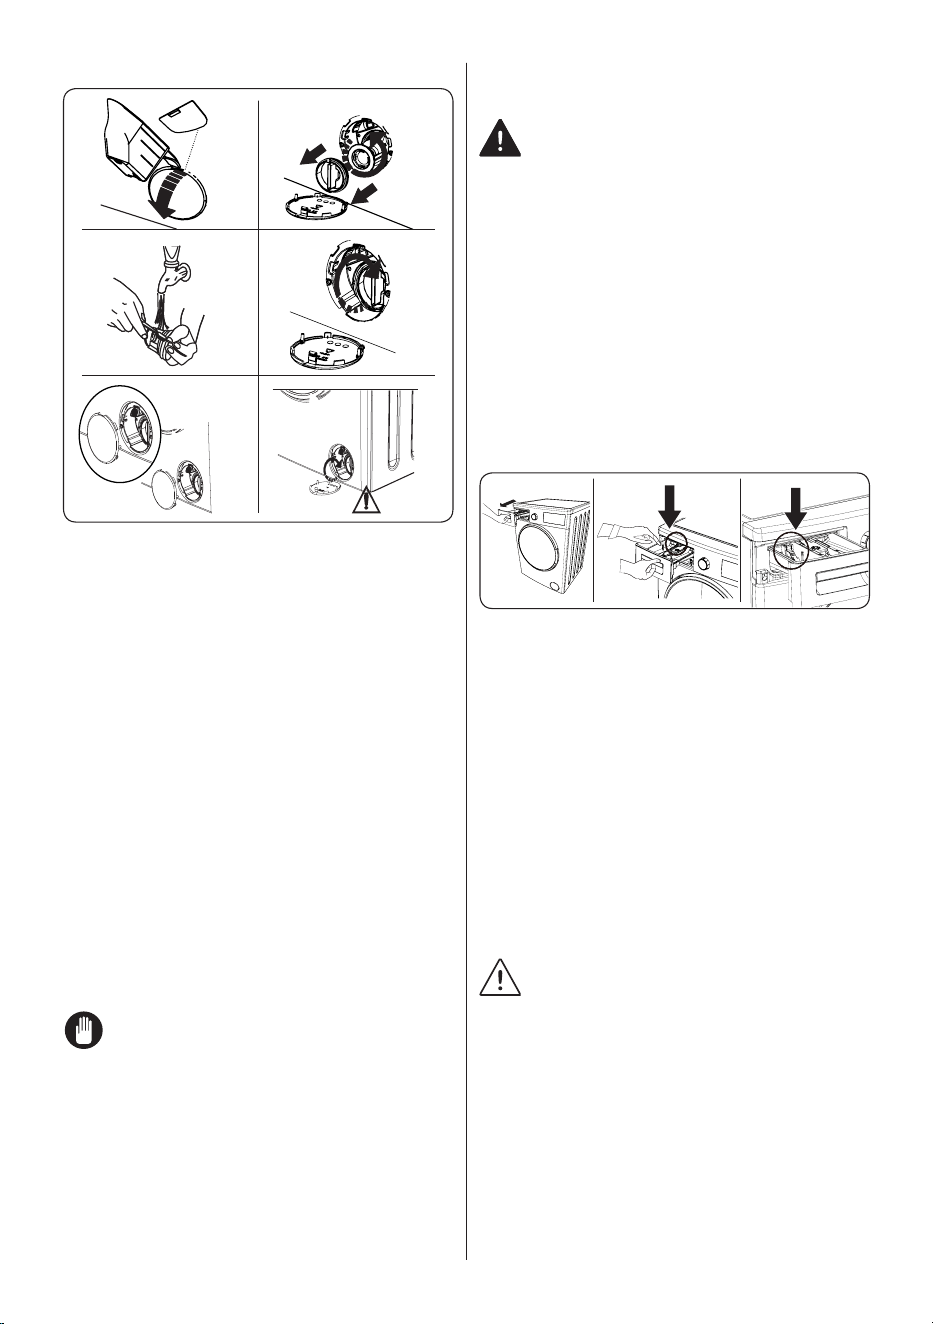
3.1 Removing the Transit Bolts
X X4 4
X4
1
3
2
4
1. Beforeoperatingthewashingmachine,
removethe4transitboltsandrubber
spacersfromtherearofthemachine.
If the bolts are not removed, they
maycauseheavyvibration,noiseand
malfunctionofthemachineandvoidthe
warranty.
2. Loosenthetransitboltsbyturning
themanticlockwisewithanappropriate
spanner.
3. Removethetransitboltswithastraight
pull.
4. Fittheplasticblankingcapssuppliedin
theaccessoriesbagintothegapsleft
bytheremovalofthetransitbolts.The
transitboltsshouldbestoredforfuture
use.
NOTE: Removethetransitbolts
beforeusingthemachineforthefirsttime.
Faultsoccurringduetothemachinebeing
operatedwithtransitboltsfittedareoutof
the scope of the warranty.
3.2 Adjusting the Feet /
Adjusting Adjustable Stays
1
1. Donotinstallyourmachineonasurface
(such as carpet) that would prevent
ventilationatthebase.
• Toensuresilentandvibration-free
operationofyourmachine,installitona
firmsurface.
• Youcanlevelyourmachineusingthe
adjustable feet.
• Loosentheplasticlockingnut.
X4
2 3
2. Toincreasetheheightofthemachine,
turnthefeetclockwise.Todecrease
theheightofthemachine,turnthefeet
anticlockwise.
• Oncethemachineislevel,tightenthe
lockingnutsbyturningthemclockwise.
3. Neverinsertcardboard,woodorother
similarmaterialsunderthemachineto
levelit.
• Whencleaningthegroundonwhich
themachineislocated,takecarenotto
disturbthelevelofthemachine.
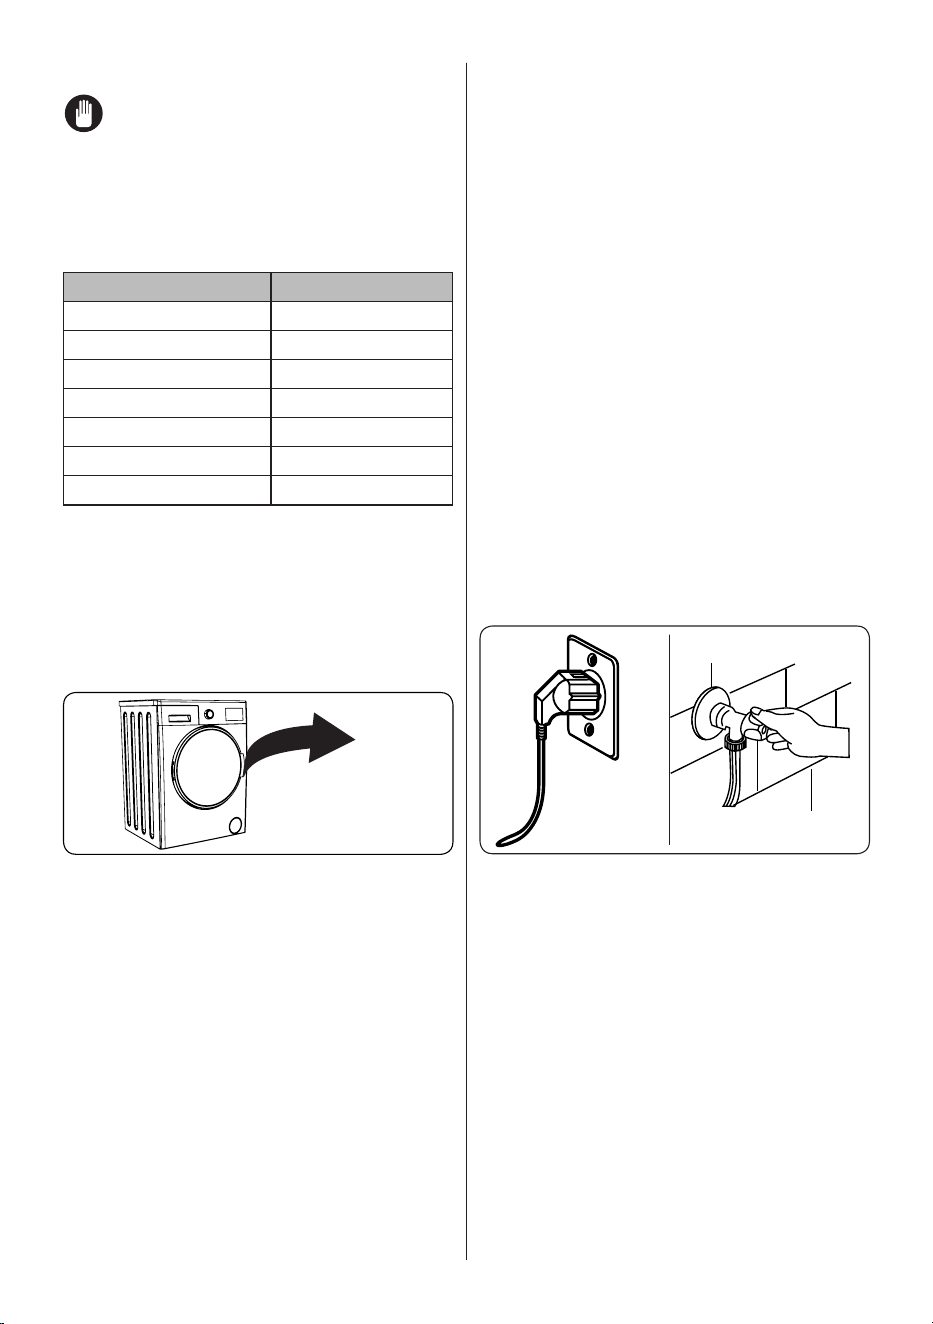
3.3 Electrical Connection
EN - 11
• YourWashingMachinerequiresa220-
240V,50Hzmainssupply.
• Themainscordofyourwashing
machineisequippedwithanearthed
plug.Thisplugshouldalwaysbe
insertedtoanearthedsocketof10
amps.
• Ifyoudonothaveasuitablesocketand
fuseconformingwiththis,pleaseensure
theworkiscarriedoutbyaqualified
electrician.
• Wedonottakeresponsibilityfor
damage that occurs due to the use of
ungroundedequipment.
NOTE: Operatingyourmachine
withlowvoltagewillcausethelifecycle
ofyourmachinetobereducedandits
performancetoberestricted.
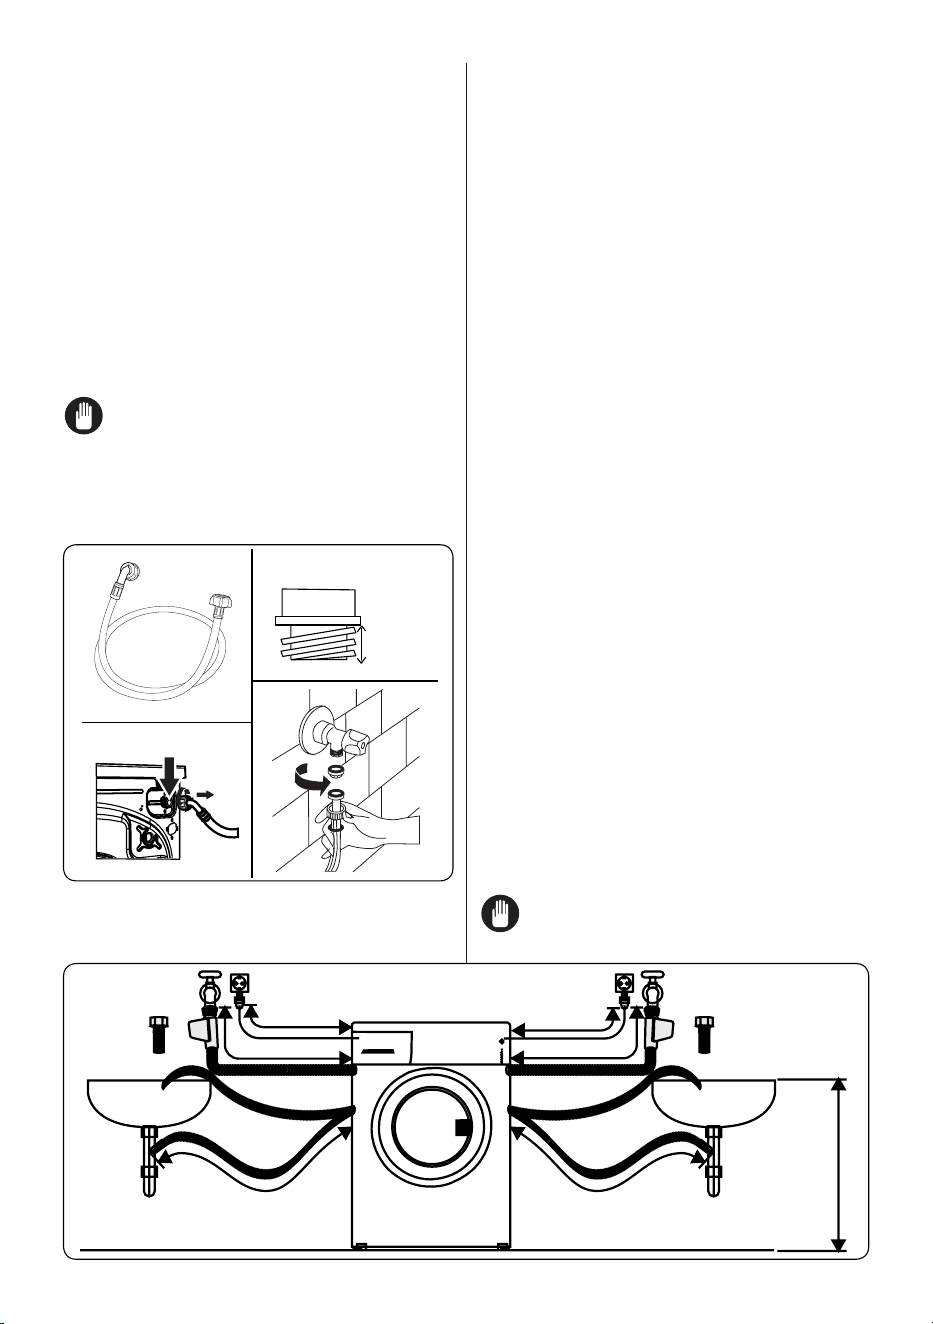
3.4 Water Inlet Hose Connection
3/4”
10 mm
1
3
2
4
1. Yourmachinemayhaveeithera
singlewaterinletconnection(cold)
ordoublewaterinletconnection(hot
andcold)dependingonthemachine
specifications.Thewhitecappedhose
shouldbeconnectedtocoldwaterinlet
and red capped hose to the hot water
inlet(ifapplicable).
• Topreventwaterleaksatthejoints,
either1or2nuts(dependingonyour
machine’sspecifications)aresupplied
inthepackagingwiththehose.Fitthese
nutstotheend(s)ofthewaterinlethose
that connect to the water supply.
2. Connectnewwaterinlethosestoa¾˝,
threaded tap.
• Connectthewhitecappedendofthe
waterinlethosetothewhitewaterinlet
valveontherearsideofthemachine
and the red capped end of the hose to
theredwaterinletvalve(ifapplicable).
• Handtightentheconnections.Ifinany
doubt,consultaqualifiedplumber.
• Waterflowwithpressureof0.1-1Mpa
willallowyourmachinetooperateat
optimumefficiency(pressureof0.1
Mpameansthatmorethan8litresof
waterperminutewillflowthroughafully
opened tap).
3. Once you have made all of the
connections,carefullyturnthewater
supply on and check for leaks.
4. Ensurethatthenewwaterinlethoses
arenottrapped,kinked,twisted,folded
or crushed.
• Ifyourmachinehasahotwaterinlet
connection,thetemperatureofthehot
watersupplyshouldnotbehigherthan
70°C.
NOTE: YourWashingMachine
~ 95 cm ~ 140 cm
~ 145 cm ~ 95 cm
0 – max. 100 cm
˜
˜
95 cm
150 cm
EN - 12
must only be connected to your water
supplyusingthesuppliednewfillhose.Old
hoses must not be reused.
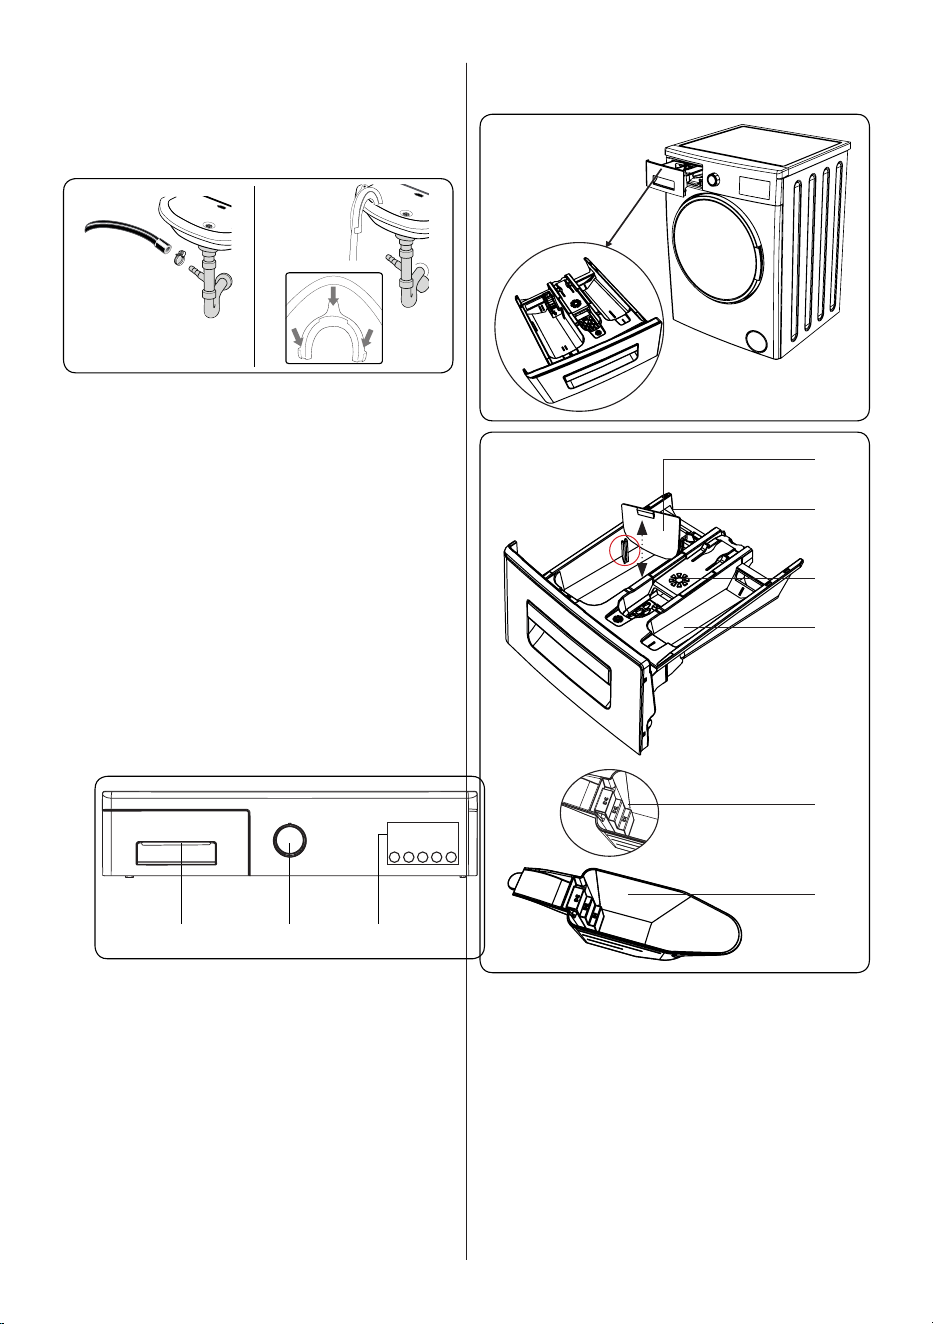
3.5 Water Discharge Connection
• Connectthewaterdrainhosetoa
standpipeortotheoutletelbowof
ahouseholdsink,usingadditional
equipment.
• Neverattempttoextendthewaterdrain
hose.
• Donotputthewaterdrainhosefrom
yourmachineintoacontainer,bucketor
bathtub.
• Makesurethatthewaterdrainhoseis
not bent, buckled, crushed or extended.
• Thewaterdrainhosemustbeinstalled
atamaximumheightof100cmfromthe
ground.
4. CONTROL PANEL OVERVIEW
5.
1 2 3
1. Detergent Drawer
2. ProgrammeDial
3. ElectronicDisplayandAdditional
Functions
4.1 Detergent Drawer
1
2
3
4
5
6
1. LiquidDetergentAttachments
2. MainWashDetergentCompartment
3. Softener Compartment
4. Pre-Wash Detergent Compartment
5. Powder Detergent Levels
6. Powder Detergent Scoop (*)
(*)Specificationsmayvarydependingon
themachinepurchased.
EN - 13
4.2 Sections
Main wash detergent compartment:
Thiscompartmentisforliquidorpowder
detergentsorlimescaleremover.Thefluid
detergentlevelplatewillbesuppliedinside
yourmachine.(*)
Fabric conditioner, starch, detergent
compartment:
Thiscompartmentisforsofteners,
conditionersorstarch.Followthe
instructionsonthepackaging.Ifsofteners
leaveresidueafteruse,trydilutingthemor
usingaliquidsoftener.
Pre-wash detergent compartment:
Thiscompartmentshouldbeusedonly
whenthepre-washfeatureisselected.We
recommendthatthepre-washfeatureis
usedonlyforverydirtylaundry.
(*)Specificationsmayvarydependingon
themachinepurchased.
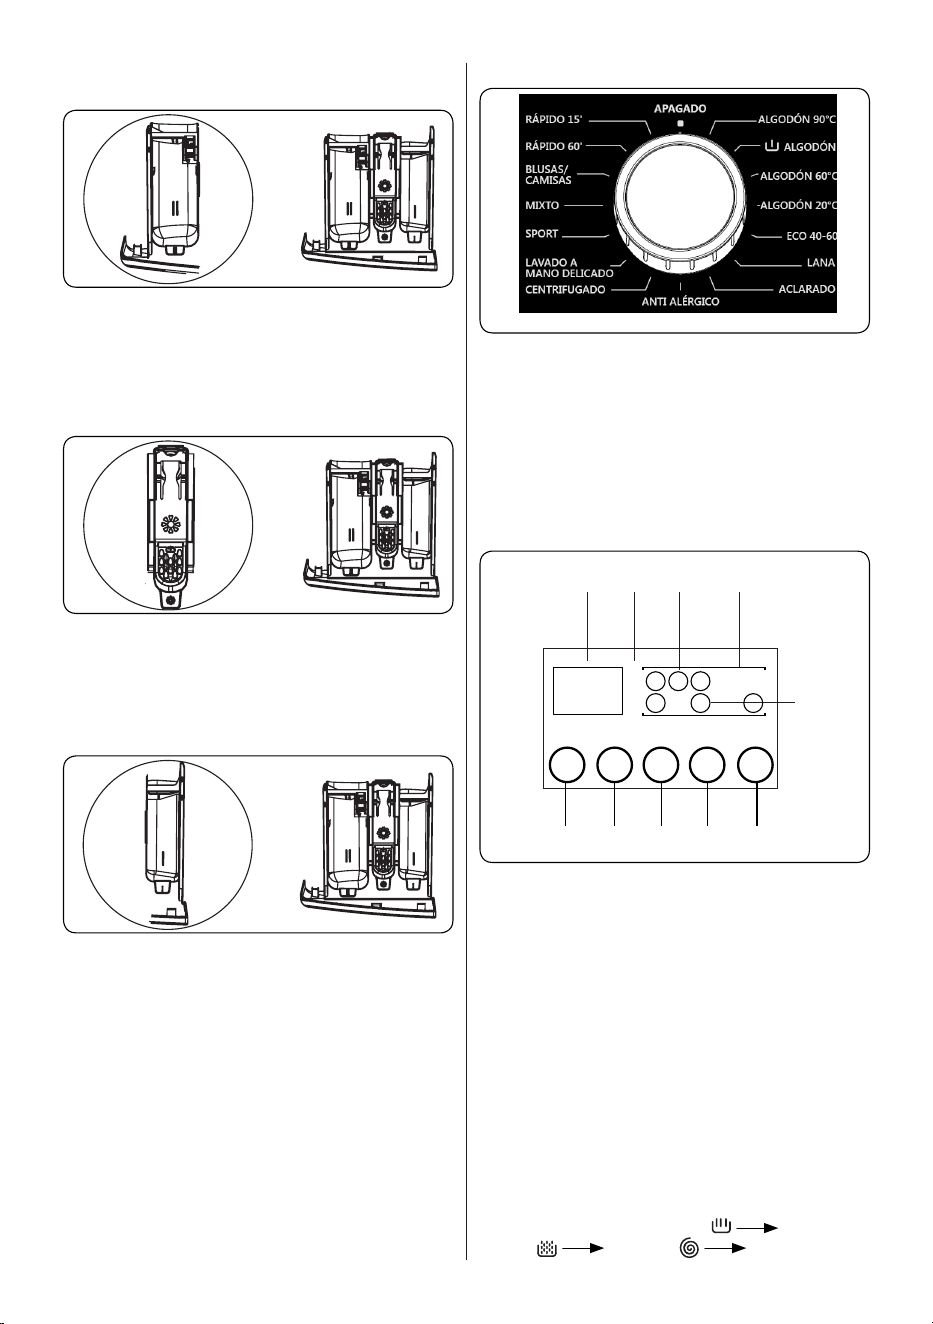
4.3 Program Dial
• Toselectthedesiredprogramme,turn
theprogrammedialeitherclockwiseor
anti-clockwiseuntilthemarkeronthe
programmedialpointstothechosen
programme.
• Makesurethattheprogrammedialis
set exactly to the programme you want.
4.4 Electronic Display
10 9 8 7
1 2 3 4
5
6
1. Water Temperature Adjustment Button
2. RPM Speed Adjustment Button
3. DelayedStartAdditionalFunction
4. AdditionalFunctionButton
5. Start/Pause Button
6. AdditionalFunctionSymbol
7. FunctionDisplay
8. WashLevelDisplay
9. ElectronicDisplay
10. DigitalDisplay
The display panel shows the washing delay
timer (if set), temperature selection, any
additional functions you have selected and
the current stage of the programme you are
running on your machine (
prewash/
wash, rinsing, spinning).
EN - 14
The display panel shows “End” when the
selected programme is complete. The
display panel also indicates if a fault has
occurred with your machine.
5. USING YOUR
WASHING MACHINE
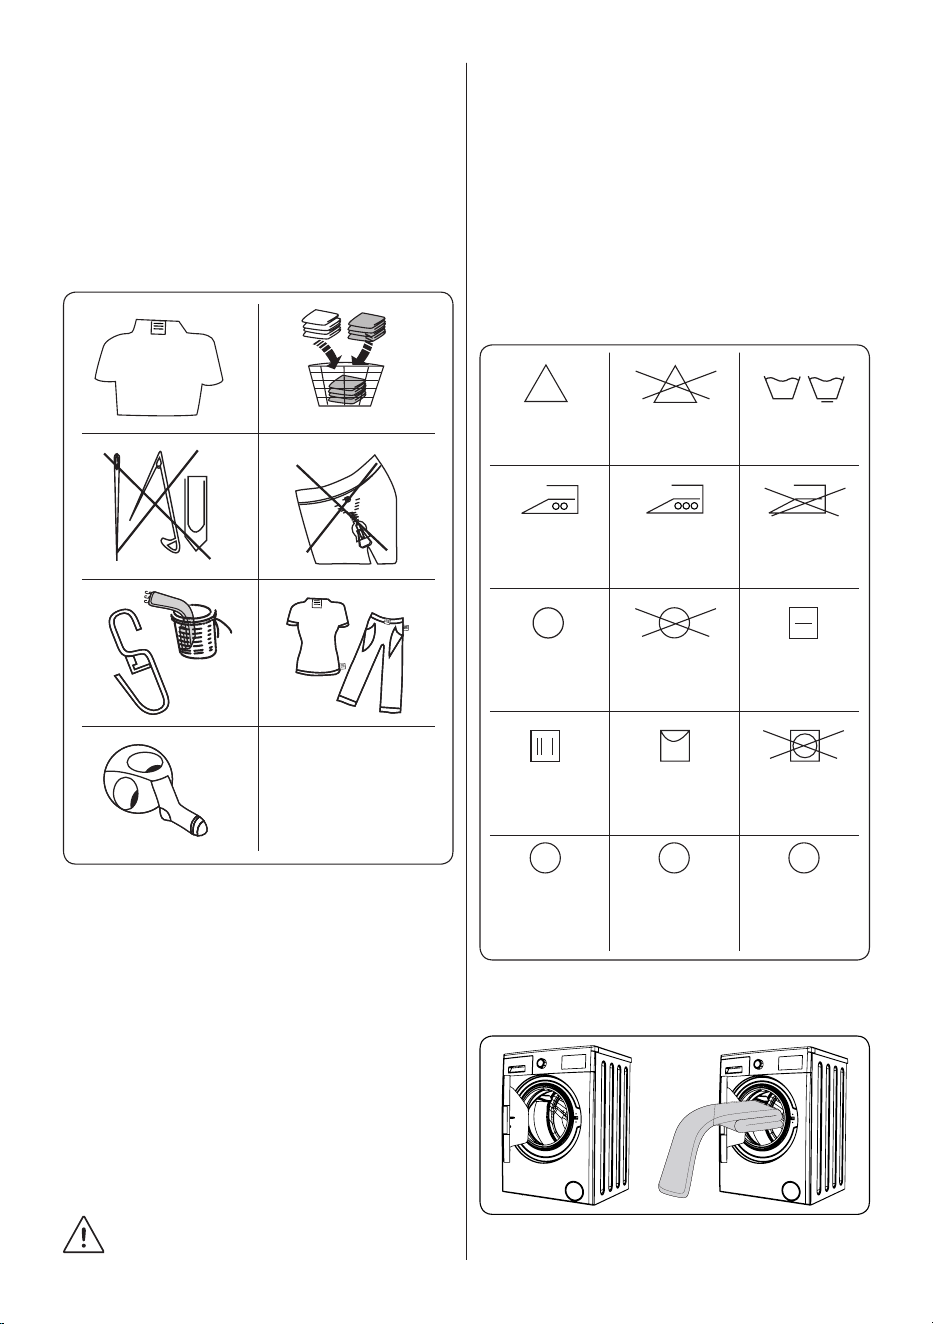
5.1 Preparing Your Laundry
1
3
5
7
2
4
6
1. Followtheinstructionsgiveninthecare
labelsontheclothing.
• Separateyourlaundryaccordingtotype
(cotton,synthetic,sensitive,wooletc.
),washingtemperature(cold,30°,40°,
60°,90°)andthedegreeofdirtiness
(slightlystained,stained,highlystained).
2. Neverwashcolouredandwhitelaundry
together.
• Darktextilesmaycontainexcessdye
and should be washed separately
severaltimes.
3. Ensurethattherearenometallic
materialsonyourlaundryorinthe
pockets;ifso,removethem.
CAUTION: Anymalfunctions
whichoccurduetoforeignmaterials
damagingyourmachinearenotcoveredby
the warranty.
4. Closezipsandfastenanyhooksand
eyes.
5. Removethemetallicorplastichooksof
curtainsorplacetheminawashingnet
or bag.
6. Reversetextilessuchaspants,
knitwear,t-shirtsandsweatshirts.
7. Washsocks,handkerchiefsandother
smallitemsinawashingnet.
Maximum
ironing
temperature
150°C
Can be dry
cleaned
Dripdry
Drycleaning
ingasoil,
pure alcohol
andR113is
allowed
Maximum
ironing
temperature
200°C
No dry
cleaning
Hang to dry
Perchloroethylene
R11, R13,
Petroleum
Normal
washing
Donotiron
Dry flat
Do not tumble
dry
Perchlorinetyhlene
R11, R113, Gas
oil
Can be
bleached
Do not bleach
F P A
5.2 Putting Laundry in the Machine
• Openthedoorofyourmachine.
EN - 15
• Spreadyourlaundryevenlyinthe
machine.
NOTE: Take care not to exceed
themaximumloadofthedrumasthiswill
givepoorwashresultsandcausecreasing.
Refertothewashingprogrammetablesfor
informationonloadcapacities.
Thefollowingtableshowsapproximate
weightsoftypicallaundryitems:
LAUNDRY TYPE WEIGHT (gr)
Towel 200
Linen 500
Bathrobe 1200
Quiltcover 700
Pillowslip 200
Underwear 100
Tablecloth 250
• Loadeachitemoflaundryseparately.
• Checkthatnoitemsoflaundryare
trapped between the rubber seal and
the door.
• Gentlypushthedooruntilitclicksshut.
click
• Makesurethedoorisfullyclosed,
otherwisetheprogrammewillnotstart.
5.3 Adding Detergent to the Machine
Theamountofdetergentyouwillneedto
putinyourmachinewilldependonthe
followingcriteria:
• Ifyourclothesareonlyslightlysoiled,
do not pre-wash. Put a small amount
ofdetergent(asspecifiedbythe
manufacturer)intocompartmentIIofthe
detergent drawer.
• Ifyourclothesareexcessivelysoiled,
selectaprogrammewithpre-washand
put¼ofthedetergenttobeusedinto
compartment I of the detergent drawer
andtherestincompartmentII.
• Usedetergentsproducedforautomatic
washingmachines.Followthe
manufacturer’sinstructionsonthe
amount of detergent to use.
• In areas of hard water, more detergent
willberequired.
• Theamountofthedetergentrequired
willincreasewithhigherwashingloads.
• Putsoftenerinthemiddlecompartment
of the detergent drawer. Do not exceed
the MAX level.
• Thicksoftenersmaycausecloggingof
thedrawerandshouldbediluted.
• Itispossibletousefluiddetergentsin
allprogrammeswithoutapre-wash.To
dothis,slidethefluiddetergentlevel
plate(*)intotheguidesincompartment
IIofthedetergentdrawer.Usethelines
ontheplateasaguidetofillthedrawer
totherequiredlevel.
(*)Specificationsmayvarydependingon
themachinepurchased.
5.4 Operating Your Machine
1 2
1. Plugyourmachineintothemains
supply.
2. Turn on the water supply.
• Openthemachinedoor.
• Evenlyspreadyourlaundryinthe
machine.
• Gentlypushthedooruntilitclicksshut.
5.5 Selecting a Programme
Use the programme tables to select the
mostappropriateprogrammeforyour
laundry.
EN - 16
5.6 Half-Load Detection System
Yourmachinefeaturesahalf-loaddetection
system.
Ifyouputlessthanhalfthemaximum
loadoflaundryintoyourmachineitwill
automaticallysetthehalf-loadfunction,
regardless of the programme you selected.
Thismeansthattheselectedprogramme
willtakelesstimetocompleteandwilluse
less water and energy.
(*) Model Dependant
5.7 Additional Functions
Beforestartingaprogramme,youcan
selectanadditionalfunction.
• Press the button on the Control Panel
belowthesymboloftheadditional
functionyouwishtoselect.
• Ifthesymboloftheadditionalfunction
flashescontinuously,thefunctionhas
beenactivated.
• Ifthesymboloftheadditionalfunction
blinks,thefunctionhasnotbeen
selected.
Reason for non-activation:
• The additional function is not
compatible with the selected washing
programme.
• Your machine has progressed too far
into the programme for the additional
function to be possible.
• The additional function you have
chosen is not compatible with
another additional function you have
already selected.
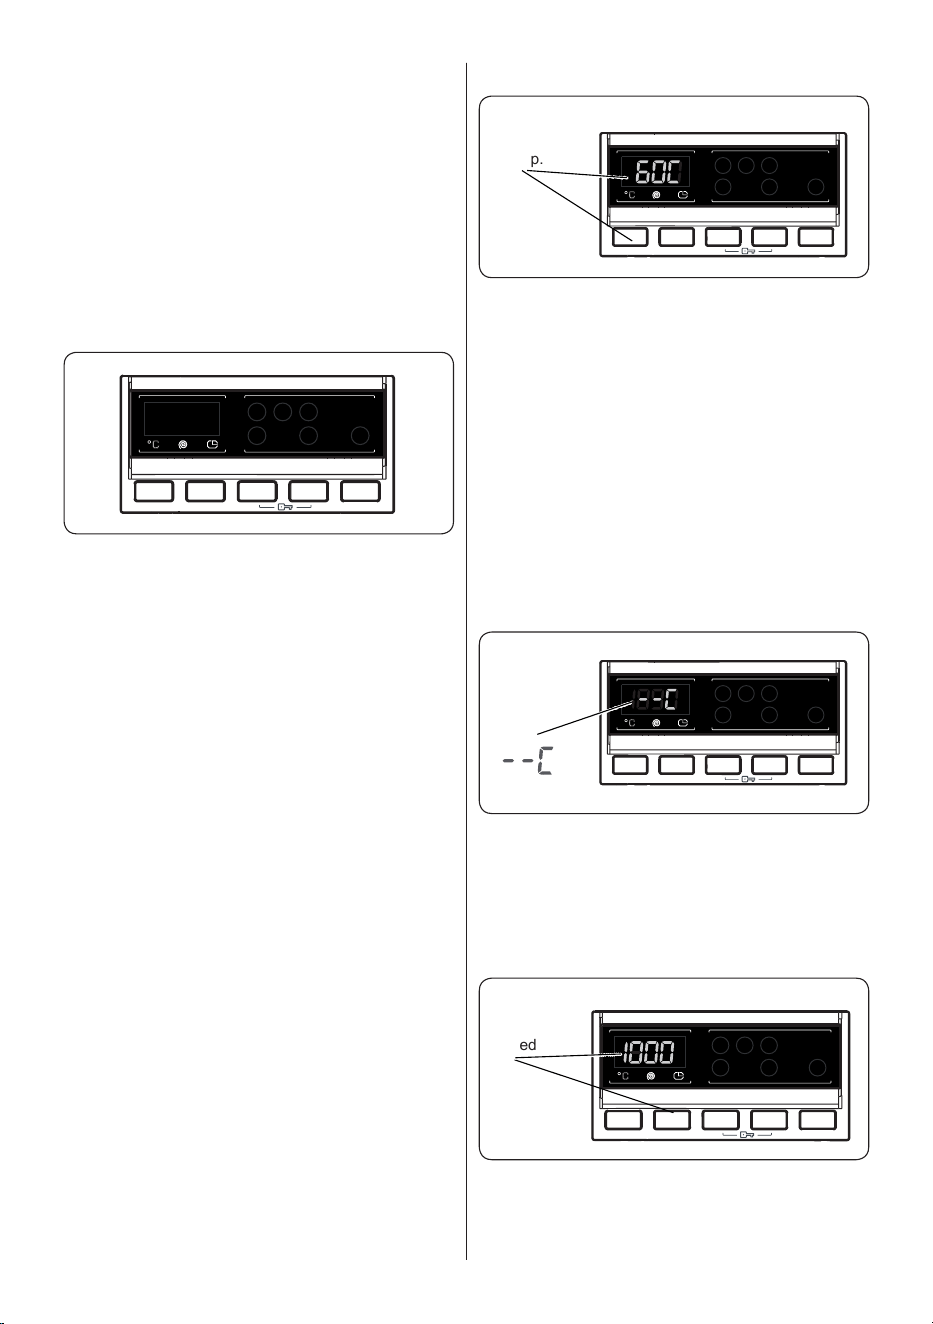
1. Temperature Selection
Temp.
Use the washing water temperature
adjustment button to alter the automatically
programmed washing water temperature.
When you select a programme the
maximum temperature for that programme
is automatically selected. To adjust the
temperature, press the water temperature
adjustment button until the desired
temperature is displayed on the digital
display.
You can gradually decrease the washing
water temperature between the maximum
washing water temperature of the selected
programme and cold washing (--) selections
by pressing the temperature adjustment
button.
Ifyouhaveskippedthewashingwater
temperatureyouwanted,keeppressing
thewashingwatertemperatureadjustment
buttonuntilthedesiredtemperatureis
displayedagain.
2. Spin Speed Selection
Spin
Speed
When you select a programme, the
maximum spin speed is automatically
selected.
To adjust the spin speed between the

EN - 17
maximum spin speed and the cancel
spinning option (--), press the Spin speed
button until the desired speed is displayed.
If you have skipped the spin speed you
want to set, keep pressing the spin speed
adjustment button until the desired spin
speed is displayed again.
3. Delay Timer
Delay
Timer
• Press the Delay button once.
• “1 h” will appear on the display.
• The
symbol will flash on the
electronic display.
• Press the Delay button until the desired
delayed time appears on the display.
• If you have skipped the delay time you
wanted to set, keep pressing the Delay
button until the desired delay time is
displayed again.
• For the delay timer function to work, you
must press Start/Pause button.
• To activate the time delay, press “Start/
Pause” button.
• To cancel the time delay once it has
been set, press the Delay button once.
The
symbol will no longer flash on
the electronic display.
• In order to add/remove laundry while
delay timer function is working, you
must press Start/Pause button. After
adding/removing laundry, you must
press Start/Pause button again to
activate delay timer function.
4. Anti- Allergic(*)
Auxiliary
function
button4Anti-
allergic
You can add an additional rinse operation to
your laundry using this additional function.
Your machine will carry out all rinsing steps
with hot water. We recommend this setting
for laundry worn on delicate skin, baby
clothes and underwear.
To select this function, press the Antiallergic
button when the
symbol is displayed.
5. Easy Ironing(*)
Auxiliary
function
button 4 Easy
ironing
Usingthisfunctionwillresultinyourlaundry
beinglesswrinkledattheendofthe
selectedwashingprogramme.
Toselectthisfunction,presstheEasy
ironingbuttonwhenthe
symbolis
displayed.
EN - 18
6. Pre-Wash(*)
Auxiliary
function
button 4 Pre-
wash
Thisadditionalfunctionallowsyoutogive
heavilysoiledlaundryapre-washbefore
themainwashingprogrammetakesplace.
Whenusingthisfunction,putdetergentin
frontwashingcompartmentofthedetergent
drawer.
Toselectthisfunction,pressthePre-wash
button when the
symbol is displayed.
7. Extra Rinse(*)
Auxiliary
function
button 4
Extrarinse
Youcanaddanadditionalrinseoperation
to the end of the selected wash programme
usingthisadditionalfunction.
Toselectthisfunction,presstheExtrarinse
button when the
symbol is displayed.
8. Rapid Wash(*)
Auxiliary
function
button4Rapid
wash
Youcanwashyourlaundryinashorter
time,usinglessenergyandwaterby
selectingthisadditionalfunction.
Werecommendthatyouonlyusethis
optionifyouarewashinglessthanhalf
themaximumdryloadfortheselected
programme.
Toselectthisfunction,presstheRapid
wash button when the
symbolis
displayed.
NOTE: If you put less than
halfthemaximumloadoflaundryinto
yourmachinethehalf-loadfunctionwill
beautomaticallyset,regardlessofthe
programmeyouselected.Thismeans
thattheselectedprogrammewilltakeless
timetocompleteandwilluselesswater
andenergy.Whenyourmachinedetects
half load, the symbolisdisplayed
automatically.
(*) Model Dependant
9. Start/Pause Button
Start-Pause
To start the selected programme, press the
Start/Pause button.
Ifyouswitchyourmachinetostandby
mode,theStart/Pauseindicatoronthe
electronicdisplaywillblink.
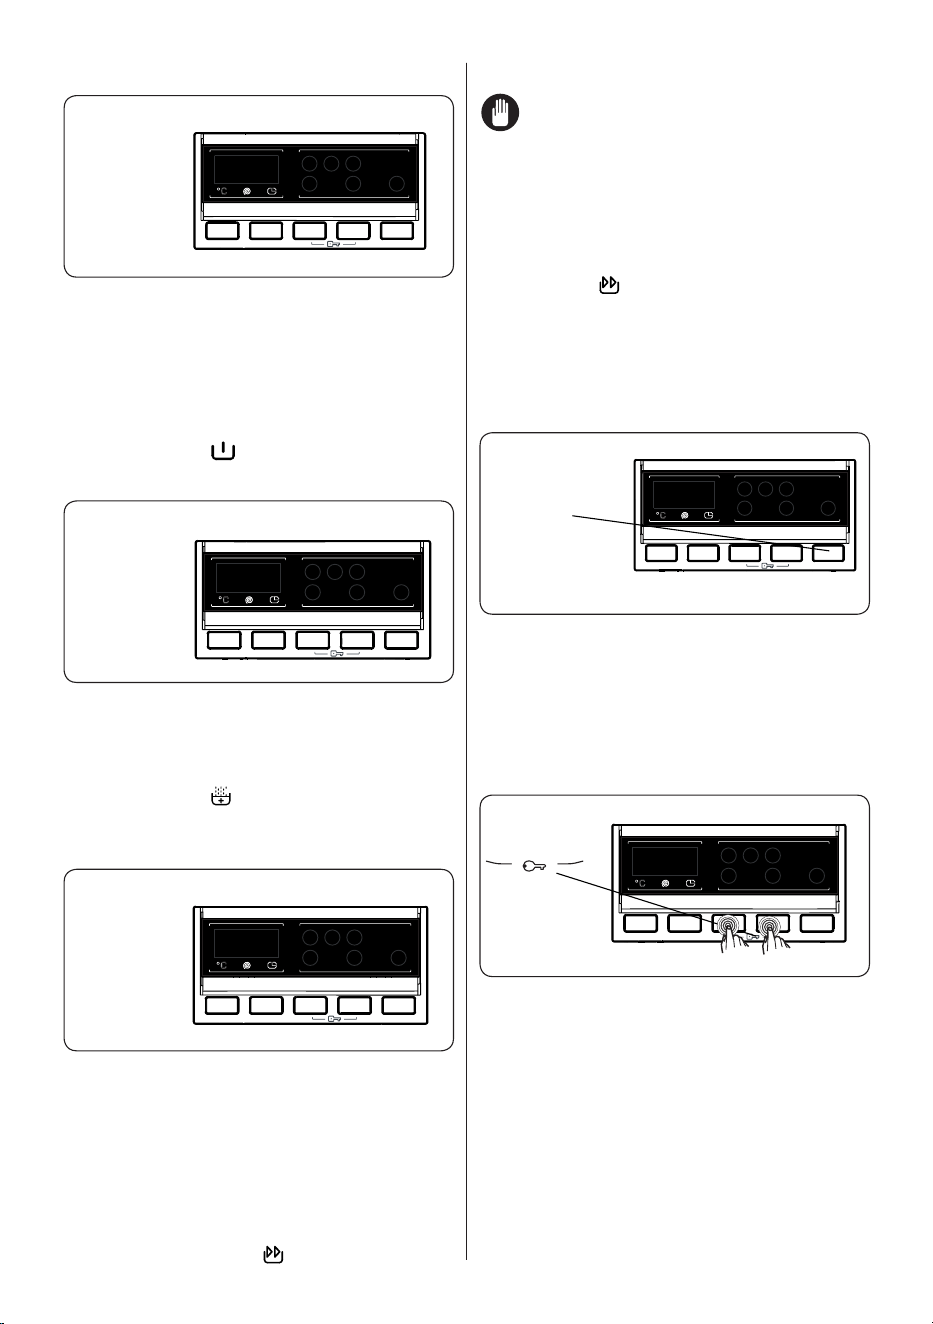
10. Child Lock
The Child Lock function allows you to lock
the buttons so that the wash cycle you have
chosen cannot be changed unintentionally.
To activate child lock, press and hold
button 3 and 4 simultaneously for at least
3 seconds. ‘’CL’’ will flash on the electronic
display for 2 seconds when the child lock is
activated.
If any button is pressed or selected
programme is changed by the programme
dial while the child lock is active, the “CL”
symbol will flash on the electronic display
for 2 seconds.
EN - 19
If the child lock function is active and
a programme is running, when the
programme dial is turned to the CANCEL
position and another programme is selected
the previously selected programme
continues from where it was left.
To deactivate the child lock, press and hold
button 3 and 4 simultaneously for at least
3 seconds until the “CL” symbol on the
electronic display disappears.
5.8 Cancelling the Programme
To cancel a running programme at any
time:
1. Turntheprogrammedialtothe“STOP”
position.
2. Yourmachinewillstopthewashing
operationandtheprogrammewillbe
cancelled.
3. Turntheprogrammedialtoanyother
programmetodrainthemachine.
4. Yourmachinewillperformthe
necessarydrainingoperationand
cancel the programme.
You can now select and run a new
programme.
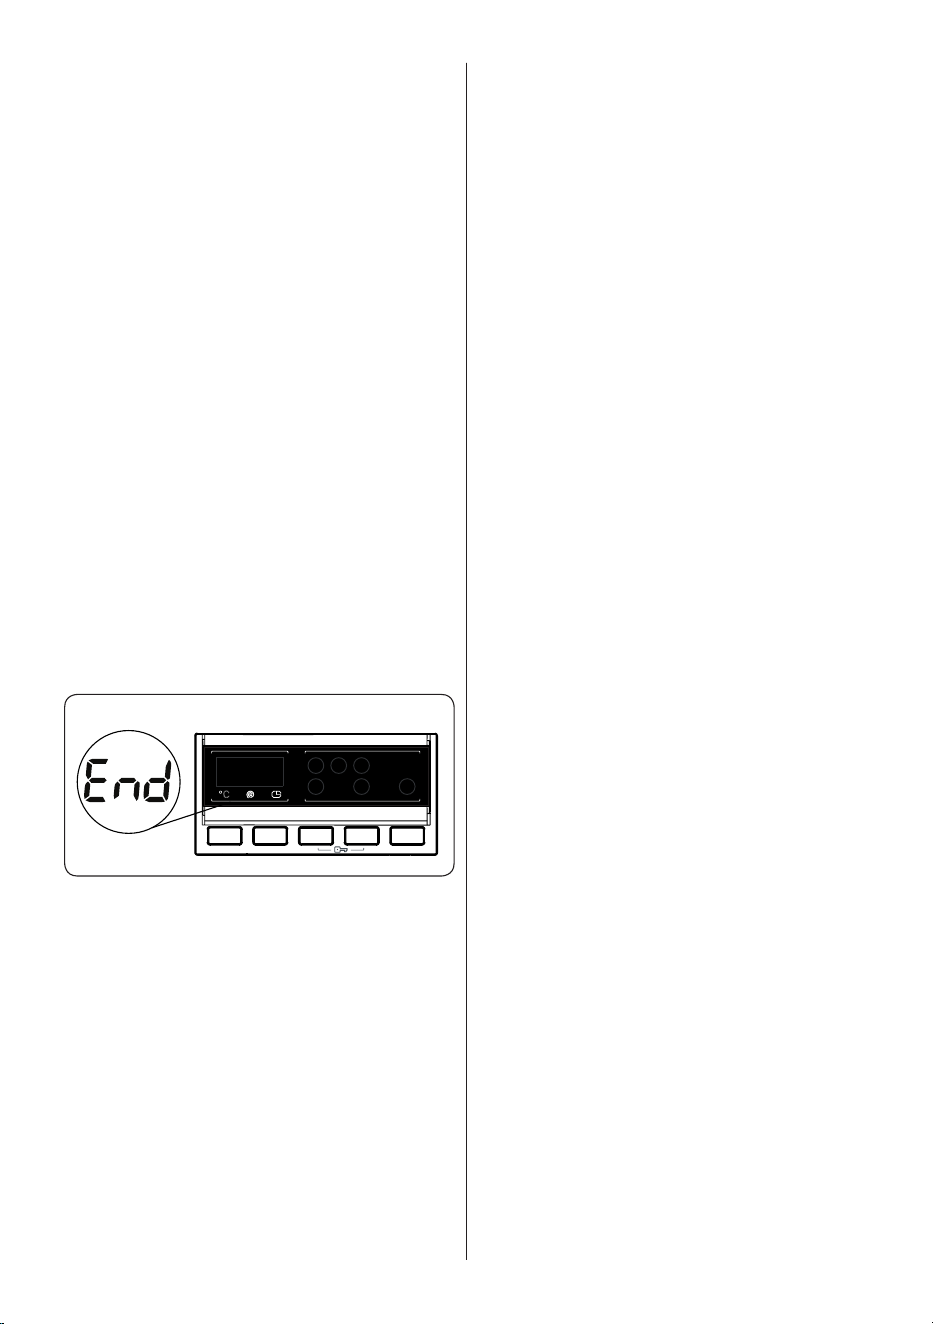
5.9 Programme End
Yourmachinewillstopbyitselfassoonas
theprogrammeyouhaveselectedfinishes.
• “END”willflashontheelectronic
display.
• Youcanopenthemachine’sdoorand
remove the laundry.
• Leavethedoorofyourmachineopen
toallowtheinnerpartofyourmachine
to dry.
• SwitchtheprogrammedialtoSTOP
position.
• Unplugyourmachine.
• Turn the water tap off.
EN - 20
6. PROGRAMME TABLE
Programme
Washing
temperature(°C)
Maximumdry
laundry amount
(kg)
Detergent
compartment
Programme
duration(Min.)
Laundrytype/Descriptions
COTTON90°C 90° 7,0 2 180
Verydirty,cottonandflaxtextiles.(Underwear,
linen,tablecloth,towel(maximum3.5kg),
bedclothes, etc.)
COTTON Pre-Wash 60° 7,0 1&2 171
Dirtycottonandflaxtextiles.(Underwear,linen,
tablecloth,towel(maximum3.5kg),bedclothes,
etc.)
COTTON60°C 60° 7,0 2 230
Dirtycottonandflaxtextiles.(Underwear,linen,
tablecloth,towel(maximum3.5kg),bedclothes,
etc.)
COTTON20°C 20° 3,5 2 96
Lessdirty,cottonandlinentextiles.(Underwear,
bedsheet, tablecloth, towel (max. 2,0 kg) bedcloth,
etc.)
ECO 40-60 40° 3,5 2 205
Dirtycottonandflaxtextiles.(Underwear,linen,
tablecloth,towel(maximum2,0kg),bedclothes,
etc.)
WOOL 30° 2,5 2 43 Woollenlaundrieswithmachinewashlabels.
RINSE - 7,0 - 42
Providesanadditionalrinsetoanytypeoflaundry
afterthewashingcycle.
ALLERGY SAFE 60° 3,5 2 197 Baby laundry
SPIN - 7,0 - 17
Providesanadditionalspincycletoanytypeof
laundryafterthewashingcycle.
HAND WASH/
DELICATE
30° 2,5 2 90
Laundryrecommendedforhandwashorsensitive
laundry.
EASY CARE/
SPORTS WEAR
40° 3,5 2 110
Verydirtyorsynthetic-mixedtextiles.(Nylonsocks,
shirts,blouses,synthetic-includingtrousersetc.)
MIX 30° 3,5 2 80
Dirtycotton,synthetics,colourandflaxtextilescan
be washed together.
BLOUSES / SHIRTS 60° 3,5 2 114
Dirtycotton,syntheticandsynthetic-mixedshirts
and blouses can be washed together.
(*) FAST 60'. 60° 3,0 2 60
Dirty,cotton,colouredandlinentextileswashedat
60°Cin60minutes.
(**) RAPID 15’
30° 2,0 2 15 Lightlysoiled,cotton,coloredandlinentextiles.
NOTE: PROGRAMME DURATION MAY CHANGE ACCORDING TO THE AMOUNT
OF LAUNDRY, TAP WATER, AMBIENT TEMPERATURE AND SELECTED ADDITIONAL
FUNCTIONS.
(*)Ifyourmachineincludestherapidwashingadditionalfunctionandyouput2kgorlessoflaundryintoyourmachine,yourmachine
willautomaticallywashthelaundryfor30minutes.
(**)Duetotheshortwashingtimeofthisprogramme,werecommendthatlessdetergentisused.Theprogrammemaylastlongerthan
15minutesifyourmachinedetectsanunevenload.Youcanopenthedoorofyourmachine2minutesafterthecompletionofawashing
operation.(The2minuteperiodisnotincludedintheprogrammeduration).
Accordingtoregulation1015/2010and1061/2010,theprogramme3withtemperatureselectionsisthe‘Standard60°Ccotton
programme’andthe‘Standard40°Ccottonprogramme’.
TheEco40-60programmeisabletocleannormallysoiledcottonlaundrydeclaredtobewashableat40°Cor60°C,togetherinthe
same cycle, and that this programme is used to assess the compiance with the EU ecodesign legislation.
EN - 21
• The most efficient programmes in terms of energy consumption are generally those that
perform at lower temperatures and longer duration.
• Loading the household washing machine up to the capacity indicated by the
manufacturer for the respective programmes will contribute to energy and water
savings.
• Program duration, energy consumption and water consumption values may vary
according to wash load weight and type, selected extra functions, tap water and
ambient temperature.
• It’s recommended to use liquid detergent for the washing programmes at low
temperature. The amount of detergent to be used may vary depending on the amount
of laundry and the level of dirtiness of the laundry. Please follow the detergent
manufacturers’ recommendations for the amount of the detergent to be used.
• The noise and remaining moisture content are influenced by the spinning speed. The
higher spinning speed in the spinning phase, the higher noise and the lower remaining
moisture content.
• You can access the product database where the model information is stored by reading
the QR code on the energy label.
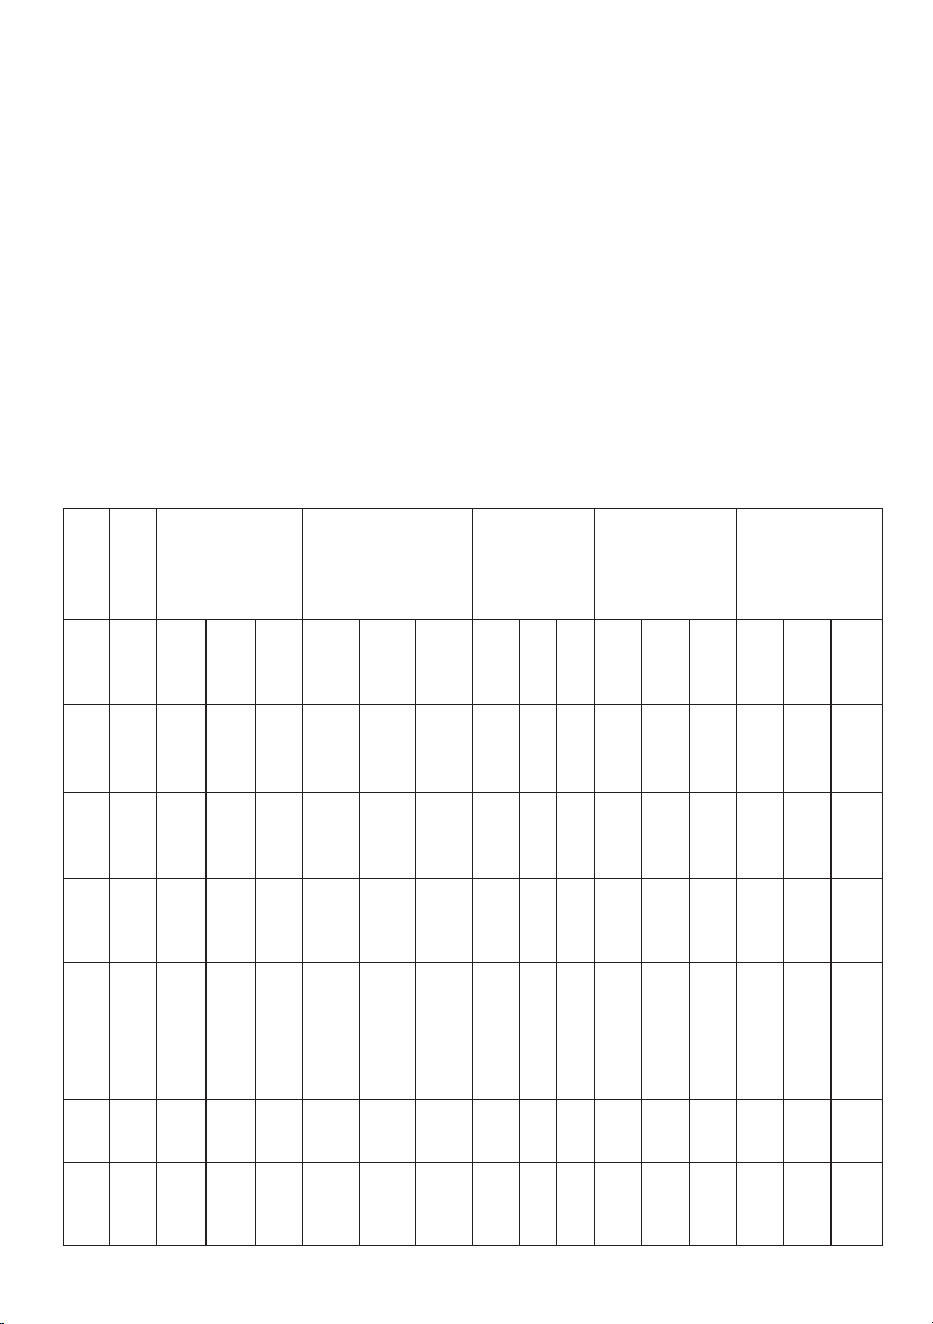
Programme
Name
Rated
Capacity kg
Energy
Consumption
kWh/cycle
Programme Duration
Hours:Minutes
Water
Consumption
Litres/Cycle
max.
Temperature
°C
Remaining
Moisture Content
%
1400 Rpm
Rated
Capacity
1/2 Load
1/4 Load
Rated
Capacity
1/2 Load
1/4 Load
Rated
Capacity
1/2 Load
1/4 Load
Rated
Capacity
1/2 Load
1/4 Load
Rated
Capacity
1/2 Load
1/4 Load
COTTON
90°C
7 2,36
03:00
80 81 53%
COTTON
60°C
7 1,00
03:50
53 46 53%
ECO
40-60
7 1,08 0,49 0,32 03:25 02:42 02:40 49 40 40 44 29 20 53% 53% 53%
EASY CARE/
SPORTS WEAR
3,5 0,55
01:50
45 42 53%
FAST
60’.
3 0,99
01:00
32 58 53%
COTTON
20°C
3,5 0,2
01:36
43 20 53%

EN - 22
6.1 Important Informations
• Use detergents, softeners and other additives suitable for automatic washing machines
only. Excessive foam has occurred and automatic foam absorption system has been
activated due to too much detergent usage.
• We recommend that periodic cleaning for washing machine every 2 months. For
periodic cleaning please use Drum Clean programme. If your machine do not have
Drum Clean programme, use Cottons-90 programme. When required, use limescale
removers manufactured specifically for washing machines only.
• Never force the door open when your Washing Machine is running. You can open the
door of your machine 2 minutes after the completion of a washing operation. *
• Never force the door open when your Washing Machine is running. The door will open
immediately after the washing cycle has ended. *
• The installation and repairing procedures should always carried out by the Authorised
Service Agent in order to avoid possible risks. The manufacturer shall not be held liable
for damages that may arise from procedures carried out by unauthorised persons.
(*)Specificationsmayvarydependingonthemachinepurchased.

EN - 23
7. CLEANING AND
MAINTENANCE
7.1 Warning
Turnyourmainspower
supply off and remove
the plug from the socket
beforecarryingout
maintenanceandcleaning
ofyourmachine.
Turn off the water
supplybeforestarting
maintenanceandcleaning
ofyourmachine.
CAUTION: Do not
usesolvents,abrasive
cleaners, glass cleaners
orall-purposecleaning
agents to clean your
WashingMachine.They
maydamagetheplastic
surfaces and other
componentswiththe
chemicalstheycontain.
7.2 Water Inlet Filters
Waterinletfilterspreventdirtandforeign
materialsfromenteringyourmachine.We
recommendthatthesefiltersarecleaned
whenyourmachineisunabletoreceive
sufficientwater,althoughyourwatersupply
isonandthetapisopen.Werecommend
thatyoucleanyourwaterinletfiltersevery
2 months.
• Unscrewthewaterinlethose(s)from
theWashingMachine.
• Toremovethewaterinletfilterfromthe
waterinletvalve,useapairoflong-
nosedplierstogentlypullontheplastic
barinthefilter.
• Asecondwaterinletfilterislocatedin
thetapendofthewaterinlethose.To
removethesecondwaterinletfilter,use
apairoflong-nosedplierstogentlypull
ontheplasticbarinthefilter.
• Cleanthefilterthoroughlywithasoft
brushandwashwithsoapywaterand
rinsethoroughly.Re-insertthefilterby
gentlypushingitbackintoplace.
CAUTION: Thefiltersatthe
waterinletvalvemaybecomeclogged
duetowaterqualityorlackofrequired
maintenanceandmaybreakdown.
Thismaycauseawaterleak.Anysuch
breakdowns are out of the scope of the
warranty.
EN - 24
7.3 Pump Filter
1
3
5
2
4
6
ThepumpfiltersysteminyourWashing
Machineprolongsthelifeofthepumpby
preventinglintfromenteringyourmachine.
We recommend that you clean the pump
filterevery2months.
Thepumpfilterislocatedbehindthecover
onthefront-lowerrightcorner.
Tocleanthepumpfilter:
1. Youmayusethewashingpowderspade
(*)suppliedwithyourmachineorliquid
detergent level plate to open the pump
cover.
2. Lodge the end of the powder spade
orliquiddetergentlevelplateinthe
openingofthecoverandgentlypress
backwards.Thecoverwillopen.
• Beforeopeningthefiltercover,placea
containerunderthefiltercovertocollect
anywaterleftinthemachine.
• Loosenthefilterbyturninganticlockwise
andremovebypulling.Waitforthe
watertodrain.
NOTE: Dependingonthe
amountofwaterinsidethemachine,you
mayhavetoemptythewatercollection
containerafewtimes.
3. Removeanyforeignmaterialsfromthe
filterwithasoftbrush.
4. Aftercleaning,re-fitthefilterbyinserting
itandturningclockwise.
5. Whenclosingthepumpcover,ensure
thatthemountingsinsidethecover
meettheholesonthefrontpanelside.
6. Closethefiltercover.
WARNING: Thewaterinthe
pumpmaybehot,waituntilithascooled
downbeforecarryingoutanycleaningor
maintenance.
(*)Specificationsmayvarydependingon
themachinepurchased.
7.4 Detergent Drawer
Theuseofdetergentmaycauseresidual
buildupinthedetergentdrawerovertime.
We recommend that you remove the drawer
every 2 months to clean the accumulated
residue.
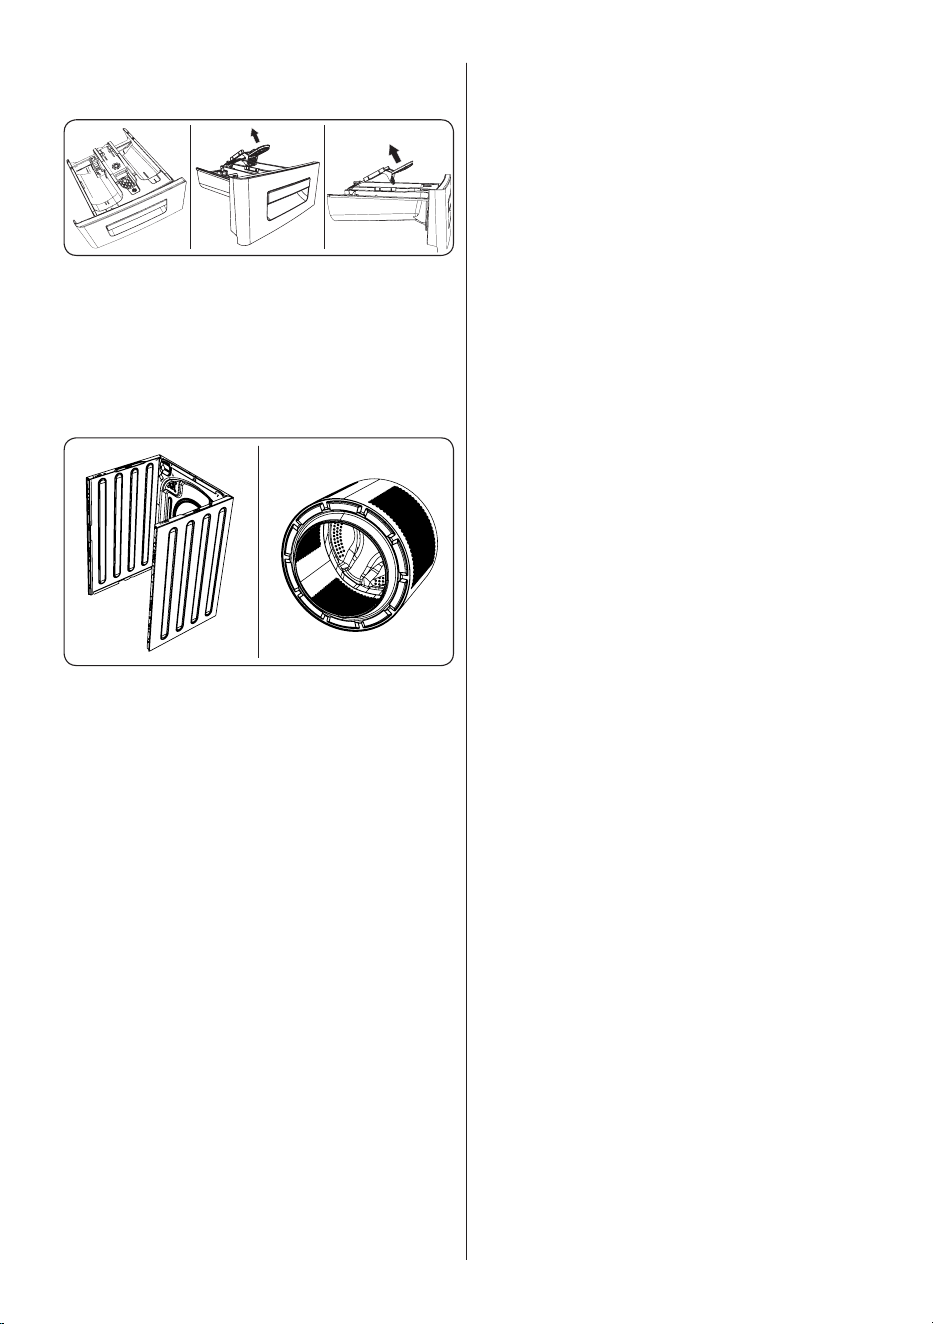
To remove the detergent drawer:
• Pullthedrawerforwardsuntilitisfully
extended.
• Gently press down on the drawer (as
shown below) and pull the drawer from
itshousing.
• Cleanthedrawerwithwaterandasoft
brush.
• Ifthereisanyresidueinthedrawer
housing,removewithasoftbrush.
Takecaretopreventanyresiduefrom
droppingintothemachine.
• Drythedrawerthoroughlyandslideit
backintothehousing.
Do not wash your detergent drawer
in dishwasher.
EN - 25
8. FLUSH STOPPER
/ BODY / DRUM
1
1. Flush stopper
Remove the detergent drawer and
disassembletheflushstopper.Clean
thoroughly to completely remove any
softenerresidue.Refittheflushstopper
aftercleaningandcheckthatitisseated
properly.
2 3
2. Body
Useamild,non-abrasivecleaningagent,
or soap and water, to clean the external
casing.Wipedrywithasoftcloth.
3. Drum
Donotleavemetallicobjectssuchas
needles,paperclips,coinsetc.inyour
machine.Theseobjectsleadtothe
formationofruststainsinthedrum.To
cleansuchruststains,useanon-chlorine
cleaningagentandfollowtheinstructionsof
manufacturerofthecleaningagent.Never
usewirewoolorsimilarhardobjectsfor
cleaningruststains.
EN - 26
9. TROUBLESHOOTING
Repairofyourmachineshouldbecarriedoutbyanauthorisedservicecompany.Ifyour
machinerequiresrepairorifyoucannotsolveanissuewiththeinformationprovided
below, then you should:
• Unplugyourmachinefromthemainspowersupply.
• Turn off the water supply.
FAULT POSSIBLE CAUSE TROUBLESHOOTING
Yourmachinedoesnotstart.
Machinenotpluggedin. Plugmachinein.
Fuses are faulty. Replace the fuses.
Nomainspowersupply. Checkmainspower.
Start/Pause button not pressed. Press the Start/Pause button.
Programmedial‘stop’position. Turntheprogrammedialtothedesiredposition.
Themachinedoorisnot
completely closed.
Closethemachinedoor.
Yourmachinedoesnot
intakewater.
Watertapisturnedoff. Turn tap on.
Waterinlethosemaybetwisted. Checkwaterinlethoseanduntwist.
Waterinlethoseclogged. Cleanwaterinlethosefilters.(*)
Inletfilterclogged. Cleantheinletfilters.(*)
Themachinedoorisnot
completely closed.
Closethemachinedoor.
Yourmachinedoesnot
dischargewater.
Drainhosecloggedortwisted.
Checkthedrainhose,theneithercleanor
untwist.
Pumpfilterclogged. Cleanthepumpfilter.(*)
Laundryistootighlypacked
togetherinthedrum.
Spreadyourlaundryinthemachineevenly.
Yourmachinevibrates.
The feet have not been adjusted. Adjust the feet. (**)
Transitboltsfittedfor
transportationhavenotbeen
removed.
Removethetransitboltsfromthemachine.(**)
Smallloadinthedrum. Thiswillnotpreventoperationofyourmachine.
Yourmachineisoverloadedwith
laundryorlaundryisunevenly
spread.
Do not overload the drum. Spread laundry evenly
inthedrum.
Yourmachinerestsonahard
surface.
DonotsetupyourWashingMachineonahard
surface.
Excessivefoamisformedin
the detergent drawer.
Excessiveamountofdetergent
used.
Press the Start/Pause button. To stop the foam,
diluteonetablespoonofsoftenerinto1/2litreof
waterandpourintothedetergentdrawer.Press
theStart/Pausebuttonafter5-10mins.
Wrong detergent used.
Onlyusedetergentsproducedforautomatic
WashingMachines.
Unsatisfactorywashing
result.
Yourwashingistoodirtyforthe
programme selected.
Usetheinformationintheprogrammetablesto
selectthemostappropriateprogramme.
Amount of detergent used
insufficient.
Usetheamountofdetergentasinstructedonthe
packaging.
Thereistoomuchlaundryinyour
machine.
Checkthatthemaximumcapacityforthe
selected programme has not been exceeded.
EN - 27
FAULT POSSIBLE CAUSE TROUBLESHOOTING
Unsatisfactorywashing
result.
Hard water.
Increasetheamountofdetergentfollowingthe
manufacturer’sinstructions.
Yourlaundryistootightlypacked
togetherinthedrum.
Checkthatyourlaundryisspreadout.
Assoonasthemachineis
loadedwithwater,water
discharges.
Theendofwaterdrainhoseistoo
lowforthemachine.
Checkthatthedrainhoseisatasuitableheight.
(**) .
Nowaterappearsinthe
drumduringwashing.
Nofault.Waterisintheunseen
part of the drum.
. . . . . . . . . . . . . . . . . . . . .
Laundry has
detergentresidue.
Non-dissolvingparticlesofsome
detergents may appear on your
laundryaswhitespots.
Performanextrarinse,orcleanyourlaundrywith
abrushafteritdries.
Grey spots appear on the
laundry.
Thereisuntreatedoil,creamor
ointmentonyourlaundry.
Usetheamountofdetergentasinstructedonthe
packaginginthenextwash.
Thespincycledoesnottake
place or takes place later
than expected.
No fault. The Unbalanced load
controlsystemhasbeenactivated.
TheUnbalancedloadcontrolsystemwilltryto
spreadyourlaundry.Thespinningcyclewillbegin
onceyourlaundryisspread.Loadthedrum
evenly for the next wash.
(*)Seethechapterregardingmaintenanceandcleaningofyourmachine.
(**)Seethechapterregardinginstallationofyourmachine.
10. AUTOMATIC FAULT WARNINGS AND WHAT TO DO
YourWashingMachineisequippedwithabuilt-infaultdetectionsystem,indicatedbya
combinationofflashingwashoperationlights.Themostcommonfailurecodesareshown
below.
TROUBLE CODE POSSIBLE FAULT WHAT TO DO
E01
Thedoorofyourmachineisnotshut
properly.
Shutthedoorproperlyuntilyouhearaclick.If
yourmachinepersiststoindicatefault,turnoff
yourmachine,unplugitandcontactthenearest
authorisedserviceagentimmediately.
E02
The water pressure or the water level
insidethemachinemaybelow.
Checkthetapisfullyturnedon.Mainswater
maybecut-off.Iftheproblemstillcontinues,your
machinewillstopafterawhileautomatically.Unplug
themachine,turnoffyourtapandcontactthe
nearestauthorisedserviceagent.
E03
Thepumpisfaultyorpumpfilteris
cloggedorelectricalconnectionofthe
pumpisfaulty.
Cleanthepumpfilter.Iftheproblempersists,
contactthenearestauthorisedserviceagent.(*)
E04
Yourmachinehasexcessiveamountof
water.
Yourmachinewilldischargewaterbyitself.Once
thewaterhasdrained,turnoffyourmachineand
unplugit.Turnoffthetapandcontactthenearest
authorisedserviceagent.
(*)Seethechapterregardingmaintenanceandcleaningofyourmachine.

52328205
www.corbero.es
Servicruz SL
Vidal i Ribes 8-10 08950 Esplugues de Llobregat
Barcelona
Telf. 911 08 08 08
The minimum period which must supply the spare parts
for the household washing machine is 10 years.

CERTIFICADO DE GARANTÍA
Imprescindible la presentación de la factura de compra acompañada del presente certificado de garantía.
Riesgos cubiertos.
Este aparato está garantizado contra cualquier defecto de funcionamiento, siempre que se destine a uso doméstico,
procediéndose a su reparación dentro del plazo de garantía y sólo por la red de SAT autorizados.
Nuestros electrodomésticos Corberó cuentan con la garantía legal del fabricante que cubre cualquier avería o defecto durante36
meses, desde su fecha factura de 1 de enero del 2022. En caso de que fuera necesario, nosotros nos ocupamos de cualquier posible
incidencia siempre que se deba a un componente defectuoso o fallo de fabricación.
Excepciones de garantía.
• Que la fecha del certificado no coincida con la fecha de venta de la factura original.
• Averías producidas por golpe, por caída o cualquier otra causa de fuerza mayor.
• Si el apa
rato ha sido manipulado por personal no autorizado.
• Las averías producidas o derivadas como consecuencia de un uso inadecuado, por defectos de instalación,
por introducir modificaciones en el aparato que alteren su funcionamiento.
• Puestas en marcha, mantenimiento, limpiezas, componentes sujetos a desgaste, lámparas, piezas estéticas,
oxidaciones, plásticos, gomas, carcasas y cristales.
“ESTAS EXCEPCIONES ANULAN LA GARANTÍA, SIENDO LA REPARACIÓN CON CARGO AL CLIENTE”
Periodo amparado en aparatos según ley de garantias en la venta de bienes de consumo Ley vigente es “RD 7/2021”
Horario de atención Lunes a Viernes de 9h00 a 19h00. Teléfono de contacto_ 911 08 08 08 Mail de contacto_ [email protected] web_ www.corbero.es
Dirección de Servicio técnico oficial_Vidal i Ribes 8-10 08950 Esplugues de Llobregat Barcelona
Sevicio Técnico Oficial: 911 08 08 08
Los hornos microondas (a excepción de los integrables) y los hornos sobremesa en el caso de cualquier incidencia de
funcionamiento, deben de llevarse al servicio técnico más próximo por parte del cliente. No se recojen ni reparan en el
domicilio.
•
Garantía termos eléctricos. Garantía de 3 años incluyendo los costes de desplazamiento y mano de obra que
correspondan de la reparación del producto, teniendo que tener un mantenimiento una vez cada 12 meses.
Especialmente si Ud. ha instalado un aparato a gas, tenga presente como titular de la instalación, la obligatoriedad de
realizar una revisión completa de los equipos, (según Real Decreto 238 / 2013, del 5 Abril. RITE. IT3, M. Lo termos
eléctricos y calderas que incluyen depósitos acumuladores de agua caliente, para que se aplique la prestación de la
Garantía, es obligatorio que el ánodo de magnesio esté operativo y que realice la función de protección
adecuadamente. Para ello es recomendable que el ánodo se revise bianualmente por el Servicio Oficial y sea renovado
cuando fuera necesario. Periodicidad que deberá ser anual en aquellas zonas con aguas críticas (contenido de CaCO3
superiores a 200mg/L, es decir a partir de 20ºfH de dureza). Depósitos sin el correcto estado del ánodo de protección, no
tienen la cobertura de la garantía. Independientemente del tipo de depósito o producto, todas las válvulas de
sobrepresión de calefacción o a.c.s., deberán ser canalizadas para evitar daños en Ia vivienda por descargas de agua. La
garantía del producto no asume los daños causados por Ia no canalización del agua derramada por esta válvula.
•

CERTIFICATE OF GUARANTEE
The presentation of the purchase invoice accompanied by this guarantee certificate is essential.
Covered Risks.
This appliance is guaranteed against any malfunction, provided that it is intended for domestic use, proceeding to its repair within
the warranty period and only by the authorized SAT network.
Our Corberó appliances have the manufacturer's legal warranty that covers any breakdown or defect for 36 months, from the
invoice date of January 1, 2022. If necessary, we take care of any possible incident whenever it is due to a defective component or
manufacturing fault. Warranty Exceptions
Warranty Exceptions
•
That the date of the certificate does not coincide with the date of sale of the original invoice.
•
Faults produced by blow, by fall or any other cause of force majeure.
•
If the device has been manipulated by unauthorized personnel.
•
Faults produced or derived as a consequence of improper use, installation defects, or modifications to the device that
alter its operation.
•
Start-up, maintenance, cleaning, components subject to wear, lamps, aesthetic parts,
oxidation, plastics, rubbers, housings and crystals.
“THESE EXCEPTIONS VOID THE WARRANTY, THE REPAIR BEING CHARGED TO THE CUSTOMER”
Period covered in devices according to the law of guarantees in the sale of consumer goods Current law is “RD 7/2021”
Hours of operation Monday to Friday from9h00 a 19h00. Telephone contact_ 911 08 08 08 Contact email_ [email protected] web_ www.corbero.es
Official Technical Service Address_Vidal i Ribes 8-10 08950 Esplugues de Llobregat Barcelona
Official Technical Service: 911 08 08 08
Microwave ovens (with the exception of built-in ones) and tabletop ovens in the event of any incident of
operation, they must be taken to the nearest technical service by the customer. They are not collected or repaired at
home.
•
Electric thermos guarantee. 3-year warranty including travel and labor costs that correspond to the repair of the
product, having to have maintenance once every 12 months. Especially if you have installed a gas appliance, keep in
mind as the owner of the installation, the obligation to carry out a complete review of the equipment, (according to
Royal Decree 238 / 2013, of April 5. RITE. IT3, M. Lo thermos electrical and boilers that include hot water storage tanks,
for the benefit of the Guarantee to apply, it is mandatory that the magnesium anode is operational and that it performs
the protection function adequately.For this, it is recommended that the anode be checked biannually by the Official
Service and is renewed when necessary Periodicity that must be annual in those areas with critical waters (CaCO3
content greater than 200mg/L, that is, from 20ºfH of hardness) Deposits without the correct state of the protection
anode are not covered by the warranty Regardless of the type of tank or product, all heating or DHW overpressure
valves must be channeled to avoid damage and n the house due to water discharges. The product warranty does not
cover damages caused by not channeling the water spilled by this valve.
•